

Page 1
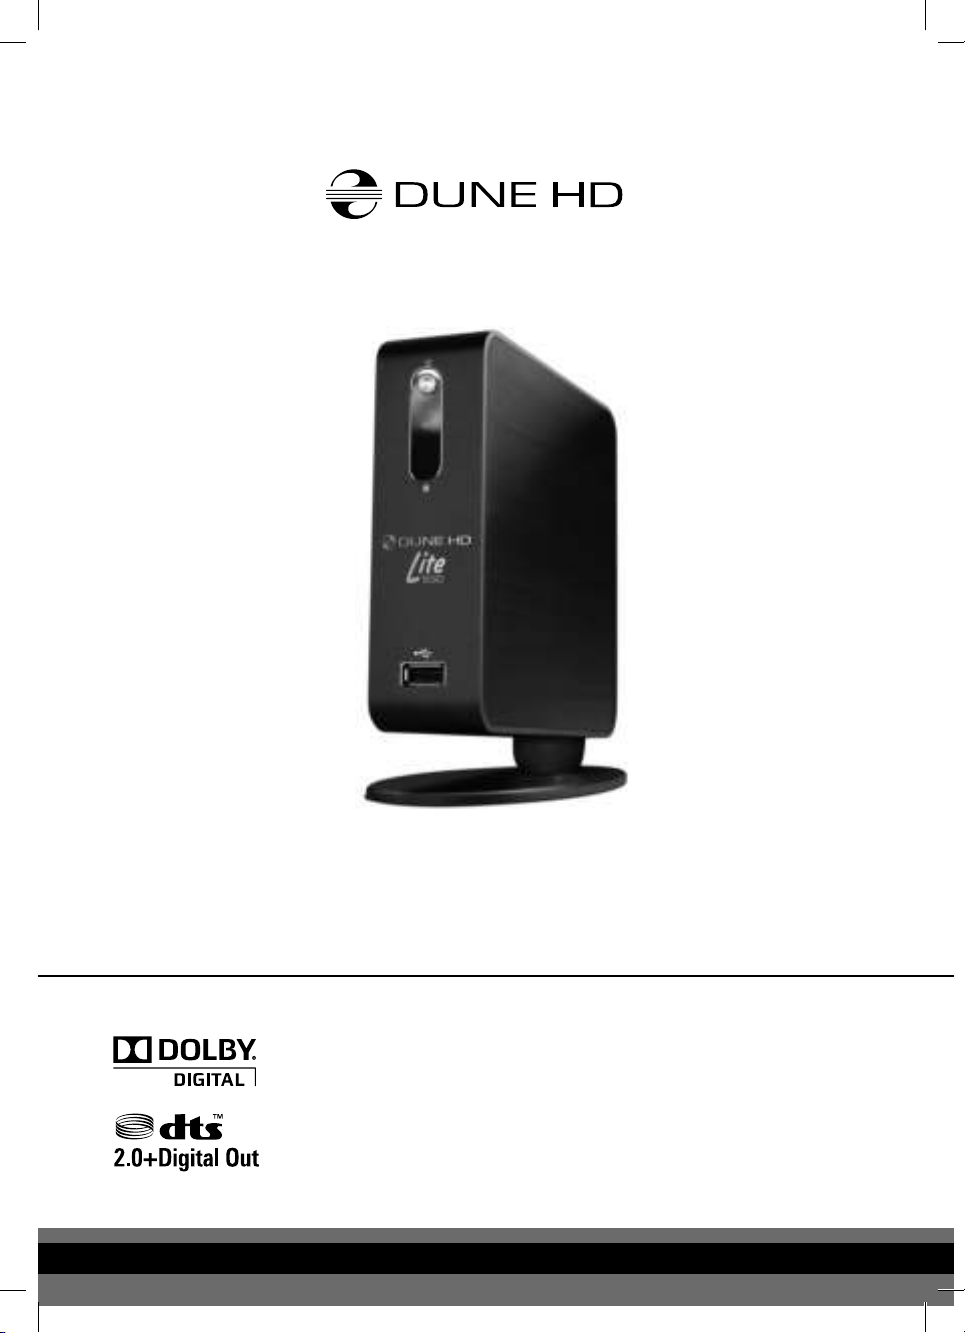
Lite 53D
Quick Start Guide ● Guide de démarrage rapide ● Schnellstartanleitung
Snel Start Gids ● Guía de instalación rápida ● Guida Rapida
Краткое руководство ● Короткий посібник ● Skrócona instrukcja Szybki Start
Manufactured under license from Dolby Laboratories.
Dolby and the double-D symbol are trademarks of Dolby Laboratories.
Manufactured under license under U.S. Patent #’s: 5,451,942; 5,956,674; 5,974,380;
5,978,762; 6,226,616; 6,487,535; 7,212,872; 7,333,929 & other U.S. and worldwide
patents issued & pending. DTS and the Symbol are registered trademarks, & DTS-HD,
DTS-HD High Resolution Audio and the DTS logos are trademarks of DTS, Inc. Product
includes software. © DTS, Inc. All Rights Reserved.
English ● Français ● Deutsch ● Nederlands ● Español ● Italiano ● Русский ● Українська ● Polski
Page 2

Page 3
Table of Contents
4
10
16
22
28
English
Quick Start Guide
Français
Guide de démarrage rapide
Deutsch
Schnellstartanleitung
Nederlands
Snel Start Gids
Español
Guía de instalación rápida
34
40
46
52
Italiano
Guida Rapida
Русский
Краткое руководство
Українська
Короткий посібник
Polski
Skrócona instrukcja Szybki Start
Table of Contents
3
Page 4

Introduction
Dune HD Lite 53D is an all-in-one solution for up to Full HD (1080p) video playback.
Key Features
● The newest Sigma Designs 8653 media processor: enjoy excellent playback and performance of
interactive features.
● HDD player: connect an HDD to the player and play content directly from the HDD.
● Network player: connect the player to a local network and play content directly from PC or NAS (UPnP,
SMB, NFS).
● MKV player: play HD and SD video in a popular MKV format and other modern video file formats,
including top quality HD video with very high bitrate.
● 2 USB ports: conveniently connect HDDs, USB flash drives, USB card readers and other USB storage
devices.
● SD card slot: easily play media files on SD memory cards from your camera or other devices, or
use an SD memory card as a local or system storage.
● HDMI 1.3: ensure the best possible quality of HD video and HD audio.
● A rich set of standard A/V connectors: use S/PDIF optical audio, stereo audio, component video,
composite video outputs to easily connect any A/V equipment.
● Video output flexibility: output video in any resolution and format (from SD to 1080p, 24p/PAL/NTSC).
● Upscaling: high quality upscaling of DVD and any other SD video content to Full HD (1080p) or other
HD resolution.
● File browser: convenient file browser with powerful file management (copy, move, delete, rename,
organize, sort).
Extra Functions
● High-quality music playback: play very high-quality (up to 192 Khz / 24-bit) music files in various
formats (FLAC, Monkey’s Audio APE, WAV/PCM, DTS, etc).
● Playlists: build playlists from your folders, use your own playlists, use repeat and shuffle functions.
● NAS function: access files on storage devices (HDD, optical drive, etc) attached to the player from the
local network (using SMB or FTP).
● BitTorrent: use built-in BitTorrent client to download files from P2P networks.
● Customizable user interface: work with media collections using cover art and icon browsing (with Full
HD graphics).
● Internet radio: playback and record various Internet radio stations (HTTP/MP3).
● IPTV: playback and record IPTV streams (multicast UDP/RTP) from your Internet provider*.
● Digital TV option: playback and record Digital TV channels using an optional Digital TV USB dongle**.
* Check availability of multicast UDP/RTP streams with your Internet provider.
** Digital TV USB dongle is not included; this option can be purchased separately.
4
Dune HD Lite 53D Quick Start Guide
Page 5
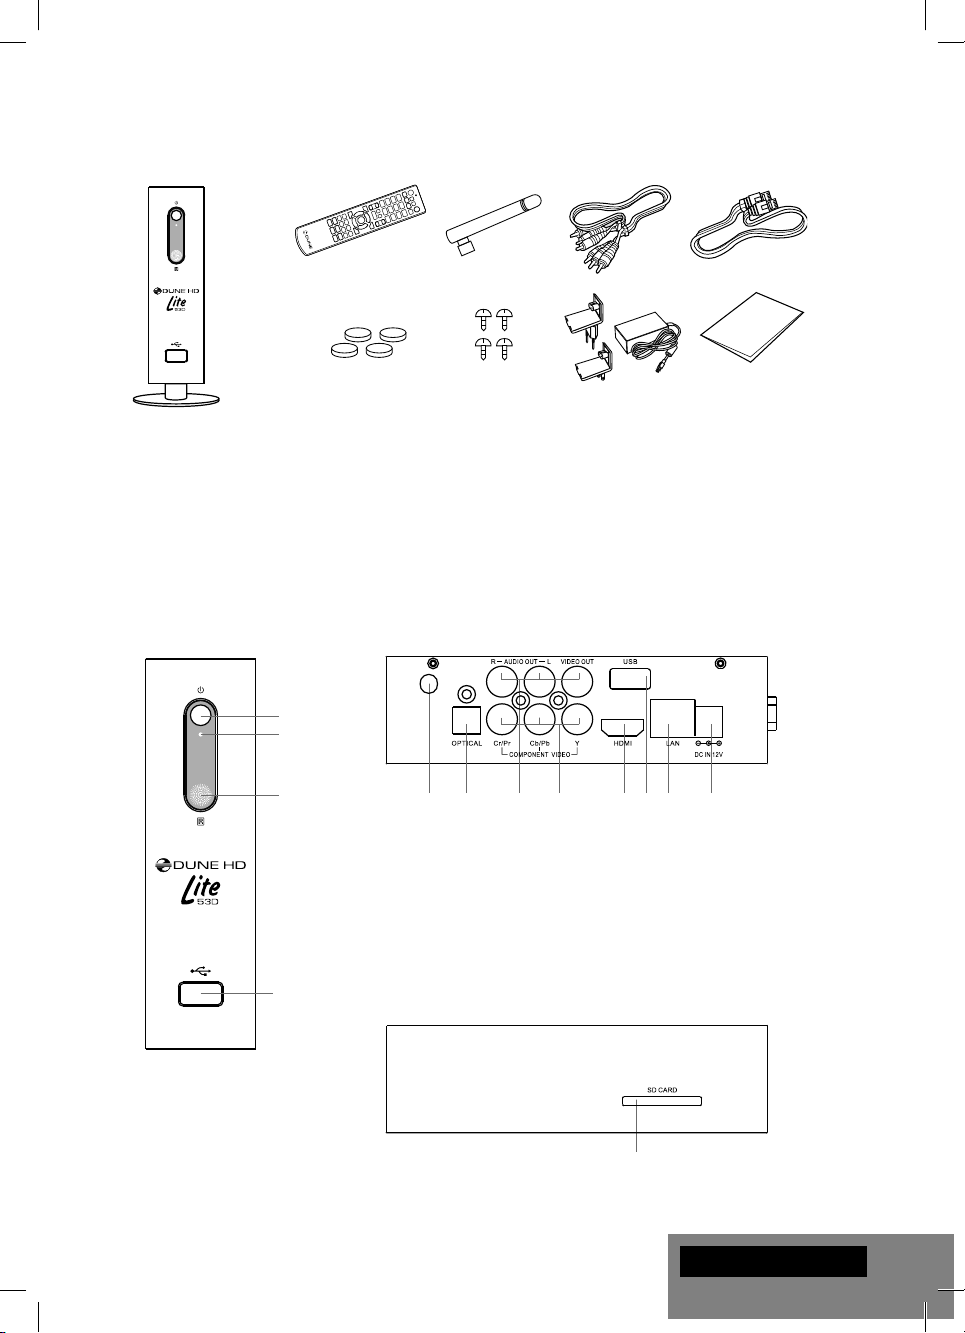
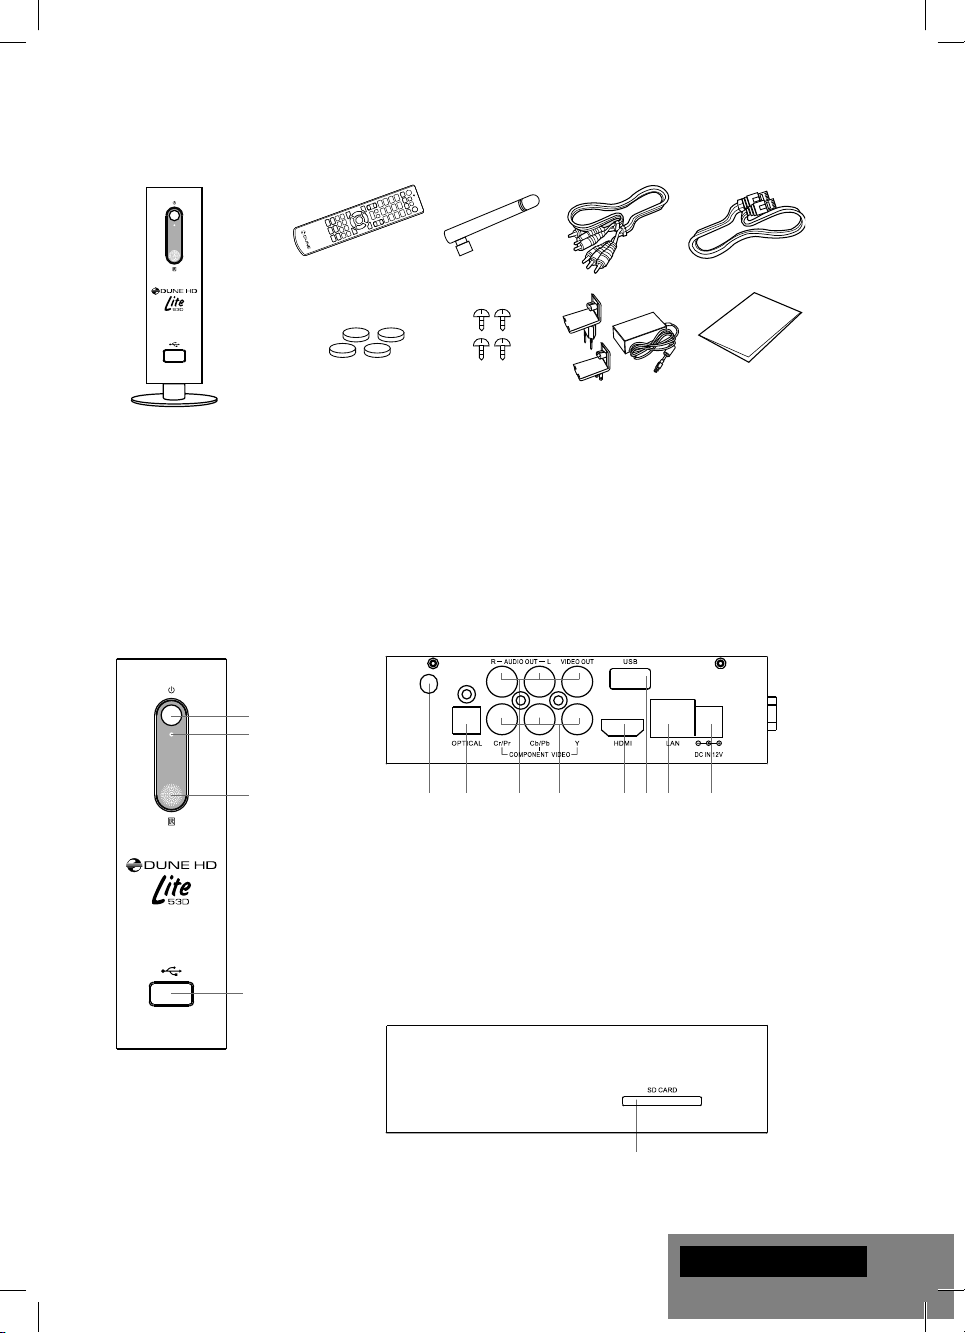
Package Contents
5423
6
1. Dune HD Lite 53D media player
2. Remote control (batteries may not
be included)
3. Wi-Fi Antenna (optonal)
NOTE: Additional items (optional) may be included into the package, depending on player configuration,
region, and distributor.
4. AV cable
5. LAN cable
6. Feet
8
7. Screws
8. External power supply
9. Quick start guide
917
Exterior
Front view
1
2
3
Rear view
21345678
1. Wi-Fi antenna (optional)
2. Optical digital audio output
3. Composite video and analog stereo audio output
4. Component (Y/Pb/Pr) video output
5. HDMI 1.3
6. USB 2.0 host
7. LAN
8. DC power 12V
1. On/off button
2. LED indicator
3. IR eye
4. USB 2.0 host
4
Top view
1. SD card slot
1
English
5
Page 6

Horizontal Placement of Player
You can place the player either vertically or horizontally. If you want to use the horizontal placement,
please do the following: detach the bottom stand from the player; use the special self-stick feet intended
for horizontal placement of the player (included into the package) and stick them to the side of the player.
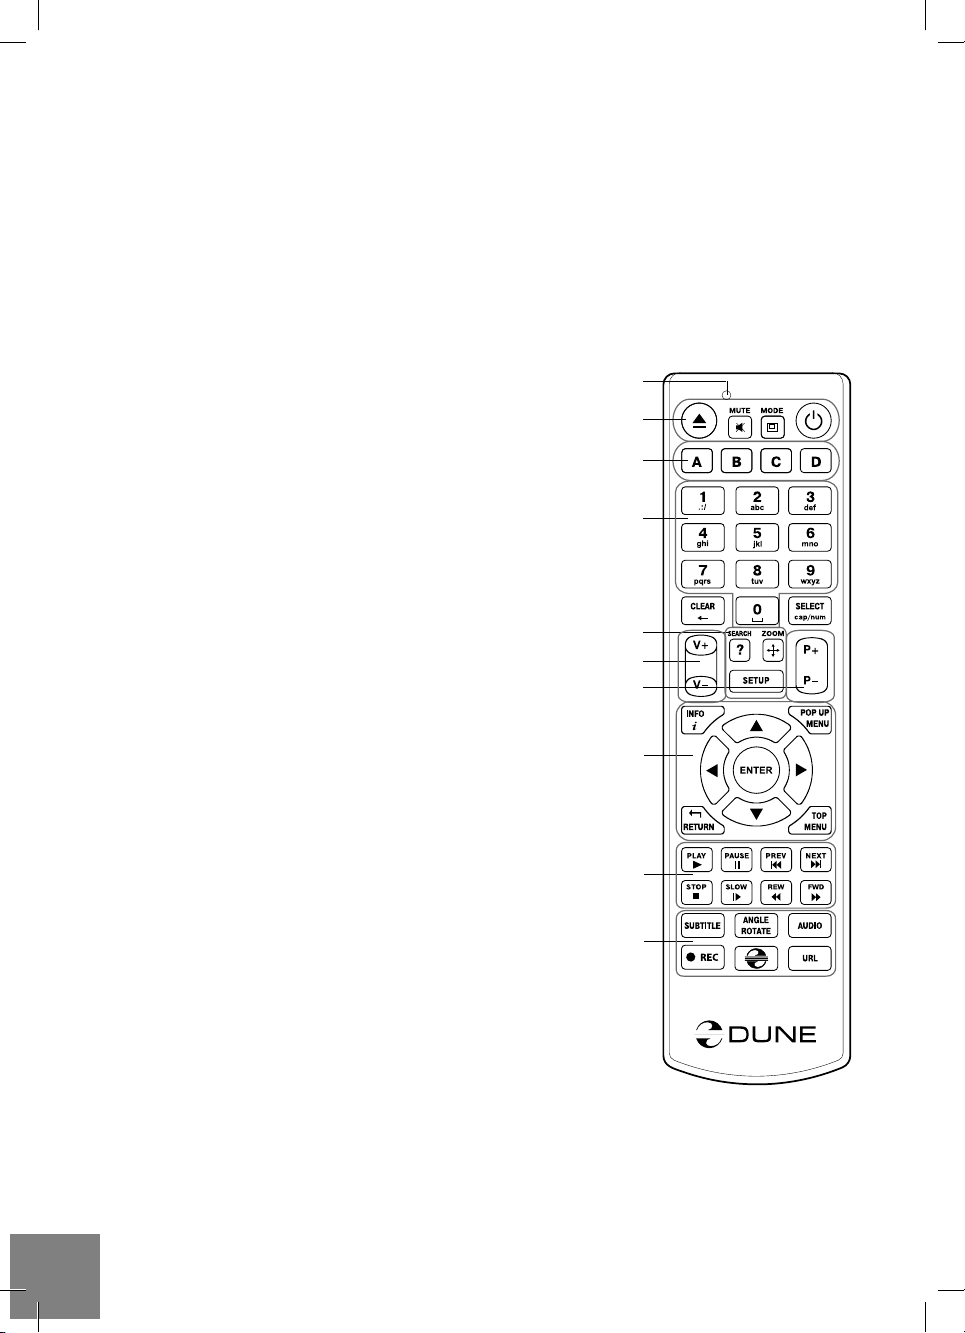
Remote Control
1. Command indicator — fl ashes in response to RC button pressing.
2. EJECT — open/close the optical drive tray. MUTE — turn the sound
on/off. MODE — switch the video output mode; control some other
player functions. POWER — toggle the standby mode.
3. A (Red), B (Green), C (Yellow), D (Blue) — access Blu-ray disc
features; control some other player functions.
4. 0–9 — enter numbers and text; control some other player func-
tions.
5. SEARCH — jump to a specifi ed playback position. ZOOM —
change the zoom factor for the video content being played. SET-
UP — enter/leave the setup menu; adjust playback settings during
playback.
6. V+/V- (volume up / volume down) — adjust the volume.
7. P+/P- (page up / page down) — scroll up and down in various
lists; control some other player functions.
8. Arrows (LEFT, RIGHT, DOWN, UP), ENTER, RETURN, TOP
MENU, POP UP MENU, INFO — main buttons for controlling the
player (navigate across the items on the screen, open/use the currently selected item, go back to the previous screen, go to main
menu, show popup menu with actions, show information, control
some other player functions).
9. PLAY, PAUSE, STOP, SLOW, REW, FWD, PREV, NEXT — control
the playback.
10. SUBTITLE, ANGLE/ROTATE, AUDIO, REC, DUNE, URL — con-
trol the playback and some other player functions.
NOTES:
● Use alkaline AAA batteries.
● Observe polarity when inserting batteries.
● Direct the remote control to the player. There must be no obstacles
between the RC and the player.
● If RC functions only at short distances or stops functioning, make
sure to replace the batteries.
● Some RC buttons may have several functions depending on the
current player mode.
● Some RC buttons may be available only in certain player modes or
only during playback of a certain content.
1
2
3
4
5
6
7
8
9
10
6
Dune HD Lite 53D Quick Start Guide
Page 7

Getting Started
Ensure there is enough space around the player for proper cooling. The space at each side should be not
less than 10 cm.
Ensure the RC has batteries installed.
Connect the player to your TV and to other A/V equipment in an appropriate way. Use HDMI connection
to get the best possible quality of video and audio. Make sure to switch off the player and all relevant A/V
equipment before connecting them. Ensure your TV and other A/V equipment are configured to use proper
inputs.
Switch on the player. The player will perform its initial loading procedure, which may take up to about 1
minute. During the loading procedure, "DUNE" logo is shown on the TV.
● If you do not see "DUNE" logo on the TV when you switch on the player, it may mean some problem with
the connection between the player and the TV or that a wrong video input is chosen in the TV or A/V
receiver/switch. In such a case, recheck the cables and the settings of the TV or A/V receiver/switch, or
try to use different cables or a different way of connecting the player to the TV.
● If you see "DUNE" logo on the TV when you switch on the player, but then the picture disappears and
no other picture appears during at least 10 seconds, it may mean that a wrong video output mode is
configured in the player. In such a case, press the "MODE" RC button, and then press one of the RC
buttons "1", "2", "3", "4" or "5" to switch to a different video output mode (see "Quick Setting of Video
Output Mode").
Finally, you should see the main screen of the player menu. The main screen shows items allowing to
use different player functions and access all storage devices and network drives connected to the player.
Adjust the player settings as needed using "SETUP" item on the main screen of the player menu (or by
pressing the "SETUP" RC button). In particular, you may want to adjust video settings, audio settings, and
network settings.
To choose the language of the player menu, use “Setup / General / Interface language” setting.
Use the RC buttons "LEFT", "RIGHT", "UP", "DOWN", "ENTER", "RETURN" to navigate through the
player menu. Use the "POP UP MENU" RC button to show the list of available commands. Use the
"INFO" RC button to show the information about the selected item.
Quick Setting of Video Output Mode
The “MODE” RC button allows quick setting of video output mode without entering the player setup menu.
This way of video output confi guration may be required if you see no picture on the screen after connect-
ing your player to a TV.
Press the “MODE” RC button and then one of the RC buttons “1”, “2”, “3”, “4”, or “5” to switch to one
of the following video output modes respectively:
1. Composite/Component, PAL
2. Composite/Component, NTSC
3. HDMI, 480i, 60 Hz
4. HDMI, 720p, 60 Hz
5. HDMI, 1080i, 60 Hz
After you see a picture on the TV, press the “ENTER” RC button, and then go to the player setup menu to
perform a more precise confi guration of the video output mode if needed.
NOTE: The procedure of quick setting of video output mode can not be used during playback. To ensure this procedure can
be used, switch the player off, then switch the player on, and the wait about 1 minute to ensure the player loading is fi nished.
English
7
Page 8

Connecting USB Drives
To connect a USB drive, ensure you are on the main screen of the player menu and connect the USB drive
to an USB port of the player. The player will recognize the USB drive, and will show an item corresponding
to the USB drive on the main screen.
When connecting a USB drive requiring signifi cant power (such as USB HDD), use an external power
supply for the USB drive. Power provided by the USB ports of the player may not be enough for correct
functioning of the USB drive.
Do not disconnect or switch off the USB drive when some write operation is in progress.
Using SD Memory Cards
To insert an SD memory card, ensure you are on the main screen of the player menu and insert the memory card into the SD card slot of the player. The player will recognize the memory card, and will show an item
corresponding to the memory card on the main screen. Some SD memory cards may not be recognized by
the player or may work incorrectly; in such a case, use other models of SD memory cards.
Do not eject the SD memory card when some write operation is in progress.
Internal 2.5” SATA HDD
You can install the 2.5’’ SATA HDD inside the player case. To install the 2.5” SATA HDD, please do the
following:
1. Power off the player.
2. Open the side cover of the case: remove two small screws at the side of the player which fasten the
cover, then pry up the cover using the small gap between the cover and the side of the player.
3. Attach the HDD to the metal plate mounted on the inner side of the player cover. Please use 4 screws
of M3 type.
4. Connect the SATA power and SATA data connectors to the HDD.
5. Put the cover with the HDD back to its place and fasten the cover to the player case with the screws.
Accessing Network Drives
To connect a network drive using SMB or NFS protocol, ensure you are on the main screen of the player menu,
press the "MENU" RC button, and choose "Create Network Folder", then fi ll the parameters of the network drive
as needed. The player will show an item corresponding to the confi gured network drive on the main screen.
To browse the list of network resources accessible via SMB or UPnP protocols, use "Network Browser"
item on the main screen of the player menu. NOTE: If some network resources are not shown by the
player, you may need to wait some minutes and then retry (or press the "MENU" RC button and choose
"Refresh" command).
Formatting HDD
To format a HDD attached to the player, select the drive item on the main screen of the player menu, press
the "INFO" RC button and choose "Format Disk" (to format the entire disk) or "Format Partition" (or to format an already existing disk partition only). The player will format the disk using "EXT2" fi lesystem. NOTE:
To use disks formatted by the player on a Windows PC, you may need to install additional software on the
PC, such as "EXT2FSD" (http://www.ext2fsd.com/).
8
Dune HD Lite 53D Quick Start Guide
Page 9

Switching the Player On and Off
To put the player into the standby mode, press the «POWER» RC button or the «on/off» button on the front
panel. To exit the standby mode, press any of these buttons again.
Depending on the player settings (see the player setup menu), the «hardware standby» or «software
standby» mode may be used. In the «hardware standby» mode, almost complete power-off takes place
and the player consumes almost no power. In the «software standby» mode, the player produces no signal
on the video output, but is still functioning. For example, if you have some storage devices connected to
the player, you may still access them from network («NAS» function of the player). Exiting the «software
standby» mode takes just a few seconds. When the player is in the «software standby» mode, it still
consumes significant power. It is not recommended to keep the player in the «software standby» mode for
a while if you do not need it.
NOTE: After switching off the player or putting the player into the «hardware standby» mode, it is
recommended to wait about 1 minute before switching it on again.
NAS (Network Attached Storage)
You can access storage devices connected to the player from the local network using FTP and SMB protocols. On a Windows PC, just type "ftp://ip_address" or "\\ip_address" in the Windows explorer, where
"ip_address" is the IP address of the player.
WiFi
You can use a USB WiFi adapter to connect the player to the local network via WiFi.
Please see here for the information on supported USB WiFi adapters:
http://dune-hd.com/support/hw_compat/
Limitations
Compatibility of the player with a particular hardware (A/V equipment, network equipment, disk drives, etc)
may depend on various factors (particular hardware model, specifi cs of hardware installation and usage,
confi guration of the player and the hardware, etc). If the player does not correctly work with a particular
hardware, try to adjust the confi guration of the player or hardware, try to use the hardware in a different
way, or try to use some other hardware.
Compatibility of the player with a particular media content (fi les, discs, etc) may depend on various factors
(specifi cs of media content encoding, specifi cs of the confi guration of the player, etc). If the player does not
play correctly a particular media content, try to adjust the confi guration of the player, or try to use media
content encoded in a different way.
Updating Your Player and Getting More Information
Please check here for updated versions of player fi rmware (which may improve player functioning and
extend player possibilities):
http://dune-hd.com/fi rmware/
(Note: You can also connect the player to Internet and use the online fi rmware upgrade function, see
Setup / Misc / Firmware Upgrade.)
Please check here for more detailed and up-to-date documentation and information on player usage:
http://dune-hd.com/manuals/
http://dune-hd.com/support/
English
9
Page 10

Introduction
La Dune Lite 53D est une solution tout-en-un pour la lecture vidéo en Full HD 1080p
.
Caractéristiques principales
● Nouvelle puce media Sigma Designs 8653: Pour une excellente lecture des contenus interactifs.
● Lecteur Disque Dur: Connectez un Disque Dur au lecteur et lisez directement son contenu.
● Lecteur réseau: Connectez le lecteur au réseau local et lisez vos fichiers depuis un PC ou un NAS
(UPnP, SMB, NFS).
● Lecteur MKV: lecture de fichiers au format MKV en HD ou SD et autres formats vidéo, incluant une
qualité d’image HD exceptionnelle à très haut débit.
● 2 ports USB: Connectez facilement disques durs, clés USB, lecteurs de cartes USB et autres périphé-
riques de stockage USB.
● Port Carte Mémoire SD: Regardez facilement du contenu multimédia sur les cartes mémoires SD ou
utilisez cette carte mémoire comme périphérique de stockage.
● HDMI 1.3: pour une qualité HD audio et vidéo optimale.
● Une multitude de connecteurs Audio/Vidéo: Sortie optique, analogique, composante et composite
pour faciliter le branchement de n’importe quel matériel.
● Sorties vidéo et résolution multiples: depuis la résolution SD jusqu’au 1080p (24p/PAL/NTSC).
● Scaler: Mise à l’échelle de haute qualité de DVD (ou autre source SD) jusqu’au 1080p FULL HD.
● Gestionnaire de fichiers avancé: grande facilité de gestion de contenu (copier, déplacer, effacer,
renommer, organiser, trier).
Fonctions supplémentaires
● Lecture musicale de haute qualité: lit les fichiers musicaux (jusqu’en 192Khz /24-bit) de divers formats
(FLAC, Monkey’s Audio APE, WAV/PCM, DTS, etc).
● Listes de lecture: Créez des listes de lecture depuis vos dossiers, jouez vos propres listes de lecture,
avec fonctions répéter et aléatoire.
● Fonction NAS: accédez aux fichiers sur des contenus externes (Disque Dur, lecteur optique, etc) ,
depuis votre réseau local.(en utilisant le protocole SMB ou FTP).
● BitTorrent: Fonction BitTorrent pour télécharger des fichiers sur les réseaux P2P .
● Interface personnalisable: Fonctionne avec les bibliothèques media utilisant le système de recherche
par jaquettes.
● Radio Internet: Lecture et enregistrement de nombreuses stations de radio Internet (HTTP/MP3).
● IPTV: Lecture et enregistrement de flux IPTV (multicast UDP/RTP) depuis votre accès Internet*.
● TNT HD: Lecture et enregistrement de chaînes TV numérique grâce au tuner TNT HD sur clef USB
optionnelle**.
10
Dune HD Lite 53D Quick Start Guide
Page 11
Contenu de la boîte
5423
6 8
1. Platine multimédia Dune HD Lite 53D
2. Télécommande (Piles non incluses)
3. Antène Wi-Fi (en option)
NOTE: Des accessoires supplémentaires (optionnels) peuvent être inclus dans la boîte en fonction du pays, du
distributeur et de la configuration du lecteur.
4. Cordon A/V
5. Câble Réseau
Pieds
6.
7. Vis
8. Bloc d’alimentation externe
9. Guide de démarrage rapide
917
Vues Extérieures
Face avant
1
2
3
Panneau arrière
21345678
1. Antène Wi-Fi (en option)
2. Sortie numérique optique
3. Sortie vidéo composite et stéréo analogique
4. Sortie vidéo composante (Y/Pb/Pr)
5. HDMI 1.3
6. ports USB 2.0
7. LAN
8. Alimentation 12V
4
1. Bouton Marche/Arrêt
2. Indicateur LED
3. Capteur IR
4. Port USB 2.0
Vue de dessus
1. Port carte mémoire SD
1
Français
11
Page 12
Placement horizontal du lecteur
Vous pouvez placer le lecteur soit verticalement soit horizontalement. Si vous souhaitez l'utiliser en configuration horizontale, veuillez suivre la procédure suivante :
1. Détachez le support du bas du lecteur.
2. Utilisez les pieds spéciaux autocollants destinés au positionnement horizontal du lecteur (inclus dans la boî-
ter) et collez-les sur le côté du lecteur.
Télécommande
1. Indicateur de commande — clignote en réponse à la pression de
touches sur la télécommande.
2. EJECT — ouverture/fermeture du tiroir du lecteur optique. MUTE —
Mise en sourdine du son. Mode — Changement de sortie vidéo; peut
s’appliquer à d’autres fonctions du lecteur. POWER— mise en veille
du lecteur.
3. A (rouge), B (Vert), C (Jaune), D (Bleu) — accès aux fonctions des
disques Blu-ray; peut s’appliquer à d’autres fonctions du lecteur.
4. 0-9 — clavier numérique et alphabétique; peut s’appliquer à d’autres
fonctions du lecteur.
5. SEARCH — permet l’accès à une position défi nie durant la lecture.
ZOOM — permet de modifi er le ratio d’agrandissement de l’image
durant la lecture. SETUP— permet l’entrée/sortie au menu réglages
ainsi que la modifi cation d’options en cours de lecture.
6. V+/V- (volume plus/ volume moins) — contrôle du volume.
7. P+/P- (page plus / page moins) — défi lement haut /bas dans di-
verses listes, peut s’appliquer à d’autres fonctions du lecteur.
8. Flèches (Gauche, Droite, Bas, Haut), ENTER, RETOUR, TOP MENU,
POP UP MENU, INFO — touches principales de contrôle du lecteur
(navigation entre les options à l’écran, validation de l’option sélectionnée, retour à l’écran précédent, aller au menu principal, affi chage
du menu popup et de ses options, affi chage des informations ; peut
s’appliquer à d’autres fonctions du lecteur.
9. LECTURE, PAUSE, STOP, RALENTI, RETOUR ARRIERE, AVANCE
RAPIDE, PRECEDENT, SUIVANT— Contrôle de lecture
10. SOUSTITRES, ANGLE/ROTATION, AUDIO, ENR, DUNE, URL—
Contrôle de lecture ainsi que d’autres fonctions du lecteur.
NOTES:
● Utilisez des piles alkaline AAA
● Respectez la polarité des piles.
● Dirigez bien la télécommande vers le lecteur. Aucun obstacle ne doit
se trouver entre la télécommande et le lecteur.
● Si la télécommande ne fonctionne que sur une courte distance ou ne
fonctionne pas du tout, assurez vous de remplacer les piles.
● Certaines touches de la télécommande peuvent avoir plusieurs fonctions selon le mode de lecture.
● Certaines touches de la télécommande ne sont disponibles que dans
certains modes ou pendant la lecture de certains contenus.
1
2
3
4
5
6
7
8
9
10
12
Dune HD Lite 53D Quick Start Guide
Page 13

Démarrage
Pour la bonne marche du lecteur, assurez-vous d’avoir au moins 10cm d’espace libre de chaque coté du lecteur.
Assurez-vous que les piles sont installées dans la télécommande.
Connectez le lecteur à votre téléviseur ou à tout autre équipement A/V de manière appropriée. Préférez l’utilisation de la connexion HDMI pour une qualité d’image et de son optimale. Assurez-vous d’éteindre le lecteur
ainsi que tous les équipements A/V avant d’effectuer les branchements. Assurez-vous que votre téléviseur et
vos différents appareils A/V soient bien configurés au niveau des entrées.
Allumez le lecteur. Le lecteur effectue sa procédure d’initialisation, qui peut prendre jusqu’à une minute. Durant
le démarrage, le logo “DUNE» s’affiche à l’écran.
● Si le logo “DUNE” n’apparait pas lors du démarrage du lecteur, cela vient peut-être d’un problème de connexion
entre le lecteur et votre diffuseur ou bien d’une mauvaise sélection d’entrée vidéo. Si tel est le cas, vérifiez vos
câbles ainsi que les réglages vidéo de votre diffuseur, remplacez les câbles si nécessaire ou choisissez une
autre manière de connecter le lecteur au diffuseur.
● Si vous voyez le logo “DUNE” sur votre écran lorsque vous allumez le lecteur et qu’il disparaît sans qu’aucune
image n’apparaisse pendant au moins 10 secondes, cela veut dire qu’il y a un problème de sortie vidéo du
lecteur. Dans ce cas veuillez appuyer sur la touche “MODE” de la télécommande et utilisez les touches “1”,
“2”, “3”, “4” ou “5” pour changer de résolution vidéo (cf. Réglage rapide de sortie vidéo).
Finalement, vous devriez voir apparaitre le menu principal du lecteur. L’écran principal se compose d’éléments
permettant à l’utilisateur d’accéder aux différents périphériques (internes ou externes) ou réseaux et d’accéder
aux paramètres du lecteur.
Vous pouvez accédez aux réglages du lecteur en sélectionnant l’icone “SETUP” sur l’écran principal du lecteur
ou tout simplement en appuyant sur la touche “SETUP” de la télécommande. Vous pouvez également régler
les paramètres vidéo, audio et réseau.
Pour choisir la langue du lecteur, veuillez sélectionner “Setup / General / Interface language”.
Utilisez les touches “LEFT”, “RIGHT”, “UP”, “DOWN”, “ENTER”, “RETURN” de la télécommande pour
naviguer à travers les menus du lecteur. Utilisez la touche “MENU” de la télécommande pour afficher la liste
des commandes disponibles. Utilisez la touche “INFO” de la télécommande pour afficher les informations
disponibles sur l’élément sélectionné.
Réglage rapide de sortie vidéo
La touche “MODE” de la télécommande permet de régler de façon rapide les modes de sorties vidéo sans
passer par le menu setup du lecteur; ce qui peut être utile si aucune image n’apparaît après allumage du
lecteur.
Appuyez sur la touche
de commuter entre les différents modes de sortie vidéo suivants :
1. Composite/Composante, PAL
2. Composite/Composante, NTSC
3. HDMI, 480i, 60 Hz
4. HDMI, 720p, 60 Hz
5. HDMI, 1080i, 60 Hz
Après affi chage de l’image à l’écran, appuyez sur la touche
le menu setup du lecteur afi n d’effectuer des réglages de sortie vidéo plus précis si nécessaire.
NOTE: La procédure de réglage rapide de sortie vidéo ne peut être utilisée en mode lecture. Pour assurer le
bon déroulement de la procédure, éteignez le lecteur puis rallumez-le et patientez environ 1 minute afi n que
le lecteur puisse achever son démarrage.
“
MODE” de la télécommande puis sur l’une des touches
“
ENTER” de la télécommande, allez ensuite dans
“1”, “2”, “3”, “4” ou “5”
Français
afi n
13
Page 14

Connexion de périphériques USB
Pour brancher un appareil USB, assurez-vous d’être sur le menu principal du lecteur et de le connecter
sur l’un des ports USB. Le lecteur va reconnaitre le périphérique USB qui sera symbolisé par une icône
sur le menu principal.
Lorsqu’un périphérique USB nécessite une alimentation conséquente (comme un disque dur externe
USB), il est préférable d’utiliser une alimentation externe. Le courant fournit par les ports USB peut ne pas
être suffi sant pour faire fonctionner correctement le périphérique USB.
Ne jamais débrancher ou déconnecter un périphérique USB lorsqu’une opération d’écriture est en cours.
Utilisation de carte mémoire SD
Pour insérer une carte mémoire SD, assurez-vous d’être sur le menu principal du lecteur, puis insérez
la carte mémoire SD dans l’emplacement prévu à cet effet. Le lecteur va reconnaître automatiquement
la carte mémoire qui sera symbolisé par une icône sur l’écran principal. Certaines cartes mémoires SD
peuvent ne pas être reconnues par le lecteur ou ne pas fonctionner correctement; dans ce cas, veuillez
utiliser un autre type de carte mémoire SD.
Ne pas éjecter la carte mémoire SD lorsqu’une opération d’écriture est en cours.
Disque dur interne 2.5” SATA
Vous pouvez installer le disque dur SATA 2.5” dans le boîtier du lecteur. Pour se faire, merci de suivre la procédure suivante :
1. Eteignez le lecteur.
2. Ouvrez le panneau latéral du boîtier : enlevez les 2 petites vis du côté du lecteur qui retiennent le couvercle,
puis soulevez ce dernier en utilisant le petit espace entre le capot et le côté du lecteur.
3. Fixez le disque dur sur la plaque en métal située sur le côté intérieur du couvercle. Veuillez utiliser 4 vis de
type M3.
4. Branchez les connecteurs d’alimentation et de données SATA sur le disque dur.
5. Remettez le couvercle avec le disque dur à sa place et fixez le couvercle au boîtier à l’aide des vis.
Accéder aux périphériques réseau
Pour connecter un périphérique réseau utilisant les protocoles SMB ou NFS, assurez-vous d’être sur
le menu principal du lecteur, ensuite pressez la touche “MENU” de la télécommande, puis sélectionnez
“Nouveau Dossier Réseau” et renseignez les paramètres du périphérique réseau tels qu’ils vous sont demandés. Le lecteur affi chera alors une icône correspondant au périphérique réseau confi guré sur l’écran
principal.
Pour naviguer dans la liste des ressources réseau accessibles via les protocoles SMB ou UPnP, cliquez
sur l’icône ‘’Navigateur Réseau’’ située sur l’écran principal du menu du lecteur.
NOTE: Si certaines ressources réseau ne sont pas affi chées par le lecteur, il se peut que vous soyez
amené à patienter quelques minutes, voire à réessayer (ou pressez la touche ‘’MENU’’ de la télécommande et sélectionnez ‘’Rafraîchir’’).
Formatage disque dur
Pour formater un disque dur rattaché au lecteur, sélectionnez l’icône correspondante au périphérique sur
l’écran principal du menu du lecteur, pressez la touche ‘’INFO’’ sur le télécommande et choisissez ‘’Formater Disque’’ (pour formater complètement le disque) ou ‘’Formater Partition’’ (pour formater une partition
déjà existante uniquement). Le lecteur va formater le disque en utilisant le système ‘’EXT2’’.
NOTE: Pour utiliser les disques formatés par le lecteur sur un PC Windows, vous pouvez être amené à
installer un logiciel tiers tel que ‘’EXT2FSD’’ (http://www.ext2fsd.com/).
14
Dune HD Lite 53D Quick Start Guide
Page 15

Allumage et extinction du lecteur
Pour mettre le lecteur en veille, appuyez sur la touche ‘’POWER’’ de la télécommande ou le bouton ‘’ON/
OFF’’ situé sur la face avant du lecteur. Pour sortir du mode veille, appuyez de nouveau sur l’une de ces
touches.
En fonction des réglages du lecteur (voir menu setup du lecteur), la mise en veille ‘’matérielle’’ ou la mise
en veille ‘’simple’’ peuvent être utilisées. Dans le mode mise en veille ‘’matérielle’’, l’extinction complète du
lecteur ne fait quasiment consommer aucune énergie. Dans le mode mise en veille ‘’simple’’, le lecteur ne
produit plus aucun signal vidéo mais reste actif. Par exemple, si vous avez des périphériques de stockage
connectés au lecteur, vous pouvez toujours y avoir accès (fonction ‘’NAS’’ du lecteur). Sortir de la mise en
veille ‘’simple’’ ne prend que quelques secondes. Quand le lecteur est en mode veille ‘’simple’’, il continue
de consommer de l’énergie de manière signifi cative. Il n’est pas recommandé de laisser le lecteur en mode
veille ‘’simple’’ durant trop longtemps si vous n’en avez pas l’utilité.
NOTE: Après l’extinction complète ou mise en veille ‘’matérielle’’ du lecteur, il est recommandé d’attendre
environ 1 minute avant de rallumer le lecteur.
NAS (Périphérique de Stockage Réseau)
Vous pouvez accéder aux périphériques de stockage connectés au lecteur depuis le réseau local par
l’intermédiaire des protocoles FTP et SMB. Sur un PC Windows, tapez ‘’ftp://adresse_ip’’ ou ‘’adresse_ip’’
dans l’explorateur Windows ; ‘’adresse_ip’’ étant l’adresse réseau du lecteur.
WiFi
Vous pouvez utiliser un adaptateur USB WiFi pour connecter le lecteur au réseau local via WiFi.
Pour plus d’informations concernant la compatibilité des adaptateurs USB WiFi, veuillez vous rendre à
l’adresse suivante :
http://dune-hd.com/support/hw_compat/
Restrictions
La compatibilité du lecteur avec certains matériels (amplifi cateurs A/V, matériels réseau, disques durs,
etc.) peut dépendre de plusieurs facteurs (modèle particulier, installation et usage spécifi que, confi gura-
tion du lecteur avec le matériel, etc.). Si le lecteur ne fonctionne pas correctement avec un matériel particulier, essayez de modifi er la confi guration du lecteur et du matériel, d’utiliser le matériel différemment ou
d’utiliser un autre matériel.
La compatibilité du lecteur avec certains contenus multimédia (fi chiers, disques, etc.) peut dépendre de
plusieurs facteurs (encodage spécifi que de fi chier, confi guration particulière du lecteur, etc.). Si le lecteur
ne fonctionne pas correctement avec un contenu multimédia particulier, essayez de modifi er la confi gura-
tion du lecteur, ou utilisez un contenu multimédia encodé différemment.
Mise à jour du lecteur et informations complémentaires
Pour rechercher les dernières mises à jour fi rmware du lecteur (pouvant améliorer le fonctionnement du
lecteur et étendre ses capacités), rendez-vous à l’adresse suivante:
http://dune-hd.com/fi rmware/.
Note: Vous pouvez également relier le lecteur à Internet afi n d’effectuer la mise à jour en ligne (Setup /
Misc / Firmware Upgrade)
Pour obtenir les dernières informations et documentations sur l’utilisation du lecteur, rendez-vous aux
adresses suivantes:
http://dune-hd.com/manuals/
http://dune-hd.com/support/
Français
15
Page 16

Einleitung
Der Dune HD Lite 53D ist die umfassende Lösung für volle HD (1080p) Videowiedergabe.
Grundfunktionen
● Neuster Sigma Designs 8653 Multimedia Prozessor: Für perfekte Wiedergabe von Videos und
beeindruckende Geschwindigkeit bei interaktiven Funktionen (z.B. Menüaufbau).
● Festplatten-Player: Verbinden Sie eine Festplatte mit dem Player und spielen Sie die Inhalte direkt von
der Festplatte ab.
● Netzwerk-Player: Integrieren Sie den Player in Ihr lokales Netzwerk und spielen Sie die Inhalte direkt
vom PC oder NAS über UPnP, SMB, NFS Verbindungen ab.
● MKV-Player: Spielen Sie HD-Videos im populären MKV-Format und zusätzlich allen weiteren gängigen
Videoformaten ab. Inklusive hochauflösenden HD-Videos bei extrem hoher Bitrate.
● 2 USB Anschlüsse: Auf einfachste Weise können USB-Festplatten, USB-Sticks, USB-Kartenleser oder
andere USB Massenspeicher an den Player angeschlossen werden.
● SD Karten-Slot: Spielen Sie Inhalte direkt von einer SD-Speicherkarte ab (z.B. von Ihrer Kamera) oder
nutzen Sie eine SD-Karte als lokalen bzw. Systemspeicher.
● HDMI 1.3: Zur Sicherstellung der bestmöglichen HD-Video und HD-Audio Qualität..
● Komplette A/V Anschlussmöglichkeiten: Nutzen Sie S/PDIF optical Audio, Stereo Audio, Component
Video und Composite Videoausgänge, um Ihre A/V Geräte mit dem Player zu verbinden.
● Unterstutzung fur Dolby TrueHD und DTS HD Master Audio: Ausgabe als Bitstream oder Decodierung
zu LPCM fur flexible Anschluss-Moglichkeiten.
● Skalierung: Automatische Skalierung von DVD und allen anderen SD Videoinhalten zu Full HD (1080p)
oder jeder anderen HD-Auflösung in perfekter Qualität.
● Dateimanager: Einfach zu nutzender Dateimanager (Kopieren, Verschieben, Loschen, Umbenennen
und mehr).
Zusätzliche Funktionen
● Musikwiedergabe in höchster Qualität: Spielen Sie Musikdateien von hoher Qualität (bis zu 192 Khz
/ 24-bit) und in den verschiedensten Dateiformaten ab (z.B. FLAC, Monkey’s Audio APE, WAV/PCM,
DTS, etc.).
● Playlisten: Erstellen Sie Playlisten aus Ihren Verzeichnissen, spielen Sie eigene Playlisten ab und
nutzen Sie die Wiederholungsfunktion oder Zufallswiedergabe.
● NAS Funktion: Im lokalen Netzwerk haben Sie Zugriff auf Daten von Speichergeräten (Festplatte,
optisches Laufwerk, etc.), die an den Player angeschlossen sind (via SMB oder FTP).
● BitTorrent: Nutzen Sie den integrierten BitTorrent Client um Dateien von P2P Netzwerken
herunterzuladen.
● Individuell anpassbare Benutzeroberfläche: Medienarchiv mit Anzeige der Covers und Icons (Full-
HD Grafik).
● Internetradio: Wiedergabe und Aufnahme von verschiedenen Internetradiostationen (HTTP/MP3).
● IPTV: Wiedergabe und Aufnahme von IPTV Streams (Multicast UDP/RTP) Ihres Internetproviders*.
● Digital-TV Option: Wiedergabe und Aufnahme von digitalen TV-Kanälen mit einem optionalen Digital-
TV USB-Dongle**.
16
Dune HD Lite 53D Quick Start Guide
Page 17

Lieferumfang
5423
6 8
1. Dune HD Lite 53D Mediaplayer
2. Fernbedienung (Batterien evtl.
nicht enthalten)
3. Wlan Antenne (optional)
HINWEIS: Im Lieferumfang kann zusätzliches (optionales) Zubehör enthalten sein, je nach Gerätekonfiguration,
Verkaufsregion und Händler.
4. AV Kabel
5. Netzwerkkabel
6. Standfuß
7. Schrauben
8. Externes Netzteil
9. Schnellstartanleitung
917
Gehäuse
Vorderansicht
1
2
3
Rückansicht
21345678
1. Wlan Antenne (optional)
2. Digitaler optischer Audioausgang
3. Composite Video und analoger Stereo Audioausgang
4. Component (Y/Pb/Pr) Videoausgang
5. HDMI 1.3
6. USB 2.0 Host
7. LAN
8. 12V Gleichstromanschluss
4
1. Ein-/Aus
2. LED-Leuchtanzeige
3. Infrarot-Auge
4. USB 2.0 Host-Anschluss
Ansicht von oben
1. SD Kartenslot
1
Deutsch
17
Page 18
Horizontale Ausrichtung des Gerätes
Sie können das Gerät sowohl Vertikal als auch Horizonal betreiben. Wenn Sie das Gerät Horizontal betreiben
möchten, beachten Sie bitte folgendes:
1. Entfernen Sie den Standfuß vom Gerät
2. Befestigen Sie die mitgelieferten selbstklebenen Standfüße am Gerät an der gewünschten Position
Fernbedienung
1. Funktionskontrolle (LED) — Blinkt, wenn ein Knopf gedrückt wird.
2. EJECT — Öffnen/Schließen des optischen Laufwerks. MUTE —
Audio Stummschaltung. MODE — Wechseln des VideoausgabeModus; Steuerung weiterer Player-Funktionen. POWER —Wechsel
zwischen Standby- und Betriebsmodus.
3. A (Rot), B (Grün), C (Gelb), D (Blau) — Blu-Ray spezifi sche
Funktionen aufrufen; Steuerung weiterer Player-Funktionen.
4. 0–9 — Eingabe von Zahlen und Text; Steuerung weiterer Player-
Funktionen.
5. SEARCH — Zu festgelegter Wiedergabeposition springen. ZOOM —
Wechseln des Zoomfaktors für aktuelle Videowiedergabe. SETUP —
Setup-Menü aufrufen/verlassen; Wiedergabeoptionen während der
Darstellung andern (Helligkeit/Kontrast...).
6. V+/V- (Lautstarke rauf / Lautstarke runter) — Einstellen der
Lautstarke.
7. P+/P- (Seite rauf / Seite runter) — Seitenweise in verschiedenen
Listen blättern; Steuerung weiterer Player-Funktionen.
8. Pfeiltasten (LINKS, RECHTS, RUNTER, RAUF), ENTER, RETURN,
TOP MENÜ, POP UP MENÜ, INFO — Tasten zur Kontrolle des Players
(Navigation im Menü, Öffnen/Abspielen des gerade selektierten
Eintrags, zurück zum vorherigen Menüpunkt, Hauptmenü öffnen,
Popup-Menü aufrufen, Informationen anzeigen, Steuerung weiterer
Player-Funktionen).
9. PLAY, PAUSE, STOP, SLOW, REW, FWD, PREV, NEXT — Steuerung
der Wiedergabeoptionen.
10. SUBTITLE, URL/2nd Audio, ANGLE/ROTATE, REPEAT,
SHUFFLE/PIP, AUDIO — Darstellungsoptionen andern.
1
2
3
4
5
6
7
8
9
10
HINWEISE:
● Verwenden Sie alkalische AAA Batterien.
● Achten Sie auf die richtige Polung beim Einlegen der Batterien.
● Halten Sie die Fernbedienung immer direkt auf das Gerät gerichtet.
Es dürfen sich keine Gegenstände oder andere Hindernisse zwischen
Fernbedienung und Gerät befi nden.
● Funktioniert die Fernbedienung nur noch über kurze Distanz, bitte
Batterien wechseln.
● Einige Tasten können verschiedene Funktionen besitzen, abhängig
vom aktuellen Modus.
● Einige Tasten sind nur abhängig vom aktuellen Modus oder bei
Wiedergabe verschiedener Inhalte nutzbar.
18
Dune HD Lite 53D Quick Start Guide
Page 19

Inbetriebnahme
Entfernen Sie die transparente Schutzfolie von der Front des Gerätes für eine bessere Optik.
Um eine ausreichende Kühlung des Gerätes zu gewährleisten, stellen Sie bitte sicher, dass sich auf allen Seiten
des Gerätes mindestens 10 cm Freiraum befindet.
Legen Sie die Batterien in die Fernbedienung ein.
Schließen Sie das Gerät an Ihren Fernseher und evtl. andere vorhandene A/V Komponenten an. Nutzen Sie die
HDMI Verbindung für die bestmögliche Qualität der Video- und Audiowiedergabe. Schalten Sie das Gerät und
evtl. vorhandene A/V Komponenten aus, bevor Sie die Geräte verbinden. Stellen Sie bitte sicher, dass Ihr TV
und evtl. vorhandene andere A/V Komponenten auf die richtigen Eingänge konfiguriert wurden.
Schalten Sie den Player ein. Der Player startet nun mit dem Ladevorgang, welcher bis zu einer Minute dauern
kann. Während dieser Zeit erscheint das ‘‘DUNE’’ Logo auf dem TV.
● Falls nach dem Einschalten das ''DUNE”-Logo nicht am Bildschirm erscheint, deutet dies auf ein Problem
mit der Verkabelung zwischen Player und TV, oder falsch eingestelltem Videoeingang am TV hin. In diesem
Fall überprüfen Sie bitte nochmals die korrekte Verkabelung und die Einstellungen am TV Gerät. Alternativ
versuchen Sie, den Player über andere Anschlüsse mit dem TV zu verbinden.
● Falls nach dem Einschalten das ''DUNE”-Logo am Bildschirm zu sehen ist, dann aber das Bild verschwindet
und das Menü nach mindestens 10 Sekunden nicht erscheint, deutet dies auf einen falsch eingestellten
Video-Modus am Player hin. In diesem Fall drücken Sie bitte die ''MODE'' Taste der Fernbedienung und
im Anschluss die Tasten ''1'', ''2'', ''3'', ''4'' oder! ''5'', um einen anderen Video-Modus zu wählen. (s.u.
''Schnellwechsel des Video-Modus'').
Das Hauptmenü sollte nun auf dem TV erscheinen. Dieses Hauptmenü erlaubt über verschiedene Menüpunkte
den Zugang zu den einzelnen Funktionseinstellungen des Players, ebenso wie den Zugriff auf angeschlossene
Speichermedien und Netzwerkfreigaben.
Nehmen Sie nun die gewünschte Konfiguration des Gerätes über den Menüpunkt “SETUP” oder durch Drücken
der Taste “SETUP” auf der Fernbedienung vor. Insbesondere die Video-, Audio- und Netzwerk-Einstellungen
lassen sich dort individuell anpassen.
Um die gewünschte Menüsprache einzustellen, wählen Sie „Setup / General / Interface Language“.
Mit den LINKS-, RECHTS-, UNTEN-, OBEN-, ENTER-, RETURN- Tasten der Fernbedienung navigieren
Sie durch die Menüs. Wenn Sie die MENU- Taste auf der Fernbedienung drücken, werden die verfügbaren
Menübefehle eingeblendet. Mit der INFO- Taste können Sie sich Informationen über den ausgewählten
Menüpunkt anzeigen lassen.
Schnellwechsel des Video-Modus
Die "MODE" Taste der Fernbedienung erlaubt das schnelle Ändern des Video-Modus, ohne das Menü
aufzurufen. Diese Art der Umschaltung könnte nötig sein, wenn Sie nach dem Einschalten des Gerätes keine
Ausgabe auf dem TV sehen und so die Umstellung per Menü nicht möglich ist.
Drücken Sie die "MODE" Taste der Fernbedienung, gefolgt von der Taste "1", "2", "3", "4", oder! "5", je
nachdem welcher Modus gewünscht ist. Die Zahlen stehen dabei für folgende Modi:
1. Composite/Component, PAL
2. Composite/Component, NTSC
3. HDMI, 480i, 60 Hz
4. HDMI, 720p, 60 Hz
5. HDMI, 1080i, 60 Hz
Sehen Sie nun ein Bild auf dem TV, drücken Sie bitte die "ENTER" Taste der Fernbedienung und wechseln
bei Bedarf in das Video Setup Menü, um weitere Feinheiten der Videodarstellung zu konfi gurieren.
HINWEIS: Der Schnellwechsel des Video-Modus funktioniert nicht bei der Wiedergabe von Inhalten. Um
diese Funktion zu nutzen, schalten Sie den Player aus und warten etwa 1 Minute, bis der Player wieder voll
betriebsbereit ist.
Deutsch
19
Page 20

USB-Geräte anschließen
Zum Einbinden von USB-Geräten wechseln Sie bitte zunächst in das Hauptmenü. Nach Anstecken des
USB-Gerätes wird dieses vom Player erkannt und es erscheint der entsprechende Menüpunkt auf dem
Bildschirm.
Bei Verwendung eines externen USB-Laufwerks mit hohem Strombedarf (z.B. Festplatte), nutzen Sie bitte
eine externe Stromversorgung für das Gerät. Die Ausgangsspannung für das Gerät über den USB-Port
kann zu gering sein und somit das Gerät nicht funktionieren.
Entfernen Sie kein externes Gerät vom USB-Anschluss während noch Daten geschrieben werden!
SD Speicherkarten verwenden
Zum Einlegen einer SD-Karte wechseln Sie bitte zunächst in das Hauptmenü. Schieben Sie die
Speicherkarte in den SD Kartenslot am Player. Der Player erkennt die Speicherkarte und es erscheint der
entsprechende Menüpunkt im Hauptmenü. Manche SD-Karten werden vom Player evtl. nicht erkannt bzw.
funktionieren nicht richtig. Bitte verwenden Sie in diesem Fall eine andere SD-Karte.
Entfernen Sie die Speicherkarte nicht während noch Daten geschrieben werden!
Interne 2.5” SATA Festplatte
Sie können im Gerät eine 2.5 Zoll Festplatte installieren. Um die Festplatte zu installieren gehen Sie wie
folgt vor:
1. Schalten Sie das Gerät aus und entfernen Sie die Spannungsversorgung
2. Öffnen Sie die seitliche Abdeckung des Gerätes. Hierzu müssen Sie 2 kleine Schrauben am Gerät
entfernen. Danach können Sie die Gehäuseabdeckung entfernen
3. Befestigen Sie die Festplatte auf der im Gehäuse vorhandenen Montageplatte. Benutzen Sie hierzu 4
Schrauben vom Typ M3
4. Verbinden Sie die beiden Daten-/Stromkabel im Gerät mit der Festplatte
5. Verschließen Sie das Gerät mit der Abdeckung und schrauen Sie die entfernten Schrauben ein.
Netzwerkfreigaben einbinden
Um eine Netzwerkfreigabe mittels SMB oder NFS(Linux) einzubinden, wechseln Sie bitte zunächst ins
Hauptmenü. Drücken Sie dort nun die «MENU» Taste der Fernbedienung und wählen «Netzwerkordner
erstellen». Geben Sie nun alle benötigten Parameter für die Netzwerkfreigabe über die Fernbedienung
ein. Im Anschluss erscheint im Hauptmenü dann ein neuer Menüpunkt mit der von Ihnen erstellten
Netzwerkverbindung.
Um alle verfügbaren SMB oder UPnP Netzwerk Ressourcen anzuzeigen, wählen Sie bitte den Menüpunkt
«Network Browser» im Hauptmenü des Players. HINWEIS: Sollten nicht alle verfügbaren Netzwerk
Ressourcen angezeigt werden, warten Sie bitte einige Minuten oder drücken nochmals die «MENU» Taste
der Fernbedienung und wählen «Refresh».
Festplatte formatieren
Zum Formatieren einer Festplatte, die an den Player angeschlossen ist, wählen Sie im Hauptmenü das
Laufwerk aus, drücken die INFO-Taste auf der Fernbedienung und wählen entweder den Befehl „Festplatte
formatieren“ (zum Formatieren der gesamten Festplatte) oder den Befehl „Partition Formatieren“ (zum
Formatieren einer bestehenden Partition). Der Player formatiert die Festplatte mit dem EXT2-Dateisystem.
HINWEIS: Wenn Sie Festplatten, die mit dem Player formatiert wurden, an einem Windows PC verwenden
möchten, müssen Sie evtl. zusätzliche Software am PC installieren, wie z.B. «EXT2FSD» (http://www.
ext2fsd.com/).
Player ein-/ und ausschalten
20
Dune HD Lite 53D Quick Start Guide
Page 21

Um den Player in den Standby Modus zu versetzen, drücken Sie die «POWER» Taste auf der Fernbedienung
oder den POWER-Knopf vorne am Player. Zum Beenden des Standby Modus drücken Sie bitte erneut eine
der genannten Tasten.
In den Player-Einstellungen (siehe Setup-Menü) können Sie zwischen zwei verschiedenen Standby-Modi
wählen: dem „Hardware Standby“ Modus oder dem „Software Standby“ Modus. Im „Hardware Standby“
Modus ist das Gerät fast komplett ausgeschaltet und der Player verbraucht fast keinen Strom. Im „Software
Standby“ Modus erzeugt der Player kein Videosignal mehr, ist aber trotzdem noch voll betriebsbereit. Z.B.
Können Sie weitere am Gerät angeschlossene Geräte über die NAS-Funktion des Players ansprechen und
nutzen. Das Beenden des „Software Standby“ dauert nur wenige Sekunden. Im „Software Standby“ Zustand
benötigt der Player signifi kant Strom. Wir empfehlen daher, den Player bei längerer Nichtnutzung nicht
diesem Standby Modus zu belassen.
HINWEIS: Nach Ausschalten des Players bzw. nach Versetzen des Players in den „Hardware Standby“
Modus sollten Sie ca. 1 Minute warten, bevor Sie den Player wieder einschalten.
NAS (Network Attached Storage)
Sie können über das lokale Netzwerk auf an den Player angeschlossene Laufwerke via FTP oder SMB
zugreifen. Auf einem Windows Rechner tippen Sie einfach «ftp://IP-Adresse» oder «\\IP-Adresse» im
Windows Explorer, wobei Sie “IP-Adresse “ durch die richtige IP-Adresse des Players ersetzen müssen
(z.B. 192.168.0.5).
WiFi (Drahtlose WLAN Verbindung)
Sie können einen USB-WLAN (WiFi) Stick verwenden, um den Player mittels WLAN mit einem lokalen
Netzwerk zu verbinden.
Weitere Informationen zu den unterstützten USB-WLAN Sticks fi nden Sie unter:
http://dune-hd.com/support/hw_compat/.
Einschränkungen
Die Kompatibilität des Players mit verschiedenen Geräten (A/V Geräte, Netzwerkgeräte,
Festplattenlaufwerke, etc.) ist abhängig von verschiedenen Faktoren (Gerätemodell und Typ,
Hardwareinstallation und Konfi guration des Players und der anderen Geräte). Sollte der Player nicht
mit einem speziellen Gerät zusammenarbeiten, versuchen Sie die Konfi guration von Player und Gerät
entsprechend zu ändern, um eine Funktion zu gewährleisten. Versuchen Sie verschiedene Möglichkeiten
der Verbindungen zwischen Player und den anderen Geräten - oder verwenden Sie ein kompatibles Gerät.
Die Kompatibilität des Players mit verschiedenen Medienformaten (Dateien, Discs, etc.) ist abhängig von
verschiedenen Faktoren (Encoding der Media Inhalte, Player Konfi guration etc.). Sollte der Player einige
Medien nicht abspielen, versuchen Sie die Konfi guration des Players entsprechend zu ändern oder nutzen
Sie Medien in einem anderen Format.
Player updaten und weitere Informationen
Die neuesten Firmware Versionen des Players (Firmware Updates können die Funktion und Stabilität des
Players verbessern und den Funktionsumfang erweitern) fi nden Sie im Internet unter folgendem Link:
http://dune-hd.com/fi rmware/.
(Hinweis: Sie können den Player auch mit dem Internet verbinden und die Firmware am Player direkt online
aktualisieren; siehe Setup / Verschiedenes / Firmware Upgrade.)
Aktuelle Anleitungen, Handbücher und weiterführende Informationen zur Bedienung und Nutzung des
Players fi nden Sie im Internet unter:
http://dune-hd.com/manuals/
http://dune-hd.com/support/
Deutsch
21
Page 22

Introductie
De Dune HD Lite 53D is een alles-in-één oplossing om tot en met Full HD (1080p) video bestanden af te
kunnen spelen.
Belangrijkste kenmerken
● De nieuwste Sigma Designs 8653 media processor: Deze krachtige processor zorgt voor het ultieme
home entertainment genot.
● HDD speler: Plaats een losse harde schijf of sluit een externe Hard Disk (HDD) aan en speel direct
hiervan af.
● Netwerk speler: Sluit de speller aan op het netwerk speel direct af vanaf een PC of NAS (UPnP, SMB,
NFS).
● MKV speler: Speel HD en SD video af in het populaire MKV formaat, inclusief hoge kwaliteit HD video
met zeer hoge bitrates.
● 2 USB poorten: Eenvoudig en gemakkelijk HDDs, USB flash drives, USB kaarlezers en overige USB
opslag apparaten.
● SD kaart slot: Makkelijk je bestanden afspelen vanaf SD geheugen kaarten van bijvoorbeeld je camera
of andere apparaten, of gebruik een SD geheugen kaart als lokale systeem opslag.
● HDMI 1.3: Garandeert de beste kwaliteit HD video en HD audio.
● Een breed aanbod van aansluitingen: Diverse Audio/Video aansluitingen waaronder S/PDIF optische
audio, stereo audio, component video, composiet video uitgangen waardoor je de HD SMART H1 op
vrijwel alle beamers, TV’s etc kan aansluiten.
● Video output flexibiliteit: stuur video signalen uit in elke willekeurige resolutie en formaat and formaat
(van SD tot en met 1080p, 24p/PAL/NTSC).
● Upscaling: Hoge kwaliteit upscaling van DVD en elk ander SD video bestand naar Full HD (1080p) of
elke andere resolutie.
● Bestands browser: Gemakkelijk door uw bestanden bladeren middels de krachtige bestandsbeheer
mogelijkheden (kopiëren, verplaatsen, verwijderen, hernoemen. Organiseren, sorteren).
Extra Functionaliteiten
● Hoge kwaliteit muziek afspeelbaarheid: Speel erg hoge kwaliteit (tot en met192 Khz / 24-bit) musiek
bestanden in diverse formaten (FLAC, Monkey’s Audio APE, WAV/PCM, DTS, etc).
● Playlists: genereer playlists uit folders, gebruik eigen playlists, gebruik herhaal en shuffle functies.
● NAS functie: Benader bestanden op de HD SMART H1 (HDD, optische drive, etc) aangesloten op de
speller vanaf je locale netwerk (SMB or FTP).
● BitTorrent: Gebruik de ingebouwde BitTorrent client om bestanden te downloaden vana P2P netwerken.
● Aanpasbare gebruikers interface: Gebruik cover art en icon browsing (met Full HD graphics).
● Internet radio: Je kan menig internet radio station afspelen en opnemen (HTTP/MP3).
● IPTV: Je kan menig IPTV streams afspelen en opnemen (multicast UDP/RTP) ondersteund door je
Internet provider*.
● Digital TV optie: Bekijk en neem Digital TV kanalen op door gebruik te maken van de optionele Digitale
TV USB dongle**.
* Raadpleeg uw internet service provider welke multicast UDP/RTP streams zij aanbieden.
** Digital TV USB dongle is optioneel.
22
Dune HD Lite 53D Quick Start Guide
Page 23

Inhoud van de verpakking:
5423
6 8
1. Dune HD Lite 53D media speler
2. Afstandsbediening (Batterijen
mogelijk inbegrepen)
Wi-Fi antenne (optioneel)
3.
* Additionele zaken kunnen afhankelijk van de configuratie en distributeur bijgelverd zijn.
4. AV kabel
Netwerk kabel
5.
6.
Zelfklevende voetjes
Aanblik/Buitenkant
Voor aanzicht
1
2
3
Achter aanzicht
21345678
1. Wi-Fi antenne (optioneel)
2. Optsche digitale audio uitgang
3. Composite video and S-Video output
4. Component (Y/Pb/Pr) video output
5. HDMI 1.3
6. USB 2.0 Host
7. LAN
8. DC 12v aansluiting
917
7.
HDD schroeven
8. Externe voeding
9. Snel start gids
1. Aan/uit knop
2. LED indicator
3. Infra Rood oog
4. USB 2.0 host
4
Bovenaangezicht
1. SD kaart slot
1
Nederlands
23
Page 24

Horizontale plaatsing van de Speler
U kunt de speler zowel horizontaal als verticaal plaatsen. Als U de horizontale plaatsing wilt gebruiken,
gelieve het volgende te doen:
1. Verwijder de voet van de speler.
2. Gebruik de speciale zelfklevende voetjes bestemd voor horizontale plaatsing van de speler (inbegrepen
verpakking) en plak ze aan de zijkant van de speler.
Afstandsbediening
1. Commando indicator - knippert in reactie als er op een knop van de
afstandsbediening gedrukt word.
2. EJECT — open/sluit de optische drive. MUTE — Zet het geluid
AAN/UIT. MODE — Schakel tussen TV modus, bedien sommige
andere functionaliteiten. POWER — zet in of haal uit stand-by
modus.
3. A (Rood), B (Groen), C (Geel), D (Blauw) — Bedien Blu-ray disk
features; bedien sommige andere functionaliteiten.
4. 0–9 — Voor cijfers en letters in; bedien sommige andere
functionaliteiten.
5. SEARCH — Navigeer naar een willekurige tijd in een bestand.
ZOOM — verander het zoom level tijdens afspelen. SETUP — enter/
verlaat het setup menu; pas tijdens het afspelen de instellingen aan.
6. V+/V- (volume omhoog / volume omlaag) — Pas het volume aan.
7. P+/P- (pagina omhoog / pagina omlaag) — scroll omhoog en
naar beneden; bedien sommige andere functionaliteiten.
8. Pijlen (LINKS, RECHTS, NAAR BENEDEN, OMHOOG), ENTER,
RETURN, TOP MENU, POP UP MENU, INFO — Navigatie knoppen
(navigeer adoor het scherm, open/gebruik het geselcteerde item,
ga een stap terug , ga terug naar het vorige scherm. go back
to the previous screen, ga naar het hoofd menu, laat het popup
menu verschijnen, laat informatie zien, bedien sommige andere
functionaliteiten).
9. PLAY, PAUSE, STOP, SLOW, REW, FWD, PREV, NEXT —
Knoppen ter bediening van bestanden.
10. SUBTITLE, ANGLE/ROTATE, AUDIO, REC, DUNE, URL.
Ondertiteling aan/uit, Bedien sommige andere functionaliteiten.
NOTITIES:
● Gebruik alleen AAA alkaline batterijen.
● Kijk goed naar de polariteit voor het plaatsen
● Zorg dat er zich géén obstakels bevinden tussen de speller en de
afstandsbediening tijdens de bediening
● Vervang de batterijen als vanaf dichtbij de afstandsbediening niet
meer correct functioneert.
● Sommige knoppen hebben meerdere functies, afhankelijk van de
mode waarin de speller zich bevind.
1
2
3
4
5
6
7
8
9
10
24
Dune HD Lite 53D Quick Start Guide
Page 25

Eerste gebruik
● Verwijder de transparante beschermende film vanaf het frontpaneel.
● Zorg ervoor dat er genoeg ruimte rondom de speler is voor een goede koeling. De ruimte aan elke kant moet
niet minder dan 10 cm bedragen.
● Zorg ervoor dat de afstandsbediening batterijen bevat.
● Sluit de speler aan op uw TV en/of andere A/V apparatuur op de correcte manier. Gebruik de HDMI-aansluiting
om de best mogelijke kwaliteit van video en audio te krijgen. Zorg ervoor dat de speler uit staat als u hem
aansluit op A/V apparatuur.
● Zorg ervoor dat uw TV en andere A/V apparatuur correct worden geconfigureerd door de juiste ingangen te
gebruiken.
● Zet de speler aan. De speler kan tijdens haar initiële opstart procedure er tot een minuut over doen om op te
starten. Tijdens de opstart fase, zal her ‘‘DUNE’’-logo worden weergegeven op de TV.
● Als je niet het ‘‘DUNE’’-logo op de TV ziet verschijnen, kan dit betekenen dat er een probleem is met de
verbinding tussen de speler en de TV of dat een verkeerde video-ingang is gekozen op de TV. In een dergelijk
geval, controleer dan de kabels en de instellingen van de TV, of proberen om verschillende kabels of een
andere manier aan te sluiten
● Als je het ‘‘DUNE’’-logo op de TV ziet, maar weer verdwijnt en er gedurende 10 seconden geen enkel beeld
verschijnt, kan het betekenen dat een verkeerd video-uitgang modus is ingesteld op de speler. In een dergelijk
geval, druk op de ‘‘MODE’’ knop van de afstandsbediening en druk vervolgens op een van de numerieke
knoppen ‘‘1’’, ‘‘2’’, ‘‘3’’, ‘‘4’’ of ‘‘5’’ om over te schakelen naar een andere video output mode (zie ‘‘Snel
instellen van de Video Output Mode’’).
Tot slot ziet u het beginscherm van het speler menu. Pas de instellingen van de speler zo nodig met behulp van
‘‘SETUP’’ item op het beginscherm van de speler aan (of door op de ‘‘SETUP’’ knop van de afstandsbediening).
In het bijzonder, kunt u video-instellingen, audio-instellingen aanpassen, en netwerkinstellingen.
Voor het kiezen van de taal, gebruik ‘‘Setup / General / Interface language’’ Gebruik de afstandsbediening
knoppen ‘‘LINKS’’, ‘‘RECHTS’’, ‘‘OMHOOG’’, ‘‘NAAR BENEDEN’’, ‘‘ENTER’’, ‘‘RETURN’’ om te navigeren
door het menu van de speler. Gebruik de ‘‘MENU’’ knop van de afstandsbediening om de lijst van beschikbare
commando’s te tonen. Gebruik de ‘‘INFO’’ knop van de afstandsbediening om de informatie over het
geselecteerde item.
Snel instellen van de Video Output Mode
Middels de
hiervoor naar het menu van de speler te moeten gaan.
Deze manier kan nodig zijn als u geen beeld op het scherm heeft na het aansluiten van de speler op een TV.
Druk op de
‘‘1’’, ‘‘2’’, ‘‘3’’, ‘‘4’’ of ‘‘5’’
1. Composiet/Component, PAL
2. Composiet/Component, NTSC
3. HDMI, 480i, 60 Hz
4. HDMI, 720p, 60 Hz
5. HDMI, 1080i, 60 Hz
Nadat u beeld heeft, drukt u op de ‘‘ENTER’’ knop van de afstandsbediening, en ga dan naar het speler
setup-menu om een meer precieze confi guratie van de video output-modus in te voeren indien nodig.
OPMERKING: De procedure kan niet worden gebruikt tijdens het afspelen.
‘‘MODE’’
‘‘MODE’’
knop van de afstandsbediening kunt u snel wisslen van video output mode zonder
knop van de afstandsbediening en vervolgens een van de afstandsbedinening knoppen
over te schakelen naar een van de volgende video output modes, respectievelijk:
Nederlands
25
Page 26

Aansluiten van USB-drives
Voor het afspelen van een optische schijf, zorgt u ervoor dat u in het hoofdscherm van de speler staat en
sluit u de USB-drive op een vrije USB-poort van de speler aan. De speler herkent het USB-station, en zal
de USB drive op het hoofdscherm tonen. Bij het aansluiten van een USB-drive die aanzienlijke capaciteit
heeft (zoals USB HDD), gebruik dan de externe voeding van de USB drive. Het kan gebeuren dat de
speler niet genoeg stroom kan leveren aan niet gevoede drives. Zet de speler niet uit, of onderbreek de
USB-Drive niet gedurende activiteit ervan.
SD-geheugenkaarten gebruiken
Als u een SD-geheugenkaart plaatst, zorg er dan voor dat u op het beginscherm van de speler staat. De
speler herkent de geheugenkaart, en zal deze op het hoofdscherm tonen . Sommige SD geheugenkaarten
kunnen niet worden kerkend door de speler of kunnen niet correct werken; in een dergelijk geval, gebruik
dan een andere model SD-geheugenkaart.
Niet de geheugenkaart verwijderen tijdens gebruik.
Interne 2.5’’ SATA HDD
U kunt in 2.5" SATA HDD in de speler plaatsen. Plaatsen van de 2.5" SATA HDD, gelieve het volgende te
doen:
1. Schakel de speler uit en koppel de externe power adapter los.
2. Open de kap van de speler: schroef de twee kleine schroeven los die kap bevestigen, dan met beleid de
kap los maken van de unit.
3. Bevestig de 2.5" SATA HDD op de aanwezige HDD houder. Gebruik voor bevestiging de meegeleverde
4 tal schroeven.
4. Sluit de aanwezige SATA HDD kabels aan.
5. Plaats met beleid de kap terug en schroef de 2 tal schroeven weer vast.
Toegang tot netwerk schijven
Voor het aansluiten van een netwerk schijf met behulp van SMB of NFS-protocol, dient u ervoor te zorgen
dat u op het beginscherm van de speler staat, en drukt op de «MENU» knop van de afstandsbediening,
kies «Maak netwerk Folder», voor de details van de netwerkschijf in indien nodig. Om te bladeren in de
lijst van de netwerk toegankelijke bestanden via SMB of UPnP, gebruik je het «Network Browser» item in
het beginscherm van de speler. OPMERKING: Als sommige netwerkbronnen worden niet weergegeven
door de speler, moet u enkele minuten wachten en dan opnieuw proberen (of druk op de «MENU» knop
van de afstandsbediening en kies «Refresh»).
Formatteren harde schijf
Om een harde schijf te formatteren, selecteer het station, druk op de «INFO» knop van de afstandsbediening
en kies «Format Disk» (de gehele schijf) of «Format Partition» (alleen een bepaalde partitie). De speler zal
de schijf formatteren in «EXT2» bestandssysteem.
OPMERKING: Voor het gebruik van schijven welke zijn geformatteerd door de speler en u de schijf los
aansluit op een Windows-pc, moet u mogelijk extra software installeren op de PC, zoals «EXT2FSD» (http://
www.ext2fsd.com/).
26
Dune HD Lite 53D Quick Start Guide
Page 27

De speler aan en uit zetten
Om de speler in de standby-modus, drukt u op de «POWER» knop van de afstandsbediening of de «on /
off»-knop op het
Afhankelijk van de instellingen van de speler zal de «hardware standby» of «soft-standby»-modus worden
gebruikt. In de «hardware standby» modus, zal de speler bijna compleetpower-uitgaan en gebruikt
nagenoeg geen stroom. In de «software standby» modus zal de speler alleen geen signaal op de videouitgang geven, maar functioneert deze nog steeds. Bijvoorbeeld, als u een aantal opslagapparaten
aangesloten heeft op de speler kunt u nog steeds toegang verkrijgen («NAS» functie van de speler). Het
verlaten van de «software standby» modus duurt slechts enkele seconden. Wanneer de speler zich in de
«software standby» modus bevind, verbruikt hij nog steeds aanzienlijk stroom. Het is niet aan te raden om
de speler voor lange tijd in de «software standby» modus te gebruiken, zeker als dit niet nodig is.
OPMERKING: Na het uitschakelen van de speler is het aanbevolen om ongeveer 1 minuut te wachten
alvorens deze weer aan te zetten.
voorpaneel. Als u de standby-modus, drukt u nogmaals op een van deze knoppen.
NAS (Network Attached Storage)
U krijgt toegang tot de opslag-apparaten aangesloten op de speler via het lokale netwerk middels gebruik
te maken van FTP en SMB-protocollen. Op een Windows PC, typ je gewoon «ftp://ip_address» of «\ \
ip_adres» in de Windows verkenner, waar «ip_adres» is het IP-adres van de speler.
WiFi
U kunt gebruik maken van een USB WiFi adapter door deze op een vrije USB poort aan te sluiten op de
speler.
Kijk hier voor de informatie over ondersteunde USB WiFi adapters:
http://dune-hd.com/support/hw_compat/
Limitaties
Verenigbaarheid/interactie van de speler met een bepaalde hardware (A / V-apparatuur, Netwerkapparatuur,
diskdrives, enz) kan afhangen van verschillende factoren (met name hardware model, specifi eke
kenmerken van de hardware-installatie en het gebruik, de confi guratie van de speler en de hardware, etc).
Als de speler niet correct werkt met bepaald hardware, probeer dan om de confi guratie van de speler of
hardware aan te passen, proberen om de hardware te gebruiken op een andere manier, of om een andere
hardware te gebruiken proberen. Verenigbaarheid/interactie van de speler met bepaalde media-inhoud
(bestanden, schijven, enz.) kan afhangen van verschillende factoren (specifi eke kenmerken van media-
inhoud codering, specifi eke kenmerken van de confi guratie van de speler, etc). Als de speler niet goed
speelt een bepaalde media-inhoud, probeer dan om de confi guratie van de speler, of probeer media te
gebruiken welke gecodeerd is op een andere manier.
Updaten van uw speler en het vinden van meer
informative
Controleer regelmatig op bijgewerkte versies van de fi rmware
http://dune-hd.com/fi rmware/
(Opmerking: U kunt de speler ook middels de online fi rmware upgrade functie van de speler updaten, zie
Setup / misc / Firmware upgrade.)
Kijk hier voor de up to date informatie aangaande handleidingen en support:
http://dune-hd.com/manuals/
http://dune-hd.com/support/
Nederlands
27
Page 28

Introducción
Dune HD Lite 53D es la solución todo en uno, con una reproducción de video Full HD (1080p).
Características principales
● El nuevo procesador Sigma Designs 8653: disfrute de la reproducción y un excelente rendimiento de
las características interactivas.
● Reproducción desde el disco duro: conecte un disco duro al reproductor y reproduzca el contenido
desde el disco duro.
● Reproducción en red: conecte el reproductor a una red local y reproduzca directamente desde el PC
o NAS (UPnP, SMB, NFS).
● Reproduce MKV: reproduce vídeo HD y SD en el popular formato MKV y otros formatos de vídeo mo-
dernos, incluida la alta calidad de vídeo HD con bitrate muy alto.
● 2 puertos USB: conecte discos duros, unidades flash USB, lectores de tarjetas USB y otros dispositivos
de almacenamiento USB.
● Ranura para tarjetas SD: reproduzca fácilmente archivos multimedia desde la tarjeta de memoria SD
de tu cámara u otros dispositivos, o utilice una tarjeta de memoria SD como almacenamiento local o de
sistema (necesaria para la función BD Live).
● HDMI 1.3: garantizar la máxima calidad de vídeo HD y audio HD.
● Un amplio conjunto de conectores A / V: Use S/PDIF óptico, audio estéreo, video componente, sali-
das de vídeo compuesto para conectar fácilmente a cualquier equipo de A / V.
● Flexibilidad de salidas da Video: salida de vídeo en cualquier resolución y formato (de SD a 1080p,
24p/PAL/NTSC).
● Mejora de la resolución: escalado de alta calidad de DVD y cualquier otro contenido de vídeo SD en
Full HD (1080p) o de otro tipo de resolución de alta definición.
● Explorador de archivos: práctico explorador de archivos con gestión de ficheros (copiar, mover, elimi-
nar, renombrar, organizar, ordenar).
Funciones adicionales
● Reproducción de música en alta calidad: reproducción de muy alta calidad (hasta 192 Khz / 24-bit)
archivos de música en varios formatos (FLAC, APE Monkey’s Audio, WAV / PCM, DTS, etc).
● Listas de reproducción: construye listas de reproducción a partir de tus carpetas, utiliza tus propias
listas, repita el uso y funciones de reproducción aleatoria.
● Función NAS: acceder a archivos en dispositivos de almacenamiento (disco duro, unidad óptica, etc)
conectado al reproductor desde la red local (mediante SMB o FTP).
● BitTorrent: uso incorporado del cliente BitTorrent para descargar archivos desde redes P2P.
● Interfaz de usuario personalizable: trabaje con colecciones de imágenes e iconos para personalizar
su interfaz de usuario (con imágenes Full HD).
● Internet radio: reproduzca y grabe varias estaciones de radio por Internet (HTTP/MP3).
● IPTV: reproduzca y grabe streams IPTV (multicast UDP / RTP) de su proveedor de Internet *.
● La televisión digital (opcional): repoduzca y grabe canales de TV digital utilizando el adaptador USB
TV Digital dongle **.
* Consultar disponibilidad de multidifusión UDP / RTP con su proveedor de Internet.
** El adaptador USB TV Digital dongle no está incluido; esta opción se puede adquirir por separado.
28
Dune HD Lite 53D Quick Start Guide
Page 29

Contenido del paquete
5423
6 8
1. Dune HD Lite 53D media player
2. Mando a distancia (pilas no
incluidas)
3. Antena WiFi (opcional)
NOTA: Los accesorios opcionales pueden ser incluidos en el paquete, dependiendo de la configuración
del reproductor, de la región, y del distribuidor.
4. Cable AV
5. Cable LAN
6. Protectores
7. Tornillos
8. Fuente de alimentación externa
9. Guía de instalación rápida
917
Exterior
Vista frontal
1
2
3
Vista trasera
21345678
1. Antena WiFi (opcional)
2. Salida audio óptica digital
3. Vídeo compuesto y salida de audio analógico estéreo
4. Salida de vídeo por componente (Y / Pb / Pr)
5. HDMI 1.3
6. Puerto USB 2.0
7. LAN
8. DC 12v
1. Botón ON/OFF
2. Indicador LED
3. IR
4. Puerto USB 2.0
4
Vista principal
1. Ranura para tarjeta SD
1
Español
29
Page 30

Colocaciуn horizontal del reproductor
Puede colocar el reproductor tanto vertical como horizontalmente. Si quiere colocarlo horizontalmente,
por favor haga lo siguiente: Retire el soporte inferior del reproductor; utilice los protectores autoadhesivos destinados para la colocaciуn horizontal del reproductor (incluido dentro del paquete) y pйguelos
en la parte lateral del reproductor.
Mando a distancia
1. Indicador de comandos — parpadea en respuesta a la presión del
botón RC
2. EJECT — abrir / cerrar la bandeja de la unidad óptica. MUTE –
desactiva el sonido de encendido / apagado. MODE – cambiar el
modo de salida de video, el control de algunas funciones de otro
reproductor. POWER – cambiar el modo de espera.
3. A (roja), B (verde), C (amarillo), D (azul) — Acceso a funciones
de discos Blu-ray, control de algunas funcionalidades de otro reproductor
4. 0–9 — introducir números y texto, c control de algunas funciones
de otro reproductor
5. BUSQUEDA – saltar a una posición de reproducción especifi cada.
ZOOM – cambiar el factor de zoom para el contenido de video que
se está reproduciendo. CONFIGURACION – entrar / salir del menu
de confi guración de reproducción durante la reproducción.
6. V+/V- (aumento de volumen / volumen abajo) — ajustar el volumen.
7. P+/P- (Página arriba / Página abajo) — desplazarse hacia arriba
y hacia abajo en varias listas, control de algunas funciones de otro
reproductor.
8. Flechas (IZQUIERDA, DERECHA, ABAJO, ARRIBA), ENTER,
RETRUN, MENU ARRIBA, MENU EMERGENTE, INFO – botones
principales para controlar el reproductor (navegar por los elemento
de la pantalla, abrir/utilizar el elemento seleccionado en ese momento, volver a la pantalla anterior, ir al menu principal, mostrar el
menu emergente con las acciones, información que se presenta,
control de algunas funciones de otro reproductor)
9. PLAY, PAUSE, STOP, SLOW, REW, FWD, ANTERIOR, SIGIUIENTE — control de la reproducción.
10. SUBTITULOS, AUDIO URL/2ND, ANGULO/ROTAR, REPETIR,
SHUFFLE/PIP, AUDIO - control de la reproducción y algunas fun-
ciones de otro reproductor
NOTAS:
● Use pilas alcalinas AAA
● Observe la polaridad de las pilas antes de insertarlas.
● Dirigir el Mando a Distancia hacia el reproductor. No debe haber
obstáculos entre el mando a distancia y el reproductor.
● Si las funciones del mando a distancia sólo funcionan en distancias
cortas o deja de funcionar, asegúrese de cambiar las pilas.
● Algunos botones de del mando a distancia pueden tener varias funciones dependiendo del modo para el reproductor actual.
● Algunos botones del Mando distancia pueden estar disponibles sólo
en ciertos modos del reproductor o sólo durante la reproducción de
un determinado contenido.
1
2
3
4
5
6
7
8
9
10
30
Dune HD Lite 53D Quick Start Guide
Page 31

Primeros pasos
Asegúrese de que haya suficiente espacio alrededor del reproductor para una refrigeración adecuada. El espacio a cada lado no deberá ser inferior a 10 cm.
Asegúrese de que al mando a distancia se le han instalado las pilas.
Conecte el reproductor a su TV y otros equipos de A / V de manera adecuada. Use conexión HDMI para ob-
tener la mejor calidad posible de vídeo y audio. Asegúrese de apagar el reproductor y todos los equipos A / V
antes de conectarlos. Asegúrese de que su TV y otros equipos de A / V están configurados para utilizar la salida
adecuada.
Encienda el reproductor. El reproductor llevará a cabo su procedimiento de carga inicial, que puede tardar hasta
1 minuto aproximadamente. Durante el procedimiento de carga, el logo “Dune” se muestra en el televisor.
● Si usted no ve el logo de “Dune” en el televisor cuando se enciende el reproductor, puede significar algún
problema con la conexión entre el reproductor y el televisor o que hay una mala configuración en la salida
de la TV o un receptor A / V / interruptor. En tal caso, vuelva a comprobar los cables y la configuración de
la TV o el receptor A / V / switch, o trate de utilizar cables diferentes o una manera diferente de conectar el
reproductor al TV.
● Si ve el logo de “Dune” en el televisor cuando se enciende el reproductor, pero luego la imagen desaparece
y no aparece otra imagen durante al menos 10 segundos, esto puede significar que un modo de vídeo de
salida está mal configurado en el reproductor. En tal caso, pulse la tecla “MODE” del Mando a distancia, y a
continuación, presione uno de los botones del Mando a Distancia “1”, “2”, “3”, “4” o “5” para cambiar a un
modo diferente de salida de vídeo (ver “Ajuste rápido del modo salida de vídeo”).
Por último, debería ver la pantalla principal del menú. La pantalla principal muestra los elementos que permiten
utilizar las funciones diferentes del reproductor y acceder a todos los dispositivos de almacenamiento y unidades de red conectadas.
Ajuste la configuración del reproductor, en “Configuración” dentro de la pantalla principal del menú del reproductor (o presione el “setup” del mando a distancia). En particular, es posible que desee ajustar la configuración de
vídeo, ajustes de audio, y la configuración de red.
Para seleccionar el idioma del menú, utilice “Setup / General / Idioma de la interfaz” de ajuste.
Utilice el botón del mando a distancia “IZQUIERDA”, “DERECHA”, “ARRIBA”, “ABAJO”, “ENTER”, “VOL-
VER” para navegar por el menú del reproductor. Utilice el botón “MENU” del mando a distancia para mostrar
la lista de comandos disponibles. Utilice la opción “INFO” del mando a distancia para mostrar la información
acerca del elemento seleccionado.
Ajuste rápido del modo salida de vídeo
El botón “MODE” del Mando a distancia permite que se cambien rápidamente los modos de salida de vídeo
sin entrar en el menú de confi guración del reproductor.
Esta confi guración de salida de vídeo puede ser necesaria si usted no ve ninguna imagen en la pantalla
después de conectar su reproductor a un televisor.
Pulse el botón “MODE” del Mando a distancia y después uno de los botones del Mando a Distancia “1”, “2”,
“3”, “4”, o “5” para cambiar a uno de los modos de salida de vídeo siguientes:
1. Compuesto / Componente, PAL
2. Compuesto / Componente, NTSC
3. HDMI, 480i, 60 Hz
4. HDMI, 720p, 60 Hz
5. HDMI, 1080i, 60 Hz
Después de ver una imagen en el televisor, presione “ENTER” en el Mando a Distancia y, a continuación,
vaya al menú de confi guración del reproductor para realizar una confi guración más precisa del modo de
salida de vídeo si es necesario.
NOTA: El procedimiento de ajuste rápido del Modo Salida de vídeo no se puede utilizar durante la reproducción. Para garantizar este procedimiento, encienda el reproductor, luego encienda el reproductor, y espere
alrededor de 1 minuto para asegurar que la carga del reproductor está acabada.
Español
31
Page 32

Conexión de las unidades USB
Para conectar una unidad USB, asegúrese de que está en la pantalla principal del menú del reproductor
y conecte la unidad USB a un puerto USB del reproductor. El reproductor reconocerá la unidad USB, y
mostrara el icono que corresponde a la unidad USB en la pantalla principal.
Al conectar una unidad USB que requieren energía (tal como USB HDD), utilice una fuente de alimentación externa para la unidad USB. La potencia suministrada por los puertos USB del reproductor puede no
ser sufi ciente para el correcto funcionamiento de la unidad USB.
No desconecte o apague la unidad USB cuando una operación de escritura este en curso.
Uso de tarjetas de memoria SD
Para insertar una tarjeta de memoria SD, asegúrese de que está en la pantalla principal del menú del reproductor e inserte la tarjeta de memoria en la ranura para tarjetas SD. El reproductor reconoce la tarjeta
de memoria y mostrara un icono que corresponde a la tarjeta de memoria en la pantalla principal. Algunas
tarjetas de memoria SD no pueden ser reconocidas por el reproductor o pueden funcionar incorrectamente, en cuyo caso, use otros modelos de tarjetas de memoria SD.
No expulse la tarjeta de memoria SD cuando se esté escribiendo en ella.
Disco duro interno SATA 2.5’’
Puedes instalar el disco duro 2.5’’ SATA dentro del reproductor. Para instalarlo, por favor, lleve a cabo los
siguientes pasos:
1. Apague el reproductor.
2. Abra la tapa lateral de la carcasa: retire los dos tornillos pequeсos del lado del que quitу la tapa y levante la tapa.
3. Coloque el disco duro sobre la placa metбlica dentro del reproductor. Por favor, utilice los 4 tornillos
del tipo M3.
4. Conecte los conectores SATA de datos y de alimentaciуn al disco duro.
5. Coloque la cubierta junto con el disco duro y vuelva a colocar la tapa en su lugar, sin olvidarse de los
tornillos que la sujetan.
Obtener acceso a unidades de red
Para conectar una unidad de red mediante SMB o protocolo NFS, asegúrese de que está en la pantalla
principal del menú del reproductor, pulse el botón “MENU” del mando a distancia, y seleccione “Crear carpeta de red”, y luego confi gure los parámetros de red. El reproductor mostrará un icono que corresponde
a la unidad de red en la pantalla principal.
Para examinar la lista de la red utilice “Network Browser” para acceder a SMB o protocolos UPnP. NOTA:
Si algunas características de la red no se muestran en el reproductor, puede que tenga que esperar unos
minutos y vuelva a intentar (o pulse la tecla “MENU” del Mando a distancia y elija la opción “Actualizar”).
Formatear el disco duro
Para formatear un disco duro conectado al reproductor, seleccione la unidad en la pantalla principal del
menú del reproductor, pulse la tecla “INFO” del Mando a distancia y elija la opción “Formato de disco”
(Para dar formato al disco entero) o “Formato de partición” (o formato a una partición de disco ya existentes solamente). El reproductor formateara el disco con el sistema de archivos “EXT2”.
NOTA: Para utilizar discos formateados por el reproductor en un PC con Windows, es posible que tenga
que instalar algún software en el PC, como “Ext2fsd” (http://www.ext2fsd.com/).
32
Dune HD Lite 53D Quick Start Guide
Page 33

Encendido y apagado del reproductor
Para poner el reproductor en el modo standby, pulse la tecla «Power» del Mando a distancia o el «botón on
/ off» en el panel frontal. Para salir del modo de espera, pulse cualquiera de estos botones de nuevo.
Dependiendo de la confi guración del reproductor (ver el menú de confi guración del reproductor), se puede
utilizar “Stanby de hardware” o un “Stanby de software”. En el «modo» de espera del hardware, casi se
completa el apagado el reproductor consume muy poca energía. En el «modo» de espera del software, el
reproductor no produce ninguna señal en la salida de vídeo, pero todavía está funcionando. Por ejemplo, si
usted tiene algunos dispositivos de almacenamiento conectados al reproductor, es posible acceder a ellas
desde la red («la función NAS» del reproductor). Para salir del modo de espera del «software» el reproductor sólo tarda unos segundos. Cuando el reproductor está en el «modo» de espera del software, sigue
consumiendo energía signifi cativa. No se recomienda para mantener el reproductor en el modo de espera
de software durante mucho tiempo si no lo necesita.
NOTA: Después de apagar el reproductor o dejando al reproductor en modo de espera de hardware, se
recomienda esperar aproximadamente 1 minuto antes de encenderlo de nuevo.
NAS (Network Attached Storage)
Puede acceder a dispositivos de almacenamiento conectados al reproductor desde la red local a través
de FTP y SMB protocolos. En un PC con Windows, simplemente escriba “ftp://ip_address” o “\ \ dirección_ip” en el explorador de Windows, donde “dirección IP” es la dirección IP del reproductor.
WiFi
Usted puede usar un adaptador USB WiFi para conectar el reproductor a la red local a través de WiFi.
Consulte aquí para obtener la información sobre el soporte de adaptadores USB WiFi:
http://dune-hd.com/support/hw_compat/
Limitaciones
La compatibilidad del reproductor con un hardware especial (equipo A / V, equipos de red, unidades de
disco, etc) puede depender de varios factores (Modelo de hardware, detalles de instalación del hardware
y uso, la confi guración del reproductor y el hardware, etc). Si el reproductor no funciona correctamente
con un hardware en particular, tratar de ajustar la confi guración del reproductor o del hardware, trate de
usar el hardware de una manera diferente, o tratar de utilizar algún otro hardware.
La compatibilidad del reproductor con un contenido determinados (archivos, discos, etc) puede depender
de varios factores (características específi cas de los archivos, requisitos específi cos de la confi guración
del reproductor, etc). Si el reproductor no puede reproducir correctamente un contenido de determinado,
trate de ajustar la confi guración del reproductor, o trate de usar el contenido con una codifi cación diferen-
te.
Actualización de su reproductor
Por favor, pinche aquí para obtener versiones actualizadas del fi rmware del reproductor (puede mejorar el
funcionamiento del reproductor y ampliar sus posibilidades):
http://dune-hd.com/fi rmware/
(NOTA: También puede conectar el reproductor a Internet y utilizar la función de actualización del fi rmware
en línea, consulte Confi guración / Varios / actualización de fi rmware.)
Por favor, consulte aquí para obtener más detalles y la documentación actualizada e información sobre uso
del reproductor:
http://dune-hd.com/manuals/
http://dune-hd.com/support/
Español
33
Page 34

Introduzione
Dune HD Lite 53D è una soluzione tutto-in-uno per la riproduzione di video Full HD (1080p)
.
Caratteristiche principali
● Il nuovo processore Sigma Designs 8653: godrai di un’eccellente riproduzione e ottime performance
nelle caratteristiche interattive.
● HDD player: connetti un HDD al player e riproduci i contenuti direttamente dall’HDD.
● Network player: connetti il player alla rete locale e riproduci i contenuti direttamente dal PC o NAS
(UPnP, SMB, NFS).
● MKV player: riproduci video HD e SD nel popolare formato MKV e altri moderni formati, inclusi i video
HD migliori con altissimo bitrate.
● 2 porte USB: connetti facilmente HDD, USB flash drive, USB card reader e altri dispositivi di memoriz-
zazione USB.
● Slot per schede SD: riproduci facilmente i file sulla memory card SD dalla tua fotocamera o altre peri-
feriche o usa la memoria SD come disco locale o di sistema.
● HDMI 1.3: assicura la qualità migliore possibile per HD video e HD audio.
● Un set ricco di connettori A/V standard: S/PDIF audio ottico, audio stereo, video componente, video
composito per connettere facilmente qualsiasi equipaggiamento A/V.
● Flessibilità per le uscite Video: uscita video in ogni formato e risoluzione (da SD a 1080p, 24p/PAL/
NTSC).
● Upscaling: upscaling di alta qualità per DVD e qualsiasi altro video SD alla risoluzione Full HD (1080p)
o altre risoluzioni HD.
● File browser: naviga tra i file facilmente e gestiscili come vuoi (copia, sposta, cancella, rinomina, orga-
nizza, ordina).
Funzioni Extra
● Riproduzione di file musicali di alta qualità: riproduzione ad alta qualità (fino a 192 kHz / 24-bit) di file
musicali in vari formati (FLAC, Monkey’s Audio APE, WAV/PCM, DTS, etc).
● Playlist: costruisci liste di brani dalle cartelle, utilizza la tua playlist, usa le funzioni di ripetizione e rip-
roduzione casuale
● Funzione NAS: accedi ai file presenti su dispositivi di memorizzazione (HDD, lettore ottico, etc) collegati
al player dalla rete locale (usando SMB o FTP).
● BitTorrent: usa il client BitTorrent incorporato per scaricare file dalle reti P2P.
● Interfaccia utente personalizzabile: associa alla tua collezione multimediale delle copertine e icone
per la navigazione (con grafica Full HD).
● Internet radio: riproduci e registra varie stazioni Internet radio (HTTP/MP3).
● IPTV: riproduci e registra stream IPTV (multicast UDP/RTP) del tuo Internet provider*.
● Navigazione Internet: guarda siti Internet Web sulla tua tv usando il Web Browser incorporato***.
* Controlla la disponibilità di stream multicast UDP/RTP col tuo Internet provider.
** La chiavetta USB Digital TV non è inclusa; questa opzione può essere comprata separatamente.
34
Dune HD Lite 53D Quick Start Guide
Page 35

Contenuto della confezione
5423
6 8
1. Dune HD Lite 53D media player
2. Telecomando (le batterie possono
non essere incluse)
3. Antenna Wi-Fi (opzionale)
NOTA: componenti addizionali (opzionali) possono essere inclusi nella confezioni a seconda della
configurazione del player, della regione e del distributore.
4. cavo AV
5. Cavo LAN
6. Piedini
7. Viti
8. Alimentatore esterno
9. Guida rapida
917
Esterno
Vista frontale
1
2
3
Vista posteriore
21345678
1.
Antenna Wi-Fi (opzionale)
2. Uscita audio digitale ottico
3. Video Composito e uscita audio stereo
4. Uscita video Componente (Y/Pb/Pr)
5. HDMI 1.3
6. USB 2.0
7. LAN
8. DC alimentazione 12V
1.Tasto On/off
2. Indicatore LED
3. Sensore IR
4. USB 2.0 host
4
Vista dall’alto
1. Lettore memorie SD
1
Italiano
35
Page 36

Posizionamento Orizzontale del Player
Puoi posizionare il player sia verticalmente che orizzontalmente. Se lo vuoi utilizzare posizionato orizzontale, per favore segui i seguenti passi:
1. Stacca la base d'appoggio dal player.
2. Utilizza gli appositi piedini speciali auto incollanti per il posizionamento orizzontale del player (inclusi
nella confezione) e attaccali sul pannello laterale del player.
Telecomando
1. Indicatore di comando — lampeggia in risposta alla pressione di
un comando.
2. EJECT — apre/chiude il vano del lettore dischi. MUTE — toglie
l’audio. MODE — cambia la modalità video in uscita; controlla qualche altra funzione del player. POWER — mette in standby.
3. A (Rosso), B (Verde), C (Giallo), D (Blu) — accede alle funzioni
dei dischi Blu-ray; controlla qualche altra funzione del player.
4. 0–9 — inserisce numeri e testo; controlla qualche altra funzione
del player.
5. SEARCH — salta a una specifi ca posizione durante la riproduzione
del video. ZOOM — cambia il fattore dello Zoom del video in corso
di riproduzione. SETUP — entra/esce dal menu di impostazioni;
modifi ca impostazioni di riproduzioni durante una riproduzione.
6. V+/V- (volume su / volume giù) — modifi ca il volume.
7. P+/P- (pagina su /pagina giù) — scorre su o giù varie liste; con-
trolla qualche altra funzione del player.
8. Frecce (SINISTRA, DESTRA, SU, GIU’), ENTER, RETURN, TOP
MENU, POP UP MENU, INFO — tasti principali per navigare nel
player (navigare tra gli oggetti sullo schermo, aprire/usare l’oggetto
selezionato, tornare indietro alla schermata precedente, tornare al
menu principale, vedere il menu popup con le azioni possibili, vedere le informazioni, controllare qualche altra funzione del player).
9. PLAY, PAUSE, STOP, SLOW, REW, FWD, PREV, NEXT — controllo della riproduzione.
10. SUBTITLE, ANGLE/ROTATE, AUDIO, REC, DUNE, URL — controllo della riproduzione e qualche altra funzione del player.
NOTE:
● Usa pile alcaline AAA.
● Rispetta la polarità quando inserisci le batterie.
● Direziona il telecomando verso il player. Non ci devono essere
ostacoli tra il telecomando e il player
● Se il telecomando funziona solo a distanza ravvicinata o non fun-
ziona, cambia le batterie.
● Alcuni tasti del telecomando possono avere diverse funzioni a
seconda della modalità in cui si trova il player.
● Alcuni tasti del telecomando possono funzionare solo in alcune
modalità o durante l’esecuzioni di alcuni contenuti.
1
2
3
4
5
6
7
8
9
10
36
Dune HD Lite 53D Quick Start Guide
Page 37

Guida Iniziale
Assicurati che ci sia abbastanza spazio attorno al player per un raffreddamento ottimale. Lo spazio libero per
ciascun lato non deve essere meno di 10 cm.
Assicurati che il telecomando abbia le batterie inserite.
Connetti il player alla tua TV o ad altro sistema A/V in modo appropriato. Usa la connessione HDMI per ottenere
la migliore qualità possibile sia video che audio. Assicurati di aver spento il player e ogni altro apparato A/V
prima di connetterli. Assicurati che la TV o altro apparato A/V sia configurato per usare la connessione adatta.
Accendi il Player. Il player inizierà una procedura di avviamento iniziale, che può durare anche 1 minuto. Durante il caricamento, il logo “DUNE” verrà mostrato sulla TV.
● Se non vedi il logo “DUNE” sulla TV quando accendi il player, può significare la presenza di qualche problema
con la connessione tra il player e la TV o che l’ingresso video sbagliato è stato selezionato sulla TV o ricevitore
A/V, o prova differenti cavi o differenti connessioni tra il player e la TV.
● Se vedi il logo “DUNE” sulla TV quando accendi il player, ma poi le immagini scompaiono e non appare più
nulla nei successivi 10 secondi, può significare che nel player è configurata una modalità video errata. In
questo caso, premi il tasto “MODE” sul telecomando e poi premi uno dei tasto del telecomando “1”, ”2”,
”3”, ”4” o “5” per cambiare le differenti modalità di uscita video (vedi “Impostazioni Rapide per la Modalità
Uscita Video”)
Alla fine, dovresti vedere la schermata principale del menu del player. La schermata principale mostra le icone
che ti permettono di utilizzare le differenti funzionalità del player e accedere alle periferiche di memorizzazione
e alle periferiche di rete collegate.
Modifica le impostazioni del player usando l’icona “SETUP” nella schermata principale (o premendo il tasto
“SETUP” sul telecomando). In particolare puoi modificare le impostazioni video, audio e di rete.
Per selezionare la lingua dei menu del player, vai nelle impostazioni “Setup / General / Interface language”.
Utilizza i tasti del telecomando “SINISTRA”, “DESTRA”, “SU, “GIU’”, “ENTER”, “RETURN” per navigare tra
i menu. Utilizza il tasto “MENU” per mostrare una lista dei possibili comadi.
Usa il tasto “INFO” per mostrare informazioni sull’elemento selezionato.
Impostazioni Rapide per la Modalità Uscita Video
Il tasto sul telecomando “MODE” permette l’impostazione rapida del video senza dover entrare nel menu
impostazioni.
Questo metodo per la confi gurazione dell’uscita video può rendersi necessario se non si visualizzano le im-
magini sullo schermo dopo aver connesso il player.
Premi “MODE” e poi i tasti sul telecomando 1, 2, 3, 4, o 5 per impostare una delle seguenti modalità video,
rispettivamente:
1. Composito/Componente; PAL
2. Composito/Componente, NTSC
3. HDMI, 480i, 60 Hz
4. HDMI, 720p, 60 Hz
5. HDMI, 1080i, 60 Hz
Dopo che le immagini sono apparse sulla TV, premi il tasto “ENTER” e poi vai nel menu di impostazioni del
player per confi gurare in modo più preciso l’uscita video se necessario.
NOTA: la procedura di impostazione rapida dell’uscita video non può essere utilizzata durante la riproduzione
di un video. Per assicurarsi che questa procedura sia utilizzabile, spegni il player e poi riaccendilo e aspetta
circa un minuto per assicurarti che la procedura di avvio sia terminata.
Italiano
37
Page 38

Connettere Periferiche USB
Per connettere periferiche USB, assicurati di essere nella schermata principale del menu e connetti la
periferica USB in una delle porte USB del player. Il player riconoscerà tale periferica e mostrerà l’icona
corrispondente alla periferica USB nella schermata principale.
Quando connetti una periferica USB che richiede una quantità signifi cativa di energia (come gli Hard Disk
USB), usa un alimentatore esterno per tale periferica. La potenza erogata dalle porte USB del player potrebbe non essere suffi ciente per alimentare la periferica USB e funzionare correttamente.
Non disconnettere o spegnere la periferica USB quando vi sono operazioni di scrittura in corso.
Usare Memory Card SD
Per inserire una memoria SD, assicurati di essere nella schermata principale del menu e inserisci la memory card nel lettore di memory card del player. Il player riconoscerà tale memory card e mostrerà un’icona corrispondente nel menu principale. Alcune memorie SD possono non essere riconosciute dal player e
non funzionare correttamente; in questo caso, usa un altro modello di memory card SD.
Non estrarre la memory card SD quando sono in corso operazioni di scrittura.
HDD SATA 2.5” Interno
Puoi installare un disco SATA da 2,5” all’interno del player. Per installare l’HDD SATA 2,5” segui i passi
successivi:
1. Spegni il player.
2. Apri il pannello laterale del case: rimuovi le due piccole viti al lato del player che chiudono il pannello,
poi fai leva sul pannello usando il piccolo spazio tra esso e il lato del player.
3. Posiziona l’Hard Disk nell’alloggio di metallo montato nella porzione interna del pannello. Usa 4 viti tipo
M3.
4. Connetti i cavi di alimentazione SATA e di dati SATA all’HDD.
5. Rimonta il pannello con il disco sul player e assicuralo con le viti al case.
Accedere ai dispositivi di Rete
Per connettere un dispositivo di rete che utilizza il protocollo SMB (Samba) o NFS, assicurati di essere nel
menu principale del player, premi il tasto del telecomando “MENU” e scegli “Crea una cartella di Rete” (in
inglese “Create Network Folder”), poi inserisci i parametri del dispositivo di rete come richiesto. Il player
mostrerà un’icona corrispondente al dispositivo di rete appena confi gurato nella schermata principale.
Per accedere a una lista di risorse di rete disponibili tramite i protocolli SMB o UPnP, usa l’icona nel menu
principale “Network Browser”. NOTA: se qualche risorsa di rete non è mostrata dal player, può essere
che tu debba aspettare qualche minuto e poi riprovare (o premere “MENU” sul telecomando e scegliere
“Aggiorna”).
Formattare l’HDD
Per formattare l’HDD collegato al player, seleziona l’icona corrispondente al disco nel menu principale del
player, premi il tasto “INFO” sul telecomando e seleziona “Formatta Disco” (per formattare l’intero disco)
o “Formatta Partizione” (per formattare una sola partizione già esistente sul disco). Il player formatterà il
disco utilizzando il fi le system “EXT2”-
NOTA: per usare dischi formattati dal player su un PC con Windows, avrai bisogno di installare software
appositi come “EXT2FSD” (http://www.ext2fsd.com/).
38
Dune HD Lite 53D Quick Start Guide
Page 39

Spegnere e Accendere il player
Per mettere il player in modalità standby, premi il tasto “POWER” sul telecomando o il tasto “on/off” sul pannello frontale. Per uscire dalla modalità standby premi uno di quei bottoni ancora.
A seconda delle impostazioni del player (vedi il menu impostazioni), potrà essere utilizzato l’”hardware
standby”o il “softwarre standby”. In modalità “hardware standby” si avrà uno spegnimento più completo e il
player non consumerà quasi nulla. In modalità “software standby” il player non produce alcun segnale video,
ma il player è ancora in funzione. Per esempio, se hai qualche periferica di memorizzazione collegata al
player, puoi continuare ad accedere ad essa dalla rete (funzione “NAS”). Per uscire dalla modalità “software
standby” occorrono pochi secondi. Quando è in modalità “software standby” il consumo energetico è signifi -
cativo. Non è raccomandato tenere il player in “software standby” per molto tempo se non lo utilizzi.
NOTA: dopo aver spento il player o averlo posto in “hardware standby” è consigliabile aspettare un minuto
prima di riaccenderlo ancora.
NAS (Network Attached Storage)
Puoi accedere a periferiche di memorizzazione connesse al player tramite la rete locale usando i protocolli
FTP e SMB. Su un PC Windows basta scrivere “ftp:// indirizzo_ip” o \\indirizzo_ip in Windows Explorer
(Esplora Risorse), dove “indirizzo_ip” è l’indirizzo IP del player.
WiFi
Puoi utilizzare un adattatore WiFi USB per connettere il player alla rete locale tramite WiFi.
Prego leggere le informazioni sugli adattatori WiFi USB supportati:
http://dune-hd.com/support/hw_compat/
Limitazioni
La compatibilità del player con particolari hardware (apparecchiature A/V, periferiche di rete, dischi, etc.)
può dipendere da vari fattori (modelli particolari di hardware, specifi che installazioni o utilizzi, confi gurazio-
ni del player o dell’hardware, etc). Se il player non dovesse funzionare correttamente con un particolare
hardware, prova a modifi care la confi gurazione del player o dell’hardware, prova a usare l’hardware in
modi differente, o prova ad usare un altro hardware.
La compatibilità del player con particolare contenuti multimediali (fi le, dischi, etc) può dipendere da vari
fattori (la codifi ca specifi ca del contenuto multimediale, confi gurazioni del player, etc.). Se il player non
dovesse riprodurre correttamente un particolare contenuto multimediale, prova a modifi care la confi gura-
zione del player, o prova a usare tale contenuto multimediale codifi cato in maniera differente.
Aggiornare il tuo Player e Ottenere Maggiori
Informazioni
Prego controllare qui per versioni aggiornate del fi rmware (le quali possono migliorare il funzionamento o
estendere le funzionalità del player):
http://dune-hd.com/firmware/
(Nota: puoi anche connetter il player a Internet e usare la funzione di aggiornamento fi rmware online, vedi
Impostazioni / Misc / Firmware Upgrade).
Prego controllare qui per maggiori dettagli e la documentazione aggiornata del player:
http://dune-hd.com/manuals/
http://dune-hd.com/support/
Italiano
39
Page 40

Введение
Dune HD Lite 53D представляет собой решение «все-в-одном» для воспроизведения видео вплоть
до Full HD (1080p).
Основные особенности
● Новейший процессор Sigma Designs 8653: обеспечивает отличное воспроизведение и высокую
скорость работы с интерактивными возможностями.
● Сетевой проигрыватель: подключение проигрывателя к локальной сети и воспроизведение содержимого напрямую с ПК или NAS (UPnP, SMB, NFS).
● Проигрывание с жесткого диска: подключение жесткого диска к проигрывателю и воспроизведение содержимого непосредственно с этого диска.
● Проигрывание MKV: воспроизведение HD и SD видео в популярном формате MKV, а также в
других современных форматах видеофайлов, включая HD-видео высочайшего качества с очень
высоким битрейтом.
● 2 порта USB: удобное подключение жестких дисков, накопителей USB-Flash, кард-ридеров и других USB-устройств хранения данных.
● Слот для карт памяти SD: воспроизведение медиафайлов с карт памяти SD из видеокамеры/
фотоаппарата или других устройств, использование карты памяти SD в качестве локального или
системного накопителя.
● HDMI 1.3: обеспечивает наилучшее качество HD-видео и HD-аудио.
● Полный набор стандартных аудио-видеоразъемов: цифровой оптический аудиовыход, стере-
овыход, компонентный и композитный видеовыходы для удобного подключения плеера к любому
A/V оборудованию.
● Гибкая система вывода видео: вывод видео в любом разрешении и формате (от SD до 1080p,
24p/PAL/NTSC).
● Увеличение разрешения (upscaling): высококачественное повышение разрешения DVD и любых других SD-видеоматериалов до Full HD (1080p) или другого HD-разрешения.
● Файловый браузер: удобный файловый браузер с развитыми возможностями манипуляции
файлами (копирование, перемещение, удаление, переименование, организация, сортировка).
Дополнительные функции
● Воспроизведение аудиофайлов с наивысшим качеством: до 192 КГц / 24-бит, в форматах
FLAC, Monkey’s Audio APE, WAV/PCM, DTS и других.
● Плейлисты: создание плейлистов из папок, использование собственных плейлистов, функции
повтора и случайного воспроизведения.
● Функция NAS: доступ к файлам на накопителях (HDD, оптический привод, и т.п.), подключенных
к плееру, из локальной сети (посредством SMB или FTP).
● BitTorrent: загрузка файлов из P2P-сетей с использованием встроенного в плеер BitTorrentклиента.
● Настраиваемый пользовательский интерфейс: поддержка медиаколлекций с показом обложек и значков (с графикой Full HD).
● Интернет-радио: воспроизведение и запись различных интернет-радиостанций (HTTP/MP3).
● IPTV: воспроизведение и запись IPTV-потоков (multicast UDP/RTP) от интернет-провайдера*.
● Опция Digital TV: воспроизведение и запись каналов цифрового телевидения посредством опционального USB-модуля Digital TV**.
* Узнавайте о наличии multicast UDP/RTP потоков у интернет-провайдера.
** USB-модуль Digital TV не входит в комплект поставки; данное устройство приобретается отдельно.
40
Dune HD Lite 53D Quick Start Guide
Page 41

Содержимое коробки
5423
6 8
1. Проигрыватель Dune HD Lite 53D
2. Пульт управления (батарейки могут
не входить в комплект)
3. Wi-Fi антенна (опционально)
ПРИМЕЧАНИЕ: Другие аксессуары (опционально) могут дополнительно включаться в комплект по-
ставки в зависимости от конфигурации проигрывателя, региона и дистрибьютора.
4. Аудио-видеокабель
5. LAN-кабель
6. Ножки
7. Комплект винтов
8. Внешний блок питания
9. Краткое руководство
917
Внешний вид
Вид спереди:
1
2
3
4
Вид сзади:
21345678
1. Wi-Fi антенна (опционально)
2. Оптический цифровой аудиовыход
3. Композитный видеовыход и аналоговый стереовыход
(левый/правый)
4. Компонентный Y/Pb/Pr выход
5. Выход HDMI 1.3
6. USB 2.0 host
7. Порт LAN
8. Разъём питания (12В)
Вид сверху:
1. Кнопка включения / выключения
2. LED-индикатор
3. ИК-приёмник
4. Порт USB 2.0 host
1. Слот для карт памяти SD
1
Русский
41
Page 42

Горизонтальное расположение проигрывателя
Вы можете расположить плеер вертикально или горизонтально. Если Вы хотите использовать горизонтальное расположение, сделайте следующее: отсоедините нижнюю подставку от проигрывателя;
спользуйте специальные самоклеющиеся ножки, предназначенные для горизонтального размещения
проигрывателя (включены в комплект поставки) и приклейте их к боковой стороне плеера.
Пульт управления
1
. Индикатор команды — мигает в ответ на нажатия кнопок пульта.
2.EJECT — открытие/закрытие лотка оптического привода. MUTE —
выключение и включение звука. MODE — переключение режимов
видеовыхода; управление некоторыми другими функциями проигрывателя. POWER — перевод проигрывателя в/из режима ожидания.
3. A (красная), B (зеленая), C (желтая), D (синяя) — доступ к функ-
циям Blu-ray; управление некоторыми другими функциями проигрывателя.
4. 0–9 — ввод цифр и текста; управление некоторыми другими
функци-
ями проигрывателя.
5. SEARCH — переход к заданной позиции воспроизведения. ZOOM
— изменение масштаба воспроизводимых видеоматериалов. SETUP
— вход/выход в меню настроек; настройка параметров воспроизведения во время воспроизведения.
6. V+/V- (увеличение громкости / уменьшение громкости) — изме-
нение громкости.
7. P+/P- (страница вверх / страница вниз) — прокрутка вверх и вниз
в различных списках; управление некоторыми другими
функциями
проигрывателя.
8. Стрелки (ВЛЕВО, ВПРАВО, ВНИЗ, ВВЕРХ), ENTER, RETURN, TOP
MENU, POP UP MENU, INFO — основные кнопки управления про-
игрывателем (выбор элементов на экране, выбор/открытие текущего
элемента, возврат к предыдущему экрану, переход к главному меню,
вывод контекстного меню с действиями, показ информации, управление некоторыми другими функциями проигрывателя).
9. PLAY, PAUSE, STOP, SLOW, REW, FWD, PREV, NEXT — управление
ходом воспроизведения.
10.SUBTITLE, ANGLE/ROTATE, AUDIO, REC, DUNE, URL — управление воспроизведением и некоторыми другими функциями проигрывателя.
Примечания:
● Используйте щелочные (alkaline) батарейки типа AAA.
● Соблюдайте полярность при установке батареек.
● Направляйте пульт на проигрыватель. Между пультом и проигрывателем не должно быть препятствий.
● Если пульт работает только с небольшого расстояния, замените
батарейки.
● Некоторые кнопки пульта могут иметь несколько значений в зависимости от режима работы проигрывателя.
● Некоторые кнопки пульта могут работать только в некоторых режимах работы проигрывателя или при воспроизведении материалов
определенного типа.
1
2
3
4
5
6
7
8
9
10
42
Dune HD Lite 53D Quick Start Guide
Page 43

Начало работы
Убедитесь, что вокруг проигрывателя достаточно места для хорошего охлаждения. Пространство с каждой стороны должно быть не менее 10 см.
Убедитесь, что в пульт вставлены батарейки.
Подключите проигрыватель к телевизору и другому аудио-видеооборудованию должным образом. Используйте HDMI-подключение для получения максимального качество видео и звука. Убедитесь, что проигрыватель и все соответствующее аудио-видеооборудование выключено при проведении подключений. Убедитесь, что телевизор и прочее аудио-видеооборудование настроено на использование нужных входов.
Включите проигрыватель. Он проведет процедуру первоначального запуска, которая займет около минуты. Во время этой процедуры на экране телевизора будет показан логотип «DUNE».
● Если вы не видите логотипа «DUNE» на экране телевизора после включения проигрывателя, это
может означать проблему соединения проигрывателя и телевизора, а также выбор неправильного видеовхода в телевизоре или аудио-видеоресивере/разветвителе. В этом случае, перепроверьте кабели
и настройки телевизора или аудио-видеоресивера/разветвителя, или используйте другие кабели или
другой способ подключения к телевизору.
● Если вы видите логотип «DUNE» на экране телевизора после включения проигрывателя, но затем
изображение исчезает и ничего не появляется в течение хотя бы 10 секунд, это может означать, что
в проигрывателе выбран неверный видеорежим. В этом случае, нажмите кнопку пульта «MODE», а
затем одну из кнопок «1», «2», «3», «4» или «5» для включения другого видеорежима (см. "Быстрое
изменение видеорежима").
В результате, вы должны увидеть главный экран меню проигрывателя. На главном экране показаны
элементы, предоставляющие доступ к основным функциям проигрывателя и к содержимому всех подключенных к проигрывателю накопителей и сетевых дисков.
Настройки проигрывателя можно изменить, воспользовавшись элементом «Настройки» на главном экране меню проигрывателя (также можно воспользоваться кнопкой пульта «SETUP»). В частности, можно
настроить параметры воспроизведения видео и аудио, а также параметры подключения к сети.
Для выбора языка меню проигрывателя, используйте настройку
Используйте кнопки пульта «ВЛЕВО», «ВПРАВО», «ВВЕРХ», «ВНИЗ», «ENTER», «RETURN» для управ-
ления меню проигрывателя. Кнопка пульта «MENU» предназначена для показа списка доступных команд. Кнопка пульта «INFO» выводит информацию о выбранном элементе.
“Setup / General / Interface language”
.
Быстрое изменение видеорежима
Кнопка пульта «MODE» позволяет быстро настроить видеорежим видеовыхода без входа в меню настроек проигрывателя. Этот способ может понадобиться, если вы не видите изображение на экране
после подключения проигрывателя к телевизору.
Нажмите кнопку пульта «MODE» и затем одну из кнопок «1», «2», «3», «4» или «5» для включения
одного из следующих видеорежимов:
1. Композитный/Компонентный, PAL
2. Композитный/Компонентный, NTSC
3. HDMI, 480i, 60 Гц
4. HDMI, 720p, 60 Гц
5. HDMI, 1080i, 60 Гц
После того, как изображение на экране появилось, нажмите «ENTER», а затем зайдите в меню настро-
ек проигрывателя для более детальной настройки видеорежима, если это необходимо.
ПРИМЕЧАНИЕ: Процедура быстрого изменения видеорежима недоступна во время воспроизведения.
Для того, чтобы гарантированно выполнить эту процедуру, выключите проигрыватель, затем включите
его снова и подождите около одной минуты для того, чтобы он успел провести процедуру начальной
загрузки.
Русский
43
Page 44

Подключение USB-накопителей
Для подключения USB-накопителя убедитесь, что вы находитесь на главном экране меню проигрывателя, и подключите USB-накопитель к одному из USB-портов проигрывателя. Проигрыватель распознает накопитель, и на главном экране появится соответствующий USB-накопителю элемент. При
подключении USB-накопителя, которому требуется существенная мощность по питанию (например,
жесткий диск), используйте внешний блок питания для USB-накопителя. Питание, которое предоставляет проигрыватель для USB-портов, может оказаться недостаточным для корректного функционирования USB-диска. Не отсоединяйте и не выключайте USB-накопитель во время операций записи
на него.
Использование карт памяти SD
Перед подключением карты памяти SD, убедитесь, что вы находитесь в главном меню проигрывателя, и после этого вставьте карту памяти в слот для карт памяти SD на передней панели проигрывателя. Проигрыватель распознает вставленную карту памяти, и на главном экране появится соответствующий карте памяти элемент. Некоторые карты памяти SD могут не распознаваться плеером
или работать некорректно; в таком случае, используйте другие модели карт памяти.
Не извлекайте карту памяти SD из слота во время операций записи на нее.
Внутренний жесткий диск SATA 2.5”
Вы можете установить жесткий диск SATA 2.5” внутрь корпуса плеера. Для установки жесткого диска SATA 2.5” сделайте следующее:
1. Отключите питание плеера.
2. Откройте боковую крышку плеера: вывинтите два небольших винта с боковой стороны плеeра,
которые крепят крышку, затем подденьте крышку, используя щель между крышкой и боковой стороной.
3. Прикрепите HDD к металлической пластине, смонтированной на крышке изнутри. Используйте
для этого четыре винта типа М3.
4. Подключите коннекторы SATA-питания и S ATA-данных к жесткому диску.
5. Установите крышку с жестким диском на место и прикрепите крышку к корпусу плеера винтами.
Доступ к сетевым дискам
Для подключения сетевого диска по протоколу SMB или NFS, убедитесь, что вы находитесь на
главном экране меню проигрывателя, нажмите кнопку пульта «MENU» и выберите пункт «Создать
сетевую папку», затем введите требуемые параметры сетевого диска. Проигрыватель будет показывать элемент, соответствующий этому сетевому диску, на главном экране.
Для просмотра списка доступных сетевых ресурсов по протоколу SMB или UPnP, воспользуйтесь
элементом «Браузер сети» на главном экране меню проигрывателя. ПРИМЕЧАНИЕ: Если какието сетевые ресурсы не показываются проигрывателем, может потребоваться подождать несколько
минут и повторить попытку (либо нажать кнопку пульта «MENU» и выбрать команду «Обновить»).
Форматирование жесткого диска
Для форматирования подключенного к проигрывателю HDD выберите соответствующую иконку в
главном меню проигрывателя, нажмите кнопку «INFO» на ПДУ и выберите элемент «Форматирование диска» (для того, чтобы отформатировать весь диск) или «Форматирование раздела» (чтобы
отформатировать уже существующий раздел). Проигрыватель произведет форматирование в файловой системе «EXT2». ПРИМЕЧАНИЕ: Для использования дисков, отформатированных проигрывателем, на компьютере с Windows, может потребоваться установка на компьютер дополнительного программного обеспечения, например, такого, как "EXT2FSD" (http://www.ext2fsd.com/).
44
Dune HD Lite 53D Quick Start Guide
Page 45

Включение и выключение проигрывателя
Для перевода проигрывателя в режим ожидания, нажмите кнопку пульта «POWER» или кнопку включения/выключения на передней панели. Для выхода из режима ожидания нажмите любую из этих
кнопок еще раз. В зависимости от настроек проигрывателя (см. меню настроек плеера), может быть
использован режим «аппаратного ожидания» или «программного ожидания». В режиме «аппартного
ожидания» питание проигрывателя почти полностью отключено и проигрыватель почти не потребляет
электроэнергию. В режиме «программного ожидания» проигрыватель не выдает сигнал на видеовыход, но продолжает функционировать. Например, если к нему подключены накопители, они попрежнему будут доступны из сети (функция «NAS» проигрывателя). Выход из режима ожидания занимает всего несколько секунд. Когда
он по-прежнему потребляет значительное количество электроэнергии. Не рекомендуется надолго
оставлять проигрыватель в режиме «программного ожидания» без необходимости.
ПРИМЕЧАНИЕ: После выключения проигрывателя или перевода проигрывателя в режим «аппарат-
ного ожидания», рекомендуется подождать около 1 минуты перед повторным включением.
проигрыватель находится в режиме «программного ожидания»,
NAS (Network Attached Storage)
Можно получить доступ к накопителям, подключенным к проигрывателю, из локальной сети по протоколам FTP и SMB. На компьютере с Windows просто наберите «ftp://ip_address» или «\\ip_address»
в Проводнике (Windows Explorer), где «ip_address» — IP-адрес проигрывателя.
WiFi
Можно использовать WiFi-адаптер, подключаемый по USB, для подключения проигрывателя к беспроводной (WiFi) локальной сети.
За информацией о поддерживаемых USB-WiFi-адаптерах обращайтесь на страницу:
http://dune-hd.com/support/hw_compat/
Ограничения
Совместимость проигрывателя с конкретным оборудованием (аудио-видеооборудование, сетевое
оборудование, накопители и т.п.) может зависеть от различных факторов (конкретной модели оборудования, особенностей аппаратной инсталляции и ее использования, настроек проигрывателя
и оборудования, и т.п.). Если проигрыватель не работает корректно с некоторым оборудованием,
попытайтесь изменить конфигурацию проигрывателя или оборудования, попробуйте использовать
оборудование другим образом, либо использовать другое оборудование.
Совместимость проигрывателя с конкретным видом медиаматериалов (файлы, диски и т.п.) может
зависеть от различных факторов (особенности кодирования медиаматериалов, особенности настроек проигрывателя и т.п.). Если проигрыватель не воспроизводит корректно некоторые медиаматериалы, попробуйте изменить настройки проигрывателя или использовать медиаматериалы,
закодированный в отличном формате.
Обновление плеера и доп.информация
Пожалуйста, проверяйте доступность обновления программного обеспечения проигрывателя («прошивки») на следующей интернет-странице (это может улучшить функциональность проигрывателя
и расширить его возможности):
http://dune-hd.com/fi rmware/
(Замечание: Вы также можете подключить плеер к интернет и воспользоваться функцией онлайн-
обновления прошивки, см. Настройки / Разное / Обновление Прошивки.)
Пожалуйста, обращайтесь к следующим интернет-страницам для получения более подробной и
актуальной документации и информации об использовании проигрывателя:
http://dune-hd.com/manuals/
http://dune-hd.com/support/
Русский
45
Page 46

Введення
Dune HD Lite 53D – це “все в одному” пристрій для відтворення відео до якості Full HD (1080p).
Основні характеристики
● Новітній Sigma Designs 8653 медіапроцесор: насолоджуйтесь відмінним відтворенням та вико-
нанням інтерактивних можливостей.
● Мережевий програвач: підключіть плеєр до локальної мережі і відтворюйте контент безпосеред-
ньо з ПК або NAS (UPnP, SMB, NFS).
● HDD-програвач: підключіть HDD до програвача і відтворюйте контент безпосередньо з нього.
● MKV-програвач: відтворюйте HD- і SD-відео в популярному форматі MKV та інших сучасних фор-
матах відео, включаючи найякіcніше HD-відео з дуже високим бітрейтом.
● RealD: відтворюйте надсучасне 3D-відео, яке використовується у найостанніших стрічках у
кінотеватрах.
● 2 USB-порти: зручне підключення жорстких дисків, флеш-дисків, USB флеш-карт та інших USB-
накопичувачів .
● Cлот для SD-карт: легко відтворюйте медіа-файли з карт пам’яті SD камери або іншого при-
строю, а також використовуйте SD-карту пам’яті в якості локального накопичувача.
● HDMI 1.3: забезпечте найкращу якість HD-відео та HD-аудіо.
● Повний набір стандартних аудіо-відеороз’ємів: цифровий оптичний аудіовихід, стереовихід,
компонентний і композитний відеовиходи для зручного підключення плеєра до будь-якого A/V обладнання.
● Гнучкість відеовиходу: виведення відео в будь
24p/PAL/NTSC).
● Збільшення резолюції: висока якість масштабування DVD та іншого SD-відео до якості Full HD
(1080p) та інших HD-резолюцій.
● Файловий браузер: зручний файловий браузер з потужним управлінням файлами (копіювання,
переміщення, видалення, перейменування, організування, сортування).
-якому форматі та резолюції (від SD до 1080p,
Додаткові функції
● Високоякісне відтворення музики: відтворюйте музичні файли дуже високої якості (до 192 кГц
/ 24 біт) в різних форматах (FLAC, Monkey’s Audio APE, WAV/PCM, DTS і т.д.).
● Плейлісти: створюйте плейлісти з Ваших папок, використовуйте свої власні плейлісти, використо-
вуйте повторне відтворення і функцію перемішування.
● Функція NAS: доступ до файлів на пристроях зберігання (HDD, оптичний привід і т.д.), підключених
до плеєра з локальної мережі (з використанням SMB і FTP).
● BitTorrent: використовуйте вбудований BitTorrent-клієнт для завантаження файлів з P2P-мереж.
● Можливість налаштовувати коритсувацький інтерфейс: робота з медіаколекціями з викори-
станням обкладинок і значків перегляду (з Full HD графікою).
● Інтернет-радіо: відтворення і запис різних інтернет-радіостанцій (HTTP/MP3).
● IPTV: відтворення і запис IPTV-потоків (групові UDP/RTP) від Вашого Інтернет-провайдеру*.
● Оція цифрового телебачення: відтворення і запис цифрових телеканалів за допомогою додат-
кового цифрового TV USB-ключа **.
* Перевірте наявність групових UDP/RTP-потоків у Вашого Інтернет-провайдеру.
** Цифровий TV USB-ключ в комплект не входить; ця опція може бути придбана окремо.
46
Dune HD Lite 53D Quick Start Guide
Page 47

Комплект поставки
5423
6
1. Dune HD Lite 53D media player
2. Пульт дистанційного керування
(батареї можуть не бути включені
в комплект)
3. Wi-Fi антена (опціонально)
ПРИМІТКА: Додаткові елементи (опціональні) можуть бути включені в пакет, в залежності від
конфігурації прогровача, регіону та постачальника.
4. AV-кабель
5. LAN-кабель
6. Ніжки
8
7. Комплект гвинтів
8. Зовнішній блок живлення
9. Короткий посібник
917
Зовнішній вигляд
Вигляд спереду
1
2
3
Вигляд ззаду
21345678
1.
Wi-Fi антена (опціонально)
2. Оптичний цифровий аудіовихід
3. Композитний відеовихід та аналоговий стереовихід
4. Компонентний (Y/Pb/Pr) відеовихід
5. HDMI 1.3
6. USB 2,0 роз’єм
7. LAN
8. Роз’єм живлення 12V
4
1. Кнопка вмикання/вимикання
2. Світлодіодний індикатор
3. ІЧ-приймач
4. USB 2.0 роз’єм
Вигляд згори
1. Слот для SD-карт
1
Українська
47
Page 48

Горизонтальне розташування програвача
Ви можете розташувати програвач вертикально або горизонтально. Якщо Ви хочете використовувати горизонтальне розміщення, виконайте наступні дії: зніміть нижню підставку з програвача;
використовуйте спеціальні самоклеючі ніжки, призначені для горизонтального розміщення плеєра
(входять в комплект) та приклейте їх до бокової сторони програвача.
Пульт Дистанційного Керування (ПДК)
1. Індикатор команд - блимає у відповідь на натискання кнопки
ПДК.
2. EJECT - відкрити/закрити лоток оптичного приводу. MUTE ввімкнення/вимикання звуку. MODE - переключити режим відеовиходу; керування деякими іншими функціями програвача.
POWER - перемикання на режим очікування.
3. А (Червона), B (Зелена), C (Жовта), D (Блакитна) - доступ до
функцій Blu-Ray диска; керування деякими іншими функціями
програвача.
4. 0-9 - введення цифр і тексту, керування деякими іншими функ-
ціями прогровача.
5. SEARCH - перехід до заданої позиції відтворення. ZOOM - зміна коефіцієнта масштабування для відеоконтенту, який відтворюється. SET-UP - вхід/вихід до/з меню налаштувань; налаштування параметрів відтворення під час відтворення.
6. V+/V- (збільшення гучності/зменшення гучності) - регулю-
вання гучності.
7. P+/P- (сторінка вгору/вниз) - прокрутка вгору і вниз різних
списків, керування деякими іншими функціями програвача.
8. Стрілки (ВЛІВО, ВПРАВО, ВНИЗ, ВГОРУ), ENTER, RETURN,
TOP MENU, POP UP MENU, INFO - основні кнопки для керу-
вання програвачем (навігація по пунктах на екрані, відкрити/
використати обраний елемент, повернутися до попереднього
екрана, перейти до головного меню, показати контекстне меню
з діями, відображення інформації, керування деякими іншими
функціями програвача).
9. PLAY, PAUSE, STOP, SLOW, REW, FWD, PREV, NEXT - керування відтворенням.
10.SUBTITLE, ANGLE/ROTATE, AUDIO, REC, DUNE, URL - керування відтворенням та деякими іншими функціями програвача.
1
2
3
4
5
6
7
8
9
10
ПРИМІТКИ:
• Використовуйте лужні “ААА” батарейки.
• Дотримуйтеся поляроності при встановленні батарей.
• Спрямовуйте ПДК на програвач. Між пультом і плеєром не повинно бути перешкод.
• Якщо ПДК працює тільки на малій відстані або перестає функціонувати, не забудьте замінити батареї.
• Деякі кнопки пульта можуть мати кілька функцій в залежності
від поточного режиму прогровача.
• Деякі кнопки пульта можуть бути доступні тільки в деяких режи-
мах прогровача чи лише під час відтворення певного контенту.
48
Dune HD Lite 53D Quick Start Guide
Page 49

Приступаючи до роботи
Забезпечіть достатнє місце навколо програвача для належного охолодження. Простору з кожного боку
повинно бути не менше 10 см.
Впевніться, що ПДК має батареї.
Підключіть програвач до телевізора та іншого A/V обладнання належним чином. Використовуйте HDMI
з’єднання, щоб отримати максимально можливу якість відео і аудіо. Переконайтеся в тому, що програвач
і все відповідне A/V обладнання вимкнене, перш ніж підключати їх. Переконайтеся, що Ваш телевізор та
інше A/V обладнання налаштовані на підключення.
Увімкніть програвач. Він буде виконувати свої первинні процедури завантаження, що може зайняти до 1
хвилини. У процесі завантаження логотип «DUNE» з’явиться на екрані.
• Якщо Ви не бачите логотип «DUNE» на екрані телевізора після ввімкнення програвача, то можливі
деякі проблеми з підключення між плеєром і телевізором, або обирається неправильний відеовхід
телевізора або A/V ресівера. У такому разі, ще раз перевірте кабелі та налаштування телевізора або
A/V ресивера, або спробуйте використати інший кабель або інший спосіб підключення програвача до
телевізора.
• Якщо Ви бачите логотип «DUNE» на екрані телевізора після ввімкнення програвача, а потім зображення
зникає і ніяке інше зображення не з’являється протягом не менше 10 секунд, це може означати, що
налаштовано неправильний режим виводу відео в програвачі. У такому випадку, натисніть кнопку ПДК
«MODE», а потім натисніть одну з кнопок ПДК «1», «2», «3», «4» або «5», щоб переключитися на інший
режим виводу відео (див. «Швидке налаштування режиму відеовиходу»).
Нарешті, Ви побачите головний екран меню прогавача. Головний екран показує елементи, які дозволяють
використовувати різні функції програвача і отримати доступ до всіх накопичувачів і мережевих дисків,
підключених до програвача.
Відрегулюйте налаштування програвача за необхідністю, використовуючи пункт «SETUP» на головному
екрані меню програвача (або, натиснувши кнопку пульта «SETUP»). Зокрема, Ви можете змінити параме-
три відео- , аудіо- і мережевих налаштувань.
Для вибору мови меню програвача, використовуйте Налаштування / Загальні / Мова інтерфейсу.
Використовуйте кнопки пульта “ВЛІВО”, “ВПРАВО”, “ВНИЗ”, “ВГОРУ”, “ENTER”, “RETURN” для
переміщення по меню програвача. Використовуйте кнопку пульта «POP UP MENU», щоб показати список
доступних команд. За допомогою кнопки пульта «INFO», Ви можете продивитись інформацію про обраний об’єкт.
Швидке налаштування режиму відеовиходу
Кнопка пульта «MODE» дозволяє здійснити швидке налаштування режиму відеовиходу, не заходячи
в меню налаштувань програвача. Цей спосіб конфігурації відеовиходу може знадобитися, якщо Ви не
бачите зображення на екрані після підключення програвача до телевізора.
Натисніть кнопку пульта «MODE», а потім одну з кнопок пульта «1», «2», «3», «4» або «5», щоб переключитися на один з наступних режимів відеовиходу, відповідно:
1. Композитний/Компонентний, PAL
2. Композитний/Компонентний, NTSC
3. HDMI, 480i, 60 Гц
4. HDMI, 720p, 60 Гц
5. HDMI, 1080i, 60 Гц
Після того як Ви бачите зображення на екрані телевізора, натисніть кнопку пульта «ENTER», а потім
перейдіть в меню налаштувань програвача, щоб виконати більш точні налаштування режиму виводу
відео в разі потреби.
ПРИМІТКА: Процедура швидкого налаштування відеовиходу не може бути використана під час
відтворення. Для забезпечення виконання цієї процедури, вимкніть програвча, а потім - увімкніть, і почекайте близько 1 хвилини, щоб завершити процедуру.
Українська
49
Page 50

Підключення USB-накопичувачів
Для підключення USB-диска, переконайтеся, що Ви на головному екрані меню програвача і USBдиск підключений до USB-порту прогавача. Програвач розпізнає накопичувач, і покаже відповідний
пункт на головному екрані.
При підключенні USB-диска, який вимагає значної енергії (наприклад, USB HDD), використовуйте
зовнішнє джерело живлення для USB-дисків. Енергії, яка надається портами USB програвача, може
бути не достатньо для правильного функціонування USB-диска.
Не вимикайте USB-накопичувач, під час операції запису.
Використання SD-карт пам’яті
Щоб вставити SD-карту пам’яті, переконайтеся, що Ви знаходитесь на головному екрані меню програвача і вставили картку в слот SD-карт програвача. Програвач розпізнає карту пам’яті і покаже відповідний пункт на головному екрані. Деякі SD-карти пам’яті, можуть бути не розпізнані програвачем,
або можуть працювати неправильно; в такому випадку використовуйте інші моделі SD-карт пам’яті.
Не від’єднуйте SD-картку пам’яті, під час операції запису.
Вбудований 2.5’’ SATA HDD
Ви можете встановити 2.5» SATA HDD всередину програвача. Для цього виконайте наступні дії:
1. Вимкніть плеєр.
2. Відкрийте бічну кришку корпусу, витягніть два маленьких гвинта на боковій стороні програвача,
на яких кріпиться кришка, потім підійміть кришку, використовуючи невеликий зазор між кришкою і
боковою стороною плеєра.
3. Прикріпіть HDD до металевої пластини, встановленій на внутрішній стороні кришки.
використовуйте 4 гвинта типу M3.
4. Підключіть коннектори SATA -живлення і SATA -даних до HDD.
5. Установіть кришку з HDD на своє місце і закріпіть кришку до корпусу прогровача гвинтами.
Будь ласка,
Доступ до Мережевих Дисків
Для підключення мережного диска за допомогою SMB і NFS-протоколів, переконайтеся, що Ви на
головному екрані меню програвача , натисніть кнопку пультау «MENU», і оберіть «Створити мережеву папку», а потім заповніть параметри мережного диска. Програвач покаже відповідний пункт на
головному екрані.
Щоб переглянути список мережевих ресурсів, доступних через SMB і UpnP-протоколи, використайте пункт “Інтернет-Браузер”. ПРИМІТКА: Якщо якісь мережеві ресурси не показуються в програвачі,
можливо, буде потрібно почекати кілька хвилин, а потім повторити спробу (або натиснути кнопку
пульта «MENU» і обрати пункт «Оновити» в командному рядку).
Форматування HDD
Щоб відформатувати HDD, підключений до програвача, оберіть пункт диска на головному екрані
меню програвача, натисніть кнопку пульта «INFO» і оберіть «Форматувати диск» (щоб форматувати
весь диск) або «Форматувати розділ». Програвач відформатує диск, використовуючи файлову систему «EXT2» . ПРИМІТКА: Для використання дисків, відформатованих програвачем, на комп’ютері
з Windows, Вам, можливо, буде потрібна установка додаткового програмного забезпечення на ПК,
такого як «EXT2FSD» (http://www.ext2fsd.com/).
Вмикання та Вимикання Прогровача
50
Dune HD Lite 53D Quick Start Guide
Page 51

Щоб переключити програвач у режим очікування, натисніть кнопку пульта «POWER» або «ввімк/вимк»
кнопку на передній панелі. Для виходу з режиму очікування, натисніть будь-яку з цих кнопок знову.
Залежно від налаштувань програвача (див. в меню налаштувань програвача), режими «апаратного
очікування» та «програмного очікування» можуть бути використані. У «апаратному режимі очікування»
відбувається майже повне відключення живлення, а програвач практично не споживає енергії. У «програмному режимі очікування» програвач не подає сигнал на відеовихід, але продовжує функціонувати.
Наприклад, якщо пристрої зберігання даних підключені до програвача, Ви все одно можете отримати
до них доступ по мережі («NAS» функція програвача). Вихід з «програмного режиму очікування» займає всього кілька секунд. Коли програвач знаходиться в «програмному режимі очікування», він, як
і раніше, споживає значну кількість енергії. Не рекомендується тримати програвач в « програмному
режимі очікування » на довгий час.
ПРИМІТКА: Після вимикання плеєра або встановлення «апаратного режиму очікування», рекомендується почекати близько 1 хвилини, перш ніж вмикати його знову.
NAS (Мережеві Пристрої)
Ви можете отримати доступ до пристроїв зберігання даних, підключених до програвача з локальної
мережі, використовуючи FTP і SMB-протоколи. На ПК з Windows, просто наберіть «ftp://ip_address»
або «\\ip_address» в Провіднику Windows, де «ip_address» - є IP-адреса програвача.
WiFi
Ви можете використовувати WiFi USB-адаптер для підключення програвача до локальної мережі
через WiFi.
Ознайомтеся з інформацією про WiFi USB-адаптери, які підтримуються:
http://dune-hd.com/support/hw_compat/
Обмеження
Сумісність програвача з конкретним обладнанням (A/V обладнання, мережеве обладнання, диски і
т.д.) може залежати від різних факторів (конкретної моделі устаткування, особливості встановлення обладнання та використання, налаштування програвача та обладнання, і т.д.). Якщо програвач
не може правильно працювати з конкретним обладнанням, спробуйте налаштувати конфігурацію
програвача або обладнання, спробуйте використовувати обладнання
використовувати інші апаратні засоби.
Сумісність програвача з конкретним медіаконтентом (файли, диски і т.д.) може залежати від різних
факторів (особливості кодування медіаконтенту, особливості налаштування програвача, і т.д.). Якщо
програвач не відтворює коректно деякий контент, спробуйте налаштувати конфігурацію програвача,
або спробуйте використовувати інший формат медіаконтенту.
в іншій формі, або спробуйте
Оновлення Програвача і Отримання Додаткової
Інформації
Будь ласка, перевірте тут оновлені версії прошивки програвача (які можуть покращити функціонування і розширити можливості програвача):
http://dune-hd.com/fi rmware/
(Примітка: Ви також можете підключити програвач до мережі Інтернет і використовувати он-лайн
функцію оновлення прошивки, див. Налаштування / Різне / Оновлення Прошивки.)
Будь ласка, перевірте тут для отримання більш детальної інформації та сучасної документації та інформації про використання програвача:
http://dune-hd.com/manuals/
http://dune-hd.com/support/
Українська
51
Page 52

Wstęp
Dune HD Lite 53D jest uniwersalnym odtwarzaczem plików wideo FullHD (do 1080p), zdjęć i muzyki,
wyposażonym w kieszeń szybkiej instalacji dysku twardego.
Główne cechy
● Najnowszy procesor multimedialny Sigma Designs 8653 — ciesz się doskonałą jakością i
wydajnością, wykorzystując interaktywne funkcje odtwarzacza.
● Odtwarzacz z dyskiem twardym — wsuń do kieszeni dysk twardy (3.5” HDD) i oglądaj zgromadzone
na nim materiały.
● Obsługa zewnętrznych dysków twardych USB/eSATA — podłącz dysk do odtwarzacza i oglądaj
zgromadzone na nim materiały.
● Odtwarzacz sieciowy — podłącz go do sieci lokalnej i odtwarzaj materiały multimedialne bezpośrednio
z komputera lub serwera NAS (UPnP, SMB, NFS).
● Odtwarzacz MKV — oglądaj wideo HD oraz SD w najpopularniejszym formacie MKV i innych
najnowszych formatach wideo, z uwzględnieniem materiałów HD wysokiej jakości, o bardzo wysokich
wskaźnikach bitrate.
● 2 porty USB — wygodnie podłącz dyski twarde, pamięci flash USB, czytnik kart USB i inne urządzenia
pamięci masowej USB.
● Gniazdo kart SD na froncie — odtwarzaj pliki multimedialne bezpośrednio z karty pamięci SD z aparatu
cyfrowego lub innych urządzeń, lub wykorzystaj kartę pamięci SD jako pamięć podręczną lub systemow.
● HDMI 1.3 — zapewnia najlepszej jakości dźwięk audio HD i obraz wideo FullHD.
● Bogaty zestaw standardowych złącz AV — optyczne audio S/PDIF, audio stereo, wideo komponent,
wideo kompozyt, które w prosty sposób umożliwiają podłączenia sprzętu AV.
● Konfigurowalne wyjścia video — wyprowadź z odtwarzacza wideo w dowolnej rozdzielczości i
formacie (od SD do formatu 1080p, 24p/PAL/NTSC).
● Skalowanie — doskonałej jakości skalowanie DVD i innych materiałów wideo standardowej
rozdzielczości SD do rozdzielczości Full HD (1080p) lub pośrednich.
● Przeglądarka plików — przeglądarka z rozbudowanym zarządzaniem plików (kopiowanie, przenoszenie,
usuwanie, zmiana nazwy, organizowanie, sortowanie).
Funkcje dodatkowe
● Odtwarzania muzyki wysokiej jakości — odtwarzanie utworów muzycznych bardzo wysokiej jakości
(do 192 kHz / 24-bit) w różnych formatach (FLAC, Monkey’s Audio APE, WAV/PCM, DTS, itd).
● Listy odtwarzania — odtwarzaj foldery jak playlistę, korzystaj z własnych list odtwarzania, wykorzystuj
funkcje losowania i powtarzania utworów.
● Funkcja NAS — dostęp do plików znajdujących się w pamięci masowej (HDD, napęd optyczny, itd)
dołączonej do odtwarzacza przez sieć lokalną (za pomocą FTP lub SMB).
● BitTorrent — wykorzystaj wbudowanego klienta BitTorrent do pobierania plików z sieci P2P.
● Konfigurowalny interfejs użytkownika: praca z kolekcją mediów za pomocą ikon i okładek (grafiki
wysokiej rozdzielczości).
● Radio internetowe — odtwarzanie i nagrywanie internetowych stacji radiowych (HTTP/MP3).
● IPTV — odtwarzanie i nagrywanie strumieni IPTV (multicast UDP / RTP) dostępnych u twojego dostawcy
internetu*.
● Opcja telewizji cyfrowej — odtwarzanie i nagrywanie kanałów telewizyjnych dzięki opcjonalnemu
tunerowi Digital TV USB** lub tunerom instalowanym w dodatkowym komponencie Dune Smart
Extension ME.
* Sprawdź dostępność strumieni multicast UDP/RTP u twojego dostawcy internetu.
** Tuner Digital TV USB nie jest zawarty w zestawie; można go kupić oddzielnie.
52
Dune HD Lite 53D Quick Start Guide
Page 53

Zawartość zestawu
5423
6 8
1. Odtwarzacz Dune HD Lite 53D
2. Pilot (baterie nie są załączone)
3. Antena WiFi (opcja)
UWAGA: Dodatkowe przedmioty (opcjonalne) mogą zostać dołączone do zestawu, w zależności od
konfiguracji odtwarzacza, regionu i dystrybutora.
4. Przewody AV
5. Kabel LAN
6. Podstawa
7. Śruby
8. Zewnętrzny zasilacz sieciowy
9. Skrócona instrukcja Szybki start
917
Obudowa
Widok panelu przedniego
1
2
3
Widok z tyłu
21345678
1. Antena WiFi (opcja)
2. Cyfrowe optyczne wyjście audio
3. Kompozytowe wyjście wideo, analogowe wyjście audio (stereo)
4. Wyjście wideo Komponent (Y/Pb/Pr)
5. Złącze HDMI 1.3
6. złącza USB 2.0 host
7. Złącze sieć LAN
8. Złącze zasilania DC 12V
4
1. Przycisk ON/OFF (włącz/wyłącz)
2. Dioda LED
3. Czujnik sygnałów pilota
4. Złącze USB 2.0 host
Widok z góry
1. Czytnik kart SD
1
Polski
53
Page 54

Praca w pozycji poziomej
Odtwarzacz jest standardowo przygotowany do pracy w pionie. Aby urządzenie mogło pracować w pozycji
poziomej, należy:
1. Odłączyć podstawkę, na której stoi obudowa przy pracy w pionie
2. Przymocować do obudowy specjalną nóżkę do pracy w poziomie, która znajduje się w zestawie z
odtwarzaczem.
Pilot zdalnego sterowania
1. Dioda sygnalizująca wysyłanie przez pilota sygnałów sterujących
do odtwarzacza
2. EJECT — otwiera i zamyka szufl adę napędu optycznego, MUTE
— wyłącza lub włącza dźwięk , MODE — przełącza tryby wideo
i kontroluje inne funkcje odtwarzacza, POWER — przełącza
odtwarzacz w tryb Stand-by i wybudza urządzenie z trybu uśpienia
3. A (Czerwony), B (Zielony), C (Żółty), D (Niebieski) — przyciski
pozwalające na dostęp do niektórych funkcji fi lmów Blu-ray;
sterowanie innymi funkcjami odtwarzacza
4. 0-9 — umożliwiają wprowadzanie liter i cyfr; sterowanie innymi
funkcjami odtwarzacza
5. SEARCH — umożliwia przejście do dowolnego miejsca w fi lmie,
ZOOM — zmienia aktualne powiększenie obrazu, SETUP —
wchodzi i wychodzi z menu ustawień odtwarzacza, oraz pozwala
na dostosowanie ustawień fi lmu podczas odtwarzania
6. V+/V- (dźwięk głośniej / ciszej) — kontrola głośności (zaleca się
sterowanie głośnością zewnętrznym wzmacniaczem)
7. P+/P- (strona wyżej / niżej) — pozwala na szybkie przewijanie
aktualnie wyświetlanej listy plików; sterowanie innymi funkcjami
odtwarzacza
8. Strzałki (LEWO, PRAWO, GÓRA, DÓŁ) — pozwalają na nawigację
po menu urządzenia, oraz wybór elementów, ENTER — otwiera
/ potwierdza wybór danego pliku lub pozycji menu, RETURN —
wraca do poprzedniego ekranu, TOP MENU — przechodzi do
głównego menu, POP UP MENU — wyświetla menu podręczne,
INFO — wyświetla informacje o wybranym elemencie. Przyciski
główne sterują pracą odtwarzacza
9. PLAY, PAUSE, STOP, SLOW, REW, FWD, PREV, NEXT —
sterowanie odtwarzaniem
10. SUBTITLE, ANGLE/ROTATE, AUDIO, REC, DUNE, URL —
sterowanie odtwarzaniem; sterowanie innymi funkcjami
odtwarzacza.
UWAGA:
● Używaj wyłącznie baterii alkalicznych typu AAA.
● Przy montażu baterii w pilocie, zwróć uwagę na prawidłową
polaryzację.
● Jeśli pilot działa z ma
łej odległości lub odtwarzacz przestaje
reagować na polecenia z pilota, wymień baterie.
● Niektóre przyciski mogą realizować kilka funkcji w zależności od
stanu, w jakim znajduje się w danej chwili odtwarzacz.
● Niektóre przyciski mogą być dostępne tylko w niektórych trybach,
lub tylko podczas odtwarzania wybranych typów materiałów.
1
2
3
4
5
6
7
8
9
10
54
Dune HD Lite 53D Quick Start Guide
Page 55

Pierwsze uruchomienie
Upewnij się, że wokół odtwarzacza znajduje się wystarczająco dużo miejsca, aby zapewnić jego prawidłowe
chłodzenie. Odtwarzacz powinien mieć co najmniej 10cm wolnej przestrzeni po bokach i od góry.
Upewnij się, że w pilocie zainstalowane są baterie.
Podłącz odtwarzacz do telewizora i innych urządzeń audiowizualnych we właściwy sposób. Użyj połączenia
HDMI, aby uzyskać najlepszą możliwą jakość obrazu i dźwięku. Przed połączeniem, upewnij się, że odtwarzacz
i wszystkie podłączane do niego urządzenia są wyłączone. Upewnij się, że telewizor oraz inne urządzenia
audio/wideo mają prawidłowo skonfigurowane wejścia.
Włącz odtwarzacz. Odtwarzacz rozpocznie procedurę startową, która może potrwać do około 1 minuty. W
trakcie procedury ładowania, logo «Dune» będzie widoczne na ekranie TV.
● Jeśli nie widzisz logo «Dune» na TV po włączeniu odtwarzacza, może to oznaczać jakieś problemy z
połączeniem pomiędzy odtwarzaczem a telewizorem lub że wybrano złe wejście wideo na TV lub amplitunerze
AV. W takim przypadku, sprawdź kable i ustawienia telewizora lub amplitunera AV lub spróbuj użyć innych
kabli lub innego sposobu podłączenia odtwarzacza do telewizora.
● Jeśli widzisz logo «Dune» na TV po włączeniu odtwarzacza, po czym obraz znika i nie pojawia się żaden obraz
w czasie co najmniej 10 sekund, może to oznaczać, źle skonfigurowany tryb wyjścia wideo w odtwarzaczu. W
takim przypadku, naciśnij przycisk «MODE» na pilocie, a następnie naciśnij jeden z przycisków «1», «2», «3»,
«4» lub «5», aby przełączyć się na inny tryb wyjścia wideo (patrz «szybkie ustawianie trybu wyjścia wideo»).
Po tej operacji, na ekranie powinno pojawić się Menu Główne odtwarzacza. Menu zawiera elementy, pozwalające
na używanie różnych funkcji odtwarzacza, dostęp do wszystkich dysków, napędu płyt DVD/BD, pamięci lokalnej,
oraz dysków sieciowych podłączonych do odtwarzacza.
Dostosuj ustawienia odtwarzacza zgodnie ze swoimi preferencjami. Wejście do menu ustawień odbywa się
przy pomocy pozycji «SETUP» na ekranie głównym lub przez naciśnięcie przycisku «SETUP» na pilocie. W
szczególności zaleca się dostosować ustawienia wideo, ustawienia audio i ustawienia sieci.
Aby zmienić język menu, należy przejść do „Setup / General / Interface language” i wybierz preferowany język.
Do poruszania się po menu odtwarzacza służą przyciski pilota «LEFT», «RIGHT», «UP», «DOWN», «ENTER»,
«RETURN». Przycisk «POPUP MENU», znajdujący się na pilocie, możesz wykorzystać, aby wyświetlić
wszystkie operacje dla zaznaczonego elementu. Przycisk «INFO» pozwala na wyświetlenie informacji o
podświetlonym pliku.
Szybkie ustawienie trybów wyjścia wideo
Przycisk «MODE» na pilocie pozwala na szybkie ustawienie trybu wyjścia wideo bez konieczności wchodzenia
do menu ustawień odtwarzacza.
Ten sposób konfi guracji wyjścia wideo można wykorzystać, jeżeli nie widać obrazu na ekranie po podłączeniu
odtwarzacza do telewizora.
Wciśnij i zwolnij przycisk «MODE», a następnie jeden z przycisków «1», «2», «3», «4», lub «5» aby przełączyć
się na jeden z następujących trybów wideo:
1. Kompozyt / Komponent, PAL
2. Kompozyt / Komponent, NTSC
3. HDMI, 480i, 60 Hz
4. HDMI, 720p, 60 Hz
5. HDMI, 1080i, 60 Hz
Po wyświetleniu obrazu na ekranie telewizora, naciśnij «ENTER», a następnie, w razie potrzeby, przejdź do
menu ustawień odtwarzacza, aby dokonać dokładniejszej konfi guracji trybu wyjścia wideo.
UWAGA: Procedura szybkiej zmiany ustawień trybów wideo nie może być uruchomiona podczas odtwarzania.
Aby możliwe było ponowne uruchomienie procedury należy wyłączyć i włączyć odtwarzacz, a następnie
odczekać około 1 minutę (czas potrzebny na pełne uruchomienie odtwarzacza).
Polski
55
Page 56

Podłączanie pamięci USB
Aby podłączyć pamięć USB, przejdź do menu głównego, a następnie podłącz pamięć do portu USB.
Odtwarzacz rozpozna pamięć i wyświetli odpowiednią pozycję na ekranie głównym.
Podłączając pamięci USB mające większe zapotrzebowanie energetyczne (np. dyski twarde USB), należy
zapewnić im zewnętrzne zasilanie. Energia dostarczana do zewnętrznego dysku przez port USB może nie
być wystarczająca do prawidłowego działania podłączonej pamięci.
Nigdy nie odłączaj pamięci USB, jeśli jakaś operacja z nią związana jest w toku.
Używanie kart pamięci SD
Aby podłączyć kartę pamięci SD, przejdź do menu głównego, a następnie wsuń kartę do czytnika.
Odtwarzacz rozpozna kartę pamięci i wyświetli odpowiednią pozycję w menu głównym. Odtwarzacz może
nie rozpoznać niektórych kart SD lub może się zdarzyć, że karta nie będzie działać prawidłowo, w takim
przypadku należy użyć innej karty pamięci SD.
Nigdy nie wysuwaj karty pamięci, jeśli jakaś operacja z nią związana jest w toku.
Wewnętrzny dysk SATA 2.5’’
Odtwarzacz jest przystosowany do instalacji wewnątrz obudowy dysku SATA 2.5”. Aby zamontować dysk
należy:
1. Wyłączyć odtwarzacz i odłączyć zasilanie
2. Odkręcić dwie małe śruby znajdujące się na boku odtwarzacza, następnie podważyć i zdjąć boczną
pokrywę obudowy.
3. Używając czterech śrub zamocować dysk w metalowej obejmie znajdującej się na wewnętrznej stronie
zdemontowanej bocznej pokrywy.
4. Ostrożnie podłączyć kabel sygnałowy SATA oraz kabel zasilający do dysku.
5. Zalożyć boczną pkrywę z dyskiem na obudowę i przykręcić odkrcone wcześniej dwie śruby.
Dostęp do dysków sieciowych
Aby podłączyć dysk sieciowy wykorzystując protokół SMB lub NFS, przejdź do menu głównego
odtwarzacza, a następnie naciśnij przycisk „MENU” na pilocie. Wybierz pozycję „Nowy katalog sieciowy”
i uzupełnij niezbędne parametry połączenia do dysku sieciowego. Odtwarzacz wyświetli na ekranie
głównym odpowiednią pozycję prowadzoną do skonfi gurowanego dysku sieciowego.
Przeglądanie listy źródeł sieciowych dostępnych przez protokoły SMB oraz UPnP, możliwe jest poprzez
„Przeglądarkę Sieci” znajdującą się w głównym menu odtwarzacza.
UWAGA: Jeśli jakieś katalogi lub dyski sieciowe nie są widoczne, poczekaj kilka minut i spróbuj ponownie
(lub naciśnij przycisk „MENU” na pilocie i wybierz polecenie „Odśwież”).
Formatowanie dysku twardego
Aby sformatować podłączony do odtwarzacza dysk twardy, podświetl dysk w menu głównym, wciśnij
przycisk „INFO” na pilocie i wybierz polecenie „Formatuj Dysk” (aby sformatować cały dysk) lub «Formatuj
Partycję» (aby sformatować jedną z partycji znajdujących się na dysku). Odtwarzacz sformatuje dysk lub
partycję w systemie plików EXT2.
UWAGA: Użytkowanie dysków sformatowanych przez odtwarzacz na komputerze z systemem Windows,
możliwe jest po zainstalowaniu dodatkowego oprogramowania takiego jak «EXT2FSD» (http://www.
ext2fsd.com/). Odtwarzacz poprawnie obsługuje także dyski formatowane przez komputer w systemie
FAT i NTFS.
56
Dune HD Lite 53D Quick Start Guide
Page 57

Włączanie i wyłączanie odtwarzacza
Przełączenie odtwarzacza w tryb Stand-by, możliwe jest poprzez wciśnięcie przycisku «POWER» na pilocie
lub przycisku «ON/OFF» na froncie. Aby wyjść z trybu Stand-by, ponownie wciśnij jeden z powyższych
przycisków.
W zależności od ustawień, odtwarzacz może przechodzić w tryb głębokiego uśpienia „sprzętowego”, lub w
tryb płytkiego uśpienia „programowego”. W trybie głębokiego uśpienia, odtwarzacz jest niemal całkowicie
wyłączony, a zużycie energii jest minimalne. W trybie uśpienia płytkiego, odtwarzacz nie wypuszcza żadnych
sygnałów audiowizualnych, ale wszystkie jego pozostałe funkcje cały czas działają. Dla przykładu, jeśli
masz podłączoną do odtwarzacza pamięć masową to po przejściu w tryb płytkiego uśpienia, nadal będzie
można uzyskać dostęp do zasobów przez sieć (funkcja «NAS» odtwarzacza). Powrót z trybu płytkiego
uśpienia do pełnego włączenia zajmuje zaledwie kilka sekund. Zużycie energii w tym trybie nadal jest duże
i zbliżone do zużycia podczas normalnej pracy. Nie zaleca się pozostawiać odtwarzacza w trybie płytkiego
uśpienia, jeśli nie jest to konieczne.
UWAGA: Po całkowitym wyłączeniu odtwarzacza lub przejściu w tryb głębokiego uśpienia, zaleca się
odczekać około 1 minutę przed ponownym włączeniem.
NAS (Sieciowy serwer plików NAS)
Możesz zdalnie przeglądać zawartość pamięci odtwarzacza po podłączeniu go do sieci lokalnej
wykorzystując protokoły FTP i SMB (Samba). Aby uzyskać dostęp do zasobów odtwarzacza z poziomu
komputera z systemem Windows, wpisz w Eksploratorze Plików «ftp://adres_ip» lub «\\adres_ip», gdzie
„adres_ip” to adres IP odtwarzacza w sieci.
WiFi
Możesz podłączyć odtwarzacz do sieci lokalnej poprzez Wifi , wykorzystując kartę USB WiFi.
Więcej informacji na temat zgodnych kart WiFi USB pod adresem:
http://dune-hd.com/support/hw_compat/
Ograniczenia
Zgodność odtwarzacza z innymi urządzeniami (urządzenia audiowizualne, urządzenia sieciowe, stacje
dysków, itp.) może zależeć od różnych czynników (w szczególności od modelu urządzenia, jego specyfi ki
instalacji i użytkowania, konfi guracji odtwarzacza i urządzeń, itp.). Jeśli odtwarzacz nie działa poprawnie z
danym urządzeniem, spróbuj zmienić konfi gurację odtwarzacza lub urządzenia, spróbuj użyć urządzenie
w inny sposób, lub użyć innego urządzenia. Zgodność odtwarzacza z niektórymi mediami i nośnikami
(pliki, dyski, itp.) może zależeć od różnych czynników (rodzaj kodowania zawartości mediów, konfi guracji
odtwarzacza, itp.). Jeśli odtwarzacz nie odtwarza poprawnie niektórych plików, spróbuj zmienić
konfi gurację, lub użyj plików z innym kodowaniem.
Aktualizacja oprogramowania oraz informacje
dodatkowe
Nowe wersje fi rmware dostępne są pod adresem: http://dune-hd.com/firmware/
Oprogramowanie może poprawić funkcjonowanie i rozszerzyć możliwości odtwarzacza.
(Uwaga: Możesz również podłączyć odtwarzacz do sieci internet i skorzystać z funkcji aktualizacji fi rmaware
„online”, aby skorzystać z tej opcji przejdź do Ustawienia/Pozostałe/Firmware Upgrade.)
Bardziej szczegółowa dokumentacja i informacje dotyczące użytkowania odtwarzacza znajdują się pod
adresem:
http://dune-hd.com/manuals/
http://dune-hd.com/support/
Polski
57
Page 58

Page 59

59
Page 60

www.Dune-HD.com
 Loading...