

Page 1

USER MANUAL
MODIX HD-2510
Page 2
Warnings and Safety Instr uctions ............................................................................4
Warning Caution⊡⊡
Operation reminder⊡
Limited Liability................................................................................................5
Introducing......................................................................................................6
Checking the items inthePackage..........................................................................8
Standard Package Contents⊡
Optional Accessories⊡
Software⊡
Name of each part.............................................................................................9
FRONT-REAR VIEW⊡
Preparing the Remote Controller...........................................................................10
System Requirements and Specifications..................................................................11
System Requirements⊡
Specifications⊡
Installation.....................................................................................................13
Installment of HDD⊡
Connect to the PC.............................................................................................14
Connect MODIX HD-2510 to the PC⊡
Disconnect USB connection⊡
Format the HDD⊡
Connection of TV ..............................................................................................21
Connecting the Video cables to TV- MODIX HD-2510⊡
Connecting the Audio cables to TV/Amplifier-MODIX HD-2510⊡
Connection of Car.............................................................................................23
Getting Started................................................................................................24
Power on player⊡
Setting up player⊡
Basic Operation................................................................................................26
Basic Play of VIDEO files⊡
Basic Play of MUSIC files⊡
Background Skin while listening music⊡
Basic Play of PHOTO files⊡
Enjoy Background Music while slide show⊡
Bookmark Function⊡
Background Image Customizing⊡
Support Password setting per each folder⊡
Firmware Upgrade............................................................................................31
Specifications..................................................................................................32
Frequently asked Questions.................................................................................33
Contact us......................................................................................................35
-3-
Page 3
This section describes precautions that should be observed in order to prevent injury to the
user and damage to property, and to ensure safe use of the product. Be sure to observe
the following items when using the product not to cause malfunction.
▣ The Product may generate heat when used for long periods of time.
▣ Do not attempt to disassemble this Product. Doing s o may cause fire, electric shock or
electrical leakage, and defectiveness in the product itself.
▣ In the event of unusually abnormal sounds, strange orders or smoke, stop using this
product immediately. Please shut down your computer and peripheral devices promptly.
▣ Do not use this product if wet or exposed to chemicals, oil or any liquid matter.
▣ Do not handle, shake or try to remove this Product while writing and reading data.
▣ Do not bend, apply excessive pressure, or place heavy objects on this product.
▣ Do not expose this product to the following conditions;
- Strongly vibration or shock
-Directsunshine
- Dusty, hot and/or humid conditions
-Extremetemperaturefluctuations
-Nearmagneticfields
▣ If the player is disconnected suddenly during file transfer, it may case data loss and an error
on the player. If this happens, attach the player to your PC and run the Windows Scan Disk
utility.
▣ If BAD sectors are generated in the HDD due to physical impact or other cause, the
product may not function normally. Please use the scan disk program in the Windows
operating system to fix the error.
▣ Regular backup is recommended to preserve and store your valuable data.
▣ We are not responsible for data deletion, damage, or any consequences caused by improper
handling or data storage.
-4-
Page 4

The manufacturer, importer and dealer can not be held responsible for accidental damage,
including personal injury or any other damage, due to inappropriate usage of the product.
Information in the user manual is written for the current specification of the product. The
manufacturer, DTS INFOCOM, continues to provide additional functions and apply new
technology to it. All specifications may be changed without notice to individual users.
Manufacturer shall not be liable for any special, incidental or consequential damages. Even if
informed of the possibility there of in advance .
Furthermore, warranty does not apply to:
. Damages or problems resulting from misuse, abuse, accident, alteration or incorrect①
electrical current or voltage.
. Any product tampered-with or damaged warranty seal or serial number label.②
. Any product without a warranty or serial number label.③
. Batteries and any consumable items delivered with or in the equipment.④
MODIX is not designed or intended to, and my not be used to violate any copyrights or other IP
(Intellectual Property) rights. Each user of MODIX may only use it in connection with materials
legallyownedbyorlicensedtotheuserandonlyextendsuchownershiporlicenserightsthat
will permit such use.
-5-
Page 5

Thanks you for your choice of this e xciting MODIX product.
MODIX HD-2510 is a Portable Digital Multimedia Storage and Player device that you can
connect to any PC or Mac via USB-2 (plug & play) in order to copy your favorite contents
(music, movies, pictures, data files). Once you have transferred your data to MODIX, you
can connect it to any TV to enjoy your movies, music and photos. You can watch your
favorite films in HDTV quality Video and Dolby Digital or DTS quality Audio. MODIX has a
pocket design that lets you take it wherever you go.
This guide will explain to you the functions of the MODIX. Our engineers have packed this
product with many functions and capabilities. The better you know how to use it, the more
enjoyment you will get from it.
Movie tank
MODIX HD-210 lets you store movies, TV shows, music videos and more into its HDD and
view them directly on a TV or Projector at anytime, anywhere. MODIX is able to play
MPEG-4 video in DVD quality. Also you can enjoy inside of your car during driving and
vacation using car power adaptor.
Mu lti-codec Music Player
MODIX features a newly designed music player that plays MP3, WMA, ASF and OGG music
files at anytime, anywhere... no computer needed.
Digital Photo Viewer and Wallet
MODIX can also store digital photo files and display them from TV or projector. Store JPEG
photos directly from a PC or Macintosh computer through the USB 2.0 interface and enjoy a
slide show for your family and friends without using a computer. PowerPoint files can also be
converted into JPEG files and use at office presentation.
Por table Storage Device
MODIX is seen as an additional drive on your computer (PC or Macintosh). By utilizing its
high capacity 2.5" Hard Disk, store any computer file using the USB 2.0 interface at
480Mbps transfer speed, which is also USB 1.1 compatible.
-6-
Page 6
USB 2.0 is supported
Supports USB 2.0 with maximum transfer speed of 480 Mbps/sec.
Firmware Upgrade
Provides the latest updated features via firmware upgrade and can be downloaded from
MODIX homepage.
DVD (.ISO) Compa tibility
ISO is One Image file backup of the complete DVD. MODIX will play the ISO file exactly the
same as if it was running from the original DVD.
Easy Graphic User Interface Menu
It makes easy to find and play any song.
Remote Control
MODIX is equipped with an elegant infrared remote control, providing standard DVD
functionality buttons.
We wish you many years of enjoyment from your product. Don't forget to check our web
site (www.modix.co.kr category software), as we periodically update the internal
operating software (Firmware) to offer new functions and improved features.
Wishing you the best Video, Music, and Photo experience.
DTS INFOCOM CO., LTD.
-7-
Page 7
Select the check boxes to confirm that all items are included in the package.
Should you find any missing item, please contact our Local Sales.
MODIX HD-25 10 player
(*No HDD Disc included in this model.)
Stand
Infrared Remote Control including 3Volt CR2025 type lithium battery
Power adaptor with automatic voltage changeover 110/220V
USB 2.0 High Speed Cable (A to mini B)
AV Cable (Composite Audio RCA)
S-VIDEO Cable
Component Cable Gender
Screw Bag for enclosure and HDD (6pcs) with Hook
Leather Case for carrying
Instructions for Use of HD-2510
YPbPrAVCableforHDTV(YPbPr Color Component Video - 3 RCA)
SPDIF Coaxial Cable Gender (RCA to mini-jack).
Car Power Adaptor
IR Remote Extend er (5M)
Cassette Audio output
Keep the box and packing material in a safe place and use them when transporting
the product for the purpose of repair or other service.
USB 2.0 driver for Windows 98
Latest Firmware
MODIX Manager for codec converting
Download all the softwares from our web site☆ www.modix.co.kr before use.
-8-
Page 8
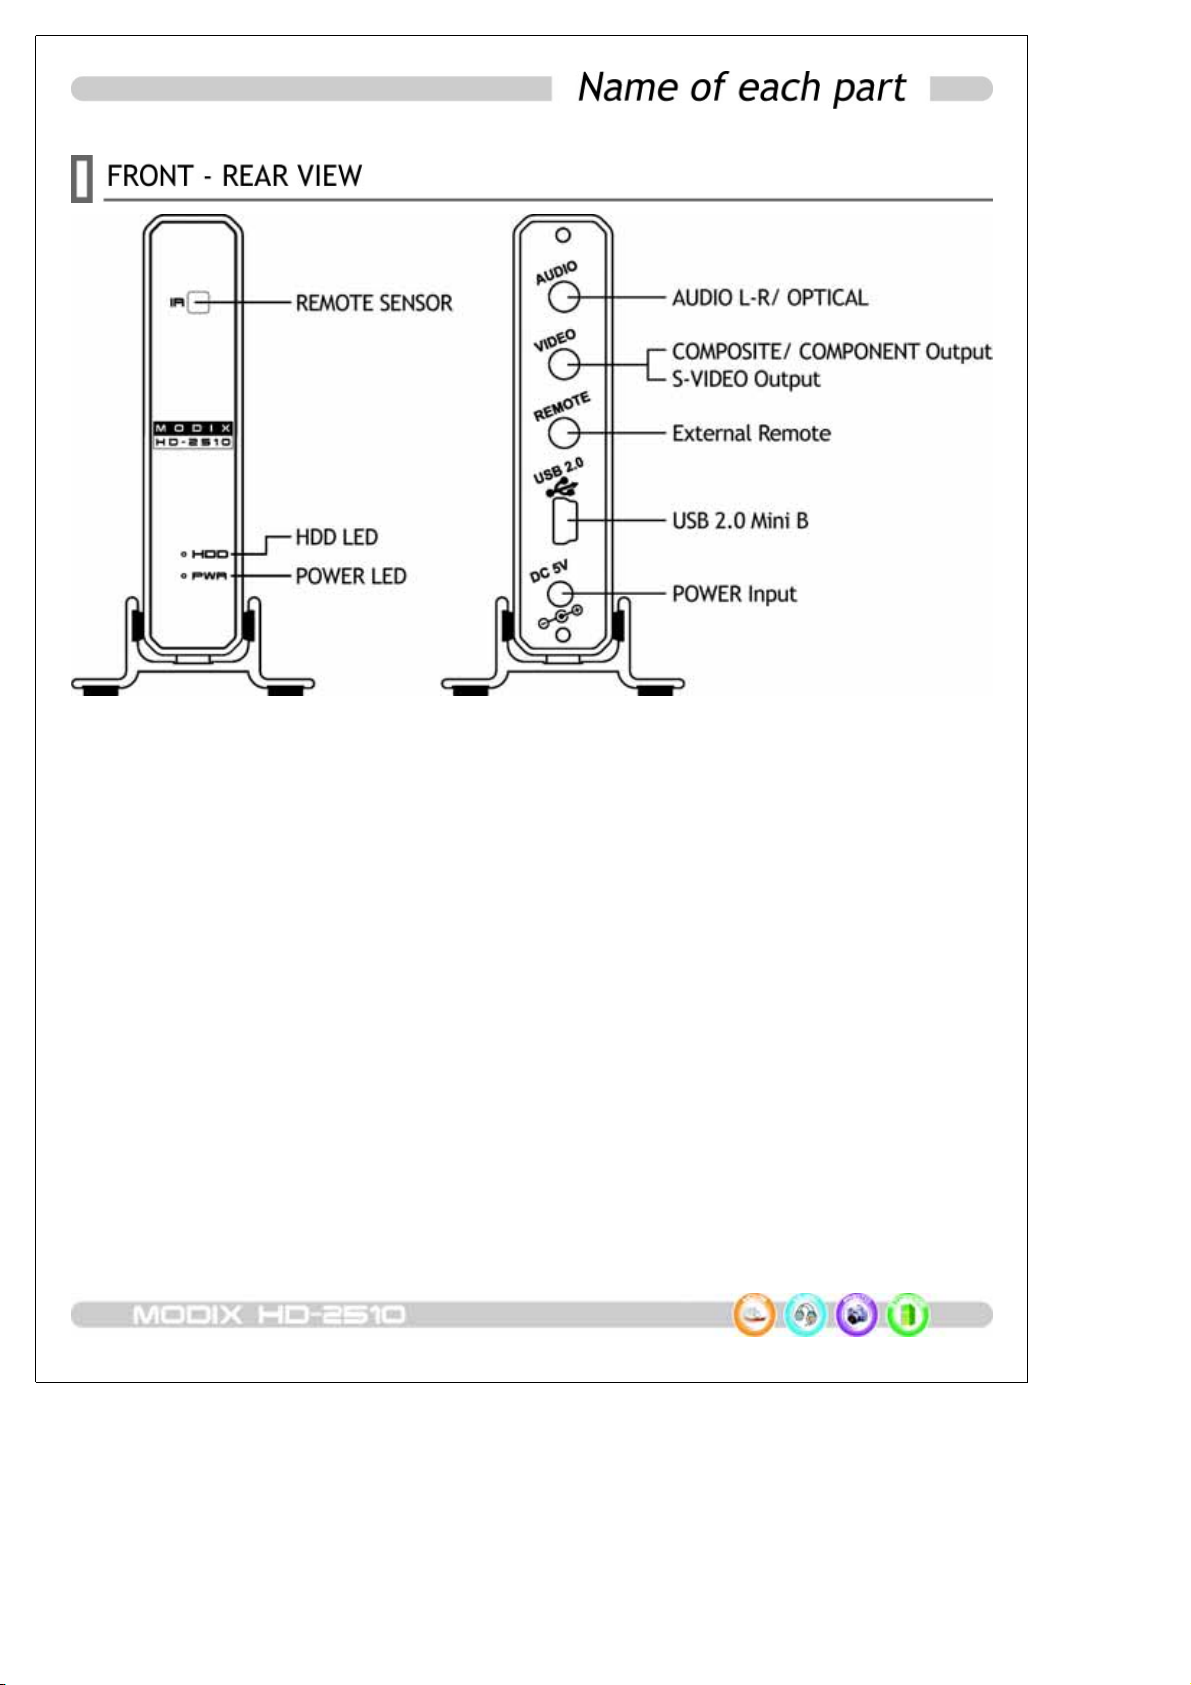
MODIX requires external ports to provide all its features.
☉ AUDIO: Connect analog audio or Optical digital audio cables.
☉ VIDEO: Connect composite or Component or S-Video cables
☉ REMOTE: Connect optionally purchased Remote Extender Cable for car use
☉ USB2.0: Connect to a PC or Mac, it is the USB 2.0 port providing power and data.
☉ DC 5V: Connect provided 5V power adaptor for TV out put
-9-
Page 9
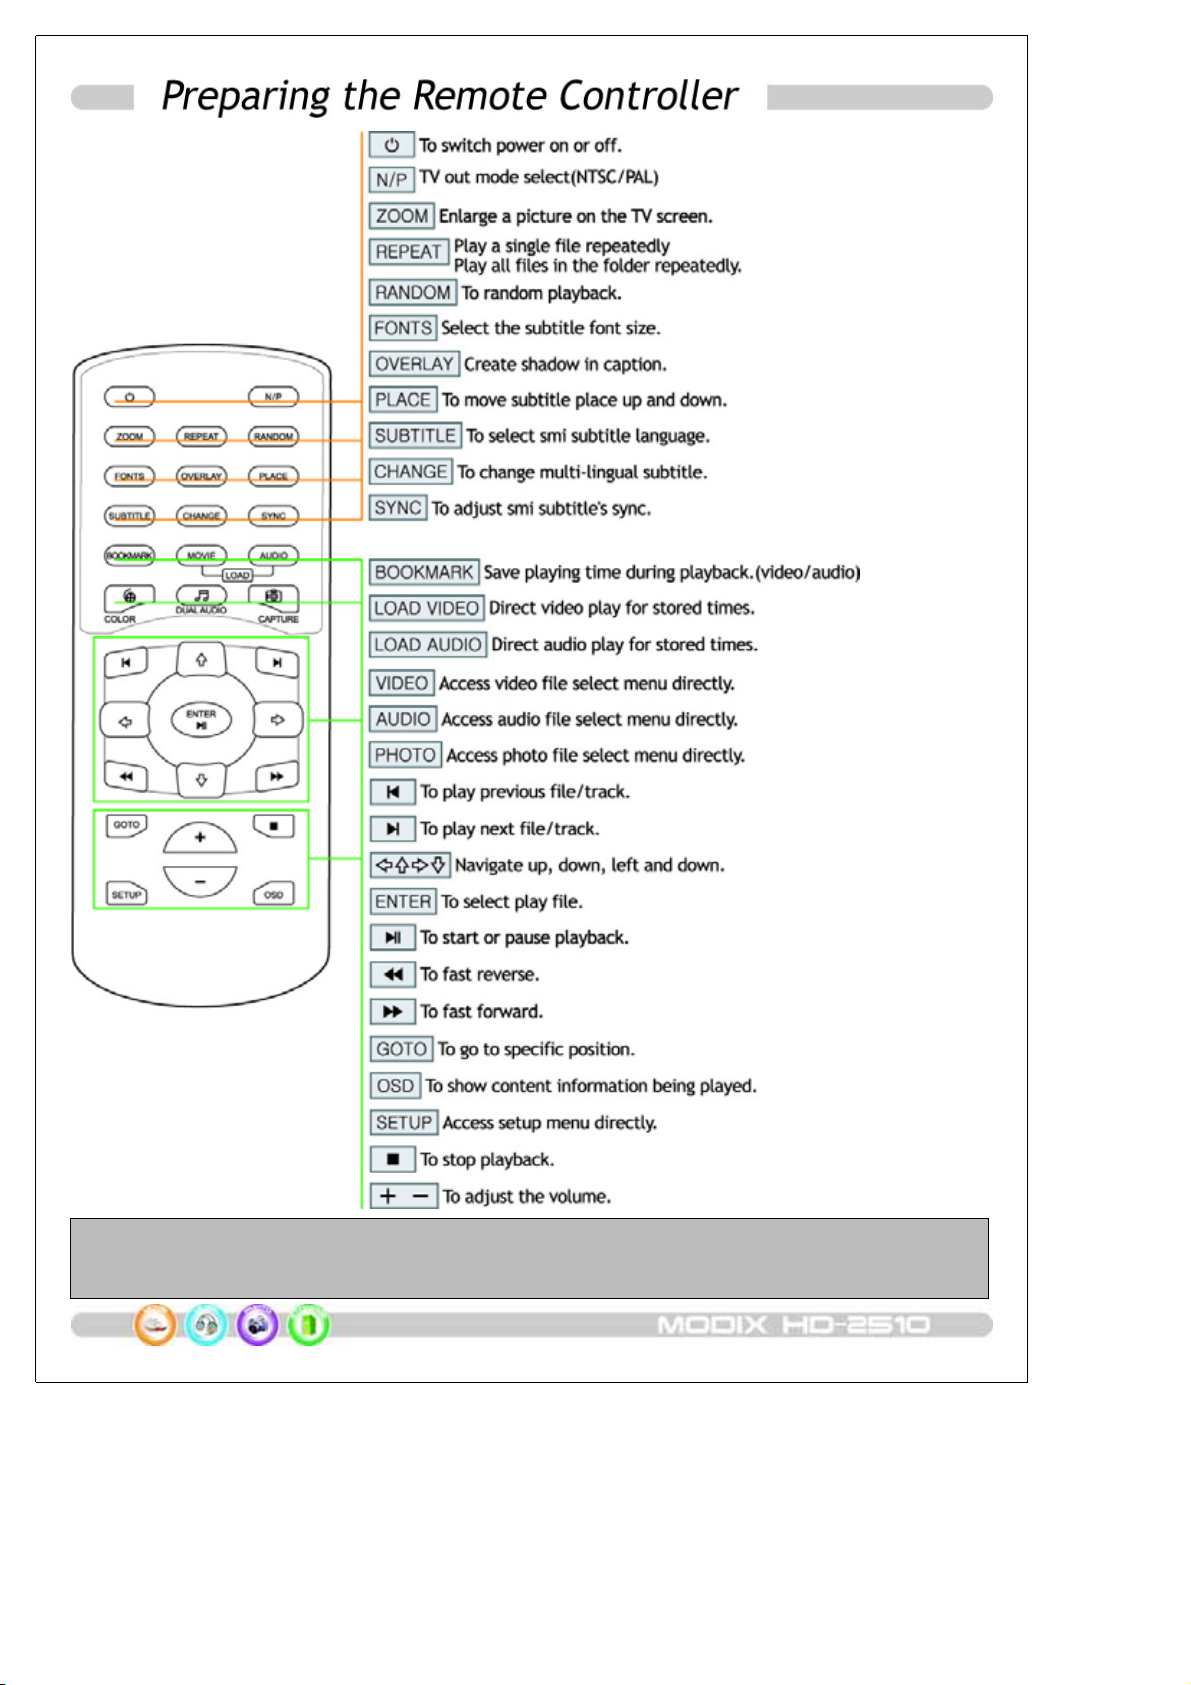
Don't drop the remote control and don't put it in wet place.
Don't expose the front panel of infrared receiver to sunshine and strong light directly.
When the remote becomes insensitive, please replace a new battery.
-10-
Page 10
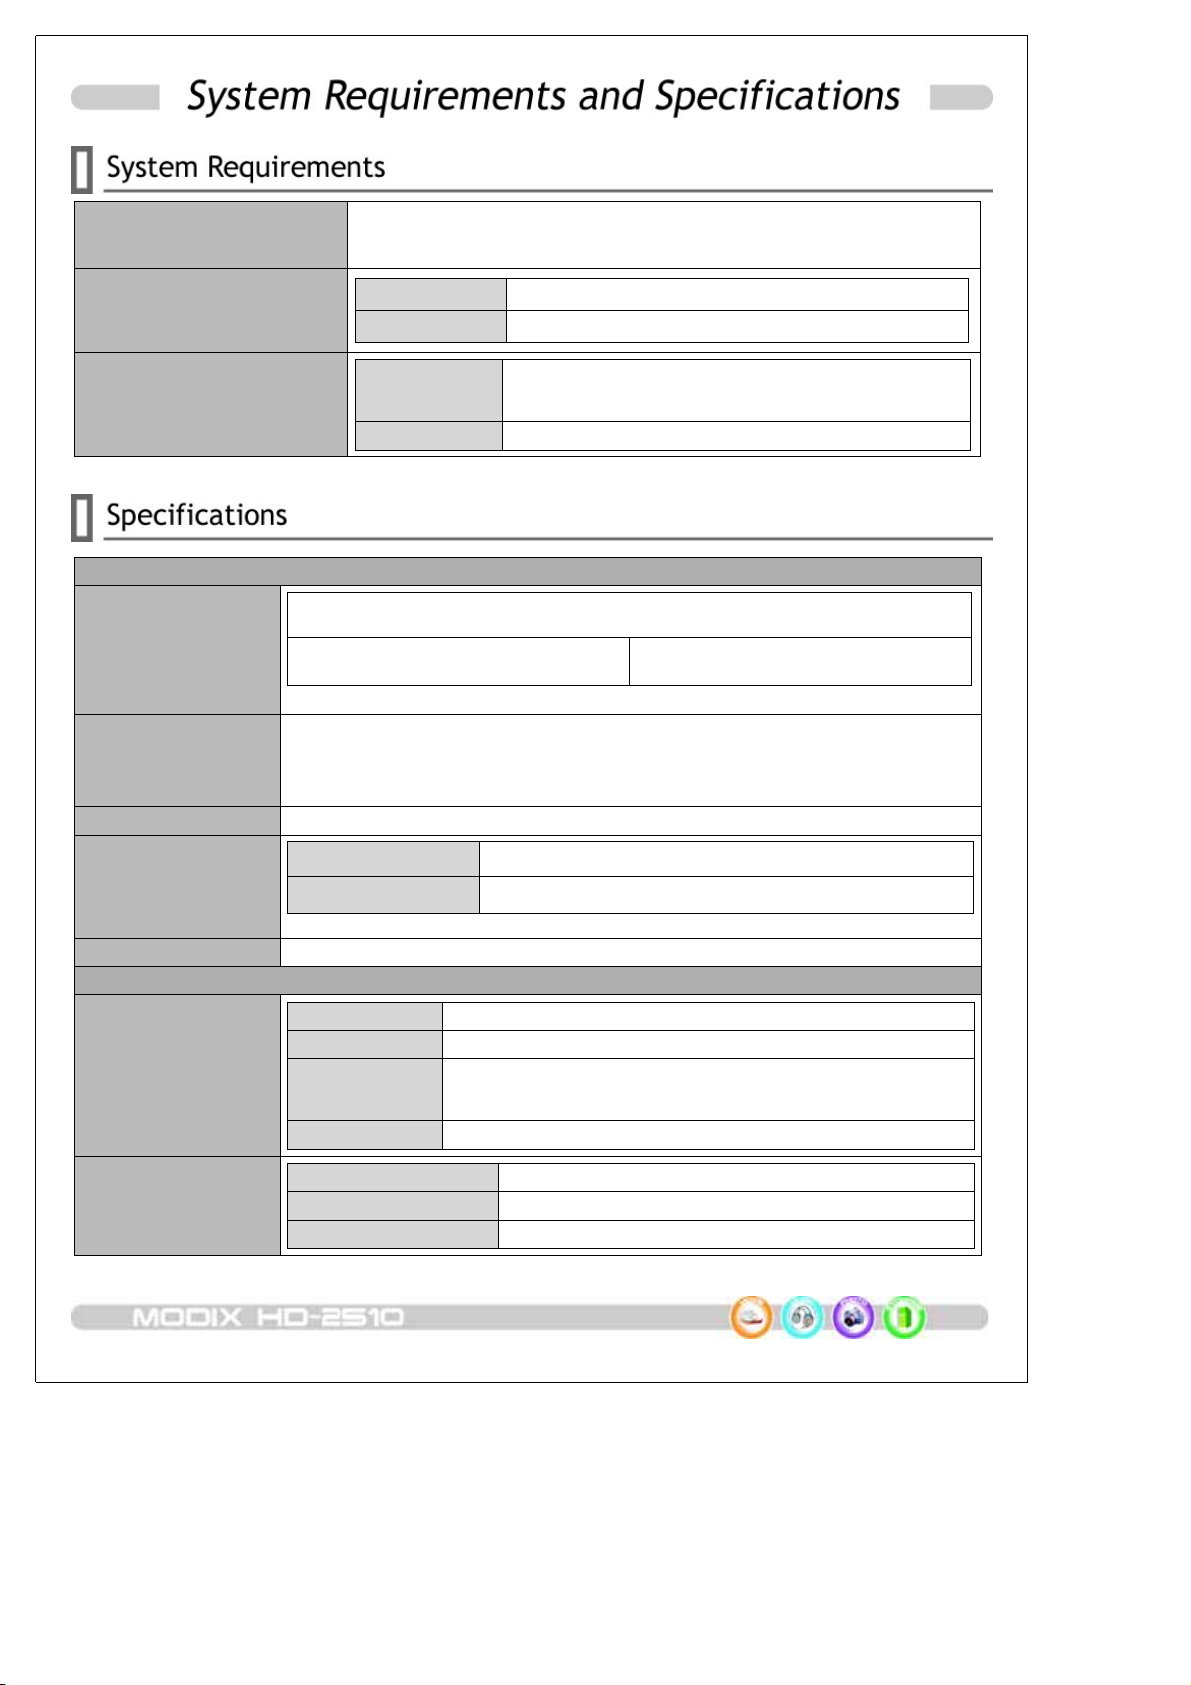
Supported OS (USB)
Windows XP、Windows Me、Windows 2000 Professional,
Windows 98 Second Edition
Minimum PC Requirements
CPU Intel Pentium III 500MHz
Memory 128MB
Compatible with 2.5" IDE HDD Disc
ENVIRONMENT REQUIRED
Support HDD
No HDD Disc included in this model☆
TV System Multi-standard ( NTSC/ PAL)
Inter face
Composite × 1 S-Video × 1
Video Connections
Component (Progressive Scan) 1080i/ 720p/ 480p/ 480i
☆ ComponentCablenotsupplied
Stereo Audio (L/R) ×1、Optical Digital Audio ×1
Audio Connections
Additional Decoder required for DTS digital output.
Optical Cable Cable not supplied☆
Output Connectors Composite, Component, S-Video
USB Spec USB 2.0 (High Speed、Full Speed: Max. 480Mbps)
USB Interface
ConnectorType USBMini-BType
☆ When used in USB1.1 mode, transfer speed is so slow
EXT. IR RECEIVER 5M
Output Performance
Video
Audio
DAC Max80MHz/ 10bit
Composite 930mVp-p(Load Impedance: 75 Ω)
Brightness(Y): 980mVp-p(75 Ω),
S-Video
Color(C): 260mVp-p(75 Ω)
Component Y: 965mVp-p(75 Ω) Pb/ Pr: 680mVp-p(75 Ω)
Audio DAC 96KHz/ 24bit
Frequency Response +/- 2dB (20Hz to 20KHz)
S/N Ratio 70dB or over
-11-
Page 11
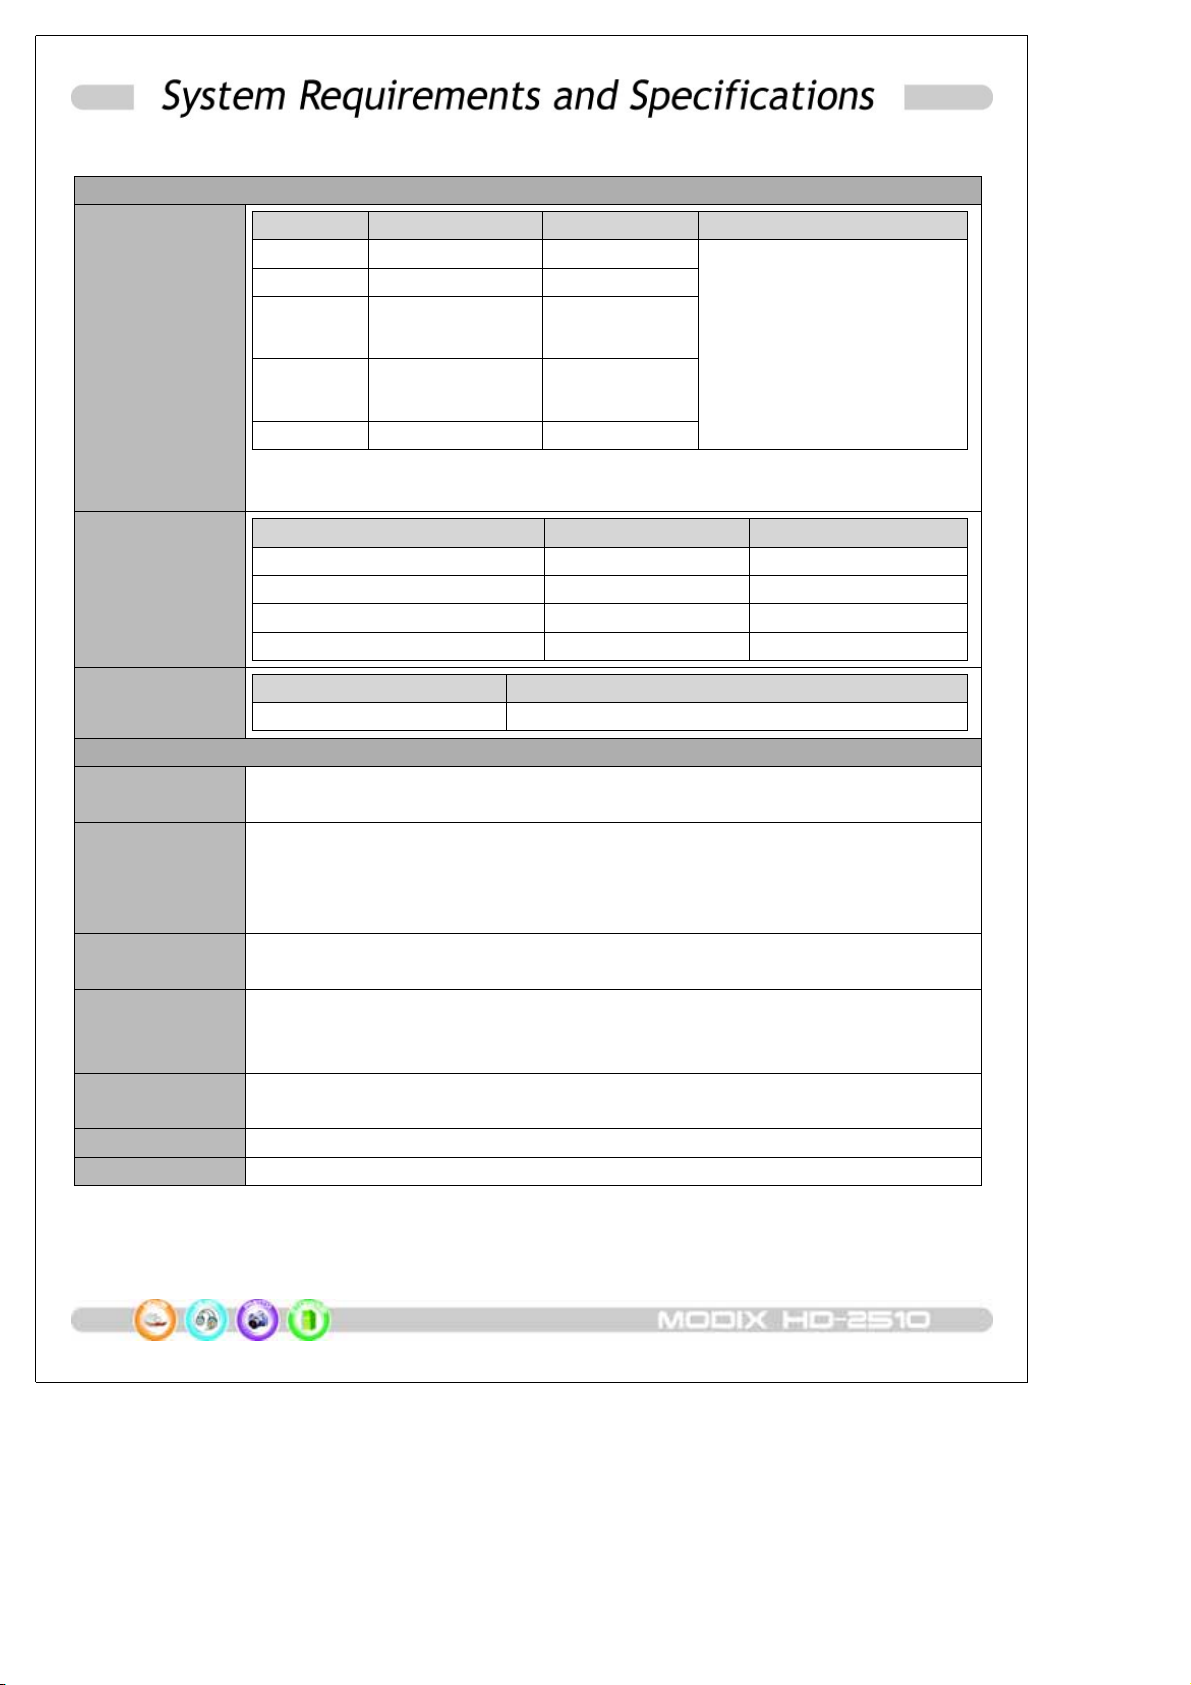
Support Format
Video
Audio
File Type Video Codec Audio Codec Remarks
DAT MPEG-1 MPEG-1
VOB MPEG-2 MPEG-2
MPG, MPA
M1V,M2V
AVI
AVI MS MPEG4 V3 MP3, AC3, DTS
☆ It is normal to expe rience an occasional pixelation and "skip"durin g
playback due to clarity of digital contents during internet downloading.
File Type Output Bit Rate Sampling Rate
MP1, MP2, MP3 64K ~ 192Kbps 32K/ 44.1K/ 48KHz
WMA, ASF(ExceptWMA9 Pro) 64K ~ 192Kbps 44.1K/ 48KHz
Ogg Vorbis 64K ~ 192Kbps -
MPEG-2 MPEG-2
DivX® Video,
MP3, AC3, DTS
XviD
AC3 64K ~ 192Kbps 32K/ 44.1K/ 48KHz
Subtitle:SMI,SRT,SUB
Resolution Max. 720 x 576
Frame Rate Max. 30fps
Do n o support GMC
(Global Motion Compensation),
QP(Quarter Pixel) Feature.
Photo
Envi ronme ntal Specifications
Rating Power
Voltage
AC output
current
(conver t ed
power )
Power
consumption
Operation
Temperatures
(°C)
Operation
Humidity (%)
Unit Dimension 128 (W) × 80(D) × 18(H)mm
Mass Approx. 165g (without Adaptor)
AC 100~240V±10% ; 50/60Hz / External AC/DC Adapter
5V, 2.0A
Max. 12W
5to50degreeC
20 to 80% Non-condensation
File Type Resolution
JPEG Baseline (Non-progressive) JPG 2048×1532
-12-
Page 12

Power off to prevent risks of electric shock.
Fasten the hard drive to the bridge board with the four(4) screws as seen above.
Slide the bridge board and hard drive back into the enclosure, replace the rear panel and
fasten the two(2) screws on the side.
Jumper settings of your hard drive should be factory default or Master.
-13-
Page 13

<< No need external Power Adator>>
. Connect USB cable to the USB jack on the player and PC's USB port.①
. Power on and check to see that the USB lamp is turned on.②
. Your system will automatically recognize as an external hard disk and you can see a③
[removable drive] icon shown by double clicking [my computer]. If it is the first time you
connect the drive to PC, you can wait several seconds for the computer to recognize the
new hardware and install it automatically.
. If not, check again that the USB connector is securely inserted or f ormat hard drive④
according to below instruction.
You can copy any file(s) you want (music, movies, pictures) and of course ANY kind of data.≽
No need for external Power. MODIX is powered from the USB cable.≽
Windows 98 SE and ME are required to install [USB2.0 driver] downloaded from MODIX⋟
website. So we suggest users to use W indows XP and above higher operation system.
When the former model's driver is installed in your pc, eliminate the former drive first then⋟
reinstall new driver.
There are few reported cases, in which the USB port of the host PC is unable to⋟
power MODIX. If your host PC is one of those rare cases, THEN you need to connect power
adaptor.
In order to have maximum transfer rate and reliability, use only the USB-2 cable provided⋟
in this package.
-14-
Page 14

1. Click the 'Safely Remove Hardware' icon in the System Tray and a [Stop USB Mass Storage
Device-Drive] message will pop up.
2. Select USB hard disk, and click [stop]. A pop-up message will appear again and click [OK].
3. Wait for few minutes. The system will show that you are safe to unplug the device, Then you
can unplug USB connection.
4. You can thus follow the previous operations to control the drive and play those files copied
from computer.
5. Refer to "STEP 3" to enjoy data files copied to hard drive.
Do not disconnect the player while the drive is in use. Complete any file copying activity
before attempting to disconnect from your PC.
If you are a new hard drive user or when you turn on the player, the MODIX logo appears and do
not turn to Video /Audio /Photo select mode, please make a new partition and format hard
drive. Owing to limitation of NTFS hard partion, we recommend you to format as FAT32.
Download「FAT32 Format Program」from our web site and format HDD Disc before you connect
to your AV system or you can still use a hard drive which is f ormatted as FAT32 system on
Windows 98 SE/ME or NTFS system on WinXP/2000.
Ifyouwanttocreatemorethan2partitions,pleasesetharddrivepartitionasprimary both
and cluster size as FAT - 32K,NTFS-4K using PartitionMagic® or PartitionExpert® software.
Formatting Hard Drives in External Enclosures
<< Windows 98SE/ Windows ME >>
The tool used here is the called 'DOS command prompt' and 'fdisk'. You can find this by going to
'Start/ Program Files/ Accessaries' and cli ck on "MS-DOS" or you can use the 'Run application and
directly type 'fdisk'.
-15-
Page 15

. The first window will be the blank MS-DOS command window. Type '① fdisk' without the marks
and press 'ENTER'. Skip this step if you typed 'fdisk' directly into the 'Run' application.
. Select 'Y' to② en able the large disk support and press 'ENTER'.
-16-
Page 16

.Enter'5'to③ chan ge the current disk drive and press 'ENTER'.
. Select the drive you want to install and format, in this example disk '2' but note that this④
may vary from your setup!
⌕ If you can not see the external hard drive at this point, please check your jumper settings,
cable connection, power supply and if required, the driver installation.
For 2.5" Hard Drive, you can also connect the drive directly to your internal IDE⌕ bus if you
encounter problems with the external drive and install it later formatting.
. Choose '1' to⑤ create a primary DOS partition and follow the on screen instructions. After you
have created the partition according to your requirement, close the MS-DOS command
prompt by typing 'exit' and press 'ENTER'.
-17-
Page 17

.⑥ Restart your Computer and then go to 'My Computer'. The new drive should appear and
you will be prompted to format it after double clicking on the drive icon. Choose FAT32
and full format, type a name and format the drive.
You external drive is now ready to use!
FAT3 2 can be used on most Operating Systems including Win98SE, WinME, Win2000,
WinXP, Mac OS 9, Mac OS X and Linux Systems.
-18-
Page 18

<< Windows 2000/ Windows XP >>
Thetoolusedhereisthesocalled'Disk Management' application. You can find this by right
clicking on 'My Computer', then choosing 'Manage' and 'Disk Management'. The alternative is to
go to 'Start/ Control Panel/ Administrative Tools/ Computer Management'.
. Select 'My Computer', right click on it and choose 'Manage'.①
. Select '② Disk Management'
⌕ If you can not see the external hard drive at this point, please check your jumper
settings, cable connection, power supply and if required, the driver installation.
For 2.5" Hard Drives, you can also connect the drive directly to your internal IDE bus⌕ if you
encounter problems with the external drive and install it later after formatting.
-19-
Page 19

. Choose the drive you want to install and right click on it for further commands. Click on③
thegrayfieldontheleftsidetoinitialize the drive or click on the empty field on the right
side to create a partition.
. Follow the④ Partition Wizar d and setup the hard drive as Primary hard drive.
Choose FAT32 or NTFS and format the drive and set the cluster size FAT32 as 32K, NTFS as
default(4k) when you format hard drive.
.Goto'MyComputer'.Thenewdriveshouldappear.⑤
Your external drive is now ready to use!
FAT3 2 can be used on most Operating Systems including Win98SE, WinME, Win2000, WinXP,
Mac OS 9, Mac OS X and Linux Systems. The only restriction if formatted on Win2000 or
WinXP is that the largest size for a single partition has to be 32GB or smaller.
To create a single partition larger then 32GB(using FAT32) has to be done on WinME.
NTFScanonlybeusedonWin2000orWinXP. There is no size restriction for NTFS, you can
create a single partition even for large drives over 200GB(this might take a while!).
-20-
Page 20

Connect only one capable video cable directly to your TV system. Its connection depends on the
outlets available on your TV set. Plug the Power Supply adaptor to the MODIX and then into the
electrical outlet.
Using Composite Video(CVBS, Yellow) : An easy way of transferring video signals.
Connecting the Y(green), Pb(blue) and Pr(red) cable : HD component and Progressive Scan
output are available and require a special type of cable and TV set.(Not supplied)
Using S-Video(black) : Another way of connecting to the TV set and picture quality is better
than CVB. *If TV display is black and white, set the video mode as NTSC/S-Video.
-21-
Page 21

Connect only one audio cable type directly capable to your AV system. Connection depends on
the outlets available on your AV set.
AUDIO OUT(L/R) jacks: To hear the sound of this Player through your TV, connect the audio
cables(white/red) to the AUDIO IN jacks on the TV.
OPTICAL: In case you have a Home Theater, you can connect the included SPDIF Coaxial Cable
to your audio system in order to gain enhanced audio quality. The digital 5.1 channel
connection provides the best sound quality. It requires a A/V receiver that supports AC3 and
DTS audio formats. Connect the Player's digital audio outlets(optical) to the corresponding input
ontheamplifier.Specialcablesarerequiredforthispurpose.Next,changetheplayer'ssettings
on the "AV settings" menu. Refer to your amplifier's instruction manual for more information on
correct setup and cables are not included in the package.(Not supplied)
-22-
Page 22

Take MODIX player and enjoy with you in the car! With our car kit, you can g et rid of the dozens
of CDs laying around your car by using your MODIX portable player on the road.
.① Connect Video Cable into MODIX and CAR TV.
. Connect Car Cassette pack cable into MODIX and slide cassette pack into tape slot.②
. Connect Car Power adaptor into Cigar jack and MODIX.③
Car Power adaptor
Ext. IR Remote Cable Length 5 M
Car Remote Controller Button 32 EA
* "Car TV" is not supplied.
INPUT / OUTPUT 12V only /12V, 5V
Length 1 M
-23-
Page 23

. Connect AC power adaptor to player.①
. Plug in the AC power cord to the power outlet.②
. Turn on your TV & MODIX and select your TV's video input as AV mode.③
.AppearsthemainmenuonyourTVwhenyouturnonthePlayer.④
If your TV is blank screen, be sure to set the TV to the correct video input type(AV mode)⋟
and channel. Refer to the equipment owner's manual for detail.
If your TV is black & white, set the video mode correctly as NTSC/S-Video.⋟
If your TV is distorted or flickering, press N /P button repeatedly to show the normal⋟
screen by this time until you see the menu again.
IfMODIXlogoappearsanddonotturntoVideoAudioPhotoselectmode,pleasereformat⋟
as FAT32 system following above format guide-Pg 15.
Use the SETTING SELECTION to select the language of the menu and then confirm/modify your
best audio and video settings.
. Press the SETUP button on your remote control, a menu will appear with the available①
options.
. Adjust the MODIX to your specific requirements and hardware.②
. Once press SETUP button again, return to main OSD.③
Advanced Option
-24-
On(W.Folder)
File Auto Play
DVD Menu Start
AVI Move Set
Slide Delay Time 1, 2, 3, 4, 5, 6, 7 Sec
Font Color
Remote Key Input Repeat On / Repeat Off
*
On(WO.Folder)
Off
On Starting with DVD Menu.
*
Off
Move X
Move MIN
White-Black/Black-White
Yellow-Black/Black-Yellow
Play all files in CD upon
turning on.
Play files only in the root
folder upon turning on.
Display menu without
starting files.
Starting without DVD
Menu.
Adjust FAST SKIP by 8x /
16x / 32times.
Adjust FAST SKIP by 1, 5,
10, 15, 20minutes.
Adjust slide show time
interval by seconds.
Adjust subtitle border
color.
Set remote to act
repeatedly.
Page 24

AUDIO/VIDEO
Initial Setting
USE for HD-8500, 8500A CD and DVD type Player☆
Hidden Menu for advanced USER: Press UP-DOWN-UP-DOWN-RIGHT-LEFT key on MODIX LOGO☆
HD-Component Out 480p, 720p, 1080i, Off
S-Video
TV Out
YPbPr
BT, CT, ST Bright, Contrast, Saturation
Analog / DPCM
Audio Out
Embed Digital
DVD, VCD PBC
Parental Level
TV Type
Change Password
OSD English / Korean
Default Setup Save
On / Off
*
Off 1~8
*
4:3LetterBox/4:3Pan
Scan / 16:9
MP4 4:3 Full / MP4 16:9 Full
*
DISPLAY.
Make sure your TV set
support progressive video
input before setting the
MPEG4 player to
progressive mode.
Otherwise, a blank screen
will show on your TV.
After connecting to 1080i
mode, screen flicking is a
normal thing and
interlaced mode is
suitable for moving
picture not for
documentation and
graphic works.
Set when connected to
S-video cable.
Set when connected to
Component cable.
Adjust video color setting.
Set when connected to
Stereo cable(L/R).
Set when connected to
Optical cable.
The digital 5.1ch optical
output will be enabled.
Used for DVD or VCD 2.0
discs playing. The menu
image displays on the
screen.
Used for parental control
ratings.
Set to normal TV or Wide
screen types.
Auto Full Screen Display
on MPEG4 files.
Use for parental control
of DVD. And the default
password is 0000.
Changing the user
interface language as
Korean and English.
Initialize all settings to
original factory
setting and all you r
personal settings will be
erased.
-25-
Page 25

. Press ENTER or VIDEO to see list of file and folder the① VIDEO menu screen.
.VideoFileandfoldernamewillbedisplayed.②
. Select the desired file t o play using direction key and press③ ENTER or
to play.
.Press[④
LOAD MOVIE
] to stop the program and turn back to previous menu.
BUTTON EXPLANATION
To switch power on or off
N/P TV out mode select(NTSC/PAL)
ZOOM EnlargeapictureontheTVscreen
REPEAT
RANDOM To random playback
FONTS Select the subtitle font size
OVERLAY Create shadow in caption
PLACE To move subtitle place up and down
SUBTITLE To load smi subtitle language
CHANGE To change multi-lingual subtitle
SYNC To adjust smi subtitle's sync
BOOKMAR K Save playing time during playback
ENTER To select play file
GOTO To go to specific position
SETUP Access setup menu directly
OSD To show content information being played
+- To adjust the volume
Playasinglefilerepeatedly
Play all files in the folder repeatedly
Direct video play for stored Bookmark.(avi/mpg)
* Press remote button on VIDEO AUDIO PHOTO Selection mode upon
power on not during playback.
Access video file select menu directly
Access audio file select menu directly
Access photo file select menu dire ctly
To start or pause playback / To stop playback
To play previous file/track. To play next file/track
Navigate up, down, left, right
To fast reverse./ To fast forward
-26-
Page 26

. Press ENTER or AUDIO to see list of file and folder the① AUDIO menu screen.
.AudioFileandfoldernamewillbedisplayed.②
. Select the desired file t o play using direction key and press③ ENTER or
. During playing MP3, you may press [④
] to stop the program and turn back to previous
menu.
BUTTON EXPLANATION
To switch power on or off
REPEAT
Playasinglefilerepeatedly
Play all files in the folder repeatedly
RANDOM To random playback
GOTO Search your favorite file by alphabetical order
BOOKMAR K
Save playing time during playback
* This function only support to FAT32 HDD Format.
Direct video play from stored Bookmark.(mp3/wma)
LOAD AUDIO
* Press remote button on VIDEO AUDIO PHOTO Selection mode upon power on
not during playback.
Access video file select menu directly
Access audio file select menu directly
Access photo file select menu dire ctly
To start or pause playback./ To st op playback
To play previous file/track./ To play next file/track
Navigate up, down, left, right
ENTER To select play file
To fast reverse./ To fast forward
SETUP Access setup menu directly
OSD To show content information being played
+- To adjust the volume
to play.
. While listening to music, you can enjoy JPG background.①
.Makeafoldernameas[② modix].
. Then copy any jpg file into [modix] folder like below.③
.Press[④
] button in the music mode to enjoy JPG Background Skin.
Copy any JPG photo upto 99 files into (../modix) directory like below ;
MODIXDrive/modix/modixaud01.jpg
MODIXDrive/modix/modixaud02.jpg
.
MODIXDrive/modix/modixaud99.jpg
-27-
Page 27

. Press ENTER o r PHOTO to see list of file and folder the① PHOTO menu screen.
. Photo File and folder name will be displayed.②
. Select the desired file t o play using direction key and press③ ENTER or
BUTTON EXPLANATION
To start Slide Show
RANDOM To random playback
To stop playback
To play previous file/track./ To play next file/track
ZOOM EnlargeapictureontheTVscreen
Navigate up, down, left, right
CAPTURE
While play slide show, you can enjoy MP3 background music.
. Make a folder name as [modix].①
. Then copy any mp3 file into [modix] folder like below.②
.Press③
button in the photo mode to enjoy mp3 background music.
To change Main OSD image to your favorite photo
* This function only support to FAT32 HDD Format
to play.
Copy any MP3 music upto 99 files into (../ modix) directory like below ;
MODIX Drive/modix/modixaud01.mp3
MODIX Drive/modix/modixaud02.mp3
.
MODIX Drive/modix/modixaud99.mp3
Only [POWER], [REPEAT], [
] key input is possible during JPG slide show.
-28-
Page 28

Press the [BOOKMAR K]buttonduringMOVIE,MUSICfileplayback,theplayingtimewillbe
stored on the memory. And the player will automatically start playing from the position where
it stored if the [BOOKMAR K]or[LOAD ] button is pressed again on the main OSD (VIDEO MUSIC
PHOTO) selection menu not during file playback.
Only apply to FAT32 HDD Format because of limitation of NTFS.
The Background Images seen on your TV can be customized like below.
Copy any JPG photo file into Root(../) directory like below;
MODIX Drive/modixmain.jpg (Main OSD)
MODIX Drive/ modixfile.jpg (File Select)
MODIX Drive/ modixsetup.jpg (Setup mode)
-29-
Page 29

Set of password⊰⊱
. Locate the cursor key on the folder which you would like to set password.①
.Press[② OSD]buttonontheremote.
. Will display "password setting" message box.③
. Press 4 nu meric passwords and will close message box establishing the password④
automatically.
Change of password⊰⊱
. Locate the cursor key on the folder which you would like to change password.①
.Press[② OSD]buttonontheremote.
.Will display "password setting" message box.③
. In case you input password correctly, will d isplay message box again.④
. Press 4 numeric passwords again and will close message box establishing the password⑤
automatically.
Cancel of password⊰⊱
. Locate the cursor key on the f older which you would like to cancel password.①
.Press[② OSD]buttonontheremote.
. Will display "password setting" message box.③
.Press[④ STOP] button then will cancel established password.
Enter of password established folder⊰⊱
.Press[① ENTER] on the password established folder.
. Will display "Please enter the password" message box.②
. In case you input password correctly, you can enter the folder.③
. If not, you will fail to enter the folder and close the message box.④
You can establish passwords by each folder.
Only supports to hard disk formatted as FAT32 partition.
Can not use password function by limitation of writing of NTFS hard format.
In case you forget password, removes "password.dbm" file in previous password established
folder.
-30-
Page 30

MODIX provides you with the latest and best features through Firmware Upgrade. After you have
completed the upgrade procedure, your player will typically perform better.
Firmware Upgrade Instructions
. Connect the product to a PC with the USB Cable. Please see Page 8 for how to connect the①
product to a PC.
. Download the② latest Firmware file from the company website www.MODIX.co.kr
. Uncompress file from the download file.③
. Copy F/W file to any folder of the MODIX drive.④
. Disconnect t he USB cable from the player.⑤
. Connect the AC adapter to the player.⑥
Only upgrade the firmware on the player with the AC adapter connected.
. Select the Firmware file and press ENTER and⑦
. "Firmware Upgrading..."⑧
Do not turn the player off or disconnect the player from the PC until the Firmware.
All screens will be erased until f/w upgrading.
. When the player powers off, the Upgrade is complete.⑨
. Power on the player and confirm the firmware version during startup.⑩
Never turn off the power while the firmware is being updated Doing so may cause damage
to the hardware.
to start upgrade.
-31-
Page 31

Model MODIX HD-2510
MOVIE
Supported media formats
Supported HDD types Support 2.5" IDE type (No limitation of Capacity)
Supported HDD formats NTFS, FAT32, Mac OS
OS Windows 98SE,ME,2000/XP or later
Video output
Audio output
USB interface
Output terminal
Power supply 5V 2A AC/DC Adapter,100 to 240 VAC,50/60Hz
Power consumption 12W (Max.)
Operating temperature
range
Operating humidity range 20 to 80%(non-condensing)
Storage temperature range -10 to 50°C
Storage humidity range 10 to 90%(non-condensing)
External dimensions 128(W) 80(D) 18(H)mm(excluding projections)⨯⨯
Weight Approx.165g (main unit only)
Access o ry
MUSIC MP3,WMA,ASF,OFF,AC3
PHOTO JPEG
Progressive video output(480p,720p,1080i),
Video D/A converter(Max.148.5MHz/12bits)
Dolby Digital(digital audio output),
Audio A/D Converter(192kHz/24bits)
USB Specification Ver.2.0(High Speed)
Number of connector/
connector shape
USB bus power Supported(Max.500mA)
HD Component 1(480i,480p,720p,1080i)
S-video output 1(S1,S2)
Composite video output 1
Analog audio output 1
Optical digital audio output 1
IR Remote Extender output 1
5 to 35°C
Standard: Player, Stand, AC Adapter, Remote, Cable(USB/
Composite/S-Video),Leather Case, Component Gender
Optional: Car Power Adapter, IR Remote Extender(5M),
Optical Gender, Component Cable
DVD-Video(ISO),DivX,XviD,
MPEG-1/2, VOB,DAT
1connector,USB mini B type
Even when the overall bit rate of a DivX file is below the maximum bit rate, some portions
of the video data may have very high bit rates.
In this case, frames may skip or sound may break in the segments of high bit ra tes. Playback
may even stop if the bit rate remains high for a long duration.
Also refer to 'Supported Formats".
-32-
Page 32

More questions and answers are available from our website.
Just visit the support site at: www.MODIX.co.kr
Why can' t I see the drive in the file manager after I reboot my computer?
Make sure the assembled HDD is installed correctly, and that the USB cable is connected①
to your computer. It may because the USB 2.0 driver is not installed correctly. Re-install②
the driver and reboot your computer. The hard disk is not formatted and formats your hard③
disk drive with FAT32 formatter downloaded from our homepage.
Driver is not display ed or an..! Icon is displayed to the left of the driver in the device manager.
Player is not connected properly. Check that the USB cable is fully inserted into the USB①
port. The support software is not properly installed. UNINSTALL the USB driver once and②
reinstall it again.
Why can't I see the drive in the file manager after installing the USB 2.0 driver under Windows
98 ?
Click the "start" icon located in the lower left corner of the Windows task bar. Click on①
"Settings", then "Control Panel". Select and click on "System" in the "Control Panel" window.
From the "System Properties" window, click on "Hard disk controllers". Select the new HDD②
unit with the right mouse button to view the "Properties" screen. Select "Disable this hardware
profile" in "Device usage". Click "OK".
I got a message that "The generic USB Hub is a HI-SPEED USB device and will function at reduced
speed when plugged into a non hi-speed port. There are no HI-SPEED USB host controllers
installed on this computer. You must add a HI-SPEED host controller to this computer to obtain
maximum performance." in XP.
In order to reach USB 2.0 speed, you must have a computer or host adapter card that has
USB 2.0 support.
TV is blank screen or distorted?
Be sure to set the TV to the correct video input type(AV Mode) and channel. Refer to the
equipment owner's manual for detail. And press N/ P button repeatedly to show the normal
screen by this time until you see the menu again.
My picture is in black and white?
Enter the setup menu and go to the video menu and change the settings here to fit your TV
screen, this usually happens if the player is set to use s-video instead of Component.
-33-
Page 33

When I power on player, the MODIX logo appears and do not turn to Video Audio Photo select
mode?
Please download 『FAT32 Format Program from our web site and format hard drive before you』
connect to your system. Next check hard drive jumper pin as MA(master) and primary partition
option.
Can I format hard disc as FAT32 system larger 32GB in Windows XP?
Windows 2000 and Windows XP can not recognize hard drive formatted FAT32 system larger
than 32GB using the Disc Management Utility or the Format Commander Utility since 32GB is the
maximum HDD size enabling to be formatted as FAT32 partition. Or you can still use a HDD
which is formatted as FAT32 system on Windows 98 SE or ME.
Some of my DivX freezes in high action scenes or when there is a lot going on in the picture.
This can occur and it do not mean that there is something wrong with the player. It is simply
because of the motion level in the movie, the player will resume playing the movie after a few
seconds. The only thing you can do is to convert the files to another format.
Some of my Divx/Xvid files do not have any sound?
This can be caused by many things, make sure that you have set the Encoded digital out
correctly in the player's setup menu. That the file actually have sound. It can also be because
the file uses an unsupported audio codec. A/V receiver and cables required.
I have problems playing DivX 3.11 with Ac3 or MP3 VBR sound?
This can be an interleaving issue, please run the file through a program like virtual Dub. Run
a direct stream copy of both Audio and Video.
Some JPG files not supported?
Some non-standard JPEG files may not be displayed. Please use "save as..." option with
graphic software.
Do I have to install all firmware updates?
No you only need to install the latest firmware to get all the new features.
HowdoIcheckwhichfirmwarethatisinstalledonmyMODIX?
You can check which firmware version is installed by pressing the setup button on the
remote control and then the player will write the firmware version in right-below of the setup
menu.
-34-
Page 34

If you experience a technical problem with one of our MODIX products, please consult the FAQ
section on this site to see if your question is listed there. If it is not listed, or if it is listed but
the answer provided did not solve the problem, please contact us;
E-mail Support: modix@modix.co.kr
Phone Support: 82-31-702-6177
We are here to assist you 9 am-6 pm Pacific Time, Monday-Friday.
Please visit our website at www.modix.co.kr
---------------------------------------------------------------------------------------------------------------------DTS INFOCOM CO., LTD.
C-409, Bundang Techno-Park, 145, Yatap-dong, Bundang-gu, Sungnam City, Kyounggi-do, KOREA
---------------------------------------------------------------------------------------------------------------------Please note: If in need of technical assistance, do not send products to DTS INFOCOM and the
address printed on this instruction manual. Please contact the location at point of purchase.
Thank you.
-35-
Page 35

 Loading...