

Page 1

PAR16
PAR 16 GU/GZ 10
PAR 16 MR16 GX5,3 12V
PAR 16 LED
03.P16.02.01.01
PAR 16 CLASSIC GU/GZ10 BLACK
+SOCKETS KIT
03.P16.02.02.01
PAR 16 CLASSIC GU/GZ10 LUX
+SOCKETS KIT
User’s Manual Rel 2.0
D.T.S. Illuminazione srl - ITALY
http://www.dts-lighting.it
GB
Made in Italy
Page 2

2
Le informazioni contenute in questo documento sono state attentamente redatte e controllate. Tuttavia
non è assunta alcuna responsabilità per eventuali inesattezze. Tutti i diritti sono riservati e questo
documento non può essere copiato, fotocopiato, riprodotto per intero o in parte senza previo consenso
scritto della D.T.S .
DTS si riserva il diritto di apportare senza preavviso cambiamenti e modifiche estetiche , funzionali o di
design a ciascun proprio prodotto. D.T.S non assume alcuna responsabilità sull’uso o sull’applicazione dei
prodotti o dei circuiti descritti.
The information contained in this publication has been carefully prepared and checked. However, no
responsibility will be taken for any errors. All rights are reserved and this document cannot be copied,
photocopied or reproduced, in part or completely, without prior written consent from D.T.S.
D.T.S. reserves the right to make any aesthetic, functional or design modifications to any of its products
without prior notice. D.T.S. assumes no responsibility for the use or application of the products or circuits
described herein.
PAR 16
Les informations contenues dans le présent manuel ont été rédigées et contrôlées avec le plus grand
soin. Nous déclinons toutefois toute responsabilité en cas d'éventuelles inexactitudes. Tous droits
réservés. Ce document ne peut être copié, photocopié ou reproduit, dans sa totalité ou partiellement,
sans le consentement préalable de .
D.T.S.
de design, sans préavis, à chacun de ses produits. décline toute responsabilité sur l'utilisation ou
Todos los derechos han sido reservados y este documento no puede ser copiado, fotocopiado
D.T.S.
estético, funcional o de diseño a cada producto suyo. no se asume responsabilidad de
se réserve le droit d'apporter toutes modifications et améliorations esthétiques, fonctionnelles ou
D.T.S.
sur l'application des produits ou des circuits décrits.
Las informaciones contenidas en este documento han sido cuidadosamenteredactadas y
controladas. Con todo, no se asume ninguna responsabilidad por eventuales inexactitudes.
o reproducido, total o parcialmente, sin previa autorizaciónescrita de
se reserva el derecho a aportar sin previo aviso cambios y modificaciones de carácter
D.T.S.
ningún tipo sobre la utilización o sobre la aplicació
n de los productos o de los circuitos descritos.
D.T.S
D.T.S.
Page 3
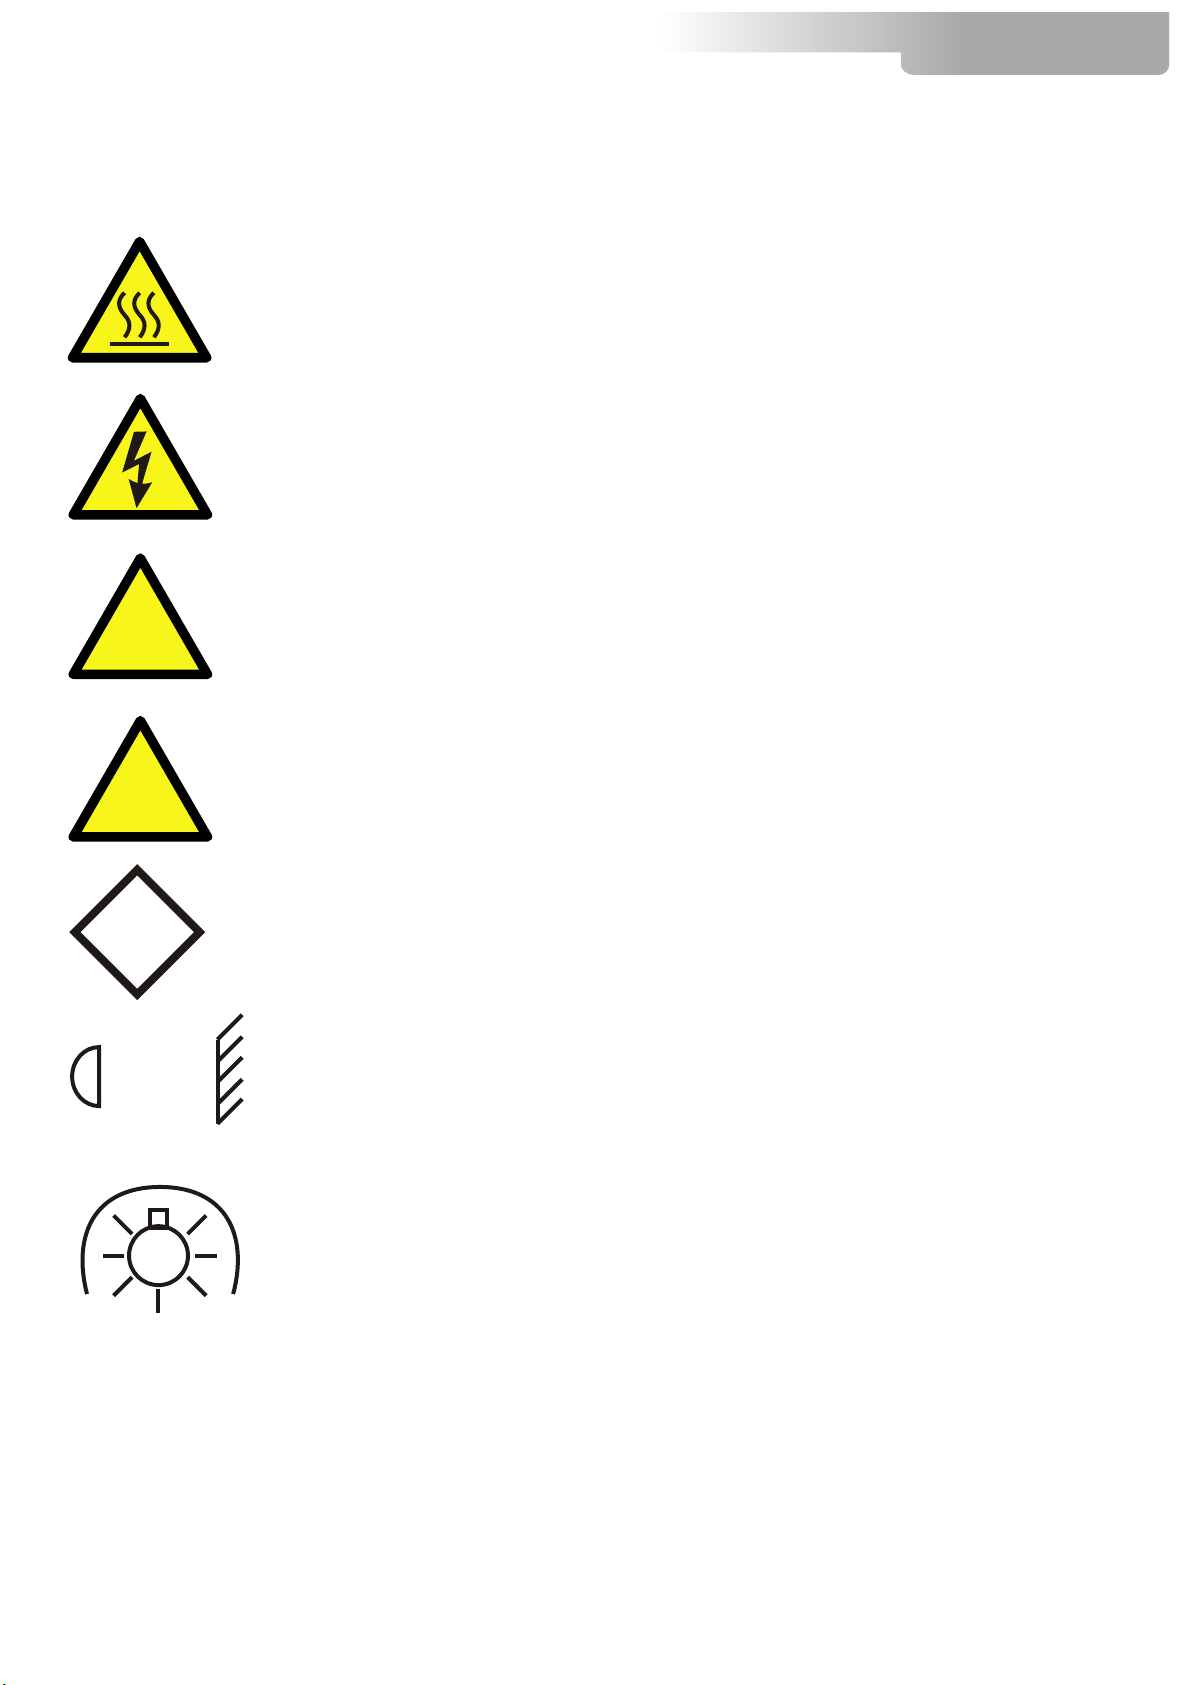
SYMBOLS
Graphic symbols used on this manual
THIS SYMBOL INDICATES A HOT SURFACE
THIS SYMBOL INDICATES ELECTRIC SHOCK RISK
3
PAR 16
!
F
III
0,5M
THIS SYMBOL INDICATES GENERAL RISK
THIS SYMBOL MEANS: “THE UNIT MAY BE INSTALLED
ON NORMAL INFLAMMABLE SURFACES”
THIS SYMBOL MEANS: “CLASS III DEVICE, DO NOT
APPLY MORE THAN 12V~
THIS SYMBOL INDICATES THE MINIMUM DISTANCE TO
BE KEPT BETWEEN THE DEVICE AND THE LIT OBJECT
THIS SYMBOL MEANS: “ USE ONLY LOW-PRESSURE
LAMPS ACCORDING TO LOCAL REGULATIONS
GENERAL WARNING
Read the instruction contained in this user manual carefully, as they give important information
regarding safety during installation, use and maintenance.
The device is not for domestic use and must be installed by a qualified electrician or experienced
person.
Always disconnect the device from the mains before replacing the lamp.
The lamp must be replaced if it has been damaged or deformed by prolonged use or overheating.
The PAR16 with GU10/GZ-10 lamp socket must always be equipped with an efficient ground connection.
Page 4

4
PAR 16
TECHNICAL FEATURES
The PAR16 CLASSIC GU/GZ10 is a projector for MR 16 lamps, with classic shape in 2 sections, with
square filter frame and polished finishing.
The projector is available also with black finishing.
D.T.S. uses top-quality 99/5 aluminium with a 20/10 thickness for its can bodies, offering greater
strength and incredible resistance to knocks and heat, together with a superior polish.
The edge is not sharp and is therefore safer; it is stronger and conveys extra strength to the body; it is
better finished, making the PAR 16 more elegant.
The PAR16 is fitted with an internal safety cable between rear and front.
The internal plate + clutch system of the PAR16 is preferable to other systems that corrode aluminium
or don’t offer a good grip. This ensures safer operation because it permits 0° ÷ 90° rotation (as
requested by international safety standards) and the par can cannot take up positions that are
hazardous for the inflammable surfaces above the par can itself.
Unlike ordinary par cans, the gelatine bearing hooks are spoked to better adhere to the body, thereby
ensuring greater strength and indeformability.
The projector is fitted with a GU10/GZ10 lamp socket for lamp (max 50W).
Within unit box is provided a
(max 50W).
The projector is also provided with a LED lens holder for DTS MR16 LED lamps (no MR16 LED lamp unit
included).
Gx5.3 lamp socket (with cables) for Low Tension 12V MR16 halogen lamp
230V halogen
~
Protection
Ip20 protection level against the penetration of solids and liquids
Construction
PAR16 is made on aluminium
Thermal
Operating ambient temperature:
PAR16 CLASSIC GU/GZ10, PAR16 CLASSIC GX5.3 0° / °
PAR16 LED -10° / 40°
-1 25
Weight
0,2 kg
Dimensions
Page 5

5
PAR 16
ACCESSORIES
As standard
03.P16.02.01.01 PAR 16 CLASSIC GU/GZ10 BLACK CLOUR + SOCKETS KIT
*User’s manual - DTS code 0517I189
*Lamp Socket Gx5.3 + cables - DTS code 0503A003
MR16 LED lens holder
* black colour - DTS code 02M00425.01
*Gel holder black - DTS code 02M00411.01
*Sticker for PAR16 Gx5.3 12V - DTS code 0517P027
*Bolt M10x1 for cable gland fixing (PAR16 in MR16 LED configuration) DTS CODE 0518P018
03.P16.02.02.01 PAR 16 CLASSIC GU/GZ10 LUX+SOCKETS KIT
*User’s manual - DTS code 0517I189
*Lamp Socket Gx5.3 + cables - DTS code 0503A003
MR16 LED lens holder
* lux - DTS code 00M00425
*Gel holder lux - DTS code 00M00411
*Sticker for PAR16 Gx5.3 12V - DTS code 0517P027
*Bolt M10x1 for cable gland fixing (PAR16 in MR16 LED configuration)
~
~
DTS CODE 0518P018
03.P16.02.01.01 PAR 16 CLASSIC GU/GZ10
Lamp Socket Gx5.3 + cables
DTS code 0503A003
Bolt M10x1 for
cable gland fixing
Sticker for PAR16 Gx5.3 12V~
Gel holder
Optional (on request)
• Barndoor polish (Cod. 03.BD16.00.02)
• Barndoor black (Cod. 03.BD16.00.01)
• “C” clamp G30 Black for 30 mm pipe (max. load 5Kg) (cod. 0521A020)
• “C” clamp G30 Chrome for 30 mm pipe (max. load 5Kg) (cod. 0512A020.20)
• Gel filters
MR16 LED lens holder
Page 6

6
PAR 16
IMPORTANT SAFETY INFORMATION
Fire prevention:
The unit may be installed on normal inflammable surfaces
-Minimum distance from the closest illuminable surface: 0,5 MT.
Prevention of electric shock:
PAR 16 CLASSIC GU/GZ10
-High voltage is present inside PAR 16 CLASSIC GU/GZ10. Unplug the unit prior to performing any
function which involves touching the inside of the unit, including lamp replacement.
-A good earth connection is essential for proper functioning of the PAR 16 CLASSIC GU/GZ10.
-Never connect the PAR 16 CLASSIC GU/GZ10 unit without proper earth connection.
-The fixture should be located in places with a good air ventilation.
F
0,5M
PAR 16 CLASSIC Gx5.3 12V
A Class III appliance is designed to be supplied from a separated/safety extra-low voltage (SELV) power
source. The voltage from a SELV supply is low enough that under normal conditions a person can safely
come into contact with it without risk of electrical shock. The extra safety features built into Class I and
Class II appliances are therefore not required.
Protection against ultraviolet radiation:
PAR 16 CLASSIC GU/GZ10
PAR 16 CLASSIC Gx5.3 12V
Tungsten filament lamps, such as halogen and incandescent, provide minimal UV.
MR16 lamps are made using special quartz, which has properties that enable it to filter out nearly all of
the UV portion of the spectrum.
Use only low-pressure lamps according to local regulations
Safety:
-The projector should always be installed with bolts, clamps and other tools that are capable of
supporting the weight of the unit.
-Always use a second safety cable to sustain the weight of the unit in case of the failure of the main
fixing point.
-The external surface of the unit, at various points, may exceed 95°C.
Never handle the unit until at least 10 minutes have elapsed since the lamp was turned off.
-Always replace the lamp if any physical damage is evident.
-Never install the fixture in an enclosed area lacking sufficient air flow. The ambient temperature should
not exceed 25°C for PAR16 GU/GZ10 and PAR16 Gx5.3.
The ambient temperature should not exceed 40°C for PAR16 LED.
-A hot lamp may explode, so always wait for at least 10 minutes prior to attempting to replace the lamp.
-Always wear suitable hand protection when handling the lamp.
!
~
~
III
Level of protection against the penetration of solid and liquid objects:
-The projector is classified as an ordinary appliance and its protection level against the penetration of
solid and liquid objects is IP 20.
!
Page 7

VOLTAGE AND FREQUENCY
7
PAR 16
PAR16 GU/GZ10
PAR16 Gx5.3 operate at 12V .
WARNING: for Main Grid connection, we reccomend the use of an isolation transformer.
Isolation transformers provide galvanic isolation and it’s used to protect against electric shock
Prior to connecting the unit to your mains supply, ensure that the model in your possession correctly
matches the mains supply available. For connection purposes, ensure that your plug is capable of
supporting 6 amps at 230V.
Strict adherence to regulatory norms is strongly recommended.
operate at 230 VOLT 50Hz; Lamp MAX Power 50W
~; Lamp MAX Power 50W
INSTALLATION
For ceiling mounted installations, we reccomend the use of appropriate clamps to fix the unit to the
mounting surface.
The supporting structure from which the unit is hung should be capable of bearing the weight of the
unit, as should any clamps used to hang it. The structure should also be sufficiently rigid so as not to
move or shake .
.
Safety cable
We recommend the use of a safety cable connected to the unit and to the suspension truss in order to
avoid the fixture accidentally falling should the main fixing point fail. Make sure that the iron cable can
bear the weight of the entire unit.
You may attach the safety cable as shown in the picture below.
!
!
Protection against liquids
The projector contains electric and electronic components which should under no circumstances come
into contact with oil, water or any other liquid. The proper unit functioning would be compromised
should this occur.
Page 8

8
PAR16 MECHANICAL PARTS DESCRIPTION
1) BRACKET
2) FIXING BRACKET KNOB
3) REAR SIDE
4) FRONT SIDE
5) GEL HOLDER
6) REAR SIDE FIXING KNOB
PAR 16
6
Page 9

9
PAR 16
PAR16 Gx5.3 LAMP SOCKET INSERTING PROCEDURE
Loosen the Allen screw on cable gland fixing the lamp socket cable
Loosen the Philips screw on back side of the unit
Pull up the rear side fixing knob and open the unit
Page 10

10
PAR16 INSERTING PROCEDUREGx5.3 LAMP SOCKET
Unplug the earth/ground fast-on female cable connector
PAR 16
Rotate the lamp socket GU/GZ10 counter clockwise
and remove it from the unit
Apply the Gx5.3 lamp sochet and rotate it clockwise
till it has been completely fixed to the unit body
Page 11

11
PAR 16
PAR16 - MR16 LED LAMP INSERTING PROCEDURE
NOTE: BEFORE TO PRECEED, REMOVE THE GU/GZ10 LAMP SOCKET AS PREVIOUSLY
DESCRIBED AT PAGES 9 AND 10.
Place a drop of silicone or other synthetic glue in the 3 holes of the pcb board to fix the LED
module to the dedicated D.T.S. Lenses.
Never touch the LEDs with hands
Silicone or
synthetic glue
Silicone or
synthetic glue
Place the MR16 LED unit into PAR16 by passing from the front side of the unit.
Fix the MR16 LED unit by using the dedicated LED lens holder
MR16 LED lens holder
Bolt M10x1 for
cable gland fixing
Page 12

The information contained in this publication has been carefully prepared and checked.
However, no responsibility will be taken for any errors. All rights are reserved and this document
cannot be copied, photocopied or reproduced, in part or completely, without prior written consent
from D.T.S.
D.T.S. reserves the right to make any aesthetic, functional or design modifications to any of its
products without prior notice. D.T.S. assumes no responsibility for the use or application of the
products or circuits described herein.
MADE IN ITALY
The Lighting Company
ISO 9001:2000
D.T.S quality system
Is certified to the
ISO 9001:2000 standard
D.T.S. Products are designed
And manufactured at the D.T.S
Plants in Italy
*0517I189*
0517I189
D.T.S. Illuminazione s.r.l - Via Fagnano Selve 10-12-14 47843 - Misano Adriatico (RN) Italy
Tel. +39 0541 611131 Fax +39 0541 611111 info@dts-lighting.it www.dts-lighting.it
 Loading...