

DTM Print LX610e Service Manual
User’s Manual
©2020, DTM Print GmbH. All rights reserved
For the most recent version of this manual please visit dtm-print.eu/manuals

Notices: The information in this document is subject to change without notice. NO WARRANTY OF ANY KIND IS MADE
WITH REGARD TO THIS MATERIAL, INCLUDING, BUT NOT LIMITED TO, THE IMPLIED WARRANTIES OF MERCHANTABILITY
AND FITNESS FOR A PARTICULAR PURPOSE. No liability is assumed for errors contained herein or for incidental or
consequential damages in connection with the furnishing, performance, or use of this material. This document contains
proprietary information that is protected by copyright. All rights are reserved. No part of this document may be
photocopied, reproduced, or translated into another language without prior written consent.
Trademark Acknowledgments: Primera and Primera LX610e are registered trademarks of Primera Technology, Inc. Windows is a
registered trademark of Microsoft Corporation. All other trademarks are the property of their respective owners.
Revision History
Edition 1.0, Copyright 2020, All rights reserved.
2 |

Table of Contents
Section 1: Getting Started ..........................................................................................................................................................................................................5
1A Choosing a Good Location ...................................................................................................................................................................................5
1B Unpacking and Inspection ...................................................................................................................................................................................6
1C Installing the Roll Holders ....................................................................................................................................................................................7
1D Identifying the Parts ........................................................................................................................................................................................... 11
Section 2: Media, Cartridges and Knives .........................................................................................................................................................................14
2A Label and Roll Specications ............................................................................................................................................................................14
2B Installing Digital Die-Cutting Label Stock ....................................................................................................................................................17
2C Installing Pre Die-Cut Label Stock ................................................................................................................................................................... 20
2D Replacing the Digital Die Cutting Knife holder ..........................................................................................................................................24
2E Replacing the Cutting Knife ...............................................................................................................................................................................26
2F Replacing Ink Cartridges .................................................................................................................................................................................... 27
2G Adjusting the Gap Sensor Position (Pre Die-Cut Labels Only) ..............................................................................................................29
Section 3: Primera PrintHub ................................................................................................................................................................................................... 31
3A Adjusting Knife Pressure and Stretch Factor ............................................................................................................................................... 32
3B Using the Cost Estimator ....................................................................................................................................................................................34
3C Set the Gap Sensor Mode (Pre Die-Cut Labels Only) ...............................................................................................................................35
3D Set the Present/Cut Mode .................................................................................................................................................................................37
3E Adjusting Print Alignment ................................................................................................................................................................................. 39
3F PrintHub Settings ..................................................................................................................................................................................................41
3G PrintHub Printer Settings ................................................................................................................................................................................... 43
3G1. Multiple Printer Support .........................................................................................................................................................................44
Section 4: Printing and Cutting with PTCreate ...............................................................................................................................................................46
4A Overview ..................................................................................................................................................................................................................46
4B PTCreate Software Activation .......................................................................................................................................................................... 50
4C Software Deactivation ......................................................................................................................................................................................... 52
4D: Tutorial: How to Setup a Print and Cut using PTCreate Pro – Vector File Cut ................................................................................ 53
4D.1 Choosing a Label Size (Page Layout) ................................................................................................................................................54
4D.2 Import a at Image (JPG, BMP, PNG, TIF, GIF) ..................................................................................................................................55
4D.3 Working with Layers in an Imported Vector File ........................................................................................................................... 57
4E Tutorial: How to Setup a Print and Cut using PTCreate Pro – Contour Cut ......................................................................................59
4E.1 Choosing a Label Size (Page Layout) ................................................................................................................................................. 59
4E.2 Import an Image .......................................................................................................................................................................................60
4E.3 Trace Image and create Cut Line .........................................................................................................................................................64
4E.4 Oset a Cut Path ........................................................................................................................................................................................67
4F Setup multiple identical cuts (Duplicate and Array) ................................................................................................................................69
4G Print Preview ..........................................................................................................................................................................................................74
4H Vector File Specications for Designer ..........................................................................................................................................................75
| 3

4I Tutorial How to setup a Print and Cut in PTCreate Standard ................................................................................................................. 76
4I.1 Choosing a Label Size (Page Layout) ..................................................................................................................................................76
4I.2 Import a at Image (JPG, BMP, PNG, TIF, GIF) ...................................................................................................................................77
4I.3 Add a Cut le ...............................................................................................................................................................................................80
4I.4 Print .................................................................................................................................................................................................................. 83
Section 5: Printing only to Pre Die-Cut labels ................................................................................................................................................................ 84
5A Using NiceLabel for Pre Die-Cut Printing ....................................................................................................................................................84
5A.1 Printing from NiceLabel ......................................................................................................................................................................... 87
5B Using BarTender for Pre Die-Cut Printing .................................................................................................................................................... 87
5C Add Text, Barcodes and Graphics to a BarTender Label ..........................................................................................................................95
5D Printing from Other Programs .........................................................................................................................................................................96
5E Creating a Full Bleed Print ..................................................................................................................................................................................98
5F Printer Driver Settings ........................................................................................................................................................................................100
Section 6: Troubleshooting ...................................................................................................................................................................................................103
6A Solving Pre Die-Cut Print Alignment Problems .......................................................................................................................................103
6B Maintenance .........................................................................................................................................................................................................105
6C Poor Print Quality – Cleaning the Cartridge ..............................................................................................................................................107
6D Technical Support ...............................................................................................................................................................................................111
Section 7: Technical Specications ....................................................................................................................................................................................112
4 |

Section 1: Getting Started
THANK YOU…
...for choosing an LX610e Color Label Printer. The LX610e Printer will print razor-sharp text and barcodes, vibrant colors, and even
stunning photo-realistic photographs directly onto rolls of labels, card stock and a variety of other approved media. AND with the
built in digital die cutter you can cut and create your labels in any size or shape you choose.
This User’s Manual is your complete step-by-step guide to quickly and easily setting up and printing with your new Color Label
Printer!
1A Choosing a Good Location
Place the printer on a at surface in a location with adequate air circulation to prevent internal heat buildup.
Do not place the printer near heat sources such as radiators or air ducts, or in a place subject to direct sun
light, excessive dust, mechanical vibration or shock.
Allow for adequate clearance in front of the printer to accommodate the printed label stock as it is leaving
the printer to avoid the possibility of binding or jamming of the label stock.
Allow for 6” of clearance behind the printer to accommodate loop creation during cutting operations. The
area directly behind the printer must also not be obstructed by USB or power cables connected to the
printer.
Allow for adequate overhead clearance for opening the top cover to allow easy access to the labels tock
and ink cartridge. The printer will require 7 inches (17.78 cm) of additional space on the top side to completely
open the cover (Total = 16.5” or 41.91 cm).
| 5
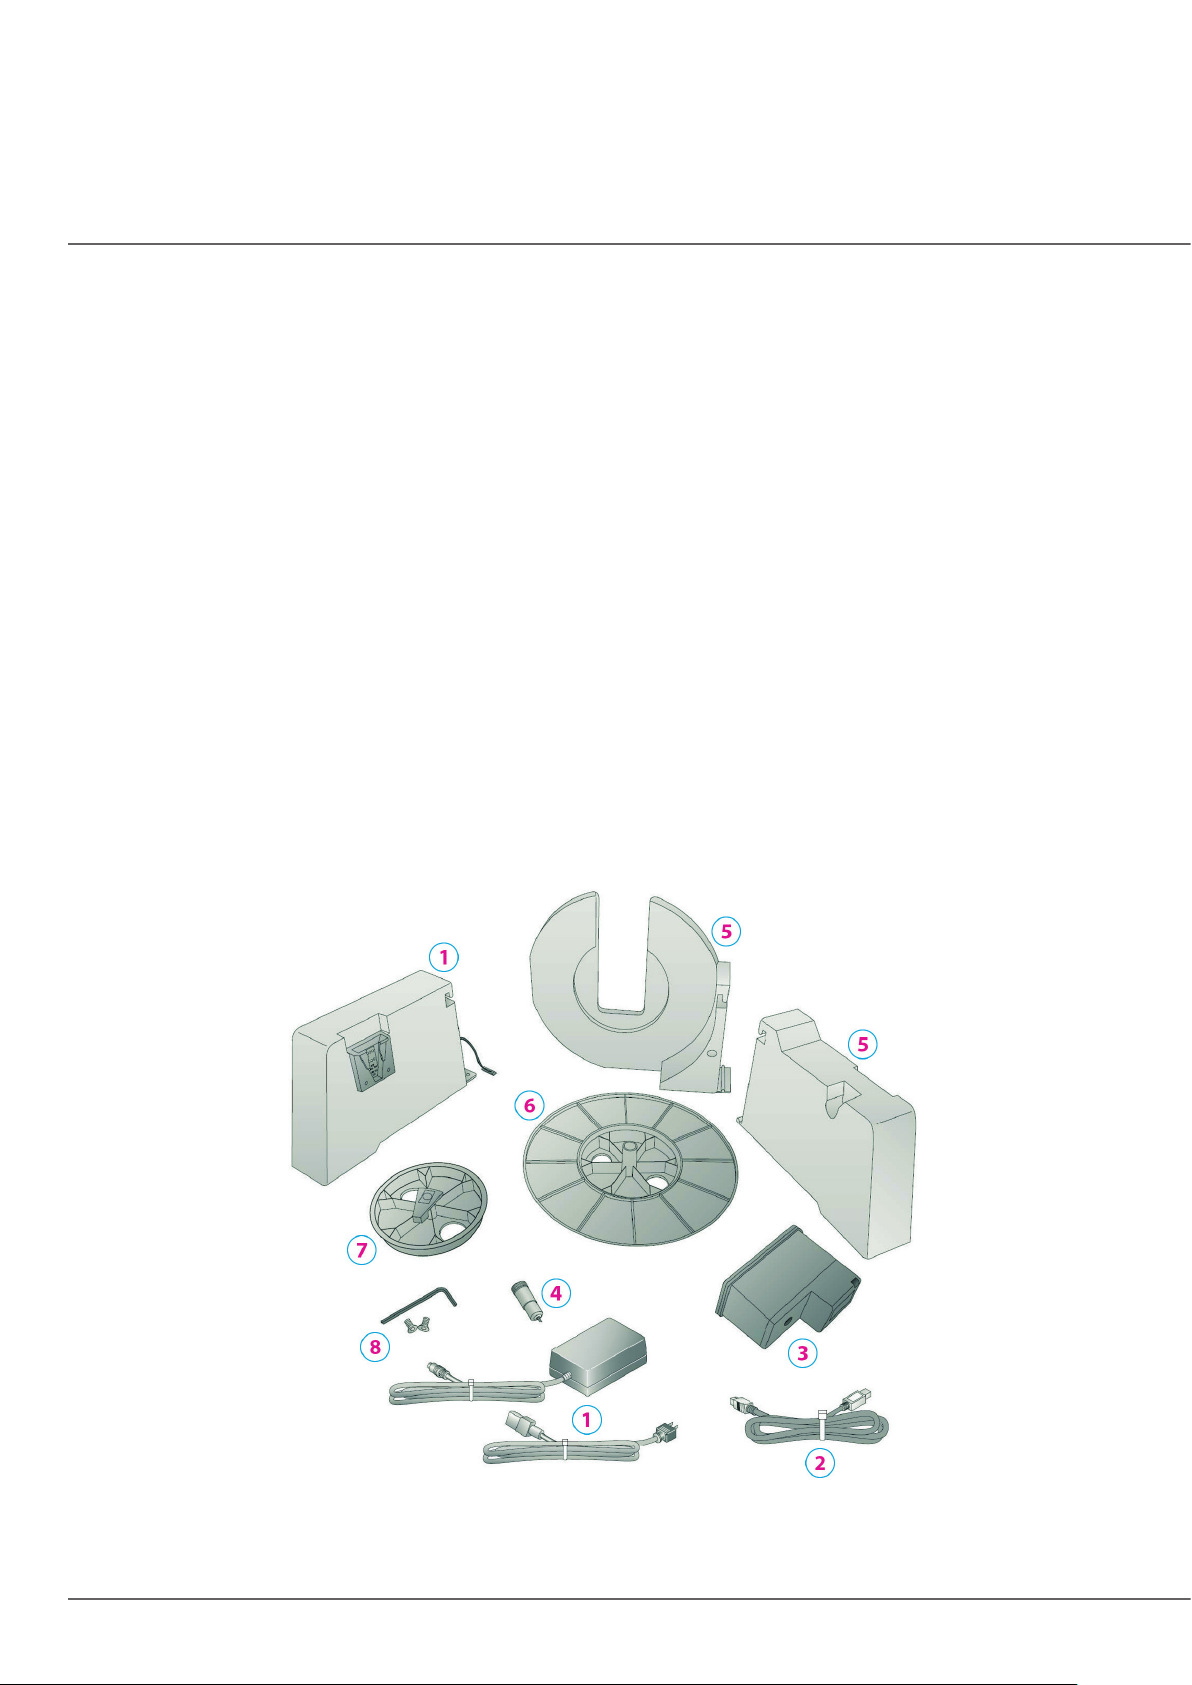
1B Unpacking and Inspection
While unpacking your printer, inspect the carton to ensure that no damage has occurred during shipping.
Make sure that all supplied accessories are included with your unit. The following items are included in the
supply box:
1. Power Adapter and Cord
2. 6’ USB Cable (If other USB cable is used, it must be 6’ (2 M) or less)
3. Color Dye Ink Cartridge Part Number 53496 (Pigment is also available – Part Number: 53491)
4. Die Cutting Knife Holder with knife preinstalled
5. Label roll holders (Assembly required – section 1C)
6. Large Roll Hub
7. Small Roll Hub
8. T8 Allen Key and two screws
9. Printed documentation
6 |
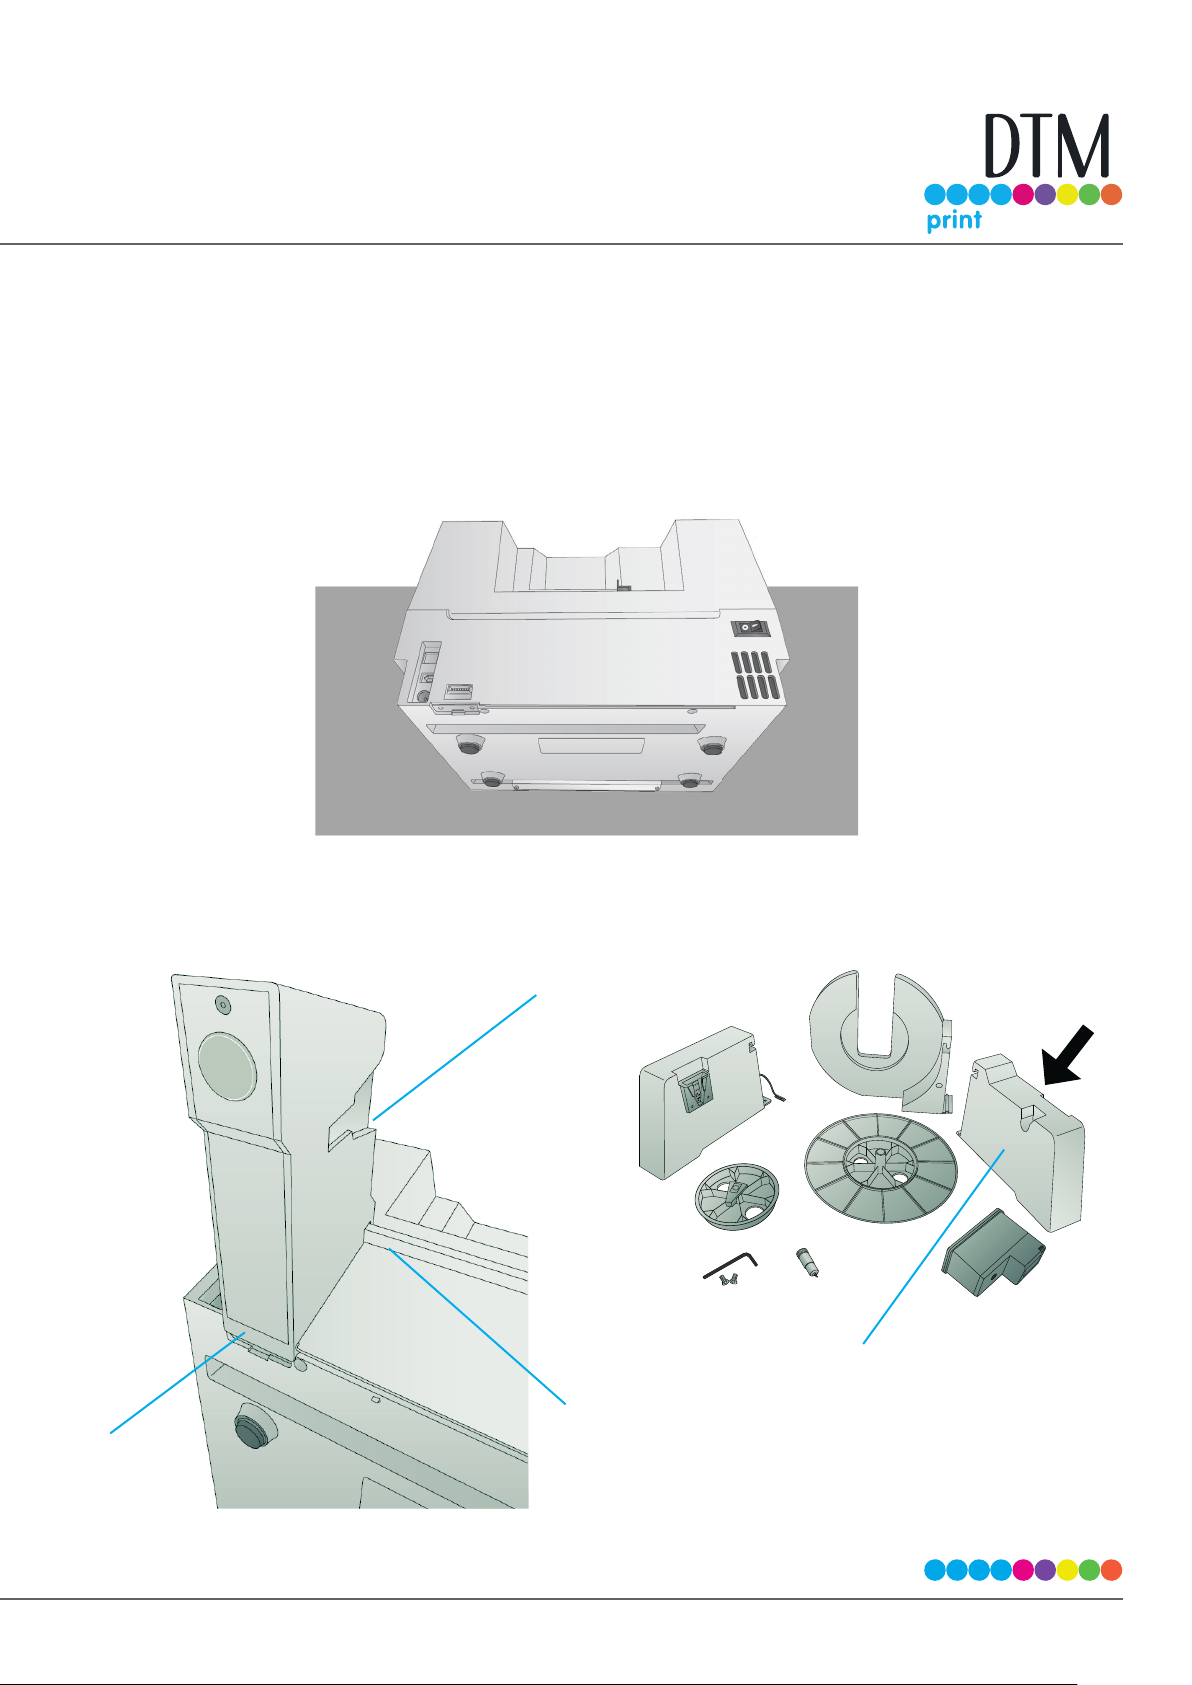
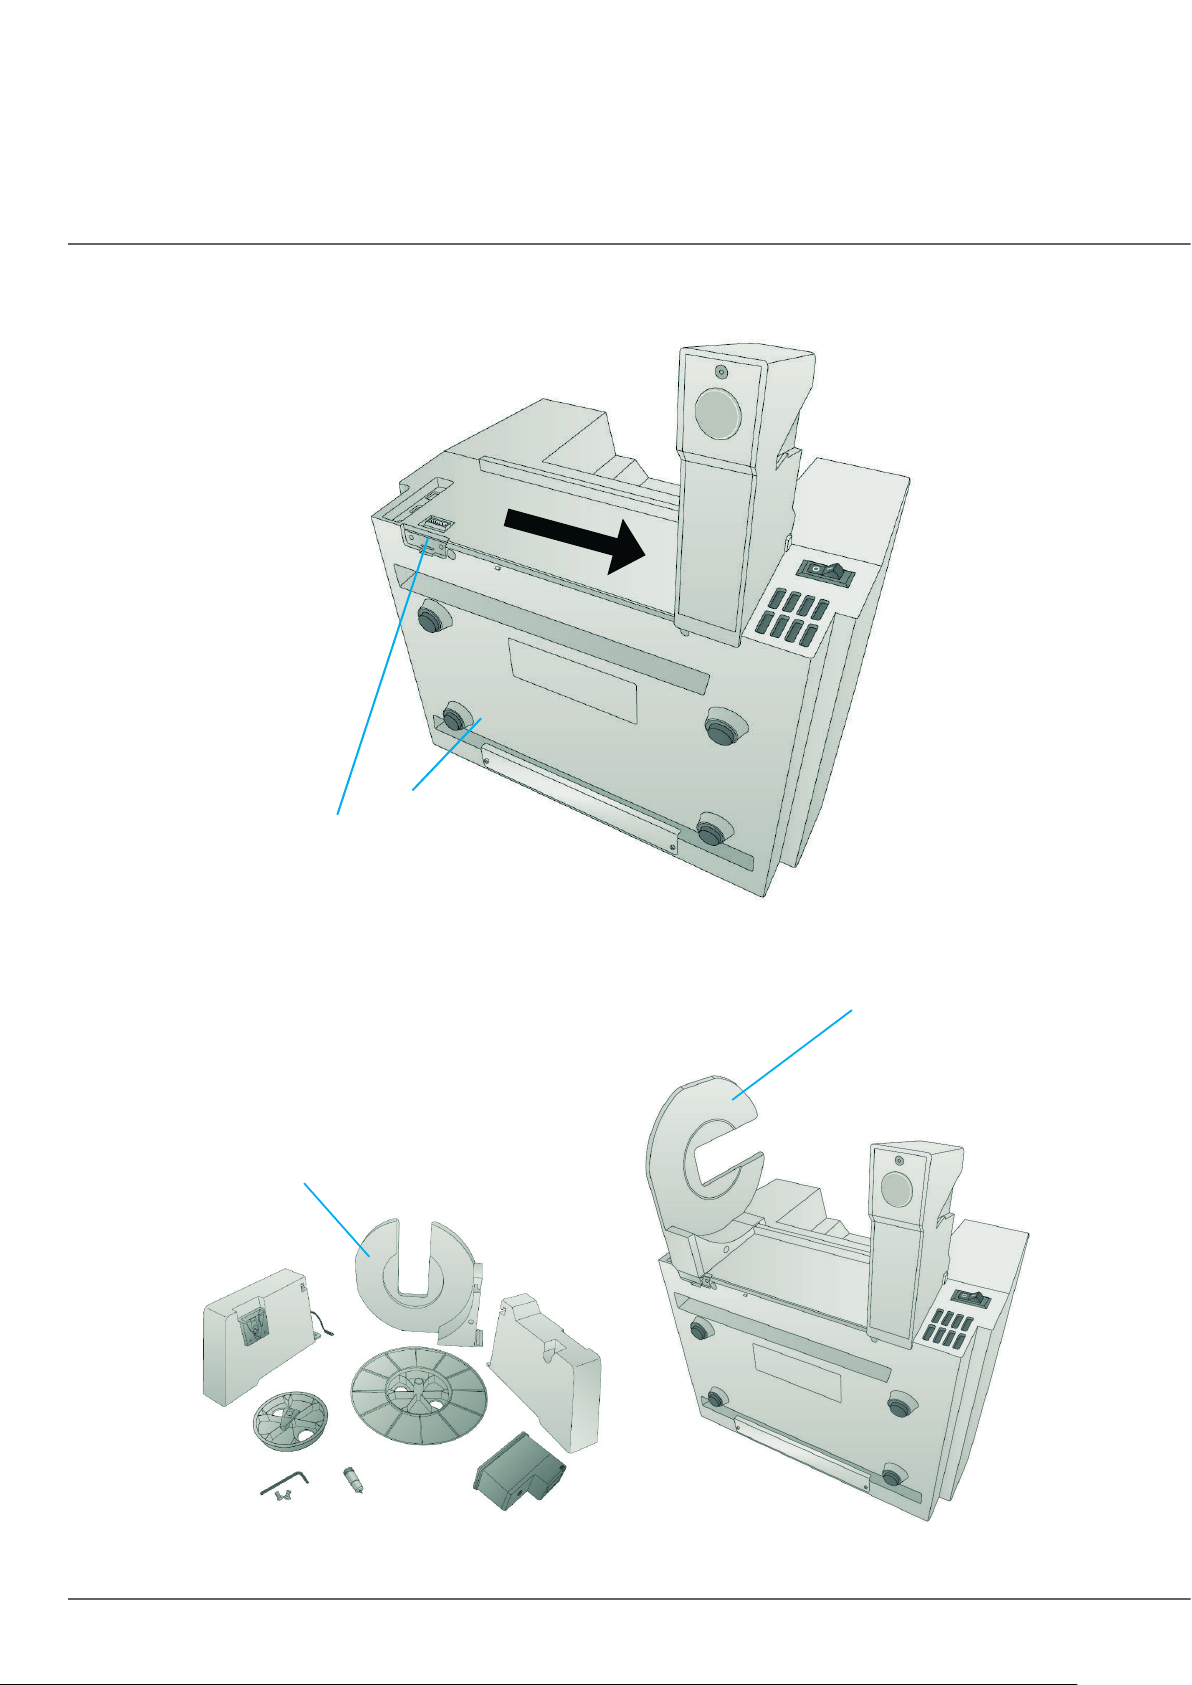
1C Installing the Roll Holders
Some light assembly is required before operating the printer.Follow these instructions to install the roll
holders.
1. Set the printer on its front so the bottom is facing you
2. Install the movable label roll holder by attaching the hooked end on the rail. The bottom of
the holder will t in the notch on the printer.
Movable Roll Holder
Tab
Movable Roll Holder
Rail
| 7
3. Slide the Roll Holder to the far right.
Notch
Notch
4. Install the roll guide by attaching the hookedend on the rail. The bottom of the holder will t in the
notch on the printer.
Roll Guide
Roll Guide
8 |
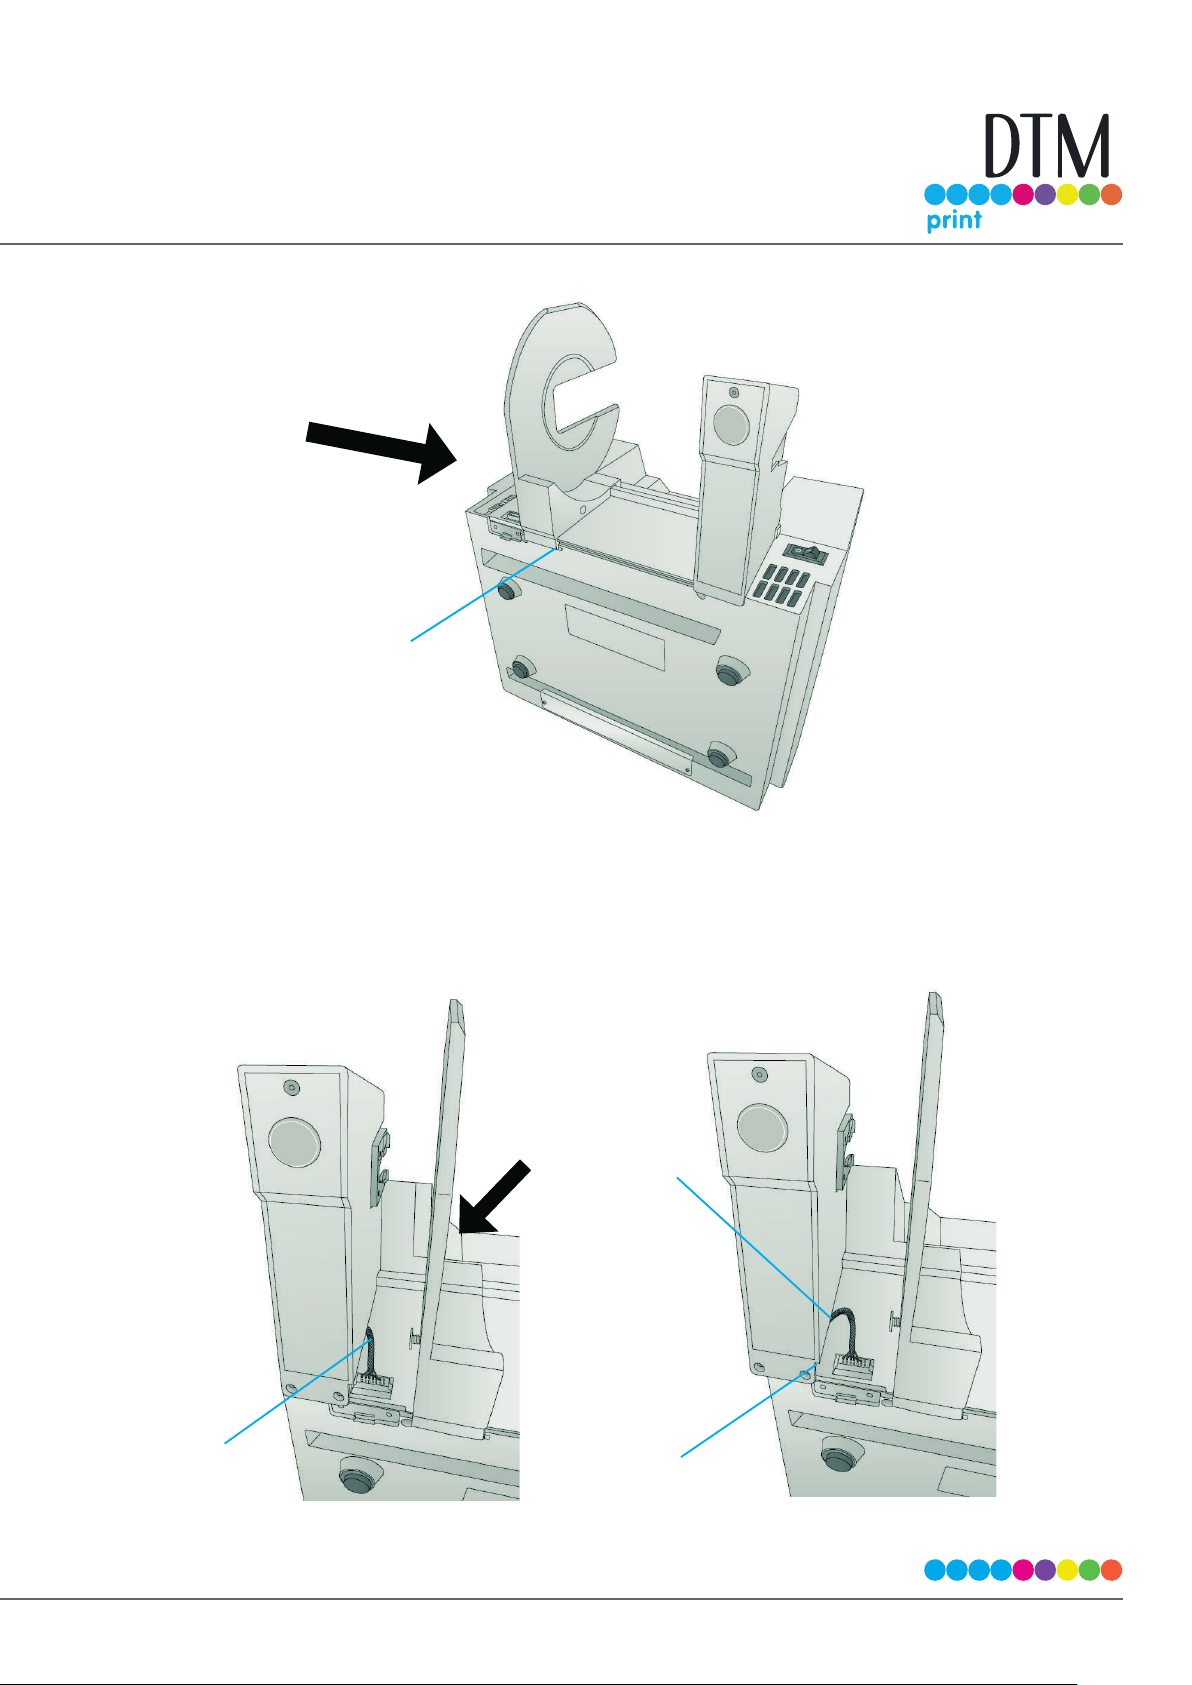
Stop
5. Slide the Roll Holder to the far right.
6. Locate the remaining roll holder with the protruding wire. Connect the wire to the port on the
printer.Tuck the wire inside the cavity.
Push the wire into
the cavity as you
move the holder
closer to the
notch
Wire
Notch
| 9
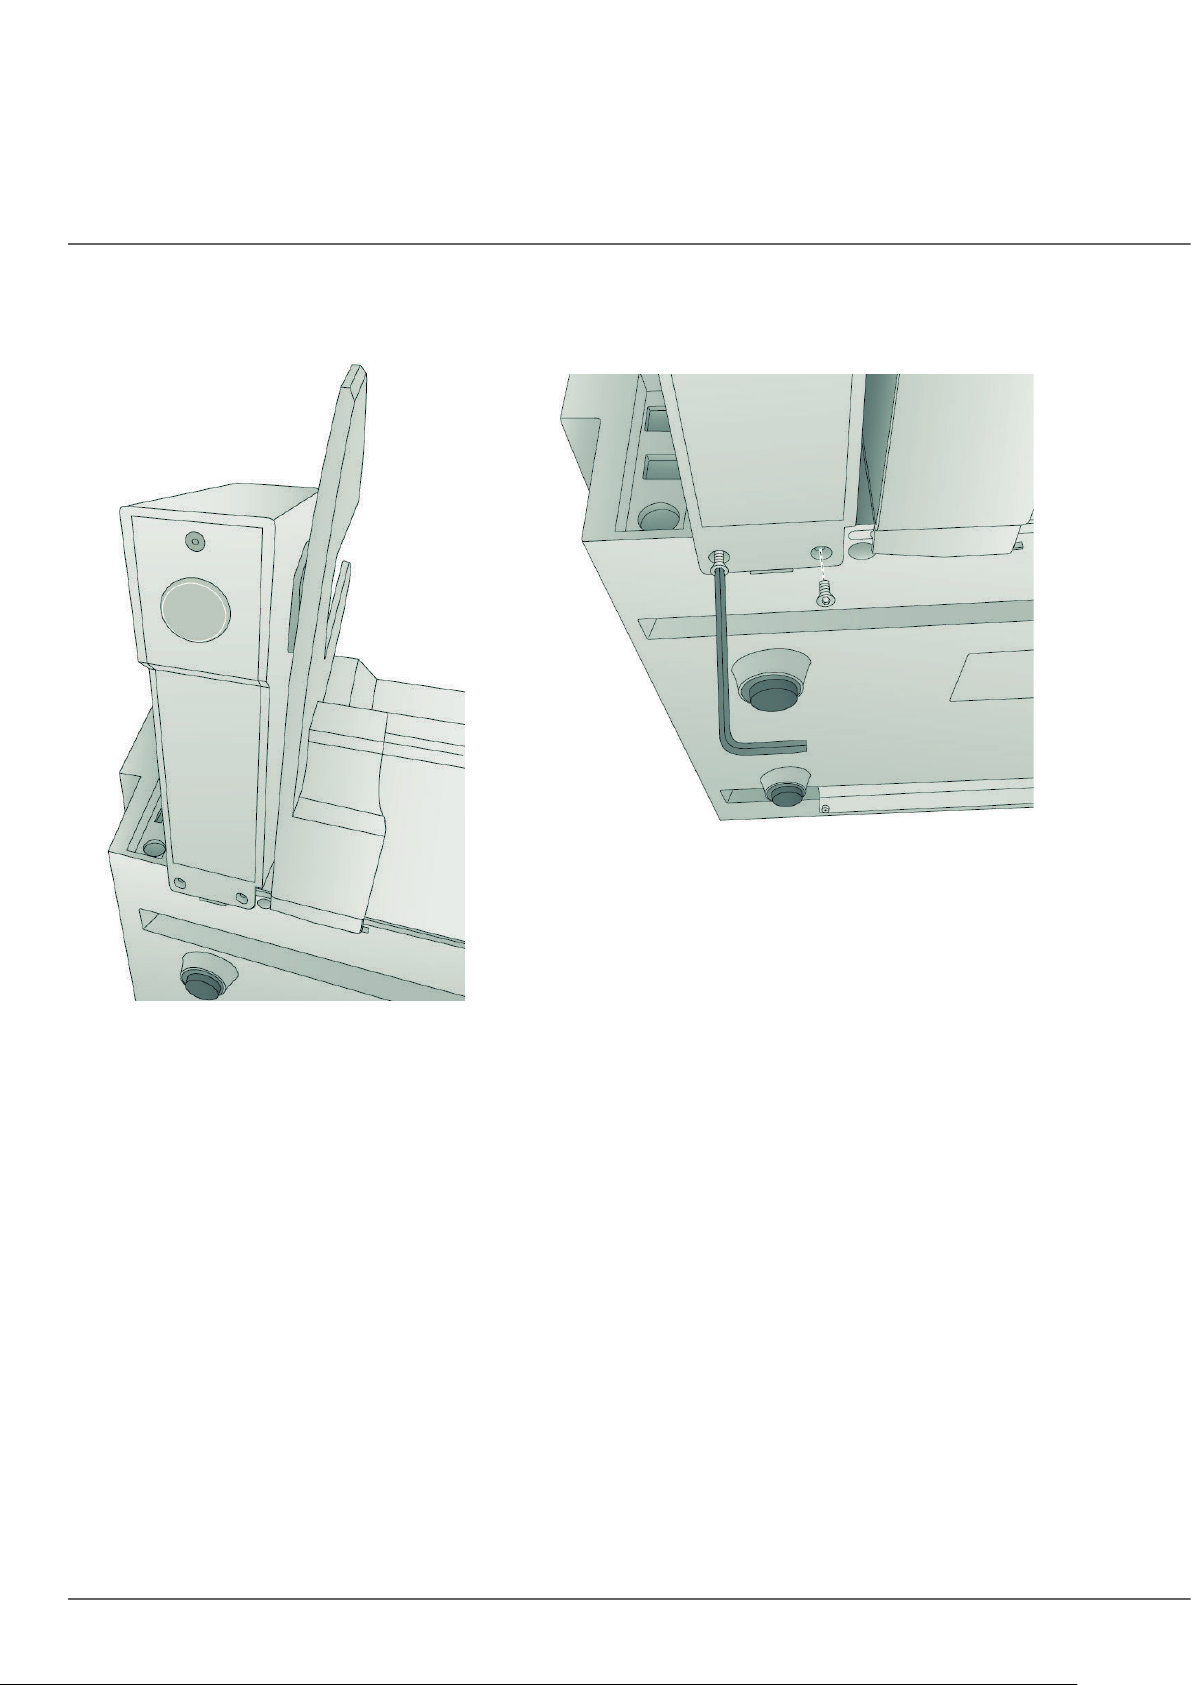
7. Snap the holder in place so the two screw holes line up with the holes on the printer.
8. Install the T8 screws using the INCLUDED Allen key or a Torx T8 screwdriver.
9. Rotate the printer back on its feet.
10 |
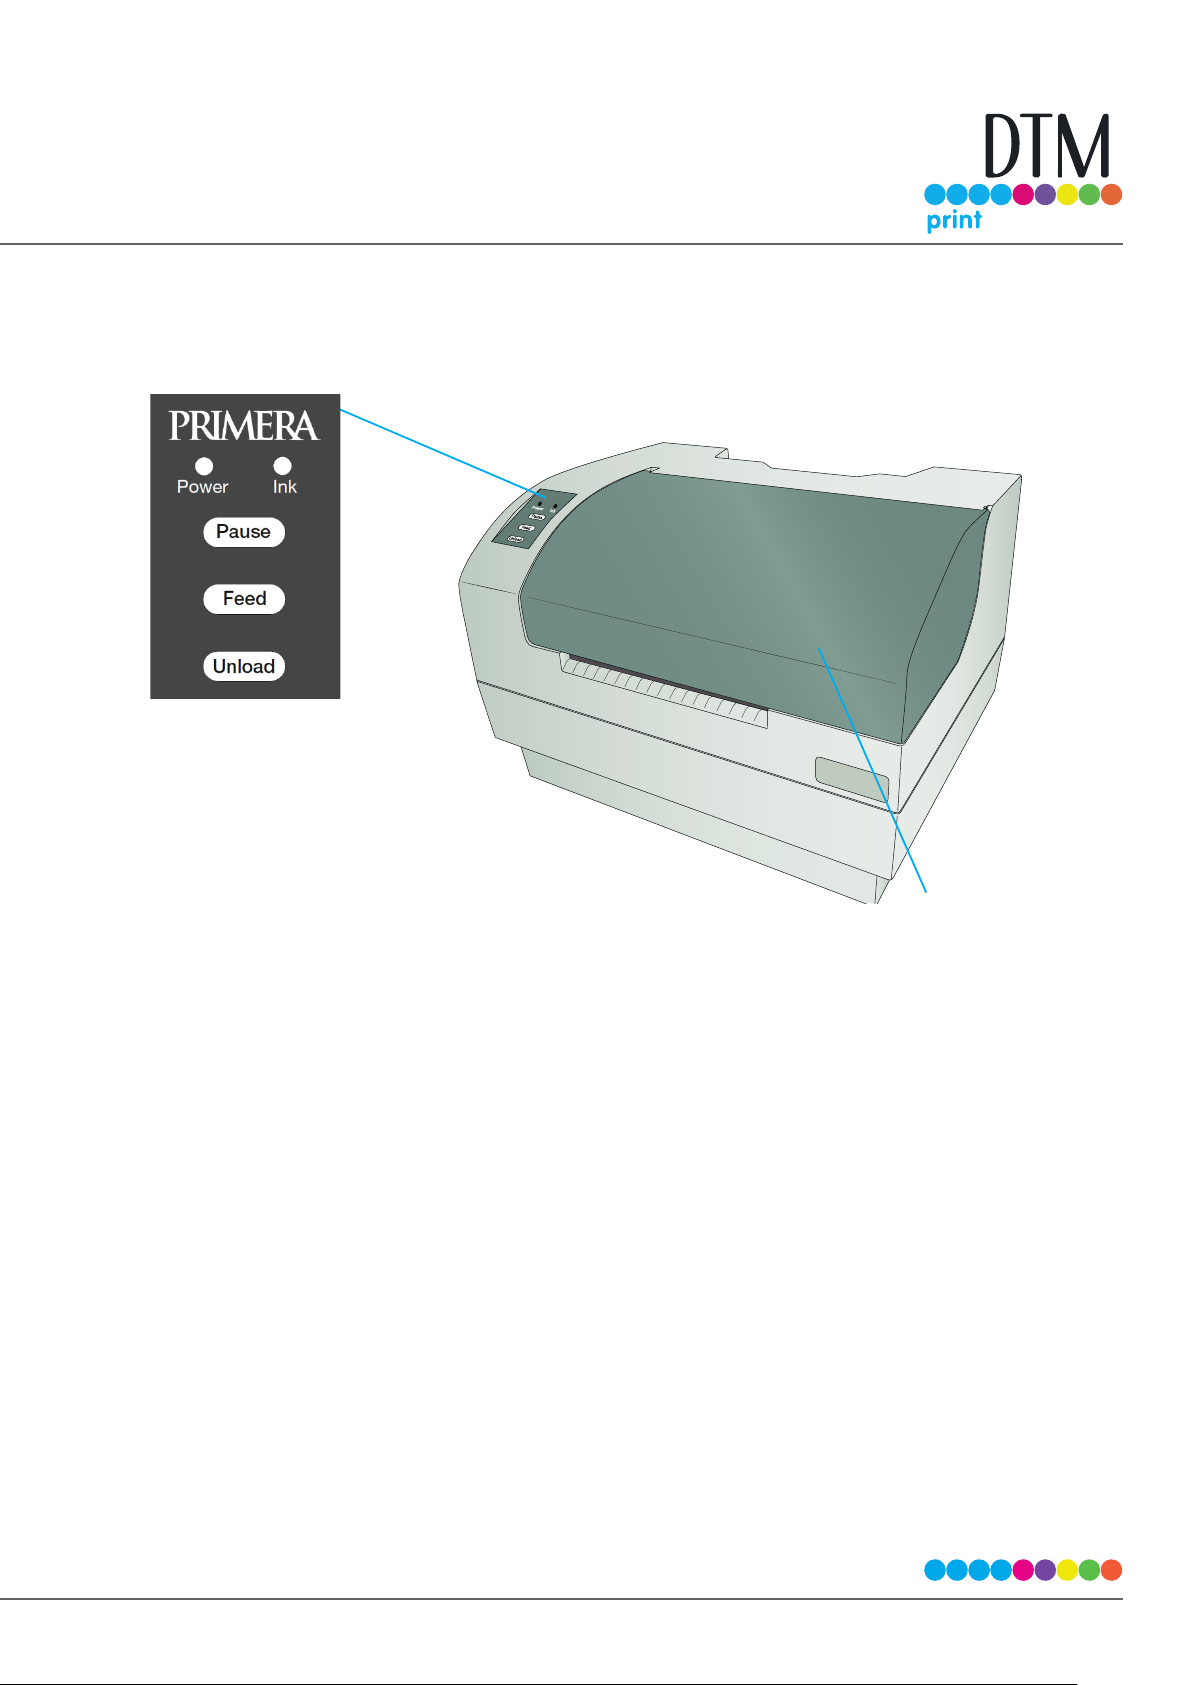
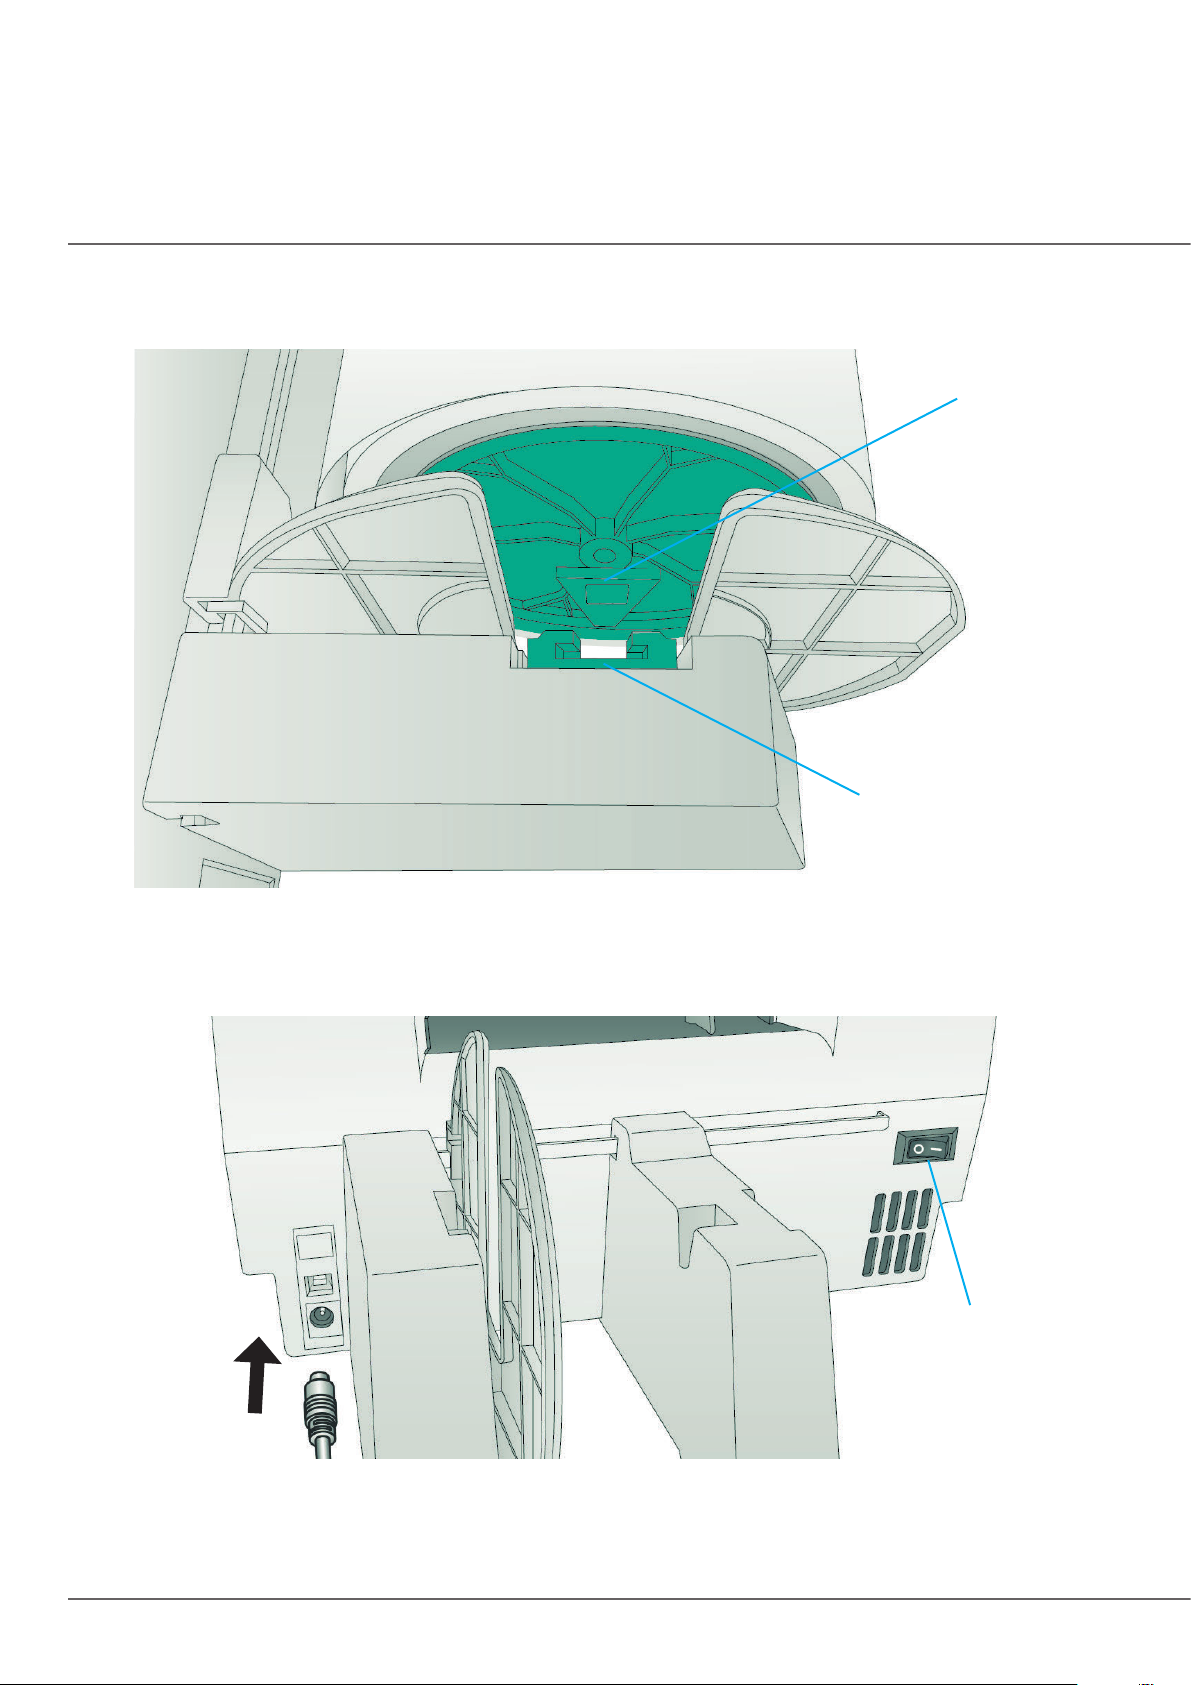
1D Identifying the Parts
These illustration shows the printer from various angles so all important parts can be identied.
Control Panel
Front Cover
The Power LED indicates that the printer is on and ready to receive print jobs.
The Ink LED will illuminate when a cartridge has 10% or less of its ink remaining.
The Pause Button is pressed to pause a job to allow for loading of label stock and ink cartridges. The print-
er pauses after the printing of the current label has nished.
The Feed Button is pressed in order to load label stock if the printer does not automatically detect the
stock. When stock is loaded each press of the button will cause one label or a few inches to be fed through
the printer.
The Unload Button is pressed to unload label stock after you receive an End of Roll message in PrintHub.
The printer will reverse the label stock through the feed area.
| 11
Interior
Die Cutting
Carriage
Die Cutter
Ribbon Cable
Upper Guide
Shaft
Print Carrier
Ribbon Cable
Print Carrier
Knife Collar
Handle
12 |
Die Cutting
Knife
Lower Guide
Shaft
Pre die-cut
rollers
Wear Strip
Die Cutting
Pinch Rollers
Cutter Wheel
Mechanism
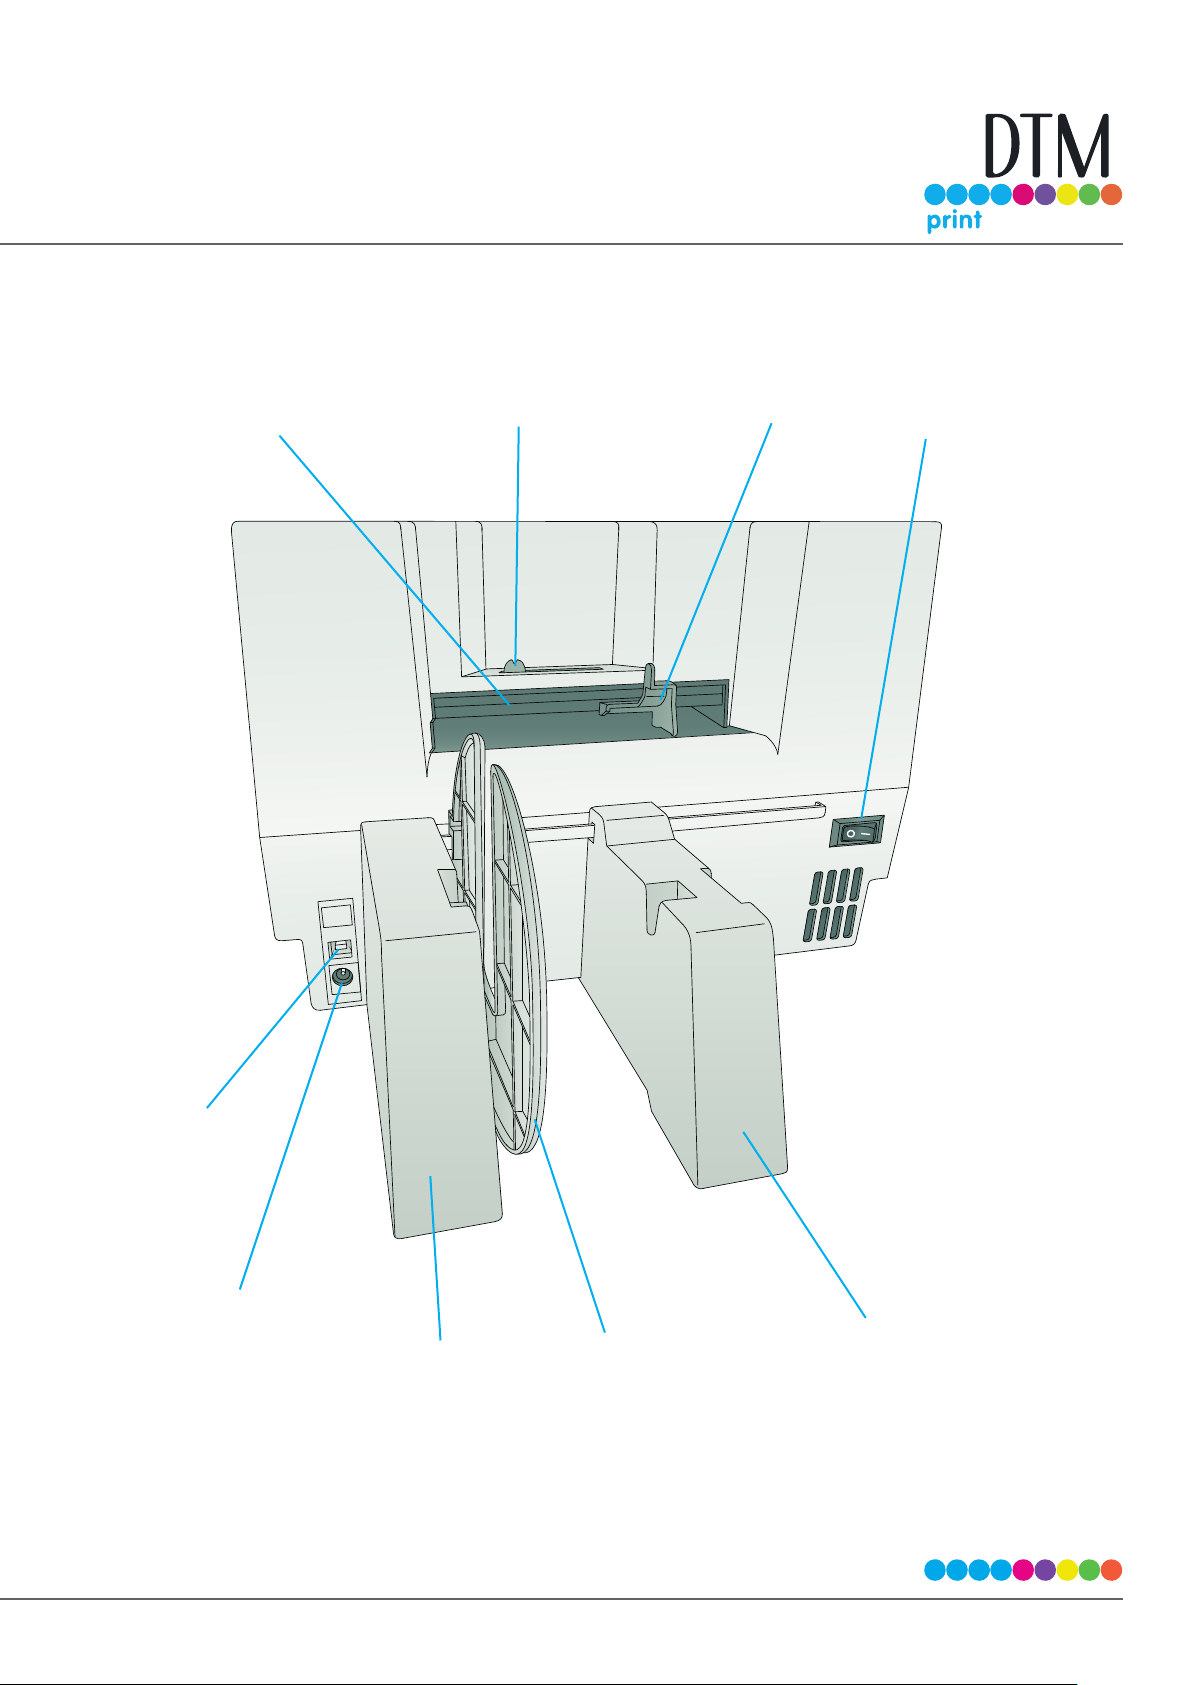
Back
Infeed Area
Gap Sensor
Adjustment
Movable
Throat Guide
Power Switch
USB
Power
Fixed Roller
Holder w/
Chip Reader
Fixed Guide
Movable Roll
Holder
| 13
Section 2: Media, Cartridges and Knives
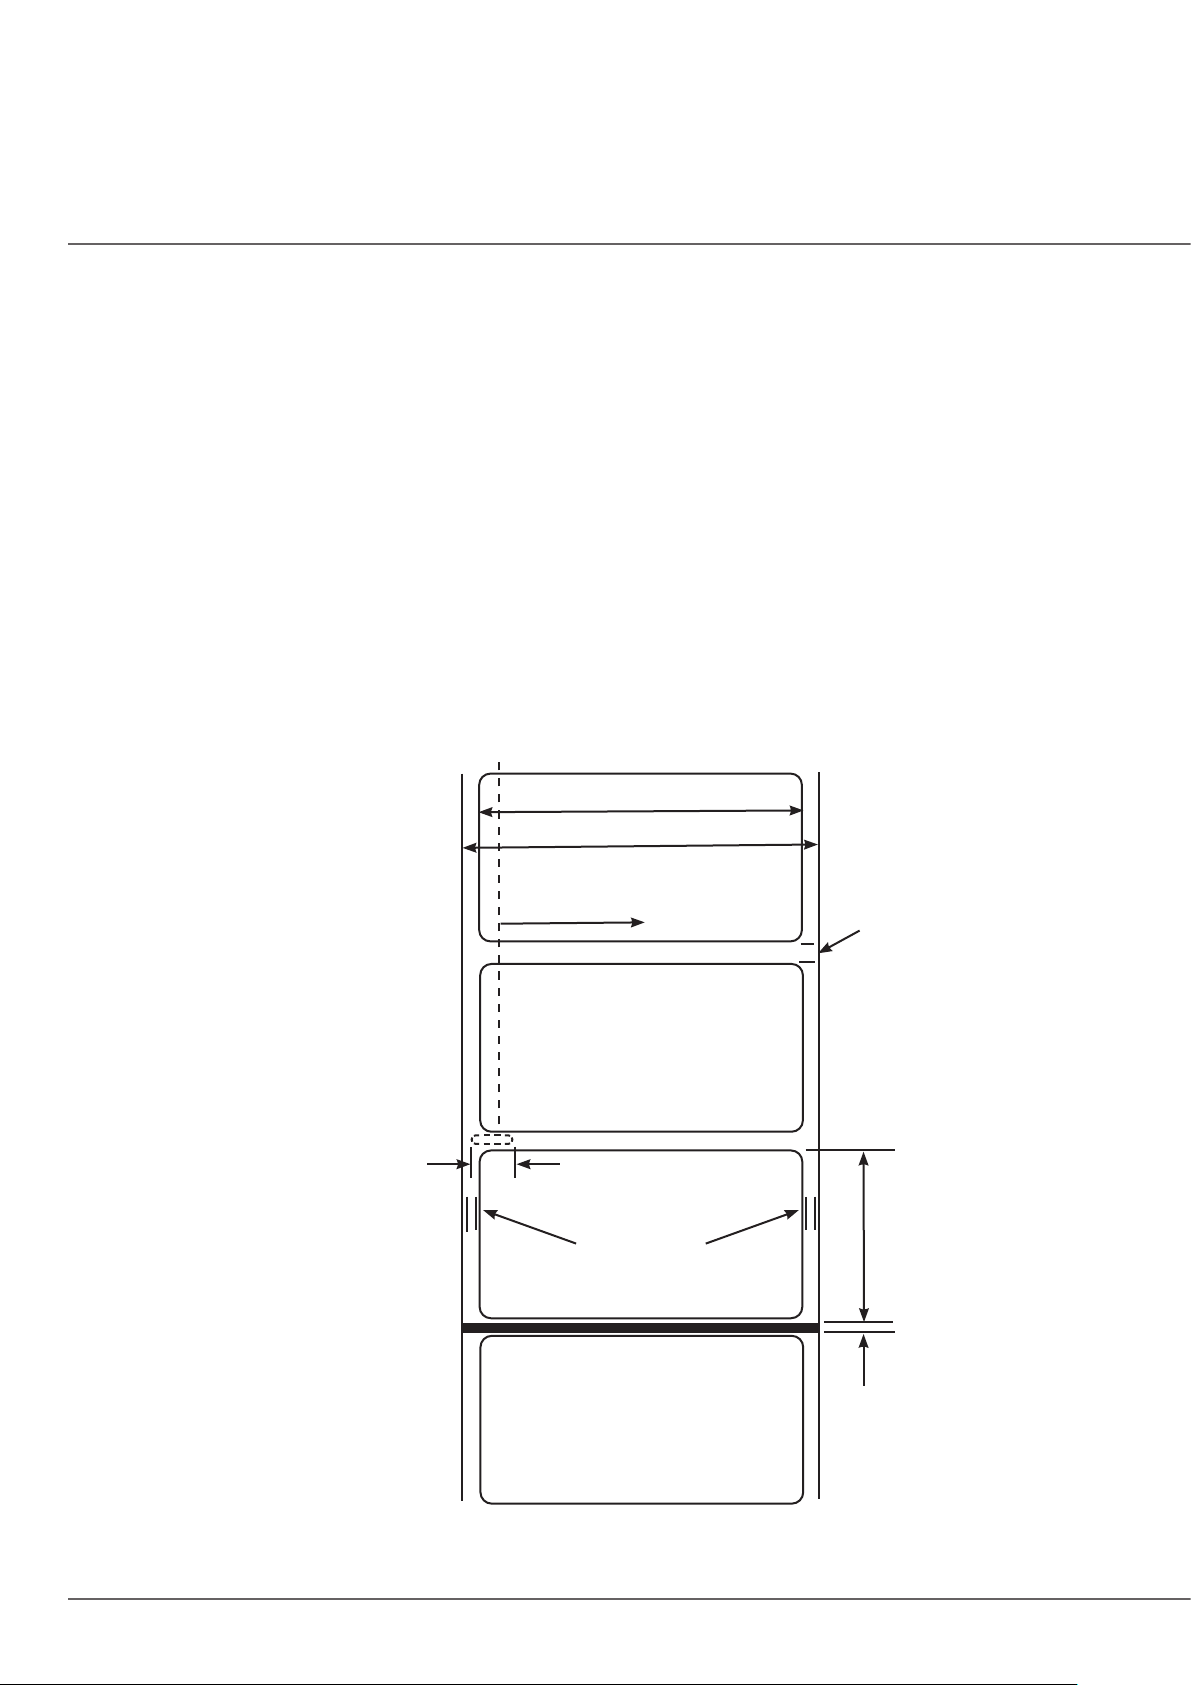
2A Label and Roll Specifications
Pre Die-Cut Labels. A wide variety of pre die-cut label stock can be used in the printer. Refer to the
specications and settings in the following sections before ordering custom stock from Primera or any
stock from another company.
Digital Die-Cut Labels. If you are using the printer to digitally die-cut your own shapes and sizes only
DTM/Primera or Primera ASIA label stock can be used.
Important! Test all custom made label stock with the intended printer before ordering large quantities!
Primera will only assume responsibility for custom label stock ordered from DTM/Primera or Primera ASIA.
Label Sensing Methods
Label Width
Method 1: Label
Gap Sensing
Method 2: Through-Hole
Sensing
Method 3: Reective/Black
Mark Sensing
(Black Mark must be printed
on back side of label stock)
Label Width
Gap Sensor Adjustment Range
Width of Opening
Distance from
edge of Media
to edge of Label
Gap Between
Labels
Label Height
Black Mark
Width
14 |
Note: See table below for Max and Min values in inches and mm.
Max Min
Label width 127 mm (5”) 13 mm (0.5”)
Liner/media width 130.17 mm (5.125”) 54 mm (2.125”)
Label height/length 305 mm (12”) 13 mm (0.5”)
Gap between labels 253 mm (10”) 2.5 mm (0.10”)
Width of through-hole 12.65 mm (0.5”) 6.325 mm (0.25”)
Gap Sensor Adjustment
Range (from left edge)
Reective/Black Mark Width* N/A 2.54 mm (0.1”)
Max Outer Diameter (OD) 152.4 mm(6.0”) N/A
Inner Core Diameter (ID) 76.2 mm (3.0”) 76.2 mm (3.0”)
Recommended Total Thickness
(Liner + Label)**
Distance from edge of media to
edge of label
52 mm (2.05”) 10.16 mm (0.40”)
10 mil (.0010”)
Printer assumes 2 mm (1/16”) gap. However, this is adjustable
via the left margin oset.
* The Reective/Black Mark should be opaque to infrared light. The mark should be between the labels. The
end of the mark should correspond with the beginning of the label.
** This is the recommended maximum. There are two factors that determine whether the printer will accept
any particular stock thickness.
1. The ability for the printer to pull the paper through the print area.
2. The ability for the sensor to read through the backing if the sensor is set to die-cut.
If you are printing in continuous or reective label sensing mode number 2 does not apply. The fact that the
printer must read through the backing in die-cut mode will limit the thickness much more than the
printer’s ability to pull the paper through the print area. However, if you adjust opacity level of the liner
enough to allow the label to be seen by the stock sensor, the thickness will only be limited by the printer’s
ability to pull it through the printer area. For these reasons the weight or thickness of the liner is a variable
that cannot easily be dened. Primera recommends and uses 40# liner with all Pre Die-Cut label stock.
It is important to test all label stock with the intended printer before ordering large quantities!
| 15
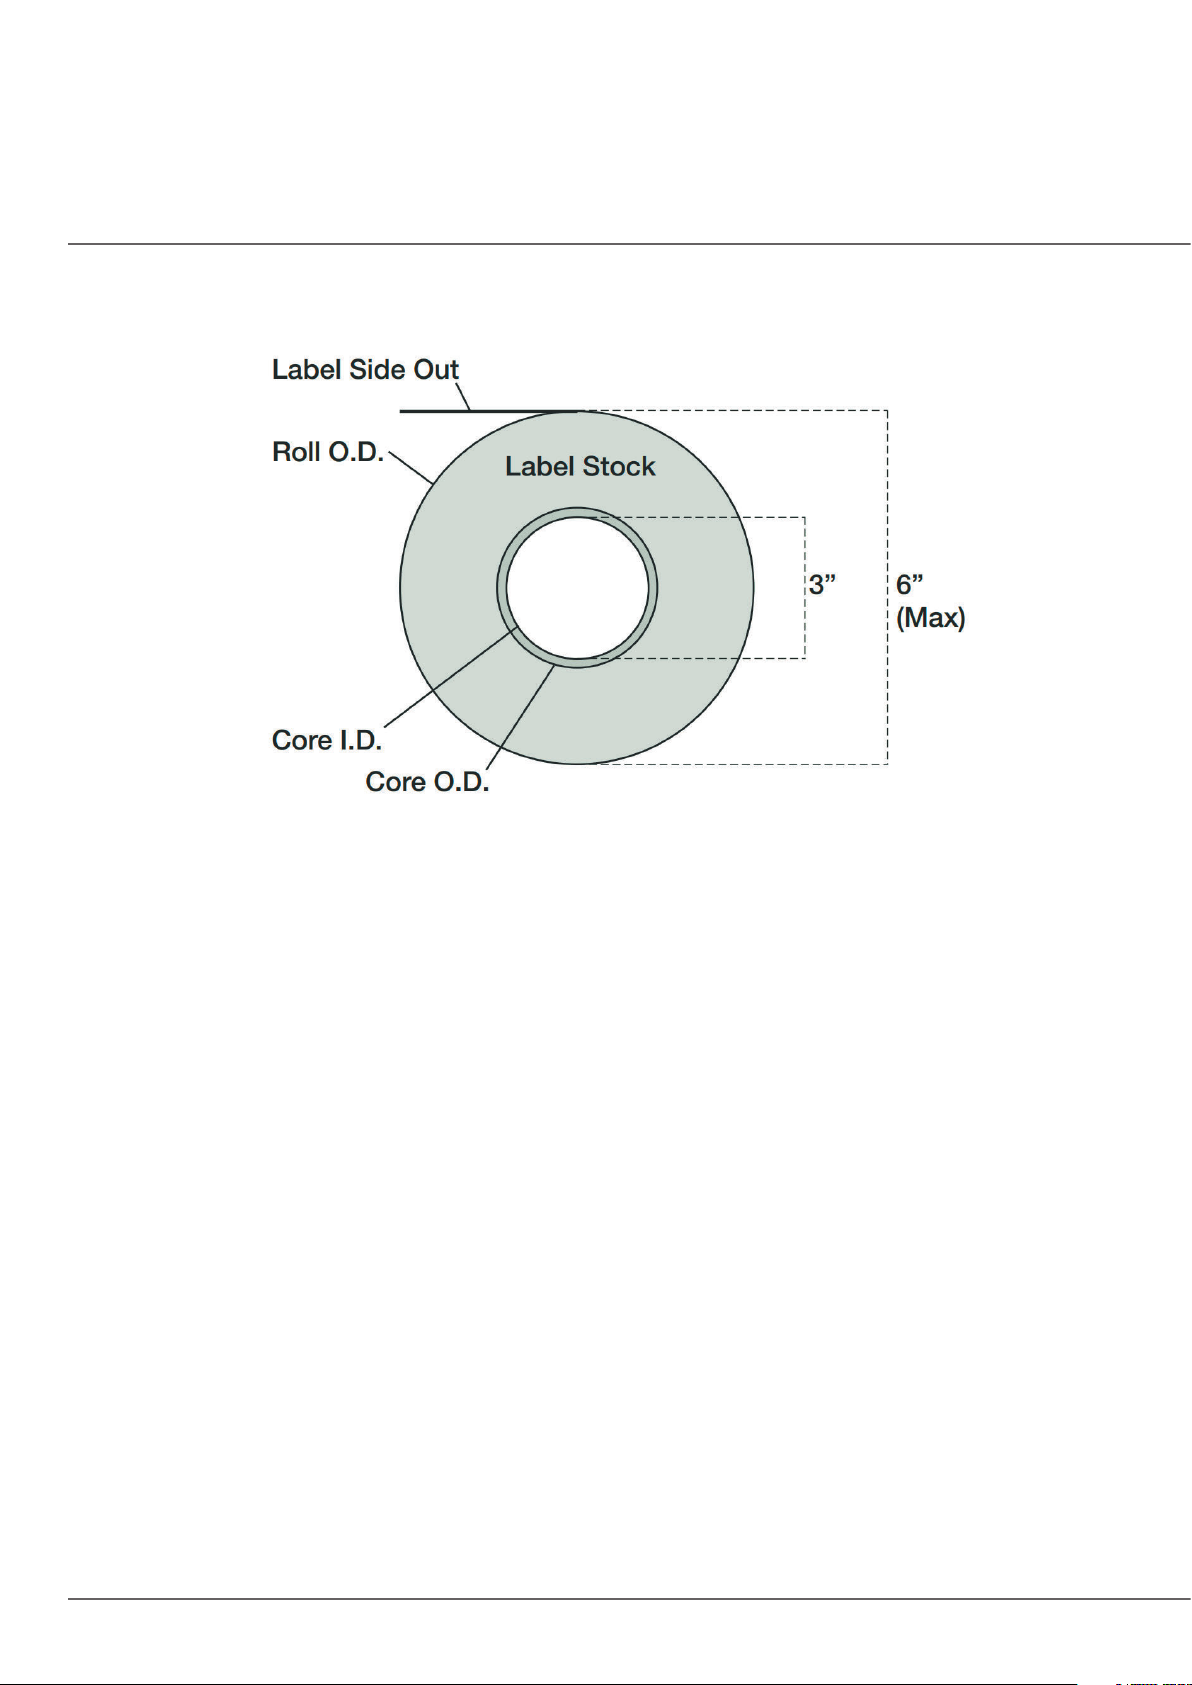
Roll specifications:
Note on Label Orientation: If you are using an applicator to apply your labels, be sure to order label stock with the correct
orientation for your applicator. For example, most applicators will apply the side of the label rst, so you will want to print the
labels sideways.
16 |
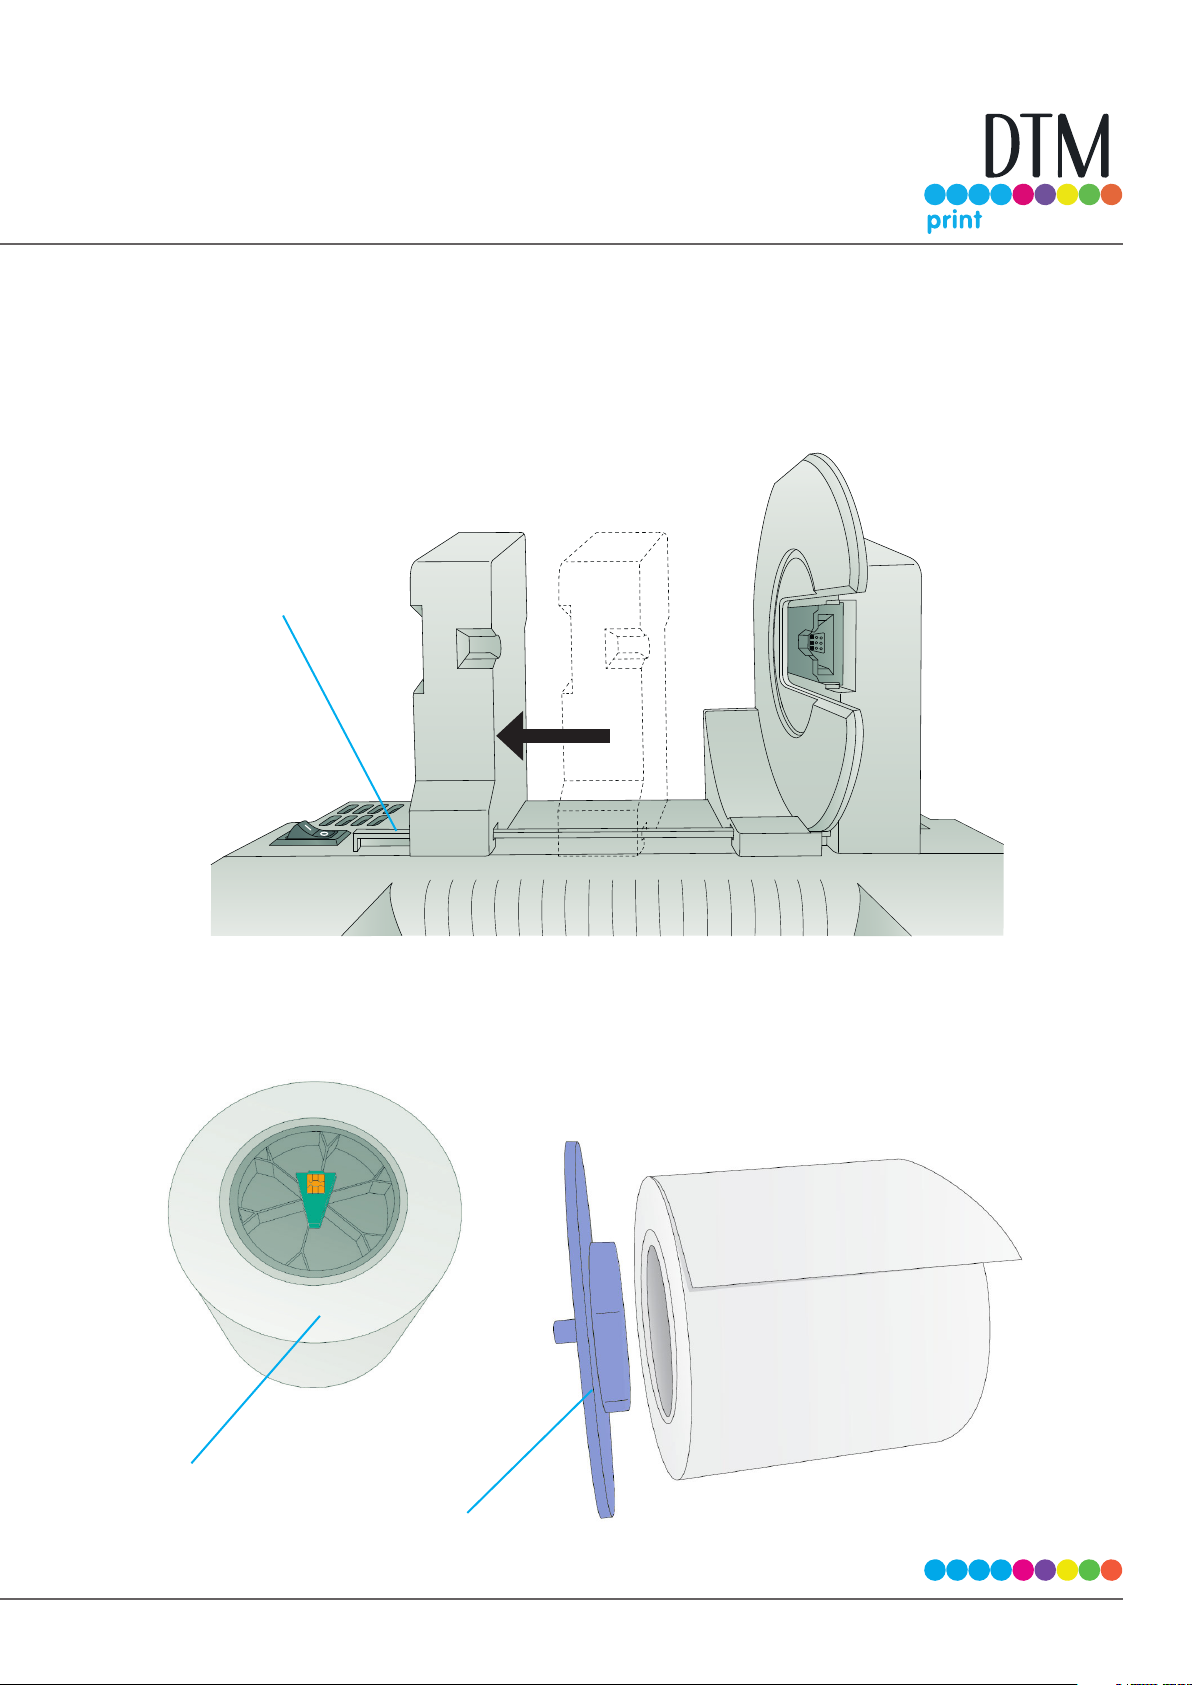
2B Installing Digital Die-Cutting Label Stock
1. Move the roll holder to the preset position for on demand digital die-cutting
(3rd mark from the left – 1.25”)
Move to third
mark from Left
2. Install the Blue Hub on the open side of the digital die-cutting media.
Note: The green hub is not needed for
digital die-cutting and can be stored in
the notch on the movable holder.
Digital Die Cutting
Media comes with
black hub with green
chip.
Blue Hub
| 17

3. Set the roll in place so that the blue pin sits in the notch on the roll holder.
Notch
Blue Pin
4. Make sure the green chip holder ts in the corresponding green slot on the roll holder.
Green Chip
Holder
Notch
18 |
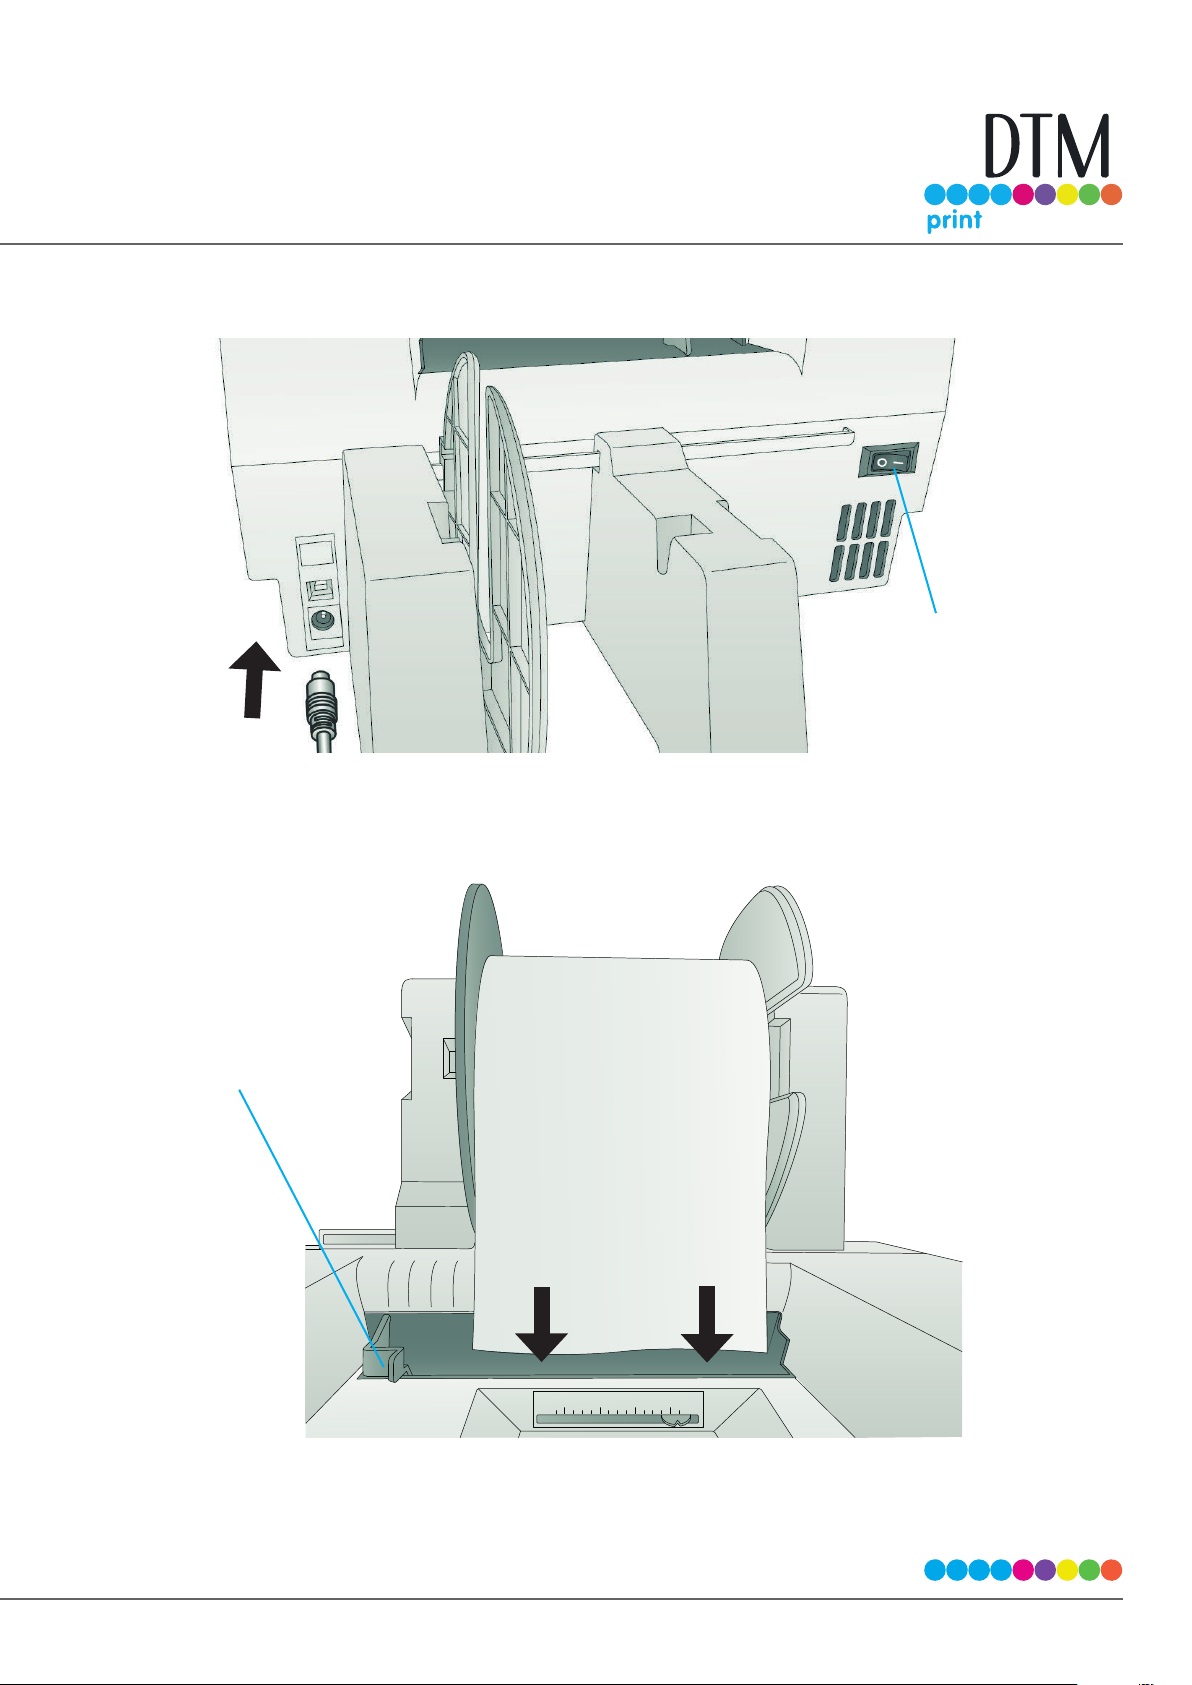
5. Before feeding the stock you must plug in power and switch on the printer.
Power Switch
Power Cable
6. Guide the leading edge of the roll into the feed area. Move the blue guide to the far side.
Blue Guide
50.8 38.1 25.4 12.7
2.0 1.5 1.0 0.5
mm
in
7. Push until the printer detects the stock, grabs it and pulls it through the printer.
| 19
2C Installing Pre Die-Cut Label Stock
1. Move the roll holder to the approximate position which matches the width of the stock you are
installing. You can always ne tune this later.
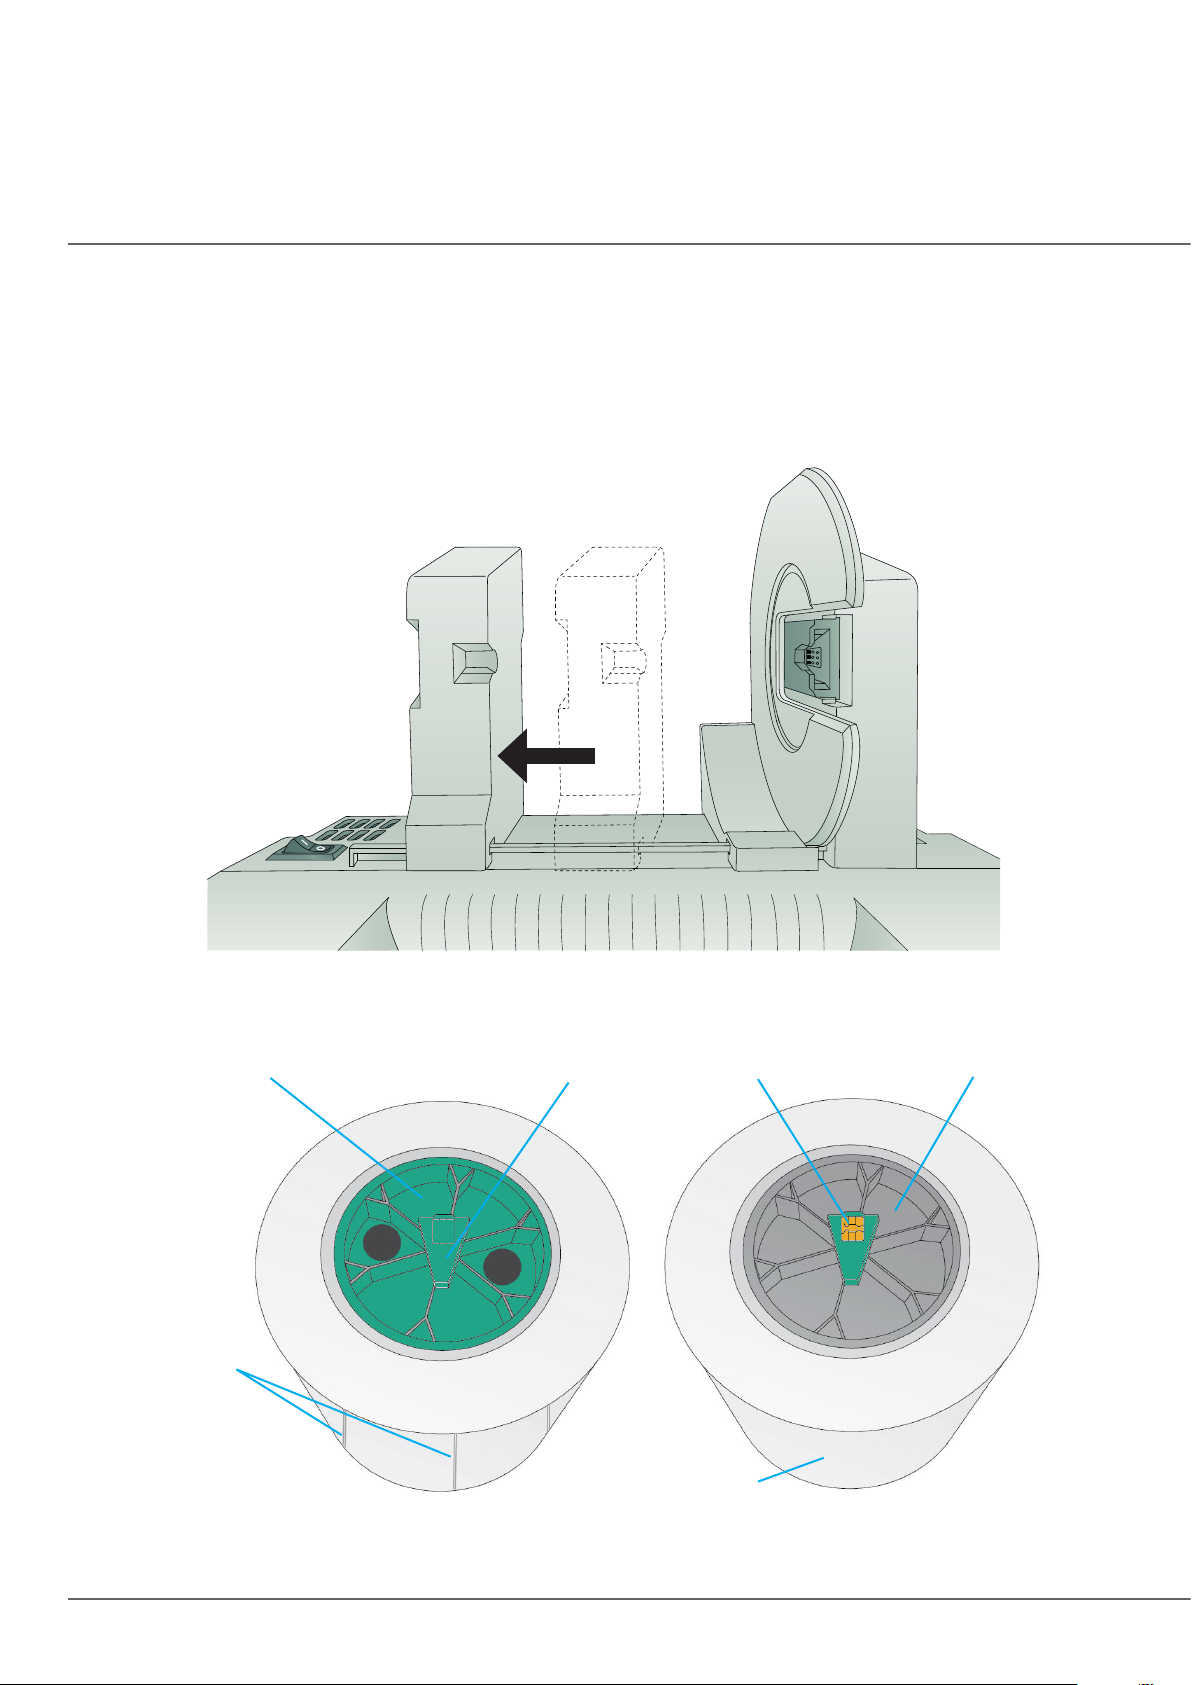
2. Install the Green Hub on the right side of the pre die-cut media.
Die Cuts
Green Hub
Blank Chip Holder
Continuous Media
Pre Die-Cut Roll
(User must install Green Hub)
Smart Chip
(Hub/Chip comes preinstalled)
Black Hub
Digital Die-Cut Roll
20 |
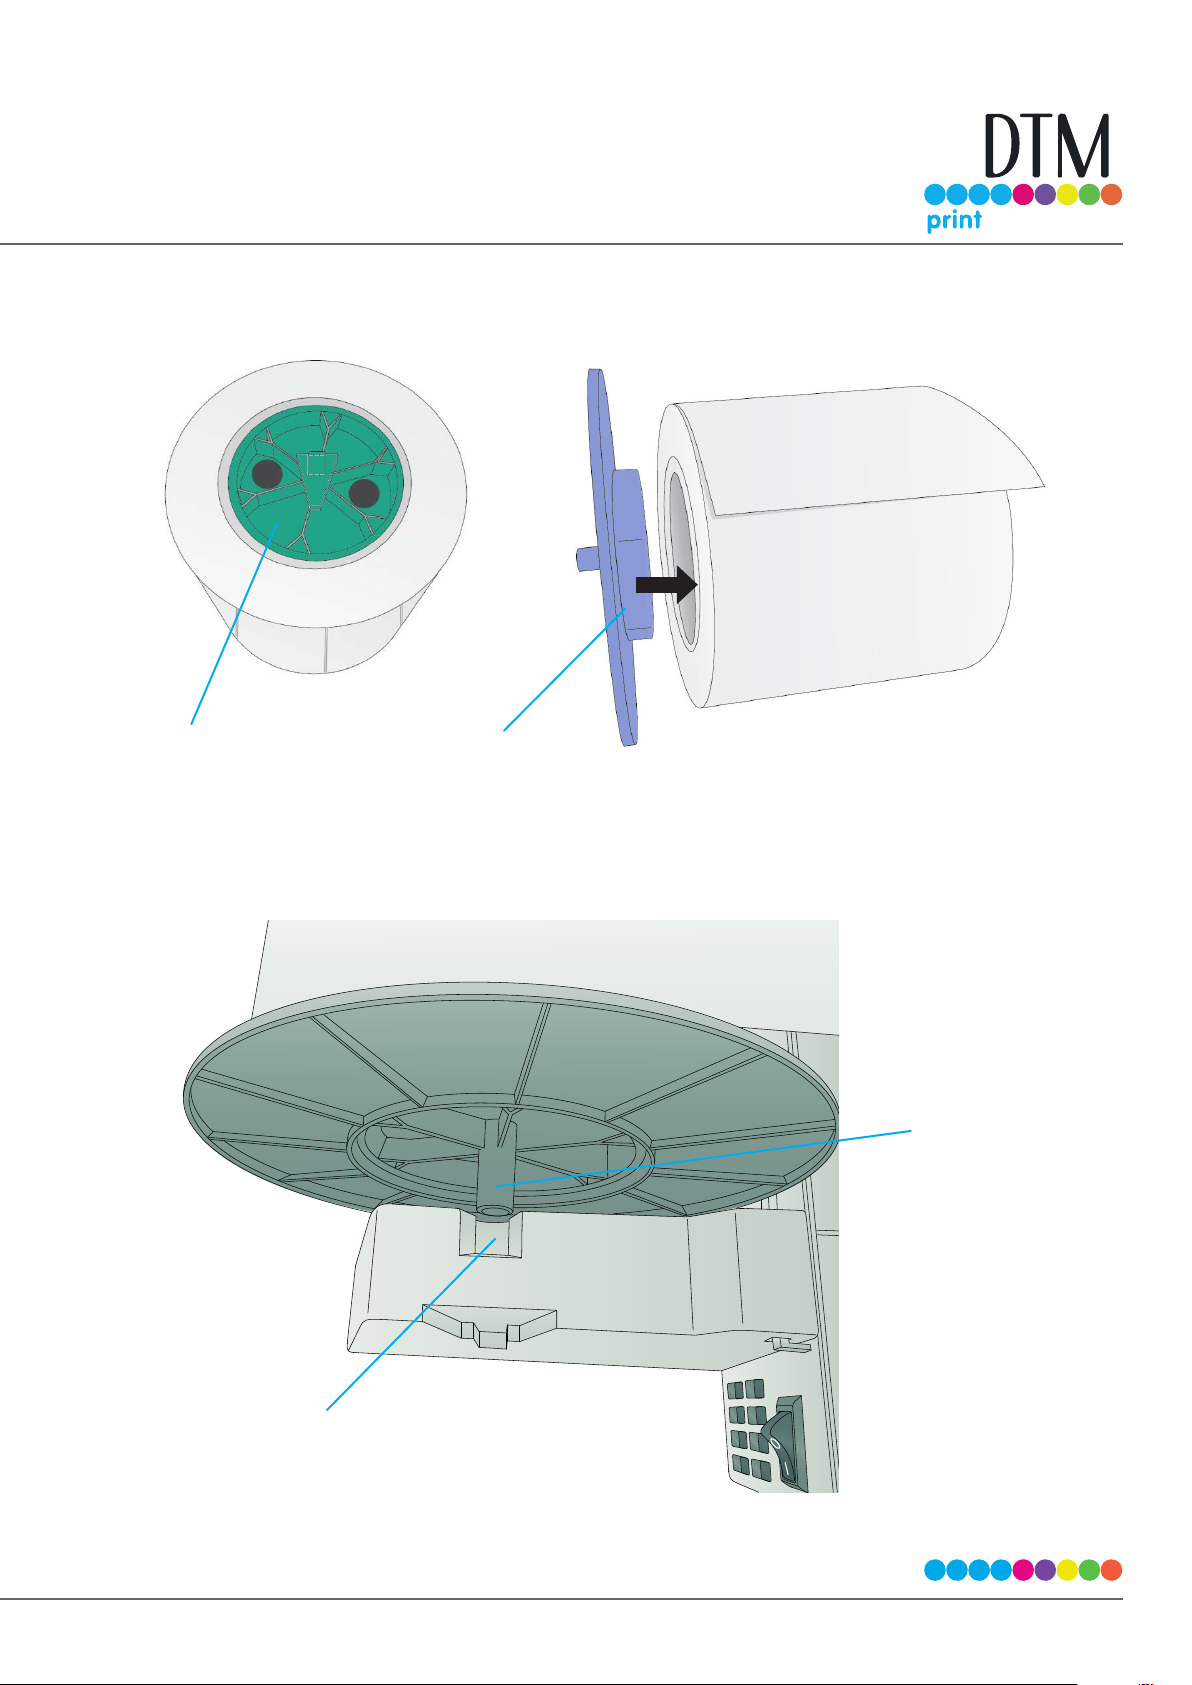
3. Install the Blue Hub on the left side of the digital die cutting media.
Pre Die-Cut Media
Blue Hub
4. Set the roll in place so that the blue pin sits in the notch on the roll holder.
Blue Pin
Notch
| 21
5. Make sure the green blank chip holder ts in the corresponding green slot on the roll holder.
Green Chip
Holder
Notch
Before feeding the stock you must plug in power and switch on the printer.
Power Cable
Power Switch
22 |

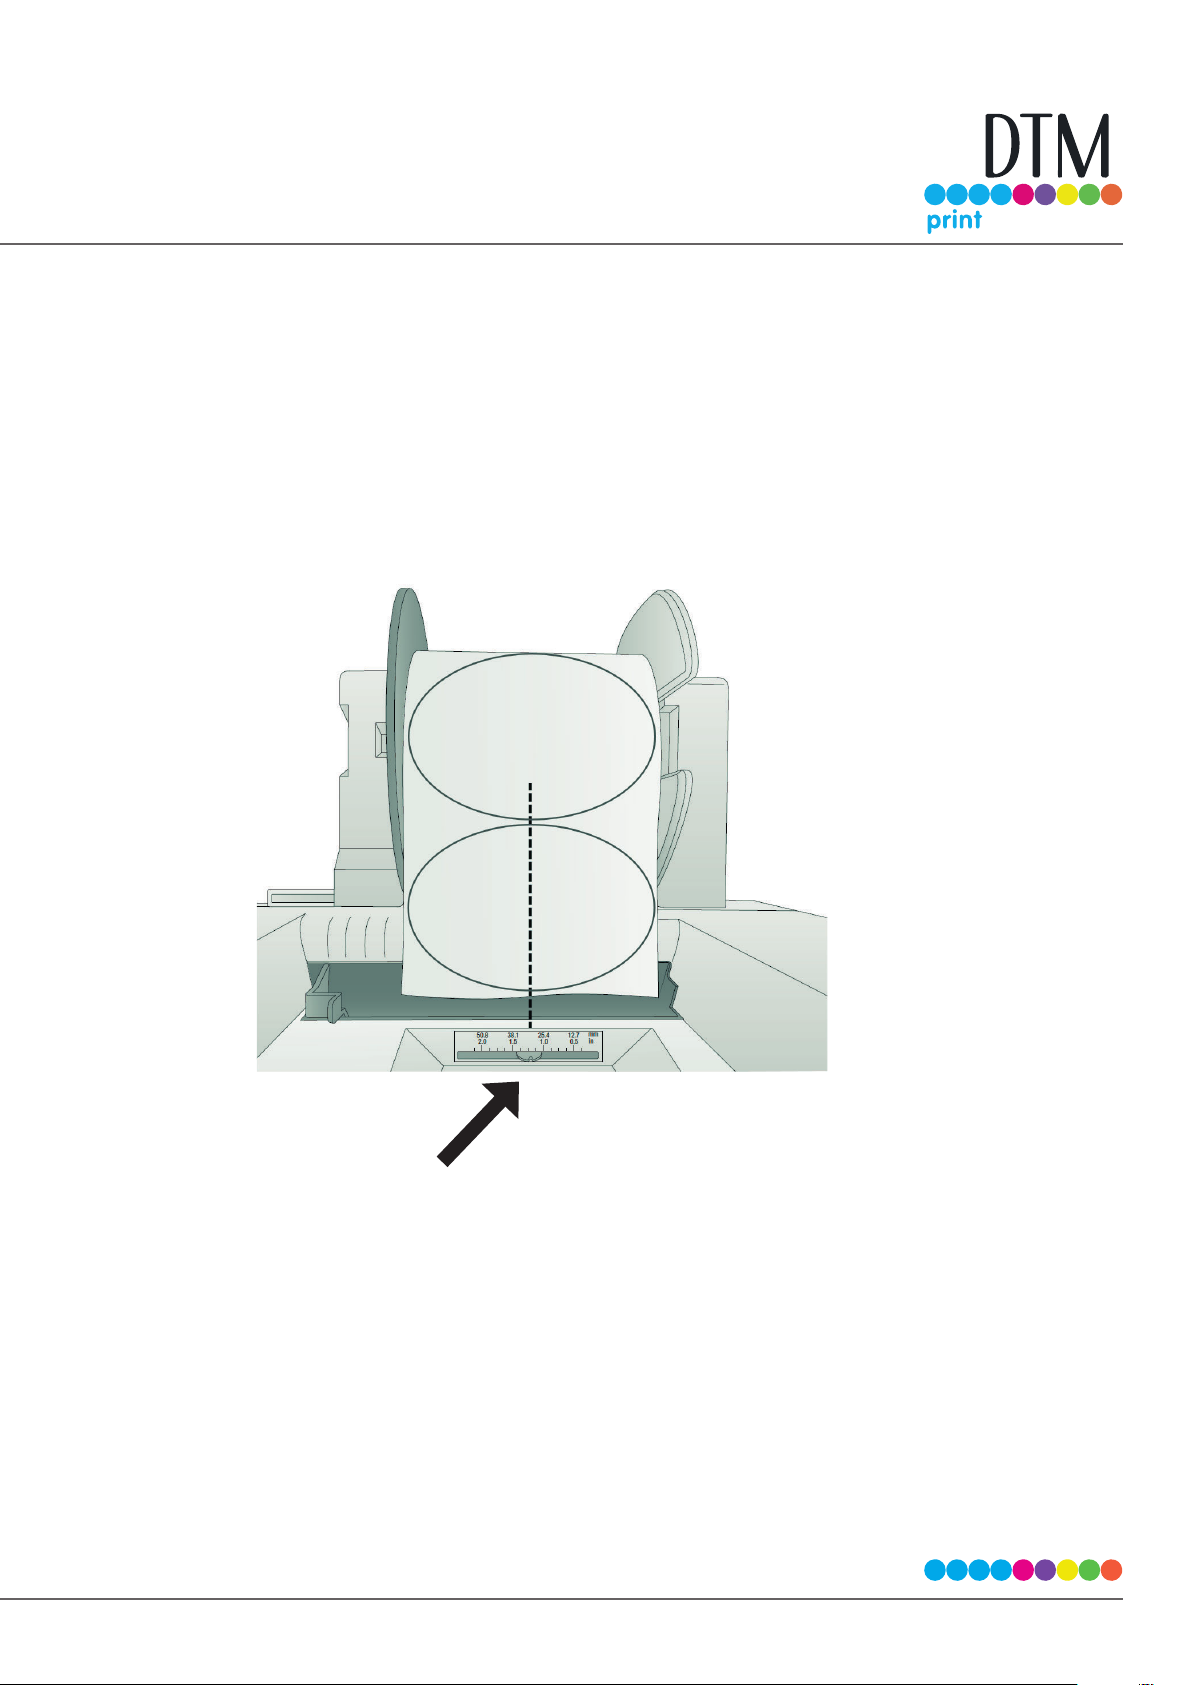
6. Guide the leading edge of the roll into the feed area. Move the blue guide so that it touches the
label stock.
Gap sensor should
intersect the gap
between labels
Blue Guide
50.8 38.1 25.4 12.7
2.0 1.5 1.0 0.5
mm
in
Note: the positon of the label sensor. Slide
the sensor position indicator so that it
intersects with the gaps between your labels.
Gap Sensor Position
Indicator from right
edge of media
For most label stock you will not need to
move this.
7. Push until the printer detects the stock, grabs it and pulls it through the printer.
| 23
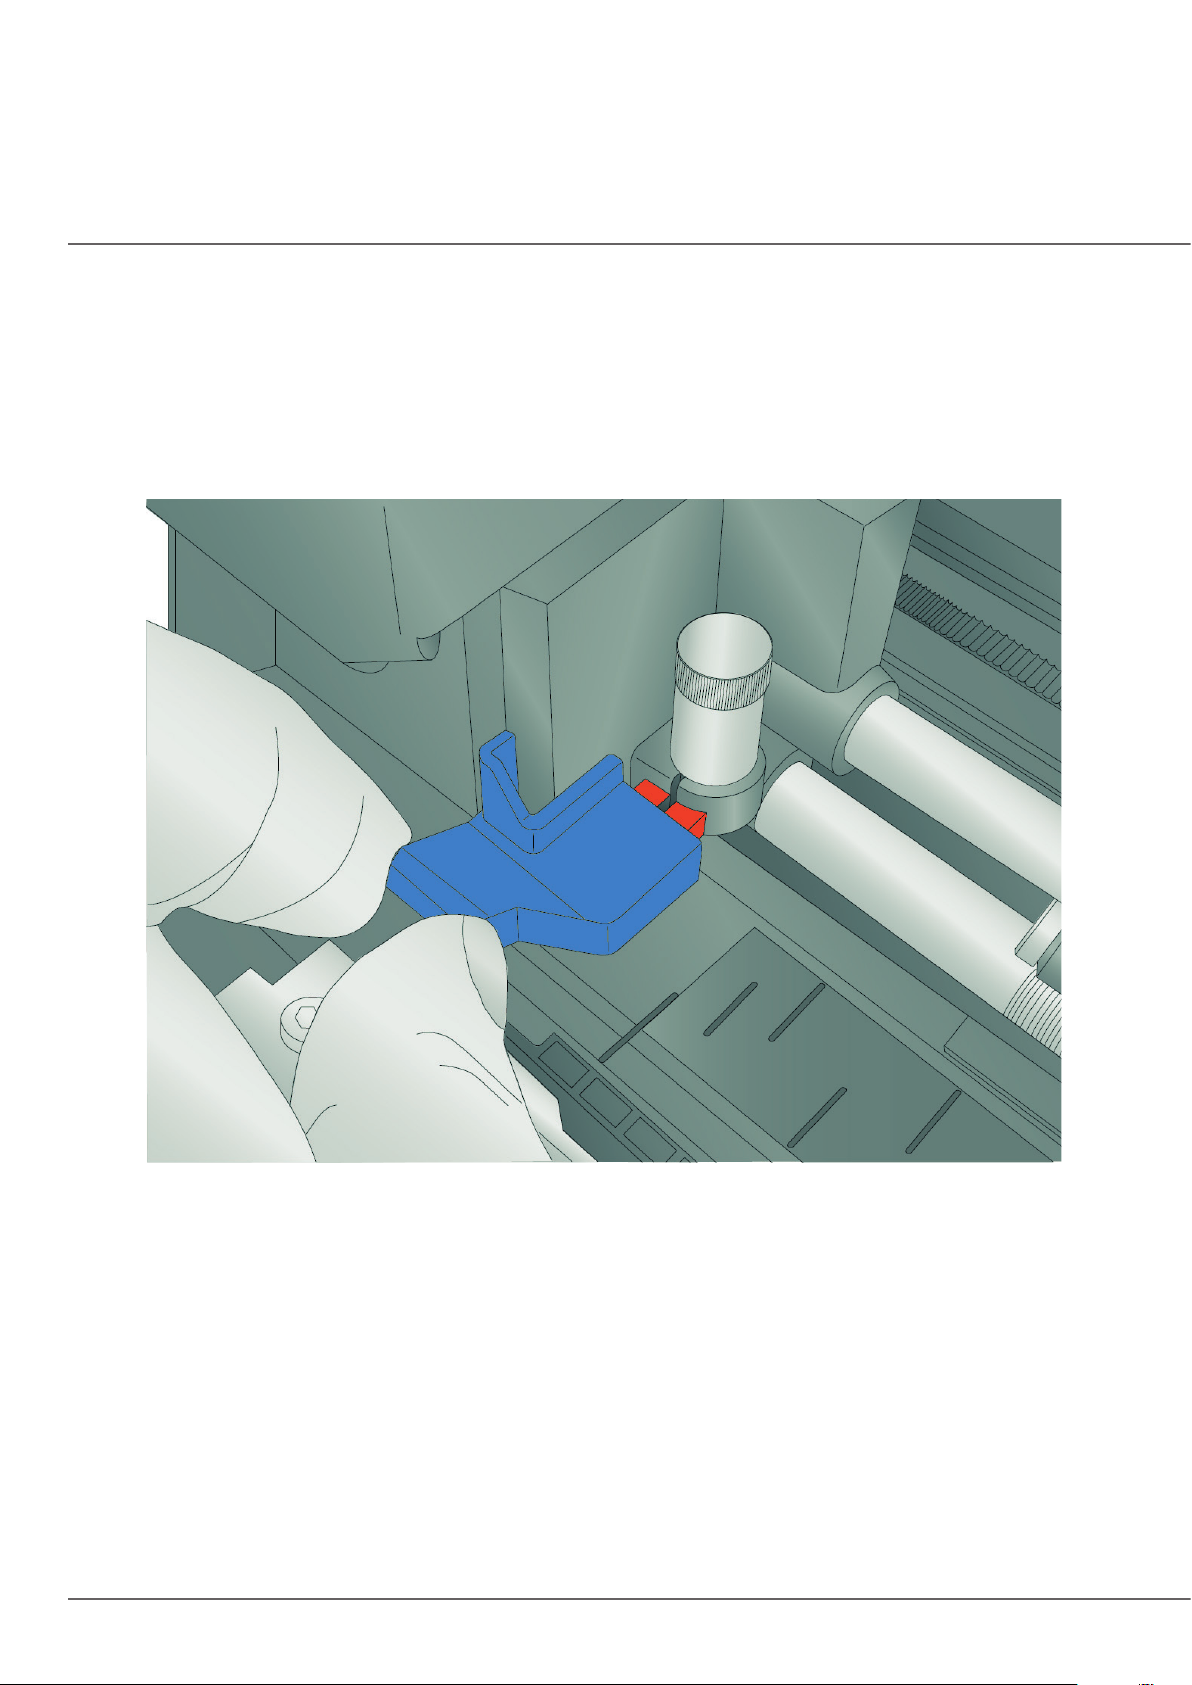
2D Replacing the Digital Die Cutting Knife holder
Install the included die cutting knife shown here.
1. Open the Cover
2. Pull out on the blue handle to loosen the knife collar.
24 |
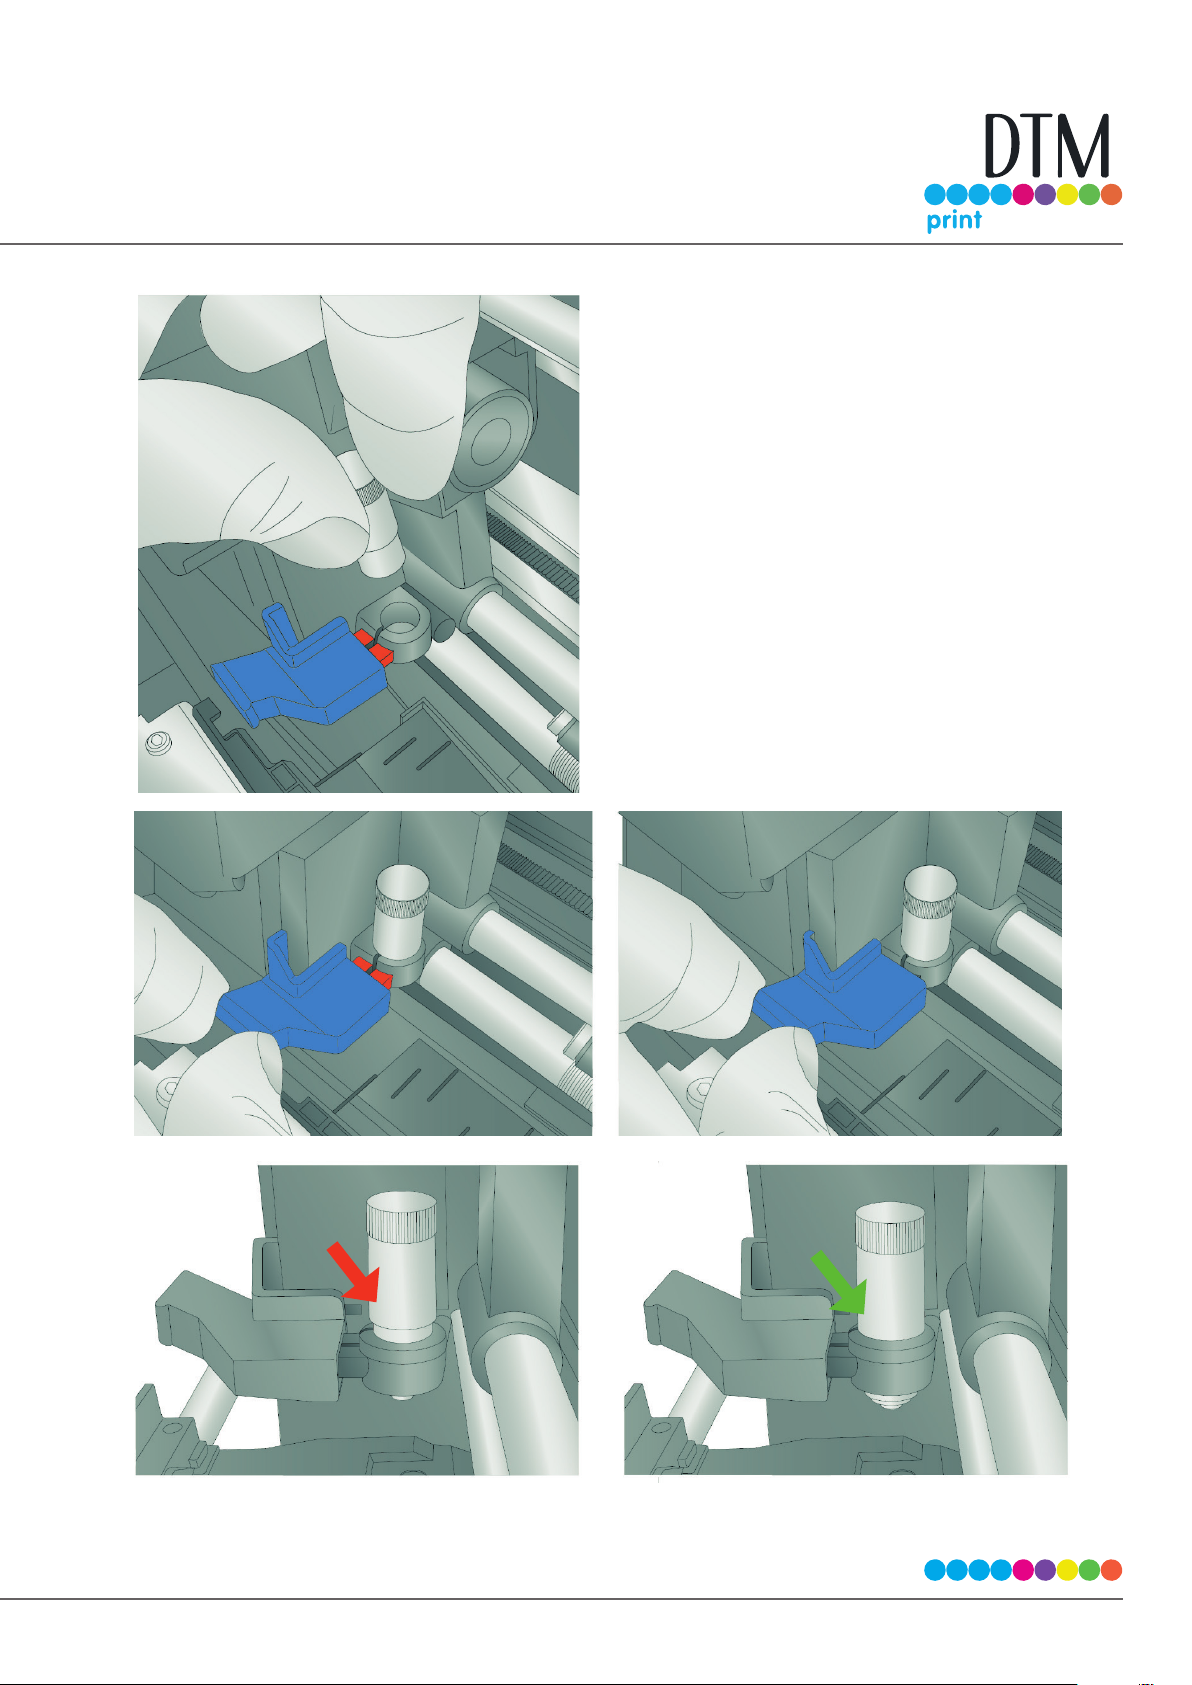
3. Install the knife holder.
4. Push on the knife so it goes all the way
down before pushing the collar in.
5. Push the collar to tighten the knife holder
and allow it to cut.
Wrong !
RIGHT
| 25
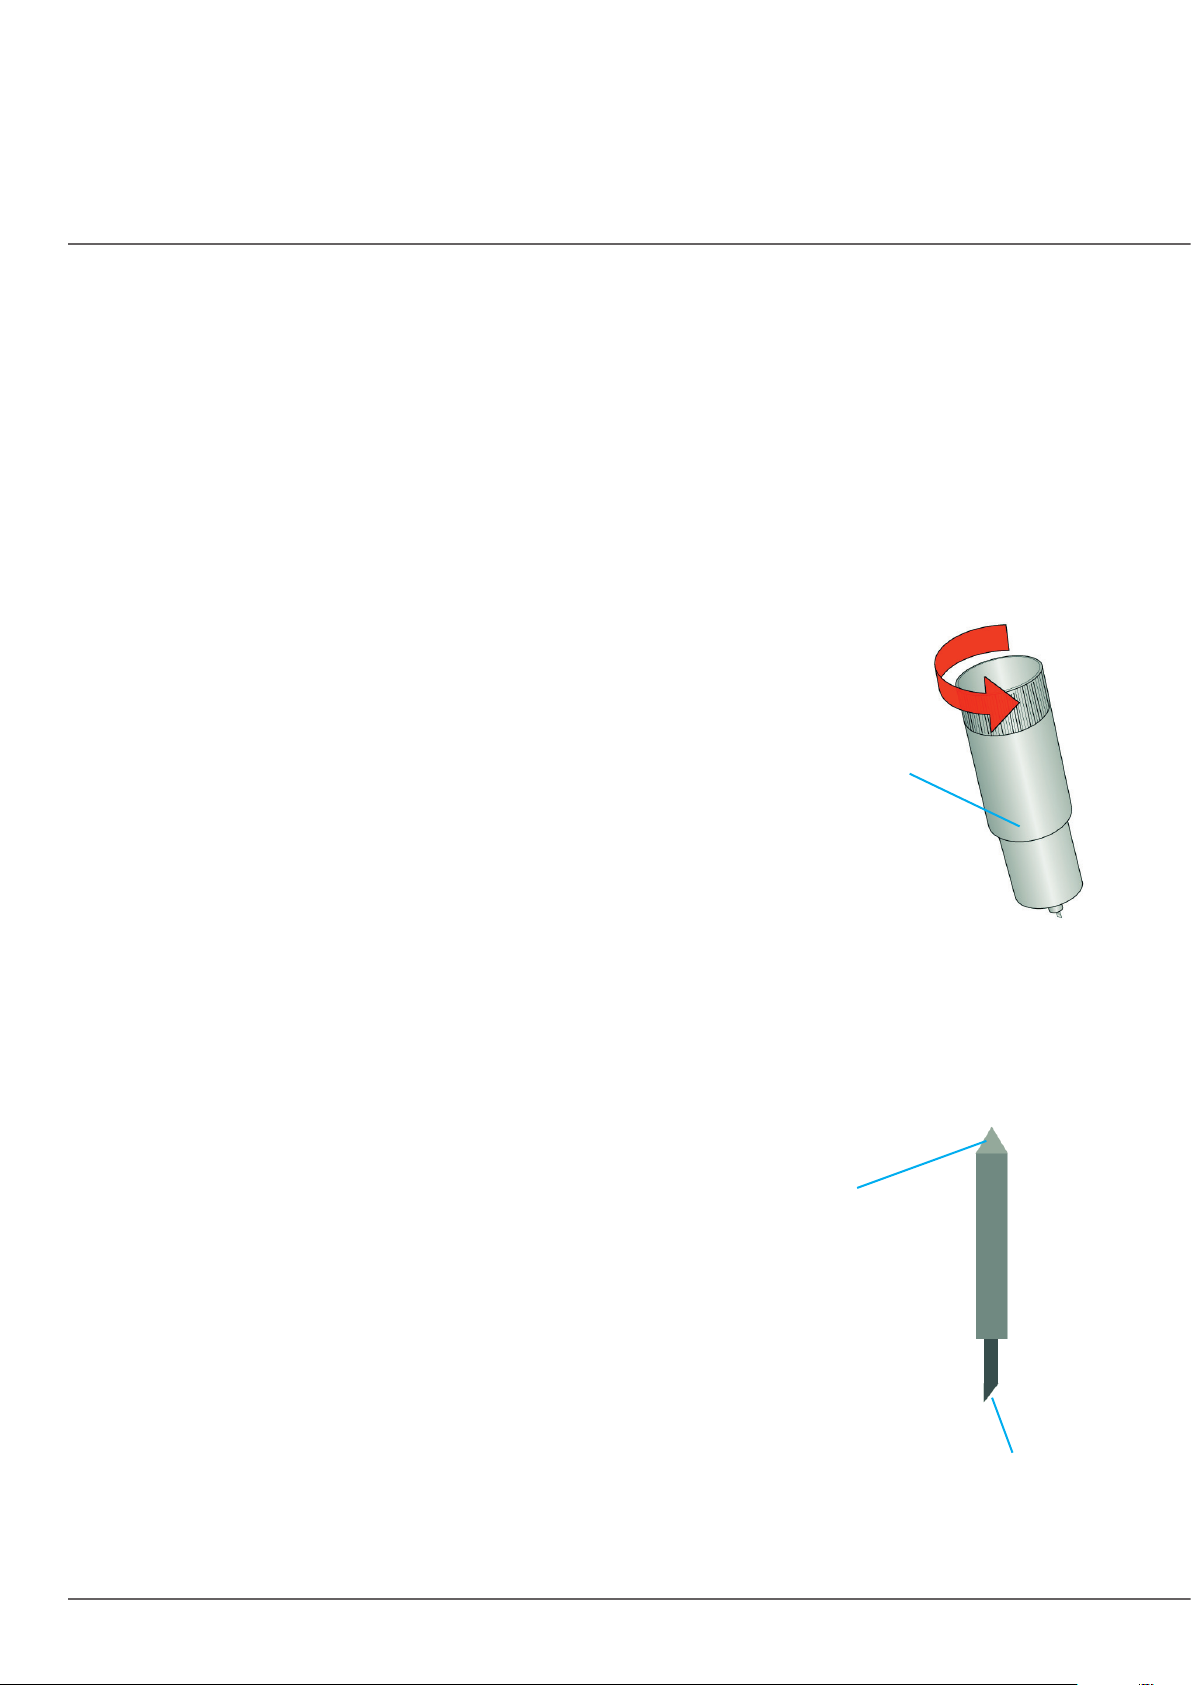
2E Replacing the Cutting Knife
When a knife is dull it will no longer cut through the label at maximum pressure. You will start to see ragged
cuts or cuts that do not cut all the way through the label material. You can attempt to increase the pressure
but you’ll probably need to replace the knife.
If a knife cuts through the liner and contacts the wear strip it may break the tip of the knife. This can be seen
under 10x magnication using a loupe or magnifying glass. If the tip is broken the knife must be replaced.
If your knife needs replacement, follow this procedure:
1. Remove the knife holder from the carrier using the instructions from
section 2D.
Knife Holder
2. Rotate the cap of the knife holder counter clockwise.
3. Remove the knife from the holder. You can tap the holder on a hard
surface to free the knife from the holder.
4. Locate a new knife. Remove the molded plastic cover from the knife. The plastic cap covers
the cutting end of the knife. However, both sides are sharp! The cutting end has an angled carbide
tip. The top end comes to a point so it can be easily centered in the receiving divot on the knife
holder cap.
5. Insert the cutting end into the knife holder.
Centering
Point
6. Using the knife holder cover center the back end of the knife in the
holder. You may need to screw down the cover and reverse it
several times until the knife has been centered. Do not force the
cap on the holder. The carbide tip will brea
Carbide Tip
Replacement Cutter Knife 5 pack Part Number: 074332
(Cutting End)
Replacement Knife Holder Part Number: 074548
26 |
2F Replacing Ink Cartridges
You can replace cartridges at any time or wait for the Low Ink Warning to prompt you to replace
cartridges. You will receive low ink warnings at 10% and 0%. Press the Load/Feed button to continue
printing after you receive this warning.
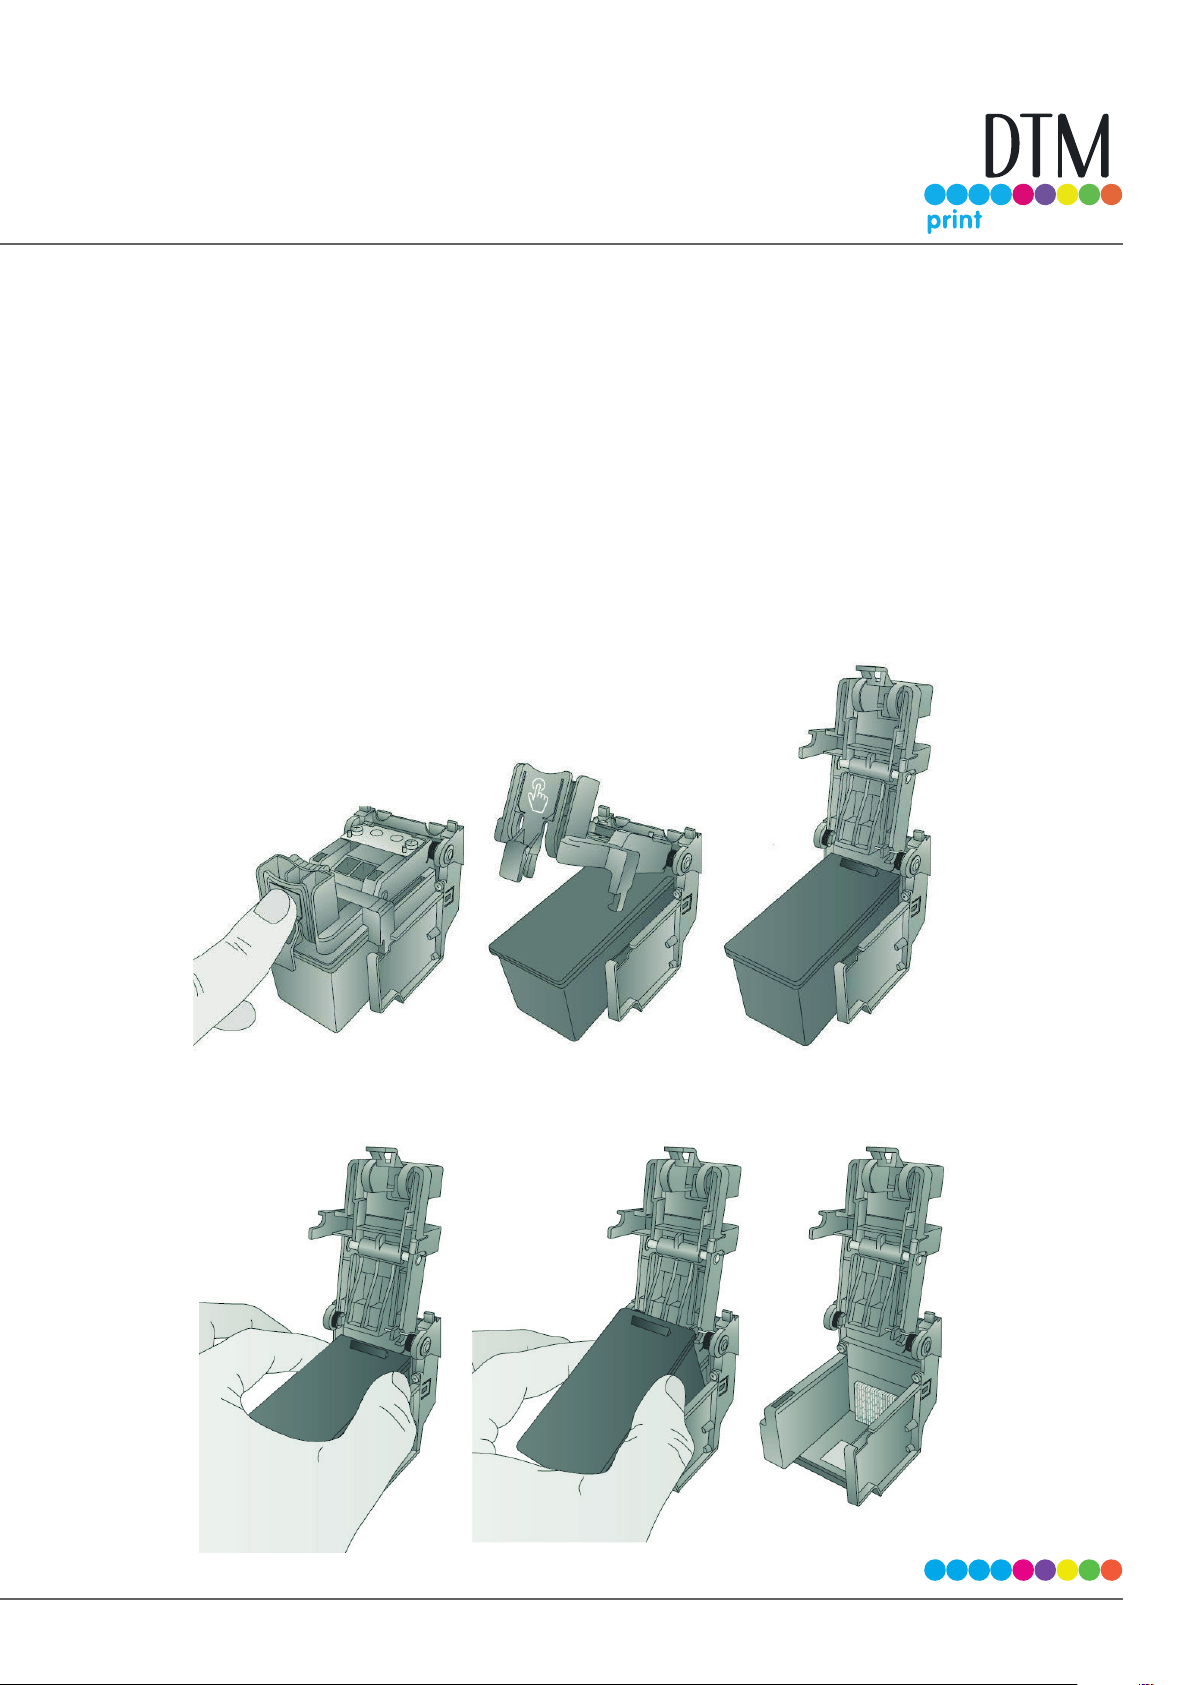
To change a cartridge, follow this procedure:
1. Open the front cover. That cartridge will automatically move to the right side if it is not
already there.
2. Press or pinch the tab on the front of the cartridge holder.
3. Remove the cartridge.
| 27
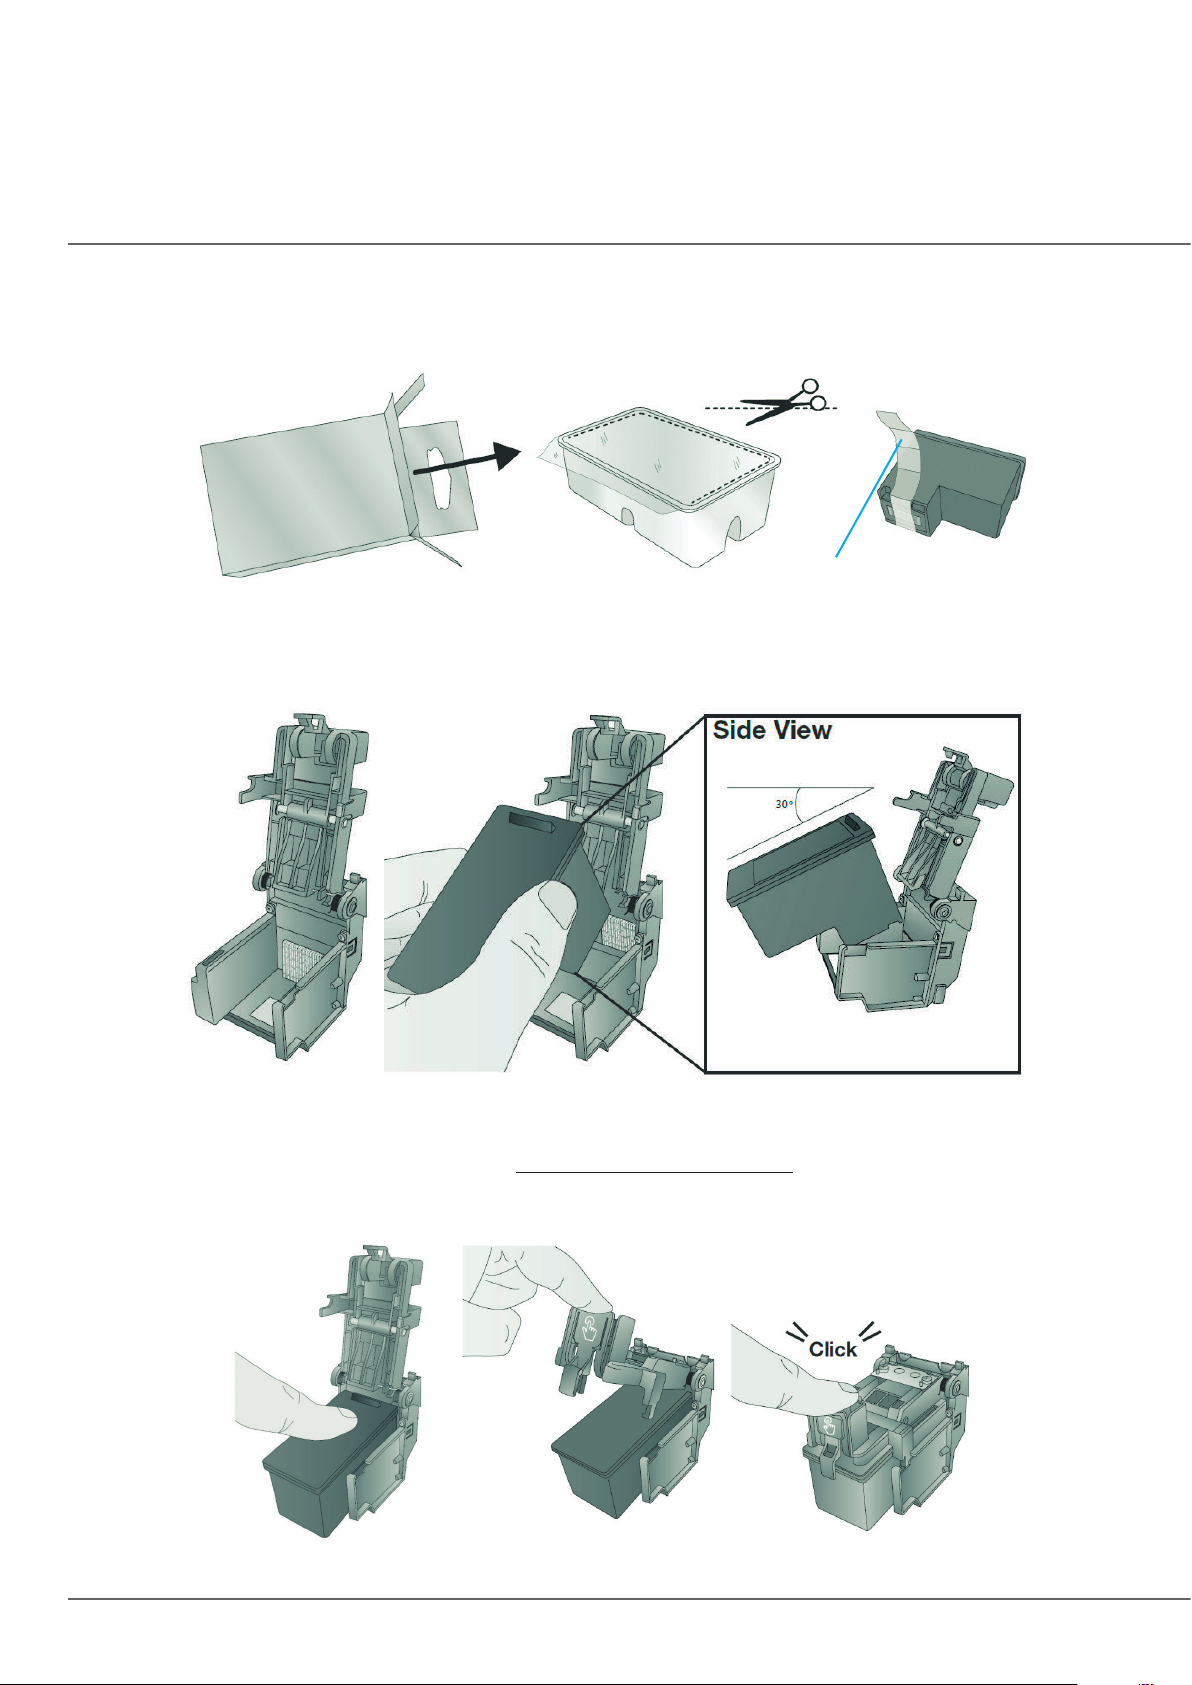
4. Locate a new cartridge and remove it from its packaging. Remove the foil outer package and
the tape covering the nozzles.
Remove Tape
5.
Place the new cartridge into the empty carriage. Note: When installing the cartridge, tilt the
cartridge at a slight backward angle of approximately 30 degrees.
6. Make sure the cartridge is pushed back far enough so the ridge on the cartridge is behind
the spring-loaded pusher on the lid. Push down on the cartridge. Close the lid on the cartridge by
lightly pressing down from the top until you hear a click.
PUSH DOWN
28 |
2G Adjusting the Gap Sensor Position (Pre Die-Cut Labels Only)
If you are using label stock other than standard square / rectangular die-cut labels such as circular die-cut
labels or through-hole stock use the instructions below to adjust the position of the label stock gap sensor.
The sensor can be adjusted using the slide bar on the back of the printer. Below the slide bar is a
measurement which represents the distance between the edge of the label stock and the sensor. Measure
the distance from the edge of the label stock to the correct position on the stock. Set the sensor so the side
of the slide bar lines up to this measurement. See dashed line in the illustration below.
Important Note: You must adjust the stock
sensor before loading nonstandard label
stock.
| 29

Circular Labels
If you are using Circular Labels you must adjust the stock sensor to correspond with the very top of the
label where the circles are closest together. If the sensor is too far to the right or the left the printer will still
sense the label but the image may be oset downward because the printer will start printing at the wrong
position. If you are using stock that has multiple labels across, make sure the sensor corresponds to a place
on the stock that has a label and not a vertical gap Important Note: You must adjust the stock sensor before
loading nonstandard label stock.31The sensor can only be moved a maximum of 2 inches from the left side
of the printable area. This means that the maximum diameter circular label that can be printed is 4 inches.
For circular labels larger than 4 inches in diameter, you must have a black mark printed on the back of the
label stock.This means that you must change the Stock Sensor Mode to Reective. The printer will now look
for the black mark representing the beginning of the next label instead of the die-cut. For moreinformation
on changing the Stock Sensor Mode see section 3C.
30 |
 Loading...