

dtm FX510e, FX510ec User Manual
User’s Manual
©2019, DTM Print GmbH. All rights reserved
For the most recent version of this manual please visit
http://dtm-print.eu/europe/manuals.html

Notices
The information in this document is subject to change without notice. No warranty of any kind is made with regard to this
material, including, but not limited to, the implied warranties of merchantability and tness for a particular purpose. No
liability is assumed for errors contained herein or for incidental or consequential damages in connection with the furnishing,
performance, or use of this material. This document contains proprietary information that is protected by copyright. All rights
are reserved. No part of this document may be photocopied, reproduced, or translated into another language without prior
written consent.
Trademark Acknowledgements
Windows is a registered trademark of Microsoft Corporation. All other trademarks are the property of their respective owners.
Printing History
Edition 1.0, #190305, Copyright 2019, DTM Print GmbH. All rights reserved.
FCC Compliance Statement
This equipment has been tested and found to comply with the limits for a CLASS A digital device, pursuant to Part 15 of the
FCC Rules. These limits are designed to provide reasonable protection against harmful interference when the equipment is
operated in a commercial environment. This equipment generates, uses, and can radiate radio frequency energy and, if not
installed and used in accordance with the instructions, may cause harmful interference to radio communications. Operation
of this equipment in a residential area is likely to cause harmful interference in which case the user will be required to correct
the interference at own expense.
EMS and EMI Compliance Statement
This equipment has been tested and passed with the requirements relating to electromagnetic compatibility based on the
standards EN 55022:1998+A1:2000+A2:2003, CISPR 22 , Class A EN 55024:1998+A1:2001+A2:2003,
IEC 61000- 4 Series EN 61000-3-2 / 2000 & EN 61000-3-3 / 1995. The equipment also tested and passed in accordance with
the European Standard EN55022 for the both Radiated and Conducted emissions limits.
Caution
» Danger of explosion if battery is incorrectly replaced
» Replace only with the equivalent type recommended by the manufacturer.
» Dispose of used batteries according to the manufacturer’s instructions.
» Only use with designated power supply adapter model.
» Changes or modications not expressly approved by the party responsible for compliance could void the user’s au-
thority to operate the equipment.
Safety Instructions
Please read the following instructions carefully
» Keep the equipment away from humidity.
» Before you connect the equipment to the power outlet, please check the voltage of the power source.
» Make sure the printer is o before plugging the power connector into the power jack.
» It is recommended that you connect the printer to a surge protector to prevent possible transient over voltage damage.
» Be careful not to get liquid on the equipment to avoid electrical shock.
» For safety and warranty reasons, ONLY qualied service personnel should open the equipment.
» Do not repair or adjust energized equipment under any circumstances.

Table of Contents
Section 1: Getting Started ...................................................................................................................................................... 5
1 A Choosing a Good Location .................................................................................................................................................................5
1 B Box Content ................................................................................................................................................................................................5
1 C Getting to Know Your Printer ............................................................................................................................................................5
Section 2: Printer Setup .......................................................................................................................................................... 8
2 A Open the Printer Cover .........................................................................................................................................................................8
2 B Open the Printing Mechanism ........................................................................................................................................................8
2 C Loading the Ribbon ............................................................................................................................................................................... 8
2 D Loading the Label Roll .......................................................................................................................................................................10
2 E Installing the Label Supply Hub .................................................................................................................................................. 11
2 F Sensor Position .......................................................................................................................................................................................12
2 G Connecting the Printer to the Host Computer .................................................................................................................. 12
2 H Installing The Driver ............................................................................................................................................................................ 12
Section 3: Operation Panel ..................................................................................................................................................14
3 A LED Operation Panel ..........................................................................................................................................................................14
3 B Label Size Calibration and Self Test Page ............................................................................................................................... 14
3 C Error Alerts ................................................................................................................................................................................................ 15
Section 4: Printing ...................................................................................................................................................................16
4 A Adding Highlights to a Label with NiceLabel ...................................................................................................................... 16
4 B Printing from NiceLabel .....................................................................................................................................................................19
4 C Sealing Labels with Clear Film ....................................................................................................................................................... 19
4 D Printer Driver Settings ......................................................................................................................................................................... 20
4 E Printing from other Programs ........................................................................................................................................................ 23
Section 5: Troubleshooting and Maintenance .............................................................................................................24
5 A Cleaning the Print Head ................................................................................................................................................................... 24
5 B Adjusting the Print Head Pressure .............................................................................................................................................. 24
5 C Adjusting the Print Line .................................................................................................................................................................... 25
5 D Adjusting the Cutter (FX510ec Model only) ......................................................................................................................... 25
5 E Troubleshooting ....................................................................................................................................................................................26
5 F Creating a Full Bleed Print (Clear Film Sealing) ....................................................................................................................26
5 G Miscellaneous .......................................................................................................................................................................................... 27
5 H Technical Support .................................................................................................................................................................................27
Section 6: Label and Ribbon Specifications .................................................................................................................. 28
6 A Label Sensing Methods .................................................................................................................................................................... 28
6 B Label Specifications ..............................................................................................................................................................................29
6 C Ribbon Specifications ......................................................................................................................................................................... 29
Section 7: Technical Specifications ....................................................................................................................................30

Section 1: Getting Started
Thank you…
… for choosing an FX510e/FX510ec Foil Imprinting System. The FX510e Foil Imprinter adds brilliant, shiny highlights to
your pre-printed or blank labels. This User’s Manual is your complete step-by-step guide to quickly and easily setting up and
printing with your new Foil Imprinting System.
1 A Choosing a Good Location
» Place the printer on a at surface in a location with adequate air circulation to prevent internal heat build up.
» Do not place the printer near heat sources such as radiators or air ducts, or in a place subject to direct sunlight, excessive
dust, mechanical vibration or shock.
» Allow for adequate clearance in front of the printer to accommodate the printed label stock as it is leaving the printer
to avoid the possibility of binding or jamming of the label stock.
» Allow for adequate overhead clearance for opening the top cover to allow easy access to the label stock and ribbons.
» When using the Passive Label Unwinder make sure you have an appropriate depth of up to 60 cm
1 B Box Content
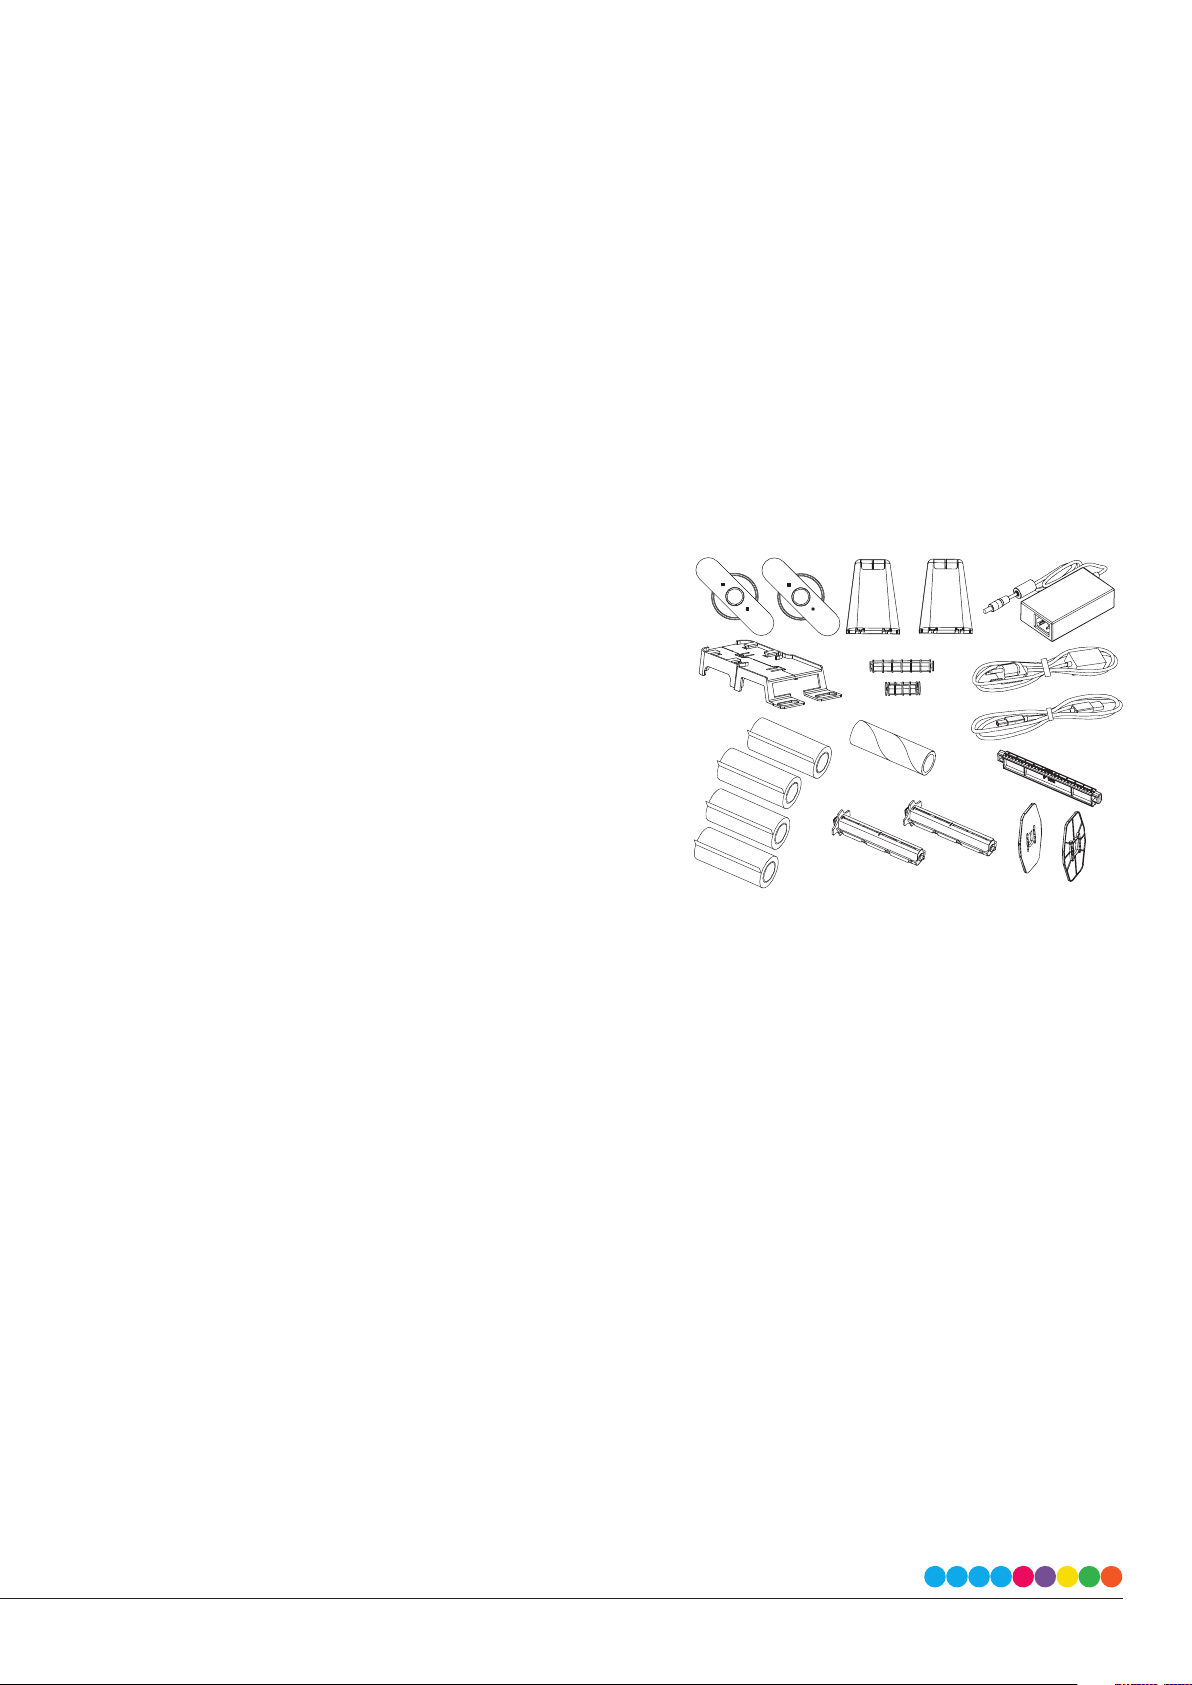
Please check that all of the following items are included with your
printer.
» FX510e Foil Imprinter
» Power Cord
» AC Adapter
» USB Cable
» 4 Sample Ribbons (Red, Gold, Silver, Blue Metallic)
» Black Ribbon Hubs (set of 2)
» Brown empty Ribbon Core
» Blue Internal Label Supply Hub with blue Label Guide Plates
(set of 2)
» Passive Label Unwinder with 2” and 4” wide Supply Hubs
» Quickstart Guide
Save the carton and packaging materials. They will come in handy when transporting the printer.
5 | Getting Started
1 C Getting To Know Your Printer
FX510e Overview
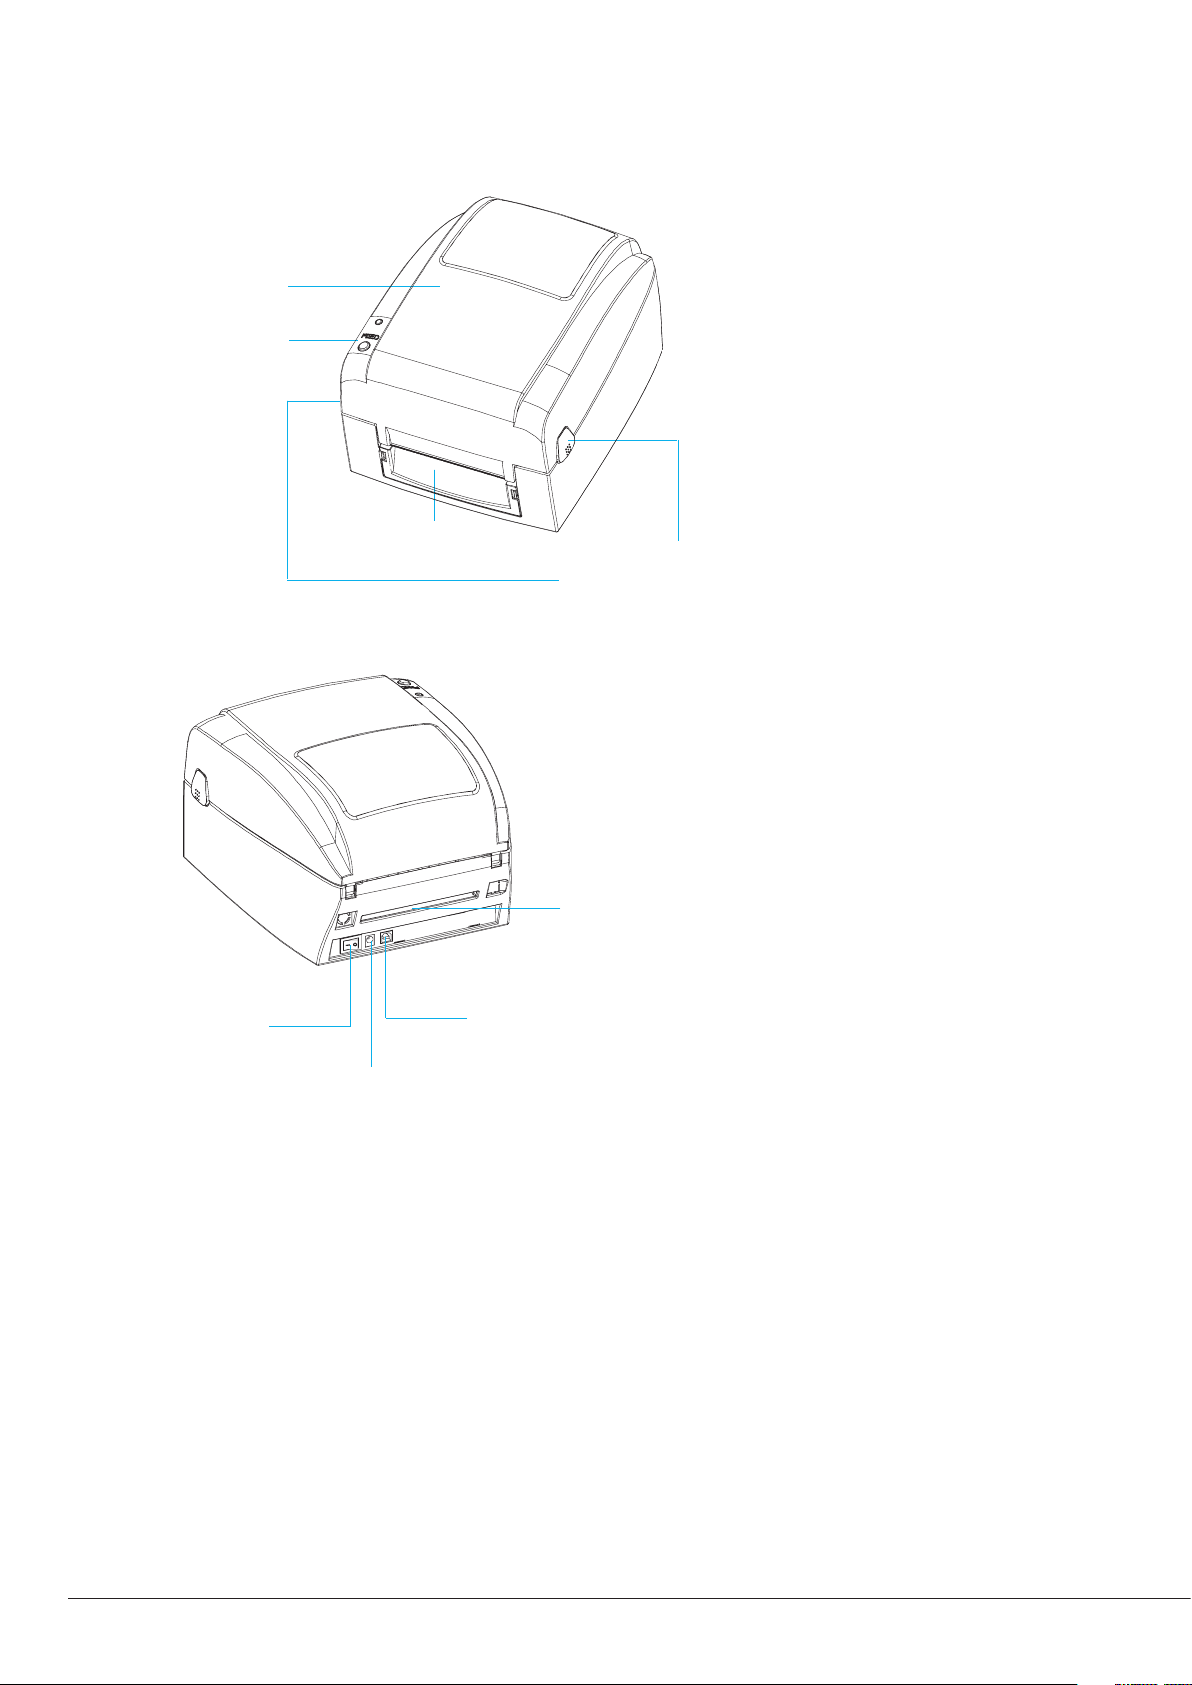
Front View. This illustration shows the front of the printer with its control buttons and LED indicator light.
Top Cover
Operation Panel
Front Cover
Cover Open Buttons
Release buttons for opening the
printer cover
Rear View. This illustration shows the USB input port and power switch found on the rear panel of the printer.
Fan-Fold Label Insert
Feed slot for external label
feeding
Power Switch
USB Port
Power Jack
6 | Getting Started
Open The Printer Cover
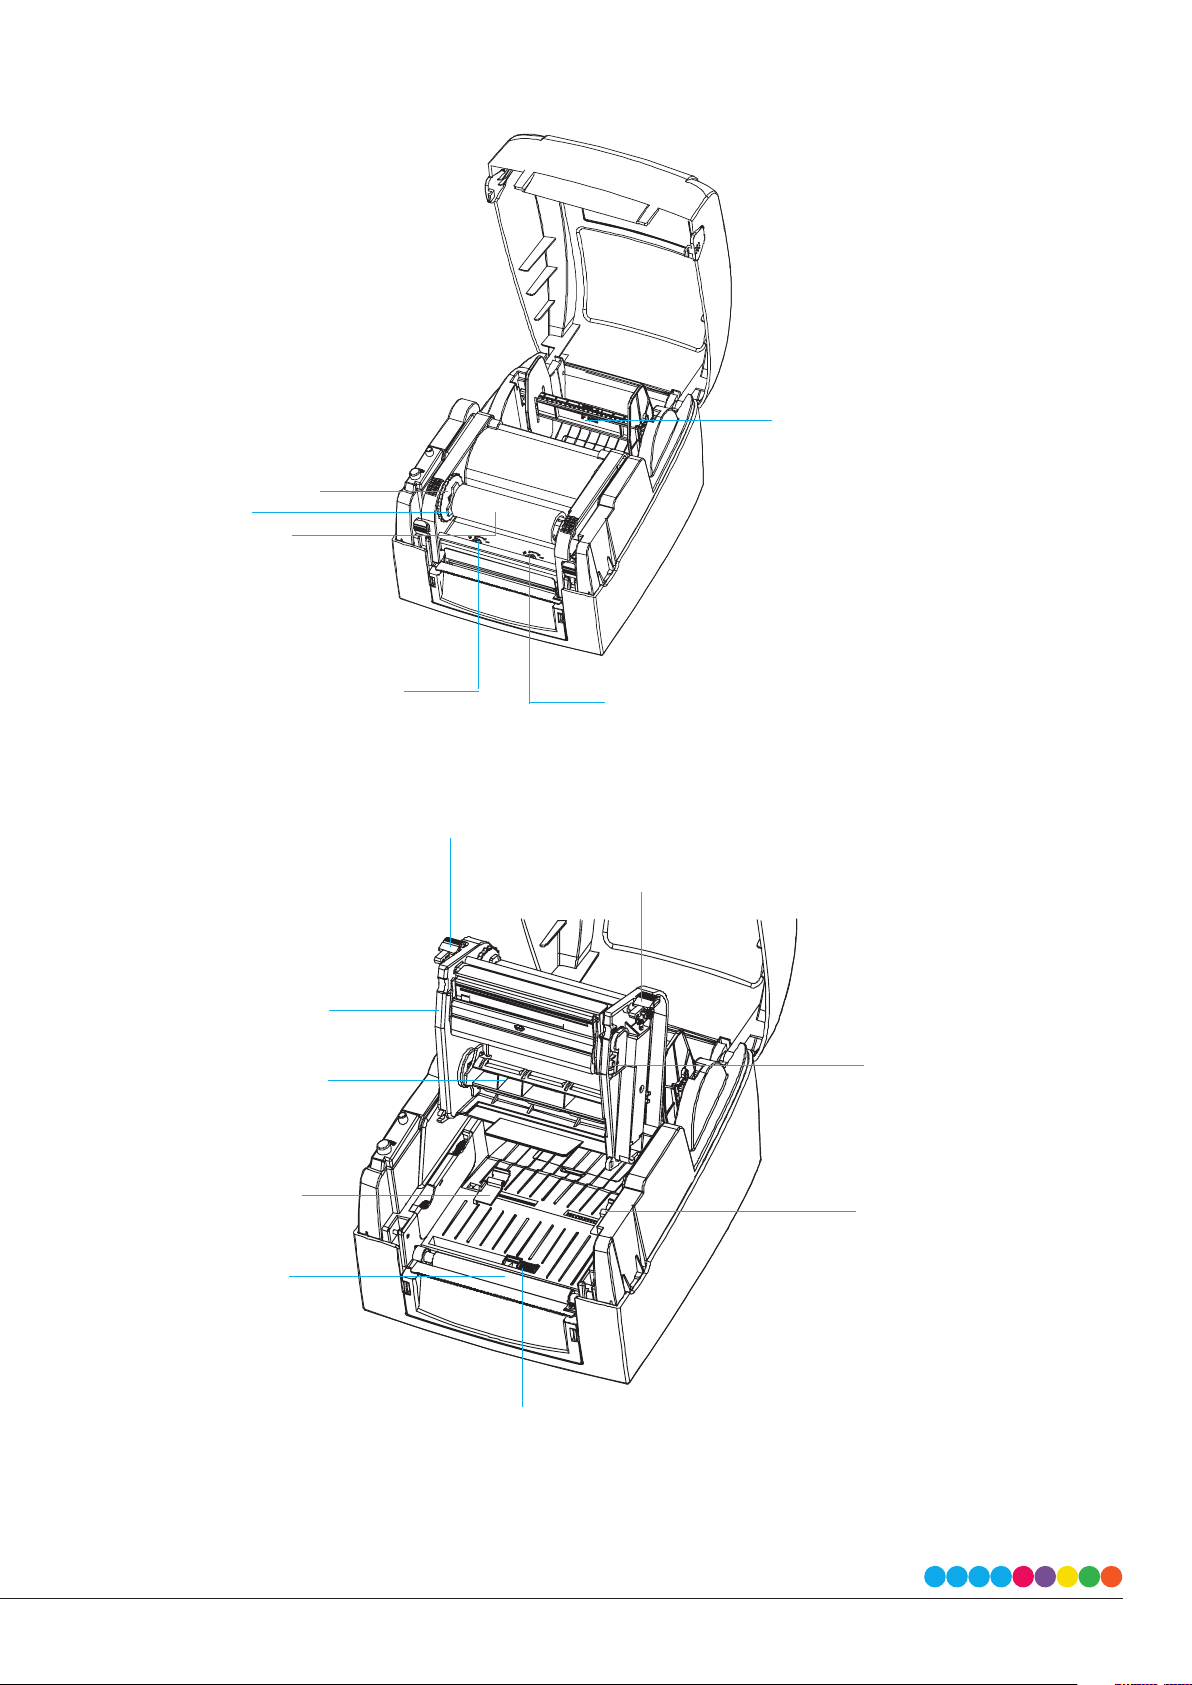
This illustration shows the interior view of the printer.
Ribbon Module
- Ribbon feed mechanism
- Ribbon hub
- Empty ribbon core
Label Supply Module
- Label Supply Hub
- Label Guide Plates (set of two)
Adjustment Screw (Left)
Screw for adjusting the print head pressure
Adjustment Screw (Right)
Screw for adjusting the print head pressure
Open The Printing Mechanism
This illustration shows the print head and ribbon mechanism.
Release Catch (Left)
Release Catch (Right)
Printing Mechanism
Ribbon Supply Hub
Label Guide (Left)
Adjustment Screw
Screw for adjusting the print line
Label Guide (Right)
Platen
Label Sensor
Movable
7 | Getting Started
Section 2: Printer Setup
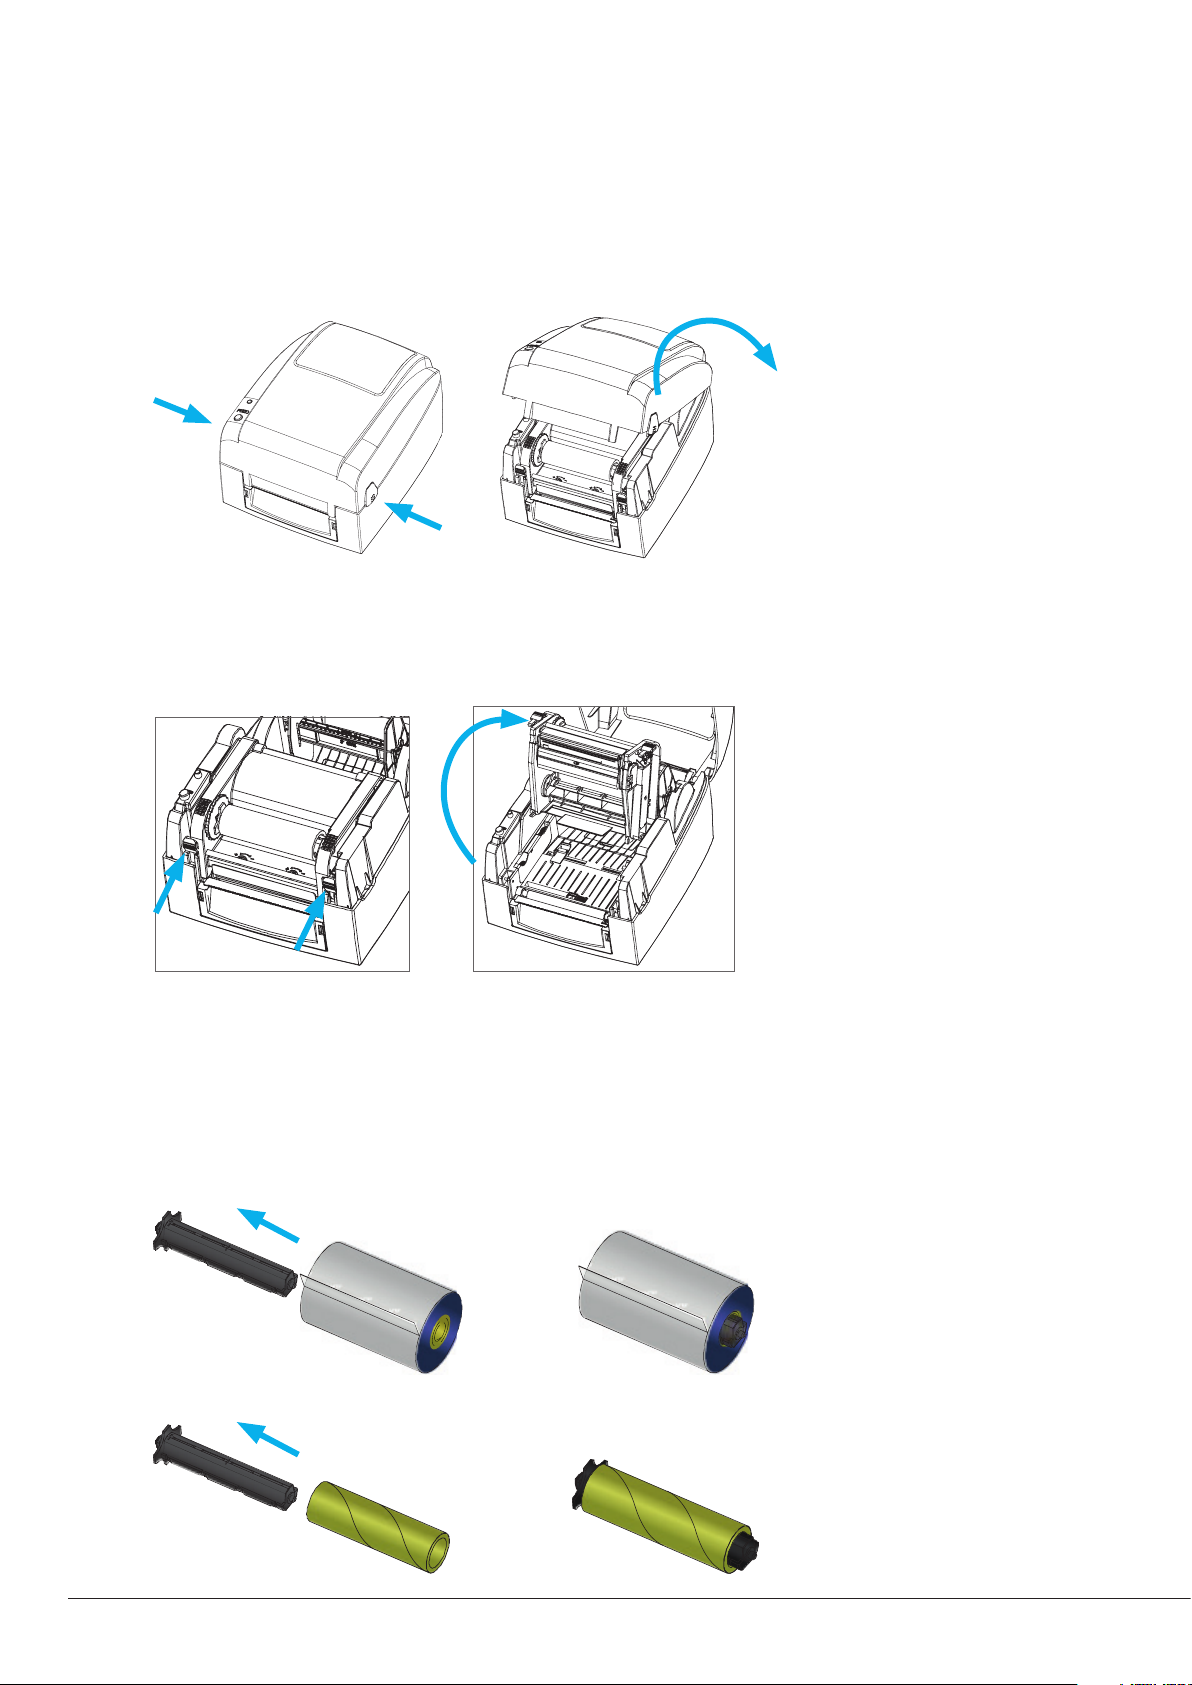
2A Open The Printer Cover
Pressing The Cover Open Buttons
Place the printer on a at surface. Open the printer cover by pressing the release buttons on both sides of the printer housing
and lift the printer cover backward.
2B Open The Printing Mechanism
Pressing The Release Catches
Release and lift the printing mechanism.
2C Loading The Ribbon
The following steps only apply to thermal transfer printing mode. Direct thermal does not need ribbon to be installed.
Note: Media and ribbon types should be matched to provide with optimal print results. Always use ribbon that is wider than the
media to protect the print head from wear. For direct thermal printing, do not load ribbon in the printer.
A New Ribbon Module Installation
Place the new ribbon on the hub which forms a ribbon supply hub.
Place the empty ribbon core on the hub which forms a ribbon rewind hub.
8 | Printer Setup
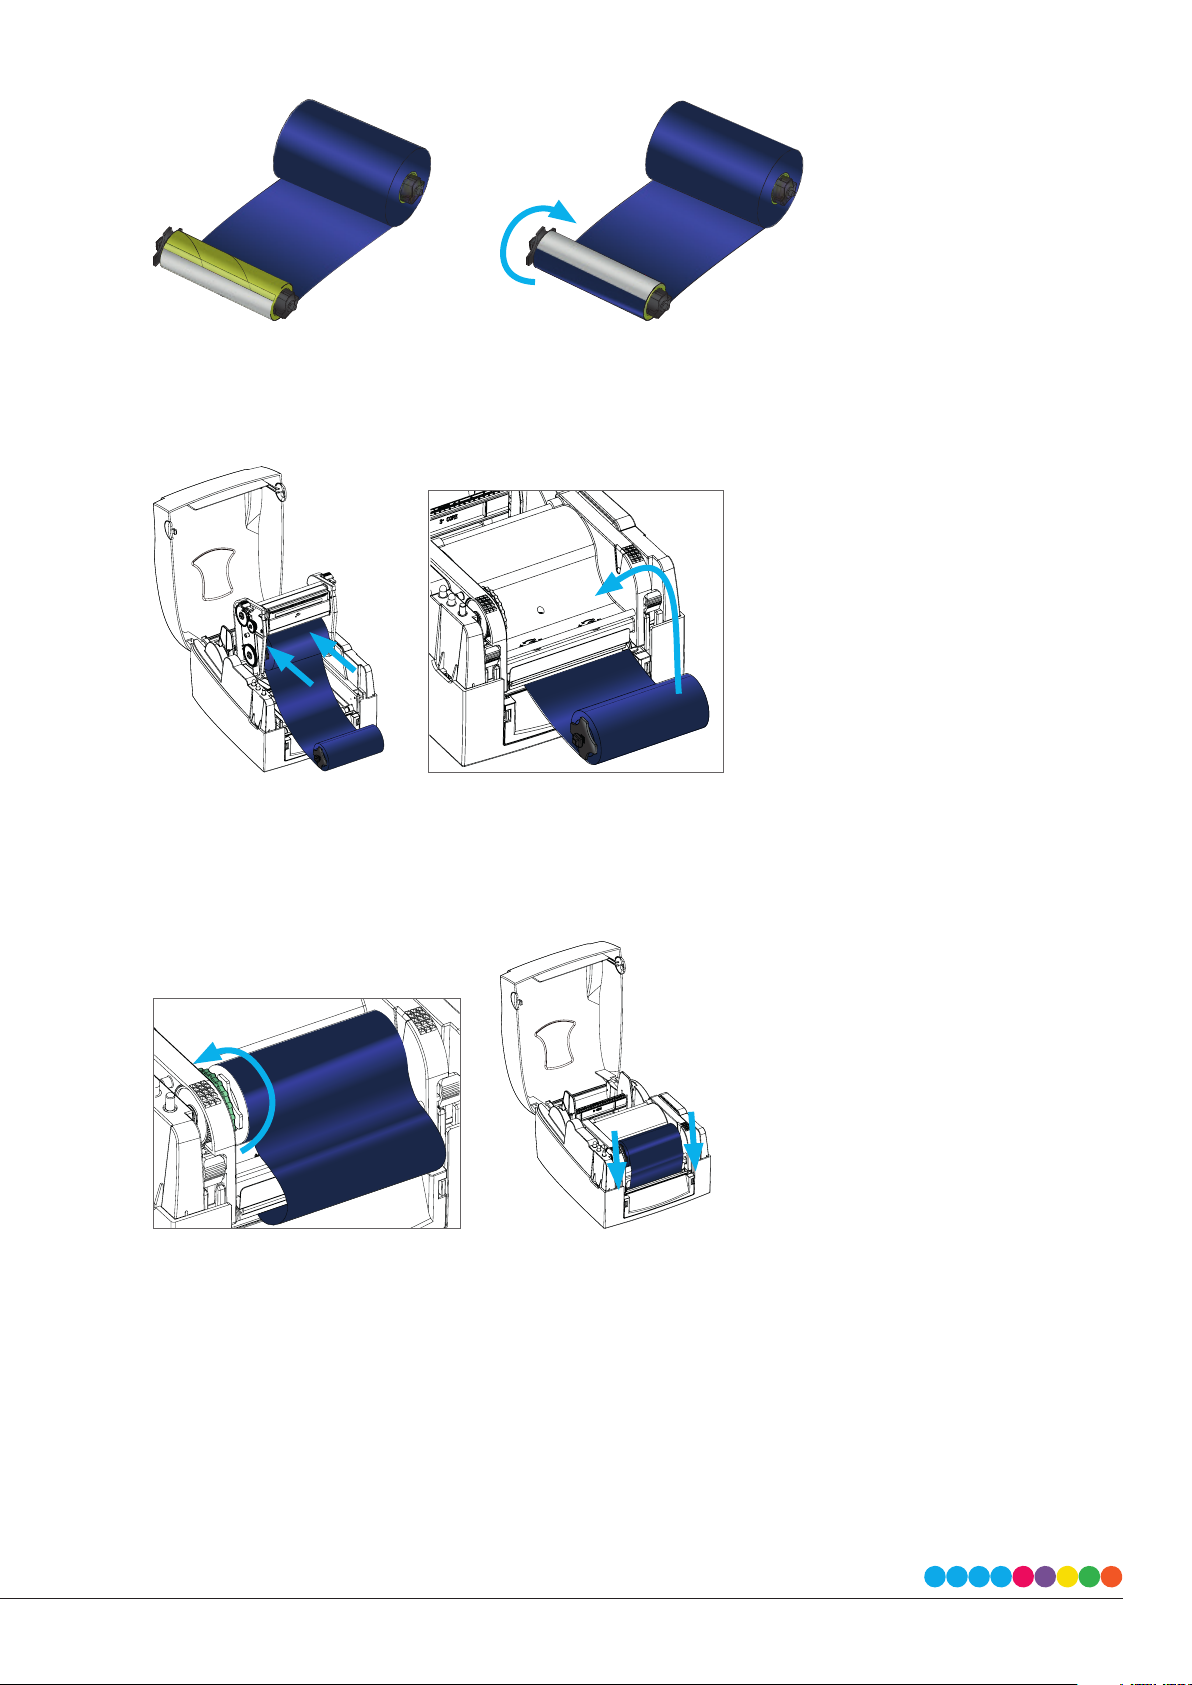
Stick the ribbon supply hub on the ribbon rewind hub and wind the rewind hub 2~3 circles.
Install The Ribbon On The Printer
Place the ribbon supply hub at the back of the printing mechanism. Pass the ribbon supply hub under the print head.
Note: The ribbon supply hub accepts the coated side of ribbon to be wound ink-inside IN or wound ink-side OUT. You will need to
wind it ink-inside IN.
Insert the ribbon rewind hub on the ribbon feed mechanism.
Note: The ribbon rewind hub accepts the coated side of ribbon to be wound ink-inside IN or wound ink-side OUT. We recommend
to wind it ink-inside IN.
Wind the ribbon to the back.
Close the printing mechanism, making sure that it clicks into place.
9 | Printer Setup
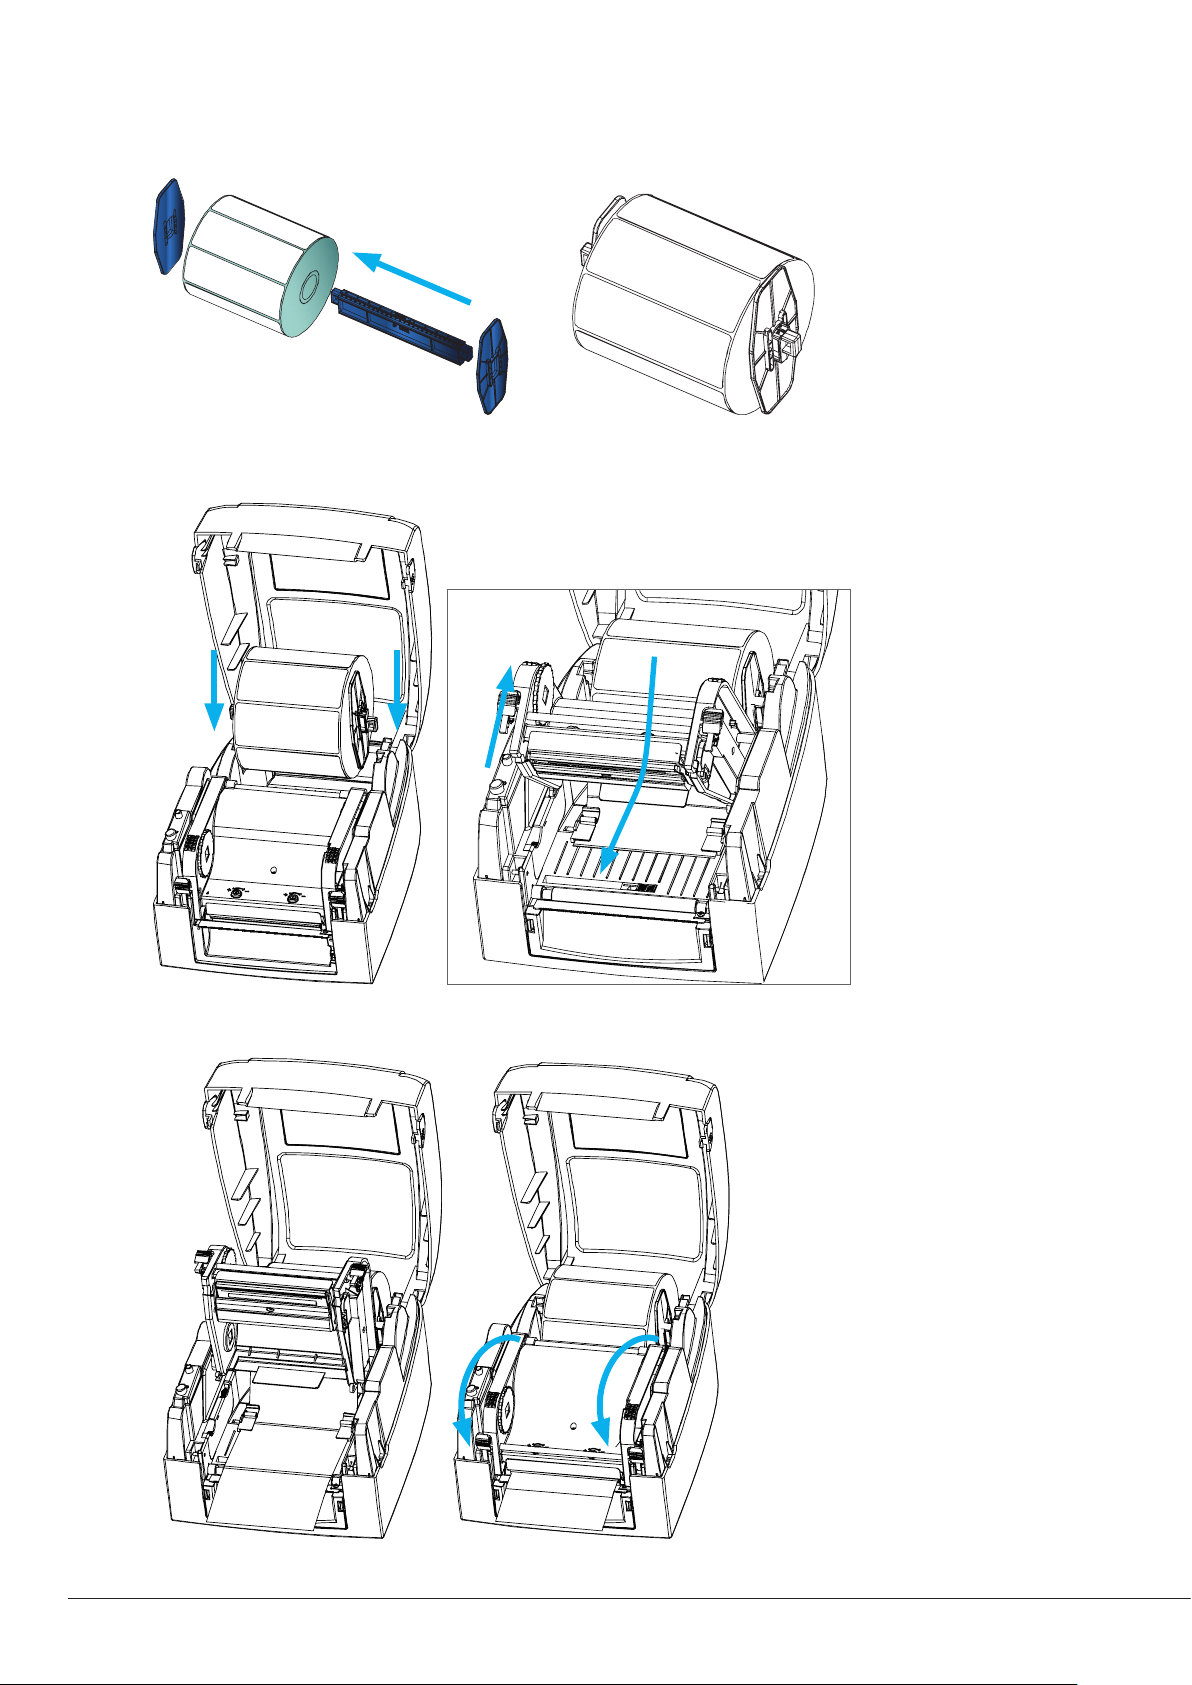
2 D Loading The Label Roll
A New Label Roll Module Installation
Place the label stock on the label supply hub, attach the guide plates to the label stock holder.
Install The Label Roll Module On The Printer
Now load the label stock into the printer. Release the printing mechanism and lift it.
Pass the labels through the label guides up to the tear-o plate. Adjust the label guides to the label width. Close the printing
mechanism.
10 | Printer Setup
 Loading...