

DTC Communications MBOX4DS User Manual
OPERATION
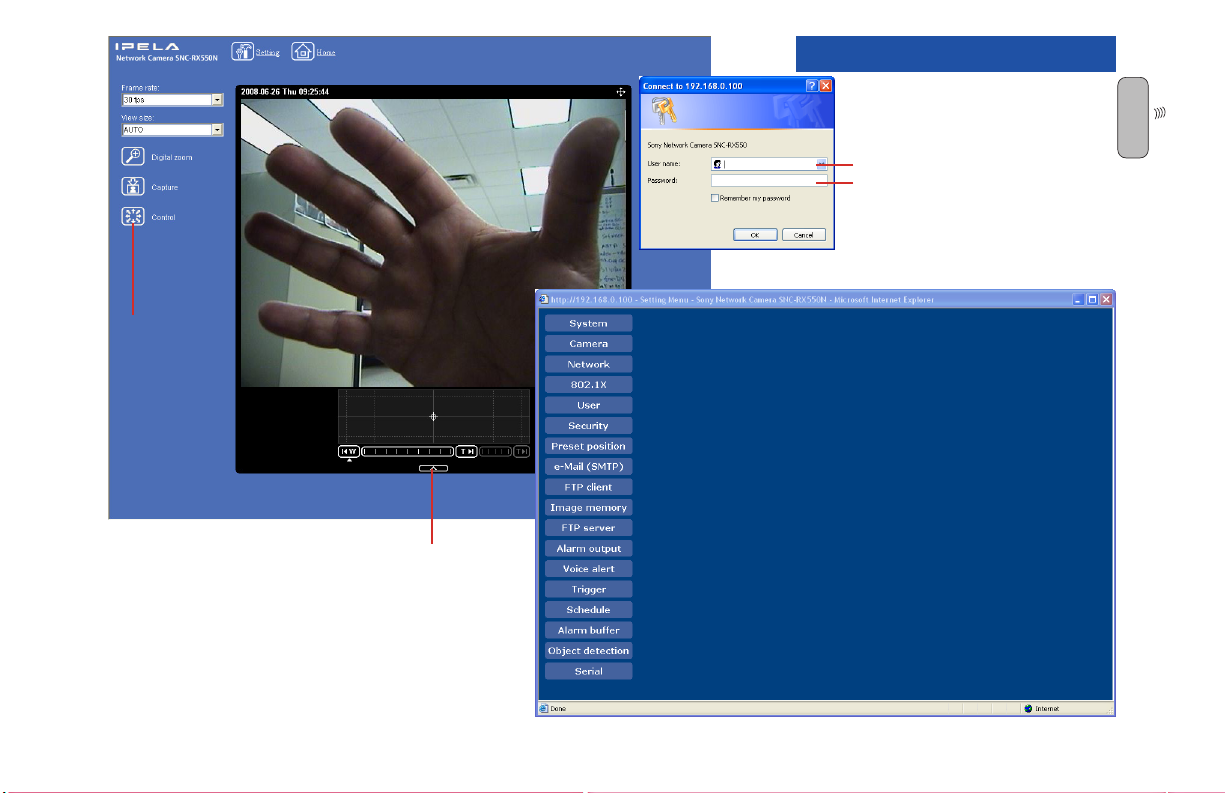
Enter User Name = admin
Password = admin
Click OK to Display Settings
Create a unique Password
for security.
W
Click 1X
to Display
Controls
Show/Hide
Controls
You should change your User
Name and Password to help protect
your MiniBox-4 from unauthorized
access. The Settings Page (right)
offers many customizable security
features.
To set a password:
Under User, In the Administrator eld, enter a user name
and password. Click OK.
To Set a unique Camera SSID (Label that shows up
with WiFi):
Under Network, Wireless tab, scroll down to SSID, Enter
new unique ID, with no spaces (i.e.: “Camera 12345”
will display as “Camera” if the SSID is set to “Camera12345” then it will display as “Camera-12345”). Click OK.
To set a password for viewing video:
Under User, In the user 1 eld enter a user name and
password. In the viewer mode select FULL (any other
setting will not allow for frame rate adjustment). In the
Viewer authentication select ON. Click OK..
DTC COMMUNICATIONS, INC.
21
OPERATION
Kenwood Radio Operation
A
1. Begin working with the radio
after it has charged overnight.
Make sure that the antenna is
D
securely connected, then turn
the unit ON.
2. Check the frequency for
activity. If you have to, change
both the radio and MiniBox-4
RX channels.
3. The radio has been configured
to transmit when any DTMF
key is depressed without
having to hold down the PTT
switch. With practice, this
allows one-hand, no-look
operation.
4. The right arrow button toggles
high-low power.
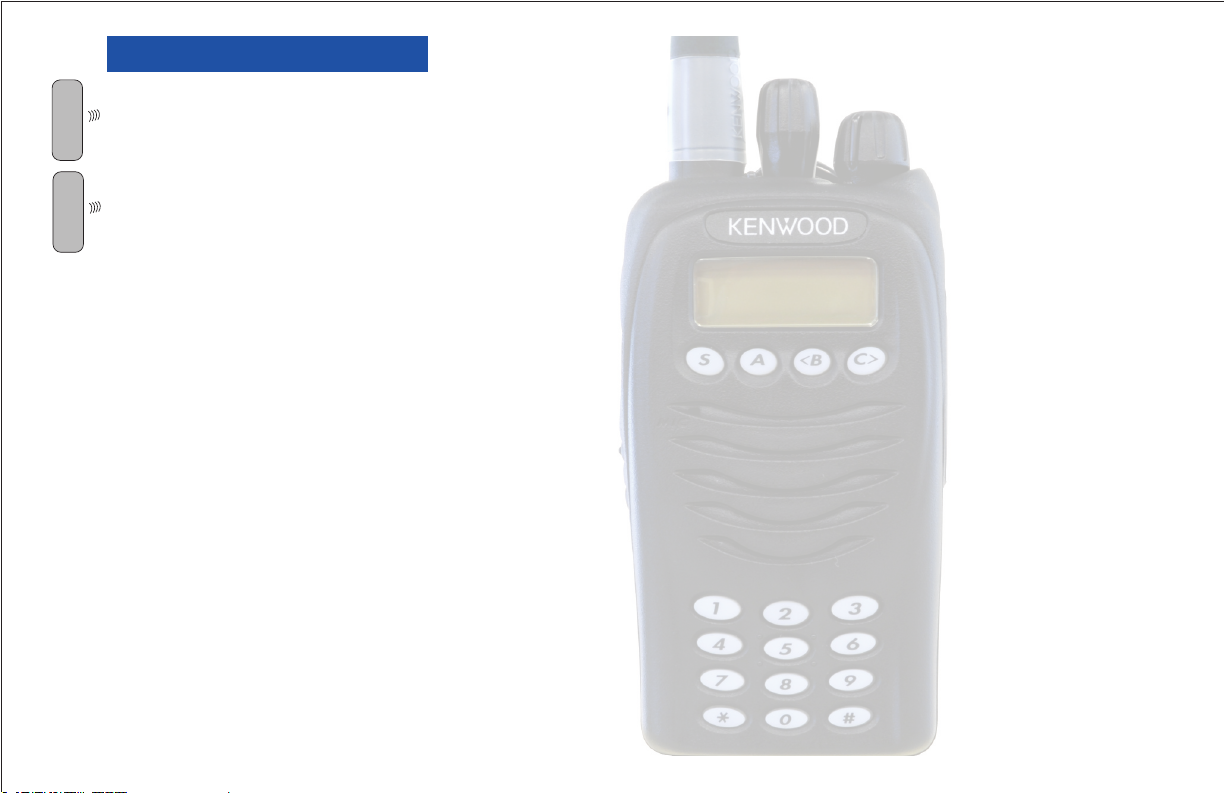
Kenwood Radio DTMF Control Transceiver
The MiniBox-4 features a Kenwood DTMF FM Transceiver for remote
control operation. The Kenwood uses a rechargeable battery and has its
own battery charging stand. The Kenwood is shipped pre-programmed for
communication with the Control Receiver in the MiniBox-4. Make sure the
antenna is attached before turning on the Kenwood.
The Kenwood Radio has been provided with transmitter models of the
MiniBox-4 in order to allow a simple remote control interface for the
camera. The radio is compact, rugged, water and dust resistant and has
Mil-Spec 810 construction.
This radio has an uncluttered control area and a large LCD display. The
radio also has practical features that make it a good radio for DTMF
control. It has been programmed at the factory to key automatically, when
a DTMF key is pressed. The radio also has a 1 second tail programmed.
This keeps the radio transmitting for a short time after a tone is sent. This
can help to smooth out the commands on pan and tilt.
One handed operation on normal pan tilt and zoom functions is easy.
22
DTC COMMUNICATIONS, INC.
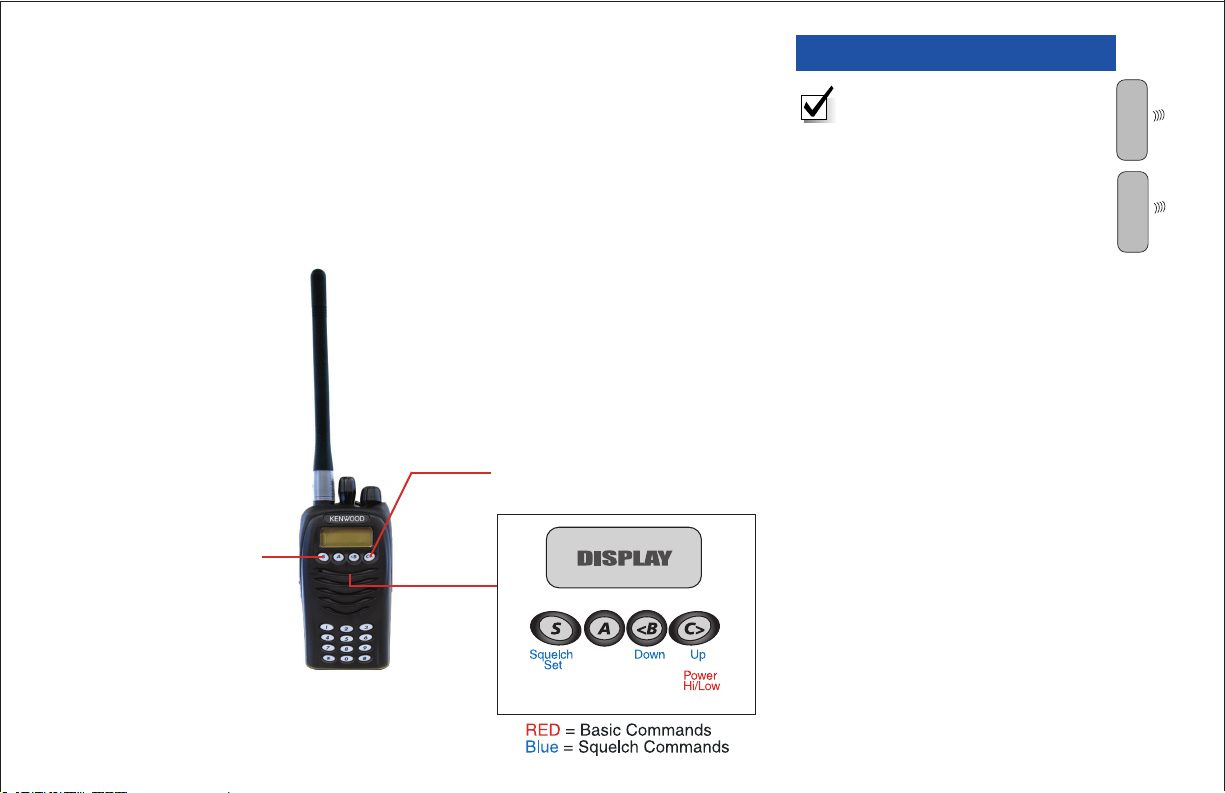
DTMF Control
With the transmitter-equipped MiniBox-4 powered ON, the unit can be
controlled by DTMF commands--using the Kenwood radio. Ensure that the
Kenwood is set to the same frequency as the control receiver in the MiniBox4 (see Control Panel). Make sure that the Kenwood’s antenna is installed
prior to operation.
The control codes for DTMF operation are listed starting on page 24.
Controlling the Kenwood is straightforward. Use the keys shown below to
adjust squelch and hi/low power level. Volume and channel controls
a r e o n t o p . T h e Kenwood is factory programmed with channels
that cor respond to the DTMF receiver in the MiniBox-4.
The C> key toggles
Hi/Low transmitter
power
The S key enables/
disables Squelch Set
Mode. Use <B and C>
keys to set squelch
level. Observe display.
Press S key again to
exit Squelch Set Mode.
OPERATION
NOTE The DTMF Control Radio
can overload the receiver if it is
too close. For testing purposes,
stand at least 10 feet from the
MiniBox-4 and set the Kenwood
to Low Power.
A
D
DTC COMMUNICATIONS, INC.
23
OPERATION
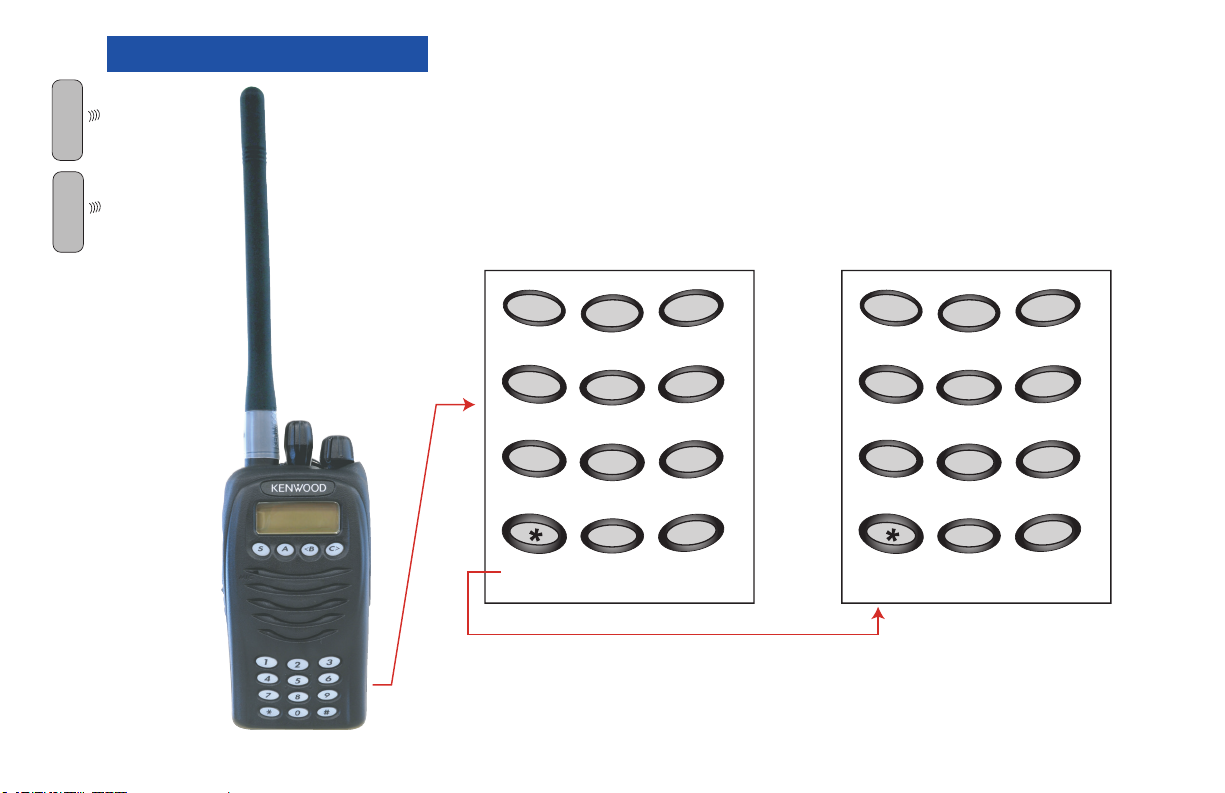
DTMF Commands
A
D
Below are the DTMF commands available on the Kenwood radio for
the MiniBox-4. Main Menu items are quickly accessible; pressing the *
button enables the SubMenu. A single button-press of a BLUE item in the
SubMenu will automatically return you to the Main Menu. RED SubMenu
items allow you to make multiple adjustments before pressing the * key to
return to the Main Menu.
MAIN MENU SUBMENU
24
DTC COMMUNICATIONS, INC.
1
ZOOM IN
4
PAN LEFT
7
ZOOM
OUT
ACCESS
2
TILT UP FOCUS
5
AUTO
FOCUS
8
TILT
DOWN
0
SPEED
3
NEAR
6
PAN
RIGHT
9
FOCUS
FAR
#
HELPSUBMENU
1
TX PWR
4
DISPLAY
ON/OFF
7
FREEZE
FRAME
2
SPEED
INCREASE
5
BACKLIGHT
ON/OFF
8
NIGHT SHOT
ON/OFF/AUTO
0
SPEED
DECREASE
3
PRESET
SUBMENU
6
SET TX
CHANNEL
9
#
HELPEXIT
Submenu functions in BLUE
will return to the Main Menu
automatically once selected.

OPERATION
The following table lists the various remote functions of the MiniBox-4 and
the DTMF codes that activate them. See Submenu on page 29 for advanced features.
FUNCTION DTMF CODE
Pan left 4
Pan right 6
Tilt up 2
Tilt down 8
Zoom in 1
Zoom out 7
Focus near 3
Focus far 9
AutoFocus ON/OFF 5
Speed 0 ( Enter number from 0 to 7 to set speed)
Nightshot On/Off/Auto *8
TX Power
1
*
NOTE: On-screen text is
visible in transmitted video
only. It does not display
on the video available at
the Video Out ports on the
Control Panel or on IPmonitored video.
NOTE: FOCUS NEAR and
FOCUS FAR commands only
work when the camera is in
MANUAL mode (AutoFocus
OFF).
NOTE: The TX Power
command toggles the RF
output ON/OFF for DIGITAL
transmitters and HIGH/
LOW/OFF for ANALOG
transmitters.
DTMF Menu Structure
The DTMF control structure for the
MiniBox-4 is set up in two layers:
the Main Menu and the Submenu.
These menus will be discussed in
turn.
Main Menu
The Main Menu is where the DTMF
Control is set when the system is
first turned-ON. The Main Menu is
where you will remotely control the
MiniBox-4 most of the time.
SubMenu (*)
The Submenu contains more
advanced and less-often used
commands.
DTC COMMUNICATIONS, INC.
25
A
D
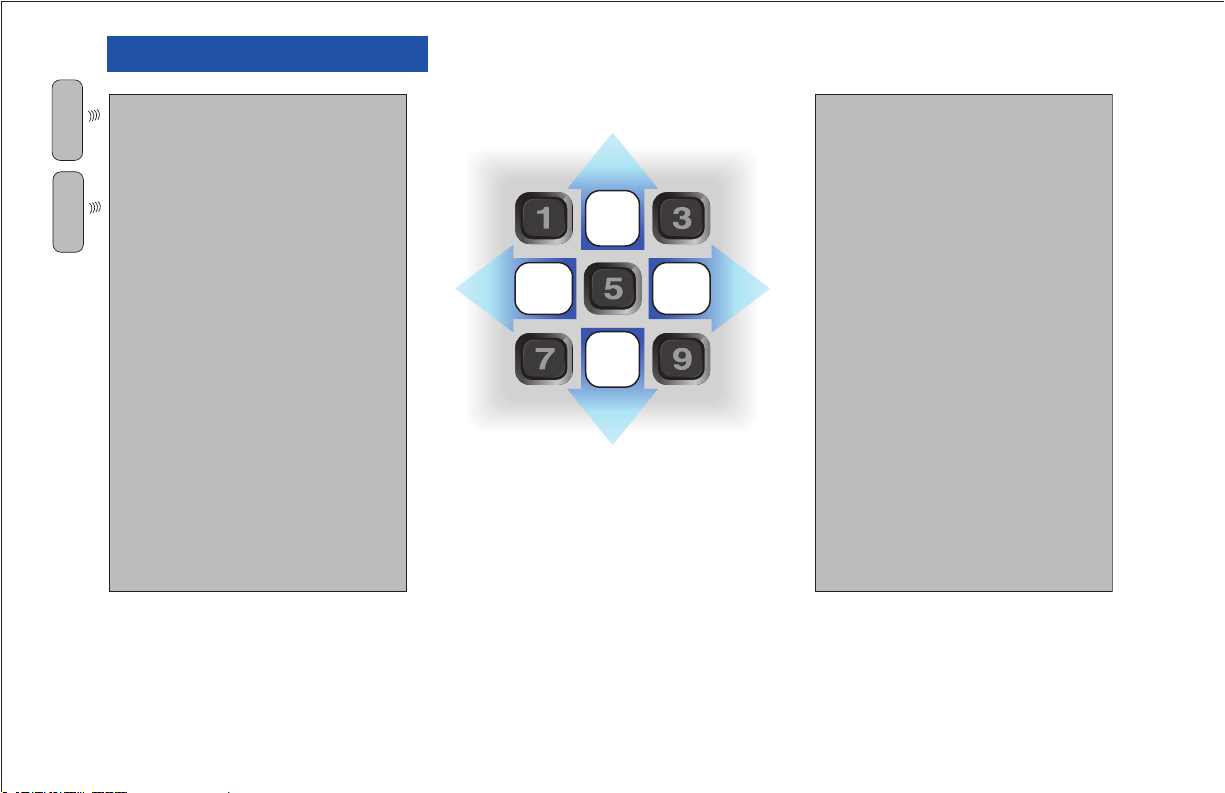
OPERATION
UP
2
DOWN
8
LEFT
4
RIGHT
6
MAIN MENU
1 = ZOOM IN
2 = TILT UP
3 = FOCUS NEAR
4 = PAN LEFT
5 = AUTO FOCUS
6 = PAN RIGHT
7 = ZOOM OUT
8 = TILT DOWN
9 = FOCUS FAR
0 = SPEED
*
= SUBMENU ACCESS
# = HELP
SUBMENU
1 = TX PWR HI/LO/OFF
(Analog)
ON/OFF
(Digital)
2 = SPEED INCREASE
3 = PRESET SUBMENU
4 = DISPLAY ON/OFF
5 = BACKLIGHT ON/OFF
6 = SET TX CHANNEL
7 = FREEZE FRAME
8 = NIGHTSHOT
ON/OFF/AUTO
0 = SPEED DECREASE
*
= EXIT
# = HELP
Submenu functions in BLUE
will return to the Main Menu
automatically once selected.
A
D
26
DTC COMMUNICATIONS, INC.
 Loading...