

DTC PRORXD-2-1RU, PRORXD-4-2RU, PRORXD-2-2RU, PRORXD-6-2RU, PRORXD-4-1RU User Manual
...
Resource Identifier 100167
Revision: 7.0
PRORXD Broadcast Receiver User Guide
Broadcast Solutions, HD/SD Products, PRORXD
Commercial in Confidence
DTC - Solent
Fusion 2
1100 Parkway
Solent Business Park
Whiteley
Hampshire
PO15 7AB
United Kingdom
+44 (0)1489 566 750

PRORXD Broadcast Receiver User Guide
Commercial in Confidence
Broadcast Solutions, HD/SD Products,
PRORXD
100167
Revision: 7.0
Commercial in Confidence
Page 0-1
0. Preface
0.1 About this Publication
This publication contains details required for the Operation and Administration of the equipment or system.
Since the available functions are licensed and rely on the actual installation, not all the functions and or
applications contained in this document can be related or applicable to the system you will be working with.
Actual screen presentation can be different from those in this document because of software changes or
your browser configuration.
0.2 Who Should Read this Book
This document is meant for anyone interested in how the system can best be used but it is of most benefit
to:
Operators who are in charge of the daily operation of the equipment
Installers who are responsible for the pre-installation, on-site installation and configuration of the
system in the end-user environment
Maintainers who are responsible for maintaining the equipment or system
0.3 Assumed Knowledge
Throughout this book it is assumed that the reader has a thorough knowledge of:
Basic Personal Computer Operations
Basic Radio Frequency (RF) Principles
0.4 Notice about Specifications
While DTC makes every attempt to maintain the accuracy of the information contained in its product
manuals, the information is subject to change without notice. Performance specifications included in this
manual are design-centre specifications and are included for customer guidance and to facilitate system
installation. Actual operating performance may vary.
0.5 Notice about this Guide
The product described in this manual is subject to continuous development and improvement. All
particulars of the product and its use (including the information and particulars in this guide) are given by
DTC in good faith. However, it is acknowledged there may be errors or omissions in this guide.

PRORXD Broadcast Receiver User Guide
Commercial in Confidence
Broadcast Solutions, HD/SD Products,
PRORXD
100167
Revision: 7.0
Commercial in Confidence
Page 0-2
0.6 Typographic Conventions
This publication uses these typographic conventions to identify text that has a special meaning:
Typographic Convention
Example
TEXT in small capitals represents a key push on the console
keyboard or hardware panel.
ESC, F1, SHIFT
The + sign means “hold down the first key while pushing the
second key”.
Push CTRL+C to abort
<Text> Serves as a placeholder for text that you will replace as
applicable to its context.
Use the filename
<system_name>.sys for…
Text in bold emphasises a new word or term of significance.
We name this a protocol and its
function is…
[-a] Text in these brackets shows an optional component that can
be left out.
Ls [-a]
NN This shows a value entered on a numeric keypad.
45 on the numeric keypad
Successive menu selections are shown with arrows to show a submenu. In this example this means:
Select the Insert menu, then select picture, then select from file.
Insertpicturefrom file
0.7 Symbols
This publication uses these symbols to highlight important information:
WARNING: A written notice given to a reader when a situation might cause personal injury or loss of life.
CAUTION: A written notice given when a situation might cause damage to or destruction of equipment or
systems.
Note: A written notice given to tell you something or to supply more information.
0.8 Trademarks
All trademarks or registered trademarks that appear in this document are the property of their respective
owners.
© Domo Tactical Communications (DTC) Limited.
Domo Tactical Communications (DTC) Limited owns the copyright of this document which is supplied in
confidence and must not be used for any purpose other than for which it is supplied and must not be
reproduced without permission in writing from the owners.

PRORXD Broadcast Receiver User Guide
Commercial in Confidence
Broadcast Solutions, HD/SD Products,
PRORXD
100167
Revision: 7.0
Commercial in Confidence
Page 0-3
0.9 Related Documents
It can also be necessary to read:
Publication
Source
Solo Concept Guide
DTC
IP Concept Guide
DTC
0.10 Document History
This publication was written and produced by the DTC Technical Publications Team.
This is a change controlled publication. Each page of this publication shows a revision number at the
bottom left corner.
Changes to a page will increase the revision status of the full publication.
Revision
Date
Authors
Summary of Changes
1.0
27/06/2014
RC
Initial release
2.0
28/11/2014
RC 3.0
20/01/2016
IR
Enhanced upgrade details
4.0
28/04/2016
IR
DTC rebranding
5.0
10/08/2016
IR
Remote commands update
6.0
14/10/2016
IR
Corrections to remote commands reply packet structure
7.0
07/11/2016
IR
Added low delay and general software updates

PRORXD Broadcast Receiver User Guide
Commercial in Confidence
Broadcast Solutions, HD/SD Products,
PRORXD
100167
Revision: 7.0
Commercial in Confidence
Page 0-4
Contents
0. Preface ...................................................................................................... 0-1
0.1 About this Publication .................................................................................................................. 0-1
0.2 Who Should Read this Book .......................................................................................................... 0-1
0.3 Assumed Knowledge ..................................................................................................................... 0-1
0.4 Notice about Specifications .......................................................................................................... 0-1
0.5 Notice about this Guide ................................................................................................................ 0-1
0.6 Typographic Conventions .............................................................................................................. 0-2
0.7 Symbols ........................................................................................................................................ 0-2
0.8 Trademarks ................................................................................................................................... 0-2
0.9 Related Documents ....................................................................................................................... 0-3
0.10 Document History ...................................................................................................................... 0-3
Contents .......................................................................................................... 0-4
1. Systems Description .................................................................................. 1-1
1.1 What is the PRORXD-1RU Broadcast Receiver? ............................................................................ 1-1
1.2 What are the Key Features of the PRORXD-1RU? .......................................................................... 1-2
1.3 What is the PRORXD-2RU Broadcast Receiver? ............................................................................ 1-3
1.4 What are the Key Features of the PRORXD-2RU? .......................................................................... 1-4
1.5 Getting an Overview of the PRORXD-2RU ..................................................................................... 1-5
2. Getting Started ......................................................................................... 2-8
2.1 Identifying your Device .................................................................................................................. 2-8
2.2 Unpacking your PRORXD ............................................................................................................... 2-8
2.3 About the Labels on your PRORXD............................................................................................... 2-12
2.4 Identifying the Variants of PRORXD ............................................................................................ 2-13
2.5 Identifying the Options of PRORXD-1RU ..................................................................................... 2-13
2.6 Identifying the Options of PRORXD-2RU ..................................................................................... 2-14
3. Controls, Connections and Indicators ...................................................... 3-16
3.1 About Controls, Connections and Indicators ............................................................................... 3-16
3.2 Exploring the Front Panel – PRORXD-1RU .................................................................................. 3-16
3.3 Exploring the Rear Panel – PRORXD-1RU ................................................................................... 3-17
3.4 Exploring the Front Panel – PRORXD-2RU .................................................................................. 3-19
3.5 Exploring the Rear Panel – PRORXD-2RU ................................................................................... 3-20
4. Setting up your PRORXD .......................................................................... 4-22
4.1 Planning the Hardware Installation ............................................................................................ 4-22
4.2 Connecting the Antennas ............................................................................................................ 4-22
4.3 Connecting AC Power .................................................................................................................. 4-23
4.4 Connecting Composite Video Signals ......................................................................................... 4-24
4.5 Connecting HD-SDI Video Signals ............................................................................................... 4-24
4.6 Connecting Audio Signals with XLR Connectors ......................................................................... 4-24
4.7 Connecting Audio Signals with CA0512 Cable ............................................................................ 4-25
4.8 Connecting Data Signals ............................................................................................................ 4-25
4.9 Connecting Serial Control Signals .............................................................................................. 4-25
4.10 Connecting IP Control Signals ................................................................................................ 4-26
5. Basic Operation ...................................................................................... 5-27
5.1 About the Software with your PRORXD ........................................................................................ 5-27

PRORXD Broadcast Receiver User Guide
Commercial in Confidence
Broadcast Solutions, HD/SD Products,
PRORXD
100167
Revision: 7.0
Commercial in Confidence
Page 0-5
5.2 Starting and Stopping the PRORXD ............................................................................................ 5-28
5.3 Exploring the Control Panel – 1RU .............................................................................................. 5-28
5.4 Exploring the LCD Display – 2RU ................................................................................................ 5-29
6. Advanced Operation ................................................................................ 6-30
6.1 About Encryption ......................................................................................................................... 6-30
6.2 Setting up Encryption ................................................................................................................. 6-30
6.3 About the Encryption Key Characters Required ........................................................................... 6-32
6.4 About IP Streaming ..................................................................................................................... 6-33
6.5 Configuring UDP Multicast Streaming ........................................................................................ 6-33
6.6 Recovering a UDP Multicast Stream – VLC ................................................................................. 6-34
6.7 Recovering a UDP Multicast Stream – Mission Commander ....................................................... 6-36
6.8 About RTSP Multicast and Unicast ............................................................................................. 6-37
7. Advanced Setup ...................................................................................... 7-38
7.1 About Advanced Setup ................................................................................................................ 7-38
7.2 Installing the Browser Application on your PC ............................................................................ 7-38
7.3 Connecting your PC to the PRORXD with IP ................................................................................. 7-38
7.4 Exploring the Primary Window ..................................................................................................... 7-40
7.5 Configuring the Basic Settings ................................................................................................... 7-42
7.6 Working with the Status Tab ....................................................................................................... 7-42
7.7 Working with the Global Settings Tab ......................................................................................... 7-56
7.8 Setting the Clock......................................................................................................................... 7-65
7.9 Working with the Configuration Tab ........................................................................................... 7-66
7.10 Working with the Copy from Config Button ............................................................................. 7-76
7.11 Working with the Log Tab ........................................................................................................ 7-78
7.12 Working with the Upload Tab .................................................................................................. 7-78
7.13 Working with the Frequency Tab ............................................................................................. 7-80
7.14 Working with the Information Tab ........................................................................................... 7-83
7.15 Working with the SNMP Tab .................................................................................................... 7-85
8. Appendix A – Cautions and Warnings ...................................................... 8-86
8.1 Cautions and Warnings .............................................................................................................. 8-86
8.2 EMC/Safety and Radio Approvals................................................................................................ 8-87
8.3 CE Marking ................................................................................................................................. 8-87
9. Appendix B – Precautions and Maintenance............................................ 9-88
9.1 Caring for your Equipment .......................................................................................................... 9-88
9.2 Charging ..................................................................................................................................... 9-88
9.3 Working with Lithium Batteries................................................................................................... 9-88
9.4 Cleaning ..................................................................................................................................... 9-89
9.5 Storage ....................................................................................................................................... 9-89
9.6 Repairs ....................................................................................................................................... 9-89
9.7 Getting Technical Support .......................................................................................................... 9-89
9.8 Using the DTC RMA Service ......................................................................................................... 9-90
10. Appendix C – Glossary ....................................................................... 10-91
10.1 Glossary ................................................................................................................................ 10-91
11. Appendix D – Downconverter Data ..................................................... 11-98
11.1 About Downconverters, Square ............................................................................................. 11-98
11.2 About Downconverters, Barrel ............................................................................................... 11-98
11.3 About Downconverters, Barrel, Gain Selectable, TNC-TNC .................................................... 11-98
11.4 About Downconverters, Barrel, Gain Selectable, Broadcast, N Type to BNC .......................... 11-99

PRORXD Broadcast Receiver User Guide
Commercial in Confidence
Broadcast Solutions, HD/SD Products,
PRORXD
100167
Revision: 7.0
Commercial in Confidence
Page 0-6
11.5 About Downconverters, Extended Barrel, Gain Selectable, Broadcast (N Type to BNC) ......... 11-99
12. Appendix E – Remote Control Guide ................................................. 12-100
12.1 About the RS232 Control General Principles ....................................................................... 12-100
12.2 About the Command Packet Structure ................................................................................ 12-100
12.3 About the Reply Packet Structure ........................................................................................ 12-100
12.4 About the Programming Model ............................................................................................ 12-101
12.5 Commands .......................................................................................................................... 12-102
PRORXD Broadcast Receiver User Guide
Commercial in Confidence
Broadcast Solutions, HD/SD Products,
PRORXD
100167
Revision: 7.0
Commercial in Confidence
Page 1-1
1. Systems Description
The equipment in this User Guide is:
Equipment Title
Part Numbers
Broadcast Receiver, 1U Version
Broadcast Receiver, 2U Version
PRORXD-2-1RU
PRORXD-4-1RU
PRORXD-2-2RU
PRORXD-4-2RU
PRORXD-6-2RU
PRORXD-8-2RU
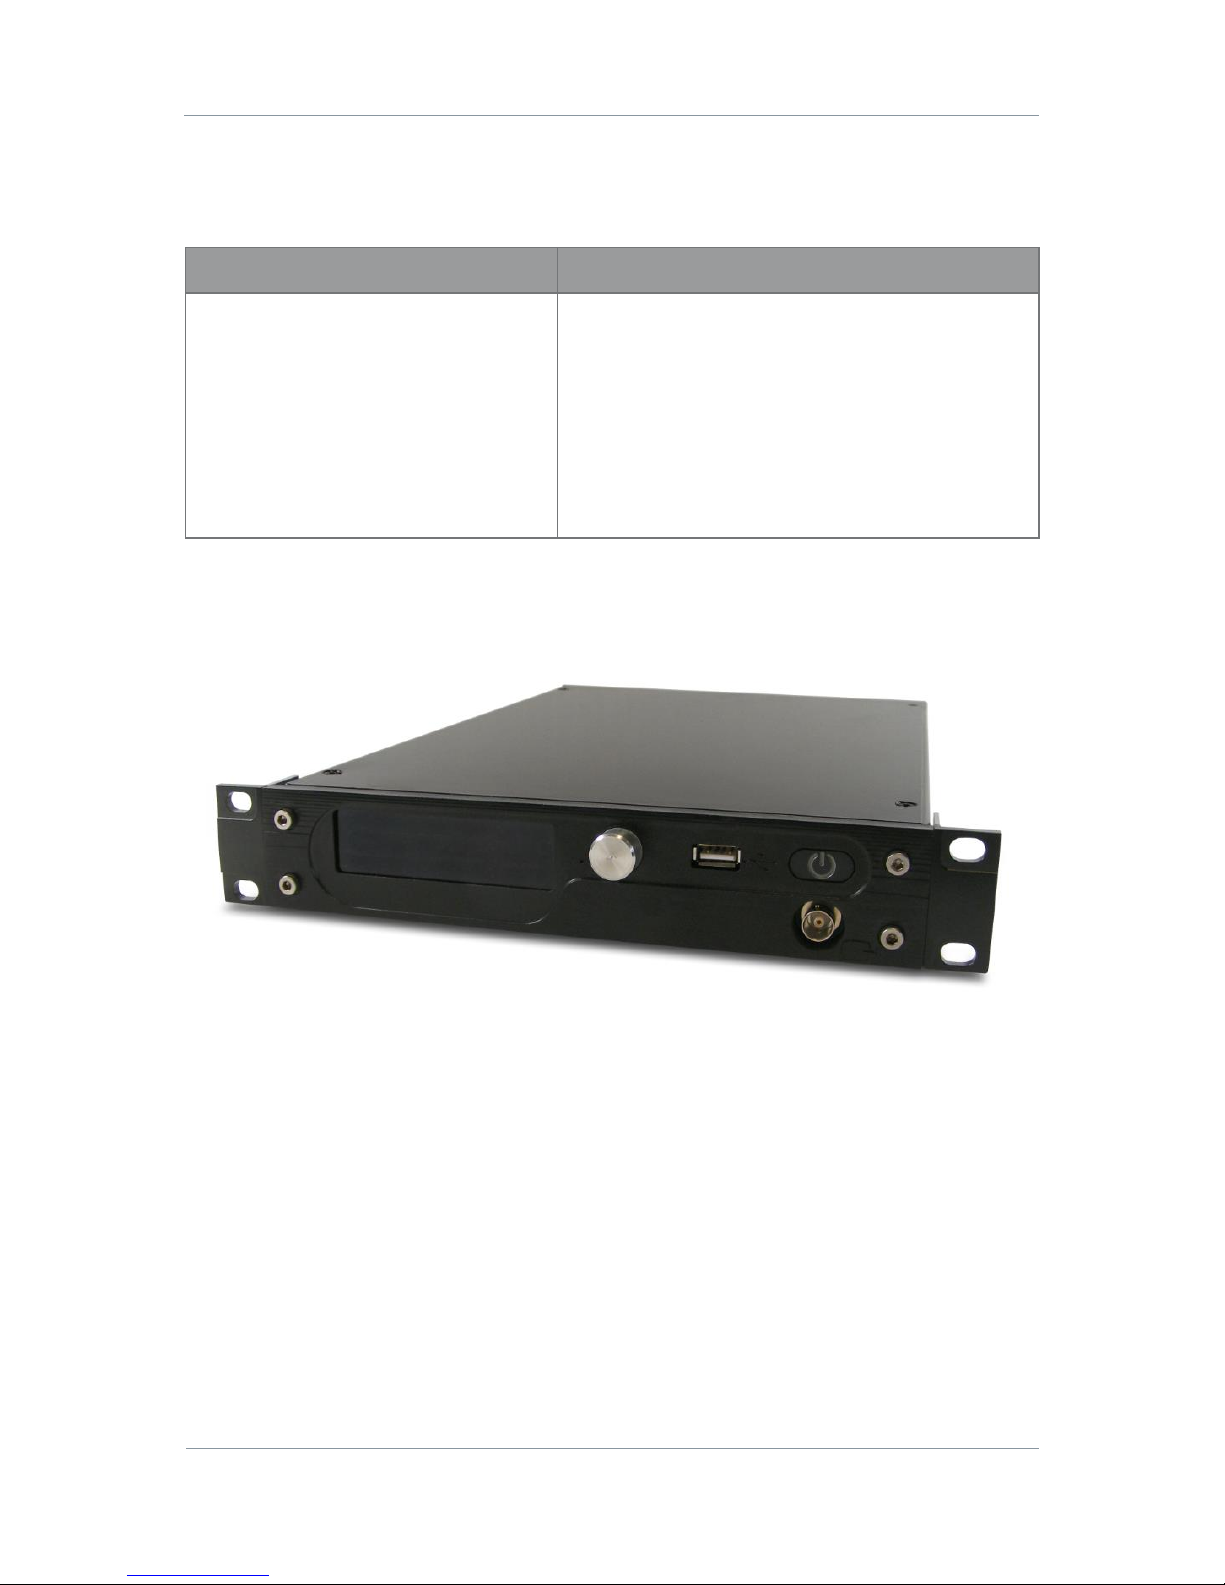
1.1 What is the PRORXD-1RU Broadcast Receiver?
Figure 1-1 PRORXD Broadcast Receiver, 1RU Version
The PRORXD-1RU is a feature-rich COFDM receiver/decoder with DUAL optional receive and HD decoding
capability in a single enclosure. Designed specifically for the demanding broadcast market, it is supplied in
a 1/2 19” 1RU high rack chassis, where two units can be mounted together to occupy a 19” slot and uses
standard broadcast connectors for signal interfaces.
The PRORXD-1RU is available with 2-way or 4-way maximum ratio combining RF inputs, ensuring video is
recovered free from the distortions typically associated with fading and multipath. All DVB-T 6/7/8MHz
modes are supported, plus DTC’s 6/7/8MHz UMVL (Ultra Mobile Video Link) modulation – designed to
enhance performance when utilising higher frequency bands or in high-speed TX applications such as
Motorsport. DTC Narrowband, enabling broadcast quality (4.8Mbps) signals to be transmitted in only
2.5MHz bandwidth is available as an option. Designed to work with external DTC down-converters, the
receiver can be located up to 100m from the antennas using standard 75Ω co-axial cables.
The unit incorporates an extremely flexible decoding platform, with low delay H.264 decoding ensuring
compatibility with all DTC and most 3rd party encoders. An optional 2nd decoder can be enabled, allowing

PRORXD Broadcast Receiver User Guide
Commercial in Confidence
Broadcast Solutions, HD/SD Products,
PRORXD
100167
Revision: 7.0
Commercial in Confidence
Page 1-2
2x SD or HD signals to be decoded. Multiple video output formats are offered with composite and SDI
outputs in SD mode and HD-SDI and in HD mode. SDI/HD-SDI both feature embedded audio and HDMI
outputs are provided for use with domestic TV’s. ASI in/out is offered as an option.
A full Genlock facility is available in both SD and HD modes. When in HD mode, an optional downconverted
SD composite video monitoring output is also offered.
The unit can also be used as an IP decoder. When paired with a DTC Broadcast IP Encoder, the unit can
send an IFB signal to the remote location via the reverse leg of the IP link. An optional adaptive bit-rate
encoding/decoding mode is also available, allowing fully automated operation on variable capacity or
contended networks such as VSAT or BGAN terminals.
The PRORXD-1RU can be controlled through its OLED front panel display, as well as on its RS232 or IP
Ethernet browser control interfaces.
A comprehensive On Screen Graphical display is available for monitoring and diagnostics, which can be
enabled or disabled separately on the two video outputs.
1.2 What are the Key Features of the PRORXD-1RU?
DVB-T & UMVL (optional) demodulation
2 or 4 RF inputs with 8/12DC switchable down converter powering
Fully compliant MPEG2 and H.264 SD/HD decoding
HD-SDI/SDI with embedded audio out
Composite video outputs (with optional HD down-conversion)
HDMI outputs
IFB input (IP mode)
2
nd
decoder (optional)
Auto bit-rate capability (with DTC Broadcast IP Encoder)
ASI input and output (optional)
Front panel control (+ Web-browser and RS232)
Genlock input
Full on-screen display (OSD) diagnostics
Low delay video operation for real-time applications (DTC H.264 systems only)
1RU half-rack mounting
12VDC powering (AC adaptor supplied)
PRORXD Broadcast Receiver User Guide
Commercial in Confidence
Broadcast Solutions, HD/SD Products,
PRORXD
100167
Revision: 7.0
Commercial in Confidence
Page 1-3
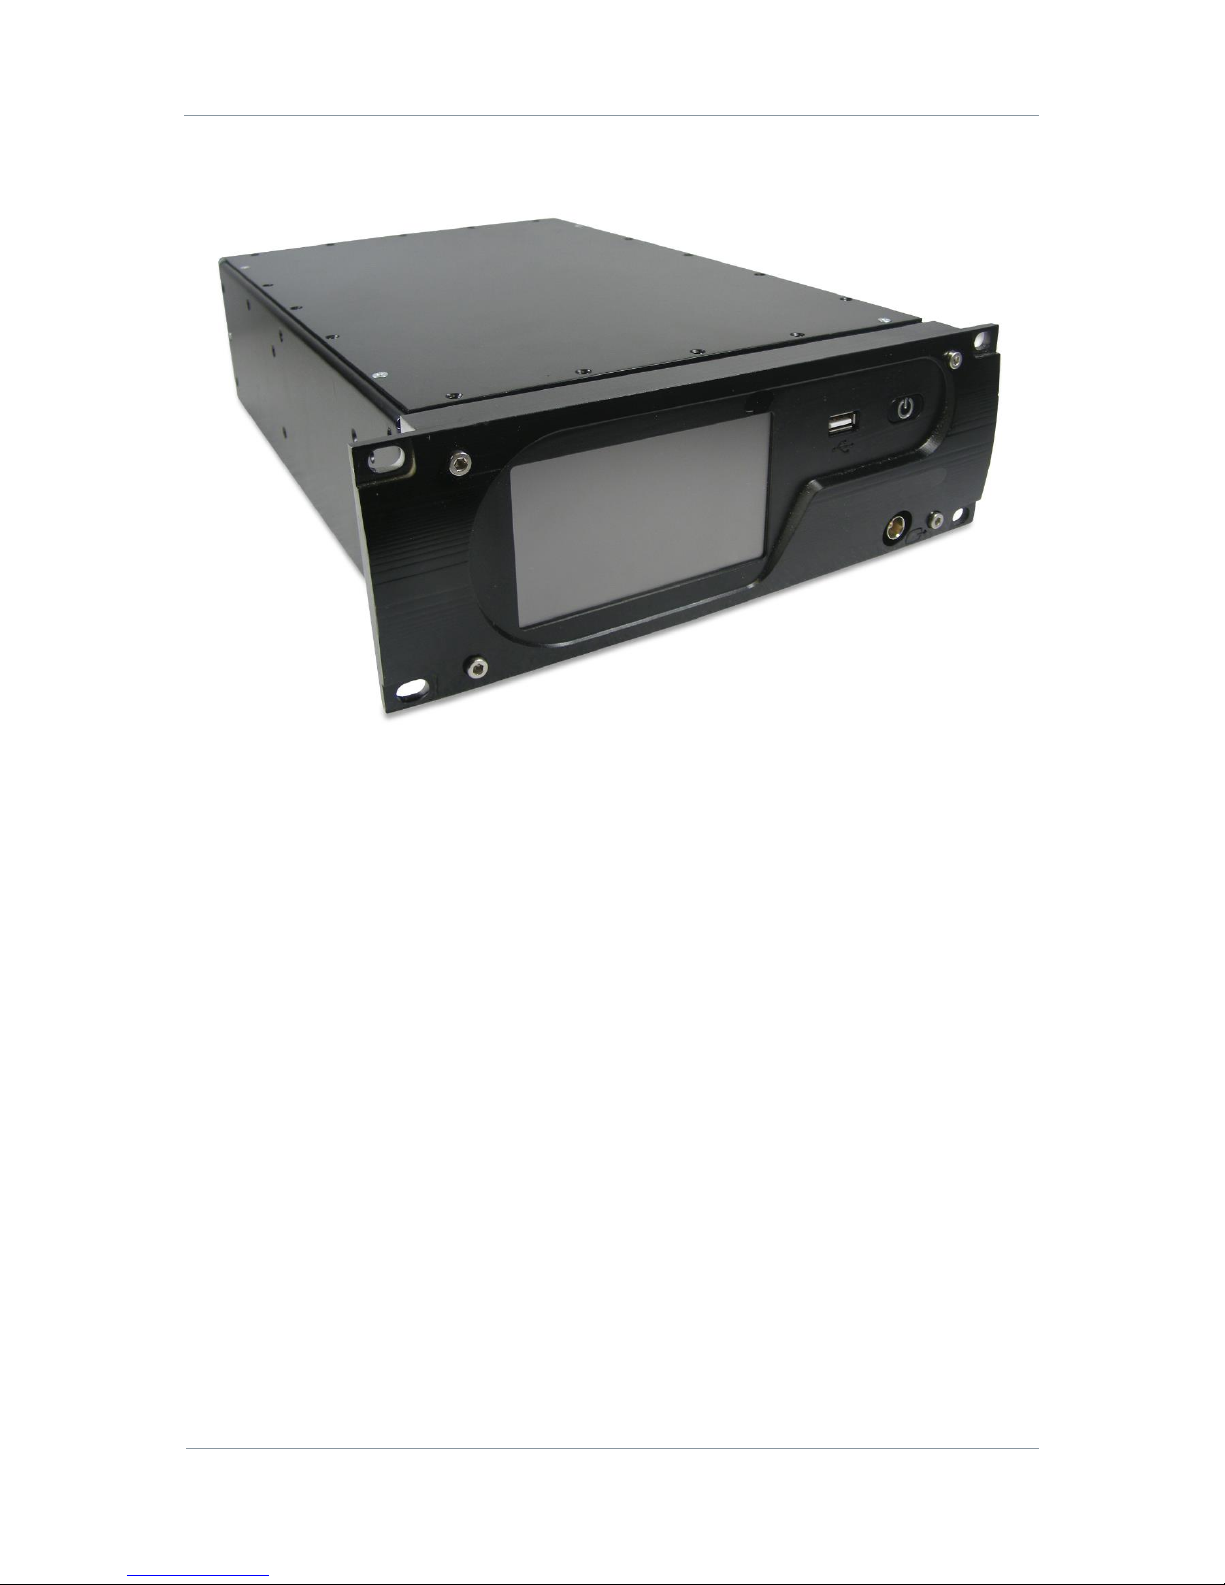
1.3 What is the PRORXD-2RU Broadcast Receiver?
Figure 1-2 PRORXD Broadcast Receiver, 2RU Version
The PRORXD-2RU is a feature-rich COFDM receiver/decoder with DUAL receive and HD decoding capability
in a single enclosure. Designed specifically for the demanding broadcast market, it is supplied in a 1/2 19”
2RU high rack chassis, where two units can be mounted together to occupy a 19” slot and uses standard
broadcast connectors for signal interfaces.
It is available with 6-way or 8-way maximum ratio combining RF inputs, ensuring video is recovered free
from the distortions typically associated with fading and multipath. All DVB-T 6/7/8MHz modes are
supported, plus DTC’s 6/7/8MHz UMVL (Ultra Mobile Video Link) modulation – designed to enhance
performance when utilising higher frequency bands or in high-speed TX applications such as Motorsport.
DTC Narrowband, enabling broadcast quality (4.8Mbps) signals to be transmitted in only 2.5MHz bandwidth
is available as an option. Designed to work with external DTC down- converters, the receiver can be located
up to 100m from the antennas using standard 75Ω co-axial cables.
The unit incorporates an extremely flexible decoding platform, with low delay H.264 decoding ensuring
compatibility with all DTC and most 3rd party encoders. An optional 2nd decoder can be enabled, allowing
2x SD or HD signals to be decoded. Multiple video output formats are offered with composite and SDI
outputs in SD mode and HD-SDI and in HD mode. SDI/HD-SDI both feature embedded audio and HDMI
outputs are provided for use with domestic TV’s. ASI in/out is offered as an option.
A full Genlock facility is available in both SD and HD modes. When in HD mode, an optional downconverted
SD composite video monitoring output is also offered.
The unit can also be used as an IP decoder. When paired with a DTC IP Encoder, the unit can send an IFB
signal to the remote location via the reverse leg of the IP link. An optional adaptive bit-rate
encoding/decoding mode is also available, allowing fully automated operation on variable capacity or
contended networks such as VSAT or BGAN terminals.
The PRORXD-2RU can be controlled through its comprehensive, full-colour front panel touch- screen
display, as well as on its RS232 or IP Ethernet browser control interfaces.

PRORXD Broadcast Receiver User Guide
Commercial in Confidence
Broadcast Solutions, HD/SD Products,
PRORXD
100167
Revision: 7.0
Commercial in Confidence
Page 1-4
A comprehensive On Screen Graphical display is available for monitoring and diagnostics, which can be
enabled or disabled separately on the two video outputs.
1.4 What are the Key Features of the PRORXD-2RU?
DVB-T & UMVL demodulation
2, 4, 6 or 8 RF inputs with 8/12DC switchable downconverter powering
Fully compliant MPEG2 and H.264 SD/HD decoding
HD-SDI/SDI with embedded audio out
Composite video outputs (with optional HD down- conversion)
HDMI outputs
IFB input (IP mode)
2
nd
decoder optional
Auto bit-rate capability (with DTC Broadcast IP Encoder)
ASI input and output
Front panel control (+ Web-browser and RS232)
Genlock input
Full on-screen display (OSD) diagnostics
Low delay video operation for real-time applications (DTC H.264 systems only)
2RU half-rack mounting
12VDC powering (AC adaptor supplied)
PRORXD Broadcast Receiver User Guide
Commercial in Confidence
Broadcast Solutions, HD/SD Products,
PRORXD
100167
Revision: 7.0
Commercial in Confidence
Page 1-5
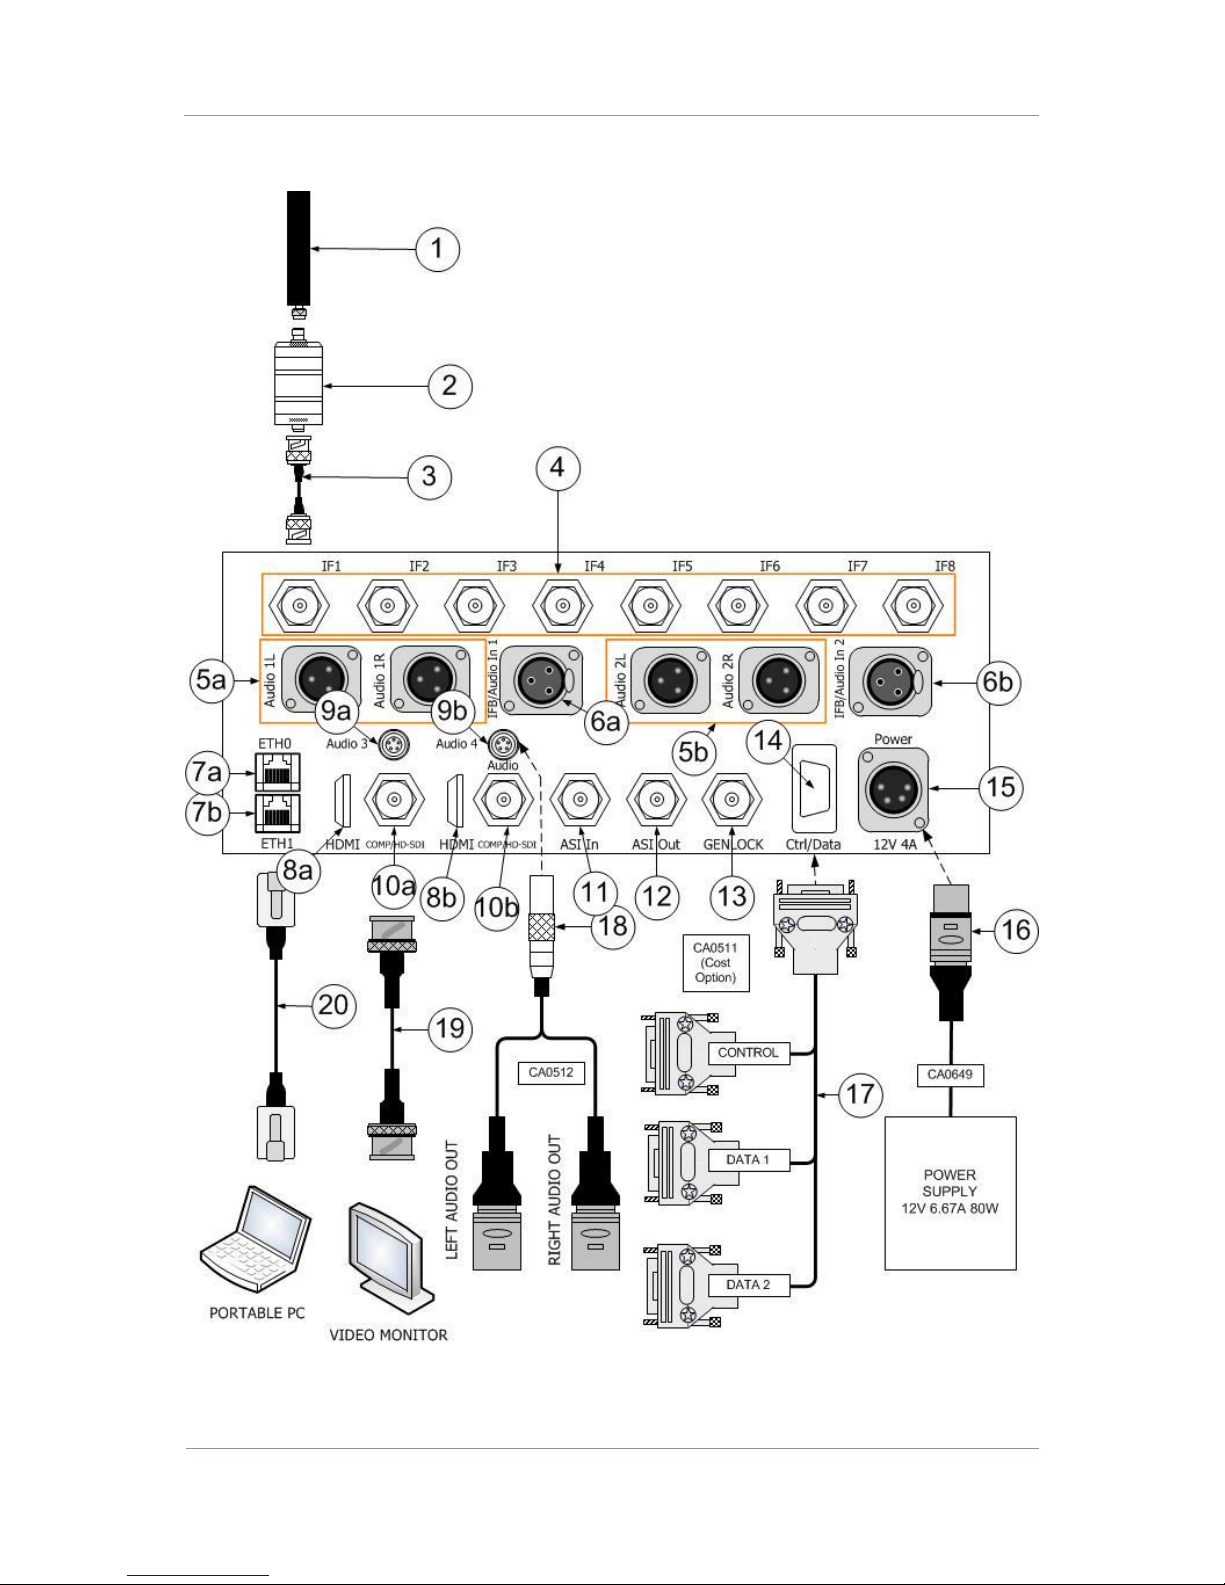
1.5 Getting an Overview of the PRORXD-2RU
Figure 1-3 Main System Diagram

PRORXD Broadcast Receiver User Guide
Commercial in Confidence
Broadcast Solutions, HD/SD Products,
PRORXD
100167
Revision: 7.0
Commercial in Confidence
Page 1-6
No
Item
Function
1
Antenna.
Matched to band of the downconverter.
Do not tighten too much – tighten with
your hand.
2
Downconverter.
Enables the PRORXD to be used in
different RF bands.
CAUTION: Do not turn the barrel of the
downconverter when attaching antennas
or IF cables. Too much twisting will
damage the inner pin.
CAUTION: Do not install the Downconverter
upside down. Power from the IF cable will
damage components in the downconverter.
3
IF cable, TNC 2-way plug, (pins) to BNC 2-way
plug, (pins).
Downconverter to PRORXD connection.
IF – Intermediate Frequency.
4
BNC 2-way receptacle (sockets), 50-850MHz,
marked IF1 to IF8.
The IF cables from the downconverters
connect here.
5ab
XLR 3-way receptacle (pins) marked AUDIO 1L and
AUDIO 1R.
Channel two is marked AUDIO 2L and AUDIO 2R.
Stereo Line Level Audio Outputs, left and
Right, channel one and two.
6ab
XLR 3-way receptacle (sockets) marked IFB/Audio
In 1.
Channel 2 is marked IFB/Audio In 2.
IFB – Interruptible Fold back.
The IFB is a special intercom circuit that
consists of a mix-minus program feed sent
to an earpiece worn by presenter via IP
(audio that is being “fed back” to
presenter) that can be interrupted and
replaced by a television producer's or
director's intercom microphone. That
microphone is connected here.
Each channel has this facility.
7ab
RJ45 8-way receptacle (sockets) marked ETH0 and
ETH1.
Ethernet 1 and 2. 10/100/1G Ethernet
Ports with PoE (Power over Ethernet)
support.
Used for Remote Control through a web
browser and for streaming.
8ab
HDMI receptacle (sockets) marked HDMI.
HDMI Video output.
Each channel has this facility.
9ab
Lemo OB 5-way receptacle (sockets) twin key
marked AUDIO 3.
Channel two is marked AUDIO 4.
For Audio output.
Each channel has this facility.
10ab
BNC 2-way receptacle (sockets) marked
COMP/HD-SDI.
CBVS/SDI/HD-SDI//ASI video output.

PRORXD Broadcast Receiver User Guide
Commercial in Confidence
Broadcast Solutions, HD/SD Products,
PRORXD
100167
Revision: 7.0
Commercial in Confidence
Page 1-7
No
Item
Function
11
BNC 2-way receptacle (sockets) marked ASI In.
ASI Input.
12
BNC 2-way receptacle (sockets) marked ASI Out.
ASI Output.
13
BNC 2-way receptacle (sockets) marked GENLOCK.
Genlock Input.
14
D-Type 15-way receptacle (sockets) marked
CTRL/DATA.
RS232 Control from PC GUI Application.
RS232 Data Output, 1K2 to 115K2 baud
switchable.
15
XLR 4-way receptacle (pins) marked POWER, 12V
4A.
6 to 26V Reverse Polarity Protected Power
from AC Adapter.
16
XLR 4-way plug (sockets).
From AC Adapter.
17
Pro-RX/B External RS232 Control/Data1/Data2
Cable Assembly 2 metres.
CA0511
18
Pro-RXB External XLR Audio Cable Assembly 2
metres.
CA0512
19
BNC-BNC Video Cable.
CA0006
20
Standard Ethernet Cable.
AP000465
Table 1-1 Main System Diagram Key
PRORXD Broadcast Receiver User Guide
Commercial in Confidence
Broadcast Solutions, HD/SD Products,
PRORXD
100167
Revision: 7.0
Commercial in Confidence
Page 2-8
2. Getting Started
2.1 Identifying your Device
There are two types of device described in this User Guide.
Product Name: PRORXD 1 RU Receiver
Product Code: PRORXD-n-1RU (where n is 2 or
4-way diversity)
Dimensions (mm): 320 (L) x 220 (W) x 44 (H)
Weight: 2.1kg
Operating Temperature: -20°C to +60°C
DC Input: 6 to 26VDC reverse polarity protected
Power Consumption: 27-49W (downconverter
dependent)
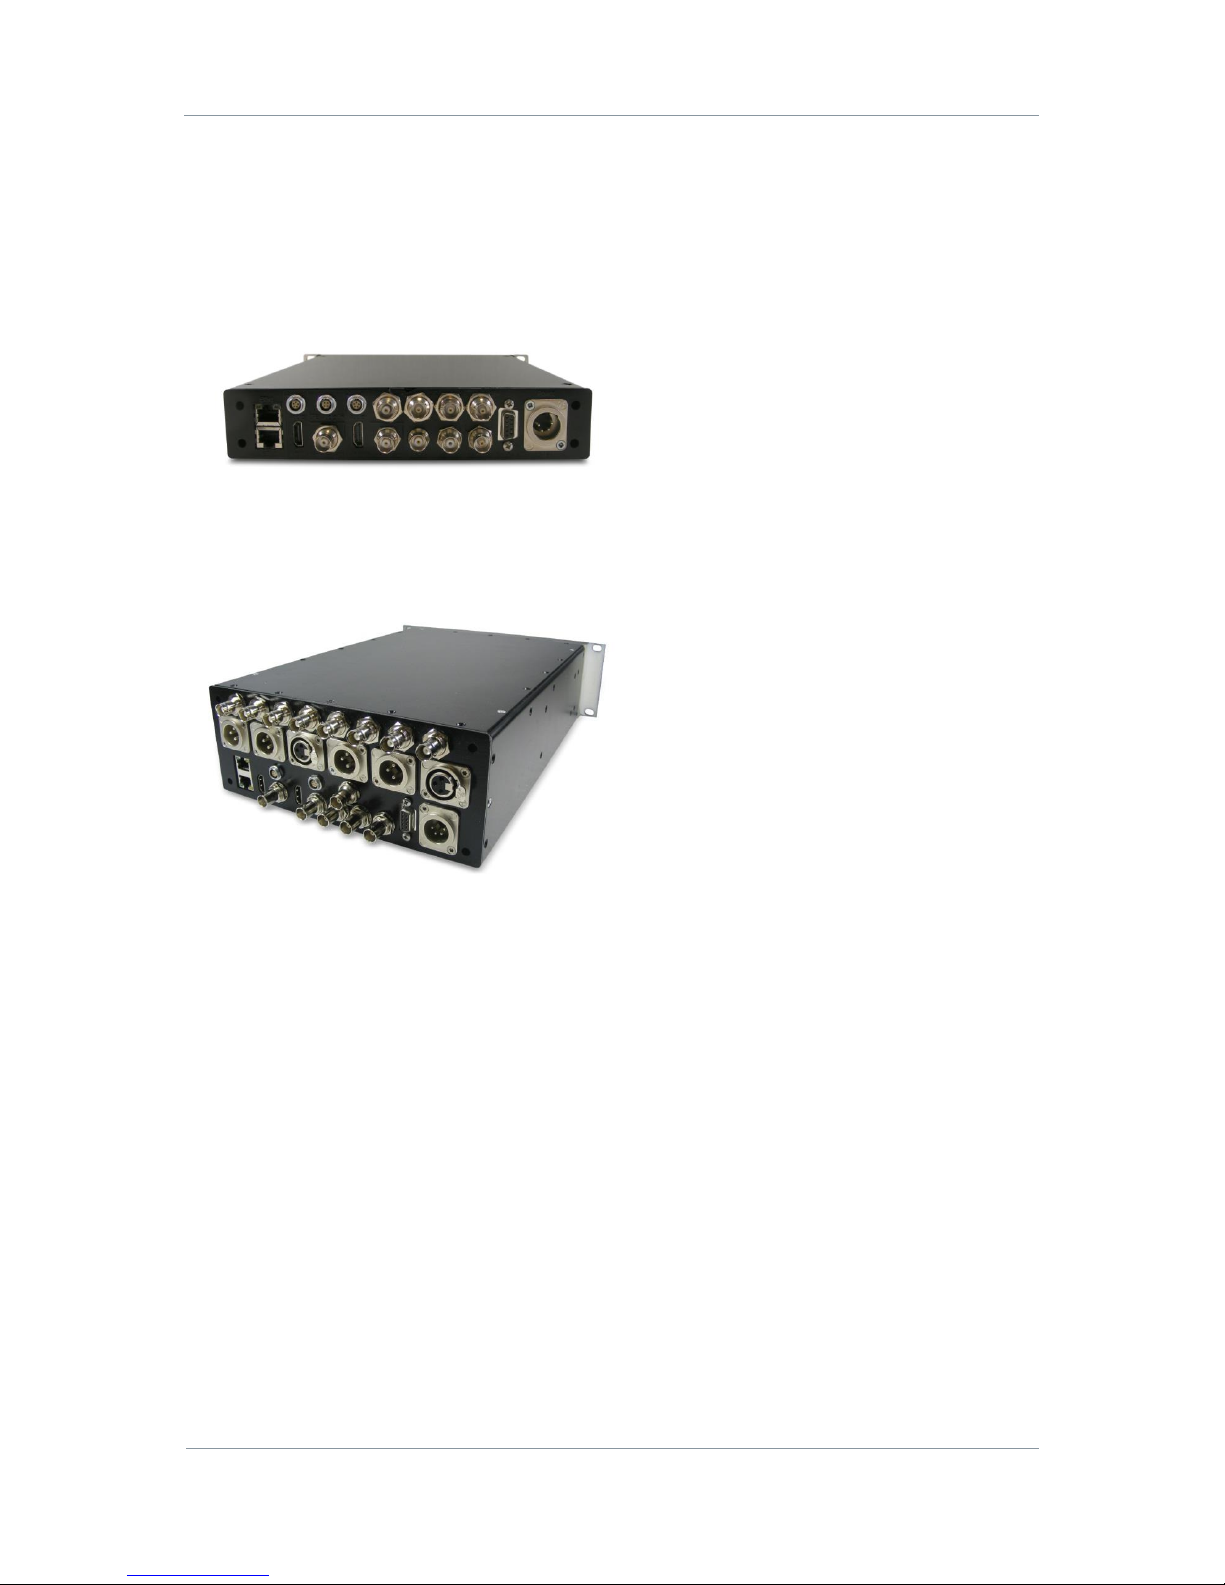
Product Name: PRORXD 2 RU Receiver
Product Code: PRORXD-n-2RU (where n is 2, 4,
6 or 8-way diversity)
Dimensions (mm): 320 (L) x 220 (W) x 88 (H)
Weight: 2.7kg
Operating Temperature: -20°C to +60°C
DC Input: 6 to 26VDC reverse polarity protected
Power Consumption: 27-49W (downconverter
dependent)
Figure 2-1 PRORXD Receiver Showing Rear Panel
2.2 Unpacking your PRORXD
Carefully open the packaging and remove the device. Make sure that all the components have been
included in the package as shown in the packing list. Look for shipping damage.
Keep the packing list and all the packing materials for storage.
The codes on the picture mean:
CA – Cable Assembly
SA – Sub Assembly
AP – Assembly Part.
The codes are useful if you buy a new cable in the future.
PRORXD Broadcast Receiver User Guide
Commercial in Confidence
Broadcast Solutions, HD/SD Products,
PRORXD
100167
Revision: 7.0
Commercial in Confidence
Page 2-9
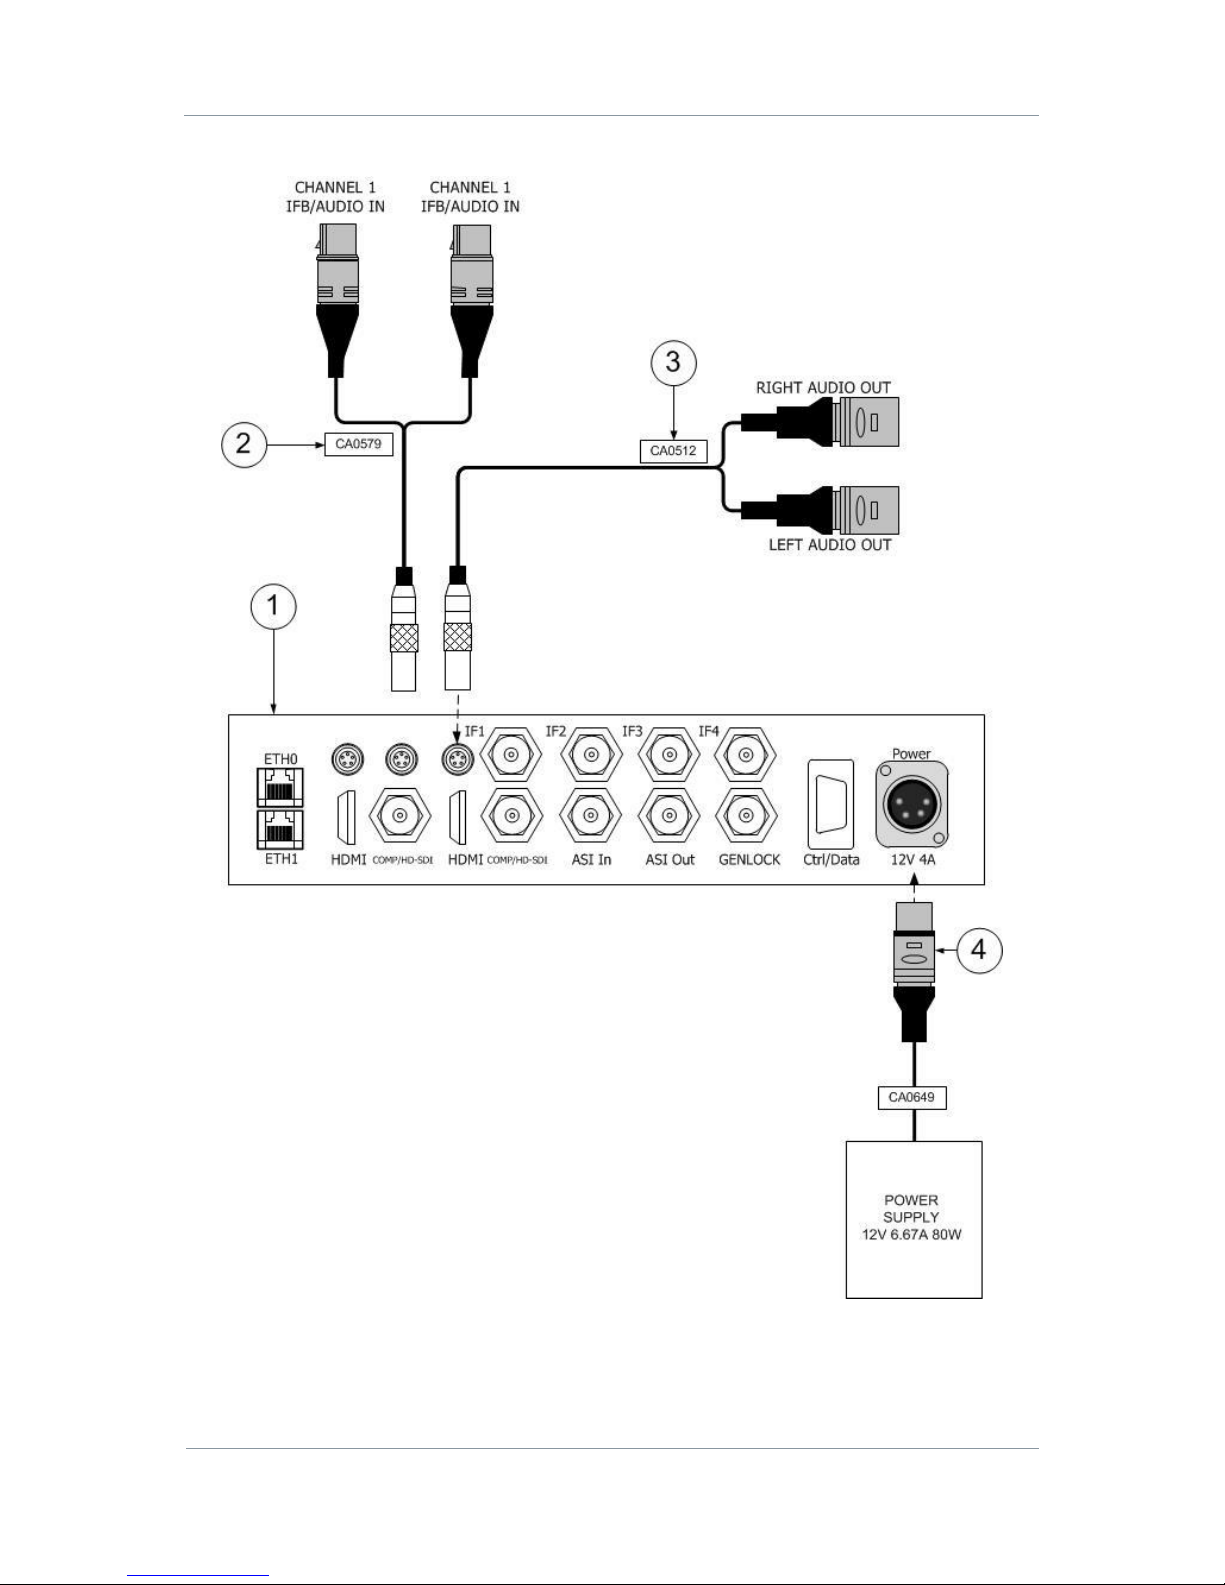
PRORXD-1RU
Figure 2-2 PRORXD-1RU Packing Diagram

PRORXD Broadcast Receiver User Guide
Commercial in Confidence
Broadcast Solutions, HD/SD Products,
PRORXD
100167
Revision: 7.0
Commercial in Confidence
Page 2-10
No
Item
Notes
1
Primary Unit.
PRORXD-2-1RU for example, 2-way diversity, DVBT
demodulation, includes MPEG2 and H.264 SD decoder,
Composite and SDI out, Genlock, Web-browser interface, with
BNC connectors, excludes antennas and down converters.
2
HDTX External XLR Audio
Cable Assembly 3 metres.
CA0579
Audio Cable Assembly (3 metres)
Lemo OB 5-way plug (pins) to
XLR 3-way plug, sockets (left audio)
XLR 3-way plug, sockets (right audio).
3
Pro-RXB External XLR Audio
Cable Assembly 2 Metres.
CA0512
Lemo OB 5-way plug (pins) to
XLR 3-way plug, pins (left audio)
XLR 3-way plug, pins (right audio).
4
Pro-RXB External 12V 6.67A
80W Desktop Power Supply
Unit Assembly 1.165 Metres.
CA0649
Power Cable Assembly (3 metres)
PSU Block to XLR 4-way plug (sockets) 12VDC.
Table 2-1 Parts in the PRORXD-1RU Package
PRORXD Broadcast Receiver User Guide
Commercial in Confidence
Broadcast Solutions, HD/SD Products,
PRORXD
100167
Revision: 7.0
Commercial in Confidence
Page 2-11
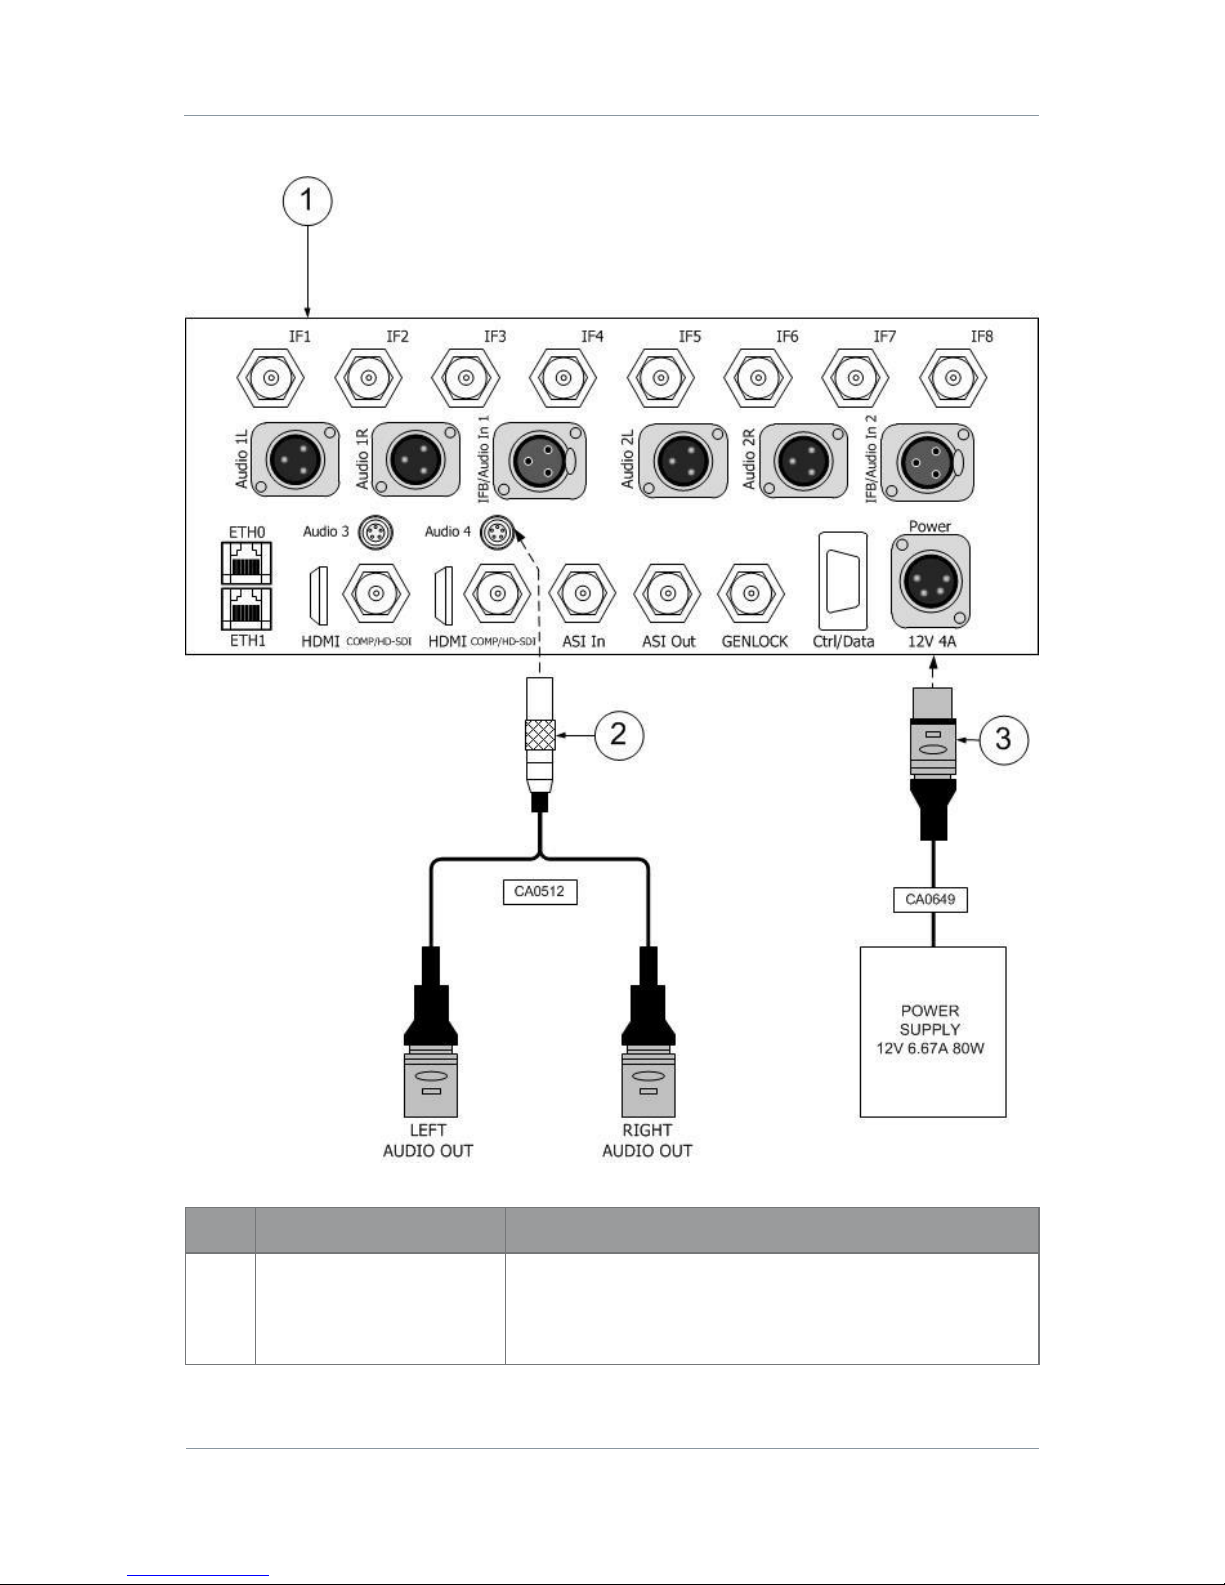
PRORXD-2RU
Figure 2-3 PRORXD-2RU Packing Diagram
No
Item
Notes
1
Primary Unit.
PRORXD-2-2RU for example, 2-way diversity, DVBT
demodulation, includes MPEG2 and H.264 SD decoder,
Composite and SDI out, Genlock, Web-browser interface, with
BNC connectors, excludes antennas and down converters.
PRORXD Broadcast Receiver User Guide
Commercial in Confidence
Broadcast Solutions, HD/SD Products,
PRORXD
100167
Revision: 7.0
Commercial in Confidence
Page 2-12
No
Item
Notes
2
Pro-RXB External XLR Audio
Cable Assembly 2 Metres.
CA0512
Lemo OB 5-way plug (pins) to
XLR 3-way plug, pins (left audio)
XLR 3-way plug, pins (right audio).
3
Pro-RXB External 12V 6.67A
80W Desktop Power Supply
Unit Assembly 1.165 Metres.
CA0649
Power Cable Assembly (3 metres)
PSU Block to XLR 4-way plug (sockets) 12VDC.
Table 2-2 Parts in the PRORXD-2RU Package
Troubleshooting
I don’t have all the parts you described!
Tell your DTC representative right away and we will find a solution for you.
DTC - Solent Fusion 2
1100 Parkway, Solent Business Park
Whiteley, Hampshire
PO15 7AB, England
+44 (0)1489 566 750
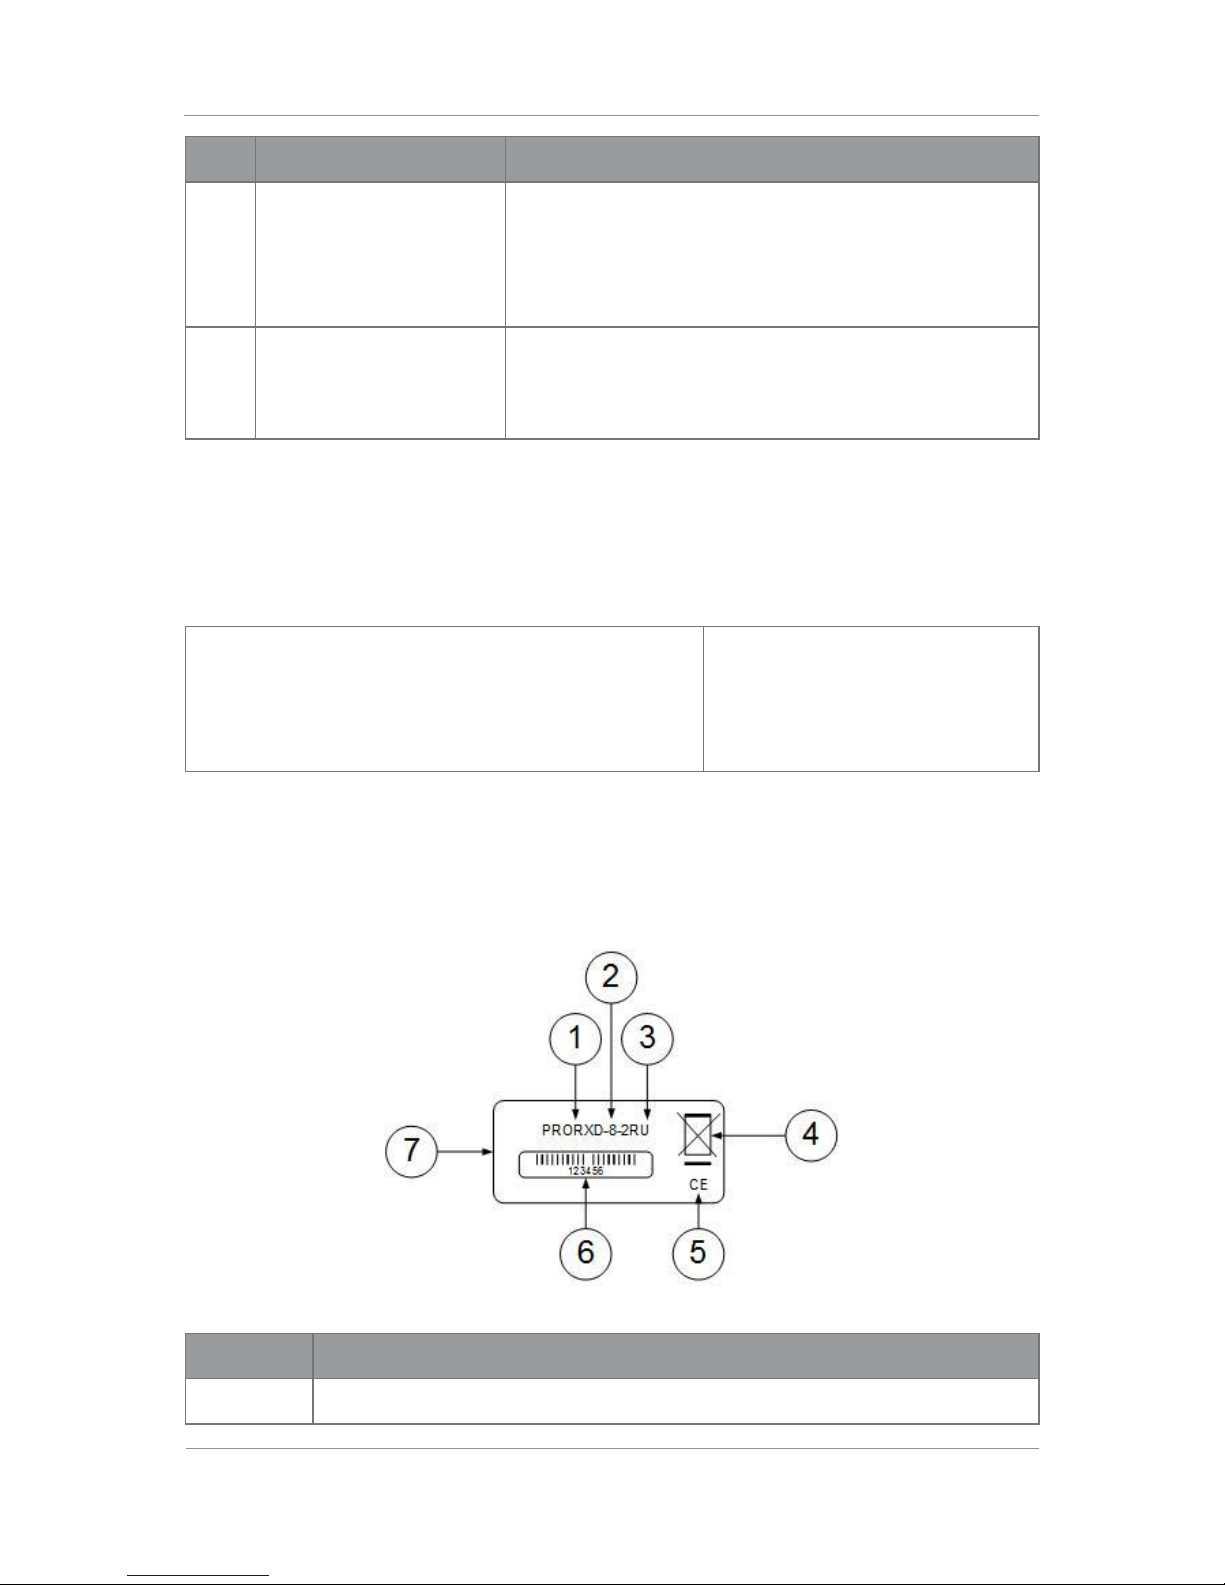
2.3 About the Labels on your PRORXD
Which model do I have? What is its Serial Number?
This topic contains information covering placards, labels, markings, etc., showing the part number, legend
and location of each placard, label, or marking required for safety or maintenance important information.
Figure 2-4 PRORXD Label
No
Item
1
Professional Receiver Group.

PRORXD Broadcast Receiver User Guide
Commercial in Confidence
Broadcast Solutions, HD/SD Products,
PRORXD
100167
Revision: 7.0
Commercial in Confidence
Page 2-13
No
Item
2
Number of ways of diversity (eight in my example).
3
One or two rack unit version. (My example is 2RU).
4
Disposal mark.
5
The CE marking (also known as CE mark) is a mandatory conformity mark on many
products placed on the single market in the European Economic Area (EEA).
The CE marking certifies that a product has met EU consumer safety, health or
environmental requirements.
6
Barcode with six digit serial number. This number will be necessary during a support
call.
7
Manufacturer.
Table 2-3 PRORXD Label Key
2.4 Identifying the Variants of PRORXD
Step 1: Identify the Variants
Part Number
Equipment Title
PRORXD-2-1RU
2-way diversity 1U Professional Receiver/Decoder
PRORXD-4-1RU
4-way diversity 1U Professional Receiver/Decoder
PRORXD-2-2RU
2-way diversity 2U Professional Receiver/Decoder
PRORXD-4-2RU
4-way diversity 2U Professional Receiver/Decoder
PRORXD-6-2RU
6-way diversity 2U Professional Receiver/Decoder
PRORXD-8-2RU
8-way diversity 2U Professional Receiver/Decoder
Table 2-4 PRORXD Variants
2.5 Identifying the Options of PRORXD-1RU
The PRORXD-1RU has two types of options:
Accessory Options
Licensing Options
Step 1: Identify the Accessory Options
Part Number
Equipment Title
PRORXDSRFP-1RU
Single rack, front panel extender 1RU

PRORXD Broadcast Receiver User Guide
Commercial in Confidence
Broadcast Solutions, HD/SD Products,
PRORXD
100167
Revision: 7.0
Commercial in Confidence
Page 2-14
Part Number
Equipment Title
PRORXCPLKT-1RU
PRORXD-1RU coupling kit
DCB/DCBGS
Downconverter barrel/downconverter barrel gain selectable. Various frequencies
available.
CABRF
RF cable. Various lengths available.
Table 2-5 PRORXD-1RU Accessory Options
Step 2: Identify the Licensing Options
Part Number
Equipment Title
SILVER - PRORXD
Includes DVB-T, MPEG-2 and H.264 SD
GOLD - PRORXD
Silver plus H.264 HD, MPEG-4 ASP, Narrowband 2.5MHz and 1.25MHz and IP
Streaming
PLATINUM - PRORXD
Gold plus Ultra Extreme Narrowband 625kHz and Ultra Mobile Video Link (UMVL)
AES128RX
AES Receiver 128 Bit decryption
AES256RX
AES Receiver 256 Bit decryption
ProRXD-DEC2
Upgrade with 2nd Decoder output
PRORXD-UP
2 way diversity upgrade for PRORX-D
Table 2-6 PRORXD-1RU Licensing Options
2.6 Identifying the Options of PRORXD-2RU
The PRORXD-2RU has two types of options:
Accessory Options
Licensing Options
Step 1: Identify the Accessory Options
Part Number
Equipment Title
PRORXDSRFP-2RU
Single rack, front panel extender 2RU
PRORXCPLKT-2RU
PRORXD-2RU coupling kit
DCB/DCBGS
Downconverter barrel/downconverter barrel gain selectable. Various frequencies
available.
CABRF
RF cable. Various lengths available.
Table 2-7 PRORXD-2RU Accessory Options

PRORXD Broadcast Receiver User Guide
Commercial in Confidence
Broadcast Solutions, HD/SD Products,
PRORXD
100167
Revision: 7.0
Commercial in Confidence
Page 2-15
Step 2: Identify the Licensing Options
Part Number
Equipment Title
SILVER - PRORXD
Includes DVB-T, MPEG-2 and H.264 SD
GOLD - PRORXD
Silver plus H.264 HD, MPEG-4 ASP, Narrowband 2.5MHz and 1.25MHz and IP
Streaming
PLATINUM - PRORXD
Gold plus Ultra Extreme Narrowband 625kHz and Ultra Mobile Video Link (UMVL)
AES128RX
AES Receiver 128 Bit decryption
AES256RX
AES Receiver 256 Bit decryption
ProRXD-DEC2
Upgrade with 2nd Decoder output
PRORXD-UP
2 way diversity upgrade for PRORX-D
Table 2-8 PRORXD-2RU Licensing Options
PRORXD Broadcast Receiver User Guide
Commercial in Confidence
Broadcast Solutions, HD/SD Products,
PRORXD
100167
Revision: 7.0
Commercial in Confidence
Page 3-16
3. Controls, Connections and Indicators
3.1 About Controls, Connections and Indicators
You must find all the controls and connections on the unit. You also must identify and interpret alarms or
indicators. These topics will help you identify all these features.
The PRORXD has front and rear panels which contain all the interface connections for the unit and the
controls and indicators. There is a control panel on the front of the unit.
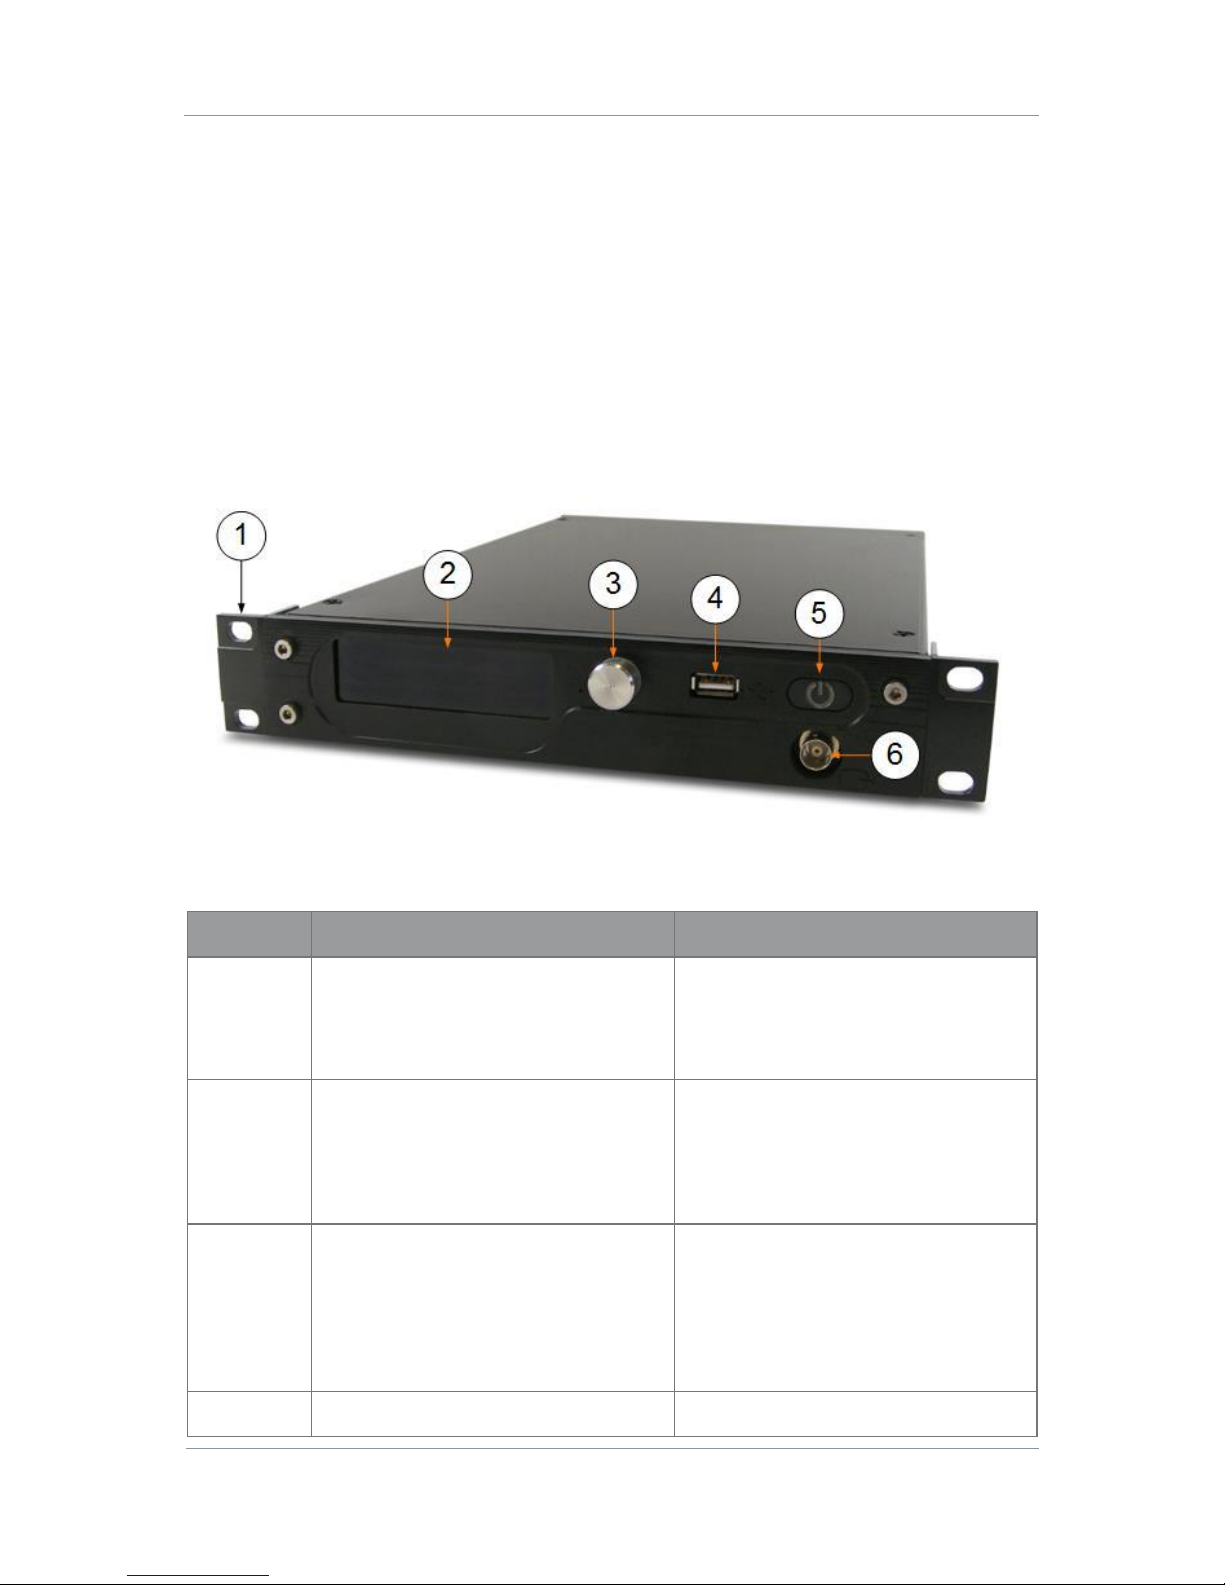
3.2 Exploring the Front Panel – PRORXD-1RU
Figure 3-1 PRORXD-1RU Front Panel
No
Item
Used for...
1
Rack Mounting Ears.
Metalwork that can be removed to let the
PRORXD to be fitted in a half of a 19” rack.
Two PRORXDs can be joined together to fill
a full 19” rack with the 1RU Joining kit.
2
Display Screen.
This OLED display with the navigation keys
lets you quickly set up many of the
features of the PRORXD.
You can see spectrum, RX SNR and RX
Power for example.
3
Joystick / Confirm Button
Move the joystick for UP, DOWN, LEFT and
RIGHT.
Turn the joystick for selection.
Short push the joystick for ENTER.
Long push the joystick for BACK.
4
USB 4-way receptacle.
Used for Preset loading.
PRORXD Broadcast Receiver User Guide
Commercial in Confidence
Broadcast Solutions, HD/SD Products,
PRORXD
100167
Revision: 7.0
Commercial in Confidence
Page 3-17
No
Item
Used for...
5
Power Button.
Toggles the power on or off.
6
BNC Receptacle.
Video output for monitoring.
Table 3-1 PRORXD-1RU Front Panel Key
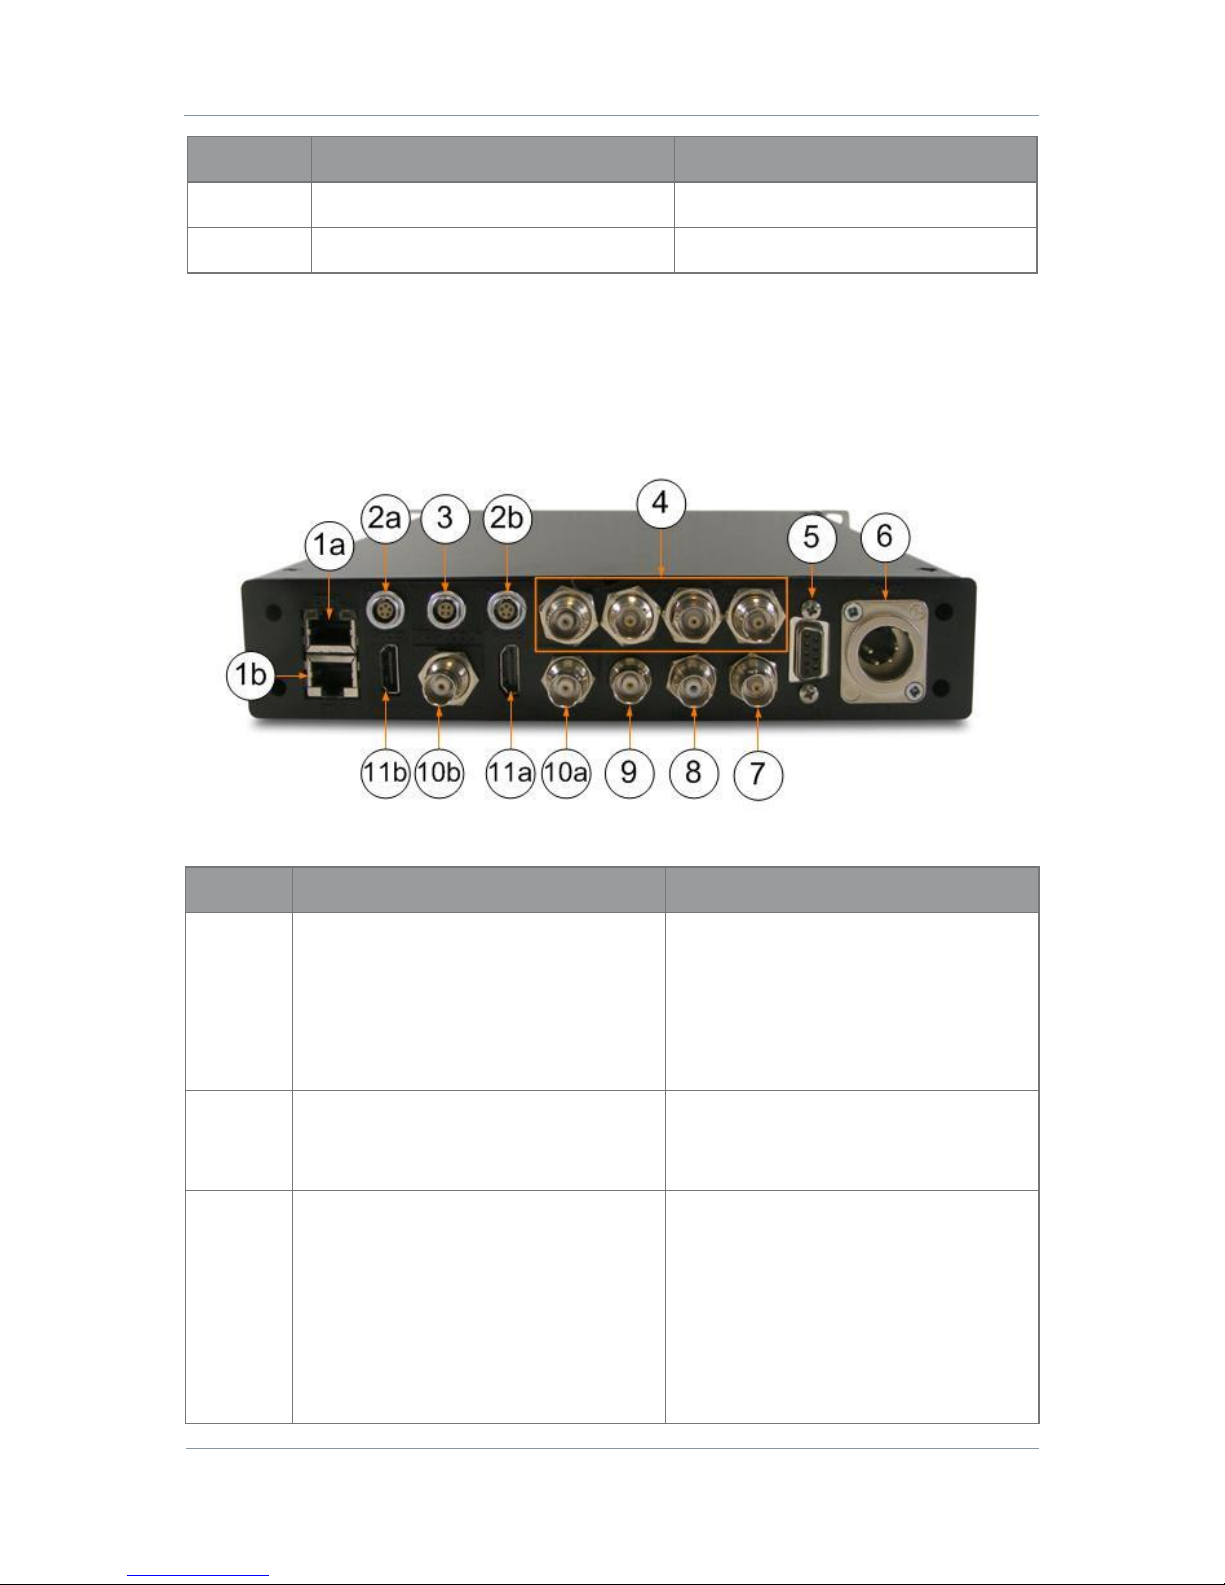
3.3 Exploring the Rear Panel – PRORXD-1RU
Figure 3-2 PRORXD-1RU Rear Panel
No
Item
Used for...
1ab
RJ45 8-way Receptacle, (sockets) marked
ETH0 and ETH1.
Ethernet input / output.
You will operate with this port to control your
PRORXD by operating a web browser on your
PC.
It is also used for streaming video if your
unit is licenced correctly.
2ab
Lemo OB 5-way receptacle (sockets) twin
key marked 1, AUDIO.
Channel two is marked 2, AUDIO.
For Audio output.
Each channel has this facility.
3
Lemo OB 5-way receptacle (sockets) marked
IFB/AUDIO IN.
IFB – Interruptible Fold back.
The IFB is a special intercom circuit that
consists of a mix-minus program feed sent
to an earpiece worn by presenter via IP
(audio that is being “fed back” to presenter)
that can be interrupted and replaced by a
television producer's or director's intercom
microphone. That microphone is connected
here.

PRORXD Broadcast Receiver User Guide
Commercial in Confidence
Broadcast Solutions, HD/SD Products,
PRORXD
100167
Revision: 7.0
Commercial in Confidence
Page 3-18
No
Item
Used for...
4
BNC 2-way Receptacle (sockets) x 4 marked
IF1 to IF4.
Connect your IF cables from the
downconverter / antenna assembly here.
Do not over tighten. Hand-tight only.
5
D-Type 9-way Receptacle, (sockets) marked
CTRL/DATA.
RS232 Data/Control port.
Data output.
Also enables you to control the PRORXD
serially if required.
6
XLR 4-way Receptacle, (pins) marked
POWER, 12V 4A.
Power input to the PRORXD.
7
BNC 2-way receptacle (sockets) marked
GENLOCK.
Connect your Genlock device to this port to
keep the receiver synchronised with all the
other equipment in your facility.
8
BNC 2-way receptacle (sockets) marked ASI
OUT.
Lets you connect this receiver to other
equipment in your operation at ASI level.
9
BNC 2-way receptacle (sockets) marked ASI
IN.
Lets you connect this receiver to other
equipment in your operation at ASI level.
10ab
BNC 2-way Receptacles, (sockets) marked
COMP/HD-SDI.
CBVS/SDI/HD-SDI//ASI video output.
11ab
HDMI Type-A 19-way Receptacle, sockets
marked HDMI.
HDMI (High Definition Multimedia Interface)
output.
Table 3-2 PRORXD-1RU Rear Panel Key
PRORXD Broadcast Receiver User Guide
Commercial in Confidence
Broadcast Solutions, HD/SD Products,
PRORXD
100167
Revision: 7.0
Commercial in Confidence
Page 3-19
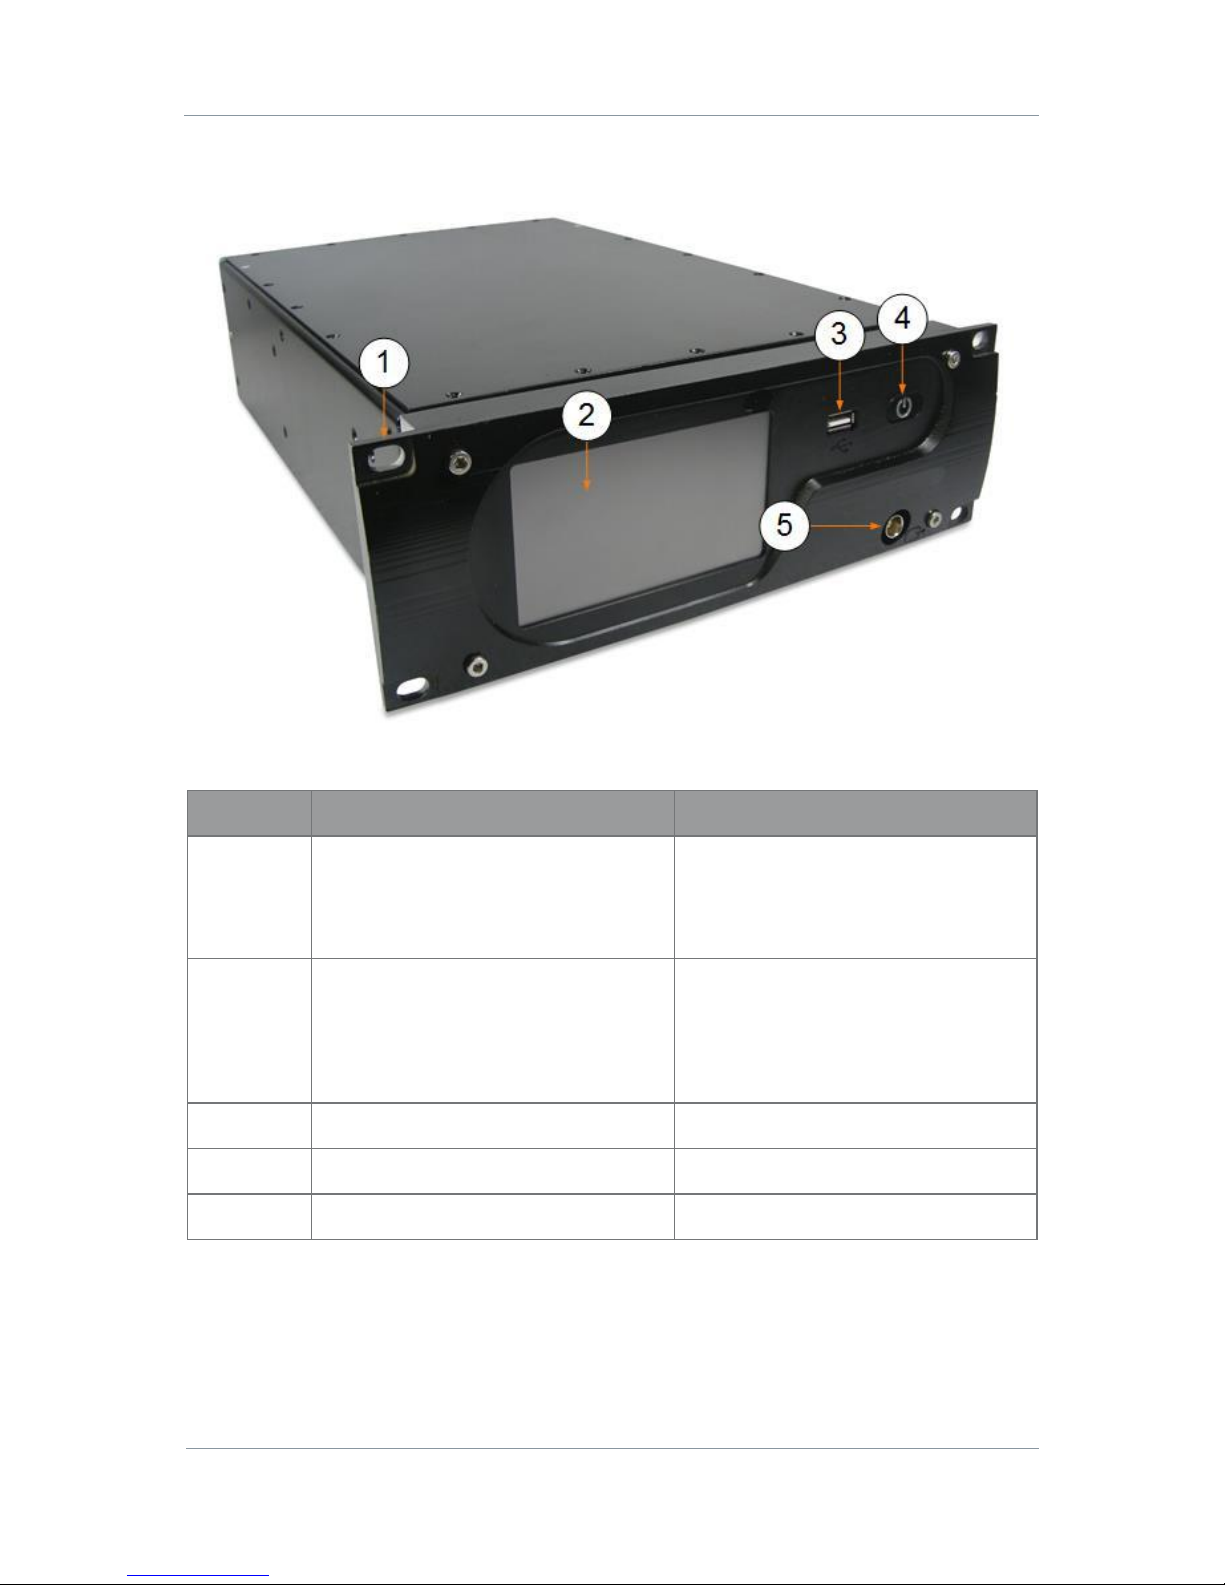
3.4 Exploring the Front Panel – PRORXD-2RU
Figure 3-3 PRORXD-2RU Front Panel
No
Item
Used for...
1
Rack Mounting Ears.
Metalwork that can be removed to let the
PRORXD to be fitted in a half of a 19” rack.
Two PRORXDs can be joined together to fill
a full 19” rack with the 2RU Joining kit.
2
Display Screen.
This OLED display with the navigation keys
let you quickly set up many of the features
of the PRORXD.
You can see spectrum, RX SNR and RX
Power for example.
3
USB 4-way receptacle.
Used for Preset loading.
4
Power Button.
Toggles the power on or off.
5
BNC Receptacle.
Video output for monitoring.
Table 3-3 PRORXD-2RU Front Panel Key
PRORXD Broadcast Receiver User Guide
Commercial in Confidence
Broadcast Solutions, HD/SD Products,
PRORXD
100167
Revision: 7.0
Commercial in Confidence
Page 3-20
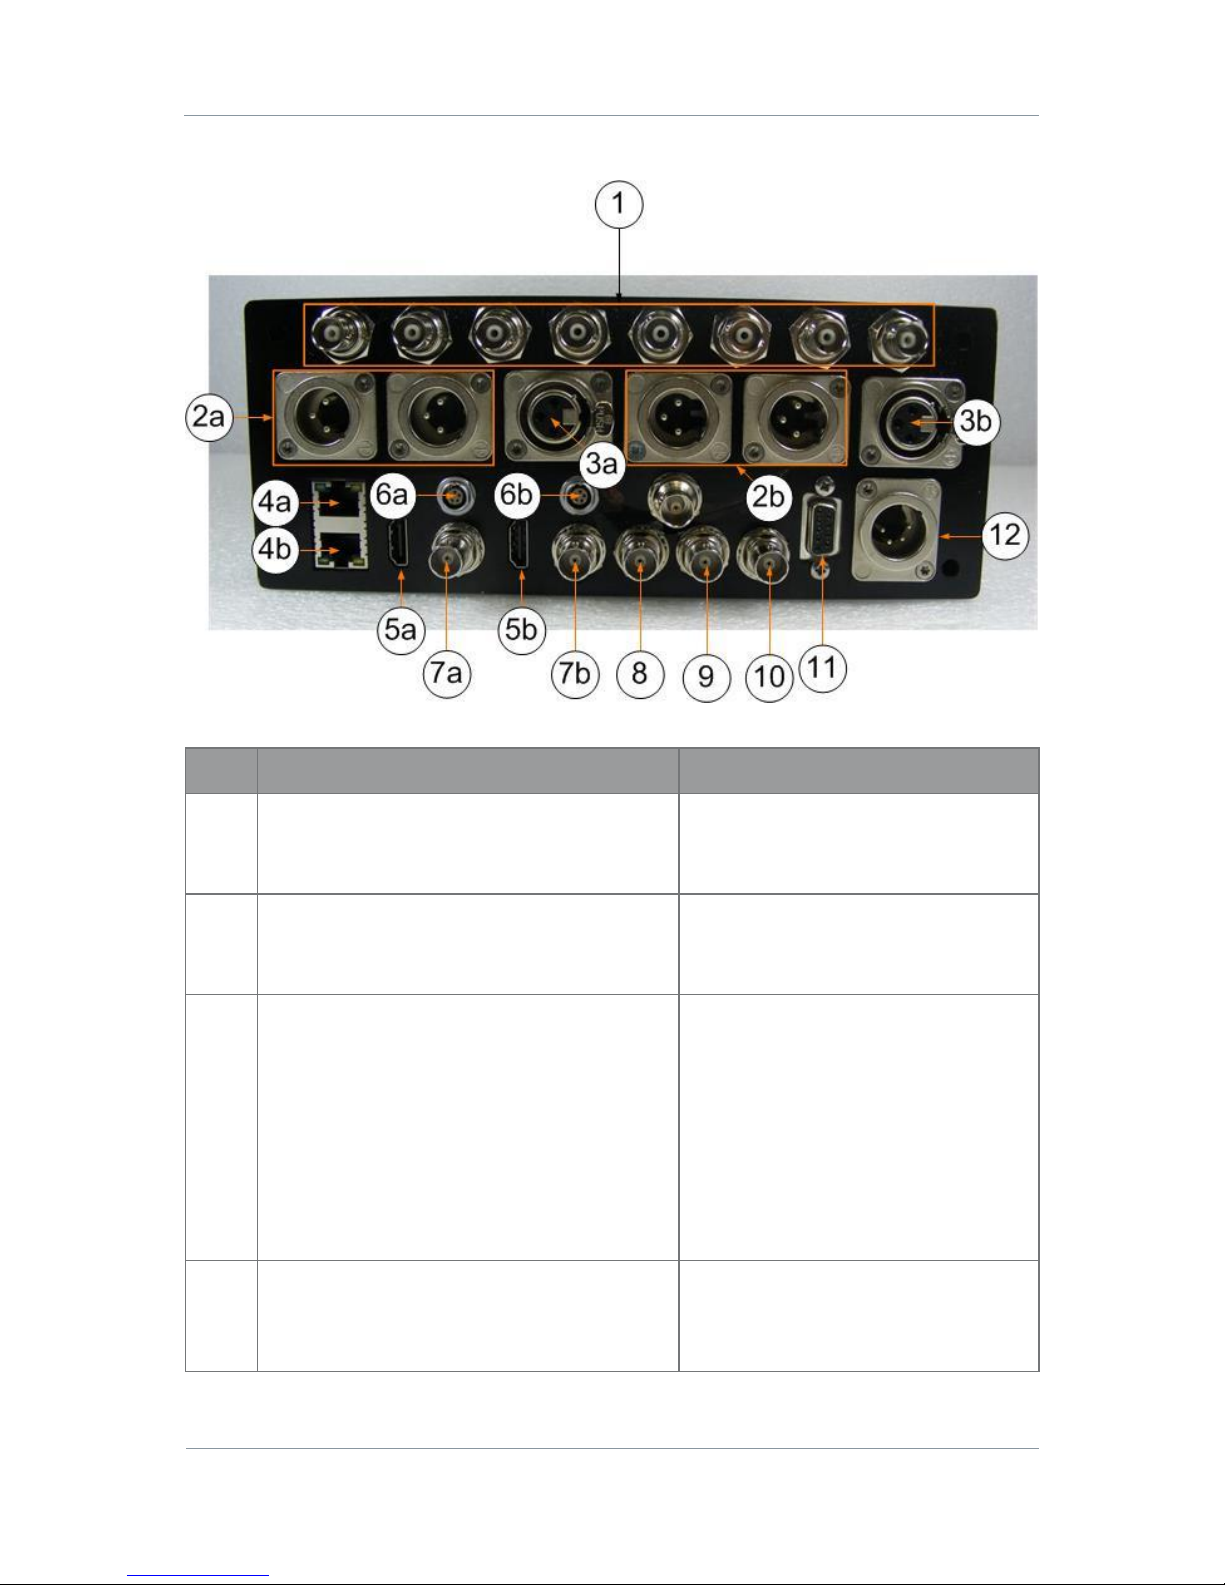
3.5 Exploring the Rear Panel – PRORXD-2RU
Figure 3-4 PRORXD-2RU Rear Panel
No
Item
Function
1
BNC 2-way receptacle (sockets), 50-850MHz
marked IF1 to IF8.
The IF cables from the downconverters
connect here.
IF=Intermediate frequency.
2ab
XLR 3-way receptacle (pins) marked AUDIO 1L and
AUDIO 1R.
Channel two is marked AUDIO 2L and AUDIO 2R.
Stereo Line Level Audio Outputs, left and
Right, channel one.
Each channel has this facility.
3ab
XLR 3-way receptacle (sockets) marked IFB/Audio
In 1.
Channel 2 is marked IFB/Audio In 2.
IFB – Interruptible Fold back.
The IFB is a special intercom circuit that
consists of a mix-minus program feed sent
to an earpiece worn by presenter via IP
(audio that is being “fed back” to
presenter) that can be interrupted and
replaced by a television producer's or
director's intercom microphone. That
microphone is connected here.
Each channel has this facility.
4ab
RJ45 8-way receptacle (sockets) marked ETH0 and
ETH1.
Ethernet 1 and 2. 10/100/1G Ethernet
Ports with PoE (Power over Ethernet)
support. Used for Remote Control through
a web browser and for streaming.

PRORXD Broadcast Receiver User Guide
Commercial in Confidence
Broadcast Solutions, HD/SD Products,
PRORXD
100167
Revision: 7.0
Commercial in Confidence
Page 3-21
No
Item
Function
5ab
HDMI receptacle (sockets) marked HDMI.
HDMI Video output.
Each channel has this facility.
6ab
Lemo OB 5-way receptacle (sockets) twin key
marked AUDIO 3.
Channel two is marked AUDIO 4.
For Audio output.
Each channel has this facility.
7ab
BNC 2-way receptacle (sockets) marked
COMP/HD-SDI.
CBVS/SDI/HD-SDI//ASI video output.
8
BNC 2-way receptacle (sockets) marked ASI IN.
ASI Input
9
BNC 2-way receptacle (sockets) marked ASI OUT.
ASI Output
10
BNC 2-way receptacle (sockets) marked GENLOCK.
Genlock Input.
11
D-Type 15-way receptacle (sockets) marked
CTRL/DATA.
RS232 Control from PC GUI Application.
RS232 Data Output, 1K2 to 115K2 baud
switchable.
12
XLR 4-way receptacle (pins) marked POWER, 12V
4A.
6 to 26V Reverse Polarity Protected Power
from AC Adapter.
Table 3-4 PRORXD-2RU Rear Panel Key

PRORXD Broadcast Receiver User Guide
Commercial in Confidence
Broadcast Solutions, HD/SD Products,
PRORXD
100167
Revision: 7.0
Commercial in Confidence
Page 4-22
4. Setting up your PRORXD
4.1 Planning the Hardware Installation
There are some general considerations for the installation of any electronics device or system. Not all of
these may apply to your installation but are worth noting:
Space – leave enough room to allow for cable bending and servicing
Proximity to other devices (for example, source equipment)
Length of cable runs – try to keep cables short
Environmental conditions (temperature, humidity, etc.)
Access for service repair
Compliance with local regulations
4.2 Connecting the Antennas
This topic describes connecting systems designed mainly for transporting the RF signals. Of all the
variables affecting single-channel radio communications, the one cause that an operator has the most
control with is the antenna. With the right antenna, an operator can change a marginal net into a reliable
net.
There are eight antenna interfaces located on the rear panel of the PRORXD-8-2RU receiver for example.
The PRORXD-2-1RU uses two.
Note: If you have four-way diversity PRORXD then you must connect four antennas to get best performance
from the four-way diversity receiver system.
If you have six-way diversity PRORXD then you must connect six antennas to get best performance from the
six-way diversity receiver system.
If you have eight-way diversity PRORXD then you must connect eight antennas to get best performance from
the eight-way diversity receiver system.
Before you Start
This is necessary:
2, 4, 6 or 8 downconverters that align with the frequency range you wish to receive.
2, 4, 6 or 8 antennas that align with the frequency range of your downconverters.
CAUTION: Do not turn the barrel of the downconverter when attaching antennas or IF cables. Too much
twisting force will damage the inner pin.
CAUTION: Do not install the Downconverter upside down. Power from the IF cable will damage components
in the downconverter.
Step 1: Select your Downconverters
All PRORXD receivers operate with downconverters to lower the frequency from microwave (L, S and C-Band)
to an Intermediate Frequency (IF) between 51 and 858MHz that the on-board tuners in the receivers can
operate with.
It is important to select the correct downconverter for the microwave transmission frequency you are
planning to receive. Downconverters have a label to help you select the correct unit.

PRORXD Broadcast Receiver User Guide
Commercial in Confidence
Broadcast Solutions, HD/SD Products,
PRORXD
100167
Revision: 7.0
Commercial in Confidence
Page 4-23
If you are operating with long cable runs from the bottom of the downconverter to the rear panel of the
PRORXD, it will be necessary to select a high gain version of the downconverter to deal with the RF losses in
the longer cable. Some downconverters are switchable between high and low gain.
Step 2: Attach the Antennas to the Downconverters
1. Connect each antenna directly to the TNC Receptacle on the top panel of each downconverter.
2. Do not tighten the antenna too much – tighten with your hand.
Step 3: Set Antenna Polarization
1. COFDM links are very robust and are tolerant to changes in antenna location, but, it is important to try
and keep the antennas in the same plane if possible.
2. The antennas used with the COFDM links are usually linearly polarized.
Step 4: Attach IF Cable to the Downconverter
1. Connect the TNC plug on the IF Cable to the TNC Receptacle on the bottom panel of each
downconverter.
2. Do not tighten the TNC connector too much – tighten with your hand.
Step 5: Attach IF Cable to the PRORXD
1. Connect the BNC plug on the IF Cable to the BNC Receptacle on the rear panel of the PRORXD. They are
marked IF1 to IF8.
Next Steps
Connect AC Power.
4.3 Connecting AC Power
Before you Start
This is necessary:
A CA0649 Pro-RXB External 12V 6.67A 80W Desktop Power Supply
PRORXD
Step 1: Connect the AC Power
1. Connect the XLR 4-way plug (sockets) from the AC adaptor to the XLR 4-way Receptacle (pins) on the
PRORXD Receiver which is located on the right side of the rear panel and marked POWER, 12V 4A.
2. At this time, connect the IEC mains 3-way plug (sockets) to the IEC mains 3-way Receptacle (pins) on
the AC adaptor.
3. Connect IEC mains plug to your local AC supply and switch it on.
Next Steps
Connect Video Signals.
 Loading...