

Page 1
®
WinDSX User’s Guide
Page 2

b
This page was intentionally left blank.
Page 3

c
DSX, Our Commitment to Service
Our Commitment to service is continually demonstrated through our Training Programs and Technical Support
Department. DSX stands behind its products and customers and constantly strives for excellence.
Our technical staff consists of engineers with field installation and service experience that are always ready to
answer any question. By providing a staff with years of security experience, DSX is able to offer valuable
insight into the complex issues that face the security contractor installing DSX equipment. DSX commitment to
service is unmatched in the security industry.
Information contained in this document was known to be true at the time of printing. This information is subject
to change at any time without notice. This document is a Team effort by the Technical Support Group at DSX.
Intent of this User Guide is to assist the actual user of the system in their daily operations. This Guide is a
supplement to the extensive Help system integrated into the software. Help is available by pressing F1.
DSX is a registered trademark of DSX Access Systems Inc; WinDSX is a trademark of DSX Access Systems
Inc.
The use of or reference to the term's Eltron, Fargo, Nisca, Pentium, Penware, Windows and Windows NT may
or may not be the registered trademarks of the respective companies.
Compliance
You must consult your local fire codes before installing any locking device on doors, gates, or barriers. A
construction and fire approval permit may be required before installing any equipment. Call your local Fire
Marshall for building code requirements in your area.
For UL installations, you must install the DSX System according to the UL Installation Manual and in
accordance with the National Electric Code, ANSI / NFPA 70 regulations and recommendations for US
Installations. Canadian installations must be in accordance with the Canadian Electric Code C22.1.
The DSX-1022, DSX-1040CDM, DSX-1040PDM, DSX-1042, DSX-1043, DSX-1044, DSX-CKI-C, DSXCKI-K, DSX-DP485 and DSX-FRB8 have been tested and found to conform to the requirements of UL 294.
The DSX-1022, DSX-1040CDM, DSX-1040PDM, DSX-1042, DSX-1043, DSX-1044, DSX-1040-PE-B, DSXMCI, DSX-LAN, DSX-SPS and DSX-2PC have been tested and found to conform to the requirements of UL
1076.
Camera and DVR integration was not tested by UL.
DSX Access Systems, Inc.
10731 Rockwall Road
Dallas, Texas 75238
888-419-8353 Sales, Shipping and Accounting
800-346-5288 Technical Support
214-553-6147 FAX
www.dsxinc.com
Page 4

d
Page 5

DataBase / Setup
WinDSX Startup
DataBase / Location
Table of Contents
Startup...................................................................................................... 1
DataBase Login........................................................................................2
Workstation Login ................................................................................. 85
ToolBar & Menus .................................................................................... 3
Menus Map .............................................................................................. 4
Operator Comments ................................................................................. 5
Operator Passwords.................................................................................. 6
Password Profiles..................................................................................... 7
Profiles – Locations.................................................................................. 8
Profiles – Menus ...................................................................................... 9
Profiles – Input/Output/Device Overrides............................................... 11
Profiles – Companies.............................................................................. 12
Profiles – Card Fields............................................................................. 13
Profiles – Access Level .......................................................................... 14
Reports / System Programming .............................................................. 15
Reports / Card Holder............................................................................. 17
DataBase Backup ................................................................................... 23
History Backup ...................................................................................... 25
Restore/Repair Data ............................................................................... 28
Event Filters........................................................................................... 31
Card Holder............................................................................................ 34
Card Holder Search ................................................................................ 35
Card Holder List..................................................................................... 38
Adding a Card........................................................................................ 39
Card Holder Phone # .............................................................................. 45
Card Holder Keys................................................................................... 46
Card Holder Skills.................................................................................. 47
Capture Card Holder Image.................................................................... 48
Import Card Holder Image...................................................................... 49
Edit Card Holder Image.......................................................................... 50
Print Card Holder Badge ........................................................................ 51
Activate/De-activate Company............................................................... 52
Access Level .......................................................................................... 53
Bulk Load Access Levels ....................................................................... 56
Time Zones ............................................................................................ 60
Company................................................................................................ 63
d
Page 6

f
Workstation
DataBase / Location
Holiday.................................................................................................. 64
User Defined Fields ............................................................................... 65
Guard Tour ............................................................................................ 68
Maps………………………………………………………… ................. 71
Override Group...................................................................................... 72
Badge Image Source .............................................................................. 73
Badge Image Type................................................................................. 74
Badge Templates ................................................................................... 75
Keys ...................................................................................................... 80
History................................................................................................... 81
Email Groups – Alarm Email Notification ............................................. 89
Workstation Login ................................................................................. 91
Workstation Overview ........................................................................... 92
Workstation Overview continued........................................................... 93
Card Holder Search................................................................................ 94
In / Out Status........................................................................................ 95
Location Operations............................................................................... 96
Devices (readers, keypads)..................................................................... 97
Inputs (alarm points).............................................................................. 98
Outputs (locks, gates)............................................................................. 99
Override Groups / Comments............................................................... 100
Cameras............................................................................................... 101
Maps / Alarms .................................................................................... 102
Alarms / Customize ............................................................................. 103
DVR Operations .................................................................................. 104
Message Definitions............................................................................. 106
Page 7

g
This page was intentionally left blank.
Page 8

Page 9
Startup
1
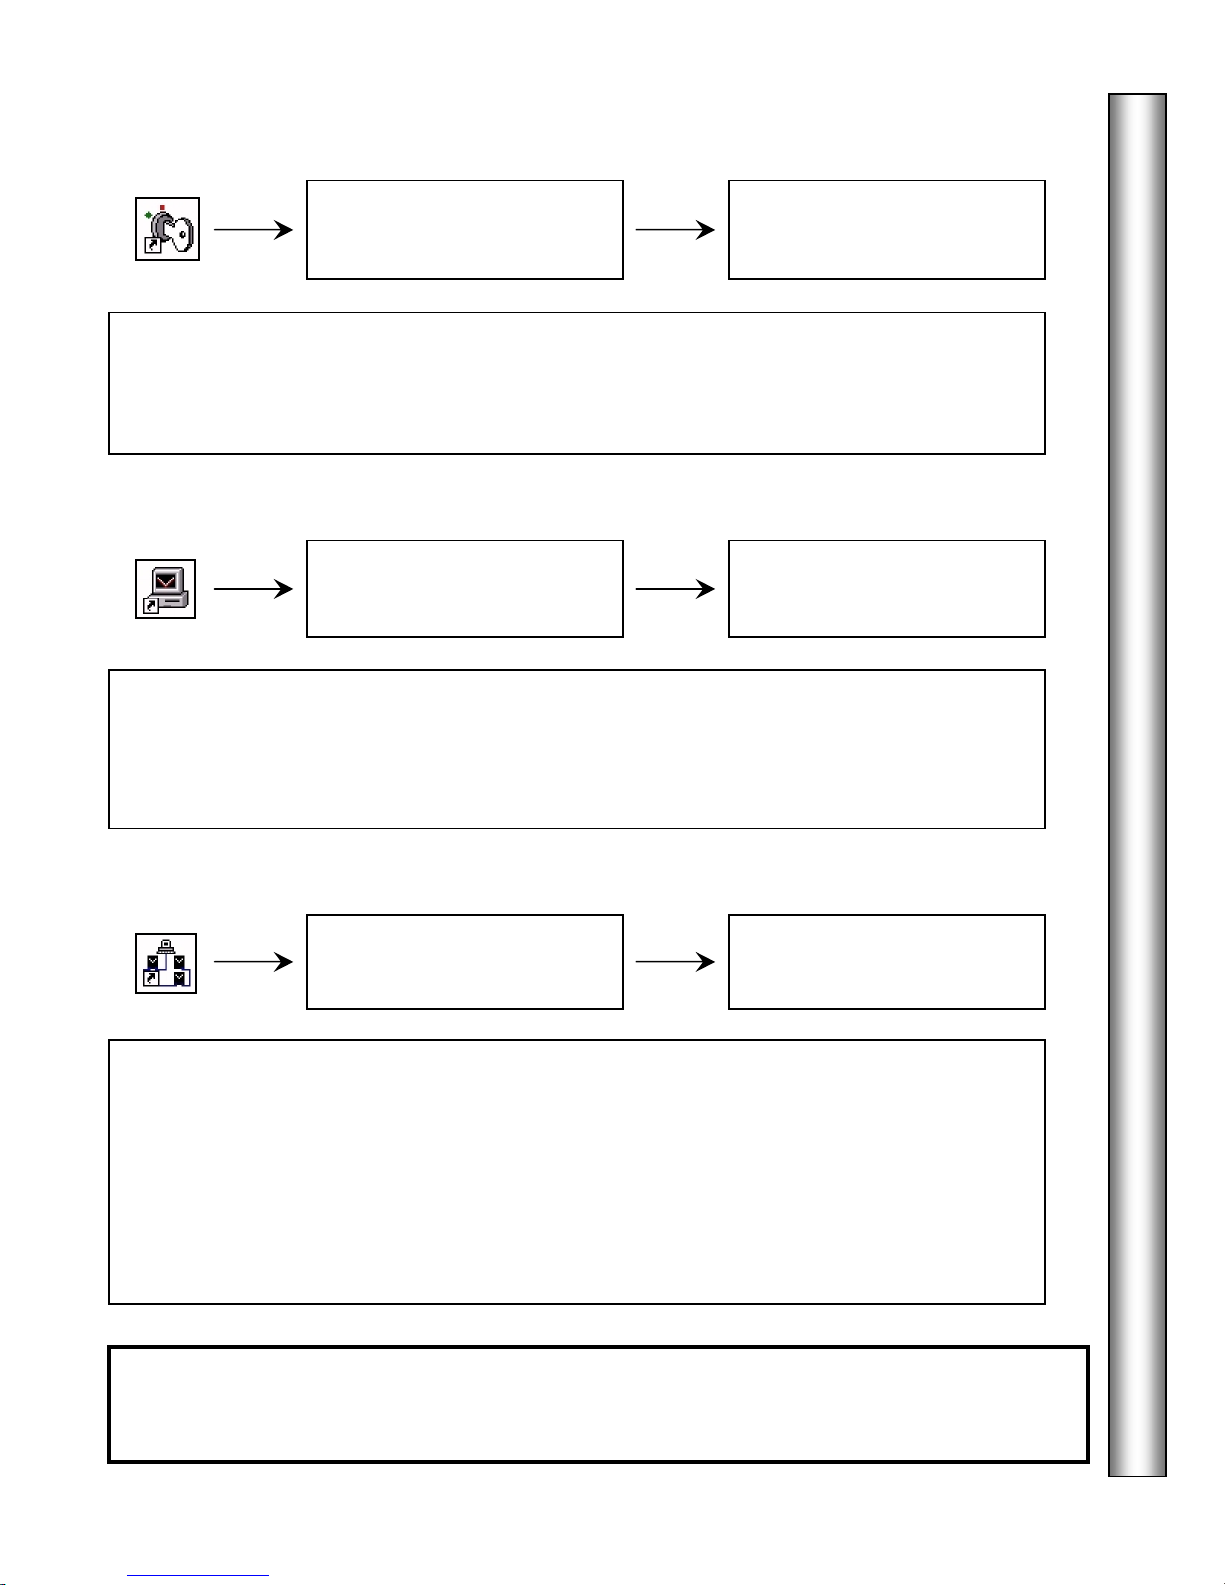
DataBase
The Database program is the very core of the system. It is where the system is defined and
configured. Database manages all of the system data and provides the user with an easy but
dynamic graphical user interface. The database program not only houses the data entry
mechanism but also contains all system management utilities including Photo ID Badging.
Workstation
The Workstation program is the actual user interface for all communications and controller
interaction in the system. There are four interactive windows within the workstation program.
These four windows are all sizeable with scroll bars to allow customizing of the desktop for
ease of use. The four Windows are Alarm, Event, Selection, and Control.
Page 2
Page 92
Comm Server
The Comm Server program is a multi-tasking, communication application that runs as a
Process or Service and is located on the PC that has the physical and/or virtual connection to
the DSX Controllers. The Comm Server has no user interface, it simply communicates with
the DSX Controllers, downloading new data, uploading panel history, and logging all
transactions to the hard disk. The Workstation program interrogates the Comm Server
program through the network using the Comm Servers TCP/IP address. The Comm Server
Program responds to the Workstation requests and routes all alarm, input/output control and
system events to the Workstation Program.
Comm Server is started and closed
by the Workstation program
Press F1 for Help Help can be received by pressing the F1 key from any Menu and
Data-Entry Screen in the DataBase program and from any location in the Workstation Program.
Page 10
DataBase
2
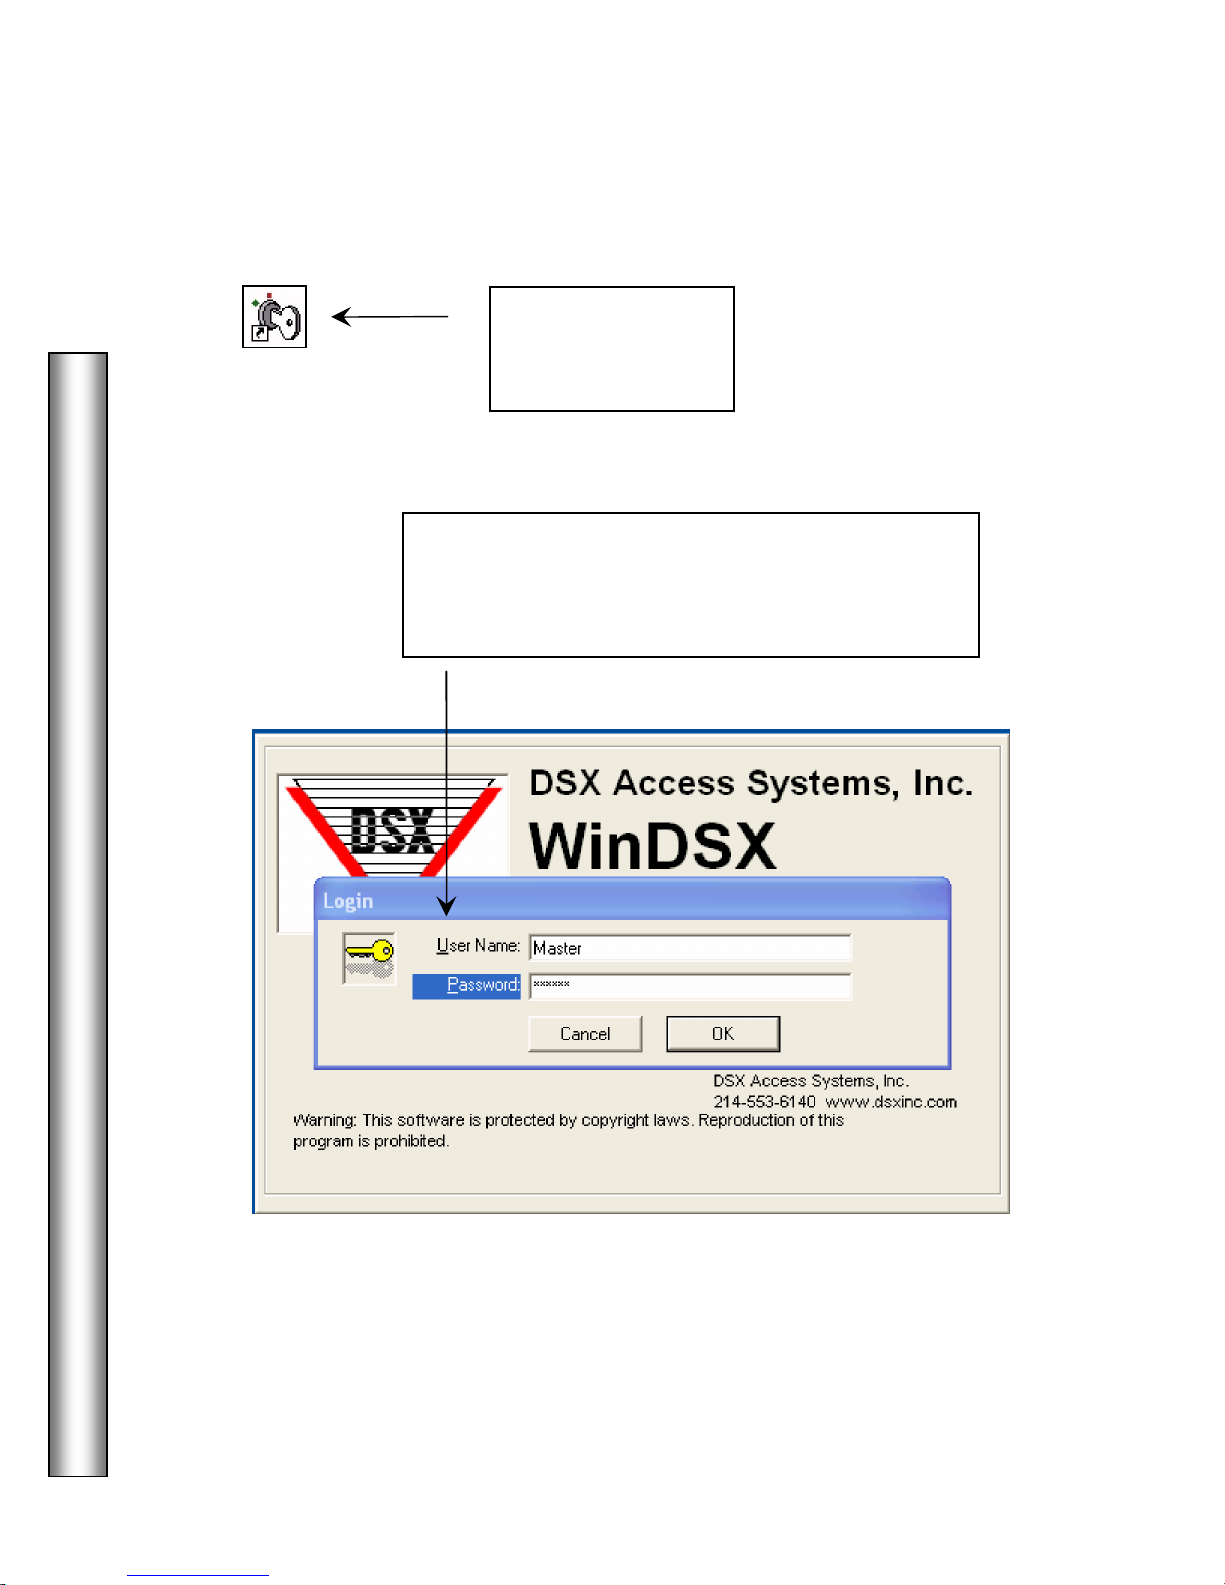
Login
Double Click on the
DataBase ICON to
start the program.
The Login Screen below is displayed when the program
is started. Enter your User Name and Password. The
Default User Name is master, the default Password is
master both entered in all lower case.
Page 11
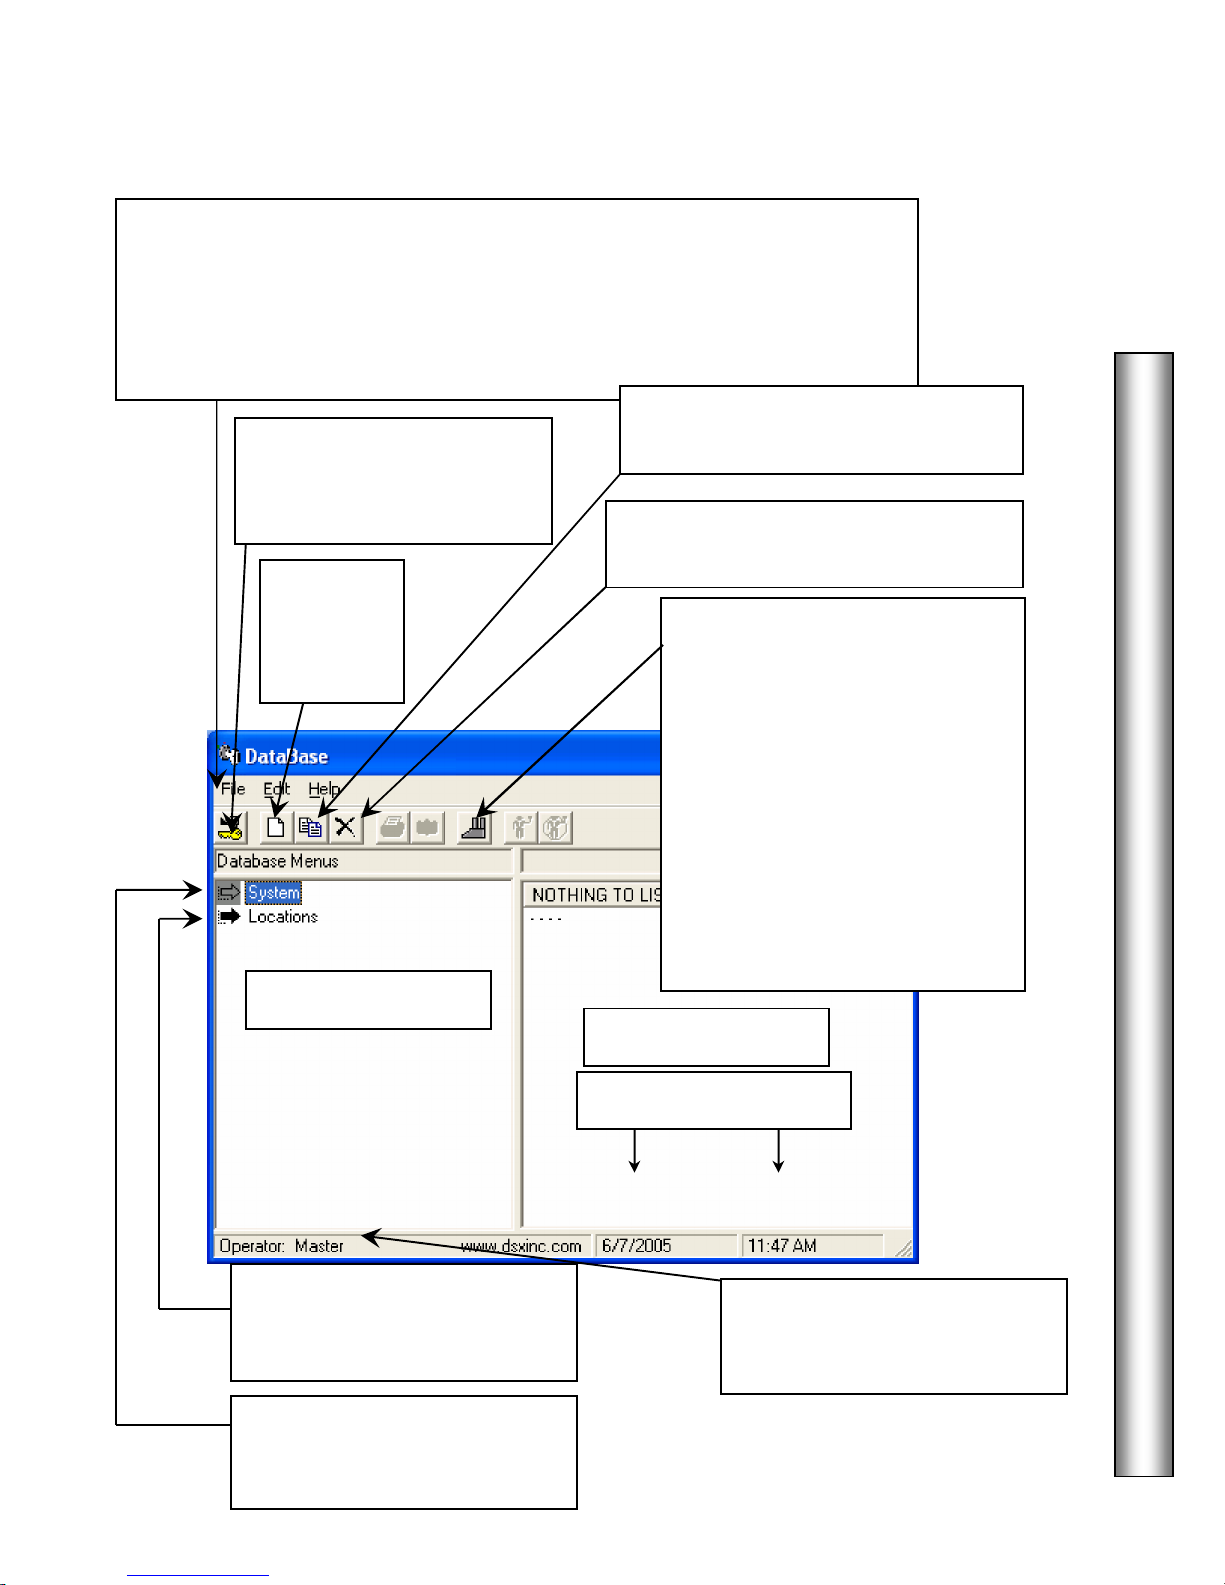
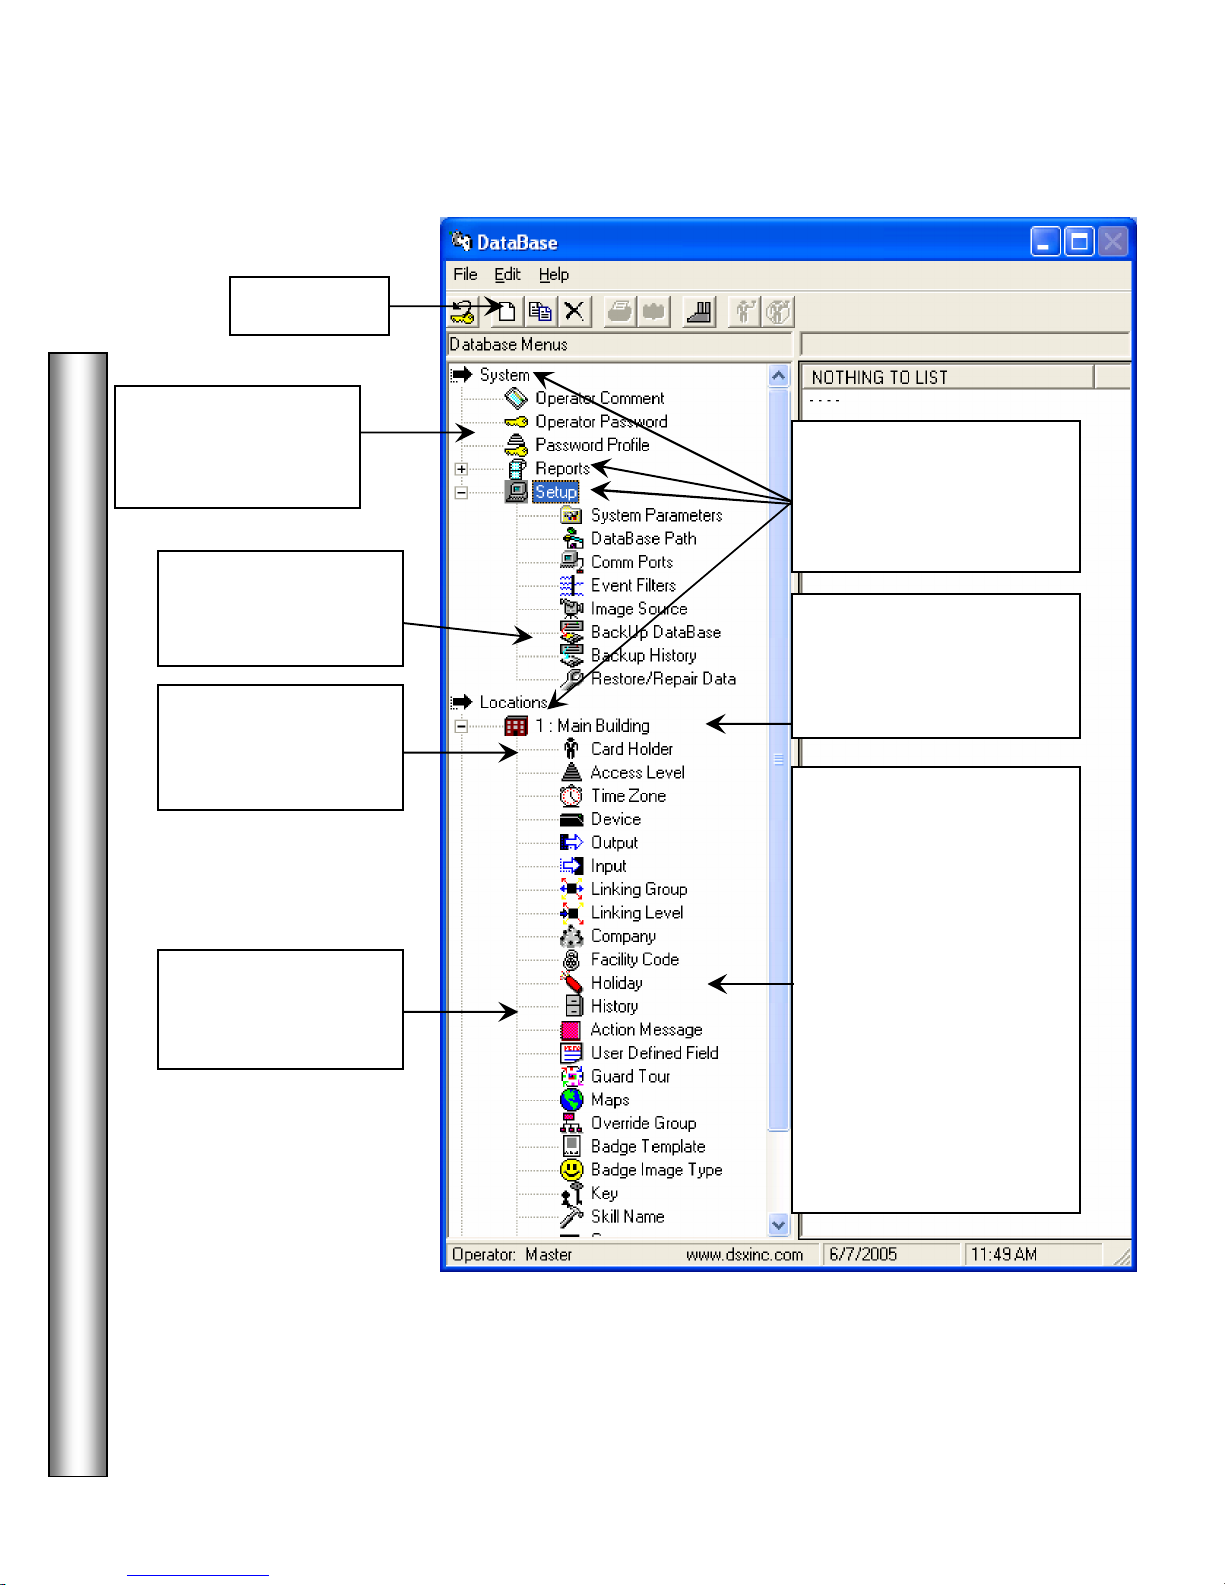
ToolBar & Menus
3
File
–
Double Click on System
Double Click on Locations
Copy
Delete
User Name
Menu Window
List Window
Operator Log Off
System Date and Time
Add
Who Is In Report
Change Operator Password – Used to change password.
Enable Multiple Selections – For multiple card holder selections to be used
with the Activate/De-activate buttons and Bulk Modify Access Levels.
Bulk Modify Access Levels – Used to make group access level changes.
Exit – Exits the Program.
Select File to access the following:
– Click
here to Log Off and Return
to the Login Screen.
–
Click here
to add new
record.
– Click here after selecting a
data record that you wish to copy.
– Click here after selecting a
data record you wish to delete.
receive a detailed report as to who
is in the facility and where they
last used their card. Card Holders
are listed by IN reader. Each list
shows a total number IN location
wide and a subtotal of those IN at
that reader.
The Who is In Report can be
configured to run from an Input
Alarm. For more Information
press “F1” for Help.
DataBase
– Click here to
expand the menu to display all
locations defined in the system
expand the menu to display
Passwords, Reports, and Setup.
to
to
The
.
Logged onto the System is
displayed here.
of the Operator
Page 12
DataBase
4
Add button
Operator Passwords
and Configuration,
Page 6
DataBase and
History Backup
Utilities, Page 23
Card Holder
Management,
Page 34
Location History
Report Generator,
Page 81
Menus Map
Double Click on: System,
Reports, Setup, and
Locations to expand their
menus.
Click on the Menu Item,
then click on the Add
button in the Toolbar at
the top.
Access Level – Page 53
Time Zone – Page 60
Company – Page 63
Holiday – Page 64
UDFs – Page 65
Guard Tour – Page 68
Badge Temp – Page 75
Keys / Skills – Page 80
Page 13
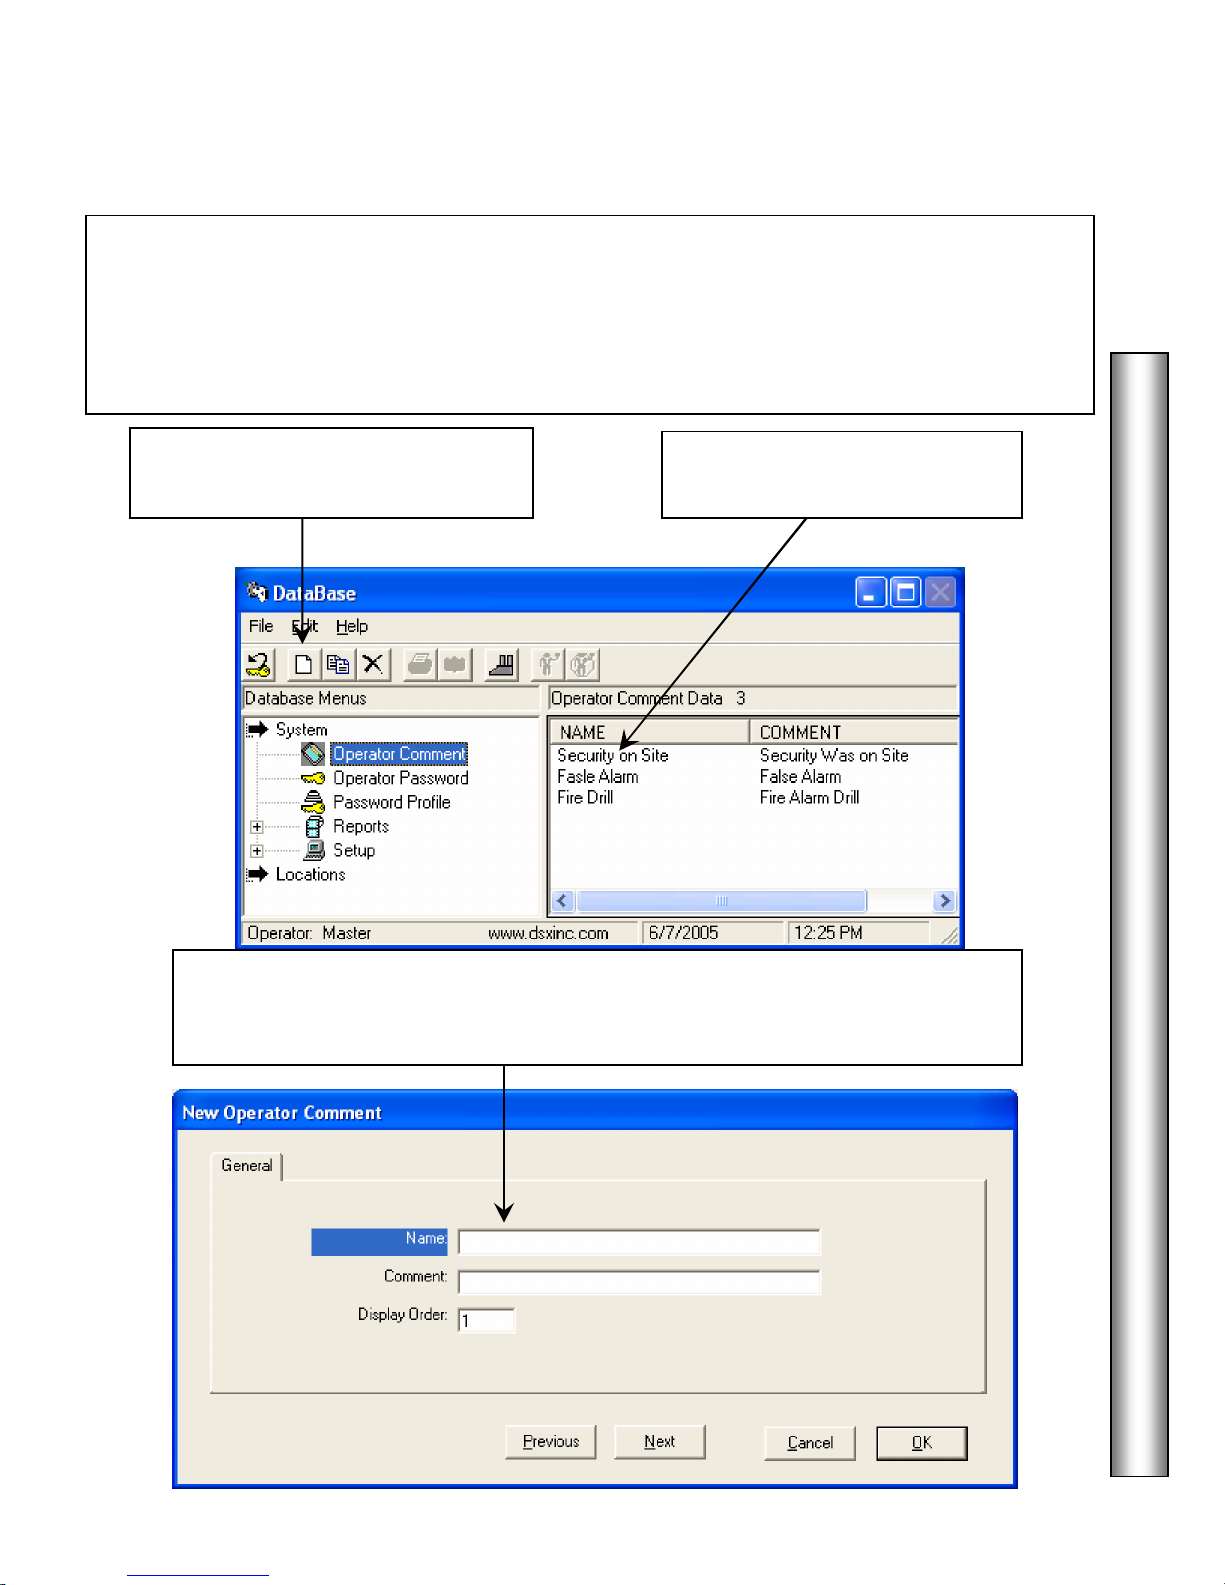
Operator Comments
5
Operator Comments
Operator Comment
Edit
Name
comments can be made and stored in history for future retrieval. The comments can be in response to
an alarm or restoral or any other incident. Predefined statements or comments can be described here
and later used by the operator. Free format comments can also be used instead of or in conjunction
with the predefined comments. Predefined Operator Comments can be used for consistent recording
of a common or recurring situation.
Click on
Menu then on Add.
are notes or text that can be recorded by the operator at any time. These
in the
Double Click here to
existing Operator Comment.
an
DataBase
1. Enter the
2. Enter the Comment to be displayed and recorded.
3. Enter the Display Order, which determines its order in the comment pick list.
of the Comment as it will be referred to and selected by.
Page 14
DataBase
6
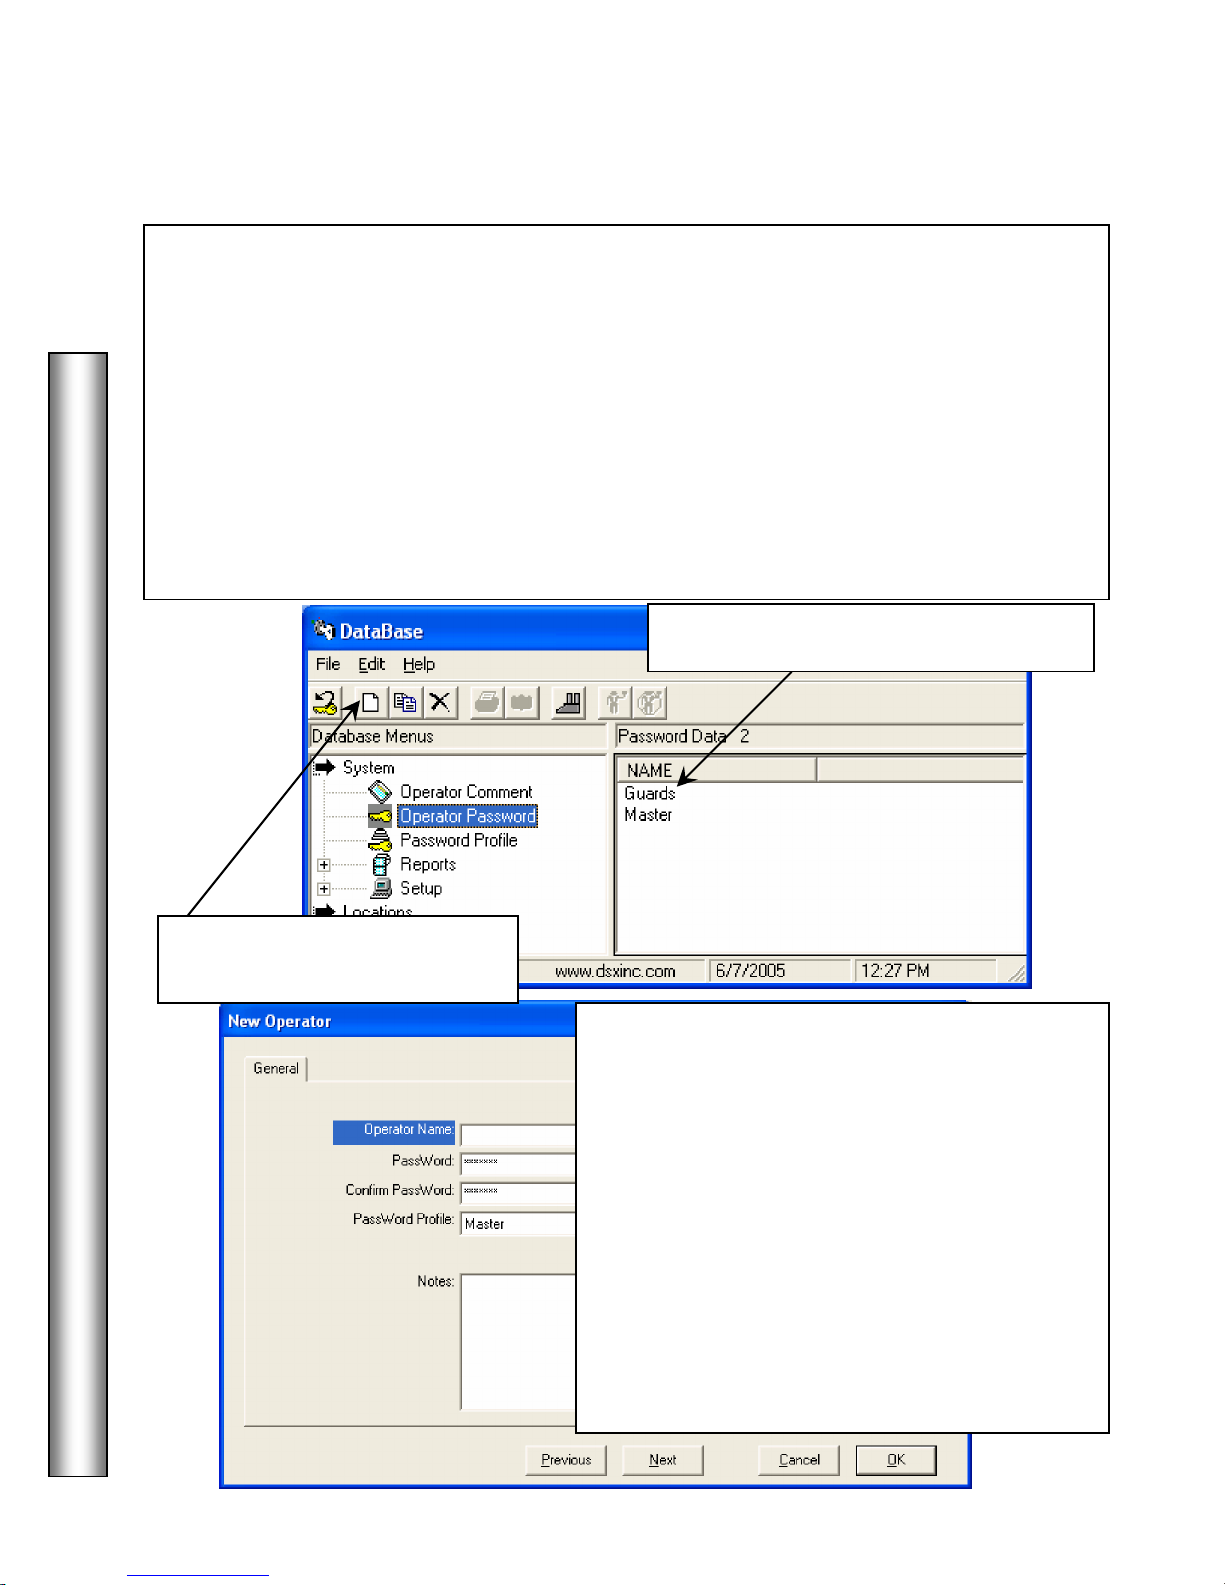
Operator Passwords
Operator Name
Operator Password
Operator Password
is the mechanism that secures the system from unauthorized use. The
Operator Passwords are unique to each operator providing the operators the same use of the
system regardless of which workstation they are at. Each operator has a Password Profile that
determines what privileges the operator has in the software. Each operator can have their own
Password Profile or multiple operators can share a profile. The Operator must enter their
Password when starting the system and must log off when leaving the workstation.
This method of password protection allows the manager to add the operator into the system and
assign them the appropriate password profile, and an initial password. The operator is given their
login name and password profile at which time they can change their password to one they only
know. Once this is done the manager can go back and modify the login name and profile without
viewing or changing the password.
Double Click here to Edit an Operator.
Click on
the Menu and then on Add.
in
1. Enter the
2. Enter up a minimum of 6 and up to 10
alphanumeric characters for a Password. The
user name and password must be entered in all
upper case letters for them to be case sensitive.
3. Enter the same password again in the Confirm
Password field.
4. Select a Password Profile from the drop down
selection box.
5. Enter Notes about this Operator if applicable.
Note /// When using AD Authentication, Enter the
Operator Name and select the PassWord Profile
without clicking on the password fields.
.
Page 15
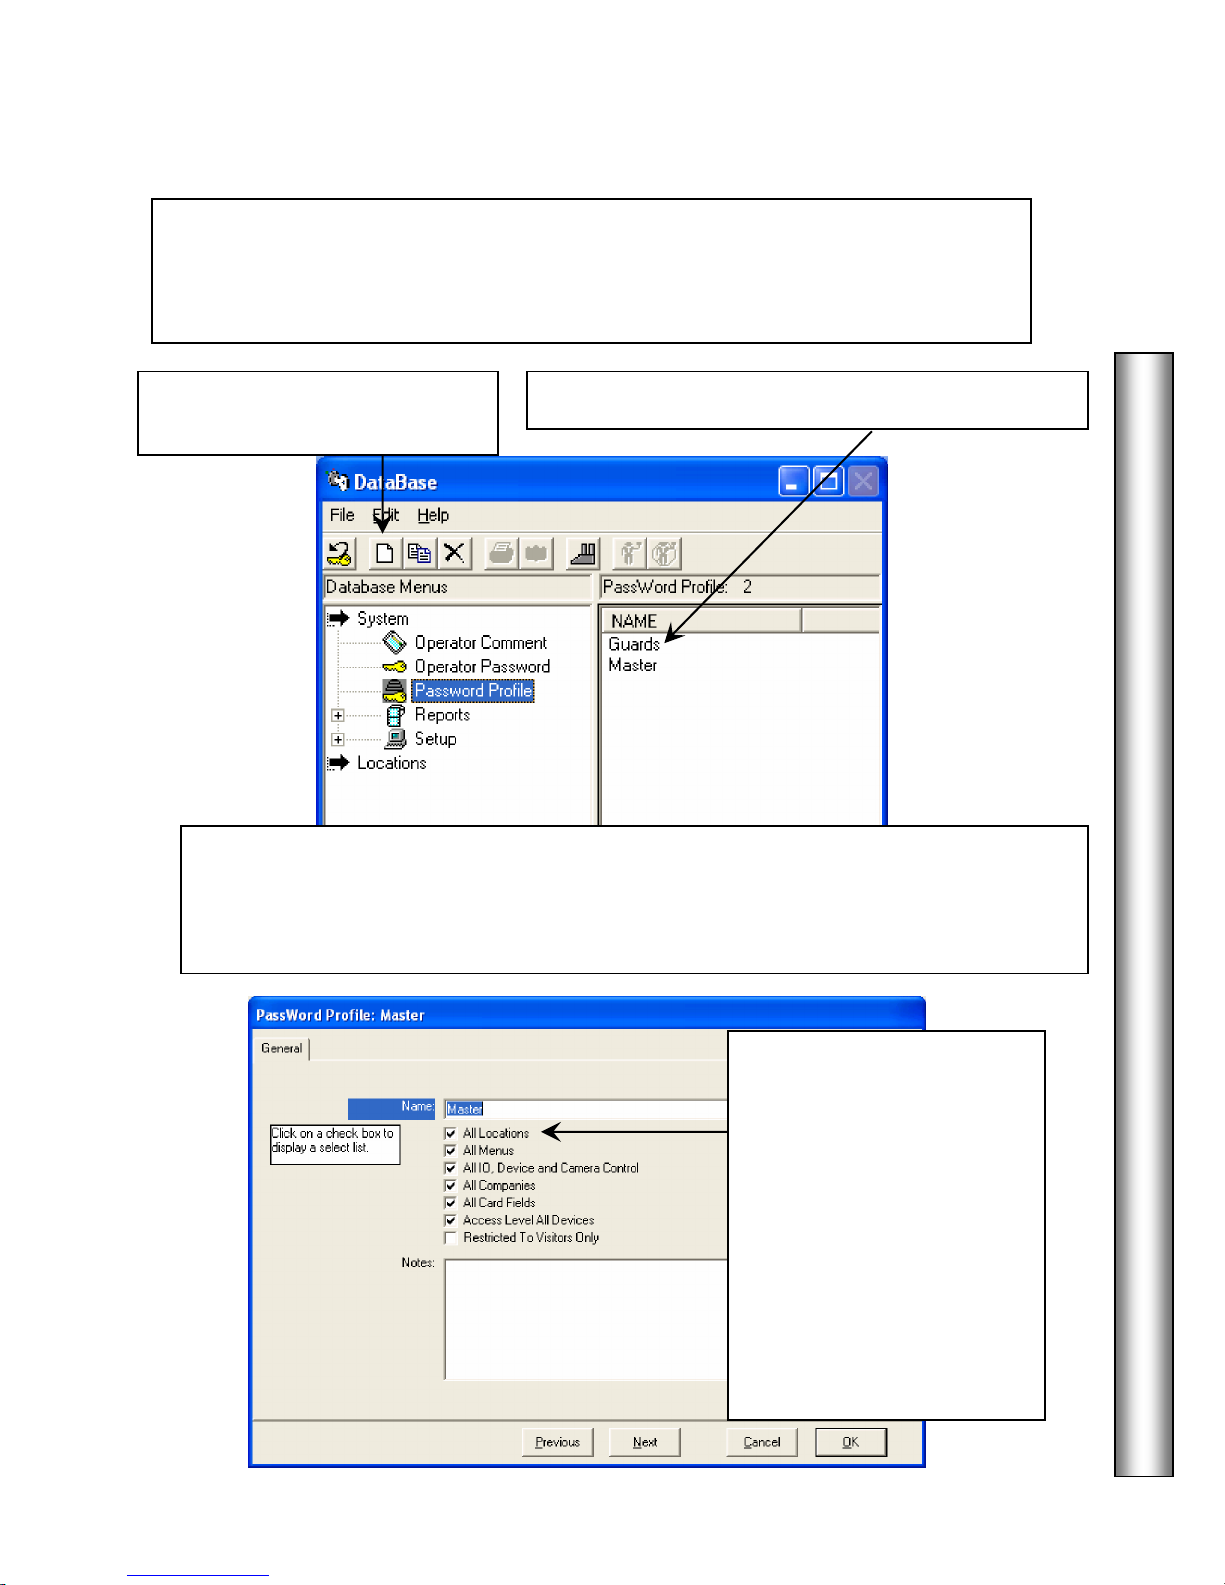
Password Profiles
7
Click on the checkbox
to the
operator to manage visitors.
Password Profiles
Password Profiles
Password Profile
Menu and then on
Add.
Edit
a Profile
- Double Click on the selected
Profile
is valid for. Custom profiles can be created for each Operator or can be shared by more
then one Operator.
Click on
are the describing elements of where a password is valid and what it
DataBase
in the
New
have rights to nothing by default, indicated by no checkmarks in
the column of selection boxes below. By clicking in the box you place a checkmark and
provide full rights to that selection. By clicking on the checkmark you take it away which
takes you to the selection menus and break down for that listing.
left of each description to
view the breakdown of, and
restrict privileges in, each
category.
View the following pages
for a breakdown of all 6
categories.
Select Visitors only if this
profile should only allow the
Page 16
DataBase
8
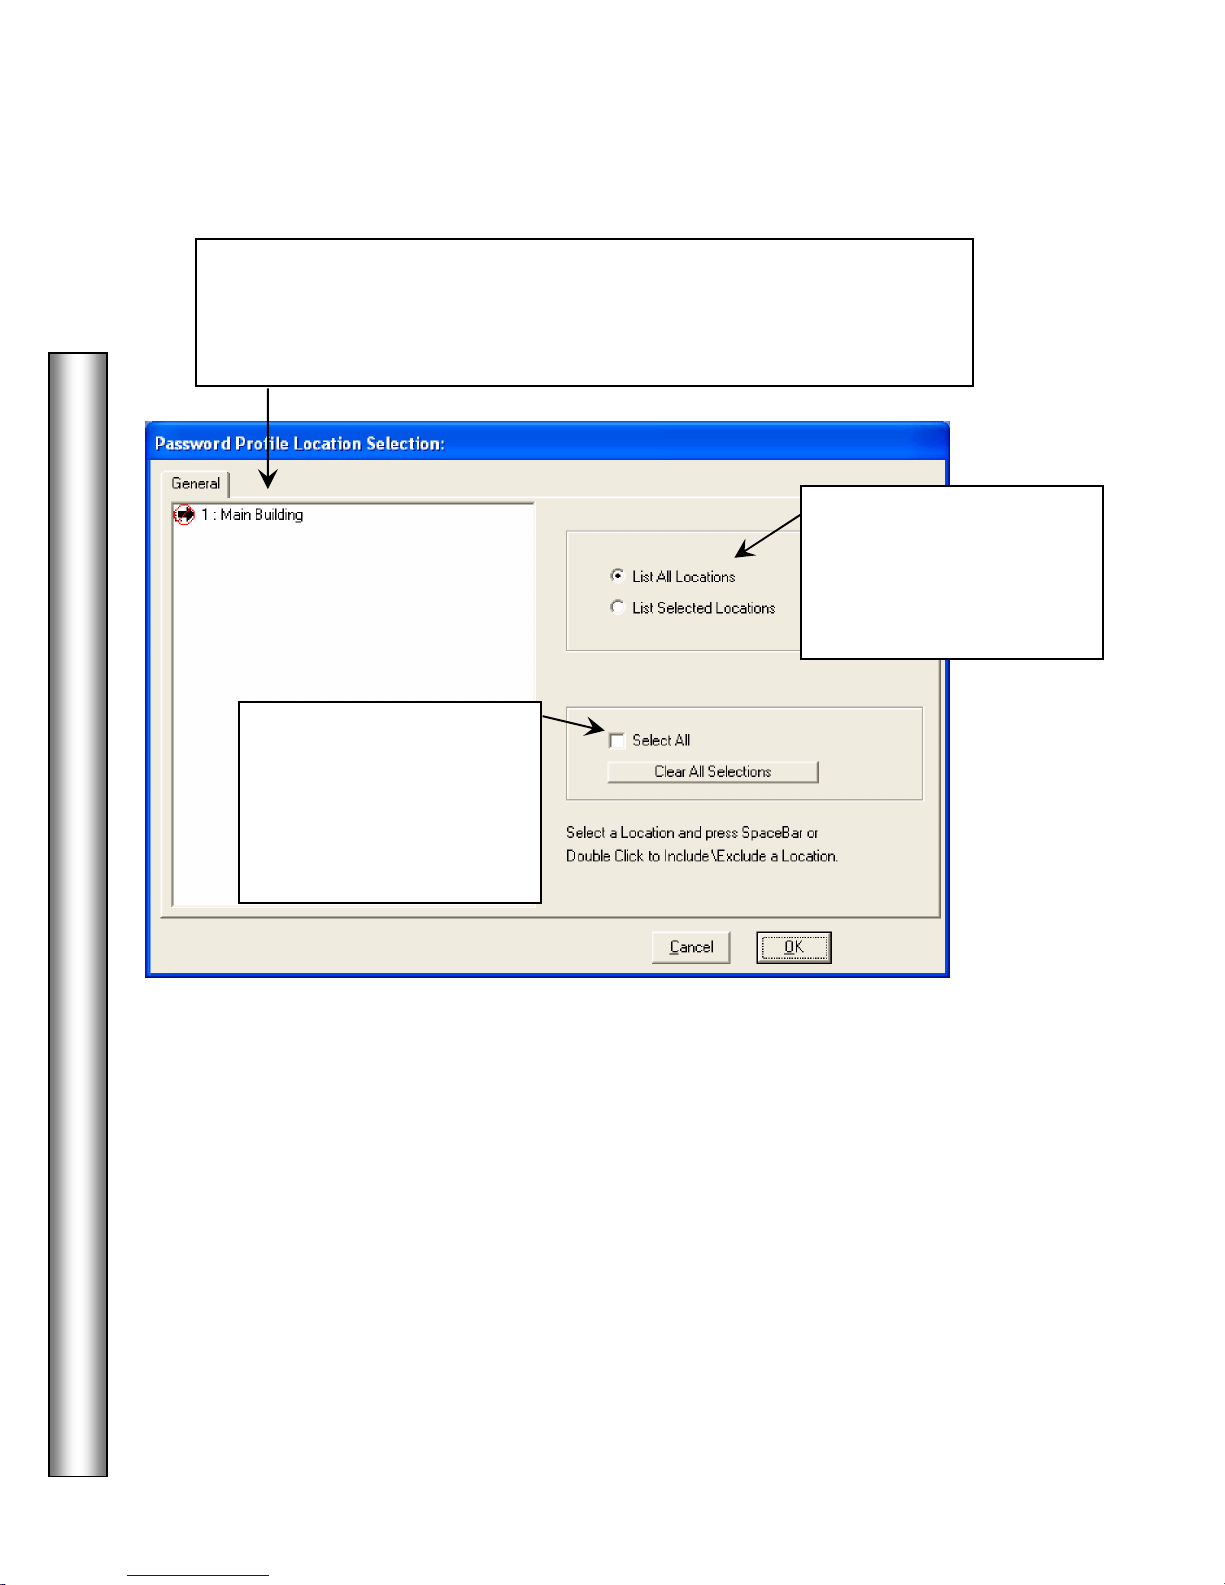
Location List
Select All
Profiles – All Locations
Use the
profile will be valid for. Select the Locations this Password should work at.
Select a Location and press the Space Bar or Double Right Click to
include or exclude a location.
below to determine which locations this password
Click on one of the
selections to the left to view
All Locations or to only
view the Locations selected
for this profile.
Click on the
checkbox to automatically
select all locations.
Click on the Clear All
Selections button to
deselect all locations.
Page 17
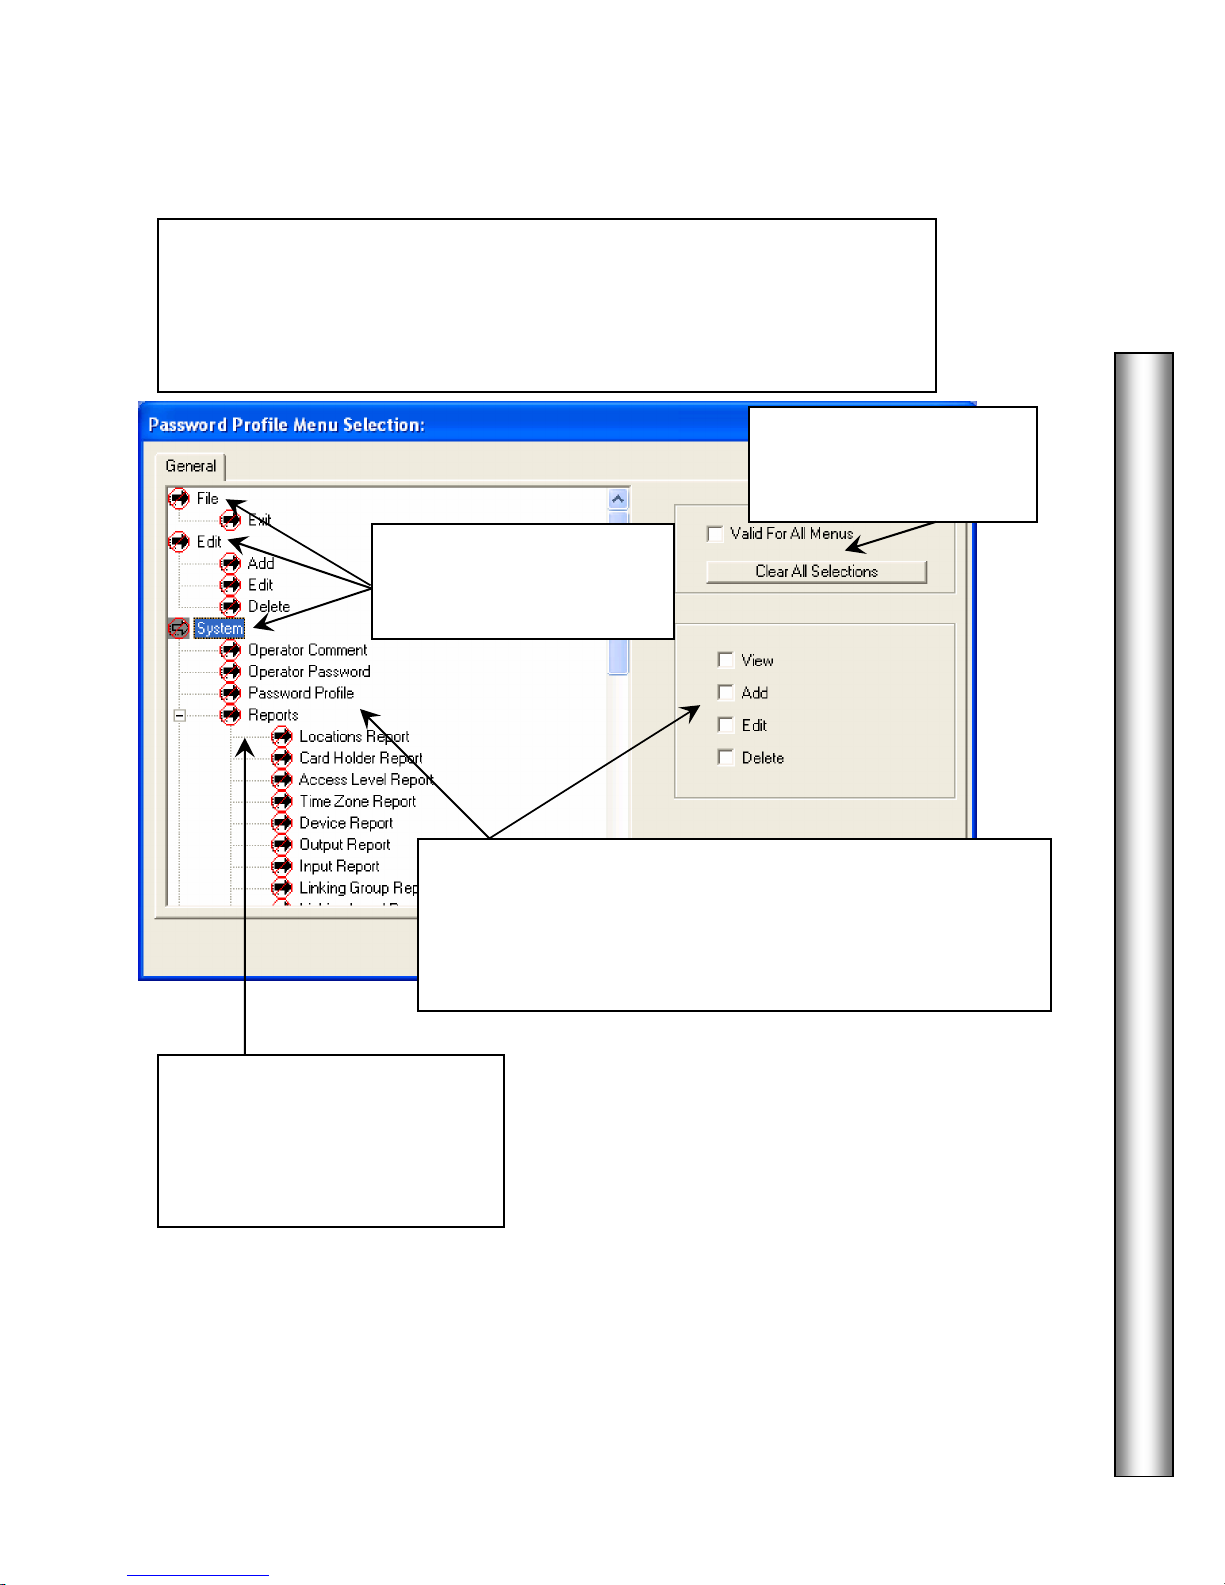
Profiles – All Menus
9
All Menus
File, Edit
Click on View, Add, Edit, and/or
Reports
Profile will be valid, are selected. Items selected here are accessible to a
password with this profile. This answers the question of what functions this
Password is allowed to perform. Select the items from the list corresponding
to what this profile should be valid for and have access to.
is where menu items and functions, for which this Password
DataBase
Click on one of these to
Select All or Clear All
Selections.
Double Click on:
and System to expand their
menus.
Select a Menu Item then
Delete to provide the respective privileges for the menu
selection.
Double Right Click on the Menu Item to provide full rights.
Double Click on
expand the menu to display all
of the system reports available.
Select all reports this profile
should have access to.
to
Page 18
DataBase
10
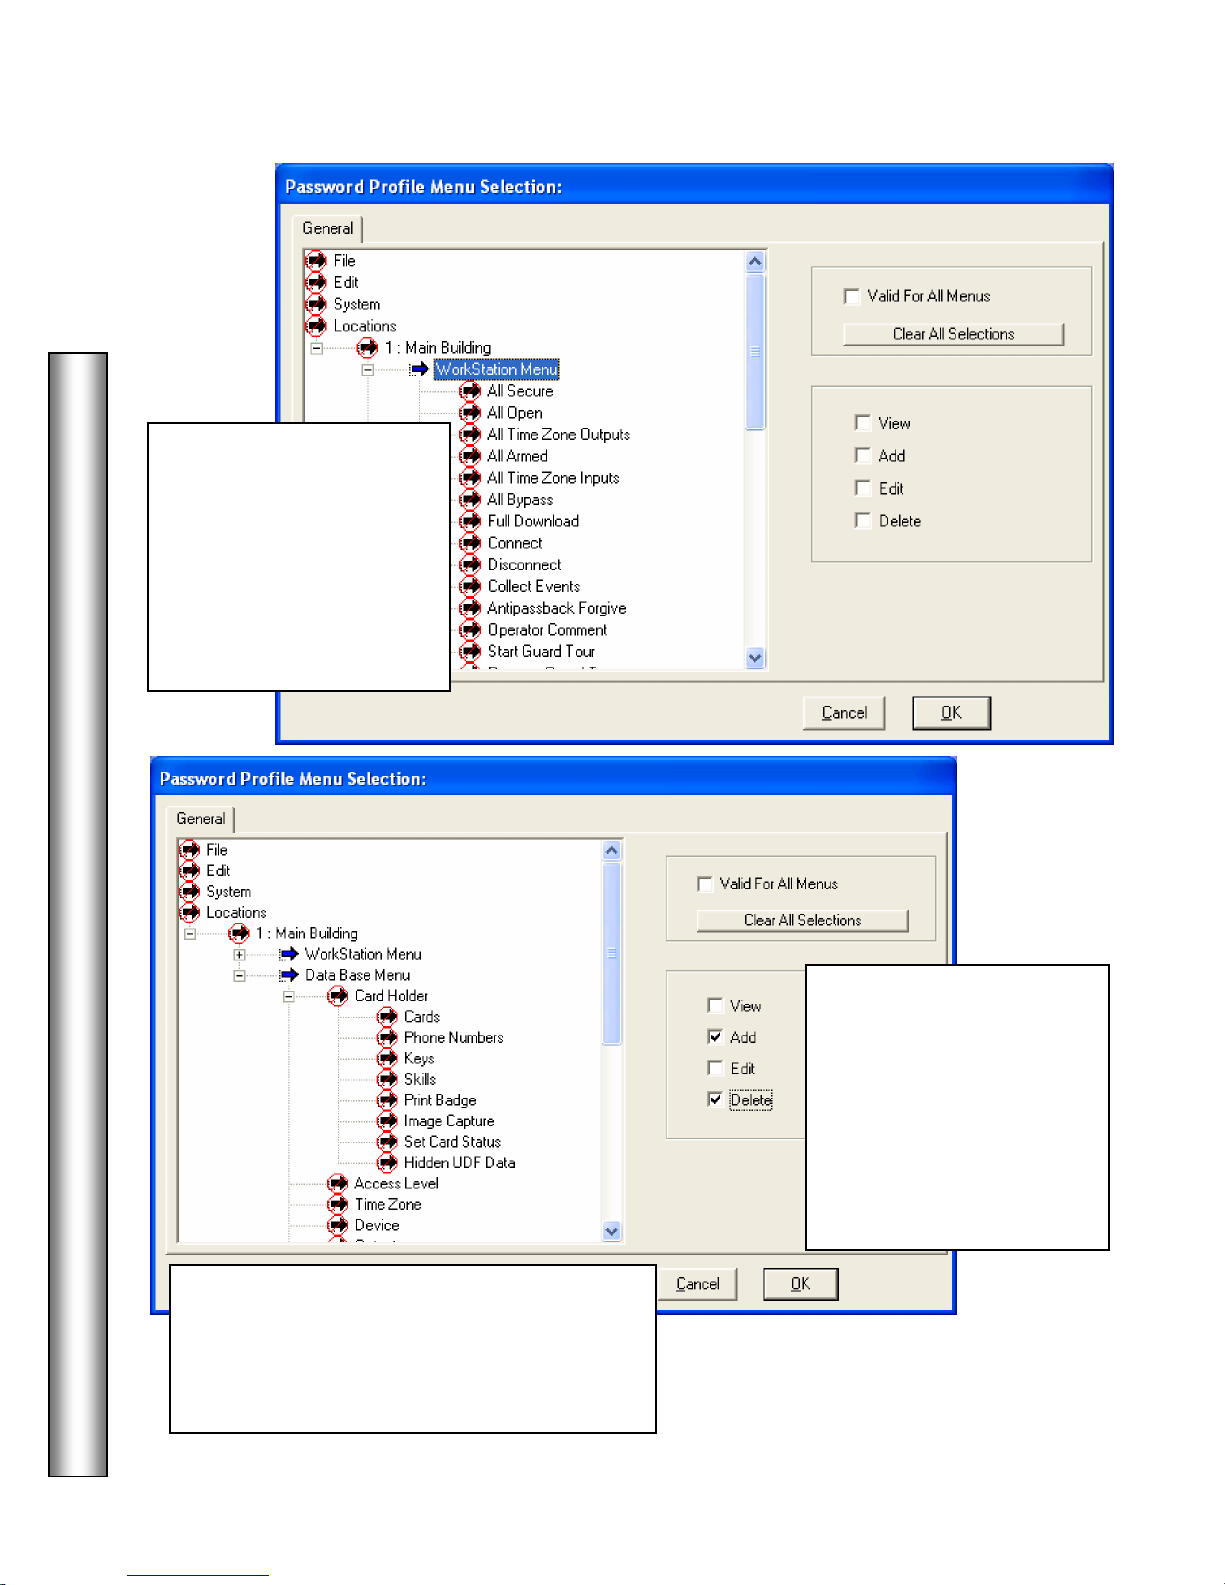
Set Card Status
Add
allows
controlled.
Menu Items
View, Add, Edit,
Profiles – All Menus
Double Click to expand the
Locations Menu. Select
the appropriate Locations
followed by Workstation,
DataBase, and Cardholder
Menus and set the level of
access for each item.
Under
the operator to Activate Cards, and selecting
Delete allows the operator to Deactivate Cards.
These two functions can now be separately
– selecting
Select the
assign the
and/or Delete privileges by
checking the appropriate
box to the right and then
Click OK at the bottom.
Double Right Click on the
Menu Item to provide full
rights.
and
Page 19
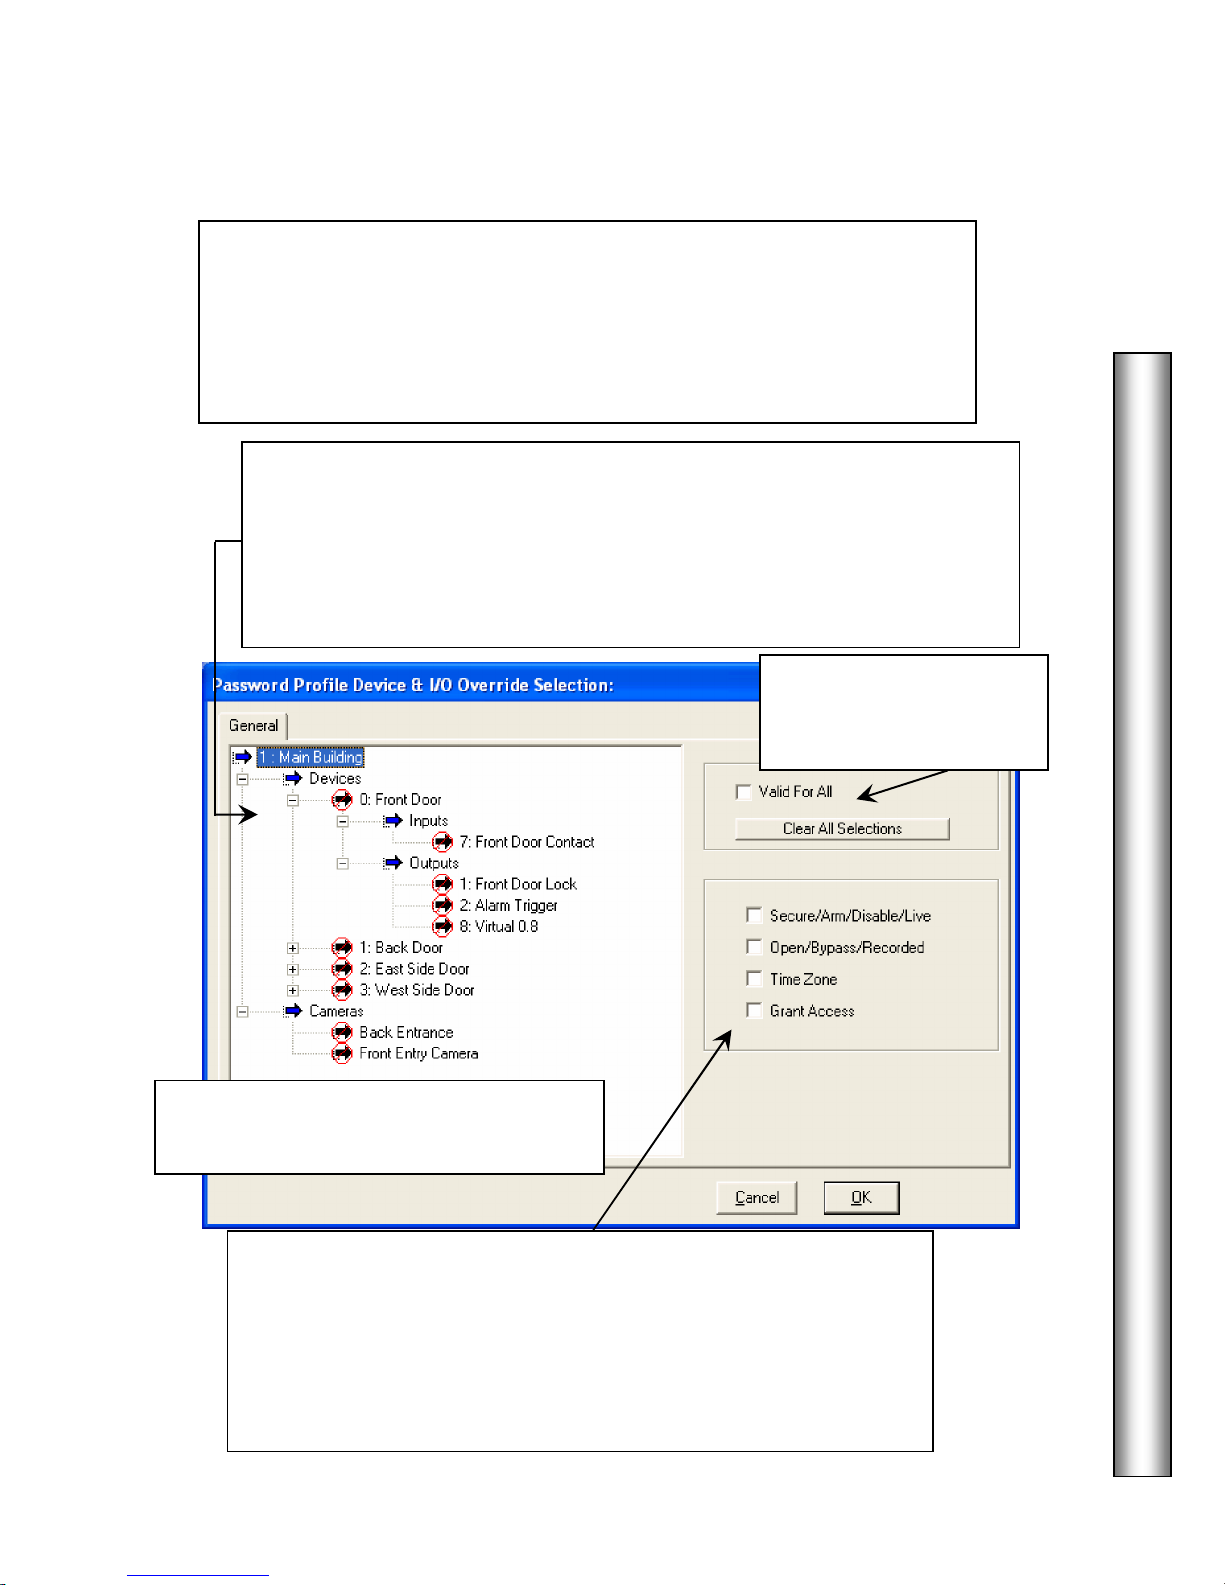
I/O, Device, & Camera Control
11
Input, Output, and Device
Overrides and
Double Click on the Location
Device, Input, Output and/or
Camera
Cameras
– Live / Recorded
Camera Control are assigned to a profile here. Select the devices, inputs,
outputs, and cameras an operator with this profile will be allowed to
manipulate and have manual control over. Select the point then select one or
all of the override commands in the lower right corner. These overrides also
apply to Scheduled Overrides.
Double Click on each Device to expand the menu to display all of the inputs
and outputs associated with that device.
Double Click on Cameras to expand the menu to display all of the cameras.
(card readers and/or keypads)
to expand the menu and display all devices.
Click on one of these to
Select All or Clear All
Selections.
DataBase
A right double click on the title item will
select/de-select all items below it.
Select the
click on the Override(s) appropriate for the point and the profile.
Devices – Disable / Time Zone
Inputs – Arm / Bypass / Time Zone
Outputs – Secure / Open / Time Zone / Grant Access
above and then
Page 20
DataBase
12
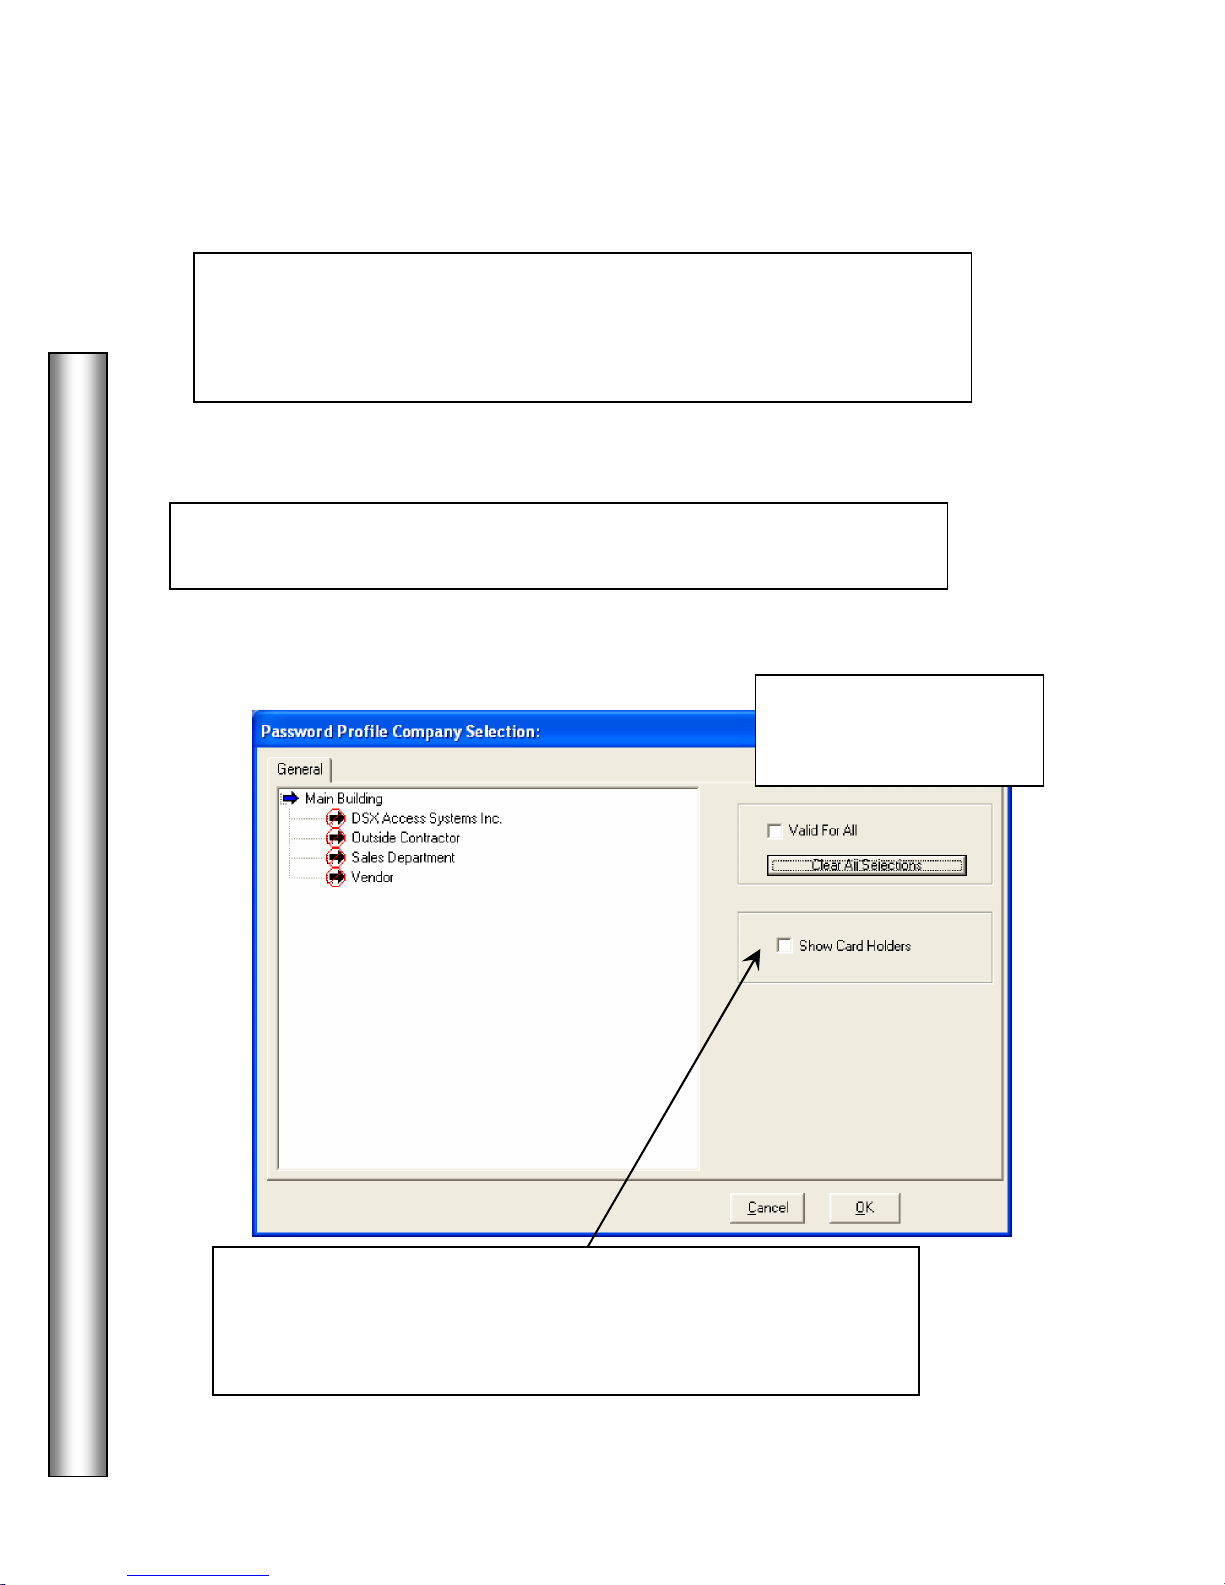
Companies
Double click on the Location or Location Group
Selections.
All Companies
are the different organizations, businesses, departments, or other
groups of card holders. By Selecting a Company here, the operator with this
profile will only have access to the card holder data for that company as well
as the history that pertains to that company.
below to expand the
menu to display all of the Companies defined for the location or locations.
Click on one of these to
Select All or Clear All
Select the company you wish to give this operator access to and
then click here on Show Card Holders. This gives the operator
access to all company data such as the card holders assigned to the
company and their associated history.
Page 21
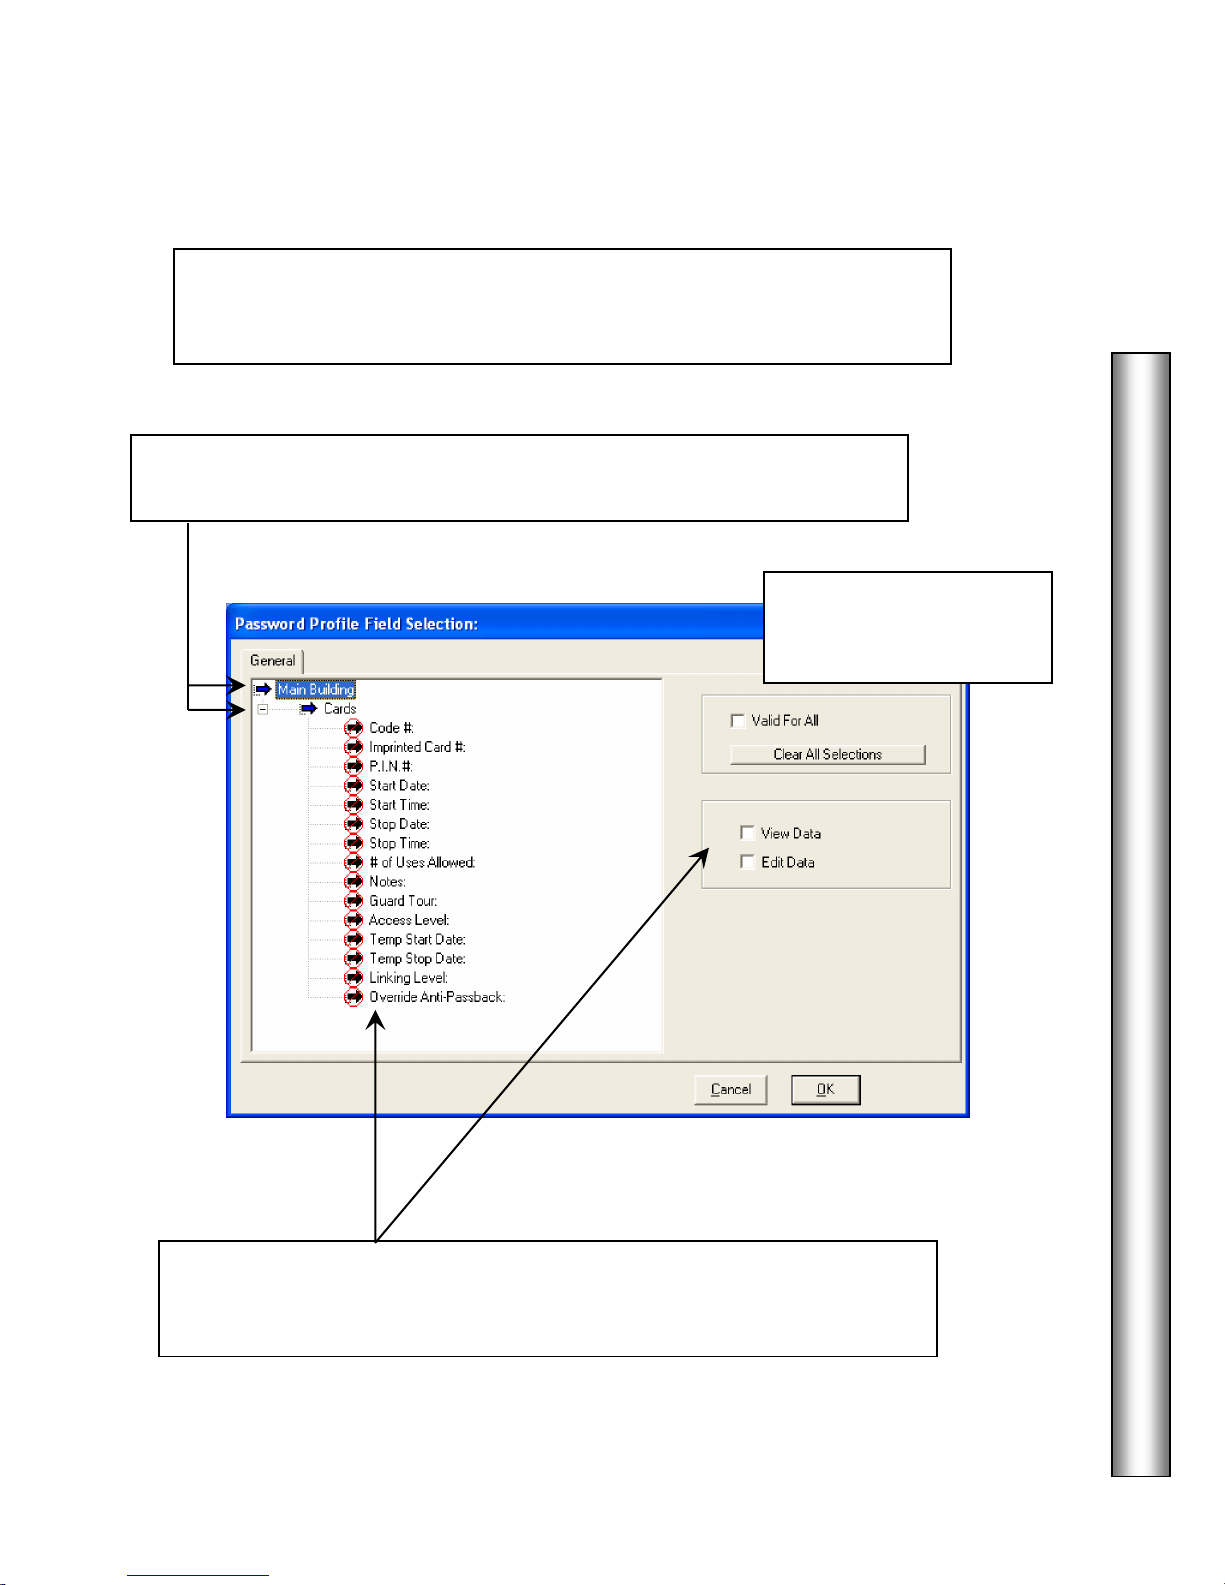
All Card Fields
13
Card Data Fields
Selections.
Select the
to be able to view and/or edit in the DataBase program under Card Holder /
Cards.
Double click on the Location or Location Group and then click on Cards
to expand the menu to display the list of card data fields.
Select the Card Fields from the list above then click on View Data and/or
Edit Data to determine which of these fields a user with this password
profile will be allowed to view and edit.
you wish an operator with this password profile
DataBase
Click on one of these to
Select All or Clear All
Page 22
DataBase
14
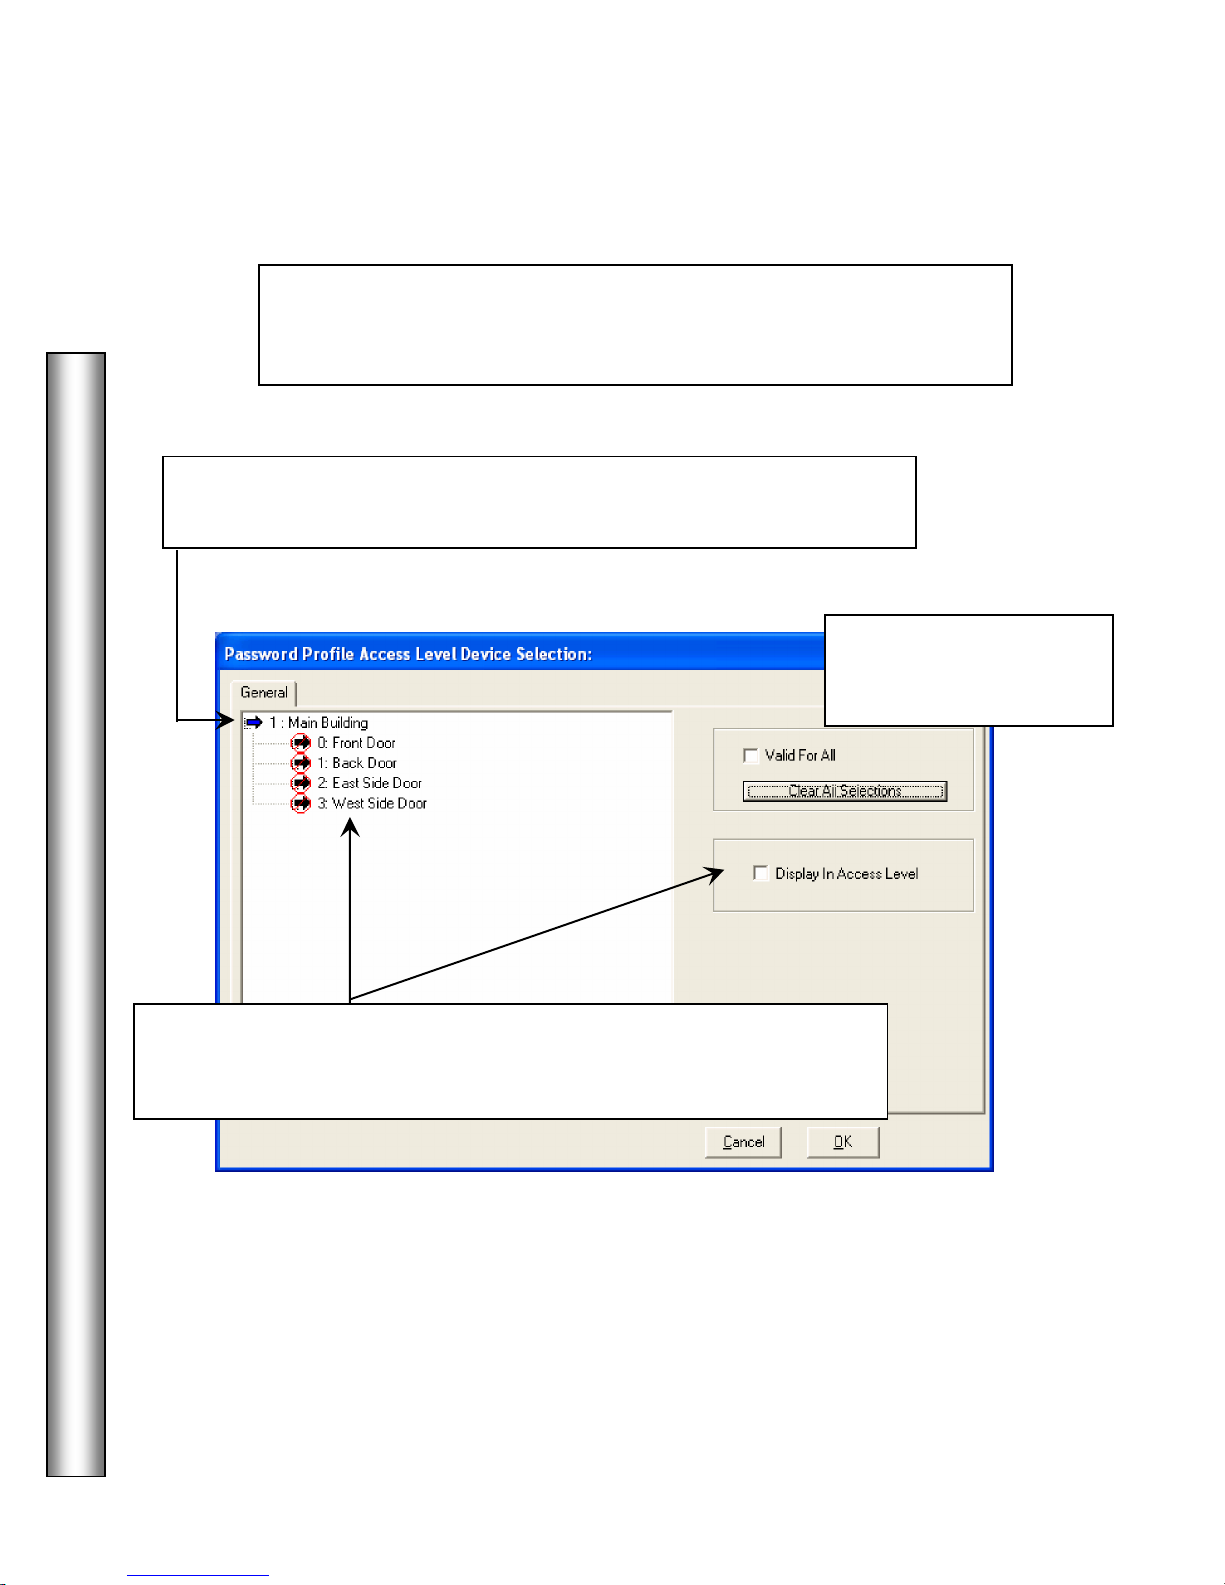
Devices
Double click on the Location or Location Group
Selections.
Select a Device then click on Display in Access Level
Access Level All Devices
Select the
profile will be able to view and assign when creating and issuing access
levels to Card Holders.
and view the list of all Card Readers/Keypads in the system.
be displayed in the list of devices to choose from when an Operator with
this Profile is creating an Access Level.
(Card Reader/Keypad Locations) the operator with this
to expand the menu
for that device to
Click on one of these to
Select All or Clear All
Page 23
15
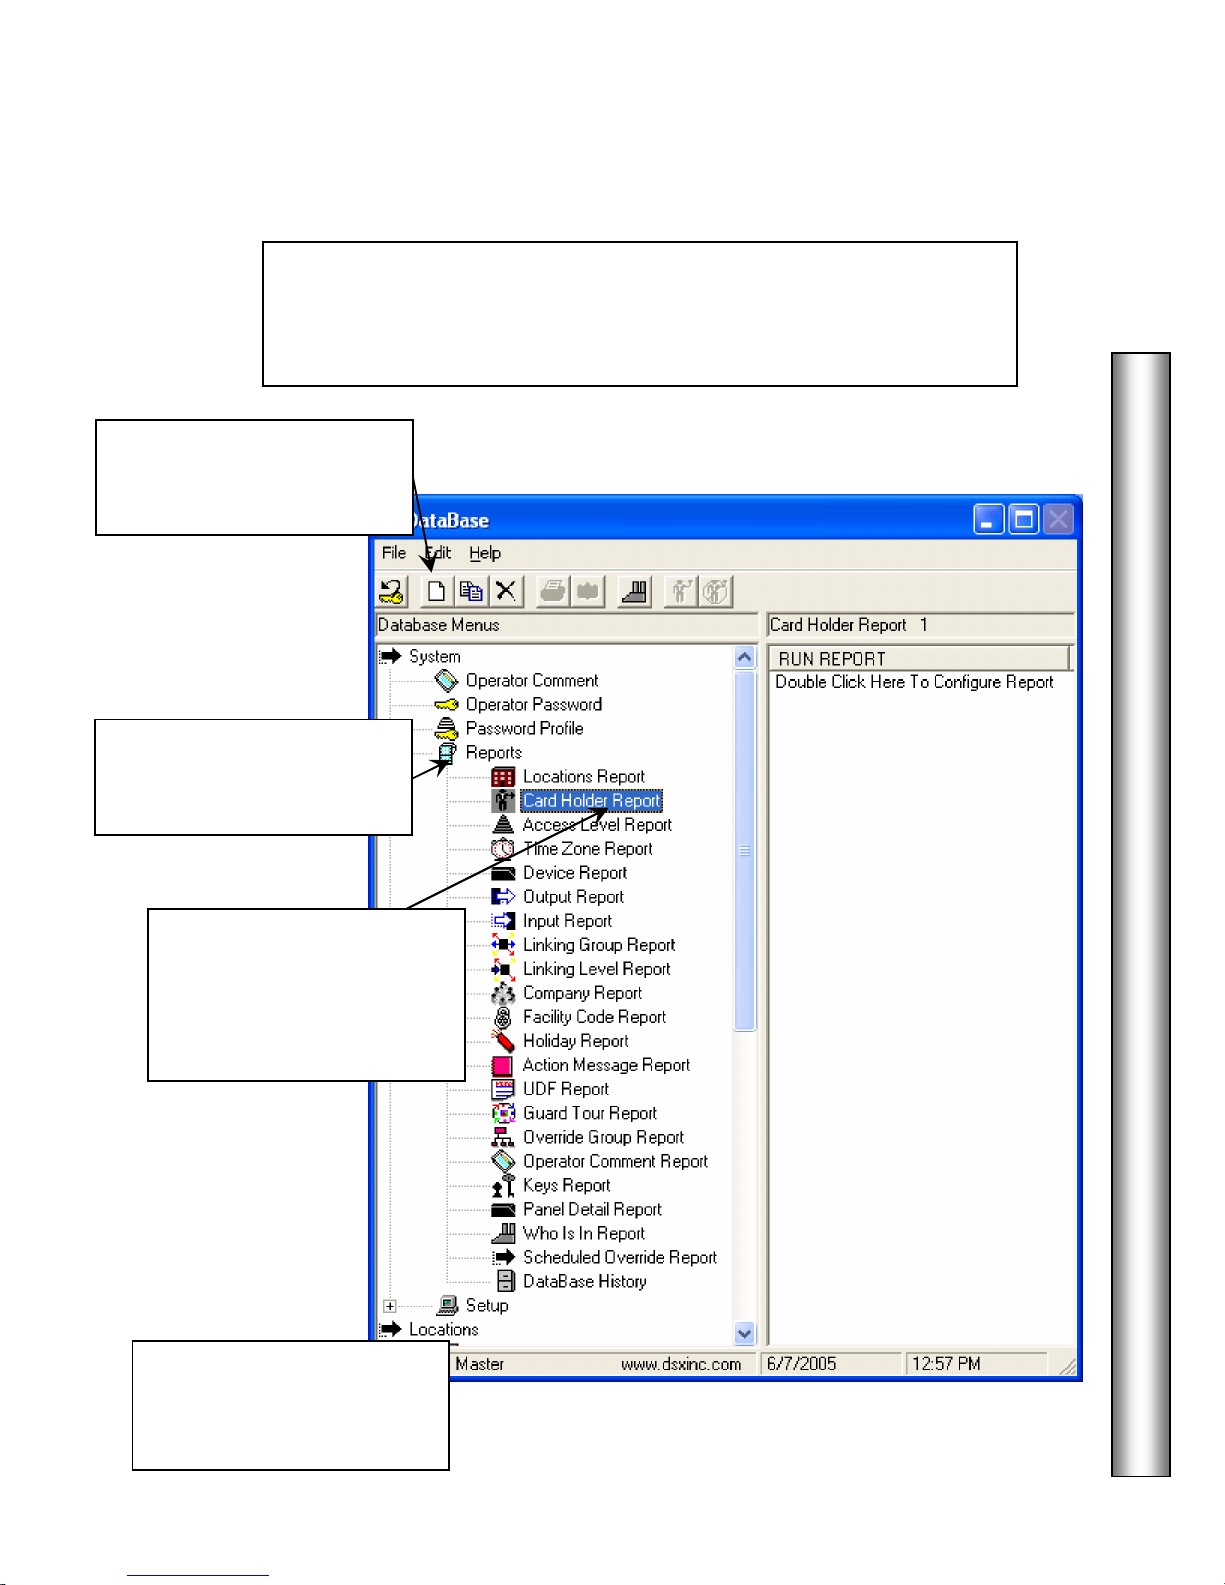
Reports
Card Holder Repo
rt
2. Select the Report desired
then click on the Add
Button.
1. Double Clicking on
reports expands the
Reports selection menu.
The
can be accessed by clicking
on Card Holder Report in
the menu and then clicking
on the Add Button. Page 17
viewed and printed. Card Holders can be searched, sorted, viewed and
printed. All reports except Keys, Who is In, History, and Time &
Attendance are exclusively run from this menu.
Reports
is the location that all system programming can be selected,
DataBase
Press F1 for Help
anywhere in the DataBase
and Workstation programs.
Page 24
DataBase
16
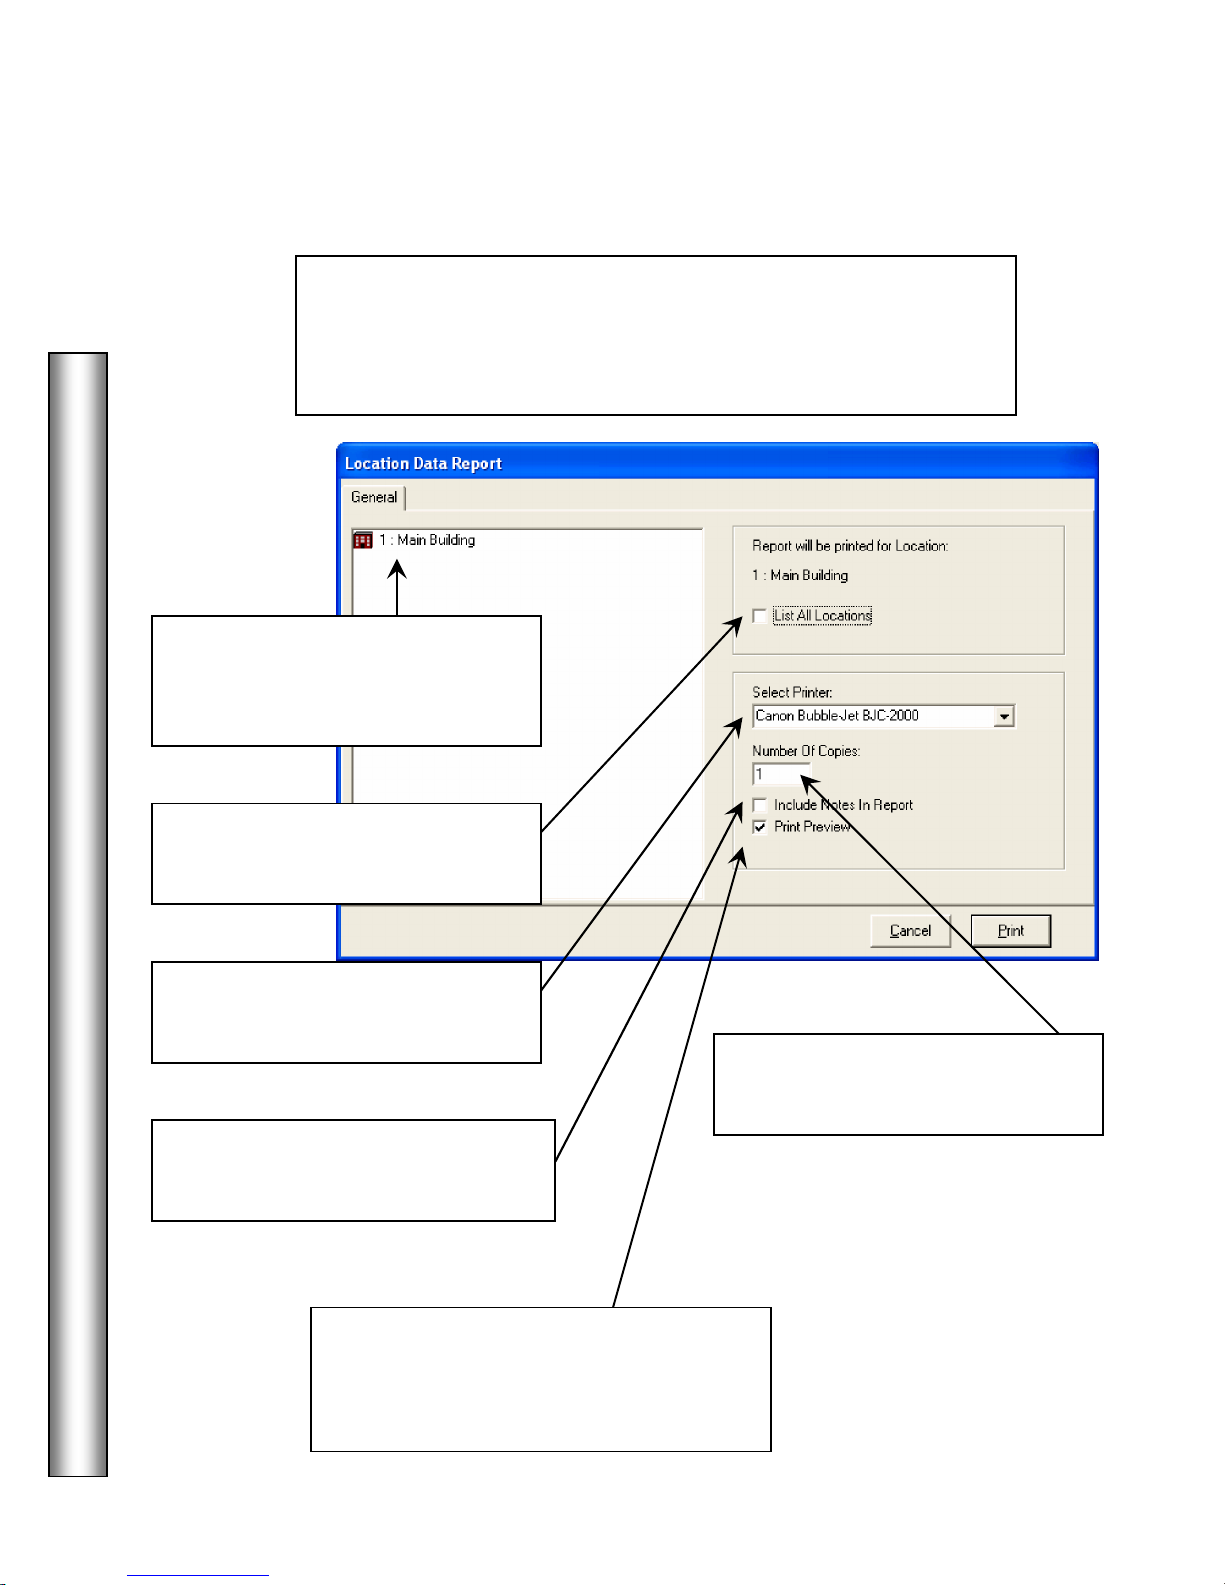
Location Reports
List All Locations
Printer
Number of Copies
Print Preview
View Screen as
Location
Reports / Example
include all location information such as which
features are enabled, address information and phone numbers.
Use this example for all reports except Card Holder.
Select the
report if there is more than one
Location.
Select
all locations in the database.
Select
Windows Default Printer.
Click here to incorporate custom
Notes in the report if desired.
desired in the
to show
if different than the
Set the
for the printing of this Report.
required
Click here to
screen prior to printing. The Report can be
exported to file from the Prewell as printed to the selected printer.
the report on
Page 25
Reports / Card Holder
17
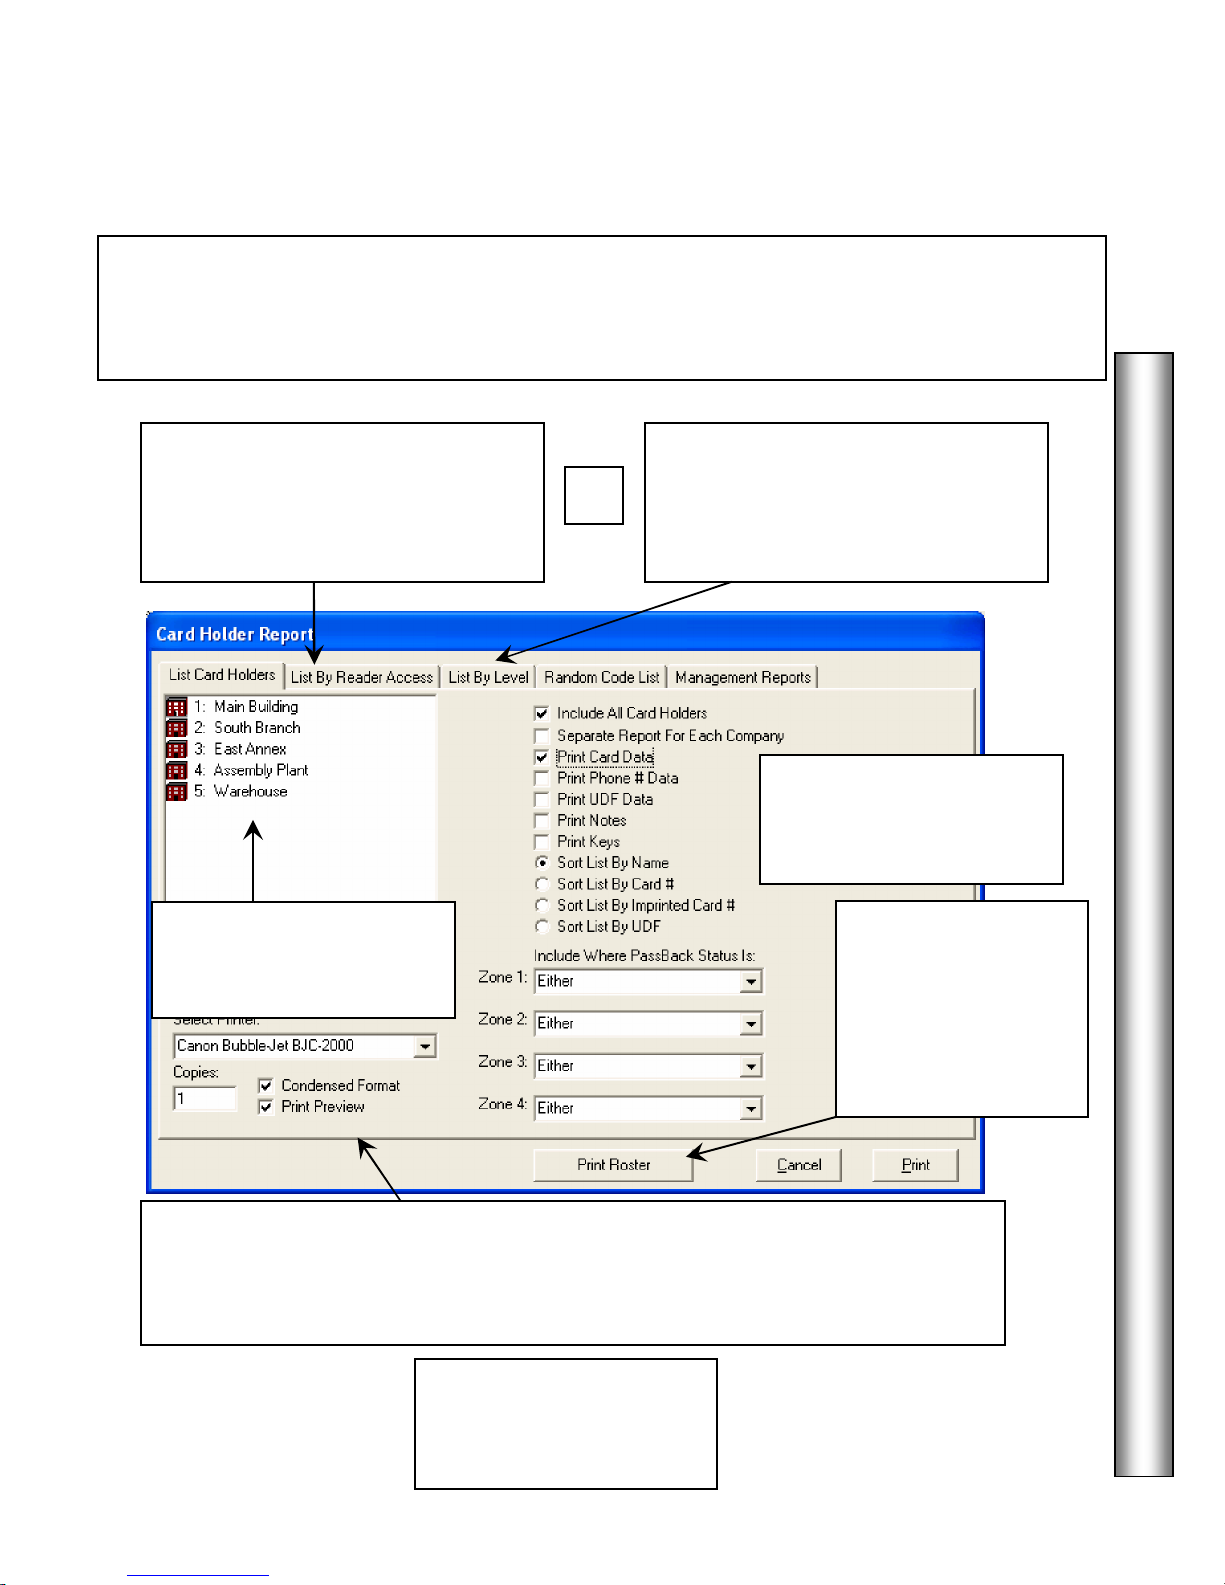
Card Holder Report
or
Location
The
this screen to select the Card Data to be included in the Report and whether or not it should be in the
condensed or full format. Each Tab represents different reports available such as List by Reader
Access or List by Access Level. These Tabs represent separate reports and do not interact.
3. After selecting a Location, Click
here for a report which contains Card
Holders that have access to a specific
Reader/Keypad that are listed here.
2. Select the
this Card Holder Report
should be pulled from.
can include all card holder information as well as all code / card data. Use
3. After selecting a Location, Click
here for a report which contains Card
Holders that have a particular Access
Level or Linking Level listed here.
4. Answer the column of
questions to the left using
the following page.
that
5. Before using the
Print Roster Option,
be sure the correct
Template has been
defined. See page 74.
DataBase
1. The Full Format contains all Card Holder data and prints approximately 5 Card
Holders per page. The Condensed Format prints the most common data and can print
approximately 53 Card Holders per page. The condensed format consists of Code,
Imprinted Card Number, Access Level, Output Linking Level, and Company.
For additional report
information access the Help
Screen by pressing F1.
Page 26
DataBase
18
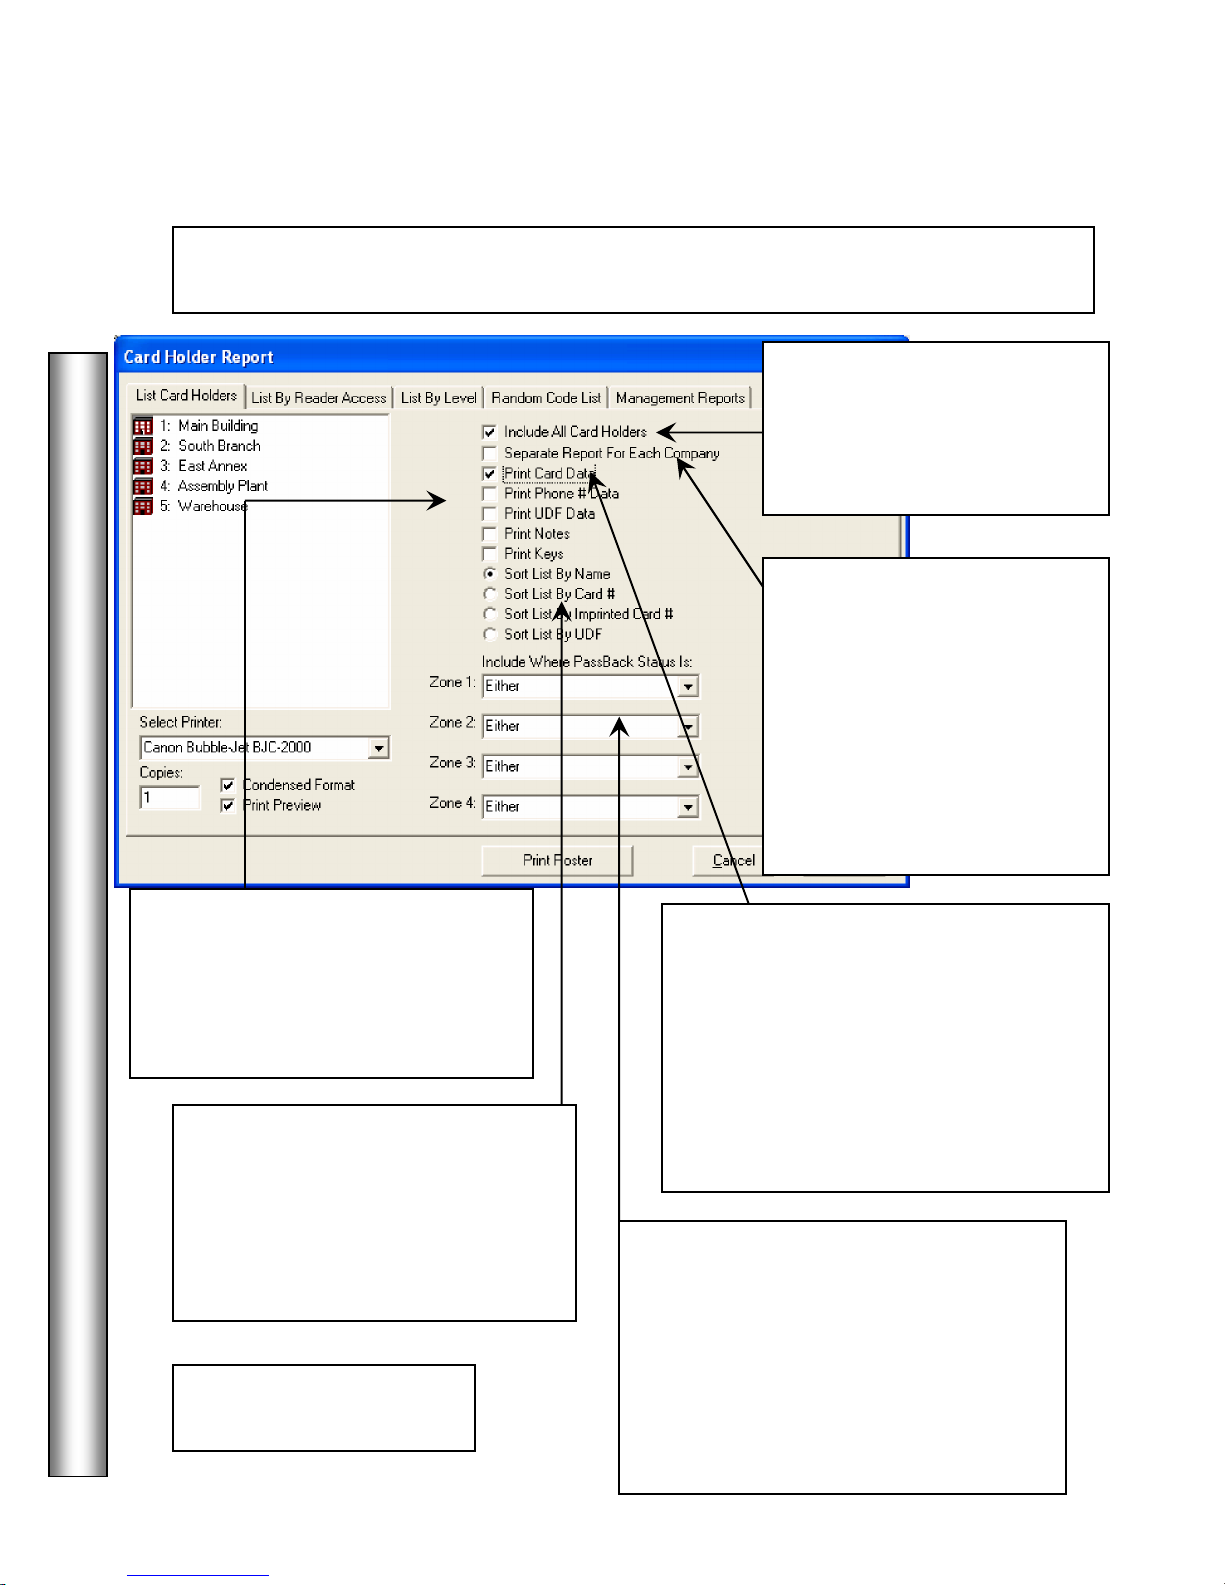
Print Car
d Data
-
Include All Card Holders
Reports / Card Holder
5.
including the state in any or all of the 4 Anti-Passback Zones, then click on Print.
and the subsequent configuration questions and optionally
Click here, remove the
checkmark and jump to the
Card Holder Search Engine to
select the card holders to be in
the report. See next page.
Separate Report for each
Company - The Card Holder
Report can be sorted by
Company or printed without
regard to the company
identifier. For a report that is
sorted by company select this
option. If selected, Card Holders
will be listed by name or code
but separated by company.
Select any or all of the additional data
to be included in the report.
Print Phone Number
Print User Defined Data
Print Notes
Print Keys
Sort the Card Holder Report in one of
the three ways listed by clicking on
one of the three radial buttons.
List by Name
List by Card Number
List by Imprinted Card Number
List by UDF
6. Click on OK and proceed
to page 22.
When selected this
option includes Card data such as name,
code, access levels, number of uses,
activate and de-activate dates, visitor and
trace options. Click on this field one time
to select or deselect this option. A check
mark indicates the report will include the
data. Data included also depends on the
condensed format selection.
Include Where Passback Status is:
Select one or all of the four anti-passback
zones and set the status selection to In /
Out or Either.
This will further set the search criteria to
only find those card holders who currently
hold “In”, “Out”, or “Either” status in one
or all of the four zones.
Page 27
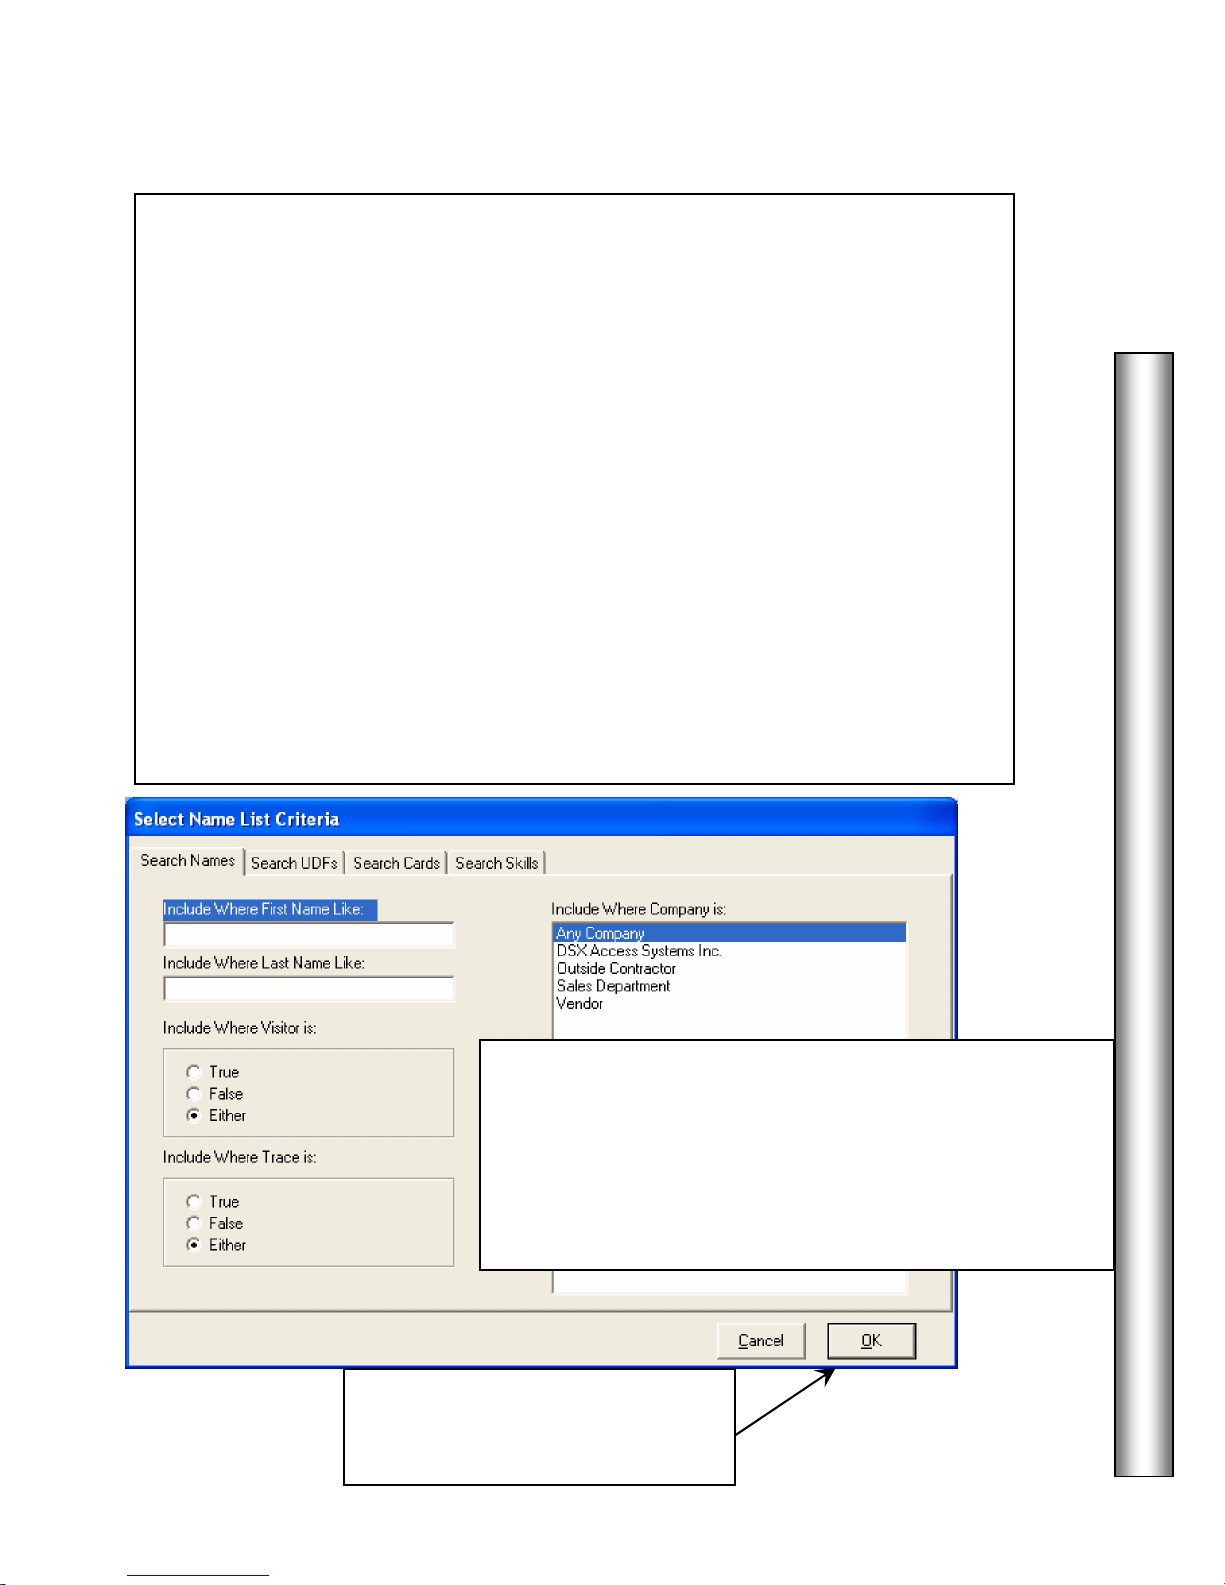
Select Names List Criteria
19
Search Names Tab
The
shown below allows for card holders to be searched and
reported based on their First and/or Last Name, Company, Visitor and Trace status.
The Search UDF Tab allows for Card Holders to be searched by the custom User
Defined Field information.
The Search Cards Tab allows for the Card Holders to be Searched by any of the Card
data such as the encoded card number, the imprinted card number, the number of days
since the card had been used or pending start and stop dates.
The Search Skills Tab allows for the Card Holders to be Searched by any of the Skills
or Trades assigned to the Card Holders.
How to Use Card Holder Search
Any or all of the data fields on any of the Search Tabs can be used to search for Card
Holders. Enter complete or partial search criteria in any or all of the data fields on each
Search Tab and click on OK. The selections form an AND statement and can be used to
form very precise Card Holder Lists. The Card Holder must meet all of the criteria
entered in all search fields on all 3 Tabs in order to be shown in the Card Holder List
shown.
DataBase
Enter the specifying criteria for
the search on any or all-4 Search
Tabs and click on OK.
Search Include Where Company is:
Select one or more Companies from the list. To select more
than 1 company press and hold the Ctrl-Key while clicking on
each one desired. The selection “Any Company” instructs the
system that the company identifier is ignored and the search
will be based on name without regard to the card holder’s
company assignment.
Page 28
DataBase
20
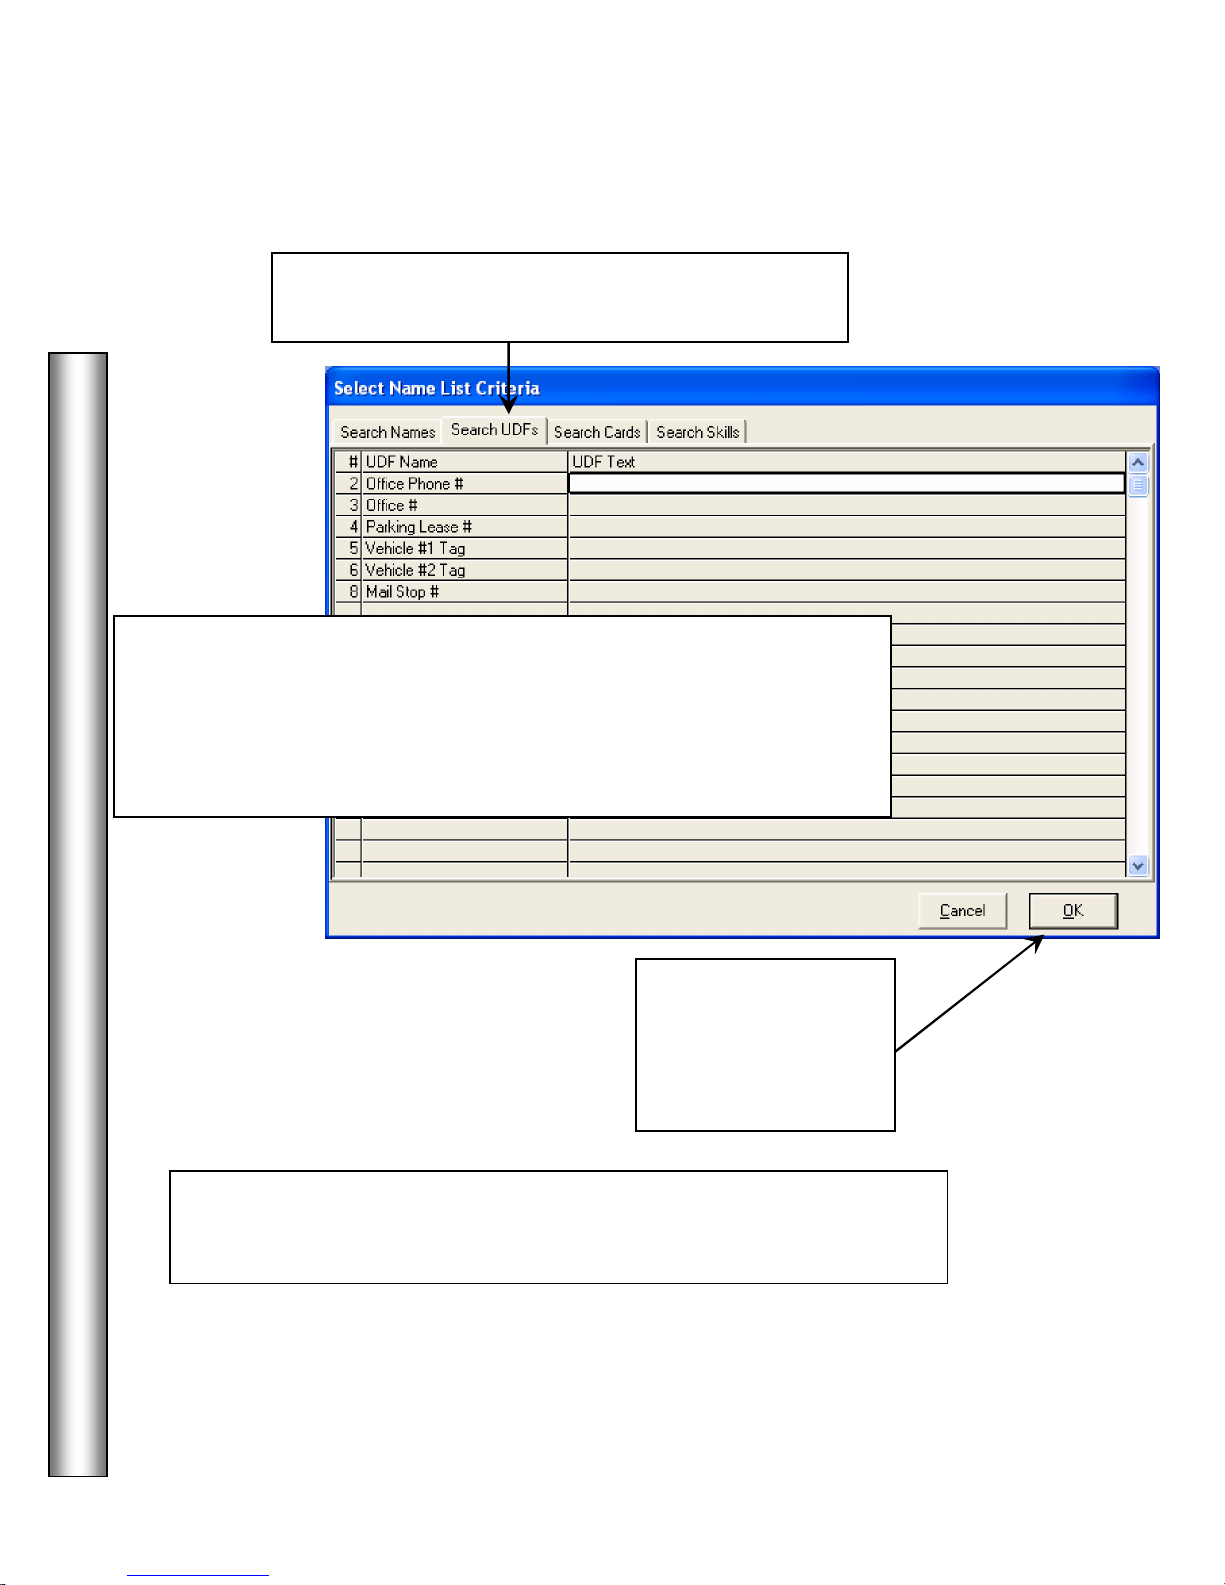
Search UDF Tab
If you are entering an
Email Address for Alar
Select UDFs List Criteria
The
searched by the custom User Defined Field information.
Any or all of the data fields on any of the Search Tabs can be used to search
for Card Holders. Enter complete or partial search criteria in any or all of the
data fields on each Search Tab and click on OK. The selections form an
AND statement and can be used to form very precise Card Holder Lists. The
Card Holder must meet all of the criteria entered in all search fields on all 3
Tabs in order to be shown in the Card Holder List shown.
allows for Card Holders to be
Email Notification be s
Page 81
Enter the specifying
criteria for the search
on any or all-4 Search
Tabs and click on
OK.
Page 29
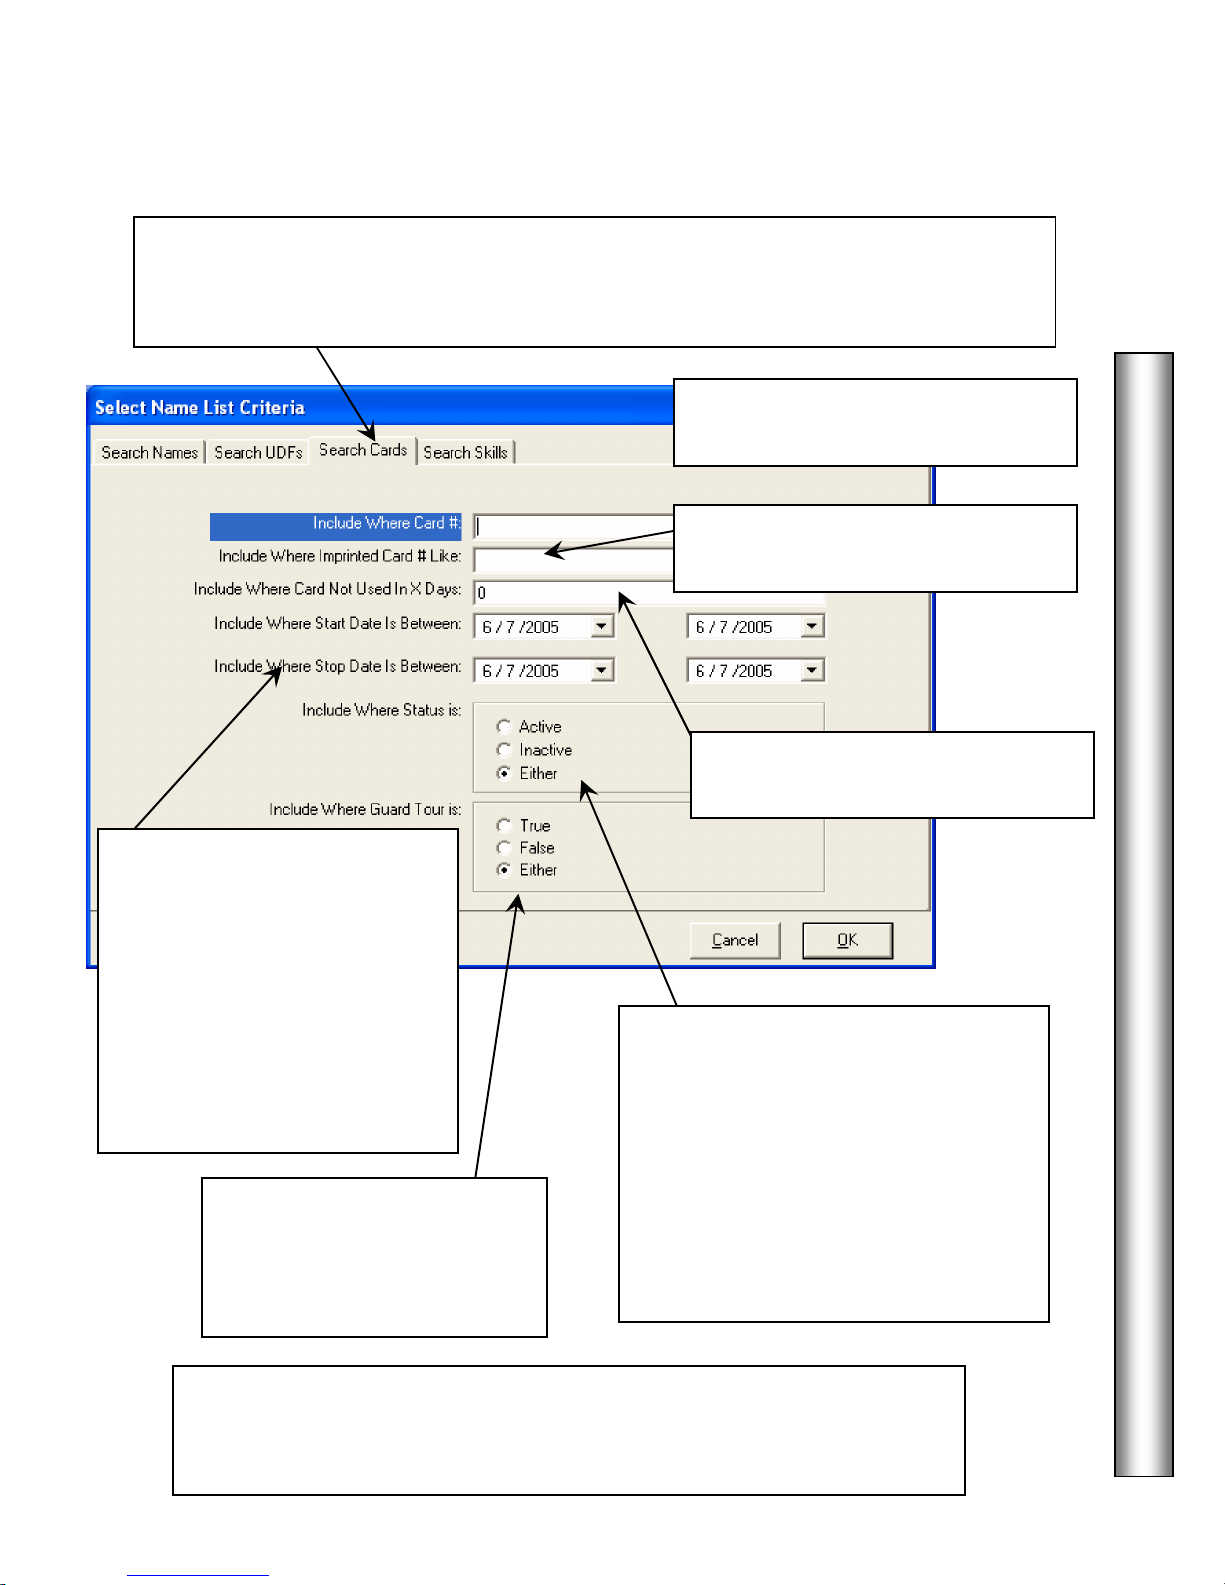
Select Card # List Criteria
21
Imprinted Card Number
Number of days
Card Holder search is complete
Search Cards
Tab
The
allows for the Card Holders to be Searched by any of the Card data
such as the encoded card number, the imprinted card number, the number of days since the
card had been used, or a pending start and stop date.
Enter the internal working or
Encoded Number of the card.
Enter the
that is found printed on the card.
Specify the
the card
would not have been used since.
DataBase
Include where Start and Stop
Date is Between. Use the drop
down calendar selection box to
set a range of dates to find
cardholders that have a Start
and/or Stop date within that
range. This search can be useful
to find Card Holders whose cards
have been set to turn on or off on
a certain date.
Specify if the code(s) to be
searched for must have the
Guard Tour feature enabled -
True, False, or Either.
Once the
to the location in the software that you requested the Card Holder Search from.
This could be Card Holder Reports, History, DataBase/Card Holder.
Include where status is:
Set the status of the Card Holder you
wish to include in the Search. Click on
Active, Inactive, or Either to set the
search status appropriately. Active are
those cards that are operational in the
system. Inactive is those cards that have
been turned off and no longer functional.
Select Either if the active status should
have no bearing on the search.
click on OK and you are returned
Page 30
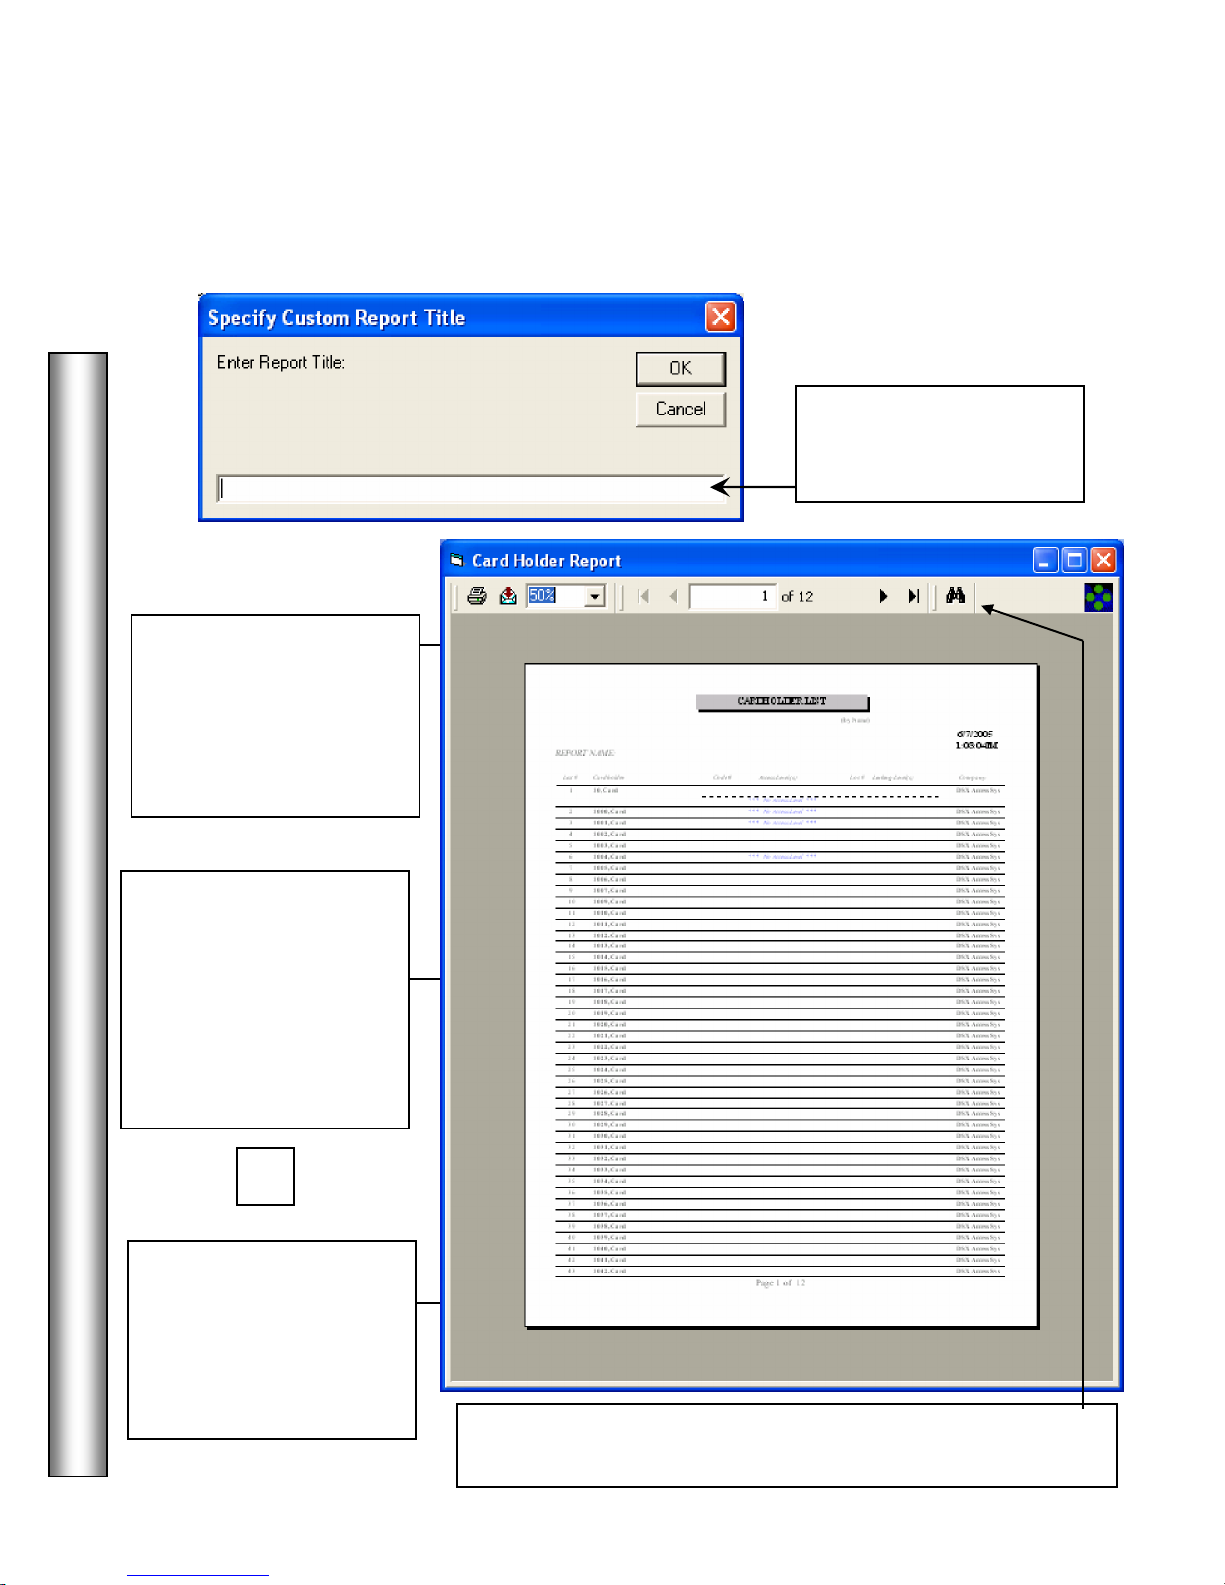
DataBase
22
Title for the
Print Pre
-
View
Report is printed
Report can be
or
binoculars at the top of the report.
Reports / Card Holder
Print PreView & Export
7. Enter a
Card Holder Report and
click on OK.
The
screen appears and
provides the ability to
change the print size for
larger and smaller
viewing.
8. The
exported to a File by
clicking on the Envelope
ICON and selecting the
file format of choice.
Use the RTF format to
best maintain the page
formatting.
8. The
by clicking on the
Printer ICON that in turn
sends the report to the
default or selected
Windows Printer.
To search for an item within the report click on the search
Page 31

System / Setup
23
DataBase Backup Utility
Backup DataBase
Restoring and Repairing a DataBase
Backup DataBase
This is where the
is located. The database can be backed
up to any drive and or directory in a compressed or non-compressed format.
Automatic Backups are configured under System Parameters at the Comm Server
only. Location selectable, this backup allows one or multiple location’s database to
be backed up. If only one Location is selected then only that location’s data will be
backed up. This backup could then be used to separate a single location from a
larger system. Backups include Scheduled Overrides for Inputs, Outputs, and
Override Groups.
1. Select
and click on either the Add button or on the
“Double Click Here to Configure Backup” message.
should only be performed by the
System Administrator. Use caution in performing these tasks.
DataBase
Page 32

DataBase
24
All Locations are automatically
Backup Image Files
Span Multiple Disk
Password to Encrypt
6.
Click OK
to proceed.
System / Setup
Backup DataBase
2.
selected to be Backed-Up. De-select the
Locations that are not to be Backed-Up
by using the space bar or double right
click.
If there are multiple locations and it is
desired to only backup one of them, click
on the De-Select All button below then
select the location to backup.
7. Save the backup to any drive available to
Windows™. The Comm Server PC is the only
one that can perform an automatic backup.
3. Select
if the system is
utilizing Photo ID Badging and it is desired to
backup the Card Holder Images.
4. Select
if the Backup is
larger than what a standard 3.5” 1.44M disk can
hold.
5. Enter a
the Backup if
desired. Use up to 9 alphanumeric characters.
Page 33

System / Setup
25
History Backup Utility.
Backup History
Backup History
This is the location of the
to any drive and or directory in a compressed or non-compressed format. Automatic
Backups are configured under “Setup” “System Parameters” and can be executed by the
Comm Server only. History can be archived and saved in a different location or resource on
regular intervals and the archived or backed up history can be deleted from the current
History database. When running a History Report the name and location of the history
database can be specified as one of the archived history files.
***See important note on page 27.***
The History database can be backed up
DataBase
1. Select
“Double Click Here to Configure Backup” message.
and click on either the Add button or on the
Page 34

DataBase
26
a Password to
All Locations are automatically selected to
Span Multiple Disk
Compress the Backup
Delete Records After Backup
Delete Records without Back UP
Start Date
System / Setup
Backup History
2.
be Backed-Up. De-select the Locations that are
not to be Backed-Up.
3. Select
only and is used only if the Backup is larger than
what a standard 1.44M disk can hold.
4. Select
the history file in size using a compression
utility. (recommended)
5. Select
remove the archived records from the current
history file. **See important note next page.**
6. Select
allows history to be selected and purged without
being archived first.
7. Set the
History purge or archive.
Set the Stop Date for the end of the History
purge or archive.
for the beginning of the
is for 3.5” disks
Files to shrink
to
9. Once the entire Archive and
Purge configuration has been
set, click on OK.
7A. Click here to have the
system return the Earliest
Date in the History File that
you can optionally enter in the
Start Date field.
8. Enter
Encrypt the Backup if
desired. Use up to 9
alphanumeric characters.
Page 35

System / Setup
27
Backup History
10. Save the backup to any drive available to
Windows™. The Comm Server PC is the only
one that can perform an automatic backup.
To Use an Archived History File
When creating a History Report you may specify
which history file to use. This way when
historical data is archived it can still be easily
accessed for reporting. Click on this name to
open a search window to find an alternate file.
DataBase
The log.mdb file contains ALL history generated on the system except for Database
Changes. This includes Access Grants, Denieds, Alarms, Restorals, etc. Therefore,
the log.mdb file can become quite large and possibly too large to be managed. It is
highly recommended that the backup and delete routine be done on at least a
monthly basis.
*** IMPORTANT ! ***
Page 36
DataBase
28
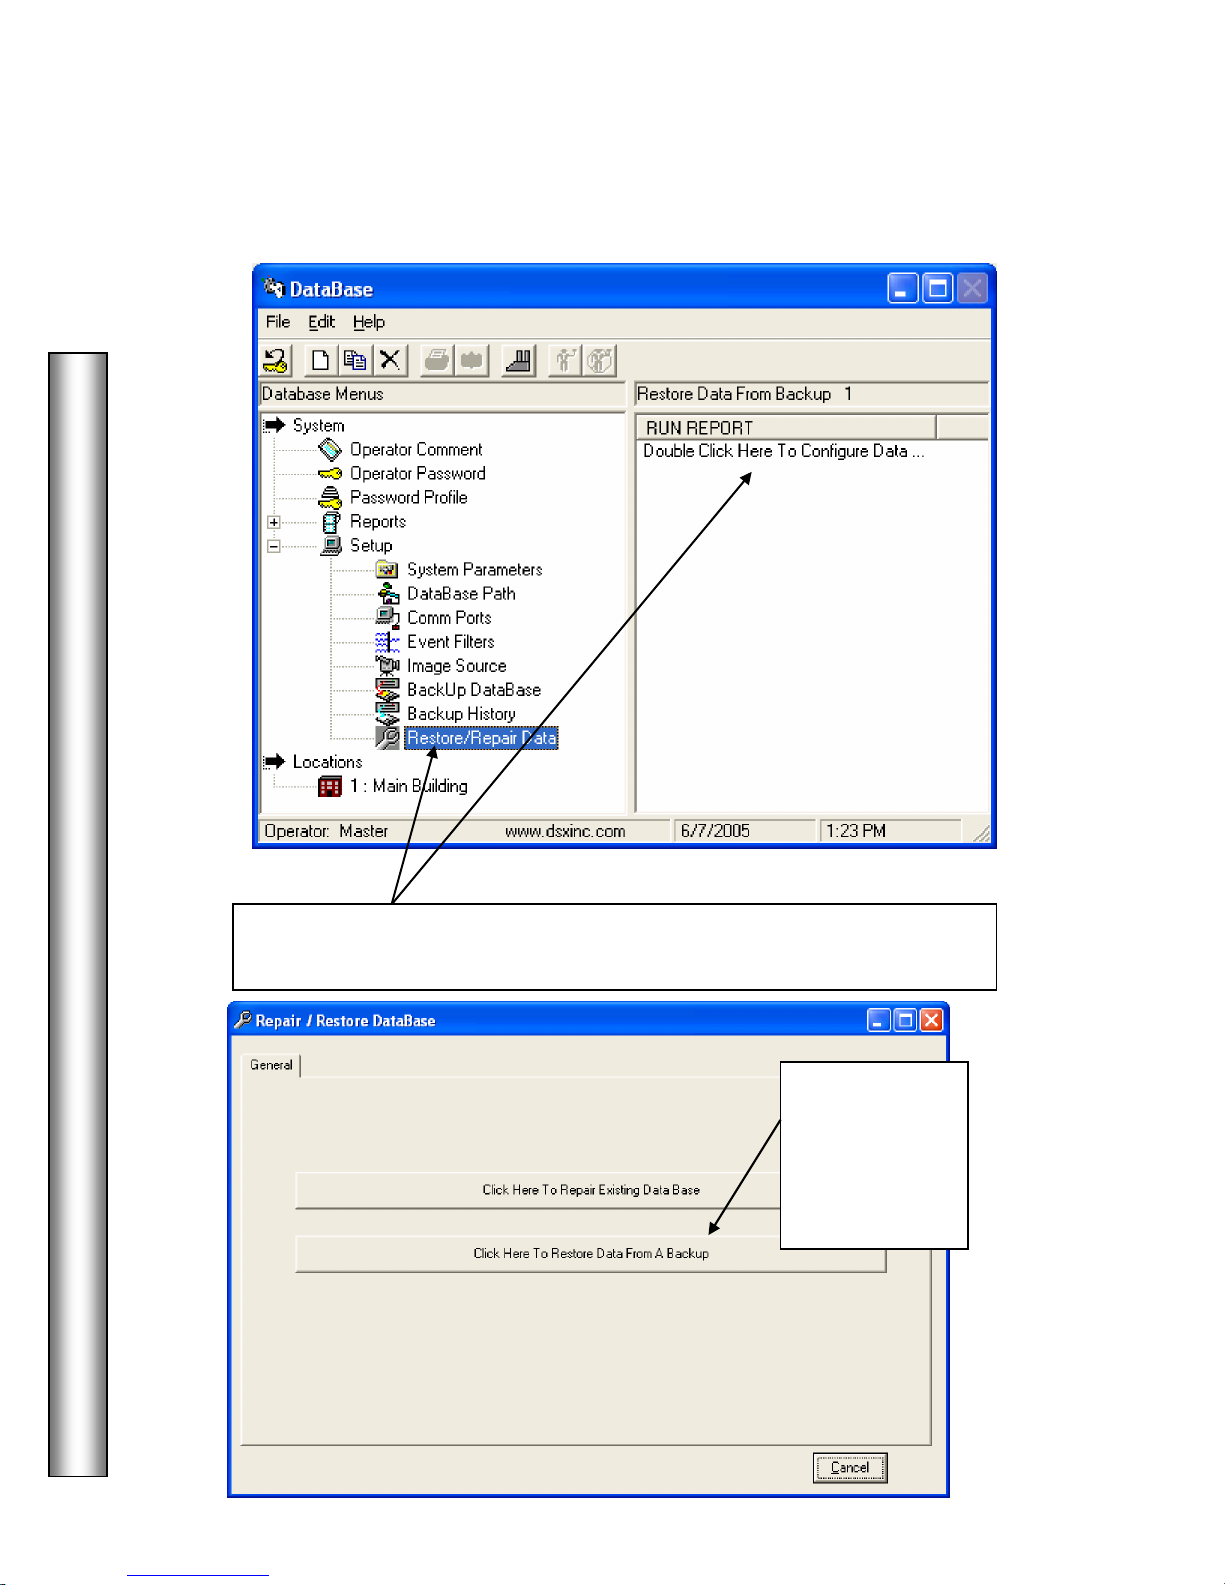
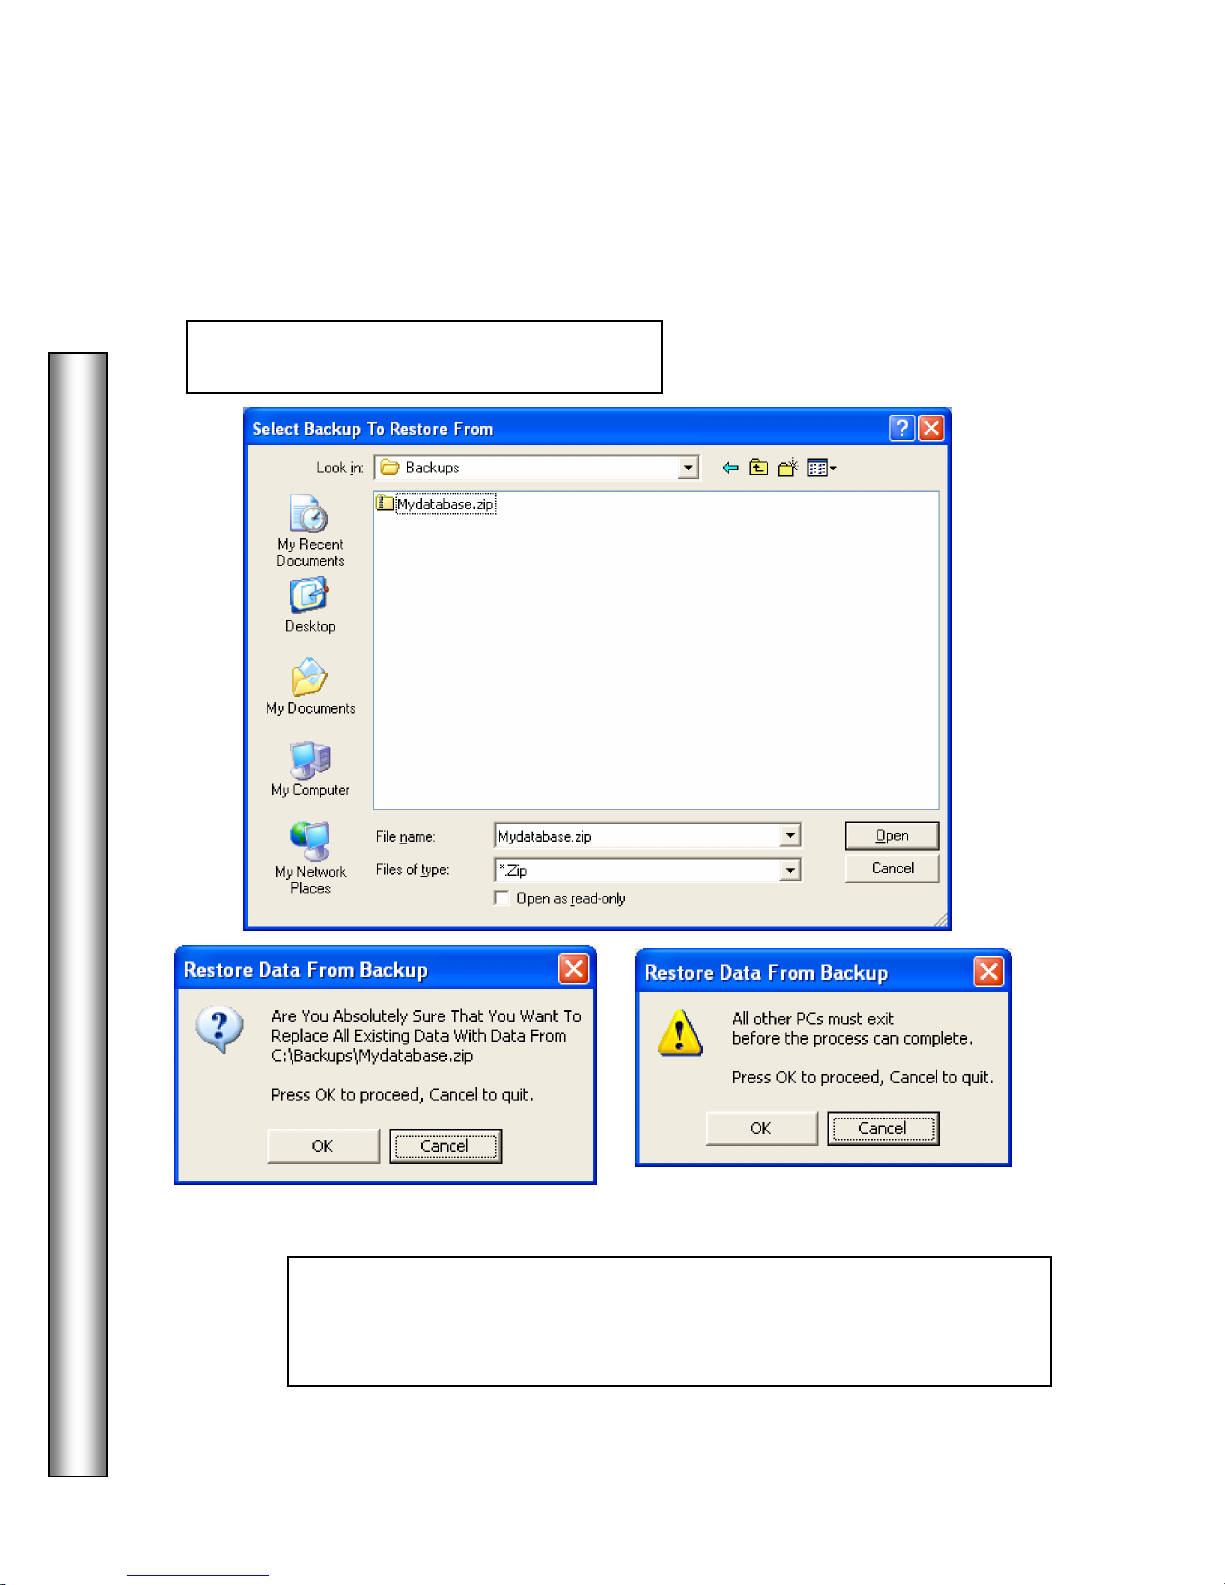
Restore/Repair Data
System / Setup
Restore/Repair Data
1. Select
Configure Data Restore/Repair”.
then choose “Double Click Here to
2. Next, choose
“Click Here to
Restore Data
From a
Backup”.
Page 37

System / Setup
29
Restore Database Files
Restore/Repair Data
3. Next, choose
which data from
the backup is to be
restored using the
check boxes.
Definitions below
for those items.
DataBase
– Select this to restore the Database Files. De-select this to
exclude it from the Restoration. This includes all location and card holder information.
Restore System Setup Files – Select this to restore the Setup Files. This includes system
parameters, and comm ports. De-select this to exclude this information from the Data
Restoration.
Restore Map Files – Select this to restore the Graphic Alarm Maps. De-select this to
exclude the Graphic Alarm Maps from the Data Restoration.
Restore Image Files – Select this to restore the Card Holder Image Files. De-select this
to exclude Image Files from the Data Restoration.
Restore Icon Files – Select this to restore the System Icons. De-select this to exclude
Icon Files from the Data Restoration.
Page 38
DataBase
30
System / Setup
Restore/Repair Data
4. Next choose the location of the backup file.
5. Click OK at the ARE YOU SURE prompt, and be sure no other
Workstations are running the program. This must include the Comm Server
program on the PC being restored to.
Page 39

Event Filter
31
Event Filters
Multiple Event Filters
Each Filter can determine which Locations, readers, inputs, and outputs will generate events that are
visible at this workstation. Event Filters are defined locally for each workstation that is to employ
them. When no filters are defined, all events from all locations are displayed at that Workstation.
This allows a Workstation on the LAN to view card read events and/or alarm activity, from one area
during one part of the day, from an additional area during another specified time of day, and possibly
from all areas during yet another period of time.
When using multiple Event Filters at a Workstation it is important to consider that each filter is in
parallel with the next. If it is desired to block a particular event then each filter must block that event
or it will be visible in the Workstation program.
can be defined to prevent unwanted activity from being displayed at this workstation.
can be defined for each Workstation with each one controlled by a time zone.
DataBase
1. Choose System, Setup, Event Filter. Then
click on the Add New Icon.
Page 40

DataBase
32
Name
Time Zone
Alarm Delay Filter
Alarm Delay Time
Event Filter
2. Enter the
filter is to be used at. Enter up to 30 characters for the Filter Name.
that best describes the filter being defined or Workstation the
3. Select the
Filtered events (those that have the red circle and slash) are never displayed. Non-filtered events
(those that do not have the red circle and slash) are displayed according to the time zone assigned.
With a 24 hour time zone non-filtered events will be displayed all of the time. The Start Time of the
Time Zone is when the non-filtered events begin to display and the Stop Time is when they are no
longer displayed. When the time zone is inactive all non-filtered events quit being displayed.
For example if there were three Locations within the system and Location 1 events are to be
displayed all of the time at this workstation, Location 2 events are to be displayed from 12:00 PM
to 8:00 AM, and Location 3 events are to be displayed from 6:00 PM to 8:00 AM three filters
would be defined.
The first Event Filter would be defined so that Location 2 and 3 would be filtered (red circle/slash)
and Location 1 would be non-filtered (no red circle/slash) with a 24 hour time zone assigned.
The second Event Filter would be defined so that Location 1 and 3 would be filtered (red
circle/slash) and Location 2 would be non-filtered (no red circle/slash) with a 12:00 PM Start to
8:00 AM Stop time zone assigned.
The third Event Filter would be defined so that Location 1 and 2 would be filtered (red circle/slash)
and Location 3 would be non-filtered (no red circle/slash) with a 6:00 PM Start to 8:00 AM Stop
time zone assigned.
that defines when the Event Filter is to start passing non-filtered events.
4.
this workstation unless the alarms are not acknowledged at a different workstation within the Alarm
Delay Time which is defined next. The alarm delay filter option applies to alarms that are not
filtered (no red circle/slash). Filtered alarms (red circle/slash) are never displayed.
5.
go unacknowledged at a different workstation before displaying on this workstation.
determines if this filter will be used to delay alarm events from displaying at
defines in minutes the amount of time that non-filtered input alarms should
Page 41

Event Filter
33
Fi
lter Inputs and Outputs
to stop all messages including alarms from those points.
the filter
–
red circle with a slash, or disable the filter
–
no red circle with a slash.
Clear all Filters
6. By default all events from all locations are restricted when defining a new Event Filter.
Double left click on Location to expand the menu displaying all Devices in that location.
Double left click on a Device to display Inputs and Outputs for that Device. Double left
click again on Inputs and Outputs to display the list of Inputs and/or Outputs defined for that
device.
Select (click on) the item and then double right click or press the space bar to enable
A right double click on
7. Use
to
remove any and all filters
that are applied to all
the device item will
select/de-select all items
below it.
Locations, Devices, Inputs,
and Outputs listed in this
window. No red circle with
slash. Use Filter all Events
Click here to apply a filter to
all Locations, Devices,
Inputs, and Outputs listed in
this window so that none of
their events will be displayed
at this workstation. Red
circle with slash.
DataBase
8. Double left click on Location to expand the menu displaying all Devices in that location.
Double left click on a Device to display Inputs and Outputs and then again on Inputs and
Outputs to display the list of Inputs and/or Outputs defined for that device.
Select the item and then double right click or press the space bar to enable the filter – red
circle with slash, or disable the filter – no red circle and slash.
Filter Location to stop all Location events such as Location Communication Loss.
Filter Devices to stop all card read events from that particular device or reader.
Page 42

DataBase
34
Search for Card Holders
Click on Card Holder in the menu
to access the Card
Add Card Holders
Show All Cardholders
Set Card Status for Company
List by Card Number
Card Holder
DataBase Location Menu
With the location menu expanded select Card Holder. The Search, Add, and
Show Card Holders selection box appears.
Holder Selection Box.
Click on
evoke the Card Holder Search Engine.
Jump to page 35.
Click on
directly to the Card Holder data entry
screen. Jump to page 39.
to
to jump
Click on
Card Holders in that Location sorted
alphabetically. Jump to page 38.
Click on
Card Holders by the Card Number.
Click on
allows all Card Holders assigned to a
company to be activated, de-activated and a
new De-activate date set. Jump to page 52.
to list all
to list all
Page 43

Card Holder - Search Names
35
Search Names Tab
The
based on their First and/or Last Name, Company, Visitor and Trace status.
shown below allows for card holders to be searched and reported
Search Include Where Company is:
Select one or more Companies from the list. To select more
than 1 company press and hold the Ctrl-Key while clicking
on each one desired. The selection “Any Company”
instructs the system that the company identifier is ignored
and the search will be based on name without regard to the
card holders company assignment.
DataBase
Click here to sort the results of the
Card Holder search by Card
number instead of by Name.
Enter the specifying
criteria for the
search on any or all4 Search Tabs and
click on OK.
How to Use the Card Holder Search
Any or all of the data fields on any of the Search Tabs can be used to search for Card
Holders. Enter complete or partial search criteria in any or all of the data fields on each
Search Tab and click on OK. The selections form an AND statement and can be used to
form very precise Card Holder Lists. The Card Holder must meet all of the criteria entered
in all search fields on all 4 Tabs in order to be shown in the Card Holder List shown.
Page 44

DataBase
36
Search UDF Tab
Card Holder - Search UDFs
The
searched by the custom User Defined Field information.
Enter complete or partial search criteria in any or all of the data fields on
each Search Tab and click on OK. Any or all of the data fields on any of the
Search Tabs below can be used to search for Card Holders. The selections
form an AND statement and can be used to form very precise Card Holder
Lists. The Card Holder must meet all of the criteria entered in all search
fields on all 4 Tabs in order to be in the list.
allows for Card Holders to be
Click here to sort the results of the
Card Holder search by Card
Number instead of by Name.
Enter the specifying
criteria for the
search on any or all4 Search Tabs and
click on OK.
Page 45

Card Holder - Search Cards
37
allows
Imprinted Card Number
False, or Either.
Number of days
many days.
Card Holder search is complete
Search Cards Tab
The
such as the encoded card number, the imprinted card number, the number of days since the
card had been used, or a pending start and stop dates including temporary access levels.
allows for the Card Holders to be Searched by any of the Card data
Enter the internal working or
Encoded Number of the card.
DataBase
Include where Start and Stop Date is
Between. Use the drop down calendar selection
box to set a range of dates to find cardholders
that have a Start and/or Stop date within that
range. This search can be useful to find Card
Holders whose cards have been set to turn on or
off on a certain date.
Temp Access Level Start and Stop Date
the search to be based on the beginning or end of
a scheduled Temporary Access Level.
Specify if the code(s) to be searched for must
have the Guard Tour feature enabled - True,
Enter the
that is found printed on the card.
Specify a
cards that have not been used in that
Include where status is:
Set the status of the Card Holder you
wish to include in the Search. Click on
Active, Inactive, or Either to set the
search status appropriately. Active are
those cards that are operational in the
system. Inactive are those cards that have
been turned off and no longer function.
Select Either if the active status should
have no bearing on the search.
to find
Once the
to the location in the software that you requested the Card Holder Search from.
This could be Card Holder Reports, History, DataBase/Card Holder.
click on OK and you are returned
Page 46

DataBase
38
Add
Copy
Delete
Print
Edit
Card Holder – View List
Capture
Image
Who is
In Report
Activate and
De-Activate
the selected
card holders.
– double
click on name
After selecting Card Holder and
then Show All, The card holders
are alphabetically listed here in
this display column.
Select a Card Holder in the list and double
click on their name to edit, or use one of the
other tools at the top of the DataBase Menu.
Page 47

Card Holder - General Tab
39
Card Holder
Add Card Quick
-
Load Button
Trace
4. Click here if this person is a
Visitor
.
Click here when you
This is the
name is entered with the options of Trace, Visitor Status, and Custom Notes. The General
Tab information is the only data that is required to enter a person into the database. The
Card Holders Image can also be taken and an Identification Badge printed using the
ICONS in the lower right corner of the screen.
The User Defined Fields are located on the center tab. UDFs are only required when a
UDF field is defined as required Data.
The Cards Tab is only required to issue the person an access code, enter the card holders
phone numbers, and assign any Keys and/or Skills.
1. Enter First and Last
names.
Data Entry Screen. The General Tab is where the Card Holder
Card Holder primary Image
Displayed Here. Clicking
on the image will rotate
through this card holders
saved images but not
signatures.
DataBase
2. Select a Company from
the drop down selection
list.
Jump to page 63.
5. Enter custom free format
3. Select
desired to have a special
annunciation and the
persons image
displayed each time the
card is used at readers
defined for Trace.
level first, allowing the system to start downloading to the field controllers,
and then return here to input the Name, Company, and UDFs.
if it is
is used to enter a card number and access
Notes regarding this Card
Holder. Not required.
Click here to capture or
import the Card Holder
Image.
Click here to
print the
card holders
Badge.
are ready to Save all
data under all 3 tabs.
Page 48

DataBase
40
training dates, supervisor or anything
Click here when you
Card Holder - UDF Tab
6. Enter the personal data for this Card Holder as it
applies to each User Defined Field listed below left.
UDF Field Name
On the left are the User Defined
Field Titles. These titles describe
pieces of information that are to be
recorded about all card holders. This
can be automobile information,
you would like to record.
See Page 65.
UDF Field Data Entry
On the right are the fields in which you enter the
corresponding data for the Card Holder as it
pertains to the UDF Titles on the Left. This
information can be used in Card Holder searches
and can be printed out in the Card Holder
reports.
are ready to Save all
data under all 3 tabs.
Page 49

Card Holder – Cards Tab
41
Use the
Add, Copy or Delete
Buttons.
Cards/
Phone Numbers
Keys
Skills
Phone Numbers
This is where Access
the Card Holder. Card Holders can be assigned any or all of these items but it is not required.
Card Holders can have more than one card or code. Each Card can a different Access Level and
Output Linking Level. When locations are grouped, each card can have an access level that
works for any or all of the Locations in the Location Group.
Keypad Codes,
,
, and
are assigned to
DataBase
7. Select one of the 4 menu items, Cards, Phone Numbers, Keys, or Skills
and then click on the Add button (blank page) at the top to add a new entry.
For information on
and Keys see pages 45-46.
If you started adding this code by selecting the
Add Card Quick Load button from the
General Tab, you need to Click on the General
Tab after the code has been added and before
you click on OK, to enter the name.
If you have already completed the General and
UDF tab screens click on OK
Page 50

DataBase
42
under code.
Start and Stop Dates
Start and
P.I.N.
# of Uses
Code
Card Holder – New Card
Enter the
this New Cardholder on the Cards tab screen. Then click on the Access Level
Tab to assign an access level and optionally on the Linking Level Tab to
assign a Linking Level (elevator control) if necessary.
number and complete all other necessary information about
8. Enter the
internal or
working
number of
the card
9. Enter the
number
printed on
the card.
10.
optional keypad code
that is entered when
the system uses both
card readers and
keypads.
is an
11. Enter the
this card will be
allowed. Once the card
has been used this
number of times it will
be automatically deactivated. The default is
9999 for unlimited use.
12. Place a
checkmark
here if this
code is to be
used for
Guard Tour.
13. Set the
Stop Times for this code. The Start Date defaults to
the current system date. The Stop Date is set to a
future date with a default of 12/31/9999 which
provides unlimited use. The Start and Stop Times
can be set in increments of 15 minutes.
The down arrow button to the right of each date field
pulls down a calendar to assist in setting these to
future dates.
and
14. Place a
checkmark
here if this
code is to be
exempt from
AntiPassback.
Page 51

Card Holder – New Card
43
Access Levels
Permanent
or Temporary
Add
Permanent Access Levels
can be assigned to a Cardholder as either
To assign a Permanent Level, simply click on the name in the left window, then click Add.
To assign a Temporary Level, click on the name in the left window, click on Temporary, set
the start and stop dates for the level to function, then click Add.
To see what Access Level a Cardholder has, you must return to this screen and click on
both the Permanent and Temporary buttons to view what Access Level is still valid vs. an
Access Level that may have expired.
15. Click on an Access Level name then click on
Permanent Level. More than one Access Level can be assigned by
repeating the process. When finished Click on OK to save.
to assign it as a
.
DataBase
If a Level is assigned in error,
click on the name in the right
window, then click on Remove.
are those that stay with the card until the access level is removed from
the card or the card is deleted. Temporary Access Levels are those that are assigned with a Start
Date and a Stop Date. At the beginning of the day on the Start Date the Permanent Access Level is
suspended and the Temporary one is activated and downloaded. The Temporary level is in effect
until the Stop Date. At the end of the Stop Date the Original (permanent level) is re-instated and the
Temporary Level is suspended. Use the Copy Permanent Button when setting the Temporary
Levels if you want the Permanent Levels to operate during the Temporary Period. Otherwise only
the Temporary Levels will work between the Temp Start and Stop Dates.
To verify what devices
(readers) are included in an
Access Level, click on the name
in either window, then click on
Page 52

DataBase
44
Output Linking Level
Temporary Access Level
Linking Level
and Click on OK.
There are basically two scenarios
Card Holder – New Card
For a Temporary Access
Level, click on the Level
name, then Temporary, then
set the Start and Stop Date.
Set a
shown below and also set an optional Output
Click on Add to include this
Temporary Level.
when issuing a Temporary Access
Level.
Scenario– 1 is the Card Holder
should have their Permanent Access
Level as well as an additional
Access Level during the period
specified by the Temporary Start
and Stop Date. In this case use the
Copy Permanent Button to assign
their Permanent Levels and then
also select the additional levels
necessary.
Scenario– 2 is the Card Holder
requires a new level and does not
need their permanent level during
the period of time specified by the
Temporary Start and Stop Dates.
if required as
Click on the
Cardholder. Each Location must be selected in the left window, then use
the pull down box at the right to select the Linking Level desired.
tab to assign Linking Levels to the
Page 53

Card Holder – Phone #
45
Phone Number
Add Button
Phone
Enter the
have multiple phone numbers. Phone numbers are not required fields.
number(s) and type for each Card Holder. Each Card Holder can
Phone Numbers
Click on Phone Numbers in the
Menu then Click on the Add Button.
DataBase
1. Enter the
2. Enter the Type of phone number this is. For
example; phone, fax, cell.
3. Enter any free format Notes that might be
useful in describing the phone number or
particular information about using it.
4. When finished Click on OK.
for this Card Holder.
Page 54
DataBase
46
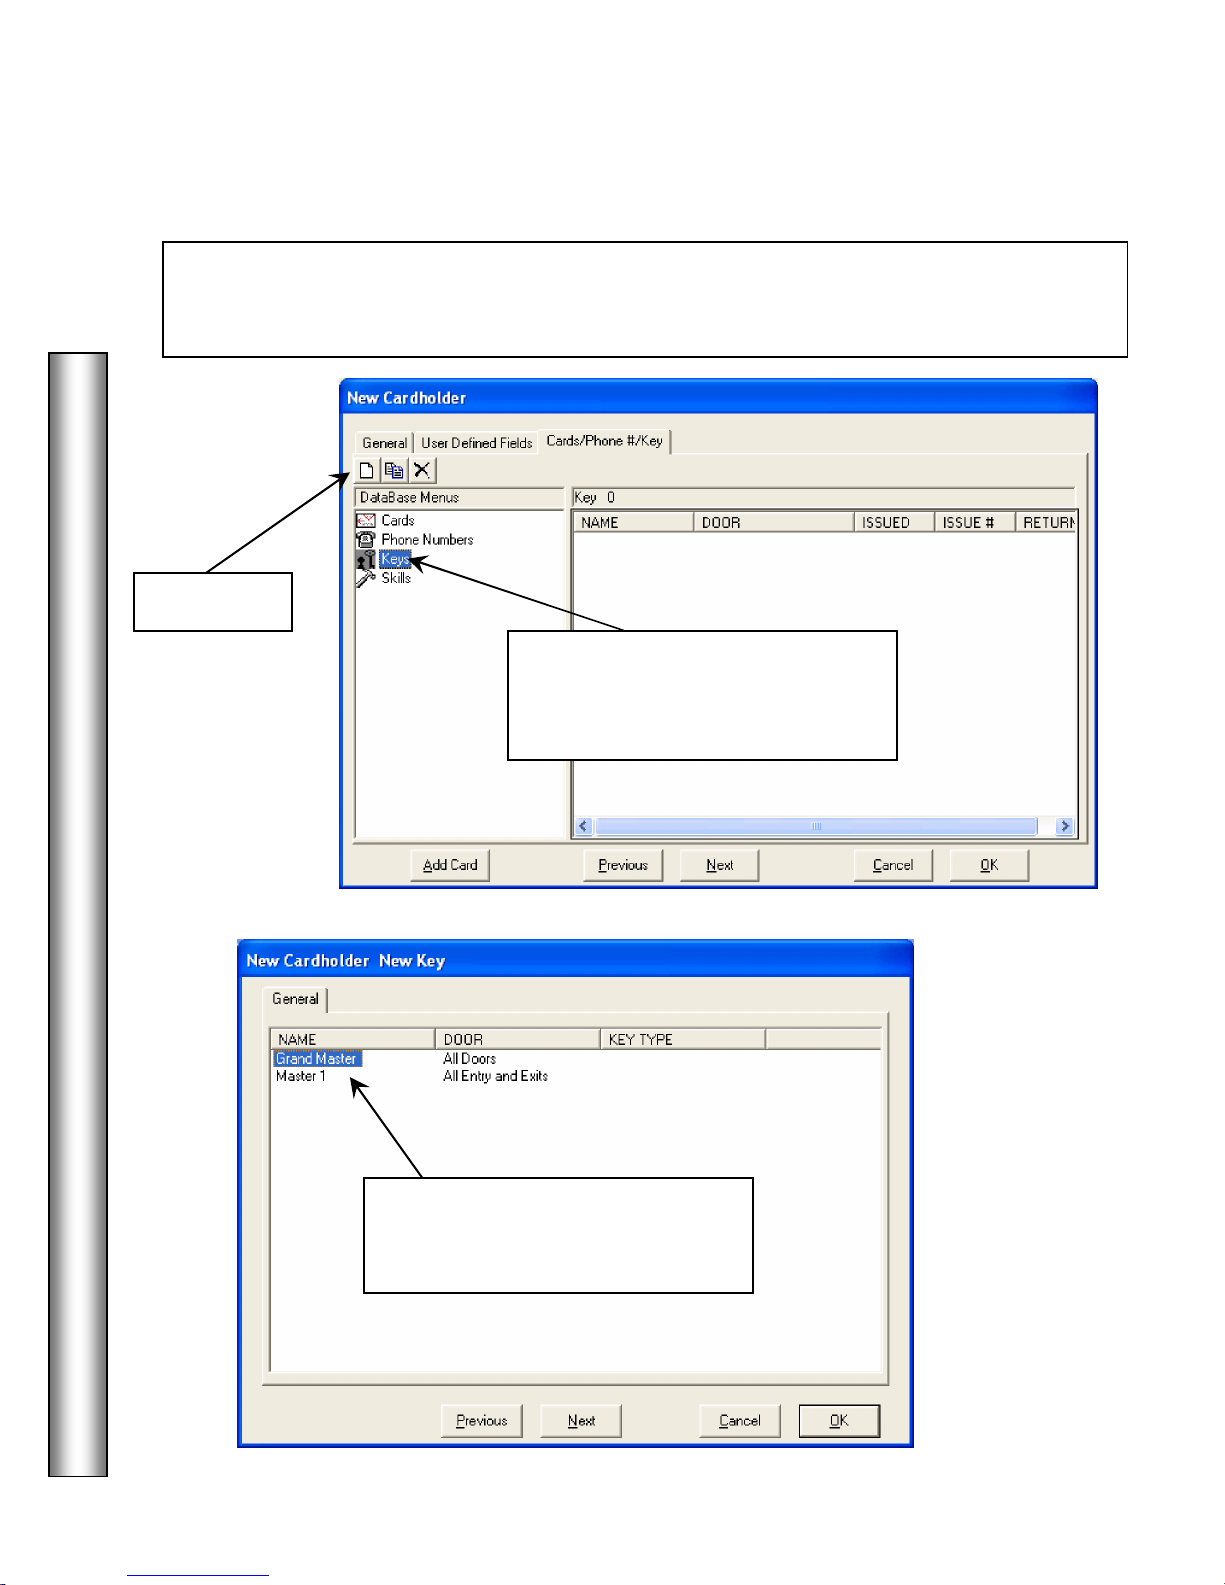
Keys
Add Button
Card Holder – Keys
This is where
key to equipment rooms, storage closets, emergency exits, or other locks that require hardware
keys. Keys are first defined under the Location Menu / Keys.
are issued to this Card Holder and viewed. This is a mechanical door lock
Keys
Click on Keys in the Menu then
Click on the Add Button.
Key Name
Click on the Key being issued from
the list then Click on the OK Button.
Page 55

Card Holder – Skills
47
Skills
This is where
trade, duty, or expertise. Card Holders can be searched for by Skill. This allows the operator to
find Card Holders that possess a skill that is needed. Skills are first defined under the Location
Menu / Skill Name.
are assigned to this Card Holder and viewed. Skills can be any kind of
Skills
Click on Skills in the Menu then
Click on the Add Button.
DataBase
Skill Name
Click on the Skill or Skills to be
assigned from the list then Click on
the OK Button.
Page 56

DataBase
48
Live Video Image Capture Screen
Ca
mera Properties
Capture
Live Video
Here
Capture Card Holder Image
This is the
Kit. If Signatures have been implemented the signature screen will appear next. If live video is
the primary source but file import is to be used as a secondary source, the live video will be
defined under image source and type instead of file import. The live video screen will be
displayed first and pressing Cancel will advance you to the image edit screen where File Import
can be selected. If file import is the primary image source, there should be an image source and
image type defined for it. The file import screen will appear when the camera icon is selected.
This allows both live and imported images to be the primary images displayed with the card
holder.
. This is available when using the DSX Camera
1. Select
video. Once captured the system will
advance the photo to the Edit Image
Screen.
to freeze the live
2. Select
adjust the Shutter Speed and the
White Balance as well as other
camera properties.
to
Page 57

Import Card Holder Image
49
Import Video Image Screen
Selected Image
Image Import
the Images subdirectory and
Cancel
OK
This is the
import is the primary image source, there should be an image source and image type defined for
it. The file import screen will appear when the camera icon is selected. If Signatures have been
implemented the signature screen will appear next. If live video is the primary source but file
import is to be used as a secondary source the live video will be defined under image source and
type instead of file import. The live video screen will be displayed first and pressing Cancel will
advance you to the image edit screen where File Import can be selected. This allows both live
and imported images to be the primary images displayed with the card holder.
. This is available in All WinDSX Software. If file
DataBase
1.
initiated by clicking in the
file name field indicated.
Select the File that you
wish to use for this Card
Holders Image. The File
Import Navigation Screen
will default to the
WinDSX\Images
subdirectory. If the file of
choice is in another
directory navigate to the
file and select it. Once
selected the file is saved in
the file format defined
under Image Source in
Setup. The copy is saved in
is typically saved in a
*.JPG format.
is
Click on
bypass the file import
and go directly to the
edit image screen.
to
is
where the Image
chosen for import is
previewed before
being saved.
2. Click on
continue when the
desired image is in
view and proceed to
either, the signature
capture or edit image
screen.
to
Page 58

DataBase
50
Edit Image
Screen the Image selected can be edited manually with the controls located
Auto Edit Image
Control Slide
Re-Capture Image
Import File
used where image
Cropping Frame
Edit Card Holder Image
From the
in the lower left section of the screen. Use any of the property controls as well as the Crop Image
tool to make changes to the Card Holders stored image.
The Image just captured or
imported will be displayed in
the Card Holder Image
Window to the right. If there
are other Image Types
defined select an Image
Type and the associated
Image will be displayed.
Click on the
Bars to make changes to the
Image. The slide bar can be
moved precisely to make the
exact change necessary. The
Restore Image can be used
until it is saved.
Click on
the image of the Image Type selected.
Clicking here will take you to the File
Import or Image Capture Screens
depending on What Image Type has
been selected on the left.
The
displays each one in a different frame. The Image is automatically adjusted 12 different ways
and displayed in separate frames. Click on the Image that best suits your taste and then return to
the Edit Image Tab where the image can be edited further and saved by clicking on OK.
screen automatically applies 12 different adjustments to the image and
Use the
subject or to remove unwanted background.
Click on OK when finished.
to retake
to better center the
Click on this
Button to import the card
holders picture. This button
is typically
files from an off-site facility
could be used as the primary
image instead of the live
video capture that is typically
performed for the card
holders on-site.
Page 59

Print Card Holder Badge
51
Badge Print Preview
Card
Card Printer
is not the
choose the direct card printer.
Print
When a Card Holder is selected and the Printer ICON is clicked on, the
screen is displayed. From here the Badge Template that is assigned to this Card Holder’s
Company is shown with the Card Holder Image. If a different template is required, it can be
selected at this time. To change templates, double click on the desired template.
DataBase
If the Card Holder has more than 1
appropriate card or code number can be selected here.
If the
Default Windows Printer
click on the printer drop
down selection box and
If it is desired to print more
than one copy of the badge
enter the Number of Copies
here.
the
Click on the
print this card holder with
this card number on the
badge template.
Button to
Page 60

DataBase
52
Company
Date
New De
-
Activate Date
Activate
Activate/De-activate Company
Set Card Status For
selected. You can further describe the codes you wish to activate by the date in
which they were de-activated. Codes in the same company that have a different
de-activate date would not be re-activated. Codes can also be re-activated
individually under Card Holders/Cards.
- Activate Cards that are assigned to the Company
1. Select
Cards to enable.
Select De-Activate
Cards to disable
2. Use the drop
down selection box
to select the
Company you wish
to turn on and/or off
3. Select the
been de-activated on or the current
deactivate date.
the Company had
4. Set a
Company that terminates the codes in
the future.
for the
Page 61

Access Level
53
Access Level
Name
access level.
Notes
Edit Access
List Access Levels that
These are the
determine what readers or keypads the card or code will work at. It also describes which days
and at what times on those days the card or code will allow entry. The Edit Access Level Tab is
where the Devices and Time Zones are mated to form the Access Level.
4. Click on the
Level Tab to define or edit the
access level.
1. Enter a
that
best describes this
Data Entry Screens. Access Levels are the describing elements that
5. Click on the “
Contain Device” Tab to find all of the levels
that have a particular reader in their
definition. This Tab is a utility that can be
used with a new or existing level.
DataBase
2. Click here to allow this Access Level to
be assigned to a Card Holder that is defined
as a Visitor.
3.
are an optional field
that allows free formatted
information to be recorded
about this access level.
Page 62

DataBase
54
Device
device and click the Paste TZ’s button.
Access Levels
Time Zone 2, 3, and 4
Access Level
can be created to include readers from different locations,
but only from within the same Location Group. In this example, the
Level shown includes two devices in Location 1, and the first device in
Location 2. If a Location does not have the same Group Name, it will
not appear in the list and not be available for inclusion in the Level being
defined.
access level has to provide more than one
period of access to the same door during a day.
6. Select a
clicking on it once. Then select a time zone from the Time
Zone 1 drop down selection box. This will remove the
not/symbol from the device and the time zone definition is
displayed in the graph to the right.
The Same Time Zone can be set on more than one device by
using the Copy and Paste buttons at the bottom of the
screen. After setting the Time Zone on one device click on
the CopyTZ’s button below, then click on another desired
(door or reader location) above by
are only used when the
7. After assigning the
appropriate doors the
appropriate time zones
click on OK.
Page 63

Access Level
55
remove a door
The
List Access Levels that Contain Device
Tab can be used to locat
e
all of the Access Levels with a user
To
the left, then remove any Time Zone references to the right by choosing the four dashes
from the dropdown time zone list. The Copy and Paste buttons can also be used to remove
time zones by first selecting a device with the NOT symbol, click Copy TZ’s, then select a
device you wish to remove the time zone and click on Paste TZ’s. Notice when the Time
Zone has been removed the Device has the Not Symbol on it. With no devices selected in
the Location, the Location has a Not Symbol shown.
(reader) from an Access Level, click on the device in the Device List on
DataBase
selected Device.
On the Right hand side in the Device List – select the Device to Locate. The right hand side will display the
Name of the Location and Door (device) and below that will list all of the Access Levels that Door is part of.
The Access Level list information on the right hand side can be copied and pasted into an Email or Document.
Page 64

DataBase
56
Bulk Modify Access Levels
This feature allows for multiple card holders to have their access level modified at once.
Then turn on Enable Multiple Selections
from the File Menu and select those
card holders from the list you wish to
modify. Holding the Ctrl key and
clicking the mouse allows single
selections. The Shift key plus the mouse
will select a range of card holders.
To use this feature, first list the card
holders that you want to modify by
doing a Search, Show All, or List by
Card Number.
Page 65

Bulk Modify Access Levels
57
The screen below will appear. Press F1 at anytime for a Help Screen. Note
All selected cardholders should be highlighted.
Next select Bulk Modify Access Levels from the
File Menu.
the warning in RED to make a backup before making Bulk Changes ! ! !
See Page 23.
DataBase
Page 66

DataBase
58
Bulk Modify Access Levels
To Add Level(s), Select the Access Level you wish to add from the Access
Level List below left. Click on the Level and then on the upper Add Button.
Multiple Levels can be added at the same time. The Levels shown in the
"Add These Access Levels" window on the right are the ones added to the
selected cards.
To Remove Level(s), Select the Access Level you wish to remove from the
Access Level List below left. Click on the Level and then on the lower Add
Button. Multiple Levels can be removed at the same time. The Levels
shown in the "Delete These Access Levels" window are the ones removed
from the selected cards.
In the example below, all Cardholders selected on the previous page will
have their previous Access Level of “All Doors” removed. At the same time,
they will all be given “Perimeter Doors” and “Storage Rooms” access.
Page 67

Bulk Modify Access Levels
59
selected Car
dholders
to make a backup
before making
Bulk Chang
es ! ! !
See Page 23.
To Add Temporary Level(s), Select the Access Level you wish to add from the Access Level
List below left. Click on the Level and then on the Add Button. Multiple Levels can be added
at the same time. The Levels shown in the "Add These Access Levels" window are the ones
added to the selected cards.
Set the Start Date for the Temporary Access Levels to take control and the Stop Date for the
card to revert back to its permanent access level.
Select Permanent + Temporary if during this temporary period you wish for the card to have
the Temporary Level in addition to its Permanent Level. By not selecting this option you are
deciding that the Temporary Access Level assigned will be instead of the Permanent Level for
the temporary period.
DataBase
In the example below, all
to the “Spa Door” for the date(s) specified, while retaining their original
Permanent Access Level assignments.
Press F1 at anytime for a Help Screen. Note the warning in RED
will be given Temporary access
Page 68

DataBase
60
Name
Time Zones
Notes
Time Zones
Most functions in an access system are controlled by "Time". "Time" may be the time of day,
day of the week or day of the month. Time Zones are defined by the time of day and day of
week.
1. Enter a
describes this Time Zone.
2.
are an optional field that
allows free formatted information
to be recorded about the time zone
and its use.
are the automatic time of day/day of week schedules where start and stop time
parameters are defined to perform automatic functions such as lock/unlock doors, arm/disarm
alarm monitor points, enable/disable readers, granting/denying card holder access,
enable/disable image recall, and enable/disable alarm echo.
that best
Page 69

Time Zones
61
Do Not program a link to a Time Zone unless all field controllers have firmware version 3114
same Location Group Name.
3. Set the state of this Time Zone using the Time Zone Is On/Off when Linked to
selection.
Linking to a Time Zone can force it to a pre-selected state of on or off as selected in the time
zone definition. Anything this Time Zone is assigned to is subsequently affected. This could
be used to control Access Levels, Alarm Echo, Devices (readers/keypads), Event Filters,
Image Recall, Inputs, Outputs, and Linking Groups.
Note/// When linking to a Time Zone especially with a Latch or Toggle response make sure
you have another link to it with a time zone response otherwise it may be impossible to get
that Time Zone to follow its schedule instead of its forced state. Including a Time Zone in a
Linking Group requires WinDSX© Version 3.7 and higher with controller firmware of 3114
and higher.
or higher! If you do you will have to delete the Linking Group from the database.
DataBase
4. Determine if you want to Add this Time
Zone to All Locations in the Location Group.
Add To Location Group causes the Time
Zone to be saved into all Locations with the
Page 70

DataBase
62
Start Time
When Time Zones are
Levels, the Start Time
Recall is active.
Time Zones
5. Click on the Schedule Tab to create
or edit a time zone definition.
6. Set the
and Stop Time for
each day of the week
and for Holidays
1,2,and 3.
used in Access
is when the card
begins working.
Enter a Start and Stop time for Monday and Click on the
Set Mon-Fri button to copy those times through Friday.
Enter the Start Time and Stop Time For each
day. Create different Time Zones for each
particular use such as Inputs, Outputs, Access
Levels, and Devices. The Start Time is when
the inputs arm, the outputs secure, the Readers
or Keypads become operational and are
required for entry. The Start Time is also when
the Cards/Codes are operational and Image
7. After assigning the appropriate
start and stop times click on OK.
The shaded
part of the
graph is the
active part of
the time
zone.
Page 71

Company
63
Company
Warning:
Companies are groups of Card Holders with something in common. The
group or department or tenant. Companies are defined within a Location so that access codes
may be grouped together for reports and searches. Company is not required data but a good
organizational tool.
entering a number in
Use it or Lose it Days
“Save Last Card Read”
must be enabled under
Location/Yes-No
Options for that same
number of days or
longer.
There are two management tools specific to Company but both are completely optional. The first
is Use it Or Lose it Days. By setting a number here, all card holders assigned to this company
must use their card within that number of days or their card is de-activated. This can be used to
automatically manage lost cards and card holder attendance. See Warning Above before using!
Before
1. Enter the company or group
Name and complete all of the
appropriate fields below.
2. After entering
the appropriate
information Click
on OK.
The next tool is Badge for those that are using the integral Photo ID Badging features of
WinDSX. This is where a Badge Template can be assigned to this Company so that all Card
Holders in this Company automatically select this Badge Template when their card is printed. At
the time of printing a different badge template can be chosen if required.
can signify a
DataBase
Page 72

DataBase
64
Notes
Holid
ay
specific date. When a date is defined as a holiday, all time zones will follow the time schedule
Date
holiday and a different time on a different holiday.
Name
re if this Holiday is to be added to
Holiday
Certain Dates can be defined as a
schedule on that day. This feature is used to override normal time zone parameters on a
assigned for their holiday. All Time Zones have a day of week schedule with three holiday
overrides. Three Holiday types are available with Firmware Version 536 and higher in the
controllers.
1. Enter the
of the Holiday.
2. Set the
of
the Holiday. Use the
drop calendar
selection box for
assistance.
5. Enter free format
describing this holiday.
5. Click he
every location within the location group.
so that all time zones will follow a different time
3. There are three possible holiday override
schedules per Time Zone. The Holiday Schedule
allows for a different start and or stop time to be
used on a date that has been defined as a Holiday.
The Holiday can be defined as Type 1 or 2 or 3.
This allows a door to unlock at a certain time one
This will also accommodate a holiday that
contains three days requiring different schedules.
All three Holiday Override Schedules only work
with Firmware Version 536 and higher. All Lower
firmware revisions only recognized Holiday
Schedule #1 per Time Zone.
4. Click here for this Holiday to
carry over to the next year.
6. When the Holiday Name, Date,
and Type are entered click on OK.
Page 73

User Defined Fields
65
Data Mask
, ( ), /. The data
Card Holders.
UDFs
Name
each Card Holder. There are up to 99 fields that
are titles assigned to 99 possible fields of which personal information for each Card
Holder can be stored. These fields are not required unless defined to be so and are primarily for
informational use only and have no effect on the performance of the system. Typical use of
these fields is to store car tag numbers, phone numbers, employee numbers, etc using up to 50
characters each. The field can be defined as an Auto-Incrementing Card # for Badge purposes.
1. For UDF
that best represent the data to be recorded for
can describe items such as Car Tag, Car Make,
Email Address, Supervisor, Training Dates,
Certification Dates or other pertinent data.
enter up to 20 characters
3. Select this to make the
field a Required entry for
each Card Holder.
DataBase
2. A
the field for different purposes such as Date, Time,
Phone Number or other useful structures. A Date
Mask would be entered as ##/##/## which causes the
spaces where the # is to be replaced with numeric
entries and automatically advances the cursor to each
segment when entering the date. Other symbols can
be used for field separators such as: entry spaces are formatted with the use of special
format commands such as” #”for numeric entries
only,”” for alpha-characters only, and “&” for
alphanumeric characters.
This type of Data Mask can force a particular type
and number of characters in the correct form. This
greatly improves consistency of the data being
entered and assists in quick and precise searches for
entered here can be used to format
4. Select this field to designate this
UDF as a de-activate date for the
card holder. The field should also
be Masked as a date field.
When the date entered for the Card
Holder becomes current the Card is
deactivated. Multiple De-activate
Fields can be used and training and
certification reminders. Once a
future date is entered into all DeActivate Date fields the card is
Activated (turned back on) and
downloaded.
Page 74

DataBase
66
ved or not.
User Defined Fields
6. Select this field to force the data
being entered to be Unique and not
shared by any other Card Holder in
the Location Group.
5. Place a checkmark here to use
this UDF field as an autoincrementing card number. This
field will become a card serial
number typically used for
badging applications. This UDF
(data) field can be placed on a
badge template so that each card
printed can have a unique number
printed on it that is automatically
assigned and incremented. Each
time a card is printed with a
badge template that this field is
on the system will prompt the
operator to print the card as is or
to increment the card number.
The first time the card is printed
the operator should opt not to
increment the number. Each time
the card is re-printed the operator
could choose to increment the
number based on whether the
original card was retrie
7. Click here is this UDF should be
the unique identifier used for the
card holder API import utility.
8. Select this to Hide the UDF
information in this field from any
operator that does not have
privileges to it in their password
profile. This allows sensitive data
to be entered without allowing
every operator to see it. This
works for card holder searches in
both DataBase and Workstation.
To include or exclude this from a
Password Profile, edit the
Password Profile in question and
navigate to > All Menus >
Locations > DataBase > Card
Holder > Hidden UDF Data. This
must be done for the base location
in the Location Group.
Page 75

User Defined Fields
67
9. Choose this option if you would like to predefine selections for the operator to choose from.
This allows data to be predefined and lets the user pick one of the selections from a drop down
list. The choices and the order in which they are viewed can be predefined. Unless the "Only
select data from list" option is chosen the operator will be able to enter their own information
instead of picking from the predefined list. Having predefined information to choose from
makes the data entry uniform and aids in the searching, sorting and reporting of cardholders
based on User Defined Fields.
10. Selecting this option forces the
operator to choose the entry from the
predefined list. It will prevent them
from entering their own data and limit
them to one of the predefined choices.
DataBase
11. Click on Add and then immediately Enter the text in the UDF Text field and the click
OK to save or Add to enter the next selection -or- Click Add to insert as many choices as
you are going to need for this UDF field. Then Click on each one in the list and Set the:
List Order (top to bottom order of the selections) and Enter the Text for each one using
up to 50 characters. To remove one of the UDF choices, select the entry and click on
Remove.
12. After Naming and setting the
formatting characteristics, and
filling in the desired UDF
information click on OK to save.
Page 76

DataBase
68
Guard Tours
Random Stat
ion Order
Guard Tour
This section of the program is used to create
schedule of events that must take place in sequence or at random and within a specified time
period. Typically a guard tour is manually initiated at the PC and a guard begins the tour by
going to the 1st tour station and performing the predefined action at that station. Each
checkpoint of a tour is referred to as a station. A guard tour is a series of stations with a
minimum and maximum amount of time the guard has to execute a predefined function at each
station. The failure to complete the entire tour in the time frame specified will cause an alarm
to be generated at the PC.
3. Enter optional free format
notes regarding this tour.
2. Select
to allow the Tour to be executed in any
order. When this is selected there is no regard to the Station Number that
typically sets the order in which the Tour Stations must be reached. When
selecting Random Station Order it is important to set the minimum and
maximum Time from Start on each Station to be the same. These times would
be the minimum and maximum time to complete the entire tour.
. A guard tour is a predefined
1. Enter the Name of
the Tour.
Page 77

Guard Tour
69
Add
Delete
Edit
This screen shows a list of all stations (checkpoints) within this tour. The Station number,
minimum and maximum times, the event or action to be taken, and the message to be displayed
if this station is not reached within the allotted time. Stations can be added, deleted, or
modified from this screen.
4. Click on the
button below to add a
Station into the tour.
To
a Tour Station, Click
on the Station in the list below
then click on the Delete button.
To
a Tour Station, double
click on the Station in the list
below.
Continue adding Tour Stations into the same
tour for a maximum of 99 Tour Stations per
tour.
To allow an overall minimum and maximum time for the entire tour, do not
set individual times for each tour station. Instead of individual times set the
Minimum and Maximum Times for each Tour Station the same and use an
overall start and stop time for the completion of the entire tour. Unless
Random Station Order is selected the stations must always be executed
according to station number.
DataBase
Page 78

DataBase
70
Station Number
tour stations are defined. However the Station Number can be changed. This number signifies the
General Tab) option is selected. Station 1 must be satisfied first followed by Station 2 and so on.
Station Events
any one of the Event Types.
Mini
mum
Maximum
Guard Tour
5. The
order in which the tour stations must be fulfilled unless the Random Station Order (set on the
7.
Action required for the Guard
to perform to fulfill the checkin requirement at this Station.
Click on the drop down
selection box to choose the
action desired.
Each of the 99 possible
Stations in a Tour can have
describe the
is a number assigned by the system according to the order in which the
6. Click on the
Device (reader)
below that is to be
used in this Tour
Station. Double click
on the Device to
expand and display a
list of all associated
inputs to choose from
if the Tour Station is
to use and input
(alarm) point.
8. Select the appropriate
Action Message by clicking
on the drop down selection
box. This is the Response Plan
displayed on the Workstation,
when there has been a failure
by a Guard to reach a Tour
Station within the Maximum
amount of time.
10. Enter the
time in minutes from the beginning
of the Tour that the Guard will
have to reach this station and
perform the action required. This
would be the maximum amount of
time from the Start of the Tour
until the Guard reaches the station
being defined. If the Guard arrives
late an alarm is generated
indicating how late to which
station and can optionally display
an Action Message.
amount of
9. Enter the
from the beginning of the Tour that the Guard will
have to reach this station and perform the action
required. This would be the minimum amount of
time from the Start of the Tour until the Guard
reaches the station being defined. If the Guard
arrives early it is logged indicating how early.
amount of time in minutes
Page 79

Maps
71
Maps
Override Groups
are placed on the Map.
the first in the list.
To remove
6. Click on the Map Icon field to choose an Icon that
will be used in the Workstation program.
can be imported into the system for alarm annunciation, Input, Output, and Camera Control.
Many different graphic file formats can be imported into the system. Once imported into the system
the Map is saved as a .bmp file at it’s original size. The General Tab is where the graphic alarm maps
are imported into the system. The I/O Points Tab is where the desired Inputs, Outputs, Cameras, and
1. Select Maps from the main menu and
Click on the Add Button.
2. Assign the Map a Name the system
will refer to it as. 30 characters or less.
3. Click here to access the File
navigation box used to locate the
graphic map you are looking for. The
system automatically opens to the Maps
subdirectory under WinDSX.
4. Enter the Width and Height the
Map should be displayed as in the
Workstation program.
5. Enter the Display Order which sets
the order the Map Icon is displayed in
the Workstation Control Window. 1 is
DataBase
an Input, Output or Override Group from a
Map, select the point from the list to the left and press
the space bar. This places the not symbol around the
point and removes it from the map.
Double Click on Override Groups and
I/O Points. Double Click the Location
Name, then continue to Double Click to
show all available inputs, outputs, and
cameras that may be selected for
inclusion on the map. Placement on the
map is achieved by dragging and
dropping the selected item from the list
on the left onto the Map in the Window
on the right. The Map then turns to full
screen to allow exact positioning of the
Icon. Once the Icon is placed exactly
where you desire click on the Map
somewhere other than the location of
the Icon to return to the I/O Points Tab.
The Icons that are selected for the
Inputs, Outputs, and Override Groups
are the same Icons that are placed on
the Map.
Page 80

DataBase
72
Override Groups
Override Group
are comprised of either Inputs or Outputs. These inputs or outputs, once
included in a group, are represented by a single set of Icons for the normal and abnormal
state of all the points in the group and allow for single action control. The groups can be
expanded for individual control and status.
Besides the summary status the Icons provide with multiple Inputs or Outputs, there is also
the ability to control the inputs armed state and the outputs on/off state through a single
action. The Override Groups are a menu item in the Selection Window located in the
Workstation program. Override Groups can also be defined on Graphic Alarm Maps for
status and control.
1. While in Database
with Override Group
selected, click on the
Add Button.
2. Enter up to 30
characters that best
describes the Override
Group and its function
or purpose.
3. Select whether the
group contains Inputs
or Outputs.
4. Click on the
Override Group I/O
Points Tab.
5. Then Double click
and expand the
Location and Inputs or
Outputs to display all
of the points defined.
6. Include the points
desired by double right
clicking on them or
selecting the point and
pressing the space bar.
Page 81

Image Source
73
Image Source
Image Source
Name
Press F1 for additional Help
The
is the location where the camera or other video device is
defined for use with the Photo ID Badging portion of this program. The
available Image Sources are File Import, Video, Twain, USB, and Signature.
Also set here is the File Format that the image will be stored in. JPG is the
suggested format.
1. Click on
in the
Setup Menu, then on the Add
button.
2. Enter a
for the Image
Source to be used.
3. Select the Source Type.
TWAIN for DSX Cameras.
4. Select the stored image File
Format from the drop down
menu. JPEG is default.
5. Set the File Compression
factor. 20 is default. 2 would be
highest resolution.
6. Set the Comm Port used if
defining a signature pad.
7. Enter any free format Notes
regarding this source.
DataBase
Page 82

DataBase
74
Badge Image
Badge Image Types
Only one Image Type can be set to be the primary image displayed with
Name
Badge Image Type
are the connecting factor between the Image Source and the Badge
Template. The Image Type identifies an Image Source and determines the order in which the
Image is to be taken in the event there are multiple images on the badge template. The Image
Type also determines which image is the primary image to be displayed with the Card Holder
for searches and Image retrieval.
1. Click on
Type, then on the Add
button.
the card holder. To do live video image capture primarily and file import
as a secondary means of grabbing an image for offsite employees, define
the live video for the source and assign it to the image type. Do not define
file import as a source or assign it to a type. File Import can be used
automatically as a backup source or manual override for the live video.
2. Enter a
for the Image
Type.
3. Select the Image Source to be
used.
4. Set the Capture Sequence that
indicates in what order this image
is taken when there are multiple
images per badge such as photos
and signatures.
5. Select Display this image with
cardholder name if this is to be the
primary image viewed for this card
holder.
6. Select Store image in black and
white if it is desired to display and
print the image in black and white.
Page 83

Badge Templates
75
Badge Templates
Badge
information regarding size, bar code, magnetic stripe encoding, and 2 sided options.
The Badge Templates can be assigned to a company for automatic selection of the
appropriate badge background for the Card Holder being added into the system.
1. Click on
Template, then on the
Add button.
are the predefined badge layouts. The templates contain
DataBase
Page 84
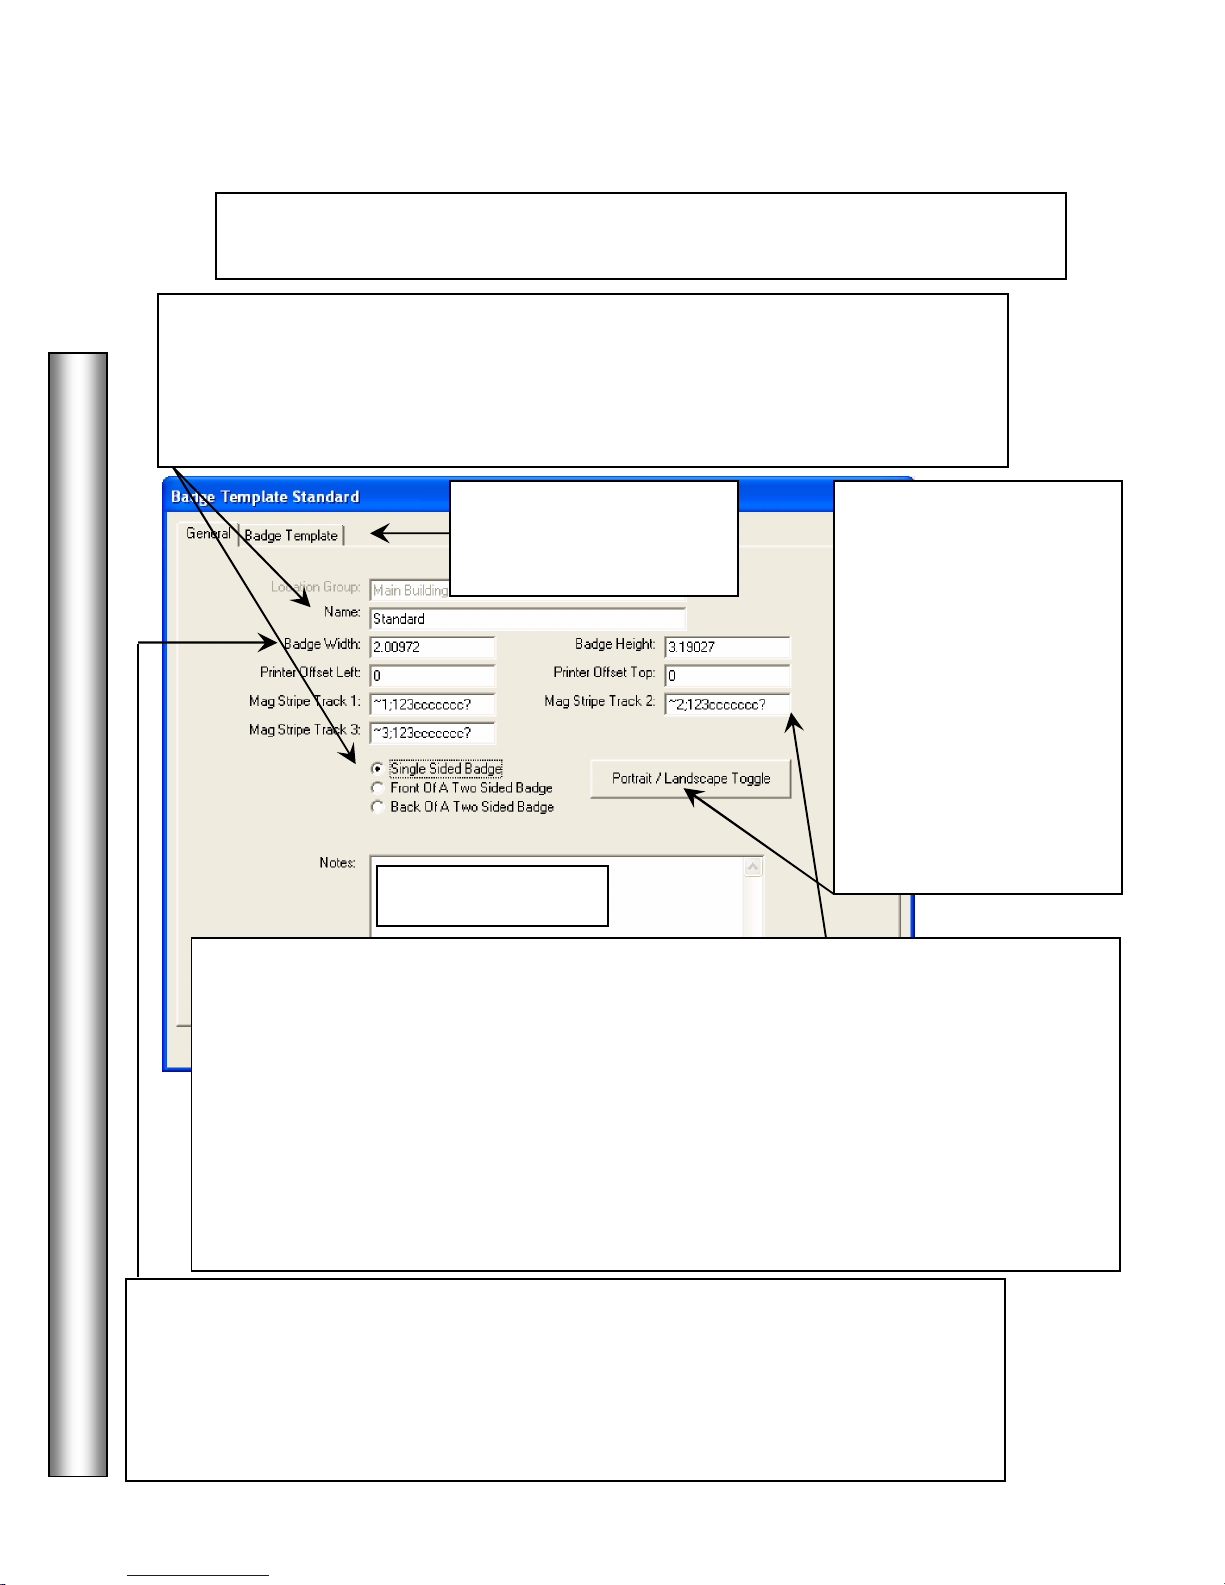
DataBase
76
Badge
Name
Badge Width and Height
Magnetic Stripe Encoding
digit facility code of 123 and a seven digit card number.
one style to the other.
Badge Templates
Enter the general information here such as size and then click on the
Template Tab to place the fields and images on the card template.
2. Enter a
sided badge must have the same name with the number 2 appended to the end. For
example: if the front side were named ACS the backside would be named ACS2.
The single sided, front side or back side of a two sided badge option must be set
appropriately on the General Tab.
for the Badge Template. Templates that are the backside of a two-
6. When finished with this
screen click on Badge
Template.
When creating a new
Badge Template the
default dimensions are for
a Portrait Style Badge. If
you desire a Landscape
style badge click here on
the Portrait/Landscape
Toggle Button.
Once the Badge Template
has been fully created you
must create a new badge
template to switch from
5. Enter optional Notes.
4. For
on Track 1, 2, and/or 3 see the following.
Fargo Direct Card Printers - Enter the formatting of the magnetic stripe encoding for
Track 1. ~1; indicates track 1, ~2; indicates track 2, ~3; indicates track 3. For Example:
~1;123ccccccc? The 123 is the facility code that would be encoded on every card. The
ccccccc is the number of code digits to be encoded on the card. This format would use
Device Type A5 which is set for a 3 digit facility code and a seven digit card number in a
clock and data format on track 1.
Eltron Direct Card Printers - Enter the formatting of the magnetic stripe encoding for
Track 1. _ represents a space. ~C0&B_1_ indicates track 1, ~C0&B_2_ indicates track 2,
~C0&B_3_ indicates track 3. For Example: ~C0&B_1_123ccccccc would be used for 3
3. Enter a
to set the size and orientation of the badge. The
sizes shown are the proper sizes for all DSX direct print cards with the exception of the
adhesive backed PVC cards that are adhered to standard proximity cards. Reverse these
values in the width and height fields to change from a portrait oriented badge to a
landscape badge. The proper size for adhesive backed laminates used to adhere to
standard proximity cards is Width – 2.075 and Height – 3.327. Badges can be up to 4”.
Page 85

Badge Templates
77
Edit
Add
,
Send to Back and Bring to Front
click on one of the two and select Send to Back or Bring to Front to set the
By default the badge is set for portrait style and can be altered to landscape by simply
switching the values in the badge width and height fields located on the General Tab.
7. To
the right. Do this by selecting an item with the mouse, click and hold the left mouse
button and drag it onto the badge canvass on the right to the desired position and release
the left mouse button. When released a formatting screen will appear that allows
specific characteristics to be set such as X/Y position, color, font, size, and barcode.
select an item from the list on the left and drag it onto the assembly area on
To
a text field, data field, graphic, image, or shape that has been placed on
the badge simply click on it once with the right mouse button and the format
screen will appear.
DataBase
8. Click on
OK when
finished
creating the
template and
assign it to the
appropriate
company.
allows items to be layered on the
badge. If there are several graphics and/or images on the layout, Send to
Back allows you to select which one will be on top. There may be an
instance where you will want a Card Holder Image sitting on top of a
Graphic like a colored box or logo. Place both images on the layout and
images in their proper place.
Page 86

DataBase
78
Roster
Badge Templates – Roster
In order to correctly use the Print Roster option located under System / Reports / Card
Holder Report, a Badge Template named Roster must first be defined. The size of this
Template will determine how many Images and how much information about each Card
Holder will fit onto a given page. Since printer drivers differ among different
manufacturers, experimentation may be necessary to achieve the output desired. The
following screens are only meant as examples of a Roster Template that include the Card
Holder’s picture and First / Last Name.
***Note***
Once the Roster Template’s Width and Height have been entered and items have been
placed on the Template layout, the Width and Height cannot be changed. If a different
size is desired, the Roster Template must be deleted, and a new one created.
The name
Template in order for the report to
function.
must be entered for this
Badge Width and Height will need to be adjusted to determine how many Card Holders, along
with their added information, will be printed to a single page. A large Template layout may
only print one Card Holder per page, while a smaller layout may print 48 or more per page.
To adjust size, either delete the entire Template and start again, or delete items on the Badge
Template screen, then adjust Width and Height as needed on the General screen.
Page 87

Badge Templates - Roster
79
In this example, the Card Holder’s Image and First / Last Name have been added to the
1.1 x 1.5 Template. The more information added to a given template, the more space it
will occupy on a printed page.
DataBase
Page 88

DataBase
80
Keys
Name
Notes
Door Description
KeyHolder Report.
Skills
Keys / Skill Name
provide the ability to create a database that catalogs each key in the location. This is
referring to conventional metal keys used to unlock doors. Each Key has a name, doors
description, key type, pinning, and notes field. These Keys once defined here are assigned to the
card holders to record who has keys to which doors.
Click here for a
This will print a list of everyone that has
possession of the specified key.
1. Enter a
that best
describes this Key.
2.
indicates the doors this key is to.
3. Key Type describes the manufacture.
4. Key Pinning is the cut of the key.
5.
is an optional field that allows
free format information to be recorded
about this Key.
6. After Naming, and
entering the data for
this key click on OK.
are used to identify particular trades or professions of the Card Holders at this location and
provide another criteria to search on. Once Skills have been defined, close and restart the
Database program and advance to the Card Holder Search engine and you will notice there are
now 4 tabs instead of 3 with the far right hand tab being the search Skills tab.
Page 89

History / General
81
History
Name
typical default. Other file
from history that is being
File Server.
Notes
Report Details Tab
Build Report
RTF f
ormat and zipped prior to being emailed.
hard disk or in any History.mdb database. The history report may include all events for a location or
be very specific about what is included in the report. This is accomplished by answering a series of
questions on what is to be included in the report.
Begin the report by clicking on the word History in the list of items underneath your location name,
then click on Add in the toolbar at the top of the Database screen.
allows the user to view and print the event logs currently stored on the shared resource or
5. Click on the
to set the report definition.
Click on the Schedule Automatic Report Tab to set the times
the report should automatically generate.
1. Enter a
that best describes
this History Report. Up to 20 Char.
2. This is the path to
the shared history files.
The path shown is the
4.
free format information to be recorded
about this Report.
are an optional field that allows
names and paths can be
specified to allow
reports to come from an
archived history file, or
DataBase
3. If this is archived history that
was encrypted with a password
enter the password here.
Enter up to Two times the report should print in the same day. If it
should only print once only enter a time in the top left field. Click on
the days the report should generate at the times designated above.
If this is a scheduled report and you desire it to be Emailed instead of
printing put the following Syntax in the beginning of the Notes field
on the General Tab- Email: Rgibson@DSXINC.COM - if there were
more than one destination address place a semi-colon then a space and
the next address. This only works with scheduled (automatic) reports
and only on a PC utilizing Outlook Express™. The report is saved in
Click on OK to
save the report
configuration.
recorded on a Network
Click on
when
the configuration is complete
and the report is ready to run.
Page 90

DataBase
82
Start Date
Start Time
Sort the History by
Time
History / Report Details
6. Enter the
the Stop Date and Stop Time the History Report is to end. Use the small
up/down arrows to increment and decrement the segments within the date fields.
Use the large down arrow to access the calendar menu.
and
that the History Report is to begin. Enter
See next page.
7. Click on one of the two
ways to apply the start and
stop times and dates. Use
either:
Apply Start Time to Start
Date and Stop Time to Stop
Date. The report will
encompass all time between
the start and stop dates and
times.
Apply the Start and Stop
Time to Each Day of the
period from the Start Date to
the Stop Date. For Example
with this selected the report
is run from the start time to
stop time on each of the days
between the start date and the
stop date.
8. Select this to have the system
Time and Date for the report. If this is not selected the
events are reported in the manner in which they were
received at the PC designated as the Comm Server.
9. Select this field to instruct the system to configure for a
and Attendance Report. Select this for Time and Attendance
only, it does not have to be selected for any other report.
Complete the series of 4 questions that are remaining
before clicking on Build Report. See page 80.
Faster History Searches can be achieved by selecting specific
card holders and specific events. Leaving either All Card
Holders or All Events checked will not use the fast search.
Page 91

83
Elevator Floor Selection History
History / Elevator Floor Select
Select this box for
Leave this
and all other
boxes at their
default. Not
needed for
the Elevator
Report.
Uncheck this
box to define
what floors
are to be
tracked. See
text below
and page 82.
.
DataBase
By selecting this report you are asking for a list of floor select activity and the associated access
granted. Include all event types can be unchecked and other events selected if desired.
If you want a report to include all access to the third floor you would select each of the devices
(readers in cabs) and the third floor inputs associated with each one.
If you want a report to include all access in a particular cab then you would select the device
(reader in a cab) and all of the floor select inputs associated with that device.
To configure the system for this report the floor select inputs have to be associated with the
Device (reader) that is in the same elevator cab. This allows for Elevator Floor Select Reports to
be run from History that show the card holders access and the floor they selected.
Also required for Floor Select Elevator reporting is the following: Under the Input Options Tab“Show status change message at PC” must be enabled (checked). On the Input General Tab-the
Name needs to reflect the Cab and the Floor select button this input is connected. For example
Cab 1 Floor 3.
Page 92

DataBase
84
Device number 7, Lobby Elevator,
History / Elevator Floor Select
To include inputs in the Elevator
Floor Select Report, either click
on the input and hit the space bar,
or double right click on the input
definition. Either action should
remove the red “Not” symbol
from the item. This must also be
done for the Device and Location
references.
In this example, Elevator Floor
Selection History will be run
against the Main Office Location,
A right double click on the device item
will select/de-select all items below it.
and Inputs 5 and 6, which
represent the 2nd and 3rd Floor
Selections. The 4th and 5th floors
are monitored by inputs on device
number 5.
When selections are completed,
click OK. Then click on Build
Report.
Page 93

History / All Events
85
All Events
All Readers
All
The default report includes
at
, from
Card Holders and displays their Code Data. To be more
selective with the report, remove the checkmark from one or all
of the selections to receive a breakdown of that selection.
10. Remove the checkmark
from Include All Events by
clicking on it once to receive a
list of all event types in the
system.
To select an event to be
included either Double right
click on it or click on it once
and press the space bar, then
click on OK.
DataBase
Page 94

DataBase
86
All Events
All Readers
All
History / All Devices (readers)
The default report includes
Card Holders and displays their Code Data. To be more
selective with the report, remove the checkmark from one or all
of the selections to receive a breakdown of that selection.
at
, from
11. Remove the checkmark from
Include Events from all Devices
by clicking on it once to receive a
list of all readers in the system.
To select a device (reader) to be
included Double click on the
location name and then double
right click on each device or click
on it once and press the space bar,
then click on OK.
A right double click on the device item
will select/de-select all items below it.
Page 95

History / All Card Holders
87
All Events
All Readers
All
WinDSX Version 2 and Lower.
The default report includes
Card Holders and displays their Code Data. To be more
selective with the report, remove the checkmark from one or all
of the selections to receive a breakdown of that selection.
12. Remove the checkmark from
Include Events from all Card
Holders by clicking on it once to
receive the Select Names to Include
screen.
By clicking on the Select Name to
List button you are taken to the Card
Holder Search Engine found on page
35. The results of what you search
for are displayed in this window.
Select one or more or all of the Card
Holders to be included in this report.
at
, from
First/Last Name Sounds Like:
Enter a name here to search history
for a Card Holder by their First
and/or Last Name. If both are
entered the Search will return
results only if both names are
found.
Use these fields when searching
History for an individual Card
Holder that has been deleted from
the database and when using
archived History created with
13. Once the Card Holders searched for
are in the list, select the ones you want or
click on the Select All Names button and
click on OK.
DataBase
Page 96
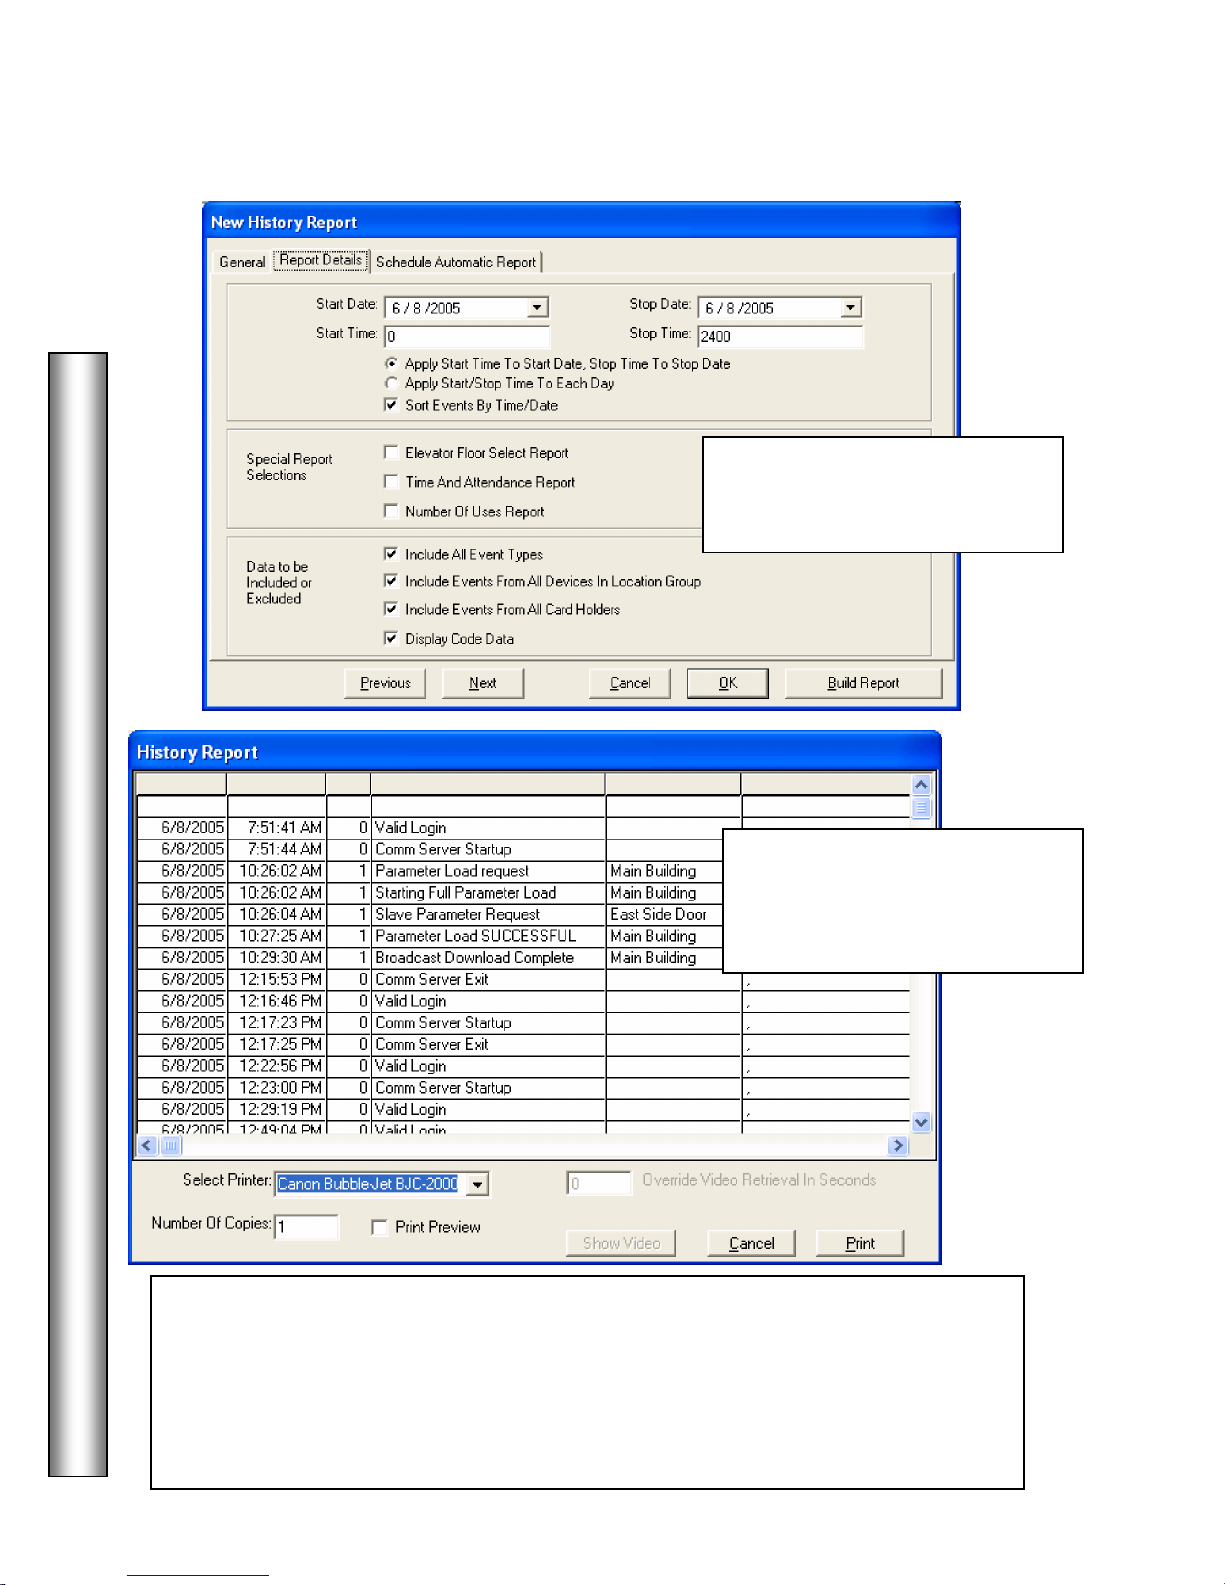
DataBase
88
Digital Video Recorder
–
Video Retrieval
History / Print PreView
14. Once the report has been
configured click on Build Report
below.
15. Once the report has been
configured, select print preview if
desired and click on the Print
button shown below.
click on an alarm event. Then you can modify the pre and post alarm video playback
time in the Override Video Retrieval In Seconds box. The default amount of stored
video that should be retrieved is preset under the Camera/DVR setup for each camera.
(One half of the time entered is for pre-Alarm and one half is post-Alarm.) Then click
on Show Video to display associated video for this alarm.
- Alternately, from this screen you may
Page 97

Email Notification / Setup
89
Email Groups are groups of people that will be sent an email due to a Location, Device, or Input
Alarm. Email Groups consist of a single or multiple Card Holders that each have a time zone
assigned. The Time Zone selected for each Card Holder determines when that person will receive
the email notification for the alarm to which the email group is assigned.
Card Holders that are to receive an Email Notification must have an Email Address in a UDF field
that is configured as an Email Address. Email Groups can be assigned to a location, to each device
and to each input desired. Those that have an Email Group assigned will send an Email upon
Alarm. For More information about Alarm Email Notification press F1 within the software.
1. Define a User
Defined Field and
mark it as an Email
Address such as the
one to the left.
2. Edit at least one
Card Holder and
enter an Email
Address under their
User Defined Fields
(UDFs).
DataBase
3. Add an Email
4. Click on the Edit
Continued on the next
page...
Group and give it a
name. The name
represents who will
receive the Emails
or possibly what is
generating them.
Email Group tab to
configure the
group.
Page 98

DataBase
90
Email Groups / Assignment
5. Click on the Select Names to List button below to bring up the Card Holder Search
Engine. Enter the criteria or make the selections to return the desired list of card holders.
6. Click on a Card
Holder in the
Select Names
List and then
click on the Add
button. Repeat
this until all Card
Holders wanted
in this group are
in the list to the
right.
8. Edit the Location (not shown) and select the Numeric Options Tab and at the bottom select
the Email Group to receive Location alarms from this location. (Location communication
Loss and Restoral)
9. Edit each Device and select the second Options Tab and at the bottom select the Email
Group to receive Device alarms from this Device. (All controller power supervision
signals, Device communication Loss and Restoral, and Consecutive Denied Exceeded)
7. Click on a Card Holder in the
Names in Email Group list and
then click on the Email Time
Zone selection box and select the
Time Zone that represents when
this person should receive the
Email Notification. Repeat this for
all Card Holders in this Email
Group.
10. Edit each Input to utilize Email Notification and select the Icons/Ascii Out Tab and at the
bottom select the Email Group to receive Input Alarms from this Input. (Input Alarms and
Restorals including Door Open too Long and Troubles)
Page 99

Login
91
The Login Screen below is displayed when the program
is started. Enter your User Name and Password. The
Default User Name is master, the default Password is
master both entered in all lower case.
Double Click on the
Workstation ICON
to start the program.
Page 100

92
Workstation Program
System Date and Time
Active Alarm
Unresolved Alarm
Primary Online
and/or wider.
Log
-
Off
Workstation
Workstation
The
is where all activity is reported including alarms. Inputs, Outputs, Override Groups, and Maps
are viewed and controlled from here.
What item is selected determines which Icons in the Toolbar are active. On the
following pages, as different items are selected in the Selection Window you
will notice different Icons will become active and inactive.
In the Workstation Program - Double Click on a Location Name in the Location
Selection Window to expand the control menu for that location. Once a
Location is selected you can select Devices, Inputs, Outputs, Override Groups,
Cameras, Maps, and Operator Comments.
is a counter that displays
the number of alarms that are currently
active in the system. See Page 93, 103.
operational between the Comm Server program and the
Workstation program.
provides the user visibility and control of the system. Workstation
Click here to
and allow a different
operator to Login. While Logged off, events
are still being transferred to the PC but are
not shown on this workstation until logged
back on.
is a
counter that displays the
number of alarms that
have been acknowledged
by the operator but have
not been resolved.
Sizing Handle
is used to resize
and shape the
Workstation
program. Click
on the diagonal
lines and push
and/or pull to
indicates the TCP/IP protocol is
make it larger,
smaller, taller,
 Loading...