

DStv HD PVR Viewer's Manual


Picture Precision!
Congratulations on purchasing your DStv HD PVR (High Definition Personal Video Recorder) Decoder!
The HD PVR is further revolutionising the television experience, with lifelike viewing, sharper images,
more vibrant colours and precision picture quality.
Now, on all High Definition content viewed with the HD PVR, you can enjoy colours so rich and a picture
so sharp, you can see every face in the crowd. You’ll be wowed!
Welcome to the world of High Definition with DStv.
Your HD PVR will allow you to do some amazing things, including :
• Record 150 hours of standard TV or 50 hours of HD TV
• View 1 and record 2 simultaneously
• Pause Live TV programming (for up to 2 hours)
• Rewind Live TV programming
• Fast forward
• View in slow motion
• XtraView capability
Please use this Viewer’s Guide to familiarise yourself with the functions and features your new HD PVR
has to offer.
Enjoy the future of television – High Definition with precision picture.
Kind regards,
Nolo Letele
CEO MultiChoice SA Group

OF
TABLE
CONTENTS
GETTING STARTED .......................................................................................................................................................... 4
FRONT PANEL ................................................................................................................................................................... 5
BACK PANEL ..................................................................................................................................................................... 6
IMPORTANT SAFETY INFORMATION .............................................................................................................................. 7
INSTALL & CONNECT THE HD PVR ................................................................................................................................. 8
Connecting the HD PVR to the Satellite Dish .......................................................................................................... 9
Set-up 1 : HD PVR and 1 HD TV .......................................................................................................................... 10
Set-up 2 : HD PVR, 1 HD TV and a Home Theatre System .................................................................................. 10
Set-up 3 : HD PVR and a Standard Definition TV ................................................................................................. 11
THE HD PVR REMOTE CONTROL ................................................................................................................................. 12
Remote Control Basics .......................................................................................................................................... 13
TV, ALT, TV Guide, Language and Mute Buttons ................................................................................................. 13
The Dial ................................................................................................................................................................. 13
Colour Buttons ...................................................................................................................................................... 14
Action Buttons ....................................................................................................................................................... 14
THE BASICS ..................................................................................................................................................................... 15
The i-Plate : Normal .............................................................................................................................................. 15
The i-Plate when "Banner Browsing" ..................................................................................................................... 16
The i-Plate : Extended Mode ................................................................................................................................. 17
Viewing Modes ...................................................................................................................................................... 18
The Channel Grids ................................................................................................................................................ 18
Reminders ............................................................................................................................................................. 19
Interactive Services and DStv touch ..................................................................................................................... 20
Parental Control .................................................................................................................................................... 20
Language Selection .............................................................................................................................................. 20
Subtitles / Teletext ................................................................................................................................................. 20
DStv Audio Channels ............................................................................................................................................ 20
THE TV GUIDE ................................................................................................................................................................. 21
Favourite Channels ............................................................................................................................................... 21
All Channels .......................................................................................................................................................... 22
PVR BASICS .................................................................................................................................................................... 23
The Buffer ............................................................................................................................................................. 23
What is Live TV? ................................................................................................................................................... 23
Automatic Standby ............................................................................................................................................... 23
The Status Bar ...................................................................................................................................................... 24
PVR ICONS ...................................................................................................................................................................... 26
SETTING RECORDINGS AND THE SCHEDULED RECORDINGS SCREEN ................................................................ 28
How to set a recording ......................................................................................................................................... 28
The Scheduled Recordings Screen ....................................................................................................................... 33
VIEWING YOUR RECORDINGS ...................................................................................................................................... 35
OTHER FEATURES ......................................................................................................................................................... 37
Extending a recording in progress ......................................................................................................................... 37
Stopping a recording in progress .......................................................................................................................... 37
Bookmarks ............................................................................................................................................................ 37
Slow Motion ........................................................................................................................................................... 37
The Safety Net ...................................................................................................................................................... 38
Fast Forwarding .................................................................................................................................................... 38
Rewinding ............................................................................................................................................................ 39
HD PVR Viewer’s Guide – UEC Page 2 of 62

THE DECODER MENU .................................................................................................................................................... 40
THE DECODER MENU - INFORMATION CENTRAL (#1) ............................................................................................... 41
Information Central Menu ...................................................................................................................................... 41
Information Central ................................................................................................................................................ 41
Hardware Status .................................................................................................................................................... 42
Tuner Status .......................................................................................................................................................... 43
Signal Status ......................................................................................................................................................... 44
THE DECODER MENU - PARENAL CONTROL (#2) ....................................................................................................... 45
Global Blocking ..................................................................................................................................................... 45
Parental Guidance Settings ................................................................................................................................... 45
Channel Blocking................................................................................................................................................... 46
Changing the PG PIN Code .................................................................................................................................. 46
THE DECODER MENU - PERSONALISE (#3) ................................................................................................................. 47
Aspect Ratio .......................................................................................................................................................... 47
Language Options ................................................................................................................................................. 48
Surround Sound .................................................................................................................................................... 48
Safety Net Settings ............................................................................................................................................... 49
Display Timeout .................................................................................................................................................... 49
Transparency ........................................................................................................................................................ 49
Automatic Standby ............................................................................................................................................... 49
THE DECODER MENU - ADVANCED OPTIONS (#4) ..................................................................................................... 50
Network Set-up ..................................................................................................................................................... 50
Equipment Set-up ................................................................................................................................................. 51
XtraView Set-up..................................................................................................................................................... 52
PVR Clean-up ....................................................................................................................................................... 52
DSD Upgrade ........................................................................................................................................................ 53
FACTORY DEFAULTS ..................................................................................................................................................... 54
SPECIFICATIONS ............................................................................................................................................................ 55
LEGAL MATTERS ............................................................................................................................................................ 57
PRODUCT WARRANTY ................................................................................................................................................... 59
TROUBLESHOOTING / HOTLINES ................................................................................................................................. 61
The whole of the HD PVR Viewer’s Guide, including the graphics, menus and information
contained herein are the subject of intellectual property rights, including copyright, under
domestic law and international conventions. All rights are reserved.
The HD PVR Viewer’s Guide supplements the information supplied with the packaging of the
HD PVR.
Due to software upgrades, the features and functionalities in this HD PVR Viewer’s Guide may
differ from those on your HD PVR.
UEC Version 2 (Dec 2008) e&oe
HD PVR Viewer’s Guide – UEC Page 3 of 62
ETTING STARTED
G
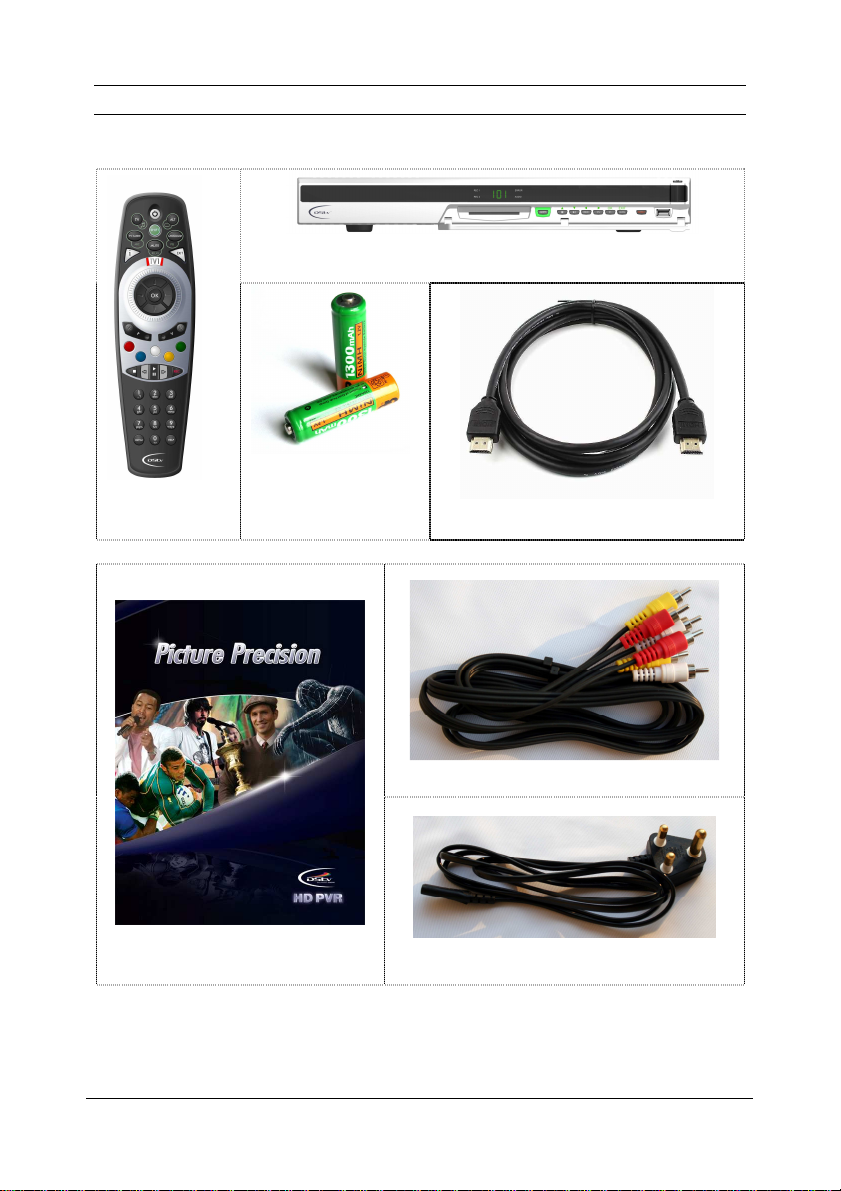
The following items are included when you purchase the HD PVR :
1 x Remote Control
1 x Remote Control
Quick Guide
1 x DStv HD PVR Decoder
2 x AA Batteries
1 x Smartcard
1 x Audio / Video Cable
1 x HDMI Cable
1 x HD PVR Viewer’s Guide
HD PVR Viewer’s Guide – UEC Page 4 of 62
1 x Power Cable
RONT PANEL
F
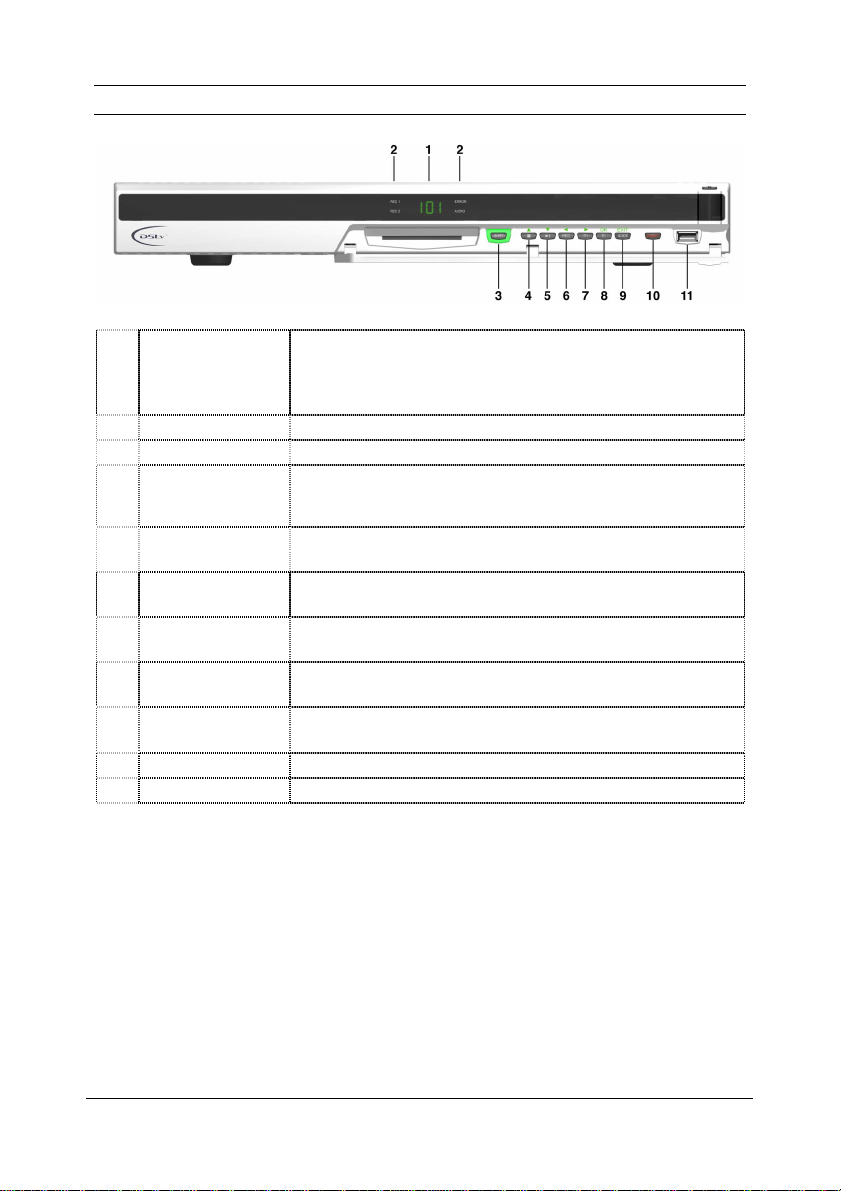
1 LED / front panel
display
2 Activity indicator Displays activity of HD PVR, example : recording.
3 Shift Toggles the available function on buttons 4 – 9.
4 Stop
(Up arrow)
5 Play / Pause
(Down arrow)
6 REC
(Left arrow)
7 P+
(Right arrow)
8 P-
(OK)
9 GUIDE
(EXIT)
10 RESET Reboots the decoder.
11 USB Reserved for future use.
Displays the state of the HD PVR :
o when the decoder is in standby – displays the current time.
o when tuned to TV or Audio channels – displays the channel
number.
If viewing from the Playlist, returns to Live TV. If a recording is in
progress, stops the recording.
If SHIFT is active = up arrow.
Starts or pauses the video.
If SHIFT is active = down arrow.
Schedules a recording.
If SHIFT is active = left arrow.
Changes to the next available channel.
If SHIFT is active = right arrow.
Changes to the previous available channel.
If SHIFT is active = same function as OK on the remote control.
Goes to the TV Guide.
If SHIFT is active = same function as EXIT on the remote control.
HD PVR Viewer’s Guide – UEC Page 5 of 62
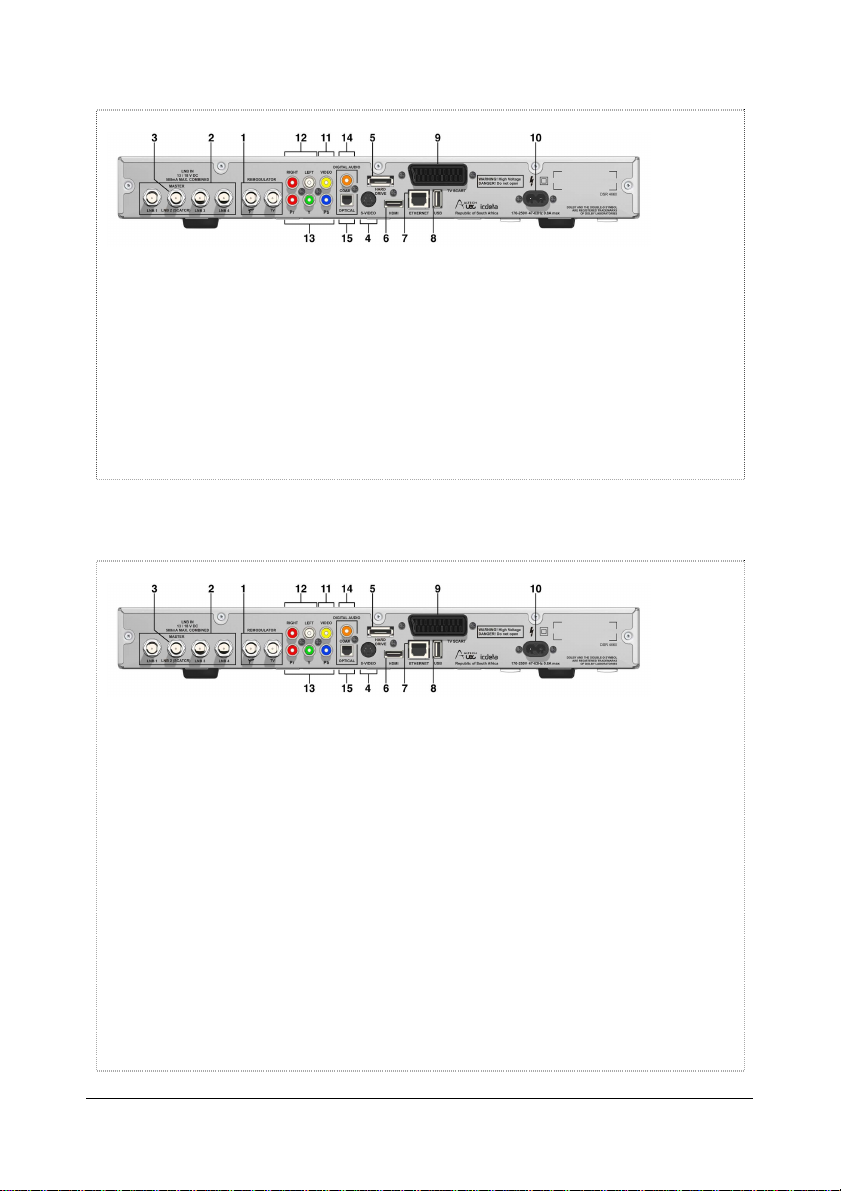
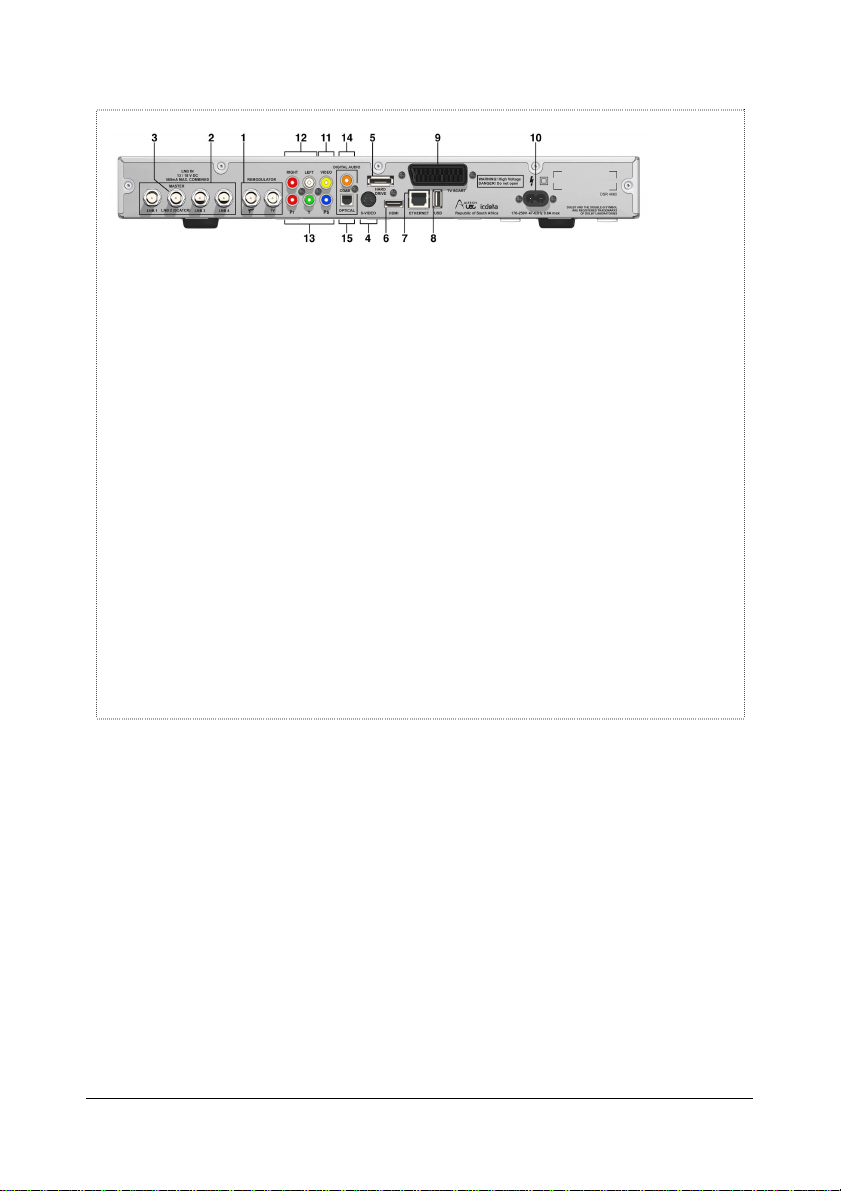
ACK PANEL
B
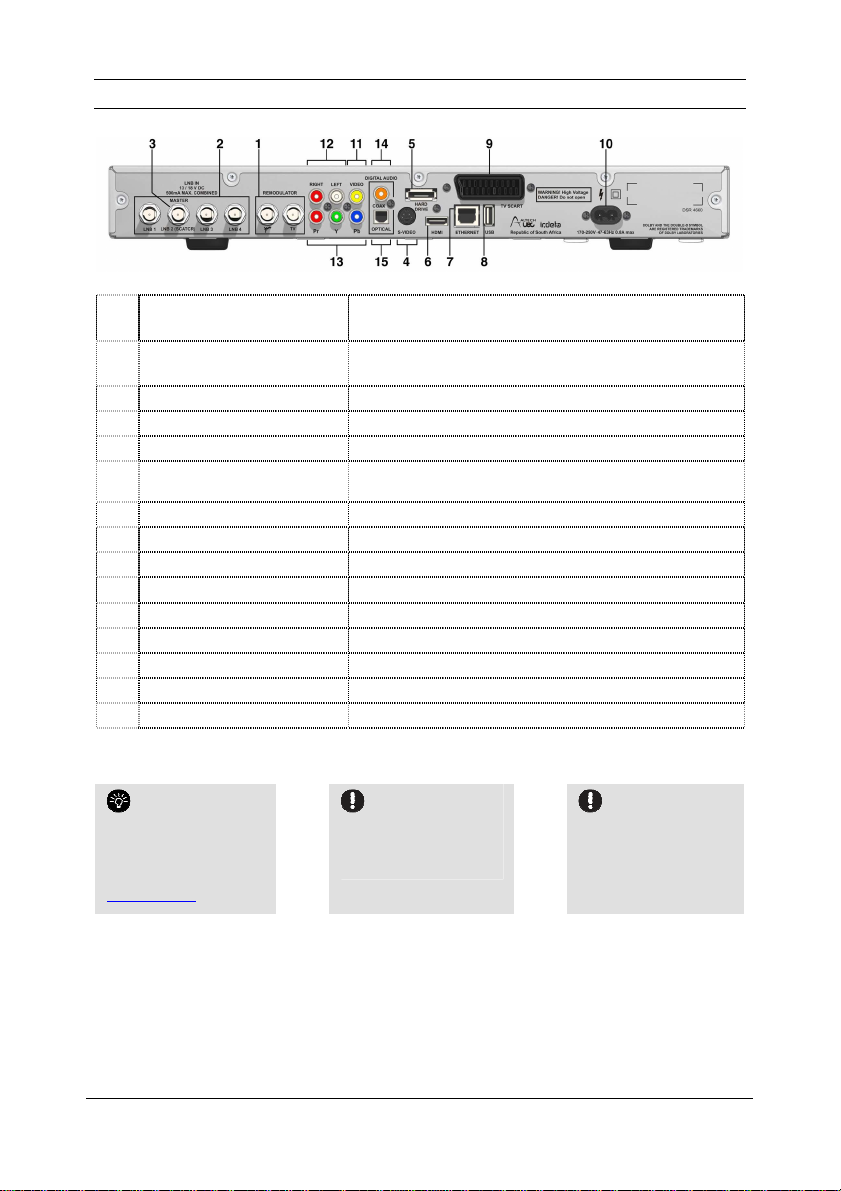
1 RF In and RF Out Connect RF In to the terrestrial antenna.
Connect RF Out to the TV antenna input.
2 Satellite / Tuner Inputs 1 to 4 Connect to the quad (4-wire) LNB feeds from the dish.
3 Tuner 2 Connect SatCR LNB feed.
4 S-Video Connect to S-Video input on the TV.
5 ESATA Reserved for future use.
6 HDMI Connect to the HDMI input on the HD TV or Home Theatre
7 Ethernet Reserved for future use.
8 USB Reserved for future use.
9 Scart Connect to the Scart input on the TV.
10 Mains Connector Connect to the mains supply using the power cable.
11 Composite Video Out Connect to the video input on the TV.
12 Audio Left and Audio Right Connect to the audio inputs on the TV.
13 Component Video (YPrPb) Connect to the component video inputs on the TV.
14 Coaxial Digital Audio Output Connect to the coaxial input on the Home Theatre amplifier.
15 Optical Digital Audio Connect to the optical input on the Home Theatre amplifier.
If using a SatCR LNB feed, connect to LNB input 2.
system.
If you have technical
comments or want to
chat to other users about
the installation and
connection of the HD
PVR, visit the forums at
www.dstv.com
HD quality content is
only available via HDMI.
The HDMI input on the HD
TV must be HDCP
compliant.
sound is delivered
through the optical and
digital coaxial audio
outputs and is not
available via HDMI.
The 5.1 surround
HD PVR Viewer’s Guide – UEC Page 6 of 62

MPORTANT SAFETY INFORMATION
I
This DStv HD PVR Decoder meets International Safety Standards. Please read the following
recommended safety precautions carefully.
M
AINS SUPPLY
This decoder operates within the range 85 – 288 V AC 47 – 63 Hz power supply only. Do not connect to
DC mains. Connect the power cable to the decoder before connecting the other end to the power outlet.
Disconnect the decoder from the power outlet before connecting or disconnecting the HD PVR from any
other equipment.
L
IQUIDS & SPILLAGE
Keep liquids away from the decoder and do not put anything on top of the decoder which may spill
(example : lit candles or containers of liquid).
Do not use the decoder in extreme temperature and humid conditions.
C
LEANING
Before cleaning the decoder, first disconnect the decoder from the mains. Use a dry cloth to clean the
exterior.
V
ENTILATION
Do not block the ventilation holes and ensure that free airflow is maintained around the decoder. It is
essential to keep the HD PVR cool to prolong the life of the hard disk.
Never stand the decoder on soft furnishings or on carpet.
Do not use or store the decoder near a heater or where it is exposed to direct sunlight.
Never stack other electronic equipment on top of, or below the decoder.
S
ERVICING
Do not attempt to repair the decoder yourself. You should also never remove the cover of the decoder.
Any tampering with the decoder will invalidate the warranty. Refer all servicing to a qualified MultiChoice
Agent, Branch or Accredited Installer.
L
IGHTNING
If the decoder is installed in an area subject to intense lightning activity, protection devices for the
decoder mains connector are recommended.
E
ARTHING
The earthing system must comply with local regulations.
HD PVR Viewer’s Guide – UEC Page 7 of 62
NSTALL & CONNECT THE HD
I
Due to the many potential configurations in each home and the variety of equipment available, it is not
possible to cover every potential installation scenario. This guide offers information on connecting the
HD PVR to the satellite dish as well as 3 basic set-up options :
o Set-up 1 : HD PVR and 1 HD TV
o Set-up 2 : HD PVR, 1 HD TV and a Home Theatre System
o Set-up 3 : HD PVR and 1 Standard Definition TV
We encourage customers with technical queries to contact a MultiChoice Accredited Installer and to
make use of the technical forums on www.dstv.com.
PVR
IMPORTANT
MultiChoice recommends that installations and
connections of the HD PVR are done by a MultiChoice
Accredited Installer.
The HD PVR is designed to work with a 4-wire LNB
installation or a one wire SatCR installation. The HD
PVR will work on an existing twin LNB with two cables,
as long as the two cables from the LNB are split into 4
using a splitter device / multiswitch.
If your TV is marketed as “HD Ready” and does not
work with the HD PVR, we suggest you check the
components and / or contact the manufacturer of the
TV for assistance.
HD quality
content is only
available via HDMI.
The HDMI input on the
HD TV must be HDCP
compliant.
The 5.1 surround
sound is delivered
through the optical and
digital coaxial audio
outputs and is not
available via HDMI.
If the HD PVR is
being linked to another
XtraView decoder, visit
www.dstv.com for full
XtraView info (including
detailed installation
options and a guide to
installation prices).
HD PVR Viewer’s Guide – UEC Page 8 of 62
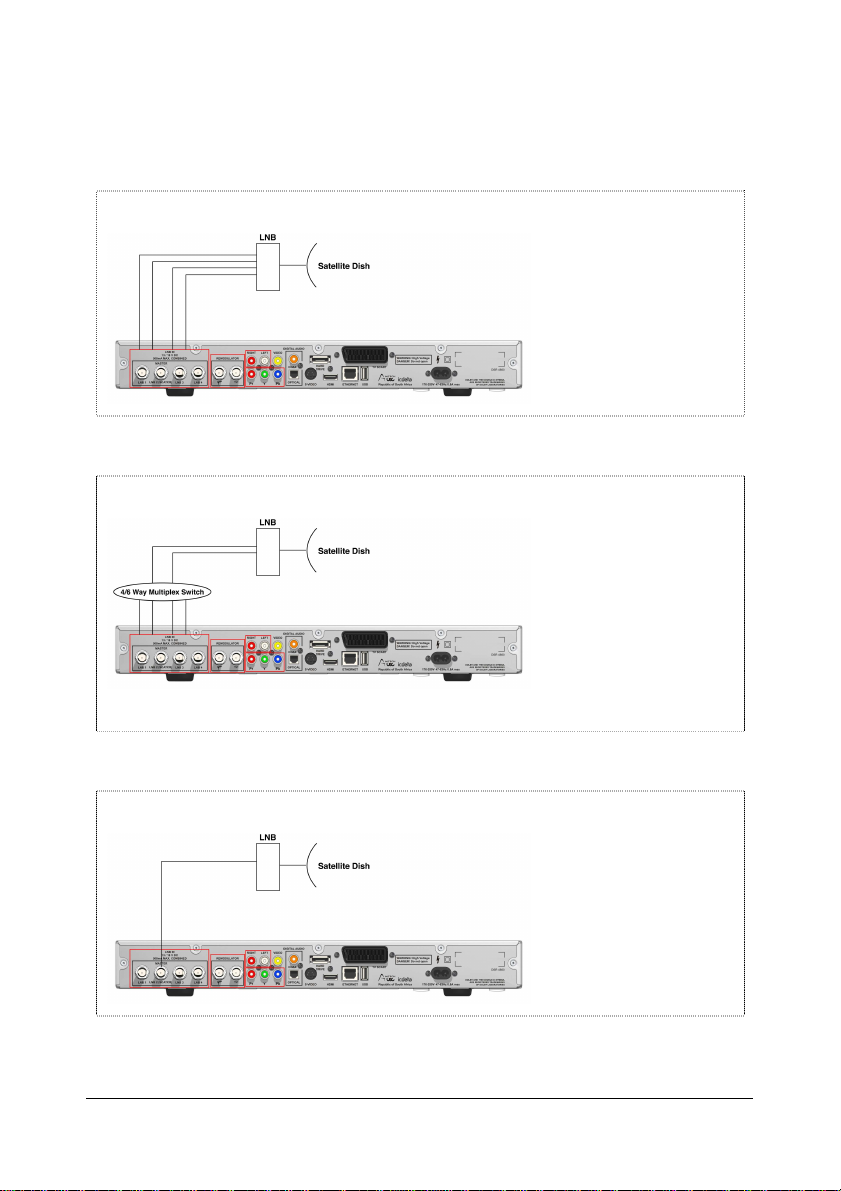
C
ONNECTING THE HD
Please consult with a MultiChoice Accredited Installer for the most cost effective solution to suit your
requirements.
O
PTION 1 : CONNECT USING A QUAD
PVR
TO THE SATELLITE DISH
(4-
WIRE)
LNB
O
PTION 2 : CONNECT USING A TWIN
(2-
WIRE)
LNB
WITH A 4-WAY MULTISWITCH
O
PTION 3 : CONNECT USING A SATCR
LNB (U
NICABLE
LNB)
HD PVR Viewer’s Guide – UEC Page 9 of 62
SET-
UP 1 : HD
PVR
AND 1 HD
TV
SET-
Connect the four satellite feeds to the four LNB inputs (#2) on the HD PVR. If using a
➊
SatCR LNB feed, connect to LNB input 2 (#3).
Connect the HDMI cable to the HDMI input on the HD TV and to the HDMI connector (#6)
➋
on the HD PVR.
Ensure that all connections are firm before you connect the power cable (#10) to the
➌
power supply.
Note : The HDMI input on the HD TV must be HDCP compliant.
UP 2 : HD
➊
➋
PVR, 1 HD TV
Connect the four satellite feeds to the four LNB inputs (#2) on the HD PVR. If using a
SatCR LNB feed, connect to LNB input 2 (#3).
Option A : Digital audio via HDMI
o Connect the HDMI cable to the HDMI input on the Home Theatre System and to the
HDMI connector (#6) on the HD PVR.
o Connect a second HDMI cable from the Home Theatre HDMI output, to the HD TV
HDMI input.
AND A HOME THEATRE SYSTEM
Option B : Digital audio via Optical or Coaxial connectors
➌
o Connect a S/PDIF optical cable from the digital audio connector (#15) on the HD PVR
to the Home Theatre’s optical input.
o Alternatively, connect a single phono-cable from the coaxial connector (#14) on the
HD PVR to the Home Theatre’s coaxial input.
Ensure that all connections are firm before you connect the power cable (#10) to the
➍
power supply
HD PVR Viewer’s Guide – UEC Page 10 of 62
SET-
UP 3 : HD
PVR
AND 1 STANDARD DEFINITION
TV
Connect the four satellite feeds to the four LNB inputs (#2) on the HD PVR. If using a
➊
SatCR LNB feed, connect to LNB input 2 (#3).
Option A : AV Connectors
➋
o Connect the Audio / Video cable to the video (#11) and audio (#12) outputs on the HD
PVR and then to the audio and video inputs on the TV.
Option B : Analogue component video YPrPb
➌
o Connect the component cables (red, green and blue) to the component outputs (#13)
on the HD PVR and then to the corresponding colours on the TV audio inputs.
Option C : RF
➍
o Connect the cable from the terrestrial antenna to the female F-type adaptor and
connect the female F-type adaptor to the aerial IN connector (#1 – marked with an
aerial) on the HD PVR.
o Connect a RF cable to the male F-type adaptor and connect the male F-type adaptor
to the aerial OUT connector (#1 – marked TV) on the HD PVR. Then connect the
other end of the RF cable to the aerial IN connector on the TV.
Ensure that all connections are firm before you connect the power cable (#10) to the
➎
power supply
HD PVR Viewer’s Guide – UEC Page 11 of 62

HE HD
T
R
EMOTE CONTROL BASICS
PVR R
EMOTE CONTROL
HD PVR Viewer’s Guide – UEC Page 12 of 62

TV, ALT, TV G
UIDE, LANGUAGE AND MUTE BUTTONS
The five buttons at the top of the remote control each have a secondary function (sometimes referred to
as the “shifted” mode).
If you have not first pressed SHIFT, these buttons do the following :
o TV : always take you to Live TV. If you are viewing from the buffer, pressing TV takes you to Live
TV on the current channel. If you are viewing in playback, pressing TV stops playback and takes
you to Live TV on the current channel.
o ALT : goes to the last viewed channel.
o TV GUIDE : goes to the TV Guide.
o LANGUAGE : displays the Language / Soundtrack pop-up.
o MUTE : switches the audio on or off (depends on the current audio status).
To activate the secondary functionality, press SHIFT followed by the required button. After pressing
SHIFT, the SHIFT button will flash, confirming the mode of the remote control. It is not necessary to hold
both buttons down at the same time.
o SHIFT TV : goes to the Audio Bouquet.
o
SHIFT ALT : displays the Subtitles / Teletext pop-up
(
Note : Subtitles / Teletext are not currently available on the HD PVR).
o SHIFT TV GUIDE : currently disabled.
o SHIFT LANGUAGE : goes to the Parental Control Menu
(Note : a valid PG PIN code is required to enter the Parental Control Menu).
o SHIFT MUTE : currently disabled.
T
HE DIAL
The dial should be set to TV1 for use with the HD PVR. sent
The “window” in the dial (where you see TV1) lights up when any button is pressed, confirming that the
remote control is active and that the command has been transmitted to the decoder.
HD PVR Viewer’s Guide – UEC Page 13 of 62

C
OLOUR BUTTONS
The colour buttons on the remote control have different functions at different times based on the current
activity of the HD PVR.
When using the Decoder Menu or the TV Guide, please refer to the onscreen instructions (at the bottom
of the screen) that clearly indicate functionality for each colour button.
When viewing TV, the colour buttons do the following :
o Press RED to go to the Playlist (see page 35).
o Press BLUE to insert a Bookmark (see page 37).
o Press WHITE to view in slow motion (see page 37).
o Press YELLOW to display the Status Bar (see page 24).
o The GREEN button is currently disabled in viewing mode.
A
CTION BUTTONS
B
STOP Button disabled if there are no recordings
REWIND
See page 39
PLAY / PAUSE Toggles between PLAY and PAUSE. Toggles between PLAY and
FAST FORWARD
See page 38
REC Schedules a recording (see page 28). Button disabled.
UTTON
W
HILE VIEWING LIVE
in progress.
If there is a recording(s) in progress, you
are able to stop the recording(s).
Press once = Instant Replay (rewinds 10
seconds) *
Hold = rewinds programme.
* only where the buffer is available (see page 23).
Button disabled (unless in buffer). Fast Forwards recorded
PVR functionality (including Pause Live TV, scheduling
and viewing recordings) requires a PVR subscription.
TV W
IMPORTANT
HILE VIEWING A
RECORDING (PLAYBACK
Stops playback and returns to
the Playlist.
Press once = Instant Replay
(rewinds 10 seconds)
Hold = rewinds programme.
PAUSE.
programme.
)
HD PVR Viewer’s Guide – UEC Page 14 of 62
HE BASICS
T
T
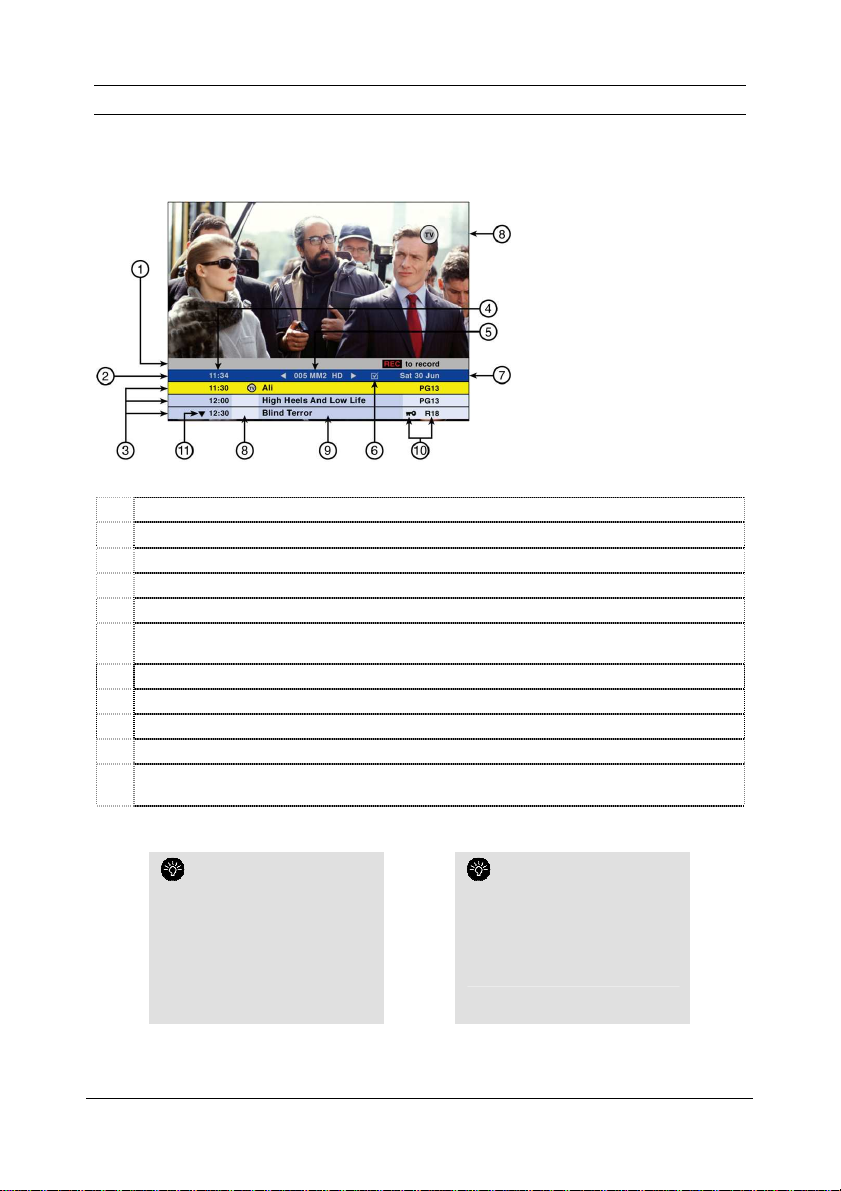
HE I-PLATE : NORMAL
The information plate (i-Plate) is displayed when you press i.
1 Instruction bar – provides helpful information and available options.
2 i-Plate Header.
3 Starting times of programme.
4 Current time.
5 Channel number & name.
6 Favourites Icon - indicates that this channel has been selected as a Favourite Channel (see
page 21).
7 Today’s date.
8 PVR Icons (see page 26).
9 Programme titles.
10 PG Lock & PG Rating.
Press the DOWN arrow to access programming information for the next 24 hours on this
11
channel.
The colour of the i-Plate
indicates the viewing mode (see
page 18).
A blue header indicates that you
are in ALL CHANNELS.
A purple header indicates that you
are in FAVOURITE CHANNELS.
An aqua blue header indicates that
you are viewing a recording.
You can personalise the time
for which the i-Plate is displayed.
Press MENU.
Select Personalise.
Go to #5 (Display Timeout).
Follow the onscreen instructions.
HD PVR Viewer’s Guide – UEC Page 15 of 62

T
HE I-PLATE WHEN “BANNER BROWSING
If you want to see what’s on other channels, press i (to display the i-Plate) and then use the left and
right arrows to view the programming information for other channels. This is called “banner browsing”.
”
HD PVR Viewer’s Guide – UEC Page 16 of 62
T
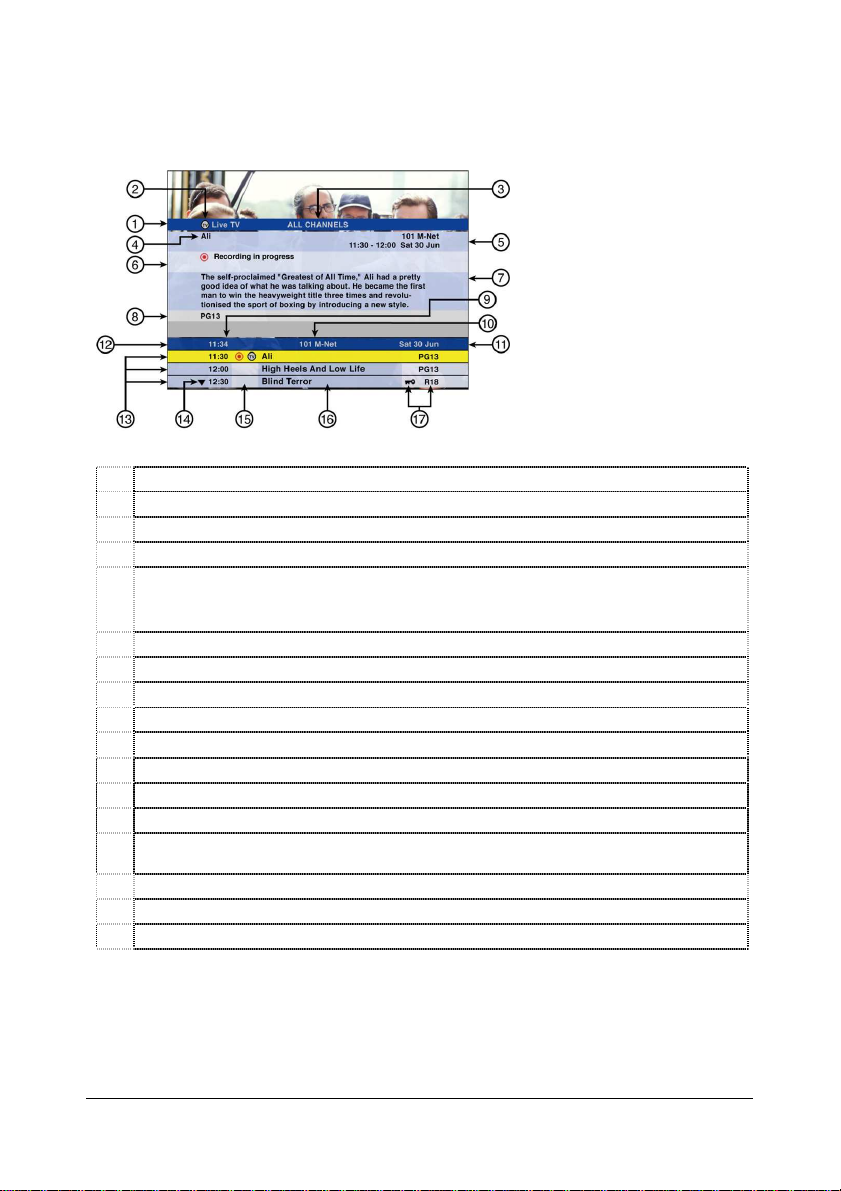
HE I-PLATE : EXTENDED MODE
To view more information on a highlighted programme, press i to display the extended information. You
can also “banner browse” in extended mode.
1 Extended information header.
2 Live TV / Buffer indicator.
3 Viewing mode - All Channels or Favourite Channels (see page 18).
4 Programme title.
5 Channel number & name.
Programme start and end time.
Date of programme.
6 PVR icons, example Scheduled Recording icon (see page 26).
7 Synopsis (programme information).
8 PG information.
9 Current time.
10 Current channel number & name.
11 Today’s date.
12 i-Plate header.
13 Starting times of programmes.
Press the DOWN arrow to access programming information for the next 24 hours on this
14
channel.
15 PVR Icons (see page 26).
16 Programme titles.
17 PG Lock & PG Rating.
HD PVR Viewer’s Guide – UEC Page 17 of 62
V
IEWING MODES
The HD PVR has two viewing modes - All Channels or Favourite Channels.
o In All Channels mode, ALL available channels are displayed, including those to which you are not
subscribed.
o In Favourite Channels mode, only the channels you selected as your Favourite Channels are
available when you banner browse or surf through the channels, so no more tripping over unwanted
channels. (For more on how to set up your Favourite Channels, see page 21.)
The colour of the i-Plate
indicates the viewing mode.
A blue header indicates that
you are in ALL CHANNELS.
A purple header indicates that
you are in FAVOURITE
CHANNELS.
When viewing Live TV, you
can switch viewing mode by
pressing TV and selecting the
other mode from the pop-up
which displays.
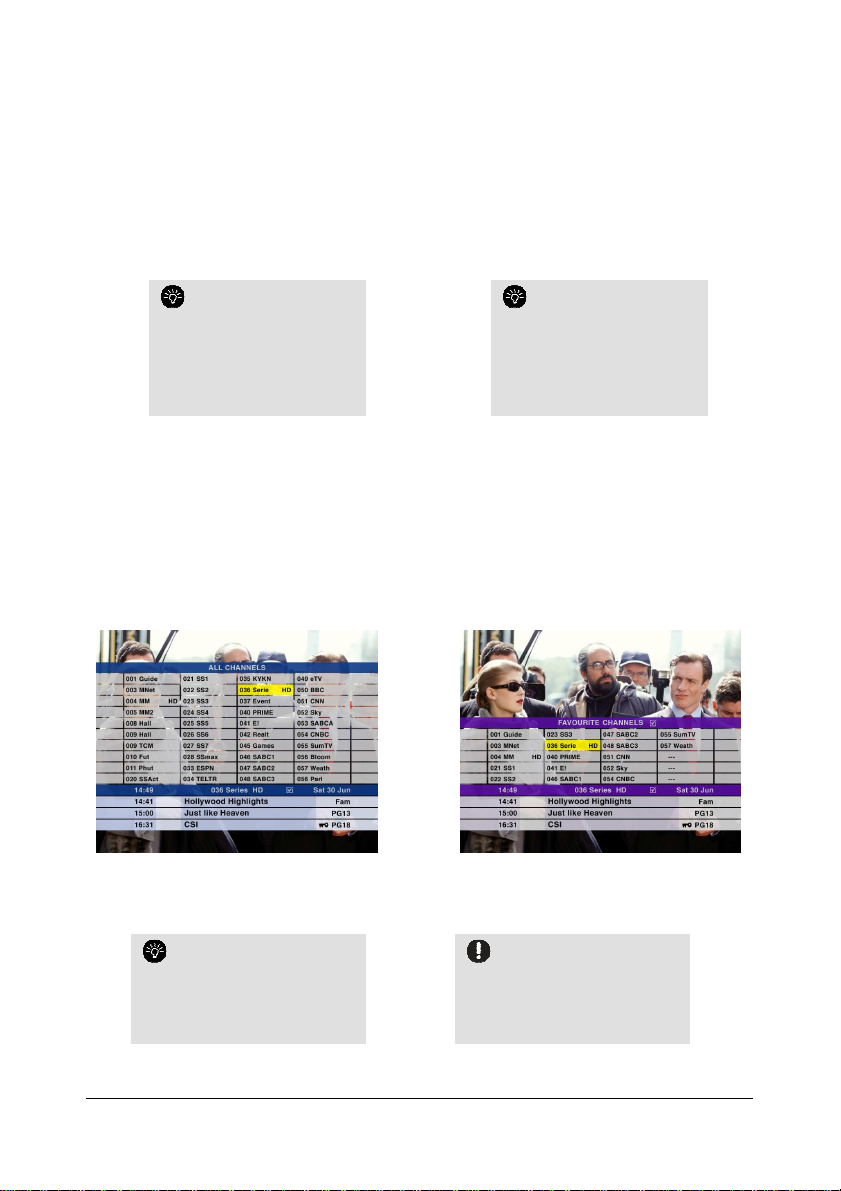
T
HE CHANNEL GRIDS
There are two channel grids on the HD PVR - the All Channels Grid and the Favourite Channels Grid
(one for each viewing mode).
The channel grid is a quick way to tune between channels or to quickly access programming info for
another channel.
Both channel grids are available from playback (ie. when viewing a recording).
When viewing TV, press the LEFT, RIGHT or DOWN
arrow to display the All Channels Grid.
When viewing TV, press the UP arrow to display the
Favourite Channels Grid.
Use the arrows to move the
highlight and press OK to tune to
the selected channel, or press i to
view extended info.
The channel grid used to tune
between channels determines
which viewing mode you go to. If
you want to go to the All Channels
viewing mode, use the All
Channels Grid to change channels.
HD PVR Viewer’s Guide – UEC Page 18 of 62
 Loading...