

Page 1

Eurocom
Terminal User Guide
Page 2

digital switch systems Ltd.
Eurocom Small Office / Home Office
Telephone System
CONFIDENTIALITY
The information contained in this manual is the property of Digital Switch
Systems Ltd.
The contents of this manual must not be copied, distributed or made available
to any third party without the prior written consent of Digital Switch Systems.
"Every effort has been made to ensure that this manual documents the
operation of the Eurocom Telephone System. However, due to the on-going
improvement and update of software, Digital Switch Systems cannot guarantee
the accuracy of printed material after the date of publication, nor can Digital
Switch Systems accept responsibility for errors or omissions. Revised manuals
and update sheets will be published as deemed necessary."
Page 3

Contents
Basic Operation 1
Layout 1
Phone Introduction 1
Key Descriptions 3
Connecting Terminals 4
Incoming Calls 5
Making Calls 6
Dialling Outside Lines 7
Transferring calls 7
Menu Programming 8
Extension Features 11
Account Codes 11
Automatic Answering 11
Brokerage Call 11
Call Diversion 12
Call Intrude 13
Call Logging 13
Call Parking 14
Call Pick -Up 14
Conference calls 15
Data Protection 15
Do not Disturb 16
Door Phone 16
Enquiry Call 17
Exchange Line Timed Break 17
Executive & Secretary Feature 18
Extension Call Back 18
Extension group calls 19
Handsfree Operation 19
Headset Operation 20
Holding Calls 21
Key Programming 21
Language 22
Last Number Redial 22
Line Access Digit 23
Lock Extension 23
Messages 24
Mute Key 25
Paging 25
Reminder call 26
Ring Settings 26
Room Monitor 27
Screen Display 28
Speed Dialling 29
Volume Settings 32
Appendix 33
Dialling and Feature Access Codes
Quick reference 33
Feature Codes after Transfer key (T)34
Feature codes on a Busy Call 35
Page 4

Page 5
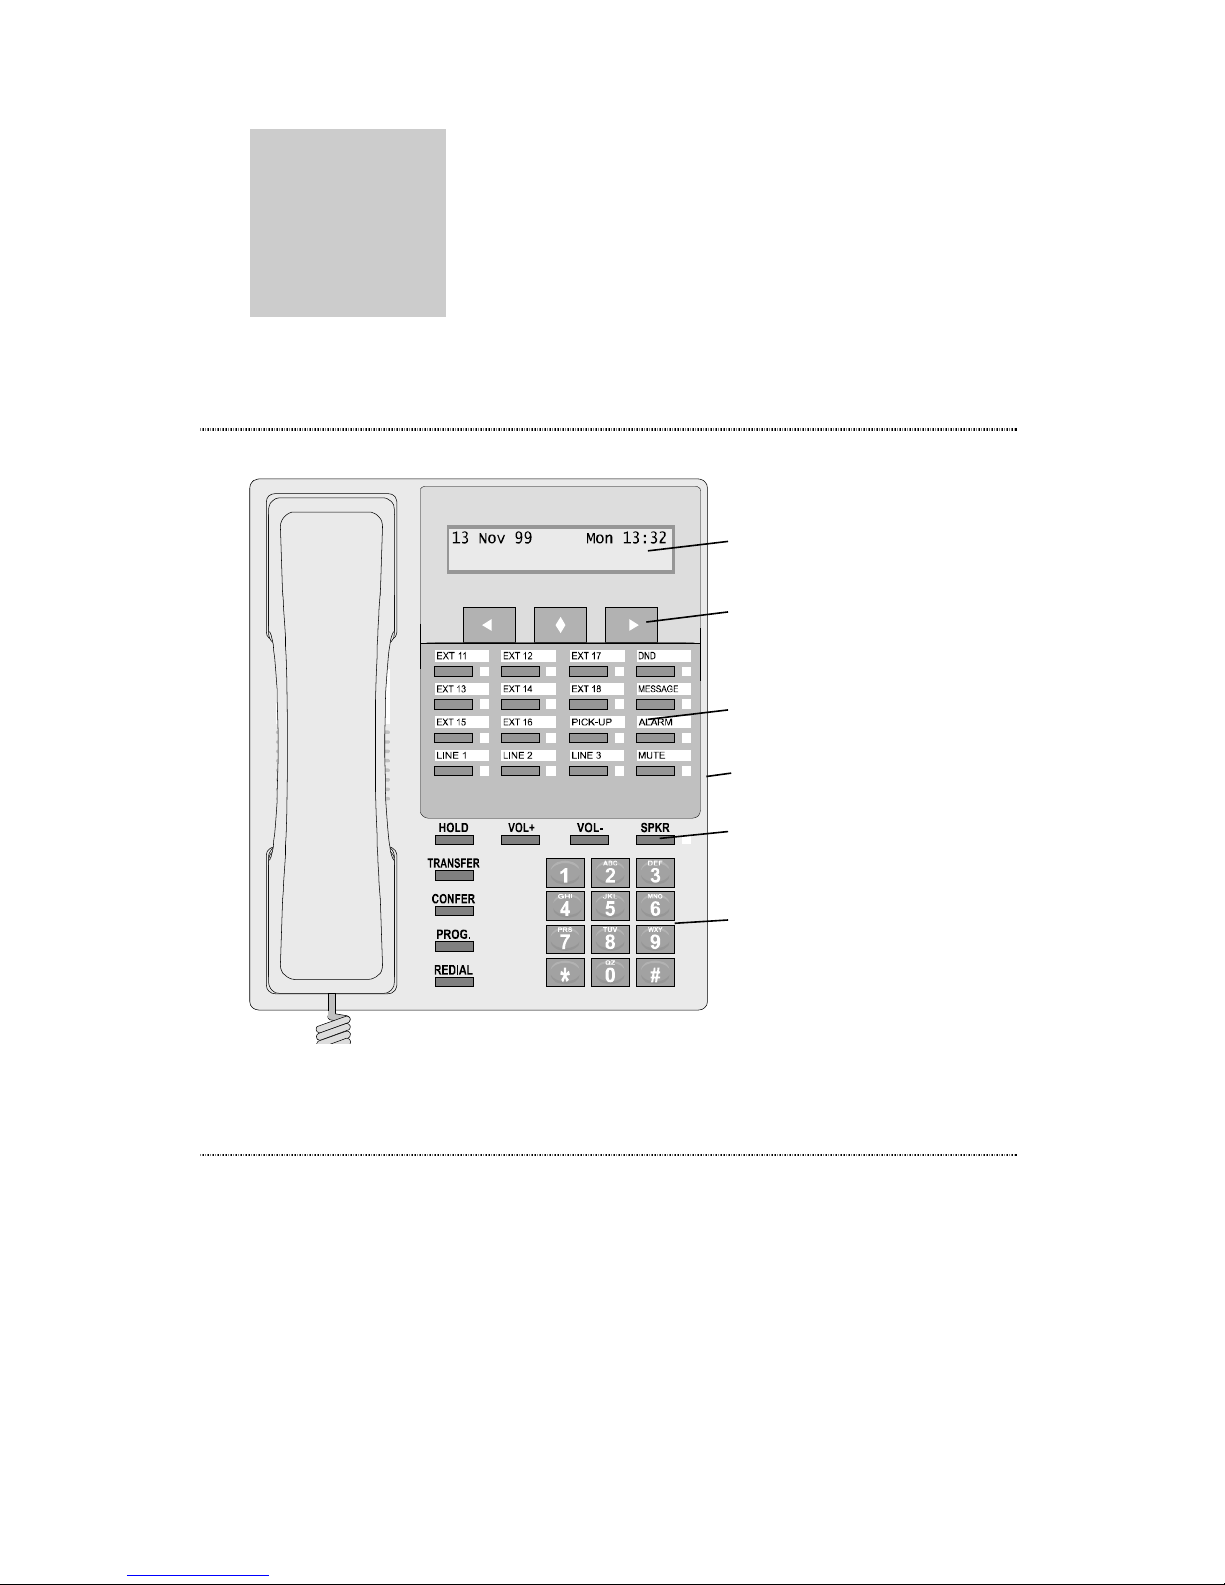
1
Basic
Operation
Layout
48 character interactive display
15 programmable keys plus
MUTE key.
8 fixed function keys
Dial keypad
Menu keys
Pull-out card under base
Figure 1 Terminal layout
Phone Introduction
The Terminals are handsfree speakerphones for use
with your telephone system. There are 15
programmable feature keys providing easy access to
frequently used system features and 9 fixed function
keys. Figure 1 shows the factory default settings for the
programmable keys. The Terminals also support
headset operation.
Page 6
Terminal User Guide
2
The Executive Terminal offers all of the features of the
Standard Terminal plus a 48 character interactive display
and menu programming keys. When a feature is unique
to the Executive model a dotted line will be drawn next
to the information, like the line to the left of this
paragraph.
With the Executive Terminal the user can take
advantage of many services such as Calling Line
Identification (CLI) and Connected Line Identification
when connected to the Telephone System fitted with
the CLI option or ISDN option. The LCD display
provides useful information such as time, call duration,
call charges, messages, line status and the number of the
incoming caller.
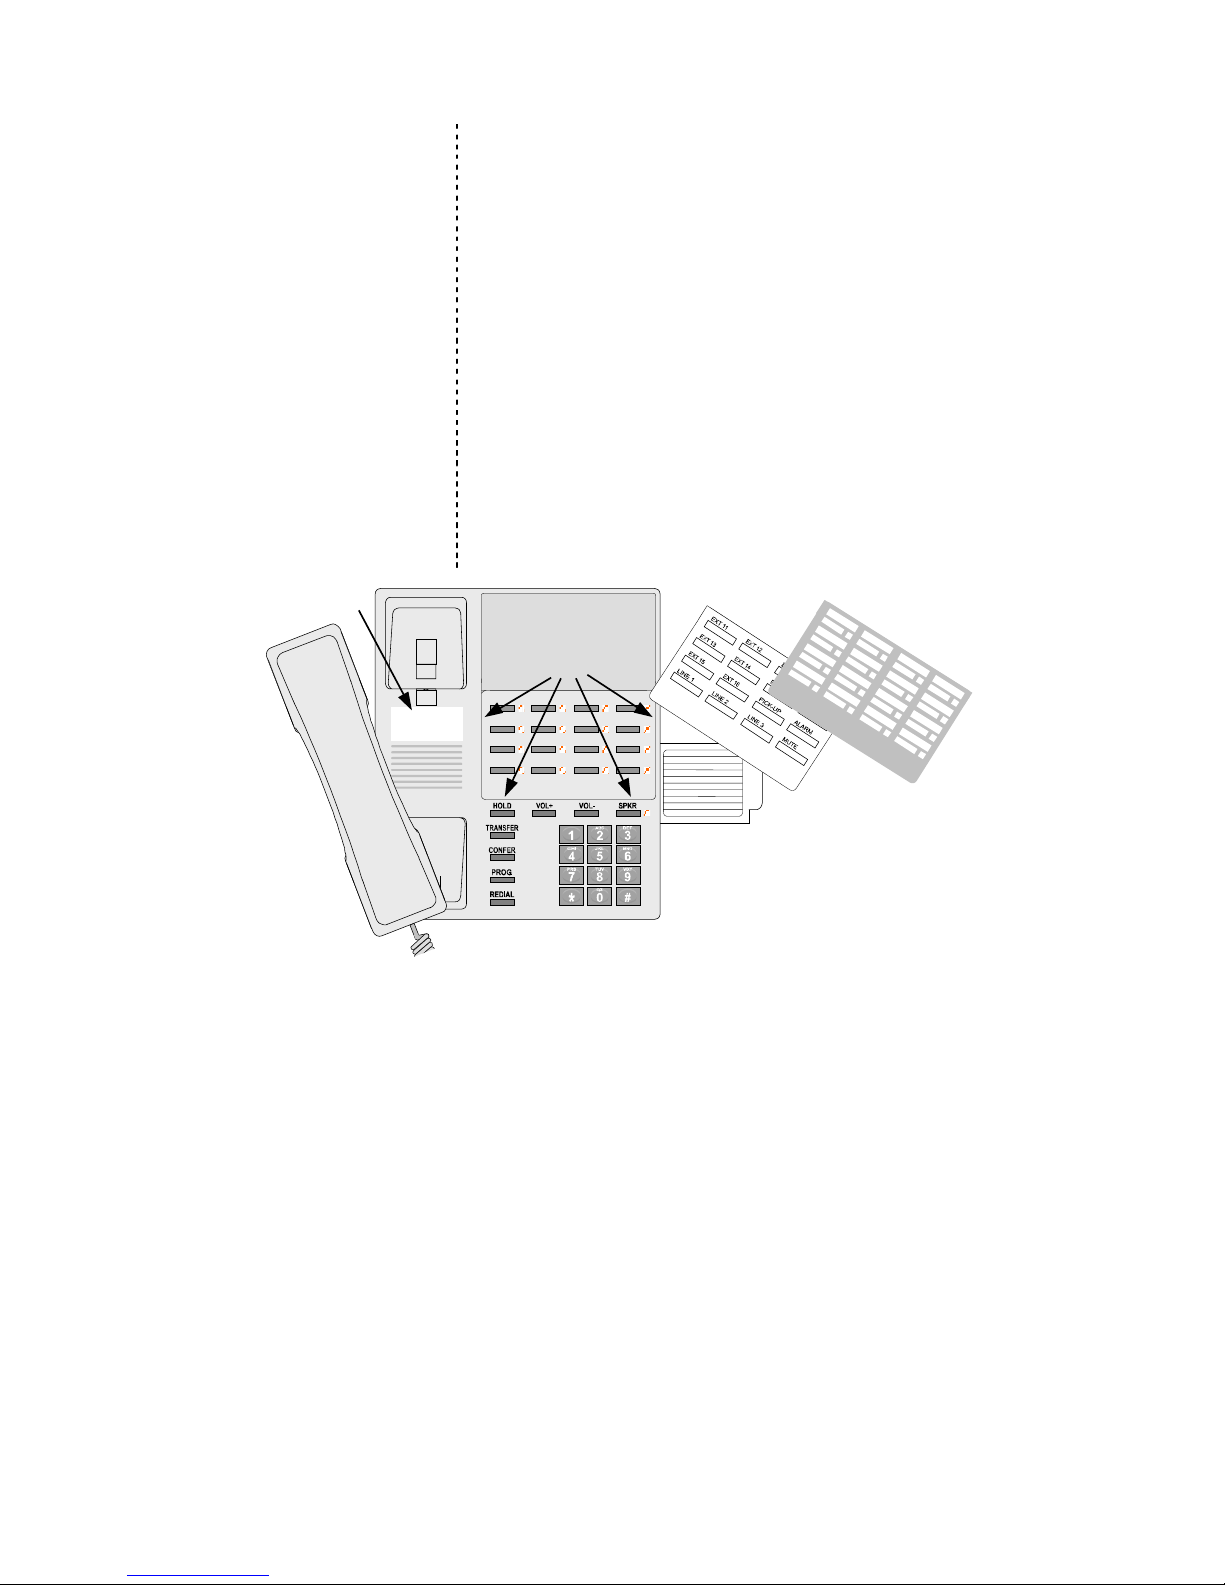
Mounting tab
holders
Index Card Cover
Index Card
Extension
identity panel
Pull out number
card in base
Figure 2 Labels and cards
The Terminal has three customisable cards as shown in
Figure 2.
An extension identity panel is located under the handset
and is used to identify the terminal extension number,
there is a small hole to one side, a paperclip may be
inserted to pull out the plastic cover. The Index card
around the re-programmable function keys may be
removed and reversed so that the new functions can be
written in. Take care to insert the four tabs on the index
card holder into the correct holes in the terminal case
when replacing. Finally, a pull-out number card in the
base allows the user to keep 10 often used numbers near
at all times.
Executive
terminal only
Page 7

Basic Operation
3
Key Descriptions
Number keypad. These keys are used for dialling and
entering codes as well as entering contact names for the
40 built-in speed dial entries. When connected to a call
they will send DTMF tones for using Teleservices.
The extension keys allow direct access to the first eight
extensions. The LED is lit when the extension is busy,
see page 6. Other keys may be re-programmed for the
extra four extensions found on the 612 system, page 21
gives details.
The three line keys show the status of the first three
external lines, if fitted. They may be pressed to connect
directly to the line. The LED is lit when the line is in use
or flashes when there is an incoming or held call on that
line. For the larger 612 system, extra keys may be
programmed to work with lines 4 to 6.
The pick-up key allows you to answer a call ringing at
another extension, see page 14.
The alarm key allows you to easily set a once only
Reminder call, see page 25.
The Do not Disturb key stops your extension from
ringing. Callers hear unobtainable/error tone. The LED
is lit when DND is active, see page 16.
The message key LED lights if you have been left a
message and the key allows you to see which extension
called.
The mute key stops a caller hearing your conversation
through the handset, headset or handsfree.
The hold key puts the current call into non-exclusive
hold, see page 20. In addition, pressing the hold key
while the phone is idle will display the extension
number.
The transfer key is used for transferring, conference and
brokerage calls. It is also used as the recall key for
teleservices, and to insert a recall into a speed dial or
programmable key sequence.
The conference key is used to quickly set up 3-way
conferences.
The prog key is used to program the programmable
to , &
Page 8
Terminal User Guide
4
keys shown in Figure 1, for details see page 21. It is also
used to go to the previous menu item, or exit the menu
altogether.
The redial key is used to quickly dial the last number. It
is also used with key programming and speed dials to
insert a two second pause into the dial sequence.
The volume keys are used to alter the handset volume,
handsfree volume or ringing volume.
The speaker key puts the phone into handsfree mode
(see page 19), or switches the headset on and off in
headset mode (page 20).
The menu left and right keys scroll through the current
menu items. Context-sensitive functions may be given
to these keys. In this case, the new function will be
displayed above the key on the second line of the
display.
The menu select key selects the current menu item. See
‘Menu Programming’ on page 8. The function of this
key may also change, as with the left and right keys, line
2 of the display will show a label with the new function.
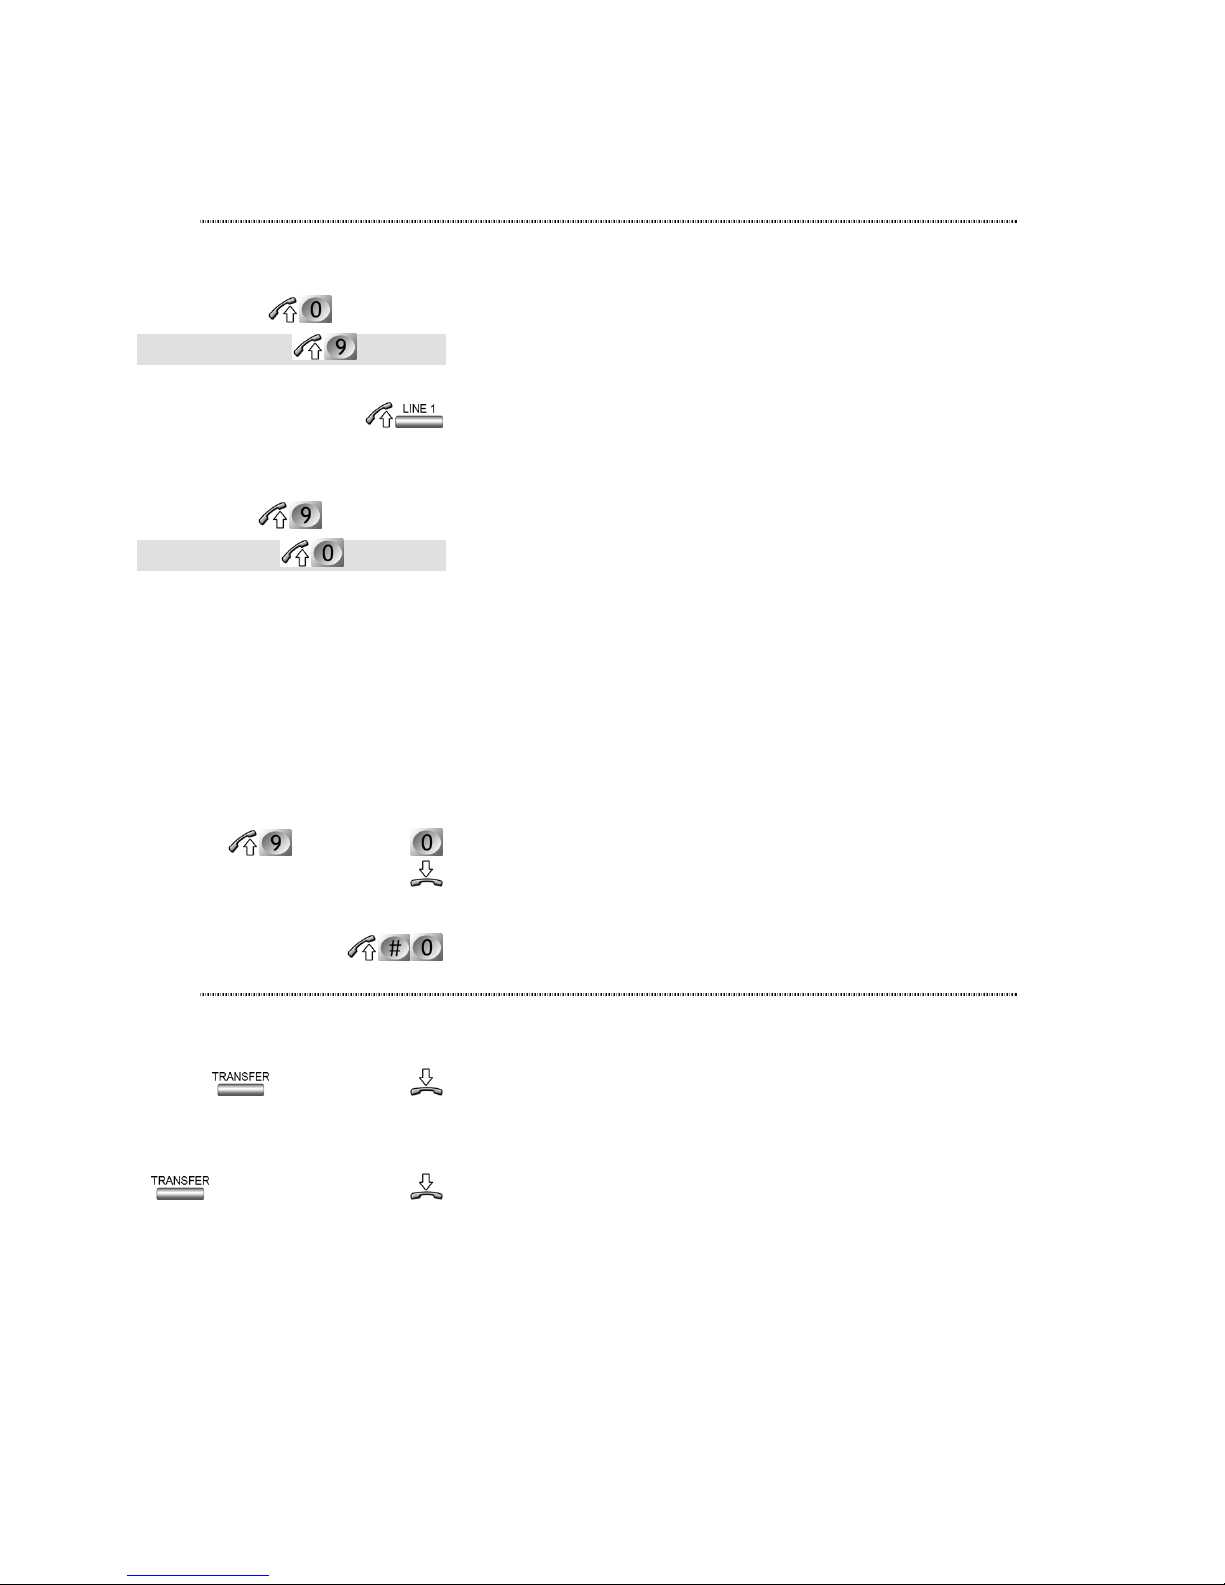
System type
Your telephone system may use either digit ‘9’ or ‘0’ to
seize a free exchange line. In these cases a few codes are
different between systems. The code to enter for the ‘9’
for line systems will be shown under the normal code in
a shaded box as shown on the left.
Symbols used in this guide
Whenever the symbol appears, it means to
take the handset off-hook. The same may be
achieved by putting the telephone into
handsfree mode with the
key. The
symbol
means to put the handset on-
hook.
Connecting Terminals
Connecting a terminal to the 612 system
The terminal will automatically configure itself when it is
connected on the 612 system.
This screen will show
the extension number
&
&
(0 for line systems)
(9 for line systems)
18 May 01 Fri 10:04
This is extension: 17
Page 9
Basic Operation
5
when it has been configured correctly.
Connecting a terminal to the 308 system
Enter the code at the extension where the terminal is
connected.
The message shown
will be displayed if it is
correctly connected.
Remove a terminal
Enter this code at the extension where the Terminal is
being removed.
A maximum of six terminals may be
connected to the 308 telephone system and
ten to the larger 612 system.
If the Terminal is moved to a new extension
then the original extension must be reprogrammed as a non-terminal when the
normal telephone is connected.
If the screen shows ‘Communication error’
then the signalling wires in the connection are
not correct.
Remember that during a power fail a terminal
will not work. The power fail extensions are
11, 15 and 17 on the 308 system and 11, 12,
21 and 23 on the larger 612 system. You
should not connect terminals to these
extensions.
Incoming Calls
Answering when phone is ringing
Lift the handset if the phone is ringing. or
Press the SPKR key to answer in handsfree mode.
Answering when other phones are ringing
Call pick-up
Lifting the handset and pressing the pick up key will
connect to the caller.
or
Pressing the pick up key on its own will answer the call
in handsfree mode.
External call pick-up with line key
For incoming external calls pressing the flashing line key
ext.
00:04
Terminal ID correct
ext.
Page 10

Terminal User Guide
6
will also connect to the caller. Pressing the line key on
it’s own will answer the call in handsfree mode.
Answering when extension is busy
If the extension is in use but other phones are ringing
then the call may be answered in one of two ways:
Drop current call
To answer a call ringing at another extension, end the
current call and pick up the handset when the phone
rings with the new call.
or
Current call on hold (for external calls only)
This will put the current external call on hold and
answer the incoming external call. The line key with the
flashing LED shows which key to press.
Making Calls
When you lift the handset, you will hear dial tone.
However, you may hear the special interrupted dial tone
indicating that incoming calls are diverted to another
extension.
You may dial as soon as the receiver is taken
off-hook. Leaving the phone without dialling
for 8 seconds will give error tone.
If you are on a call and an exchange line call
arrives then the alert tone will let you know
that a call is waiting if programmed by the
administrator.
All extensions have two digit numbers. The
extension numbers are 11 to 18, plus 19,
which can be used for a door phone only. The
larger 612 system also supports extensions 21
to 24 when fully expanded.
If you dial a code which is not valid, you will
hear the error tone. Replace the receiver and
then re-dial the correct number.
With programmable key
The extension will be dialled directly. To dial in
handsfree mode do not lift the handset.
Dialling with extension number
Dial the extension number. or
ÑÑÑÑ
RINGING
ÒÒÒÒ
ext.
Page 11
Basic Operation
7
Dial the number without lifting the handset, the
extension will be dialled in handsfree mode.
Dialling Outside Lines
Access the next free line
Go off hook and press the line access digit, external dial
tone will be heard. Now dial the telephone number.
Access a specific line
Go off hook and press the corresponding line key, you
will be unable to seize lines with a lit LED as these are
busy. Now dial the telephone number required.
or
In order to access the extra lines 4 to 6 on the larger
6+12 system dial the digit shown followed by the line
number. It is also possible to re-program a key to work
with the extra lines, see page 21 for details.
Ring Back with Line when free
If all outside lines are busy, you may request the system
to place you in a queue for the next line which becomes
available, the system will ring your extension back when
the line becomes available. After answering you are
connected to the line.
When seizing a line and busy tone is heard, press 0 to
camp on the line.
Cancel Ring Back
Go off hook and dial the cancel code.
Transferring calls
Internal unannounced
Transfer a call so that it rings at another extension. This
is an unannounced transfer.
Internal announced
Transfers a call after you have announced to the
extension who is calling.
Trunk to Trunk transfer
Calls on one exchange line may be transferred to
another exchange line. A trunk to trunk transfer will
timeout after 30 seconds. A warning tone will be heard
10 and 5 seconds before this happens, either user may
extend the call by pressing digits 1 to 9, to increase the
ext.
tel number
(9 for line) tel number
line number
(9 for line) line number
ÑÑÑÑ
BUSY TONE
ÒÒÒÒ
ÑÑÑÑ
CONFIRMATION TONE
ÒÒÒÒ
ÑÑÑÑ
CONFIRMATION TONE
ÒÒÒÒ
ext. ÑÑÑÑ
RINGING
ÒÒÒÒ
ext.ÑÑÑÑ
CALL ANSWERED
ÒÒÒÒ
Page 12
Terminal User Guide
8
call time in multiples of 30 seconds. E.g. pressing '4' will
increase the call length by 2 minutes before it is cut off.
Transfer the call as with announced internal transfer but
dial an external number instead. Note that the external
number may be dialled using any of the methods in the
‘Dialling Outside Lines’ section, above.
If an internal transfer call is not answered
within 60 seconds the call is disconnected, the
original caller hears engaged tone.
If an external call is transferred to an
extension and not answered within 1 minute,
all extensions will ring as if it is a normal
incoming call for 30 seconds. If the call is not
answered within this time it is dropped. Note:
these times may be changed by the system
administrator.
Menu Programming
All the features available to the extension may be found
in the built-in programming menus, the menu items to
select are shown in this manual as on the left.
A full list of the first two menu levels are displayed in
Figure 3 on page 9. Note that two extra sub-menus
‘ISDN Settings’ and ‘General Settings’ are available at
the master programming extension. This is extension 12
for the 308 system or extension 13 for the 612 system.
tel number
ÑÑÑÑ
CALL ANSWERED
ÒÒÒÒ
(9 for line) tel number
Ñ
CALL ANSWERED
Ò
1st menu item to select
pppp 2nd menu item to select
Page 13

Basic Operation
9
Figure 3 Executive Terminal Menu Items
To use features through the built-in menus, follow steps
1 – 5 below.
1. Enter menu programming mode
Press the select key to enter the menu-programming
mode when the phone is idle. You will enter the menu
at the same item and level as last time.
2. Scroll through items in current menu
Use the left and right menu keys to cycle forwards and
backward through the current menu items.
3a. Go to previous menu level
The prog key is used to go back to the previous menu
level. Repeated presses will exit the menus completely.
3b. Select displayed menu / option
The centre menu key enters the currently displayed
menu / selects the displayed option.
/
Call diversion
Data protection
Do not disturb
Send msg.
Leave msg. on terminal
Clear msg. on terminal
Reminder Call
Room monitor
Extension speed numbers
Disable terminal
Low pitch
Mid pitch
High pitch
Auto answer On
Auto answer Off
Headset operation On
Headset operation Off
Reset prog. Keys
Language English
Language ....
Line access code: 0
Line access code: 9
Show display line 2
Hide display line 2
Show Command strings
Hide Command strings
Extension Settings
Terminal Features
CLI messages
Page 14

Terminal User Guide
10
4a. Enter required feature information
If when selecting a
feature more
information is required,
then the top row of the screen will show the prompt for
the required information, while the bottom of the
screen will show a colon (:) like the screen oppposite.
Here the requested information may be entered if the
area is blank, as above, followed by the key to enter.
4b. Cycle through feature options
If an option is
displayed, as in the
screen display opposite, then the option can be cycled
through with the menu left and right keys. The key
selects the currently displayed option.
5. Send command
When programming
has finished then there
will be one final chance
to cancel the operation. The left menu key will send the
code, other wise the right key will cancel if you have
made a mistake. The programming code will be
displayed on screen while it is sent unless this option has
been disabled with the 'Hide Command strings' option
in the 'Terminal' menu. After the code has been sent,
confirmation or error tone will sound depending on
whether the operation was successful or not. Note that
settings in the 'Terminal' menu will not send codes but
take immediate effect as these menu items affect only
the terminal.
ÑÑÑÑ
INFO REQUESTED
ÒÒÒÒ
enter information
Set divert all
Ext:
ÑÑÑÑ
INFO REQUESTED WITH OPTION
ÒÒÒÒ
/ select option
Set divert delay
:10 sec. delay
ÑÑÑÑ
CONFIRMATION / ERROR
TONE
ÒÒÒÒ
Send the command ?
Yes No
Page 15

11
Extension
Features
Account Codes
This feature is set up by the system administrator in
order to keep a personal account of all external calls,
you will be told if it is active. It is not possible to make
external calls without first entering '**' followed by your
secret account PIN code.
Enter account code
Go off hook and dial the code shown, where the secret
account PIN number will be given to you by the system
administrator. After entering the code then calls may be
made in the normal manner, as shown in the Dialling
Outside Lines section on page 7.
Automatic Answering
This feature will automatically answer internal calls and
switch the phone into handsfree after three brief ring
bursts. If the other caller hangs up then your Terminal
will also hang up automatically. External calls must still
be answered manually.
Enable auto-answer
Switches on automatic answer.
Select the menu option ‘Terminal Features’ then select
the option ‘Auto Answer On’.
Disable auto-answer
Switches off automatic answer.
Select the menu option ‘Terminal Features’ then select
the option ‘Auto Answer Off’.
Brokerage Call
This feature allows you to switch between two calls
PIN
(now dial line and number)
Terminal Features
pppp Auto answer On
Terminal Features
pppp Auto answer Off
Page 16

Terminal User Guide
12
without the other parties being able to speak to, or hear
one another.
Add an extension
While on a call dialling * after transfer shows that the
call is to be used in a brokerage call.
Add an exchange line
While on a call dialling * after transfer shows that the
call is to be used in a brokerage call.
Switch between calls
With a brokerage call set up one press of transfer will
switch between the calls.
Removing caller from brokerage call
Hanging up will drop the current call, the phone will
ring back with the other call.
Call Diversion
This feature allows you to divert calls to another
extension. There are three different types of call
diversion.
Divert all calls, all the time.
Divert all calls if not answered after a number
of rings.
Divert calls when extension is busy.
Note that the first two diversion methods
cannot be set at the same time.
If your extension is set to divert calls to
another extension then the dial tone will
change to a broken tone to remind you that
you may not receive all calls.
Divert all calls
All calls to your extension will ring the new extension
instead.
Divert if no answer
Enter the diversion code then the extension number.
Enter the delay as follows: 2 = 10 seconds, 3 = 15
seconds … 9 = 45 seconds.
ext. no.
number
(9 for line) number
ÑÑÑÑ
RINGING
ÒÒÒÒ
ext.
or Extension Settings
pppp Call diversion
pppp Set divert all
delay, ext.
or Extension Settings
pppp Call diversion
pppp Set divert delay
Page 17

Extension Features
13
Divert if busy
Enter the divert on busy code with the extension to
divert to.
Cancel all diversions
Cancels all diversions.
Cancel divert all calls and no answer
Enter the cancel code, note this will not affect a divert
on busy setting.
Cancel divert on busy
Enter the cancel code, note this will not affect divert on
no answer.
Cancel all call diversion from another extension
If the extension is receiving diverted calls from another
extension then it is possible to cancel the setting from
the receiving extension. Enter the cancel diversion code
with the extension calls are being diverted from.
Cancel divert on busy from another extension
Cancel divert on busy. Enter the extension at which
divert is set.
Call Intrude
It is possible to intrude on a call and make a 3-way
conversation. A warning tone will be heard over the
conversation while the call is being intruded on. Note
that it is only possible to use this feature if it has been
enabled by the system administrator.
Intrude on call
Press 1 if the extension is busy, you are now intruding
on the call.
Call Logging
The time, date and exchange line of every outside caller
that rings on an Executive Terminal will be logged. If
the optional CLI card is fitted, or the call arrives on an
ISDN line then the telephone number of the caller will
also be logged. The Executive terminal is able to store
up to 50 calls. If a call arrives when the memory is full
the oldest entry will be discarded and the entries shifted
down to fit the latest in at entry 50.
ext.
or Extension Settings
pppp Call diversion
pppp Set divert busy
or Extension Settings
pppp Call diversion
pppp Divert all/delay Off
or Extension Settings
pppp Call diversion
pppp Divert busy Off
ext.
ext.
ÑÑÑÑ
BUSY
ÒÒÒÒ
Page 18

Terminal User Guide
14
The total number of
logged calls is displayed
on the main screen in the bottom-right hand corner. If
it is not visible then the display line 2 must be enabled –
see ‘Show / Hide Display line 2’ on page 28 for details.
View Call Log
Press the right menu key under the call log total, or
select the menu option. The last received call will be
displayed. The information displayed is as follows:
Return a missed call
With the number you wish to dial on display, press the
centre menu key, then select the dial option. The
number will be dialled out in handsfree mode.
Delete a single Call Log entry
To delete a call log
press the centre menu
key with the entry displayed on screen, then select 'Del'.
This will erase the entry. All subsequent entries will be
moved down to fill the gap.
Clear entire Call Log
Press the centre key
while viewing a call log
entry, then select 'Del ALL'. Select 'Yes' to confirm the
command or 'No' to cancel without deleting.
Call Parking
This feature will allow you to ‘park’ an external call; this
call can then be retrieved from any extension.
Park an exchange line call
Whilst on a call enter the park code.
Pick up a parked exchange line call
From any extension dial the call pick up code, you are
re-connected to the original call.
Call Pick -Up
This feature enables you to ‘pick-up’ a call ringing on
02 Jun 00 Fri 16:06
dial menu call 23
or
or or
or CLI Messages
02 JUN 10:04 Call#23
L 3 0123456789
Dial
Del Dial Del ALL
Del
Erase ALL CLI numbers ?
Yes No
Del ALL
Yes
Time and date of call
Exchange line
Telephone number or
name of caller
Entry number in call log
(higher is more recent)
Page 19

Extension Features
15
another extension. It will pick up the incoming call, with
external calls always taking priority over internal calls.
Pick up call
If an extension is ringing this will connect you to the
caller.
or
Press the pickup key to take the call in handsfree mode.
Conference calls
This feature allows a conversation between three parties,
up to two of which may be external numbers.
Add an extension
While on a call enter this code. The final transfer press
starts the conference.
Add an external number
The external number may be dialled after pressing
using any of the methods in the ‘Dialling Outside Lines’
section on page 7.
Leaving a conference call
Go on-hook, the other parties will be connected
together in a normal two-way call, unless the callers
were both external, in which case they will be dropped.
Removing last caller from conference
When on a conference call, press transfer. The last
person in the conference will be rejected, the other party
will be put on hold.
Talk privately to original caller
While on a conference call press transfer twice, the first
will reject the last party in the conference, the second
will bring the first caller back.
Data Protection
It is possible to prevent the system from sending
warning tones or intruding on an exchange line call.
This allows an extension to communicate simply with
teleservices, computers etc.
Using Data Protection may depend on whether the
extension has several pieces of equipment connected. In
this case, you may decide per external line call whether
you want data protection (ad-hoc data protection). You
ext. ÑÑÑÑ
ANSWER
ÒÒÒÒ
number
ÑÑÑÑ
ANSWER
ÒÒÒÒ
(9 for line) number
Ñ
ANSWER
Ò
Page 20

Terminal User Guide
16
can also set an extension up with permanent data
protection. This is enabled for all calls.
Make a data protected external call
Dial the data protection code, then the external number.
Make call in progress data protected
The data protection code after transfer will enable data
protection for the current exchange line call.
Permanent data protection
All following calls will be made with data protection
active.
Disable permanent data protection
All following calls will be made without data protection
active.
Do not Disturb
This feature allows you to stop calls ringing at your
extension. The caller hears unobtainable/error tone
when DND is set.
Toggle do not disturb on/off
Pressing the DND key toggles the feature on and off
You will not receive any calls and will hear
broken dial tone to remind you that DND is
set. The DND lamp will also remain lit to
remind you that the feature is active.
The screen will also
flash ‘DND’ while the
Do Not Disturb feature is active.
Door Phone
The door phones are designed to work with this
telephone system only. Each provides a two-way speech
link between any extension on the system and the door.
The doorphone has a call button for ‘ringing’ and a
permanently lit LED for easy location. Extension
numbers 19 and 29 are reserved for the door phones.
Call Door Phone 1
Door phone 1 is automatically connected with two-way
speech after a brief tone.
tel. no.
ÑÑÑÑ
ON CALL
ÒÒÒÒ
/
ÑÑÑÑ
CONFIRMATION TONE
ÒÒÒÒ
16 May 01 Fri 10:06
DND
Page 21

Extension Features
17
Call Door Phone 2 (factory fitted option)
Door phone 2 is automatically connected with two-way
speech after a brief tone.
Answer Door Phone
Calls from the door phones will each have a distinctive
ringing sound.
Door phone calls will
display 'Door' or ‘Door
2’ on the screen as
shown.
Open door while connected to a doorphone
While connected with either door phone, dialling the
open door code will activate the relay contacts to open
an automatic door latch, if fitted.
Open door 1 latch
This will operate the first door latch relay at any time.
Open door 2 latch (option)
This will operate the second door latch relay at any time.
Both the extension calling and the Door
Phone hear a single burst of tone before
speech can commence.
If no extension answers a door phone call
within 70 seconds the ringing will end.
Enquiry Call
This feature enables you to call another extension while
the original party is on hold
Enquire at another extension
While on a call press transfer, then dial the extension
with which to enquire.
Return to original call
Press transfer, you are connected to the original call.
Exchange Line Timed Break
The system has a function called Forward Recall. This
allows you to operate telephone services via the
telephone system and allows you to connect the
telephone system behind a PBX.
Door Wed 10:49
ÑÑÑÑ
ON CALL WITH DOORPHONE
ÒÒÒÒ
ÑÑÑÑ
ON CALL
ÒÒÒÒ ext.
ÑÑÑÑ
ON ENQUIRY CALL
ÒÒÒÒ
Page 22

Terminal User Guide
18
Flash Signal on External Line
Whilst on an existing call enter the code to send a recall
to the exchange line.
Flash Transparency
By dialling 84 instead of '0' to seize an exchange line
then any press of the recall key on the phone will be
sent out to the exchange line.
With a flash transparency call it is not possible
to use any features which require the use of
the
key, including the programmable
keys.
Calls should not be made for at least 3
seconds after replacing the handset on a call
with flash transparency.
Executive & Secretary Feature
The administrator is able to set up an 'Executive' and
'Secretary' extension. If calls are made between these
two extensions a buzzer in the Terminal will sound for
one second every five seconds, instead of the normal
ringing. The display will show if it is a ‘Boss call’ or ‘Sec
call’. The buzzer will sound even if the extension is
busy. The extensions used are as follows:
System size Executive Secretary
308 12 13
612 13 15
Answer Secretary / Executive call
Drop the current call and pick up the handset to
connect to the secretary / executive call.
The display will show
the call as a call from
the boss or secretary as appropriate.
Note: this feature requires a Terminal to be
connected to both the Executive and
Secretary extension.
Extension Call Back
If the extension you are calling is busy, you may leave a
call back indication, sometimes called camping on an
extension. When the extension becomes free you will be
ÑÑÑÑ
BUZZER
ÒÒÒÒ
Sec call Thu 10:49
dial menu call 41
Page 23

Extension Features
19
called back.
Enabling
Press 5 at busy tone to enable call-back.
When you hear busy tone, press the left menu key under
the ‘Camp On’ text.
Activation
Your extension will ring when the busy extension
becomes free, pick up the handset and the other
extension will now begin ringing.
Cancelling
If you do not answer a call back within 30 seconds, it
will be cancelled.
or
To cancel at any time enter the cancel code.
Extension group calls
This feature allows you to ring a programmed set of
extensions simultaneously. The group ‘80’ will ring with
the normal internal ring cadence. Groups 81 to 83 have
a special ring cadence to tell them apart.
Call extension group 80 with normal internal ring
cadence.
Call extension group 81 with one brief ring per cycle.
Call extension group 82 with two brief rings per cycle.
Call extension group 83 with two brief rings per cycle.
On the 308 system the groups are not
programmable. These codes will ring all
extensions except the programmed fax and
answering machine extension.
Handsfree Operation
The Terminal is able to operate in a handsfree mode,
the handset may be left in the cradle and an internal
microphone and speaker allow two-way conversation.
Make external call in handsfree
Press the line access digit, a free line will be seized
automatically.
or
Press free line key (dark LED), the phone switches to
handsfree automatically and takes the line ready to dial.
ÑÑÑÑ
BUSY TONE
ÒÒÒÒ
ÑÑÑÑ
BUSY TONE
ÒÒÒÒ
Camp On
ÑÑÑÑ
RINGING
ÒÒÒÒ
ÑÑÑÑ
RINGING
ÒÒÒÒ
tttt
30 sec
(9 for line)
/
/
Page 24

Terminal User Guide
20
or
Press the key shown, followed by the line number if no
line key is available, followed by the telephone number.
Make internal call in handsfree
Press a free extension key, the phone switches to
handsfree automatically and calls the extension.
or
Dial the extension number if there is no key for this
extension.
Change from handset to handsfree
Press the SPKR key and hang up. The SPKR key lamp
will light to show handsfree is active.
Change from handsfree to handset
The SPKR key lamp will go out when the handset is
picked up.
Change handsfree volume
Use the volume keys while on a handsfree call. A bar on
the display will show the current volume setting. There
are eight volume steps.
Headset Operation
The Terminal is able to support a headset, which is
plugged into the same socket as the handset. When a
headset is connected the hook switch in the Terminal is
not used, the handsfree key is used to answer calls
instead.
Headset operation
Enter this code to switch to headset operation, the hook
switch will now be disabled.
Select the menu item
shown to enable
headset. ‘Head Set’ will flash on-screen every 5 seconds
while the feature is active.
Handset Operation
Enter this code to return to normal handset operation.
Turns off headset operation and returns handset
operation. The hook switch will now function again.
Answer a call with headset
Press the speaker key to answer the call, instead of going
line, tel number
(9 for line) line, tel number
Ext. no.
&
Terminal Features
pppp Headset operation On
16 May 01 Fri 10:06
Head Set
Terminal Features
pppp Headset operation Off
Page 25

Extension Features
21
to handsfree mode the call will be answered with the
headset.
End a call with the headset
Press the speaker key again to finish the call. The light
will extinguish to show there is no call active.
Holding Calls
It is possible to place any number of external callers ‘on
hold’. While on hold the caller hears the hold tone or
music if this option is fitted. The caller will be unable to
hear you. A call can be held in two ways, exclusively and
non-exclusively. A non-exclusive call hold allows any
number of calls to be placed on hold. Any extension
may then pick up the held call. For calls placed on nonexclusive hold the line LED will flash slowly. An
exclusive hold allows you to hold a call temporarily, to
talk with another extension, for example. A call on
exclusive hold will ring back when you hang up, and
cannot be picked up by other extensions.
Put an external call on non-exclusive hold
This will place an external line on hold, if it is not
retrieved within 30s to 4 ½ minutes the call will ring
back as a general call. Any extension may retrieve the
held call.
Retrieve a call on non-exclusive hold
Press the line key with the call on hold. The lamp will
flash if the line contains a held call.
or
Press the key shown followed by the line number that
was held if no key is available.
Put a call on exclusive hold
While on a call press the transfer button, you may then
dial another number to make an enquiry call. If the
extension hangs up the call will ring back your extension
immediately.
Retrieve a call on exclusive hold
If on a call, repeat the transfer button press again.
Key Programming
The bank of sixteen keys on the Terminal are all
programmable except the Mute key, as shown in Figure
ÑÑÑÑ
ON CALL
ÒÒÒÒ
line no.
(9 for line) line no.
ÑÑÑÑ
ON CALL
ÒÒÒÒ
ÑÑÑÑ
ON CALL
ÒÒÒÒ
codes, key
Page 26

Terminal User Guide
22
1, page 1. Any code or number that may be dialled by
pressing the keys may also be programmed onto a key.
The key may be programmed with a feature code,
extension number or an external number.
Program a key with a new feature
Press prog, the key sequence to store, followed by the
key onto which the code will be stored. Up to 30 key
presses may be stored onto each programmable key. A
2 second pause may be inserted with the
key and a
transfer press may be inserted with the
key.
Changing the Index card
The Index card may be taken out and reversed when
keys are re-assigned, see Figure 2 on page 2 for details.
This allows you to write in the new function of each key
after re-programming.
Restore key default setting
Program the default settings back onto the key. LED
operation will also return to this key.
When a key is re-programmed as an extension
with digits 11-18 or 21-24 then the LED will
also be enabled to show the state of the
extension. Similarly, if a key is re-programmed
with the codes 91 – 96 then the LED will be
enabled to show the state of the line.
Restore all keys to default setting
All 15 programmable keys will return to their default
programming.
Language
Change Executive terminal language (Option)
The menu option will toggle between the two installed
languages for display.
Last Number Redial
Redial last number in Terminal memory
Dials the last number, or code dialled from the terminal.
Pressing redial without going off-hook will switch the
terminal to handsfree mode. This is stored in the
terminal memory, not the system memory unlike the
codes below.
number, key to program
key to restore
Terminal Features
pppp Reset prog. Keys
or
Terminal Features
pppp Language xxxx
Page 27

Extension Features
23
Redial last number in system memory
Dials the last external number only phoned from the
Terminal. An external line will be seized automatically.
If the redial code is dialled without going off-hook then
the phone switches to handsfree automatically.
Redial last 10 numbers in Executive Terminal
Press the left scroll key,
the last number dialled
will be displayed in the screen. Further presses will show
the 2
nd
to the 10th number dialled. To dial the displayed
number press the select key.
The last 10 numbers in the redial store can be deleted by
overwriting with 10 separate numbers.
Delete last number from System memory
The last number will be deleted from the system
memory. Note that the last 10 numbers dialled are also
stored separately in the Executive Terminal, these will
not be erased by this code.
Note that if a specific line was seized to dial
the last number then
will try to seize the
same line, it will give busy tone if this line is in
use, even if other lines are free. If ‘0’ is used to
seize a line then a free line will be used
automatically.
Line Access Digit
Your system may use either ‘0’ or ‘9’ to seize a free
exchange line, the terminal must be programmed to use
the same digit. Until correctly programmed, the ‘Line’
keys will not function correctly.
Set terminal to 0 for a line
Set terminal to use ‘0’ for a free line and 9(line) to use a
specific line.
Set terminal to 9 for a line
Set terminal to use ‘9’ for a free line and 0(line) to use a
specific line.
Lock Extension
It is possible to lock an extension so that it is not
possible to make or receive external calls, depending on
(308 system)
(612 system)
dial
redial
…
07 Jun 00 Wed 10:09
R10 0123456789
Terminal Features
pppp Line access code: 0
or
(9 for line)
Terminal
TerminalTerminal
Terminal Features
FeaturesFeatures
Features
p
Line
LineLine
Line access
accessaccess
access code:
code:code:
code: 9999
or
Page 28

Terminal User Guide
24
the system programming. To return to normal
operation the user must unlock the extension with a
unique PIN number.
Lock an extension
Enter the code. No further external calls may be made
or received at the extension.
Unlock an extension
Enter the code, including the PIN number. This will be
provided by the system administrator.
For security your PIN
number will be
disguised on screen when entering the unlock code or
after pressing .
Note that it is always possible to dial internally
from a locked extension and to dial the
emergency services.
Messages
It is possible to light the message LED on another
Terminal extension when a user is busy. A voicemail
unit can also make the message LED flash to show a
message may have been left. Each extension may have
only one message waiting at one time.
The LED next to the
key will light and the
extension can find out who called.
It is also possible to leave a text message on the
Executive Keyphone display that will be displayed on
any other Executive Terminal which dials your
extension.
Leave a text message at a busy Terminal extension
Dial the busy extension then press the 6 key. The
message light on the terminal will light.
Press the right menu key under the ‘send msg text’. The
message LED on the Terminal will light. Only one
message maybe left for each Executive Terminal.
Return message from extension user
Press the message key if the LED is lit find out who
called. The LED next to the calling extension will begin
to flash distinctively when it is pressed.
ÑÑÑÑ
CONFIRMATION TONE
ÒÒÒÒ
PIN
ÑÑÑÑ
CONFIRMATION TONE
ÒÒÒÒ
13 Nov 99 Sat 18:30
*7*@@@#
extÑÑÑÑ
BUSY TONE
ÒÒÒÒ
ÑÑÑÑ
CONFIRMATION TONE
ÒÒÒÒ
ÑÑÑÑ
BUSY TONE
ÒÒÒÒ
Send msg
Page 29

Extension Features
25
Executive Terminals
will also show the
calling extension on the display.
Leave message on Executive Terminal display
Enter the menu shown.
You may then select
between one of four
different messages: ‘In a meeting’, ‘Gone for lunch’,
‘On a holiday’ or ‘Gone home’. Callers from Executive
Terminals will be shown the same message when they
call your extension.
Erase message from display
This menu item clears message from the display.
Retrieve voicemail
If the Message LED is flashing then a caller has been
diverted to your answering machine or voice mailbox.
Dial the voicemail extension to extinguish the LED.
Note: A voicemail unit may not be programmed or
installed.
Mute Key
The Mute key stops the caller hearing conversation at
your extension. The other caller may still be heard.
Toggle Mute on & off
The LED will be lit when mute is active.
Paging
A paging call can be made to all terminals. This will
connect a call in handsfree mode without waiting for a
user to answer. The system administrator must enable
this feature for your extension before it can be used. A
brief warning ring will be heard by the called person
before the page is connected.
Page a single terminal extension directly
Dial 1*, followed by the extension number.
Page a single terminal extension if no answer
Dial an extension, then dial 1 during the first 10 seconds
of ringing tone.
call ext. 14 00:14
*1
Extension Settings
pppp Leave msg. On terminal
In a meeting Tue 12:00
Extension Settings
pppp
Clear msg. On terminal
(
)
dial voicemail ext.
/
ext
extÑÑÑÑ
RINGING
ÒÒÒÒ
Page 30

Terminal User Guide
26
Page all terminals in an extension group
Dial 1*, follwwed by the extension group number 80 –
83.
Page via public address system
Dialling 10 will connect directly to the public address
system, if connected.
Reminder call
It is possible to set an alarm which will ring at a set time
of the day. It has a special ring sound of a quick burst, a
longer burst, repeated every 3 seconds.
Once only alarm
Enter the time in 24-hour format and with 4 digits. E.g.,
1:30 am is entered as 0130. This alarm will ring only
once; it must be set again before it will sound again.
The Executive
Terminal prompts for
the settings as shown.
Daily alarm
Enter the time as with the once only alarm. This alarm
will ring at the same time every day until cancelled.
The menus contain a
programming menu for
the daily alarms.
Answer alarm
Go off-hook, the alarm will then stop sounding.
Cancel once only alarm
This will erase the alarm setting and the extension will
remain quiet.
Cancel daily alarm
This will stop the reminder call sounding.
Ring Settings
The volume and tone of the ringing on the Terminal
may be changed so that each Terminal has a unique
ring.
group
time
ÑÑÑÑ
CONFIRMATION TONE
ÒÒÒÒ
Extension Settings
pppp Reminder Call
pppp Set daily reminder call
time
Set onceoff remind. call
(hhmm):
time
ÑÑÑÑ
CONFIRMATION TONE
ÒÒÒÒ
Set daily reminder call
(hhmm):
Extension Settings
pppp Reminder Call
pppp Set daily reminder call
time
or
Extension Settings
pppp Reminder Call
pppp Onceoff remind. call Off
or
Extension Settings
pppp Reminder Call
pppp Daily remind.call Off/On
Page 31

Extension Features
27
Ringer volume
Use the volume keys to change the ring volume when
the Terminal is ringing. There are eight volume levels.
The current setting is
shown on the display.
Ringer Pitch
The ringer pitch may be changed to one of three
different levels.
Low ringer pitch.
Medium ringer pitch.
High ringer pitch.
The Executive Terminal can also be programmed using
the menus.
Room Monitor
This feature allows you to listen in to a room whenever
you want. This can be achieved from any extension or
via an outside line. Do not replace the handset or press
after entering the code. This feature is enabled at
the extension to be monitored only.
Set an extension to be monitored from other extensions
only
Enter the room monitor code or select this menu item,
then leave the phone off-hook after the confirmation
tone.
Use the menu option to enable internal room monitor.
Set extension to be monitored from extensions and
exchange lines
Enter code where ‘exch’ may be 1, 2 or 3 and
corresponds to the exchange line which can monitor
this extension.
Use the menu option to enable internal and external
room monitor.
Listen to room monitor
Go off hook and dial the extension number which has
been left off-hook. The system administrator will have
details about accessing the room monitor from an
exchange line.
/
R >>>>.... Tue 11:08
Terminal Settings
pppp Low/Med/High pitch
ÑÑÑÑ
CONFIRMATION TONE
ÒÒÒÒ
Extension Settings
pppp Room monitor
pppp Internal monitor
exch
ÑÑÑÑ
CONFIRMATION TONE
ÒÒÒÒ
Extension Settings
pppp Room monitor
pppp Internal/externalMonitor
ext. no.
Page 32

Terminal User Guide
28
De-activate room monitor
Replace the handset on the monitored extension to turn
off.
Screen Display
The Executive Terminal incorporates an interactive
display, which changes its contents depending on the
current phone status and user action.
Phone Idle
The time and date are
always displayed when
the terminal is idle.
Also, if enabled (see page 28), a second line may be
shown with the options available for each of the menu
keys, plus the number of logged calls in memory.
Incoming call
For incoming calls,
either the extension or
the line number will be
displayed. For systems with the ISDN option card or
analogue CLI option card installed then the calling
party number sent by the network may also be displayed
on the bottom row. If the calling party has opted to
keep their number private then the display will show
'Private'. Depending on the caller location the display
may also show ‘Operator’, ‘Overseas’, ‘Unknown’ or
‘Payphone’.
Call in progress
A timer counts the
duration of the call in
progress at the right
hand side of the screen. For outgoing external calls, the
left side of the screen will display the current call cost if
the optional CLI /Meter pulse card has been fitted and
the network is sending out meter pulses, otherwise it
will remain at zero.
Show / Hide Display line 2
Enabling and disabling
the second display line
is possible through the 'Terminal'
menu item. The menu keys will remain active regardless
13 Nov 99 Sat 18:30
dial menu call 40
Line 2 Sat 18:30
012312345
Line 2 04:32
00.50 011233455
Terminal Settings
pppp Show display line 2
&
Terminal Settings
Hide display line 2
13 Nov 99 Sat 18:30
dial menu call 40
Display line 2
Page 33

Extension Features
29
of the setting.
Show / Hide Command string
When a menu item has
been selected, the
Executive terminal will send a
command to the telephone system. The command
digits are hidden by default but can be shown on screen
as they are sent.
Speed Dialling
There are many different types of speed dial available
when using the Executive Terminal.
Forty Executive Terminal speed dial numbers,
with names for easy identification. The name
may be up to 16 characters long while the
telephone number may be up to 20 digits,
including recall and pauses. These are stored
in the Terminal and will move from extension
to extension if the Terminal is moved. These
speed dial entries may be used for either
telephone numbers or programming codes.
Fifteen programmable keys which may store
either programming codes or telephone
numbers. These are dealt with separately on
page 22.
Forty-nine system-wide speed dial numbers of
up to 25 digits on the 308 system, or ninetynine speed dial numbers on the 612. These
can be used by all extensions but only changed
by the administrator.
Ten personal speed dial numbers of up to 25
digits each, dialled with codes 70 – 79, these
are stored in the telephone system and may be
freely changed. They will remain at the
extension at which they were programmed.
Dial a System or Extension speed dial number
Go off-hook and dial the speed dial code. Numbers 7079 are used for extension specific speed dial numbers.
System speed dial codes on the 308 system use 511 –
559, while 501-599 are used on the larger 612.
Terminal Settings
pppp Show Command strings
&
Terminal Settings
pppp Hide Command Strings
00:04
*76811200#
Extension Settings
pppp Leave msg. On terminal
speed dial code
Command string
Page 34

Terminal User Guide
30
Program a personal extension speed dial number
Program personal speed dial numbers, where the
number may be a maximum of 25 digits. It is not
necessary to include the line seize digit in the telephone
number. Entry may be a digit from 0 to 9 for speed dial
numbers 70 to 79.
Delete a personal extension Speed dial number
Where ‘entry’ is a number from 0 – 9 for the personal
speed dial numbers 70 - 79. Alternatively, use the menu
item as with programming, but leave the telephone
number blank.
Search for a telephone number
To search for a name in
the Terminal select the
search option. Enter the first letter or letters of the
name, then enter.
The entries matching
your text will be shown,
scroll through them with next if there is more than one
matching record.
Select a speed dial number
If you don’t remember
the contact name, you
can scroll through each
entry one-by-one. Enter the speed dial number menu,
select the entry with the right menu key, or enter the
two-digit table entry number if known. Select the 'dial'
option at the correct entry.
Dial an Executive Terminal speed dial entry
Select the dial option at the required entry. The number
will be dialled in Handsfree. Pick up the handset if
required.
Edit an Executive Terminal speed dial entry
At the required entry,
select the edit option,
now change the details
as shown in Entering & editing names and numbers,
below.
Delete an Executive Terminal speed dial entry
With the speed dial
entry shown, select the
entry
tel no or
Extension Settings
pppp Extension speed numbers
pppp Speed number 70 - 79
entry
dial
speed
search
enter text
enter
next
name ?:CO_
clear exit enter
Company XYZ 28
edit dial next
COMPANY NAME 12
edit dial next
dial
speed
recall
select entry with
next
Dial
ÑÑÑÑ
NUMBER DISPLAYED
ÒÒÒÒ
dial
20 Jun 99 Sun 11:30
M4 0123456P7890
ÑÑÑÑ
NUMBER DISPLAYED
ÒÒÒÒ
edit
ÑÑÑÑ
NUMBER DISPLAYED
ÒÒÒÒ
edit
del rec
delete record ?
Yes No
Page 35

Extension Features
31
edit, then del rec options. You will be asked for
confirmation.
Add an Executive Terminal speed dial entry
Select the speed dial store option. You will be prompted
for a contact name, enter the name as shown in
'Entering & editing names and numbers', below. If the
display shows 'memory full' then all 40 entries are in use,
to free a speed dial entry see 'Delete an Executive
Terminal speed dial entry', above.
Entering & editing names and numbers
To enter a letter press
the digit key with the
letter shown repeatedly until the required letter is
shown. E.g. for 'S' press key '7' four times. To enter a
space use key '1'. Each letter is confirmed when either a
different key is pressed or no key is pressed for ½
second. To switch between lowercase and uppercase
letters, press the ‘#’ key before the letter. If a mistake is
made the 'clear' key deletes the last letter, or all letters if
held down. Contact names may be up to 16 characters
long. Punctuation symbols may also be found on each
key, all characters for each key are shown below.
(space)
.-’1
ABC!2 DEF?3
GHI(4 JKL)5 MNO&6
PQRS7 TUV%8
WXYZ9
*=@<>
+;,$0
(Caps lock)
Press the 'enter' key to confirm the contact name.
Next, enter the
telephone number,
remembering '0' to seize an outside line, or any of the
line seizing codes shown in the table on page 33. A twosecond pause in the dial string may be added with ,
shown as P on the display. A recall or transfer key press
may be inserted into the dial string by pressing ,
shown as 'F' on the display. The dial string may be up to
20 digits in length. Press enter to store the entry. The
clear key will delete the last digit entered, while 'del num'
will clear the whole telephone number. Press 'enter' to
confirm the entry. Use the 'prog' key to exit at any time
without saving.
dial
speed
store
enter name
enter
enter number
enter
name:Company Name_
clear exit enter
No:01234567F123P123
clear del num enter
Page 36

Terminal User Guide
32
Volume Settings
The ring, handset and handsfree volumes may be
changed for ringer volume (see page 27).
Change Handset volume
While on a call using the handset, the volume keys will
alter the volume to one of three levels.
The screen shows the
current volume level.
Change handsfree volume
While on a handsfree call, use the volume keys to
increase and decrease the volume to one of eight levels.
The current level is
shown on the display.
/
S >>>>>... 00:12
/
S >>>>>>.. 00:14
Page 37

33
Appendix
Dialling and Feature Access Codes Quick reference
Access Code Dialled Service Feature Description
0
(or 9)
Outgoing Exchange Line Call
(* For systems using 9 for a line)
1* ext. Page a terminal extension
1* group Page terminals in an extension group 80-83
10 Page via public address system
11-18
& 21-24
Call extensions
(612 systems only)
19 Door Phone 1 (optional)
29 Door Phone 2 (optional)
50 Last number redial (308 system only)
500 Last number redial (612 system only)
511-559 System speed dial (308 system only)
501-599 System Speed Dial Call (612 system only)
70-79 Dial extension speed dial numbers
80 Extension group call with standard ring
81 Extension group 1 call with 1 ring
82 Extension group 2 call with 2 rings
83 Extension group 3 call with 3 rings
84 Outgoing Call with flash transparency
85 Pick up parked call
86 Pick up any call
88 Outgoing Call with Data Protection
89 Camp off
91 – 96
(or 01 – 06)
Outgoing Call via Exchange Line 1 – 6
(* For systems using 9 for a line)
#0 Cancel Exchange Line Call-back When Free
#5 Cancel Internal Call Call-back When Free
Page 38

Terminal User Guide
34
Access Code Dialled Service Feature Description
**account_PIN Code to enter before dialling out if account codes
are active
* 719 # Operate door 1 latch relay
* 729 # Operate door 2 latch relay
* 21 ext. # Set All Call Diversion From Own Extension
* 2 N ext. # Set Divert No Answer After delay N = 2 – 9 for 5, 10,
… 45 sec.
# 21 ext. # Cancel All Call Diversion from another extension
# 21 # Cancel All Call Diversion from own extension
# 20 # Cancel all diversions
*31 ext. # Set Diversion On Busy
#30 # Cancel Diversion On Busy
#30 ext. #' Cancel Diversion On Busy from another extension
*7411# Toggle Do not disturb
*1 Read message on Executive Terminal (optional)
*6 … Extension feature programming code
*7 … Extension feature programming code
*8 … System feature programming code
*9 … System feature programming code
Feature Codes after Transfer key (T)
Access Code Dialled Service Feature Description
T0
(or 9)
Outgoing Exchange Line Call
(* For systems using 9 for a line)
T ext. Enquiry call to an extension (hang up to transfer)
T19 Operate door latch relay of connected door phone
T** account_PIN Code to enter before dialling out if account codes
are active
T* ext. Make a brokerage call to an extension
T*0
(or T*9)
Make a brokerage call to exchange line
(* For systems using 9 for a line)
T*9 exch. line
(or T*0 exch. line)
Make brokerage call to specific exchange line
(* For systems using 9 for a line)
T3 ext. Initiate conference call with extension
T39
(or T30)
Initiate conference call with free exchange line
(* For systems using 9 for a line)
T30 exch. line
(or T39 exch. line)
Initiate conference call with specific exchange line
(* For systems using 9 for a line)
T50 Redial last number (308 system only)
Page 39

Appendix
35
Access Code Dialled Service Feature Description
T500 Redial last number (612 system only)
T511-559 Dial system speed numbers (308 system only)
T501 – 599 Dial system speed numbers (612 system only)
T70 – 79 Dial extension speed numbers
T80 Extension group call with standard ring
T81 Extension group 1 call with 1 ring
T82 Extension group 2 call with 2 rings
T83 Extension group 3 call with 3 rings
T85 Park an exchange line
T86 Pick up any call
T87 Send a flash signal to exchange line
T88 Make outgoing call with data protection
T90
(or T00)
Hold an exchange line call
(* For systems using 9 for a line)
T9 exch. line
(or T0 exch. line)
Pick up call on exchange line 1 – 6
(* For systems using 9 for a line)
Feature codes on a Busy Call
Access Code Dialled Service Feature Description
0 Exchange Line Call-back when free (Camp on)
1 Interrupt busy calls
2 Pick up call from answering machine
3 Set exchange call to camp on extension
5 Extension call-back when free (Camp on)
6 Send message if calling party is busy (optional)
89 Exchange or extension call-back when free
Page 40

Digital Switch Systems Ltd. as manufacturer hereby
declares that this product is in compliance with the
essential requirements and other relevant provisions
of the EC Directive 1999/5/EC.
©2002 Digital Switch Systems
Ltd.
Version 2.1
2002-05-29
 Loading...