

Page 1

Eurocom 612
Installation & Programming Manual
Page 2

digital switch systems
Eurocom 612
Small Office / Home Office
Hybrid Telephone System
C
ONFIDENTIALITY
The information contained in this manual is the property of Digital Switch Systems Ltd.
The contents of this manual must not be copied, distributed or made available to any third party
without the prior written consent of Digital Switch Systems Ltd.
"Every effort has been made to ensure that this manual documents the operation of the Eurocom 612
Telephone System. However, due to the on-going improvement and update of software, Digital
Switch Systems Ltd. cannot guarantee the accuracy of printed material after the date of publication,
nor can Digital Switch Systems Pty. Ltd. accept responsibility for errors or omissions. Revised manuals
and update sheets will be published as deemed necessary."
©2002 Digital Switch Systems Ltd.
Page 3

iii
Contents
1. System Overview 1
Introduction 1
General Description 1
System Capacity 2
2. Using an Extension 4
Introduction 4
Extension Codes Quick Reference 4
Key Descriptions 6
Basic Extension Operation 6
Account Codes 8
Brokerage Call 8
Call Diversion 8
Call Intrude 9
Call Parking 9
Call Pick -Up 9
Conference calls 9
Data Protection 10
Do not Disturb 10
Door Phones 11
Enquiry Call 11
Exchange Line Timed Break 11
Extension Call Back 12
Extension Group Calls 12
Holding Calls 12
Last Number Redial 13
Lock Extension 13
Paging 13
Reminder call 14
Room Monitor 14
Speed Dialling 14
3. System Programming 16
Introduction 16
How to Program the System 16
Executive Terminal Programming Menus 17
System Programming Code Summary 20
Account Code Operation 24
Alternative Carrier Selection (ACS) 25
Answering Machine / Voicemail Programming 26
Automatic Answering 27
Boss-secretary Mode 32
Call Barring 33
Call Unit Cost 35
Call Detail Recording (CDR) 35
Call Waiting Tone 37
Clock Setting 37
Courtesy Service 37
Day/Night Mode 38
DTMF Extensions 39
Exchange Line Assignment 39
Extension locking 40
External Call Diversion 40
Fax Call Handling 40
Hold and ring timers 42
Hot Line Programming 42
Intrusion & Paging Programming 43
ISDN Programming 43
Music on Hold 45
Ringing Settings 45
Security Alarm Programming 46
System PIN Number 49
System Size 49
System Speed Dialling 49
Voice Message Programming 50
4. Installation 51
Telephone System Installation 51
Extension wiring 54
Expansion / Optional PCB Installation 56
0+2 / 1+2 / 2+2 Expansion Cards 57
Fax /Voice Card 58
V24 / RS-232C Serial Data Interface 58
V24 / FSK Card 58
CLI and Meter pulse detector card 58
25Hz Ringer Card 59
Door Phones 59
ISDN Cards 60
Music on Hold Source 60
Battery Back-up Unit 60
5. Maintenance 63
Self-Test 63
Customer Database Protection 63
Generic Software Memory 63
Expansion / Optional Plug-In PCB 63
Repair Procedures 64
Problem Solving 64
6. Specifications 66
Electrical Specifications 66
Environmental 66
Loop Limits 66
Dialling Specifications 66
Power up default settings 67
7. Glossary 68
8. Index 70
GenMan V1.1 20020529
Page 4

Installation & Programming Manual
iv
Page 5

1
1. System Overview
Introduction
Purpose
This manual provides the information needed to install, program and operate your telephone System,
it should be used in conjunction with the market-specific specification sheet supplied with this
manual.
Regulatory Information
Maintenance Limitations
Maintenance on the Telephone System is to be performed only by authorised dealers and installers.
The user is not authorised to make any changes and/or repairs except as specifically noted in this
manual. If unauthorised alterations or repairs are performed, any remaining warranty may be void.
System Components and Options
Main Equipment (2 PSTN Exchange Lines / 8 Extension Ports)
2 + 2 Expansion Card (2 PSTN Exchange lines / 2 Extension Ports) (Option)
1 + 2 Expansion Card (1 PSTN Exchange line / 2 Extension Ports) (Option)
0 + 2 Expansion Card (2 Extension Ports) (Option)
Fax / Voice Card (Option)
V24 Communications Interface Board/SMDR Port with PC Program (Option)
Up to 10 Standard And Executive Terminals (Option)
Up to 2 ISDN Cards (2 Exchange lines / 2 Extension Ports) (Option)
Door Phone Units (Option)
Meter pulse detection card (Option)
Calling line identity card (Option)
BBU - Battery Back-up Unit (Option)
25Hz ringer card (Option)
General Description
Your Telephone System is a modern stored-program controlled System designed to meet the
requirements of small office/home office applications, whether on analogue PSTN lines or on
ISDN basic rate lines. The system offers an extensive range of service features including Fax Call
Section
1
Page 6
Installation & Programming Manual
2
Detection, Call Logging, DISA, System Integral Call Answering, Remote programming and many
others, Figure 1-1 shows many of the options available.
The System supports approved single line telephones (DTMF or pulse), modems, facsimile and
answering machines. In addition a Standard and Executive Terminal are available which provide
extra features on the system. System capacity can be increased from 2+8 to a maximum of 6+12
using plug-in expansion cards.
System programming may be carried out at extension 13 using either a tone phone or the built in
menu commands of the Executive Terminal. A PC programming option is supplied with the
optional V24 expansion card.
There are two independent alarm loops which can be used to monitor the status of security doors,
gates and many other similar applications. Automatic external alarm calls (with voice messages if the
optional fax/voice card is fitted) can be made to programmed numbers such as mobile phones, in
the event that alarm contacts are triggered.
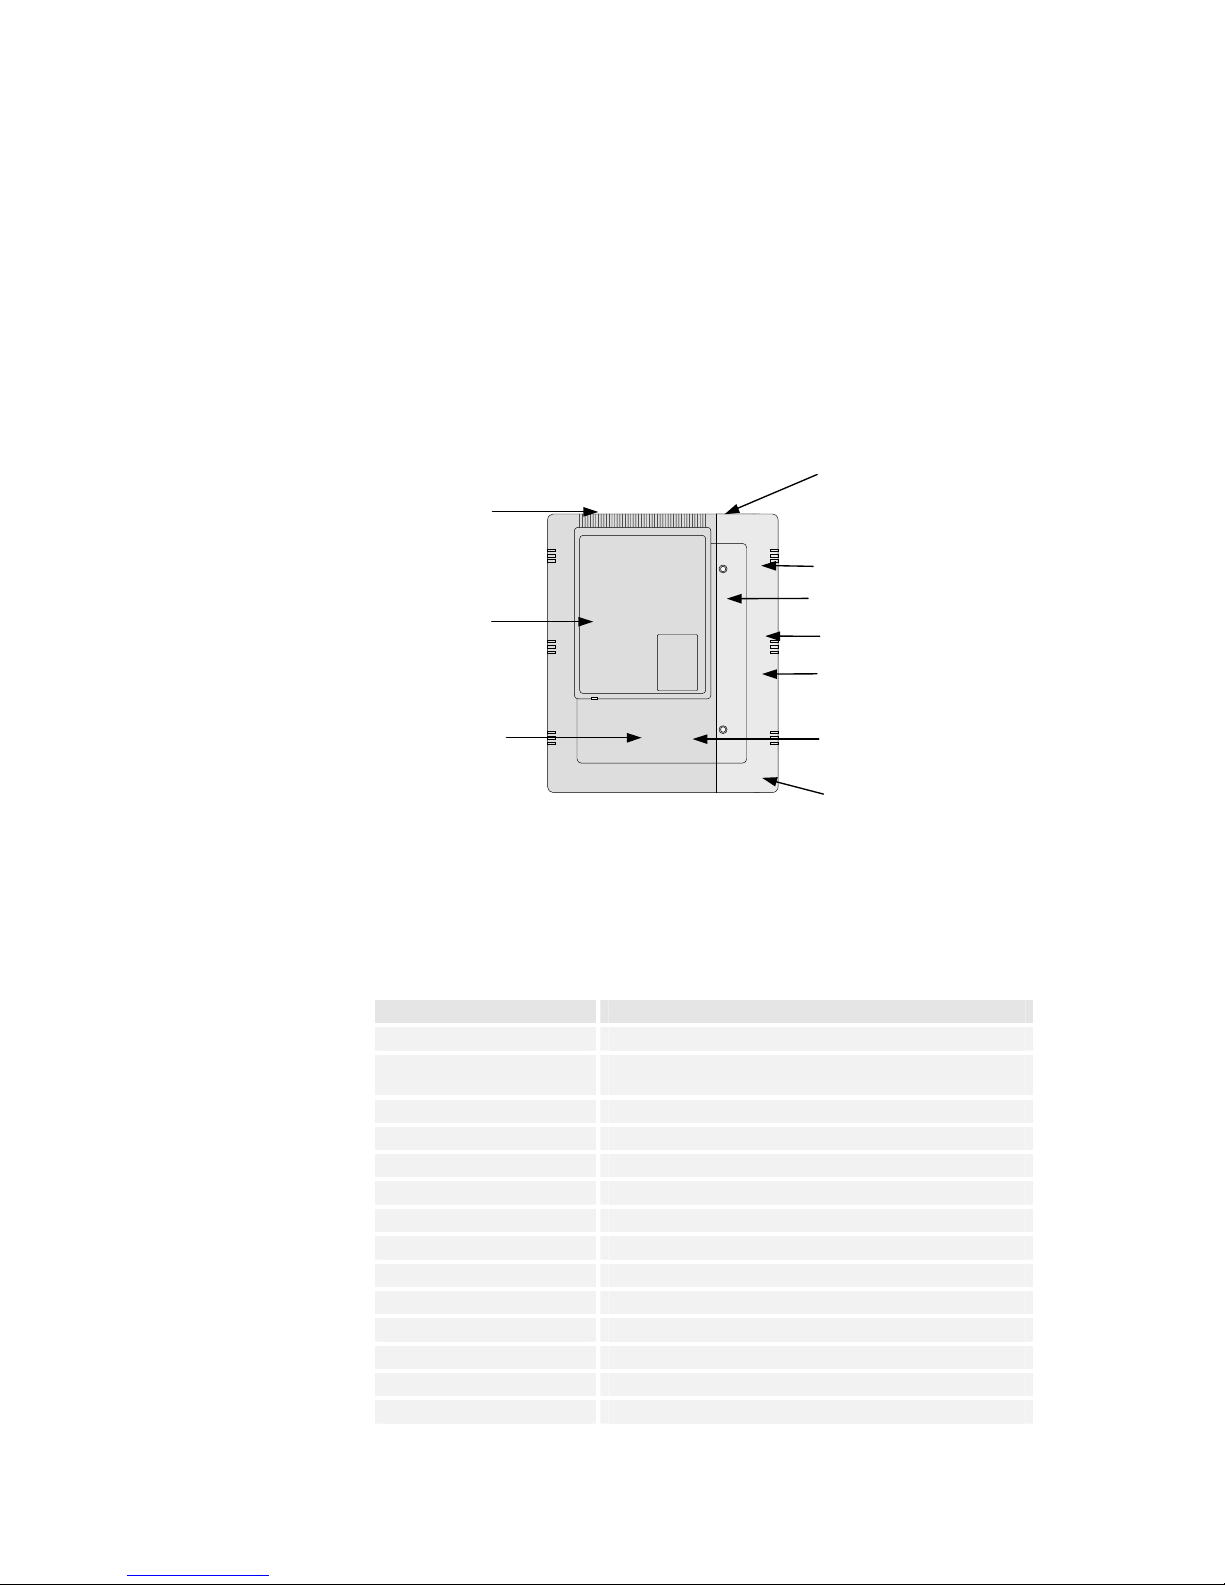
Figure 1-1 Expansion Options
System Capacity
Basic System Configuration
Feature Configuration
Alarm Loops 2
MOH Port Audio via 3.5mm jack
Internal hold tone
Internal Links 4 (Up to 4 internal calls)
Extension Speed Dial 10 Per Extension plus 1 last number redial, 25 digits
System Speed Dial 99 Per System, 25 Dialled Digits
Last Number Redial 25 Dialled Digits
Door phone ports 1 standard, 1 optional factory fitted
Control Contact (Door Latch) 1 standard, 1 optional factory fitted
Conference 3 Party Conference (All Combinations)
DISA All Exchange Line Ports, ISDN and PSTN
Power fail extensions 11, 12, 21 (Card 1 must be 2+2), 23 (Card 2 must be 2+2)
Maximum terminals 10 (Not power-fail extensions 11, 12)
DTMF Receiver 3 Per System
DTMF Sender 2 Per System
External music
on hold port
RS232 CDR output
Port and PC
program option
2 standard Alarm sensor inputs
plus 2 optionally factory fitted
External Paging output
Up to 2 Door phones
Up to 12 extension
p
orts
PSTN Exchange line
Calling Line Identity
& meter pulse card
option
Expansion card 1:
2+2 card with
extensions 21 & 22
and 2 analogue or
digital exchange lines
Expansion card 2:
2+2 card with
extensions 23 & 24
and 2 analogue or
digital exchange lines
Page 7

Section 1 - System Overview
3
System Expansion Configurations
System Type Exchange
lines
+ Extensions ISDN S0 bus Expansion
slot 1
Expansion
slot 2
(basic) 2 + 8
2 + 10 0+2 card
3 + 10 1+2 card
4 + 10 2+2 card
2 + 12 0+2 card 0+2 card
3 + 12 1+2 card 0+2 card
4 + 12 2+2 card 0+2 card
5 + 12 2+2 card 1+2 card
Analogue only system configurations
6 + 12 2+2 card 2+2 card
4 + 10 1 ISDN card
4 + 12 1 ISDN card 0+2 card
5 + 12 1 ISDN card 1+2 card
6 + 12 1 ISDN card 2+2 card
ISDN / Analogue
hybrid system
configurations
6 + 12 2 ISDN card ISDN card
Page 8

4
2. Using an Extension
Introduction
Any standard tone telephone may be used with your telephone system. Extension programming and
operations are carried out with a tone telephone plus a 100ms recall/flash key.
Extension Codes Quick Reference
Dialling and Feature Access Codes
Access Code Dialled Service Feature Description
0
(or 9)
Outgoing Exchange Line Call
(* For systems using 9 for a line)
1* ext. Page a single terminal extension
1* group Page all terminals in an extension group
10 Paging port
11-18 & 21-24 Call extensions (Internal Calls)
19 Door Phone 1 (optional)
29 Door Phone 2 (optional)
500 Last Number Redial
501-599 System Speed Dial Call
70-79 Dial extension speed dial numbers
80 Make a general call
81 Extension group 1 call with 1 ring
82 Extension group 2 call with 2 rings
83 Extension group 3 call with 3 rings
84 Outgoing Call with flash transparency
85 Pick up parked call
86 Pick up any call
88 Outgoing Call with Data Protection
89 Camp off
91 – 96
(or 01 – 06)
Outgoing Call via Exchange Line 1 – 6
(* For systems using 9 for a line)
#0 Cancel Exchange Line Call-back When Free
#5 Cancel Internal Call Call-back When Free
**account_PIN Code to enter before dialling out if account codes are active
* 719 # Operate door 1 latch relay
* 729 # Operate door 2 latch relay
Section
2
Page 9

Section 2 – Using an Extension
5
Access Code Dialled Service Feature Description
* 21 ext. # Set All Call Diversion From Own Extension
* 2 N ext. # Set Divert No Answer After delay N = 2 – 9 for 5, 10, … 45 sec.
# 21 ext. # Cancel All Call Diversion from another extension
# 21 # Cancel All Call Diversion from own extension
# 20 # Cancel all diversions
*31 ext. # Set Diversion On Busy
#30 # Cancel Diversion On Busy
#30 ext. #' Cancel Diversion On Busy from another extension
*7411# Toggle Do not disturb
*1 Read message on Executive Terminal (optional)
*6 … Extension feature programming code
*7 … Extension feature programming code
*8 … System feature programming code
*9 … System feature programming code
Feature Access Codes after Recall (R) or Transfer key
Access Code Dialled Service Feature Description
R0
(or 9)
Outgoing Exchange Line Call
(* For systems using 9 for a line)
R ext. Enquiry call to an extension (hang up to transfer)
R19 Open relay contact of connected door phone
R** account_PIN Code to enter before dialling out if account codes are active
R* ext. Make a brokerage call to an extension
R*0
(or R*9)
Make a brokerage call to exchange line
(* For systems using 9 for a line)
R*9 exch. line
(or R*0 exch. line)
Make brokerage call to specific exchange line
(* For systems using 9 for a line)
R3 ext. Initiate conference call with extension
R39
(or R30)
Initiate conference call with free exchange line
(* For systems using 9 for a line)
R30 exch. line
(or R39 exch. line)
Initiate conference call with specific exchange line
(* For systems using 9 for a line)
R500 Redial last number
R501 – 599 Dial system speed numbers
R70 – 79 Dial extension speed numbers
R80 Make a general call to all extensions
R81 Extension group 1 call with 1 ring
R82 Extension group 2 call with 2 rings
R83 Extension group 3 call with 3 rings
R85 Park an exchange line
R86 Pick up any call
R87 Send a flash signal to exchange line
R88 Make outgoing call with data protection
R90
(or R00)
Hold an exchange line call
(* For systems using 9 for a line)
R9 exch. line
(or R0 exch. line)
Pick up call on exchange line 1 – 6
(* For systems using 9 for a line)
Page 10

Installation & Programming Manual
6
Feature codes on a Busy Call
Access Code Dialled Service Feature Description
0 Exchange Line Call-back when free (Camp on)
1 Interrupt busy calls
2 Pick off TAM extension if connected to exchange line
3 Set exchange call to camp on extension
5 Extension call-back when free (Camp on)
6 Send message if calling party is busy (optional)
89 Exchange or extension call-back when free
Key Descriptions
Number keypad. These keys are used for dialling and entering codes. When connected to a call they
will send DTMF tones for using Teleservices.
The recall key is used in various ways to hold, transfer and carry out different operations when on a
call.
Basic Extension Operation
Incoming Calls
Answering when phone is ringing:
Lift the handset when the phone is ringing.
Answering when other phones are ringing:
Call pick-up
Dialling the pick up call code will answer the call even if your extension is not programmed to ring.
Answering when extension is busy:
If the extension is in use but other phones are ringing then the call may be answered in one of two
ways:
Park current call
Park the call and answer the new call. See page 9 for details.
Drop current call
To answer a call ringing at another extension end the current call and pick up the handset when the
phone rings with the new call.
or
Current call on hold (external calls only)
This will put the current call on hold and answer the incoming external call.
Making Calls
When you lift the handset, you will hear dial tone. However, you may hear the special interrupted dial
tone indicating that incoming calls are diverted to another extension.
After you hear either type of dial tone, you may begin dialling. If you wait for more than 8
seconds without dialling, the engaged tone will be heard.
If you are on an internal call and an exchange line call arrives then the alert tone will let you
know that a call is waiting.
All extensions have two digit numbers. The extension numbers are 11 to 18, plus
extensions 21 to 24 when fully expanded. Extension number 19 is reserved for door phone
to , &
ÑÑÑÑringingÒÒÒÒ
or
Key
top: 0 for line systems
bottom: 9 for line sytems
Page 11

Section 2 – Using an Extension
7
1, 29 is reserved for door phone 2, while extension 10 is used to connect to the paging
port.
If you dial a code which is not valid, you will hear the error tone. As soon as you hear the
error tone you may replace the receiver and then try again with the correct number.
If the administrator has enabled call barring then external call may not be possible to all
destinations. Also, an account code may need to be entered to dial an external number (see
page 8).
Dialling an extension
Go off-hook and dial the extension number, or 10 for the paging port and 19 or 29 for the door
phone 1 or 2.
Dialling Outside Lines
Access the next free line
Go off hook and dial the free line seize digit, external dial tone will be heard. Now dial the telephone
number.
Access a specific line
Go off hook and dial the line digit followed by the line number 1 –6. If the line is present and free
then you will hear dial tone, now dial the telephone number required.
Ring Back with Line when free
If all outside lines are busy, you may request the system to place you in a queue for the next line
which becomes available, the system will ring back when the line is free. After answering you are
connected to the line.
When seizing a line and busy tone is heard press 0 to camp on the line.
Cancel Ring Back
Go off hook and dial the cancel code.
Transferring calls
Internal unannounced
Transfer a call so that it rings at another extension. This is an unannounced transfer.
Internal announced
Transfers a call only after you have announced to the extension who is calling.
Trunk to Trunk transfer
Calls on one exchange line may be transferred to another exchange line. A trunk to trunk transfer will
timeout after 1 minute. A warning tone will be heard 10 and 5 seconds before this happens, either
caller may extend the call by pressing digits 1 to 9, to increase the call time in multiples of 30 seconds.
E.g. pressing '4' will increase the call length by 2 minutes before it is cut off.
Transfer the call as with announced internal transfer but dial an external number instead. Note that
the external number may also be dialled using any of the methods in the ‘Dialling Outside Lines’
section above.
If an internal transfer call is not answered within 60 seconds the call is disconnected. The
original caller will hear engaged tone.
Trunk to trunk transfer will be subject to the normal call barring and account code
checking as normal external calls.
If an external call is transferred to an extension and not answered within 60 seconds, all
extensions will ring as if it is a normal incoming call for 30 seconds. If the call is not
answered within this time it is dropped.
ext.
tel number
or
tel number
line, tel number
or
line, tel number
lineÑÑÑÑbusy toneÒÒÒÒ
ÑÑÑÑconfirmation toneÒÒÒÒ
or
lineÑbusy toneÒ
Ñ
confirmation toneÒ
ÑÑÑÑconfirmation toneÒÒÒÒ
ext. ÑÑÑÑringingÒÒÒÒ
ext.ÑÑÑÑcall answeredÒÒÒÒ
tel number
ÑÑÑÑcall answeredÒÒÒÒ
or
tel number
Ñ
call answeredÒ
Key
top: 0 for line systems
bottom: 9 for line sytems
Page 12
Installation & Programming Manual
8
Account Codes
This feature is set up by the system administrator in order to keep a personal account of all external
calls. It is not possible to make external calls without first entering '**' followed by your secret
account PIN code.
Enter account code
Go off hook and dial the code shown, followed by your account PIN number. After entering the
code the call may be made in the normal manner as shown in the Dialling Outside Lines section on
page 7.
Brokerage Call
This feature allows you to switch between two calls without the other parties being able to speak to,
or hear one another.
Add an extension
While on a call dialling * after recall shows that the call is to be used in a brokerage call.
Add an exchange line
While on a call dialling * after recall shows that the call is to be used in a brokerage call.
Switch between calls
With a brokerage call set up one press of recall will switch between the calls.
Removing caller from brokerage call
Hanging up will drop the current call, the phone will ring back with the other call.
Call Diversion
This feature allows you to divert calls to another extension. There are three different types of call
diversion.
Divert all calls, all the time.
Divert all calls if not answered after a number of rings.
Divert calls when extension is busy.
Note that the first two diversion methods cannot be set at the same time.
If your extension is set to divert calls to another extension then the dial tone will change to
a broken tone to remind you that you may not receive all calls.
Divert all calls
All calls to your extension will ring the new extension instead.
Divert if no answer
Enter the diversion code then the extension number.
Enter the delay as follows: 2 = 10 seconds, 3 = 15 seconds … 9 = 45 seconds.
Divert if busy
Enter the divert on busy code with the extension to divert to.
PIN
(now dial line and number)
Key
top: 0 for line systems
bottom: 9 for line sytems
ext. no.
number
or
number
ÑÑÑÑringingÒÒÒÒ
ext.
delay, ext.
ext.
Page 13

Section 2 – Using an Extension
9
Cancel all diversions
Cancels all diversions.
Cancel divert all and no answer
Enter the cancel code, note this will not affect a divert on busy setting.
Cancel divert on busy
Enter the cancel code, note this will not affect divert on no answer.
Cancel all call diversion from another extension
If the extension is receiving diverted calls from another extension then it is possible to cancel the
setting from the receiving extension. Enter the cancel diversion code with the extension calls are
being diverted from.
Cancel divert on busy from another extension
Cancel divert on busy. Enter the extension at which divert is set.
Call Intrude
It is possible to intrude on a call and make a 3-way conversation. A warning tone will be heard over
the conversation while the call is being intruded upon. Note that it is only possible to use this feature
if it has been enabled by the system administrator.
Intrude on call
Press 1 if the extension is busy, you are now intruding on the call.
Call Parking
This feature will allow you to ‘park’ an external call, this call can then be retrieved from any extension
without needing to know the exchange line parked. The parked caller hears hold tone or music while
parked, depending on system programming.
Park an exchange line call
Whilst on a call enter the park code.
Pick up a parked exchange line call
From any extension dial the call pick up code, you are re-connected to the original call.
Call Pick -Up
This feature enables you to ‘pick-up’ a call ringing on another extension. It will pick up the incoming
call with external calls always taking priority over internal calls.
If an extension is ringing this will connect you to the caller.
Conference calls
This feature allows a conversation between three parties, two of which may be external numbers.
Add an extension
While on a call enter this code. The final recall press starts the conference.
ext.
ext.
ÑÑÑÑbusyÒÒÒÒ
Key
top: 0 for line systems
bottom: 9 for line sytems
ext. noÑÑÑÑanswerÒÒÒÒ
Page 14

Installation & Programming Manual
10
Add an external number
The external number may be dialled after pressing using any of the methods in the ‘Dialling
Outside Lines’ section on page 7.
Leaving a conference call
Go on-hook. If the other calls were both external numbers they will be dropped, otherwise the
callers are connected in a normal two-way call.
Removing last caller from conference
When on a conference call, press recall. The last person in the conference will be rejected, the other
party will be put on hold.
Talk privately to original caller
While on a conference call press recall twice, the first will eject the last party in the conference, the
second will bring the first caller back.
Data Protection
It is possible to prevent the system from sending warning tones or intruding on an exchange line call.
This allows an extension to communicate reliably with data calls from a modem or fax.
Using Data Protection may depend on whether the extension has several pieces of equipment
connected. In this case, you may decide per external call whether you want data protection (ad-hoc
data protection). You can also set an extension up with permanent data protection, this will stop
warning tones being heard over all future calls.
Make a data protected external call
Dial the data protection code, then the external number.
Make call in progress data protected
The data protection code after transfer will enable data protection for the current exchange line call.
Permanent data protection
All following calls will be made with data protection active.
Disable permanent data protection
All following calls will be made without data protection active.
Do not Disturb
This feature allows you to stop calls ringing at your extension. The caller hears unobtainable/error
tone when DND is set.
Turn on Do not Disturb
Callers will hear error tone when calling your extension.
You will not receive any calls and will hear broken dial tone to remind you that DND is
set.
Turn off Do not Disturb
Calls will be received as normal.
numberÑÑÑÑanswerÒÒÒÒ
numberÑanswerÒ
tel. no.
ÑÑÑÑon callÒÒÒÒ
Page 15

Section 2 – Using an Extension
11
Door Phones
The Door phone is designed to work with this telephone system only. It provides a two-way speech
link between any extension and the Door. The door phone has a call button for ‘ringing’ and a
permanently lit LED for easy location. Extension numbers 19 and 29 are reserved for the Door
Phones.
Call Door Phone 1
Door phone 1 is connected automatically after a brief alert tone.
Call Door Phone 2 (option)
Door phone 2 is connected automatically after a brief alert tone.
Answer a Door Phone call
Calls from the door phones will have a special ringing sound. The different rings are shown in your
Country specific specification sheet packed with this manual.
Open door while connected to door phone
While connected with the door phone dialling the open door code will activate the relay contacts for
the door phone you are connected to. This is usually to open an automatic door latch, if fitted.
Open door 1 latch
This will operate the first door latch relay at any time.
Open door 2 latch (option)
This will operate the second door latch relay at any time.
Both the extension calling and the Door Phone hear a single burst of tone before speech
can commence.
If no extension answers a door phone call within 70 seconds, the ringing will end.
Enquiry Call
This feature enables you to call another extension while the original party is on hold
Enquire at another extension
While on a call press recall, then dial the extension with which to enquire.
Return to original call
Press recall, you are connected to the original call.
Exchange Line Timed Break
The system has a function called Forward Recall. This allows you to operate telephone services on an
exchange line from an extension and allows you to connect the unit behind another telephone
system.
Flash Signal on External Line
Whilst on an existing call enter the code to send a recall to the exchange line.
Flash Transparent external call
Dialling 84 to seize a line, followed by the telephone number. Any press of the recall key on the
ÑÑÑÑon call with door phoneÒÒÒÒ
ÑÑÑÑon callÒÒÒÒ ext.
ÑÑÑÑon enquiry callÒÒÒÒ
Page 16

Installation & Programming Manual
12
phone will be sent out to the exchange line.
With a flash transparency call, it is not possible to use any features which require the use of
the
key.
Calls should not be made for at least 3 seconds after replacing the handset on a call with
flash transparency.
Extension Call Back
If the extension you are calling is busy, you may leave a call back indication, sometimes called
camping on an extension. When the extension becomes free you will be called back.
Enabling
When you hear busy tone, press 5.
Activation
Your extension will ring when the busy extension becomes free, pick up the receiver and the other
extension will now begin ringing.
Cancelling
If you do not answer a call back within 30 seconds, it will be cancelled. or
To cancel at any time enter the cancel code.
Extension Group Calls
The feature allows you to ring a programmed set of extensions simultaneously. The group ‘80’ will
ring with the normal internal ring cadence. Groups 81 to 83 have a special ring cadence to tell them
apart.
Call Extension Group
Call extension group 80 with normal internal ring cadence.
Call extension group 81 with one brief ring per cycle.
Call extension group 82 with two brief rings per cycle.
Call extension group 83 with two brief rings per cycle.
Holding Calls
It is possible to place any number of external callers on hold. While on hold the caller hears the hold
tone, or external music if this option is fitted. The caller will be unable to hear you. A call can be held
in two ways, exclusively and non-exclusively. A non-exclusive call hold allows any number of calls to
be placed on hold. Any extension may then pick up the held call. An exclusive hold allows you to
hold a call temporarily, e.g. to talk with another extension. A call on exclusive hold will ring back
when you hang up, and cannot be picked up by other extensions.
Put an external call on non-exclusive hold
This will place an external line on hold, if it is not retrieved within 1 minute the call will ring back as a
general call. The system administrator can change this 1 minute timeout to between 30 seconds and
4½ minutes, see page 40. Any extension may pick up this call.
Retrieve a call on non-exclusive hold
Dial the code shown with line number.
ÑÑÑÑbusy toneÒÒÒÒ
ÑÑÑÑringingÒÒÒÒ
ÑÑÑÑringingÒÒÒÒ
tttt
30 sec
Key
top: 0 for line systems
bottom: 9 for line sytems
ÑÑÑÑon callÒÒÒÒ
or
Ñ
on call
Ò
line no.
or
line no.
Page 17

Section 2 – Using an Extension
13
Put a call on exclusive hold
While on a call press the recall button, you may then dial another number to make an enquiry call. If
the extension hangs up the call will ring back your extension immediately.
Retrieve a call on exclusive hold
Press recall.
Last Number Redial
Redial last number
Dials the last external number phoned from this extension. An external line will be seized
automatically.
Delete last number from system memory
The last number will be deleted from the system memory, the 500 code above will no longer
function.
Each telephone may have a redial store of its own, independent from the system redial.
You must erase this too to ensure the last dialled number is kept confidential.
Note that if a specific line was seized to dial the last number then the phones redial key will
try to seize the same line. It will give busy tone if this line is in use, even if other lines are
free. If ‘0’ is used to seize a line then a free line will be used automatically.
Lock Extension
It is possible to lock an extension so that it is not possible to make or receive external calls,
depending on the system programming. To return to normal operation the user must unlock the
extension with a unique PIN number.
Lock an extension
Enter the code. No further calls may be made from this extension.
Unlock an extension
Enter the code, including the PIN number. The system administrator will provide this. It is now
possible to make and receive calls as normal.
Note that it is always possible to dial internally from a locked extension and to dial the
emergency services.
Paging
A paging call can be made to all terminals. This will connect a call in handsfree mode without waiting
for a user to answer. The system administrator must enable this feature for your extension before it
can be used. A brief warning ring will be heard by the called person before the page is connected.
Page a single terminal extension directly
Dial 1*, followed by the extension number.
Page a single terminal extension if no answer
Dial an extension, then dial 1 during the first 10 seconds of ringing tone.
ÑÑÑÑon callÒÒÒÒ
ÑÑÑÑon callÒÒÒÒ
ÑÑÑÑconfirmation toneÒÒÒÒ
PIN
ÑÑÑÑconfirmation toneÒÒÒÒ
ext
extÑÑÑÑringing ÒÒÒÒ
Page 18

Installation & Programming Manual
14
Page all terminals in an extension group
Dial 1*, follwwed by the extension group number 80 – 83.
Page via public address system
Dialling 10 will connect directly to the public address system, if connected.
Reminder call
It is possible to set an alarm which will ring at a set time of the day. It has a special ring sound shown
in your country specific specification sheet, packaged with this manual.
Once only alarm
Enter the code where the time in 24-hour format and with 4 digits. E.g., 1:30 am is entered as 0130.
This alarm will ring only once; it must be set again before it will sound again.
Daily alarm
Enter the time as with the once only alarm. This alarm will ring at the same time every day until
cancelled.
Answer alarm
Go off-hook, the alarm will then stop sounding.
Cancel once only alarm
This will erase the alarm setting and the extension will remain quiet.
Cancel daily alarm permanently
This will turn off the alarm.
Room Monitor
This feature allows you to listen in to an extension left off-hook directly. This can be achieved from
any extension or via an outside line.
Set an extension to be monitored from other extensions only
From the extension to be monitored, enter the room monitor code and leave the phone off hook.
Set extension to be monitored from extensions and exchange lines
Enter code where ‘exch’ is the exchange line to monitor from. Do not replace the handset.
Listen to room monitor
Go off hook and dial the extension number that was left off-hook. The system administrator will
have details about accessing the room monitor from an exchange line.
De-activate room monitor
Replace the handset on the monitored extension to turn off.
Speed Dialling
Regularly dialled numbers can be programmed into the system and accessed by dialling a short code.
There are 2 types of speed dialling available to a SLT:
group
time
ÑÑÑÑconfirmation toneÒÒÒÒ
time
ÑÑÑÑconfirmation toneÒÒÒÒ
ÑÑÑÑconfirmation toneÒÒÒÒ
ÑÑÑÑconfirmation toneÒÒÒÒ
ÑÑÑÑconfirmation toneÒÒÒÒ
exch
ÑÑÑÑconfirmation toneÒÒÒÒ
ext. no.
Page 19

Section 2 – Using an Extension
15
Ninety-nine system-wide speed dial numbers. These can be used by all extensions but only
changed by the administrator. System speed dials are exempt from call barring.
Ten personal speed dial numbers of up to 25 digits each, dialled with codes 70 – 79. These
are unique to each extension and may be freely changed.
Dial a speed dial number
Go off-hook and dial the speed dial code. Numbers 70 to 79 are used for extension specific speed
dial numbers, while 501 to 599 are used for the system-wide speed dial numbers.
Program a personal speed dial number
Program personal speed dial numbers, where ‘entry’ is a digit from 0 to 9, for personal speed dial
numbers 70 - 79. The telephone number is an external number of 25 digits maximum. It is not
necessary to include the digit ‘0’ to seize an outside line.
Delete a personal Speed dial number
Where ‘entry’ is a number from 0 - 9 for the personal speed dial numbers 70 – 79.
speed dial code
entry
tel no
entry
Page 20

16
3. System Programming
Introduction
All system programming is carried out from either extension 13 or a PC running the programming
tool, connected via the V24 option card. In order to program from extension 13 a tone telephone
must be used. The Executive Terminal simplifies the operation further by providing full menu driven
programming on its built in display. The factory defaults on power-up prior to any programming are
shown on page 67.
After programming features, the power must not be switched off for six minutes. This is to
ensure the system has written all the programming details to the non-volatile system
memory (EEPROM).
How to Program the System
Step 1: Lift handset of Extension 13.
Step 2: Enter the Programming Code shown in this section.
Step 3: Wait for confirmation tone, three short beeps.
Step 4: Repeat at step 2 for further codes, or hang up.
Remember to keep the system powered up for a minimum of 6 minutes following the last
programming step.
Repeat this procedure for each programming step.
Throughout the Programming section there are boxes like the one below, which show where codes
may be found in the Executive Terminal programming menu. These menus ensure the correct codes
are always sent and are the preferred method of programming where available. This method of
programming is dealt with on page 17.
System Settings Miscellaneous Example menu item
During system programming, the installer must listen for -
Confirmation Tone (3 short beeps) after the Programming Command has been entered, or
Error Tone, an interrupted tone like busy tone, indicating that Programming Code has not
been accepted.
A list of the different tones may be found in the Country specific specification sheet.
To Program Several Extensions with the same Feature:
E.g.: to allocate call barring class C (0 to 5) to
extensions 11,13 & 21
There is a master reset code to restore factory defaults and erase all programmed data except the
system configuration pin code and clock which will remain as per previous settings.
Master Reset Code
Section
3
Important!
PIN C
PIN
Page 21

Section 3 – System Programming
17
Special Programming Mode
There is also a special programming mode that allows the installer to omit '*9' PIN prefixes when
programming feature codes. To enter this mode at extension 13 dial the code above. You will hear
confirmation tone followed by an interrupted dial tone. If you are using a Terminal at extension 13
the LED for extension 13 will stay on, indicating that the extension is busy. An extended menu of all
the relevant system programming codes will then be accessible on the Executive Terminal.
During this special programming mode outgoing calls cannot be made at extension 13. Incoming
calls will be accepted, although the extension will then no longer be in programming mode when an
incoming call is answered. The programming mode may be exited by any of the following methods:
Entering the code 9990# at extension 13.
Answering a normal incoming call at extension 13.
Leaving extension 13 idle for five minutes, this will automatically exit the system
programming mode.
Enter Special Programming Mode
Exit Special Programming Mode
Executive Terminal Programming Menus
To access programming menus at extension 13 using the Executive Terminal press the Menu key
(centre key under the display) and scroll through the menus using the Scroll Keys (left and right
under the display)
The main menu and sub menus are:
Extension Settings
General Settings
ISDN Settings
Terminal Features
When in special programming mode after entering *9 PIN 9991# (details above) one more menu is
available, System Settings, detailed on page 19. Note that some settings are accessible through the
General Settings menu. This allows features to be turned on and off, such as auto answer features,
day/night switching and alarms.
PIN
Page 22
Installation & Programming Manual
18
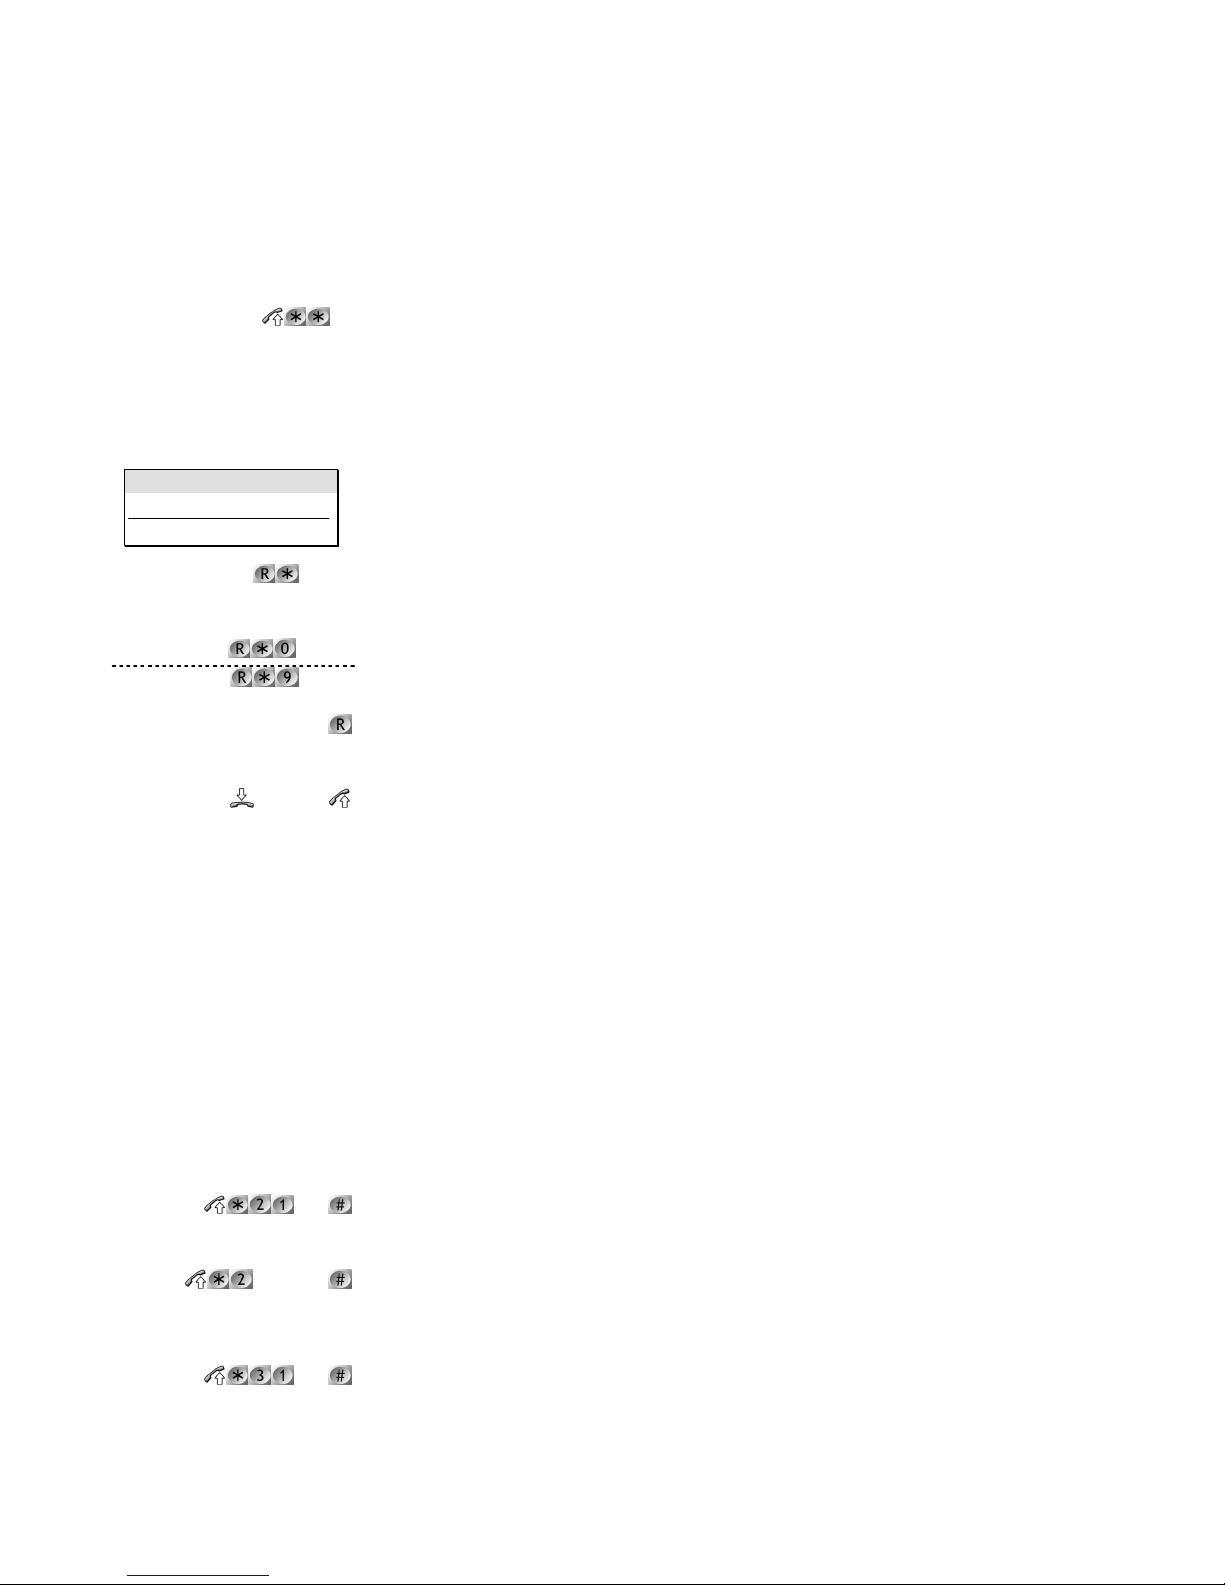
Executive Terminal Extension programming menu
Figure 3-1 shows the menus available for programming an extension from any Executive Terminal,
note that the General Setting and ISDN setting menus are only available when connected to the
master extesnion 13.
Figure 3-1 Extension programming menus
Call diversion
Data protection
Do not disturb
Send msg.
Leave msg. on terminal
Clear msg. on terminal
Reminder Call
Room monitor
Extension speed numbers
Disable Terminal
Clock settings
Day-Night mode
Exch allocation
CDR
Call warning tone
FAX
A
uto answer settings
Hot line assignment
Set Exch divert
Set alarms
Change pin code
Music On Hold
Boss / Secretary
Set the unit cost
Low pitch
Mid pitch
High pitch
A
uto answer On
A
uto answer Off
Headset operation On
Headset operation Off
Reset prog. Keys
Language English
Language Spanish
Line access code: 0
Line access code: 9
Show display line 2
Hide display line 2
Show command strings
Hide command strings
Line 1 Off/On
Set pt to pt/mpt
Pick analog/ISDN first
CLIR
COLR
Set MSN numbers
Clear all MSN numbers
Set MSN ignore no.
Clear all MSN ignore no.
Extension Settings
General Settings
ISDN Settings
Terminal Features
CLI Messages
Set divert all
Set divert delay
Divert all/delay Off
Set divert busy
Divert busy Off
Daily remind.call Off/On
Set daily reminder call
Onceoff remind.call Off
Set onceoff remind.call
Internal/external Monitor
Internal monitor
Set FAX extension
Clear FAX extension
Enable to receive FAX
Disable FAX
A
dhoc night mode
A
dhoc day mode
A
utomatic mode
Set time
Set date
Exch diversion Off/On
Set diversion on line N
Set immediate hot line
Immediate hot line Off
Set delayed hot line
Delayed hot line Off
A
uto answer Off/On
Set call control
Disable call control
Set remote control
Disable remote control
Set remote paging
Disable remote paging
Set DISA
Disable DISA
Arm Alarm 1
Arm Alarm 2
Alarm 1 warning msg.
Alarm 2 warning msg.
Page 23
Section 3 – System Programming
19
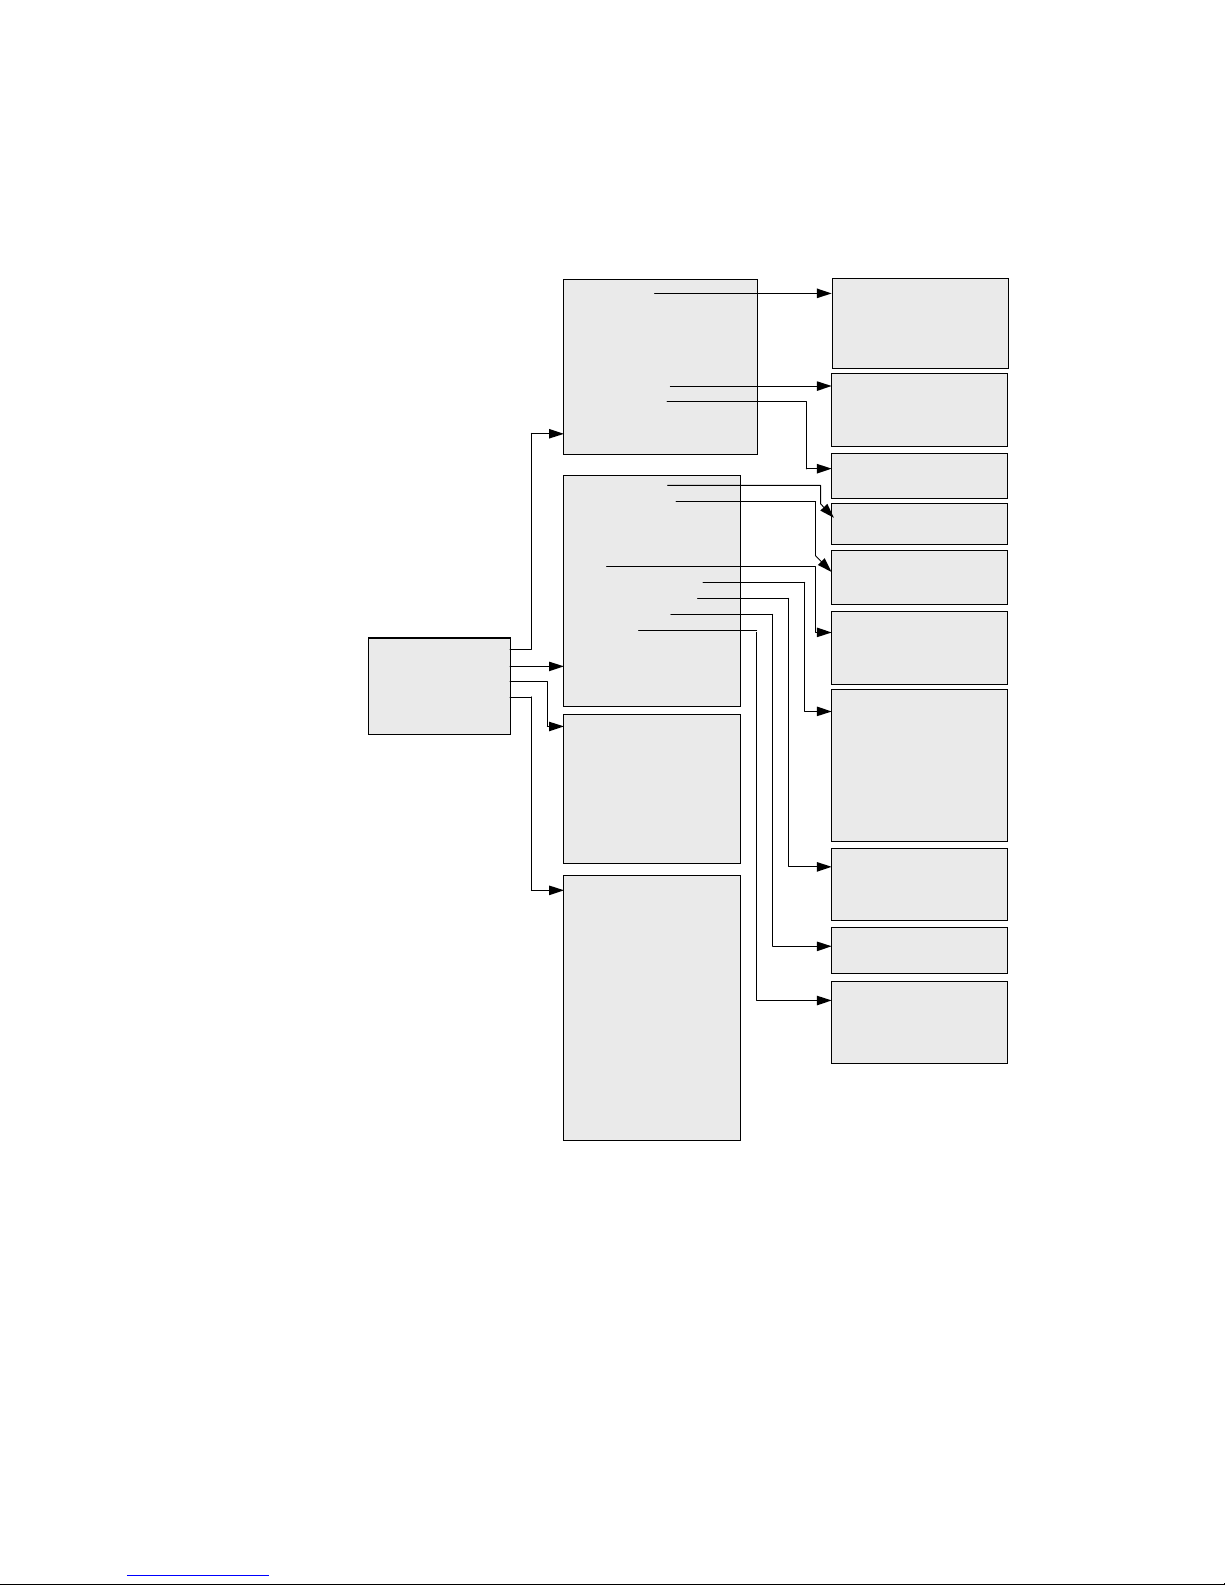
Executive Terminal System programming menu
An Executive Terminal connected to extension 13 is able to enter a system programming mode with
the code *9 PIN 9991 #. One further menu will then be made available for changing system
parameters, shown in Figure 3-2.
Figure 3-2 System Programming Menu
Clock settings
Incoming ring
System speed numbers
A
uto answer access codes
Set call barring
Program bar filters
Program exempt filters
Exch divert number
Miscellaneous
A
larms
Hot line
Bundle splitting
System size
A
ccount Access
Set Exch 1 day mode
Set Exch 2 day mode
Set Exch 3 day mode
Set Exch 4 day mode
Set Exch 5 day mode
Set Exch 6 day mode
Set door ph. day mode
Set All Exch day mode
Set Exch 1 night mode
Set Exch 2 night mode
Set Exch 3 night mode
Set Exch 4 night mode
Set Exch 5 night mode
Set Exch 6 night mode Set
door ph. night mode
Set All Exch ni
g
ht mode
Remote control code
Remote paging code
DISA code
Bar filter 1 … 9
Clear bar filter 1 … 9
A
ssign Ext. day class 1 … 5
A
ssign Ext. night class 1 … 5
Clear Ext. day class
Clear Ext. night class
Bar filter -> class 1
Bar filter -> class 2
Bar filter -> class 3
Exempt filter -> class 1… 5
Clear all bar settings
Enable intrusion rights
Disable intrusion rights
Enable DTMF phone
Disable DTMF phone
Set TAM
Clear TAM
Exch 1 special cadence
Exch 1 normal cadence
Reset system
Disarm alarm 1
Disarm alarm 2
A
larm 1 function
A
larm 2 function
A
larm 1 loop
A
larm 2 loop
A
larm number 1
A
larm number 2
Confirm number
Reset alarms
Immediate numbe
r
Delayed number
A
ssign Exch 1 to Ext
…
A
ssign Exch 6 to Ext
A
ssign All Exch to Ext
Cancel Exch 1 to Ext
…
Cancel Exch 6 to Ext
Cancel All Exch to Ext
2+8 system
4+10 system
6+12 system
Set time
Set date
Set day time zone
Clear da
y
time zone
System Settings
LCR Settings
Exempt filter 1 … 9
Clear exempt filter 1 … 9
A
ssign Extension
Remove Extension
A
ssign Class to Account
A
ssign PIN to Account
LCR On/Off
Carrier access codes
Set peak time zone
Clear peak time zone
Carrier selection
Set pause period
LCR pin code
LCR exempt numbers 0-19
LCR exem
p
t numbers 20-39
Page 24

Installation & Programming Manual
20
System Programming Code Summary
The prefix *9 is used to program a feature, *8 is used to activate it.
The default PIN code is 7373.
System programming can only be carried out at extension 13.
Feature Programming Codes Action
*9 PIN 881 ac_no, ac_pin # Assign a PIN number to an account (01-40)
*9 PIN 882 ac_no, class # Assign a call barring class to an account
*9 PIN 883 1 ext. # Switch on account code operation for an extension
Account Code
Operation
(p 24)
*9 PIN 883 0 ext. # Switch off account code operation for an extension
*9 PIN 2 carrier 0 acc.code # Program carrier access code (9 digits max)
*9 PIN 2 carrier 0 # Clear access code for carrier
*9 PIN 215 carrier
auth_code #
Program optional authorisation code (10 digits max)
*9 PIN 215 carrier # Clear authorisation code
*9 PIN 202 tab_ent prefix # Program 4 digit exempt table number
*9 PIN 202 tab_ent # Clear the exempt number (tab_ent = 00 to 39)
*9 PIN 205 start end # Program peak time zone
*9 PIN 205 # Clear time zone
*9 PIN 206 pause # Program pause, 0 – 9 secs
*9 PIN 203 day
charge_period carrier #
Program alternative carrier for set time
*9 PIN 201 # Switch on alternative carrier feature
Alternative
Carrier
Selection
(p 25)
*9 PIN 200 # Switch off alternative carrier feature
*9 PIN 435 ext. # Set TAM ext.; ext. will not ring on internal general calls
and code calls
Answering
Machine /
Voicemail
Programming
(p 26)
*9 PIN 435 # Clear TAM extension
*9 PIN 242 # Record answer message 1 (fax/voice card option)
*9 PIN 243 # Record answer message 2 (fax/voice card option)
*8 430 # Switch off incoming call control all exch. Lines
*8 43 N A # Switch on incoming call control exch. line N
*8 440 # Switch off remote paging all exch. Lines
*8 44 N A # Switch on remote paging exch. line N
*8 450 # Switch off Fax select for all exch. Lines
*8 45 N A # Switch on Fax select for exch. line N
*8 460 # Switch off DISA for all exch. lines
*8 46 N A # Switch on DISA for exch. Line N
*9 PIN 840 number # Program DISA emergency number
*8 470 # Switch off remote programming for all exch. Lines
*8 47 N A # Switch on remote programming for exch. line N
*9 PIN 461 ACCESS CODE # Program DISA Access Code
*9 PIN 471 ACCESS CODE # Program Remote programming Access Code
*9 PIN 441 ACCESS CODE # Program Remote paging Access Code
*9 PIN 4X0# Delete access code X= 4, 6 or 7
*8 48 N delay # Program ring period before auto-answer
Automatic
Answering
(p 27)
*8 401 # Switch on automatic answering
Page 25

Section 3 – System Programming
21
Feature Programming Codes Action
*8 400 # Switch off automatic answering
*8 531 # Enable boss – secretary working Boss –
Secretary Mode
(p 32)
*8 530 # Disable boss – secretary working
*9 PIN 981 F 1 number # Program number prefix to bar filter F
*9 PIN 981 F 0 # Clear bar filter F
*9 PIN 96 CFX # Assign (X=1) / clear (X=0) bar filter F to class C
*9 PIN 9810 # 9810 # Clear all user programmable bar filters
*9 PIN 960 # 960 # Clear all bar filters from all classes
*9 PIN 982 F 1 number # Program "number" to exempt filter F
*9 PIN 982 F 0 # Clear exempt filter F
*9 PIN 9820 # 9820 # Clear all programmable exempt filters
*9 PIN 97 C F X # Assign (X=1) / clear (X=0) exempt filter F to class C
*9 PIN 970 # 970 # Clear all exempt filters from all classes
*9 PIN 95 C ext. # Assign class C for daytime operation to extension
*9 PIN 85 C ext. # Assign class C for nighttime operation to extension
*9 PIN 882 ac_no C # Assign class to user account
*9 PIN 950 ext. # Remove barring from an extension for day time
operation
*9 PIN 850 ext. # Remove barring from an extension for night time
operation
*9 PIN 900 # 900 # Clear all call barring user programmable data
Call Barring
(p 33)
*9 PIN 990 # 990 # Reset Call Bar settings to default data
*8 251 # Enable CDR format for a serial printer
*8 250 # Disable CDR printer format & enable PC mode
*8 3111 # Mask last 4 digits in CDR record
*8 3110 # Do not mask last 4 digits in CDR record
*8 323 ext # Output call details for hotel logging enabled extension
*8 3240 # Enable logging of standard extension calls at end of call
*8 3241 # Disable logging of standard extension calls
*8 321 ext # Enable hotel call logging for extension
Call Detail
Recording
(p 35)
*8 320 ext # Disable hotel call logging for extension
*8 510 # Disable the call waiting tone Call waiting
tone
(p 37)
*8 511# Enable the call waiting tone(default)
*8 951 xxxx # Set the metering unit cost in tenths of a currency unit,
e.g.: 8324 = $8, 32.4c.
Call Unit Cost
(p 35)
*8 951 0000 # Clear the unit cost and count unit meter pulses only.
*9 PIN 675 HH MM # Setting the time in 24 Hour / Military Format Clock Setting
(p 37)
*9 PIN 676 DD MM YY # Setting the date.
*9 PIN 242 # Record answer message 1 (fax/voice card option)
*9 PIN 243 # Record answer message 2 (fax/voice card option)
*8 48 L delay # Switch on courtesy service and answer after delay secs.
*8 48 L 0 # Switch off courtesy service on line L
*8 491 ext # Assign single extension for courtesy service ringing
Courtesy
Service
(p 37)
*8 490 # Cancel single extension for courtesy service ringing
*9 371 # 371 # Clear current day-night zone settings
*9 PIN 371 hhmm HHMM# Program day zone which is used in Automatic mode
Day/Night
Mode
(p 38)
*8 371 # Switch on automatic day/night switching
Page 26

Installation & Programming Manual
22
Feature Programming Codes Action
*8 360 # Set day mode and disable automatic mode
*8 361 # Set night mode and disable automatic mode
*9 PIN 726 # Use switch on alarm loop 2 for day / night switching
*9 PIN 361 EXT # Set extension as DTMF only.
*9 PIN 360 EXT # Cancel extension as DTMF only.
*8 390 # Default recall window (40 – 160 ms)
DTMF
Extensions
(p 39)
*8 39 w # Recall window (w=1: 60 – 160 ms … w=5: 100 – 160ms)
*9 PIN 91 line 1 ext # Allow an extension to use an exchange line
(exch.=1…6 or 0 for all)
*9 PIN 91 line 0 ext # Prevent an extension using an exchange line
*8 911 # Enable Exchange Line Group feature
Exchange Line
Assignment
(p 39)
*8 910 # Disable Exchange Line Group feature
*8* ext. PIN # Set extension PIN number (3 digits) Extension
locking
(p 40)
*8* ext. # Reset to default extension PIN (any 3 digits allowed)
*9 PIN 840 number # Program call forward number
*9 PIN 841 number # Program and verify call forward number
*9 PIN 842 number Program call forward number including # and time out
*9 PIN 840 # Reset call forward number
*8 8NA # Switch on external call forwarding on line N
*8 8N0 # Switch off external call forwarding on line N
*8 871 # Enable call forwarding for the system
External Call
Diversion
(p 40)
*8 870 # Disable call forwarding for the system
*9 PIN 455 ext # Program ext. as a fax (no general calls, data protection)
*9 PIN 455 # Clear fax extension
*8 45 line 4 # Set fax monitoring on a line
*8 45 line ans_type # Set auto-answer monitoring on a line
Fax Call
Handling
(p 40)
*8 450 # Clear automatic fax answering
*8 23 delay #
Program call hold timeout delay (x 30s)
*8 221 delay #
Program call park timeout delay (x 30s)
*8 222 delay #
Program camp on call timeout delay (x 30s)
*8 224 delay #
Program extension ring timeout delay (x 15s)
*8 225 delay #
Program unannounced transfer timeout delay (x 15s)
Hold and ring
timers
(p 42)
*8 226 delay #
Program call back extension timeout delay (x 15s)
*9 PIN 660 number # Program immediate hot line number
*9 PIN 661 number # Program Immediate hot line number & verify
*8 661 EXT # Switch on immediate hot line & assign to an ext.
*8 660 # Switch off immediate hot line
*9 PIN 680 number # Program delayed hot line number
*9 PIN 681 number # Program delayed hot line number & verify
*8 681 EXT # Switch on delayed hot line & assign to an ext.
Hot Line
Programming
(p 42)
*8 680 # Switch off delayed hot line
*9 PIN 791 ext. # Enable extension paging and intrusion on busy calls. Intrude
Programming
(p 43)
*9 PIN 790 ext. # Disable extension paging and intrusion on busy calls.
*8 260# Set all ISDN cards point to point mode
(then switch off / on)
ISDN
Programming
(p 43)
*8 261# Set all ISDN cards to point to multipoint mode
(then switch off / on)
Page 27

Section 3 – System Programming
23
Feature Programming Codes Action
*9 PIN 0100 num # Program ISDN base number, card 1
*9 PIN 0102 num Program ISDN base number, card 1 incl. # (wait 5sec for
conf. tone)
*9 PIN 0100# Clear ISDN base number, card 1
*9 PIN 0200 num # Program ISDN base number, card 2
*9 PIN 0202 num Program ISDN base number, card 2 incl. # (wait 5sec for
conf. tone)
*9 PIN 0200# Clear ISDN base number, card 2
*8 271# Enable CLIR for system
*8 270# Disable CLIR for system
*8 281# Enable COLR for system
*8 280# Disable COLR for system
*9 PIN 0 ext 0 num # Program MSN number to extension
*9 PIN 0 ext 2 num Program MSN number to extension, incl. # (wait 5sec for
conf. tone)
*9 PIN 0 ext 0 # Clear MSN number from extension
*9 PIN 0100# 0100# Clear all MSN numbers
*9 PIN 05 N 0 num # Program MSN number to ignore (N=1 to 8)
*9 PIN 05 N 2 num Program MSN number to ignore, including # (N=1 to 8)
*9 PIN 05 N 0 # Clear entry from MSN ignore table
*9 PIN 0500# 0500-# Clear all 8 MSN to ignore numbers
*8 291# Enable analogue line 1
*8 290# Disable analogue line 1
*8 200# Line selection analogue first then ISDN
*8 201# Line selection ISDN first then analogue
*9 PIN 150# Internal hold tone Music on Hold
(p 45)
*9 PIN 151# External music source
Reset System
(p 16)
*9 PIN 000# 000# Clock and PIN Code unchanged
*9 PIN 61 line delay ext # Add extension to ring on exch line during day
*9 PIN 61 line 0 ext # Remove extension from ringing on exch line during day
*9 PIN 31 line delay ext # Add extension to ring on exch line during night
*9 PIN 31 line 0 ext # Remove extension from ringing on exch line during night
*9 PIN 600 # 600 # Reset ringing to default (all extensions ring day & night)
*8 211 MSN_entry ext # Add an extra extension to ring on MSN number
*8 210 MSN_entry ext # Remove an extension from ringing on an MSN number
*8 351 group ext # Add an extension to ring in extension group
*8 350 group ext # Remove an extension from ringing in extension group
*8 3121 # Swap internal ring and external ring cadences
*8 3120 # Use normal internal and external ring cadences
*9 PIN 630 # Use standard exch line ring cadence on line 1
Ringing
Settings
(p 45)
*9 PIN 631 # Use alternate ring cadence for call on line 1
*9 PIN 73 x # Alarm Loop 1 Setting and Entry Time Delay
*9 PIN 74 x # Alarm Loop 2 Setting and Entry Time Delay
*9 PIN 781 ext # Add an extension to ringing on internal alarm
*9 PIN 780 ext # Remove an extension from ringing on internal alarm
*9 PIN 7510 number # Program external notification number 1
Security Alarm
Programming
(p 46)
*9 PIN 7520 number # Program external notification number 2
Page 28

Installation & Programming Manual
24
Feature Programming Codes Action
*9 PIN 771 number # Program Confirmation Number (4 digits max)
*9 PIN 71 type # Select Alarm loop 1 type
*9 PIN 72 type # Select Alarm loop 2 type
*9 PIN 7* type # Select Alarm loop type both loops
type=1: internal, 2:ext no conf., 3: ext with conf., 4: int
& ext no conf, 5: int & ext with conf., 6: day/night
switch, 7: social 1, 8: social 2
*9 PIN 244 # Record alarm loop 1 trigger notification message
*9 PIN 245 # Record alarm loop 2 trigger notification message
*9 PIN 246 # Record alarm code confirmation message
*8 73 x # Assign Tone/ Msg1/2 to Alarm 1 x=1/2/3
*8 74 x # Assign Tone/Msg1/2 to Alarm 2 x=1/2/3
*8 711 # Arm Alarm 1
*8 721 # Arm Alarm 2
*8 7 * 1 # Arm both Alarms
*9 PIN 710 # 710 # Disarm Alarm 1
*9 PIN 720 # 720 # Disarm Alarm 2
*9 PIN 7*0 # 7*0 # Disarm both alarms
*9 PIN 700 # 700 # Master Reset Security alarm settings to default
*9 PIN 730 # 730 # Reset Alarm 1 to default settings
*9 PIN 740 # 740 # Reset Alarm 2 to default settings
System PIN
Number
(p 49)
*5 OLD PIN NEW PIN # NEW
PIN#
Change system PIN Number and reset Power Fail LED
Indicator
*9 PIN 9991# Enter system programming mode
(Extension 13 hears special dial tone for 5 minutes. *9
PIN codes not needed at start of codes)
Special
Programming
Mode
(p 17)
9990# Exit system programming mode
*9 PIN 110# 110# System size 2 exchange lines, 8 extensions max
*9 PIN 111# 111# System size 4 exchange lines, 10 extensions max
System Size
(p 49)
*9 PIN 121# 121# System size 6 exchange lines, 12 extensions max
*9 PIN entry 0 tel no # Program system speed call number (entry = 501 to 599)
*9 PIN entry 0 # Clear system speed call number (entry = 501 to 599)
System Speed
Dialling
(p 49)
*9 PIN 500 # 500 # Clear all system speed call numbers
*9 PIN 24 X # Voice Message Recording from Extension 13 Voice Message
Programming
(p 50)
*8 24 X # Play back system message from Extension 13
Account Code Operation
Account code operation allows calls to be barred and logged depending on the user, not the
extension. An extension may be switched to 'account code mode', it will then require each user to
input the sequence: ** then 'account-pin' before making the external call in the normal manner. Up
to 40 different accounts may be set up.
Call detail logging will record the external call details with the user account number as well as the
extension number if the extension has account code operation enabled. See Call Detail Recording
(CDR) on page 35 for the format used.
Each extension may be separately configured to work with account code operation or work in the
standard manner. Only one PIN code may be assigned to each user account.
Page 29

Section 3 – System Programming
25
Extensions which have account code operation set up but no valid account pin is entered will be
assigned call barring class 4. This means incoming calls will be accepted but only emergency numbers
and numbers found in the exempt table may be dialled. In order to dial other numbers the user must
dial the account PIN code before the telephone number. System speed dial numbers are exempt
from call bar checking after the account pin has been entered.
Default
No extensions use call accounting and no accounts are set up.
Assign a PIN number to an account
System Settings Account Access Assign PIN to Account
Assign a call barring class to an account
System Settings Account Access Assign Class to Account
Switch on account code operation for an extension
System Settings Account Access Assign Extension
Switch off account code operation for an extension
System Settings Account Access Remove Extension
Alternative Carrier Selection (ACS)
Default
No calls are routed via alternative carriers. All carrier details
are blank.
Description
ACS allows four alternative carriers to be used for external
calls in addition to the standard network. The carrier is
selected using three programmable values as follows:
Four alternative carriers may be programmed, each
with an access code of up to 9 digits.
An optional authorisation code may be programmed
with up to ten digits for each of the four alternative
carriers.
An optional pause of 0-9 seconds may be
programmed between dialling the carrier access code,
authorization code and the dialled telephone number,
if required by the network.
Alternative carrier selection works in the following way:
If an alternative carrier is enabled and active for the time of
day then the full external number is compared against an
exempt table. The exempt table contains 40 entries of 1-4
digits. If the digit(s) of any exempt table entry match the
start of the dialled digits then the call will not be sent via an
alternative carrier. This allows local numbers, freephone
numbers and other network specific numbers to be
excluded from ACS. A number in the exempt table will
never be sent via ACS, regardless of the other settings. The
figure opposite shows the procedure used by the system to
route calls via an alternative carrier.
The time and day method of carrier selection works by
allowing or clearing an alternative carrier for the peak time
and off-peak time period of every day. The peak time
period is separately programmed between any two hours of
Key
ac_no =
01 – 40 for user account
number
ac_pin =
pin number for the
account, 4 digits
class =
0 for no COS checking
1 – 5 for call barring
class of service 1 to 5
PIN ac_no, ac_pin
PIN ac_no, class
PIN ext.
PIN ext.
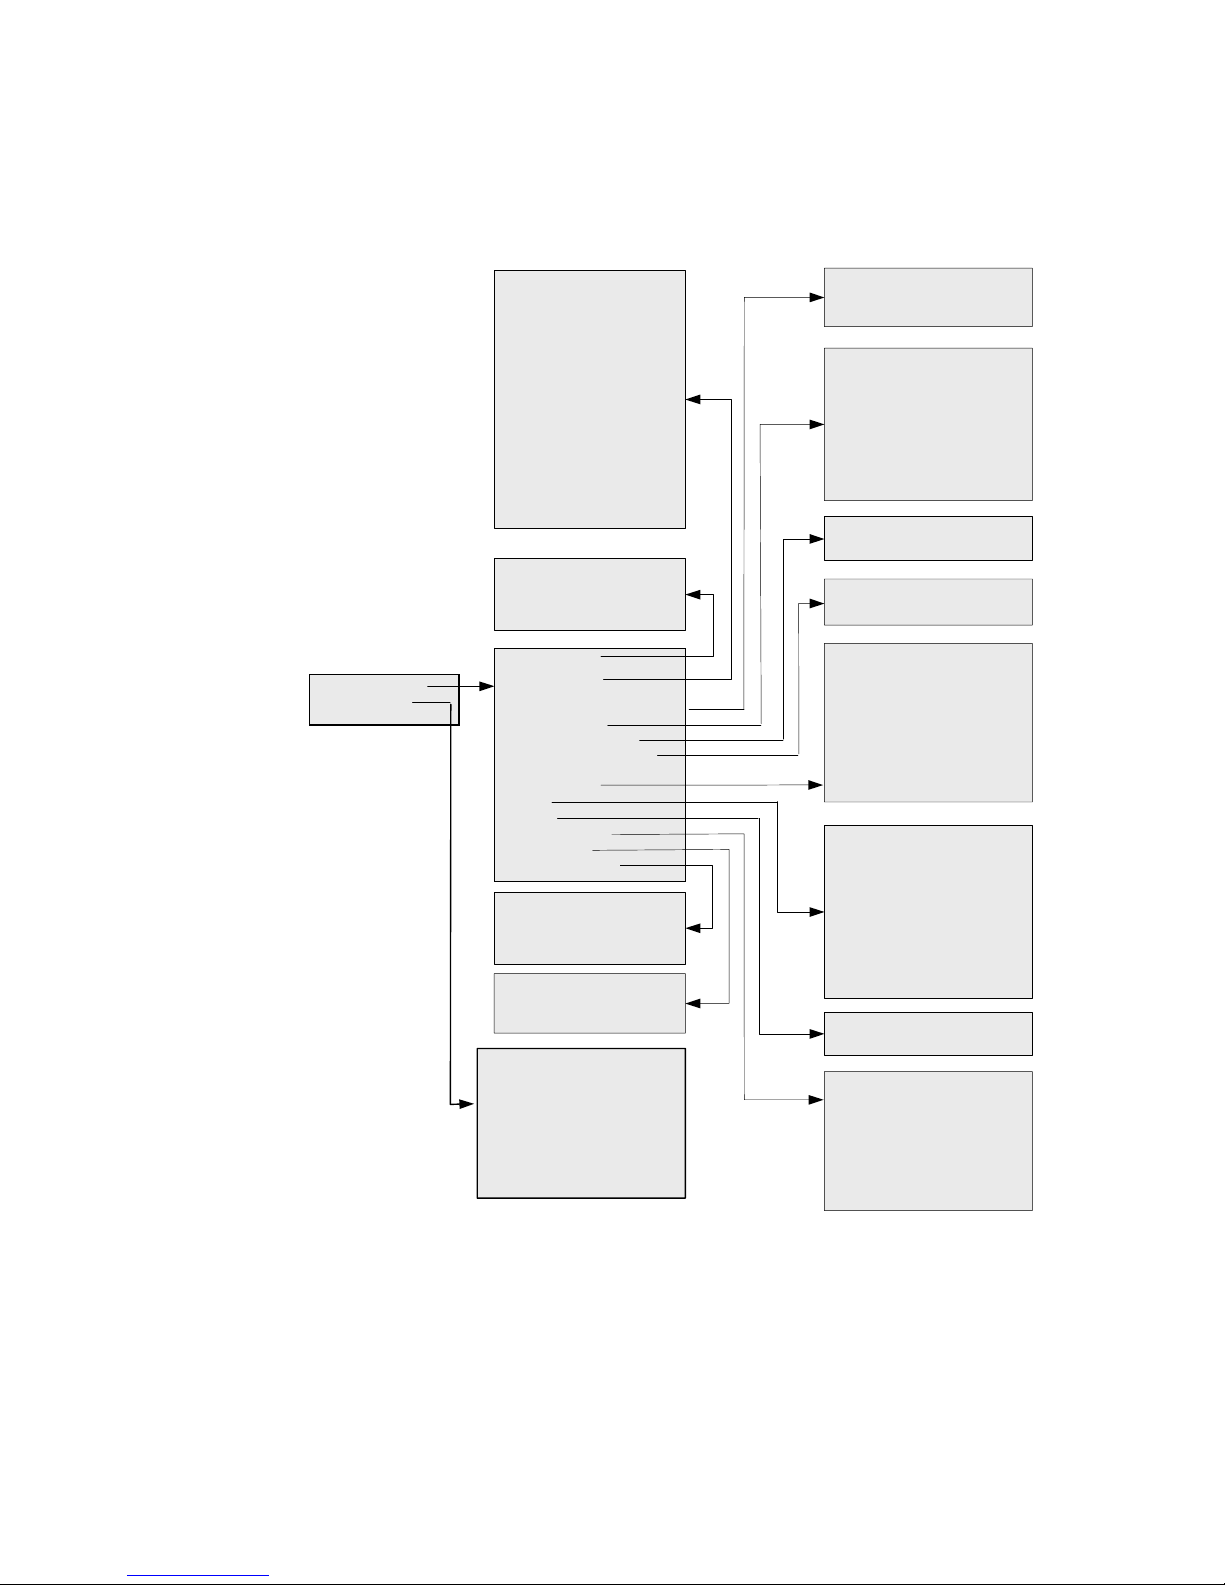
Figure 3-2 A.C.S. Dialling
Yes
No
Yes
Yes
Yes
No
External tel. no. dialled
Is non-default
carrier prog. for
curr. day/time?
Tel. no. begins
with an entry in
exempt table?
Is authorization
code
programmed?
Dial external telephone
number
Dial out carrier access code
for cur. time and day then
pause for programmed
pause time
Dial authorization code then
pause for programmed
pause time
Dialing finished
Page 30

Installation & Programming Manual
26
the day and is not to be confused with day/night programming.
There is a separate code which acts as a 'master switch'. This is to enable and disable alternative
carrier selection without losing any of the ACS programming.
Program Carrier access code
LCR Settings Carrier access codes
Clear access code for the carrier
Program optional Carrier Authorisation code.
LCR Settings Carrier auth codes
Clear Authorisation code for the carrier
Program optional pause duration of 0 to 9 seconds
LCR Settings Set pause period
Switch on ACS for a particular carrier all day every day
LCR Settings Carrier selection
Switch on ACS feature
LCR Settings LCR On/Off On
Switch off ACS feature
LCR Settings LCR On/Off Off
Advanced Programming For Alternative Carriers
Note: the day of the week is set automatically by the system whenever the date is programmed. See
Clock Setting on page 37.
Programme the peak time zone
LCR Settings Set peak time zone
Clear the peak time zone
Programme ACS by time and by day
LCR Settings Carrier selection
Programme table of 40 exempt numbers
LCR Settings LCR exempt numbers
Numbers beginning with these 4 digits are not to be re-routed and will be dialled without using an
alternative carrier.
Clear an ACS exempt table entry
Answering Machine / Voicemail
Programming
An extension set as an answering machine does not ring on internal code calls or general calls. Also, a
call answered at an answering machine extension may be picked up from another extension by
calling the TAM extensions, then dialling 2 at busy tone.
The system also provides DTMF signalling for connecting advanced voicemail systems. This allows
intelligent routing of calls to the correct extension mailbox.
Each user must enable a divert mode to the answering machine extension (see page 8). When the
answering machine receives a call diverted from another extension, the system will send the DTMF
digit ‘8’ followed by the extension number when the call is answered. The voicemail unit should be
programmed to recognise this sequence to divert to the correct mailbox.
When a call has been diverted to the answering machine extension, the system will give the extension
a broken dial tone to indicate a message is waiting. In addition the system Terminal message key
LED will flash. The dial tone and LED will only return to normal when the extension has returned a
call to the answering machine extension to retrieve the message.
If the answering machine extension picks up a general call then the system will send the codes ‘813’
for the master extension mailbox 13.
PIN carrier accesscode
Key
carrier =
1 - 4 for alternative
carrier
0 = no alternative carrier
accesscode =
carrier access number
(9 digits max)
authcode =
optional carrier
authorization code (10
digits max)
pause =
0 – 9 for pause of 0 – 9
secs
start =
00 – 23 for time of day in
hours to begin peak time
end =
00 – 23 for time of day in
hours to end peak time
day =
1 – 7 for Sunday to
Saturday
8 for every day.
charge_period=
0 for off peak
1 for peak
2 for all day
table_entry =
00 – 39 for table position
exempt_prefix =
number to ignore for
carriers (4 digits max)
PIN carrier
PIN carrier, authcode
PIN carrier
PIN pause
PIN carrier
PIN
PIN
PIN start, end
PIN
PIN day, charge_period, carrier
PIN table_entry, exempt_prefix
PIN table_entry
Page 31

Section 3 – System Programming
27
Default
No extension is set as an answering machine.
Set TAM extension
System Settings Miscellaneous Set TAM
Clear TAM extension
System Settings Miscellaneous Clear TAM
Automatic Answering
Automatic answering provides a powerful and simple way of giving callers access to extensions,
external numbers, remote programming and the public address port without any user intervention.
The system can automatically answer incoming calls on specific exchange lines with a tone or one of
two voice messages of up to 20 seconds, if the fax/voice card option is fitted. By dialling a digit the
caller can access one of the auto-answer features shown in the table below:
Type Digit Description
Remote
programming
This allows access to system programming codes which start *8 or *9
Remote paging
This gives access to paging port
DISA
This allows the caller to directly dial extensions or be forwarded to an
external number.
Incoming Call
Control
This prevents any extensions ringing until an access code is dialled.
Fax N/A Automatic fax switching - (Fax/Voice Card Required – see page 41)
Another auto-answer service may be set up called courtesy service, detailed on page 37. This feature
will answer and play a courtesy message to callers if the call is left unanswered. Courtesy service and
the above auto-answer services cannot be set up on an exchange line at the same time. The autoanswer modes take priority over the Courtesy service option.
If the caller does not enter any digits for 5½ seconds, or an invalid code was dialled then it will ring
as a general call (unless Call Control is active, see page 30). There is a master code which enables and
disables the auto-answer feature without erasing any of the access codes or auto-answer settings. This
is also possible through the PC program status screen. After dialling a digit to enter an auto-answer
mode an optional access code may be required.
Several auto answer features such as call control and DISA may be programmed at the same time on
a line. The user dials the appropriate code to proceed. If a line has fax switching set, it can also have
DISA, remote control or remote paging programmed.
Default
No automatic answering is enabled.
PIN ext
PIN
Page 32

Installation & Programming Manual
28
Remote Programming
Dial at auto answer.
Remote programming allows the caller to change system settings remotely. All the codes listed in this
manual may be entered at a remote location. defines the operation of remote programming. Figure
3-3 defines the operation of remote programming.
Figure 3-3 Remote Programming Operation Flowchart
Yes
Call
extension
Error
tone
Silence
Enter
code
Error tone Confirmation tone
Yes
Dial Tone
heard
No
No
Incoming call
A
uto-answered ?
A
uto-answer not enabled
Dial 2 for Remote
Programming
A
ccess code
required?
Enter remote
programming
access code
What can be
heard?
Enter prog. code, with PIN if
required
(*8 and *9 codes only)
What can be
heard?
Ext. 13 or PC currently
has control
What do you
want to do now?
Press # and dial the
extension number
Extension will ring as an
external call
Code was not allowed. Press
# key to re-try
Hang up remote tel. or do
nothing for 10 secs
End
programming
Page 33

Section 3 – System Programming
29
Remote Paging
Dial at auto answer.
It is possible to access the paging port from a remote location through auto-answer. The operation is
defined in Figure 3-4.
Figure 3-4 Remote Paging Operation Flowchart
No
Yes
Ring back tone or
disconnected
Incoming call
A
uto-answered ?
A
uto-answer not enabled
What can be
heard?
Dial 3 for Remote Paging
Remote Paging not
enabled on line
Connected to the
paging port
Hang up when finished
Silence
Page 34

Installation & Programming Manual
30
DISA
Dial at auto answer.
The system can be set to answer incoming calls with a voice message, prompting the user to dial a
specific extension, or dial ‘00’ to be diverted to an emergency external number. The external number
is shared with the External call diversion feature, on page 40. Depending on the digits entered, the
caller is put through to the correct extension directly, or to the emergency number. If no digits are
dialled the call will revert to a general call. It is possible to program a PIN number with the DISA
facility so that the extensions or external number may only be dialled directly if a PIN is also entered
with the DISA code. Callers into the system will be treated according to the flowchart of Figure 3-5.
Note also that the access code is shared with the incoming call control feature above.
Figure 3-5 DISA Operation Flowchart
Yes
No
No
Yes
No
Yes
No
Yes
Yes
No
Incoming call
A
uto-answered ?
A
uto-answer not enabled
Dial 4 for DISA
A
ccess code
required?
Enter DISA access
code
A
ccess code
correct?
Call accepted,
ext. rings with incoming
call
Incoming Call
control enabled?
Call
disconnected
Call goes to a general
call, all extensions ring
Enter a valid
extension
number
Entered ‘00’ &
external no.
programmed?
Call diverted to
external number
Yes
Page 35

Section 3 – System Programming
31
Incoming Call Control
Dial at auto answer.
This prevents any extensions ringing until an access code is dialled. This is useful in situations where
users are receiving unwanted calls and wish to limit access to a known group. When incoming call
control is active on a line the normal 5.5-second timeout to become a general call does not apply.
Incoming call control is accessed by dialling 5 at the answer tone, or after the end of the voice
message. Figure 3-6 defines how incoming call control operates.
Figure 3-6 Incoming Call Control Operation Flowchart
Programming Codes
Step 1: (Optional – fax/voice card must be installed) Record your answering messages, speak at
tone then hang up quietly.
Record answer message 1 at extension 13
Record answer message 2 at extension 13
Step 2: Enable the auto-answer modes
Switch off incoming call control for all exchange lines
General Settings Auto answer settings Disable call control
PIN
PIN
Yes
No
Network disconnect
tone
Ringback
tone
Yes
No
Incoming call
A
uto-answered ?
A
uto-answer not enabled
Dial 5 for Incoming call
control
A
ccess code
required?
Enter call control
access code
What can be
heard?
Wrong password entered,
call disconnected
Call accepted,
normal incoming call
Page 36

Installation & Programming Manual
32
Switch on incoming call control for exchange line
General Settings Auto answer settings Set call control
Switch off remote paging for all exchange lines
General Settings Auto answer settings Disable Remote Paging
Switch on remote paging for exchange line
General Settings Auto answer settings Set Remote Paging
Switch off DISA for all exchange lines
General Settings Auto answer settings Disable DISA
Switch on DISA for exchange line
General Settings Auto answer settings Set DISA
Program DISA emergency call forward number (also diversion number)
System Settings Exch divert number
Switch off remote programming for all exchange lines
General Settings Auto answer settings Disable remote control
Switch on remote programming for exchange line
General Settings Auto answer settings Set remote control
Step 3: (Optional) Secure auto-answer features with access codes
Program DISA / call control access code
System Settings Auto answer access codes DISA code
Program Remote programming access code
System Settings Auto answer access codes Remote control
code
Program Remote paging access code
System Settings Auto answer access codes Remote paging
code
Step 4: (Optional) If you wish the call to ring as a normal call first, and auto-answer only if
unanswered, program the delay for each line here. By default the call will not ring internally
and be auto-answered within 5 seconds of ringing.
Program delay before answering call
Note: this code also enables the Courtesy service option, but the
courtesy service is overridden by the auto-answer modes of step 2. If auto-answer is
disabled on exchanges lines after entering this code then the courtesy service must also be
disabled.
Step 5: Switch on the auto-answer service
Switch on automatic answering
General Settings Auto answer settings Auto answer Off/On On
Switch off automatic answering
General Settings Auto answer settings Auto answer Off/On Off
Boss-secretary Mode
A boss-secretary mode can be enabled which allows a boss terminal on extension 13 to call a
secretary terminal on extension 15 with a distinctive tone in place of the normal ringing cadence, this
tone will sound even if the extension is busy on a call. In addition, the executive terminal will show
the caller on-screen, e.g. ‘Sec call’ or ‘Boss call’.
Default
Boss-secretary feature is inactive
Enable boss-secretary operation
General Settings Boss / Secretary Enable boss-secretary
Disable boss-secretary operation
General Settings Boss / Secretary Disable boss-secretary
line, ans_type
Key
line =
0 for all exchange lines
1 - 6 for single exch. line
ans_type =
1 for answer with tone
2 for answer with msg. 1
3 for answer with msg. 2
5 for msg1 during day,
msg2 during night
number =
emergency call forward
number (25 digits max)
line, ans_type
line, ans_type
PIN number
line, ans_type
PIN access_code
PIN access_code
Key
access_code =
security number, 4 digits
long
line =
0 for all exchange lines
1 - 6 for single exch. line
delay =
1 – 8 for delay before
answering call 1=5 secs
… 8=40secs
PIN access_code
line, delay
Page 37

Section 3 – System Programming
33
Call Barring
The system has five call barring classes for each extension, a different barring class can be active for
daytime operation and another for night time operation. The day/night switching details may be
found on page 37. An extension may also be set up for account code operation. The call barring class
is then dependant on the account number, not on the extension class of service, see page 24 for
further details.
The system speed dial numbers 501 to 599 are exempt from call barring checks, see page 49 for
programming details.
The default setting is that all extensions have no class allocated and can make calls on an unrestricted
basis.
Class Restrictions
0 User defined
1 User defined
2 User defined
3 User defined
4 The user cannot make outgoing calls, except factory set emergency number
Incoming external calls can be answered
5 The user cannot make or answer external calls, except to factory set emergency number
When a call barring class is assigned to an extension then that extension cannot invoke recall to hold
or transfer for 2 seconds after the last digit is dialled, or 2 seconds after an incoming call is answered.
Default
No call barring is set. All extensions belong to class 0 – no barring.
Call bar class of service programming
Each call barring class 1 to 3 can have telephone numbers with up to 9 different prefixes barred.
Additionally any number which has a prefix found in the exempt table will be allowed if enabled for
that bar class.
The factory default codes in the bar and exempt filters are shown in your country specific detail
sheet. The table format is shown below.
Filter Class 1 Class 2 Class 3 Bar Number
1 (y/n) (up to 6 digits)
2
3
4
5
6
7
8
9
The exempt filters are all disabled by default for all classes. A table in the following format should be
used to keep a record of the settings.
Filter Class 1 Class 2 Class 3 Class 4 Class 5 Exempt number
1 (y/n) (up to 10 digits)
2
3
Page 38

Installation & Programming Manual
34
4
5
6
7
8
9
The system has 9 user programmable barring filters and 9 user programmable exempt filters
numbered 1 to 9 which can be switched in or out in each class.
Step 1: Program the number prefixes to bar in bar table
Program number prefix to a bar filter
System Settings Program bar filters Bar
filter x
Clear a bar filter
System Settings Program bar filters Clear bar filter x
Step 2: Allocate the bar prefixes to the call bar class of service
Note class 4 and 5 cannot make outgoing calls, filters are not required.
Switch on or off a bar filter in any barring class
System Settings Set call barring Bar filter > class x
Clear all bar filter numbers
Clear all bar filters from all classes
Step 3: Program the number prefixes to exclude from
barring in exempt table
Program a number in an exempt filter
System Settings Program exempt filters
Exempt filter x
Clear an exempt filter
System Settings Program exempt filters Clear
Exempt filter x
Clear all programmable exempt filters
Step 4: Allocate the exempt table entries to
barring classes to stop numbers from being barred.
Switch on or off an exempt filter in any class
System Settings Set call barring Exempt
filter -> class x
Clear all exempt filters from all classes
Step 5: Allocate Class of service to each extension and
user account.
Assign a class for day-time operation to an extension
System Settings Set call barring Assign Ext Day class x
Assign a class for night-time operation to an extension
System Settings Set call barring Assign Ext Night class x
Assign a class to extensions 11,13,15 for example
Assign a class to a user account
System Settings Account Access Assign Class to
Account
Remove barring from an extension for day time operation
System Settings Set call barring Clear Ext day class
Remove barring from an extension for night time operation
System Settings Set call barring Clear Ext night class
Reset settings
Clear all call bar settings
System Settings Set call barring Clear all bar
settings
PIN bar_entry number
Key
bar_entry =
1 - 9 for bar filter table
entry
number =
prefix to bar (max 6
digits)
class =
1 - 3 for class 1 - 3
enabled =
1 for filter on
0 for filter off
PIN bar_entry
PIN class, bar_filter, enabled
PIN
PIN
PIN exempt_entry number
Key
exempt_entry =
1 - 9 for exempt filter
table entry
number =
prefix to exempt from
barring (max 10 digits)
class =
1 - 5 for class of service
enabled =
1 for filter on
0 for filter off
account_no =
00 – 39 for account
number
PIN exempt_entry
PIN
PIN class, exempt_entry, enabled
PIN
PIN class, ext.
PIN class, ext.
PIN class
PIN account_no, class
PIN ext.
PIN ext.
PIN
Page 39

Section 3 – System Programming
35
It is recommended that the optional V24/PC Program be used to change call barring defaults or to
program exempt or additional barred numbers. Users unfamiliar with the system should not attempt
advanced programming.
If you have run into problems and wish to restart programming, you can reset the Call barring
programming to the default data that was originally provided. To reset to default data: *9 PIN 990 #
990 #.
Call Unit Cost
Description
The cost of the call will be displayed on both the Executive Terminal and the Call Detail Recording
output, see below for details. The meter unit cost is entered as four digits in tenths of a currency unit,
e.g. if each unit costs 12.4, it is entered as *8 951 0124 #. Note that this requires the use of a meter
pulse detection option card, or Advice of Charge service on an ISDN line. These options must be
enabled by your telephone service provider.
Default
The meter pulses only are counted if a meter pulse detection card is present.
Set the meter unit cost in tenths of a currency unit
General Settings Set the unit cost
Clear the meter unit cost and count number of meter pulses only
Call Detail Recording (CDR)
The system produces CDR information which can be sent to a serial printer or to a PC. By default
this information is sent at the end of each external call. A hotel logging option may be enabled which
will store the call logs of specific extensions and output them as a list when required. This feature can
operate if the optional V24 card is fitted and either a PC or serial printer is connected to record the
data. To log data using the PC program select the menu option ‘Configuration’ ‘Misc / PC Setup’,
then select the ‘Add’ or ‘New’ option to append data to an existing file or create a new file
respectively. Figure 3-7 shows the format of the CDR output. At midnight every night the telephone
system outputs a header containing a sequence of asterisks to denote the end of each day, as shown
below. Features which dial automatically, such as external call diversion and external alarm
notification have no extension, the output used is 'Dn' or 'An' where n is the exchange line used, e.g.
D2.
Figure 3-7 Call Detail Logging file Format
xxxx
01 13 11 10:52 0:10:3 0000 0 01 1191 18 04
01 13 11 11:47 0:00:0 0000 0 02 123456 18 12
01 17 11 14:12 0:00:5 0012 1 01 112233 12
01 17 11 14:53 0:01:0 0006 0 01 00441234523 23
01 17 11 15:40 0:00:2 01.03 0 03 0198765**** 24 02
01 17 11 00:00 ****************************************************
01 18 11 07:00 0:03:0 02.50 0 01 0123456 D3
01 18 11 09:20 0:10:1 00.00 1 02 Private 15
01 18 11 10:02 0:03:3 00.00 1 02 Unknown 14
CDR BUFFER NEARLY FULL
NO CDR AVAILABLE FOR 11
01 10 07 00:16 0:00:0 0000 0 03 123456 11
Year Day Month Time of call Call duration
(hour:min:10secs) Call cost /
meter pulses 0–out 1-in Exchange line Telephone number
(26 digits max)
Extension User account
(
o
p
tional
)
(Used for hotel call logging only)
Page 40

Installation & Programming Manual
36
Telephone numbers over 26 digits in length are truncated.
If a call is transferred then the call is logged against the extension which originally made (or
received) the call.
The start time and duration of call are measured using the internal real time clock. Note:
The start time is measured from dialling the last digit for outgoing calls and answering the
call on incoming calls. The duration is rounded down to the nearest multiple of 10
seconds, e.g. 0:15:2 is a duration of 15 minutes, 20 seconds.
If a meter pulse card has been fitted and the telecom operator has enabled this option on
exchange line then the number of meter pulses for each call will also be logged. If the call
unit cost has been programmed then the correct call cost is calculated and output instead.
See Call Unit Cost on page 35 for details.
If the CDR log is sent to a serial printer, not the PC program, then the extra status
messages sent via the serial port must be disabled using the code shown below.
The last 4 digits of recorded telephone numbers of 5 digits or more may be masked with
the ‘*’ character if the numbers must be kept private, this option may be toggled on and
off.
The call duration is counted from the time the line is seized. In the case of ISDN calls the
call duration timer is restarted when the call is answered. In the case of analogue calls, the
call duration timer is restarted at the first meter pulse, this requires the use of a meter pulse
detection card and the service enabled by your telephone service provider.
The PC program is able to log calls to a file automatically. Select the menu item ‘Configuration’
‘Misc / PC setup’ and select the ‘New’ option to begin a new log file or ‘Append’ to add call records
to the end on an existing file. Call details will continue to be logged until the program is exited.
Hotel / Motel Operation
In addition to an immediate log of each call made, the system has a feature called hotel call logging
which may be enabled for each extension. Each call made from an extension with hotel call logging
active will be stored internally in the telephone system and not sent directly to the serial port as with
normal extensions. A code may be entered at the master extension to output all call details for one
extension via the V24 port to a connected printer or terminal program on a PC.
The system will store a maximum of 144 call records in total.
When the hotel call buffer has only ten empty records left, the system will send the
message ‘CDR BUFFER NEARLY FULL’ through the V24 port at the end of each call
until the buffer becomes full, when the message ‘CDR BUFFER FULL *******’ will be
sent. No new calls will be logged until some calls are cleared from the buffer by outputting
an extension CDR log.
When the call records for an extension are output, the call details for that extension are
removed from the system memory and logging of new calls for the extension starts again.
If the code to output call details for an extension is entered, but no calls are stored then the
message ‘NO CDR AVAILABLE FOR (ext)’ will be output.
When disabling hotel call logging for an extension, be sure to clear any records stored for
the extension with the send CDR records command.
It is possible to disable logging of calls from normal extensions so that the CDR output of
hotel logging enabled extensions is not corrupted with extra information from other
extensions.
Default
Call detail recording to printer is disabled. The system is in PC mode. No extnsion have hotel call
logging enabled.
Switch CDR output to serial printer format
(ASCII CDR information only)
General Settings CDR On
Important!
Page 41

Section 3 – System Programming
37
Switch CDR output to PC program format
(ASCII CDR information plus binary PC program information)
General Settings CDR Off
Enable hotel call logging for an extension
Disable hotel call logging for an extension
(remember to clear the extension’s call log with code below)
Send call details for hotel logging enabled extension to printer
Mask last 4 digits of telephone number in CDR record
Show full telephone number in CDR record
Log only hotel logging enabled extensions in CDR output, not standard extension
call information
Log both standard extension calls at end of call and hotel logging enabled
extensions
Call Waiting Tone
A tone will sound on calls in progress to warn of another incoming call. The tone type may be found
in the country specific information sheet packed with this manual. It may be disabled for the
telephone system with a master code.
Setting an extension as data-protected will disable the call waiting tone on an extension by
extension basis.
Default
The call waiting tone is enabled.
Disable call waiting tone
General Setting Call warning tone off
Enable call waiting tone
General Setting Call warning tone on
Clock Setting
The system employs a real-time clock which is backed up for at least 6 hours in case of power
failures. This time is displayed on the Executive Terminal and affects Alarm Calls, Call Detail
Recording, Alarm Loop Control, and Automatic Day/Night Mode.
Systems with an ISDN option will automatically set the time at the start of each day when
an ISDN call has been connected.
Setting the time (24-hour format)
General Setting Clock Setting Set time
Setting the date
General Setting Clock Setting Set date
Courtesy Service
Note: A fax/voice option card is required for this feature, and a day and night courtesy message must
be recorded.
This feature will answer and play a courtesy message to callers if the call is left unanswered. The call
will continue to ring as an incoming call and may still be answered as normal at any time. Callers will
hear a different message depending on whether the system is in day or night mode. The message will
be repeated every 15 seconds while the call remains unanswered, with the programmed hold tone or
music being played between messages.
An extension may be designated to receive these calls in preference to other extensions. An incoming
call will ring all normal extensions until the Courtesy service answers. At this point it will ring only the
ext
ext
ext
PIN HHMM
PIN DD MM YY
Page 42

Installation & Programming Manual
38
designated courtesy service extension for a further 30 seconds. If it is still unanswered after this time
the caller will be disconnected.
Note that this service will be overridden by any other auto-answer modes or external call diversion, if
set up on the same exchange line. The day and night messages are shared between the auto-answer
modes and courtesy service so they cannot both use voice messages.
Default
Courtesy service is not set up on any exchange lines.
Step 1: (Optional – fax/voice card must be installed) Record your answering messages, speak at
tone then hang up quietly.
Record answer message for daytime at extension 13
Record answer message for night time at extension 13
Step 2: Enable courtesy service for each exchange line.
Switch on courtesy service on exchange line
Switch off courtesy service on exchange line
Step 3: (Optional) Assign single extension for courtesy service
ringing.
Assign single extension for Courtesy service ringing
Cancel single extension for Courtesy service ringing
Day/Night Mode
The system can be programmed to switch between day and night modes automatically. These two
modes affect the operation of the ring assignments (page 45) and call barring (page 32). The day zone
does not necessarily mean that it is daytime, but can mean the times at which people are in an office.
The system could, for example, switch to night time operation during a lunch break for one hour at
noon every day.
It may be switched between day and night mode in three different ways:
Automatically switch during two time periods for each day of the week to switch to day
mode automatically. Night mode is used for all other times.
Using programming codes to manually switch between day and night at extension 13.
Using a switch on alarm loop 2 to switch between day and night modes manually.
The display on the Executive Terminal will show ‘night’ when it is in night time operation.
Default
The system is in day mode permanently.
Automatic Day & Night Switching by time
Step 1: (Optional) Erase existing day-night zone settings if previously programmed
Clear current Day Zone Settings
System Settings Clock Settings Clear day time zone
Step 2: Define period of day to use as daytime service.
Set Day Zone Used In Automatic Mode (repeat code for single
second period later each day).
System Settings Set day time zone
The same command is repeated if there are two different periods in a day that the system is
to be in day mode. The start time chosen for zone 2 must be later than the end time for
day zone 1, otherwise the system will return error tone.
Step 3: Switch on automatic switching.
PIN
PIN
Key
line =
0 for all exchange lines
1 - 6 for single exch. line
delay =
1 – 8 for delay before
playing courtesy
message 1=5 secs …
8=40secs
line delay
line
ext
PIN
PIN hhmm, HHMM
Key
hhmm =
start time 24hr format
HHMM =
end time in 24hr format
Page 43

Section 3 – System Programming
39
Switch on automatic day/night switching
General Settings Clock Settings Automatic mode
Manual Day/Night Setting by programming code
Set to Day Mode and switch off automatic day/night switching
General Settings Day-Night mode Adhoc day mode
Set to Night Mode and switch off automatic day/night switching
General Settings Day-Night mode Adhoc night mode
Manual Day/Night Setting with switch
Use switch on alarm loop 2 for day/night switching
System Settings Alarms Alarm 2 function day/nightswitch
When the switch contacts are closed the system will be in night mode, when the contacts are opened
the system will switch to day mode. This setting will override any security alarm function previously
programmed onto alarm loop 2.
DTMF Extensions
DTMF extensions will allow only DTMF signalling. The time window for recall pulses is
programmable for DTMF extensions to prevent problems with hook switch bounce.
For all extensions programmed as DTMF only a recall signal is recognised if the pulse length falls
between a certain programmable period.
Default
Extensions are compatible with both pulse and DTMF signalling. The time window for DTMF only
extensions is between 40 and 160 ms.
Set an extension as DTMF only
System Settings miscellaneous Enable DTMF phone
Reset an extension from DTMF only
System Settings miscellaneous Disable DTMF phone
Set default recall time window (40 – 160 ms)
Set programmable time window
Exchange Line Assignment
This separates the Exchange Line ports into groups for individual extension access. When there are
two or more exchange lines, extensions can be programmed to make outgoing calls on designated
lines, e.g. a fax line. The default is that all extensions can access all exchange lines. The system will
always access the first free line from 1 to 6, in that order.
Default
All extensions are able to make and receive calls on all exchange lines.
Step 1: Set which lines can be accessed by extensions.
Allow an extension to use an exchange line
System Settings Bundle Splitting Assign Exch x to Ext
Prevent an extension using an exchange line
System Settings Bundle Splitting Cancel Exch x to Ext
Step 2: Enable the exchange line group feature
Enable the Exchange Line Group Feature
General Settings Exch allocation On
Disable Exchange Line Group Feature
General Settings Exch allocation Off
PIN
PIN ext
PIN ext
Key
window =
0 default 40 – 160ms
1 between 60 – 160ms
2 between 70 – 160ms
3 between 80 – 160ms
4 between 90 – 160ms
5 between 100 – 160ms
window
PIN line ext
Key
line =
0 for all exchange lines
1 - 6 for single exch. line
PIN line ext
Page 44

Installation & Programming Manual
40
Extension locking
Each extension may be locked from accessing external lines by entering the lock code *7*#. It may
be unlocked by dialling the code *7* PIN #, where PIN is a 3-digit code unique to each extension.
The PIN numbers for each extension are programmed as follows:
Default
Each extension may use any 3-digit code to unlock an extension.
Program extension lock PIN code
Reset extension lock PIN code to allow any 3 digits
Until a PIN number has been programmed to an extension, the unlock
code may use a PIN of any 3 digits and the code will be accepted.
External Call Diversion
External call diversion or exchange line call forwarding, allows an incoming call to be automatically
routed to an external number using a second exchange line. Two warning tones are heard at 10
seconds and then 5 seconds before a time limit of 30 seconds expires. An informed calling party can
then extend this call duration by pressing keys digits 1 to 9, to increase the call time in multiples of 30
seconds. E.g. pressing '4' will increase the call length by 2 minutes before it is cut off. An interrupted
dial tone is heard at all extensions when this facility is in operation. When the optional ISDN line
card is used then the timeout does not apply when the call forwarding is ISDN to ISDN. This is
because the ISDN Network ensures a correct disconnection of the call.
The external call diversion number is also accessible to incoming callers through the DISA service,
see page 30.
Note: this setting will override both Automatic Answering or Courtesy service on an exchange line.
Default
Exchange line call forwarding is not set up. All numbers are empty.
Step 1: Program a call divert number
Program call forward number
System Settings Exch divert number
Reset call forward number
Program and verify call forward number
Step 2: Set exchange lines to divert
Switch on call forward feature on line N
General Settings Set diversion on line N
Switch off call forward feature on line N
Step 3: Switch on external divert feature
Switch on call forward feature
General Settings Exch diversion Off/On Off
Switch off call forward feature
General Settings Exch diversion Off/On On
Fax Call Handling
If a fax machine is fitted to the system then the extension must be programmed as a fax extension. If
a Fax/Voice Card is fitted then automatic fax detection and transfer to the fax extension can operate.
This can allow a line to be shared with voice calls.
ext PIN
ext
PIN number
PIN
Key
line =
0 for all exchange lines
1 - 6 for single exch. line
ans_type =
1 for enable call forward
with tone
2 for enable call forward
with call diversion
message
number =
external number to dial
(max 25 digits)
PIN number
line, ans_type
line
Page 45

Section 3 – System Programming
41
As only one fax detector is fitted it is recommended that fax detection is set up on one exchange line
only. This will prevent problems where a fax on two simultaneous incoming calls may not be
detected.
There are two automatic fax-switching modes.
Automatic answer mode
This mode answers with a tone or voice message recorded by the user and looks for fax tone to
determine if it is a fax call. If no fax calling tone (CNG tone) is detected within 5 seconds of the end
of a message, or the fax detector is busy on another call, then a normal incoming general call will be
generated.
Note: Older fax machines may not send CNG tone and therefore there may be a certain
number of ‘silent’ incoming fax calls which need to be transferred manually to the fax
machine. This is not a limitation of the telephone system.
The automatic fax answering service may be set up in parallel with any of the automatic
answering services, on page 26.
To record an answer message refer to ‘Voice Message Programming’ on page 50. An
appropriate message would be ‘If you are sending a fax, please press send now, otherwise
please wait to be connected.’.
The number of rings before auto-answering is programmable, but it is recommended to
keep this settings at its minimum as some fax machines timeout after 30 seconds without a
response from the receiving fax.
Monitor mode
In this mode, the call will initially be handled as a normal call. If a fax tone is detected at any time up
to 45 seconds after the call is answered then the call will be automatically transferred to the
nominated fax extension. The person answering the call will hear busy tone when the fax call is
switched to the fax extension.
If an extension is designated as a fax extension (i.e. where the fax machine is located) then the system
will not ring this extension on normal incoming exchange line calls or internal code calls. The fax
extension must be nominated before programming the fax detection mode for the required
extension.
Set the fax machine to answer immediately or after 2 rings. If it is programmed to ring after
4 or more rings this may cause excessive delays in fax handling as some models of fax time
out after 30 seconds.
Default
No extensions are set up to receive faxes.
Only 1 extension can be assigned to receive fax calls.
Step 1: Set an extension as a fax extension
Set An Extension To Receive Fax Calls
General Settings FAX Set FAX Extension
Clear Fax Receive Function From The Extension
General Settings FAX Clear FAX Extension
Step 2: (Optional – fax/voice card required) Enable / disable fax detection on exchange lines
Have Fax Detection/Switching On An Exchange Line
General Settings FAX Enable to receive FAX
Clear Automatic Fax Answering/Detection.
General Settings FAX Disable FAX
PIN ext
Key
ans_type =
1 for answer with tone
2 for voice message 1
3 for voice message 2
4 for fax monitor mode
line =
1-6 for exchange lines
PIN
line, ans_type
Page 46

Installation & Programming Manual
42
Hold and ring timers
The system provides many programmable timers to change the duration of ringing and the time
exchange line calls can be left on hold or unanswered.
Exchange line hold timer.
When a call is placed on hold using the Hold key or the R00 sequence on a telephone it will remain
on hold for a programmable length of time between 30 seconds and 4½ minutes. After this timeout
the call will ring at the extension which put the call on hold. If this extension is busy, or not answered
for 30 seconds then the call will ring as a general incoming call.
Default
An external call on hold will timeout and call back after 1 minute.
Set exchange line on hold timeout delay
Exchange line park timer
When a call is placed on park using R85 sequence on a telephone it will remain on park for a
programmable length of time between 30 seconds and 4½ minutes. After this timeout the call will
ring at the extension which put the call on park. If this extension is busy, or not answered for 30
seconds then the call will ring as a general incoming call.
Set exchange line call park timeout delay
Exchange line call camp timer
When a call is placed on camp while the extension is busy by dialling 3 on a telephone it will remain
on camp for a programmable length of time between 30 seconds and 4½ minutes. After this timeout
the call will ring at the extension which put the call on camp. If this extension is busy, or not
answered for 30 seconds then the call will ring as a general incoming call.
Set camp on exchange line timeout delay
Extension ring timer
When the extension is calling the other extension, it will ring for a programmable length of time
between 15 seconds and 135 seconds. After this timeout the ring will stop.
Set extension ring timeout
Unannounced transfer timer
When the incoming call is transferred blindly to another extension (see ‘Transferring calls - Internal
unannounced’ on page 7), it will remain ringing for a programmable length of time between 15
seconds and 135 seconds. After this timeout the call will ring as a general incoming call.
Set Blind transfer extension ring timeout delay
Call back extension
This timer is started after the extension ring timer has expired and no-one has answered the call.
When this timer expires, the external caller is cut off.
Set Call back extension ring timeout delay
Hot Line Programming
There are two Hot Line features Immediate and Delayed. Immediate Hot Line allows a preprogrammed telephone number to be dialled immediately when the extension user lifts the handset.
Delayed Hot Line Services are activated after the extension user lifts the handset and a timeout has
expired. A pre-programmed number is dialled automatically after the timeout of approx. 10 seconds.
Key
delay (x30s) =
1 – 9 for delay in
multiples of 30 seconds,
1=30, … 9=4.5min
delay (x15s) =
1 - 9 for delay in
multiples of 15 seconds,
1=15, … 9=2m 15s.
delay (x30s)
delay (x30s)
delay (x30s)
delay (x15s)
delay (x15s)
delay (x15s)
Page 47

Section 3 – System Programming
43
It is not possible to assign an immediate hot line to extension 13 as to do so would block
any further system programming.
Default
No hotlines are set.
Immediate Hotline
Step 1: Set the external number to dial for immediate hotline
Set Immediate Hot Line Number
System Settings Hot line Immediate number
Set Immediate Hot Line Number and dial out to verify
Step 2: Enable the immediate hotline on a single extension
Switch on Immediate Hot Line and assign to an extension
General Settings Hot line assignment Set immediate hotline Ext: x
Switch off immediate hot line
Delayed Hotline
Step 1: Set the external number to dial for delayed hotline
Set Delayed Hot Line Number
System Settings Hot line Delayed number
Set Delayed Hot Line Number and dial out to verify
Step 2: Enable the delayed hotline on a single extension
Switch on delayed hot line and assign to an extension
General Settings Hot line assignment Set immediate hotline Ext: x
Switch off delayed hot line
Intrusion & Paging Programming
Description
It is possible for extensions to intrude on a call if an extension is busy, or to connect in handsfree
mode directly for teminal extensions. This feature must be enabled individually for each extension. It
is not possible to intrude upon data protected or fax/modem extensions.
Default
No extensions are allowed to intrude on other calls.
Enable an extension to page and intrude on extensions
System Settings Miscellaneous Enable Intrusion rights
Disable an extension from paging and intruding on extensions
System Settings Miscellaneous Disable Intrusion rights
ISDN Programming
The system supports up to 2 basic rate ISDN accesses if the optional ISDN cards are fitted. MSN
and DDI numbering is supported by the telephone system.
In the case of MSN calls an incoming call will ring at the programmed extension for 30 seconds after
which it will become a general incoming call - ringing at all extensions normally programmed to ring
on general calls. It is possible to override this default setting and program any combination of
extensions to ring on any MSN number, the procedure is detailed in ‘Ringing Settings’ on page 45.
The programmed MSN number and the incoming MSN number may have different lengths, in this
case the system looks at the shorter number and compares it with the last digits of the longer
number.
PIN number
Key
number =
external number to dial
PIN number
ext
PIN number
PIN number
ext
PIN ext
PIN ext
Page 48

Installation & Programming Manual
44
CLIP data and CLIR status are sent to the ISDN network when an outgoing call is made. COLP
data and COLR status are sent to the network when a call is answered.
When an extension sets up or answers an external call the CLIP/COLP data is based on the MSN
number programmed for the extension. If there is no MSN number programmed then the base
number for that particular ISDN line is used. If there is no base number programmed then no
CLIP/CLIR data is sent, though the network may add it’s own later. In the case of external call
diversion and external alarm calls the ISDN base number for the line is used.
Note: After installing or changing the lines from point to point to point to multipoint the
system should be powered off after a delay of six minutes and then powered up while
connected to the S bus to correctly establish ISDN settings.
Default
Default is point to multipoint operation for both ISDN lines. All MSN and MSN ignore tables are
empty. Incoming calls to an MSN number will ring only one extension, as contained in the code.
CLIP is active – your number is sent to other callers and COLR is inactive, your number is not
withheld from callers when you answer.
Set both ISDN lines as point to point mode
ISDN Settings Set pt to pt/mpt pt
Set both ISDN lines as point to multipoint mode
ISDN Settings Set pt to pt/mpt mpt
Program ISDN base number for ISDN card 1
ISDN Settings Set MSN numbers Base number 1
Clear ISDN base number for ISDN card 1
Program ISDN base number for ISDN card 2
ISDN Settings Set MSN numbers Base number 2
Clear ISDN base number for ISDN card 2
Enable CLIR system wide
ISDN settings CLIR On
Disable CLIR system wide
ISDN settings CLIR Off
Enable COLR system wide
ISDN settings COLR On
Disable COLR system wide
ISDN settings COLR Off
Program MSN number to extension
ISDN Settings Set MSN numbers MSN number ext.
Clear MSN number from extension
Reset all MSN numbers
ISDN Settings Clear all MSN numbers
Program MSN numbers to ignore
ISDN Settings Set MSN ignore no.
Clear all MSN numbers to ignore
ISDN Settings Clear all MSN ignore no.
Clear an individual MSN number to ignore
Enable access to analogue line 1
ISDN Settings Line 1 Off/On On
Disable access to analogue line 1
ISDN Settings Line 1 Off/On Off
Select ISDN lines first on outgoing calls, then analogue
ISDN Settings Pick analog/ISDN first ISDN
Select analogue lines first on outgoing calls, then ISDN
ISDN Settings Pick analog/ISDN first analog
PIN basenumber
Key
basenumber =
ISDN card base number
(max 12 digits)
PIN
PIN basenumber
PIN
PIN ext. number
Key
msn_number =
MSN number (12 digits
max)
ignore_number =
MSN number to ignore (8
digits max)
ignore_entry =
1-8 for MSN ignore table
entry
PIN ext.
PIN
PIN ignore_entry ignorenumber
PIN
PIN ignore_entry
Page 49

Section 3 – System Programming
45
Music on Hold
When a caller is placed on hold they will hear one of two different sound sources.
Default
The caller will hear hold tone by default.
Internal Hold tone - held calls will hear two brief tone bursts every 5 seconds.
General Settings Music on Hold Internal Tone
External music - held calls will hear the music source connected to MOH socket.
General Settings Music on Hold External Music
Ringing Settings
When the system is initially switched on the default setting is that all extensions will ring on all
incoming exchange line calls. The system is in day mode.
Before setting the ringing patterns it is best to establish the time when the day mode and night mode
begin and end, this also affects the call bar settings. See ‘Day/Night Mode’ on page 38.
When the day/night settings are programmed each extension can be programmed to ring
immediately, with a delay of 10 to 45 seconds on incoming exchange line calls or Door Phone calls,
or not to ring at all.
With ISDN it is possible to set up MSN/DDI numbers to ring specific groups of extensions. By
default if an MSN number is programmed (see page 43) it will ring only the extension it was
programmed for, extra extensions can then be added or taken away from ringing on this extension’s
MSN number. Ring assignments for MSN numbers are unaffected by day or night service.
It is also possible to switch the ringing cadence for internal and external calls, in this case the ring
cadences shown in the country specific specification sheet are reversed. Also, line 1 can be given a
different ringing assignment sound to the other extensions. Incoming calls on analogue line 1 may be
given a different ring to those on the other CO lines. The ringing cadences can be found in the
country specific specification sheet packed with this manual.
Default
All extensions will ring immediately, day and night, for each exchange line and the door phones.
Every extension is a member of every extension group.
Only the designated extension will ring for an MSN number.
Exchange line 1 uses the same ring cadence as all other exchange lines.
PIN
PIN
Page 50

Installation & Programming Manual
46
Extensions to ring for exchange lines and door phones
Add extension to ring for exchange line during day
System Settings Incoming Ring Set Exch x day mode
Stop extension ringing for exchange line during day
System Settings Incoming Ring Set Exch x day mode
Add extension to ring for exchange line during night
System Settings Incoming Ring Set Exch x night mode
Stop extension ringing for exchange line during night
System Settings Incoming Ring Set Exch x night mode
Reset all extensions to ring for all exchange lines
Extensions to ring for MSN numbers
Add an extra extension to ring on MSN number
Stop an extension ringing on MSN number
Extensions to ring in extension groups
Add an extension to ringing in extension group
Remove an extension from ringing in extension group
Ringing cadences
Swap internal and external ring cadence
Use normal internal and external ring cadence
Use Normal Ring Cadence for calls on line 1
System Settings Miscellaneous Exch 1 normal cadence
Use Different Ring Cadence for calls on line 1
System Settings Miscellaneous Exch 1 special cadence
Security Alarm Programming
Description
The system has two independent alarm sensor ports. These can support single contacts, multiple
contacts, passive infra-red devices, outputs from current alarm systems or smoke detectors, in series
for normally closed or in parallel for normally open contacts. The system can ring extensions
internally and dial out to up to two different external numbers when the alarm is activated, with a
voice message if the fax/voice message option card is fitted.
Alarm Sensors
The system provides two alarm ports to which alarm sensors may be attached, see Figure 4-3 on
page 54. These may be programmed and set independently as normally open or normally closed
contacts. If the alarm contact changes from it's normal state then the alarm is triggered. An optional
entry delay of 90 seconds may be added to give the user time to disarm the alarm when entering the
alarmed area. An alarm loop may also be programmed as a social alarm. In this case the alarm is
triggered if the loop does not change state for a period of 24 hours. Alarm sensor 2 can also operate
as a switch to select between day and night operation modes, for information see the section 'Manual
Day/Night Setting with switch' on page 39.
Alarm Notification
Whenever an alarm is triggered then the system can ring internal extensions, ring external telephone
numbers, or both.
Internal notification will ring all extensions for a period of 30 seconds. This ring may be
stopped temporarily by going off-hook at any extension. This internal alarm repeats every 5
minutes until the alarm is correctly reset.
External notification will make an external call and can use a voice message or a special
alarm tone to warn the user of the alarm. Up to 2 external numbers may be dialled a
PIN line delay ext.
Key
line =
0 for all exchange lines r
1 - 6 for single exch. line
7 for the Door phones
delay =
0 for no ringing
1 for immediate ringing
2 - 9 for ringing after 10,
15 … 45 seconds
MSN_entry =
11-18, 21-24 for
extension with
programmed MSN
ext =
extension number 11-24
or 1* for all extensions
group =
0 – 3 for extension
groups 80 - 83
PIN line ext.
PIN line delay ext.
PIN line ext.
PIN
MSN_entry, ext
MSN_entry, ext
group, ext
group, ext
PIN
PIN
Page 51

Section 3 – System Programming
47
maximum of 255 times until the alarm is correctly acknowledged. The flow diagram used
for external alarm calls is shown in Figure 3-8 below.
External alarm without notification is silenced by answering the external call.
External alarm with notification is silenced and re-armed when the call is answered and the
correct confirmation code is entered.
Alarm functions
Security alarm – this alarm is triggered whenever the contacts change from their normal
state (open or closed).
Entry & exit delay. Security alarms have a built-in 90-second exit delay. This allows 90
seconds to leave an area and secure it during which time the sensor state is ignored. The
entry delay is optional and an alarm will not trigger the instant the sensors change state.
They will trigger only if the alarm has not been correctly reset within 90 seconds.
Social alarm. There are two types of social alarm. They work if there is no activity for a
period of 24 hours.
Type 1 will trigger if no one has used an extension for a period of 24 hours. It is cancelled
as soon as an extension is used. An external call is made if the internal alarm is not cleared
within 1 hour.
Type 2 will trigger if an alarm loop has not changed state for 24 hours, such as a door
contact, unlike type 1 this alarm must be cancelled using the alarm cancel code. The alarm
will ring on all internal extensions initially. If the alarm is still not cleared for a further one
hour and the alarm loop does not change state then an external alarm call will be made.
Figure 3-8 External Alarm Flow Diagram
Dial tone heard, now enter
the confirmation code
Press any digit
2 second tone or alarm
confirmation message
Network disconnect
tone
No
Yes
Yes
No
A
larm is activated and
entry delay has timed out
System dials
external number
Call answered
before 70 secs?
System plays 3 rapid tones,
plus optional voice message
What can be
heard?
A
larm Re-armed
Switch to next external
number
Wrong confirmation code
entered. System waits
approx 3 min from call end
A
larm Silenced
Wait 3 minutes
Confirm. code
enabled?
Page 52

Installation & Programming Manual
48
Default
No alarms are enabled. All alarm external numbers are empty. All extensions are programmed to ring
on internal alarm. Alarm loops sensors are set to normally closed, no entry delay.
Programming
It is recommended that inexperienced users use the PC program option for security alarm
programming.
Alarm programming codes should follow the seven steps in order below. This is to prevent incorrect
setting of the alarm. The system performs checks on settings after each programming code. E.g. a
code to set an external alarm will be rejected unless a number to dial has first been programmed.
Step 1: Set the alarm loop type and entry delay
Alarm Loop 1 Setting and Entry Time Delay
System Settings Alarms Alarm 1 loop
Alarm Loop 2 Setting and Entry Time Delay
System Settings Alarms Alarm 2 loopn
Step 2: Set the extensions to ring on internal alarm, by default all extensions will ring. A
minimum of two extensions must be in the internal ring group.
Exclude an extension from internal alarm ringing group.
Include an extension to internal alarm ringing group.
Step 3: Program the external telephone number(s) to ring,
required for external alarm only.
External number 1 for alarms
System Settings Alarms Alarm number 1
External number 2 for alarms
System Settings Alarms Alarm number 2
Step 4: Program the alarm confirmation number, required for external alarm with
confirmation only.
Program Confirmation Number
System Settings Alarms Confirm number
Step 5: Program the alarm type and internal / external notification options.
Alarm type Loop 1
System Settings Alarms Alarm function 1
Alarm type Loop 2 (Including day/night switch)
System Settings Alarms Alarm function 2
Alarm type for both Loops 1 & 2
Step 6: If a fax/voice card is installed then a message may be
recorded at extension 13 and played back to the external number if the alarm is triggered.
Record alarm 1 triggered message, speak at tone then hang up gently
Record alarm 2 triggered warning message
Record correct alarm confirmation code has been received message
Step 7: If external notification is required then select the notification
method.
Assign Warning Tone/Voice Msg. to Alarm 1
General Settings Set alarms Alarm 1 warning msg.
Assign Warning Tone/Voice Msg. to Alarm 2
General Settings Set alarms Alarm 2 warning msg.
Daily Operation Codes
Arm Alarm 1
General Settings Set alarms Arm alarm 1
Arm Alarm 2
General Settings Set alarms Arm alarm 2
Arm Both Alarms
PIN loop
Key
loop =
1 for Normally closed, 90
second entry delay
2 for normally closed, 0
second entry delay
3 for Normally open, 90
second entry delay
4 for normally open, 0
second entry delay
number =
external number to dial
confirmnumber =
4 digit confirmation
number to reset alarm
type =
1 for internal alarm
2 external alarm without
confirmation
3 for external alarm with
confirmation
4 for internal/external
alarm without
confirmation
5 for internal/external
alarm with confirmation
6 for day / night switch
on loop 2
7 for social alarm type 1
8 for social alarm type 2
notify_type =
1 for warning tone
2 for alarm voice msg. 1
3 for alarm voice msg. 2
alarm_no =
1 for alarm loop 1
2 for alarm loop 2
* for both alarms
PIN loop
PIN ext.
PIN ext.
PIN number
PIN number
PIN confimnumber
PIN type
PIN type
PIN type
PIN
PIN
PIN
notify_type
notify_type
Page 53

Section 3 – System Programming
49
Disarm the Alarm Loops
System Settings Alarms Disarm alarm 1 /
2
Clear Alarm settings
Alarm Master Reset (erases all settings)
System Settings Alarms Reset alarms
Clear all Alarm 1 Settings (erases all settings)
Clear all Alarm 2 Settings (erases all settings)
System PIN Number
The system PIN number is a security block to stop unauthorised access to system programming. It
can be changed to any four-digit number. The power LED will stop blinking and remain on
permanently when a new PIN has been set.
Default
The default PIN is 7373.
Change PIN number (4 digits)
General Settings Change pin code
System Size
The system must be told when an analogue expansion card has been fitted, ISDN cards are
automatically detected. When an expansion card is fitted it should occupy slot 1 first, then slot 2. The
expansion cards fitted should then be programmed accordingly. Any of the configurations shown in
the table on page 3 are valid.
Default
The system will be delivered factory-configured to the correct size. Use this code if cards are
removed or installed.
No expansion cards fitted.
System Settings System size 2+8 system
One expansion card fitted.
System Settings System size 4+10 system
Two expansion cards fitted.
System Settings System size 6+12 system
System Speed Dialling
The system provides up to 99 speed dial entries of up to 25 digits. The system speed dial number are
exempt from call barring class of service 1, 2 and 3 from account code enabled extensions, unlike
individual extension speed dial numbers (see page 14) which undergo full class of service checking.
Default
All 99 system speed dial entries are empty.
Program system speed dial number
System Settings System speed numbers Speed number xxx
Clear all system speed dialling numbers
Clear system speed dial number
PIN alarm_no alarm_no
PIN
PIN
PIN
old_PIN, new_PIN new_PIN
PIN
PIN
PIN
PIN entry tel_no
Key
entry =
501 to 599 for speed dial
tel_no =
Telephone number to
program, up to 25 digits
PIN
PIN entry
Page 54

Installation & Programming Manual
50
Voice Message Programming
Note: a fax / voice option card is required for this service.
Default
There are no voice messages recorded by default.
Voice Message Application Maximum Duration
(sec.)
Call diversion 10
Auto-answer message 1 or
Courtesy daytime message
20
Auto-answer message 2 or
Courtesy nighttime message
20
Alarm call message 1 15
Alarm call message 2 15
Alarm confirmation message 8
Record a voice message at extension 13
Lift the handset, enter the code, speak, and then hang up quietly.
Play back a system message from Extension 13
PIN message
Key
message =
1 for call diversion msg.
2 for auto-answer msg. 1
3 for auto-answer msg.2
4 for alarm call msg. 1
5 for alarm call msg. 2.
6 for alarm confirmation
message
message
Page 55

51
4. Installation
Telephone System Installation
The installer must visually check the Telephone System main equipment prior to actual power-up
and making wiring connections to ensure correct programming and subsequent operation of the
system. This check must include:
An inspection of the main unit housing for damage during product delivery.
An inspection of the fitted 220-240VAC Power Cord & Plug.
An inspection of integral MDF wiring terminals for appropriate screw terminals (Side
Cover Removal).
Installation Checklist
Before starting installation remember the following points:
Always disconnect the mains during installation.
Inspect the fitted Power Cord & Plug.
Twisted Pair cable must be used to support all extensions and system integral devices with
only one extension per cable. Four-wire (2 pair) cable must be used for Terminal wiring.
Install an Executive Terminal at Extension 13 (Master Extension) for System
Programming purposes, if this phone is not available, then a DTMF single line telephone
may also be used but it will lack menu driven operation.
The system has a REN of 1 per exchange line and 3 per extension. Do not exceed the
limit.
Locating the Telephone System
The location selected for the telephone system should be clean, dry, temperature controlled and
accessible to authorised personnel only. When selecting a site it is important to consider the
following:
Availability of a 220-240V AC mains power socket located within 2m of the system.
Additional outlets for a paging amplifier and music source if needed.
The unit is designed for wall mounting.
Proximity to the C.O. line / system line terminations.
Proximity of the extension telephone locations so that the prescribed cable lengths are not
exceeded.
A well-ventilated area having a temperature range of 0-50°C with a recommended
temperature range of 20-26°C and a humidity range of 10-95% (non-condensing).
Lighting and accessibility of the system for maintenance.
Section
4
Important!
Important!
Important!
Important!
Page 56

Installation & Programming Manual
52
The Telephone System must not be subjected to harsh environmental conditions. To ensure easy
servicing and reliable operation, several factors must be considered when planning the system
installation. The following locations are to be avoided at installation sites:
Avoid heat-producing or steam producing equipment.
Avoid Areas with temperature and humidity extremes.
Avoid installation near a passageway or aisle used for moving machinery or vehicles.
Avoid installation near equipment which generates high electromagnetic interference.
Possible sources are photocopiers, computer terminals, mobile phones fluorescent tube
light fittings and electrical machinery.
Avoid areas liable to flooding, near flammable materials, excessive dust, vibration or
mechanical stress.
Unpacking the Main Equipment
Static handling precautions must be observed when handling this system.
Remove the telephone system from shipping carton and lay it flat on a stable working
surface with the cover facing upwards. Remove the 2 screws on the front of the case and
remove the plastic side-cover to access the MDF connection terminals.
Inspect the main unit housing for damage during product delivery.
The resources listed below are all necessary for a working system.
Main system
Single Line Telephones or System terminals
UTP twisted pair cables
PSTN Exchange Lines or ISDN basic rate line.
Mounting the System
When mounting the telephone system care should be taken to ensure all cables and AC cords are
neatly arranged. The telephone system should not be mounted directly onto masonry, concrete, or
other surface subject to moisture or condensation. (Use a plywood backing board when mounting to
these types of surfaces). A drill template is provided for mounting the system onto the wall. The
screw fasteners chosen should be the correct type for the wall surface and capable of supporting the
full cabinet weight.
Two #10 screws approximately 40mm long are required to locate into the slots provided on the rear
of the Main Equipment as shown in Figure 4-1 below.
Figure 4-1 Rear View of Telephone System
Screw housing
slots for wall
mounting
Serial number
Page 57

Section 4 - Installation
53
Preliminary Procedures
After the case has been wall mounted, connect one exchange line, and two extension telephones (11
and 12)
Exchange Line 1 must be connected to EXCHANGE terminals marked CO1, line 2 to
CO2, line 3 to CO3, line 4 to CO4, line 5 to CO5 and line 6 to CO6.
A DTMF telephone (or Executive Terminal) must be fitted to EXTENSION terminals
marked ext.13. This is the Master Extension and is used for system programming.
Lift the handset at Extension 11 (a power fail telephone) and listen for PSTN dial tone,
before power up. Verify that you can directly dial external numbers, without the normal
prefix 0 for a line.
Power up Sequence
Turn on the 220 – 240VAC supply, then wait about 10 seconds.
Wait until the green LED on the front cover is on and flashing.
Call between Extension 12 and extension 11.
Make an exchange line test call to verify wiring between extensions, main unit and PSTN
exchange lines.
Set the system clock (see page 37).
If an Executive Terminal or Standard Terminal is fitted then log on the terminal by dialling
the code * 751 ext. #.
The Telephone System comprises a 220 - 240VAC Power Unit, MBU (Main Board Unit), MOH
Port, two PSTN Exchange Line Port, eight hybrid ports for Terminals or SLTs,
Expansion/Optional PCB Connectors, Ring Generator Circuit and MDF Connection Unit. A split
Main Equipment cover (Top cover/Side cover) is provided to allow individual access to the MDF
Connection Unit without access to the Main Equipment circuitry and option cards.
Figure 4-2 Front View of Telephone System
MDF Connection Unit - Wiring
The MDF Connection Unit provides access to the Main Equipment ports via screw-terminals. These
screw terminals have been arranged so as to provide:
Separation between exchange lines and internal equipment.
Access to extension ports.
Access to the Door Phones, Paging port, Alarm Loops and Terminal signalling ports.
Important!
Top-cover
Loosen two screws
and remove side
cover for access to
cable connectors
(
MDF
)
Page 58

Installation & Programming Manual
54
Extension 14 is suitable for external wiring and is fitted with the required protection circuitry.
Figure 4-3 below, shows the terminal layout.
Figure 4-3 MDF connections
Extension wiring
To eliminate cross-talk, it is a requirement that twisted pair cable must be used to support
all extensions and system integral devices with only one extension per cable. Four-wire
cable must be used.
If an ordinary telephone is connected to an extension which previously had a Terminal connected,
the system needs to be told that the Terminal is no longer connected. Ringing will not be heard at the
extension until this has been done, though dialling will still be possible. After plugging in the SLT, go
off-hook and enter the code *750 ext #.
Important!
Important!
Powerfail connections
(
PSTN onl
y)
Paging port
Door 2 latch relay
Door phone 2 (option)
Not used
2
1
Door phone 1
Door 1 latch relay
24
23
22
21
18
17
16
15
14
13
12
11
1
2
3
4
5
6
Terminal Signalling (4 pairs in parallel)
DrRly_Dr1v
CO4__CO3
-Tx+ -Rx+
CO2__CO1
Pfail Pfail
Ext11_Ext12
Ext13_Ext14
Ext15_Ext16
Ext17_Ext18
Pfail
Ext21_Ext22
Pfail
Ext23_Ext24
CO6__CO5
-Tx+ -Rx+
TerSig1_Sig2 AuxSig1_Sig2 Dr2v_Page Alm1_Alm2 Alm3_Alm4
AlmRly
C NC C NO
Extensions Miscellaneous Exchange Lines Alarms
Alarm Loops
Expansion slot 1
Expansion slot 2
Basic system
Expansion slot 2 ISDN or PSTN
Expansion slot 1 ISDN or PSTN
Basic system
Page 59

Section 4 - Installation
55
Twisted pair wiring must be used to eliminate interference from other sources. Individual cable-runs
between the extension device and the MDF Connection Terminals is a mandatory requirement (StarWiring technique). The maximum cable run lengths are as follows:
Single Line Telephone Extensions (900Ω)
3285m Cable 0.4mm
Executive / Standard Terminals / Door phone (mains
power)
950 m Cable 0.4mm
Executive / Standard Terminals / Door phone
(Battery Back-up)
200 m Cable 0.4mm
Power Failure Transfer
In the event of a power fail the analogue exchange lines will be connected directly to the designated
power fail extensions as shown in the table below. The system Executive and Standard Terminal will
not function correctly in the event of a power fail and should not be connected to these extensions.
Exchange Line Pre-set Power Fail
Extension
Configuration
1 11 Standard
2 12 Standard
3 21 Requires 1+2 or 2+2 in expansion slot 1
4 None
5 23 Requires 1+2 or 2+2 in expansion slot 1
6 None
The power fail telephone must match the line signalling characteristics provided by the carrier. The
optional Executive or Standard Terminal must not be connected to extensions 11, 12, 21 or 23 as it
not suitable for direct connection to exchange lines in power fail mode.
Executive & Standard Terminals
The system can support up to ten Executive Terminals and Standard Terminals combined.
The Executive/Standard Terminal cannot be used on power fail extensions 11 or 12. It is also
recommended that extensions 21 and 23 do not have Terminals connected if the system uses
analogue exchange lines. A terminal will not function in the event of a power failure. Figure 4-3
shows the location of the power fail extensions.
When installing the Executive or Standard Terminal both the speech pair and the signalling pair are
polarity dependent. The speech pair is connected to the normal speech connections for the
extension. The signalling pair is connected to any of the signalling pairs shown in Figure 4-3. Each of
the pins are labelled on the casing under the MDF cover. When the speech wires are correctly wired
then the terminal LED's will flash and it will be possible to make a call. If the signalling wiring is
reversed then the display will show ‘Communication Error’ on the Executive Terminal screen after a
short delay and the LEDs will not function on the Standard Terminal.
After connecting the Executive Terminal or Standard Terminal the extension will automatically
configure itself and the display will show ‘This is extension: xx’ if it correctly connected.
European Telephone RJ11 connection
The European socket is connected as shown in Figure 4-4, below. Note: if the socket is different the
pin references should be used, the socket may use Insulation displacement connectors in place of
screw terminals.
Important!
Page 60

Installation & Programming Manual
56
Figure 4-4 European RJ11 telephone socket wiring
UK Telephone connection
To connect an extension socket in the UK a BT type ‘master’ or ‘primary’ socket must be used to
connect the first telephone, connected as shown in Figure 4-5 below. This socket includes extra
components in addition to the direct connection found in an ‘Extension’ socket. Subsequent sockets
on the same extension may use standard ‘Extension’ sockets. Note: the diagram may not reflect the
layout of your master socket – use the pin numbers as labelled in the diagram and on the socket as a
guide. Also, the socket may use Insulation displacement connectors in place of screw terminals. The
recommended wiring colours are also specified in the figure.
Figure 4-5 UK BT telephone socket wiring
Expansion / Optional PCB Installation
The Expansion/Optional PCB contains digital circuitry which, while extremely reliable, can be
damaged by exposure to excessive static electricity. Use static handling precautions when handling
these boards, e.g.
Extension connector
block. Connect to the
terminals marked
‘Extensions’
Pin 2 to voice +
(white with blue bands)
Pin 4 – not used
Pin 5 to voice –
(blue with white bands)
Pin 3 - not used
Pin 6 – signalling +
(green with white bands)
Pin 1 to signalling –
(white with green bands)
BT Master
telephone
socket
For System Terminals only
Connect to the terminals marked
‘Ter 1’ or ‘Ter 2’.
For System Terminals only
Connect to the terminals marked
‘Ter 1’ or ‘Ter 2’.
Extension connector block.
Connect to the terminals
marked ‘Extensions’
Pin 2 to signalling -
Pin 4 to voice -
Pin 5 to signalling +
Pin 3 to voice +
Extension
telephone
socket
Pin 6 - not used
Pin 1 - not used
Page 61

Section 4 - Installation
57
If power is inadvertently left connected while installing or removing any expansion cards
then before the telephone system is used it should be powered down. Whilst the cards will
not be damaged the telephone system is designed to detect these cards during a self-test at
power-up.
Keep all PCBs in their protective anti-static bags until they are installed in the Main Unit.
All PCBs that are not in protective bags should be handled by the card edges only.
Never lay an unprotected PCB on a carpeted surface.
Each card has it's own corresponding connectors on the main board, in the positions shown in
Figure 4-6 below.
Figure 4-6 Expansion / Optional PCB Mounting Location
0+2 / 1+2 / 2+2 Expansion Cards
These expansion cards provide capacity to support two extra extensions with zero, one or two
optional PSTN lines. These cards mount onto the Expansion Card slots 1 and 2. A maximum of two
PCBs can be mounted on the MBU to provide maximum system capacity of 6 + 12.
PSTN CO Line Ports:
The CO line ports will support DTMF and Pulse dialling. By default, if the extension uses pulse
dialling then the telephone system will use pulse dialling onto the exchange line. Likewise, if the
extension is DTMF then the exchange line signalling will also use DTMF. If the line is a DTMF line
then all speed-dialled numbers from the telephone system will be DTMF, even if the extensions are
pulse. The PSTN CO Line ports can be connected to a host PBX’s extension ports for analogue
networking purposes. Timed Loop Break line (Recall) signalling is provided to support carrier
network services.
Extension Ports:
These are analogue single line ports to support telephony devices.
UTP Cat-3 twisted pair wiring must be used to eliminate interference from other sources. Individual
cable-runs between the extension device and the MDF Connection Terminals are a mandatory
requirement. (Star-Wiring technique.)
V24
socket
Music on hold
external source
Telephone system motherboard
CLI /Meter pulse detection Card
Expansion card 2
System software on
socketed EPROM
V24 card
Fax / Voice Card
MDF Connectors
Expansion card 1
BBU connector
Optional 25Hz
ringer card
Page 62

Installation & Programming Manual
58
For each SLT extension, the wiring pair must have a maximum DC loop resistance of 900Ω. Each
system terminal maximum loop resistance is 200Ω under normal conditions (or 50Ω under battery
back-up).
All extensions except extension 14 are for internal use only and are not suitable for external use
without additional external lightning protection.
When a SLT or other equipment is connected to the exchange lines, it is not necessary to pause
between seizing the line and dialling out the digits.
Fax /Voice Card
This option card is used to store the various voices messages used in Auto Answer features and
Security alarm applications. The card also has a fax detector, which is used to automatically route fax
calls to the fax machine. The card plugs into the slot shown in Figure 4-6 on page 57. This card is
automatically detected when the telephone system powers up.
V24 / RS-232C Serial Data Interface
The optional V24/RS-232C option board is mounted on dedicated MBU terminals provided for this
purpose. (Refer to Figure 4-6 on page 57 for location details). The board is connected using the RJ11
cable and either a D9 or D25 serial port connector. Before installing the optional board it is necessary
to break out the thin plastic tongue in the moulding to allow the R J11 socket to fit in the side of the
case.
Before connecting SMDR port to the terminal device, check that the transmit (TX), receive (RX) and
ground pins of the terminal device are RS232 compatible to ensure serial data transmission
compatibility. The terminal device can be a Serial ASCII Printer or Computer.
Protocol: 4800Baud, 8 data bits, 1 stop bit, no parity, no flow control
Signal 25 pin D 9 pin D RJ11 on V24 V24 card
Rx 3 2 4 (black) 3
Tx 2 3 3 (blue) 4
GND 7 5 5 (yellow) 2
DSR 6 6 2 (green) 1
V24 / FSK Card
This optional card is identical to the V24 card above plus it is able to generate CLI information for
analogue extensions from incoming ISDN calls.
CLI and Meter pulse detector card
There are three options for this slot.
Meter pulse detector card
6-line CLI card
Combined CLI and Meter pulse detector card
The meter pulse detector card detects meter pulses which are displayed on the Executive terminal as
either the number of meter pulses or as a call charge for logging to the CDR file.
The CLI and Meter pulse detector card detects meter pulses as described above and detects the
Calling Line Identification (CLI) information. The CLI data is also sent to Executive Terminals and
to the CDR file.
Important!
Page 63

Section 4 - Installation
59
25Hz Ringer Card
Note: This option may be fitted as standard, see Figure 4-6 on page 57 for the board location.
Some older fax machines or automatic answering equipment may not be designed to operate with
the 50Hz ringing generated by the telephone system. The ringer card option provides a true 25Hz
sinewave ringing waveform to ensure compatibility.
1. First disconnect the telephone system from the mains power outlet.
2. Disconnect the transformaer leads from SK27 on the main pcb.
3. Connect the transformer leads to socket X2 on the 25Hz ringer card.
4. Connect socket X1 on the Ringer card to SK27 on the main PCB. The connector can only be
fitted with the components facing away from the transformer.
5. Replace cover, then re-connect the mains power. Ensure the power LED lights when power is
applied.
6. Make a test call to a SLT extension and verify it rings correctly.
Door Phones
The telephone system may support one or two door phones, depending on the configuration
purchased. The door phone is a proprietary unit designed to work with this telephone system only. It
provides a two-way speech link between the door phone and any extension. The unit provides a
button for ringing and a permanently lit LED for easy location. As it provides a two-way speech link
the door phone is not restricted to doorways, it may be used anywhere an intercom is required.
Contents
Door phone
Two wall plugs
Two wall screws
Installation
The door phone must be connected to the system with standard telephone cable. It must be placed
in a location away from the rain.
Unscrew the front fixing screw and unclip the wall mounting bracket.
Attach the bracket to the wall using the wall plugs and screws provided.
Connect the two screw terminals on the door phone to the door phone connectors
labelled DR1V on the MDF for door phone 1, or DR2V for door phone 2, if supported.
See Figure 4-3 for details, note that the cable should first be fed through the cable entry
hole of the wall bracket before connecting. The polarity is not important. Also note that it
is not necessary to power down the telephone system during this operation. The telephone
system will ring with a door phone call when it is first connected, this is normal and may be
silenced by going off and on-hook at a ringing extension.
Clip the cover back onto the wall unit and replace the retaining screw.
The telephone system provides a dry relay contact for door latch operation with each door phone.
Door phone 1 uses the relay latch labelled 'DrRly', while door phone 2 uses the contacts labelled
‘Alm_rly NO’ This is used to drive an electric door latch, purchased separately. Note that this must
be powered independently. Maximum rating is 24 volts 1 amp AC/DC.
Important!
Page 64

Installation & Programming Manual
60
ISDN Cards
This optional card provides an interface to a basic rate ISDN exchange line. Support for 2 basic rate
lines is possible with an ISDN card fitted into expansion slot 1 and expansion slot 2. Each ISDN
card adds two exchange lines to the unit, using the two ISDN b channels on a basic rate ISDN
connection. Two analogue extensions are also added with each ISDN card. An ISDN card in
expansion slot 1 will add exchange lines 3 and 4 plus extensions 21 and 22. An ISDN card in the
second expansion slot will give exchange lines 5 and 6 plus extensions 23 and 24.
Socket & connector supplied with ISDN card
to pin 5 (green)
to pin 4 (red)
to pin 3 (black)
to pin 6 (yellow)
ISDN connector
Rx+
Rx-
Tx+
Tx-
pin 1
pin 8
Figure 4-7 ISDN RJ 45 Socket wiring
A connector is supplied with the ISDN card, wired as shown in Figure 4-7 above. When the system
is powered up the ISDN card is automatically detected and the system runs a test to verify that the 1
st
and 2
nd
S bus, if connected, are operational. If either S bus is not connected or temporarily down
then the tests will be repeated at 5 minute intervals until the B channels are available, during this time
attempts to seize an external line routed over an ISDN exchange line will be blocked with busy tone.
The system may be connected in parallel with other ISDN devices with a line in point to multipoint
configuration. If a B channel is busy on another ISDN device connected to the ISDN line then the
system will show the line as busy and stop calls being routed out on that line.
The ISDN card will generally function directly without programming, though to take advantage of
the extra services offered by ISDN some programming is recommended. Programming details are
found in the ISDN Programming section on page 43. Use of the PC program with V24 option card
is recommended to simplify the process.
If you wish outgoing calls to be made on the ISDN network in preference to any PSTN lines then
program the feature ‘ISDN first’. The code to be entered at extension 13 is *8 201 #.
The end of line 100Ω terminating resistors must be fitted to the last device connected to the ISDN
S
0
bus. This also applies if the device is the only equipment connected, or if it is the only device
connected. The ISDN card contains two links, J1 and J2 which will put the termination in place if
fitted.
Music on Hold Source
The telephone system provides a standard audio 3.5mm socket for an external music source, located
next to the V24 port. The music source should be 600Ω, 0 dBm / 775mV max, as found at the ‘line-
out’ connectors of many items of audio equipment. It is important to take anti-static precautions and
discharge any static build-up on your person before connecting this music source. It is recommended
that the telephone system be powered down for this operation. Note that the external music on hold
has to be activated before it is enabled, see page 45 for details.
Battery Back-up Unit
The telephone system is powered by an integral 220-240 V AC power supply. During mains failure
the analogue exchange lines 1, 2, 3 and 5 are connected directly to extensions 11, 12, 21 and 23
respectively, providing a direct telephone to exchange link, no telephone system services or ISDN
exchange line operation will be possible. The optional battery back up unit will power the system in
the event of a mains failure and it will operate as normal until the internal batteries are exhausted.
Important!
Page 65

Section 4 - Installation
61
The BBU is housed in a similar plastic case to the telephone system and is wall mounted.
It is designed to operate with two 12V, 1.2 Ah sealed lead acid batteries of maximum dimensions 97
mm x 48.5mm x 57mm. The batteries are not supplied with the battery back up unit.
This unit provides the telephone system with a 24 volt dc feed and a 75V
RMS,
25Hz sine wave ringing
supply.
The unit will allow the telephone system to continue to operate for at least 1 hour and possibly up to
3 hours depending on how many telephones are connected and on how much they ring. System
software in the telephone system controls the ringing supply to maximise back up time.
Figure 4-8 BBU to telephone system connection diagram
Battery specifications
Measurement Required
Height: 57mm
Width: 97 mm
Depth: 48.5 mm
Electrical spec: 12V 1.2Ah
Recommended source: Yuasa A512/1.2S
Installation of battery back up unit
1. First disconnect the telephone system from the mains power outlet and ensure that the battery
back up unit is NOT connected to the 220-240 volt supply.
2. Ensure the 4-pin socket with the red, blue, white and black leads are connected to plug J4 on
the BBU.
3. Check if the optional 25Hz ringer card is fitted, see Figure 4-6 on page 57 for location. If fitted
remove from socket SK27 and from the transformer leads. This is not required with a BBU
unit.
4. Remove the cord bushing/grommet, which secures the mains cable to the back of the
telephone system case and remove the mains connector from the plug SK41.
Important!
PABX power
cable grommet
fits here
System Power
cable socket reconnects here
+-
Kickstart contacts
Green LED –
Mains power ok
Battery connector
+
-+
-
Batteries
Black
SK27
BBU
SK22
BBU cable entry grommet
Connect white 3
wire connector
to plug
12 34
Connect 2
pin socket
with single
wire to pin 2
Telephone System Battery Back-up Unit
Blue
Red LED –
System using
Battery power
Red
Page 66

Installation & Programming Manual
62
5. Remove the cover of the battery back up unit and proceed to install the batteries. Place the
batteries on their side with the terminals facing the side of the case, as shown in Figure 4-8.
6. Using the short red cable with two spade connectors, connect the positive terminal (+) of the
left-hand battery to the negative (-) terminal of the right hand battery.
7. Connect the spade connector on the red wire of the long lead to the remaining positive battery
terminal and the spade connector on the black wire to the negative battery terminal. The other
end of this lead with the 2-pin socket with red and black wires should be connected to plug J3
on the BBU.
8. Connect the 2-pin socket with the single wire to the matching 4-pin plug marked SK27 on the
main board. Ensure that the single wire is connected to pin 2 of the connector, as shown in
Figure 4-8.
9. Thread the external cable from the battery unit through the cable entry at the rear of the
telephone system case, where the 220-240 volt cable was removed.
10. Connect the 3-pin socket to the matching connector pins marked BBU (SK22) on the
telephone system main board.
11. Close the lid of the system and Battery unit and plug the battery unit into the 220-240 volt
mains outlet.
Note if a 25Hz ringer card is fitted, it must be removed completely when a BBU is connected.
The green led on the front case of the telephone system will light to indicate it is receiving power.
After the batteries are charged (approx. 4 to 5 hours) then the system will run without mains power
for between 1 and 3 hours depending on the usage of the system and the number and duration of
extensions ringing.
When the system is running on battery the internal red led only is lit and when the 220-240 volt
power is operating then both the red and green LED’s on the battery back up unit are lit.
To turn off the power feed to the telephone system while the system is running on battery it is
necessary to disconnect the batteries at connector J3.
N.B. While the system is running on battery if, for some reason, the battery leads are
disconnected and then re-connected the system will not run unless the installation
technician shorts the two solder pads marked X1 and X2. This is also necessary if the unit
is started up using battery power only.
Important!
Page 67

63
5. Maintenance
Self-Test
The Telephone System initiates a 'self-test' when the 220-240VAC mains supply is switched on. This
self-test power-on sequence includes:
RAM Test
PSTN Dial Tone Detection
Expansion card detection
Electronic Switching
PSTN Exchange Line Ports
PSTN Exchange Line Signalling Method (DTMF/Decadic)
ISDN line status
DTMF Resources
The power-on self-test procedure takes about 10 seconds to complete.
After the power-on self-test the green LED on the case will flash slowly, after about 10 seconds. If
this does not flash then there is either a power supply problem or a faulty processor or EPROM.
Check the fuse and check that the EPROM has been inserted correctly if it has been replaced.
Customer Database Protection
EEPROM (E²PROM) protects the Customer Database containing all the system programming in
the event of a mains power failure. Batteries are not
used anywhere in the system. After
programming changes, the system should not be switched off for 6 minutes.
Generic Software Memory
The system's generic operating software is stored on an EPROM and is self-protected in the event of
a commercial power failure. Before replacing this ensure that the system is powered off
Expansion / Optional Plug-In PCB
Some of the plug-in boards have lines with ringing voltage of up to 70V AC. The mains power must
be removed from the unit before removing and replacing these boards.
These are specific dedicated function boards and can be easily identified for maintenance purposes.
It is recommended that you do not remove or replace these PCB’s from their connectors with power
connected to the system, as the system may be reset or cause a lock up.
Section
Warning!
Page 68

Installation & Programming Manual
64
Anti-static precautions should be taken before handling these boards as they could be damaged by
electrostatic build up.
Repair Procedures
On site repair is limited to replacement of system option boards or the main board.
The boards which maybe replaced by a trained and competent installation engineer are:
Main 2+8 board
0+2, 1+2 & 2+2 expansion cards
Fax / voice card
V24 card
ISDN card
CLI detector card
Meter Pulse detector card.
25Hz ringer card
Telephone repair on site is limited to replacement of handsets, line cords and handset cords.
Problem Solving
Green LED not on
Check mains fuse and power connection. Led should flash 10 seconds after power up. It will light
steadily after the pin code is set. If power is ok then check that the system EPROM is correctly fitted.
If not then replace, ensuring that the pins are all seated correctly. If green LED does not flash then
check the system voltages on the test pins labelled SK33 located between the music on hold jack and
the RJ11 connector (if fitted). If any of the 24, 12, 6 or 5 volt rails are low then power the system
down, remove all option cards and phones to establish if one is faulty before powering back up. If a
faulty expansion card or terminal is not found and if the power is not restored on the test pins then
return the unit to the dealer.
No dial tone on extensions
Check that sockets are correctly wired. Check that the system has been correctly configured for 2+8,
4+10 or 6+12 operation, as described. Remember that the system terminals are polarity sensitive.
No dial tone when you access an external line
Check that PSTN dial tone is on the exchange line by connecting directly to the line at the master
socket.
Check that class of service 5 is not assigned to the extension. Check that dial tone is given when you
select a B channel directly on an ISDN terminal connected to the S bus. If not make sure the ISDN
bus is not set for data calls only, without dial tone. If the analogue line is not connected and if you are
using ISDN then make sure you have programmed the system to select ISDN channels first.
Extension is not ringing on incoming exchange line calls
Check that the correct ringing assignment has been made. Default is that all extensions ring on
incoming calls. If there is an interrupted dial tone then Do Not Disturb, Internal Diversion or
External Call Forwarding may be active. Check that the extension is not fitted with a single line
telephone but programmed as a Terminal. Dial *750 EXT # at the extension where EXT is the
extension number to ensure correct ringing on single line telephones.
Page 69

Section 5 - Maintenance
65
Outgoing calls do not get through
Check that the line or host PABX extension is set for tone (DTMF) dialling if the extension you are
using is DTMF. If the external line is pulse signalling then the extension must be pulse mode and
vice versa. Check also that call barring class 5 (no outgoing calls allowed) is not assigned.
Other ISDN equipment will not work with the telephone system
Check the polarity of the connectors on the MDF to Figure 4-7 on page 60. Ensure that your ISDN
access is configured as 'Point to Multipoint', your network operator will provide this information
with the ISDN line.
PC program status display
The PC program allows the user or installation engineer to see the status of all extensions, exchange
lines, and system programming on one screen. While the PC program has control then it is not
possible to carry out system programming from extension 13.
The phone rings back when the handset is replaced
The hook switch contacts may be bouncing and simulating a hook-flash before hanging up properly.
Try setting the extension as DTMF only and programming the recall time window to eliminate the
problem. See ‘DTMF Extensions’ on page 39 for programming details.
Music on hold is not audible
Dial the code *9 PIN 151 # at extension 13 to enable external music through the music jack. Code
*9 PIN 150# cancels this and the system operates with a hold tone.
Unable to transfer calls to an extension
Check that the extension involved has not been assigned call barring class 5, which prevents transfer
of exchange line calls to the extension from another extension with a different class of service. Check
that if an Executive or Standard Terminal had been used previously that the correct setting was then
entered for single line telephone operation. Press *7 50 extension # and ring the extension from
another phone to check this. Also check that the time break button (R) is set for a 100 ms break (if it
is 200, or 600 ms) then the hold and transfer function will not operate.
There are ‘silent’ calls on extensions
Incoming callers who are trying to send a fax are not pressing the START button after the tone or
message and the fax switching has timed out and caused a general call. Check that the recorded
message gives a clear instruction. Also, some older fax machines may not send CNG tone and this
causes ‘silent’ incoming fax calls which need to be transferred manually to the fax machine. NOTE:
This is not a limitation of this telephone system.
External call forwarding / trunk-trunk transfer breaks down
This is because there is a time limit of 30 seconds allowed for external call forwarding and trunktrunk transfer. A warning tone will be heard 10 and 5 seconds before this happens, either user may
extend the call by pressing digits 1 to 9, to increase the call time in multiples of 30 seconds. E.g.
pressing '4' will increase the call length by 2 minutes before it is cut off.
PC program or printer do not operate
Verify that the PC and printer are correctly wired – see page 58. The printer must be a serial printer
(4800 baud setting). To send the data to a printer enter *8 251# at extension 13. To connect to a PC
dial *8 250# at extension 13.
Check that there is no COM port conflict with other devices such as modems on the PC. The
default pin code for the PC program is 7373 and the menu allows you to select a COM port setting
under the GENERAL PARAMETERS menu choice, selecting then FACTORY DEFAULT when
prompted.
Page 70

66
6. Specifications
For tone and ringing specifications please see the Country Specific Specification sheet
packaged with this manual.
Electrical Specifications
AC Input to Power Supply 220-240VAC 50 Hz
Power Consumption 20VA (Maximum), 10VA (Idle)
Power Supply Fuse Rating 125 mA, 250V
External Music Port (MOH)
600Ω, 0 dBm / 775mV
Contact Rating (Door Latch) 1A, 24V AC/DC
Ringing Current 70V rms, 50Hz or
70V rms, 25Hz with 25Hz ringer card
External Paging Port
600Ω, 0 dBm/775mV
Real time clock operation during power fail Min. 6 hours
Environmental
Operating Temperature
0-50°C 32-122°F
Optimum Operating Temperature
20-25°C 68-77°F
Storage Temperature
0-70°C 32-158°F
Relative Humidity non-condensing 10%-95%
Loop Limits
These are recommended maximum limits.
Single Line Extensions (900Ω)
3285m Cable 0.4mm
Executive / Standard Terminals / Door phone (mains
power)
950 m Cable 0.4mm
Executive / Standard Terminals / Door phone
(Battery Back-up)
200 m Cable 0.4mm
V24/RS-232C (SMDR Port) 15m Cable 0.4mm
Dialling Specifications
DTMF Dialling
Frequency Deviation Less than +/- 1.5%
Rise time 3 ms.
Section
Page 71

Section 6 - Specifications
67
Duration of DTMF Signal 65 ms. min.
Inter-digit time 75 ms. min.
Decadic Pulse Dialling
Pulse Dialling rate 10 PPS
Pulse Break/Make duration 66/33
Recall pulse 40 - 160ms for detect; 100ms for send
PSTN CO Line Type
Loop Calling, Unguarded clearing
Power up default settings
All extensions can make and receive external calls (call barring class 0)
Alarm contacts are set to Normally Closed, 90-second entry delay, alarm with tone.
Factory default pin code is 7373
V24 output of SMDR is in PC mode
System is in Day Mode
All extension ringing is immediate, no delays
No internal diversions on busy, no answer are set
All extensions can be either DTMF or Pulse Dialling
Intrusion rights not set
No automatic answering features are programmed
All extensions are set to act as single line telephones, with ringing activated
Default ISDN mode is point to multipoint
Internal hold tone used.
Call waiting tone enabled.
Alternative Carrier Selection is disabled.
Page 72

Installation & Programming Manual
68
7. Glossary
0+2 / 1+2 / 2+2 expansion cards
The 0+2 expansion card refers to a card
which provides no exchanges lines and two
extensions. Similarly the 1+2 and 2+2 cards
provide 1 and 2 exchange lines respectively
and 2 extensions.
Basic Rate Access
Single ISDN access with two B channels and
one D-channel. The two B channels can
carry voice, and are used as exchange lines on
the telephone system.
BBU
Battery back-up unit. A separate unit that
allows the system to operate during a power
failure.
Call waiting
During a call a tone signals that there is
another call.
CDR
Call detail recording. This is a feature offered
by the system which can log all calls with
destination, duration, time, cost and
originator. It is referred to as SMDR by some
systems.
CLIP
Calling line identification presentation. If you
have ordered this from your carrier, you can
suppress the display of your telephone
number at the called party. For this system a
CLI card must be connected for analogue
lines or an ISDN card for ISDN line for the
CLIP feature to be active. The feature must
also be requested from the Telecom
provider.
CNG tone
Fax machines transmit a special tone at the
start of a call so that other equipment knows
it is for a fax machine. The system is able to
transfer calls to a fax extension when it
detects fax CNG tone.
COLP
Connected line presentation. This shows the
calling party your telephone number, if
different from the dialled number. This is
relevant in the case of MSN numbering. This
service is available on ISDN lines only.
DDI
Direct dialling inward. This is an ISDN
service similar to MSN. It allows a single
ISDN line to have many telephone numbers.
DISA
Direct Inward Station Access. This allows
you to dial into the telephone system direct
to an extension on an external number
without needing an operator to manually
answer the call first.
DTMF
Dual-tone, multi-frequency. This is the name
given to the tones used by phones to dial
numbers or access network services.
Exchange
Node in public telecommunications network.
Often also referred to as Central Office.
Your external telephone line is connected to
the telephone network through equipment in
the local exchange.
Flash
A flash is a short break in the line. It is
detected by the system to activate certain
features during a call and can also be sent to
the exchange line to activate network
services. Often called recall.
Hotline
A Hotline is an extension that dials a number
automatically whenever the extension is
taken off-hook.
ISDN
ISDN stands for Integrated Services Digital
Network. Compare with PSTN.
Page 73

Glossary
69
KTS
Key telephone system. A system which uses
it’s own system telephones, often with extra
functions. This unit is a hybrid telephone
system, capable of supporting both ordinary
SLT and Terminal phones.
MSN
See Multiple subscriber number.
Multiple subscriber number (MSN)
An ISDN basic rate access can have many
numbers assigned to it. This is called multisubscriber numbering. Another version is
DDI, which is treated exactly the same in the
system. The numbers are used to address the
connected terminals.
NT / NTBA
Network Termination Basic Access. This is a
device which adapts a two- wire system to a
four- wire connection to the ISDN S0
interface.
Personal identification number (PIN)
You need the personal identification number
(PIN) to program the system. This should be
changed to a safe, easy to remember number.
PSTN
Public Switched Trunk Network. This is the
name given to the analogue telephone
network, compare with ISDN, the digital
network.
Recall
See flash.
RTC
Real time clock. This is the clock inside the
system which is backed up by battery and will
not lose the time if power is lost and the
BBU runs out of charge.
Serial Port
See V.24
SLT
Single line telephone. This is an ordinary
telephone which can be connected to the
network on it’s own.
SMDR
Station message detail recording. This the
ability to log all calls made by the system for
accounting purposes. The system uses a
system called CDR, or call detail recording.
Terminal
A terminal refers to different devices
depending on the context. In the case of this
telephone system the Terminals are the
system phones connected to it, the Executive
Terminal and Standard Terminal.
V.24
Technical name of the internationally
standardised serial data interface as also
found on PCs. Also referred to as a serial
port or an RS232 interface.
Page 74

Installation & Programming Manual
70
8. Index
0+2, 1+2, 2+2 expansion cards.......... 57
accounts ................................... 25
using ..................................... 8
alarm
calls .................. See reminder call
connector locations...................54
notification options ...................46
sensors..................................46
social....................................47
alternative carrier selection ............ 25
answering calls..............................6
answering machine....................... 26
automatic answering..................... 27
courtesy service .......................37
baby monitor............See room monitor
bar filters.................................. 34
battery back-up unit .............. See BBU
BBU
connections .......................61, 62
installation.............................60
boss-secretary ............................ 32
broker call...................................8
busy call
pick-up................................... 9
call
answering ............................... 6
barring..................................34
brokerage ............................... 8
conference .............................. 9
data protected ........................10
detail recording .......................36
dialling out.............................. 6
diversion................................. 8
door phone.............................11
general & code ........................12
holding..................................12
parking................................... 9
pick up................................... 9
reminder................................14
speed dial ..............................14
transferring .............................7
waiting tone ...........................37
call control flow diagram................ 31
call intrusion
programming...........................43
using ..................................... 9
call logging ................................ 36
call-back................................... 12
calling line identity restriction ..See CLIR
CDR ......................................... 36
CLI card .................................... 58
CLIR .........................................44
clock setting...............................37
CO lines ................See exchange lines
code calls ..................................12
COLR ........................................44
conference calls
making .................................. 9
connected line identity restriction ... See
COLR
connection
terminals............................... 54
connections
layout................................... 54
COS..........................................33
courtesy service...........................37
data protection............................10
date setting................................37
DDI numbers .............See MSN numbers
default settings ...........................67
delayed hot line...........................43
dialling
codes .................................... 4
extensions .............................. 6
outside lines............................ 7
diverting calls ..............................8
do not disturb .............................10
door latch
connecting............................. 59
operating............................... 11
door phone
calling .................................. 11
connector locations .................. 54
installation ............................ 59
opening door .......................... 11
ring settings ........................... 46
DTMF
dialling specifications................ 66
extensions ............................. 39
EEPROM................................ 16, 63
electrical specifications..................66
environmental specifications............66
exchange line
connector locations .................. 54
disabling line 1 ........................ 44
groups .................................. 39
ISDN..................................... 60
priority on outgoing calls ............ 44
PSTN .................................... 57
timed break ........................... 11
Page 75

Index
71
exclusive hold............................. 12
executive terminal
extension programming menu .......18
system programming menu ..........19
executive-secretary...See boss-secretary
exempt filters............................. 34
expansion
options.............................1, 2, 3
expansion cards
0+2, 1+2, 2+2 ..........................57
installing................................56
extension
accounts................................25
boss-secretary .........................32
call intrusion...........................43
call logging.............................36
call-back................................12
connector locations...................54
dialling................................... 4
DTMF ....................................39
exchange line allocation .............39
fax, setting as .........................41
groups...................................46
hotel call logging......................36
how to lock.............................13
locking ..................................40
loop limits..............................66
ringing on exchange line .............46
set as answering machine............26
external alarm notification ............. 46
external calls................................7
external music on hold .................. 45
fax
exension ................................41
monitor mode..........................41
fax / voice card........................... 58
flash memory.................. See EEPROM
flash transparency........................ 11
forward recall............................. 11
general call................................ 12
glossary .................................... 68
group
extensions..............................46
hold
exclusive ...............................12
music....................................45
music source installation.............60
non-exclusive ..........................12
timeout .................................42
holding calls............................... 12
hotel operation ........................... 36
immediate hot line....................... 43
incoming call control .................... 31
installation
BBU......................................60
checklist................................51
doorphone..............................59
fax / voice card .......................58
ISDN card............................... 60
location ................................ 51
MPD / CLI card ........................ 58
music source .......................... 60
terminals............................... 55
V24 card................................ 58
internal alarm notification ..............46
internal music on hold ...................45
introduction to system .................... 1
intruding on calls ..................... 9, 43
ISDN
base number........................... 44
card installation ...................... 60
CLIR..................................... 44
COLR.................................... 44
connections............................ 60
ignore numbers ....................... 44
MSN groups ............................ 46
MSN numbers .......................... 44
point to point / multipoint.......... 44
priority on outgoing calls ............ 44
programming .......................... 44
least cost routing See alternative carrier
selection
locking extensions
change lock PIN ....................... 40
how to lock ............................ 13
logging calls................................36
loop limits..................................66
maintenance...............................63
maintenance limitations .................. 1
making calls.................................6
MDF
connecting............................. 53
layout................................... 54
monitor room..............................14
MPD card ...................................58
MSN
numbers................................ 44
ring groups............................. 46
music on hold..............................45
non-exclusive hold ........................12
open door ..................................11
outgoing call allocation ..................39
paging port connections..................54
paging remotely...........................29
parking calls ................................ 9
pick up call ................................. 9
PIN number
account code using .................... 8
set account PIN ....................... 25
set extension lock PIN................ 40
set system programming PIN ........ 49
power fail
connections............................ 54
power up sequence .......................53
printer connections.......................58
Page 76

Installation & Programming Manual
72
problem solving........................... 64
programming
code summary .....................20–24
how to ..................................16
introduction............................16
remotely................................28
special programming mode ..........17
system PIN number....................49
using executive terminal.............17
pulse dialling specifications............. 67
quick reference
extension codes ........................4
recall
detection window.....................39
to exchange line.......................11
transparency...........................11
recording voice message ................ 50
redial....................................... 13
regulatory information.....................1
reminder call.............................. 14
remote paging ............................ 29
remote programming .................... 28
repair procedures ........................ 64
retrieve held call ......................... 12
ring
assignments ............................46
extension groups ......................46
MSN groups.............................46
swap internal and external sound ..46
ring cadences See Country Specific Sheet
room monitor
how to ..................................14
serial port connections .................. 58
signalling
connector locations...................54
social alarm ............................... 47
special programming mode ............. 17
specifications
battery ................................. 61
default settings ....................... 67
dialling ................................. 66
electrical............................... 66
environmental......................... 66
loop limits ............................. 66
ringing cadences See Country Specific
Sheet
tones ......See Country Specific Sheet
speed dialling
extension programming.............. 15
system programming ................. 49
using.................................... 14
standard terminal installation ..........55
system
capacity................................. 2
checklist ............................... 51
expansion options...................... 1
installation ............................ 51
introduction ............................ 1
maintenance .......................... 63
memory ................................ 63
repair................................... 64
self test ................................ 63
size .................................. 3, 49
size programming..................... 49
terminal
installation ............................ 55
wiring details.......................... 54
three party calls ....See conference calls
tones
call waiting tone...................... 37
hold tone............................... 45
specifications.... See Country Specific
Sheet
transferring calls ........................... 7
trunk to trunk transfer ....................7
unlock an extension ......................13
user accounts..............................25
V24 card....................................58
voice messages............................50
Page 77

Index
73
Page 78

Installation & Programming Manual
74
Page 79

Index
75
Page 80

Digital Switch Systems Ltd. as manufacturer hereby declares that
this product is in compliance with the essential requirements and
other relevant provisions of the EC Directive 1999/5/EC.
©2002 Digital Switch Systems Ltd.
Version 1.1
2002-05-29
 Loading...