

DSR DSR132 Pro Series Owner's Manual

0099002021-00
PLEASE SAVE THIS OWNER’S MANUAL AND READ BEFORE EACH USE.
This manual will explain how to use the jump starter safely and effectively.
Please read and follow these instructions and precautions carefully.
POR FAVOR GUARDE ESTE MANUAL DEL PROPIETARIO Y LEER ANTES DE
CADA USO. En este manual se explica cómo utilizar el arrancador con seguridad
y ecacia. Por favor, lea y siga las siguientes instrucciones y precauciones.
ESSAYER DE GARDER LE MANUEL D’INSTRUCTIONS ET LE LIRE AVANT
CHAQUE UTILISATION. Ce manuel explique comment utiliser le booster d’une
façon sûre et efcace. S’il vous plaît lisez et suivez ces instructions et précautions.
MODEL / MODELO / MODÈLE :
DSR132
Ultracapacitor Hybrid Jump Starter
Arrancador híbrido de Ultracapacitor
Booster hybride à ultra-condensateur
OWNERS MANUAL / MANUAL DEL USUARIO / MANUEL D’UTILISATION

• 2 •
1. IMPORTANT SAFETY INSTRUCTIONS – SAVE THESE INSTRUCTIONS.
1.1 Working in the vicinity of a lead-acid
battery is dangerous. Batteries generate
explosive gases during normal operation.
It is important that you follow these
instructions each time you use the jump
starter.
1.2 To reduce the risk of battery explosion, follow
these instructions and those published by the
battery manufacturer and the manufacturer
of any equipment you intend to use in the
vicinity of a battery. Review cautionary
marking on these products and on the
engine.
1.3 Keep out of reach of children.
1.4 Use only in a well-ventilated area.
1.5 Do not disassemble the jump starter. Take it
to a qualied service professional if service
or repair is required. Incorrect assembly may
result in re or electrical shock.
1.6 Never operate the jump starter if it is
damaged.
1.7 Do not set the jump starter on ammable
materials, such as carpeting, upholstery,
paper, cardboard, etc.
1.8 Place the jump starter as far away from the
battery being jumped as the cables
will permit.
1.9 Do not expose the jump starter to rain
or snow.
1.10 Never place the jump starter directly above
battery being jumped.
1.11 To prevent arcing, never allow the clamps to
touch together or to contact the same piece
of metal.
1.12 If someone else uses the jump starter,
ensure they are well informed on how to use
it safely, and have read and understood the
operating instructions.
1.13 The jump starter is NOT designed to be
installed as a replacement for a vehicle
battery.
1.14 Do not use for dry cell batteries that are
commonly used with home appliances.
1.15 Make sure your vehicle is in “park” and the
emergency brake is engaged.
1.16 Turn off ALL electronics in your vehicle (air
conditioner, heat, radio, lights, chargers,
etc.).
1.17 Make sure the key is in the “OFF” position.
For smart-key fobs (push-to-start vehicles),
make sure the vehicle is completely OFF
before jump starting.
2. PERSONAL SAFETY PRECAUTIONS
2.1 Wear complete eye protection and protective
clothing when working near lead-acid
batteries. Always have someone nearby for
help.
2.2 Have plenty of fresh water, soap and baking
soda nearby for use, in case battery acid
contacts your eyes, skin, or clothing. Wash
immediately with soap and water and seek
medical attention.
2.3 If battery acid comes in contact with eyes,
ush eyes immediately for a minimum 10
minutes and get medical attention.
2.4 Neutralize any acid spills thoroughly with
baking soda before attempting to clean up.
2.5 Remove all personal metal items from your
body, such as rings, bracelets, necklaces
and watches. A battery can produce a short
circuit current high enough to weld a ring to
metal, causing a severe burn.
2.6 Never smoke or allow a spark or ame in the
vicinity of the battery or engine.
• 3 •
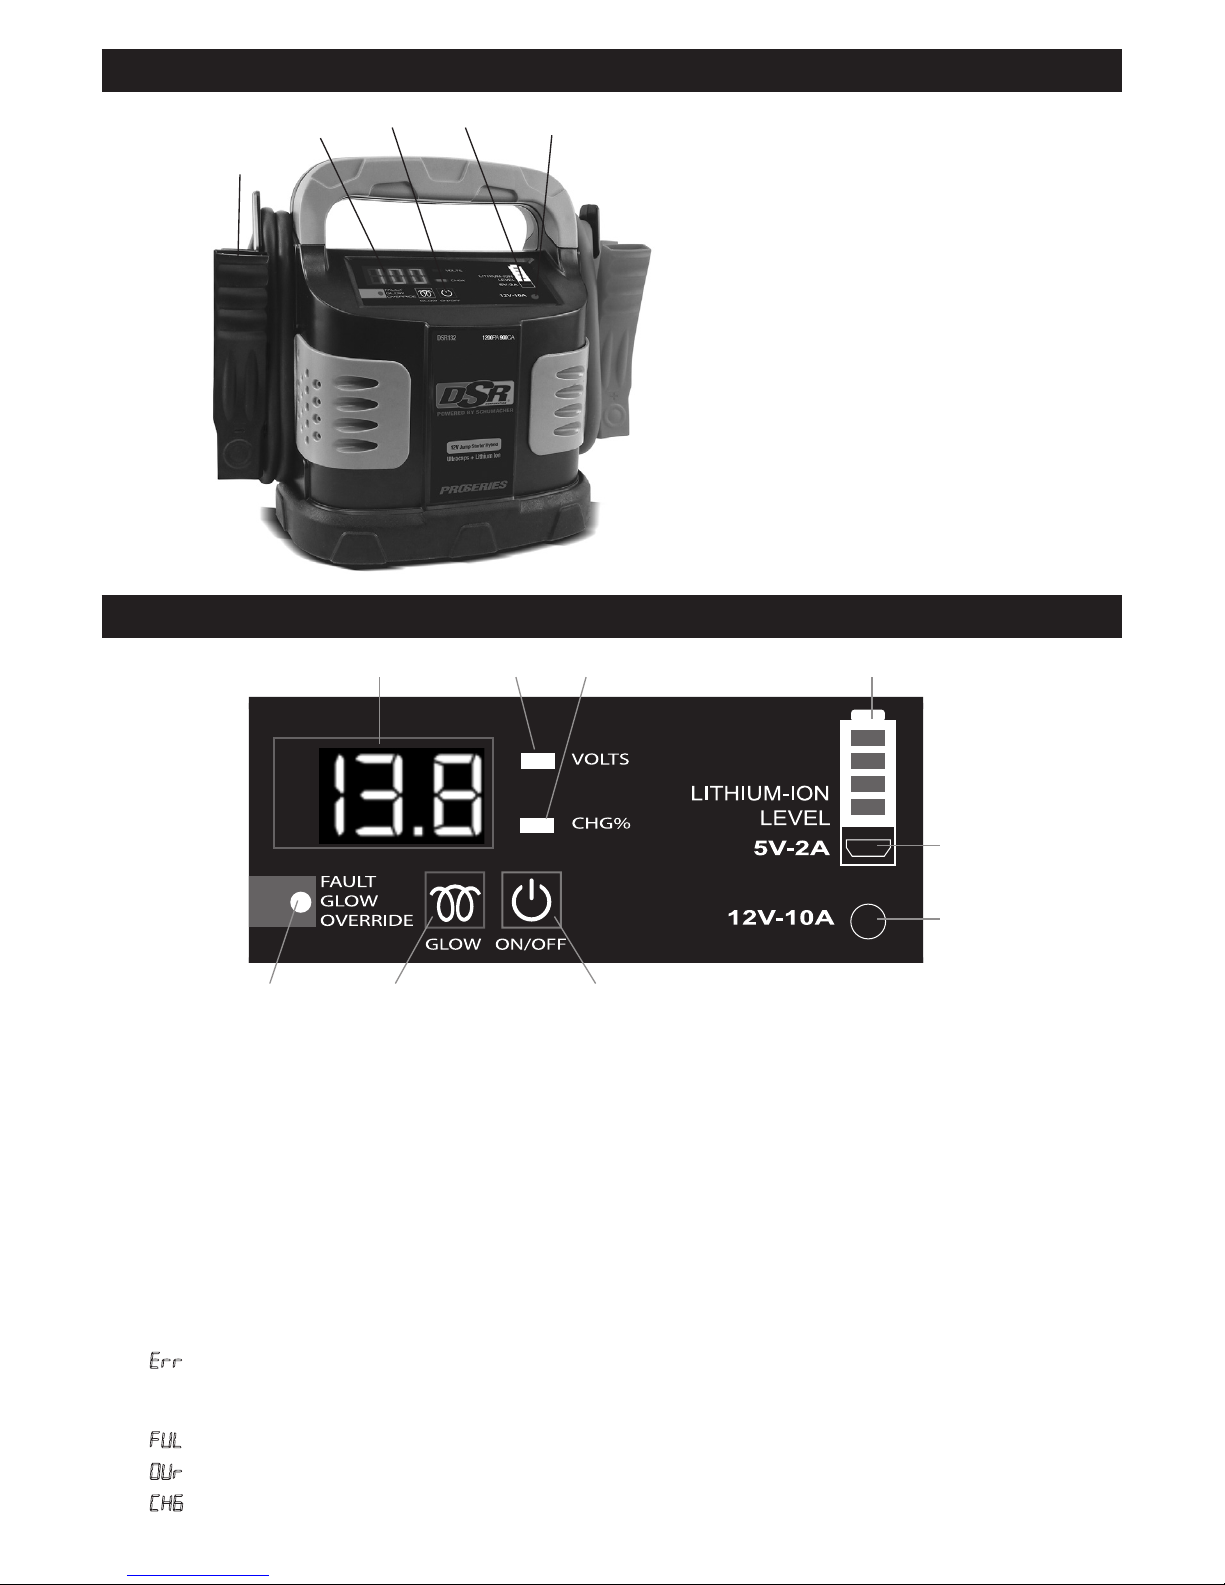
3. FEATURES
1. Battery clamps
2. Digital display
3. ON/OFF button
4. Micro USB input port
5. 12V DC socket
Not shown:
6. Lithium battery compartment
(on back)
7. 12V DC car charger
for charging ultracapacitors
8. Micro-USB cable
for charging lithium battery
1
2
3 4
5
4. CONTROL PANEL
1. Digital display
2. Voltage indicator
3. Ultracapacitor charge indicator
(Solid LED)
Ultracapacitors are charging
(Pulsing LED)
4. Lithium battery level indicator
5. Micro USB input
6. 12V DC input port
7. ON/OFF button
8. GLOW button
9. Condition indicator
1 2 3 4
5
6
789
Digital Display
V Vehicle’s battery voltage
% Charging percentage
of the ultracapacitors
Err Reverse polarity connection/
Lithium battery too low to charge
ultracapacitors
FUL Ultracapacitors are fully charged
OUr Override mode is active
CH6 Lithium battery is charging
Condition Indicator
• Steady red:
Reversed Connection/Fault
• Alternating red and green:
Glow Mode
• Blinking green for 5 seconds,
then steady green:
Override Mode
• Steady green:
Ready
• 4 •
5. OPERATING INSTRUCTIONS
Pre-Charging
The DSR132 must be pre-charged before
it can be used to jump start your vehicle.
(Press the ON/OFF button once to see the
Ultracapacitor charge %.) The “Standard
Mode” instructions will guide you on using your
current vehicle’s “weak” battery to pre-charge
the jump starter. If your vehicle’s battery is
completely discharged, or does not allow you
to pre-charge the jump starter, see “Alternative
Pre-Charge Methods”.
Standard Mode
In most cases, the weak battery can fully
recharge the jump starter.
Follow these steps to pre-charge your jump
starter and get your car started:
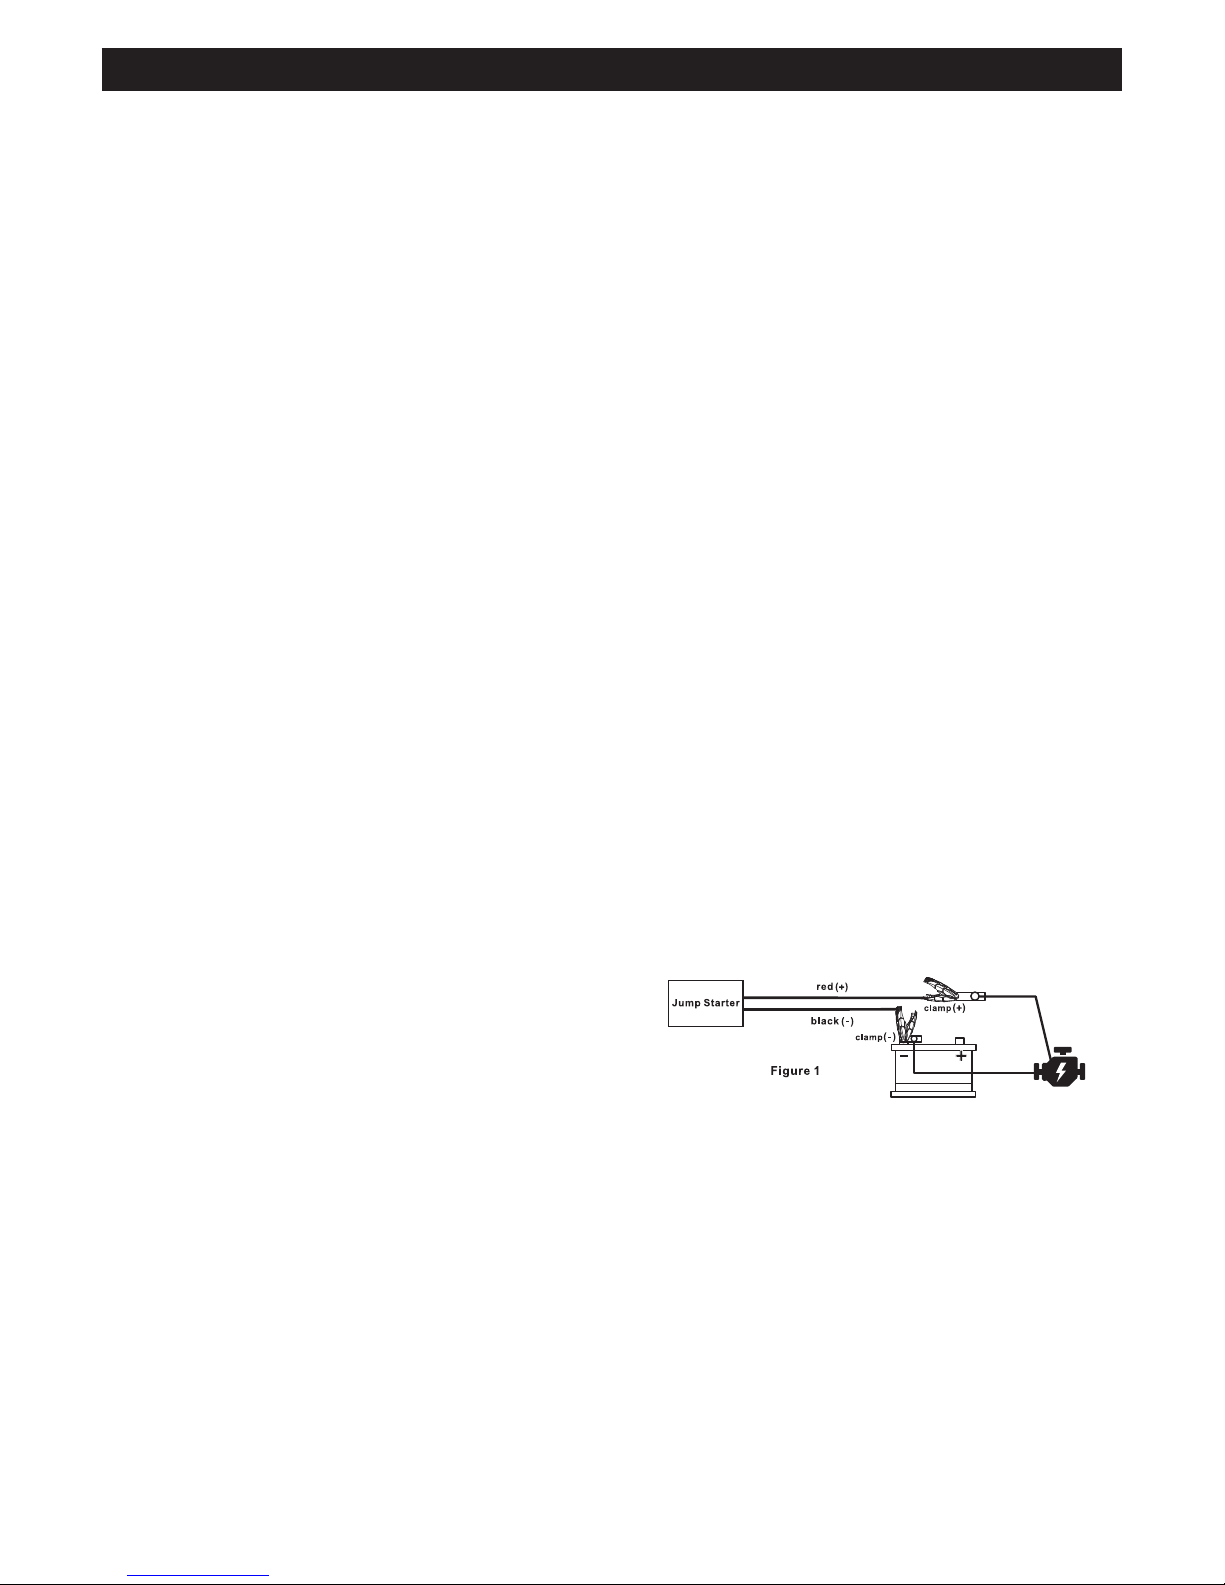
1. For a negative-ground vehicle (as in
most vehicles), connect the POSITIVE
(RED) clamp to the POSITIVE (POS, P, +)
battery post. Next, connect the NEGATIVE
(BLACK) clamp to the vehicle chassis or
engine block, away from the battery.
2. For a positive-ground vehicle, connect
the NEGATIVE (BLACK) clamp to the
NEGATIVE (NEG, N, -) battery post. Next,
connect the POSITIVE (RED) clamp to
the vehicle chassis or engine block away
from the battery.
3. The jump starter will turn on automatically.
The digital display will show the voltage of
the vehicle’s battery.
4. Press the ON/OFF button. The jump
starter will start to recharge. The digital
display will show the charging percentage
of the internal ultracapacitors.
5. When digital display shows FUL, and the
condition indicator is steady green, crank
the engine.
Alternative Pre-charge Methods
If your vehicle’s battery is completely
discharged, or is unable to charge the jump
starter, the Fault indicator will turn on and an
audio alarm will sound. You can use one of the
following alternative pre-charging methods:
• From a battery (i.e, friend’s car)
Connect the jump starter’s red (POSITIVE)
output clamp to the POSITIVE post of
the battery. Next, connect the black
(NEGATIVE) output clamp to a heavy,
unpainted metal part of the chassis or
engine block, away from the battery. DO
NOT connect clamp to the negative
battery post, carburetor, fuel line or a
sheet metal part. The jump starter will start
to charge itself automatically. When the
digital display shows FUL, the audio alarm
sounds and the condition indicator is steady
green, turn off and disconnect the jump
starter by removing the output clamp from
the chassis or engine block, followed by the
output clamp from the battery post.
• From a 12V socket
The jump starter can be recharged from a
donor car’s 12V DC socket. Make sure the
car is running. Plug in the provided 12V
adapter. Charging starts automatically.
Once you have fully charged your jump
starter (the digital display shows 100%),
you can continue with the connection and
starting instructions in Standard Mode.
If your vehicle’s battery is completely
discharged, and you are unable to start the
vehicle in Standard Mode, you may need to
use the Override Mode starting instructions.
Override Mode
If there is no battery mounted on the engine
to be started, follow these steps to use
Override mode:
NOTE: The GLOW function will not operate in
this mode.
• Always read the vehicle manufacturer’s
instruction manual.
• An initial battery indication of below 12V may
suggest that there is an internal fault.
1. Remove the vehicle’s positive (red) lead
from the battery terminal (g. 1). Ensure
that the jump starter is switched off.
Connect the jump starter’s positive clamp
to the vehicle positive lead, NOT the
battery terminal (g.1).
2. Press the ON/OFF button for 2 seconds and
then release.
Override can be activated two ways:
• If the capacitor’s charge is over 80%,
Override mode (OUr) will activate and an
audio alarm will sound.
• If the capacitor’s charge is less than 80%,
the lithium ion batteries will recharge the
capacitors until the display shows 100%.
Override mode (OUr) will then activate,
and an audio alarm will sound.
3. After Override mode is activated, the
condition indicator will pulse to show that
the jump starter is getting ready to start
the engine.
• 5 •
4. When the condition indicator turns steady
green, crank the engine right away.
(The ability for an engine to continue to
run without a battery connected will vary,
depending on the make and model of the
vehicle).
WARNING: Do not leave the engine running
without a connection to the jump starter or
the battery. Failure to comply could result in
damage to the vehicle ECU. The manufacturer
will not accept responsibility for any damage
caused by incorrect use of this product.
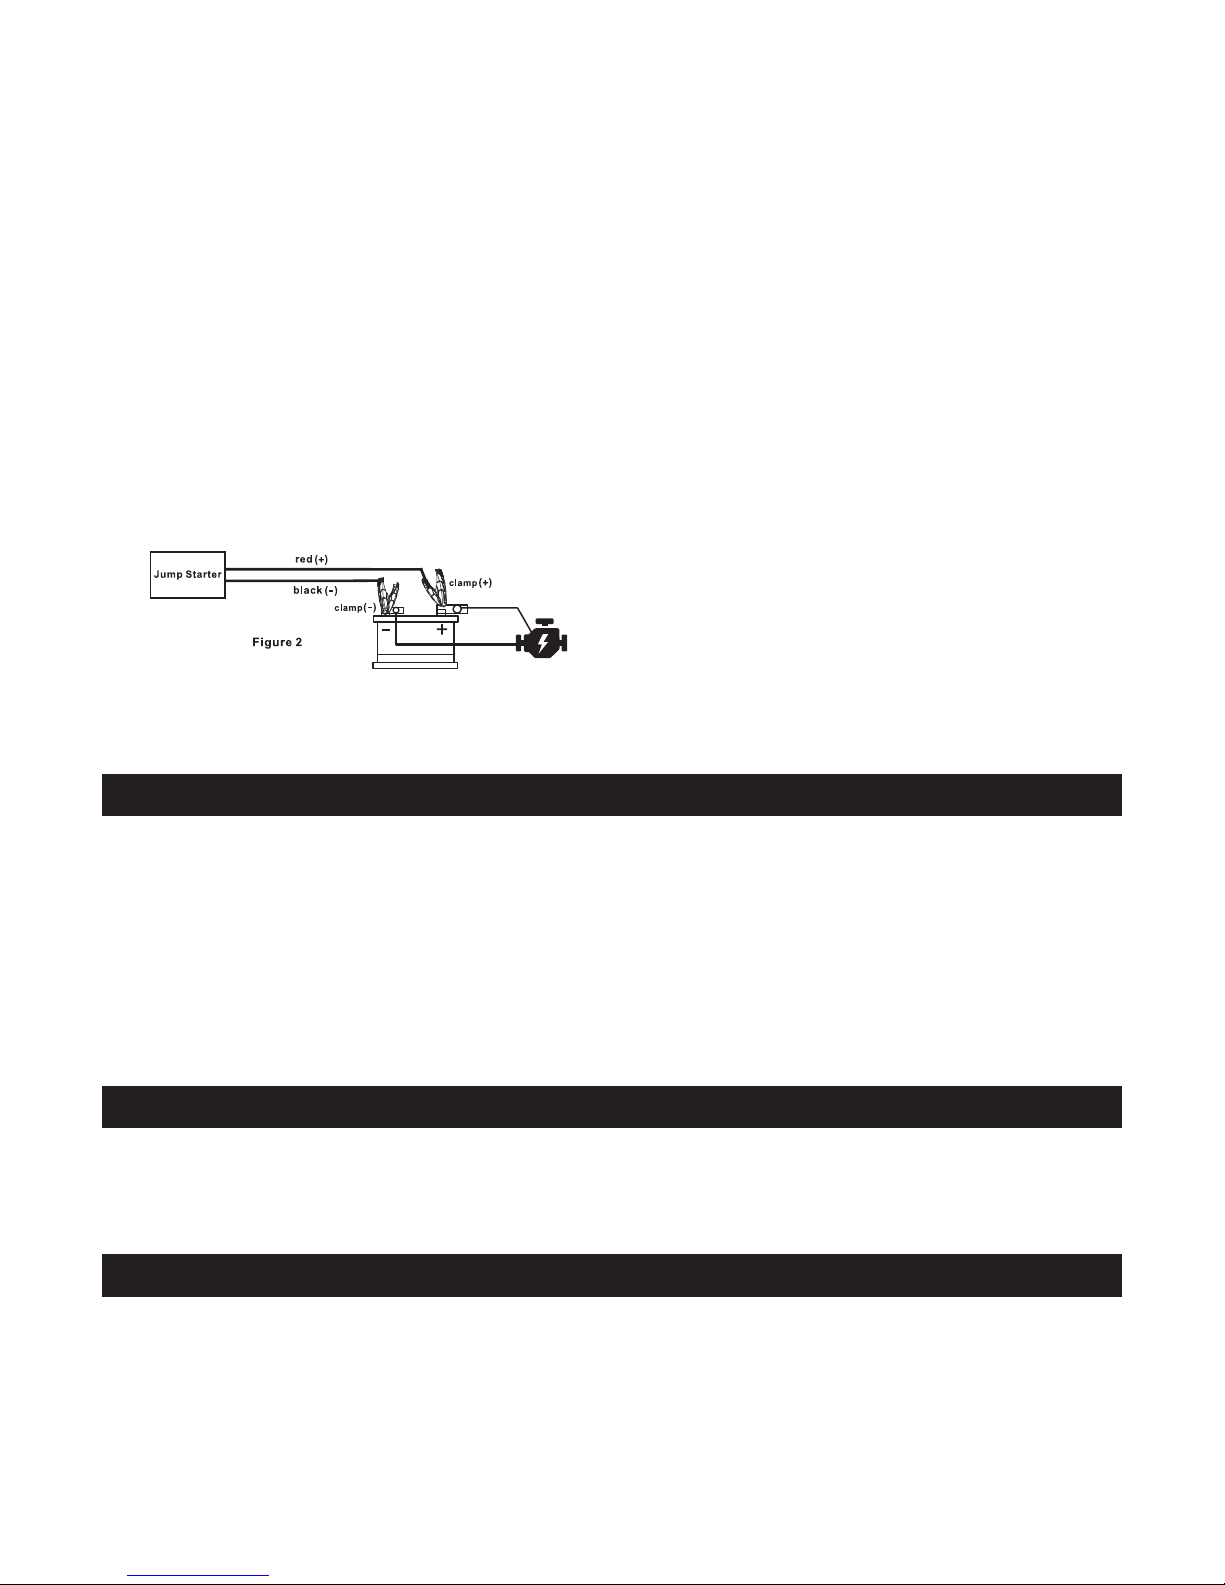
5. As soon as the engine starts, and keeping
the jump starter clamp and battery lead
connected, attach the positive lead to the
positive battery terminal and tighten the
terminal clamp (g. 2). After the positive
lead has been secured to the battery
terminal, switch off the jump starter and
disconnect from the battery.
Glow Mode:
In cold weather, the glow plugs in most diesel
vehicles will energize rst to heat up the
engine chamber before the engine start, as
indicated by the GLOW sign on the dashboard.
The process needs a current of 40-60Amp and
takes about 4-6 seconds. In this case, after the
jump starter is fully recharged and connected,
press the GLOW button, and then turn on the
ignition.
NOTE: GLOW is inactive during Override
Mode.
Lithium Back-up Battery Pack
This jump starter is equipped with a lithium
battery pack. Recharge the battery pack
with the micro USB charging cable and USB
charger (included). Once connected to a USB
charger, charging starts automatically.
Recharge time is approximately 5-8 hours.
The battery level indicators will show battery
status. Fully recharge the lithium battery
pack at least once a year or after using
Override Mode 2-3 times.
Working Cycle
• Maximum of 3 consecutive jump starting
operations.
• Allow a 20-minute interval between each
session.
6. SPECIFICATIONS
Input .....................................................................................................12V DC 10A, 5V DC 2A
Working temperature ............................................................... -40°C to 65°C (-40°F to 150°F)
Starting current ................................................................................................................. 900A
Battery pack ..................................................................................... Lithium, 11.1V / 2200mAh
Recharge time from vehicle battery ...................................................................... 130 seconds
Recharge time from 12V socket.................................................................................4 minutes
Recharge time from lithium battery .........................................................................5-6 minutes
7. REPLACEMENT PARTS
12V DC cig charging cable ................................................................................. 3899003573Z
Micro-USB charging cable .................................................................................. 3899003781Z
Lithium battery pack ............................................................................................ 5799000052Z
8. FREQUENTLY ASKED QUESTIONS
Q: Is this jump starter safe for the ECU and car’s computer?
A: Unlike traditional jump starters, this jump starter uses ultracapacitors instead of a battery.
The voltage of capacitors is restricted to a range which is safe for all kinds of ECU.
Therefore, there is no risk from overvoltage.
Capacitors have a very small capacity, about 0.2-0.4Ah. They will fully recharge from the
alternator within couple seconds once the vehicle is started. Disconnecting the jump starter
will not cause any load dump, so there is no voltage spike produced.

• 6 •
Q. Will the transfer of residual energy to the jump starter damage the weak battery?
A. No. This jump starter draws only 0.2-0.4Ah energy from the battery. A weak car battery
normally has a capacity of 10-30Ah and can recharge the jump starter many times without
any adverse effects.
Q. How many jump starts can a fully recharged jump starter perform?
A. This jump starter is designed to start only once when fully recharged. It recharges itself after
each use, if left connected to a car’s battery. Therefore, it can jump start many times as
needed, successively.
Q. How long can the jump starter hold a charge?
A. This jump starter will self-discharge to 0 in a few days, but it can be instantly recharged from a
weak battery or from the back-up lithium battery, and be ready for use.
Q. What is the life span of this jump starter?
A. This jump starter can be used more than 10,000 times before noticeable loss of performance.
Ultracapacitors remain operable for more than 10 years.
Q. Is my hybrid jump starter safe?
A. It is extremely safe. Ultracapacitor technology is one of the foremost advantages over the
battery-based jump starters. Ultracapacitors are specially designed to receive and release a
large electrical current of instant power.
This jump starter is also equipped with short circuit/reverse polarity protection. Therefore,
short circuit due to unintended use will not damage the ultracpacitors. They will not overheat
and cause re or explosion.
NOTE: Reverse polarity and short circuit protection is disabled during Override Mode.
Q. Does the jump starter need to be regularly recharged?
A. No. The jump starter relies on the instant recharging of ultracapacitors rather than stored electric
energy. Therefore, it does not need regular recharge and can be stored for years. However, the
back-up lithium battery needs to be recharged at least once a year.
Q. What is OVERRIDE mode?
A. The ECU of some cars does not allow engine to start if battery’s voltage is lower than 8V. In
this situation, the positive lead needs to be disconnected from the car battery, and instead
connected directly to the jump starter. Then the ECU can detect the high voltage provided by
the jump starter.
WARNING: CAREFULLY READ USER’S MANUAL BEFORE USING OVERRIDE MODE.
Q. What is GLOW?
A. In cold weather, the glow plugs in most diesel vehicles will energize rst to heat up the engine
chamber before the engine start, as indicated by the GLOW sign on the dashboard. The
process needs a current of 40-60Amp and takes about 4-6 seconds. In this case, after the
jump starter is fully recharged and connected, press the GLOW button, and then turn on the
ignition.
Q. What size of engines can be used with this jump starter?
A. Success of a jump start depends on many factors such as battery condition, temperature, age of
the car, etc.
Here is general guide of jump starter choice for different engine size:
GASOLINE DIESEL
Cranking
Current
Warm Cold Warm Cold Cold
No Battery No Battery No Battery
Weak Battery
No Battery
900A <8.0L <7.0L <5.0L <5.0L <4.0L

• 7 •
9. BEFORE RETURNING FOR REPAIRS – NORTH AMERICA
For more information about troubleshooting,
contact customer service for assistance:
services@schumacherelectric.com
www.batterychargers.com
or call 1-800-621-5485
For REPAIR OR RETURN, contact Customer Service at 1-800-621-5485.
DO NOT SHIP UNIT until you receive a RETURN MERCHANDISE AUTHORIZATION (RMA)
number from Customer Service at Schumacher Electric Corporation.
10. LIMITED WARRANTY – NORTH AMERICA
SCHUMACHER ELECTRIC CORPORATION, 801 BUSINESS CENTER DRIVE, MOUNT
PROSPECT, IL 60056-2179, MAKES THIS LIMITED WARRANTY TO THE ORIGINAL
RETAIL PURCHASER OF THIS PRODUCT. THIS LIMITED WARRANTY IS NOT
TRANSFERABLE OR ASSIGNABLE.
Schumacher Electric Corporation (the “Manufacturer”) warrants this jump starter for one (1) year
from the date of purchase at retail against defective material or workmanship that may occur
under normal use and care. If your unit is not free from defective material or workmanship,
Manufacturer’s obligation under this warranty is solely to repair or replace your product, with a
new or reconditioned unit, at the option of the Manufacturer. It is the obligation of the purchaser
to forward the unit, along with proof of purchase and mailing charges prepaid to the Manufacturer
or its authorized representatives in order for repair or replacement to occur.
Manufacturer does not provide any warranty for any accessories used with this product that are
not manufactured by Schumacher Electric Corporation and approved for use with this product.
This Limited Warranty is void if the product is misused, subjected to careless handling, repaired,
or modied by anyone other than Manufacturer or if this unit is resold through an unauthorized
retailer. Manufacturer may void this Limited Warranty if a “warranty void if removed” label is
removed from the product.
Manufacturer makes no other warranties, including, but not limited to, express, implied or statutory
warranties, including without limitation, any implied warranty of merchantability or implied warranty
of tness for a particular purpose. Further, Manufacturer shall not be liable for any incidental,
special or consequential damage claims incurred by purchasers, users or others associated
with this product, including, but not limited to, lost prots, revenues, anticipated sales, business
opportunities, goodwill, business interruption and any other injury or damage. Any and all such
warranties, other than the limited warranty included herein, are hereby expressly disclaimed
and excluded. Some states do not allow the exclusion or limitation of incidental or consequential
damages or length of implied warranty, so the above limitations or exclusions may not apply to
you. This warranty gives you specic legal rights and it is possible you may have other rights which
vary from this warranty.
THIS LIMITED WARRANTY IS THE ONLY EXPRESS LIMITED WARRANTY AND THE
MANUFACTURER NEITHER ASSUMES OR AUTHORIZES ANYONE TO ASSUME OR
MAKE ANY OTHER OBLIGATION TOWARDS THE PRODUCT OTHER THAN THIS
WARRANTY.

• 8 •
11. LIMITED WARRANTY – AUSTRALIA
WARRANTY TERMS AND CONDITIONS
Schumacher Electric Corporation (the “Manufacturer”) or the resellers authorized by the Manufacturer
(the “Reseller”) warrant this charger (the “Product”) for one (1) year, according to the following
stipulations. Any and all warranties, other than the warranty included herein, are hereby expressly
disclaimed and excluded to the fullest extent permissible under applicable law. Legislation may
imply warranties or conditions or impose obligations on Manufacturer which cannot be excluded,
restricted or modied in relation to consumer goods.
Consumer End-User Warranty
Any claims under this warranty must be communicated to Reseller within 2 months after discovery
of the non-conformity.
Resellers/Professional End-User Warranty
The Manufacturer provides a limited warranty for hidden defects or non-conformities. This
warranty is subject to the following conditions:
a. The Manufacturer only warrants hidden defects in material or workmanship present in their root
cause at the moment of the rst sale by the Manufacturer;
b. Manufacturer’s obligation under this warranty is limited to repairing or replacing the Product
with a new or reconditioned unit at the sole option of the Manufacturer;
c. Manufacturer does not have any warranty obligations if the alleged defects were caused by
abnormal usage, fair wear and tear, unauthorized use of the Product or use of the Product differing
from the description in the applicable manual or other specications given by the Manufacturer,
insufcient care, repairs carried out by persons or entities or with parts not approved by
Manufacturer, poor care, accidents, unauthorized changes or modications, incorrect transport,
storage or treatment of the Product;
d. In order to exercise this right, the Product must be returned complete and in its original state
and packaging, with mail costs prepaid, along with proof of purchase to the Manufacturer or its
authorized representatives in order for repair or replacement to occur.
Common Warranty Provisions
The warranty mentioned above only applies to the rst professional or consumer user having
legally acquired the Product from the Manufacturer or a Reseller. No warranty is extended towards
clients, agents or representatives of those buyers.
The Product is sold under the specications, for the use and purpose in accordance with the
provisions of this manual, with express exclusion and disclaimer of warranty of any other
specications, uses and purposes.
Authorized Resellers are prohibited from making any statements or providing any warranty in
excess of the above warranties Non-authorized resellers may only sell the product under the
condition that they assume all warranty obligations with the total exclusion of any warranty
provided by the Manufacturer.
Manufacturer does not provide any warranty for any accessories used with the Product that are not
manufactured by Schumacher Electric Corporation.
This warranty does not exclude or diminish any claims the Manufacturer may have against the
distributors of The Product.
THE MANUFACTURER NEITHER ASSUMES NOR AUTHORIZES ANYONE TO ASSUME
OR MAKE ANY OTHER OBLIGATION TOWARDS THE PRODUCT OTHER THAN THIS
WARRANTY.
Warranty, Repair Service and Distribution Centers:
Australia/New Zealand:
Schumacher Asia Pacic Pty. Ltd.
A.B.N. 43613943525
Unit 53B – 28 Burnside Road, Ormeau
Queensland, Australia, 4208
07 3807 6510
Schumacher® is a registered trademark of Schumacher Electric Corporation.
 Loading...