

Page 1
Public Address System
MP3/Tuner/Integrated PA Power Amplifier MP9006
MP9012
MP9025
MP9035
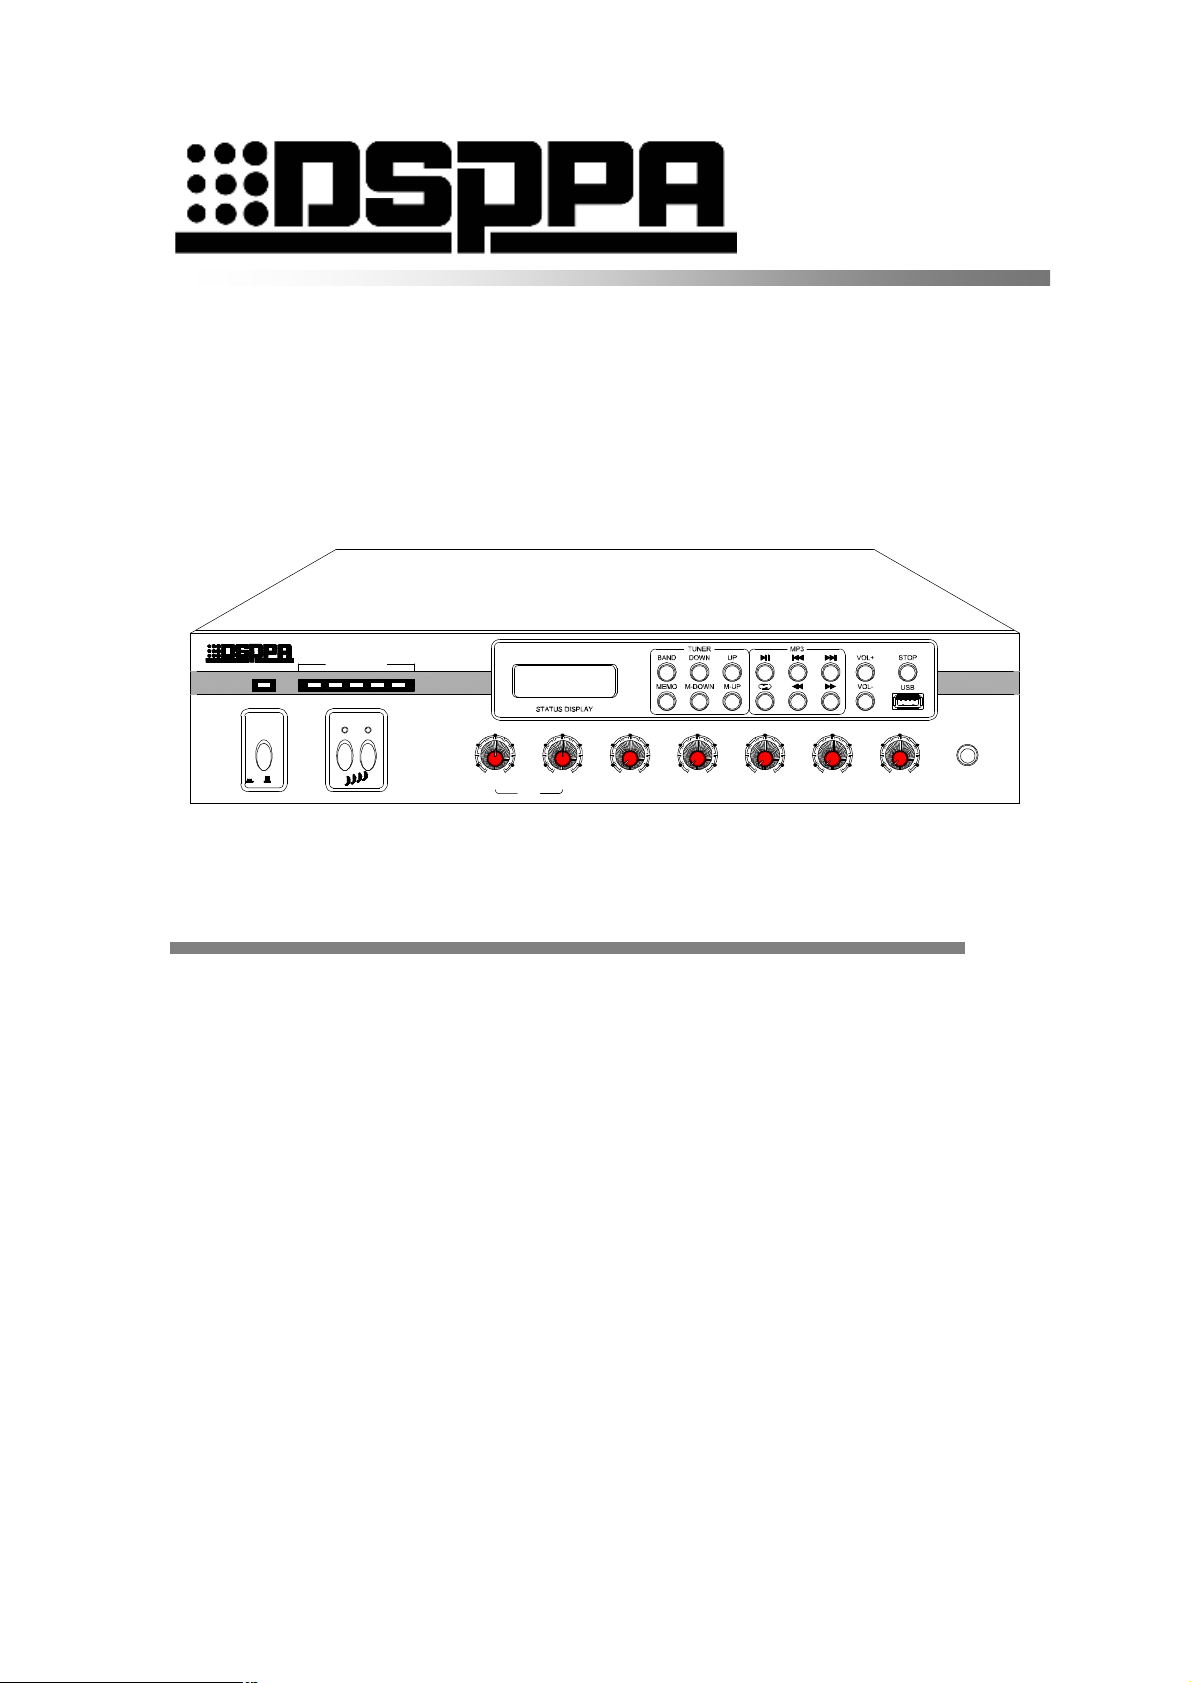
MIXING AMPLIFIER/TUNER/MP3 MP9006
ON 1084 62
POWER
LEVELMETER
CHIME 2CHIME 1
OFFON
DIGITAL MP3 PLAYER & AM/FM TUNER
5
4
3
2
1
MIN MAXMIN MAX
TREBLEBASS
TONE MIC1 VOL MIC2 VOL MIC3 VOL MIC4/AUX1 VOL MIC5/AUX2 VOL
0
5
6
4
7
3
8
2
9
1
10
0
5
6
4
7
3
8
2
9
1
10
0
5
6
10
6
4
7
3
8
9
7
2
8
1
9
0
10
5
6
4
3
7
2
8
1
9
0
10
MIC1 IN
Operation Instructions
Welcome your patronage. Please read this manual carefully before use.
Performance features
● 5-channel microphone input ports, 2-channel auxiliary line input ports, 1-channel EMC input port,
1-channel line output port.
● Tuning and MP3 converting play is very convenient, the station tuning and saving with permanent
saving function at power failure.
● Chime output function.
● Two stages priority mute function, available to insert the priority PA.
● The tuner/MP3 status liquid crystal display (LCD), Chinese subtitle, 5-unit LED level meters,
inspecting the operating status very easily.
● Each channel with independent volume control, treble and bass adjusting.
● 100V, 70V constant voltage output and 4Ω fixed resistance (balanced, non-grounding) output.
● AC 220V working voltage.
● Output short-circuit protection and alarm.
● The single board is a complete PA system.
Page 2
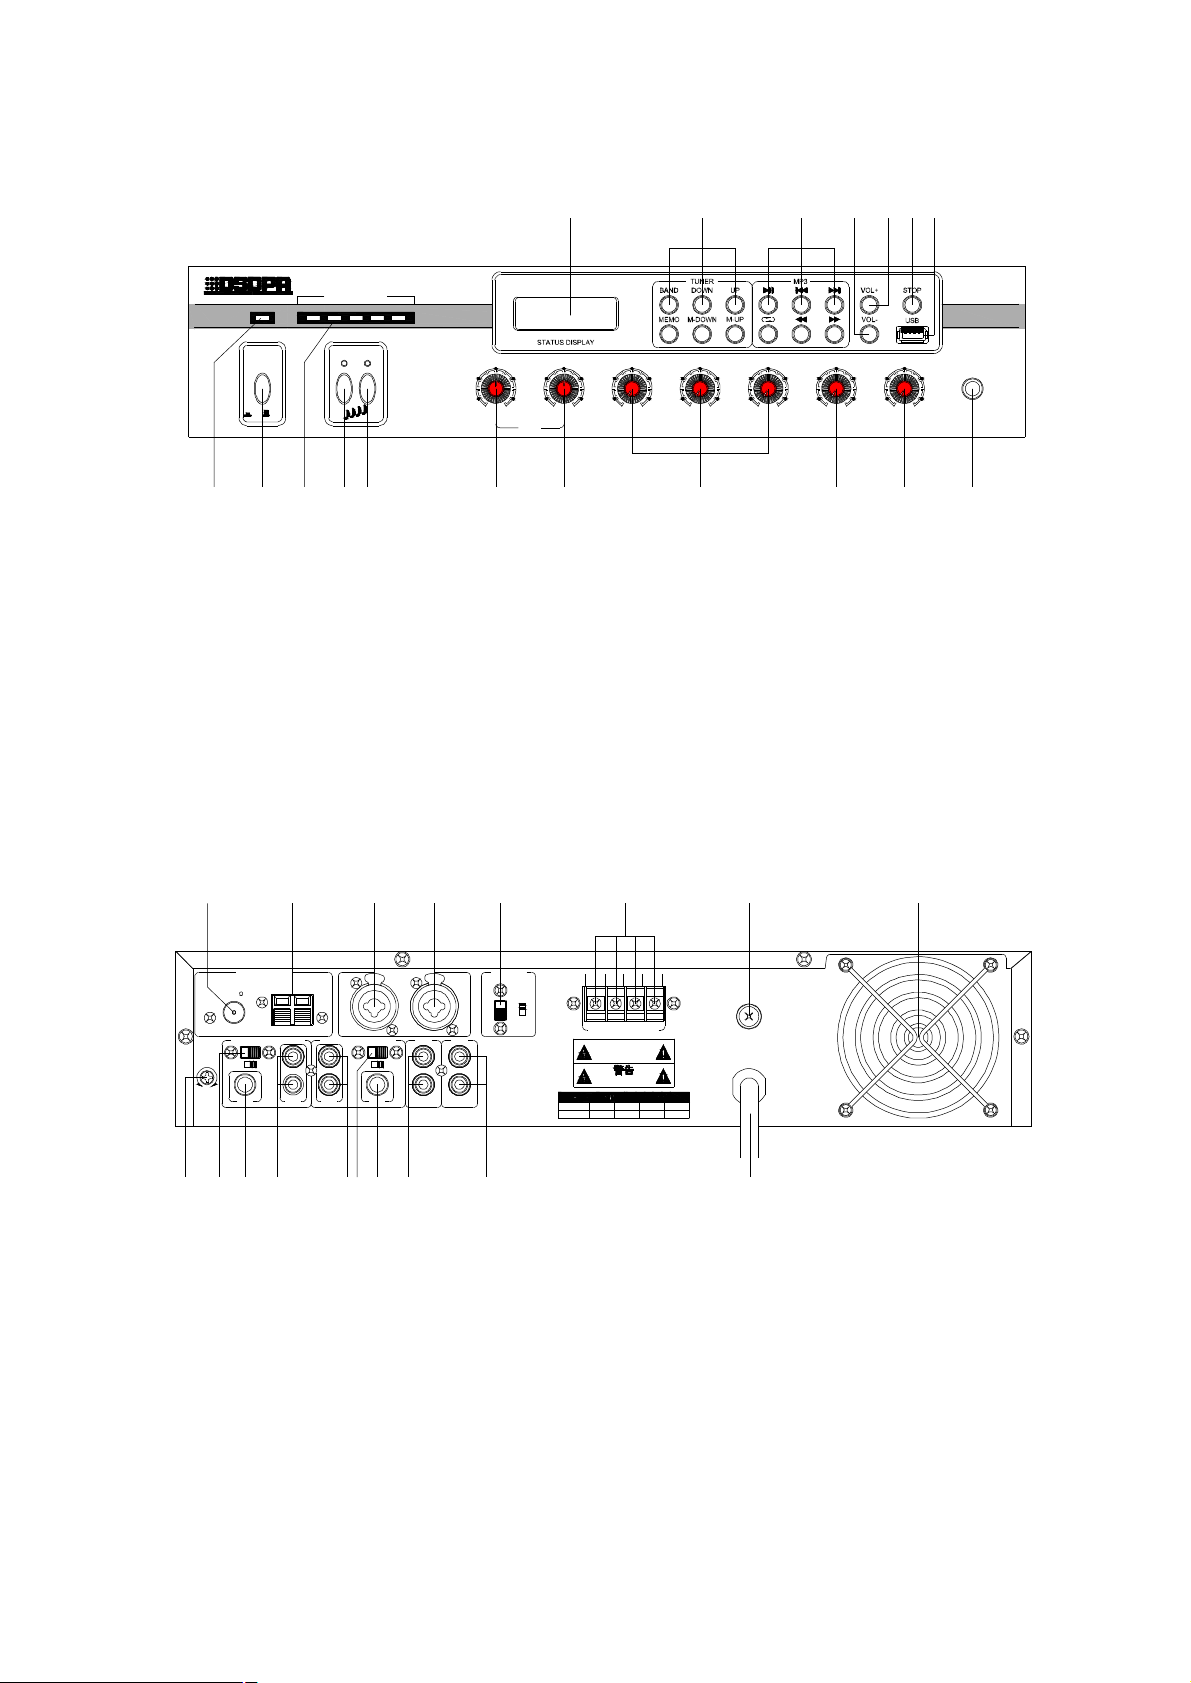
Front panel
liary input (AUX) 2 jack
MIXING AMPLIFIER/TUNER/MP3 MP9006
ON 1084 62
LEVELMETER
12 13 14 15 181716
DIGITAL MP3 PLAYER & AM/FM TUNER
POWER
OFFON
1 2 3 4 5 6 7 8 9 10 11
1. Power indicator 7. Treble adjust 13. Tuning status operation button
2. Mains switch 8. Microphone volume adjust 14. MP3 play status operation button
3. LED level meter 9. Line 1/Microphone 4 volume adjust 15. Tuning/MP3 volume increase button
4. Chime 1 button 10. Line 2/Microphone 5 volume adjust 16. Tuning/MP3 volume decrease button
5. Chime 2 button 11. No. 1 (priority) microphone jack 17. Tuning/MP3 status stop button
6. Bass adjust 12. Tuning/MP3 play status display screen 18. USB movable disc port
Remarks: It means overload distortion when 5 LED are normally bright, and it is necessary to adjust the
related volume control knob to make the 4-5th indicators flash.
CHIME 2CHIME 1
MIN MAXMIN MAX
TREBLEBASS
TONE MIC1 VOL MIC2 VOL MIC3 VOL MIC4/AUX1 VOL MIC5/AUX2 VOL
5
4
3
2
1
0
5
6
4
7
3
8
2
9
1
10
0
5
6
4
7
3
8
2
9
1
10
0
5
6
4
7
3
8
2
9
1
10
0
5
6
4
6
7
3
8
9
10
7
2
8
1
9
0
10
MIC1 IN
Back panel
1 2 3 4 5 6 7 8
TUNER ANTENNA
GND AM
FM(75 )
AUX1/MIC4 INPUT SELECT
CHIME
VOL
AUX1 MIC4
MIN MAX
MIC4 AUX1 AUX2
DSPPA Acoustic Technology Co.,Ltd.
9 101112
1. FM antenna jack 7. AC 220V fuse 13. Auxi
2. AM antenna jack 8. Heat radiation blower window 14. Auxiliary line 2/ Microphone
3. No. 2 microphone jack 9. Chime volume adjust knob 15. Microphone 5 jack
4. No. 3 microphone jack 10. Auxiliary line 1/Microphone 4
5. Phantom mains switch 11. Microphone 4 jack 17. EMC signal input jack
6. 4 output terminals 12. Auxiliary input (AUX) 1 jack 18. AC220V power cord
MIC2 & MIC3 INPUT
AUX2/MIC5 INPUT SELECT
AUX2 MIC5
MIC5
AUX
OUT
PHANTOM
+24V
ON
EMC
OFF
IN
COM 100V70V4Ω
SPEAKER OUTPUTS
RISK OF ELECTRIC SHOCK
请勿打开,以免触电
F A
CAUTION!
DO NOT OPEN
MP9012
~220V-240V/50Hz-60Hz/10A
MP9025MP9006DSPPA
MP9035
F6ALF4ALF2AL
F6AL
13141516 17 18
convert switch
F A
5 convert switch
16. Line output port
Remarks: Among the four output terminals, it is only appropriate to use one pair of them.
2
Page 3
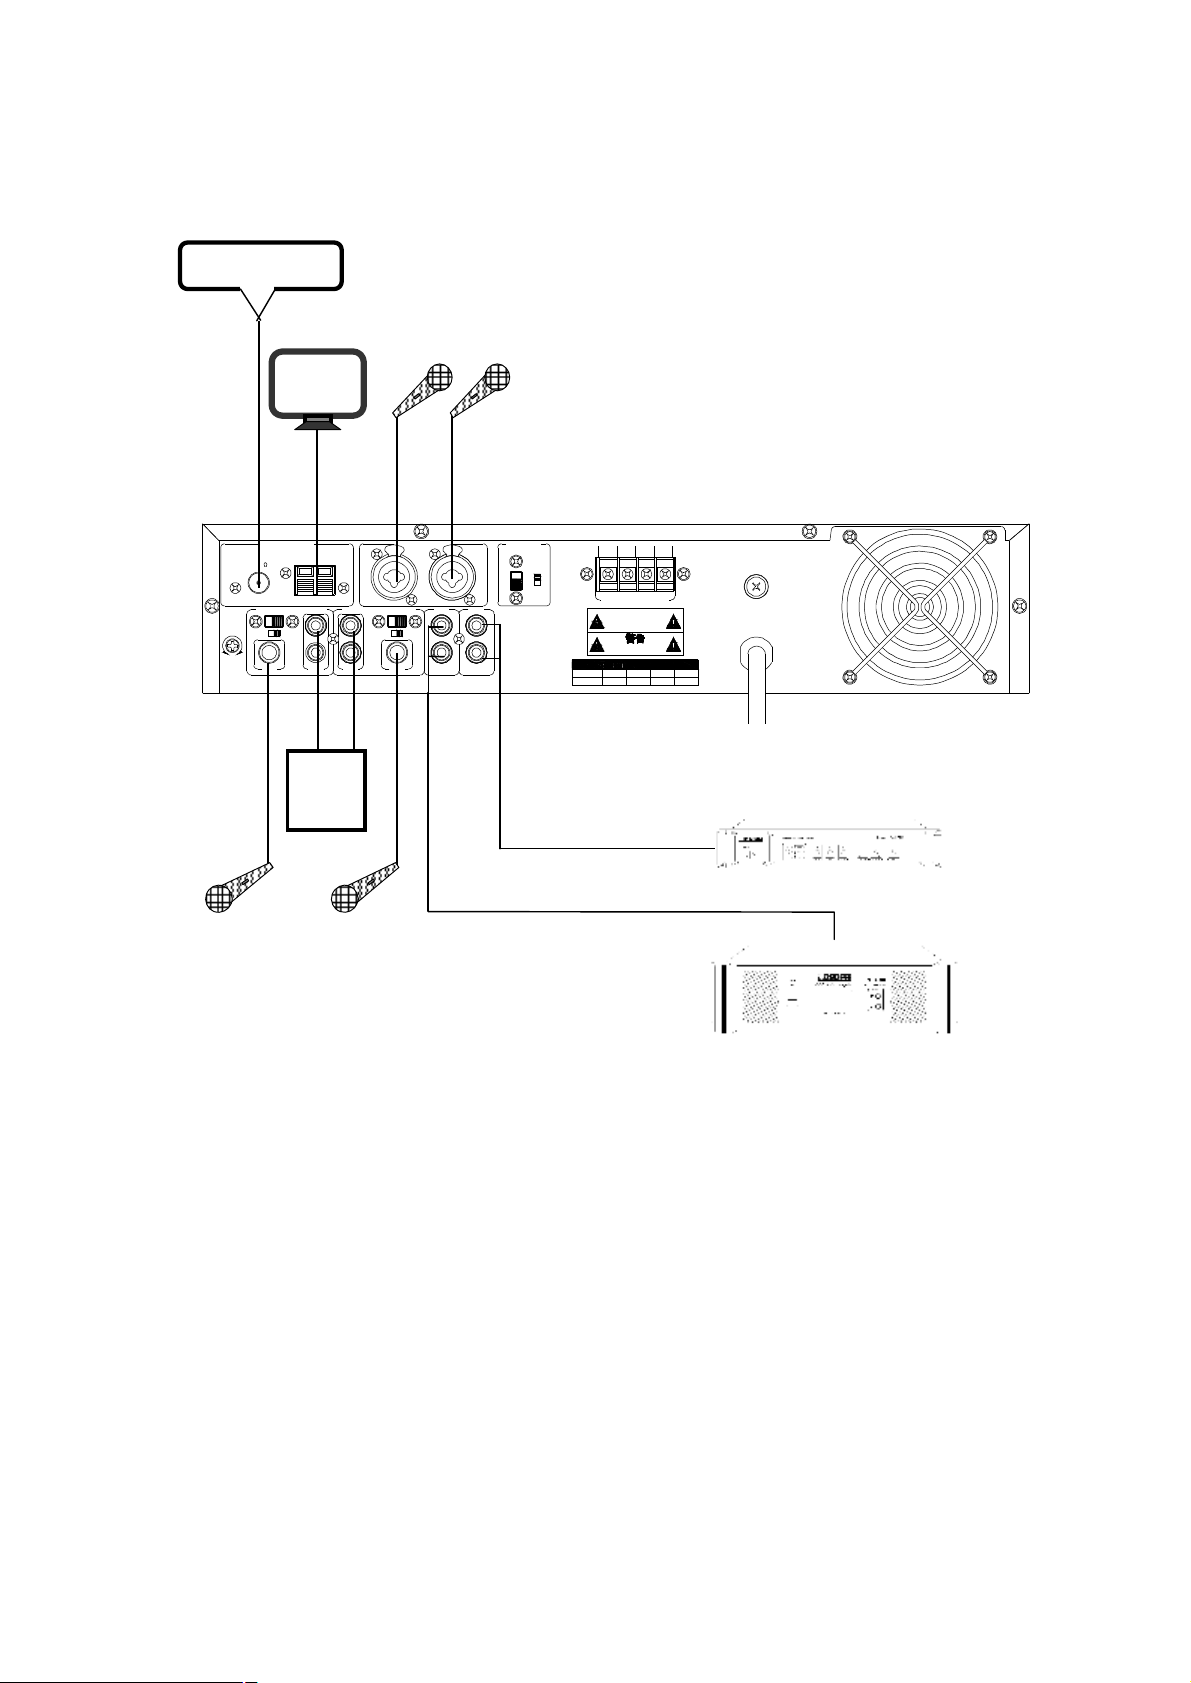
System connection
FM INT
MIC2
MIC3
AM INT
TUNER ANTENNA
GND AM
FM(75 )
AUX1/MIC4 INPUT SELECT
CHIME
VOL
AUX1 MIC4
MAX
MIN
MIC4 AUX1 AUX2
DSPPA Acoustic Technology Co.,Ltd.
MIC2 & MIC3 INPUT
AUX2/MIC5 INPUT SELECT
AUX2 MIC5
MIC5
AUX
EMC
OUT
Other
Audio
Device
PHANTOM
+24V
ON
OFF
IN
DSPPA
F A
COM 100V70V4Ω
SPEAKER OUTPUTS
CAUTION!
RISK OF ELECTRIC SHOCK
DO NOT OPEN
请勿打开,以免触电
MP9025MP9006
MP9012
F6ALF4ALF2AL
MP9035
F6AL
F A
~220V-240V/50Hz-60Hz/10A
ALARM GENERATOR
MIC4
MIC5
AMP
3
Page 4
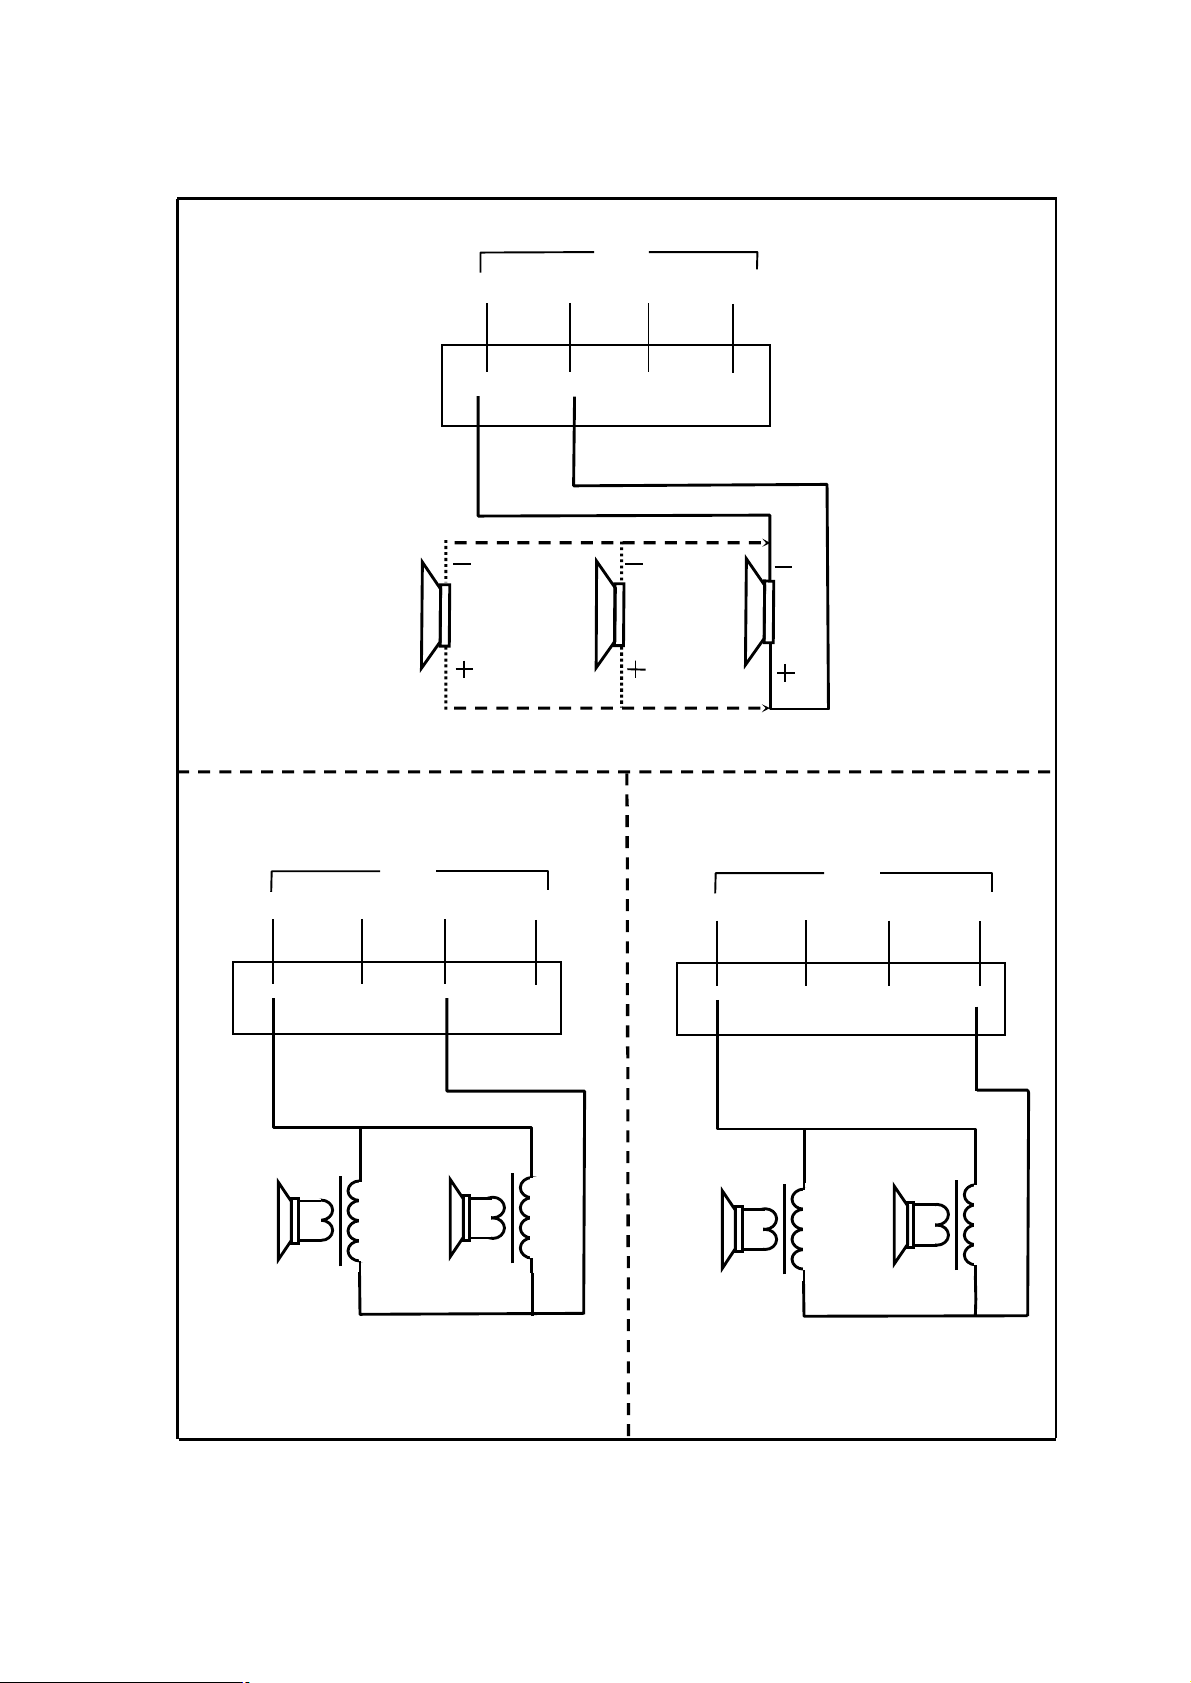
Power output connection
SPEAKER OUTPUT
SPEAKER OUTPUT
SPEAKER OUTPUT
4-16Ω Connection
70V Connection
COM
4-16Ω
70V
Speaker
100V Connection
100V
Speaker
4-16Ω COM
70V
Speaker
100V
COM
Speaker
4-16Ω
70V
Speaker
100V
4
Page 5

Operation instructions
I Operating instructions of equipment function
1. Volume adjusting: To satisfy customer's different demands on the music tone, this equipment is
provided with 7 adjusting knobs relative to sound in total. Among them, “BASS” is the bass tone
adjusting knob, “TREBLE” is the treble tone adjusting knob, “MIC1, MIC2, MIC3” knobs are used
to adjust the volume of Microphone 1, Microphone 2, and Microphone 3. The adjustment of the
corresponding volume for “MIC4/AUX1 VOL” and “MIC5/AUX2 VOL” knobs is controlled
through the “AUX1/MIC4” and “ AUX2/MIC5” selecting switches at the back panel. When
“AUX/MIC” selection switch selects the line (AUX) scale, “MIC4/AUX1 VOL” and
“MIC5/AUX2 VOL” knobs adjust the volume of the line (AUX); When “AUX/MIC” selection
switch selects MIC scale, “MIC4/AUX1 VOL” and “ MIC5/AUX2 VOL” knobs adjust the volume
of MIC.
2. Microphone application: The microphone is provided with the phantom power supply, and when the
capacitor type microphone is used, please turn on the phantom mains switch on the back panel, and
when the movelly-cicle type microphone is used, please turn off the phantom mains switch; The
switch is turned to “ ON” for turning on status, and the switch is turned to “OFF” for turning off
status. This machine is provided with 5-channel microphone inputs and 2-channel auxiliary line
inputs. Among them, the microphone input jacks for MIC1, MIC4 and MIC5 are 6.35mm; The
MIC2, MIC3 are XLR type 3-core socket jacks.
The volumes of Microphone 1, Microphone 2 and Microphone 3 are adjusted through “MIC1 VOL”,
“MIC2 VOL” and “MIC3 VOL” at the front panel respectively. Microphone 4 and Microphone 5
jacks are compatible with the Auxiliary line 1 and the Auxiliary line 2 jacks, and “AUX1/MIC4”
and “AUX2/MIC5” converting switches at the back panel are used to change over freely the input
method. AUX switch selects the line signal; MIC switch selects the signal from microphone.
2. Priority function: Microphone 1 has the highest priority, and its signal overlays all the input signals
from other ports. The chime and the EMC port has the second highest priority, and its signal
overlays all the other signals except Microphone 1, including Microphone 2 and Microphones 3.
3. Chime: This equipment is provided with Chime 1 and Chime 2 signals, and the chime volume can be
adjusted by the chime adjusting knob at the back panel, increasing the volume by rotating clockwise
and decreasing the volume by rotating counter clockwise. Pressing Chime 1 button is to start the
chime signal, and the output terminal will send out ‘1-3-5-i’ chime note, in the meantime, the signal
indicator of Chime 1 button is bright; Similarly, pressing Chime 2 button also starts the chime signal,
and the output terminal will send out ‘i-5-3-1’ chime note, and in the meantime, the signal indicator
of Chime 2 button is bright, until pressing this button again to cancel the chime signal, and the
indicator will be distinguished automatically.
II Setup operation of the play status
The equipment is built-in with two kinds of players, the tuner and the MP3 player. It is easy to
convert between these two kinds of players conveniently: When the equipment is placed at the tuner
playing mode, and when pressing whichever button under MP3 operation mode, the equipment will
be converted to MP3 playing status automatically, and the screen will display “CONVERT TO
MP3”. In this case, the MP3 will enter the program playing mode under the situation that the USB
port is connecting with memory; When the equipment is placed under MP3 play mode, the
equipment will convert to the tuner play mode automatically when pressing whichever button for the
tuner to operate in playing mode, and the screen will display "CONVERT TO RADIO".
After converting to a certain play mode, the concrete setup operation is as follows:
1. The setup operation of tuner at play mode:
1) Press down BAND button to change over between ‘AM’ and ‘FM’ bands.
2) Press (lightly) the UP button each time to raise the station frequency one step (one step for FM
5
Page 6

being 50 kHz, one step for AM being 9 kHz). If you press the UP button over 3 seconds, it
will enter the auto search mode, and it will search the station frequency from the low end to
the high end continuously until the highest end is reached and then stop automatically. The
station searched will be saved automatically to the station saving numbers one by one in the
sequence of (1-20). During the period of continuous searching and if pressing the UP button,
the equipment will stop searching. If you want to enter continuous searching again, it will
search continuously from the minimum terminal upward again after pressing the UP button for
3 seconds. It will restart the saving again.
3) Each time you press DOWN button, the station frequency will be reduced by one step (for FM,
one step 50 kHz, for AM, one step 9 kHz). After you press DOWN button over 3 seconds, it
will enter auto search mode, the receiving frequency will be searching continuously from the
highest end to the lowest band. The station searched will be saved automatically to the station
saving numbers one by one in the sequence of (1-20). During the period of continuous
searching and if pressing the DOWN button, the equipment will stop searching. If you want to
enter continuous searching again, it will search continuously from the minimum terminal
upward again after pressing the DOWN button for 3 seconds and it will restart the saving
again.
4) MEMO button is used to store the station frequency received. FM band contains 1-20 saving
numbers, and AM band also has 1-20 saving numbers. Press MEMO button, the digit
displayed on the screen is the operation number of the last time, namely the saving sequence
number and tuner frequency number last time.
5) M-DOWN and M-UP buttons are used to save the station saving number upward or
downward. M-DOWN button is for downward adjusting, and M-UP button is for upward
adjusting. For example, if you want to save frequency 107.65 to the 18th saving number, but
when you press the MEMO button, the screen displayed is the 19th saving number, then, you
press M-DOWN button and press again MEMO button at this time to save the band of
frequency 107.65 to the 18th saving number.
2. The setup operation of MP3 play mode:
The USB port of the machine can accept a memory such as common disc, MP3 player and movable
hard disc and card reader machine, etc. When these equipment are inserted to the USB port of the
machine, it can search automatically and play the MP3 music file from them. Firstly, the display
screen will display ‘***WELCOME***’in the first line and ‘ DSPPA’ in the second line, then the
equipment will play automatically according to the file saving sequence, and the display screen will
display the corresponding play information; If there is no suitable play music file in the memory,
then, if you press whichever operation button of MP3, the display screen will display ‘No Disk’.
If the MP3 tracks played are over 99, A blue dot ‘●’will be lit on the display screen to show the
carry.
● Play/pause: Plug into the USB memory, the equipment under the default status will play the MP3
files in the memory automatically. Press button during play will pause the play, and press that
button once more, it will go on playing the track from where it paused.
● Selective play: Press
Press
7or8
Press
7
button to fast rewind to 00:00 time section and it will return to the last track; Press
8
button to fast forward to the end time of the track and it will enter the next track.
● Repeat play: The default play sequence of equipment is to play the whole disc in repeat play. When
you press button for the first time, it will start the function of the single track and current track
:or9
button to select any time section of any track forward or backward.
button to select any track for play forward or backward;
play; Press again button, it will start repeating function of playing the current track; Press
6
Page 7

button for the third time, it will start the function of the current folder play; Press button for
the fourth time, it will play the current folder repeatly; Press button for the fifth time, it will
play the whole disc.
● Stop play: Press STOP button to stop the play in any playing process.
Precautions
1. Safety Precautions
l Disconnect the power plug of the console from the mains before wiring the system.
l Ensure that the input voltage to the console is as specified to avoid a risk of damage to the console.
l Never open the casing of the console to avoid electric shock from inside.
l Always disconnect the power plug from the mains when the console is not used, because the console
is not disconnected from the mains even when the power switch is turned to the “off” position.
l Do not leave the console in a too hot or too cold place.
l Keep the console well ventilated to avoid damage to the console due to excessively high temperature.
l Disconnect the power plug if the air is moist or the console is not used for a long period.
l Remove the power plug from the outlet to disconnect the console from the mains before removing
or reinstalling any part, or disconnecting or reconnecting any plug or cable.
l Do not open the casing for maintenance by yourself or unauthorized personnel in case of failure, so
as to avoid an accident or further damage.
l Never place any corrosive on or near the console.
2. After-sales Service Precautions
l DSPPA will provide a three-year charge-free warranty (including replacement of parts) from the
date when you purchase provided that the product is installed and operated as specified.
l The user should show the warranty card copy kept by the user and the sales invoice for repair.
l The warranty is invalid in the cases as follows:
(1) The product is damaged due to wrong installation, operation or handling.
(2) The product is damaged due to abnormal situations (e.g. excessively high mains voltage or
ambient humidity).
(3) The product is damaged due to disasters and accidents.
(4) The ID number on the product body is changed, modified or removed.
(5) The product is repaired or modified by unauthorized personnel.
l Please store the manual and warrant card well.
l For problems or precautions not referred in this manual, please contact our distributor or visit our
site at http://www.dsppa.com.
l Please contact our technician (or distributor) in case of failure within the warranty period. We will
take no responsibility in case that the product is disassembled or repair by unauthorized personnel.
7
Page 8

Appendix
01
.MP
3 02
.MP
3 99
.MP
3
00
Application of File Format of USB Disk
1. This system supports a USB disk, mobile HDD or USB card reader (hereinafter collectively referred
to as the USB storage) utilizing a general USB interface. The maximum bit rate of an MP3 file is
320kbps. Audio files in non-.MP3 format cannot be played. In case that a track cannot be played,
check whether it is as specified. Supports FAT12, FAT16 and FAT32 file system.
2. To improve the operation speed and optimize management, it is recommended that the USB disk or
mobile HDD used only store .MP3 files other than files in other format, so as to facilitate the access
of files and schedule programming.
3. Up to 99 primary directories can be created in the root directory, in each of which up to 99 tracks can
be stored. Also, up to 99 tracks can be stored in the root directory. It is not necessary to create a
secondary directory in a primary directory; otherwise, tracks in the secondary directory cannot be
read. Tracks can be stored in a USB disk by three methods as follows: Tracks can be stored in a USB
disk by three methods as follows:
Ø Create no directory, and store all tracks in the root directory. This method facilitates track
selection, but only 99 tracks can be stored. Note: To select a track in the root directory, the
directory number should be set as “00”, e.g .
03
\
USB storage
Ø Store all tracks in primary directories. By this method, tracks can be stored by classification,
and up to 99x99 tracks can be stored.
Directory 1
01.MP3
02.MP3
99.MP3
USB storage
01.MP3
02.MP3
Directory 99
8
99.MP3
Page 9

Store tracks in root and primary directories. Up to 99 + 99 x 99 tracks can be stored.
Directory 1
01.MP3
02.MP3
99.MP3
Directory 99
01.MP3
02.MP3
99.MP3
01.MP3
99.MP3
9
Page 10

Performance specifications
Model No. MP9006 MP9012 MP9025 MP9035
Rated output 60W 120W 250W 350W
Output adjust rate From full load to no load, less than 3dB.
Output mode 4Ω fixed resistance output, 70V, 100V constant voltage output
AUX output 300Ω, 0. 8V
Mic1,2,3,4,5 with phantom power supply (optional): 600Ω, 2.5mV(±0.5mV)
Input sensitivity
Frequency response Line : 50Hz-20kHz (±3dB); Mic : 100Hz-10kHz (±3dB)
Harmonic distortion Less than 0.5% at 1kHz, 1/3 rated power
Signal/noise ratio
Tone adjust
Protection AC fuse×1, overload, short-circuit
Mute function
Built-in music source Tuner, MP3
Mains source AC 220-240V/50-60Hz
Power consumed 100W 200W 350W 450W
Outer Packing Size
(mm)
AUX1,2 : 10kΩ , 250mV(±50dB)
EMC IN : The 10kΩ, 250mV(±50mV)
Mic1, Mic2, Mic3 and Mic4, Mic5 : 70dB
AUX1 and AUX2 : 75dB
Bass : ±10dB (100Hz)
Treble : ±10dB (10kHz)
Mic1 input overlays other inputs
CHIME, EMC cover others (except Mic1) inputs
(L×W×H)525×460×140
Unit Size (mm) (L×W×H)430×368×88
Gross weight 13.5kg 14.5kg 17.2kg 18kg
Net weight 11.5kg 12.5kg 15.2kg 16kg
No prior notice will be given if there is any alteration in the specifications.
DSPPA Acoustic Technology Co., Ltd.
10
 Loading...