

Page 1
FAMILY MUSIC CONSOLE AM8130
User’s Manual
Thank you for using DSPPA family music console. For better use of the console, please carefully read this
manual before using the equipment.
http://www.dsppaglobal.com
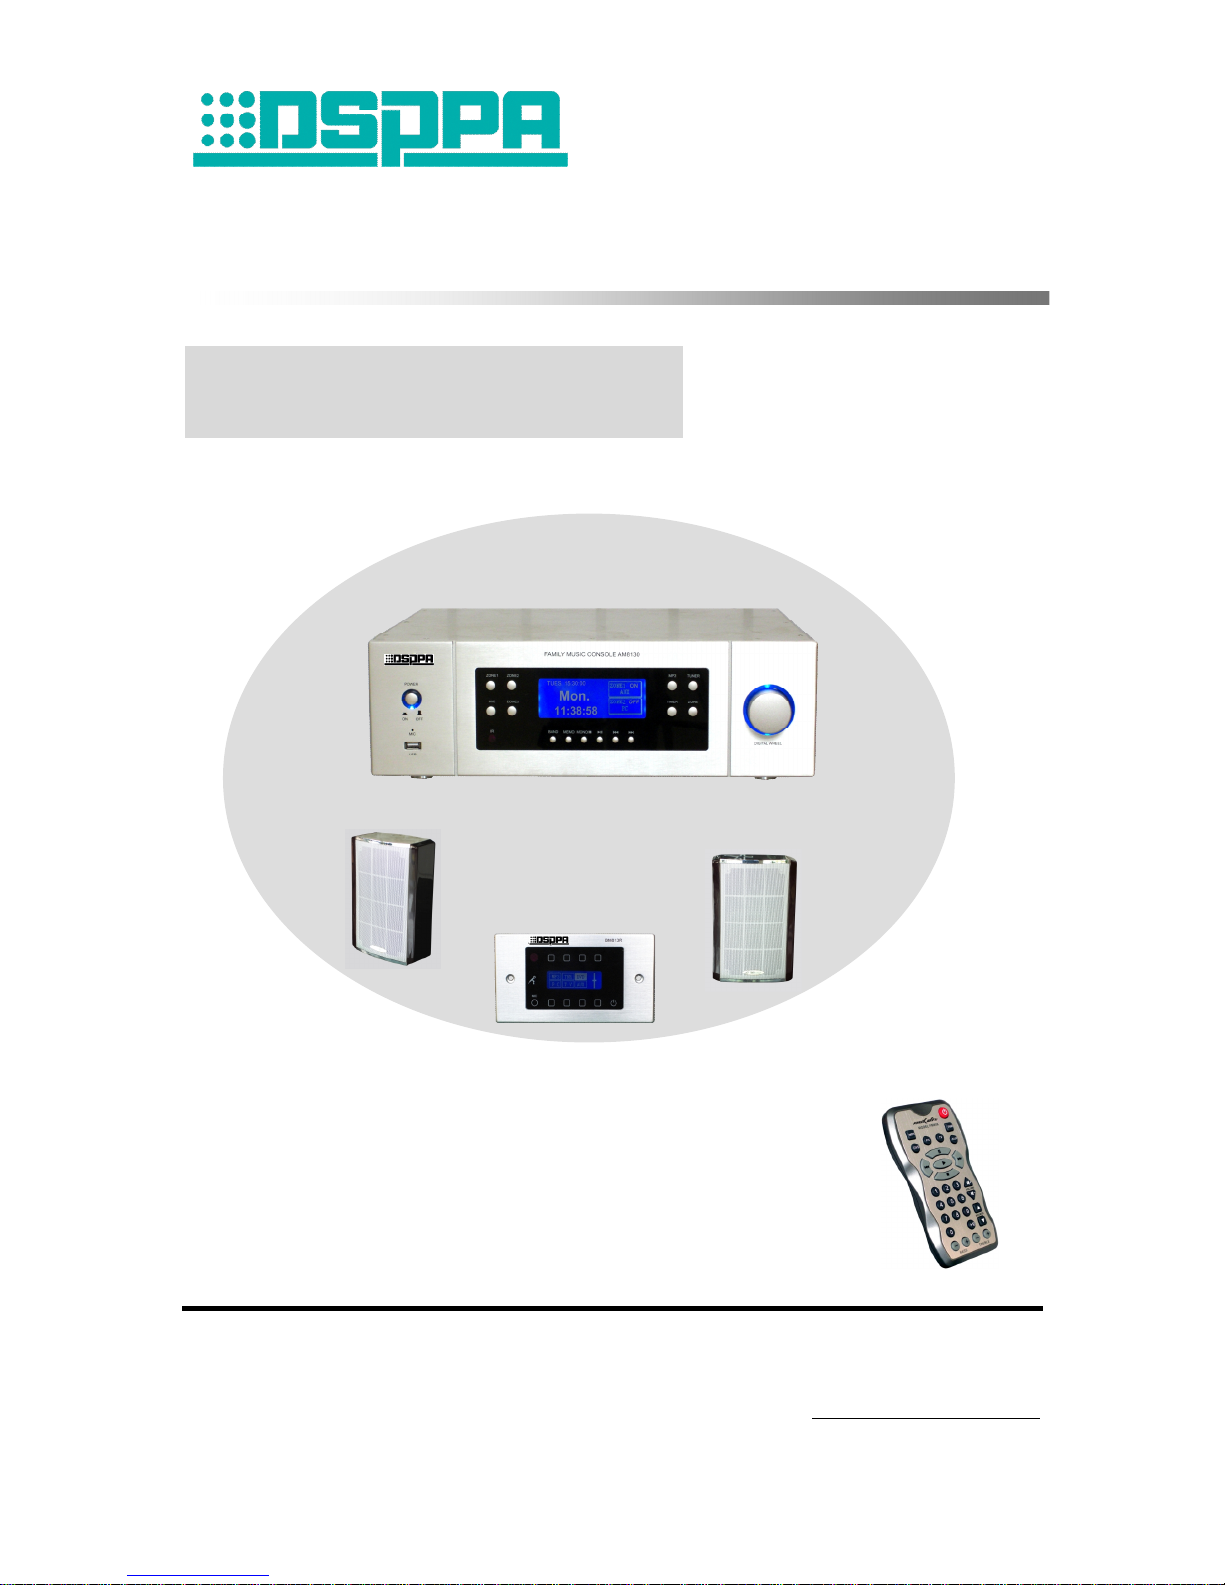
Family Music Console AM8130
Room Controller BM813R
Speaker
Speaker
IR Remote Controller FM808
AUX518
AUX518
Page 2

Contents
※ Overview.........................................................................................................................1
1. About Family Music Console AM8130..........................................................................................1
2. Features of Console.........................................................................................................................1
※ Functions of Console.......................................................................................................3
1. Functions of Front Panel.................................................................................................................3
2. Functions of Rear Panel..................................................................................................................5
※ Wiring Diagram of the System.........................................................................................6
1. Example of Console Wiring............................................................................................................6
Diagram for making a network cable connector.............................................................................6
2. Typical Example of Room Controller Wiring.................................................................................7
※ Operation of Console.......................................................................................................8
1. Status upon Turning on the Console................................................................................................8
2. Manual Operation of a Zone...........................................................................................................8
3. Manual Operation of MP3 Player...................................................................................................9
3.1 Mode selection......................................................................................................................9
3.2 Time display.........................................................................................................................9
3.3 Track selection......................................................................................................................9
4. Manual Operation of Tuner...........................................................................................................10
4.1 Band selection....................................................................................................................10
4.2 Tuning.................................................................................................................................10
4.3 Storage of station................................................................................................................10
4.4 Mute mode..........................................................................................................................10
4.5 Calling a station..................................................................................................................10
5. Timer Programming.......................................................................................................................11
5.1 Timer setting........................................................................................................................11
5.2 Time setting........................................................................................................................13
5.3 IR teaching..........................................................................................................................14
5.4 Copy schedule....................................................................................................................14
5.5 System setting.....................................................................................................................15
Page 3

5.6 Operation of talk.................................................................................................................15
※ Functions of IR Remote Controller................................................................................16
※ Application of File Format of USB Disk........................................................................18
※ Precautions....................................................................................................................20
1. Safety Precautions.........................................................................................................................20
2. After-sales Service Precautions.....................................................................................................20
※ Packing List...................................................................................................................21
※ Specifications................................................................................................................22
1. MP3 Player....................................................................................................................................22
2. AM/FM Tuner...............................................................................................................................22
3. Timer.............................................................................................................................................22
4. Comprehensive Specifications......................................................................................................23
Page 4

* Family Music Console
1
※ Overview
1. About Family Music Console AM8130
AM8130 is an ideal, state-of-the-art family music console, which not only has all basic functions of
a traditional home audio system, but also has the following functions. A. Timing function, which
presets specific task executed at certain time: For example, alert is set to notify you that you
should get up on time in the morning; fresh and pleasing background music can be listened to when
you are home after a day of busy work; fixed-time news can be listened to, just in the room in which
you are staying while listening to the background music. All these only take several minutes to
preset in the system that will automatically execute as preset. B. Different music for different
rooms: For example, due to the difference of interests in music between the elders and teenagers,
traditional opera can be listened in the room of the elders, pop music can be listened on in the room
of the teenagers, TV can be watched in the living room, and TV programs can be listened to in the
kitchen or washing room. All these can be realized as desired. C. Talk function, through which
you can give a talk with other rooms in any room: For example, by this function, all families can
be notified that dinner is ready, so that there is no need to call everyone in every room or speak
loudly.
In addition, the operation status of the console is controllable in a room. For example, the program
played by the console can be selected by a room controller, and the volume and tone for the room
can be controlled.
The console of the system integrates with MP3 player, tuner, zone controller, timer, pre- and
post-amplifiers, and accommodates DVD, PC, TV and AUX audio input interfaces, zone 1 and 2
line output interfaces, and zone 3 interface (for controller of all rooms), which facilitates the
operation by interactive control between the user and the console.
2. Features of Console
l A feature-packed, state-of-the-art audio system.
l Built-in MP3 player and tuner.
l A talk can be given between rooms.
l With double USB interfaces, supports. MP3 files stored in a common USB disk, MP3
player, mobile HDD, card reader, etc.
l FM/AM tuner.
l Accommodates DVD, PC, TV and AUX audio input interfaces, and zone 1 and 2 line
output interfaces, which utilize RCA connectors.
l Integrates with 6 individual stereo output interfaces, for connection to up to 32 room
Page 5

* Family Music Console
2
controllers of 2 zones of which volume and tone are operable individually.
l Different audio sources are selectable simultaneously for each room controller and 2
zones.
l Controllable through the console and remote control.
l Features teaching control of DVD and TV IR remote controllers.
l 2 built-in audio sources can operate and play at scheduled time, and up to 4 external
sources can be set as the source for up to 100 schedules per day. Schedules repeat by
week.
l The starting time of a timer reaches accuracy level of a second.
l One 220V timer control output power is available for external audio sources.
Page 6
* Family Music Console
3
※ Functions of Console
1. Functions of Front Panel
1) Power switch: Press down the button to turn on the power, and release the button to turn off the
power. The blue indicator around the power switch is indicated when the power is on.
2) MIC pick-up: Opening for microphone pick-up.
3) USB interface: Connects to a USB disk, mobile HDD or card reader.
4) Remote control receiver: Receiver of IR remote control signal.
5) Tuner AM/FM switchover key.
6) Tuner station memory key.
7) Tuner mono/stereo switchover key or MP3 stop key.
8) Tuner mute key or MP3 pause/play key.
9) Select the next stored station in tuner mode, or select the next track in MP3 mode.
10) Select the previous stored station in tuner mode, or select the previous track in MP3 mode.
11) Digital wheel: Initiates tuning by frequency in tuner mode; initiates a search for a track and
selects a track to play in MP3 mode; highlights an item, selects an item to operate and confirm
the operation in timer setting; selects to access a zone control interface, and performs operation
and confirm the operation in zone control mode.
FAMILY MUSIC CONSOLE AM8130
POWER
USB
ON OFF
DIGITAL WHEEL
MIC
MP3
TIMER
TUNER
ZONE
BAND MEMO MONO/
ZONE1 ZONE2
MIC ZONE3
IR
1 2 3 4
5
6
7
8 9
10 11
201918171615141312
Page 7
* Family Music Console
4
12) MIC key: Press the key to initiates a talk.
13) Zone 1 on/off key.
14) Zone 2 on/off key.
15) Zone 3 key: Press the key to access centralized control interface for centralized control of all
room controllers.
16) Display: Shows the operation status and setting interface of the console.
17) System and timer setting key: Press the key to access the system setting menu, including
various system settings and timer settings.
18) MP3 setting key: Press the key to access the MP3 setting interface.
19) Tuner setting key: Press the key to access the tuner setting interface.
20) Zone setting key: Press the key when the display shows any interface to return to the standby
interface, where zone 1 or 2 control interface can be accessed by press the digital wheel.
Switching between operation interfaces:
Function operation interface can be switched over by pressing a function key on the front panel
when the primary menu (interface) is shown. For example, press the “MP3” key on the front panel
when the tuner status interface is shown, and the tuner status interface will be switched to the MP3
status interface for operation of MP3 status; press the “TIMER” key to access the system and timer
setting interface; press the “ZONE” key or one of the zone keys to access the zone status control
interface (or standby interface). Interfaces which can be directly switched to are as shown below.
Operation options
Timer setting Time setting IR teaching
Copy schedule System setting Exit
Mode MP3 player
03
\
0 1
Overriding directories.
Please wait…
All 00
:
00 00
:
00
100.45MHz
Mono
AM/FM tuner
Memo
40
Wed 16:55:08
Fri
20:08:08
TUNER
ZONE1
ZONE2
Off MP3
Zone 03 control
DVD
Program
Volume
Bass
Trebl
OK
Page 8

* Family Music Console
5
2. Functions of Rear Panel
1) DVD audio input interface: Connects to a DVD player.
2) PC audio input interface: Connects to a PC player.
3) TV audio input interface: Connects to audio output interface of a TV.
4) AUX audio input interface: Connects to an audio source outputting satisfactory signal levels.
5) Zone 1 audio signal line output interface: Outputs zone 1 audio signals, and can be connected
to a power amplifier for power scaling.
6) Zone 2 audio signal line output interface: Outputs zone 2 audio signals, and can be connected
to a power amplifier for power scaling.
7) Data output interface: Connects to a room controller with a CAT-5 cable.
8) Zone 1 audio power output interface: Connects to a speaker. Do not reverse polarity.
9) Zone 2 audio power output interface: Connects to a speaker. Do not reverse polarity.
10) AC220V power input interface: Connect the interface with the power cord before connecting
the console to the mains.
11) FM antenna interface: With an impedance of 75Ω, connects to the provided FM antenna or to a
cable TV network.
12) AM antenna interface: Connects to the provided AM antenna.
13) USB interface: Connects to a USB disk, mobile HDD or card reader.
14) Remote control output interface: Controls a DVD player or TV connected.
15) DC power output interface: Supplies power to a room controller.
16) Room controller power output protection switch: Automatically turns off the DC power output
in case of a short circuit of output power supply. To restore the console, reset the switch
manually.
17) Timer power output socket.
INPUT
DVD PC TV AUX
L
R
L
R
ZONE2 ZONE1
LRL
R
OUTPUT
GND AMFM(75 )
ANTENNA
DATA 1DATA 2DATA 3DATA 4
1 2 3 4
ZONE 1 ZONE 2
+
TIMER OUT / 2A
REMOTE
OUT
2
RISK OF ELECTRIC SHOCK
DO NOT OPEN
请勿打开,以免触电
USB
1
++ +
L L
R R
DC36V OUTPUT
DC36V
OUTPUT
PROTECT
1 2 3 4
5
6
7
8 9 10
17161514131211
~220V/50Hz/8A
Page 9

* Family Music Console
6
RJ45 connector
From left to right:
Green-white, green, orange-white, blue,
Blue-white, orange, and brown-
white. The
same for the other end.
With the
tab
backwards
Pin 1
※ Wiring Diagram of the System
1. Example of Console Wiring
Diagram for making a network cable connector
FM antenna
AM antenna
IR remote controller
HIFI
TV
PC
DVD player
Page 10

* Family Music Console
7
2. Typical Example of Room Controller Wiring
Note: Through 4 output channels DATA1 to DATA4, up to 8 room controllers can be connected in the
form of “hand in hand” connection, and the length of a signal line of any channel should be less than
150m.
Page 11

* Family Music Console
8
※ Operation of Console
1. Status upon Turning on the Console
Connect the system according to the wiring diagram and turn on the power supply, and the power
indicator will turn on. If no zone is turned on after the console is turned on, the system will be in
standby status and the display will show the standby interface (as shown in Fig. 1-1), where if the
digital wheel is turned or a zone or source key is pressed down, the corresponding operation
interface or the one as shown in Fig. 1-2 will be accessed.
(Fig. 1-1) (Fig. 1-2)
2. Manual Operation of a Zone
Operation of a zone includes control of a zone switch, selection of an audio source, and adjustment
of volume and tone. Procedure of operation is as follows:
Ø Access to zone operation interface: Select a zone by turning the digital wheel when the main
interface is shown (as shown in Fig. 2-1), and then press down the digital wheel once to access
the zone control interface (as shown in Fig. 2-2) where above-mentioned setting can be
performed.
Ø Selection of an audio source: Turn the digital wheel to highlight (i.e. the item is highlighted by
the cursor) the content in the box following the “Program” and press down the wheel once, and
a icon will be shown. Turn the wheel again to show up to 6 audio sources successively. In
case that the source desired is highlighted, stop turning the wheel, and press down the wheel
again to assign the highlighted source to the zone.
Ø Adjustment of volume: Turn the digital wheel to highlight the content in the box following the
“Volume”, and press down the wheel once. Turn the wheel clockwise or counterclockwise to
move the slider leftwards or rightwards for adjustment of zone volume. The bass and treble can
be adjusted in the same way.
Ø To end the operation above, turn the digital wheel to highlight the “OK” button, and press it
once to apply and exit.
Operation for other zones can be performed in the same way.
Wed 16:55:08
Fri
20:08:08
TUNER
ZONE1
ZONE2
Off MP3
Wed 16:55:08
Fri
20:08:08
TUNER
ZONE1
ZONE2
Off MP3 Off
Page 12

* Family Music Console
9
3. Manual Operation of MP3 Player
Press the “MP3” key on the panel to access MP3 player control interface (as shown in Fig. 3-1 in
the next page).
3.1 Mode selection
This option is used to set the play mode of MP3 player, including “All”, “Single” and “Repeat
single”. All music files stored in the player will be played successively in the “All” mode, only the
track currently selected will be played in the “Single” mode, and only the track currently selected
will be repeated in the “Repeat single” mode.
Operation of setting: Turn the digital wheel to highlight the content in the box following the “Mode”,
and then press down the wheel to show the icon. Turn the wheel to select, and press it again to
apply and exit.
3.2 Time display
As shown in Fig. 3-1, the preceding time 00:00 is the play time elapsed of the track currently played,
and the one following is the total play time of the track currently played.
3.3 Track selection
As shown in Fig. 3-1, highlight the “ 03 \ 01” box, press and turn the digital wheel to select. Digits
in the preceding box refer to the directory, e.g. “03” means that the 3rd directory of the USB disk is
selected. Digits in the following box refer to the number of a track in the directory. The track name
is shown following these boxes. In case that the text “No USB disk exists. Please connect a USB
disk.” is shown on the lower part of the display, no USB disk is connected to the USB interface or
an unidentifiable USB disk is connected. In case that the text “A USB disk is connected. Please
wait…” is shown, a USB disk is connected, and the console can access the disk. In case that no
track exists in the directory selected, the text “No track exists in the directory. Please select other
directory.” is shown, then another directory is accessed and the name of a track in the directory is
shown automatically.
Press other function key to exit from the MP3 setting interface after setting.
When manually operating MP3, press the “ ” or “ ” key on the panel to select a track, press
the “
” key to play or pause. Also, this can be performed by a line or IR remote controller. For
details, refer to functions of the key in this manual.
(Fig. 2-1)
Zone 01 control
DVD
Pro
Vol
Bass
Treble
OK
(Fig. 2-2)
Wed 16:55:08
Fri
20:08:08
TUNER
ZONE1
ZONE2
Off MP3
Page 13

* Family Music Console
10
4. Manual Operation of Tuner
Press the “TUNER” key to access the tuner control interface (as shown in Fig. 4-1), where the band,
station and mono/stereo can be set.
4.1 Band selection
Press the “BAND” key to switch between AM and FM bands. Also, this can be performed by a line
or IR remote controller. The frequency range of AM band is 522–1620 kHz, and 87.00–108.00 MHz
for FM band.
4.2 Tuning
Press the “ ” or “ ” key on the panel select a station stored. Turn the digital wheel for tuning
by frequency. Turn the wheel clockwise to tune to a higher frequency, or turn it counterclockwise to
tune to a lower frequency. In case that a station is tuned in to, signal bar indicator as shown in Fig.
4-1 is shown. More bars will be shown if the signal is strong.
4.3 Storage of station
In case that a station is tuned in to, press the “MEMO” key in combination with the “ ” or
“ ” key to store the station as the storage number successively or randomly. Up to 40 station
numbers are available. To store a station, press the “MEMO” key once, and the storage number
following the “MEMO” option on the display will flash. Press the “ ” or “ ” key to adjust the
number, and then press the “MEMO” key again to store the station.
4.4 Mute mode
Press the “
” key on the panel, and the “ ” icon will turn into the “ ” icon (as shown in
Fig.4-2) indicating that the console is in mute mode. The preset timer is executed at the scheduled
time. Press the “
” key again to exit from the mute mode.
4.5 Calling a station
Ø A stored station can be called at the scheduled time. For details, refer to timer setting.
Mode MP3 player
03
\
0 1
A thousand dreams of you
(Fig. 3-1)
All 00
:
00 00
:
00
(Fig. 4-1)
100.45MHz
Signal
Mono
AM/FM tuner
Memo 40
(Fig. 4-2)
100.45MHz
Mono
AM/FM tuner
Memo 40
Tuner mute
mode
Page 14

* Family Music Console
11
Ø A stored station can be directly called by a line or IR remote controller. For details, refer to
functions of remote controller keys.
5. Timer Programming
Press the “TIMER” key on the panel to access system setting status, and the display will show the
“Operation options” interface (as shown in Fig. 5-1 in the next page), where options like timer
setting, time setting, IR teaching, copy schedule, and system setting can be selected.
5.1 Timer setting
Turn the digital wheel to highlight the “Timer setting” option, and press it again to access the timer
setting interface (as shown in Fig. 5-1-1 in the next page). Turn the wheel to select an option in the
timer setting interface for operation.
5.1.1 Weekday setting:
Turn the digital wheel to highlight the “Weekday” option and press it again, and a icon will be
shown. Turn the wheel to select a weekday (e.g. Wed), and press it again to apply and exit.
5.1.2 New schedule:
When the weekday in the “Weekday” option is set as a weekday (e.g. Mon), all information of the
first schedule of the day will be shown in the other options of the interface. In case that other
options shows nothing (as shown in Fig. 5-1-2) (Next page), no schedule is set for this day. To
create a schedule, select the “New” option and set other options of the new schedule. The new
schedule is always assigned to the last schedule number of the day. However, schedules are
executed according to their set time.
5.1.3 Number setting:
Turn the digital wheel to highlight the content in the box following the “No.”, and then press down
the wheel once to show the icon. Turn the wheel to select, and press it again to apply and exit.
5.1.4 Power setting:
This option is used for timing of power output socket on the rear panel (as described in item 17 in
page 4), which supplies power AC220V to other devices. In case that the power setting is set as
“On”, power is supplied from the socket at the scheduled time; in case that it is set as “Off”, no
power is supplied from the socket at the scheduled time; in case that it is set as “…”, the default
setting (i.e. the previous setting) applies. Setting can be done in the same way as the “No.” setting.
5.1.5 Time setting:
This option is used to set the starting time of a schedule, which is accurate to a second and uses
24-hour system. Setting can be done in the same way as the “No.” setting.
5.1.6 Setting of scheduled MP3 tracks
Page 15

* Family Music Console
12
Ø Turn the digital wheel to highlight the “MP3 setting” option, and press down the wheel once to
access the “MP3 timer setting“ interface (as shown in Fig. 5-1-3), where up to 3 tracks can be
applied to a schedule. The “00/00” refers to the track played, where the first two digits refer to
the directory where the track is, and the later two digits refer to the number of the track in the
directory. If the directory is set as “00”, no directory is selected. If the track number is set as
“00”, no track is selected.
Ø Selection of track: Turn the digital wheel to highlight the box showing digits, and then press
down the wheel once to show the icon. Turn the wheel to select the directory or track
number, and press it again to apply and exit.
Ø Selection of repetition: Turn the digital wheel to highlight the content in the box following the
“Repeat”, and then press down the wheel to show the icon. Turn the wheel to select “Off”,
“Repeat” or “Normal”. This option is used to set the play mode of 3 tracks played at the
scheduled time.
Ø Select the “OK” button to apply setting and exit from the MP3 timer setting interface.
MP3 tracks set for each schedule are only available for the corresponding schedule. When the
next schedule is executed, the system will execute the next schedule, of which setting will
overwrite the MP3 setting of the previous schedule. If no MP3 is set for the next schedule, no
MP3 is played for the next schedule.
5.1.7 Tuner timer setting:
Turn the digital wheel to highlight the “Tuner setting” option, and press it once to access the “Tuner
timer setting” interface (as shown in Fig. 5-1-4) (Next page), where band and station can be
selected.
Ø Highlight the content in the box following the “Band”, and then press down the wheel to show
the icon. Turn the wheel to select, and press it again to apply and exit. The “Station” option
can be set in the same way.
Note: Select the “…” in the “Band” option to set as default setting, or select the “Stop” to stop
the tuner at the scheduled time.
(Fig. 5-1)
(Fig. 5-1-1)
Sat
:
No.
001
Power On
Add
MP3 setting
Time
08
10
00 :
Tuner setting Zone setting
Delete Delete all Return
Sat
:
No.
Power
Add
MP3 setting
Time
:
Tuner setting Zone setting
Delete Delete all
Return
(Fig. 5-1-2)
Operation options
Timer setting Time setting IR teaching
Copy schedule System setting Exit
MP3 timer setting
Please select the directory and
Repeat
OK
1
(Fig. 5-1-3)
\
12
05
2
\
06
00
3
\
00 07
Repeat
Page 16

* Family Music Console
13
Ø Both AM and FM bands have up to 40 stations for selection, and the number refers to the
storage number of a station. Stations tuned in to and stored to numbers during manual tuner
operation can be called directly at the scheduled time.
Ø Select the “OK” button to apply and exit.
5.1.8 Zone setting:
Turn the digital wheel to highlight the “Zone setting” option, and press it once to access the “Zone
timer setting” interface (as shown in Fig. 5-1-5), where a zone can be selected to set its volume and
source.
Ø Selection of zone: Turn the digital wheel to highlight the content in the box following the
“Zone”, and then press down the wheel once to show the icon. Turn the wheel to select,
and press it again to apply and exit.
Ø Adjustment of volume: For details, refer to the “Adjustment of volume” section in page 5.
Ø Selection of source: Select the source in the same way as selection of zone. When the “…” is
selected, the default setting is selected; when the “Off” is selected, the zone is off at the
scheduled time. This operation is used for selection of up to 6 audio sources, and all zones can
use one source or different sources. If setting as described in sections 5.1.6 or 5.1.7 in page 10
is not done when source MP3 player or tuner is selected, the zone is in mute mode at the
scheduled time. If the MP3 or tuner is playing before the scheduled time, and no setting is done
for MP3 or tuner in the schedule, the MP3 player or tuner will keep playing the program which
is played before the scheduled time is reached.
Ø Default: If it is set as default setting, the audio source status of the schedule is the same as the
one executed previously.
Ø Select the “OK” button after setting to apply and exit from the zone timer setting interface.
5.1.9 Delete: To delete an existing schedule.
5.1.10 Delete all: To delete all existing schedules of the day selected (e.g. Wed).
5.2 Time setting
Turn the digital wheel to highlight the “Time setting” option in the “Operation options” interface,
and press it to access the “Time setting” interface (as shown in Fig. 5-2 in the next page). Turn the
wheel to highlight the desired option, and then press it to show the icon. Turn the wheel to
Zone timer setting
Default
MP3
Zone
02
Volume
OK
Program
(Fig. 5-1-5)
Tuner timer setting
OK
01 Band
FM
Cancel
Station
(Fig. 5-1-4)
Page 17

* Family Music Console
14
change the digit, and press it again to apply and exit. After setting other options, select the “OK”
button to apply and exit from the time setting interface, or select the “Cancel” button to cancel the
setting and exit.
5.3 IR teaching
Ø Turn the digital wheel to highlight the “IR teaching” option in the “Operation options”
interface, and press it to access the “IR teaching” interface (as shown in Fig. 5-3-1). Turn the
wheel to highlight the desired function key. For example, to teach the “Play” function of DVD,
select the “Play” option first, aim the DVD IR remote controller at the console, and then press
the “
” key (i.e. play/pause key), and the text “OK” will be shown after the “Play” option
(as shown in Fig. 5-3-2), indicating that teaching of “Play” function is completed. Perform the
same operation to teach the others.
Ø After teaching a function, direct operation can be performed to the function of DVD player or
TV through a room controller by using the IR remote controller. For example, the “Play/Pause”
function of DVD player can be executed directly in the DVD control interface of a room
controller after teaching the DVD “Play” function.
5.4 Copy schedule
Turn the digital wheel to highlight the “Copy schedule” option in the “Operation options” interface,
and press it to access the “Copy schedule” interface (as shown in Fig. 5-4), where all schedules of a
weekday (e.g. Monday) can be copied to one weekday or more shown in the box n√. Operation is
as follows:
Ø Turn the digital wheel to highlight the “Weekday” option and press it again, and a icon will
be shown. Turn the wheel to select a weekday, and press it again to apply and exit.
Ø Turn the digital to highlight the box “ ”, and press it, and the “X” will become “√”
indicating that the weekday is selected. The “X” means that no copy is performed, and the “√”
means that copy is performed.
YY
08
Mon
Cancel
Time setting
MM
1 0 0 9
DD
OK
0 6
:
1 0 0 9
:
Copy schedule
OK
Copy all schedules of
Monday
to: 2
×
Cancele
3×
4
×
5×
6×
S
×
The existing schedules
are overwr
itten.
(Fig. 5-2)
(Fig. 5-4)
DVD teaching
Play
(Fig. 5-3-1)
TV teaching
Previous
Next
Previous
Return
Next
DVD teaching
Play
(Fig. 5-3-2)
TV teaching
Previous
Next
Previous
Return
Next
OK
n
×
Page 18

* Family Music Console
15
Ø Select the “OK” button after operation to apply and exit from the interface, or select the
“Cancel” button to cancel and exit.
5.5 System setting
Turn the digital wheel to highlight the “System setting” option in the “Operation options” interface,
and press it to access the “IR teaching” interface (as shown in Fig. 5-5), where the backlight lighting
status can be set (as “Auto” or “Always”). Operation is as follows:
Ø Turn the digital wheel to highlight the content in the box following the “Backlight”, and then
press down the wheel once to show the icon. Turn the wheel to select “Always” or “Auto”,
and press it again to apply and exit. If it is set as “Auto”, the display will automatically turn off
when no operation is performed within 20 seconds.
Ø Select the “OK” button to apply and exit.
Ø Select USB disk: This option is used to select a USB interface from the “Front panel” or “Rear
panel”. If it is set as “Front panel”, tracks from the USB interface on the front panel will be
played; if it is set as “Rear panel”, tracks from the USB interface on the rear panel will be
played.
5.6 Operation of talk
To initiate a talk through the console, press and hold the “MIC” key and talk to the “MIC” pick-up.
To end a talk, release the “MIC” key. Press and hold the “MIC” key, and the text “CALLING” will
be shown on the interface. Release the “MIC” key, and the system will automatically return to the
previous status.
System setting
OK
Backlight
Auto
(Fig. 5-5)
Auto
Always
Select USB disk
Front panel
Front panel
Rear panel
Page 19

* Family Music Console
16
3
※ Functions of IR Remote Controller
Tip: The IR remote controller is designed only for control of zone 1, MP3 player and tuner.
1. Zone on/off control key
2. Audio source selection key
3. Play status control key: Pause, stop, and
previous or next track selection for MP3 mode,
and stored station selection, mute and play for
tuner mode.
4. Number keys: MP3 track selection key: Stored
station selection key
5. Bass adjustment key
6. Volume control key
7. Source selection key
8. Treble adjustment key
When using the IR remote controller to control the MP3 or tuner, select the MP3 or tuner first, and then
press any operation key or number key to access the operation interface of the source status. Press one of
the selection keys of six sources or the “SOURCE” key when any display status is shown to return to the
main interface. Press any volume or tone control key when any display status is shown to access the zone 1
control interface. Press the “TUNER” key when the system is in tuner status to switch between AM and FM
bands.
Page 20

* Family Music Console
17
Diagram of receiving angle of IR remote controller
The maximum receiving angle of the console is 160°.
The maximum receiving angle of a line remote controller is 160°.
Page 21

* Family Music Console
18
※ Application of File Format of USB Disk
1. This system supports a USB disk, mobile HDD or USB card reader (hereinafter collectively
referred to as the USB storage) utilizing a general USB interface. The maximum bit rate of an
MP3 file is 320kbps. Audio files in non-.MP3 format cannot be played. In case that a track
cannot be played, check whether it is as specified.
2. Supports FAT12, FAT16 and FAT32 file system.
3. To improve the operation speed and optimize management, it is recommended that the USB
disk or mobile HDD used only store. MP3 files other than files in other format, so as to
facilitate the access of files and schedule programming.
4. Up to 99 primary directories can be created in the root directory, in each of which up to 99
tracks can be stored. Also, up to 99 tracks can be stored in the root directory. It is not necessary
to create a secondary directory in a primary directory; otherwise, tracks in the secondary
directory cannot be read. Tracks can be stored in a USB disk by three methods as follows:
Ø Create no directory, and store all tracks in the root directory. This method facilitates track
selection, but only 99 tracks can be stored. Note: To select a track in the root directory, the
directory number should be set as “00”, e.g. 00 \ 03.
Ø Store all tracks in primary directories. By this method, tracks can be stored by classification,
and up to 99x99 tracks can be stored.
USB storage
01.MP3
02.MP3
99.MP3
USB storage
Directory 99
Directory 1
01.MP3
99.MP3
02.MP3
01.MP3
99.MP3
02.MP3
Page 22

* Family Music Console
19
Ø Store tracks in root and primary directories. Up to 99+99x99 tracks can be stored.
01.MP3
Directory 99
Directory 1
01.MP3
99.MP3
02.MP3
01.MP3
99.MP3
02.MP3
99.MP3
USB storage
Page 23

* Family Music Console
20
※ Precautions
1. Safety Precautions
l Disconnect the power plug of the console from the mains before wiring the system.
l Ensure that the input voltage to the console is as specified to avoid a risk of damage to the
console.
l Never open the casing of the console to avoid electric shock from inside.
l Always disconnect the power plug from the mains when the console is not used, because the
console is not disconnected from the mains even when the power switch is turned to the off
position.
l Do not leave the console in a too hot or too cold place.
l Keep the console well ventilated to avoid damage to the console due to excessively high
temperature.
l Disconnect the power plug if the air is moist or the console is not used for a long period.
l Remove the power plug from the outlet to disconnect the console from the mains before
removing or reinstalling any part, or disconnecting or reconnecting any plug or cable.
l Do not open the casing for maintenance by yourself or unauthorized personnel in case of
failure, so as to avoid an accident or further damage.
l Never place any corrosive on or near the console.
2. After-sales Service Precautions
l DSPPA will provide a three-year charge-free warranty (including replacement of parts) from
the date when you purchase provided that the product is installed and operated as specified.
l The user should show the warranty card copy kept by the user and the sales invoice for repair.
l The warranty is invalid in the cases as follows:
(1) The product is damaged due to wrong installation, operation or handling.
(2) The product is damaged due to abnormal situations (e.g. excessively high mains voltage or
ambient humidity).
(3) The product is damaged due to disasters and accidents.
(4) The ID number on the product body is changed, modified or removed.
(5) The product is repaired or modified by unauthorized personnel.
Page 24

* Family Music Console
21
l Please store the manual and warrant card well.
l For problems or precautions not referred in this manual, please contact our distributor or visit
our site at http://www.DSPPA.com.cn.
l Please contact our technician (or distributor) in case of failure within the warranty period. We
will take no responsibility in case that the product is disassembled or repair by unauthorized
personnel.
※ Packing List
1 AM8130 console, 1 pc. of power cord, 1 pc. of 1.5m-long cable with 2-2 RCA connectors, 1 FM antenna,
1 set of AM antenna and its base, 1 copy of User’s Manual, 1 copy of certificate, 1 copy of warranty card, 1
FM808 unit, 1 USB disk, 4 terminators, and 1 IR remote controller.
Page 25

* Family Music Console
22
※ Specifications
1. MP3 Player
Item Description
Format supported MP3, at bit rate of <320kbps
Compatible storage Compatible with most mobile storages utilizing USB interface.
Frequency response 20Hz-20KHz
THD <0.2%
2. AM/FM Tuner
Item Description
Frequency range received 522-1620KHz
Sensitivity 52dBμ
S/N ratio 35dB
Pass band 6kHz
AM
THD 0.2%
Frequency range received 87.0MHz-108.0MHz
Sensitivity 18dBμ
S/N ratio 75dB for mono, and 70dB for stereo
Pass band 15kHz
THD 0.6%
FM
Stereo crosstalk 35dB
3. Timer
Item Description
Programmable control power supply 1 channel (at mains voltage)
Socket capacity 220V, 2A
Time system 24-hour system
Numbers of programmable schedules 100 schedules, not repeated for a week.
Programmable options for a zone
a. Zone on/off
b. Selection of audio source
c. Volume control
d. Treble and bass control
e. MP3 player control
f. AM/FM control
Page 26

* Family Music Console
23
4. Comprehensive Specifications
Item Description
Number of room controllers connected Up to 32 controllers.
Number of zones 2 zones, each of which is provided with a 2-channel stereo
power amplifier.
Room controller interface Uses CAT-5 cables.
Line input sensitivity 500mV±25mV
Line input resistance >10kΩ
Zone output power 4X80W/8Ω
Frequency response 20Hz-20kHz±0.5dB
THD Less than 0.2% at 1kHz and 1/3 rated output power.
Tone control
Bass: ±10dB/100Hz
Treble: ±10dB/10kHz
Audio
specifications
S/N ratio ≥80dB
DC output voltage 40V±10%
DC output power 250W
Input power AC220-240V/50-60Hz
Protection AC220V/F8AL
Maximum power consumption 500W
Dimensions (L x W X H) 430×340×132mm
Weight 13kg
Specifications are subject to change without further notice.
http://www.dsppaglobal.com
 Loading...