

Page 1
www.dsmaref.com
USER MANUAL
ISO 9001
EN ISO 13485
0068
This device is a medical device, designed to be used under a doctor’s instruction.
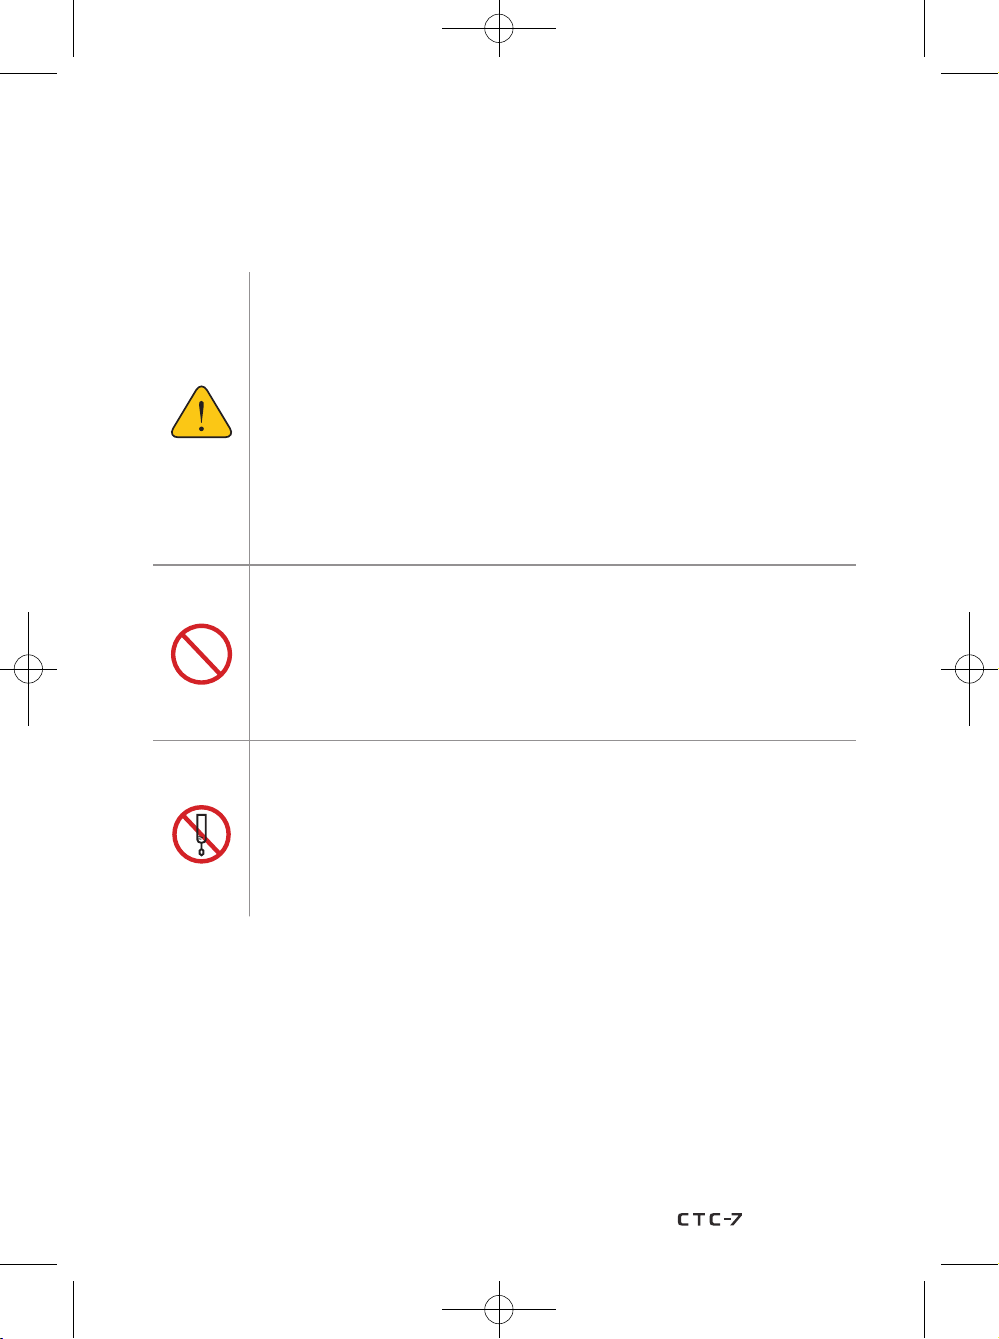
This user manual is intended to keep user safety and prevent property damage.
Please keep this manual at a place where a user can find it whenever he/she needs.
Page 2
1
Device Information
CONTENTS
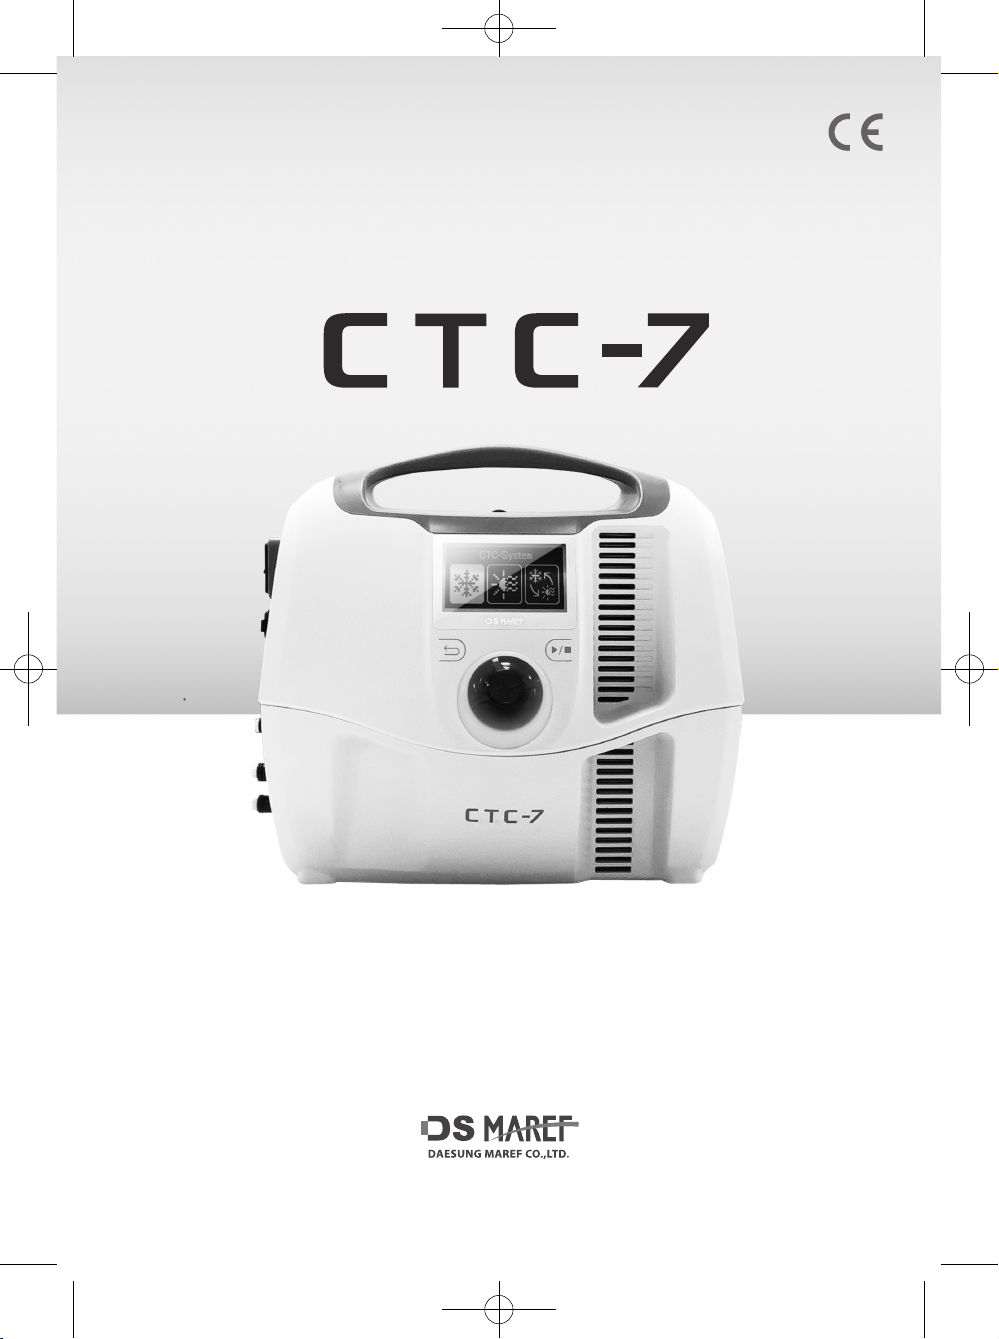
1-1. CTC-7 Introduction
1-2. Intended use
1-3. Target Patient … 04
1-4. Contraindications
1-5. Side effect
General warnings and Cautions
2
2-1. Electrical safety cautions
2-2. Cautions prior to use
2-3. Cautions during use
2-4. Cautions after use
2-5. Cleaning
2-6. Operating / Storage conditions
2-7. WEEE
Device Composition
3
3-1. Basic set
3-2. Accessories
Device Description
4
4-1. Device specifications / Characteristics
4-2. Parts name /function
Installation
5
… 22
… 04
… 04
… 05
… 06
… 07
… 08
… 10
… 12
… 14
… 15
… 16
… 17
… 18
… 19
… 20
How to use
6
6-1. Cold & Heat Therapy setting
6-2. RCT Therapy setting
Cleaning and Draining
7
7-1. Cleaning
7-2. Draining
Storage
8
… 28
… 31
… 24
… 25
… 31
… 32
… 34
2
Page 3
USER MANUAL
9
System setting
How to set the Backlight time
9-1.
How to set the Beep sound
9-2.
How to set the RTC initial
9-3.
How to set the Temp unit
9-4.
F-Reset (Factory-Reset)
9-5.
10
Troubleshooting
Matters to be checked prior to submitting a request for service
10-1.
Error code occurrence
10-2.
11
Labels Information
12
Information on EMC
Guidance and Manufacturer's Declaration
12-1.
– Electromagnetic Immunity
Guidance and Manufacturer's Declaration
12-2.
– Electromagnetic Emissions
… 35
… 41
… 35
… 36
… 36
… 37
… 37
… 38
… 39
… 42
… 43
Symbols information
13
… 44
3
Page 4
1
Device Information
1-1. CTC-7 Introduction
Thanks for purchasing CTC-7.
DAESUNG MAREF, we pledge to provide the highest quality device with excellent support
and service.
This user manual specifies the procedures required for properly using, storing and repairing
this device. In addition, this user manual specifies the instructions that must be followed to
not only prevent causing property damages to users and other people, but also safely use the
purchased device. Since it is important that you learn to control and connect the equipment
in order to properly use this device, make sure to read and follow the instructions specified in
this user manual prior to safely using this device.
Please always keep this manual with the device.
You must carefully read it before first use and as many times as needed.
※
The IFU can be distributed in English / Korean.
If users request, we can provide IFU in the requested language.
1-2. Intended use
The purpose of this system is to treat post-operative injuries and acute injuries to reduce
swelling, edema and pain. and It is to treat symptoms requiring medically or surgically local
thermal therapy (Cold, Heat, RCT) after post-traumatic or post-operative.
1-3. Target Patient
a) Age : No restrictions
b) Body weight : No restrictions
c) Nationality : Plural (not relevant)
d) Intended patient population : 1 person
e) Patient condition : 'Patients who need cooling, heating therapy after acute injury, trauma,
surgery (Not specified)
4
Page 5
USER MANUAL
1-4. Contraindications
* The patient must not use to CTC-7 system if the patient is suspected the following.
Heat Therapy
and/or
Contrast Therapy
Cold therapy
and/or
Contrast Therapy
- Vascular dysregulation
- Vascular ischemic disease
- Venous or Arterial Occlusive Disease
- Acute inflammations of the Veins
- Local malignancy
- Acute inflammatory skin disease or infection
- Venous or Lymphatic return is not desirable
- Local or systemic active infection
- Vascular dysregulation
- Vascular ischemic disease
- Venous or Arterial Occlusive Disease
- Acute inflammations of the Veins
- Decompensated Hypertonia
- Cerebral infraction
- Venous or Lymphatic return is not desirable
- Incapacitated patients
- A pregnancy
- Acute unstable frac
- Cutaneous insensitivity
- Acute trauma
- Bleeding diathesis
- Large scar
- Endocarditis
- Atheromatous embolic plaque
- Lymphedema after breast cancer
- Cold urticarial
- Atrial fibrillation
- Cutaneous insensitivity
ture
* The following patients must use the device for temperature contact therapy under the
supervision of a physician.
- Extremities not sensitive to pain
- Raynaud's Disease
- Hypersensitive to cold
- Children
- Incapacitated patients
- Recent skin graft
- Unstable angina
- Uncontrolled blood pressure
Thermotherapy
(Heat and Cold)
and / or
Contrast Therapy
- Diabetes mellitus
- Decompensated Cardiac Insufficiency
- Hypertension, Cardiac failure
- Extreme low pressure
- Multiple sclerosis- Spinal cord injuries
- Rheumatoid arthritis
- Poor circulation
5
Page 6
1-5. Side effect
Heat Therapy
- Burns
- Skin discoloration
- Increased pain
- Increased inflammation
Cold Therapy
Contrast Therapy
- Frostbite
- Cardiovascular effects (bradycardia)
- Raynaud’s phenomenon
- Cold urticarial
- Burns
- Frostbite
- Cold urticarial
- Raynaud’s phenomenon
- Nerve and tissue damage
- Slowed wound healing
6
Page 7
USER MANUAL
2
Make sure that you follow all the specified cautions and warnings prior to using this device.
※
Caution for safety
2-1. Electrical safety cautions
- When this device is not in use, disconnect the power cord.
- When you connect or disconnect the power cord to or from the socket,
make sure to grab the plug instead of the line.
- When thunder and lightning cause a sudden blackout, turn off this device
and disconnect the power plug.
(There is a risk of device failure or electric shock.)
- Accurately connect the power cord so that it is rigidly plugged in.
(When the power cord is not stably connected, there is a risk of malfunction
and fire.)
- Make sure to untie the power cord prior to use.
(There is a risk of heat generation and fire.)
- When you move this device, use the handle instead of pulling the power
cord line.
(When the power cord is damaged, there is a risk of fire and electric shock.)
- Do not use this device near any equipment that creates electromagnetic
waves such as X-ray equipment and MRI equipment.
(When influenced by electromagnetic waves, this device may not function
properly.)
(There is a risk of malfunction which may cause injury.)
- When this device is dropped and damaged, do not operate this device.
- When the power cord is damaged, do not operate this device.
- When adding or draining distilled water, make sure to be careful.
(There is a risk of fire or electric shock which may cause injury.)
- Operators should not touch the patient while touching the SD card, USB port
of the device.
7
Page 8
- Use a power cord in compliance with the standard in the involved country.
(There is a risk of fire and electric shock.)
- To avoid causing electric shock, use this device by connecting it with
a main-power supply unit with a protective ground.
(There is a risk of fire and electric shock.)
- Do not use a damaged power cord/plug or a loose socket.
(When the connection is unstable, there is a risk of fire and electric shock
which may cause injury.)
- When you smell something abnormal while this device is in use, immediately
stop using this device. In this case, immediately turn off the power switch,
disconnect the power cord from the socket, and contact the manufacturer or
the seller.
- Do not use wet hands or other wet body parts to touch this device, the
power cord, plug and socket.
(There is a risk of electric shock which may cause injury.)
- Do not damage, bend, twist, or heat up the power cord.
(When the cord is damaged, there is a risk of fire and electric shock.)
2-2. Cautions prior to use
- Do not use this device for any purposes other than the intended use.
- The device cannot be used in home health care environment.
- When the intended user is wearing a life support system, make sure that
the intended user consults one’s doctor.
(Ex; heart assist device)
- When the intended user’s skin is sensitive to high or low temperature, make sure
that the intended user consults one’s doctor prior to use.
(There is a risk of low temperature burn and frostbite (on the spot where this
device is worn) which may cause injury.)
- When this device is not used for a long time, clean this device and check
whether or not this device functions properly prior to use.
- Do not install this system in an environment exposed to heating devices and
direct light.
(There is a risk of deformation and failure which may cause malfunction.)
8
Page 9
USER MANUAL
- Check whether or not the tubing is damaged.
(When the tubing is damaged, there is a risk of oil leak and water leak which
may cause fire and electric shock.)
- Prior to use, check the status of this device as well as the status of the accessories.
(When this device or the exterior of the accessories is/are damaged, contact the
seller or the service center. When you intend to use the damaged device and
accessories, there is a risk of electric shock or current leakage which may cause
fire and injury.)
- Do not install this device on a desk or a table to which vibration or impact is
frequently applied.
(There is a risk of fall caused by vibration or impact which may cause failure
and injury.)
- Make sure to install this device in a place where the power plug can be connected
and disconnected without any interfering obstacles and where the power plug can
be removed without any interfering obstacles.
- Do not use a separate coolant for this device.
- When installing this device, make sure that the vent is not blocked.
- The SD card and USB cable can only be used as a firmware update.
- Prior to use, make sure that the water tank cover is locked.
- Do not paint this device or attach stickers and other foreign substances to
this device.
(When any foreign substance is inserted into the air socket or the connection
port, there is a risk of malfunction.)
(Depending on the physical constitution of the intended user, there is a risk
that the paint or the stickers may cause allergy and eczema. In this case,
stop using this device consult your doctor.)
- Do not cover the power cord with a carpet or other objects.
(As you walk, your feet may be caught in the power cord, making this
device fall.)
(There is a risk of fall which may cause failure and injury.)
- Make sure to install this device on a flat and stable surface.
(When this device is installed on a tilted or unstable surface, there is a risk
of noise, fall, failure and malfunction.)
- Use the wrap with wearing thin cloths.
(It can cause an allergy to a person with sensitive skin.)
9
Page 10
- Do not remodel, disassemble, or repair this device at your own discretion.
(When this device is remodeled, disassembled, or repaired at your own
discretion, you will not be able to receive our free repair service. Make sure
to submit a request to our service center to repair this device.)
- Do not install this device on a foldable, portable, or lightweight table.
(When the weight leans towards one side, there is a risk of table fall which
may cause failure and injury.)
- When installing this device, make sure that no liquid or foreign substance is
inserted into any part of this device other than the inlet of the water container.
(When any foreign substance is inserted into any part of this device,
there is a risk of failure, fire and malfunction which may cause injury.)
- When this device is transferred at a temperature below 0℃, make sure
to completely dry this device at room temperature for approximately 1~2hours
until the dew condensation disappears.
(Any moisture and liquid ingredients may damage the parts and circuits of
this device.)
- The wrap is intended to be connected with the device manufactured
by DAESUNG MAREF only. Do not connect the wrap with other devices
manufactured by other companies.
- The accessories and parts to be used in CTC-7 must be of those provided or
approved by DAESUNG MAREF.
(When any accessories and parts not approved by DAESUNG MAREF are
used, there is a risk of malfunction which may not guarantee user safety.)
2-3. Cautions during use
- When it comes to determining how the temperature, mode and time of this
device should be set, follow the instructions given by your doctor.
- Use this device indoor where the temperature is above 10℃ and below 25℃.
(When the service environment conditions are not satisfied, there is a risk
that the cooling/heating performance of this produce may be degraded.)
- CTC-7 Warp is not sterilized. Make sure that no wounded site is directly
touching the cooling/heating pad.
- Do not apply extreme impact by dropping this device.
- Do not use this device while it is inside the recovery bag.
(When this device is used while the vent is blocked, the device may not
function properly.)
10
Page 11
USER MANUAL
- Do not operate this device while the tubing is facing your eyes, nose and lips.
(The water and air released from the tubing may cause injury.)
- Make sure that no heat is applied to the gonad and developing embryo.
(If you are a pregnant woman, be aware when you wear the back wrap.)
- When this device is used in the Cold, Heat, or RCT mode, do not use this
device with other heat sources.
(Doing so may result in an outcome different from the purpose of the
intended treatment.)
- Do not insert your finger into the water container or the vent.
- Make sure that the front, side, or rear vent of this device is not blocked
while this device is in operation.
- Make sure not to touch the side vent of this device while this device is in
use or immediately after this device is used.
- When connecting the tubing, make sure not to bend it.
- When moving this device, make sure to turn off this device prior to moving it.
(While this device is in operation, do not move this device.)
- Do not use a safety pin on the wrap to fix it.
(The wrap may be torn by the sharp part of a safety pin.)
- Prior to wearing the wrap, remove all accessories from the part of your body where
the wrap will be worn.
* When accessories are worn, there is a risk that the wrap may be damaged or that
the part of your body where the wrap is worn may be injured.
* When the wrap is to be worn on your leg: your belongings within trouser pockets,
ankle bracelet, etc.
* When the wrap is to be worn on your waist: your waist belt, belongings within
trouser pockets, key chain, mobile phone, etc.
* When the wrap is to be worn on your arm and hand: your watch, bracelet, ring, etc..
11
Page 12
2-4. Cautions after use
- When disconnecting the power cord from the device, disconnect the power cord
from the socket prior to removing it from this device.
- Check whether or not this device is damaged and whether or not this device
functions properly at least once per year.
(When this device is used without conducting maintenance, there is a risk
of malfunction and injury.)
- Prior to cleaning this device, disconnect the power cord from the socket,
and then disconnect the power cord from this device.
(When you get caught in the power cord line as you clean this device,
there is a risk of fall injury, damage and electric shock.)
- Make sure that no liquid is inserted into the socket, AC inlet and vent located
on the side of this device.
(When any liquid is inserted, the influenced internal parts may cause
malfunction, electric shock and fire.)
- Do not directly apply the liquid detergent to this device or use benzene,
thinner, or alcohol to clean this device. Make sure to apply the liquid
detergent to a cloth to be used for cleaning this device.
(There is a risk of discoloration, damage, electric shock and fire.)
- After operating this device, always wait until this device reaches room
temperature prior to storage.
- When the case of this device is damaged, immediately submit a request
for repair to the supplier or the customer center.
- Store this device and the accessories in a dry place free from water and
moisture.
(Moisture and liquid ingredients may damage the parts and circuits of this
device.)
12
Page 13
USER MANUAL
- Do not store this device in a dirty place full of dust.
(Dust and foreign materials may result in failure, fire, or electric shock which
may cause injury.)
- When this device and the accessories are to be stored for a long time,
make sure to completely remove the distilled water inside this systems.
(Unless the distilled water inside this device is completely drained, there is
a risk of contamination(microorganism inside this device) which may
cause failure.)
- The adequate temperature range for storing this device is from 1℃ to 50℃.
Make sure that the temperature is within that range while this device is stored.
- Do not play any objects on this device.
(When this device is operated or moved while any liquid container(vase, water
bottle, cup, cosmetic device and chemical), volatile substance, chemical, or
sharp object(scissor and knife) is placed on this device, there is a risk of fall
which may cause fire and injury.)
- Do not disassemble or remodel this device at your own discretion for repair.
This device can only be disassembled and repaired by the approved personnel.
(When you disassemble and repair this device at your own discretion, there is a
risk of malfunction and injury.)
13
Page 14

2-5. Cleaning
2-5-1.
Device cleaning
- When any foreign substance(ex: filth, dust, blood) is attached to this device, turn off this
device, apply a bit of water or neutral detergent to a cloth, and use the cloth to gently
remove the foreign substance.
(There is a risk of discoloration, damage and malfunction.)
(When this device is cleaned, make sure to dry this device completely prior to use.)
- Please be careful to prevent any liquid from going into the air socket or AC inlet on the back
of device. If liquid does get in operation errors, electric shock, and fire could occur due to
do an affect of internal parts.
- Do not wipe the device with benzene, thinner, alcohol, etc or spray water directly on the
device.
(It may cause discoloration, damage, electric shock or fire.)
* Use neutral detergent or the alkalescence for cleaning.
Dilute in water if it is Alkali undiluted state.
Drug use: be careful not to enter into the skin or eyes.
2-5-2.
Wrap cleaning
- When necessary apply a bit of neutral/mild detergent or water to a soft cloth, use the cloth
to clean the wrap, and completely dry the wrap prior to use.
- Close the tubing hole at the bottom with a rubber stopper before cleaning.
(If you do not close the tubing hole with a rubber stopper, there is a risk of contamination
which may cause failure.)
* Do not use a dryer to dry the wrap.
14
Page 15
USER MANUAL
2-6. Operating / Storage conditions
2-6-1.
Operating condition
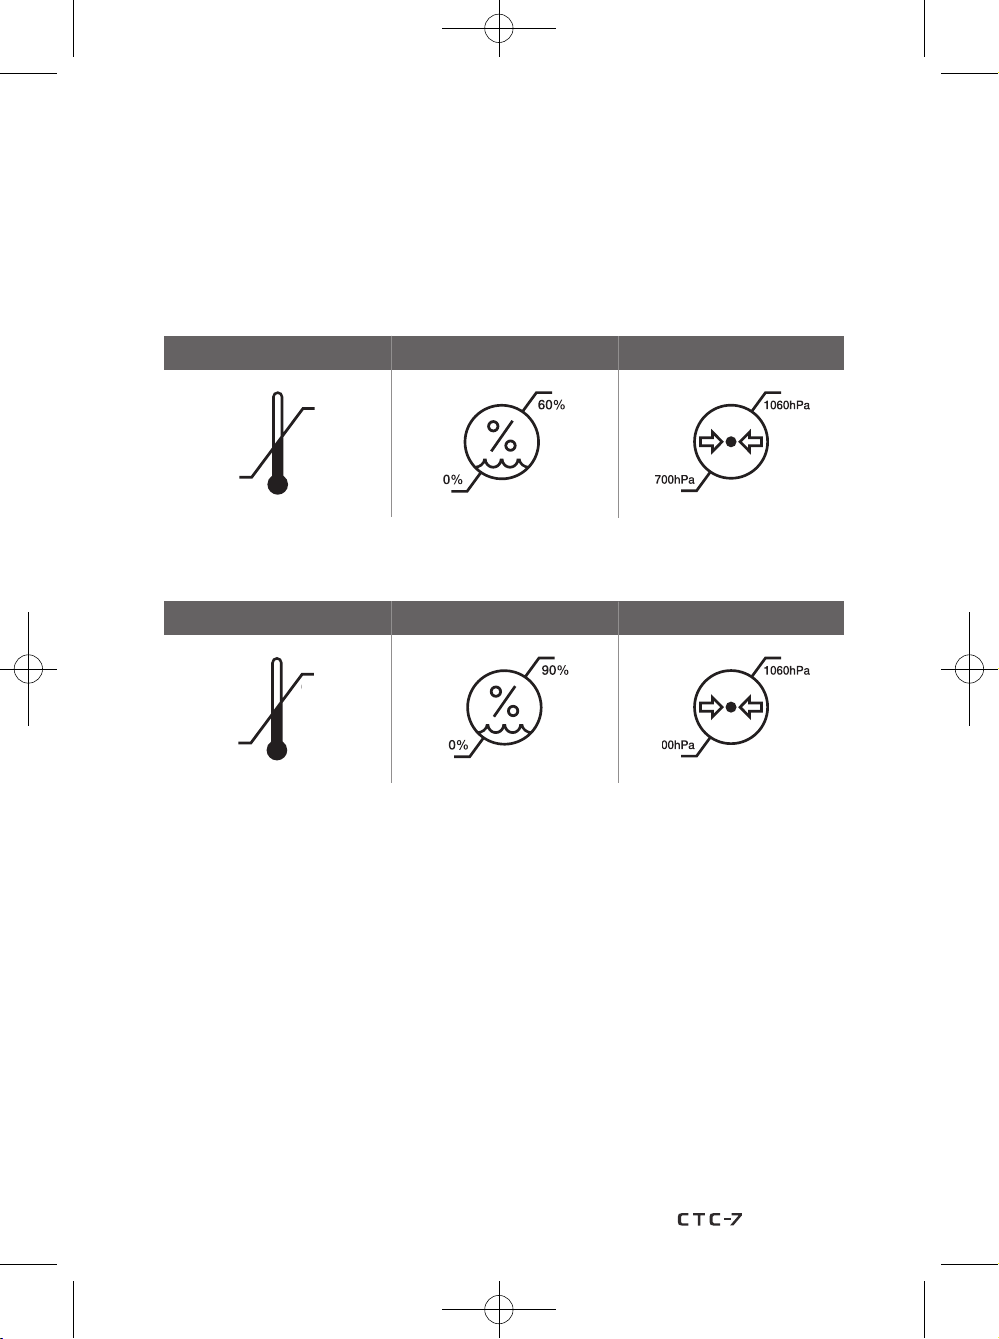
Temperature (oC) Relative Humidity (%) Atmospheric Pressure(hPa)
℃
25
℃
10
2-6-2.
Storage condition
Temperature (oC) Relative Humidity (%) Atmospheric Pressure(hPa)
℃
50
℃
1
5
15
Page 16
2-7. WEEE
This symbol indicating separate collection for EEE is based on
DIRECTIVE 2012/19/EU.
The purpose of this Directive is to contribute to sustainable production
and consumption by, as a first priority, the prevention of WEEE and, in
addition, by the re-use, recycling and other forms of recovery of such
wastes so as to reduce the disposal of waste and to contribute to the
efficient use of resources and the retrieval of valuable secondary raw
materials.
This Directive cover all EEE used by consumers and EEE intended for
professional use.
Consumers have to actively contribute to the success of such collection and should be
encouraged to return WEEE.
The Producer have to provide the information of re-usable, recyclable and recoverable rate.
75% shall be recovered, and 55% shall be prepared for re-use and recycled within category
5 (Small equipment) in DIRECTIVE 2012/19/EU ANNEX III.
CTC-7 is a recoverability rate of 74.4% and a recyclability rate of 81.8%.
Information for treatment facilities shall be made available to centres which prepare for
re-use and treatment and recycling facilities by producers of EEE.
DAESUNG MAREF, whenever, is prepared to provide.
16
Page 17
USER MANUAL
3
Device Composition
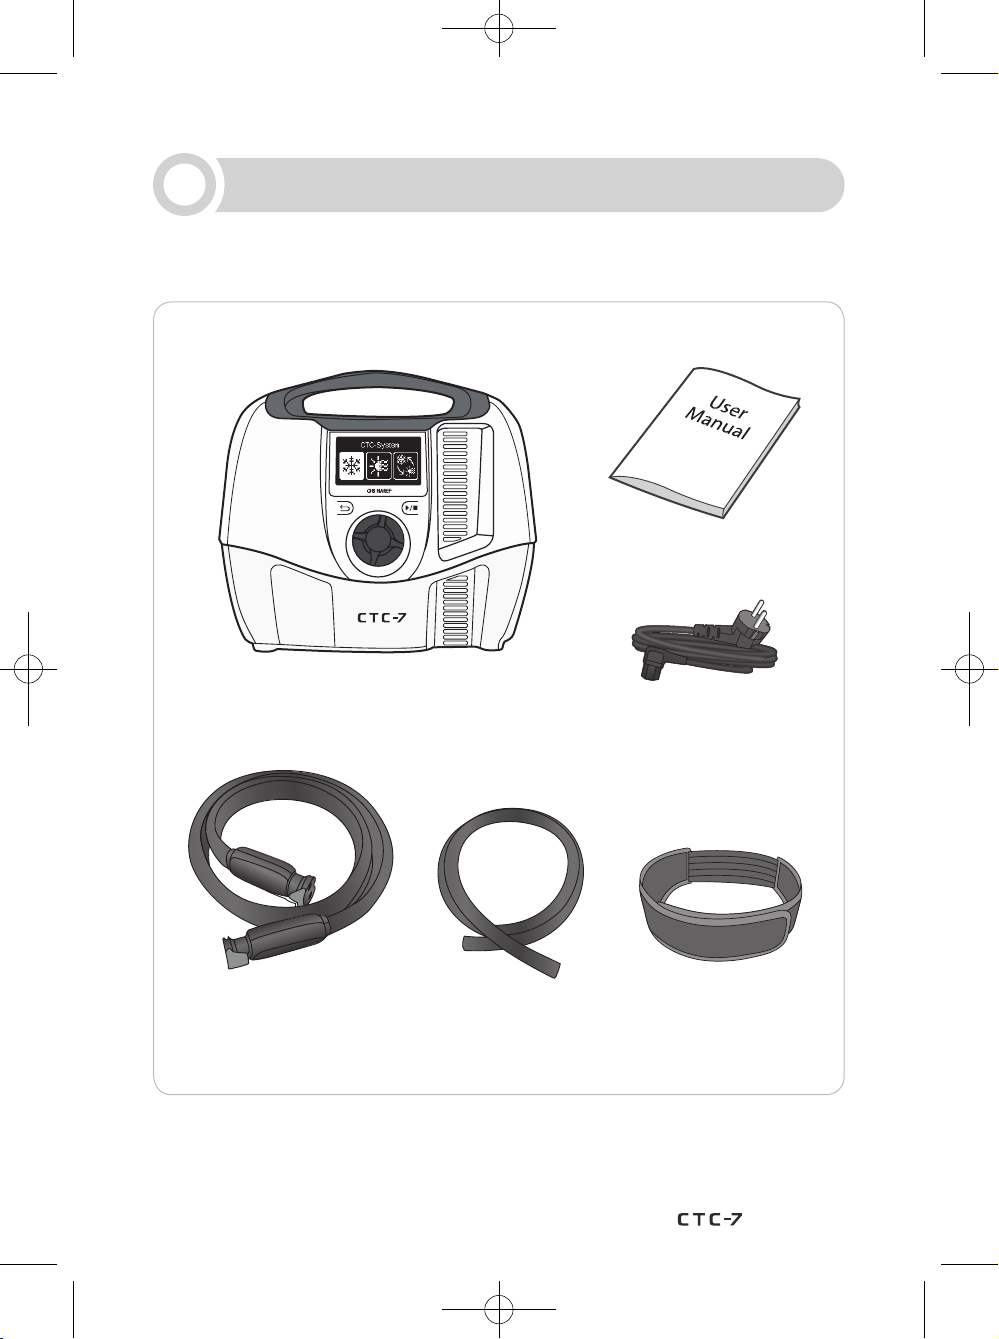
3-1. Basic set
User Manual
Tubing (Air + Water)
Ref. CTC7210
Device
Power Cord
Tubing (Drain) Assistant Strap
17
Page 18
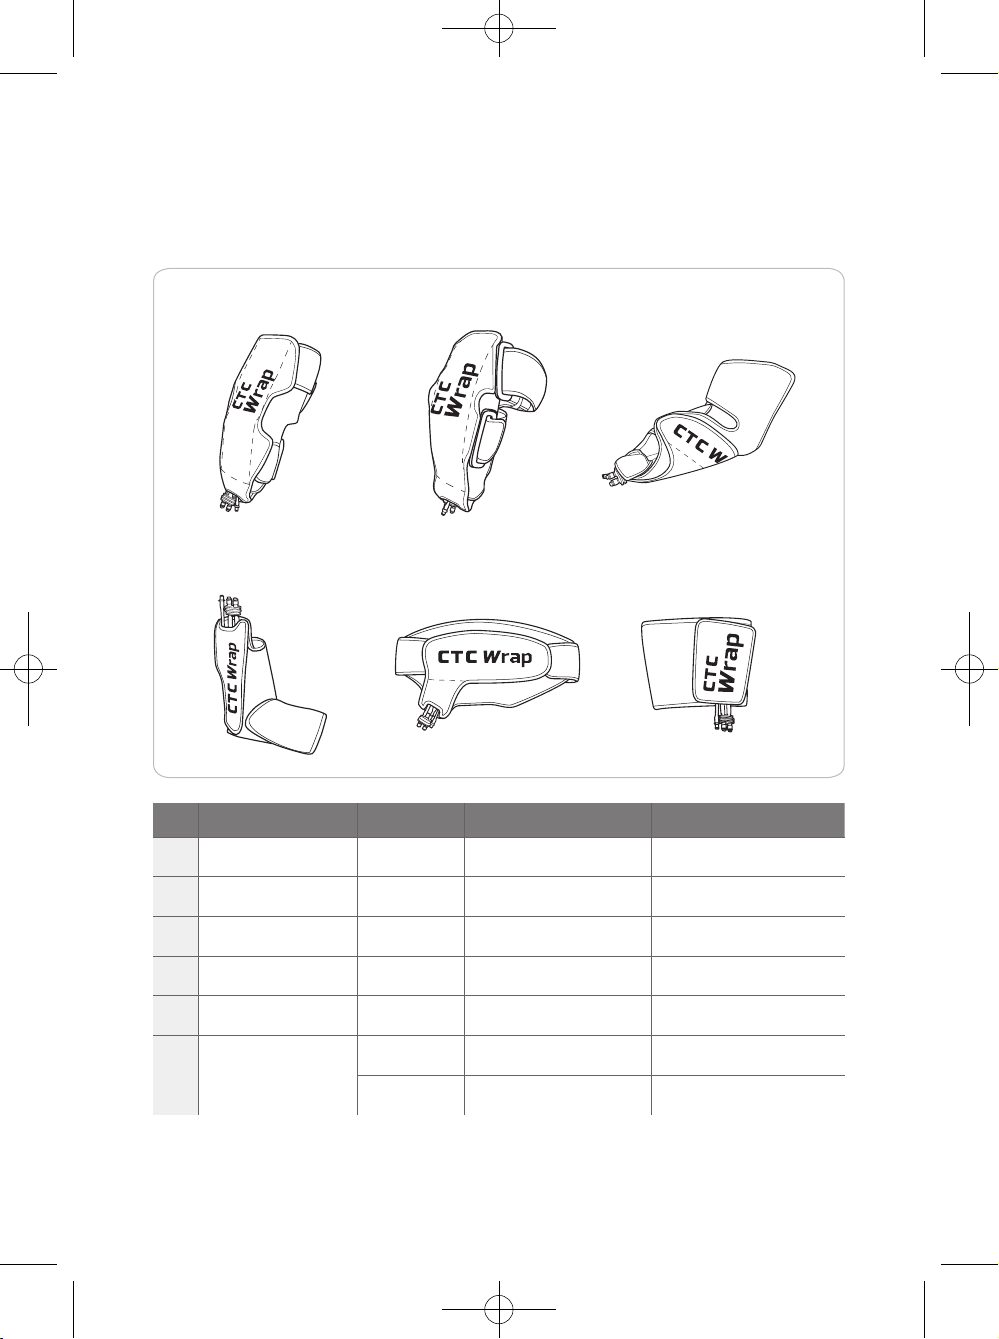
3-2. Accessories
- The wrap is a consumable device.
- The wrap is defined as the mounting part in IEC 60601-1.
1. Knee Wrap
4. Ankle Wrap 5. Back Wrap
NO Name Size Ref.No (Reusable Wrap) Ref.No (Disposable Wrap)
1 Knee Wrap Free CTCKF00 CTCKFD0
2. Shoulder Wrap
3. Elbow Wrap
6. Universal Wrap
2 Shoulder Wrap M CTCSM00 CTCSMD0
3 Elbow Wrap Free CTCEF00 CTCEFD0
4 Ankle Wrap Free CTCAF00 CTCAFD0
5 Back Wrap Free CTCBF00 CTCBFD0
6 Universal Wrap
M CTCUM00 CTCUMD0
L CTCUL00 CTCULD0
18
Page 19
USER MANUAL
4
Device Description
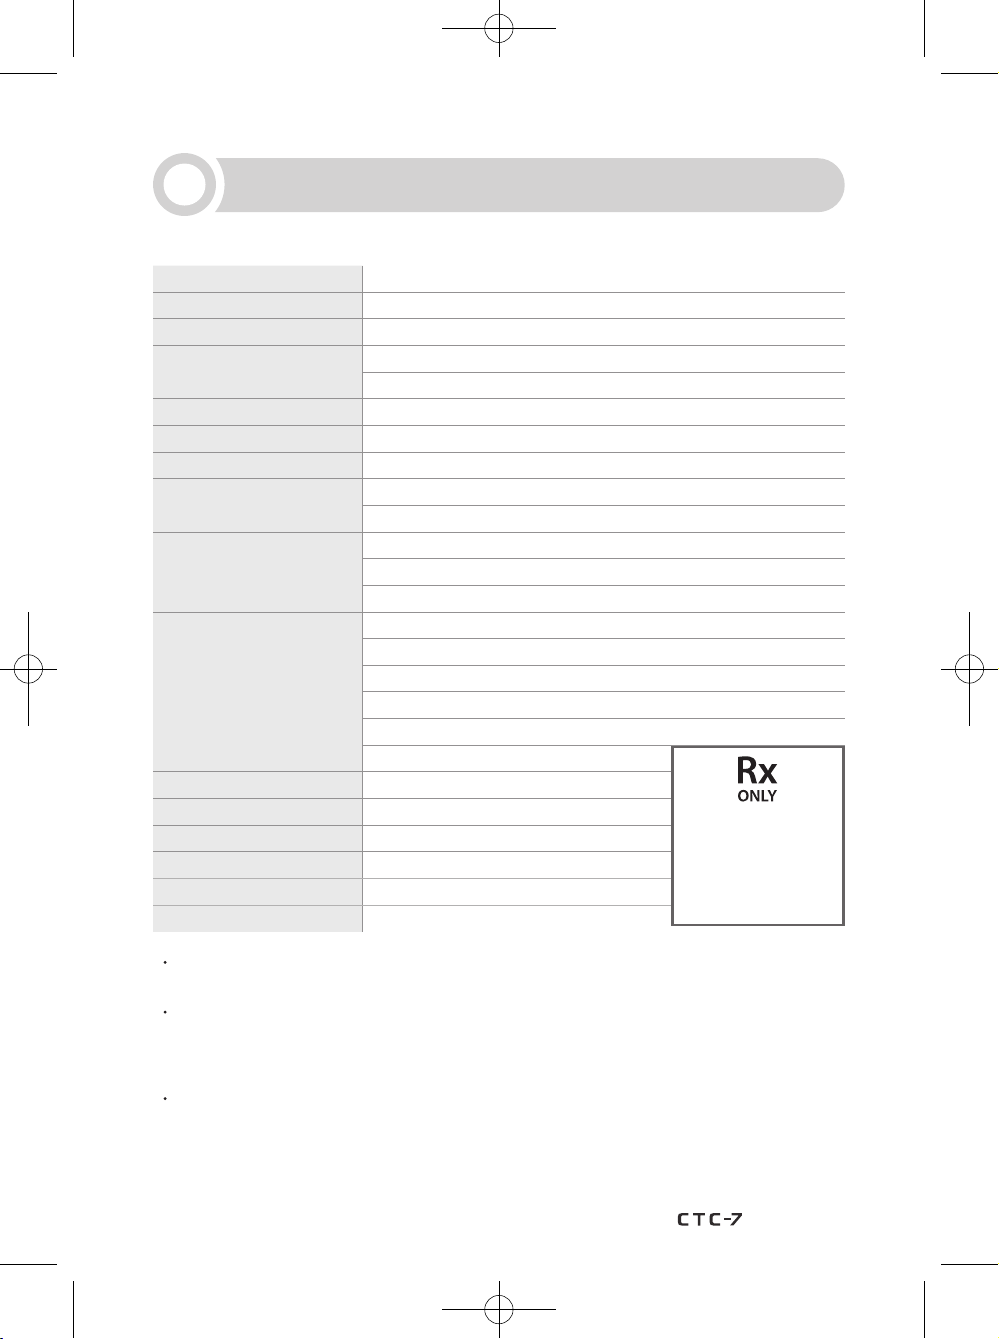
4-1. Device specifications/Characteristics
Device name
Model
Dimension
Weight
Power source
Power consumption
Mode
Therapy Temperature
Range
Time Range
Pressure Range
Coolant
Refrigerant
Fluid Capacity
Ambient Operating Range
Type of protection IP
Class / type of protection
Circulating-fluid thermal/compression therapy system control unit
CTC-7
272(W) x 180(D) x 239(H) mm
3.7kg (empty water container)
3.9kg (full water container)
AC 100 – 240V, 50/60Hz
270VA
Cold Therapy, Heat Therapy, RCT Therapy
Cold Therapy : 6 - 15℃ ± 3℃ (43 - 59℉ ±5.4℉)
Heat Therapy : 35 - 45℃ ± 3℃ (95 - 113℉ ±5.4℉)
Manual (Cold Therapy) : 5 - 60 min
Manual (Heat Therapy) : 5 - 30 min
PRESET (Run/Rest) : 20/20, 20/40, 30/30, 30/60 min
Cold Therapy :
0 Level : 0mmHg
1 Level : 15mmHg ±5mmHg
2 Level : 30mmHg ±5mmHg
3 Level : 50mmHg ±5mmHg
4 Level : 75mmHg ±5mmHg
Distilled water
None
250mL
10 – 25
IPX0
Class I
0 - 4 Level /
℃
Heat Therapy
* Setting value
: 0 - 1 Level
should be operated
under doctor's
instructions.
The exterior and specifications of this device may be changed without notice for performance
improvements.
You can purchase the accessories through the official website of DAESUNG MAREF.
You must purchase the official parts provided by DAESUNG MAREF. When accessories produced
by other companies are used, this device may not function properly. In this case, our free as will not
be applicable.
The time it takes for this device to reach the set temperature may vary depending on the ambient
temperature. This device may fail to reach the set temperature depending on the case.
19
Page 20
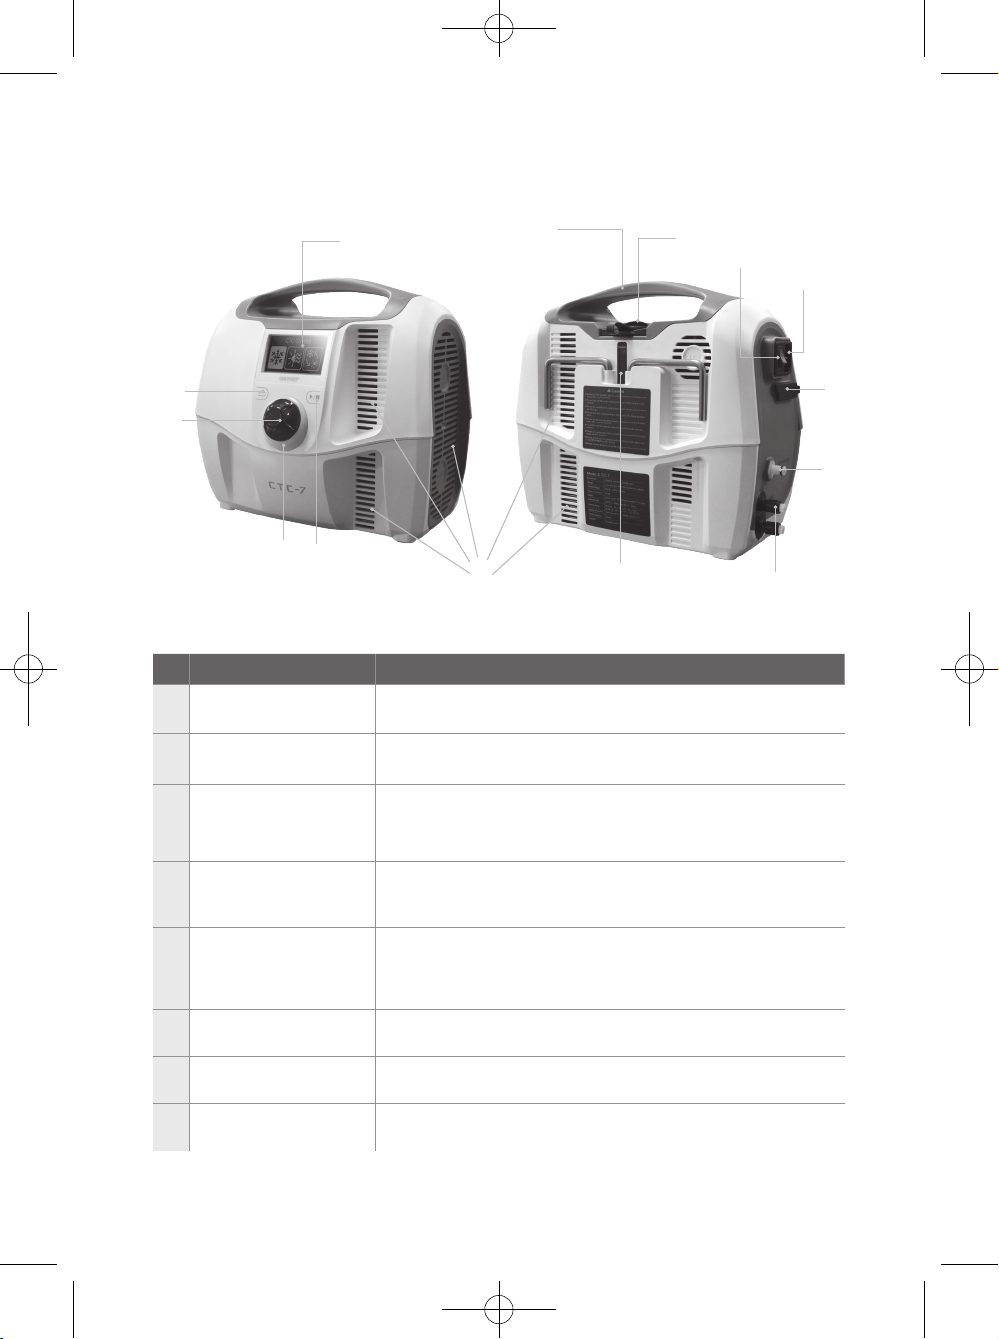
4-2. Parts name/function
1
14
2
3
4
5
6
No Parts Name Function
1 LCD display
2 Back button
3 Knob wheel
4 Alarm LED
5 Start / Stop button
6 Air vent
It is a screen that displays the GUI and operating status of
CTC-7
When the back button is shortly pressed, the previous
screen will appear.
When the knob wheel is rotated or pressed, the temperature,
time and pressure level of this device can be controlled.
* While this device is in operation, press the knob wheel to stop
this device from operating.
- Standby status : Green
- In operation : Blue and Green flickering
- Error : Orange flickering
When the button is shortly pressed, this device will operate
based on the set values.
While this device is in operation, press the button shortly to stop
this device from operating.
This is a fan-operated air vent, an air-circulated vent that allows
internal air to circulate during operation.
12
13
10
11
9
8
7
7 Water socket It is a water socket used to connect the tubing with this device.
8 Air socket It is an air socket used to connect the tubing with this device.
20
Page 21
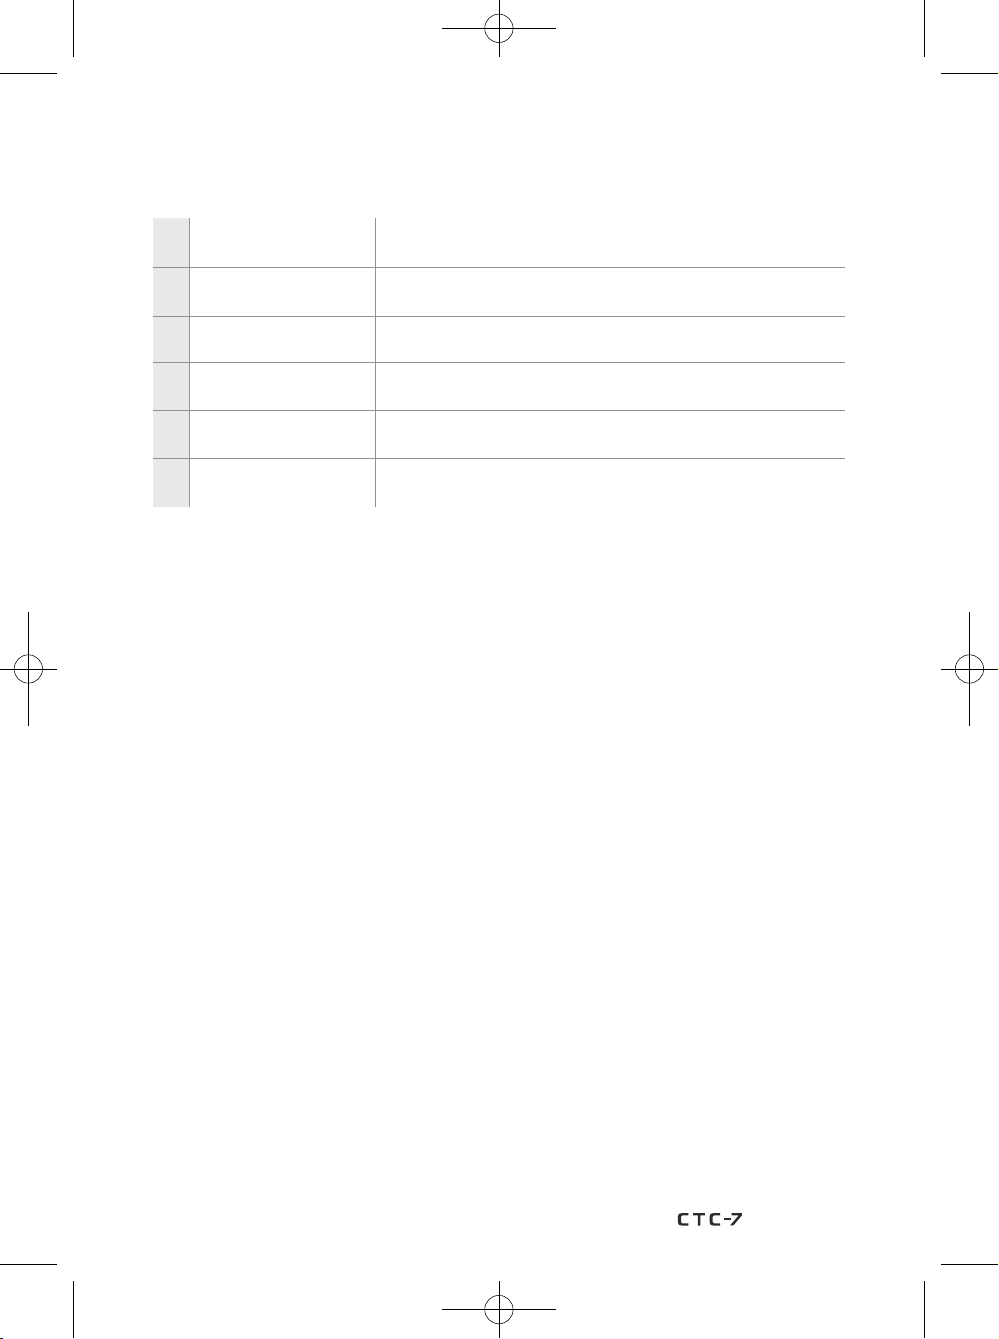
USER MANUAL
Memory card /
9
USB port
10 Power on/off switch It is a switch used for turning on/off this device.
11 Power cord socket It is a socket used for connecting the AC cord with this device.
It is a port in which the memory card and USB cable can be
inserted for device firmware updates.
12 Water level indicator
13 Water tank cover
14 Handle It is a handle used for moving this device.
It is an indicator used for checking the amount of distilled water
contained in the water container.
It is a cover used for preventing the distilled water contained in
the water container of this device from spilling.
21
Page 22
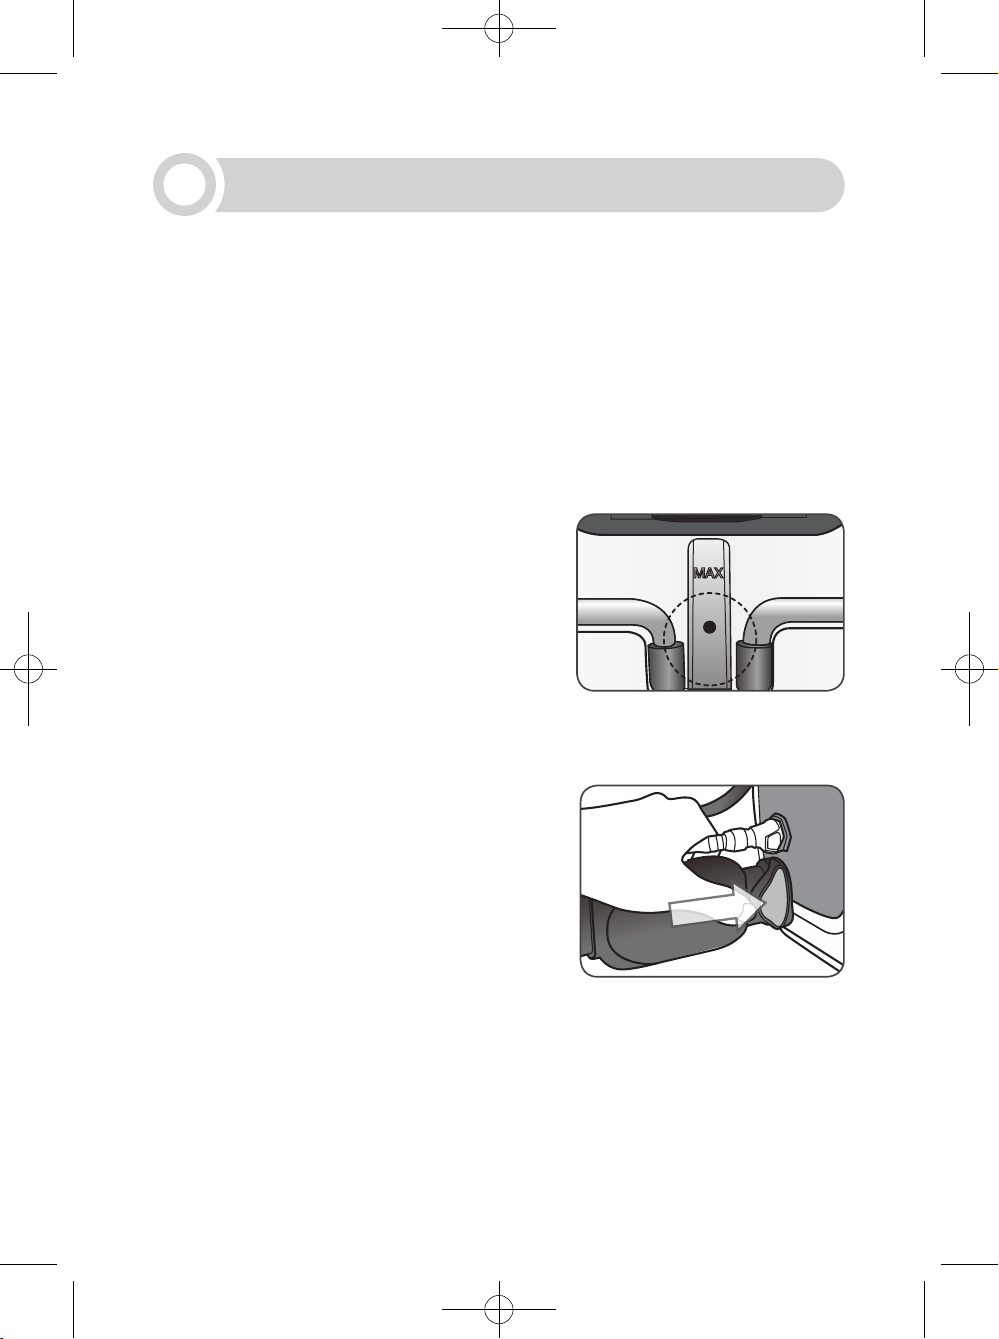
5
1) When you open the package and take out this device, proceed with caution to avoid
causing damages. After you take out this device, check whether or not this device and
the parts are damaged.
2) Install this device on a flat and stable surface.
* To avoid the air flow of this device from being interrupted, install this device in a place,
where the obstacles are at least 30cm away from the vent of this device.
3) Open the water bottle cap located on the rear side of
this device, fill the water bottle with distilled water,
and rotate the cap until it is completely closed.
* When adding distilled water, use a syringe, or
a cup with a sharp spout.
* Check the water level buoy located on the rear-
side of this device.
* When this device is used without completely
closing the cap, the distilled water may spill.
* The maximum volume of distilled water is 250mL.
Installation
4) Check the projected section of the water socket
located on the side of this device and connect the
water socket to this device by pushing it in the
correct direction until you hear a “click” sound.
* When this device is used without properly
connecting the tubing with this device, there is
a risk of water leakage.
22
Page 23
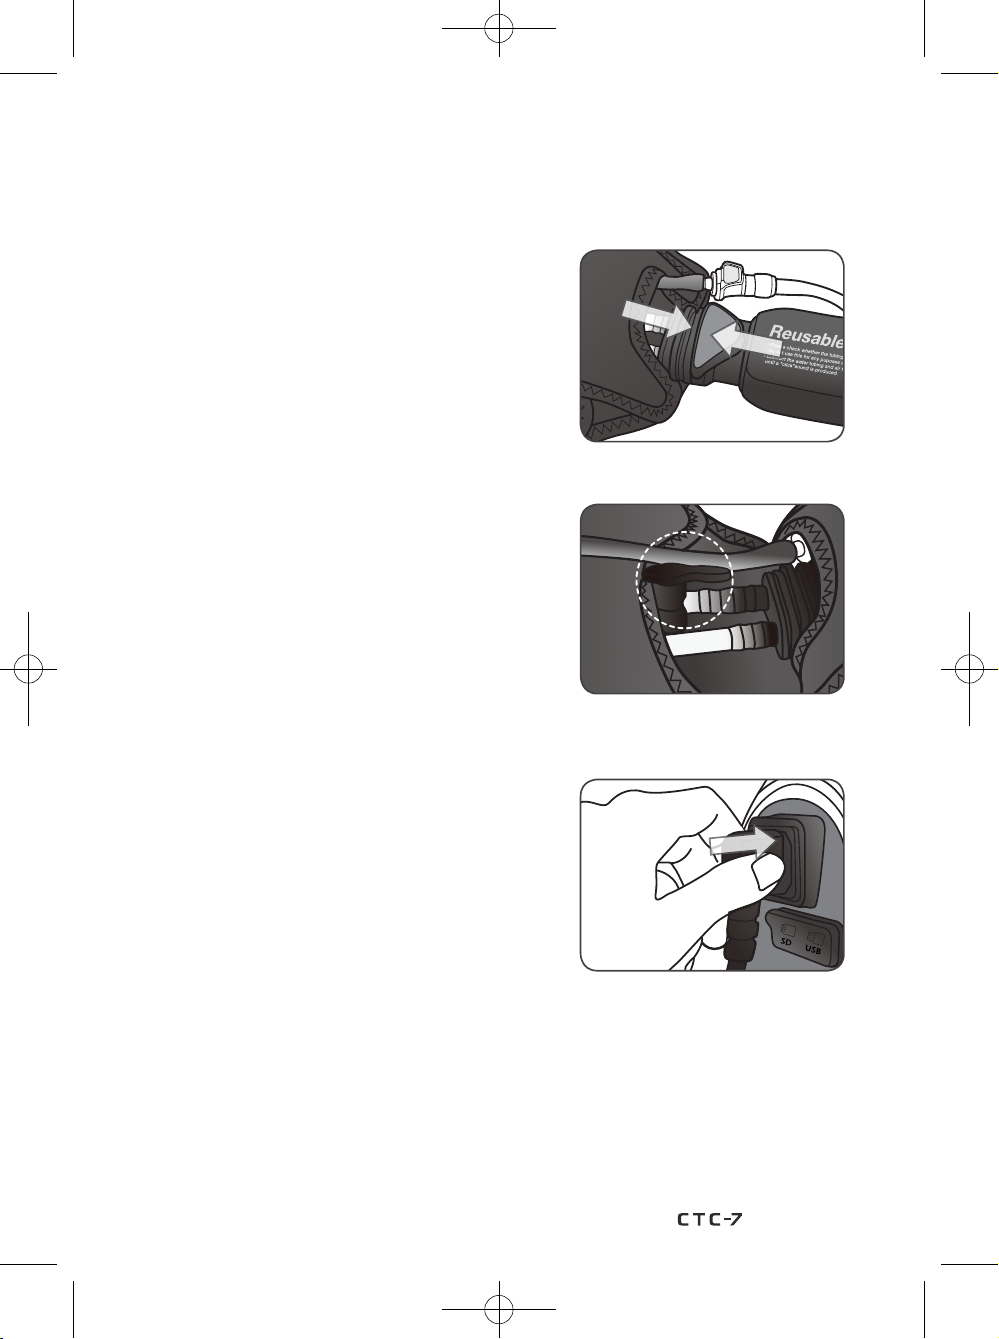
USER MANUAL
5) After you connect the water socket of the tubing with
FLOW
this device, connect the air socket by pushing it
until you hear a “click” sound.
* When this device is used without properly
connecting the tubing with this device, there is
a risk of oil leakage.
6) Check whether or not the pipe attached to the wrap
is rotated.
* When the pipe is rotated 90 degrees, the distilled
water will spill.
* The pipe is only in the reusable wrap.
(Disposable wrap do not have drain pipes.)
7) Check the direction of the power cord socket located
on the side of this device, and connect the cord.
Then, connect the power cord with the socket.
* Install this device in an environment where the
power cord can be easily connected and
disconnected.
23
Page 24
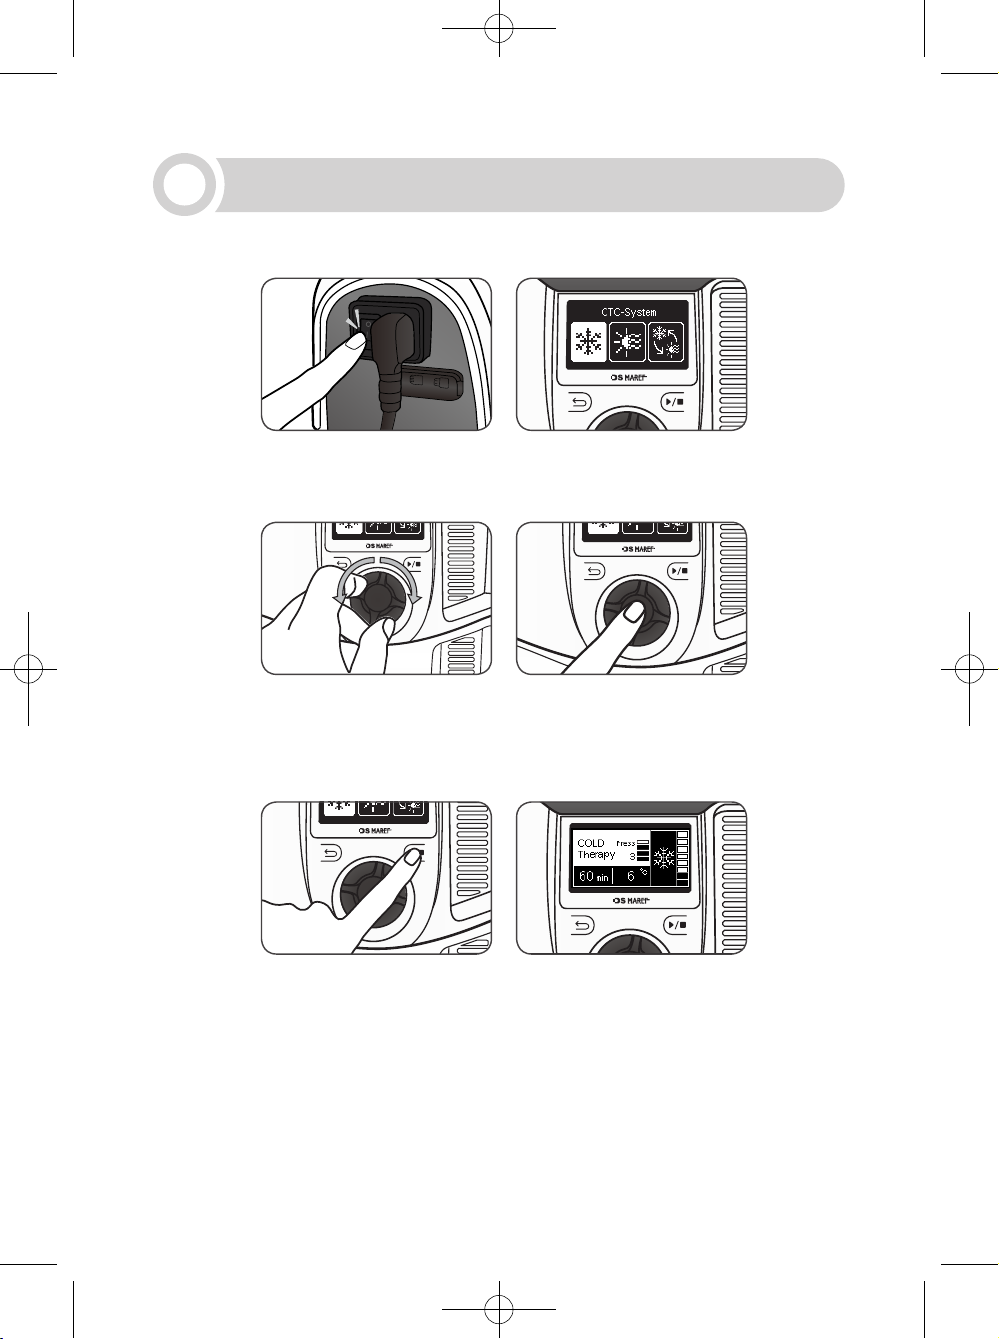
6
SD
USB
Use “Clause 5. Installation” as your reference to install CTC-7 in your intended environment.
※
1) When you turn on the power switch located on the side of this device, the mode selection
screen will appear.
2) On the mode selection screen, rotate the knob wheel counterclockwise or clockwise to
select the most to be used. Select the mode to be used and press the knob wheel to move
to the standby screen of the selected mode.
How to use
3) Finish setting the mode to be used and press the start/stop button to activate the mode
based on the settings.
* Use “6-1, 6-2 Setting” as your reference to set each mode.
* While this device is in operation, the settings cannot be changed.
To change the settings, stop this device from operating.
* To stop this device from operating, press the start/stop button and press the knob wheel.
24
Page 25
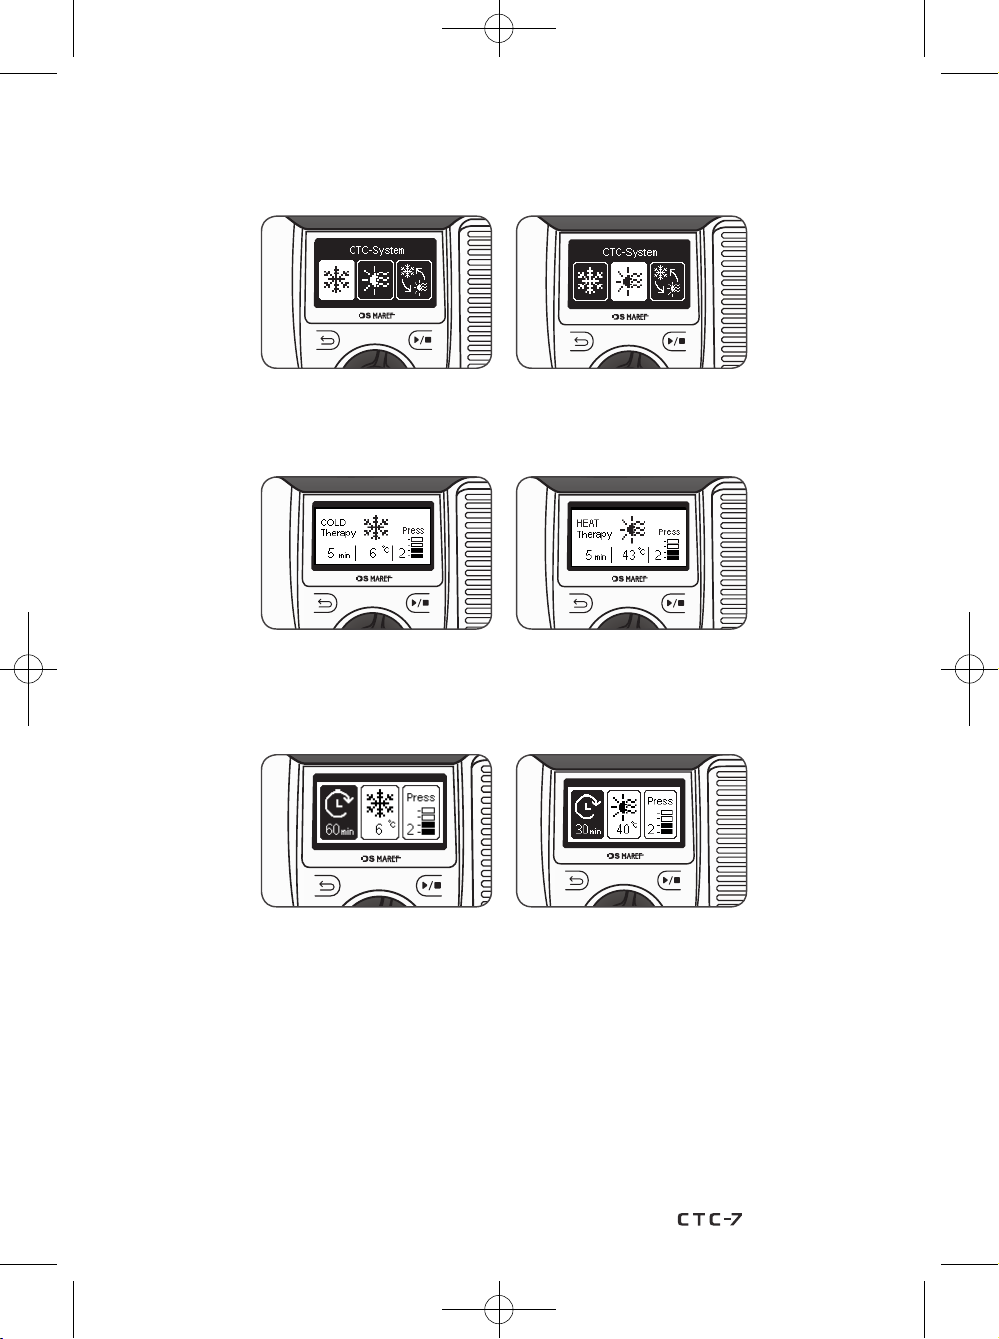
USER MANUAL
6-1. Cold & Heat Therapy setting
1) On the mode selection screen, rotate the knob wheel to select Cold or Heat Therapy,
and press the knob wheel to move to the standby screen.
2) On the standby screen, press the knob wheel to move to the setting screen.
* On the mode setting screen, you can set the time, temperature and pressure level.
3) On the setting screen, rotate the knob wheel counterclockwise or clockwise to select
from ‘Time’, ‘Temperature’ and ‘Pressure Level’. Select the item (Time, Temperature,
Pressure Level) to be set and press the knob wheel, and a pop-up screen will appear.
Rotate the knob wheel counterclockwise or clockwise to adjust the levels.
Press the knob wheel to save the settings, and press the back button to return to the
standby screen without saving the settings.
* On the setting screen, press the start/stop button to activate the mode based on
the currently settings.
25
Page 26
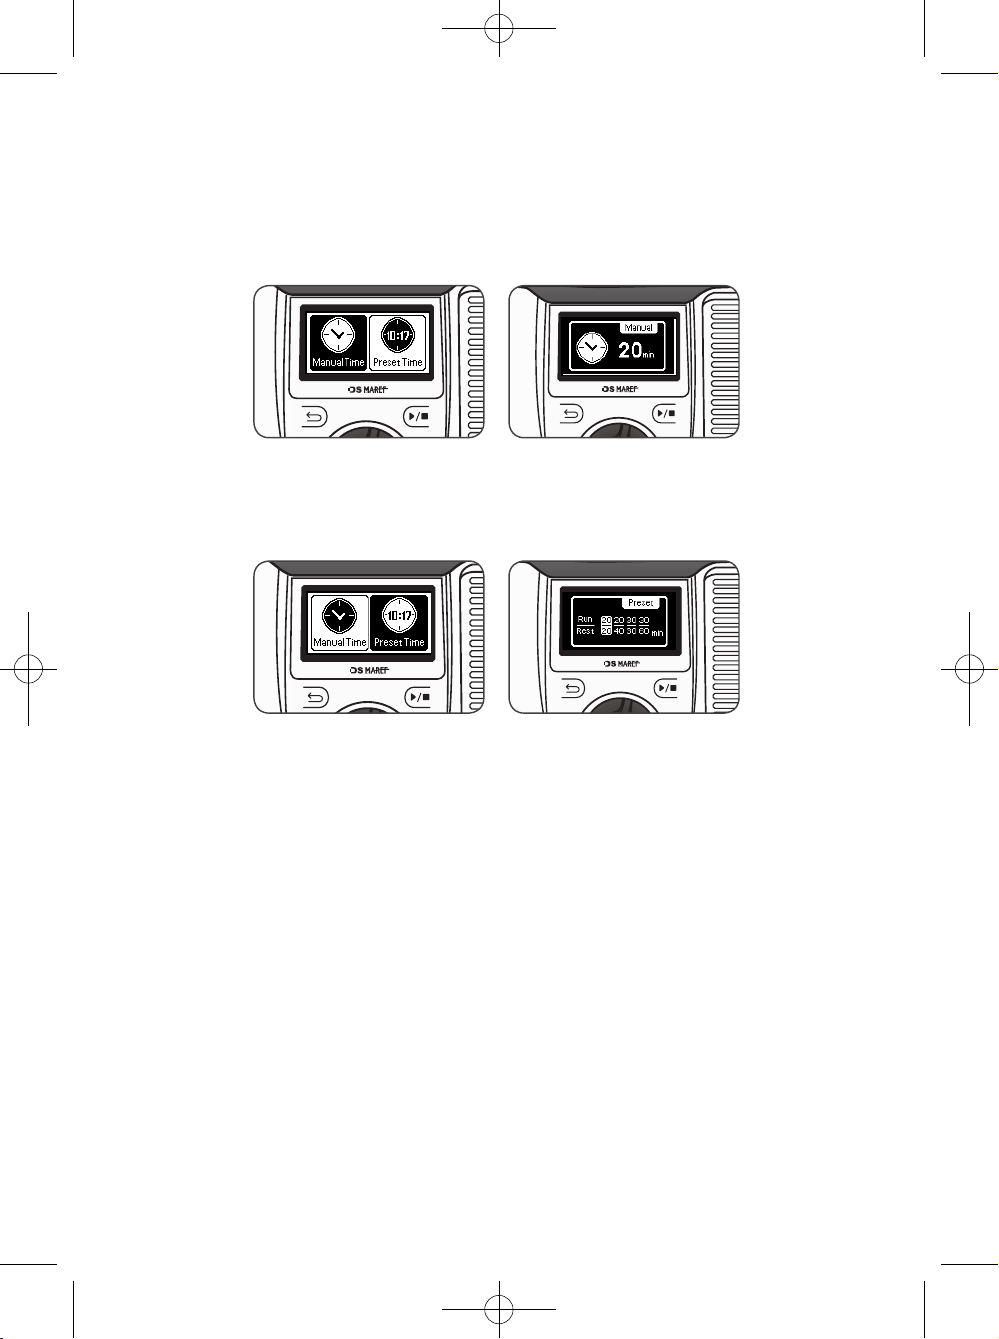
4) On the Time setting screen, rotate the knob wheel to select Manual or Preset.
On the Manual Time setting screen, you can set the run time.
* Manual Time range
Cold Therapy : 5 - 60min / Heat Therapy : 5 - 30min
On the Preset Time setting screen, you can choose the time which is continuously
moving for run and rest setting.
* Preset Time range (Run / Rest) : 20/20, 20/40, 30/30, 30/60 min
26
Page 27
USER MANUAL
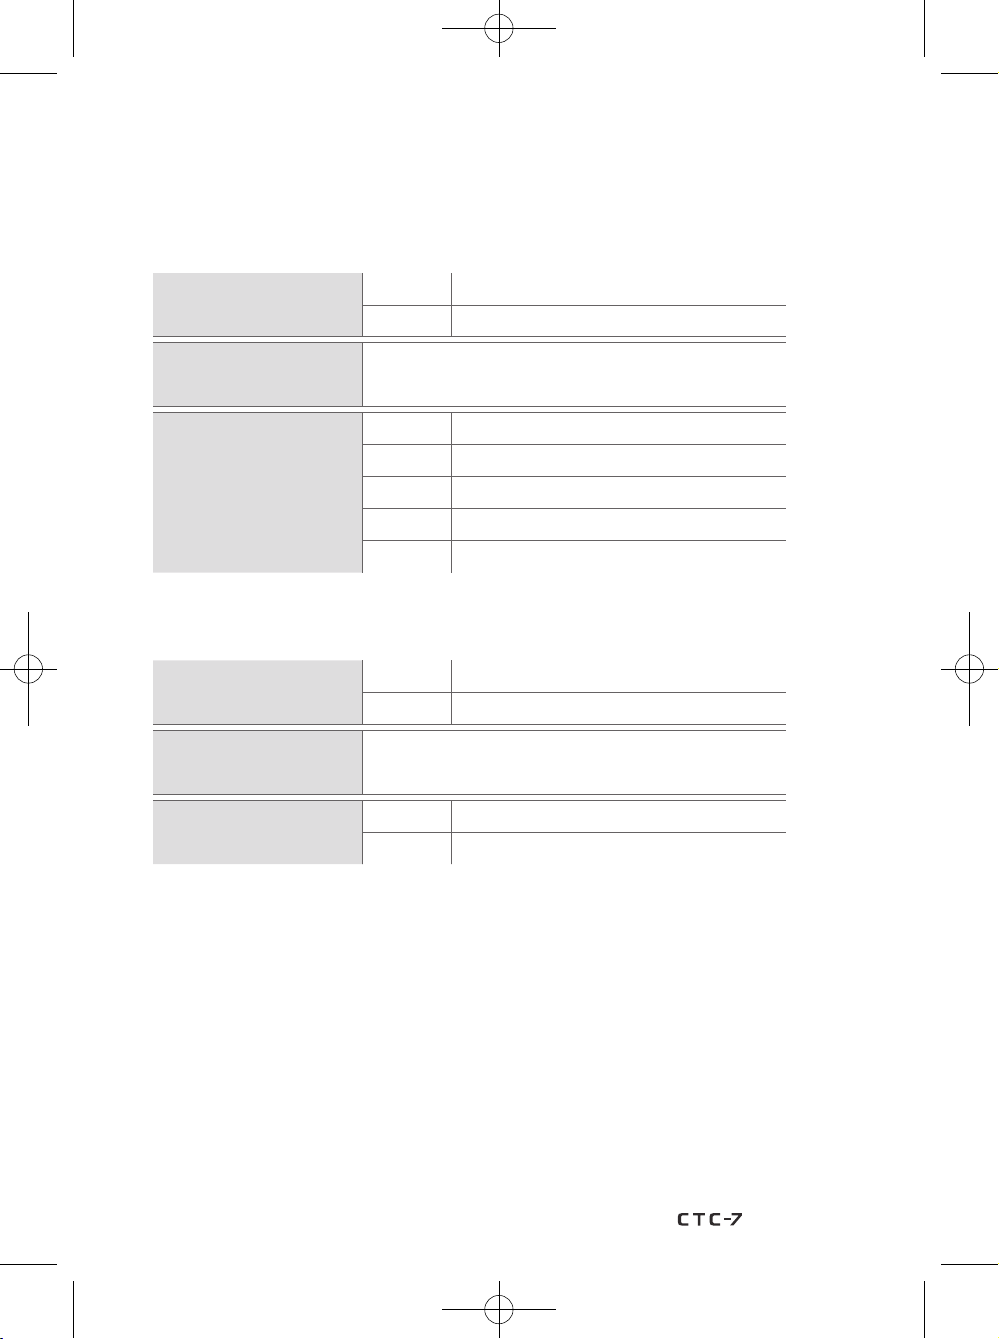
* Cold Therapy setting range
Cold Therapy mode
Time range
Cold Therapy mode
Temperature range
Cold Therapy mode
Pressure range
* Heat Therapy setting range
Heat Therapy mode
Time range
Heat Therapy mode
Temperature range
Heat Therapy mode
Pressure range
Manual 5 - 60 min
Preset Run/Rest : 20/20, 20/40, 30/30, 30/60 min
6 - 15℃ ± 3℃ (43 - 59℉ ± 5.4℉)
0 Level 0 mmHg
1 Level 15 mmHg ± 5mmHg
2 Level 30 mmHg ± 5mmHg
3 Level 50 mmHg ± 5mmHg
4 Level 75 mmHg ± 5mmHg
Manual 5 - 30 min
Preset Run/Rest : 20/20, 20/40, 30/30, 30/60 min
35 - 45℃ ± 3℃ (95 - 113℉ ± 5.4℉)
0 Level 0 mmHg
1 Level 15 mmHg ± 5mmHg
When the Heat therapy is used at high temperature for a long time, your skin may be
*
damaged. Do not consecutively apply the Heat therapy to the same skin area.
27
Page 28
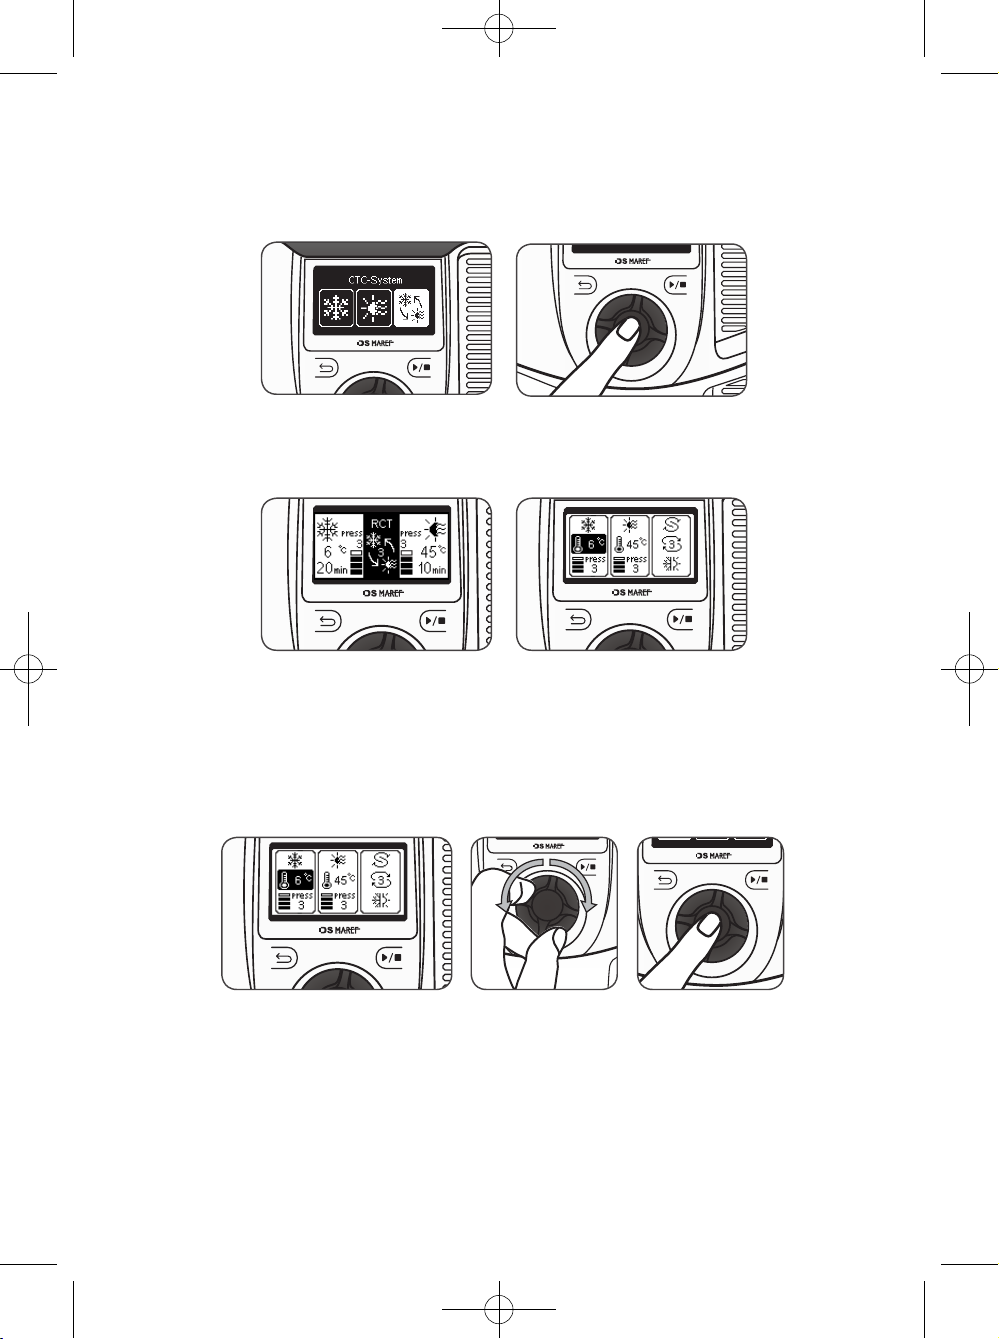
6-2. RCT Therapy setting
1) On the mode selection screen, rotate the knob wheel to select ‘RCT Therapy’, and press the
knob wheel to move to the RCT therapy standby screen.
2) On the RCT therapy standby screen, press the knob wheel to move to the RCT setting screen.
* On the RCT setting screen, you can set the temperature, pressure level and treatment
cycle for Cold therapy and Heat therapy.
* In the RCT mode, the time for Cold therapy is fixed to 20 minutes and the time for
Heat-therapy is fixed to 10 minutes.
3) On the RCT setting screen, rotate the knob wheel counterclockwise or clockwise to select
‘Cold’, ‘Heat’, and ‘Cycle’. Select the item(‘Cold’, ‘Heat’, ‘Cycle’) to be set and press
the knob wheel, and a pop-up screen will appear.
Press the knob wheel counterclockwise or clockwise to adjust the settings.
* On the RCT setting screen, press the start/stop button to activate the mode base on
the currently settings.
28
Page 29
USER MANUAL
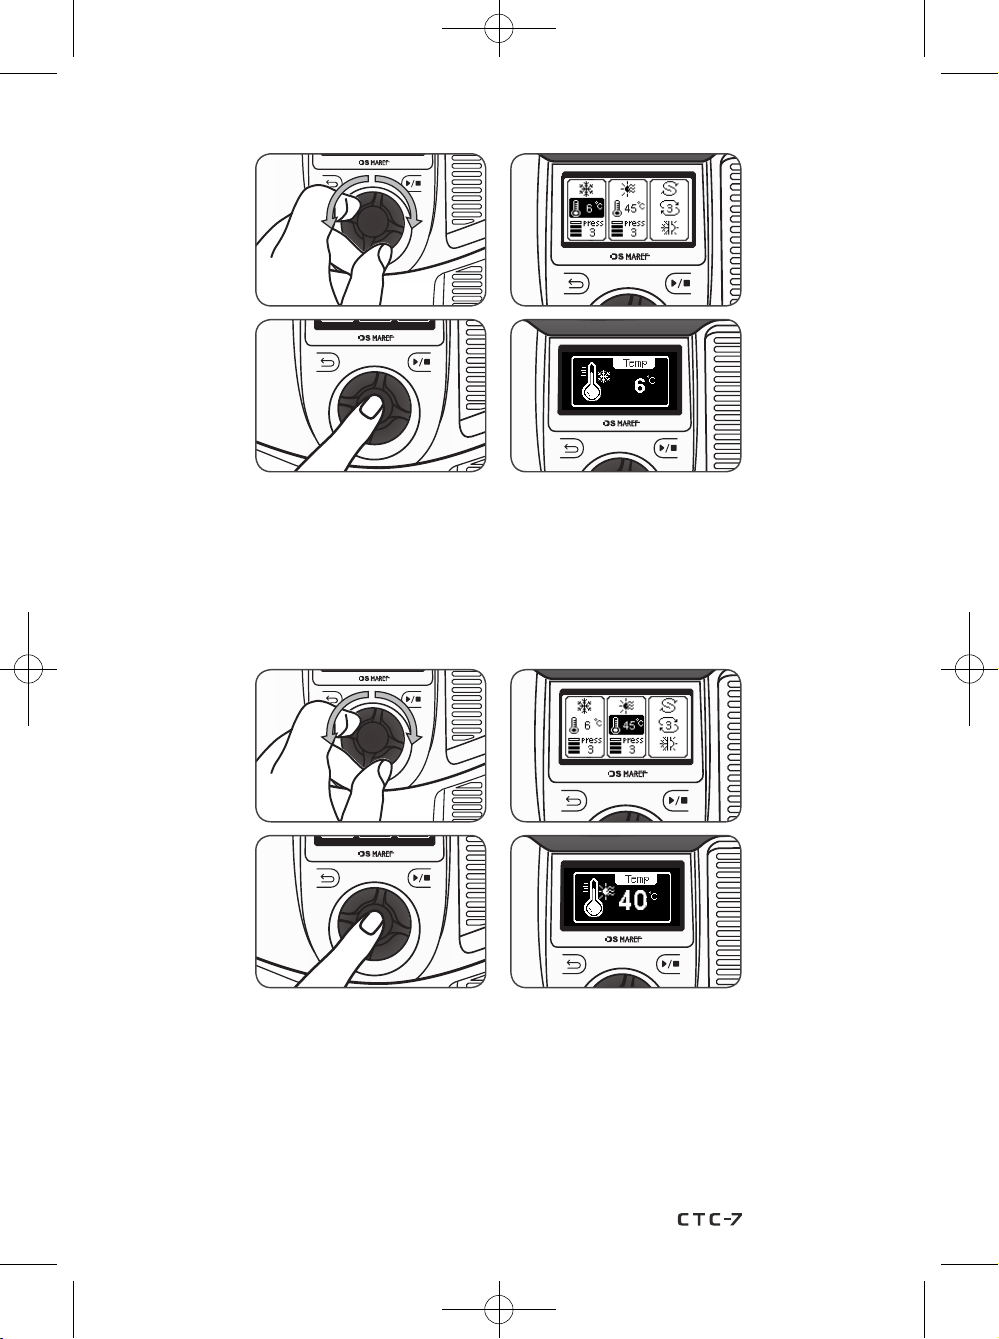
3-1) On the Cold setting screen, rotate the knob wheel counterclockwise or clockwise to select
from ’Temperature’ and ‘Pressure Level’. Select the item (‘Temperature’, ‘Pressure Level’)
to be set and press the knob wheel, and a pop-up screen will appear.
Rotate the knob wheel counterclockwise or clockwise to adjust the levels.
Press the knob wheel to save the settings, and press the Back button to return to the
RCT therapy standby screen without saving the settings.
3-2) On the Heat setting screen, rotate the knob wheel counterclockwise or clockwise to select
from ’Temperature’ and ‘Pressure Level’. Select the item (‘Temperature’, ‘Pressure Level’)
to be set and press the knob wheel, and the pop-up screen will appear.
Rotate the knob wheel counterclockwise or clockwise to adjust the levels.
Press the knob wheel to save the settings, and press the Back button to return to the
RCT therapy standby screen without saving the settings.
29
Page 30
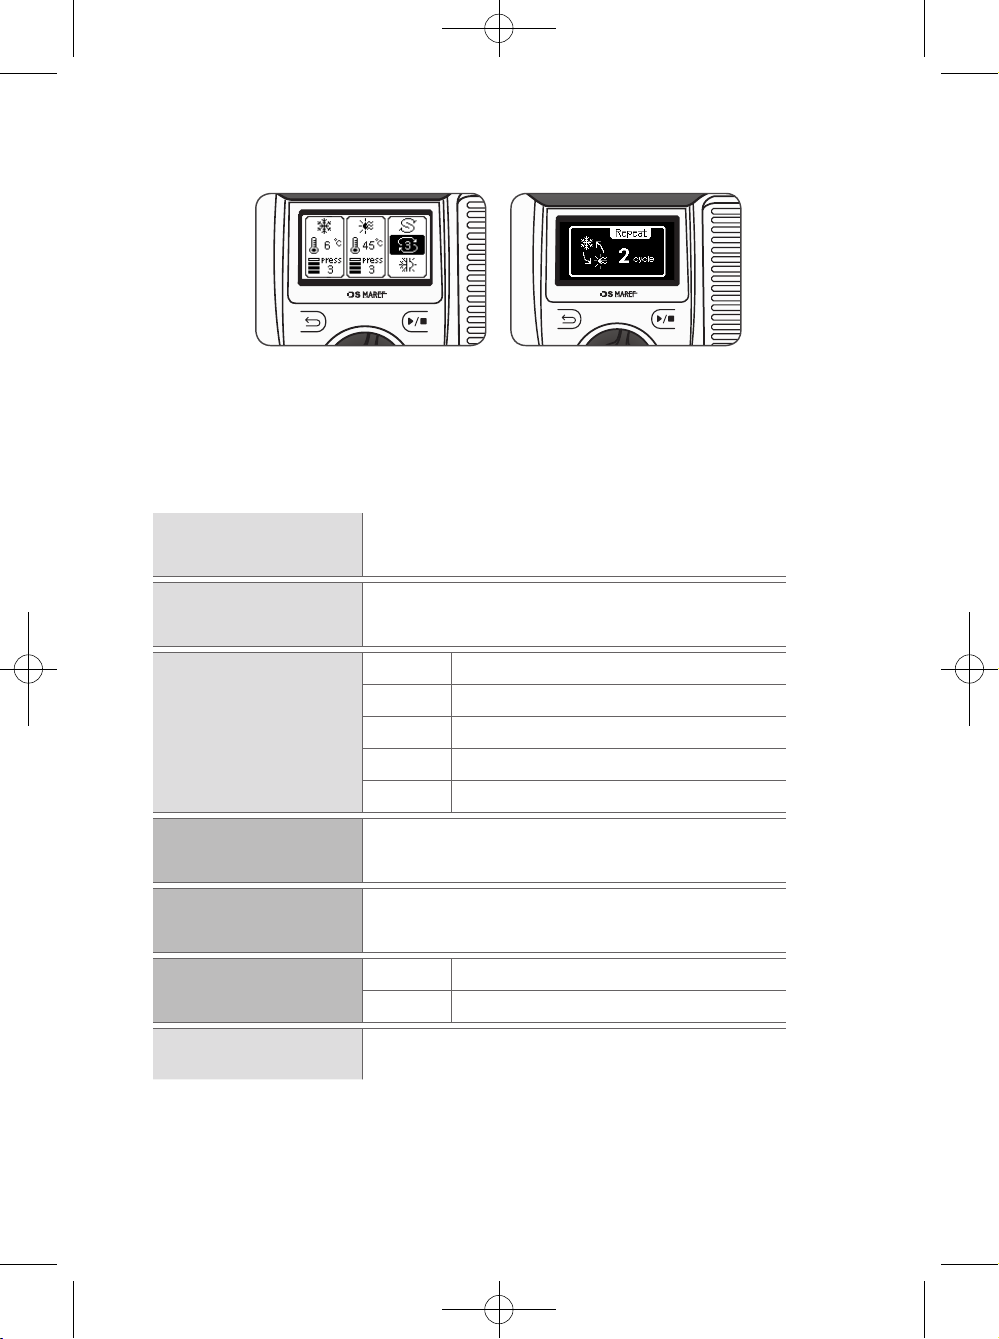
3-3) On the Cycle setting screen, rotate the knob wheel counterclockwise or clockwise to adjust
the levels. Press the knob wheel to save the settings, and press the Back button to return
to the RCT therapy standby screen without saving the settings.
* RCT Therapy setting range
Cold Therapy mode
Time range
Cold Therapy mode
Temperature range
Cold Therapy mode
Pressure range
Heat Therapy mode
Time range
Heat Therapy mode
Temperature range
Heat Therapy mode
Pressure range
Cycle range
20 min
6 - 15℃ ± 3℃ (43 - 59℉ ± 5.4℉)
0 Level 0 mmHg
1 Level 15 mmHg ± 5mmHg
2 Level 30 mmHg ± 5mmHg
3 Level 50 mmHg ± 5mmHg
4 Level 75 mmHg ± 5mmHg
10 min
35 - 45℃ ± 3℃ (95 - 113℉ ± 5.4℉)
0 Level 0 mmHg
1 Level 15 mmHg ± 5mmHg
1 - 3 cycle
30
Page 31
USER MANUAL
7
FLOW
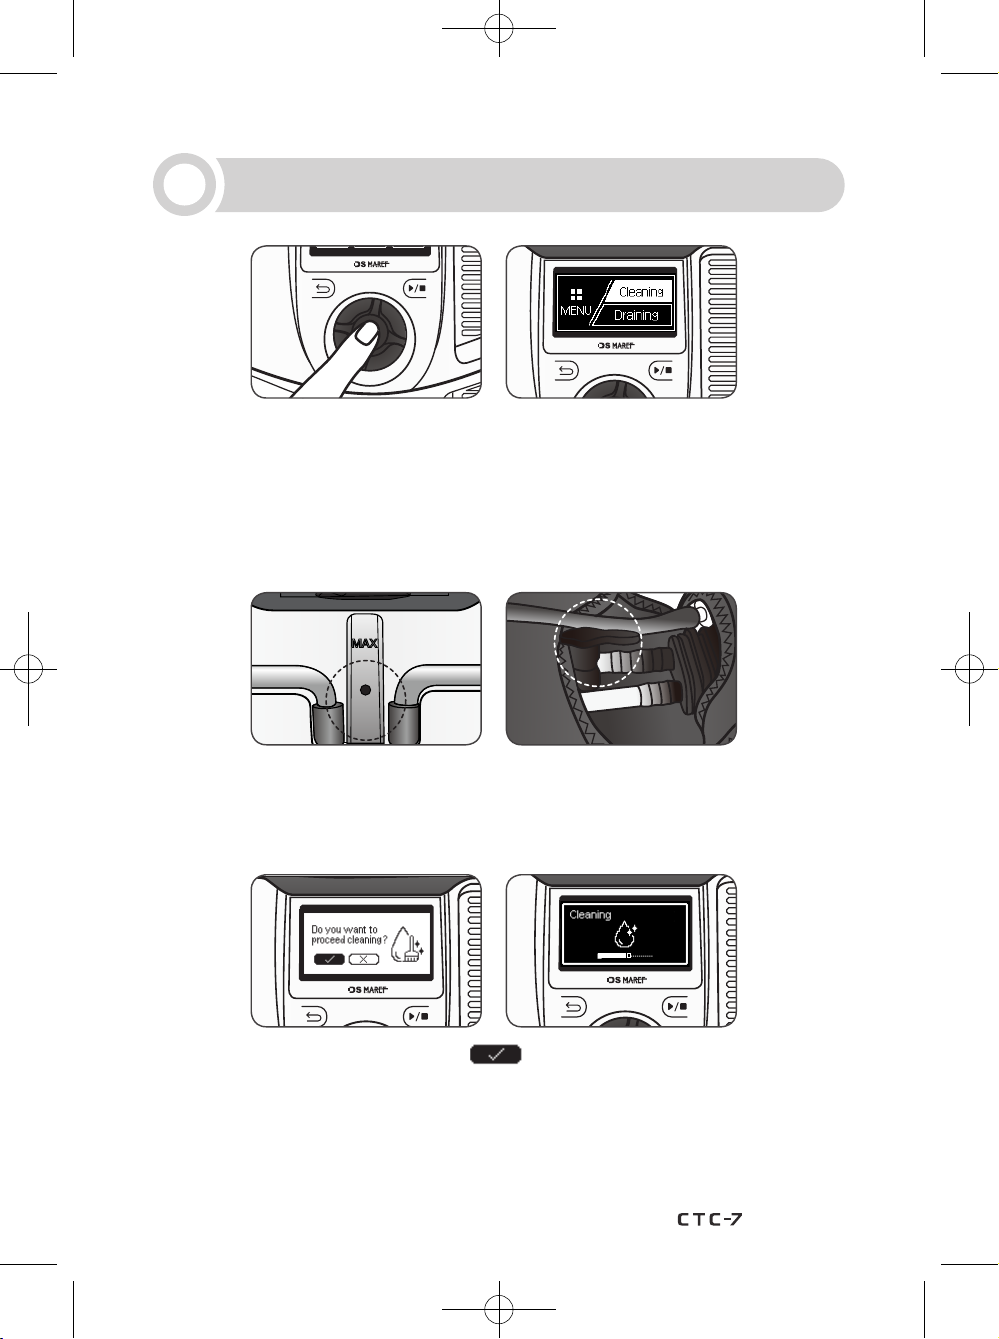
1) On the standby screen, press and hold the knob wheel to activate the menu mode.
2) On the menu mode selection screen, rotate the knob wheel counterclockwise or clockwise
to select from ‘Cleaning’ and ‘Draining’, and press and hold the knob wheel to move to the
screen of the selected item.
Cleaning and Draining
7-1. Cleaning
1) Fill CTC-7 with distilled water and check whether or not the tubing and wrap are all connected.
* Check whether or not the pipe attached to the wrap is rotated. When the pipe is rotated,
the water will leak during cleaning.
* Disposable wrap do not have drain pipes.
2) On the cleaning standby screen, select and press the knob wheel, and the cleaning
process will run for approximately 10 minutes.
* While the cleaning process is running, press the knob wheel to stop the process and
return to the cleaning standby screen.
31
Page 32
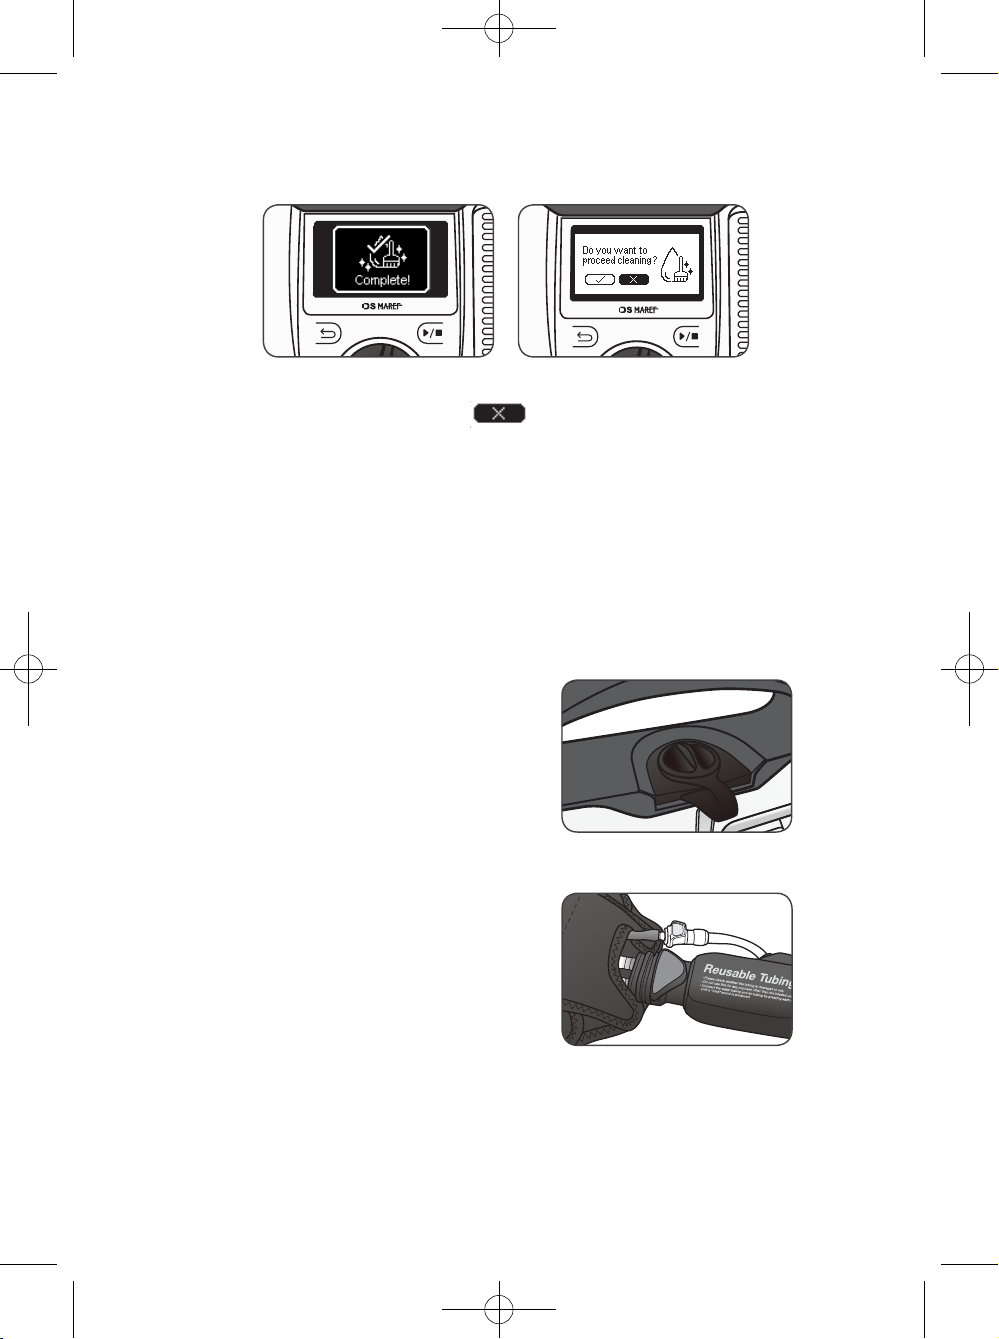
3) After the cleaning process is complete and a pop-up screen appears, press the knob wheel.
On the cleaning standby screen, select and press the knob wheel to return to the
menu mode.
* When this device requires more distilled water, a pop-up screen reading ‘ERROR-11’
will appear prior to activating the cleaning process.
* When a certain temperature is not reached during the cleaning process, a pop-up screen
reading ‘ERROR-21’ will appear.
* If impurities or contamination are found when using the device stored for a long time
without removing the distilled water, contact the dealer for cleaning method.
7-2. Draining
1) Check whether or not the cap of the water container
located on the rear side of this device is completely
closed.
2) Check whether or not the tubing and wraps are
connected to CTC-7.
32
Page 33
USER MANUAL
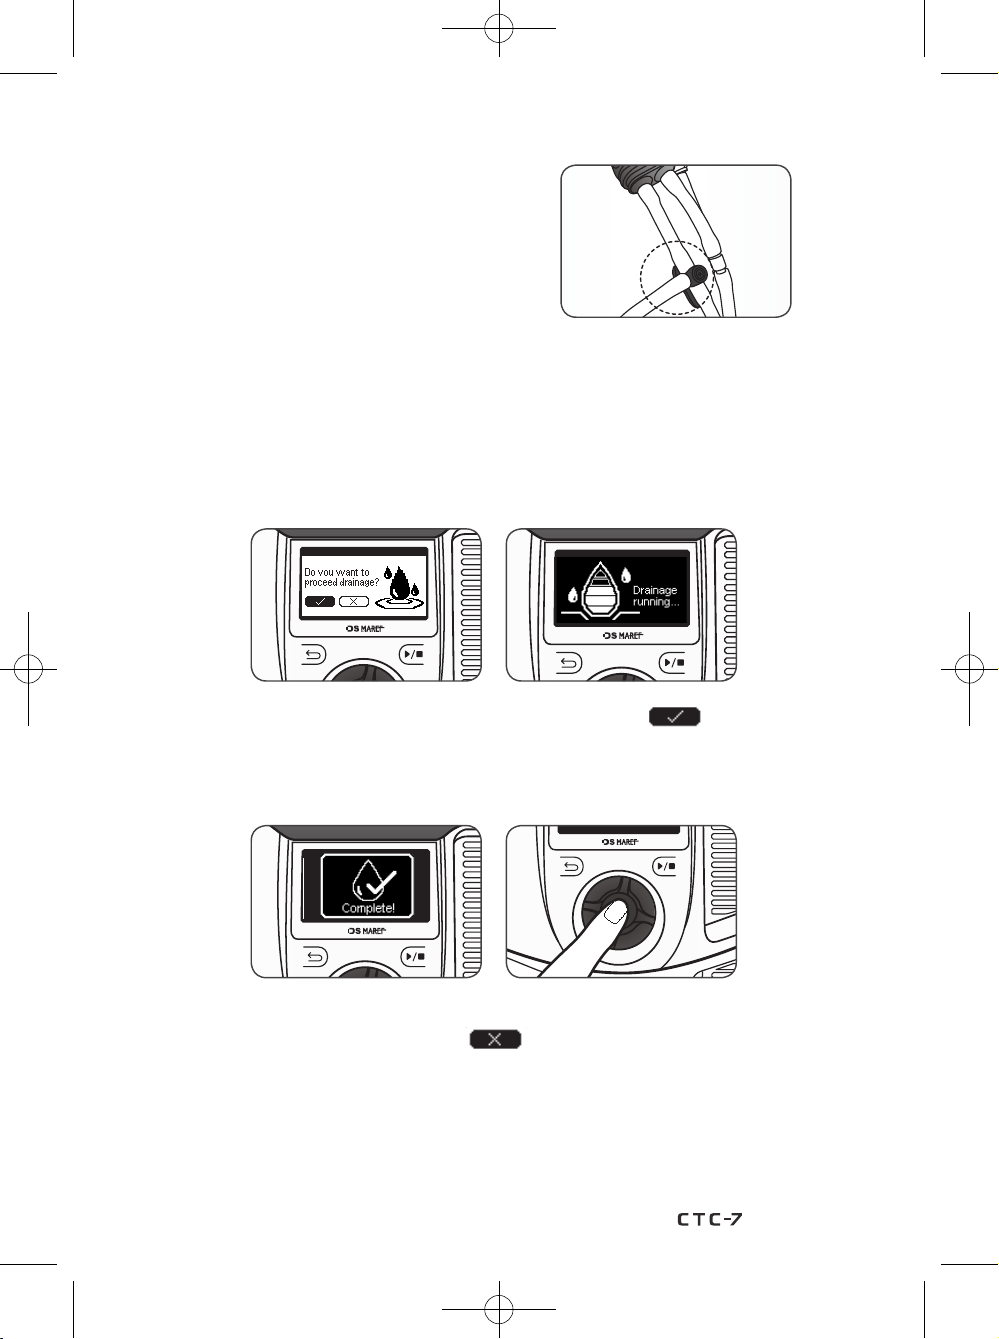
3) Connect the connector tubing supplied with
the wrap pipe.
4) When draining, prepare a water container for receiving the drained water.
Set the tubing attached to the wrap in a way that it faces the prepared water container, and
open the pipe by rotating it 90 degrees.
5) On the Draining standby screen, rotate the knob wheel to select , and press the
knob wheel to drain the water inside this device as well as the water inside the tubing
and wrap.
6) After the Draining process is complete and a pop-up screen appears, press the knob wheel.
On the Draining standby screen, select and press the knob wheel to return to the
menu mode.
* When the water level remains the same during the Draining process, a failure will occur.
* When a failure occurs, check whether or not the tubing and wrap are all connected to
CTC-7, and check whether or not the pipe is open.
33
Page 34
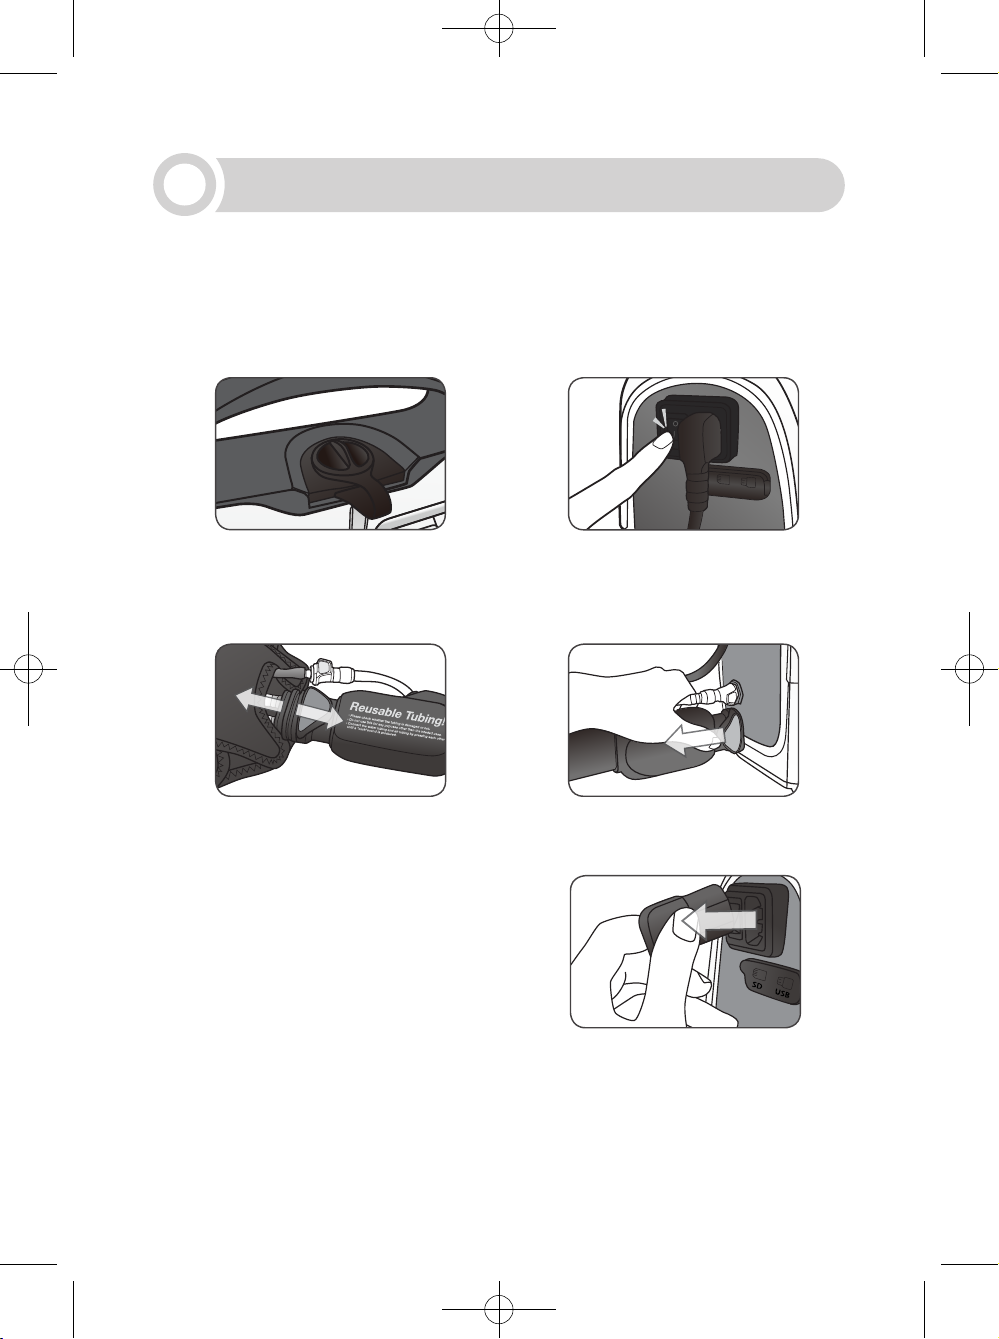
8
SD
USB
To prevent causing problems while moving and storing this device, make sure to use
※
the packaging that this device was initially covered in.
For long term storage refer to section 7-2 Drain Methods of CTC-7 to remove distilled
※
water from the device and accessories.
Storage
1) Check whether or not the cap of the water
bottle located on the rear side of this
device is completely closed.
3) Remove the tubing connected with this device and with the wrap.
4) Disconnect and remove the power cord connected
with this device from the socket.
5) Store this device and the tubing and wrap in a safe place.
* Do not store this device (including the tubing and wrap) in a place exposed to direct light,
or in a humid place, or in a place where there is a risk of fall.
* Make sure to store the tubing in a way that it is not folding.
2) Turn off the power switch located on the
side of this device.
34
Page 35
USER MANUAL
9
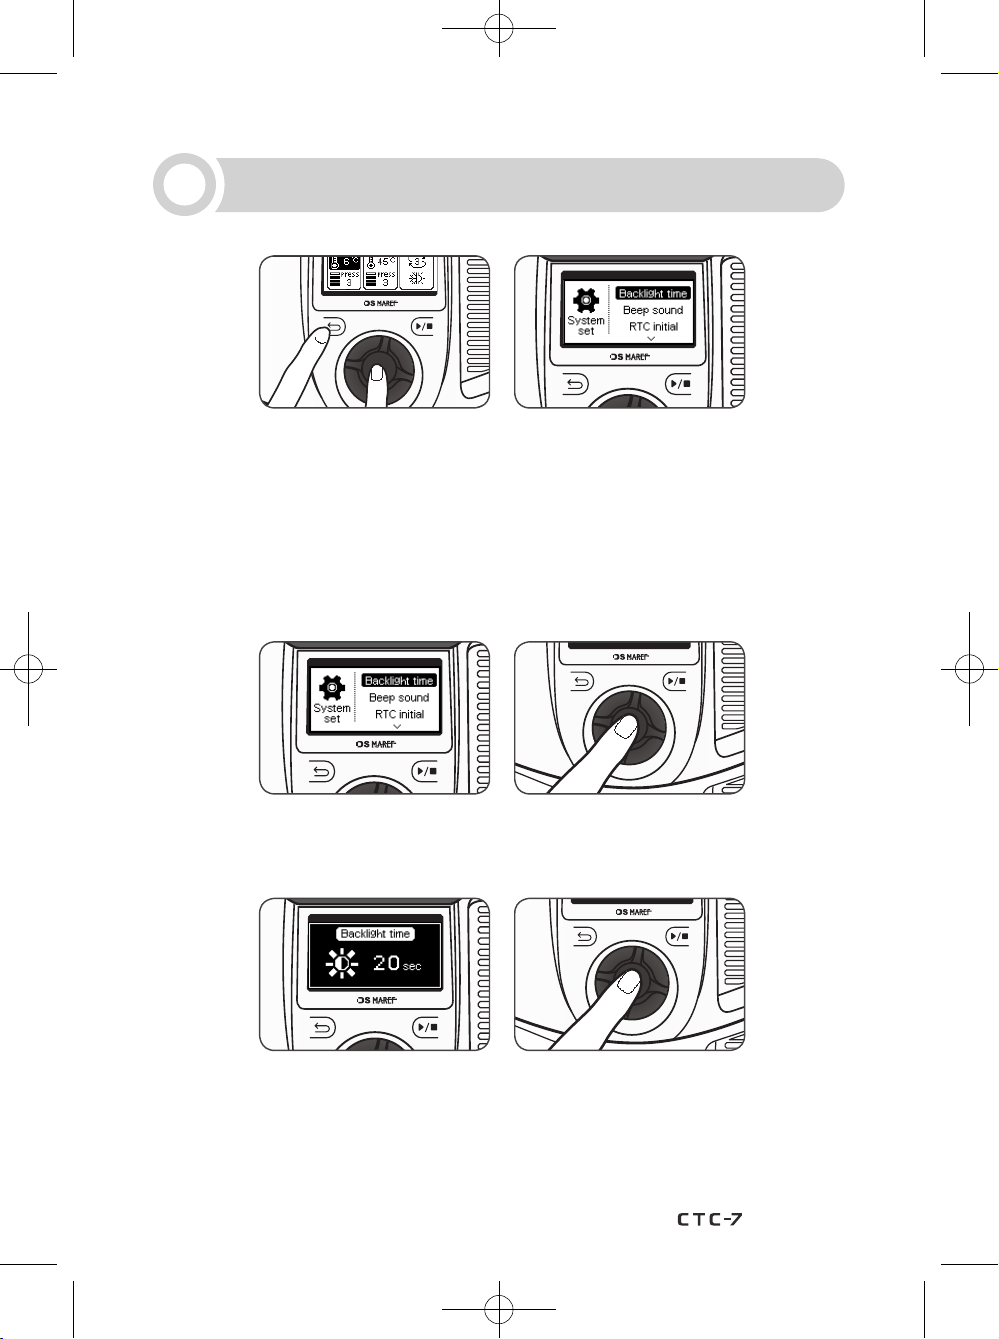
When this device is in the standby mode, press and hold the ‘Back button’ and ‘knob wheel’
at the same time to go to the System set screen.
* On the system set screen, you can set 5 items : Backlight, Beep sound, RTC initial,
Temp unit, and Factory reset.
* Press the 'Back button' to return to the standby mode after the system setting is complete.
* You can check the firmware version when you turn on the device the first time.
System setting
9-1. How to set the Backlight time
1) On the System set screen, rotate the know wheel, select ‘Backlight time’, and press the
knob wheel to set the time it takes to turn on the LCD screen of this device.
2) On the Backlight time set screen, rotate the knob wheel, set the time, and press the
know wheel to return to the system set screen.
* Time setting : 0~60 sec, or all ways
35
Page 36
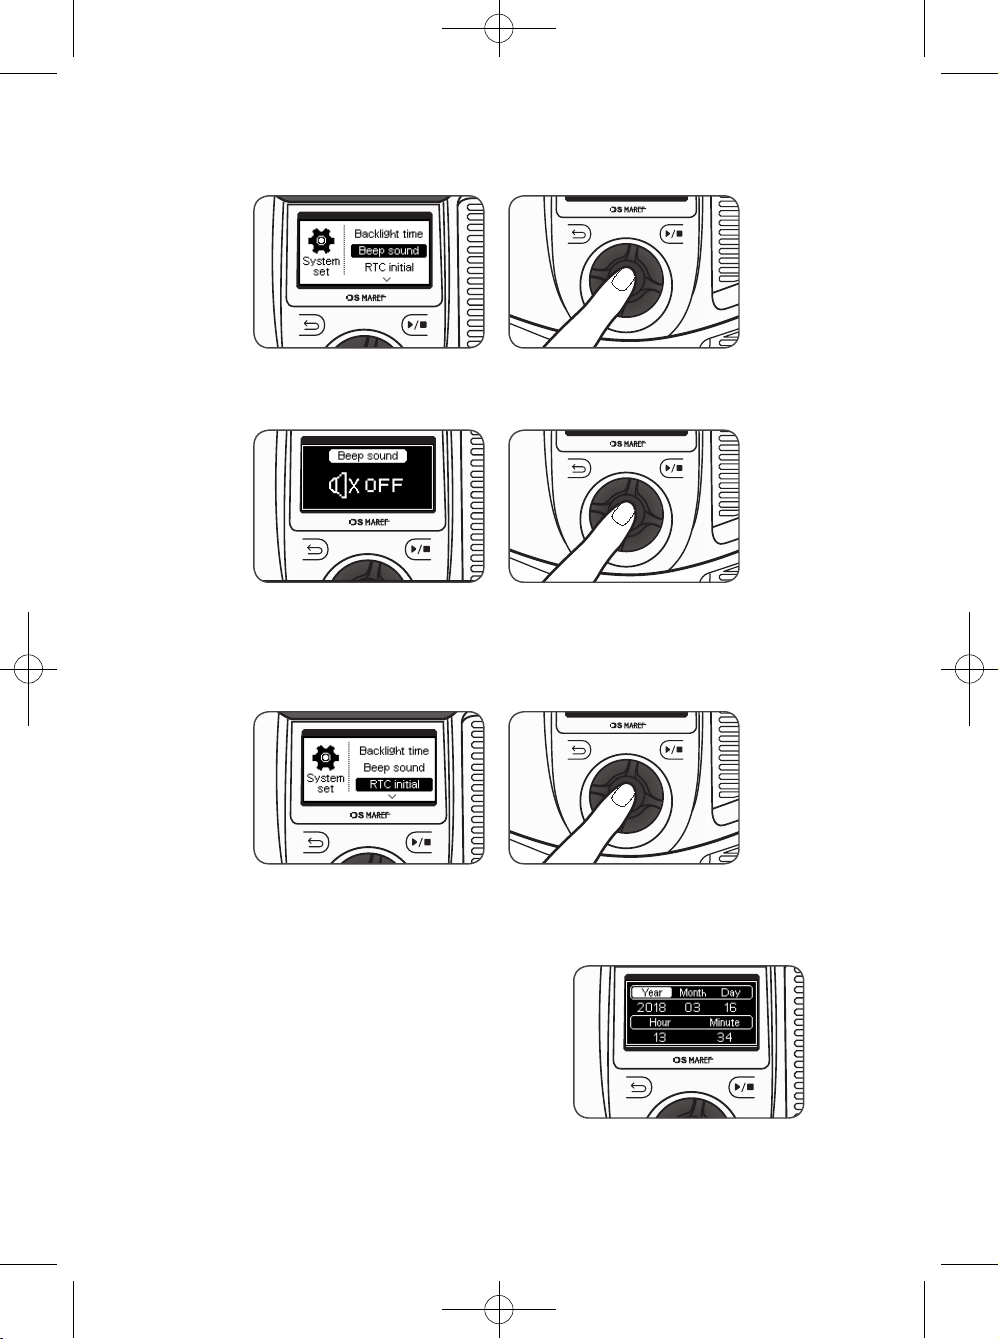
9-2. How to set the Beep sound
1) On the System set screen, rotate the knob wheel, select ‘Beep sound’, and press the
knob wheel to turn on/off the beep sound of this device.
2) On the Beep sound set screen, rotate the knob wheel, set the beep sound, and press the
knob wheel to return to the system set screen.
9-3. How to set the RTC initial
1) On the System set screen, rotate the knob wheel, select ‘RTC initial’, and press the
knob wheel to set the date and time of this device.
2) On the RTC set screen, rotate the knob wheel,
select the item to be set, and press the knob wheel.
When the number flickers, rotate the knob wheel
to set the preferred date and time, and press the
knob wheel to save the setting, and press the
Back button to return to the system set screen.
36
Page 37
USER MANUAL
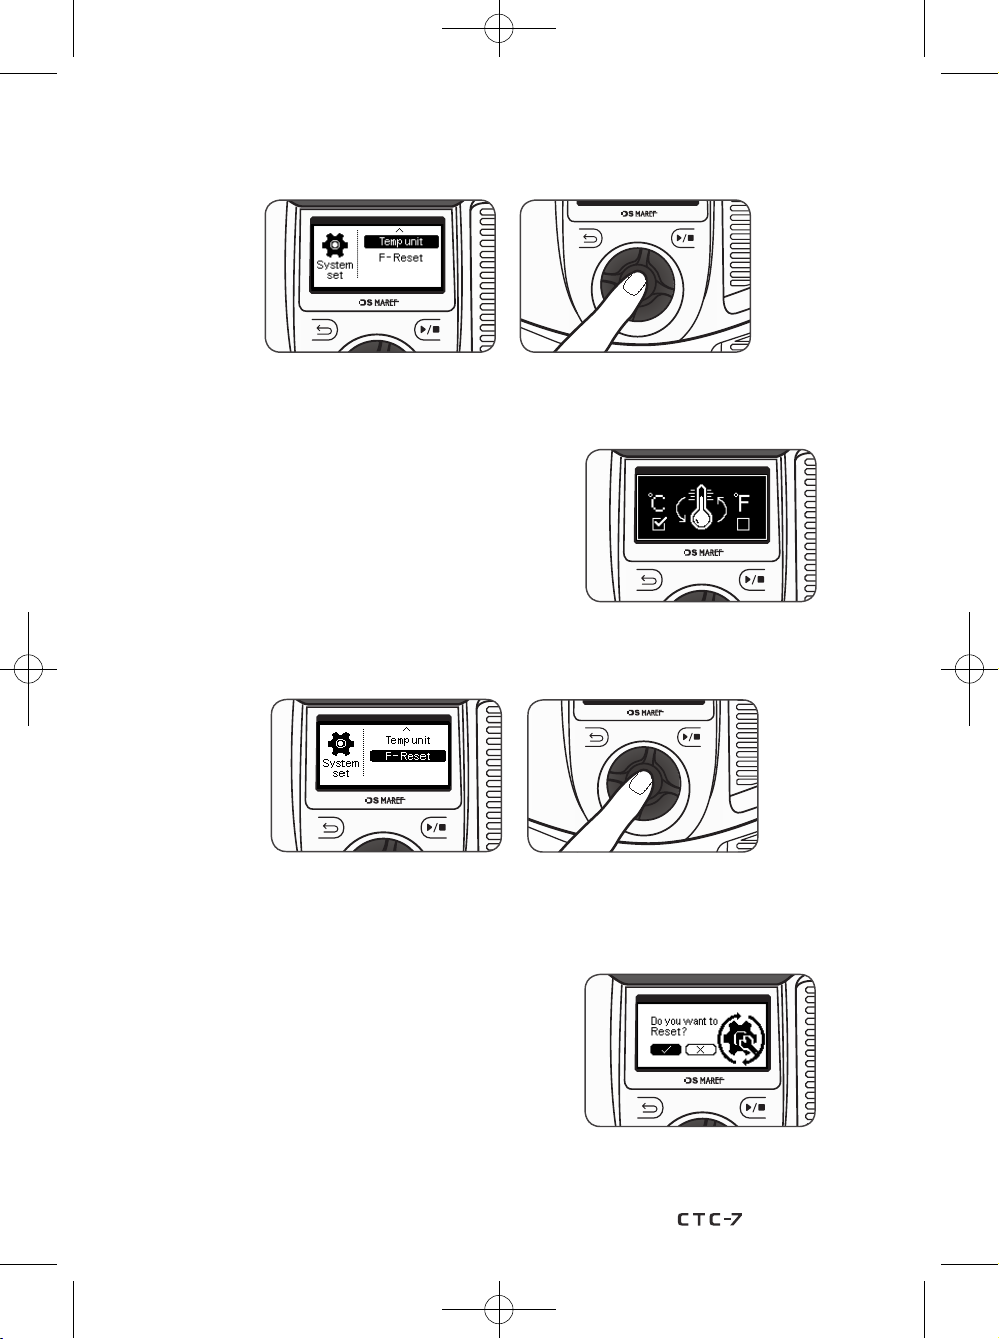
9-4. How to set the Temp unit
1) On the System set screen, rotate the knob wheel, select ‘Temp unit’, and press the
knob wheel to change how the temperature is displayed on the device.
2) On the Temp unit set screen, rotate the knob wheel,
select either (℃) or (℉), and press the knob wheel
to return to the system set screen.
9-5. How to set the F-Reset (Factory-Reset)
1) On the System set screen, rotate the knob wheel, select ‘F-Reset’, and press the
knob wheel to reset the default setting value of this device.
2) By activating ‘F-Reset’, you can reset,
the default 'Backlight time', 'Beep sound', "Temp unit'
of this device.
37
Page 38
10
The user is encouraged to receive a device quality test from the manufacturer
every 1 year.
Troubleshooting
10-1. Matters to be checked prior to submitting a request for service.
* When this device does not function properly, make sure to read the user manual and follow
the instructions to take adequate actions against the following symptoms prior to contacting
the customer center.
* Refer to the Service Manual for assembly and circuit drawings of the device.
I cannot turn on this device.
Check whether or not the power cord is connected with this device.
Check whether or not the supplied power satisfies AC100-240V and 50/60Hz.
While operating this device, I got a message saying that there is no water.
This device needs more water. Add more water to the water container.
If this device is tilted, install it on a flat floor.
Water is leaking from this device.
Check whether or not the cap of the water tank located on the rear side of this device is
completely closed.
When dew condensation occurs inside this device, water may be created on the floor.
Check whether or not the pipe of the wrap is closed.
When water is leaking from a hole created on the wrap, contact the agency or the store
from which you purchased this device.
I cannot drain water from this device.
Disconnect the tubing and wrap from this device and re-connect the tubing and wrap
with this device.
Check whether or not the pipe valve attached to the wrap is open.
I cannot apply pressure.
Check whether or not the tubing is connected with this device and with the wrap.
When air is leaking from the wrap, contact the agency or the store from which you
purchased this device.
38
Page 39
USER MANUAL
While using this device, I got a message saying that the temperature of this
device is high.
Turn off this device and let it cool down for approximately 1 hour prior to turning it back
on for use.
When the ambient temperature is high or this device is continuously used for a long
time, take a break from using this device. When you still get a message saying that the
temperature of this device is high even after taking a break, contact the service center
and the local person in charge.
I feel like the wrap is neither hot nor cold.
When the tubing or the wrap is bent, water will not flow.
When the ambient temperature is too high or too low, the cooling and heating may not
function properly.
When the peltier inside this device does not function properly, the cooling and heating
will not function properly. In this case contact the service center and the local person in
charge.
This device generates too much noise.
Check whether or not there is any foreign substance attached to the fan of the vent hole.
Check whether or not this device is placed on an unstable or tilted floor.
10-2. Error Code Occurrence
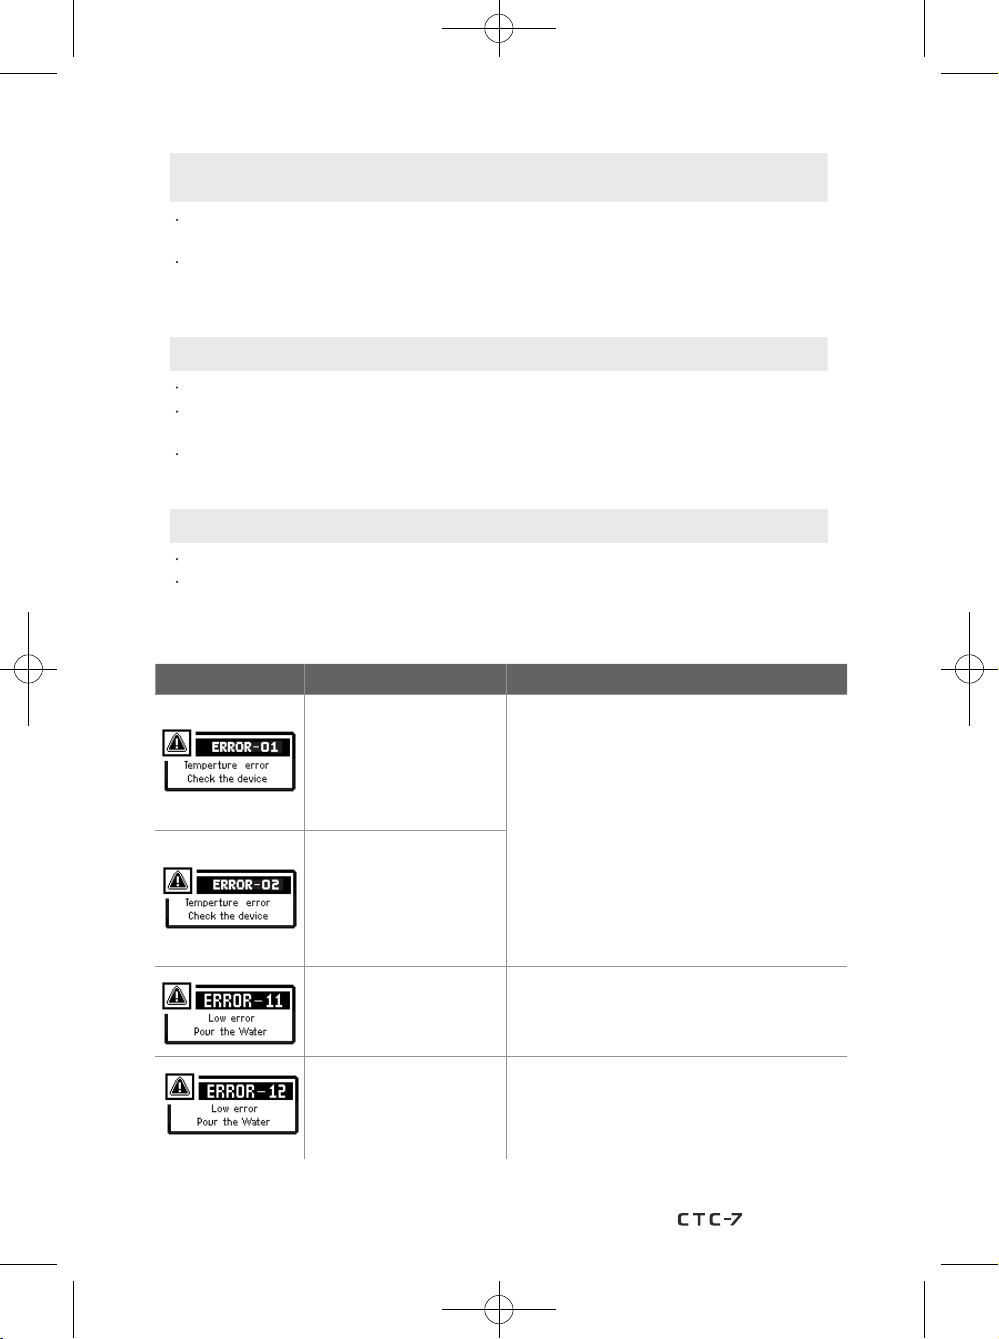
* If an error occurs during operation, the device displays the error code on the LCD screen.
Error Code Symptom Solution
Occurs when the internal
temperature of this device
increases
Occurs when the
temperature of the heat
sink increases
- Turn off and turn of this device.
- Turn off this device and let this device cool
down for approximately 1 hour prior to turning
it back on.
- When the error occurs when this device is
used after it is cooled down, contact the service
center and local person in charge.
Occurs when the water
container lacks water prior
to operating this device
Occurs when the water
container lacks water while
this device is in operation
- This device lacks water. Add more water to the
water container.
- Check whether or not this device is tilted.
Install this device on a flat floor.
- This device lacks water. Add more water to the
water container.
- Check whether or not the pipe of the wrap is
open. Check whether or not there is any water
leakage.
39
Page 40
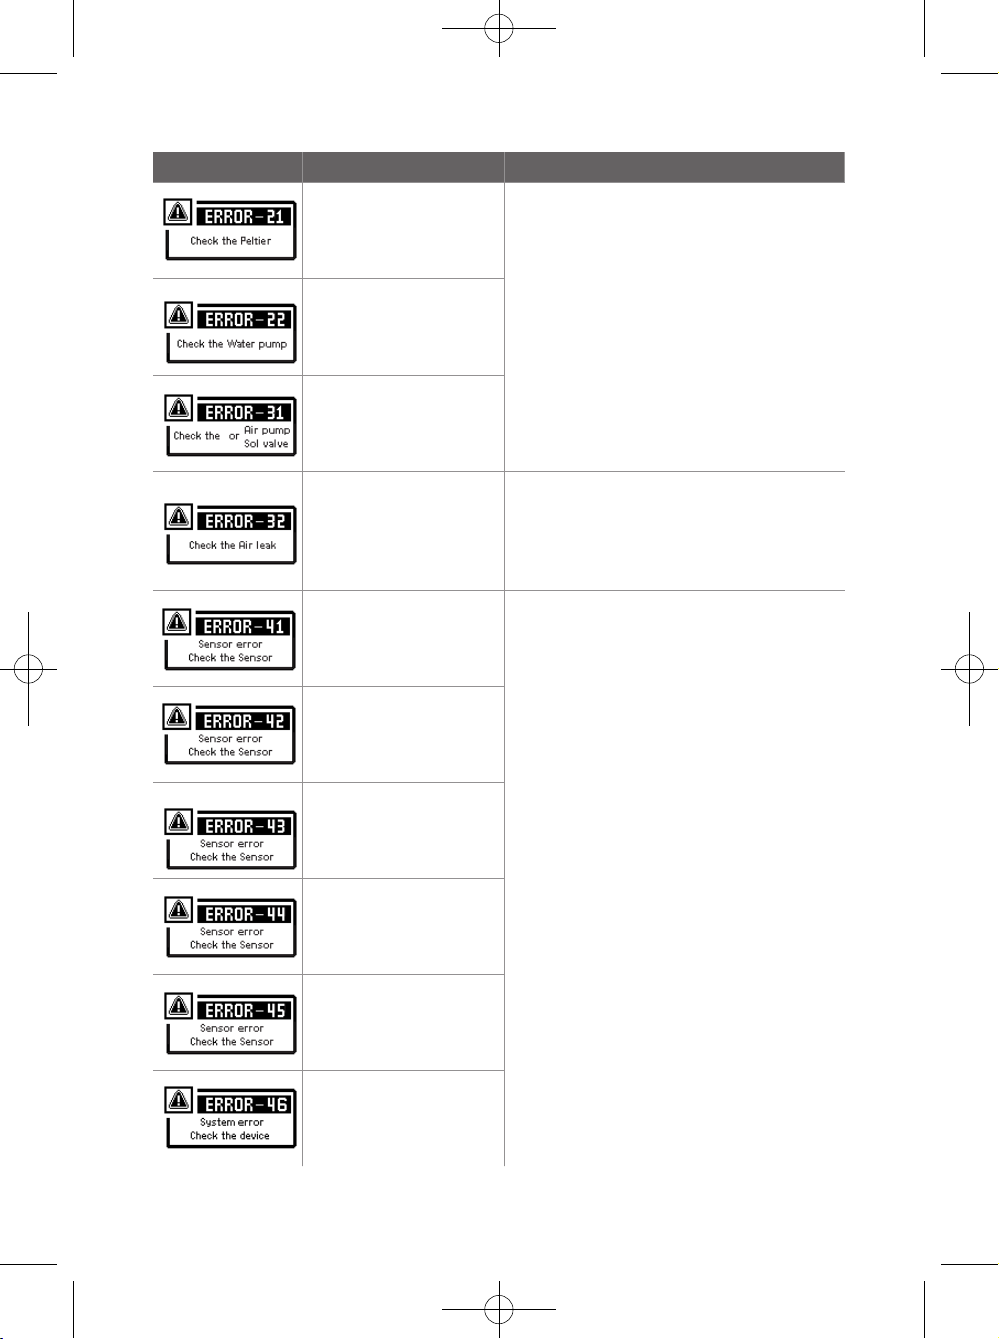
Error Code Symptom Solution
Occurs when the
temperature cannot be
adjusted due to failure of
the cooling system
Occurs when the
temperature cannot be
adjusted due to failure of
the water pump
Occurs when the air sensor
has no load while this
device is in operation
- Contact the service center and local person in
charge.
Occurs when no
pressurization is executed
due to air leakage in the
wrap area
Occurs when the
temperature sensor within
this device causes an error
Occurs when the
temperature sensor within
the heat sink causes an
error
Occurs when the water
temperature sensor causes
an error
Occurs when the pressure
sensor causes an error
Occurs when the IR-Sensor
causes an error
- Check whether the wrap/tubing has any air
leakage.
- Disconnect and re-connect the tubing
connected to the wrap and main body.
When the same error occurs, contact the
service center and local person in charge.
- Contact the service center and local person in
charge.
40
Occurs when the System
overload an error
Page 41
USER MANUAL
11
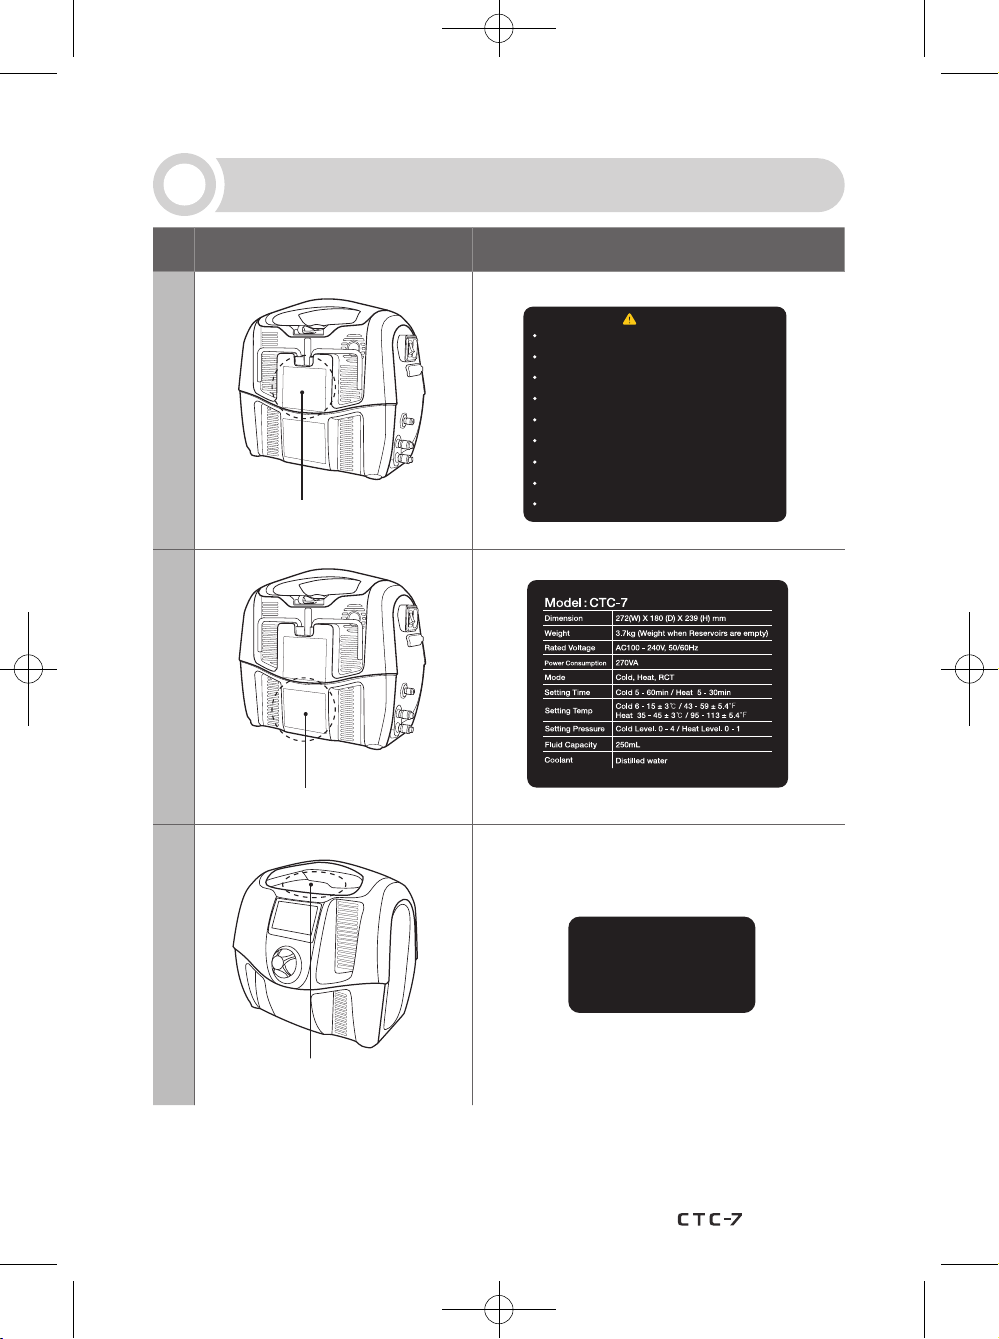
Labels Information
No
1
2
Label Position Label Design
Caution
Device Back
Before use the product, please read the manual and follow every
precautions and warnings.
Please turn off the power when you fill up distilled water in the
product.
Please be careful not to spill distilled water on the product when
you fill it up.
Please lock the cap by turning it till the end after fill up distilled
water.
Please do not use any other liquid or refrigerant except distilled
water when use the product.
It is 250mL for the optimum amount of distilled water into the
product.
Please be careful not to block ventilation to prevent overheating
when use the product.
Please do not use the product with other heat source when use
it on CROY, HEAT, or RCT mode.
Please remove accessories on the body part before wear a wrap.
Device Back
Bubbles or a small amount
of water could be gathered
3
around the water tank cover
during or after use of the
device, but it does not
indicate a malfunction of it.
Device Top
41
Page 42
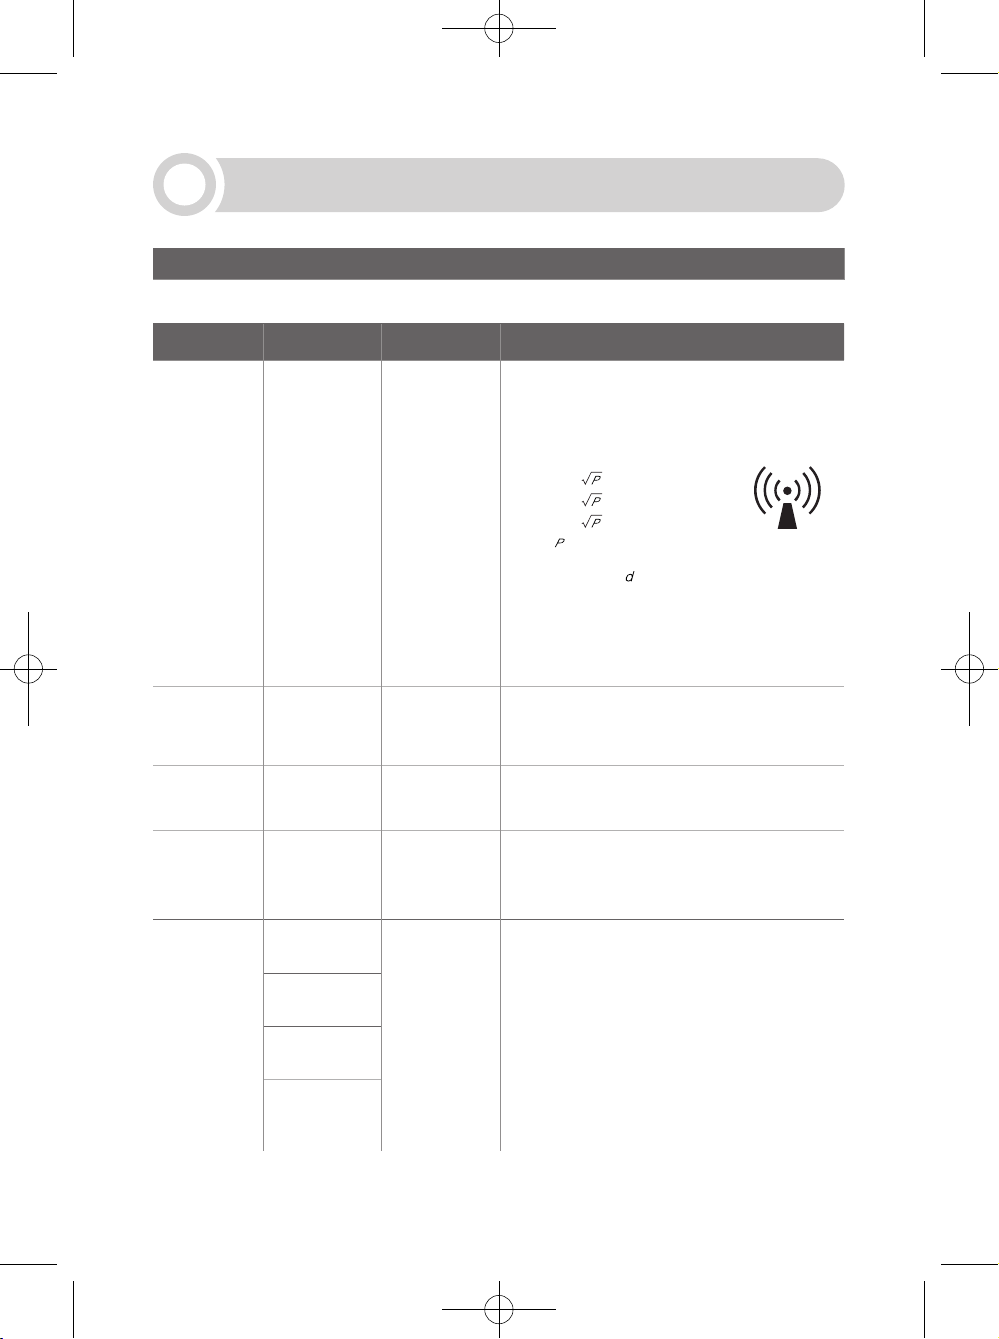
12
d = [1.2]
d = [1.2]
d = [2.3]
The CTC-7 is intended for use in the electromagnetic environment specified below.
The customer or the user of the CTC-7- should assure that it is used in such an environment.
Immunity Test
Conducted RF
IEC 61000-4-6
Radiated RF
IEC 61000-4-3
Electrostatic
Discharge(ESD)
IEC 61000-4-2
Information on EMC
Guidance and Manufacturer's Declaration – Electromagnetic Immunity
12-1.
IEC 60601
Test Level
3 Vrms
(150 kHz to 80
MHz)
3 V/m
(80 MHz to 2.5
GHz)
± 8 kV (contact)
± 2 kV, ± 4 kV, ±
8 kV, ± 15 kV (air)
Compliance
Level
3 Vrms
3 V/m
± 8 kV (contact)
± 2 kV, ± 4 kV, ± 8
kV, ± 15 kV (air)
Electromagnetic environment-guidance
Portable and mobile RF communications equipment
should be used no closer to any part of the CTC-7,
including cables, than the recommended separation
distance calculated from the equation applicable to
the frequency of the transmitter.
Recommended separation distance
80 MHz to 800 MHz
800 MHz to 2,50GHz
Where is the maximum output power rating of the
transmitter in watts (W) according to the transmitter
manufacturer and is the recommended separation
distance in meters (m).
Field strengths fixed RD transmitter, as determined
by an electromagnetic site surveya, should be less
than the compliance level in each frequency range b.
Interference may occur in the vicinity of equipment
marked with the following symbol:
Floors should be wood, concrete or ceramic tile.
If floors are covered with synthetic material; the
relative humidity should be at least 30%.
Electrical fast
transient/burst
IEC 61000-4-4
IEC 61000-4-5
Voltage dips,
interruptions
variations on
power supply
IEC 61000-4-11
42
Surge
short
and voltage
input lines
± 2 kV, 100
kHz repetition
frequency
± 0.5 kV, ± 1 kV
differential mode
± 0.5 kV, ± 1 kV,
± 2 kV
Common mode
< 5% U
(>95% dip in UT)
(60% dip in UT)
(30% dip in UT)
(>95% dip in UT)
for 5 seconds
T
for 0.5cycle
40% U
T
for 5 cycles
70% U
T
for 25 cycles
< 5% U
T
± 2 kV, 100
kHz repetition
frequency
± 0.5 kV, ± 1 kV
differential mode
± 0.5 kV, ± 1 kV, ±
2 kV
Common mode
N/A
Mains power quality should be that of a typical
commercial or hospital environment.
Mains power quality should be that of a typical
commercial or hospital environment.
Mains power quality should be that of a typical
commercial or hospital environment. If the user of the
CTC-7 requires continued operation during power
Mains interruptions, it is recommended that the CTC7 be powered from an uninterruptible power supply
or a battery.
Page 43
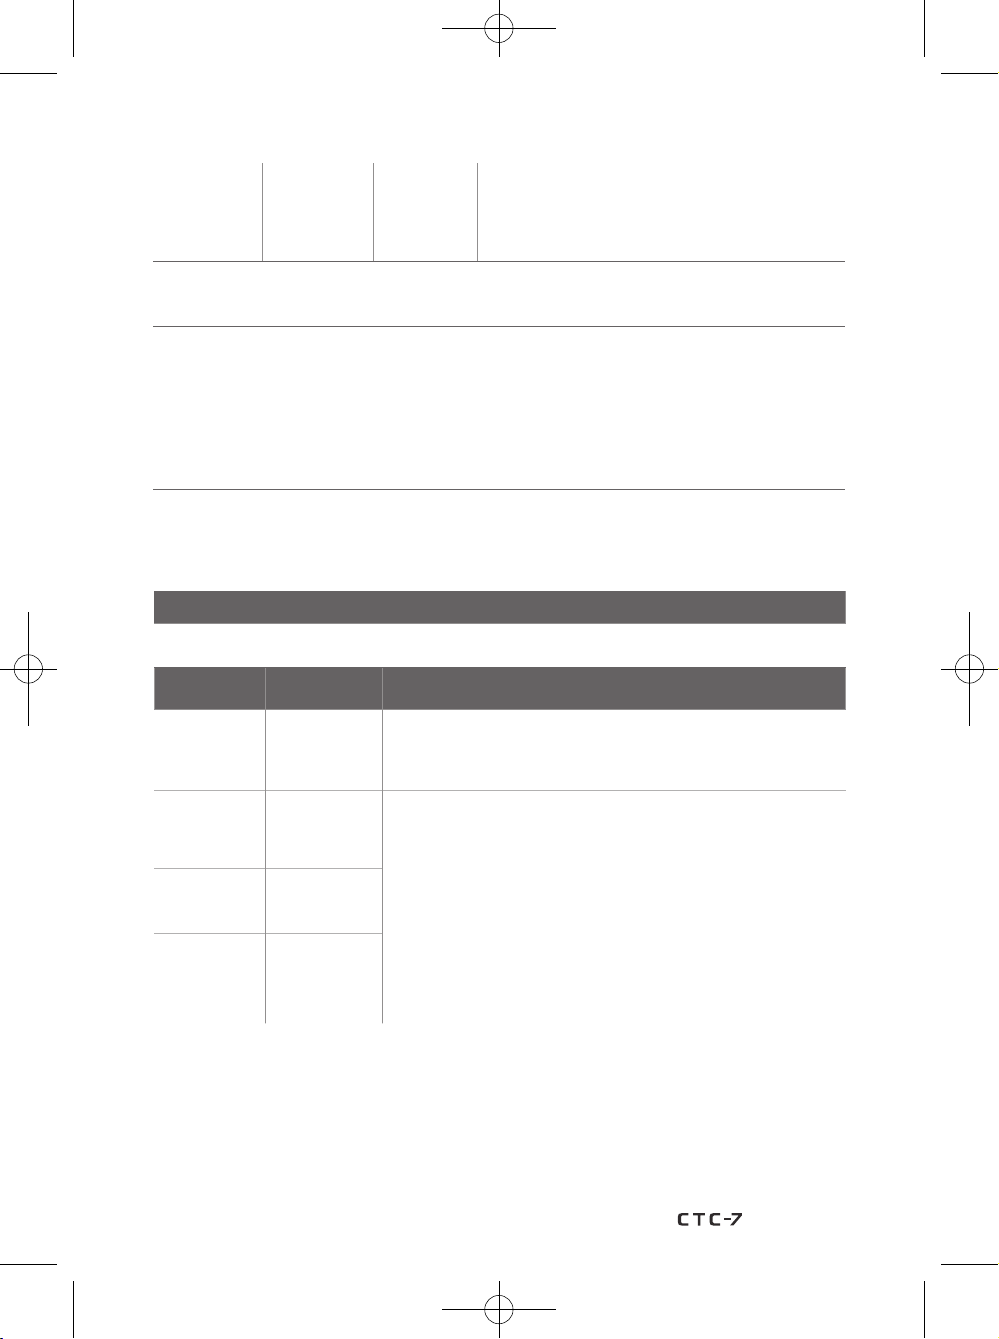
USER MANUAL
Power
Frequency
(50/60Hz)
magnetic field
IEC 61000-4-8
Note 1 At 80 MHz and 800 MHz, the higher frequency range applies.
Note 2 These guidelines may not apply in all situations. Electromagnetic propagation is affected by
absorption and reflection from structures, objects and people.
a. Field strengths from fixed transmitters, such as base stations for radio (cellular/cordless) telephones and
land mobile radios, amateur radio, AM and FM radio broadcast and TV broadcast cannot be predicted
theoretically with accuracy. To assess the electromagnetic environment, due to fixed RF transmitters, an
electromagnetic site survey should be considered. If the measured field strength in the location in which
the CTC-7 is used exceeds the applicable RF compliance level above, the CTC-7 should be observed to
verify normal operation. If abnormal performance is observed, additional measures may be necessary,
such as reorienting or relocating the CTC-7.
b. Over the frequency range 150 kHz to 80 MHz, field strengths should be less than 3 V/m.
UT is the a.c. mains voltage prior to application of the test level.
12-2.
The CTC-7 is intended for use in the electromagnetic environment specified below.
The customer or the user of the CTC-7- should assure that it is used in such an environment.
Emission test Compliance Electromagnetic environment-guidance
30 A/m
50 Hz or 60 Hz
30 A/m
50 Hz or 60 Hz
Guidance and Manufacturer's Declaration – Electromagnetic Emissions
Power frequency magnetic fields should be at levels
characteristic of a typical location in a Typical
commercial or hospital environment.
RF emissions
CISPR 11
RF emissions
CISPR 11
Harmonic
emissions
IEC 61000-3-2
Voltage
fluctuations/
flicker emissions
IEC 61000-3-3
Group 1 The product does not use RF energy.
Class A
Applicable
Applicable
The CTC-7 is suitable for use in all establishments other than domestic
and those directly connected to the public low-voltage power supply
network that supplies buildings used for domestic purposes.
43
Page 44
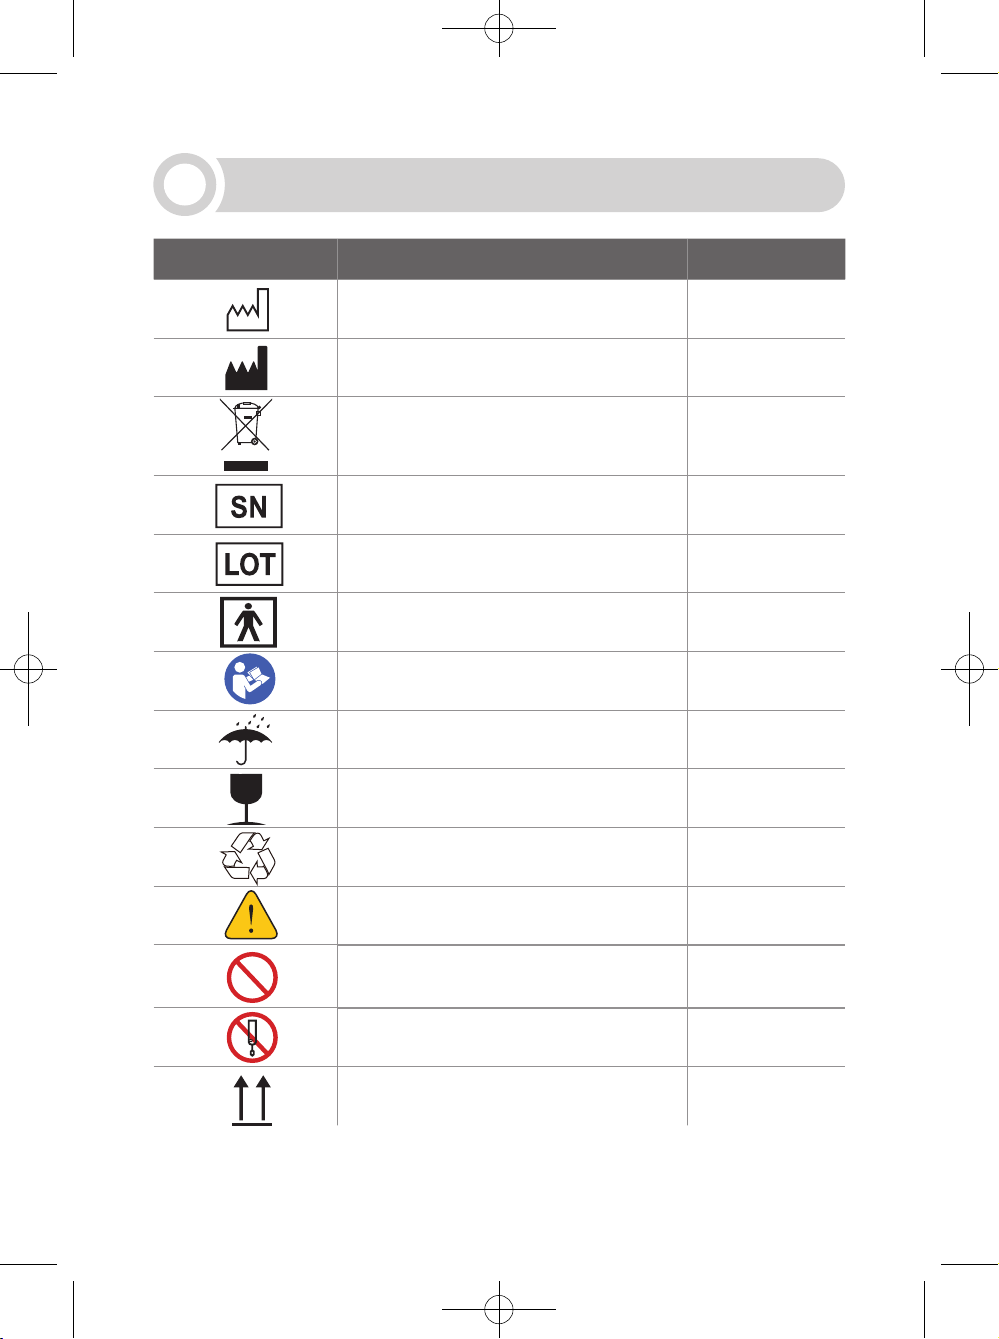
13
Symbols Information
Symbol Description Reference
Manufactured Date
Manufacturer
Symbol that indicates electrical and
electronic components which must be
collected separately.
Serial Number
Batch code
Type of applied part
Refer to the User Manual
Keep dry
Fragile, handle with care
Symbol recommending the recycling
of polluting components
EN ISO 15223-1
5.1.3
EN ISO 15223-1
5.1.1
EN 50419
EN ISO 15223-1
5.1.7
EN ISO 15223-1
5.1.5
IEC 60878
5333
ISO 7010
M002
ISO 15223-1
5.3.4
ISO 15223-1
5.3.1
IEC 60878
1135
44
General warning, Caution
General prohibition sign
Do not take to pieces Custom Symbol
This way up
ISO 7010
W001
ISO 7010
P001
ISO 7000
0623
Page 45
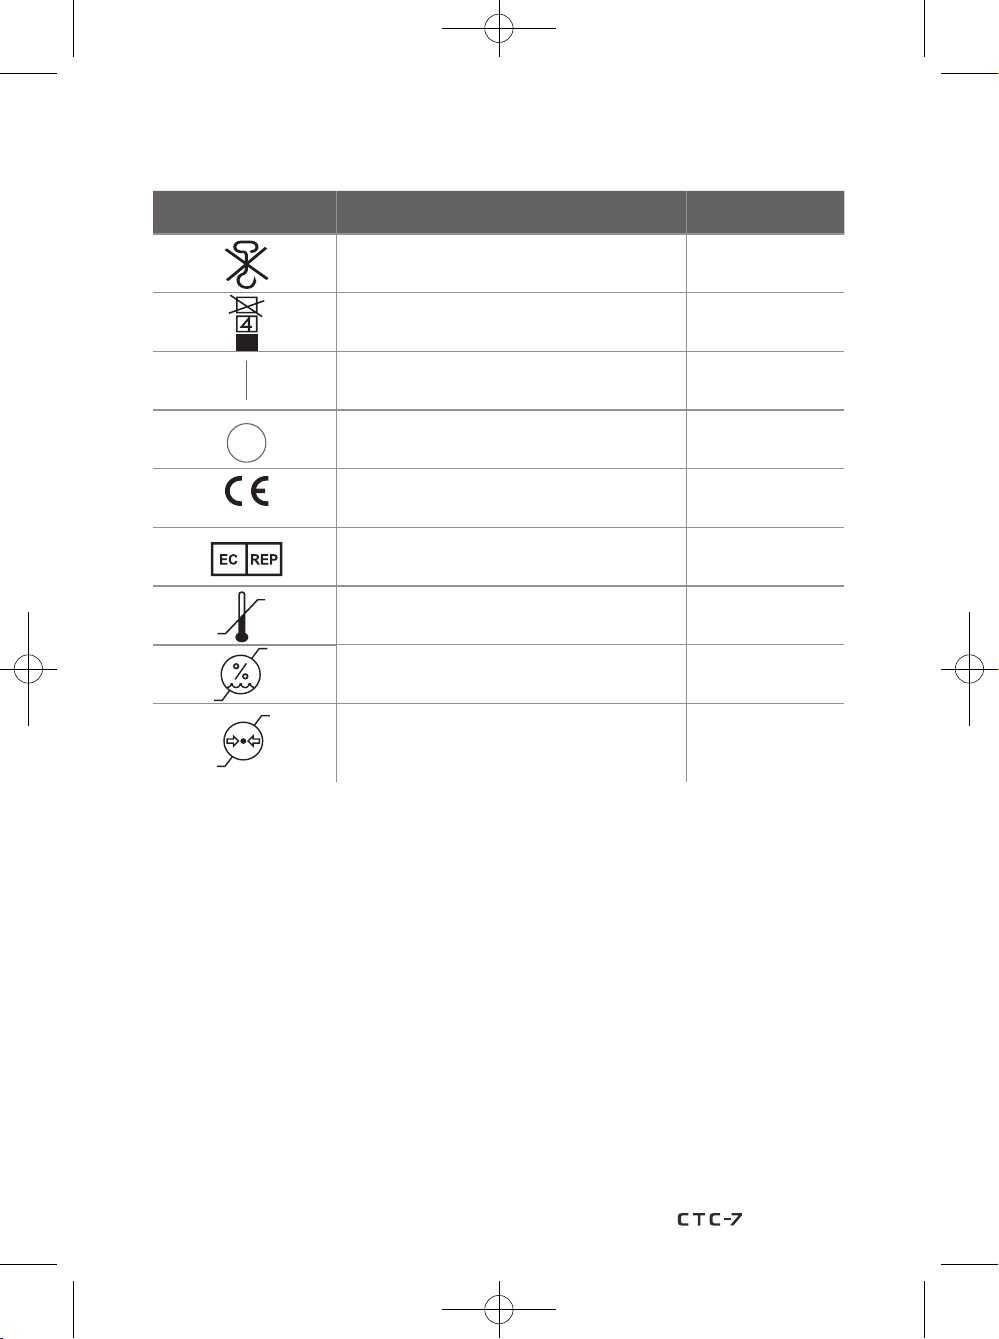
USER MANUAL
Symbol Description Reference
0068
Convenience
Load Limitation
"ON" (power) button
"OFF" (power) button
The official mark of Europe Certificate
European Representative
Temperature limitation
(Operating: 10℃~25℃ / Storage: 1℃~50℃)
Humidity limitation
(Operating: 0%~60% / Storage: 0%~90%)
Atmospheric pressure limitation
(Operating: 700hPa~1060hPa /
Storage: 500hPa~1060hPa)
ISO 7000
0622
ISO 7000
2403
IEC 60878
5007
IEC 60878
5008
CE logo
EN ISO 15223-1
5.1.2
EN ISO 15223-1
5.3.7
EN ISO 15223-1
5.3.8
EN ISO 15223-1
5.3.9
45
Page 46
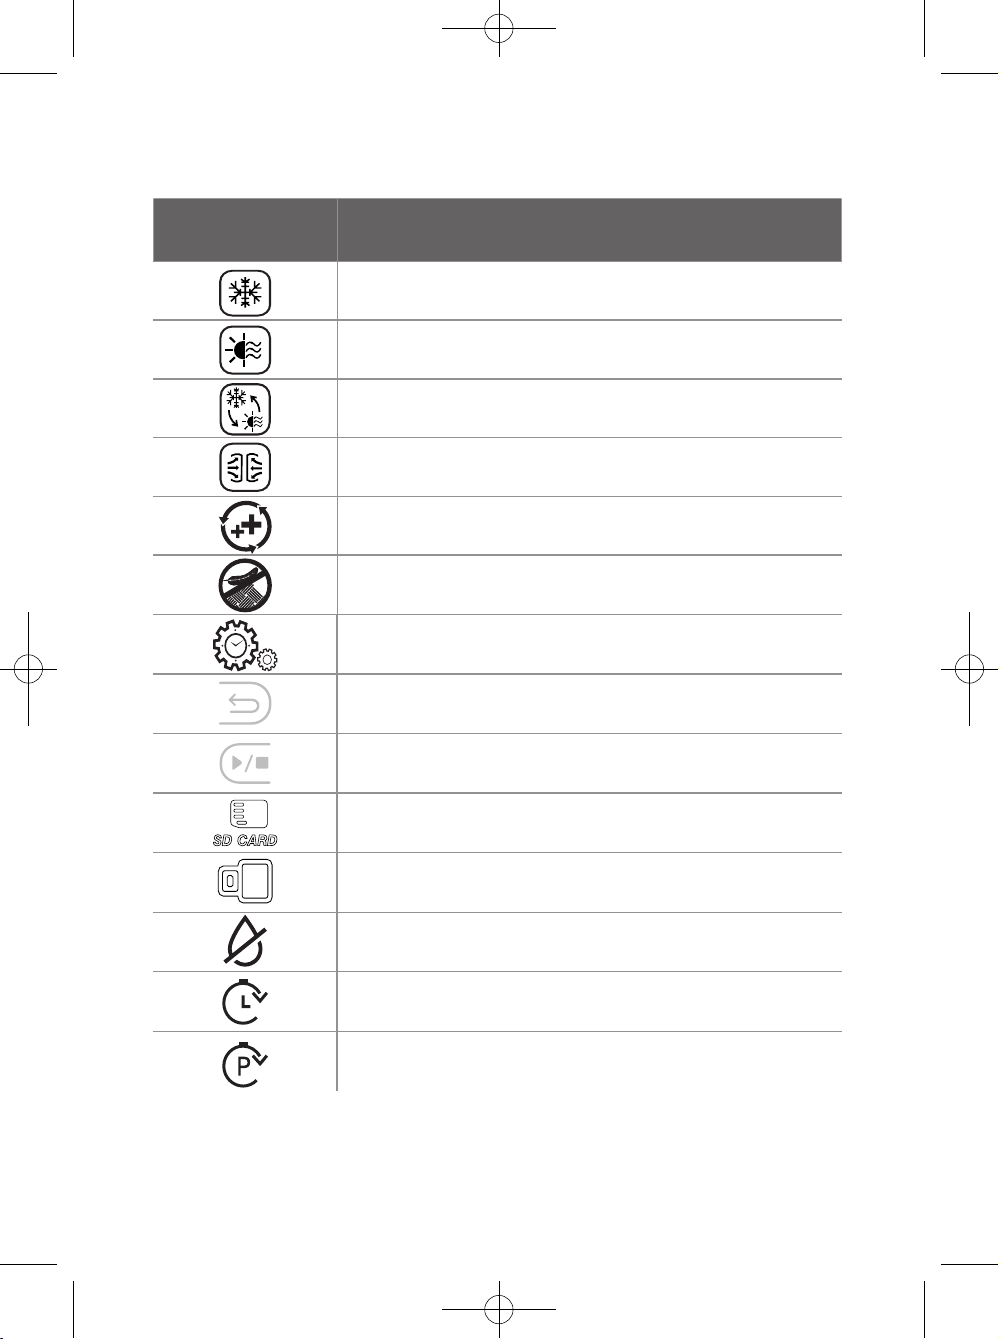
Custom
Symbol
Description
Cold therapy
Heat therapy
RCT
(Rapid Contrast Therapy)
Air compression
Synergy
No moisture
Convenience
Back button
Start/Stop button
46
Memory card port icon
USB port icon
No leakage
Manual Time
Preset Time
Page 47
Warranty
Much appreciated on using our device. We, DAESUNG MAREF are
doing our best to improve the quality of our products.
※
We can not be responsible for any defect occured from user's
careless use or in case of followings, even though warranty period :
1. Disorder happened by strong impact.
2. In case user repair or reproduce internal part arbitrarily.
3. In case of using the device in prohibited place.
4. In case of against our <How To Use>
5. Wraps are articles of consumption.
Device name
Model name
Warranty
Circulating-fluid thermal compression
therapy system control unit
CTC-7
Device : 1 year
Page 48
RND-R-MUM-501-01-01 (Rev.0) 2019-09
COMPANY HISTORY
1990's
1986
- Established DAESUNG Machinery Company
1994
- Conversion to DAESUNG MAREF CO.,LTD.
1999
- Registered DOCTOR LIFE
- Registration of utility model for limb
compression circulation therapy machine
2000's
2004
- The 34th precious Technique bronze awards
- Vice president award
- Selected World class products
2006
- Innovation management awards
- KGMP registration
- KFDA awards by Prime minister
2007
- Authentication of Merit certicate
2008
- Received a citation from the Chungbu
Regional Tax Service Director
2009
- Gunpo-si Mayor's Citation
- Awarded by the Minister of Health and Welfare
2010's
2010
- Awarded the Governor's Citation for
Day of Commerce and Industry by
Gyeonggi province
2011
- President Award
- Gold Listed at the Korea Precision
Industry Technology Contest
2012
- Selected an Global Small Giants Company
2013
- A credit guarantee fund star company
- Member of Trade Industry Forum
2014
- Commissioned member of INNO-BIZ
- Korean world-class product award in
recognition of DVT prevention system
2015
- The 8th medical devices day president
award to industrial company
2017
- Selected as a design innovation company
- Grand prize of service satisfaction
selected by consumers
2018
- Ocial sponsor of Seoul E-Land FC
- A citation from the Ministry of
Employment and Labor
DAESUNG MAREF CO.,LTD
298-24, Gongdan-ro, Gunpo-si, Gyeonggi-do, 15809, Korea
Tel : +82-31-459-7211 | Fax : +82-31-459-7215
E-mail : [email protected] | http://www.dsmaref.com
KTR Europe GmbH
Mergenthalerallee 77, Eschborn, Hessen, 65760, Germany
Tel : +49(0) 6196-887170 | Fax : +49(0) 6196-887-1728
 Loading...