

DSIC DS6, DS4A User Manual
1
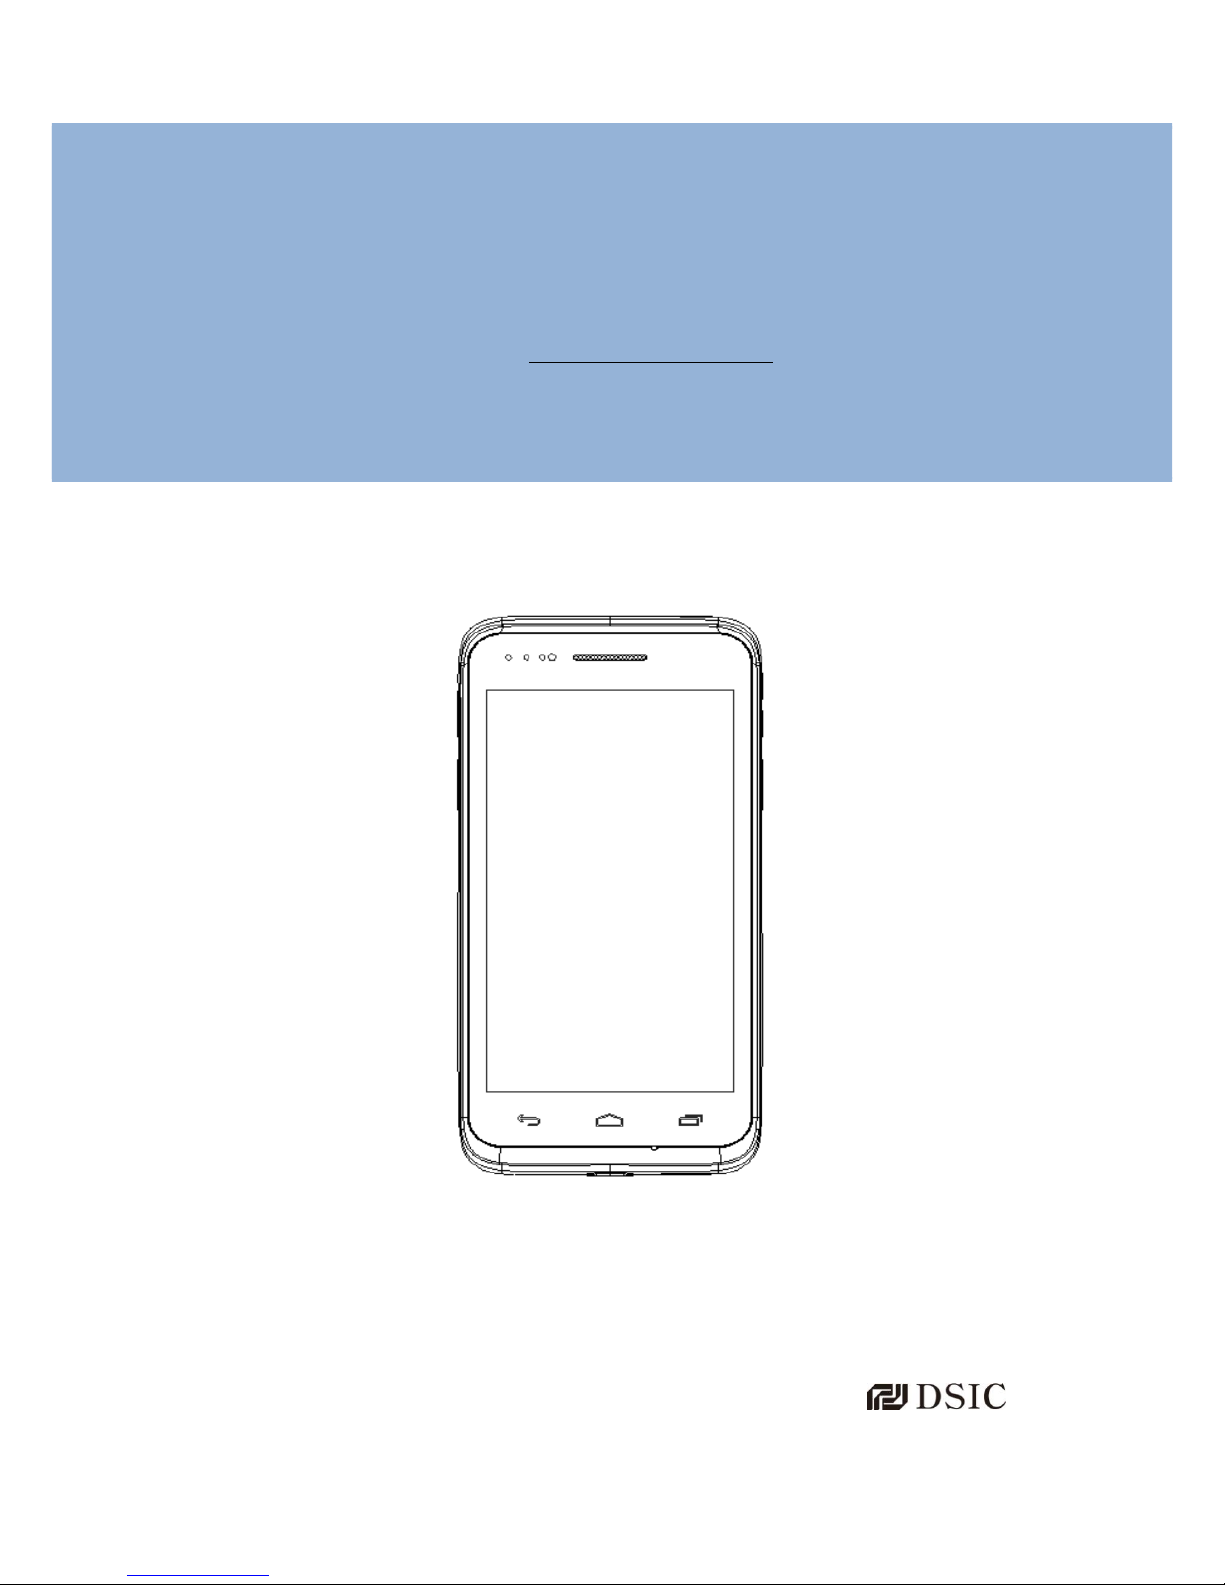
DS6
User Manual
ISO 9001 Certified
Quality Management System

2
Revision History
Changes to the original manual are listed below
Date
Description
May. 2018
Initial release
This device doesn’t violate any of the regulations of use the radio frequency spectrum,
and is able to be operated in at least one member of nations.
This device complies with Requirements 10.10, Radio Equipment Directive(RED)
since It is able to deal with the data by the package. Also, it is restricted for the device to
work between 5150~5250 MHz indoor environment.

3
○C 2018 DSIC Co., Ltd.
All Rights Reserved.
Notice
While reasonable efforts were made to ensure that the information in this document was complete
and accurate at the time of printing, DSIC Co., Ltd. can assume to no liability for any errors. Changes
and corrections to the information in this document might be incorporated in future release.
Document disclaimer
DSIC Co., Ltd. is not responsible for any modifications, additions, or deletions to the original
published version of this documentation unless Customer and/or End User agree to indemnity and
hold harmless DSIC, DSIC’s agents, servants, and employees against all claims, lawsuits, demands
and judgments arising out of, or in connection with, subsequent modifications, additions, or
deletions to this documentation to the extent made by the Customer or End User.
Link disclaimer
DSIC Co., Ltd. is not responsible for the contents or reliability of any linked Web sites referenced
elsewhere within this documentation, and DSIC does not necessarily endorse the products, services,
or information described or offered within them. We cannot guarantee that these links will work at
all times and we have no control over the availability of the linked pages.
Warranty
DSIC Co., Ltd. provides a limited warranty on this product. Refer to the sales agreement for more
information on the terms of the limited warranty. In addition, DSIC’s standard warranty language,
as well as information regarding support for this product, while under warranty, is available through
the DSIC Support Web site: http://www.dsic.co.kr/ENG/
Copyright
Except where expressly stated otherwise, the Product is protected by copyright and other laws
respecting proprietary rights. Unauthorized reproduction, transfer, and/or use could be a criminal
offense, as well as a civil offense under the applicable law.
Third-party components
Certain software programs or portions thereof included in the Product may contain software
distributed under third party agreements (“Third Party Components”), which may contain terms that
expand or limit rights to use certain portions of the Product (“Third Party Terms”).

4
Trademarks
All other trademarks are the property of their respective owners.
Downloading documents
For the most current versions of the manual, visit our DSIC Support Web site:
http://www.dsic.co.kr/ENG/
Contact DSIC Support
DSIC Co., Ltd. provides a technical support customer service for you to report problems or to ask
questions about the product. Please contact us through our email: dsic_pda@dsic.co.kr.
For additional support, visit the DSIC Web site: http://www.dsic.co.kr/ENG/
DS6 is a trademark of DSIC Co., Ltd.
MOBILEBASE is a brand name of DSIC rugged mobile computer.
The Bluetooth word mark and logos are owned by Bluetooth SIG, Inc.
All trademarks and trade names are the property of their respective owners.

5
Contents
Safety Instruction ......................................................................................................................................................................... 7
Chapter 1: Introduction ............................................................................................................................................................ 8
Spec Sheet ............................................................................................................................................................................. 8
Overview of DS6 features .............................................................................................................................................. 9
Front view ..................................................................................................................................................................... 9
Back view ................................................................................................................................................................... 10
Chapter 2: Getting Started ................................................................................................................................................... 11
Installing Micro SD card/ SAM card/ SIM card (optional) ........................................................................... 12
Bumper installation ........................................................................................................................................................ 13
Installing DS6 Battery .................................................................................................................................................... 13
Battery power source ........................................................................................................................................... 14
Cradle Adjustment .......................................................................................................................................................... 15
Power Adapter .................................................................................................................................................................. 15
Connecting power source ........................................................................................................................................... 16
To use Micro USB Travel Charger ................................................................................................................... 16
To use Cradle ........................................................................................................................................................... 17
Cradle front view .................................................................................................................................................... 17
Cradle back view .................................................................................................................................................... 18
Cradle right side view .......................................................................................................................................... 18
Connecting cradles for multi-slot charging ........................................................................................................ 19
Operating power of the terminal ............................................................................................................................ 20
Power On ................................................................................................................................................................... 20
Suspend and Resume .......................................................................................................................................... 20
Reset ............................................................................................................................................................................ 20
Power options ................................................................................................................................................................... 21
Power Off ................................................................................................................................................................... 21
Reboot ......................................................................................................................................................................... 21
Airplane mode ......................................................................................................................................................... 21
Hot swap .................................................................................................................................................................... 21
Home Screen ..................................................................................................................................................................... 22
Organize your Home screen ...................................................................................................................................... 24
Touch & type .................................................................................................................................................................... 26
Android version & updates ........................................................................................................................................ 27
Chapter 3: Essentials ............................................................................................................................................................... 28
Notifications & settings ............................................................................................................................................... 28
Quick Settings ................................................................................................................................................................... 30

6
Lock screen ........................................................................................................................................................................ 30
Lock screen actions ........................................................................................................................................................ 30
Android Beam ................................................................................................................................................................... 31
NFC (13.56 MHz) ............................................................................................................................................................. 32
File Manager ...................................................................................................................................................................... 33
Screenshots ........................................................................................................................................................................ 34
Chapter 4: Using the keyboard .......................................................................................................................................... 35
Enter & edit text .............................................................................................................................................................. 35
Chapter 5: Trying some apps .............................................................................................................................................. 38
All Apps ............................................................................................................................................................................... 38
Phone .................................................................................................................................................................................... 39
Camera ................................................................................................................................................................................. 40
Gallery .................................................................................................................................................................................. 41
People ................................................................................................................................................................................... 42
Chapter 6: Settings .................................................................................................................................................................. 43
Chapter 7: Accessibility .......................................................................................................................................................... 44
Chapter 8: Application Guide ............................................................................................................................................. 45
Barcode Tray ...................................................................................................................................................................... 45
Key Mapping ..................................................................................................................................................................... 46
OTA Update........................................................................................................................................................................ 49
Chapter 9: Developer’s Guide............................................................................................................................................. 50
USB Driver .......................................................................................................................................................................... 50
OS Update .......................................................................................................................................................................... 50
KIOSK MODE ..................................................................................................................................................................... 52
Password change ................................................................................................................................................... 53
Setting Background .............................................................................................................................................. 54
Admin Setting.......................................................................................................................................................... 54
KIOSK and eZGo ..................................................................................................................................................... 55
eZGo ...................................................................................................................................................................................... 56
Create your QR CODE ......................................................................................................................................... 56
Device Administration ................................................................................................................................................... 58
7
Safety Instruction
Read this instruction carefully to keep yourself safe and to avoid the loss of property.
Make sure that battery terminals (metal part) do not come into contact with any
conductive materials like a necklace or coin. Also make sure that batteries do not get
damaged by teeth or nails. Impact may cause an explosion of batteries.
Use dedicated batteries only and do not use the batteries for any purposes other than
operating this product. Using an inauthentic battery may reduce the lifespan of the
product, or cause an explosion.
Make sure to use the adapter or the standard charger supplied with this product. Using
an inauthentic charger may reduce the lifespan of the batteries or cause an explosion.
Caution in relation with Laser Scanner
Do not flash scanner into human and animal’s eyes. It may cause damages to retina and amblyopia.
Caution in relation with Batteries
Batteries may explode when damaged, impacted, heated, flooded, or taken apart with
a gimlet. Make sure to keep the batteries out of reach of children or pets.
Do not use the Product in the area with the risk of explosion.
Safety information
This Product is compliant with EMC. For safety and health reasons, use the authentic
parts supplied by the manufacturer. Any inauthentic parts may affect safety.
Do not press the power button when the Product is wet. Touching the adapter or power
cord with wet hands may cause an electric shock.
Do not modify, disassemble, or repair the product at your discretion. Also make sure to
follow the safety instructions.
Record the data in the Product and keep it in a separate place. Data stored in the
Product may be deleted during repairing or upgrading the Product. So, make sure to
back up important data.
Do not use this Product in a hot or humid place. Using the product under a hot/humid
temperature such as rain or sauna may cause a trouble.
Keep this Product away from magnetic products such as credit card, telephone card,
bank book, and traffic ticket. The magnetic field of the terminal may affect the data.
When storing a battery for a long period of time, recharge it and keep it at a room
temperature. Even a fully charged battery will suffer reduced lifespan due to the char
acteristics of the battery.
8
Chapter 1: Introduction
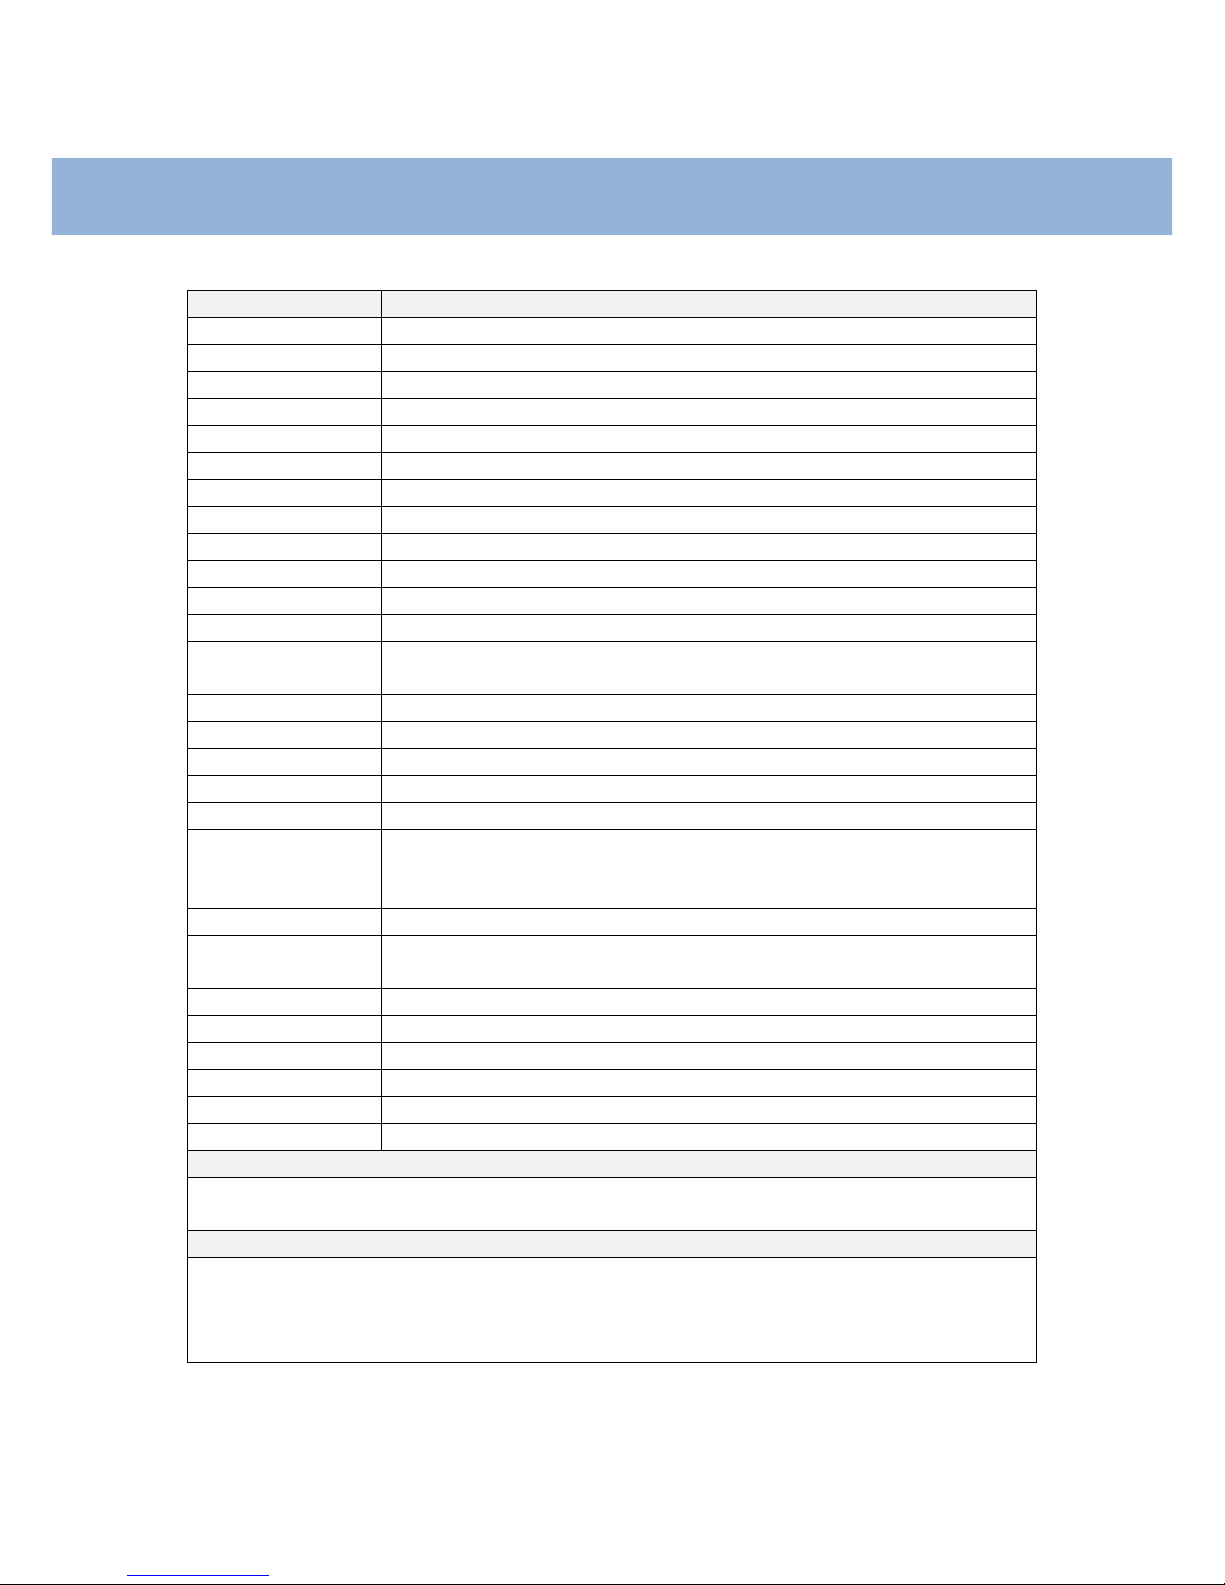
Spec Sheet
Characters
Descriptions
Display
5” inch HD (1280x720) IPS / Capacitive multi touch screen
Dimensions (mm)
76 x 154 x 18.7
Weight (g)
250g with Battery
Battery
Lithium-ion 3.8V 4000mAh
OS
Android AOSP 7.1 Nougat
Processor
Qualcomm ARM Cortex-A53, 2.0Ghz 64-bit Octa-core processor
Memory (RAM/ROM)
DDR3 2GB/16GB, 4GB/32GB NAND (optional)
USB
USB 3.0 (Type-C)
External interface
Micro SD slot, SIM slot, SAM slot
Sound & MIC
Speaker, Receiver, MIC, Headset jack (3.5mm)
LED & Indicators
Charging LED, Notification LED (Multi-color & Programmable), Vibration
Physical keys
Scan (left & right), Volume up / down, Function key (left side)
Sensors
Ambient light sensor & Proximity sensor, 3-axis compass
Motion tracking sensors (3-axis gyroscope, 3-axis accelerometer, Digital motion processor)
Sealing & Drop
IP67, 1.5m multi drops to concrete / 2.0m multi drops with rugged boot
Storage Temperature
-30°C to 70°C
Operation Temperature
-20°C to 60°C
Humidity
95% non-condensing
Regulatory
KCC, CE, RoHS
WWAN
LTE Advanced support
LTE FDD / TDD: 1,3,5,7,8,20 / 38,39,40,41
WCDMA / GSM : 1,5,8 / 850, 900, 1900
WLAN
IEEE 802.11 a/b/g/n/ac
WLAN Security
WEP, WPA-PSK, WPA2-PSK, 802.1x EAP (PEAP-MSCHAPV2, PEAP-GTC, TLS, TTLS-PAP, TTLSMSCHAP, TTLS-MSCHAPV2, TTLS-GTC, PWD)
WPAN
Bluetooth v4.2 (Bluetooth
○
R
BR/EDR+BLE)
Scanner
SE4710 imager (1D & 2D)
RFID (NFC)
13.56 MHz, ISO14443A&B, ISO15693, MIFARE, Felica, NFCIP-1, NFCIP-2
Camera
16M Pixel AF with Flash
GPS
Stand alone, A-GPS
Warranty
1 year manufacturer’s warranty
Default Accessories
· Micro USB Type-C cable (Charging & Data Sync)
· Protection Film · Hand belt
Optional Accessories
· Desktop Cradle: Spare battery charging, Micro USB 2.0(OTG), RS232(optional), Ethernet(optional)
– Coupling multiple cradles
· AC/DC USB adapter (5V / 3A) / (12V / 7A) – for multiple cradles
·Stylus pen · Vehicle cradle · Bumper · Gun Trigger · Snap on
9
Chapter 1: Introduction
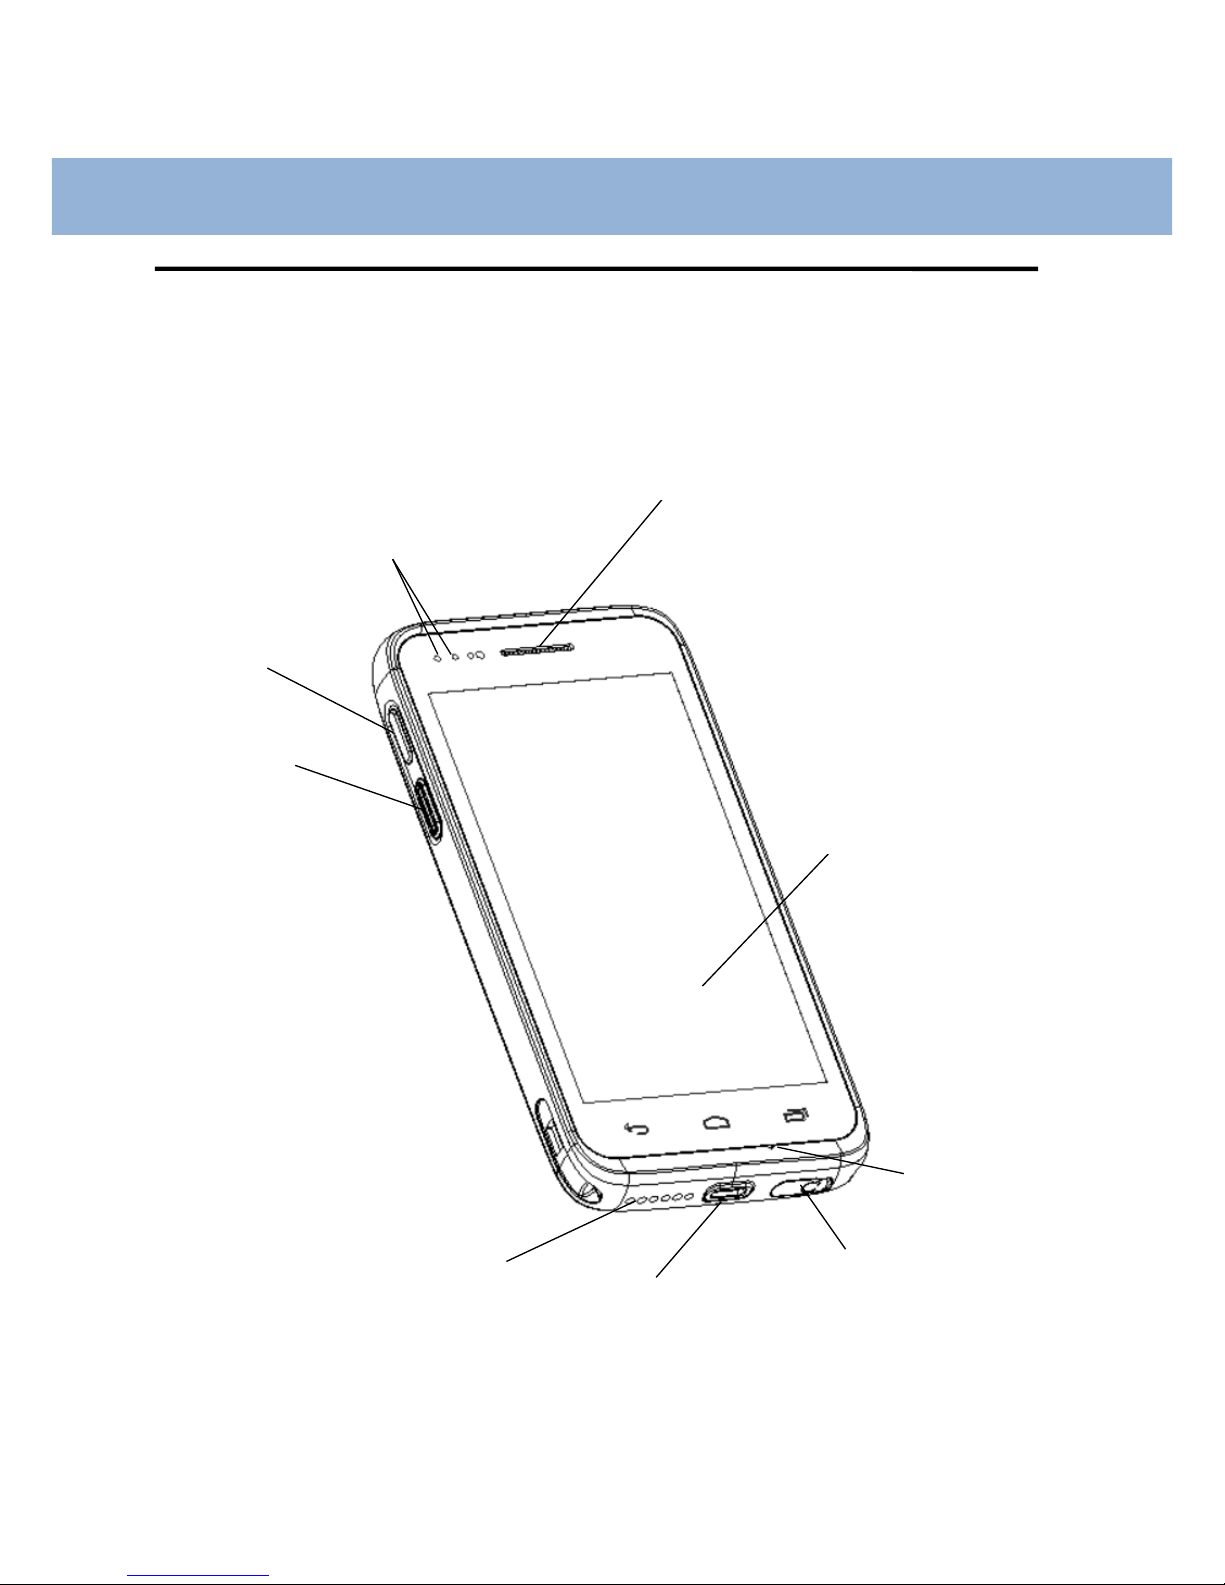
Overview of DS6 features
Front view
Scan trigger
Receiver
Microphone
5” HD IPS
Touch screen
Function
key
Speaker
Micro USB (Type-C)
port
Headset jack
LED
Indicators
10
Chapter 1: Introduction
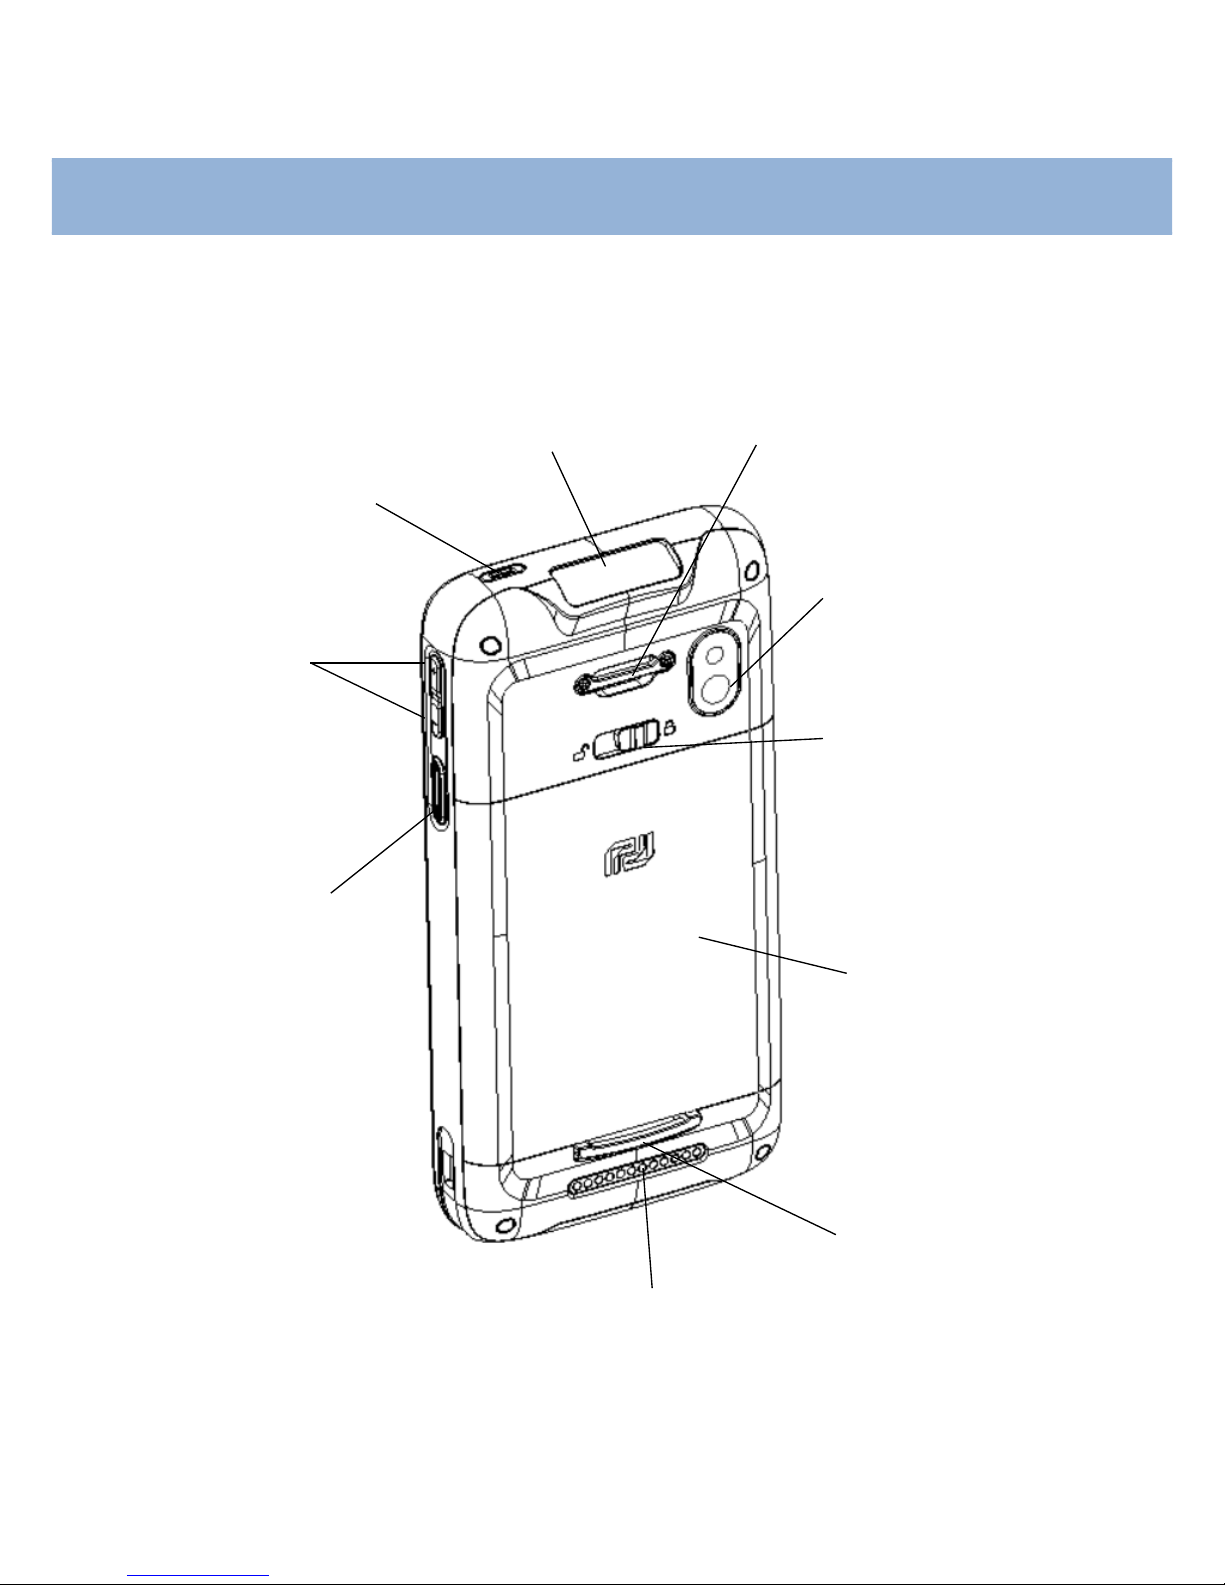
Back view
16 MP Camera
Barcode scanner
Battery lock lever
Scanner trigger
Hand belt hook
Volume key
Power button
Battery
Hand belt hook
Hand belt hook
Pogo

11
Chapter 2: Getting Started
This chapter will describe how to set up DS6 for the first time.
To start up the terminal,
Installing Micro SD / SAM / SIM card (optional)
Bumper Installation
Installing DS6 Battery
Cradle Adjustment
Connecting power source
Connecting cradles for multi-slot charging
Operating power of the terminal
Power Options
Home Screen (Android 7.1 Nougat)
Organize your Home Screen
Touch & Type
Android version & Updates
12
Chapter 2: Getting Started
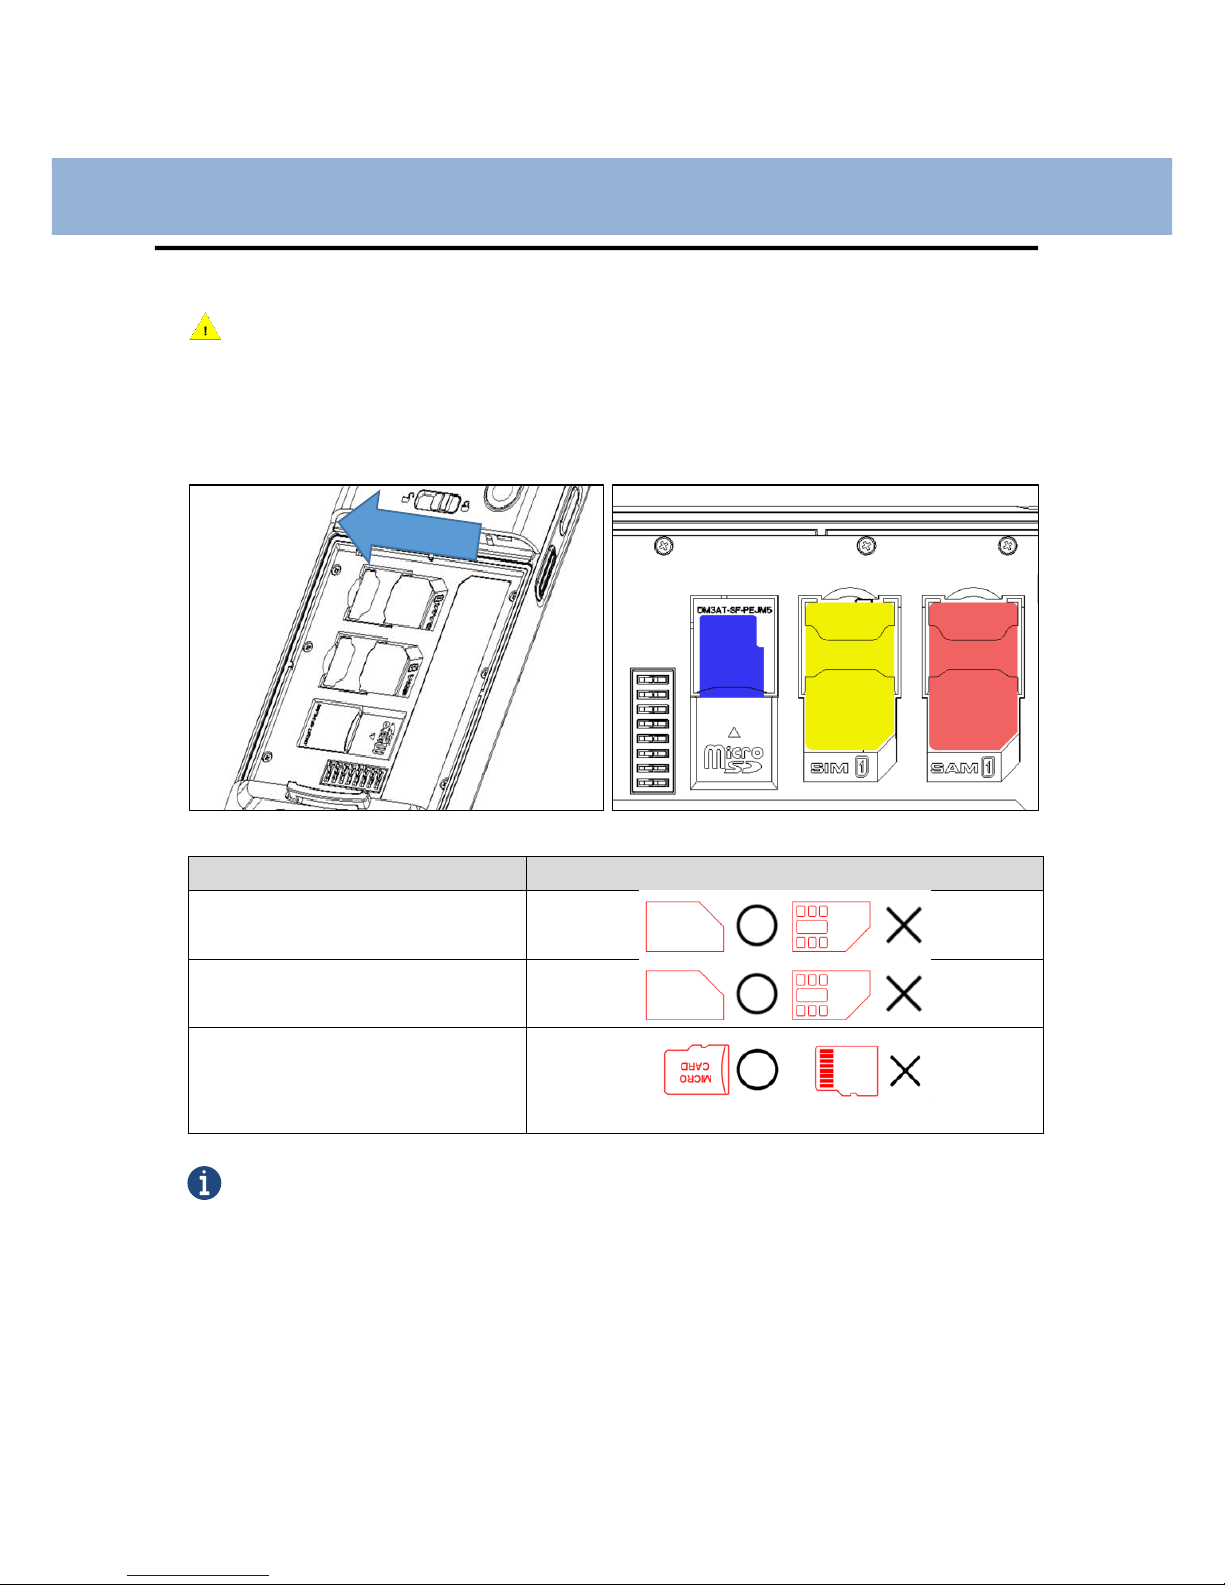
Installing Micro SD card/ SAM card/ SIM card (optional)
Important: Turn your device off before installing or removing a card. Be careful not to bend or scratch the card
and avoid exposing it to static electricity, water, or dirt. Keep cards out of the reach of small children.
Insert the card carefully as the shown below. Make sure that terminal part is correctly faced down
before inserting. Push the back end of the card to firm position.
Card types
Insert direction
SAM card
SIM card
Micro SD card
Note
Do not force too much when inserting the micro SD card. The micro SD card may be damaged.
If you install the micro SD card in the wrong position, the micro SD card may be damaged or it may cause the
malfunction of the micro SD card slot.
Keep the terminal part of the micro SD card clean and swipe the dust off the terminal part of the micro SD card.
Since the micro SD card is a consuming product, it may not be able to save data upon the end of its lifespan or
if used over certain times. In this case, it must be replaced with a new micro SD card.
13
Chapter 2: Getting Started
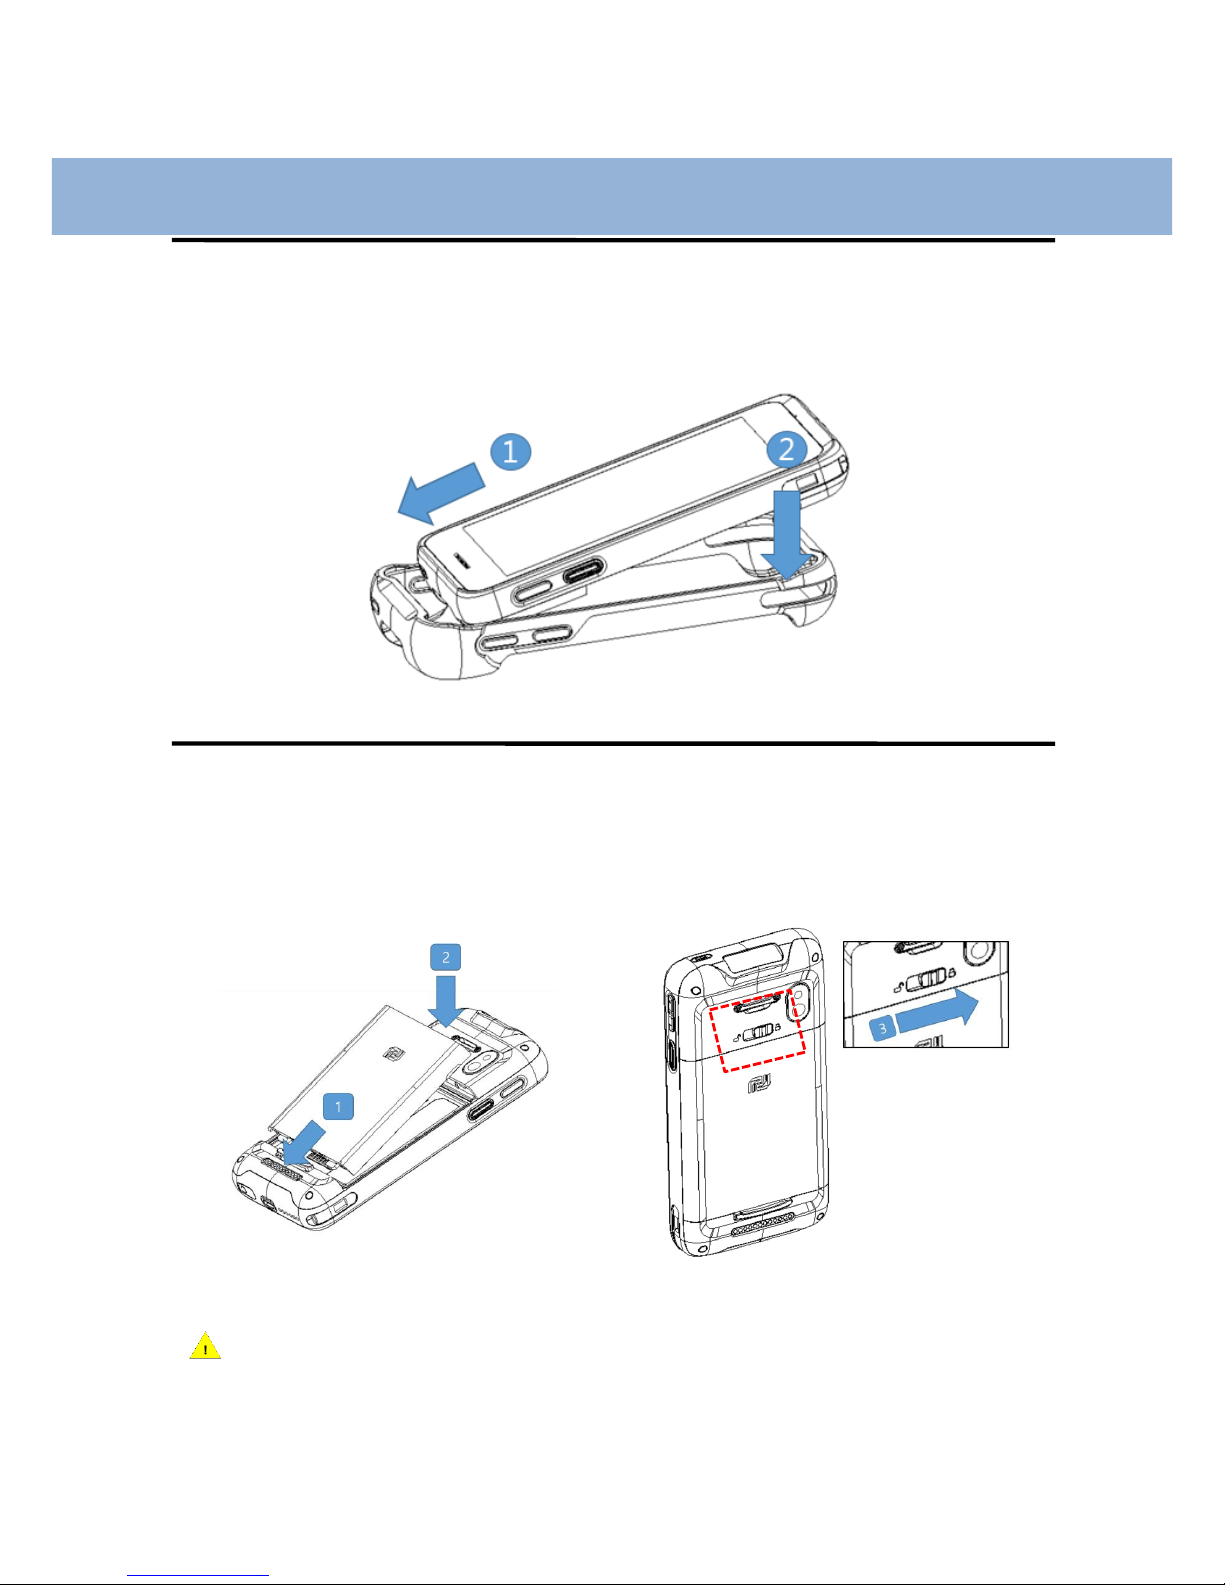
Bumper installation
Install bumper to the terminal as shown below.
Installing DS6 Battery
Align the bottom of the battery and press down the top.
Then, lock the battery by sliding the lever from left to right.
Caution If the Product is wet, do not put it in a device that may heat the terminal (heater, microwave oven,
etc.). Heating batteries may cause an explosion, deformation, or fault. (Water or any other liquid will change the color
of the label inside the terminal.)

14
Chapter 2: Getting Started
Battery power source
Series
Description
DS6
3.8V, 4000mAh (14.8Wh)
You may need to fully charge the battery before using your terminal for the first time.
Note
Battery Maintenance
Lithium-ion batteries have a limited life, which is affected by several factors; environment, storage, the number of charge/
discharge cycles, and level of discharge/charge.
To extend battery life, we recommend following these simple guidelines;
Avoid heat and humidity
If the terminal is not used regularly, fully recharge the battery at least once per month.
Do not leave the terminal connected to a charging device for more than 3 days.
Only use charging adapters that are approved
In case of storing terminal for 3 months or longer,
- The best temperature for proper care and storage is between 0~25°C
- It can cause batteries to discharge deeply, which can deteriorate the cell and reduce battery capacity,
service life, and the ability to recharge. Therefore, it is recommended that the battery be fully charged
before putting into the terminal and that it gets recharged fully every three months while in storage.
Update the terminal Operating System as new updates come available. OS updates may contain new programs
to optimize battery life.
Transportation
The contained lithium-ion batteries are subject to the Dangerous Goods Legislation requirements. The user can transport
the batteries by road without further requirements. When being transported by third parties (e.g.: air transport or
forwarding agency), special requirements on packaging and labeling must be observed. For preparation of the item being
shipped, consulting with a hazardous material expert is required.
Disposal
Rechargeable batteries must be recycled for environmental friendly purposes. Do not dispose batteries into household
waste. According to the European Guideline 2006/66/EC, defective or used battery packs/ batteries must be collected
separately and disposed in an environmentally correct manner. Batteries that is no longer suitable for use can be directly
returned at:
DSIC Co., Ltd.
PDA Dept. DSIC Bldg. 205-28, Gasan digital 1-ro, Guemchun-gu, Seoul, Korea
Tel: +82-2-2107-5178
Fax: +82-2-2107-5178
Email: dsic_pda@dsic.co.kr
Subject to change without notice

15
Chapter 2: Getting Started
Cradle Adjustment
Cradle comes with a spare piece for a device without bumper.
In that case, Install the piece manually into the Cradle.
Install a spare piece for bumper removed
Remove a spare piece for bumper installed
Tighten 2 screws into the two marked points
after mounting the spare piece
After removing 2 screws as above, lift up the
spare piece
Power Adapter
Recharge only with the charger specified by the manufacturer.
Power adapter
Specification
Mini USB Cable
5V, 3A
Desktop Cradle
5V, 3A / 12V, 7A
16
Chapter 2: Getting Started
Connecting power source
Connect power using one of the methods listed below.
Caution Verify that the terminal battery is installed prior to the connection. If the battery is not properly installed
and is connected to the wall charger, the terminal may power on and off continuously, preventing proper operation.
Note
Failure to unplug the wall charger before removing the battery may cause damage to the terminal.
The charging unit varies by country or region.
Use only the USB charging unit and micro USB cable that come with your device. Using a different charging unit
or cable may damage your device.
To avoid risk of injury or damaging your device, peel the protective film from the USB charging unit and USB
cable before charging the battery.
The input voltage ranges between the wall outlet and this charging unit is AC 100V–240V, and the charging unit’s
output voltage is DC 5V, 3A
Your DS6 can be charged via the USB port on a computer only when DS6 is in sleep mode (screen off) or
turned off. Charging through the USB port will take longer than charging with the USB charging unit.
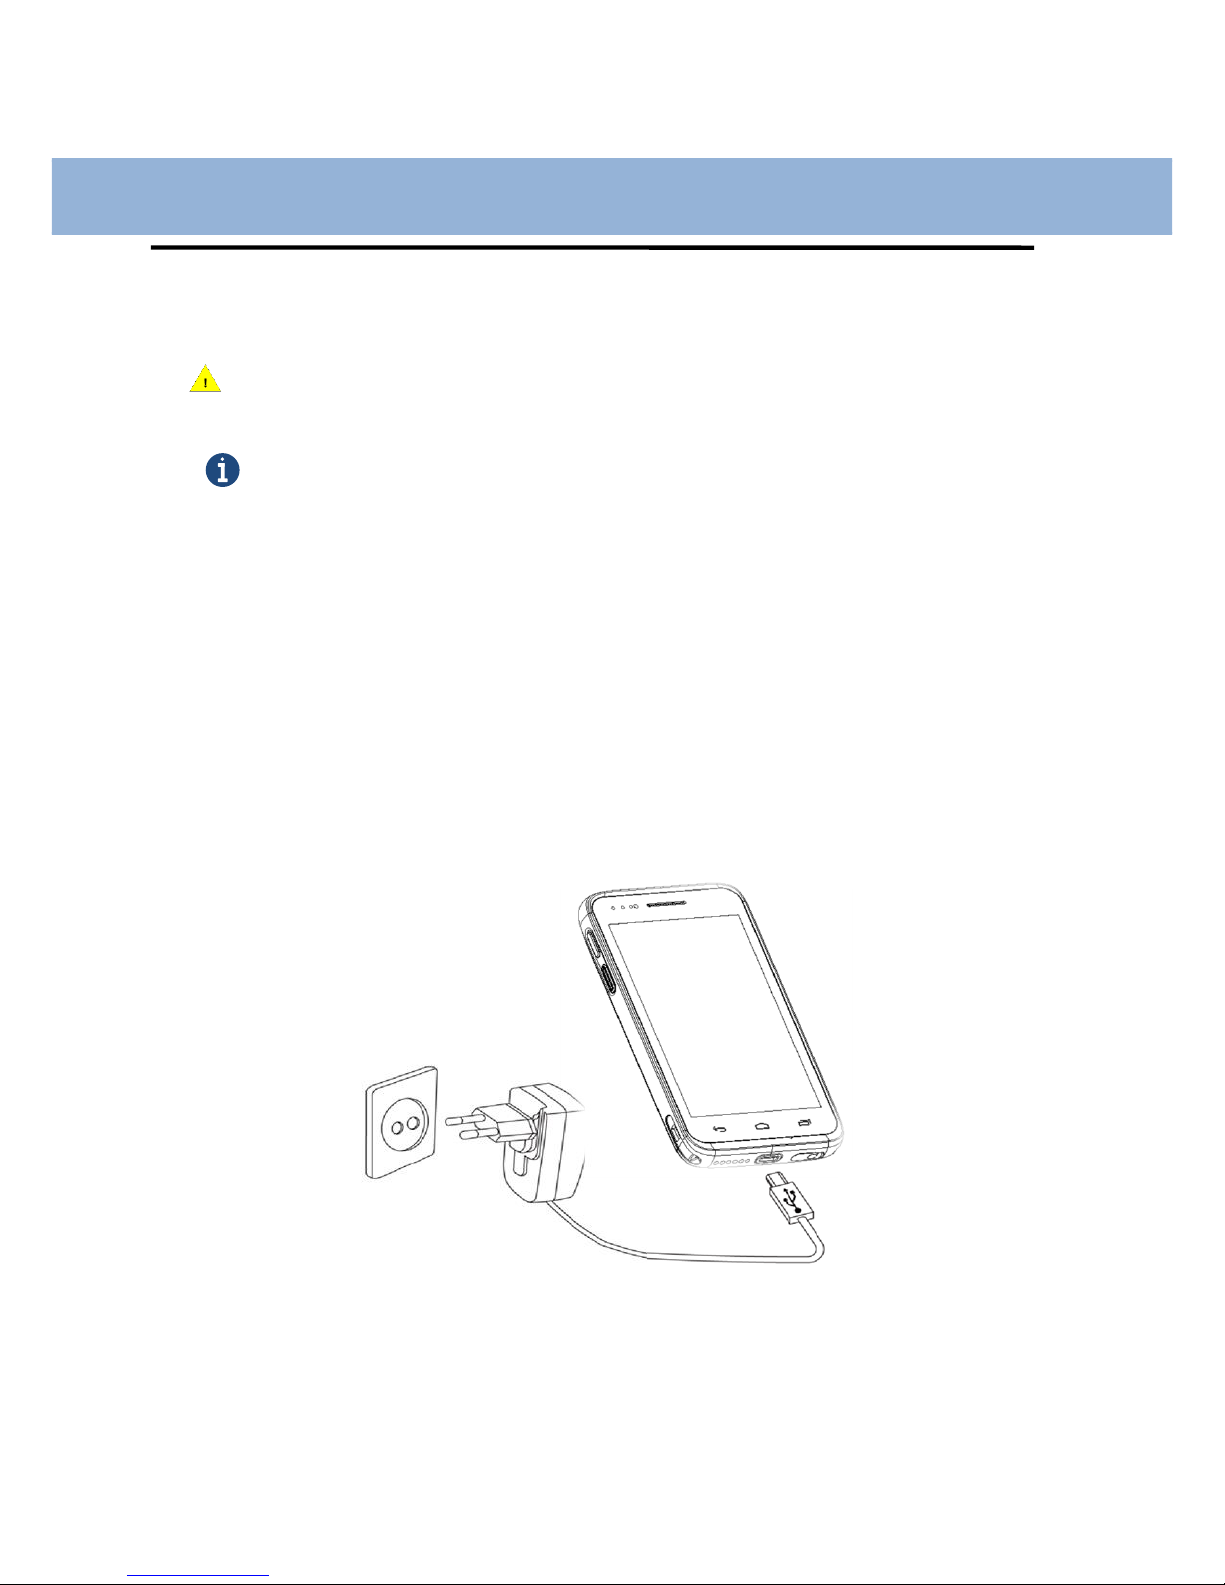
To use Micro USB Travel Charger
1. Plug the flat end of the mini USB Travel Charger into the Power interface connector
and the other end into standard AC wall outlet
2. When charging is finished, remove the flat end from the interface connector jack on
the terminal
17
Chapter 2: Getting Started
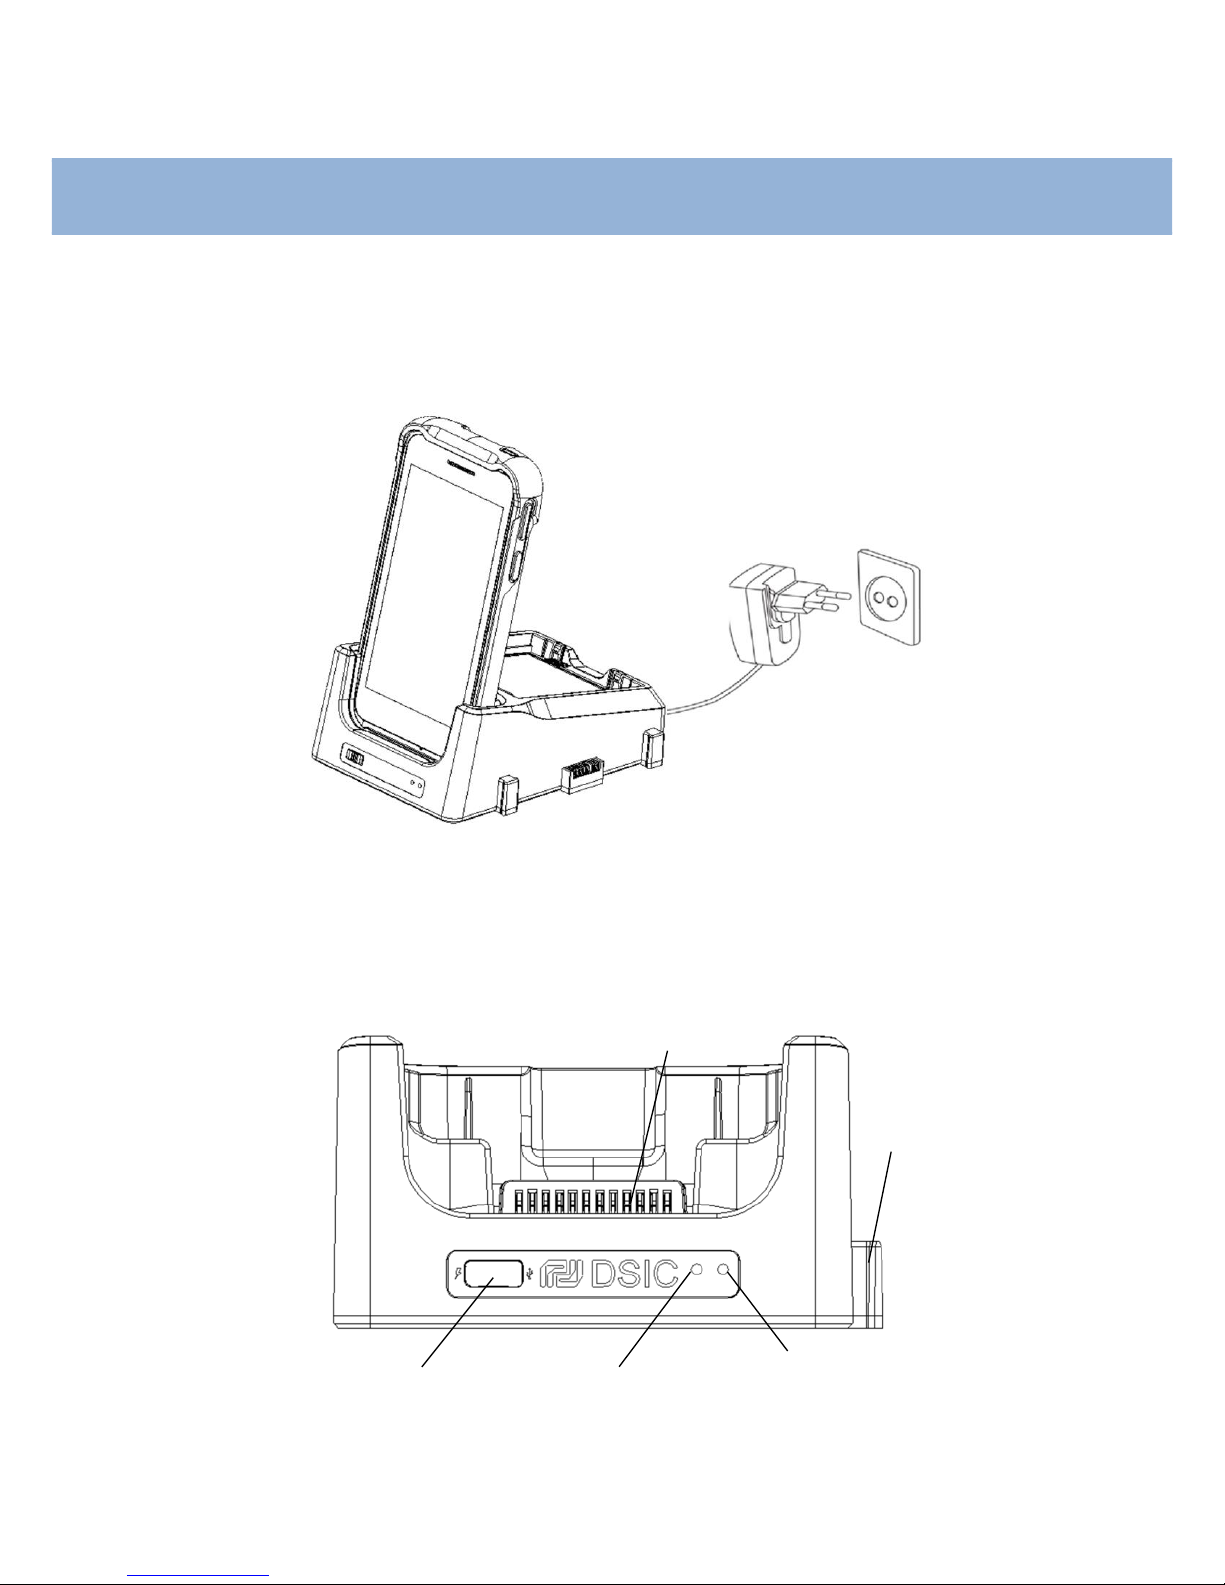
To use Cradle
Plug the AC power connector into the cradle and plug the other end into a power outlet.
Cradle front view
Slide switch: Turn the switch to choose charge or data sync mode.
Slide switch
LED indicator
(Spare battery charging)
Power indicator
(5V: Red / 12V: Green)
Blade connector
(Male)
Pogo interface
18
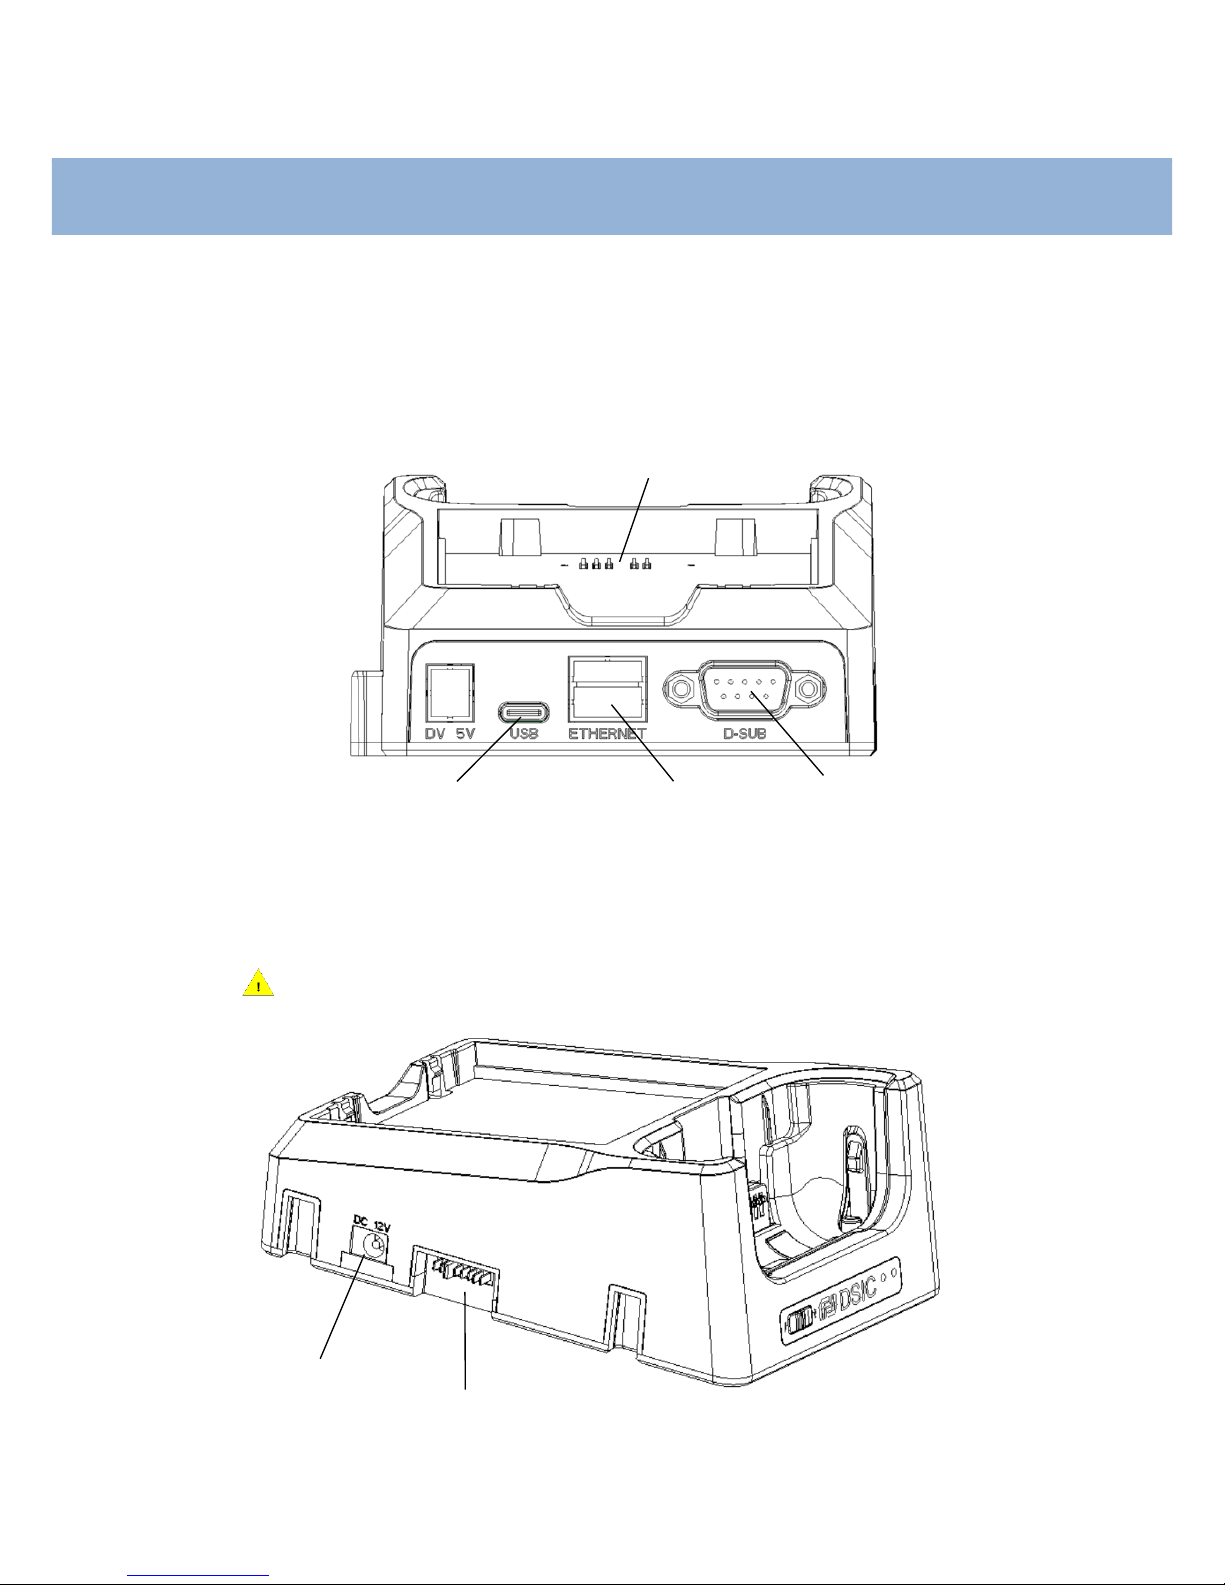
Chapter 2: Getting Started
Cradle back view
AC Adapter: Charging DS6 and spare battery simultaneously
Micro USB: PC sync and charging DS6 only. It is not able to charge spare battery.
Cradle right side view
To connect power into desktop cradle, use AC Adapter port 5V / 12V on the right side.
Caution Make sure that you use 12V AC Adapter.
RS232
(female)
Micro USB port
(C-type)
Ethernet
port
AC Adapter port
(5V / 12V)
Blade Connector
(Female)
Spare battery
charging slot
 Loading...