

Page 1
DS2 User Manual Ver.0 2016. 08. 18
1
DS2 Series
User Manual
Android 5.1.1
Aug. 18, 2016
ISO 9001 Certified
Quality Management System
Page 2

DS2 User Manual Ver.0 2016. 08. 18
2
○C 2016 DSIC Co., Ltd.
All Rights Reserved.
Notice
While reasonable efforts were made to ensure that the information in this document was complete
and accurate at the time of printing, DSIC Co., Ltd. can assume to no liability for any errors. Changes
and corrections to the information in this document might be incorporated in future release.
Document disclaimer
DSIC Co., Ltd. is not responsible for any modifications, additions, or deletions to the original
published version of this documentation unless Customer and/or End User agree to indemnity and
hold harmless DSIC, DSIC’s agents, servants, and employees against all claims, lawsuits, demands
and judgments arising out of, or in connection with, subsequent modifications, additions, or
deletions to this documentation to the extent made by the Customer or End User.
Link disclaimer
DSIC Co., Ltd. is not responsible for the contents or reliability of any linked Web sites referenced
elsewhere within this documentation, and DSIC does not necessarily endorse the products, services,
or information described or offered within them. We cannot guarantee that these links will work at
all times and we have no control over the availability of the linked pages.
Warranty
DSIC Co., Ltd. provides a limited warranty on this product. Refer to the sales agreement for more
information on the terms of the limited warranty. In addition, DSIC’s standard warranty language,
as well as information regarding support for this product, while under warranty, is available through
the DSIC Support Web site: http://www.mobilebaseglobal.com
Copyright
Except where expressly stated otherwise, the Product is protected by copyright and other laws
respecting proprietary rights. Unauthorized reproduction, transfer, and/or use could be a criminal
offense, as well as a civil offense under the applicable law.
Third-party components
Certain software programs or portions thereof included in the Product may contain software
distributed under third party agreements (“Third Party Components”), which may contain terms that
expand or limit rights to use certain portions of the Product (“Third Party Terms”).
Page 3

DS2 User Manual Ver.0 2016. 08. 18
3
Trademarks
All other trademarks are the property of their respective owners.
Downloading documents
For the most current versions of the manual, visit our DSIC Support Web site:
http://www.mobilebase.co.kr
Contact DSIC Support
DSIC Co., Ltd. provides a technical support customer service for you to report problems or to ask
questions about the product. Please contact us through our email: [email protected]. For
additional support, visit the DSIC Web site: http://www.mobilebase.co.kr
DS2 is a trademark of DSIC Co., Ltd.
MOBILEBASE is a brand name of DSIC rugged mobile computer.
The Bluetooth word mark and logos are owned by Bluetooth SIG, Inc.
All trademarks and trade names are the property of their respective owners.
Page 4

DS2 User Manual Ver.0 2016. 08. 18
4
Contents
Revision History ........................................................................................................................................................................... 6
Chapter 1: Introduction to the DS2 ................................................................................................................................ 8
Specifications ................................................................................................................................................................................. 8
Overview of terminal features ...................................................................................................................................... 9
Chapter 2: Getting Started ................................................................................................................................................ 11
SIM card installation ...................................................................................................................................................... 12
Battery mounting and operation ............................................................................................................................. 13
Connecting power source ........................................................................................................................................... 15
Operating power of the terminal ............................................................................................................................ 16
Home Screen ..................................................................................................................................................................... 17
Get around ................................................................................................................................................................ 17
DS2 navigation buttons ...................................................................................................................................... 17
Status bar ................................................................................................................................................................... 18
Quick Settings ......................................................................................................................................................... 18
Manage battery life .............................................................................................................................................. 18
Organize your Home screens ........................................................................................................................... 19
Touch & type ........................................................................................................................................................... 19
Android version & updates ........................................................................................................................................ 20
Chapter 3: Essentials ............................................................................................................................................................. 21
Display .................................................................................................................................................................................. 21
Sound and notification ................................................................................................................................................. 21
Security ................................................................................................................................................................................ 23
Printing ................................................................................................................................................................................. 23
File storage ......................................................................................................................................................................... 23
Screenshots ........................................................................................................................................................................ 24
Chapter 4: Use the keyboard ........................................................................................................................................... 25
Enter & edit text .............................................................................................................................................................. 25
Emoji ..................................................................................................................................................................................... 26
Use next-word suggestions ........................................................................................................................................ 26
Keyboard dictionaries .................................................................................................................................................... 27
Chapter 5: Try some apps ................................................................................................................................................. 28
All Apps ............................................................................................................................................................................... 28
Gallery .................................................................................................................................................................................. 28
Contacts ............................................................................................................................................................................... 29
Calendar .............................................................................................................................................................................. 29
Chapter 6: Settings ................................................................................................................................................................ 30
Chapter 7: Accessibility ....................................................................................................................................................... 31
Page 5

DS2 User Manual Ver.0 2016. 08. 18
5
Chapter 8: Application Guide .......................................................................................................................................... 32
Barcode Tray ...................................................................................................................................................................... 32
File Manager ...................................................................................................................................................................... 35
Key Mapping ..................................................................................................................................................................... 35
OTA Update........................................................................................................................................................................ 39
Chapter 8: Developer’s Guide ......................................................................................................................................... 40
USB Driver .......................................................................................................................................................................... 40
OS Update .......................................................................................................................................................................... 40
Emergency Update ......................................................................................................................................................... 40
Barcode scanner API ...................................................................................................................................................... 41
Environments ........................................................................................................................................................... 41
Basic Implementation .......................................................................................................................................... 42
Controlling scanning & barcode using AIDL ............................................................................................ 45
KIOSK MODE ..................................................................................................................................................................... 52
Password change ................................................................................................................................................... 53
Notification clear .................................................................................................................................................... 53
Setting Background .............................................................................................................................................. 54
Admin Setting ................................................................................................................................................................... 54
Device Administration ................................................................................................................................................... 55
Page 6

DS2 User Manual Ver.0 2016. 08. 18
6
Revision History
Date
Description
Link
Aug.12.2016
Released Manual
Nov.28.2016
Barcode Tray Update
Page 7
DS2 User Manual Ver.0 2016. 08. 18
7
Safety Instruction
Read this instruction carefully to keep yourself safe and to avoid the loss of property.
Make sure that battery terminals (metal part) do not come into contact with any
conductive materials like a necklace or coin. Also make sure that batteries do not get
damaged by teeth or nails. Impact may cause an explosion of batteries.
Use dedicated batteries only and do not use the batteries for any purposes other than
operating this product. Using an inauthentic battery may reduce the lifespan of the
product, or cause an explosion.
Make sure to use the adapter or the standard charger supplied with this product. Using
an inauthentic charger may reduce the lifespan of the batteries or cause an explosion.
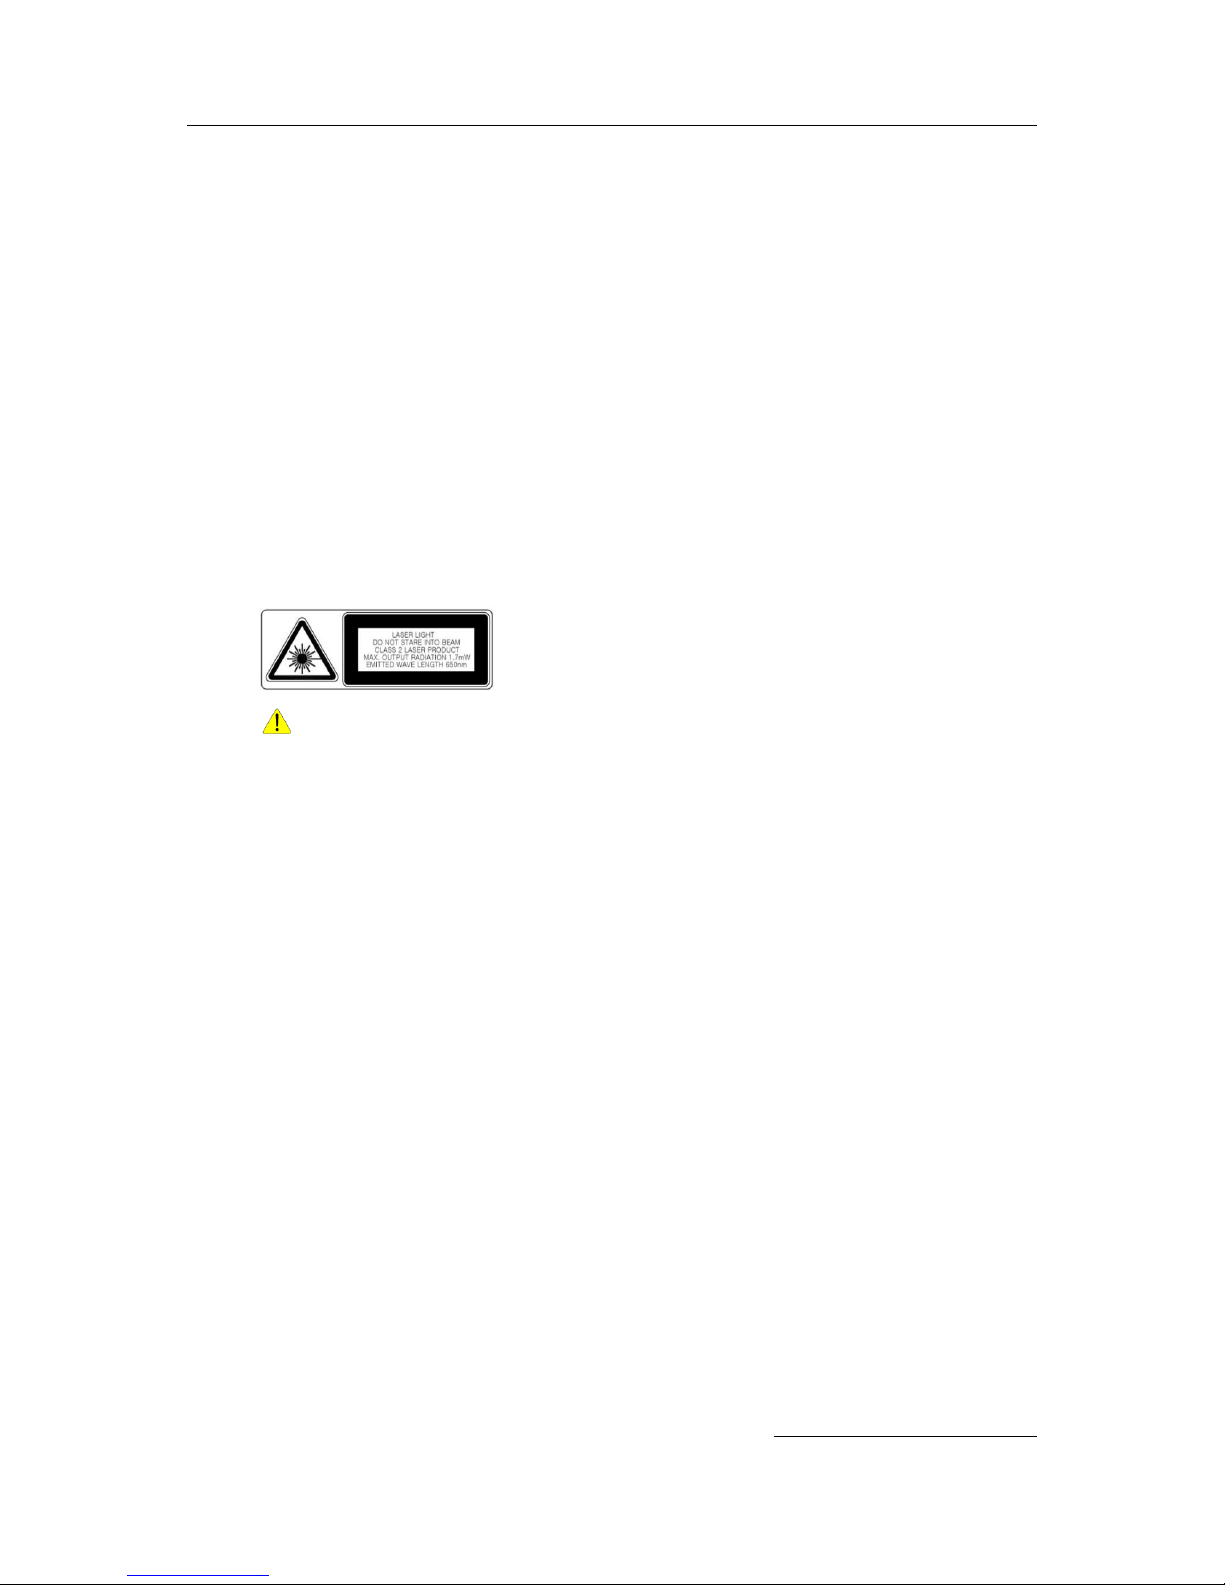
Caution in relation with Laser Scanner
Do not flash scanner into human and animal’s eyes. It may cause damages to retina and amblyopia.
Caution in relation with Batteries
Batteries may explode when damaged, impacted, heated, flooded, or taken apart with
a gimlet. Make sure to keep the batteries out of reach of children or pets.
Do not use the Product in the area with the risk of explosion.
Safety information
This Product is compliant with EMC. For safety and health reasons, use the authentic
parts supplied by the manufacturer. Any inauthentic parts may affect safety.
Do not press the power button when the Product is wet. Touching the adapter or power
cord with wet hands may cause an electric shock.
Do not modify, disassemble, or repair the product at your discretion. Also make sure to
follow the safety instructions.
Record the data in the Product and keep it in a separate place. Data stored in the
Product may be deleted during repairing or upgrading the Product. So, make sure to
back up important data.
Do not use this Product in a hot or humid place. Using the product under a hot/humid
temperature such as rain or sauna may cause a trouble.
Keep this Product away from magnetic products such as credit card, telephone card,
bank book, and traffic ticket. The magnetic field of the terminal may affect the data.
Page 8

DS2 User Manual Ver.0 2016. 08. 18
8
When storing a battery for a long period of time, recharge it and keep it at a room
temperature. Even a fully charged battery will suffer reduced lifespan due to the char
acteristics of the battery.
Chapter 1: Introduction to the DS2
Specifications
Characters
Descriptions
Display
5.inch WVGA (480x854) / Capacitive multi-touch
Dimensions (mm)
79 x 157 x 19
Weight (g)
220g including battery
Battery
4,000mAh rechargeable Li-polymer
Operating System
Android AOSP 5.1 Lollipop
Processor
1.4GHz Quad-core
Memories(RAM/ROM)
1GB/ 4GB
Interface
Micro USB-A type
Audio
Speaker
LED & Indication
Charging LED, Notification LED (Multi-color & Programmable), Vibration
Key buttons
Scan (left & right), Power
Sealing & Drop
IP54, 1.5m multi-drop resistance to concrete
Storage Temperature
-25°C to 70°C
Operating Temperature
-20°C to 60°C
Humidity
95% non-condensing
Regulatory
KCC, CE, FCC, CCC, RoHS complaint
Optional Integration Features
WLAN
IEEE 802.11 b/g/n, or a/b/g/n (optional)
WLAN Security
WEP, WPA-PSK, WPA2-PSK, 802.1x EAP
(PEAP-MSCHAPV2, PEAP-GTC, TLS, TTLS-PAP, TTLS-MSCHAP, TTLS-MSCHAPV2, TTLS-GTC,
PWD)
WPAN
Bluetooth v4.0 (Bluetooth
○
R
Smart Technology)
Scanner
Integrated 1D CCD, or 2D Imager
Warranty
1 year manufacturer’s warranty
Default Accessories
· micro USB cable for charging & PC sync
· AC/DC Adapter & Country configured adaptor plug
· Screen protection film
· Hand strap
Optional Accessories
Cradle Kit
Battery Quad charger
Page 9
DS2 User Manual Ver.0 2016. 08. 18
9
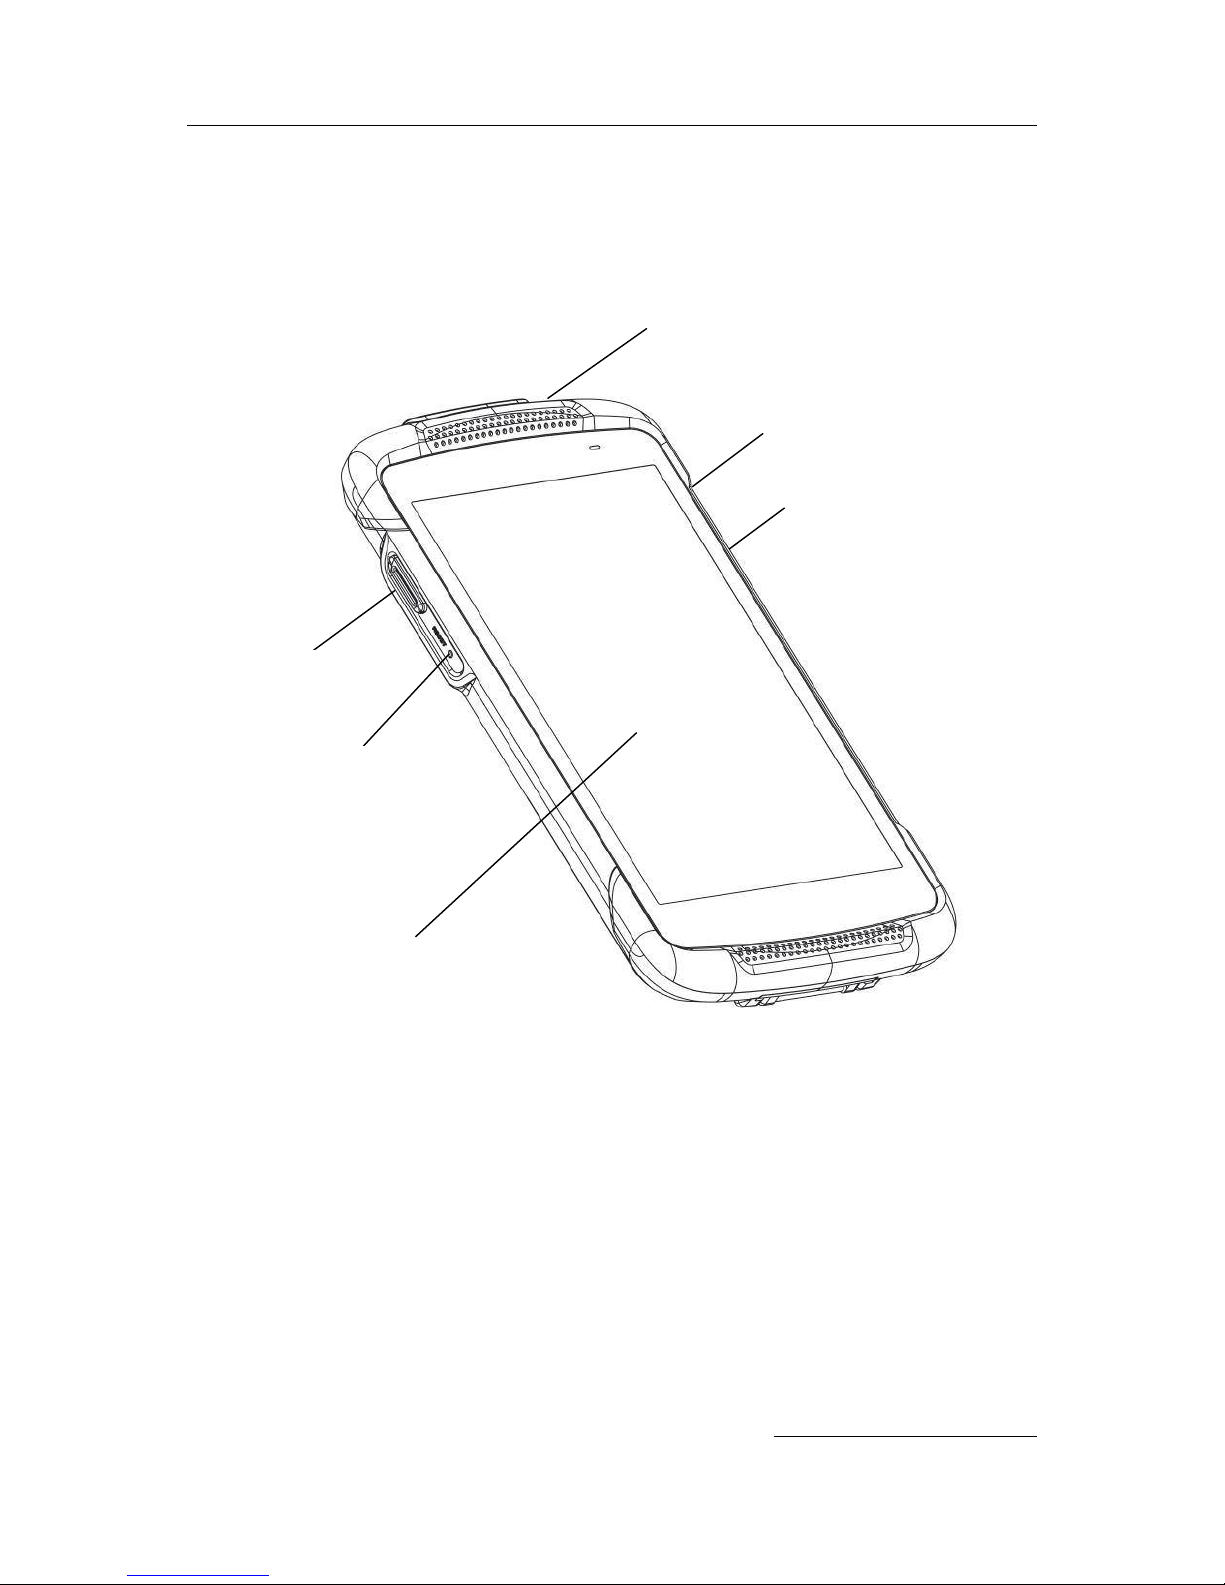
Overview of terminal features
Front view
Scanner trigger
(Programmable)
Micro USB port
5inch WVGA
touch screen
Reset
Scanner trigger
(Programmable)
Power Button
Page 10

DS2 User Manual Ver.0 2016. 08. 18
10
Back view
Speaker
Barcode scanner
Battery cover
Battery cover lock
Scanner trigger
Power button
Hand belt hook
Hand belt hook
Barcode scanner
Micro USB port
Page 11

DS2 User Manual Ver.0 2016. 08. 18
11
Chapter 2: Getting Started
This chapter will describe how to install and charge battery, mount micro SD card and start the
terminal
To start up the terminal,
Install Micro SD card
Mount battery
Connect power source
Operate power of terminal
Made your Home screen
Page 12
DS2 User Manual Ver.0 2016. 08. 18
12
Micro SD card installation
Important: Turn your device off before installing or removing a card. Be careful not to bend or scratch the card
and avoid exposing it to static electricity, water, or dirt. Keep cards out of the reach of small children.
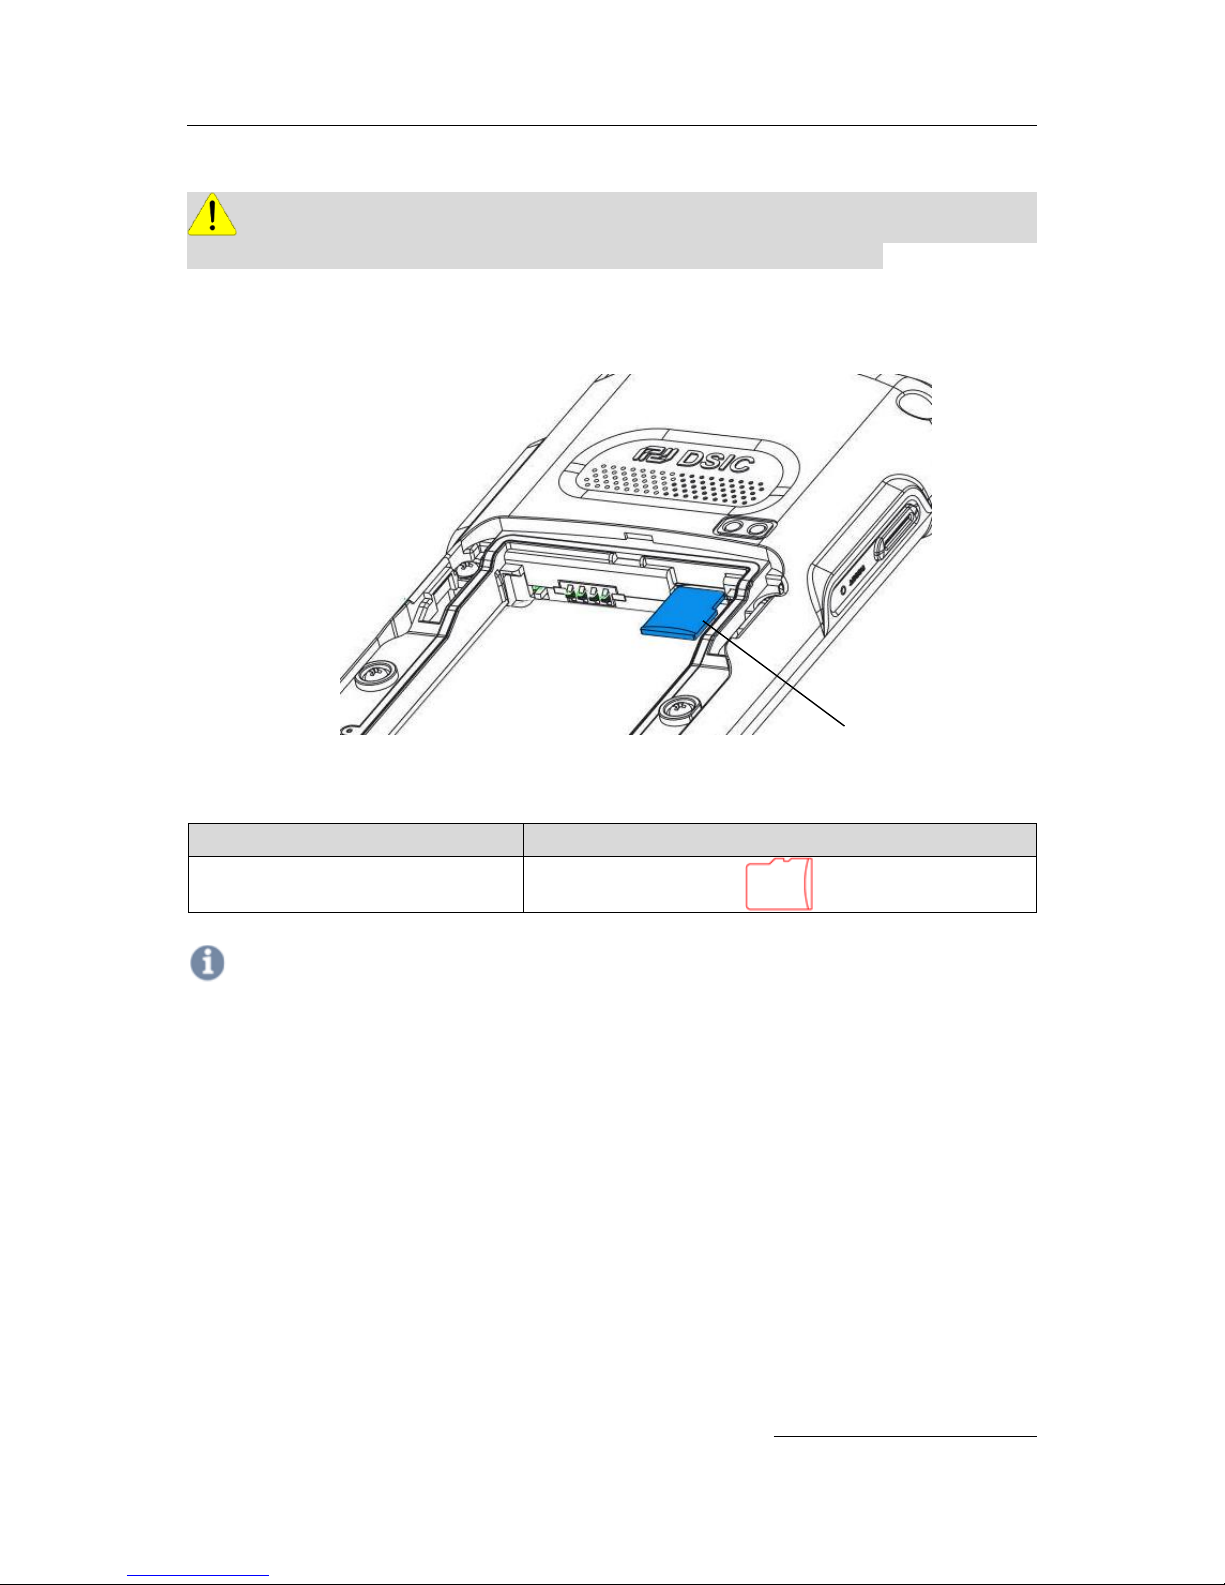
Insert the card carefully as shown in the following picture. Make sure the card terminal is correctly
faced up before inserting. Push the back end of the card to firmly position the card.
Card types
Insert direction
Micro SD card
Note
Do not force too much when inserting the micro SD card. The micro SD card may be damaged.
If you install the micro SD card in the wrong position, the micro SD card may be damaged or it may cause the
malfunction of the micro SD card slot.
Keep the terminal part of the micro SD card clean and swipe the dust off the terminal part of the micro SD card.
Since the micro SD card is a consuming product, it may not be able to save data upon the end of its lifespan or
if used over certain times. In this case, it must be replaced with a new micro SD card.
Micro SD card
Page 13
DS2 User Manual Ver.0 2016. 08. 18
13
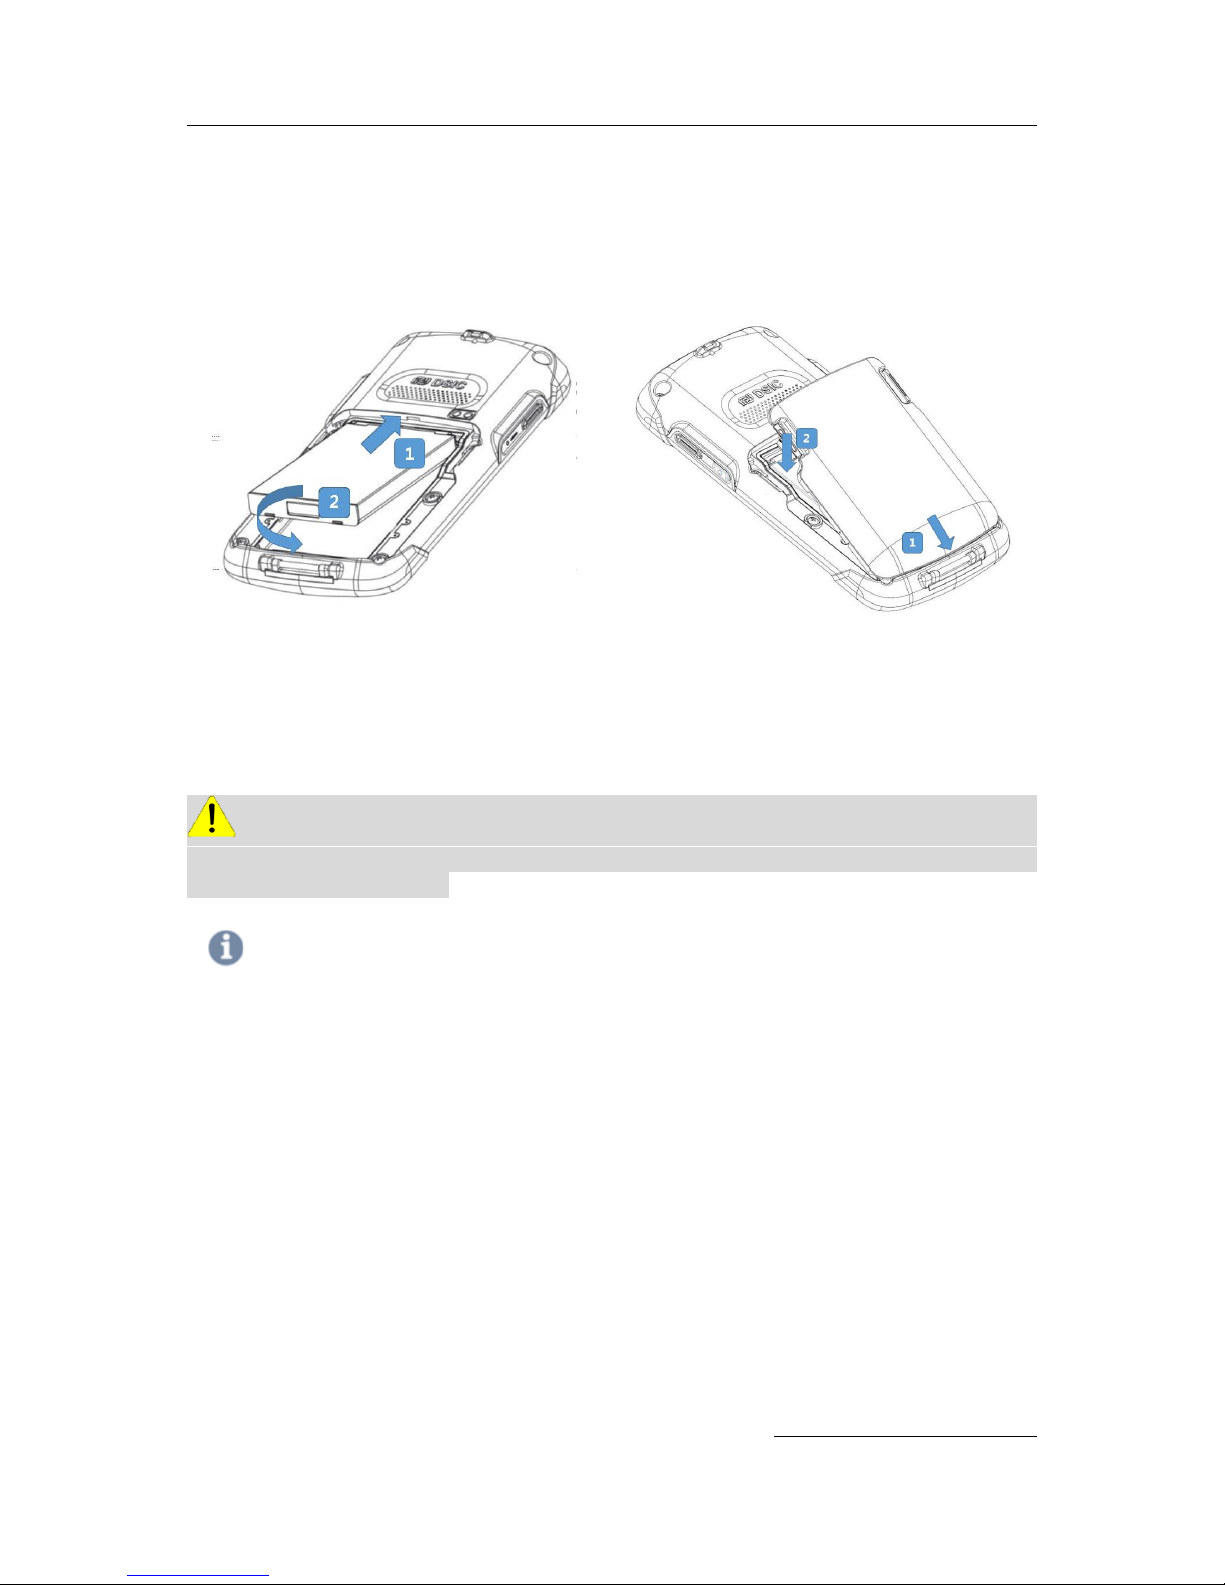
Battery mounting and operation
Slide in a battery and press down to mount clear
Then, install battery cover to the device and lock as process
Slide in a battery and press down to mount
clear
Install battery cover to the device and lock as
picture above
Caution If the Product is wet, do not put it in a device that may heat the terminal (heater, microwave ove
n, etc.). Heating batteries may cause an explosion, deformation, or fault. (Water or any other liquid will change the c
olor of the label inside the terminal.
Note
Battery Maintenance
Lithium-ion batteries have a limited life, which is affected by several factors; environment, storage, the number of charge/
discharge cycles, and level of discharge/charge.
To extend battery life, we recommend following these simple guidelines;
Avoid heat and humidity
If the terminal is not used regularly, fully recharge the battery at least once per month.
Do not leave the terminal connected to a charging device for more than 3 days.
Only use charging adapters that are approved
In case of storing terminal for 3 months or longer,
- The best temperature for proper care and storage is between 0~25°C
- It can cause batteries to discharge deeply, which can deteriorate the cell and reduce battery capacity,
service life, and the ability to recharge. Therefore, it is recommended that the battery be fully charged
before putting into the terminal and that it gets recharged fully every three months while in storage.
Update the terminal Operating System as new updates come available. OS updates may contain new programs
to optimize battery life.
Page 14

DS2 User Manual Ver.0 2016. 08. 18
14
Transportation
The contained lithium-ion batteries are subject to the Dangerous Goods Legislation requirements. The user can transport
the batteries by road without further requirements. When being transported by third parties (e.g: air transport or
forwarding agency), special requirements on packaging and labeling must be observed. For preparation of the item being
shipped, consulting with a hazardous material expert is required.
Disposal
Rechargeable batteries must be recycled for environmental friendly purposes. Do not dispose batteries into household
waste. According to the European Guideline 2006/66/EC, defective or used battery packs/ batteries must be collected
separately and disposed in an environmentally correct manner. Batteries that is no longer suitable for use can be directly
returned at:
DSIC Co., Ltd.
2nd Floor, Daeryung Technotown 3, 448 Gasan-Dong, Guemchun-Gu, Seoul, Korea
Tel. Service: +82-2-2107-5152
Fax: +82-2-2107-5178
Email:[email protected]
Page 15
DS2 User Manual Ver.0 2016. 08. 18
15
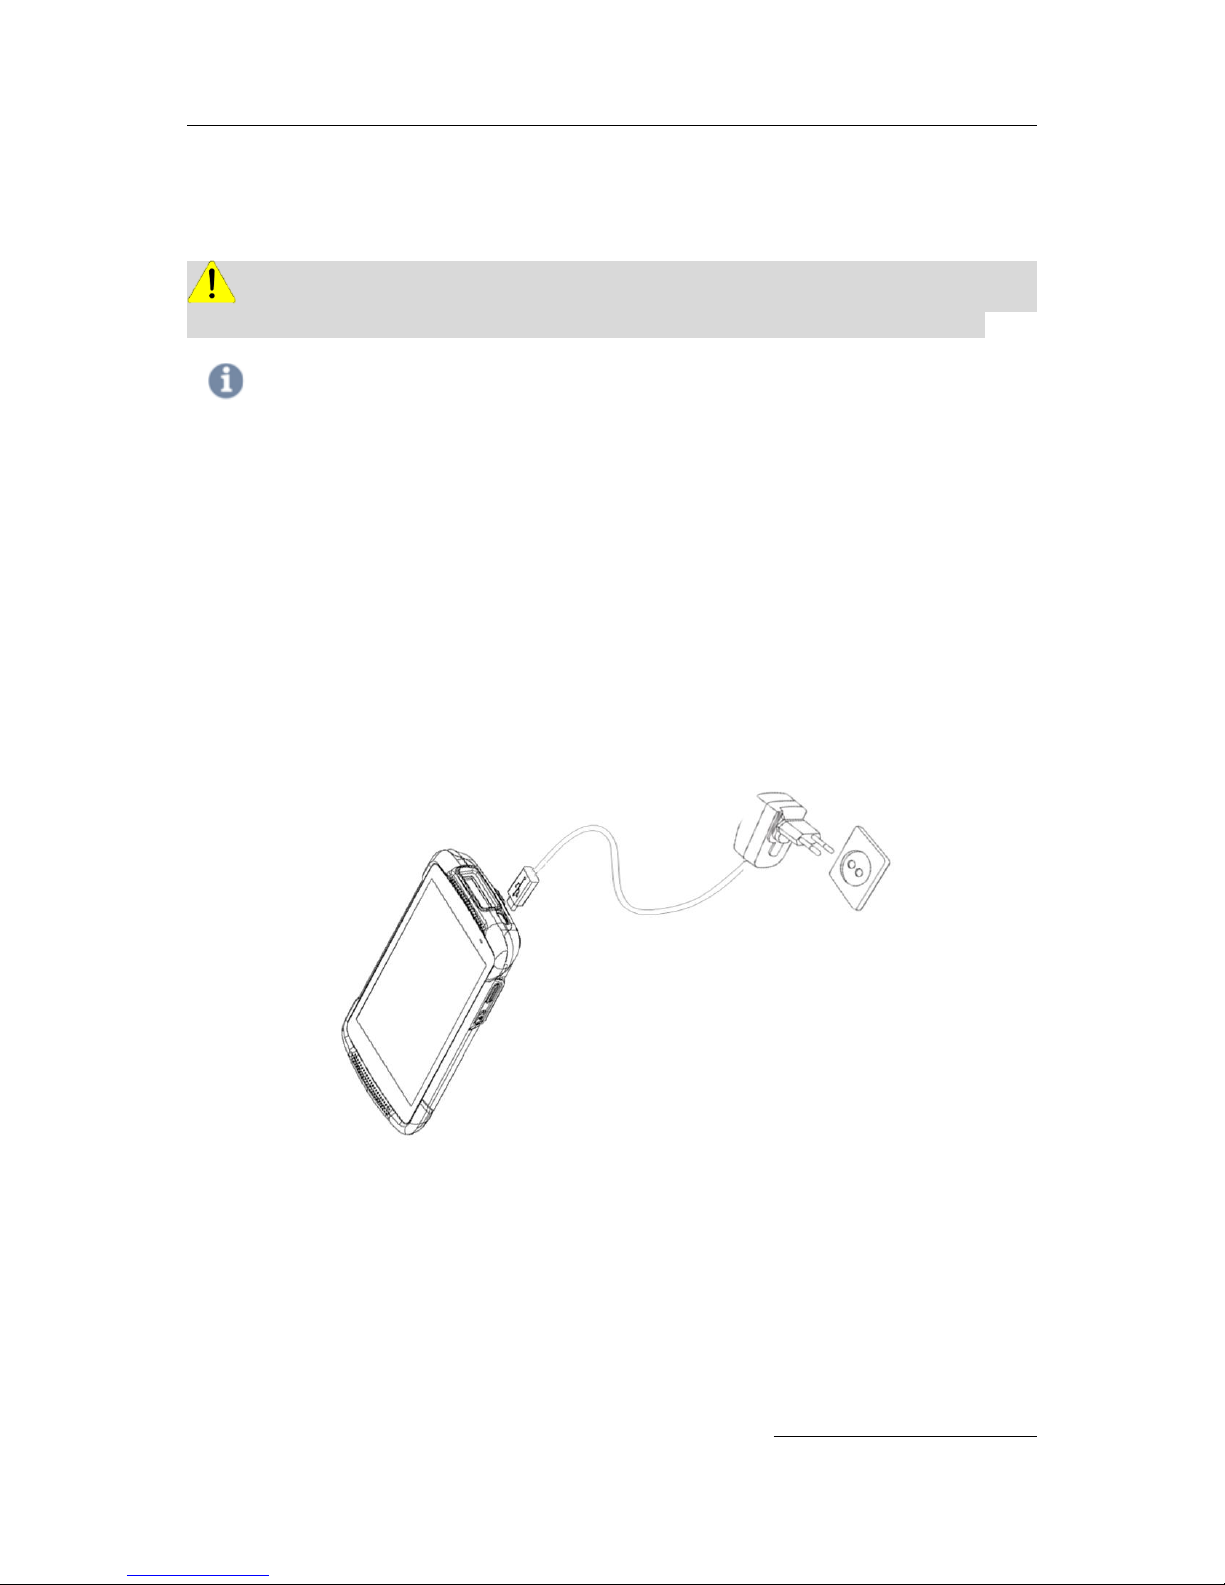
Connecting power source
Connect power using one of the method listed below.
Caution Verify that the terminal battery is installed prior to the connection. If the battery is not properly installed
and is connected to the wall charger, the terminal may power on and of continuously, preventing proper operation.
Note
Failure to unplug the wall charger before removing the battery may cause damage to the terminal
The charging unit varies by country or region.
Use only the USB charging unit and micro USB cable that come with your device. Using a different charging unit
or cable may damage your device.
To avoid risk of injury or damaging your device, peel the protective film from the USB charging unit and USB
cable before charging the battery.
The input voltage range between the wall outlet and this charging unit is AC 100V–240V, and the charging unit’s
output voltage is DC 5.2V, 1.35A.
Your DS2 can be charged via the USB port on a computer only when DS2 is in sleep mode (screen off) or
turned off. Charging through the USB port will take longer than charging with the USB charging unit.
To use micro USB Travel Charger
1. Plug the flat end of the micro USB Travel Charger into the Power interface connector and
the other end into the standard AC wall outlet.
2. When the charging is finished, remove the flat end from the interface connector.
Page 16
DS2 User Manual Ver.0 2016. 08. 18
16
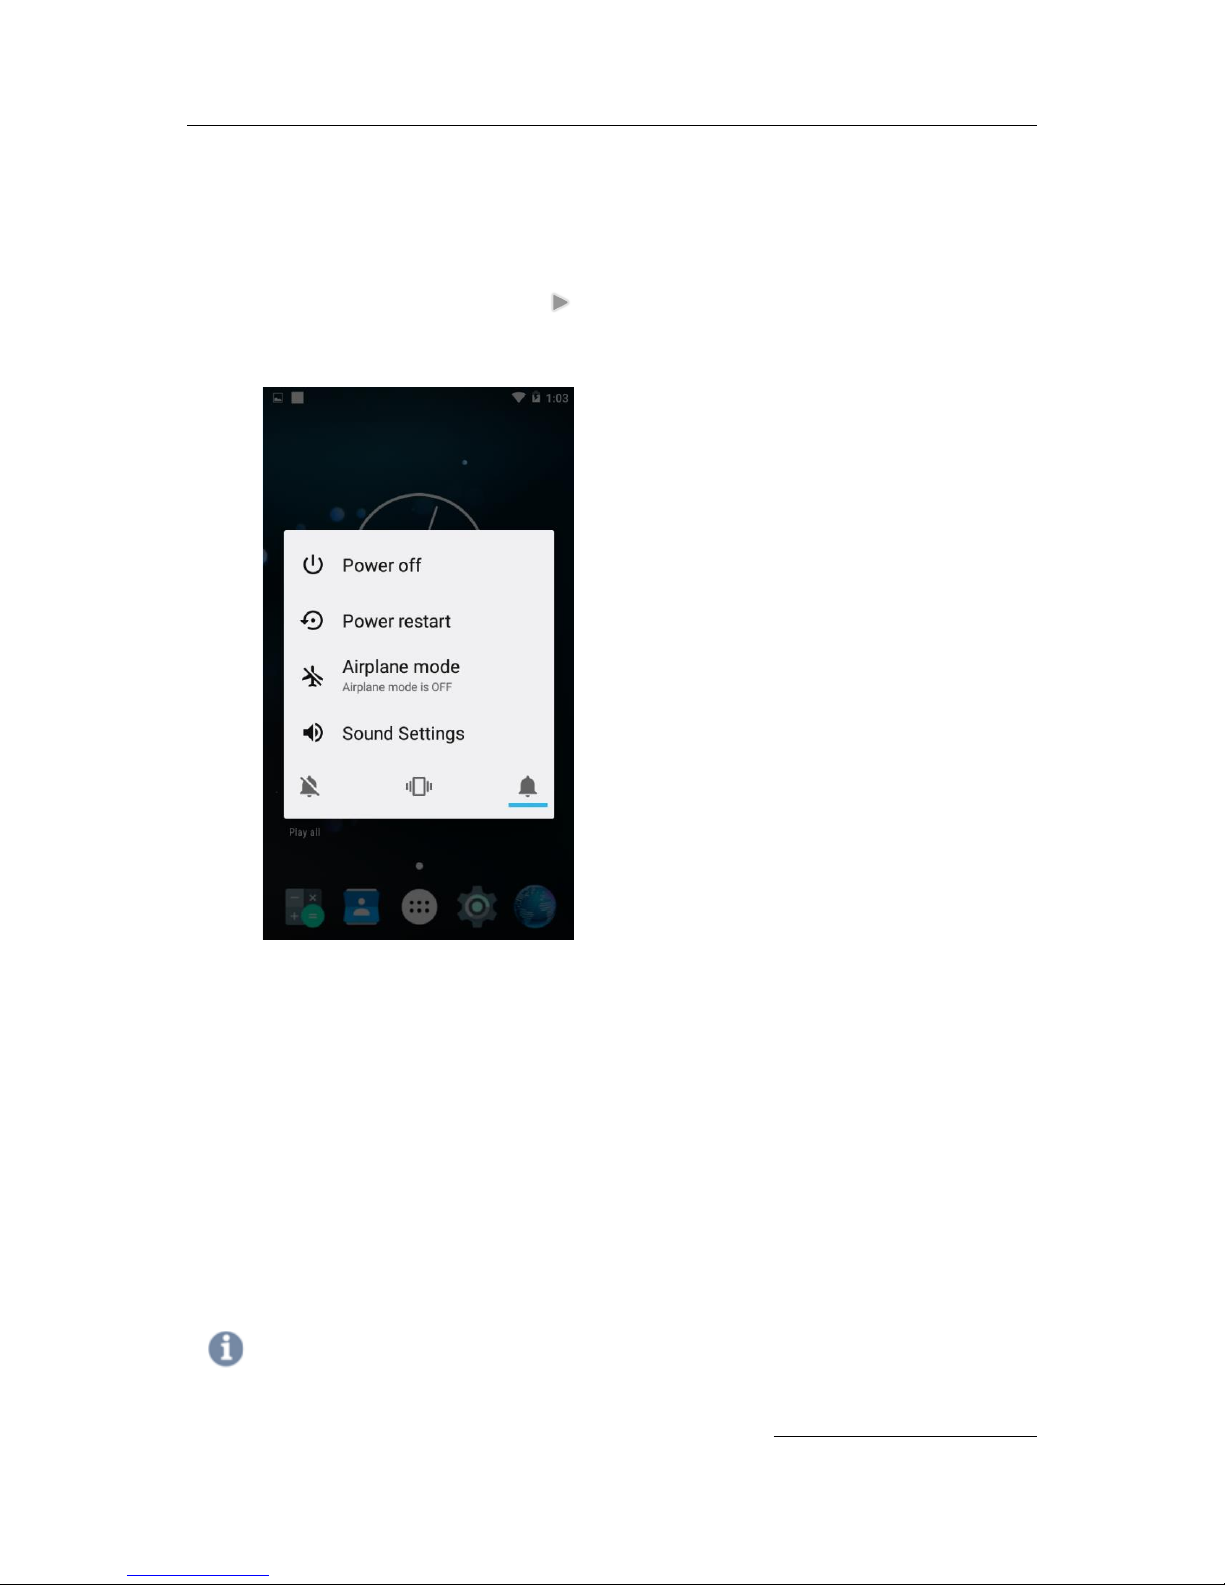
Operating power of the terminal
Power on / off
Make a long press Power button at the right side of the terminal to turn on.
When you first turn on your device, you’ll see a Welcome screen. Choose the right language
you want and touch Start or the Start icon.
Make a long press Power button and select Power off
Sleep and Wake up
Press Power button shortly to enter Sleep, or Wake up the device
Power restart
Make a long press Power button at the right side of the terminal. Select Power restart.
Your device will shut down and restart
Sound Setting
Make a long press Power button. Select Sound Settings You can change volume of Media,
Alarm, Notification and other media settings.
Note
In case you need to force to restart your device, such as device hang up, long press Power button for 10 seconds.
Your device will shut down and restart
Page 17
DS2 User Manual Ver.0 2016. 08. 18
17
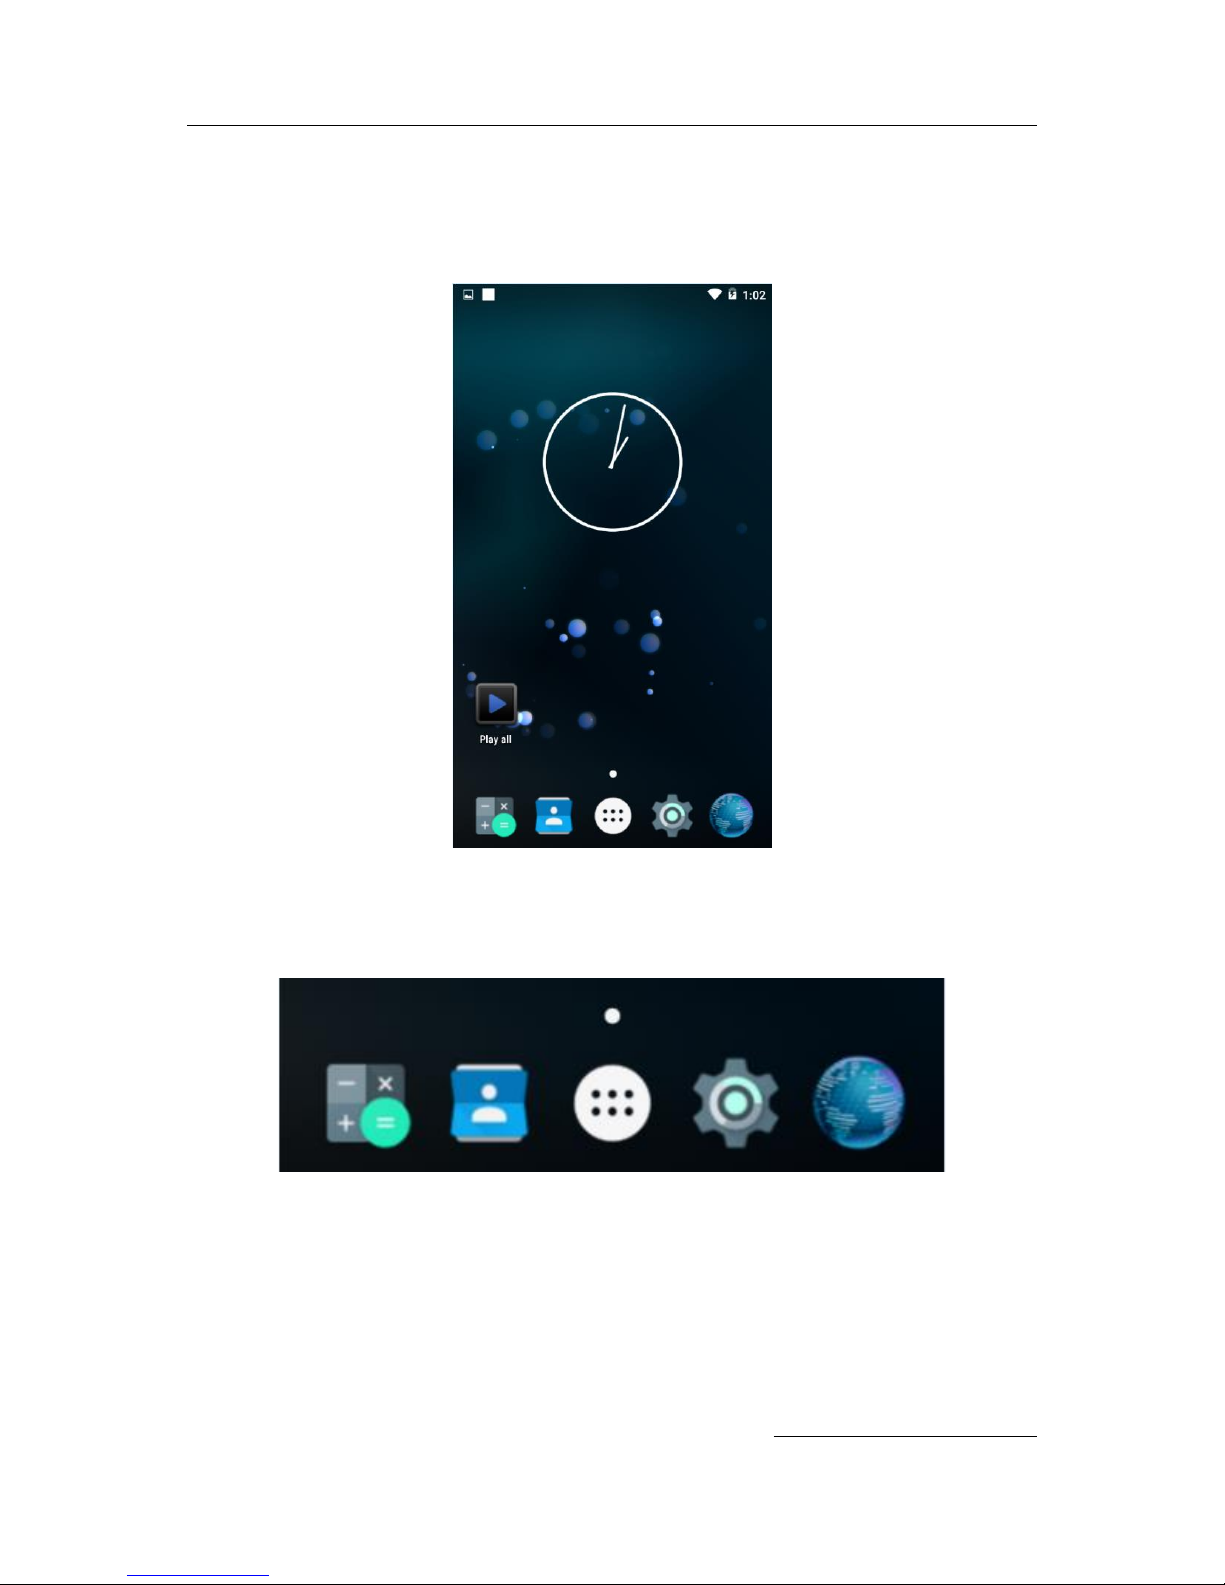
Home Screen
Make yourself at home. After you finish setting up your device, the Home screen appears for the
first time. To move between Home screens, swipe left or right.
Get around
At the bottom of every Home screen you’ll find the Favorites tray: another quick way to get to your
apps. Here’s what it looks like on a DS2.
To open an app, touch it. To drag an app in or out of the Favorites tray or anywhere else on a Home
screen, touch & hold it, then move it with your finger into position.
DS2 navigation buttons
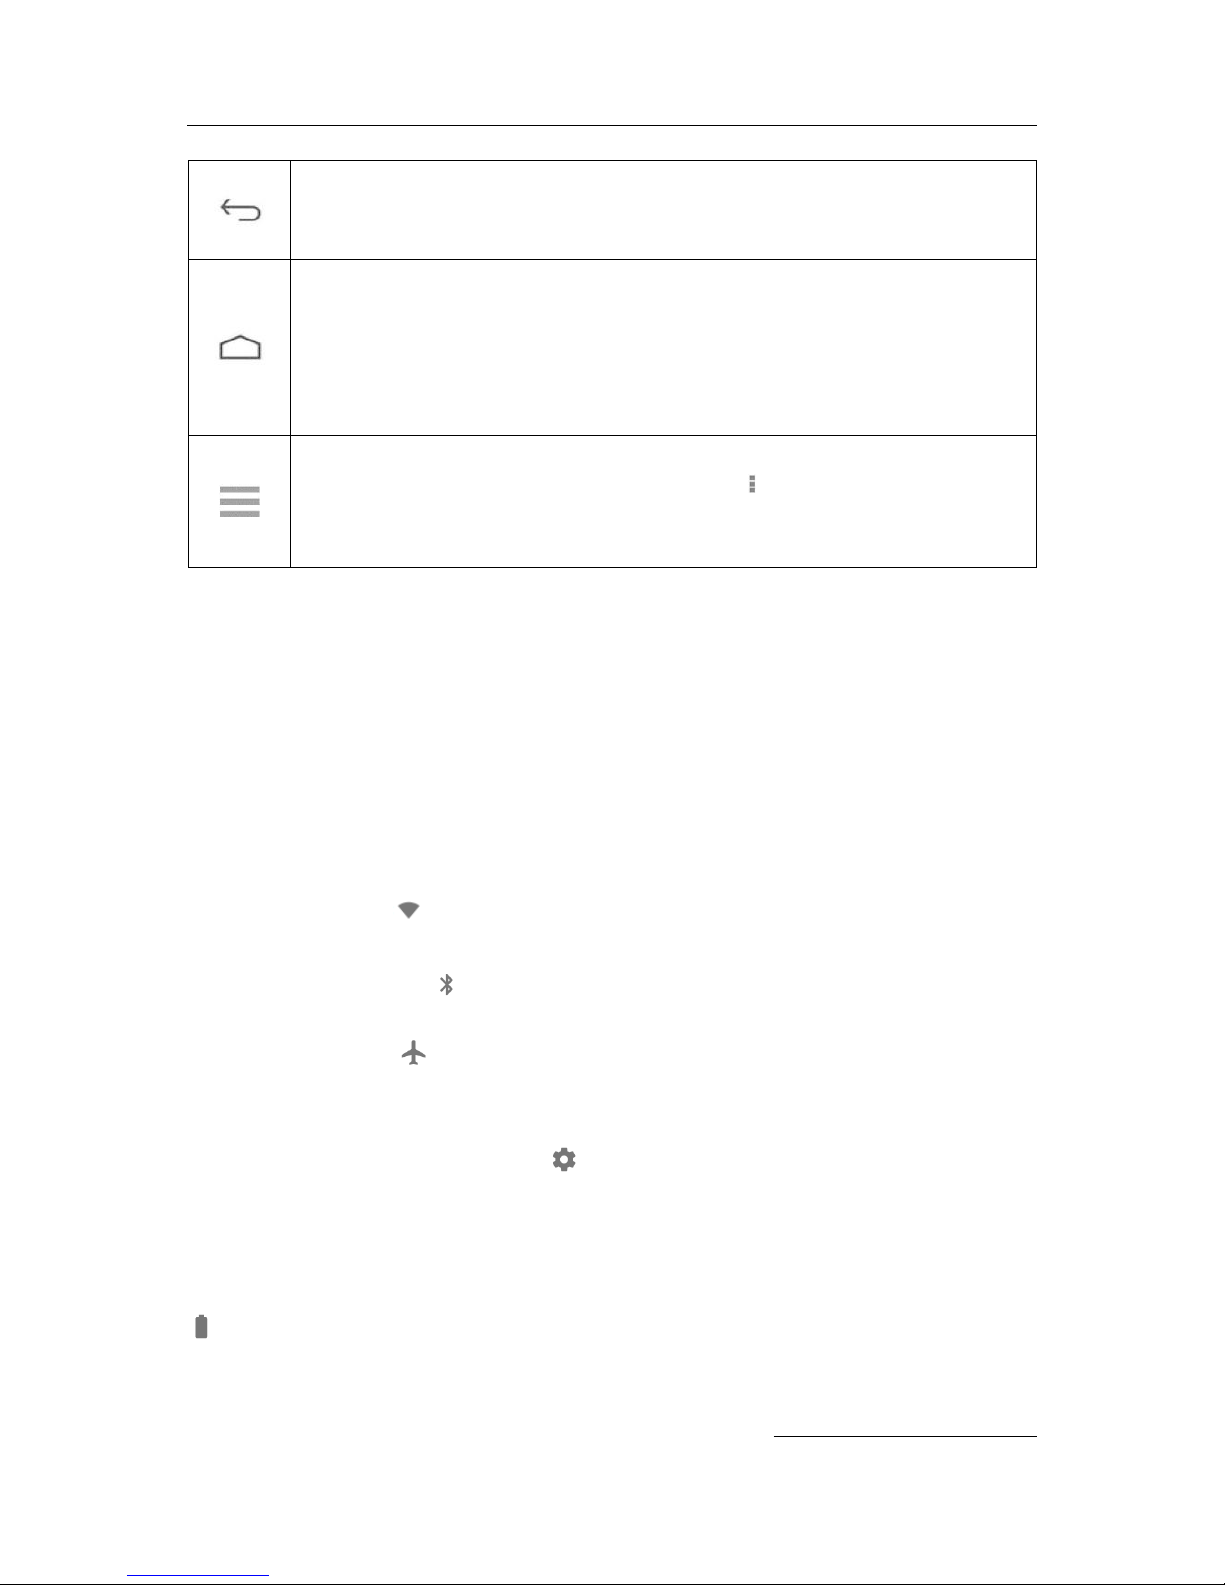
At the bottom of DS2, no matter what you’re doing, you’ll always find the navigation bar with three
buttons:
Page 18
DS2 User Manual Ver.0 2016. 08. 18
18
Back
Opens the previous screen you were working in, even if it was in a different app.
Once you back up to the Home screen, you can’t go back any further.
Home
Opens the central Home screen.
Recent apps
Press Home for few seconds to browse a list of thumbnail images of app you’ve worked with recently. To
open an app, touch it. To remove a thumbnail from the list, swipe it left or right.
Menus
Many screens in apps and Settings include either a menu icon or items in the
permanent Menu button at the bottom of the screen. Touch it to explore additional
options, including help.
Status bar
The status bar is at the very top of the screen. On the right, you can see the Wi-Fi strength, how
much battery power is left, and the time. On the left, you can see which apps have sent you
notifications.
Quick Settings
Use Quick Settings to easily get to frequently used settings, like turning on airplane mode. To open
Quick Settings, swipe down from the top of the screen with two fingers or twice with one finger. To
change a setting, just touch the icon:
Wi-Fi network: Turn Wi-Fi on or off. To open Wi-Fi settings, touch the Wi-Fi network
name.
Bluetooth settings: Turn Bluetooth on or off. To open Bluetooth settings, touch the
word “Bluetooth”.
Airplane mode: Turn airplane mode on or off. Airplane mode means your tablet won’t
connect to Wi-Fi, even if one is available.
Portrait/Landscape: Rotate your device’s orientation in portrait or landscape mode.
Open the main Settings app by touching Settings in the top right.
Manage battery life
The status bar shows how much battery you have left, but you can also see the exact percentage
and approximate time of battery life remaining. Swipe down from the top of the screen, then touch
Battery. Your Android device’s battery is built to get you through your day. When you’re running
low, Android’s battery saver conserves your battery power so you can still run the device. To turn it
on, go to Settings> Battery> Battery saver.
Page 19

DS2 User Manual Ver.0 2016. 08. 18
19
Organize your Home screens
To change the wallpaper:
1. Touch & hold the background, then touch Wallpapers.
2. Swipe right to left to choose a wallpaper image. Or choose an image from your Photos,
Downloads or Drive.
To add an app icon to a Home screen:
1. Go to the Home screen where you want to place the app.
2. Touch the All Apps icon.
3. Swipe from right to left, if necessary, to find the app you want.
4. Touch & hold the app until the Home screen appears, slide it into place, and lift your finger.
To add a widget:
1. Touch & hold the background then touch Widgets
2. Swipe right to choose a widget, which provides a quick view or way to access information
on your home scree, like a larger size clock.
To move an app or widget to another position:
1. Touch & hold the icon.
2. Slide your finger to the new position.
To move between Home screens, slide toward the edge of the screen. To bump another
icon out of the way, slide slowly into it.
3. Lift your finger.
Touch & type
To select or activate something, touch it.
To type something, such as a name, password, or search terms, just touch where you want to type.
A keyboard pops up that lets you type into the field.
Other common gestures include:
Touch & hold. Touch & hold an item on the screen by touching it and not lifting your
finger until it responds. For example, this is how you access accent and other special
characters on the keyboard.
Touch, hold & drag. Touch & hold an item for a moment and then, without lifting your
Page 20
DS2 User Manual Ver.0 2016. 08. 18
20
finger, move your finger on the screen until you reach the target position. For example,
you can move apps around on the Home screen.
Swipe or slide. Quickly move your finger across the surface of the screen, without pausing
when you first touch (so you don’t drag something instead). For example, you can slide a
Home screen left of right to view the other Home screens.
Double-tap. Tap quickly twice on a webpage, map, or other screen to zoom. For example,
double-tap a picture in Chrome to zoom in, and double-tap again to zoom out.
Scale. In some apps (such as Gallery), you can scale by placing two or more fingers on the
screen at once and pinching them together (to enlarge scale) or spreading them apart (to
reduce it). Alternatively, in some apps you can double-tap and then, without lifting your
finger, drag up to reduce or down to enlarge the scale or the image.
Rotate the screen. To rotate the screen, drag and find the status bar. To lock or unlock a
device’s vertical orientations, swipe down from the top right of any screen and touch the
Rotation icon in Quick Settings. To do the same thing on a device, go to Settings > Device
> Display.
You can open your device’s Settings app from the All Apps screen or from Quick
Settings.
For example, to change notification sounds, volumes, and more, go to Settings >
Device > Sound
To change brightness, font size, and more, go to Settings > Device > Display.
Android version & updates
To check your version number or get the latest system update for a DS2, first go to Settings >
System > About tablet. Then look for these labels:
Android version. Look partway down the list for this heading and the number just below
it.
OTA Update Start. Touch to check whether you have any pending system updates.
For comprehensive online help and support, including details about Android 4.4, visit
http://support.google.com/android
Page 21

DS2 User Manual Ver.0 2016. 08. 18
21
Chapter 3: Essentials
Display
Change the display settings on your device by following these steps:
1. Go to Settings > Device > Display
2. Choose from the following settings. Some of these settings may vary by your device and
version of Android. All can affect battery life.
Brightness level: Move the slider to set the brightness level on your device.
Sleep: Change how long it takes for your device’s screen to go black when you’re
not using it
Daydream: Set up screensavers that display photos, colorful backgrounds, and
more when your device is charging or docked.
Sound and notification
You can change the sound and notification settings on your device by going to Settings
>Device > Sound & notification.
Notifications alert you to the arrival of new messages, calendar events, and alarms, as well as
ongoing events, such as video downloads.
Interruptions. Prioritize sound notifications so they don’t interrupt you. Touch the settings
to turn notification interruptions on or off. If you turn notifications on, touch Bar to specify
from whom you accept notifications (Anyone, Starred contacts or Contacts Only). In
Downtime, select which days and times you allow for sound notifications.
When device is locked. Manage whether notifications can be seen when your tablet is
locked, and whether sensitive content in a notification can be seen. Sensitive content
includes things like the title of a song you downloaded, who sent you an email, or the
details of a calendar event. For more information, see Help Center.
App notifications. Modify the notification settings individually for apps. The setting under
When device is locked will always take precedence over the setting for individual app.
Notification access. See which apps can access your notifications.
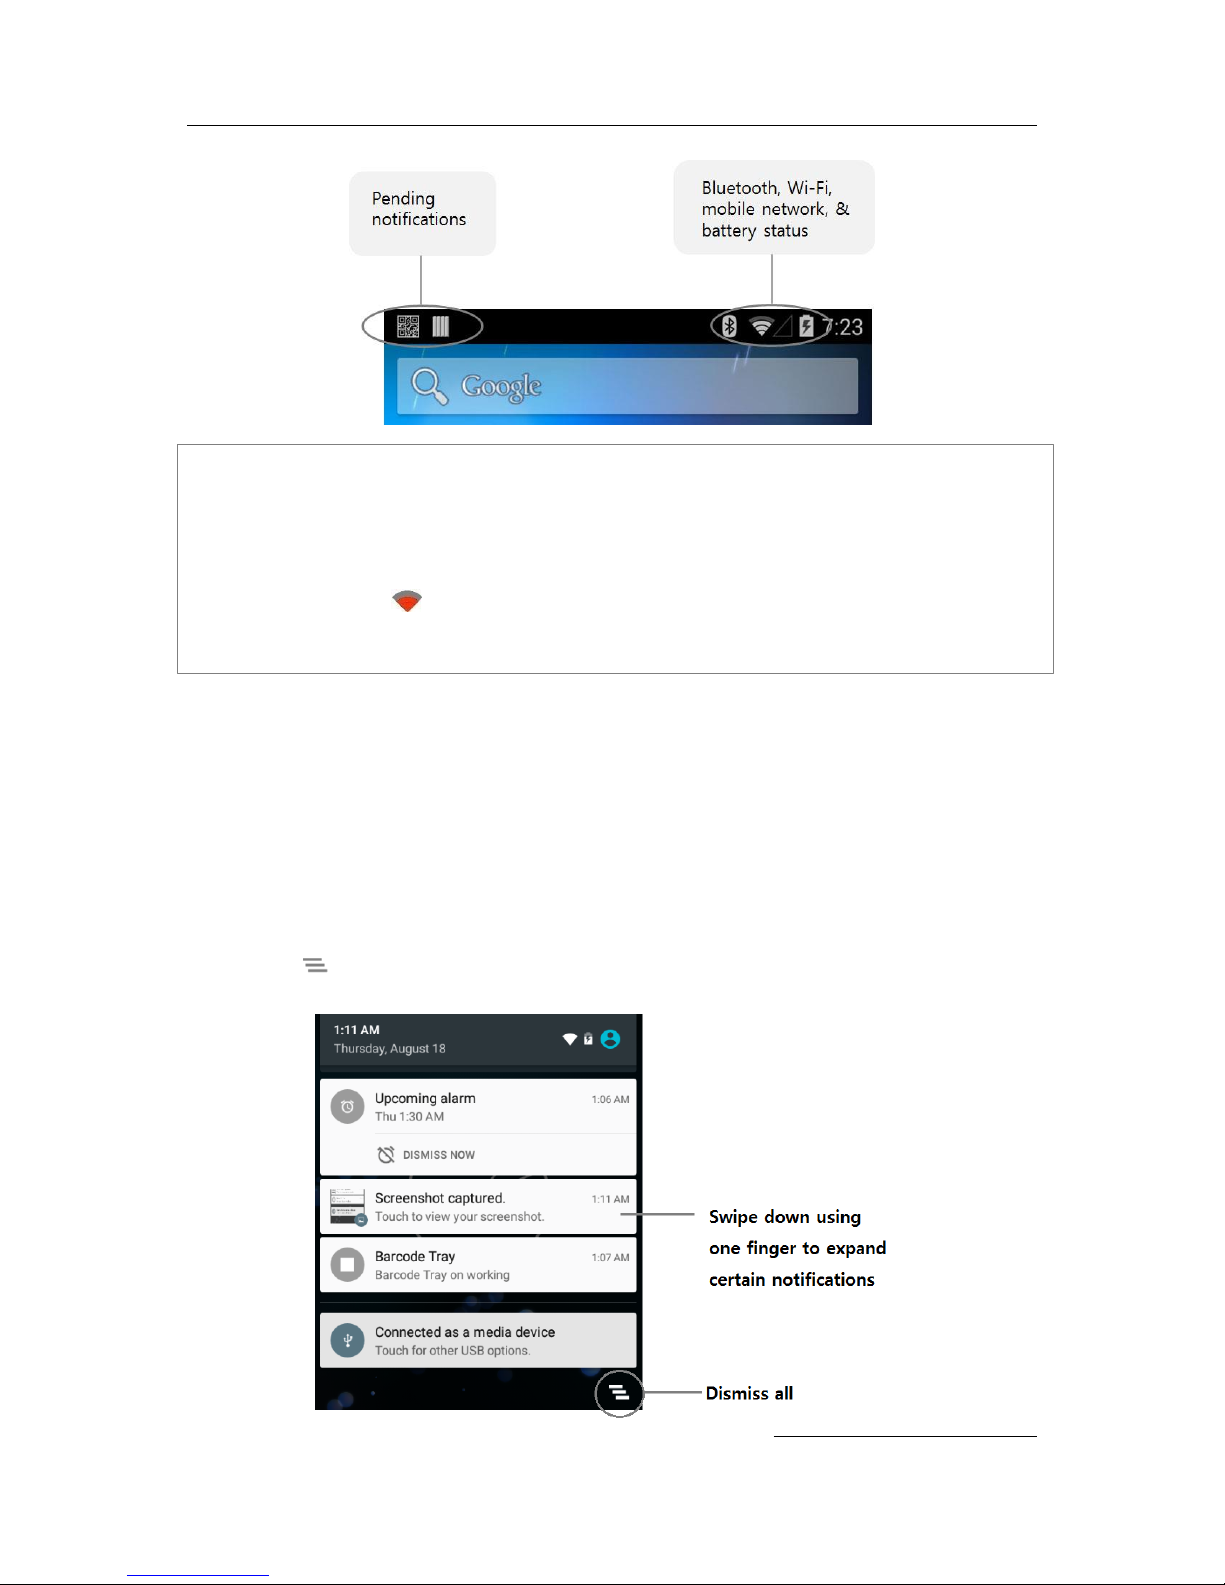
When a notification arrives, its icon appears at the top of the screen. Icons for pending notifications
appear on the left, and system icons showing things like Wi-Fi signal, mobile carrier signal, or
battery strength on the right:
Page 22
DS2 User Manual Ver.0 2016. 08. 18
22
TIP: Wi-Fi and mobile signal strength are indicated at the top of the screen by white bars. To see
whether the selected Wi-Fi network has a full internet connection, open Quick Settings: swipe down
from the top right on tablets, or with two fingers on the phones.
In Quick Settings only, white bars in the Wi-Fi or mobile signal indicators indicate the signal
strength of a normal internet connection.
Certain notifications can be expanded to show more information, such as email preview. The one
at the top is always expanded when possible. To expand a notification, position one finger inside it
and swipe down slowly.
To open the related app, touch the notification icon on the left. Some notifications also allow you
to take specific actions by touching icons within the notification.
When you finished with a notification, just swipe it away. To dismiss all notifications, touch the
Dismiss icon at the very bottom of the notifications list.
Page 23

DS2 User Manual Ver.0 2016. 08. 18
23
Security
If a lock is set for your screen, the screen goes dark and locks when the display goes to sleep or if
you press the Power button.
You can set locks of different strengths using Screen lock settings:
1. Go to Settings > Personal > Security > Screen lock.
2. Touch the type of lock you’d like to use.
Even when your screen is locked, you can perform certain activity
Quick Settings: Slide down from the top of the screen to open Quick Settings without
entering your password.
Printing
With Android 5.0, you can preview and print the content of certain screens (such as web pages
displayed in Chrome) to a printer on the same Wi-Fi network as your Android device.
Before you can print, you need a printing service installed on your device. To check what services
are currently available, go to Settings > System > Printing.
From here, you can open each available service to turn it on or off, check which printers it makes
available, add new printers, and adjust the service’s settings.
To print a document, such as a webpage in Chrome:
1. Touch Menu > Print
2. In the dialog that appears, adjust settings such as printer, copies, orientation, and so on.
3. Touch print
File storage
Android 5.0 makes it easy to store and browse through pictures, videos, and other files on your
device and attach them to an email, Hangout message, and so on. You can also use stored images
as your Home screen wallpaper.
For example, to attach an image to an email you’re composing, touch the paper clip in the top
right and choose to either Attach file or Insert from Drive to select stored images in your Drive
folder.
Form here, you can view any of these sources:
Recent shows you the photos or video you’ve taken or opened most recently.
Images displays any photos, videos, or other images on your device.
Page 24
DS2 User Manual Ver.0 2016. 08. 18
24
Downloads includes most files (excluding Play content) you’ve downloaded from emails or
the Web
Gallery lets you browse all the images and videos that have been uploaded to your account.
Use the Downloads app to view, reopen, or delete files you download from email or
other sources (excluding videos, magazines and other media)
In the Downloads app:
Touch an item to open it.
Touch headings for earlier downloads to view them.
Check items you want to share. Then touch the Share icon and choose a sharing
method from the list.
Check items you want to delete. Then touch the Trash icon.
At the bottom of the screen, touch Sort by size or Sort by date to switch back and forth.
Screenshots
To take a screenshot from DS2:
1. Make sure the image you want to capture is displayed on the screen.
2. Press the Power and Left Scan buttons simultaneously.
The screenshot is automatically saved in your Gallery.
TIP: To easily share your screenshot via message, or Bluetooth, and email, swipe down the
notification shade and touch the Share icon, or email icon below the previous of your
screen shot.
Page 25
DS2 User Manual Ver.0 2016. 08. 18
25
Chapter 4: Use the keyboard
Enter & edit text
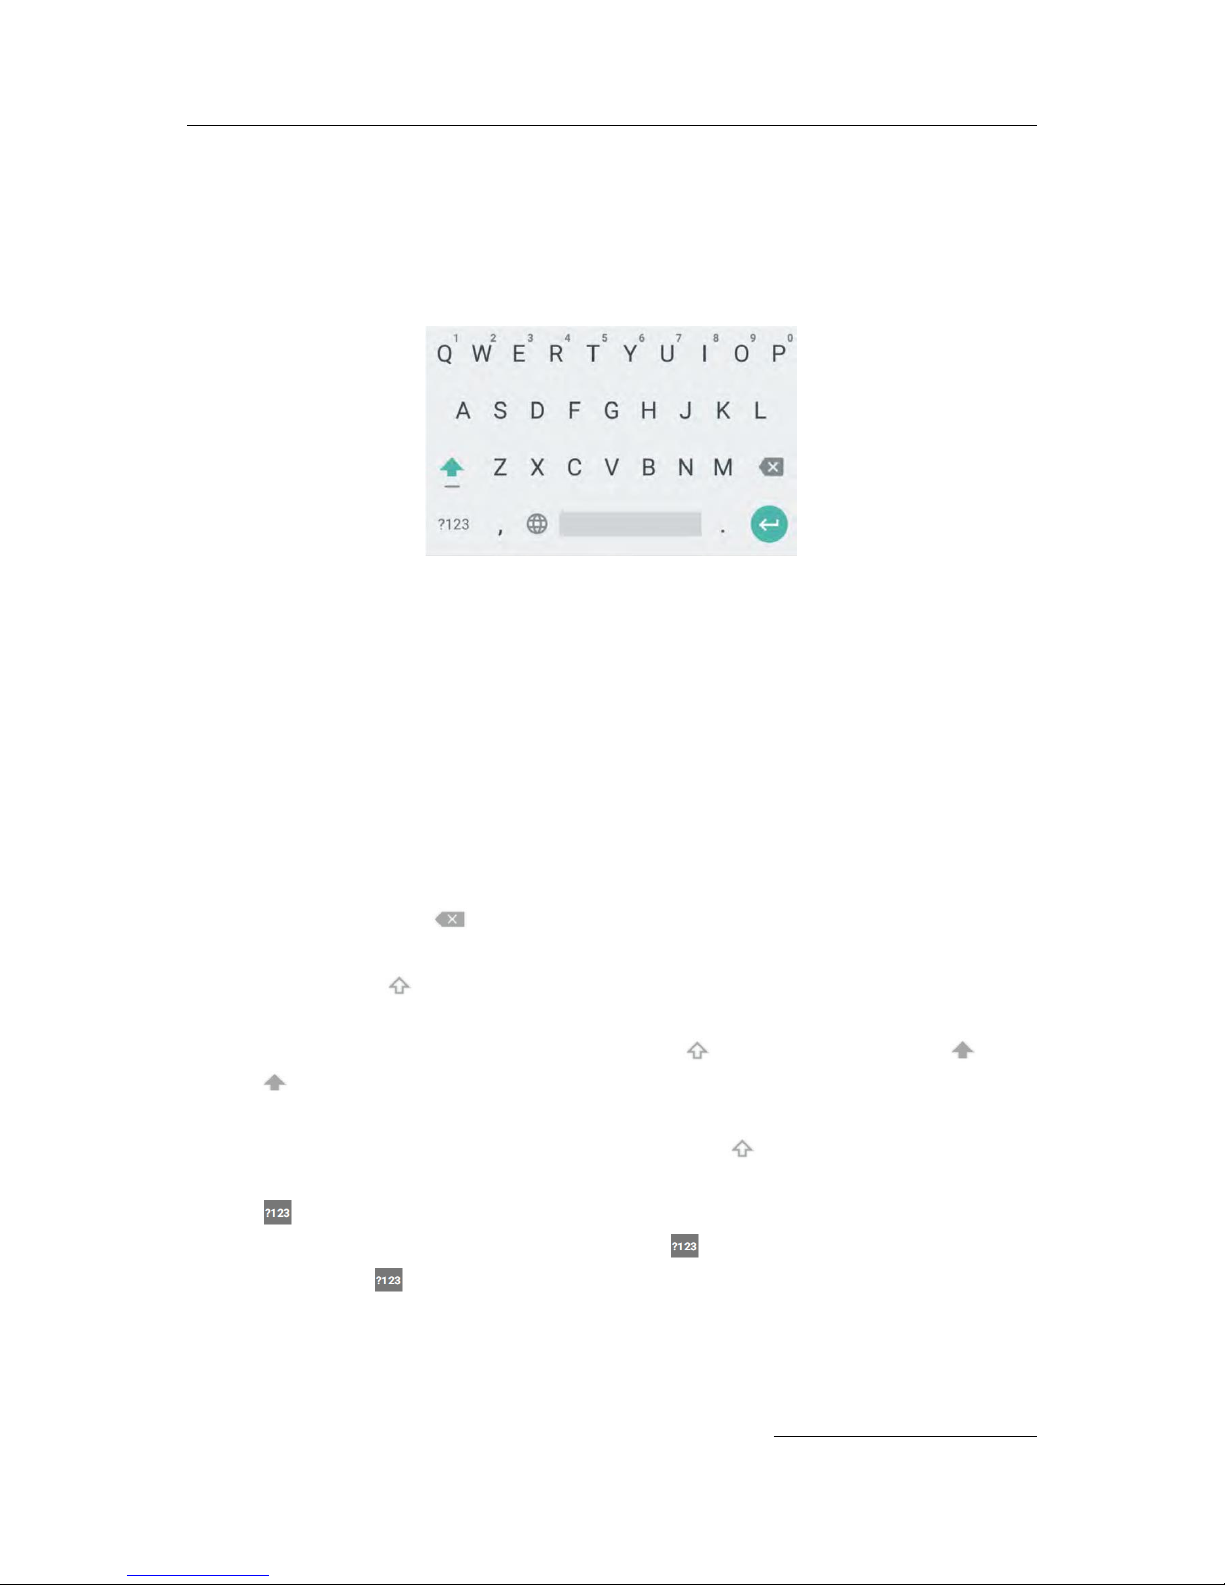
Use the onscreen keyboard to enter text. Here’s what it looks like on a DS2 device:
To make the keyboard go away, touch the Back button below it.
Some apps open the keyboard automatically. In others, you first need to touch where you want to
type.
Basic editing
Change where you want to type. Touch the cursor, then touch and drag the tab that
appears below it to new position.
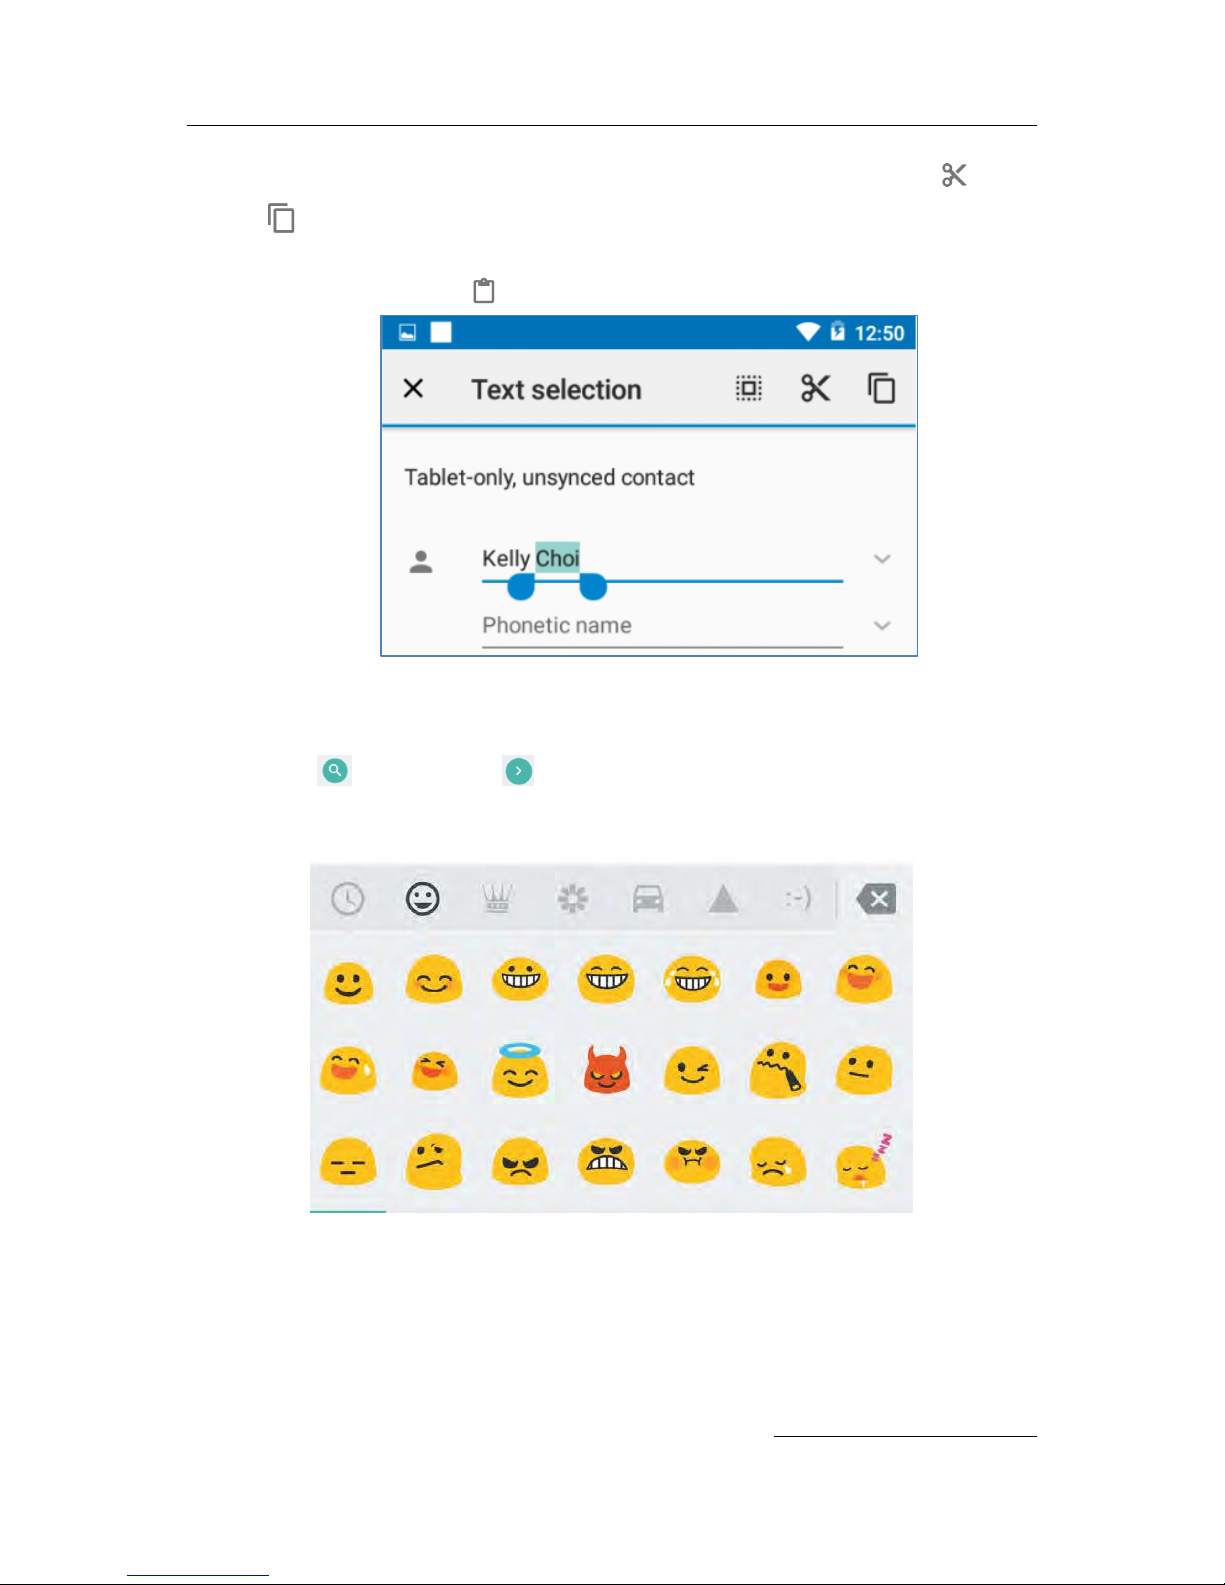
Select Text. Touch & hold or double-tap within the text. The nearest word highlights, with
a tab at each end of the selection. Drag the tabs to change the selection. The tab disappears
after a few moments. To make it reappear, touch the text again.
Delete text. Touch to delete selected text or the characters before the cursor.
Type capital letters. Touch the Shift key once to switch to capital letters for one letter. Or
touch & hold Shift key while you type. When you release the key, the lowercase letters
reappear.
Turn caps lock on. Double-tap or touch & hold Shift key, so it changes to . Touch
Shift key again to return to lowercase.
Change word capitalization. If you want to quickly change the capitalization of a word
you’ve already typed, you can select it and touch the Shift Key.
Type a symbol or character. To switch to symbol keys for one word, touch the symbol key
once.
You can also touch and hold the symbol key while you type or you can touch the
symbol key and slide to another key. When you release the key, the letter keys
reappear.
View more symbols and characters. Touch and hold symbols or characters to get accented
characters or additional symbols.
Page 26
DS2 User Manual Ver.0 2016. 08. 18
26
Cut, copy, paste. Select the text you want to cut or copy. Then touch the Cut or Copy
icons. To paste, touch the space where you want to paste your text and then touch
Paste. If you want to replace other text with the text you copied, highlight the text then
touch the Paste button .
Emoji
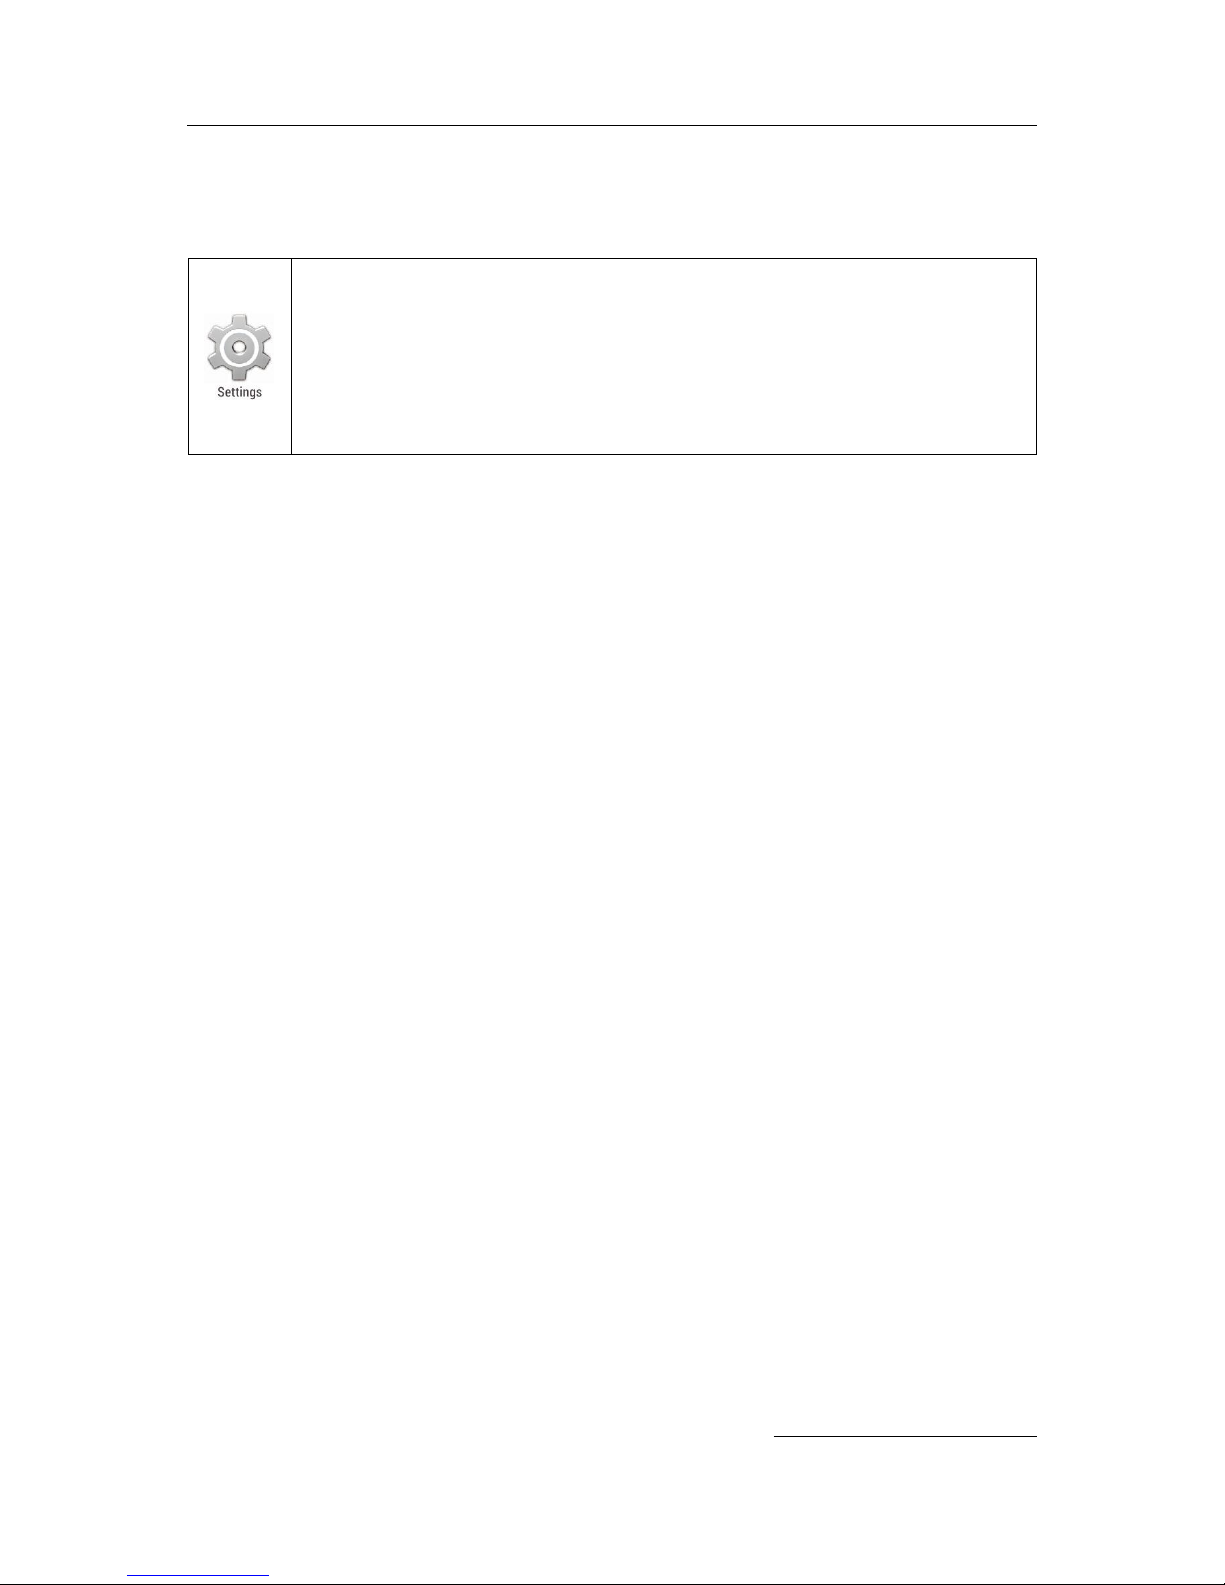
Android 5.1 vastly expands the variety of emoji available at your fingertips. Touch and hold the
Search Button or Arrow button on the bottom right of keyboard to display emoji. You‘ll
see a panel like this. To move between categories, swipe left or right or touch the symbols in the
top row. To type an emoji, touch it:
Use next-word suggestions
1. Touch the location where you want to input text.
2. Start typing out a word. When the word you want is displayed in a list above the key
board, touch it.
Page 27
DS2 User Manual Ver.0 2016. 08. 18
27
3. Continue to touch words unless the one you want doesn’t appear. If so, type it. Android
continues to suggest words as you type.
To change your keyboard and input methods, go to Settings > Personal >
Language & input.
To turn next-word suggestion on or off, go to Setting > Personal > Language &
input methods > Android keyboard. Touch the Setting icon, then check the box
next to Next-word suggestions.
Keyboard dictionaries
To manage keyboard dictionaries, go to Setting > Personal > Language & input.
Personal dictionary
You can add your own words to your personal dictionary so that your device remembers them. To
add a word or phrase, including an optional shortcut, touch Personal Dictionary, then the Add
icon. Go to Settings > Personal > Language & input > Personal dictionary > + button to add
words
Page 28
DS2 User Manual Ver.0 2016. 08. 18
28
Chapter 5: Try some apps
All Apps
To see all your apps, touch the All Apps icon in the Favorites tray on any Home
screen.
This is where you can see all your apps. You can move app icons to any of your
Home screens.
From All Apps, you can:
Move between screens. Swipe left or right.
Open an app. Touch its icon.
Place an app icon on a Home screen. Touch & hold the app icon, slide your finger, and
lift your finger to drop the icon in place.
Brose widgets. Touch the Widgets tab at the top of any All Apps screen.
To remove an app icon from the Home screen without removing it permanently from your device,
touch & hold it, slide your finger toward the top of the screen, and drop the app over the
Remove icon.
To view info about an app from an All App screen, touch & hold it, slide your finger toward the top
of the screen, and drop the app over the App Info icon.
Gallery
The Gallery app gives you an easy way to browse pictures and videos. It displays
screenshots and auto backups from other devices.
To open Gallery from the Home screen: Touch the Gallery icon.
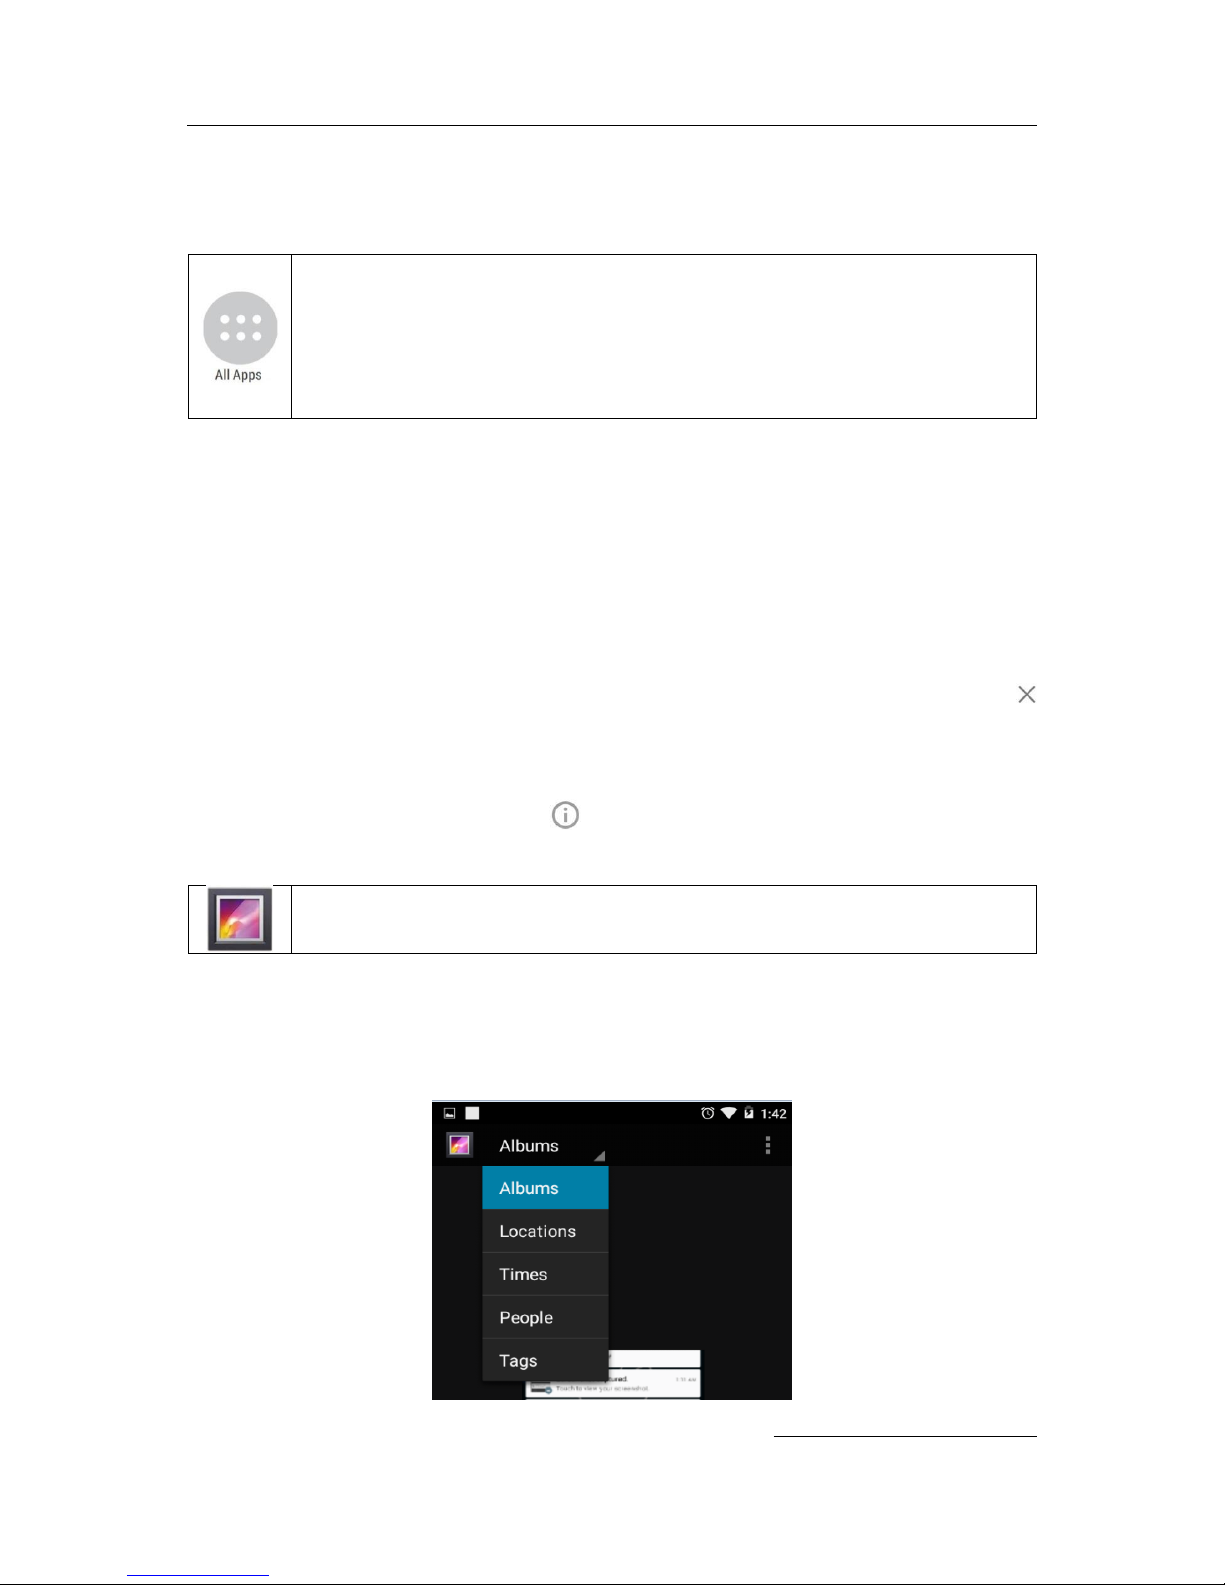
To get to the top level of the Gallery app, touch the icon at the upper left. From there, open the
drop-down menu to view the available categories.
Page 29
DS2 User Manual Ver.0 2016. 08. 18
29
Within each category you can browse groups of images, crop, edit, and tag them, create
slideshows, make pictures or videos available offline, and share with friends.
Contacts
The Contacts app gives you quick access to everyone you want to reach. To open it,
touch the Contacts icon on a Home or All Apps screen. If you use Exchange, you
can also sync that contact information with People.
When you open the People app, you can:
View all contacts, favorites, or groups. Choose from the top left of the screen.
Read details. Touch a name to see details for a contact or group.
View recent activity. When viewing a contact, swipe to the right to see recent updates.
Edit details. While viewing a contact, touch icons at the top of the screen or the Menu
icon to edit or share contact details, delete a contact, and so on. You can touch the star
besides the contact’s name to add that contact to your Favorites list.
Change your settings. While viewing the main list screen, touch the menu to import or
export contacts, choose display options for the Group and All tabs, and add or edit
accounts.
No matter where you are within People, you can always get back to the main lists by touch the
Contacts icon at the top of the screen.
Calendar
Use the Calendar app to view and edit your schedule. To open it, touch Calendar
on a Home or All Apps screen.
As you edit events, they’re synced automatically across all the places you need them. To change the
Calendar view, touch the Menu and choose Schedule, Day, or Week from the top of the screen.
From any of these views, you can:
Read or edit event details. Touch an event to view its details.
Manage events and calendars. Touch icons across the top of the screen or the menu to
search or create events, return to today, or adjust settings.
Page 30
DS2 User Manual Ver.0 2016. 08. 18
30
Chapter 6: Settings
Most apps include their own settings, typically available from Menu > Settings on DS2 devices.
The fastest way to adjust system settings that you access frequently, such as Wi-Fi or brightness,
is through Quick Settings.
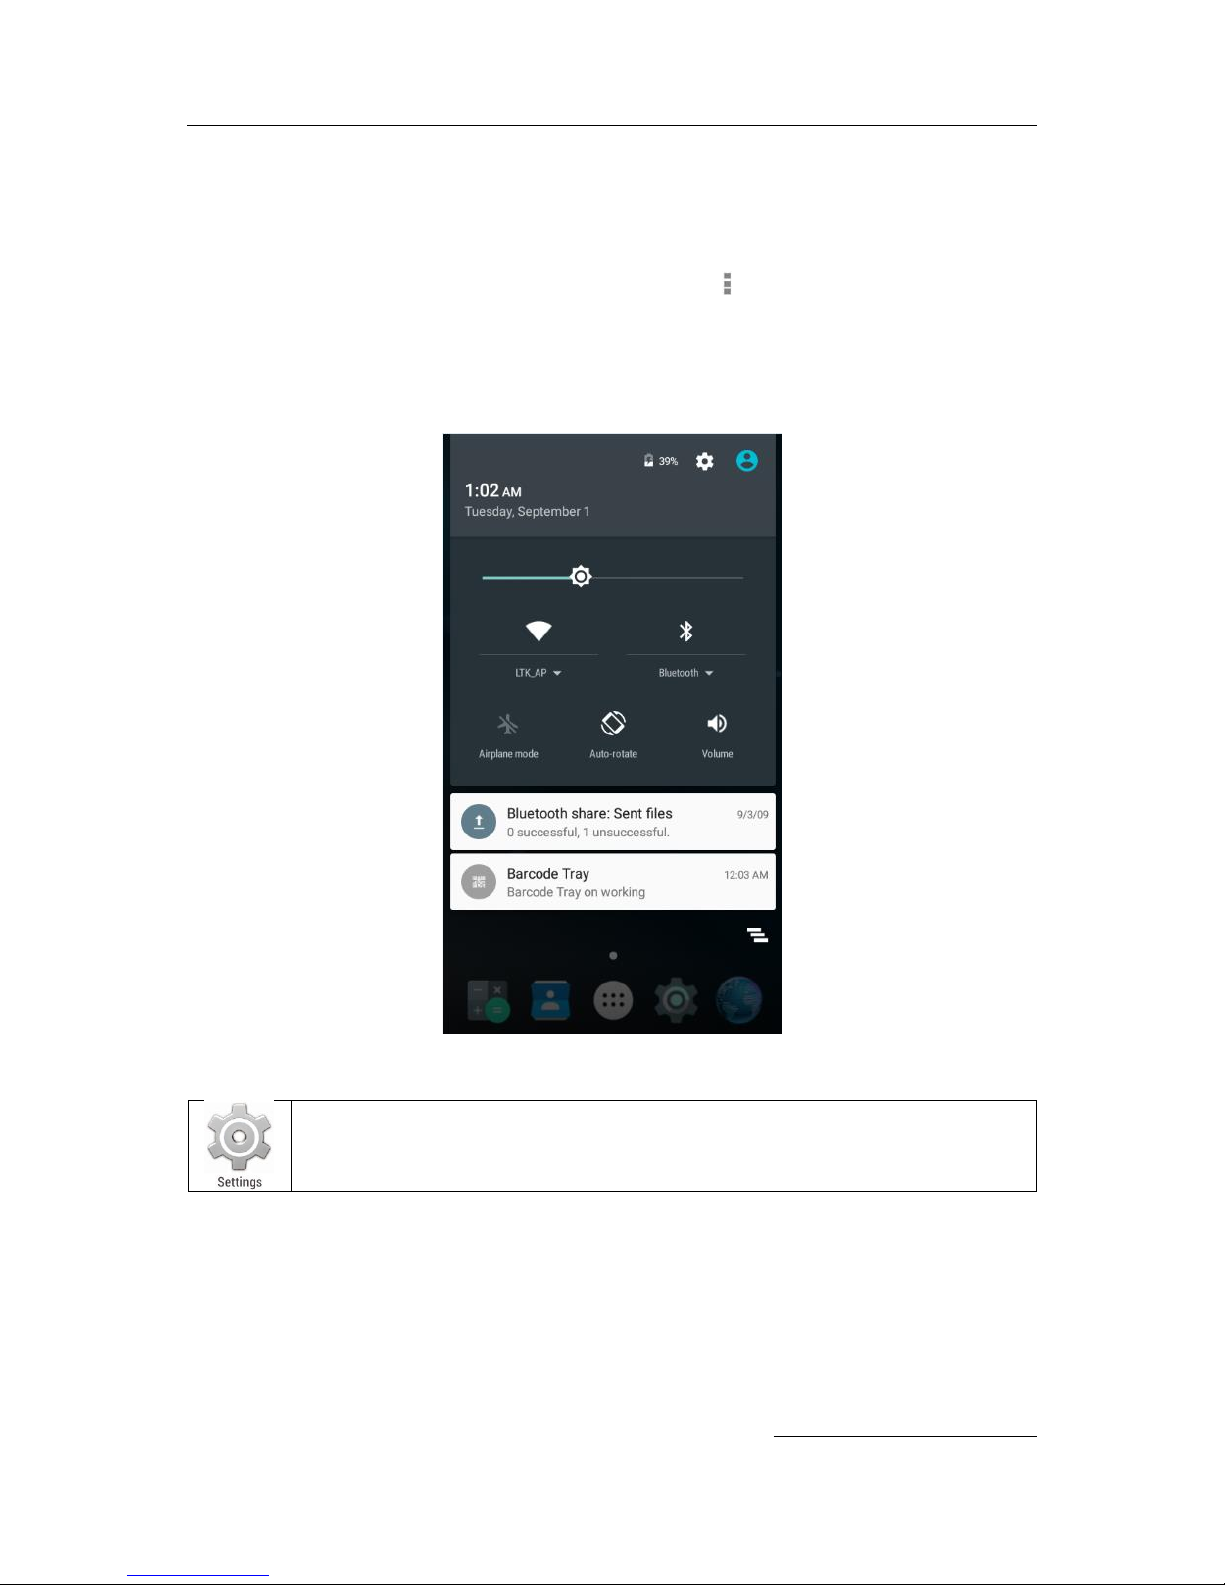
Here are the Quick Settings for a DS2:
To open Quick Settings, swipe down from the top of the screen the Settings icon.
The Settings app controls the core Android settings for networks, hardware,
location, security, language, accounts, and so on.
Page 31

DS2 User Manual Ver.0 2016. 08. 18
31
Chapter 7: Accessibility
To use the accessibility options, open Settings > System > Accessibility.
Accessibility settings let you modify your device’s display and sound options, such as increasing the
text size, changing the speed at which text is spoken, and more.
You can also try magnification gestures which allow you to zoom in and out, as well as temporarily
magnify what’s under your finger. To try magnification gestures, go to Settings > Accessibility >
Magnification gestures.
Page 32
DS2 User Manual Ver.0 2016. 08. 18
32
Chapter 8: Application Guide
Barcode Tray
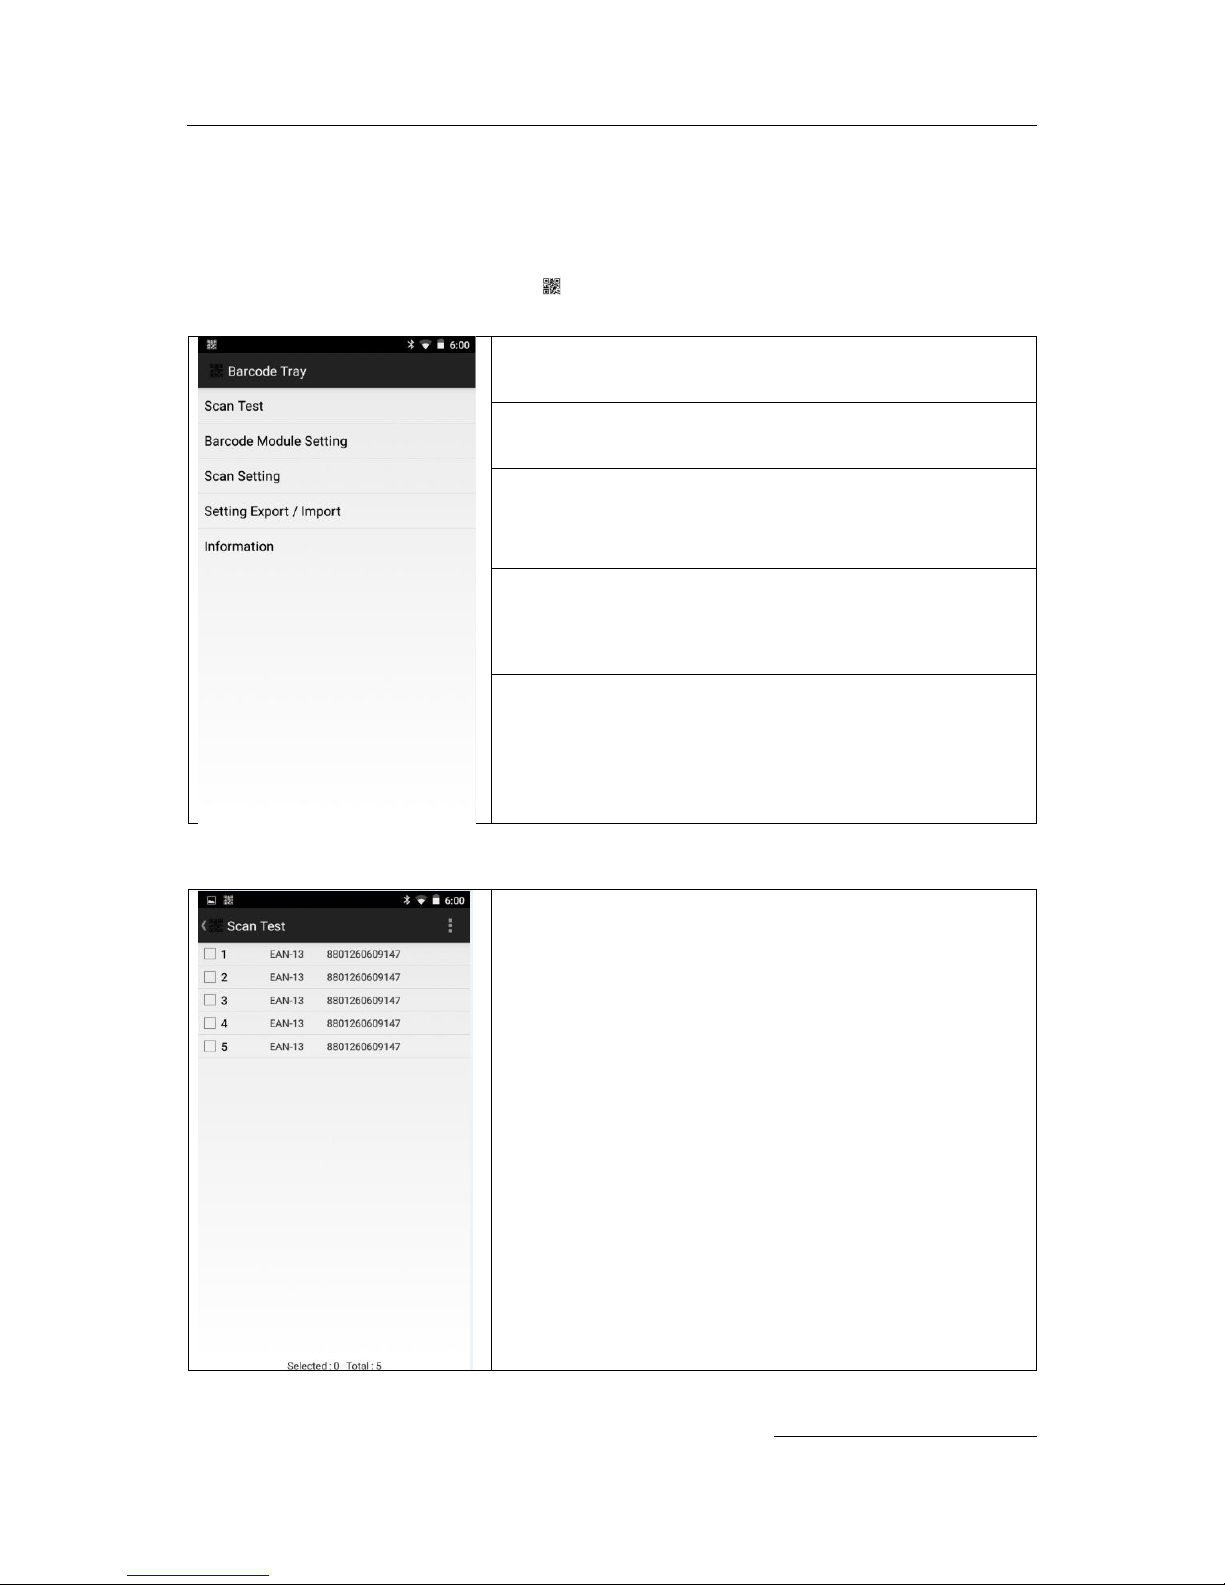
To activate Barcode Tray program, touch barcode tray icon at your screen.
Scan Test
Text view the scanned barcode
Barcode Module Setting
Setting to enable, or disable barcode types
Scan Setting
Setting scanning feature, such as time out, prefix and suffix,
scanner key setting, notification options and etc.
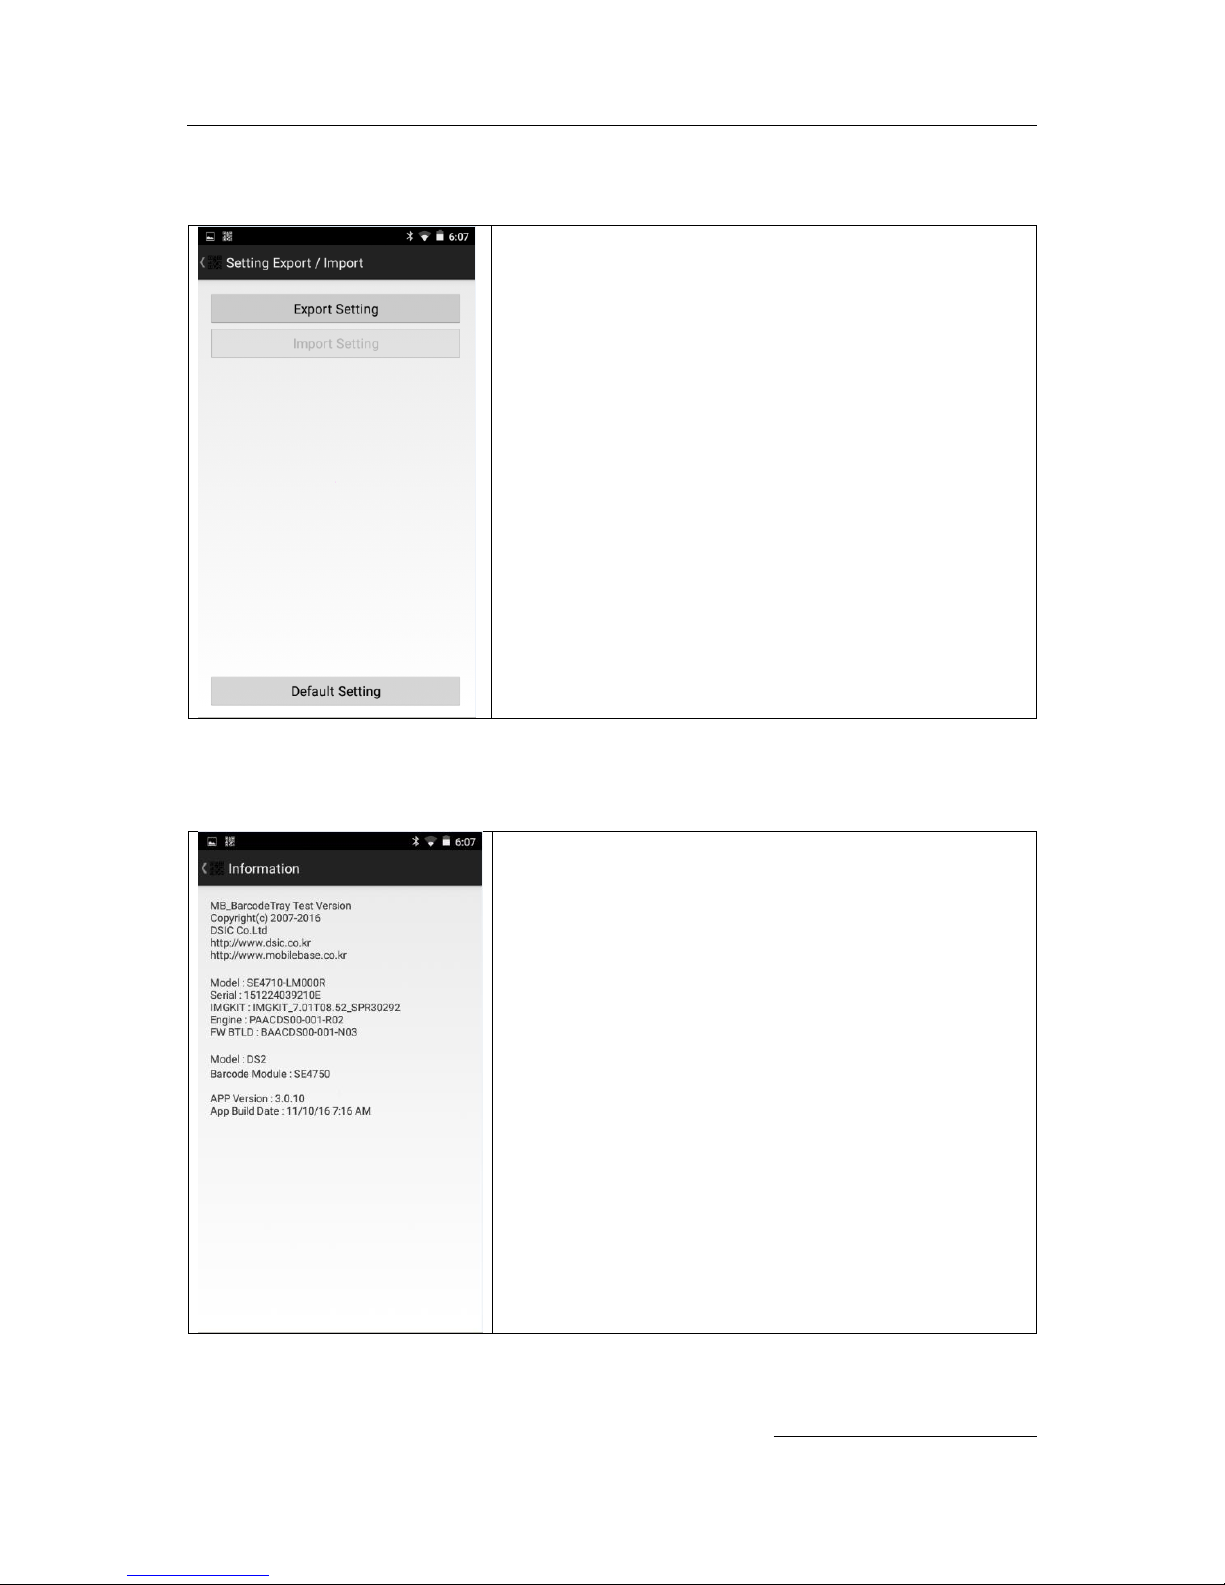
Setting Export / Import
Set up barcode configuration by programming, or export
the set up to file
Information
Demonstrate the installed barcode scanner to your device
and application version information of your barcode scanner.
Scan Test
Demonstrate scanning data details
Page 33
DS2 User Manual Ver.0 2016. 08. 18
33
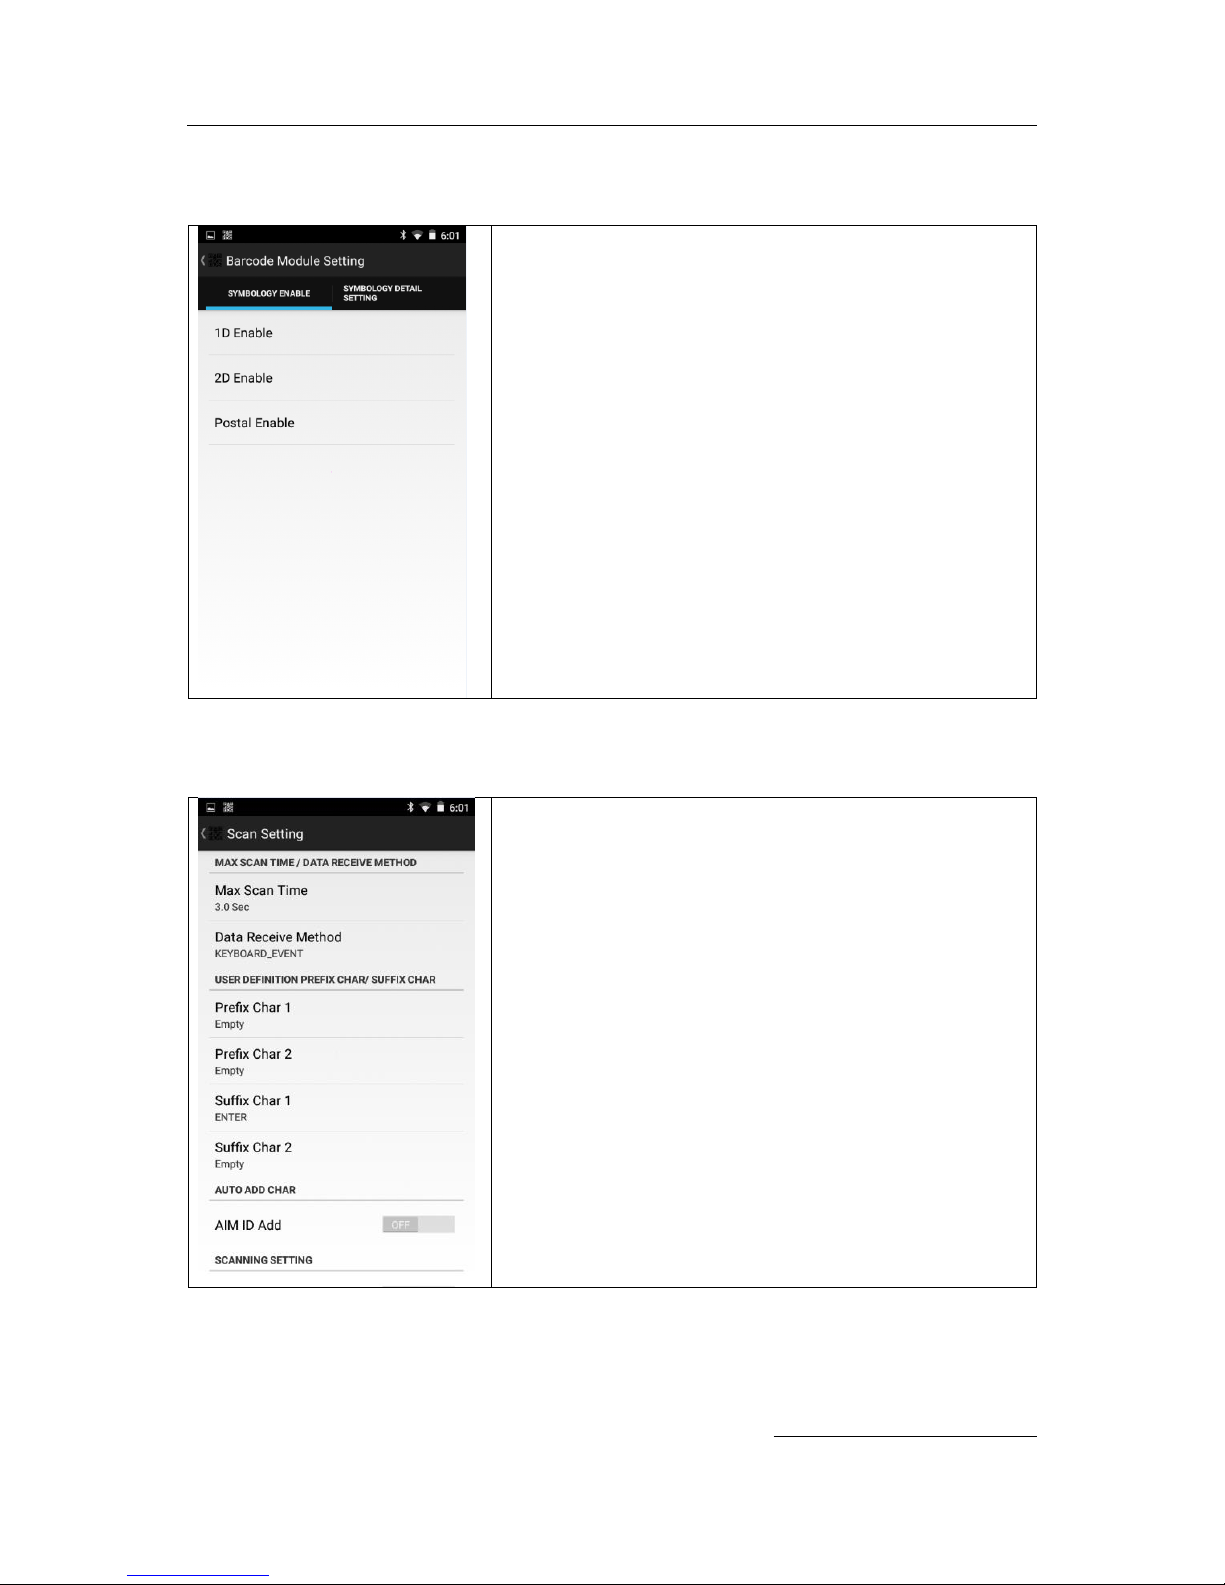
Barcode Module Setting
Setting to enable, or disable barcode types
Scan Setting
Setting scanning feature, such as time out, prefix and suffix,
scanner key setting, notification options and etc.
Page 34
DS2 User Manual Ver.0 2016. 08. 18
34
Setting Export / Import
Set up barcode configuration by programming, or export
the set up to file
Information
Demonstrate the installed barcode scanner to your device
and application version information of your barcode scanner.
Barcode tray program is able to be updated by OTA Update
Page 35
DS2 User Manual Ver.0 2016. 08. 18
35
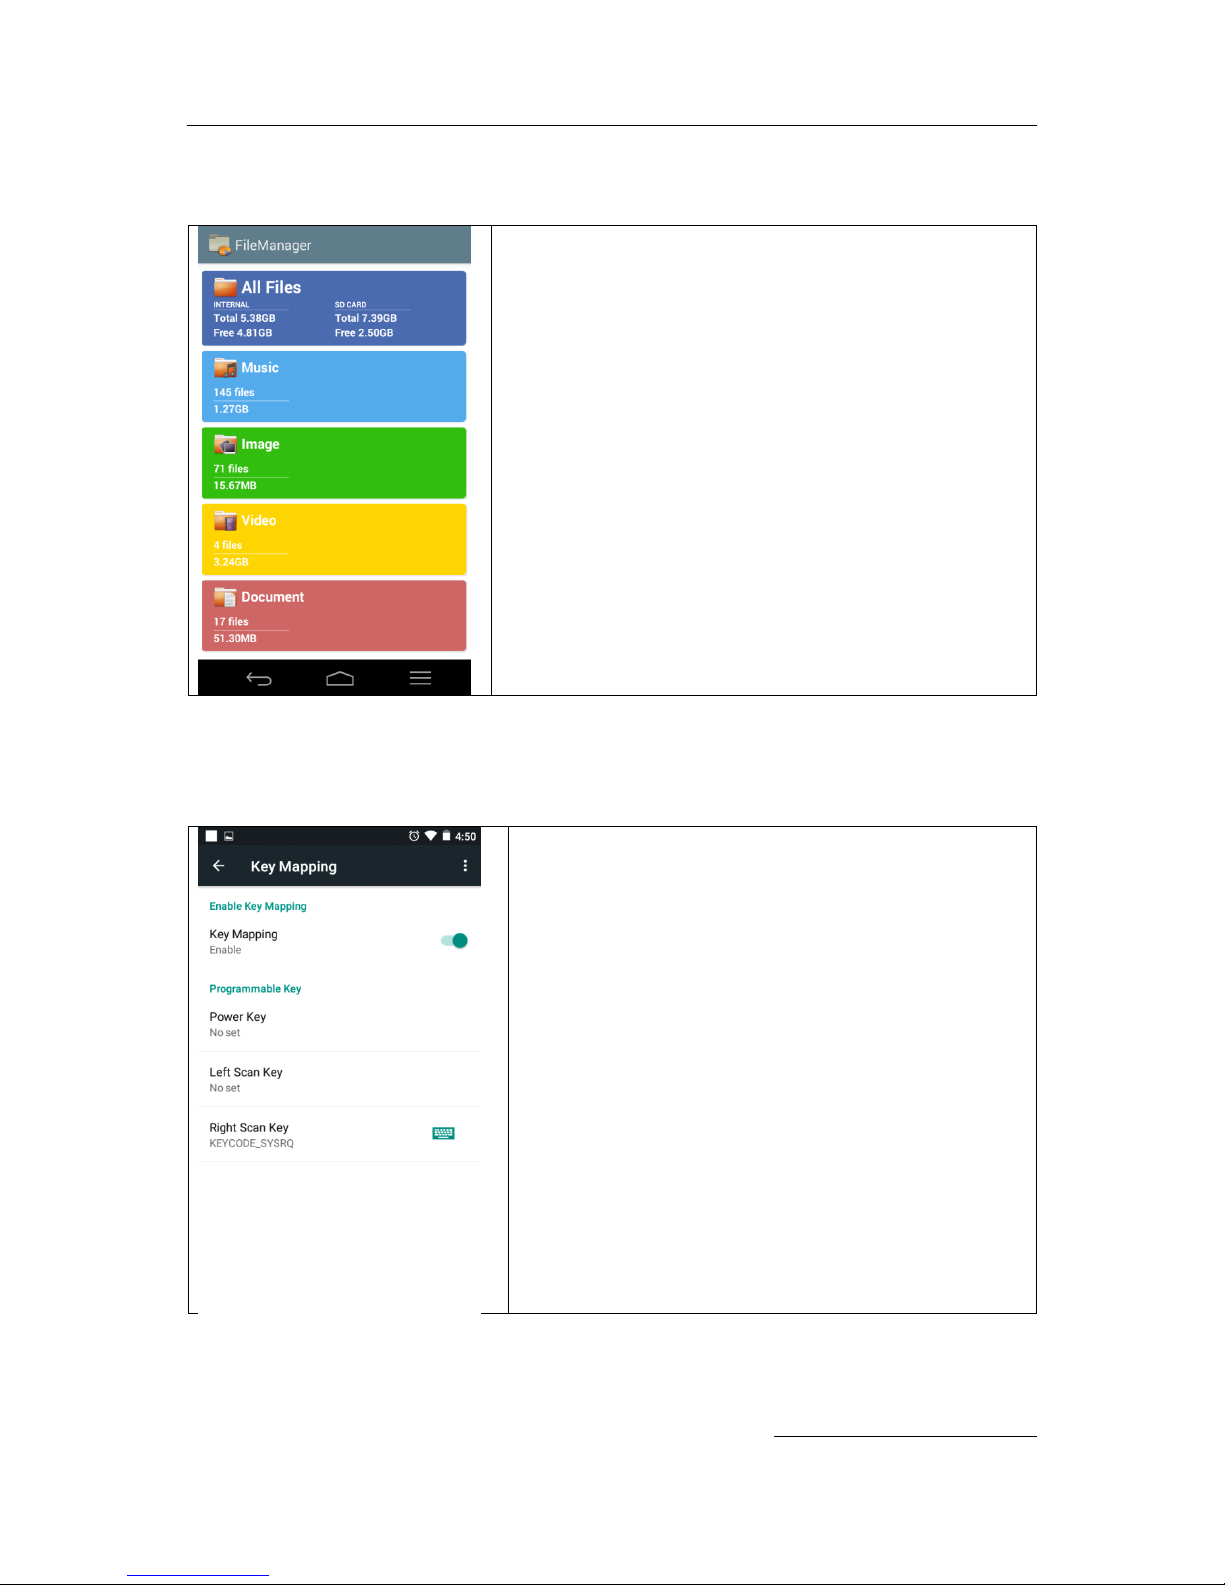
File Manager
It demonstrates capacity of internal memory and SD card
memory. File search, move, delete, rename, share, and
property is available.
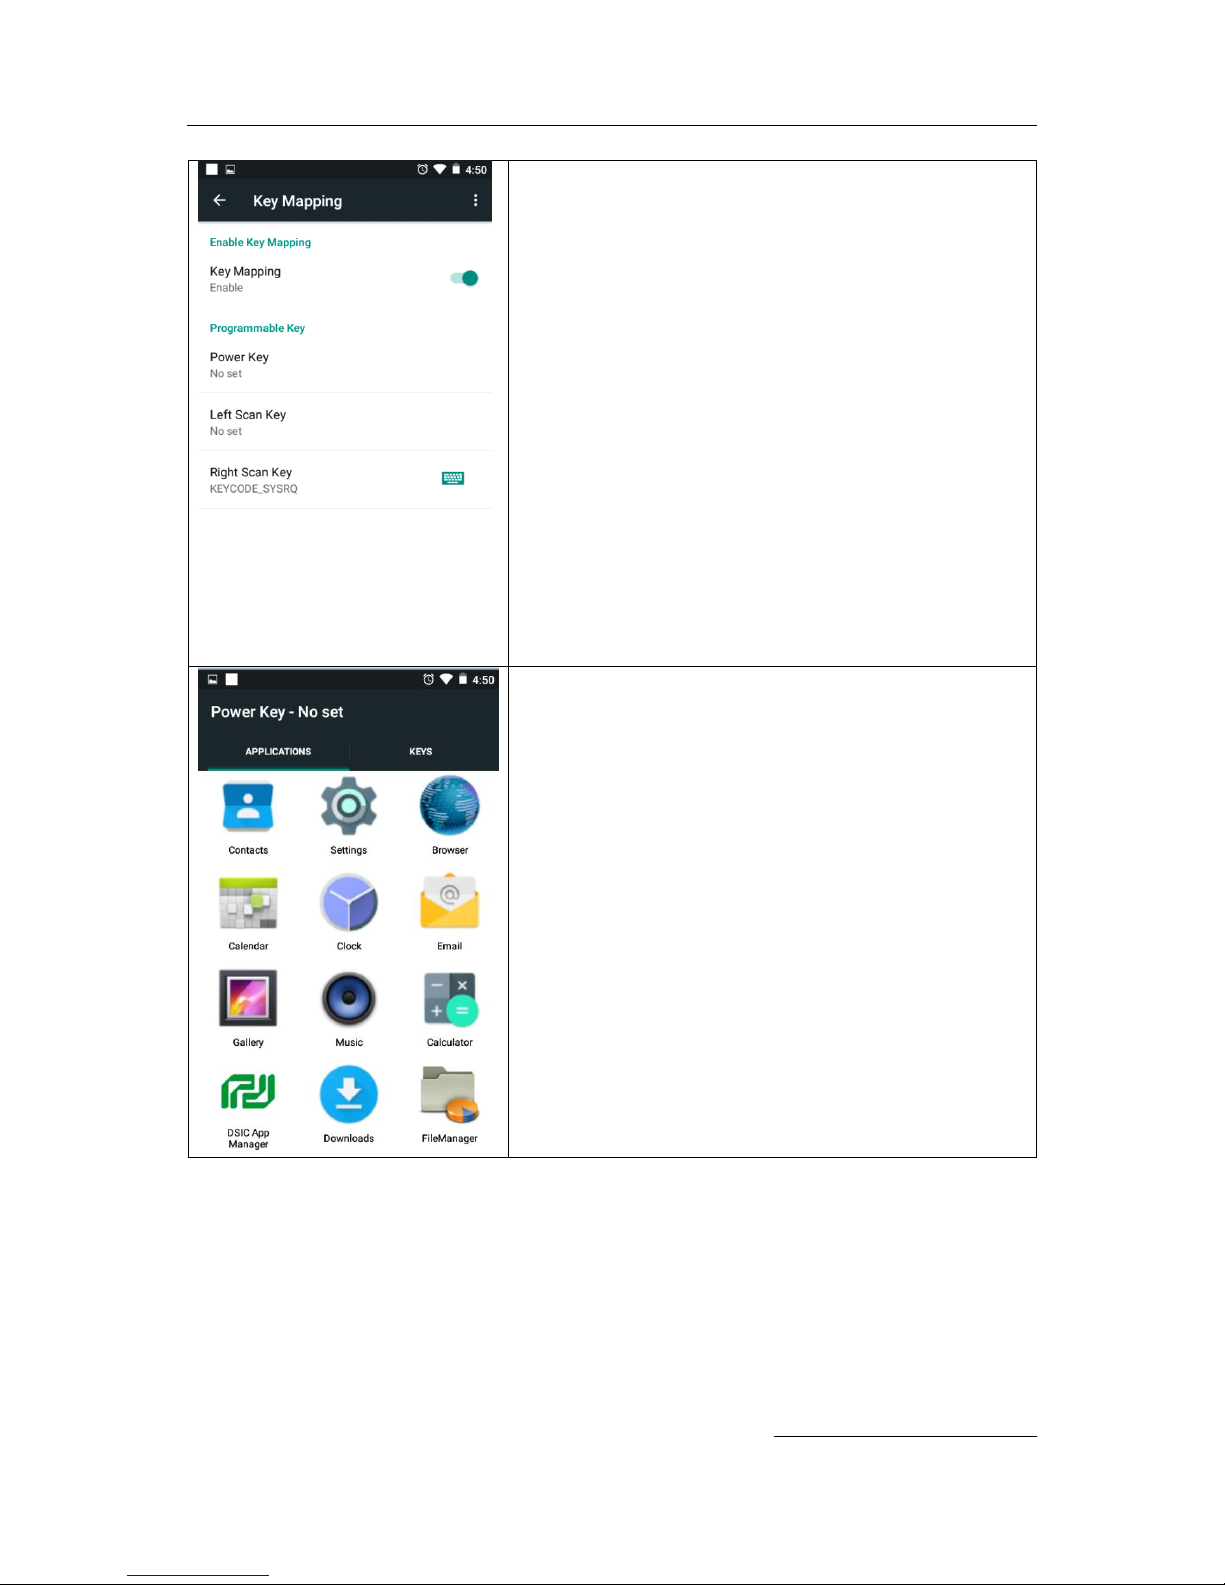
Key Mapping
It is enabling you to create a shortcut for repeating a sequence of keys or commands.
Go Settings > Personal > Key Mapping
Total 3 hardware Keys as below are able to be set as your
sequenced key or short cut to execute application.
Power Key, Left Scan Key, Right Scan Key
Key Mapping is On by default.
Page 36
DS2 User Manual Ver.0 2016. 08. 18
36
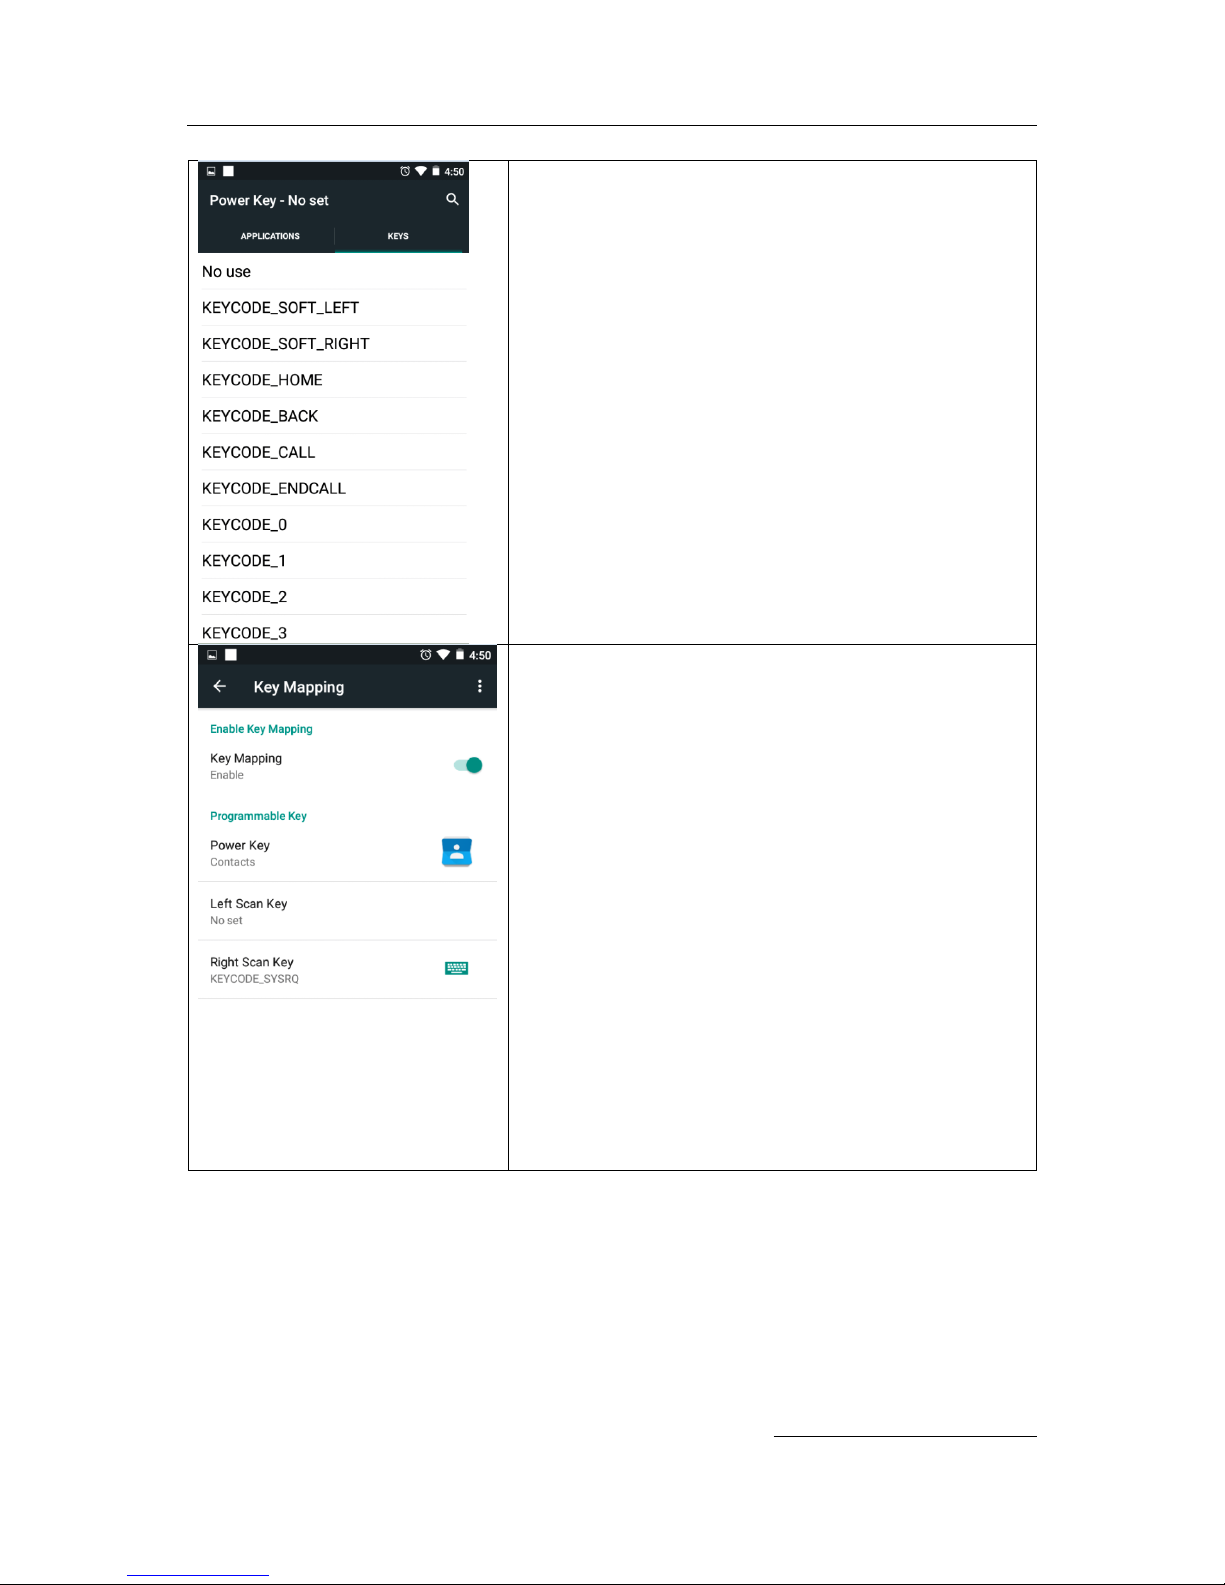
Select one of key in PROGRAMMABLE KEY
You can select an application to short cut for execution
Page 37
DS2 User Manual Ver.0 2016. 08. 18
37
Or, swipe the screen to left to set sequence.
When you select No use, then the key has no function
To reset the function key, press the icon. Then you can
reset the config.
Page 38
DS2 User Manual Ver.0 2016. 08. 18
38
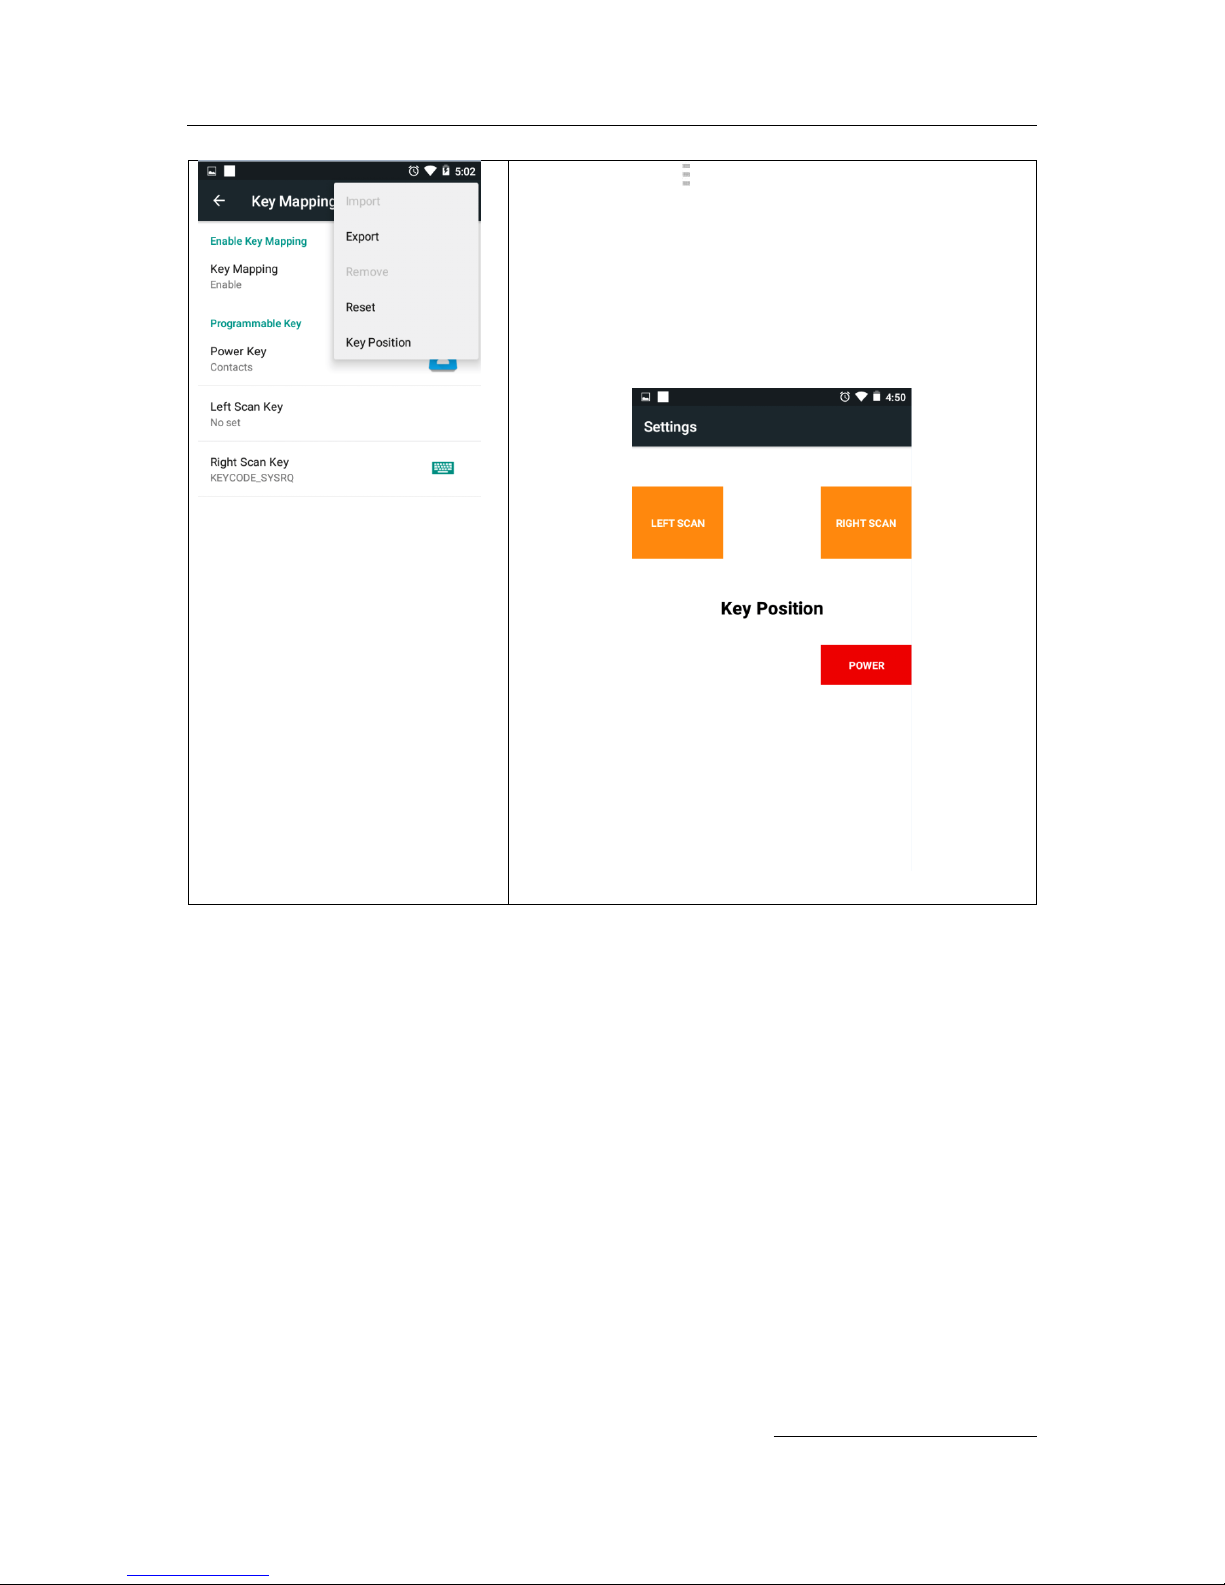
Press Menu icon to import, export, remove, or reset
your key mapping configuration
Key Position
You can set your key mapping with graphic interface as
below
Page 39
DS2 User Manual Ver.0 2016. 08. 18
39
OTA Update
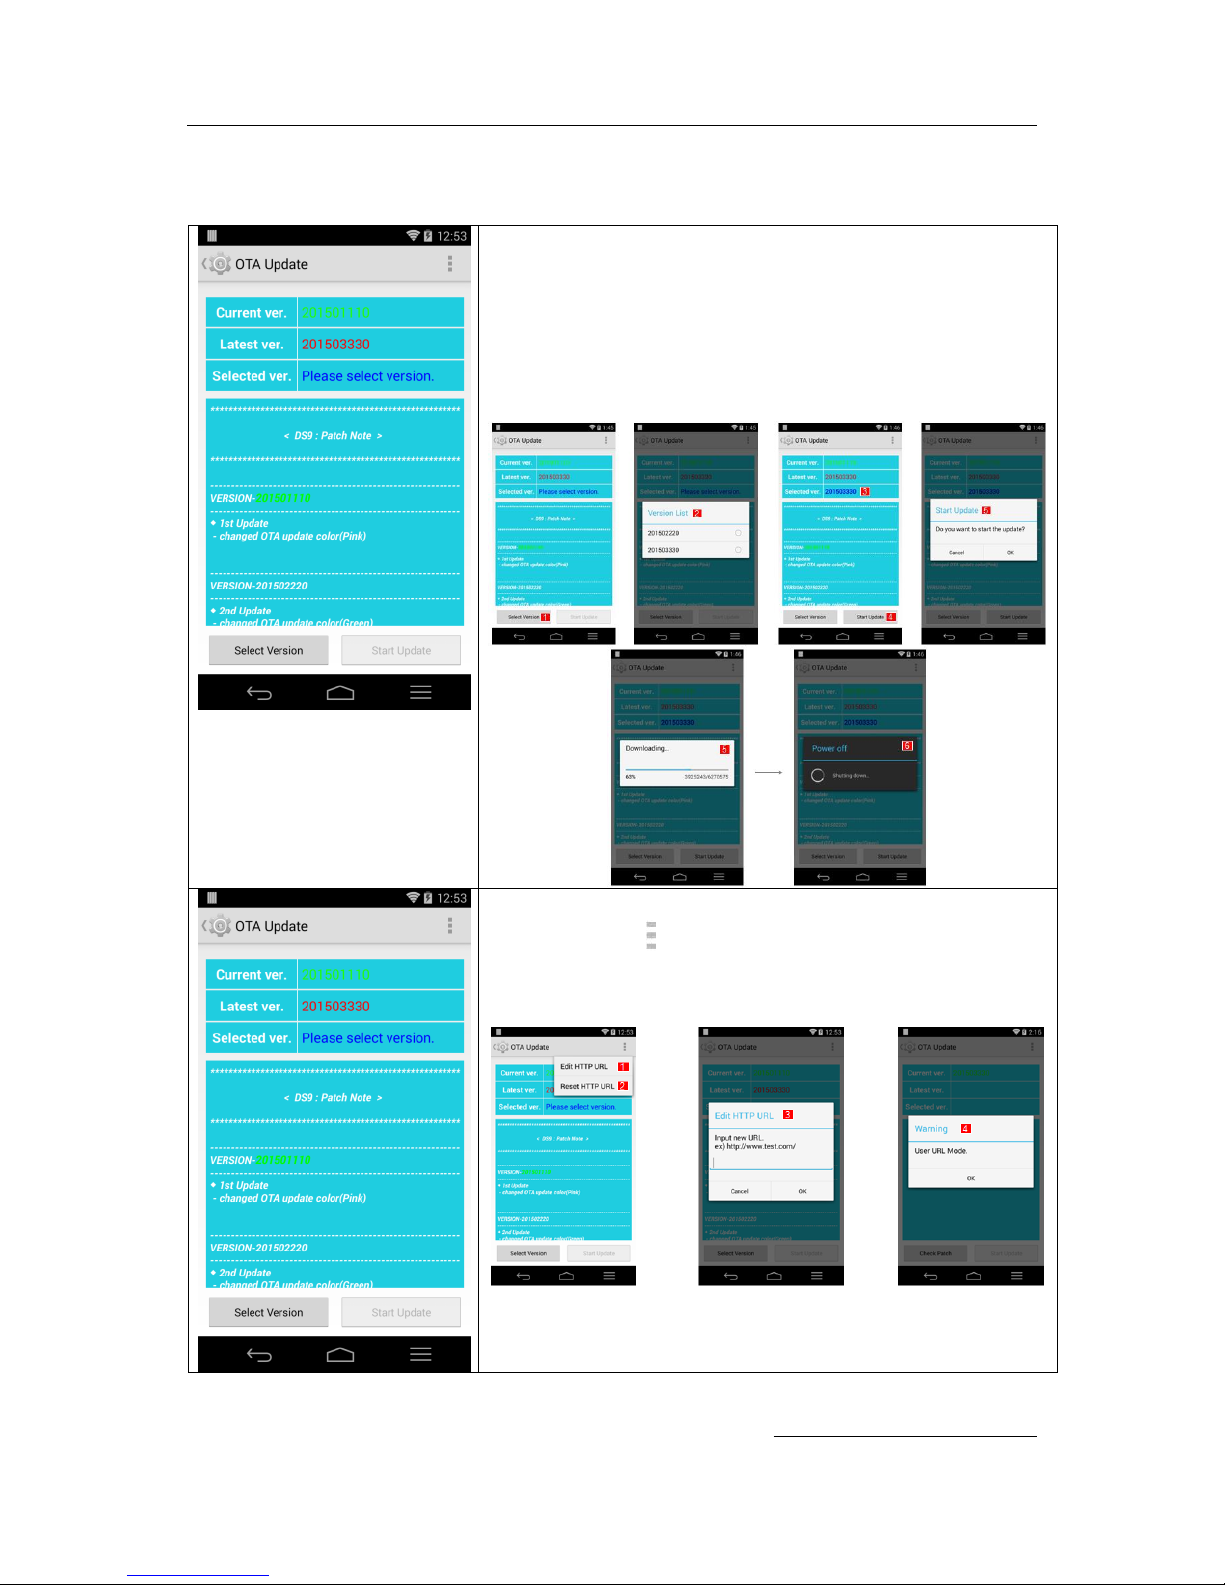
Go to Settings > About tablet > OTA Update Start > OTA Start
Check your available latest OS update at Select Version
Then touch Start Update button if you have available OS
update.
After new OS download, your device will be restarted
Examples
OS update by your own URL
Select Menu icon
Examples
Page 40

DS2 User Manual Ver.0 2016. 08. 18
40
Chapter 8: Developer’s Guide
USB Driver
If you are Android developer, please download from below link and install on your PC before you
connect DS2 to your PC. This is shell for ADB synchronization between your PC and DS2.
ADB: Android Development Bridge
This driver is useful when you have “Unknown device” message at your PC while you are connecting
DS2 to your PC.
https://www.dropbox.com/s/zkfqn3hesnnr60v/DS2_usb_driver.zip?dl=0
OS Update
You shall need below 5 types of files
- Boot.img
- Boot_ui_logo.bin
- Recovery.img
- System.img
- U-boot.bin
Update Instruction
Download your OS and install on your device as below
- Copy the firmware 5 files to root/sdfuse folder of the SD card
- Input micro SD card into your device
- WHILE pressing and holding Power + Left Scan Key on your device and, afterward to
enter DSIC SD Download screen
- When OS image file has been copied and installed completely, Done will be displayed
on your device screen.
- After the Done message, long press power button to restart your device
For latest OS, please contact your sales, or http://www.mobilebaseglobal.com
Emergency Update
When your device is not able to update OS with above OS Update guide due to hardware
malfunction, please apply Emergency Update. Update guide is as below linked manual.
https://www.dropbox.com/s/nuda9ig5af9h522/Emergency%20Update%20Manual.pdf?dl=0
Page 41
DS2 User Manual Ver.0 2016. 08. 18
41
Barcode scanner API
Environments
To develop barcode scanner feature on your application, please download 2 files from below link.
- Barcode Sample_dsic
- DS2_usb_driver
https://www.dropbox.com/sh/vatneib1h0828um/AAA2VgQkmW84czxEErD3IFena?dl=0
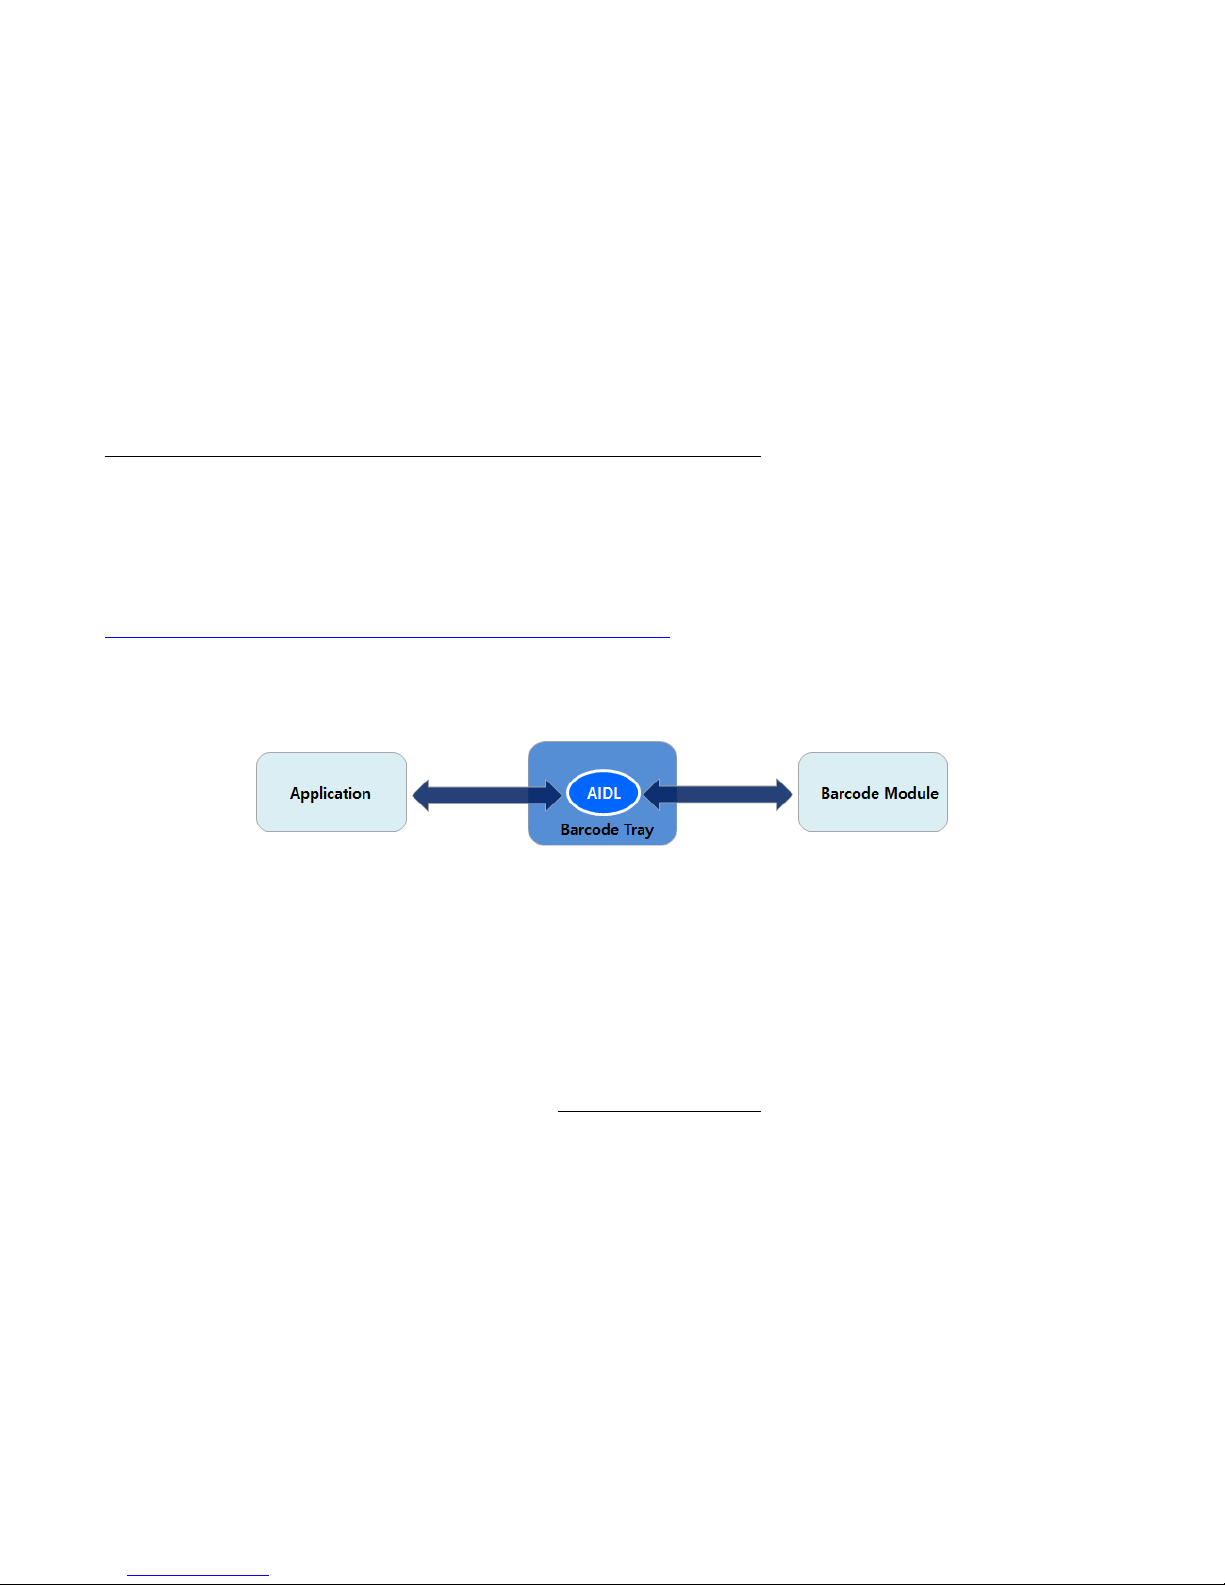
SDK made by AIDL(Android Interface Definition Language) and Android SDK 19 version (Lollipop). AIDL service starts at Barcode Tray. To use SDK,
Barcode Tray must be turned on.
Software Development Framework
Please refer below environment description of Barcode Sample
- Development Tool: Android Studio
- Android SDK version: API 19 (Lollipop 5.1.1)
- Interface: AIDL and Broadcast
Tested version: JDK 1.6.0_45
Please refer Scan Start button and Stop button on the API. The structure is to control scanner module using AIDL for binding to barcode service
Page 42

DS2 User Manual Ver.0 2016. 08. 18
42
Basic Implementation
In case decode data without AIDL, The decoded data is spread by Broadcast. Two action shall be required, such as Declaration and registry.
- Example of global declaration of broadcast
BroadcastReceiver mBarcodeReadBroadCast = new BroadcastReceiver() {
@Override
public void onReceive(Context context, Intent intent) {
if (intent.getAction().equals("app.dsic.barcodetray.BARCODE_BR_DECODING_DATA")) {
BarcodeDeclaration.SYMBOLOGY_IDENT symbology_ident =
BarcodeDeclaration.SYMBOLOGY_IDENT.fromInteger(
intent.getIntExtra("EXTRA_BARCODE_DECODED_SYMBOLE", -1));
TextView editText = (TextView) findViewById(R.id.editText);
if (symbology_ident != BarcodeDeclaration.SYMBOLOGY_IDENT.NOT_READ) {
String data =
"["+symbology_ident.toString()+"]"+
intent.getStringExtra("EXTRA_BARCODE_DECODED_DATA");
editText.setText(data);
}else
{
editText.setText("NOT READ");
}
}
}
};
Page 43

DS2 User Manual Ver.0 2016. 08. 18
43
- Name of Decoding Broadcast (
Modifiable
): app.dsic.barcodetray.BARCODE_BR_DECODING_DATA
In case to modify the name of Decoding Broadcast, please use AIDL API.
Decoding Broadcast contains below
Symbology Identification
and
Decoding data
Contents
Type
Default Value
Description
Symbology identification
Integer
-1
It will be get with getIntExtra function.
- Name of Extra: EXTRA_BARCODE_DECODED_SYMBOLE
In case your decoding fail, such as
Scan stop
, or
Scan Time out
, you still shall be received
Broadcast without decoded data.
Decoding data
String
UTF-8
It will be get with getStringExtra function.
- Name of Extra: EXTRA_BARCODE_DECODED_DATA
Page 44

DS2 User Manual Ver.0 2016. 08. 18
44
- Example of registry broadcast
@Override
protected void onResume() {
super.onResume();
/*Set Broadcast receiver*/
registerReceiver(mBarcodeReadBroadCast,
new IntentFilter("app.dsic.barcodetray.BARCODE_BR_DECODING_DATA"));
}
@Override
protected void onPause() {
super.onPause();
/*AIDL Service disconnect*/
unregisterReceiver(mBarcodeReadBroadCast);
}
Note: Above examples are an example. You can also add at Androidmanifest.xml.
Page 45

DS2 User Manual Ver.0 2016. 08. 18
45
Controlling scanning & barcode using AIDL
It is able to control scanning and barcode setting used by AIDL, such as start and stop, disabling specific symbology identification. Below is introduction
of some general part of function out of AIDL which is including many functions. Many of functions don’t need to intent service implement. Some are
using only barcode tray. For details, please refer Common APIs.
Step 1: Connect to AIDL
import app.dsic.barcodetray.IBarcodeInterface;
private IBarcodeInterface mBarcode;
/*AIDL Service Connection*/
private ServiceConnection srvConn =
new ServiceConnection() {
@Override
public void onServiceConnected(ComponentName name, IBinder service) {
mBarcode = IBarcodeInterface.Stub.asInterface(service);
}
@Override
public void onServiceDisconnected(ComponentName name) {
mBarcode = null;
}
};
@Override
Page 46

DS2 User Manual Ver.0 2016. 08. 18
46
protected void onResume() {
super.onResume();
/*AIDL Service connect*/
bindService(new Intent("app.dsic.barcodetray.IBarcodeInterface"),
srvConn, BIND_AUTO_CREATE);
}
@Override
protected void onPause() {
super.onPause();
/*AIDL Service disconnect*/
unbindService(srvConn);
}
Step 2: Copy
IBarcodeInterface.aidl
package in your source code. Then, make
serviceConnection
global value and set barcode.
Barcode interface value. Bind and unbind service at resume and pause.
Page 47

DS2 User Manual Ver.0 2016. 08. 18
47
The API related files
API has consisted as below;
- BarcodeDeclaration.java
- IBarcodeInterface.aidl
BarcodeDeclaration.java
This is declaration files related to return value and parameter. Below is meaning of each declaration in the file;
BARCODE_RESULT: API return value
RECEIVE_TYPE: Receiving method for decoded data
SCAN_NOTIFICATION: Determine how to notification when decoding barcode
DELAY_MODE: Determine the speed of data transmission when keyboard event mode
SYMBOLOGY_IDENT: It changes the broadcasted
Symbology ident integer
to actual data
SYMBOLOGY_ENABLE: It determines usability for a specific symbology
Please refer below table for return values and parameters of each declaration
Declaration
Type
Related APIs
Values
Applied Version
Value
Description
BARCODE_RESULT
Return Value
All APIs
RESULT_SUCEESS
Success
1.0.11
RESULT_UNKNOWN
Unknown result
1.0.11
RESULT_NOT_YET_IMPLEMENT
Unimplemented API
1.0.11
RESULT_NOT_SUPPORT
Not supporting in this version
1.0.11
RESULT_OPENED
You are trying to open again, even while it has been open
already
1.0.11
RESULT_CLOSED
You are trying to close again, even while it has been closed
already
1.0.11
Page 48

DS2 User Manual Ver.0 2016. 08. 18
48
RESULT_OPEN_FAIL
Barcode scanner open fail
1.0.11
RESULT_NOT_ON_SCANNING
Do not use anymore
1.0.11
RESULT_SCAN_DISABLE
Scanning disable status
1.0.11
RESULT_DRIVER_ERROR
Error in barcode driver layer
1.0.11
RECEIVE_TYPE
Parameter
Value
ㆍvoid SetRecvType(int nRecvType)
ㆍint GetRecvType()
INTENT_EVENT
It is receiving data with INTENT method. Regarding Action
Name and Extra Value of the specific INTENT, please refer
below;
ㆍGetIntentName()
ㆍGetIntentBarcodeData()
ㆍGetIntentSymData()
1.0.11
KEYBOARD_EVENT
Print decoding data typing with virtual keyboard
1.0.11
CLIPBOARD_EVENT
After putting the decoded data in Clipboard, print it using
Menu + V key
1.0.11
SCAN_NOTIFICATION
Parameter
Value
ㆍInt GetScanSuccessNoti()
ㆍvoid SetScanSuccessNoti(int nNoti)
ㆍint GetScanFailNoti()
ㆍvoid SetScanFailNoti(int nNoti)
NOTI_MUTE
No sound
1.0.11
NOTI_SOUND
Sound
1.0.11
NOTI_VIB
Vibration
1.0.11
NOTI_SOUND_VIB
Sound and vibration
1.0.11
DELAY_MODE
Parameter
Value
ㆍint GetDelayMode()
ㆍvoid SetDelayMode(int nMode)
ㆍint GetCustomDelayTime()
ㆍvoid SetCustomDelayTime(int
nDelayTime)
ㆍint GetDelayTime()
DELAYMODE_NONE
0 sec
1.0.11
DELAYMODE_SLOWLY
0.1 sec
1.0.11
DELAYMODE_NORMAL
0.01 sec
1.0.11
DELAYMODE_FAST
0.001 sec
1.0.11
DELAYMODE_USER_DEFINITION
User programmable option
1.0.11
SYMBOLOGY_IDENT
Symbology
identity
ㆍBroadcastReceiver
(@Override public void
onReceive(Context context, Intent intent)
Please refer BarcodeDeclaration.java
file
1.0.11
SYMBOLOGY_ENABLE
Parameter
Value
ㆍboolean
SE4750_SetSymbologyEnable(int
nIdent,boolean bEnable)
Please refer BarcodeDeclaration.java
file
1.0.11
Page 49

DS2 User Manual Ver.0 2016. 08. 18
49
IBarcodeInterface.aidl
These files are to communicate with barcode service
Name
Description of function
Parameter
Return Value
User Accessibility
Version
Open()
It activates barcode scanner module
None
Int (BARCODE_RESULT)
1.0.11
Close()
It deactivates barcode scanner module
None
Int (BARCODE_RESULT)
1.0.11
IsBarcodeOpened()
It is to check activation status of barcode scanner module
None
boolean
√
1.0.11
ScanStart()
It starts barcode scanning
None
Int (BARCODE_RESULT)
√
1.0.11
ScanStop()
It stops barcode scanning
None
Int (BARCODE_RESULT)
√
1.0.11
IsScanEnable()
It is to check usability of barcode scanning
None
boolean
√
1.0.11
SetScanEnable(booleanbEnable)
It is to set to enable/disable scanning
boolean bEnable
void √ 1.0.11
GetVersionInfo()
It brings version information of the scanner module
None
String √ 1.0.11
SetScanTimeout()
It is to set maximum term of reading per single trigging
float nTimeout
boolean
√
1.0.11
GetScanTimeout()
It is to get maximum term of reading per single trigging
None
float √ 1.0.11
GetRecvType()
It determines how to receive decoded data between Intent, keyboard, or
clipboard methods
None
Int (RECEIVE_TYPE)
√
1.0.11
SetRecvType(int nRecvType)
it is to check how to receive decoded data between Intent, keyboard, and
clipboard methods
int nRecvType
void √ 1.0.11
SetPrefix1(String strPrefix1)
It determines value of the first prefix in KEYBOARD_EVENT, or
CLIPBOARD_EVENT
String strPrefix1
boolean
1.0.11
GetPrefix1()
It is to check value of the first prefix in KEYBOARD_EVENT, or
CLIPBOARD_EVENT
None
String 1.0.11
SetPrefix2(String strPrefix2)
It determines value of the second prefix in KEYBOARD_EVENT, or
CLIPBOARD_EVENT
String strPrefix2
boolean
1.0.11
GetPrefix2()
It is to check value of the second prefix in KEYBOARD_EVENT, or
CLIPBOARD_EVENT
None
String 1.0.11
SetSuffix1(String strSuffix1)
It determines value of the first suffix in KEYBOARD_EVENT, or
CLIPBOARD_EVENT
String strSuffix1
boolean
1.0.11
GetSuffix1()
It is to check value of the first suffix in KEYBOARD_EVENT, or
CLIPBOARD_EVENT
None
String 1.0.11
SetSuffix2(String strSuffix2)
It determines value of the second suffix in KEYBOARD_EVENT, or
CLIPBOARD_EVENT
String strSuffix2
It is available for only 1
character.
boolean
1.0.11
Page 50

DS2 User Manual Ver.0 2016. 08. 18
50
Example:
“A”
“a”
“B”
“b”
Exception:
EMPTY: “EMPTY”
TAB: “TAB”
ENTER: “ENTER”
SPACE: “SPACE”
GetSuffix2()
It is to check value of the second suffix in KEYBOARD_EVENT, or
CLIPBOARD_EVENT
None
String 1.0.11
GetEnableKeyupStop()
It is to determine scan stop, or maintain until time out after release
scanner trigger. If you set to true, it stops immediately. If false, it
maintains until time out
None
Boolean
1.0.11
SetEnableKeyupStop(boolean
bSetEnableKeyupStop)
It is to determine scan stop, or maintain until time out after release
scanner trigger. If you set to true, it stops immediately. If false, it
maintains until time out
boolean
bSetEnableKeyupStop
void 1.0.11
GetMultiScan()
It gets choice of multi scanning availability
void
Boolean
1.0.11
SetMultiScan(boolean bEnable)
It set choice of multi scanning availability
boolean bEnable
void 1.0.11
GetScanSuccessNoti()
It gets what kind of alarm event when scanning succeed
void
Int (SCAN_NOTIFICATION)
√
1.0.11
SetScanSuccessNoti(int nNoti)
It set what kind of alarm event when scanning succeed
int nNoti
void √ 1.0.11
GetScanFailNoti()
It gets what kind of alarm event when scanning fail
void
Int (SCAN_NOTIFICATION)
√
1.0.11
SetScanFailNoti(int nNoti)
It set what kind of alarm event when scanning fail
int nNoti
void √ 1.0.11
GetDelayMode()
It gets Delay Mode
void
Int (DELAY_MODE)
√
1.0.11
SetDelayMode(int nMode)
It sets Delay Mode
int nMode
void 1.0.11
GetCustomDelayTime()
It gets Delay Time for user customized delay
void
Int 1.0.11
SetCustomDelayTime(int
nDelayTime)
It set Delay Time for user customized delay
int nDelayTime
void 1.0.11
GetDelayTime()
It gets current Delay Time
void
Int 1.0.11
GetIntentName()
It gets Action Name of broadcast when Intent Event
Default value: “app.dsic.barcodetray.BARCODE_BR_DECODING_DATA”
void
String √ 1.0.11
SetIntentName(String
IntentName)
It is to set Action Name of broadcast when Intent Event
String IntentName
void √ 1.0.11
Page 51

DS2 User Manual Ver.0 2016. 08. 18
51
GetIntentBarcodeData()
It gets Action Name of broadcast when Intent Event. Default value:
“EXTRA_BARCODE_DECODED_DATA”
Void
String √
SetIntentBarcodeData(String
BarcodeData)
It is to set Barcode Data Name when Intent Event
String BarcodeData
void √
GetIntentSymData()
It gets name of barcode symbology data of broadcast when Intent event
Default value: “EXTRA_BARCODE_DECODED_SYMBOLE”
Void
String √
SetIntentSymData(String
SymData)
It set barcode symbology name of broadcast when Intent Event
String SymData
void √
GetDecodingCharset()
It gets the used charset when decoding
Void
String √
SetDecodingCharset(String
strCharset)
It sets using Character Set when decoding
1
SetDecodingCharset(String
strCharset)
boolean
√
GetURLDirection()
It get the choice to view with internet browser when barcode has
included URL
Void
boolean
SetURLDirection(boolean
bEnable)
It determines to show with internet browser when barcode has included
URL
boolean bEnable
boolean
SetAllSymbologyEnable()
It is enabling all types of barcode symbologies
None
Void √
SetAllSymbologyDisable()
It is disabling all types of barcode symbologies
None
Void √
SetSymbologyEnable(int
nIdentifier,boolean bEnable)
It is enabling/ disabling for specific barcode symbologies
int nIdent
* SYMBOLOGY_IDENT
Boolean
√
boolean bEnable
* Scanning availability
1
Available character set: IBM00858, IBM437, IBM775, IBM850, IBM852, IBM855, IBM857, IBM862, IBM866, ISO-8859-1, ISO-8859-2, ISO-8859-4, ISO-8859-5, ISO-8859-7, ISO-8859-9, ISO-8859-13, ISO-8859-15,
KOI8-R,KOI8-U, US-ASCII, UTF-8, UTF-16, UTF-16BE, UTF-16LE, UTF-32, UTF-32BE, UTF-32LE, x-UTF-32BE-BOM, x-UTF-32LE-BOM, windows-1250, windows-1251, windows-1252, windows-1253, windows-1254, windows1257, x-IBM737, x-IBM874, x-UTF-16LE-BOM, Big5, Big5-HKSCS, EUC-JP, EUC-KR, GB18030, GB2312, GBK, IBM-Thai, IBM01140, IBM01141, IBM01142, IBM01143, IBM01144, IBM01145, IBM01146, IBM01147, IBM01148,
IBM01149, IBM037, IBM1026, IBM1047, IBM273, IBM277, IBM278, IBM280, IBM284, IBM285, IBM297, IBM420, IBM424, IBM500, IBM860, IBM861, IBM863, IBM864, IBM865, IBM868, IBM869, IBM870, IBM871, IBM918,
ISO-2022-CN, ISO-2022-JP, ISO-2022-KR, ISO-8859-3, ISO-8859-6, ISO-8859-8, JIS_X0201, JIS_X0212-1990, Shift_JIS, TIS-620, windows-1255, windows-1256, windows-1258, windows-31j, x-Big5-Solaris, x-euc-jp-linux,
x-EUC-TW, x-eucJP-Open, x-IBM1006, x-IBM1025, windows-1258, windows-31j, x-Big5-Solaris, x-euc-jp-linux, x-EUC-TW, x-eucJP-Open, x-IBM1006, x-IBM1025, x-IBM1046, x-IBM1097, x-IBM1098, x-IBM1112, xIBM1122, x-IBM1123, x-IBM1124, x-IBM1381, x-IBM1383, x-IBM33722, x-IBM834, x-IBM856, x-IBM875, x-IBM921, x-IBM922, x-IBM930, x-IBM933, x-IBM935, x-IBM937, x-IBM939, x-IBM942, x-IBM942C, x-IBM943, xIBM943C, x-IBM948, x-IBM949, x-IBM949C, x-IBM 950, x-IBM964, x-IBM970, x-ISCII91, x-ISO2022-CN-CNS, x-ISO2022-CN-GB, x-iso-8859-11, x-JIS0208, x-JISAutoDetect, x-Johab, x-MacArabic, x-MacCentralEurope, xMacCroatian, x-MacCyrillic, x-MacDingbat, x-MacGreek, x-MacHebrew, x-MacIceland, x- MacRoman, x-MacRomania, x-MacSymbol, x-MacThai, x-MacTurkish, x-MacUkraine, x-MS950-HKSCS, x-mswin-936, x-PCK, xSJIS_0213, x-windows-50220, x-windows-50221, x-windows-874, x-windows -949, UTx-windows-950, x-windows-iso2022jp
Page 52
DS2 User Manual Ver.0 2016. 08. 18
52
KIOSK MODE
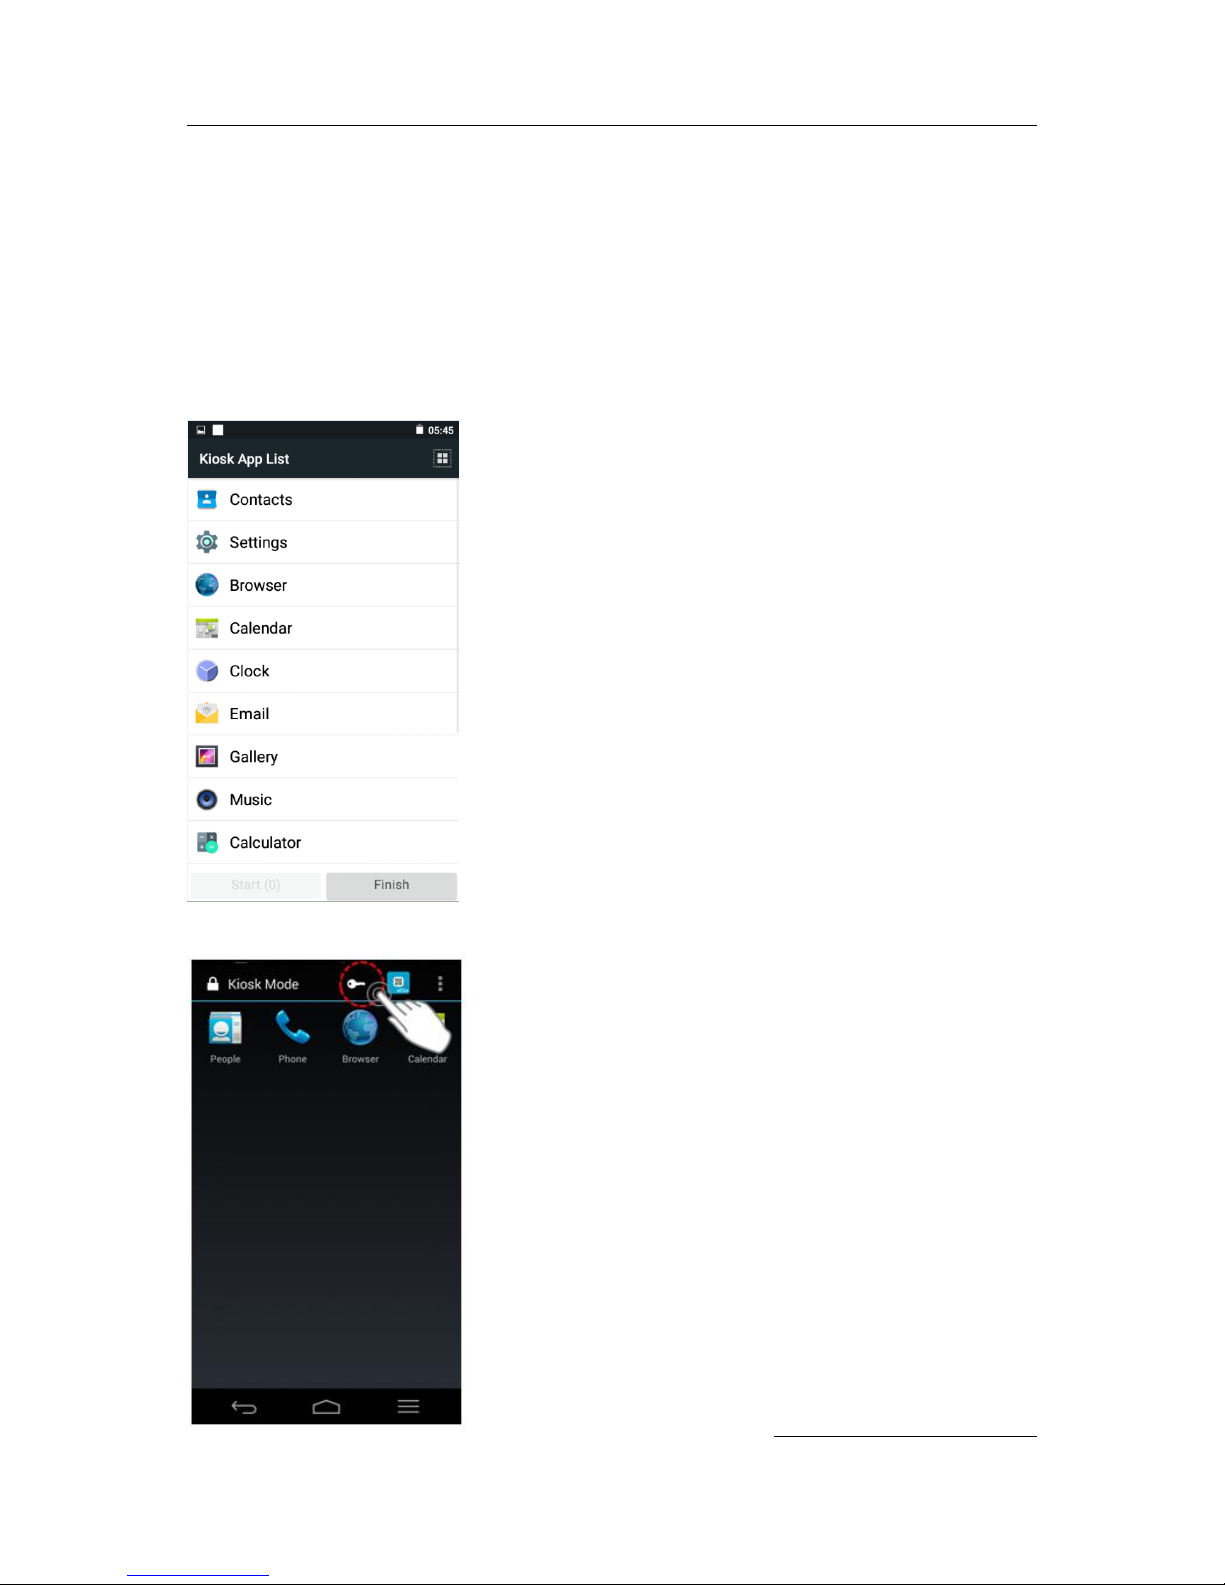
Kiosk mode is enabling to lock down unwanted device misuse. It is to control which application and
device features can be used by user such as blocking access to games, social media apps and etc.
When you allow access to business application apps, KIOSK MODE will ensure that the user cannot
access anything other than those allowed application.
Select Settings > Kiosk Mode > Enable Kiosk Mode > Input Admin Password: default “0000”
After enter Kiosk Mode, select necessary applications from Kiosk App List as below. Touch Start
To return Kiosk App List, touch key icon on top of the screen.
Page 53
DS2 User Manual Ver.0 2016. 08. 18
53
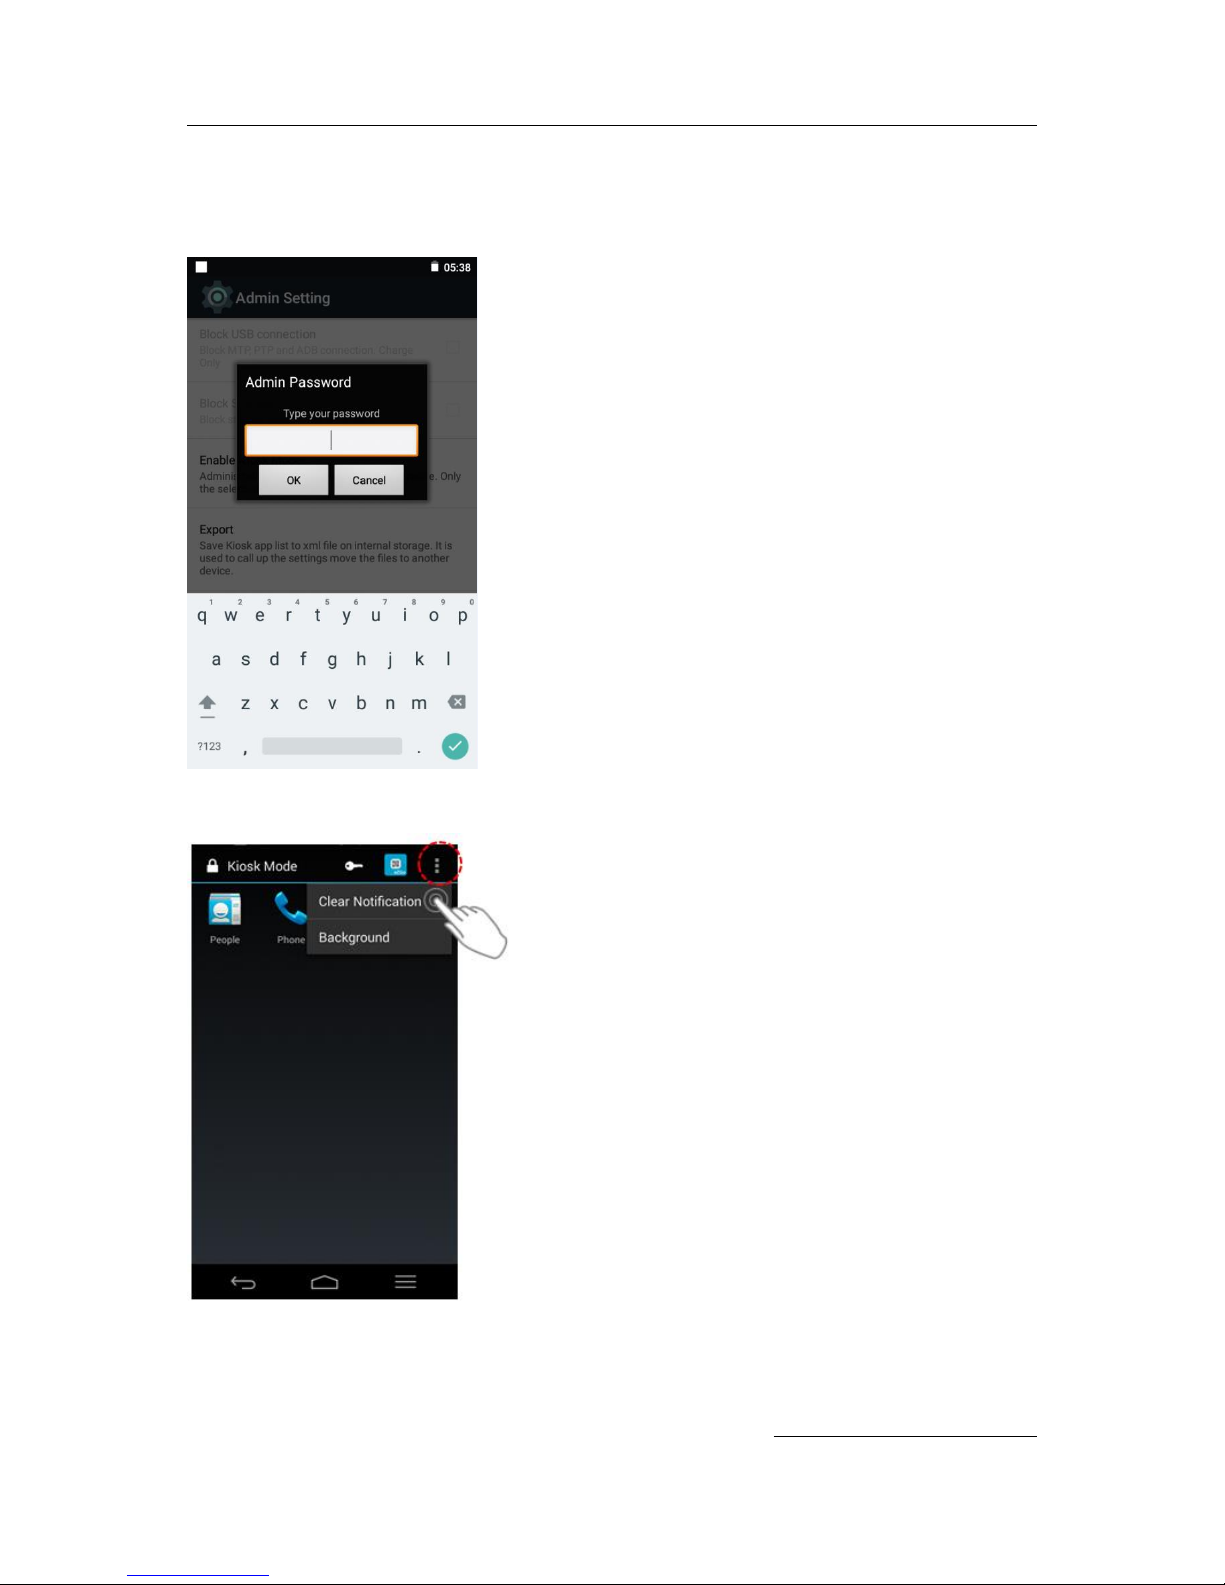
Password change
Input new password more than 4 characters
Notification clear
Page 54
DS2 User Manual Ver.0 2016. 08. 18
54
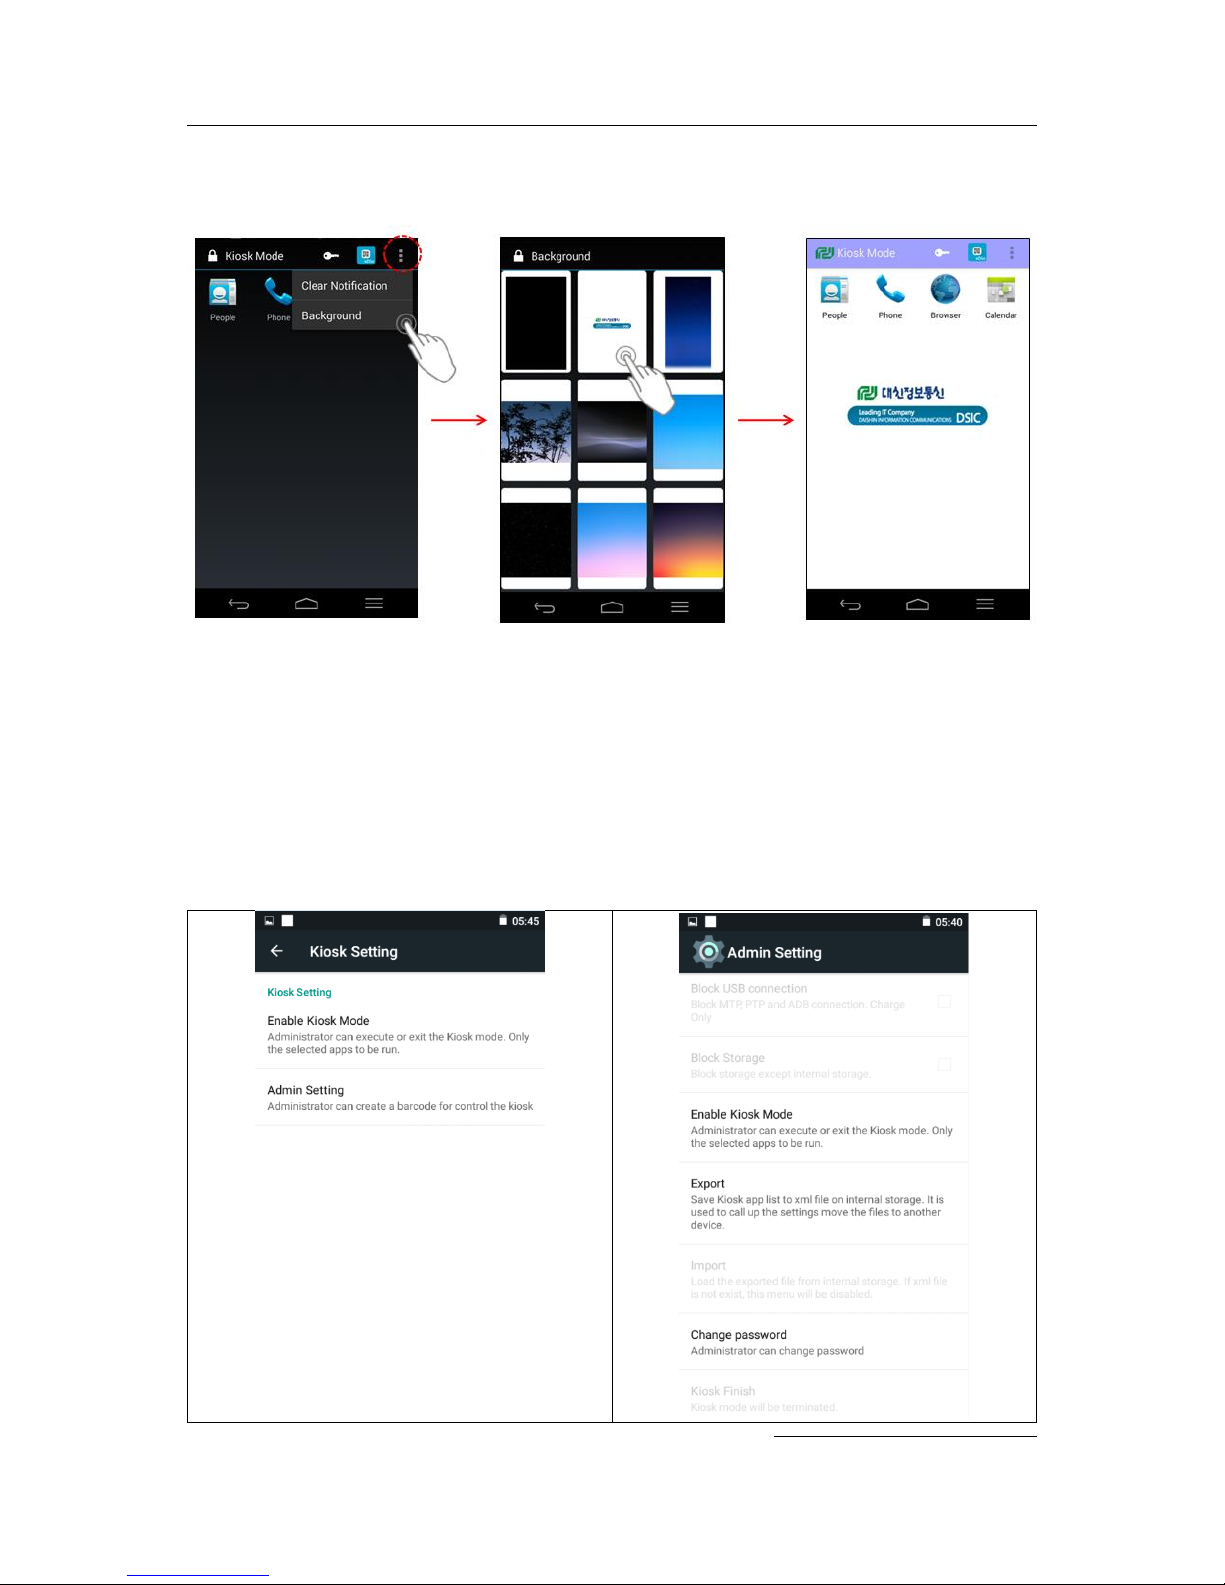
Setting Background
Select Menu > Background > Wall pager image
Admin Setting
Select Admin Setting to export KIOSK setting information of the device by email, or xml file, such
as allowed APP List, KIOSK On, KISOK Off and new password.
If you want to assign special email account, then select Receive Email.
To check the exported file, go File Manager > All Files > Internal > DSIC > kiosk
Page 55

DS2 User Manual Ver.0 2016. 08. 18
55
Device Administration
Go Settings > Security > Device administrators > XXXXX (Your application) > Activate
You use the Device Administration API to write device admin applications that users install on
their devices. The device admin application enforces the desired policies. Here's how it works:
- A system administrator writes a device admin application that enforces remote/local
device security policies. These policies could be hard-coded into the app, or the
application could dynamically fetch policies from a third-party server.
- The application is installed on users' devices. Android does not currently have an
automated provisioning solution. Some of the ways a sysadmin might distribute the
application to users are as follows:
Google Play (Not supported in DS2)
Enabling installation from another store
Enabling installation from another store
- The system prompts the user to enable the device admin application. How and when
this happens depends on how the application is implemented.
- Once users enable the device admin application, they are subject to its policies.
Complying with those policies typically confers benefits, such as access to sensitive
systems and data.
For more information, please refer below link
http://developer.android.com/guide/topics/admin/device-admin.html
Page 56

DS2 User Manual Ver.0 2016. 08. 18
56
 Loading...