

USER MANUAL
Micromotor for oral surgery
01_26/04/2018
USER MANUAL
DSI MICROMOTOR FOR ORAL SURGERY
0476
Page 1 of 15

USER MANUAL
Micromotor for oral surgery
01_26/04/2018
INTENDED USE
The DSI Mini Surgery Motor product are brushless micromotor for oral surgery. The use of DSI Mini Surgery Motor is
allowed only to specialized personnel (licensed medical specialists) in hospitals, nursing homes, clinics and private
practices.
SAFETY RULES
1. Clean, disinfect and sterilize all the sterilizable parts (ref. par. Maintenance) after each treatment as instructed in
this manual.
2. All new or repaired products are in not-sterilized conditions: before using on the patient the sterilizable parts
must be disinfected and sterilized.
3. Check periodically the condition of the supply cord. Replace it with a genuine spare part when worn down.
4. Check periodically the condition of the micromotor handpiece cord. Replace it with a genuine spare part when
worn down.
5. Connect to the device only the accessories/components (supplied from DSI Dental Solutions company) that
are part of the original product (see par. Components). Using accessories/components not indicated or put in
the market by DSI Dental Solutions as spare parts for replacement may cause an increase of electromagnetic
emissions or a decrease of the device’s electromagnetic immunity.
6. Do not use the instrument where strong electromagnetic elds are present (cellular phones, receiver-transmitter
radios, microwaves, etc…).
7. In the event of malfunctioning, shut off the apparatus and contact the manufacturer’s Customer Service
Department. Before using the equipment on the patients, check the pre-set operating parameters.
8. Use only contra-angles/handpieces that conform with the essential requirements of European Directives and
bear the CE mark as specied in the Medical Devices Directive 93/42/EEC.
9. Only qualied personnel can open the control unit case.
10. Do not use the equipment if the case is damaged.
11. To disconnect electrically the equipment from the main disconnect the power cord and/or press the main switch.
DSI Dental Solutions guarantees to provide on request the technical documentations about components parts
lists, schemes of electrical connections, information about range, accuracy and precision of the displayed values.
This documentation can be useful to skilled personnel in order to repair the equipment’s part that the manufacturer
considers repairable.
SAFETY INFORMATION
• Before attempting to operate the device, read and become familiar with the contents of the User’s Manual supplied
with the instrument.
• Failure to follow these recommendations, even partly, may cause equipment damage along with malfunctions.
Following the instructions and recommendations given by the manufacturer is the key to top performance and
efcient technical support, when necessary.
• This manual must be kept nearby the instrument so that it can be rapidly consulted whenever necessary. This
manual must accompany the instrument whenever it changes hands or is re-sold so that the new owner can
familiarize him/herself about the safety rules and precautions and how to properly operate the instrument.
• These rules and precautions are furnished for safety reasons. They must be carefully read in their entirety before
attempting to install and use the instrument.
Page 2 of 15

USER MANUAL
Micromotor for oral surgery
01_26/04/2018
ATTENTION
1. Conformity to the Electromagnetic Compatibility Directive DOES NOT GUARANTEE the total absence of
interferences with other electronic devices; therefore:
• The instruments MUST NEVER be used on or near patients who have pace-makers or other electronic implants.
2. Likewise, make sure the equipment does not interfere with other electronic devices that are vital for the life of
the patient or other persons.
3. The equipment is not protected against the risk of explosions or res caused by mixtures of anesthetics or
inammable gases; therefore:
• Never use the equipment where mixtures of anesthetics or inammable gases are present.
4. Electric parts connected to the supply mains are housed inside the equipment; therefore:
• Make certain the supply mains is in perfectly safe condition before hooking up the instrument;
• Never open the instrument’s casing;
• If the casing accidentally breaks, unplug the power cord before handling the equipment.
5. Water or other liquids that get electric parts inside the equipment wet may cause damage while the operator
risks electrocution. If liquids are split on the equipment, proceed as follows:
• Shut off the equipment and unplug the power cord;
• Immediately dry the equipment casing outside with a rag that absorbs well;
• Wait enough time for any liquid that got into the casing to evaporate;
• Make sure nothing inside or outside the equipment is still damp before plugging in and turning the equipment
back on.
6. Even though the equipment cannot run at full power when the handpiece is not connected, remember that
dangerous electric potentials are normally present at the contacts of the handpiece connector even at low
power; therefore:
• Do not turn on the equipment if the handpiece is not connected to the cord;
• Never detach the handpiece from the cord when the equipment is on;
• Before connecting the handpiece to the cord, make certain the point where the handpiece is connected to the
cord is perfectly dry, in particular after the handpiece has been sterilized in autoclave.
• The equipment is to be stored and used at normal room temperature, pressure and humidity.
No modication of this equipment is allowed.
Do not modify this equipment without authorization of the manufacturer.
If this equipment is modied, appropriate inspection and testing must be conducted to ensure continued safe
use of the equipment.
Page 3 of 15
USER MANUAL
Micromotor for oral surgery
01_26/04/2018
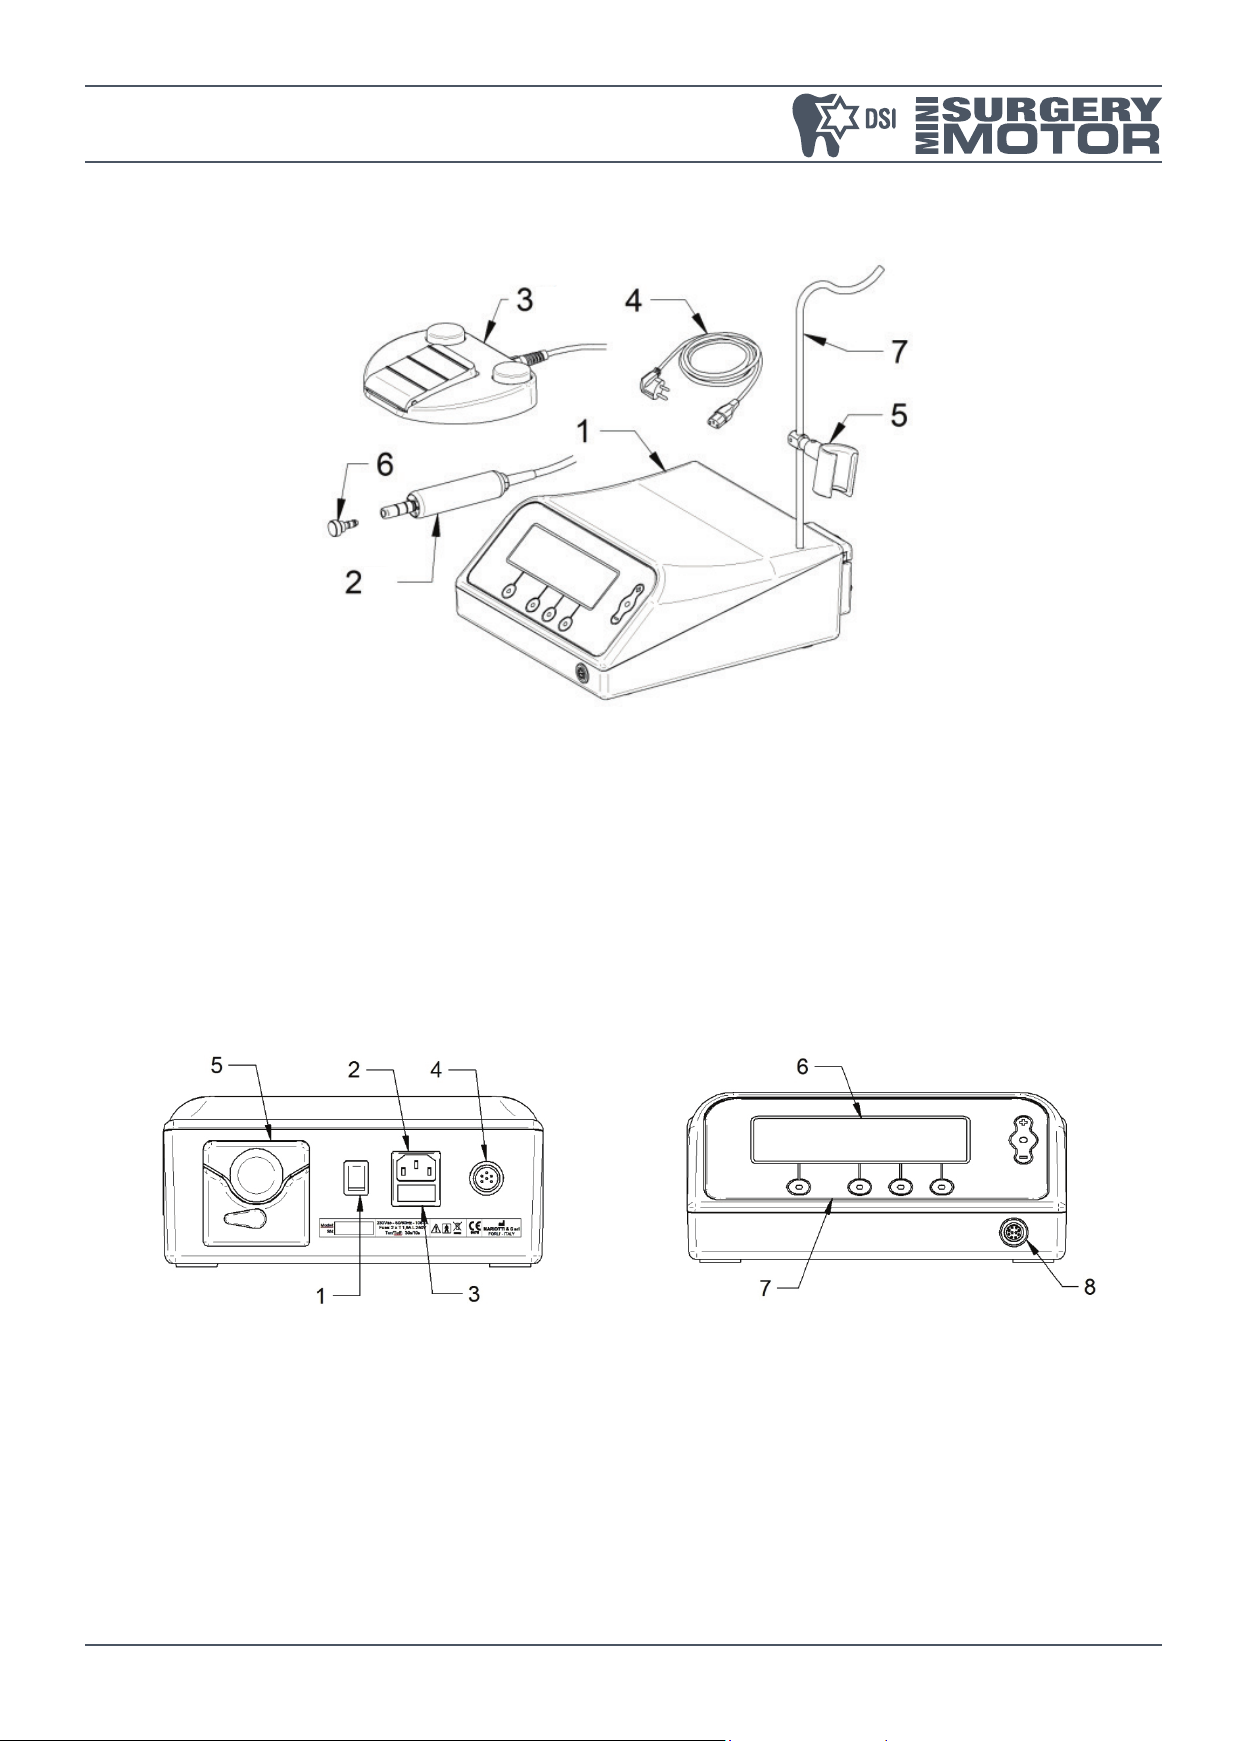
DESCRIPTION OF VERSIONS AND COMPONENTS
1. Control unit.
2. Micromotor with led.
3. Variable speed pedal.
4. Power supply cord.
5. Micromotor support.
6. Protective plug for sterilization.
7. Bar for physiological solution.
Pic. 1.
Pic. 2. Pic. 3.
1. Main switch.
2. Power supply socket.
3. Fuses-holder.
4. Pedal socket.
5. Peristaltic pump.
6. Display.
7. Control panel.
8. Micromotor socket.
Page 4 of 15

USER MANUAL
Micromotor for oral surgery
01_26/04/2018
INSTALLATION
• Take off the tape and open the box. Carefully take out the unit and accessories along with their original
packaging and place them on a at surface. Cut the protective material and remove the packaging for the unit
and accessories. Leave enough space free around the unit to assure adequate ventilation.
• Check the equipment to assure it was not damaged before installing it. Damage incurred during shipment must
be reported to your sales representative within 24 hours from when the goods were received.
• After opening the packaging, make sure all the parts specied in the paragraph “DESCRIPTION OF VERSIONS
AND COMPONENTS” are provided.
• The serial number stamped on the back of the unit must match the one written on the warranty card attached to
this manual.
When installing the device follow the safety rules given below:
• This equipment can be operated only by specially trained persons. Do not allow third parties to tamper with the
controls. This instrument is not a toy. Do not play with it or use it for purposes other than those it is specically
designed for.
• Do not place the equipment near direct or indirect sources of heat.
• Do not put the equipment in humid environments or in contact with any type of liquids.
• Make sure enough air is able to circulate around the equipment to cool it down.
• It is risky and severely forbidden to alter or in any case modify the characteristics of the product. DSI Dental
Solutions shall not be held responsible for any personal injury or equipment damage caused by failure to heed
this precaution.
• Do not use the device near cellular phones.
Operating conditions:
• Temperature: 10° C /40° C.
• Humidity: 30% to 75%.
• Pressure: 500hPa to 1060hPa.
• After shipment allow the device to get accustomed to the climate in the work environment.
• The power supply may uctuate not more than +/– 10% of the rated voltage.
• The micromotor cannot run continuously for more than 30 sec., with minimum 10 sec. intervals.
Transport and storage conditions:
• Temperature: –10° C /70° C.
• Humidity: 10% to 90%.
• Pressure: 500hPa to 1060hPa.
Before connecting the unit, make sure the voltage indicated on the plate found on the rear panel corresponds to
the mains voltage.
To avoid the risk of electrical shock this device must be connected only to an approved electrical system
properly grounded.
Page 5 of 15

USER MANUAL
Micromotor for oral surgery
01_26/04/2018
• Put down the control unit on a stable base.
• Insert the bar into the hole and assemble the support of the micromotor.
Pic. 4.
• Connect the micromotor connector to the control unit.
• Assembly the handpiece (contra-angle or straight) on the micromotor and insert the micromotor into the support.
Use only handpieces with E-Type connection (ISO 3964) that comply (as medical devices) with directive 93/42/
CEE modied by the directive 2007/47/CEE.
• Insert the irrigation tube into the peristaltic pump. To make the insertion of the tube easier take the tube lightly
stretched at the inlet and outlet connections.
Pic. 5.
Page 6 of 15

USER MANUAL
Micromotor for oral surgery
01_26/04/2018
• Connect the irrigation tube with the physiological solution bag and with the handpiece.
Pic. 6.
• Connect the foot-switch (or the foot-control) to the panel connector.
• Place the pedal in a easy-to-use position.
• Check that main power switch is in 0 position (off).
• Connect the power supply cord to the socket in the back panel of control unit.
• Connect the power supply cord to a grounded socket.
• Switch on the device by the main switch.
USE
All the adjustments are to be made with the motor stopped.
The display shows the following elements:
• SPEED: rotation speed (max 40000 rpm with reduction ratio 1:1);
• TORQUE: maximum torque (max 80 Ncm with reduction ratio ≥ 32:1);
• PUMP: physiological solution ow rate (max 90 ml/min);
• REDUCT: reduction ratio of the current use handpiece;
• PROGRAM: the current use program (1, 2, 3……, 10);
• Symbol : led activation;
• Symbol : activation of “reverse” function (rotation way changing);
• Symbol : pump activation.
Page 7 of 15

USER MANUAL
Micromotor for oral surgery
01_26/04/2018
Function keys:
Pic. 7.
Key 1 Set in succession the parameter to modify (SPEED, TORQUE, PUMP, REDUCT): the adjustable
parameter is highlighted.
Key 2 Increase the highlighted parameter.
Key 3 Decrease the highlighted parameter.
Every adjustment is automatically saved in the current program, you don’t need to press any key for conrmation.
Even if a parameter is highlighted it’s possible to start the micromotor (by the foot-switch) or press any key.
Key 4 Selection of the programs (in sequence from 1 to 10): the current use program is shown on display.
Key 5 Led activation.
Switch on/off the led (when led is turned on the symbol is highlighted:
).
If pressed for 2 seconds key n.5 activates/deactivates “motor+led” function: this function
automatically switch on the led when the micromotor starts. On the display the led symbol is circled:
.
Key 6 Activation/deactivation “reverse” function (rotation way changing), when “reverse” is activated the
symbol is highlighted:
For reduction higher than 4:1 the “reverse” function is activable only if the set rotation speed
(SPEED) is lower or equal to 50 rpm.
Key 7 start/stop the peristaltic pump (when pump is activated the symbol is highlighted:
for 2 seconds key n.7 activates/deactivates “motor+pump” function: this function automatically start
the pump with the micromotor. On the display the pump symbol is circled:
Page 8 of 15
.
). If pressed

USER MANUAL
Micromotor for oral surgery
01_26/04/2018
Pedal functions
The handpiece can be activated only by pedal.
Pic. 8.
1. Activation of the micromotor with variable speed (in proportion to the pressure on the pedal) until the maximum
set value.
2. Pump start/stop or (by keeping pressed) program setting.
3. Activation/deactivation “reverse” function.
MAINTENANCE
Before carrying out whichever maintenance to the machine switch off the control unit.
CLEANING, DISINFECTION AND STERILIZATION
WARNINGS
Limitations to Repeated
Processes
The operators performing the cleaning and sterilization operations must be
adequately protected and trained.
Repetition of processes has minimal effect on the equipment.
The end of life is generally determined by wear and damage due to use.
In any case it is recommended to carry out regular maintenance of the handpieces with
cable after 500 sterilization cycles.
INSTRUCTIONS
Cleaning processes must start immediately after each use.
Site of use
Containers and transport There are no particular requirements.
Do not allow contaminated instruments to dry before starting the cleaning and
sterilization process.
Page 9 of 15

USER MANUAL
Micromotor for oral surgery
01_26/04/2018
Preparation before cleaning
Cleaning
Disinfection
Switch off the device using the switch and unplug the power cord.
Disconnect all components from the control unit and separate all accessories:
• micromotor.
• micromotor support.
• pedal.
Clean the surface of all components and accessories with a clean, soft cloth moistened
with a cleaning solution (pH 6-9).
Automated cleaning is not recommended.
If you intend to disinfect a component, use a non-aggressive disinfectant solution with a
neutral pH (pH7), following the instructions provided by the manufacturer of the solution;
dry with a clean, non-abrasive cloth.
Pay particular attention to the drying of the electrical connectors of the micromotor.
Drying Not applicable.
Maintenance No special requirements.
Inspection and function tests No special requirements.
Insert the protective cap on the micromotor.
The micromotor can be sterilized (see instructions below) only if provided with the
Packaging
protective cap (accessory supplied).
List of sterilisable components:
• micromotor with protective cap.
• micromotor support.
Seal all individually sterilizable accessories in a disposable sterilization bag.
The class B steam autoclaving process is recommended according to EN 13060.
Type of cycle: 3 times Pre-vacuum (minimum pressure 60 mBar).
Minimum sterilization temperature: 132° C (range 0° C ± 3° C).
Maximum sterilization temperature: 135° C.
Minimum sterilization time: 4 minutes.
Sterilization
Minimum drying time: 20 minutes.
All sterilization steps must be performed by the operator in accordance with EN ISO
17665-01.
Wait until the sterilized components, especially the handpiece and the micromotor,
cool completely before using them.
Storage Store sterilized materials in a dry and dust-free place.
Additional Information No additional information.
Manufacturer contact Ref. last page of this user manual.
Page 10 of 15

USER MANUAL
Micromotor for oral surgery
01_26/04/2018
The instructions provided above have been validated by the manufacturer of the medical device as ABLE to prepare a
medical device for re-use.
It is up to the process manager to ensure that repeated processes are actually performed using the equipment,
materials and personnel in the repeated process structure to achieve the desired result.
This generally requires systematic validation and monitoring of the process. Likewise, all deviations from the
process manager from the instructions provided should be appropriately evaluated to judge its effectiveness and
potential unwanted consequences.
Fuses replacement
The control unit is protected by two fuses that are placed in the power supply source.
If you need to replace fuses please follow the following instructions:
• Disconnect the supply.
• Remove the fuses-holder cover.
• Replace the blown fuse with one of the same type (see Technical features).
• Put on the fuses-holder cover again.
Description of the electro-magnetic elds with renard to the EN 60601-1-2 Directive:
• The DSI Mini Surgery Motor device must function in the electro-magnetic eld specied below. The customer/
user of DSI Mini Surgery Motor must guarantee that it is used in this environment.
• DSI Mini Surgery Motor can’t be used near or placed on an other device.
• If you can’t do in a different way, you have to check in normal use conditions the good working of the device
before using.
The essential performance of DSI Mini Surgery Motor is to provide mechanical energy through an electrical
micromotor to a tool (rotating burr) for surgical treatments, by controlling (with specic feedbeck loops) the
rotational speed and the maximum torque, so that the burr rotates, for less than little variations, at the set speed.
EMISSION TEST CONFORMITY ELECTROMAGNETIC ENVIRONMENT
DSI Mini Surgery Motor uses RF energy only for its
Emissions RF – CISPR 11 Group 1
Emissions RF – CISPR 11 Class B
internal functioning. So its RF emissions are very low and
probably it doesn’t cause any interference with nearby
electronic devices
DSI Mini Surgery Motor is suitable for using in all the
environments, included domestic ones and those directly
connected to a low voltage electricity network that
supplies domestic buildings
Harmonic emission Class A
Voltage uctuation and icker Complying
Page 11 of 15

USER MANUAL
Micromotor for oral surgery
01_26/04/2018
IMMUNITY TEST TEST LEVEL IEC 60601 CONFORMITY LEVEL ELECTROMAGNETIC ENVIRONMENT
Electrostatic discharge ± 6 kV contact
± 8 kv air
Electrical fast transient ± 2 kV power supply line
± 1 kv input/output line
Surges ± 2 kV phase(i)-ground
± 1 kv phase (i)-phase(i)
Voltage dips, short
interruptions and
voltage variations IEC
61000-4-11
• <5% UT (>95% dip in
UT) for 0.5 cycles
• 40% UT (60% dip in UT)
for 5 cycles
• 70% UT (30% dip in UT)
for 25 cycles
• <5% UT (>95% dip in
UT) for 250 cycles
Magnetic eld at
3 A/m 3 A/m Magnetic elds at network frequency
network frequency (50
Hz)
± 6 kV contact
± 8 kv air
± 2 kV power supply line
± 1 kv input/output line
± 2 kV common mode
± 1 kv differential mode
• <5% UT (>95% dip in
UT) for 0.5 cycles
• 40% UT (60% dip in UT)
for 5 cycles
• 70% UT (30% dip in UT)
for 25 cycles
• <5% UT (>95% dip in
UT) for 250 cycles
Floors must be wood, concrete, cement or
tiled. If oors are covered with synthetic
material (carpet, etc.), the relative
humidity must be at least 30%.
Mains power quality should be that
of a typical commercial or hospital
environment (hospital, clinic).
Mains power quality should be that
of a typical commercial or hospital
environment (hospital, clinic).
Mains power quality should be that
of a typical commercial or hospital
environment (hospital, clinic).
If the use of the DSI Mini Surgery
Motor requires continued operation
during power mains interruption, it
is recommended that the product be
powered from a separate power supply
(UPS, etc.).
should be that of a typical domestic or
commercial or hospital environment.
IMMUNITY TEST TEST LEVEL IEC 60601 CONFORMITY LEVEL ELECTROMAGNETIC ENVIRONMENT
Portable and mobile radiofrequency communications devices must not be used near the DSI Mini Surgery Motor (including its
cables) at a distance less than that recommended and calculated according to the frequency and power of the emitter.
d = 1.17· √ P
Where P is the maximum power rating of
Conducted disturbance,
radiofrequency elds
3 V/m
150 kHz to 80 MHz
3 V/m
the emitter in watts (W) according to the
manufacturer’s specications and d is
the recommended minimum separation
distance in meters (m).
d = 1.17· √ P – 80 MHz to 800 MHz
d = 2.33· √ P – 800 MHz to 2,5 GHz
Radiated radiofrequency
electromagnetic eld
3 V/m
80 MHz to 2.5 GHz
3 V/m
Where P is the maximum power rating of
the emitter in watts (W) according to the
manufacturer’s specications and d is
the recommended minimum separation
distance in meters (m).
The electromagnetic eld strengths of xed radiofrequency emitters, as determined by an electromagnetic environment
measurement (a), must be less than the compliance level in each frequency range (b).
Interference may occur near equipment marked with the symbol below:
Page 12 of 15

USER MANUAL
Micromotor for oral surgery
01_26/04/2018
Note 1: At 80 MHz and 800 MHz, the higher frequency range applies.
Note 2: These specications may not be applicable in all situations. Electromagnetic propagation is affected by absorption and
reection from structures, objects and persons.
(a): The electromagnetic eld strengths of xed radiofrequency emitters, such as base stations for mobile telephones (cellular /
cordless), mobile radios, amateur radio, AM/FM radio broadcasts and TV broadcasts cannot be determined exactly by theory. To
assess the electromagnetic environment due to xed radiofrequency emitters, an electromagnetic environment measurement
must be made. If the measured radiofrequency eld strength in the immediate environment where the product is used exceeds
the compliance level specied above, the performance of the product must be tested to verify whether it conforms to the
specication. If abnormal performance is observed, additional measures may be necessary, such as reorienting or relocating
the product.
(b): In the 150 kHz to 80 MHz frequency range, the electromagnetic eld strengths must be less than 3 V/m.
DSI Mini Surgery Motor is intended for use in an electromagnetic environment in which radiated radiofrequency
disturbances are controlled.
The DSI Mini Surgery Motor user and/or installer can help prevent electromagnetic interference by maintaining a
minimum distance between portable and mobile radiofrequency communications equipment emitters and the DSI
Mini Surgery Motor, according to the maximum output power of the equipment, as recommended in the table below.
SEPARATION DISTANCE IN METRES (M) ACCORDING TO EMITTER FREQUENCY
Rated max. power of the emitter (W)
150 kHz to 80 MHz 80 MHz to 800 MHz 800 MHz to 2.5 GHz
0.01 0.12 0.12 0.23
0.1 0.37 0.37 0.74
1 1.17 1.17 2.33
10 3.69 3.69 7.38
100 11.67 11.67 23.33
For emitters rated at max. power not listed above, the recommended separation distance d in meteres (m) can be estimated
using the equation applicable to the frequency of the emitter, where P is the max. power rating of the emitter in watts (W)
according the manufacturer.
Note 1: At 80 MHz and 800 MHz, the higher frequency range applies.
Note 2: These specications may not be applicable in all situations. Electromagnetic propagation is affected by absorption and
reection from structures, objects and persons.
Cable lengths:
• Power supply cord – 2.0 m.
• Footswitch cord – 1.8 m.
• Micromotor cord – 2.0 m.
Page 13 of 15

USER MANUAL
Micromotor for oral surgery
01_26/04/2018
“SEPARATE COLLECTION”
Information based on Art. 13 of Legislative Decree 14 March 2014, n. 49 “Implementation of Directive 2012/19 / EU
on the reduction of hazardous substances in electrical and electronic equipment, as well as waste disposal.
The crossed-out wheeled bin symbol on the appliance or its packaging indicates that, at the end of its useful life, the
product must be collected separately from other waste.
The separate collection of this equipment at the end of its life is organized and managed by the manufacturer.
The user who wishes to dispose of the present equipment must therefore contact the manufacturer and follow
the system adopted by the latter to allow separate collection of the equipment at the end of its life. Appropriate
separate collection for the subsequent start-up of the disused equipment for recycling, treatment and compatible
environmental disposal helps to avoid possible negative effects on the environment and health and favors the re-use
and / or recycling of the materials it is composed of the equipment.
The illegal disposal of the product by the holder implies the application of the administrative sanctions provided for
by the current legislation.
The Declaration of conformity to Directive 2012/19 / EU must be requested from the DSI Dental Solutions company.
TECHNICAL FEATURES
Supply voltage 230 Vac-50/60 Hz (optional 115 Vac-50/60 Hz)
Fuses 2 x T 1,6 A L 250 V (vers.115 Vac: 2xT2,5 A L 250 V)
Power 106 VA
Isolation Class I, type BF
Intermittent operation Ton-Toff=30s-10s
Operating temperature +10°C/+40°C
Pump max ow rate 90 ml/min
Control unit dimensions 235 x 255 x 104 mm
Micromotor
Motor torque (1:1) 4 Ncm
Maximum torque (with reduction) Electronically limited at 80Ncm (with reduction ≥ 32:1)
Motor rotation speed (1:1) 400-40.000 rpm
Handpiece max diameter 24 mm
Main functions
Control of speed, torque, pump rate, reduction; automatic activation of pump and
led; reverse; programs
Page 14 of 15

USER MANUAL
Micromotor for oral surgery
01_26/04/2018
LABEL SYMBOLS
0476
Manufacturer logo
Product name
Medical device compliant with Directive 93/42 / EEC and ss.mm.ii
Follow the instructions for use
Attention, carefully read the user manual before use
It is afraid of humidity
RAEE appliance, separate collection object
BF type electro-medical device
Fragile, load and discharge with care
Made in Italy for
DSI Dental Solutions
Address: 59 haAvoda st., Ashdod Israel
Phone: +972 8931 7235
Email: info@dsisrael.com
Fax: +972 8995 9449
Page 15 of 15
 Loading...