

Page 1
TECHNICAL NOTE
Configuring the F40-TT transmitter in Dataquest A.R.T.
The F40-TT was formally added as a transmitter model in Dataquest A.R.T. v4.1; however,
Dataquest A.R.T. v4.0 and earlier versions can be used with a custom configuration.
Additionally, as of June 2008, the F40-TT is being calibrated over an extended temperature
range (22-41ºC) to provide accurate measurements of tail temperature. This document
outlines the steps used to configure the F40-TT transmitter including the adjustments in the
software that are required to accommodate the extended temperature range.
Important! The following steps are required in A.R.T. version 4.1 and earlier to ensure
the accuracy of temperature measurements even if the F40-TT device is not being
used over the extended temperature range. This document is a supplement to the
configuration information found in the Dataquest A.R.T. user manual.
No changes in the software configuration are required for A.R.T. v4.2.
Dataquest ART version 4.1
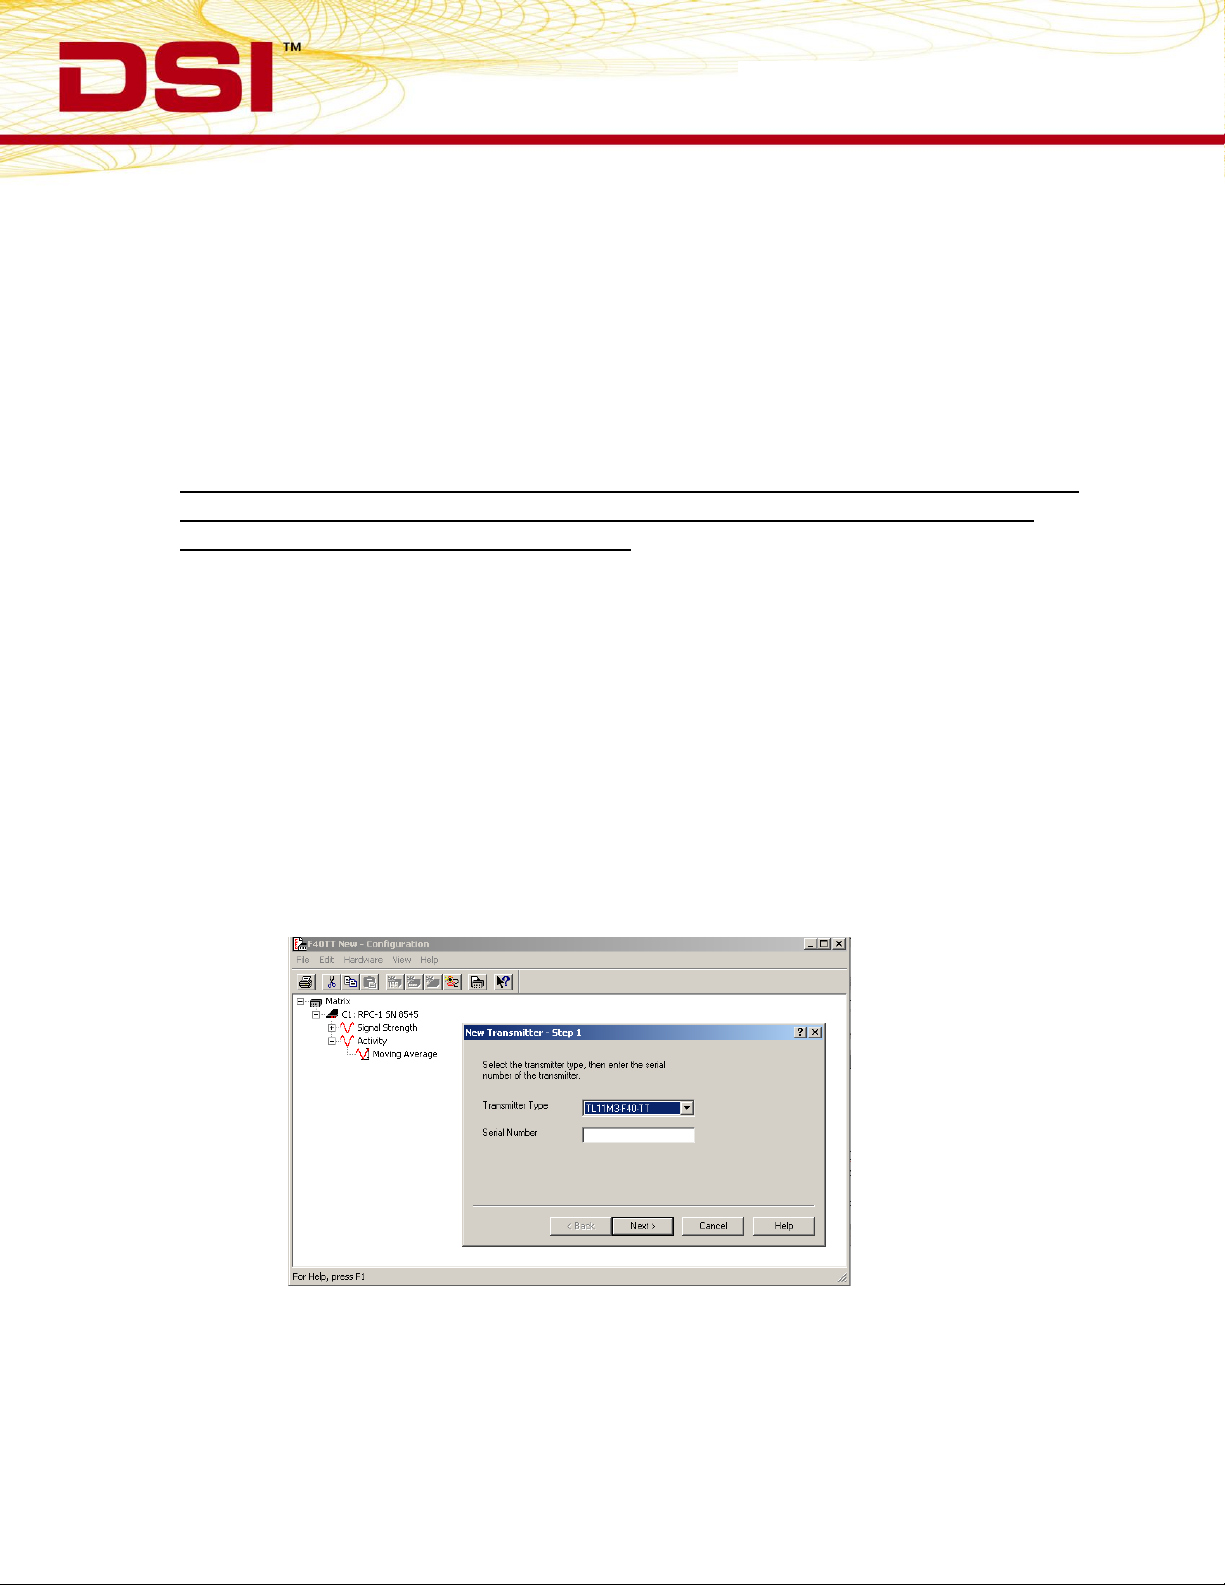
1. In Dataquest A.R.T. Acquisition, go to Hardware|Configuration
2. Highlight the receiver in which the F40-TT will be used, right-click and choose “New
Transmitter”.
3. Select the model name ‘TL11M3-F40-TT’ from the list of transmitters and enter the
device’s unique serial number and select Next>
4. Select the species and create a unique Animal ID name, select Finish>
392-0027-029 Rev 61
Page 2
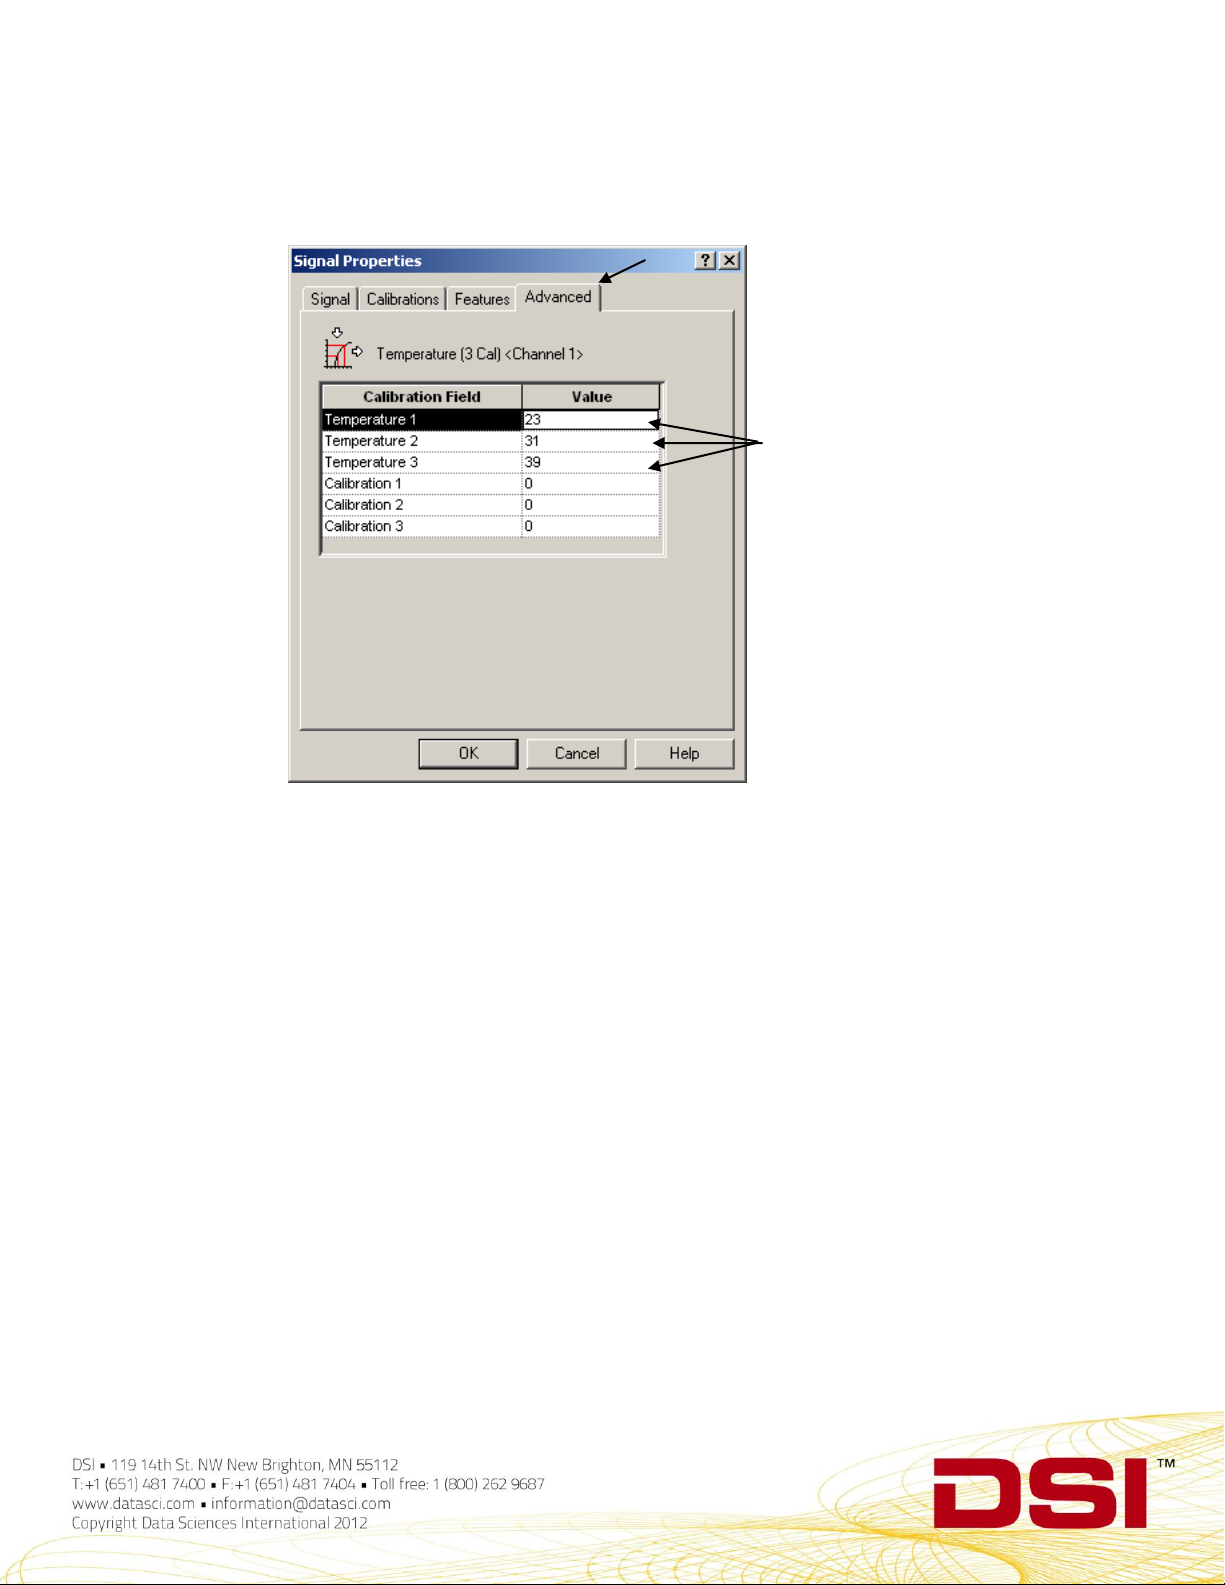
5. The next window prompts for the calibration values to be entered. Before doing so, go
Critical step
to the Advanced Tab and adjust the temperature values to 23, 31, 39 as shown:
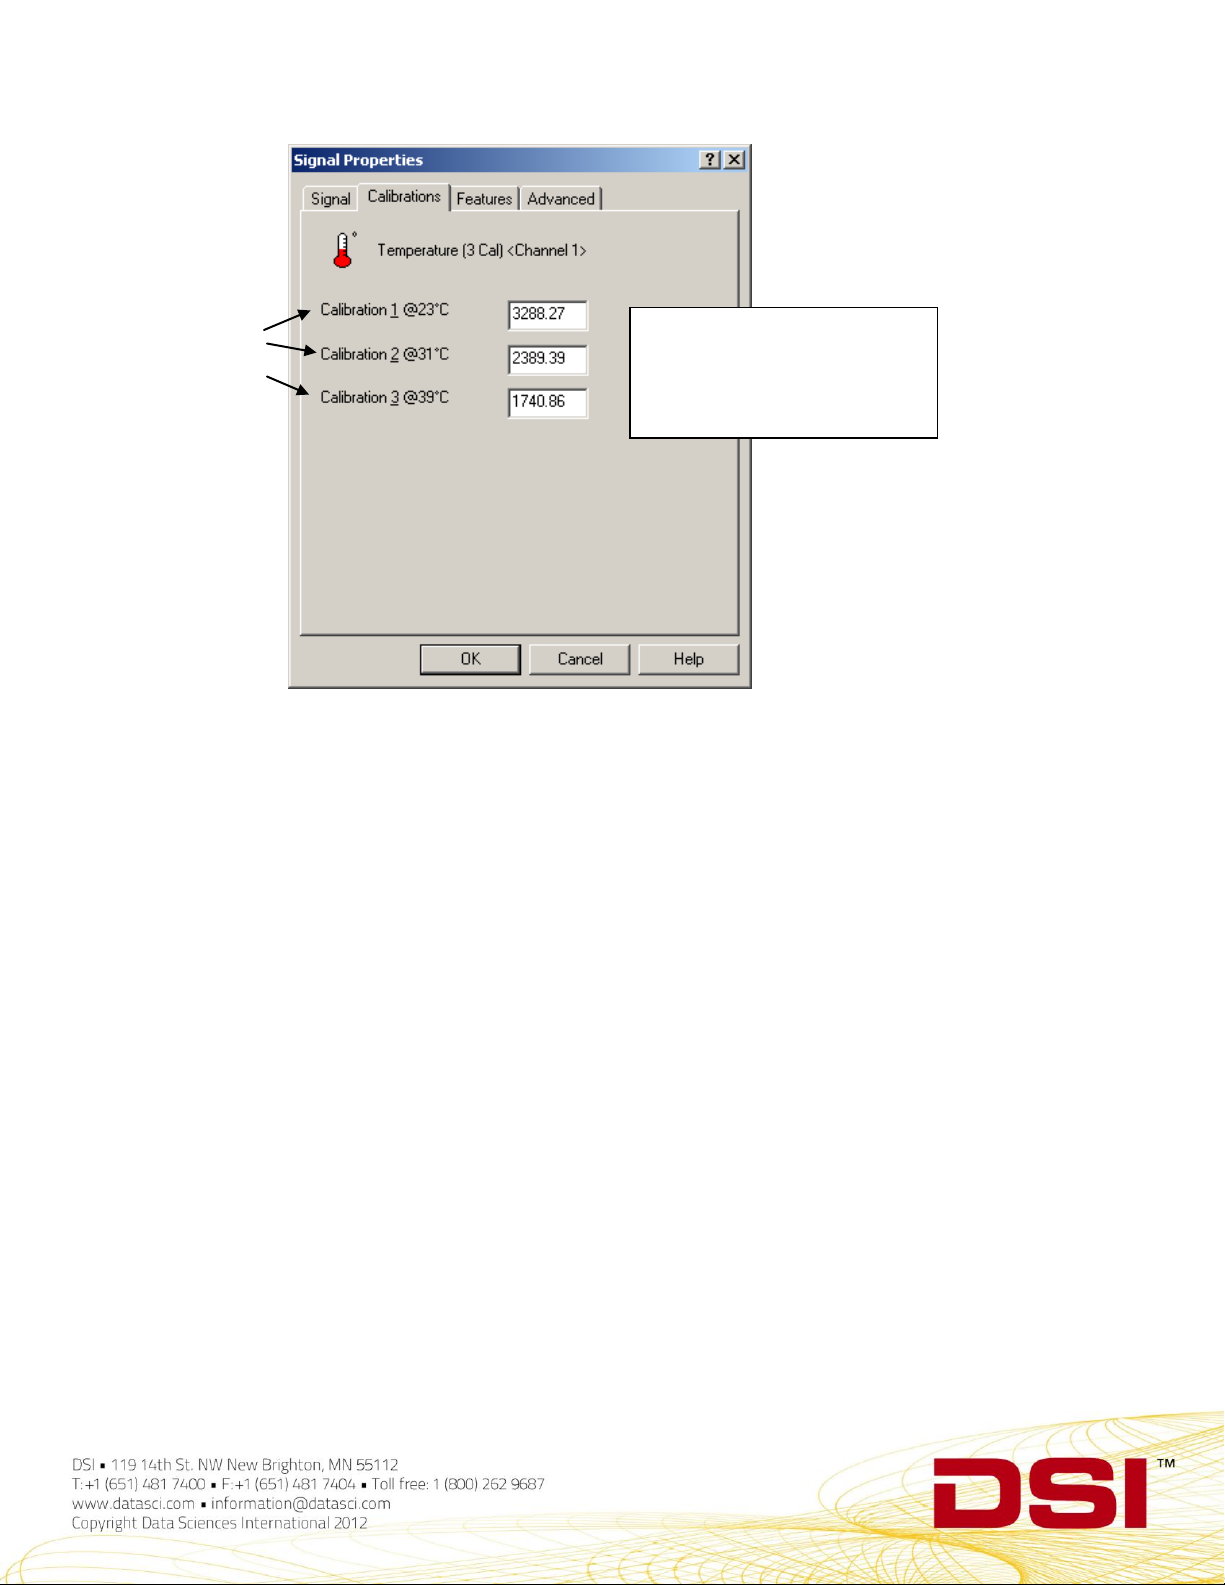
6. Optionally, the calibration values can be entered here or you may revert back to the
Calibrations tab.
7. Enter the calibration values found on the sterile package and select OK.
Page 3
New calibration
temperatures from
the previous step
appear here
Note: The calibration values
shown are examples. Use
those found on each device’s
sterile package.
8. Repeat steps 5-7 for channel 2.
9. Enter the battery voltage levels and calibrations found on the sterile package and select
OK.
Page 4

10. The device is now configured. Repeat for additional transmitters or proceed with data
collection.
Dataquest A.R.T. version 4.0 and earlier
1. In Dataquest A.R.T. Acquisition, go to Hardware|Configuration.
2. Highlight the receiver in which the F40-TT will be used, right-click and choose “New
Transmitter”.
3. Select the model name ‘TLM3’ from the list of transmitters and enter the device’s unique
serial number and select Next>
Page 5

4. Select the species and create a unique Animal ID name, select Finish>
5. A new transmitter will appear in the configuration window with 4 channels listed as
‘unconverted’.
6. Select and right-click the first unconverted signal and choose Properties.
7. Change the signal type to ‘Temperature (3 Cal)’.
Page 6

8. Go to the Advanced Tab and adjust the temperature values to 23, 31, 39 as shown:
Page 7

Critical step
9. Optionally, the calibration values can be entered here or you may revert back to the
Calibrations tab.
10. Enter the calibration values found on the sterile package and select OK.
Page 8

New calibration
temperatures from
the previous step
appear here
Note: The calibration values
shown are examples. Use
those found on each device’s
sterile package.
11. Repeat steps 6-10 for channel 2.
12. For channel 3, change the ‘unconverted’ signal to Voltage in the signal properties
window.*
13. Enter the battery voltage levels and calibrations found on the sterile package and select
OK.
*Please note that for A.R.T. versions 2.2 and earlier, the ‘voltage’ signal type is not
available. Channel 3 should be left as ‘unconverted’ and the battery voltage data will not
be usable.
Page 9

14. Leave channel 4 with the ‘unconverted’ designation.
15. The device is now configured and should appear as shown. Repeat steps for additional
transmitters or exit Hardware Configuration.
16. In the main Acquisition window, double-click the animal ID icon to access the subject’s
Page 10

Source Settings. Remove the check for the Period data in waveforms and parameters
uncheck
uncheck
so it is not saved (online). It is not necessary to save these data.
 Loading...