

Page 1

IP870
Operation Manual
Voice Communication for Free
DSG Technology, Inc.
www.dsgtechnology.com
03IP87ME.A
Page 2

Chapter 1. Understanding Your IP870
A Brief Overview
No Computer Needed
User-Friendly Interface
Main Features
Device-to-Device Mode
Device-to-Phone Mode
Free Online Upgrade
Chapter 2. Installing Your IP870
Package Contents
Installing Your IP870
Basic Requirements to Use IP870
Chapter 3. IP870 Configuration Mode
Entering Configuration Mode
Structure of Configuration Mode
Using Phone Keypad to Configure IP870
Browsing the Menu
Selecting Between Fixed Values
Editing the Data of an Option
Using Buttons to Configure IP870
Browsing the Menu
Selecting Between Fixed Values
Editing the Data of an Option
Basic Setup
ITSP Setup
System Setup
Open to Public
Edit Your IP Phone Book
TABLE OF CONTENTS
Table of Contents
Page 3

Chapter 4. Making Internet Calls
Making an Device-to-Device Call
Making an Device-to-Phone Call
How to Use Your IP Phone Book
Monitoring the Status of IP870
To End an Internet Call
Chapter 5. Upgrading Your IP870
Upgrade Notification
Restoring Original Version
Chapter 6. How to Get an ITSP Account
Checking Your Account Balance
Chapter 7. How to Setup IP870 in NAT Environment
Setup Your IP870
Telnet Your IP870
Telnet Setting Items
Enable NAT Function
Assign TCP & UDP Port Index
Exit Telnet
Port Mapping
Chapter 8. Telephone Features
Volume
Redial
Speaker
Mute
Flash
Speed Dial
Appendix A. Technical Specifications
Appendix B. Troubleshooting
Table of Contents
Page 4

Understanding Your IP870
Congratulations! You have selected the world's most future-proof Internet Telephony
product.
CHAPTER 1
IP870 is an innovative and standards compliant Voice over Internet Protocol (VoIP)
solution for corporations and individuals. IP870 allows various connection modes such as
IP870-to-IP870, IP870-to-IPStar, IP870-to-InterStar, IP870-to-InterPhone and IP870-toPhone via Internet or other TCP/IP networks.
You start saving big budgets by owning an IP870 today! Better yet, thanks to DSG's
JustDialIt technology, your receiver end does not need another IP870 to enjoy this
advanced VoIP technology. Your long-distance and international call charges will
disappear with this extraordinary device. It is the first Ethernet phone device that offers
full duplex, supreme quality and low latency voice conversation via Internet/Intranet at
extra-low charges.
Understanding Your IP870 1-1
Page 5

A Brief Overview
1-2 IP870 Operation Manual
In the past, real-time voice information is sent over the Public Switched Telephone
Network (PSTN). With the Circuit-switched technology, every call takes up a dedicated
bandwidth. End-to-end calls are established on the basis of a sequence of dialed digits,
and the PSTN dedicates a physical path between callers. Although the telephone
equipment establishes the call path at the beginning of the call, the path may change
between calls, but not during any specific call.
In comparison with a PSTN, an Internet Protocol (IP) network has a packet-switched
architecture. Devices transmit data in packets, and the path from end to end can vary
within an established session. In addition to data, packets also contain addressing
information, which routing devices used to send information to its destination. Routing
devices maintain tables which instruct them how to direct packets. As networking
environments change, routing devices are updated with dynamic protocols.
A Brief Overview
Traditionally, the PSTN was the only network supporting voice communication. With an
IP870, voice traffic can be sent over IP-based packet-switched networks!
IP870 possesses its own processor and network interface; it works intelligently! Simply
enter the Internet access information into your IP870, then you are ready to talk as long as
you wish via Internet. All of the communication cost will be eliminated except a local
Internet connection charge.
No Computer Needed
With a back-lit LCD display and five buttons, IP870 is extremely easy to use and to
configure. Smart setup program makes your IP870 ready to go in three minutes. You can
clearly monitor all the system status from the LCD panel.
User - Friendly Interface
Page 6
Main Features
Understanding Your IP870 1-3
IP870 is an amazing electronic device being made. In addition to Device-to-Device
Mode, the unparalleled IP870-to-Phone Mode greatly enhance the capability of voice
communication by using Internet or TCP/IP networks. IP870 users can save significantly
on long-distance and international call charges with these features.
Main Features
If the party you wish to call is equipped with an IP870 or other DSG VoIP devices like
IPStar, InterStar, InterPhone or IP770, you may enter the Device ID directly and talk to
the remote device owner instantly.
Every DSG VoIP Device has a unique ID number. Make sure that your receiving user is
already online, simply dial the ID number of the receiving device and you will be
automatically connected. Or you may use IP Phone Book to call the receiving party with
user-defined codes.
Device-to-Device Mode
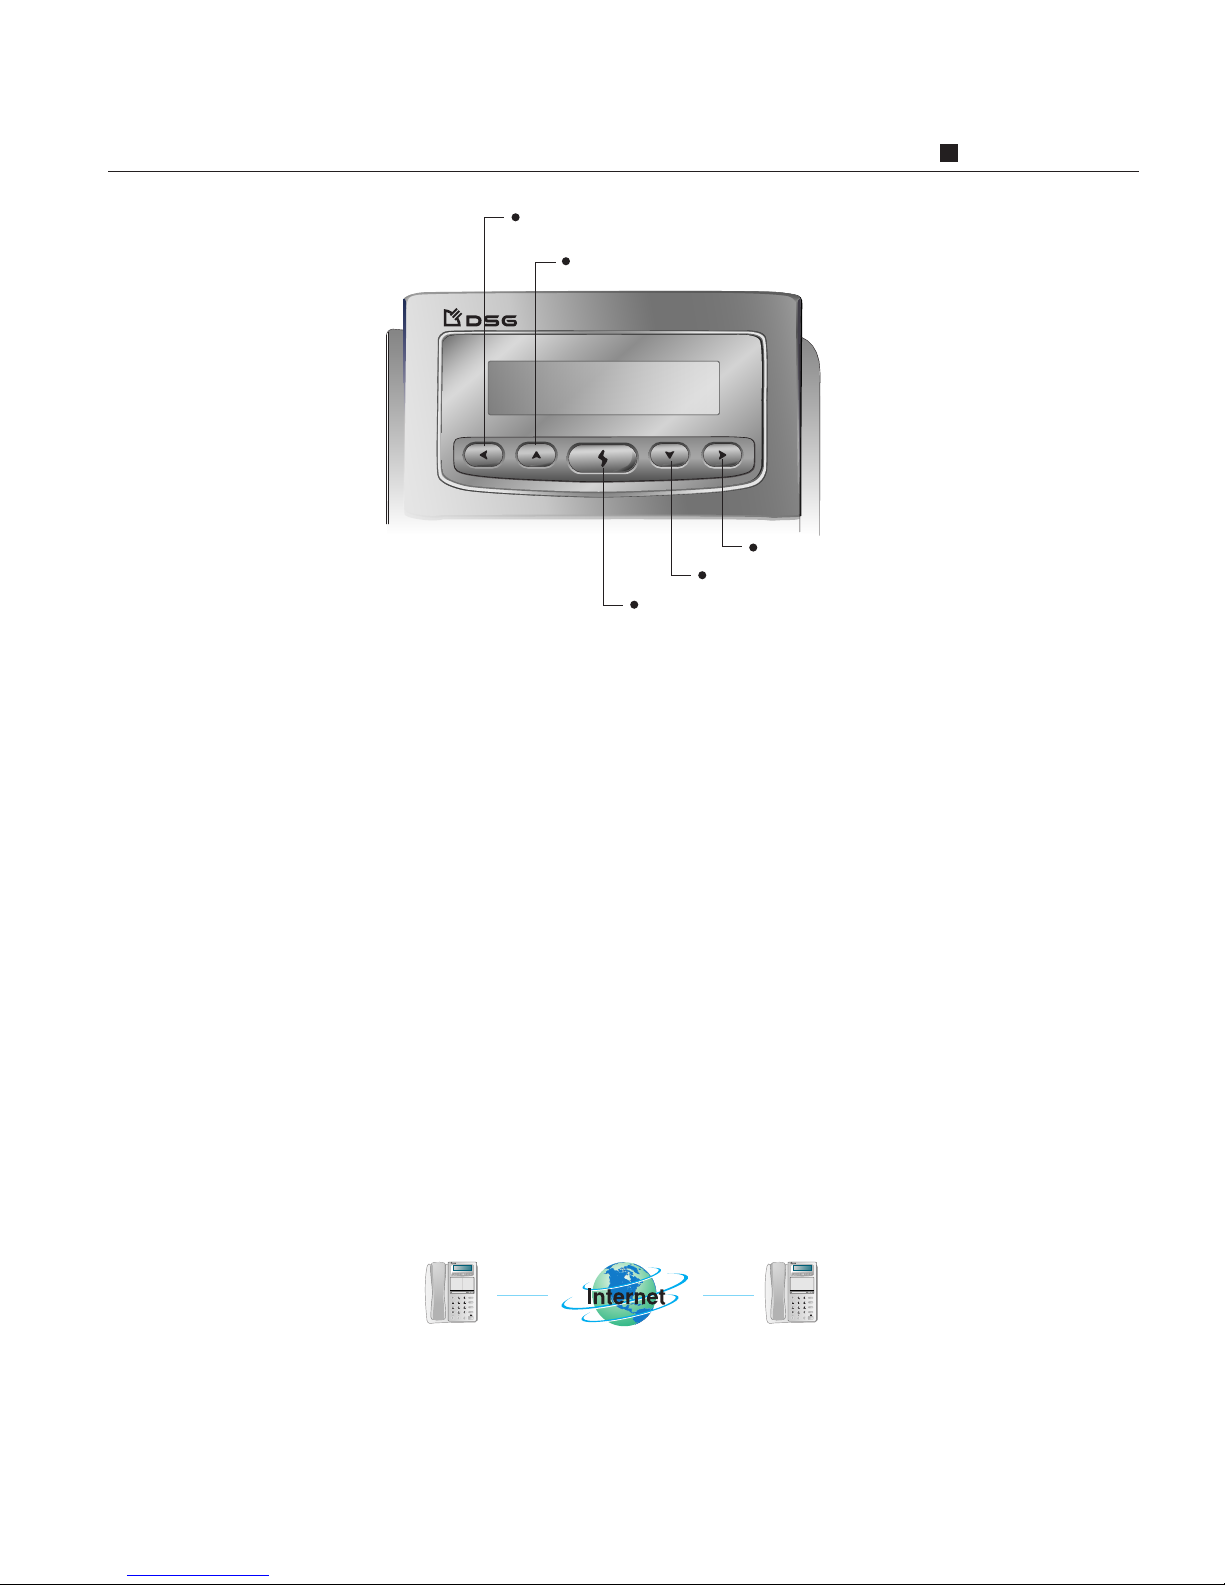
Backward Button
Downward Button
Flash Button (Start/Stop/Setting)
Upward Button
Forward Button
IP870
REDIAL
MUTE
FLASH
PROGRAM
MEMORY
VOLUME
1
2
3
4
5
6
7
8
9
10
11
12
Ubiquitous Communications
Backed by the proven technology of DSG
IP870
REDIAL
MUTE
FLASH
PROGRAM
MEMORY
VOLUME
1
2
3
4
5
6
7
8
9
10
11
12
Ubiquitous Communications
Backed by the proven technology of DSG
Page 7
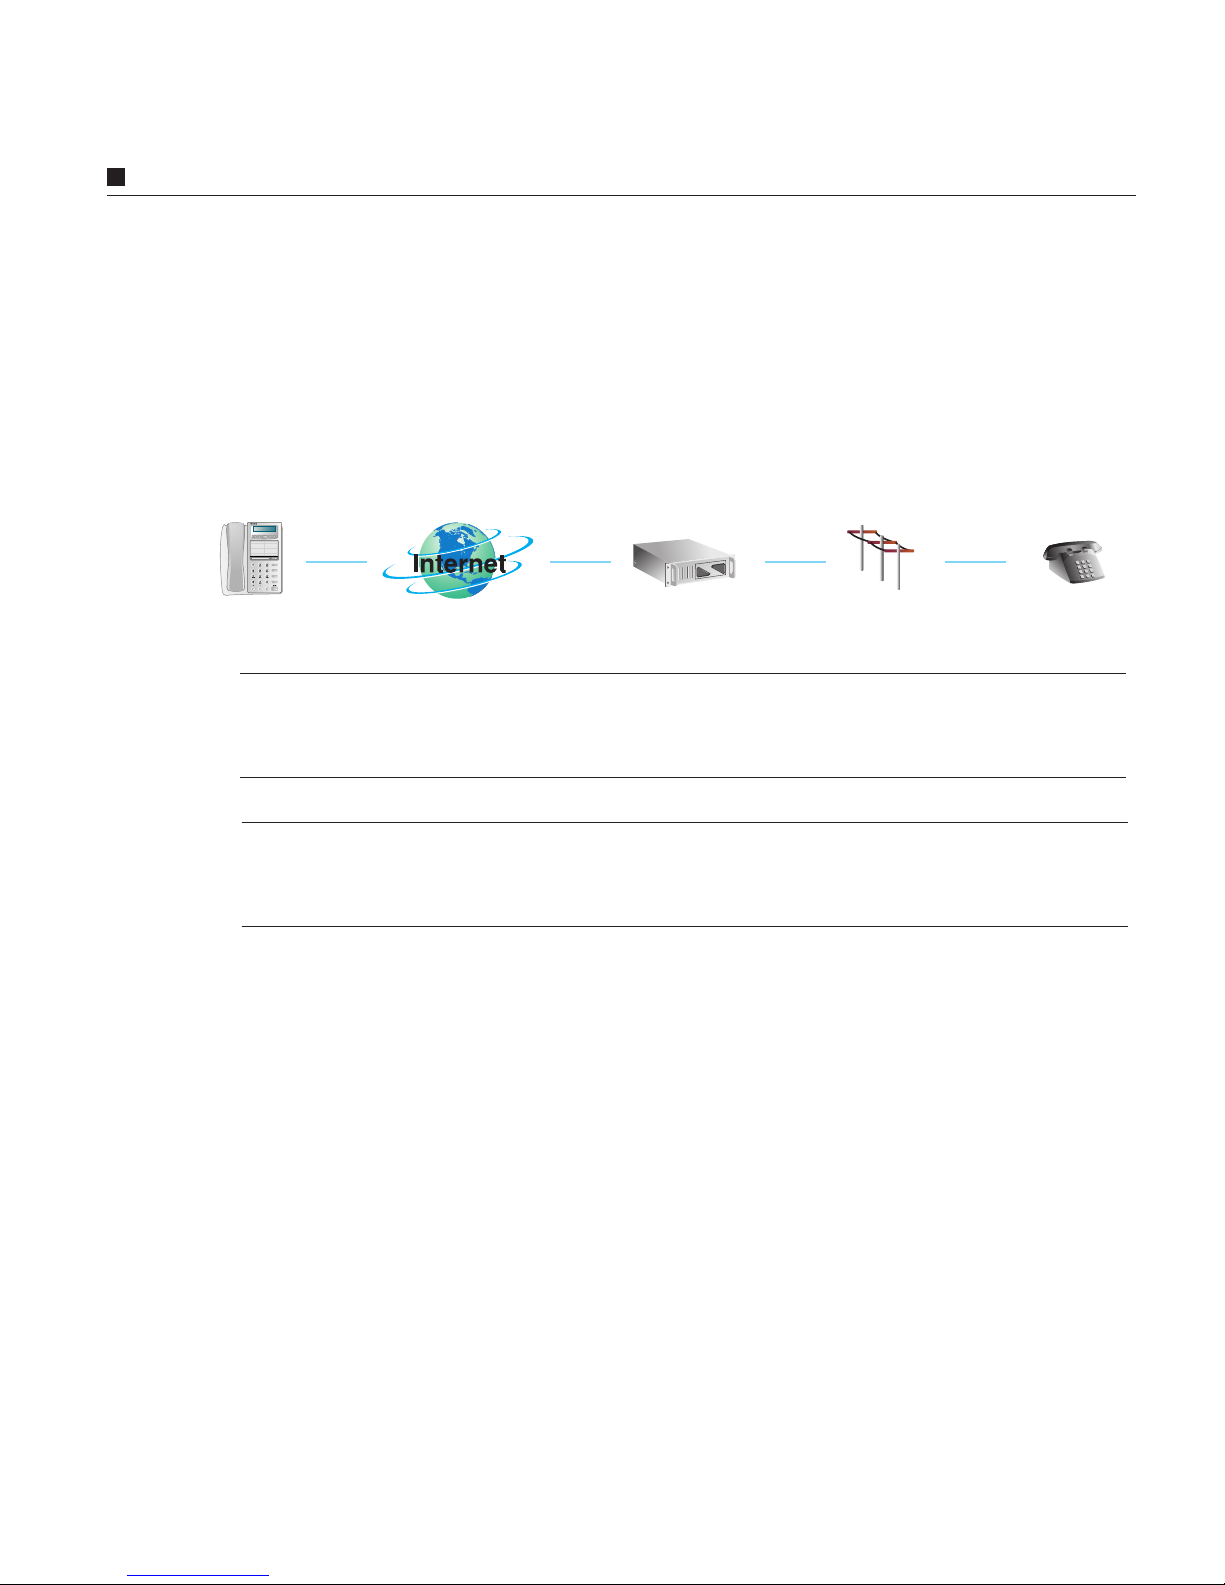
With great interoperability, IP870 is capable of connecting to other Internet Telephony
products like IP2000 Gateways*. With an active Internet Telephony Service Provider*
(ITSP) account or Device ID Account, you can call all the covered areas with ultra low
rates. In this mode, the receiver end does not need an IP870.
Device-to-Phone Mode
Main Features
1-4 IP870 Operation Manual
Note: An Internet Telephony Gateway is a gate between Internet and PSTN (Public
Switched Telephone Network). The Internet Telephony Gateway enables callers using
Internet to talk to regular phone users without traditional telecommunication services.
Note: To use Device-to-Phone Mode, callers must apply an active ITSP account number
from DSG compatible ITSPs. Please check www.dsgtechnology.com and refer to
Chapter 6 How to Get an ITSP Account for further information.
The design of IP870 is extremely flexible. More and more selections and options will be
added into your IP870 via the online upgrade function. You are guaranteed to enjoy the
latest Internet Telephony technologies at no cost.
Free Online Upgrade
PSTN
1
2
3
4
5
6
7
8
9
0
*
#
Destination PhoneVoIP Gateway
IP870
REDIAL
MUTE
FLASH
PROGRAM
MEMORY
VOLUME
1
2
3
4
5
6
7
8
9
10
11
12
Ubiquitous Communications
Backed by the proven technology of DSG
Page 8

Installing Your IP870
Connecting IP870 is as simple as connecting a regular telephone.
CHAPTER 2
In your IP870 package, you will find:
• An IP870
• A quick start guide
• A warranty card
• A 12V/1A DC power adapter
• An RJ-45 network cable
Package Contents
Installing Your IP870 2-1
Page 9
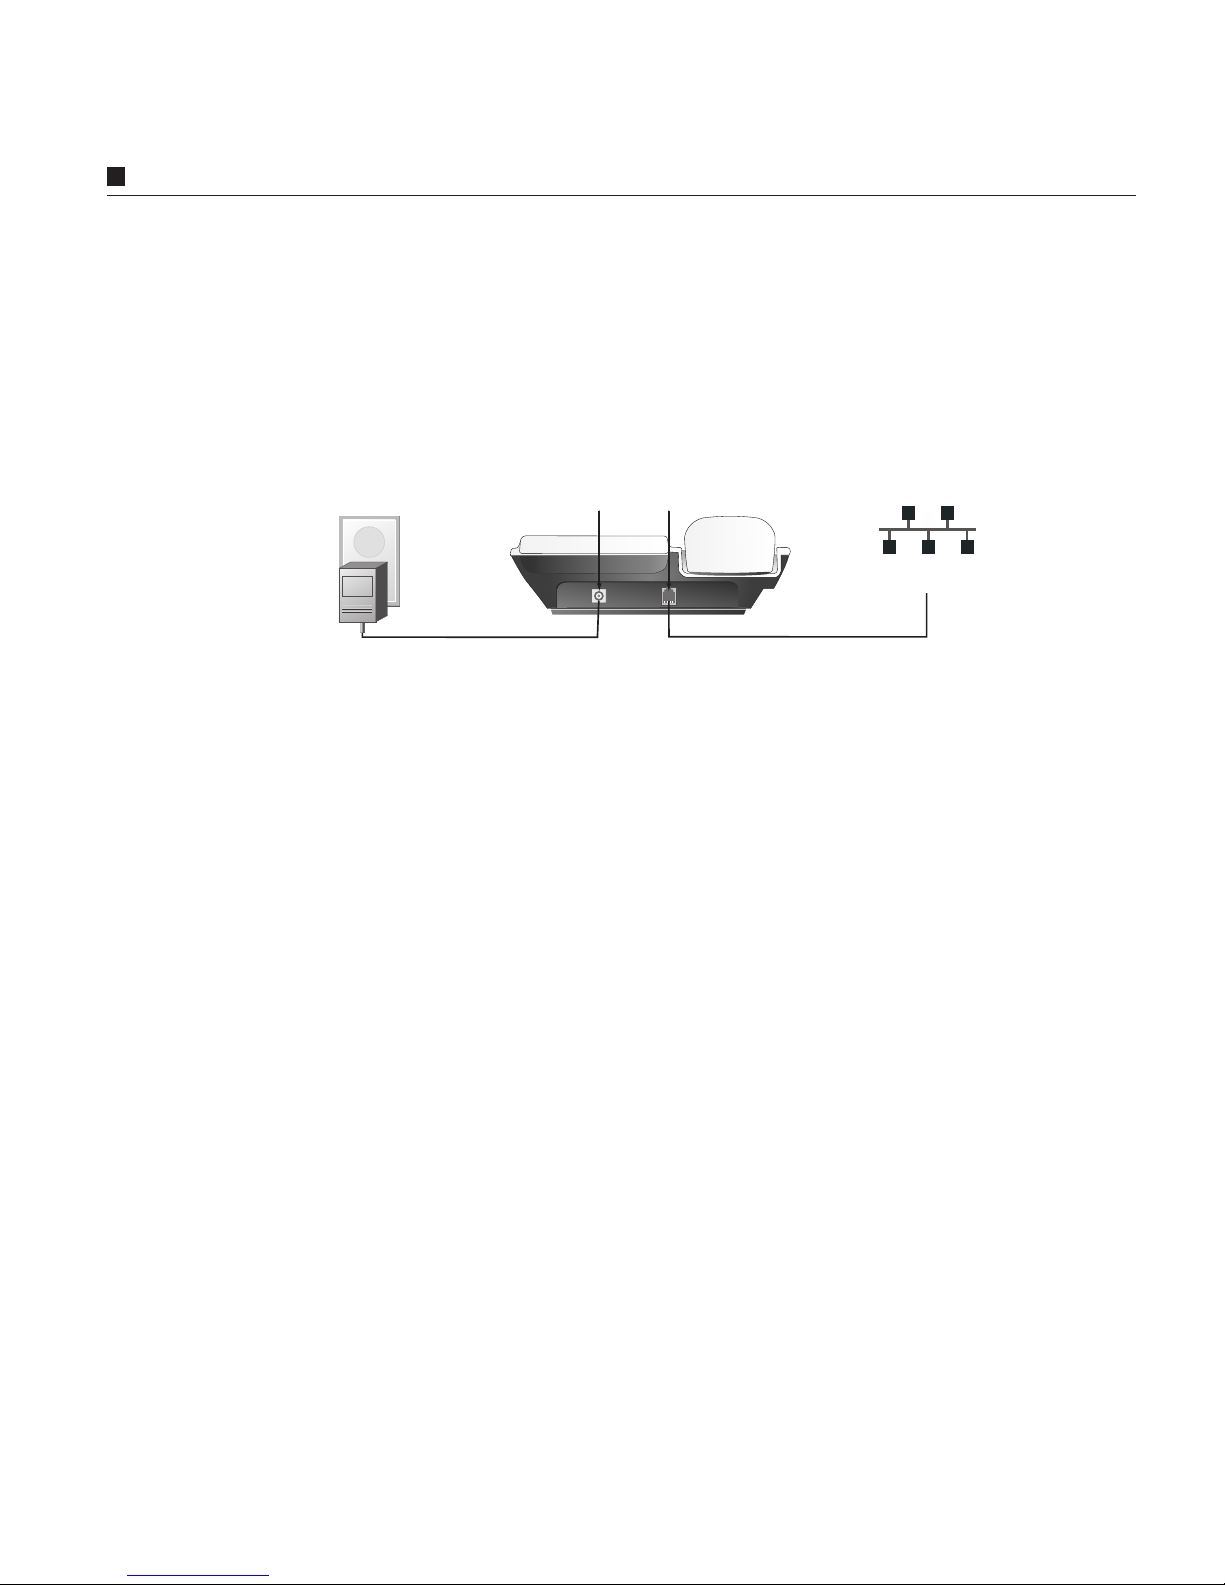
As shown in the following graph, connecting IP870 is as simple as connecting a
telephone.
Installing Your IP870
1. Plug one end of the network cable in the Ethernet hub.
2. Plug the other end of the network cable in the RJ45 jack labeled LAN on your
IP870.
3. Plug power adapter into an electrical outlet.
4. Plug the DC adapter connector into IP870 power socket labeled DC 12V.
To install the IP870
Installing Your IP870
2-2 IP870 Operation Manual
DC 12V
LAN
Wall Power Socket
TCP/IP Network
AC/DC Adaptor
Internet / Intranet
Page 10
IP870 00:00:00
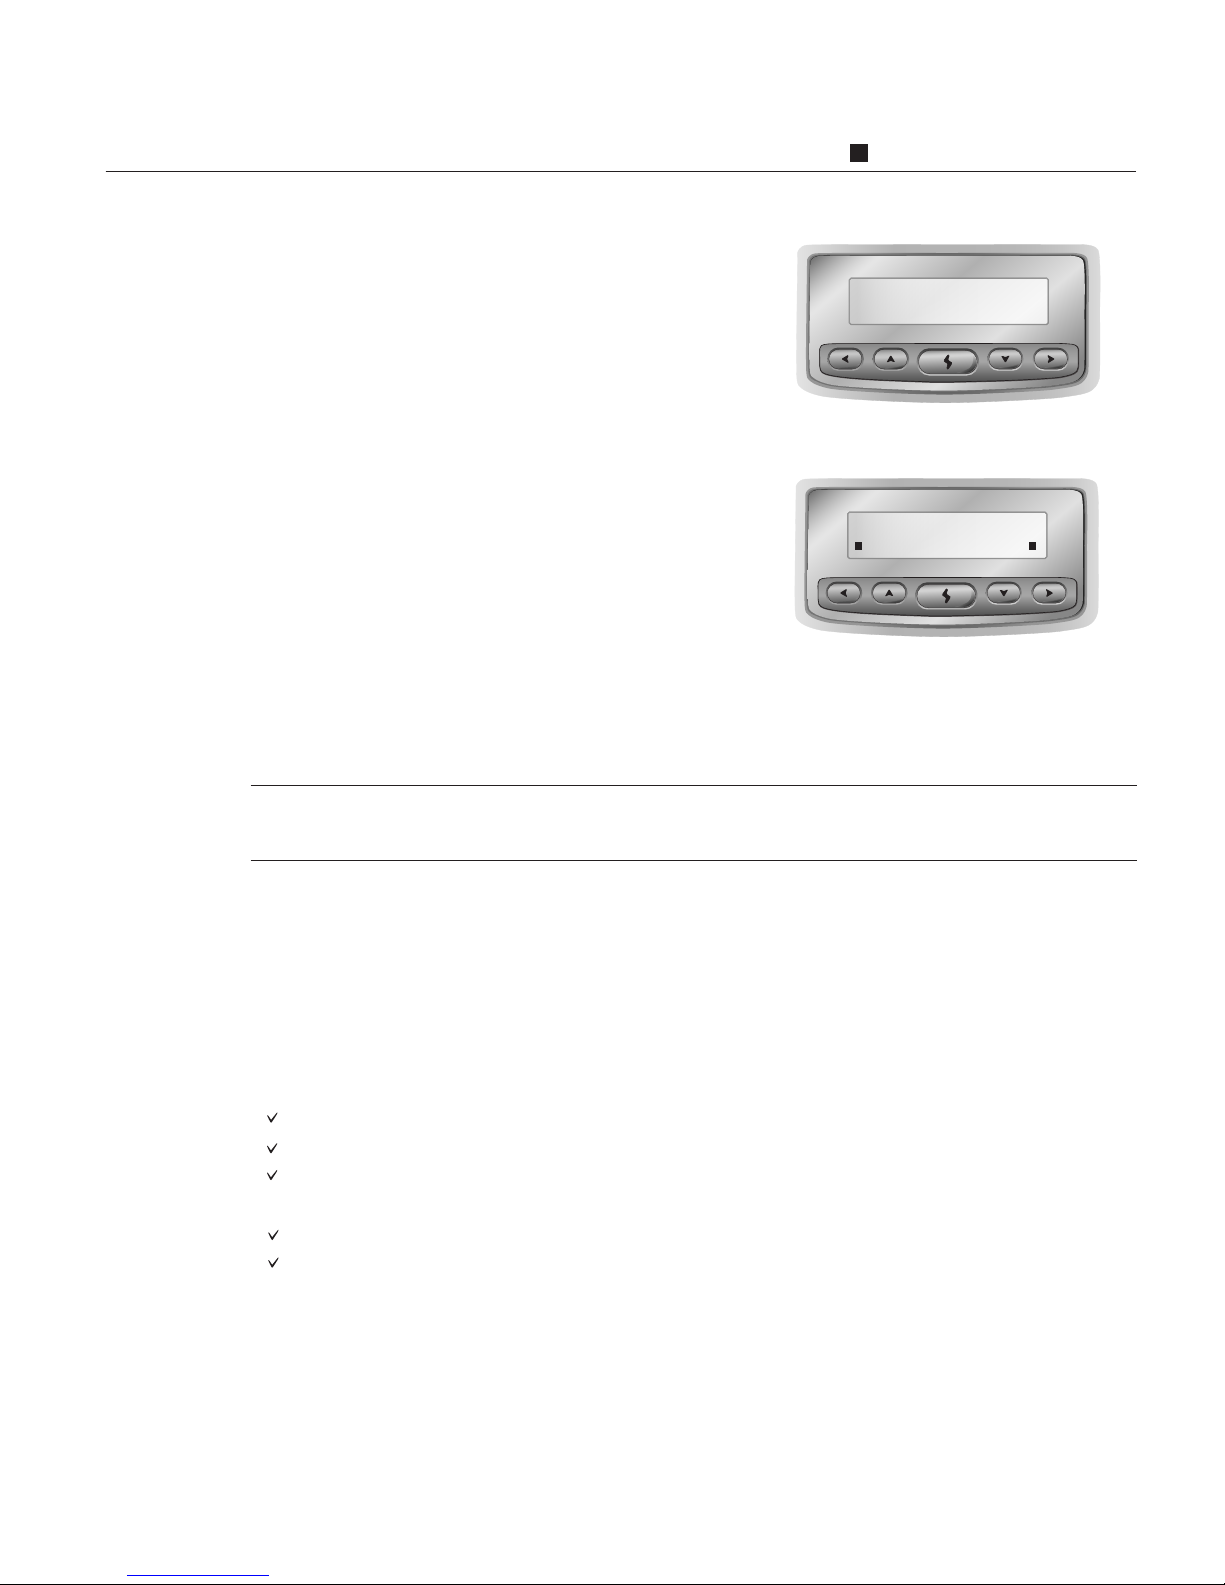
After turning the power on, you will see
IP870 's LCD screen shows:
After the system checking process, you
will see IP870 's LCD screen shows:
You can pick up your telephone handset at this stage. If you hear a ready tone that means
you have successfully completed the installation.
Enjoy the best
Please check the following list in order to make an Internet call through your IP870.
• An active Internet connection
Your Internet IP address
Your Gateway IP address
Subnet Mask of your Internet environment
If you are a PPPoE client
User name
Password
• An 110/230V electrical outlet
Basic Requirements to Use IP870
Installing Your IP870
Installing Your IP870 2-3
Note: If you see the "@" symbol flashing that means your IP870 has not successfully
connected to the Internet. Please prefer to Chapter 3 IP870 Configuration Mode.
If you have a static IP
DSG IP870
Syst em Check...
Page 11
IP870 Configuration Mode
With our smart configuration program, your IP870 is ready to use in three minutes!
CHAPTER 3
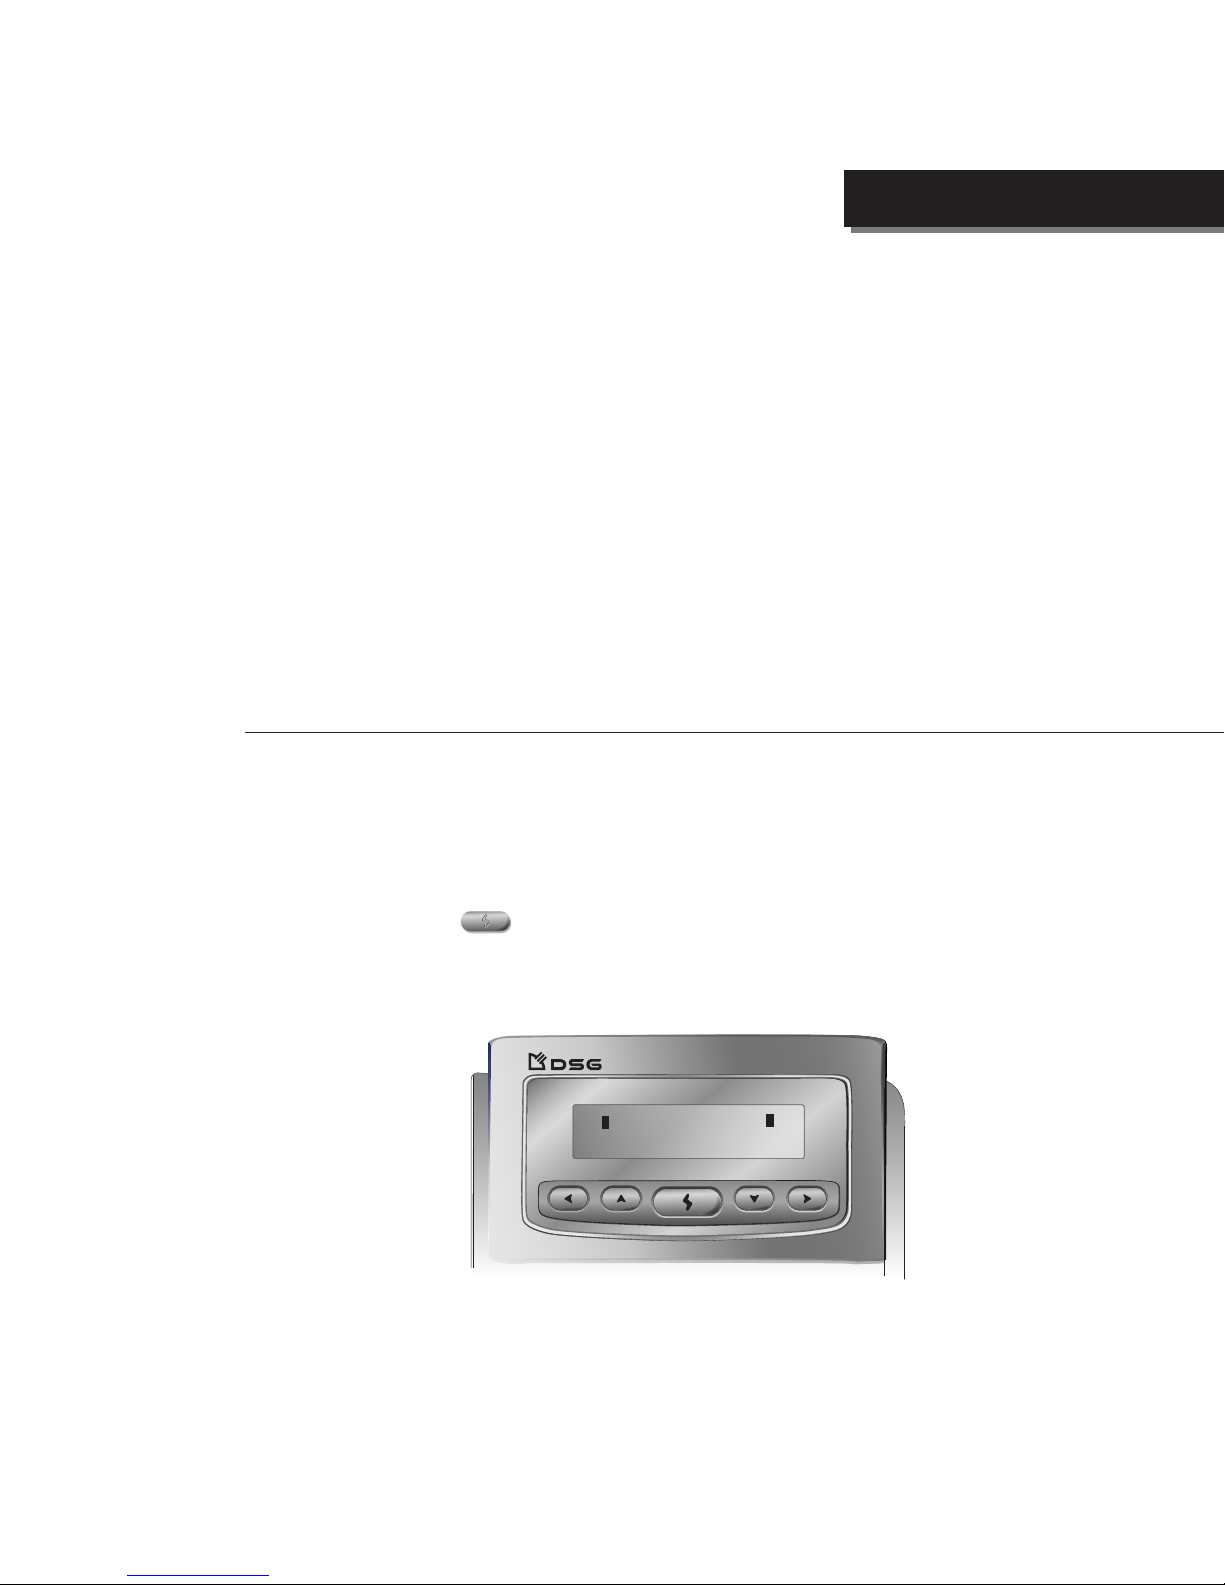
Press and hold IP870 for 2 seconds. IP870 will switch to Configuration Mode and
display IP TYPE:
Entering Configuration Mode
IP TYPE
tTYPETyT
000.000.000.000
IP870 Configuration Mode 3-1
Page 12
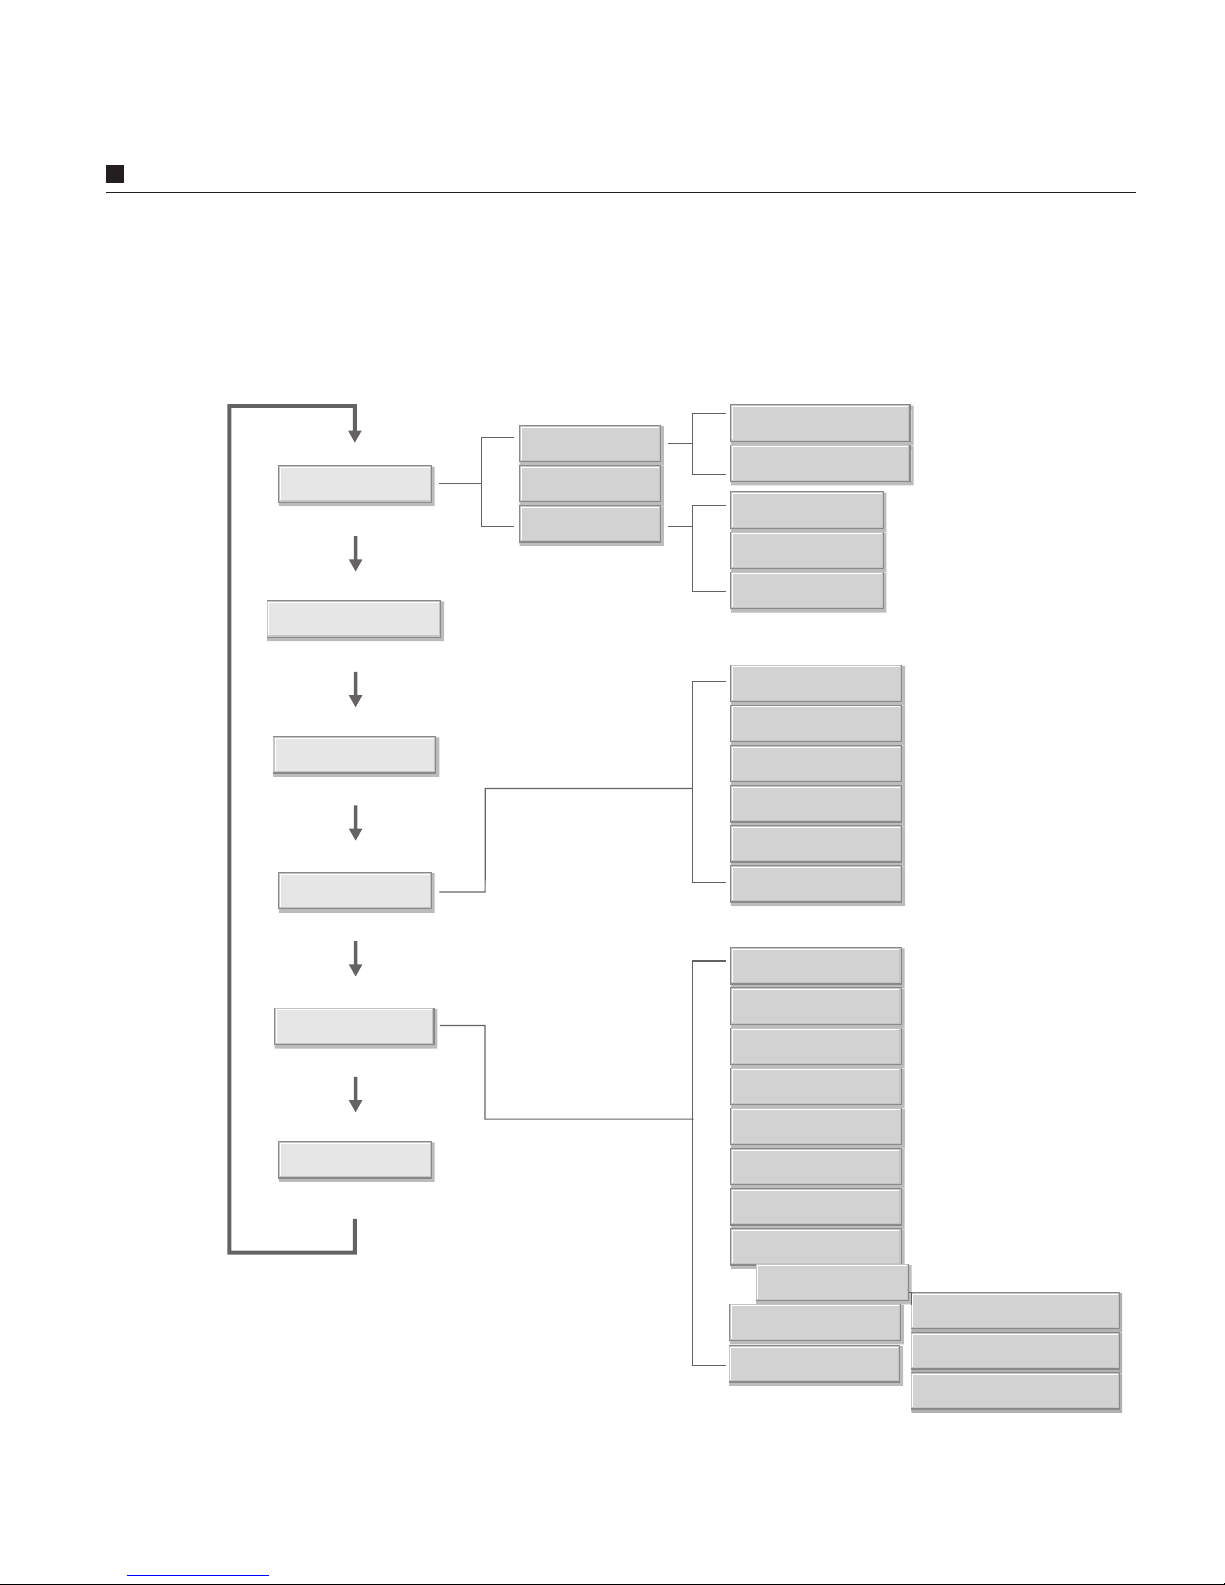
Structure of Configuration Mode
3-2 IP870 Operation Manual
Structure of Configuration Mode
DOWNLOAD NOW
EXIT
RESTORE
IP TYPE
OPEN TO PUBLIC
IP PHONE BOOK
ITSP SETUP
SYSTEM SETUP
EXIT SETUP
EXIT TO MAIN
LONG DIST CODE
INT'L CODE
COUNTRY CODE
YOUR PHONE NO
ITSP ACCOUNT
PPPoE PASSWORD
PPPoE ID
STATIC
DHCP
PPPoE
SUBNET MASK
GATEWAY IP
STATIC IP
DEVICE ID
VOICE DELAY
MAC ADDRESS
DNS ADDRESS
EMAIL ADDRESS
PLAY VOLUME
BACKLIGHT
SYSTEM CLOCK
AUTO UPGRADE
EXIT TO MAIN
TELNET PASSWD
Page 13
Using Phone Keypad to Configure IP870
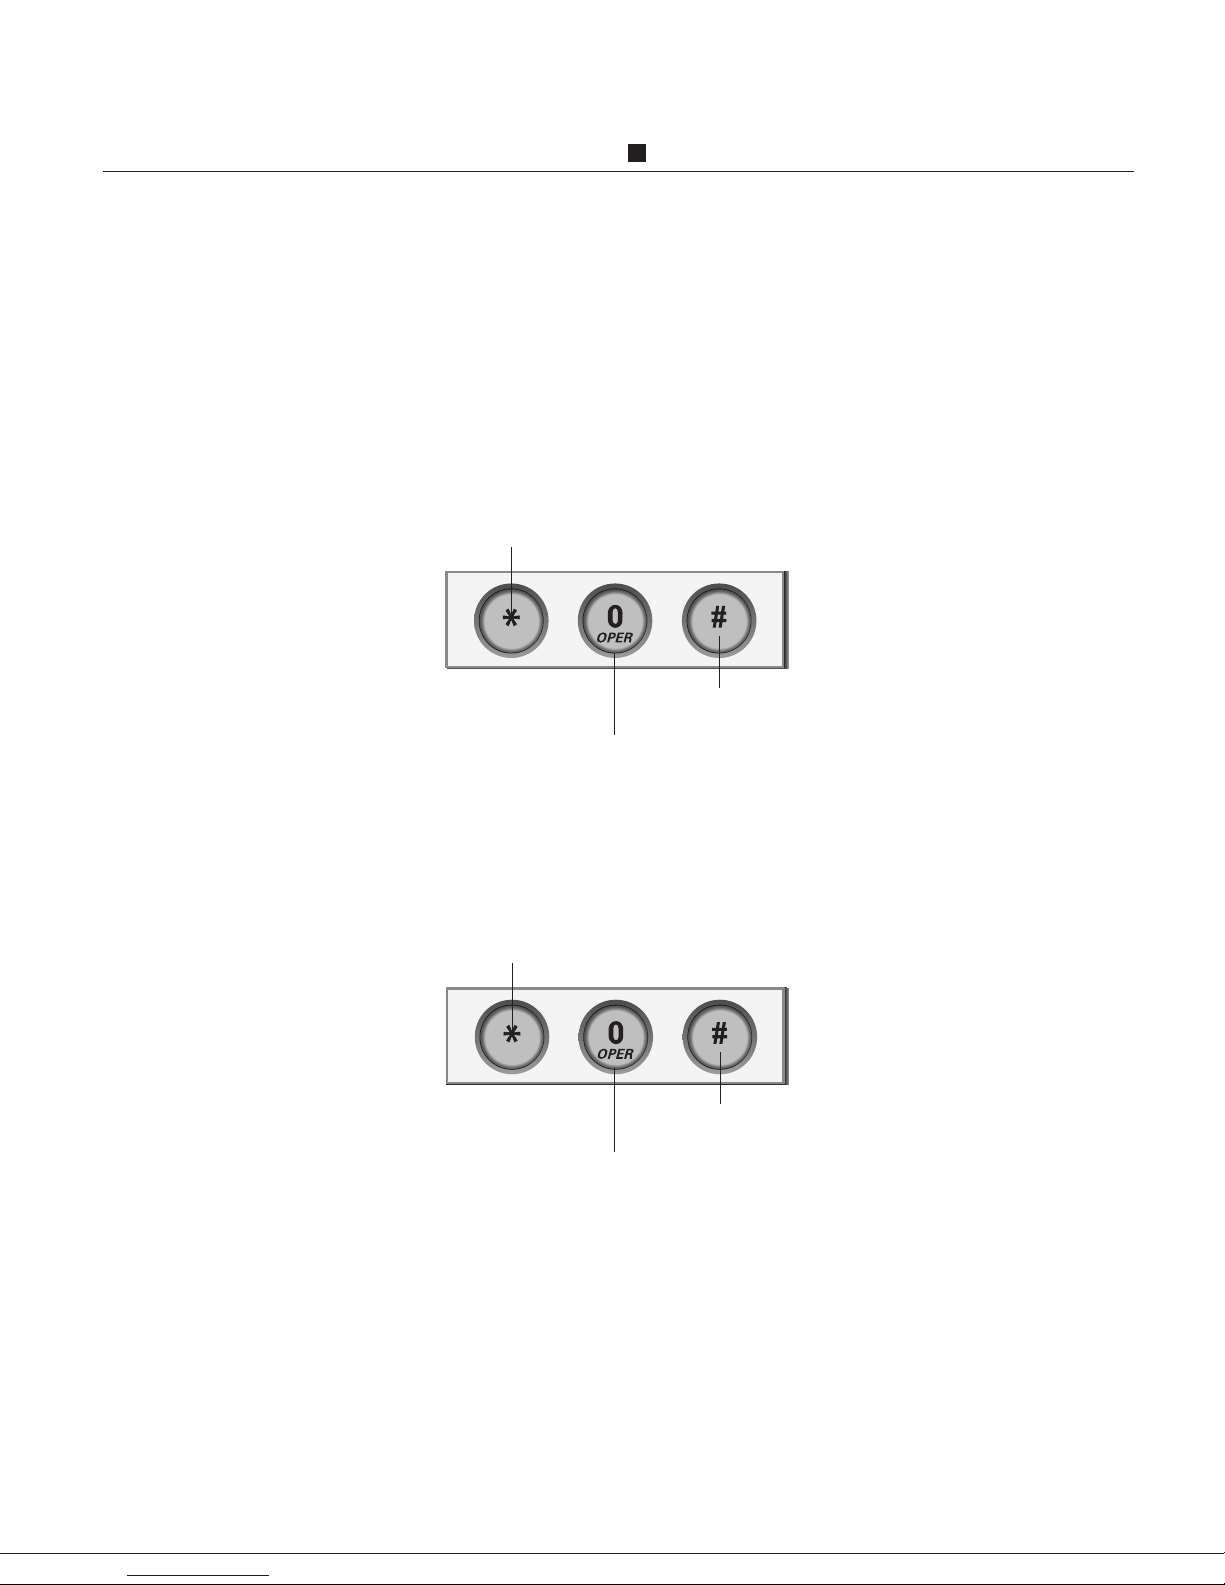
Using Phone Keypad to Configure IP870
To configure your IP870, use the keypad on IP870 to scroll the menu and to input the
necessary information as below:
Browsing the Menu
Selecting Between Fixed Values
back to the previous option
go to the next option
select the option or enter the editing mode
back to the previous value
go to the next value
save the setting and leave the editing mode
IP870 Configuration Mode 3-3
Page 14
Using Buttons to Configure IP870
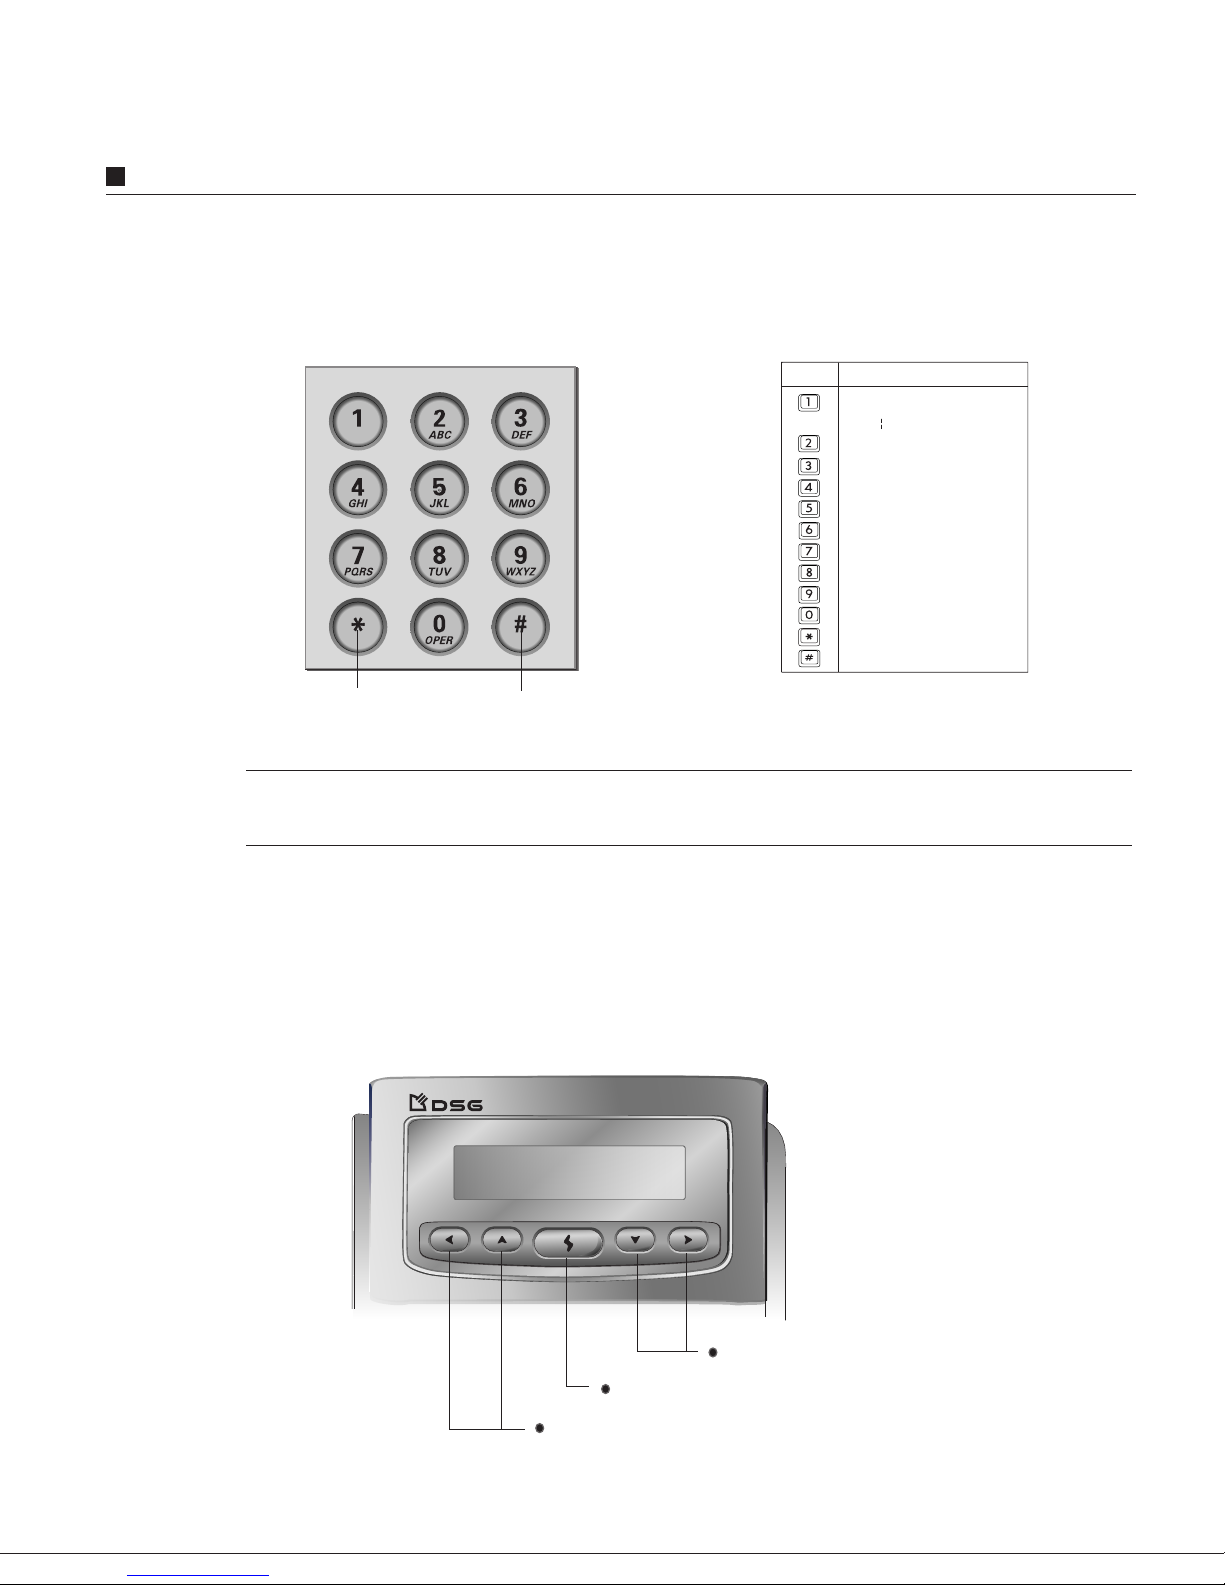
Using Buttons to Configure IP870
The functions of five buttons on IP870 are described as following:
Browsing the Menu
Editing the Data of an Option
Tips: Performing hook-flash (momentarily depressing the hook-switch) will save the
current setting and escape to upper menu level.
back to the previous option
go to the next option
select the option or enter the editing mode
3-4 IP870 Operation Manual
backspace and
delete the character
add a space
Key Characters
1 ~ ! # $ % ^ & * ( ) _
+ : " < > ? - =; ' /
2 a b c A B C
3 d e f D E F
4 g h i G H I
5 j k l J K L
6 m n o M N O
7 p q r s P Q R S
8 t u v T U V
9 w x y z W X Y Z
0 . , @
*
#
Page 15
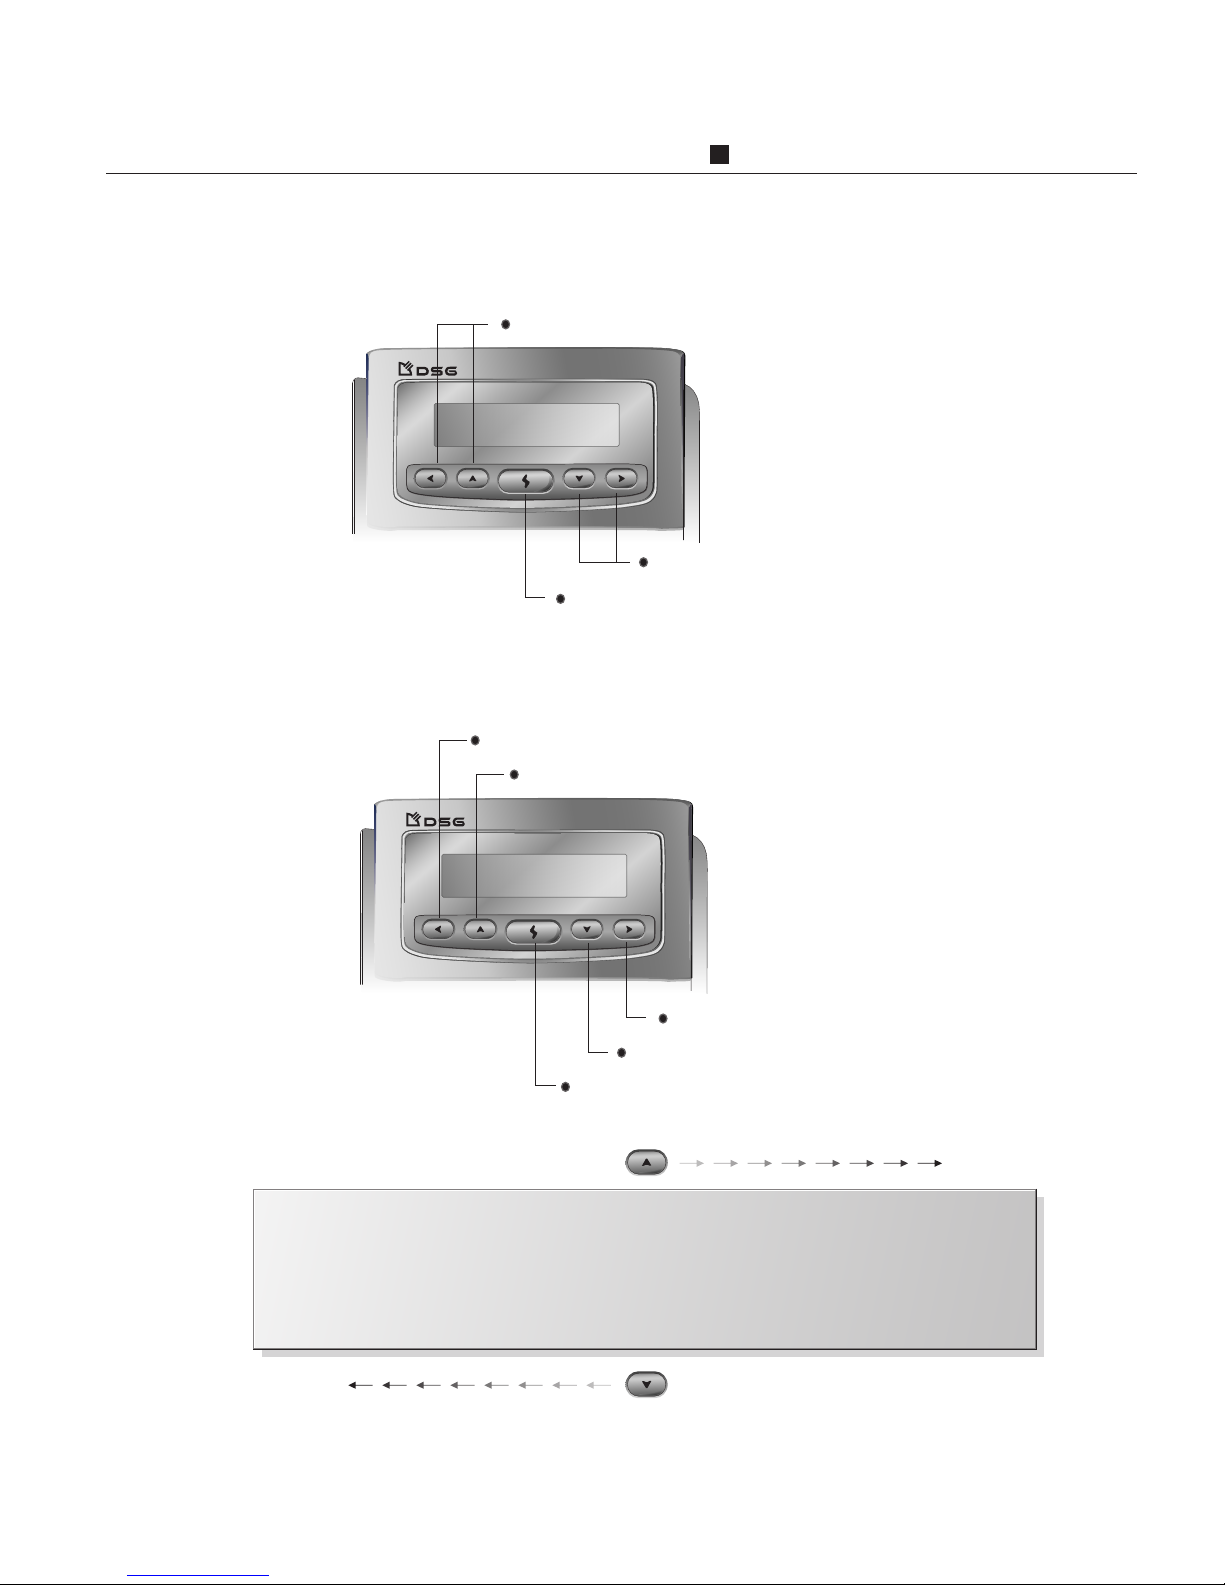
Using Buttons to Configure IP870
Selecting Between Fixed Values
Editing the Data of an Option
back to the previous value
go to the next value
save the setting and leave the editing mode
data input (scroll the character set forward)
data input (scroll the character set backward)
save the setting and leave the editing mode
back-space and delete the character
add a space
IP870 Configuration Mode 3-5
0 1 2 3 4 5 6 7 8 9 a b c d e f g h i j k l m n o p q r s t u v w x y z
A B C D E F G H I J K L M N O P Q R S T U V W X Y Z . @ ~ ! # $ %
^ & * ( ) _ + | : " < > ? - = ; , / , [ ]{ } ` \
backward
forward
Page 16
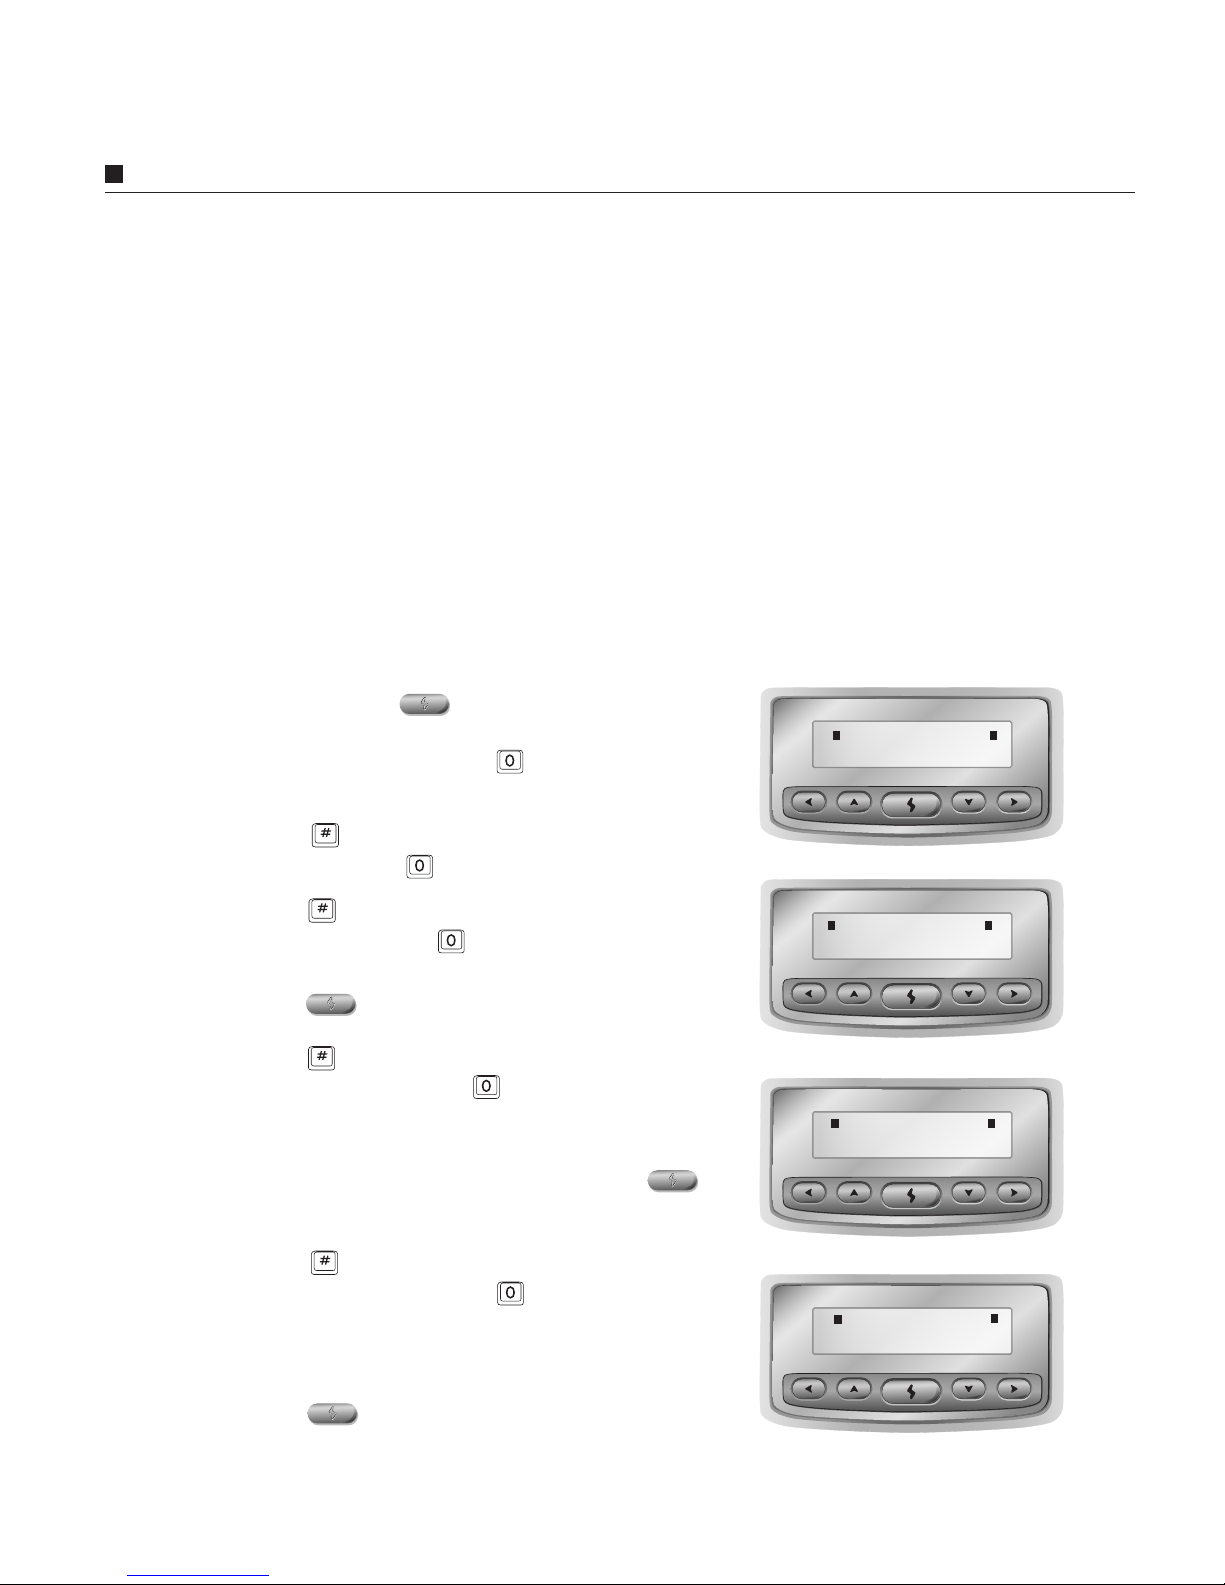
Basic Setup (Device-to-Device / Device-to-Phone Mode)
1. Press and hold button for 2 seconds
and the LCD screen will show IP TYPE. Pick
up the handset and press to edit
this option.
2. Press till the LCD screen displays
STATIC. Press to save.
3. Press and the LCD screen will show
STATIC IP. Press to edit this option. Use
the keypad to input one of the IP address.
Press to save.
4. Press and the LCD screen will show
GATEWAY IP. Press to edit this option.
Input the gateway IP address with your
keypad. Please check your ISP or network
administrator for this information. Press to
save.
5. Press and the LCD screen will show
SUBNET MASK. Press to edit this
option. Input your subnet mask with your
keypad. Please check with your ISP or
network manager for this information.
Press to save and exit.
If you can obtain a static IP address from your ISP, setup your Internet
access as below.
Basic Setup
(Device-to-Device / Device-to-Phone Mode)
3-6 IP870 Operation Manual
Before you start using your IP870, you need to subscribe an Internet access line from your
local ISP. It could be ADSL, Cable Modem or Leased Line. You will be given the
following information: (1) Available IP address (2) Gateway IP address (3) Subnet mask.
Some DSL ISPs provide PPPoE connections with end users. If you use dial-up DSL and
obtain a dynamic IP address automatically from your DSL ISP, you will be given (1) User
Name (2) Password.
Static
IP TYPE
000.000.000.000
SUBNET MASK
000.000.000.000
GATEWAY IP
000.000.000.000
STATIC IP
Page 17
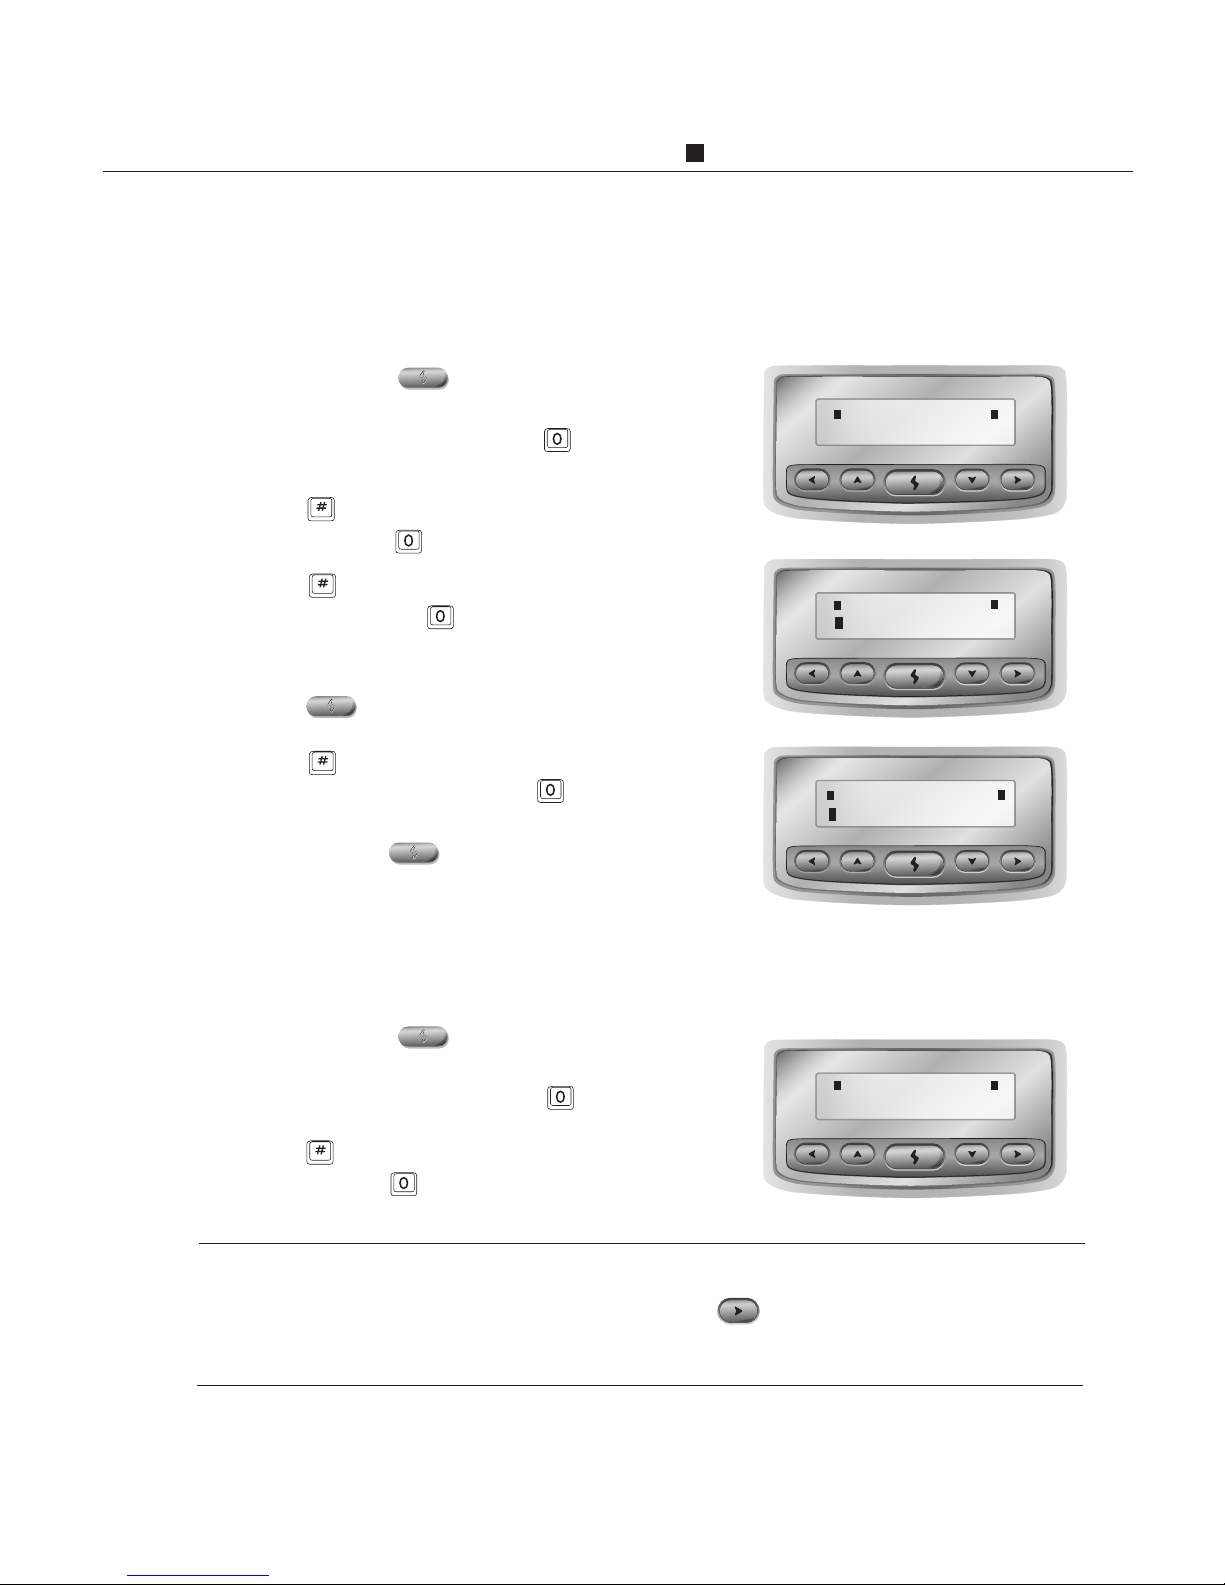
Tips: If you connect to the Internet with a dynamic IP address using PPPoE or DHCP,
you could check what your IP address is by pressing button when on-hook. Your IP
address will show on the LCD screen. You can use this IP address to Telnet your IP870.
1. Press and hold button for 2 seconds
and the LCD screen will show IP TYPE.
Pick up the handset and press to edit this
option.
2. Press till the LCD screen displays
PPPoE. Press to save.
3. Press and the LCD screen will show
PPPoE ID. Press to edit this option.
Refer to the above character conversion chart
and use the keypad to input your User ID.
Press to save.
4. Press and the LCD screen will show
PPPoE PASSWORD. Press to edit this
option. Input your password from your
keypad. Press to save and exit.
1. Press and hold button for 2 seconds
and the LCD screen will show IP TYPE.
Pick up the handset and press to edit this
option.
2. Press till the LCD screen displays
DHCP. Press to save and exit.
If your network has a DHCP server assigning an IP address automatically
when you log in, setup your Internet access as below.
If you are a PPPoE client and obtain a dynamic IP address from your
DSL ISP, setup your Internet access as below.
ITSP Setup (Device-to-Phone Mode)
IP870 Configuration Mode 3-7
PPPoE
IP TYPE
DHCP
IP TYPE
PPPoE PASSWORD
PPPoE ID
Page 18

Note: If your network is in NAT environment, you will be able to use IP870 with pseudo
or private IP addresses after performing the port mappings. Please refer to Chapter 7
How to Setup IP870 in NAT Environment.
Tips: If you use PPPoE for connecting to the Internet, you could shutdown the Internet
connection by pressing and holding button for 2 seconds when off-hook. You will see
the steady @ sign on the LCD screen turn to be a flashing @ sign. To retrieve the Internet
connection, repeat the above procedure.
ITSP Setup (Device-to-Phone Mode)
3-8 IP870 Operation Manual
Note: The default account is the 6-digit Device ID preset in your device when you
purchase the IP870. You may ask your retailer or dealer to credit the Device ID so you
can use it instantly.
ITSP Setup (Device-to-Phone Mode)
The Device-to-Phone Mode allows your IP870 to connect to a compatible gateway, such
as DSG IP2000, so that the receiving party is able to receive an Internet phone call with a
regular phone. To use the Device-to-Phone Mode, you may use the default account* or
you need to get a valid ITSP account* and enter all of required information in ITSP Setup
section.
Note: Please check www.dsgtechnology.com and refer to Chapter 6 How to Get an ITSP
Account for further information about applying an active ITSP account number from DSG
compatible Internet Telephony Service Providers (ITSP).
Press on ITSP SETUP to enter the Sub-menu.
Page 19
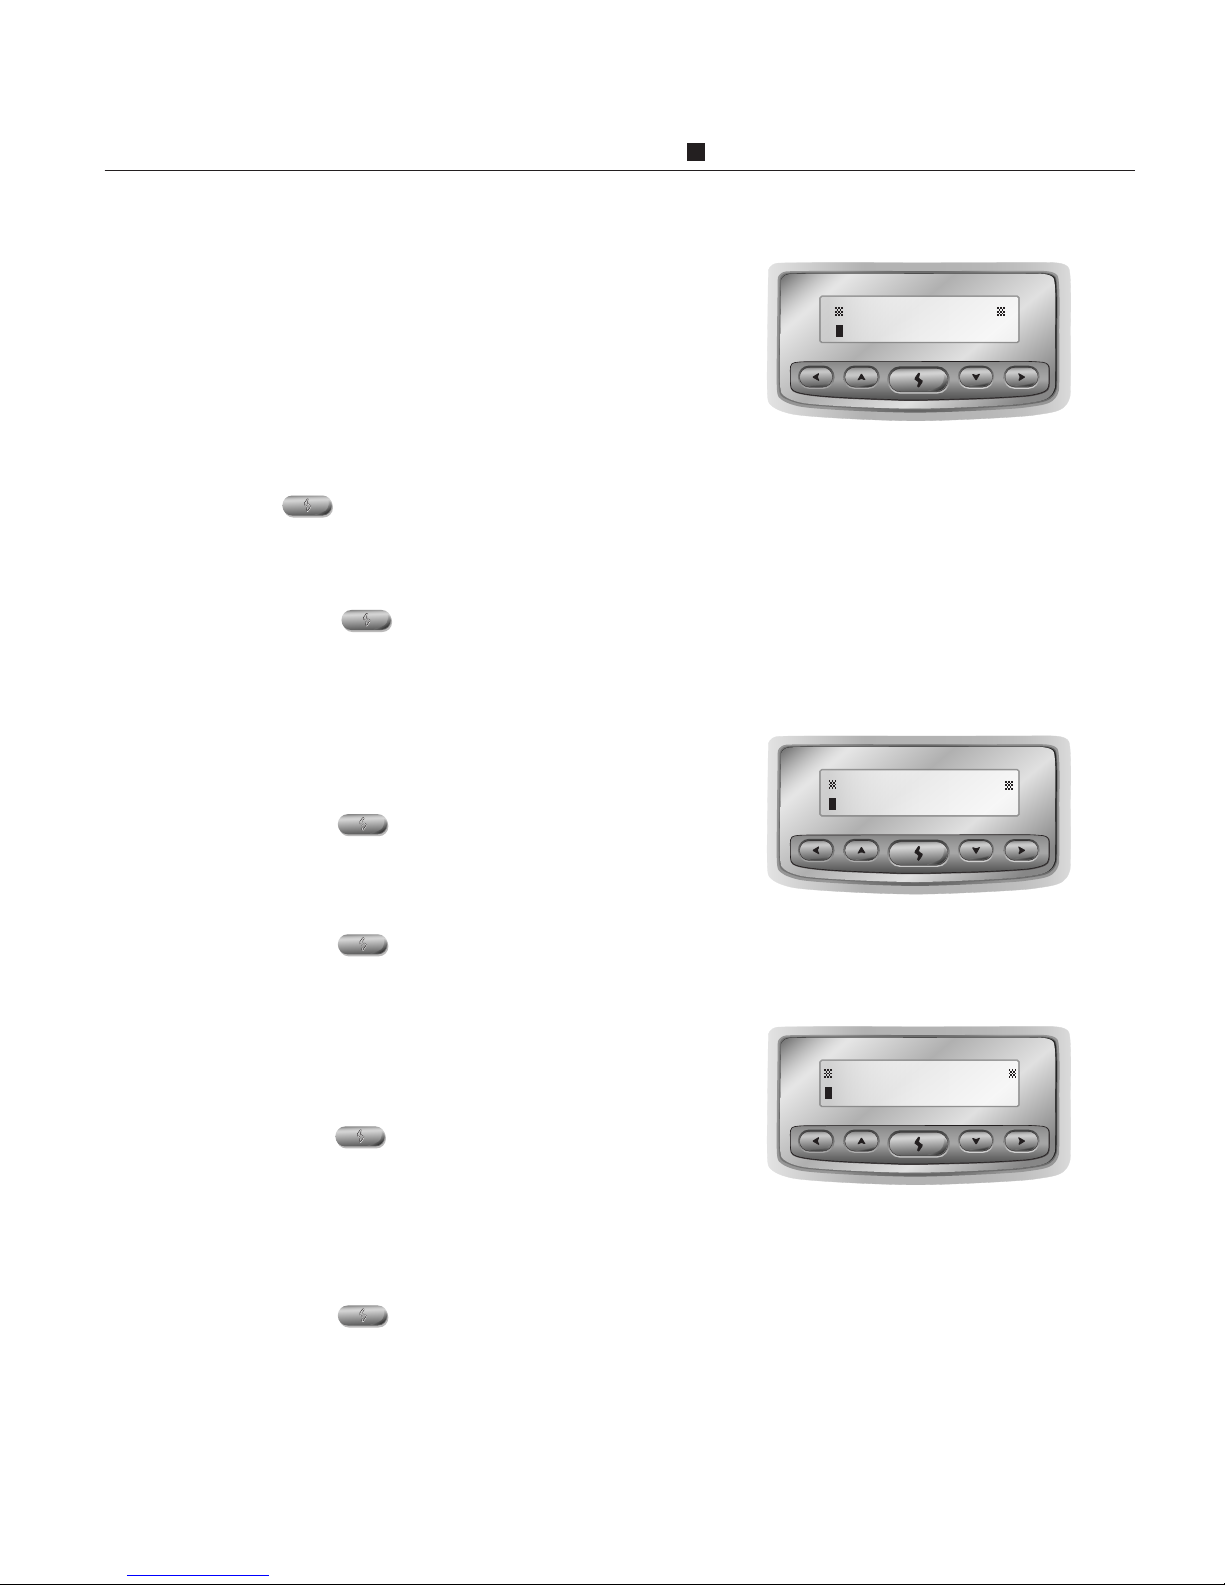
ITSP Setup (Device-to-Phone Mode)
IP870 Configuration Mode 3-9
2. Use the keypad on IP870 to input your
phone number.
3. Press to save and exit edit mode.
1. With LONG DIST CODE displayed,
press to edit.
2. Use the keypad on IP870 to input the code
for making a domestic long-distance phone
call. For instance, the long-distance code in
USA is 1.
3. Press to save and exit edit mode.
Long-distance Code (Required for
Device-to-Phone Mode)
LONG DIST CODE
1. With YOUR PHONE NO displayed,
press to edit.
Your Phone Number (Optional)
YOUR PHONE NO
If you use the 6-digit Device ID Number
as your account of credit, you don't have
to input anything in this item.
1. With ITSP ACCOUNT displayed, press
to edit.
2. Use the keypad on IP870 to input the
account number obtained from your ITSP.
3. Press to save and exit edit mode.
ITSP Account ID (Required for
Device-to-Phone Mode)
ITSP ACCOUNT
Page 20
3-10 IP870 Operation Manual
System Setup
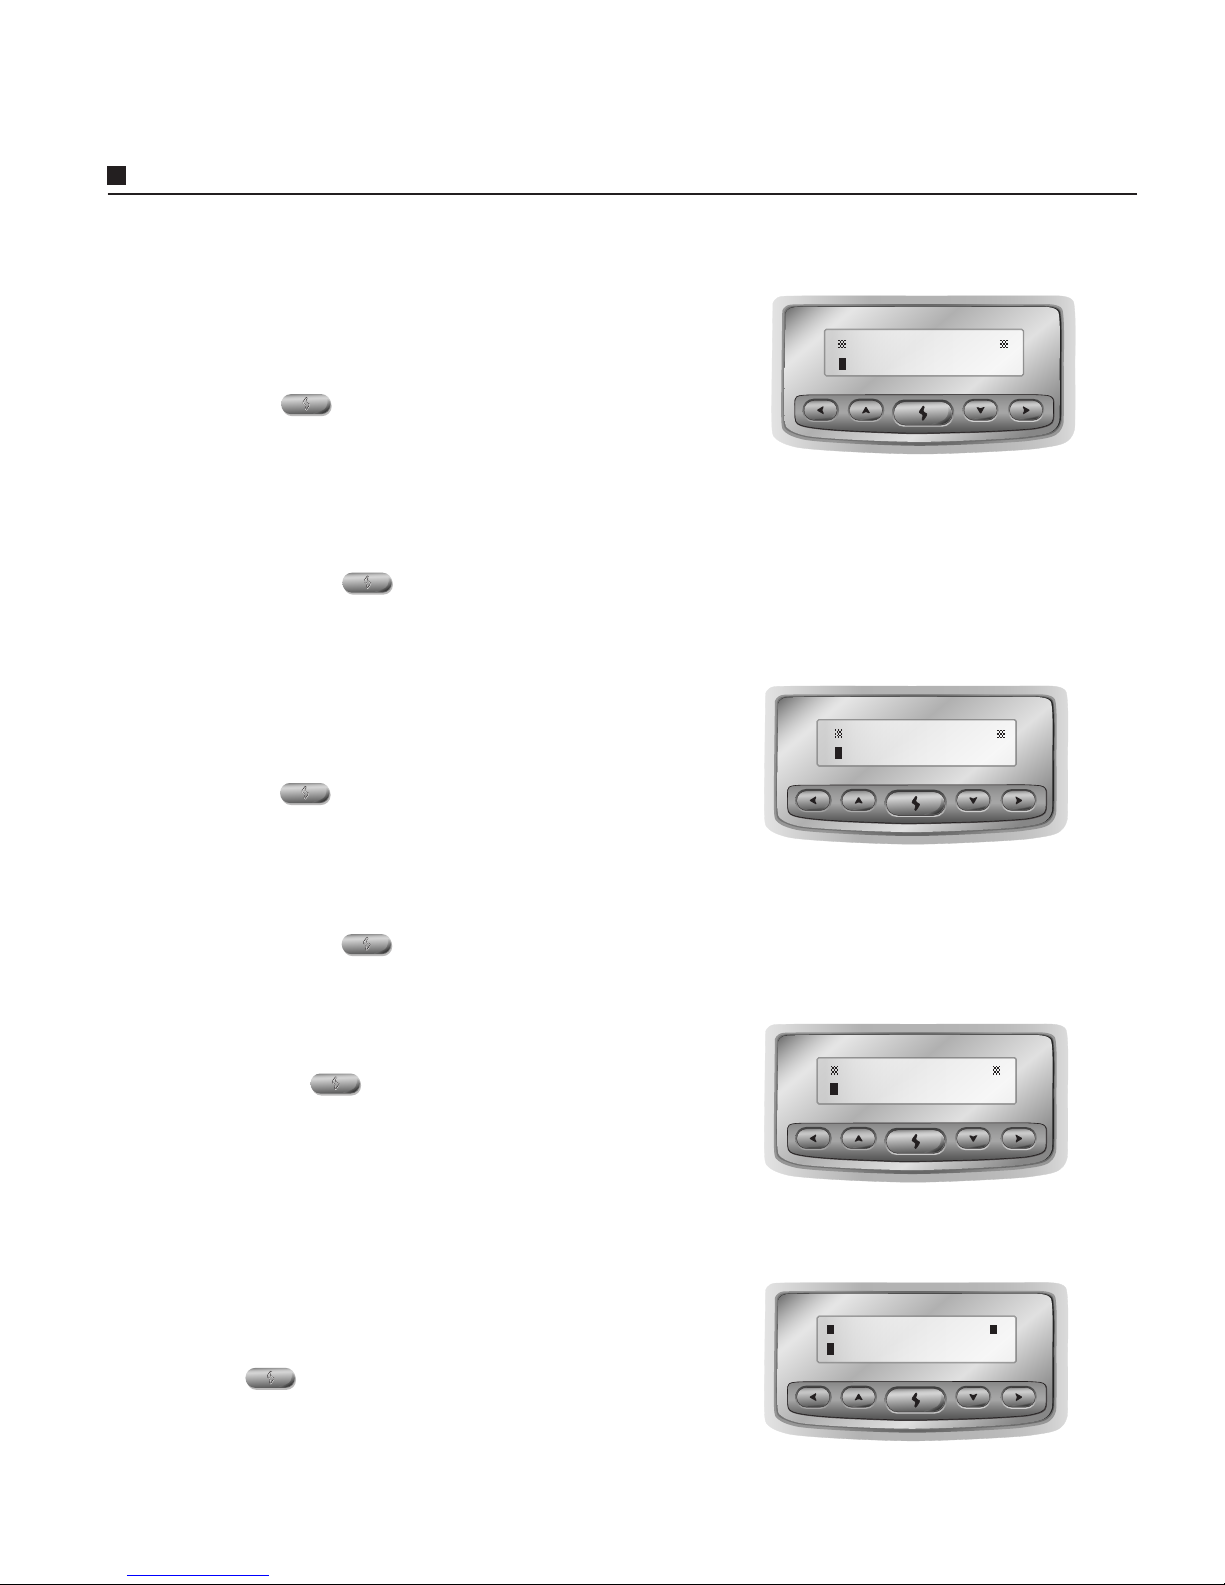
1. With COUNTRY CODE displayed, press
to edit.
2. Use the keypad on IP870 to input the country
code. For example, the country code of USA
is 1.
3. Press to save and exit edit mode.
Country Code (Required for
Device-to-Phone Mode)
COUNTRY CODE
Press on EXIT TO MAIN to leave
ITSP SETUP section.
Exit to Main Menu
EXIT TO MAIN
This section consists of all settings for your
IP870 device. You can adjust these settings
to maximize the performance of IP870. Press
on SYSTEM SETUP to enter the submenus.
System Setup
SYSTEM SETUP
1. With INT'L CODE displayed, press
to edit.
2. Use the keypad on IP870 to input the code
for making an international phone call. For
instance, the international code in USA is
011.
3. Press to save and exit edit mode.
International Code (Required for
Device-to-Phone Mode)
INT'L CODE
Page 21
IP870 Configuration Mode 3-11
System Setup
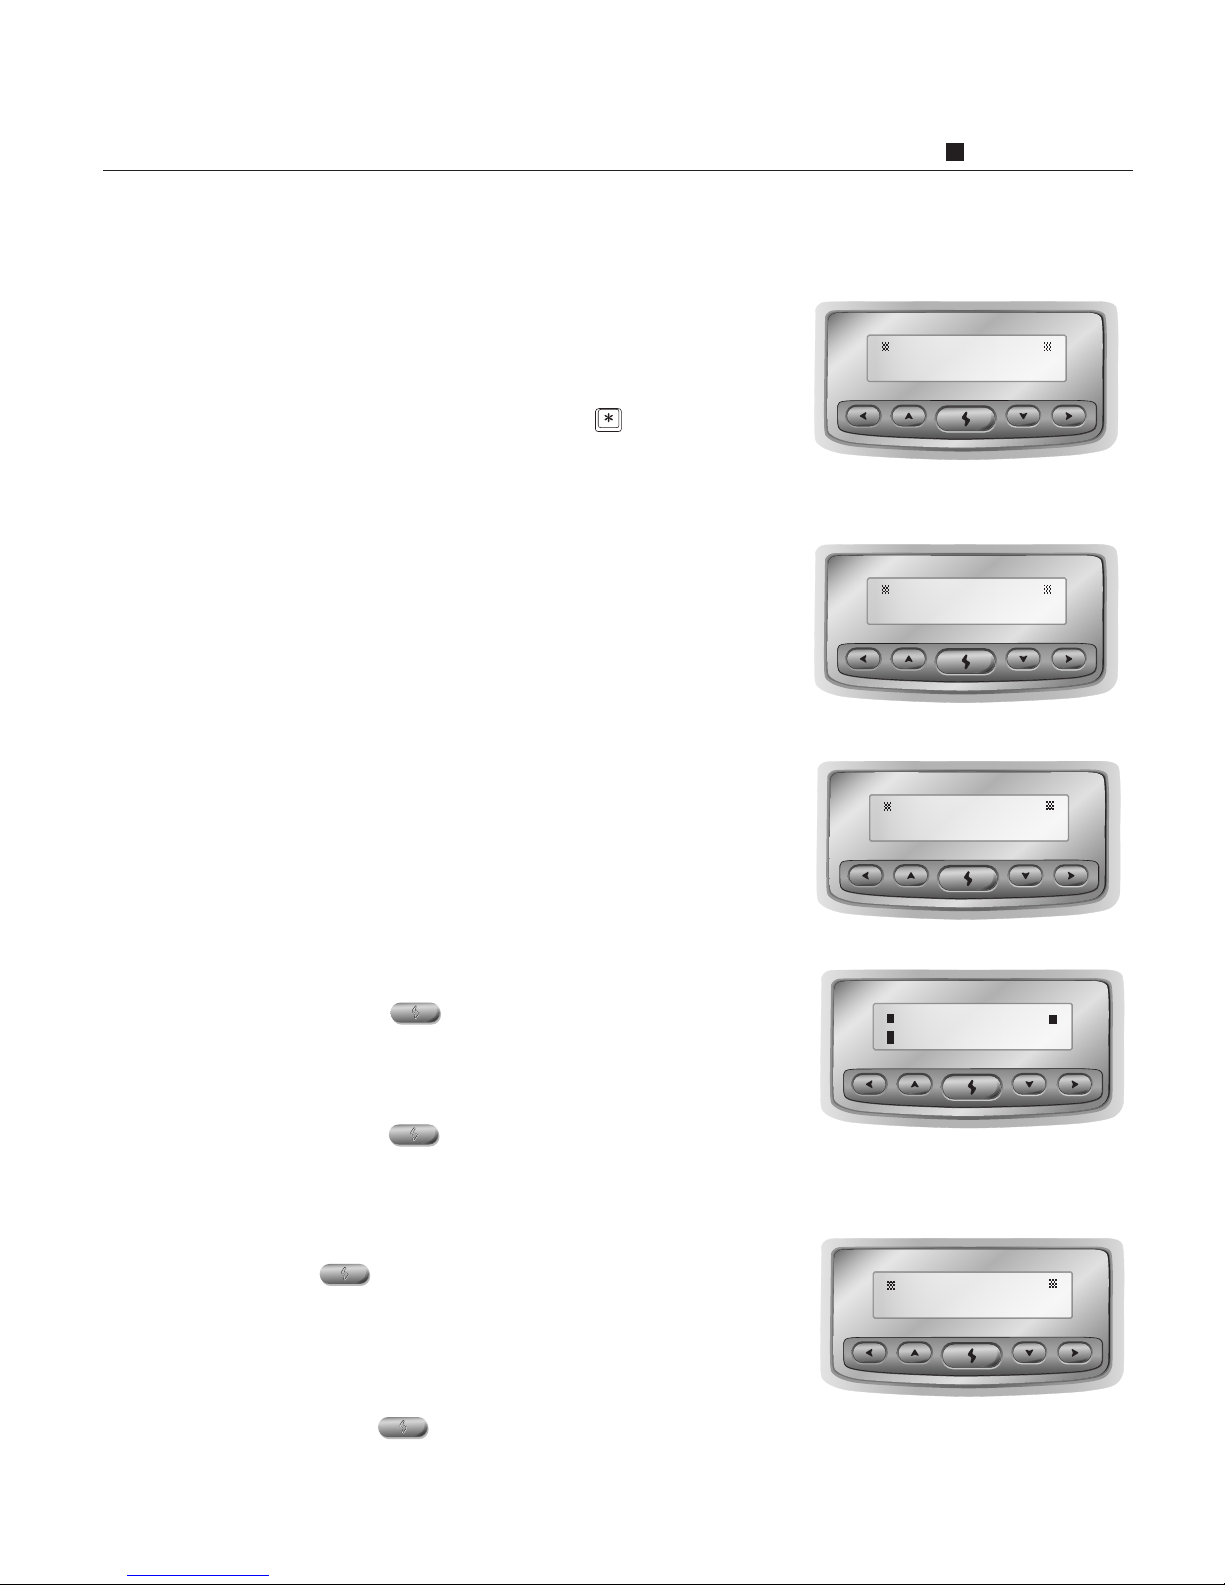
1. With PLAY VOLUME displayed, press
to edit.
2. Use the keypad or buttons on IP870 to
input the level of play volume. The valid
range is from 1 to 9. The default setting is 5.
3. Press to save and exit edit mode.
Play Volume
1. With E-MAIL ADDRESS displayed,
press to edit.
2. Use the keypad on IP870 to input your e-
mail address.
3. Press to save and exit edit mode.
E-mail Address (Optional)
E-MAIL ADDRESS
5(default)
PLAY VOLUME
MAC address is a unique serial number
burned into the device. It is the physical
address to identify a device on network. This
is a non-editable field.
MAC Address (Non-editable)
IP870 comes with a default DNS Address
168.95.1.1. If your ISP requires subscribers
using specific DNS. If yes, edit the DNS
assigned by your ISP.
DNS Address
MAC ADDRESS
0030EE-8212E3
DNS ADDRESS
168.095.001.001
Every IP870 has its own unique six-digit ID.
When using the Device-to-Device Mode, you
can talk to another online IP870 by simply
entering the six-digit ID with a leading
key. This is a non-editable field.
Device ID (Non-editable)
DEVICE ID
800000
Page 22
3-12 IP870 Operation Manual
System Setup
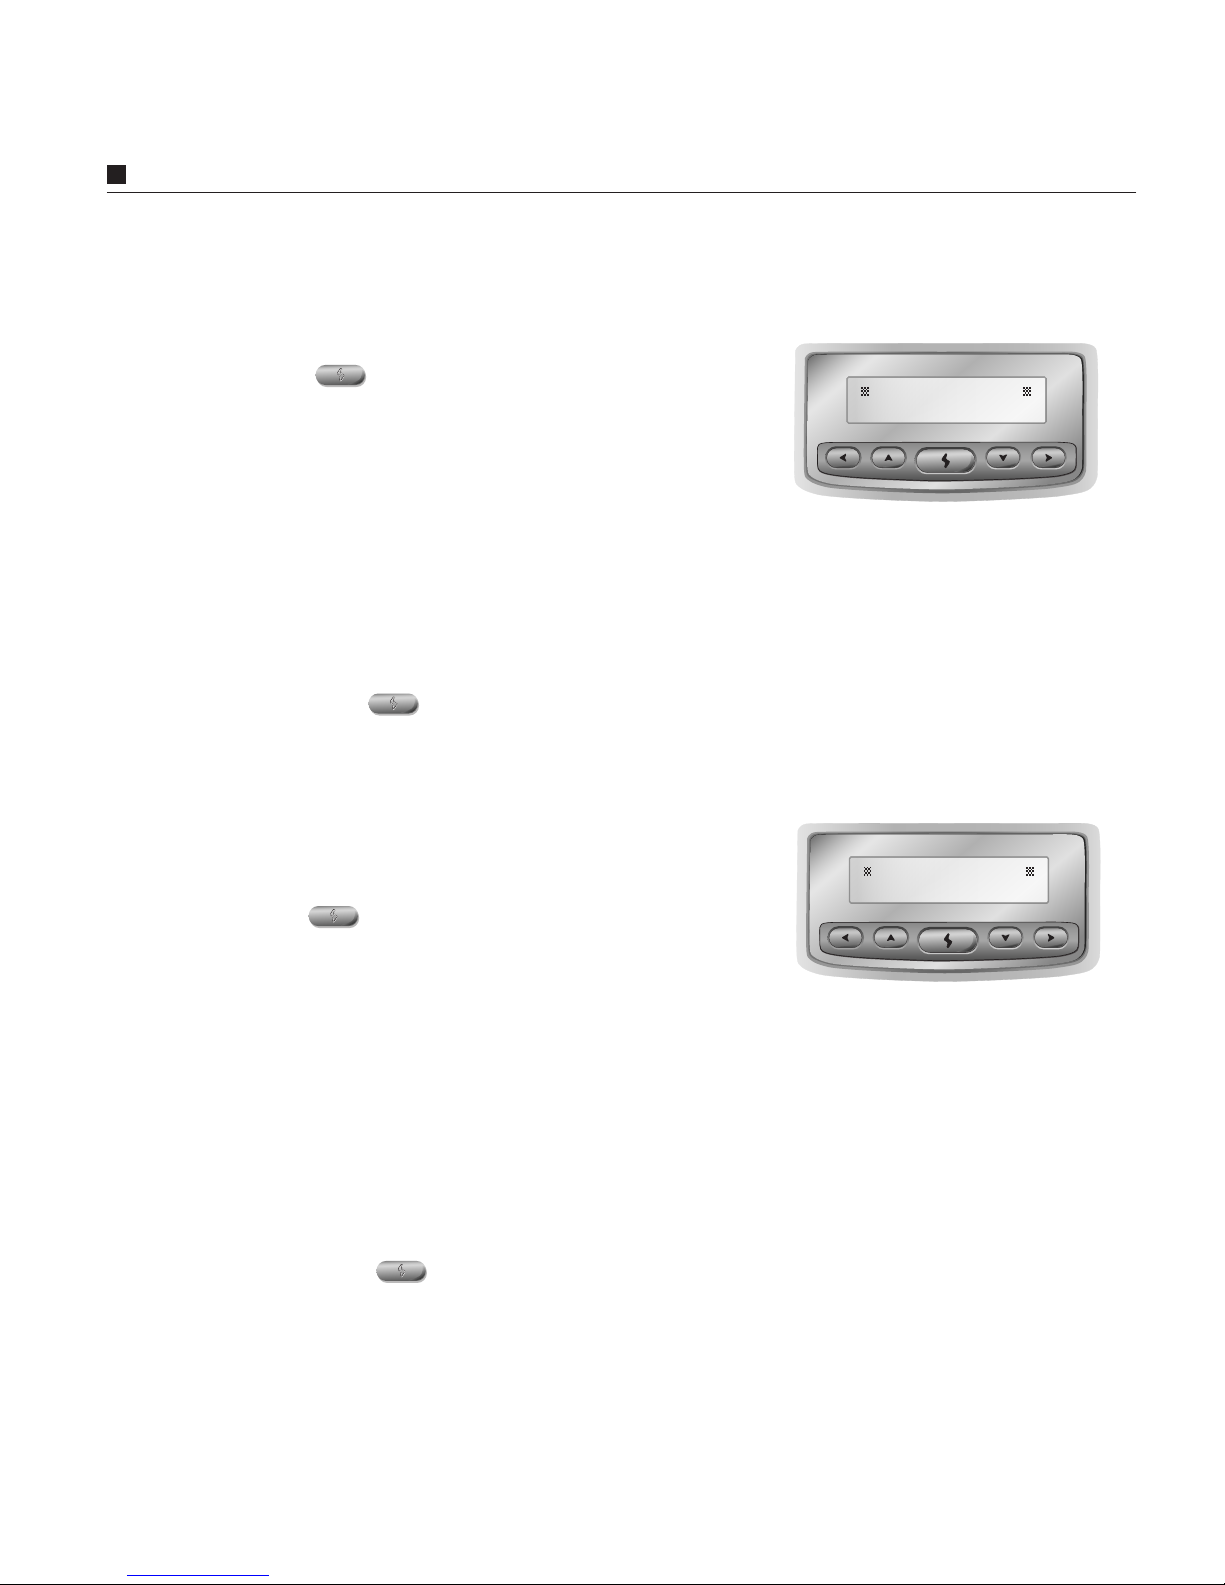
1. With BACKLIGHT displayed, press
to edit.
2. The LCD screen is always lit if this
parameter is set to On or turn it off by
switching this parameter to Off. If this
parameter is set to Automatic, the LCD
screen light is on whenever the user picks
up the phone or when there is an
incoming call. Use the keypad on your
phone or buttons on IP870 to select
from these three options. The default is
set on Automatic.
3. Press to save and exit edit mode.
Backlight
BACK LIGHT
Automati c
1. With VOICE DELAY displayed, press
to edit.
2. Voice delay is the variation of delayed
data experienced during the packet
routing and switching over the Internet.
Occasionally, the Internet traffic flow is
not stable, you can adjust the value to
HIGH in order to obtain a better voice
quality. Use the buttons on IP870 to select
the setting from Low, Medium or High.
The default setting is Low.
3. Press to save and exit edit mode.
Voice Delay
Low (default)
VOI CE DELAY
Page 23
IP870 Configuration Mode 3-13
System Setup
Press to leave System Setup submenu.
Exit to Main Menu
EXIT TO MAIN
This function allows you to change the
password when using Telnet to enter the
configuration mode of IP870. The default
setting is 0000. Please refer to Chapter 7
How to Setup IP870 in NAT Environment.
Telnet Password
TELNET PASSWD
****
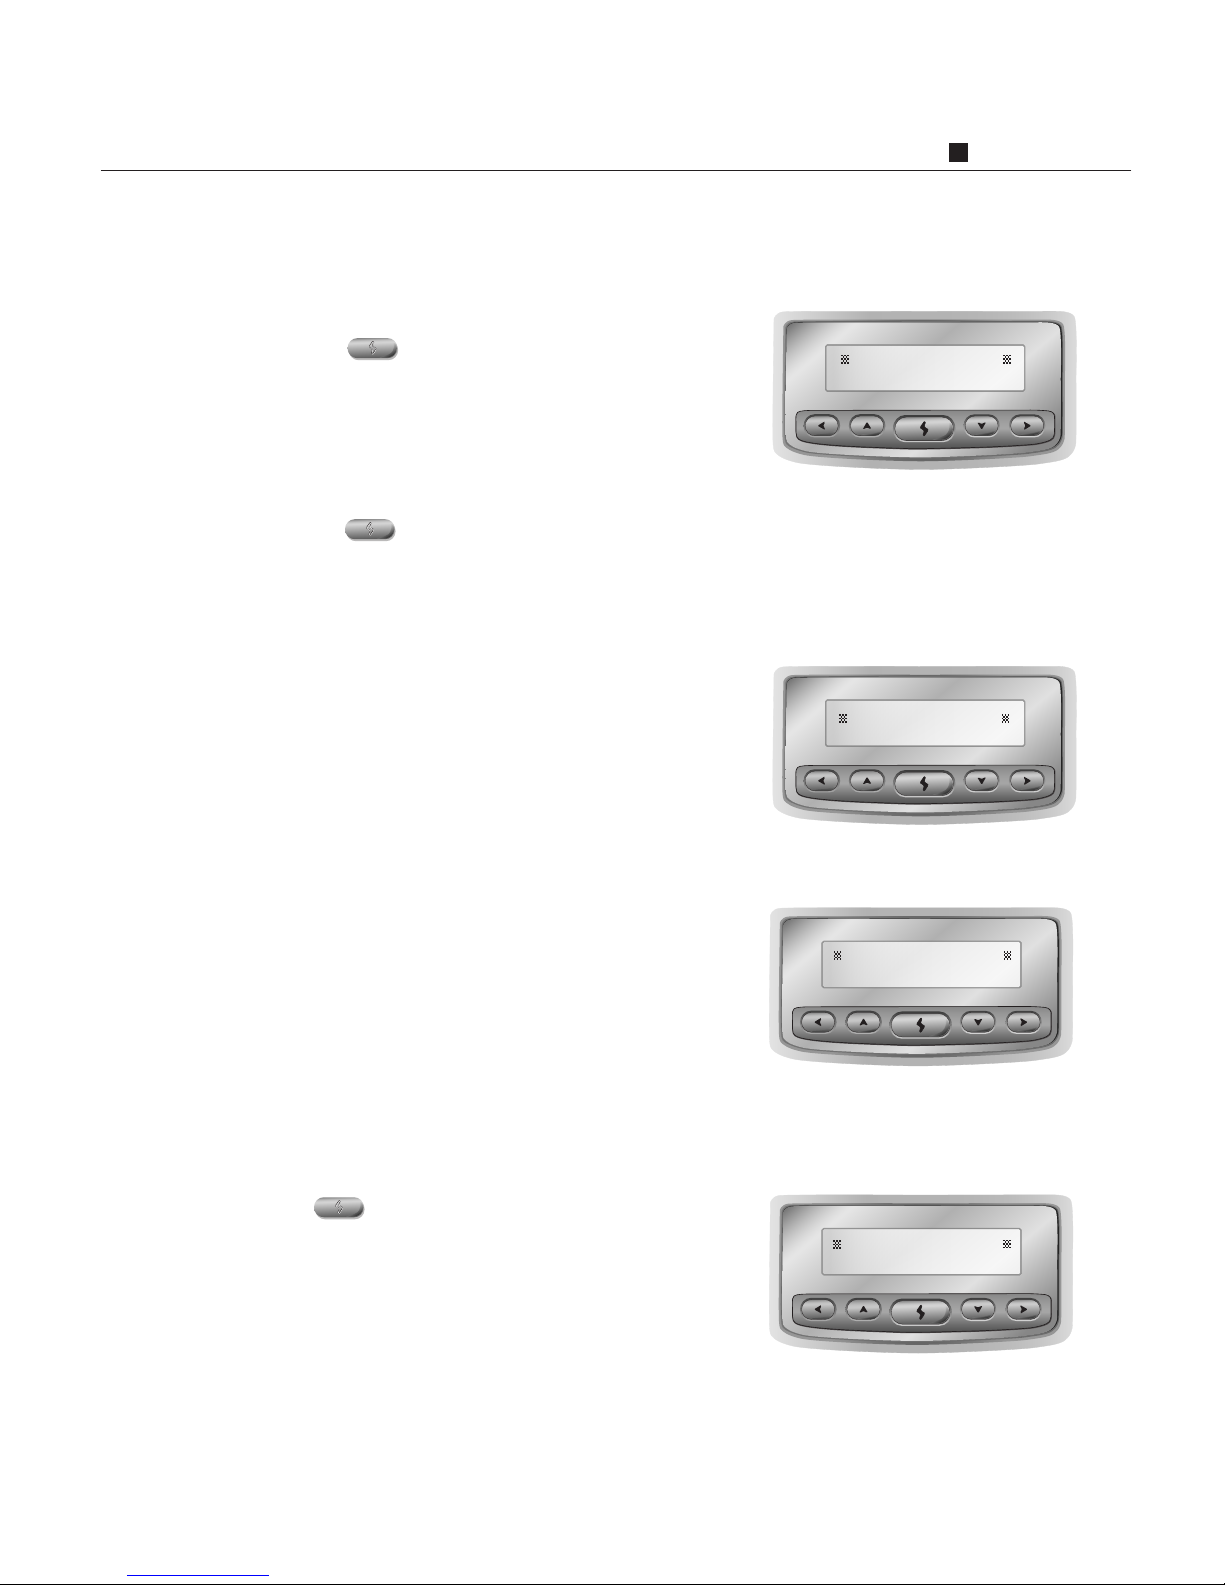
1. With SYSTEM CLOCK displayed,
press to edit.
2. Use the keypad on your phone or buttons
on IP870 to input the time. IP870
uses the 24-hour setting. The valid range
is from 00:00:00 to 23:59:59.
3. Press to save and exit edit mode.
System Clock
SYSTEM CLOCK
00:00: 00
This function allows you to download new
version of software through Internet to your
IP870. Please refer to Chapter 5
Upgrading Your IP870.
Auto-Upgrade
AUTO-UPGRADE
Page 24
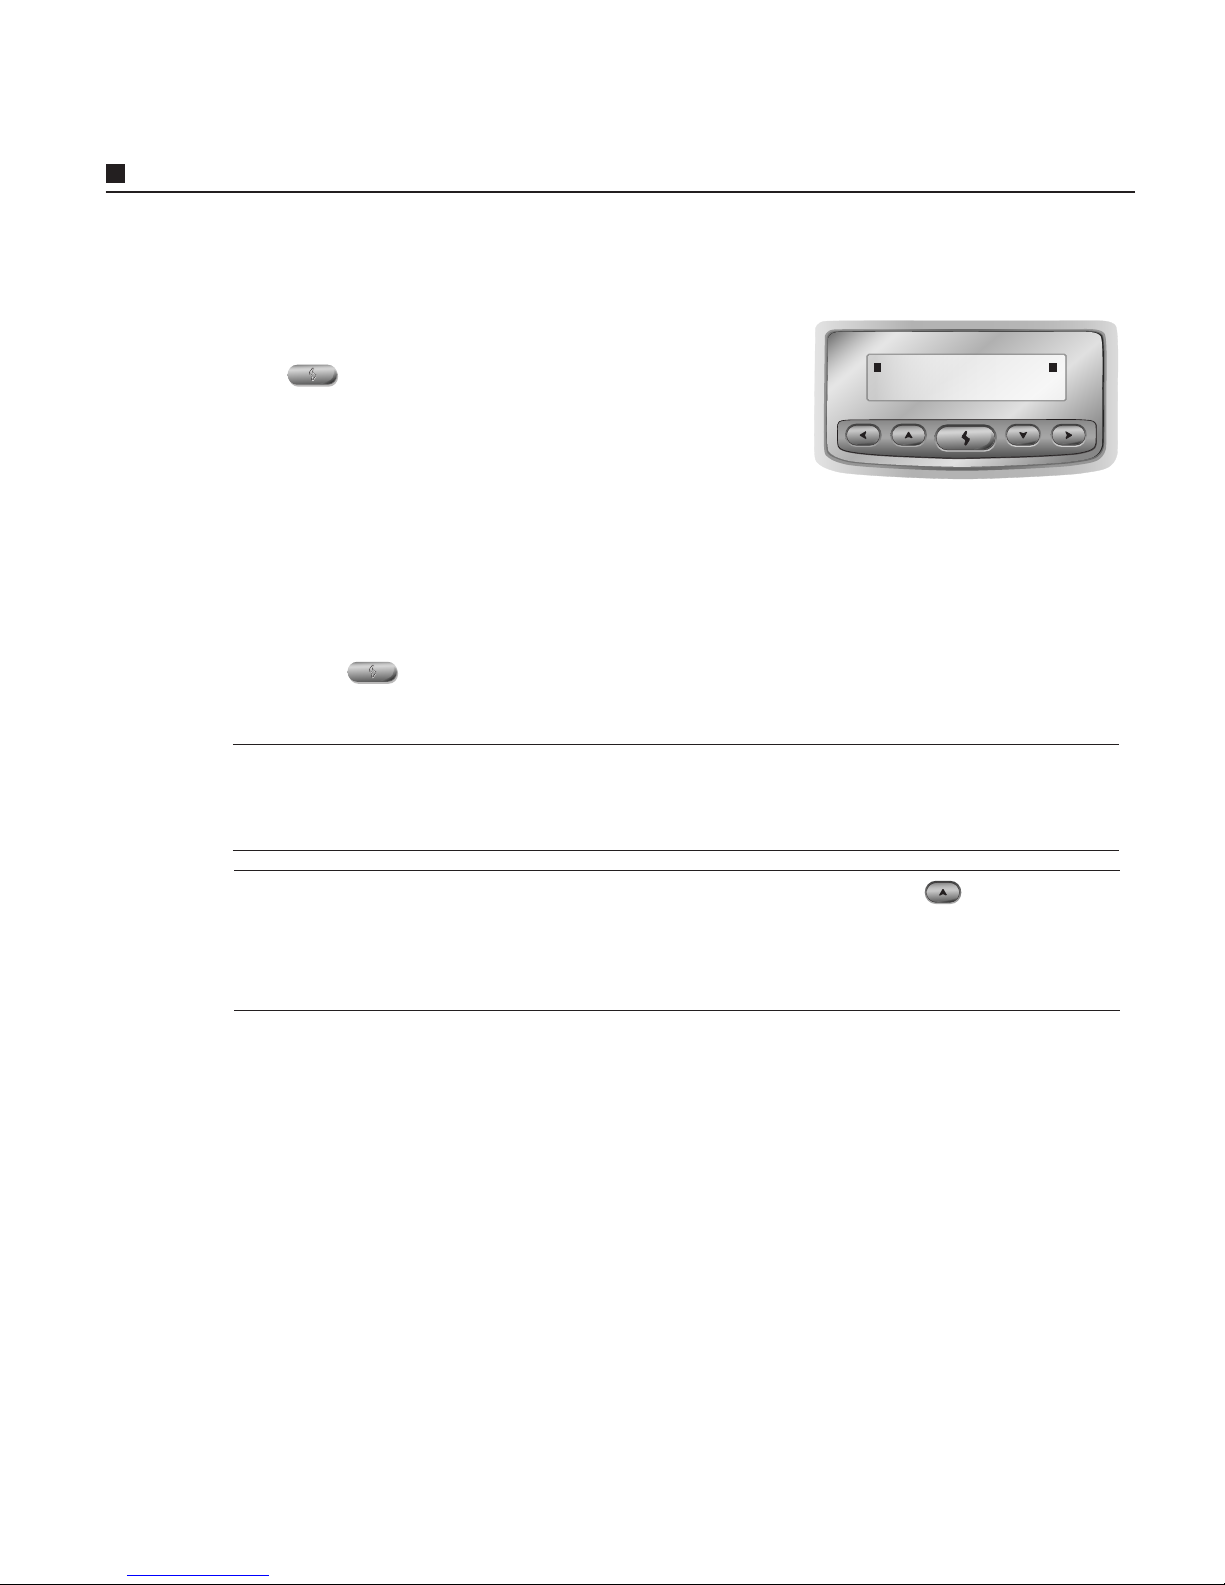
3-14 IP870 Operation Manual
System Setup
Tips: You can switch to the other mode by pressing and holding button for 2
seconds when off-hook, without the need of entering the configuration mode. You
can judge your current mode by the appearance of @ sign. The temporary switch
does not change the settings on IP870.
Note: In OFF mode, you won't see the @ sign shown on the LCD even though you are
connected to the Internet. In ON mode, you can see a steady @ sign shown on the LCD
screen.
1. With OPEN TO PUBLIC displayed, press
to edit.
2. This option allows you to be visible or
invisible from remote parties on the Internet.
In either ON or OFF mode, you can initiate
Internet phone calls. In OFF mode, you will
not be reached by your Device ID. However
you could still be reached by IP address. Use
the keypad or buttons on IP870 to select the
setting. The default setting is ON.
3. Press to save and exit edit mode.
Open to Public (Optional)
OPEN TO PUBLI C
On
Page 25

IP870 Configuration Mode 3-15
System Setup
1. Press and hold button for 2 seconds and the LCD screen will show
IP TYPE.
2. Use the buttons on the IP870 to scroll the menu.
3. Press the on the IP870 when you scroll to IP PHONE BOOK.
4. Pick up your phone and press key to input or edit the Phone Book entries.
5. Key in the name for the entry using the character converter chart stated prior in this
chapter. Press the on your IP870 to save.
6. Key in the IP address and press the on your IP870 to save.
7. Press the buttons on IP870 to scroll to another entry.
8. Repeat steps 4 to 7 to input more IP Phone Book entries. You can save up to 10 entries.
9. You can scroll to EXIT TO MAIN and press to exit to main menu.
Edit Your IP Phone Book
Tips: Performing hook-flash (momentarily depressing the hook-switch) will save the
current setting and escape to upper menu level.
Page 26

Making Internet Calls 4-1
Making Internet Calls
With DSG JustDialIT Technology, operating IP870 is like using a regular phone!
CHAPTER 4
If you have finished the configuration in Chapter 3, then you are set to go with your newly
programmed IP870.
For Internet users: There are two modes available to make an Internet phone call
with your IP870.
• Device-to-Device Mode
• Device-to-Phone Mode
For Intranet (TCP/IP Networks) users: By setting the correct IP Address,
Gateway IP and Subnet Mask, you can use the Device-to-Device Mode as
an Internet application.
Page 27

1. Check to see that the party you wish to call is equipped with an IP870 or other DSG
VoIP devices like InterStar, InterPhone, IPStar or IP770.
2. Make sure that you and your receiving party have the device connected to the
Internet*.
3. Pick up the handset and you will hear a ready tone*.
4. There are 3 possible ways for you to call the receiving party:
a) Dial the Device ID number of the remote IP870.
Every IP870 has a unique six-digit ID number found at the bottom of the device.
For example, if the receiving IP870 is 555888, then you dial
and followed by a key to speed up the connecting process.
b) Dial the IP Address directly*.
For example: if the IP address of the receiving IP870 is 200.111.66.8, then you
enter and followed by a key to speed up
the connecting process.
c) Dial the entry number in your IP Phone Book.
There are 10 available entries in your IP Phone Book numbered from 00 to 09. For
example: if you program the 2nd entry of your IP Phone Book as 200.111.66.8, by
dialing and followed by a key to confirm, you will be connected to the
IP870 with the IP address 200.111.66.8. (For usage instructions, refer to the end of
this chapter)
5. Hold the handset and wait for the connection. You will hear a ringback tone
indicating that the remote IP870 is ringing. Otherwise, you will hear a busy tone
if the remote IP870 user is on the phone. You can see the status shown on the
screen of your IP870.
6. Once the connection is complete, you can enjoy your conversation with your party as
long as you wish!
4-2 IP870 Operation Manual
Making a Device-to-Device Call
Making a Device-to-Device Call
Note: A still "@" symbol on your LCD screen indicates that you are successfully
connected to the Internet. Otherwise, the "@" symbol will keep flashing.
Note: For devices like IPStar or IP770 not able to obtain a fixed IP address, you may not
be able to call the remote device by dialing its IP address.
Page 28

Making Internet Calls 4-3
Making a Device-to-Device Call
Note: Ready Tone is the audio signal to indicate that IP870 is ready for dialing or
receiving an Internet call.
Note: The a
)
method is not available for closed Intranet users.
Page 29

4-4 IP870 Operation Manual
Making a Device-to-Phone Call
Note: An Internet Telephony Gateway is a gate between Internet and PSTN (Public
Switched Telephone Network). The Internet Telephony Gateway enables callers using
Internet to talk to regular phone users without an IP870.
IP870 is a state-of-the-art Internet Phone device with great interoperability! It allows you
to connect to a compatible gateway, such as DSG IP2000 Internet Telephony Gateway*.
In this mode, the receiving party can answer an Internet phone call with just a regular
phone. To use Device-to-Phone Mode, you need to obtain a valid Device ID Account or
ITSP account* been set in ITSP Setup section.
1. Make sure that your IP870 is setup properly and you have correctly entered all the
information needed in the ITSP SETUP section.
2. Check to see if your IP870 have successfully connected to the Internet, which is
indicated by a still "@" symbol on the screen.
3. Pick up the handset and you will hear a ready tone.
4. You may dial any long-distance or international telephone numbers as you normally
would from your touch-tone phone.
For Domestic Long-Distance Calls
[Long-distance code] + [Area code] + [Telephone number]
For International Calls
[International code] + [Country code] + [Area code] + [Telephone number]
5. Hold the handset and wait for the connection. You should be able to hear a faster
progress tone to indicate that your call is in the connecting process.
6. You may hangup the phone and wait for ringing, or just hold the handset. You can
clearly monitor all the online status on your IP870's LCD screen.
7. Once your receiving end picks up the phone, you may enjoy talking as long as you
wish!
Making a Device-to-Phone Call
Note: Please check www.dsgtechnology.com and refer to Chapter 6 How to Get an ITSP
Account for further information about applying an active ITSP account number from DSG
compatible Internet Telephony Service Providers (ITSP).
Page 30

Making Internet Calls 4-5
How to Use Your IP Phone Book
There are two ways to use your IP Phone Book: A) Search and B) Speed Dial
A) Search
1. Pick up your handset.
2. Press the key on your keypad or the on your IP870.
How to Use Your IP Phone Book
3. You will see the IP Phone Book entries starting at '00'. Use the keypad
( or ) or buttons on IP870 to scroll the entries.
4. After you have selected an entry number, press key on keypad or press
the on your IP870 to confirm.
5. You will be connected to the remote IP870 with the IP address listed on that specific
entry.
6. Hold the handset to wait for connection. You will hear a faster progress tone to
indicate that your call is in the connecting process. You will hear a ring back tone
indicating that your remote IP870 is ringing. Otherwise, you will hear a busy tone
if your remote IP870 user is on the phone. You can see the status shown on the
screen of your IP870.
7. Once your remote IP870 user picks up the receiver, you may begin your
conversation.
B) Speed Dial
1. Pick up your telephone handset.
2. Enter the IP Phone Book entry number you wish to call and followed by a key to
view the name and address of that entry.
3. Press on the keypad to confirm. You can see the status shown on the
screen of your IP870.
4. Once your remote IP870 user picks up the receiver, you may begin your
conversation.
Page 31
4-6 IP870 Operation Manual
Monitoring the Status of IP870
Monitoring the Status of IP870
To End an Internet Call
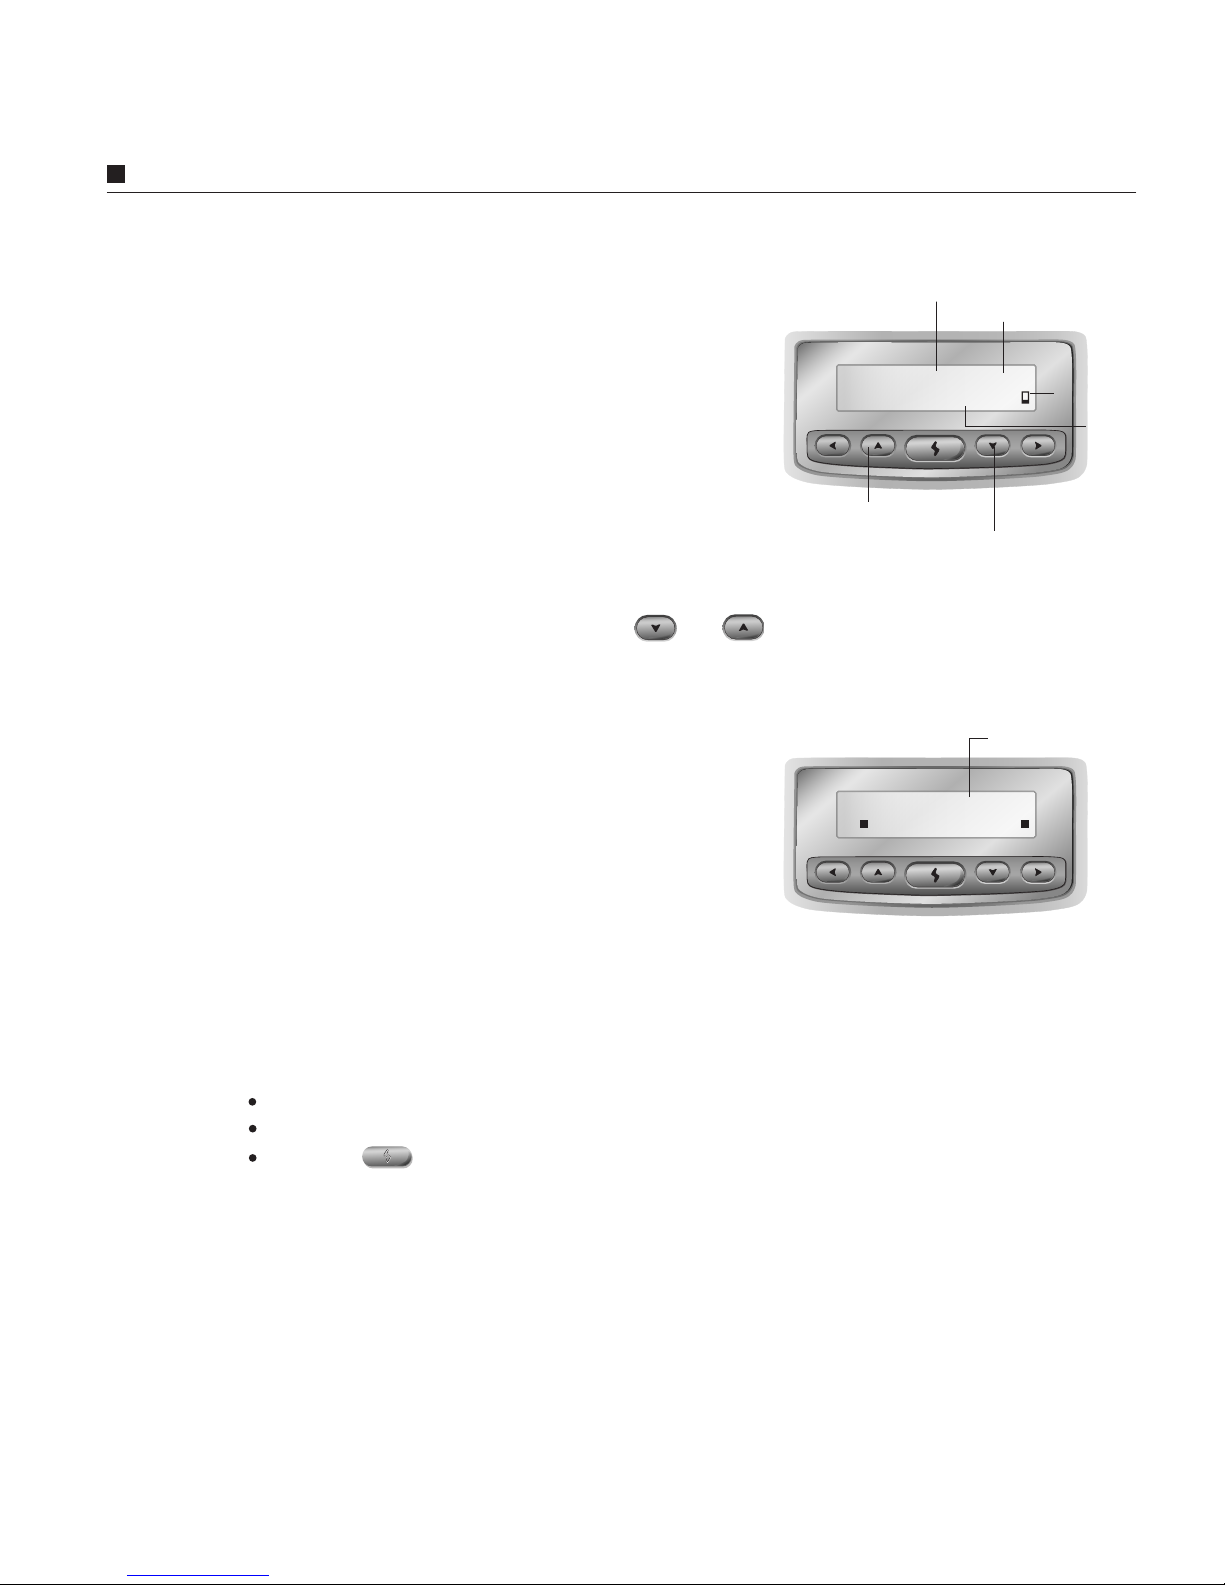
During an Internet call, the LCD screen of
IP870 will show:
During Talking
increase volume
decrease volume
talking duration
line volume
network
condition
voice delay
If the volume of your IP870 is too loud and
you hear some background noise, you can
adjust the volume by pressing or
to get the desired voice quality.
Volume Control
Volume : 5 00:30
Network: 98
%
Your IP870's LCD screen will display the
status during the Internet connecting
process. A still "@" symbol indicates that
you are successfully connected to the
Internet.
During Internet Connecting Process
IP870 @12:00
Ready for Dial
@ :
on-line
If you wish to end your call, you may:
Simply hang up the phone or
Perform a hook-flash or
Press the button on your IP870 to end a call
Page 32

Upgrading Your IP870 5-1
Upgrading Your IP870
Now with our online upgrade feature, your IP870 ensures you to enjoy the
latest Internet Telephony technologies without any charge!
CHAPTER 5
You can upgrade your IP870 whenever a new software version becomes available.
Whenever your IP870 is connected to the Internet Service Provider (ISP), DSG will notify
you by displaying the message UPGRADE AVAILABLE on your IP870 LCD screen.
Upgrades will enhance the performance and add more features to your IP870. With such a
convenient feature, you are guaranteed to have the most updated IP870!
Upgrade Notification
To upgrade your IP870 with the newest
software version, follow the instructions below.
The upgrade process will only take about three
to ten minutes depending on the Internet traffic.
1. Press IP870 button for two seconds
to enter the Configuration Mode.
Note: Before the upgrading or restoring process, make sure that your IP870 has
successfully connected to the Internet.
Page 33
5-2 IP870 Operation Manual
Upgrading Your IP870
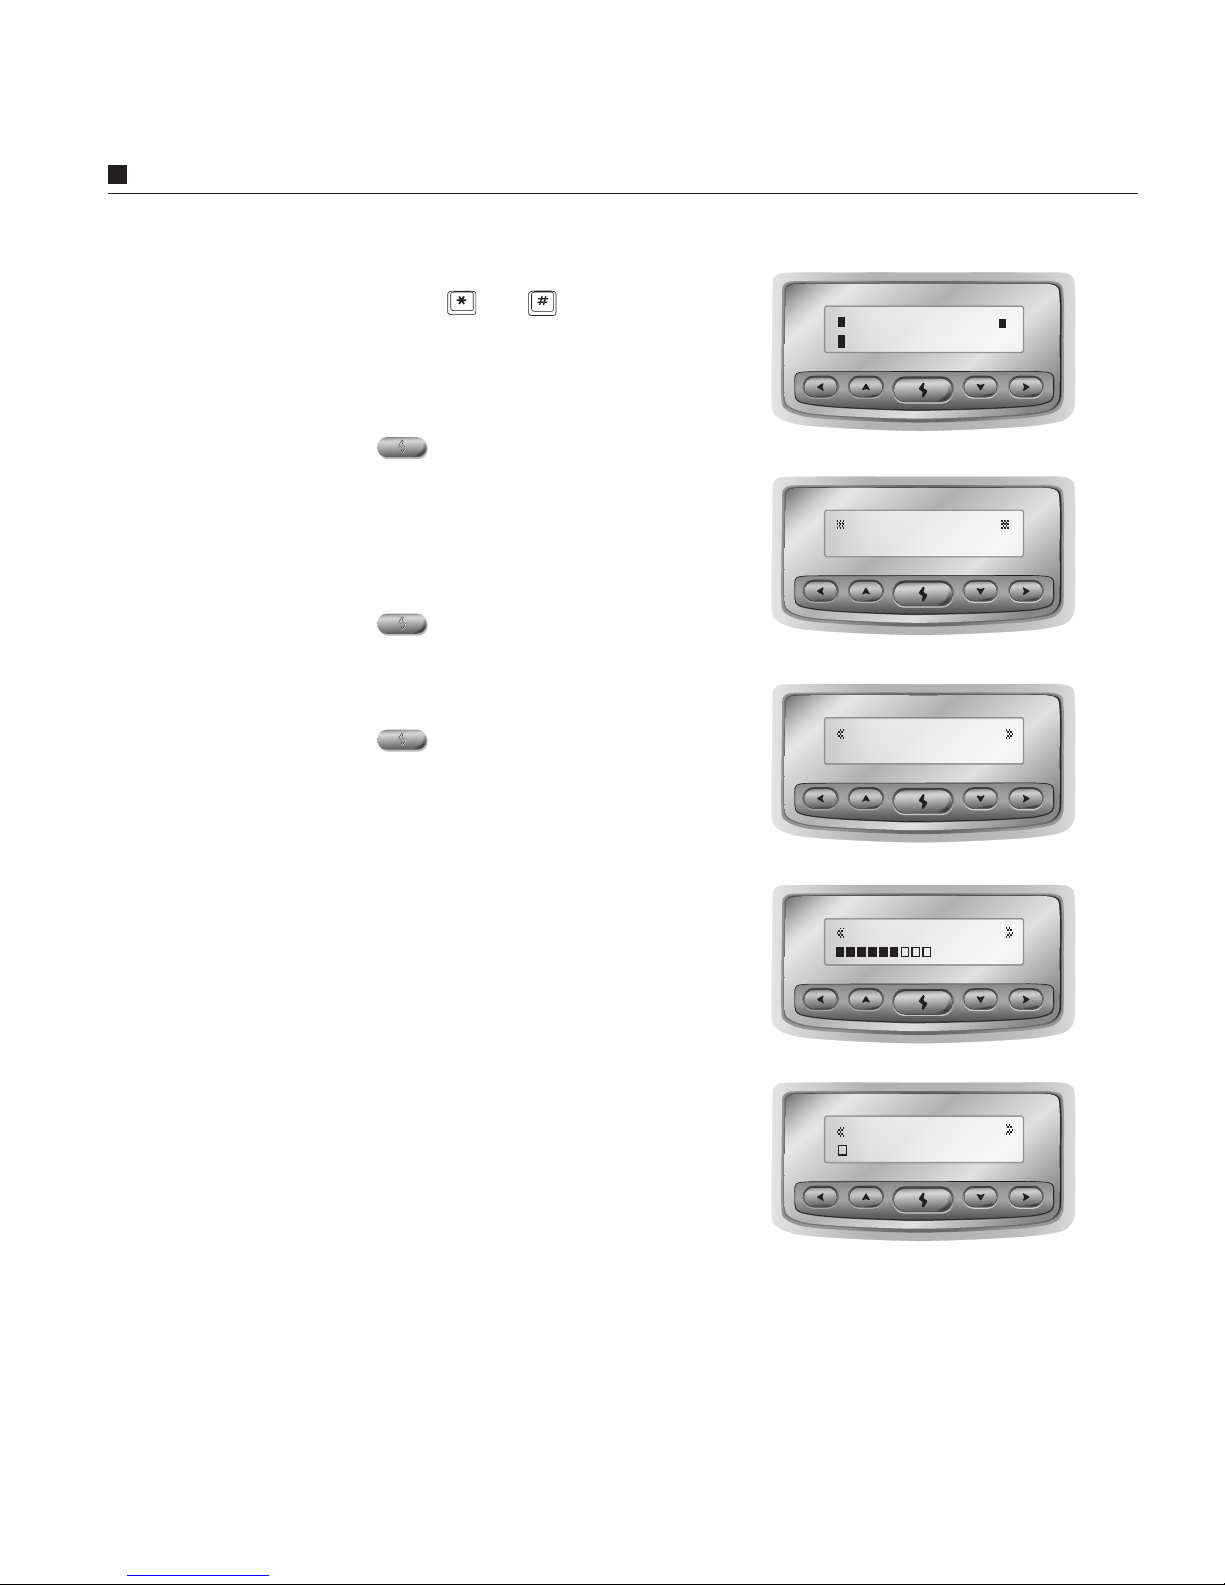
2. Use the keypad ( and ) or buttons on
the IP870 to scroll the main menu.
3. Press the button when you see
SYSTEM SETUP.
4. Scroll the menu to AUTO-UPGRADE and
press the button.
5. Press the button when you see
DOWNLOAD NOW to start the upgrading
process.
6. IP870 will proceed to connect the DSG
Download Server and the screen will show
the progress of the downloading process.
7. Press any button to restart your IP870. If
the new software version is downloaded
successfully, IP870 will reboot itself
automatically.
DOWNLOAD NOW
AUTO-UPGRADE
DOWNLOAD NOW
Version is Updated,
DOWNLOAD NOW
SYSTEM SETUP
Page 34
Restoring Original Version
IP870 has a powerful auto-recovery capability! If there is any error that occurs during the
downloading process or other unexpected conditions, IP870 will automatically restore the
default software version.
When you upgrade your IP870 to the new software version, IP870 will automatically
store the original version as a backup. If for any reason, you wish to discard your new
version and restore the old version, you may follow the steps below:
Restoring Original Version
1. Press IP870 button for two seconds
to enter the Configuration Mode.
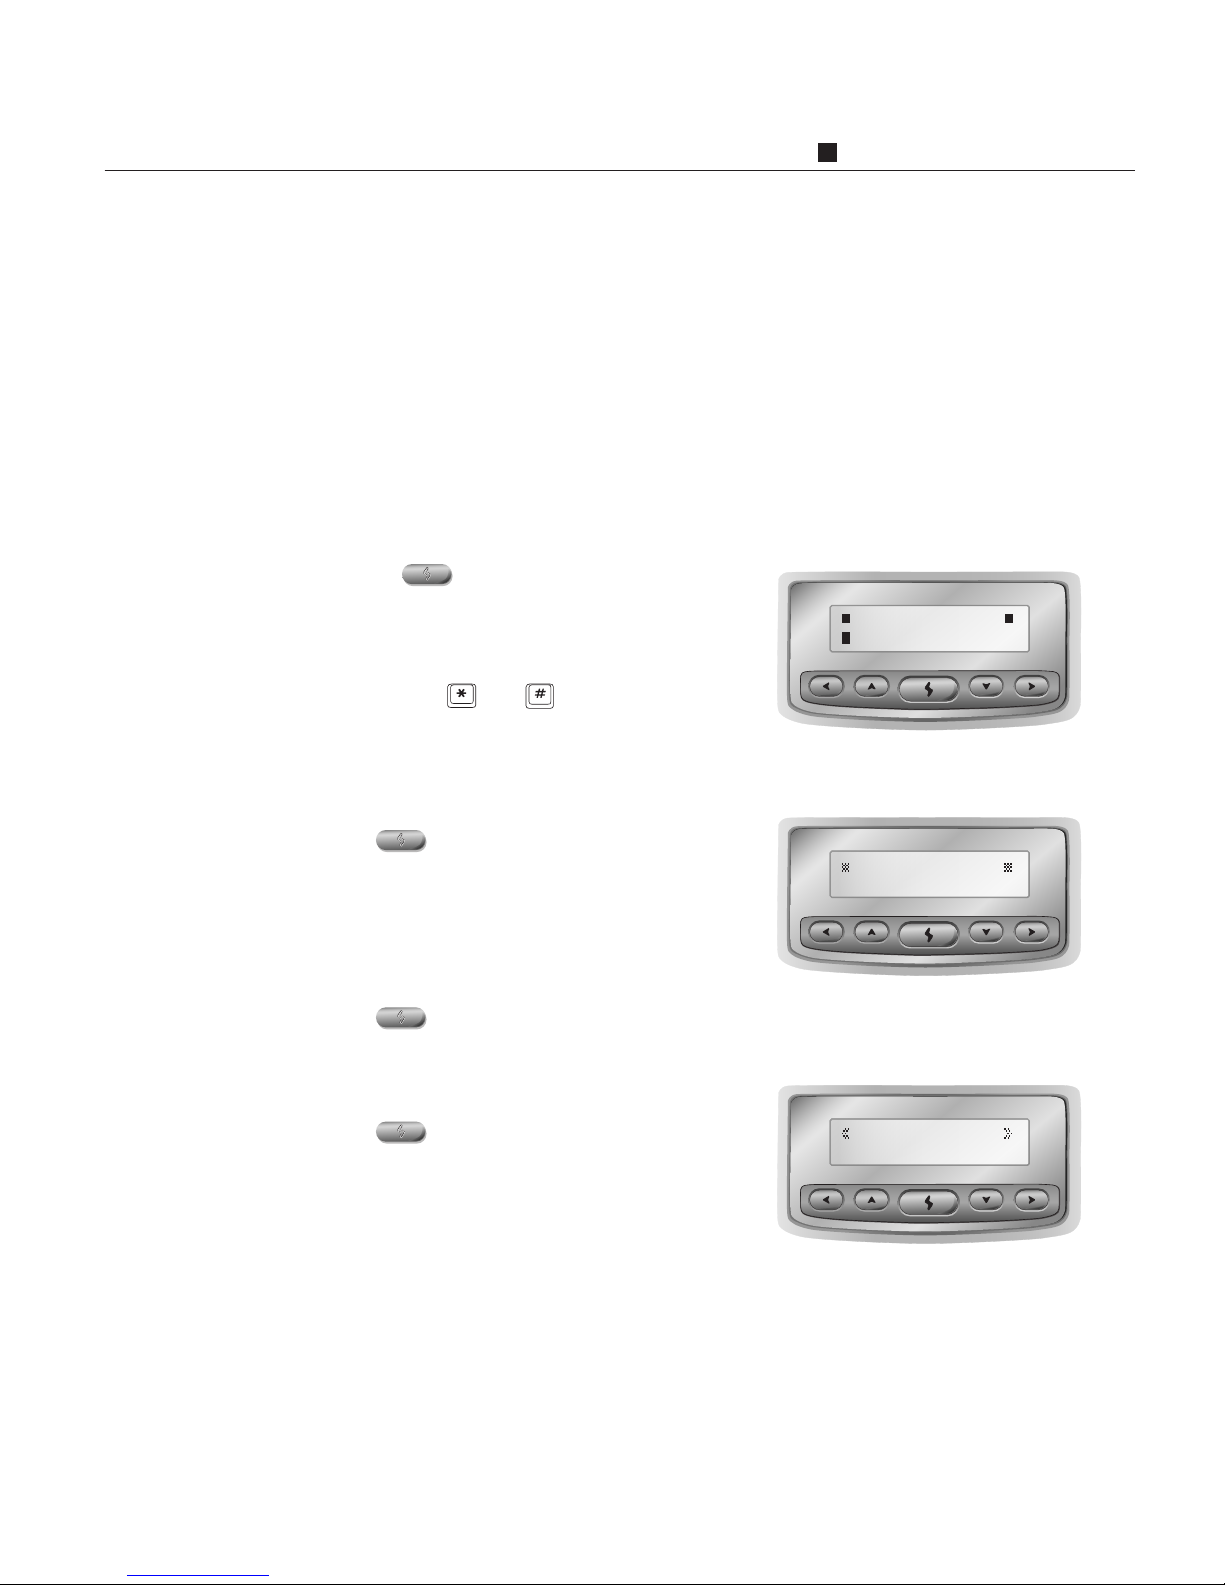
2. Use the keypad ( and ) or buttons on
the IP870 to scroll the main menu.
3. Press the button when you see
SYSTEM SETUP.
4. Scroll the menu to AUTO-UPGRADE and
press the button.
5. Press the button when you see
RESTORE to start the restoring process.
AUTO-UPGRADE
SYSTEM SETUP
RESTORE
Restoring Your IP870 5-3
Page 35

How to Get an ITSP Account 6-1
CHAPTER 6
The DSG Internet Telephony Network is an integrated telephony system based on Internet
environment that provides various services such as Phone-to-Phone, Device-to-Phone and
Device-to-Device. The Device-to-Phone Modes allow your IP870 to connect to a
compatible gateway, such as DSG IP2000, so that the receiving party is able to receive or
make an Internet phone call with a regular phone. In order to use IP870-to-Phone Mode,
you have to get a valid Internet Telephony Service Provider (ITSP) account and enter the
required information* into your IP870.
How to Get an ITSP Account
(Device-to-Phone Mode)
IP870 is an intelligent VoIP telephone that provides Device-to-Phone capability! An
IP870 is all you need for huge savings on long-distance or international calls!
Note: Before you use Device-to-Phone Mode, make sure that you have entered all related
information needed in the ITSP SETUP section. Please refer to Chapter 3 IP870
Configuration Mode for details.
Page 36
6-2 IP870 Operation Manual
How to Get an ITSP Account
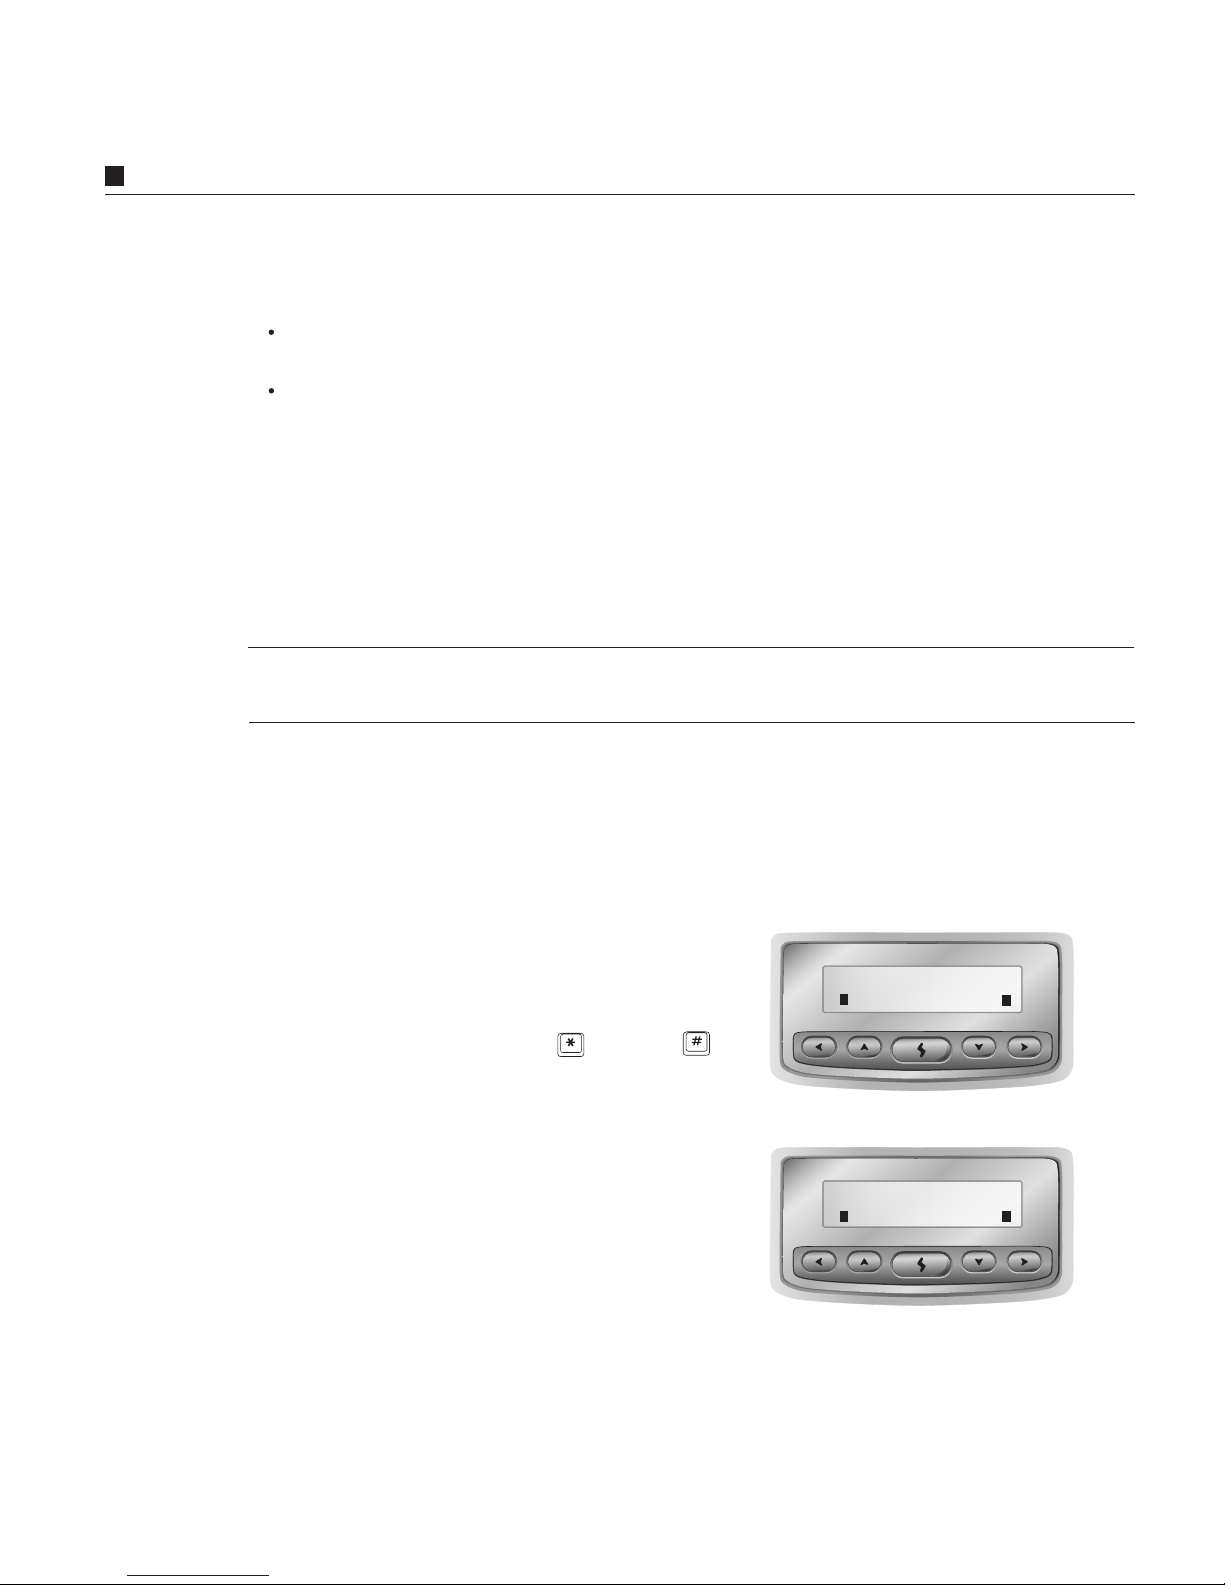
To check the Device ID account balance, follow
the steps below:
1. Pick up the handset and dial + [99] +
2. The balance of the account will be shown on
the LCD screen.
There are two ways to get an account:
You already have a pre-programmed Device ID account when you purchase your
IP870, and you may ask the dealer or retail store to add a value to your account or
You may apply for a new prepaid ITSP Account from your dealer or retail store and
enter the account number into your IP870.
Check the web site www.dsgtechnology.com. periodically or send a mail to
[email protected] to get the information about compatible ITSP list and other Internet
Telephony services*. The DSG web site will show you how to apply for a valid account
from our ITSP partners. You may also get the new information such as calling rates on
your IP870 LCD screen dynamically when you make an Internet call.
Note: DSG is a system provider of Internet Telephony solutions and does not provide any
telephony services. DSG will take no responsibility for using these services.
IP870 has a built-in account balance function. You may check your account balance in the
comfort of your own home!
Checking Your Account Balance
IP870 @15:32
Device Balance
IP870 @15:23
Balance 7001
Page 37
Check Your ITSP Account Balance
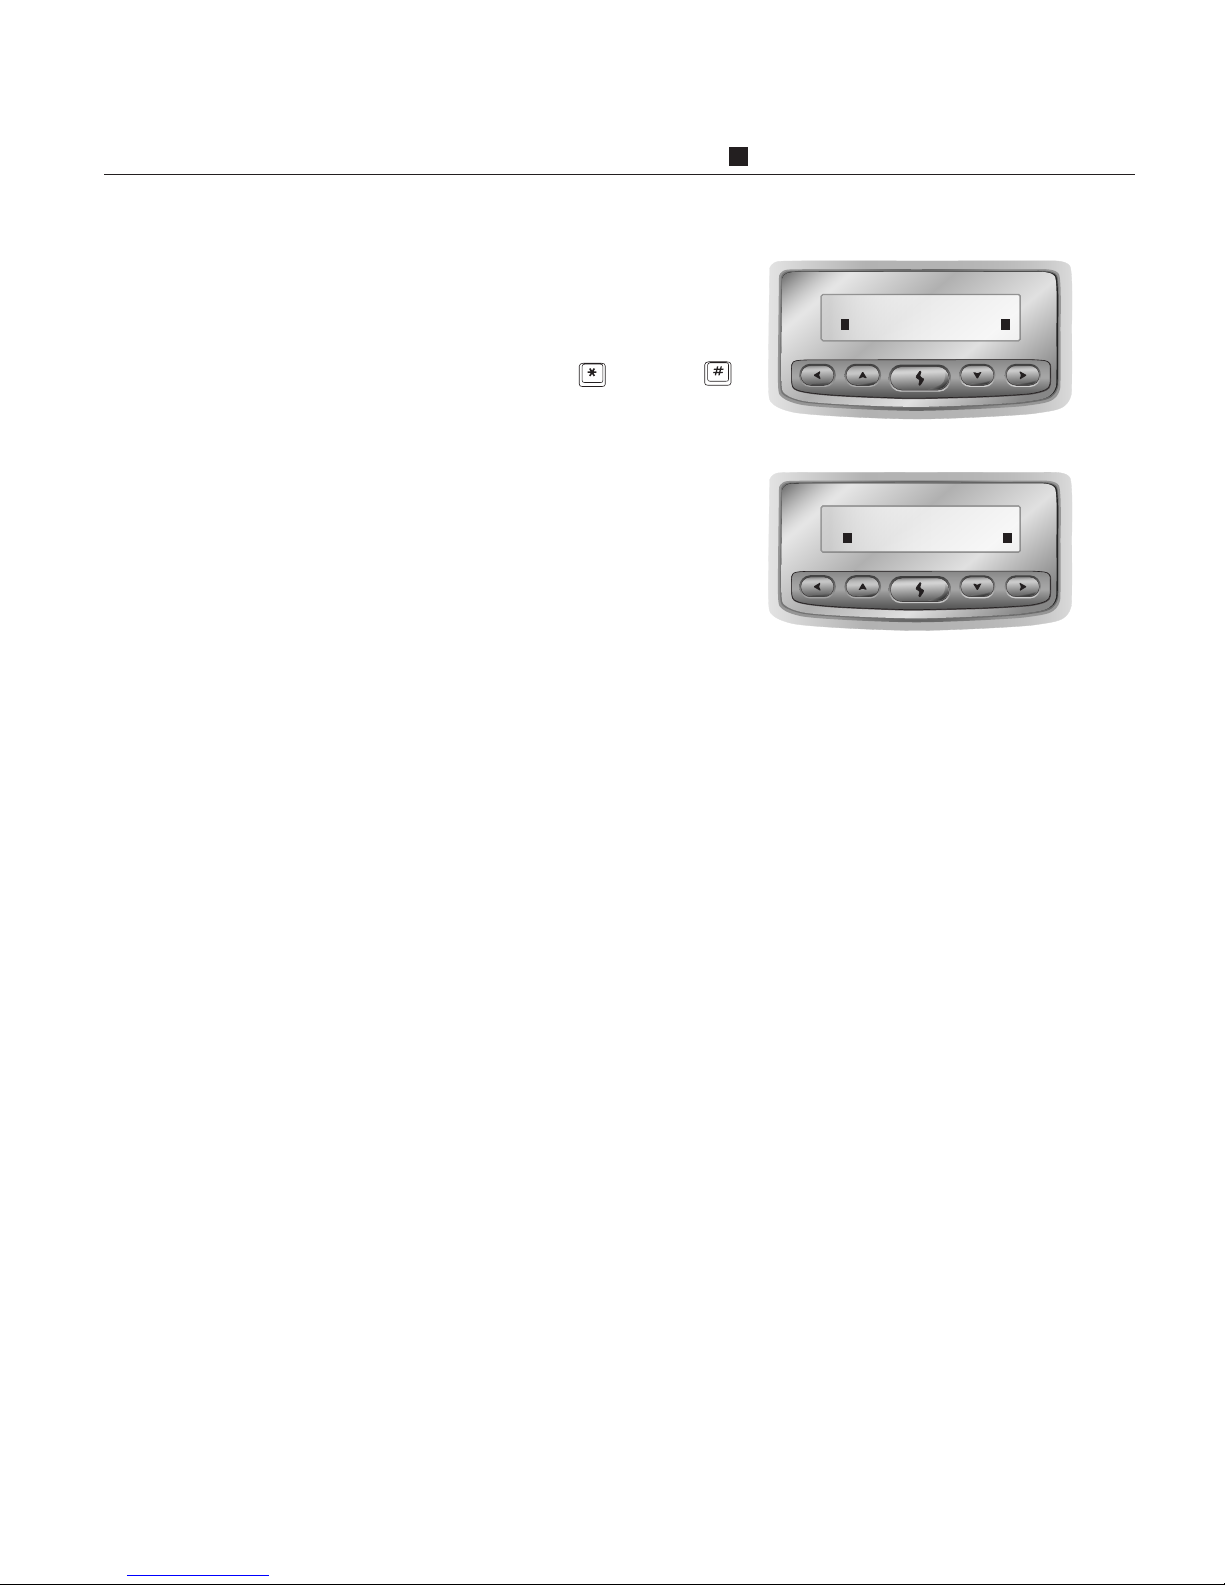
To check an ITSP Account balance, follow the steps
below:
1. Hold up your handset and dial + [88] +
2. The ITSP account balance will be shown on the
LCD screen.
IP870 @15:23
ITSP Balance
How to Get an ITSP Account 6-3
IP870 @15:23
Balance 500
Page 38

How to Setup IP870 in NAT Environment 7-1
How to Setup IP870 in NAT
Environment
CHAPTER 7
The IP870 supports NAT (Network Address Translation). You can connect IP870 behind a
firewall, NAT router or IP sharing equipment or software for better enhancement of
network security and the utilization of Internet access. You can assign pseudo or private IP
addresses on IP870 and perform port mappings allowing your IP870 to communicate with
remote IP870 or DSG VoIP devices over the Internet.
Page 39
7-2 IP870 Operation Manual
Setup Your IP870
1. Assign specific IP sharing/NAT equipment as
the gateway for IP870 and other nodes.
2. Prepare a set of IP address for IP870.
1) Available Pseudo IP Address
2) Gateway IP Address
3) Subnet Mask
3. Press and hold button for 2 seconds to
enter the configuration mode. Refer to Chapter
3 IP870 Configuration to edit the above IP
information on IP870.
4. Prepare a computer on the LAN to Telnet
IP870. Make sure the computer's TCP/IP setting
is in the same subnet as the above IP870.
Setup Your IP870
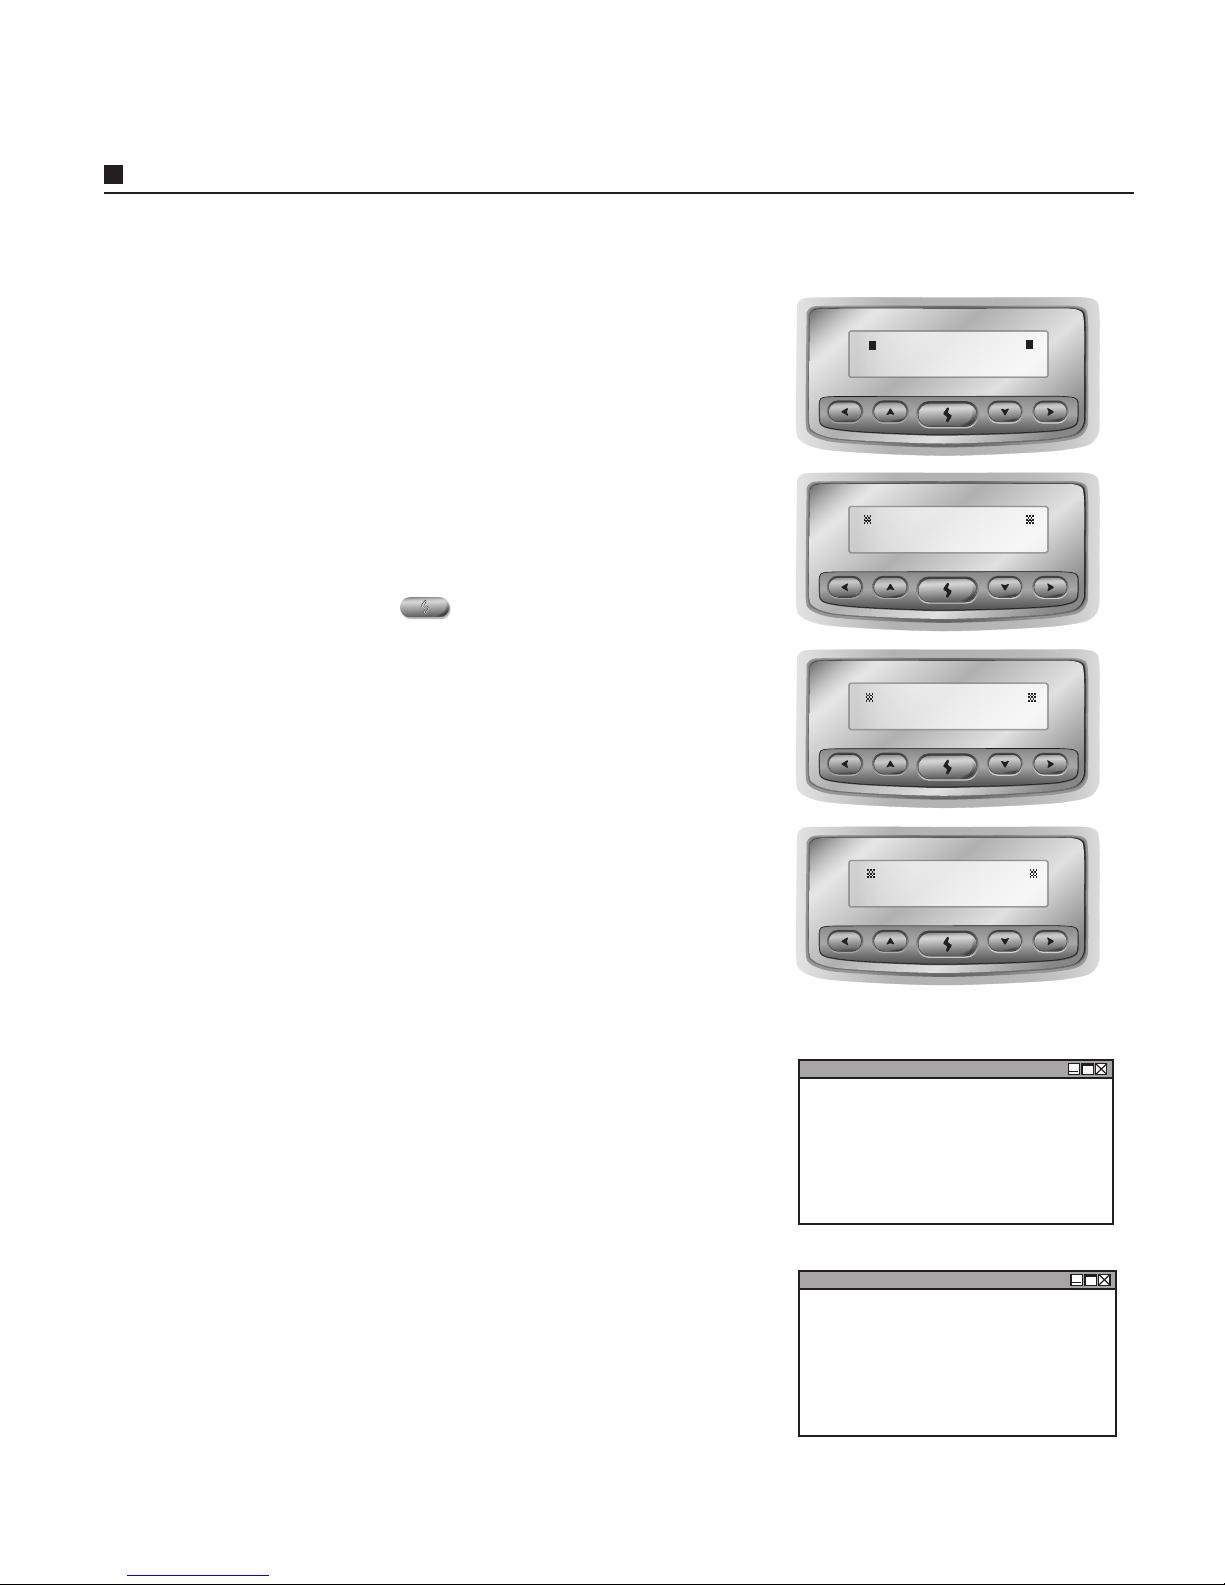
1. From your computer, run Telnet program for
connecting to IP870 by its default IP address
192.168.0.30 or the IP address you have
assigned.
2. After connecting to IP870, the prompt will
display the current software version, MAC
address and password. The default Telnet
password is 0000. Input the default password
or your specified password, if any, and press
Enter to continue.
Telnet Your IP870
Telnet
C:\ telnet 192.168.0.30
(or telnet the IP address you assigned
on IP870)
DSG IP870 Setup R.x.xx
MAC Address [xx-xx-xx-xx-xx-xx]
Password: 0000
192.168.000.030
STATIC IP
192.168.000.254
GATEWAY IP
255.255.000.000
SUBNET MASK
Static
IP TYPE
Page 40

Telnet Setting Items
How to Setup IP870 in NAT Environment 7-3
Telnet
(0) Device ID : xxxxxx
(1) IP Type: Static/PPPoE/DHCP
(2) IP Address : 192.168.0.30
(3) Gateway IP : 192.168.0.254
(4) Subnet Mask : 255.255.0.0
(5) DNS IP : 168.95.1.1
(6) PPPoE ID:
(7) PPPoE Password:
(8) Open to Public: On/Off
(9) Volume : 5
(10) Backlight : Automatic
(11) Voice Delay : Low (default)
(12) E-mail Address :
(13) ITSP Account :
(14) Your Phone Number:
(15) Long Distance Code :
(16) International Code :
(17) Country Code :
(18) IP Phone Book :
(19) NAT Setup :
(20) Exit (Save)
(21) Exit (without save)
Select the option to setup:
You can change Telnet password from IP870
setting item. Please refer to Chapter 3 IP870
Configuration Mode.
You can see setting items as below displayed on the Telnet window. For
most setting items, you can configure directly from your IP870. You only
need to Telnet your IP870 to enable its NAT function when your IP870 is in
NAT environment. i.e. you assign a private IP address to IP870.
Telnet Setting Items
Page 41

1. At the prompt displays Select an item to setup
(or quit): , type 2 and press Enter to assign a
specific TCP port.
2. At (2) NAT TCP Port Index (0-255): , type 0
to assign the first TCP port index to IP870 then
press Enter.
3. At the prompt displays Select an item to setup
(or quit): , type 3 and press Enter to assign a
specific UDP port.
4. At (3) NAT Voice Port (UDP) Index (0-255): ,
type 0 to assign the first UDP port index to
IP870 then press Enter.
5. You can install up to 256 units of IP870 in
LAN under NAT Environment. After Telnet the
specific IP870, repeat the above procedures and
assign the specific TCP and UDP ports index
from 0-255 separately.
7-4 IP870 Operation Manual
Enable NAT Function
Telnet
NAT Setup :
(1) NAT : Enable
(2) NAT TCP Port Index : 0
(3) NAT Voice Port (UDP) Index : 0
Select an item to setup (or quit) : 2
(2) NAT TCP Port Index (0-255): 0
NAT Setup :
(1) NAT : Enable
(2) NAT TCP Port Index : 0
(3) NAT Voice Port (UDP) Index : 0
Select an item to setup (or quit) : 3
(3) NAT Voice Port (UDP) Index (0-255): 0
NAT Setup :
(1) NAT : Enable
(2) NAT TCP Port Index : 0
(3) NAT Voice Port (UDP) Index : 0
Enable NAT Function
Assign TCP & UDP Port Index
1. At the prompt displays Select the option to
setup: , type 19 and press Enter to edit (19)
NAT Setup.
2. At the prompt displays Select an item to setup
(or quit): , type 1 and press Enter to edit.
3. At (1) NAT (0: Disable 1: Enable): , type 1 to
enable NAT function then press Enter.
Telnet
Select the option to setup: 19
NAT Setup :
(1) NAT : Disable
(2) NAT TCP Port Index : 0
(3) NAT Voice Port (UDP) Index: 0
Select an item to setup (or quit) : 1
(1) NAT (0: Disable 1: Enable): 1
NAT Setup :
(1) NAT : Enable
Page 42

Exit Telnet
How to Setup IP870 in NAT Environment 7-5
NAT Port Index Converter
NAT TCP Port Index 0 1 2 3 - - - - - 255
NAT Voice Port (UDP) Index 0 1 2 3 - - - - - 255
TCP Port Number 1801 1802 1803 1804 - - - - - 2056
UDP Port Number 1102 1103 1104 1105 - - - - - 1357
Exit Telnet
1. At the prompt displays Select an item to setup
(or quit): , type quit and press Enter to leave
(19) NAT Setup.
2. At the prompt displays Select an option to
setup: , type 20 and press Enter to save and
exit Telnet.
Port Mapping
After you set the NAT Port Index to IP870, refer to the NAT Port Index
Converter blow, write down the TCP and UDP port numbers and its
correspondent IP address in order to perform the port mapping on your IP
Sharing equipment or NAT router. To know how to perform port mapping,
consult with your vendor of IP Sharing equipment or NAT router.
Page 43

CHAPTER 8
IP870 combines VoIP and telephone functions in a stand-alone phone set. In addition to
VoIP functions, you can enjoy many regular phone features brought by IP870.
IP870 Operation Manual 8-1
Telephone Features
IP870 integrates VoIP and telephone functions all together giving you a more
complete communication solution.
Page 44

To increase or decrease the volume of your handset, press the up or down Volume button.
The volume adjustment will change the volume for the currently active voice.
8-2 IP870 Operation Manual
Telephone Features
Volume
You can redial the last outside number by pressing the Redial button. To redial, lift the
handset and press the Redial button. This function is not available when placing Internet
calls.
Redial
You can place or answer calls with the handset or using the Speaker button. Press the
Speaker button for hands-free conversation.
Speaker
You can mute the handset or speakerphone when in a call. This will prevent the remote
party from hearing what you are saying to other people.
Mute
You can generate a flash hook on the outside line by pressing the Flash button. To toggle
between calls waiting, you can also press the Flash button.
Flash
Page 45

Speed Dial
IP870 Operation Manual 8-3
Telephone Features
You can program up to 12 entries of speed dial for placing calls to regular phone numbers.
1. Press the Program button.
2. Press the Memory button.
3. Input the entry number from 1 to 12.
4. Input the phone number you would like to edit for speed dialing.
5. Press the Program button again to save.
6. Repeat Step 1 to 5 to edit more entries.
When using Speed Dials to place calls, follow the steps below.
1. Lift the handset and press the Memory button.
2. Press the entry number of speed dial from 1 to 12.
Page 46

Appendix A. Technical Specifications
Appendix A. Technical Specifications
Dimensions 200 mm x 195 mm x 70 mm
Weight Approximately 1,600 g
Power Input DC12V 1A
Temperature 0-50oC ( 32oF~122oF )
Humidity 10% to 90% non-condensing
Internal RAM 2Mbytes
Flash Memory 1Mbytes
LCD Display 16 x 2 with backlight
Voice Compression G.723.1 compliant
Network Interface 10BaseT, RJ45
Network Protocol TCP/IP , PPPoE, DHCP, NAT
Page 47

Appendix B. Troubleshooting
Appendix B. Troubleshooting
You attempted to make an IP870-to-IP870 call but it didn't work.
Use our quick start guide, check that both IP870s are configured properly. During the
process of making an IP870-to-IP870 call, you can check for an online symbol "@" on
the LCD screen of your IP870 to confirm your status. When one of the IP870 users dials
to the receiving IP870, you can clearly monitor the connecting process on the LCD
screen. If you have made several attempts by device ID and have failed, then try using
the IP Phone Book option with user-defined codes! (Refer to Chapter 4 How To Use
Your IP Phone Book).
Problems Making an IP870-to-IP870 Call
No clue on finding your IP870's six-digit ID.
Every IP870 has a unique six-digit device ID number and it can be found at the bottom of
your IP870 device. You can also find this six-digit ID number in the configuration mode
SYSTEM SETUP/DEVICE ID. If you are still having trouble finding this ID number,
please refer to Chapter 3 for more information.
You entered the IP870's six-digit ID and the screen showed "Ready for Dial".
You probably left out a leading * key before the six-digit ID number. For example, if you
want to make an IP870-to-IP870 call to a friend with an IP870 ID 001234, enter
*001234# in the 'Ready to Dial' mode to complete your call.
You entered your receiving IP870's six-digit ID number and the screen showed
"Party Off Line".
Before you make an IP870-to-IP870 call, check to see that you have entered the correct
six-digit ID number of the receiving IP870. At the same time, you may check to see if the
remote IP870 you wish to connect is online by simply entering the IP Address. If your
receiving party is not online, then you can try again later.
Page 48

Appendix B. Troubleshooting
You entered the designated phone number and the screen showed "Ready for Dial".
You should check if the ITSP account number is entered correctly. If you need further
information on ITSP account, please refer to Chapter 6 for help.
Problems Making an IP870-to-Phone Call
You entered the designated phone number and the screen showed "No Service".
It is important that you input the correct country code, long-distance code, and
international code when making an IP870-to-Phone call since your IP870 uses these
information to analyze the phone number you dialed. Another possible reason for "No
Service" could be that the number you dialed is out of the service area. To obtain the
detailed information on all the available countries, please refer to our web site
www.dsgtechnology.com.
You entered the designated phone number and the screen showed "Wrong
Account".
When the screen shows "Wrong Account", it's either you have entered an invalid ITSP
account, or there is no balance remaining in your ITSP account. To renew, update, or reactivate your ITSP account, contact your local distributor or visit our web site at
www.dsgtechnology.com.
You entered the designated phone number and the screen showed "Server Busy".
When the screen shows "Server Busy", it means that all lines are busy and temporarily
unavailable. You can try calling later.
Page 49

Problems during an Internet Call
Appendix B. Troubleshooting
During the call, you experienced a slight delay in your conversation.
This is an expected Internet phone situation. The degree of voice delay depends on the
Internet traffic and the routing path. IP870's Dynamic Jitter Buffer Control algorithm will
optimize the delay time automatically in the first ten seconds of your call.
During your call, you have difficulty hearing the other party.
On your IP870's LCD screen, you will see the network percentage indicator to identify if
the Internet traffic is congested. You can wait to see if the traffic subsides indicated by
the percentages or press the button to end your call or try calling later.
During the call, the other party's voice seems slow or delays seriously (more than
three seconds).
It is a matter of the bandwidth between your IP870 and the ISP. It could be that the
bandwidth is not enough to support a regular Internet call. At this point, you may end
your call and place another call to see if the voice quality improves. If the voice quality
remains unsteady, then set the Voice Delay in the Configuration Mode to High and try
calling again.
If there are still other problems other than the ones stated above.
We recommend that you use other ISPs to ensure the best Internet connection quality.
Page 50

Corporate Headquarters
7F, 222, Cheng Teh Road, Sec.4
Taipei, Taiwan
Tel: 886 2 88615558
Fax: 886 2 88615557
E-mail: [email protected]
http://www.dsg.com.tw
DSG Technology USA
20265 Valley Blvd., #N
Walnut, CA 91789
Tel: 1 909 5958908
Fax: 1 909 5955508
E-mail: [email protected]
http://www.dsgtechnology.com
Copyright ©2003 DSG Technology. All rights reserved. DSG, DSG Technology, and the DSG Technology
logo are registered trademarks of DSG Technology, Inc. or its affiliates in the U.S. All other trademarks
mentioned in this document are the property of their respective owners. The use of the word partner does
not imply a partnership relationship between DSG and any of its resellers.
 Loading...