

Page 1
Instruction Manual
Handleiding
Gebrauchsanweisung
Manuel d’instruction
Manuale di Istruzioni
Manual de Instrucciones
DSRV 1005C
Instruction manual dServe 1005C Multi 14-05-2012 09:04 Pagina 1
Page 2
© 2012, dServe Technology B.V.
ALL RIGHTS RESERVED.This manual contains material protected under International
and Federal Copyright Laws and Treaties. Any unauthorized reprint or use of this
material is prohibited. No part of this manual may be reproduced or transmitted in
any form or by any means, electronic or mechanical, including photocopying, recording,
or by any information storage and retrieval system without explicit written permission
from dServe Technology B.V.
Instruction manual dServe 1005C Multi 14-05-2012 09:04 Pagina 2
Page 3
3
ENGLISH
Instruction Manual
1 What's Included
The following components are included with your purchased product:
- 10.1 inch Tablet PC
- Power Adapter
- USB Cable
- Instruction Manual
2 Getting Started
Before operating your Tablet PC for the first time, please read this manual
carefully and follow the instructions as below.
3 Battery charging
The tablet is equipped with a built-in rechargeable Lithium battery. It is
suggested to fully charge the battery before use.
We strongly recommend to use the power adapter included in the
packaging, using other adapter may damage the tablet and void the
warranty.
Charging Process
- Connect the power adapter to your tablet, and plug the power adapter
to the nearest electrical outlet.
- Users can still use the tablet while it is being charged.
Instruction manual dServe 1005C Multi 14-05-2012 09:04 Pagina 3
Page 4
4
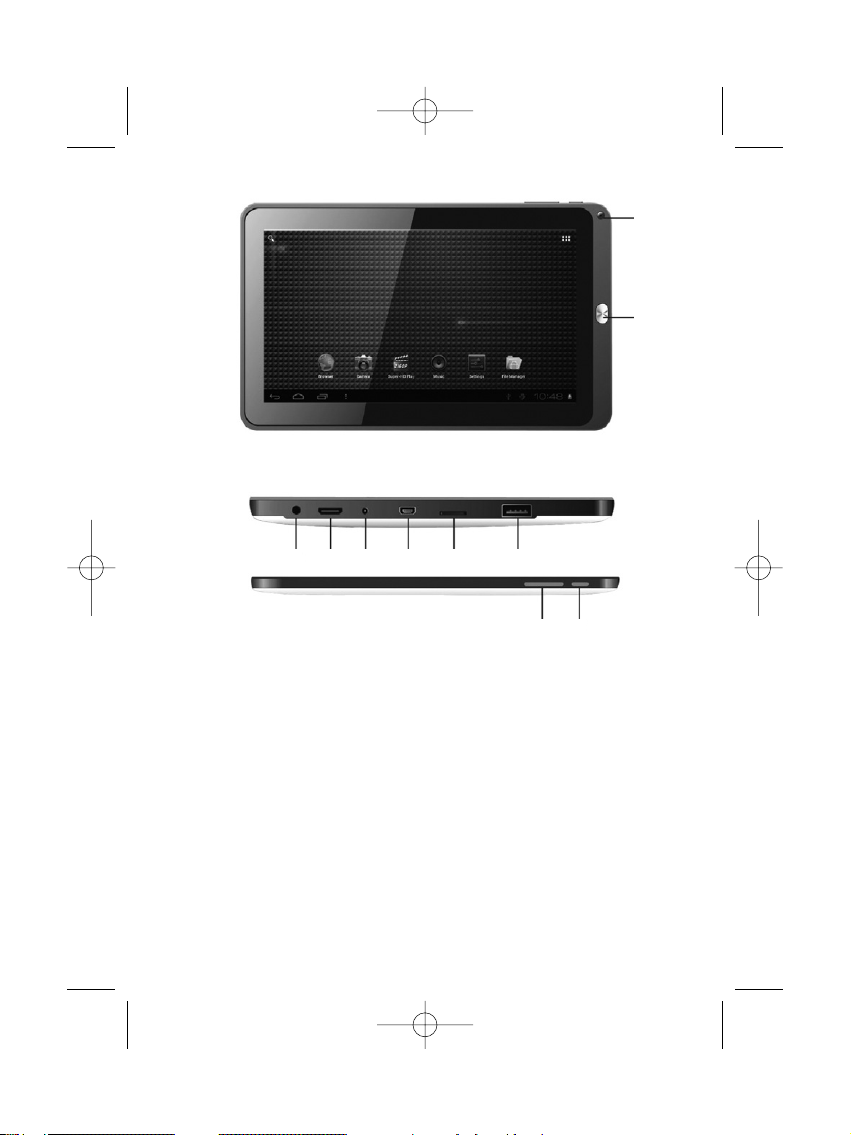
4 Appearance and buttons
1. Camera
2. ESC
Press on ESC button will return to the previous interface.
3. Headphone Socket
3.5 mm standard earphone socket
4. HDMI output interface
HDMI output interface
5. Power Socket
1
2
3 4 5 6 7 8
9 10
Instruction manual dServe 1005C Multi 14-05-2012 09:04 Pagina 4
Page 5

5
ENGLISH
6. Mini USB Port
Mini USB port: you can use it to connect to PC for data transmission,
charging or connection with external USB devices.
7. TF Card Slot
Micro SD card slot
8. USB2.0 Port
Use it to read your U-Disk or other media devices with USB2.0
interface.
9. Menu & Home Button
Menu button and back to Home button. Both buttons can also have
the functions of Volume + and Volume - (press on either button and
hold it for 3 seconds to increase or decrease the sound volume.)
10. Power Switch
Turn on/off tablet
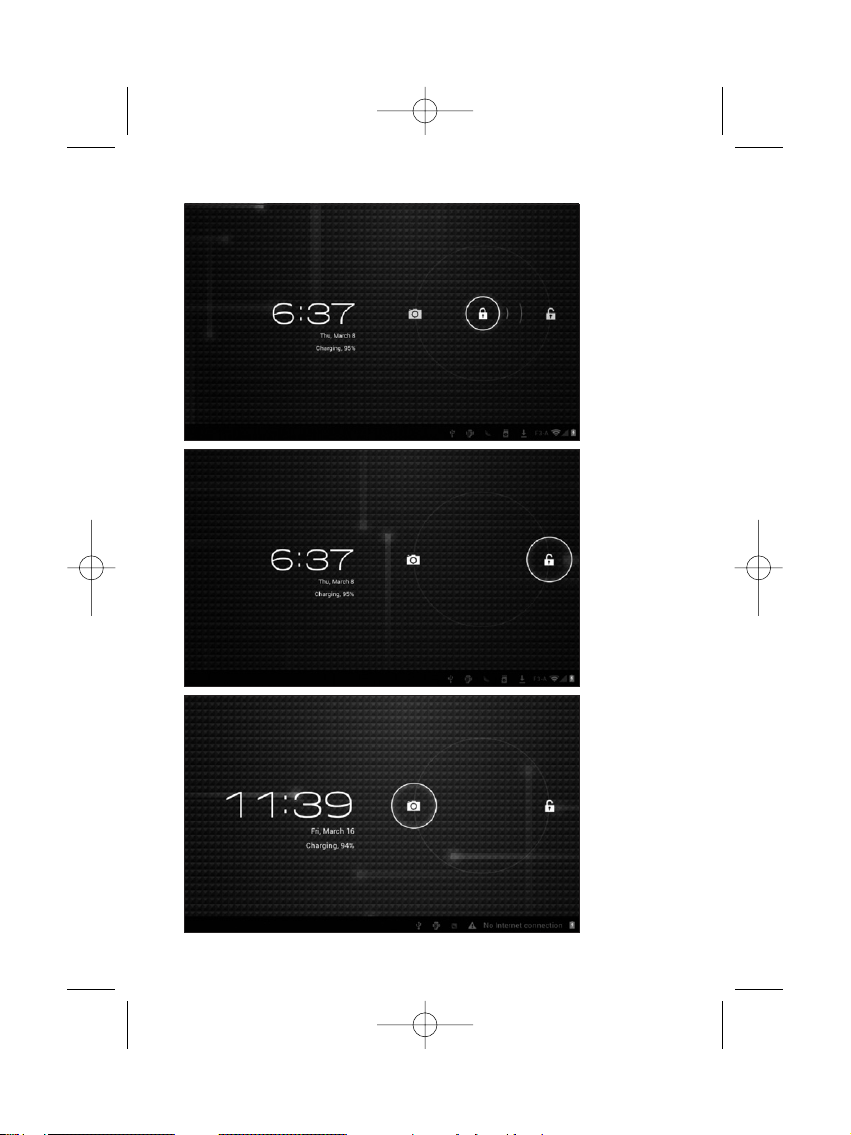
5 Turn ON/OFF Tablet
1. Turn On: after the battery has been fully charged, press & hold the
power switch for around 3 seconds to turn on the device. Screen lock
will be showed after starting up.
2. Turn Off:When the tablet is ON, press & hold the power switch for
around 3 seconds and the system will popup out power off option, tap
on it to turn the tablet off.
3. Lock screen: quickly press Power Switch and release to lock screen.
4. Unlock screen: slide the lock icon rightward onto the unlock icon to
unlock the screen and go to main interface; Slide the lock icon leftward
onto the camera icon to open camera.
Instruction manual dServe 1005C Multi 14-05-2012 09:04 Pagina 5
Page 6
6
Instruction manual dServe 1005C Multi 14-05-2012 09:04 Pagina 6
Page 7
7
ENGLISH
Remarks:
- When battery power has been used up, the tablet will shut down itself
automatically.
- If you illegally turn off the device, restart will scan and restore the disk,
it may take longer time to enter into system.
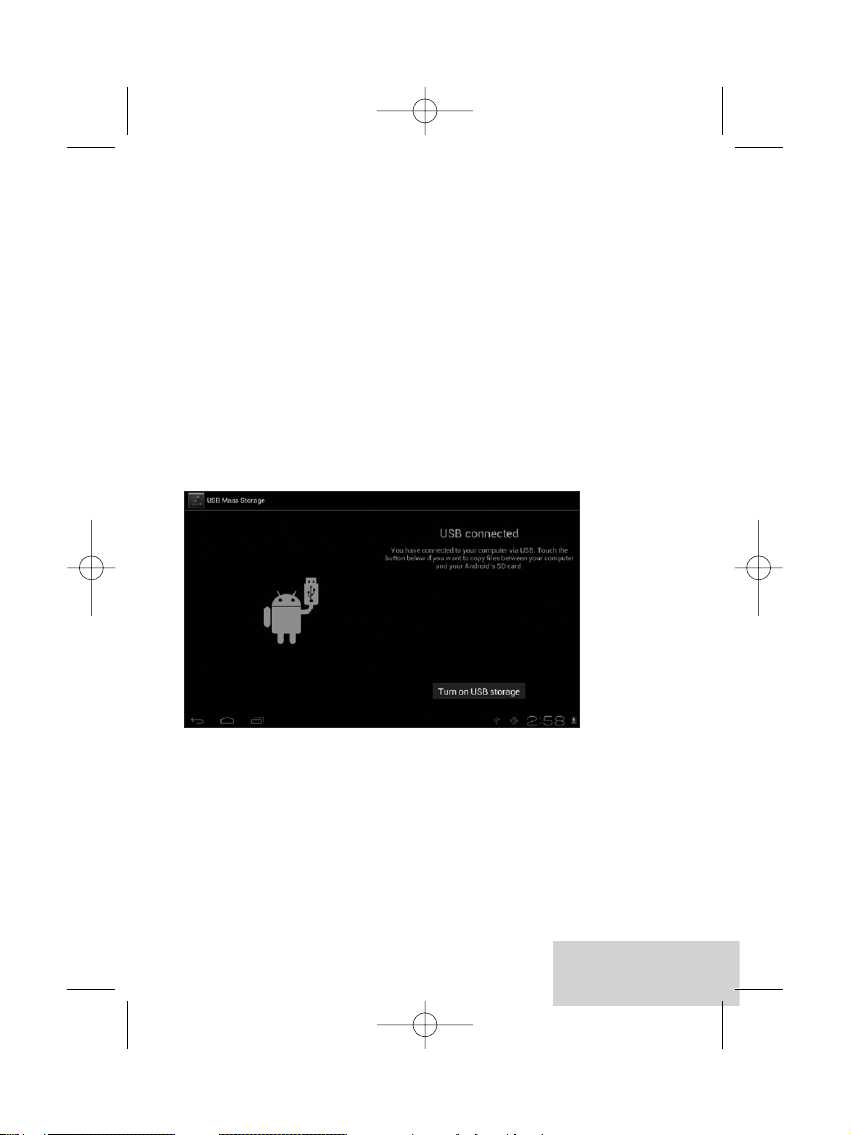
6 Connection with PC
1. Use the USB cable provided to connect the tablet with PC, device will
pop up the USB connection window, click “Turn on USB storage”
to connect to PC, in the connection mode, you can copy or delete the
file on the device or the file on the memory device.
Instruction manual dServe 1005C Multi 14-05-2012 09:04 Pagina 7
Page 8
8
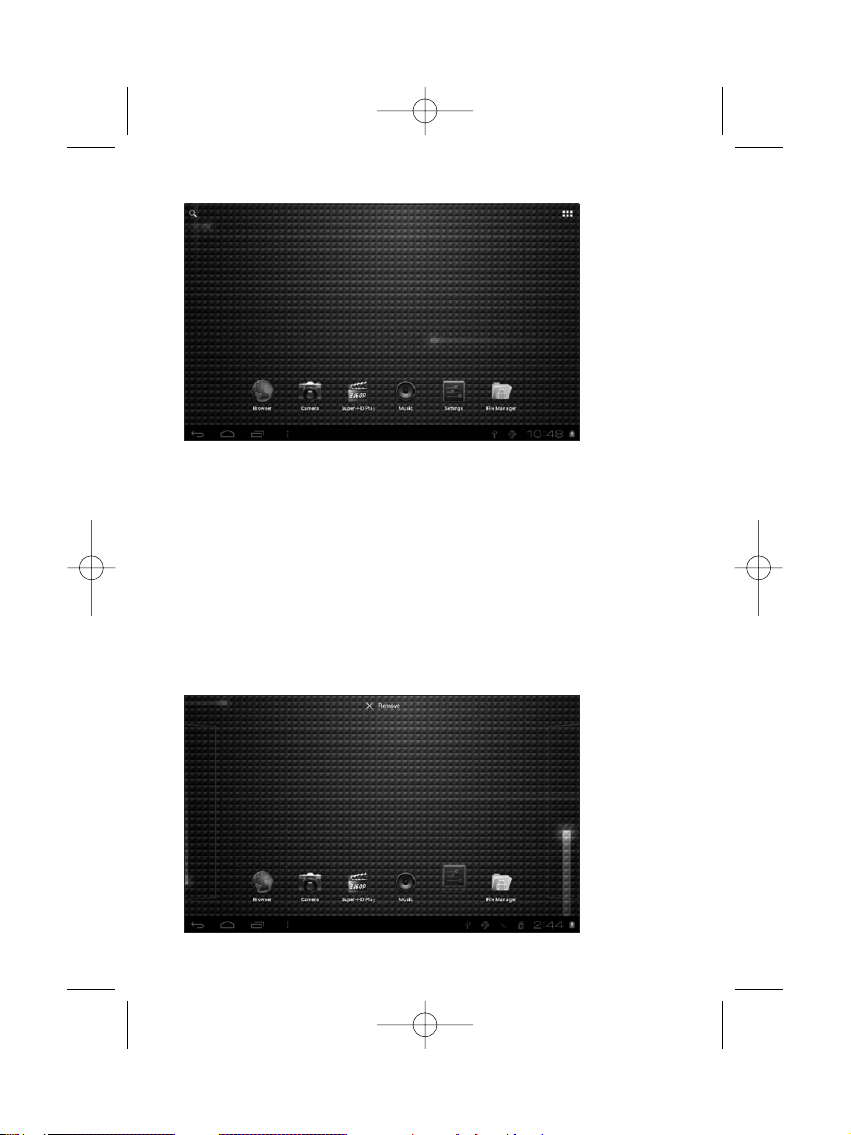
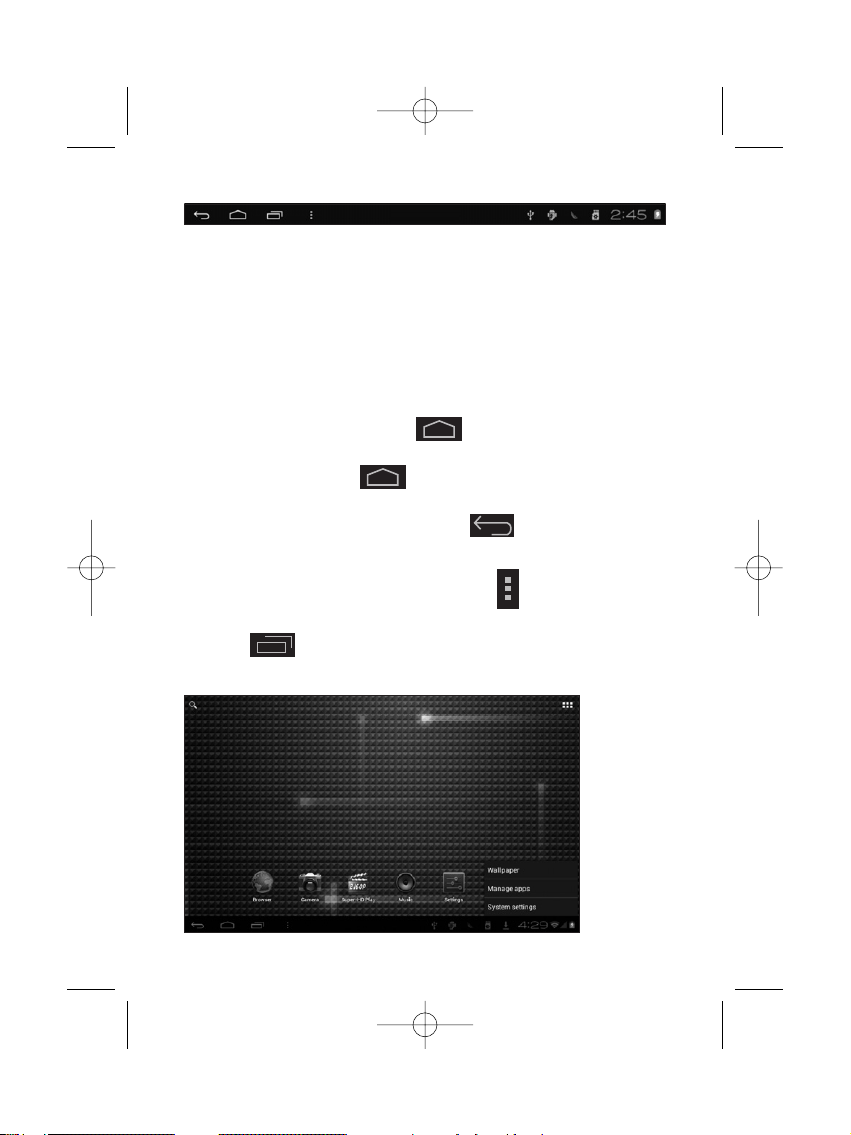
7 Tablet Operation Interface
1. After starting up, you will enter into below main screen interface
2. In the main interface, you can manage main interface software
icons: press the icon and hold it for 3 seconds, then you can drag
anywhere in the main interface.
3. Delete icons: press the icon and hold it for 3 seconds, and drag
the icon onto the “Remove” icon, then you can delete that icon
from desktop.
Instruction manual dServe 1005C Multi 14-05-2012 09:04 Pagina 8
Page 9
9
ENGLISH
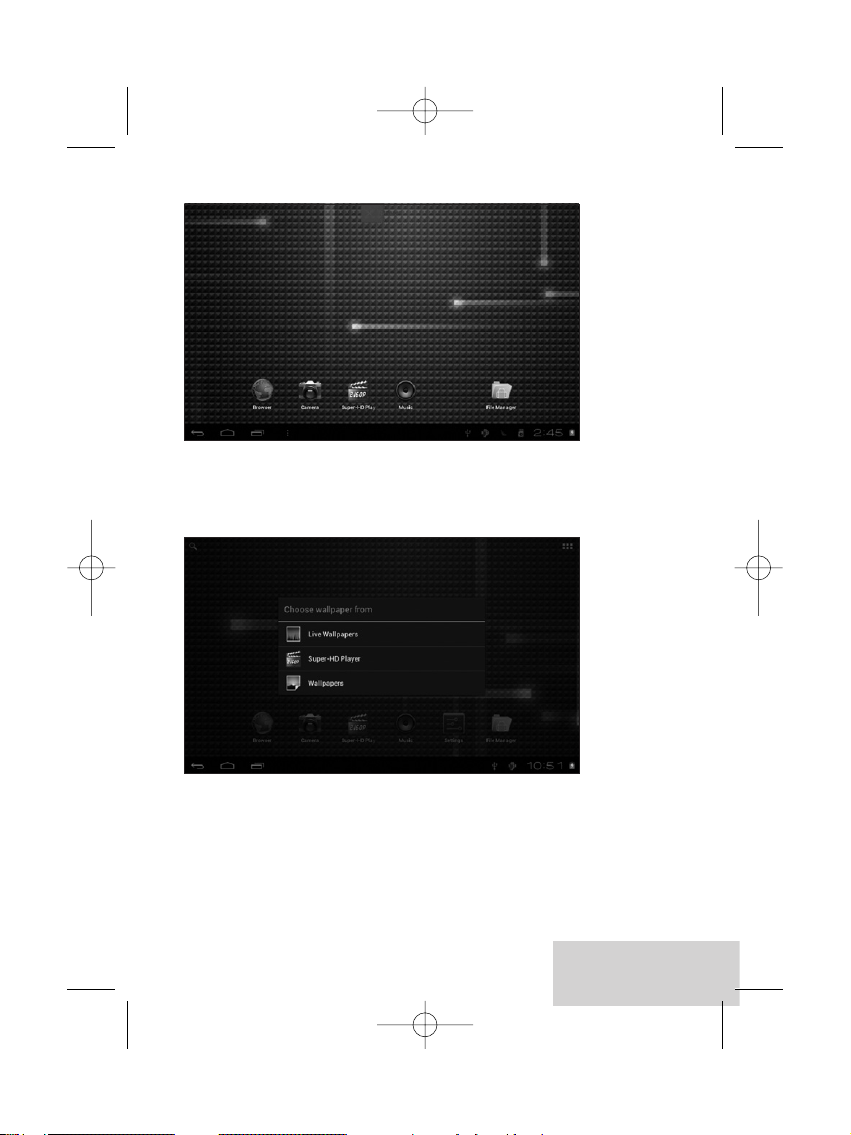
4. Touch the screen and hold for around 4 seconds, the dialog box
“Choose wallpaper from” will pop out as shown below:
You can choose the wallpaper from different sources and change
the wallpaper.
Instruction manual dServe 1005C Multi 14-05-2012 09:04 Pagina 9
Page 10
10
5. Status Bar Descriptions
From left to right: Back to previous interface, Back to main interface,
Display the Apps performed previously, Menu key, USB connected, USB
connected, USB debugging connected,TF-card information, Current
time, battery charge icons, current time.
6. Quick Guide For Touch Operations
- No matter which interface you are on the screen, you can go back to
main screen by tapping the key located at the left bottom
corner of the main screen.
[Attention] The key functions as back to main screen
interface.
- During options, by tapping the back key at the left bottom
corner of the touch screen, you can return to previous screen
interface.
- During operations, by tapping the menu key on the left bottom
corner of touch screen, the screen will pop out the below interface:
- Click to see all history of Apps performed previously.
Instruction manual dServe 1005C Multi 14-05-2012 09:04 Pagina 10
Page 11
11
ENGLISH
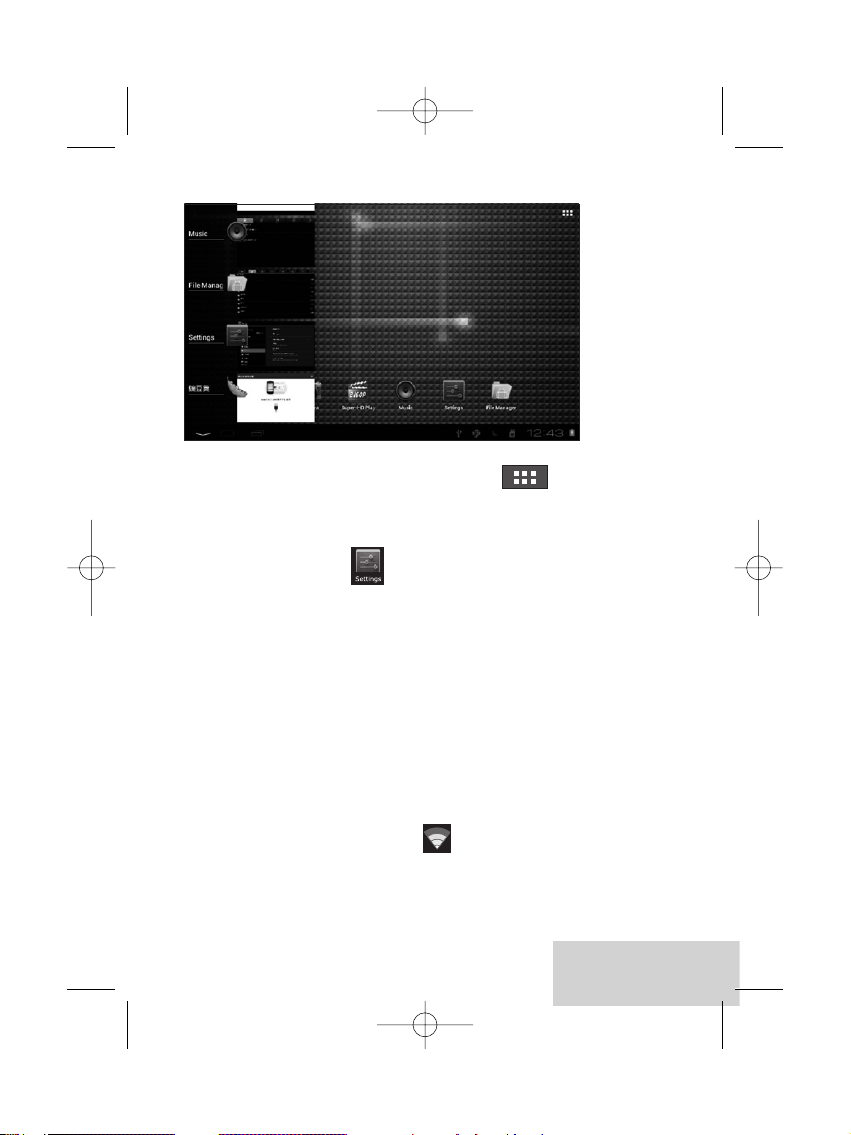
- In the main interface, you can touch the icon to see all the
APPS, tap on any App icon and hold it for around 3 seconds, you can
drag that App icon onto main screen interface.
8 Basic Settings
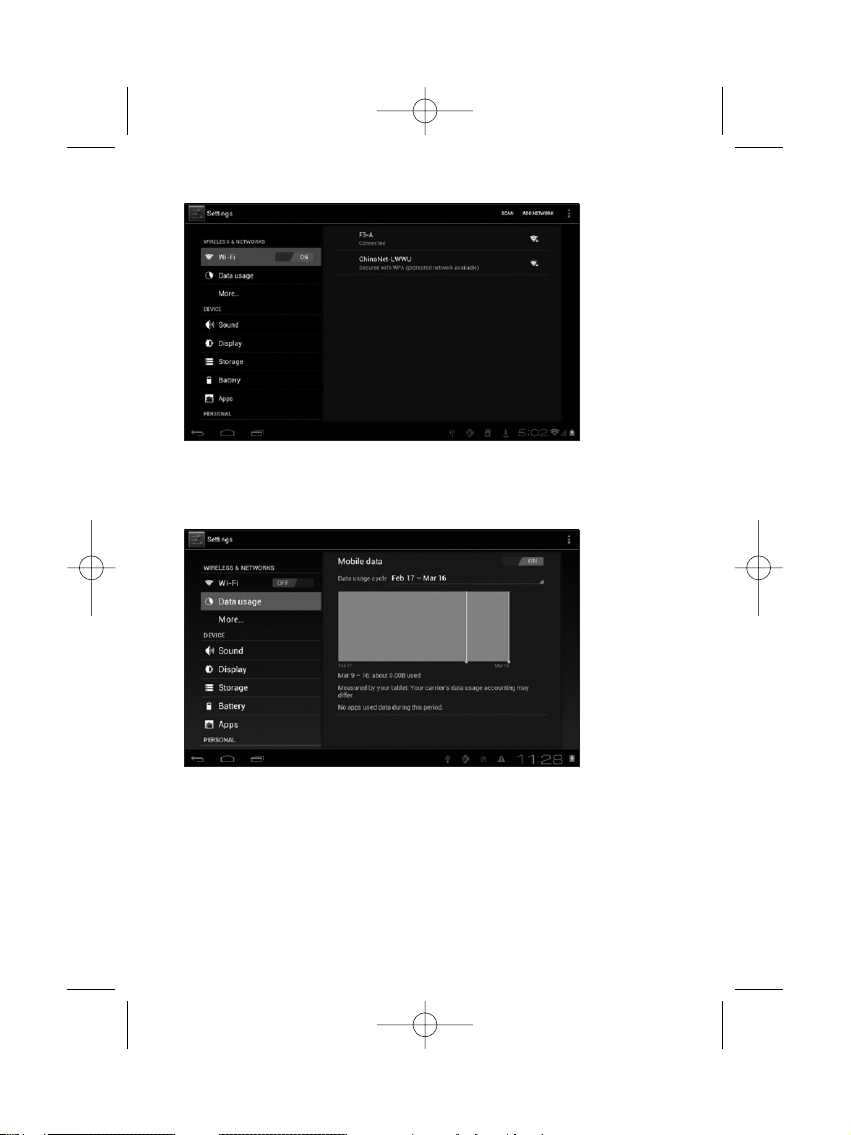
1. WIRELESS & NETWORKS
- Wi-Fi
Tap on setting icon, then ap on the “OFF” to open Wi-Fi,All available
Wi-Fi networks will be listed, tap on your Wi-Fi network and start to
connect. If the Wi-Fi network does not need a password, tap "connect"
to start the connection. If the Wi-Fi network needs a password, then
input the password and tap “connect” to start the connection. If the
Wi-Fi network has been successfully connected before, that
information will be stored.
Connection will be done automatically. Once your tablet connects to
Wi-Fi successfully, the Wi-Fi icon will appear on the status bar at
the below of the screen.
Instruction manual dServe 1005C Multi 14-05-2012 09:04 Pagina 11
Page 12
12
- Data Usage
Select to turn on/off Mobile data, Set mobile data limit.
Instruction manual dServe 1005C Multi 14-05-2012 09:04 Pagina 12
Page 13
13
ENGLISH
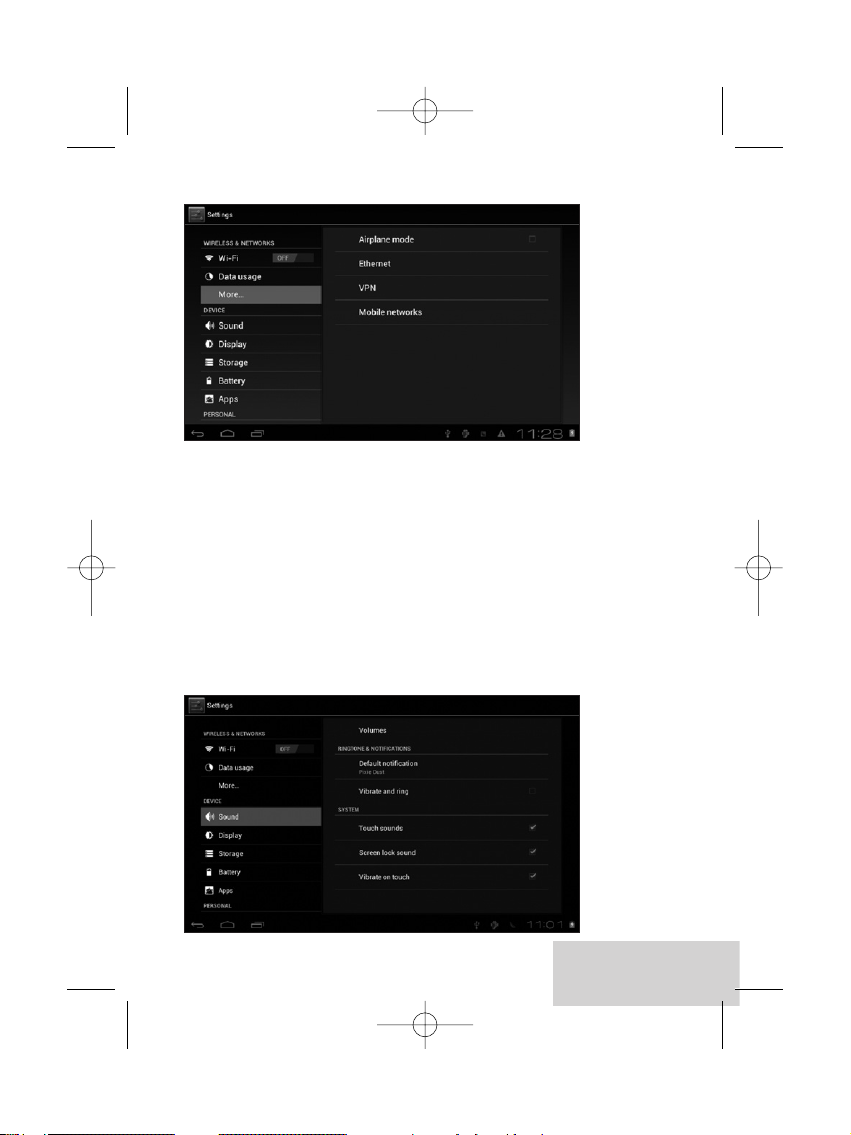
- More…
Select to turn on/off Airplane mode, to setup Ethernet connection,
VPN and Mobile networks.
2. DEVICE
- Sound
Settings on Volume, Ringtone & Notifications, you can also tick to select
or untick to unselect for Vibrate and ring,Touch sounds, Screen lock
sound and Vibrate on touch.
Instruction manual dServe 1005C Multi 14-05-2012 09:04 Pagina 13
Page 14
14
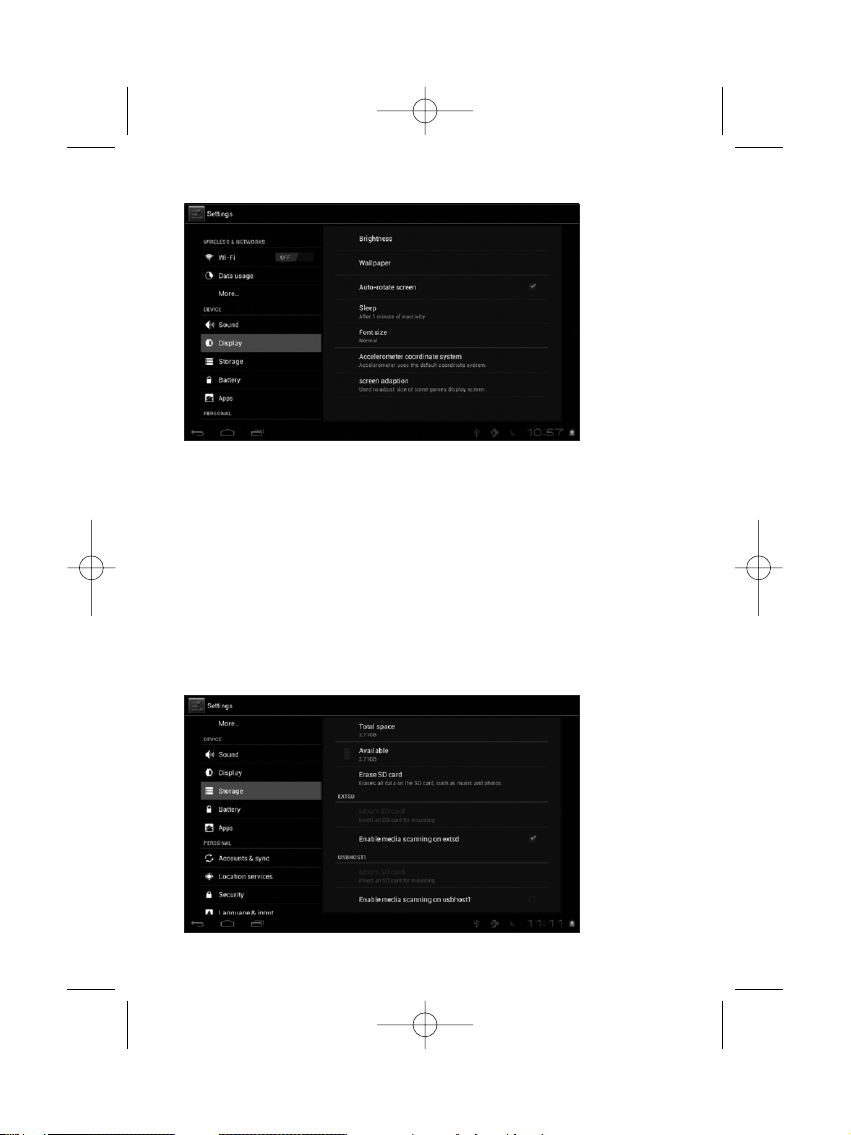
- Display
Settings on LCD Panel brightness,Wallpaper, Auto-rotate screen, sleep,
Font size, Accelerometer coordinate system, Screen adaption.
- Storage
To view the available storage space, Erase SD card(format the internal
memory) and select the option of enabling media scanning of external
SD card or external USB devices
Instruction manual dServe 1005C Multi 14-05-2012 09:04 Pagina 14
Page 15
15
ENGLISH
[Remarks]:
1. If you want to safely remove the Micro SD card or USB flash drive,
please tap on the option “Unmount SD card”, and confirm the
selection, after this, you can safely remove SD card/USB host.
2. Make sure to tick the option of “Enable media scanning on extsd” and
“Enable media scanning on usbhost 1”, this way, your tablet can scan
and display the files in the external TF card and USB devices.
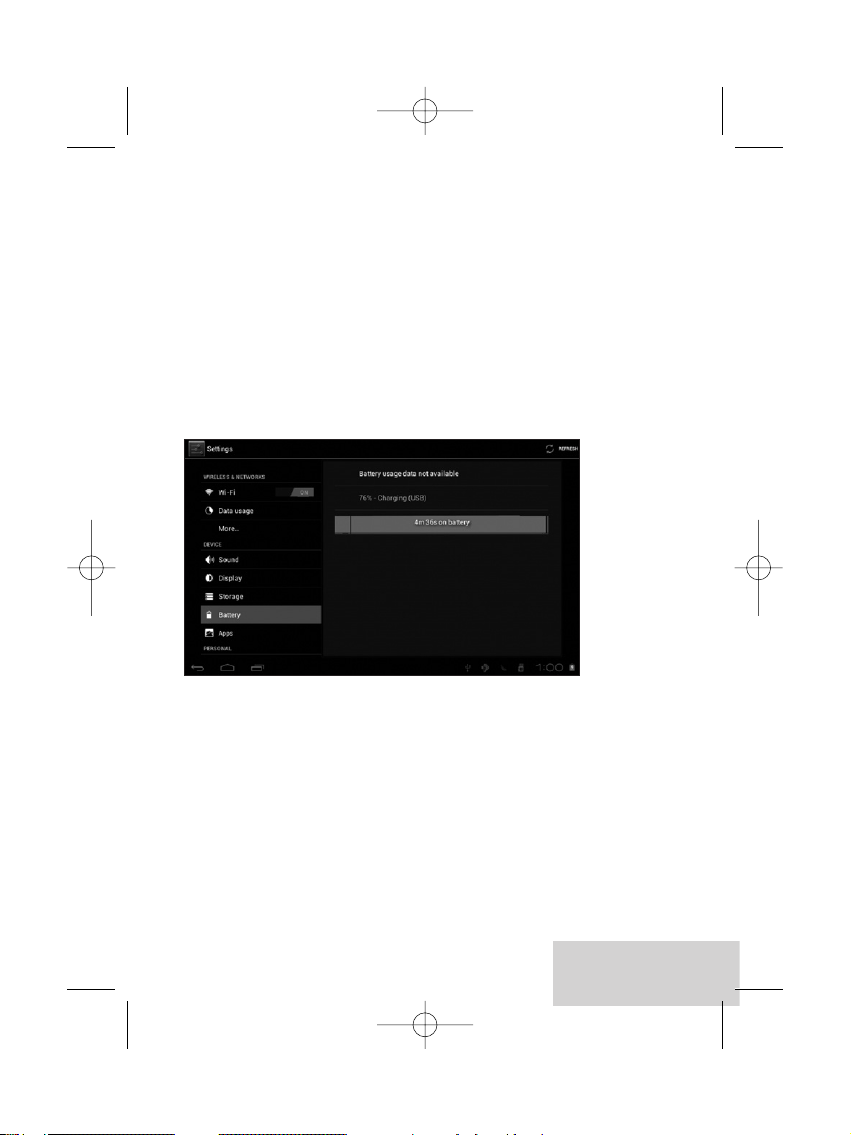
- Battery
To know the battery usage information
Instruction manual dServe 1005C Multi 14-05-2012 09:04 Pagina 15
Page 16

16
- Apps
To Manage the applications.Tap on the directories(DOWNLOAD, ON
SD CARD, RUNNING or ALL) and select the application which you
want to uninstall, you will enter into the following interface, tap on
Uninstall, then you can remove that application from tablet.
3. PERSONAL
- Accounts & sync
To set up the account and synchronization information.
Instruction manual dServe 1005C Multi 14-05-2012 09:04 Pagina 16
Page 17
17
ENGLISH
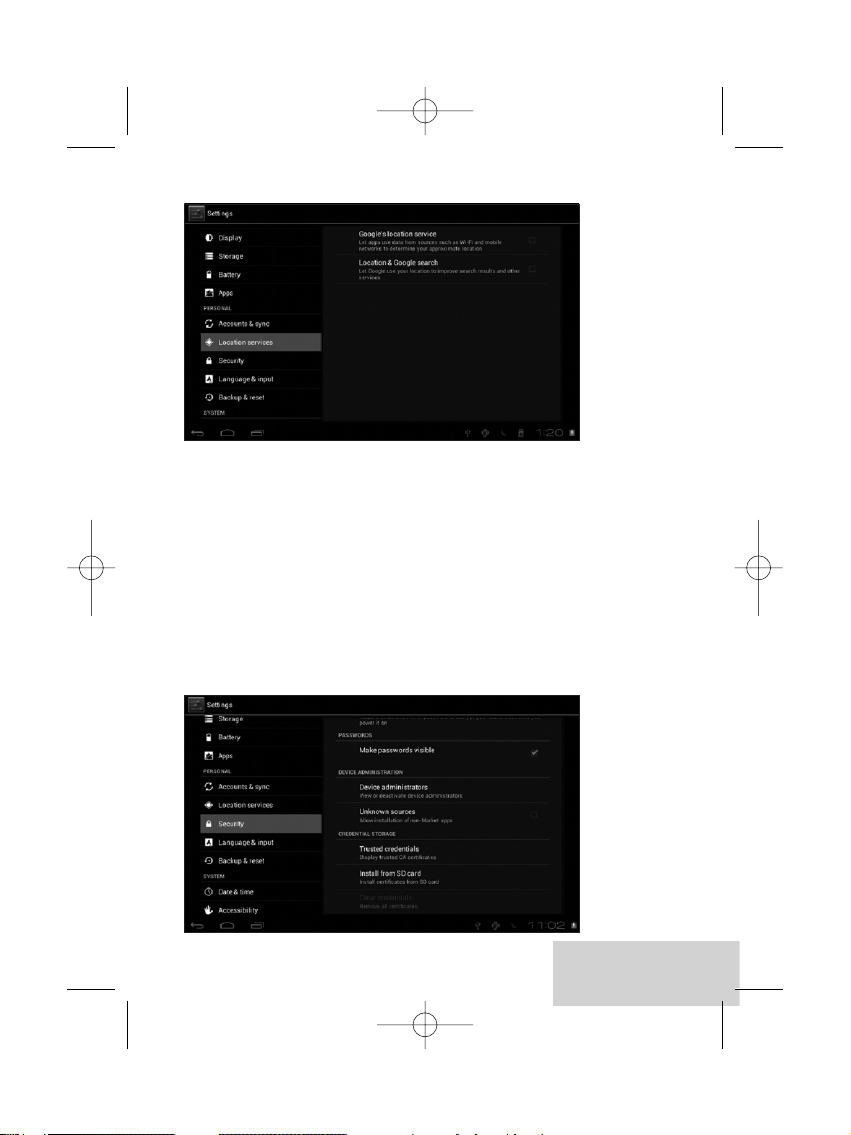
- Location services
Options for you to select “Google's location service” and “Location &
Google search”
- Security
Settings for Screen lock, Owner info, Encrypt tablet, Make passwords
visible, Device administrators, Unknown sources,Trusted credentials,
Install from SD card.
Instruction manual dServe 1005C Multi 14-05-2012 09:04 Pagina 17
Page 18
18
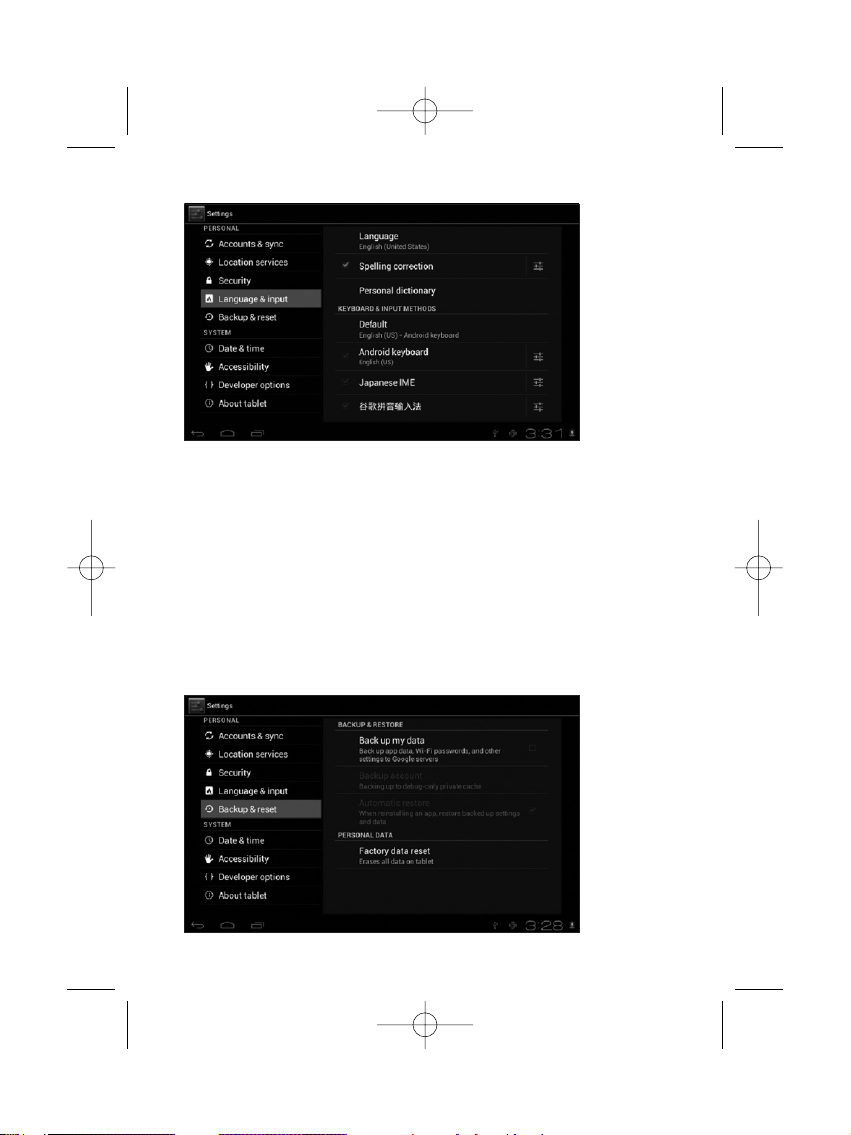
- Language & keyboard
Language selection, text input and automatic error correction option,
select your desired Keyboard & Input methods, and settings on Text-tospeech output, Pointer speed.
- Backup & reset
Option of for backup & restore, erase personal data.
Warning: once you perform the “Factory data reset”,it will
erase all personal data in tablet, make sure to back up your
personal data before performing this function.
Instruction manual dServe 1005C Multi 14-05-2012 09:04 Pagina 18
Page 19
19
ENGLISH
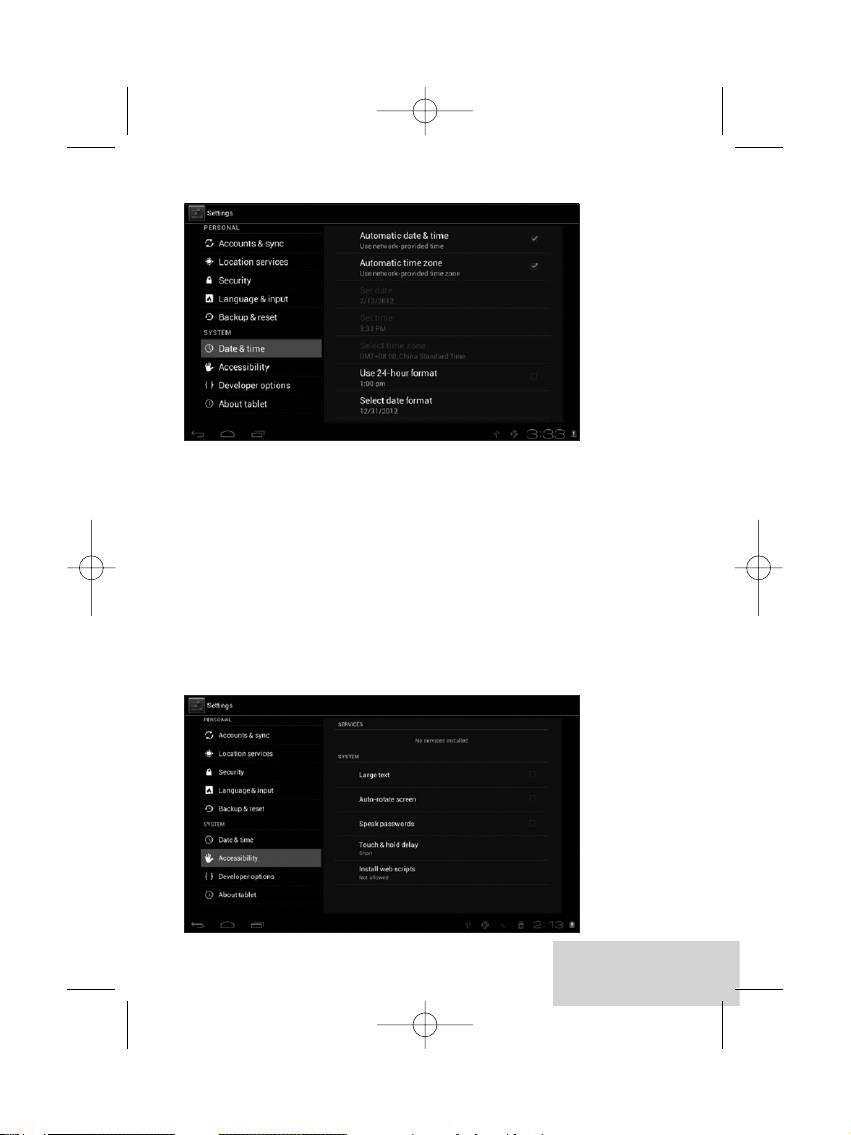
4. SYSTEM
- Date & time
You can use network-provided time or time zone, or you can manually
setup date, time, select time zone and you can also select time format
and date format
- Accessibility
TalkBack provides spoken feedback help blind and low-vision users.You
need to download this application from Android Market.
Instruction manual dServe 1005C Multi 14-05-2012 09:04 Pagina 19
Page 20
20
You can also setup system settings here. You can choose the options of
Large text, Auto-rotate screen, Speak passwords,Touch & hold delay
time and Install web scripts.
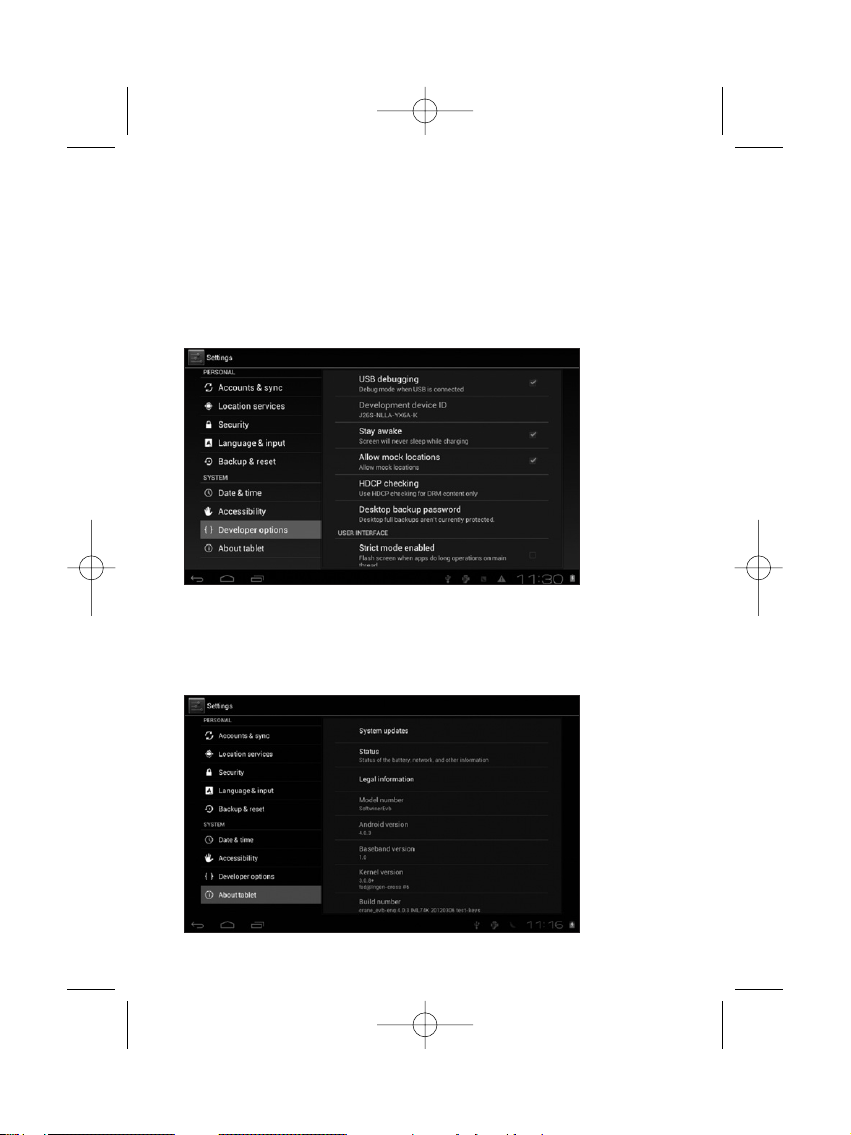
- Developer options
Some advanced settings for the tablet.
- About tablet
Additional informations about the Tablet
Instruction manual dServe 1005C Multi 14-05-2012 09:04 Pagina 20
Page 21
21
ENGLISH
9 Apps Installation
You can download the Apps from Android Market and install them
online, or you can install the Apps from your Micro SD card or USB
devices. Just tap on the App and run the installation, you can finish the
installation and run that App right away.
10 Introductions of Typical Applications
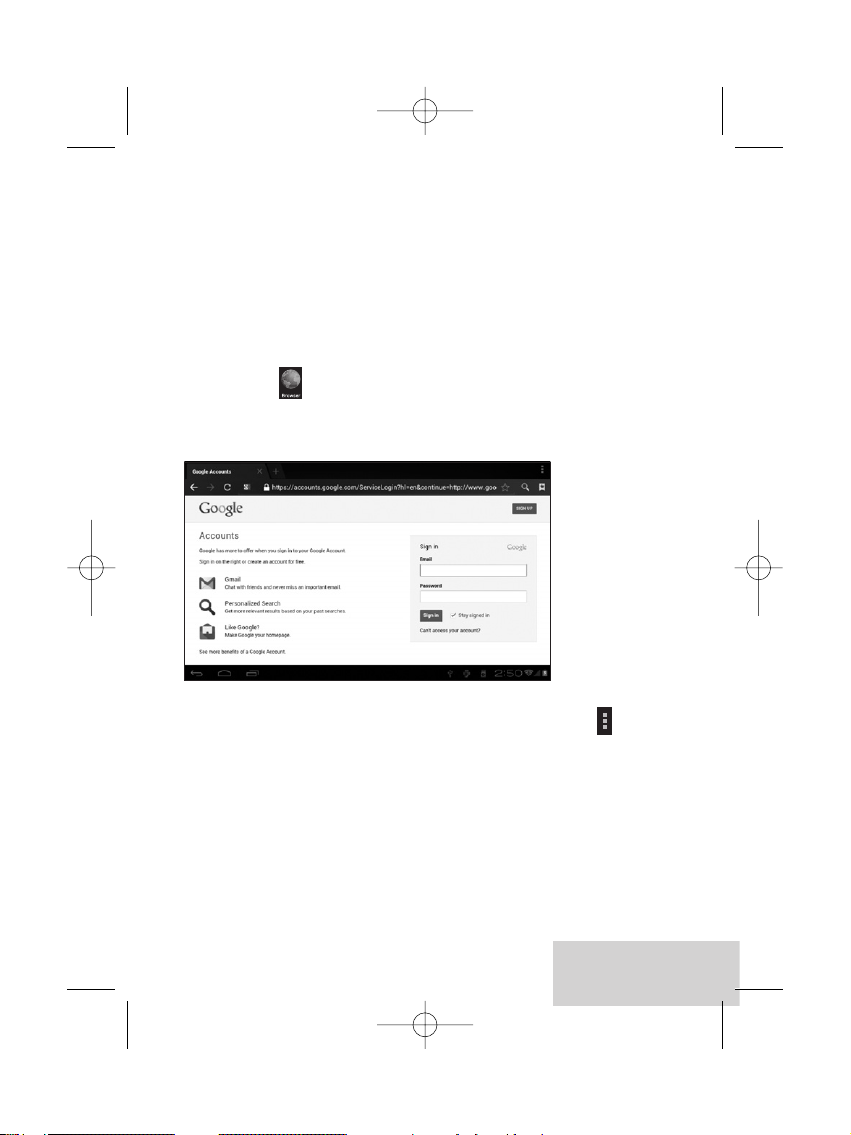
- Browser
After connecting your tablet to Wi-Fi network, tap the Browser icon on
desktop to open web browser. The following interface pops up immediately:
Then you can start web surfing now, during web surfing, tap on the
menu icon located at the right top corner of the screen to
get more options:
New window: to open up new window of web browser
Bookmarks: to see the Bookmarks, Most visited websites and History
Windows: to see different windows of web surfing
Refresh: to refresh the page
More: more options of “Add bookmark”, “Find on page”, “Select text”,
“Page info”,“Share page”,“Downloads”,“Settings”.
Instruction manual dServe 1005C Multi 14-05-2012 09:04 Pagina 21
Page 22
22
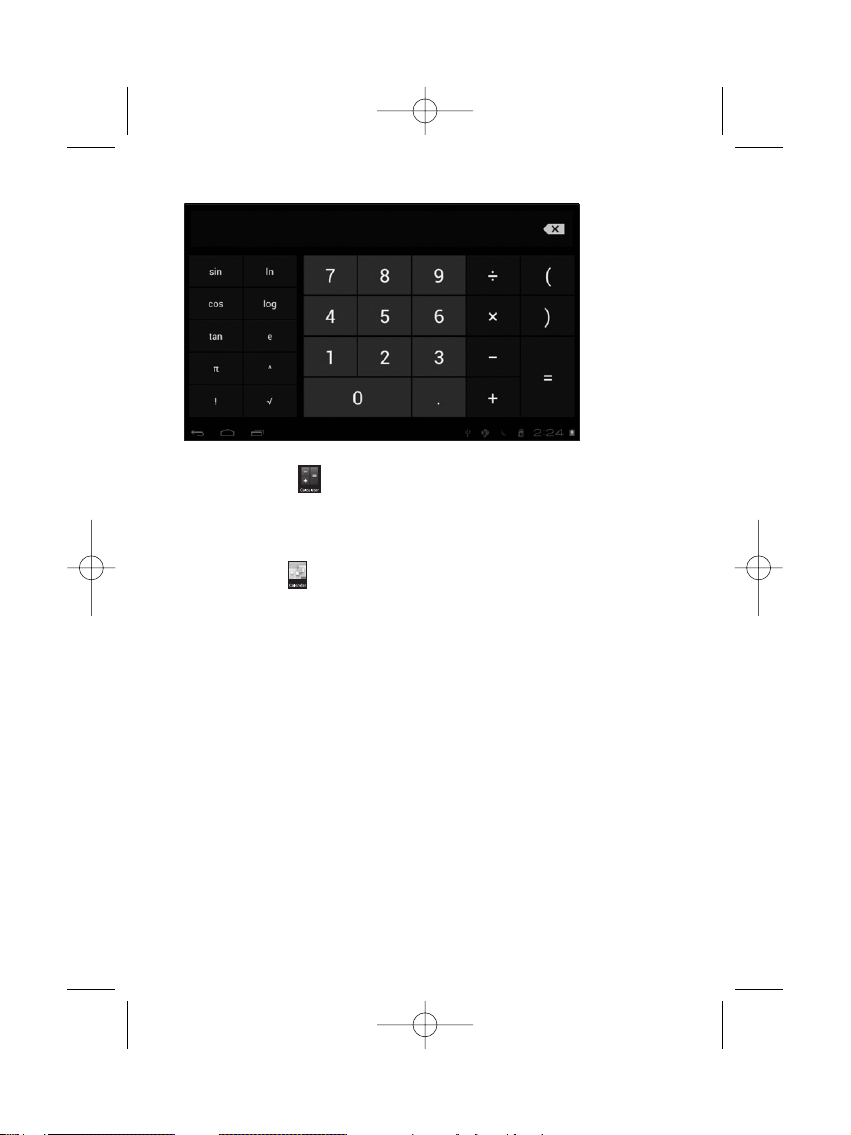
- Calculator
The tablet is with built-in calculator, tap on the Calculator icon to
carry out your calculations.
- Calendar
Users can use the Calendar to check date, time and memorandum or
add memorandum etc. But before doing this, you have to sign in the
Google Account.
1 Tap on the Calendar icon, then a dialog box of “New a Google
Account” will pop up.Tap “Next” to go the next step.
2 If you do not have a Google Account, then tap “Create” to create
a new Google account, if you already had a Google Account, tap
on “Sign in” to go to next step.
3 Input Gmail address and password, then tap “Next” to go forward.
4 After you finish the setup, the interface will automatically exit and
return to the main interface.Tap on the Calendar icon again to
check date, time and add memorandum etc.Tap on the menu
button to popup more setting options of 1 Day, 7 Weeks, Agenda,
Today, More, see the screen interface as below:
Instruction manual dServe 1005C Multi 14-05-2012 09:04 Pagina 22
Page 23

23
ENGLISH
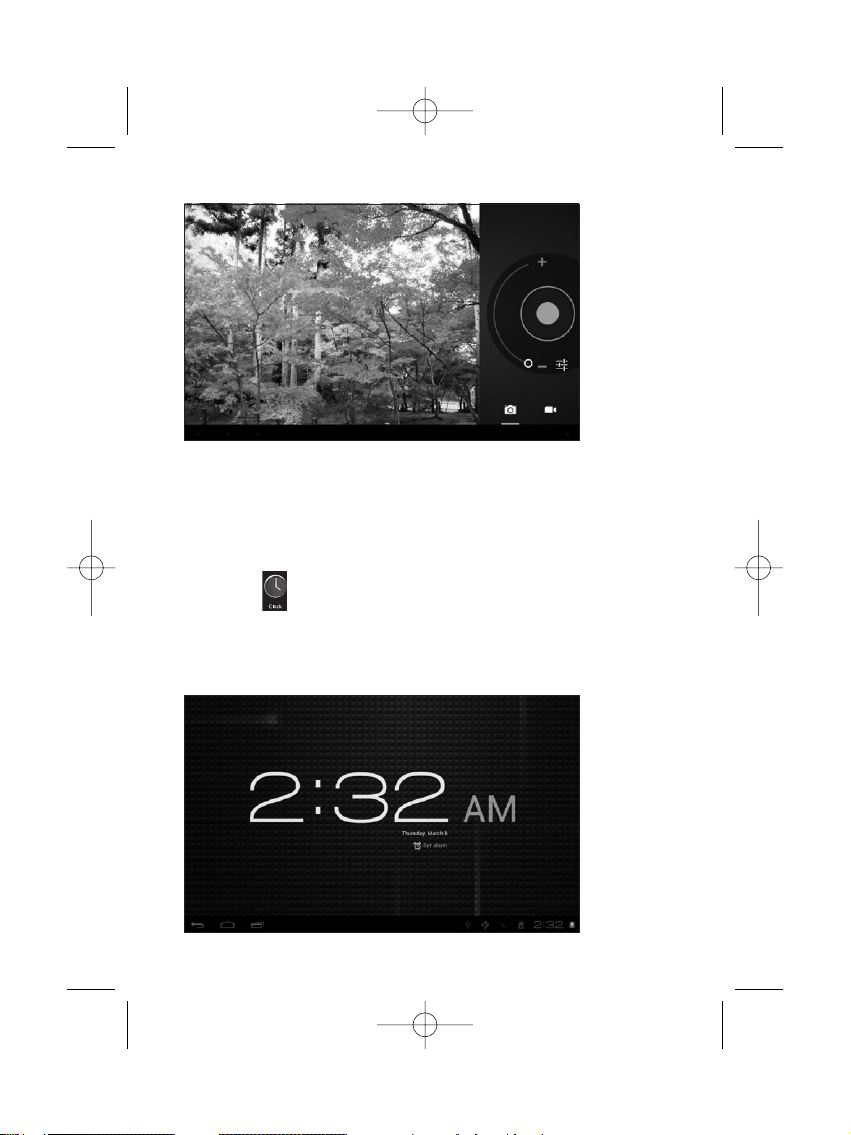
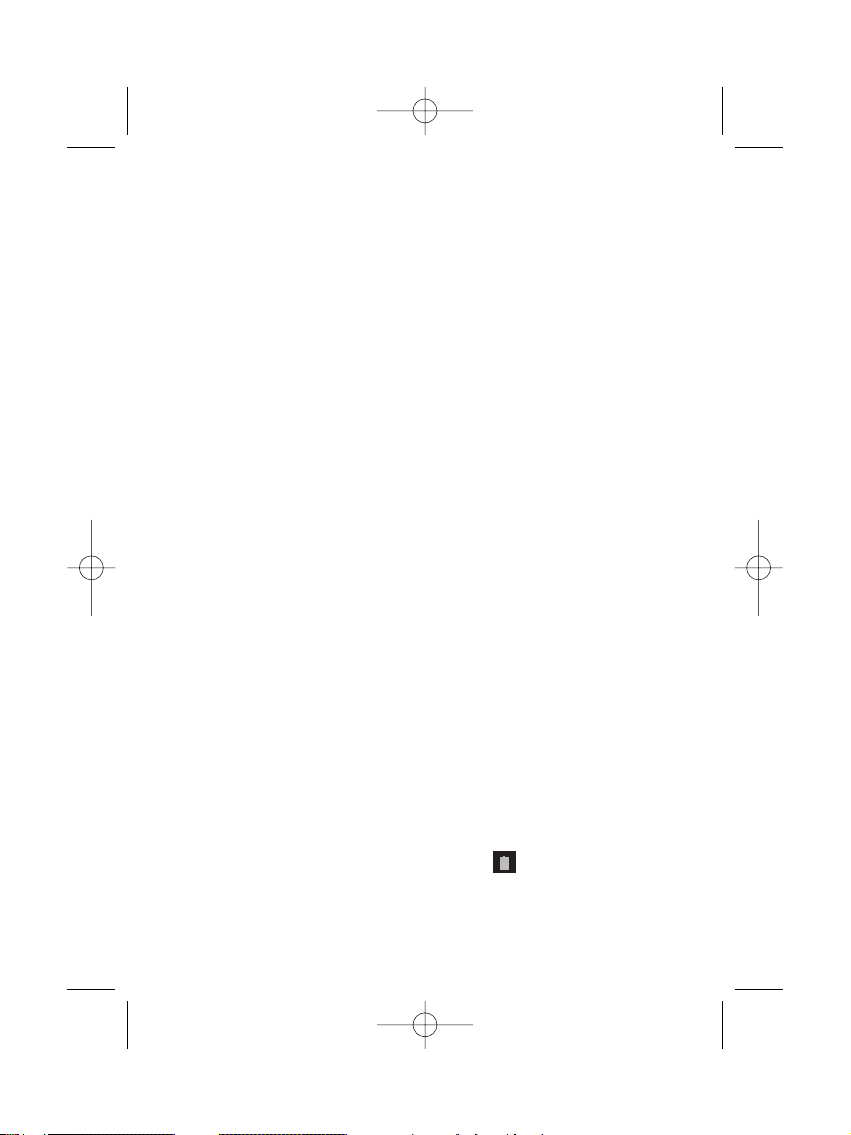
- Camera
Tap on the Camera icon to run the application
The camera is located at the right of tablet top, aim at it when you
take photo or video.Tap to start to take photo or video.
If you want to take photo, tap the icon to take photo; if you want to
take video, tap on the icon to take video.
The photos or videos will be saved automatically to internal memory,
select “File Manager”, then select folder “DCIM”, select “Camera” to find
the photos or videos just took.
Instruction manual dServe 1005C Multi 14-05-2012 09:04 Pagina 23
Page 24
24
You can also view your previous photos or videos by tapping on the
photo icon at the top right corner of screen. When you view the
photos or videos, tap on it to display more options of slideshow,
delete, share, zoom in/out, clip, rotating, or set as wallpaper etc.
- Clock
Tap on the Clock icon to run the application.
After running the Clock application, you can setup alarm clock
Instruction manual dServe 1005C Multi 14-05-2012 09:04 Pagina 24
Page 25
25
ENGLISH
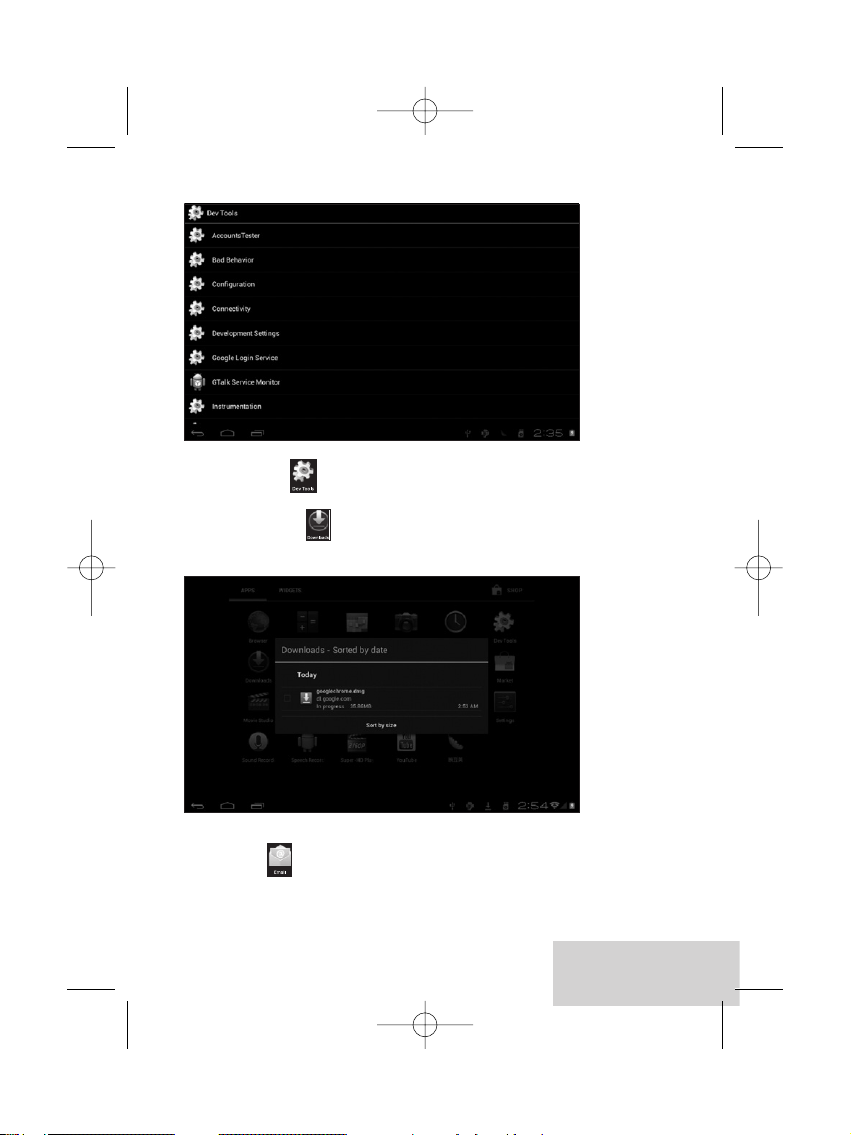
- Dev Tools
Development tools provided by Android.
- Downloads
Tap to check all downloaded history.
- Email
You can enter one or more personal email address which you would
like to access through this tablet.
Instruction manual dServe 1005C Multi 14-05-2012 09:04 Pagina 25
Page 26
26
Tap on Email icon to setup your email account according to the
procedures.You can receive or send e-mails after setup.
To read emails, tap on the Email icon, if you setup only one email
account, it opens immediately, if you have setup multiple accounts, they
will be listed in the Accounts screen.Tap on the desired email
account, and then tap “Inbox”, all emails will be listed, tap on the email
which you want to open.You can also Reply , Forward or Delete
the emails.
On the Inbox screen, you can Compose New Email, type on menu
icon for more settings on your Email account.
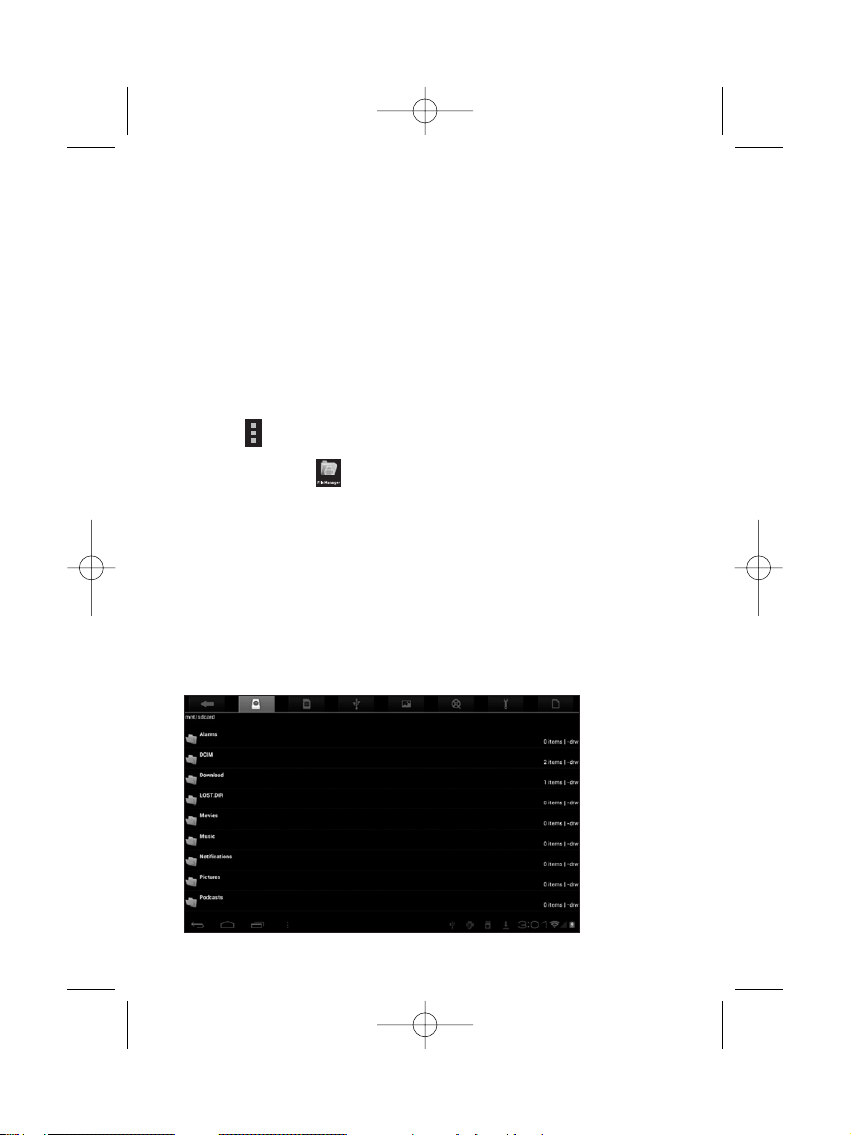
- File Manager
Tap on File Manager icon to browse the files saved in your memory
devices(Local, SD card or U-Disk).You can view the files by categories.
Tap on corresponding memor y devices(Local, SD card or U-Disk) to
see the files inside.Tapping on the file and hold it for 3 seconds, you
will have the options of: Delete File, Rename File, Copy File,
Move File and Email File.You can also Copy, Move or Paste files
between each memory device.You can have the options of Delete
Instruction manual dServe 1005C Multi 14-05-2012 09:04 Pagina 26
Page 27

27
ENGLISH
Folder, Rename Folder, Copy Folder, Move Folder, Zip Folder
when you tap on a folder and hold it for 3 seconds.
How to copy file: to copy a file: tap on the file and hold it for 3
seconds, select Copy, then tap&hold on the folder which your file
needs to be copied into, select “Paste into folder” to copy your file
into that folder.
- Play Store
After you signed in the Google Account(mentioned above), tap on the
Play Store icon, and accept the Google Play Terms of Service to
enter into play shop.You can download more apps from the Android
market.
If you want to download apps from Android market, tap on the app
icon which you want to download, follow the procedures to download
the app and install it onto you tablet.
- Music
To play the music, tap on the Music icon to run the application.
All songs will be listed and tap on your desired song to play it.
Instruction manual dServe 1005C Multi 14-05-2012 09:04 Pagina 27
Page 28
28
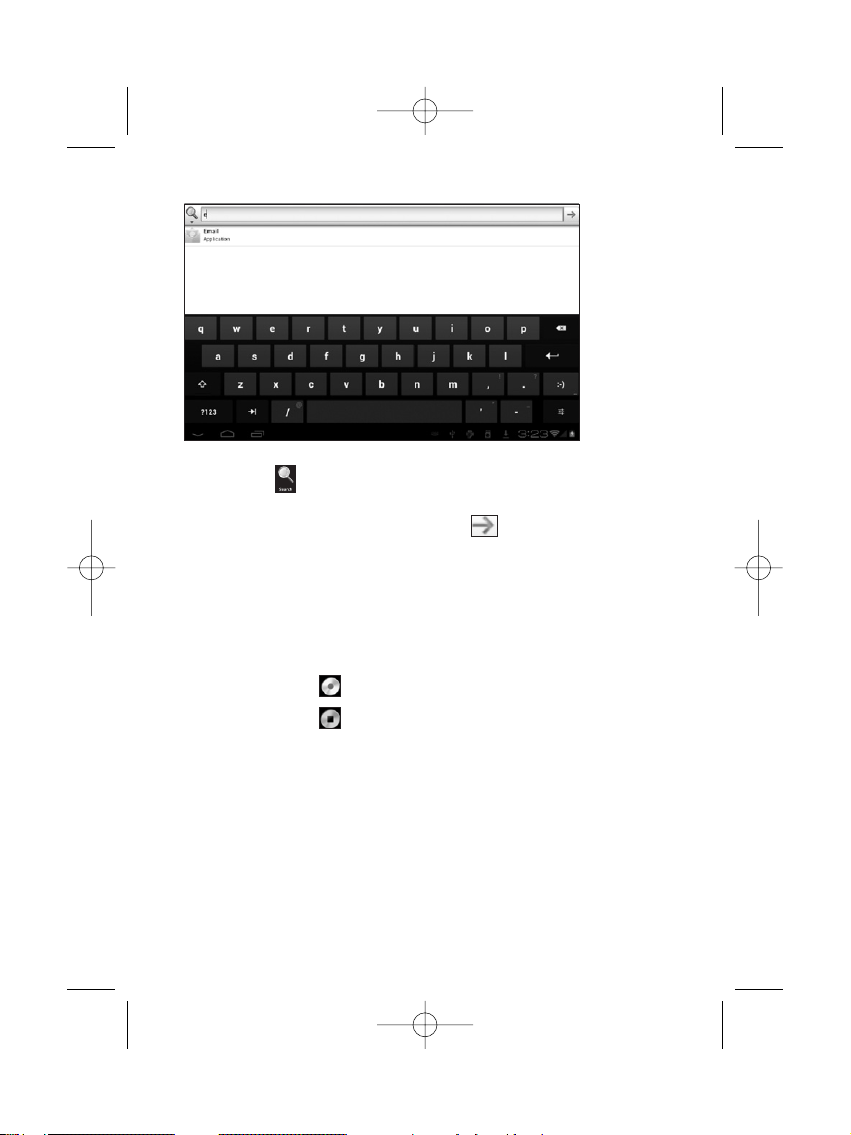
- Search
Search the APK files in your tablet or search online.
To search online, please tap on the icon
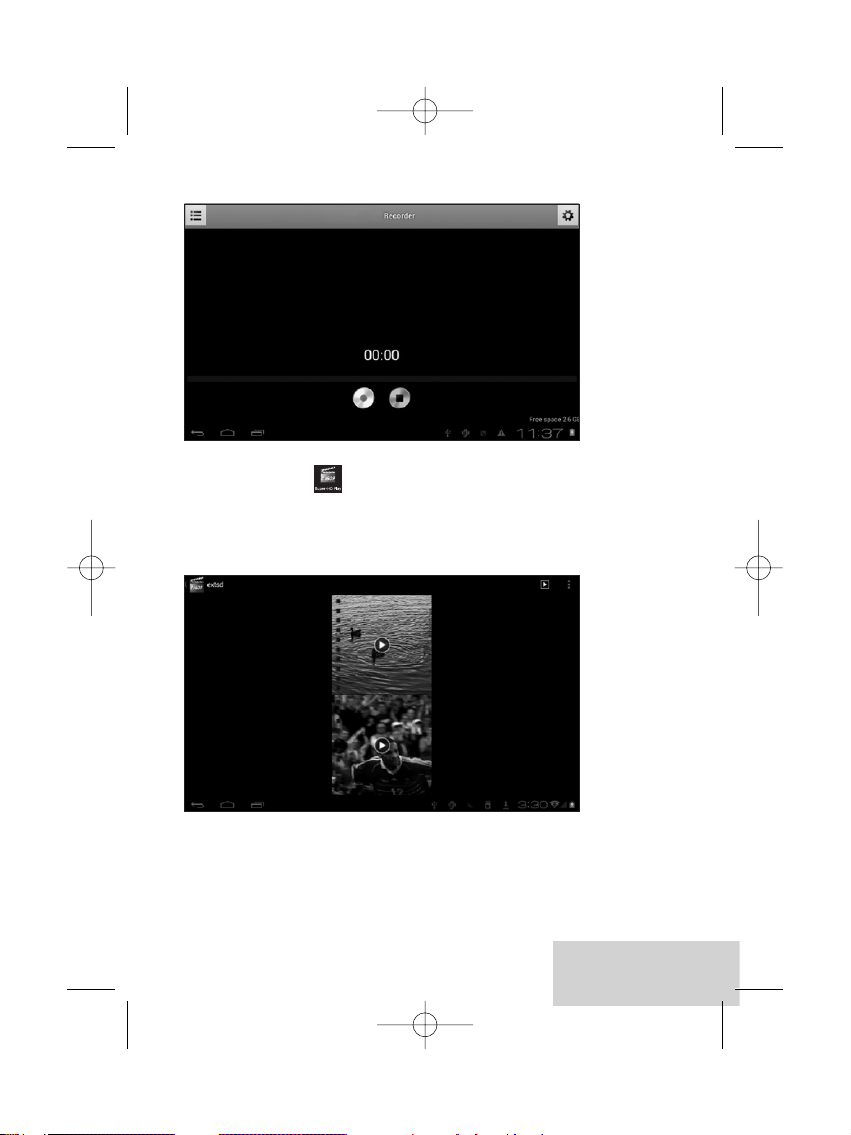
- Recorder
To start the sound recorder, tap on the Recorder icon to run the
application.The App will start self-checking when you run this App at
the first time, if self-checking passes, tap on “Continue” to run the
application.
Tap on the icon to start recording.
Tap on the icon to stop recording.
Once you stopped the recording, system will save the recording
automatically.
Tap on recording icon located at the left top corner of screen to play
the recording just recorded.
The recorded files can be found at folder of “Recordings” inside
File Manager folder.
Instruction manual dServe 1005C Multi 14-05-2012 09:04 Pagina 28
Page 29
29
ENGLISH
- Video Player
To play the videos, tap on the Video Player icon to run the
application.
All videos will be listed and tap on your desired video to play it.
Instruction manual dServe 1005C Multi 14-05-2012 09:04 Pagina 29
Page 30
30
11 Forced shutdown
In case of your tablet was down and you are unable to turn it off according
to standard procedures, press the power switch and hold it for 7 seconds,
the tablet will be turned off.
12 Factory Reset
To restore the tablet to original factory settings and erase all personal
informations, tap on “Settings” > “Backup&reset” > “Factory data reset”.
Warning: After resetting the device, Google account, data, system settings,
and downloaded applications will be removed from your tablet.
13 Battery Management
The battery is not fully charged from factory, so it is recommended that
you charge the battery for at least 6 hours before you start to use the
device.
The rechargeable battery is designed and manufactured to be used and
recharged frequently.As same with all of lithium batteries, the capacity of
the battery reduces each time it is charged. However, you can still try to
prolong the battery's lifetime by following the suggestions below:
- Use your Tablet at least once a week.
- Fully charge the battery regularly.
- Never leave the battery fully discharged for a long period of time.
- Always keep the device and the battery away from heat and moisture.
14 Charge Battery
Plug the power adapter into an electrical wall outlet and then connect to
the device to fully charge the battery before use.
When fully charged, the battery icon displays as:
A fully discharged battery will take you approximately 6 hours, but you can
use the device while it is being charged.
Instruction manual dServe 1005C Multi 14-05-2012 09:04 Pagina 30
Page 31

31
ENGLISH
Do not use other adapters than the one provided in your packaging, it may
cause damage to the Lithium battery inside.
Do not attempt to open the tablet to replace the battery inside, this will
damage the tablet and void the warranty.
15 Important Safety Precautions
Always follow these basic safety precautions when using your Tablet.This
reduces the risk of fire, electric shock, and injur y.
- Do not expose this product to rain or moisture.
- Keep the device out of direct sunlight and heat sources.
- Do not place other objects on LCD screen, as it may crush and
damage the LCD screen.
- Do not use any sharp objects to touch the LCD screen, as this will
scratch the screen.
- Only use the AC adapter included with the device. Using any other
power adapters will damage your tablet and void the warranty.
- Do not attempt to dismantle the tablet by yourself to do any repair,
this will damage the tablet and void the warranty.
16 Clean Your Device
To clean fingerprints or dust from the screen, we recommend to use soft,
non-abrasive and non-corrosive cloth for cleaning, such as a camera lens
cloth.
Instruction manual dServe 1005C Multi 14-05-2012 09:04 Pagina 31
Page 32

32
Frequently Asked Questions
Android
Q: What Android OS version is on my Device?
A: Android 4.0.3
Basic Functionality
Q: Do I have to charge the battery before use?
A: You should charge the batter y for at least 6 hours, but you can use the
device while it’s being charged. Use the included power adapter to
charge.
Email
Q: Can I use any of my personal email addresses to send/receive email?
A: The device supports POP3 accounts. Some free email accounts are not
supported on mobile devices. Check with your email provider to see if
you account is supported.
Media Cards
Q: Which media cards are compatible with my Device?
A: Micro SD cards.
Music
Q: What type of music files can I play on my device?
A: MP2, MP3,WAV, AAC,WMA
Q: How do I add music files to my device?
A: Copy the music files from your PC, Micro SD card or USB storage
device directly to your device.
Instruction manual dServe 1005C Multi 14-05-2012 09:04 Pagina 32
Page 33

33
ENGLISH
Frequently Asked Questions
Photos
Q: What type of photo files can I view on my device?
A: JPEG,BMP,GIF,PNG
Q: How do I add photo files to my device?
A: Copy the photos from your PC, Micro SD card or USB storage device
directly to your device.
Videos
Q: What type of video files can I play on my device?
A: Video Decoding (Full HD)Support all formats of video,such as
H. 264,H. 263,VC-1, MPEG-1, 2,4,DIVX-3, 4, 5, 6£¨XVID, H263,
WMV7/8,VP6,AVS,and other popular video formats.
Q: Can I play YouTube videos on my device?
A: Yes, you can run the YouTube application icon to play the videos
Q: How do I add video files to my device?
A: Copy the video files from your PC, Micro SD card or USB storage
device directly to your device.
Wi-Fi
Q: Do I need a Wi-Fi adapter to connect to the Internet?
A: No, the Wi-Fi adapter is built-in to the device.
Instruction manual dServe 1005C Multi 14-05-2012 09:04 Pagina 33
Page 34

1
NEDERLANDS
Handleiding
1 Wat krijgt u geleverd?
De volgende items zijn meegeleverd bij uw aankoop:
- 10.1 inch Tablet PC
- Voedingsadapter
- USB Kabel
- Gebruiksaanwijzing
2 Getting Started
Lees eerst deze handleiding zorgvuldig door alvorens uw tablet-pc in
gebruik te nemen, en volg de instructies op zoals hieronder beschreven.
3 Het opladen van de batterij
De tablet is uitgerust met een ingebouwde oplaadbare Lithium batterij. Het
is raadzaam de batterij volledig op te laden voor gebruik.
Alleen de meegeleverde adapter gebruiken. Het gebruik van een andere
adapter kan de tablet beschadigen en hiermee vervalt de garantie.
Laadproces
- Sluit de adapter aan op de tablet, en steek de voedingsadapter in het
dichtstbijzijnde stopcontact.
- De tablet kan gewoon gebruikt worden tijdens het opladen.
Instruction manual dServe 1005C Multi 14-05-2012 09:11 Pagina 1
Page 35

2
4 Uiterlijk en knoppen
1. Camera
2. ESC
Door op de ESC knop te tikken, bladert u terug naar de vorige
interface.
3. Hoofdtelefoonaansluiting
Standaard 3,5 mm hoofdtelefoonaansluiting
4. HDMI output interface
HDMI uitgang
5. Voedingsaansluiting
1
2
3 4 5 6 7 8
9 10
Instruction manual dServe 1005C Multi 14-05-2012 09:11 Pagina 2
Page 36

3
3
NEDERLANDS
6. Mini USB aansluiting
Mini USB-aansluiting: om de tablet op de PC aan te sluiten voor
datatransmissie, opladen of om verbinding te maken met externe USBapparaten
7. TF Kaartgleuf
Micro SD kaartgleuf
8. USB2.0 Port
Gebruik deze om uw U-schijf of andere media-apparaten te lezen met
USB 2.0-interface
9. Menu & Home Button
Menu-knop en Home-knop. Beide knoppen hebben ook de functies
van Volume + en Volume - (druk op één van de knoppen gedurende 3
seconden om het volume te verhogen of verlagen.)
10. Aan/Uit schakelaar
Voor het in/uitschakelen van de tablet
5 Tablet In- en Uitschakelen
1. Inschakelen: nadat de batterij volledig is opgeladen, houdt u de
schakelaar ongeveer 3 seconden ingedrukt om het apparaat te
activeren. Scherm slot zal te zien zijn na het opstarten.
2. Uitschakelen: Als de tablet is ingeschakeld, houdt u de schakelaar
ongeveer 3 seconden ingedrukt en het systeem zal de optie
'uitschakelen' in een venster zichtbaar maken.Tik hierop om de tablet
uit te schakelen.
3. Scherm vergrendelen: Druk kort op de Aan/Uit schakelaar om het
scherm te vergrendelen.
4. Scherm ontgrendelen: sleep het slotje naar rechts naar het open-slot
pictogram om het scherm te ontgrendelen en naar het hoofdmenu te
gaan. Sleep het slot icoontje naar links naar het camera-icoontje om de
camera te activeren.
Instruction manual dServe 1005C Multi 14-05-2012 09:11 Pagina 3
Page 37

4
Instruction manual dServe 1005C Multi 14-05-2012 09:11 Pagina 4
Page 38

5
NEDERLANDS
Opmerkingen:
- Wanneer de batterijspanning te laag wordt, schakelt de tablet zichzelf
automatisch uit.
- Indien het apparaat niet op de juiste wijze is afgesloten, zal opnieuw
opstarten een scan en herstel van de schijf in gang zetten. Het kan
langer duren om toegang tot het systeem te verkrijgen.
6 Verbinding met de PC
1. Gebruik de meegeleverde USB-kabel om de tablet met de PC te
verbinden. Het USB verbindingsvenster wordt zichtbaar. Om verbinding
met de PC tot stand te brengen tikt u op “Turn on USB storage”.
In de 'connection mode' kunt u de bestanden op het apparaat of de
bestanden op het opslag medium kopiëren of deleten.
Instruction manual dServe 1005C Multi 14-05-2012 09:11 Pagina 5
Page 39

6
7 Tablet Gebruikersinterface
1. Na het opstarten komt u in het onderstaande Hoofdscherm
2. In het hoofdscherm kunt u de software iconen beheren: druk
gedurende 3 seconden op een icoon, dan kunt u het overal heen
slepen in het scherm.
3. Iconen verwijderen: druk gedurende 3 seconden op een icoon, en
sleep het icoon naar de “Remove” icoon, vervolgens kunt u het icoon
verwijderen van uw bureaublad.
Instruction manual dServe 1005C Multi 14-05-2012 09:11 Pagina 6
Page 40

7
NEDERLANDS
4. Raak het scherm aan en druk gedurende ongeveer 4 seconden.
Het venster “Choose wallpaper from” wordt zichtbaar zoals
hieronder weergegeven:
U kunt een achtergrond kiezen vanaf verschillende bronnen en uw
achtergrond wijzigen.
Instruction manual dServe 1005C Multi 14-05-2012 09:11 Pagina 7
Page 41

8
5. Status Balk functies
Van links naar rechts:Terug naar vorig menu,Terug naar hoofdmenu,
Laat eerder uitgevoerde App's zien, Menu knop, USB aangesloten, USB
aangesloten, USB foutopsporing,TF-kaart informatie,Tijdsaanduiding,
batterij iconen.
6. Korte handleiding voor tikhandelingen
- Ongeacht welk venster actief is, kunt u altijd terug naar het hoofdmenu
door op de knop te tikken welke zich in de linker
benedenhoek van het hoofdscherm bevindt.
[Let op] De knop brengt u altijd terug naar het hoofdmenu.
- Ongeacht welk venster actief is, kunt u door in de linker benedenhoek
op de knop te tikken, altijd terug naar een vorig scherm.
- Ongeacht welk venster actief is, kunt u door in de linker benedenhoek
van het touchscherm op de knop te tikken het onderstaande
scherm oproepen:interface:
- Tik op om een lijst van alle eerder uitgevoerde App's te zien.
Instruction manual dServe 1005C Multi 14-05-2012 09:11 Pagina 8
Page 42

9
NEDERLANDS
- In het hoofdmenu kunt u op de icoon tikken om alle App's te
zien. Druk gedurende ongeveer 3 seconden op een APP icoon, dan
kunt u deze naar het hoofdmenu slepen.
8 Basic Settings
1. DRAADLOOS & NETWERKEN
- Wi-Fi
Tik op het setting icoon, tik vervolgens op “OFF” om Wi-Fi te
openen. Er verschijnt een lijst van alle beschikbare WIFI netwerken.Tik
op het gewenste WIFI netwerk en maak zo uw keuze. Indien het Wi-Fi
netwerk geen wachtwoord vereist, tikt u “connect” om te verbinden.
Indien het Wi-Fi netwerk wel een wachtwoord vereist, typ dan eerst
het wachtwoord en tik “connect” om te verbinden. Indien met het WiFi netwerk reeds eerder succesvol verbinding tot stand werd gebracht,
is deze informatie opgeslagen.Verbinding wordt dan automatisch tot
stand gebracht. Indien uw tablet succesvol een verbinding heeft
gemaakt met Wi-Fi, wordt het Wi-Fi icoon zichtbaar in de
statusbalk onderaan het scherm.
Instruction manual dServe 1005C Multi 14-05-2012 09:11 Pagina 9
Page 43

10
- Data Usage
Selecteer deze optie om mobiele data aan / uit te schakelen en om
een mobiele datalimiet in te stellen.
Instruction manual dServe 1005C Multi 14-05-2012 09:11 Pagina 10
Page 44

11
NEDERLANDS
- More…
Selecteer deze optie om vliegtuigmodus aan / uit te inschakelen en om
Ethernet-verbinding,VPN en mobiele netwerken in te stellen.
2. APPARAAT
- Sound
Instellingen van Volume, Ringtoon & Meldingen. U kunt tikken om te
selecteren of nogmaals tikken om te deselecteren voor Trilfunctie en
bellen,Touch geluiden, Schermvergrendelingsgeluid en trillen bij aanraking.
Instruction manual dServe 1005C Multi 14-05-2012 09:11 Pagina 11
Page 45

12
- Display
Instellingen voor LCD-scherm helderheid, Achtergrond, Auto-rotate
scherm, slaapstand, Lettergrootte,Accelerometer coordinatie,
Schermaanpassingen.
- Storage
Om de beschikbare opslagruimte te bekijken, Erase SD card (intern
geheugen formateren) en selecteer de optie “enabling media scanning
of external SD card or external USB devices”
Instruction manual dServe 1005C Multi 14-05-2012 09:11 Pagina 12
Page 46

13
NEDERLANDS
[Opmerkingen]:
1. Voor het veilig verwijderen van de Micro SD-kaart of USB flash drive,
tikt u op de optie “Unmount SD card”, en bevestigt u de selectie.
Daarna kunt u de SD-kaart / USB-host veilig verwijderen.
2. Zorg ervoor dat u de opties “Enable media scanning on extsd” en
“Enable media scanning on usbhost 1” aanvinkt. Op deze manier kan
uw tablet de bestanden op de externe external TF card and USB
devices lezen en tonen.
- Battery
Dit geeft een indicatie over de tijd dat de batterij nog spanning levert.
Instruction manual dServe 1005C Multi 14-05-2012 09:11 Pagina 13
Page 47

14
- Apps
Het beheren van de Applicaties.Tik op de mappen (DOWNLOAD,
ON SD CARD, RUNNING of ALL) en selecteer de applicatie die u
wilt de-installeren.Ver volgens opent het volgende scherm.Tik op
Uninstall, zo kunt u de applicatie van uw tablet verwijderen.
3. PERSONAL
- Accounts & sync
Voor het instellen van de account- en synchronisatie-informatie.
Instruction manual dServe 1005C Multi 14-05-2012 09:11 Pagina 14
Page 48

15
NEDERLANDS
- Location services
Opties voor het instellen van “Google's location service” en “Location
& Google search”
- Security
Instellingen voor schermbeveiliging, Info eigenaar, Encrypt tablet, Make
passwords visible, Device administrators, Unknown sources,Trusted
credentials, Install from SD card.
Instruction manual dServe 1005C Multi 14-05-2012 09:11 Pagina 15
Page 49

16
- Language & keyboard
Taalkeuze, tekstinvoer en optie voor automatische foutcorrectie.
Selecteer het gewenste Keyboard & Input methodes, en instellingen
voor Tekst-naar-spraak, Cur sor snelheid.
- Backup & reset
Opties voor backup & restore, wissen van persoonlijke gegevens.
Waarschuwing: het uitvoeren van de optie “Factory data reset”
wist alle persoonlijke gegevens in de tablet. Maak een back-up van
uw persoonlijke gegevens alvorens deze functie uit te voeren.
Instruction manual dServe 1005C Multi 14-05-2012 09:11 Pagina 16
Page 50

NEDERLANDS
4. SYSTEM
- Date & time
U kunt de klok automatisch synchroniseren met een tijdserver op het
internet, of u kunt de datum, tijd en tijdzone handmatig instellen en ook
kunt u kiezen hoe de tijd en datum wordt weergegeven.
- Accessibility
TalkBack geeft gesproken feedback om blinde en slechtziende
gebruikers te helpen. U dient deze toepassing te downloaden van de
Android Markt. U kunt hier ook systeeminstellingen wijzigen.
17
Instruction manual dServe 1005C Multi 14-05-2012 09:11 Pagina 17
Page 51

18
U kunt kiezen voor de opties Large text, Auto-rotate screen, Speak
passwords,Touch & hold delay time en Install web scripts.
- Developer options
Diverse geavanceerde instellingen voor de tablet.
- About tablet
Aanvullende informatie over de Tablet.
Instruction manual dServe 1005C Multi 14-05-2012 09:11 Pagina 18
Page 52

19
NEDERLANDS
9 Apps Installation
U kunt App's downloaden vande Android Markt en online installeren,
of u kiest voor het installeren van App's vanaf uw Micro SD card of
USB device.Tik simpelweg op de App en kies voor installeren. U kunt
direct na het afronden van de installatie gebruik maken van de App.
10 Introducties van Specifieke Toepassingen
- Browser
Na verbinding te hebben gemaakt met een Wi-Fi netwerk, tikt u op het
Browser icoon op het bureaublad om de web browser te openen.
Het volgende scherm wordt onmiddellijk zichtbaar:
U kunt nu beginnen met surfen op het web.Tijdens het surfen op het web,
tikt u op het menu icoon in de rechter bovenhoek voor meer opties:
New window: voor het openen van een nieuw venster in de browser
Bookmarks: voor het zichtbaar maken van bladwijzers, vaak bezochte
websites en Geschiedenis
Windows: om andere geopende vensters van de browser te zien
Refresh: voor het opnieuw laden van de pagina
More: meer opties zoals “Add bookmark”,“Find on page”,“Select text”,
“Page info”,“Share page”,“Downloads”,“Settings”.
Instruction manual dServe 1005C Multi 14-05-2012 09:12 Pagina 19
Page 53

20
- Calculator
De tablet heeft een ingebouwde rekenmachine.Tik op het Calculator
icoon voor het uitvoeren van uw berekeningen:
- Calendar
Gebruikers kunnen gebruik maken van de kalender om de datum, tijd en
memo's te controleren of memo's toe te voegen etc. U dient aangemeld
te zijn bij een Google-account om hiervan gebruik te kunnen maken.
1 Tik op het Calendar icoon, dan opent zich het venster “New Google
Account”.Tik “Next” om naar de volgende stap te gaan.
2 Indien u nog geen Google Account heeft, tikt u “Create” voor het
aanmaken van een nieuwe Google account. Indien u reeds een
Google Account heeft, tikt u op “Sign in” voor de volgende stap.
3 Typ e-mailadres en wachtwoord, tik op “Next” om verder te gaan.
4 Nadat u de set-up heeft voltooid, sluit het venster automatisch en
keert u terug in het hoofdvenster. Tik opnieuw op het Calendar icoon
om datum en tijd te controleren en memo's toe te voegen etc.Tik
op de Menuknop om te kunnen kiezen uit meer opties zoals 1 Day,
7 Weeks,Agenda,Today, More. Zie het hieronder weergegeven:
Instruction manual dServe 1005C Multi 14-05-2012 09:12 Pagina 20
Page 54

21
- Camera
Tik op het Camera icoon om de applicatie te starten.
De camera bevindt zich rechts bovenaan op de tablet. Richt hiermee
wanneer u een foto of een video maakt.Tik to star t to take photo or
video.
Voor het maken van een foto tikt u op het icoon. Voor het maken
vaneen video tikt u op het icoon.
De foto's of video's worden automatisch opgeslagen in het interne
geheugen, selecteer “File Manager”, en vervolgens “DCIM”.
NEDERLANDS
Instruction manual dServe 1005C Multi 14-05-2012 09:12 Pagina 21
Page 55

22
Selecteer “Camera” om de foto's en video's te zien die u zojuist heeft
gemaakt.
U kunt ook uw oude foto's of video bekijken door te tikken op het foto
icoon in de rechterbovenhoek van het scherm.Wanneer u de foto's of
video's bekijkt, tikt u erop om meer opties te zien zoals slideshow, delete,
share, zoom in/out, clip, rotating, or set as wallpaper etc.
- Clock
Tik op het Clock icoon om de applicatie te starten.
Na het uitvoeren van de Clock applicatie, kunt u de wekker instellen.
Instruction manual dServe 1005C Multi 14-05-2012 09:12 Pagina 22
Page 56

23
NEDERLANDS
- Dev Tools
Development tools meegeleverd met het Android besturingssysteem.
- Downloads
Tik hierop om de download geschiedenis te zien.
- Email
U kunt één of meer persoonlijke e-mailadressen instellen waartoe u
toegang wilt hebben met deze tablet.
Instruction manual dServe 1005C Multi 14-05-2012 09:12 Pagina 23
Page 57

24
Tik op het Email icoon om uw e-mailaccount te configureren overeenkomstig
de procedures. Direct hierna kunt u e-mails ontvangen en verzenden.
Voor het benaderen van e-mail, tikt u op het Email icoon. Indien u slechts 1
e-mailaccount heeft geconfigureerd, zal deze direct worden geopend. Indien u
meerdere accounts heeft geconfigureerd, worden deze getoond in het
Accounts scherm.Tik op de gewenste e-mailaccount.Tik vervolgens op
“Inbox”. Alle e-mails worden nu weergegeven in een lijst.Tik op de e-mail die u
wilt openen. U kunt ook voor Reply, Forward of Delete kiezen.
In het inbox scherm kunt u kiezen voor Compose New Email.Tik op het
menu icon voor meer instellingen van uw e-mailaccount.
- File Manager
Tik op het File Manager icoon om de bestanden opgeslagen op uw
geheugenapparaat te doorzoeken (Lokaal, SD kaart of U-schijf). U kunt de
bestanden rangschikken per categorie.
Tik op het betreffende geheugenapparaat (Lokaal, SD kaart of U-Schijf)
om de bestanden te zien. Gedurende 3 seconden op een bestand
drukken geeft de opties: Delete File, Rename File, Copy File, Move
File en Email File. U kunt de bestanden ook Copy, Move of Paste
Instruction manual dServe 1005C Multi 14-05-2012 09:12 Pagina 24
Page 58

NEDERLANDS
tussen de geheugenapparaten onderling. De opties Delete Folder,
Rename Folder, Copy Folder, Move Folder, Zip Folder maakt u
zichtbaar door gedurende 3 seconden op een map te drukken.
Voor het kopiëren van een bestand, drukt u gedurende 3 seconden op
het bestand, selecteer Copy, vervolgens drukt u 3 seconden op de map
waarnaar u de bestanden wilt kopiëren. Selecteer “Paste into folder”
om uw bestand naar de betreffende folder te kopiëren.
- Play Store
Nadat u op uw Google Account (eerder omschreven) bent ingelogd, tikt
u op het Play Store icoon, en accordeert u de Google Play Terms of
Service om de play shop te bezoeken. U kunt meer App's downloaden
van de Android markt.
Voor het downloaden van App's van de Android markt, tikt u op het
icoon van de App die u wilt downloaden.Volg dan de procedure voor
het downloaden van de App en installeer deze op uw tablet.
- Music
Om muziek te luisteren, tikt u op het Music icoon om de applicatie
op te starten. Alle nummers verschijnen in een lijst.Tik op het gewenste
nummer om
af te spelen.
25
Instruction manual dServe 1005C Multi 14-05-2012 09:12 Pagina 25
Page 59

26
- Search
Zoek naar APK bestanden in uw tablet of zoek online.
Voor online zoeken, dient u op het icoon te tikken.
- Recorder
Voor het opnemen van geluid, tikt u op het Recorder icoon om de
applicatie op te starten. Wanneer de App voor het eerst wordt
opgestart, wordt de autocontrole uitgevoerd. Nadat de autocontrole is
uitgevoerd, tikt u op “Continue” om de applicatie op te starten.
Tik op het icoon om te beginnen met opnemen.
Tik op het icoon om opnemen te stoppen.
Nadat u het opnemen heeft gestopt, zal het systeem de opname
automatisch opslaan.Tik op het opname icoon in de linker bovenhoek
van het scherm om de opname af te spelen die u zojuist heeft gemaakt.
Eerder gemaakte opnames kunt u vinden in de map “Recordings”
binnen de map File Manager.
Instruction manual dServe 1005C Multi 14-05-2012 09:12 Pagina 26
Page 60

27
NEDERLANDS
- Video Player
Voor het afspelen van video's, tikt u op het Video Player icoon om
de applicatie op te starten. Alle video's verschijnen in een lijst.Tik om
de gewenste video om af te spelen.
Instruction manual dServe 1005C Multi 14-05-2012 09:12 Pagina 27
Page 61

28
11 Geforceerd Uitschakelen
In het geval uw tablet bijna leeg is en u er niet in slaagt het apparaat uit te
schakelen volgens de standaard procedures, houdt u de aan/uit schakelaar
gedurende 7 seconden ingedrukt. De tablet schakelt nu uit.
12 Fabrieksinstellingen Resetten
Om de tablet te herstellen naar fabrieksinstellingen en het wissen van alle
persoonlijke informatie, tikt u op “Settings”> “Backup&reset” > “Factory
data reset”.
Waarschuwing: Na het resetten van uw apparaat zijn, Google account, data,
systeem instellingen, en gedownloade applicaties van uw tablet verwijderd.
13 Batterij Beheer
De batterij is in de fabriek niet volledig opgeladen. Het is derhalve
raadzaam de batterij gedurende minstens 6 uur op te laden alvorens het
apparaat te gebruiken. De oplaadbare batterij is geschikt voor frequent
gebruik en om vaak te worden opgeladen. Zoals geldt voor alle lithium
batterijen, vermindert de capaciteit van de batterij elke keer dat hij wordt
opgeladen. U kunt echter proberen de levensduur van de batterij te
verlengen door het opvolgen van de onderstaande suggesties:
- Gebruik de Tablet minstens één maal per week.
- Laad de batterij regelmatig volledig op.
- Laat de batterij nooit gedurende langere tijd volledig ontladen.
- Houd het apparaat en de batterij uit de buurt van warmte en vocht.
14 Opladen van de Batterij
Steek de adapter in een stopcontact en sluit het apparaat aan om de
batterij volledig op te laden voor gebruik.
Wanneer volledig opgeladen, ziet de batterij-icoon er zo uit:
Een volledig lege batterij opladen duurt ongeveer 6 uur, maar u kunt het
Instruction manual dServe 1005C Multi 14-05-2012 09:12 Pagina 28
Page 62

29
NEDERLANDS
apparaat gebruiken terwijl het wordt opgeladen.
Gebruik geen andere adapters dan de meegeleverde, omdat dit kan leiden
tot schade aan de Lithium batterij.
Probeer niet om de tablet te openen om de batterij te vervangen. Dit leidt
tot beschadiging van de tablet en hiermee vervalt de garantie.
15 Belangrijke Veiligheidsinstructies
Volg altijd deze basis veiligheidsinstructies bij het gebruik van de Tablet. Dit
vermindert risico op brand, elektrische schokken of lichamelijk letsel.
- Dit product niet blootstellen aan regen of vocht.
- Houd het apparaat buiten bereik van direct zonlicht en andere
warmtebronnen.
- Plaats geen voorwerpen op het LCD-scherm, Dit kan het LCD scherm
breken of beschadigen.
- Gebruik geen scherpe voorwerpen om het LCD scherm aan te raken,
daar dit krassen op het scherm veroorzaakt.
- Gebruik alleen de AC-adapter meegeleverd met het apparaat. Het
gebruik van andere voedingsadapters kan schade toebrengen aan de
tablet en hiermee vervalt de garantie.
- Probeer niet de tablet te openen om zelf een reparatie uit te voeren.
Dit leidt tot beschadiging van de tablet en hiermee vervalt de garantie.
16 Het Reinigen van uw Apparaat
Om vingerafdrukken of stof van het scherm te verwijderen, raden wij u aan
een zachte, niet-schurende en niet-corrosieve doek te gebruiken voor het
reinigen, zoals een cameralens doek.
Instruction manual dServe 1005C Multi 14-05-2012 09:12 Pagina 29
Page 63

30
Vaak Gestelde Vragen
Android
V: Welk Android OS is op mijn apparaat geïnstalleerd?
A: Android 4.0.3
Basis Functionaliteit
V: Moet ik de batterij opladen alvorens het apparaat in gebruik te nemen?
A: De batterij dient minimaal gedurende 6 uur te worden opgeladen,
maar u kunt het apparaat gebruiken terwijl het wordt opgeladen.
Gebruik de meegeleverde adapter om op te laden.
E-mail
V: Kan ik e-mail verzenden/ontvangen via mijn persoonlijke
e-mailadressen?
A: Het apparaat ondersteunt POP3-accounts. Sommige gratis
e-mailaccounts worden niet ondersteund op mobiele apparaten. Neem
contact op met uw e-mailprovider om na te gaan of uw account wordt
ondersteund.
Geheugen Kaarten
V: Welke geheugenkaarten zijn compatibel met mijn apparaat?
A: Micro SD kaarten.
Muziek
V: Wat voor soort muziekbestanden kan ik afspelen op mijn apparaat?
A: MP2, MP3,WAV, AAC,WMA
V: Hoe kan ik muziekbestanden toevoegen aan mijn apparaat?
A: Kopieer de muziekbestanden van uw pc, Micro SD-kaart of USB-
opslagapparaat direct naar uw apparaat.
Instruction manual dServe 1005C Multi 14-05-2012 09:12 Pagina 30
Page 64

31
NEDERLANDS
Foto's
V: Welk type fotobestanden kan ik bekijken op mijn apparaat?
A: JPEG,BMP,GIF,PNG
V: Hoe kan ik foto's toevoegen aan mijn apparaat?
A: Kopieer de videobestanden van uw pc, Micro SD-kaart of
USB-opslagapparaat direct naar uw apparaat.
Videos
V: Wat voor soort videobestanden kan ik afspelen op mijn apparaat?
A: Video Decoding (Full HD) ondersteunt alle formaten van video, zoals
H. 264, H. 263,VC-1, MPEG-1, 2,4, DIVX-3, 4, 5, 6, XVID, H263, WMV7
/ 8,VP6,AVS, en andere populaire videoformaten.
V: Kan ik YouTube-video's afspelen op mijn apparaat?
A: Ja, u kunt het YouTube-applicatie icoon aantikken om de video's af te
spelen.
V: Hoe kan ik videobestanden toevoegen aan mijn apparaat?
A: Kopieer de videobestanden van uw pc, Micro SD-kaart of USB-
opslagapparaat direct naar uw apparaat.
Wi-Fi
V: Heb ik een Wi-Fi-adapter nodig om verbinding met internet tot stand
te brengen?
A: Nee, de Wi-Fi adapter is ingebouwd in het apparaat.
Instruction manual dServe 1005C Multi 14-05-2012 09:12 Pagina 31
Page 65

1
GERMAN
Gebrauchsanweisung
1 Was kriegen Sie geliefert?
Die nächste Ware sind mitgeliefert bei Ihrem Kauf
- 10.1 Inch Tablett
- Netzteil
- Datenkabel
- Gebrauchsanweisung
2 Erste Schritte
Bitte lesen Sie diese Gebrauchsanweisung sorgfältig, bevor
Ingebrauchnahme Ihrer Tablett, und folgen Sie den Anweisungen wie unten
beschrieben.
3 Das aufladen der Batterie
Das Tablett ist mit einem integrierten Lithium-Akku ausgestattet. Es wird
empfohlen, den Akku vor dem Gebrauch vollständig aufzuladen.Verwenden
Sie nur den mitgelieferten Akku. Der Gebrauch eines anderen Akkus kann
das Tablett beschädigen und hiermit verfällt die Garantie.
Beladungszyclus.
- Verbinden Sie den Adapter auf das Tablett und stecken Sie das Netzteil
an die nächstgelegene Steckdose an.
- Das Tablett kann während des Ladevorgangs normal verwendet
werden.
Instruction manual dServe 1005C Multi 14-05-2012 09:27 Pagina 1
Page 66

2
4 Design und Tasten
1. Kamera
2. ESC
Durch auf die ESC-Taste zu drücken, blättern Sie zurück zu dem letzten
Interface.
3. Kopfhörerausgang
Standard 3.5 mm Kopfhörerausgang
4. HDMI Output Interface
HDMI Ausgang
5. Netzanschluss
1
2
3 4 5 6 7 8
9 10
Instruction manual dServe 1005C Multi 14-05-2012 09:27 Pagina 2
Page 67

3
GERMAN
6. Mini-USB-Anschluss
Mini-USB-Anschluss: um das Tablett auf dem PC an zu schließen für
Datenübertragung, zum aufladen oder zum Herstellen einer Verbindung
mit externen USB-Geräten
7. TF Card Slot
Micro SD card slot
8. USB2.0 Anschluss
Verwende diesen Anschluss um Ihre U-Scheibe oder andere MedienGeräte mit USB 2.0-interface zu lesen.
9. Menü-Taste und Home-Taste
Menü-Taste und Home-Taste. Beide Tasten haben auch die Funktionen
von Volume + und-Volumen (Drücken Sie für 3 Sekunden auf einer der
Tasten um die Lautstärke zu erhöhen oder senken.)
10. An/Aus Schalte
Um das Tablett ein und aus zu schalten
5 Tablett Ein- und Ausschalten
1. Einschalten:Wenn die Batterie voll aufgeladen ist, halten Sie den
Schalter für ca. 3 Sekunden eingedrückt um das Gerät zu aktivieren.
Nach dem Start ist die Bildschirmsperre sichtbar.
2. Ausschalten:Wenn das Tablett eingeschaltet ist, halten Sie den Schalter
für ca. 3 Sekunden eingedrückt und das System wird die Option
‘Ausschalten’ in einem Fenster Sichtbar machen.Tippen Sie hierauf, um
das Tablett zu aus zu schalten.
3. Sperre Bildschirm: Drücken Sie kurz die Ein-/Ausschalter um den
Bildschirm zu sperren.
4. Bildschirm entsperren: schleppen Sie das Schloss nach rechts, zu das
Schloss-Öffnungssymbol um das Bildschirm zu entsperren und zum
Hauptmenü gehen, schleppen Sie das Schloss-Symbol nach der linken
Seite auf das Kamerasymbol um die Kamera zu aktivieren.
Instruction manual dServe 1005C Multi 14-05-2012 09:27 Pagina 3
Page 68

4
Instruction manual dServe 1005C Multi 14-05-2012 09:27 Pagina 4
Page 69

5
GERMAN
Bemerkungen:
- Wenn die Batteriespannung zu niedrig ist, deaktivier t das Tablett selbst
automatisch.
- Wenn das Gerät nicht ordnungsgemäß abgeschlossen ist, wird erneut
starten einen Scan und eine Korrektion der Festplatte im Gang setzen.
Es kann länger dauern um Zugang auf das System zu kriegen.
6 Verbindung mit den PC
1. Verwenden Sie das mitgelieferte USB-Kabel, um das Tablett mit dem
PC zu verbinden. Das USB-Verbindungsfenster wird sichtbar. Um mit
dem PC zu verbinden, tippen Sie auf “Turn on USB storage”. In der
“connection mode” können Sie die Dateien auf dem Gerät und die
Dateien auf dem Speichermedium kopieren oder löschen.
Instruction manual dServe 1005C Multi 14-05-2012 09:27 Pagina 5
Page 70

6
7 Tablett Anwenderschnittstelle
1. Nach den einschalten kommen Sie in das unterstehendes Hauptschirm
2. Im Hauptbildschirm können Sie die Software Symbole verwalten:
Drücken Sie auf ein Symbol für 3 Sekunden, dann können Sie es überall
im Fenster hin schleppen.
3. Entfernen von Symbolen: Drücken Sie für 3 Sekunden auf ein Symbol,
und schleppen Sie das Symbol auf das Symbol “Remove”. Danach
können Sie das Symbol von Ihrem Desktop löschen.
Instruction manual dServe 1005C Multi 14-05-2012 09:27 Pagina 6
Page 71

7
GERMAN
4. Berühren Sie den Bildschirm, und drücken Sie für ca. 4 Sekunden. Das
Fenster “Choose wallpaper from” wird sichtbar, wie unten dargestellt:
Sie können einen Hintergrund aus verschiedenen Quellen wählen und
Ihren Hintergrund ändern.
Instruction manual dServe 1005C Multi 14-05-2012 09:27 Pagina 7
Page 72

8
5. Status bar Funktionen
Von links nach rechts: Zurück zum letzten Menü, Zurück zum HauptMenü, Zuvor ausgeführten Apps zeigen, Menü-Taste, USB
angeschlossen, USB angeschlossen, USB Fehlermeldung,TF-CardInformationen, Zeitmarkierung, Akkusymbole, zeitmarkierung.
6. Kurzanleitung für Tiphandlungen
- Unabhängig davon, welches Fenster aktiv ist, können Sie immer zurück
zum Hauptmenü durch auf der Taste zu tippen, welche sich in
der unteren linken Ecke des Hauptbildschirms befindet.
[Achtung] Die Taste bringt Sie immer zurück zu dem
Hauptmenü.
- Unabhängig davon, welches Fenster aktiv ist, können Sie durch auf die
Taste in der unteren linken Ecke zu tippen immer zum
vorherigen Schirm zurückkehren.
- Unabhängig davon, welches Fenster aktiv ist, können Sie durch in der
unteren linken Ecke des Touchscreens auf die Taste zu tippen das
folgende Schirm aufrufen:
- Tippen Sie auf um eine Liste von
alle zuvor ausgeführten Apps zu sehen.
Instruction manual dServe 1005C Multi 14-05-2012 09:27 Pagina 8
Page 73

9
GERMAN
- In das Hauptmenü können Sie auf das Symbol tippen um alle
Apps zu sehen. Drücken Sie ungefähr 3 Sekunden auf ein App-Symbol,
dann können Sie diese zum Hauptmenü schleppen.
8 Grundeinstellungen
1. WIRELESS & NETWORKS
- Wi-Fi
Tippen Sie auf das Symbol Setting.Tippen Sie dann auf “OFF” um zu
Wi-Fi zu öffnen. Es erscheint eine Liste der verfügbaren WIFI
Netzwerke.Tippen Sie auf das gewünschte WLAN-Netzwerk und
treffen Sie Ihre Wahl. Wenn für das Wi-Fi-Netzwerk kein Kennwort
erforderlich ist, tippen Sie auf “connect” um zu verbinden.Wenn mit
der Wi-Fi Netzwerkverbindung zuvor schon Erfolgreich eine Verbindung
zu Stande gebracht wurde, sind diese Informationen gespeichert. Die
Verbindung wird automatisch hergestellt werden.Wenn Ihr Tablett eine
erfolgreiche Verbindung gemacht hat mit Wi-Fi, wird das Wi-Fi-Symbol
in der Status bar am unteren Rand des Bildschirms sichtbar.
Instruction manual dServe 1005C Multi 14-05-2012 09:27 Pagina 9
Page 74

10
- Data Usage
Wählen Sie diese Option, um mobilen Daten ein-und aus zu schalten
und um eine mobile Datenlimit ein zu stellen.
Instruction manual dServe 1005C Multi 14-05-2012 09:27 Pagina 10
Page 75

11
GERMAN
- More…
Wählen Sie diese Option um den Flugzeug-Modus ein-und aus zu
schalten und um die Ethernet-Verbindung,VPN und mobile Netzwerke
ein zu stellen.
2. DEVICE
- Sound
Einstellungen der Lautstärke, Klingelton & Benachrichtigungen. Sie
können tippen um zu selektieren oder nochmals tippen um zu
deaktivieren für die Vibrations-Funktion und anrufen,Touch-Tönen,
Schirmverriegelungs-Tönen und vibrieren wenn berührt.
Instruction manual dServe 1005C Multi 14-05-2012 09:27 Pagina 11
Page 76

12
- Display
Einstellungen für LCD Bildschirm Helligkeit, Auto-Rotation Bildschirm,
Schlafstand, Schriftgröße, Beschleunigungsmesser Koordination,
Schirmanpassungen.
- Storage
Um den verfügbaren Speicherplatz anzuzeigen, löschen Sie SD-Karte
(internen Speicher-Format) und wählen Sie die Option “enabling media
scanning of external SD card or external USB devices”
Instruction manual dServe 1005C Multi 14-05-2012 09:27 Pagina 12
Page 77

13
GERMAN
[Bemerkungen]:
1. Um die Mikro SD-Karte oder USB-Flash-Treiber sicher zu entfernen,
tippen Sie auf die Option “Unmount SD Card” und bestätigen Sie die
Auswahl. Sie können dann den SD-Karte/USB-Host sicher entfernen.
2. Stellen Sie sicher dass Sie die Optionen “Enable media scanning on
extsd” und “Enable media scanning on usbhost 1” anstreichen. Auf diese
Weise kann Ihrem Tablett die Dateien auf dem externen TF-Karte und
USB-Geräte lesen und zeigen.
- Battery
Dies gibt eine Indikation auf die Zeit, die die Batterie noch Spannung
liefert.
Instruction manual dServe 1005C Multi 14-05-2012 09:27 Pagina 13
Page 78

14
- Apps
Verwalten von Anwendungen.Tippen Sie auf den Mappen (Download,
ON SD CARD, RUNNING oder ALL), und wählen Sie die
Anwendung, die Sie deinstallieren möchten. Öffnen Sie dem nächsten
Schirm.Tippen Sie auf deinstallieren, damit Sie die Anwendung aus dem
Tablett entfernen können.
3. PERSONAL
- Accounts & sync
Für das einstellen der Account- und Synchronisierungsinformationen.
Instruction manual dServe 1005C Multi 14-05-2012 09:27 Pagina 14
Page 79

15
GERMAN
- Location services
Optionen für das einstellen von “Google’s location service” und
“Location & Google search”
- Security
Schirmsicherungs-Einstellungen, Info Besitzer, Encrypt tablet, Make
passwords visible, Device administrators, Unknown sources,Trusted
credentials, Install from SD card.
Instruction manual dServe 1005C Multi 14-05-2012 09:27 Pagina 15
Page 80

16
- Language & keyboard
Sprachauswahl,Texteingabe und Option für die automatische
Fehlerkorrektur.Wählen Sie die gewünschten Tastatur & EingabeMethoden und Einstellungen für Text-zu-Sprache, Cursor
Geschwindigkeit.
- Backup & reset
Optionen für backup & restore, löschen von persönlichen Daten.
Warnung:die Ausführung der Option “Factory data reset”,
löscht alle persönlichen Informationen in den Tablett. Erstellen
Sie eine Sicherungskopie Ihrer persönlichen Daten, bevor Sie
diese Funktion ausführen.
Instruction manual dServe 1005C Multi 14-05-2012 09:27 Pagina 16
Page 81

17
GERMAN
4. SYSTEM
- Date & time
Sie können die Uhr automatisch mit einem Internetzeitserver
synchronisieren, oder Sie können das Datum, die Zeit und die Zeitzone
manuell einstellen, und Sie können auch auswählen, wie die Uhrzeit und
das Datum werden angezeigt.
- Accessibility
Talkback bietet gesprochenes Feedback um blinde Nutzern mit
Sehminderung zu helfen. Sie können diese Anwendung aus dem
Android Market herunterladen.
Instruction manual dServe 1005C Multi 14-05-2012 09:27 Pagina 17
Page 82

18
Sie können auch die Systemeinstellungen ändern. Sie können die
Optionen Large text, Auto-rotate screen, Speak passwords,Touch &
hold delay time und Install web scripts wählen.
- Developer options
Verschiedene erweiterte Einstellungen für das Tablett.
- About tablet
Weitere Informationen über das Tablett.
Instruction manual dServe 1005C Multi 14-05-2012 09:27 Pagina 18
Page 83

19
GERMAN
Sie können jetzt beginnen mit Surfen im Web.Während des Surfens im
Web, tippen Sie auf das Menü-Icon in der oberen rechten Ecke für
weitere Optionen:
New window: um ein neues Fenster im Browser öffnen
Bookmarks: um Lesezeichen, oft besuchte Websites und Geschichte
sichtbar zu machen
Windows: um anderen geöffneten Fenstern des Browsers zu sehen
Refresh: um die Seite erneut zu laden
More: mehrere Optionen so wies “Add bookmark”,“Find on page”,
“Select text”,“Page info”,“Share page”,“Downloads”,“Settings”.
9 Apps Installation
Sie können die Apps von den Android Market herunterladen und
online Installieren, oder Sie entscheiden sich davor die Apps von Ihrem
Mikro SD-Karte oder USB-Gerät zu installieren. Tippen Sie einfach auf
die App und wählen Sie installieren. Unmittelbar nach Abschluss der
Installation können Sie die App verwenden.
10 Einleitungen Bestimmter Anwendungen
- Browser
Nachdem die Verbindung mit einem Wi-Fi-Netzwerk hergestellt ist,
tippen Sie auf das Browser-Icon auf dem Desktop um den
Webbrowser zu öffnen. Der nächste Schirm wird sofort sichtbar:
Instruction manual dServe 1005C Multi 14-05-2012 09:27 Pagina 19
Page 84

20
- Calculator
Das Tablett hat einen integrierten Taschenrechner.Tippen Sie auf das
Taschenrechner-Symbol für Ihre Berechnungen:
- Calendar
Benutzer können den Kalender verwenden, um das Datum, die Uhrzeit und
Memos zu kontrollieren oder Memos hinzu zu fügen usw. Sie müssen
angemeldet sein, mit einem Google-Account um dies verwenden zu
können.
1 Tippen Sie auf das Calendar-Symbol, dann öffnet sich das Fenster “New
Google Account”.Tippen Sie “Next” um zu dem nächsten Schritt zu gehen.
2 Wenn Sie noch keinem Google Account haben, tippen Sie “Create” um ein
neues Google Account her zu stellen.Wenn Sie bereits ein Google Account
haben, tippen Sie auf “Sign in” für den nächsten Schritt.
3 Tippen Sie die e-Mail-Adresse und das Passwort, tippen Sie “Next” um
fortzufahren.
4 Nachdem Sie den Setup abgeschlossen haben, schließt das Fenster
automatisch und kehren Sie zurück in das Hauptfenster. Tippen Sie erneut
auf das Calender-Symbol, um Datum und Uhrzeit zu kontrollieren und für
das Hinzufügen von Notizen usw.Tippen Sie auf die Menü-Taste, um
weitere Optionen wie z. B. 1 Day, 7 Weeks,Agenda,Today, More. Siehe das
unten gezeigtes:
Instruction manual dServe 1005C Multi 14-05-2012 09:27 Pagina 20
Page 85

21
GERMAN
- Camera
Tippen Sie auf das Camera-Symbol, um die Anwendung zu starten.
Die Kamera befindet sich oben rechts auf das Tablett. Richten Sie
hiermit, wenn Sie ein Foto oder ein Video machen.Tippen Sie ,
wenn Sie ein Foto oder ein Video machen möchten.
Tippen Sie für das machen eines Fotos auf das Symbol. Tippen
Sie für das machen eines Videos auf das Symbol.
Die Fotos oder Videos werden automatisch in den internen Speicher
gespeichert. Wählen Sie “File-Manager” und dann “DCIM”.Wählen Sie
“Camera” um die Fotos und Videos, die Sie gerade gemacht haben, zu
sehen.
Instruction manual dServe 1005C Multi 14-05-2012 09:27 Pagina 21
Page 86

22
Sie können sich auch Ihre alten Fotos oder Video anschauen, indem Sie
auf das Fotosymbol in der oberen rechten Ecke des Schirms tippen.
Beim Blick auf die Fotos oder Videos, tippen Sie darauf für weitere
Optionen, so wie slideshow, delete, share, zoom in/out, clip, rotating,
oder set as wallpaper usw.
- Clock
Tippen Sie auf das Clock-Symbol um die Anwendung zu starten.
Nachdem Sie die Clock-Anwendung ausgeführt haben, können Sie
den Alarm einstellen.
Instruction manual dServe 1005C Multi 14-05-2012 09:27 Pagina 22
Page 87

23
GERMAN
- Dev Tools
Entwicklungs-Tools mit Android-Betriebssystem enthalten.
- Downloads
Tippen Sie hierauf um die Herunterlandungsgeschichte zu sehen.
- Email
Sie können eine oder mehrere persönliche E-Mail Adressen einrichten,
womit Sie Zutritt auf diesem Tablett haben möchten.
Instruction manual dServe 1005C Multi 14-05-2012 09:27 Pagina 23
Page 88

24
Tippen Sie auf das E-Mail-Symbol um Ihre E-Mail-Account in Einklang mit der
Prozedur zu konfigurieren.
Danach können Sie Ihre E-Mails direkt senden und empfangen.
Tippen Sie für den Zugriff auf E-Mail auf das E-Mail-Symbol. Wenn Sie nur 1
E-Mail-Account konfiguriert haben, öffnet dieser direkt.Wenn Sie mehrere
Accounts konfiguriert haben, werden diese in den Account-Schirm angezeigt.
Tippen Sie auf das gewünschte E-Mail-Account.Tippen Sie dann auf “Inbox”.
Alle E-Mails werden in einer Liste angezeigt.Tippen Sie auf die E-Mail, die Sie
öffnen möchten. Sie können auch Reply,Forward oder Delete wählen. Sie
können im Inbox-Schirm Compose New Email wählen.Tippen Sie auf das
Menüsymbol für weitere Einstellungen Ihres E-Mail-Accounts.
- File Manager
Tippen Sie auf das File Manager-Symbol um die auf Ihr Speichergerät
gespeicherten Dateien zu durchsuchen (Lokal, SD-Karte oder U-Scheibe). Sie
können die Dateien nach Kategorie anordnen.
Tippen Sie auf das entsprechenden Speichergerät (lokal, SD-Karte oder UScheibe), um die Dateien anzuzeigen. Für 3 Sekunden auf eine Datei drücken
gibt die Optionen: Delete File,Rename File, Copy File, Move File und
E-Mail File. Sie können die Dateien auch Copy, Move oder Paste
zwischen den Speichergeräten selbst. Die Optionen Delete Folder, Rename
Instruction manual dServe 1005C Multi 14-05-2012 09:27 Pagina 24
Page 89

25
GERMAN
Folder, Copy Folder, Move Folder, Zip Folder machen Sie sichtbar, indem Sie
für 3 Sekunden auf einer Mappe drücken. Selektieren Sie Copy, und dann
drücken Sie 3 Sekunden lang auf die Mappe, wonach Sie die Dateien kopieren
möchten.Wählen Sie “Paste into Folder” um die Datei zu der
entsprechenden Mappe zu kopieren.
How to copy file: to copy a file: tap on the file and hold it for 3 seconds, select
Copy, then tap&hold on the folder which your file needs to be copied into,
select “Paste into folder” to copy your file into that folder.
- Play Store
Nachdem Sie auf Ihrem Google-Account (wie zuvor beschrieben) angemeldet
sind, tippen Sie auf das Play Store-Symbol, und akkordieren Sie den Google
Play Terms of Service um den Play Store zu besuchen.Von der Android
Market können Sie mehr Apps herunterladen.
Um Apps aus dem Android Market herunter zu laden, tippen Sie auf das
Symbol der App, die Sie herunterladen möchten. Dann verfolgen Sie den
Prozedur für das herunterladen der App und installieren Sie diese auf Ihrem
Tablett.
- Music
Um Musik zu hören, tippen Sie auf das Music-Symbol um der Anwendung
zu Starten. Alle Titel werden in einer Liste angezeigt.Tippen Sie auf den
gewünschten Song, um diese ab zu spielen
Instruction manual dServe 1005C Multi 14-05-2012 09:27 Pagina 25
Page 90

26
- Search
Um zu suchen nach APK Dateien in Ihrem Tablett oder für Online
suchen, sollen Sie auf das -Symbol tippen.
- Recorder
Für Sound-Aufnahme, tippen Sie auf das Recorder-Symbol, um die
Anwendung zu starten. Wenn die App zum ersten Mal startet, wird
Auto-Kontrolle durchgeführt werden. Nachdem die Auto-Kontrolle
ausgeführt ist, tippen Sie auf “Continue”, um die Anwendung zu starten.
Tippen Sie auf das Symbol, um die Aufnahme zu starten.
Tippen Sie auf das Symbol, um die Aufnahme zu beenden.
Nachdem Sie die Aufnahme beendet haben, speichert das System
automatisch die Aufnahme.Tippen Sie auf das Aufnahme-Symbol in der
oberen linken Ecke des Schirms, um die gerade gemachte Aufnahme ab
zu spielen.
Zuvor erstellte Aufnahmen können Sie in die Mappe “Recordings” in
der File Manager Mappe finden
Instruction manual dServe 1005C Multi 14-05-2012 09:27 Pagina 26
Page 91

27
GERMAN
- Video Player
Tippen Sie für die Wiedergabe von Videos auf das Video PlayerSymbol, um die Anwendung zu starten. Alle Videos erscheinen in einer
Liste.Tippen Sie auf das gewünschte Video um diese ab zu spielen.
Instruction manual dServe 1005C Multi 14-05-2012 09:27 Pagina 27
Page 92

28
11 Forciert Ausschalten
Wenn Ihre Tablett fast leer ist und Sie das Gerät nicht über den Standard
Prozedur ausschalten können, behalten Sie den An/Ausschalter für 7
Sekunden eingedruckt. Das Tablett schaltet jetzt aus.
12 Betriebseinstellungen Resetten
Um das Tablett zurück zu setzen auf die Betriebseinstellungen und um alle
persönlichen Daten zu löschen, tippen Sie auf “Settings” ? “Backup&reset” ?
“Factory Data reset”.
Warnung: Nach dem resetten von Ihrem Gerät, sind Google-Account,
Daten, Systemeinstellungen und heruntergeladenen Anwendungen gelöscht
von Ihrem Tablett.
13 Batterie Verwaltung
Die Batterie ist in den Fabrik nicht voll aufgeladen, daher ist es ratsam, die
Batterie, vor der Verwendung des Geräts, mindestens 6 Stunden aufzuladen.
Der Akku ist geeignet für den häufigen Einsatz und um oft wieder
aufgeladen zu werden.Wie bei allen Lithium-Batterien, reduziert die
Kapazität der Batterie jedes Mal, wenn er aufgeladen wird.Allerdings können
Sie versuchen, die Lebensdauer der Batterie zu verlängern, indem Sie die
folgenden die folgenden Vorschläge verfolgen:
- Benutze das Tablett mindestens einmal pro Woche.
- Lade die Batterie regelmäßig ganz auf.
- Lade die Batterie nie für längere Zeit ganz entladen.
- Halte das Gerät und den Akku von Hitze und Feuchtigkeit.
14 Aufladen der Batterie
Stecken Sie den Adapter in eine Steckdose und verbinden Sie das Gerät an
um den Akku vor dem Gebrauch vollständig aufzuladen. Sie können auch
den Akku mit dem USB-Kabel aufladen. Bei voller Aufladung, sieht das Akku-
Instruction manual dServe 1005C Multi 14-05-2012 09:27 Pagina 28
Page 93

29
GERMAN
Symbol so aus:
Eine komplett leere Batterie aufladen dauert etwa 6 Stunden, aber Sie
können Ihr Gerät verwenden, während es aufgeladen wird. Verwenden Sie
nicht anders als die mitgelieferten Adapter, da dies zu Schäden an der
Lithium-Batterie führen kann.
Versuchen Sie nicht das Tablett zu öffnen um den Akku zu ersetzen. Dies
führt zu Schädigung der Tablett und zum verfallen der Garantie.
15 Wichtige Sicherheitshinweise
Befolgen Sie immer diese grundlegende Sicherheitshinweise bei der
Verwendung des Tabletts. Dies verringert die Gefahr von Feuer,
Stromschlägen oder Verletzungen.
- Dieses Gerät nicht aussetzen an Regen oder Feuchtigkeit.
- Halten Sie das Gerät entfernt von direktem Sonnenlicht oder anderen
Wärmequellen.
- Keine Gegenstände auf dem LCD-Bildschirm stellen, weil dies den
LCD-Bildschirm kann brechen oder beschädigen.
- Verwenden Sie keine scharfe Gegenständen um das LCD Bildschirm zu
berühren, da dies Kratzer auf dem Bildschirm verursacht.
- Verwenden Sie nur den mitgelieferten Netzadapter. Die Verwendung
anderer Netzteile kann das Tablett beschädigen und damit verfällt die
Garantie.
- Versuchen Sie nicht um das Tablett selbst zu öffnen um eine Reparatur
durchzuführen. Dies führt zu Beschädigung an das Tablett und zum
verfallen der Garantie.
16 Die Reinigung Ihres Apparates
Zum Entfernen von Fingerabdrücken oder Staub vom Bildschirm,
empfehlen wir eine weiche, nicht-reibender und nicht korrosiver Tuch
zu verwenden für Reinigung, wie z. B. einem Kamera-Objektiv-Tuch.
Instruction manual dServe 1005C Multi 14-05-2012 09:27 Pagina 29
Page 94

30
Häufig gestellte Fragen
Android
F: Welchem Android OS ist auf mein Gerät installiert?
A: Android 4.0.3
Grundfunktionen
F: Soll ich den Akku aufladen bevor ich das Gerät in Gebrauch nehme?
A: Der Akku soll für mindestens 6 Stunden aufgeladen werden, aber Sie
können das Gerät benutzen weil es aufgeladen wird.Verwende den
mitgelieferten Adapter um auf zu laden. Dieses Gerät kann aufgeladen
werden mit der USB-Kabel.
E-Mail
F: Kann ich E-Mail schicken/empfangen über meine persönliche E-Mail
Adressen?
A: Das Gerät unterstutzt POP3-Accounts. Manche Gratis E-Mail Accounts
werden nicht unterstutzt auf Mobilgeräte. Kontaktieren Sie Ihren E-Mail
Provider um zu sehen ob Ihre Account unterstützt wird.
Speicherkarten
F: Welche Speicherkarten sind kompatibel mit meinem Gerät?
A: Mikro SD Karten.
Musik
F: Welche Art von Musik-Dateien kann ich auf meinem Gerät abspielen?
A: MP2, MP3,WAV, AAC,WMA
F: Wie kann ich Musik-Dateien an meinem Gerät hinzufügen?
A: Kopieren Sie die Musikdateien von Ihrem pc, Mikro SD-Karte oder
USB-Speichergerät, direkt auf Ihr Gerät.
Instruction manual dServe 1005C Multi 14-05-2012 09:27 Pagina 30
Page 95

31
GERMAN
Häufig gestellte Fragen
Fotos
F: Welche Art von Fotodateien kann ich auf meinem Gerät anschauen?
A: JPEG,BMP,GIF,PNG
F: Wie kann ich Fotos an meinem Gerät hinzufügen?
A: Kopieren Sie die Fotodateien von Ihrem pc, Mikro SD-Karte oder USB-
Speichergerät, direkt auf Ihr Gerät.
Videos
F: Welche Art von Video-Dateien kann ich auf meinem Gerät abspielen?
A: Video Decoding (Full HD) unterstützt alle Video-Formate, so wie H.
264, H. 263,VC-1, MPEG-1, 2,4, DIVX-3, 4, 5, 6, XVID, H263,WMV7 / 8,
VP6, AVS, und andere beliebte Video-Formate.
F: Kann ich YouTube-Videos abspielen auf meinem Gerät?
A: Ja, Sie können das YouTube-Anwendungs-Symbol antippen um die
Videos ab zu spielen.
F: Wie kann ich Videodateien an meinem Gerät hinzufügen?
A: Kopieren Sie die Videodateien von Ihrem pc, Mikro SD-Karte oder
USB-Speichergerät, direkt auf Ihr Gerät.
Wi-Fi
F: Brauche ich einem Wi-Fi-Adapter um Verbindung ins Internet zu
bekommen?
A: Nein, der Wi-Fi-Adapter ist im Gerät eingebaut
Instruction manual dServe 1005C Multi 14-05-2012 09:27 Pagina 31
Page 96

1
FRENCH
Manuel d’instruction
1 Ce qui est inclus
Les éléments suivants sont livrés avec votre achat :
- Tablet PC 10,1 pouces
- Adaptateur d’alimentation
- Câble USB
- Mode d’emploi
2 Mise en route
Avant d’utiliser votre Tablet PC pour la première fois, lisez attentivement ce
manuel et suivez les instructions ci-dessous.
3 Chargement de la batterie
La Tablet PC est équipée d’une batterie au lithium, intégrée et rechargeable.
Il est recommandé de charger complètement la batterie avant l’utilisation.
Utiliser uniquement l’adaptateur d’alimentation inclus dans la livraison, un
autre adaptateur pourrait endommager la Tablet PC et annuler la garantie.
Processus de chargement
Charging Process
- Branchez l’adaptateur à votre Tablet PC, et branchez l’adaptateur
d’alimentation sur la prise électrique la plus proche.
- La Tablet PC peut être utilisée sans problèmes pendant son
chargement.
Instruction manual dServe 1005C Multi 14-05-2012 09:35 Pagina 1
Page 97

1
2
3 4 5 6 7 8
9 10
2
4 Aspect visuel et boutons
1. Caméra
2. ESC
Utiliser le bouton ESC pour revenir à la fenêtre précédente.
3. Branchement casque
Branchement d’écouteurs standard (3,5 mm)
4. Sortie HDMI
Sortie HDMI
5. Prise d’alimentation
6. Mini port USB
Mini port USB : permet de vous connecter à un PC pour la
Instruction manual dServe 1005C Multi 14-05-2012 09:35 Pagina 2
Page 98

3
FRENCH
transmission de données, le téléchargement ou la connexion avec des
périphériques USB externes.
7. Fente pour carte TF
Emplacement pour carte Micro SD
8. USB2.0 Port
Utilisez-le pour lire votre Disque externe ou d’autres périphériques
avec interface USB2.0
9. Bouton Menu & Accueil
Bouton Menu et Retour à l’accueil. Les deux boutons peuvent aussi
avoir les fonctions de Volume + et Volume - (appuyez sur un des
boutons pendant 3 secondes pour augmenter ou diminuer le volume
sonore.)
10. Bouton de démarrage
Allumer / Eteindre la Tablet PC
5 Allumer / Eteindre la Tablet PC
1. Allumer : après que la batterie est complètement chargée, cliquez et
maintenez le bouton de démarrage pendant environ 3 secondes pour
allumer l’appareil. Le verrouillage de l’écran sera affiché après le
démarrage.
2. Eteindre : lorsque la Tablet PC est allumée, cliquez et maintenez
l’interrupteur d’alimentation pendant environ 3 secondes et le système
affichera l’option « Arrêter » dans une fenêtre, cliquez pour éteindre la
Tablet PC.
3. Verrouiller l’écran : appuyez et relâchez rapidement le Bouton de
démarrage.
4. Déverrouiller l’écran : glissez l’icône de verrouillage vers la droite sur
l’icône de déverrouillage afin d’accéder à la fenêtre principale ; glissez
l’icône de verrouillage vers la gauche sur l’icône caméra pour activer la
caméra.
Instruction manual dServe 1005C Multi 14-05-2012 09:35 Pagina 3
Page 99

4
Instruction manual dServe 1005C Multi 14-05-2012 09:35 Pagina 4
Page 100

5
FRENCH
Remarques:
- Lorsque la batterie est déchargée, la Tablet PC s’éteint
automatiquement.
- Si vous n’éteignez pas l’appareil correctement, le redémarrage
entraînera l’analyse et la restauration du disque, ce qui peut prendre
plus de temps pour accéder au système.
6 Connection with PC
Utilisez le câble USB fourni à la livraison pour connecter la Tablet PC
au PC, la fenêtre de connexion USB apparaîtra ; cliquez sur « Turn on
USB storage » our se connecter au PC, dans le mode de connexion
vous pouvez copier ou supprimer le fichier sur le périphérique ou sur
le dispositif de mémoire.
Instruction manual dServe 1005C Multi 14-05-2012 09:35 Pagina 5
 Loading...