

DSE XH6830 Installation Manual
XH6830
DSE 802.11g ADSL Router
Installation Guide
V1.0 – Last Updated on 05/04/04 by Julius Spencer – © Copyright 2004- DSE(NZ)Ltd

1
Life Support Ap p l i c a t i o n s
This product is not designed for use in life support appliances, devices, or systems where
malfunction of the product can reasonably be expected to result in personal injury. Customers
using this product for use in such applications do so at their own risk and agree to fully indemnify
DSE(NZ)Ltd for any damages resulting from such improper use or sale.
Warning
This is a Class B product. In a domestic environment, this product may cause radio interference
in which case the user may be required to take adequate measures.
Telepermit Note
The grant of a Telepermit for any item of terminal equipment indicates only that Telecom has
accepted that the item complied with minimum conditions for connection to its network. It
indicates no endorsement of the product by Telecom, nor does it provide any sort of warranty.
Above all, it provides no assurance that any item will work correctly in all respects with another
item of Telepermitted equipment of a different make or model, nor does it imply that any product
is compatible with all of Telecom’s network services.
Manual Versions
Date Version Author Changes
12 / 01 / 04 1.0 Julius Spencer Original version

XH6830 – DSE 802.11g ADSL Router
2
Contents
1 INTRODUCTION .................................................................................................................4
1.1 P
1.2 M
2 FEATURES & SPECIFICATIONS.......................................................................................5
3 PANEL DESCRIPTION.......................................................................................................7
3.1 F
3.2 R
4 HARDWARE INSTALLATION ............................................................................................9
4.1 C
4.2 C
4.3 C
4.4 C
5 NETWORK SETTINGS CONFIGURATION .....................................................................12
5.1 W
5.2 W
6 DEVICE ADMINISTRATION .............................................................................................15
6.1 W
6.2 Q
7 ADVANCED SETTINGS MENU........................................................................................21
7.1 D
7.2 A
7.3 WAN ...........................................................................................................................26
7.4 LAN ............................................................................................................................32
7.5 W
7.6 A
7.7 MAC F
7.8 S
7.9 LAN PC M
7.10 URL B
7.11 V
7.12 DMZ........................................................................................................................53
7.13 A
7.14 D
ACKAGE CONTENTS
INIMUM SYSTEM REQUIREMENTS
RONT PANEL
EAR PANEL
ONNECTING THE ROUTER TO YOUR NETWORK
ONNECTION TO POWER SUPPLY
ONNECTION TO
..................................................................................................................8
4.3.1 Make sure ADSL service is activated
4.3.2 Configure your phone equipment
4.3.3 Option 1: Install ADSL Filter/s yourself
4.3.4 Option 2: Have an ADSL splitter professionally installed
ONNECTION TO
INDOWS
INDOWS
EB BASED CONFIGURATION
UICK SETUP
EVICE INFO
DMINISTRATION
7.2.1 System Settings ..................................................................................................23
7.2.2 Administrator .......................................................................................................24
7.2.3 Upgrade Firmware ..............................................................................................24
7.2.4 Miscellaneous Commands ..................................................................................24
IRELESS
7.5.1 Info ......................................................................................................................34
7.5.2 Basic ...................................................................................................................35
7.5.3 Security ...............................................................................................................37
7.5.4 Association..........................................................................................................39
7.5.5 Advanced ............................................................................................................40
7.5.6 802.1x .................................................................................................................41
CCESS CONTROL
ERVICE TIME
98/ME C
NT/2000/XP C
................................................................................................................21
(802.11G)...................................................................................................34
ILTER
................................................................................................................45
ANAGEMENT
LOCKING
IRTUAL SERVER
UTO
2-W
AY APPLICATIONS
YNAMIC
DNS .........................................................................................................56
......................................................................................................4
..................................................................................4
................................................................................................................7
................................................................9
...................................................................................9
WAN .................................................................................................10
...........................................................10
..................................................................10
.........................................................10
..........................11
LAN...................................................................................................12
ONFIGURATION
ONFIGURATION
...............................................................................................................17
..........................................................................................................23
........................................................................................................43
..............................................................................................................46
................................................................................................49
........................................................................................................50
......................................................................................................51
...............................................................................13
.....................................................................14
.......................................................................................15
.....................................................................................55

3
7.15 UPNP ......................................................................................................................57
8 ABOUT WI-FI ....................................................................................................................58
8.1 WI-F
8.2 WI-FI CERTIFIED = C
8.3 WI-FI C
8.4 W
9 TROUBLESHOOTING ......................................................................................................60
10 FREQUENTLY ASKED QUESTIONS...........................................................................64
11 SUPPORT......................................................................................................................66
12 WARRANTY ..................................................................................................................66
13 GLOSSARY OF TERMS ...............................................................................................66
14 HOTSPOTS IN NEW ZEALAND ...................................................................................71
I IS FREEDOM
ONNECTS YOU
HO CAN USE WI-FI
.......................................................................................................58
ONFIDENCE
..................................................................................................58
? .................................................................................................59
...............................................................................58

XH6830 – DSE 802.11g ADSL Router
4
1
Introduction
Thank you for purchasing the DSE 802.11g ADSL router. This product is the perfect option to
connect a group of wired or wireless PCs to a high-speed ADSL Internet connection.
Configurable as a DHCP server for your existing network, this router acts as the only externally
recognized Internet gateway on your local area network (LAN) or wireless local area network
(WLAN) and serves as an Internet NAT firewall against unwanted outside intruders. This router
can also be configured to filter users by MAC address, provide a level of security using Wired
Equivalent Privacy (WEP) and control internal users’ access to the Internet.
A typical router relies on a hub or a switch to share its Internet connection, but this Wireless
Router channels this connection through the blazing, full duplex speed of its built-in 4-Port
10/100Mbps Switch. This cutting-edge combination of Wireless Router and switch technology
eliminates the need to buy an additional hub or switch and extends the range of your wireless
network.
1.1 Package Contents
Carefully unpack and remove the contents. If any of the following items are missing or damaged,
contact the Dick Smith Electronics store you purchased the device from.
• 1 x XH6830 DSE 802.11g ADSL router
• 1x Power adapter
• 1 x RJ-11 Cable
• 1 x RJ-11 to BT Adapter
• 1 x RJ-45 Cable
• Vertical Stand Supports
• Installation CD
• This installation guide
• Quick Start Guide
1.2 Minimum System Requirements
• Pentium class computer, 200 MHz or higher with a network card or a 802.11b/g adaptor
• Any operating system or computer capable of 10Mbps or 100Mbps, Simplex or Duplex
connection with support for TCP/IP. HTTP browser and FTP client required for web
access and firmware upgrading respectively
• One ADSL enabled telephone line and account with an ISP
• One splitter or one filter (XH7556) for each telephone connected in the home
• A Java capable web browser

5
2 Features & Specifications
• Web-based setup for installation and management.
• Built in 4 x 10/100 Mbps Switch port for LAN connection.
• One 10/100Mbps WAN port for cable/xDSL modem connection.
• 802.11g wireless networking, with the ability to operate in 802.11g-only or 802.11b+g
modes.
• OFDM modulation with data rate up to 54Mbps.
• 64-bit and 128-bit WEP encryption security.
• Support full-duplex 802.3 flow control.
• Compliant with IEEE 802.3/802.3u and auto-negotiation.
• Support packet filtering functionality (To/From WAN).
• Flash memory for firmware upgrade.
• Hardware Reset button for fast default setting recovery.
• LED indicator indicates connection status.
• IEEE 802.11g standard compliant.
• Operate in 802.11g-only or 802.11b+g modes, providing backwards compatibility with
802.11b devices or dedicating the wireless network to the higher bandwidth 802.11g 54
-Mbps devices.
• Wireless access can be restricted by MAC address.
• Wireless network name broadcast can be turned off so that only devices that have the
net- work name (SSID) can connect.
• Blocks unwanted traffic from the Internet to your LAN.
• Blocks access from your LAN to Internet locations or services that you’d specified.
• Logs security incidents. The Wireless Router will log security events such as blocked
incoming traffic, port scans, attacks, and administrator logins.
• Extensive Protocol Support
• IP Address Sharing by NAT. The Wireless Router allows several networked PCs to
share an Internet account using only a single IP address, which may be statically or
dynamically assign -ed by your Internet service provider (ISP).

XH6830 – DSE 802.11g ADSL Router
6
•
•
•
•
•
Automatic Configuration of DHCP. The Wireless Router dynamically assigns network
configuration information, including IP Address, WAN Gateway, Domain Name Server
( DNS ) Addresses, … etc. This greatly simplifies configuration of PCs on your local
network.
Dynamic DNS. This is a method of keeping a domain name linked to a changing IP
Address as not all computers use Static IP addresses. Typically, when a user connects
to the Internet, the user's ISP assigns an unused IP address from a pool of IP
addresses, and this address is used only for the duration of that specific connection.
PPP over Ethernet (PPPoE). PPPoE is a method for the encapsulation of PPP packets
over Ethernet frames from the user to the ISP over the Internet. One reason PPPoE is
preferred by ISPs is because it provides authentication (username and password) in
addition to data transport. A PPPoE session can be initiated by either a client application
residing on a PC, or by client firmware residing on a modem or router.
PPTP (Point-to-Point Tunneling Protocol) – PPTP is a protocol (set of communication
rules) that allows corporations to extend their own corporate network through private
"Tunnels" over the public Internet. Effectively, a corporation uses a wide-area network
as a single large local area network. A company no longer needs to lease its own lines
for wide-area communication but can securely use the public networks. This kind of
interconnection is known as a virtual private network.
Support UPnP. Universal Plug and Play (UPnP) enhances peer-to-peer network
connectivity for personal computers, wireless devices, and other intelligent appliances,
in a distributed, open networking architecture. UPnP provides an architectural
framework for creating self-configuring, self-describing devices and services. Networks
managed by UPnP require no configuration by users or network administrators because
“UPnP” supports automatic discovery. UPnP enables a device to dynamically join a
network, obtain an IP address, and convey its capabilities on request.
•
•
•
•
•
Easy Installation and Management
Quick Setup. The Quick Setup is meant to help you install the product quickly and
easily.
Browser-based management. Browser-based configuration allows you to easily
configure your router from almost any type of personal computer, such as Windows,
Macintosh, or Linux.
Visual monitoring. The Wireless Router’s front panel’s LEDs provide an easy way to
monitor the connection status and activity.
NZ Telepermit: PTC 272/04/001
7
3 Panel Description
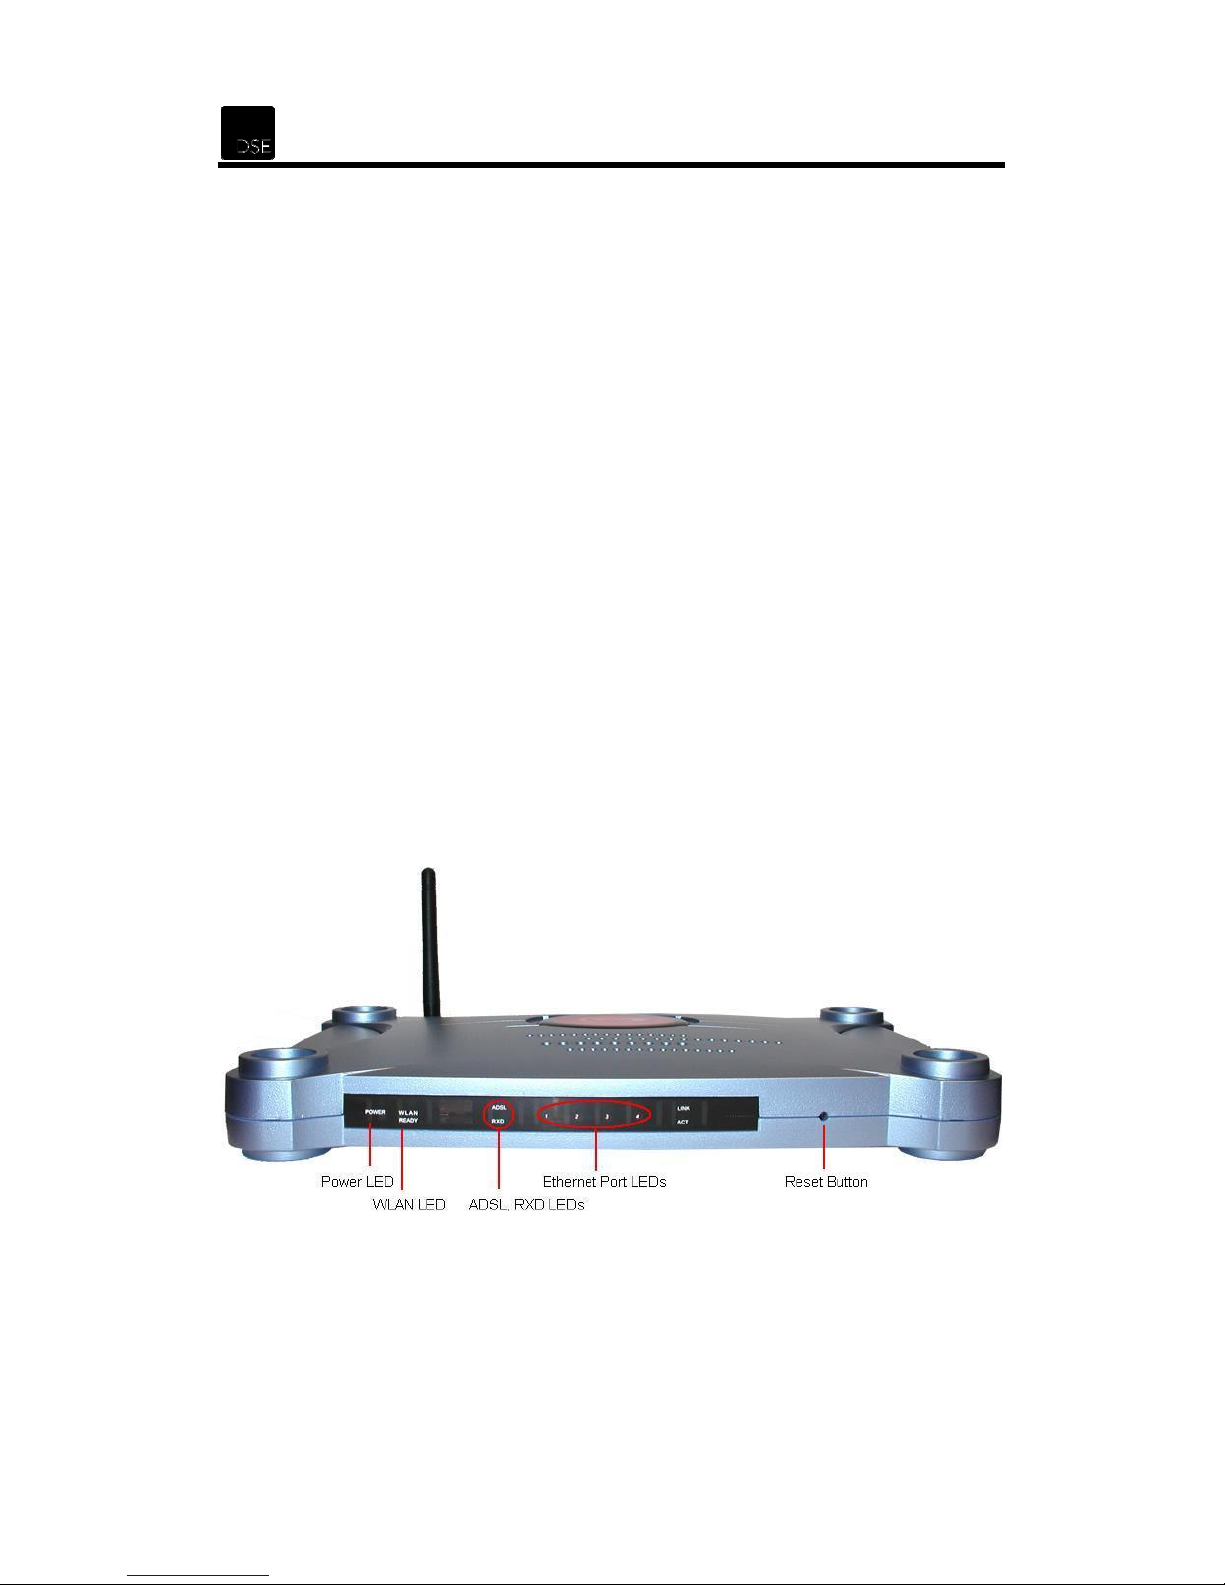
3.1 Front Panel
The router’s front panel’s LEDs provide an easy way to monitor the connection status and
activity.
• POWER: Lights up when the router is powered on.
• WLAN READY: Lights up when the wireless communication is active.
• ADSL: Steady green light indicates a valid ADSL connection. This light will blink during
the ADSL negotiation process.
•
•
•
•
•
•
RXD: Blinks when the router is actively sending/receiving data.
1: Blinks when the router is actively sending/receiving data.
2: Blinks when the router is actively sending/receiving data.
3: Blinks when the router is actively sending/receiving data.
4: Blinks when the router is actively sending/receiving data.
Reset: Press for 10 seconds to restore the router factory default settings.
XH6830 – DSE 802.11g ADSL Router
8
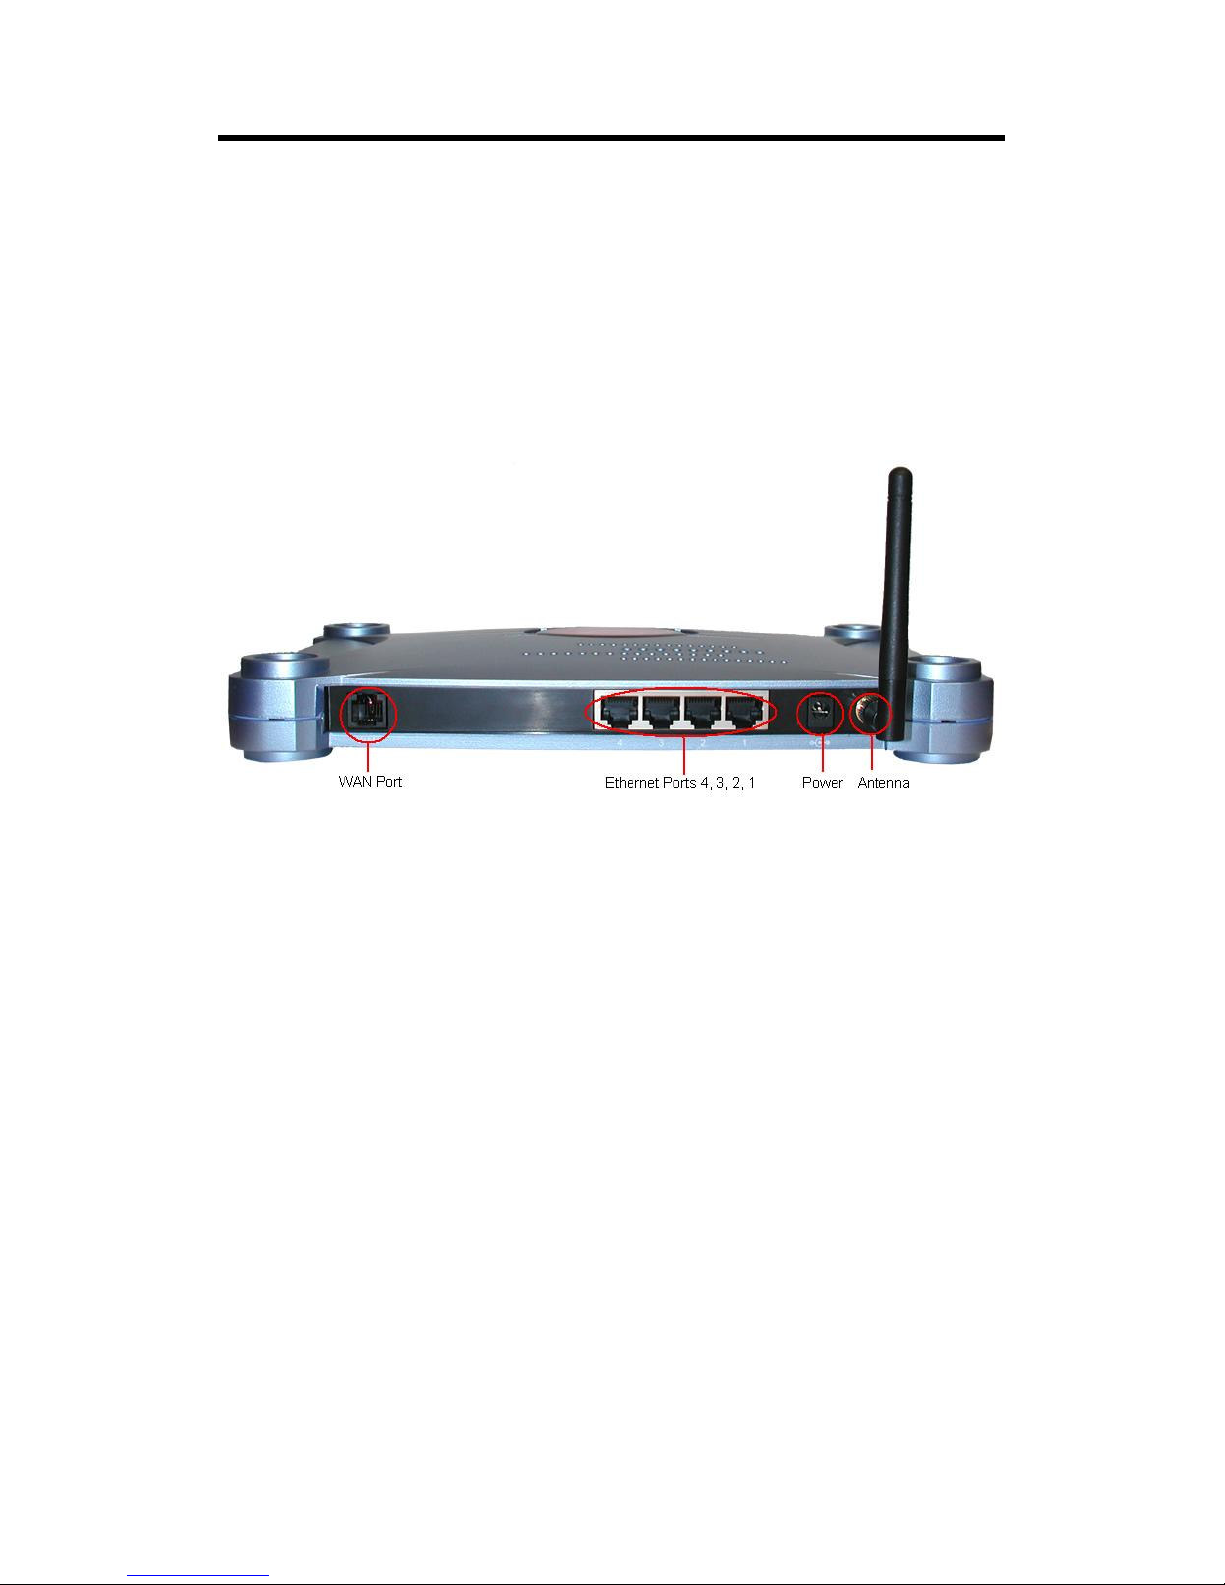
3.2 Rear Panel
The router’s rear panel provides the following connections.
•
•
•
•
WAN: Connects to an ADSL enabled telephone line through a filter/splitter.
Ports 1~4: Connects to a network device. Supports auto crossover functionality.
Power: Connects to the AC/DC power adaptor.
Antenna: The antenna connects here.
9
4 Hardware installation
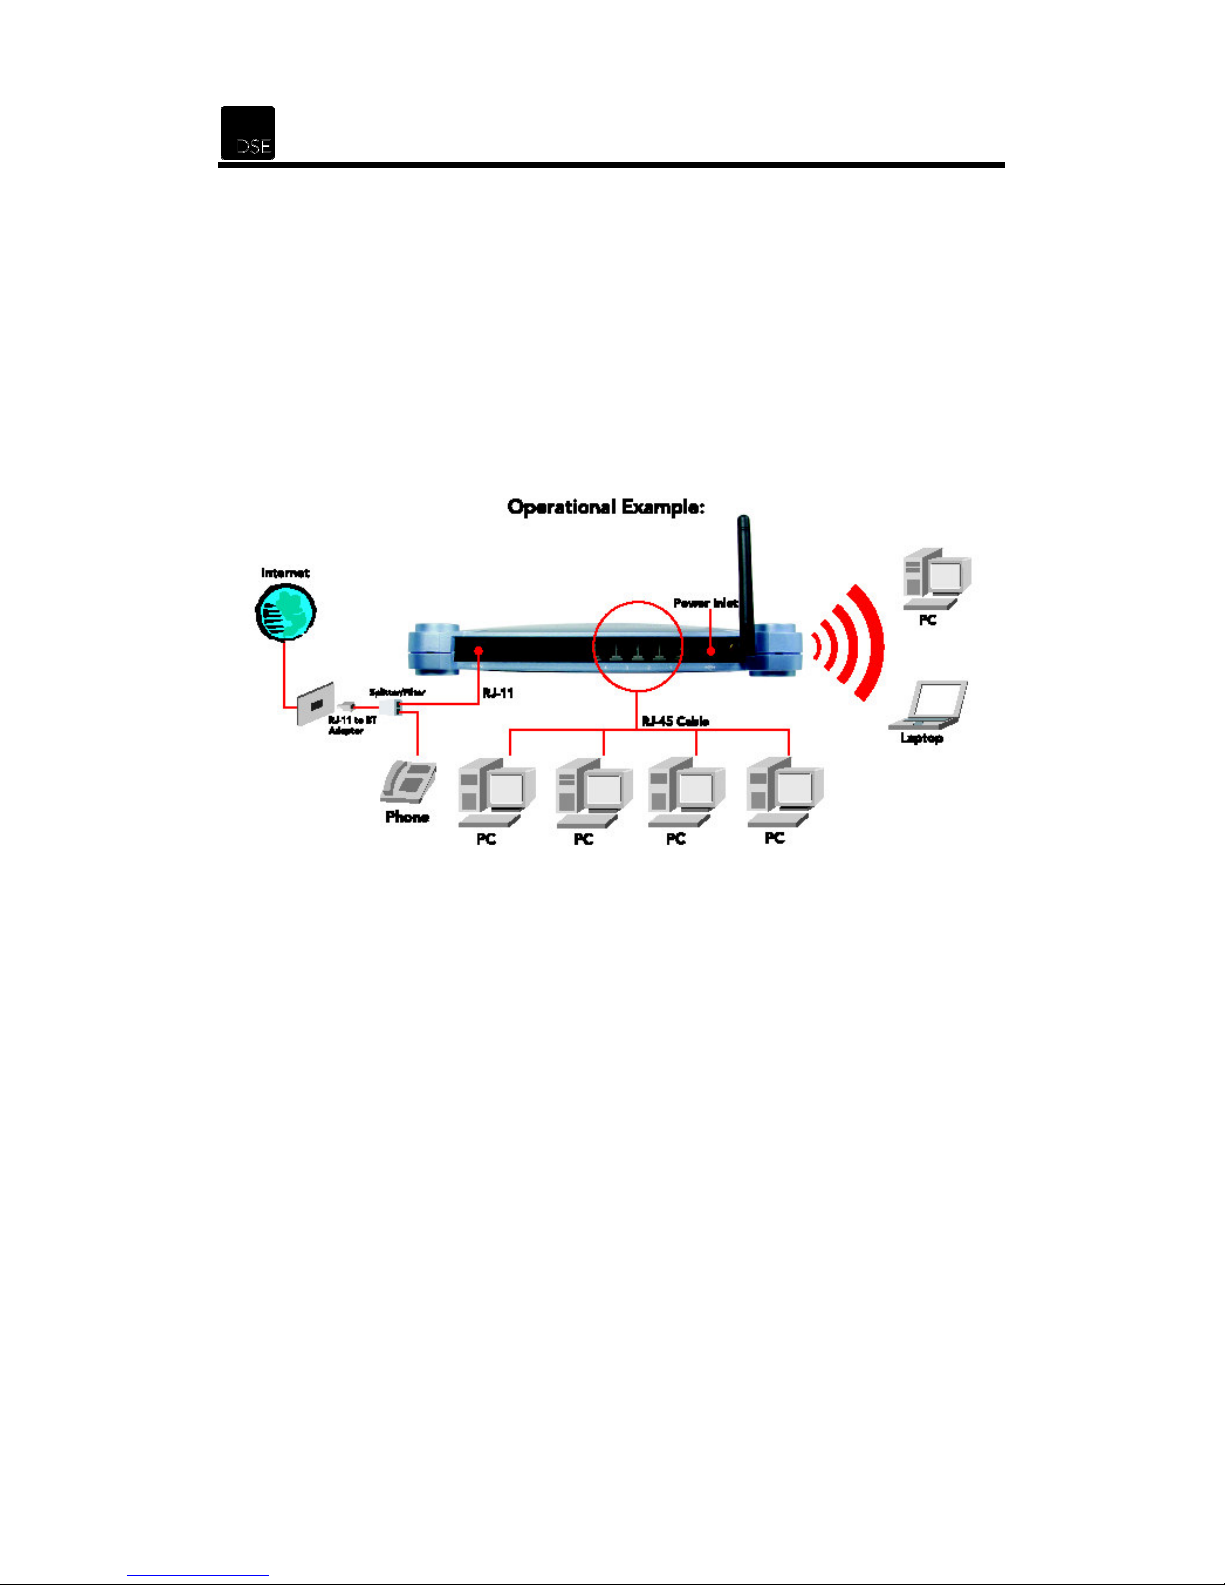
4.1 Connecting the router to your network
This router can connect to PCs via Ethernet with network cables or wirelessly via radio waves.
The router can also be connected to the Internet through an ADSL enabled telephone line via a
filter/splitter to allow all PCs in your network to have access to the Internet.
4.2 Connection to Power Supply
Connect the Power Adaptor provided to the router’s POWER port, and then plug the other end
of the power adaptor to the power outlet.

XH6830 – DSE 802.11g ADSL Router
10
4.3 Connection to WAN
4.3.1 Make sure ADSL service is activated
Before you can use any ADSL modem or router, you must confirm the following:
• You are located within about 5km of an ADSL enabled phone exchange and you can get
Telecom’s ADSL service. This can be checked on-line by visiting “adsl.dse.co.nz” and
clicking on the link “your area” – or by calling Telecom on 0800 253 878.
Telecom has enabled the ADSL service to your house or office.
•
This can be facilitated by Ihug, Xtra or directly with Telecom
Because ADSL and voice works on the same phone line at the same time, you need to
•
install ADSL filter/s on each of your normal Telephone devices or contact Telecom on 123 to
arrange for someone to install a central splitter. You can also order ADSL on-line by visiting
“adsl.dse.co.nz” and clicking on the “Order JetStream @ Home” or “Order JetStream @
Work” links.
You need to have an account with an Internet Service Provider (ISP) to enable your new
•
ADSL line to connect to the Internet.
•
To connect with IHUG, simply call 0800 GET IHUG or visit www.ihug.co.nz/dse
To connect with XTRA, simply call 0800 GET XTRA
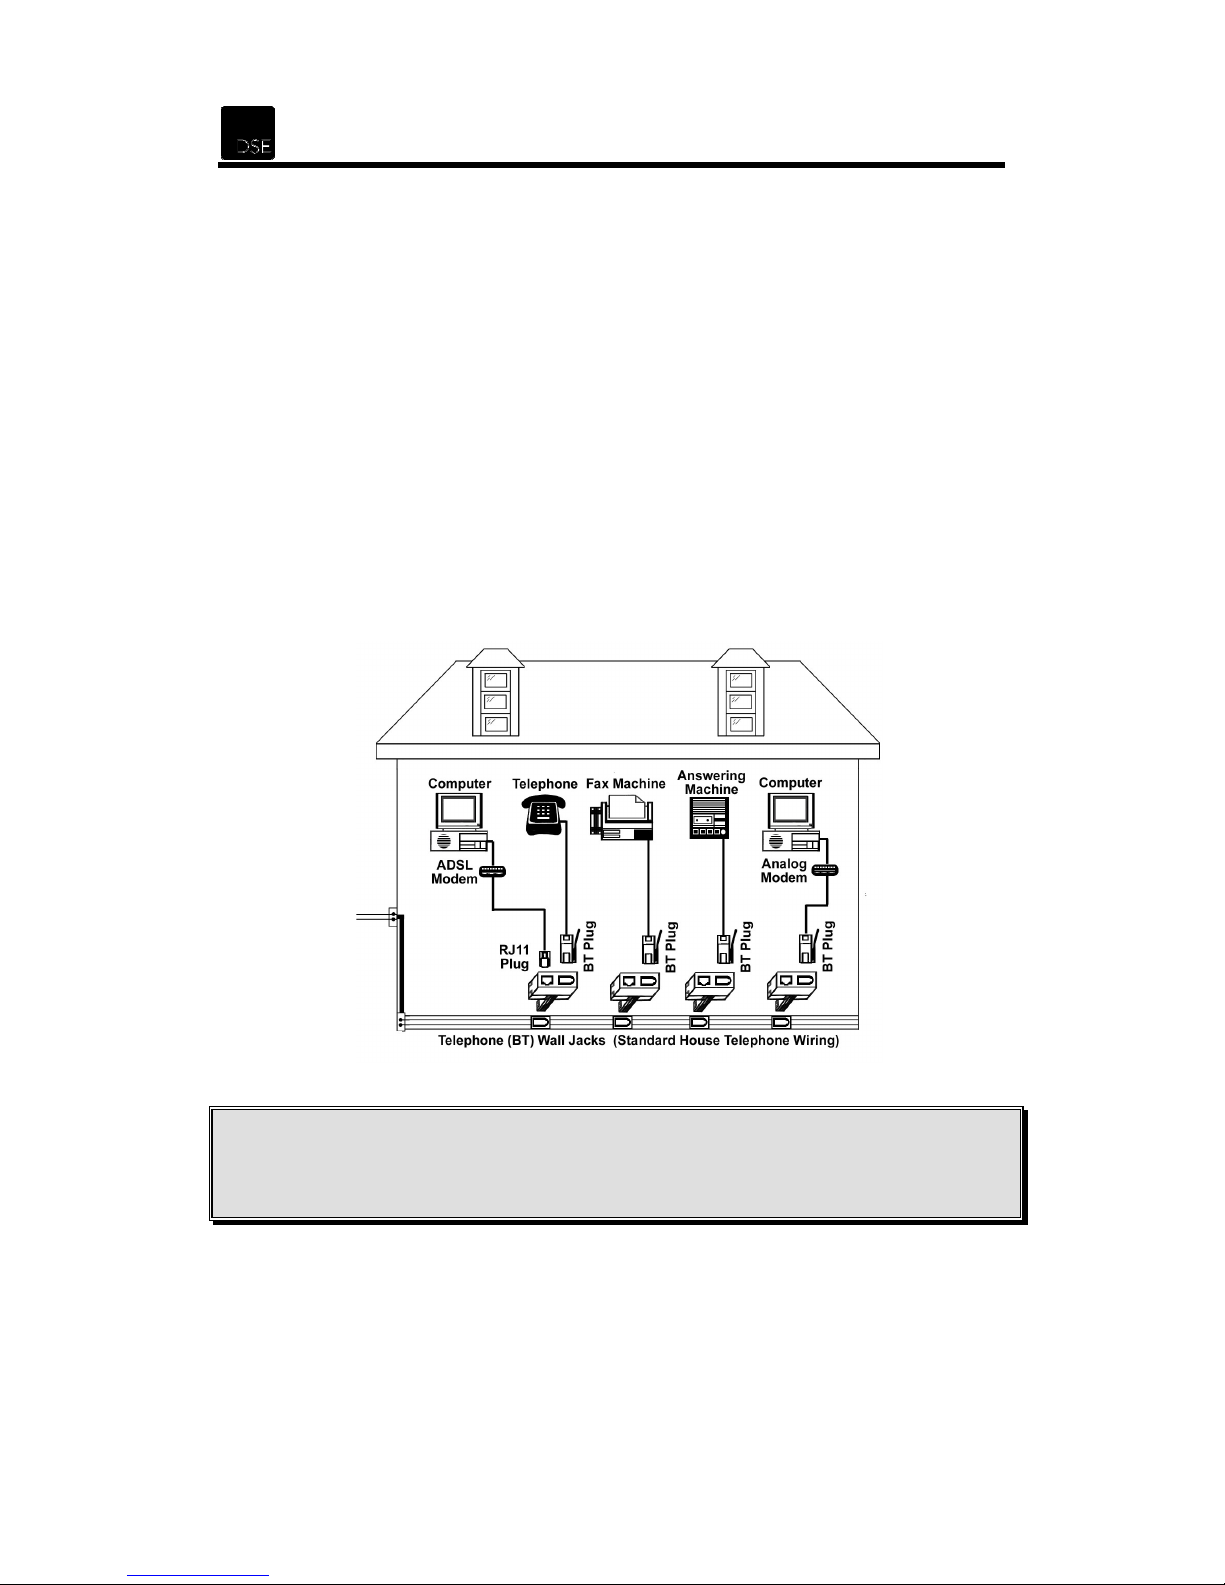
4.3.2 Configure your phone equipment
ADSL works by combining both voice and data signals on the same phone line. At your
premises, these signals need to be separated through the use of an approved Filter or Splitter.
Whilst both achieve the same results, each has their pro’s and cons.
Filter Splitter
Ideal for
Installation method
Maximum phones
How to get
Cost
Smaller installations with a
limited amount of phone
outlets (phones, answering
machines, cordless phones,
56K modems, Fax, etc.)
Self install Professional contractor only
5 – although double and triple
adaptors can be plugged into
the phone socket of each filter.
Dick Smith Electronics –
XH7556
Low per unit for most
installations
Larger installations or
situations where filters
cannot be used (alarm
diallers and other
permanently wired
telephone devices).
Unlimited
Call Telecom on 123
Higher – depends on
installer and the actual
installation
4.3.3 Option 1: Install ADSL Filter/s yourself
• All telephone equipment must be filtered in an ADSL installation. This includes corded &
cordless phones, answering machines, faxes, caller display units, analogue modem
(including such devices as a Sky digital decoder with integrated modem), dedicated diallers,
Etc. Filtering telephone equipment is as simple as plugging the XH7556 DSE ADSL filter
in-line with the device/s.
11
Your ADSL modem or router will be the only device that can connect directly to your
•
jackpoint. However should an adaptor be required between the plug on the modem cord and
the jackpoint, or you wish to connect telephone equipment to the same jackpoint, the DSE
ADSL filter can be used by plugging the router or modem into the “ADSL” socket.
Do not plug an ADSL modem or router into the “PHONE” socket if the modem cord has this
•
type of plug.
It is important that the filter is connected the right way around.
•
- The lead coming out of the side marked “LINE” is plugged into the telephone jackpoint
- Non-ADSL telephone equipment then plugs into the “PHONE” socket on the filter
- The ADSL Modem or Router plugs into the “ADSL” socket on the filter.
Up to 5 filters can be used on a single telephone line. If you need to install more than 5
•
filters, a central splitter must be installed by Telecom.
If you need to connect more than one item of telephone equipment at the same jackpoint,
•
then a double adaptor can be plugged into the “PHONE” socket of this filter.
This Line Filter has a RJ11 “ADSL” socket incorporated. Only ADSL modems or routers
•
may be plugged into this socket.
CAUTION:
Failure to connect ALL telephone type equipment via a filter will result in loss of the data link
whenever a call is made or answered. In many cases the link will also be lost when a call is
received, even if it is not answered.
4.3.4 Option 2: Have an ADSL splitter professionally installed
Contact Telecom on 123 to arrange for a central splitter to be installed.

XH6830 – DSE 802.11g ADSL Router
12
4.4 Connection to LAN
Connect an Ethernet network cable from your PC’s Ethernet port to one of the router’s LAN
ports. The LAN LINK/ACT LED indicator will be lit by the corresponding port’s number when a
successful connection is made.
All the Ethernet ports support auto crossover functionality which means that either a patch or
crossover cable can be used.
5 Network Settings Configuration
This section will help you configure your computers to be able to communicate with the router.
Computers access the network and the Internet using a protocol called TCP/IP (Transmission
Control Protocol/ Internet Protocol). Each computer on your network must have TCP/IP installed
and selected as its networking protocol. If a Network Interface Card (NIC) or Wireless LAN Card
is already installed in your PC, then TCP/IP is probably already installed as well.
The following description assumes the router has the factory default settings. (If not, please hold
the reset button down for 10 seconds). The default router’s LAN IP is 192.168.8.1 and the DHCP
server setting for LAN users is on (offered IP range from 192.168.8.17 to 192.168.8.128 by
default).
Follow the procedures below to set your computers to get an IP address from the router.
13
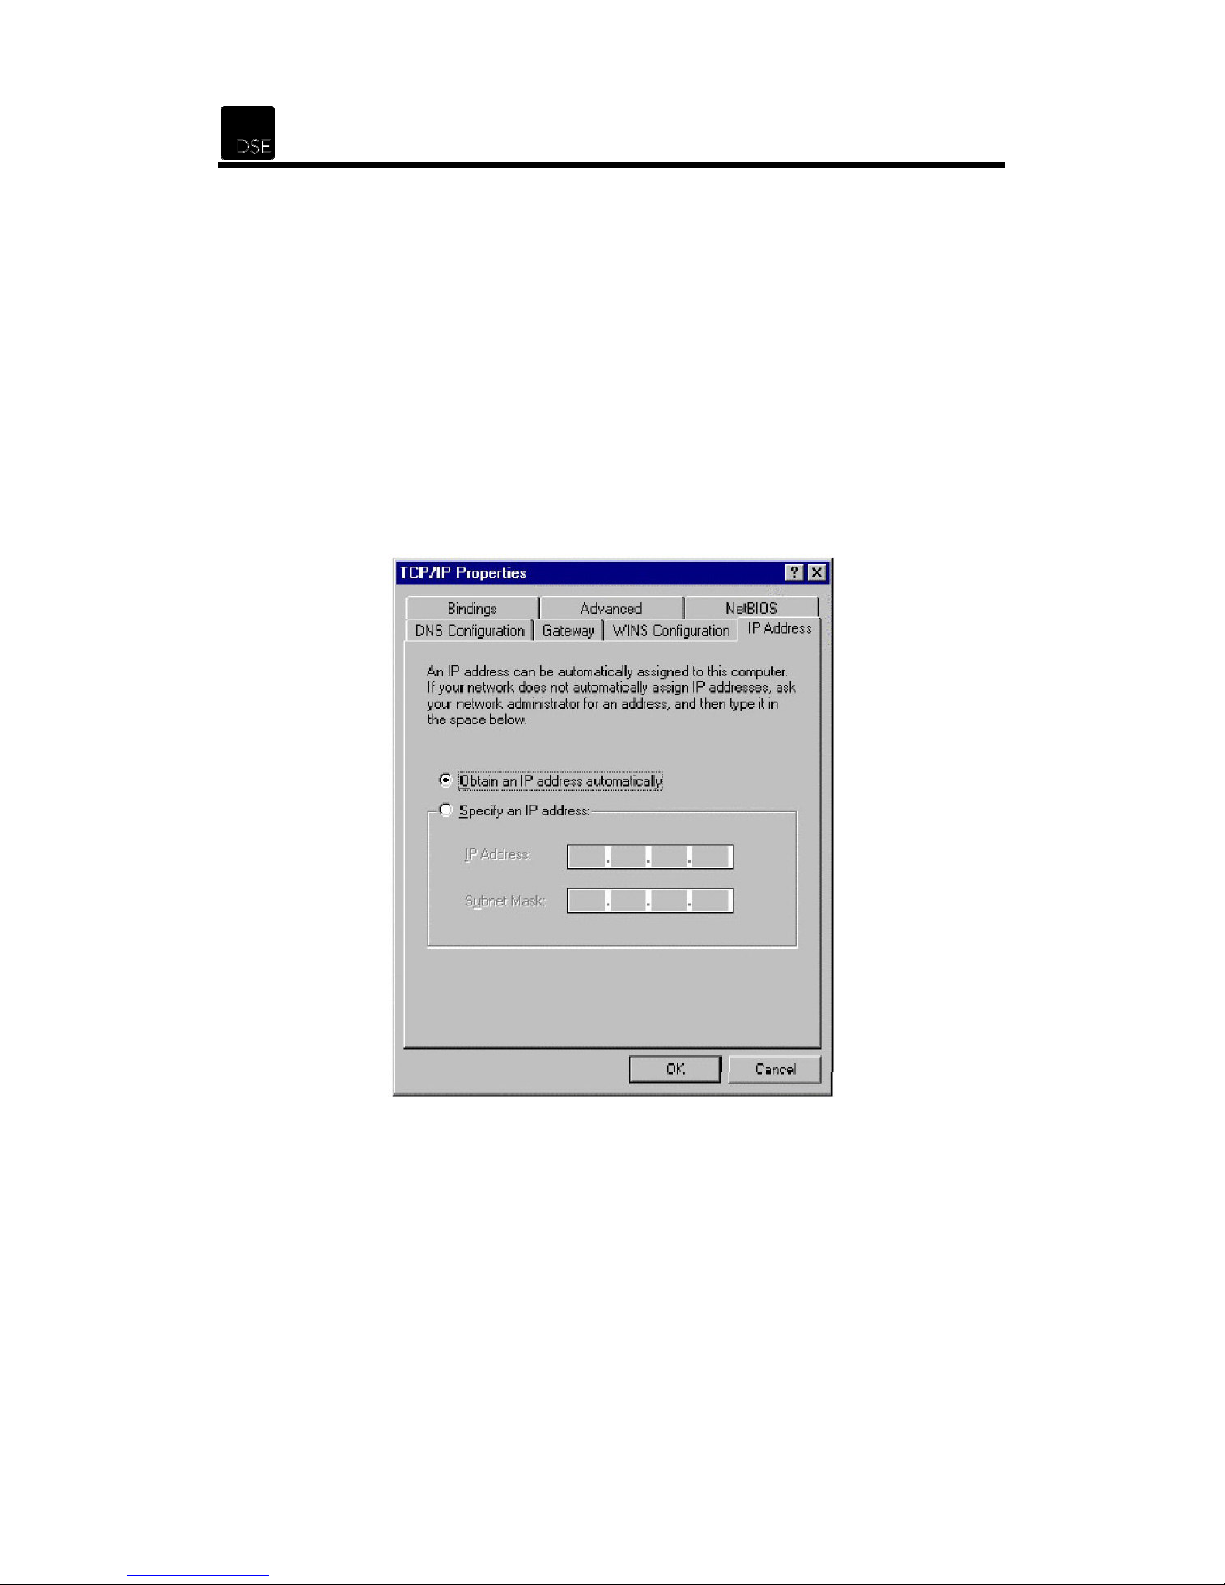
5.1 Windows 98/Me Configuration
1. From the Windows desktop, click the Start button and choose Settings, then click Control
Panel.
2. From Control Panel, double-click the Network icon.
3. In the Network window, under the Configuration tab, double-click the TCP/IP entry of the
WLAN adaptor.
4. On the Internet Protocol (TCP/IP) Properties dialog box, make sure Obtain an IP
address automatically and Obtain DNS server address automatically are selected. If
not, select them, click OK and OK again. Note that Windows may ask you to insert the
Windows 98 CD so have it ready.
5. Restart your computer.
XH6830 – DSE 802.11g ADSL Router
14
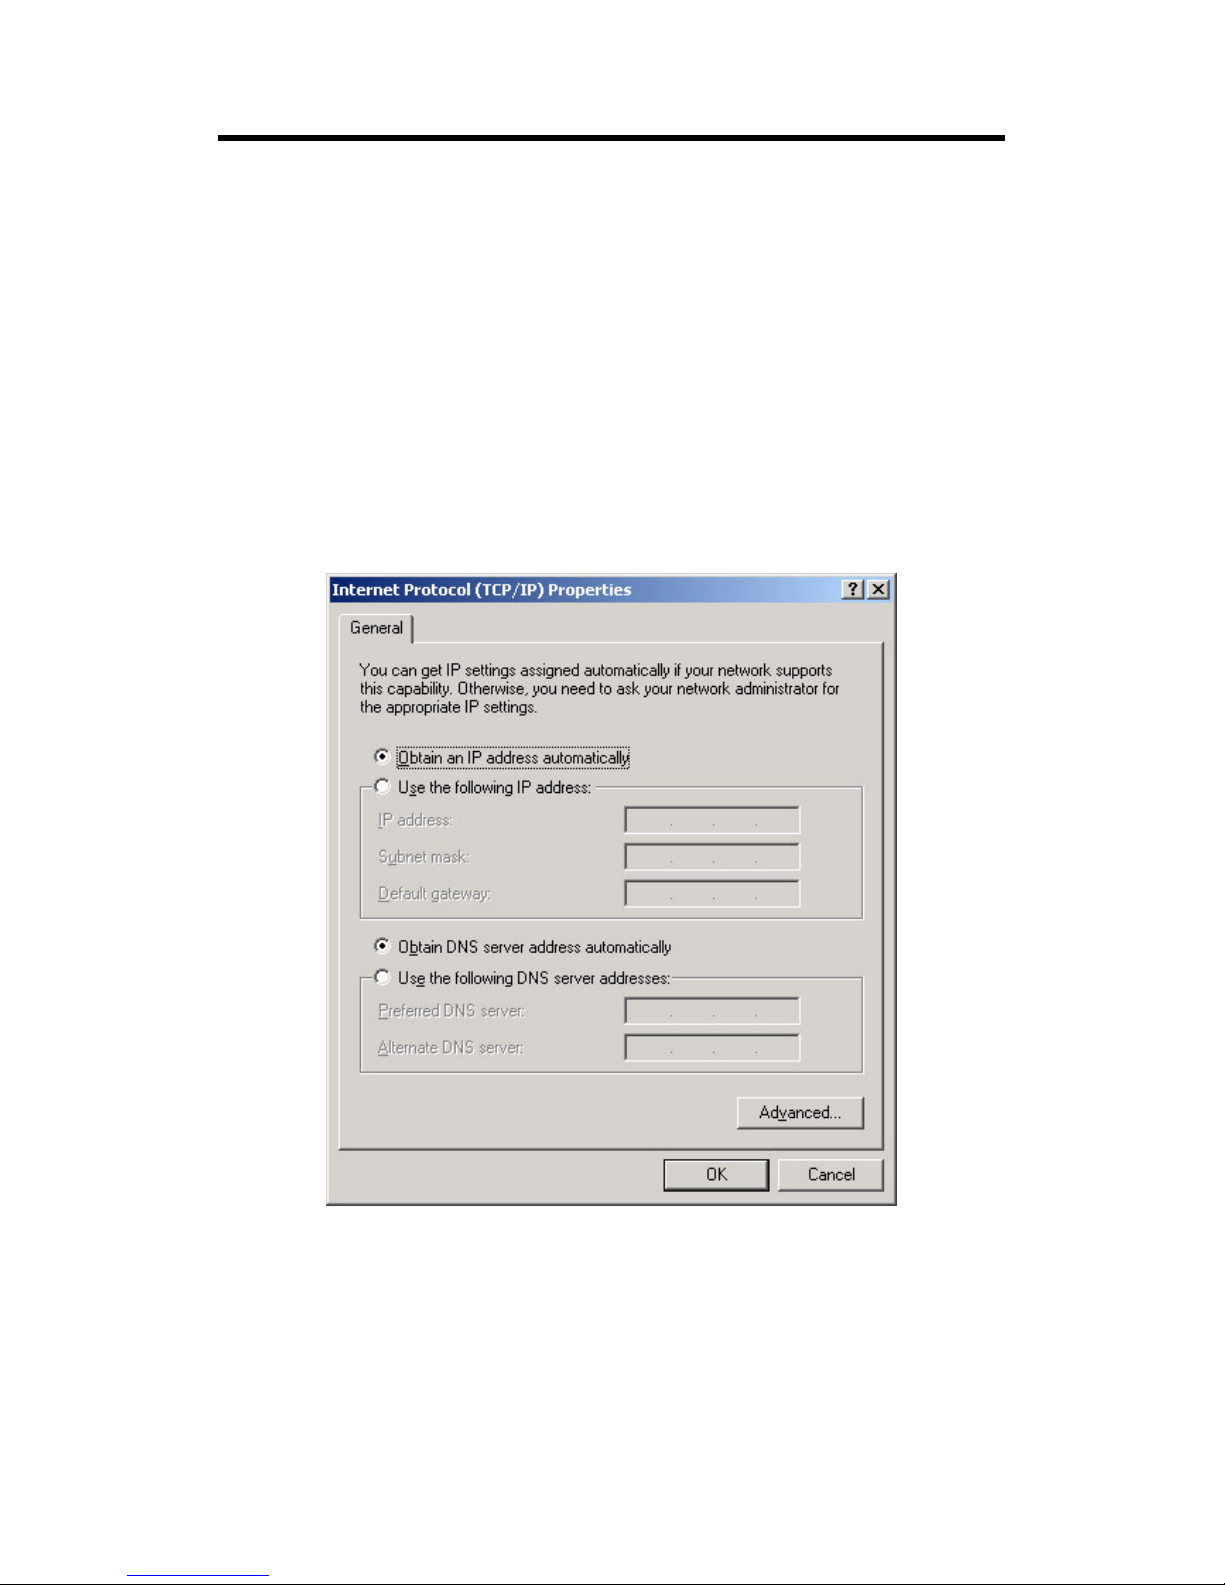
5.2 Windows NT/2000/XP Configuration
1. From the Windows desktop, click the Start button. Choose Settings, then click Control
Panel.
2. From Control Panel, double-click the Network & Dial-Up Connections icon.
3. Double-click the icon that corresponds to the connection to your router.
4. Click Properties and double-click Internet Protocol (TCP/IP).
5. On the Internet Protocol (TCP/IP) Properties dialog box, make sure Obtain an IP
address automatically and Obtain DNS server address automatically are selected. If
not, select them and click OK to close the window.
15
6 Device Administration
The router has a web-based utility that allows you to manage it. This section discusses the
functions in the utility.
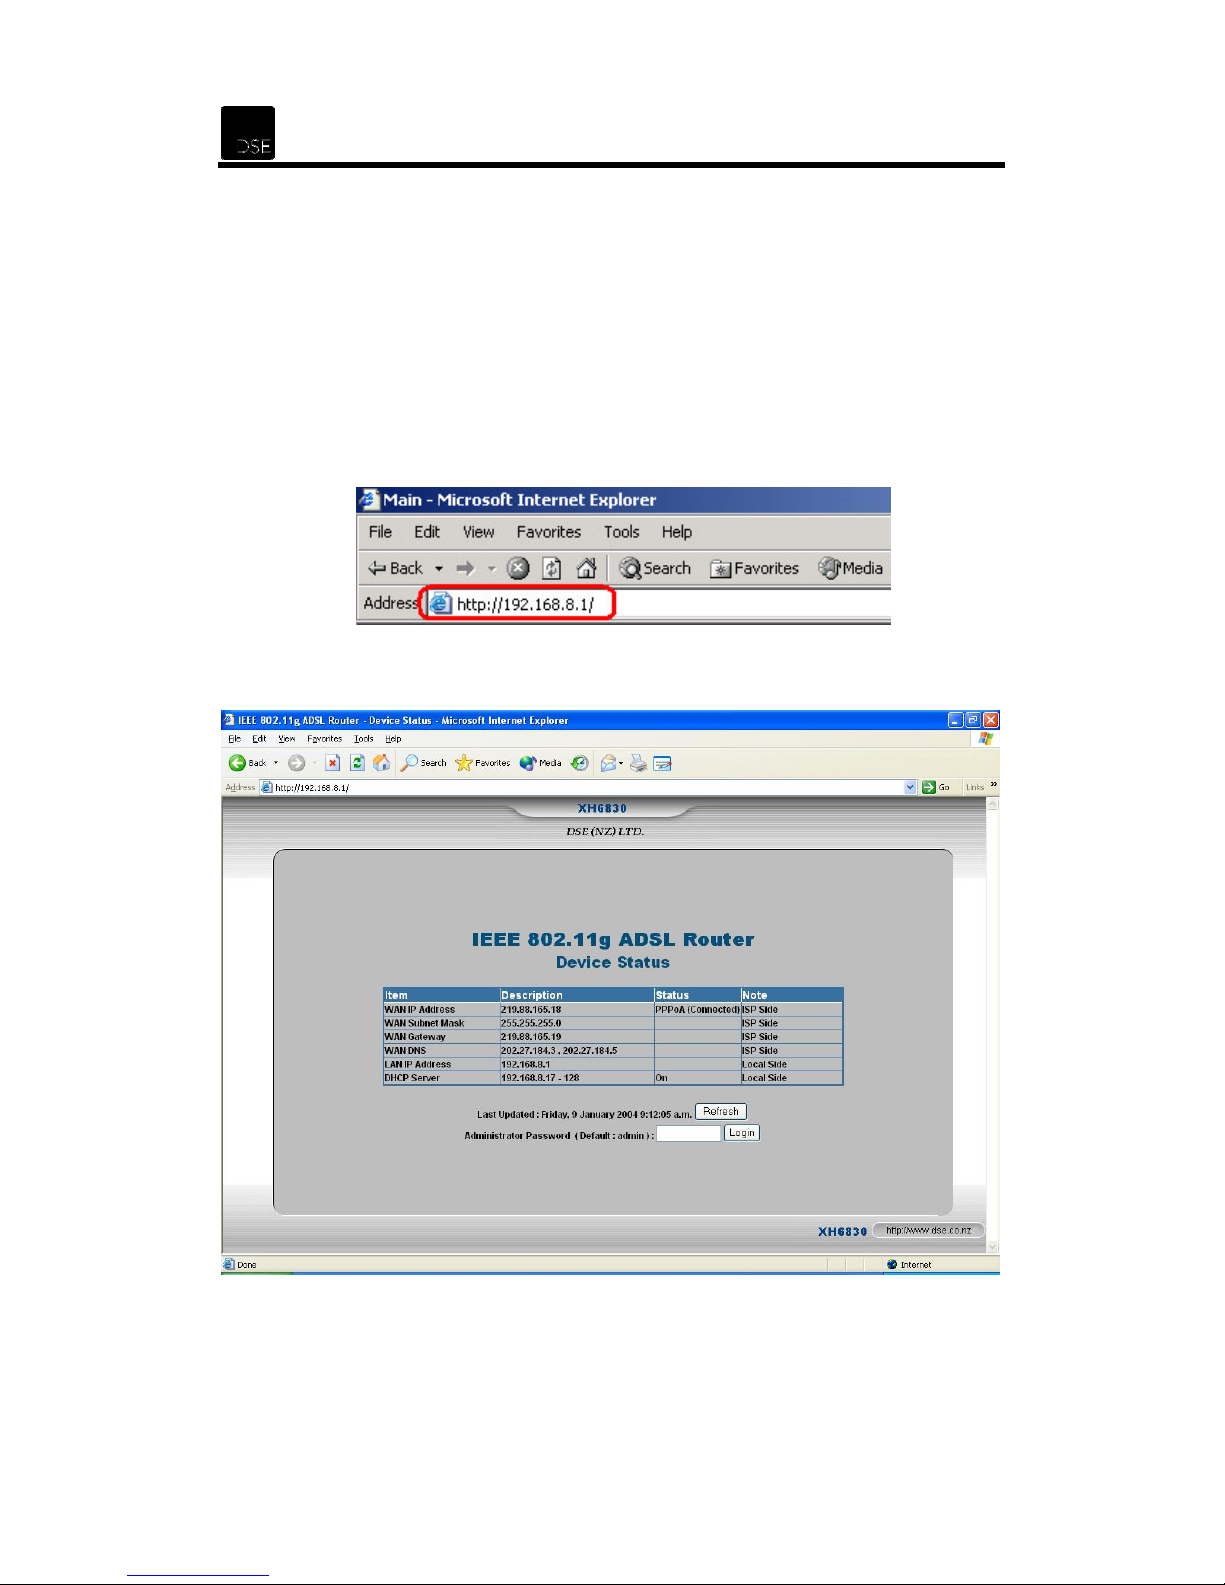
6.1 Web Based Configuration
To access the web-based utility, launch Microsoft Internet Explorer, Netscape Navigator or the
web browser you normally use. Enter the router’s default IP address, http://192.168.8.1 in the
Address field and press Enter.
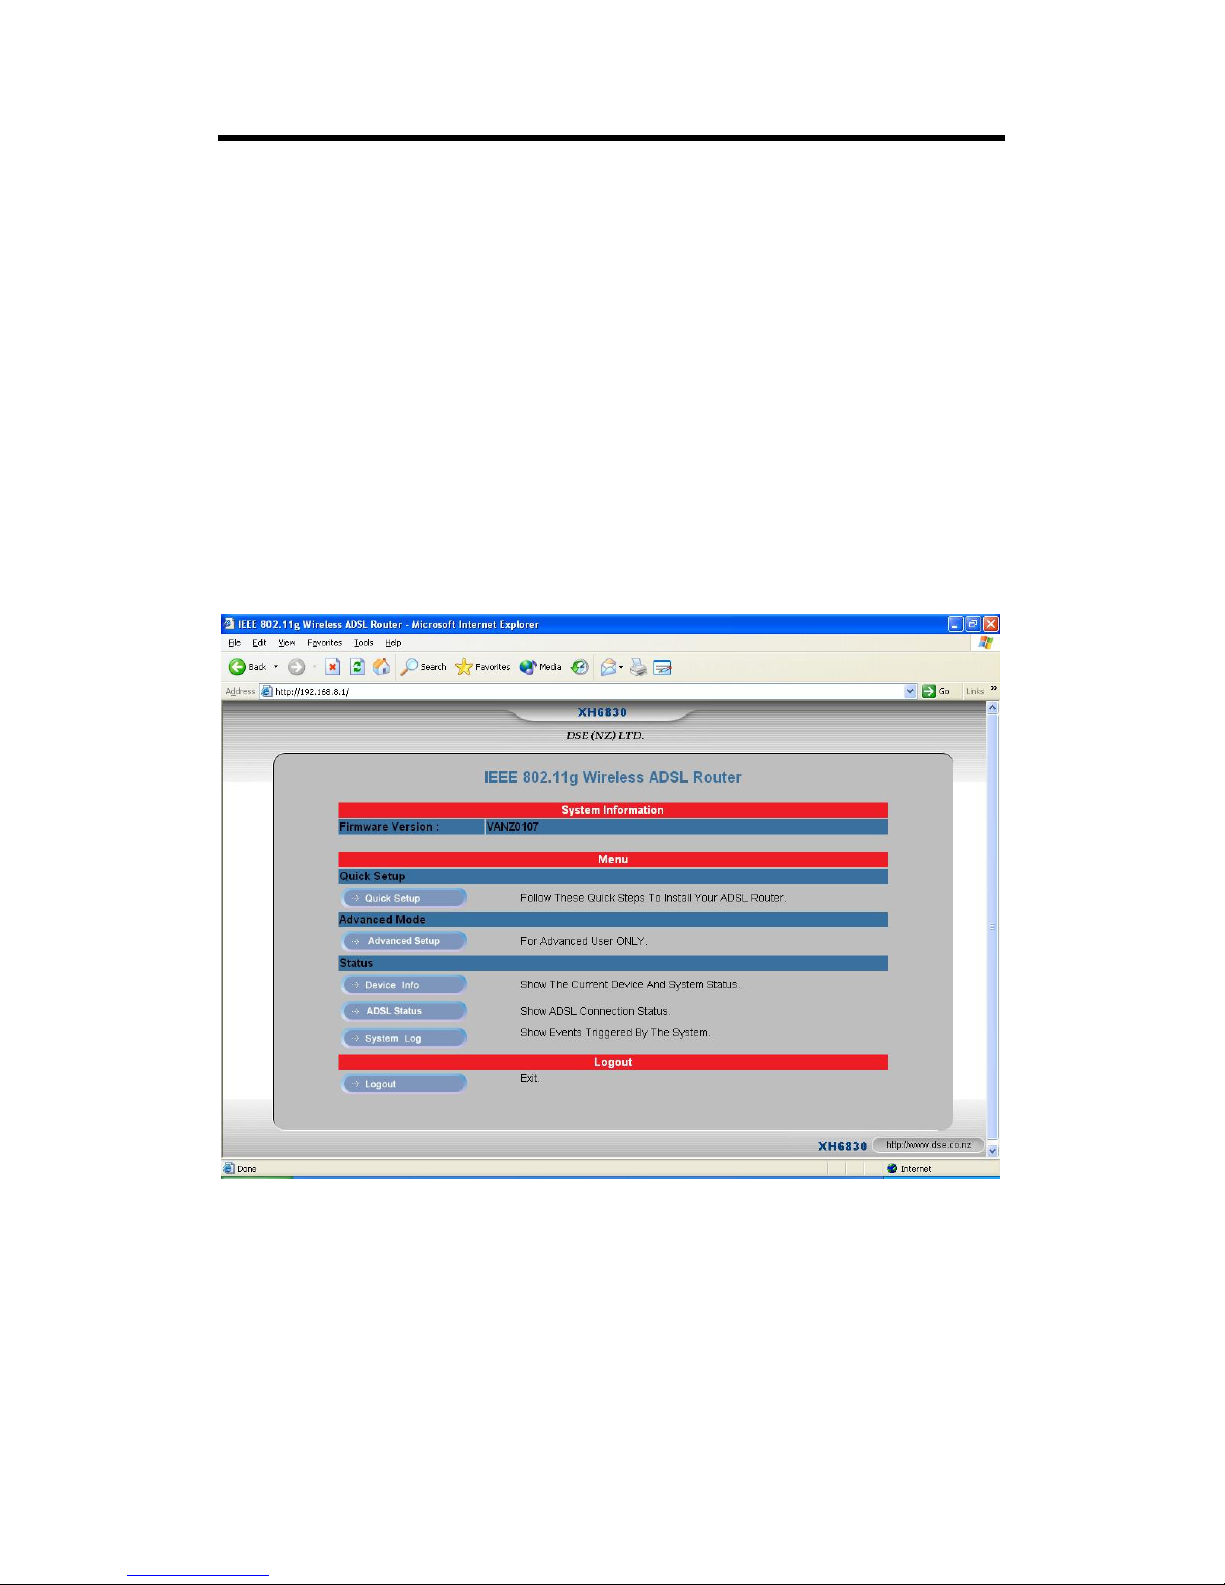
The main page with all the device status information will appear.
Enter the default Administrator password admin and press Enter to log in. The router System
Information will appear.
XH6830 – DSE 802.11g ADSL Router
16
Firmware Version: Shows the current router Firmware version.
Quick Setup: The Quick Setup is provided to help you set up the router quickly and easily.
Advanced Settings:
the router. No changes should be made to this section without a
networking concepts.
Device Info:
status.
ADSL Status
upstream/downstream errors and other statistics.
System Log: Displays a log of system events such as system start, administrator log-in/log-out,
dial/hang-up, etc…
Logout: To log out of the web management interface.
Displays the
The
Advanced
router
: Displays the current status of the ADSL connection: data rate,
Settings page allows the advanced user to configure
thorough understanding of
’s current or previous connection settings, con
figuration and
17
6.2 Quick Setup
The Quick Setup is provided to help you set up the router quickly and easily. Follow the steps
described below.
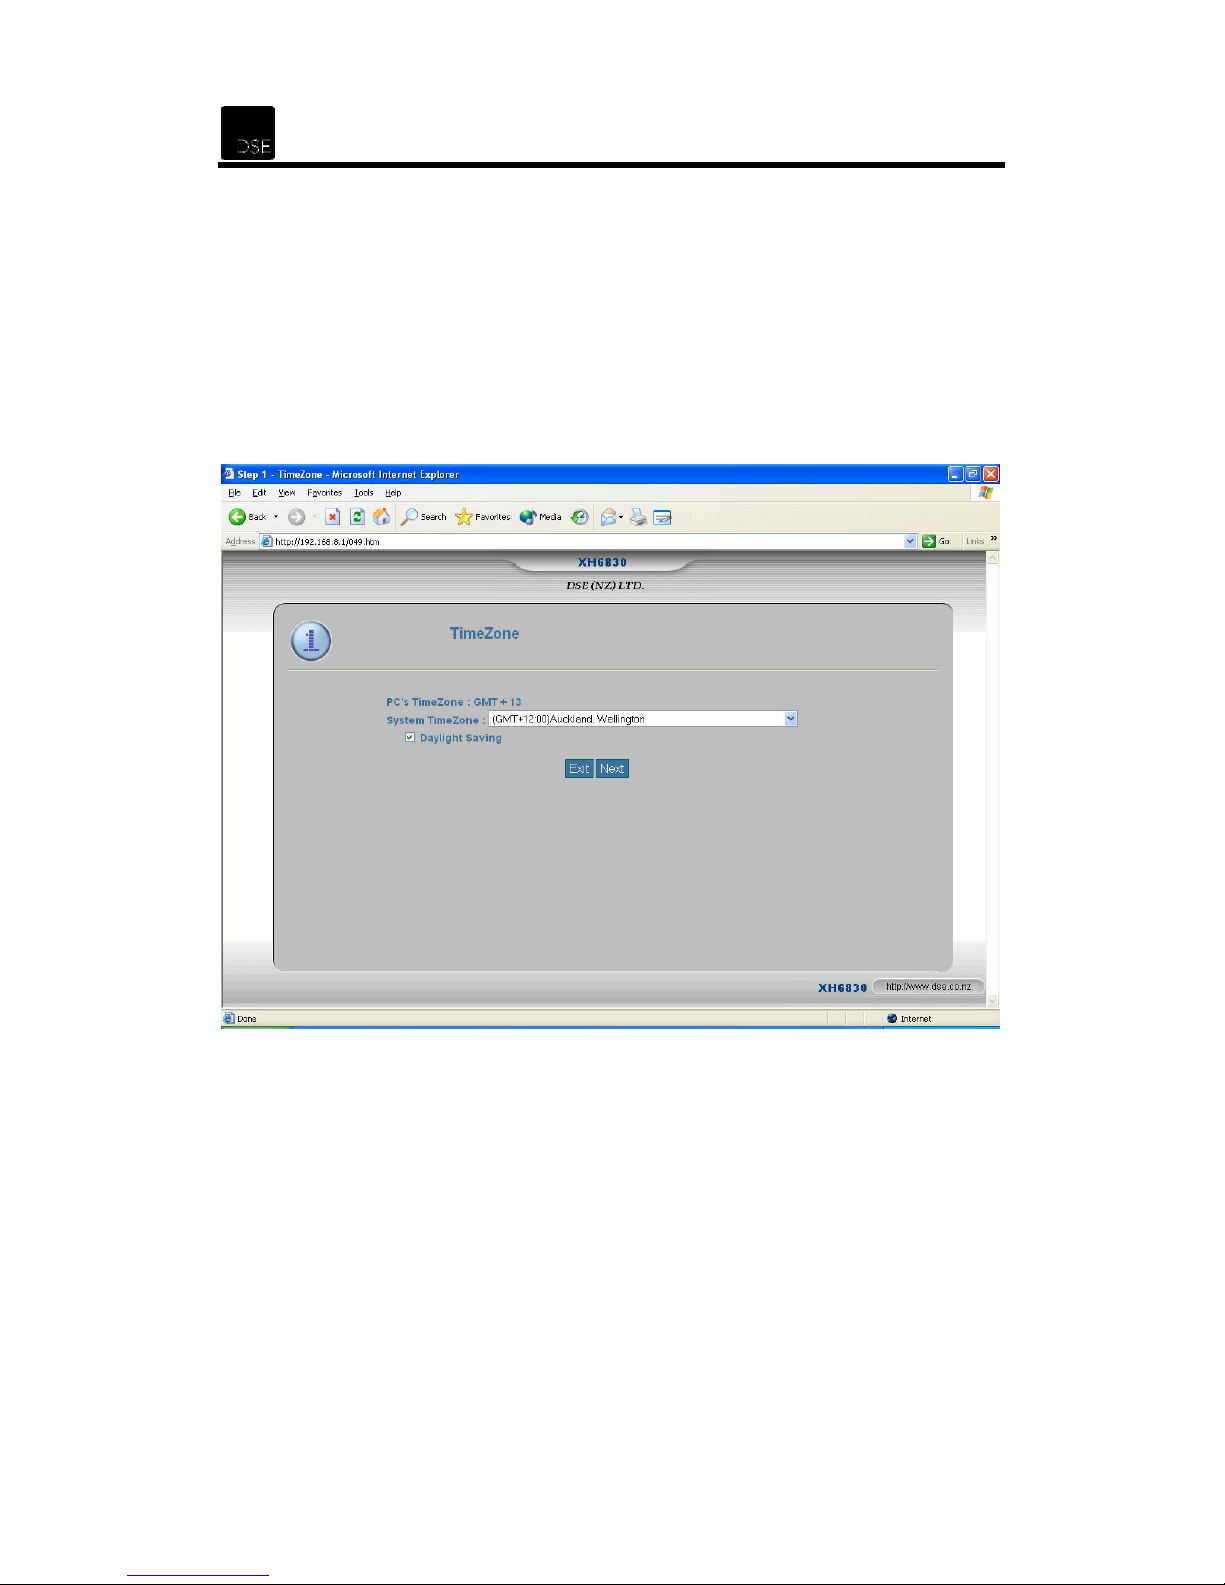
STEP 1. Time Zone
Select the System Time Zone / Country. Click Next after your selection.
If your region uses Daylight Savings Time, click the box to activate this feature.
XH6830 – DSE 802.11g ADSL Router
18
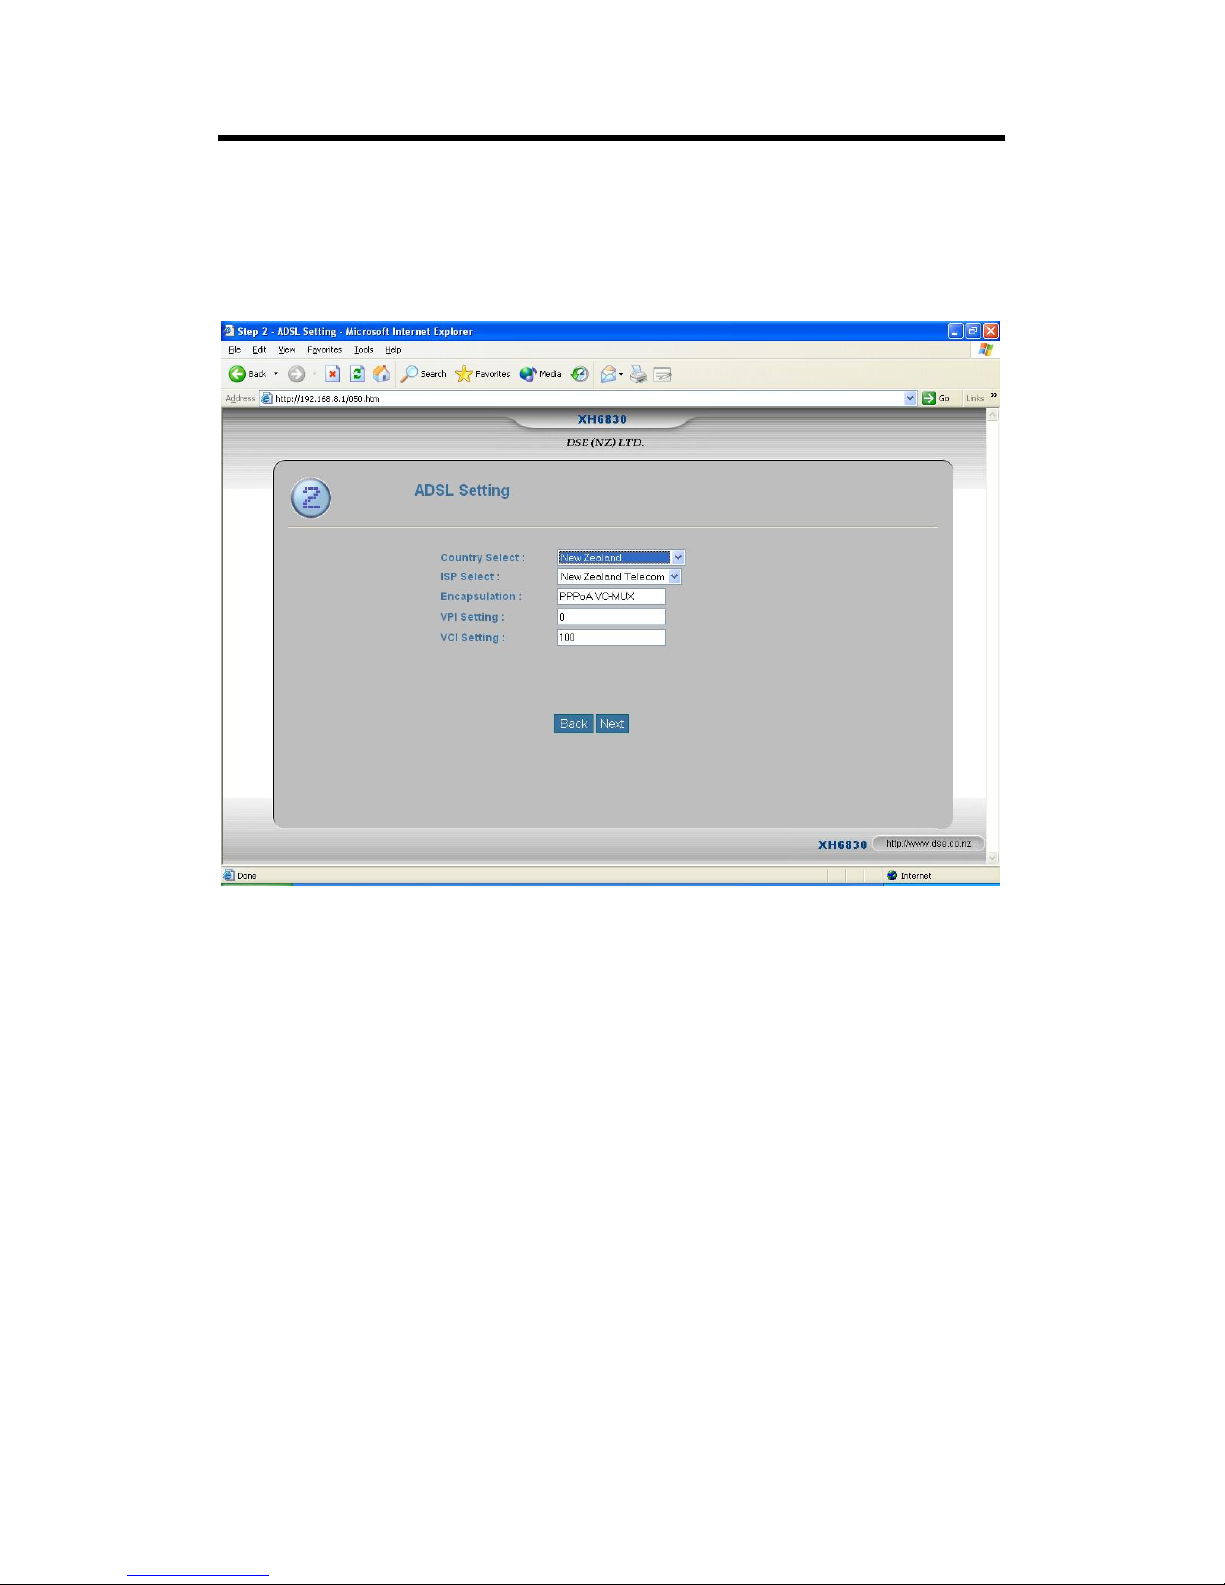
STEP 2. ADSL Setting
From the top drop down box, select New Zealand as your country. This should automatically
select Telecom New Zealand as your ISP, PPPoA VC MUX for Encapsulation, VPI 0 and VCI
100.
19
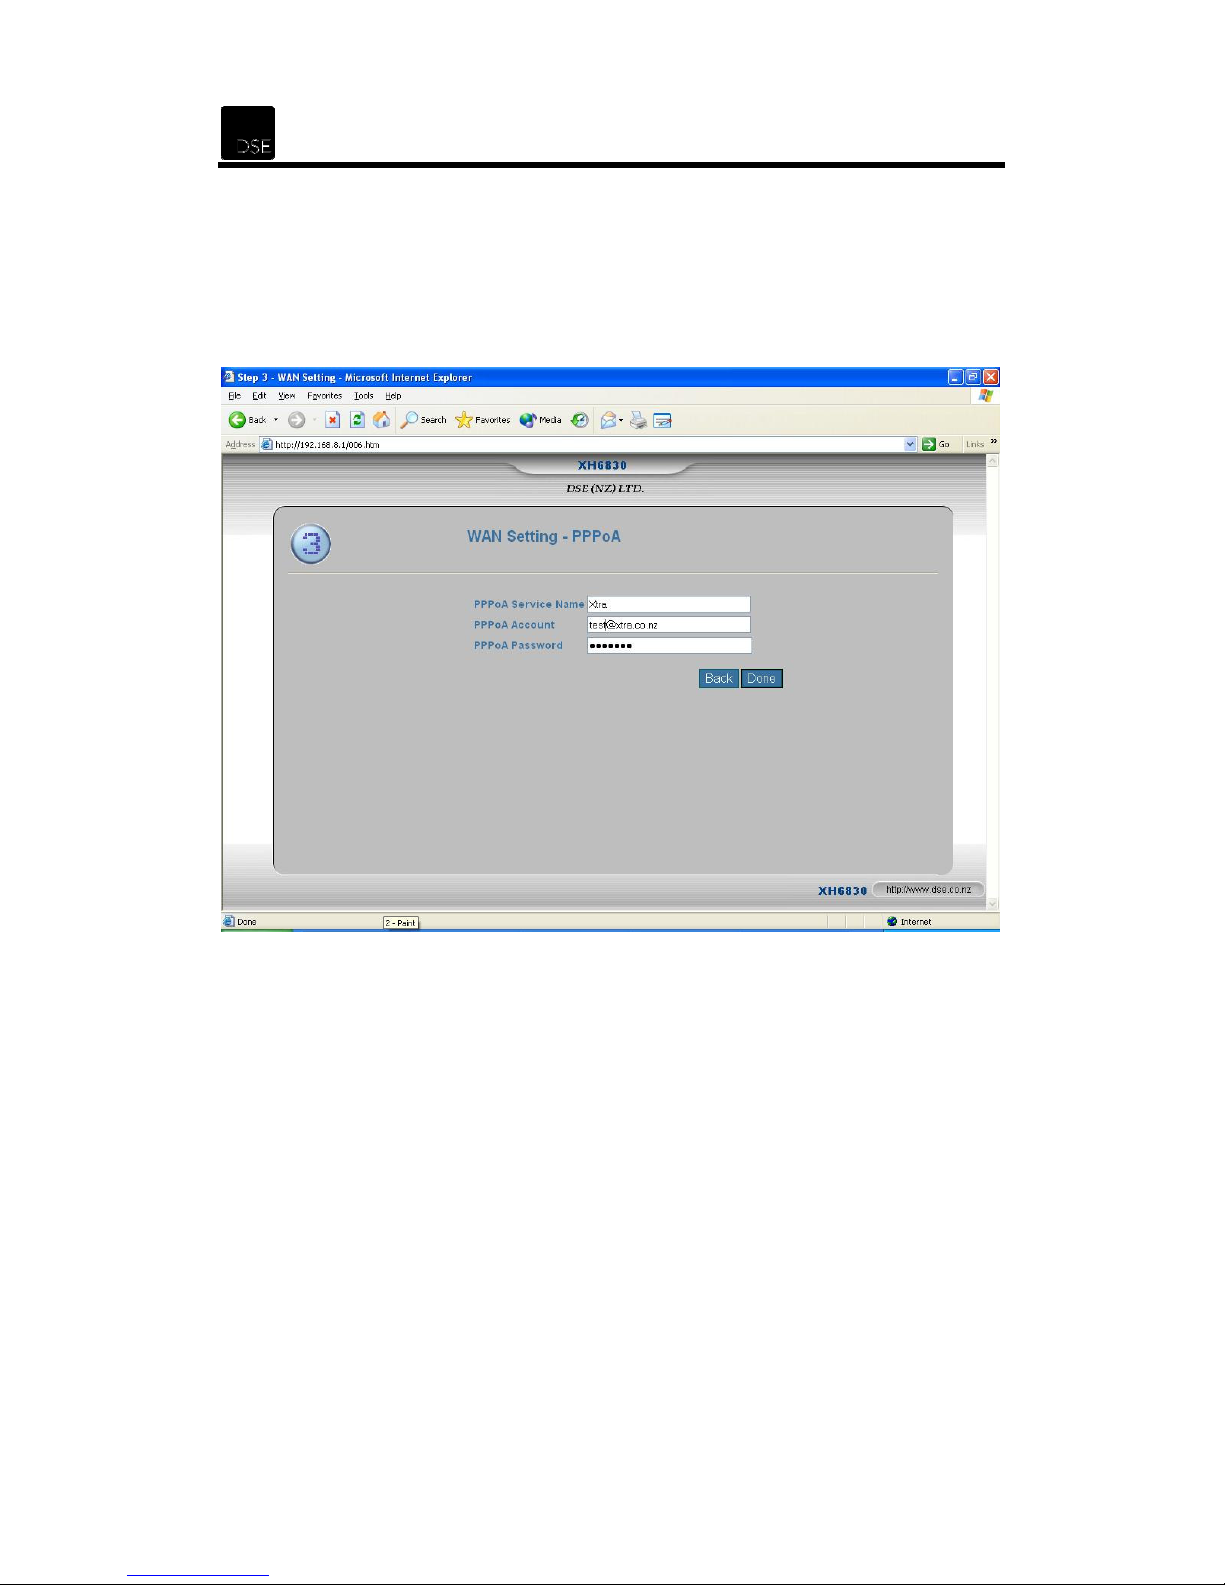
STEP 3. WAN Setting - PPPoA
In the boxes provided insert your account details as provided by your ISP (Account, Password)
and select Next. For Ihug, the format is
user.xadsl@xtra.co.nz. In both instances, user is the user name advised to you by your ISP.
user@adsl.ihug.co.nz.
For Xtra, the format is
“Restarting…” should appear and your connection may be temporarily lost to the router. You
should then see Congratulations and then be forwarded back to the main System Information
page.
XH6830 – DSE 802.11g ADSL Router
20
The router should now be operational and the only things left to do are to change the default
administrator password and enable WEP in order to have a secure wireless network. Please
refer to the appropriate sections later in this manual.
21
7 Advanced Settings Menu
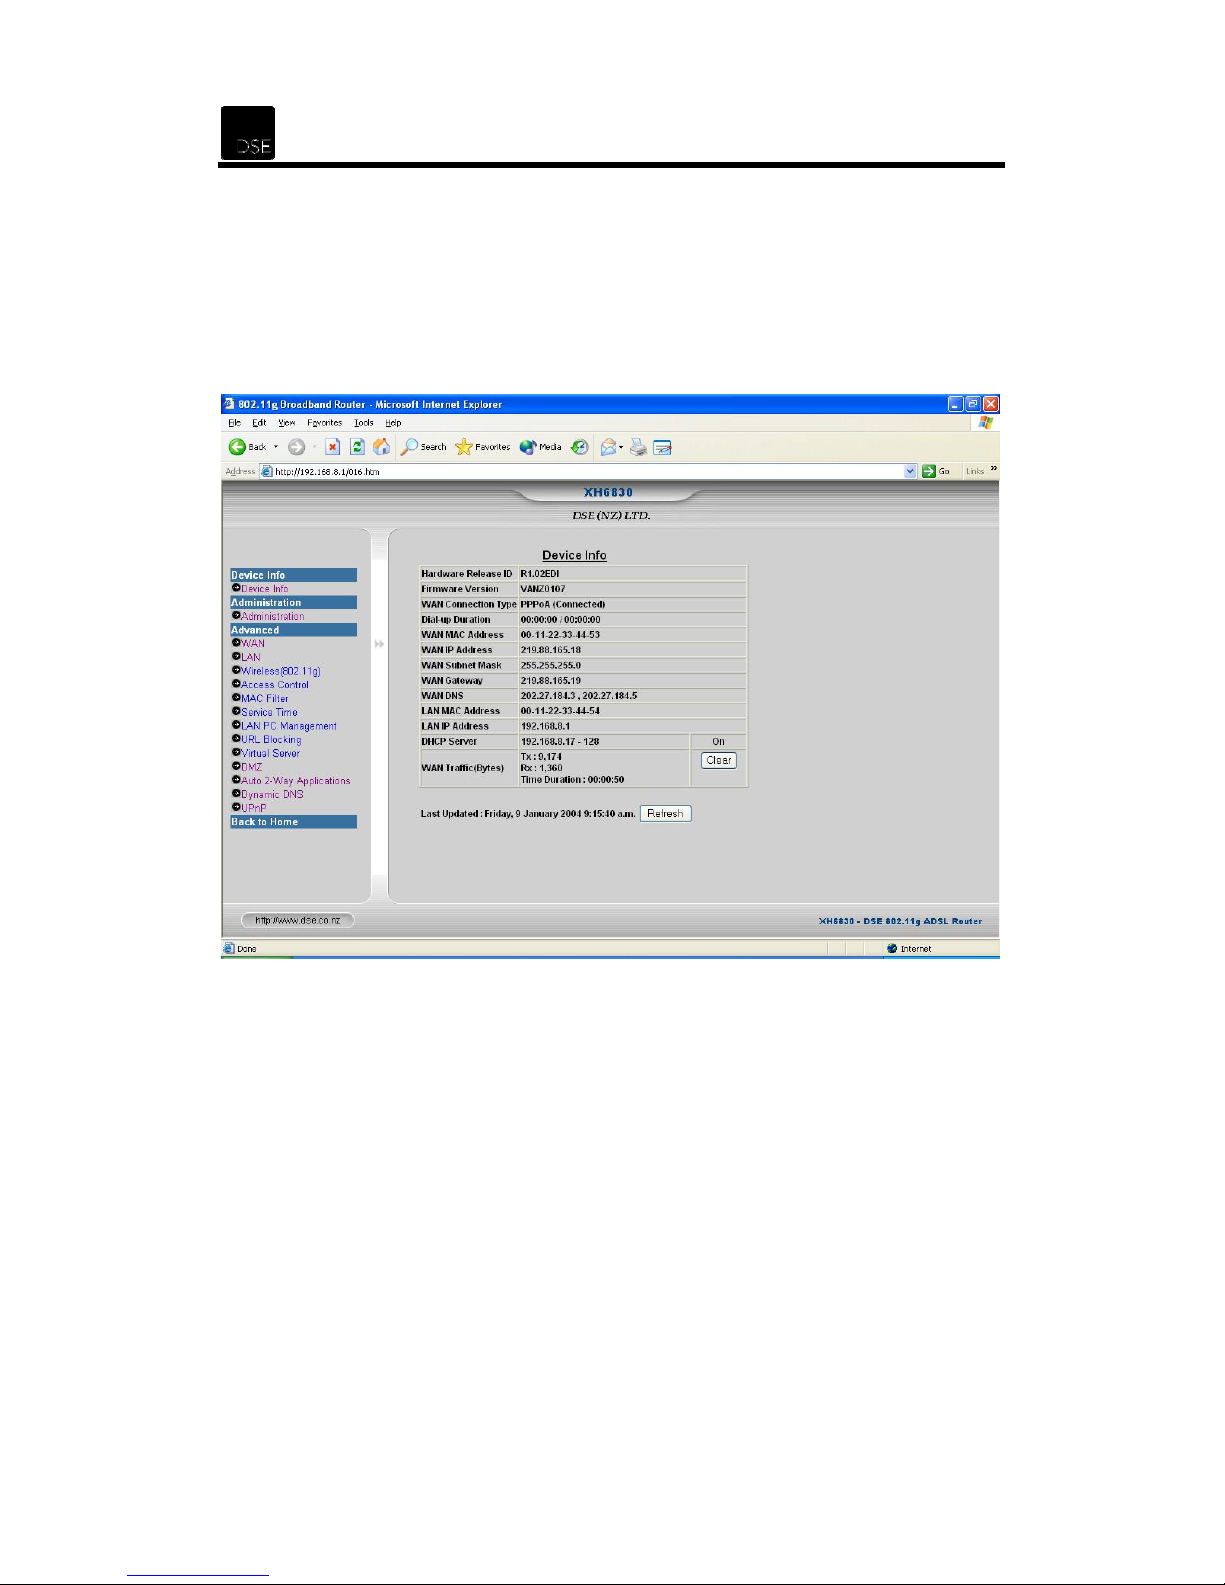
7.1 Device Info
This page displays the
status
.
router
’s current or previous connection settings, con
figuration and
See the table on the following page for explanations of the fields.

XH6830 – DSE 802.11g ADSL Router
22
s WAN connection, by default, set as a DHCP
IP Address as seen by external
as seen by external users
as seen by
DNS (Domain Name System) IP
Wireless
are common. In most cases, the
s IP Address. The default value is
Hardware Release ID
Firmware Version Shows the firmware version you are using.
Wan Connection Type
Dial-up Duration Shows the connected time duration of the device
WAN MAC Address Display the WAN MAC address of the Internet interface
WAN IP Address
WAN Subnet Mask
WAN Gateway
WAN DNS
Shows the hardware version of the Wireless Router.
The Wireless Router’
client
Shows the Wireless Router’s WAN
users on the Internet
Show the Wireless Router’s Subnet Mask
on the Internet.
Show the Wireless Router’s WAN Gateway IP Address
external users on the Internet
Shows the WAN
Address/Addresses of the DNS currently used by the
Router. Multiple DNS IP settings
first available DNS entry is used.
LAN MAC Address Shows the LAN MAC Address of the LAN interface
LAN IP Address
DHCP Server
WAN Traffic (Bytes)
Refresh
Shows the Wireless Router’
192.168.8.1
Shows the ranges of the DHCP (Dynamic Host Configuration
Protocol) Server IP addresses to each computer on its network
Shows the packets/data been Transmitted/Received. Press the
[Clear] button to clear the WAN traffic counter
Press the
[Refresh]
button to refresh the last update
 Loading...