

Page 1
XH1148
DSE ADSL Modem - USB
Quick Setup Guide
V2.0 – Last Updated on 15/07/03 by David Chanson – © Copyright 2003- DSE(NZ)Ltd
Page 2

Copyright
Copyright 2003 by DSE(NZ)Ltd - all rights reserved. No part of this publication may be
reproduced, transmitted, transcribed, stored in a retrieval system, or translated into any
language or computer language, in any form or by any means, electronic, mechanical,
magnetic, optical, chemical, manual or otherwise, without the prior written permission of
DSE(NZ)Ltd.
Disclaimer
DSE(NZ)Ltd makes no representations or warranties, either expressed or implied, with
respect to the contents hereof and specifically disclaims any warranties, merchantability or
fitness for any particular purpose. Any software described in this manual is sold or licensed
"as is". Should the programs prove defective following their purchase, the buyer (and not
DSE(NZ)Ltd, its distributor, or its dealer) assumes the entire cost of all necessary servicing,
repair, and any incidental or consequential damages resulting from any defect in the software.
Further, DSE(NZ)Ltd reserves the right to revise this publication and to make changes from
time to time in the contents hereof without obligation to notify any person of such revision or
changes.
All brand and product names mentioned in this manual are trademarks and/or registered
trademarks of their respective holders.
Contents
INTRODUCTION........................................................................................................................3
STEP 1 - MAKE SURE ADSL SERVICE IS ACTIVATED........................................................3
STEP 2 - CONFIGURE YOUR PHONE EQUIPMENT..............................................................3
PTION
O
PTION
O
1: I
2: H
NSTALL
AVE AN
ADSL F
ADSL
ILTER/S YOURSELF
SPLITTER PROFESSIONALLY INSTALLED
..........................................................................4
.............................................4
STEP 3 - CONNECTING THE ROUTER TO YOUR PC...........................................................5
STEP 4 – DRIVER INSTALLATION..........................................................................................6
INDOWS
W
INDOWS
W
AC
M
OS X D
RIVER INSTALLATION
98 D
RIVER INSTALLATION
XP D
RIVER INSTALLATION
.........................................................................................6
.........................................................................................7
.............................................................................................8
STEP 5 – NETWORKING SETTINGS ......................................................................................9
INDOWS CONFIGURATION
W
M
AC
OS X C
ONFIGURATION
.......................................................................................................9
...................................................................................................10
APPENDIX...............................................................................................................................11
IHUG SETTINGS & SUPPORT DETAILS........................................................................................11
TRA SETTINGS & SUPPORT DETAILS
X
ONTACTING THE
C
ETTINGS
MY S
UPPORT TEAM
DSE S
.........................................................................................................................11
.......................................................................................11
..................................................................................11
2
Page 3
XH1148 - DSE ADSL Modem – USB
Introduction
This guide is a summary of the most common steps that are required to configure the DSE
ADSL modem to work with a PC. This guide outlines the procedures to get you up and
running as quickly as possible.
These instructions refer to the common settings for two Internet Services Providers (ISP’s) Ihug and Xtra. However, there are many more ISP’s who can provide ADSL services. If you
are using an ISP other than Ihug or Xtra, please refer to them directly for their setup details.
This modem supports a wide range of ADSL protocols. The settings described here are
suitable for users wishing to connect to the Telecom ADSL service. This product can however
be configured for many other forms of ADSL service that could be implemented in the New
Zealand market.
Step 1 - Make sure ADSL service is activated
Before you can use any ADSL modem, you must confirm the following:
•
You are located within about 5km of an ADSL enabled phone exchange
Telecom’s ADSL service. This can be checked on-line by visiting “
clicking on the link “your area” – or by calling Telecom on 0800 253 878.
•
Telecom has enabled the ADSL service to your house or office. This can be facilitated by
Ihug, Xtra or directly with Telecom
and
you can get
adsl.dse.co.nz
and
”
•
Because ADSL and voice works on the same phone line at the same time, you need to
install ADSL filter/s on each of your normal Telephone devices or contact Telecom on 123
to arrange for someone to install a central splitter. You can also order ADSL on-line by
visiting “
JetStream @ Work
•
You need to have an account with an Internet Service Provider (ISP) to enable your new
ADSL line to connect to the Internet.
• To connect with IHUG, simply call 0800 GET IHUG or visit
To connect with XTRA, simply call 0800 GET XTRA
adsl.dse.co.nz
” links.
”
and clicking on the “
Order JetStream @ Home
www.ihug.co.nz/dse
” or “
Order
Step 2 - Configure your phone equipment
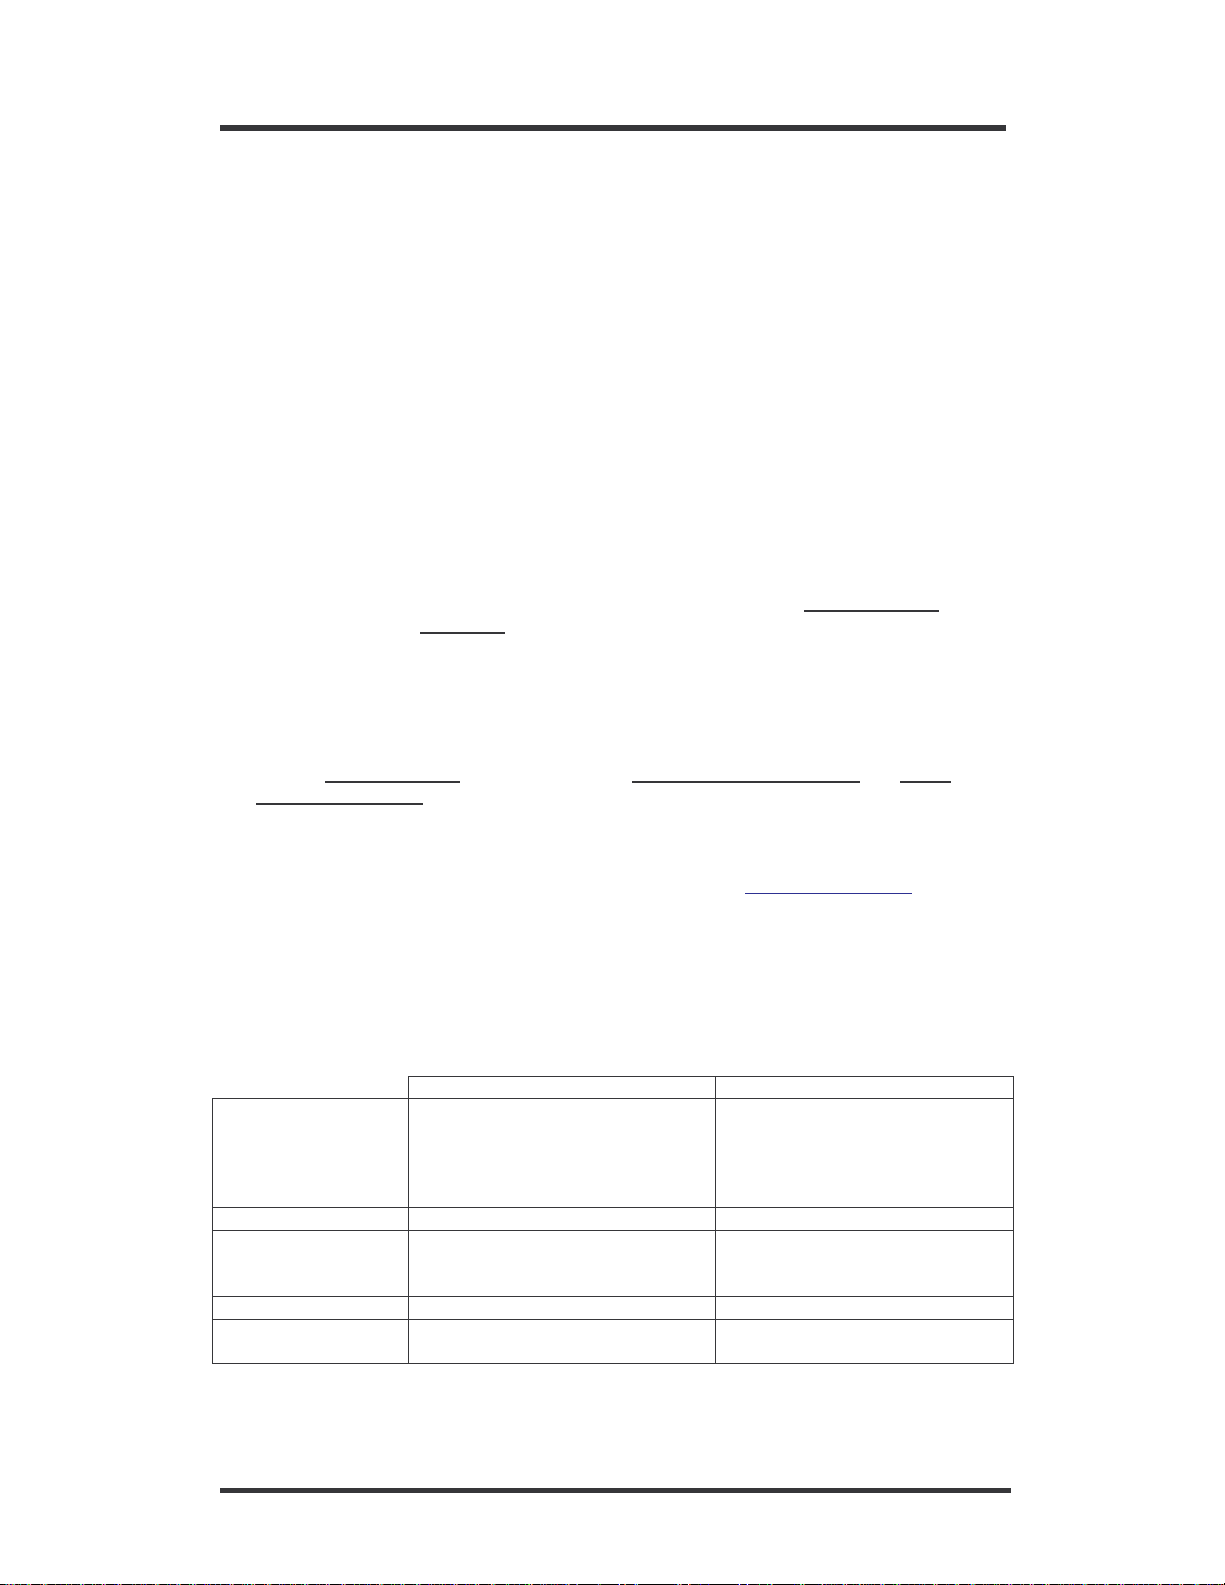
ADSL works by combining both voice and data signals on the same phone line. At your
premises, these signals need to be separated through the use of an approved Filter or
Splitter. Whilst both achieve the same results, each has their pro’s and cons.
Filter Splitter
Ideal for Smaller installations with a limited
amount of phone outlets (phones,
answering machines, cordless
phones, 56K modems, Fax, etc.)
Installation method Self install Professional contractor only
Maximum phones 5 – although double and triple
adaptors can be plugged into the
phone socket of each filter.
How to get
Cost
Dick Smith Electronics – XH7556 Call Telecom on 123
Low per unit for most installations Higher – depends on installer
Larger installations or situations
where filters cannot be used
(alarm diallers and other
permanently wired telephone
devices).
Unlimited
and the actual installation
3
Page 4
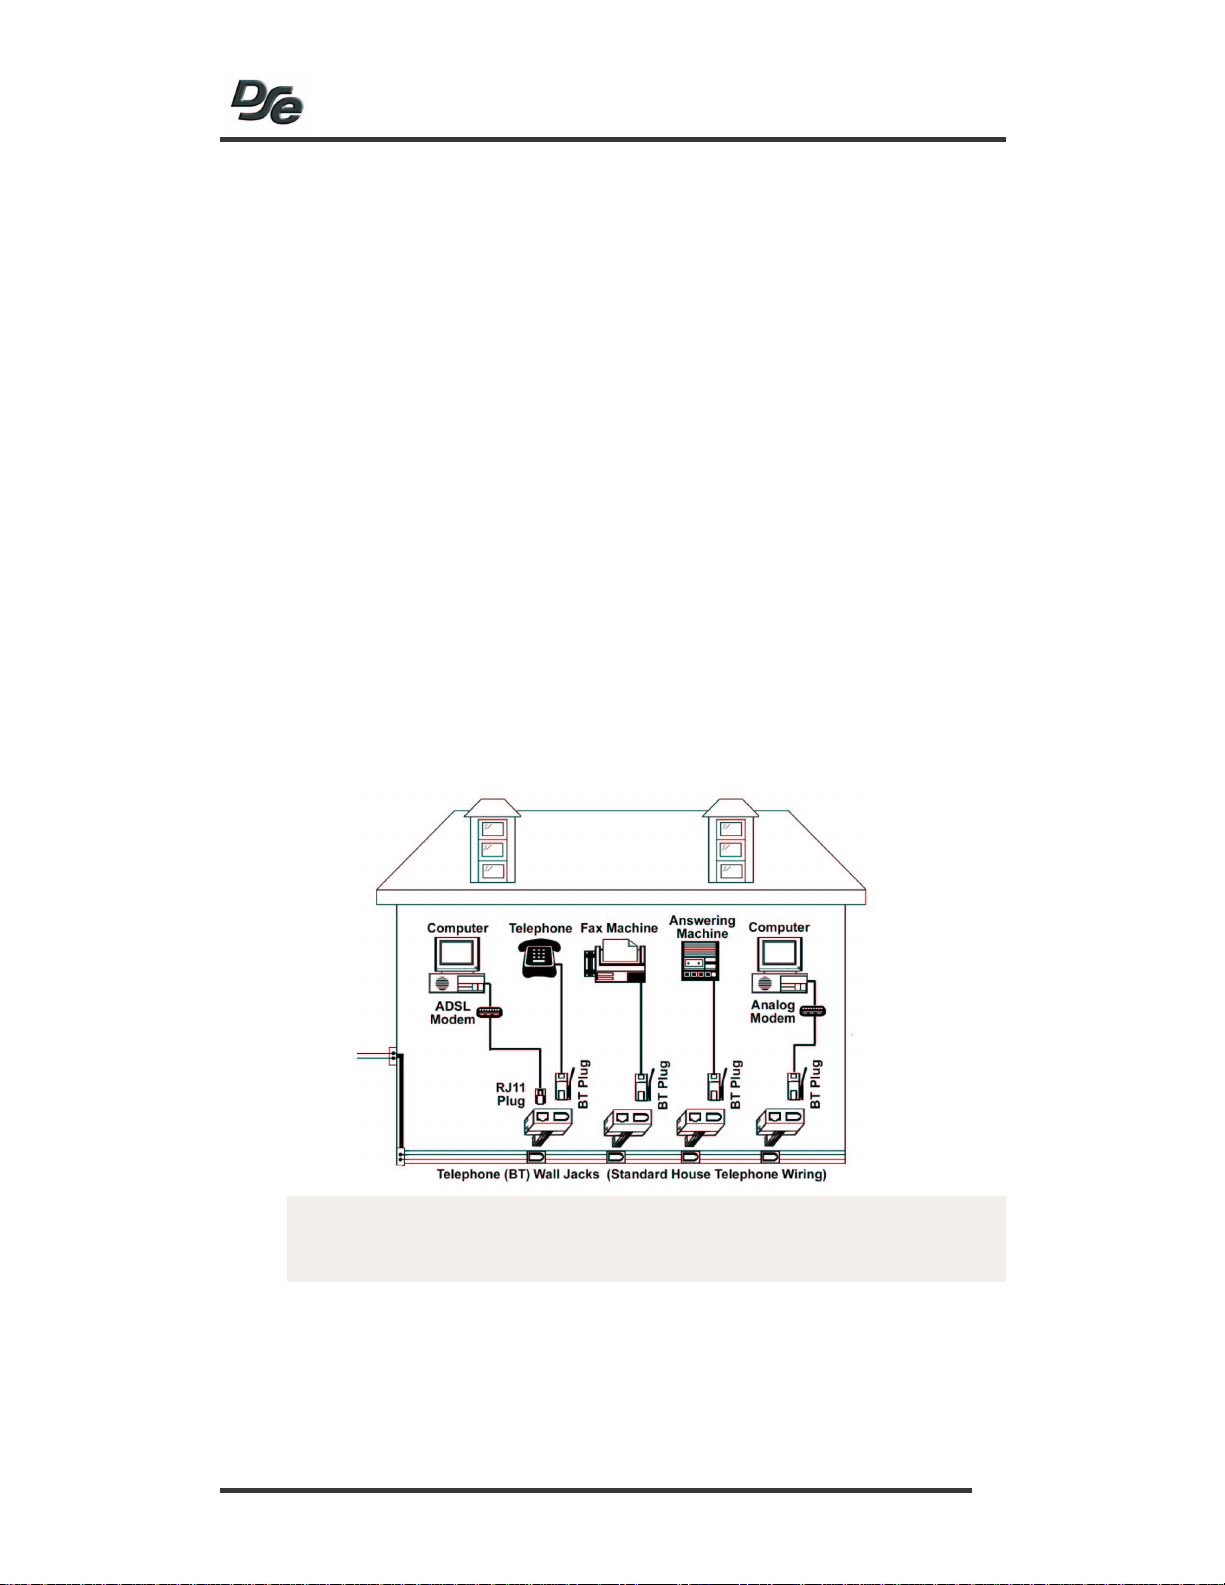
Option 1: Install ADSL Filter/s yourself
•
All telephone equipment must be filtered in an ADSL installation. This includes corded
& cordless phones, answering machines, faxes, caller display units, analogue modem
(including such devices as a Sky digital decoder with integrated modem), dedicated
diallers, Etc. Filtering telephone equipment is as simple as plugging the XH7556 DSE
ADSL filter in-line with the device/s.
• Your ADSL modem will be the only device that can connect directly to your jackpoint.
However should an adaptor be required between the plug on the modem cord and
the jackpoint, or you wish to connect telephone equipment to the same jackpoint, the
DSE ADSL filter can be used by plugging the modem into the
“ADSL”
socket.
• Do not plug an ADSL modem into the
type of plug.
• It is important that the filter is connected the right way around.
- The lead coming out of the side marked
jackpoint
- Non-ADSL telephone equipment then plugs into the
- The ADSL modem plugs into the “ADSL” socket on the filter.
• Up to 5 filters can be used on a single telephone line. If you need to install more than
5 filters, a central splitter must be installed by Telecom.
• If you need to connect more than one item of telephone equipment at the same
jackpoint, then a double adaptor can be plugged into the “PHONE” socket of this
filter.
•
This Line Filter has an RJ11
be plugged into this socket.
“ADSL”
“PHONE”
“LINE”
socket incorporated. Only ADSL modems may
socket if the modem cord has this
is plugged into the telephone
“PHONE”
socket on the filter
CAUTION:
Failure to connect ALL telephone type equipment via a filter will result in loss of the
data link whenever a call is made or answered. In many cases the link will also be
lost when a call is received, even if it is not answered.
Option 2: Have an ADSL splitter professionally installed
•
Contact Telecom on 123 to arrange for a central splitter to be installed.
4
Page 5

XH1148 - DSE ADSL Modem – USB
Step 3 - Connecting the Router to your PC
Follow the steps below to connect the modem to your PC via the USB port.
•
The modem is extremely easy to install. Please follow the two simple steps below to
connect the modem to your PC.
• Connect the ADSL/phone line to the connector port on the modem and plug the other end
of the cable into your phone line.
• With your computer turned on, connect the USB cable to the connector port on the modem
and plug the other end of the cable to a free USB port on your computer.
5
Page 6

Step 4 – Driver installation
The following procedures are to be followed to be able to use the ADSL services as provided
by Telecom NZ. These procedures are to be followed to install the drivers for Windows 98 SE
and Windows XP. Installation for the other Windows operating systems will be similar.
Windows 98 Driver Installation
1. When the modem is connected to your computer, the
dialog box appears. Click
2. In the new dialog box, select Search for the best driver for your device
(Recommended)
3. In the new dialog box, select
E:\drivers\Wan folder on your CD-ROM (where E is the letter of your CD-ROM drive).
Then click
4. Windows is ready to install the driver for the modem (XH1148 – DSE ADSL Modem
USB Interface). Click Next.
5. Windows has finished installing the driver. Click
6. Windows may ask to insert the Windows 98 CD. If it is the case, remove the Modem
installation CD and insert the Windows 98 CD.
7. Restart your PC. After the PC has restarted, the shortcuts named
Connection and DSE ADSL Control Panel will be on the desktop.
8. The USB ADSL driver has been successfully installed and the Status Task Bar icon
will appear in the System Tray.
Next
and click
.
Next
.
Next
.
Specify a location
, and click
Finish
Add New Hardware Wizard
Browse
.
to navigate to the
DSE ADSL
9. To verify that the ADSL modem has been installed properly, right click the
Computer icon on the desktop and select Properties. Select Device Manager tab.
XH1148 DSE USB ADSL WAN Adapter
The
Adapters
Universal Bus Controllers.
, and the
XH1148 – DSE ADSL Modem USB Interface
should be under the
should be under the
Network
After your computer restarts, proceed to the
instructions for your operating system.
“Network Settings”
section and follow the
My
6
Page 7

Windows XP Driver Installation
XH1148 - DSE ADSL Modem – USB
1. When the modem is connected to your computer, a
dialog box appears. Select
Next
click
2. The
installation options. Select
navigate to the
CD-ROM drive). Then click Next.
3. The
Windows logo testing. Click
4. The
installing has not passed Windows Logo testing to verify its compatibility with Windows
XP. Click
5. Windows has completed the installation for the ADSL modem (XH1148 – DSE ADSL
Modem USB Interface). Click
6. Another warning appears. Click Continue Anyway.
7. The USB ADSL driver has been successfully installed and the Status Task Bar icon
will appear in the System Tray.
8. Another window appears. Click
9. Windows will ask if you want to restart your computer. Click
10. After the PC has restarted, the shortcuts named
ADSL Control Panel
11. To verify that the ADSL modem has been installed properly, right click the My
Computer
select
under the
should be under the Universal Bus Controllers.
After your computer restarts, proceed to the
instructions for your operating system.
.
Found New Hardware Wizard
E:\drivers\Wan
Hardware Installation
Software Installation
Continue Anyway
icon on the desktop and select
Device Manager
Network Adapters
Install from a list or specific location (Advanced)
dialog box asks you to choose the search and
Include this location in the search
folder on your CD-ROM (where E is the letter of your
dialog box will notify you that this driver has not passed
Continue Anyway
dialog box will notify you that the software you are
.
Finish
.
Finish
.
will be on the desktop.
Properties
XH1148 DSE USB ADSL WAN Adapter
. The
, and the
XH1148 – DSE ADSL Modem USB Interface
“Network Settings”
Found New Hardware Wizard
and click
.
Yes
.
DSE ADSL Connection
. Choose the
section and follow the
Hardware
should be
Browse
and
. Then
to
DSE
tab and
7
Page 8

Mac OS X Driver Installation
Note: Ensure that the modem is connected to the ADSL wall socket and the USB cable is
connected between the modem and the computer before installing the driver.
1. Download the latest version of the OSX driver from our website at
http://www.dse.co.nz/cgi-bin/dse.storefront/en/product/XH1148
2. Double-click the XH1148_MacOSX.zip file to extract it, make a note of where it
extracts to. This step will create a file called OSX_non.sit.
3. Double-click the file OSX_non.sit, this will extract the drivers and put them into a folder
called OSX_non.
4. Open the OSX_non folder and double-click the icon there called
Install_USB_ADSL_PKG and follow instructions on screen to install the driver.
5. After completion of the driver installation, you should be prompted to restart the
computer, just click the Restart button to continue. If no restart prompt appears,
shutdown and restart using the normal means.
Note:
Drivers for Mac OS 9.1 are provided on the driver CD “as is” and DSE is only able to
support Mac OS X. The Mac OS 9.1 drivers provided are
NOT
supported.
8
Page 9

XH1148 - DSE ADSL Modem – USB
Step 5 – Networking Settings
Windows Configuration
1. After your PC has rebooted, double-click the
desktop.
2. Press Alt + C to display the advanced configuration settings screen.
3. Select the
Telecom network in New Zealand,
or G.lite preferred.
4. Select the
Telecom network in New Zealand,
Encapsulation Mode should be set to PPP over ATM VCMUX (RFC2364). Click OK to
close the window.
5. Double click on the
and Password supplied by your Internet service provider (ISP). Then click Connect.
Note:
The user name and password are case sensitive so make sure you type them correctly.
6. Internet service is now established and the Diagnostic tool icon should now be in the
system tray on the task bar.
Line Setup
Protocol Setup
tab and check that the settings are as shown below. For the
DSE ADSL Connection
Modulation
tab and check that the settings are as shown below. For the
VPI
DSE ADSL Control Panel
should be set to
should be set to
icon on the desktop. Enter the
0, VCI
should be set to
icon on the
Automatic, ITU G.dmt
100
and
User name
9
Page 10

Mac OS X Configuration
The following instructions are for Mac OS X only. Please note that DSE is only able to support
Mac OS X. Any earlier versions are not supported.
1. After restarting, you will need to set up the internet/networking, go to the System
Preferences and click Network.
2. When Network preferences opens, it should state that a new adapter has been detected,
you will need to select the new adapter from the drop down list under Show (your modem
should show as Ethernet Adaptor en1 or en2 depending on what else is installed in the
computer).
3. Change to the PPPoE tab and uncheck the box Connect using PPPoE.
4. Set the adapter to Using DHCP in the Configure field, then click Apply Now. An IP
address of 10.0.0.3 subnet mask of 255.0.0.0 and Router address of 10.0.0.2 should now
appear on the screen, make a note of the Router address here, you will need it in the next
steps to configure the modem.
5. Open your web browser and type in the Router address (see above, default is 10.0.0.2), it
will prompt you for a gateway login and password, (default login is admin and
default password is epicrouter.
6. From the router configuration screen, click WAN under Configuration then check that
Encapsulation is set to PPPoA VC-Mux, VPI is set to 0, VCI is set to 100, set Static IP,
subnet mask and Gateway are all set to 0.0.0.0 then enter your username and password
provided to you by your ISP into the fields provided, then click the Submit button at the
bottom of the page, then scroll down and click the Save Configuration link at the bottom of
the page, then click Submit on the next screen which appears.
7. Once you have completed the above steps, you should have a connection to the internet
via your XH1148 ADSL modem.
10
Page 11

Appendix
Ihug settings & support details
XH1148 - DSE ADSL Modem – USB
Primary DNS
Secondary DNS 203.109.252.43
Incoming Mail Server
Outgoing Mail Server
Please contact the Ihug helpdesk if you require more information on other settings:
Email: help@ihug.co.nz
Phone:
0800 438 448
pop.ihug.co.nz
smtp.ihug.co.nz
203.109.252.42
Xtra settings & support details
Primary DNS
Secondary DNS
Incoming Mail Server pop3.xtra.co.nz
Outgoing Mail Server
Please contact the Xtra helpdesk if you require more information on other settings:
Email:
Phone: 0800 438 987
helpdesk@xtra.co.nz
smtp.xtra.co.nz
202.27.184.3
202.27.184.5
Contacting the DSE Support Team
DSE national support operates Monday to Friday during normal business hours.
Email:
Or call into your nearest Dick Smith Electronics store
support@dse.co.nz
Phone:
(09) 414 2823
My Settings
We suggest you write down your modem’s default settings for future reference:
Name of ISP _________________________________________
ISP Contact _________________________________________
ADSL Logon Name _________________________________________
My ADSL Logon Password _________________________________________
Primary DNS __ __ __ . __ __ __ . __ __ __ . __ __ __
Secondary DNS __ __ __ . __ __ __ . __ __ __ . __ __ __
Incoming Mail Server _________________________________________
Outgoing Mail Server
_________________________________________
11
 Loading...