

Page 1
USER MANUAL
Megapixel H.264 IP CAMERAS
Page: 1 Page: 1
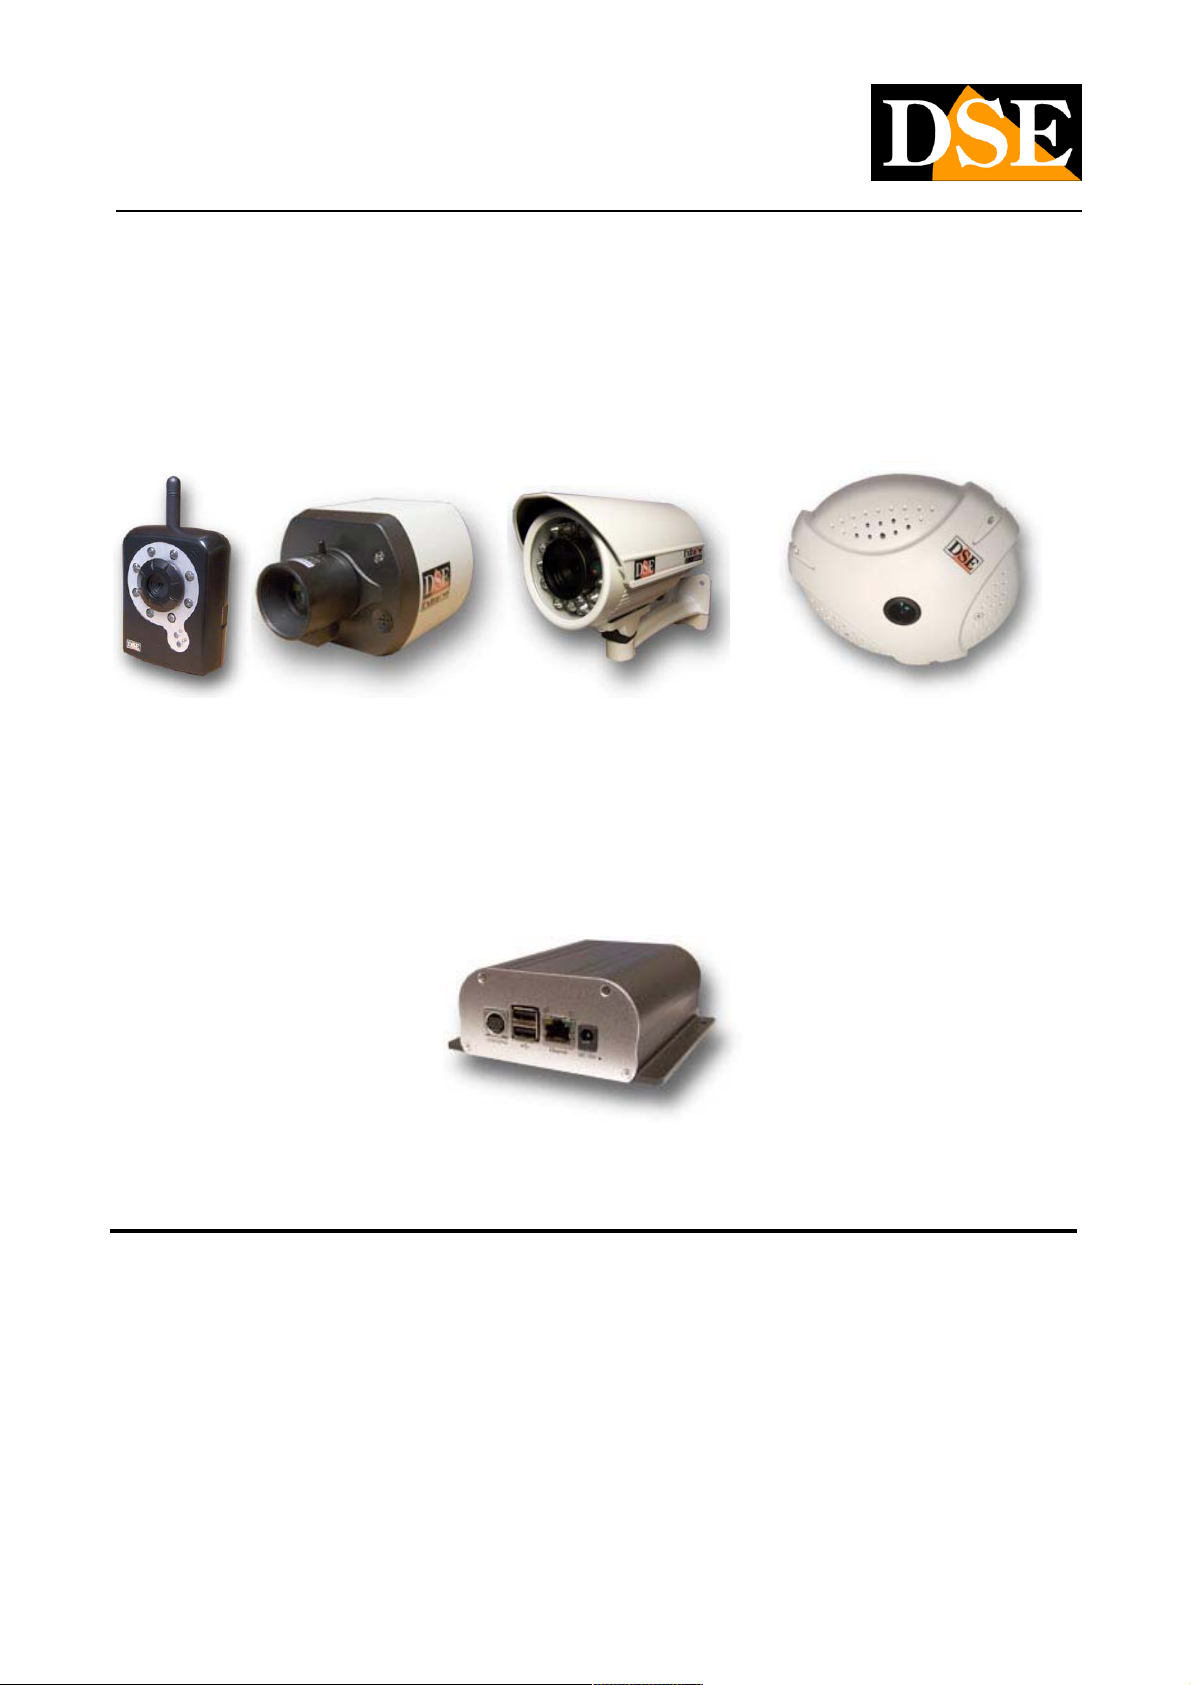
RN-606W-600C RN RN RN-621B-636E
IP Camera 2 megapixel H.264 compression
RN-6901
Video server H.264 compression D1
Introduction
The RN series consists of cameras and video servers over IP with H.264 compression. The units are connected to a LAN via RJ45
port as any PC or other device and the images are displayed on the PC on the network using a standard Internet browser or special
registration programs. The megapixel resolution allows image detail not possible with analog systems. The video servers are used to
integrate analog sources into an IP system.
The RN series of network equipment using H.264 compression, the latest evolution in digital video compression that allows fidelity
and bandwidth economy.
DSE SRL - ITALY - WWW.DSE.EU
Page 2
USER MANUAL
Megapixel H.264 IP CAMERAS
Page: 2 Page: 2
Technical data
RN-606W RN-621B RN-600C RN-636E RN-6901
Camera Type IP camera IP camera IP camera IP camera IP video servers
Sensor
Color or black / white colors colors colors colors colors
Resolution
Frame rate
video Compression H264 / MJPEG H264 / MJPEG H264 / MJPEG H264 / MJPEG H264 / MJPEG
Audio compression u-Law PCM 8Khz u-Law PCM 8Khz u-Law PCM 8Khz u-Law PCM 8Khz u-Law PCM 8Khz
Lan RJ45 RJ45 RJ45 RJ45 RJ45
Wifi connection 802.11b / g - - - -
1/3 "progressive scan CMOS
2mpx
UXGA: 1600x1200 HD720:
1280 x 720 SVGA: 800 x 600
VGA: 640 x 480 QVGA: 320 x
240
30 f / sec up to
1280x720 15 f /
sec to 1600x1200
1/3 "progressive scan CMOS
2mpx
UXGA: 1600x1200 HD720:
1280 x 720 SVGA: 800 x 600
VGA: 640 x 480 QVGA: 320 x
240
30 f / sec up to
1280x720 15 f /
sec to 1600x1200
1/3 "progressive scan CMOS
2mpx
UXGA: 1600x1200 HD720:
1280 x 720 SVGA: 800 x 600
VGA: 640 x 480 QVGA: 320 x
240
30 f / sec up to
1280x720 15 f /
sec to 1600x1200
1/3 "progressive scan CMOS
2mpx
UXGA: 1600x1200 SVGA 800 x
600 VGA: 640 x 480
30 f / sec up to
800x600 15 f /
sec to 1600x1200
-
D1: 720x576 PAL (720x480
NTSC)
25 f / sec (PAL) 30 f / sec
(NTSC)
Power over Ethernet - IEEE802.3af IEEE802.3af IEEE802.3af -
+ Microphone input minijack input minijack
audio Input Microphone minijack input Microphone
Audio output for two-way dialogue
minijack minijack minijack minijack minijack
Alarm inputs - 1 2 4 1
Alarm outputs - 1 1 1 1
Day / Night Yes Yes Yes Yes -
Lighting
Infrared compatible 840nm ... 1100nm 840nm ... 1100nm 840nm ... 1100nm 840nm ... 1100nm
DSE SRL - ITALY - WWW.DSE.EU
-
Page 3

USER MANUAL
Megapixel H.264 IP CAMERAS
Page: 3 Page: 3
integrated LED 5 m. 15 m. - - -
IR filter automatic removal (ICR)
AWB 5 options 5 options 5 options 5 options -
Analog Video Output - Composite BNC Composite BNC - Composite BNC
memory slots microSD - SD microSD 2 USB 2.0 ports
Supply 5..12V DC 12V DC or PoE 12V DC or PoE 12V DC or PoE DC 12V
Absorption Max. 5W Max. 5W Max. 5W Max. 5W Max. 5W
230VAC power supply Yes No No No Yes
Support bracket Yes Yes Yes No No
Attaching the S CS CS S -
Objective Standard 4.9 mm. pin-hole 6 mm. 6 mm. 1.25 mm. -
Target
interchangeable
Operating
temperature
Degree of protection IP40 IP66 IP40 IP40 IP40
- Yes Yes Yes -
- Yes Yes - -
0 ° ... + 50 ° C - 30 ° ... + 50 ° C 0 ° ... + 50 ° C 0 ° ... + 50 ° C 0 ° ... + 50 ° C
External dimensions (mm.)
Weight 90 gr. 370 gr. 700 gr. 380 gr. 570 gr.
PPPoE protocol Yes Yes Yes Yes Yes
DHCP Protocol Yes Yes Yes Yes Yes
SMTP Protocol Yes Yes Yes Yes Yes
FTP protocol Yes Yes Yes Yes Yes
UPnP Protocol Yes Yes Yes Yes Yes
RTSP protocol Yes Yes Yes Yes Yes
Protocol 3GPP / ISMA Yes Yes Yes Yes Yes
HTTPS protocol Yes Yes Yes Yes Yes
Other protocols
supported
DDNS Support Yes Yes Yes Yes Yes
Disable ping response
60x76x26 85x70x78 77x80x160 180 (diameter) x55 135x40x85
TCP / IP, ARP, ICMP, NTP,
RTP, HTTP, TCP, UDP,
Bonjour
Yes Yes Yes Yes Yes
TCP / IP, ARP, ICMP, NTP,
RTP, HTTP, TCP, UDP,
Bonjour
TCP / IP, ARP, ICMP, NTP,
RTP, HTTP, TCP, UDP,
Bonjour
TCP / IP, ARP, ICMP, NTP,
RTP, HTTP, TCP, UDP,
Bonjour
TCP / IP, ARP, ICMP, NTP,
RTP, HTTP, TCP, UDP,
Bonjour
DSE SRL - ITALY - WWW.DSE.EU
Page 4

USER MANUAL
Megapixel H.264 IP CAMERAS
Page: 4 Page: 4
supported browsers
PC (IE) Mac
(Safari)
Access Password Protection 20 3 users access
levels
Motion detection Yes Yes Yes Yes Yes
alarm Sending video E-mail / FTP E-mail / FTP E-mail / FTP E-mail / FTP E-mail / FTP
FTP Upload timed
Yes Yes Yes Yes Yes
Videoconferencing Terminal
Yes (10 'stations max.) Yes (max 10' stations.) Yes (max 10 'stations.) Yes (max 10' stations.) Yes (max 10 'stations.)
function
Recording on memory
Yes - Yes Yes Yes
programmable timer
Explorer interface customizable
Yes (colors and logo) Yes (colors and logo) Yes (colors and logo) Yes (colors and logo) Yes (colors and logo)
PC (IE) Mac
(Safari)
20 3 users access
levels
PC (IE) Mac
(Safari)
20 3 users access
levels
PC (IE) Mac
(Safari)
20 3 users access
levels
PC (IE) Mac
(Safari)
20 3 users access
levels
DSE SRL - ITALY - WWW.DSE.EU
Page 5
USER MANUAL
Megapixel H.264 IP CAMERAS
Page: 5 Page: 5
Installation
Product Overview
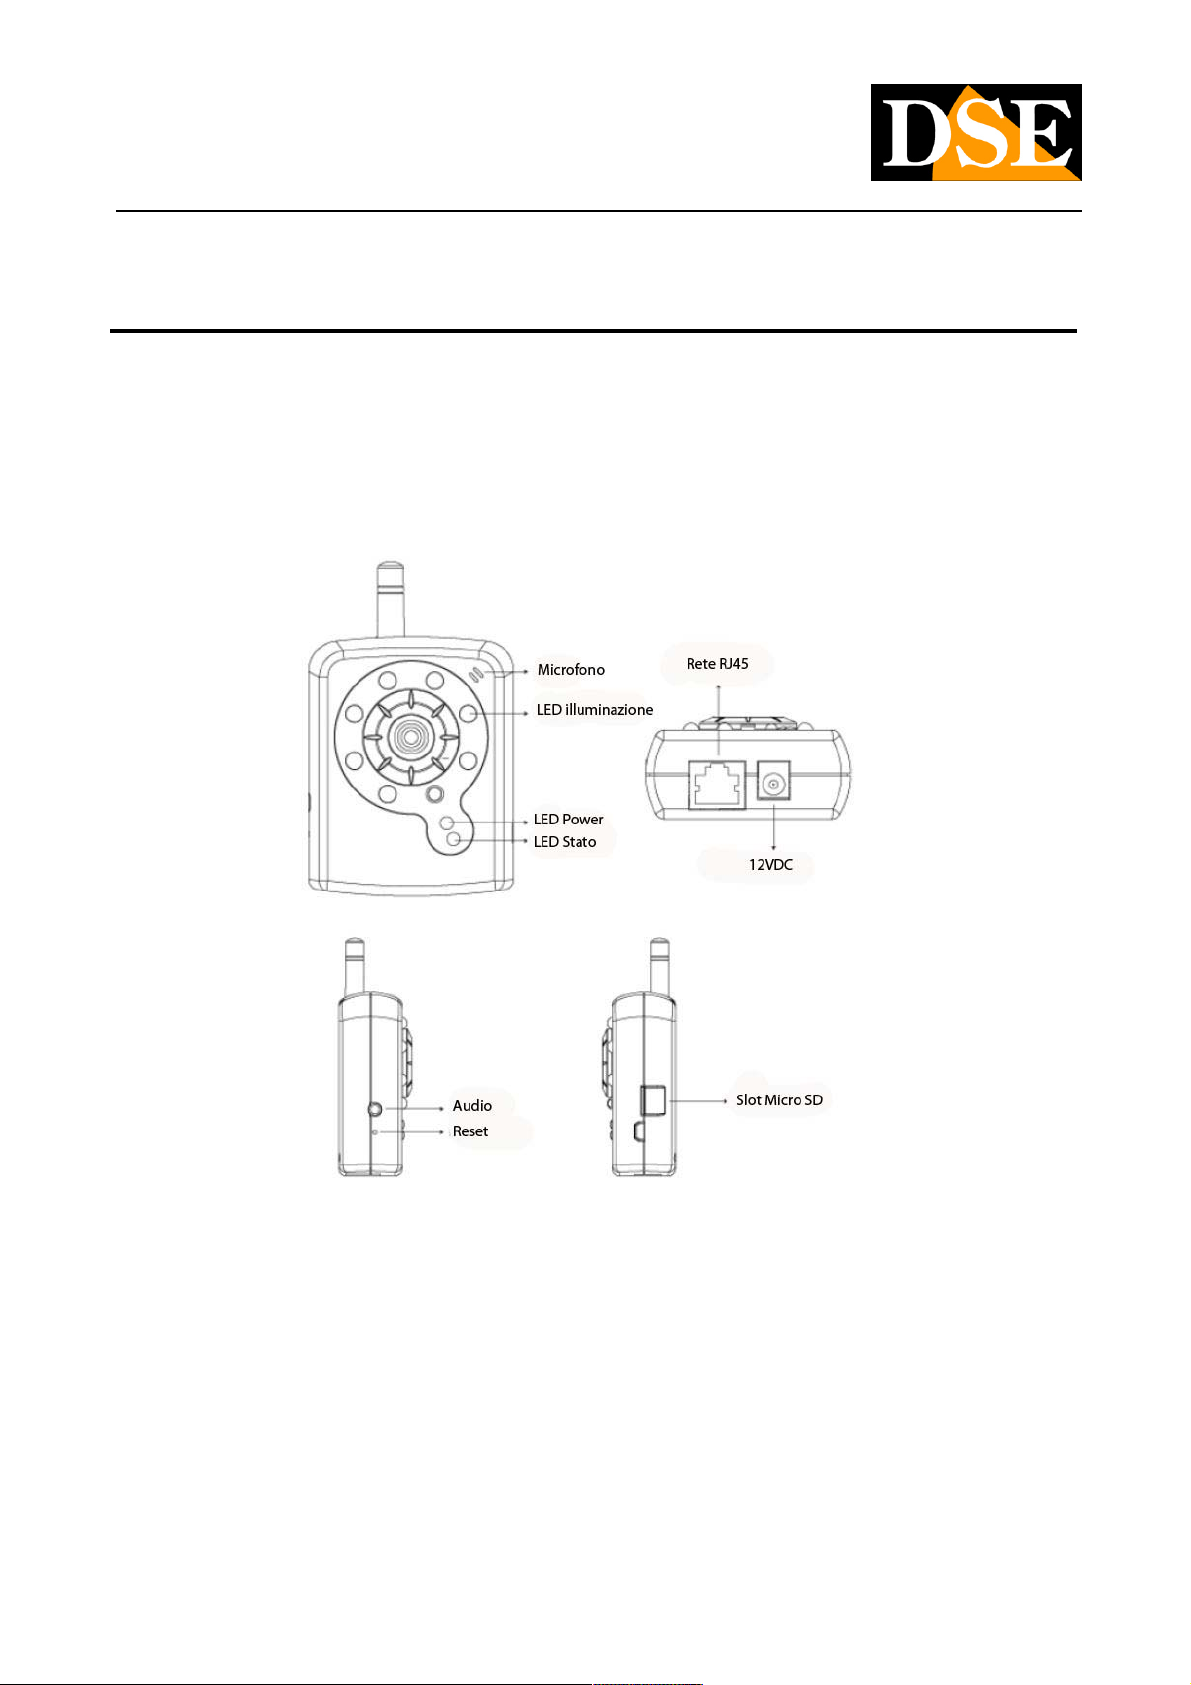
RN-606W
MIC IN - The camera is equipped with built-in microphone MIC IN - The camera is equipped with built-in microphone
AUDIO OUTPUT - This 3.5 mm jack allows you to connect the local speakers. This feature allows you to create a two-way audio AUDIO OUTPUT - This 3.5 mm jack allows you to connect the local speakers. This feature allows you to create a two-way audio
conversation between the person in front of the camera and the operator in front of the client PC.
Micro SD CARD SLOT - Slot to insert a Micro SD card to save aboard the same camera images. Micro SD CARD SLOT - Slot to insert a Micro SD card to save aboard the same camera images.
12VDC - plug which connect the power supply 220VAC / 12VDC supplied. 12VDC - plug which connect the power supply 220VAC / 12VDC supplied.
NETWORK RJ45 - RJ45 connector to connect the networkNETWORK RJ45 - RJ45 connector to connect the network
DSE SRL - ITALY - WWW.DSE.EU
Page 6
USER MANUAL
Megapixel H.264 IP CAMERAS
Page: 6 Page: 6
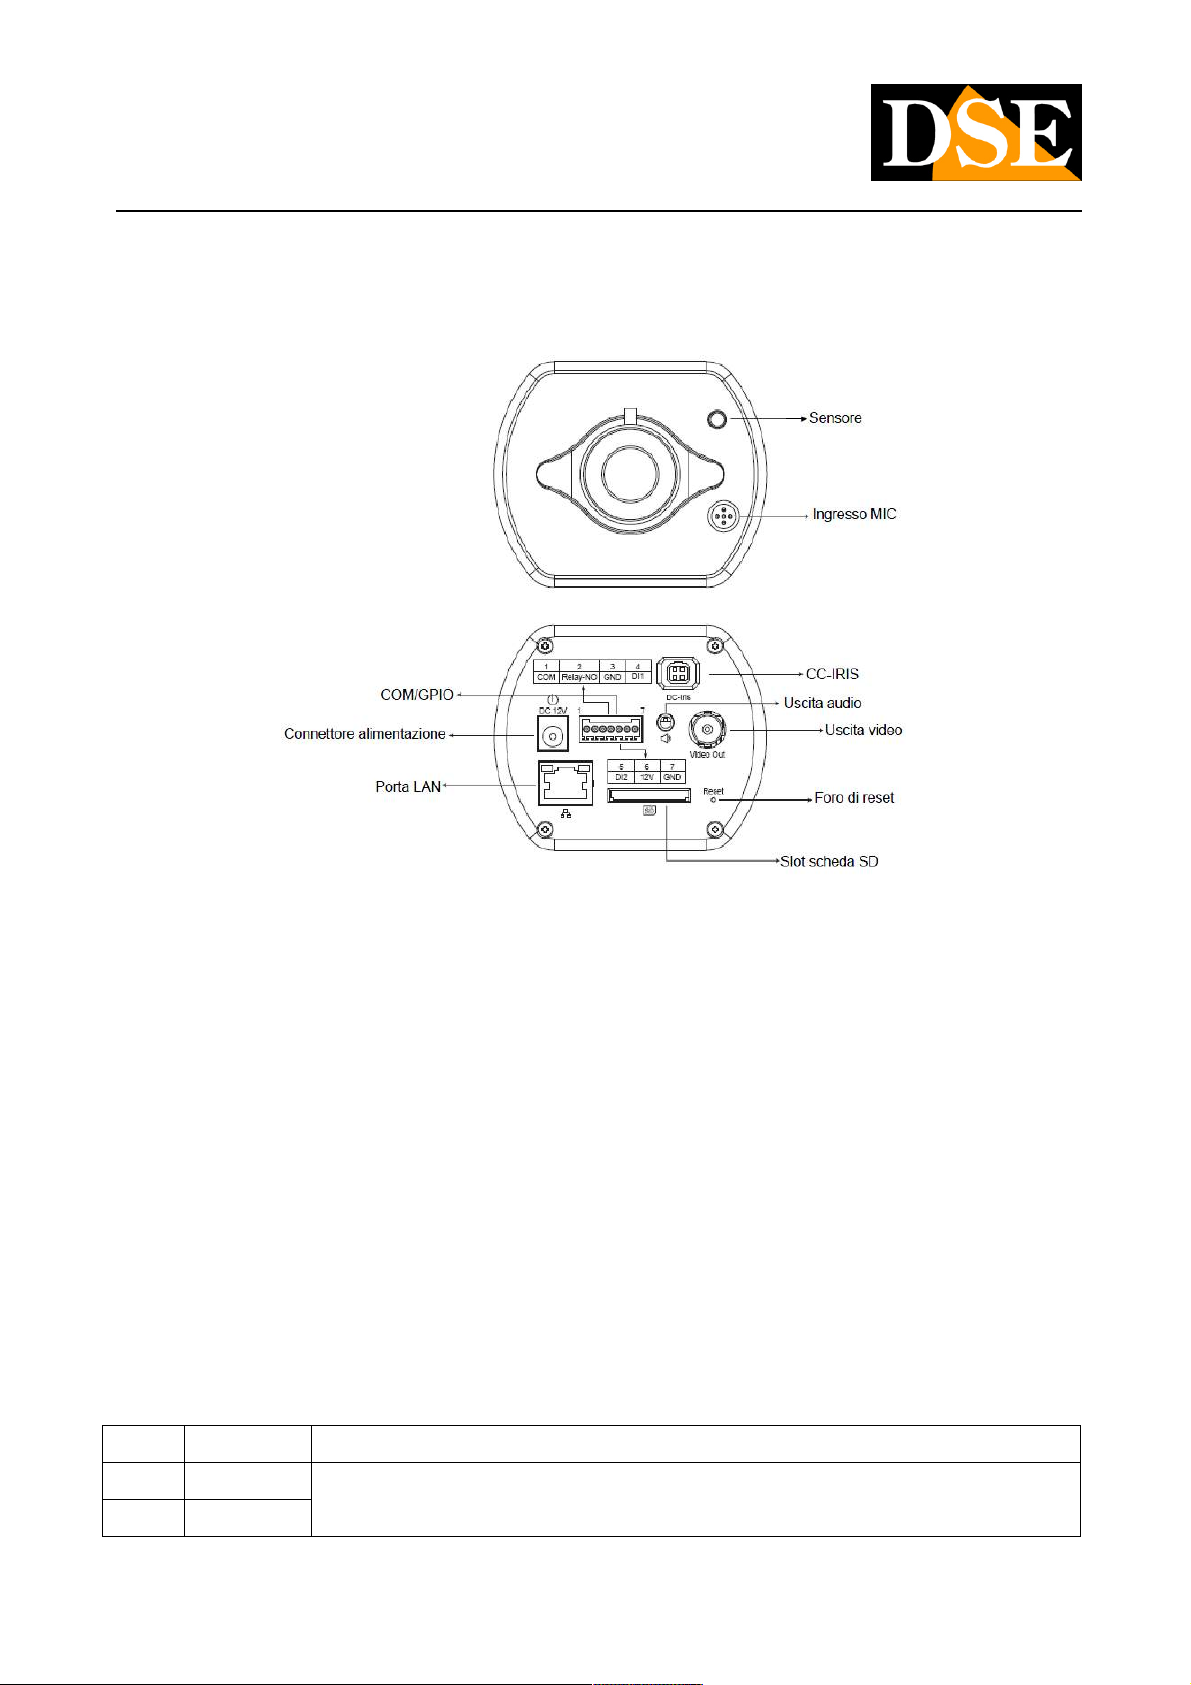
RN-600C
IRIS - The 4-pole black connector allows you to connect an auto-iris lens control cable type DC Drive IRIS - The 4-pole black connector allows you to connect an auto-iris lens control cable type DC Drive
VIDEO - The camera provides a video output of the analog type with BNC connector that can be connected to a monitor or a VCR VIDEO - The camera provides a video output of the analog type with BNC connector that can be connected to a monitor or a VCR
AUDIO OUTPUT - This 3.5 mm jack allows you to connect the local speakers. This feature allows you to create a two-way audio AUDIO OUTPUT - This 3.5 mm jack allows you to connect the local speakers. This feature allows you to create a two-way audio
conversation between the person in front of the camera and the operator in front of the client PC.
SD CARD SLOT - slot to insert an SD card (also SDHC) to save aboard the same camera images. SD CARD SLOT - slot to insert an SD card (also SDHC) to save aboard the same camera images.
SUPPLY - plug which connect the power supply 220VAC / 12VDC supplied. SUPPLY - plug which connect the power supply 220VAC / 12VDC supplied.
LAN PORT - RJ45 connector to connect the network LAN PORT - RJ45 connector to connect the network
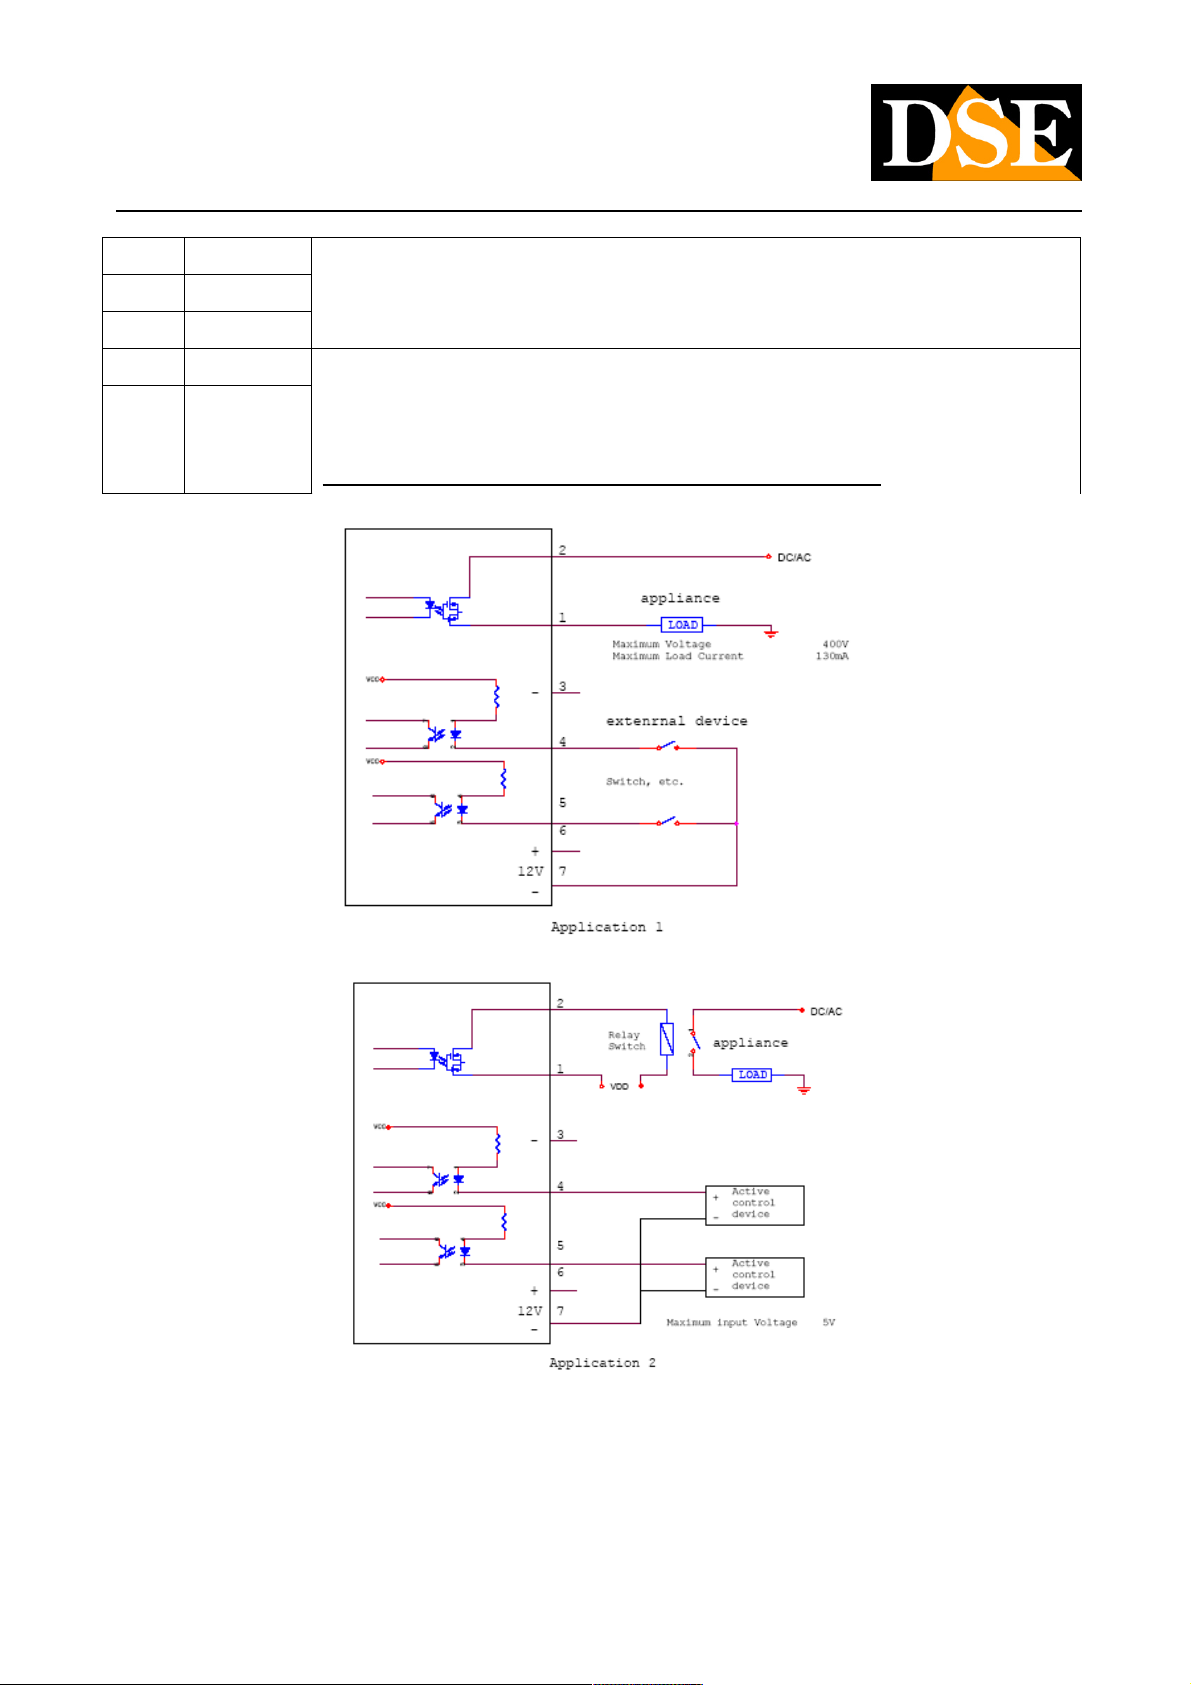
COM / GPIO - This terminal is used to connect the inputs and outputs to control local alarm and signaling contacts. The terminal COM / GPIO - This terminal is used to connect the inputs and outputs to control local alarm and signaling contacts. The terminal
functions are as follows: PIN
RIFER. DESCRIPTION
1 COM Alarm output normally open (NO). It is a relay contact able to control an external device. The max.
2 Relay NO
drivable current is 130mA
DSE SRL - ITALY - WWW.DSE.EU
Page 7
USER MANUAL
Megapixel H.264 IP CAMERAS
Page: 7 Page: 7
3 GND 2 alarm inputs for connecting sensors or external contacts. The ON / OFF type contacts are
4 5 DI1
DI2 6
12V If you use the 12VDC power jack with the external power supply 2 these terminals serve to be able
7 GND
connected between the input terminal and the GND
to provide 12VDC power to any external equipment (eg IR illuminator). If the plug is not used
12VDC is possible to use these two terminals as a 12VDC power supply input.
DSE SRL - ITALY - WWW.DSE.EU
Page 8
USER MANUAL
Megapixel H.264 IP CAMERAS
Page: 8 Page: 8
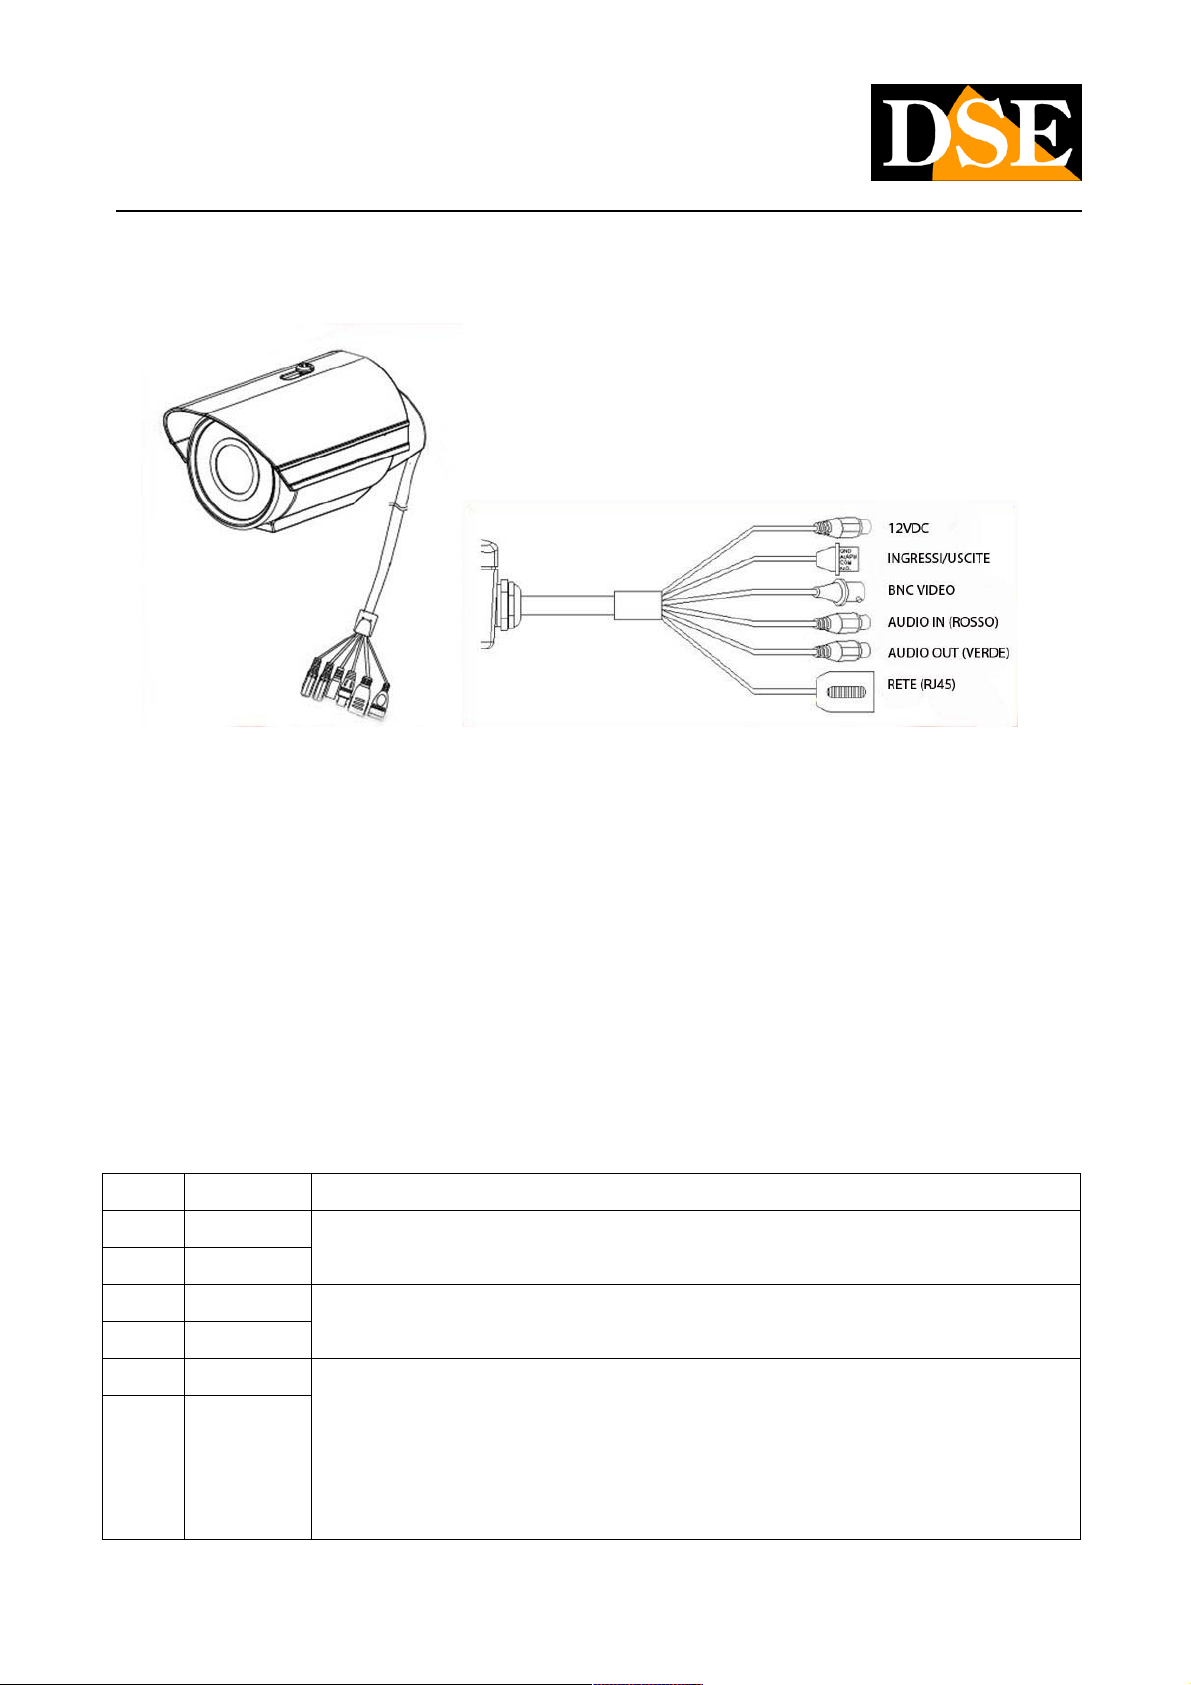
RN-621B
12VDC - plug which connect the power supply 220VAC / 12VDC supplied. 12VDC - plug which connect the power supply 220VAC / 12VDC supplied.
BNC VIDEO - The camera provides a video output of the analog type with BNC connector that can be connected to a monitor or a BNC VIDEO - The camera provides a video output of the analog type with BNC connector that can be connected to a monitor or a
VCR
AUDIO - This 3.5 mm jack Pink allows you to connect a microphone for sound environmental recovery AUDIO - This 3.5 mm jack Pink allows you to connect a microphone for sound environmental recovery
AUDIO OUTPUT - This 3.5 mm jack lets you connect green local speakers. This feature allows you to create a two-way audio AUDIO OUTPUT - This 3.5 mm jack lets you connect green local speakers. This feature allows you to create a two-way audio
conversation between the person in front of the camera and the operator in front of the client PC.
NETWORK - RJ45 connector to connect the networkNETWORK - RJ45 connector to connect the network
INPUT / OUTPUT - This terminal is used to connect the inputs and outputs to control local alarm and signaling contacts. The terminal INPUT / OUTPUT - This terminal is used to connect the inputs and outputs to control local alarm and signaling contacts. The terminal
functions are as follows: PIN
RIFER. DESCRIPTION
1 COM Alarm output normally open (NO). It is a relay contact able to control an external device. The max.
2 Relay NO 3
GND alarm input for connecting sensors or external contacts. The ON / OFF type contact
4 Digital IN 5
drivable current is 130mA
connects between the input terminal and the GND
GND These two terminals running the hardware reset of the camera and restore the factory settings. Should
6 DEFAULT
proceed as follows: 1 - Disconnect the power
2 - connect together with a cable terminals 5 and 6 3 - connect the power
supply the POWER LED will flash.
DSE SRL - ITALY - WWW.DSE.EU
Page 9

USER MANUAL
Megapixel H.264 IP CAMERAS
Page: 9 Page: 9
4 - when the LED starts to flash quickly break the connection between the two terminals. Wait until the
camera is reset.
DSE SRL - ITALY - WWW.DSE.EU
Page 10
USER MANUAL
Megapixel H.264 IP CAMERAS
Page: 10 Page: 10
RN-636E
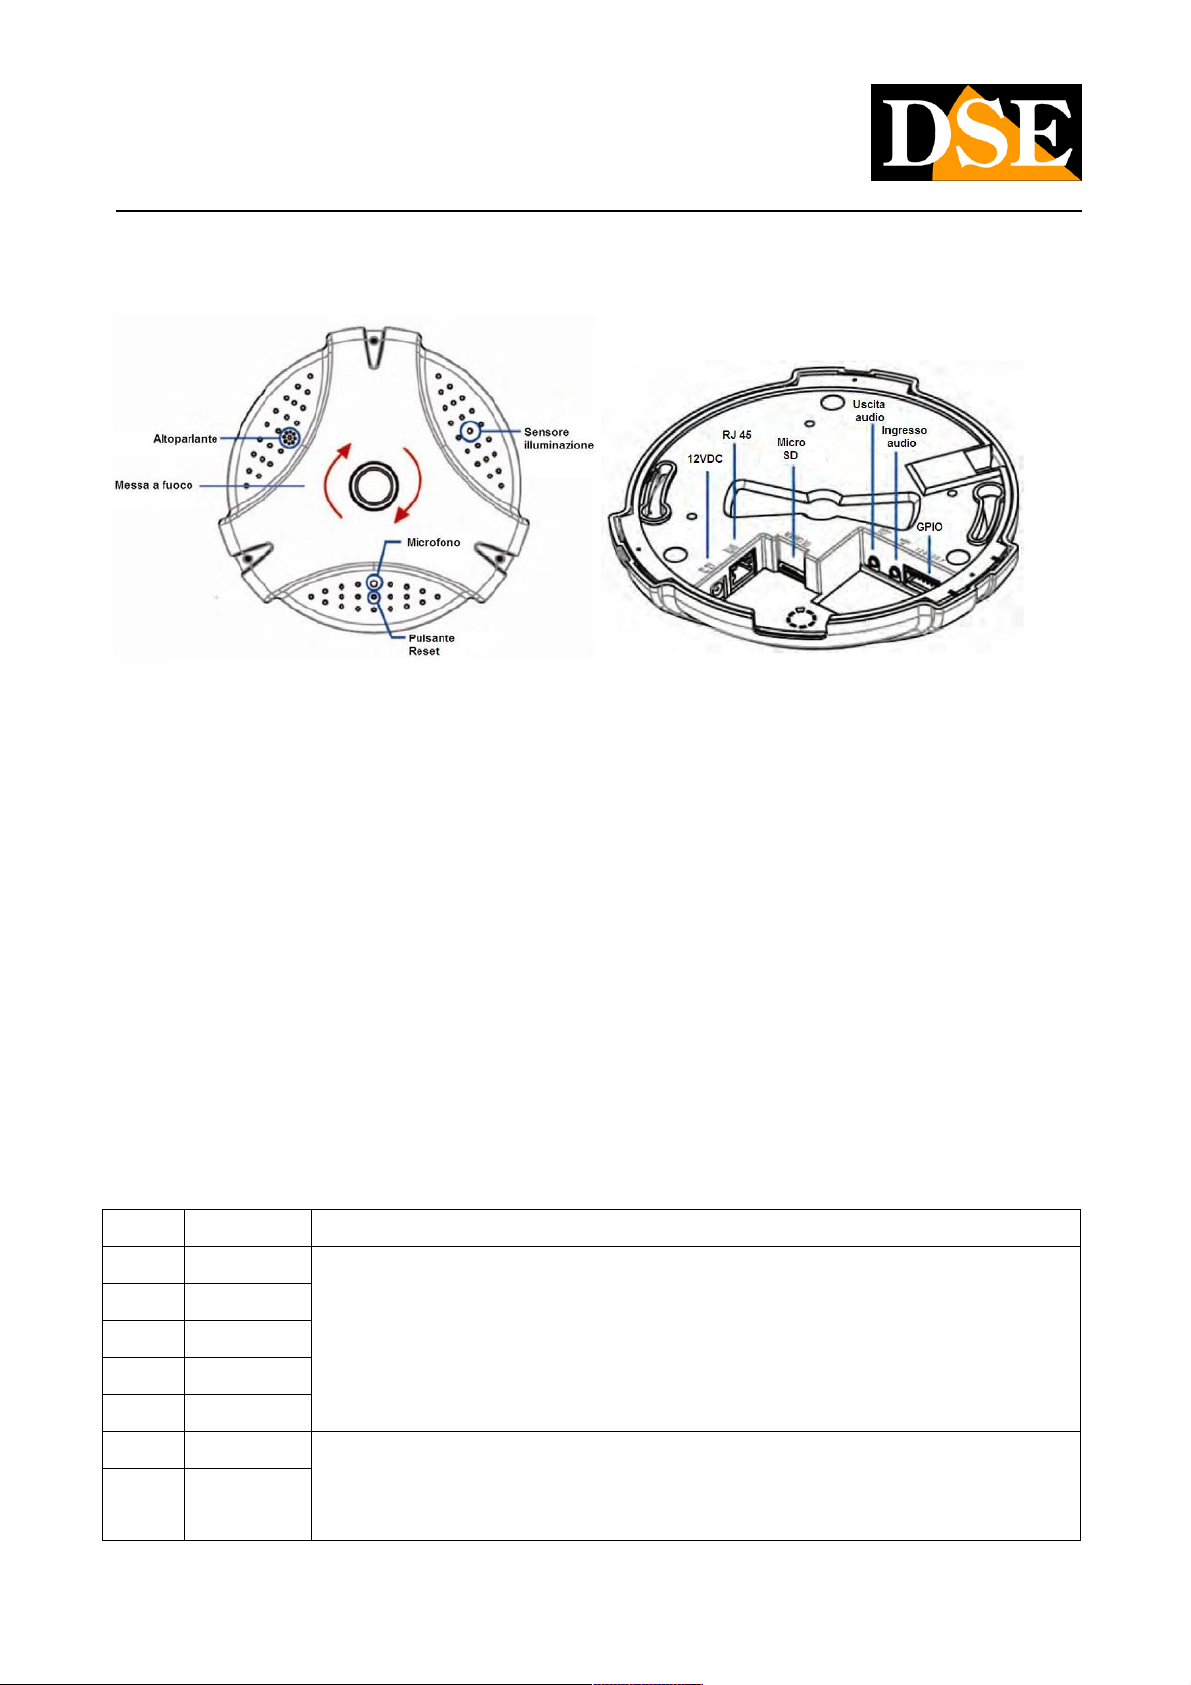
On the front of the camera are present microphone and speaker for audio as well as a light sensor for day / night function and the
RESET button. By turning the lens you can adjust the FOCUS. On the back there are the following connections.
12VDC - Jack to which connect a power supply 220VAC / 12VDC min. 2 A (not supplied). The power supply is not necessary if you use 12VDC - Jack to which connect a power supply 220VAC / 12VDC min. 2 A (not supplied). The power supply is not necessary if you use
the PoE power through the network cable (requires PoE switch or PoE injectors)
RJ45 - RJ45 connector to connect the network. Use CAT5 cableRJ45 - RJ45 connector to connect the network. Use CAT5 cable
MICRO SD - Slot to insert a MicroSD card to save aboard the same camera imagesMICRO SD - Slot to insert a MicroSD card to save aboard the same camera images
AUDIO - This 3.5 mm jack lets you connect a microphone for sound environmental recovery. The camera is also equipped with a built-in AUDIO - This 3.5 mm jack lets you connect a microphone for sound environmental recovery. The camera is also equipped with a built-in
microphone. The use of incroporato microphone or the external microphone is set in programming.
AUDIO OUTPUT - This 3.5 mm jack allows you to connect the local speakers. This feature allows you to create a two-way audio AUDIO OUTPUT - This 3.5 mm jack allows you to connect the local speakers. This feature allows you to create a two-way audio
conversation between the person in front of the camera and the operator in front of the client PC.
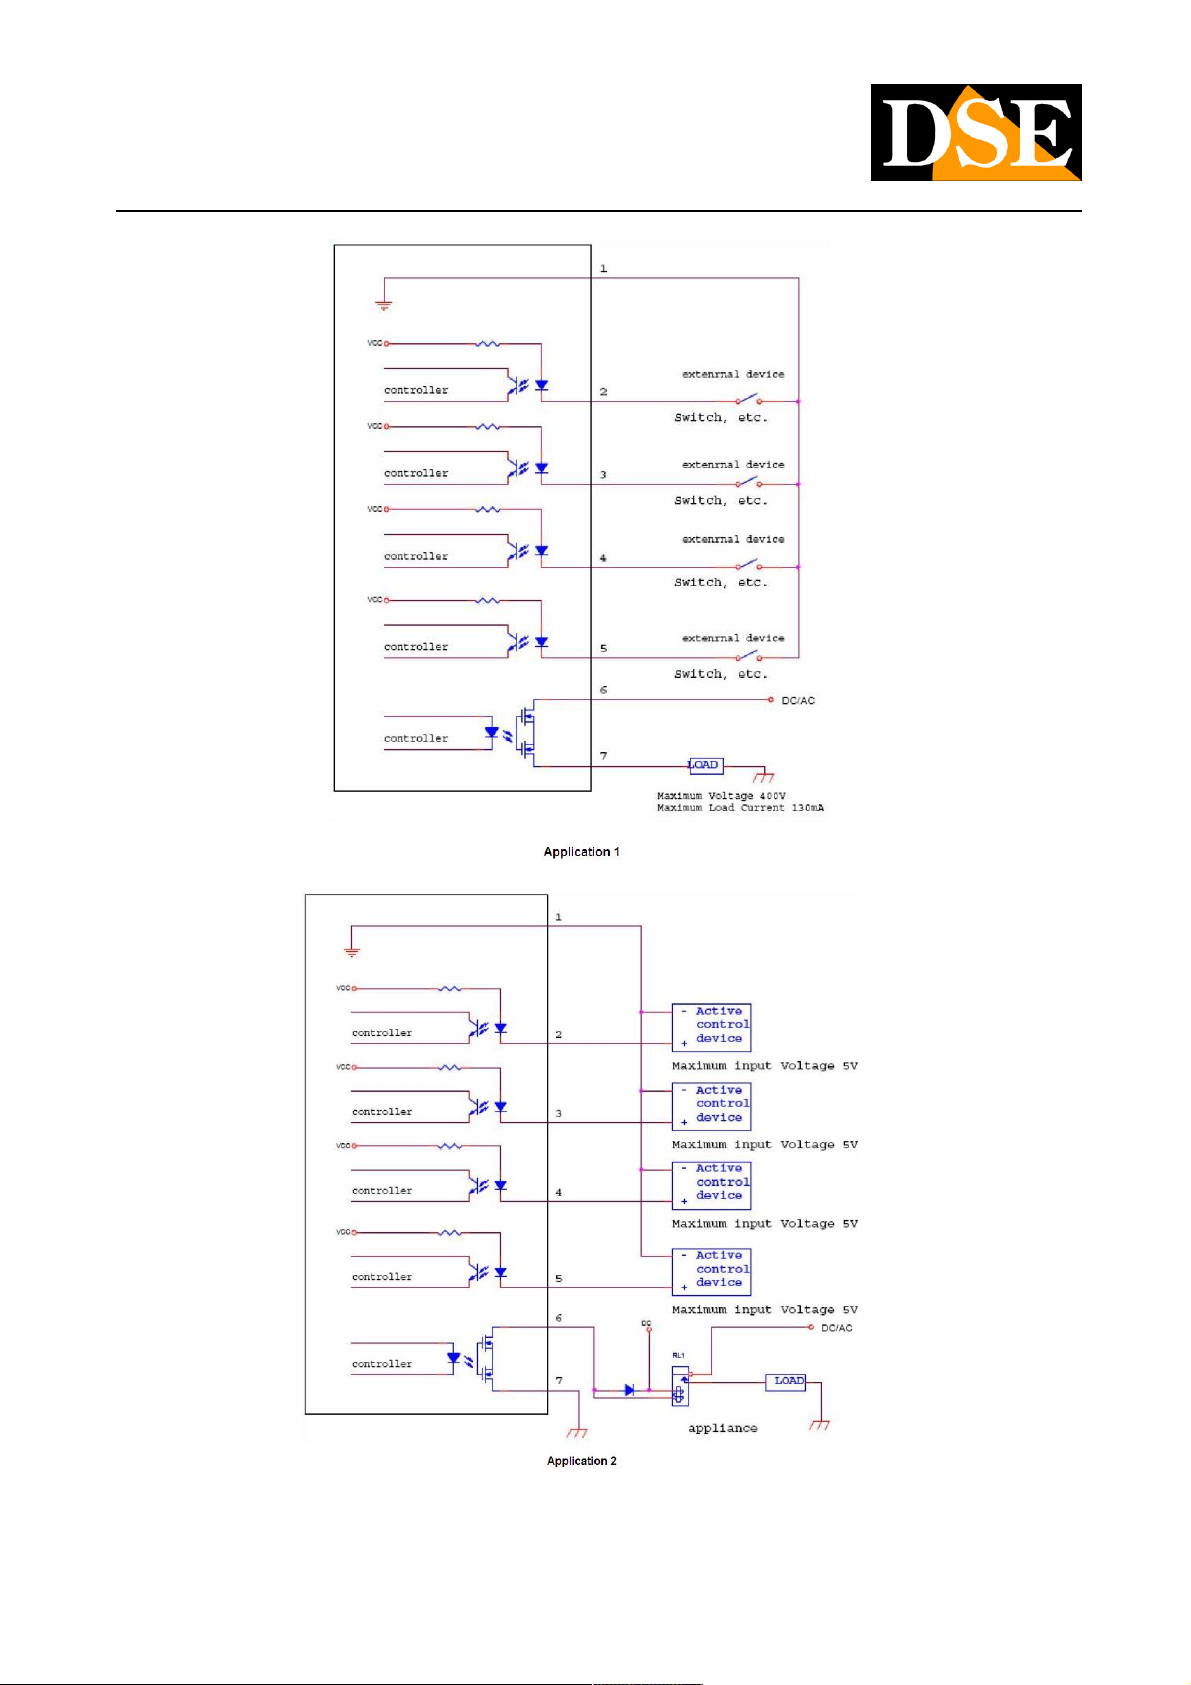
GPIO - This terminal is used to connect the inputs and outputs to control local alarm and signaling contacts. The terminal functions GPIO - This terminal is used to connect the inputs and outputs to control local alarm and signaling contacts. The terminal functions
are as follows PIN
RIFER. DESCRIPTION
1 GND 4 the alarm digital inputs for connecting sensors or external contacts.
2 DI4 The ON / OFF type contacts are connected between the input terminal and the GND.
3 4 DI3
DI2 5
DI1 6
GIFT Alarm output normally open (NO). It is a relay contact able to control an external device. The max.
7 COM
drivable current is 130mA. To drive of greater absorption equipment resorting to an external relay.
DSE SRL - ITALY - WWW.DSE.EU
Page 11
USER MANUAL
Megapixel H.264 IP CAMERAS
Page: 11 Page: 11
DSE SRL - ITALY - WWW.DSE.EU
Page 12
USER MANUAL
Megapixel H.264 IP CAMERAS
Page: 12 Page: 12
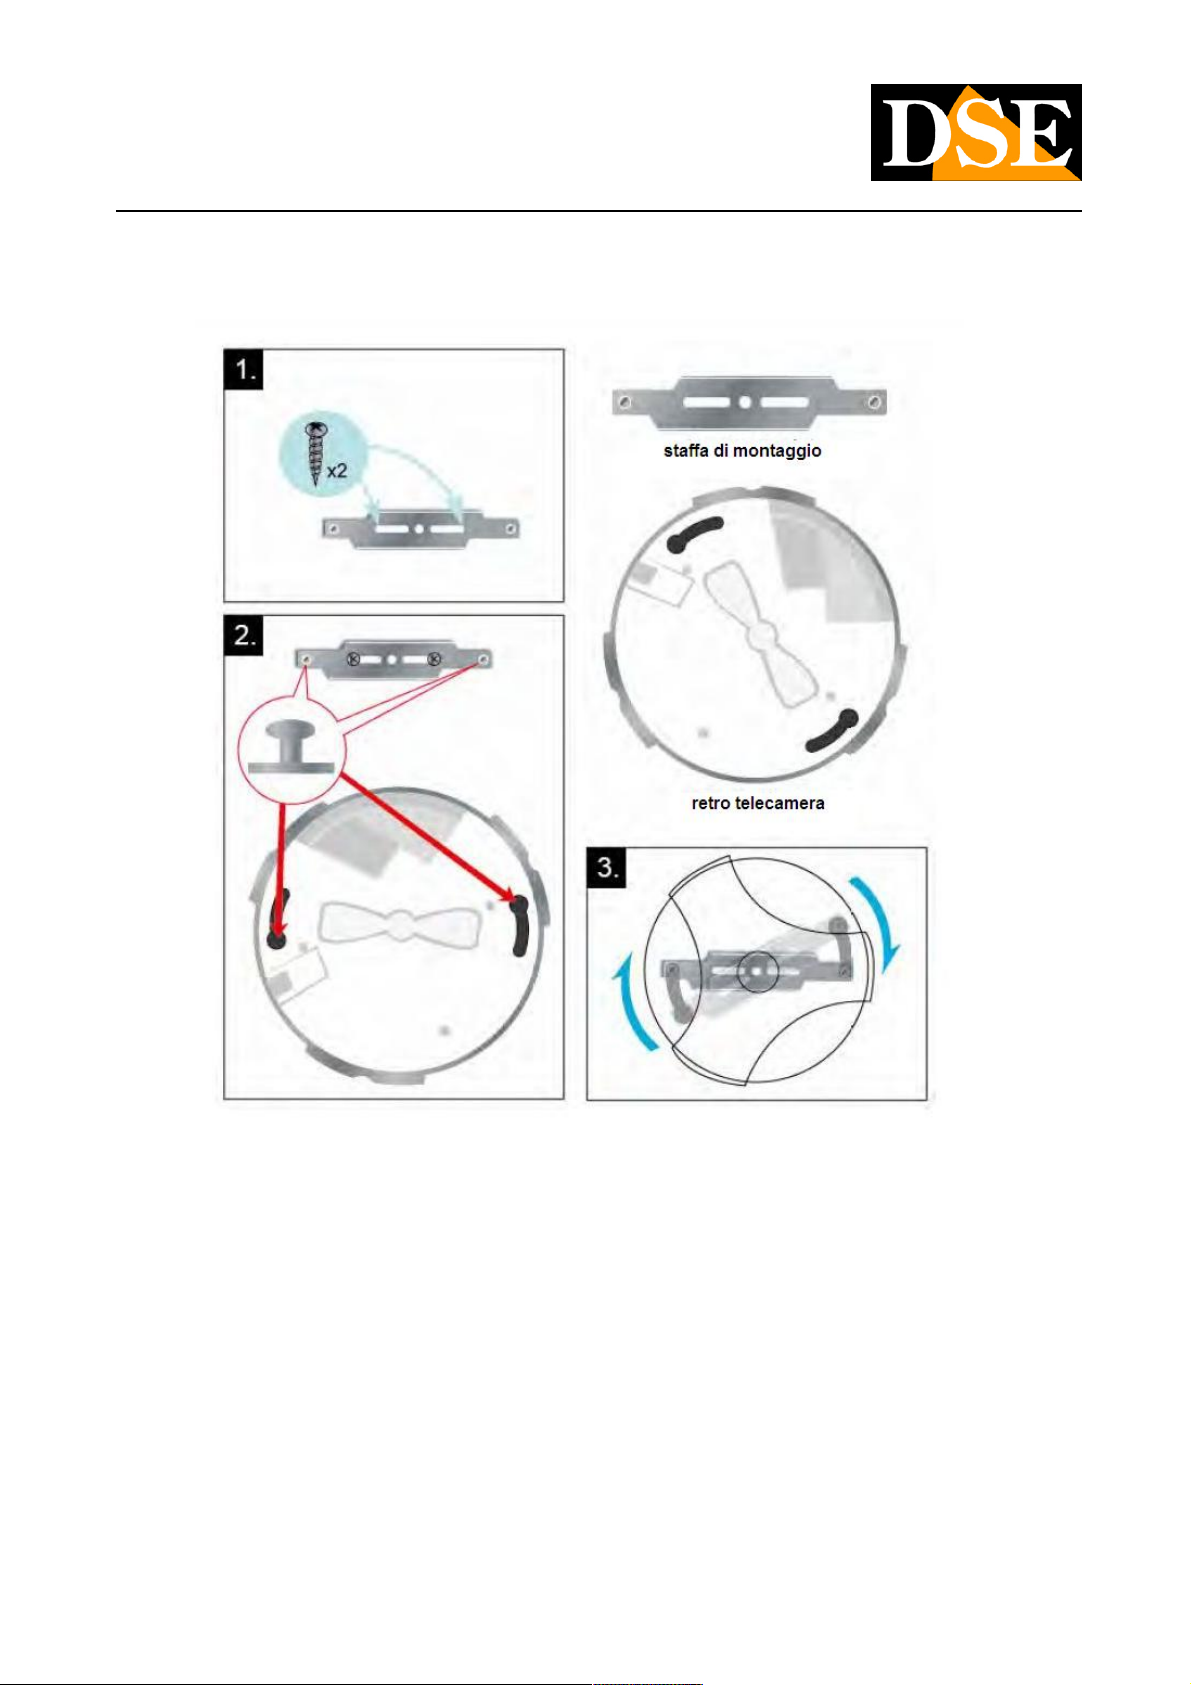
Mounting RN-636E
Carefully follow the three basic steps for mounting the camera.
1. Attach the mounting bracket with the two screws present in the package to the ceiling or wall. The bracket is fastened to the
left output cable. The camera connections are in fact accommodated in a recess that allows housing a small cable
abundance.
2. Once connected the camera to do enter the two protrusions in the mounting bracket in the slots on the back of the camera
3. Turn the camera clockwise until snug
DSE SRL - ITALY - WWW.DSE.EU
Page 13
USER MANUAL
Megapixel H.264 IP CAMERAS
Page: 13 Page: 13
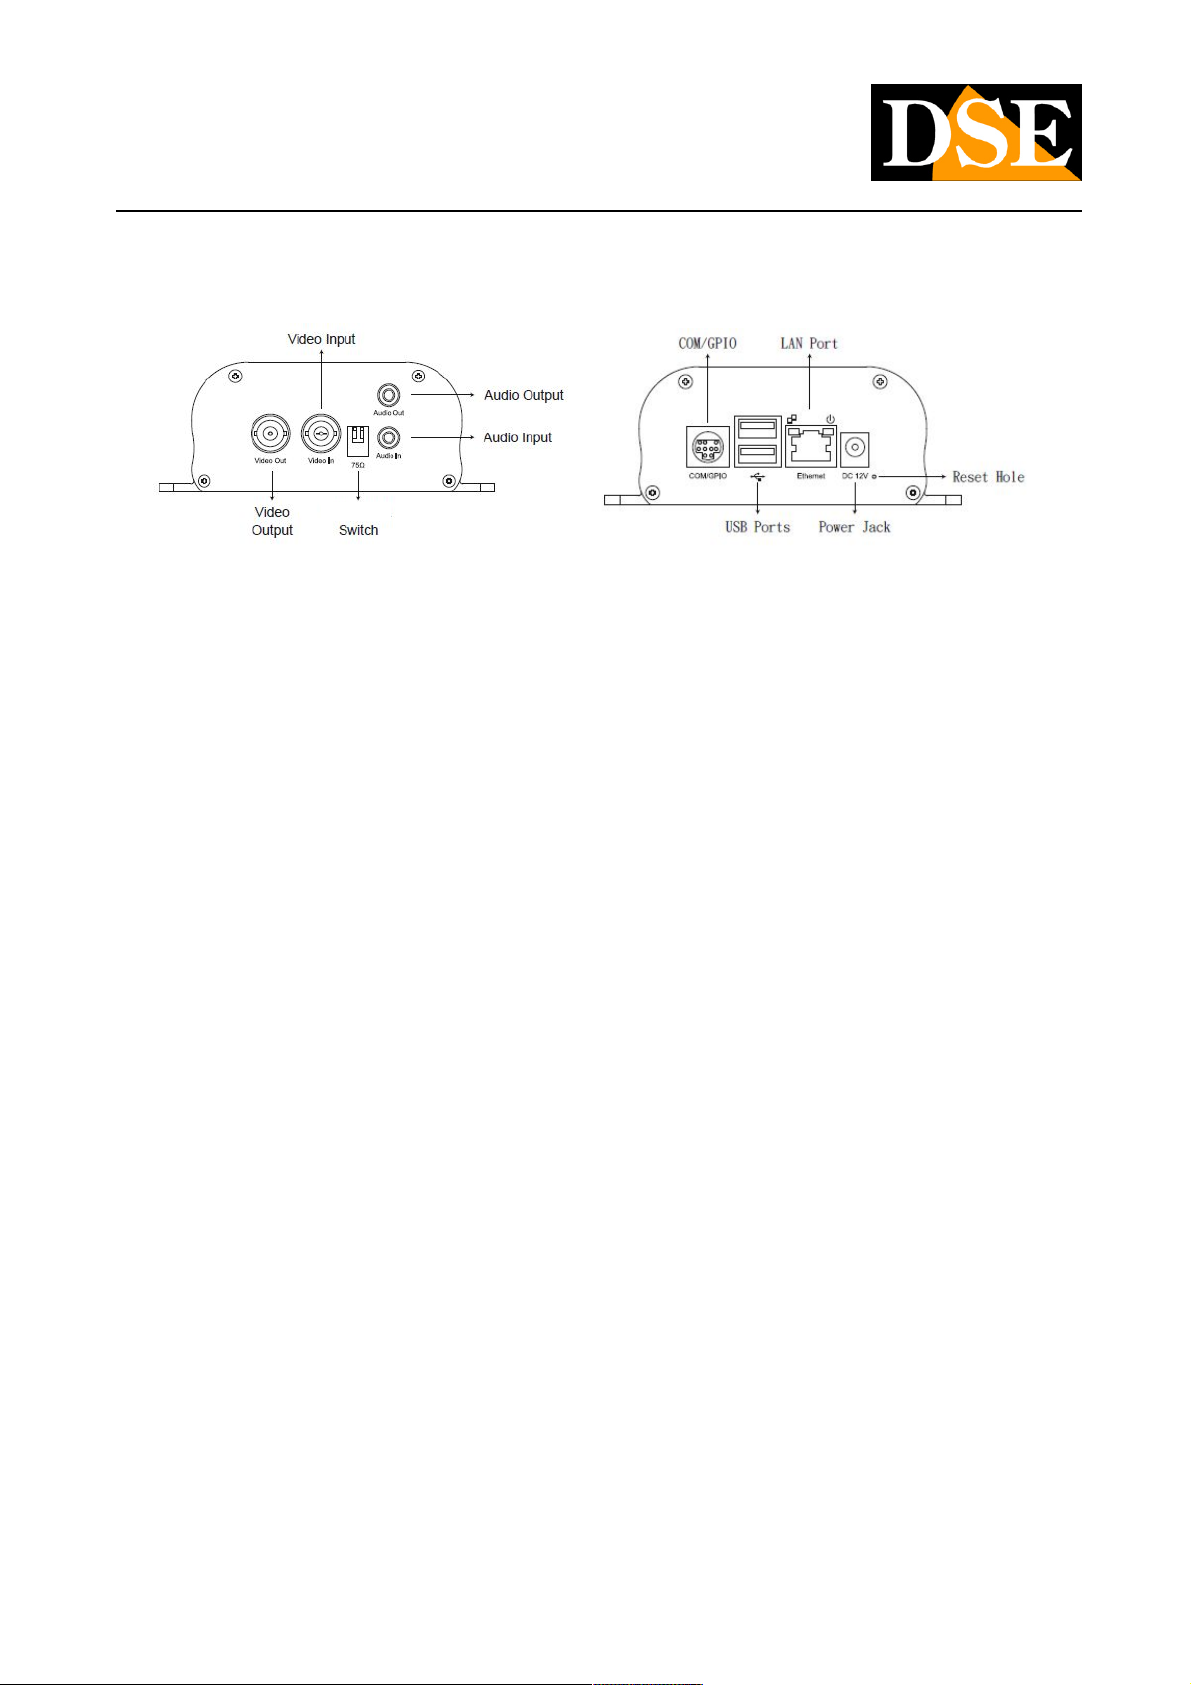
RN-6901
VIDEO INPUT - BNC female connector to connect the video source (eg. Camera) VIDEO INPUT - BNC female connector to connect the video source (eg. Camera)
VIDEO OUTPUT - E 'available video output analog BNC connector that can connect to a monitor or a VCR VIDEO OUTPUT - E 'available video output analog BNC connector that can connect to a monitor or a VCR
AUDIO - This 3.5 mm jack lets you connect a microphone to the sound recovery AUDIO - This 3.5 mm jack lets you connect a microphone to the sound recovery
AUDIO OUTPUT - This 3.5 mm jack allows you to connect the local speakers. This feature allows you to create a two-way audio AUDIO OUTPUT - This 3.5 mm jack allows you to connect the local speakers. This feature allows you to create a two-way audio
conversation between the person in front of the camera and the operator in front of the client PC.
USB PORTS - Slot to insert USB or USB Hard Disk drives for normal recording USB PORTS - Slot to insert USB or USB Hard Disk drives for normal recording
POWER - plug which connect the power supply 220VAC / 12VDC supplied. POWER - plug which connect the power supply 220VAC / 12VDC supplied.
PORT LAN - RJ45 connector to connect the network PORT LAN - RJ45 connector to connect the network
75 Ohm SWITCH - The left switch is used to connect or not the 75 ohm termination impedance depending on the device connected to 75 Ohm SWITCH - The left switch is used to connect or not the 75 ohm termination impedance depending on the device connected to
the analog video. The majority of DVR monitors have integrated impedance so there is no need to intervene in this selection. The switch
to the right does not currently have combined function.
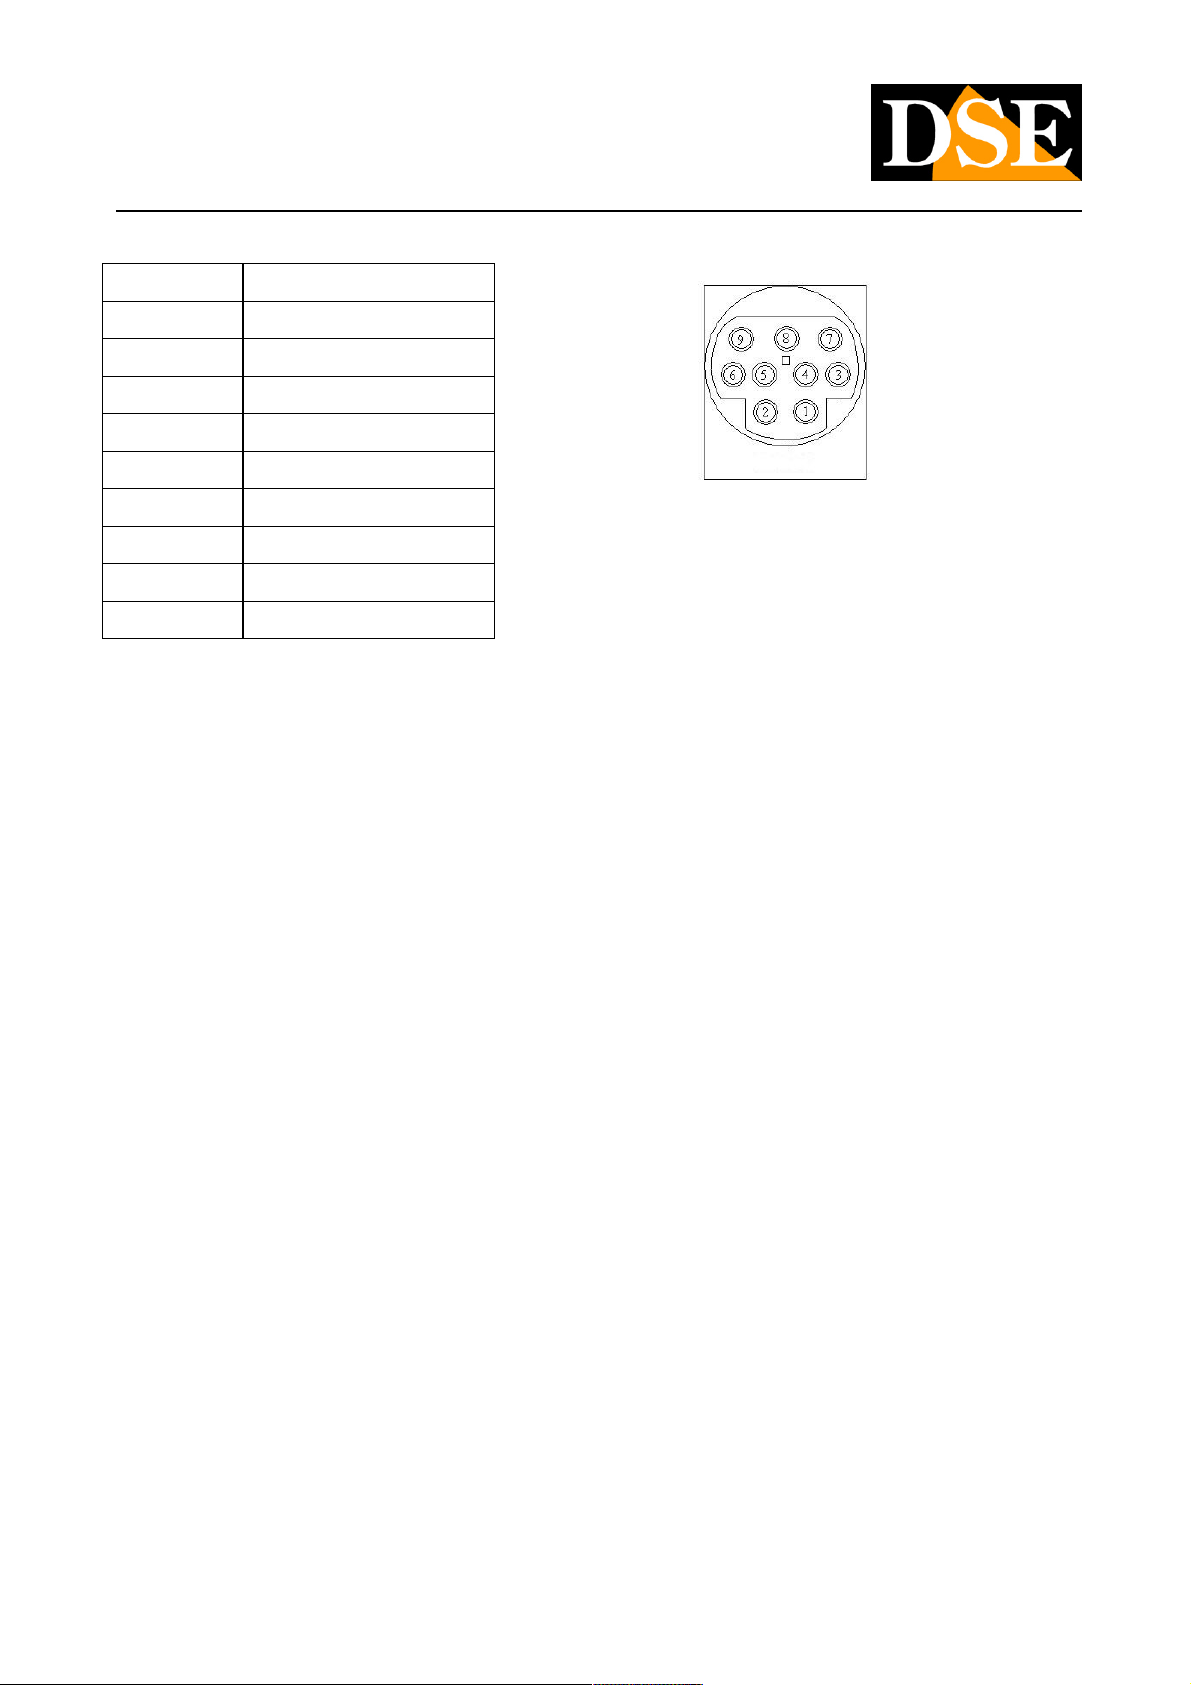
CONNECTOR COM / GPIO
In terms of the RN-6901 is a jack Mini-DIN 9-pin to connect the adapter cable. The following connections are available:
Serial line RS485A and B - for the control of a motorized speed dome camera with Pelco D / P Lilin and protocols Dynacolor Serial line RS485A and B - for the control of a motorized speed dome camera with Pelco D / P Lilin and protocols Dynacolor
RS232 serial line (RXD TXD) - as above on RS232 BUS RS232 serial line (RXD TXD) - as above on RS232 BUS
relay input - Alarm input to which it is possible to connect a NO contact and with it being able to generate an alarm condition. relay input - Alarm input to which it is possible to connect a NO contact and with it being able to generate an alarm condition.
relay output - Can be operated remotely via browser or motion detection / external input. relay output - Can be operated remotely via browser or motion detection / external input.
video Output additional available video Output additional available
The following is the rule of the PIN access scheme for those who want to create a custom connector:
DSE SRL - ITALY - WWW.DSE.EU
Page 14
USER MANUAL
Megapixel H.264 IP CAMERAS
Page: 14 Page: 14
PIN FUNCTION
1 alarm Input
2 RXD
3 TXD
4 RS485A
5 GND
6 Relay output NO
7 Relay output COM
8 RS485B
9 video Output
DSE SRL - ITALY - WWW.DSE.EU
Page 15
USER MANUAL
Megapixel H.264 IP CAMERAS
Page: 15 Page: 15
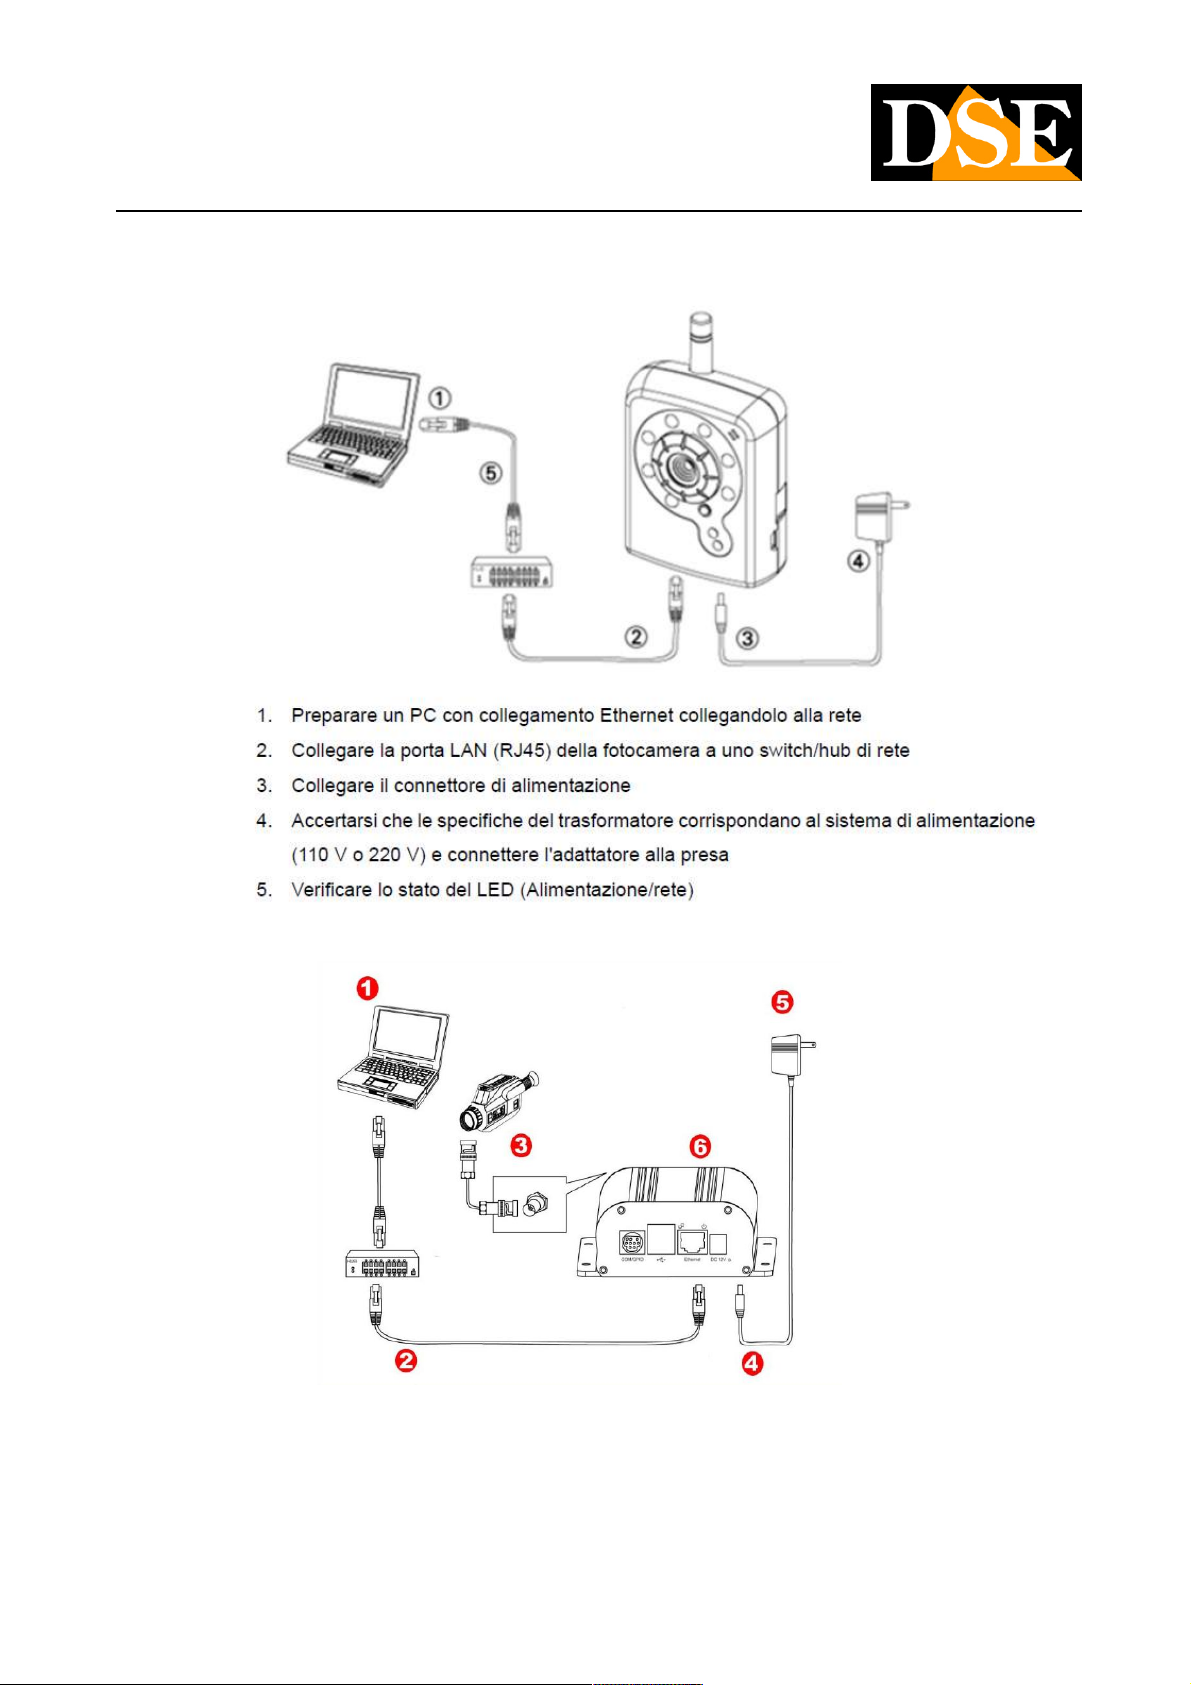
Example of connection
1. PC connected to the LAN
2. The video server connects to the network swicth with a straight CAT5 cable. To connect to a
single PC without a switch using a crossover cable
DSE SRL - ITALY - WWW.DSE.EU
Page 16

USER MANUAL
Megapixel H.264 IP CAMERAS
Page: 16 Page: 16
3. The camera's video output connects to the VIDEO IN BNC male
4. Connect the power supply plug 12VDC
5. The power supply 220VAC / 12VDC is supplied with the appliance
6. LED on the right is the corrected power 12V LED = left in a
proper network connection
Installing Software
The CD supplied with the camera software is included IP INSTALLER which must be installed on a PC connected to the network The CD supplied with the camera software is included IP INSTALLER which must be installed on a PC connected to the network The CD supplied with the camera software is included IP INSTALLER which must be installed on a PC connected to the network
in which you will connect the camera. The function of this software is to detect the presence of the camera network regardless of
the class of addresses used on your network and allow you to configure the network address of the camera so as to be consistent
with your network. We recall that because the camera is visible from the other PCs on the network it is necessary that the first 3
address parts are the same as other network PC and is equal also the subnet mask.
Network Configuration
The IP Installer is a program that makes it easy and very efficient configuring IP address and the device's network settings.
Preliminary checks for network configuration
Before you must obtain from your network some information about the management of the IP addresses used on your network. E
'need to know an IP address can be assigned to the camera that is not equal to any other device already present in the network.
At this point it is possible to feed the camera and connect the network cable. The wired connection is essential also in the
installation of Wi-Fi cameras to enable the wireless connection. If you are unsure about your network's operation you can use
certain commands in DOS PROMPT
On a network PC launched a DOS window available between the Windows accessory programs.
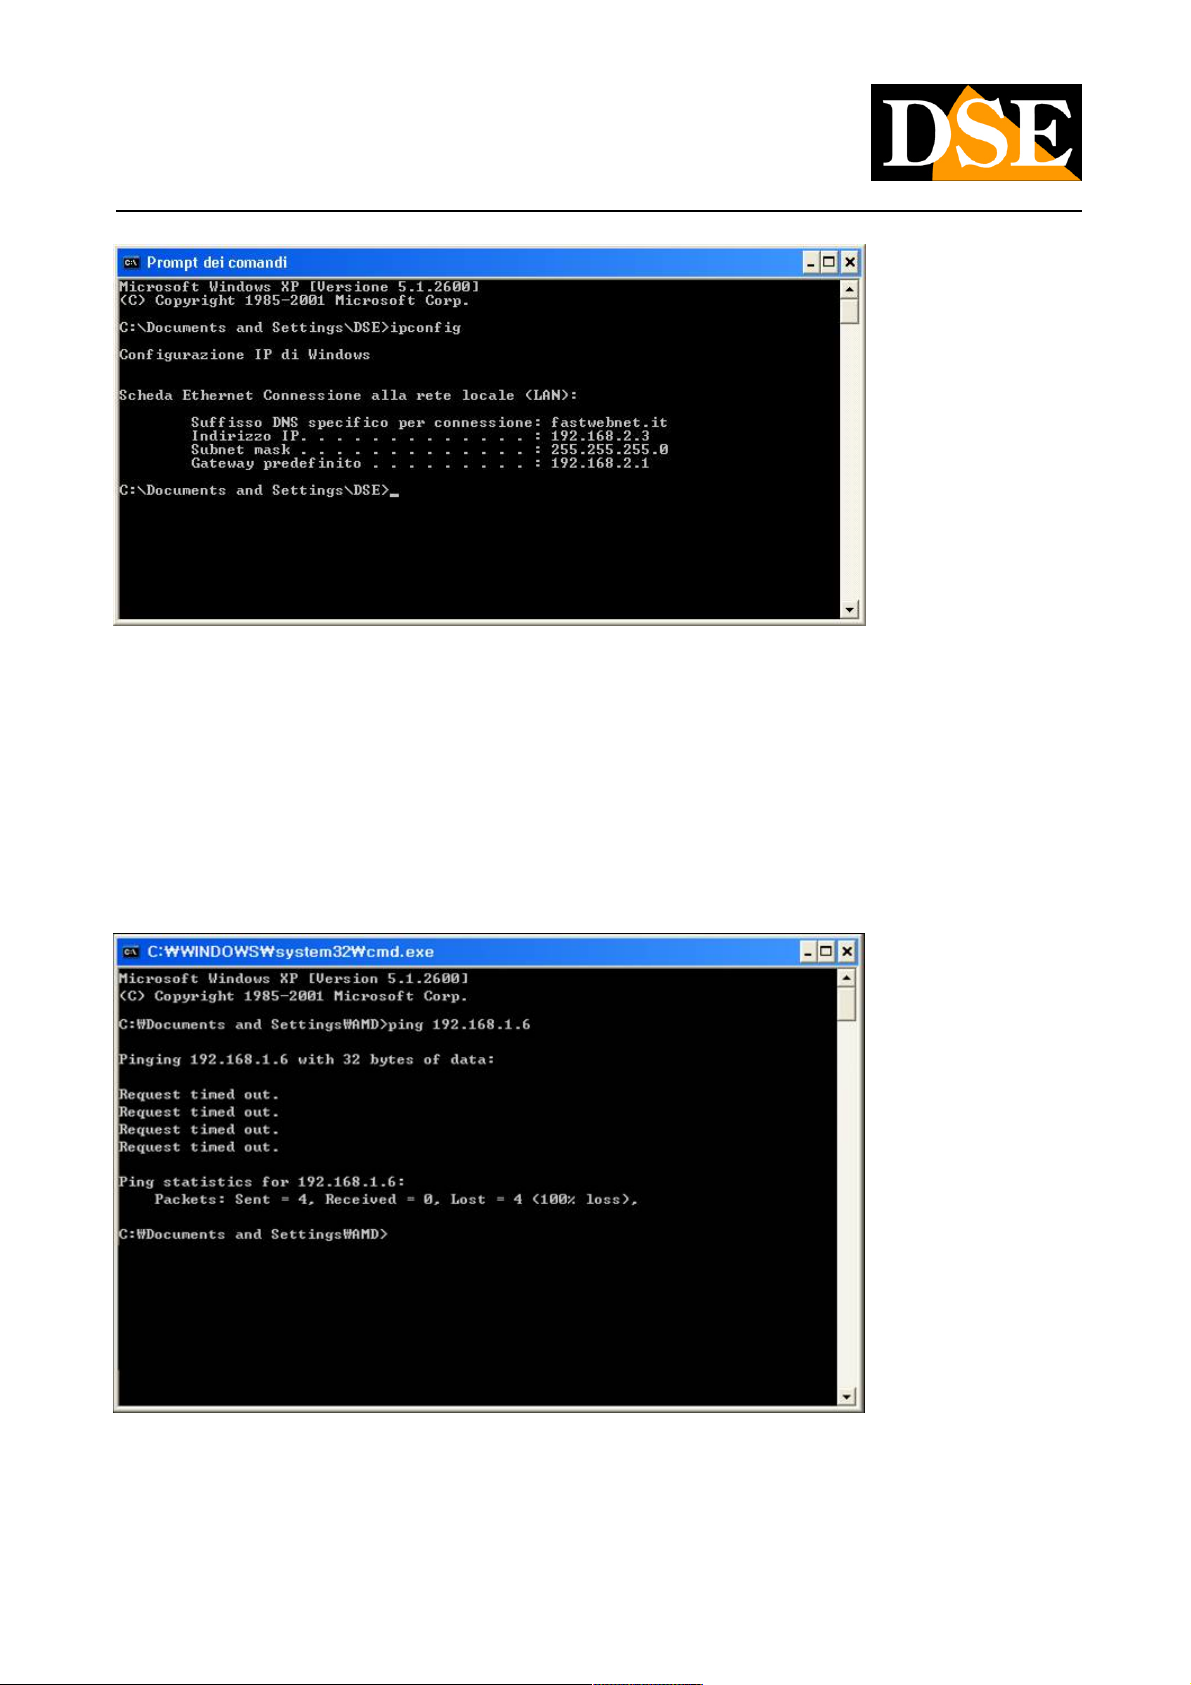
Type IPCONFIG at the command prompt and press ENTER. They will see the TCP / IP parameters. The second line is the IP
address assigned to your computer.
DSE SRL - ITALY - WWW.DSE.EU
Page 17
USER MANUAL
Megapixel H.264 IP CAMERAS
Page: 17 Page: 17
In the above example the address of the PC on which you are working is 192.168.2.3 and the subnet mask used is the classic
255.255.255.0. The camera can therefore assign an address chosen by the 192.168.2.XXX type, where XXX stands for a number
between 0 and 255. It 'important choose an address that is not already used by other devices of network. To verify that the between 0 and 255. It 'important choose an address that is not already used by other devices of network. To verify that the between 0 and 255. It 'important choose an address that is not already used by other devices of network. To verify that the
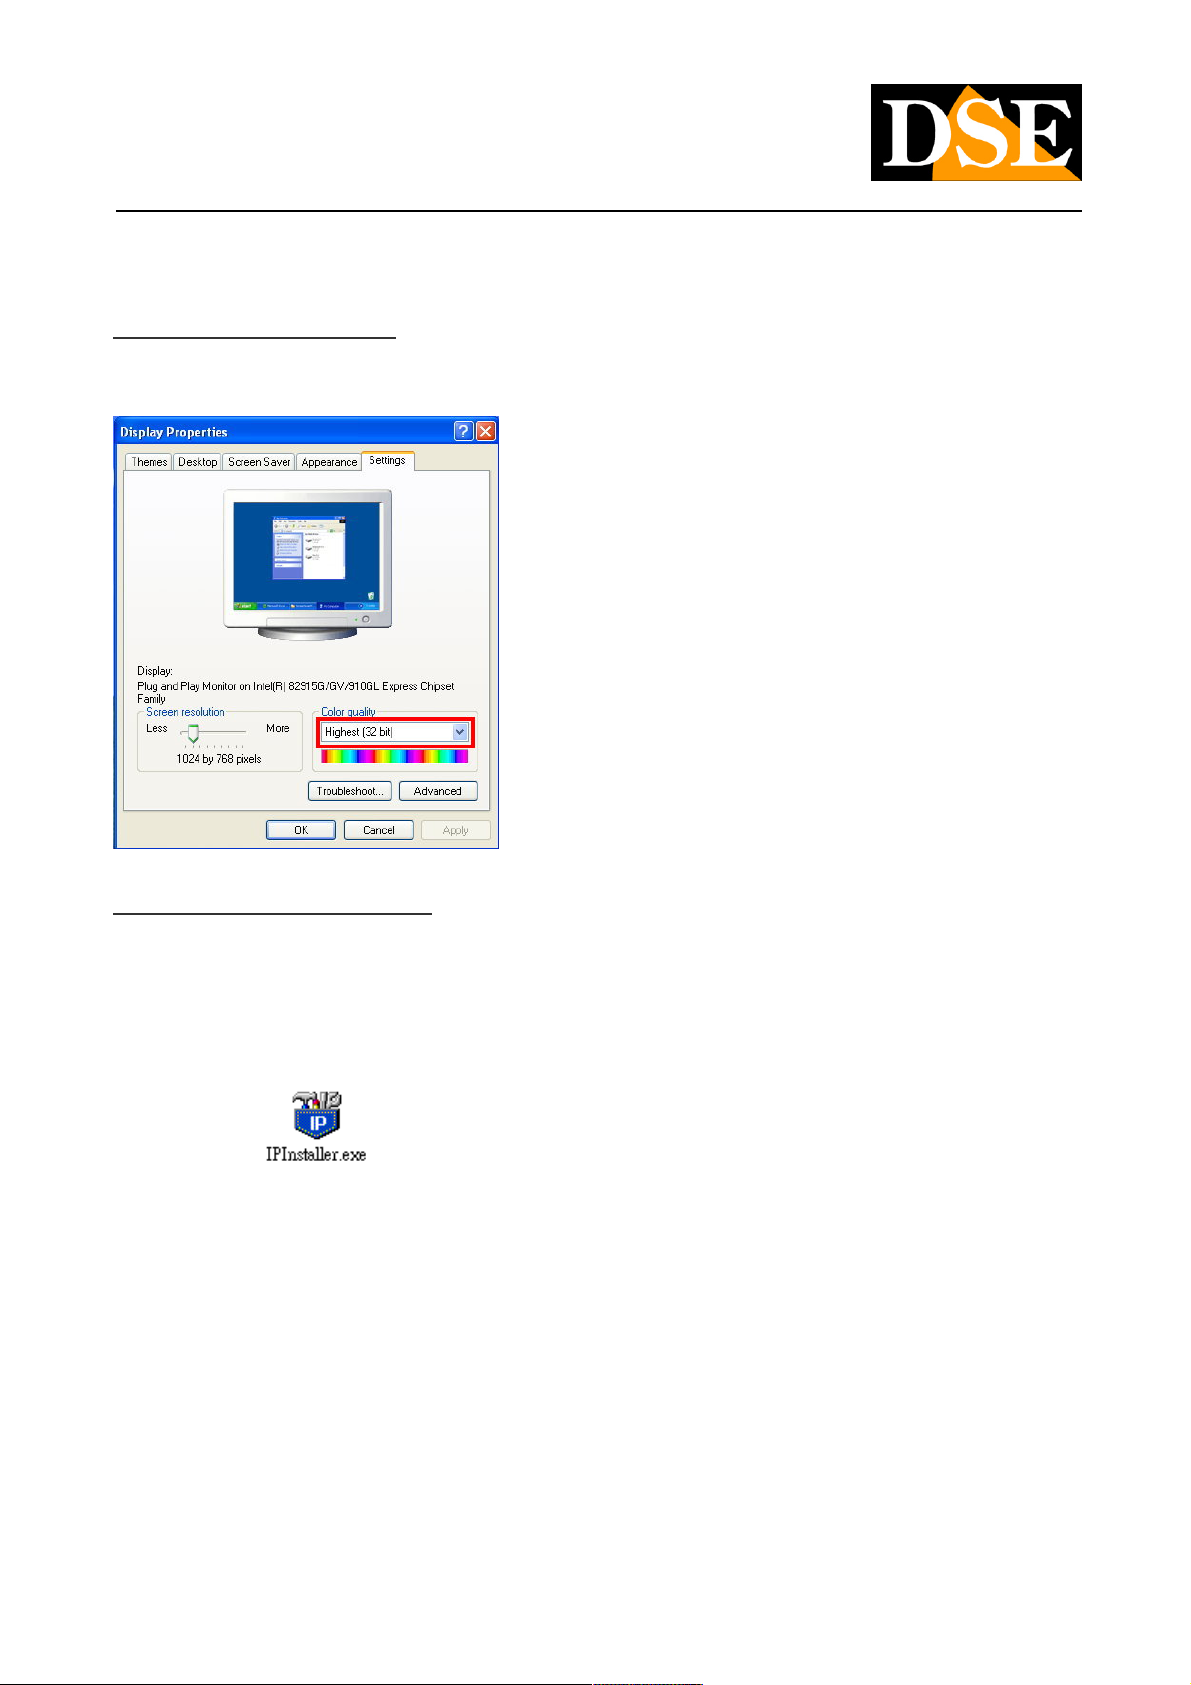
chosen address is free, try to make a PING from the same DOS window by typing PING followed by a space and by the IP you
wish to assign to the camera. If there is no device responds to that address, you will receive 4 REQUEST TIME OUT as in the
following example:
All cameras support the automatic IP address assignment from a DHCP server. However, this mode is not recommended as it is
possible that in case of power failure or restart of the equipment is possible for the camera to change the IP address making it
necessary
DSE SRL - ITALY - WWW.DSE.EU
Page 18
USER MANUAL
Megapixel H.264 IP CAMERAS
Page: 18 Page: 18
reconfiguration of the registration software.
Preliminary checks on the video card
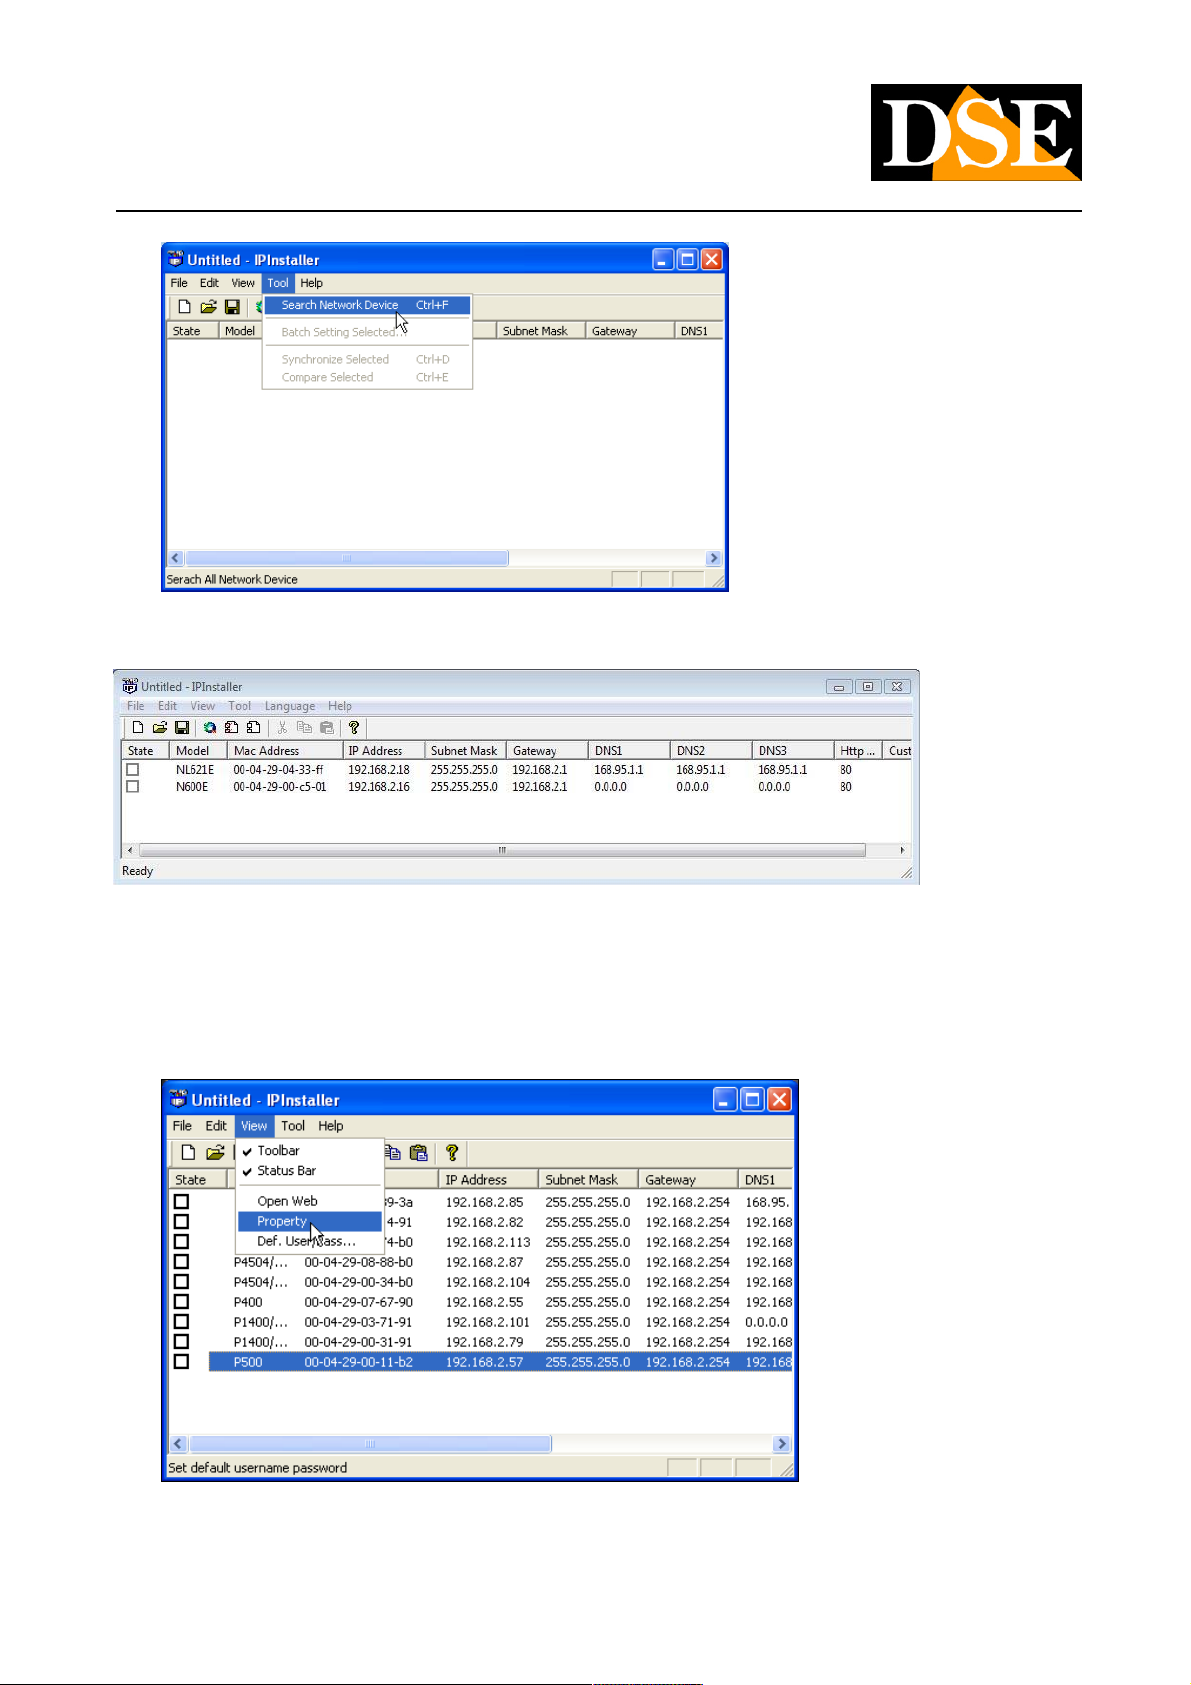
To view the images you need to set the color quality of the PC video card of 32bit
Using IP Installer to assign the IP address
1. Once you have successfully installed the IP Installer on a PC properly connected to the network, double-click the icon in the
START MENU. Click Start Menu> Programs> IP Installer> IP Installer> Launch IP Installer. This will open the program window.
The appearance of the program window may vary depending on the release without changing the function.
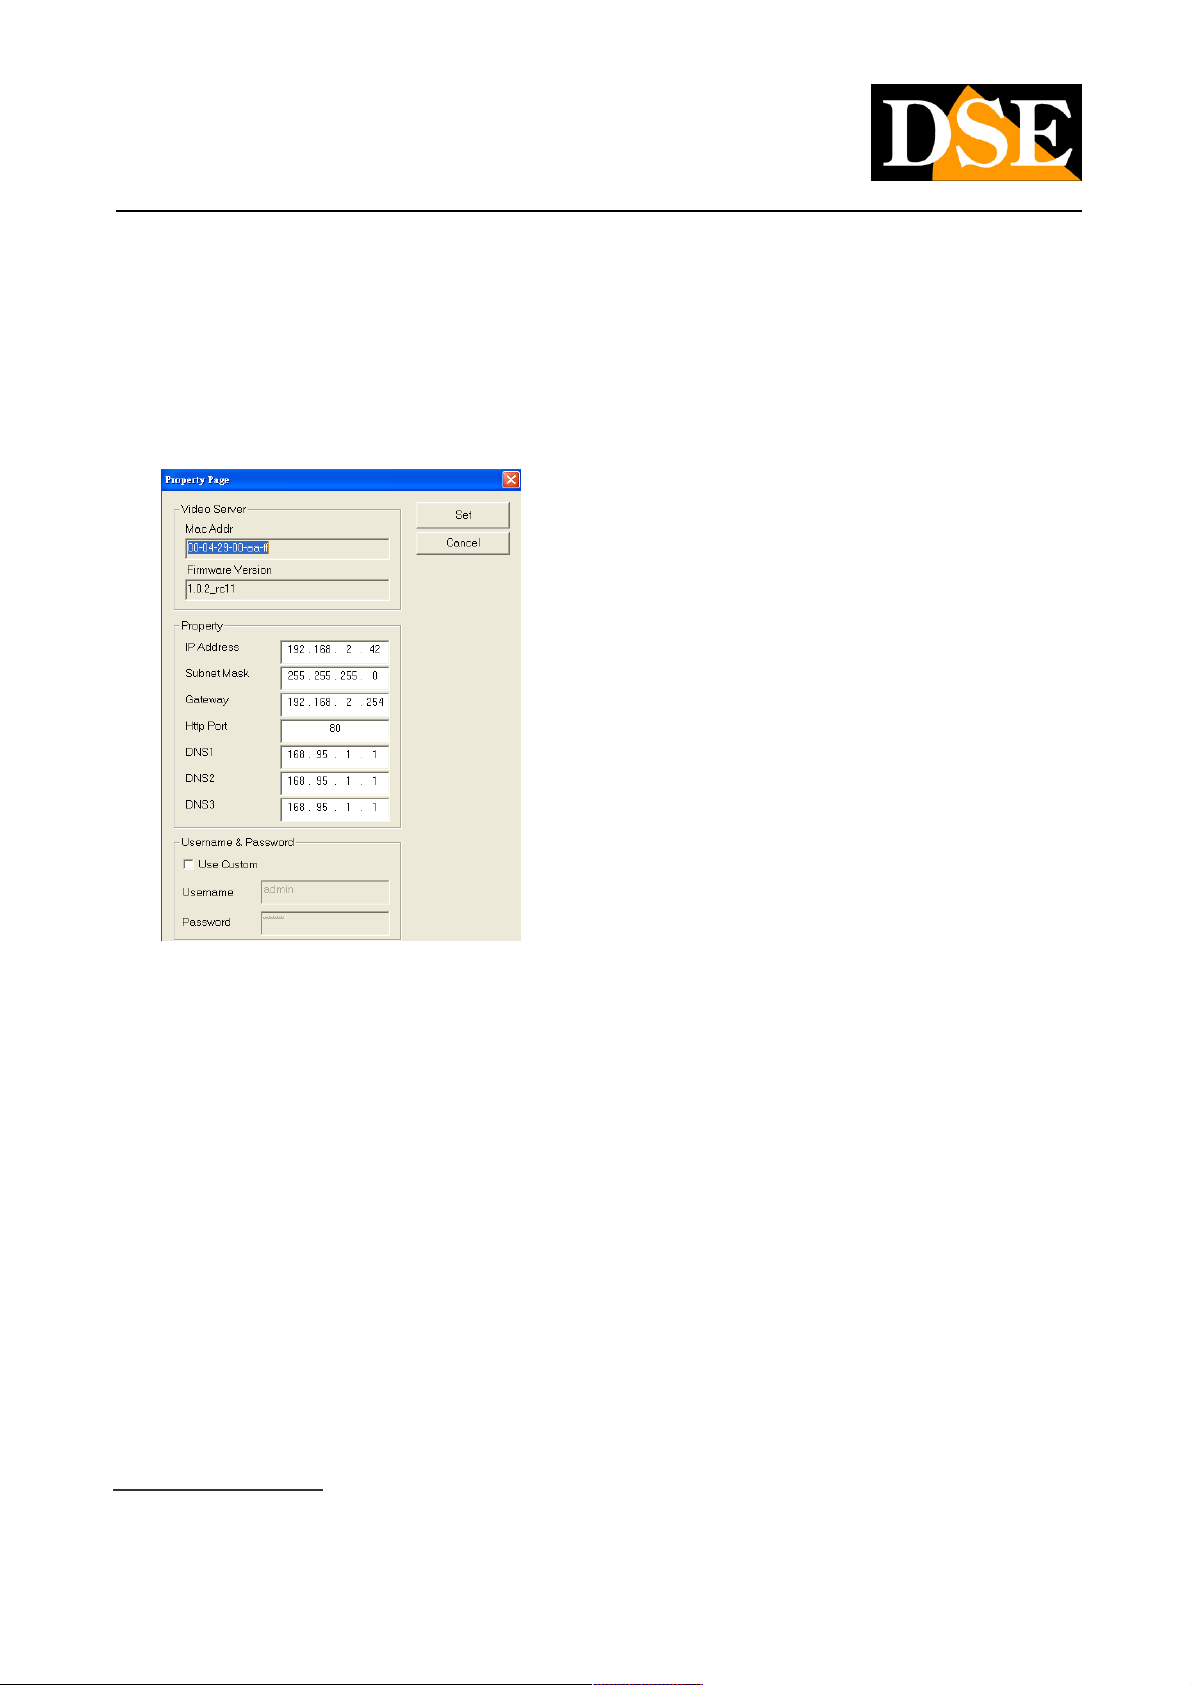
2. Click on the Tools menu bar (Tools)> Device Search Network (search network device) or click the icon with the search or press the
lens DEVICE SEARCH button. The program begins to scan the RN series IP cameras on the network. Wait to complete the
search.
DSE SRL - ITALY - WWW.DSE.EU
Page 19
USER MANUAL
Megapixel H.264 IP CAMERAS
Page: 19 Page: 19
3. When the search will see the list of detected cameras. If the camera is not detected check the functionality of network links.
4. If you need to recognize which camera refers to physically a voice controlled list of the MAC address, a unique identifier, different
for each camera, which is reported by the IP INSTALLER and is also indicated on the camera itself. Double-click on the camera
line to be configured to open the Properties page, or click on the View menu bar (View)> Property (Properties).
DSE SRL - ITALY - WWW.DSE.EU
Page 20
USER MANUAL
Megapixel H.264 IP CAMERAS
Page: 20 Page: 20
5. In the Properties window, you can enter all network data necessary to integrate the camera into your network. Check especially to
set an address with class and subnet mask similar to those used by your network. In the following figure, for example, the address
class is 192.168.2 and the last number 42 is the camera identifier. The subnet mask is 255.255.255.0. Once you have entered the
properties, click the SET button to transfer the configuration to the camera.
The IP Installer program also has some additional functions:
SAVE / SAVE AS - Allow to save the list of devices detected by IP Installer in a file that you can then open off-line but not connected to SAVE / SAVE AS - Allow to save the list of devices detected by IP Installer in a file that you can then open off-line but not connected to
the network.
INSERT SERVER - Allows you to enter the camera's IP parameters from scratch, without having it detected with the search function. INSERT SERVER - Allows you to enter the camera's IP parameters from scratch, without having it detected with the search function.
DEF. USER PASSWORD - The modification of the IP parameters that is carried out by IP Installer provides you access the camera DEF. USER PASSWORD - The modification of the IP parameters that is carried out by IP Installer provides you access the camera
configuration, an operation that requires the use of USER NAME and PASSWORD. The factory in the RN series cameras are set to the
following values: USER: admin PASSWORD: admin. For IP INSTALLER logic also uses the same factory admin / admin values. In this following values: USER: admin PASSWORD: admin. For IP INSTALLER logic also uses the same factory admin / admin values. In this following values: USER: admin PASSWORD: admin. For IP INSTALLER logic also uses the same factory admin / admin values. In this
window you can change the data of dafult access to suit your needs. In the properties of each camera (see the previous figure) it is still
possible to individually modify the access parameters for each camera by clicking USE CUSTOM and typing them freely.
Opening web user interface
1. Once properly set the network parameters, you can make the first access to the
DSE SRL - ITALY - WWW.DSE.EU
Page 21
USER MANUAL
Megapixel H.264 IP CAMERAS
Page: 21 Page: 21
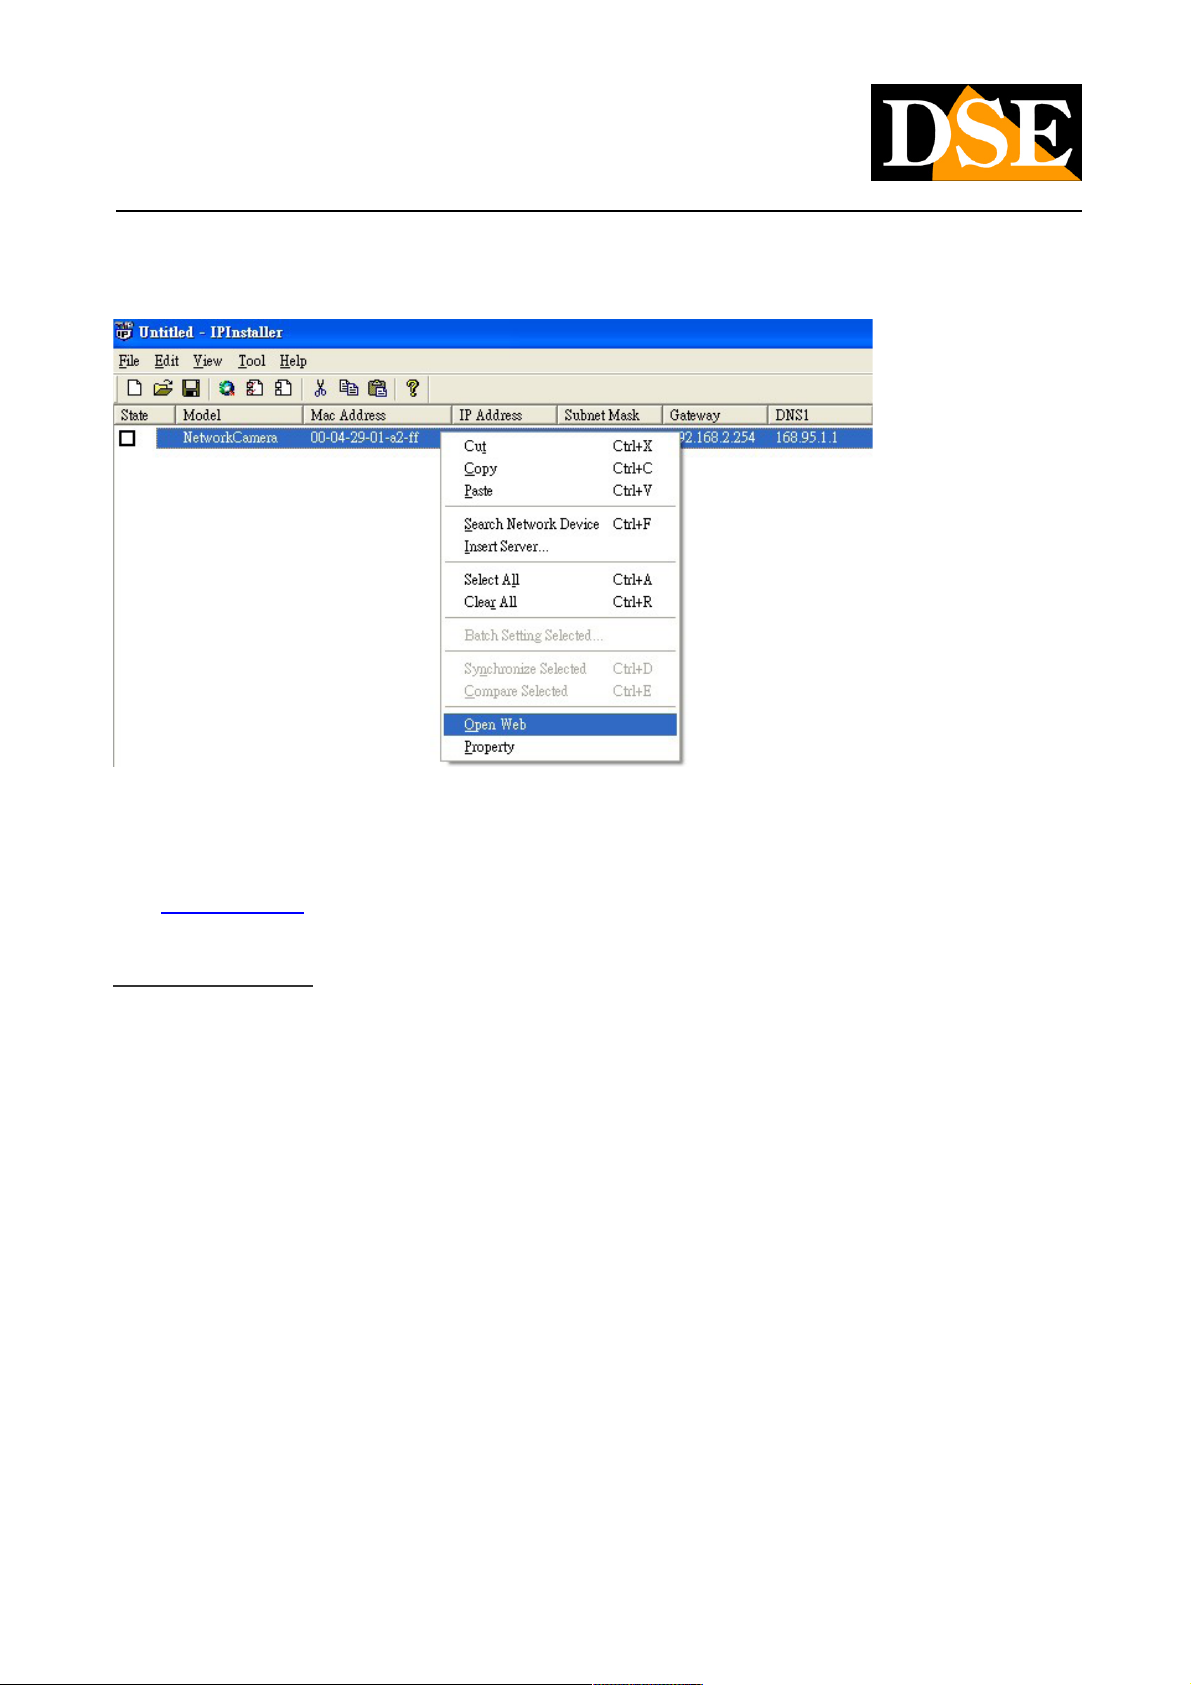
camera using the Web browser. To access the selected drive web user, run View (View)> Open Web (Open Web) on the menu
bar.
2. It will automatically start your default web browser (Internet Explorer recommended) and you get access to the camera.
Alternatively it is possible to manually open Internet Explorer and type in the address box, the IP address that you gave to the Alternatively it is possible to manually open Internet Explorer and type in the address box, the IP address that you gave to the Alternatively it is possible to manually open Internet Explorer and type in the address box, the IP address that you gave to the
camera (see previous section), for example.
http://192.168.2.201 . http://192.168.2.201 .
Install ActiveX component
When you connect to a RN camera using Internet Explorer for the first time, the system will be installed in the browser ActiveX
components necessary to the vision of the cameras. You will get a confirmation window asking the approval to install the ActiveX control
required for the video transfer. Reply OK to install.
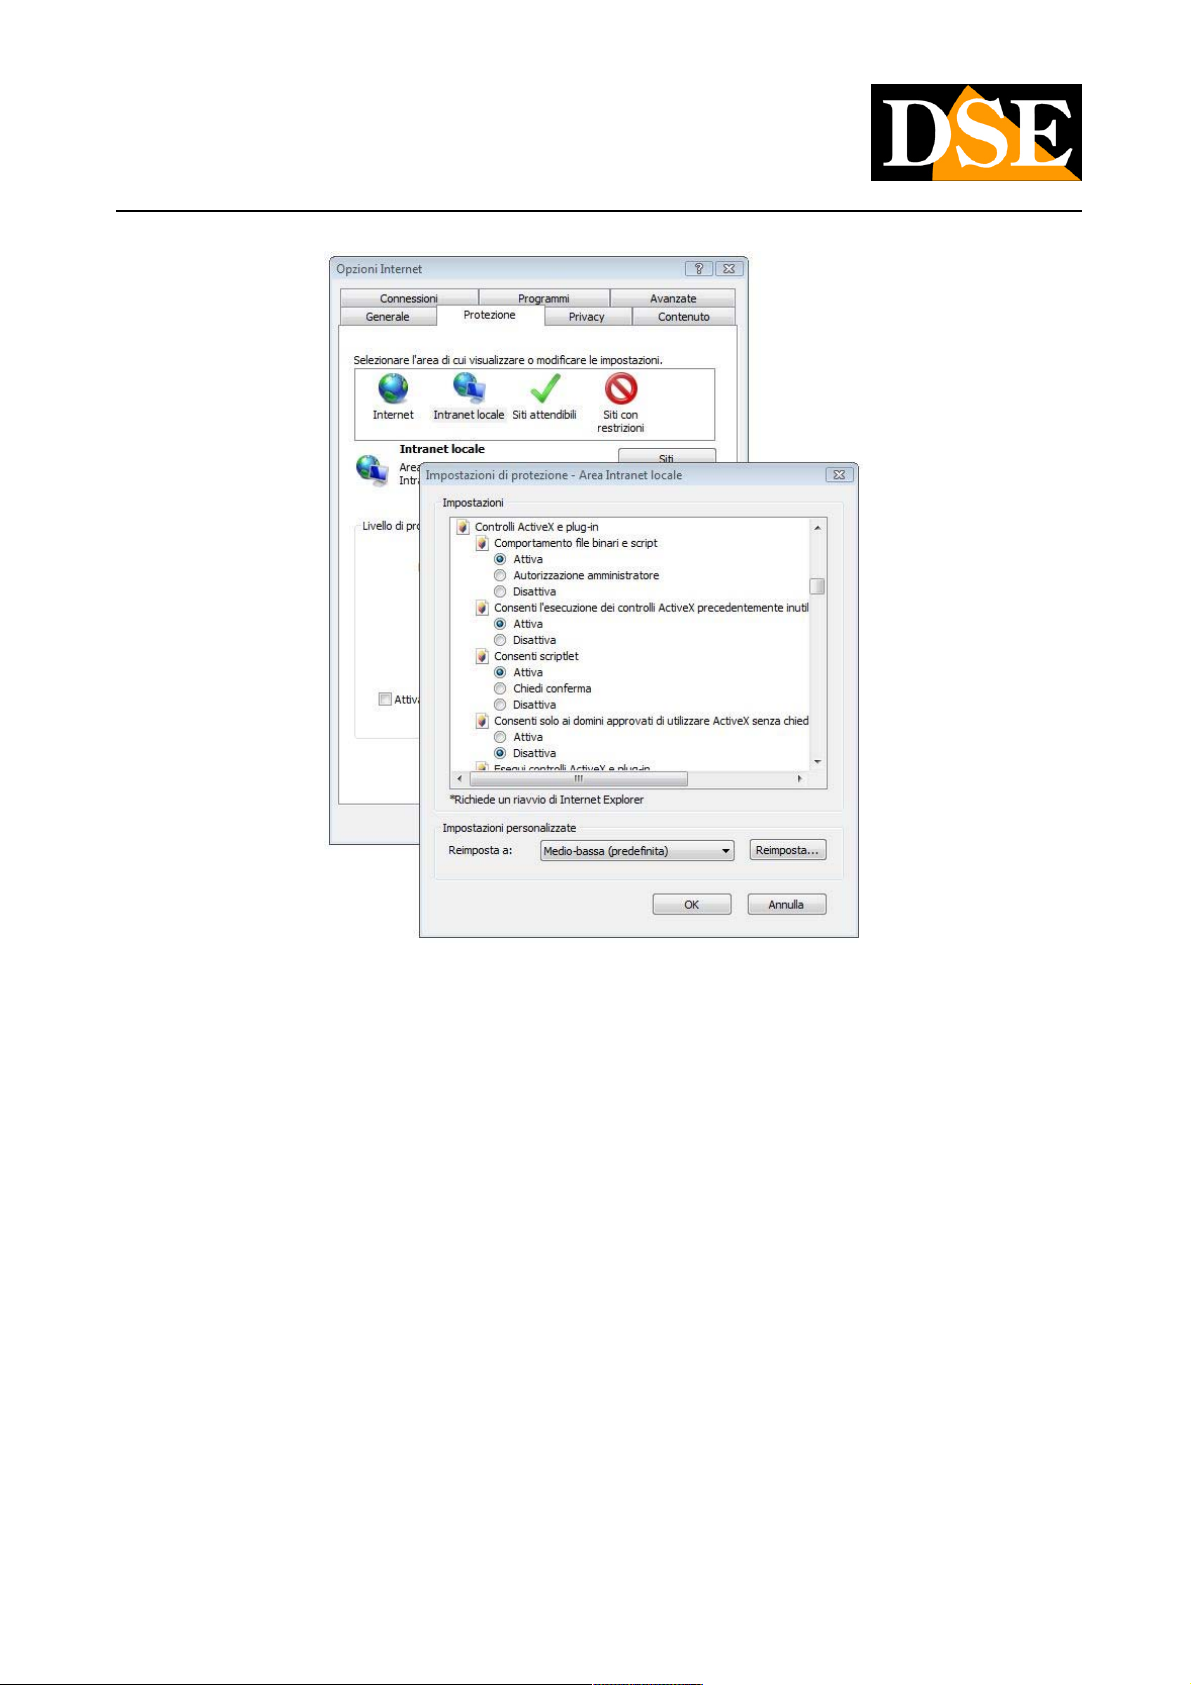
If it is not no message, or the installation does not go to fruition obviously the security settings of Internet Explorer are preventing the
installation. Open TOOLS / Internet Options and select the PROTECTION table. Select the area of interest: if you are accessing the
Internet from outside the network or intranet camera if you are connecting to a local network. Set the security level to LOW. Click
CUSTOM LEVEL check they're enabled all the rumors regarding the ActiveX management is marked as safe that are not marked. All
security parameters related to ActiveX are enabled or at least allowed after confirmation.
DSE SRL - ITALY - WWW.DSE.EU
Page 22
USER MANUAL
Megapixel H.264 IP CAMERAS
Page: 22 Page: 22
Be careful if you have set the parameters with ASK CONFIRMATION because Internet Explorer will require explicit consent to the
installation of the ActiveX control with a message that appears below the address bar.
After completing the installation of ActiveX in Internet Explorer browser will open the initial access to the camera page.
If it does not return to check the security settings remember to restart your browser after each change.
DSE SRL - ITALY - WWW.DSE.EU
Page 23
USER MANUAL
Megapixel H.264 IP CAMERAS
Page: 23 Page: 23
DSE SRL - ITALY - WWW.DSE.EU
Page 24
USER MANUAL
Megapixel H.264 IP CAMERAS
Page: 24 Page: 24
LIVE VIEW - LIVE Login with your browser
The RN series cameras are developed for full compatibility with the most popular browser
INTERNET EXPLORER. E 'can also use other browsers like Mozilla Firefox or Apple Safari but this is not recommended INTERNET EXPLORER. E 'can also use other browsers like Mozilla Firefox or Apple Safari but this is not recommended INTERNET EXPLORER. E 'can also use other browsers like Mozilla Firefox or Apple Safari but this is not recommended INTERNET EXPLORER. E 'can also use other browsers like Mozilla Firefox or Apple Safari but this is not recommended
because some functions may not be accessible. For the use of other browsers you must also install the VLC codec while Internet because some functions may not be accessible. For the use of other browsers you must also install the VLC codec while Internet because some functions may not be accessible. For the use of other browsers you must also install the VLC codec while Internet
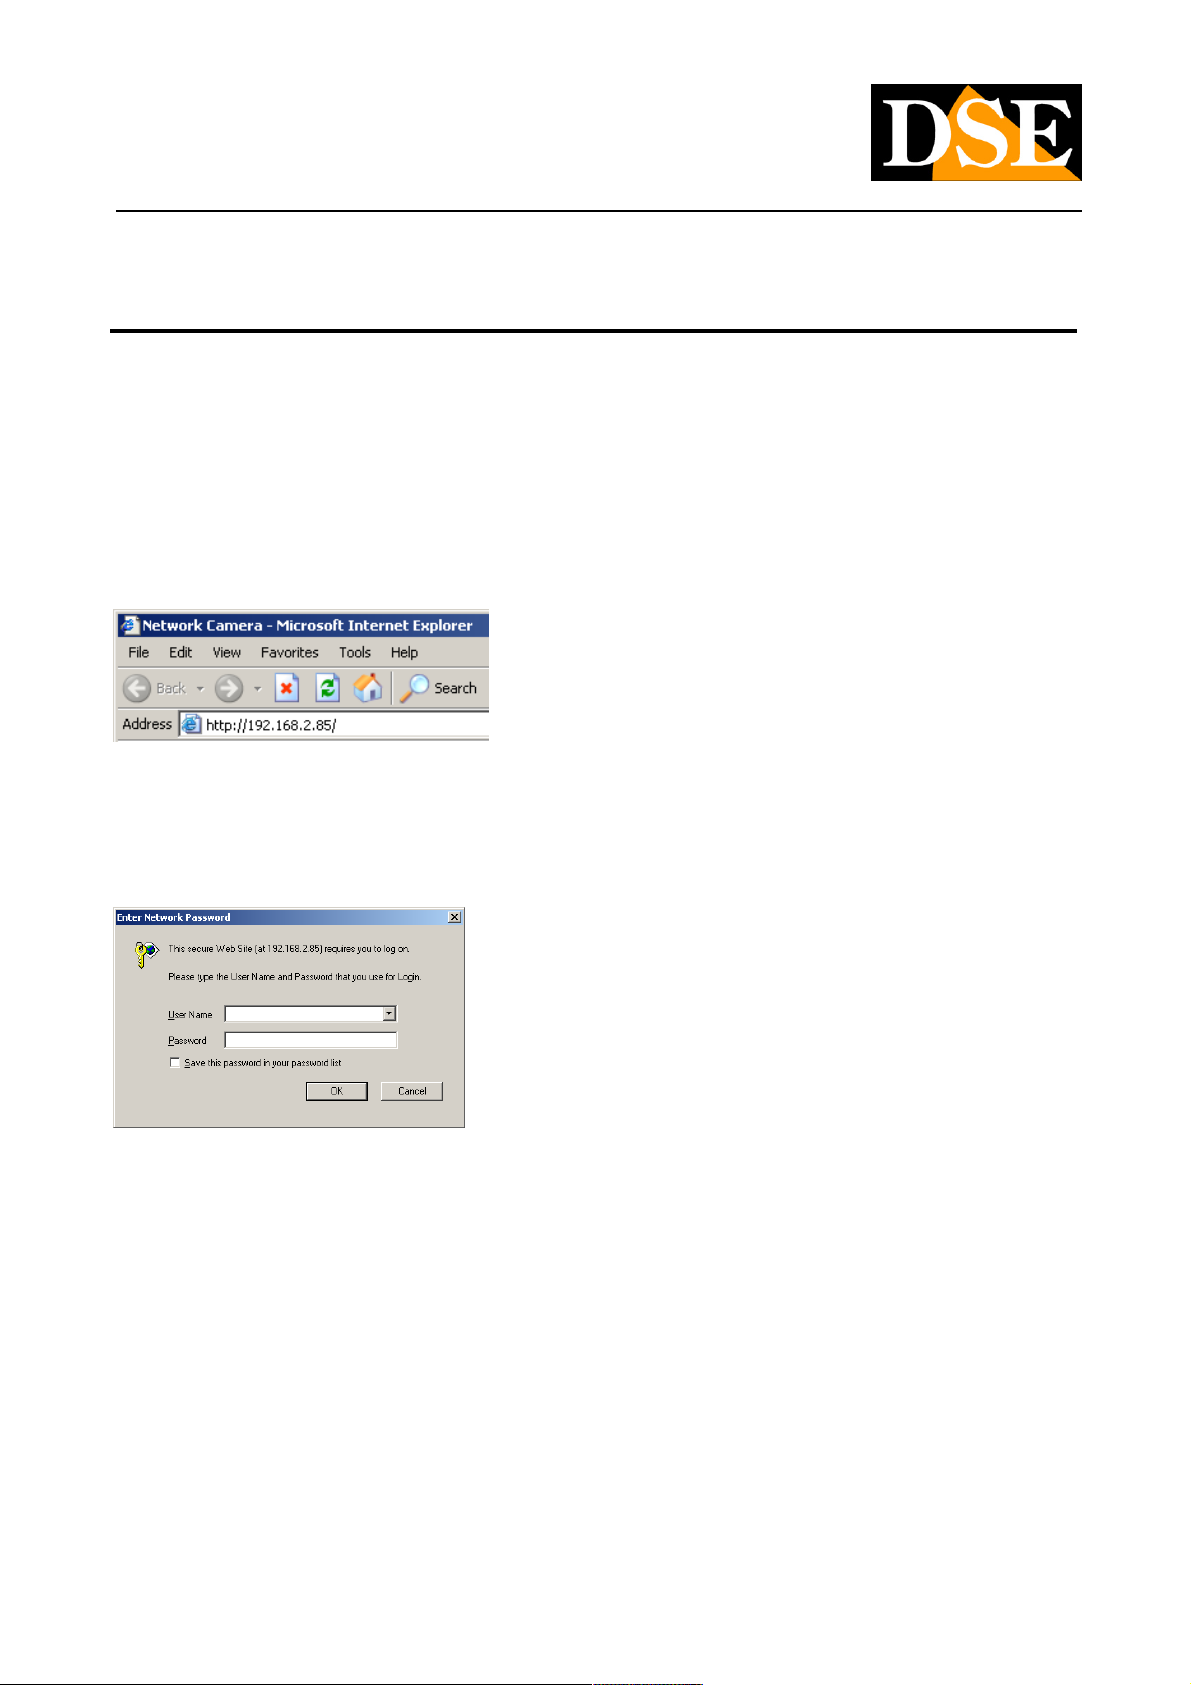
Explorer installation deli 'appropriate activeX is automatic as shown above .. To access the camera using Internet Explorer just
type the address in the browser bar:
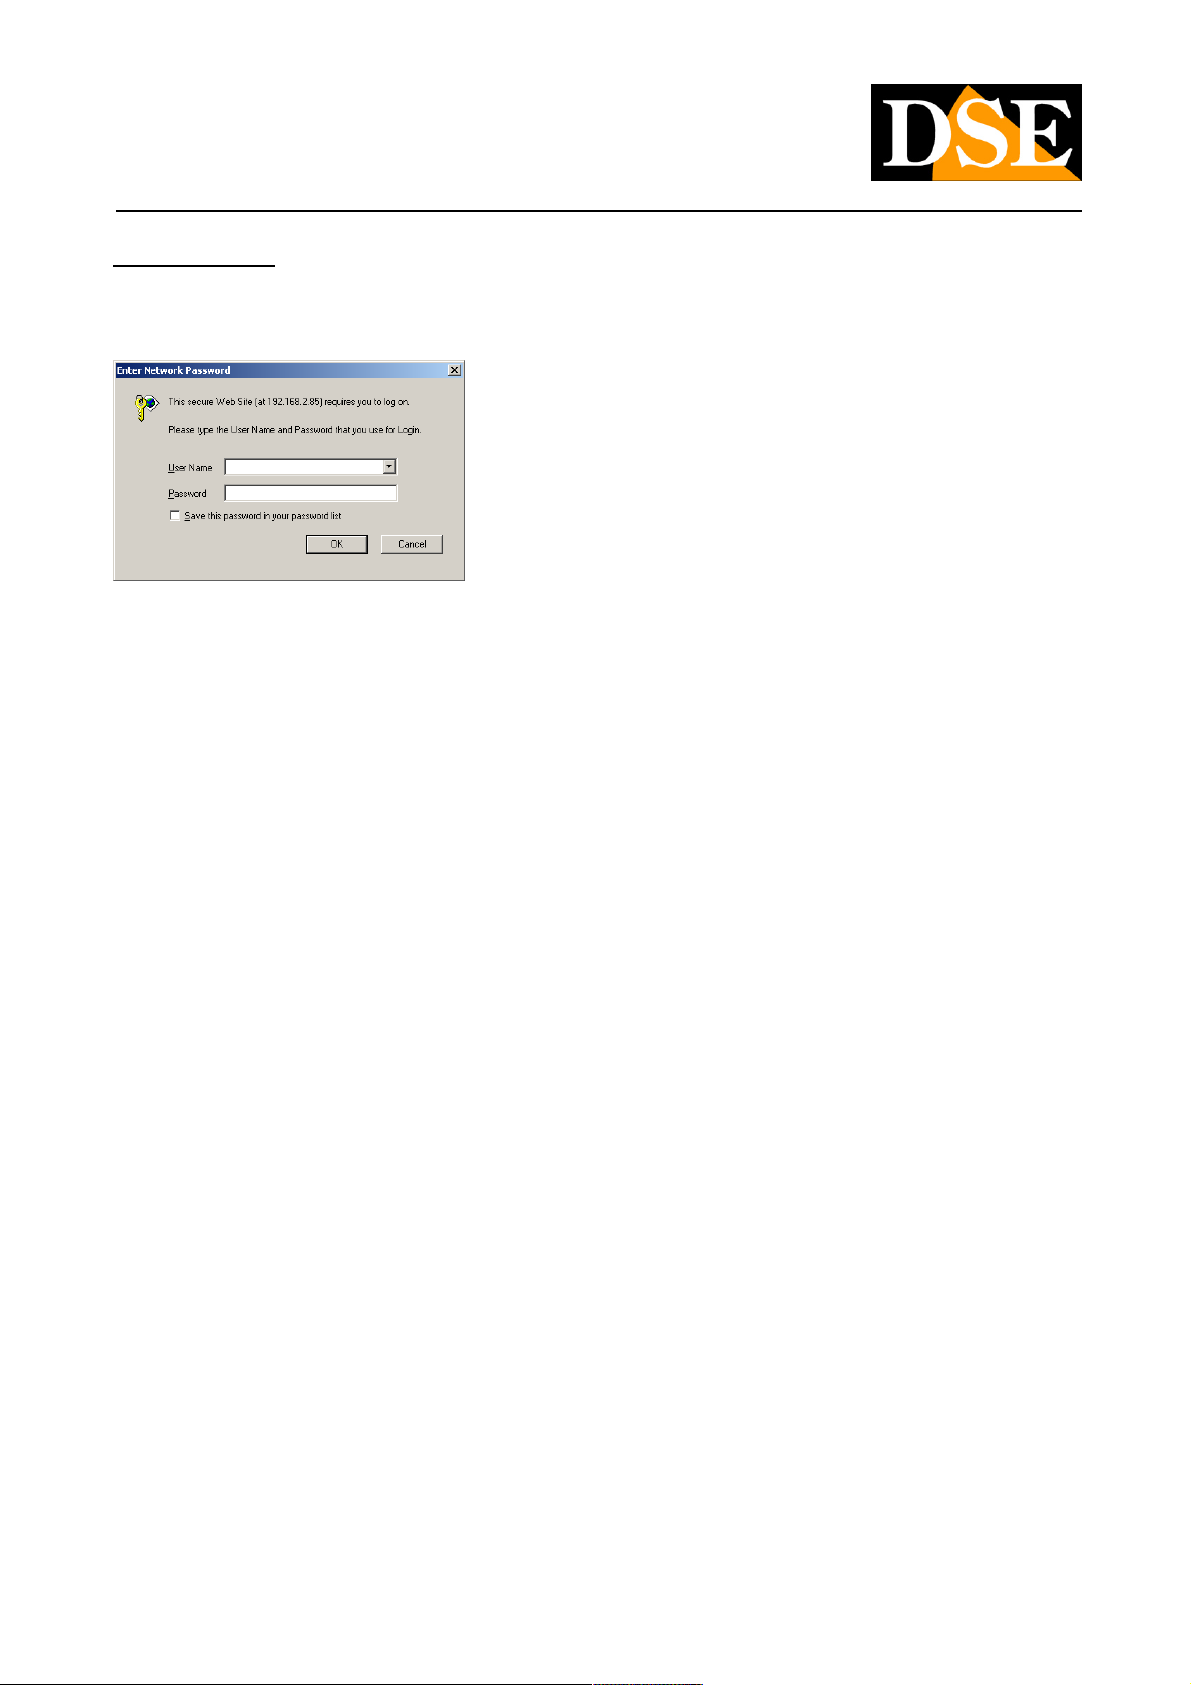
Depending on the security settings of the camera could be offered a window of log-in for entering username and password for
access.
The data of the RN Series cameras factory passwords are:
USERNAME: admin
PASSWORD: admin
The access to the camera control mask:
DSE SRL - ITALY - WWW.DSE.EU
Page 25
USER MANUAL
Megapixel H.264 IP CAMERAS
Page: 25 Page: 25
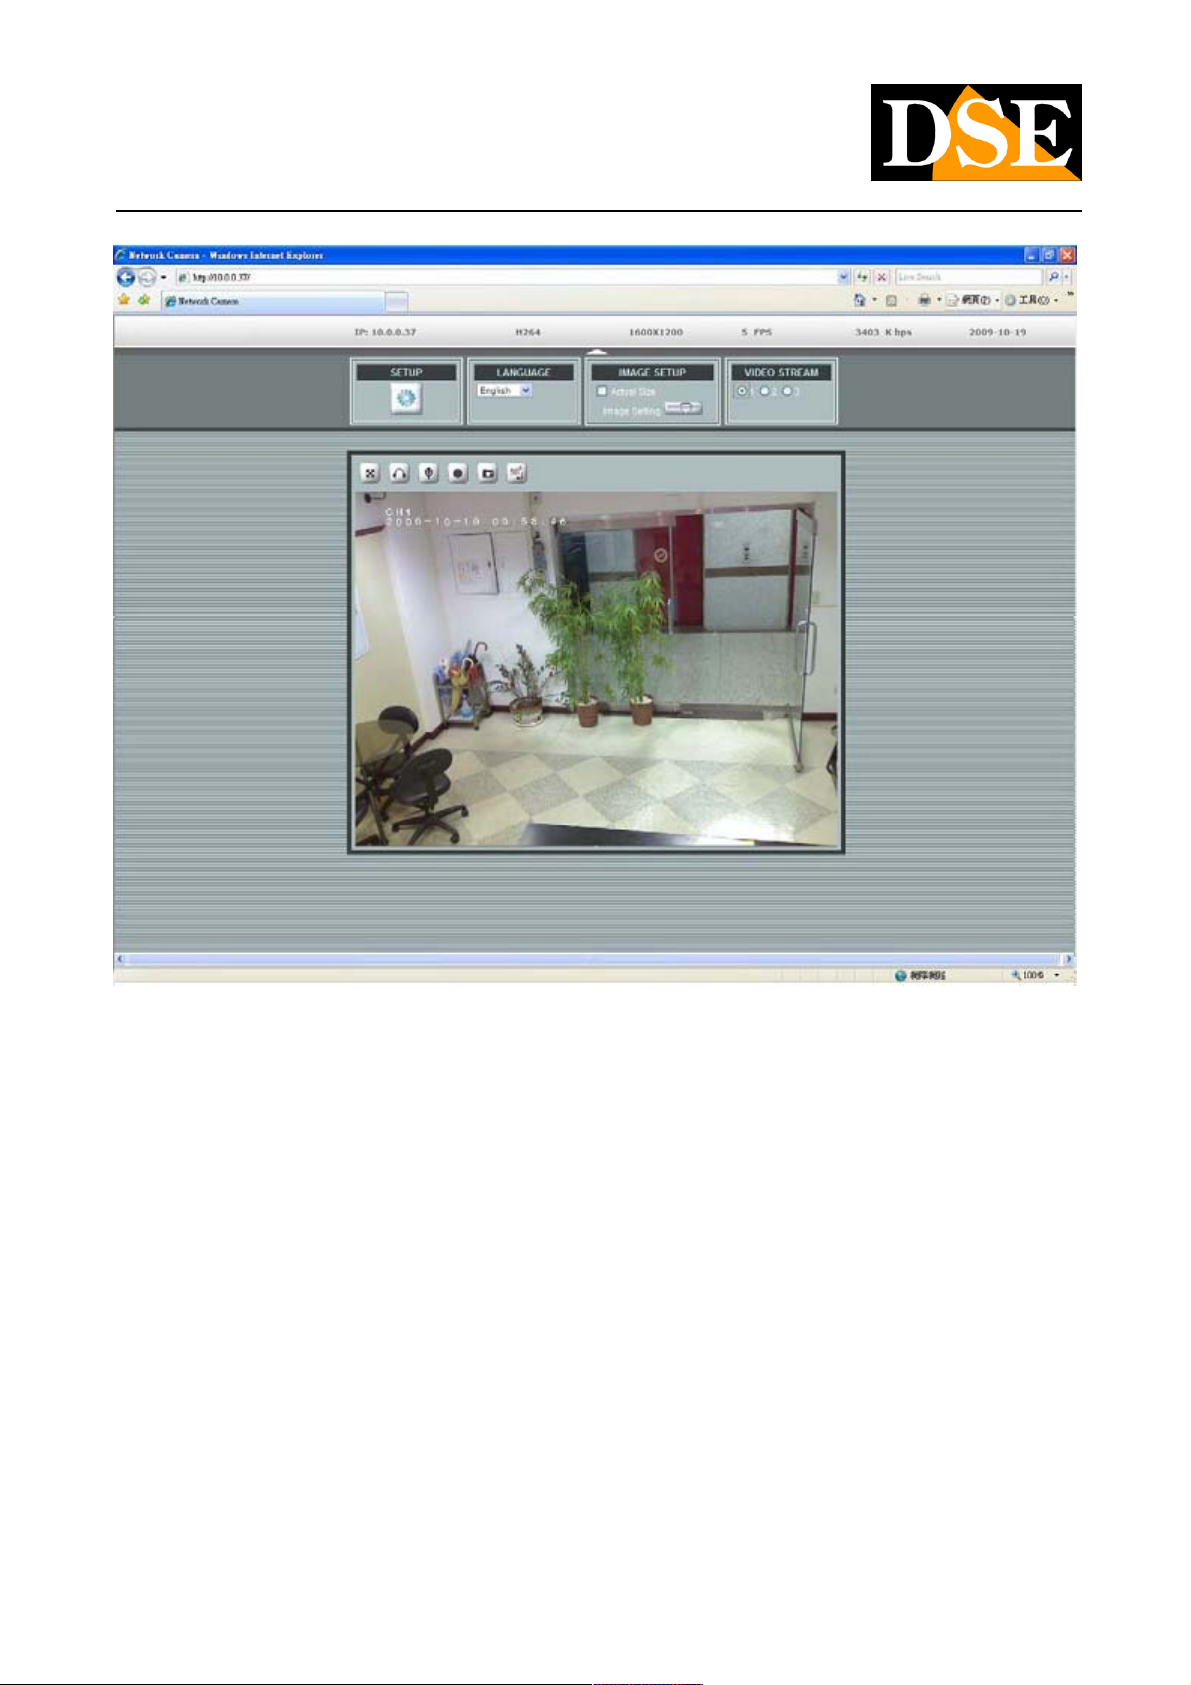
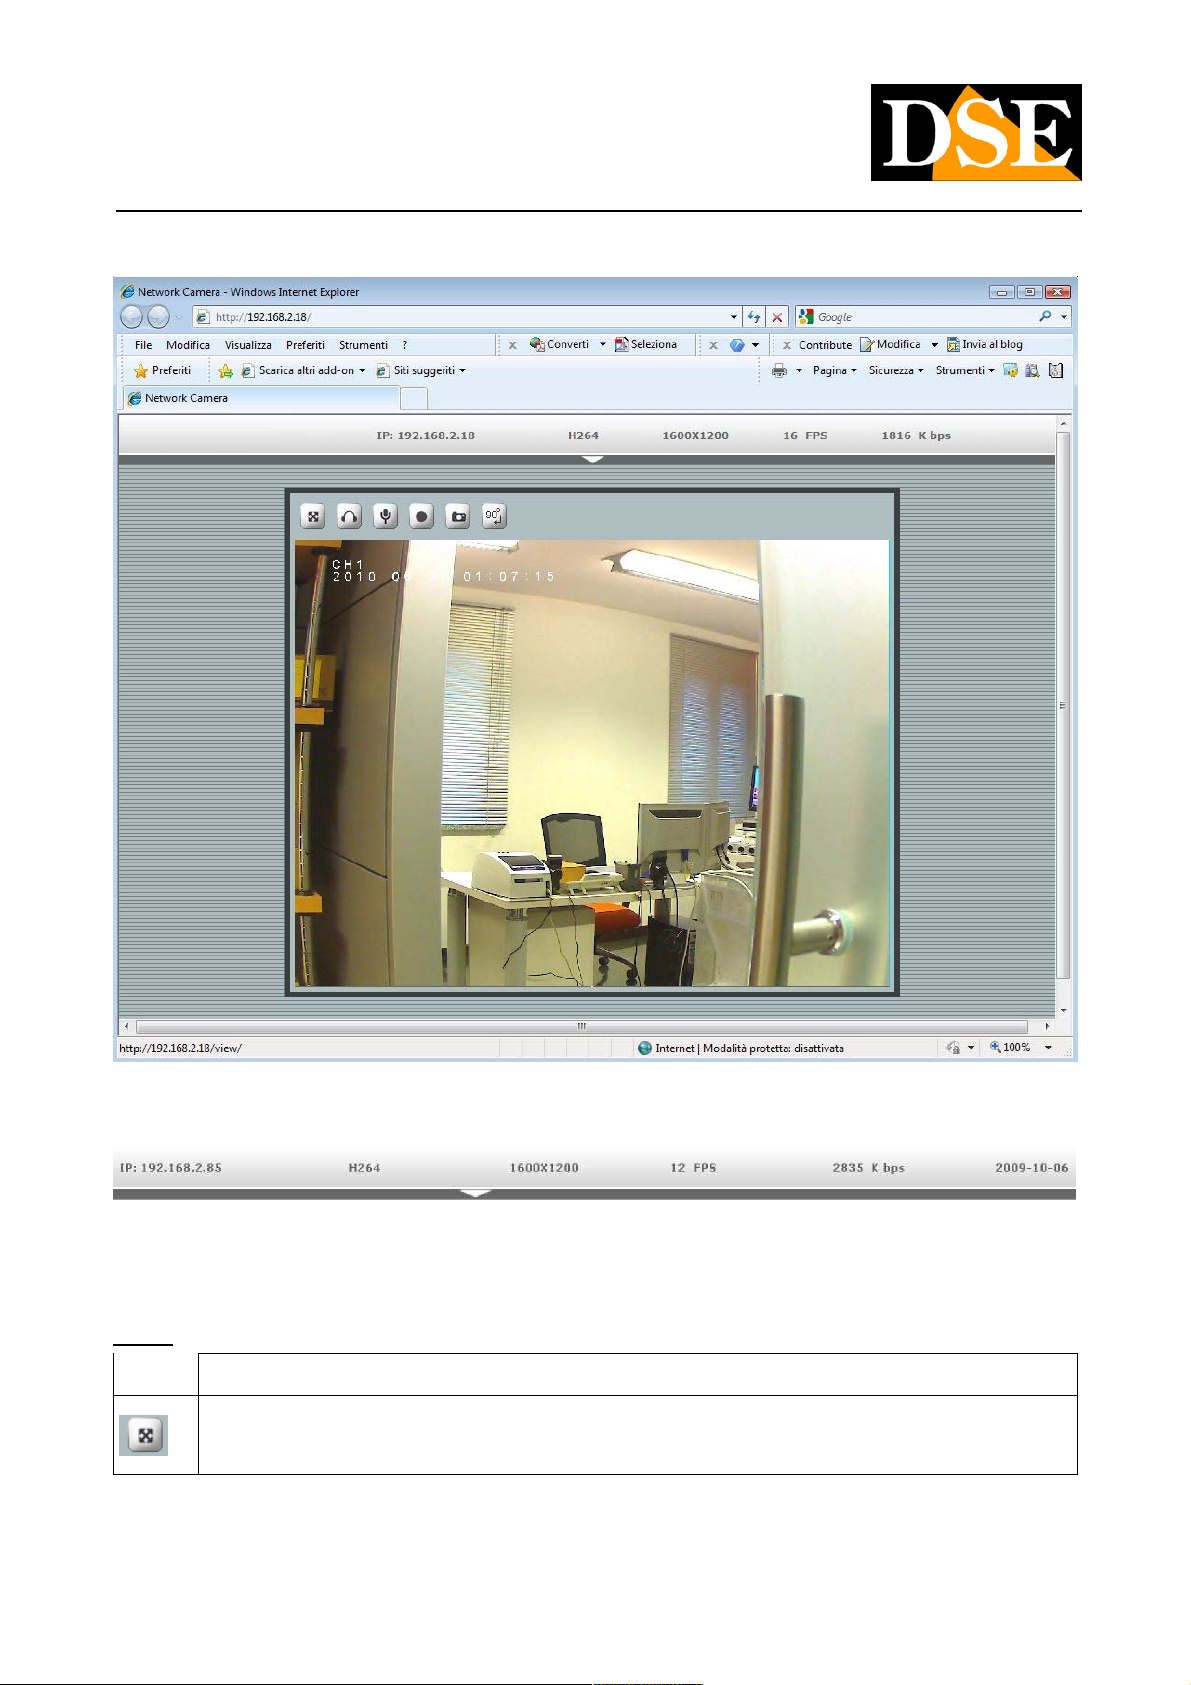
The window that allows the display of real-time image looks like this:
At the top of the main window shows the connection parameters:
From left to right:
IP Address - video compression format - Resolution - Frame Rate - Bit Rate Above the image some buttons that allow quick
access to commonly available
functions
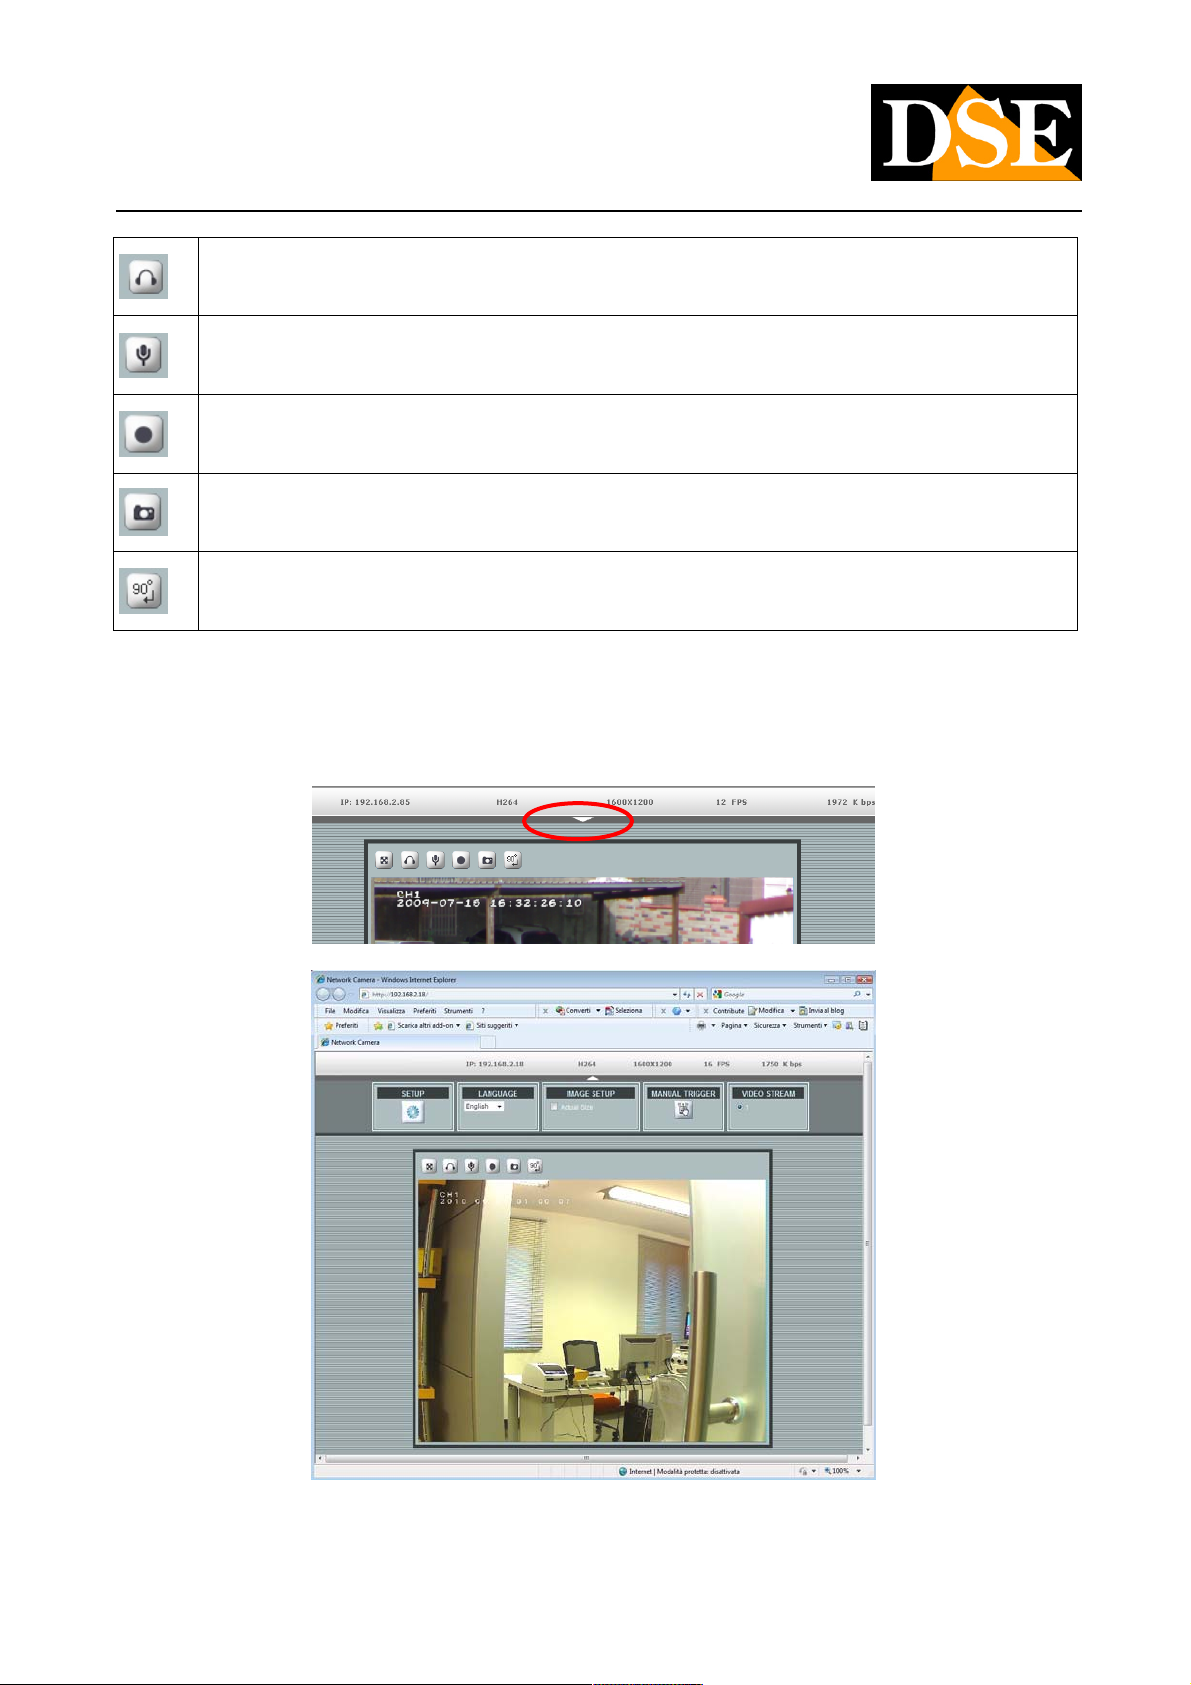
Icon Description
Increase to full screen
DSE SRL - ITALY - WWW.DSE.EU
Page 26
USER MANUAL
Megapixel H.264 IP CAMERAS
Page: 26 Page: 26
Active listening to the sound coming from the camera
Send audio from the local microphone to the camera speakers output
Record video while you watch it in AVI format
Take a photo in JPG format
Rotate the image 90 degrees clockwise with each click (NO RN-636E)Rotate the image 90 degrees clockwise with each click (NO RN-636E)
To access additional commands is required to open the curtain by clicking on the arrow on the top center of the display window.
DSE SRL - ITALY - WWW.DSE.EU
Page 27
USER MANUAL
Megapixel H.264 IP CAMERAS
Page: 27 Page: 27
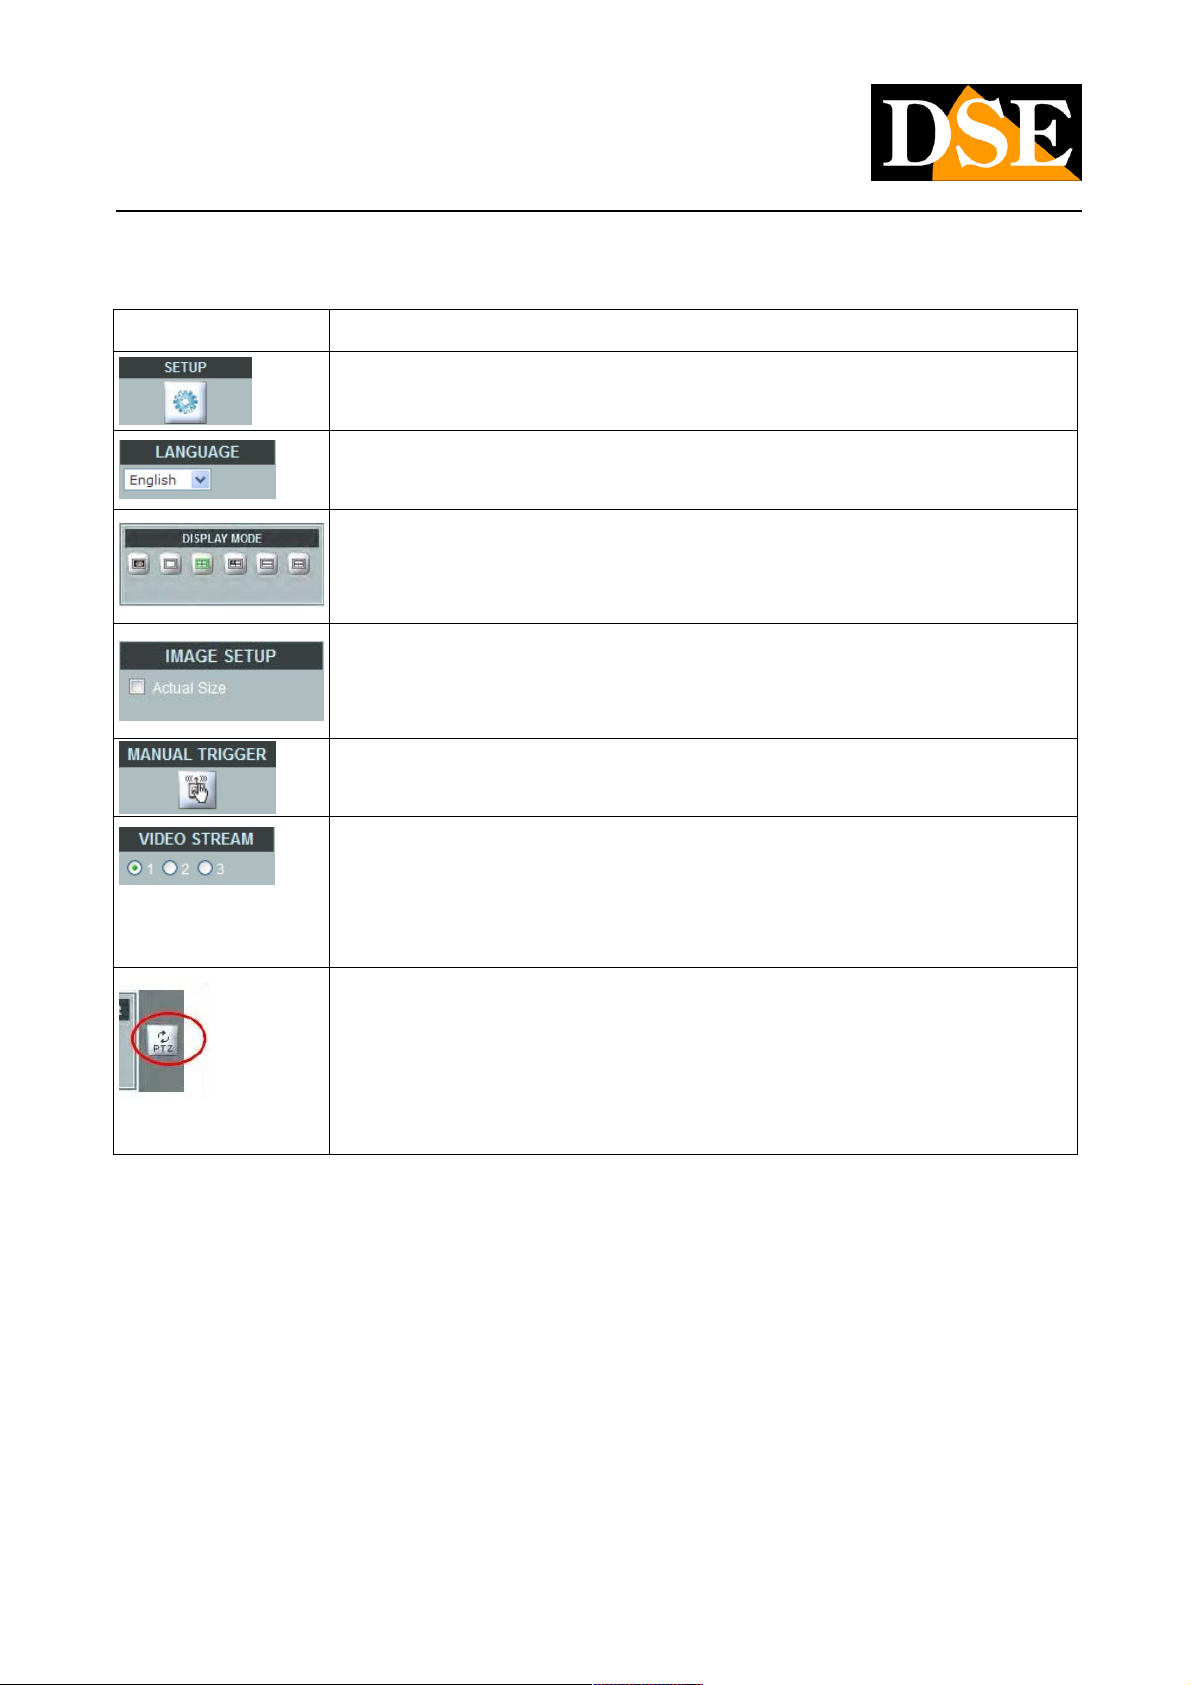
There are up to 7 frames depending on the camera models:
Button Description
Click to open the menu of camera settings
Click to select the web interface language (currently available English only)
The RN-636E panoramic camera allows you to choose different display types
Click to change the size of the display window and bring it to the actual size corresponding to the resolution set in the
camera.
Click to manually operate the camera alarm condition (see Manual alarm in the programming section of the alarm
management) The RN series cameras allow you to set three types of video streams with different settings that are
configured in the SETUP of the camera. Using these buttons you can quickly choose which stream to use without
having to access the camera program . (NO RN-636E)having to access the camera program . (NO RN-636E)
The only dome camera RN-636Econ panoramic vision has the ability to activate a PTZ control electronic simulation
that allows you to rotate the vision as if you were moving the camera. The PTZ button to activate this function is
present only if you choose the option in the settings to CEILING
Ceiling mount (section
Room / advance / mount camera - see section CAMERA - Camera Configuration)
DSE SRL - ITALY - WWW.DSE.EU
Page 28
USER MANUAL
Megapixel H.264 IP CAMERAS
Page: 28 Page: 28
Programming access
The following chapters refer to the programming of the camera which is accessed by pressing the SETUP key and typing User and
Password
The data of the RN Series cameras factory passwords are:
USERNAME: admin
PASSWORD: admin
DSE SRL - ITALY - WWW.DSE.EU
Page 29
USER MANUAL
Megapixel H.264 IP CAMERAS
Page: 29 Page: 29
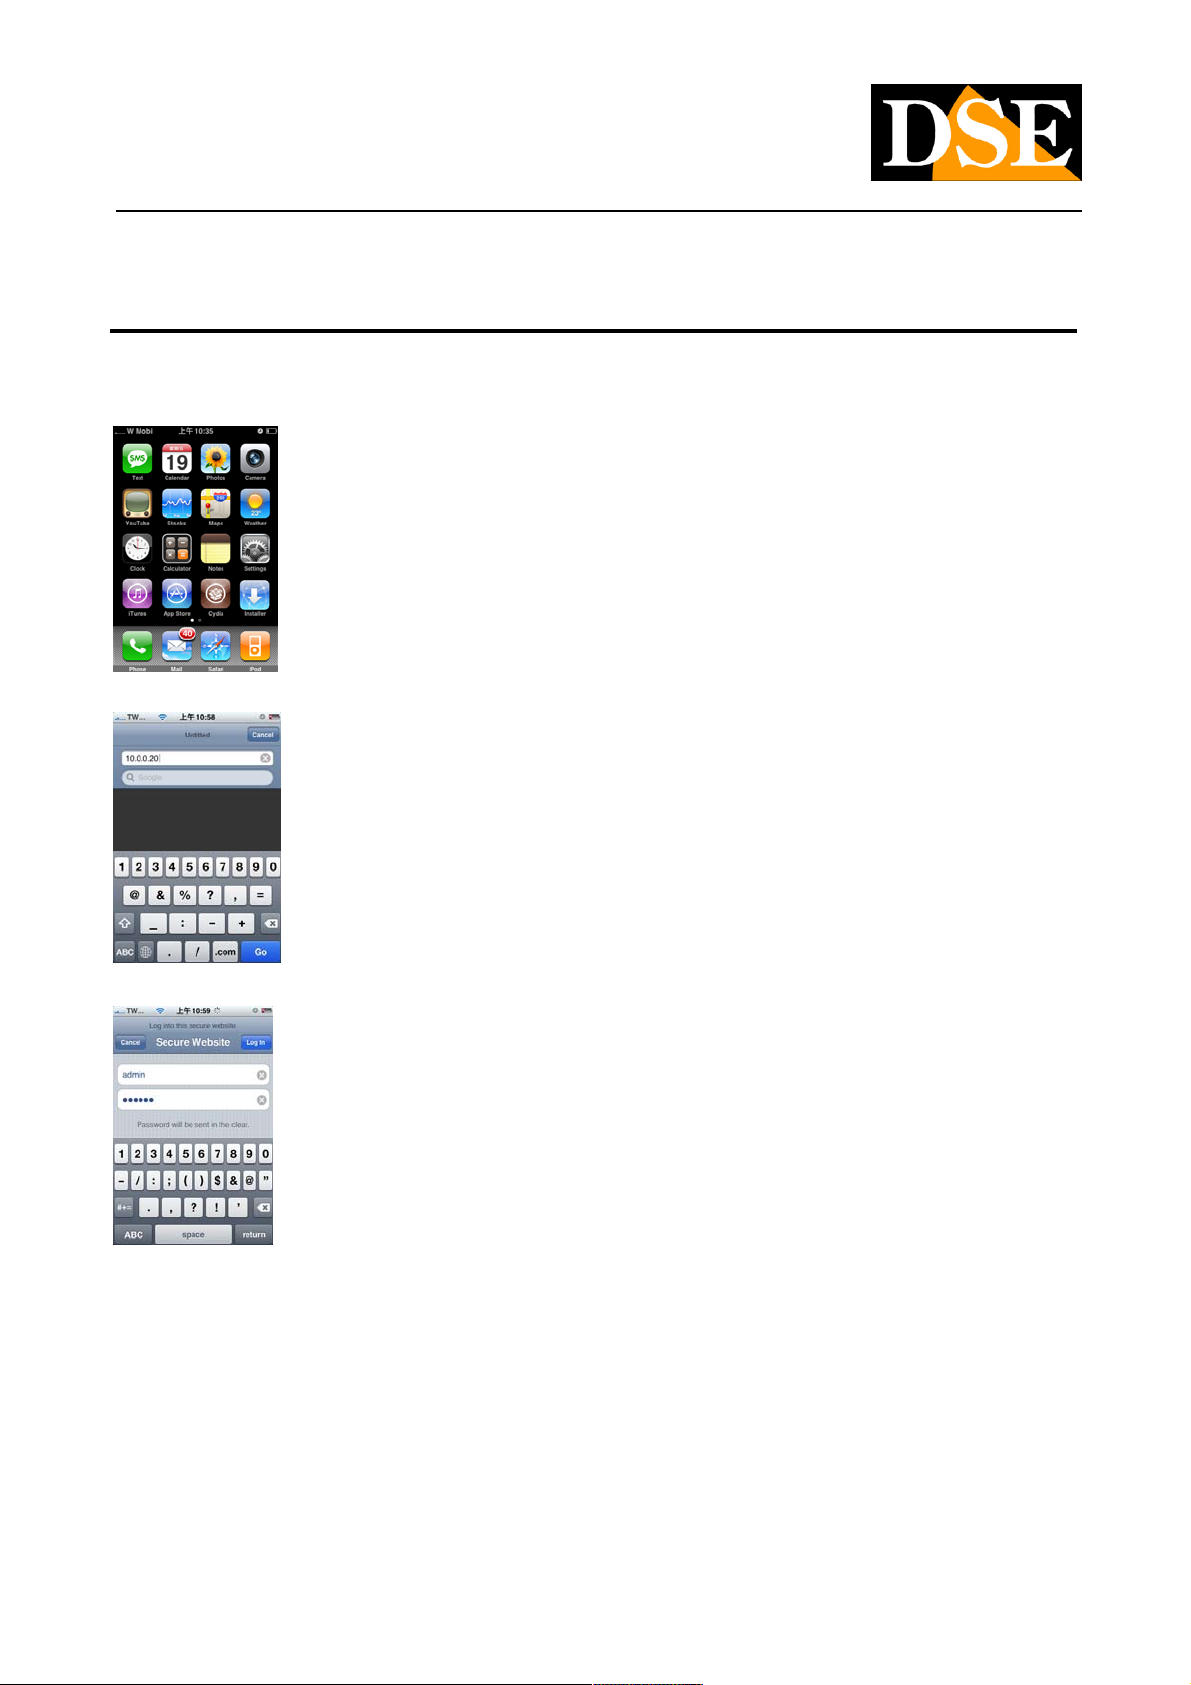
LIVE VIEW - LIVE Login with PDA
E 'can also connect to cameras with a phone I-Phone, Android and many other common PDA. Select the BROWSER function
Insert the camera's IP address
Insert the credentials of the factory access if requested by the access settings (see above) Insert the credentials of the factory access if requested by the access settings (see above)
The link page allows real-time visualization and 'acting can zoom with two fingers on the screen.
DSE SRL - ITALY - WWW.DSE.EU
Page 30
USER MANUAL
Megapixel H.264 IP CAMERAS
Page: 30 Page: 30
VIDEO - Video Setup
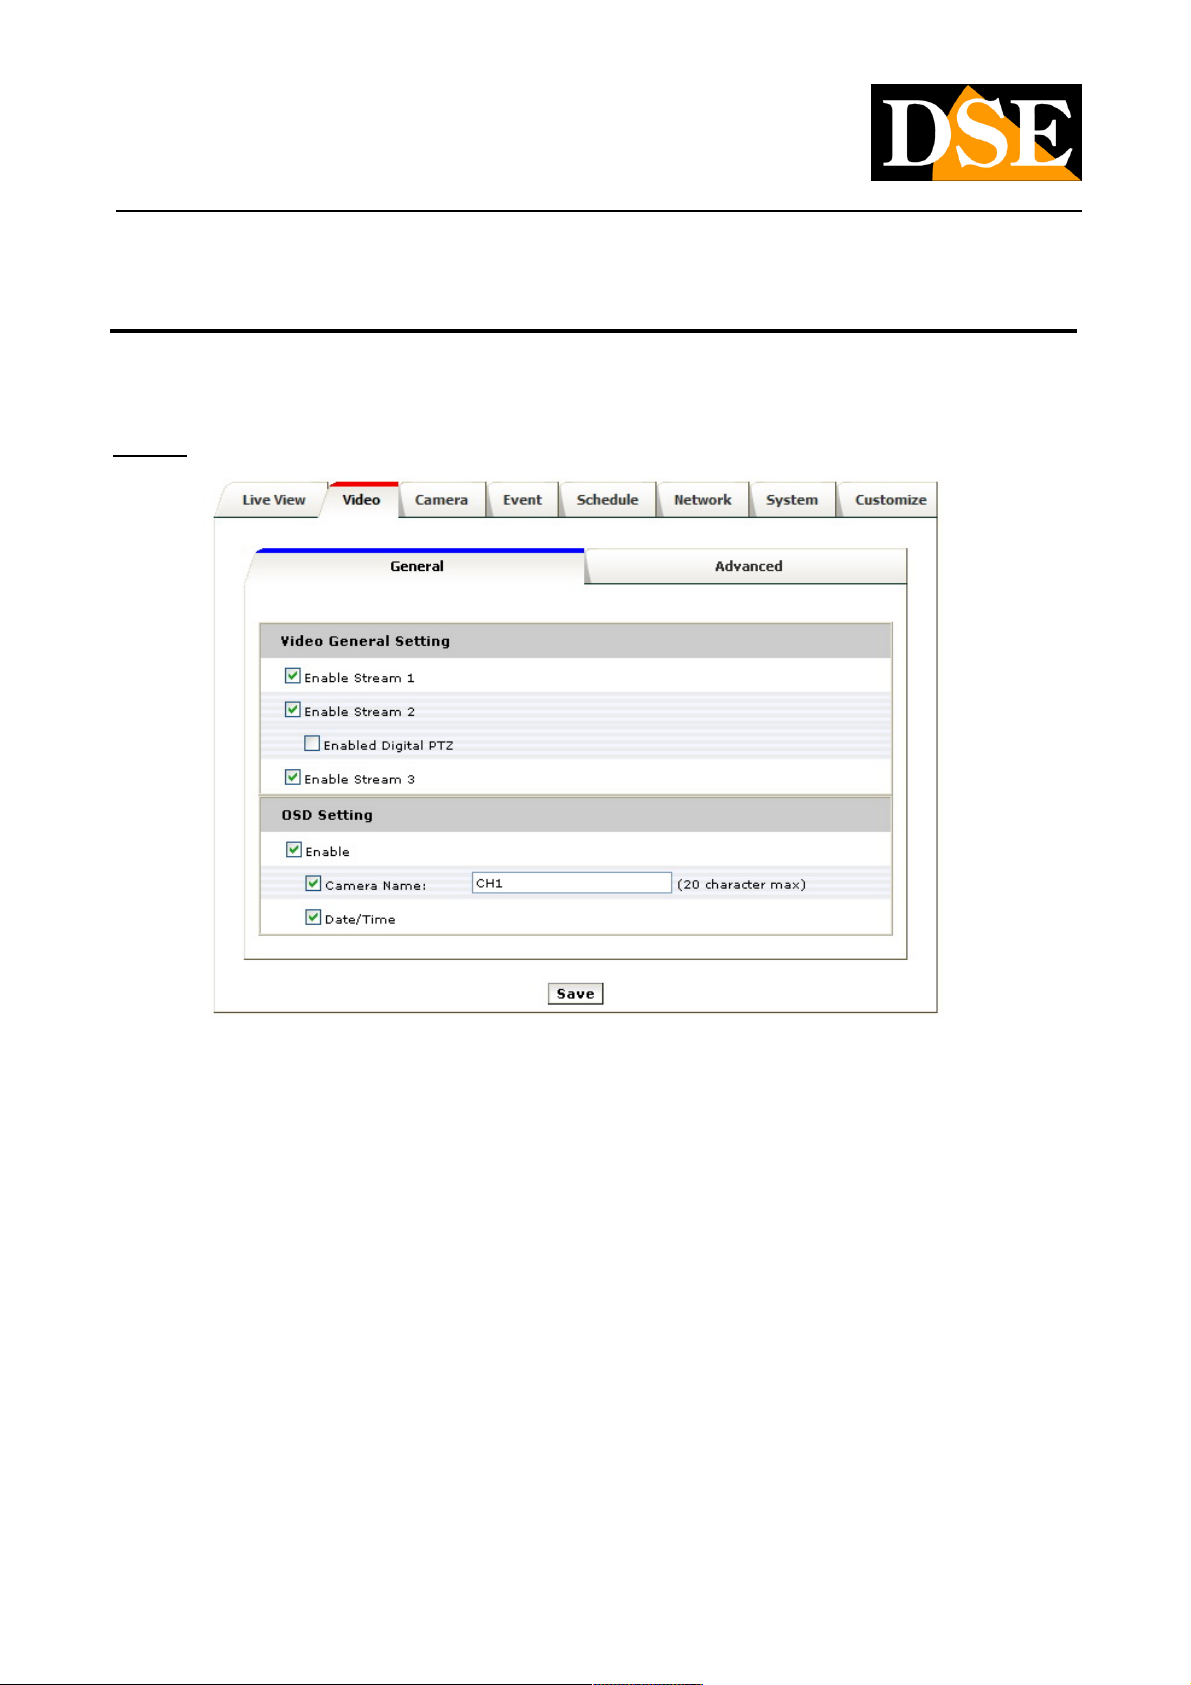
The first programming section refers to the camera video streaming settings and is divided into 3 sections: GENERAL, ADVANCED AND
EXTERNAL VIDEO SOURCES
General
Video General Setting: The RN series cameras allow you to configure default three types of streaming video with different video Video General Setting: The RN series cameras allow you to configure default three types of streaming video with different video
settings. And 'you can display the LIVE switch between streaming with just one click. In this section you can define how many streaming
enabled. Note that stream 1 is enabled in the factory and that the PTZ control (for models with this feature) is available only for streaming
2. (NB The RN-636E model does not provide for the management of multiple streaming)
OSD Setting: Tick OSD Enable to enable the overlay of the camera name, and the current date and time. E 'can set a distinctive name OSD Setting: Tick OSD Enable to enable the overlay of the camera name, and the current date and time. E 'can set a distinctive name
of max camera. 20 characters.
DSE SRL - ITALY - WWW.DSE.EU
Page 31
USER MANUAL
Megapixel H.264 IP CAMERAS
Page: 31 Page: 31
advanced
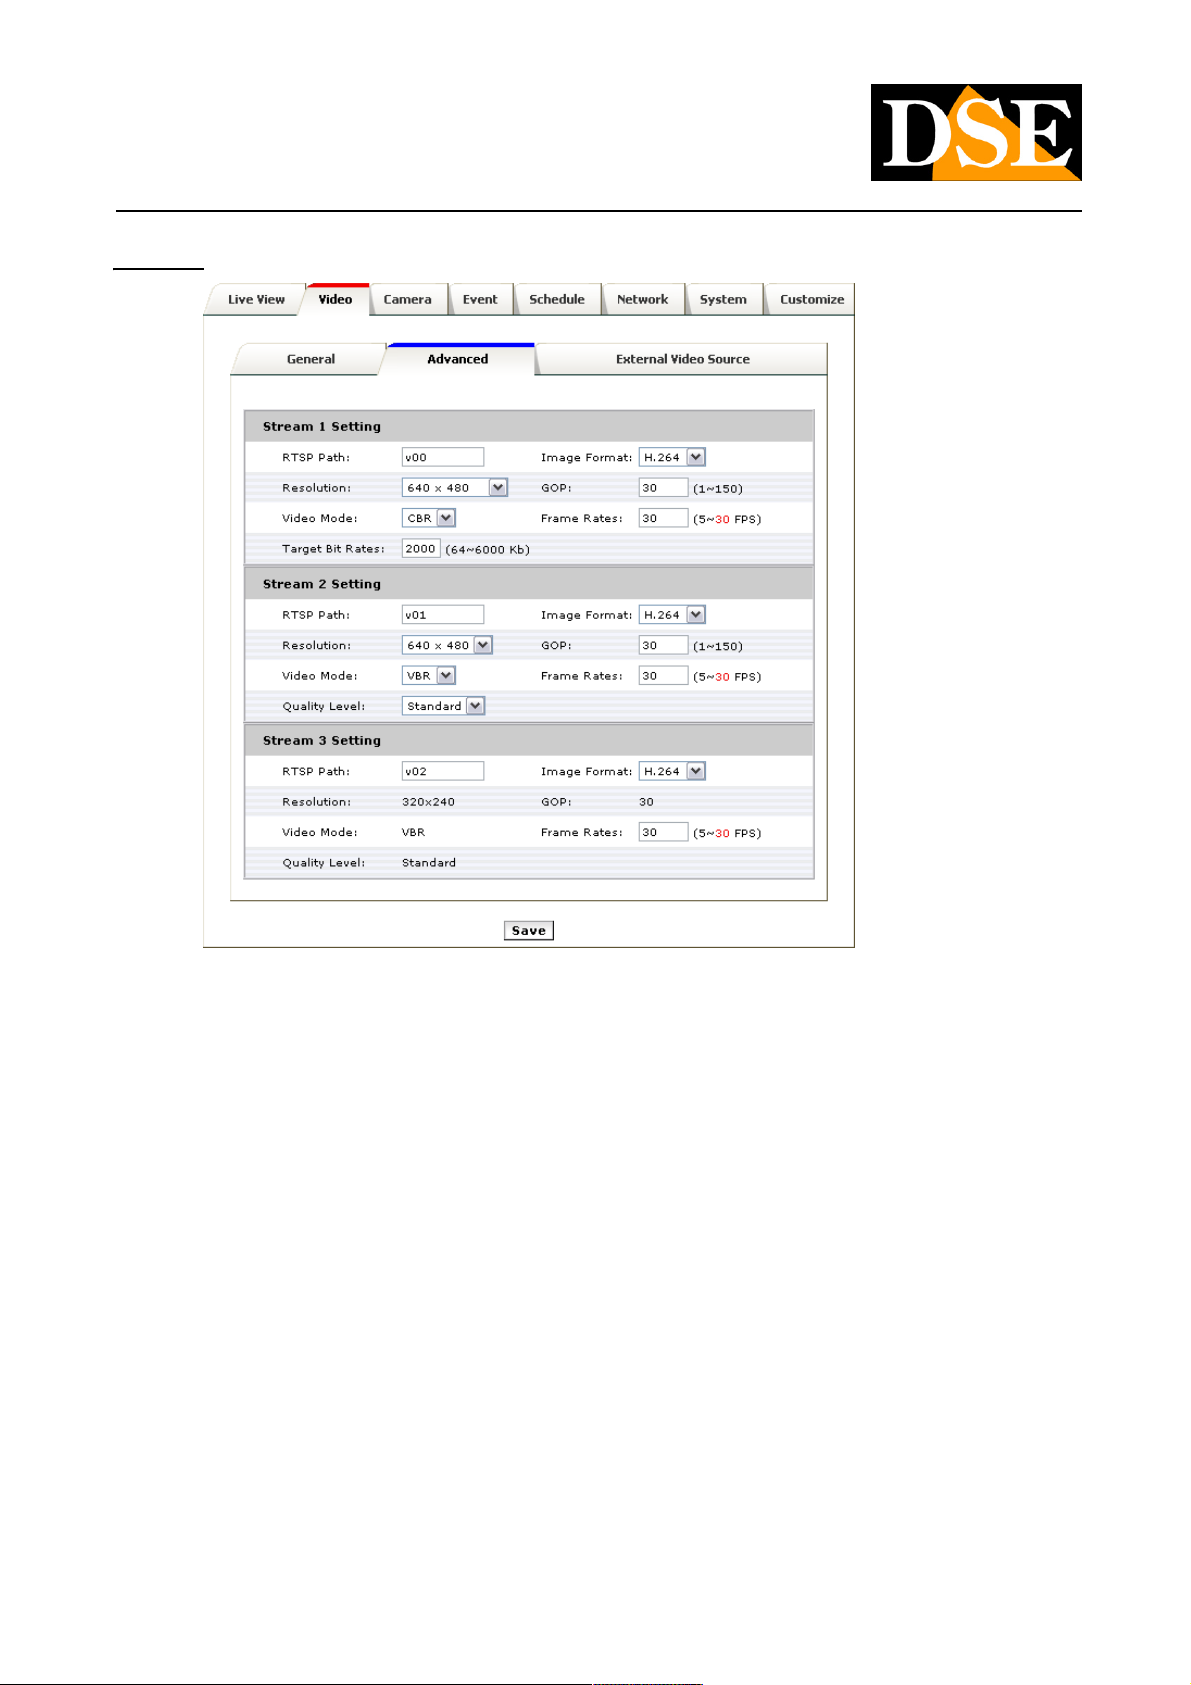
In this tab you set the parameters for the 3 streaming video available, (NB. The RN-636E camera,
you can set one video streaming)
RTSP Path -
It 'a streaming identifier value used by RTSP players like VLC Player to identify which stream play. The default values are v00, v01, v02 for It 'a streaming identifier value used by RTSP players like VLC Player to identify which stream play. The default values are v00, v01, v02 for It 'a streaming identifier value used by RTSP players like VLC Player to identify which stream play. The default values are v00, v01, v02 for
the respective stream 1, stream 2 and stream 3. In the field you have to enter a combination of numbers and letters.
Resolution -
It is intended that the RESOLUTION is expressed by two values, which are the width and height of the display screen.
From the Stream 1 there are several options RESOLUTION: 1600x1200 (2 megapixels), 1280x720 (HD), 800x600 (VGA), 320x240
(QVGA).
From the Stream 2 VGA and QVGA are available. From the Stream 3 of the
resolution option is only QVGA.
In RN-636E camera resolution options are reduced compared to other cameras and depend on the type of the camera assembly and the
display so that you choose.
DSE SRL - ITALY - WWW.DSE.EU
Page 32

USER MANUAL
Megapixel H.264 IP CAMERAS
Page: 32 Page: 32
The table below shows the resolutions available each mounting type and any type of display. The table below shows the resolutions available each mounting type and any type of display.
WALL (wall) CEILING (Ceiling) TABLE (table)
ORIGINAL VIEW
BROAD VIEW
DOUBLE VIEW
TRIPLE VIEW
QUAD VIEW
QUAD WITH SOURCE VIEW
1600X1200
800X600
640X480
1600X600 1600X300 -
- 1600X300
1600X1200
800X600
640X480
-
1600X1200
800X600
640X480
1600X1200
800X600
640X480
1600X1200
800X600
640X480
1600X1200
800X600
640X480
1600X1200
800X600
640X480
1600X1200
800X600
640X480
1600X1200
800X600
640X480
-
-
-
Video Mode -
This section gives the possibility to choose between two different modes to manage the bandwidth occupied: CONSTANT BIT RATE (CBR)
and VARIABLE BIT RATE (VBR).
In the CBR mode, the camera maintains a constant bit rate that can be set to 64 and 6000 Kb (default 2000 Kb). In the VBR mode
instead of changing the bit rate camera in different operating conditions in order to maintain a constant video quality. In this mode you do
not set the band but the video quality (STANDARD, GOOD, BEST).
The CBR mode is recommended if you plan continued use of connection via the Internet, especially with modest bandwidth. VBR mode
allows for better optimization of bandwidth available, but it is recommended only for use on the local network and not via the Internet.
Image Format -
The RN series cameras are Dual Codec equipment, ie allow to choose 2 different type of video compression: dynamic (H.264) or static
(MJPEG). The H.264 is the latest development in video compression and occupies little bandwidth while maintaining high image quality.
The H.264 compression is preferred in almost all video surveillance applications for most smooth operation and the ability to transfer
full-resolution megapixel images without overstraining the
DSE SRL - ITALY - WWW.DSE.EU
Page 33
USER MANUAL
Megapixel H.264 IP CAMERAS
Page: 33 Page: 33
Network and equipment.
The compression MJPEG is a much less efficient compression but which in certain circumstances may provide more detail of image. In
view of the greater bandwidth demand it is not recommended in access via the Internet, but only on the local network ..
GOP -
Group of Pictures. This parameter relates to the compression mechanism H.264 and each indicates how many frames an I-Frame is
inserted. Since an I-Frame is less compressed than the other frames it is the highest GOP (distance between two I-frames), the smaller
the bandwidth required for the transmission. Excessive GOP size can, however, lead to transmission errors.
The GOP size of the DVD is 15. And 'possible to set higher values for the GOP size (1 to 150) to reduce the occupied bandwidth. 30 is
the recommended factory setting and is normally a good compromise.
Frame Rates -
And 'the number of frames per second that make streaming video. The PAL system provides 25 f / sec real-time, but you can set lower
values to take up less bandwidth if necessary. If you use the maximum resolution megapixel 1600x1200 maximum value of Frame
Network is 15 f / sec.
NOTE: FURTHER DETAILS ABOUT STREAMING SETTINGS IN APPENDIX
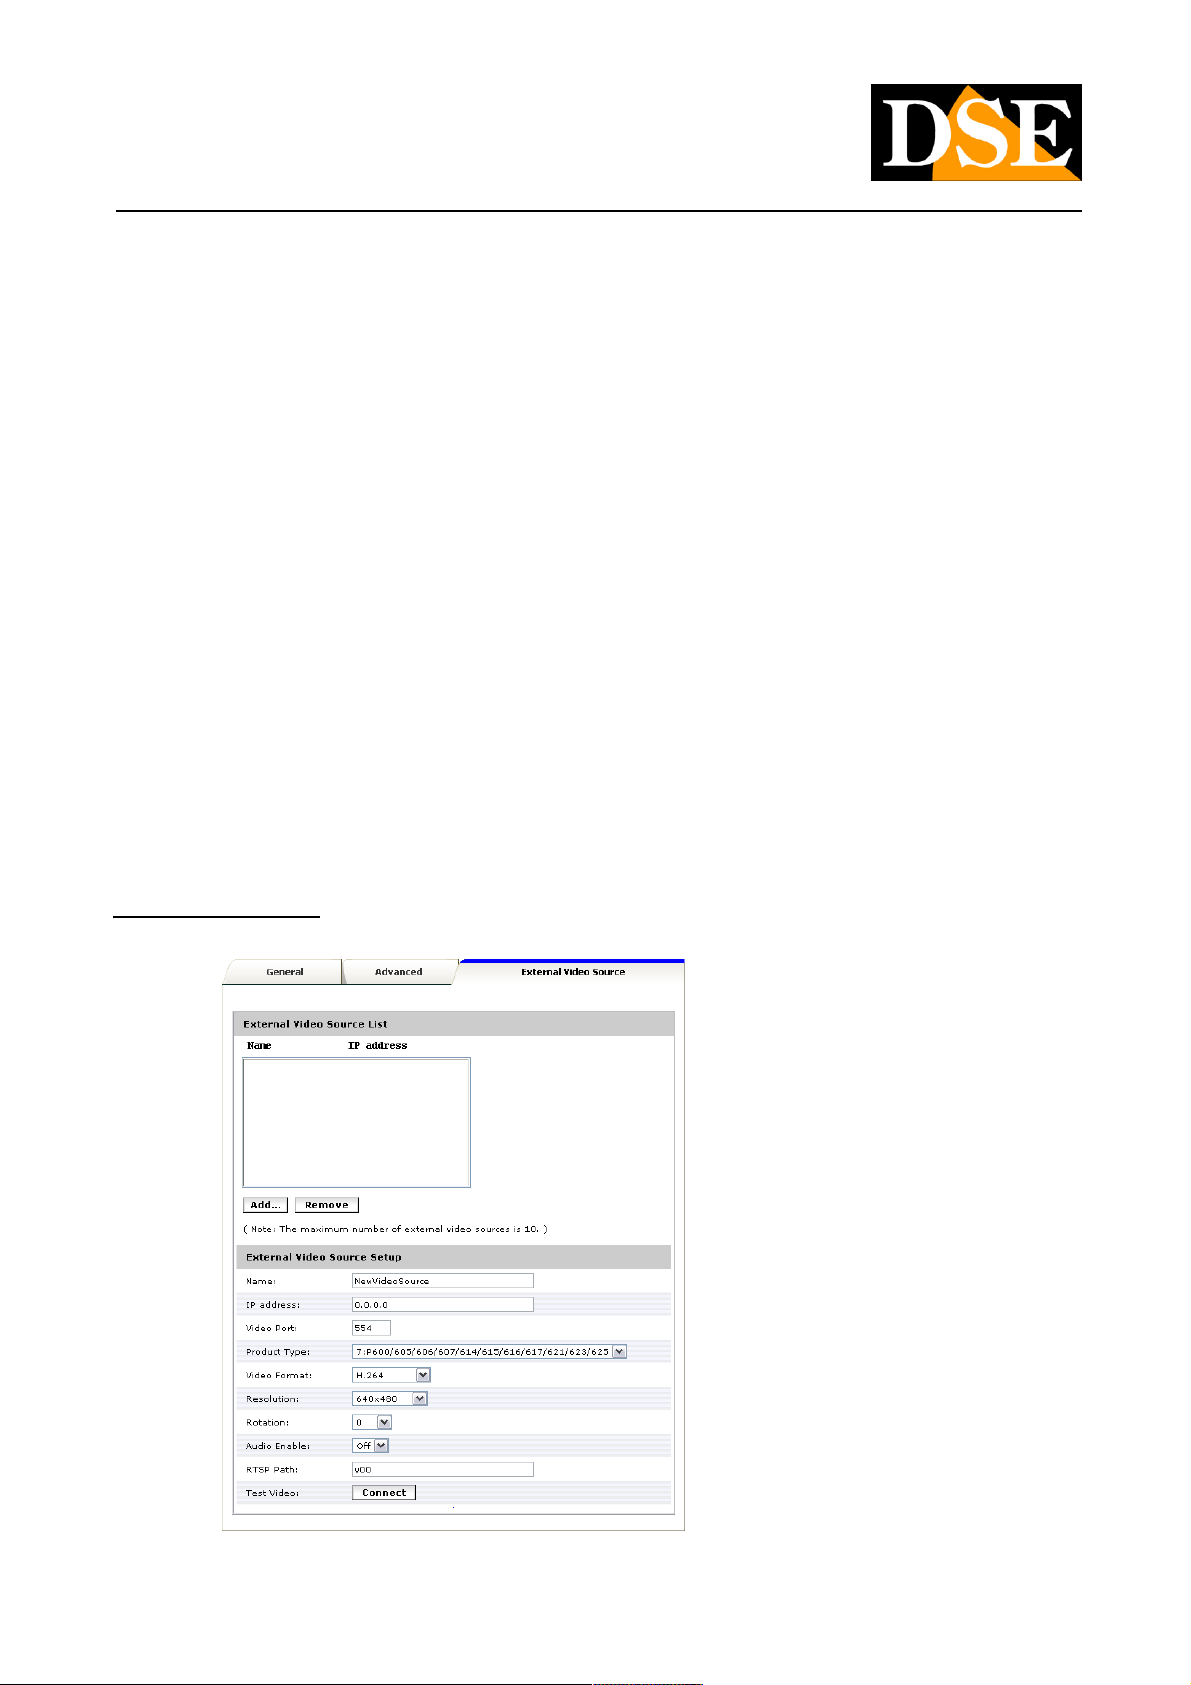
External Video Source
DSE SRL - ITALY - WWW.DSE.EU
Page 34
USER MANUAL
Megapixel H.264 IP CAMERAS
Page: 34 Page: 34
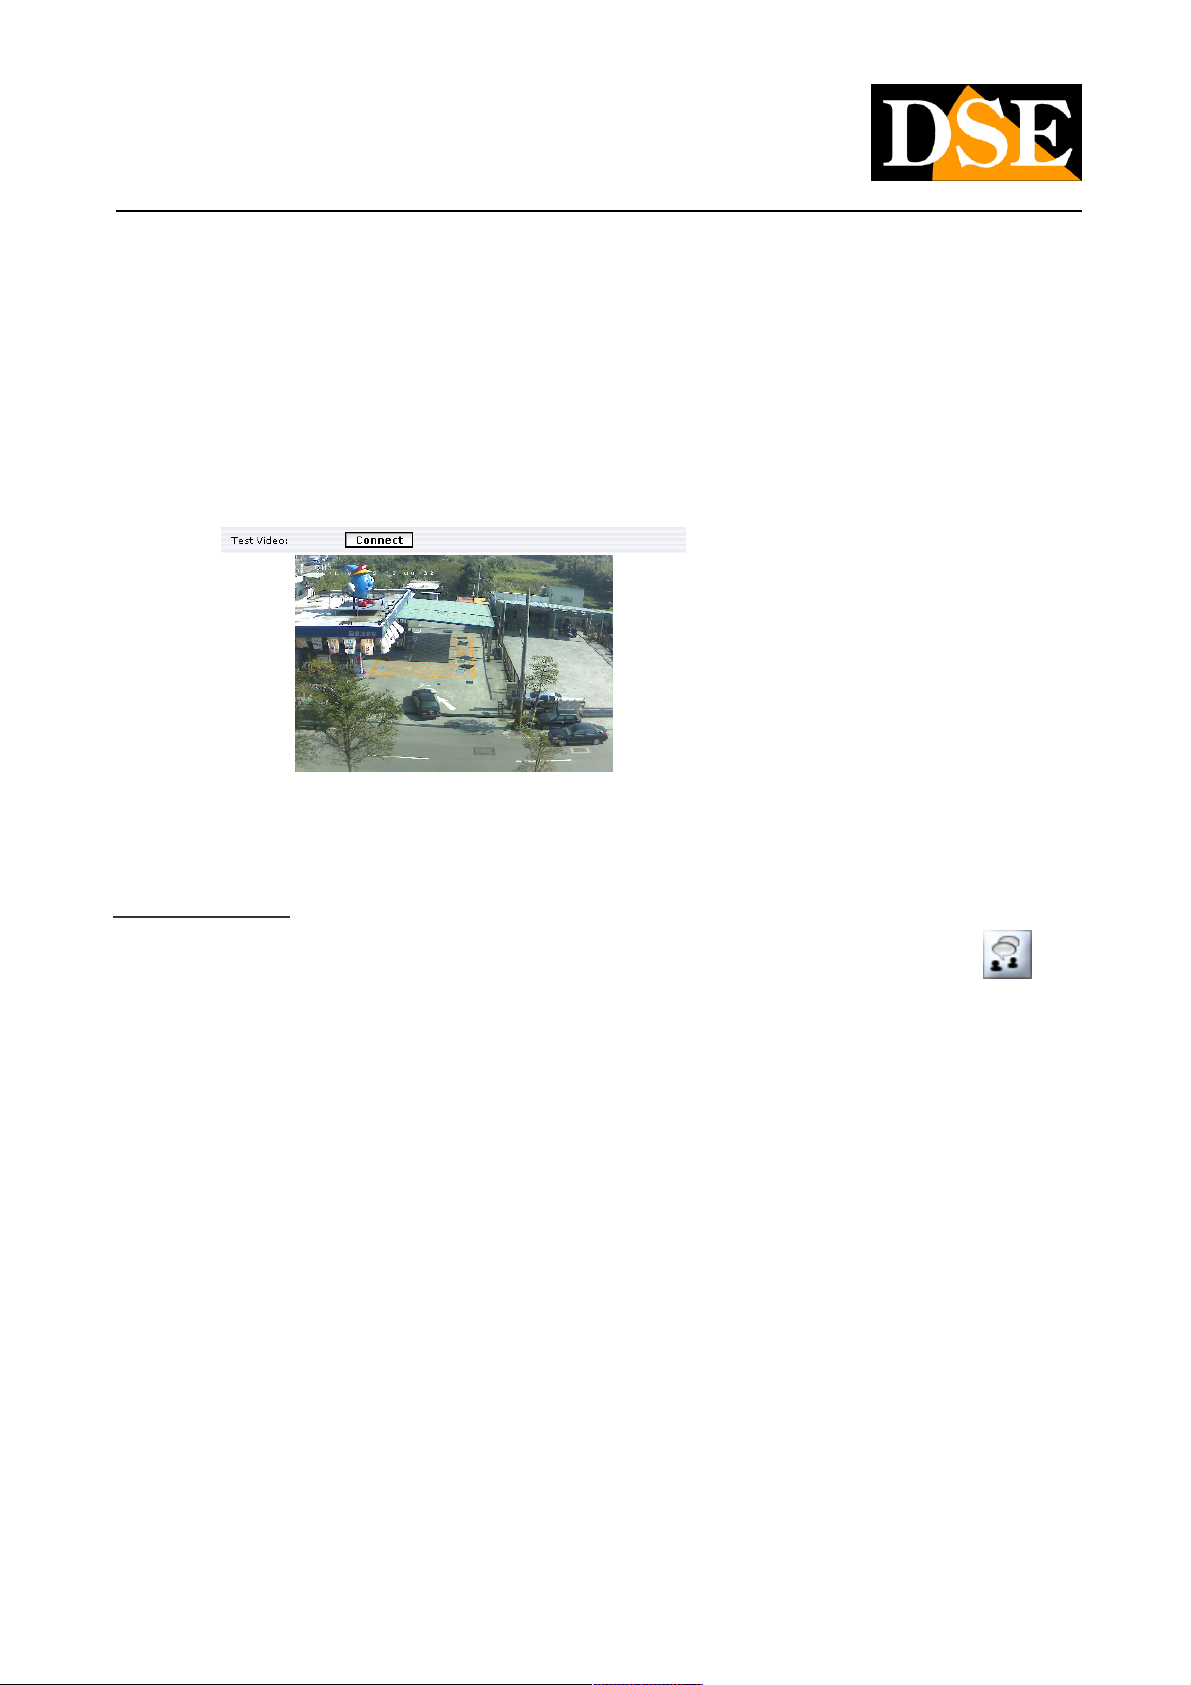
On this page you can configure the display of other LINK Video belonging to other cameras connected to the RN NETWORK. This On this page you can configure the display of other LINK Video belonging to other cameras connected to the RN NETWORK. This On this page you can configure the display of other LINK Video belonging to other cameras connected to the RN NETWORK. This On this page you can configure the display of other LINK Video belonging to other cameras connected to the RN NETWORK. This On this page you can configure the display of other LINK Video belonging to other cameras connected to the RN NETWORK. This
application is primarily used for VIDEO CONFERENCING.application is primarily used for VIDEO CONFERENCING.
To add a LINK External video must click ADD, then complete all connection parameters relating to the remote camera. When you have To add a LINK External video must click ADD, then complete all connection parameters relating to the remote camera. When you have To add a LINK External video must click ADD, then complete all connection parameters relating to the remote camera. When you have To add a LINK External video must click ADD, then complete all connection parameters relating to the remote camera. When you have To add a LINK External video must click ADD, then complete all connection parameters relating to the remote camera. When you have
completed this page, click CONNECT to test the display.
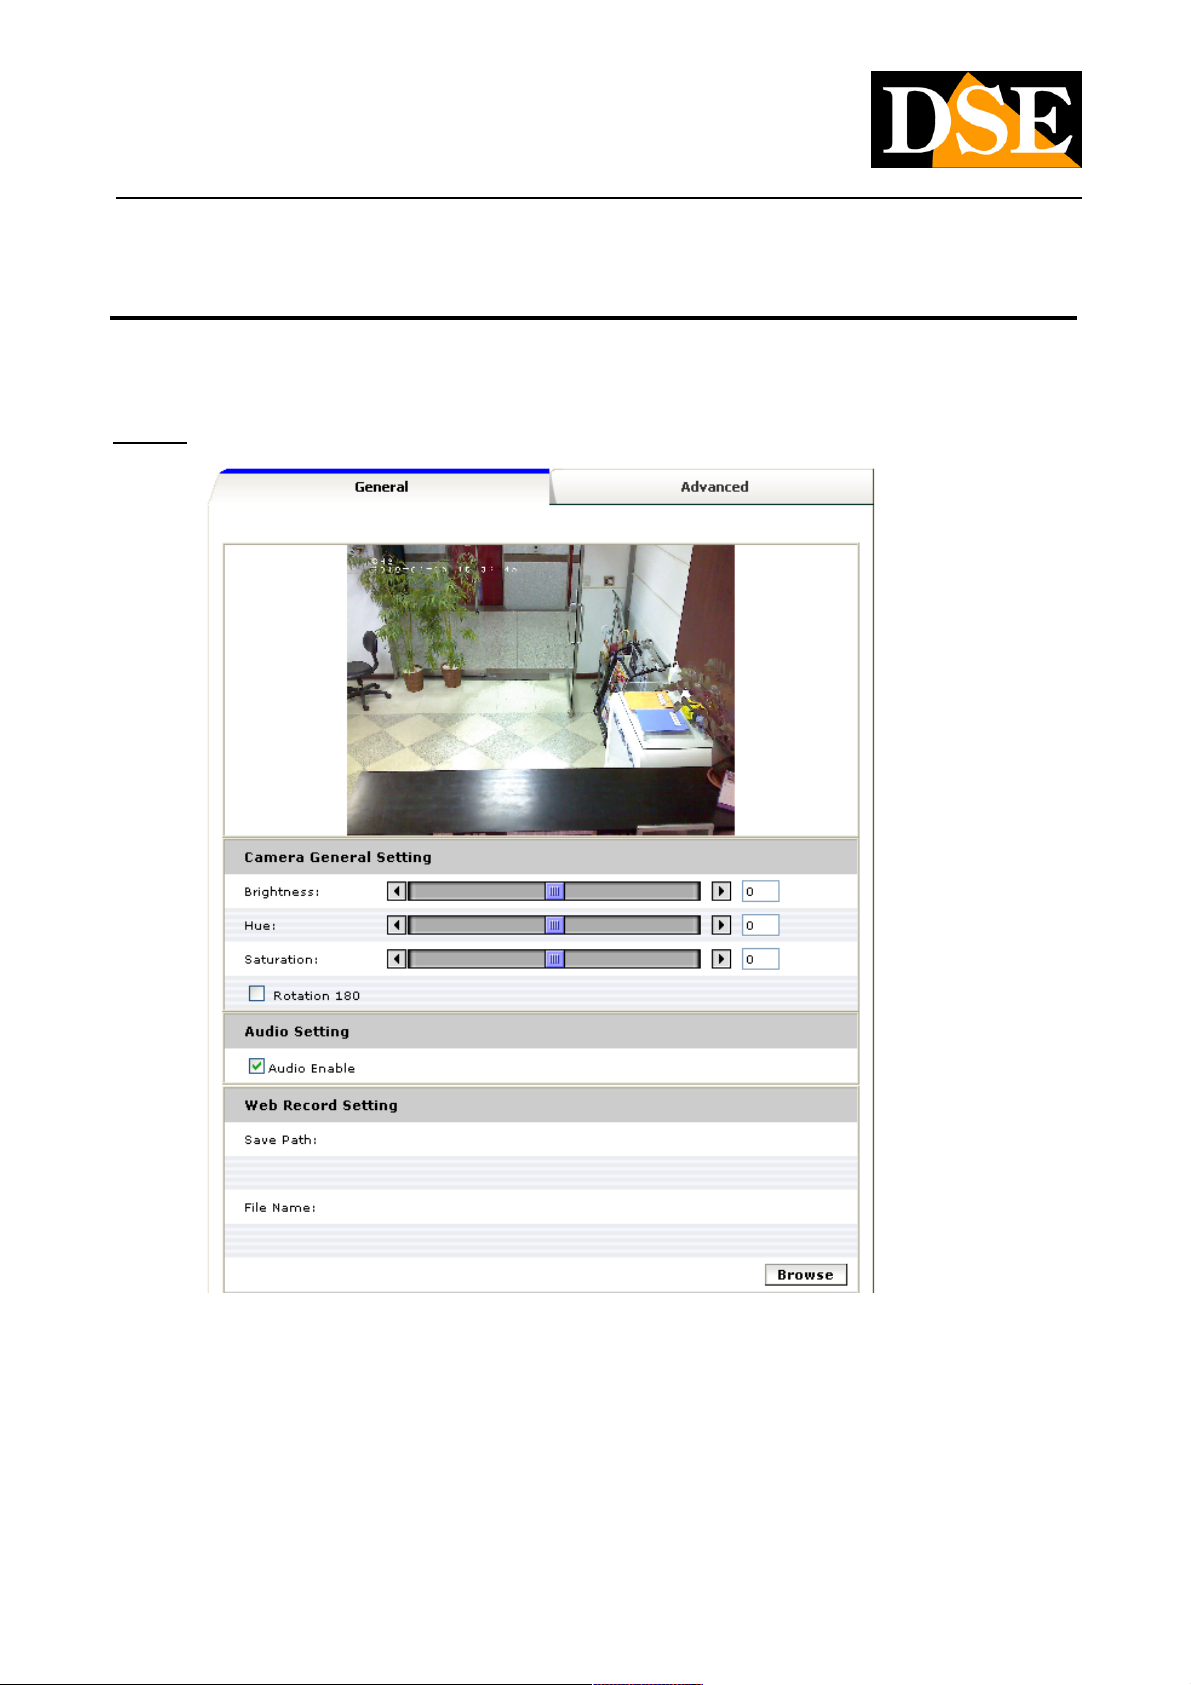
Video Conference
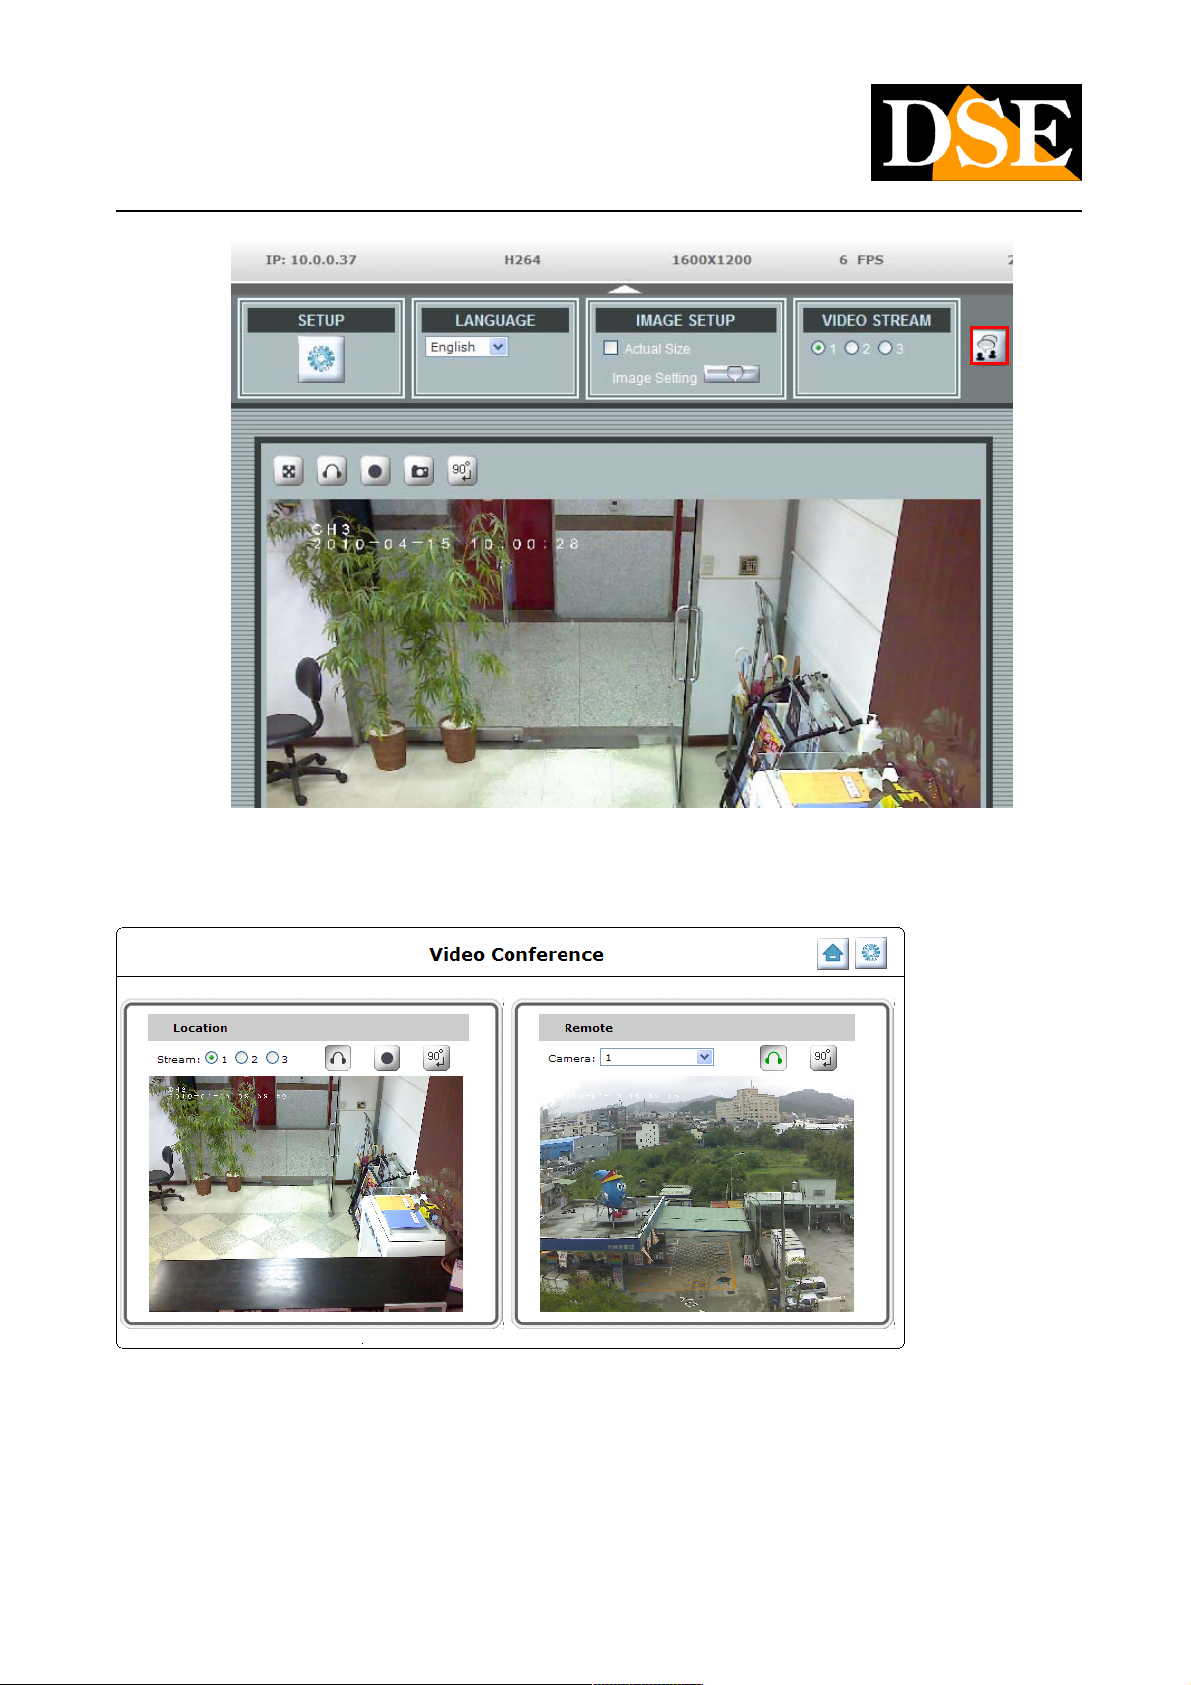
When the EXTERNAL VIDEO SOURCE is set up, will appear in the Live View button that
It allows you to activate the VIDEO CONFERENCE.
DSE SRL - ITALY - WWW.DSE.EU
Page 35
USER MANUAL
Megapixel H.264 IP CAMERAS
Page: 35 Page: 35
Click the button to start the video conference between the local camera and those configured as external links.
DSE SRL - ITALY - WWW.DSE.EU
Page 36
USER MANUAL
Megapixel H.264 IP CAMERAS
Page: 36 Page: 36
CAMERA - Camera Setup
The second programming table refers to the settings of the camera and is divided into 2 sections: GENERAL and ADVANCED
General
DSE SRL - ITALY - WWW.DSE.EU
Page 37
USER MANUAL
Megapixel H.264 IP CAMERAS
Page: 37 Page: 37
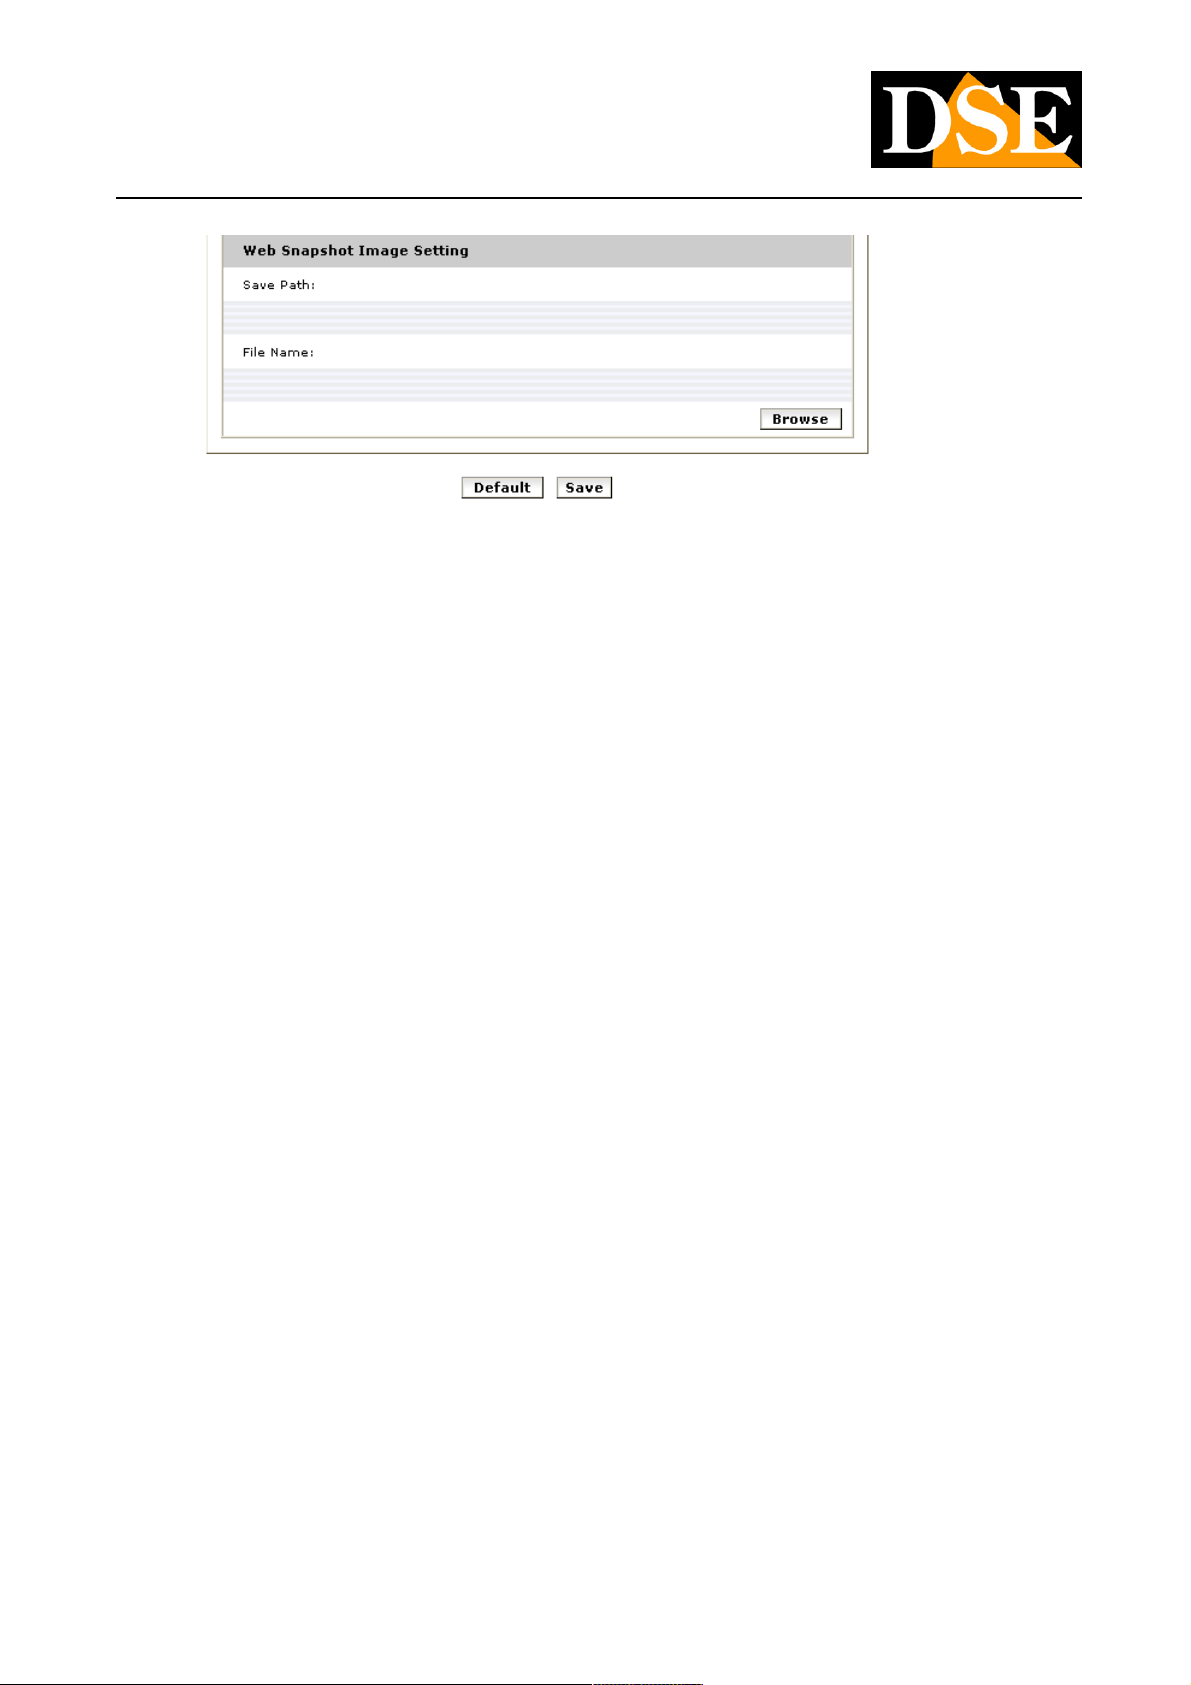
Chamber General Setting:
Brightness: adjusts the brightness of the image. Hue: Adjusts the
color tone of the image. Saturation: Adjusts the intensity of the
image.
Rotation: rotates the image. This option can be applied when the camera is to be mounted to a ceiling and the image is then inverted.
Audio Setting:
To enable or disable incoming audio of the camera. In RN-636E model it is also possible to select whether you want to use the
microphone and speaker built-in or external inputs.
Web Record / Snapshot Image Setting:
This section defines where to save movies and photos recorded with the web interface controls. Click on the Browse button to select
where to save the file and give it the name as a prefix. Movies are saved in AVI or MP4 format, pictures in JPG format.
Default:
Restore the factory settings only CHAMBER GENERAL SETTING and AUDIO SETTING. Save:Restore the factory settings only CHAMBER GENERAL SETTING and AUDIO SETTING. Save:Restore the factory settings only CHAMBER GENERAL SETTING and AUDIO SETTING. Save:Restore the factory settings only CHAMBER GENERAL SETTING and AUDIO SETTING. Save:
Save the changes to the settings.
DSE SRL - ITALY - WWW.DSE.EU
Page 38
USER MANUAL
Megapixel H.264 IP CAMERAS
Page: 38 Page: 38
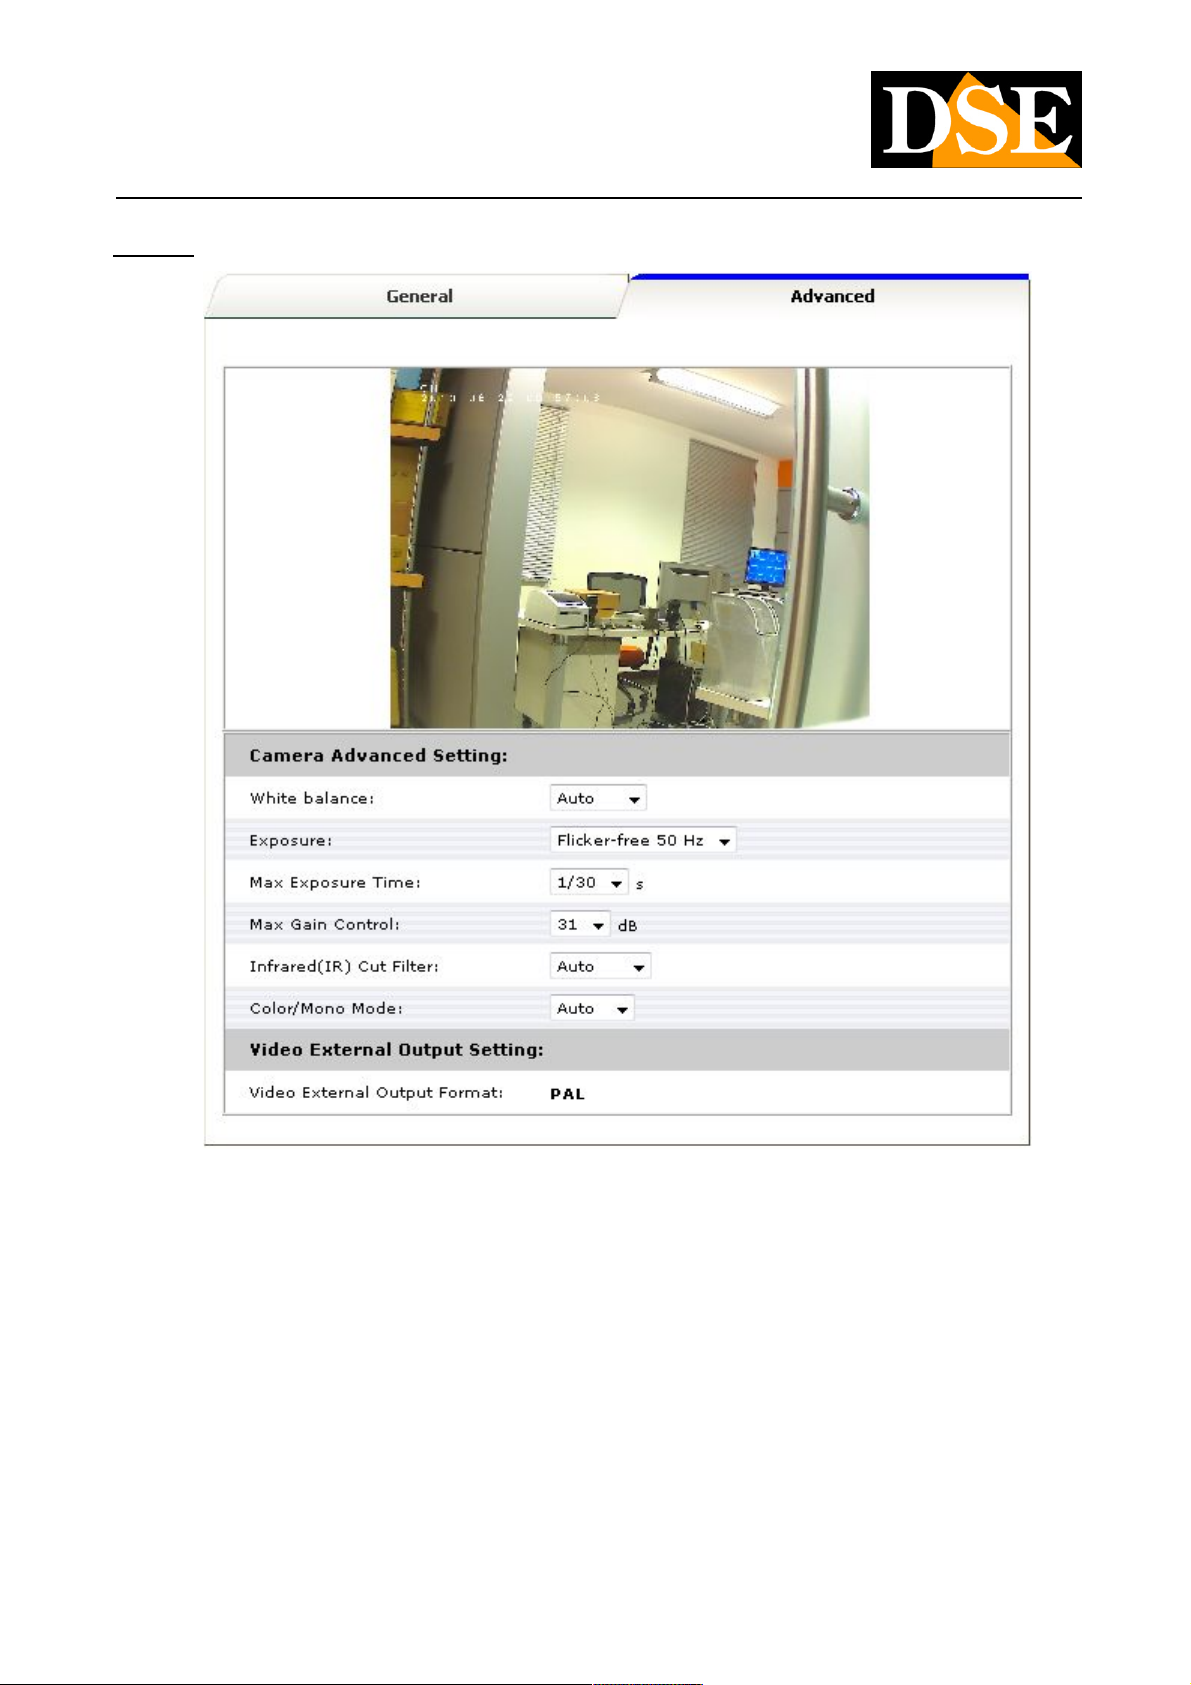
Advance
White balance: This setting allows to adapt the quality of the white light source that there is in the environment in order to make the White balance: This setting allows to adapt the quality of the white light source that there is in the environment in order to make the
colors in the best way. They have several options to be selected based on the visual result.
Exposure: This Anti-flicker setting is used to adapt the lighting frequency. The frequency is 50 Hz for most European countries, while in Exposure: This Anti-flicker setting is used to adapt the lighting frequency. The frequency is 50 Hz for most European countries, while in Exposure: This Anti-flicker setting is used to adapt the lighting frequency. The frequency is 50 Hz for most European countries, while in
the United Satti is 60 Hz. This setting should therefore be set according to the reference area. The Default value is 50Hz the United Satti is 60 Hz. This setting should therefore be set according to the reference area. The Default value is 50Hz
Max Exposure Time: It refers to the SHUTTER speed. Of brighter rule it is the shortest environment can be the shutter.Max Exposure Time: It refers to the SHUTTER speed. Of brighter rule it is the shortest environment can be the shutter.
Max Gain Control: And 'the amplification factor of the incoming light. Increasing the Gain you get a better night vision, however, the Max Gain Control: And 'the amplification factor of the incoming light. Increasing the Gain you get a better night vision, however, the
amplified image poterebbe also increase the noise (noise of
DSE SRL - ITALY - WWW.DSE.EU
Page 39
USER MANUAL
Megapixel H.264 IP CAMERAS
Page: 39 Page: 39
bottom) of the image.
Infrared IR cut filter: to enable or disable the automatic removal of IR filter in night vision. The default setting is AUTO, so that the Infrared IR cut filter: to enable or disable the automatic removal of IR filter in night vision. The default setting is AUTO, so that the
camera automatically manages the transition from day to night depending on the ambient brightness.
LED Status: turn on or off the LEDs of the camera status.LED Status: turn on or off the LEDs of the camera status.
Color / Mono Mode: the default value is AUTO so that the camera provides color images until there is sufficient light, and black / white in Color / Mono Mode: the default value is AUTO so that the camera provides color images until there is sufficient light, and black / white in
the gloom cases. If you want you can also force a color camera with low light as in the case of shows and demonstrations resumed.
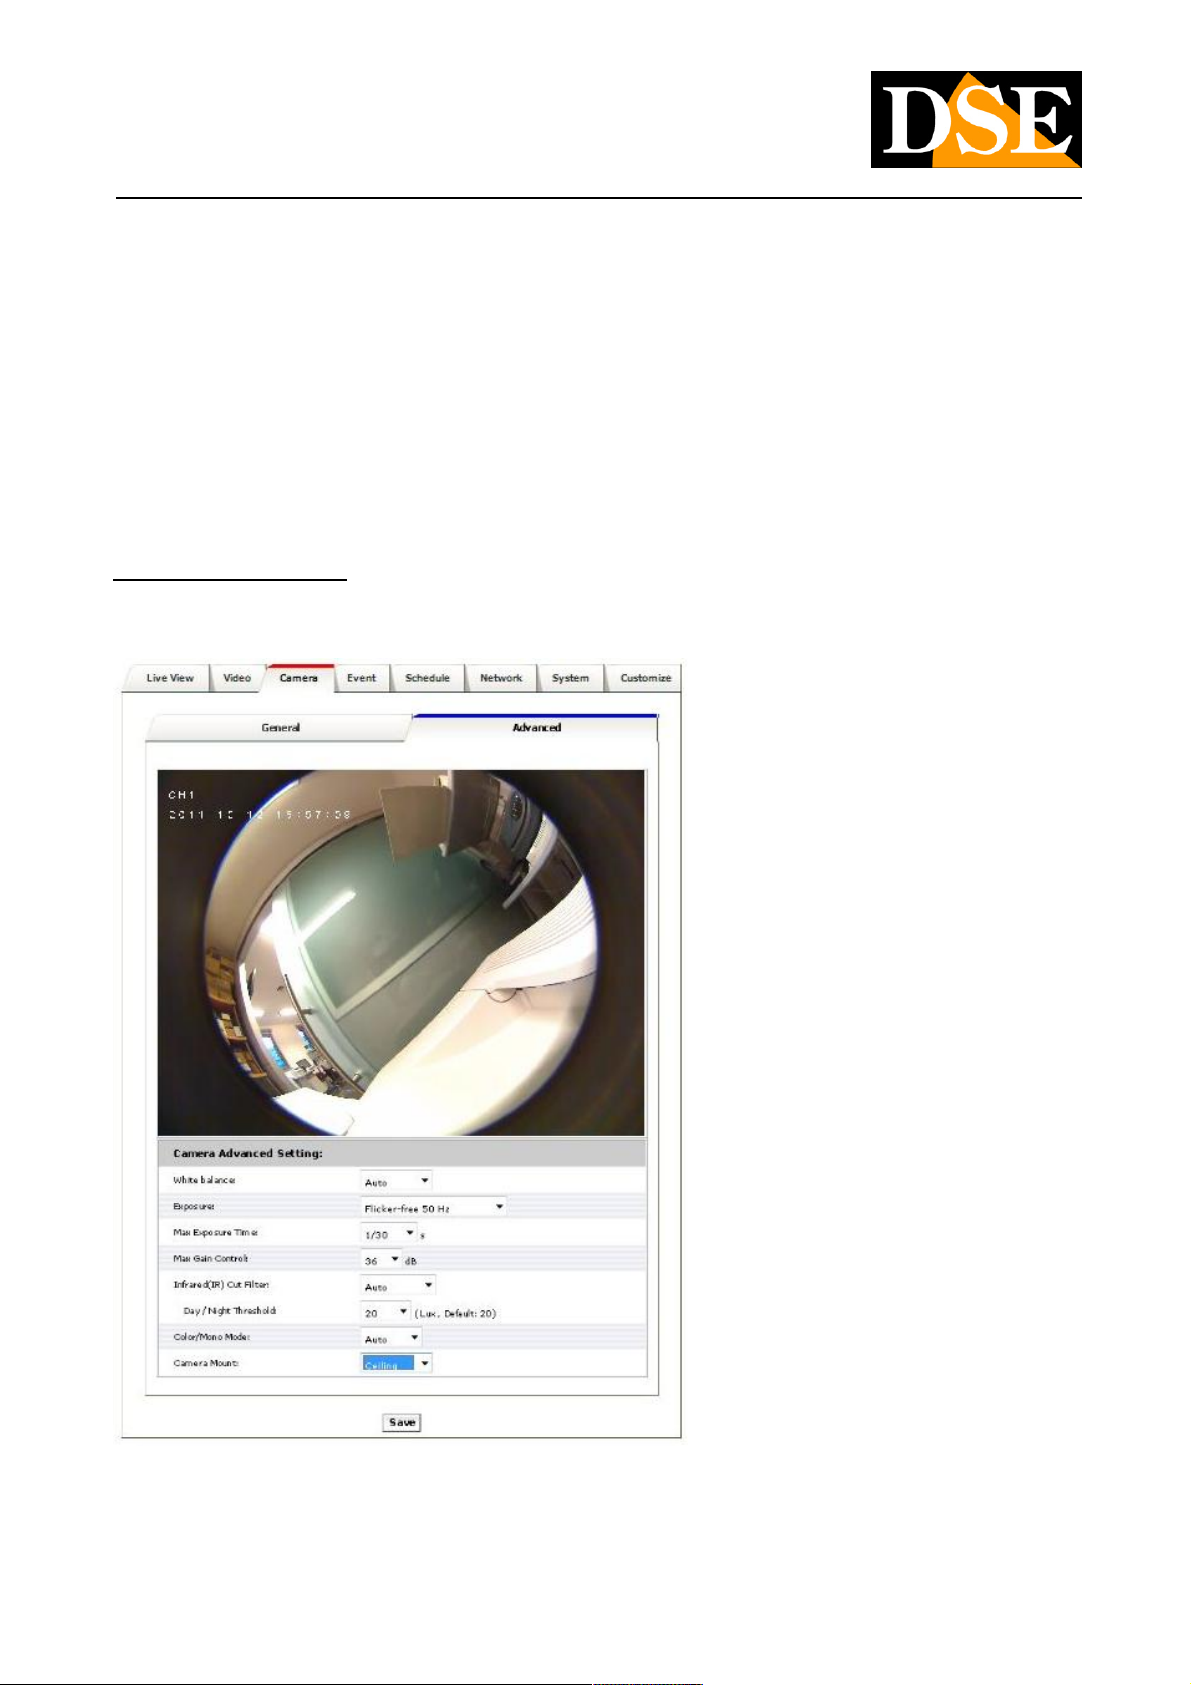
Advance - RN-636E Only
In RN-636E camera CAMERA / ADVANCE section includes some additional options:
Day / Night Threshold: sets the threshold to activate DAY or NIGHT mode. The default value is 20 lux. When the light falls below 20 lux Day / Night Threshold: sets the threshold to activate DAY or NIGHT mode. The default value is 20 lux. When the light falls below 20 lux
the NIGHT mode is activated, and the camera becomes
DSE SRL - ITALY - WWW.DSE.EU
Page 40
USER MANUAL
Megapixel H.264 IP CAMERAS
Page: 40 Page: 40
sensitive IR illumination when shooting in black / white ..
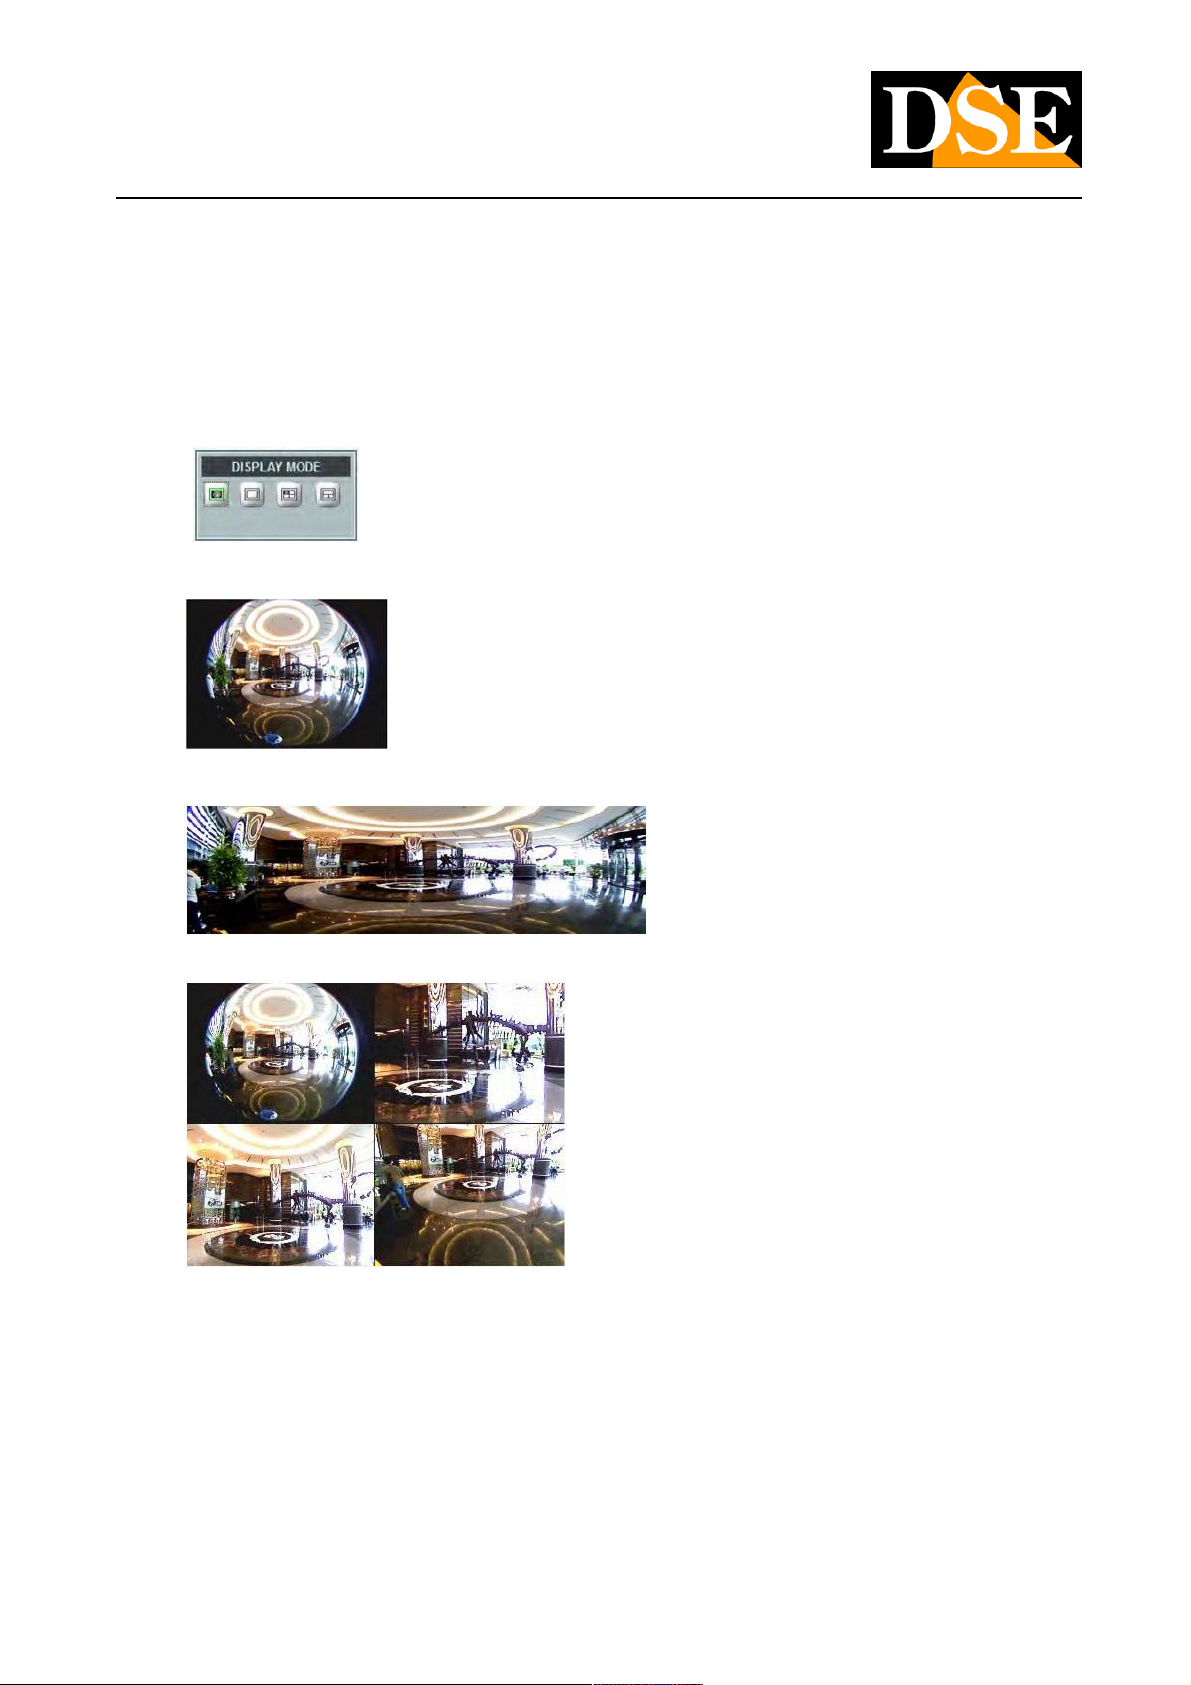
Mount House: here you must indicate the type of the camera mount: Wall (wall), Ceiling (ceiling), Table (table). Mount House: here you must indicate the type of the camera mount: Wall (wall), Ceiling (ceiling), Table (table).
• WALL: If the camera is installed on the wall choose WALL. Back to Live View, you have four types of video layouts to choose WALL: If the camera is installed on the wall choose WALL. Back to Live View, you have four types of video layouts to choose
from: Original view, Broad view, Quad view with source, Triple view.
1. ORIGINAL VIEW
2. BROAD VIEW
3. QUAD WITH SOURCE VIEW
4. TRIPLE VIEW
DSE SRL - ITALY - WWW.DSE.EU
Page 41
USER MANUAL
Megapixel H.264 IP CAMERAS
Page: 41 Page: 41
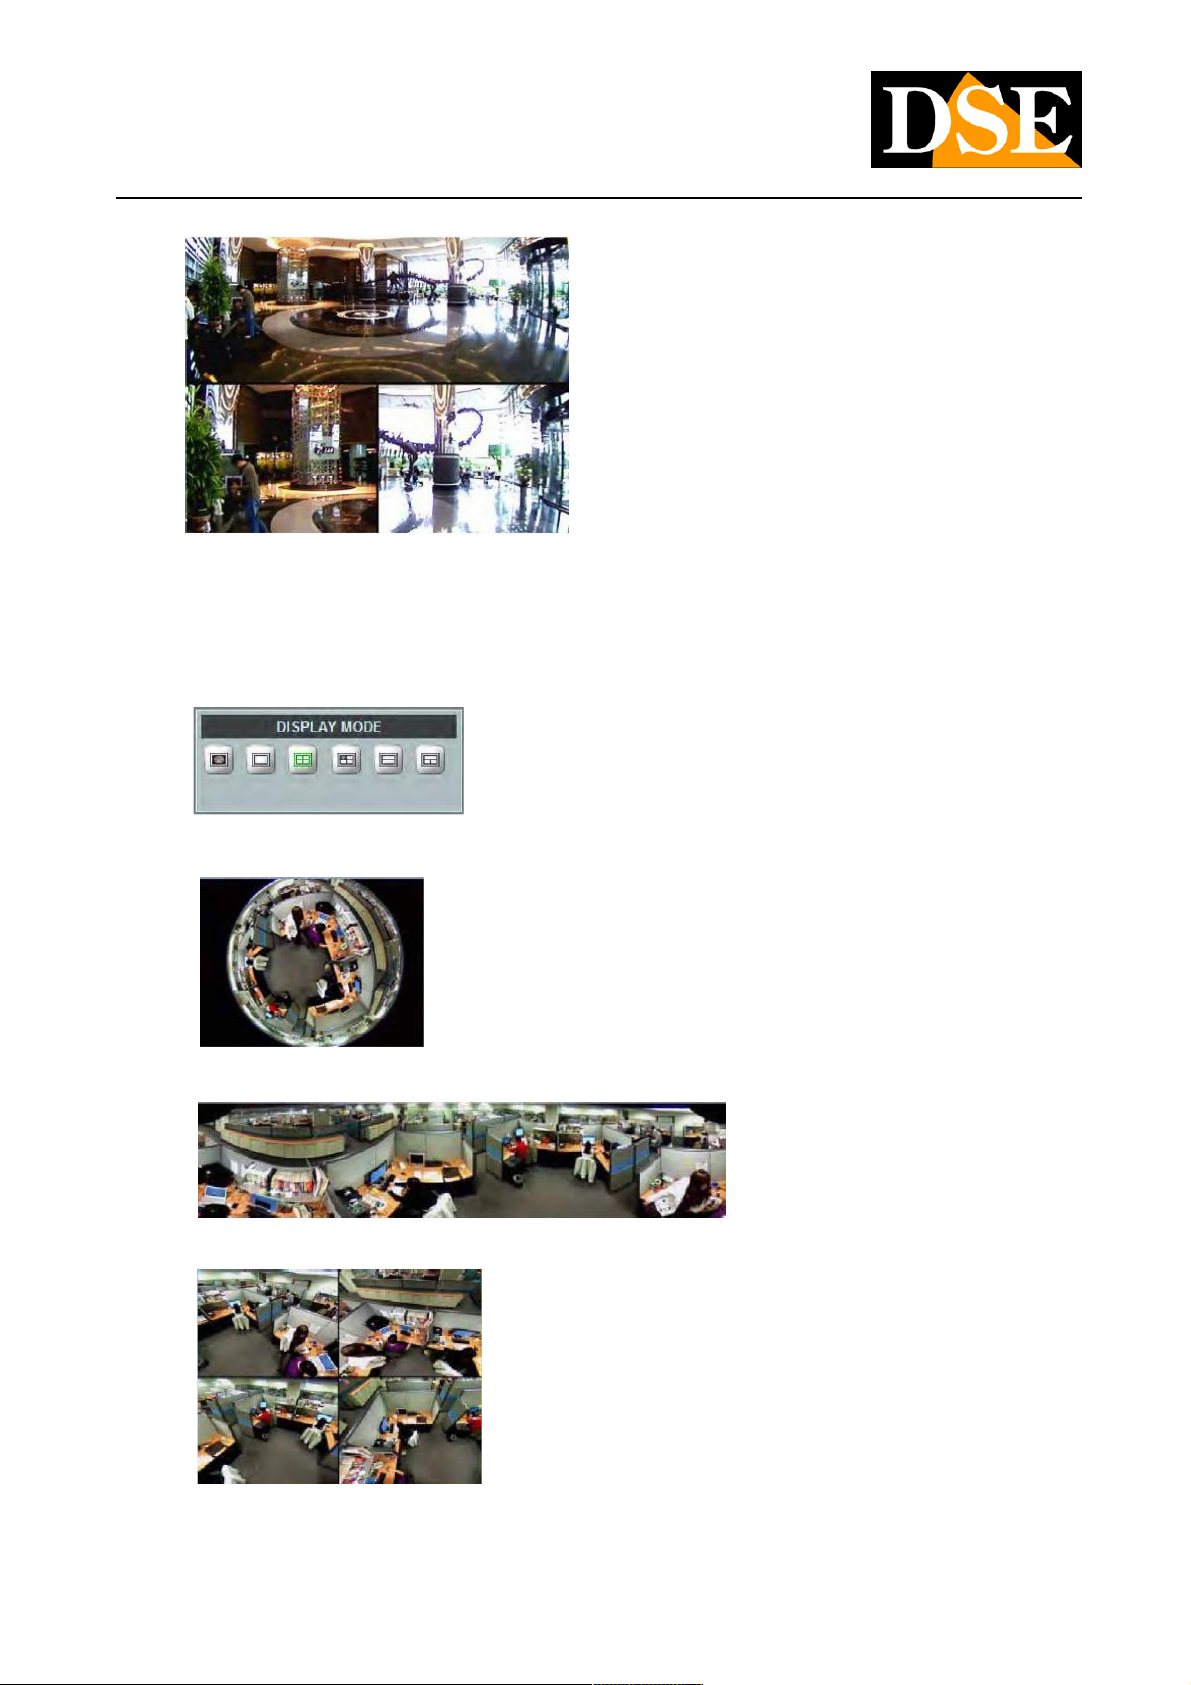
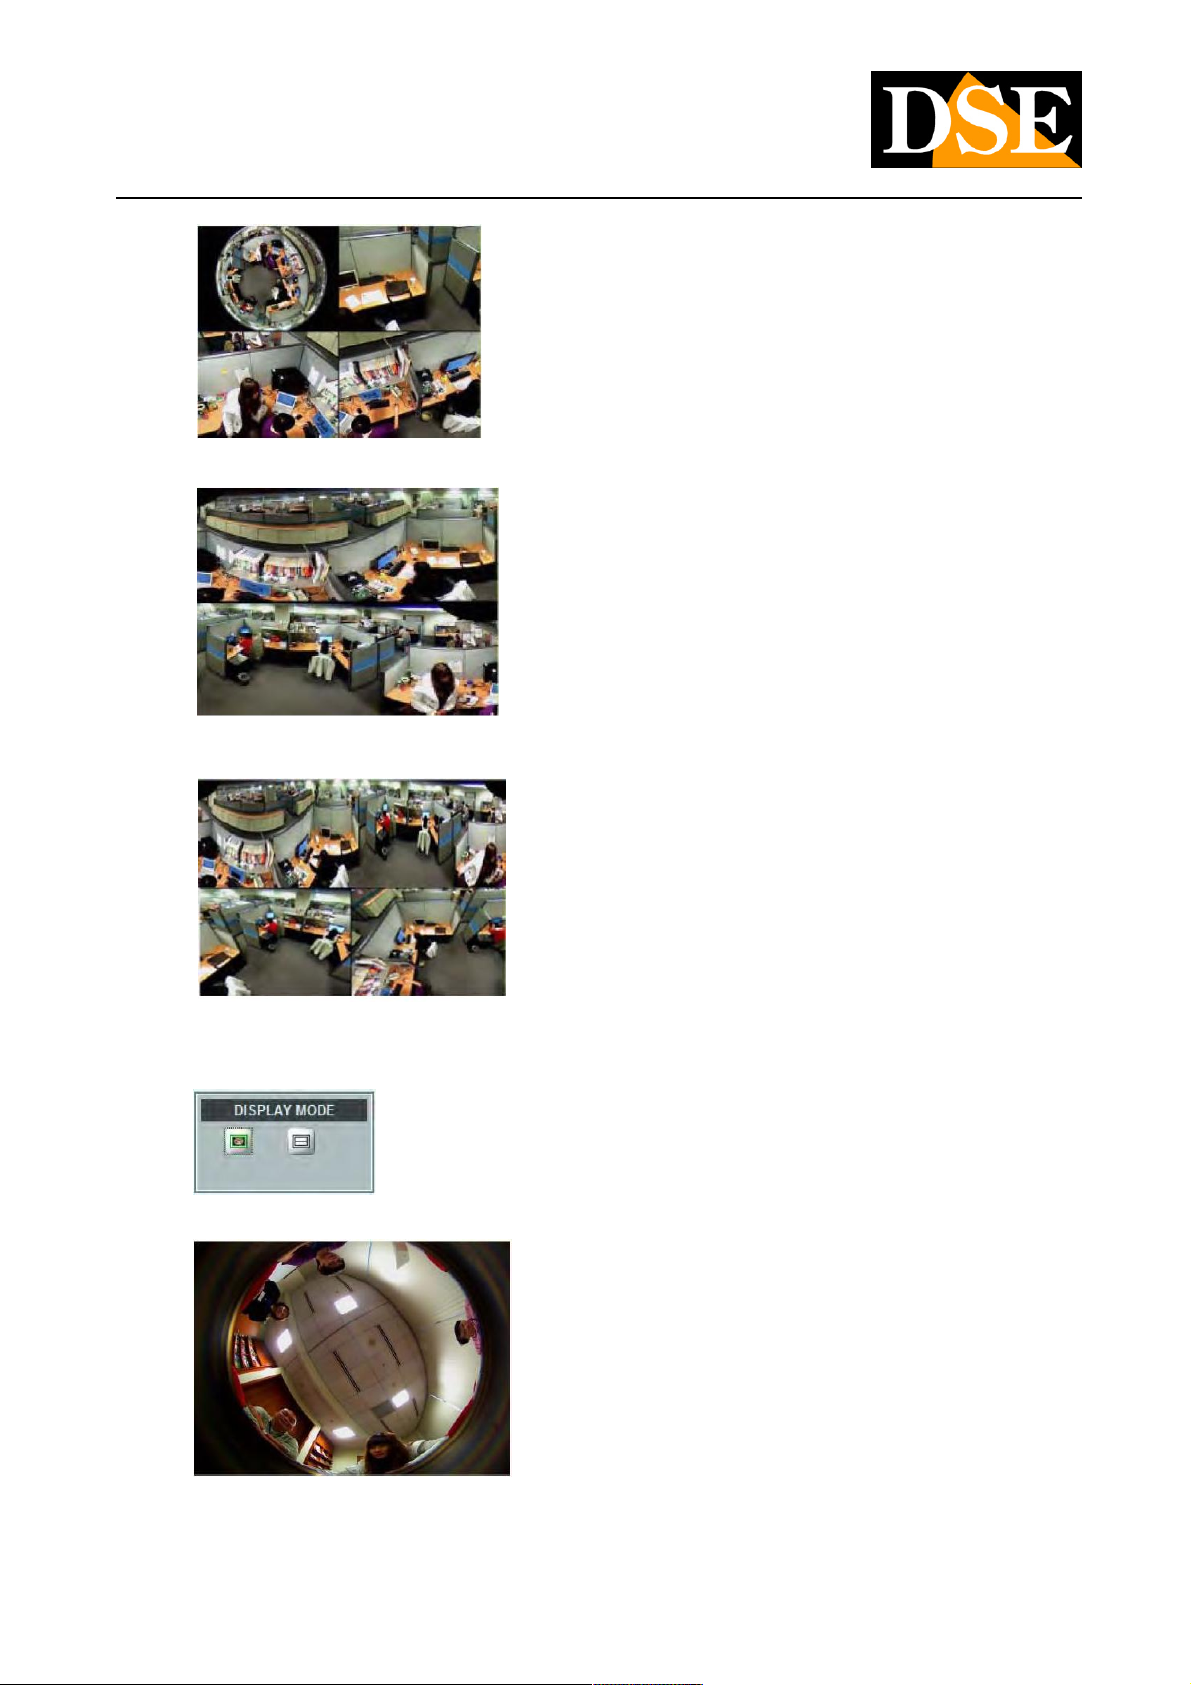
CEILING: to install the ceiling camera choose CEILING. Back to Live View, there are six kinds of layouts to choose from: CEILING: to install the ceiling camera choose CEILING. Back to Live View, there are six kinds of layouts to choose from:
•
Original view, Broad view, Quad view, Quad view with source, view Double, Triple view.
1. ORIGINAL VIEW
2. BROAD VIEW
3. QUAD VIEW
4. SOURCE WITH QUAD VIEW
DSE SRL - ITALY - WWW.DSE.EU
Page 42
USER MANUAL
Megapixel H.264 IP CAMERAS
Page: 42 Page: 42
5. DOUBLE VIEW
6. TRIPLE VIEW
• TABLE: to position the camera on a table choose TABLE. Returning to Live View, you have two types of video layouts to TABLE: to position the camera on a table choose TABLE. Returning to Live View, you have two types of video layouts to
choose from: Original view, Double view
1. ORIGINAL VIEW
2. DOUBLE VIEW.
DSE SRL - ITALY - WWW.DSE.EU
Page 43

USER MANUAL
Megapixel H.264 IP CAMERAS
Page: 43 Page: 43
PTZ (RN-6901 only)
In the section ROOM the menu of the RN-6901 video server instead of the voice ADVANCED There is the voice In the section ROOM the menu of the RN-6901 video server instead of the voice ADVANCED There is the voice In the section ROOM the menu of the RN-6901 video server instead of the voice ADVANCED There is the voice In the section ROOM the menu of the RN-6901 video server instead of the voice ADVANCED There is the voice In the section ROOM the menu of the RN-6901 video server instead of the voice ADVANCED There is the voice In the section ROOM the menu of the RN-6901 video server instead of the voice ADVANCED There is the voice
PTZ to set the options for the communication protocol to control a possible speed dome camera connected to the RS485 port of the PTZ to set the options for the communication protocol to control a possible speed dome camera connected to the RS485 port of the
video server. In this section we find the following items:
PTZ STATUS deactivates or activates the PTZ control through the RS485 port. PTZ STATUS deactivates or activates the PTZ control through the RS485 port.
PTZ PROTOCOL select the communication protocol. There are the protocols Pelco P, Pelco D (to be used for speed dome SD-22 / PTZ PROTOCOL select the communication protocol. There are the protocols Pelco P, Pelco D (to be used for speed dome SD-22 /
SD-27), LI-LIN, LI-LIN NEW, Dynacolor.
DEVICE ID It indicates the address that has been set in the camera typically via microswitches and that identifies the BUS. DEVICE ID It indicates the address that has been set in the camera typically via microswitches and that identifies the BUS.
SPEED set the movement speed of the camera (1 to 10). SPEED set the movement speed of the camera (1 to 10).
PORT MODE BUS sets which type of use for the command speed dome (RS485 or RS232) almost the speed dome SD-22/27 cameras PORT MODE BUS sets which type of use for the command speed dome (RS485 or RS232) almost the speed dome SD-22/27 cameras
use RS485 BUS.
BAUD RATE tax the speed of the RS485 protocol, from 300 to 115200 baud. The speed dome SD-22/27 cameras support 1200, 2400, BAUD RATE tax the speed of the RS485 protocol, from 300 to 115200 baud. The speed dome SD-22/27 cameras support 1200, 2400, BAUD RATE tax the speed of the RS485 protocol, from 300 to 115200 baud. The speed dome SD-22/27 cameras support 1200, 2400,
4800 or 9600 baud. The prescribed speed must match the speed controlled by the camera that the rule is selected with DIP switches on
the camera itself ..
DATA BIT to be set according to information provided by the camera manufacturer DATA BIT to be set according to information provided by the camera manufacturer
STOP BIT to be set according to information provided by the camera manufacturer STOP BIT to be set according to information provided by the camera manufacturer
PARITY to be set according to information provided by the camera manufacturer PARITY to be set according to information provided by the camera manufacturer PARITY to be set according to information provided by the camera manufacturer
DSE SRL - ITALY - WWW.DSE.EU
Page 44
USER MANUAL
Megapixel H.264 IP CAMERAS
Page: 44 Page: 44
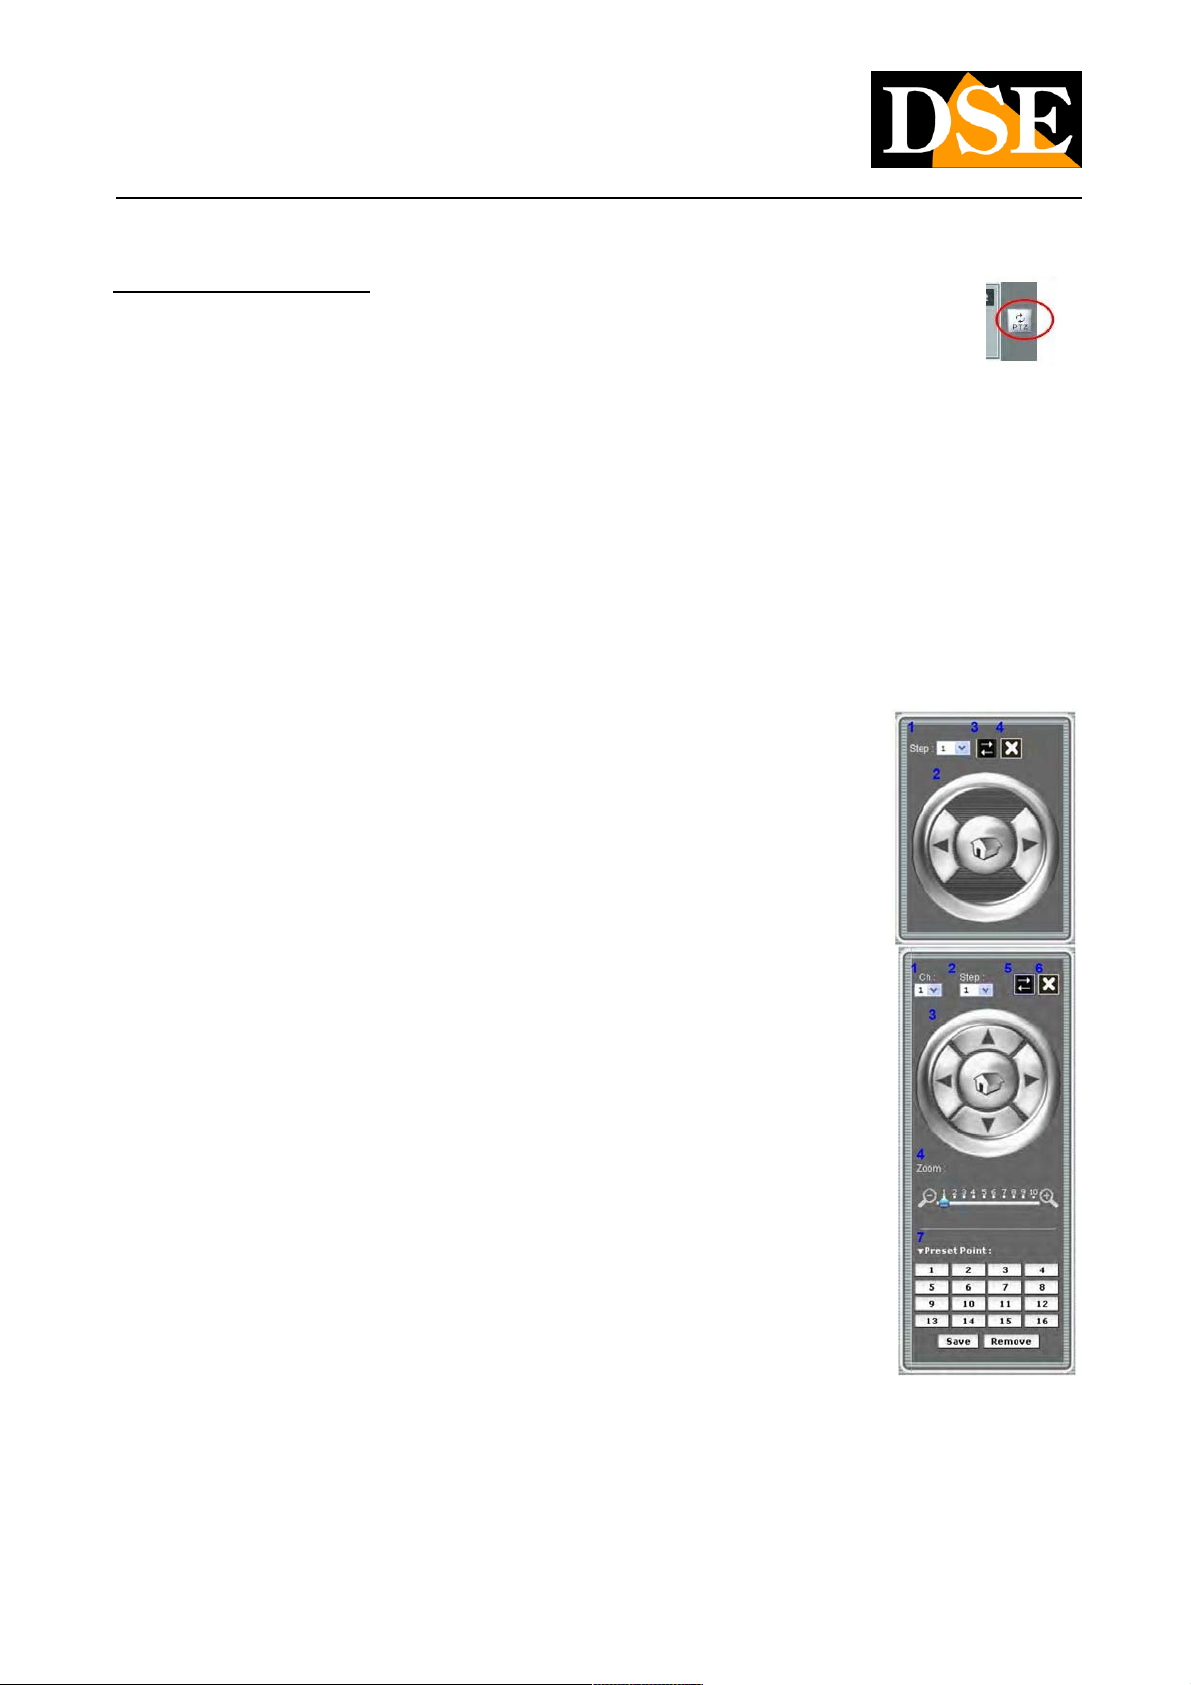
PTZ control (RN-636E only)
The dome camera RN-636E has a panoramic vision to 180 degrees and provides the ability to digitally simulate the PTZ
camera movement as if it were a motorized camera. To enable this feature, click the PTZ button.
The PTZ button is present only if you choose the option to CEILING ceiling mounting, as seen in chapter CAMERA / ADVANCE.
The PTZ function is available only in BROAD VIEW, VIEW QUAD, QUAD WITH SOURCE VIEW, VIEW DOUBLE and TRIPLE VIEW.
Clicking on the button will appear on the screen PTZ PTZ control panel that takes on different aspects depending on which view we
chose:
IN BROAD VIEW, VIEW DOUBLE, TRIPLE VIEW
STEP 1. to set the speed of the pan function (1-10)
2. PAN movement: to move the image horizontally
3. To move the PTZ panel in the screen
4. To close the PTZ panel
IN VIEW QUAD, QUAD WITH SOURCE VIEW
1. Ch: to select the window to apply the PTZ function
2. STEP: to set the speed of the pan / tilt function (1-10)
3. For moving the image both horizontally and vertically
4. ZOOM: Digital Zoom (1-10)
5. To move the PTZ panel in the screen
6. To close the PTZ panel
7. List of Preset points (1-16). Here you can set the preset by pressing the number button and click
SAVE. The presets can be recalled quickly by clicking the numbered button.
DSE SRL - ITALY - WWW.DSE.EU
Page 45
USER MANUAL
Megapixel H.264 IP CAMERAS
Page: 45 Page: 45
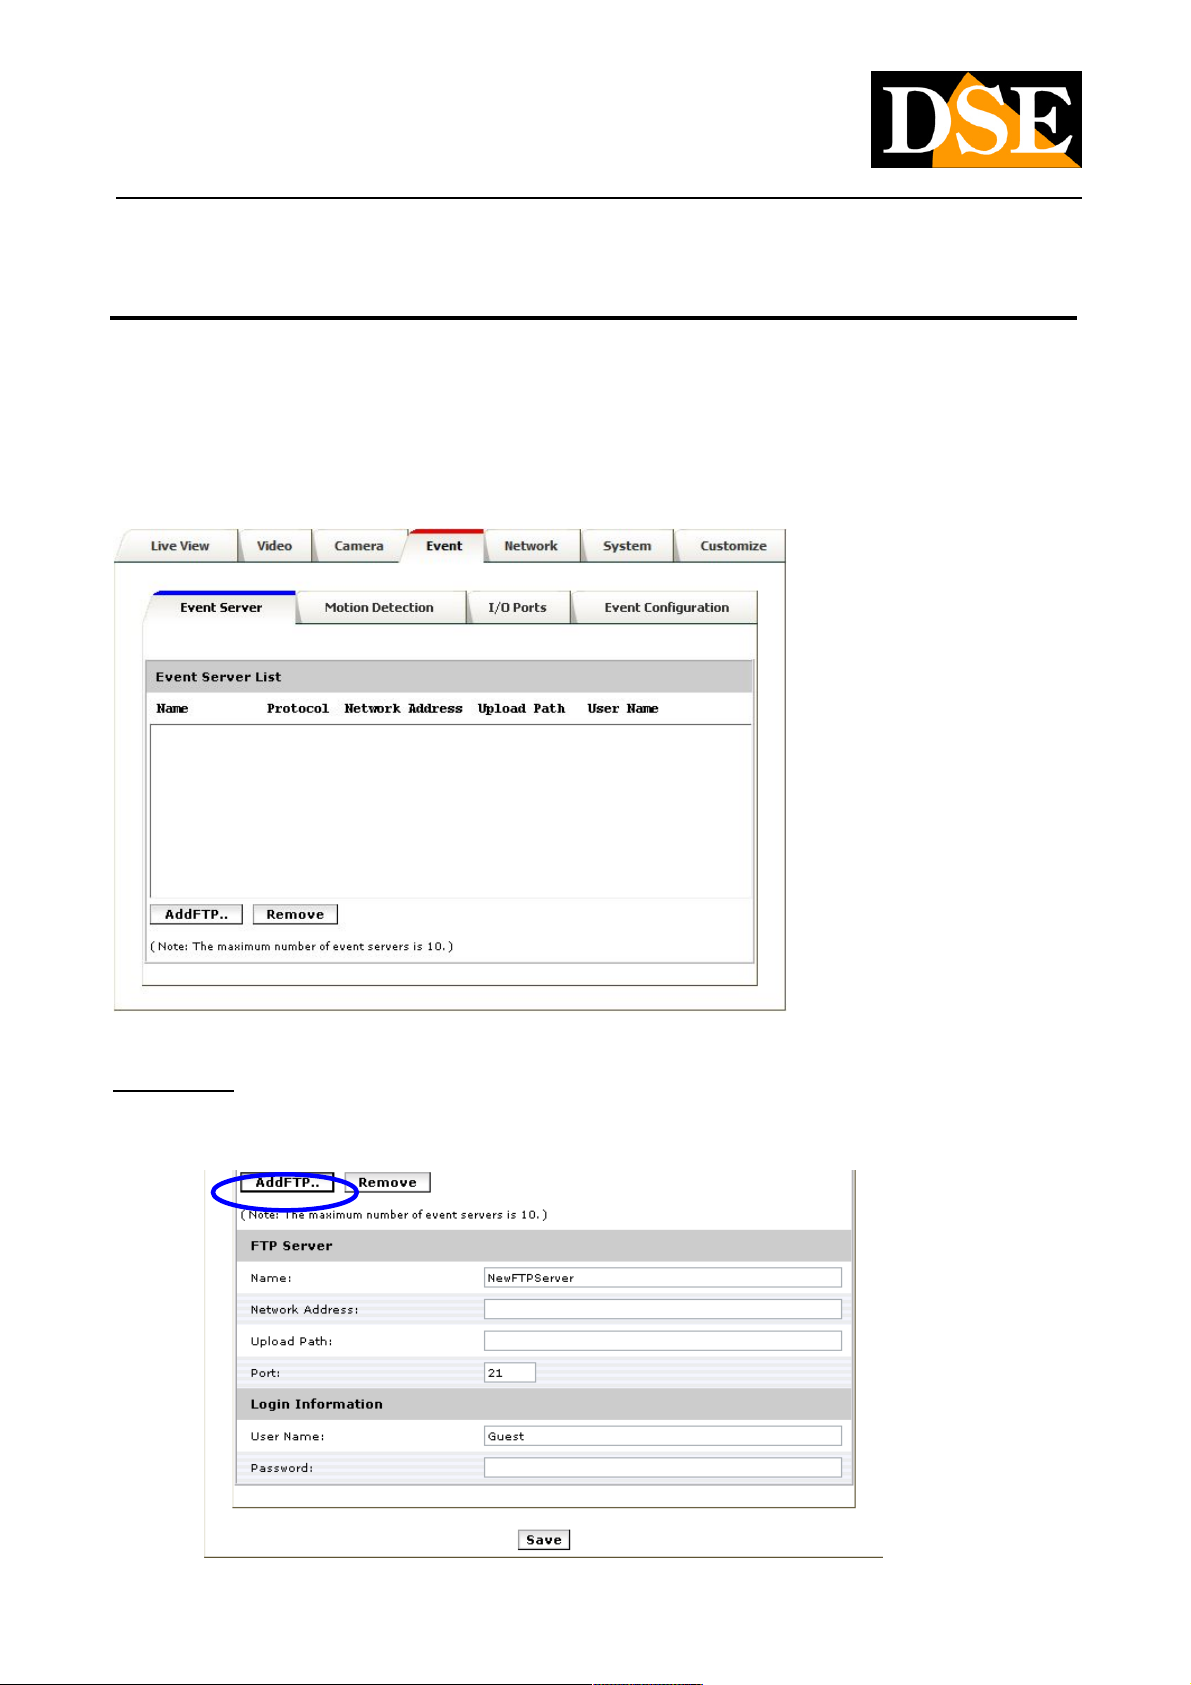
EVENT - Alarms
The RN series cameras are able to generate alarms with a detection control of the movement or via alarm inputs. It 'also possible to
generate alarm events with manual activation, or on a time basis.
Following an alarm, you can send photos and videos to an FTP server, but also
send email alert or turn on the camera's alarm output. This section allows the alert actions configurations. Click the
folder EVENTfolder EVENT
Event Server
The SERVER EVENT LIST lists the FTP server ( and HTTP to RN-636E) that can receive alarm events. E 'can enter the network The SERVER EVENT LIST lists the FTP server ( and HTTP to RN-636E) that can receive alarm events. E 'can enter the network The SERVER EVENT LIST lists the FTP server ( and HTTP to RN-636E) that can receive alarm events. E 'can enter the network
parameters and the access credentials.
DSE SRL - ITALY - WWW.DSE.EU
Page 46
USER MANUAL
Megapixel H.264 IP CAMERAS
Page: 46 Page: 46
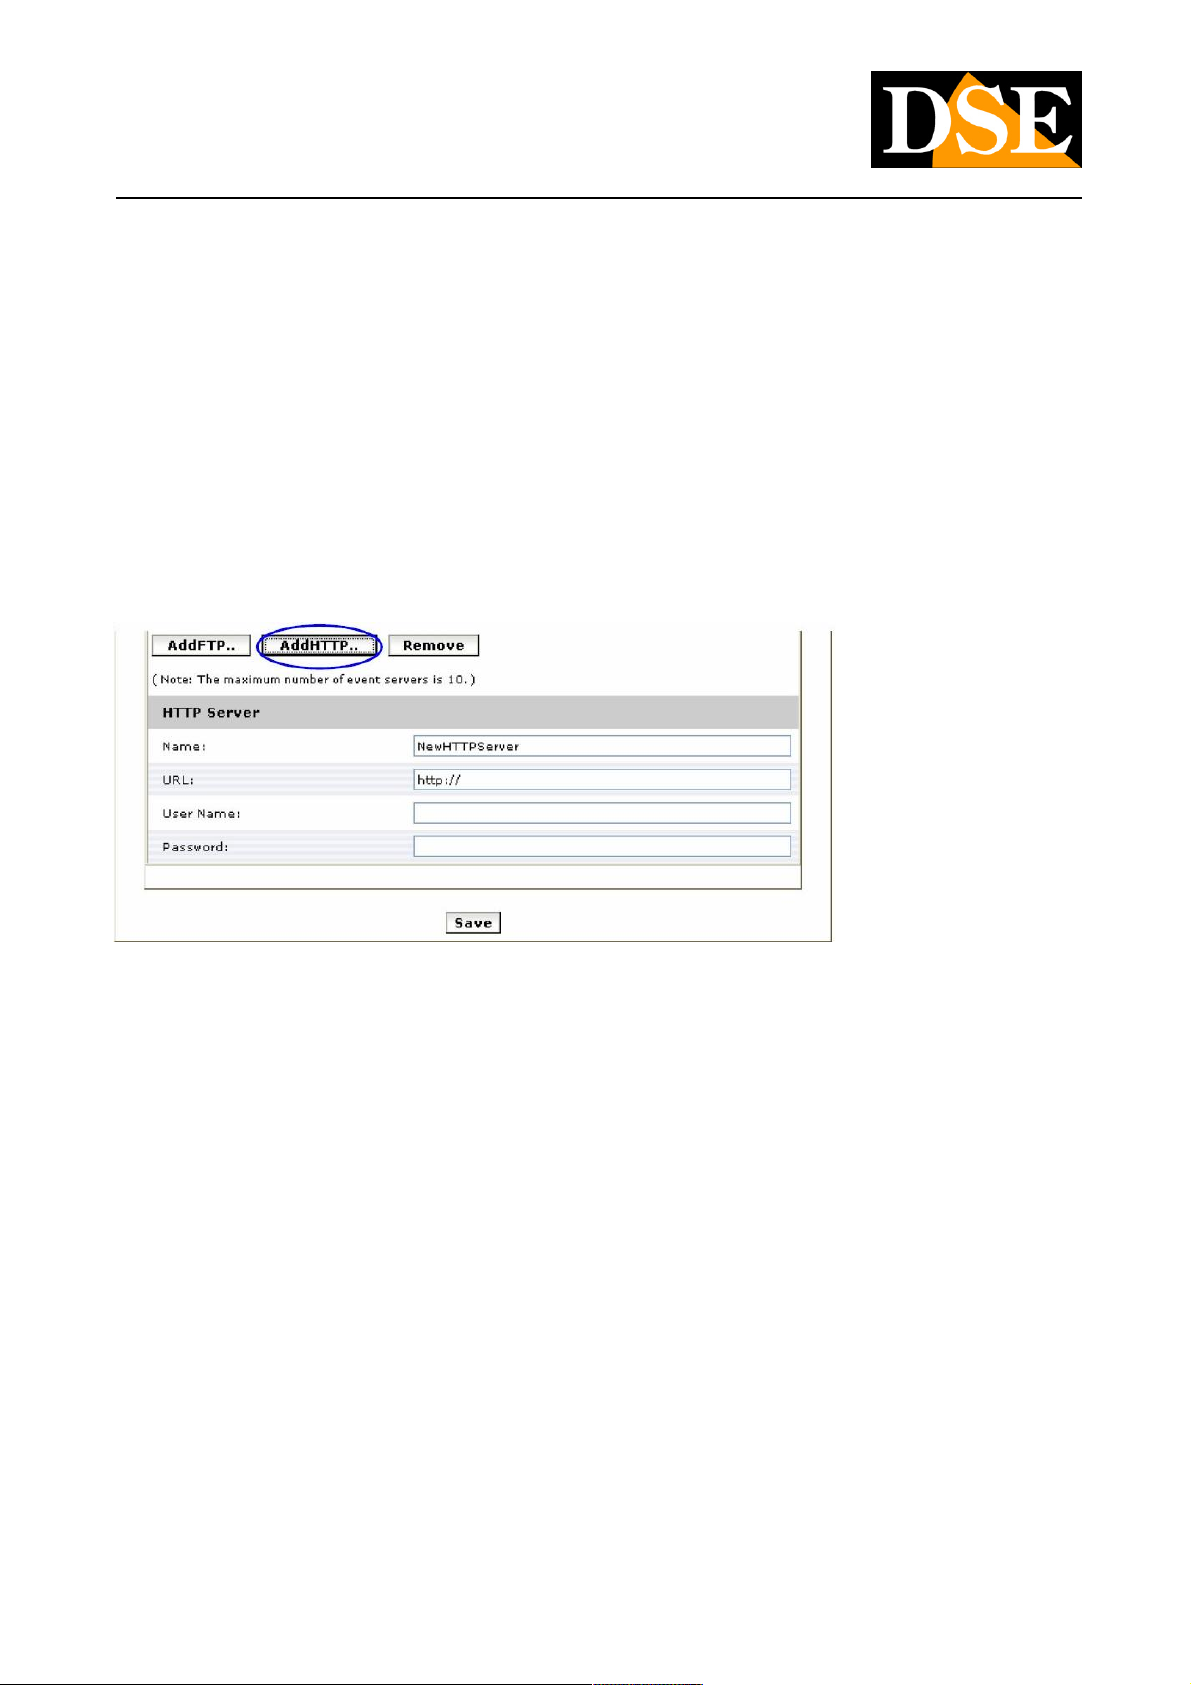
Click [ Add FTP] to enter a new FTP server Click [ Add FTP] to enter a new FTP server Click [ Add FTP] to enter a new FTP server
FTP Server:
• Name: enter the name of the FTP server
• Network Address: Enter the IP address of the FTP server
• Upload Path: choose the path where you want to upload the alarm information
• Port: enter the port number used by FTP servers
Login Information:
• Username / Password: Enter USER NAME AND PASSWORD of the FTP server
The RN-636E camera also allows you to enter an HTTP server:
DSE SRL - ITALY - WWW.DSE.EU
Page 47
USER MANUAL
Megapixel H.264 IP CAMERAS
Page: 47 Page: 47
Motion Detection
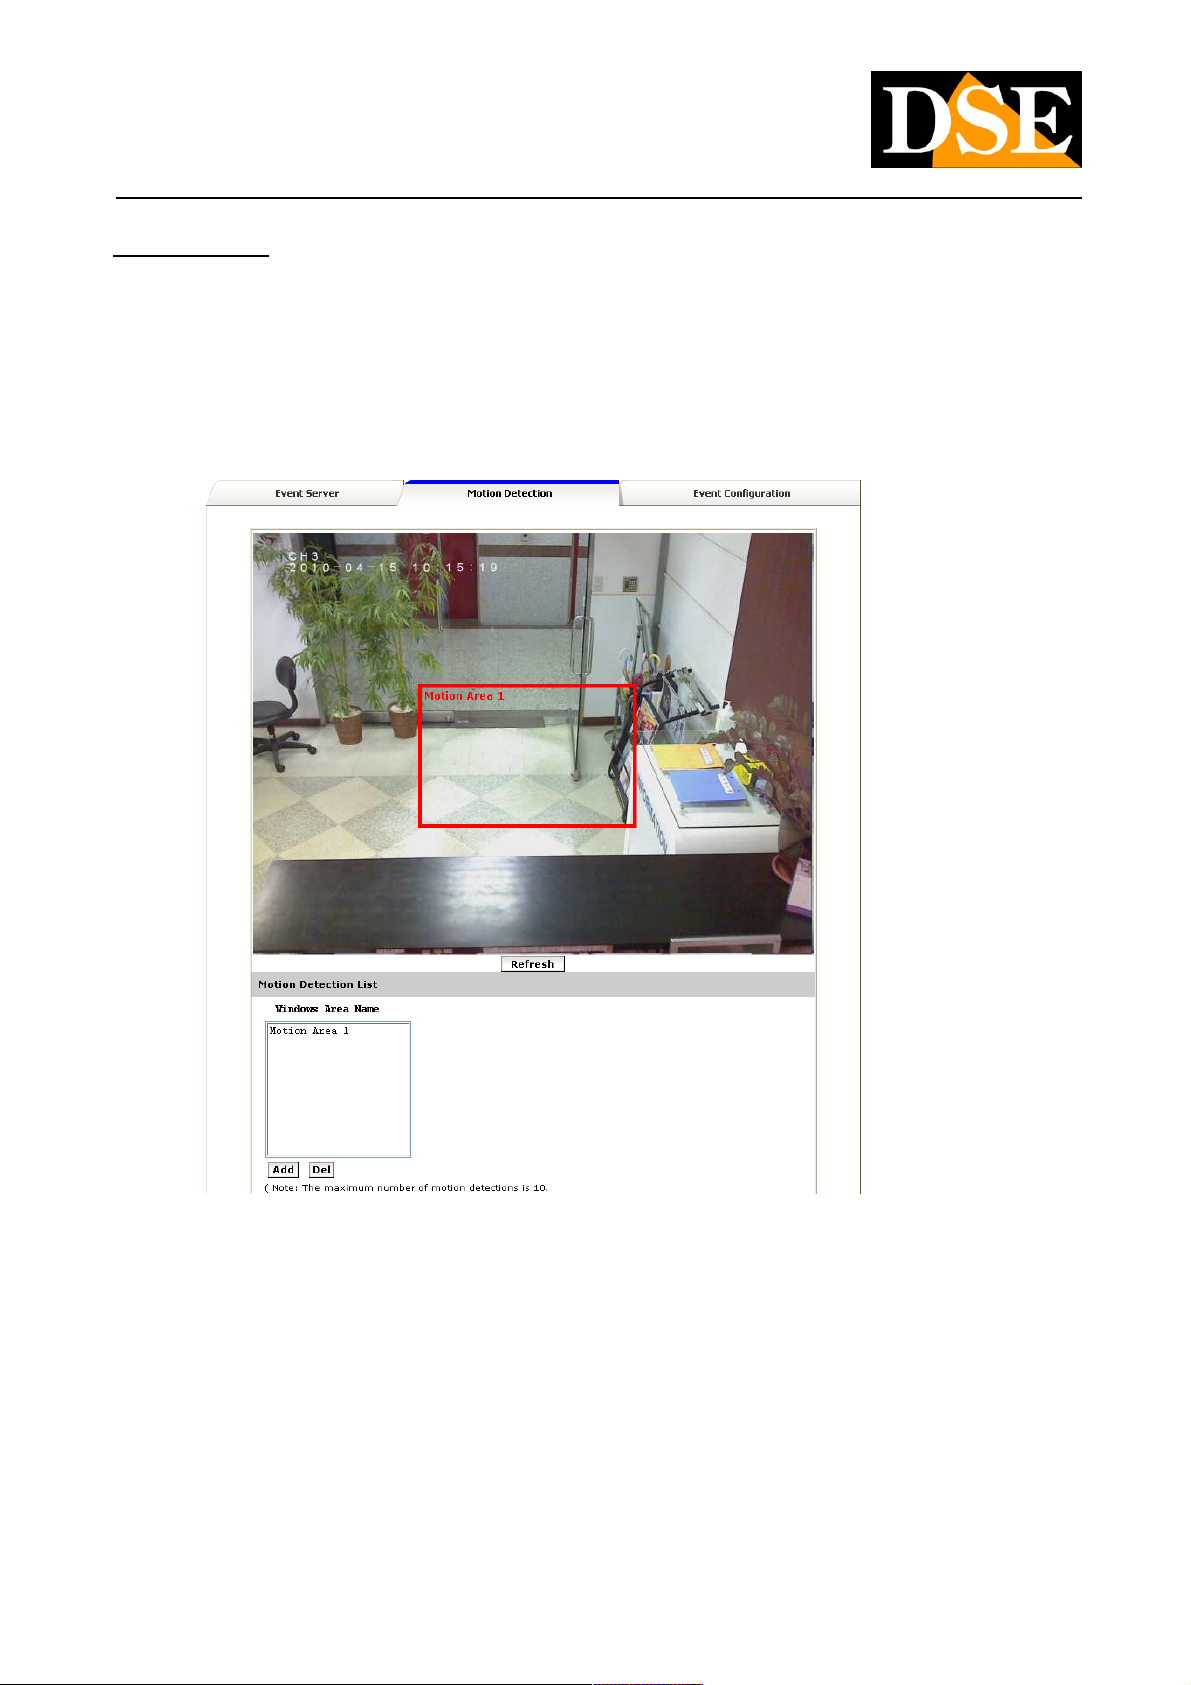
The image will appear coming from the camera. E 'can set the areas within which the movement will be detected that will generate the
alarm. To select a motion detection area, click directly on the image, and then change the size and position by dragging with the mouse
the rectangular design. They can be added up to 10 motion zones. For each detection area, a value of intervention and sensitivity
threshold can be set.
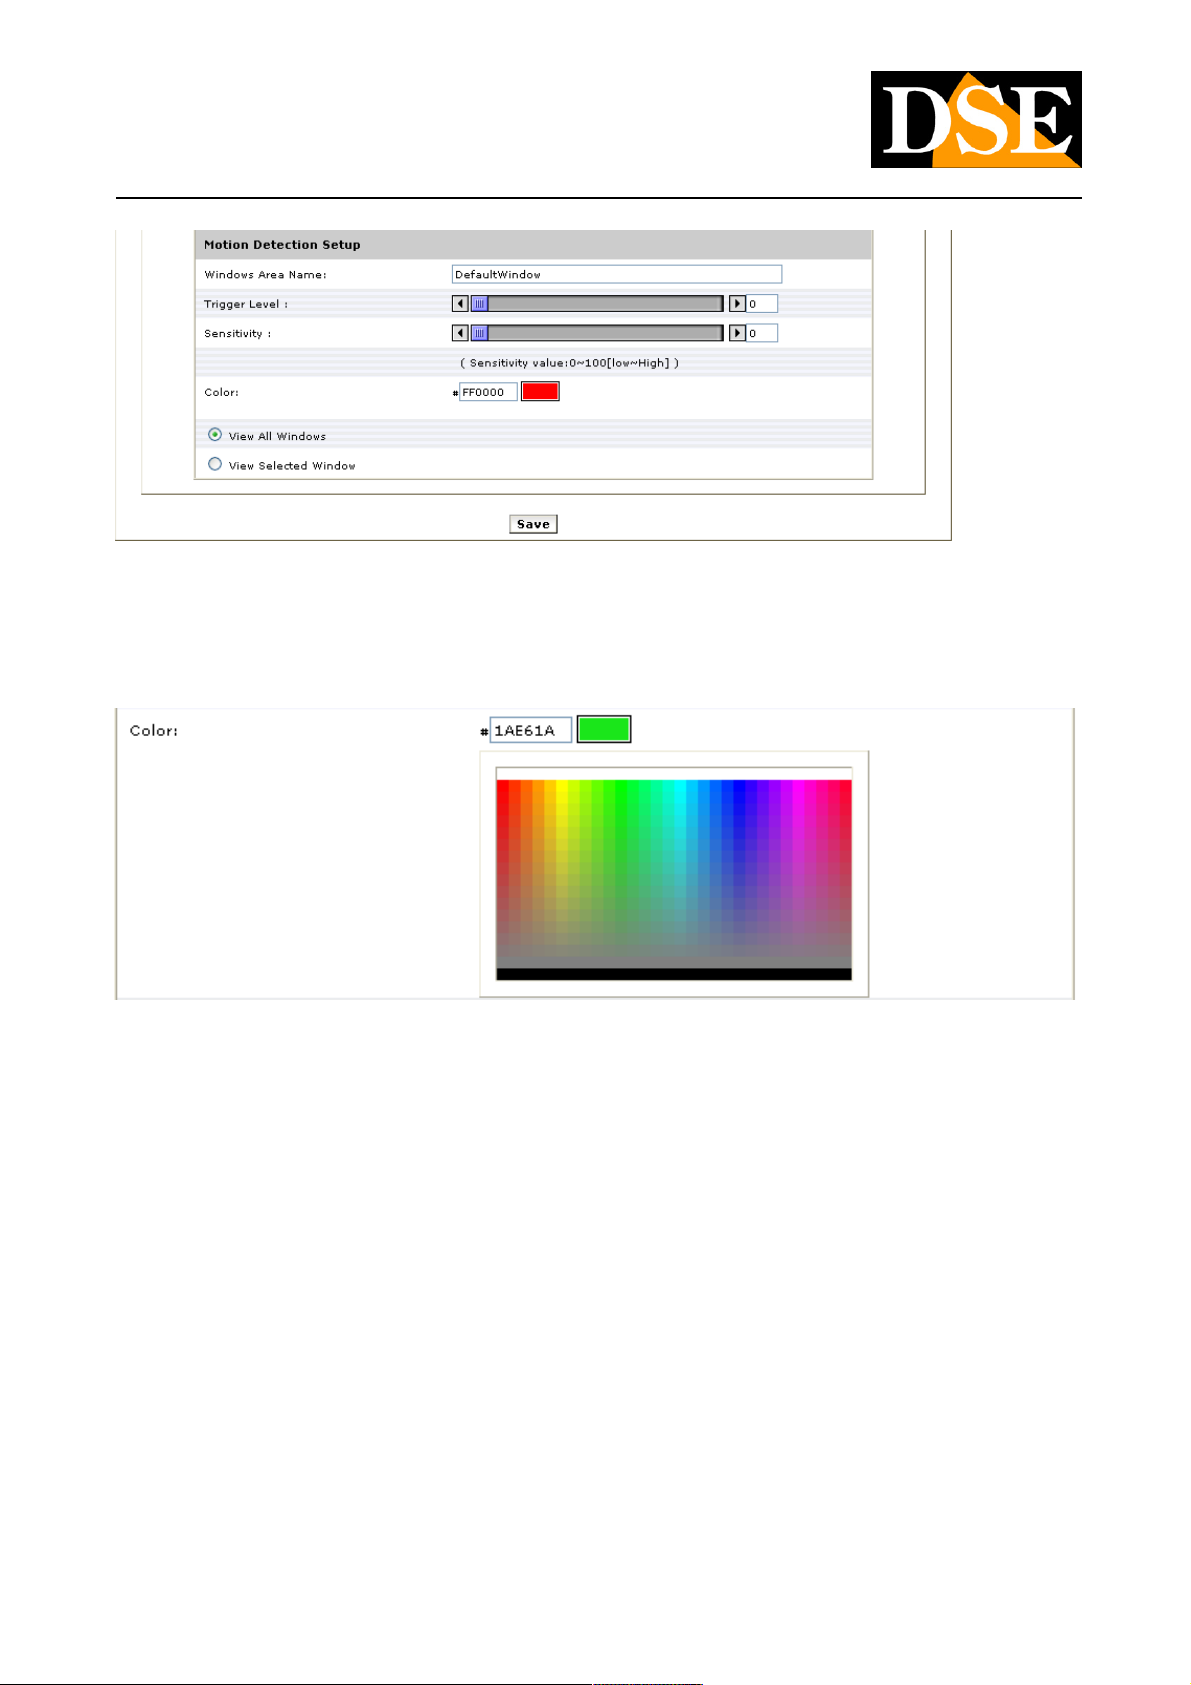
To add an area of motion detection:
1. Click [ Add] to set an area (a settings menu is displayed) 1. Click [ Add] to set an area (a settings menu is displayed) 1. Click [ Add] to set an area (a settings menu is displayed)
DSE SRL - ITALY - WWW.DSE.EU
Page 48
USER MANUAL
Megapixel H.264 IP CAMERAS
Page: 48 Page: 48
2. Give a name to the area of detection
3. Select INTERVENTION THRESHOLD (TRIGGER LEVEL) and SENSITIVITY '(SENSIVITY) per detection area (0 ~ 100, Hi ~)
4. Select the color that identifies the window
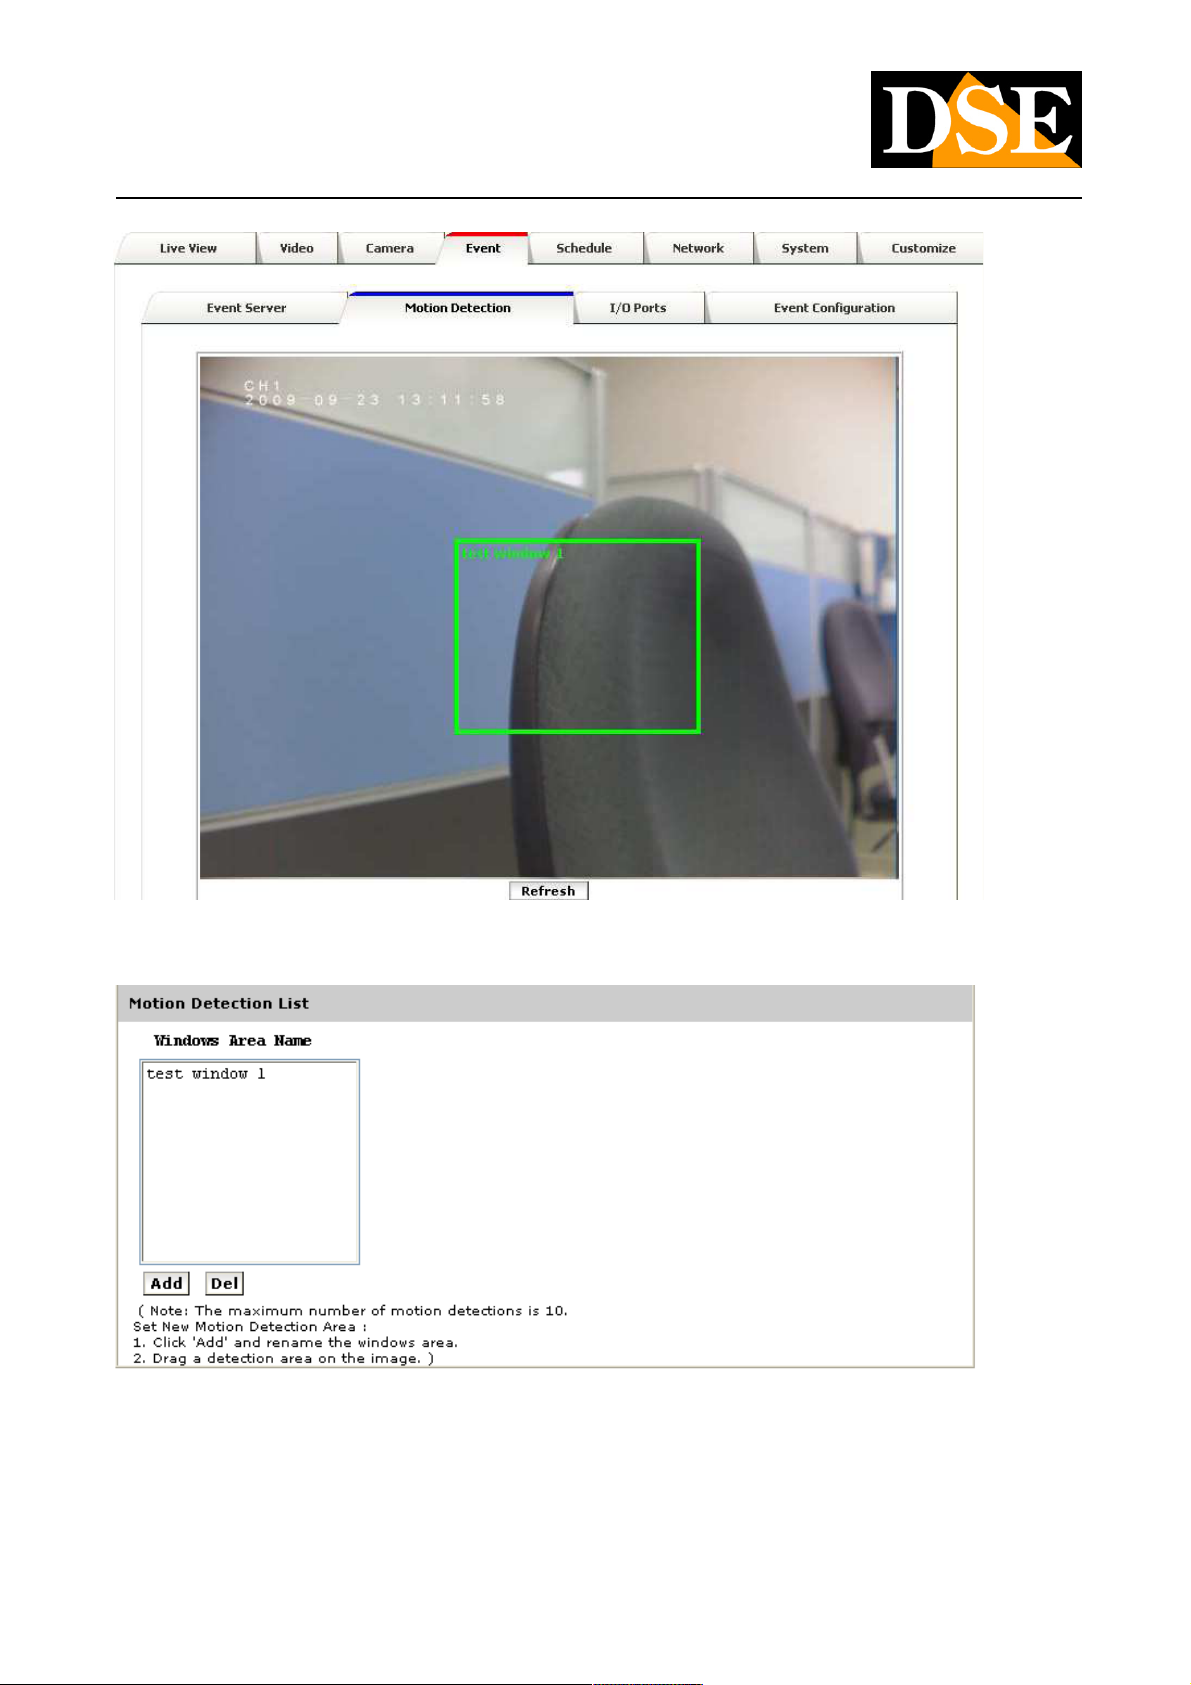
5. Draw the image sensing window
DSE SRL - ITALY - WWW.DSE.EU
Page 49
USER MANUAL
Megapixel H.264 IP CAMERAS
Page: 49 Page: 49
6. After that, click [ Save] to save the configuration. The new detection area will be listed in the After that, click [ Save] to save the configuration. The new detection area will be listed in the After that, click [ Save] to save the configuration. The new detection area will be listed in the
motion detection list
DSE SRL - ITALY - WWW.DSE.EU
Page 50
USER MANUAL
Megapixel H.264 IP CAMERAS
Page: 50 Page: 50
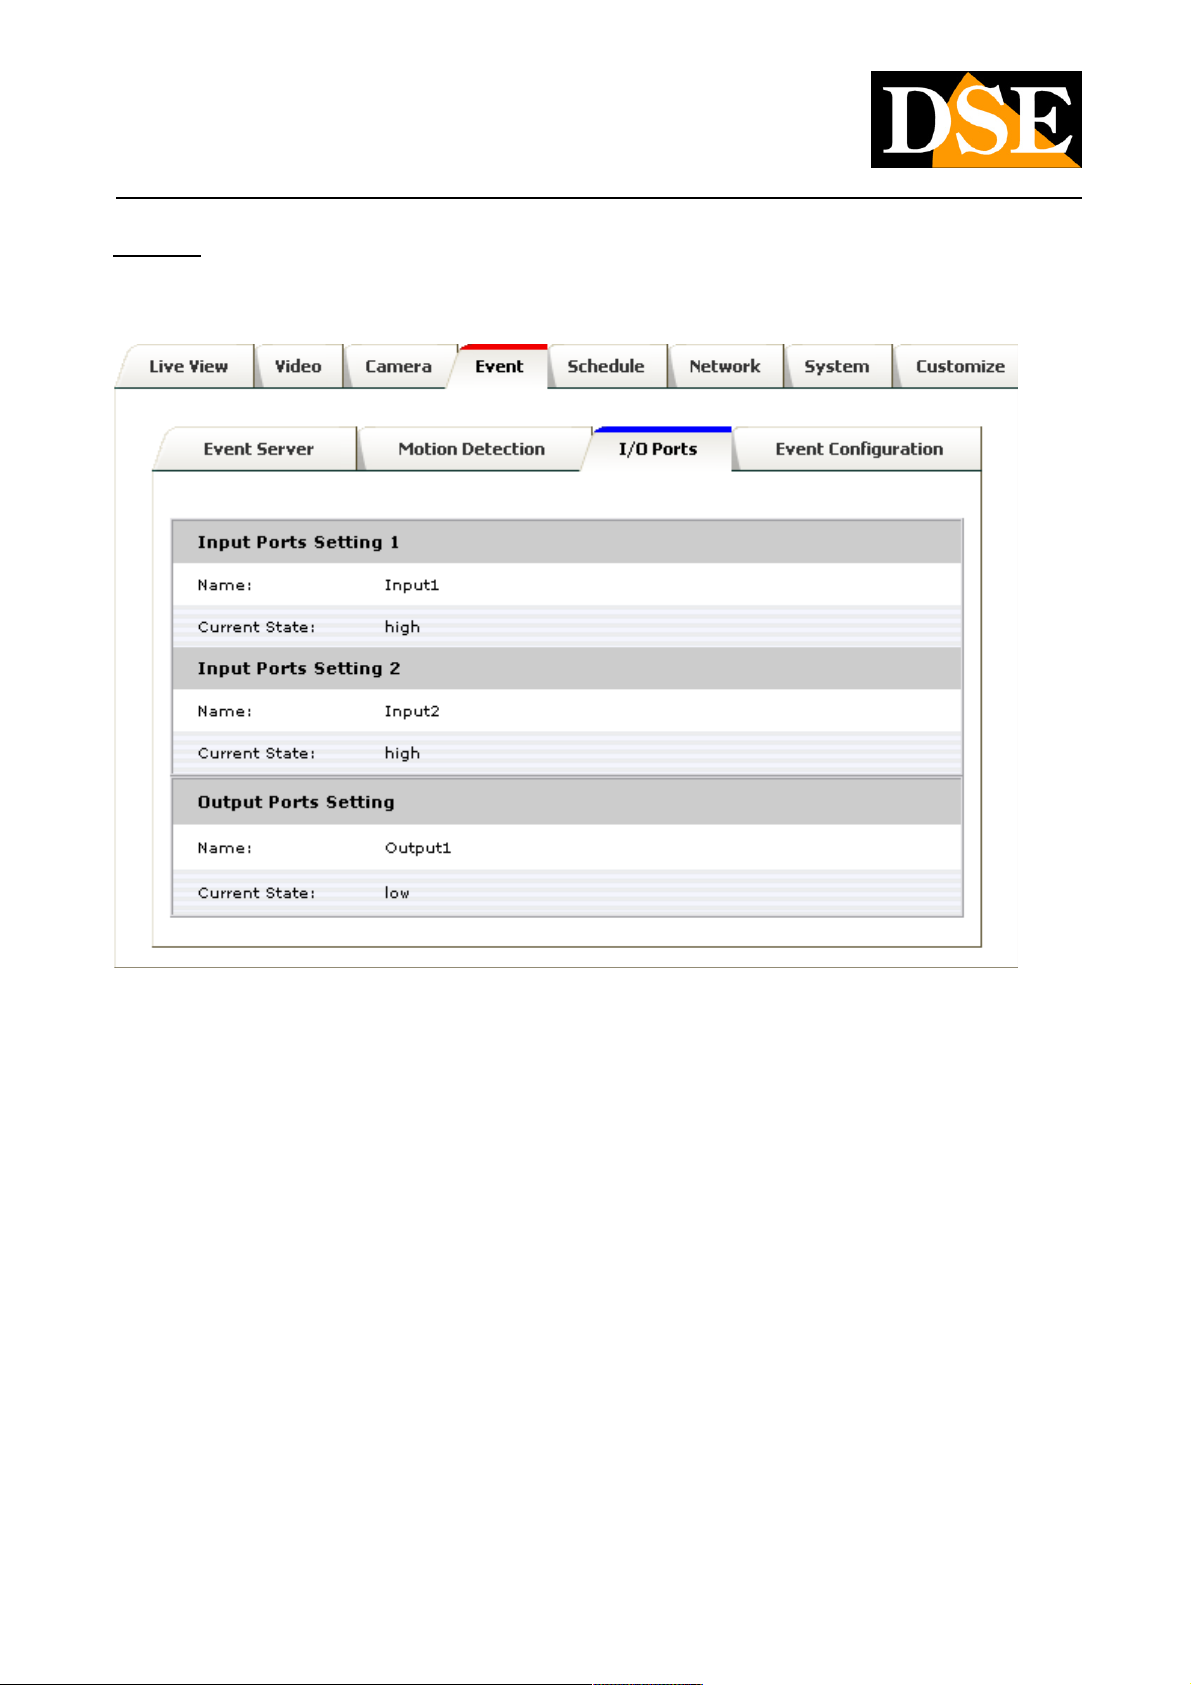
I / O Ports
If the camera you purchased is equipped with inputs and alarm outputs for connecting any external equipment, here it is possible to
visualize the state of operation.
DSE SRL - ITALY - WWW.DSE.EU
Page 51
USER MANUAL
Megapixel H.264 IP CAMERAS
Page: 51 Page: 51
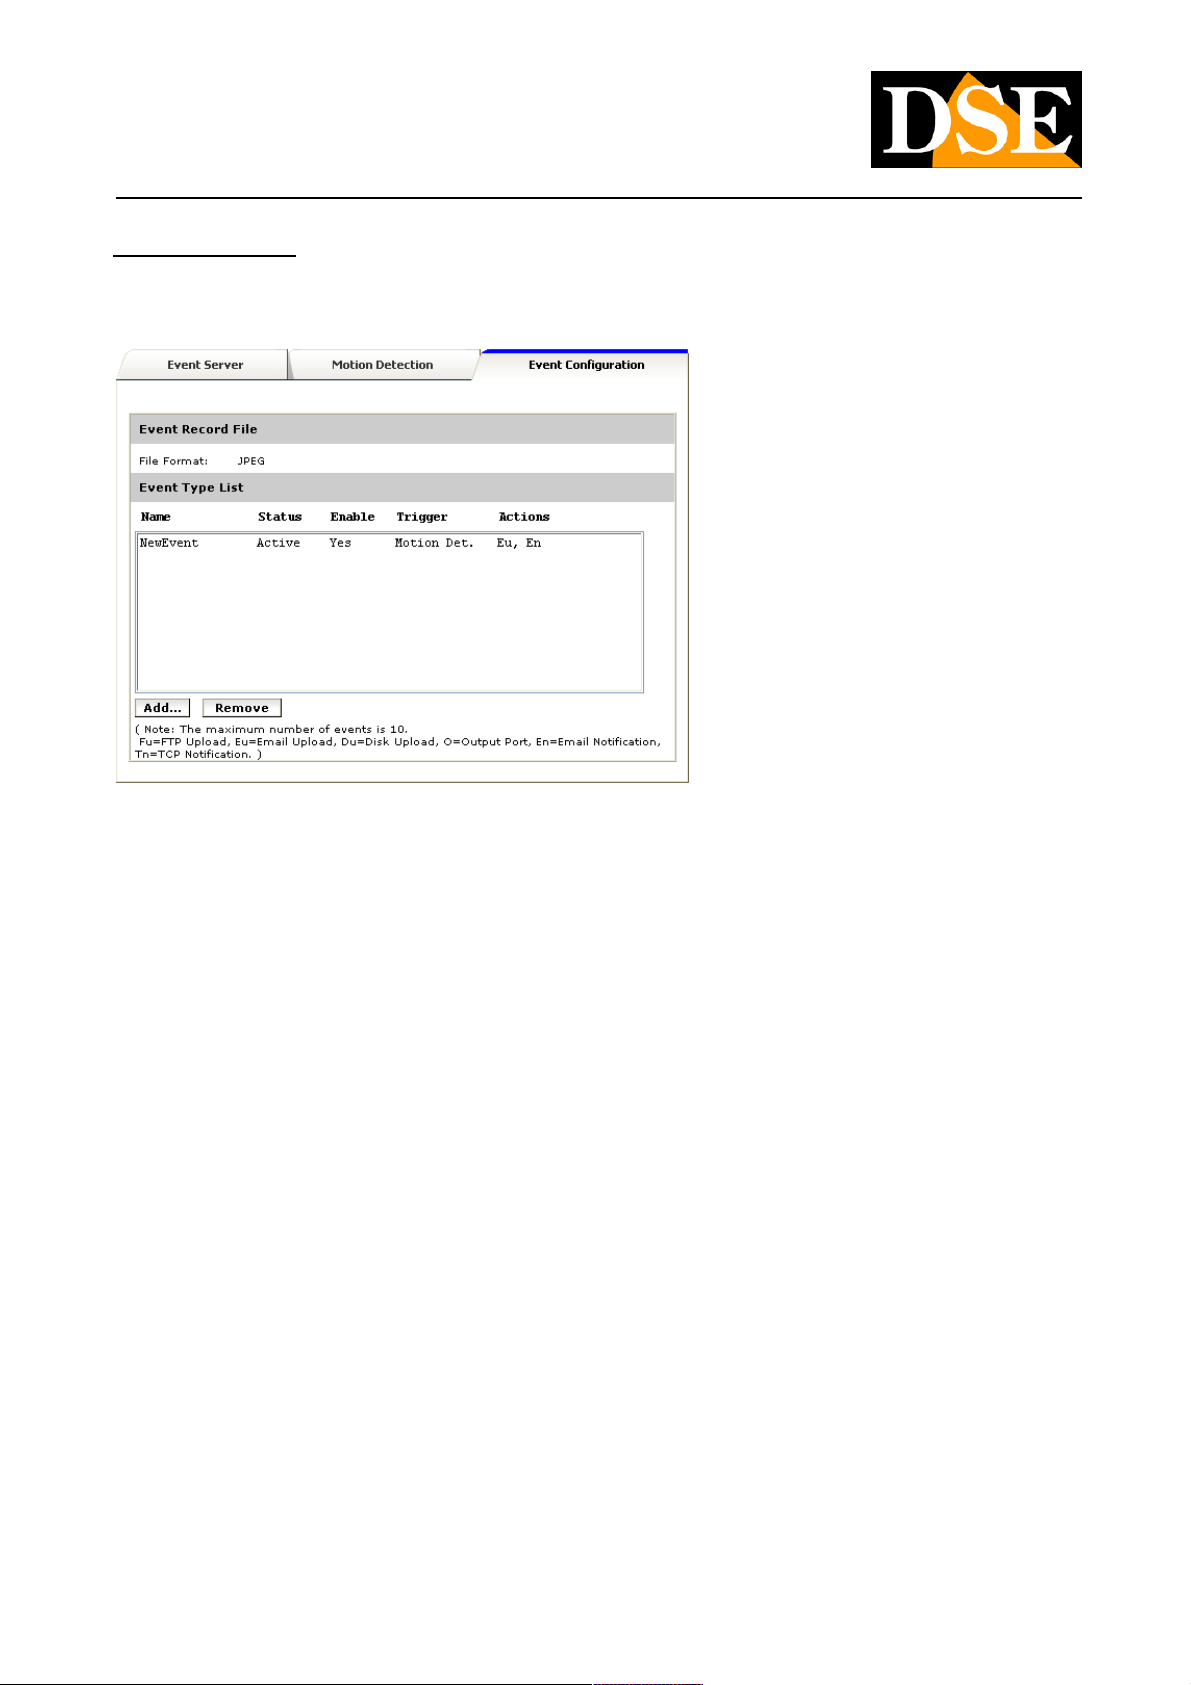
Event Configuration
In CONFIGURATION EVENT tab to assign the actions that you should take after specific events. E 'can set up to 10 different events
The table lists the configured events. Click on " Add ... "To add a new event The table lists the configured events. Click on " Add ... "To add a new event The table lists the configured events. Click on " Add ... "To add a new event
DSE SRL - ITALY - WWW.DSE.EU
Page 52
USER MANUAL
Megapixel H.264 IP CAMERAS
Page: 52 Page: 52
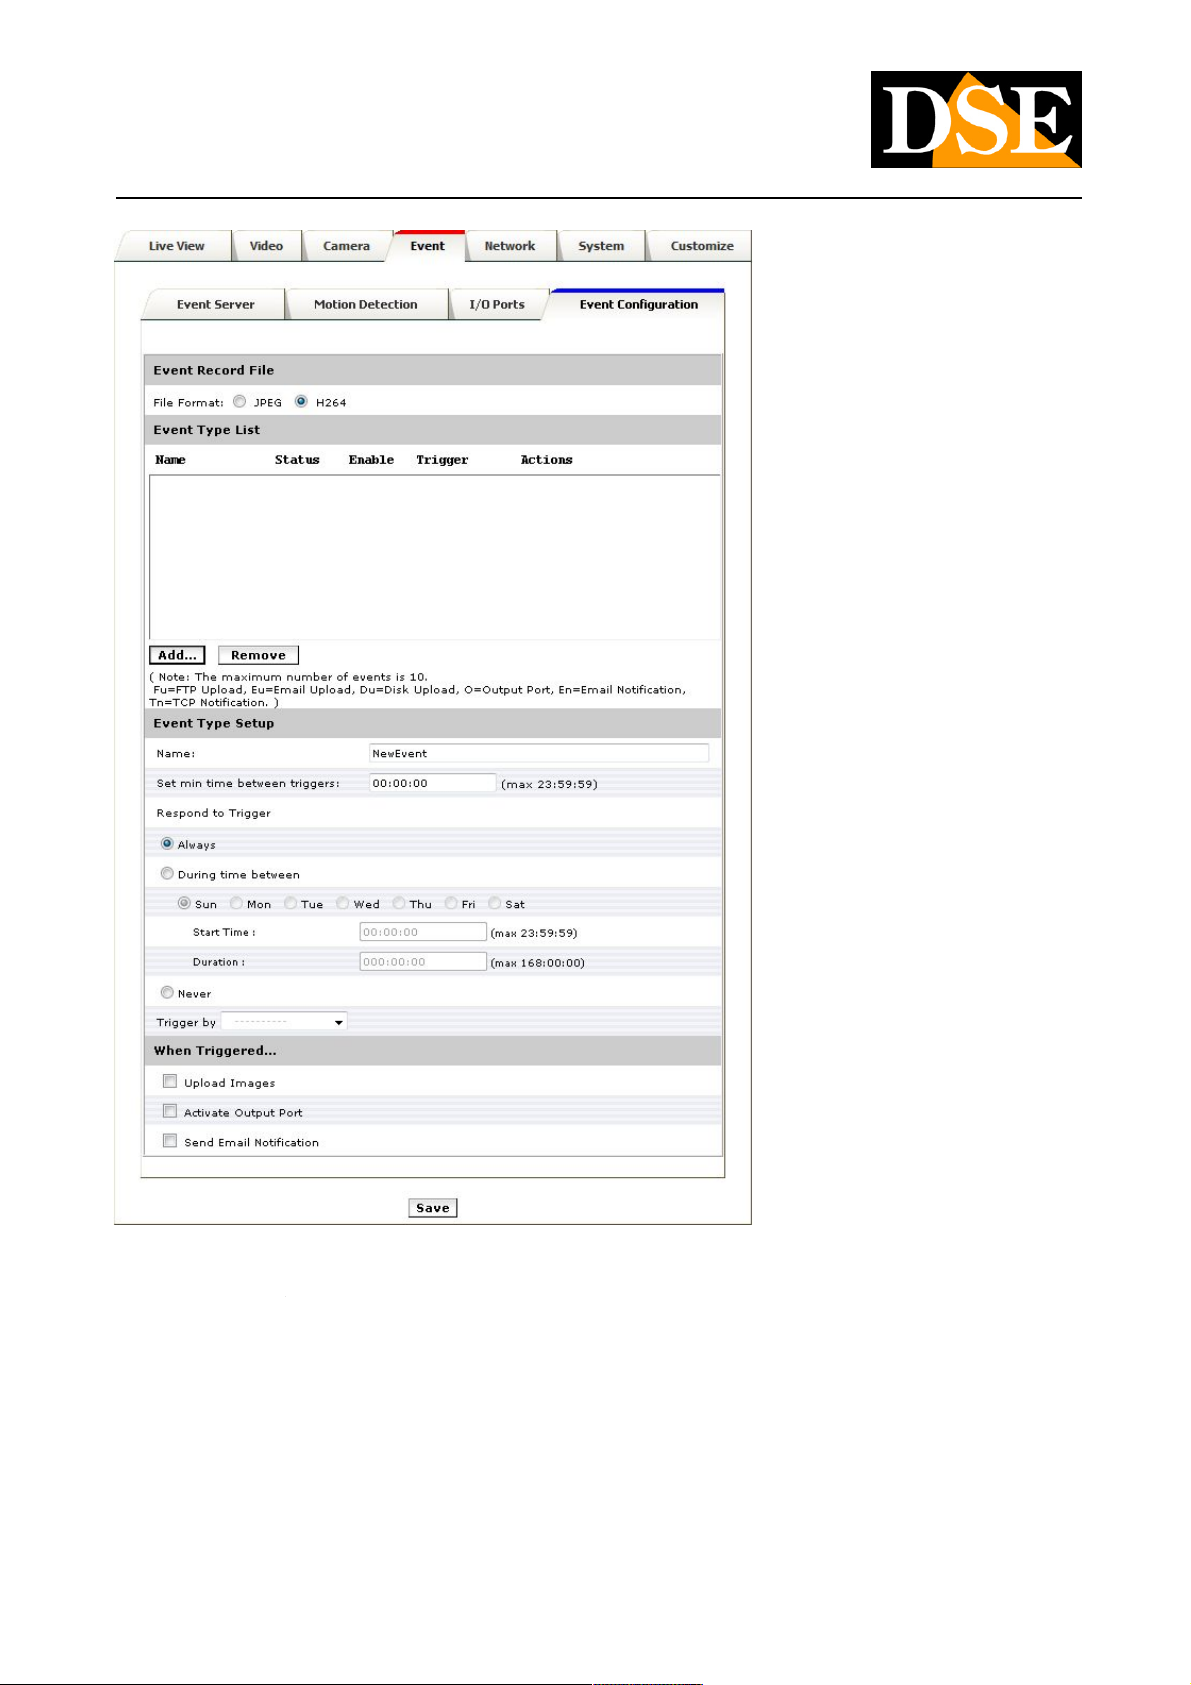
Event records files - E 'can choose whether on alarm only send photographs (JPEG) or video about 15 seconds (H.264). To change this Event records files - E 'can choose whether on alarm only send photographs (JPEG) or video about 15 seconds (H.264). To change this
option you must first disable the scheduled recording in the folder SCHEDULE
Name - indicative of the event Name Name - indicative of the event Name
Set Minimum time between triggers - E 'can set the minimum time that must elapse between two consecutive alarms. In practice, after Set Minimum time between triggers - E 'can set the minimum time that must elapse between two consecutive alarms. In practice, after
generating an alarm, the camera will wait for the set time before being able to generate another.
Respond to trigger - E 'can enable the alarm ALWAYS, or in special groups Respond to trigger - E 'can enable the alarm ALWAYS, or in special groups
DSE SRL - ITALY - WWW.DSE.EU
Page 53

USER MANUAL
Megapixel H.264 IP CAMERAS
Page: 53 Page: 53
Hourly outside of which the detection will not be active. You can set the day of the week, the beginning of the recognition and the
duration of the activation period. E 'can also set NEVER (NEVER) to temporarily disable the detection.
Trigger by - In this window you set the cause that triggers the event. There are 4 options: INPUT CAMERA ALERT (GPIN) with a choice Trigger by - In this window you set the cause that triggers the event. There are 4 options: INPUT CAMERA ALERT (GPIN) with a choice
of resting state / alarm DRIVE MANUAL (MANUAL TRIGGER)
MOTION DETECTION (MOTION DETECTION) area with a choice of TIMER detection (PERIOD) to trigger the
event every XX minutes or hours
When Triggered - In this window you set the action to take after the alarm. The following options are available:When Triggered - In this window you set the action to take after the alarm. The following options are available:
UPLOAD IMAGES - Send images to FTP server or EMAIL address. In this option you can also choose to record images on the SD card
on board. OUTPUT ACTIVATE - Activate the SEND EMAIL camera alarm output - Send E-mail alarm information
SEND MESSAGE NOTIFICATION (TCP) - Available only for input drive event (GPIN) allows you to send event notifications to a web site
with a TCP / IP packet that can be used by developers to integrate other software.
DSE SRL - ITALY - WWW.DSE.EU
Page 54
USER MANUAL
Megapixel H.264 IP CAMERAS
Page: 54 Page: 54
SCHEDULE - Local Video Storage
Some SD series cameras are equipped with an SD card or Micro SD card for recording video onboard the camera itself. Registration is
carried out on the basis of a weekly programmer. E 'can also save JPG images on alarm.
Insert the SD card into the slot and click the folder SCHEDULE (available only on cameras with SD card slot).
The folder is divided into two sections: GENERAL and STORAGE
DSE SRL - ITALY - WWW.DSE.EU
Page 55
USER MANUAL
Megapixel H.264 IP CAMERAS
Page: 55 Page: 55
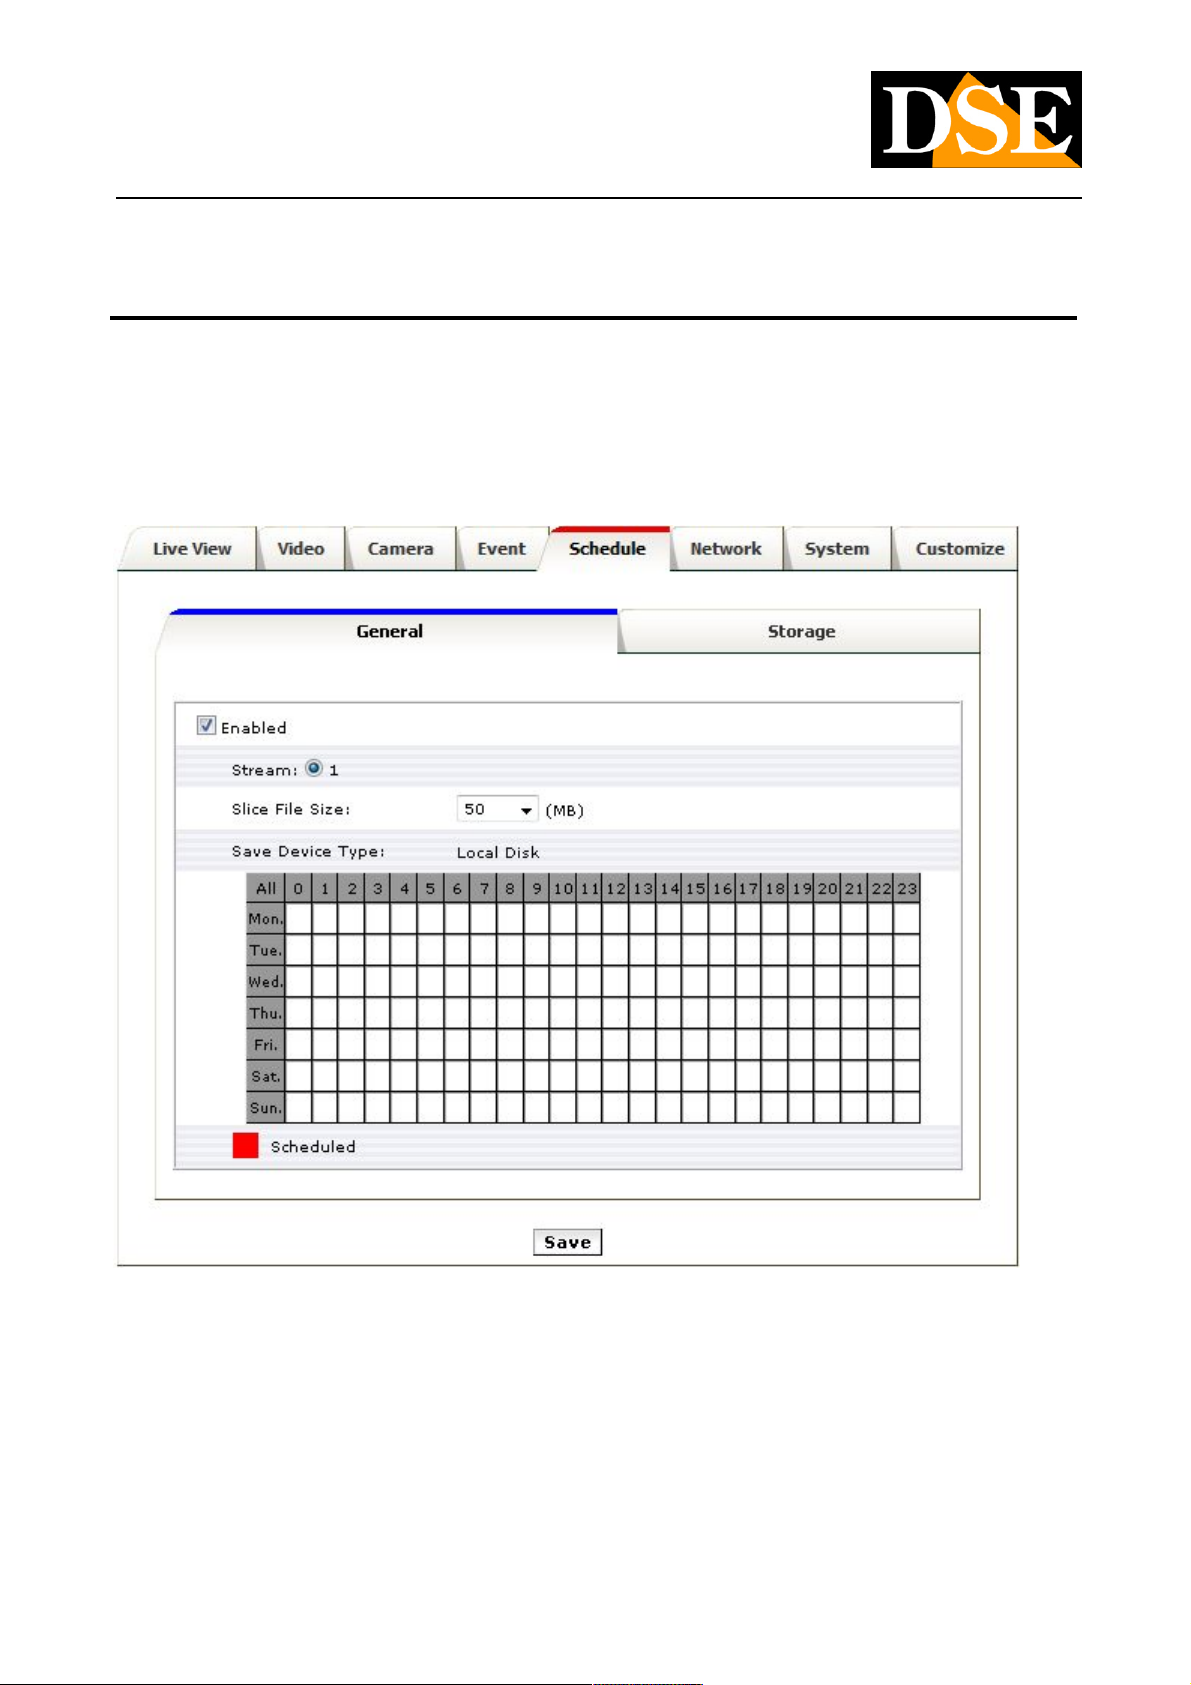
General
Define the date and time you want to record by clicking on the corresponding boxes a day and time when you want to record will remain
marked in red. You can also specify which of the enabled video streams to be recorded and the size of each file in which the recording
will be divided.
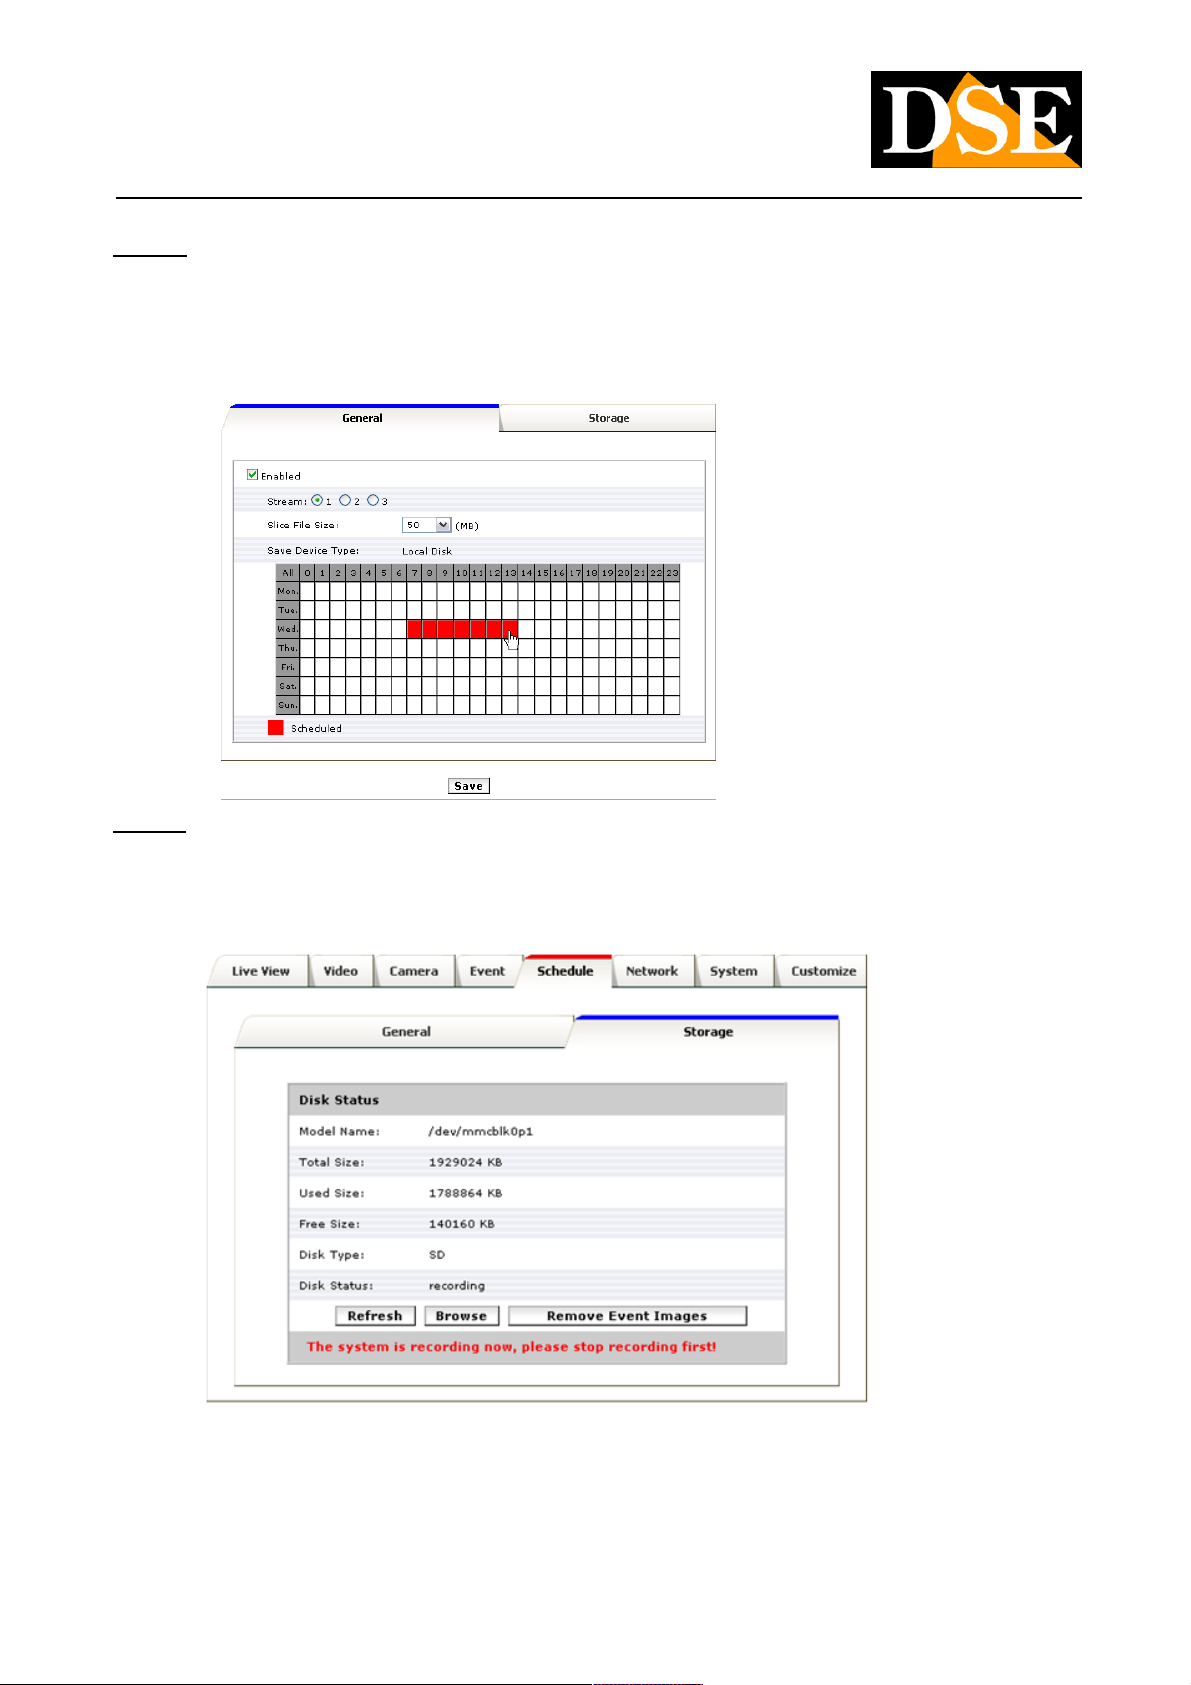
Storage
View the storage of information, including the size of the type and status. The warning message indicates when the recording is in action.
The SD card must not be removed during the registration process.
The window Disk Status It contains information on the status of the memory card, namely: CAPACITY '(Total Size), SPACE OCCUPIED The window Disk Status It contains information on the status of the memory card, namely: CAPACITY '(Total Size), SPACE OCCUPIED The window Disk Status It contains information on the status of the memory card, namely: CAPACITY '(Total Size), SPACE OCCUPIED
(Used Size), SPACE (Free Size), PAPER TYPE (Disk Type), CONDITIONS (Disk Status).
DSE SRL - ITALY - WWW.DSE.EU
Page 56
USER MANUAL
Megapixel H.264 IP CAMERAS
Page: 56 Page: 56
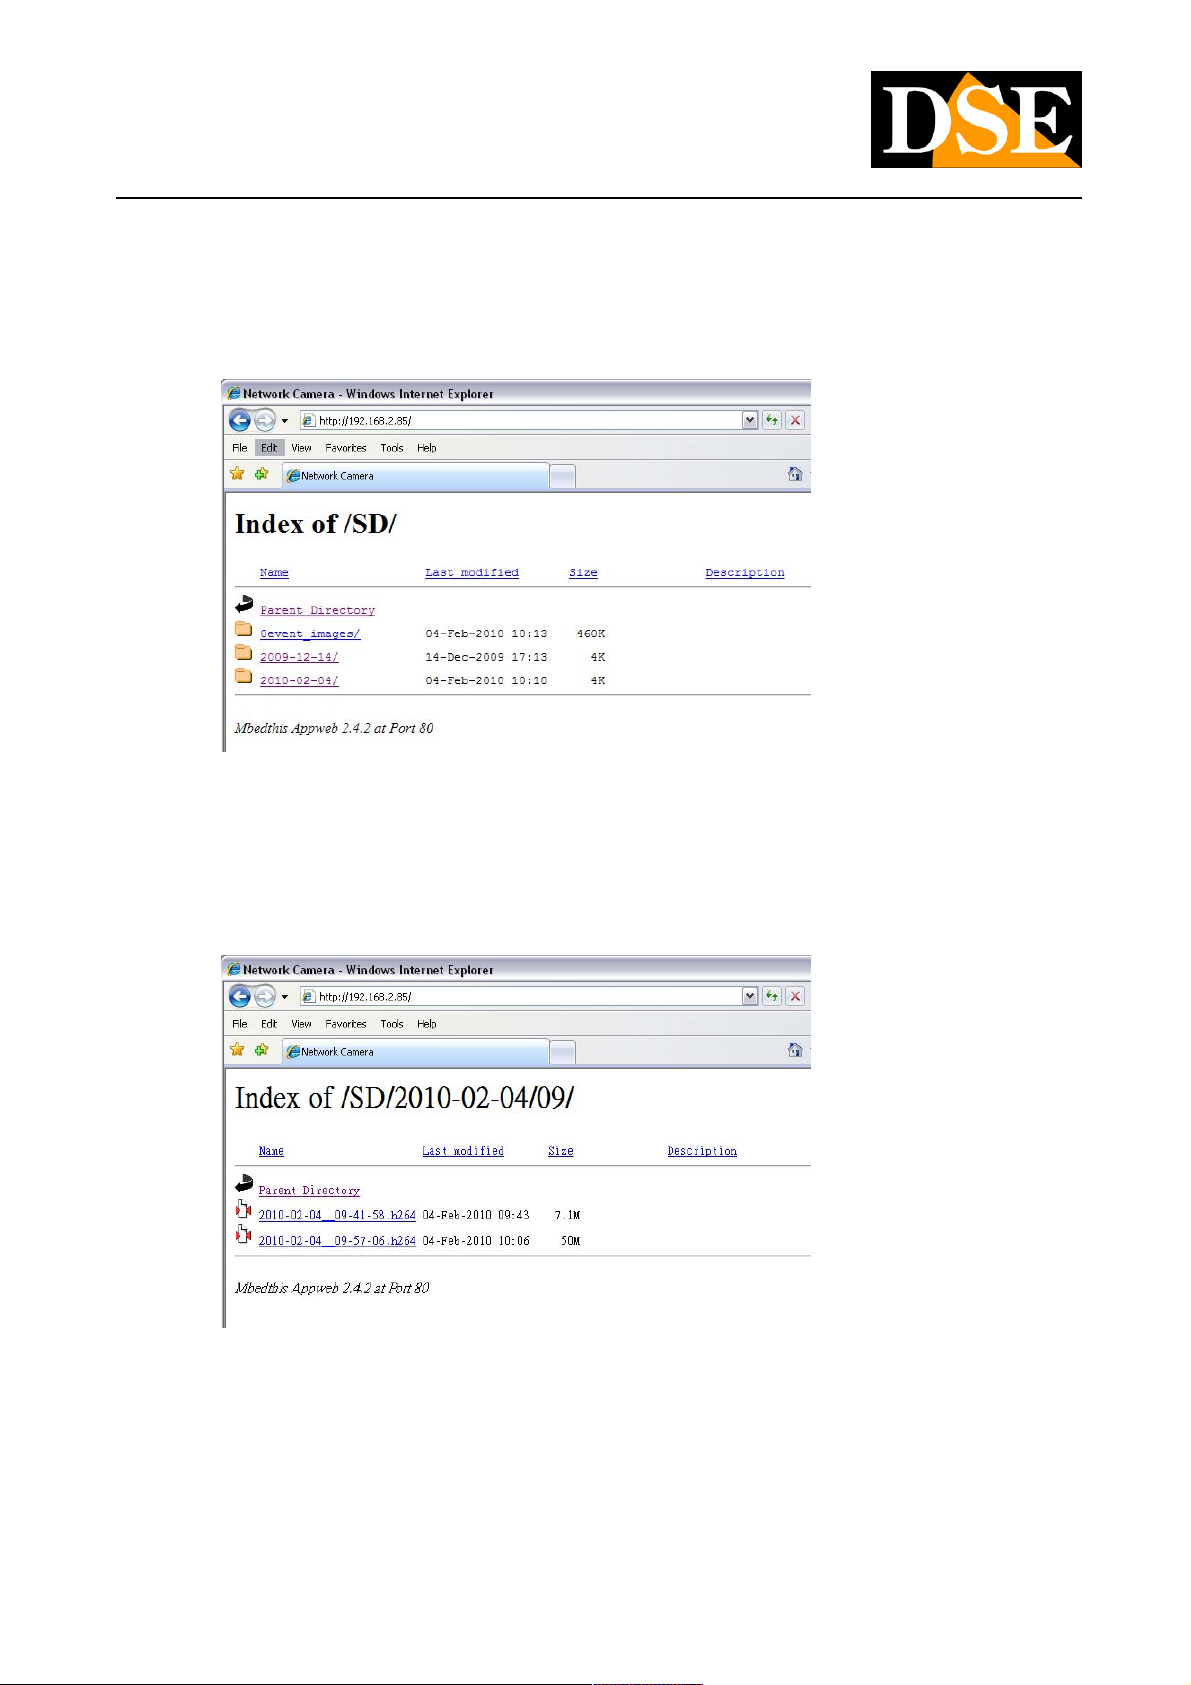
The button Browse It allows you to view the list of recorded files. The list includes several folders including Parent Directory which returns The button Browse It allows you to view the list of recorded files. The list includes several folders including Parent Directory which returns The button Browse It allows you to view the list of recorded files. The list includes several folders including Parent Directory which returns The button Browse It allows you to view the list of recorded files. The list includes several folders including Parent Directory which returns The button Browse It allows you to view the list of recorded files. The list includes several folders including Parent Directory which returns
to the main camera control page, Event images containing JPEG images captured in response to alarm events and folders video files to the main camera control page, Event images containing JPEG images captured in response to alarm events and folders video files to the main camera control page, Event images containing JPEG images captured in response to alarm events and folders video files
divided by day.
The video files are named using the date and time and the extension of the file. " h264 ". The files in h264 format can be performed with The video files are named using the date and time and the extension of the file. " h264 ". The files in h264 format can be performed with The video files are named using the date and time and the extension of the file. " h264 ". The files in h264 format can be performed with
free media player VLC media player. Note that recording is done for video only and NOT FOR AUDIO.free media player VLC media player. Note that recording is done for video only and NOT FOR AUDIO.free media player VLC media player. Note that recording is done for video only and NOT FOR AUDIO.
NOTE: The timer recording setting inhibits the activation of the system settings. Disable the timer recording to be able to freely access all
the programming options.
DSE SRL - ITALY - WWW.DSE.EU
Page 57
USER MANUAL
Megapixel H.264 IP CAMERAS
Page: 57 Page: 57
NETWORK - Network Settings
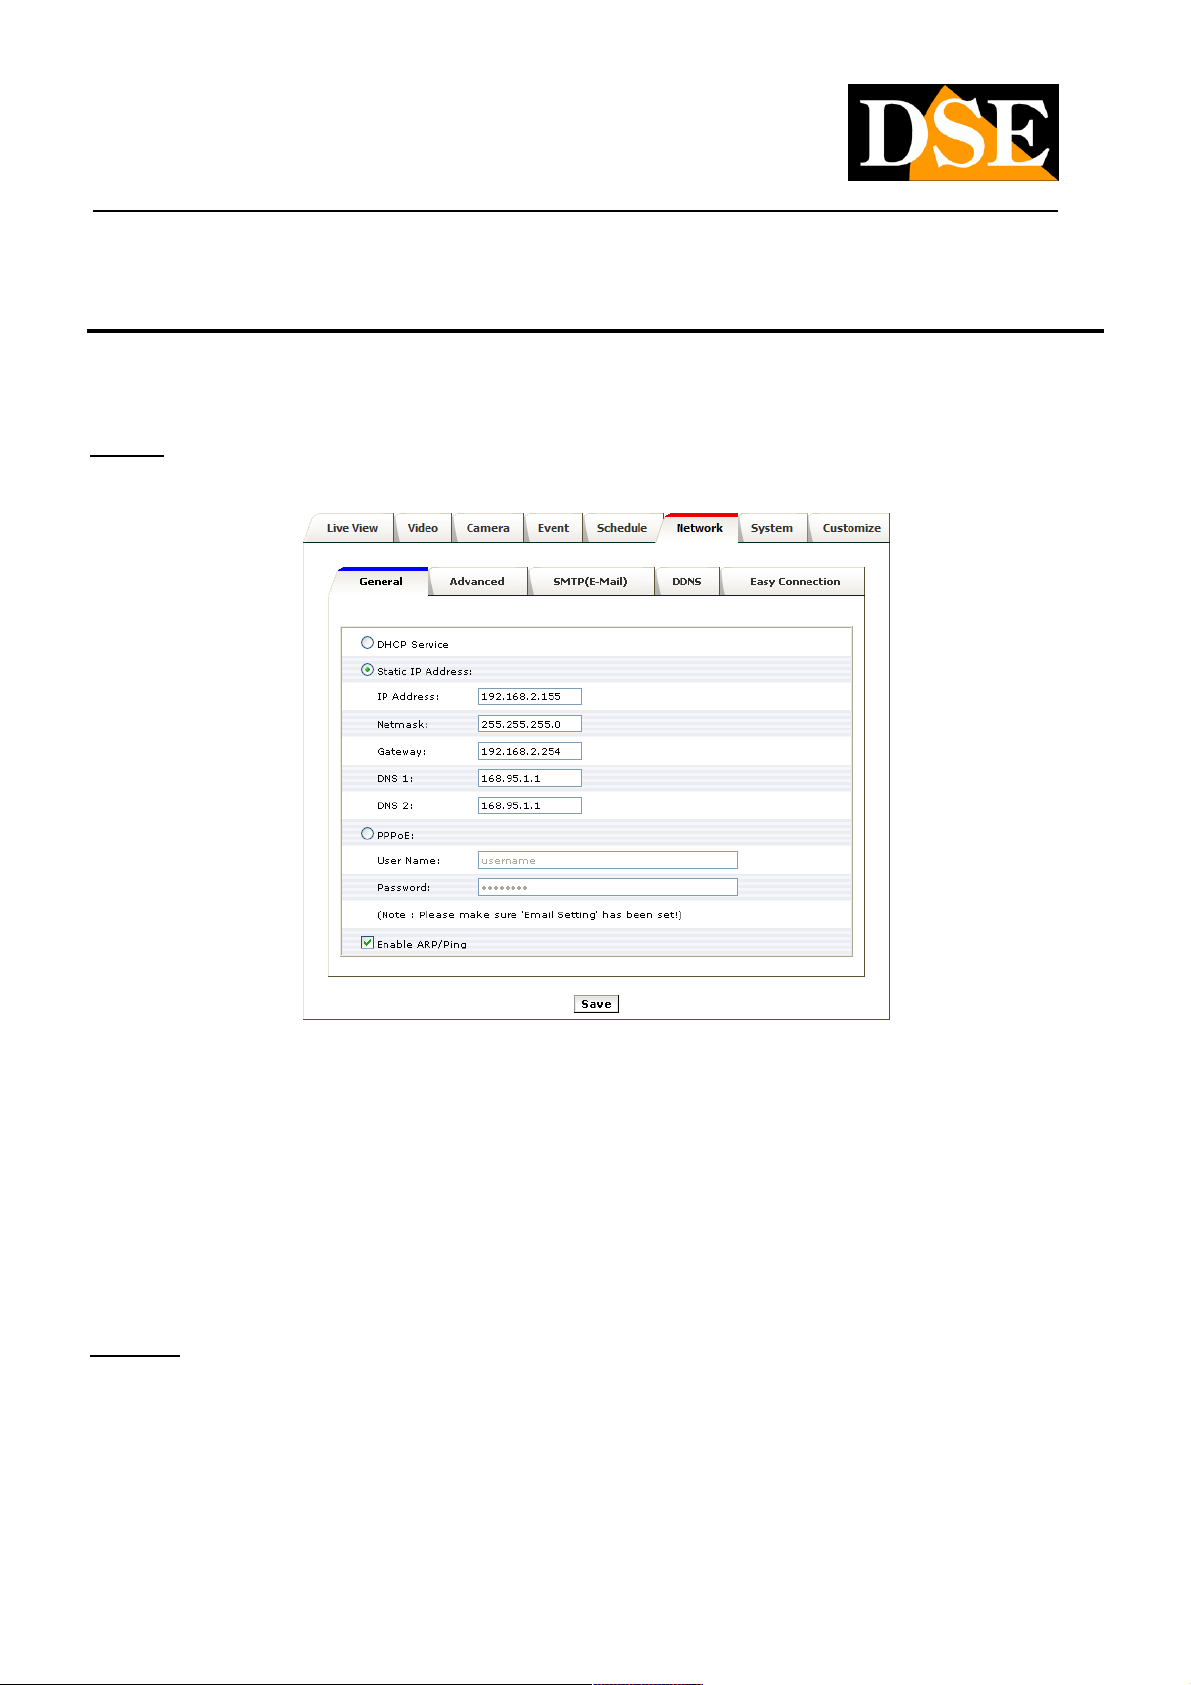
This series of cameras acts as a any network device. This section describes how to configure the network settings. The board is divided into
sections: GENERAL, ADVANCED, SMTP, DDNS.
General
In this section you can be configured to assign IP address to the device and the main network parameters.
DHCP - Select whether the network works with IP addresses automatically assigned by a DHCP server. DHCP - Select whether the network works with IP addresses automatically assigned by a DHCP server.
STATIC IP - This section allows you to instead set a fixed IP address, with relative Netmask, Gateway and DNS. STATIC IP - This section allows you to instead set a fixed IP address, with relative Netmask, Gateway and DNS.
PPPoE - If the camera is not connected to a network but directly to an ADSL modem must enable PPPoE and enter the login information to PPPoE - If the camera is not connected to a network but directly to an ADSL modem must enable PPPoE and enter the login information to
connect to the internet
ENABLE ARP / PING It allows to enable ARP packets or PING from the network. Disabling this option is recommended if you want to make the ENABLE ARP / PING It allows to enable ARP packets or PING from the network. Disabling this option is recommended if you want to make the
camera not easily found the net with traditional PING.
advanced
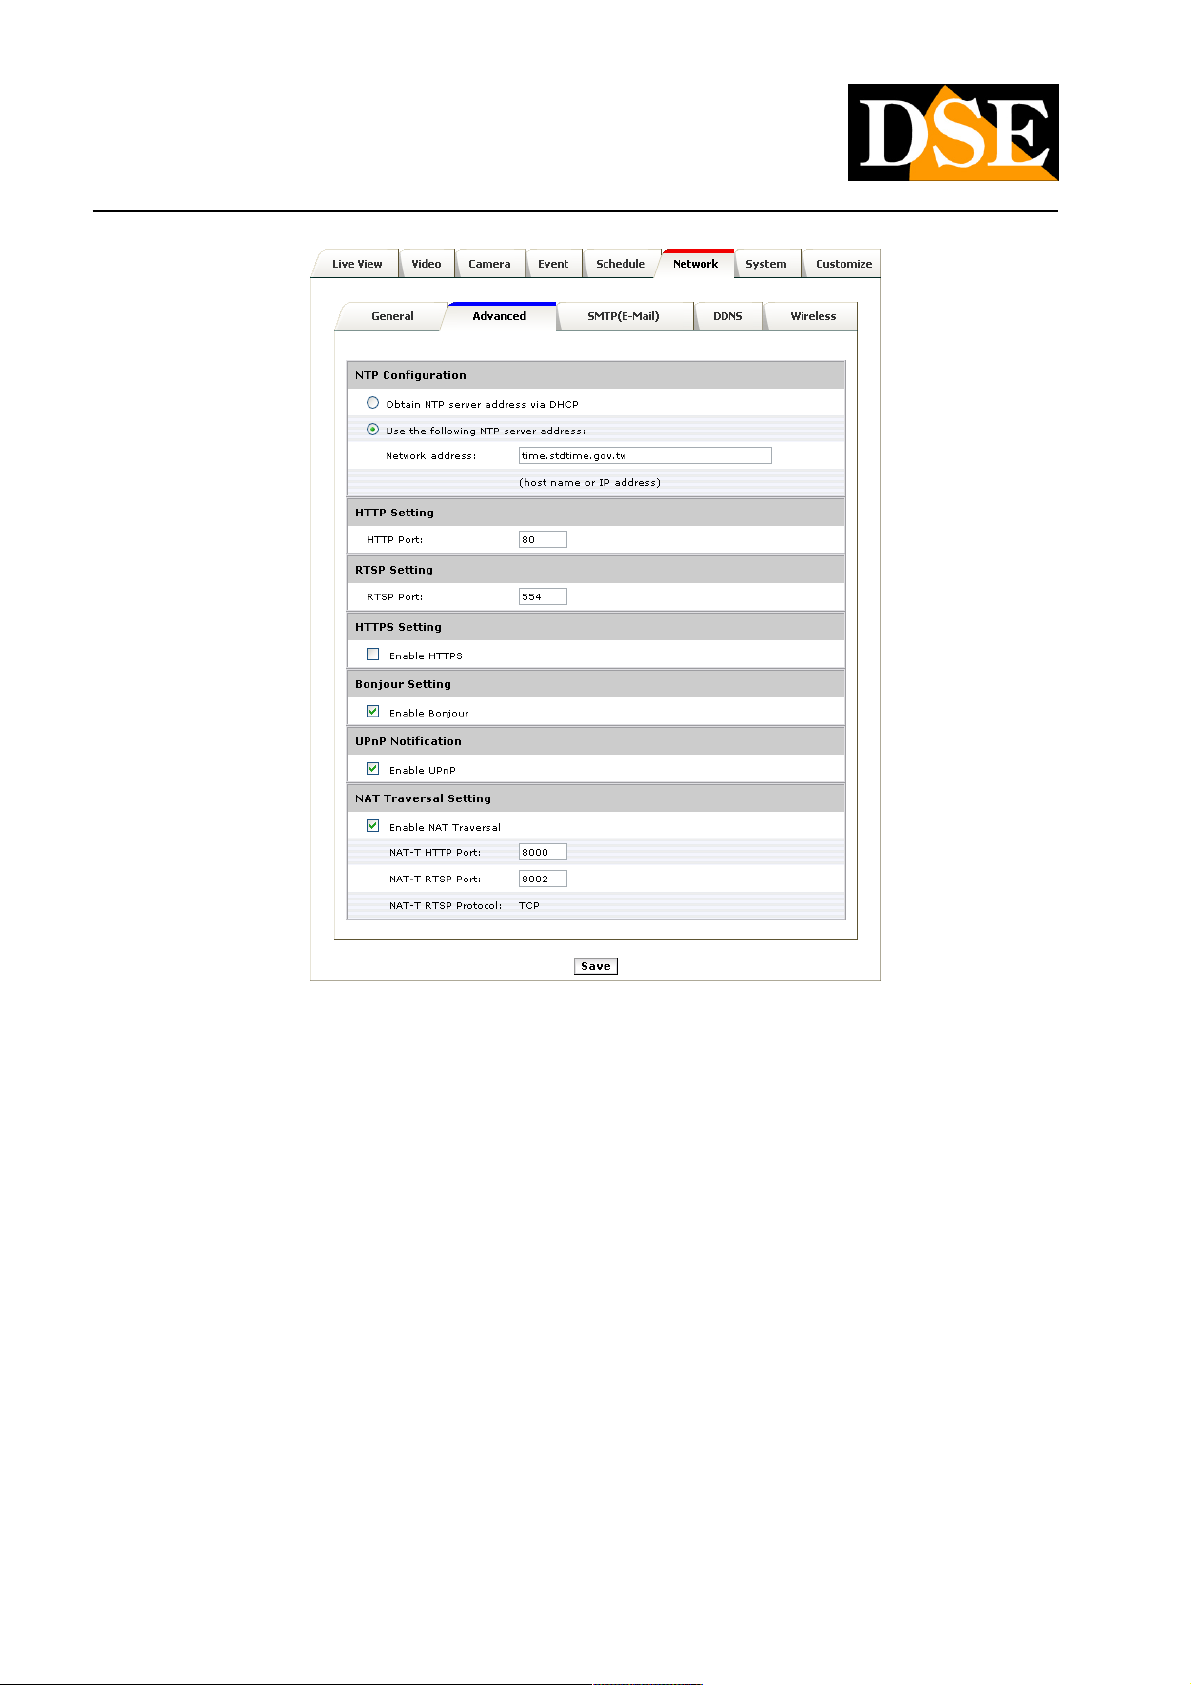
In this folder are set advanced network configurations, not strictly necessary to the operation of the camera.
DSE SRL - ITALY - WWW.DSE.EU
Page 58
USER MANUAL
Megapixel H.264 IP CAMERAS
Page: 58 Page: 58
NTP: Configure an NTP (Network Time Protocol), so that the date and time of the camera to be automatically synchronized. E 'can set a specific NTP: Configure an NTP (Network Time Protocol), so that the date and time of the camera to be automatically synchronized. E 'can set a specific
server by entering the name or get the name of the NTP server from the equipment that manages the distribution of DHCP address if it allows.
HTTP: sets the HTTP port that is used to access the browser (default: 80) HTTP: sets the HTTP port that is used to access the browser (default: 80)
RTSP: set the RTSP port (Video) which is used for video data transmission (default: 554). RTSP: set the RTSP port (Video) which is used for video data transmission (default: 554).
HTTPS: enables or disables the use of the HTTPS security communication and allows you to set the port to use (default: 443). HTTPS HTTPS: enables or disables the use of the HTTPS security communication and allows you to set the port to use (default: 443). HTTPS
(Hypertext Transfer Protocol over Secure Socket Layer) is an encrypted language used in internet secure connections, typical of protected
services (banking etc.)
All cameras in the range support https so you can connect to a camera via the Internet by typing https: // ..... instead of http: // .... The standard
communication port will vary from 80 of http to 443 of https.
Bonjour: BONJOUR enables the communication protocol. Bonjour is a protocol created by Apple that allows you to configure network Bonjour: BONJOUR enables the communication protocol. Bonjour is a protocol created by Apple that allows you to configure network
equipment through a wizard without setting parameters directly. Many applications use this protocol to configure network equipment easily. For
more information, visit the Apple website.
DSE SRL - ITALY - WWW.DSE.EU
Page 59
USER MANUAL
Megapixel H.264 IP CAMERAS
Page: 59 Page: 59
UPnP: enables the UPnP (universal plug and play). Enable UPnP (Universal Plug and Play) is highly recommended to make sure that Windows UPnP: enables the UPnP (universal plug and play). Enable UPnP (Universal Plug and Play) is highly recommended to make sure that Windows
Explorer can automatically detect the cameras between the network resources.
NAT Traversal: Enable NAT TRAVERSAL so that from the Internet clients can easily access the camera placed behind the router. With the NAT Traversal: Enable NAT TRAVERSAL so that from the Internet clients can easily access the camera placed behind the router. With the
UPnP enabled routers that support this dialogue function with the camera to set the directing of the doors you need to communication from the
Internet to the local network.
SMTP (E-Mail)
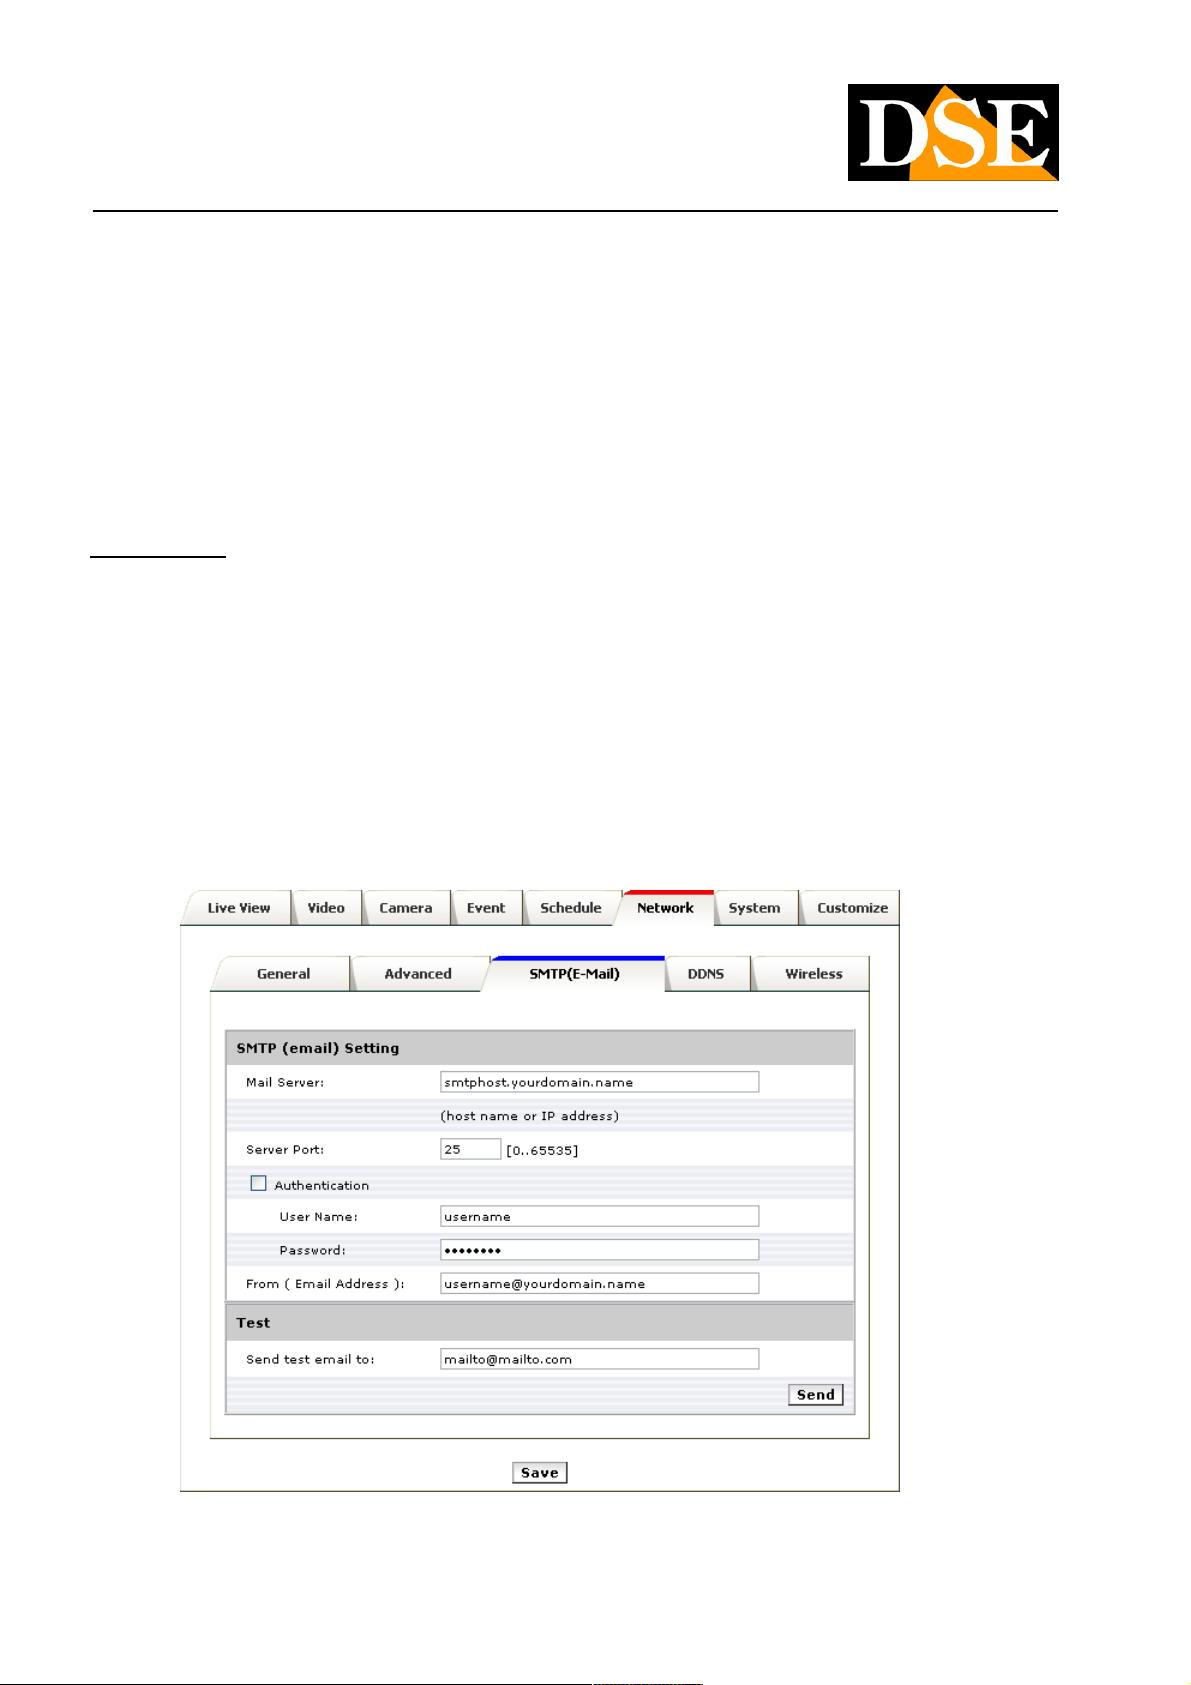
The RN Series cameras can send E-mails after alarm events. In this section you set the parameters for the
SMTP server for sending e-mail.
Mail Server: Name of the SMTP server that is used for sending email Mail Server: Name of the SMTP server that is used for sending email
Server Port: Port used for sending emails Server Port: Port used for sending emails
Authentication: If the SMTP server requires a user name and password to send email you can place Authentication: If the SMTP server requires a user name and password to send email you can place
from: Enter the sender address that will appear in the email sent by the camera. from: Enter the sender address that will appear in the email sent by the camera.
Test: E 'can enter an email address and send a test email by pressing SEND to check the proper functioning. Test: E 'can enter an email address and send a test email by pressing SEND to check the proper functioning.
DSE SRL - ITALY - WWW.DSE.EU
Page 60
USER MANUAL
Megapixel H.264 IP CAMERAS
Page: 60 Page: 60
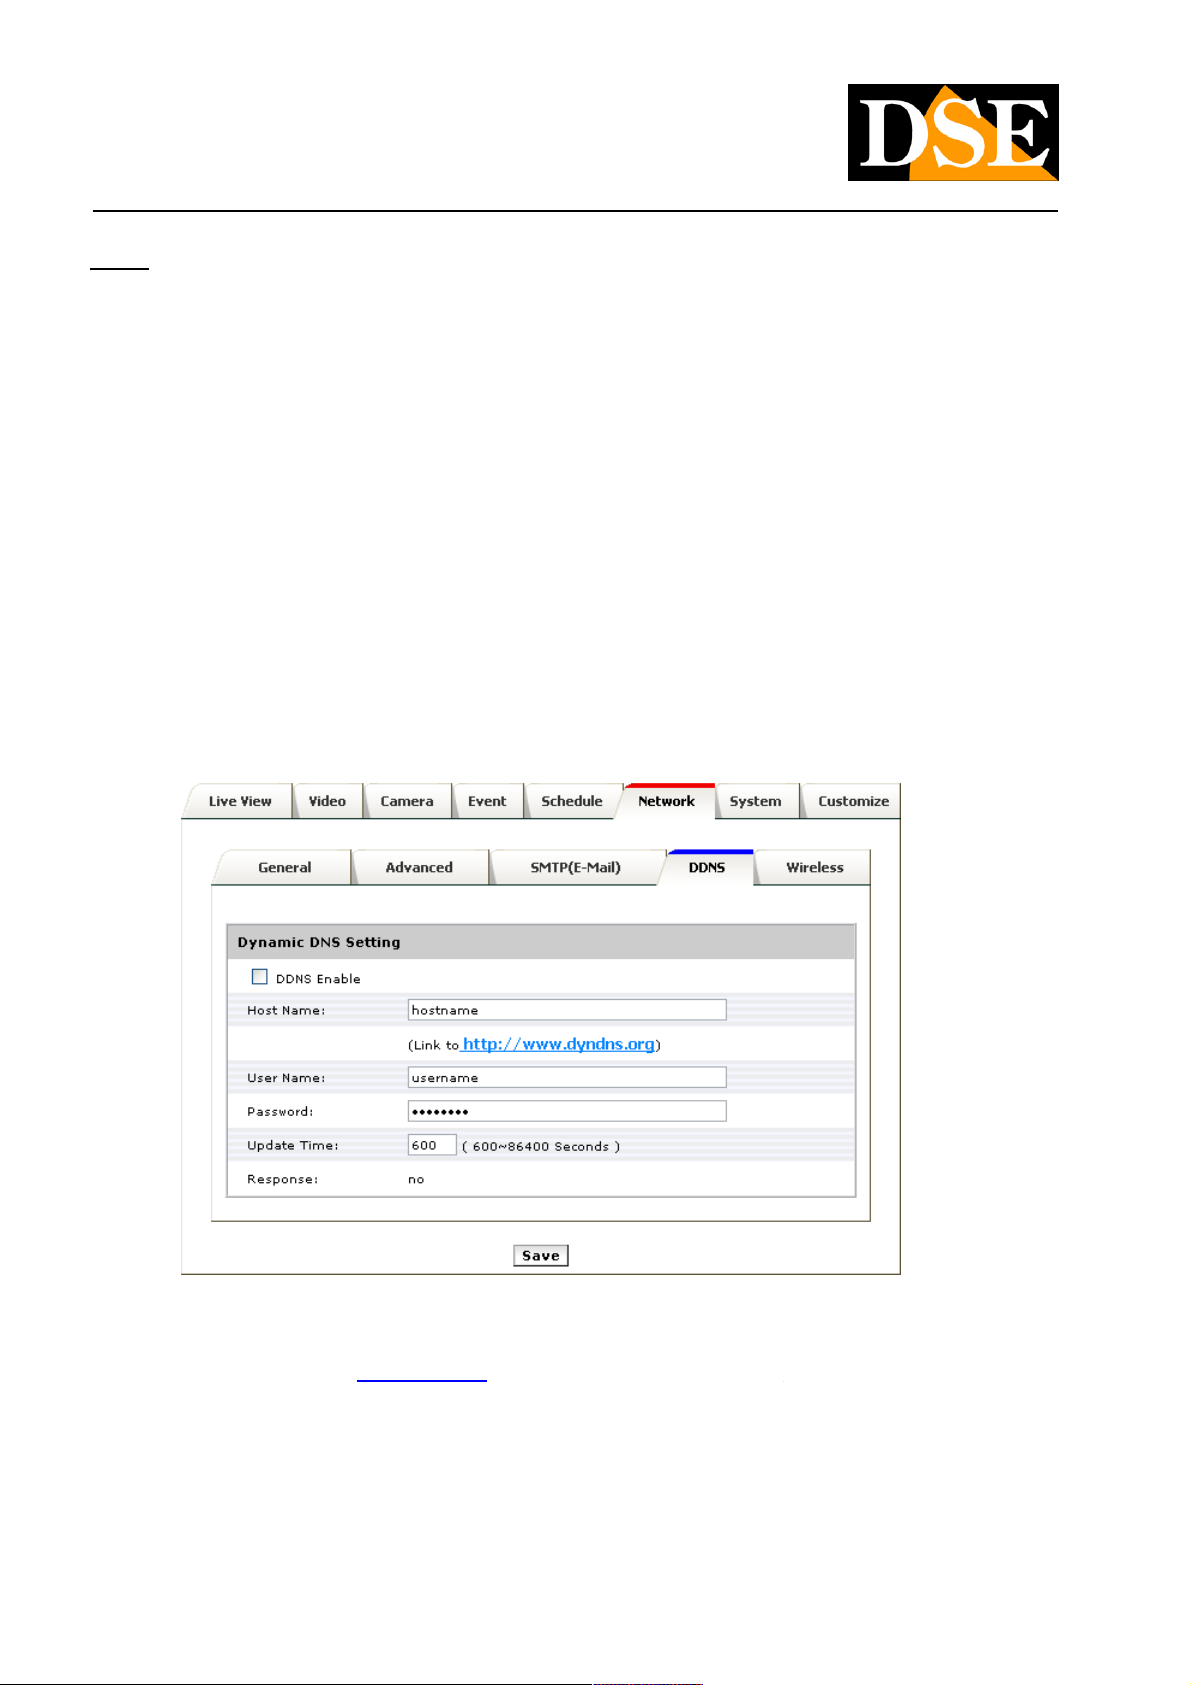
DDNS
To connect to an IP camera through the Internet is highly advisable to have a fixed IP address so that you always know the exact address to
connect. If it can not get from your provider, all cameras in the range support services DDNS (Dynamic DNS) that allow you to constantly
monitor the machine's IP address. These services, also available for free, provide the user with a domain name that you type into your browser.
The DDNS provider redirects communication to the IP address that the camera has at that moment.
All RN Series cameras support the most common DDNS services and are able to send to the DDNS provider periodically Internet IP address
assigned to them. You can set the following parameters:
Host Name: personal domain name that is assigned by the DDNS provider to the device Host Name: personal domain name that is assigned by the DDNS provider to the device
User Name / Password: account authentication for access to the service. User Name / Password: account authentication for access to the service.
Update Time: frequency with which the camera sends its IP address to DDNS server. Update Time: frequency with which the camera sends its IP address to DDNS server.
Response: It indicates whether the camera is properly connected to the service and the DDNS is in operation. Response: It indicates whether the camera is properly connected to the service and the DDNS is in operation.
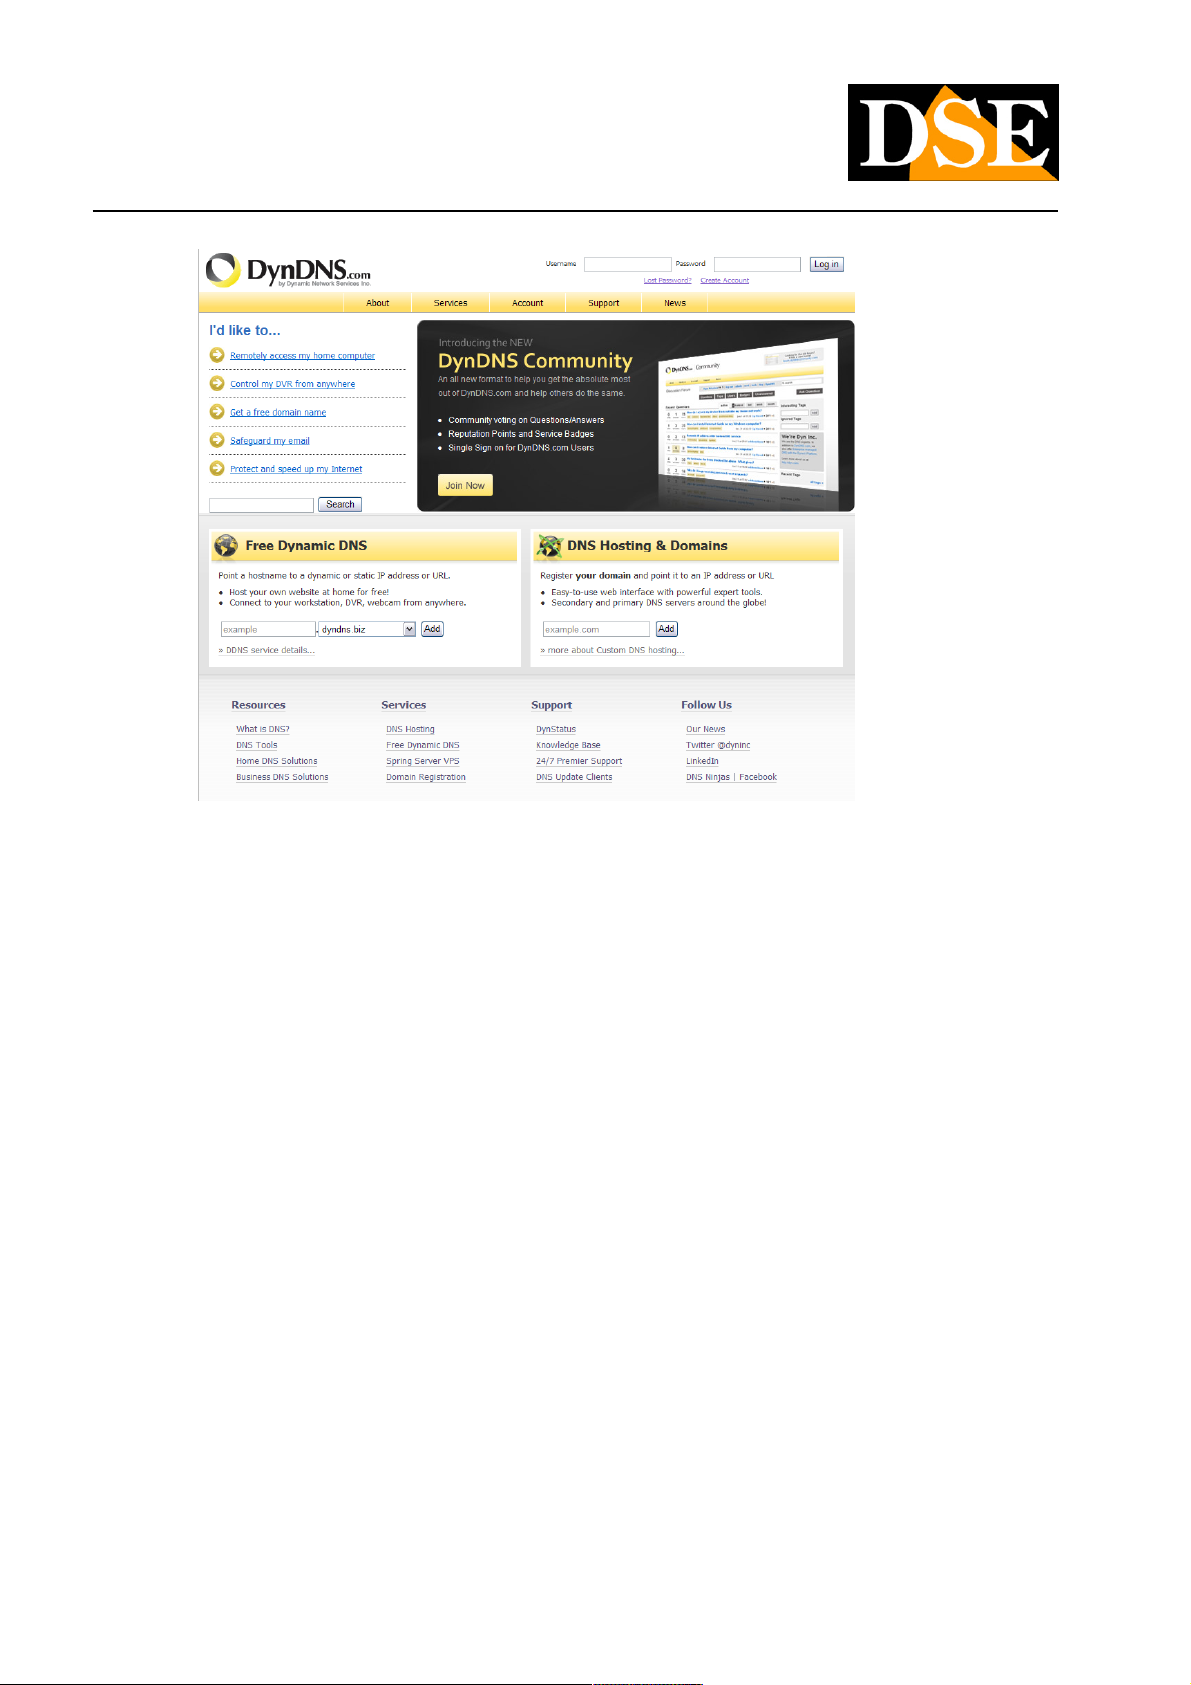
The following describes how to use the DDNS service offered by one of the leading providers DYNDNS.COM whose link is also present in the
configuration tab. Open the web page www.dyndns.comconfiguration tab. Open the web page www.dyndns.com
DSE SRL - ITALY - WWW.DSE.EU
Page 61
USER MANUAL
Megapixel H.264 IP CAMERAS
Page: 61 Page: 61
DSE SRL - ITALY - WWW.DSE.EU
Page 62
USER MANUAL
Megapixel H.264 IP CAMERAS
Page: 62 Page: 62
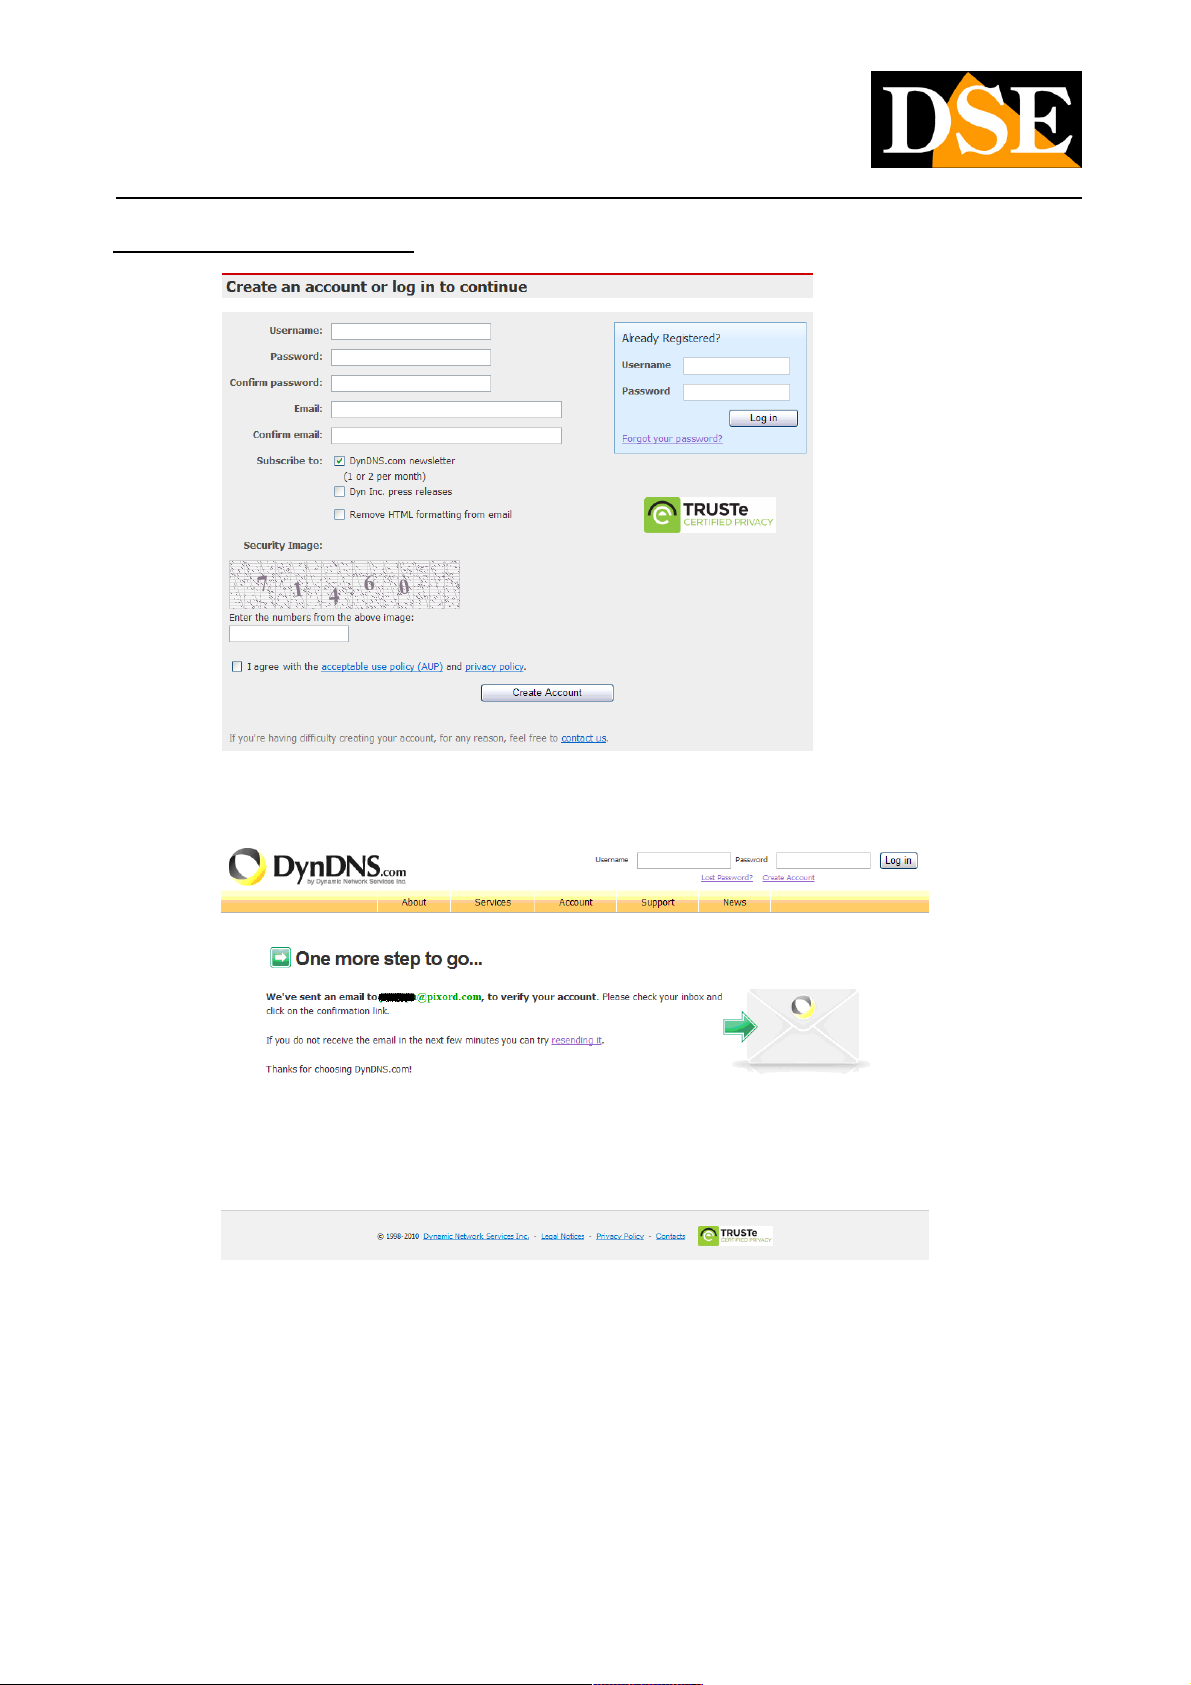
Creating an account with DYNDDNS.COM
Enter USER NAME, PASSWORD and EMAIL to create an account to use for your camera.
The site has accepted the new account and send an e-mail verification.
DSE SRL - ITALY - WWW.DSE.EU
Page 63
USER MANUAL
Megapixel H.264 IP CAMERAS
Page: 63 Page: 63
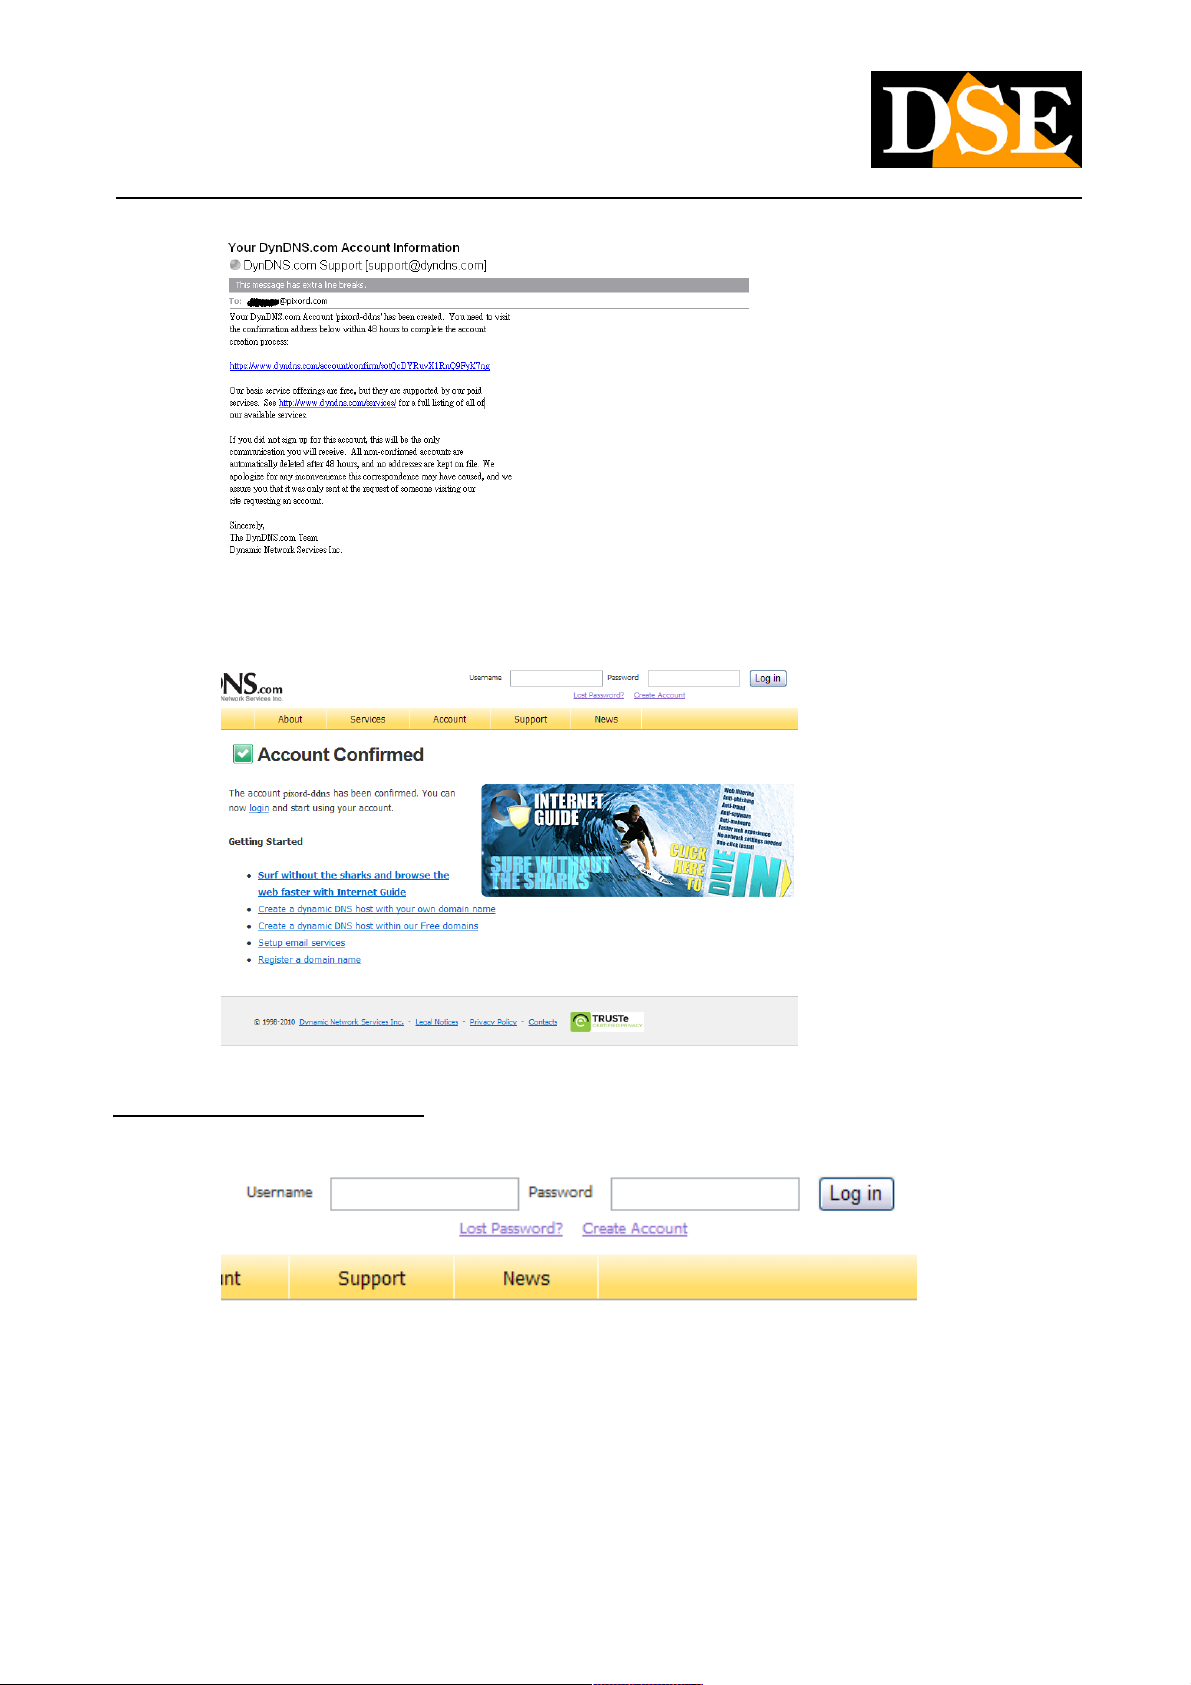
In the email sent by DynDNS, you need to click the link to activate the service. The account will be activated by entering the web site to
confirm.
Login and use the service DYNDNS.COM
For the LOGIN, enter USER NAME and PASSWORD assigned
DSE SRL - ITALY - WWW.DSE.EU
Page 64
USER MANUAL
Megapixel H.264 IP CAMERAS
Page: 64 Page: 64
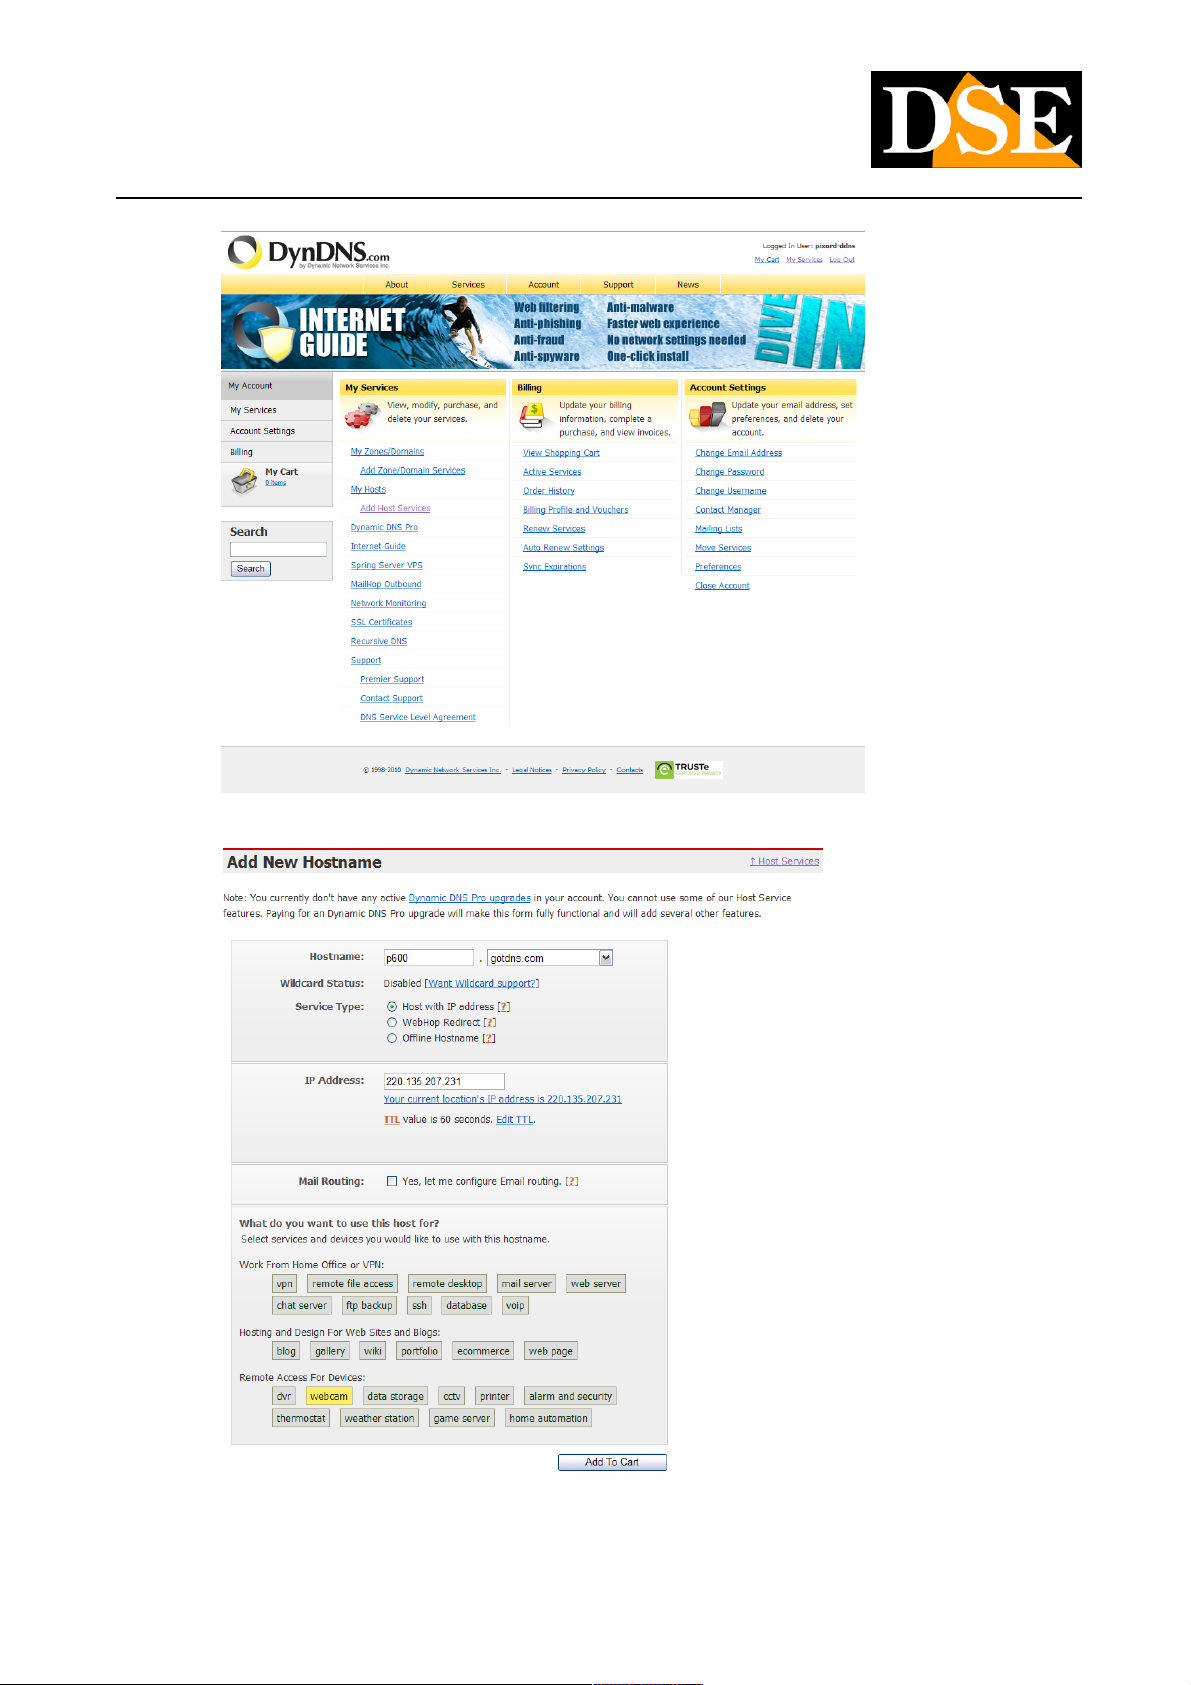
After entering the created, in the " My Services "Click" Add Host Services ". After entering the created, in the " My Services "Click" Add Host Services ". After entering the created, in the " My Services "Click" Add Host Services ".
HOST Enter the name given to the device. The field where ' "IP Address" is entered can be filled with any address as it will be updated
once the device is registered to the service. click on
DSE SRL - ITALY - WWW.DSE.EU
Page 65
USER MANUAL
Megapixel H.264 IP CAMERAS
Page: 65 Page: 65
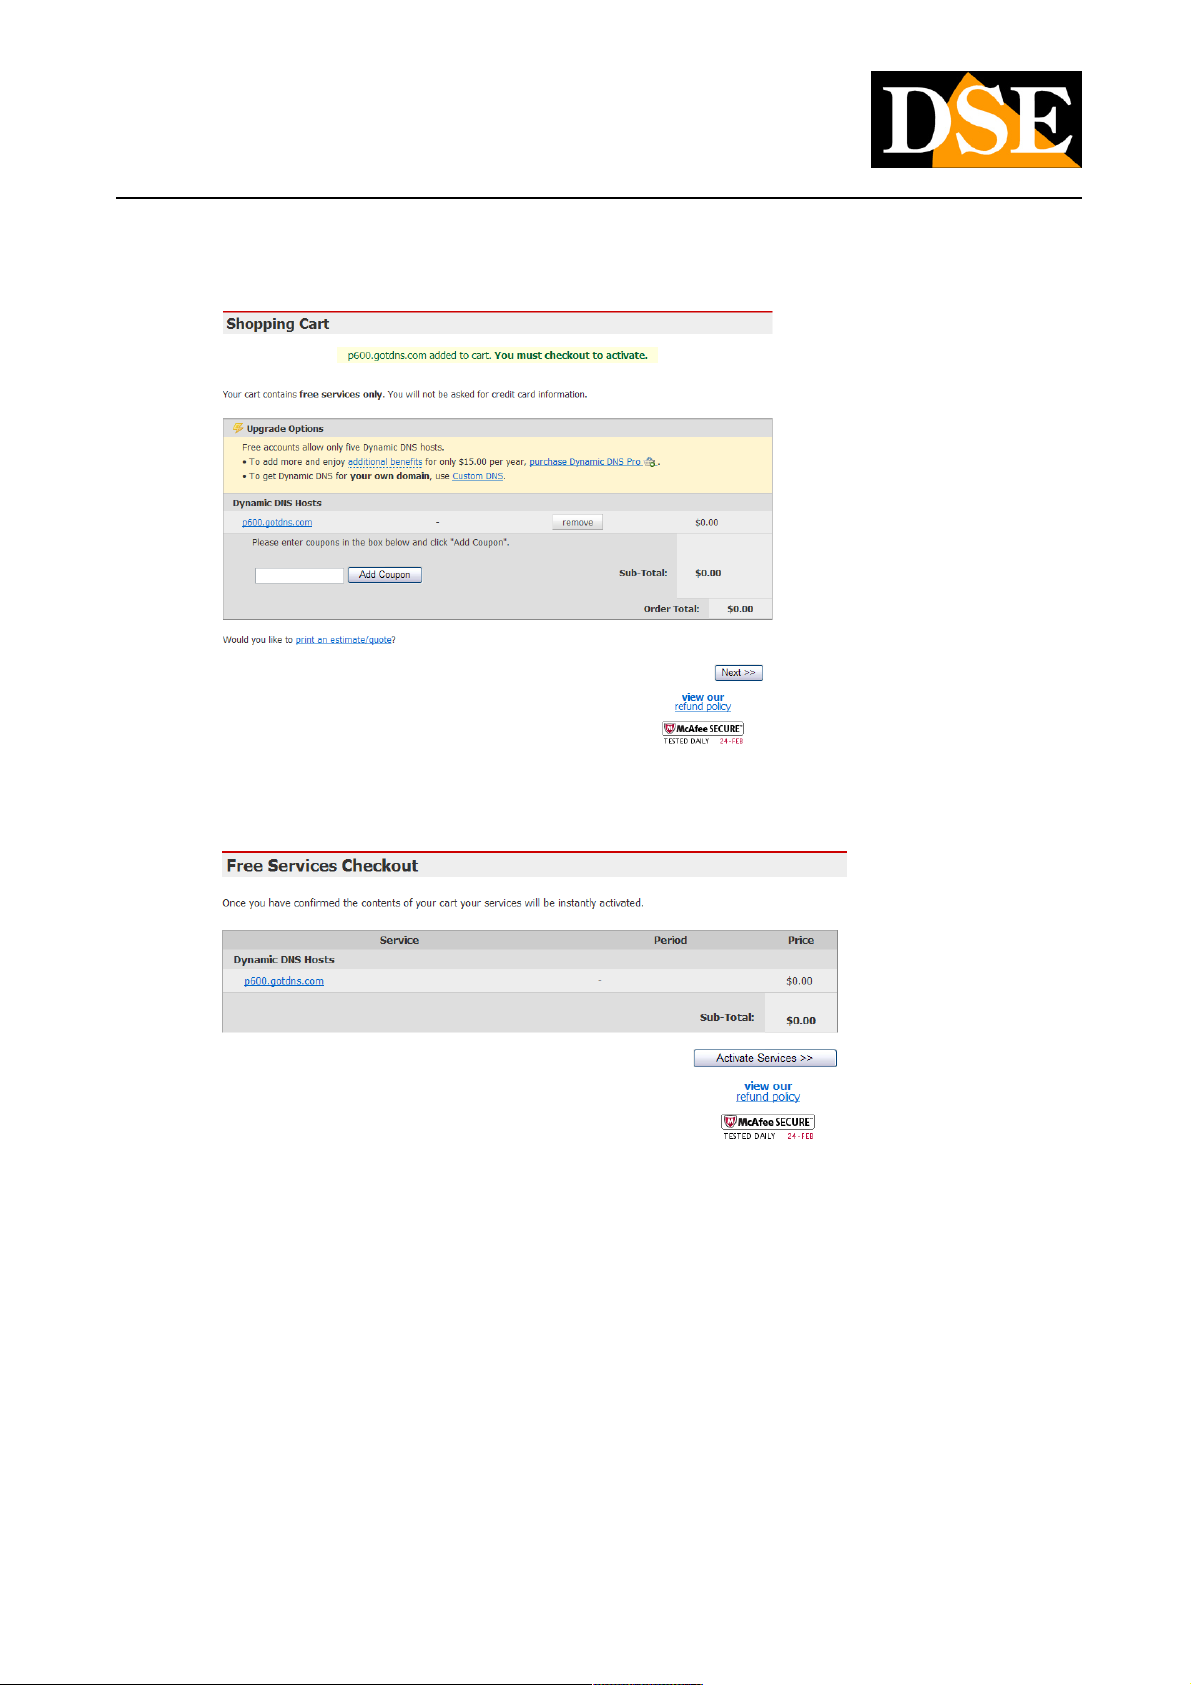
"Add To Cart" to move to the next step.
The Dynamic DNS hosting service is free. only on "Next" Click.
DSE SRL - ITALY - WWW.DSE.EU
Page 66
USER MANUAL
Megapixel H.264 IP CAMERAS
Page: 66 Page: 66
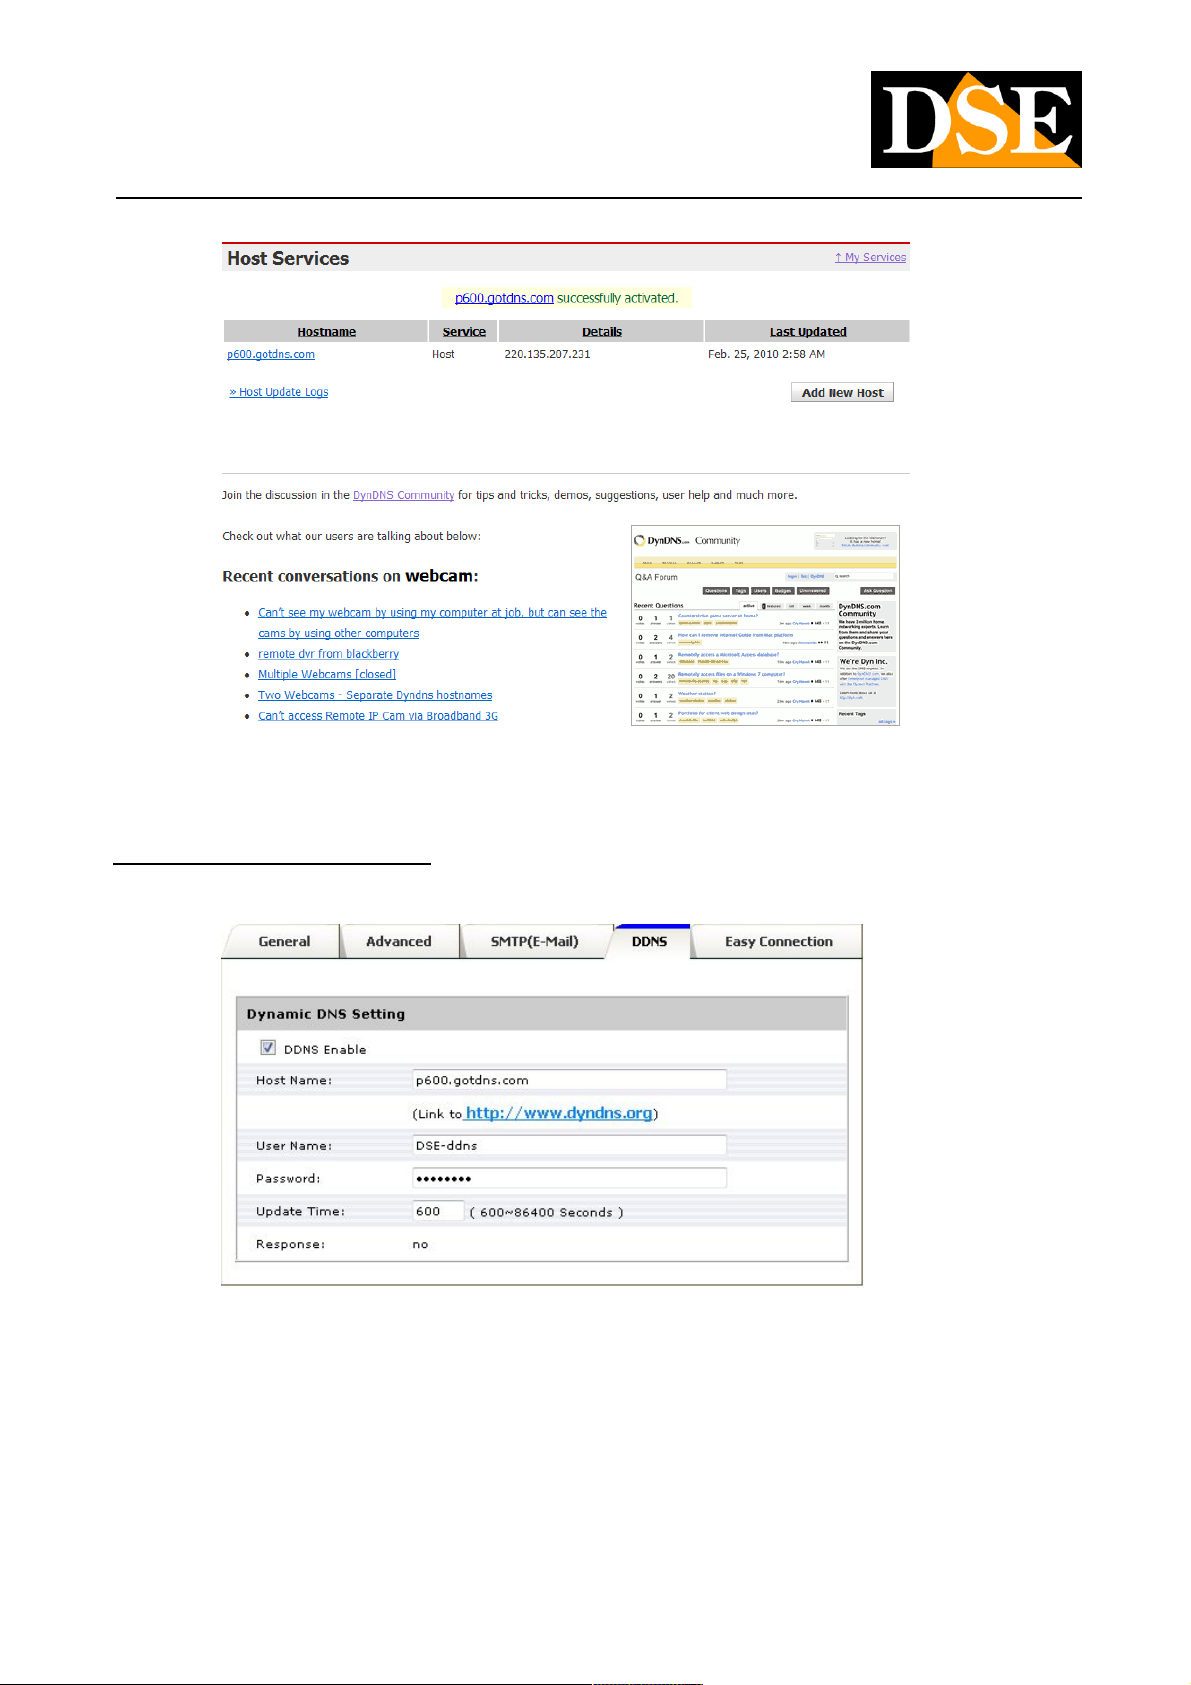
Click "Add New Host" option if you want to record other additional IP cameras.
Enter the DDNS parameters in the camera
On the Device Configuration page, Setup -> Network -> DDNS, enter the name HOST logged and the username and password. Enable
DDNS then save the settings. In the "Response" she says "yes" to indicate that registration has been successful. If you click on the LINK
in blue will show the Live View page of the device.
DSE SRL - ITALY - WWW.DSE.EU
Page 67
USER MANUAL
Megapixel H.264 IP CAMERAS
Page: 67 Page: 67
Wireless
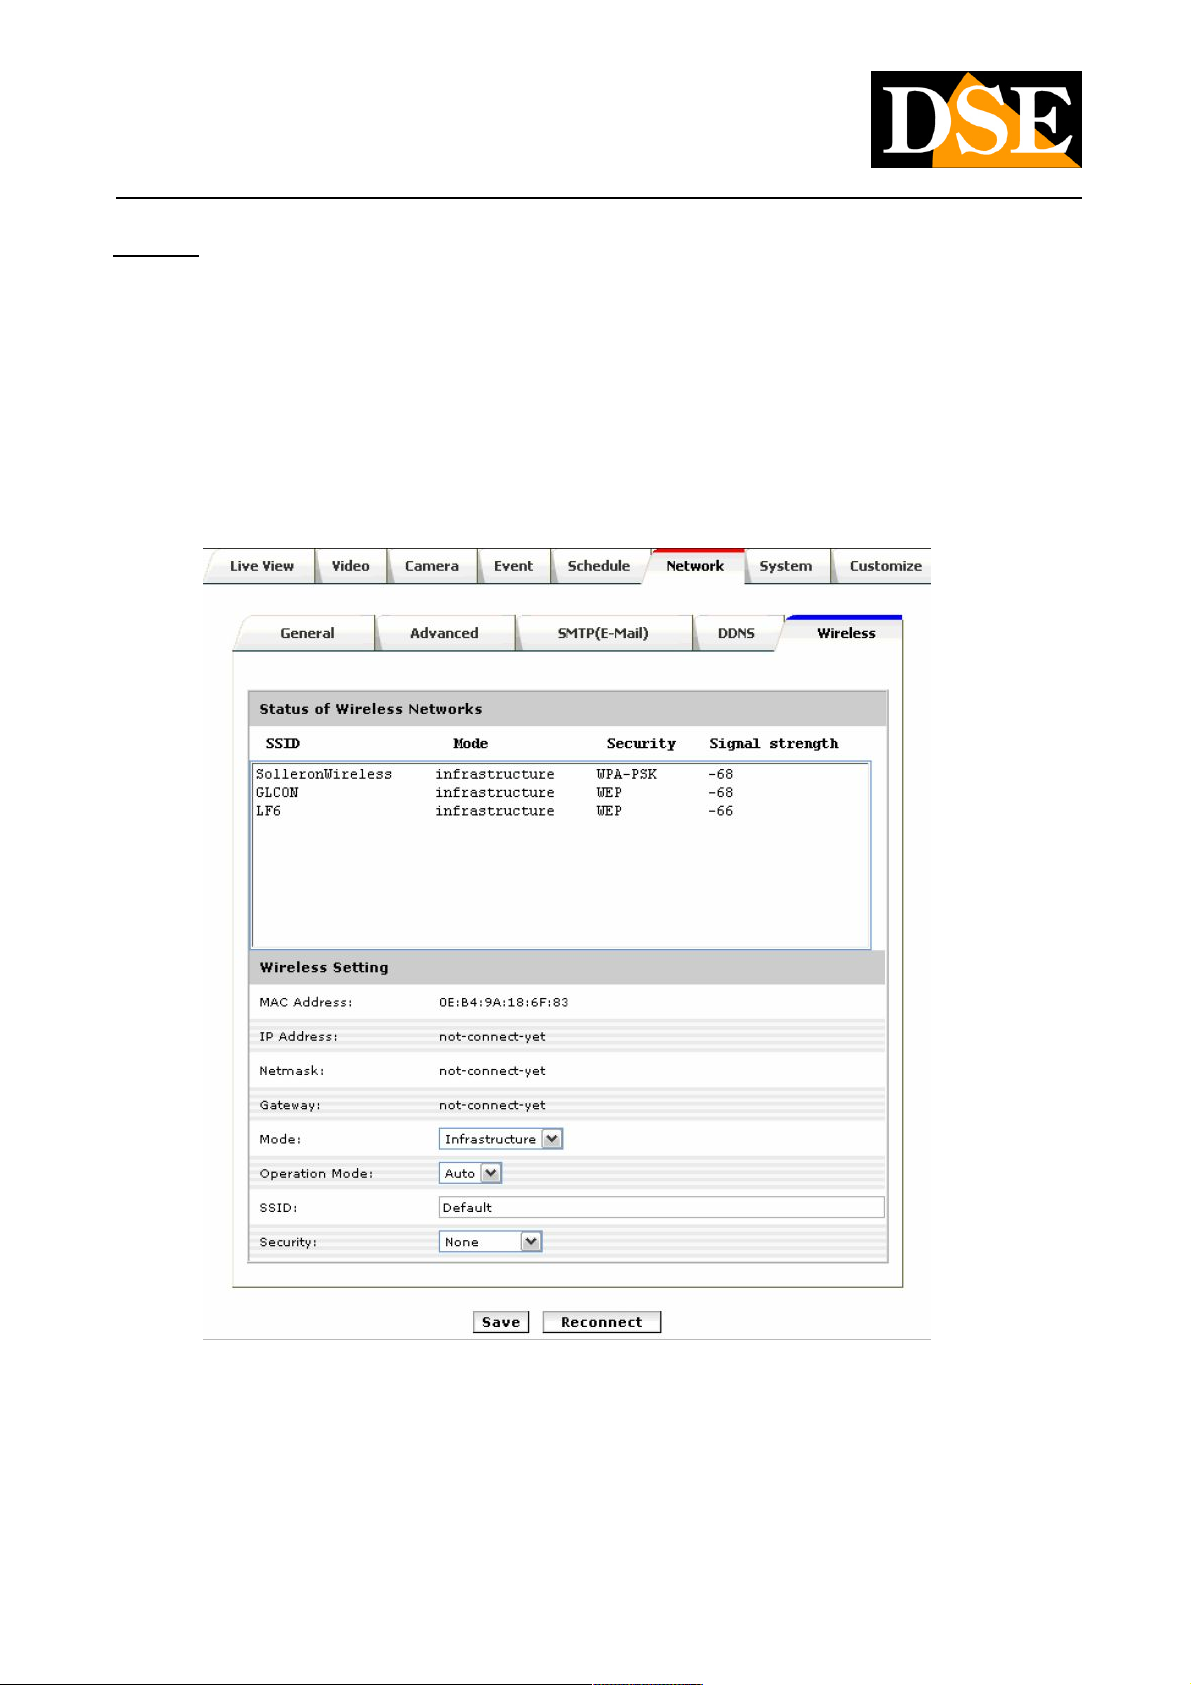
This section is only available in cameras that support the connection to the wireless network Wi.Fi. E 'need to access the camera via
hardwired connection initially to configure the disconnection wireless power and subsequently disconnect the network cable. The window
shows all the wireless networks available in the environment (Access Points) and indicates the type, the safety guard and the signal
strength.
Enter the connection parameters adjusted according to the settings of your wireless network SSID and especially any security
parameters to connect
DSE SRL - ITALY - WWW.DSE.EU
Page 68
USER MANUAL
Megapixel H.264 IP CAMERAS
Page: 68 Page: 68
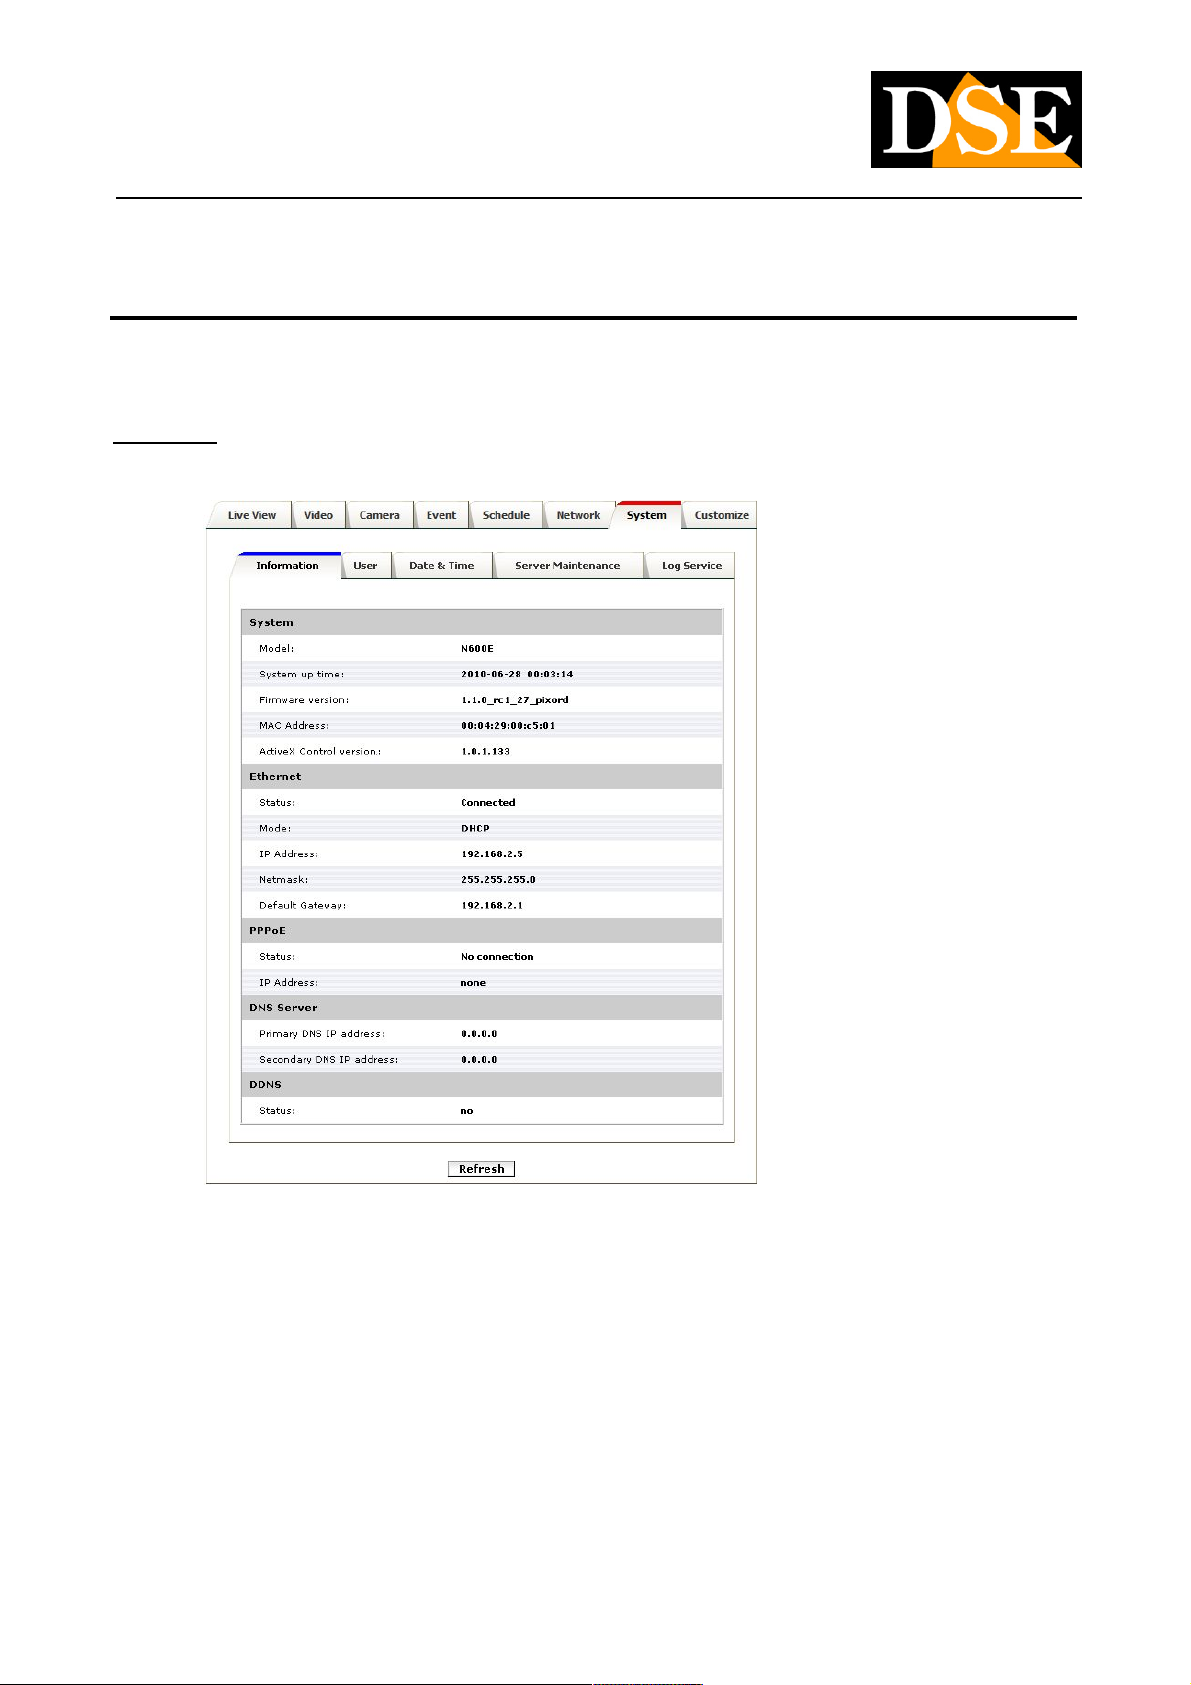
SYSTEM - System Settings
In this section you set the general options for system
Information
This tab summarizes the information about the product and network configuration.
DSE SRL - ITALY - WWW.DSE.EU
Page 69
USER MANUAL
Megapixel H.264 IP CAMERAS
Page: 69 Page: 69
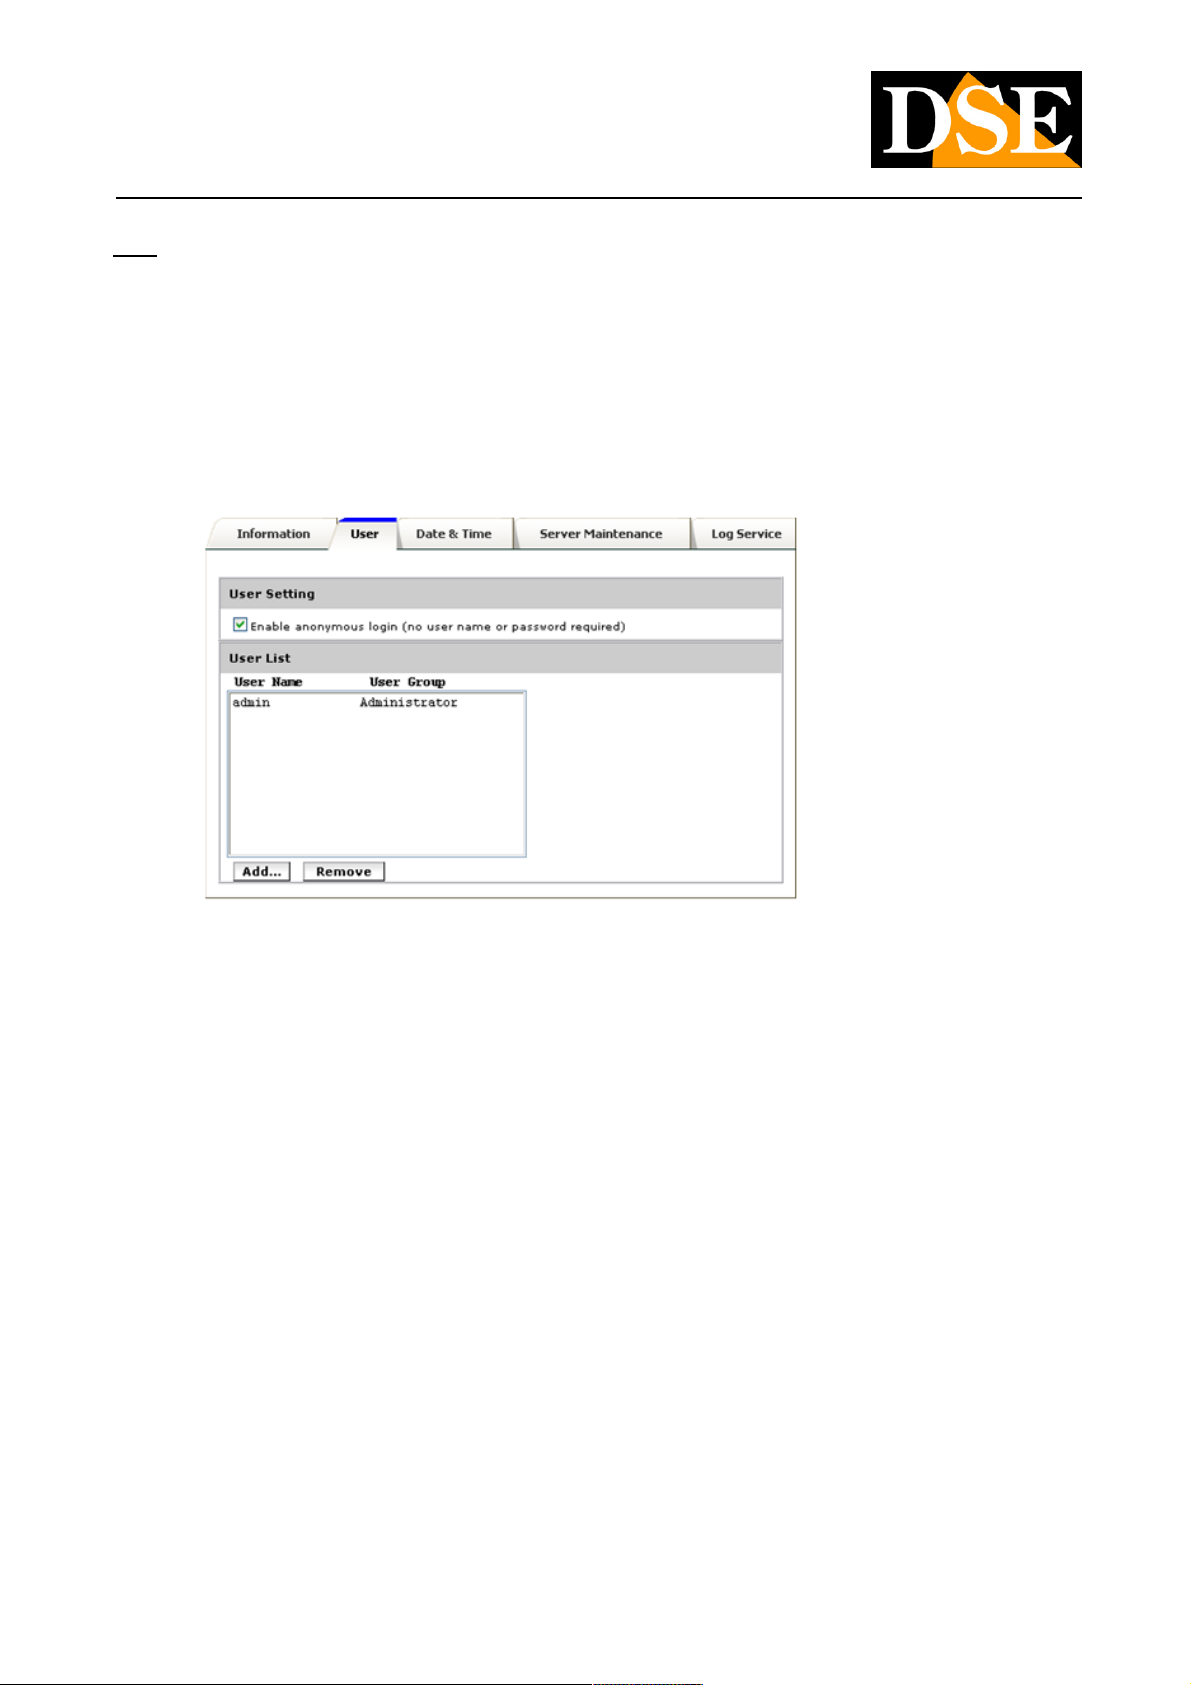
User
Access to the camera is controlled by a password so that only authorized personnel can access them. E 'can enter up to 20 users
Each user can have one of the following levels of access to the system:
ADMINISTRATOR: full access ADMINISTRATOR: full access
OPERATOR: Access to display and single programming sections and VIDEO CAMERA. OPERATOR: Access to display and single programming sections and VIDEO CAMERA.
VIEWER: Access to only live viewing VIEWER: Access to only live viewing
Use the ADD button to add a new user.
The default user ADMIN can not be eliminated, but you can of course customize the password to it combined. The option ENABLE The default user ADMIN can not be eliminated, but you can of course customize the password to it combined. The option ENABLE
ANONYMOUS LOGIN You can be enabled if you want to allow access to only viewing without requiring any access passowrd. ANONYMOUS LOGIN You can be enabled if you want to allow access to only viewing without requiring any access passowrd.
DSE SRL - ITALY - WWW.DSE.EU
Page 70
USER MANUAL
Megapixel H.264 IP CAMERAS
Page: 70 Page: 70
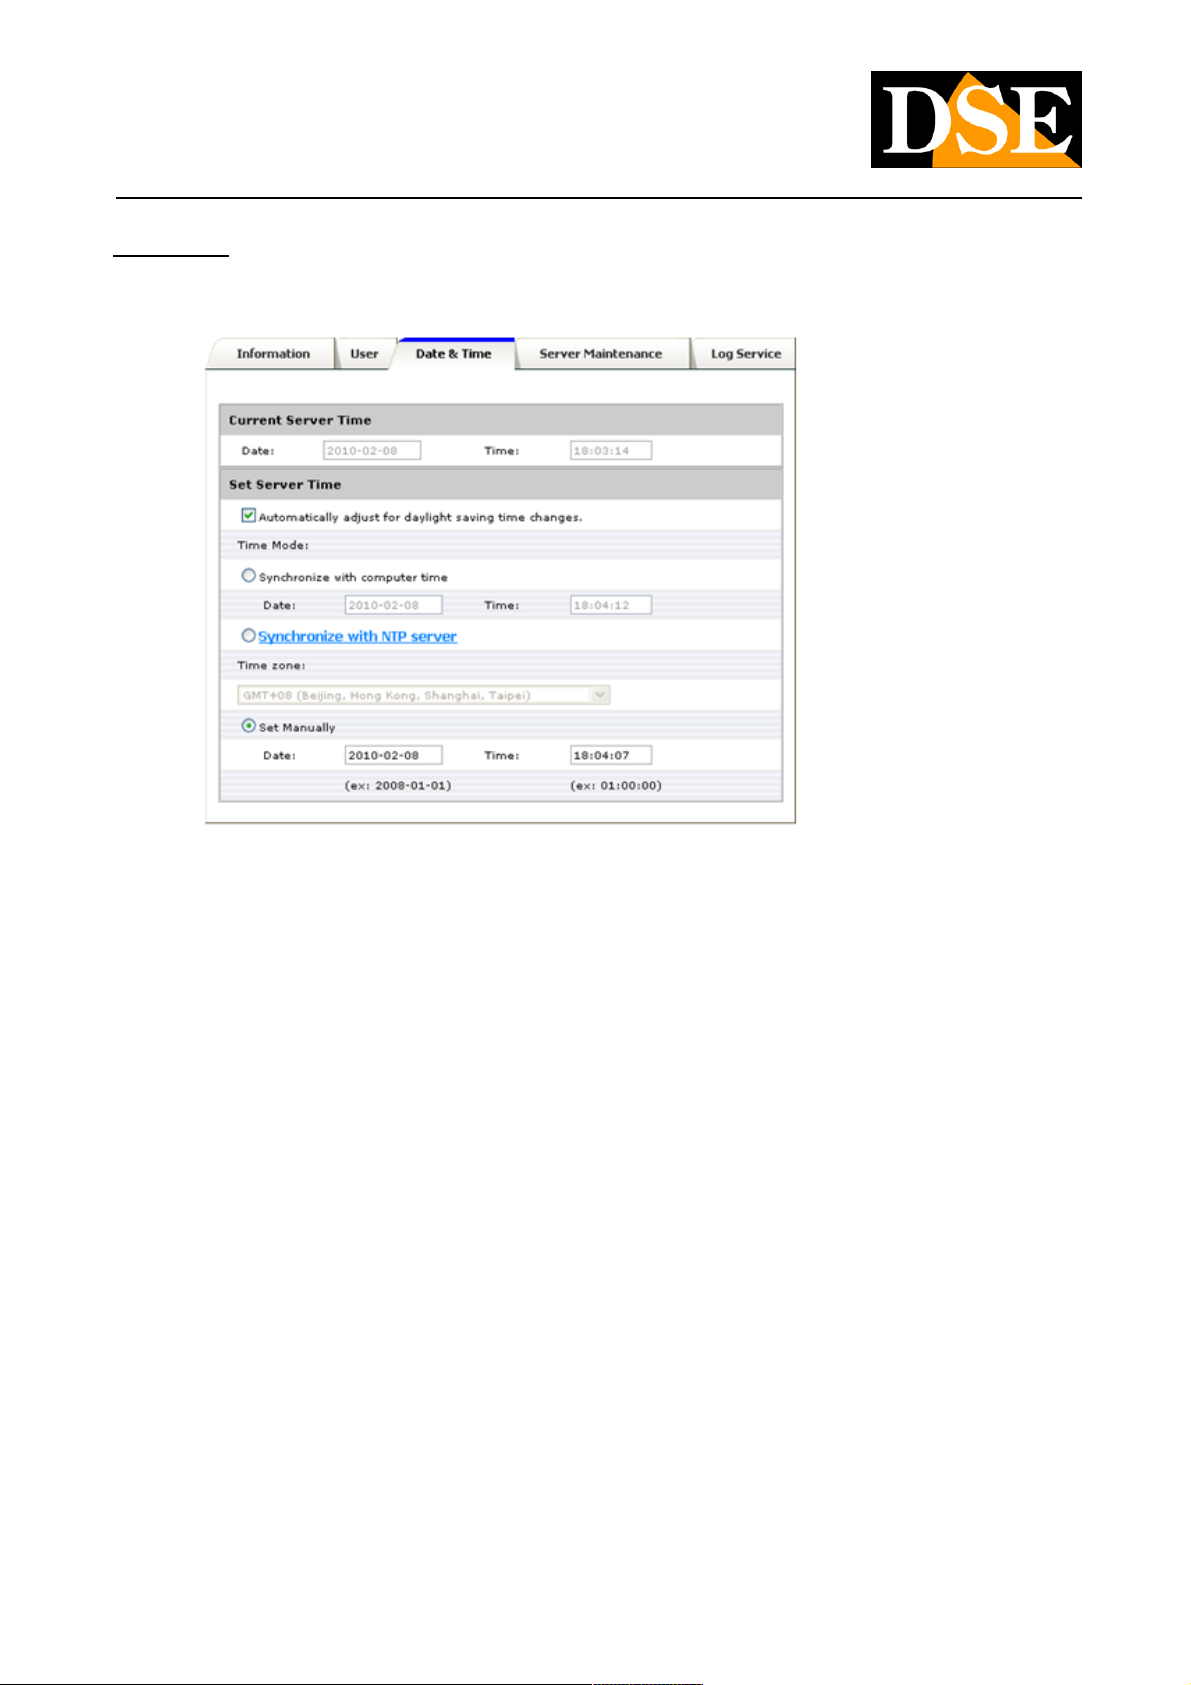
Date & Time
In this tab, it is possible to configure the date and time of the device. The options for synchronization with PC and NTP server are
provided for the automatic adjustment.
AUTOMATICALLY ADJUST FOR DST - Automatically adjust clock for summer / winter AUTOMATICALLY ADJUST FOR DST - Automatically adjust clock for summer / winter
SYNCHRONIZE WITH COMPUTER TIME - Sync time to that of the PC SYNCHRONIZE WITH COMPUTER TIME - Sync time to that of the PC
SYNCHRONIZE WITH NTP SERVER - Rule automaticanente time with an NTP server on the network to configure in the NETWORK SYNCHRONIZE WITH NTP SERVER - Rule automaticanente time with an NTP server on the network to configure in the NETWORK
section.
TIME ZONE - Set the time zone (GMT + 1 in Italy) TIME ZONE - Set the time zone (GMT + 1 in Italy)
Set Manually - Set date and time manually Set Manually - Set date and time manually
DSE SRL - ITALY - WWW.DSE.EU
Page 71
USER MANUAL
Megapixel H.264 IP CAMERAS
Page: 71 Page: 71
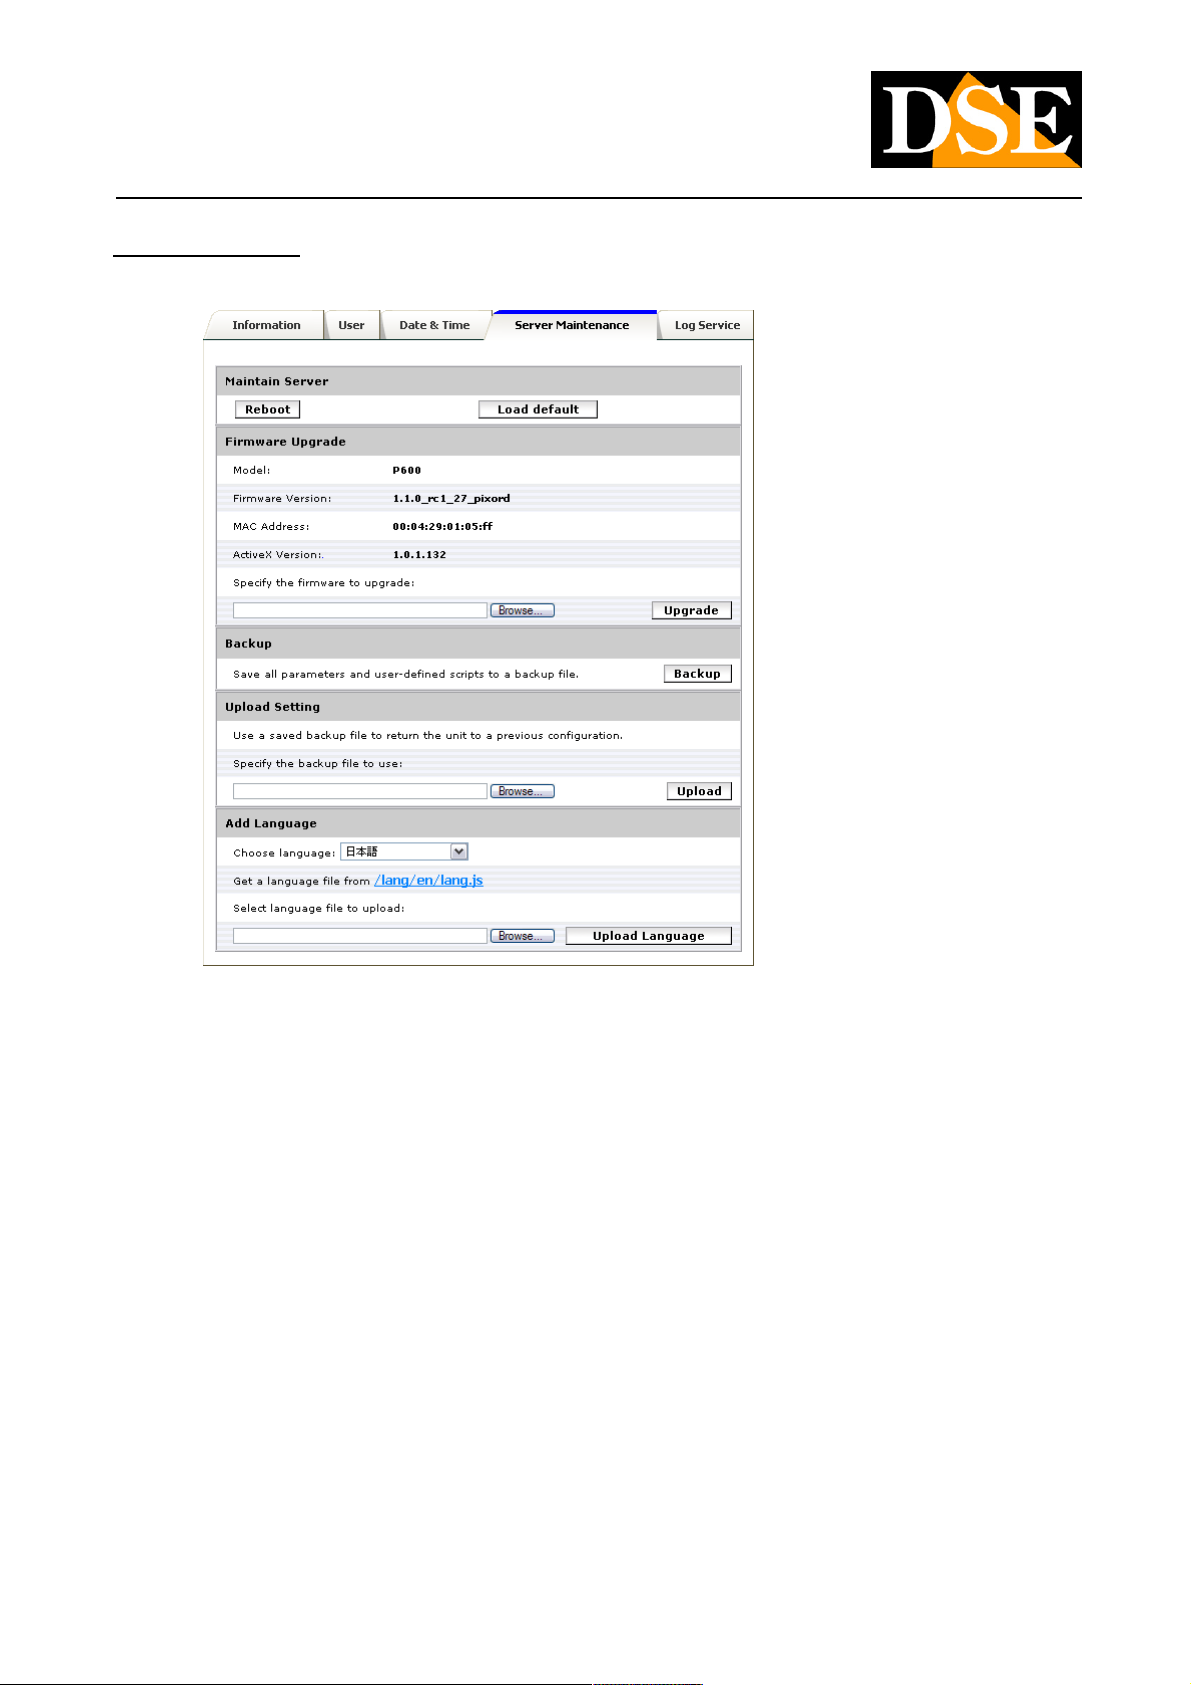
Server Maintenance
This page provides tools for maintenance of the camera system on board.
REBOOT - Reboot the camera REBOOT - Reboot the camera
LOAD DEFAULT - Restore the factory parameters LOAD DEFAULT - Restore the factory parameters
UPGRADE - Allows you to choose and to send a new updated Camera Firmware UPGRADE - Allows you to choose and to send a new updated Camera Firmware
BACK UP - Save the camera configuration in a file .TGZ BACK UP - Save the camera configuration in a file .TGZ
UPLOAD - Allows you to send to a previously saved configuration Camera UPLOAD - Allows you to send to a previously saved configuration Camera
ADD LANGUAGE - This command is useful if you want to translate the English text web interface of the camera or change it at will. E ADD LANGUAGE - This command is useful if you want to translate the English text web interface of the camera or change it at will. E
'can by clicking the link in blue, from the camera to download the file containing all the web interface texts in the international factory
language (English) and translate them into any language using any text editor such as notepad windows With the command UPLOAD language (English) and translate them into any language using any text editor such as notepad windows With the command UPLOAD
LANGUAGE you can send the translated file to the camera. LANGUAGE you can send the translated file to the camera.
DSE SRL - ITALY - WWW.DSE.EU
Page 72
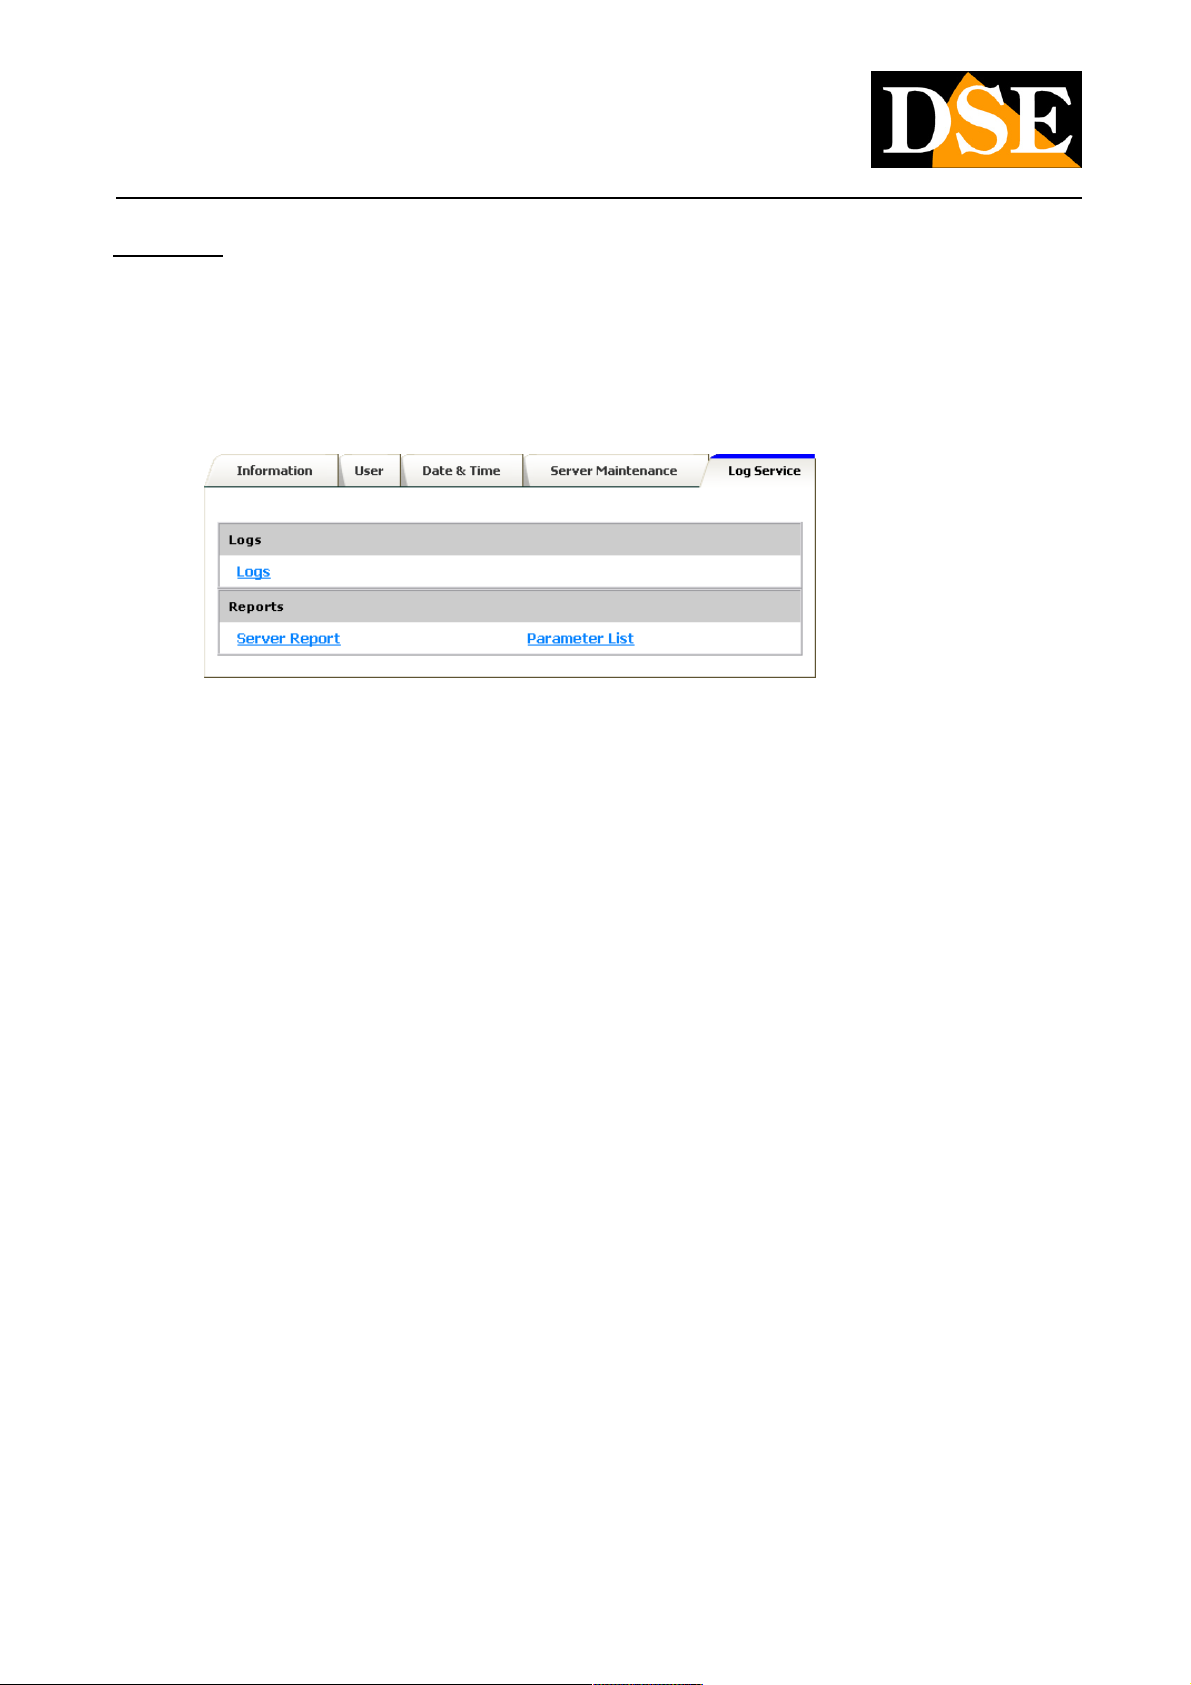
USER MANUAL
Megapixel H.264 IP CAMERAS
Page: 72 Page: 72
Log Service
Most system operations are stored in a LOG. On this page you can view the log in a browser window. There are 3 types:
LOGS - List of transactions carried out the network LOGS - List of transactions carried out the network
PARAMETER LIST - Complete programming PARAMETER LIST - Complete programming
REPORTS SERVER - Full report REPORTS SERVER - Full report
DSE SRL - ITALY - WWW.DSE.EU
Page 73
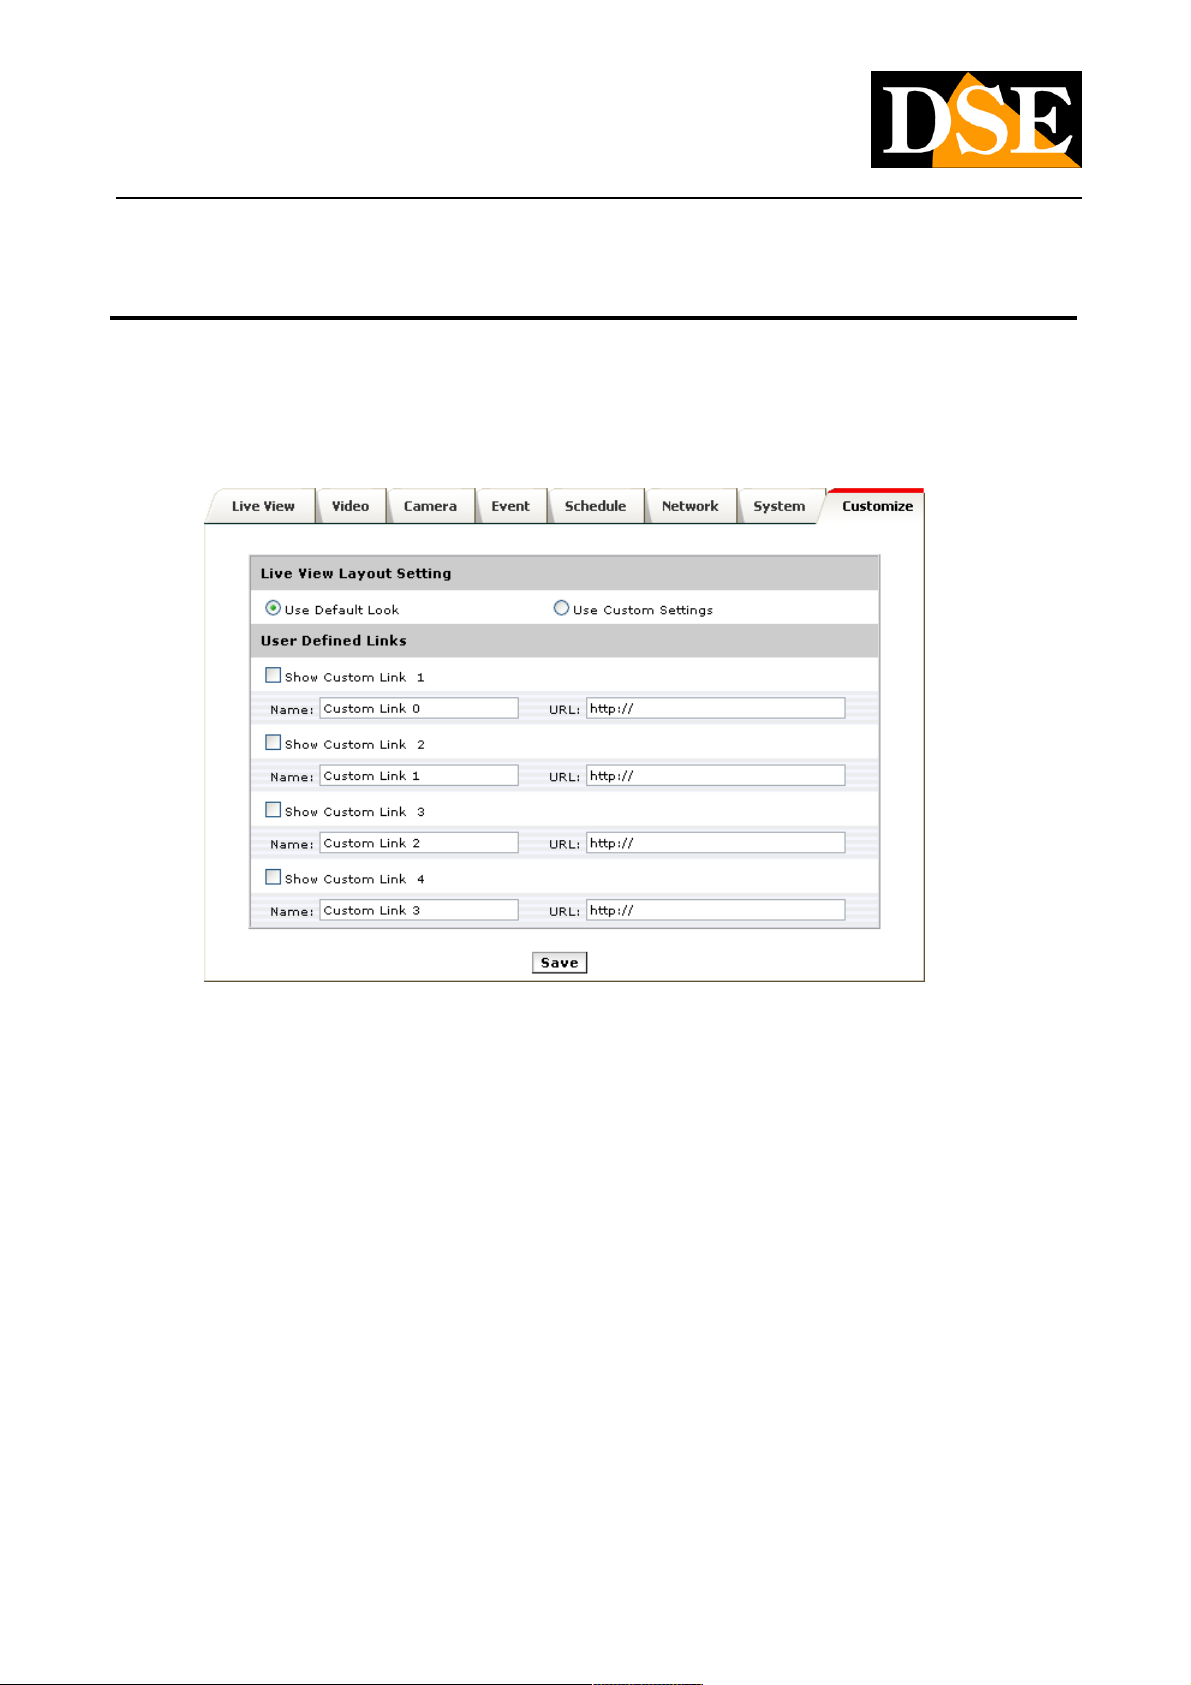
USER MANUAL
Megapixel H.264 IP CAMERAS
Page: 73 Page: 73
CUSTOMIZE - Customization
In this section there is the possibility to customize the appearance of the LIVE camera view page. There are two types of layout setting:
the factory DEFAULT display or use custom settings.
Use Default Look: Use the aesthetics of the graphical Factory Use Default Look: Use the aesthetics of the graphical Factory
Use Defined Links: E 'can enter the IP addresses that link will be shown in the live display of the camera. For example, you can enter Use Defined Links: E 'can enter the IP addresses that link will be shown in the live display of the camera. For example, you can enter
the IP address of other cameras or network devices (NAME: see description URL: address).
Use Custom Settings: E 'can customize the graphical web interface according to your needs: BACKGROUD COLOR - background color Use Custom Settings: E 'can customize the graphical web interface according to your needs: BACKGROUD COLOR - background color
TEXT COLOR - text color
BACKGROUND PICTURE - Background image (file or external link) TITLE - the page
title
DESCRIPTION - description LOGI page - Logo reproduced on the
page (file or external link)
DSE SRL - ITALY - WWW.DSE.EU
Page 74
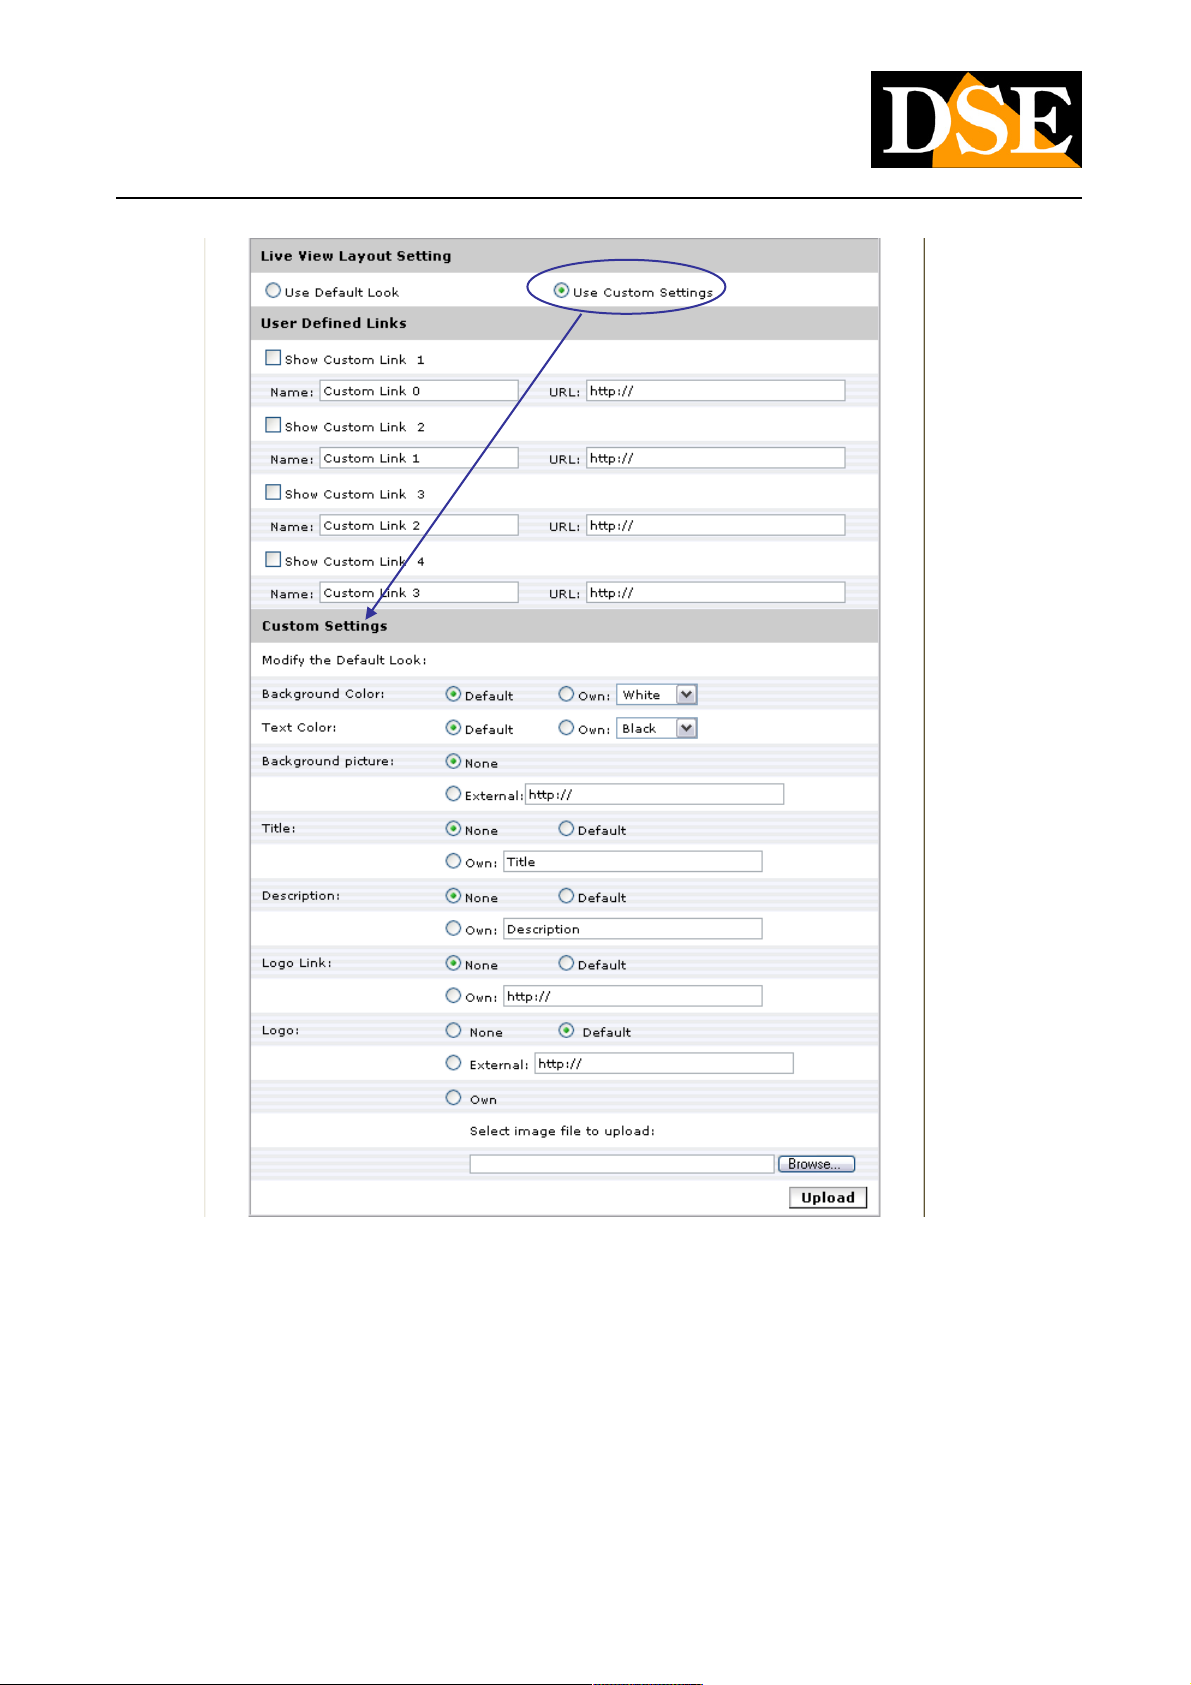
USER MANUAL
Megapixel H.264 IP CAMERAS
Page: 74 Page: 74
DSE SRL - ITALY - WWW.DSE.EU
Page 75
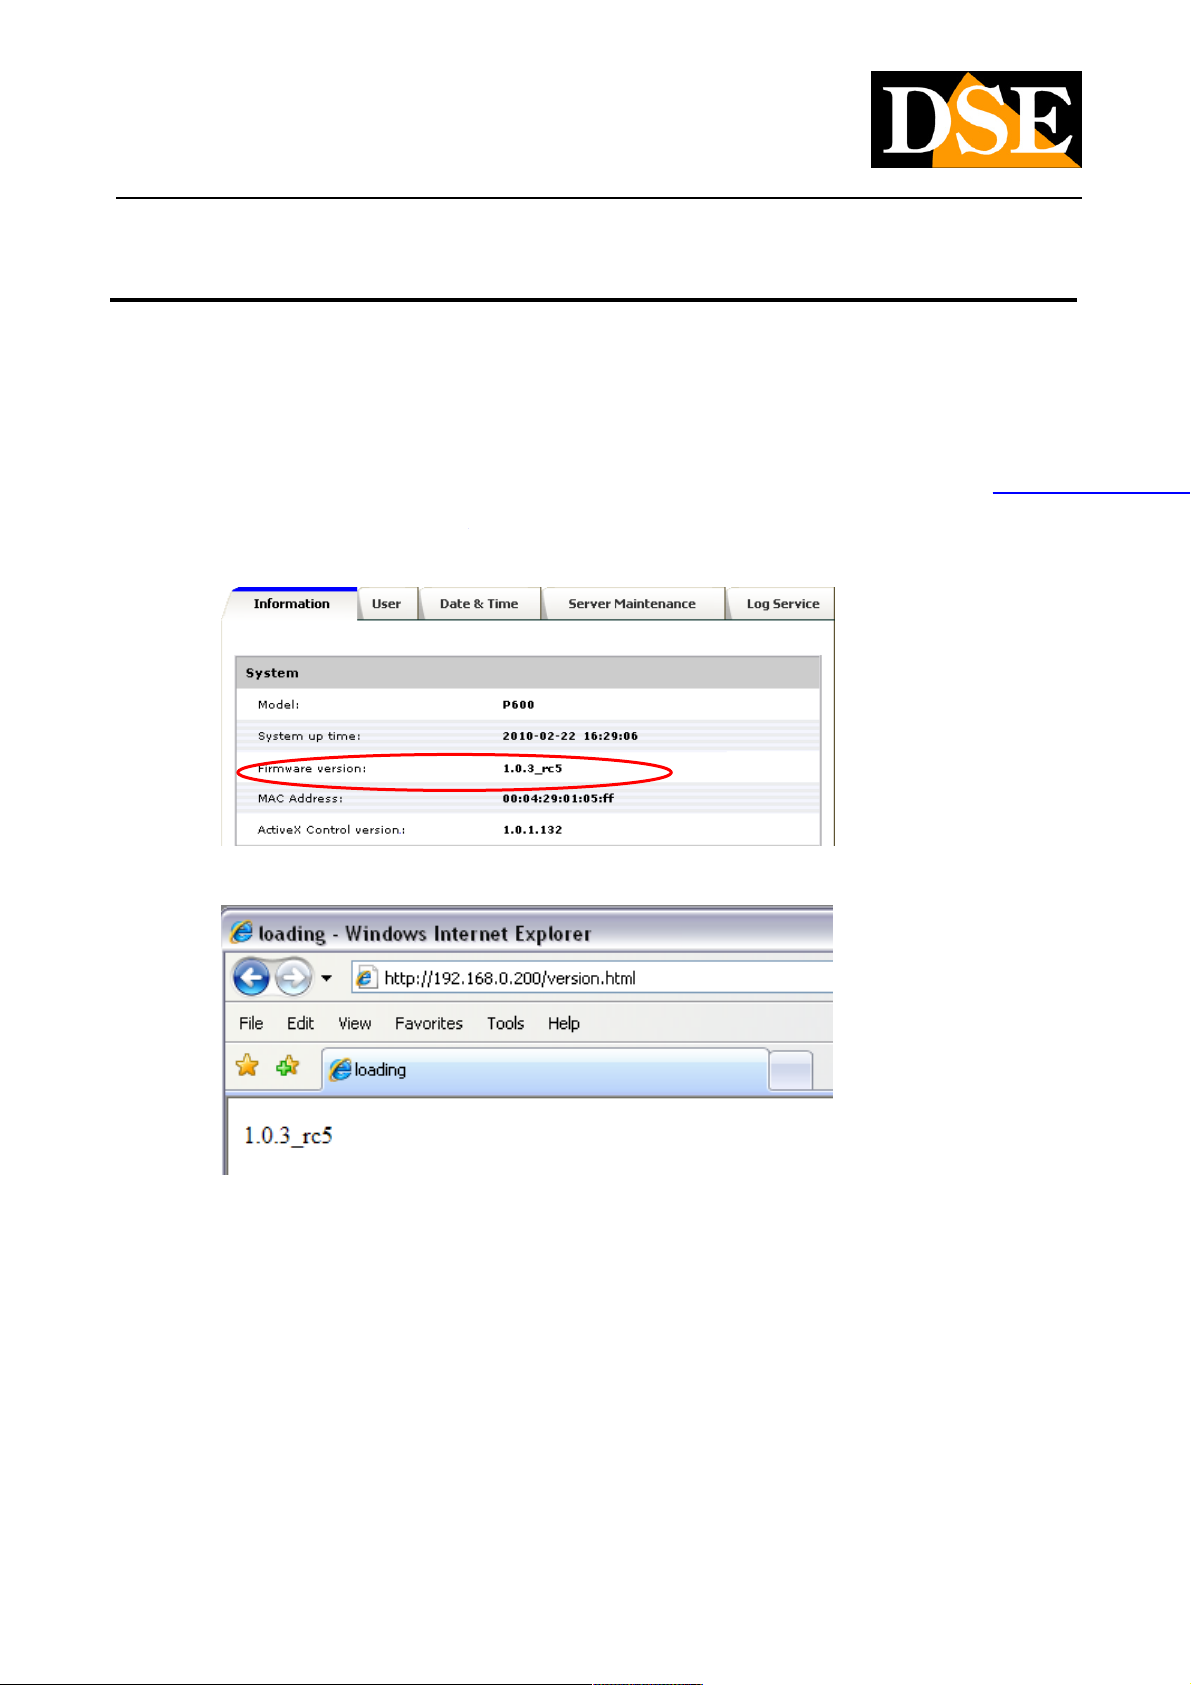
USER MANUAL
Megapixel H.264 IP CAMERAS
Page: 75 Page: 75
firmware Update
Check Firmware Version
How Firmware is the set of software instructions within the camera that govern its operation. The version of the Firmware installed in the
device can be checked by entering the menu
Setup, then System, in the folder Information.Setup, then System, in the folder Information.Setup, then System, in the folder Information.Setup, then System, in the folder Information.Setup, then System, in the folder Information.
You can come to knowledge of the firmware version also simply typing "version.html" after the camera address, for example http://192.168.0.200/version.htmlYou can come to knowledge of the firmware version also simply typing "version.html" after the camera address, for example http://192.168.0.200/version.html
.
Firmware Update
All RN series cameras allow you to upgrade the camera firmware with a newer one. In any case it is never recommended to update the
firmware unless under indication of our technicians. The
the firmware update process is done through the browser by going to Information -> Server Maintenance -> Firmware Upgrade.the firmware update process is done through the browser by going to Information -> Server Maintenance -> Firmware Upgrade.
Follow the following guidelines:
1. Obtain the latest version of firmware and save it on the client PC.
2. Disconnect all clients connected to the camera.
3. Turn off any scheduled recording SCHEDULE.
4. Go to the page for updating the firmware, try the update file by clicking on BROWSE,
DSE SRL - ITALY - WWW.DSE.EU
Page 76
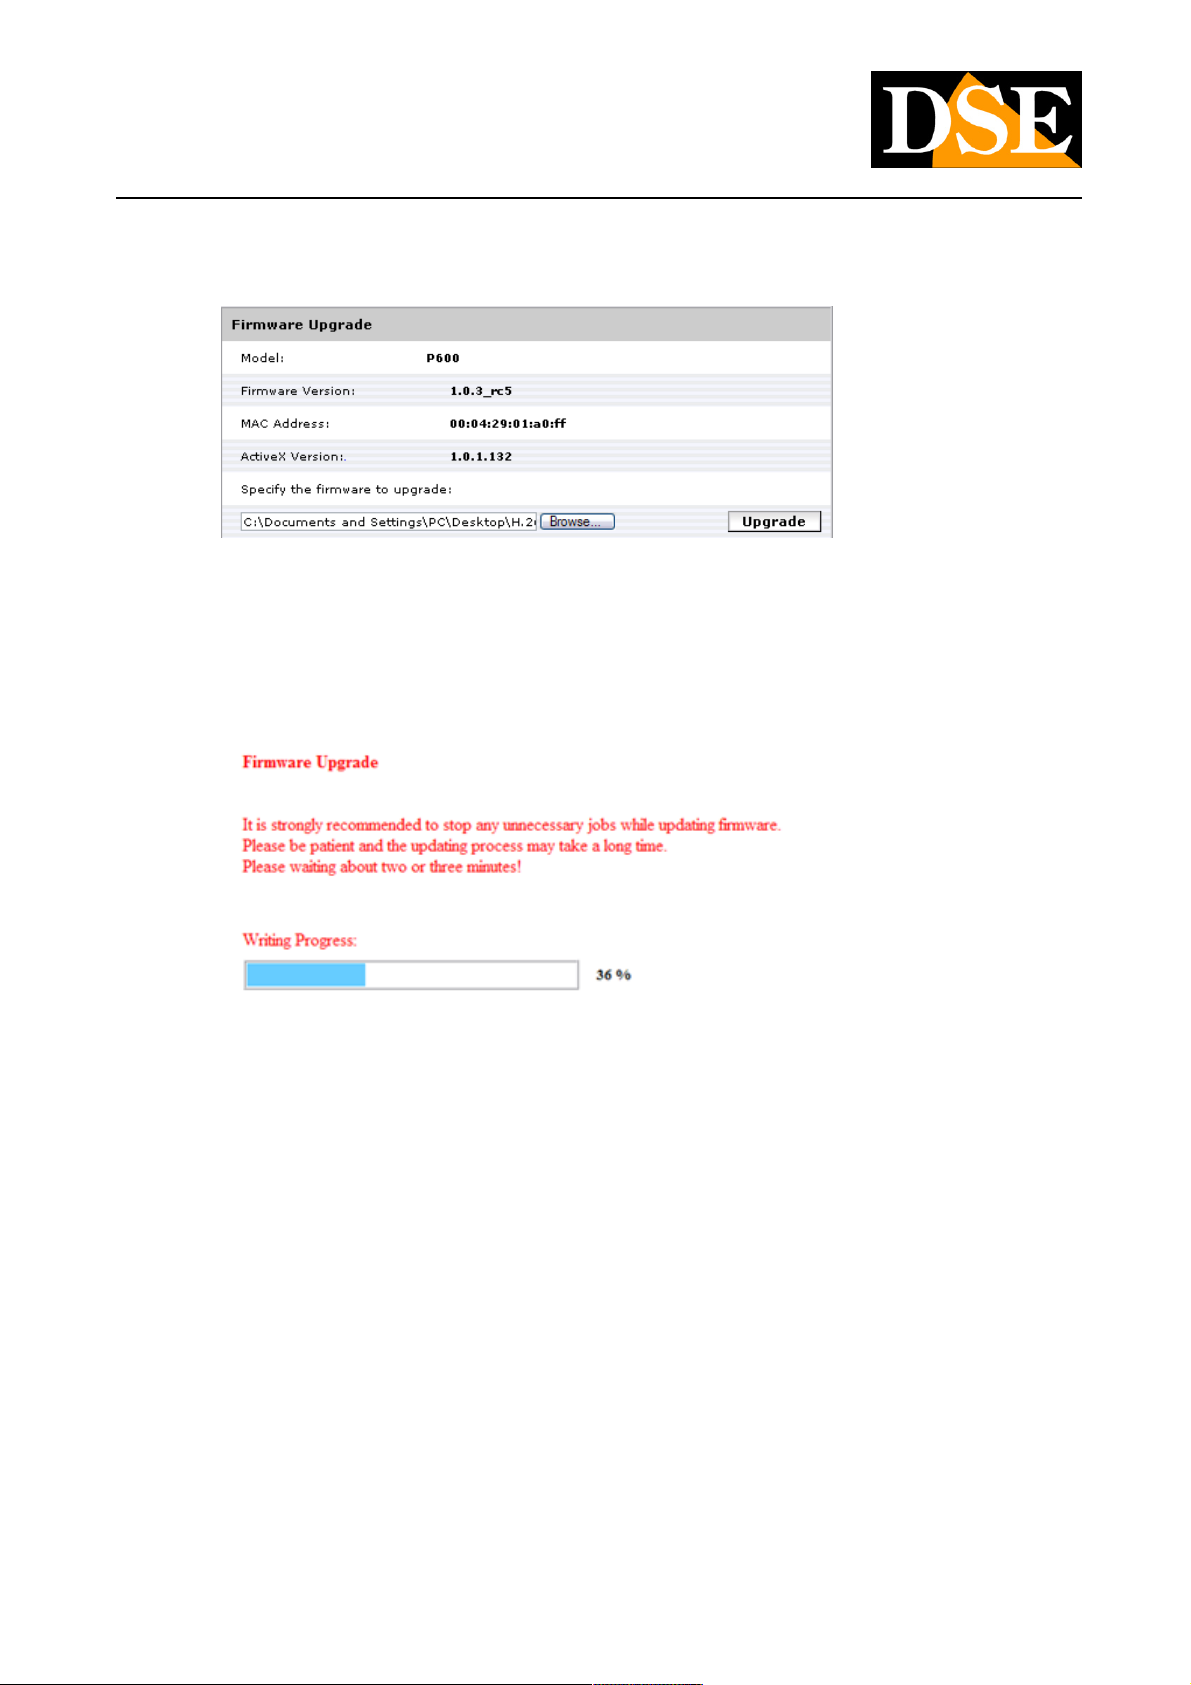
USER MANUAL
Megapixel H.264 IP CAMERAS
Page: 76 Page: 76
then click on UPGRADE to start the update.
5. The update will start in a few minutes depending upon the transfer status. The update process takes about 5-10 minutes. Do not
disconnect the device during the update process to avoid any damage.
6. The orange indicator LED camera flash during the update process. When the LED is again fixed the camera will be ready for use.
DSE SRL - ITALY - WWW.DSE.EU
Page 77

USER MANUAL
Megapixel H.264 IP CAMERAS
Page: 77 Page: 77
Restoring the factory settings
If you are not satisfied with the settings made or if detected irregularities in operation due to incorrect settings may be convenient to
restore the factory parameters of the camera. All cameras and video servers RN for this series are fitted with a reset button indicated by
RESET or DEFAULT.
If the button is not directly accessible from the outside there is a small hole inside which it is possible to insert a thin object, such as a
suitably deformed paperweight clips so as to press the reset button inside.
Some models, in waterproof, do not have a button accessible from the outside. In this case there is a DEFAULT terminal in the terminal
inputs and outputs. Instead of pressing the reset button will connect together the DEFAULT terminal with a GND terminal to start
precedura.
To restore the factory settings is not simply press the reset button, but you must scrupulously perform the following steps:
1. Disconnect the power supply of the camera and the outlet.
2. Insert a pin into the RESET hole and hold (in the models without the reset hole to short the DEFAULT and GND terminals)
3. Connect the power of the camera while continuing to press the button for a few seconds until the status LED flashes rapidly
..
4. Releasing the reset button by removing the pin from the hole (in the models without the reset hole to remove the connection between the
DEFAULT and GND terminals)
5. Wait until the LED flash quickly and reconnect terms of the network
The camera has now returned to its factory settings.
CAUTION: Restoring the factory settings also includes access passwords, and network parameters.
DSE SRL - ITALY - WWW.DSE.EU
Page 78

USER MANUAL
Megapixel H.264 IP CAMERAS
Page: 78 Page: 78
Video streaming Specifications
OPTIONS
As previously seen the RN series cameras, except for the RN-636E camera, they can manage 3 different video streams simultaneously.
You should consider the following rules:
1. Each stream can be set in MJPEG or H.264 mode
2. Each stream can be configured to CBR or VBR
3. The Stream1 (main stream) is available in all resolutions listed
4. The maximum settable resolution for Stream 2 is 640x480
5. The maximum settable resolution for Stream 3 is 320x240
6. The maximum frame rate for the transfer is 1600x1200 15fps. Other resolution can be up to 30fps
STREAM1 STREAM2 STREAM3
coding mode
H.264 / MJPEG
Transfer Mode
CBR / VBR
Maximum resolution / FPS
1600x1200 @ 15
1280x720 @ 30
800x600 @ 30
640x480 @ 30
320x240 @ 30
RELATIONS
Some of the video streaming settings are dependent STREAM 1 adjustment.
1. Fps Maximum: when
Fps Maximum: when
Fps Maximum: when
Fps Maximum: when
Fps Maximum: when
Fps Maximum: when
Fps Maximum: when
Fps Maximum: when
Fps Maximum: when
Fps Maximum: when
Fps Maximum: when
Stream1
Stream1
Stream1
Stream1
Stream1
Stream1
Stream1
Stream1
Stream1
Stream1
Stream1
It is set in
It is set in
It is set in
It is set in
It is set in
It is set in
It is set in
It is set in
It is set in
It is set in
It is set in
1600x1200,
1600x1200,
1600x1200,
1600x1200,
1600x1200,
1600x1200,
1600x1200,
1600x1200,
1600x1200,
1600x1200,
1600x1200,
the maximum frame rate is
the maximum frame rate is
the maximum frame rate is
the maximum frame rate is
the maximum frame rate is
the maximum frame rate is
the maximum frame rate is
the maximum frame rate is
the maximum frame rate is
the maximum frame rate is
the maximum frame rate is
V V V
V V V
V
V
V
V V
V V V
15fps.
As a result, both the
15fps.
As a result, both the
15fps.
As a result, both the
15fps.
As a result, both the
15fps.
As a result, both the
15fps.
As a result, both the
15fps.
As a result, both the
15fps.
As a result, both the
15fps.
As a result, both the
15fps.
As a result, both the
15fps.
As a result, both the
Stream2
Stream2
Stream2
Stream2
Stream2
Stream2
Stream2
Stream2
Stream2
Stream2
Stream2
that
that
that
that
that
that
that
that
that
that
that
Stream3
Stream3
Stream3
Stream3
Stream3
Stream3
Stream3
Stream3
Stream3
Stream3
Stream3
They can be configured with frame rate 15.05 fps
2. resolution Dependency: the maximum resolution for the
set to 320x240, Stream 2 is limited to 320x240.
3. Independence frame rate: The setting frame rate for each stream can be independent. Independence frame rate: The setting frame rate for each stream can be independent.
DSE SRL - ITALY - WWW.DSE.EU
Stream2
Stream2
Stream2
Stream2
Stream2
Stream2
It depends on the resolution set for
It depends on the resolution set for
It depends on the resolution set for
It depends on the resolution set for
It depends on the resolution set for
It depends on the resolution set for
Stream1.
Stream1.
Stream1.
Stream1.
Stream1.
Stream1.
When Stream1 is resolution Dependency: the maximum resolution for the
When Stream1 is resolution Dependency: the maximum resolution for the
When Stream1 is resolution Dependency: the maximum resolution for the
When Stream1 is resolution Dependency: the maximum resolution for the
When Stream1 is resolution Dependency: the maximum resolution for the
When Stream1 is
Page 79
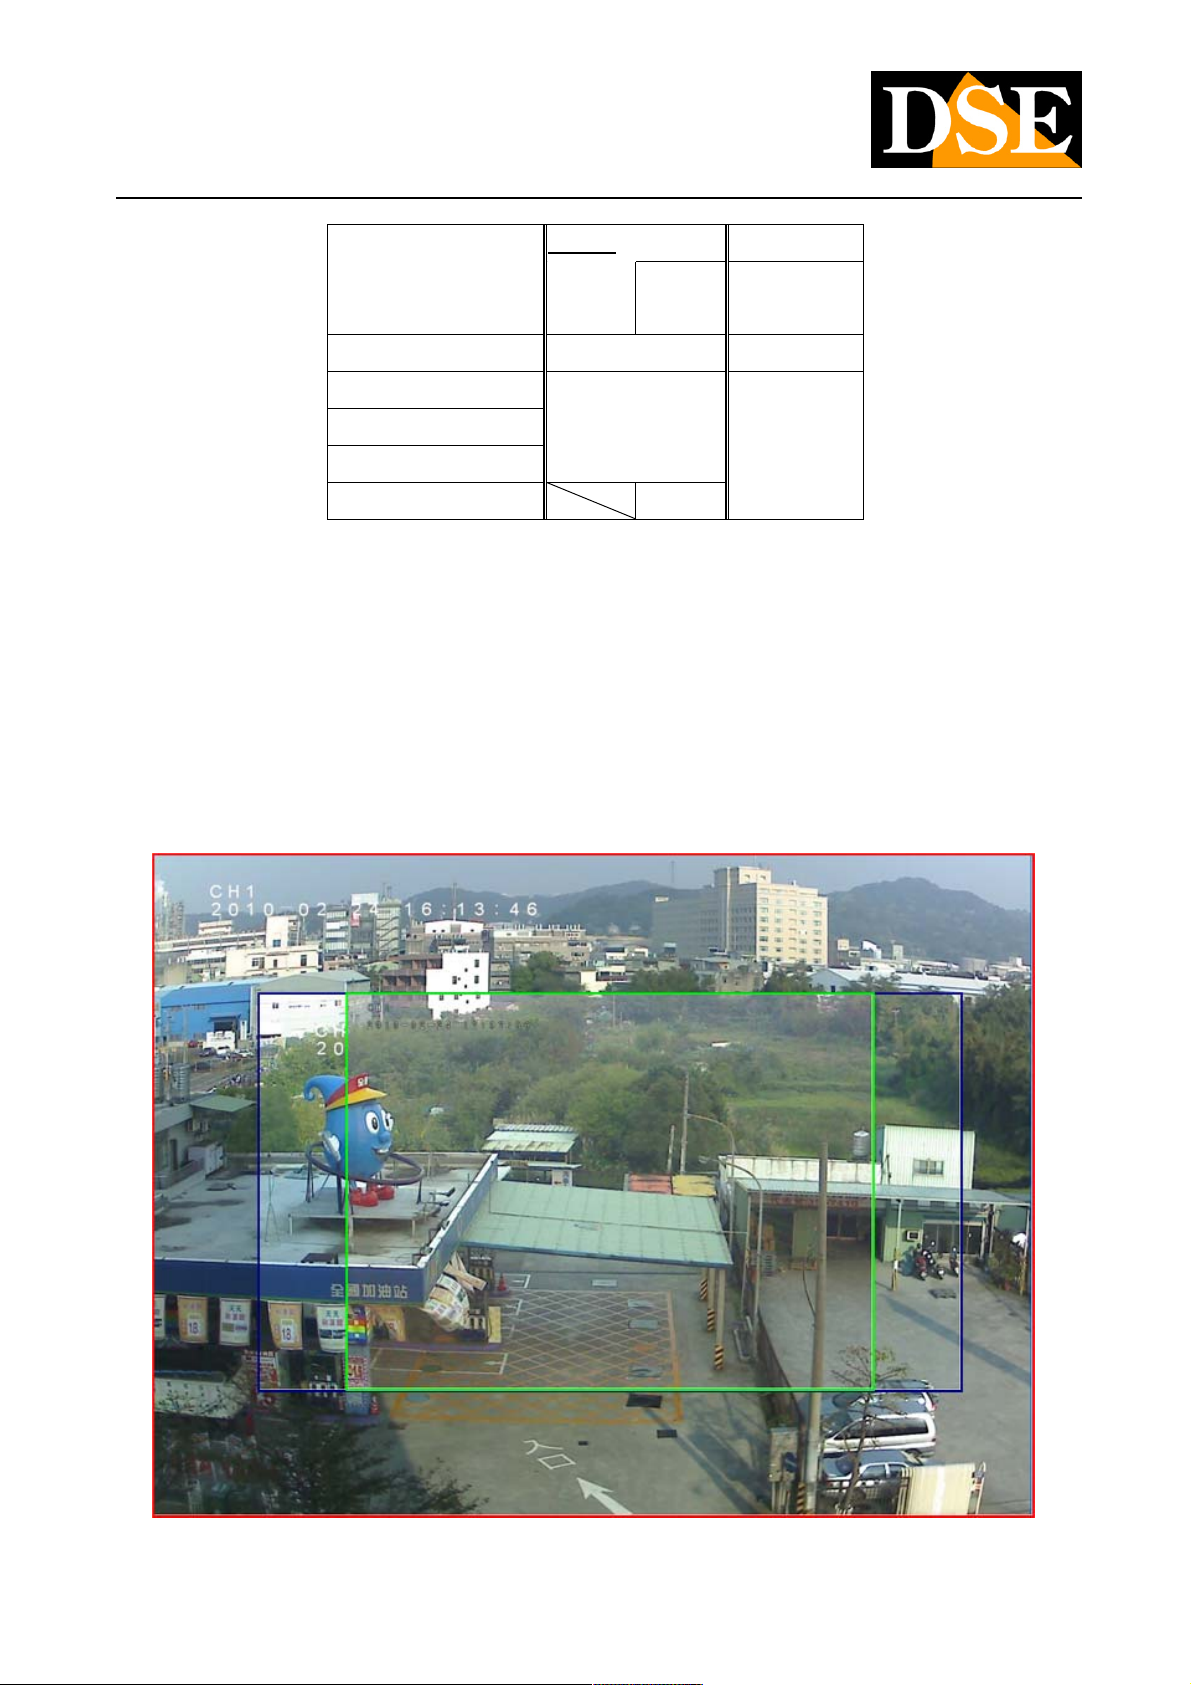
USER MANUAL
Megapixel H.264 IP CAMERAS
Page: 79 Page: 79
STREAM 2 STREAM 2 STREAM3
STREAM1
640x480 320x240 320x240
(Fixed)
1600x1200, 5 ~ 15 fps
1600x1200, 5 ~ 15 fps
1280x720, 30 fps 5 ~
800x600, 640x480 5 ~ 30
fps, 30 fps 320x240 5 ~, 5
~ 30 fps
5 ~ 15 fps
5 ~ 15 fps
5 ~ 15 fps
5 ~ 30 fps
5 ~ 30 fps
5 ~ 30 fps
The resolution setting should follow: Stream1 ≧ Stream2 ≧ Stream3. The resolution setting should follow: Stream1 ≧ Stream2 ≧ Stream3. The resolution setting should follow: Stream1 ≧ Stream2 ≧ Stream3. The resolution setting should follow: Stream1 ≧ Stream2 ≧ Stream3. The resolution setting should follow: Stream1 ≧ Stream2 ≧ Stream3.
VIEW ANGLE
The influence of the STRAM1 setting the angle of view of the camera. Nell photo below shows the same shot with 3 1600x1200
resolutions, 960x720 and 1280x720 (the latter not available in the camera menu. As can be seen the angle of view is different in the 3
situations.
The 800x600, 640x480, 320x240, are the reduction in the original image scale and vary depending on whether the stream 1 has
1600x1200 resolution or 1280x720.
Angle actual view of the stream 1 to 1600x1200, 1280x720 and 960x720
DSE SRL - ITALY - WWW.DSE.EU
Page 80
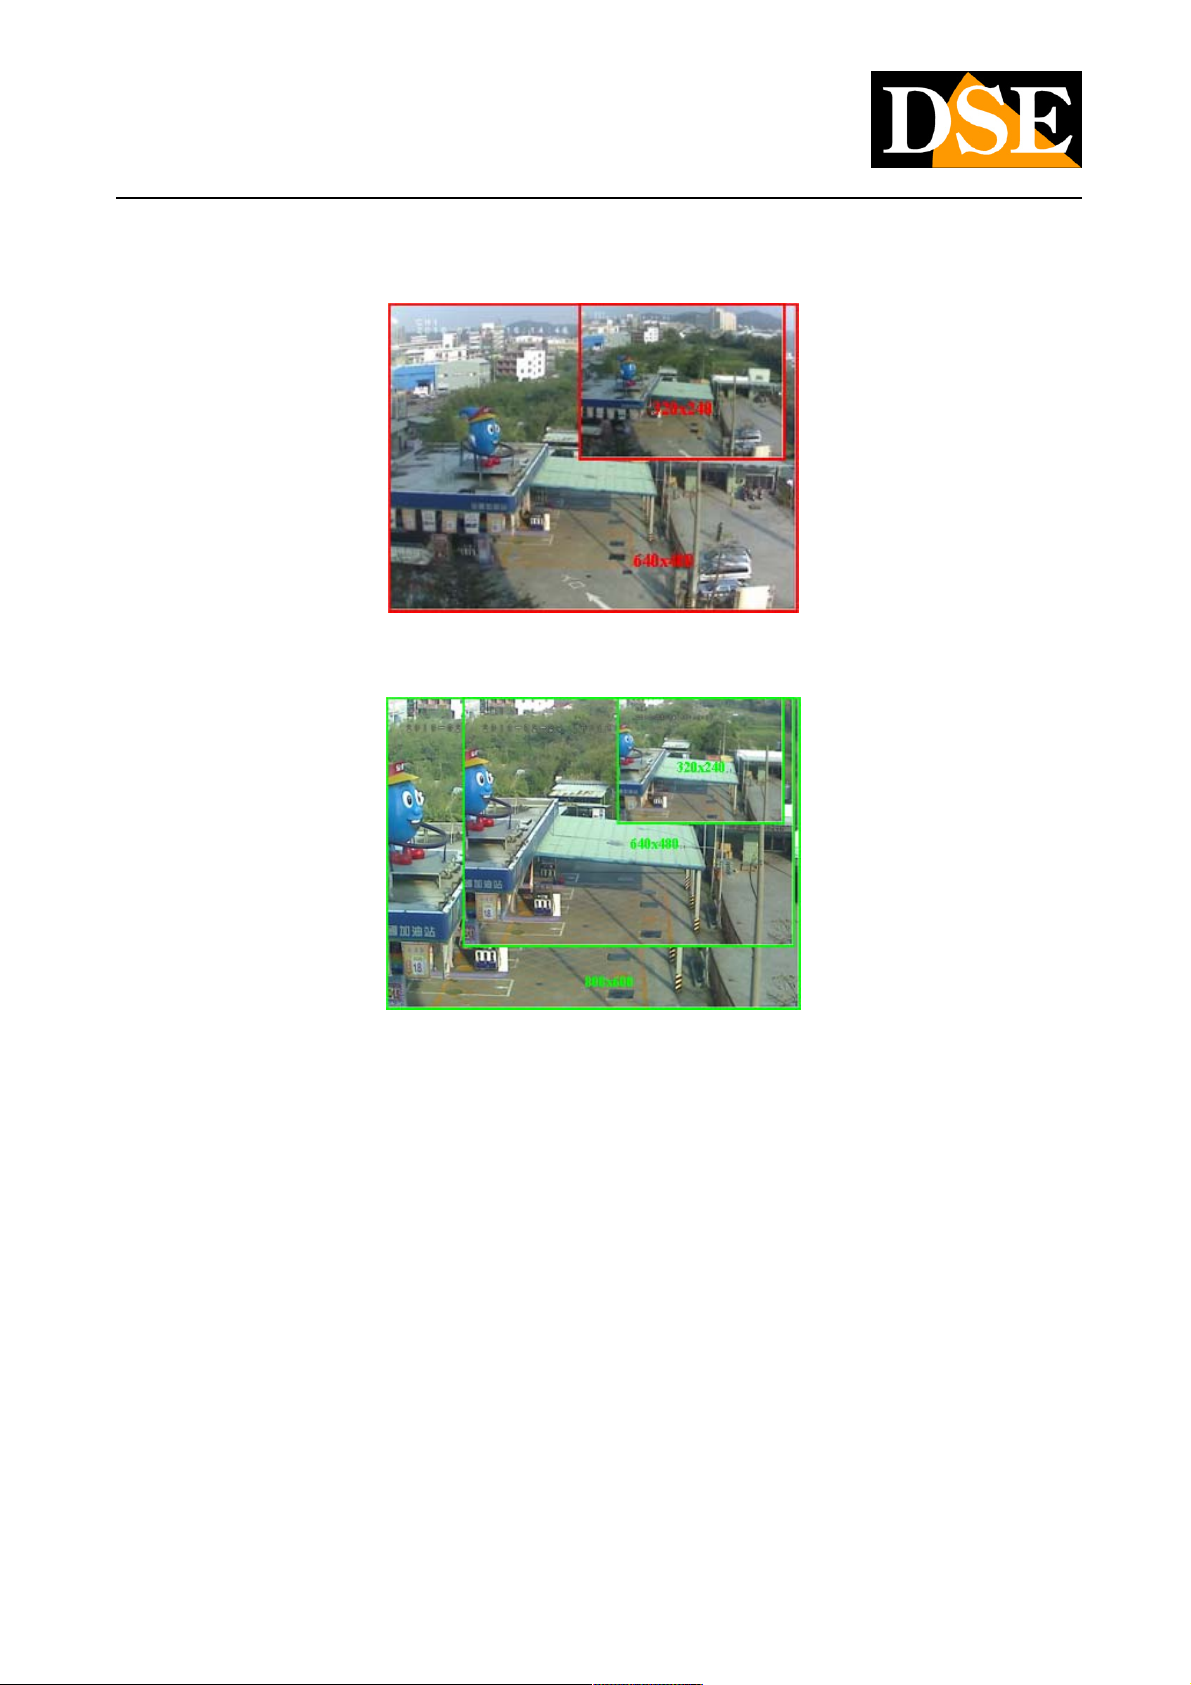
USER MANUAL
Megapixel H.264 IP CAMERAS
Page: 80 Page: 80
STREAM 1 to 1600x1200
Angle of view with STREAM 1 to 1280x720
DSE SRL - ITALY - WWW.DSE.EU Angle with
 Loading...