

Page 1
USER MANUAL
CAMERAS IP H.264 1080P FULLHD
Page: 1 Page: 1
RH-TCC1 BCC1 RH-RH-DCC1
IP Cameras Full HD 1080p H.264
Introduction
The RH series consists of IP network cameras with H.264 compression and maximum FULL HD
1920x1080 resolution. The units are connected to a LAN via RJ45 port as any PC or other
device and the images are displayed on the PC on the network using a standard Internet
browser or special registration programs. applications are also available for access by
smartphone.
The megapixel resolution allows image detail not
attainable with analog systems. The format 16: 9 Full HD, now an established television standard, is the new dimension of
surveillance, optimal for viewing on wide screen TV or monitor. The RN series of network equipment using H.264 compression, the
latest evolution in digital video compression that allows fidelity and bandwidth economy.
The RH Series cameras support ONVIF protocol 1 and 2 and are compatible with any IP recording software or network video
recorder (NVR) multiprotocol. And 'it is including network recording software for Windows XP / Vista / 7.
DSE SRL - ITALY - WWW.DSE.EU
Page 2
USER MANUAL
CAMERAS IP H.264 1080P FULLHD
Page: 2 Page: 2
Technical data
RH-TCC1 RH-BCC1 RH-DCC1
Camera Type IP camera IP camera IP camera
APTINA 1 / 2.5 "progressive scan
Sensor
Color or black / white
maximum resolution Full HD: 1920x1080 Full HD: 1920x1080 Full HD: 1920x1080
Frame rate up 25 f / sec 25 f / sec 25 f / sec
video Compression H264 high profile / MJPEG H264 high profile / MJPEG H264 high profile / MJPEG
audio Compression
Lan RJ45 10 / 100Base-T RJ45 10 / 100Base-T RJ45 10 / 100Base-T
Connection integrated Wi-Fi - - -
Power over Ethernet (POE) IEEE802.3af IEEE802.3af IEEE802.3af
audio Input
CMOS 5 Mega Pixel
colors with function
Day / Night
G711 A-Law / G711 U-Law / RAW-PCM G711 A-Law / G711 U-Law / RAW-PCM G711 A-Law / G711 U-Law / RAW-PCM
Microphone built +
Unmute input. External
(Minijack 3.5 mm)
APTINA 1 / 2.5 "progressive scan
CMOS 5 Mega Pixel
colors with function
Day / Night
Unmute input. External
(RCA female)
APTINA 1 / 2.5 "progressive scan
CMOS 5 Mega Pixel
colors with function
Day / Night
Unmute input. External
(RCA female)
Speakers Audio Out 3.5 mm minijack RCA female RCA female
Alarm inputs 1 - 1
Alarm outputs 1 - 1
RS485 output for PTZ and speed dome keyboards
Day / Night Yes Yes Yes
Lighting infrared
compatible
integrated LED - 30 m. 20 m.
Pelco-P / D - Pelco-P / D
840nm ... 1100nm 840nm ... 1100nm 840nm ... 1100nm
DSE SRL - ITALY - WWW.DSE.EU
Page 3

USER MANUAL
CAMERAS IP H.264 1080P FULLHD
Page: 3 Page: 3
automatic IR cut filter (ICR) Yes Yes Yes
AWB Yes Yes Yes
Analog Video Output BNC RCA female BNC
memory slots microSD SD microSD
Supply 9 ... 12V DC or PoE 9 ... 12V DC or PoE 9 ... 12V DC or PoE
Absorption Max. 5W Max. 5W Max. 5W
230VAC power supply Not included Not included Not included
Attaching the CS CS CS
Objective Standard Nobody Varifocal 2.8 ... 12 mm. Varifocal 2.8 ... 12 mm.
interchangeable Lens Yes No No
Operating temperature - 10 ° C ... + 50 ° C - 10 ° C ... + 50 ° C - 10 ° C ... + 50 ° C
Degree of protection IP40 IP66 IP66
Lung 130 x W 75 x H 62
(without lens)
External dimensions (mm.)
Weight 480 gr. 1690 gr. 880 gr.
ONVIF Protocol 2.1 2.1 2.1
PPPoE protocol Yes Yes Yes
DHCP Protocol Yes Yes Yes
SMTP Protocol Yes Yes Yes
FTP protocol Yes Yes Yes
UPnP Protocol Yes Yes Yes
RTSP protocol Yes Yes Yes
Protocol 3GPP / ISMA Yes Yes Yes
TCP / IP, RTP, RTCP, HTTP, TCP, UDP, IPv4 /
Other protocols supported
IPv6
DDNS Support Yes (3322 / DynDNS) Yes (3322 / DynDNS) Yes (3322 / DynDNS)
Only camera body diam. 74 x length 190 Room
with bracket width 110 x height 110 x 377 lung Diam 123 Height
110
TCP / IP, RTP, RTCP, HTTP, TCP, UDP, IPv4 /
IPv6
TCP / IP, RTP, RTCP, HTTP, TCP, UDP, IPv4 /
IPv6
supported browsers Internet Explorer Internet Explorer Internet Explorer
Password protection
Motion detection Yes Yes Yes
Sending images on alert E-mail E-mail E-mail
Recording on SD Memory
Multi-level user with programmable access Multi-level user with programmable access Multi-level user with programmable access
Scheduled or on alarm (with recording days
limitation)
Scheduled or on alarm (with recording days
limitation)
Scheduled or on alarm (with recording days
limitation)
DSE SRL - ITALY - WWW.DSE.EU
Page 4

USER MANUAL
CAMERAS IP H.264 1080P FULLHD
Page: 4 Page: 4
custom overlays
Privacy Masks Yes Yes Yes
Registration Remote HD FTP or NAS FTP or NAS FTP or NAS
contemporary Client Up to 10 Up to 10 Up to 10
Yes Yes Yes
DSE SRL - ITALY - WWW.DSE.EU
Page 5
USER MANUAL
CAMERAS IP H.264 1080P FULLHD
Page: 5 Page: 5
Installation
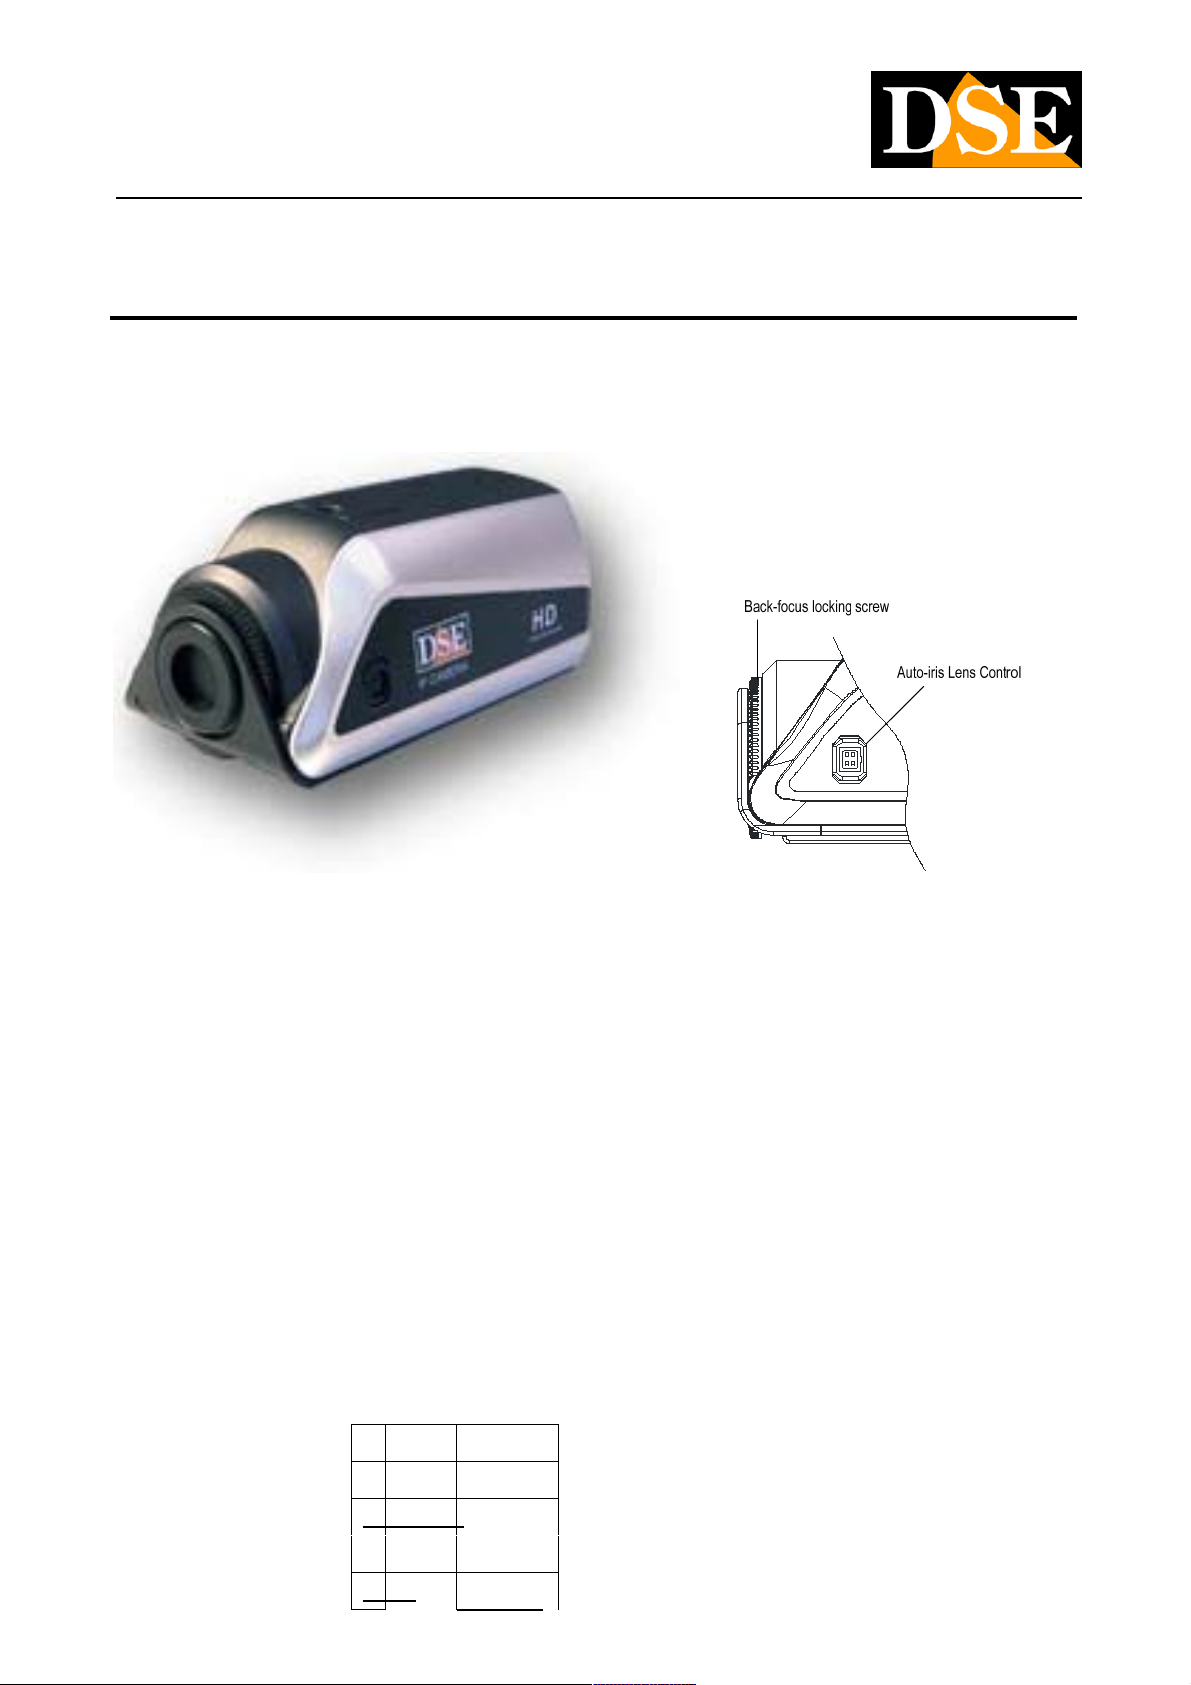
RH-TCC1 - room BoxRH-TCC1 - room BoxRH-TCC1 - room Box
LENS ASSEMBLY
The camera body is provided with a rotary dial to adjust the position of the optical sensor. In this way it is possible to focus on any
type of target without having to resort to spacer rings. Once the lens screwed, adjust the focus. The camera has a BNC analog video
output in order to connect possibly a small portable monitor and adjust the focus on location. Acting by turning the adjusting nut if you
are unable to obtain an image in sharp focus with the only mass of the lens.
USE OF OBJECTIVES AUTOIRIS
The camera allows the use of fixed iris lenses, manual and automatic. In the latter case the lens auto iris is provided with a connector
to be connected to the camera body. The camera is compatible with all oiettivi autoiris DC drive type with the following wiring
connections.
Video DC 1 NC
Control +
2 VCC Control-
3 GND Drive-
4 Video Drive + 4 Video Drive +
DS E SRL - The TALY - WWW.DSE.EU DS E SRL - The TALY - WWW.DSE.EU DS E SRL - The TALY - WWW.DSE.EU
Page 6
USER MANUAL
CAMERAS IP H.264 1080P FULLHD
Page: 6 Page: 6
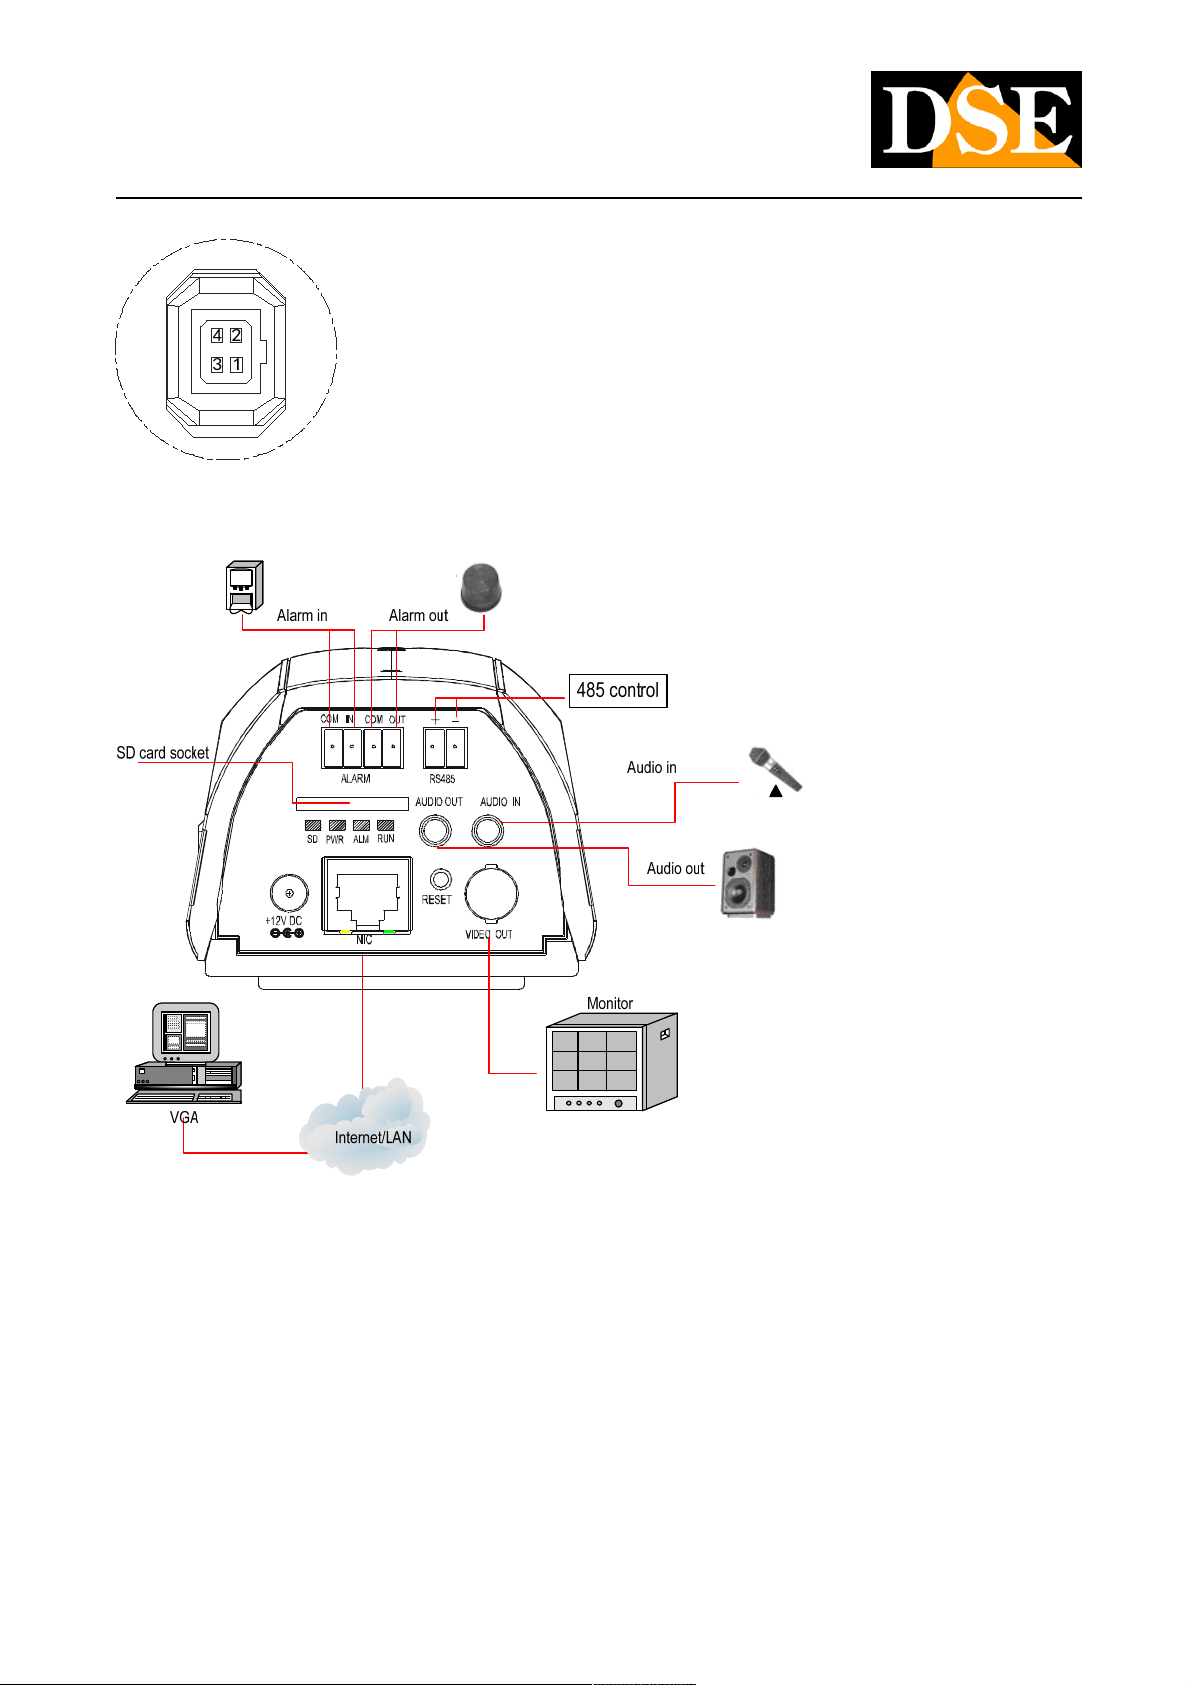
REAR CONNECTIONS
• AUDIO IN - MICROPHONE INPUT - The camera is equipped with built-in microphone, however, a 3.5 mm mini-jack for connecting
an external microphone is available. The choice between the two sources is carried out in configuration. (Impedance 1 KOhm)
• AUDIO OUTPUT - This 3.5 mm jack allows you to connect the local speakers. This feature allows you to create a two-way audio
conversation between the person in front of the camera and the operator in front of the client PC. (Impedance sup.16 Ohm)
• Micro SD CARD SLOT - Slot to insert a Micro SD card (up to 32GB) to save aboard the same camera images.
• 12VDC - plug that connect the power supply 220VAC / 12VDC (not included). Alternatively, it is possible to feed the camera POE
directly from the network if the network switch
DSE SRL - ITALY - WWW.DSE.EU
Page 7
USER MANUAL
CAMERAS IP H.264 1080P FULLHD
Page: 7 Page: 7
It supports this feature.
• NIC (NETWORK) RJ45 - RJ45 FEMALE connector to connect the network. To connect to a hub or network switch using a standard
LAN cable. To connect a PC directly just use a crossover cable.
• RS485 - This port allows you to connect external devices such as PTZ and speed dome cameras to control them via the web
interface of the camera. Supported Protocols Pelco P / D.
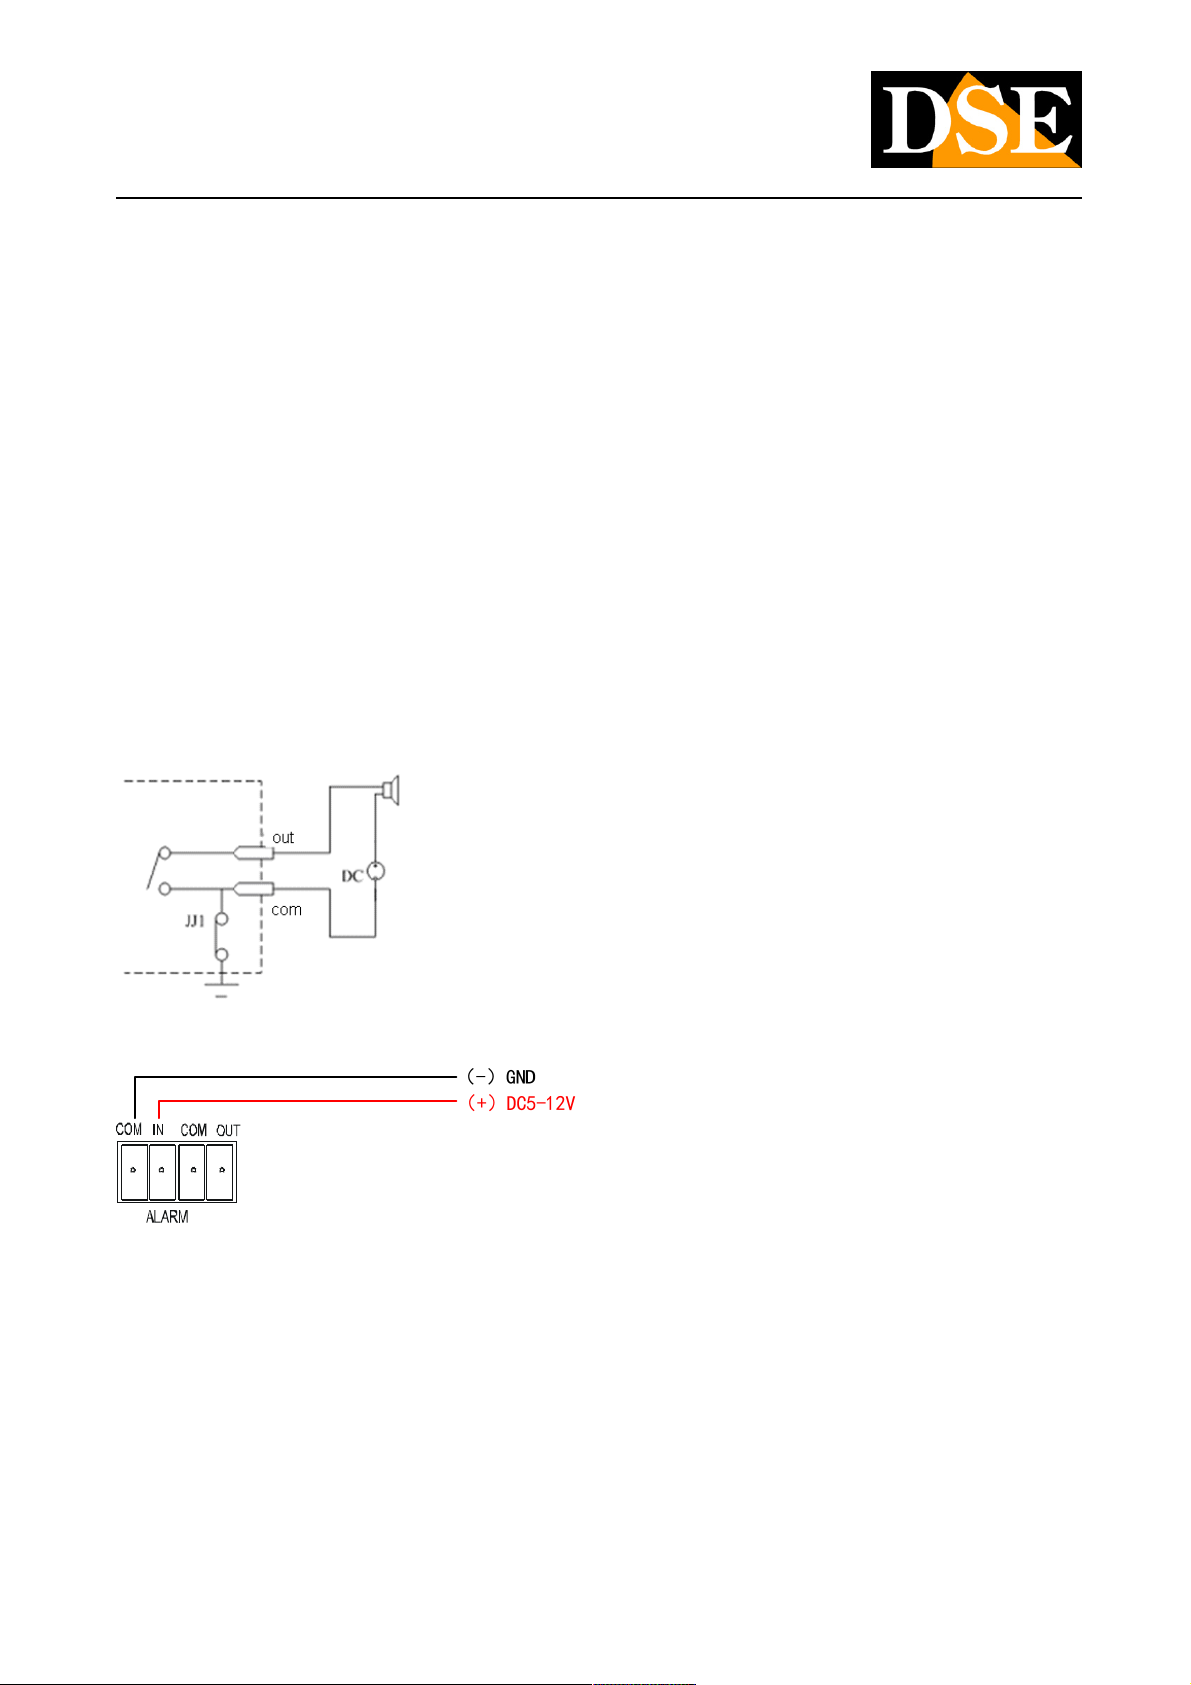
• ALARM IN / OUT - alarm entrance, between the IN and COM terminals can be connected with a voltage input between 5 and
12VDC. In programming it is possible to define whether the alarm is considered in the presence or in the absence of tension. The
alarm output is used to actuate external devices such as acoustic or luminous alarms. The contact is ON / OFF type with maximum
load can be driven directly to 300mA at 12VDC. In programming it is possible to set the operation (NO / NC), the eventual
intermittently, and the duration of activation in the event of an alarm.
Example output connection
Example input connection
• VIDEO OUT - BNC output to connect analog monitors. Connects such as a portable monitor to comfortably focus on the goal after
installation. CAUTION: this output may not be active if disabled in the camera configuration.
• RESET - Button to restore the factory settings. Hold for 5 seconds to restore the factory settings including network data.RESET - Button to restore the factory settings. Hold for 5 seconds to restore the factory settings including network data.
MOUNTING THE CAMERA
If installed inside the camera it can be fixed to the wall with a bracket for cameras such as RE-ST2L. For outdoor installation should be
used as a protective case
DSE SRL - ITALY - WWW.DSE.EU
Page 8

USER MANUAL
CAMERAS IP H.264 1080P FULLHD
Page: 8 Page: 8
RE-C3.
DSE SRL - ITALY - WWW.DSE.EU
Page 9
USER MANUAL
CAMERAS IP H.264 1080P FULLHD
Page: 9 Page: 9
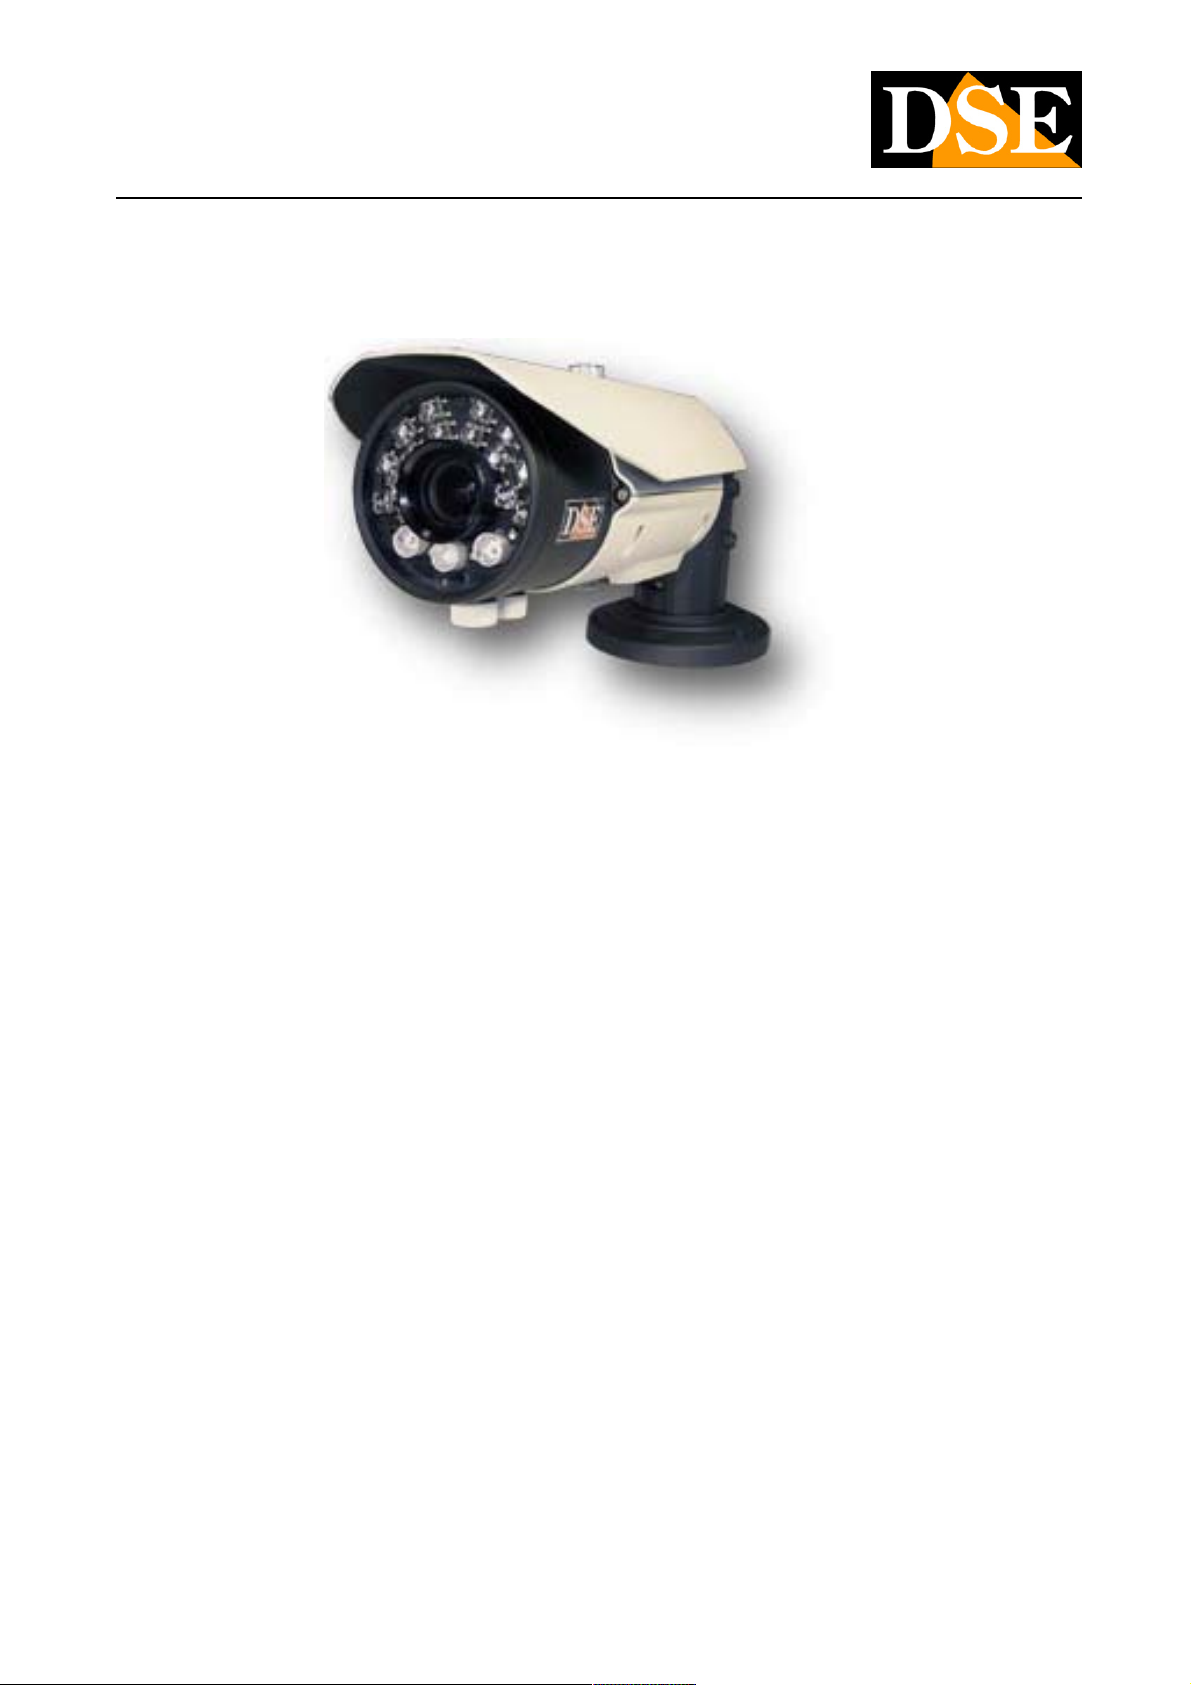
RH-BCC1 - Waterproof camera with IR illuminator 30 m.RH-BCC1 - Waterproof camera with IR illuminator 30 m.
GOAL SETTING
The camera is provided competa adjustable lens from 2.8 to 12 mm focal length so as to allow a perfect adjustment of the area to be
framed. The camera body is provided with two knobs to adjust the focal length (ZOOM) and the focus (FOCUS) that can be rotated
without using any tool. It 'also local analog video output with RCA connectors behind the tin lid on the bottom of the camera. This
output can be used to connect a monitor locally and be able to adjust the lens to the actual position of the camera operation.
Adjust with the screw of the focal area framed and subsequently act on the screw of the focus in order to optimize the vision.
CONNECTIONS
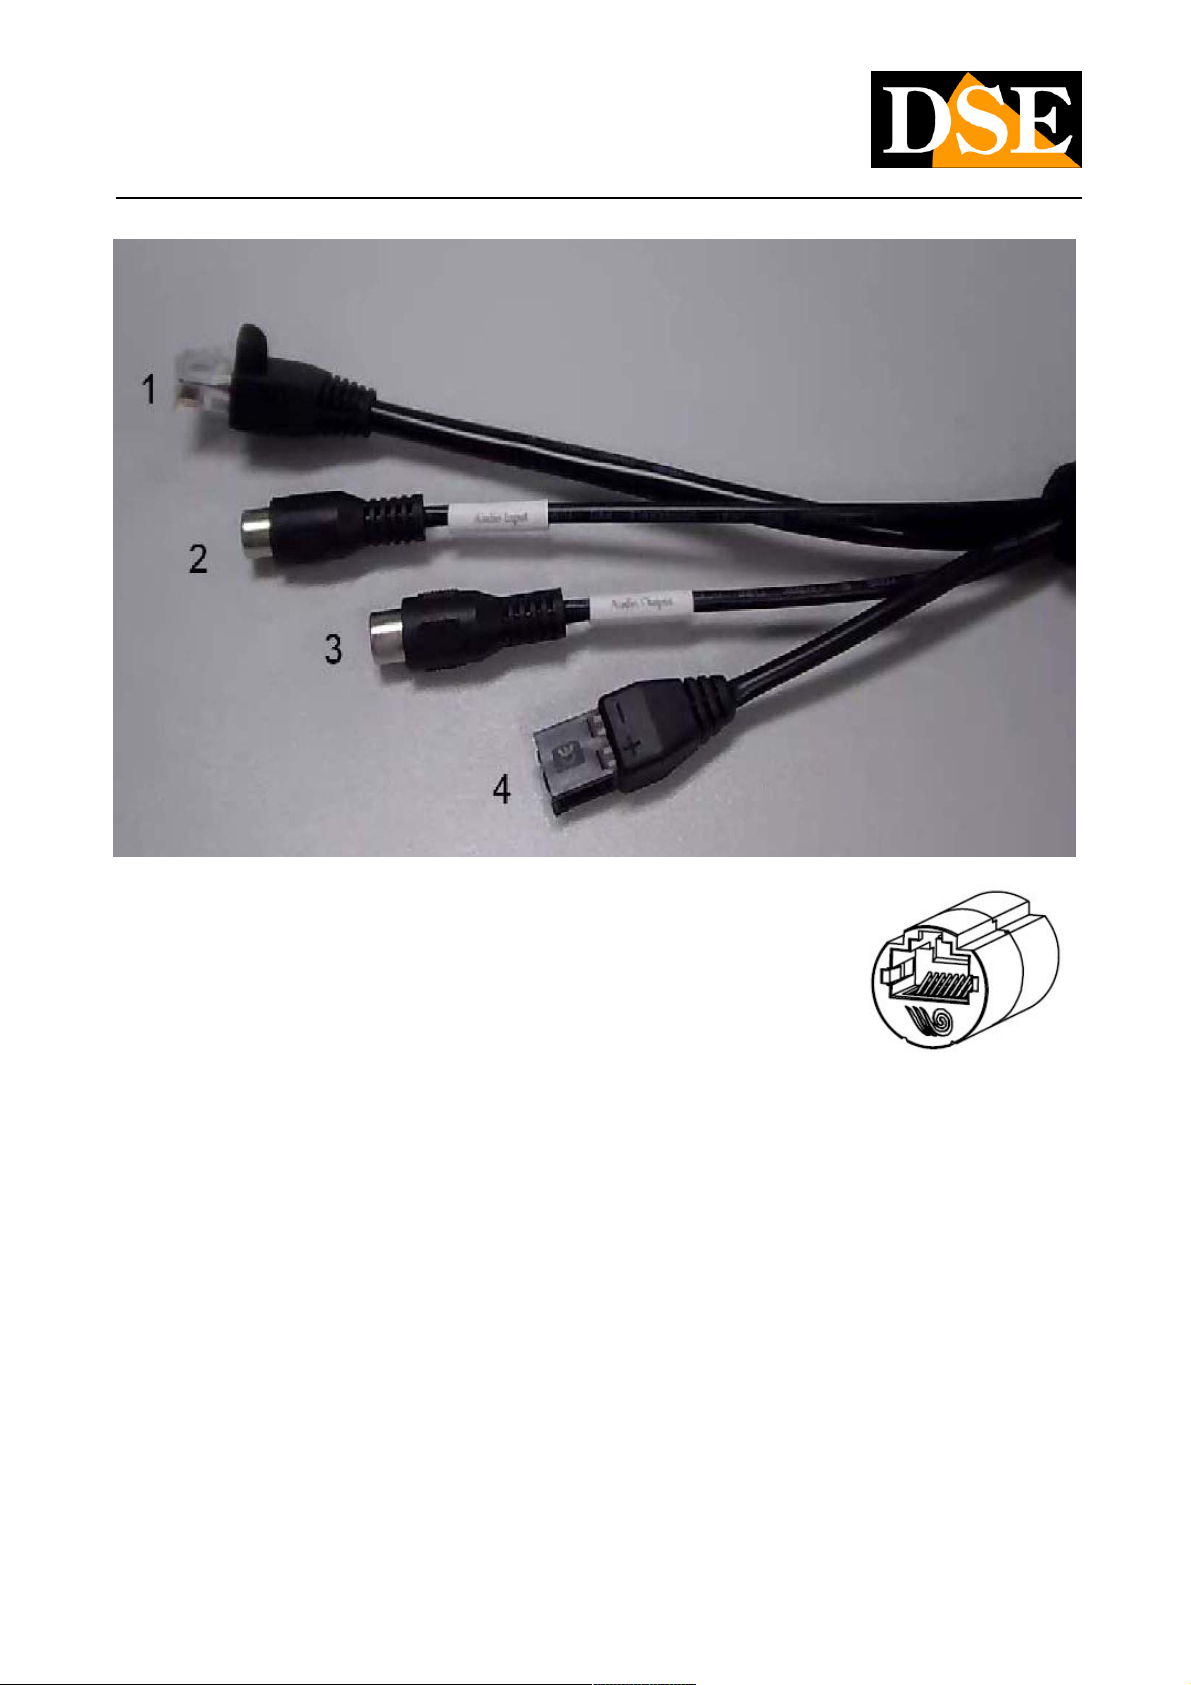
The connections are placed at the end of the cable that protrudes from the camera body. The cable connections is 40 cm long and is
used to reach a protected box to be prepared to accommodate inside the connectors.
DSE SRL - ITALY - WWW.DSE.EU
Page 10
USER MANUAL
CAMERAS IP H.264 1080P FULLHD
Page: 10 Page: 10
• RJ45 (NET) (1) - MALE RJ45 connector to connect the network. To connect to a hub or network
switch using a standard LAN cable. To connect a PC directly just use a crossover cable. It
provided an RJ45 adapter female-female for connecting a cable with male connector.
• AUDIO IN (2) - MICROPHONE INPUT - The camera is equipped with an RCA female connector to connect an external
microphone. (Impedance 1 KOhm)
• AUDIO OUTPUT (3) - The camera is equipped with an RCA female connector which allows connection of local speakers. This
feature allows you to create a two-way audio conversation between the person in front of the camera and the operator in front of
the client PC. (Impedance sup.16 Ohm)
• 12VDC (4) - RTB two places that connect the power supply 220VAC / 12VDC (not included). Alternatively, it is possible to feed the
camera POE directly from the network if the network switch supports this feature.
DSE SRL - ITALY - WWW.DSE.EU
Page 11
USER MANUAL
CAMERAS IP H.264 1080P FULLHD
Page: 11 Page: 11
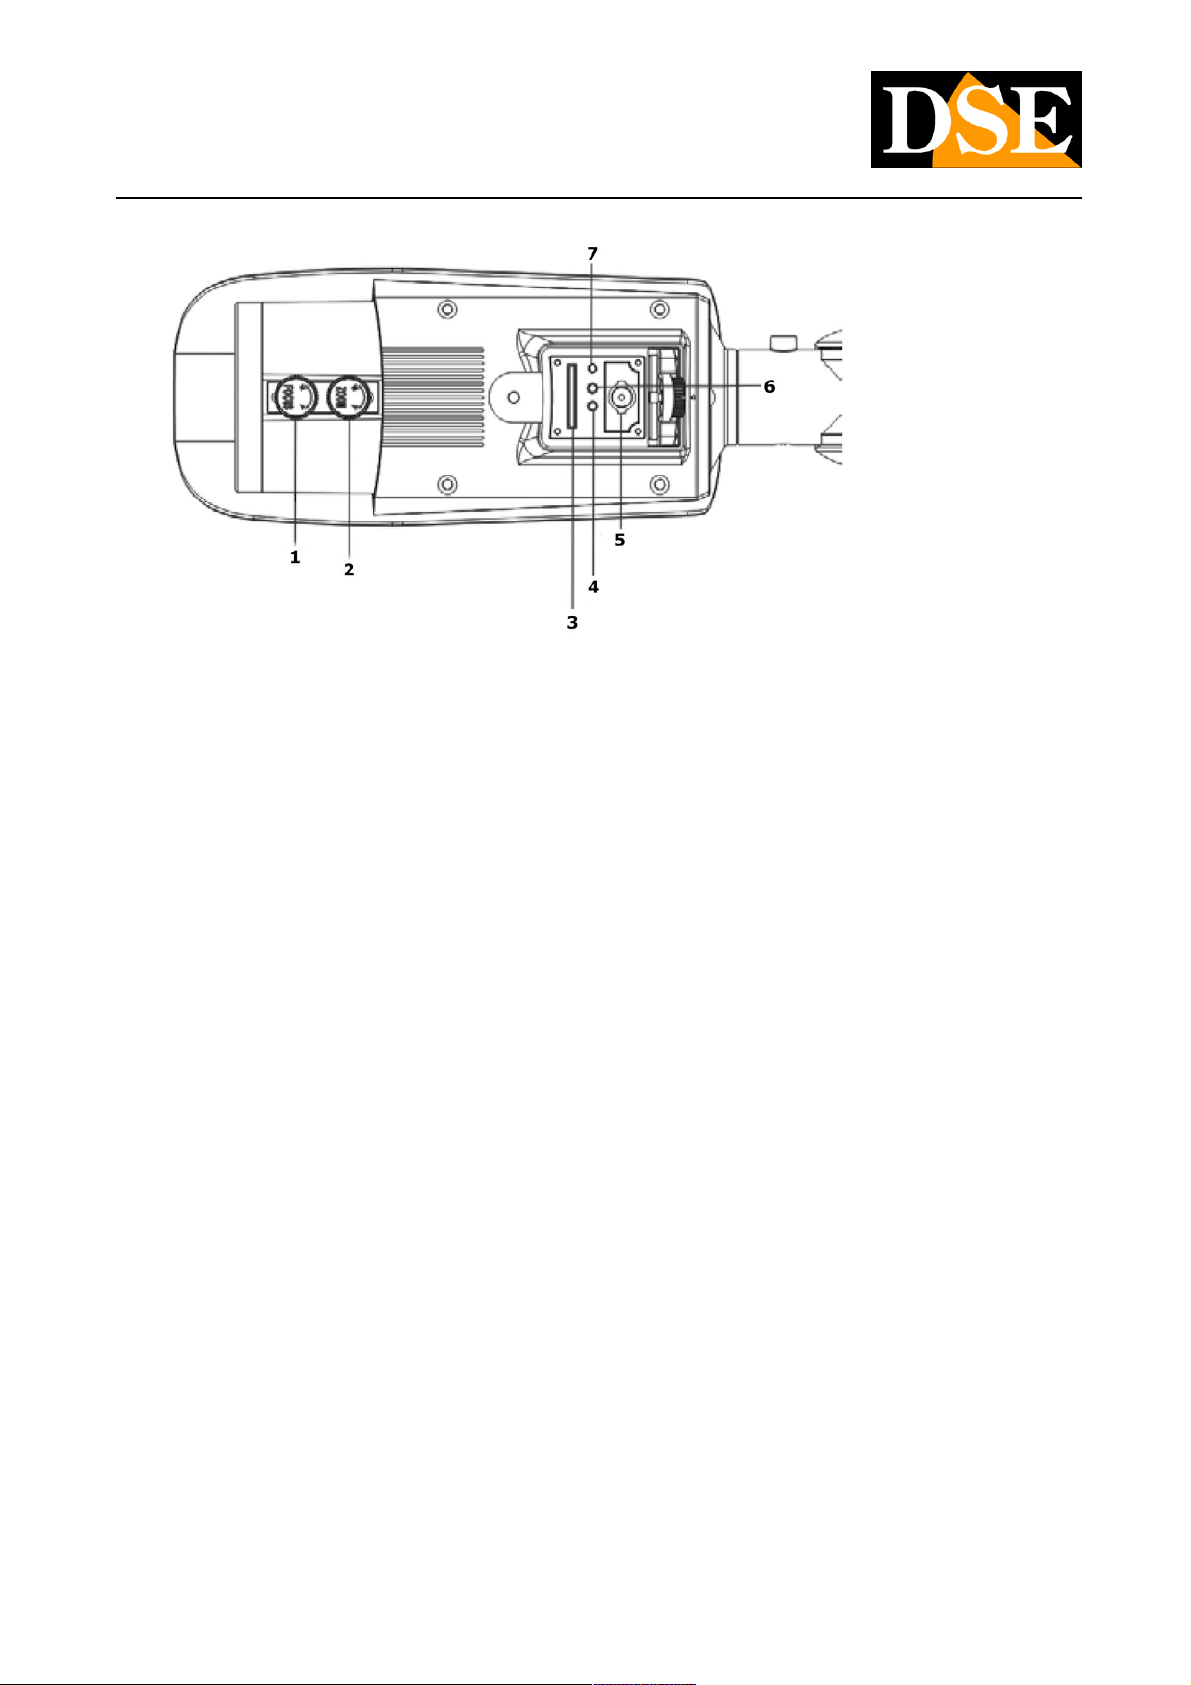
• ZOOM ADJUSTMENT (1) - Adjusts the focal length of 2.8 to 12 mm
• SETTING FIRE (2) - Adjust the focus
• Micro SD CARD SLOT (3) - The slot to insert a Micro SD card (32GB max) to save on board images from the same camera is
placed behind the pond door located on the underside of the camera.
• VIDEO OUT (5) - E 'this female RCA output for connecting analog monitor. Connects such as a portable monitor to comfortably
focus on the goal after installation. The connector is placed behind the pond door located on the underside of the camera.
CAUTION: this output may not be active if disabled in the camera configuration.
• RESET (7) - The button to restore the factory parameters, including the network parameters, is placed behind the pond door located RESET (7) - The button to restore the factory parameters, including the network parameters, is placed behind the pond door located
on the underside of the camera. Hold for 5 seconds to restore the factory settings including network data.
• RED LED (4) - Set behind the pond door on the underside of the camera indicates the correct power of the camera with external
power supply 12VDC
• YELLOW LED (6) - Set behind the pond door on the underside of the camera indicates the correct dialogue with the network
switch.
MOUNTING THE CAMERA
The camera has a sealed container that allows its installation in the exterior without protections.
DSE SRL - ITALY - WWW.DSE.EU
Page 12
USER MANUAL
CAMERAS IP H.264 1080P FULLHD
Page: 12 Page: 12
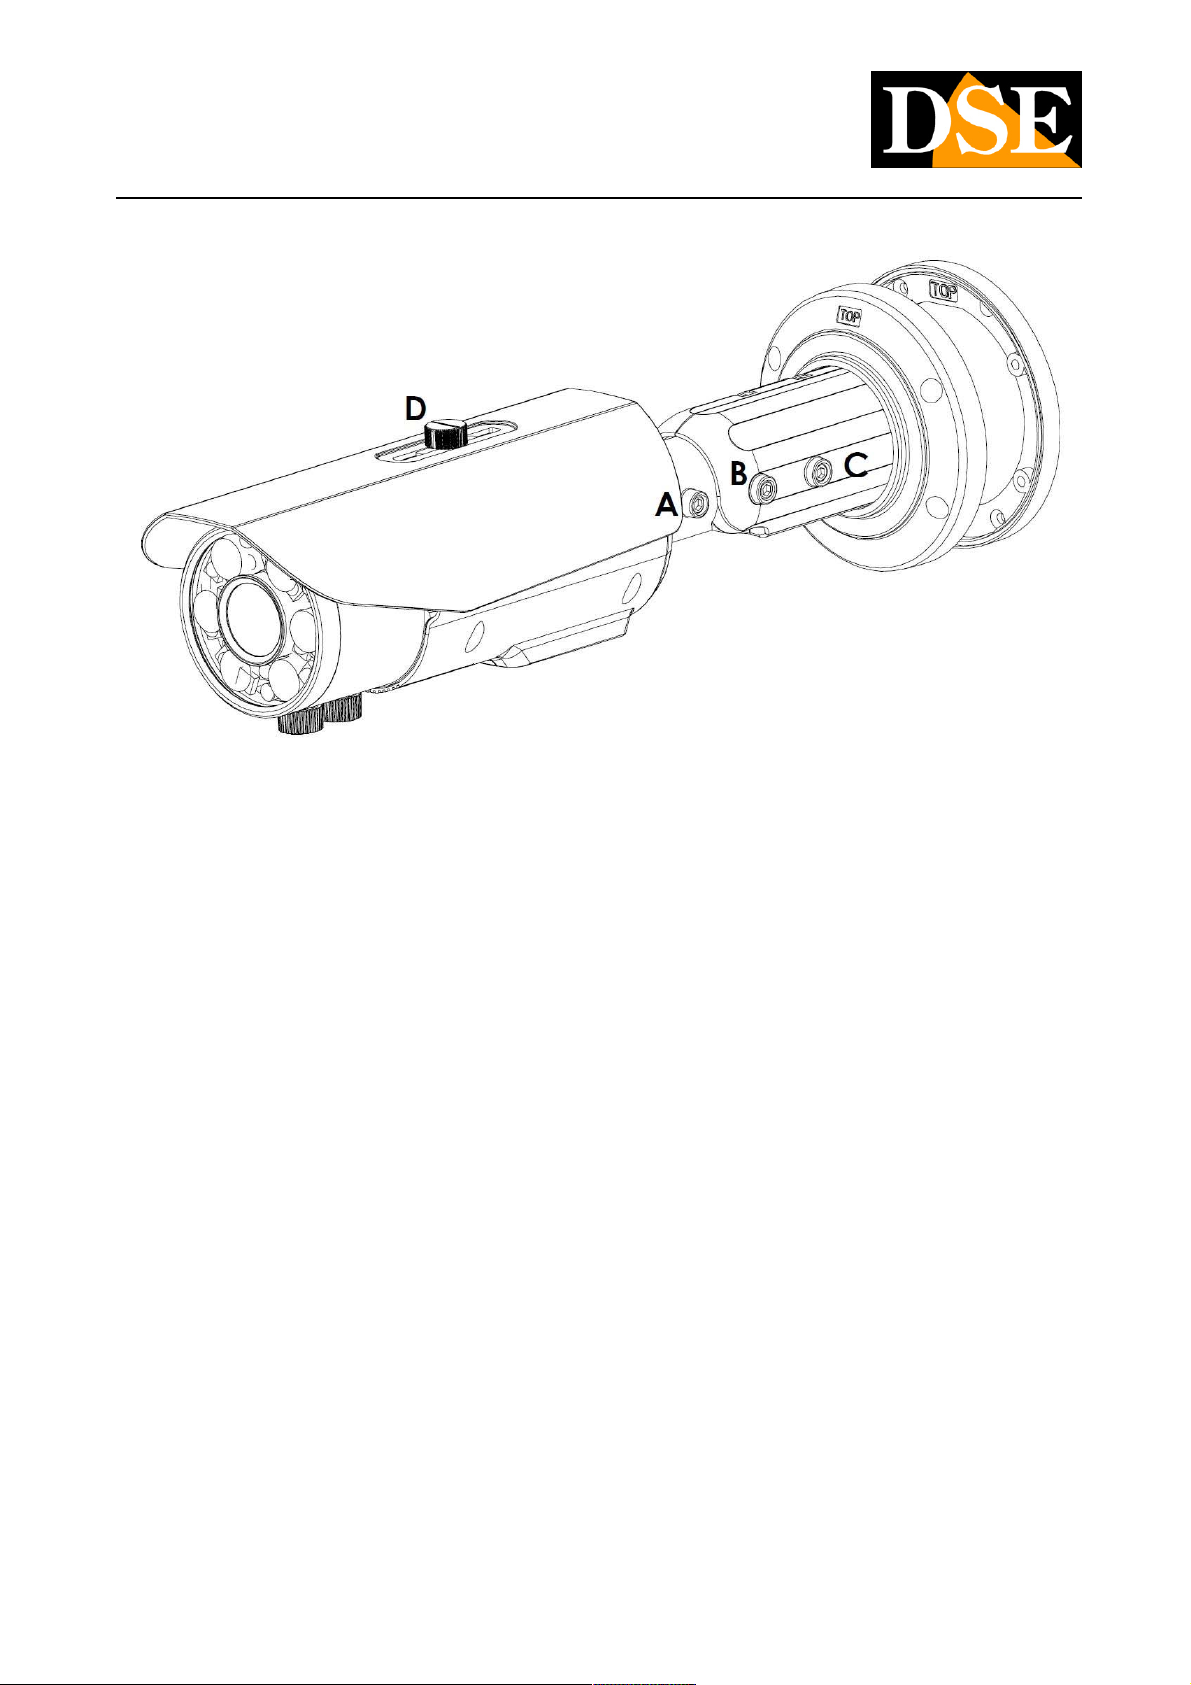
E 'it supplied with the camera fixing a metal ring to be fixed to the wall with 4 anchors (supplied) using the drilling template included in the
package. On the ring bearing the inscription TOP to indicate the side to be kept at the top. On this ring, firmly anchored to the wall, is
screwed with 4 screws the camera bracket always respecting the TOP written in such a way that the slit lateral cable outlet remains
downward. The cables can pass back of the bracket or exit laterally through the slit arranged in the bracket.
Attention to the seal placed on the fixing disk which must remain in position in its housing during the fastening of the bracket to ensure
the impermeability.
The bracket of the camera is equipped with 3 allen star ABC (key supplied) which must be loosened to allow the orientation on the 3
axes. Once the camera oriented properly it is necessary to retighten the bottom. Finally adjust the sun visor with the screw D
DSE SRL - ITALY - WWW.DSE.EU
Page 13
USER MANUAL
CAMERAS IP H.264 1080P FULLHD
Page: 13 Page: 13
RH-DCC1 - Vandal proof, waterproof IR 20m.RH-DCC1 - Vandal proof, waterproof IR 20m.
MOUNTING THE CAMERA
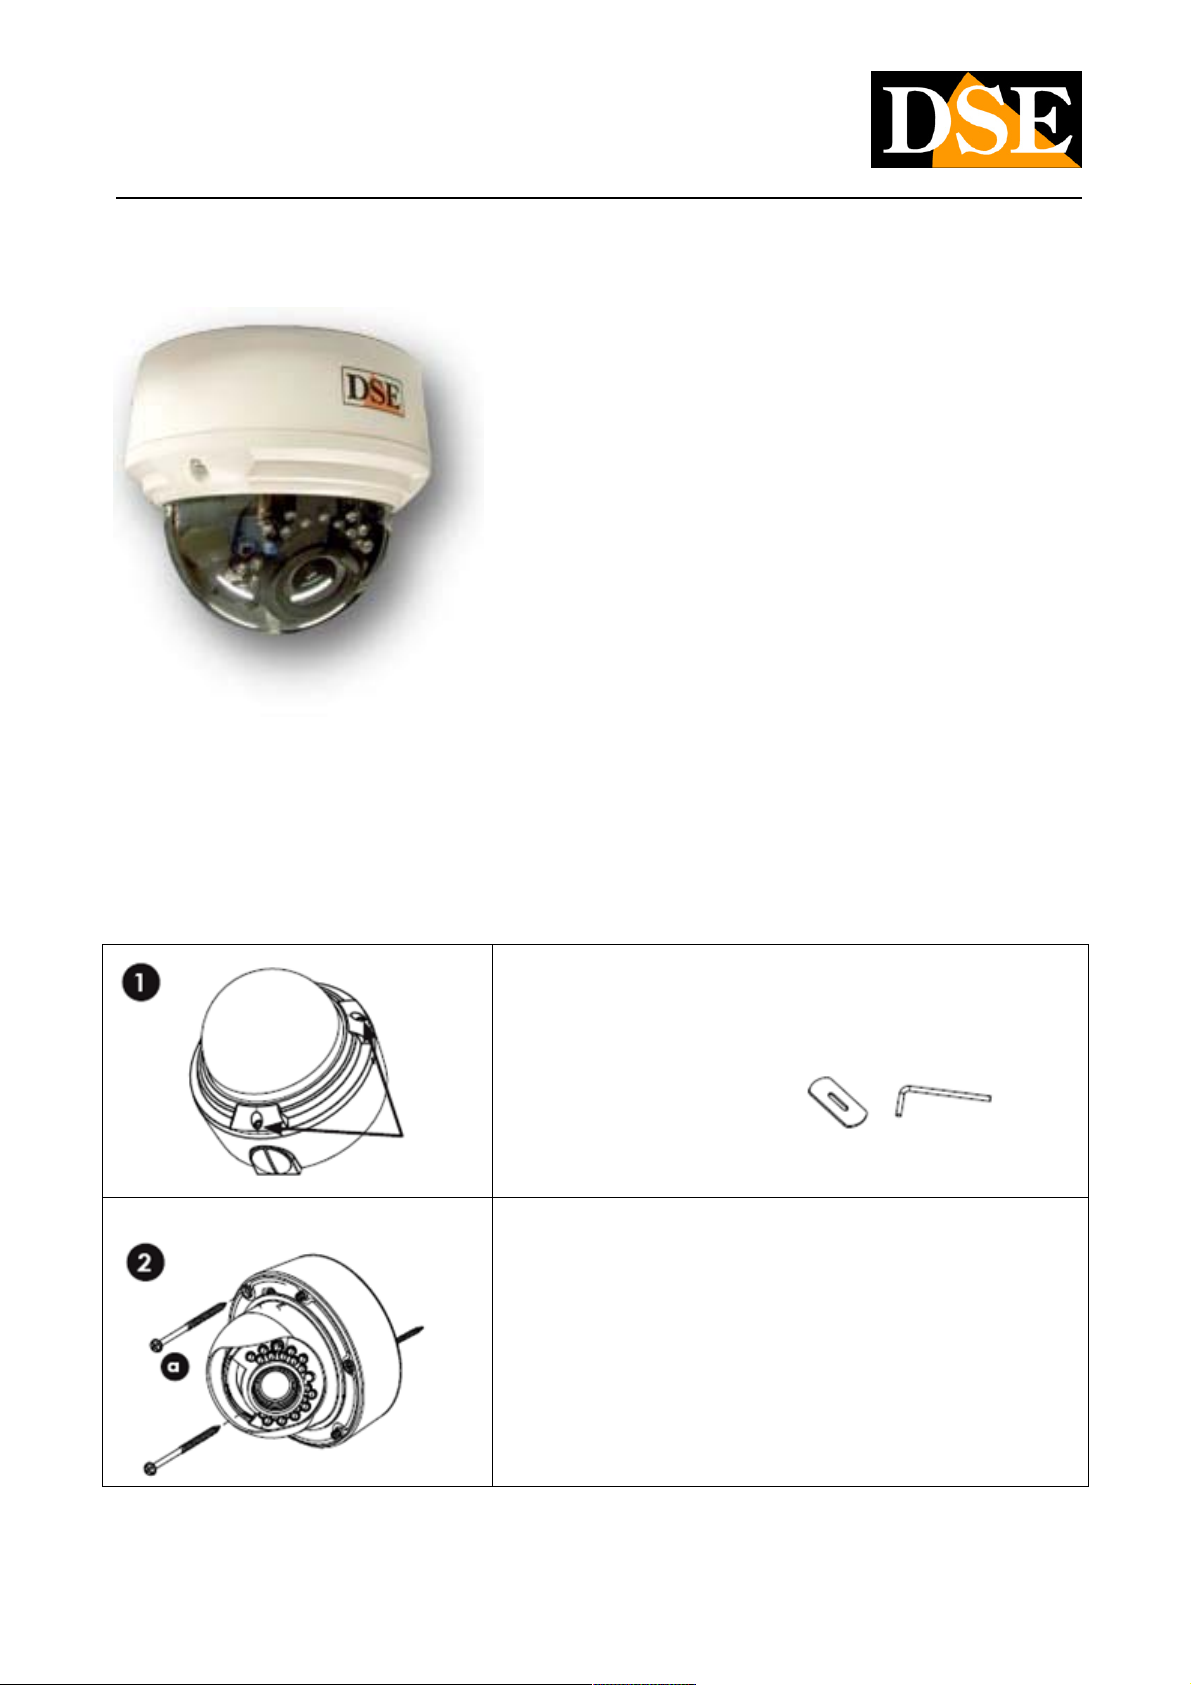
The camera is closed in a vandal-proof sealed container that can be installed on the ceiling both internally and externally. The
camera is composed of 3 distinct parts: BASE FOR FIXING, CAMERA BODY AND SHELL DOME. First, it must separate the 3
elements. The cap is secured with Phillips screws (key supplied) and the camera body with screws to the cross.
Remove the Phillips screws tamper stopping the dome housing with the key
provided. If you plan on using the side cable access unscrew
cap with the key provided.
Remove the Phillips screws that join the chamber body with the fixing base.
DSE SRL - ITALY - WWW.DSE.EU
Page 14
USER MANUAL
CAMERAS IP H.264 1080P FULLHD
Page: 14 Page: 14
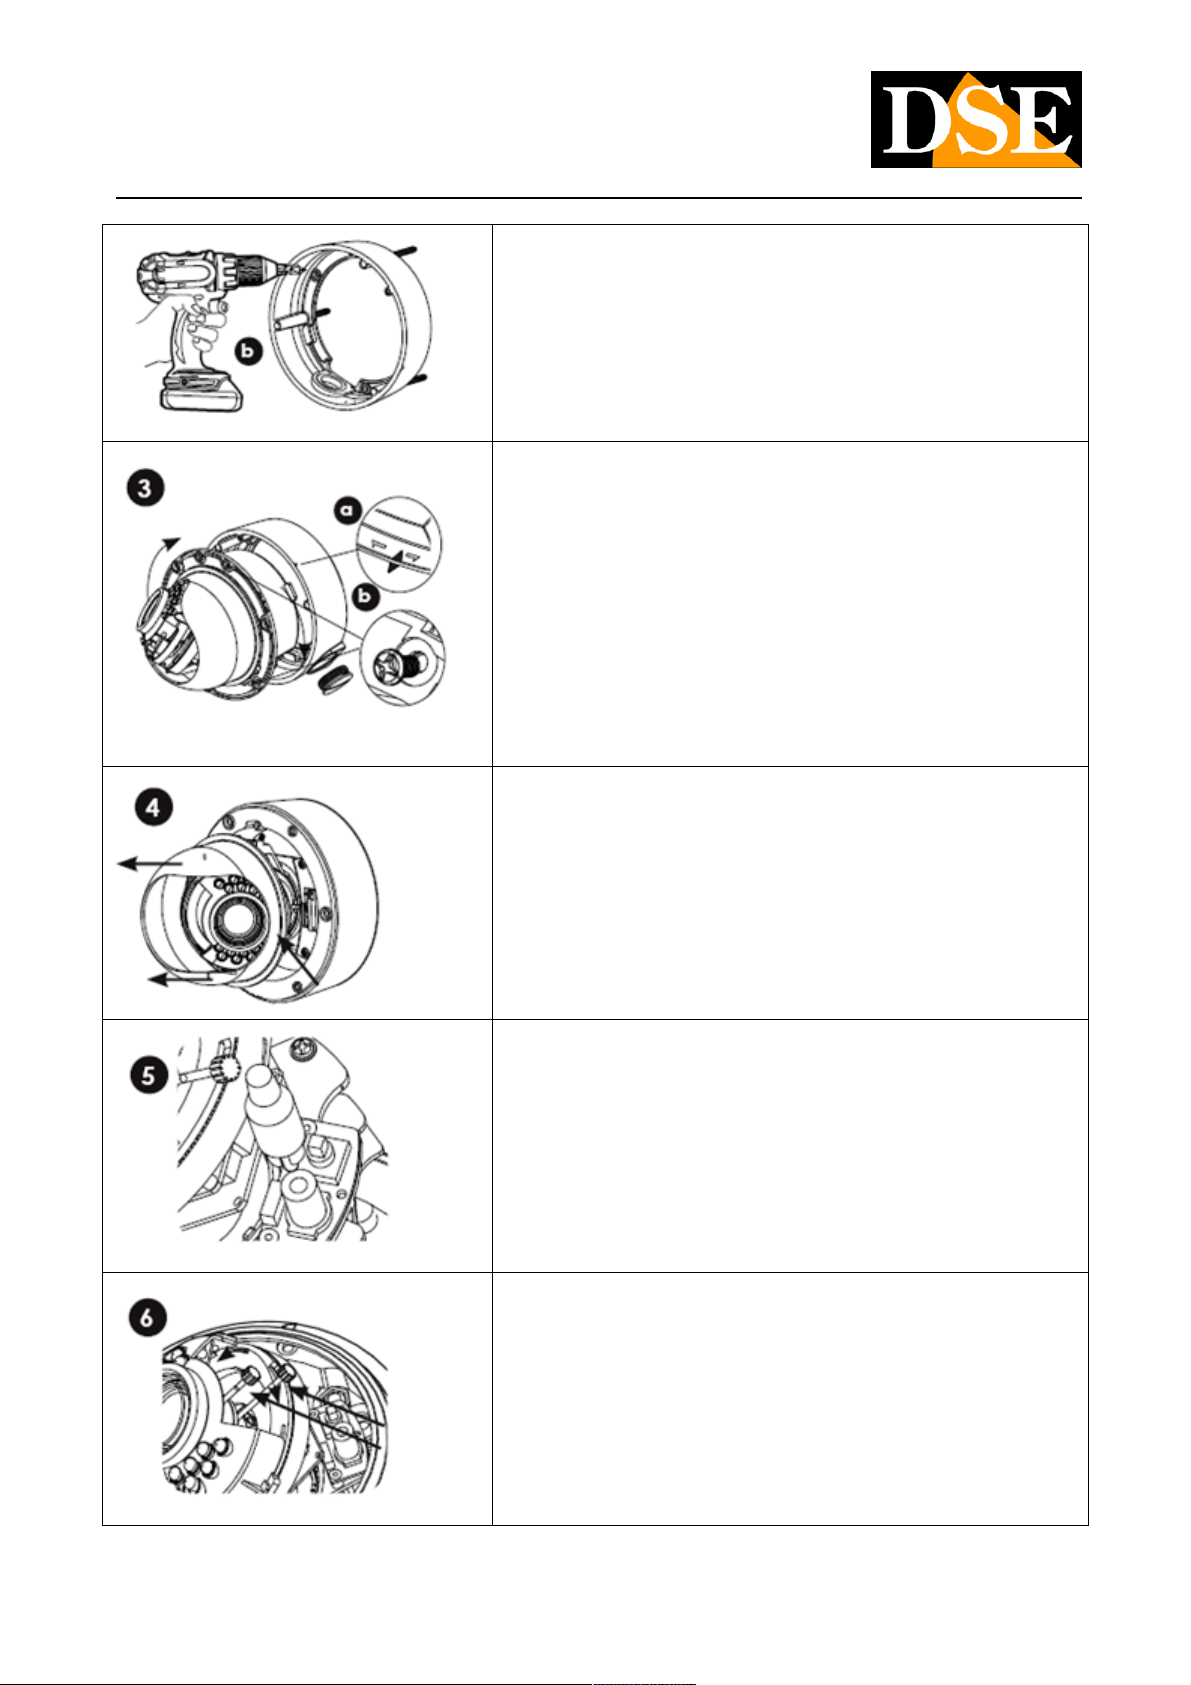
Attach to the ceiling fixing base with dowels by means of the drilling template
provided. different mounting options with 2 or more anchors are available.
Once fixed the base to the ceiling make the electrical connection and re-enter
the chamber body, paying attention to the fastening lugs and rotating
clockwise.
Orient the camera toward the target to be captured. Screw the fixing screws
in the cross.
The camera is provided with a masking cap, which prevents us from seeing
the outside camera. Remove the masking plastic cap by pressing in
correspondence with the arrow.
Enter the TEST VIDEO cable provided in the set up on the card connector.
The cable is terminated with a BNC connector to which you can connect a
monitor for adjusting the lens.
On the lens 2 are adjustment screws that allow to modify FOCAL and FOCUS
lens. It should be noted that the screws must first be loosened with a
screwdriver to release the movement. At the end of the adjustment retighten
the screws to avoid unwanted movements of the lens.
DSE SRL - ITALY - WWW.DSE.EU
Page 15

USER MANUAL
CAMERAS IP H.264 1080P FULLHD
Page: 15 Page: 15
Close the container by mounting the dome bubble.
CONNECTIONS
The connections are placed on the cable that protrudes from the camera
The cable connections is 40 cm long and is used to reach a protected box to be prepared to accommodate inside the connectors.
• AUDIO IN - MICROPHONE INPUT - The camera is equipped with a 3.5 mm mini-jack for connecting an external microphone.
(Impedance 1 KOhm)
• AUDIO OUTPUT - minijack 3.5 mm allows the connection of the local speakers. This feature allows you to create a two-way audio
conversation between the person in front of the camera and the operator in front of the client PC. (Impedance sup.16 Ohm)
• Micro SD CARD SLOT - The slot to insert a Micro SD card (up to 32GB) to save aboard the same camera images on the card is
placed behind the lens.
• 12VDC - plug that connect the power supply 220VAC / 12VDC (not included). Alternatively, it is possible to feed the camera POE
directly from the network if the network switch supports this feature.
• RJ45 (NETWORK) - MALE RJ45 connector to connect the network. To connect to a hub or network
switch using a standard LAN cable. To connect a PC directly just use a crossover cable. It provided
an RJ45 adapter female-female for connecting a cable with male connector.
• RS485 - (TX + / TX- / RX + / RX) This port allows you to connect external devices such as PTZ and speed dome cameras to
control them via the web interface of the camera. Supported Protocols Pelco P / D.
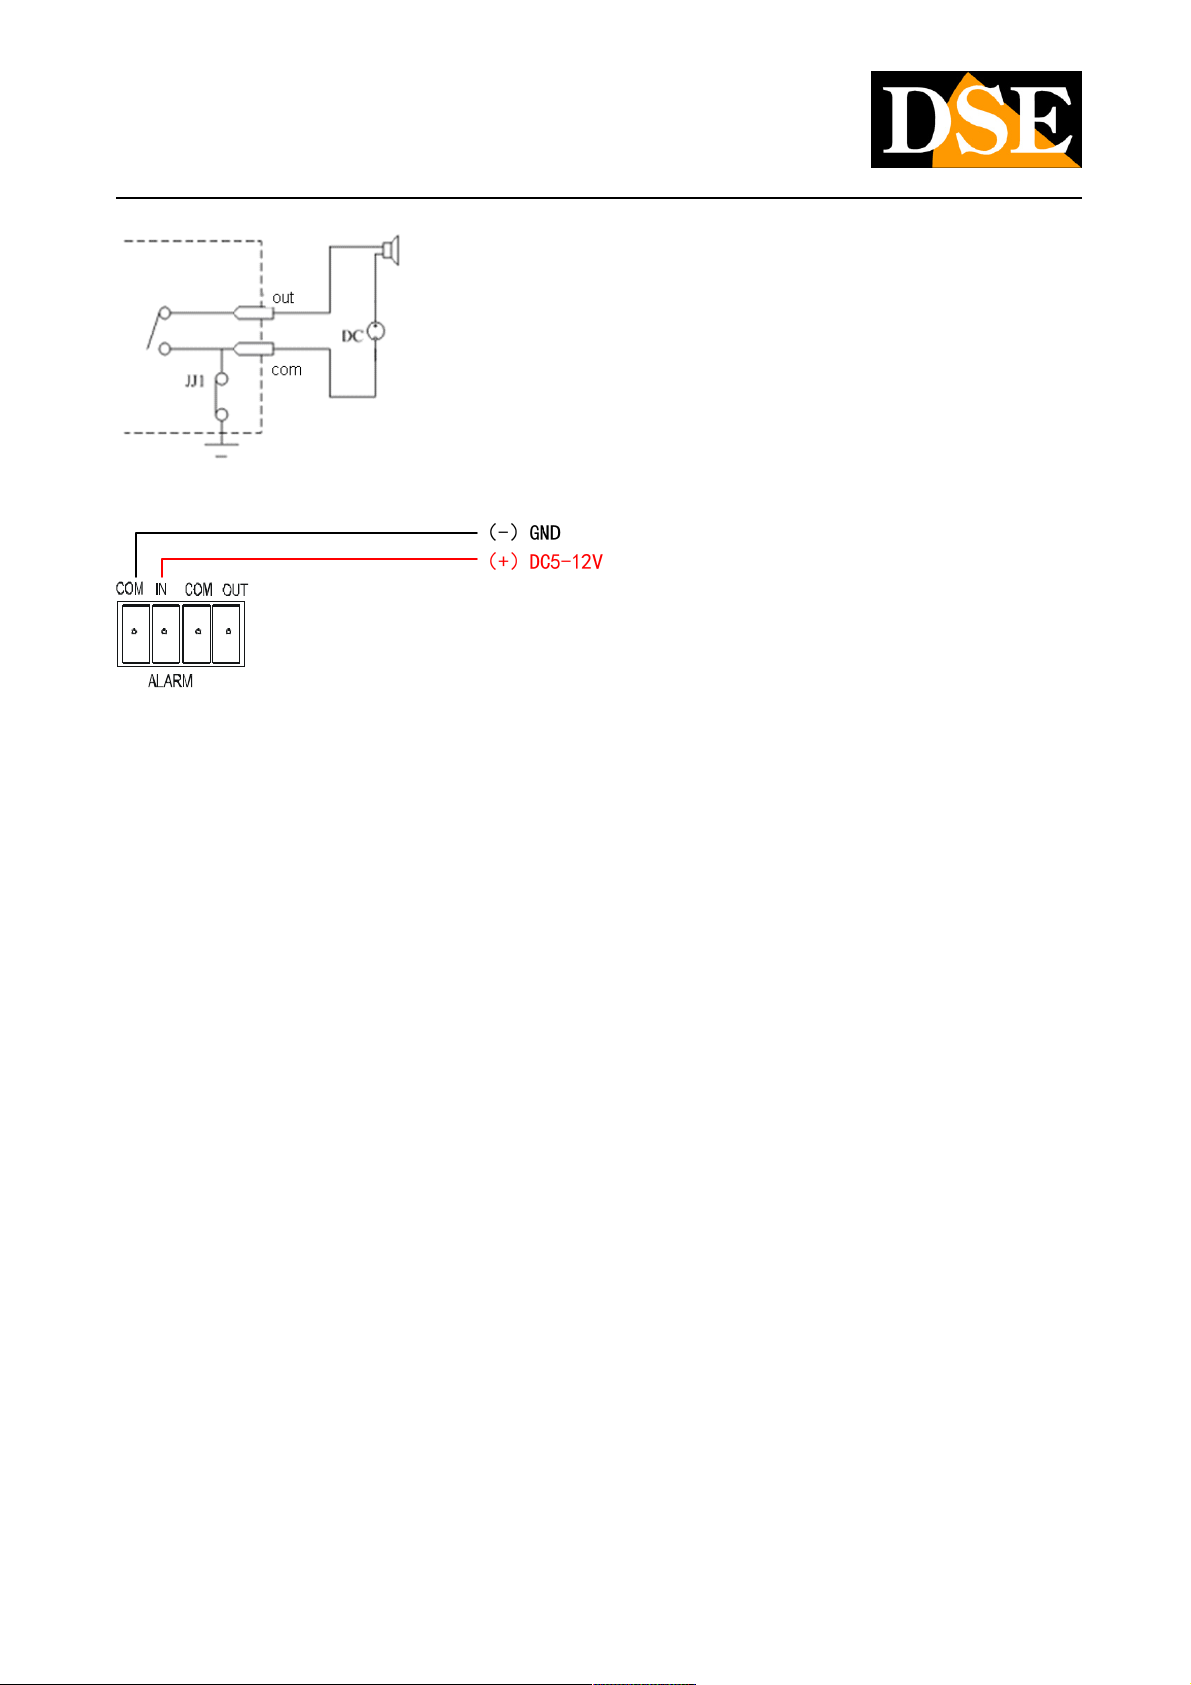
• ALARM IN / OUT - alarm entrance, between the IN and COM terminals can be connected with a voltage input between 5 and
12VDC. In programming it is possible to define whether the alarm is considered in the presence or in the absence of tension. The
alarm output is used to actuate external devices such as acoustic or luminous alarms. The contact is ON / OFF type with maximum
load can be driven directly to 300mA at 12VDC. In programming it is possible to set the operation (NO / NC), the eventual
intermittently, and the duration of activation in the event of an alarm.
Example output connection
DSE SRL - ITALY - WWW.DSE.EU
Page 16
USER MANUAL
CAMERAS IP H.264 1080P FULLHD
Page: 16 Page: 16
Example input connection
• VIDEO OUT - output to connect analog monitors. Connects such as a portable monitor to comfortably focus on the goal after
installation. And 'placed on the camera board next to the SD card slot. CAUTION: this output may not be active if disabled in the camera
configuration.
• RESET - Button to restore the factory settings. And 'place on the camera card close to the SD card slot. Hold for 5 seconds to
restore the factory settings including network data.
DSE SRL - ITALY - WWW.DSE.EU
Page 17
USER MANUAL
CAMERAS IP H.264 1080P FULLHD
Page: 17 Page: 17
Network Configuration
After providing power to the camera via a 12VDC power supply or via POE and after connecting the network you are necessary to
proceed to the configuration of the network parameters in order to be able to make the cameras are accessible from the PC on the
network. The cameras are supplied with address 192.168.0.120 Factorynetwork. The cameras are supplied with address 192.168.0.120 Factory
SOFTWARE IPSEARCH
The CD supplied with the camera software is included IPSEARCH that requires no installation and can easily be run on any PC on The CD supplied with the camera software is included IPSEARCH that requires no installation and can easily be run on any PC on The CD supplied with the camera software is included IPSEARCH that requires no installation and can easily be run on any PC on
the network. The function of this software is to detect the presence of the camera network regardless of its address and allow you
to configure the network address of the camera so as to be consistent with your network. We recall that because the camera is
visible from the other PCs on the network it is necessary that the first 3 address parts are the same as other network PC and is
equal also the subnet mask. And 'advisable to connect a network camera at a time, and insert new ones after you have set earlier.
PRELIMINARY CHECKS
Before you must obtain from your network some information about the management of the IP addresses used on your network. E
'need to know an IP address can be assigned to the camera that is not equal to any other device already present in the network. If
you are unsure about your network's operation you can use certain commands in DOS PROMPT
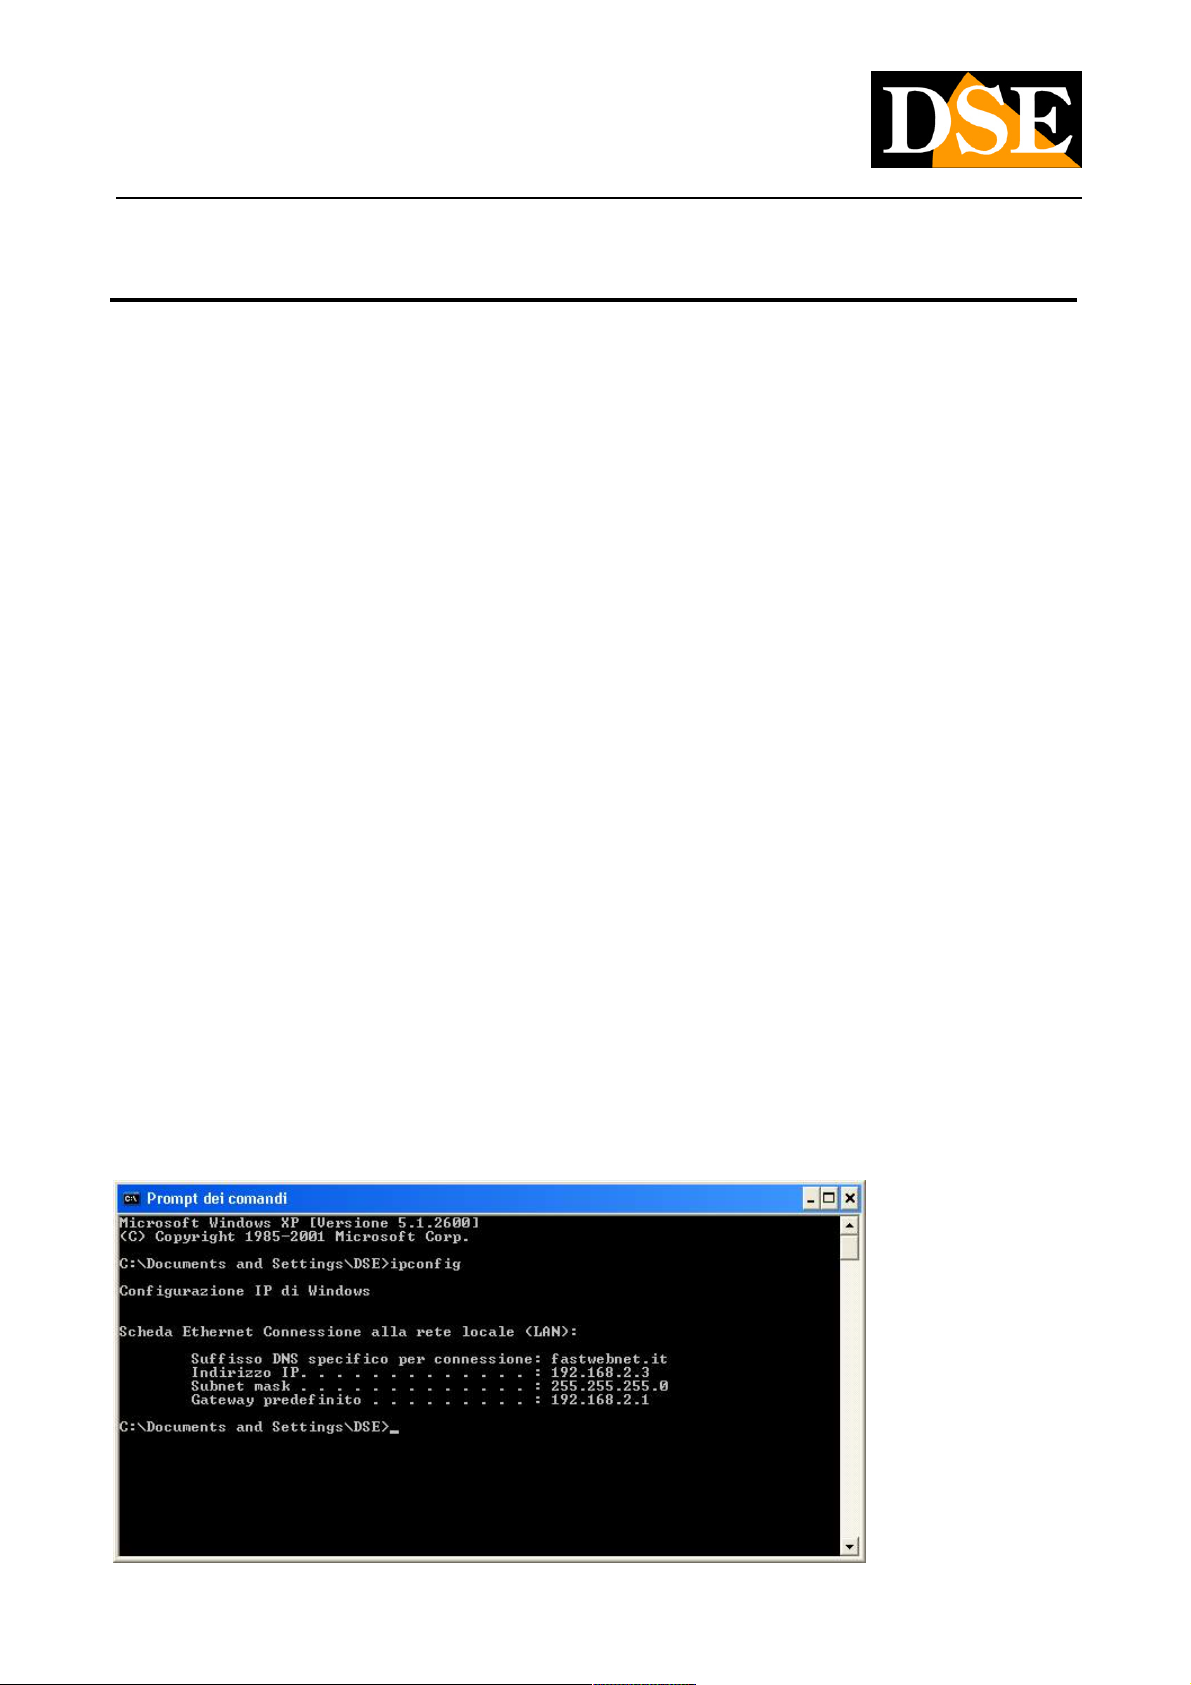
On a network PC launched a DOS window available between the Windows accessory programs. Type IPCONFIG at the
command prompt and press ENTER. They will see the TCP / IP parameters. The second line is the IP address assigned to your
computer.
DSE SRL - ITALY - WWW.DSE.EU
Page 18
USER MANUAL
CAMERAS IP H.264 1080P FULLHD
Page: 18 Page: 18
In the above example the address of the PC on which you are working is 192.168.2.3 and the subnet mask used is the classic
255.255.255.0. The camera can therefore assign an address chosen by the 192.168.2.XXX type, where XXX stands for a number
between 0 and 255. E '
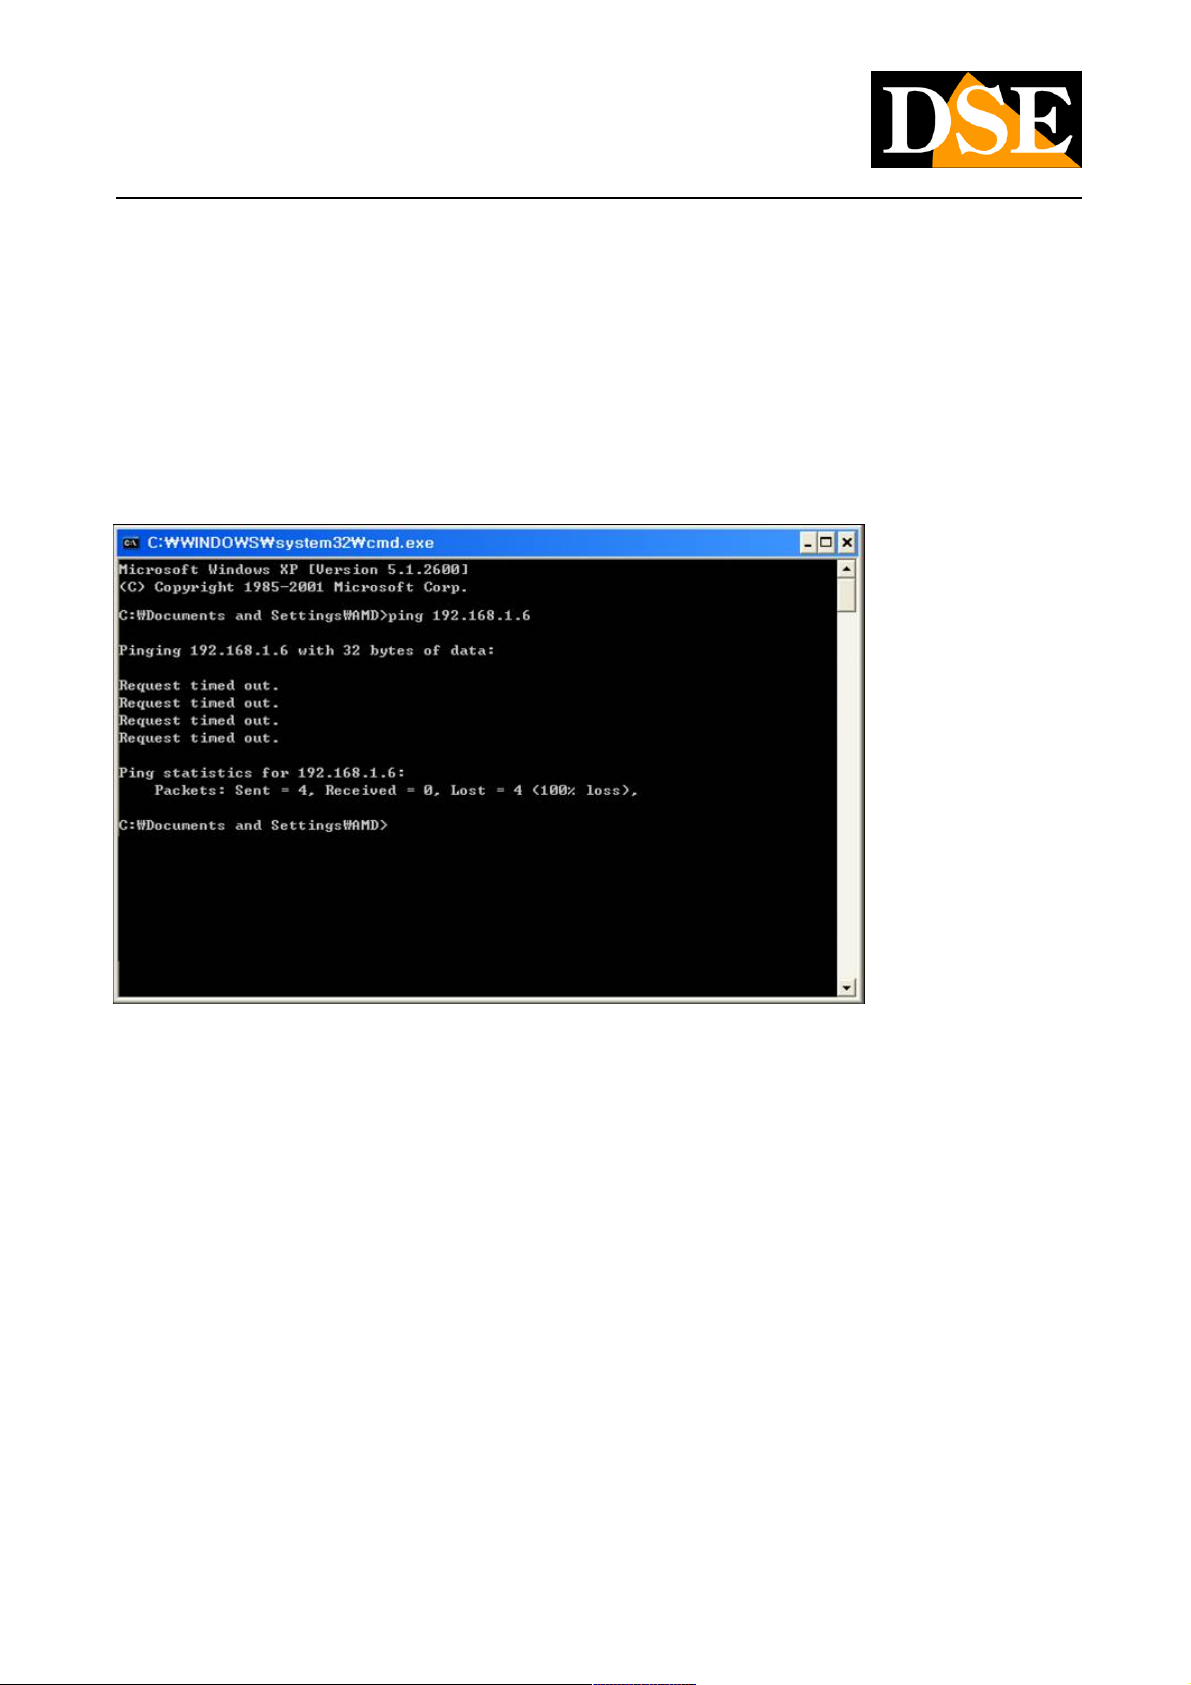
important choose an address that is not already used by other devices of network. To verify that the chosen address is important choose an address that is not already used by other devices of network. To verify that the chosen address is important choose an address that is not already used by other devices of network. To verify that the chosen address is
free, try to make a PING from the same DOS window by typing PING followed by a space and by the IP you wish to assign to the
camera. If there is no device responds to that address, you will receive 4 REQUEST TIME OUT as in the following example:
All cameras support the automatic IP address assignment from a DHCP server. This mode, however, is not recommended
because in the event of power failure or restart of the equipment it is possible that the cameras IP address change necessitating a
reconfiguration of recording software.
IPSEARCH OF USE TO ASSIGN IP ADDRESS
1. Insert the CD into a PC player and explore the content. You will find a folder called IPSEARCH inside some files. IP SEARCH
does not require installation. Double-click the IPSEARCH.EXE and will start the program.
E 'can copy this folder to a USB key to easily run the program on any PC on the network.
DSE SRL - ITALY - WWW.DSE.EU
Page 19
USER MANUAL
CAMERAS IP H.264 1080P FULLHD
Page: 19 Page: 19
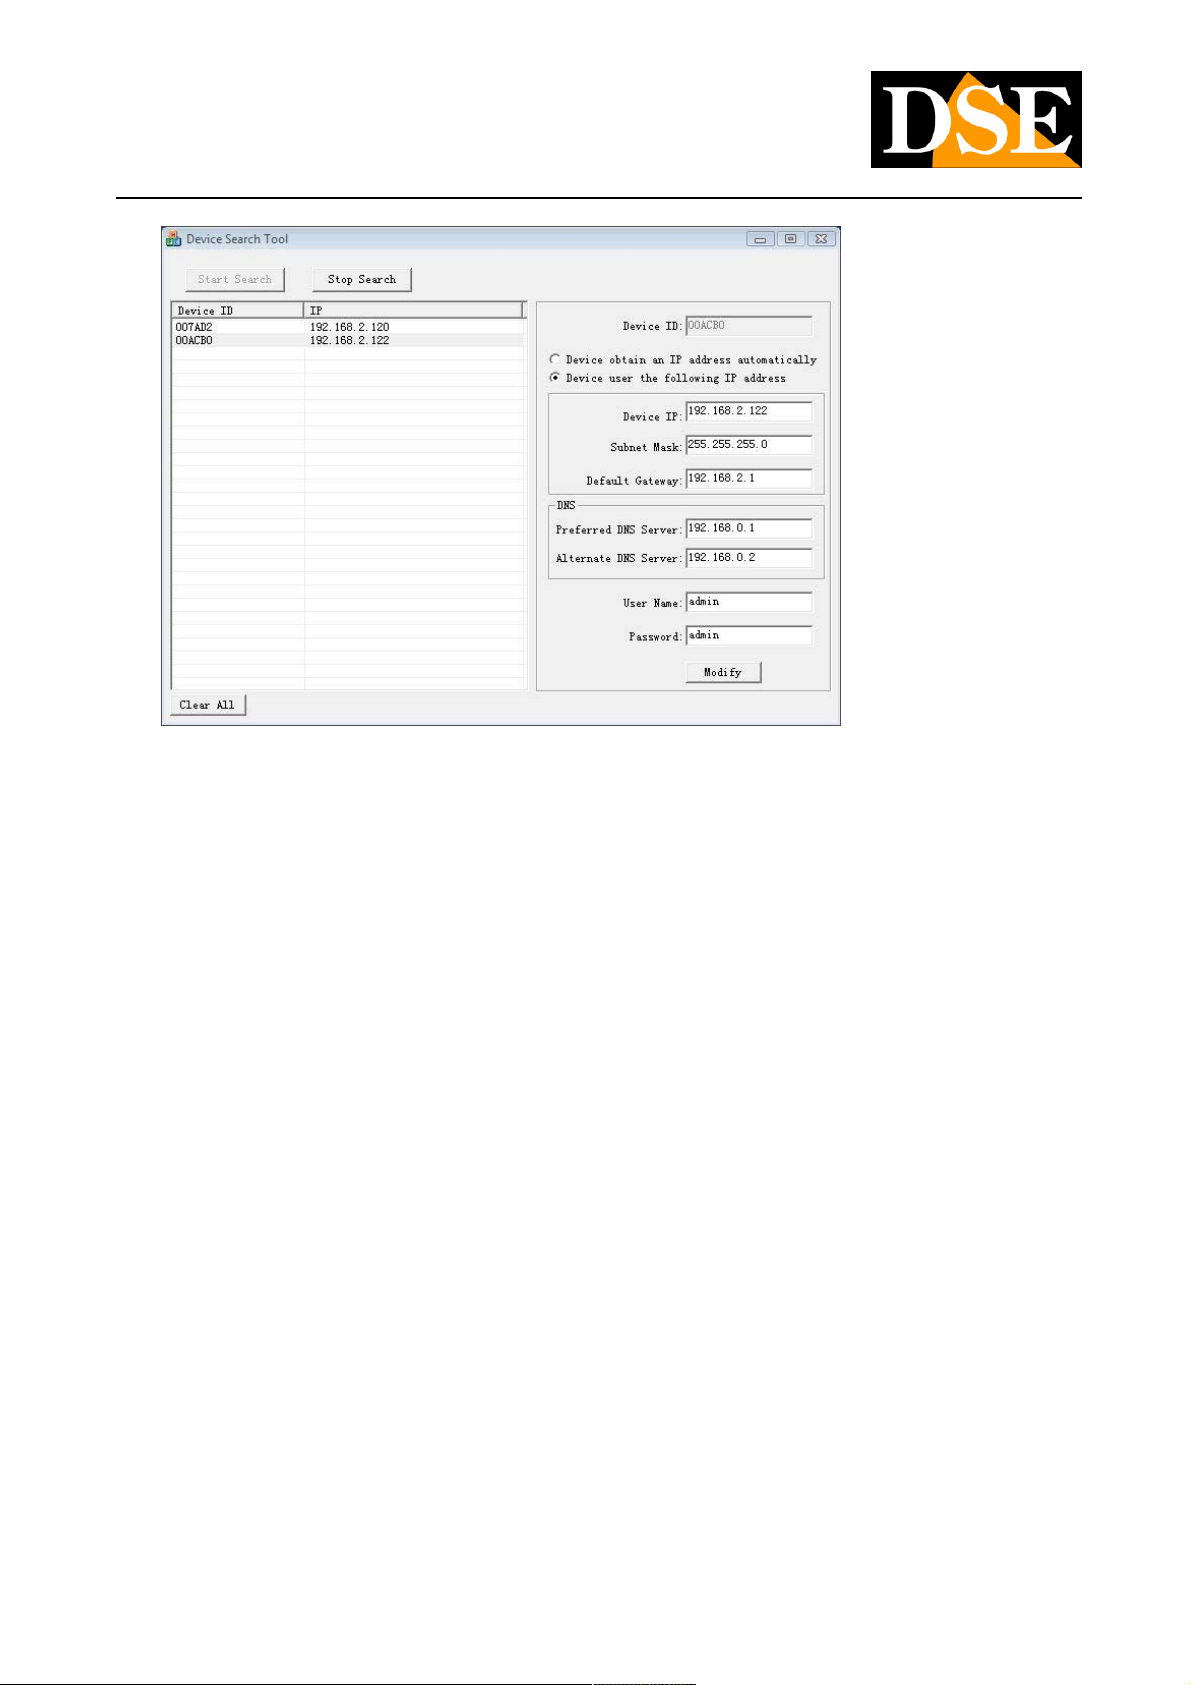
2. Click on START SEARCH button. The program will start to search for the IP cameras2. Click on START SEARCH button. The program will start to search for the IP cameras
RH series on the network. Wait to complete the search. IP search is able to detect even cameras with different address class from
that of the PC on which you are working.
3. When the search will see the list of detected cameras. If the camera is not3. When the search will see the list of detected cameras. If the camera is not
It was detected check the functionality of network links. Each camera is distinguished by a unique ID that is inherent in the device.
A appears beside the current IP address of the camera. In the right section, there are all the other network parameters and
password.
4. Of particular relevance are of the IP address (IP DEVICE) which must have the same class 4. Of particular relevance are of the IP address (IP DEVICE) which must have the same class
network (first three groups of equal numbers) and the SUBNETMASK which must be the same as that used by the network
(typically 255.255.255.0). You can edit the network parameters as desired by writing in the boxes.
5. Press MODIFY for transferring the pattern into the camera. 5. Press MODIFY for transferring the pattern into the camera.
DSE SRL - ITALY - WWW.DSE.EU
Page 20
USER MANUAL
CAMERAS IP H.264 1080P FULLHD
Page: 20 Page: 20
with browser access
Once properly set the network parameters it is possible to perform the first access to the camera using the Internet browser you prefer,
for example INTERNET EXPLORER, SAFARI, FIREFOX, CHROME etc.
FLASH TECHNOLOGY SUPPORTS ALL BROWSERS
Unlike most IP cameras on the market, the RH cameras dialogue with the browser using Flash
technology instead of the traditional activeX. This way you have imported several advantages:
1 - Support for all internet browsers on the market, and all operating systems. You can connect
with your favorite browser (Internet Explorer, Firefox, Chrome, Safari etc) and use any Windows
or Mac OS to access the cameras without changing your habits.
2 - The camera web interface does not install external components (activeX) in the browser and therefore it is not necessary to intervene
in the settings, reducing the security parameters.
The web interface is based on ADOBE FLASH PLAYER the most common and efficient video player that will presumably already The web interface is based on ADOBE FLASH PLAYER the most common and efficient video player that will presumably already The web interface is based on ADOBE FLASH PLAYER the most common and efficient video player that will presumably already
installed on your PC if you have already used before to play an online video from sites like you tube or similar. If your PC does not have
installed ADOBE FLASH PLAYER is required to first access to the installation that you do for free in seconds.
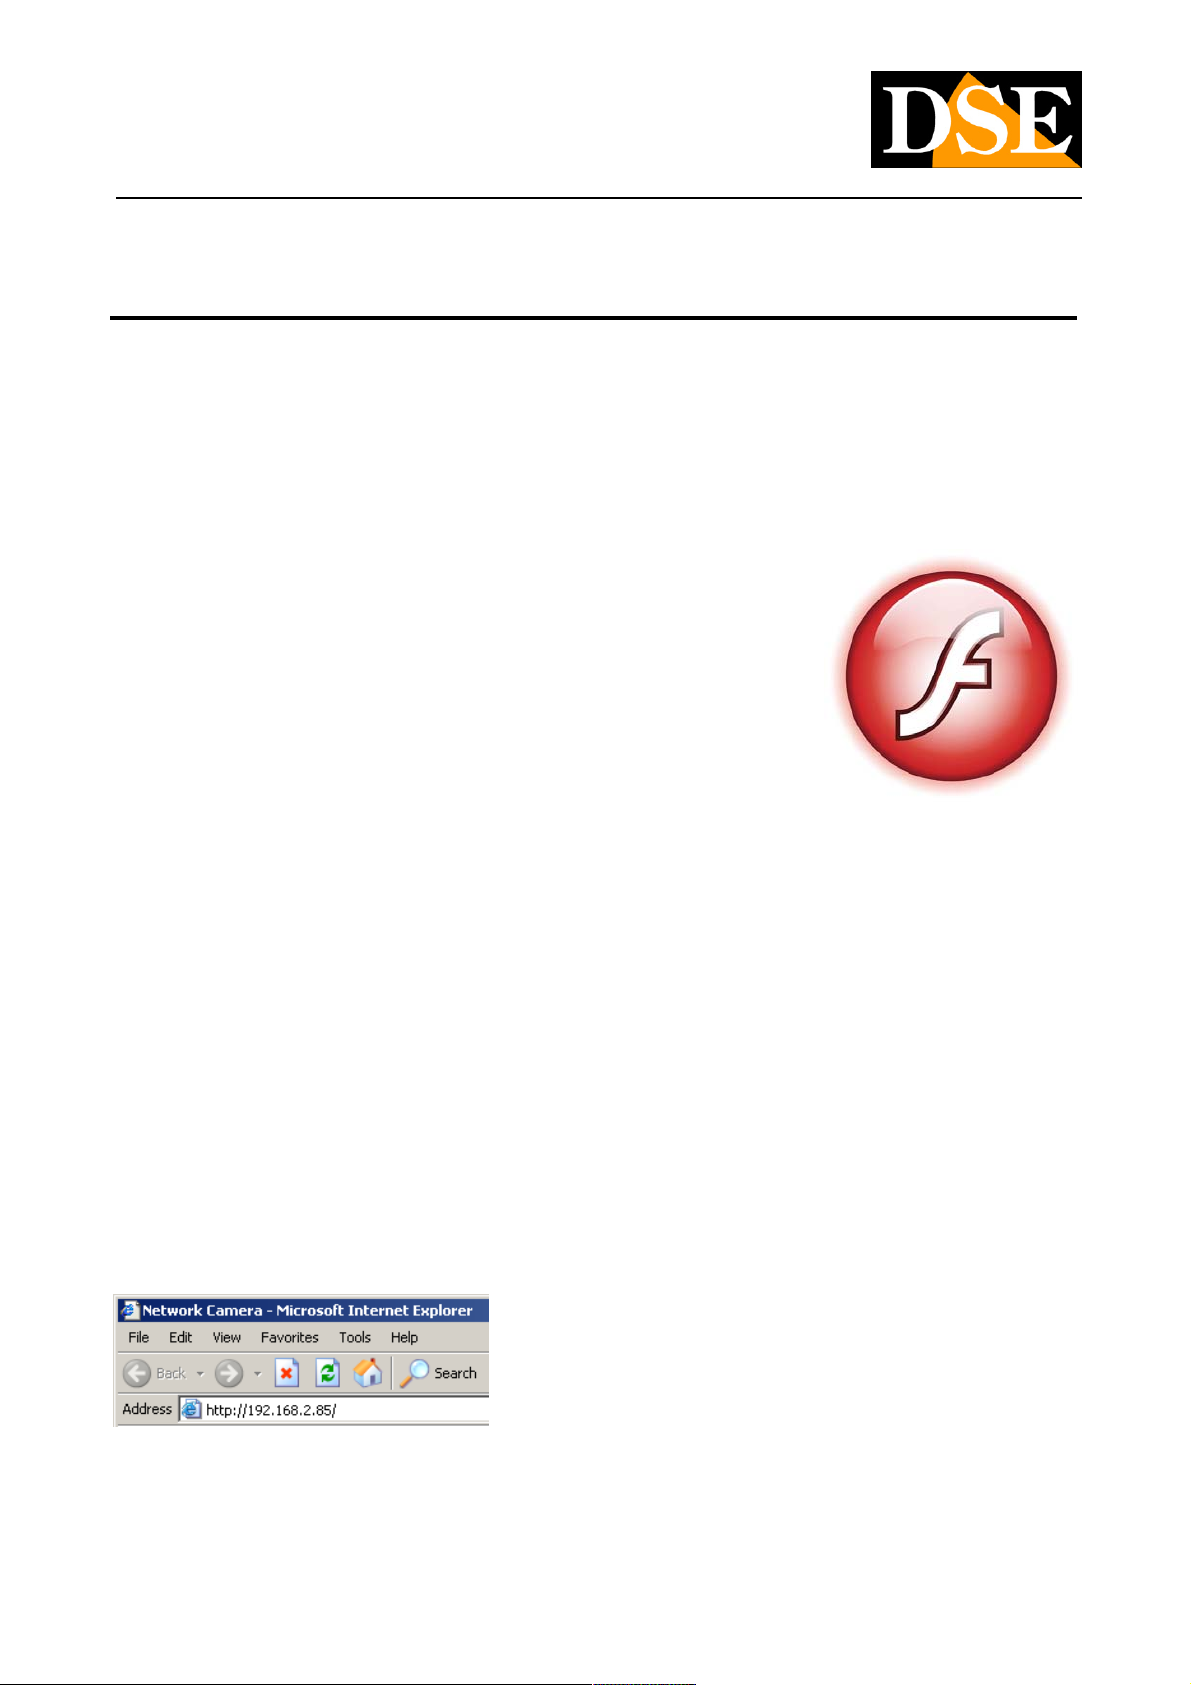
ACCESS WITH BROWSER
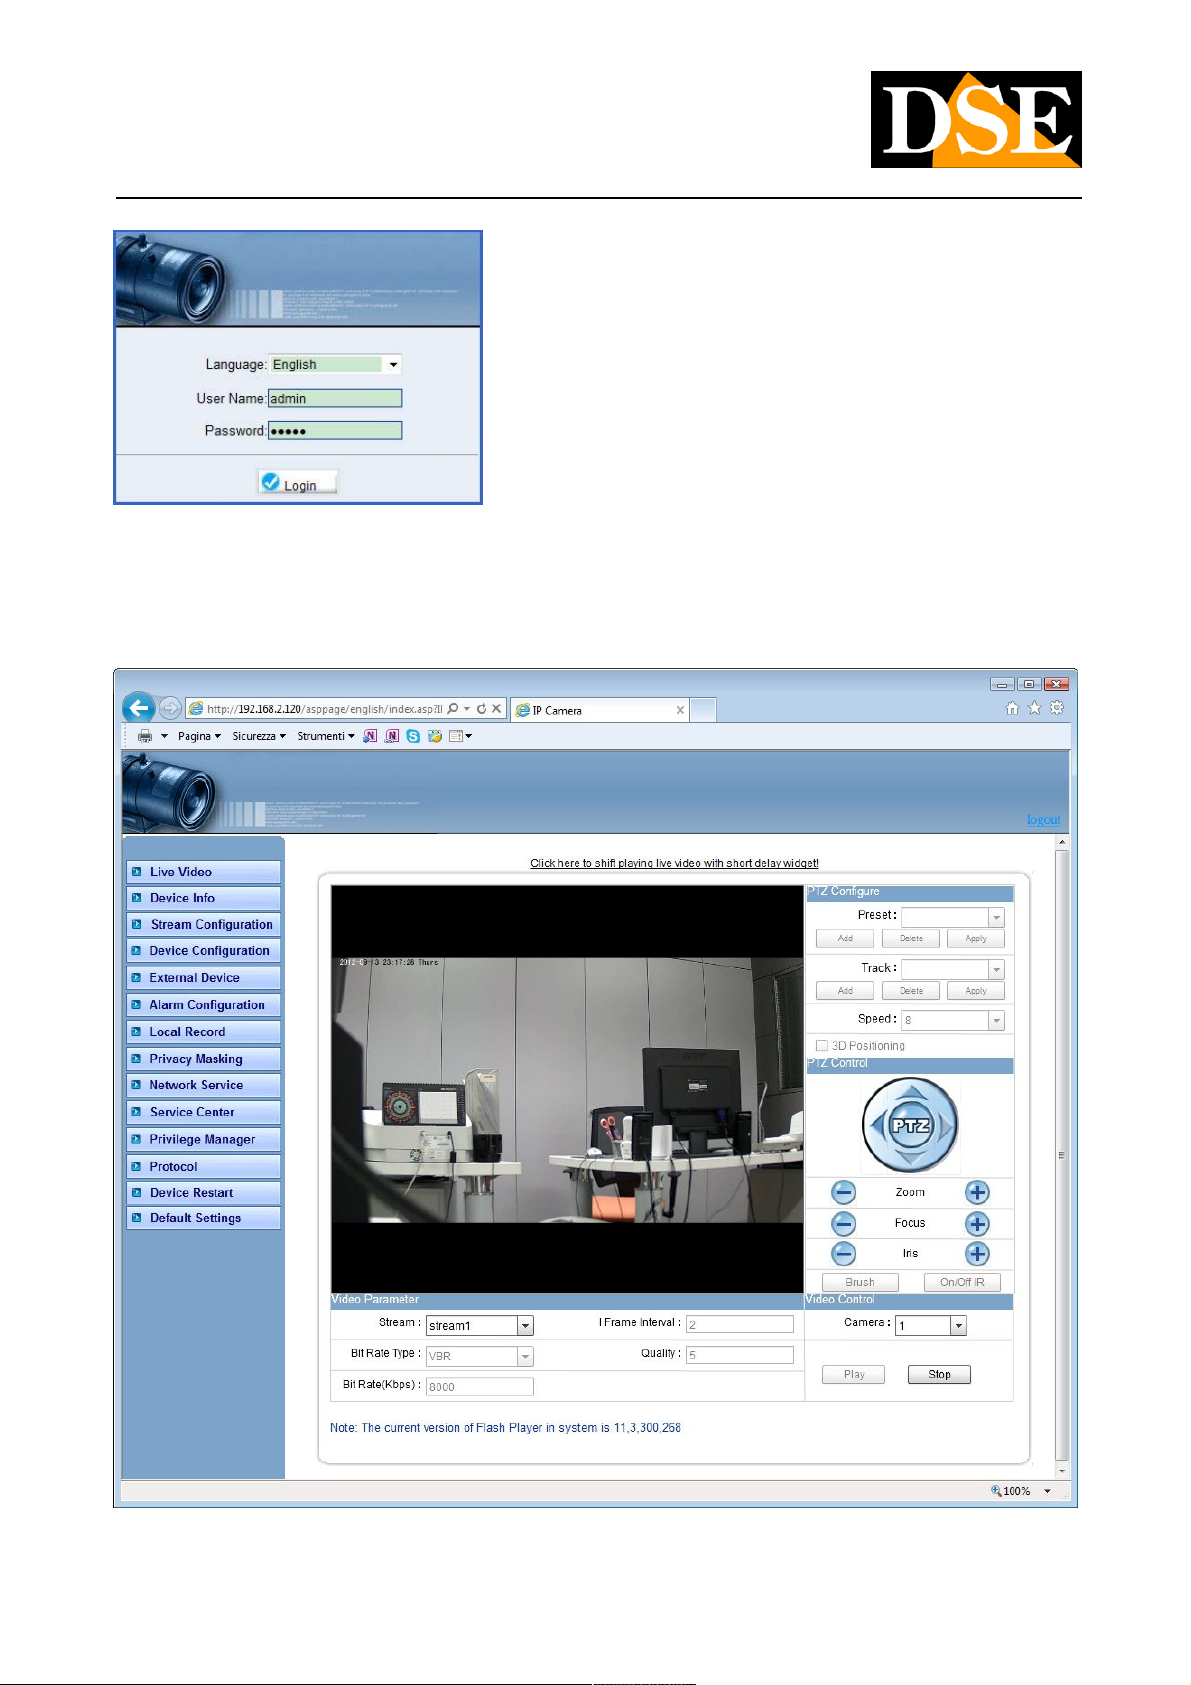
To access the camera using the Internet browser just type the address in the browser bar as in the following example:
A window will appear first log-in for entering username and password for access.
DSE SRL - ITALY - WWW.DSE.EU
Page 21
USER MANUAL
CAMERAS IP H.264 1080P FULLHD
Page: 21 Page: 21
The RH Series of cameras factory login details are:
USERNAME: admin PASSWORD:
admin
The access to the camera control mask.
On the left side of the window are the camera setup buttons which will be discussed
DSE SRL - ITALY - WWW.DSE.EU
Page 22

USER MANUAL
CAMERAS IP H.264 1080P FULLHD
Page: 22 Page: 22
in the next chapter. At the center is the image in real time. By clicking the right button on the image you can activate the following
functions:
FULL SCREEN - To port the live image of the camera in full screen without frame and buttons, double-click on the image and then press FULL SCREEN - To port the live image of the camera in full screen without frame and buttons, double-click on the image and then press
Esc to exit.
ZOOM IN / OUT - Allows you to zoom in the image. Alternatively you can also draw a rectangle by dragging the mouse to zoom in the ZOOM IN / OUT - Allows you to zoom in the image. Alternatively you can also draw a rectangle by dragging the mouse to zoom in the
defined area.
RESTORE PANORAMA - Restore the overall vision of eliminating all activated zoom RESTORE PANORAMA - Restore the overall vision of eliminating all activated zoom RESTORE PANORAMA - Restore the overall vision of eliminating all activated zoom
SENSOR CONFIGURATION - allows access to the circuit configuration of the camera by intervening on its programmable parameters. SENSOR CONFIGURATION - allows access to the circuit configuration of the camera by intervening on its programmable parameters.
The detail is described later.
To the right in the window there are PTZ commands that are used to control any traverses connected to the RS485 port of the camera.
Below you can choose which stream among those set in the camera using the live view.
CAUTION - E 'can connect several clients simultaneously up to a maximum of 10 per camera client.
DSE SRL - ITALY - WWW.DSE.EU
Page 23
USER MANUAL
CAMERAS IP H.264 1080P FULLHD
Page: 23 Page: 23
sensor Configuration
E 'possible to intervene in the camera configuration of the sensor to change the video output.
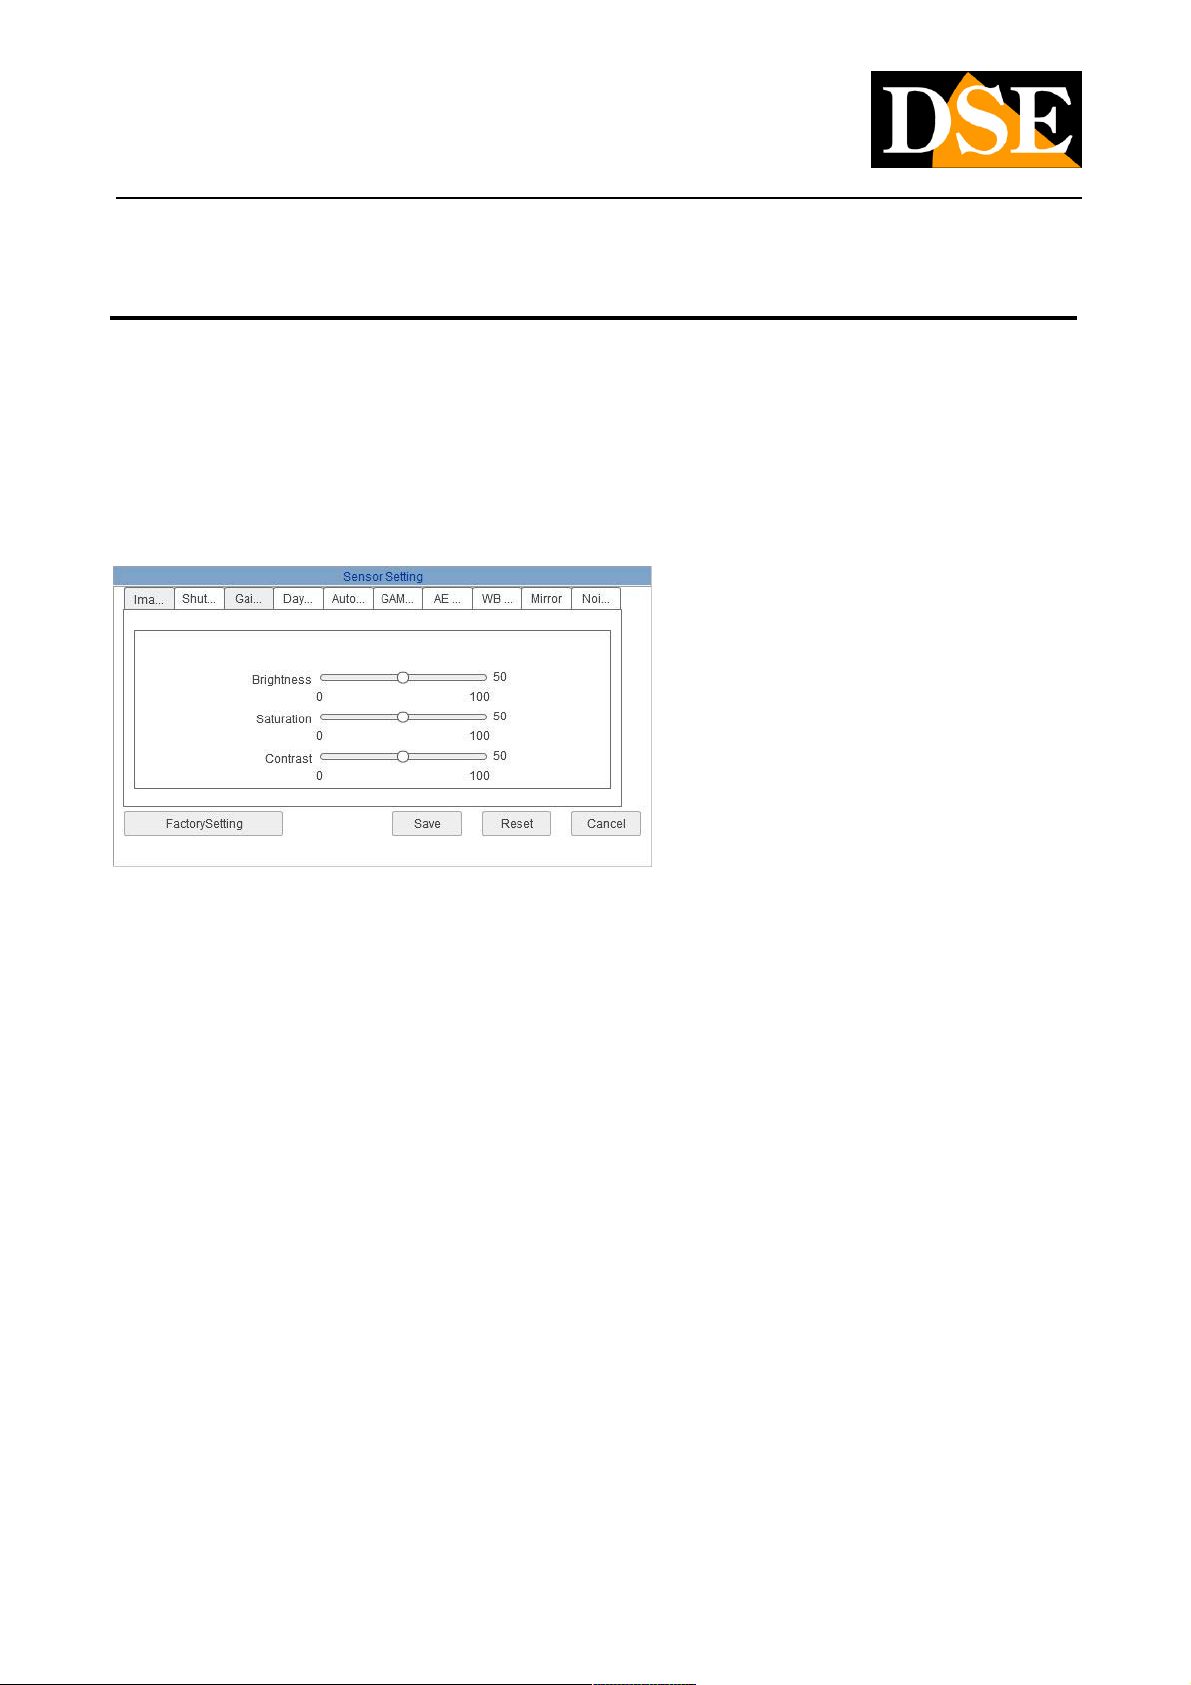
In view live click the right button and select SENSOR SETUP. A window opens with several folders that we see below.
IMAGE ADJUST
Adjusts Brightness, Saturation and Contrast in the image.
The brightness adjustment acts on the 3 parameters of the camera: The electronic iris (shutter), the diaphragm of the lens iris and gain.
These three parameters are changed in the order indicated that if the brightness of the image does not correspond to the camera set
value will act as follows:
1. Changing the electronic shutter to achieve the required brightness 1. Changing the electronic shutter to achieve the required brightness
2. If one point unsuccessfully change IRIS lens to achieve the brightness 2. If one point unsuccessfully change IRIS lens to achieve the brightness
request
3. If step 2 without changing the GAIN successfully to achieve the brightness 3. If step 2 without changing the GAIN successfully to achieve the brightness
request
4. If step 3 without success the request brightness is not reached Obviously it is necessary that the following settings SHUTTER, 4. If step 3 without success the request brightness is not reached Obviously it is necessary that the following settings SHUTTER,
GAIN and AUTOIRIS allow the automatic adjustment, otherwise the camera will not change the parameter set as a fixed.
SHUTTER CONTROL
DSE SRL - ITALY - WWW.DSE.EU
Page 24
USER MANUAL
CAMERAS IP H.264 1080P FULLHD
Page: 24 Page: 24
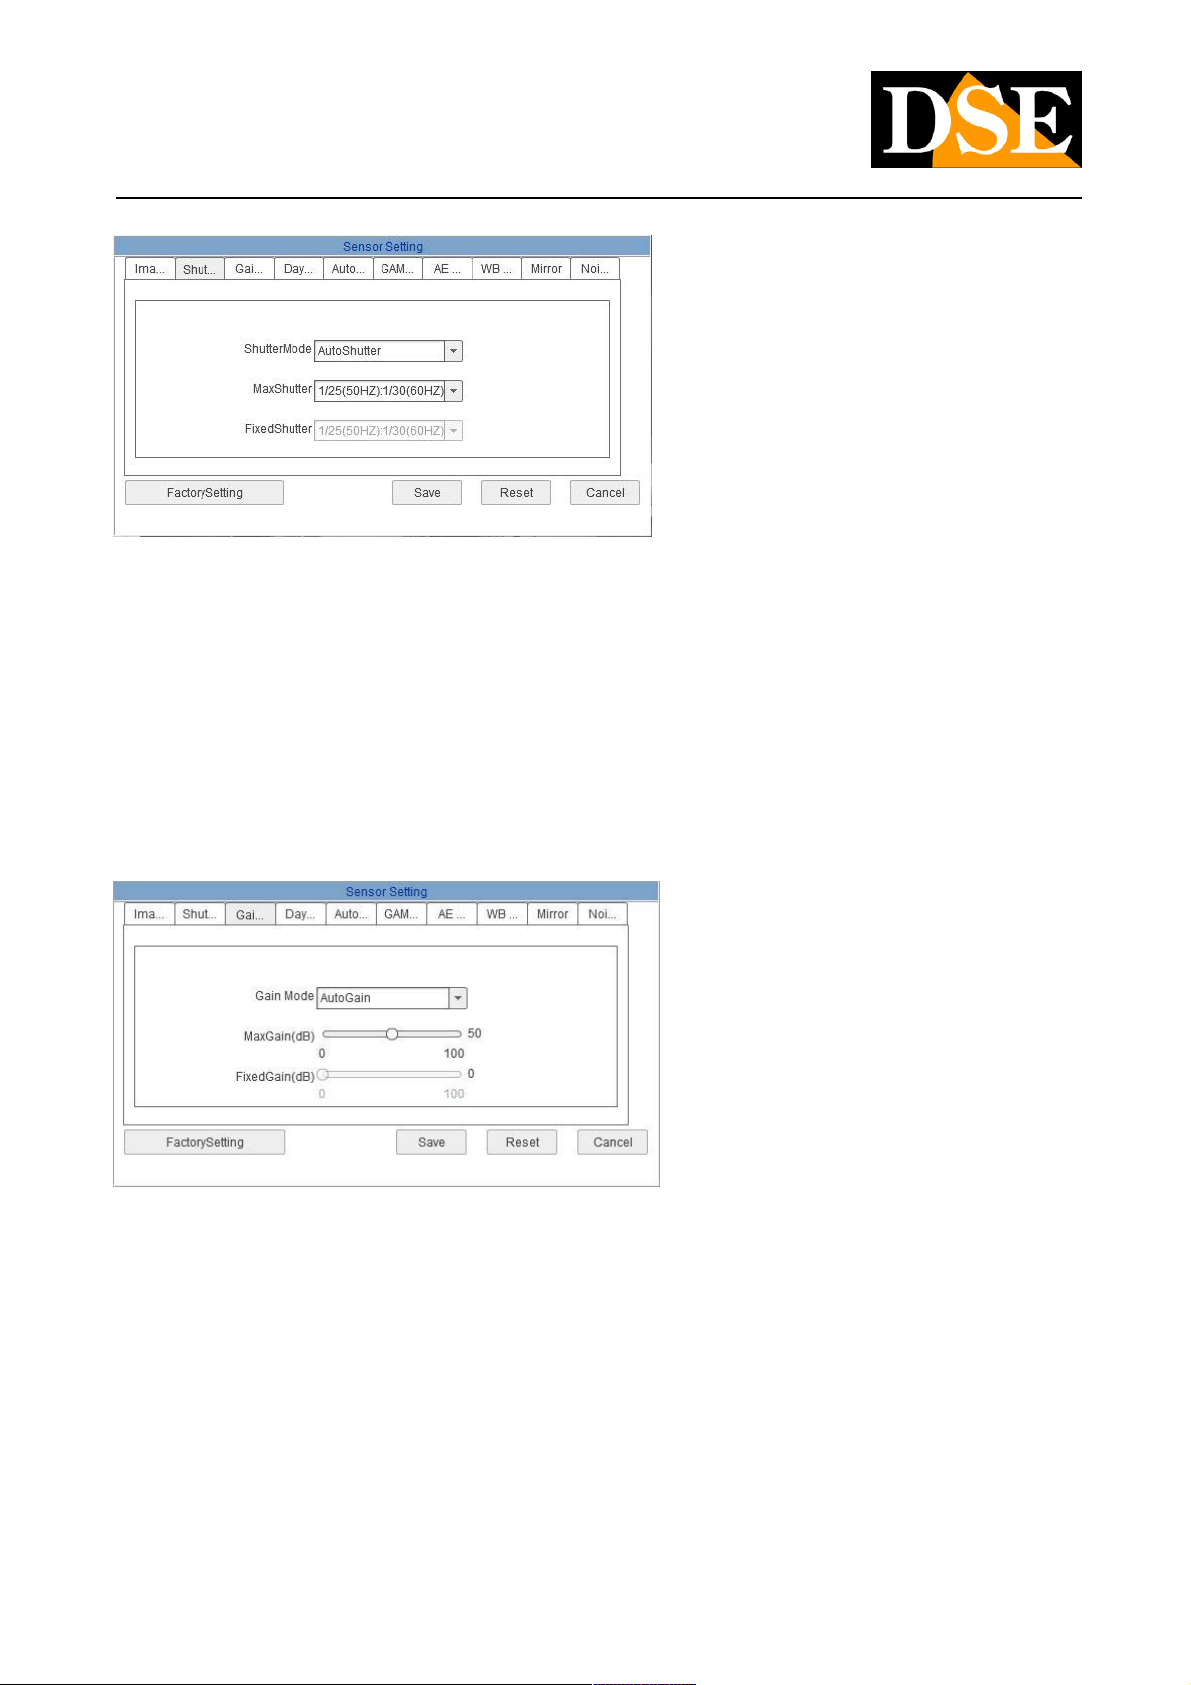
Adjust the speed of the electronic shutter to be defined depending on the ambient brightness. A slow diaphragm is very bright with little
light but is likely to give whitening in case of strong daylight. Instead a quick shutter will be excellent with bright but could give
under-exposed images in low light.
By choosing AutoShutter (recommended), the camera automatically adjust the electronic shutter while allowing to set the shutter
maximum permissible value. By choosing FIXEDSHUTTER the camera shutter will maintain a constant value that can be defined.
GAIN CONTROL
It allows you to adjust the gain of the sensor. E 'can set an automatic value (with a maximum adjustable threshold) or fixed.
DAY & NIGHT
DSE SRL - ITALY - WWW.DSE.EU
Page 25
USER MANUAL
CAMERAS IP H.264 1080P FULLHD
Page: 25 Page: 25
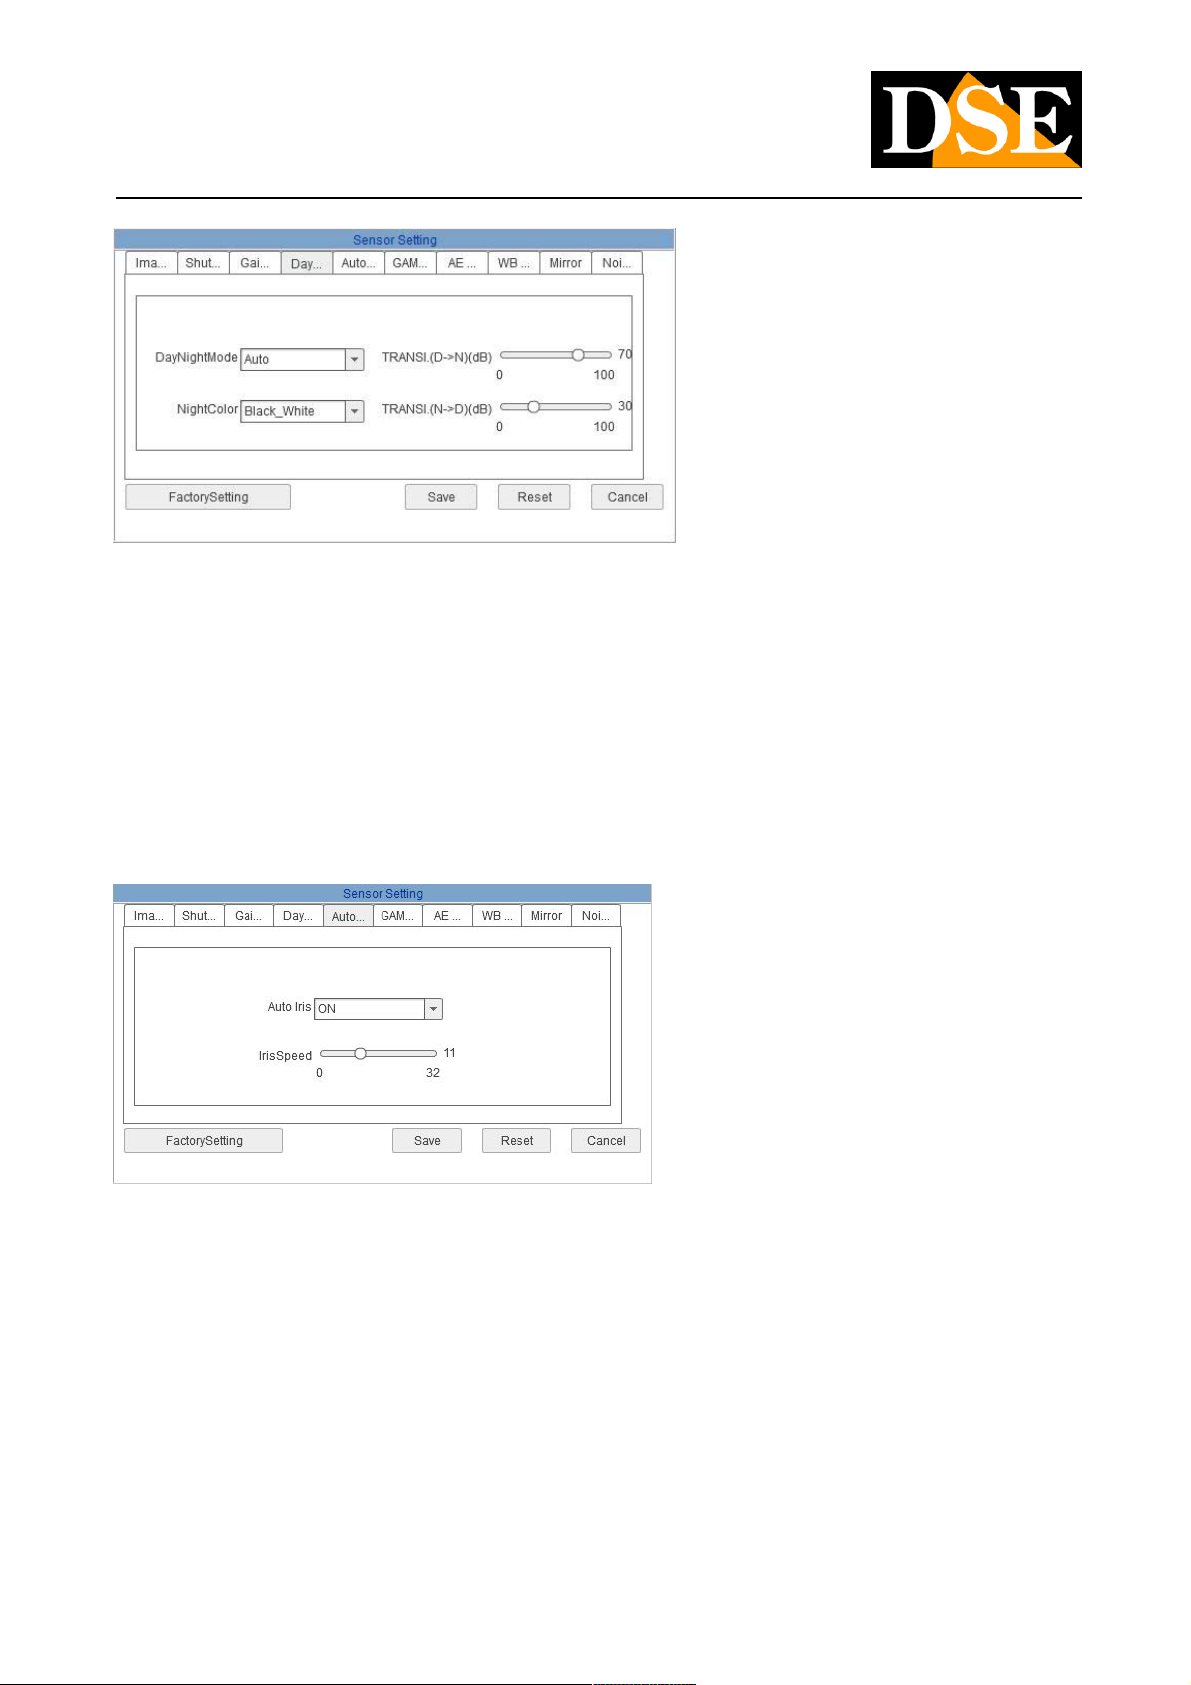
In this tab you set the behavior of the Day / Night DAY / NIGHT MODE - Auto: means to enable the automatic switch to night mode when
it gets dark. Off: means excluding the day / night function.
NIGHTCOLOR - E 'can define whether at night mode keep the color vision or switch to B / N
With the AUTO setting you can set the gain threshold for switching Day / Night (DN) and Night / Day (ND).
AUTOIRIS
If the camera uses an auto iris lens it is possible to set the drive speed. In the case of fixed lens leave the setting to OFF. In AUTOIRIS
OFF mode, the priority of the brightness adjustment is given to the electronic shutter. IRIS SPEED indicates the reaction rate of the lens.
Reduce speed if the lens were to open and close continuously giving a flash effect under certain lighting conditions.
RANGE
DSE SRL - ITALY - WWW.DSE.EU
Page 26
USER MANUAL
CAMERAS IP H.264 1080P FULLHD
Page: 26 Page: 26
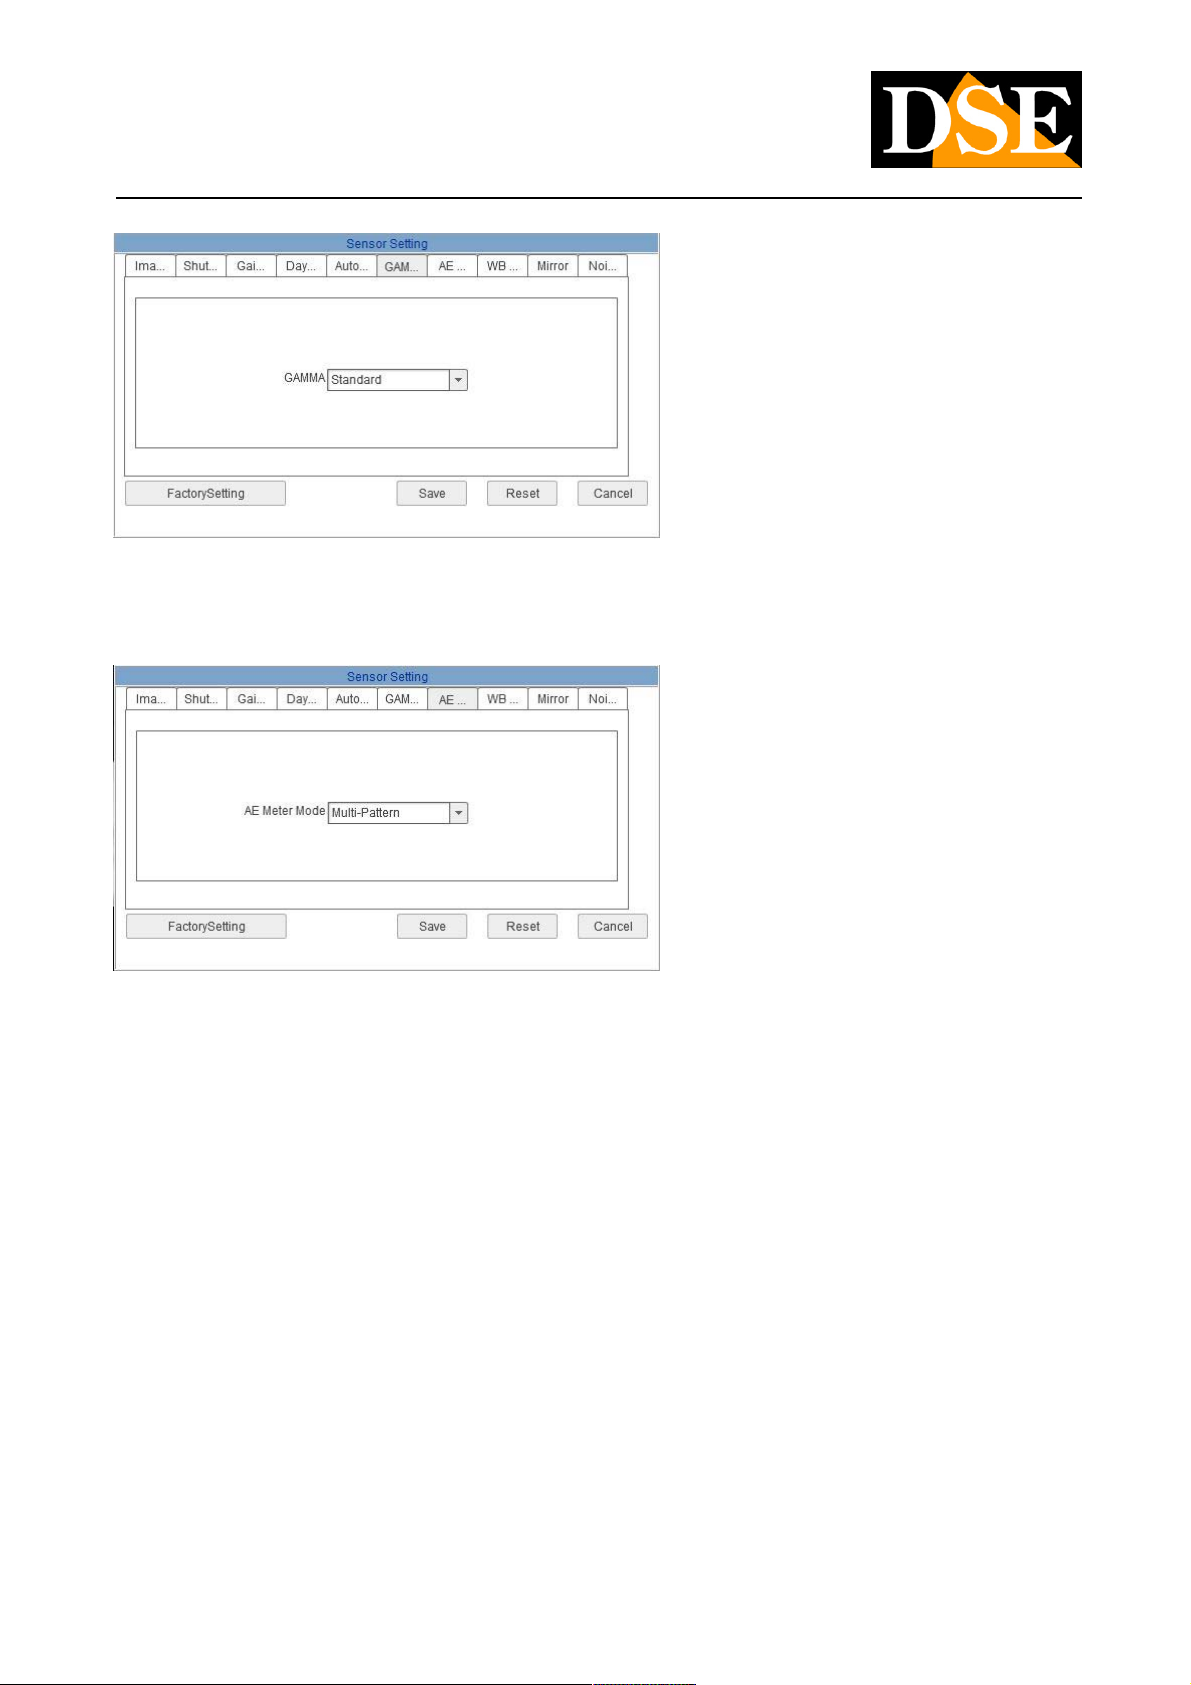
E 'can adjust the gamma correction with several pre-configured options
AE METER MODE
When the camera measures the brightness of the image to adjust the shutter typically considers all the framed area. However, if the
image has areas with different brightness it is possible to indicate which area must have greater importance. MULTI PATTERN - The
whole area is considered CENTER - The central area (1/5 of the total) has the prevalence
VERTICAL CENTER - The vertical area in the center (1/2 of the total) has the prevalence HORIZONTAL CENTER - The
horizontal area at the center (1/2 of the total) has the prevalence
WB MODE
DSE SRL - ITALY - WWW.DSE.EU
Page 27
USER MANUAL
CAMERAS IP H.264 1080P FULLHD
Page: 27 Page: 27
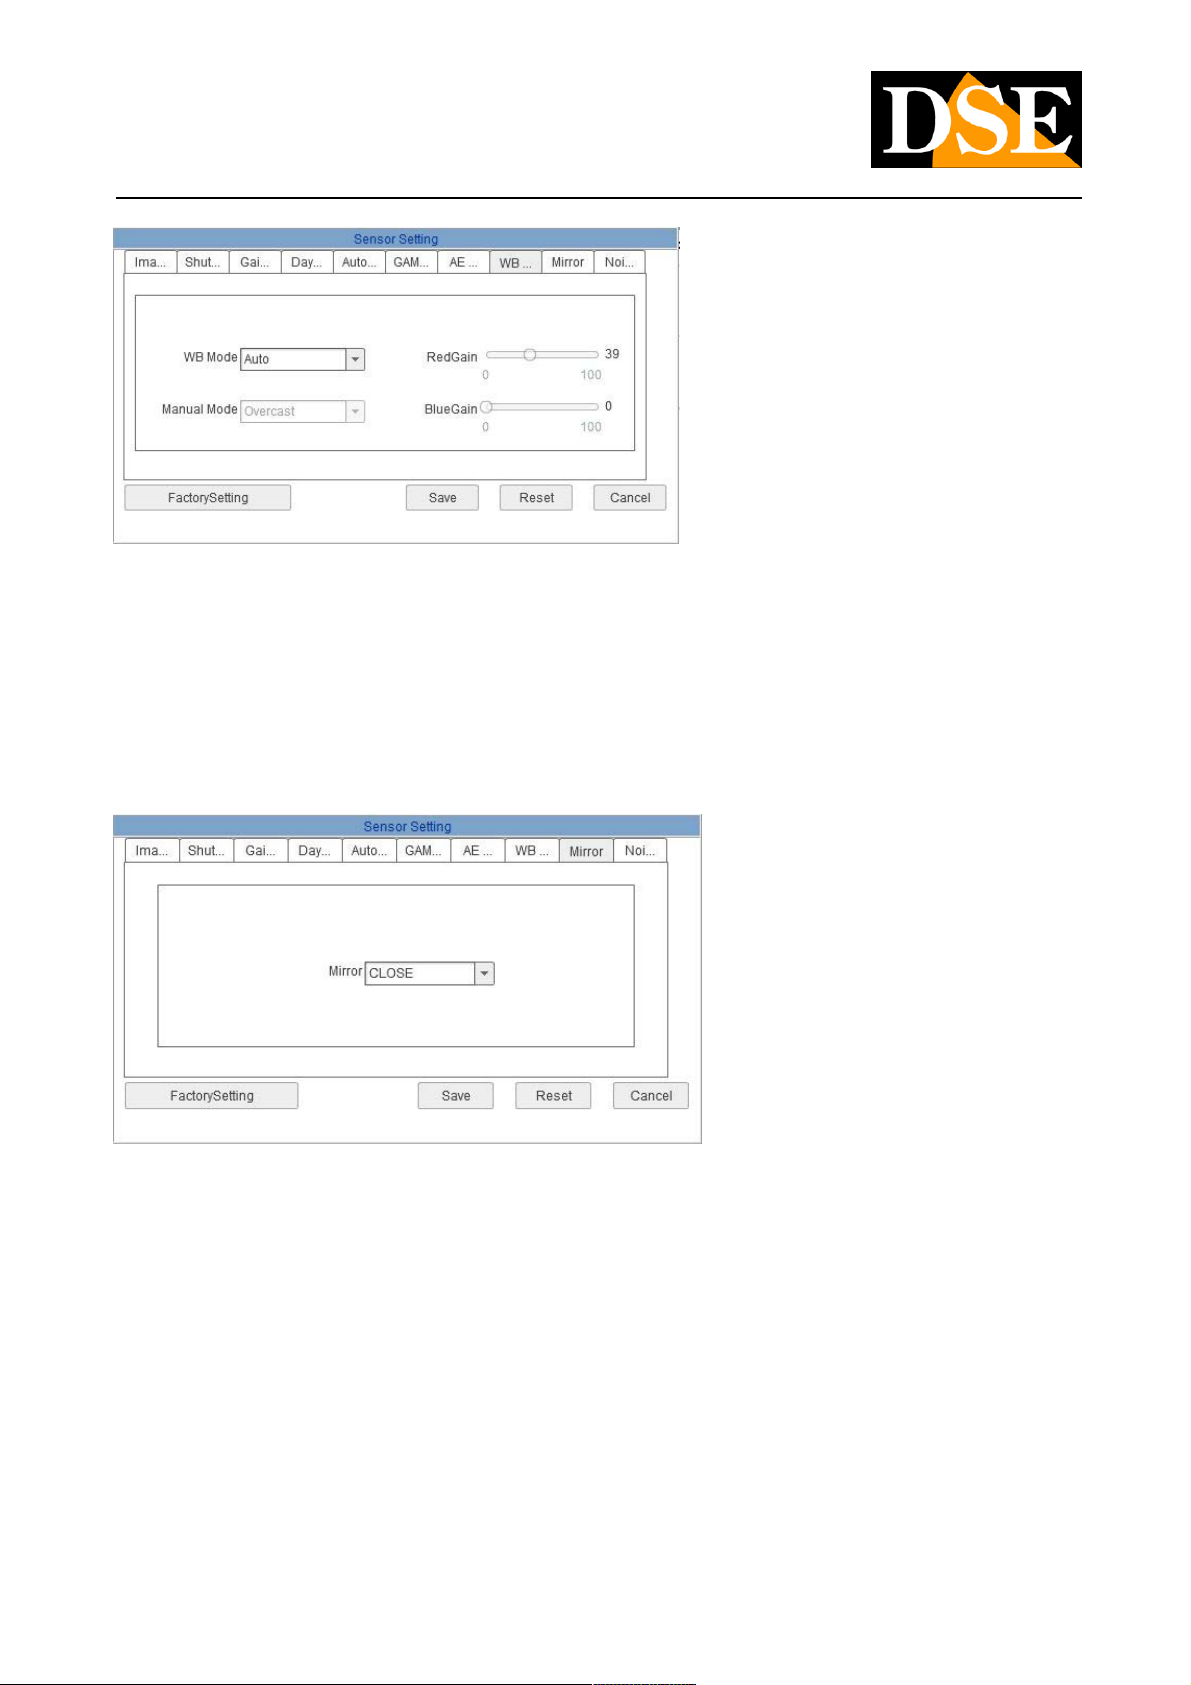
In this window you define the white balance. The AUTO mode is recommended for most applications.
In cases of particular light and can set the MANUAL mode that offers several options already preconfigured refer to the most common
types of lighting and also the possibility to establish the white tone manually.
MIRROR
E 'can flip the image to adjust the vision to the camera location. CLOSE - True vision
HORIZONTAL - VERTICAL Flip Horizontal - vertical tilting
PICTURE FLIP - Horizontal and vertical tilting
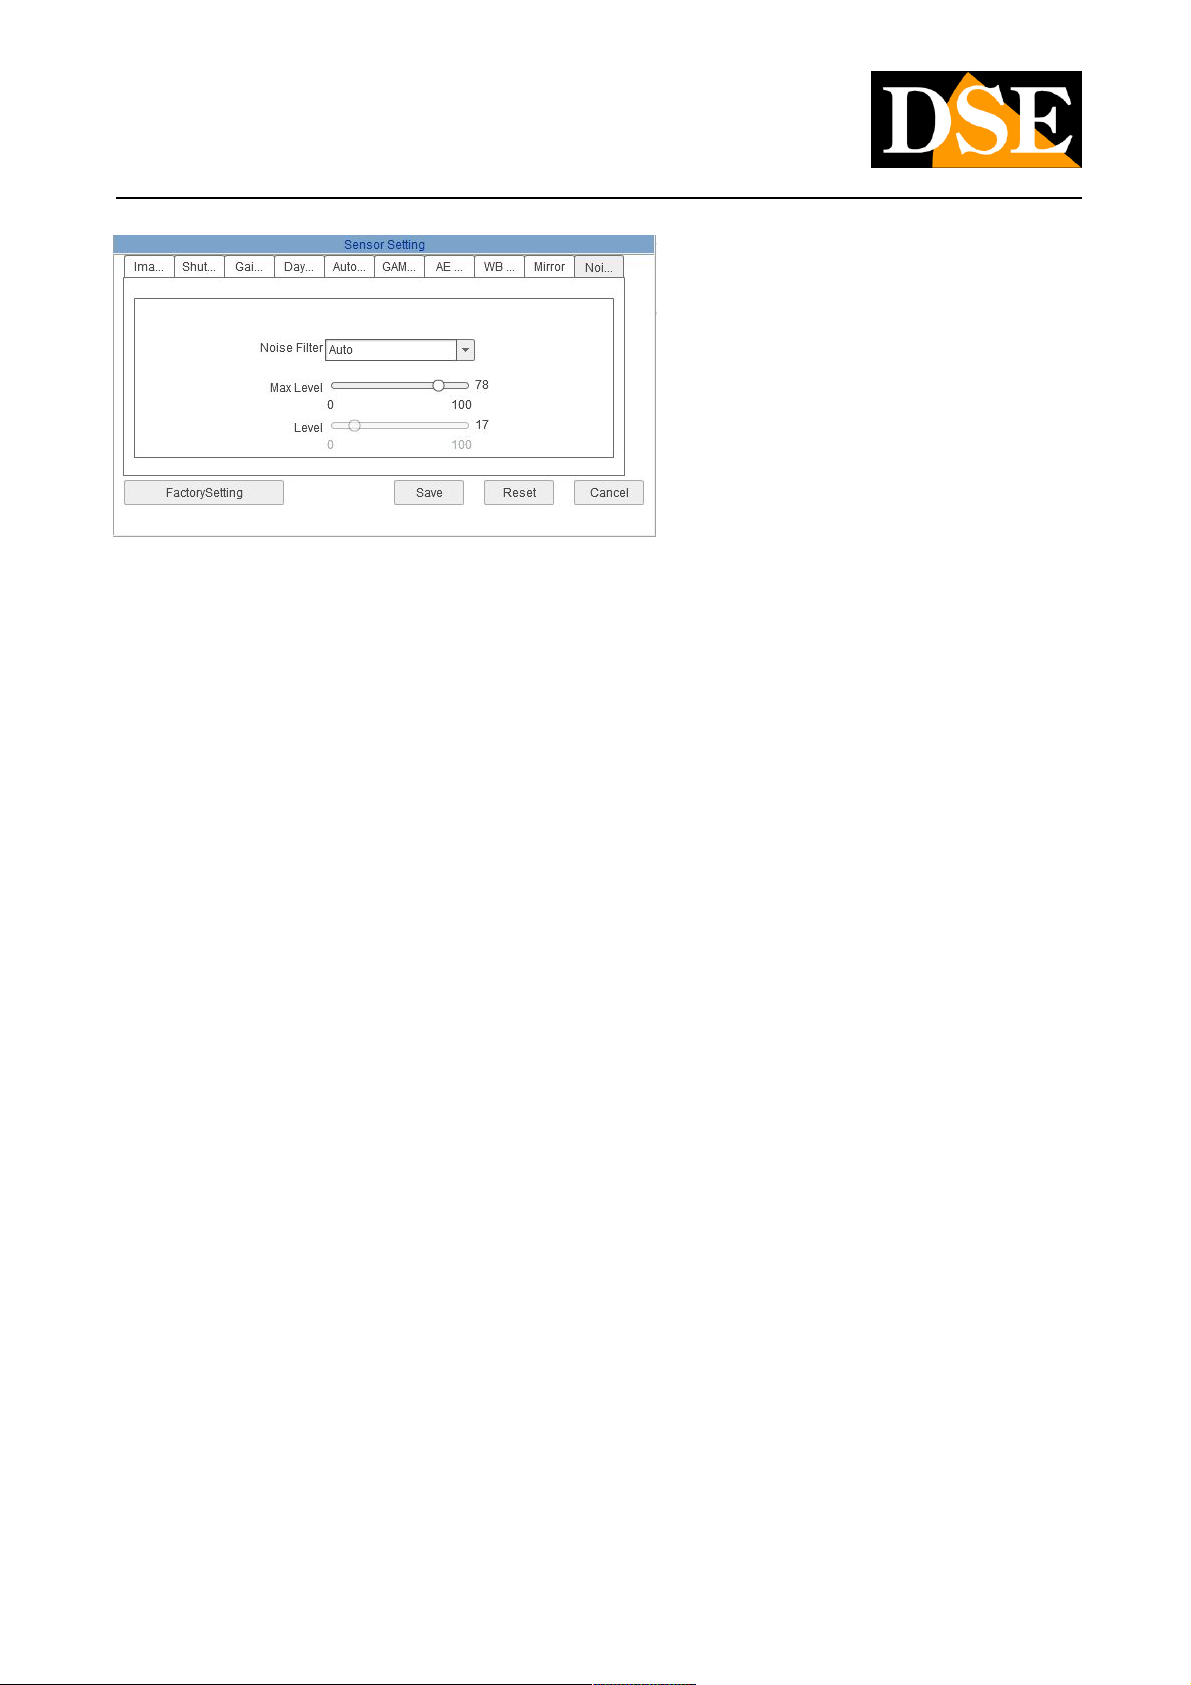
NOISE FILTER
DSE SRL - ITALY - WWW.DSE.EU
Page 28
USER MANUAL
CAMERAS IP H.264 1080P FULLHD
Page: 28 Page: 28
E 'can set the photo automatically reducing video noise (with a maximum adjustable threshold) or manual (adjustable fixed noise level)
DSE SRL - ITALY - WWW.DSE.EU
Page 29
USER MANUAL
CAMERAS IP H.264 1080P FULLHD
Page: 29 Page: 29
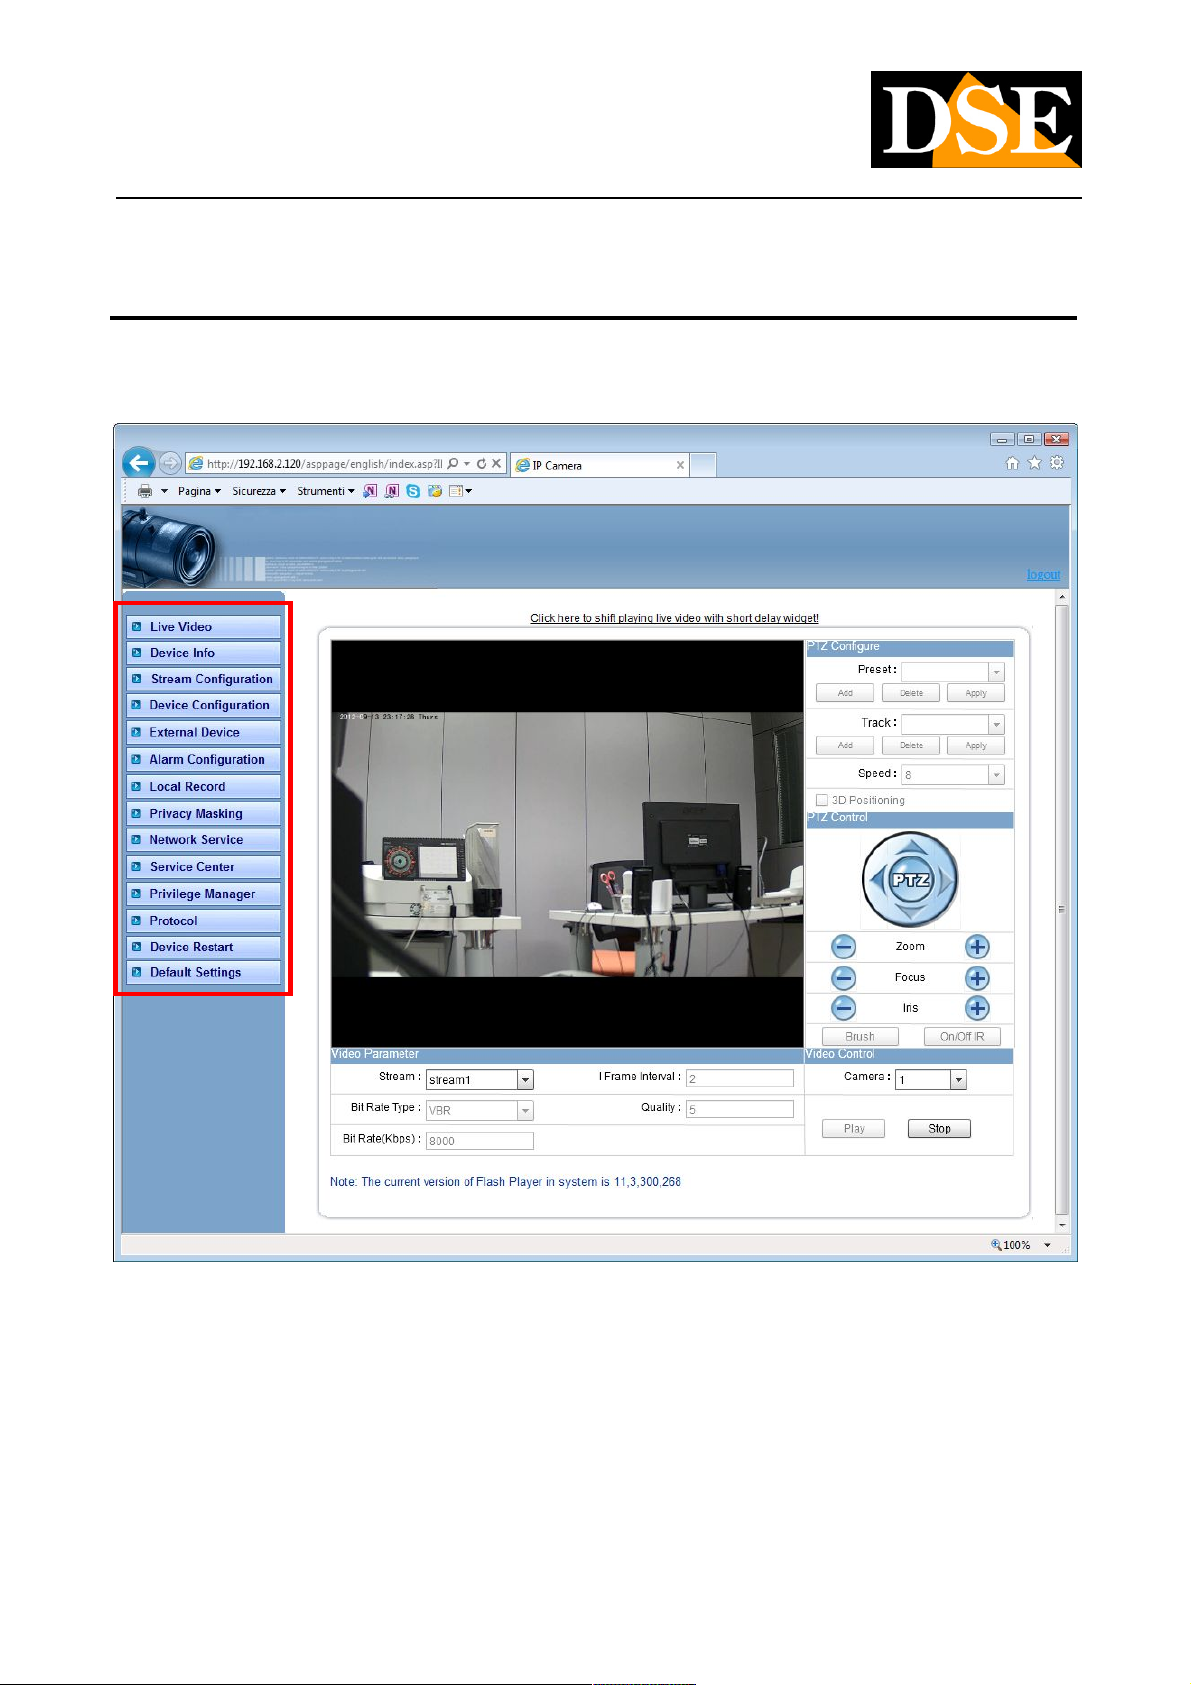
Configuration
All the camera setup pages are accessible via the buttons on the left of the screen
DEVICE INFO
DSE SRL - ITALY - WWW.DSE.EU
Page 30
USER MANUAL
CAMERAS IP H.264 1080P FULLHD
Page: 30 Page: 30
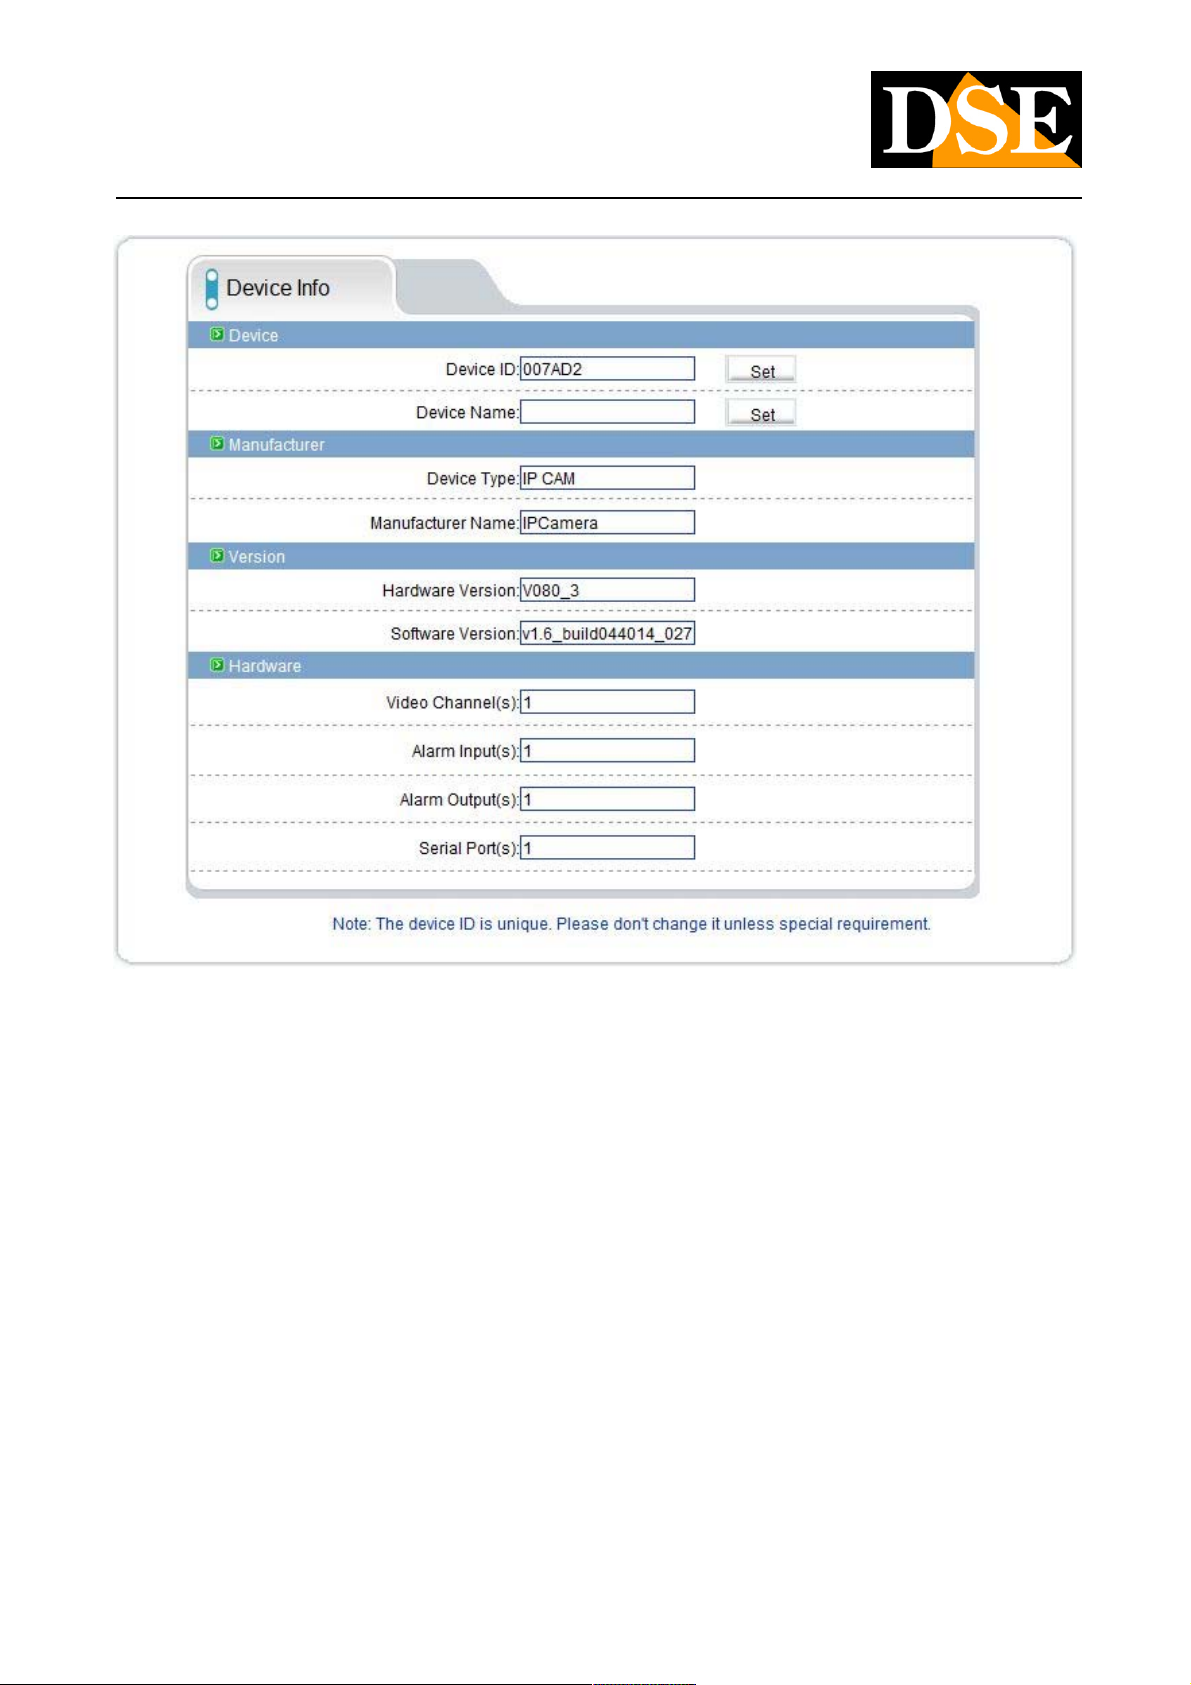
This window shows all the camera data and its capabilities.
The top two parameters can be edited. You should not change the device ID which is a unique identifier of the camera while you can set
the camera name based on its location so you can easily identify. To set a new name, type it into the text box and press SET.
STREAM CONFIGURATION
DSE SRL - ITALY - WWW.DSE.EU
Page 31
USER MANUAL
CAMERAS IP H.264 1080P FULLHD
Page: 31 Page: 31
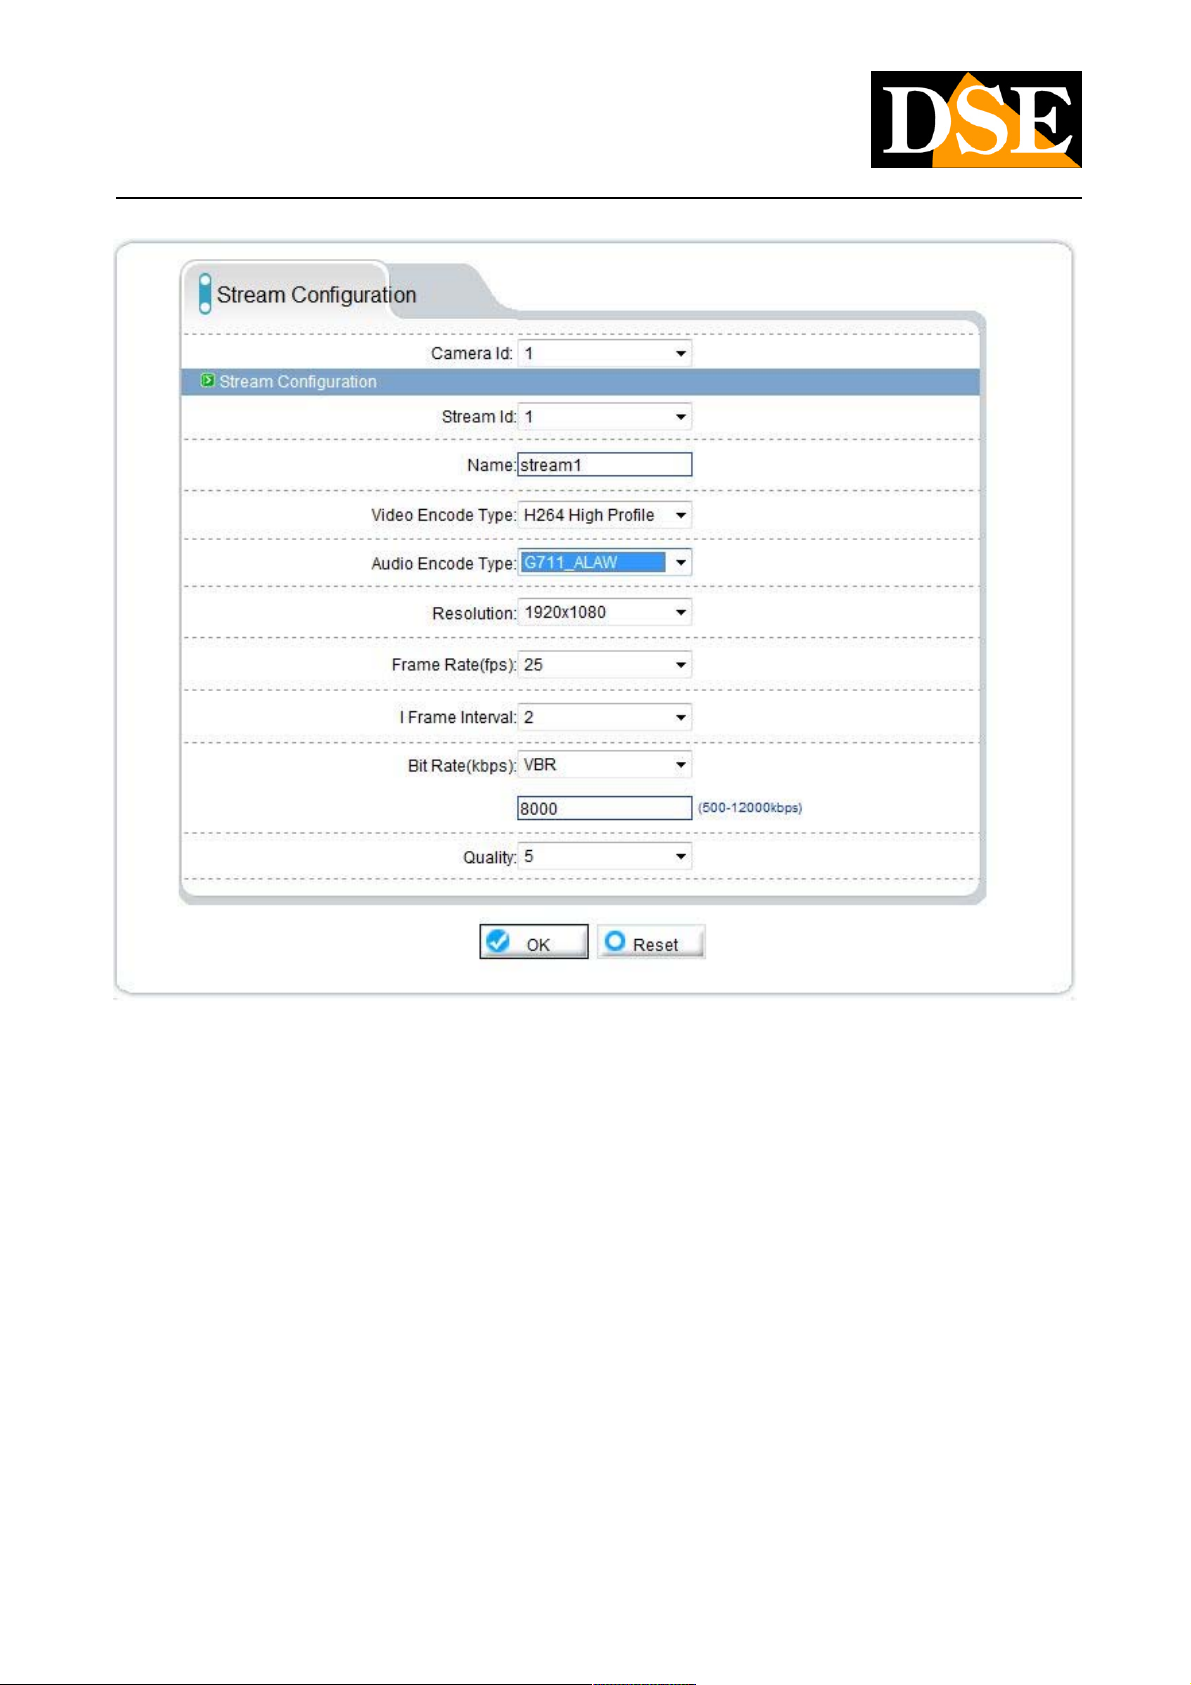
Each camera can generate up to three different types of video streams that you can choose from the client. In this way it will be able to
easily adapt to the bandwidth that you have available during the connection.
STREAM ID - Select the stream to program: 1,2 or 3 STREAM ID - Select the stream to program: 1,2 or 3
NAME - Assign a name to the stream NAME - Assign a name to the stream
ENCODE VIDEO / AUDIO ENCODE - Select the video and audio compression ENCODE VIDEO / AUDIO ENCODE - Select the video and audio compression
RESOLUTION - Defines the resolution 1920x1080 (Full HD) or 640x360, the latter to be preferred with small bandwidth availability in the RESOLUTION - Defines the resolution 1920x1080 (Full HD) or 640x360, the latter to be preferred with small bandwidth availability in the
case of mobile telephones.
FRAME RATE - The number of frames per second (max. 25) FRAME RATE - The number of frames per second (max. 25)
The FRAME INTERVAL - E 'the interval between two consecutive I-Frame is can be set to 1.2 or 3 seconds. A shorter interval The FRAME INTERVAL - E 'the interval between two consecutive I-Frame is can be set to 1.2 or 3 seconds. A shorter interval
corresponds greater accuracy in the location of the video but greater use of bandwidth. Recommended Value: 2.
BIT RATE - This section gives the possibility to choose between two different bandwidth management mode occupied: CONSTANT BIT BIT RATE - This section gives the possibility to choose between two different bandwidth management mode occupied: CONSTANT BIT BIT RATE - This section gives the possibility to choose between two different bandwidth management mode occupied: CONSTANT BIT
RATE (CBR) and VARIABLE BIT RATE (VBR). In the CBR mode, the camera maintains a constant bit rate that can be set between
DSE SRL - ITALY - WWW.DSE.EU
Page 32
USER MANUAL
CAMERAS IP H.264 1080P FULLHD
Page: 32 Page: 32
500 to 12,000 Kbps (default 2000 Kb). In the VBR mode instead of changing the bit rate camera in different operating conditions in order
to maintain a constant video quality. In this mode you do not set the band but the video quality (1 to 9, recommended: 7). The CBR mode
is recommended if you plan continued use of connection via the Internet, especially with modest bandwidth. VBR mode allows for better
optimization of bandwidth available, but it is recommended only for use on the local network and not via the Internet.
DEVICE CONFIGURATION / LOCAL NETWORK
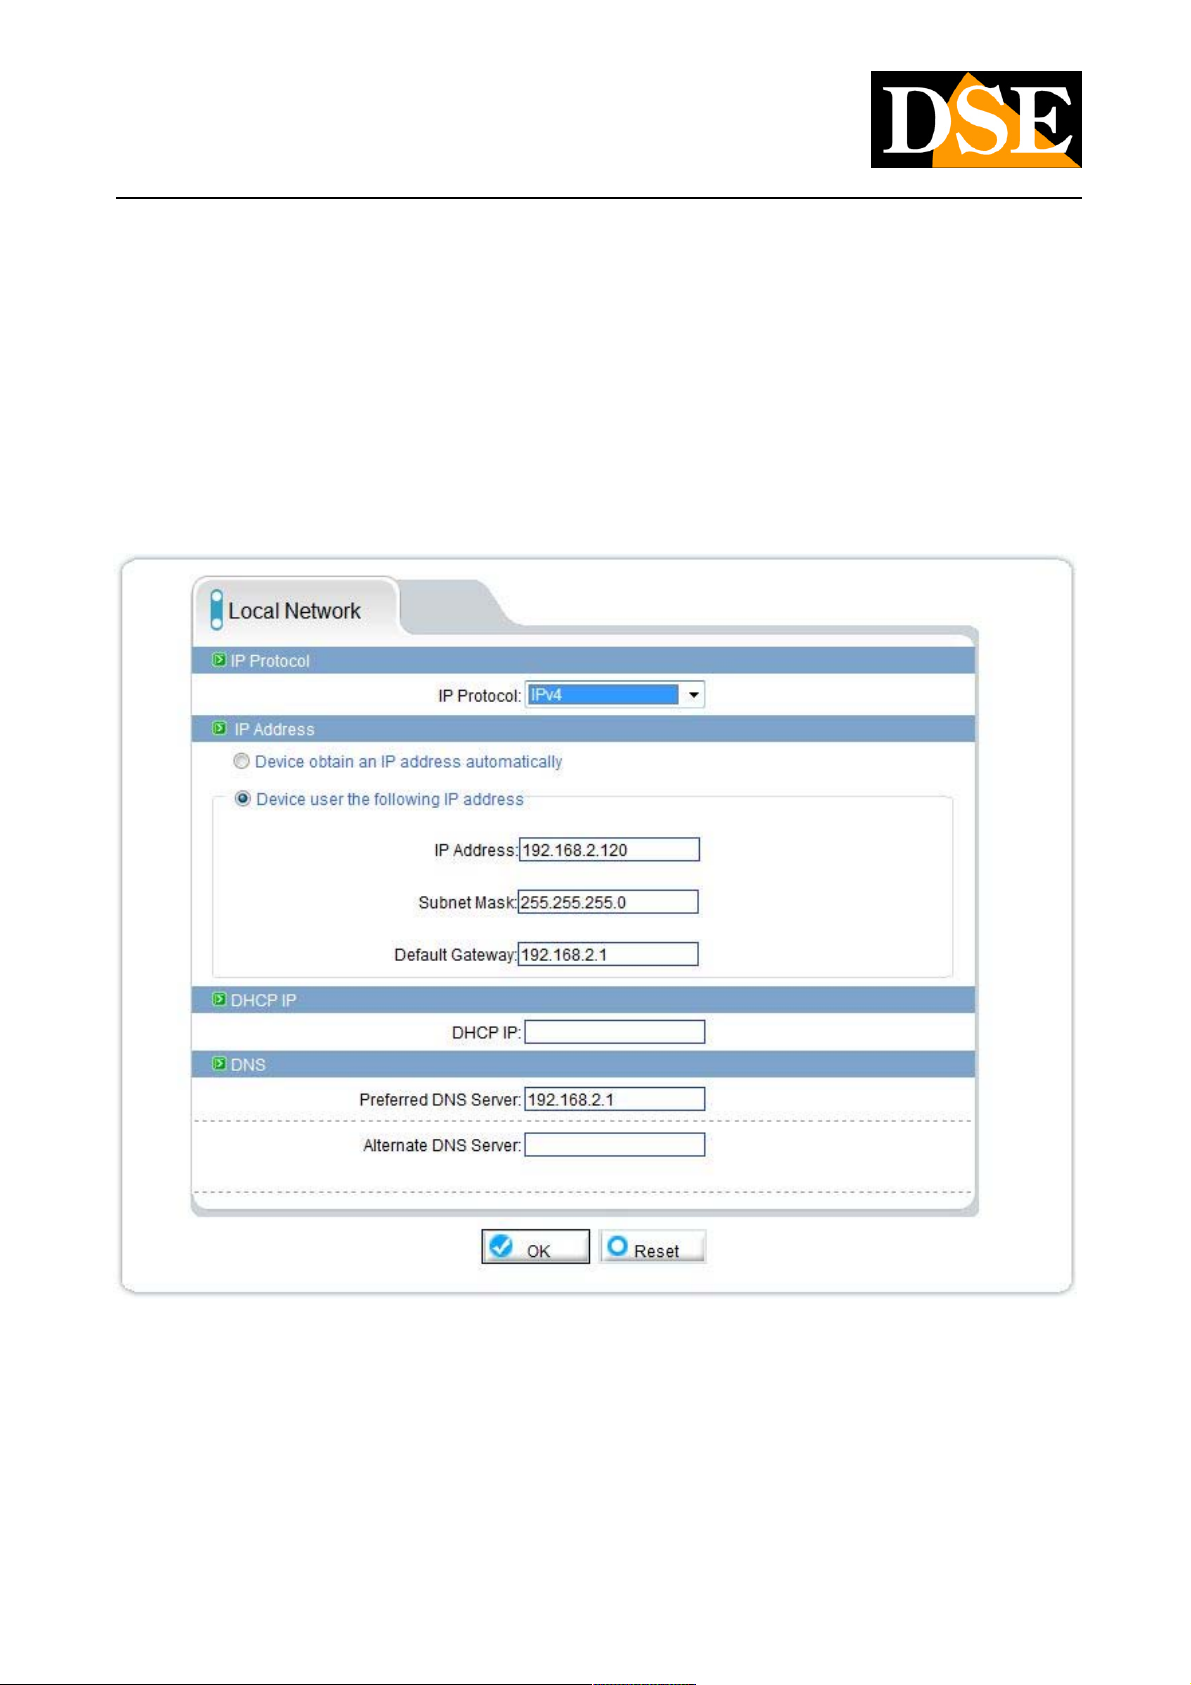
On this screen, you set the parameters of the local network LAN. The cameras support both a fixed IP address automatic assignment in
DHCP. The fixed IP address is usually preferred in safety applications as from the guarantee that the address will remain invariable even
during blackouts and avoids the need to reconfigure the recording devices.
DEVICE CONFIGURATION / DEVICE PORT
DSE SRL - ITALY - WWW.DSE.EU
Page 33
USER MANUAL
CAMERAS IP H.264 1080P FULLHD
Page: 33 Page: 33
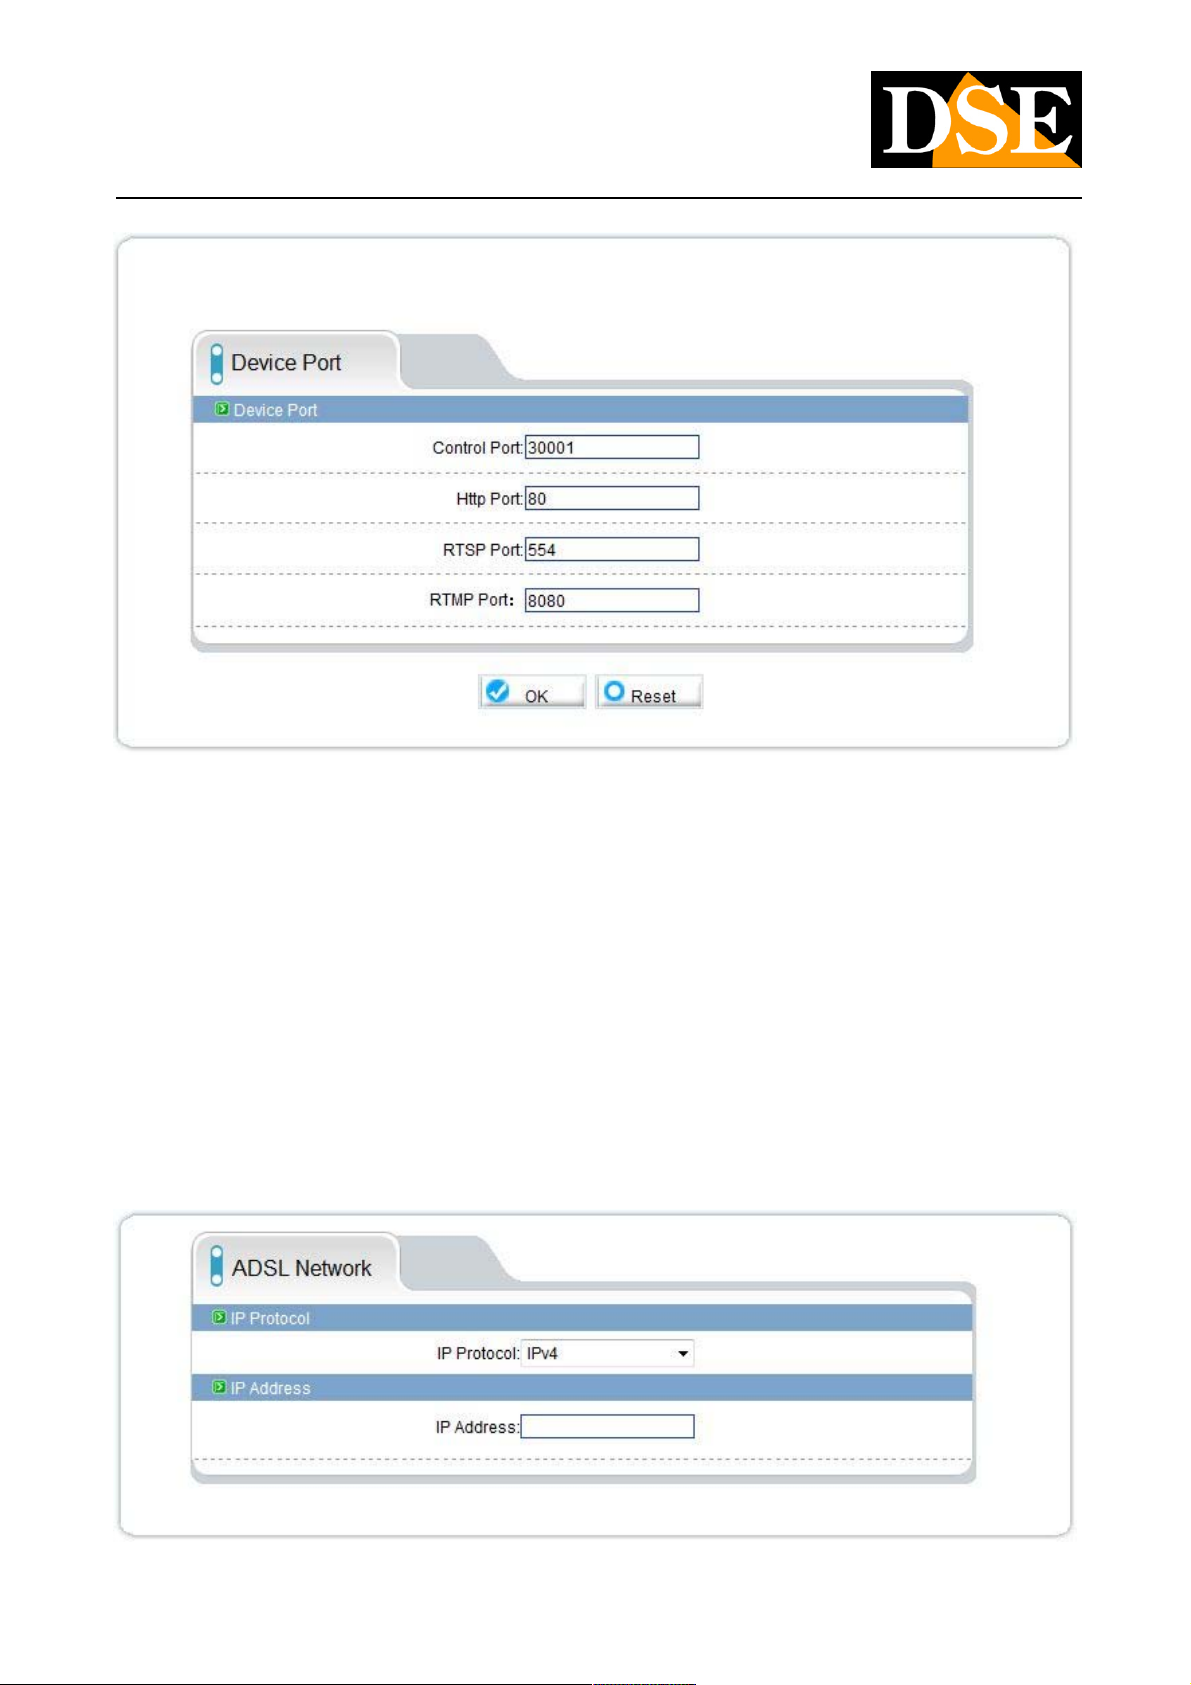
In this window, you set the communication ports used by the camera. And 'advisable to not change them unless absolutely necessary.
CONTROL PORT: used for the commands and configuration CONTROL PORT: used for the commands and configuration
HTTP PORT: the port used by the browser. The default port 80 is used by the browser normally. If you change it you will need to specify HTTP PORT: the port used by the browser. The default port 80 is used by the browser normally. If you change it you will need to specify
the new port in the browser address bar. For example, to connect to the address 192.168.2.120 on port 72 enter http://192.168.2.120:72
RTSP PORT: the port used for RTSP streaming video used when the client uses this protocol (like the browser ActiveX mode). RTSP PORT: the port used for RTSP streaming video used when the client uses this protocol (like the browser ActiveX mode).
RTMP PORT: the port used by the FLASH technology RTMP PORT: the port used by the FLASH technology
DEVICE CONFIGURATION / ADSL NETWORK
DSE SRL - ITALY - WWW.DSE.EU
Page 34
USER MANUAL
CAMERAS IP H.264 1080P FULLHD
Page: 34 Page: 34
If the camera is connected to an ADSL router and you enable the PPPoE function to establish the Internet connection, in this window,
after a log in successfully, you will see the IP address of the WAN side.
DEVICE CONFIGURATION / MULTICAST
This page has currently not practical functionality for the user.
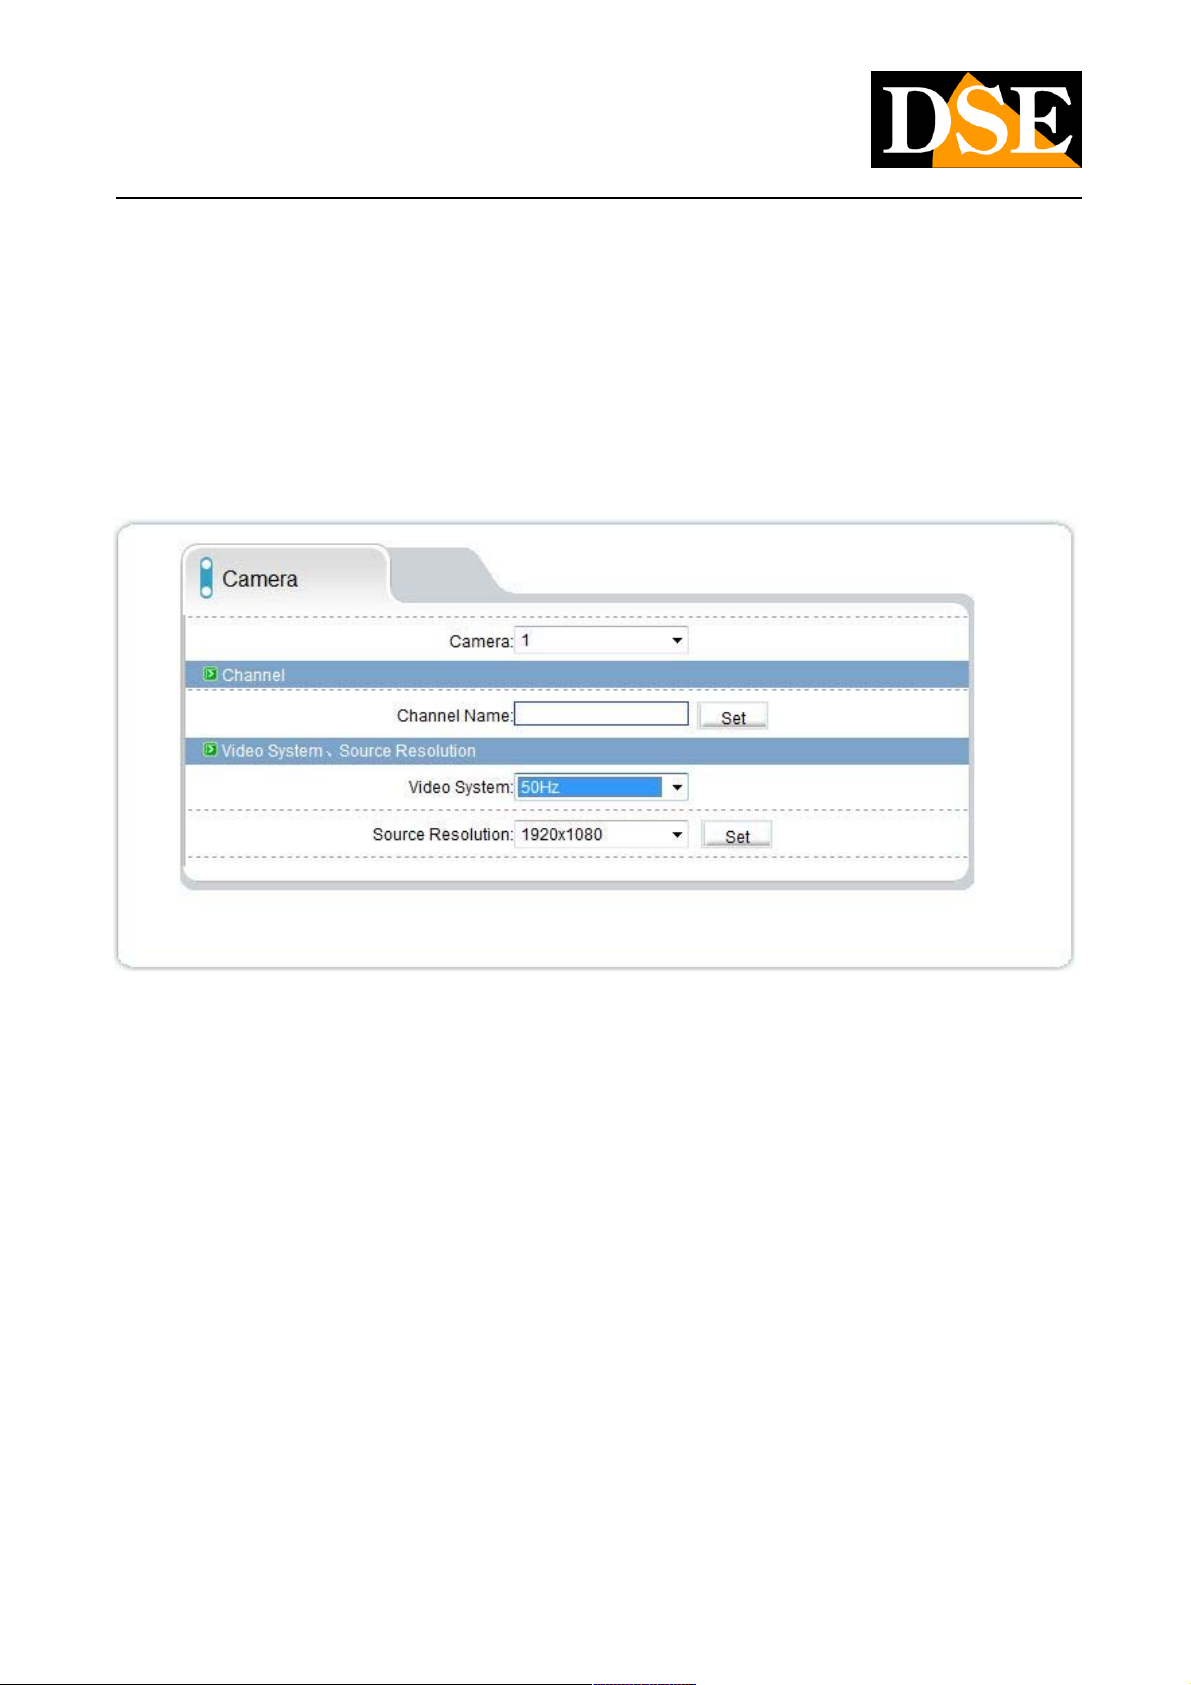
DEVICE CONFIGURATION / CAMERA
CHANNEL NAME - E 'can set the video channel name that you may want to bring up an overlay in the OSD programming page (see CHANNEL NAME - E 'can set the video channel name that you may want to bring up an overlay in the OSD programming page (see
below).
VIDEO SYSTEM - Choice of the European frequency 50 Hz or 60 Hz American. VIDEO SYSTEM - Choice of the European frequency 50 Hz or 60 Hz American.
SOURCE RESOLUTION - Native resolution of the camera. E 'can choose between FULL HD 1920x1080 and 1280x720 HD both in 16.:9. SOURCE RESOLUTION - Native resolution of the camera. E 'can choose between FULL HD 1920x1080 and 1280x720 HD both in 16.:9.
The range of RH IP cameras no longer supports the 4: 3 format.
DEVICE CONFIGURATION / DATE & TIME DEVICE CONFIGURATION / DATE & TIME
DSE SRL - ITALY - WWW.DSE.EU
Page 35
USER MANUAL
CAMERAS IP H.264 1080P FULLHD
Page: 35 Page: 35
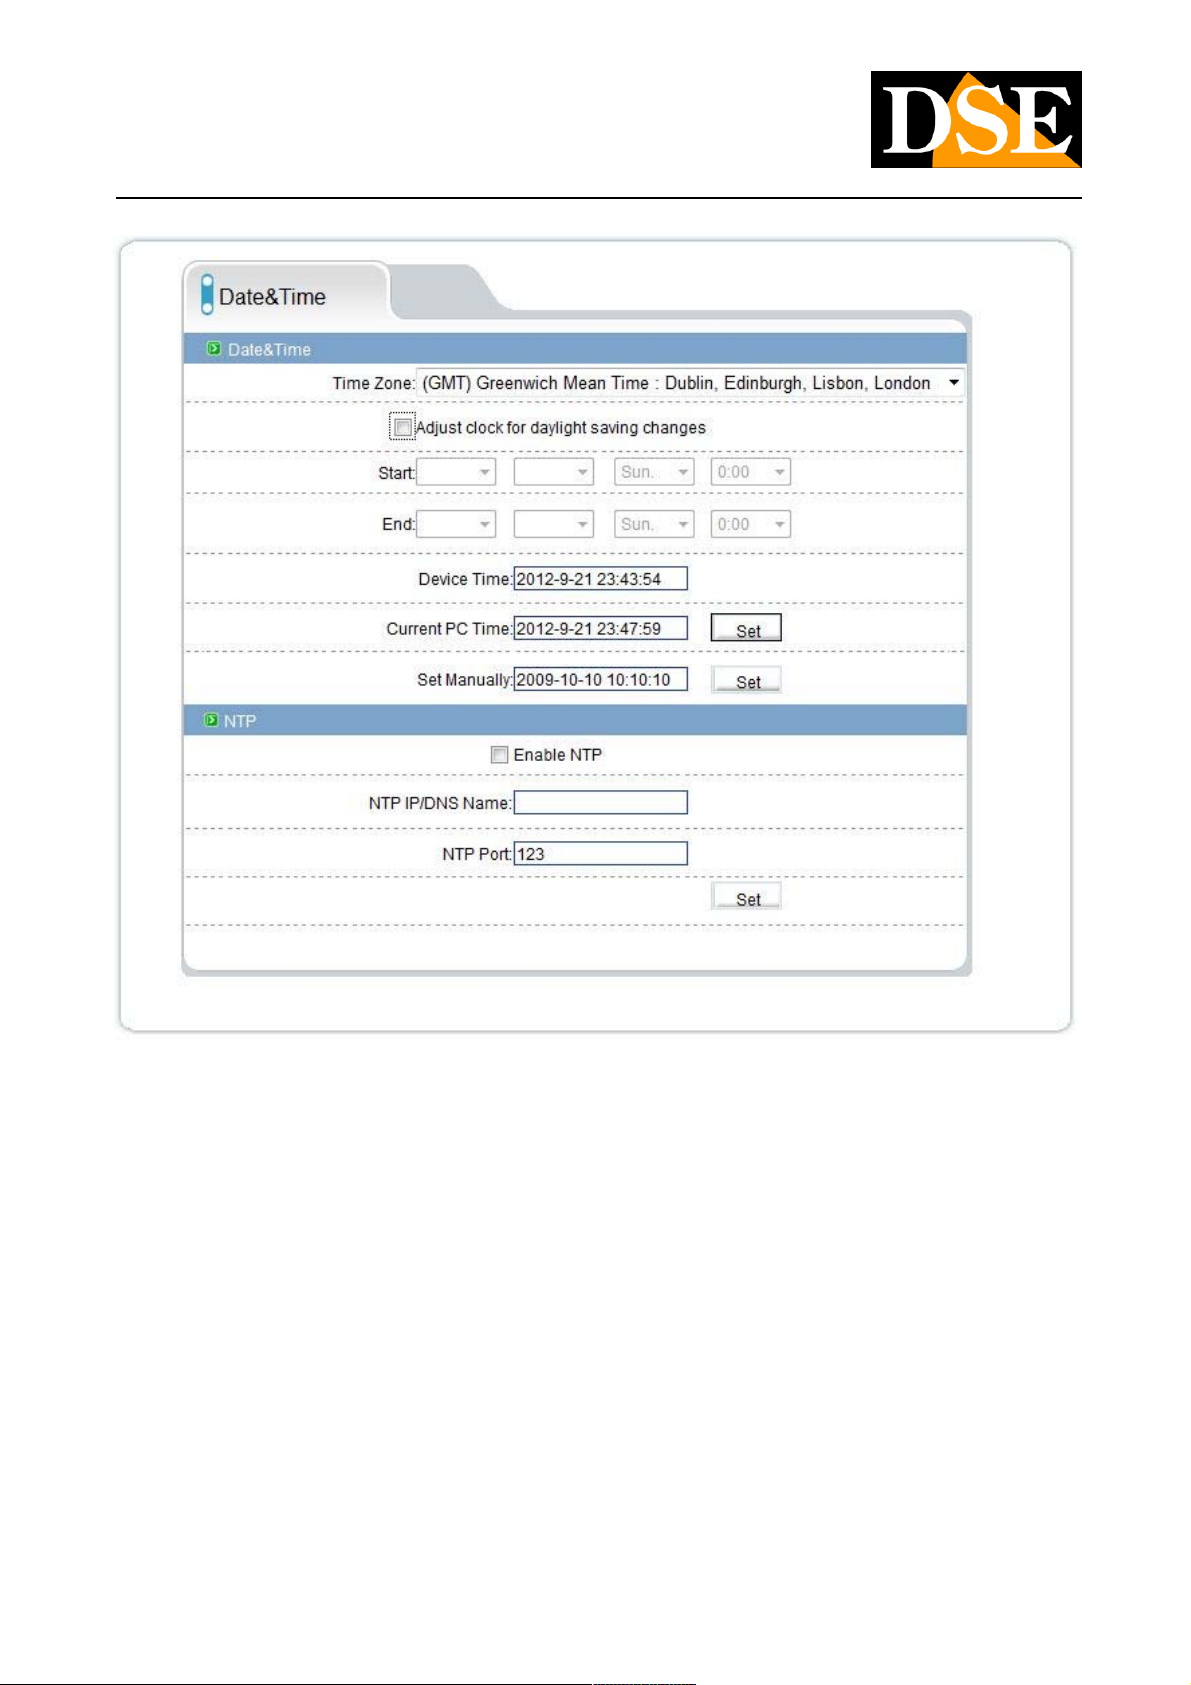
This window is used to set the date and time of the camera
TIME ZONE - Select the reference time zone TIME ZONE - Select the reference time zone
ADJUST CLOCK FOR DAYLIGHT SAVING - Allows you to set the beginning and end of summer time so that the camera will ADJUST CLOCK FOR DAYLIGHT SAVING - Allows you to set the beginning and end of summer time so that the camera will
automatically adapt.
DEVICE TIME - The date and time stored camera DEVICE TIME - The date and time stored camera
PC TIME - The computer time. Press SET and the camera is traferitaPC TIME - The computer time. Press SET and the camera is traferita
Set Manually - Set the time and date manually and transfer them to the camera by pressing SET. Set Manually - Set the time and date manually and transfer them to the camera by pressing SET.
ENABLE NTP - you 'can make sure that the camera synchronizes the time automatically via the Internet and date with an NTP server. E ENABLE NTP - you 'can make sure that the camera synchronizes the time automatically via the Internet and date with an NTP server. E
'can indicate the domain of the NTP server and the port to use.
DEVICE CONFIGURATION / OSD DEVICE CONFIGURATION / OSD
DSE SRL - ITALY - WWW.DSE.EU
Page 36
USER MANUAL
CAMERAS IP H.264 1080P FULLHD
Page: 36 Page: 36
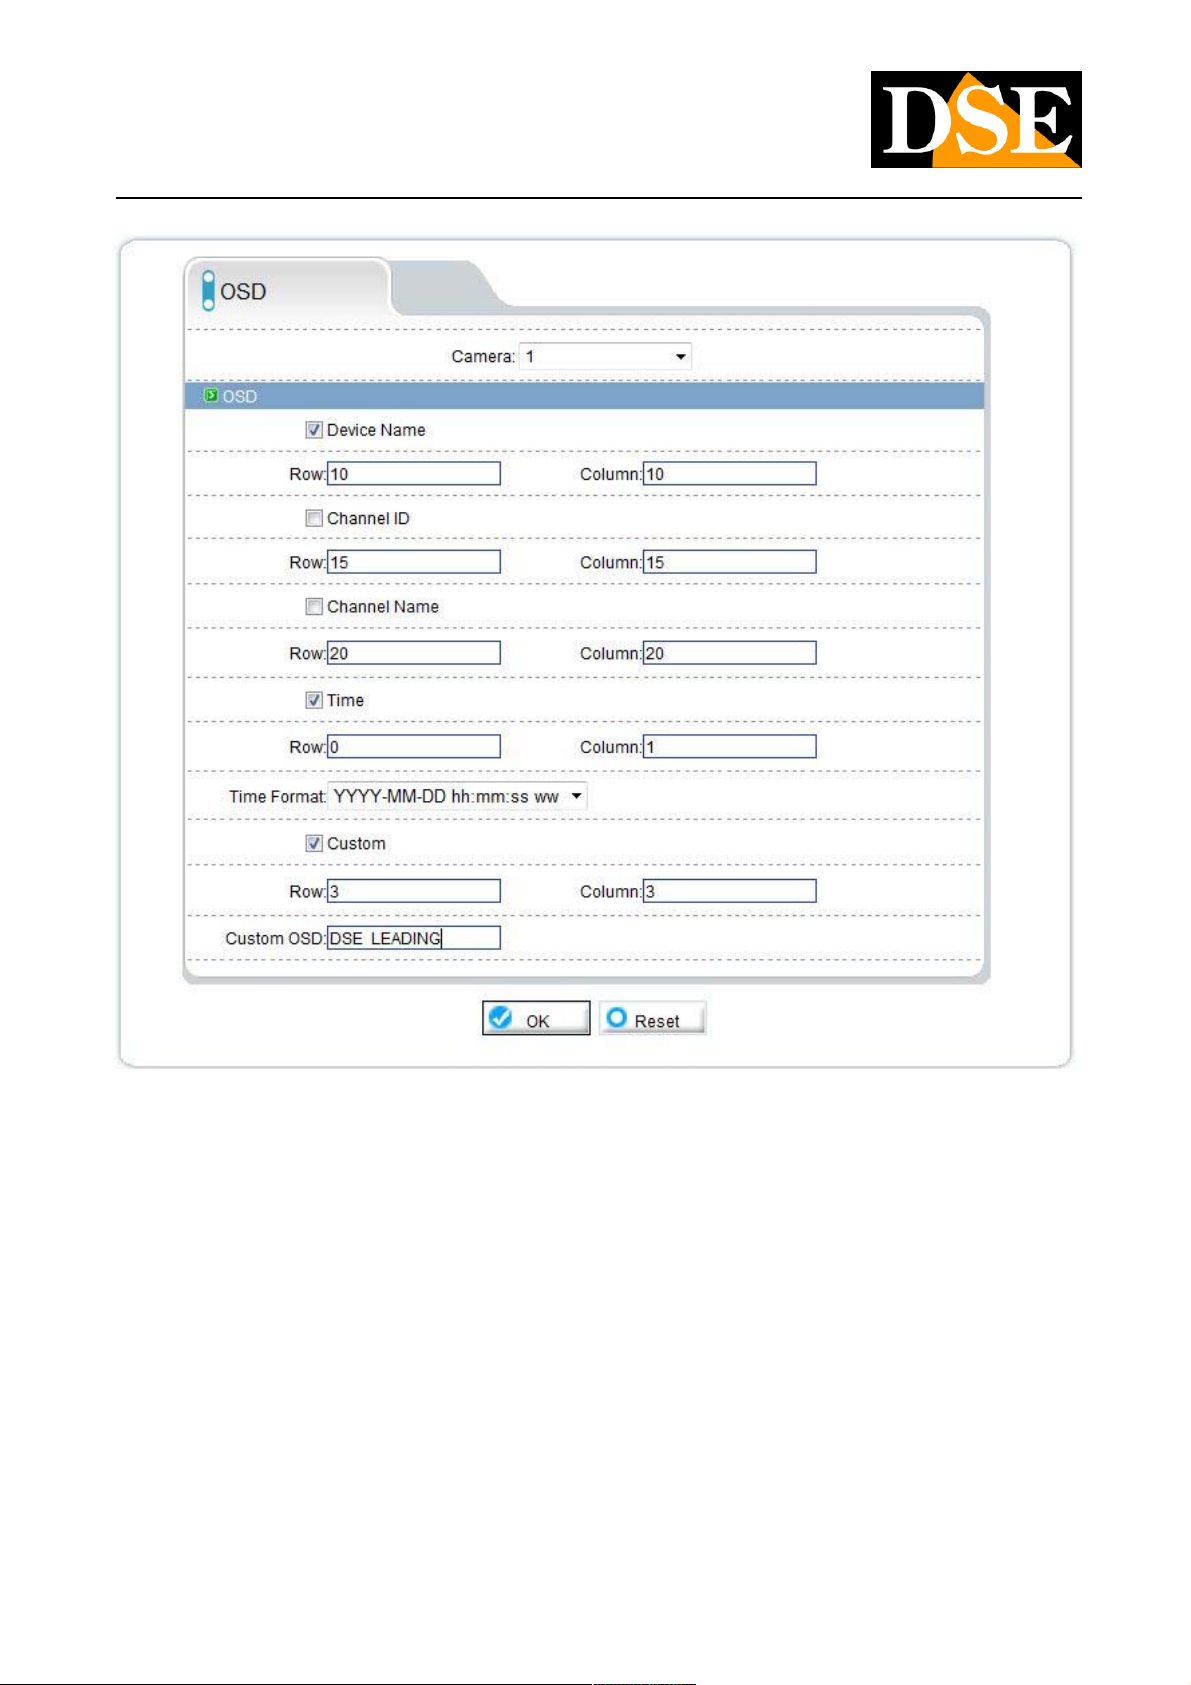
In this window you program what indications to appear superimposed on the video during the LIVE display. E 'can enable DEVICE
NAME, CHANNEL NAME CHANNEL ID and the text of which is set in other programming pages. E 'can be defined in that the line (ROW)
and column (COLUMN) bring up the overlay on the screen. E 'can also bring up the date and time (enabled by default) and even a
custom text that you can edit (CUSTOM OSD)
DEVICE CONFIGURATION / MICROPHONE DEVICE CONFIGURATION / MICROPHONE
DSE SRL - ITALY - WWW.DSE.EU
Page 37
USER MANUAL
CAMERAS IP H.264 1080P FULLHD
Page: 37 Page: 37
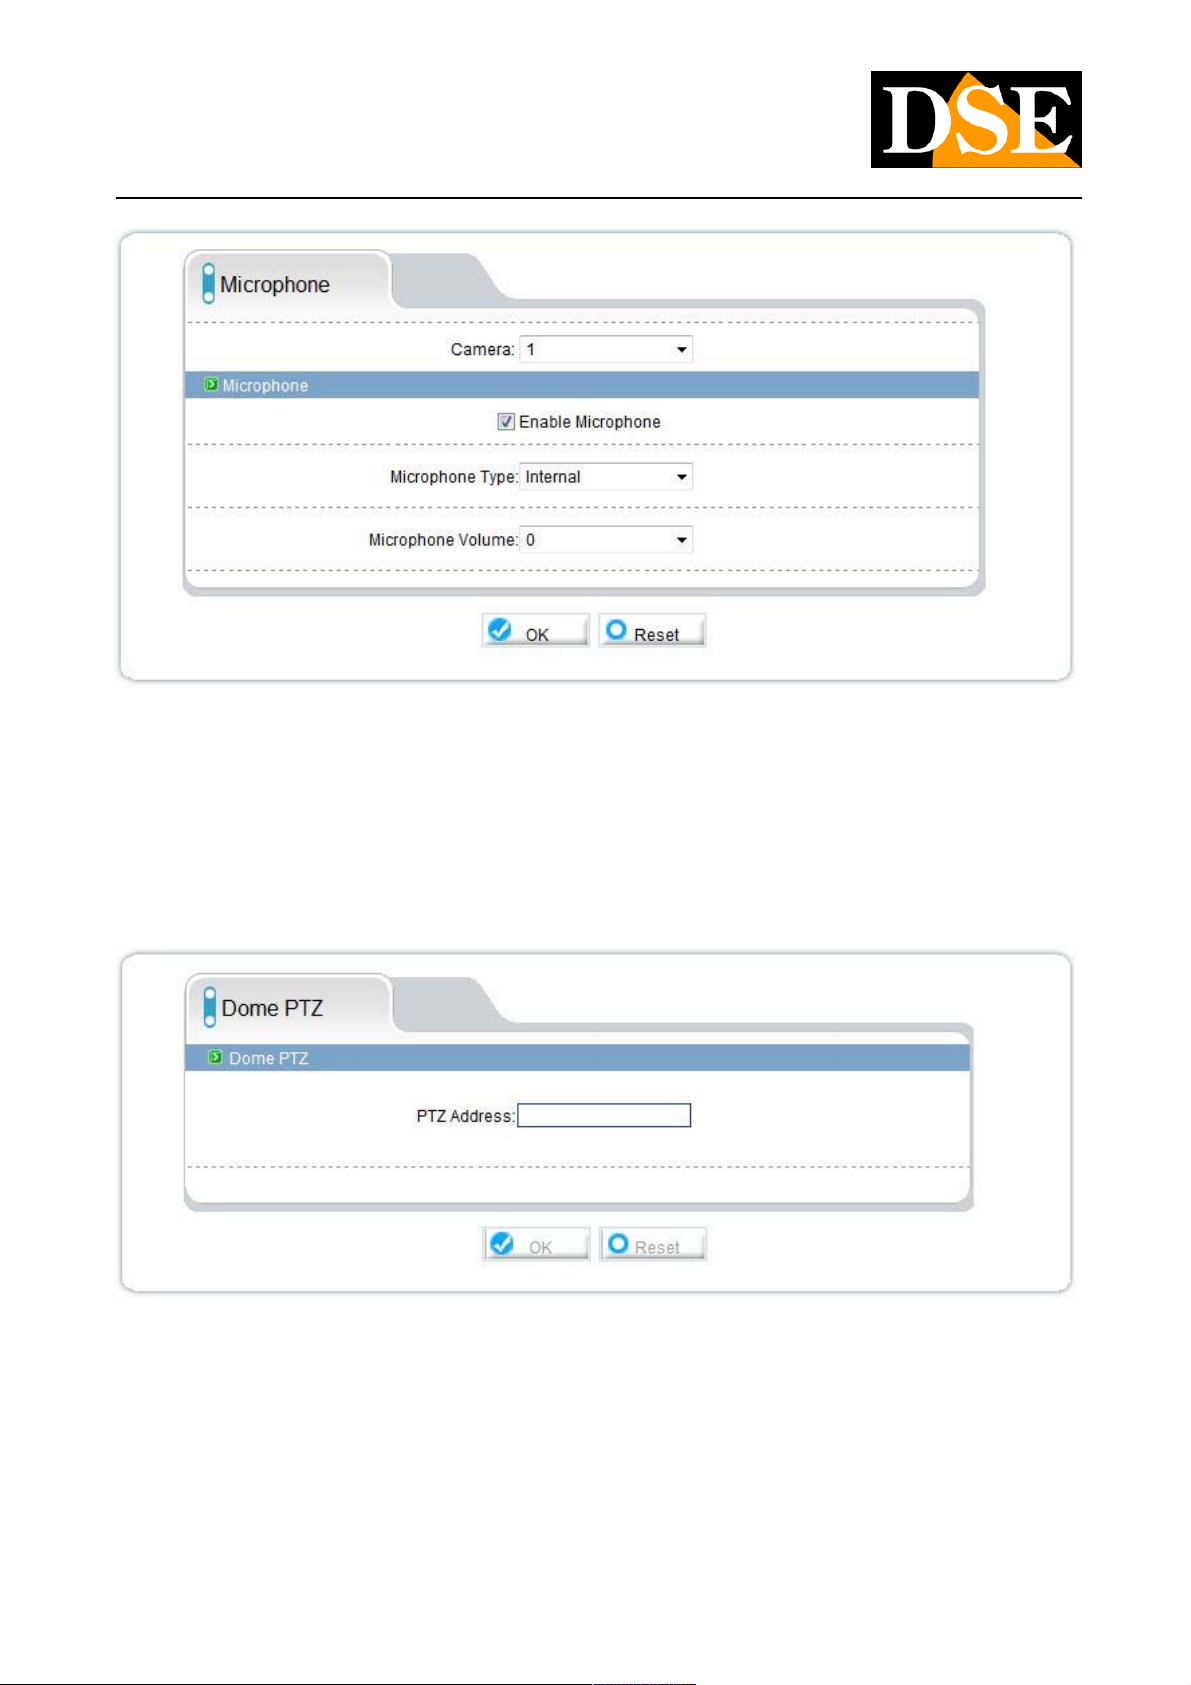
In this tab there are the settings for the microphone for audio recording
MICROPHONE TYPE - If the camera is equipped with built-in microphone here it is possible to choose between the built-in microphone MICROPHONE TYPE - If the camera is equipped with built-in microphone here it is possible to choose between the built-in microphone
and the external source LINE IN
MICROPHONE VOLUME - E 'can set the microphone gain to adapt the size and noise of the environment. MICROPHONE VOLUME - E 'can set the microphone gain to adapt the size and noise of the environment.
DEVICE CONFIGURATION / PTZ DOME DEVICE CONFIGURATION / PTZ DOME
In motorized cameras in this window you can enter the address of the PTZ camera (currently in development function).
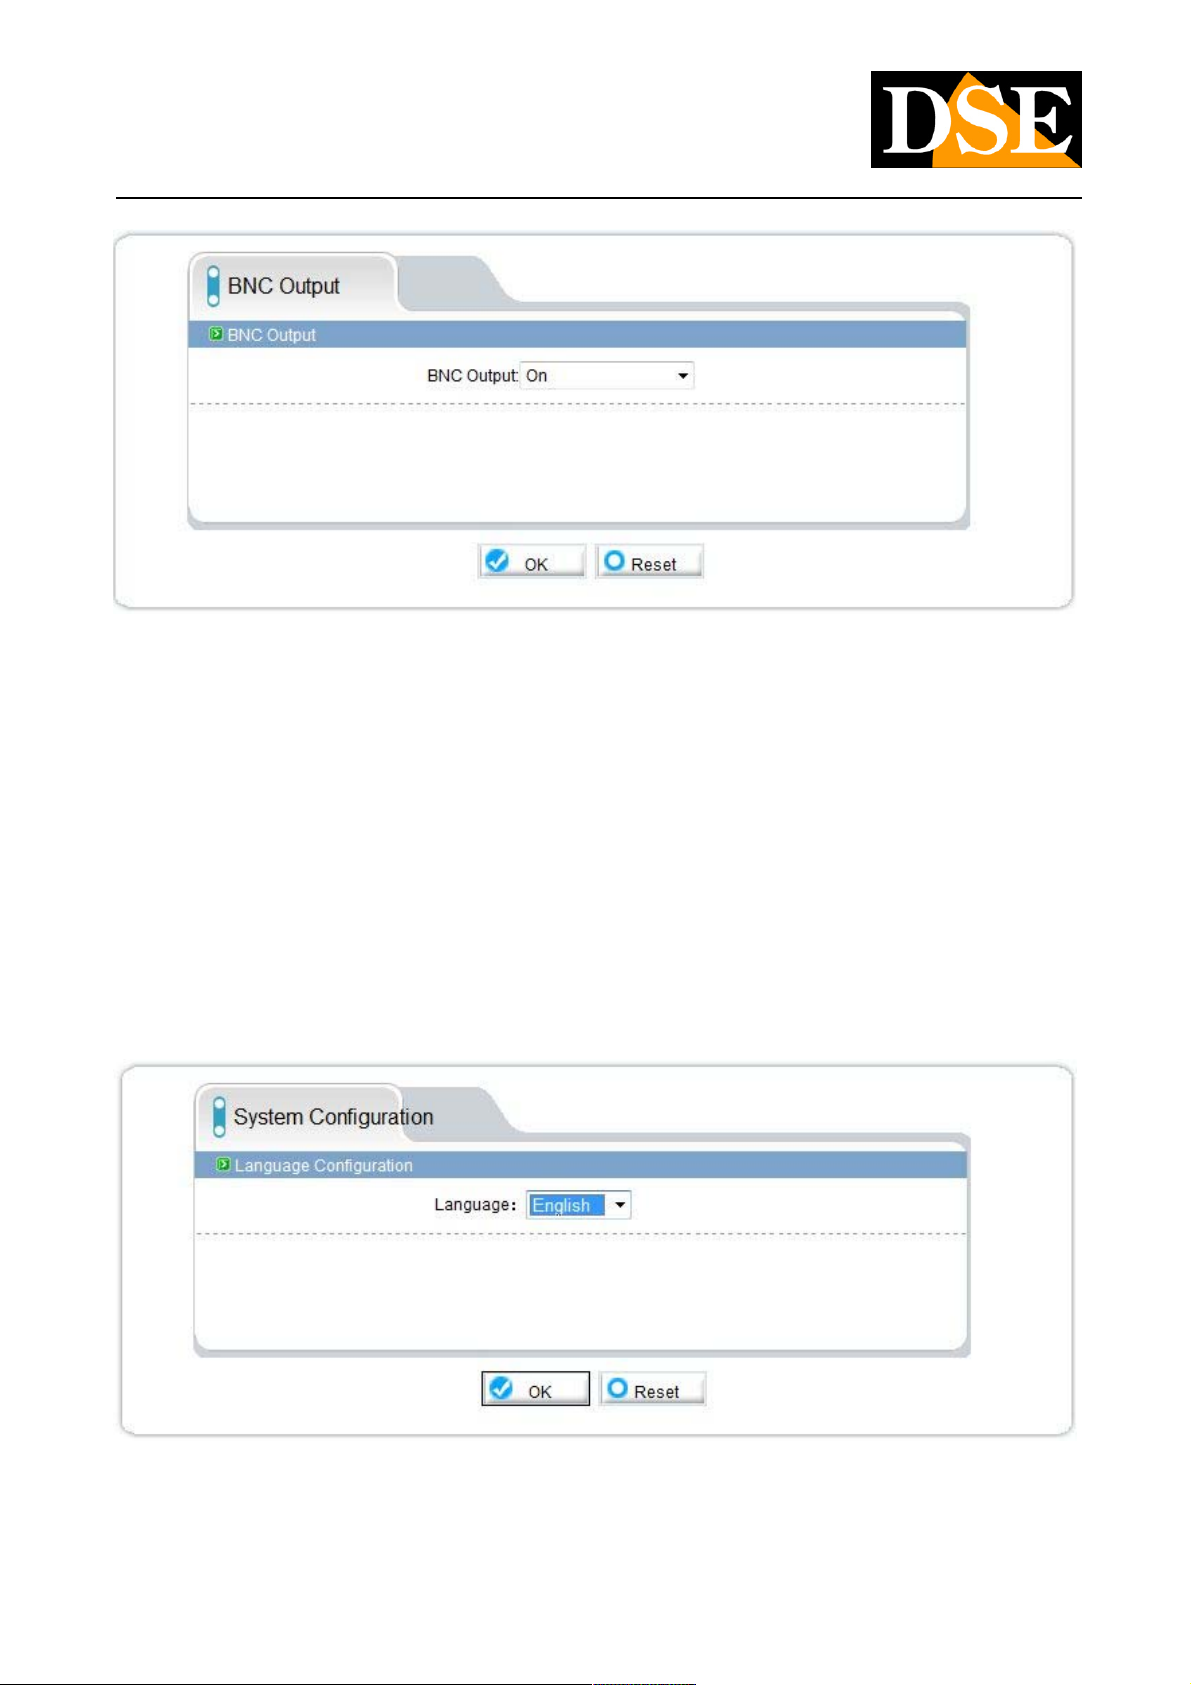
DEVICE CONFIGURATION / BNC OUTPUT DEVICE CONFIGURATION / BNC OUTPUT
DSE SRL - ITALY - WWW.DSE.EU
Page 38
USER MANUAL
CAMERAS IP H.264 1080P FULLHD
Page: 38 Page: 38
The RH Series cameras are equipped with BNC output that provides an analog composite video to connect local analog monitor useful
for example to adjust the camera lens in place without having to access the web via video. On this page you can enable or disable this
output. If the BNC output is not used it is advisable to disable it in order to not unnecessarily CPU resources.
DEVICE CONFIGURATION / SYSTEM SERVICE DEVICE CONFIGURATION / SYSTEM SERVICE
This page contains some features for debugging that are used by our technicians but have no functionality for the user. It is
recommended not to enable these functions except upon instruction of our technical staff.
DEVICE CONFIGURATION / LANGUAGE DEVICE CONFIGURATION / LANGUAGE
Language selection. Currently only English.
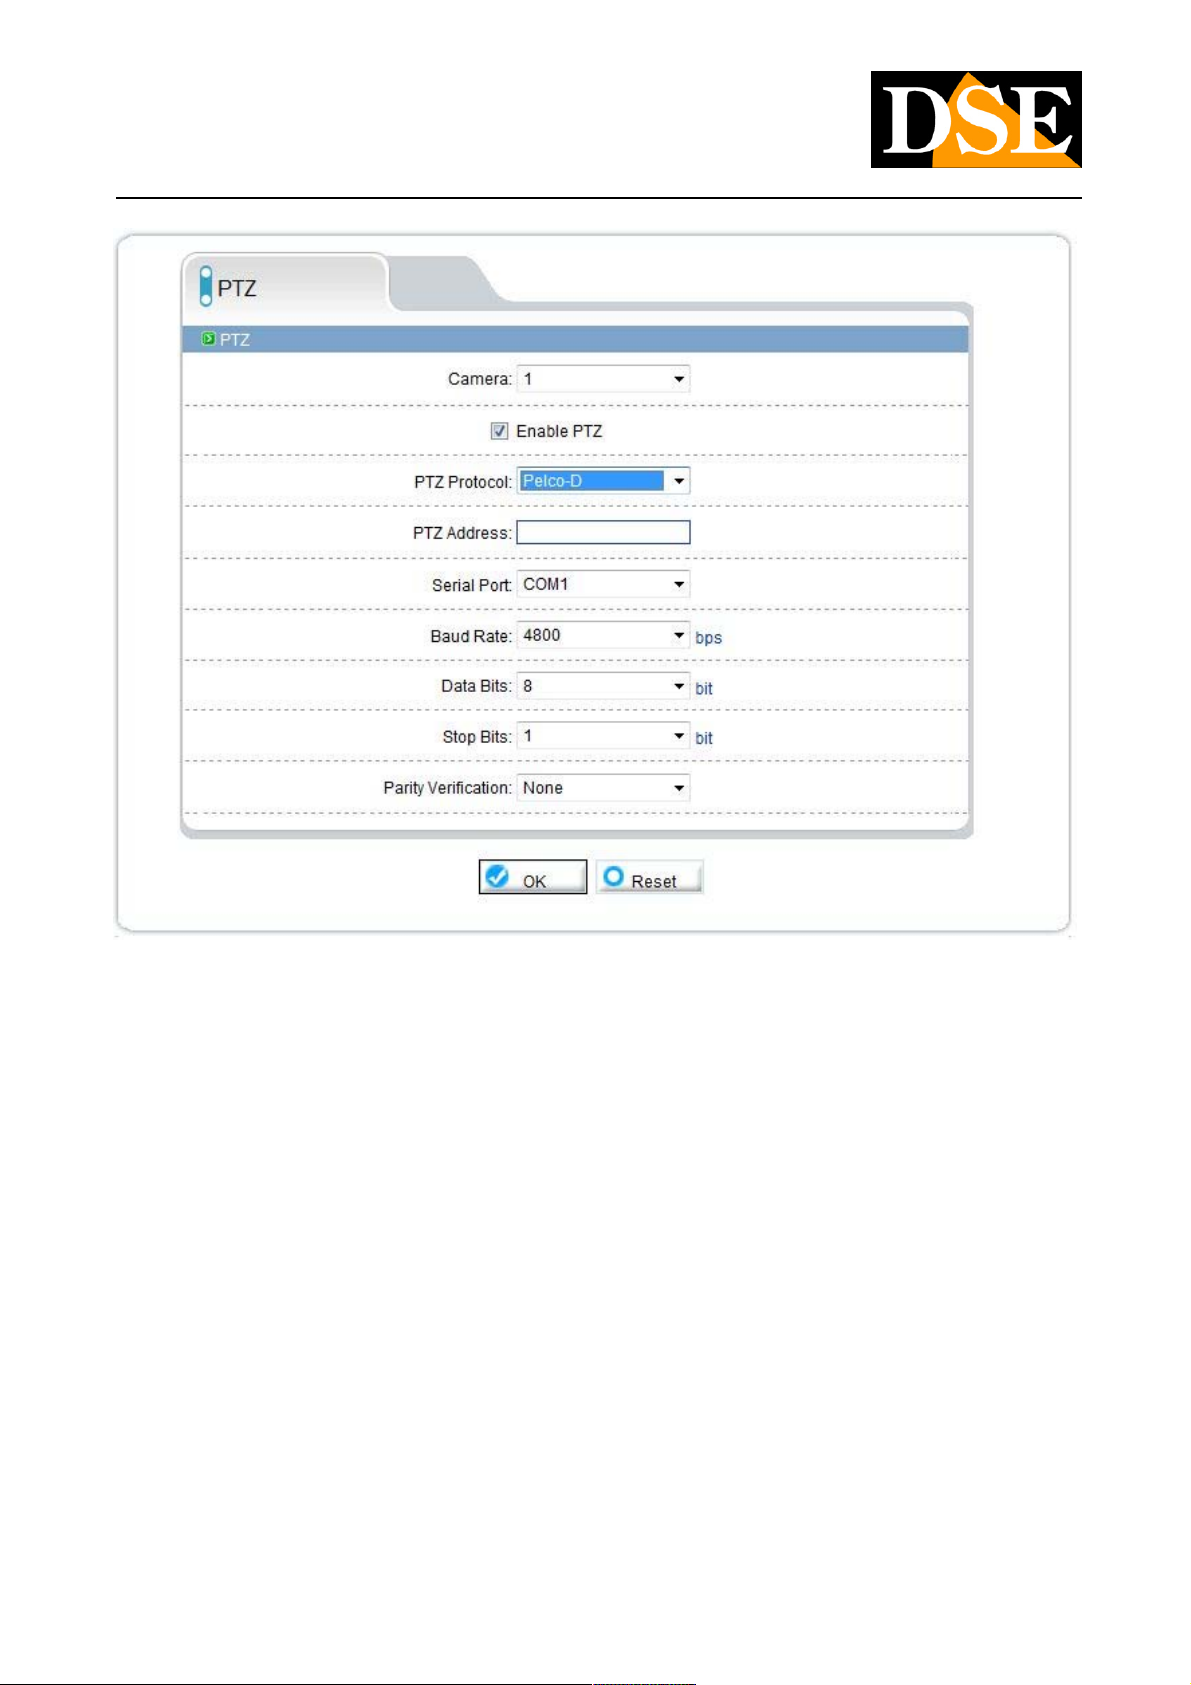
EXTERNAL DEVICE / PTZ
DSE SRL - ITALY - WWW.DSE.EU
Page 39
USER MANUAL
CAMERAS IP H.264 1080P FULLHD
Page: 39 Page: 39
Some RH series cameras are equipped with an RS485 port which can be used to control the motorized devices such as the PAN / TILT
unit to power the camera. On this page you can set the communications protocol data to be used on the RS485 port. They supported the
most common protocols Pelco P and Pelco D with all the speed of communication. Refer to the manual to be controlled to set the
settings so consistent with it.
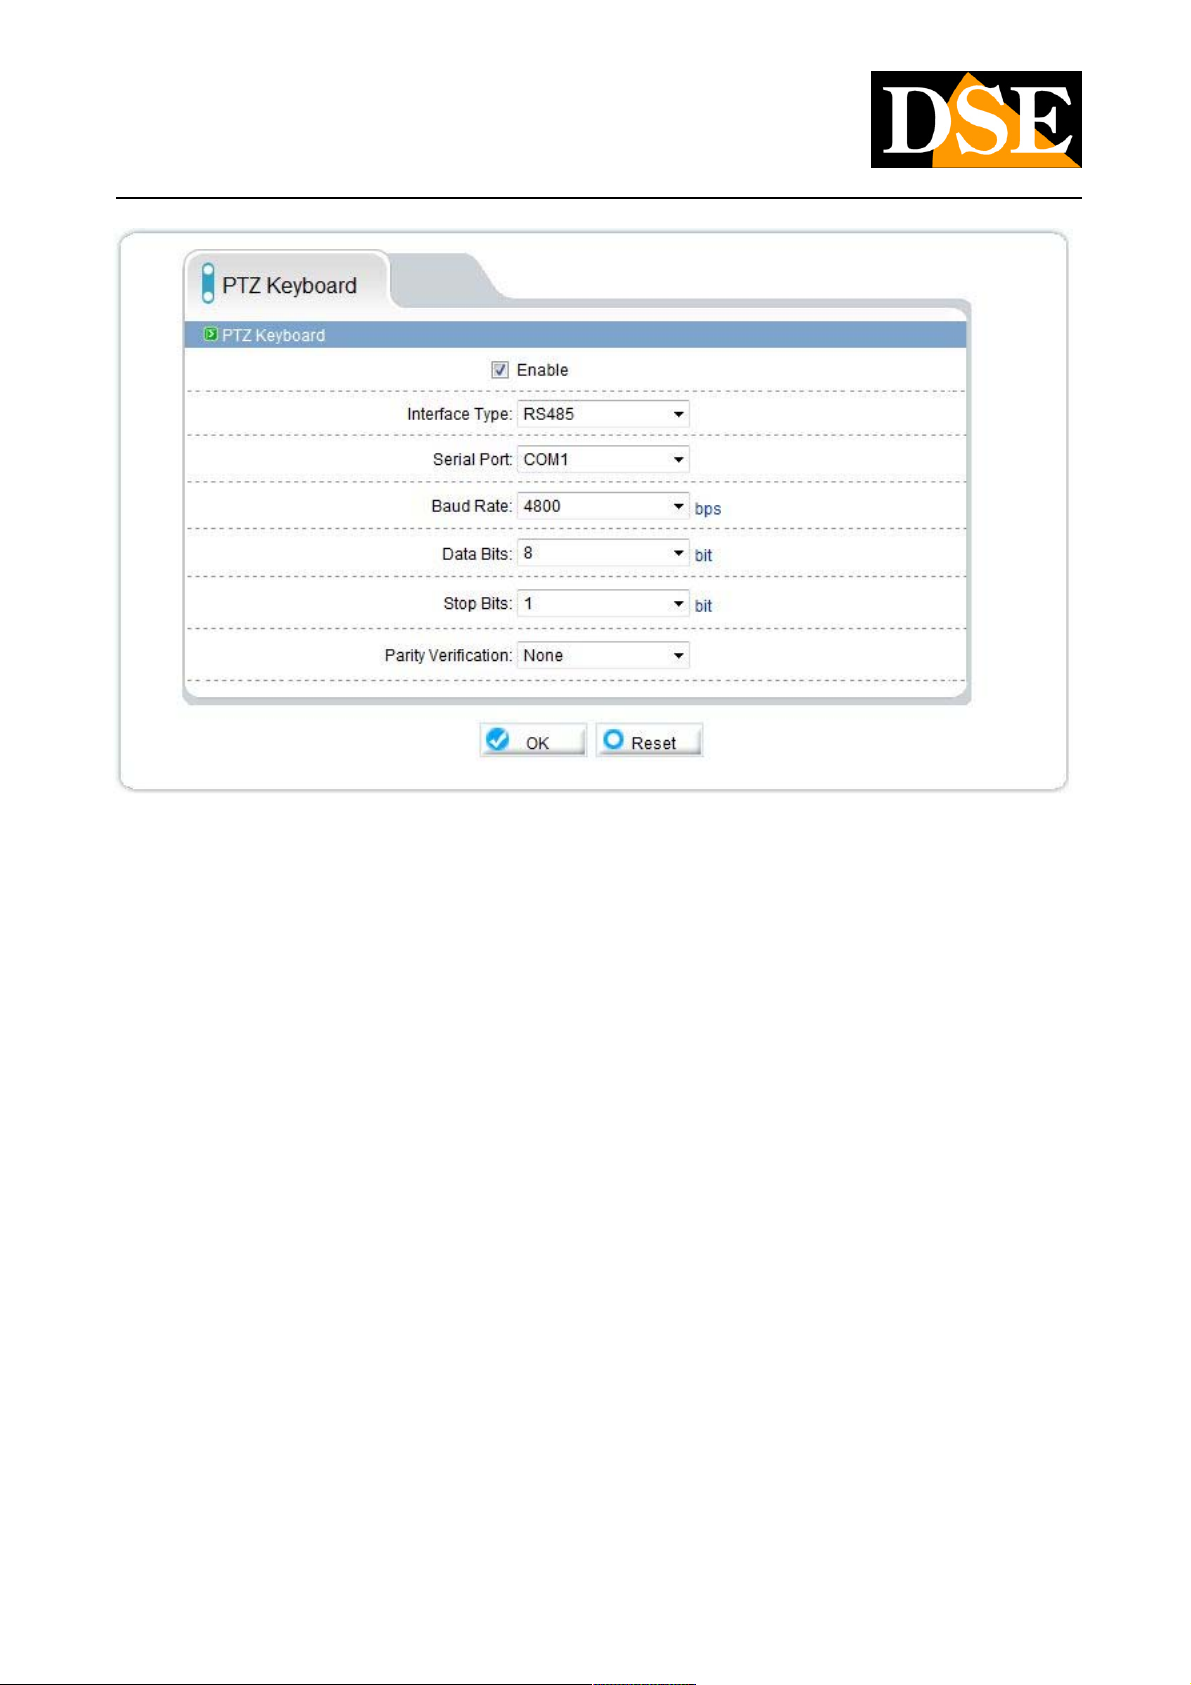
EXTERNAL DEVICE / PTZ KEYBOARD
DSE SRL - ITALY - WWW.DSE.EU
Page 40
USER MANUAL
CAMERAS IP H.264 1080P FULLHD
Page: 40 Page: 40
The RS485 port available on some cameras can be used, as well as for controlling external units Pan Tilt, also to connect the control
there keyboards for speed-dome cameras with RS485 communication port. On this page you can set the communication parameters.
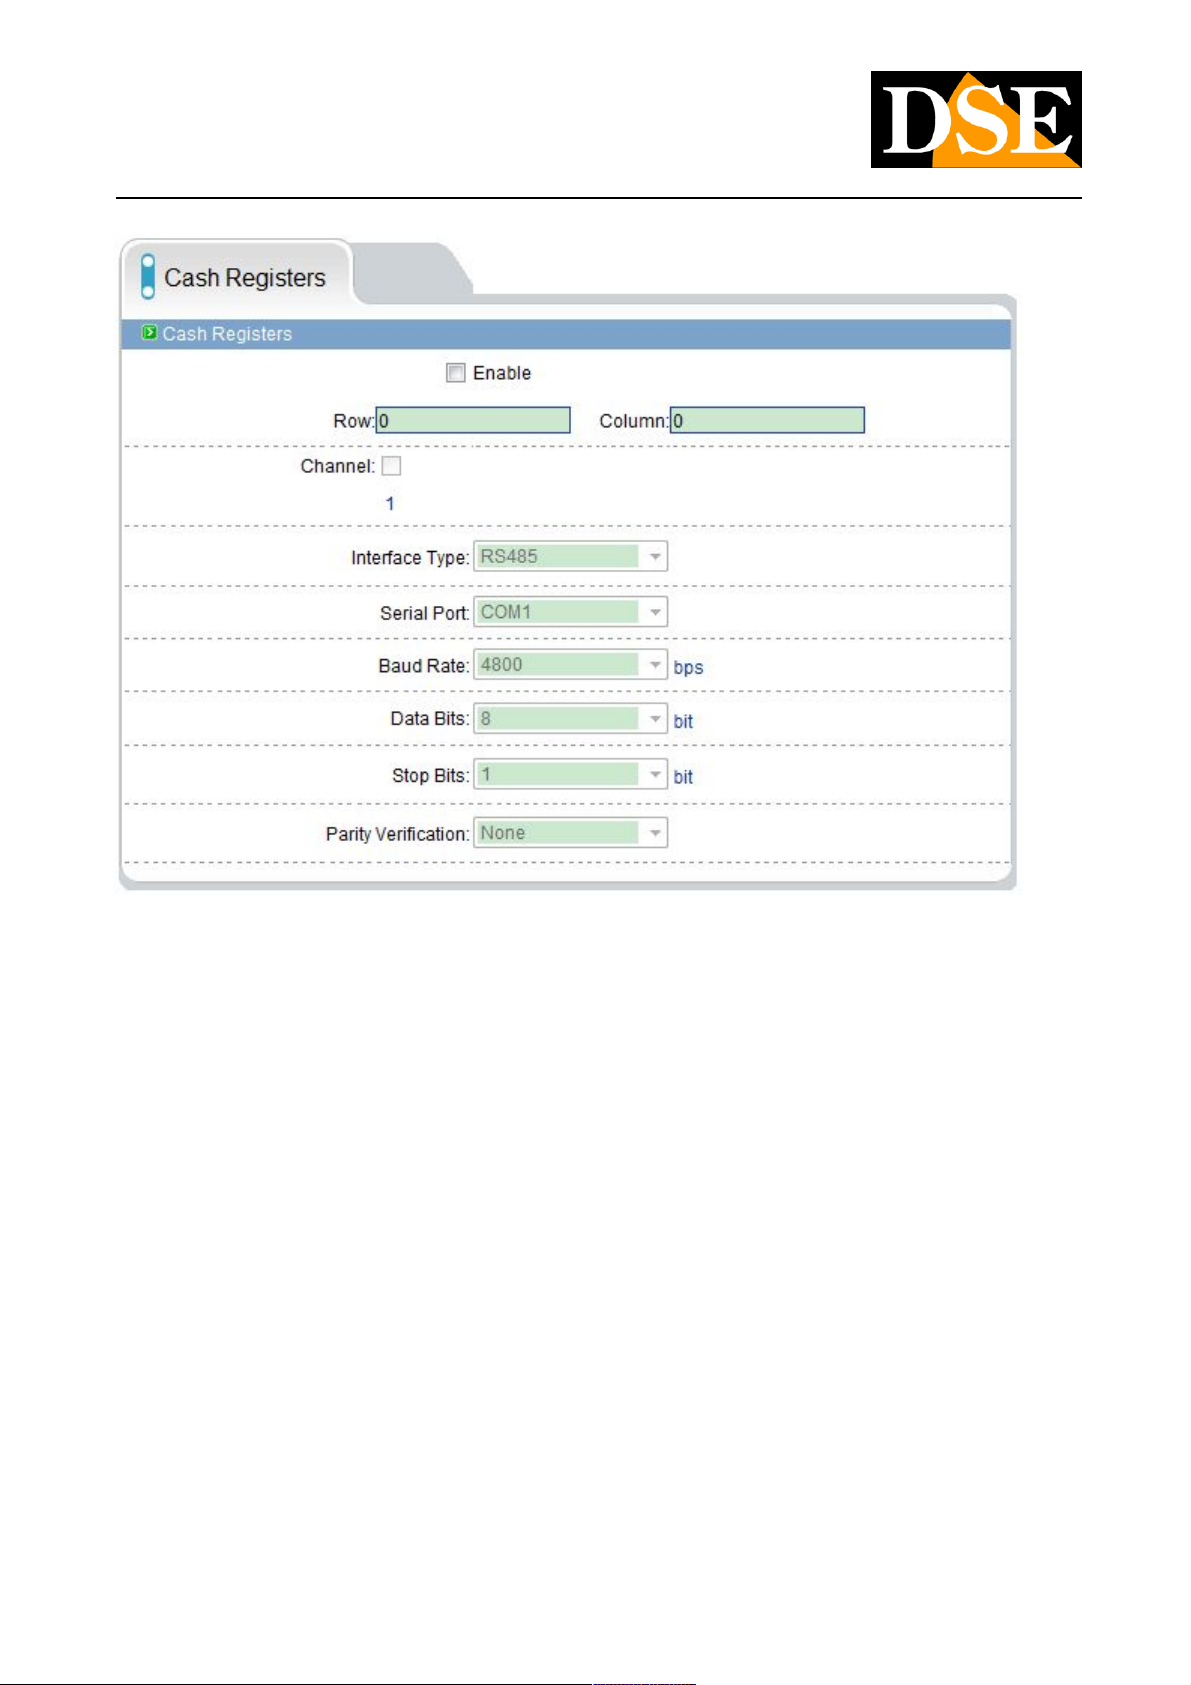
EXTERNAL DEVICE / CASH REGISTER
DSE SRL - ITALY - WWW.DSE.EU
Page 41
USER MANUAL
CAMERAS IP H.264 1080P FULLHD
Page: 41 Page: 41
The RS485 port is available in cameras can be used, as well as for connecting Pan Tilt units or external keyboards, also to interface the
camera with a cash register in order to be able to record video overlay in the cash flow. Here you can set the X / Y coordinates where to
bring up the overlay and all communication parameters.
WARNING - To support this function need for specific external drives. Contact our. technical service.
ALARM CONFIGURATION / ALARM I / O
DSE SRL - ITALY - WWW.DSE.EU
Page 42
USER MANUAL
CAMERAS IP H.264 1080P FULLHD
Page: 42 Page: 42
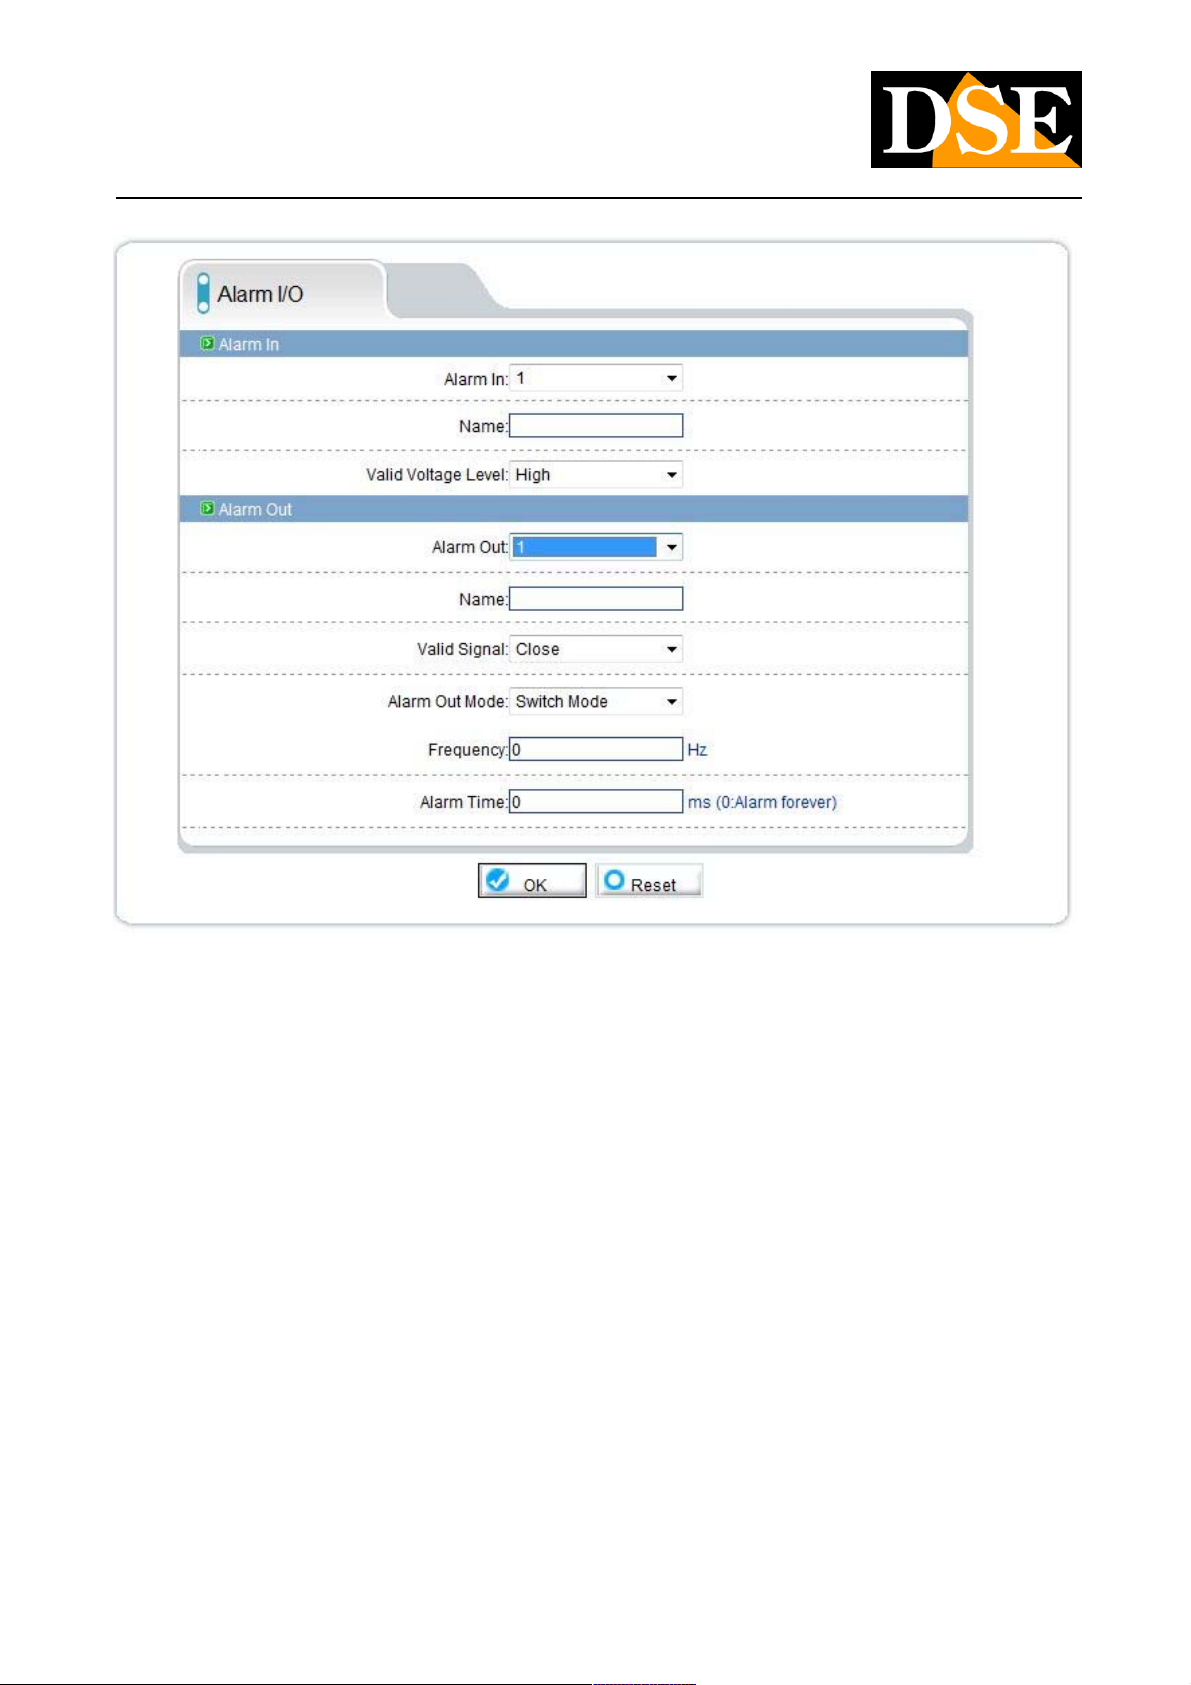
Some RH series cameras have alarm inputs and outputs that are configurable in this section.
Between the two of the alarm input terminals must apply a voltage between 5 and 12VDC. The output is relay type (NO / NC
programmable) and can directly drive up to 300mA 12VDC
ALARM IN - Select the camera alarm input. ALARM IN - Select the camera alarm input.
NAME - Edit an input distinctive name NAME - Edit an input distinctive name
VALID VOLTAGE LEVEL - It determines the type of operation. With HIGH is meant that the alarm is active in the presence of voltage. VALID VOLTAGE LEVEL - It determines the type of operation. With HIGH is meant that the alarm is active in the presence of voltage. VALID VOLTAGE LEVEL - It determines the type of operation. With HIGH is meant that the alarm is active in the presence of voltage.
With LOW it means that the alarm is active to miss the tension.
ALARM OUT - Select the alarm output ALARM OUT - Select the alarm output
NAME - Edit output a distinctive name NAME - Edit output a distinctive name
VALID SIGNAL - Determines the operation of the alarm contact. CLOSE it indicates that the contact is normally open (NO) and closes in VALID SIGNAL - Determines the operation of the alarm contact. CLOSE it indicates that the contact is normally open (NO) and closes in
the event of an alarm. OPEN indicates that the contact is normally closed (NC) and opens in the event of an alarm.
ALARM MODE OUT - Indicates the output drive mode. SWITCH MODE indicates that the relay closes or opens (depending on its logic) ALARM MODE OUT - Indicates the output drive mode. SWITCH MODE indicates that the relay closes or opens (depending on its logic)
in a continuous manner for the entire duration of scheduled activation. PULSE MODE It indicates that the relay is activated in an in a continuous manner for the entire duration of scheduled activation. PULSE MODE It indicates that the relay is activated in an in a continuous manner for the entire duration of scheduled activation. PULSE MODE It indicates that the relay is activated in an
intermittent manner with
DSE SRL - ITALY - WWW.DSE.EU
Page 43
USER MANUAL
CAMERAS IP H.264 1080P FULLHD
Page: 43 Page: 43
ON / OFF periods. If you activate the PULSE mode you can set in the box below the frequency of pulsations.
FREQUENCY - The frequency of the output pulse is expressed in Hz, ie the number of periods of an imaginary square wave which FREQUENCY - The frequency of the output pulse is expressed in Hz, ie the number of periods of an imaginary square wave which
regulates the intermittently. The minimum settable value is 1, which means that the output, in the space of a second, will be active for half
a second and the remaining half a second off.
ALARM TIME - E 'the duration of activation of the output in case of alarm in milliseconds. Eg. to make sure that the output to 10 seconds ALARM TIME - E 'the duration of activation of the output in case of alarm in milliseconds. Eg. to make sure that the output to 10 seconds
after an alarm: set
10000. The duration of the activation takes effect both in the case of continuous drive mode and intermittent.
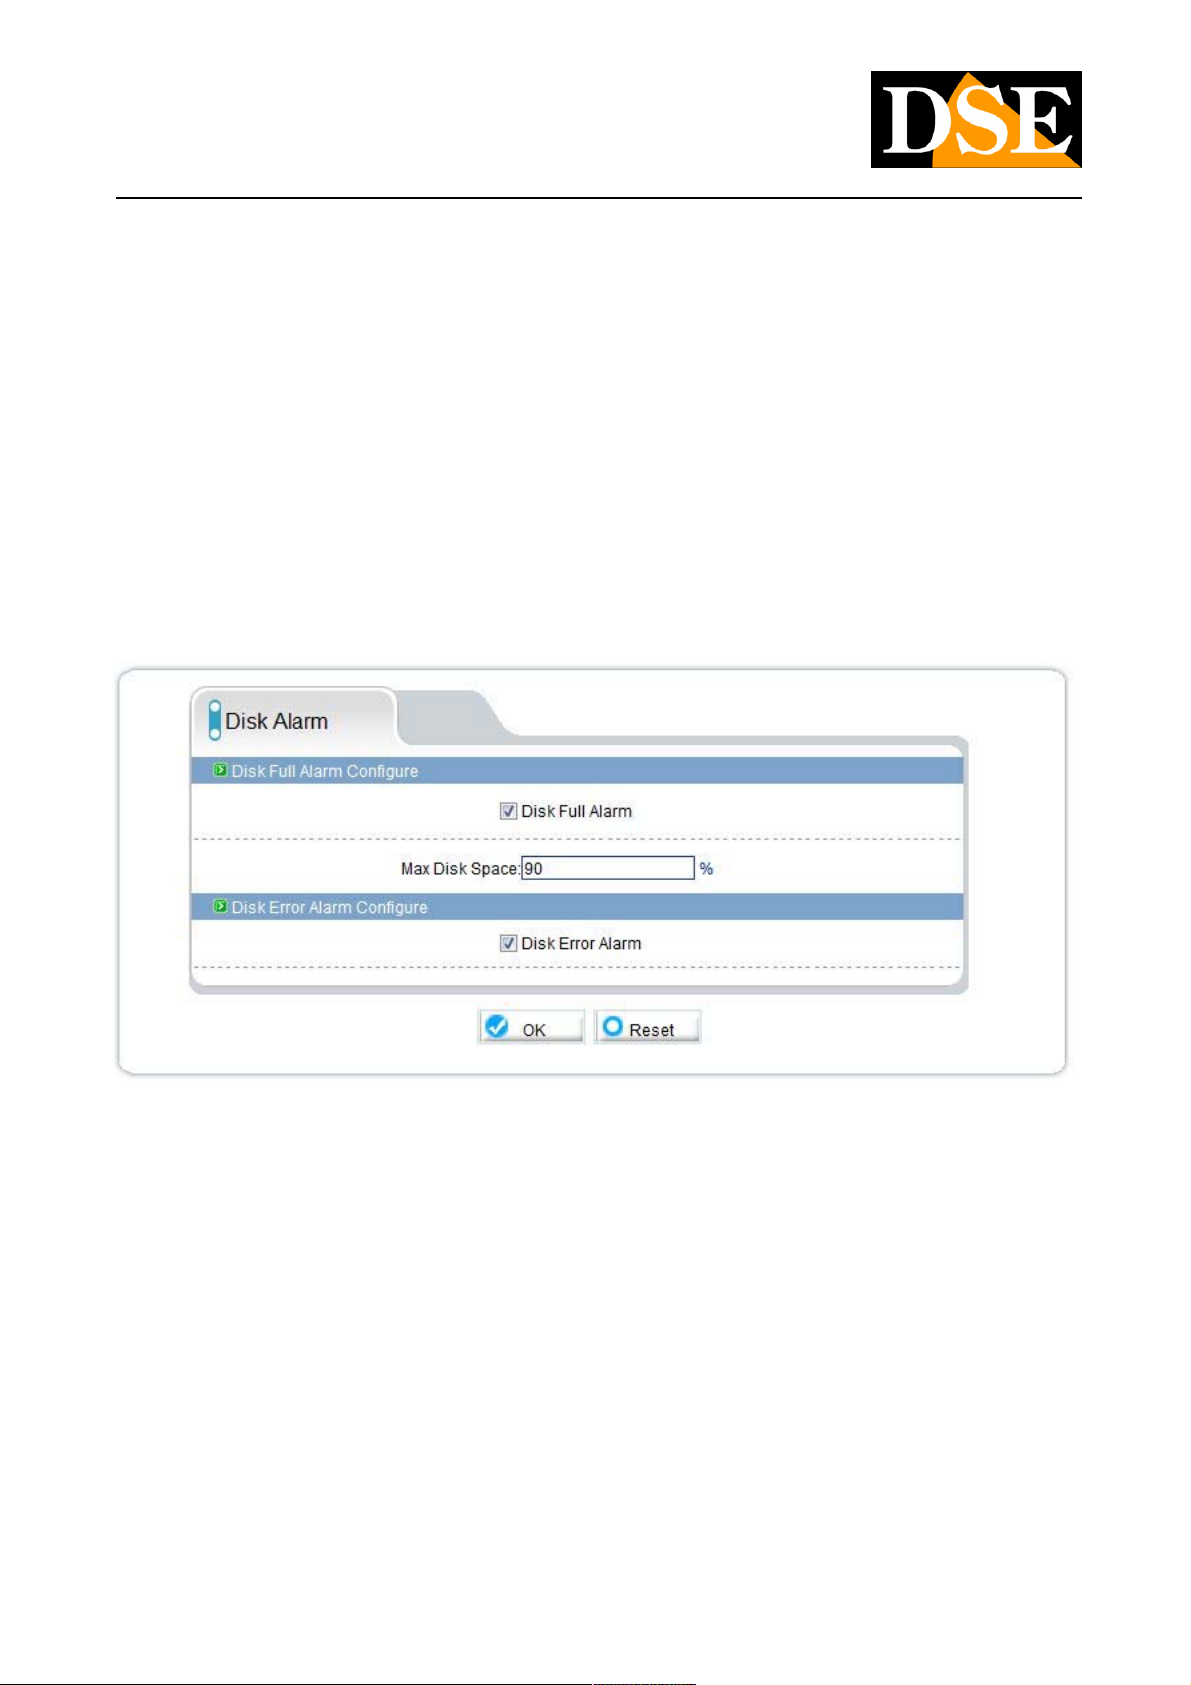
ALARM CONFIGURATION / DISK ALARM
The RH cameras can accommodate within them a microSD memory to record images independently even if disconnected from the
network. In this section you can define whether an alarm in case of almost full memory (set the percentage) or in the case of writing
errors (SD card needed replacing)
ALARM CONFIGURATION / I / O ALARM LINKAGE
DSE SRL - ITALY - WWW.DSE.EU
Page 44
USER MANUAL
CAMERAS IP H.264 1080P FULLHD
Page: 44 Page: 44
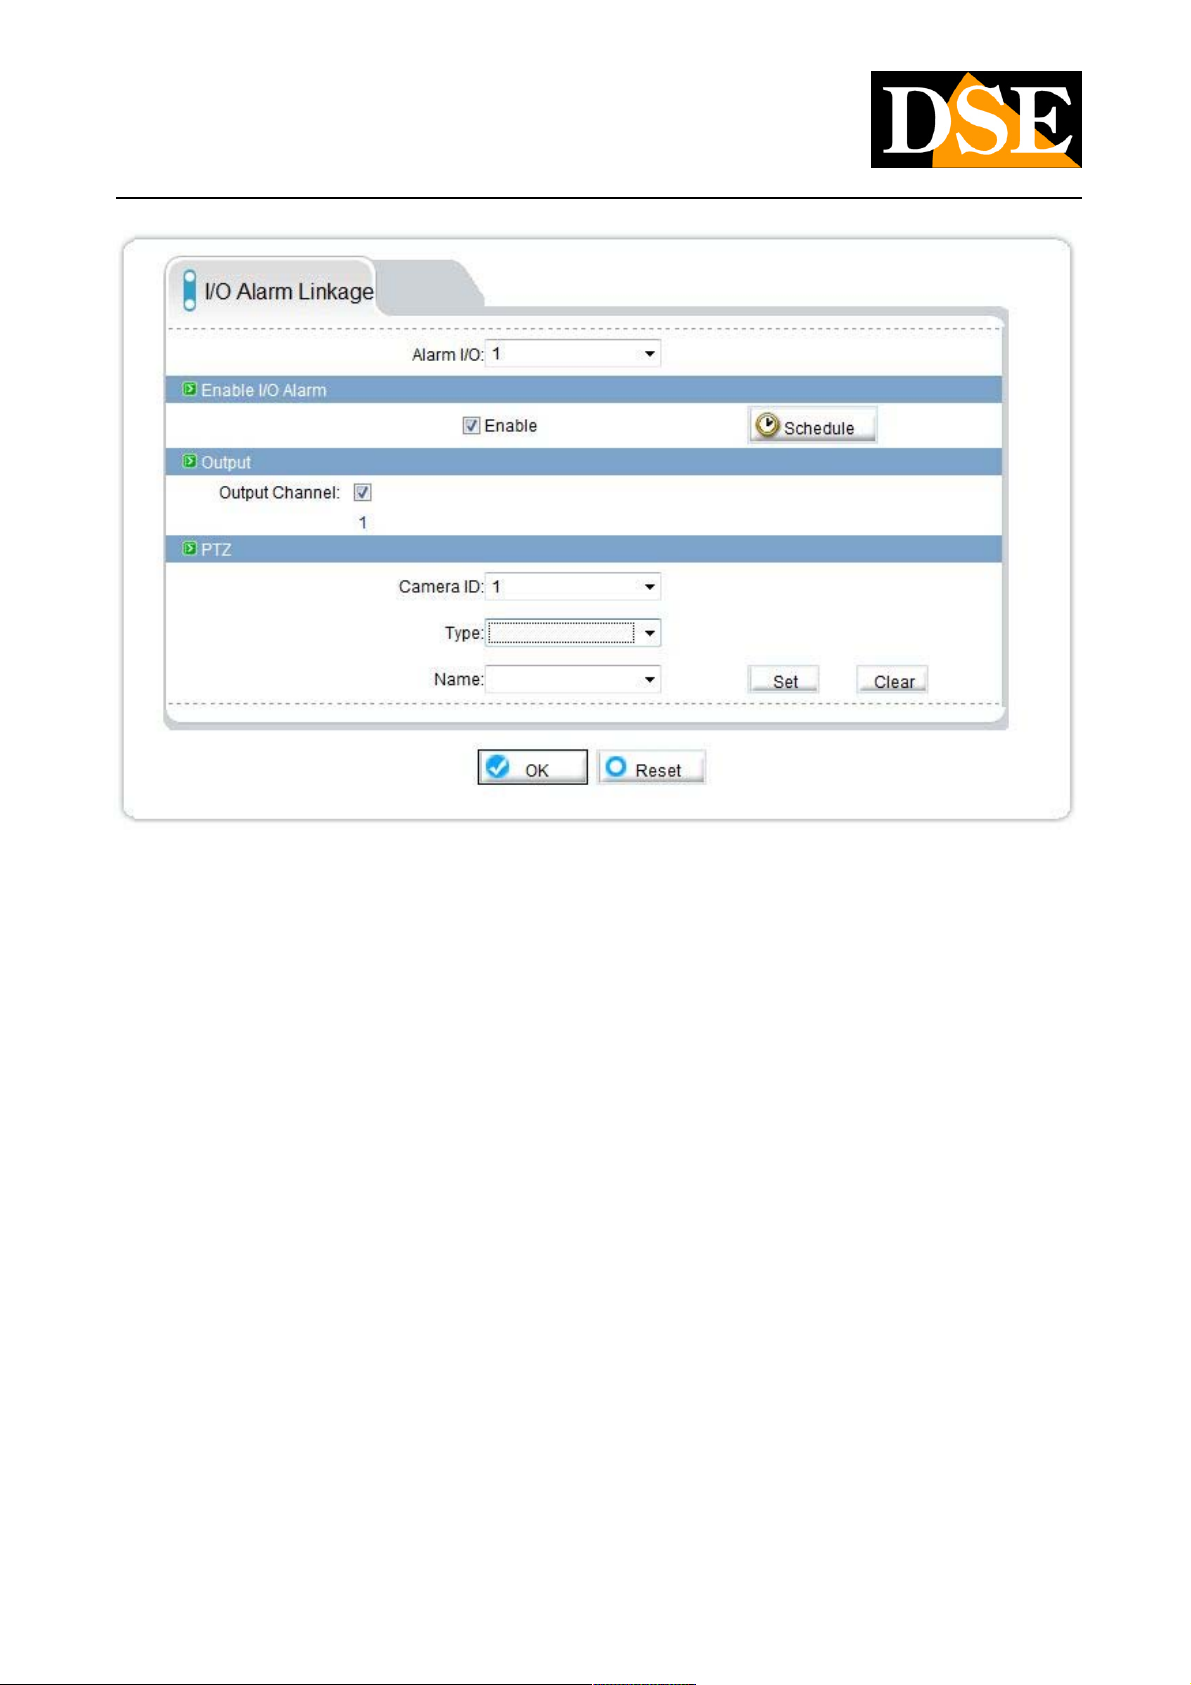
In this section it is possible to determine the actions to be performed in case of external input activation of the alarm operation of which
has been programmed just above.
ENABLE - Enable input is used to generate alarms ENABLE - Enable input is used to generate alarms
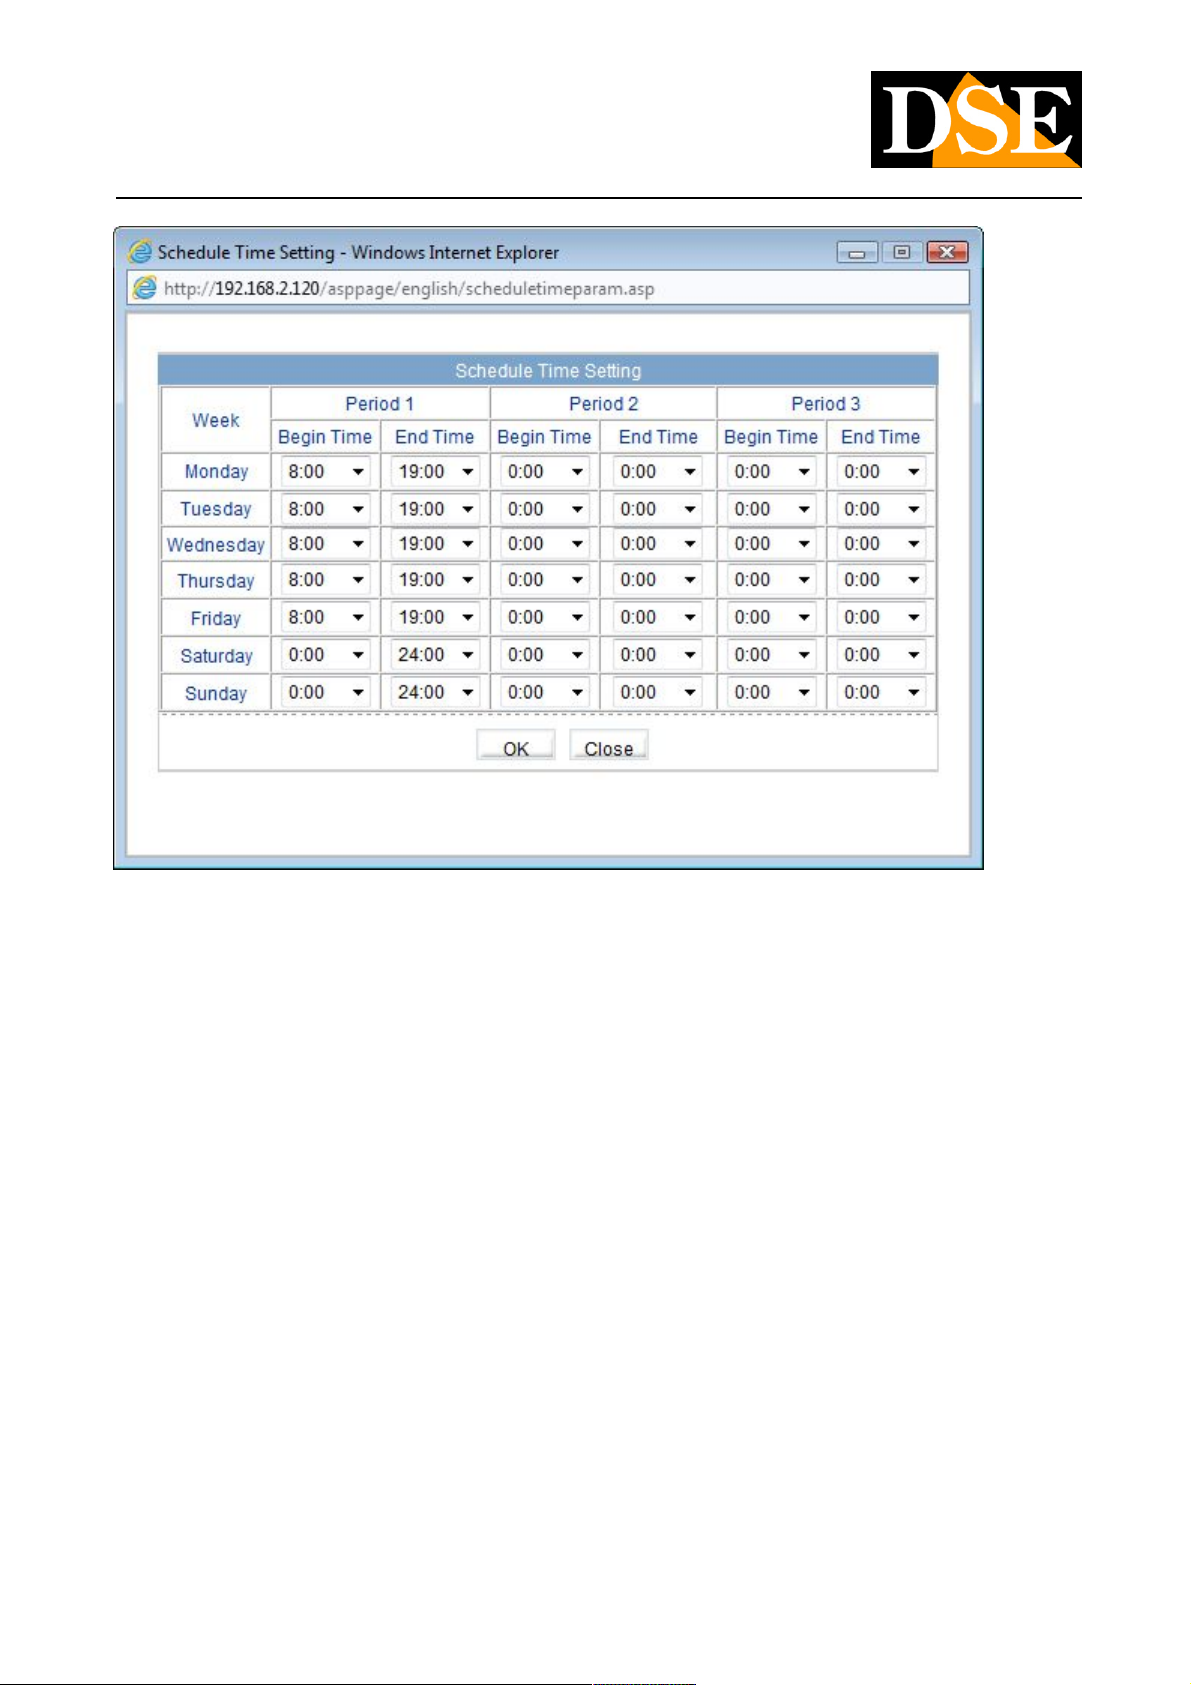
SCHEDULE - you 'can make sure that the alarm function is enabled only at certain times of the day or week. For each day of the week SCHEDULE - you 'can make sure that the alarm function is enabled only at certain times of the day or week. For each day of the week
there are 3 time slots in which to enable the activation of alarms. In the example that follows in the figure it is enabled the alarm function
on weekdays from 8 to 19 and all day during the weekend. CAUTION - The factory is not enabled any time slot. At least one set to be
able to activate the detection
DSE SRL - ITALY - WWW.DSE.EU
Page 45
USER MANUAL
CAMERAS IP H.264 1080P FULLHD
Page: 45 Page: 45
OUTPUT CHANNEL - Defines whether to activate the alarm output when the alarm input is activated OUTPUT CHANNEL - Defines whether to activate the alarm output when the alarm input is activated
PTZ - If the camera is powered it is possible after the trigger input alarm invoke an automatic shift function PTZ - If the camera is powered it is possible after the trigger input alarm invoke an automatic shift function
CONFIGURATION ALARM / MOTION ALARM
DSE SRL - ITALY - WWW.DSE.EU
Page 46
USER MANUAL
CAMERAS IP H.264 1080P FULLHD
Page: 46 Page: 46
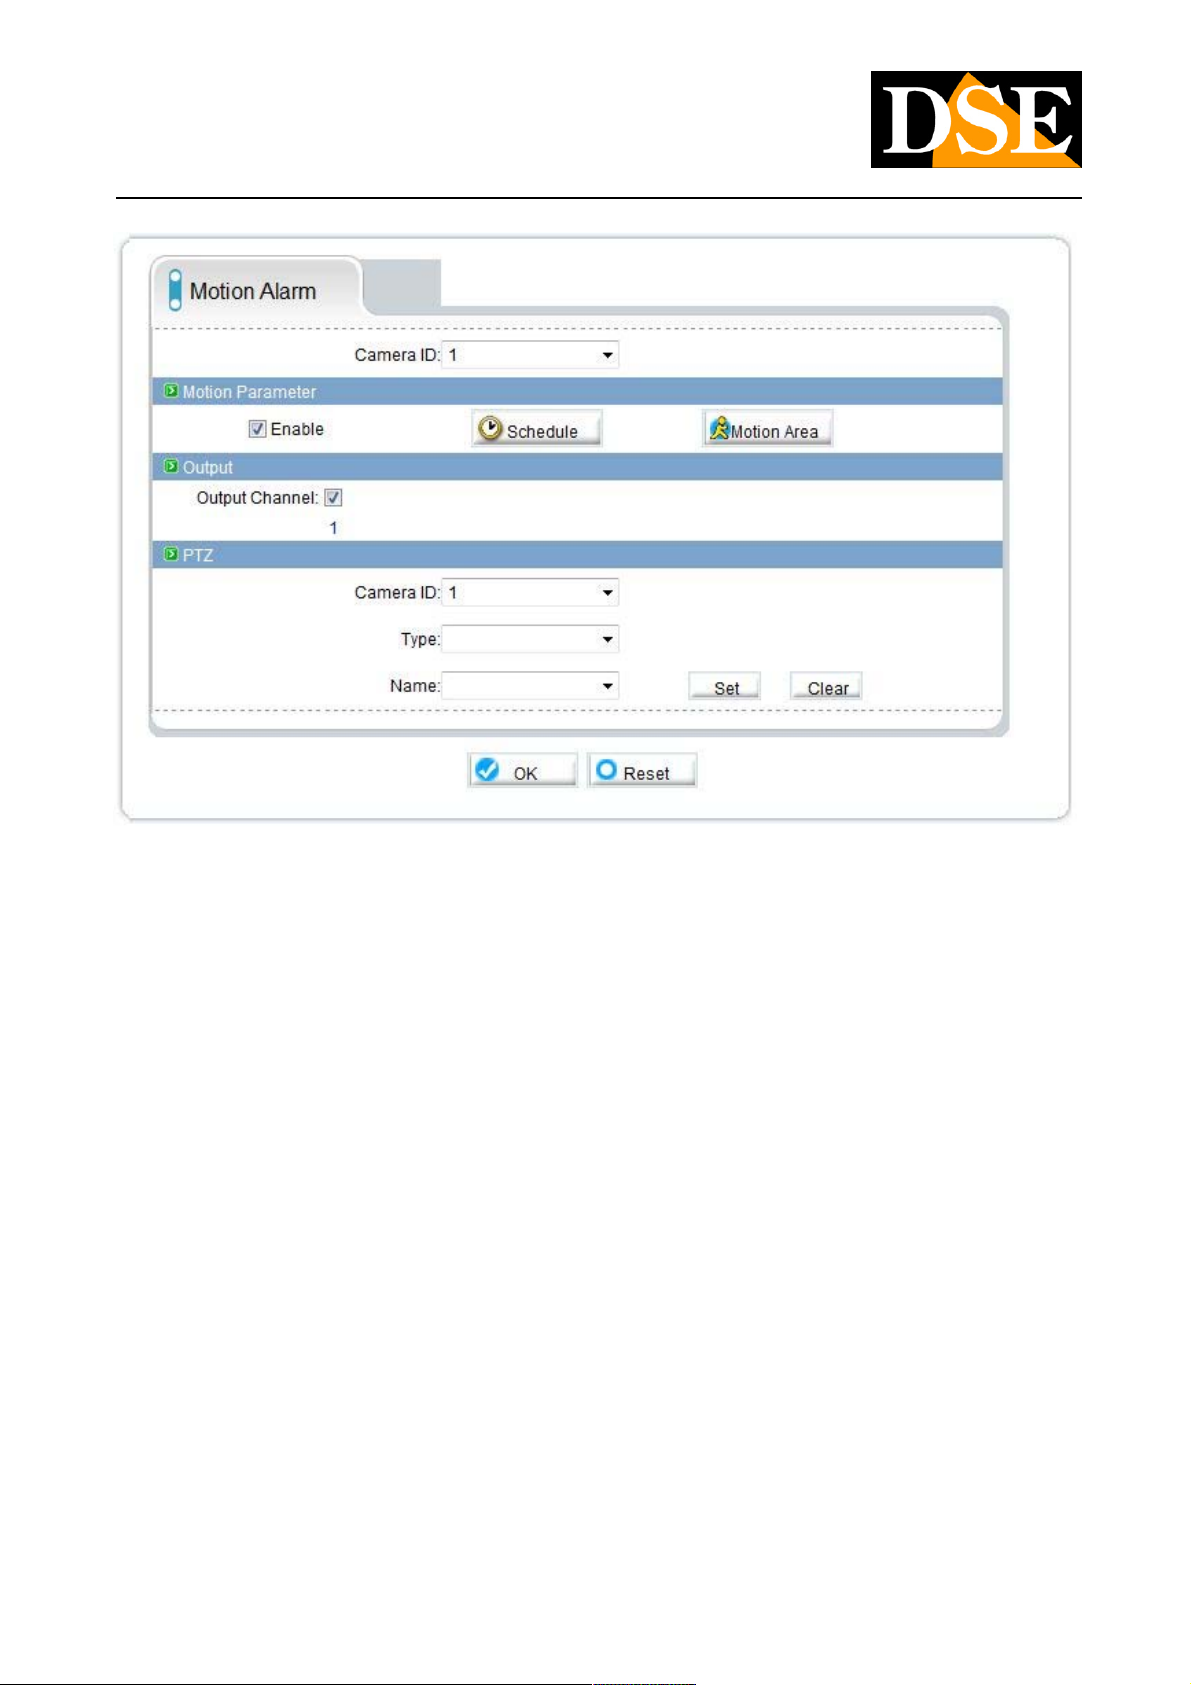
The RH cameras are able to detect an intrusion through the analysis of the recorded and generate significant alarm actions. In this
section you can set the parameters of the Motion Detetction determine the actions to take in case of alarm MOTION.
ENABLE - Enables the use of the MOTION DETECTION to generate alarms ENABLE - Enables the use of the MOTION DETECTION to generate alarms
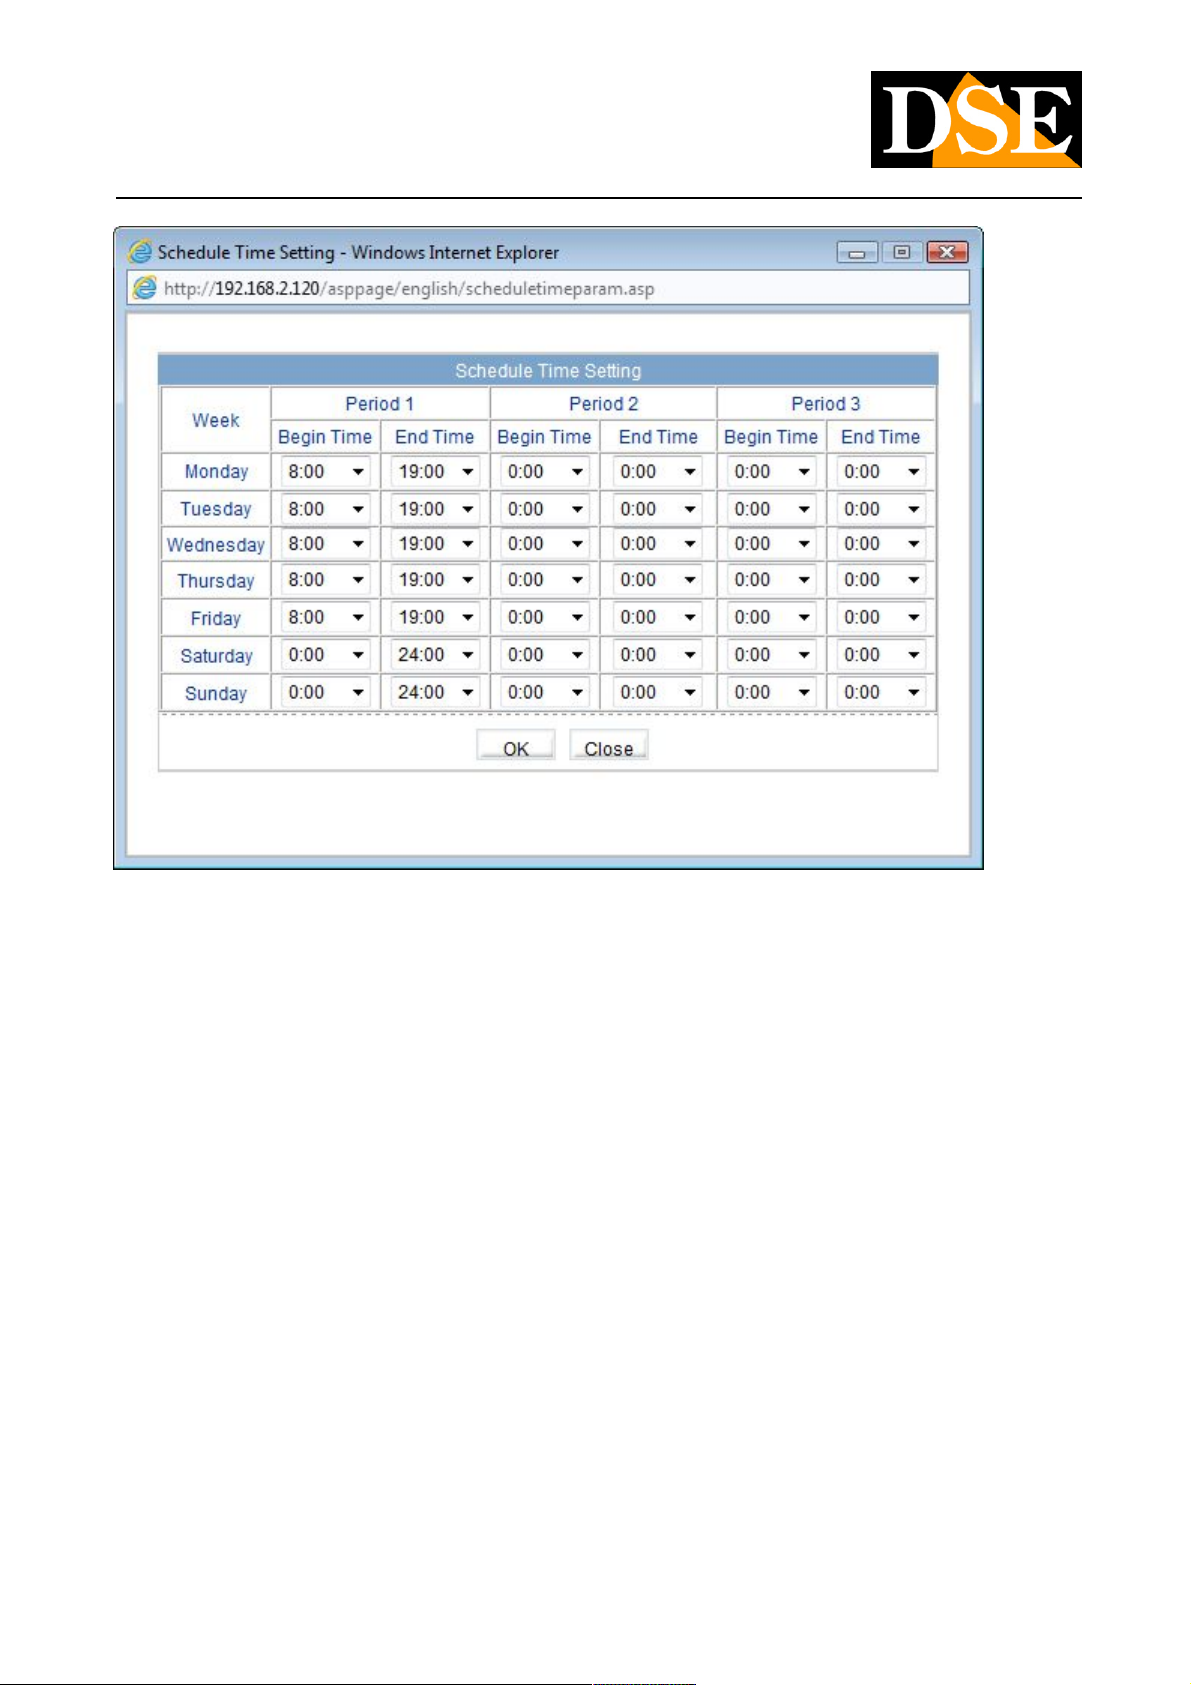
SCHEDULE - you 'can make sure that MOTION is enabled only at certain times of the day or week. For each day of the week there are 3 SCHEDULE - you 'can make sure that MOTION is enabled only at certain times of the day or week. For each day of the week there are 3
time slots in which to enable the activation of alarms. In the example that follows in the figure it is enabled the alarm function on
weekdays from 8 to 19 and all day during the weekend. CAUTION - The factory is not enabled any time slot. At least one set to be able
to activate the detection
DSE SRL - ITALY - WWW.DSE.EU
Page 47
USER MANUAL
CAMERAS IP H.264 1080P FULLHD
Page: 47 Page: 47
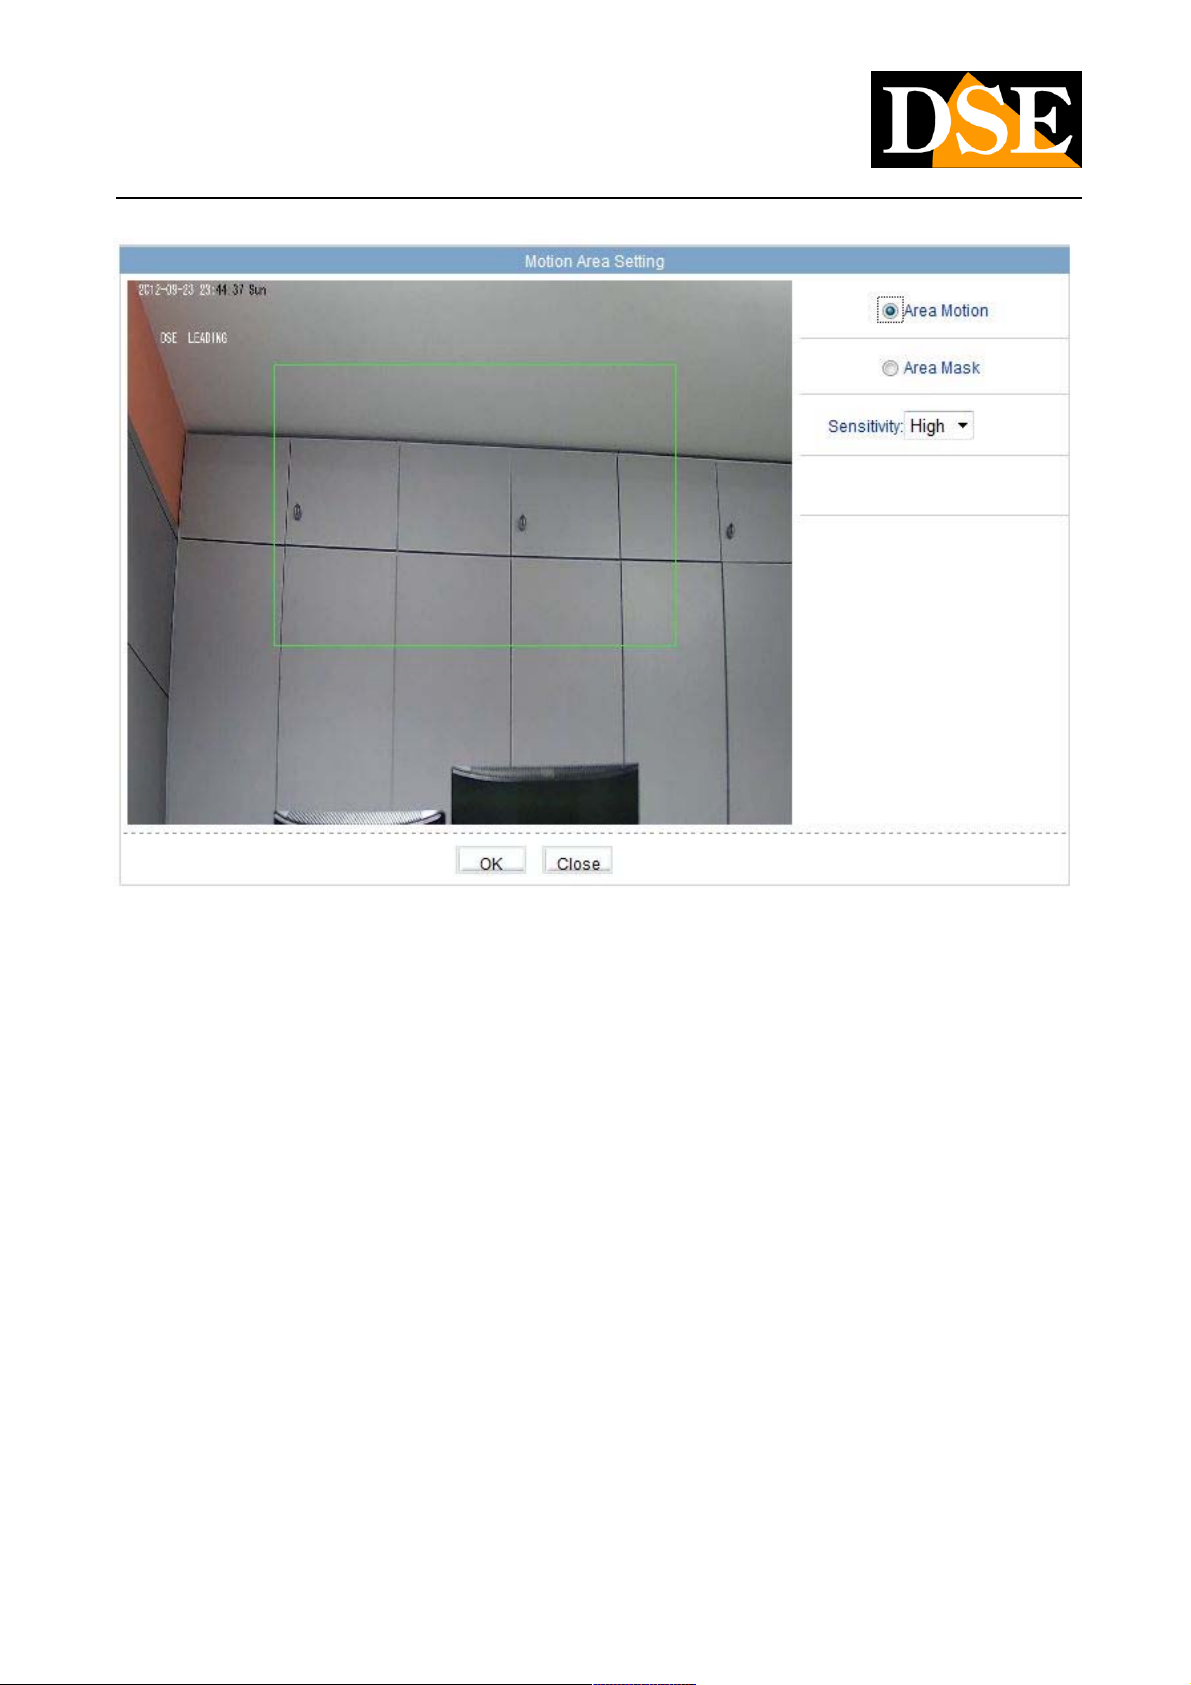
MOTION AREA
By pressing this button you can select the area to consider in motion detection. E 'can act in two ways
MOTION AREA - Drag the mouse on the screen to define the area where the survey will be valid. To remove the mask, click the right MOTION AREA - Drag the mouse on the screen to define the area where the survey will be valid. To remove the mask, click the right
mouse button.
MASK AREA - Drag the mouse on the screen to define the area where it will NOT valid detection. To remove the mask, click the right MASK AREA - Drag the mouse on the screen to define the area where it will NOT valid detection. To remove the mask, click the right
mouse button.
SENSITIVITY - Adjust the sensitivity of detection Low, Medium, High.SENSITIVITY - Adjust the sensitivity of detection Low, Medium, High.
DSE SRL - ITALY - WWW.DSE.EU
Page 48
USER MANUAL
CAMERAS IP H.264 1080P FULLHD
Page: 48 Page: 48
OUTPUT CHANNEL - Defines whether to activate the alarm output when you activate the motion detection OUTPUT CHANNEL - Defines whether to activate the alarm output when you activate the motion detection
MOTION AREA -
PTZ - If the camera is motorized it is possible following the activation of the motion invoke an automatic shift function PTZ - If the camera is motorized it is possible following the activation of the motion invoke an automatic shift function
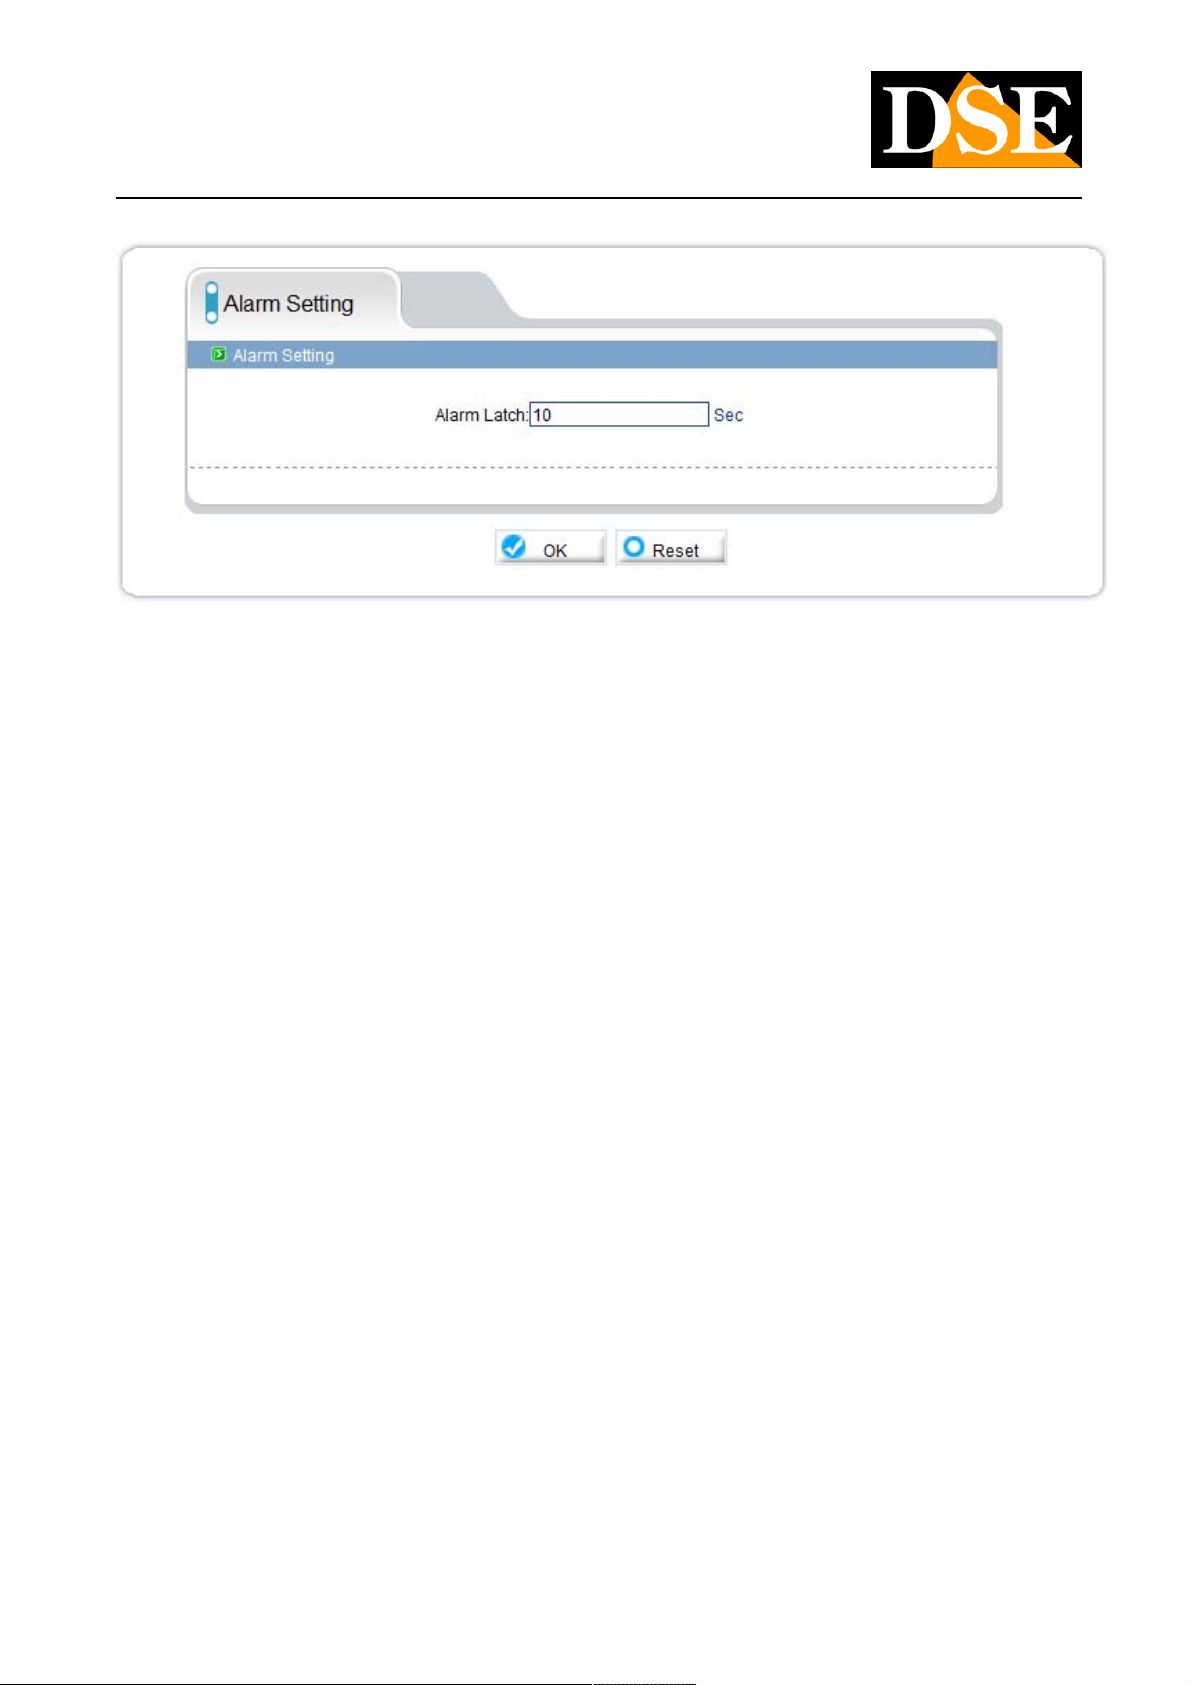
ALARM CONFIGURATION / SETTING ALARM
DSE SRL - ITALY - WWW.DSE.EU
Page 49
USER MANUAL
CAMERAS IP H.264 1080P FULLHD
Page: 49 Page: 49
Set the idle time to maintain compulsory between one alarm and the next.
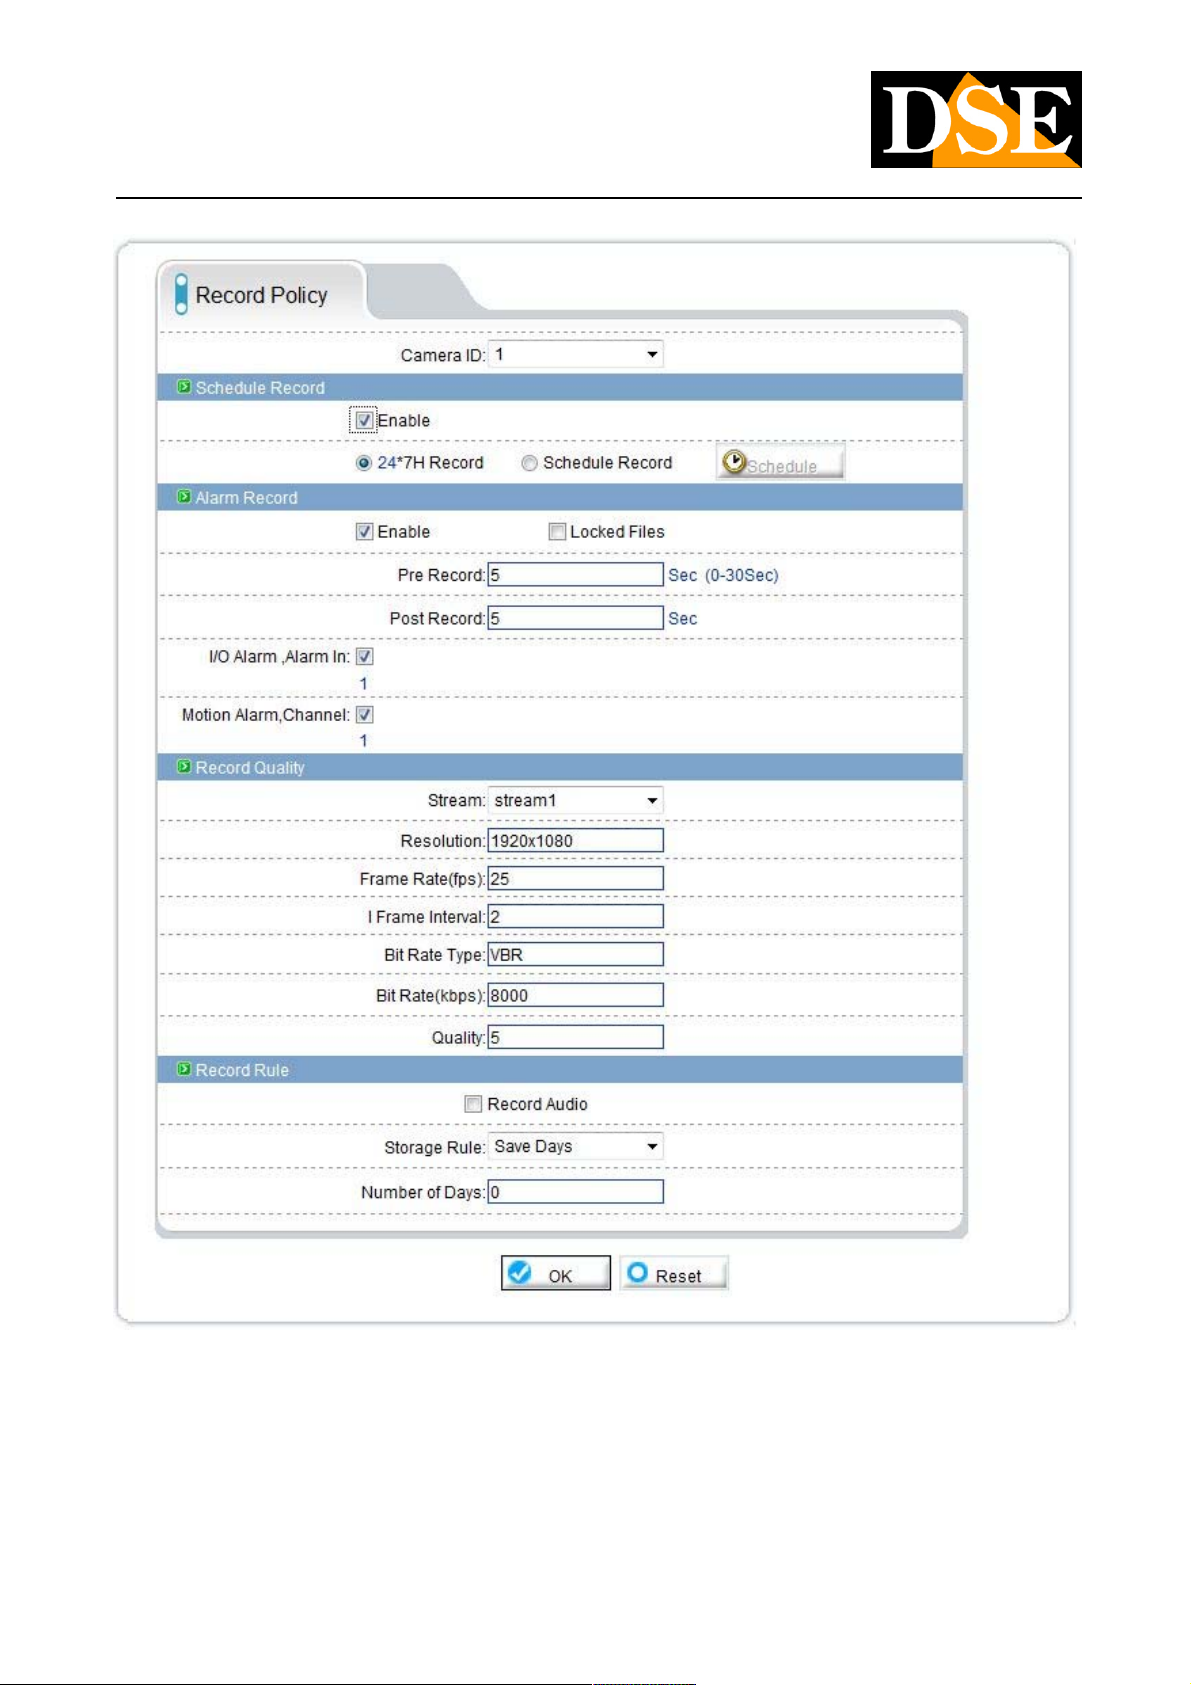
LOCAL RECORD / RECORD POLICY
The RH cameras can accommodate a microSD card inside to record video locally on the camera. In this section you set the recording
options.
DSE SRL - ITALY - WWW.DSE.EU
Page 50
USER MANUAL
CAMERAS IP H.264 1080P FULLHD
Page: 50 Page: 50
SCHEDULE RECORD - The first section allows you to set the recording continuous or timed. Clicking 24 * 7H RECORD the camera SCHEDULE RECORD - The first section allows you to set the recording continuous or timed. Clicking 24 * 7H RECORD the camera
always records on SD card 24 hours a 24. Alternatively you can choose SCHEDULE RECORD to set up recording at specific times
depending on the day of the week.
ALARM RECORD - The second section allows to set the recording parameters in case of alarm (motion or input). Click ENABLE to ALARM RECORD - The second section allows to set the recording parameters in case of alarm (motion or input). Click ENABLE to
enable this type of recording.
DSE SRL - ITALY - WWW.DSE.EU
Page 51
USER MANUAL
CAMERAS IP H.264 1080P FULLHD
Page: 51 Page: 51
Click I / O ALARM and / or MOTION ALARM to make sure that happens register later linked with an external or motion detection. If you
set a time in seconds in the PRE-POST RECORD RECORD spaces and will also record the images before and after the event (max. 30
sec.).
RECORD QUALITY - Choose which of the three streams recorded on the SD card RECORD QUALITY - Choose which of the three streams recorded on the SD card
RECORD AUDIO - Click to enable audio recording. RECORD AUDIO - Click to enable audio recording.
STORAGE RULE - E 'can decide whether to record continuously on the SD card, overwriting older images at the end of the ability or set STORAGE RULE - E 'can decide whether to record continuously on the SD card, overwriting older images at the end of the ability or set
the maximum number of days to keep in memory.
LOCAL RECORD / RECORD DIRECTORY
The RH cameras are able to record video independently without the need for external recorders. The videos can be stored on three types
of support:
MICRO SD-CARD INTERNAL - Inserted in the camera slot MICRO SD-CARD INTERNAL - Inserted in the camera slot
FTP - Uploading to an FTP server FTP - Uploading to an FTP server
NAS - Archiving on a network storage device (Network Attached Storage) NAS - Archiving on a network storage device (Network Attached Storage)
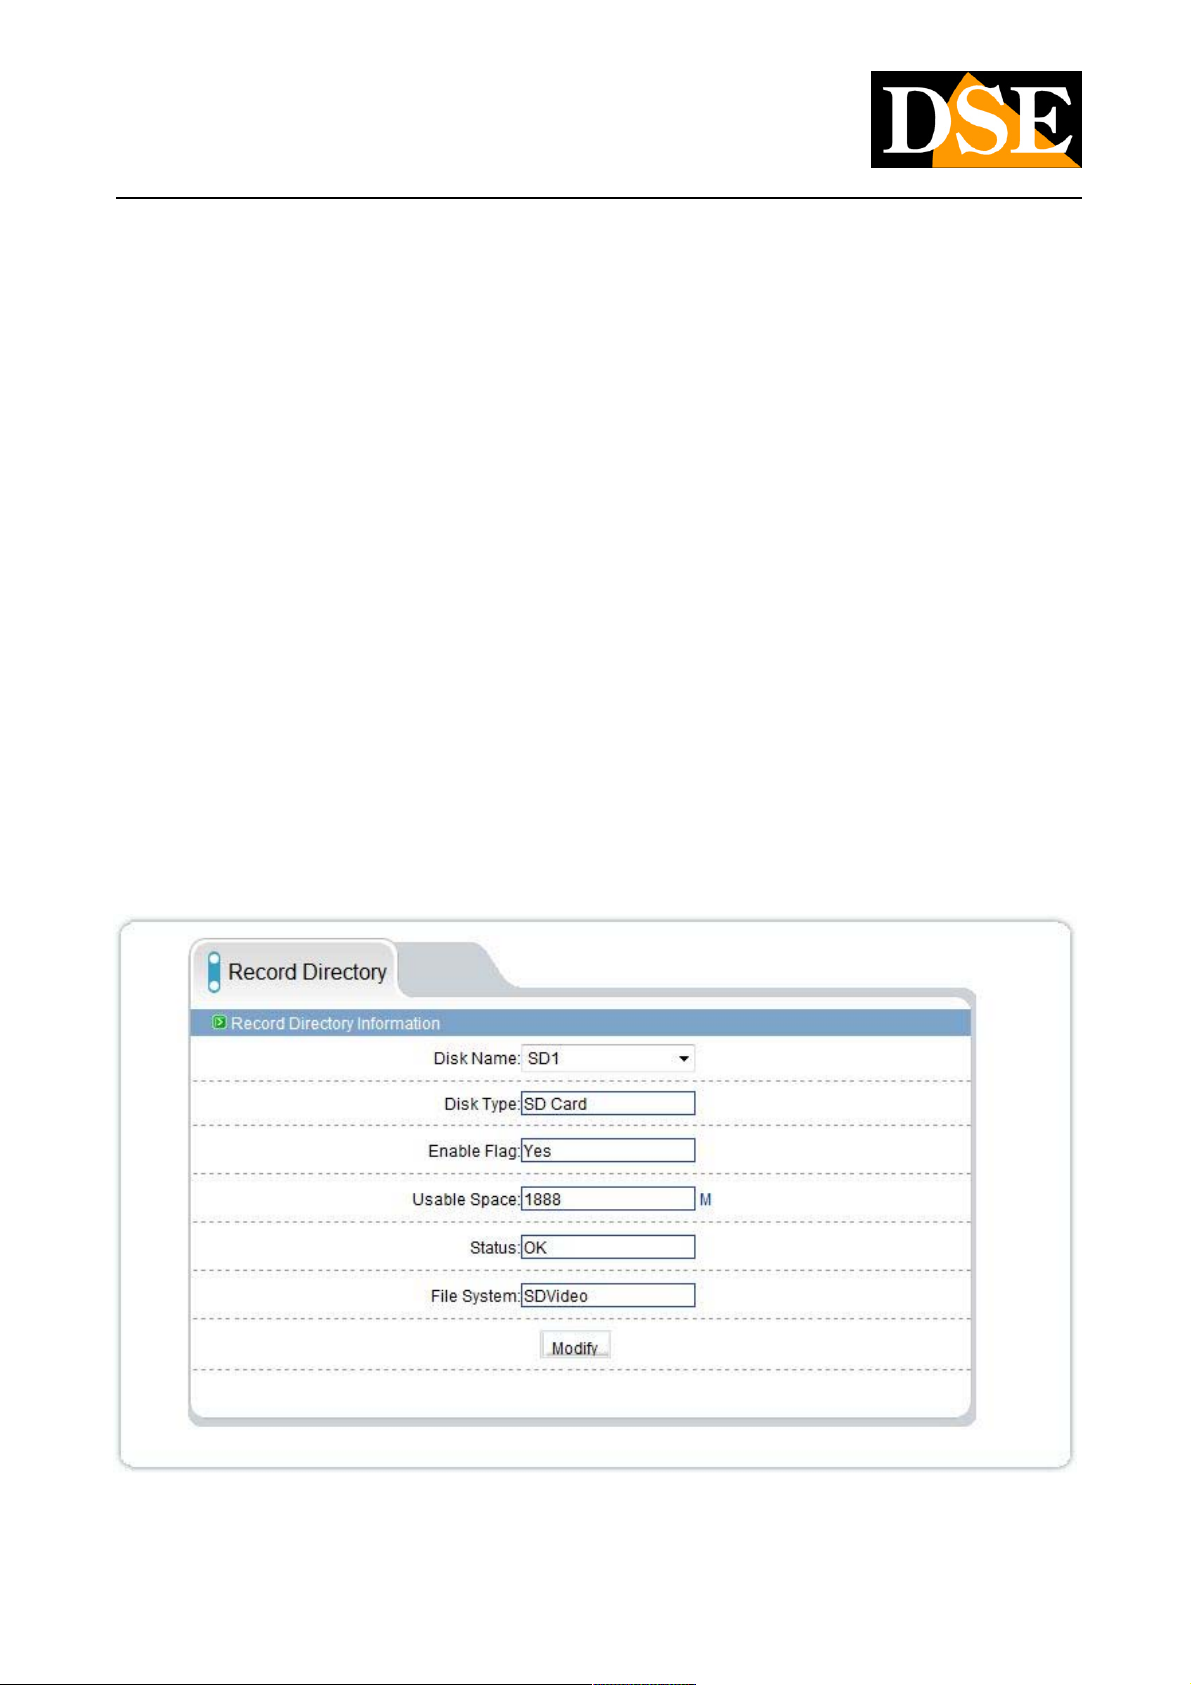
FILING ON SD CARD
In the first DISK NAME box to choose SD card
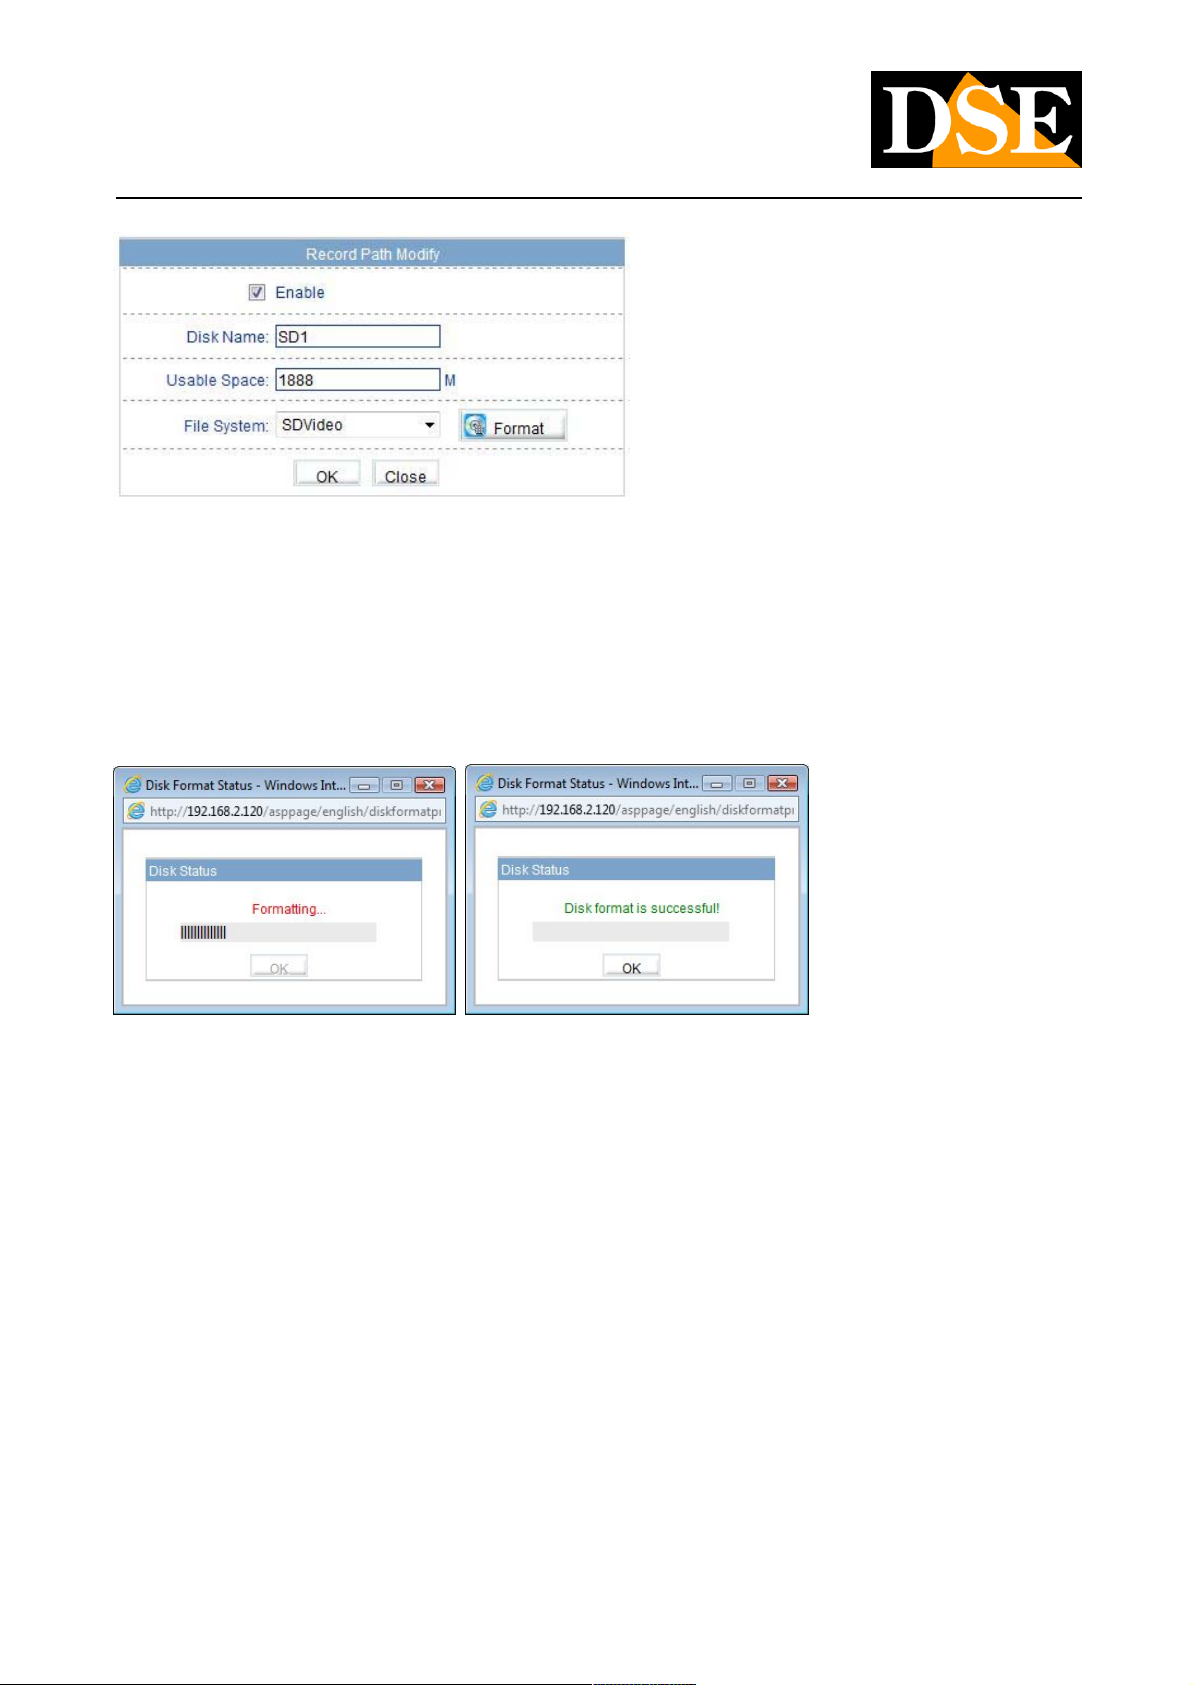
This section displays the status of SD internal memory state. If it is the first time you insert the SD card must format by pressing MODIFY
DSE SRL - ITALY - WWW.DSE.EU
Page 52
USER MANUAL
CAMERAS IP H.264 1080P FULLHD
Page: 52 Page: 52
Click FORMAT and wait for the formatting is complete. There are 2 modes of file system for formatting: SD Video and EXT3. For practical
purposes the two file systems are equivalent: SD Video is a proprietary file system and EXT3 file system is used by GNU / Linux
systems.
CAUTION - To be able to proceed with formatting is necessary that the scheduled recordings and / or are suspended alarm, by acting on CAUTION - To be able to proceed with formatting is necessary that the scheduled recordings and / or are suspended alarm, by acting on
the buttons enables / disables the corresponding sections of the RECORD POLICY table already illustrated above.
The camera records on SD card based on the previously already seen settings. Note that you can not remove the SD card and read it with
a PC because of the different file system. For viewing of the recordings on the SD card to make the remote search using the NetVMS
program that allows both to see the recorded files is to export and save them to your PC in .TS format playable with Free VLC player or program that allows both to see the recorded files is to export and save them to your PC in .TS format playable with Free VLC player or
with SNPlayer player included in the camera CD.
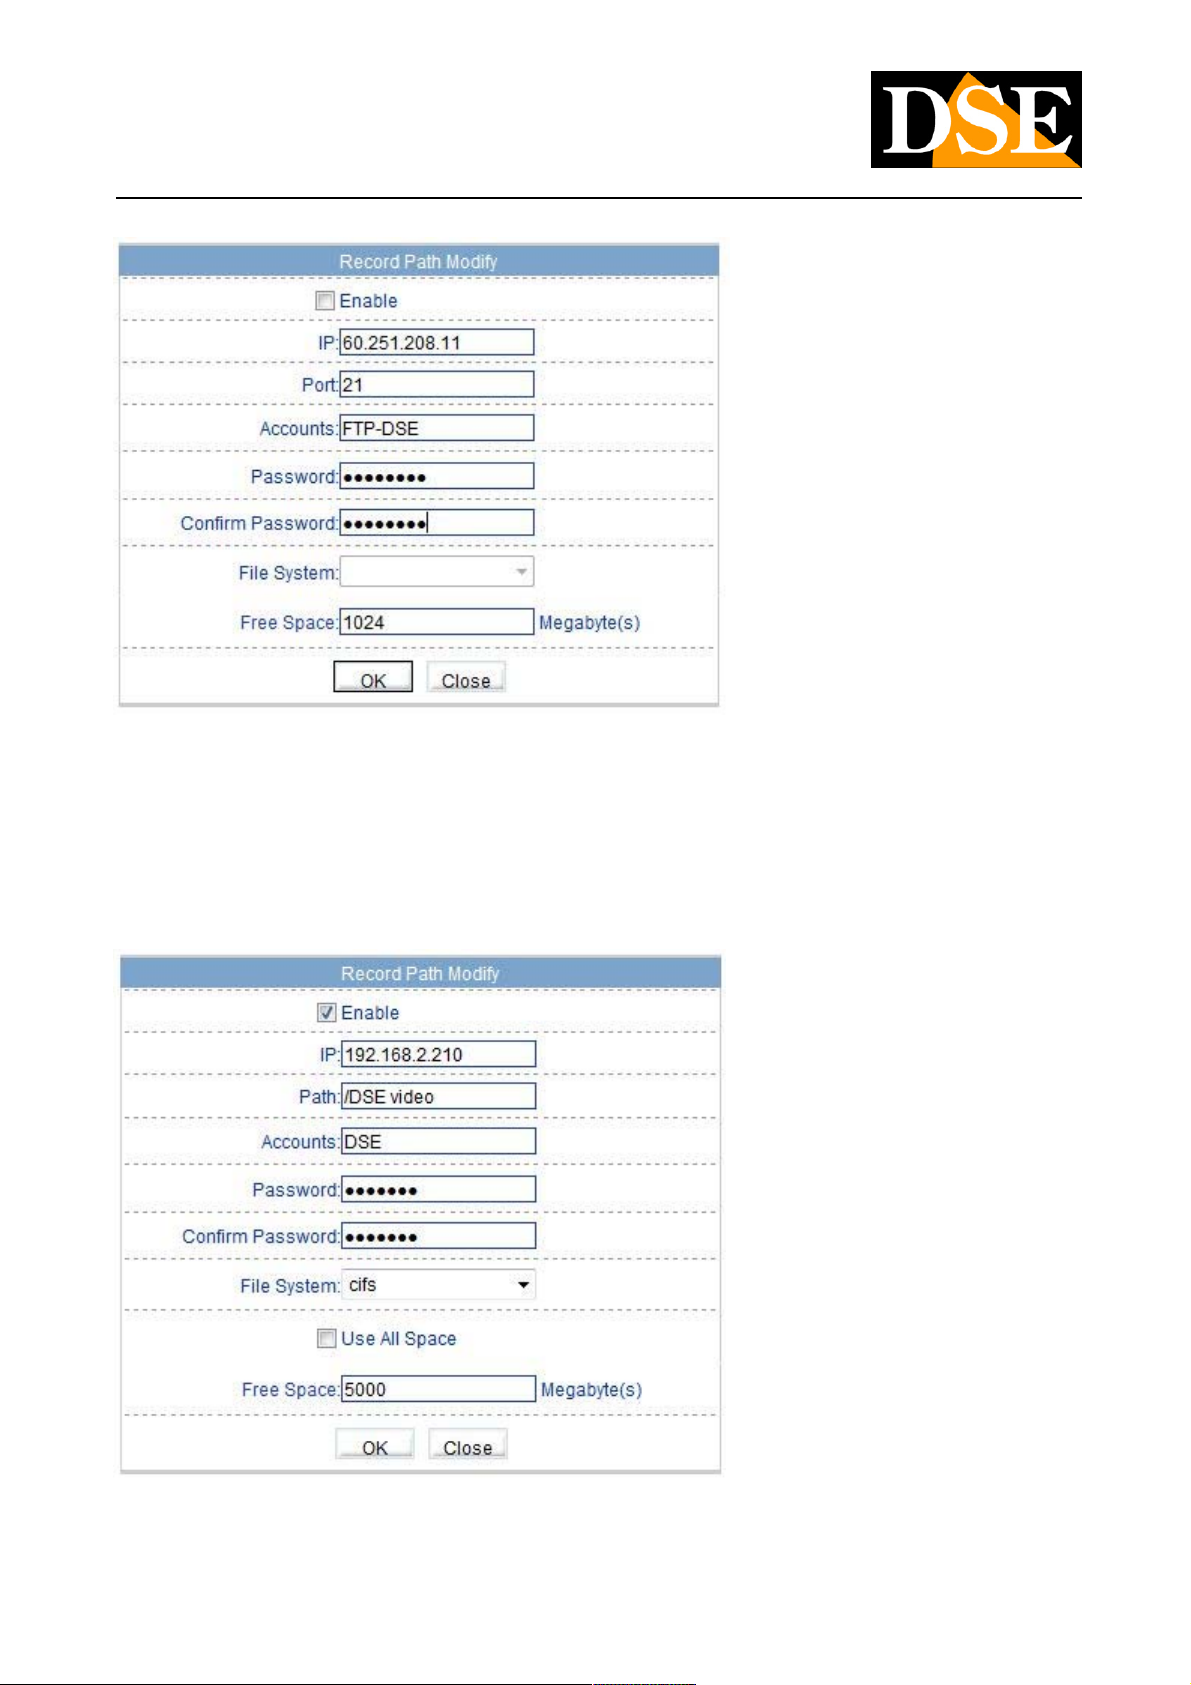
ARCHIVE VIA FTP
In the first DISK NAME box, select FTP and click MODIFY
DSE SRL - ITALY - WWW.DSE.EU
Page 53
USER MANUAL
CAMERAS IP H.264 1080P FULLHD
Page: 53 Page: 53
In the window you can enter all the access parameters of the FTP server: address, port, and login information. FREE SPACE In the box
you can insert a memory space to be left free to avoid taking up the entire hard drive of the server and put in difficulty the operating
system.
FILING ON NAS
In the first DISK NAME box, click NAS and click MODIFY
In the window you can enter all the relevant parameters of the drive network storage: address, location, and access data. And 'possible to
manage CIFS and NFS file systems. In
DSE SRL - ITALY - WWW.DSE.EU
Page 54
USER MANUAL
CAMERAS IP H.264 1080P FULLHD
Page: 54 Page: 54
FREE SPACE box you can insert a memory space to be left free to avoid taking up all the space available in the NAS. Alternatively it is
possible to choose USE ALL SPACE to allow the use of the whole memory capacity.
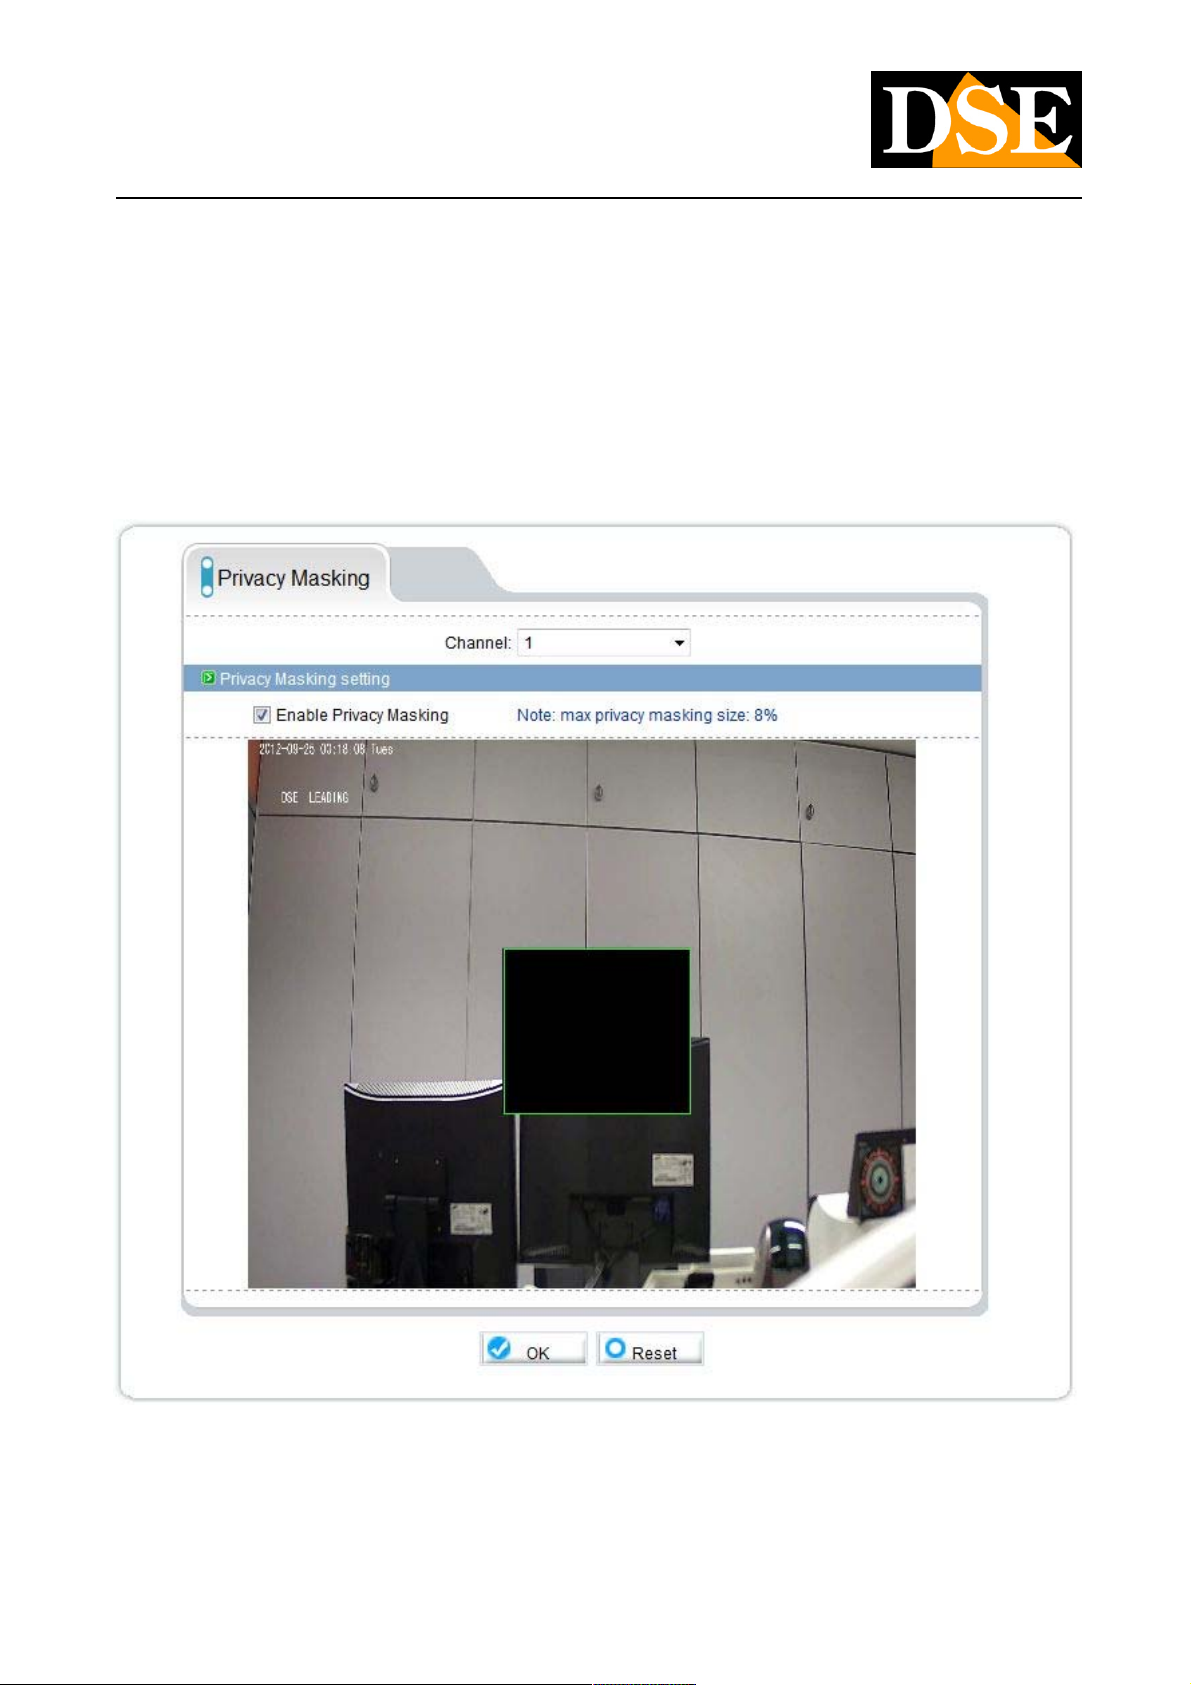
PRIVACY MASKING
The RH cameras allow you to set privacy zones to mask images to view that jeopardize the privacy, such as a worker to work in a
company
Click ENABLE PRIVACY MASKING to enable the feature, then dragging the mouse to draw the perimeter of the area you want to mask.
E 'can set multiple masks, but their total area can not exceed 8% of the total image. To eliminate the masks to use the RESET button.
Any change requires you to press the OK button to be
DSE SRL - ITALY - WWW.DSE.EU
Page 55
USER MANUAL
CAMERAS IP H.264 1080P FULLHD
Page: 55 Page: 55
applied.
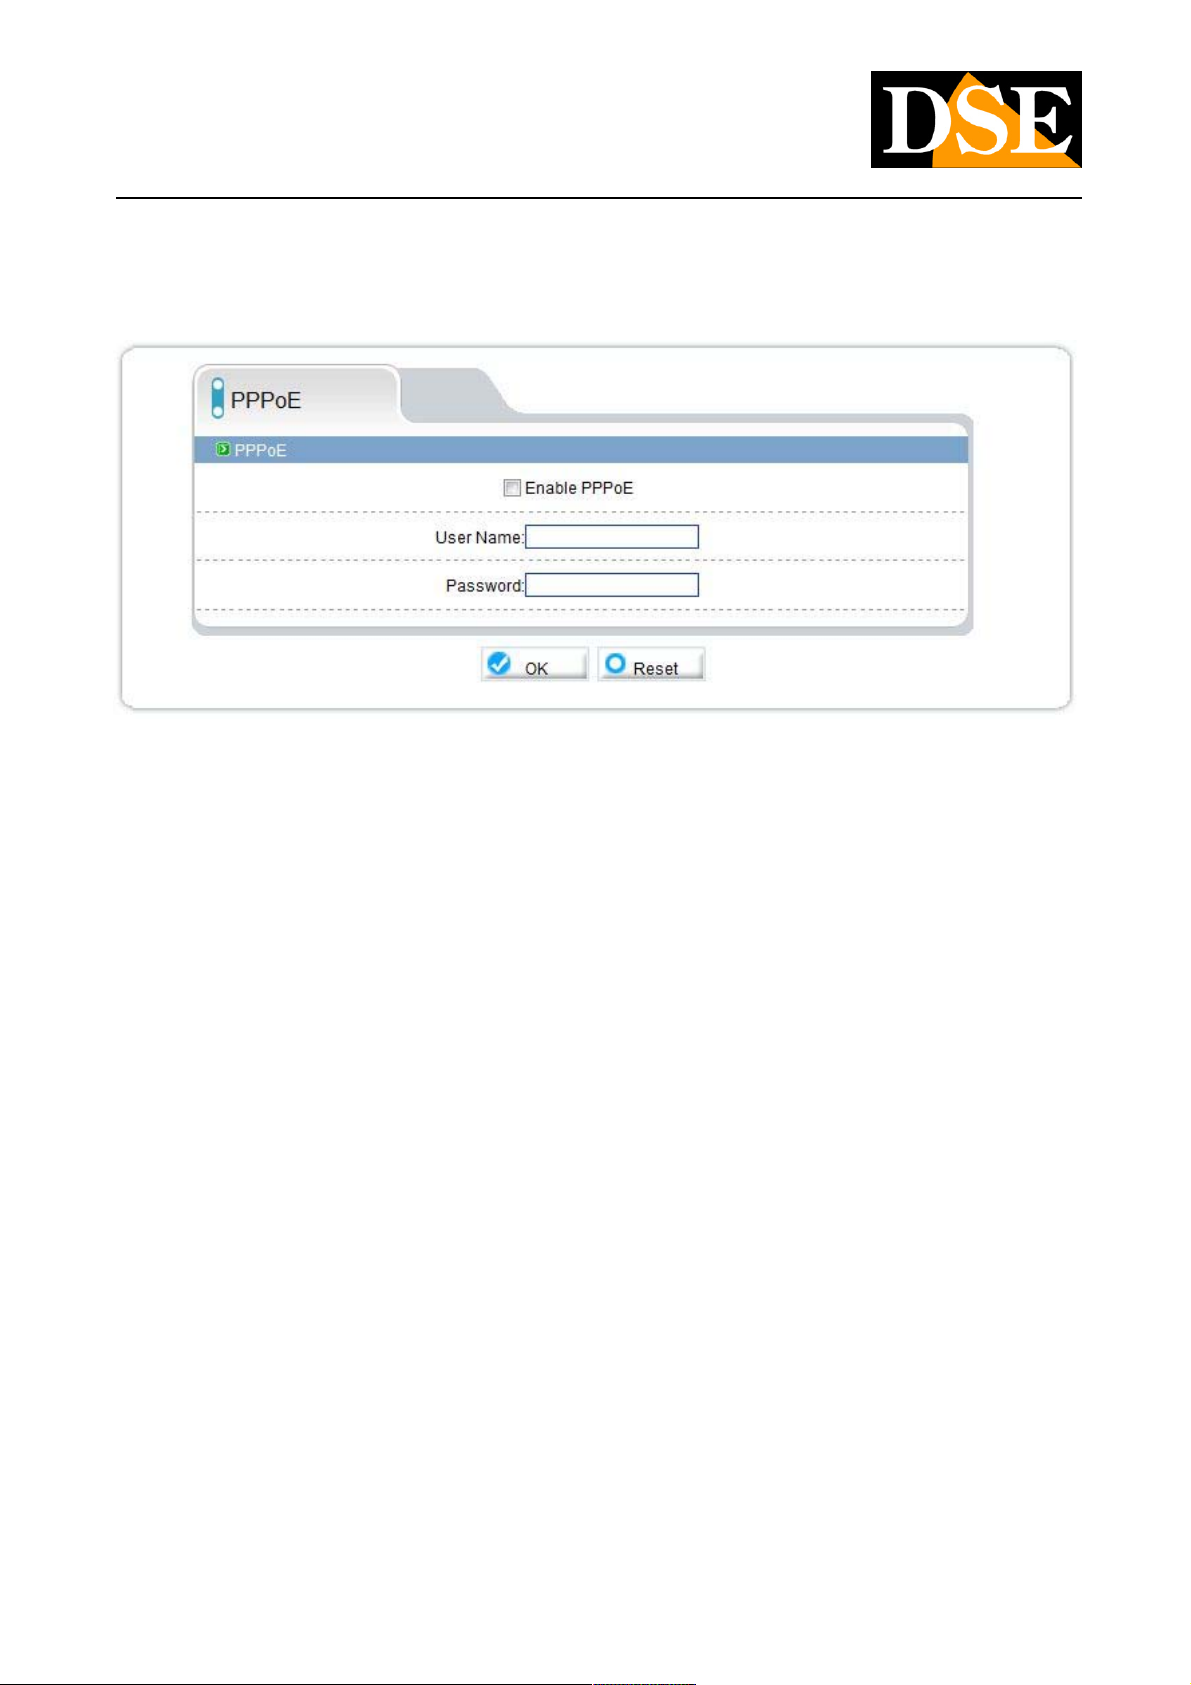
NETWORK SERVICE / PPPoE
The RH cameras are usually connected to a network that has access to the Internet run by other equipment. However, you can imagine
to install an even alone camera, directly connected to an ADSL modem for Internet access. And 'the case of remote cameras, for
example, used for traffic control.
In this case, the camera is able to make the LOG IN to gain access to the Internet using PPPoE. Click ENABLE PPPoE to enable this
feature and enter your log in credentials. When you turn the camera will automatically log in to establish the connection to the Internet.
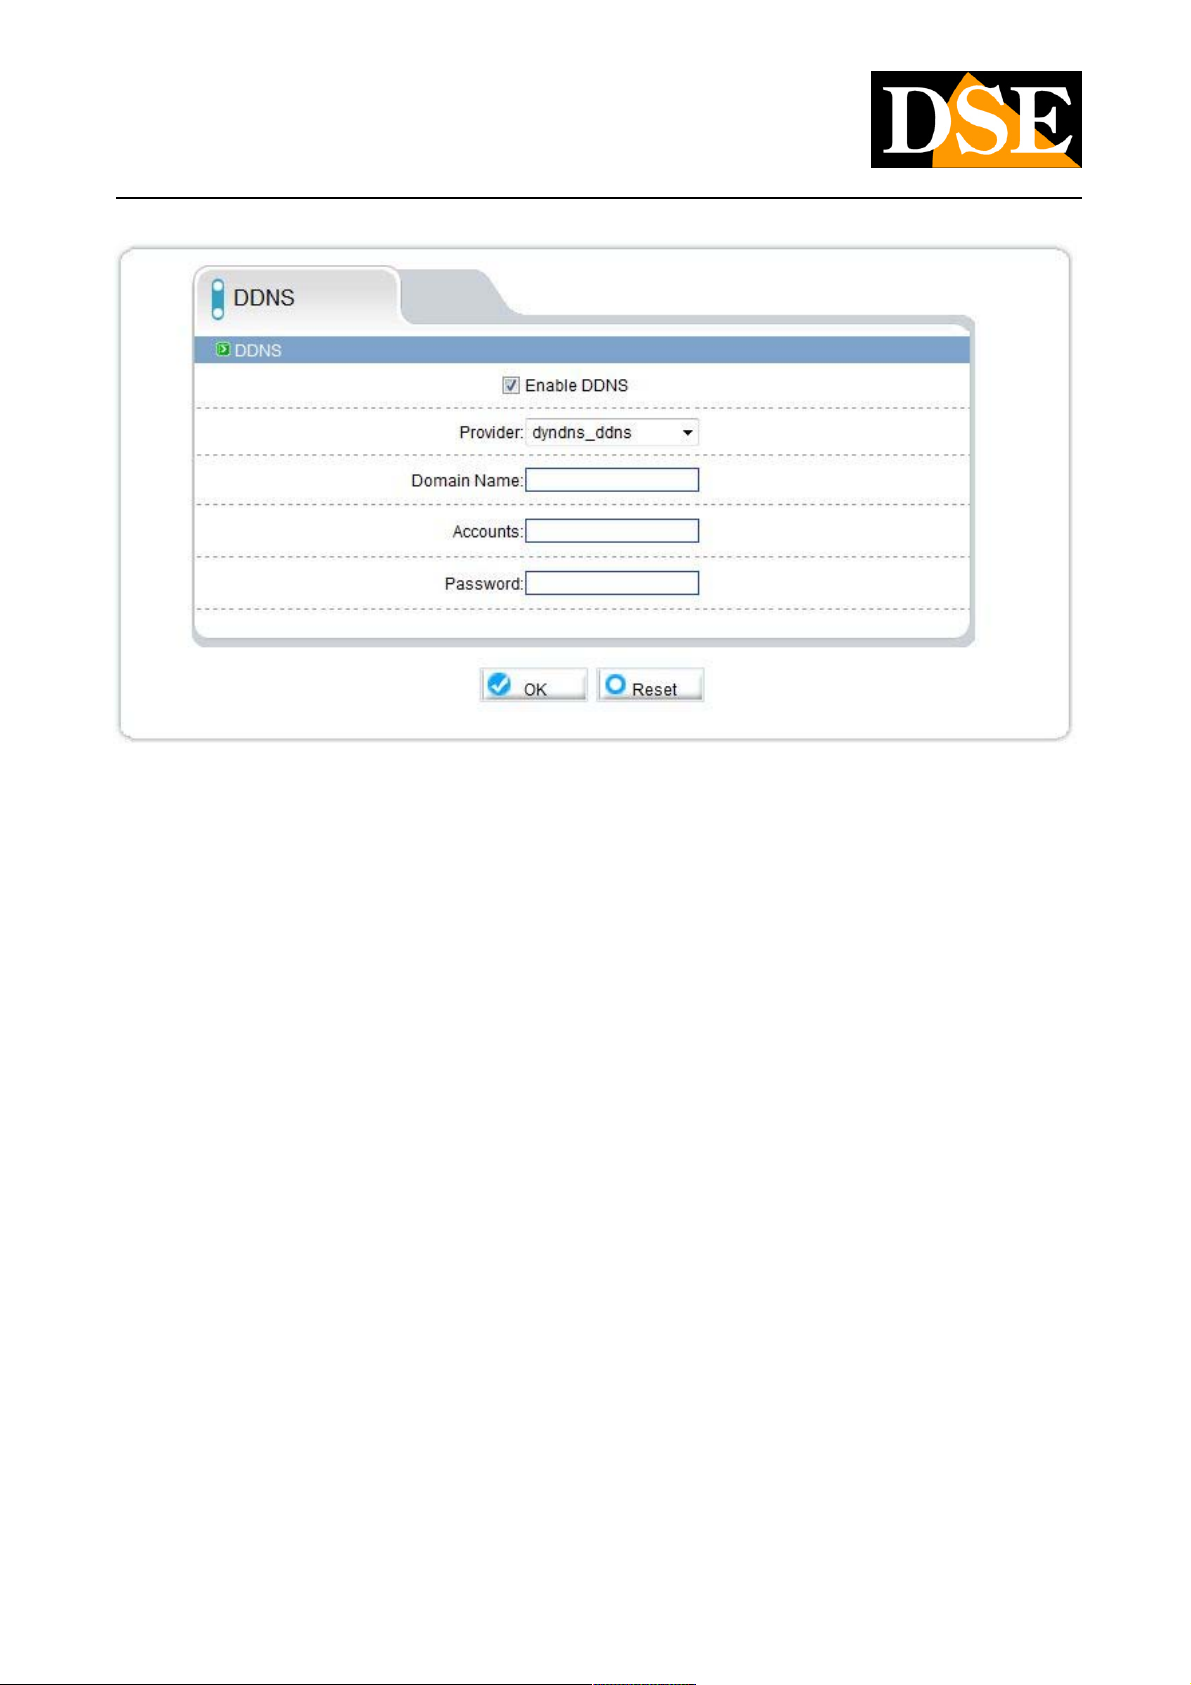
SERVICE NETWORK / DDNS
DSE SRL - ITALY - WWW.DSE.EU
Page 56
USER MANUAL
CAMERAS IP H.264 1080P FULLHD
Page: 56 Page: 56
DSE SRL - ITALY - WWW.DSE.EU
Page 57
USER MANUAL
CAMERAS IP H.264 1080P FULLHD
Page: 57 Page: 57
To connect to an IP camera through the Internet is highly advisable to have a fixed IP address so that you always know the exact
address to connect. If it can not get from your provider, all cameras in the range support services DDNS (Dynamic DNS) that allow you to
constantly monitor the machine's IP address. These services, also available for free, provide the user with a domain name that you type
into your browser. The DDNS provider redirects communication to the IP address that the camera has at that moment.
The RH Series cameras support the most common DDNS services and are able to send to the DDNS provider periodically Internet IP
address assigned to them. You can set the following parameters:
PROVIDER: Supplier of DDNS service. At the time of publication of this manual, the www.dyndns.com services are available and PROVIDER: Supplier of DDNS service. At the time of publication of this manual, the www.dyndns.com services are available and
www.3322.org
DOMAIN NAME: personal domain name that is assigned by the DDNS provider to the device DOMAIN NAME: personal domain name that is assigned by the DDNS provider to the device
ACCOUNTS / PASSWORD: account authentication for access to the service. ACCOUNTS / PASSWORD: account authentication for access to the service.
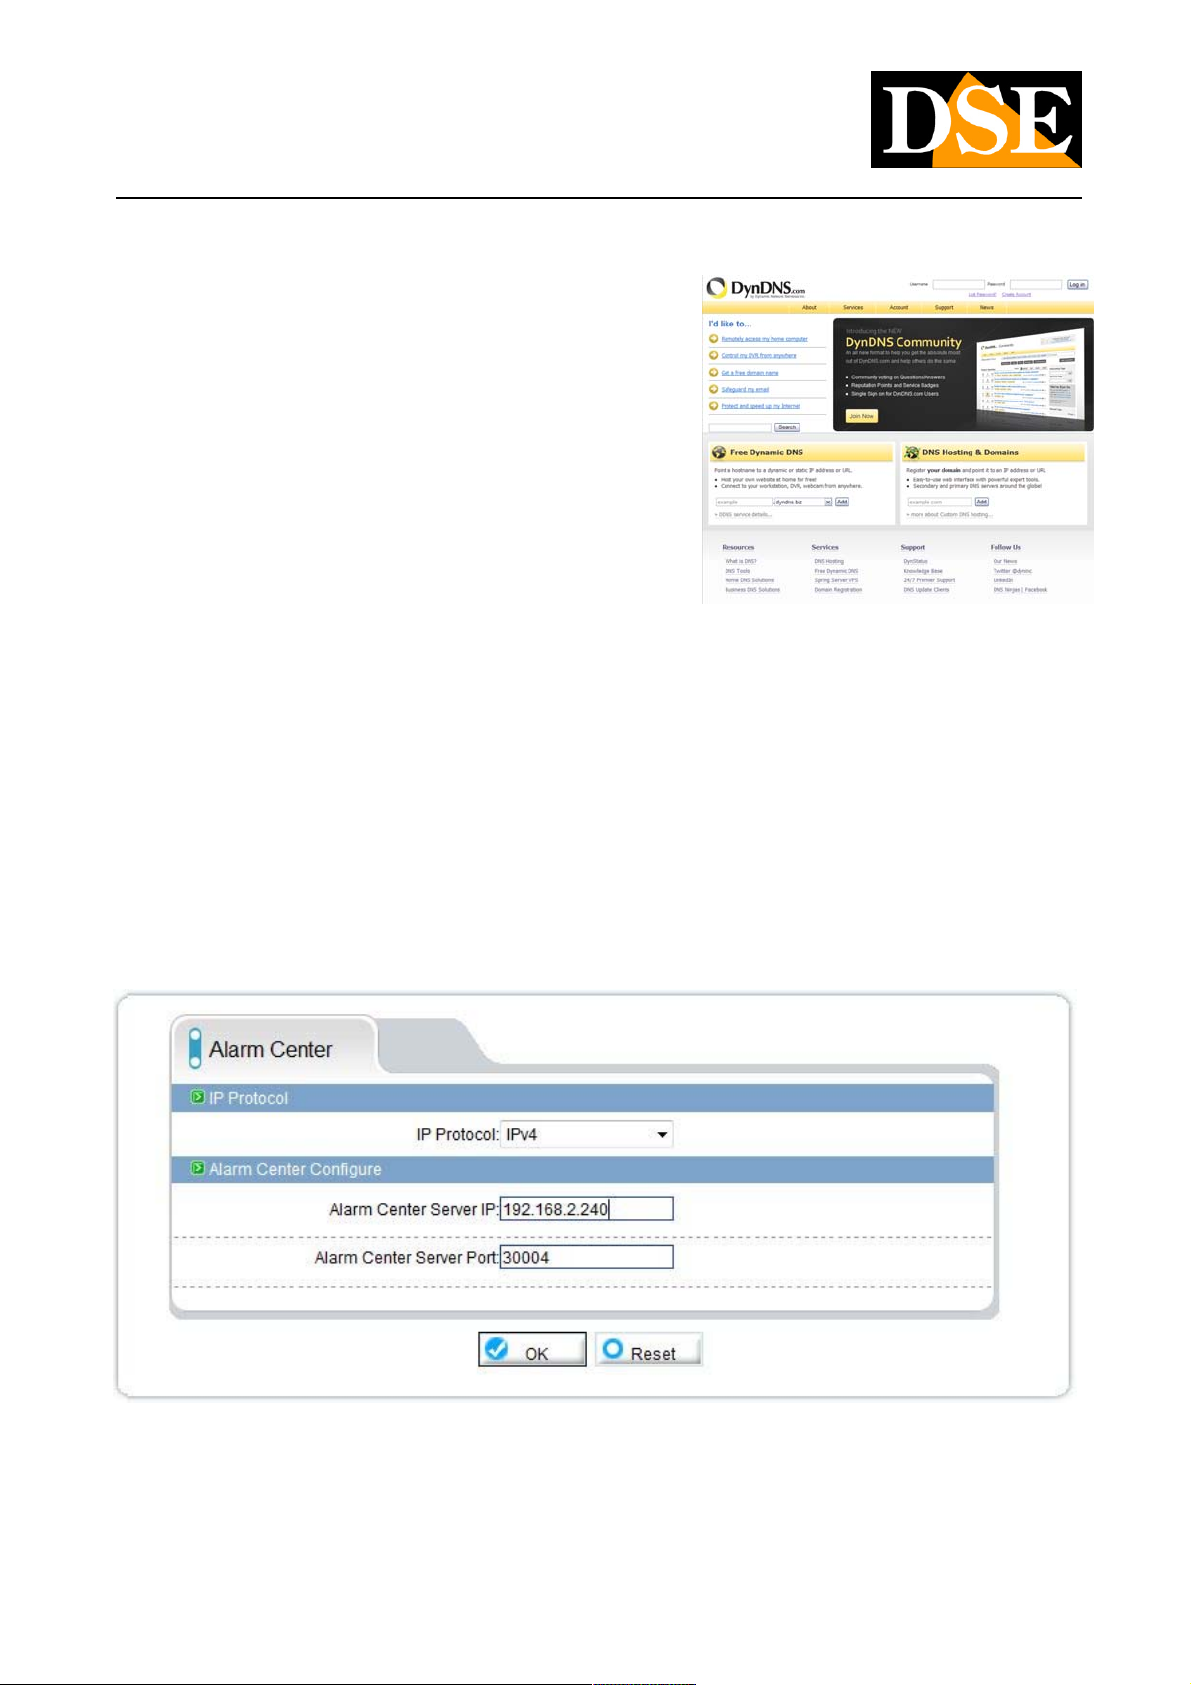
SERVICE CENTER / ALARM CENTER
The camera can send alarm messages to the NetVMS control software. In this section you set the IP address of the PC where you install
the software and NetVMS the communication port that by default in the software is the 30004.
DSE SRL - ITALY - WWW.DSE.EU
Page 58
USER MANUAL
CAMERAS IP H.264 1080P FULLHD
Page: 58 Page: 58
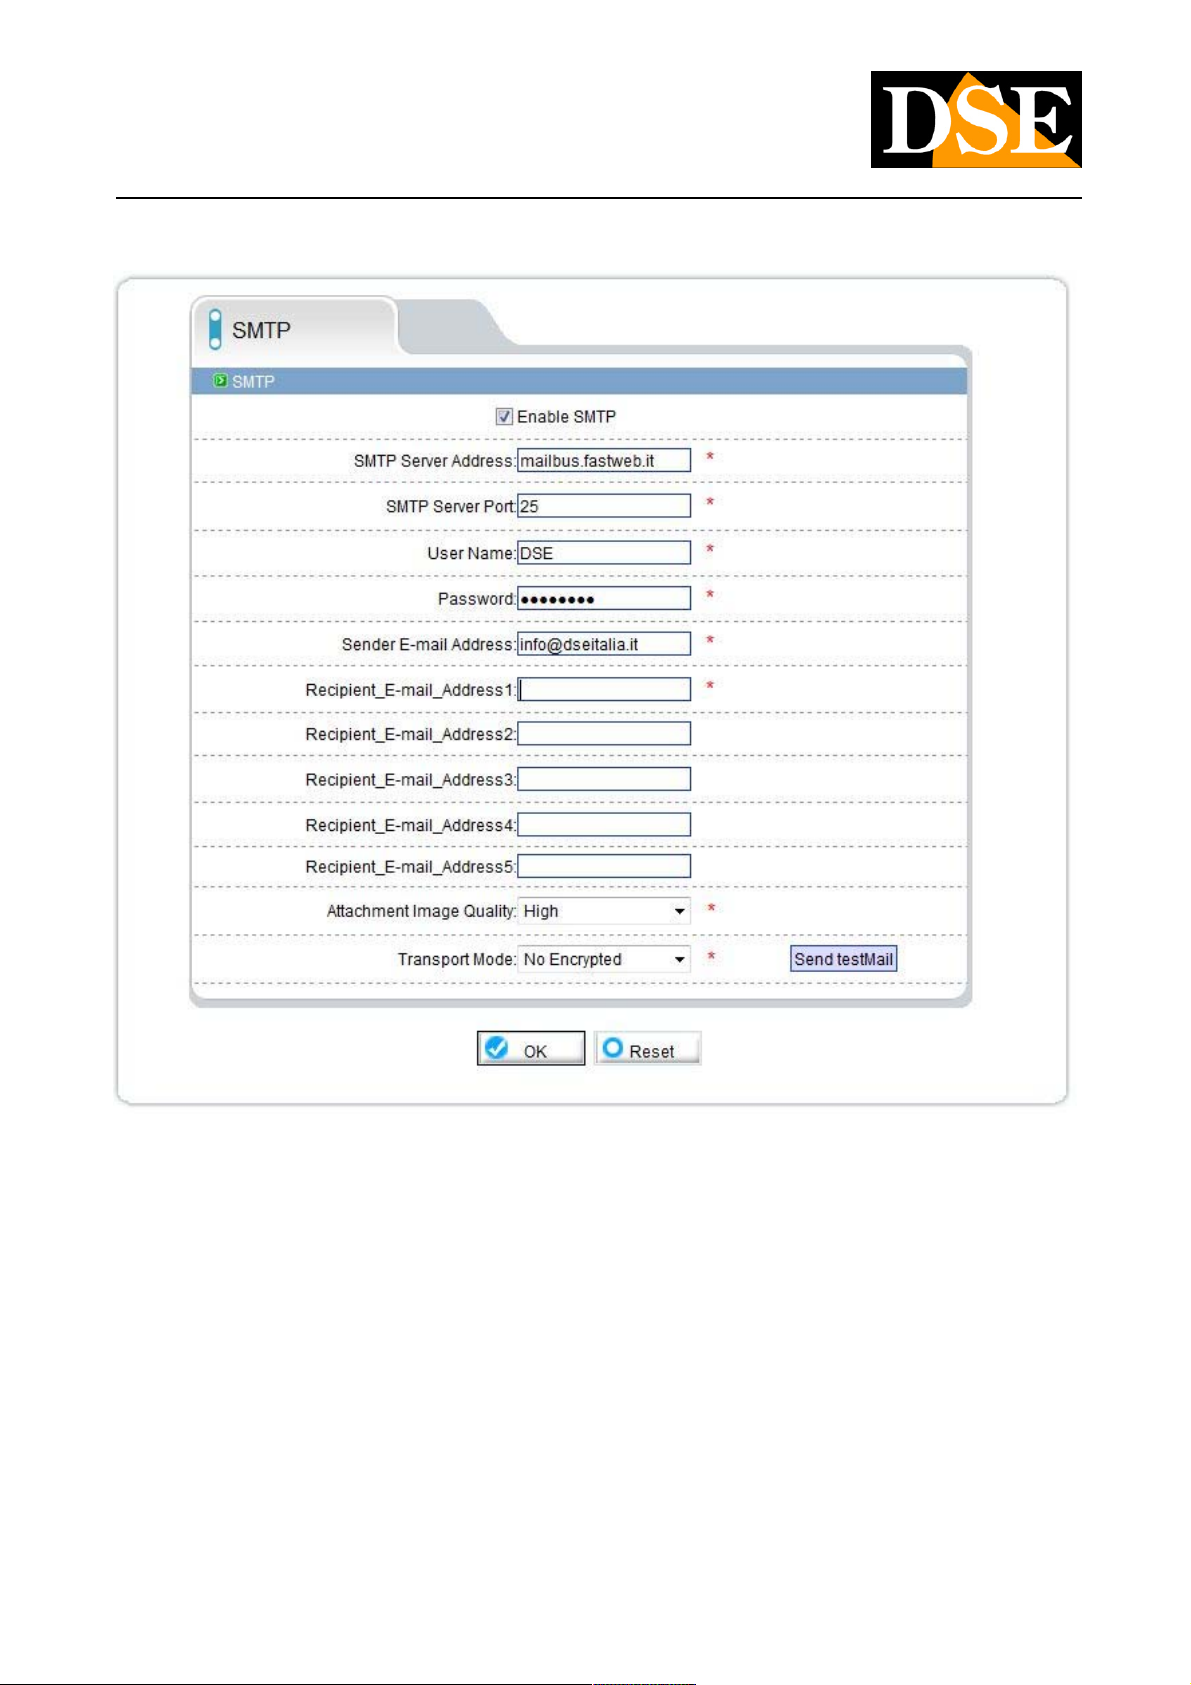
SERVICE CENTER / SMTP
The RH cameras can send alarm emails following an event generated by the entry of alarm or motion detection. The e-mail is attached a
JPEG photos taken instant the event began. In this tab you set the SMTP server and the recipients to send the message (max. 5). To set
the parameters to check with your Internet provider. Also ensure that the provider does not prevent sending email from any device other
than the mail client with spam purposes.
SMTP ENABLE - Enables sending email SMTP ENABLE - Enables sending email SMTP ENABLE - Enables sending email
SMTP SERVER - Name of the SMTP server that is used for sending email SMTP SERVER - Name of the SMTP server that is used for sending email SMTP SERVER - Name of the SMTP server that is used for sending email
SMTP SERVER PORT - Port used for sending emails (usually 25) SMTP SERVER PORT - Port used for sending emails (usually 25)
USER NAME / PASSWORD - If the SMTP server requires a user name and password to send email, you can enter them. Typically Italian USER NAME / PASSWORD - If the SMTP server requires a user name and password to send email, you can enter them. Typically Italian
provider does not require this authentication.
SENDER EMAIL ADDRESS - the return address that will appear in the email SENDER EMAIL ADDRESS - the return address that will appear in the email posted by
DSE SRL - ITALY - WWW.DSE.EU
Page 59
USER MANUAL
CAMERAS IP H.264 1080P FULLHD
Page: 59 Page: 59
camera.
RECIPIENT E-MAIL ADDRESS - Max. 5 recipient addresses RECIPIENT E-MAIL ADDRESS - Max. 5 recipient addresses
ATTACHMENT IMAGE QUALITY - attached image quality. A higher quality corresponds most file size and therefore more time was ATTACHMENT IMAGE QUALITY - attached image quality. A higher quality corresponds most file size and therefore more time was
needed for sending.
TRANSPORT MODE - The cameras support sending emails encrypted with SSL encryption and STARTTLSTRANSPORT MODE - The cameras support sending emails encrypted with SSL encryption and STARTTLS
SEND TEST MAIL - And 'you can send an email test to check the proper functioning SEND TEST MAIL - And 'you can send an email test to check the proper functioning
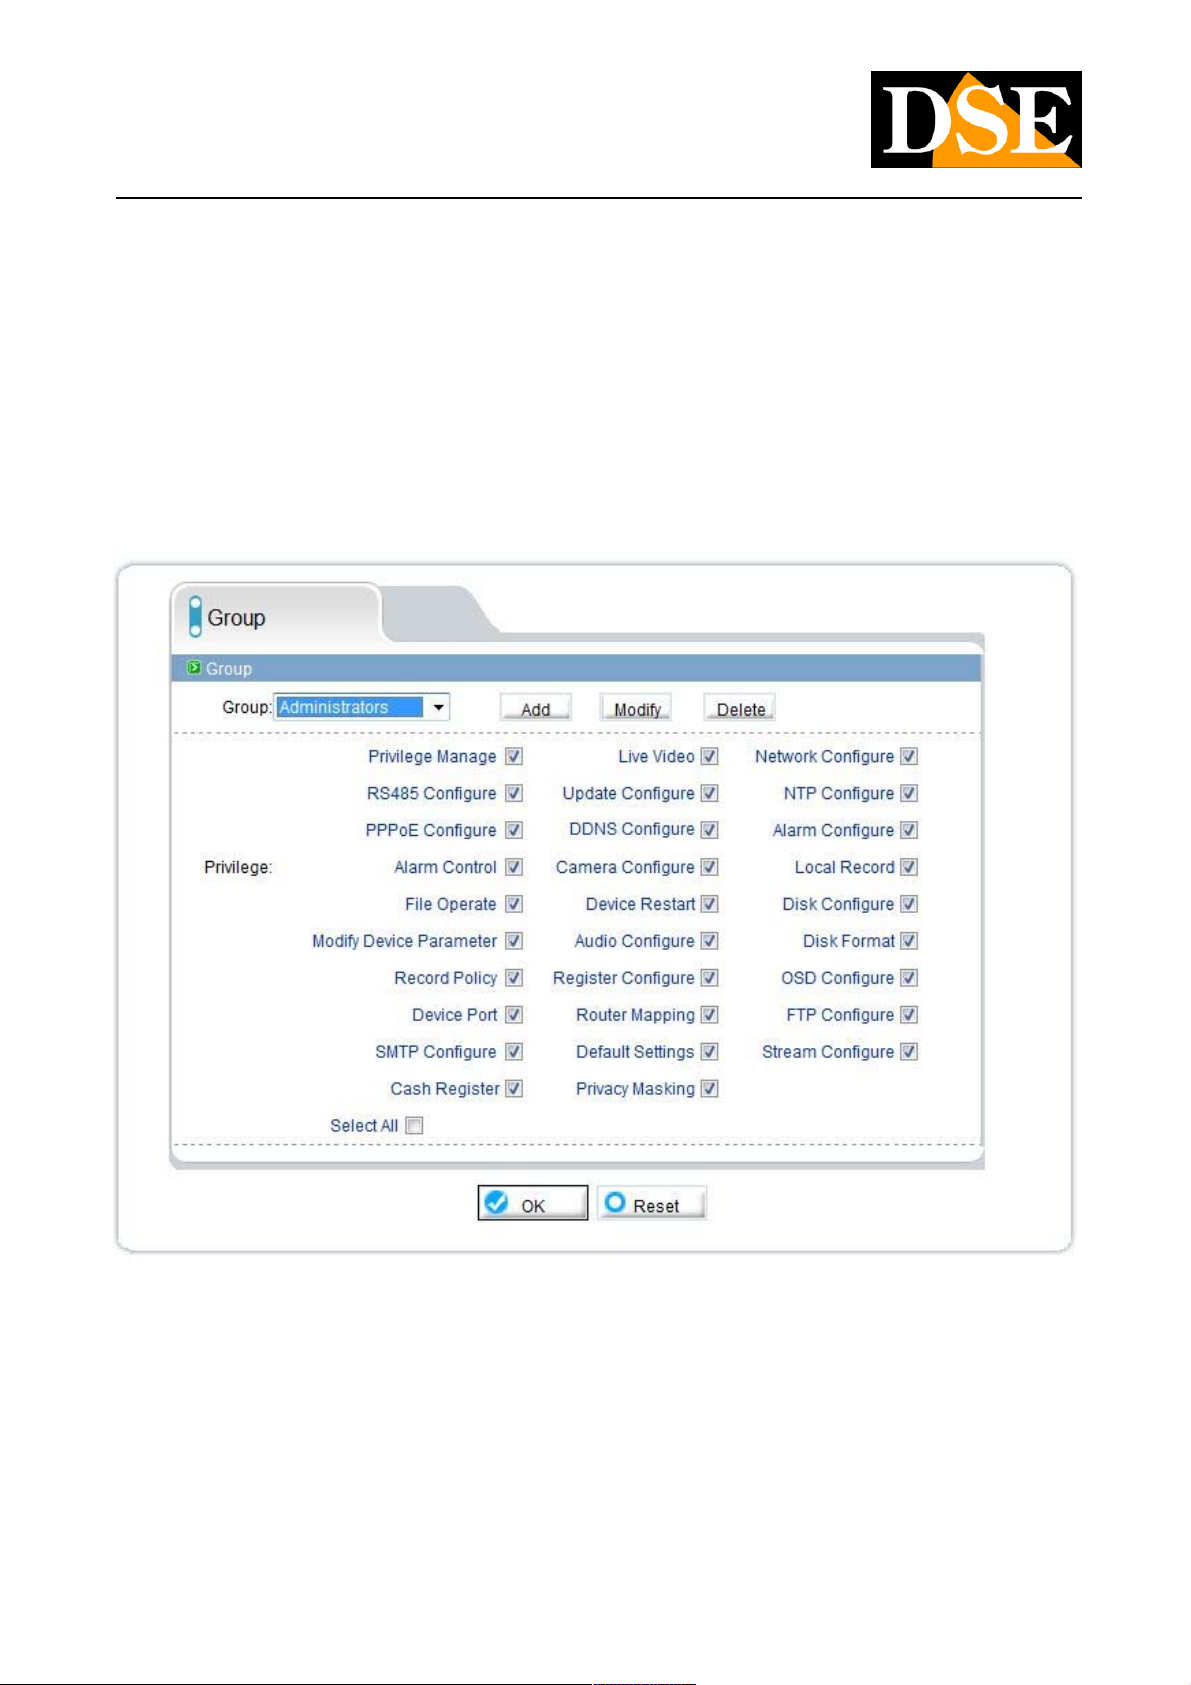
PRIVILEGE MANAGER / GROUP
Access to the camera is protected by a log-in procedure. In this section you set of user groups to each of which corresponds to a level of
personalized access. There are already three groups of factory users.
ADMINISTRATOR - Full access to all functions. You can not eliminateADMINISTRATOR - Full access to all functions. You can not eliminate
OPERATOR - Access to all functions except those of the administrative level (changing codes etc.) OPERATOR - Access to all functions except those of the administrative level (changing codes etc.)
AVERAGE USER - Access to display only AVERAGE USER - Access to display only
You can change the qualification of the individual groups and also create new custom.
DSE SRL - ITALY - WWW.DSE.EU
Page 60
USER MANUAL
CAMERAS IP H.264 1080P FULLHD
Page: 60 Page: 60
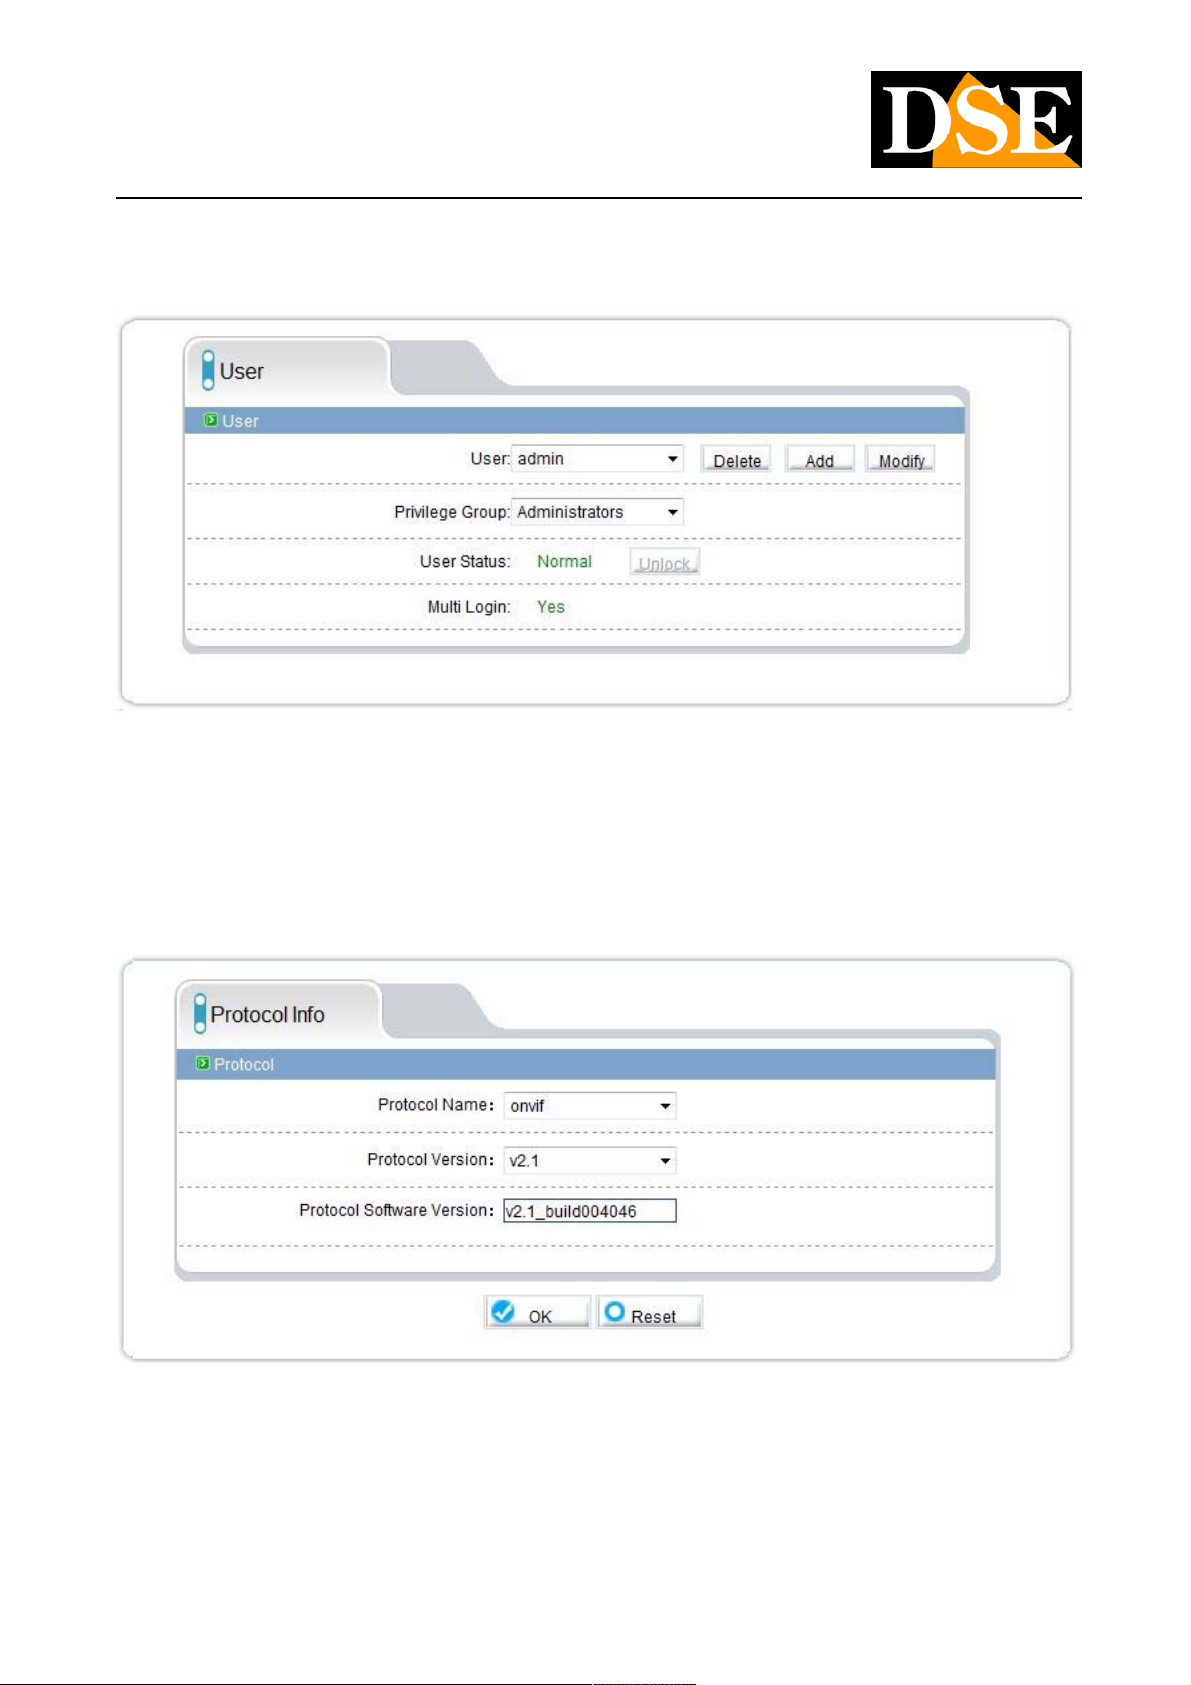
PRIVILEGE MANAGER / USER
On this page you create users who can access the camera using the buttons ADD, MODIFY, DELETE. Each user can be combined to a
group that determines its access to the camera level. The LOG-IN MULTI option allows the user to
log in
simultaneously from multiple locations (client) simultaneously.
PROTOCOL
This window defines the protocol used by the camera in the conversation with the client. The RH cameras use the ONVIF protocol that
has established itself as a universal standard in the world of IP cameras. The full ONVIF integration allows you to use the RH cameras
with the majority of software platforms for recording and NVR on the market. The ONVIF latest version at the time of publication of this
manual is 2.1.
DSE SRL - ITALY - WWW.DSE.EU
Page 61
USER MANUAL
CAMERAS IP H.264 1080P FULLHD
Page: 61 Page: 61
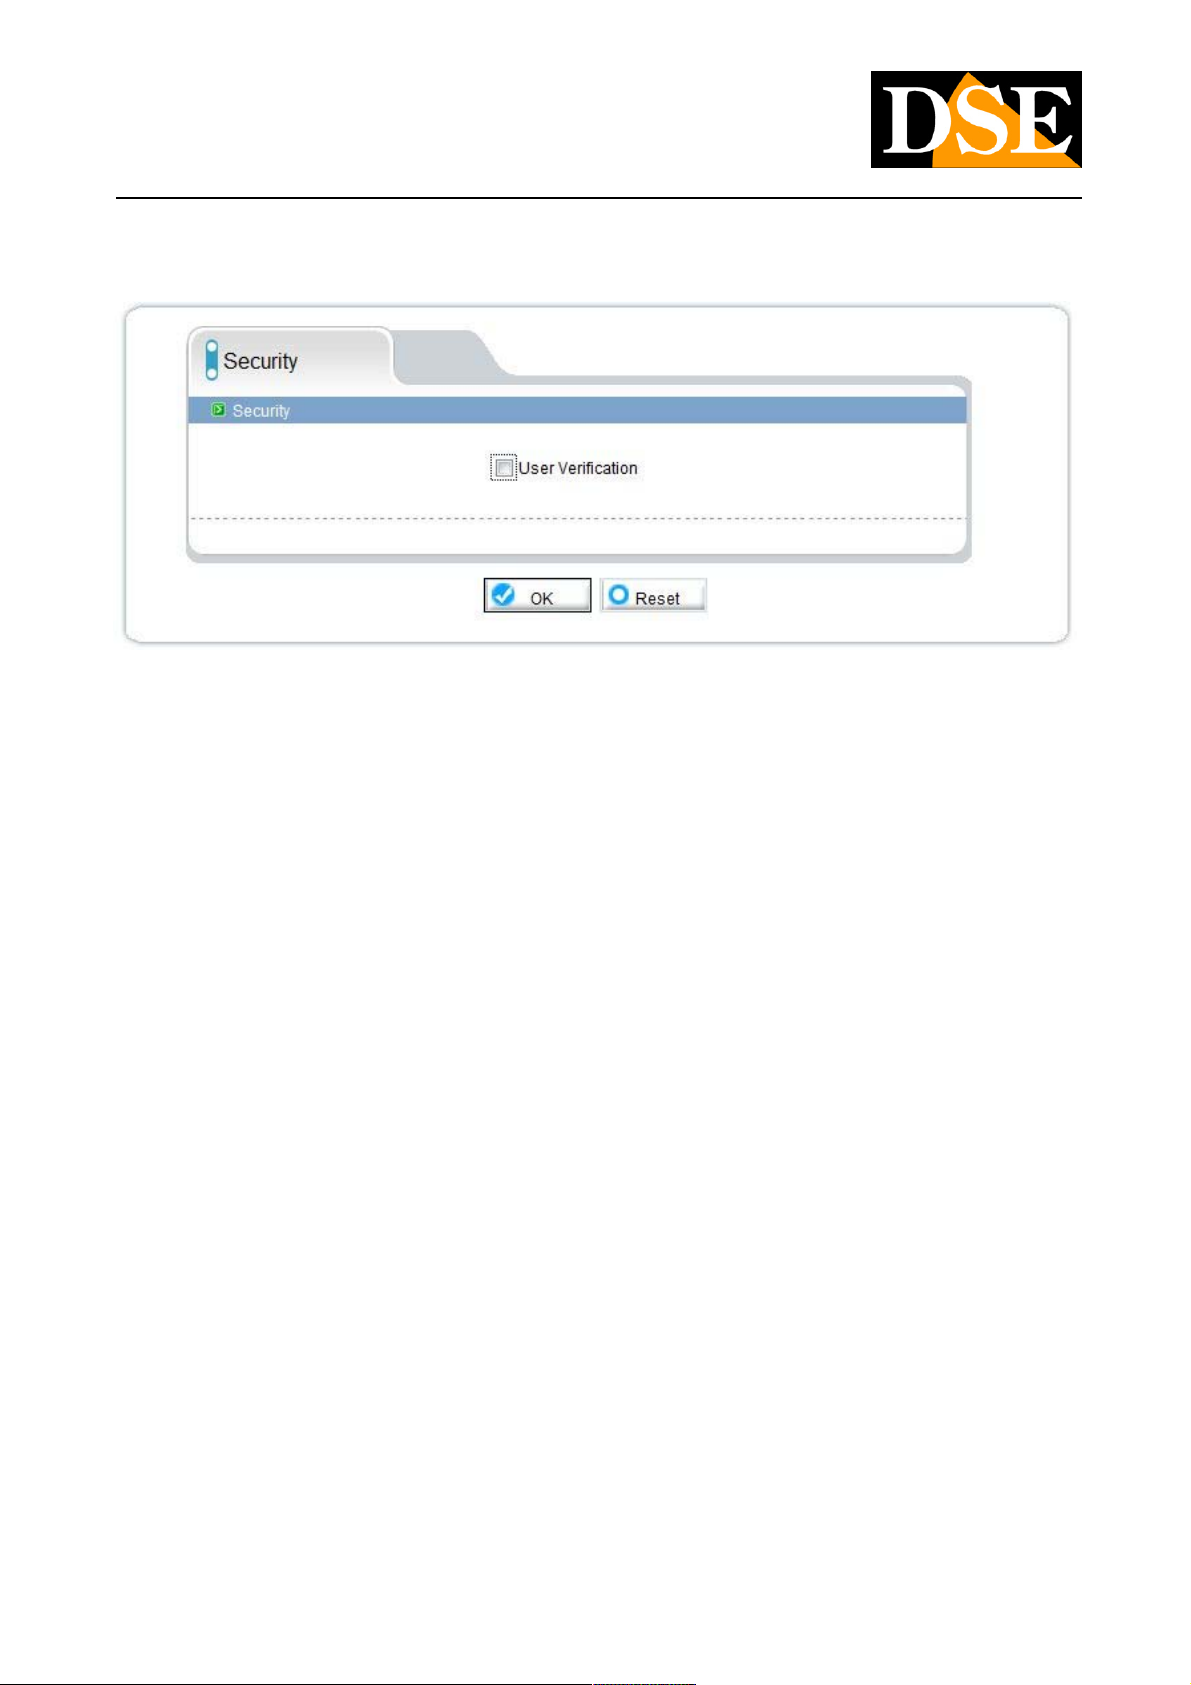
PROTOCOL / SECURITY
The ONVIF protocol provides the ability to use as a security option user verification.
DEVICE RESTART
This window allows you to reboot the camera
DEFAULT SETTING
This window allows you to restore the factory settings.
DSE SRL - ITALY - WWW.DSE.EU
Page 62
USER MANUAL
CAMERAS IP H.264 1080P FULLHD
Page: 62 Page: 62
Login with RTSP client
E 'can receive the video stream RTSP camera without using a browser, but directly with RTSP players like REAL PLAYER, QUICKTIME,
VLC etc. Obviously this type of access only allows live image viewing, without access to any kind of command.
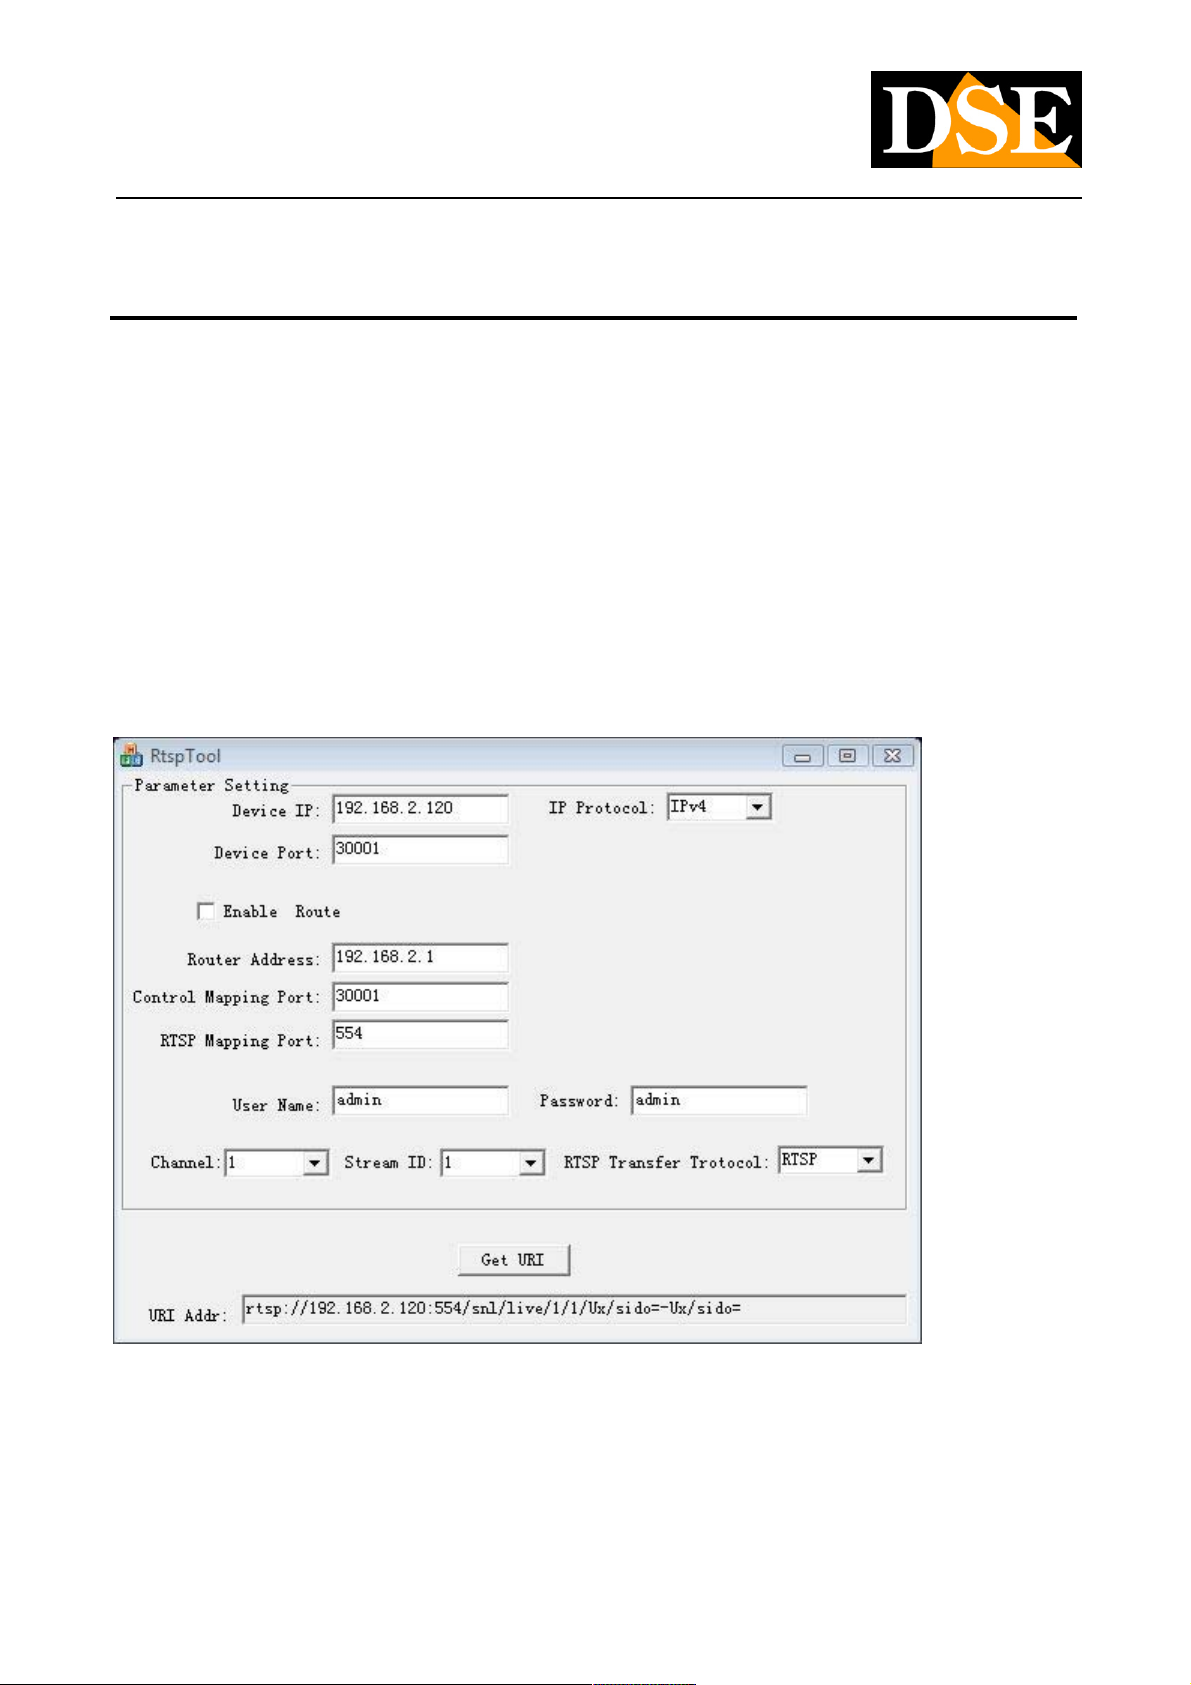
RTSP TOOL
To know the exact address to be inserted in the drive using a utility included on the CD to the camera. RTSP TOOL does not require
installation and the folder that contains it can be easily copied to your desktop or on a memory stick to use the programs easily.
Explore the contents of the CD and launch the program RTSPTOOL
Enter the IP address of the camera in the IP box and press DEVICE GET URL will appear in the box below the full
address RTSP to be inserted into the reader.
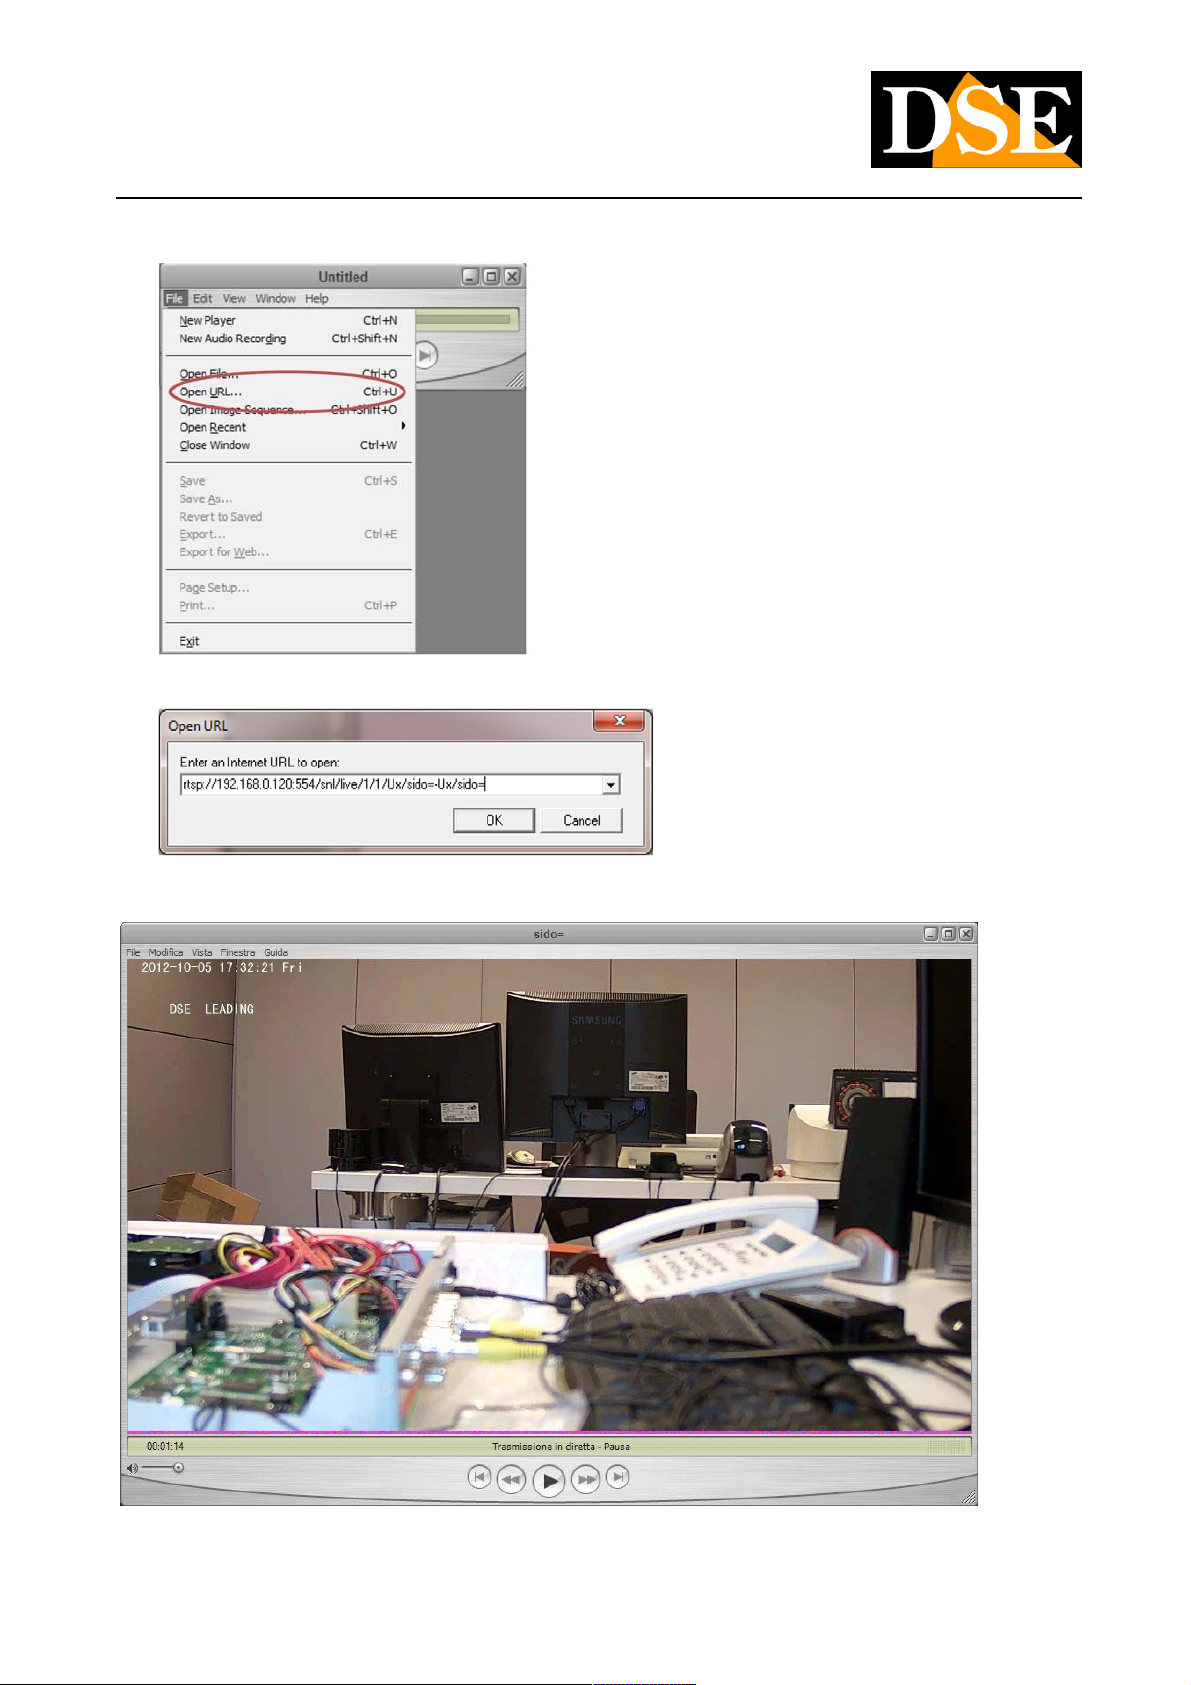
PLAYER RTSP
The diagram how to operate using the QUICKTIME player free download on the net. Similarly it will act with other readers RTSP.
DSE SRL - ITALY - WWW.DSE.EU
Page 63
USER MANUAL
CAMERAS IP H.264 1080P FULLHD
Page: 63 Page: 63
• Select the URL OPEN command
• Type the address obtained through RTSP TOOL
•
• You start RTSP streaming directly from the camera
DSE SRL - ITALY - WWW.DSE.EU
Page 64
USER MANUAL
CAMERAS IP H.264 1080P FULLHD
Page: 64 Page: 64
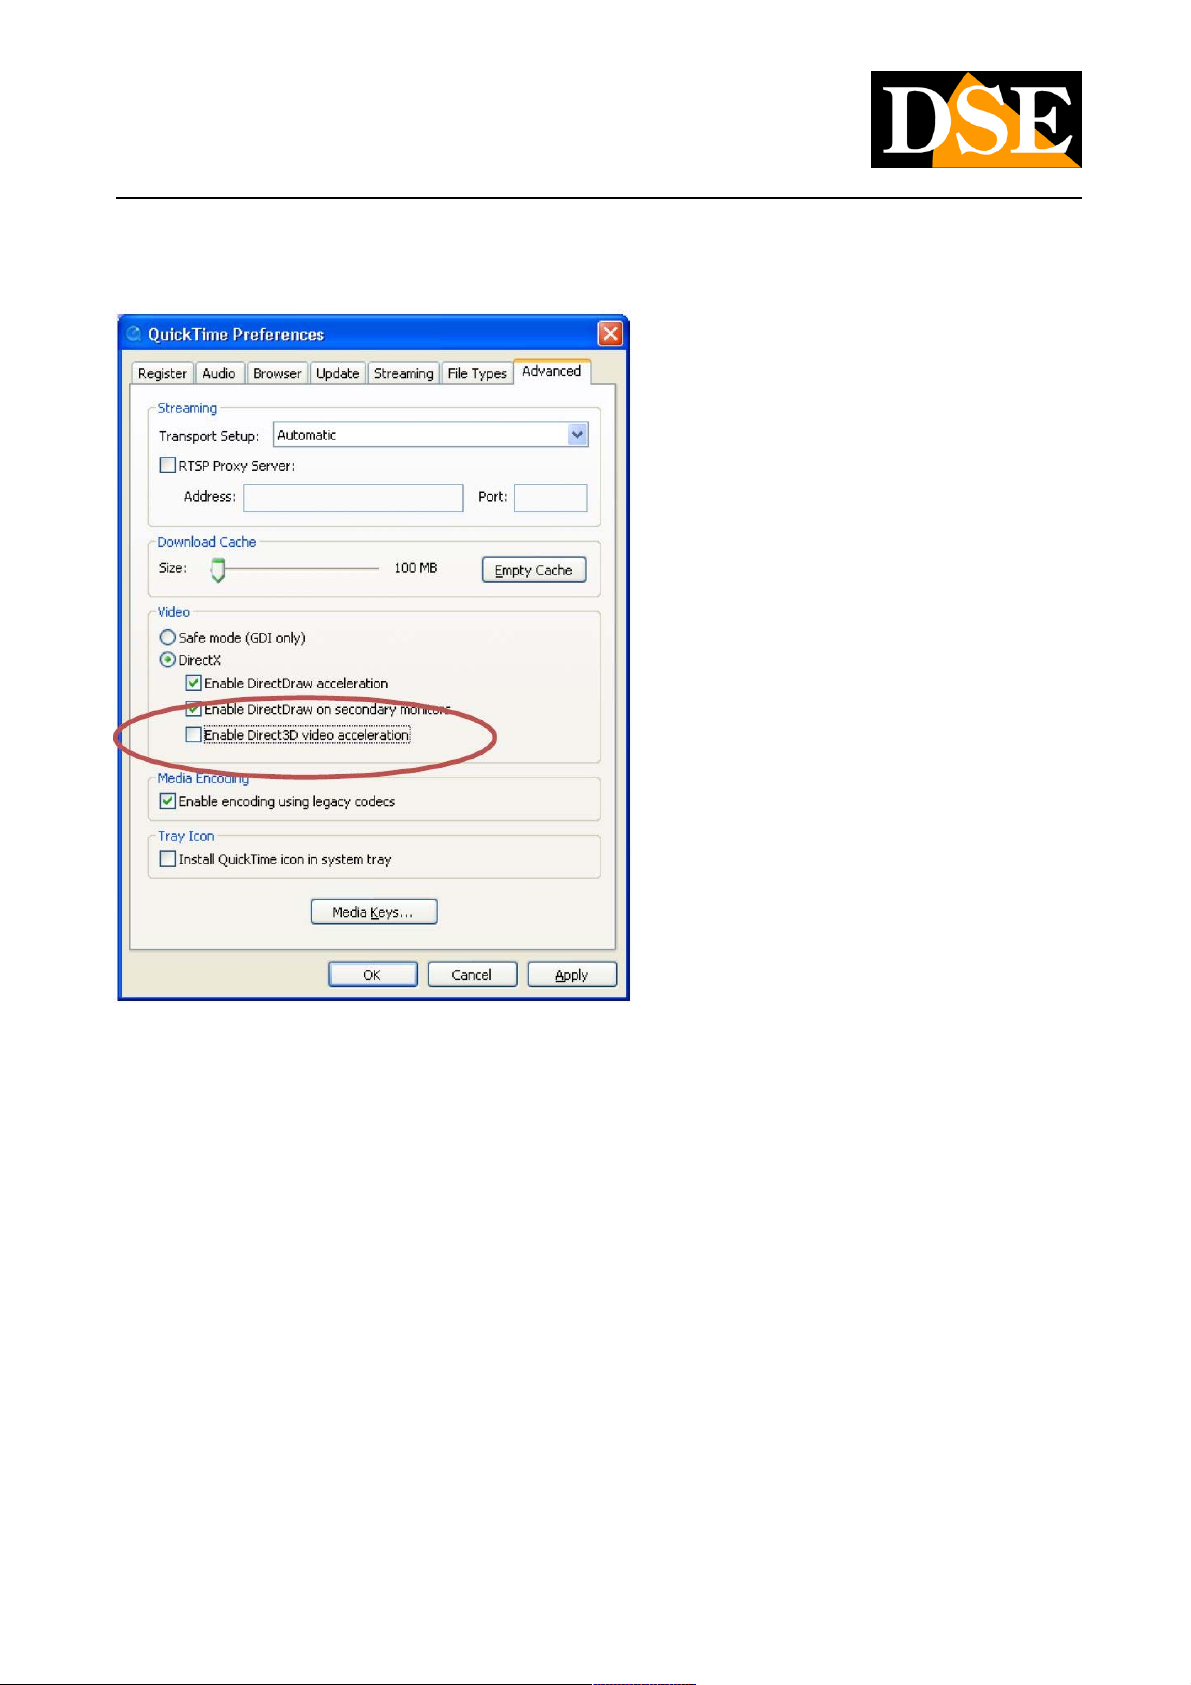
Failure to start playback verify that you have disabled the acceleration DIRECT3D in the advanced options.
DSE SRL - ITALY - WWW.DSE.EU
Page 65
USER MANUAL
CAMERAS IP H.264 1080P FULLHD
Page: 65 Page: 65
Login with NetVMS
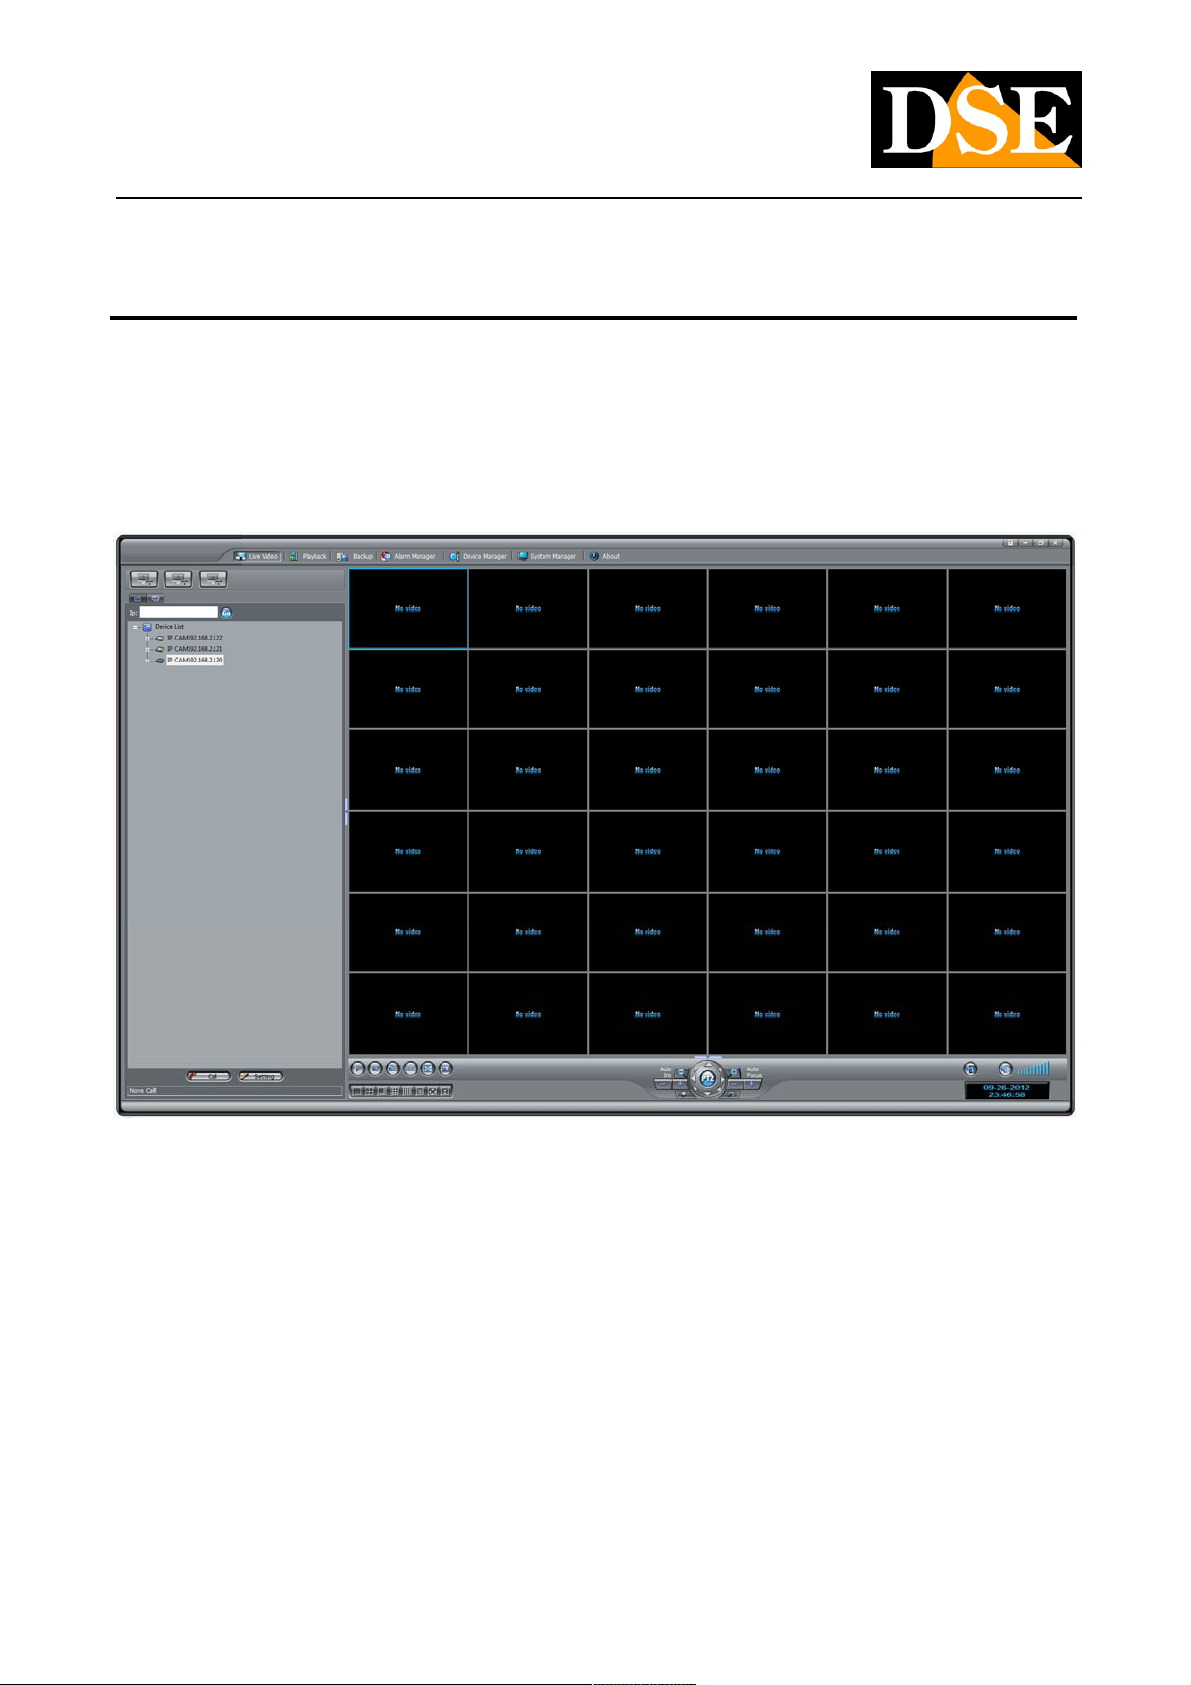
The RH Series cameras are equipped with software for windows for viewing and recording of computer cameras. The NetVMS program
is included on the CD and can also be installed on more than one PC freely. NetVMS is a very powerful and configurable. For it has
always dedicated a specific manual on the CD attached to the camera.
DSE SRL - ITALY - WWW.DSE.EU
Page 66

USER MANUAL
CAMERAS IP H.264 1080P FULLHD
Page: 66 Page: 66
Login with third party software
If your application requires special software analysis can not be managed by
NetVMS software or you need to coexist IP cameras RH series with other
manufacturers' cameras it is appropriate to evaluate the purchase of a
multi-NVR software. The RH series cameras
They can integrate with any software platform to accept the international standard ONVIF protocol.
It is a universal protocol that at the time of publication of this manual is now in version 2.1. All RH series cameras support ONVIF 2.1
protocol Thanks to this standard it is possible to easily integrate RH series camera in a few steps. Here, as an example, we explain how
to integrate the RH series camera in the MILESTONE program, one of the most important NVR software on the market. Similarly, you
can proceed with other manufacturers' platforms
Milestone XProtect
Milestone NVR offers a free program called XProtect freely downloadable online from www.milestonesys.com/downloads site. It is
capable of handling up to 8 camera and has many limitations compared to more advanced versions, however it will take for example the
integration of RH cameras. We proceed in a similar manner with other versions or with other manufacturers' software.
What follows is not its intention to provide instructions on using the Milestone Software, a company with which our product does not have
any kind of relationship, but simply to provide an example to the user who is having to make this integration.
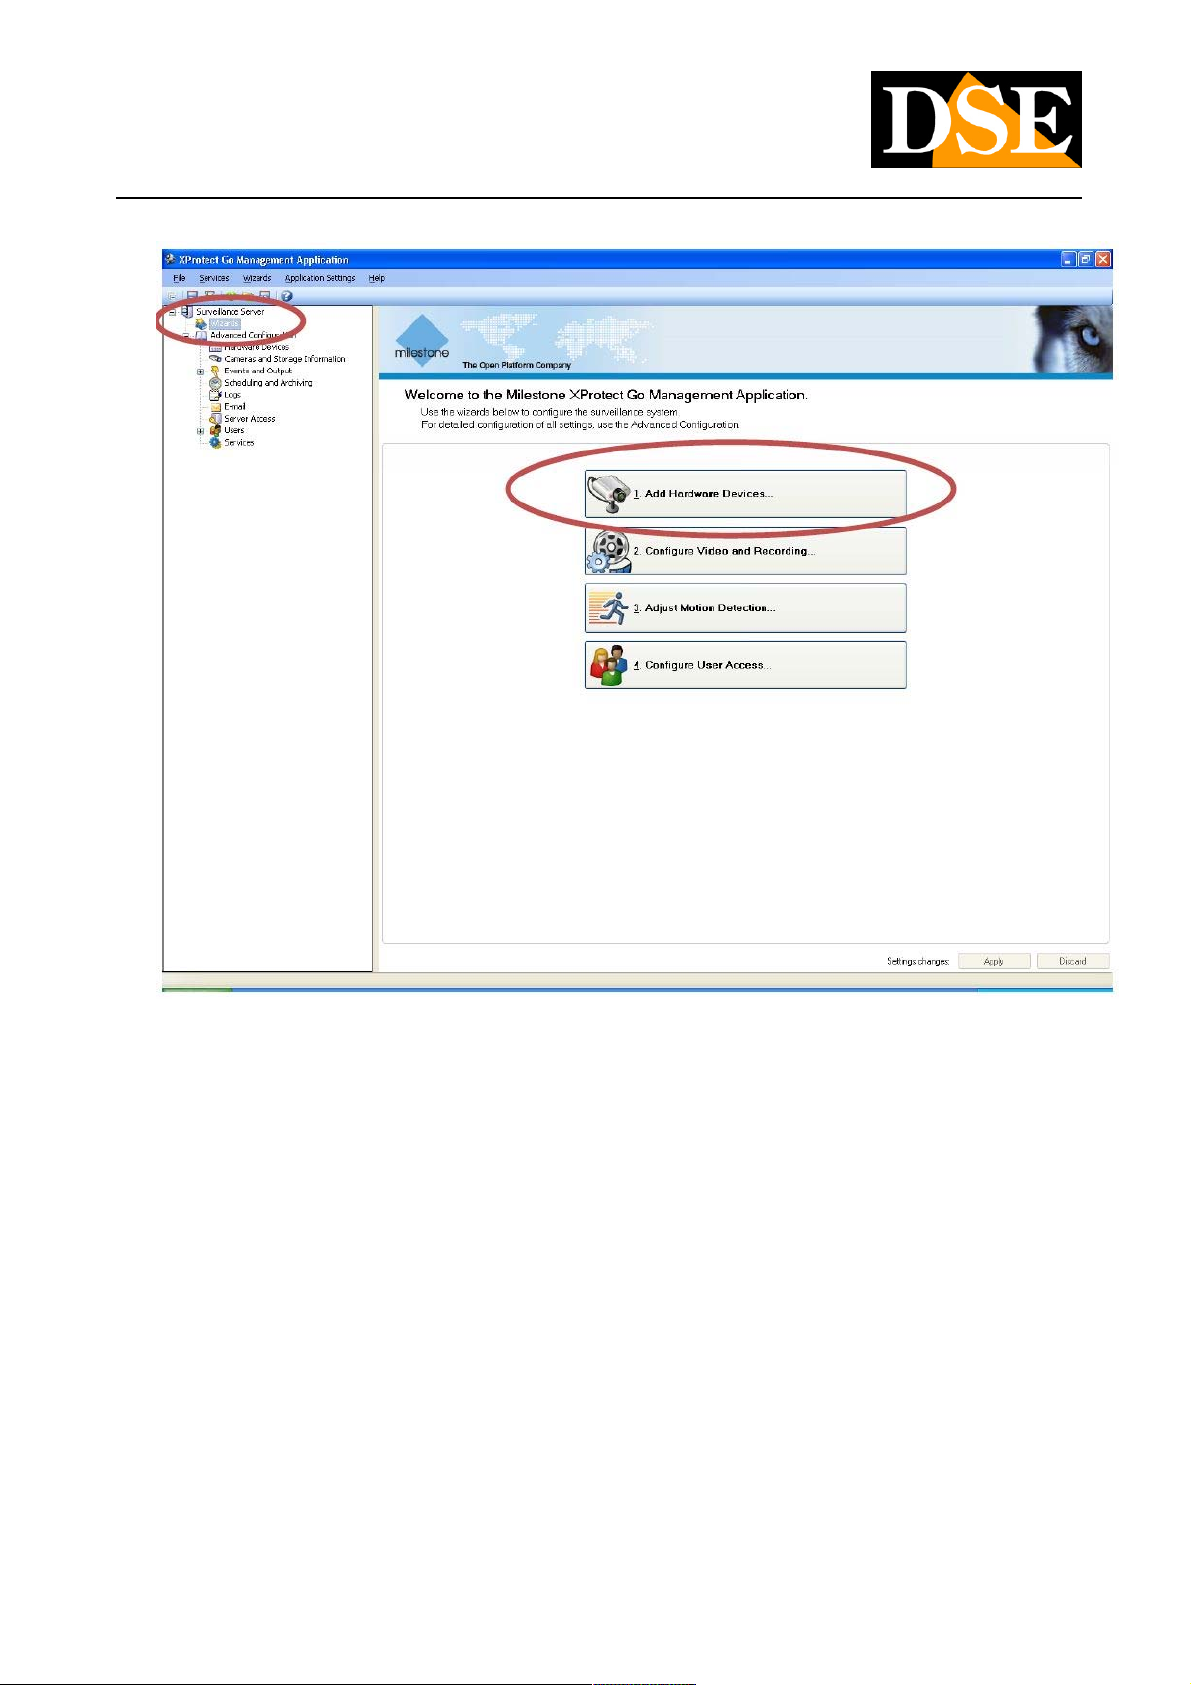
• Click WIZARDS tree on the left, and ADD HARDWARE DEVICE to add the camera
DSE SRL - ITALY - WWW.DSE.EU
Page 67
USER MANUAL
CAMERAS IP H.264 1080P FULLHD
Page: 67 Page: 67
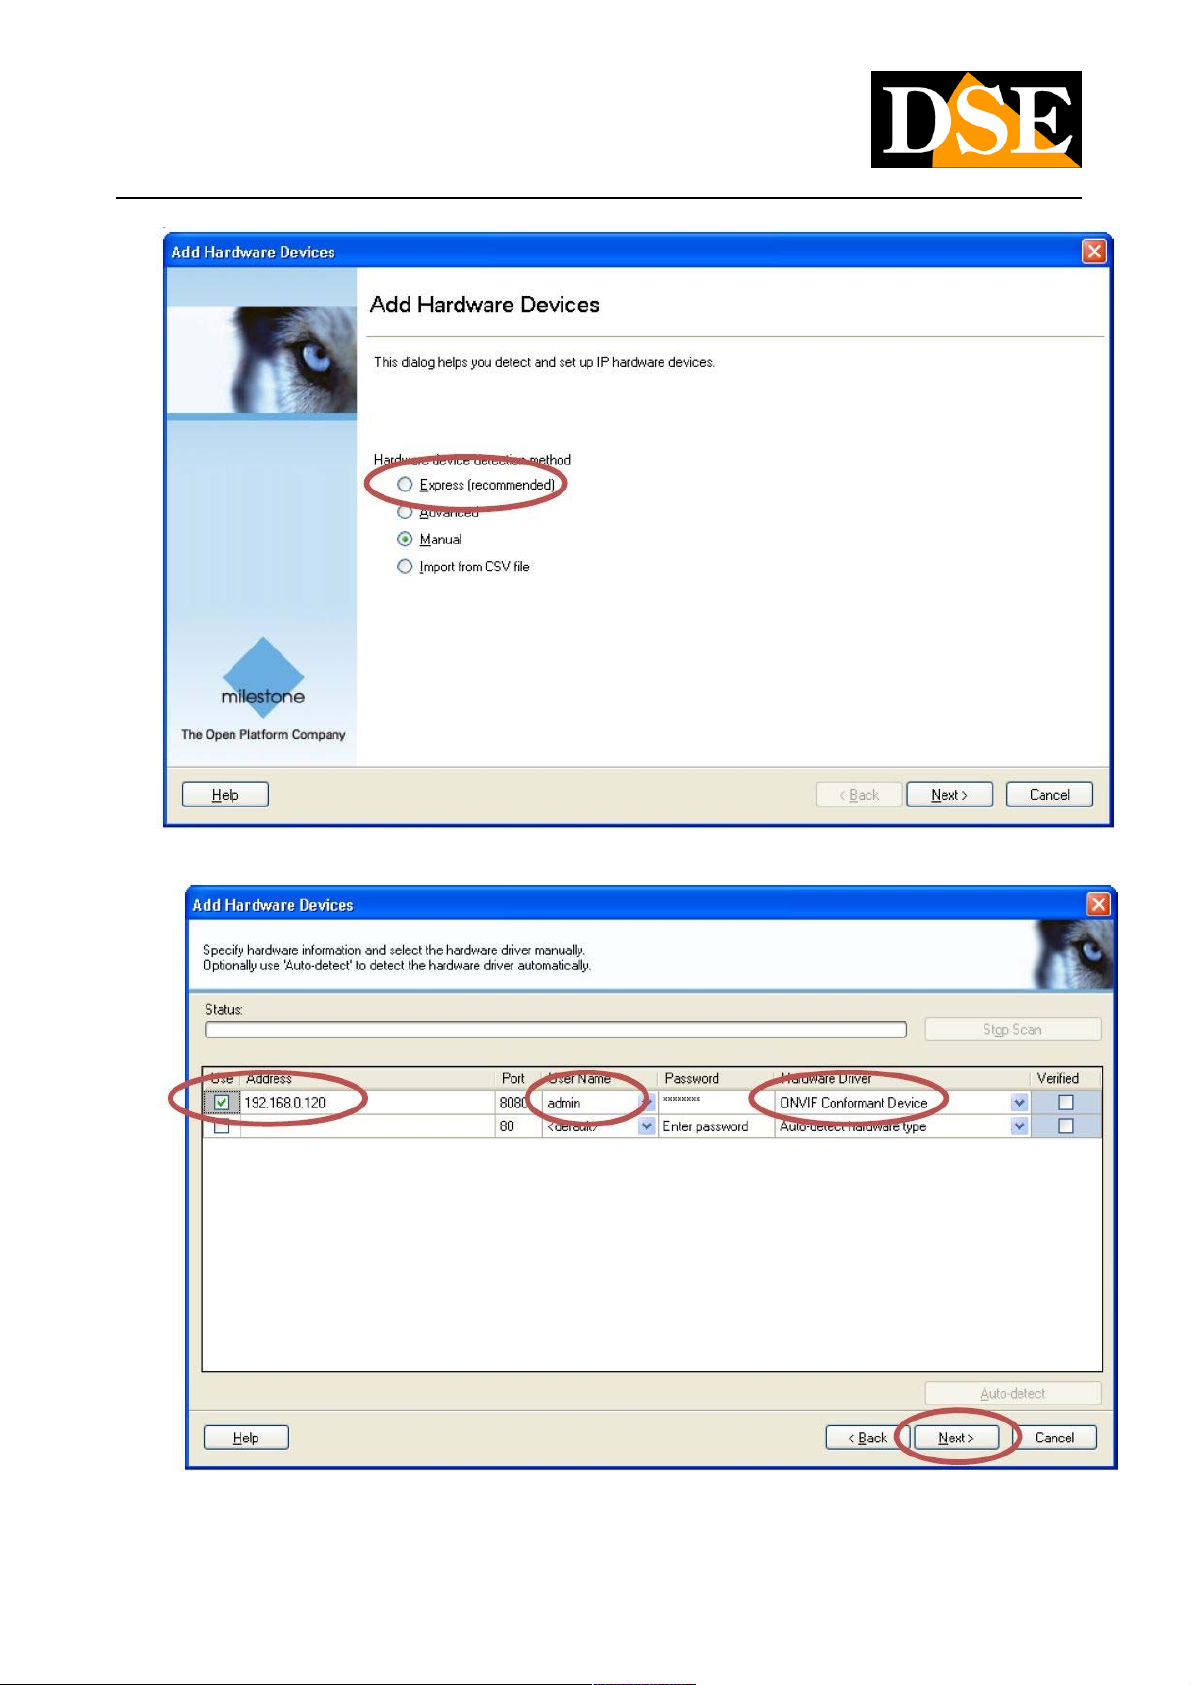
• Choose the EXPRESS detection method. Milestone will detect all network cameras with ONVIF protocol
DSE SRL - ITALY - WWW.DSE.EU
Page 68
USER MANUAL
CAMERAS IP H.264 1080P FULLHD
Page: 68 Page: 68
• Select the camera and specify the access credentials (default admin / admin)
• Click NEXT to continue
DSE SRL - ITALY - WWW.DSE.EU
Page 69
USER MANUAL
CAMERAS IP H.264 1080P FULLHD
Page: 69 Page: 69
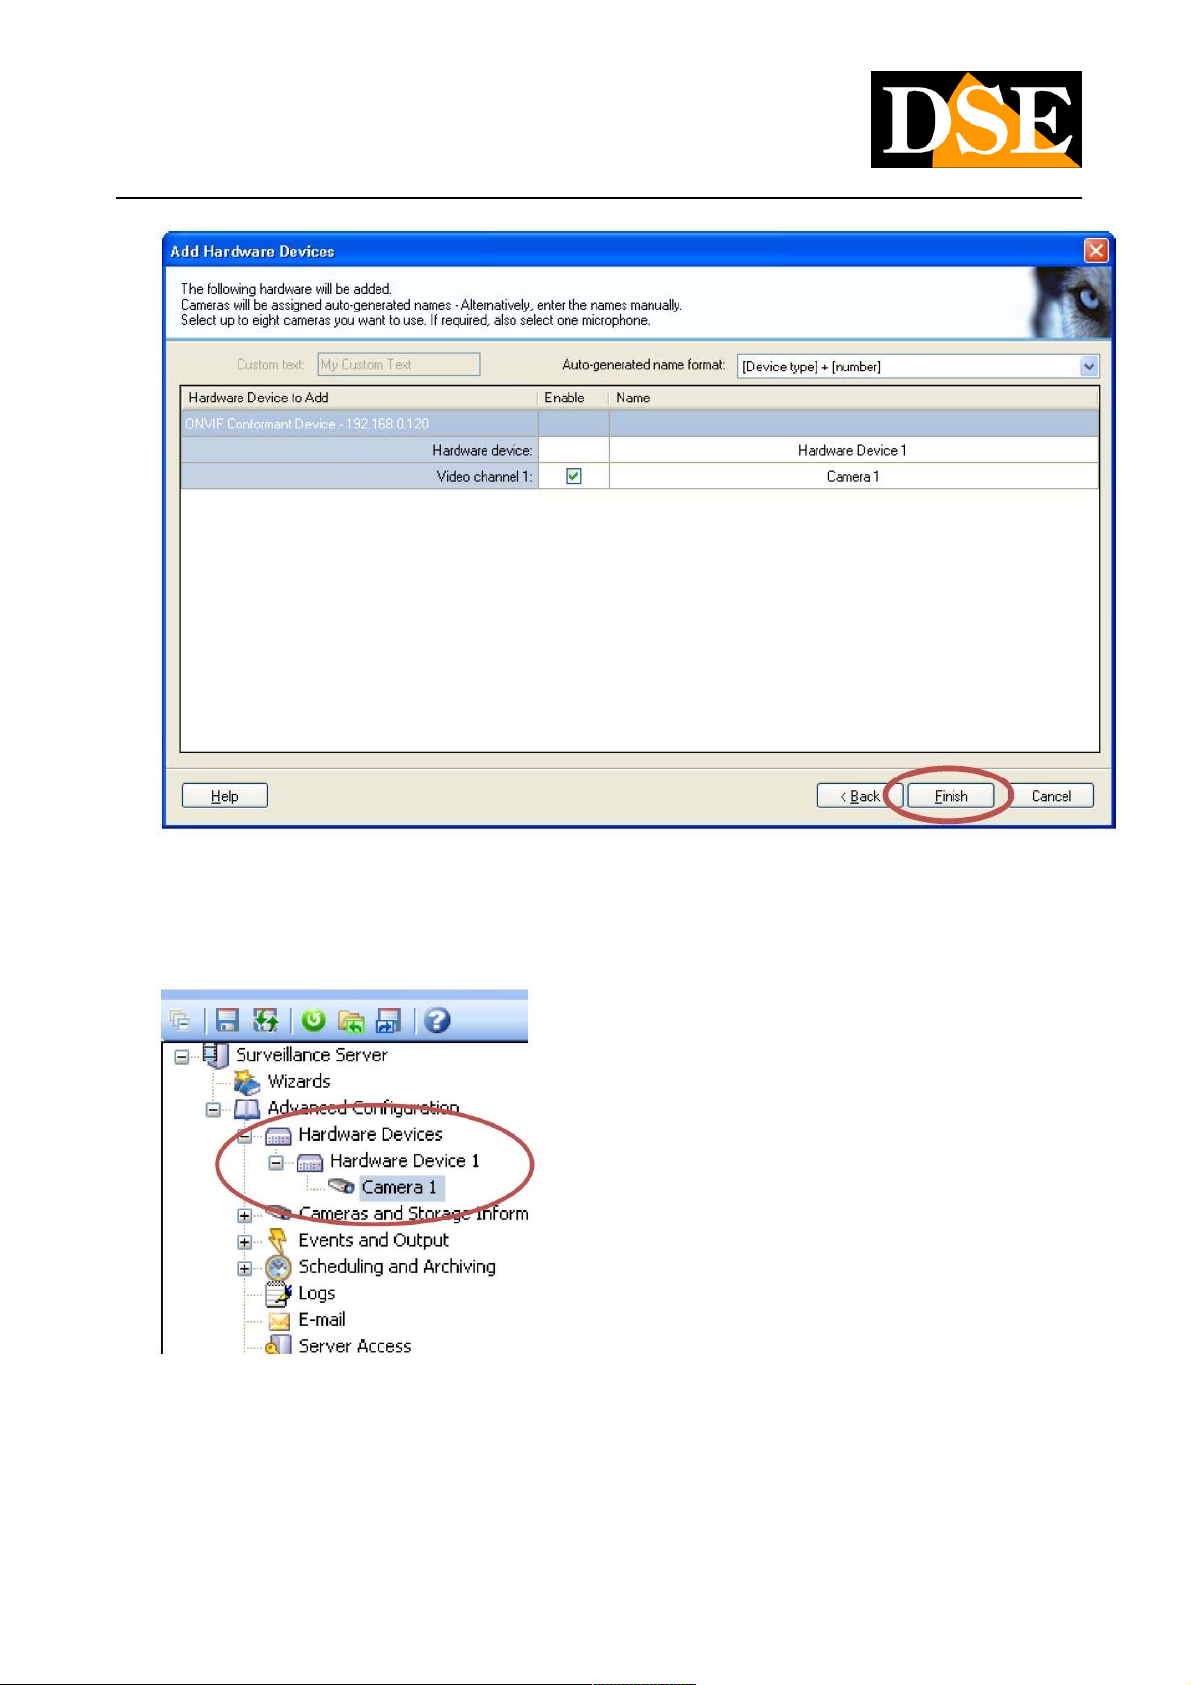
• Click FINISH to incorporate the camera in the milestone schedule
• Once the connection to the camera will take a few more settings in the configuration
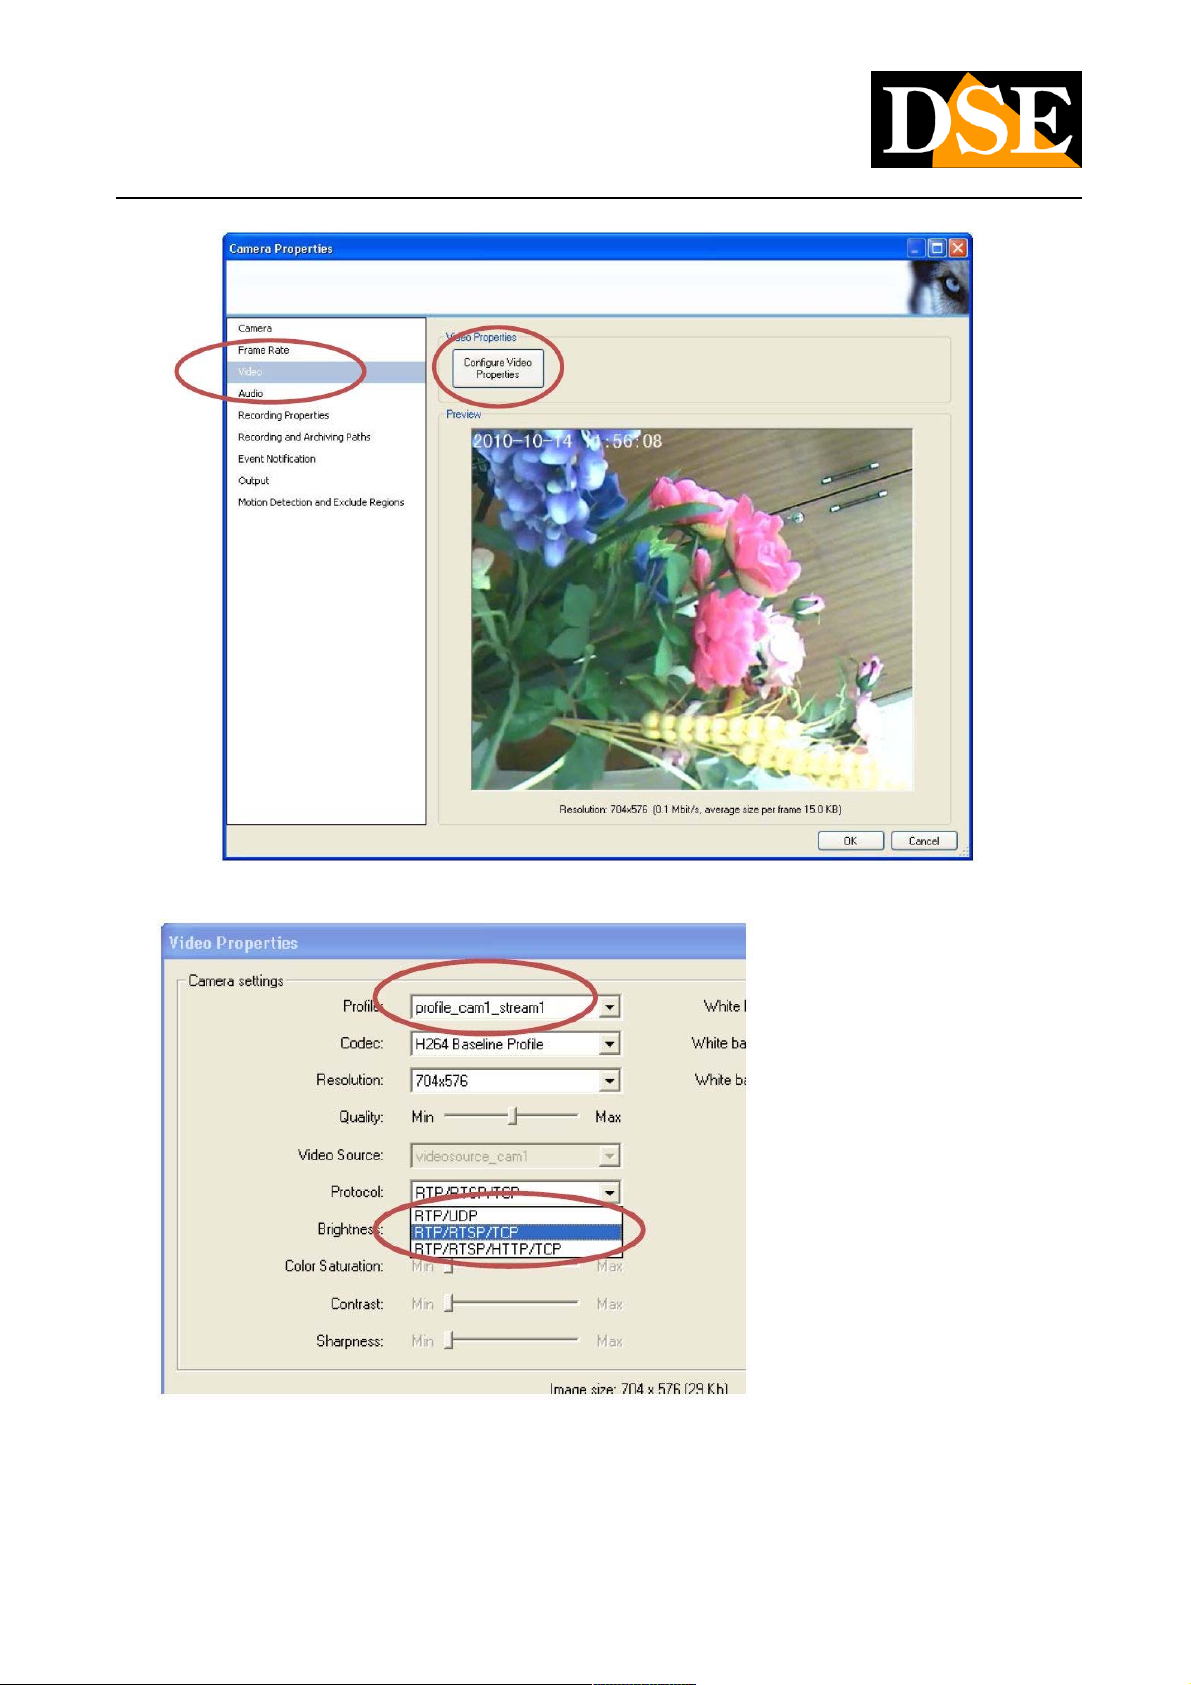
• Click the right mouse button on the camera icon
• This opens the properties panel of the camera
DSE SRL - ITALY - WWW.DSE.EU
Page 70
USER MANUAL
CAMERAS IP H.264 1080P FULLHD
Page: 70 Page: 70
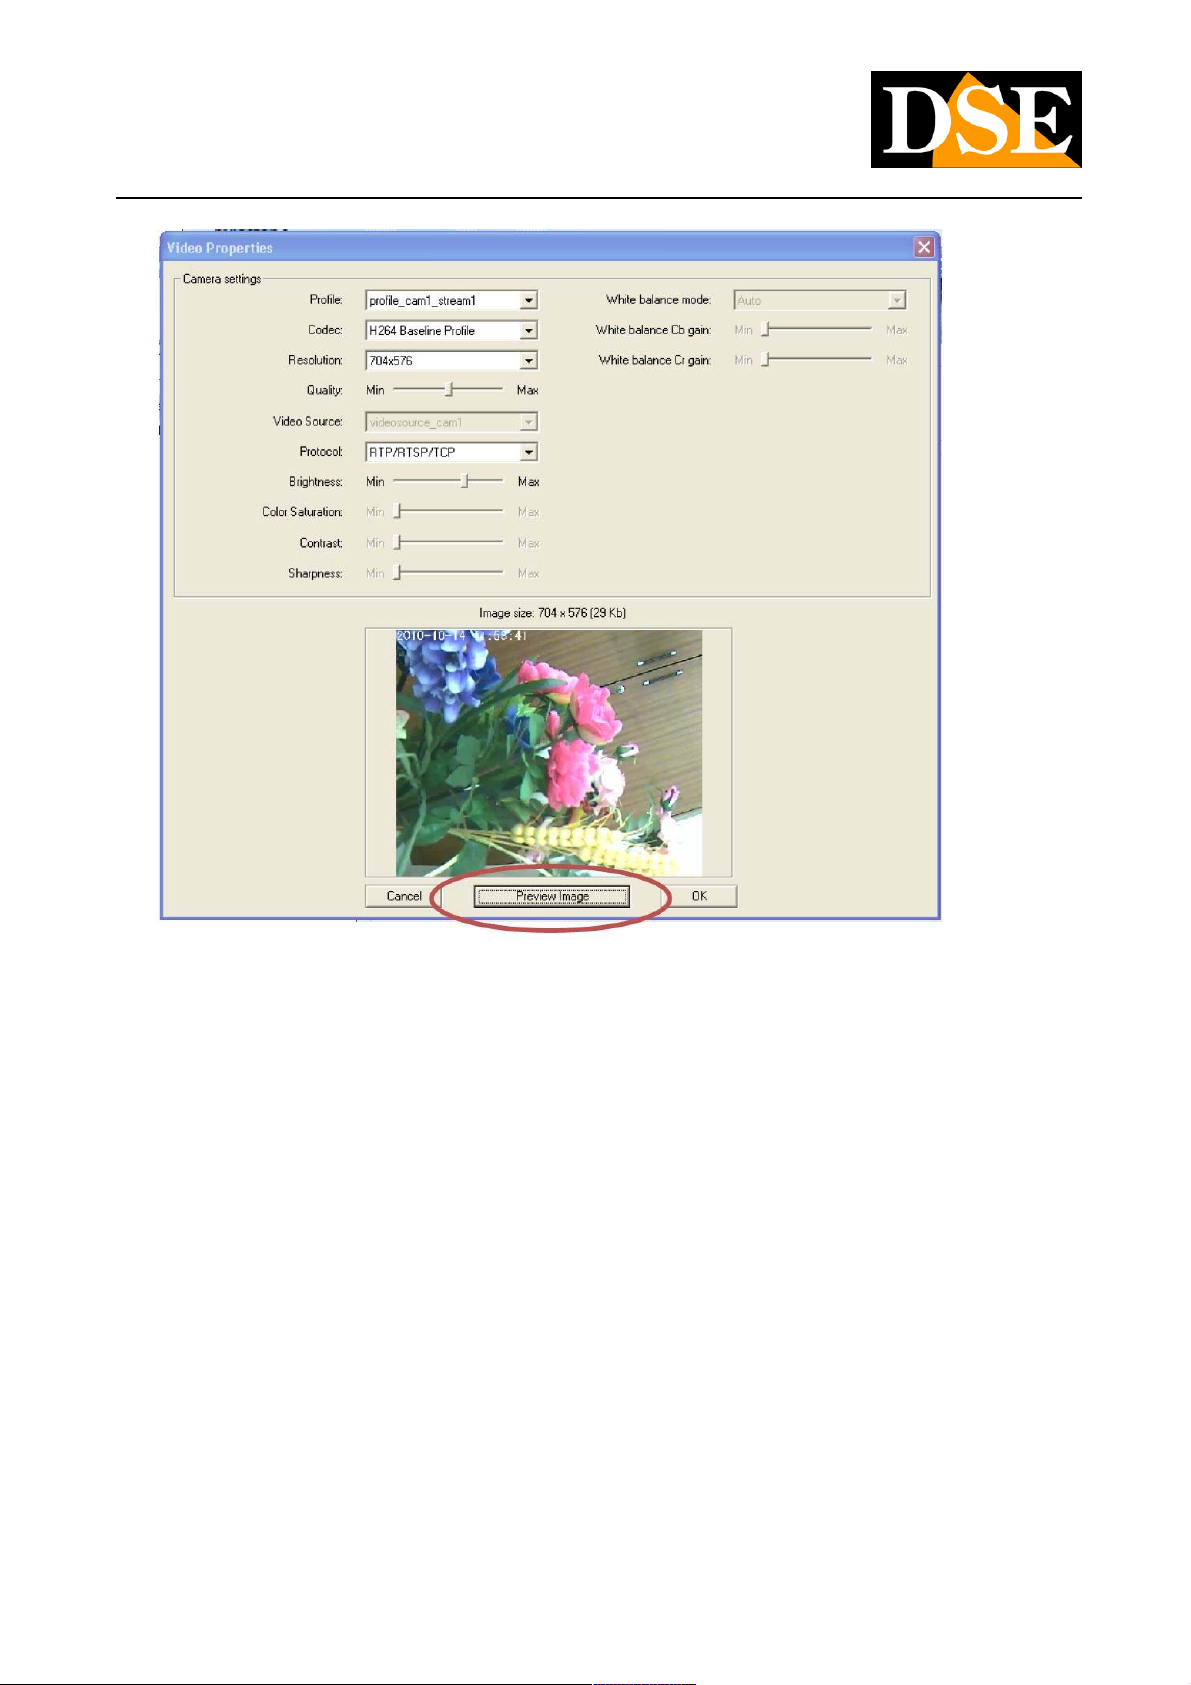
• Select VIDEO / CONFIGURE VIDEO PROPERTIES
• Select the stream to use and RTP / RTSP / TCP
• IMAGE PREVIEW Click to test the live viewing
DSE SRL - ITALY - WWW.DSE.EU
Page 71
USER MANUAL
CAMERAS IP H.264 1080P FULLHD
Page: 71 Page: 71
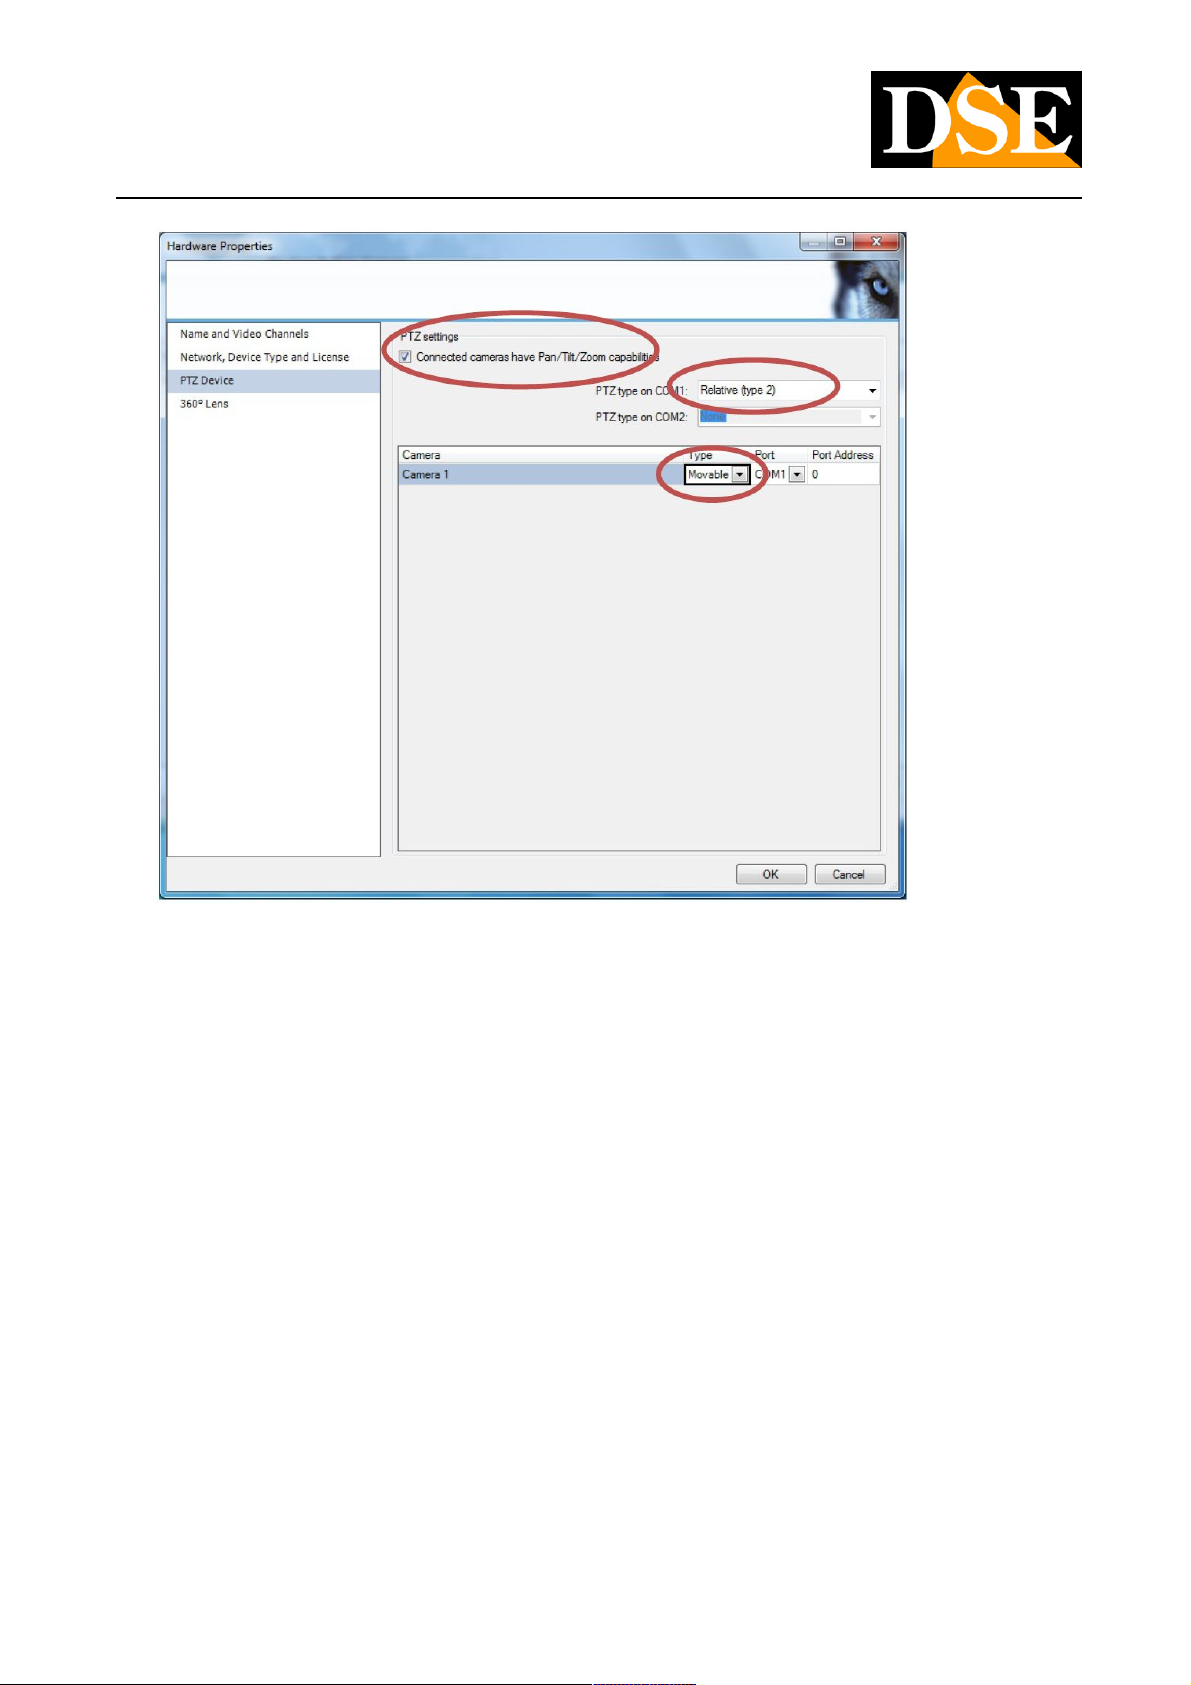
• PTZ - If your camera has PTZ (at the time of publication of this document not yet available) you must set the camera as MOVABLE
and type of PTZ: Relative (type 2)
DSE SRL - ITALY - WWW.DSE.EU
Page 72
USER MANUAL
CAMERAS IP H.264 1080P FULLHD
Page: 72 Page: 72
DSE SRL - ITALY - WWW.DSE.EU
Page 73
USER MANUAL
CAMERAS IP H.264 1080P FULLHD
Page: 73 Page: 73
from web access router
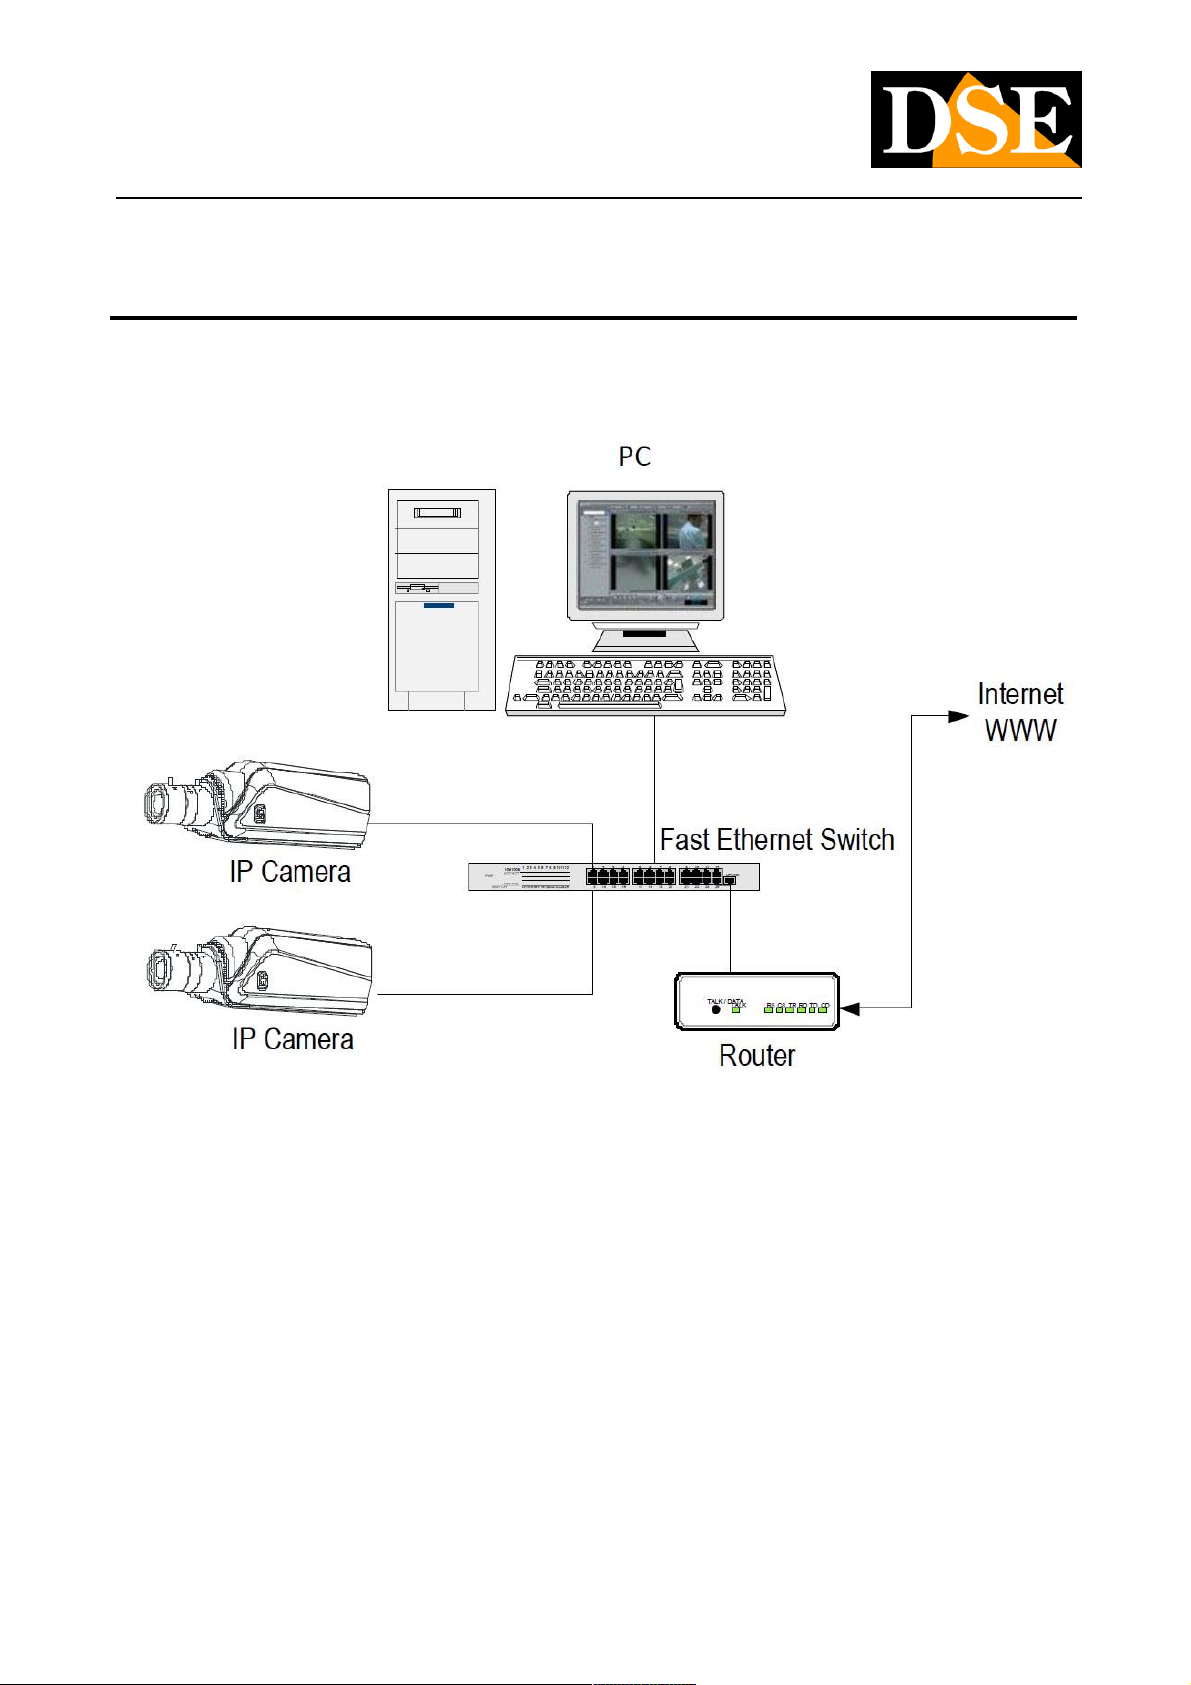
An installation of IP cameras is often placed inside a LAN connected to the Internet via a router as in the following scheme
If we work on the internal PC to the network camera addresses (usually the type
192.168.XXX.XXX) are directly reachable via browser with software like NetVMS. If we want to connect over the Internet from a PC
placed elsewhere on the network internal addresses will no longer be accessible and the only visible IP address will be what will our
router from the WAN side that is towards the outside world of the Internet. This address is assigned by the provider (ISP). And 'advisable
to get from the provider a fixed address each time you connect. If there is a chance you need to use DDNS services (see above).
However, it is not typing in the browser the IP address of the WAN side Router to connect to the cameras. The router acts as a filter and
drops every external call that a call from within the network is not paid before. To avoid this you need to enter in the router ports of
directing instructions according to manufacturers
DSE SRL - ITALY - WWW.DSE.EU
Page 74

USER MANUAL
CAMERAS IP H.264 1080P FULLHD
Page: 74 Page: 74
can be PORT FORWARDING calls, PORT MAPPING, etc. NAT
In practice it is necessary to instruct the router so that directs the external incoming calls on certain ports, toward the internal IP address
to the network of cameras. The doors must map are as follows
• HTTP PORT: Default 80. The cameras use this port to communicate with browsers like IE, Chrome etc. Browsers such as Internet HTTP PORT: Default 80. The cameras use this port to communicate with browsers like IE, Chrome etc. Browsers such as Internet
Explorer use port 80 to call a domain. If in the browser address bar is written as: http://212.12.34.201 the call will be the port 80. If
the configuration of the camera is set to a different HTTP port (eg. 81) in the browser you will need to specify the port after the
address inserting ":" as the separation (eg. http://212.12.34.201:81).
• PORT VIDEO / DATA: By default 30001 used by the camera to communicate with the software NetVMS PORT VIDEO / DATA: By default 30001 used by the camera to communicate with the software NetVMS
• PORT RTSP: By default 554 used by the camera for sending video to software ONVIF Protocol, or RTSP to clients such as VLC, PORT RTSP: By default 554 used by the camera for sending video to software ONVIF Protocol, or RTSP to clients such as VLC,
Real Player etc ..
• PORT RTMP: By default 8080 used by the camera for the use of FLASH technology PORT RTMP: By default 8080 used by the camera for the use of FLASH technology
As a result the doors to be mapped according to the client used are:
• BROWSER ( IE, CHROME, etc.): HTTP (80) + RTMP (8080) BROWSER ( IE, CHROME, etc.): HTTP (80) + RTMP (8080)
• NetVMS: DATA / VIDEO (30001) NetVMS: DATA / VIDEO (30001)
• MOBILE DEVICES ( ANDROID, IPHONE, IPAD): DATA / VIDEO (30001) MOBILE DEVICES ( ANDROID, IPHONE, IPAD): DATA / VIDEO (30001)
• SOFTWARE ONVIF NVR: RTSP (554) + HTTP (80) SOFTWARE ONVIF NVR: RTSP (554) + HTTP (80)
• CLIENT (RTSP REAL PLAYER, VLC etc.): RTSP (554) CLIENT (RTSP REAL PLAYER, VLC etc.): RTSP (554)
In the router programming it is necessary to direct the incoming external calls on these ports 4 to the internal address of the camera.
If behind the router counts more than one camera must be assigned to each of them a different HTTP port. From the browser you will
decide which camera view by specifying the port call.
DSE SRL - ITALY - WWW.DSE.EU
Page 75
USER MANUAL
CAMERAS IP H.264 1080P FULLHD
Page: 75 Page: 75
Access by iPhone and iPad
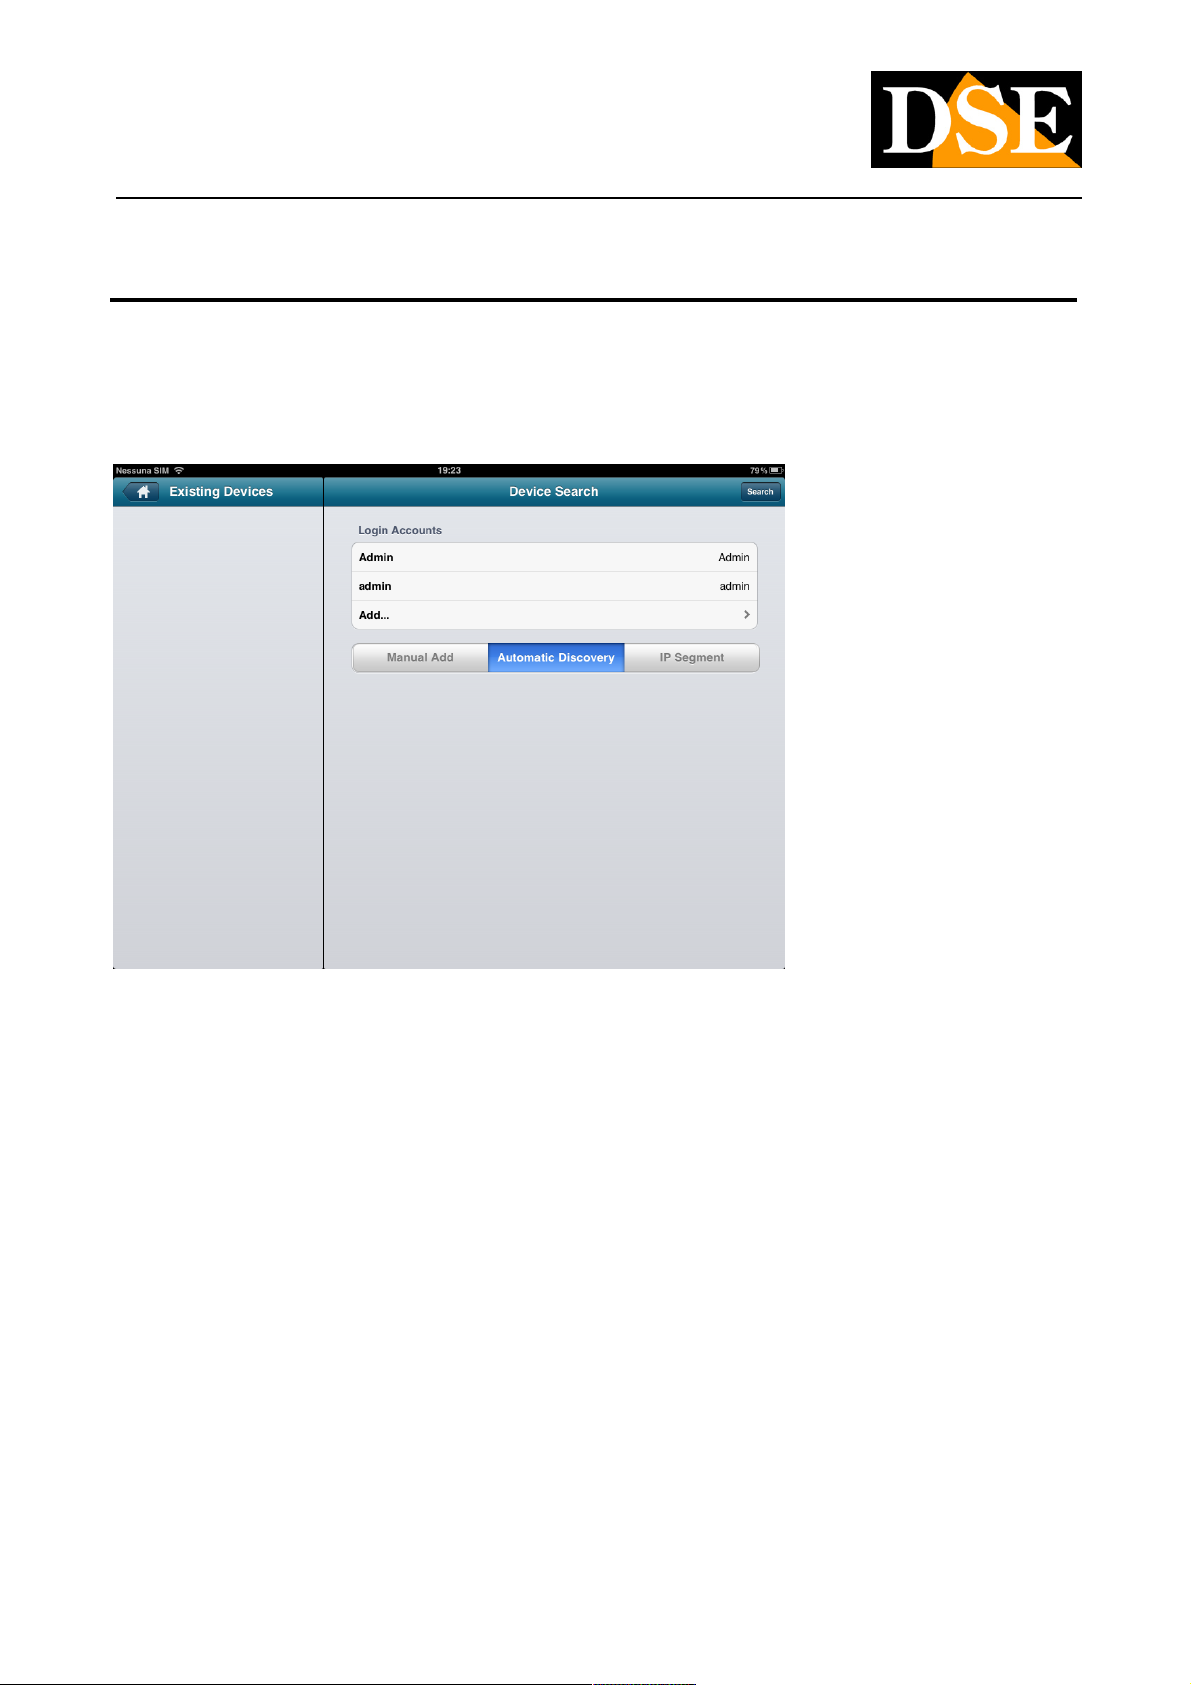
E 'can view and configure the RH cameras via iPhone / iPad. E 'available on the Free Application APPLE STORE DSE Smartlive to E 'can view and configure the RH cameras via iPhone / iPad. E 'available on the Free Application APPLE STORE DSE Smartlive to E 'can view and configure the RH cameras via iPhone / iPad. E 'available on the Free Application APPLE STORE DSE Smartlive to
download and install on the device.
Here is the first boot screen. For convenience shows the iPAD version.
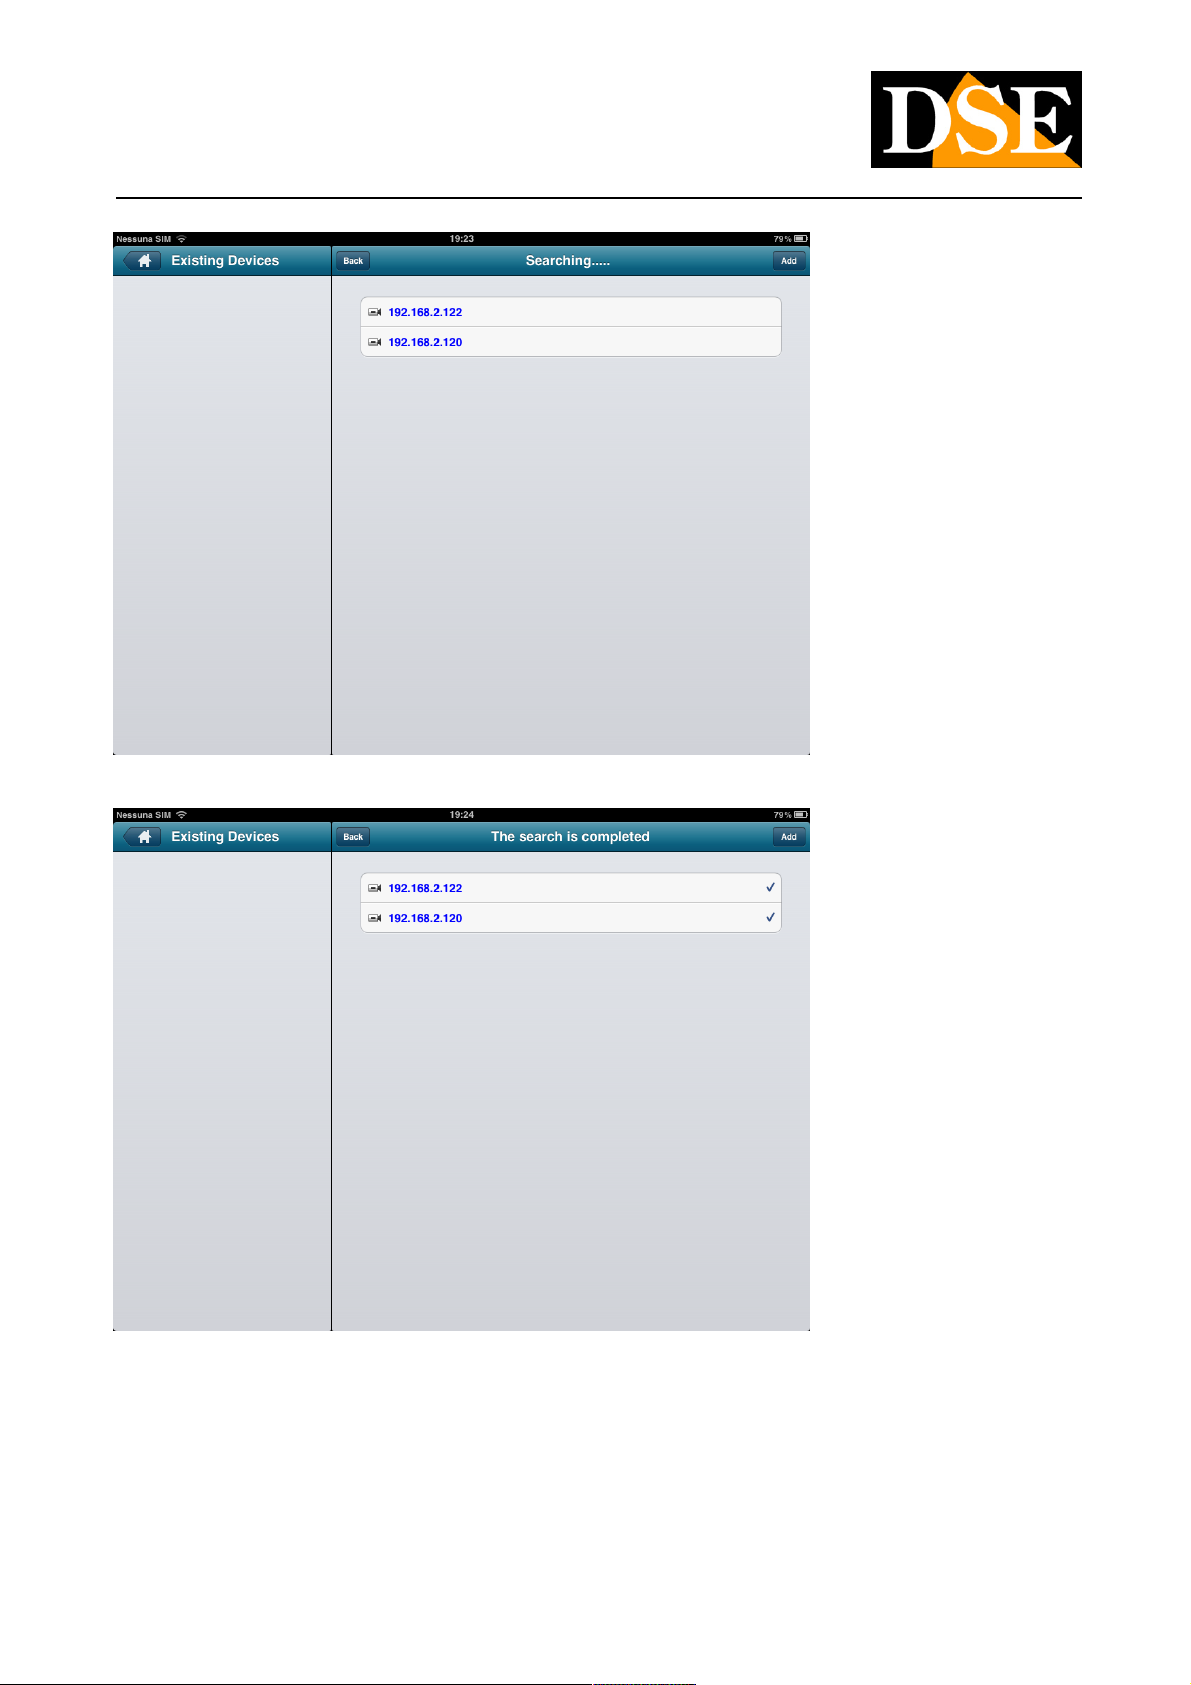
You first need to configure addresses for the cameras to connect. To set up a local network cameras should use the AUTOMATIC
DISCOVERY and press SEARCH function to find all the cameras on the network. It 'also a mode of manual input MANUAL ADD to
manually insert cameras to reach via internet on other networks.
DSE SRL - ITALY - WWW.DSE.EU
Page 76
USER MANUAL
CAMERAS IP H.264 1080P FULLHD
Page: 76 Page: 76
Select the cameras you wish to achieve with the device
Press the ADD button to add the cameras
DSE SRL - ITALY - WWW.DSE.EU
Page 77
USER MANUAL
CAMERAS IP H.264 1080P FULLHD
Page: 77 Page: 77
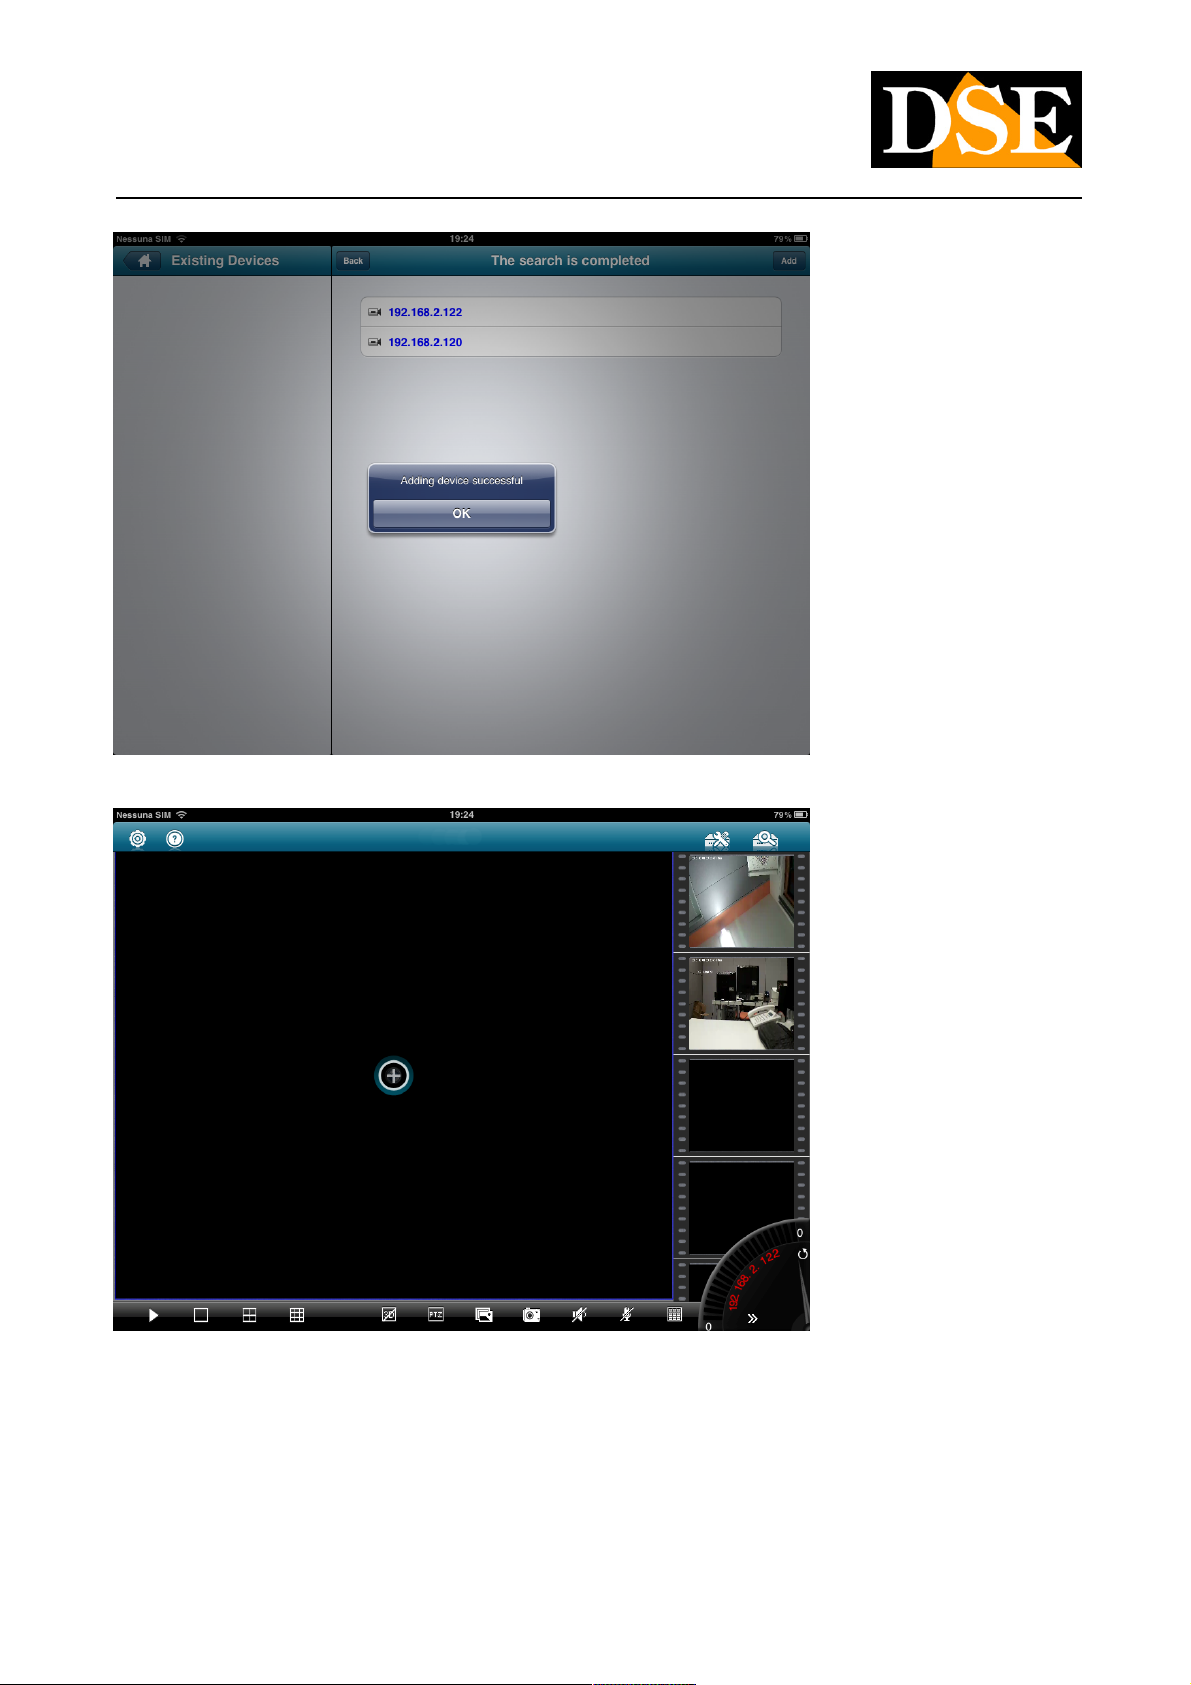
With EXISTING DEVICE button to return to the main window
Drag the preview of the camera right in the middle pane to begin streaming With the bottom button on the right you can also close the
camera thumbnail bar. The thumbnail bar, as well as the management of the mink more screen cameras is only possible with the iPad
and not with phones mostly too small screen.
DSE SRL - ITALY - WWW.DSE.EU
Page 78
USER MANUAL
CAMERAS IP H.264 1080P FULLHD
Page: 78 Page: 78
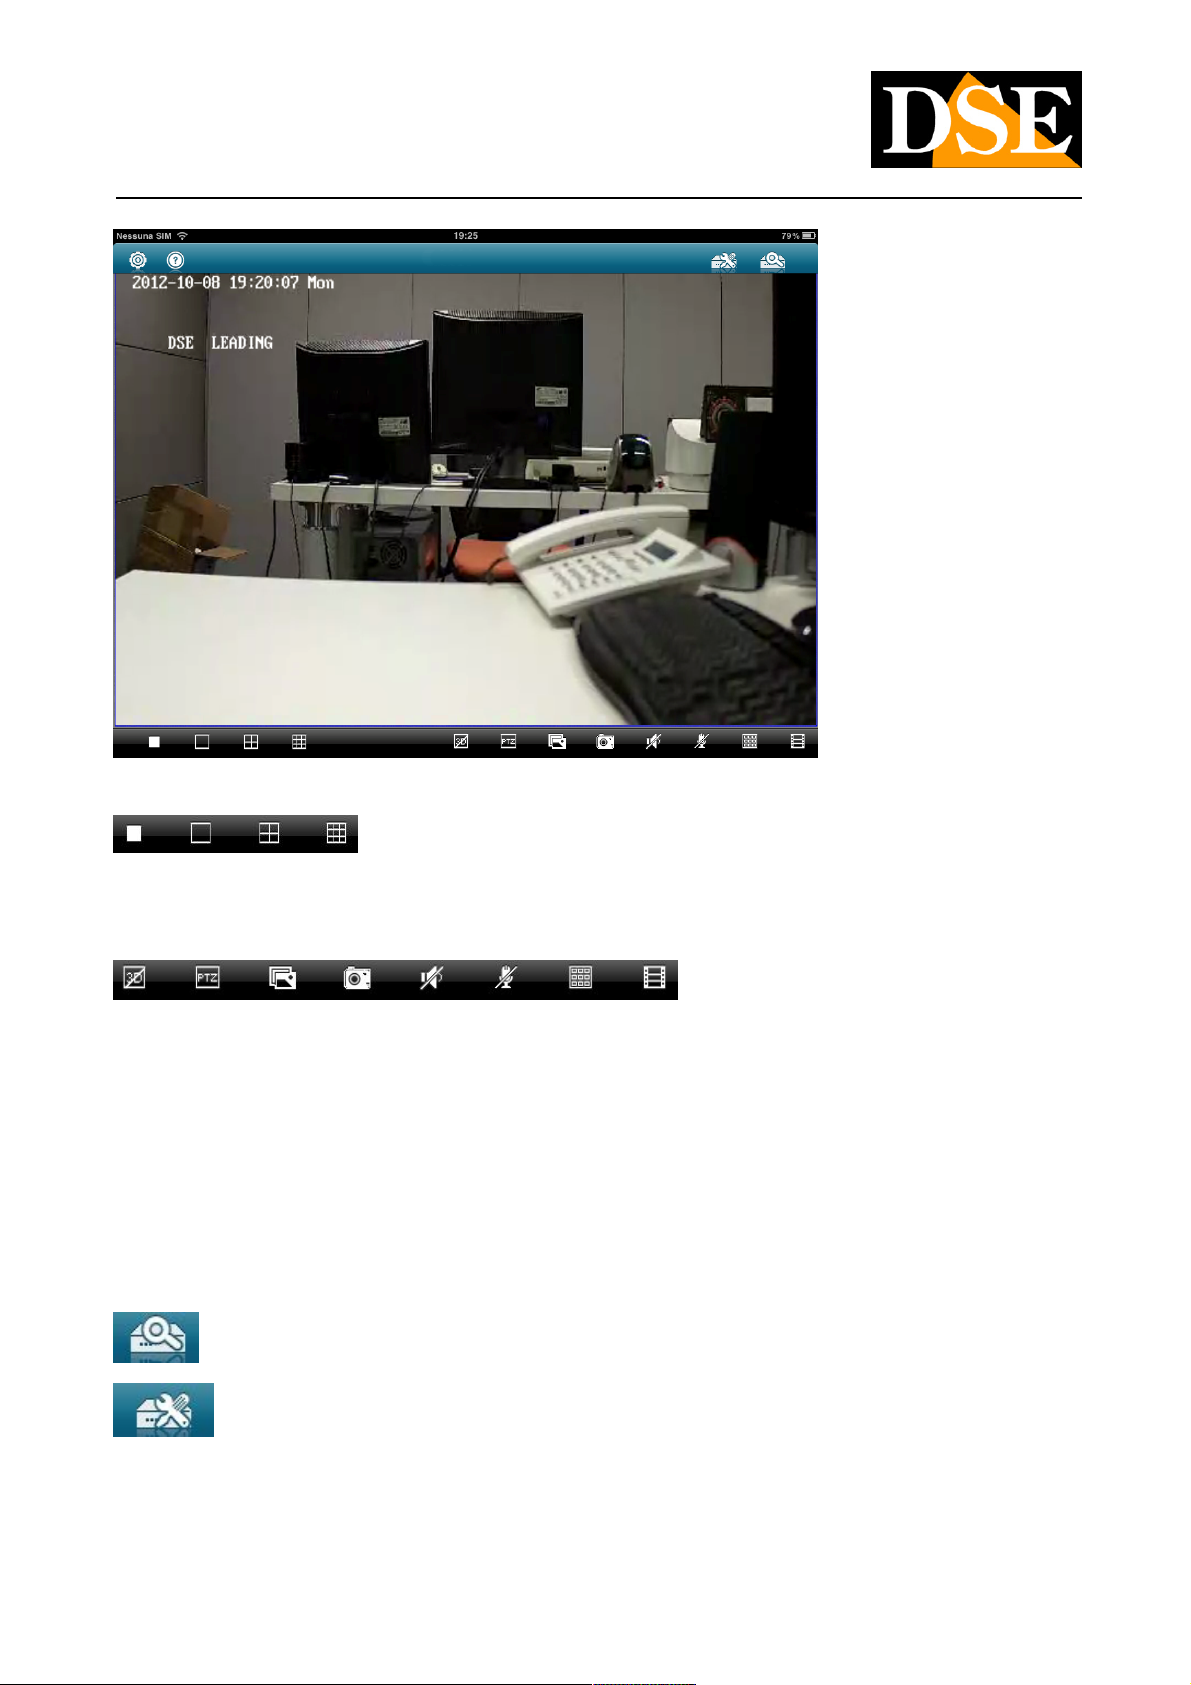
Available controls:
Division screen. And 'possible to divide the screen into 1.4 or 9
dials to see more cameras on the screen simultaneously. The following controls are available in single
camera view
• 3D - 3D positioning designed to speed dome cameras
• PTZ - Control movements designed to speed dome cameras
• SENSOR SETTING - You can access all the internal settings of the camera sensor
• SNAPSHOT - You can take a screen picture image
• AUDIO - Enable audio playback on the device
• MICROPHONE - Enable the microphone to speak to whoever is in front of the camera
• ON-LINE - Window showing ON-LINE cameras among those configured
• PREVIEW CAMERAS - Opens the sidebar with thumbnails of the cameras.
Logs in the environment of cameras for research will add new devices
Accesses to the camera setup window
DSE SRL - ITALY - WWW.DSE.EU
Page 79
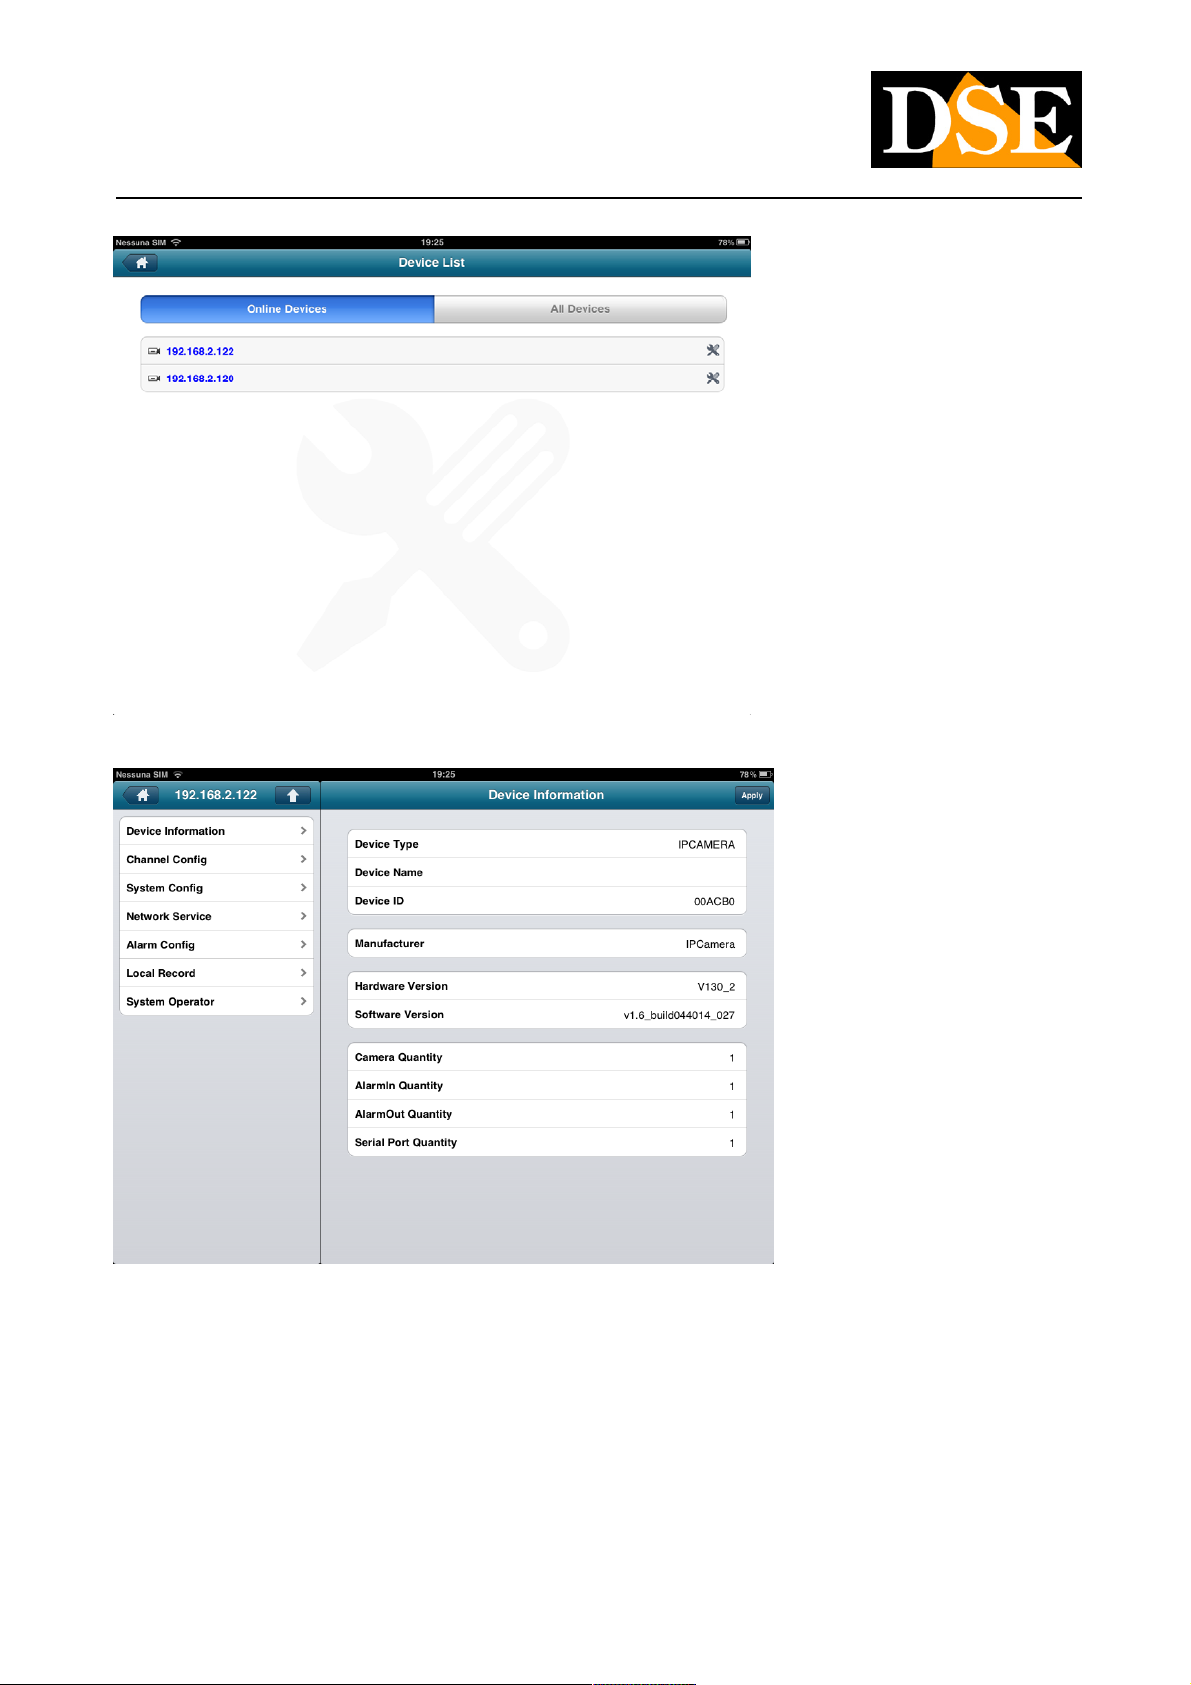
USER MANUAL
CAMERAS IP H.264 1080P FULLHD
Page: 79 Page: 79
Click the icon next to the camera you want to configure
Where it is possible to configure the portable device all the functions of the camera.
DSE SRL - ITALY - WWW.DSE.EU
Page 80

USER MANUAL
CAMERAS IP H.264 1080P FULLHD
Page: 80 Page: 80
Login with Android
E 'can view and configure the RH cameras with mobile devices equipped with ANDROID operating system like Samsung Galaxy and
many more. E 'available on GOOGLE PLAY the free app DSE Smartlive to download and install on the device. many more. E 'available on GOOGLE PLAY the free app DSE Smartlive to download and install on the device. many more. E 'available on GOOGLE PLAY the free app DSE Smartlive to download and install on the device.
The functions are similar to those just seen for the iPhone app.
DSE SRL - ITALY - WWW.DSE.EU
Page 81

USER MANUAL
CAMERAS IP H.264 1080P FULLHD
Page: 81 Page: 81
software Developers
The RH range of IP cameras is designed for developers who want to integrate the hardware into their applications. Complete SDK for
Windows and Linux are available on request. Contact our technical service.
firmware Update
The update of the camera firmware operation is potentially dangerous because if it does not go to fruition can lead to the impossibility of use
of the camera. It is therefore recommended to proceed only update to eliminate precise causes of malfunction and on the advice of our
technical service.
The firmware update of the cameras is performed by means of a utility that is included in the CD attached to the camera. This program
allows you to update the firmware of all cameras simultaneously. And 'necessary to first obtain the
file
firmware update by following the instructions of the technical service. CLIENT UPDATE Start the program that is already provided in a
folder containing all the necessary files and requires no installation. E 'can copy the folder to your hard disk or on a flash drive to run
easily on any PC.
Reset factory settings
To restore the factory settings of the cameras and hold for 20 seconds the Reset button on board.
DSE SRL - ITALY - WWW.DSE.EU
Page 82
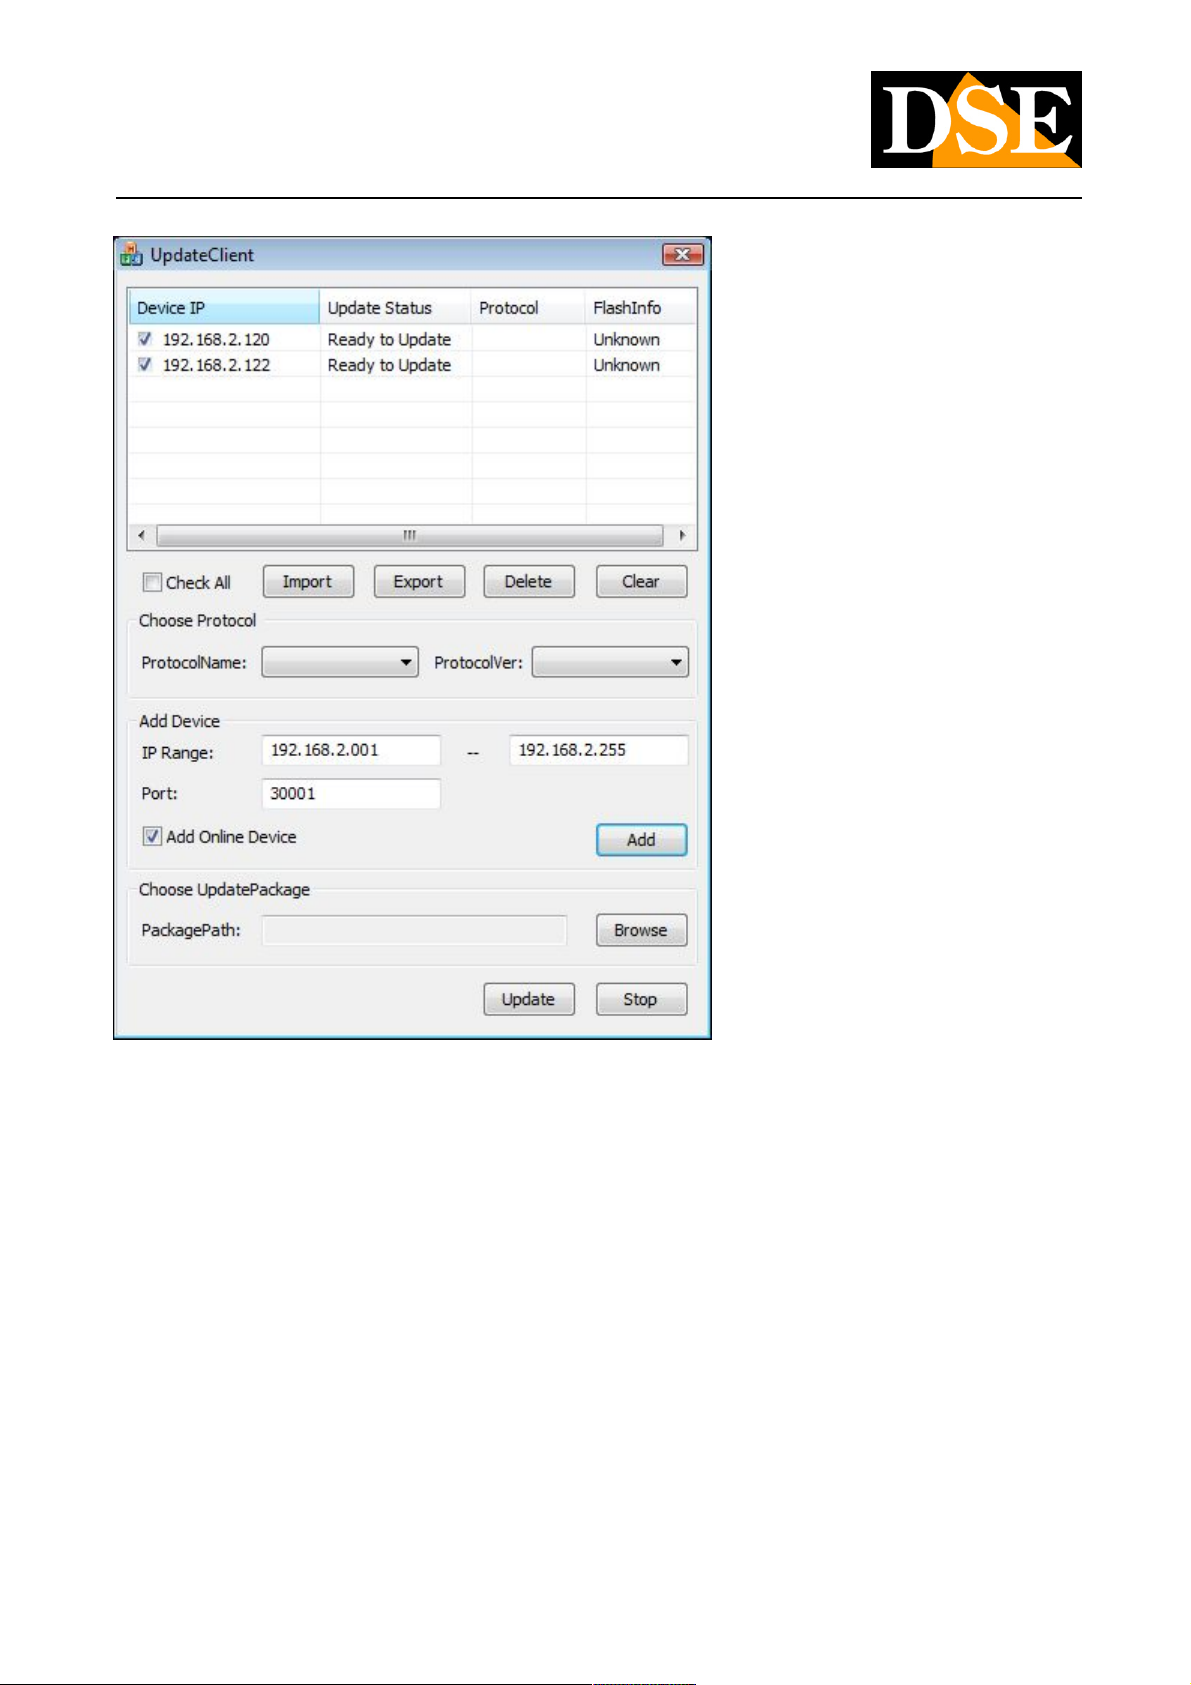
USER MANUAL
CAMERAS IP H.264 1080P FULLHD
Page: 82 Page: 82
Select ADD ON LINE DEVICE DA..A and define the interval in which to search the IP address of the cameras to be updated. Click ADD:
will list the program in the top window all cameras on the network.
Please tick the cameras that require updating.
Click BROWSE to search on your hard disk for the upgrade file. Finally click UPDATE to start the update of all the selected cameras.
Wait for the end of the operation without completely turning off the cameras or PC during the procedure.
DSE SRL - ITALY - WWW.DSE.EU
 Loading...