

Page 1

Recorder DR-N16
User Manual
Page 2

USER MANUAL
DIGITAL VIDEO RECORDER DR-N16
Page: - 2 - Page: - 2 - Page: - 2 -
DSE srl - ITALY - WWW.DSE.EU
1. Product Overview
The DR-N16 VCR was developed for professional video surveillance and consists of a digital video
recorder on the hard disk, a multiplexer, and a web server.
1.1 Product Features
• Possibility to connect up to 16 cameras in both color and B / W
• H264 Video compression with configurable quality
• ADPCM audio compression
• Hexaplex - The unit can not stop recording in case of live viewing, playback, backup, control and
remote access
• Recording capacity - total for Full-D1 DVR: 60 (NTSC) / 50 (PAL) IPS
(Images Per Second) Half-D1: 120 (NTSC) / 100 (PAL) IPS CIF: 240
(NTSC) / 200 (PAL ) IPS
Real-time display, 30 (NTSC) / 25 (PAL) IPS, for each channel
• alarm recording or on an hourly basis
• Playback search by time or event (alarm, motion, video loss)
• the display format Versatility: full screen or split screen in windows 4/7/9/10/13/16
• Digital zoom, X2 & X4
• Intelligent Motion detection with programmable area and sensitivity
• Powerful alarm analysis with the configuration of the activation condition and reaction sensitivity
• Maximum 2 SATA hard drives
• Video / audio backup to USB2.0 storage devices, including USB sticks, external HDD and DVD +
RW recorders, DVD + R, and DVD-R
• Ethernet interface for remote access via web browser, remote alarm notification, remote control, tele
programming and remote firmware upgrade.
• PTZ control capability of speed dome cameras with Pelco D Protocol
• Multi-language support
• Enter password to ensure a high degree of safety.
Page 3
USER MANUAL
DIGITAL VIDEO RECORDER DR-N16
Page: - 3 - Page: - 3 - Page: - 3 -
DSE srl - ITALY - WWW.DSE.EU
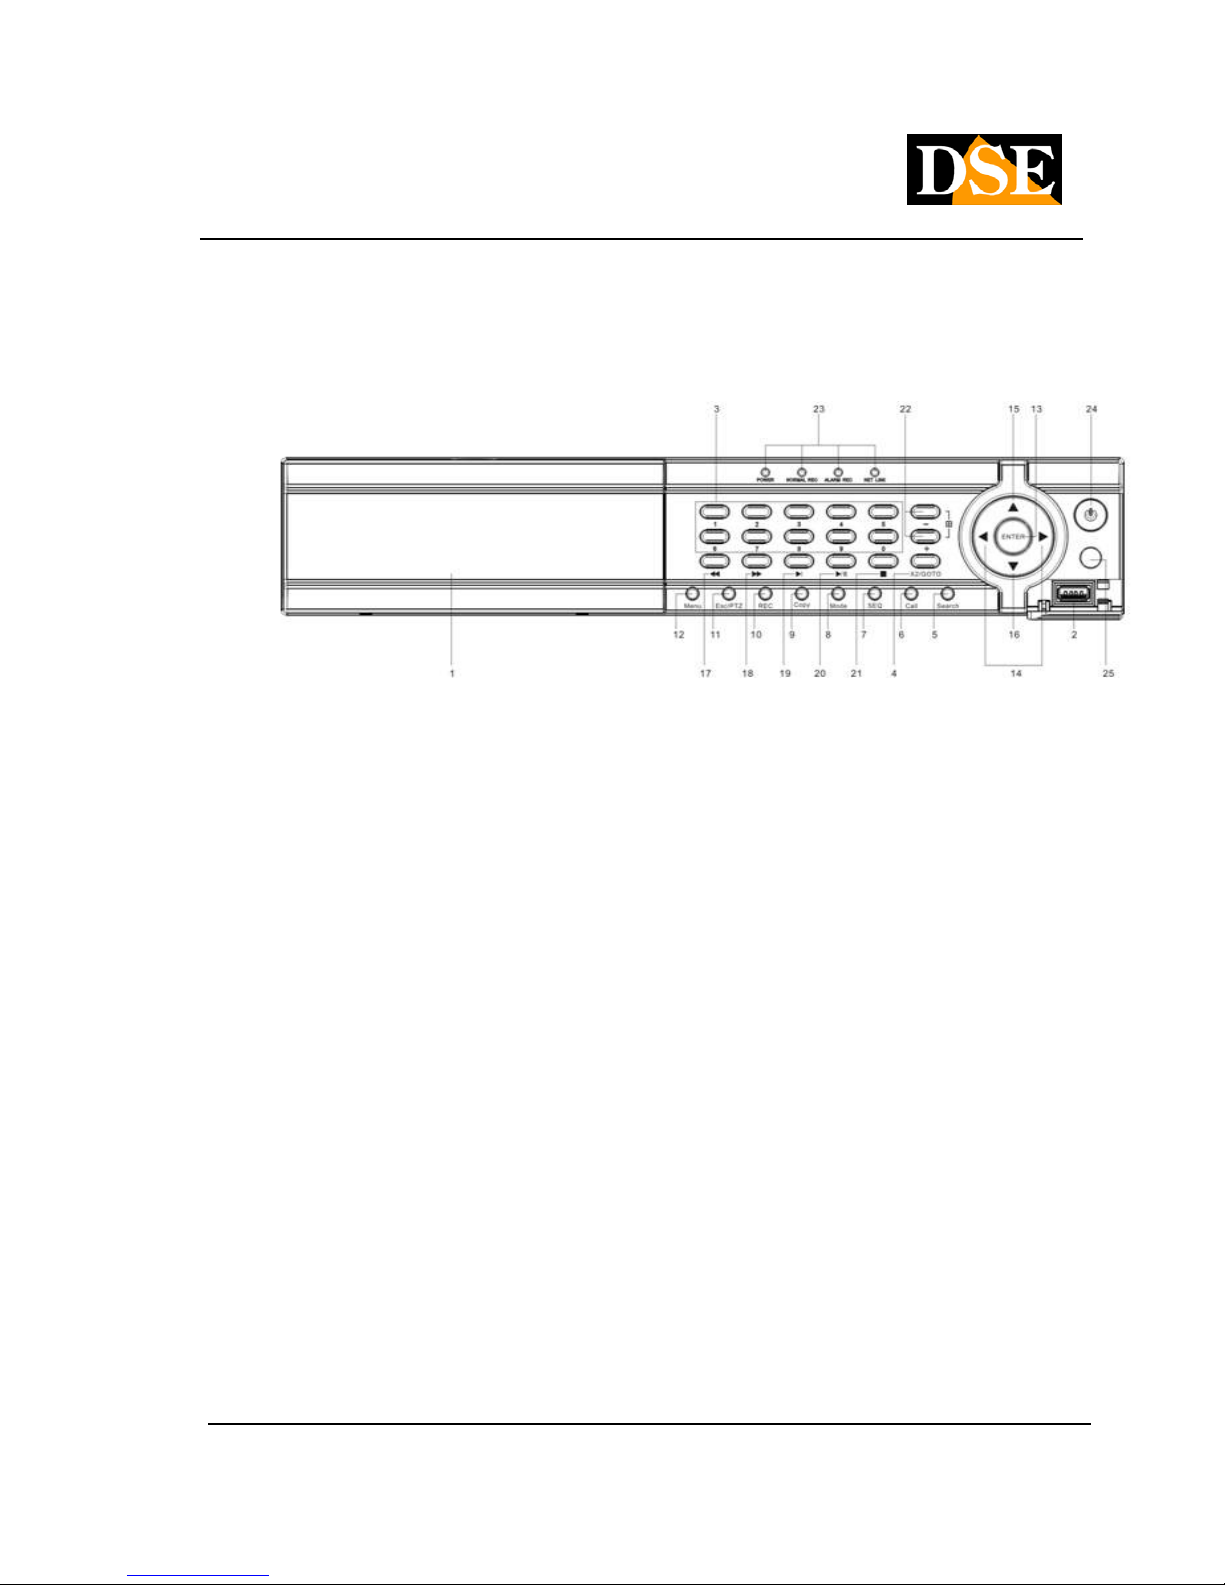
2. Front controls, connections and remote control
2.1 Front controls
1 Front Door
Drawer for Hard Disk
2 USB port
USB 2.0 Connection device, DVD + RW, etc. ..
3 Keys Alphanumeric
They are used for the selection of a camera.
4 button X2 / GOTO
Pressing this button in PTZ control can move the camera in preset positions (PRESET).
In full screen mode you get a Digital Zoom X2 / X4
5 Button SEARCH
Pressing this button opens the search menu.
6 Button CALL
Pressing this button switches between full screen view to the initial multivision and vice versa. In some
dialogs, this button is used for various functions.
7 Button SEQ
Pressing this button in full-screen mode will start a scan of all video inputs. In some dialogs, this button is
used for various functions.
Page 4

USER MANUAL
DIGITAL VIDEO RECORDER DR-N16
Page: - 4 - Page: - 4 - Page: - 4 -
DSE srl - ITALY - WWW.DSE.EU
8 MODE button 8 MODE button
Press this button to switch between live mode and playback. In some dialogs, this button is used for various
functions.
9 Button COPY
This button allows you to copy the playback images to an external memory via USB. Press again to stop
copying.
10 REC Button
Pressing this button will start manual recording and pressing it a second time will stop.
11 Button ESC / PTZ
Pressing this button in the main display screen, you can enter or exit the PTZ control if the selected camera is
a dome camera connected to the rear RS485 port.
12 MENU button
Press this button to display the main menu or return to the previous display (ESC).
13 Enter button
This button is used in many cases to confirm the data.
14 left / right button (◄, ►)14 left / right button (◄, ►)
In PTZ control, press these buttons to move the camera. In viewing movies recorded press these buttons to
go forward or rewind. In other situations. press this button to move the cursor or focus on a particular window.
15 Sù Button (▲)15 Sù Button (▲)
In most cases, press this button to move the cursor up. In PTZ control, press this button to tilt the camera
upwards (TILT). In text editing mode, this button is used as a space bar.
16 Down Button (▼)
In most cases, press this button to move the cursor downwards. In PTZ control, press this button to tilt down
the camera. In text editing mode, this button is used as a DELETE key to delete.
Page 5

USER MANUAL
DIGITAL VIDEO RECORDER DR-N16
Page: - 5 - Page: - 5 - Page: - 5 -
DSE srl - ITALY - WWW.DSE.EU
17 Rewind Button
Press this button to go back into play.
18 Fast Forward Button
Press this button to move forward in playback.
19 single-step button
Press this button to play back recorded images step by step.
20 Play / Pause button ( 20 Play / Pause button (
)
Press this button to start or pause playback of recorded movies.
21 Stop Button
Press this button to stop playback.
22 +/- button multivision (
)
Press this button to choose to view one camera full screen or split the screen into quadrants to display
multiple cameras simultaneously. E 'can see the screen
1,4,7,9,10,13,16 cameras. In other circumstances, press this button to change the contents.
23 Leds
Power indicators, recording, alarm, access network and dialogue network.
24 Power button 25 IR receiver
It receives the signal sent to it from the remote control. Avoid obstacles that can interfere in the signal
direction.
Page 6
USER MANUAL
DIGITAL VIDEO RECORDER DR-N16
Page: - 6 - Page: - 6 - Page: - 6 -
DSE srl - ITALY - WWW.DSE.EU
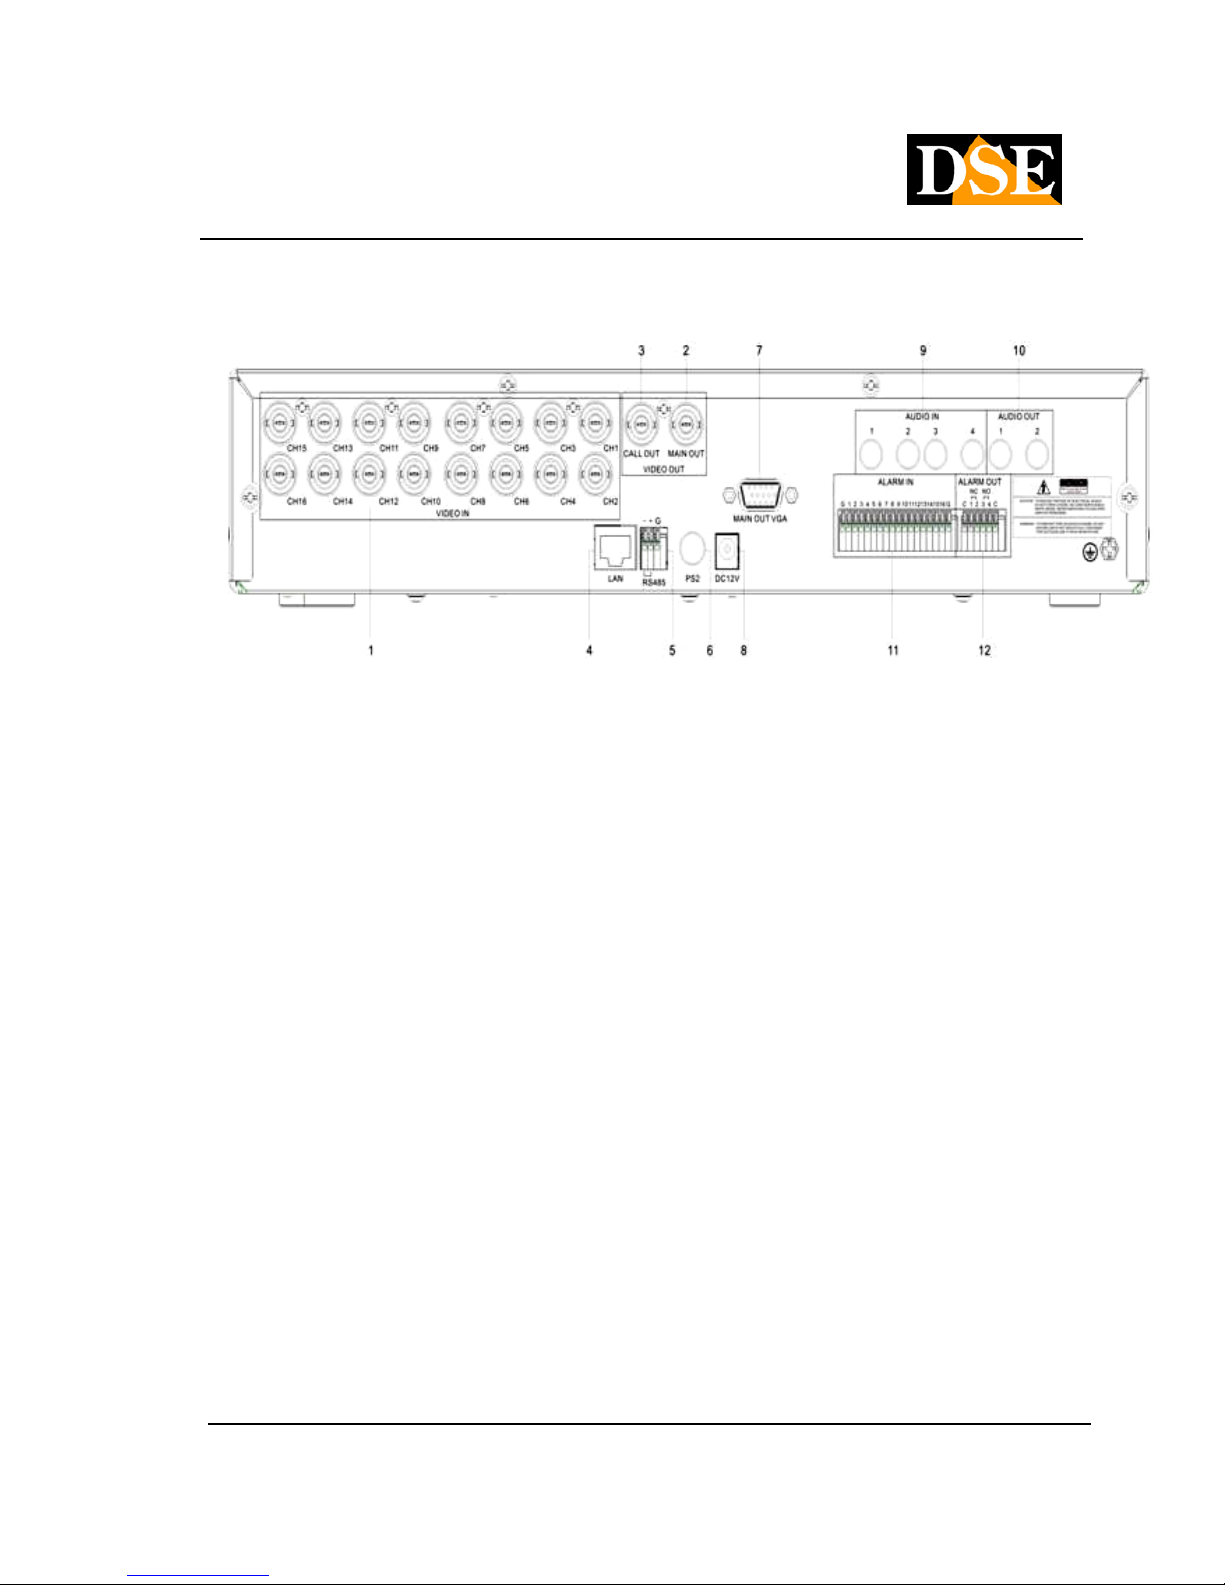
2.2 Connections
1 Video Input Connectors (1-16)
Connect cameras to these BNC connectors. If the cable has RCA connectors using adapters
2 main video output connector (MAIN OUT)
BNC connector for connecting the analog type main external monitor. It display all the windows even if the
video signal is absent and provides access to the programming menu.
3 Auxiliary Video Output Connector (CALL OUT)
BNC connector to connect a secondary external monitor said CALL. The monitor said no CALL visualises the
menu, but only images from the cameras. Compared to the main output monitor it has an independent
programming and visualization can bring up specific cameras according to alarm events.
4 Ethernet connector
Connect the unit to an Ethernet 10/100 Base-T through this door. E 'can also connect a PC directly with a
crossover cable or ADSL modem.
5 RS-485 connector
RS485 port to connect the twisted pair leads commands to speed dome cameras.
6 Mouse Port
It allows to connect the mouse to the VCR (inclusive). The mouse is not
Page 7

USER MANUAL
DIGITAL VIDEO RECORDER DR-N16
Page: - 7 - Page: - 7 - Page: - 7 -
DSE srl - ITALY - WWW.DSE.EU
indispensable for the use of the appliance but is faster and more convenient to use than the front buttons.
7 VGA connector
VGA connector for PC monitor output. And 'possible to directly connect a PC monitor with a VGA cable. This
replica output exactly the analog output MAIN
8 Power connector
Connect the power supply
9 Audio input connector (AUDIO IN 1-4)
These RCA connectors allow you to enter up to 4 external audio inputs to record audio files into the VCR.
10 Audio output connector (AUDIO OUT 1-2)
This RCA connector allows you to connect an external audio device to play back the recorded audio.
11 alarm inputs
You can connect sensors 16 or external contacts to generate alarms. The 2-wire inputs are connected
between the common terminals (G) and the numbered terminal (1..16). From programming you can define
whether the working condition is NO (normally open) or NC (normally closed)
12 Alarm output
Here it is possible to connect external devices to operate in the event of an alarm. Terminals C-1/2 Normally
closed (NC) terminals C-3/4 Normally open (NO)
Page 8

USER MANUAL
DIGITAL VIDEO RECORDER DR-N16
Page: - 8 - Page: - 8 - Page: - 8 -
DSE srl - ITALY - WWW.DSE.EU
2.3 Remote Control
The remote is a standard accessory with the DVR to facilitate the user. You can perform all the functions
with the remote control at a distance instead of going to select the front panel. The effective distance is
about 10 meters without any obstacle.
The keyboard of the DR-N16 also has only the essential buttons for
operation, while several additional functions are only available using the mouse or remote control.
commands
Each of these keys corresponds to those present in the front panel.
Page 9
USER MANUAL
DIGITAL VIDEO RECORDER DR-N16
Page: - 9 - Page: - 9 - Page: - 9 -
DSE srl - ITALY - WWW.DSE.EU
3. Installation
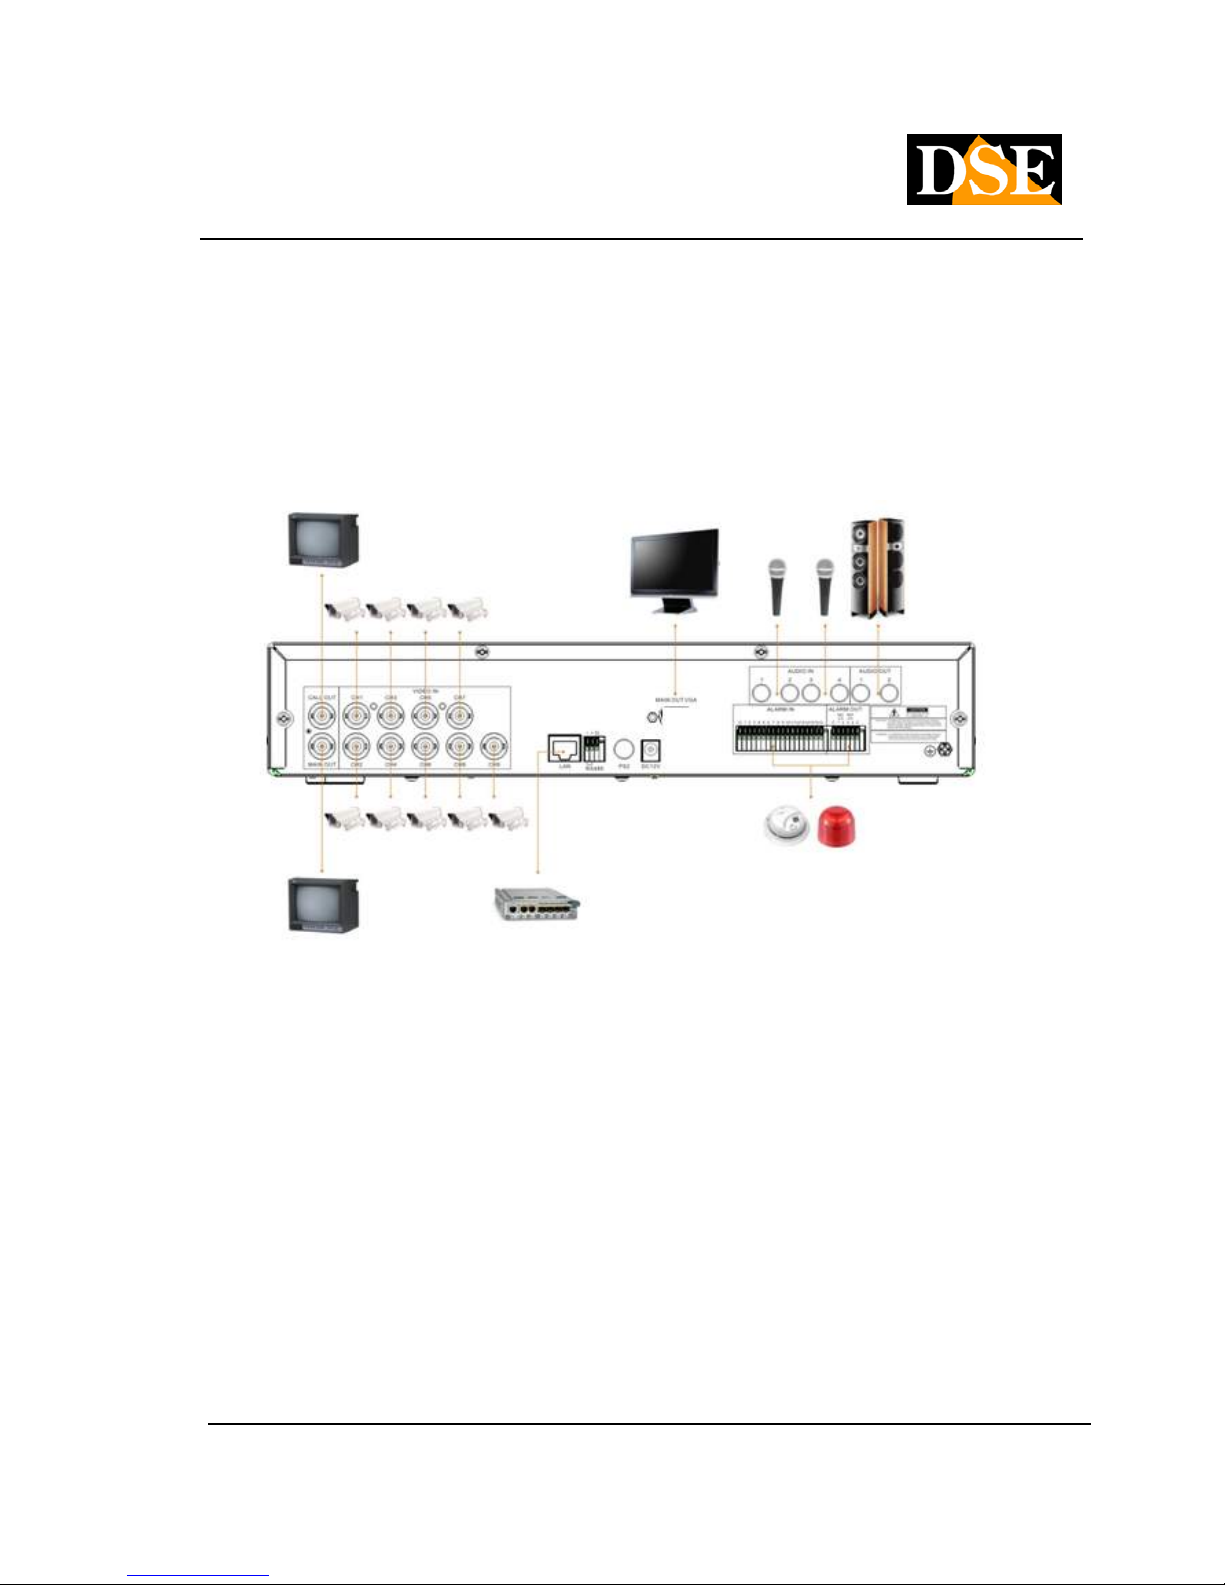
3.1 Basic Connections
Before turning on the VCR to ensure this, the following connections:
• Connect cameras
The cameras are connected to the BNC Video IN (channel 1 ... 16). If the cable you have available
has RCA connectors you must use a RE-BNCRCA1 adapter.
• Connect the main monitor
A classic CRT or LCD monitor or a TV can be connected to the MAIN OUT with BNC attack.
Alternatively you can collagre a PC to the VGA monitor.
• hard disk installation
The first thing to do is to install the hard drive inside the equipment. Without hard-disk video recorder
it is obviously not able to function. Before installation make sure the hard drive is the type SATA it is obviously not able to function. Before installation make sure the hard drive is the type SATA
3,5, Then install the hard disk: 3,5, Then install the hard disk:
Page 10

USER MANUAL
DIGITAL VIDEO RECORDER DR-N16
Page: - 10 - Page: - 10 - Page: - 10 -
DSE srl - ITALY - WWW.DSE.EU
1. Turn off the appliance open the VCR removing the protection 1. Turn off the appliance open the VCR removing the protection
unscrewing the upper side fixing screws.
2. Attach the hard disk unit in its seat by means of the screws 2. Attach the hard disk unit in its seat by means of the screws
fixing.
3. Connect the red SATA cable for data and power cable.
4. Close the device with its casing. 4. Close the device with its casing.
The video recorder also features a front drawer in which you can, if necessary, install a second hard
drive removed from the front.
Note: Before you start recording you must perform physical formatting of the hard drive Note: Before you start recording you must perform physical formatting of the hard drive
according to the instructions given later in this section
6.
• feeder Connection
Connect the power supply 220VAC / 12VDC supplied to the rear connector 12VDC
3.2 Other connesioni
• audio Inputs
Camera equipped with microphone, or separate microphone can be connected to DR-N16 through
the 4 inputs AUDIO IN. Be sure to set the audio functions in the setup of DVR cameras so as to
match the audio input to the correct camera ..
• audio Outputs
You can connect speakers, headphones or other external audio device through the AUDIO OUT
output.
• Alarm inputs
CH1 ... 16 - it allows you to connect external alarm sensors which can activate recording. They are
compatible with both NO contacts NC to be programmed in configuration. Connect the contact between
the alarm terminals (1 ... 16) and municipalities
G.
• Alarm output
4 relay outputs for external alarm devices.
C-1 and C-2 = Alarm outputs 1-2 of NC type (normally closed) C-3 and C-4 = Alarm
outputs 3-4 NO type (normally closed)
• LAN
The connection to the network is simply the VCR via LAN cable. Before using the LAN connection
set parameters in the internal menu of the VCR.
Page 11

USER MANUAL
DIGITAL VIDEO RECORDER DR-N16
Page: - 11 - Page: - 11 - Page: - 11 -
DSE srl - ITALY - WWW.DSE.EU
• USB 2.0
If the user wants to use USB 2.0 devices to retrieve audio / video recordings or important images
you can connect this device to the VCR through the appropriate rear USB port. You can connect
USB flash drives, USB Hard Disk and DVD burners.
• CALL OUT
E 'can connect a second TV monitor for surveillance through the CALL OUT output. Depending on
the programming this monitor only displays the full screen images of the cameras when they occur
alarm events (alarm or motion) or the images of all cameras sequentially. It does not allow
programming menu control.
• PTZ Cameras
DR-N16 is capable of controlling motorized cameras speed dome with PELCO D protocol and
SAMSUNG SCC-641P. The BUS is connected to terminals A / B of the RS485 port according to the
directions supplied by the camera manufacturer. The communication settings are operating in
RS485 configuration menu
3.3 Language Selection
The DR-N16 VCR comes with a factory setting of English. This manual is for convenience to the
instructions in Italian, so as a preliminary step necessary to set the language in the options. The
procedure is as follows:
• Turn on your DVR
Press the ON / OFF button
• Press MENU
The programming menu appears on the screen
• Select LOGIN / LOGOUT
Press ENTER
• Press LOGIN
Without changing the default password, press ENTER. You access the menu.
• Press SETUP
Select with the arrow keys and press ENTER
• Press SYSTEM
Select with the arrow keys and press ENTER
• Choose LANGUAGE
Select LANGUAGE with the arrows and press +/- to select the Italian language.
• Press MENU and 2 times ENTER
To exit the menu and save
The DR-N16 will perform a restart and will show MENU in the Italian language.
Page 12
USER MANUAL
DIGITAL VIDEO RECORDER DR-N16
Page: - 12 - Page: - 12 - Page: - 12 -
DSE srl - ITALY - WWW.DSE.EU
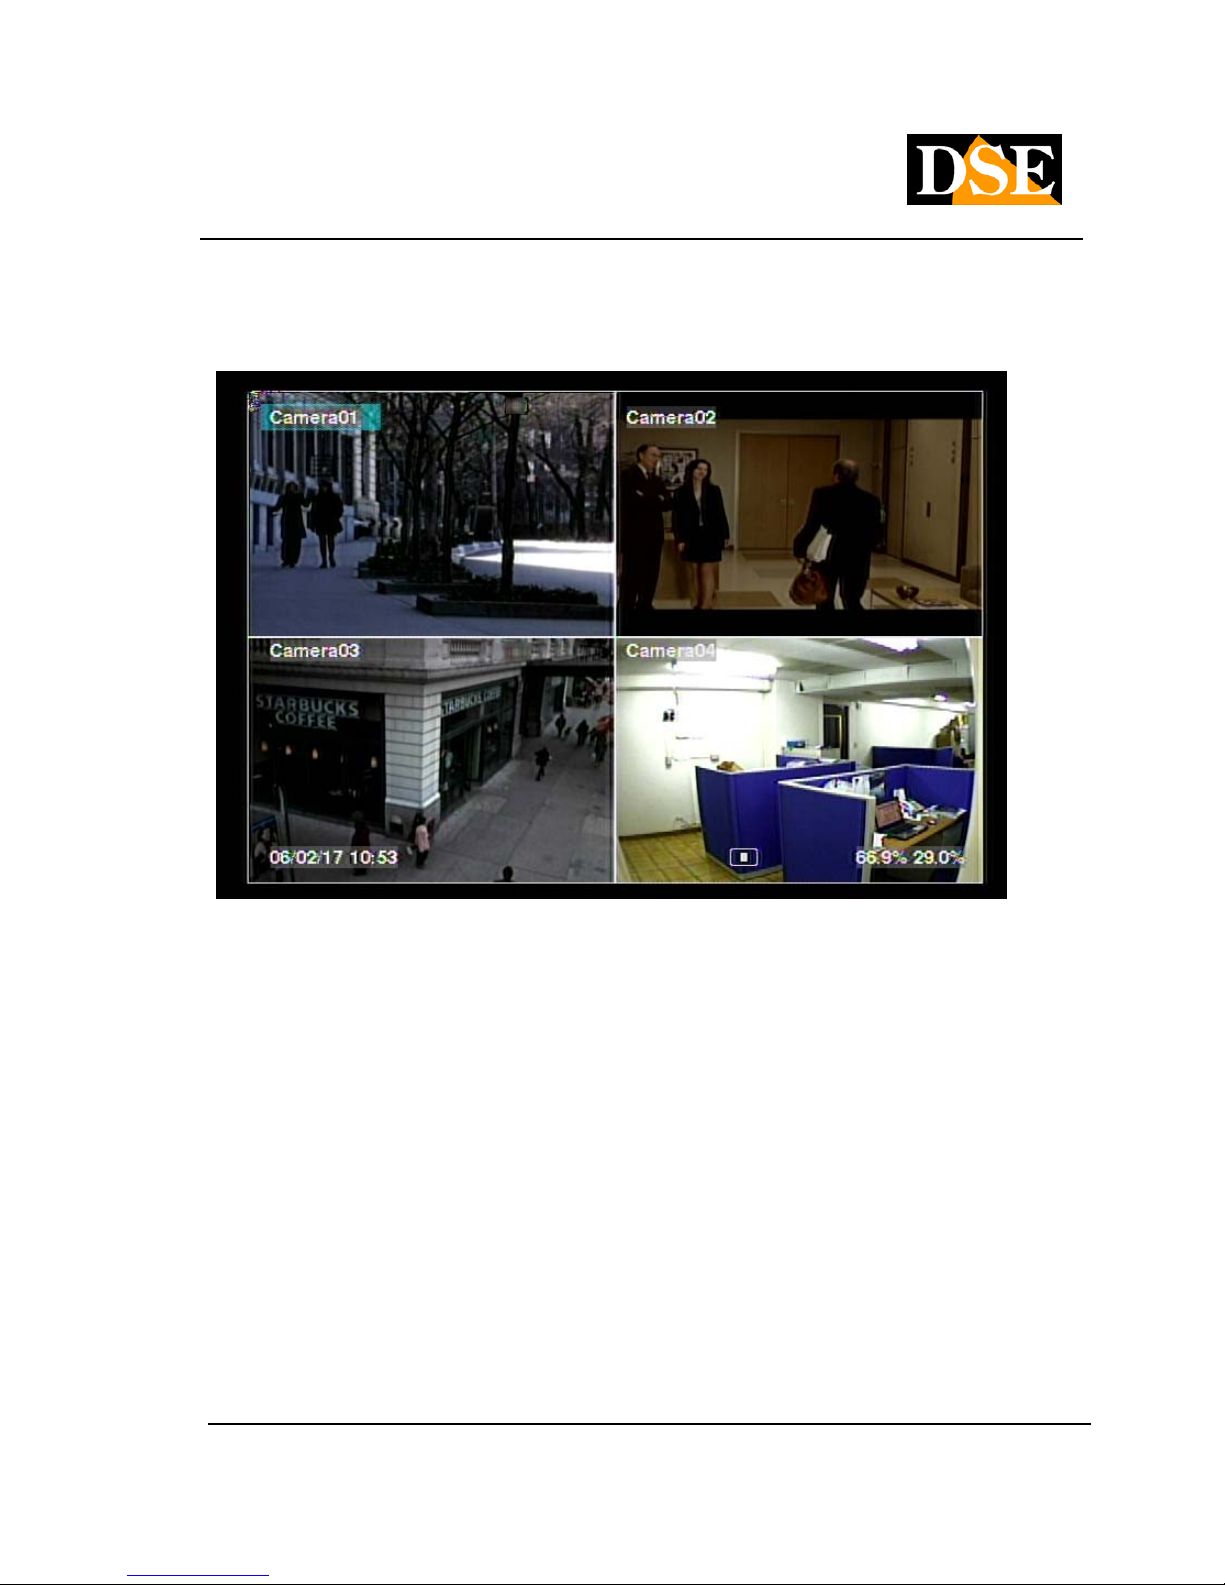
4. Main Screen And Basic Operations
The monitor is divided into multiple display windows, as indicated above, is the main screen after starting
the system. You can view
4-7-9-10-13-16 windows by pressing the +/- buttons or a single full screen by pressing the corresponding
channel button. To return to the multi-vision camera, just press the +/- button.
CAUTION
Before you can perform any operation on the DVR you have to login with the Log In procedure (see
below)
The name of the camera overlays can be customized. In the lower left of the screen there is indicated
the date and current time while in the lower left may appear the following system directions (from right to
left in order):
SPACE OCCUPIED - Percentage of Hard Disk space occupied. They are indicated 2
36%
Page 13

USER MANUAL
DIGITAL VIDEO RECORDER DR-N16
Page: - 13 - Page: - 13 - Page: - 13 -
DSE srl - ITALY - WWW.DSE.EU
percentages: the figure on the right shows the space occupied by normal recording, the second left as
alarm recording.
MUTE - The speaker icon indicates that audio is activated and if it appears disabled because you have
activated the mute function
ZOOM - When using the digital zoom will appear indicating the selected magnification X2 or X4
REGISTRATION - The recording icon appears if the recording is in progress. BACK UP - icon means
saving being filmed. SEQUENCE - The letter S indicates that the cyclical scan is SEQ
Page 14
USER MANUAL
DIGITAL VIDEO RECORDER DR-N16
Page: - 14 - Page: - 14 - Page: - 14 -
DSE srl - ITALY - WWW.DSE.EU
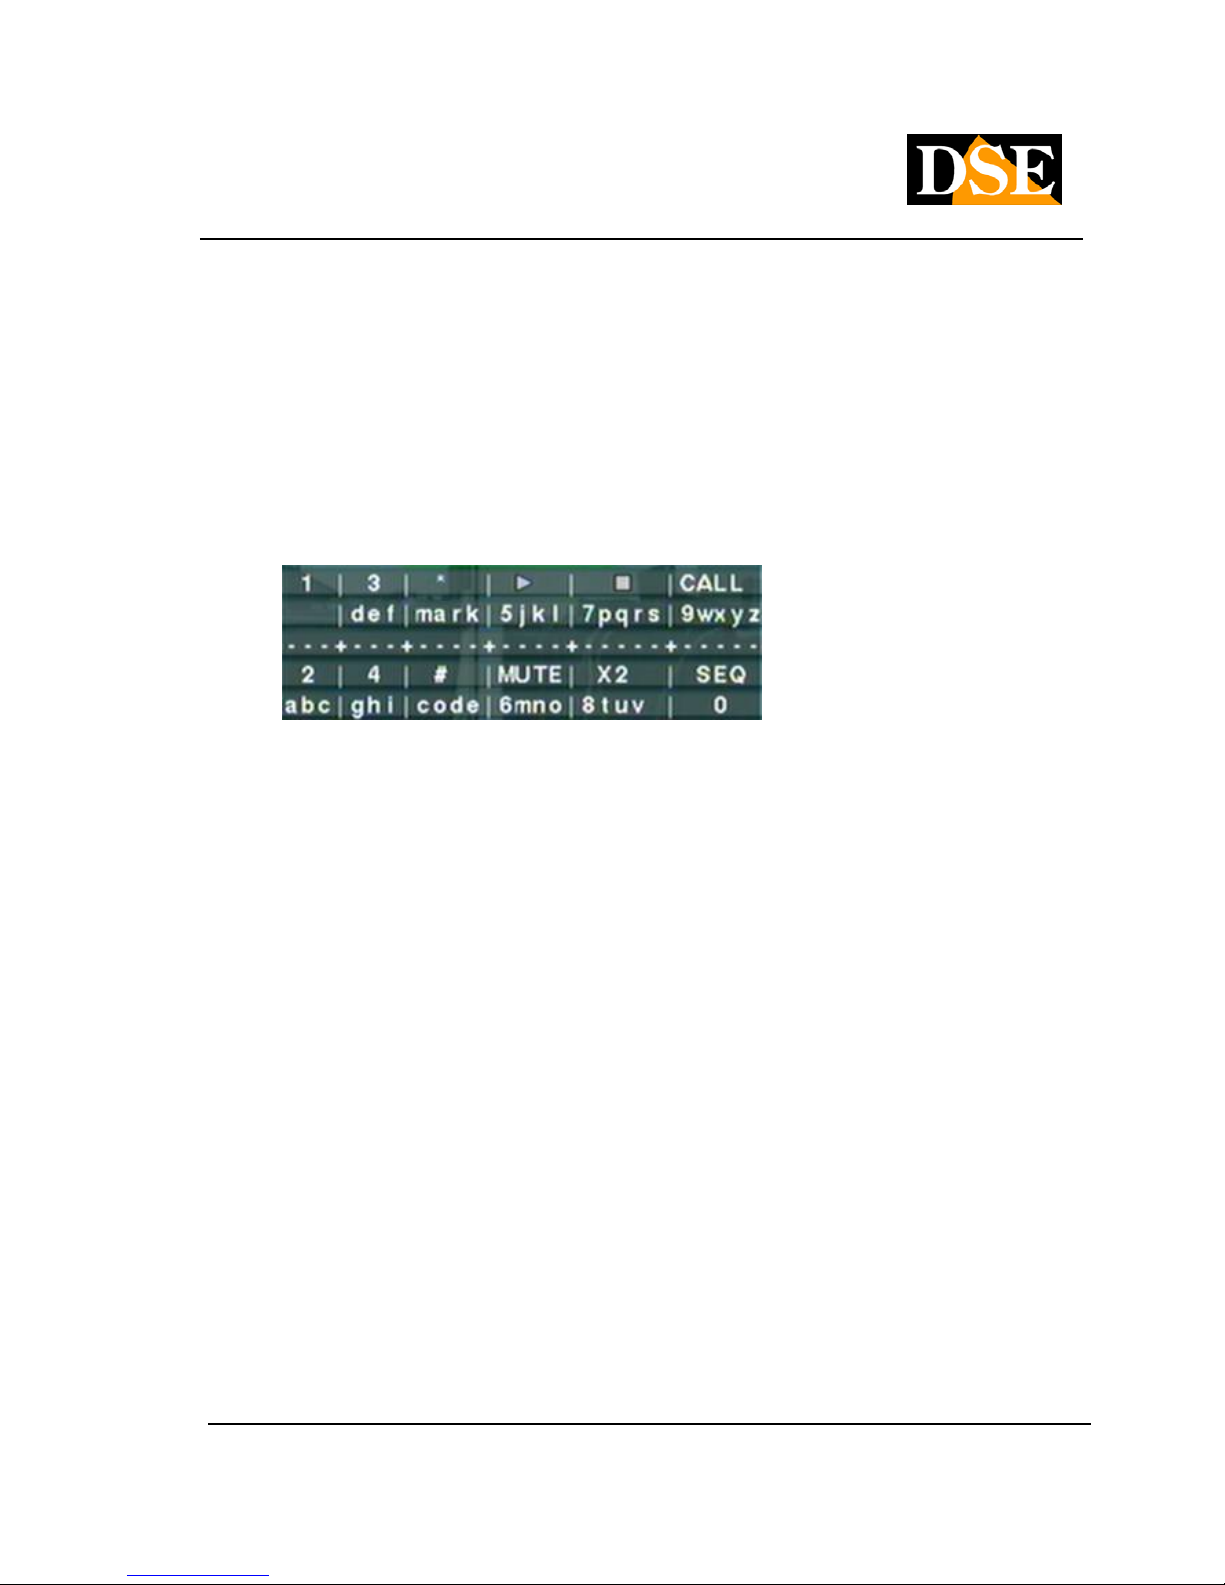
4.1 Enter text
Certain circumstances such as writing log, write the name of the camera etc. must require entering text.
To enter any text must operate on TV REMOTE and follow the guidelines below. To enter any text must operate on TV REMOTE and follow the guidelines below. To enter any text must operate on TV REMOTE and follow the guidelines below.
(1) Press ENTER to display the screen with controls for writing to
panel, as illustrated below. It will see a flashing cursor indicates the point where you want to write
the text.
(2) Press ◄► to move the cursor from left to right. (3) Press CODE ( the remote control) in the text to (2) Press ◄► to move the cursor from left to right. (3) Press CODE ( the remote control) in the text to (2) Press ◄► to move the cursor from left to right. (3) Press CODE ( the remote control) in the text to (2) Press ◄► to move the cursor from left to right. (3) Press CODE ( the remote control) in the text to (2) Press ◄► to move the cursor from left to right. (3) Press CODE ( the remote control) in the text to
change the way of writing
(Lowercase, uppercase ....). The on-screen indicators show the following settings:
123 = numbers only 123 = numbers only
abc = lower case abc = lower case
ABC = case ABC = case
CODE = unused. (4) Press the number keys ( 1-9, 0) on the remote control referring to what you want CODE = unused. (4) Press the number keys ( 1-9, 0) on the remote control referring to what you want CODE = unused. (4) Press the number keys ( 1-9, 0) on the remote control referring to what you want CODE = unused. (4) Press the number keys ( 1-9, 0) on the remote control referring to what you want
write as well as on a cell phone. (5) Pressing mark on the remote control will show a list of all write as well as on a cell phone. (5) Pressing mark on the remote control will show a list of all write as well as on a cell phone. (5) Pressing mark on the remote control will show a list of all
punctuation
existing and most special characters. to press ▲ ◄► ▼ to change the selection. (6) If you make a existing and most special characters. to press ▲ ◄► ▼ to change the selection. (6) If you make a existing and most special characters. to press ▲ ◄► ▼ to change the selection. (6) If you make a existing and most special characters. to press ▲ ◄► ▼ to change the selection. (6) If you make a
mistake, press BS to delete the character to the left of mistake, press BS to delete the character to the left of mistake, press BS to delete the character to the left of
cursor, or press OF THE to delete the character on which the cursor is placed. (7) In the typing and cursor, or press OF THE to delete the character on which the cursor is placed. (7) In the typing and cursor, or press OF THE to delete the character on which the cursor is placed. (7) In the typing and
the list of symbols press ENTER to go out and the list of symbols press ENTER to go out and the list of symbols press ENTER to go out and
save your changes, press ESC to exit without saving changes. save your changes, press ESC to exit without saving changes. save your changes, press ESC to exit without saving changes.
Page 15
USER MANUAL
DIGITAL VIDEO RECORDER DR-N16
Page: - 15 - Page: - 15 - Page: - 15 -
DSE srl - ITALY - WWW.DSE.EU
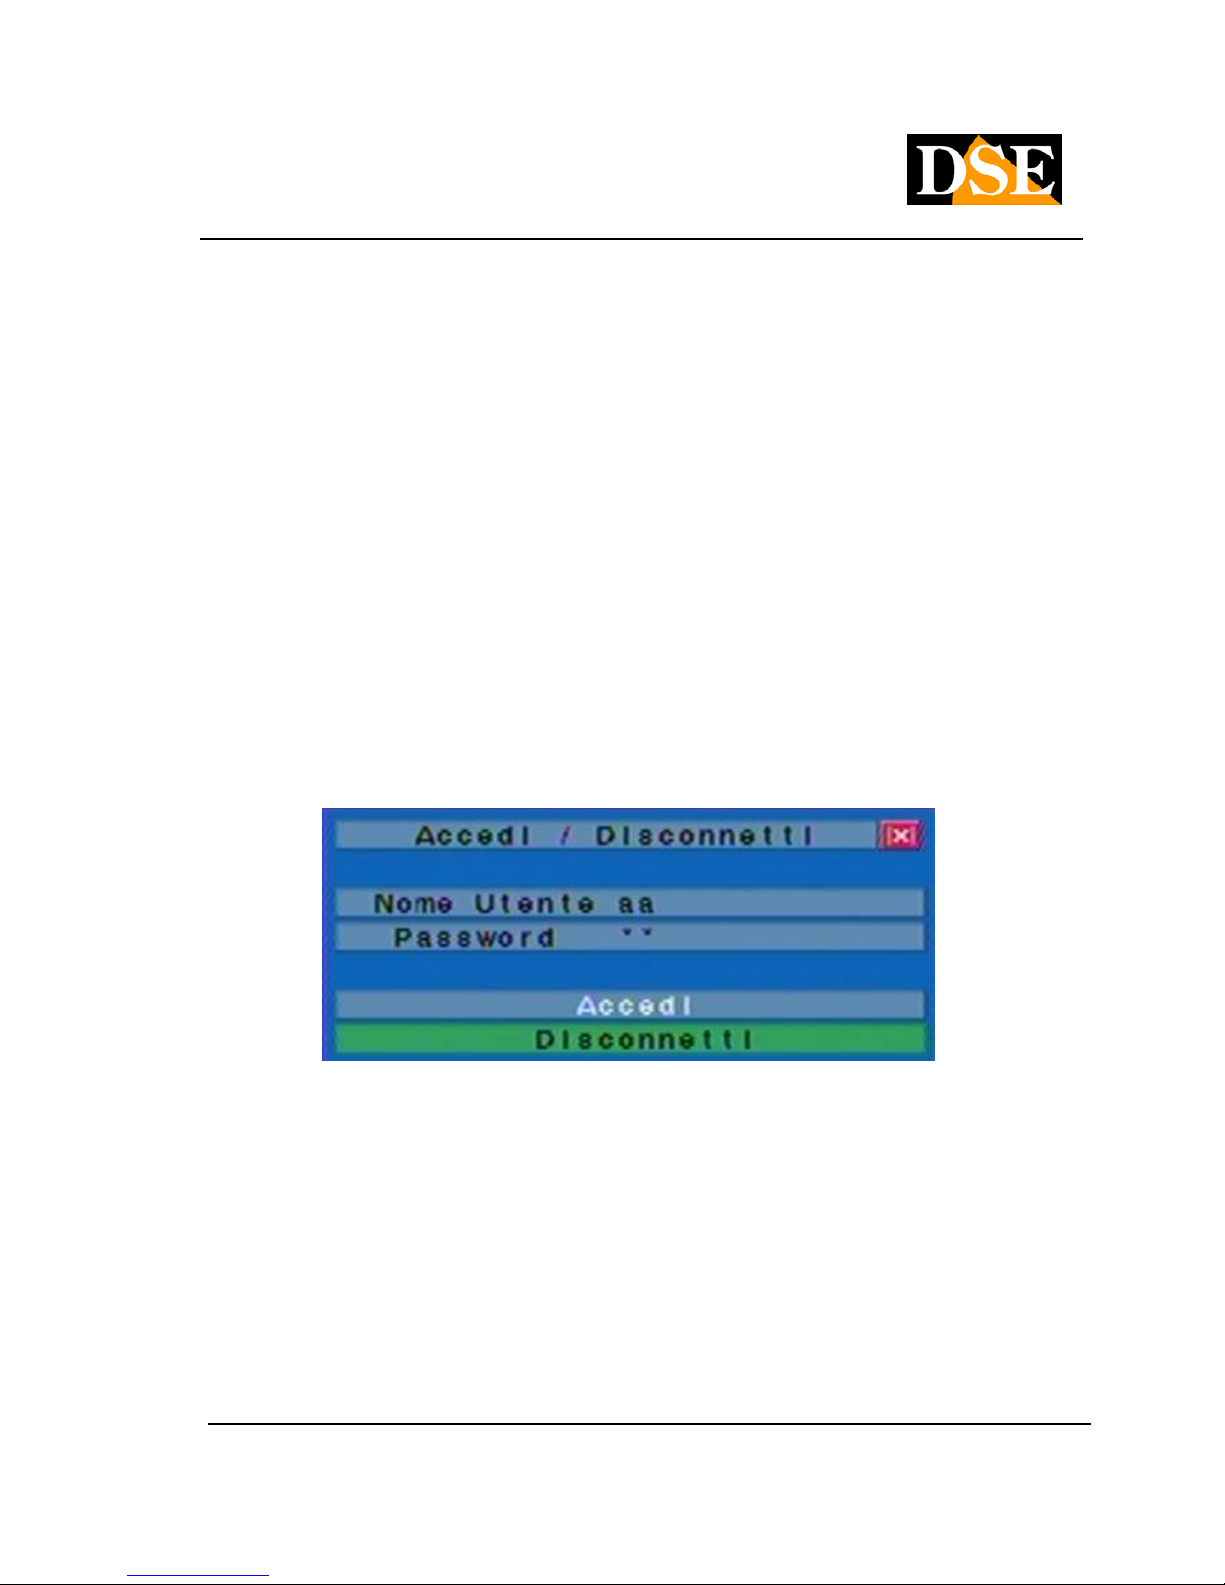
4.2 Sign in and sign out
The access to the functions of the DR-N16 is password protected. You can enter users with 3 different
access levels: Administrator, Supervisor, is Operator.access levels: Administrator, Supervisor, is Operator.access levels: Administrator, Supervisor, is Operator.access levels: Administrator, Supervisor, is Operator.
Just started the machine, if the user logs in, the system will treat it as a "guest" and can only see the
display of live cameras. To be able to have access to the full use of the DVR, you must log in with a user
name and a valid password.
The system allows access up to 18 different users. The administrator can set login and password for
each user. The access level operator can only see the live images, the supervisoreach user. The access level operator can only see the live images, the supervisoreach user. The access level operator can only see the live images, the supervisoreach user. The access level operator can only see the live images, the supervisor
You can also access recorded video, and the ' Administrator It can operate throughout the system without You can also access recorded video, and the ' Administrator It can operate throughout the system without You can also access recorded video, and the ' Administrator It can operate throughout the system without
blocks.
To access or log off the system, press MENU the main screen, then press ENTER on LOGIN / To access or log off the system, press MENU the main screen, then press ENTER on LOGIN / To access or log off the system, press MENU the main screen, then press ENTER on LOGIN / To access or log off the system, press MENU the main screen, then press ENTER on LOGIN /
DISCONNECT. A window will appear as illustrated below DISCONNECT. A window will appear as illustrated below
In Login / Logout window, follow the instructions described in
4.1precedente to write username is password, to press ▲ ▼ to move in the menu, then press ENTER to 4.1precedente to write username is password, to press ▲ ▼ to move in the menu, then press ENTER to 4.1precedente to write username is password, to press ▲ ▼ to move in the menu, then press ENTER to 4.1precedente to write username is password, to press ▲ ▼ to move in the menu, then press ENTER to 4.1precedente to write username is password, to press ▲ ▼ to move in the menu, then press ENTER to 4.1precedente to write username is password, to press ▲ ▼ to move in the menu, then press ENTER to 4.1precedente to write username is password, to press ▲ ▼ to move in the menu, then press ENTER to 4.1precedente to write username is password, to press ▲ ▼ to move in the menu, then press ENTER to 4.1precedente to write username is password, to press ▲ ▼ to move in the menu, then press ENTER to 4.1precedente to write username is password, to press ▲ ▼ to move in the menu, then press ENTER to
access the system. If the user wants to log out to let in OPERATOR mode must be selected
diconnetti, then press ENTER.diconnetti, then press ENTER.diconnetti, then press ENTER.
The unit leaves the factory already set up with a username it's a passwordThe unit leaves the factory already set up with a username it's a passwordThe unit leaves the factory already set up with a username it's a passwordThe unit leaves the factory already set up with a username it's a password
corresponding to the level of Administrator (user name: aa, password: 11).corresponding to the level of Administrator (user name: aa, password: 11).
You can use these settings unchanged to use the system for the first time and become familiar with the
system
Page 16

USER MANUAL
DIGITAL VIDEO RECORDER DR-N16
Page: - 16 - Page: - 16 - Page: - 16 -
DSE srl - ITALY - WWW.DSE.EU
If the user had forgotten all the passwords of directors, please contact your dealer or installer.
4.3 Basic Operations
The user, once logged in, you can perform several basic operations listed below:
• Numeric keys 0-9
Press the number buttons to choose which camera you want to view. Select the area box, then type
the number of the camera will appear in that box ..
• Alarm Reset
Press this button on the remote control to cancel alarm activation reset the alarm outputs and
silence the buzzer.
• MODE (Administrator / Supervisor)
On the main screen, press this button to mix cameras to screen playback and live viewing.
• SEQ
Press this button to enter or exit mode sequence (SCAN CYCLIC). For this mode requires that you Press this button to enter or exit mode sequence (SCAN CYCLIC). For this mode requires that you Press this button to enter or exit mode sequence (SCAN CYCLIC). For this mode requires that you
magnify one of the full-screen cameras. Once activated the sequence will alternate the cameras will
appear on the screen and an icon at the bottom to indicate that the mode SEQ It has been activated. appear on the screen and an icon at the bottom to indicate that the mode SEQ It has been activated. appear on the screen and an icon at the bottom to indicate that the mode SEQ It has been activated.
To pause the cyclical scanning press again SEQ. .
• CALL
Press this button to send the camera to full screen you have selected.
• SEARCH (Administrator / Supervisor)
Press this button on the main screen to enter the SEARCH menu that lets you browse the contents
of the Hard Disk.
• REC
Press this button to force manual recording, regardless of the time programmer. To stop recording,
press this button again.
Page 17

USER MANUAL
DIGITAL VIDEO RECORDER DR-N16
Page: - 17 - Page: - 17 - Page: - 17 -
DSE srl - ITALY - WWW.DSE.EU
• MENU
In the main multi-image screen, press this button to display the function menu.
• PTZ
In the main quad screen, press this button to activate the remote control PTZ camera (if the selected
camera is a speed dome camera).
• X2
In the full-screen mode, pressing this button will change the mode to
DIGITAL ZOOM. More information about zoom will find them later .. DIGITAL ZOOM. More information about zoom will find them later ..
• ▲ ◄► ▼▲ ◄► ▼
Press to select a camera. The selected camera's name will be highlighted.
• MUTE / VOL +/-
Press this button on the remote to control the audio output volume ..
•
+ / -
Press this button to switch between the views (cameras) available full screen, or to return to the
main screen with quadrivisione ..
Page 18
USER MANUAL
DIGITAL VIDEO RECORDER DR-N16
Page: - 18 - Page: - 18 - Page: - 18 -
DSE srl - ITALY - WWW.DSE.EU
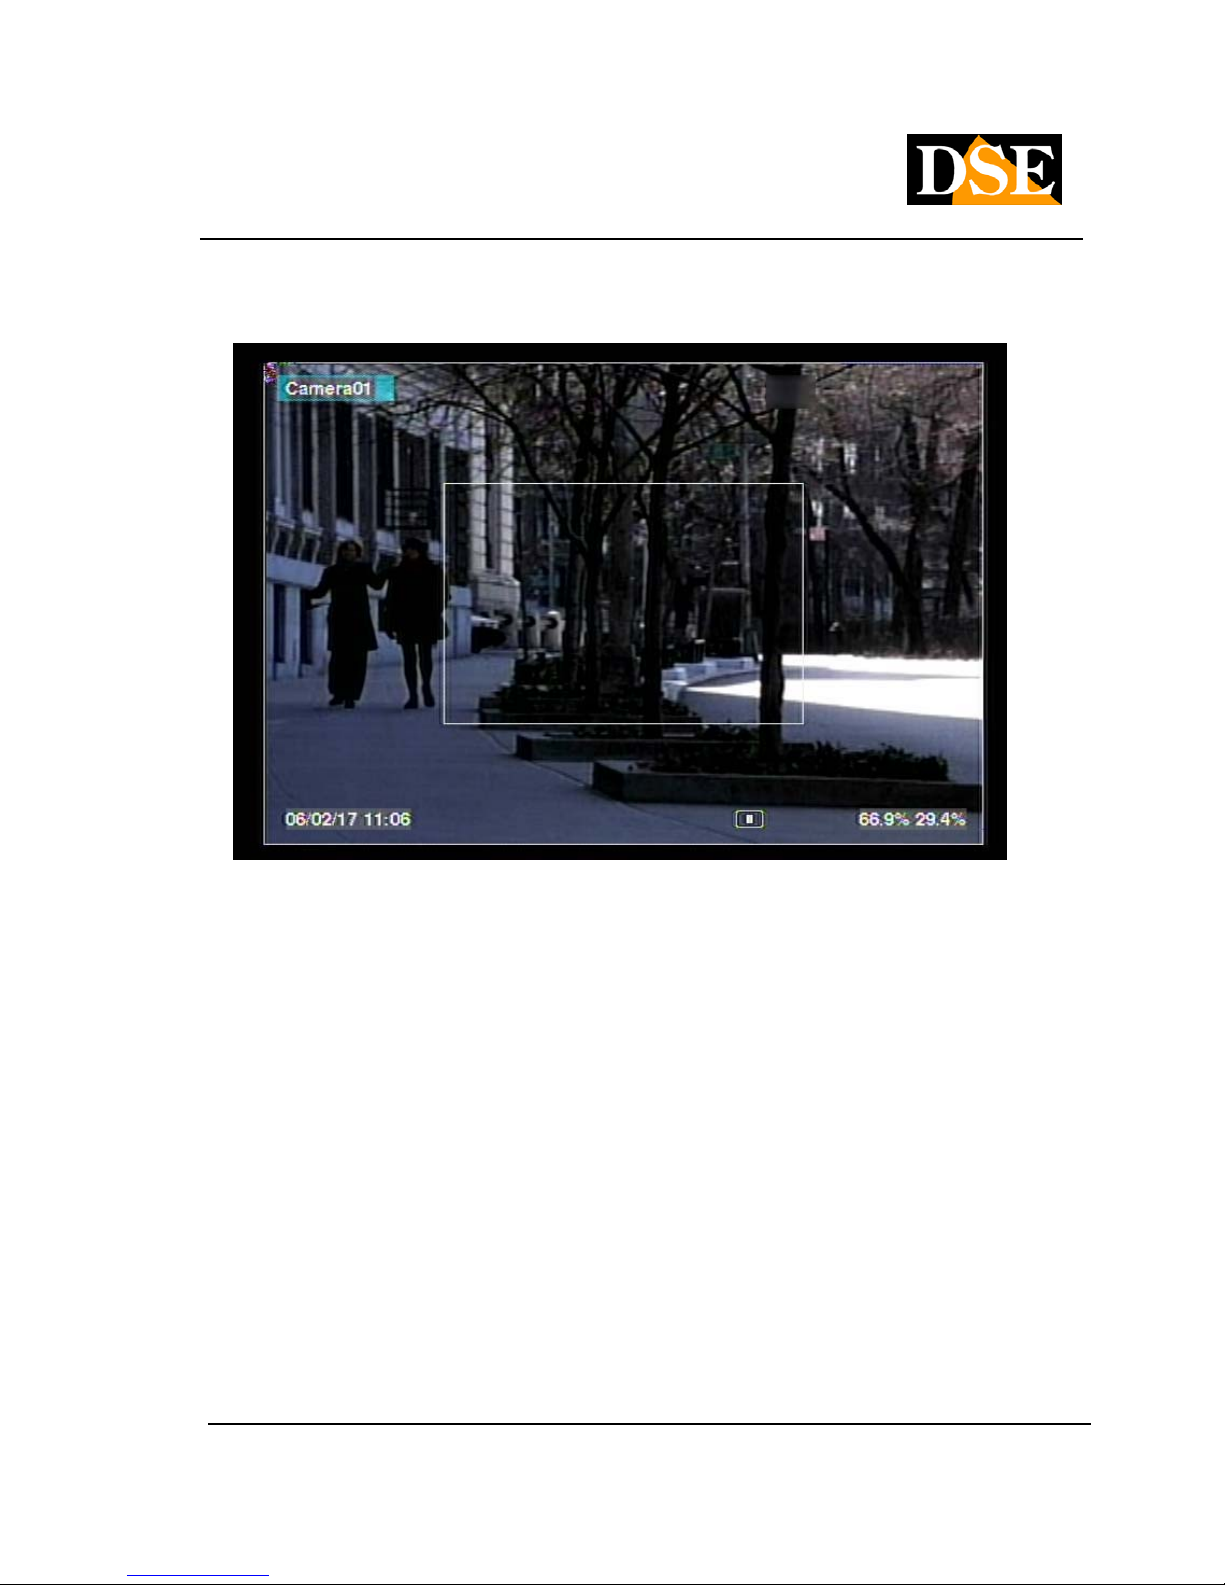
4.4 Digital Zoom
The system supports a ZOOM X2 and X4. To use this feature press
X2 on the remote control in full screen display. It will see a smaller window to select the particular to be X2 on the remote control in full screen display. It will see a smaller window to select the particular to be
enlarged, as shown in the picture above. The mode operations DIGITAL ZOOM They are the following: enlarged, as shown in the picture above. The mode operations DIGITAL ZOOM They are the following: enlarged, as shown in the picture above. The mode operations DIGITAL ZOOM They are the following:
• ▲ ▼ ◄►▲ ▼ ◄►
Press these buttons to move the zoom window in particular you want to enlarge.
• ENTER
Press this button to enlarge the detail that you chose.
• X2
Press this button to activate the DIGITAL ZOOM mode between the different displays NORMAL,
X2, X4.
• ESC
Press this button to turn off the function DIGITAL ZOOM. It will return to view the image full screen Press this button to turn off the function DIGITAL ZOOM. It will return to view the image full screen Press this button to turn off the function DIGITAL ZOOM. It will return to view the image full screen
(ZOOM X1).
Page 19
USER MANUAL
DIGITAL VIDEO RECORDER DR-N16
Page: - 19 - Page: - 19 - Page: - 19 -
DSE srl - ITALY - WWW.DSE.EU
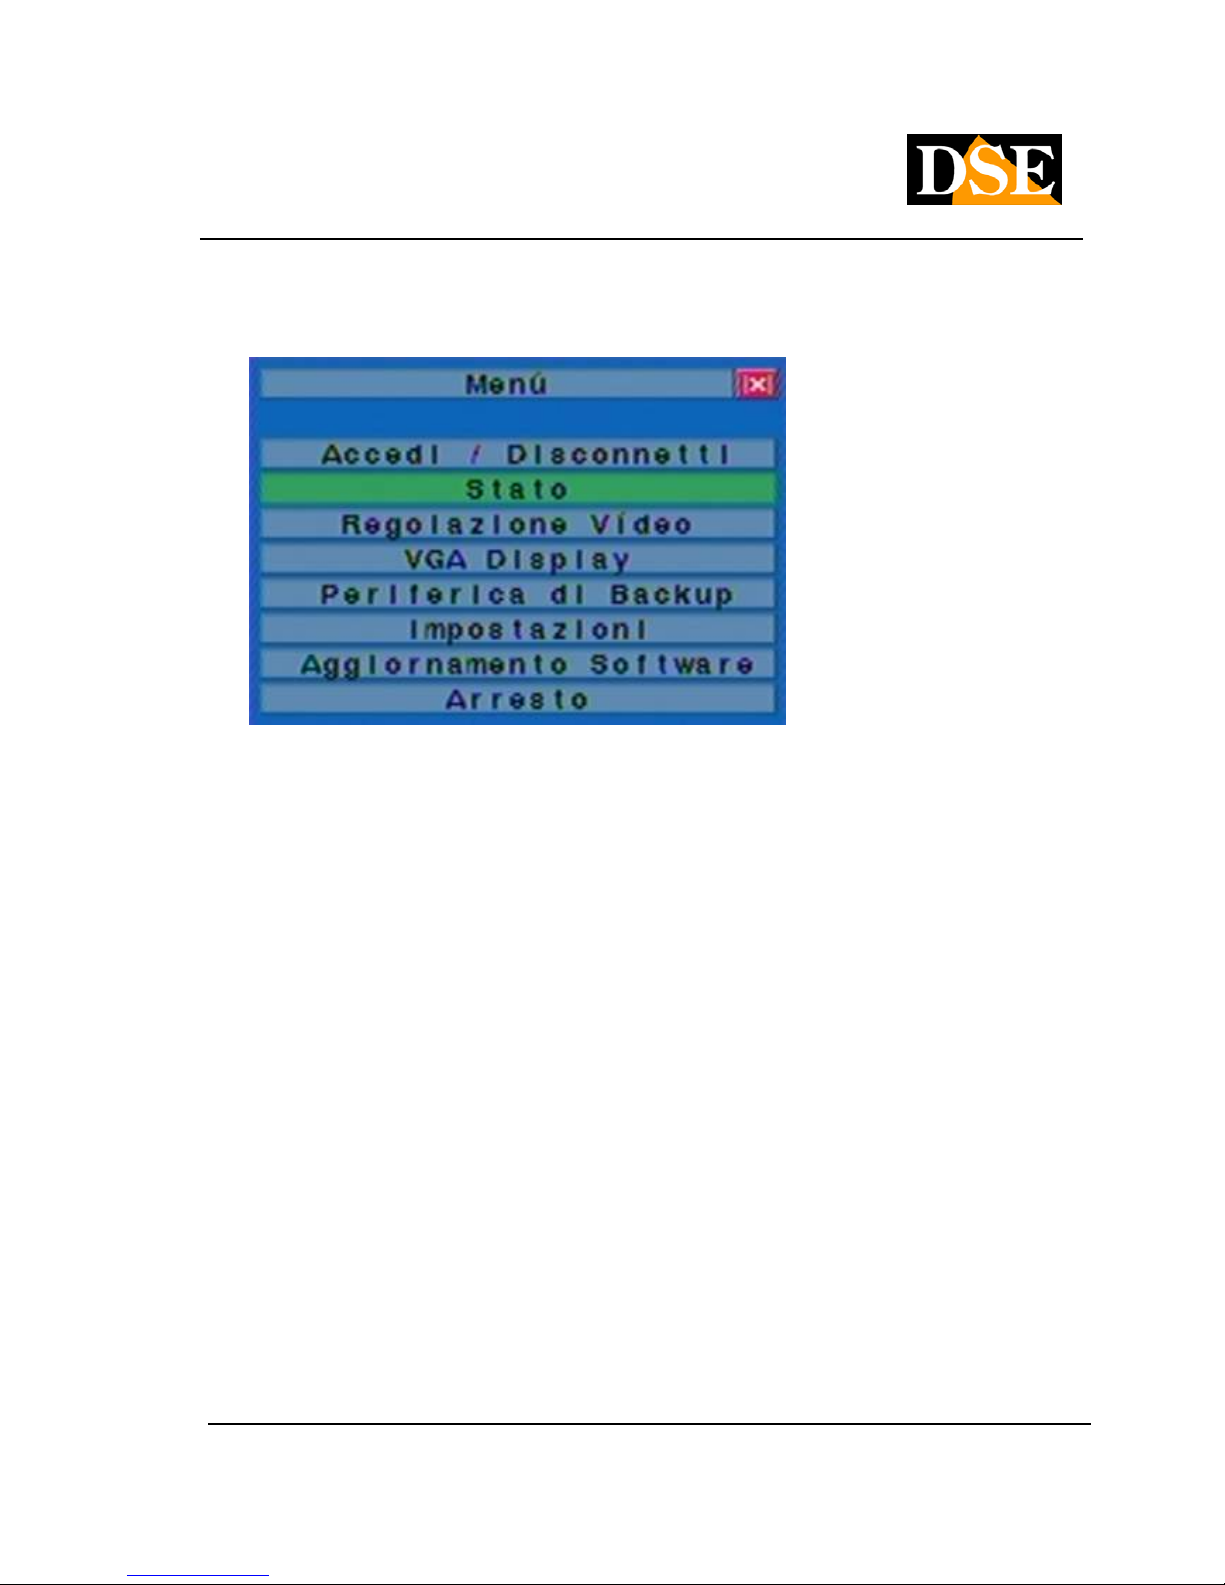
5. Main Menu
On the main screen, press MENU to display the MAIN MENU. In MAIN MENU There are a variety of On the main screen, press MENU to display the MAIN MENU. In MAIN MENU There are a variety of On the main screen, press MENU to display the MAIN MENU. In MAIN MENU There are a variety of
options to choose from. The options that you can access it are black, those in which it is not possible to
enter are white.
If most of the options are not accessible check that you are logged in as administrator as described
above.
The operations that the user must perform to use the MAIN MENU are the following:
• ▲ ▼
Press these buttons to operate the menu.
• ENTER
Press this button to select the highlighted option
• ESC
Press this button to exit the menu and return to the main screen.
5.1 Status Menu
Page 20
USER MANUAL
DIGITAL VIDEO RECORDER DR-N16
Page: - 20 - Page: - 20 - Page: - 20 -
DSE srl - ITALY - WWW.DSE.EU
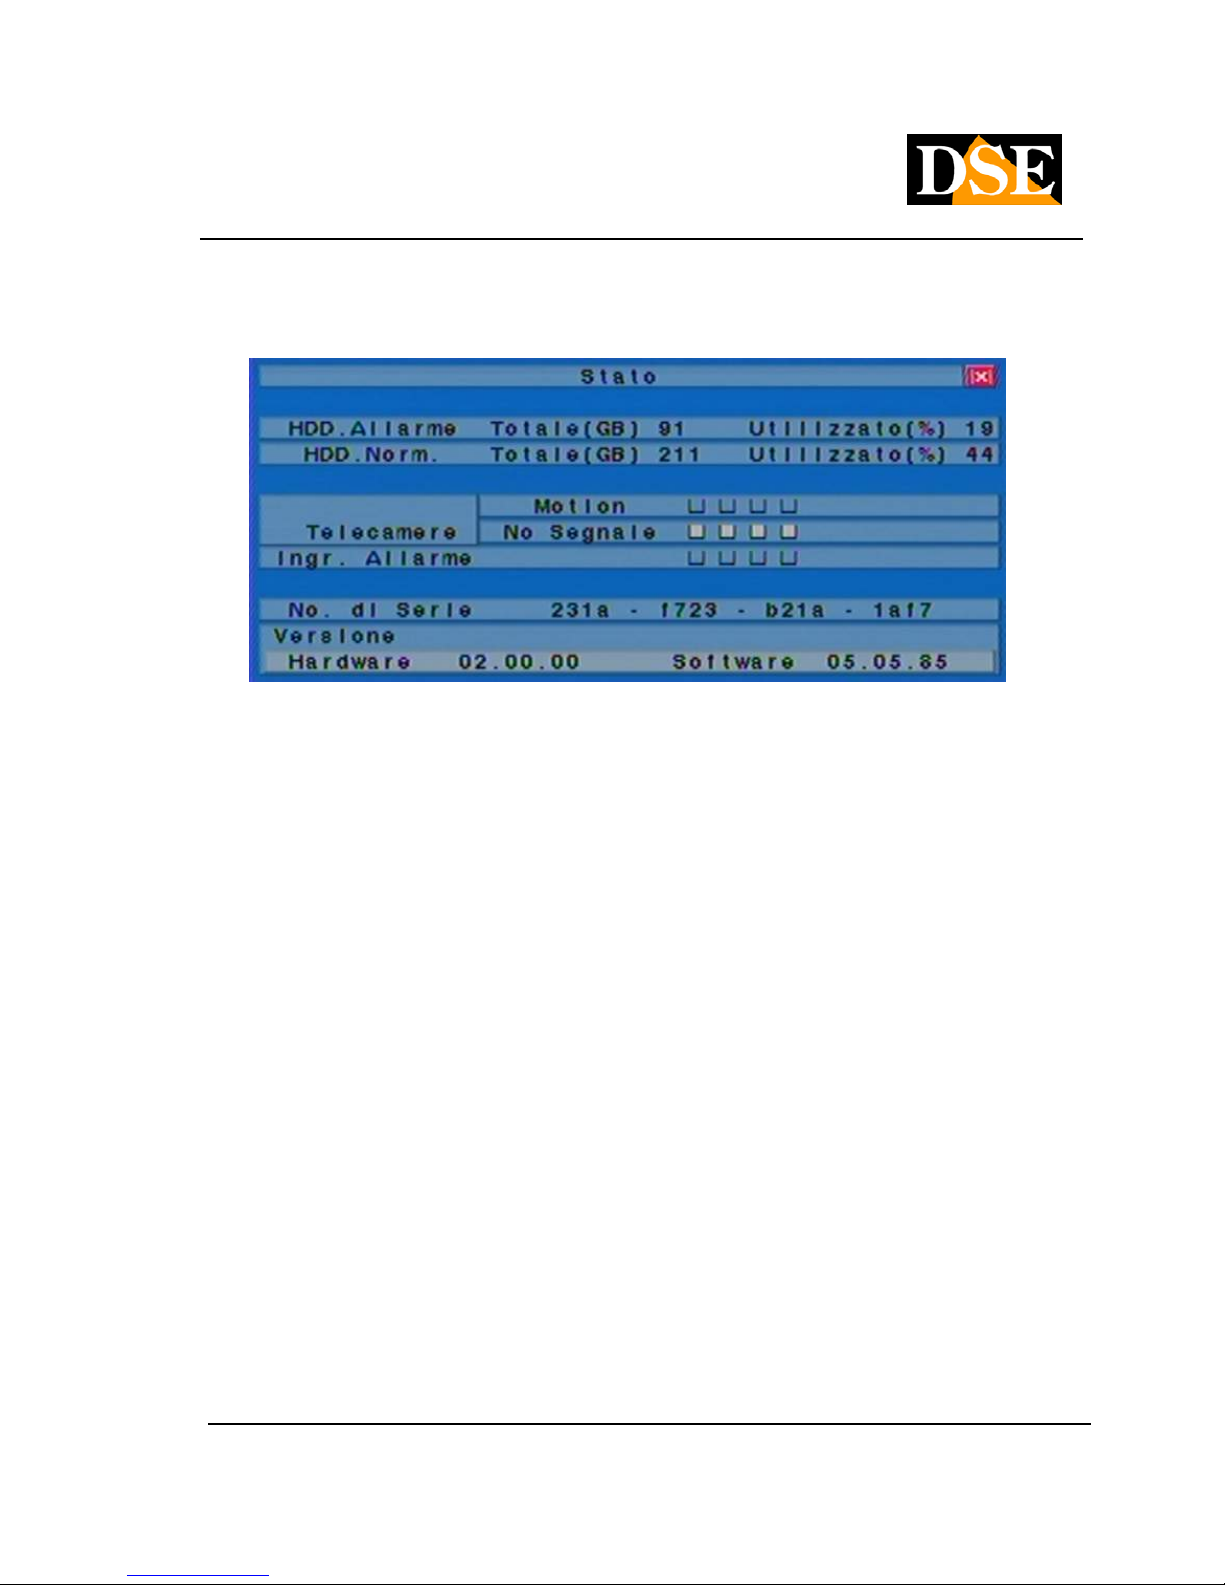
In MAIN MENU press ▲ ▼ to go to highlight State, then press ENTER to get in STATUS MENU.In MAIN MENU press ▲ ▼ to go to highlight State, then press ENTER to get in STATUS MENU.In MAIN MENU press ▲ ▼ to go to highlight State, then press ENTER to get in STATUS MENU.In MAIN MENU press ▲ ▼ to go to highlight State, then press ENTER to get in STATUS MENU.In MAIN MENU press ▲ ▼ to go to highlight State, then press ENTER to get in STATUS MENU.In MAIN MENU press ▲ ▼ to go to highlight State, then press ENTER to get in STATUS MENU.In MAIN MENU press ▲ ▼ to go to highlight State, then press ENTER to get in STATUS MENU.In MAIN MENU press ▲ ▼ to go to highlight State, then press ENTER to get in STATUS MENU.In MAIN MENU press ▲ ▼ to go to highlight State, then press ENTER to get in STATUS MENU.
The STATUS MENU includes the following information about your system:
HDD ALARM - shows the total and used memory (%) from the recordings in alarm condition
HDD NORMAL - indicates the total and used memory (%) from the recordings in normal timer recording
condition.
CAMERAS - The white icons indicate which cameras are detecting motion, and which do not present
video signal. INPUT. ALARM - The white icons indicate active inputs At the bottom of the information
about the product version. to press ESC to exit and return to the main menu. about the product version. to press ESC to exit and return to the main menu. about the product version. to press ESC to exit and return to the main menu.
5.2 Volume
In this menu you adjust the audio properties of four mic inputs. The following commands are available:
• ▲ ▼
Press these buttons to select an item to edit ..
• LIVE1,2,3,4
The four lines represent the four audio inputs.
Page 21

USER MANUAL
DIGITAL VIDEO RECORDER DR-N16
Page: - 21 - Page: - 21 - Page: - 21 -
DSE srl - ITALY - WWW.DSE.EU
• MUTE
Disarm video inputs
• VOLUME
Set the input volume. Change the value using the +/- buttons (0 to 20)
5.3 Video Adjustments
In MAIN MENU press ▲ ▼ to go to highlight Video Adjustments,In MAIN MENU press ▲ ▼ to go to highlight Video Adjustments,In MAIN MENU press ▲ ▼ to go to highlight Video Adjustments,In MAIN MENU press ▲ ▼ to go to highlight Video Adjustments,In MAIN MENU press ▲ ▼ to go to highlight Video Adjustments,
then press ENTER to get in VIDEO ADJUSTMENT.then press ENTER to get in VIDEO ADJUSTMENT.then press ENTER to get in VIDEO ADJUSTMENT.then press ENTER to get in VIDEO ADJUSTMENT.
In this menu, you have 4 different voices that you can adjust to your liking. The entries are brightness,
contrast, color, saturation. The buttons to be used in ADJUSTMENTS VIDEO are the following: contrast, color, saturation. The buttons to be used in ADJUSTMENTS VIDEO are the following: contrast, color, saturation. The buttons to be used in ADJUSTMENTS VIDEO are the following:
• ▲ ▼
Press these buttons to select the item to change.
• number buttons
To change the camera.
• + / -
Press these buttons to change the selected item.
• SEQ
Press this button to reset the camera settings to the factory settings.
• CALL
Press this button to reset the settings for all cameras in the factory settings.
Page 22
USER MANUAL
DIGITAL VIDEO RECORDER DR-N16
Page: - 22 - Page: - 22 - Page: - 22 -
DSE srl - ITALY - WWW.DSE.EU
• MODE
Press this button to restore the old values.
• ESC
Press this button to exit and return to the MAIN MENU. The adjustment settings will be saved
automatically.
5.4 VGA Display
In this section there are the parameter settings for the VGA output for PC monitor:
• → Resolution 640 x 480; 800 x 600; 1024 x 768; 1280 x 1024 (this parameter should be set based
on the optimal resolution for the monitor used.
• User adjustable Brightness →
• Contrast → User-adjustable
• Color → User-adjustable Color → User-adjustable
• Saturation → User-adjustable
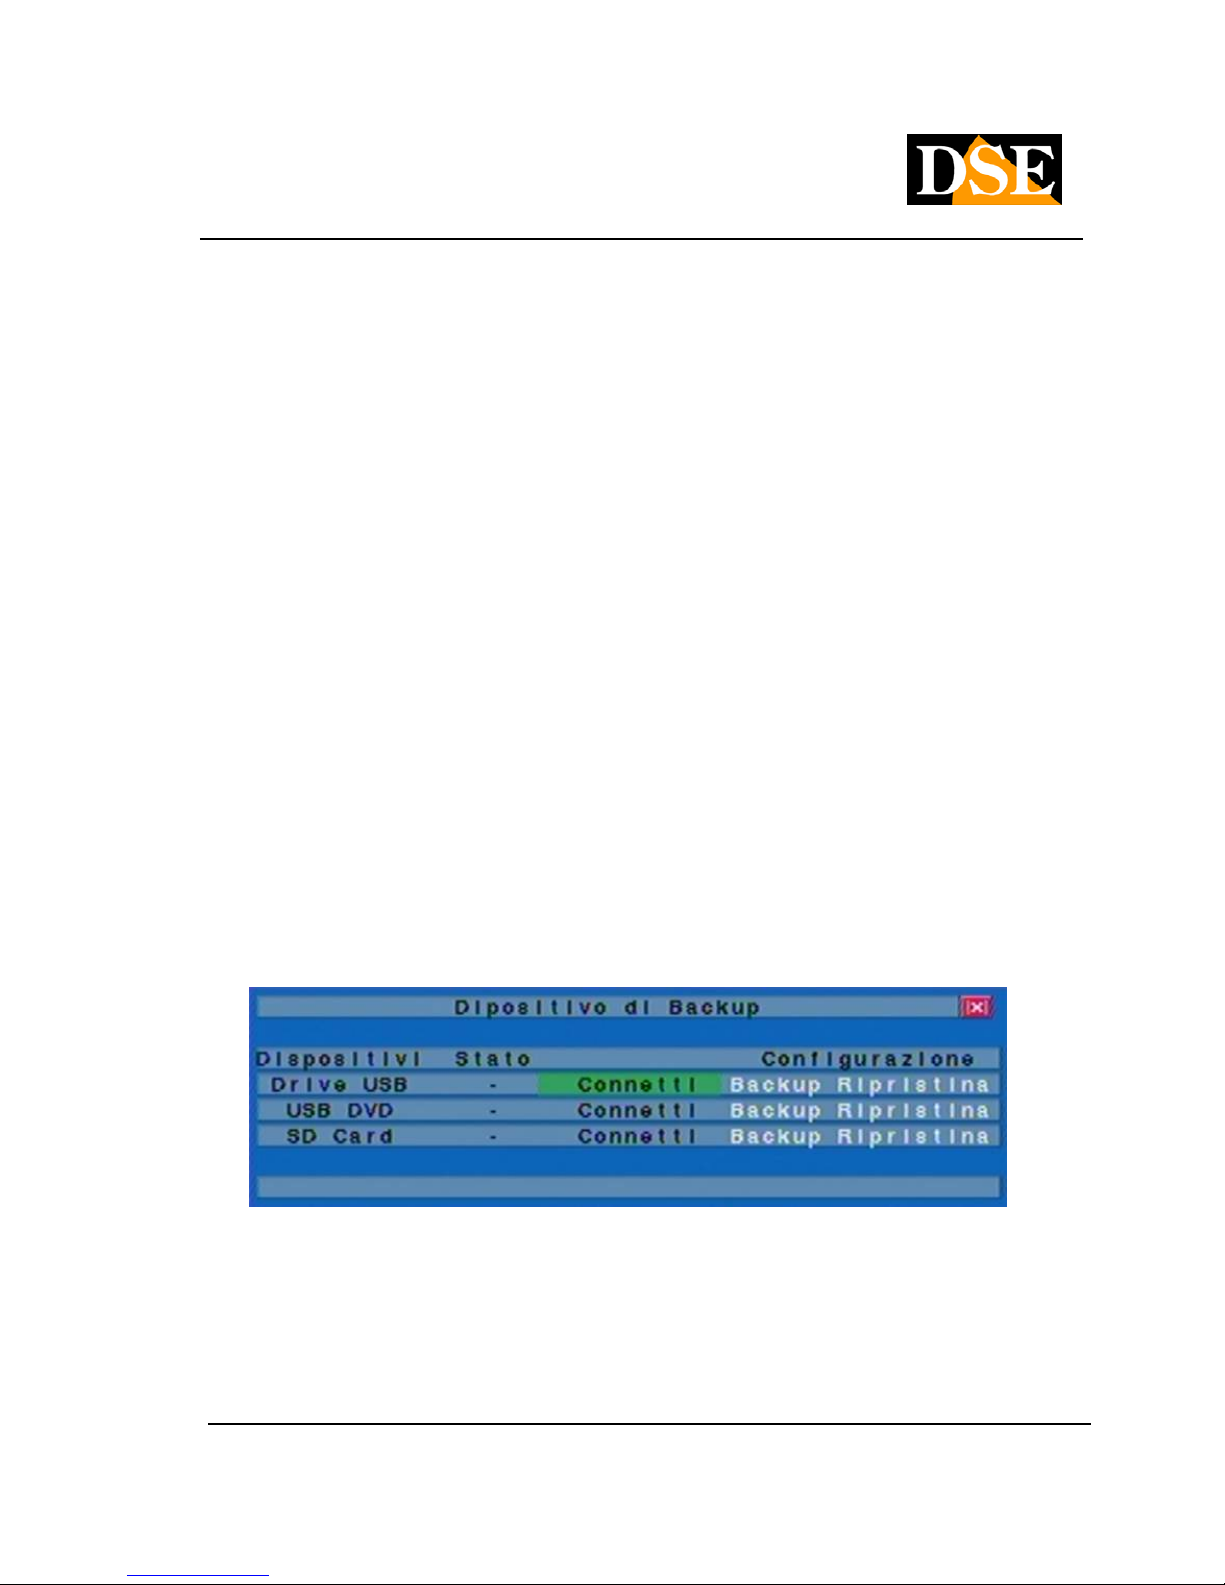
5.5 Backup Device
In MAIN MENU press ▲ ▼ to go to highlight Backup Device then press ENTER, a window like the one In MAIN MENU press ▲ ▼ to go to highlight Backup Device then press ENTER, a window like the one In MAIN MENU press ▲ ▼ to go to highlight Backup Device then press ENTER, a window like the one In MAIN MENU press ▲ ▼ to go to highlight Backup Device then press ENTER, a window like the one In MAIN MENU press ▲ ▼ to go to highlight Backup Device then press ENTER, a window like the one In MAIN MENU press ▲ ▼ to go to highlight Backup Device then press ENTER, a window like the one In MAIN MENU press ▲ ▼ to go to highlight Backup Device then press ENTER, a window like the one In MAIN MENU press ▲ ▼ to go to highlight Backup Device then press ENTER, a window like the one
below:
The system supports a wide range of USB 2.0 storage devices such as USB drives, hard disk recorders
and DVD + RW, DVD + R and DVD-R (DVD-RW is not supported). The operations are as follows:
• ▲ ▼ ◄►▲ ▼ ◄►
Page 23

USER MANUAL
DIGITAL VIDEO RECORDER DR-N16
Page: - 23 - Page: - 23 - Page: - 23 -
DSE srl - ITALY - WWW.DSE.EU
Press these buttons to select the device you want to connect. The voice SD card is not usable.
• ESC
Press this button to exit and return to the MAIN MENU.
• Connect / Disconnect - If the device is disconnected you have to connect it to the USB port, then Connect / Disconnect - If the device is disconnected you have to connect it to the USB port, then
press ENTER to connect the device with the VCR. If the device is connected and you want to press ENTER to connect the device with the VCR. If the device is connected and you want to press ENTER to connect the device with the VCR. If the device is connected and you want to
remove it, press ENTER to disconnect, then disconnect from the USB port of the VCR. remove it, press ENTER to disconnect, then disconnect from the USB port of the VCR. remove it, press ENTER to disconnect, then disconnect from the USB port of the VCR.
Note 1: Do not format the DVD
Note 2: The USB drive is formatted with the FAT32 file system for Windows before
to be connected to the DVR.
Note 3: Before removing the backup device to click DISCONNECT
avoid system instability.
The CONFIGURATION items to save all programming
DVR on a USB device to be able to copy integrally on another device.
• Backup
Pressing ENTER when you are on the item Backup It saves the configuration of the DR-N16 in USB Pressing ENTER when you are on the item Backup It saves the configuration of the DR-N16 in USB Pressing ENTER when you are on the item Backup It saves the configuration of the DR-N16 in USB Pressing ENTER when you are on the item Backup It saves the configuration of the DR-N16 in USB Pressing ENTER when you are on the item Backup It saves the configuration of the DR-N16 in USB
memory
• Restore
to press ENTER when you are on the item Restore is loaded on the DR-N16 the configuration to press ENTER when you are on the item Restore is loaded on the DR-N16 the configuration to press ENTER when you are on the item Restore is loaded on the DR-N16 the configuration to press ENTER when you are on the item Restore is loaded on the DR-N16 the configuration to press ENTER when you are on the item Restore is loaded on the DR-N16 the configuration
previously saved on the USB media
CAUTION
As always in the use of hardware from other manufacturers you may occur compatibility problems. Test
other backup devices in the event of a failed connection. As an indication, we are indicated below some
models of which have been tested for full compatibility.
USB 2.0 compatible devices
USB-Storage Enclosures 5.25 "- Macpower's Alumni Prefect
USB 2.0 - PF-U2MS USB-Disk Storage - USB 2.0 - PF-U2MS USB-Disk Storage -
Page 24

USER MANUAL
DIGITAL VIDEO RECORDER DR-N16
Page: - 24 - Page: - 24 - Page: - 24 -
DSE srl - ITALY - WWW.DSE.EU
Transcend's JetFlash 150 / V60 Series
Apacer's Handy Steno AH220 Pretec's i-Disk
Wave 512M-Black
Kingston's DataTraveler USB Flash Driver (DTI / 512FE) SanDisk's
Cruzer Micro USB Flash Driver Sony MICRO VAULT's Classic Series
DVD writers
Asus DRW-1608P Series
Pioneer DVR-A11 Series
LITEON Light Scribe DVD Writer Model SHM-165H6S Series Sony DVD / CD
Rewritable Drive DRX-810UL Model Series NEC DVD / CD Rewritable Drive
Model ND-4550A Series dvd9404e HP 18X External Super Multi DVD Writer
Series
Compatible DVD Discs
Info Mitsubishi 16X DVD + R media
DVD + RW DVD + RW 1-4X 1-4X
Philips Ritek Ritek DVD-R 8X DVD
+ RW Verbatim DVD + RW 1-4X
1-4X
NOTE: The internal DVD option is not available.
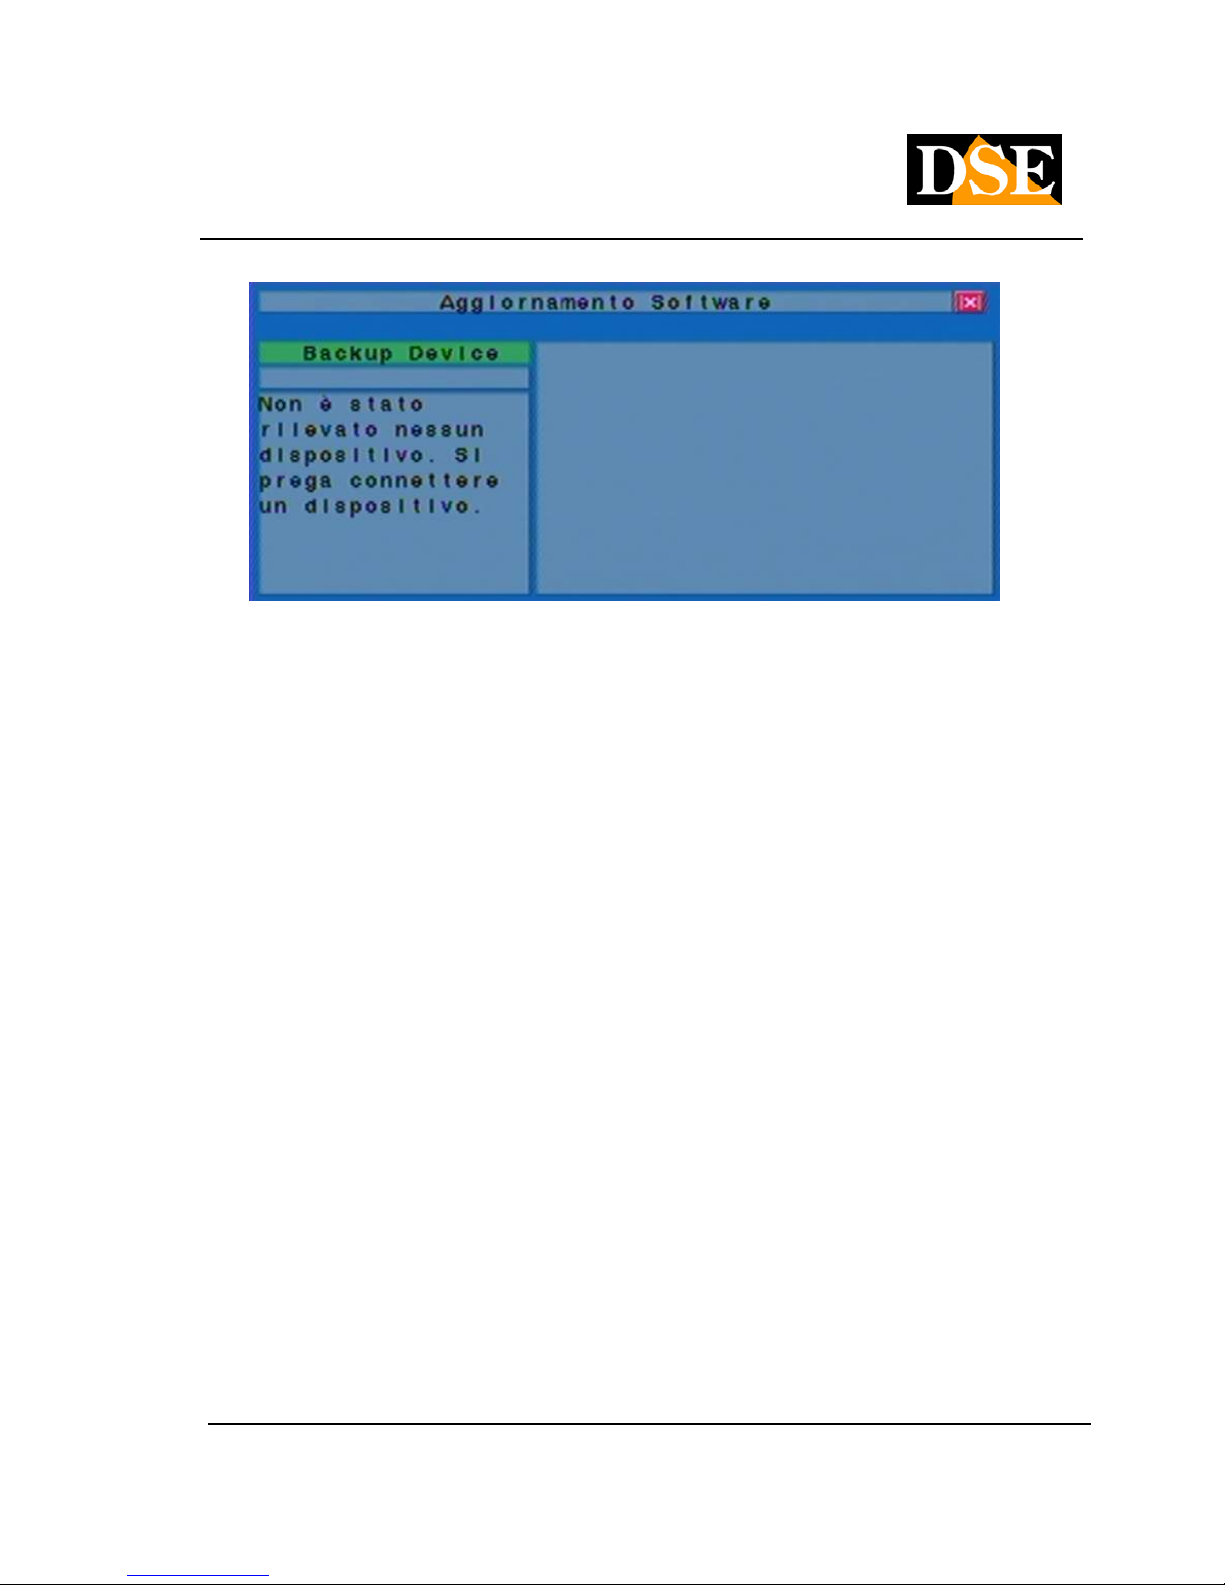
5.6 Software Upgrade (Administrator)
In MAIN MENU press ▲ ▼ to go to highlight Software update then press ENTER to get in Software In MAIN MENU press ▲ ▼ to go to highlight Software update then press ENTER to get in Software In MAIN MENU press ▲ ▼ to go to highlight Software update then press ENTER to get in Software In MAIN MENU press ▲ ▼ to go to highlight Software update then press ENTER to get in Software In MAIN MENU press ▲ ▼ to go to highlight Software update then press ENTER to get in Software In MAIN MENU press ▲ ▼ to go to highlight Software update then press ENTER to get in Software In MAIN MENU press ▲ ▼ to go to highlight Software update then press ENTER to get in Software In MAIN MENU press ▲ ▼ to go to highlight Software update then press ENTER to get in Software In MAIN MENU press ▲ ▼ to go to highlight Software update then press ENTER to get in Software
update,
then it appears a window like the one below:
Page 25
USER MANUAL
DIGITAL VIDEO RECORDER DR-N16
Page: - 25 - Page: - 25 - Page: - 25 -
DSE srl - ITALY - WWW.DSE.EU
Of course, before proceeding with a USB device you must have been connected (see above) containing
the update files. The operations are as follows:
• ▲ ▼ ◄►▲ ▼ ◄►
Press to select the USB device.
• ESC
Press to exit and return to MAIN MENU.Press to exit and return to MAIN MENU.
Below is a brief description of each item and its specific actions:
• Backup Device - to press ENTER to open the USB connection page if the device had not yet been Backup Device - to press ENTER to open the USB connection page if the device had not yet been Backup Device - to press ENTER to open the USB connection page if the device had not yet been Backup Device - to press ENTER to open the USB connection page if the device had not yet been
connected. If the device appears in the list and highlight it to proceed.
• Update the DVR - to press ENTER to start the upgrade process. A confirmation window, press ENTERUpdate the DVR - to press ENTER to start the upgrade process. A confirmation window, press ENTERUpdate the DVR - to press ENTER to start the upgrade process. A confirmation window, press ENTERUpdate the DVR - to press ENTER to start the upgrade process. A confirmation window, press ENTERUpdate the DVR - to press ENTER to start the upgrade process. A confirmation window, press ENTER
to confirm the update.
Note: After you have upgraded your software, the DVR will automatically reboot.
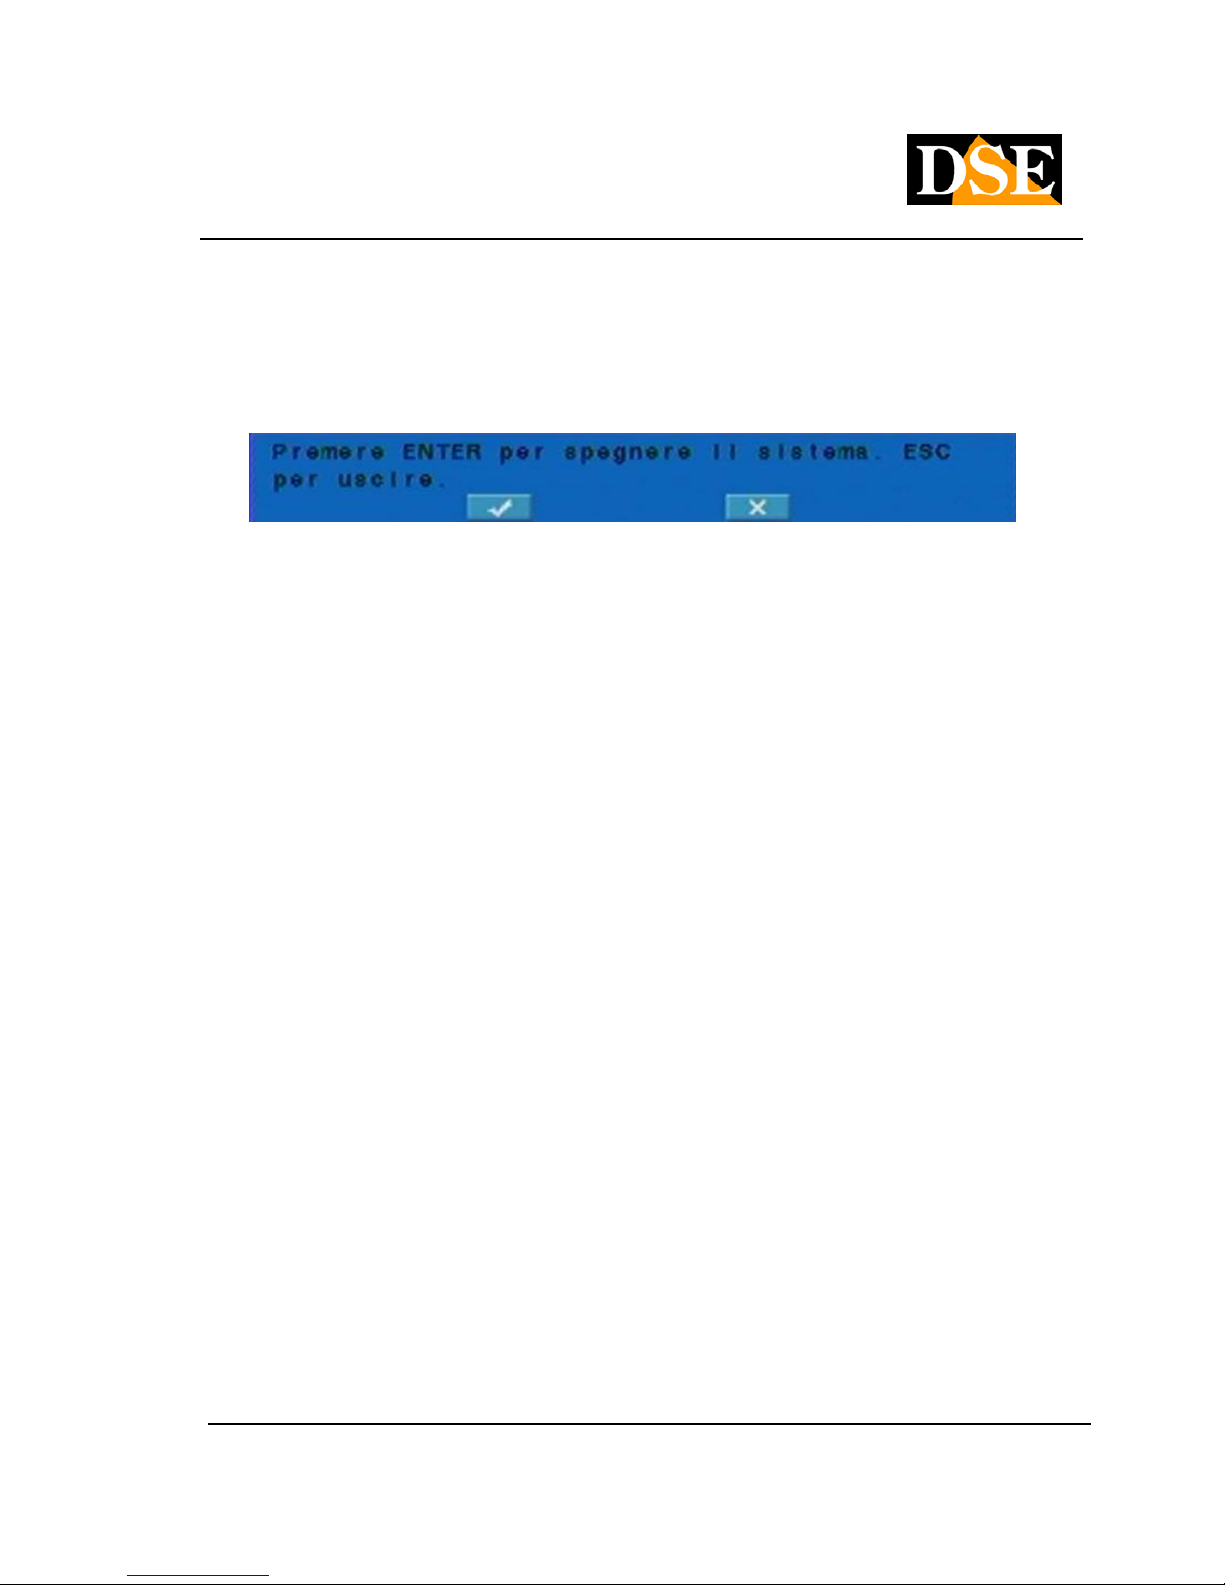
5.7 System Shutdown (Administrator)
As with all machines that write to a hard drive is not correct to simply turn off the DR-N16 with the ON /
OFF button. To ensure that all files
Page 26
USER MANUAL
DIGITAL VIDEO RECORDER DR-N16
Page: - 26 - Page: - 26 - Page: - 26 -
DSE srl - ITALY - WWW.DSE.EU
are saved should act on this menu command. In MAIN MENU press ▲ ▼ to go to highlight arrest then press are saved should act on this menu command. In MAIN MENU press ▲ ▼ to go to highlight arrest then press are saved should act on this menu command. In MAIN MENU press ▲ ▼ to go to highlight arrest then press are saved should act on this menu command. In MAIN MENU press ▲ ▼ to go to highlight arrest then press are saved should act on this menu command. In MAIN MENU press ▲ ▼ to go to highlight arrest then press are saved should act on this menu command. In MAIN MENU press ▲ ▼ to go to highlight arrest then press
ENTER to select the shutdown. Then it will open a dialog box to confirm the shutdown, press ENTER to ENTER to select the shutdown. Then it will open a dialog box to confirm the shutdown, press ENTER to ENTER to select the shutdown. Then it will open a dialog box to confirm the shutdown, press ENTER to ENTER to select the shutdown. Then it will open a dialog box to confirm the shutdown, press ENTER to
confirm.
The system will automatically save all files and All the variations. A written: STOP RUNNING will scroll
on the screen. For complete shutdown you can turn off your DVR with the back button sure not to have
lost precious recording files.
Page 27
USER MANUAL
DIGITAL VIDEO RECORDER DR-N16
Page: - 27 - Page: - 27 - Page: - 27 -
DSE srl - ITALY - WWW.DSE.EU
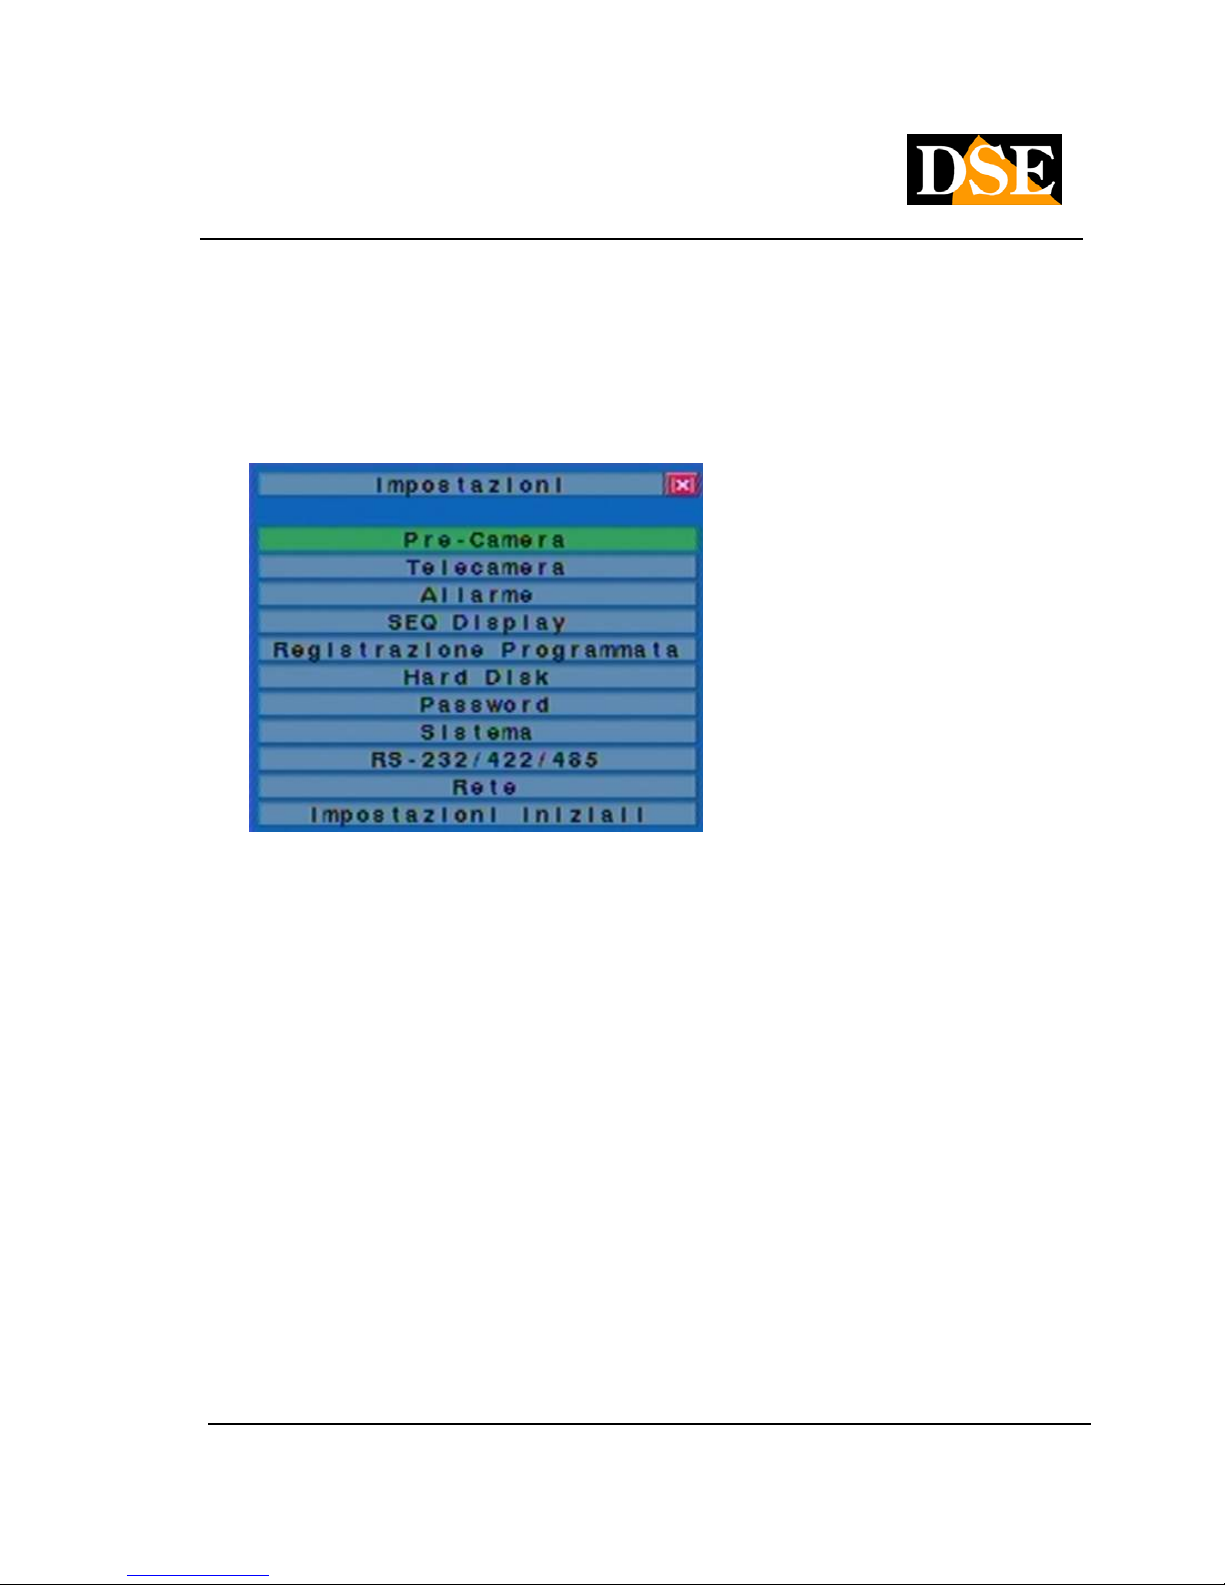
6. Settings (Administrator)
In MAIN MENU press ▲ ▼ to go to highlight Settings In MAIN MENU press ▲ ▼ to go to highlight Settings In MAIN MENU press ▲ ▼ to go to highlight Settings In MAIN MENU press ▲ ▼ to go to highlight Settings In MAIN MENU press ▲ ▼ to go to highlight Settings
then press ENTER to enter the settings menu where you program all DVR functions. then press ENTER to enter the settings menu where you program all DVR functions. then press ENTER to enter the settings menu where you program all DVR functions.
The operations are as follows: The operations are as follows:
• ▲ ▼ ▲ ▼
Press these buttons to move through the settings menu. Press these buttons to move through the settings menu.
• ENTER
Press this button to select the highlighted item in the Settings menu. Press this button to select the highlighted item in the Settings menu.
• ESC
Press this button to exit the menu and return to the main menu. If you want to return to the factory
settings just go to highlight
Initial Settings with buttons ▲ ▼, then press ENTER. This will open a dialog box to confirm the operation, Initial Settings with buttons ▲ ▼, then press ENTER. This will open a dialog box to confirm the operation, Initial Settings with buttons ▲ ▼, then press ENTER. This will open a dialog box to confirm the operation, Initial Settings with buttons ▲ ▼, then press ENTER. This will open a dialog box to confirm the operation, Initial Settings with buttons ▲ ▼, then press ENTER. This will open a dialog box to confirm the operation, Initial Settings with buttons ▲ ▼, then press ENTER. This will open a dialog box to confirm the operation,
press ENTER or ppure ESC to exit without confirming. press ENTER or ppure ESC to exit without confirming. press ENTER or ppure ESC to exit without confirming. press ENTER or ppure ESC to exit without confirming. press ENTER or ppure ESC to exit without confirming. press ENTER or ppure ESC to exit without confirming.
Page 28

USER MANUAL
DIGITAL VIDEO RECORDER DR-N16
Page: - 28 - Page: - 28 - Page: - 28 -
DSE srl - ITALY - WWW.DSE.EU
6.1 Pre-Camera Settings
In press MENU SETTINGS ▲ ▼ to go to highlight Pre-Camera,In press MENU SETTINGS ▲ ▼ to go to highlight Pre-Camera,In press MENU SETTINGS ▲ ▼ to go to highlight Pre-Camera,In press MENU SETTINGS ▲ ▼ to go to highlight Pre-Camera,
then press ENTER to select the highlighted item. then press ENTER to select the highlighted item. then press ENTER to select the highlighted item.
Up to 4 cameras can be connected to the system. The pre-camera settings allow the administrator to
define some fundamental attributes for all the installed cameras.
The operations are as follows:
• ▲ ▼ ◄►▲ ▼ ◄►
Press these buttons to move between the different items on the screen.
• Camera This. 1..16
Choose the camera that you want to change settings.
• ESC
Press this button to exit and return to the SETTINGS menu. If we changed some settings, before
leaving the SETTINGS PRE-ROOM, a window to confirm saving the settings, press ENTER to exit leaving the SETTINGS PRE-ROOM, a window to confirm saving the settings, press ENTER to exit leaving the SETTINGS PRE-ROOM, a window to confirm saving the settings, press ENTER to exit
and save, ESC to exit without saving. and save, ESC to exit without saving. and save, ESC to exit without saving.
Below is a brief description of each item and its specific actions:
• Thous. Res. Rec. - Sets the resolution for recording. For the systemThous. Res. Rec. - Sets the resolution for recording. For the system
Page 29

USER MANUAL
DIGITAL VIDEO RECORDER DR-N16
Page: - 29 - Page: - 29 - Page: - 29 -
DSE srl - ITALY - WWW.DSE.EU
PAL available, 720x576 (FULL D1), 720x288 (HALF D1), or 360x288 (CIF). Press +/- buttons to
select the resolution. Obviously higher resolution correspond most image quality, but also a smaller
number of frames per second recordable by the DVR. (100 / CIF, 50 / Half-D1, 25 / Full-D1).
• watermark - The feature is not available watermark - The feature is not available
• Installed - Does the camera is installed or not. If it is installed, its parameters will be selected. to Installed - Does the camera is installed or not. If it is installed, its parameters will be selected. to
press ENTER or +/- to change this item. press ENTER or +/- to change this item. press ENTER or +/- to change this item.
• PTZ ID - Here you set the address (0..255) to match the control in the PTZ camera, obviously if it is a PTZ ID - Here you set the address (0..255) to match the control in the PTZ camera, obviously if it is a
speed dome camera connected to the rear RS485 port. Press +/- buttons to change the value (N / A
or 0-255).
The factory settings are " N / A "- Not available, to be held if not using a speed dome The factory settings are " N / A "- Not available, to be held if not using a speed dome The factory settings are " N / A "- Not available, to be held if not using a speed dome
PTZ camera.
• GROUP - This function is only possible if you are working with 360x288 resolution and allows you to GROUP - This function is only possible if you are working with 360x288 resolution and allows you to
group the cameras 2 by 2 in order to economize space on the Hard Disk .. The cameras grouped
between them must have the same settings.
6.2 Camera Settings
In press MENU SETTINGS ▲ ▼ to go to highlight Camera,In press MENU SETTINGS ▲ ▼ to go to highlight Camera,In press MENU SETTINGS ▲ ▼ to go to highlight Camera,In press MENU SETTINGS ▲ ▼ to go to highlight Camera,
then press ENTER to select the highlighted item. then press ENTER to select the highlighted item. then press ENTER to select the highlighted item.
Page 30

USER MANUAL
DIGITAL VIDEO RECORDER DR-N16
Page: - 30 - Page: - 30 - Page: - 30 -
DSE srl - ITALY - WWW.DSE.EU
The camera setup program allows the administrator to define the settings for each camera. Up to 4
cameras can be connected to the system.
The operations are as follows:
• ▲ ▼ ◄►▲ ▼ ◄►
Press these buttons to move between the different items on the screen
• Camera This. 1..16
Press these buttons to select the camera. Alternatively take action on the left / right arrows.
• CALL / BACKUP
Press this button to copy all the settings of a selected camera in all other cameras. They
excluded from copies the parameters of motion detection, video loss, and audio name.
• ESC
Press this button to exit and return to the SETTINGS MENU. If you submit a confirmation Save
screen, press ENTER to exit and save, ESC to exit without saving. screen, press ENTER to exit and save, ESC to exit without saving. screen, press ENTER to exit and save, ESC to exit without saving. screen, press ENTER to exit and save, ESC to exit without saving. screen, press ENTER to exit and save, ESC to exit without saving.
Below is a brief description of each item and its specific actions:
Page 31

USER MANUAL
DIGITAL VIDEO RECORDER DR-N16
Page: - 31 - Page: - 31 - Page: - 31 -
DSE srl - ITALY - WWW.DSE.EU
• Title - The camera name (max. 8 characters) of the camera in question. Use the instructions on Title - The camera name (max. 8 characters) of the camera in question. Use the instructions on
inserting texts previously seen.
• Lack signal - Use this setting to determine what actions to take when the system detects a lack of Lack signal - Use this setting to determine what actions to take when the system detects a lack of
video signal. It leads to a subform that is explained later
• Motion Detection - Turn on this option to enable / disable motion detection that allows you to start Motion Detection - Turn on this option to enable / disable motion detection that allows you to start
recording in case of intrusion in the camera field of view. to press ENTER or +/- to switch to recording in case of intrusion in the camera field of view. to press ENTER or +/- to switch to recording in case of intrusion in the camera field of view. to press ENTER or +/- to switch to
deactivate the MOTION DETECTION.
• Motion - Used to set the parameters of the MOTION DETECTION at your convenience in the Motion - Used to set the parameters of the MOTION DETECTION at your convenience in the
selected camera. to press ENTER in Settings to activate the motion detection settings. These selected camera. to press ENTER in Settings to activate the motion detection settings. These selected camera. to press ENTER in Settings to activate the motion detection settings. These selected camera. to press ENTER in Settings to activate the motion detection settings. These selected camera. to press ENTER in Settings to activate the motion detection settings. These
settings are described below.
• Covert (concealment) -If the camera in question is selected COVERT can only be seen if the user Covert (concealment) -If the camera in question is selected COVERT can only be seen if the user
is logged in as administrator. to press ENTER or +/- to select the concealment or cancel the is logged in as administrator. to press ENTER or +/- to select the concealment or cancel the is logged in as administrator. to press ENTER or +/- to select the concealment or cancel the
selection.
• Recall per event - To make the camera automatically appear in the auxiliary monitor CALL when a Recall per event - To make the camera automatically appear in the auxiliary monitor CALL when a
particular event occurs for the camera in question. There are 4 possible option you can choose to
set the event off (off), motion, alarm, both (alarm / motion). Press +/- buttons to select the preferred
option.
• Pause time - You set here the residence time of the camera on the CALL in the event monitor has Pause time - You set here the residence time of the camera on the CALL in the event monitor has
been activated the previous function Recall for event. Press +/- buttons to change the time been activated the previous function Recall for event. Press +/- buttons to change the time been activated the previous function Recall for event. Press +/- buttons to change the time
(From 3 to 60 seconds).
• Audio - Here you can match the audio input registration for one or more cameras. Press +/- buttons Audio - Here you can match the audio input registration for one or more cameras. Press +/- buttons
to select N / A (no audio input) or 1/2 (AUDIO ACTIVE).
• Recording quality - To set the recording quality of the camera in question. Press +/- buttons to Recording quality - To set the recording quality of the camera in question. Press +/- buttons to
select the value (1-9): 1 is to indicate the + 9 low value while the + upper corresponding to higher
quality but also more space occupied HDD.
• IPS Events Registration - The camera IPS (Images Per Second) in IPS Events Registration - The camera IPS (Images Per Second) in
Page 32

USER MANUAL
DIGITAL VIDEO RECORDER DR-N16
Page: - 32 - Page: - 32 - Page: - 32 -
DSE srl - ITALY - WWW.DSE.EU
whether certain events (motion, alarm). This camera will record with the IPS set when the event
occurs. Press +/- buttons buttons to select the value (0-25 PAL / NTSC 30).
• IPS Pre-registration - The IPS (Images Per Second) of the camera during the pre-registration IPS Pre-registration - The IPS (Images Per Second) of the camera during the pre-registration
period before the alarm, and that will be described later .. Be careful because the sum of the IPS
during the event and pre-registration must not exceed the maximum capacity DVR (100 / CIF, 50 /
Half-D1, 25 / Full-D1) Press +/- buttons to select the value to be given.
• Normal Record IPS - The IPS (Images Per Second Camera) during normal recording. If there are Normal Record IPS - The IPS (Images Per Second Camera) during normal recording. If there are
no events remains unchanged the record pace. Considering the maximum capacity of the DVR (100
/ CIF, 50 / Half-D1, 25 / Full-D1): This parameter allows you to increase the number of IPS of a more
significant of the other camera. Press the buttons +/- to select the value to be given. significant of the other camera. Press the buttons +/- to select the value to be given.
6.2.1 Lack video
In the setting of the camera program, go to Signal failure,In the setting of the camera program, go to Signal failure,
then press ENTER to enter the Settings Signal Failure and go and change at will the different options then press ENTER to enter the Settings Signal Failure and go and change at will the different options then press ENTER to enter the Settings Signal Failure and go and change at will the different options then press ENTER to enter the Settings Signal Failure and go and change at will the different options then press ENTER to enter the Settings Signal Failure and go and change at will the different options
that you have available for the camera in question. All this serves the administrator to define how the
answers
system to video loss of a particular camera.
The operations are as follows:
• ▲ ▼
Press these buttons to navigate the menu.
Page 33

USER MANUAL
DIGITAL VIDEO RECORDER DR-N16
Page: - 33 - Page: - 33 - Page: - 33 -
DSE srl - ITALY - WWW.DSE.EU
• Camera This. 1..16
Press these buttons to select the camera.
• CALL / BACK UP
Press this button to copy all the settings of a camera in all the following cameras.
• ESC
Press this button to exit and return to the SETTINGS MENU. If you submit a confirmation Save
screen, press ENTER to exit and save, ESC to exit without saving. screen, press ENTER to exit and save, ESC to exit without saving. screen, press ENTER to exit and save, ESC to exit without saving. screen, press ENTER to exit and save, ESC to exit without saving. screen, press ENTER to exit and save, ESC to exit without saving.
Below is a brief description of each item and its specific actions:
• Duration - defines how long (in seconds) remain active the alarm output and the buzzer (acoustic Duration - defines how long (in seconds) remain active the alarm output and the buzzer (acoustic
signal) from the time in which there is a lack of signal for the camera in question. However, the
alarm output and the buzzer will be reset when the camera returns to transmit the video signal.
Press +/- buttons to change the duration time (3 to 60 seconds).
• Pre-registration - to define how long before video loss, the relevant camera pre-registration must Pre-registration - to define how long before video loss, the relevant camera pre-registration must
be activated. The period of pre-registration, often significantly, you can set as above a frame rate
(IPS) accurate, generally greater than normal recording. Press +/- buttons to change the value (from
0 to 10 seconds).
• alarm output - defines whether the alarm output will remain active at the moment in which they alarm output - defines whether the alarm output will remain active at the moment in which they
present a lack of video signal into the camera in question. Press +/- buttons to select which alarm
output to activate (1-2) or to disable the alarm (N / A).
• Buzzer - to activate the tone when he has a lack of video signal in the camera in question. to press ENTERBuzzer - to activate the tone when he has a lack of video signal in the camera in question. to press ENTERBuzzer - to activate the tone when he has a lack of video signal in the camera in question. to press ENTER
or +/- buttons to select this option or not.
• Log - to record whether or not the video events lost in the DVR event log. to press ENTER or +/- to Log - to record whether or not the video events lost in the DVR event log. to press ENTER or +/- to Log - to record whether or not the video events lost in the DVR event log. to press ENTER or +/- to Log - to record whether or not the video events lost in the DVR event log. to press ENTER or +/- to
toggle this setting.
• Message - to see or not to see the message of the video loss. to press ENTER or the +/- keys to toggle Message - to see or not to see the message of the video loss. to press ENTER or the +/- keys to toggle Message - to see or not to see the message of the video loss. to press ENTER or the +/- keys to toggle Message - to see or not to see the message of the video loss. to press ENTER or the +/- keys to toggle
this option.
Page 34

USER MANUAL
DIGITAL VIDEO RECORDER DR-N16
Page: - 34 - Page: - 34 - Page: - 34 -
DSE srl - ITALY - WWW.DSE.EU
• E-mail - to send an e-mail address set in view of the lack of signal. to press ENTER or the +/- keys to E-mail - to send an e-mail address set in view of the lack of signal. to press ENTER or the +/- keys to E-mail - to send an e-mail address set in view of the lack of signal. to press ENTER or the +/- keys to E-mail - to send an e-mail address set in view of the lack of signal. to press ENTER or the +/- keys to
toggle this option.
6.2.2 Motion Detection
In the setting of the camera program to go to MOTION press
ENTER SETTINGS to enter the menu Setting Motion the camera that you chose to set. The SETTINGS ENTER SETTINGS to enter the menu Setting Motion the camera that you chose to set. The SETTINGS ENTER SETTINGS to enter the menu Setting Motion the camera that you chose to set. The SETTINGS ENTER SETTINGS to enter the menu Setting Motion the camera that you chose to set. The SETTINGS
MOTION allow the administrator to define how the system should respond when it detects a transmission
MOVEMENT in the camera in question.
The operations are as follows:
• ▲ ▼
Press these buttons to navigate the menu.
• Camera This. 1..16
Press these buttons to select the camera.
• CALL / BACKUP
Page 35

USER MANUAL
DIGITAL VIDEO RECORDER DR-N16
Page: - 35 - Page: - 35 - Page: - 35 -
DSE srl - ITALY - WWW.DSE.EU
Press this button to copy all the motion detection settings of the camera in all the following cameras.
• ESC
Press this button to exit and return to the SETTINGS MENU. If you submit a confirmation Save
screen, press ENTER to exit and save, ESC to exit without saving. screen, press ENTER to exit and save, ESC to exit without saving. screen, press ENTER to exit and save, ESC to exit without saving. screen, press ENTER to exit and save, ESC to exit without saving. screen, press ENTER to exit and save, ESC to exit without saving.
Below is a brief description of each item and its specific actions:
• Duration - defines how long (in seconds) remain active the output of alarm and the buzzer (acoustic Duration - defines how long (in seconds) remain active the output of alarm and the buzzer (acoustic
signal) from the time in which the MOTION is activated in the camera in question. However, the
alarm output and the buzzer will be reset at the moment when the motion is deactivated. Press +/-
buttons to change the duration time (3 to 60 seconds).
• Goto Preset - If using speed dome cameras can all'attivarsi of motion detection recall a precise Goto Preset - If using speed dome cameras can all'attivarsi of motion detection recall a precise
camera presets (1..99).
• Pre-registration - it defines how long, prior to movement rilavazione into the camera in question, Pre-registration - it defines how long, prior to movement rilavazione into the camera in question,
must be activated pre-registration to the frame rate (IPS) previously set. Press +/- buttons to change
the value (from 0 to 10 seconds).
• After Recording - to define how long after motion detection in the camera in question, must continue After Recording - to define how long after motion detection in the camera in question, must continue
recording the frame rate (IPS) previously set. Press +/- buttons to change the value (from 0 seconds
to 60 minutes).
• alarm output - defines which alarm output will remain active at the moment when it detects a alarm output - defines which alarm output will remain active at the moment when it detects a
MOVEMENT into the camera in question. Press the buttons
+ / - to select which alarm output to activate (1-2) or to deactivate the activation of the alarm relay (N + / - to select which alarm output to activate (1-2) or to deactivate the activation of the alarm relay (N
/ A).
• Detection - Access to the detection settings that are described in the following paragraph. Detection - Access to the detection settings that are described in the following paragraph.
• Buzzer - to activate the acoustic signal at the moment when you activate the MOTION in the camera Buzzer - to activate the acoustic signal at the moment when you activate the MOTION in the camera
in question. to press ENTER or +/- buttons to select this option or not. in question. to press ENTER or +/- buttons to select this option or not. in question. to press ENTER or +/- buttons to select this option or not.
• Log - to record whether or not the MOTION detection events in memory Log - to record whether or not the MOTION detection events in memory
Page 36

USER MANUAL
DIGITAL VIDEO RECORDER DR-N16
Page: - 36 - Page: - 36 - Page: - 36 -
DSE srl - ITALY - WWW.DSE.EU
events of the DVR. to press ENTER or +/- to toggle this setting. events of the DVR. to press ENTER or +/- to toggle this setting. events of the DVR. to press ENTER or +/- to toggle this setting.
• Message - to see on screen the warning following the activation of motion detection. to press ENTER or Message - to see on screen the warning following the activation of motion detection. to press ENTER or Message - to see on screen the warning following the activation of motion detection. to press ENTER or Message - to see on screen the warning following the activation of motion detection. to press ENTER or
the +/- keys to toggle this option.
• E-mail - to send an e-mail address set in view of the activation of the MOTION. to press ENTER or the E-mail - to send an e-mail address set in view of the activation of the MOTION. to press ENTER or the E-mail - to send an e-mail address set in view of the activation of the MOTION. to press ENTER or the E-mail - to send an e-mail address set in view of the activation of the MOTION. to press ENTER or the
+/- keys to toggle this option.
6.2.3 Detection of Motion Detection
In the camera settings, select MOTION DETECTION SETUP and then SETTINGS. Here you adjust the
manner in which a motion is detected within the visual field of the camera. In the MOTION DETECTION
video settings it is divided into many small squares that form a real grid, if the background is
transparent MOTION is on, when in fact the background is dark MOTION DETECTION is turned off. To
choose which image areas to exclude from detection appear a green square of the grid that can be
extended to all or part of the screen. Pressing enter will then excludes the area highlighted by the
motion detection of creating masks.
Page 37

USER MANUAL
DIGITAL VIDEO RECORDER DR-N16
Page: - 37 - Page: - 37 - Page: - 37 -
DSE srl - ITALY - WWW.DSE.EU
The operations are as follows:
• number buttons
Press these buttons to select the camera.
• ▲ ▼ ◄►▲ ▼ ◄►
Press these buttons to move the selection along the grid
• + / -
Press these buttons to increase or decrease the area where you want to deactivate the
MOTION.
• ENTER
Press this button to enable or disable the detection area highlighted.
Page 38

USER MANUAL
DIGITAL VIDEO RECORDER DR-N16
Page: - 38 - Page: - 38 - Page: - 38 -
DSE srl - ITALY - WWW.DSE.EU
• MODE
Press this button to activate / deactivate the MOTION setting to your whole screen.
• SEQ
Press to decrease the SENSITIVITY 'MOTION (10 to 1).
• CALL / BACKUP
Press this button to increase the SENSITIVITY 'MOTION (1 to 10).
• SEARCH
Press this button on the REMOTE MOTION to test the camera in question. The detected motion
will be displayed on the screen. Press this button again to stop the test.
• ESC
Press this button to exit the RECORD SETTING menu and go back to
SETTINGS MOTION.
6.3 Alarm Settings
In the SETTINGS menu, press the ▲ ▼ buttons to move between items, then select the item Alarm and In the SETTINGS menu, press the ▲ ▼ buttons to move between items, then select the item Alarm and In the SETTINGS menu, press the ▲ ▼ buttons to move between items, then select the item Alarm and
press ENTER to enter the ALARM SETTINGS menu. press ENTER to enter the ALARM SETTINGS menu. press ENTER to enter the ALARM SETTINGS menu.
The Settings of alarm permit
administrator to define each of the 4 rear alarm inputs, and the actions to be performed if it is activated.
Page 39

USER MANUAL
DIGITAL VIDEO RECORDER DR-N16
Page: - 39 - Page: - 39 - Page: - 39 -
DSE srl - ITALY - WWW.DSE.EU
The operations are as follows:
• ▲ ▼ ◄►▲ ▼ ◄►
Press these buttons to navigate the menu.
• Camera This. 1..16
Press these buttons to choose the alarm input.
• CALL / BACKUP
Press this button to copy all settings of one input to all the following inputs.
• ESC
Press this button to exit and return to the SETTINGS MENU. If you submit a confirmation Save
screen, press ENTER to exit and save, ESC to exit without saving. screen, press ENTER to exit and save, ESC to exit without saving. screen, press ENTER to exit and save, ESC to exit without saving. screen, press ENTER to exit and save, ESC to exit without saving. screen, press ENTER to exit and save, ESC to exit without saving.
Below is a brief description of each item and its specific actions:
• Normal State - press the +/- buttons to select N / A, Close or You open.Normal State - press the +/- buttons to select N / A, Close or You open.Normal State - press the +/- buttons to select N / A, Close or You open.Normal State - press the +/- buttons to select N / A, Close or You open.Normal State - press the +/- buttons to select N / A, Close or You open.
DR-N16 allows you to connect inputs both normally open (OPEN) and normally closed (CLOSE). If
there is nothing connected please select
N / A ( not available). N / A ( not available).
• Focus Camera - the camera corresponding to this alarm input Focus Camera - the camera corresponding to this alarm input
Page 40

USER MANUAL
DIGITAL VIDEO RECORDER DR-N16
Page: - 40 - Page: - 40 - Page: - 40 -
DSE srl - ITALY - WWW.DSE.EU
that will start recording when activated
• Duration - defines how long (in seconds) remain active the alarm output and the buzzer (acoustic Duration - defines how long (in seconds) remain active the alarm output and the buzzer (acoustic
signal) from the time in which it activates the alarm input device. However, the alarm output and the
buzzer will be reset when the alarm input device turns off. Press the buttons
+ / - to change the duration of time (from 3 to 60 seconds). + / - to change the duration of time (from 3 to 60 seconds).
• Goto Preset - If using speed dome cameras you can set the preset to display when you activate the Goto Preset - If using speed dome cameras you can set the preset to display when you activate the
alarm input device. The camera will rotate combined entrance to the default preset upon activation
input.
• Pre-registration - it defines how long, prior to activation of the alarm input device, the Pre-registration - it defines how long, prior to activation of the alarm input device, the
pre-registration to the frame rate previously set in the camera settings must be activated (IPS).
Press +/- buttons to change the value (from 0 to 10 seconds).
• After Recording - it defines how long, after the alarm input device activation, must continue After Recording - it defines how long, after the alarm input device activation, must continue
recording the frame rate set in the camera settings IPS (IPS). Press +/- buttons to change the value
(from 0 seconds to 60 minutes).
• alarm output - defines whether the alarm output will remain active at the moment when an alarm alarm output - defines whether the alarm output will remain active at the moment when an alarm
input device is activated. Press +/- buttons to select which alarm output enable (1-2), or to turn off
the alarm output (N / A).
• Buzzer - to activate the acoustic signal in the moment in which it activates the alarm input device. to Buzzer - to activate the acoustic signal in the moment in which it activates the alarm input device. to
press ENTER or the +/- keys to select this option or not. press ENTER or the +/- keys to select this option or not. press ENTER or the +/- keys to select this option or not.
• Log - To decide whether to store the LOG in the DVR events activations of the alarm inputs .. Press ENTERLog - To decide whether to store the LOG in the DVR events activations of the alarm inputs .. Press ENTERLog - To decide whether to store the LOG in the DVR events activations of the alarm inputs .. Press ENTER
or the +/- keys to toggle this option.
• Message - to see on screen the warning message for activating the alarm input device. to press ENTERMessage - to see on screen the warning message for activating the alarm input device. to press ENTERMessage - to see on screen the warning message for activating the alarm input device. to press ENTER
or the +/- keys to toggle this option.
• E-mail - to send an e-mail address set in view of the activation of the alarm input device. to press ENTERE-mail - to send an e-mail address set in view of the activation of the alarm input device. to press ENTERE-mail - to send an e-mail address set in view of the activation of the alarm input device. to press ENTER
or the +/- keys to toggle this option.
Page 41

USER MANUAL
DIGITAL VIDEO RECORDER DR-N16
Page: - 41 - Page: - 41 - Page: - 41 -
DSE srl - ITALY - WWW.DSE.EU
6.4 SEQ Display Settings
In the SETTINGS menu, press the ▲ ▼ buttons to move between the different items, and select SEQ In the SETTINGS menu, press the ▲ ▼ buttons to move between the different items, and select SEQ
Display and press ENTER to enter the menu of SEQ Display settings. Here you can adjust the Display and press ENTER to enter the menu of SEQ Display settings. Here you can adjust the Display and press ENTER to enter the menu of SEQ Display settings. Here you can adjust the Display and press ENTER to enter the menu of SEQ Display settings. Here you can adjust the
operations of cyclical scans in an independent way for the main monitor and the auxiliary monitor
CALL. The polling shows screen each individual cameras.
To monitor the call can only select a scan type, while for the main monitor is possible to select different
scans depending on which are activated in the 1,4,7,9,10,13,16-screen mode cameras
The operations are as follows:
• ▲ ▼ ◄►▲ ▼ ◄►
Press these buttons to navigate the menu.
• ESC
Press this button to exit and return to the SETTINGS MENU. If you submit a confirmation Save
screen, press ENTER to exit and save, ESC to exit without saving. screen, press ENTER to exit and save, ESC to exit without saving. screen, press ENTER to exit and save, ESC to exit without saving. screen, press ENTER to exit and save, ESC to exit without saving. screen, press ENTER to exit and save, ESC to exit without saving.
Below is a brief description of each item and its specific actions:
• Total Pages - the total pages of polling, to be displayed in sequence. And 'possible to cycle all Total Pages - the total pages of polling, to be displayed in sequence. And 'possible to cycle all
pages scanned to show all cameras (proposed by default) or exclude some. Press the +/- buttons to
choose how many cameras to cycling.
• Pause Time - the dwell time (3 to 60 seconds) specifies how each page must remain in the Pause Time - the dwell time (3 to 60 seconds) specifies how each page must remain in the
sequence. Press +/- buttons to change the value
Page 42

USER MANUAL
DIGITAL VIDEO RECORDER DR-N16
Page: - 42 - Page: - 42 - Page: - 42 -
DSE srl - ITALY - WWW.DSE.EU
Pause time.
• Page Settings - to select which cameras to show in scanning pages. Press +/- buttons to select the Page Settings - to select which cameras to show in scanning pages. Press +/- buttons to select the
page and the number buttons to set the camera combined with the page. to press ESC to exit and page and the number buttons to set the camera combined with the page. to press ESC to exit and page and the number buttons to set the camera combined with the page. to press ESC to exit and
save ..
6.5 Recording Settings Schedule
In the SETTINGS menu, press the ▲ ▼ buttons to move between the different items, and select Scheduled In the SETTINGS menu, press the ▲ ▼ buttons to move between the different items, and select Scheduled
Recording and press ENTER to enter the menu REGISTRATION PROGRAM. Recording and press ENTER to enter the menu REGISTRATION PROGRAM. Recording and press ENTER to enter the menu REGISTRATION PROGRAM. Recording and press ENTER to enter the menu REGISTRATION PROGRAM.
Page 43

USER MANUAL
DIGITAL VIDEO RECORDER DR-N16
Page: - 43 - Page: - 43 - Page: - 43 -
DSE srl - ITALY - WWW.DSE.EU
The SCHEDULE OF RECORDING SETTINGS allow the administrator to define when and how to record
based on the time and day of the week. They are programmable in 16 segments of time system (T1-T16)
for each weekday.
The operations are as follows:
• ▲ ▼ ◄►▲ ▼ ◄►
Press these buttons to navigate the menu.
• CALL / BACKUP
Press this button to copy all settings from one day of the week on all the following days, for example.
if the scheduled day is Tuesday the command will copy the program from Wednesday to Sunday ..
• ESC
Press this button to exit the current screen and return to the SETTINGS menu. If you submit a
confirmation Save screen, press
ENTER to exit and save, ESC to exit without saving. ENTER to exit and save, ESC to exit without saving. ENTER to exit and save, ESC to exit without saving. ENTER to exit and save, ESC to exit without saving.
Below is a brief description of each item and its specific actions:
• Home - The time of recording start can be varied by increasing it to 30 minutes (00: 30/1: 00/1: 30/2: Home - The time of recording start can be varied by increasing it to 30 minutes (00: 30/1: 00/1: 30/2:
00 ... etc). The end of recording time coincides with the start time of the next segment recording (For
the last time segment T 16 it will end with the beginning of the segment 1.) Press
Page 44

USER MANUAL
DIGITAL VIDEO RECORDER DR-N16
Page: - 44 - Page: - 44 - Page: - 44 -
DSE srl - ITALY - WWW.DSE.EU
+/- buttons to select the recording start time.
• Alarm - record mode (No recording, Video, or Audio / Video) to be performed when an alarm is Alarm - record mode (No recording, Video, or Audio / Video) to be performed when an alarm is
detected. Press +/- buttons
• Motion - recording mode (No registration, Video, or Audio / Video) to be performed when an Motion - recording mode (No registration, Video, or Audio / Video) to be performed when an
activation verification of motion detection. Press +/- buttons
• Normal - record mode (No recording, Video, or Audio / Video) to be carried out under normal Normal - record mode (No recording, Video, or Audio / Video) to be carried out under normal
conditions. Press +/- buttons
6.6 HDD Setup
In the SETTINGS menu, press the ▲ ▼ buttons to move between the different items, and select Hard In the SETTINGS menu, press the ▲ ▼ buttons to move between the different items, and select Hard
Disk and press ENTER to enter the menu of SETUP HARD DISK. Disk and press ENTER to enter the menu of SETUP HARD DISK. Disk and press ENTER to enter the menu of SETUP HARD DISK. Disk and press ENTER to enter the menu of SETUP HARD DISK.
In a video surveillance applications, recording audio / video alarm is the most important rule of the
normal one. So, this video recorder is designed to
split out there registration in two different partitions:
RECORDING ALARM and NORMAL RECORD.
HARD DISK The Settings allow the administrator to be able to format
Page 45

USER MANUAL
DIGITAL VIDEO RECORDER DR-N16
Page: - 45 - Page: - 45 - Page: - 45 -
DSE srl - ITALY - WWW.DSE.EU
each partition, to view the occupied space of each partition, and you can define the behavior of both
partitions to near exhaustion of hard disk space.
The operations are as follows:
• ▲ ▼ ◄►▲ ▼ ◄►
Press these buttons to navigate the menu.
• MODE Format / Erase hard drive MODE Format / Erase hard drive
Press this button to format or erase the hard drive.
• ESC
Press this button to exit the current screen and return to the SETTINGS menu. If you submit a
confirmation Save screen, press
ENTER to exit and save, ESC to exit without saving. ENTER to exit and save, ESC to exit without saving. ENTER to exit and save, ESC to exit without saving. ENTER to exit and save, ESC to exit without saving.
Below is a brief description of each item and its specific actions:
• Size (GB) - all content in GB (Giga-Byte) of the respective recording partitions. This item is only Size (GB) - all content in GB (Giga-Byte) of the respective recording partitions. This item is only
informative since the division of Hard Disk space to devote to the recordings is defined during format
(see next paragraph).
• Overwrite Automatica - Enabling the overwriting of both partitions when recording space on the Overwrite Automatica - Enabling the overwriting of both partitions when recording space on the
hard disk will be in the vicinity of the exhaustion system will proceed to the cancellation of the oldest
images to make room for new ones. If Overwrite is disabled, the system will not overwrite the normal
recording then stop recording until the user presses the button Alarm Reset. to press ENTER or +/- recording then stop recording until the user presses the button Alarm Reset. to press ENTER or +/- recording then stop recording until the user presses the button Alarm Reset. to press ENTER or +/- recording then stop recording until the user presses the button Alarm Reset. to press ENTER or +/- recording then stop recording until the user presses the button Alarm Reset. to press ENTER or +/-
buttons to activate or deactivate this entry.
• Hard Disk Full - Enable this feature if you want to generate actions when saved registrations have Hard Disk Full - Enable this feature if you want to generate actions when saved registrations have
reached the maximum limit of free space on hard disk. They will enable a result all of the following
options. to press
ENTER or +/- buttons to activate or deactivate this entry. ENTER or +/- buttons to activate or deactivate this entry.
• Duration - defines how long (in seconds) remain active the alarm output and the buzzer (acoustic Duration - defines how long (in seconds) remain active the alarm output and the buzzer (acoustic
signal) at the time when the hard disk space is near exhaustion. Press +/- buttons to change the
duration time (3 to 60 seconds).
Page 46

USER MANUAL
DIGITAL VIDEO RECORDER DR-N16
Page: - 46 - Page: - 46 - Page: - 46 -
DSE srl - ITALY - WWW.DSE.EU
• alarm output - defines whether the alarm output will remain active at the moment when the hard alarm output - defines whether the alarm output will remain active at the moment when the hard
disk space is near exhaustion. Press +/- buttons to select which alarm output enable (1-2), or to turn
off the alarm output (N / A).
• Buzzer - to activate the acoustic signal at the moment when the hard disk space is near exhaustion. Buzzer - to activate the acoustic signal at the moment when the hard disk space is near exhaustion.
to press ENTER or the +/- keys to select this option or not. to press ENTER or the +/- keys to select this option or not. to press ENTER or the +/- keys to select this option or not.
• Log - To define whether the alarm should run out of hard drive to be stored in the DVR event log. to Log - To define whether the alarm should run out of hard drive to be stored in the DVR event log. to
press ENTER or the +/- keys to toggle this option. press ENTER or the +/- keys to toggle this option. press ENTER or the +/- keys to toggle this option.
• E-mail - for E-mail - for send an e-mail address set, in warning
exhaustion of free hard disk space. to press ENTER or +/- buttons to activate or deactivate this entry. exhaustion of free hard disk space. to press ENTER or +/- buttons to activate or deactivate this entry. exhaustion of free hard disk space. to press ENTER or +/- buttons to activate or deactivate this entry.
Two other commands can be used in this window:
CONTROL MODE - Access to formatting hard drive (see next paragraph) CONTROL MODE - Access to formatting hard drive (see next paragraph)
SEQ COMMAND ( remote control) - Allows you to access a form to set alarm actions at the Hard Disk SEQ COMMAND ( remote control) - Allows you to access a form to set alarm actions at the Hard Disk
write error.
6.6.1 Format / Erase Hard Disk
In the SETUP HARD DISK, press MODE to enter the menu and formatting hard drive erasure. In the SETUP HARD DISK, press MODE to enter the menu and formatting hard drive erasure. In the SETUP HARD DISK, press MODE to enter the menu and formatting hard drive erasure.
Page 47

USER MANUAL
DIGITAL VIDEO RECORDER DR-N16
Page: - 47 - Page: - 47 - Page: - 47 -
DSE srl - ITALY - WWW.DSE.EU
The hard disk must be formatted before the start of the audio / video recording. This function The hard disk must be formatted before the start of the audio / video recording. This function
allows the administrator to format the hard disk, delete data and gives the possibility to set the maximum
size (as a percentage) of the two different recording partitions: normal and alarm
NOTE: Verify that no remote connection before proceeding to the formatting is not active. NOTE: Verify that no remote connection before proceeding to the formatting is not active.
The window contains two columns to potential Hard Disk 2, but only the first is available on this model.
The first two lines: GB Size and% normal recording is for information and are not accessible. E 'can
instead change the percentage of Hard Disk-up to the alarm recording, press ENTER and using the
inclusion texts explained in section 4.1. The percentage of HDD for normal recording will be changed
accordingly. E 'can set the percentage of HDD alarm also to 0 and 100 depending on whether you are
using only the alarm recording or recording only on an hourly basis.
The operations are as follows:
• MODE => FormatMODE => Format
Press this button to start formatting the hard disk. A dialog box to confirm whether or not the
formatting; to press ENTER to confirm, or ESC to exit without formatting. Please note that it will take formatting; to press ENTER to confirm, or ESC to exit without formatting. Please note that it will take formatting; to press ENTER to confirm, or ESC to exit without formatting. Please note that it will take formatting; to press ENTER to confirm, or ESC to exit without formatting. Please note that it will take formatting; to press ENTER to confirm, or ESC to exit without formatting. Please note that it will take formatting; to press ENTER to confirm, or ESC to exit without formatting. Please note that it will take
about 40 seconds to complete the formatting of a hard disk.
If the HDD is formatted for the first time it will be divided into the default partitions (30% alarm - 70%
of normal). If you have already formatted before then will be divided in the proportions set screen.
Note that unlike the physical format (see below), this formatting does not delete
Page 48

USER MANUAL
DIGITAL VIDEO RECORDER DR-N16
Page: - 48 - Page: - 48 - Page: - 48 -
DSE srl - ITALY - WWW.DSE.EU
any content residing on the hard disk.
• SEQ => ClearSEQ => Clear
Press this button to delete the contents of the hard disk. A dialog box to confirm whether or not the
cancellation; to press ENTER to confirm, or ESC to exit without erasing. cancellation; to press ENTER to confirm, or ESC to exit without erasing. cancellation; to press ENTER to confirm, or ESC to exit without erasing. cancellation; to press ENTER to confirm, or ESC to exit without erasing. cancellation; to press ENTER to confirm, or ESC to exit without erasing.
• CALL => physical format CALL => physical format
Press this button to start FORMAT Physical hard drive. A dialog window by pressing ENTER it is Press this button to start FORMAT Physical hard drive. A dialog window by pressing ENTER it is Press this button to start FORMAT Physical hard drive. A dialog window by pressing ENTER it is
confirmed, while pressing ESC It exits without confirming the physical formatting. We recommend confirmed, while pressing ESC It exits without confirming the physical formatting. We recommend confirmed, while pressing ESC It exits without confirming the physical formatting. We recommend confirmed, while pressing ESC It exits without confirming the physical formatting. We recommend
using the PHYSICAL FORMAT to format the hard disk for the first time. The physical formatting using the PHYSICAL FORMAT to format the hard disk for the first time. The physical formatting
always take about a minute and split the hard disk in the default percentage (30% alarm - 70%
normal). All contents of the Hard Disk will be deleted.
• ESC
Press this button to exit the current screen and return to the SETTINGS menu HARD DISK. If you
submit a confirmation Save screen, press ENTER to exit and save, ESC to exit without saving. submit a confirmation Save screen, press ENTER to exit and save, ESC to exit without saving. submit a confirmation Save screen, press ENTER to exit and save, ESC to exit without saving. submit a confirmation Save screen, press ENTER to exit and save, ESC to exit without saving. submit a confirmation Save screen, press ENTER to exit and save, ESC to exit without saving.
Following is a brief description of each menu item:
• Size (GB) - the maximum capacity in GB (Giga-Byte) hard disk after formatting. This item is Size (GB) - the maximum capacity in GB (Giga-Byte) hard disk after formatting. This item is
informational only.
• Alarm Recording (%) - the maximum size of the alarm recording in percentage. Alarm Recording (%) - the maximum size of the alarm recording in percentage.
• Normal Record (%) - the maximum size of the normal recording as a percentage. Normal Record (%) - the maximum size of the normal recording as a percentage.
Page 49

USER MANUAL
DIGITAL VIDEO RECORDER DR-N16
Page: - 49 - Page: - 49 - Page: - 49 -
DSE srl - ITALY - WWW.DSE.EU
6.7 Password Settings
In the SETTINGS menu, press the ▲ ▼ keys to navigate in the menu and go to select the item Password,In the SETTINGS menu, press the ▲ ▼ keys to navigate in the menu and go to select the item Password,
then press ENTER to enter the menu then press ENTER to enter the menu then press ENTER to enter the menu
SETTINGS PASSWORD.
The PASSWORD SETTINGS allow the administrator to add new users, delete unwanted users and
modify their user name and password.
There are three different password levels in the system: Director ( higher level) Supervisor, is Operator There are three different password levels in the system: Director ( higher level) Supervisor, is Operator There are three different password levels in the system: Director ( higher level) Supervisor, is Operator There are three different password levels in the system: Director ( higher level) Supervisor, is Operator There are three different password levels in the system: Director ( higher level) Supervisor, is Operator There are three different password levels in the system: Director ( higher level) Supervisor, is Operator
( lower level). ( lower level).
- The operator can access only to the live view of the cameras
- The Supervisor can access the live view of the cameras and viewing records
- The administrator has access to all functions and displays, including device configuration. The system
can handle up to a maximum of 18 users.
The system leaves the factory with a user name and password already set, so you can come in for the
first time as Administrator, then go and change at a later time. first time as Administrator, then go and change at a later time. first time as Administrator, then go and change at a later time.
Default USER NAME: PASSWORD aa
default: 11
The operations are as follows:
• ▲ ▼ ◄►▲ ▼ ◄►
Page 50

USER MANUAL
DIGITAL VIDEO RECORDER DR-N16
Page: - 50 - Page: - 50 - Page: - 50 -
DSE srl - ITALY - WWW.DSE.EU
Press these buttons to navigate the menu.
• MODE => Set default access MODE => Set default access
Press this button if you want to set the default access. The asterisk appears next to the user number
that is highlighted, it means that that user is set as the default access. His name and password will
be automatically proposed by the DVR when you log in and you will not need to enter your user
name and password each time.
• ESC
Press this button to exit the current screen and return to the SETTINGS menu. If you submit a
confirmation Save screen, press
ENTER to exit and save, ESC to exit without saving. ENTER to exit and save, ESC to exit without saving. ENTER to exit and save, ESC to exit without saving. ENTER to exit and save, ESC to exit without saving.
Below is a brief description of each item and its specific actions:
• Username
• Password
• Level - the password level ( Administrator, Supervisor, or Level - the password level ( Administrator, Supervisor, or Level - the password level ( Administrator, Supervisor, or Level - the password level ( Administrator, Supervisor, or
Operator) . Press +/- buttons to change the level. Operator) . Press +/- buttons to change the level. Operator) . Press +/- buttons to change the level.
6.8 System Settings
In the SETTINGS menu, press the ▲ ▼ keys to navigate in the menu and go to select the item System, then In the SETTINGS menu, press the ▲ ▼ keys to navigate in the menu and go to select the item System, then In the SETTINGS menu, press the ▲ ▼ keys to navigate in the menu and go to select the item System, then
press ENTER to enter the menu press ENTER to enter the menu press ENTER to enter the menu
SYSTEM SETTINGS.
Page 51

USER MANUAL
DIGITAL VIDEO RECORDER DR-N16
Page: - 51 - Page: - 51 - Page: - 51 -
DSE srl - ITALY - WWW.DSE.EU
The SYSTEM SETTINGS allow the administrator to set different information data in the system, such as
the time, time zone, language etc.
The operations are as follows:
• ▲ ▼ ◄►▲ ▼ ◄►
Press these buttons to navigate the menu.
• ESC
Press this button to exit the current screen and return to the SETTINGS menu. If you submit a
confirmation Save screen, press
ENTER to exit and save, ESC to exit without saving. Please note that if the language is changed, ENTER to exit and save, ESC to exit without saving. Please note that if the language is changed, ENTER to exit and save, ESC to exit without saving. Please note that if the language is changed, ENTER to exit and save, ESC to exit without saving. Please note that if the language is changed, ENTER to exit and save, ESC to exit without saving. Please note that if the language is changed,
you need a system reboot.
Below is a brief description of each item and its specific actions:
• Time Zone - press the +/- buttons to select the time zone of belonging (for Italy: GMT + 1). Time Zone - press the +/- buttons to select the time zone of belonging (for Italy: GMT + 1).
• Daylight savings time - to press ENTER or +/- buttons to activate or deactivate the automatic switch from Daylight savings time - to press ENTER or +/- buttons to activate or deactivate the automatic switch from Daylight savings time - to press ENTER or +/- buttons to activate or deactivate the automatic switch from Daylight savings time - to press ENTER or +/- buttons to activate or deactivate the automatic switch from
summer time to winter time.
• Schedule
• Synchronization - indicates whether you want the time to be synchronized Synchronization - indicates whether you want the time to be synchronized
Page 52

USER MANUAL
DIGITAL VIDEO RECORDER DR-N16
Page: - 52 - Page: - 52 - Page: - 52 -
DSE srl - ITALY - WWW.DSE.EU
automatically with a server TSP (Time Synchronization Protocol). to press ENTER or +/- buttons automatically with a server TSP (Time Synchronization Protocol). to press ENTER or +/- buttons automatically with a server TSP (Time Synchronization Protocol). to press ENTER or +/- buttons
to activate or deactivate this entry.
• TSP Server - E 'can enter the text insertion procedure explained in paragraph 4.1 the name of TSP Server - E 'can enter the text insertion procedure explained in paragraph 4.1 the name of
the TSP server you want to use.
• Date - the date of the system. Press +/- buttons to change the date.Date - the date of the system. Press +/- buttons to change the date.
• Now - system time. Press +/- buttons to change the hour. Now - system time. Press +/- buttons to change the hour.
• Display Format - format used for displaying the date and time. Press +/- buttons to change the Display Format - format used for displaying the date and time. Press +/- buttons to change the
display format.
• Tongue - press the +/- keys to select the appropriate language. Changing the language will require a Tongue - press the +/- keys to select the appropriate language. Changing the language will require a
system reboot
6.9 Settings RS-232/422/485
In the SETTINGS menu, press ▲ ▼ to move up RS-232/422/485, then press ENTER to access the window In the SETTINGS menu, press ▲ ▼ to move up RS-232/422/485, then press ENTER to access the window In the SETTINGS menu, press ▲ ▼ to move up RS-232/422/485, then press ENTER to access the window In the SETTINGS menu, press ▲ ▼ to move up RS-232/422/485, then press ENTER to access the window In the SETTINGS menu, press ▲ ▼ to move up RS-232/422/485, then press ENTER to access the window
below.
The RS-232/422/485 settings allow the administrator to change the settings of the rear RS485 port used
for operating any motorized speed dome cameras. The window also shows the RS232 and RS422
indication, but these ports are not available on this model.
Consult your camera manual for the settings required by the connected camera.
Page 53

USER MANUAL
DIGITAL VIDEO RECORDER DR-N16
Page: - 53 - Page: - 53 - Page: - 53 -
DSE srl - ITALY - WWW.DSE.EU
The available commands are:
• ▲ ▼ ◄►▲ ▼ ◄►
Press these buttons to navigate the menu.
• MODE
Accesses advanced settings RS232, not used on this model.
• ESC
Press this button to exit the current screen and return to the SETTINGS menu. If you submit a
confirmation Save screen, press
ENTER to exit and save, ESC to exit without saving. ENTER to exit and save, ESC to exit without saving. ENTER to exit and save, ESC to exit without saving. ENTER to exit and save, ESC to exit without saving.
Below is a brief description of each item and its specific actions:
• device type - PTZ or N / A ( Not used). Press +/- to change. Set the parameter of PTZ if you intend to device type - PTZ or N / A ( Not used). Press +/- to change. Set the parameter of PTZ if you intend to device type - PTZ or N / A ( Not used). Press +/- to change. Set the parameter of PTZ if you intend to device type - PTZ or N / A ( Not used). Press +/- to change. Set the parameter of PTZ if you intend to device type - PTZ or N / A ( Not used). Press +/- to change. Set the parameter of PTZ if you intend to device type - PTZ or N / A ( Not used). Press +/- to change. Set the parameter of PTZ if you intend to
use the RS485 port to control speed dome cameras connected to it.
• Template - Set the communication protocol to be used according to the connected cameras The Template - Set the communication protocol to be used according to the connected cameras The
DVR includes the protocol D and Pelco, Samsung SCC-641P. Press the +/- button to change the DVR includes the protocol D and Pelco, Samsung SCC-641P. Press the +/- button to change the DVR includes the protocol D and Pelco, Samsung SCC-641P. Press the +/- button to change the
protocol.
• Baud Rate - press +/- to vary the speed of the Protocol Baud Rate - press +/- to vary the speed of the Protocol
• Data Bit - press +/- to change Data Bit - press +/- to change
• Stop Bit - press +/- to vary. Stop Bit - press +/- to vary.
• Parity - ( Odd, Even, or None). Press +/- to change. Parity - ( Odd, Even, or None). Press +/- to change. Parity - ( Odd, Even, or None). Press +/- to change. Parity - ( Odd, Even, or None). Press +/- to change. Parity - ( Odd, Even, or None). Press +/- to change. Parity - ( Odd, Even, or None). Press +/- to change.
• ID DVR / Camera - The address to be assigned to the VCR in the RS485 BUS, must be different ID DVR / Camera - The address to be assigned to the VCR in the RS485 BUS, must be different
from those assigned to the cameras. Press +/- to change.
For instructions on how to set the communication parameters suitable for / and cameras by using
consult your camera manual. Obviously all the connected cameras, though of different models, will be
able to share the same communication protocol.
Page 54

USER MANUAL
DIGITAL VIDEO RECORDER DR-N16
Page: - 54 - Page: - 54 - Page: - 54 -
DSE srl - ITALY - WWW.DSE.EU
6.10 Network Settings
In the settings menu, press ▲ ▼ to move up Network, then press to access the following dialog In the settings menu, press ▲ ▼ to move up Network, then press to access the following dialog In the settings menu, press ▲ ▼ to move up Network, then press to access the following dialog
Here the administrator can set all the parameters related to the connection in DVR network via the rear
Ethernet port.
The available commands are:
• ▲ ▼ ◄►▲ ▼ ◄►
Press these buttons to navigate the menu.
.
• ESC
Press this button to exit the current screen and return to the SETTINGS menu. If you submit a
confirmation Save screen, press
ENTER to exit and save, ESC to exit without saving. ENTER to exit and save, ESC to exit without saving. ENTER to exit and save, ESC to exit without saving. ENTER to exit and save, ESC to exit without saving.
Below is a brief description of each item and its specific actions:
• Network Type - Static IP, PPPoE, or DHCP. DHCP can only be used for local area networks, while Network Type - Static IP, PPPoE, or DHCP. DHCP can only be used for local area networks, while
Static IP and PPPoE can be used for both local networks and Internet. Press +/- to change.
Page 55

USER MANUAL
DIGITAL VIDEO RECORDER DR-N16
Page: - 55 - Page: - 55 - Page: - 55 -
DSE srl - ITALY - WWW.DSE.EU
• IP address - The IP address of the machine to fit with the input method text described in section 4.1 IP address - The IP address of the machine to fit with the input method text described in section 4.1
• Net Mask - To be fitted with the input method text described in section Net Mask - To be fitted with the input method text described in section
4.1
• Gateway - To be fitted with the input method text described in section Gateway - To be fitted with the input method text described in section
4.1
• DNS - DNS (Domain Name Server). To be inserted with the insertion method text described in DNS - DNS (Domain Name Server). To be inserted with the insertion method text described in
section 4.1
• Username - To be inserted in case of PPPoE connection to the Internet, with the input method text Username - To be inserted in case of PPPoE connection to the Internet, with the input method text
described in section 4.1
• Password - To be inserted in case of PPPoE connection to the Internet, with the input method text Password - To be inserted in case of PPPoE connection to the Internet, with the input method text
described in section 4.1
• Type DDNS - The use DDNS service allows you to facilitate the internet access even without a static Type DDNS - The use DDNS service allows you to facilitate the internet access even without a static
IP address. DR-N16 supports the most common DDNS services. Press +/- to change.
• URL - The address to be included in case of PPPoE connection to the Internet, with the input URL - The address to be included in case of PPPoE connection to the Internet, with the input
method text described in section 4.1
• Username DDNS - user name provided by the DDNS service provider, to be included with the input Username DDNS - user name provided by the DDNS service provider, to be included with the input
method text described in section
4.1
• DDNS Password - Password provided by DDNS service provider, to be included with the input DDNS Password - Password provided by DDNS service provider, to be included with the input
method text described in section 4.1
• E-mail - to press ENTER this item to access the settings of the email address to which to send the E-mail - to press ENTER this item to access the settings of the email address to which to send the E-mail - to press ENTER this item to access the settings of the email address to which to send the E-mail - to press ENTER this item to access the settings of the email address to which to send the
warning notices. See the following section 6.10.1.
• Avan. - to press ENTER this item to access the advanced network settings. See the following section Avan. - to press ENTER this item to access the advanced network settings. See the following section Avan. - to press ENTER this item to access the advanced network settings. See the following section Avan. - to press ENTER this item to access the advanced network settings. See the following section
6.10.2
6.10.1 E-mail Settings
Page 56

USER MANUAL
DIGITAL VIDEO RECORDER DR-N16
Page: - 56 - Page: - 56 - Page: - 56 -
DSE srl - ITALY - WWW.DSE.EU
In the NETWORK SETTINGS Press ENTER on item E-mail to enter the following window In the NETWORK SETTINGS Press ENTER on item E-mail to enter the following window In the NETWORK SETTINGS Press ENTER on item E-mail to enter the following window
DR-N16 is able to send e-mail alarm in different conditions such as detection of activated movement,
etc. alarm input In this section, the administrator can set up email delivery parameters. Consider that
most Internet providers insert anti-spam systems that can make impossible sending emails without using
the common mail browser. This could result in a failure of the function. Consult your ISP about it.
The available commands are:
• ▲ ▼
Press these buttons to navigate the menu.
• ESC
Press this button to exit the current screen and return to the SETTINGS menu. If you submit a
confirmation Save screen, press
ENTER to exit and save, ESC to exit without saving. ENTER to exit and save, ESC to exit without saving. ENTER to exit and save, ESC to exit without saving. ENTER to exit and save, ESC to exit without saving.
Below is a brief description of each item and its specific actions:
Page 57

USER MANUAL
DIGITAL VIDEO RECORDER DR-N16
Page: - 57 - Page: - 57 - Page: - 57 -
DSE srl - ITALY - WWW.DSE.EU
• SMTP Server - SMTP server to use for sending e-mail. To be inserted with the insertion method text SMTP Server - SMTP server to use for sending e-mail. To be inserted with the insertion method text
described in section 4.1
• Authentication - Set SMTO if the server requires a user name and password for sending email. to Authentication - Set SMTO if the server requires a user name and password for sending email. to
press ENTER or the +/- keys to toggle press ENTER or the +/- keys to toggle press ENTER or the +/- keys to toggle
• Username - User name to be used towards SMTP servers that require authentication in 'the e-mail Username - User name to be used towards SMTP servers that require authentication in 'the e-mail
sending. To be inserted with the insertion method text described in section 4.1
• Password - Password to use towards SMTP servers that require authentication in 'the e-mail Password - Password to use towards SMTP servers that require authentication in 'the e-mail
sending. To be inserted with the insertion method text described in section 4.1
• Mail from - This will appear as the sender address in e-mails sent from the DR-N16. To be inserted Mail from - This will appear as the sender address in e-mails sent from the DR-N16. To be inserted
with the insertion method text described in section 4.1
• Mail to # 1-5 - These are the email addresses to which to send event notifications. The system Mail to # 1-5 - These are the email addresses to which to send event notifications. The system
supports up to 5 different addresses. To be inserted with the insertion method text described in
section 4.1
• Attachment - Here you can specify whether the notification e-mail must be attached to the image at Attachment - Here you can specify whether the notification e-mail must be attached to the image at
the time of the event. The options are: N / A (no picture), Original picture (picture in original size),
QCIF picture (reduced image). Press +/- to change.
6.10.2 Advanced Network Settings
In the NETWORK SETTINGS Press ENTER AVAN on the item to access the following window where In the NETWORK SETTINGS Press ENTER AVAN on the item to access the following window where In the NETWORK SETTINGS Press ENTER AVAN on the item to access the following window where
you can modify some advanced parameters related to network communication.
If you are not familiar with this type of setting it is not recommended to change these parameters.
Page 58

USER MANUAL
DIGITAL VIDEO RECORDER DR-N16
Page: - 58 - Page: - 58 - Page: - 58 -
DSE srl - ITALY - WWW.DSE.EU
The available commands are:
• ▲ ▼
Press these buttons to navigate the menu.
• ESC
Press this button to exit the current screen and return to the SETTINGS menu. If you submit a
confirmation Save screen, press
ENTER to exit and save, ESC to exit without saving. ENTER to exit and save, ESC to exit without saving. ENTER to exit and save, ESC to exit without saving. ENTER to exit and save, ESC to exit without saving.
Below is a brief description of each item and its specific actions:
• Control Port / Data Port / HTTP port - These are the ports that are used in remote communication Control Port / Data Port / HTTP port - These are the ports that are used in remote communication Control Port / Data Port / HTTP port - These are the ports that are used in remote communication
with the To be inserted with the insertion method text described in section 4.1 If these ports should
be modified with other that they are not accessible, the DVR will restore the default ports
automatically.
• WAP image quality - Quality image used in communication with cell phones. Press +/- to change.WAP image quality - Quality image used in communication with cell phones. Press +/- to change.
6:11 Initial Settings
This item in the setup menu allows you to restore the factory settings if you are not satisfied of the
customizations you have made. It has a reset confirmation screen, press ENTER to restore, customizations you have made. It has a reset confirmation screen, press ENTER to restore, customizations you have made. It has a reset confirmation screen, press ENTER to restore,
ESC to exit. ESC to exit.
Page 59

USER MANUAL
DIGITAL VIDEO RECORDER DR-N16
Page: - 59 - Page: - 59 - Page: - 59 -
DSE srl - ITALY - WWW.DSE.EU
7. PTZ Control
The DR-N16 VCR enables controlling speed dome cameras connected to the rear RS485 port.
Before you must have connected the camera correctly (see chapter 3.2), it has programmed correctly the
communication protocol to be used (see section 6.9) and have set the address of the individual cameras
in the PRE-CAMERA settings (see section 6.1)
If the camera provides remote control functions will appear an asterisk before its name in the main
display window.
Select the arrows at the camera and press the PTZ button to access the remote control. The asterisk will
begin to flash to indicate that the camera control that is active.
The control is easy when operated by remote control.
Once PTZ control enabled has the following general commands:
Main controls:
• PTZ
He exits the PTZ control. The asterisk next to the name of the camera stops blinking
• ▲ ▼▲ ▼
Controls up / down.
• ◄►
Controls LEFT / RIGHT.
• ZOOM (
) + / -
Zoom Command forward back.
• GOTO
recall button of a preset (PRESET) After pressing the button type the PRESET callback number
(00-99).
• NEXT
Press this button to access additional functions, generally less used. The function selected will
appear at the bottom right. Additional features are as follows
Page 60

USER MANUAL
DIGITAL VIDEO RECORDER DR-N16
Page: - 60 - Page: - 60 - Page: - 60 -
DSE srl - ITALY - WWW.DSE.EU
Advanced commands:
Function Operation Description
Focus
+ / -
ENTER
Focus Near / Far auto
focus
Iris
+ / -
Iris open / closed
Auto Pan (3)
+ / -
ENTER
*
#
The pan speed is in parenthesis increase /
decrease speed Have / Stop panoramic Sets the
position of panoramic early Set the pan end
position
SEQ (5 sec.)
+ / -, NUMBER
ENTER
The residence time is between brackets. It activates
the automatic scanning between presets 0-9 (or
1-10) changes the residence time of the preset Start
/ Stop the sequence. An asterisk indicates the active
cyclic tour function.
Preset (1)
+ / -, NUMBER
ENTER
The program currently is in brackets To set
the preset changes the preset number to
set the preset position
Pan Speed (3)
+ / -
The speed is indicated in brackets To vary
the speed in the manual command.
increases / decreases the speed
Page 61

USER MANUAL
DIGITAL VIDEO RECORDER DR-N16
Page: - 61 - Page: - 61 - Page: - 61 -
DSE srl - ITALY - WWW.DSE.EU
8. Search and Playback (Administrator, Supervisor)
The management of long recording periods requires appropriate research systems to be able to quickly
locate images of interest. There are three search methods to start playback. (to) Search by date, (b) Search locate images of interest. There are three search methods to start playback. (to) Search by date, (b) Search locate images of interest. There are three search methods to start playback. (to) Search by date, (b) Search
for event (c) Search archived files. for event (c) Search archived files.
In quadrivisione window, press the button with the play symbol or the SEARCH button on the
remote.
The available commands are:
• ▲ ▼
Press these buttons to navigate the menu.
• ENTER
Press to access the selected search function.
• ESC
Press this button to exit the current screen
The following explains the different search modes.
Page 62

USER MANUAL
DIGITAL VIDEO RECORDER DR-N16
Page: - 62 - Page: - 62 - Page: - 62 -
DSE srl - ITALY - WWW.DSE.EU
8.1 Search by date / time
The time search allows you to start playing at a certain date and time
The active functions are:
• ▲ ▼
Press these buttons to navigate the menu.
• ESC
Press this button to exit the current screen
• SEARCH / MODE or PLAY (
)
Press the button to start search and play the movie clip. If it was not any camera in playback mode
set with the MODE button, then all displayed cameras will take you to playback mode.
• CALL / BACKUP
Press this button if you want to save the recording as of the date selected on external media via USB
without playing the video on the monitor.
Page 63

USER MANUAL
DIGITAL VIDEO RECORDER DR-N16
Page: - 63 - Page: - 63 - Page: - 63 -
DSE srl - ITALY - WWW.DSE.EU
This will open the backup window that we will see below in section 8.4. This type of backup is
performed in the background to almost all DVR functions are accessible.
Below is a brief description of each item and its specific actions:
• Year / Month / Day / Hour / Minute - Play will begin from the date entered with +/- Change Year / Month / Day / Hour / Minute - Play will begin from the date entered with +/- Change
• Video / Audio - ( Alarm, Motion, No Signal, Normal). Select the type of recording you want to Video / Audio - ( Alarm, Motion, No Signal, Normal). Select the type of recording you want to Video / Audio - ( Alarm, Motion, No Signal, Normal). Select the type of recording you want to Video / Audio - ( Alarm, Motion, No Signal, Normal). Select the type of recording you want to
search. to press ENTER or +/- search. to press ENTER or +/- search. to press ENTER or +/-
8.2 Search by Event
The Search for event provides access to the event memory (LOG) DVR
There are 4 types of selectable events:
1) Alarm - Alarm from external contact
2) Motion - Alarm by motion detection
3) No signal - alarm from video loss
4) System - Technical Events
Page 64

USER MANUAL
DIGITAL VIDEO RECORDER DR-N16
Page: - 64 - Page: - 64 - Page: - 64 -
DSE srl - ITALY - WWW.DSE.EU
The memory contains the last 1000 events. If you want minor events are not recorded and can specify it The memory contains the last 1000 events. If you want minor events are not recorded and can specify it The memory contains the last 1000 events. If you want minor events are not recorded and can specify it
in the program
The active functions are:
• ▲ ▼
Press these buttons to navigate the menu.
• ESC
Press this button to exit the current screen
• MODE => Refresh MODE => Refresh
Press the button to update this window with the latest events that happened after the opening of the
window.
• SEQ (remote control) => Page up SEQ (remote control) => Page up
• X2 (remote control) => Page down X2 (remote control) => Page down
• Numbers
By pressing the number buttons to access the log of the corresponding page.
Below is a brief description of each item and its specific actions:
• Event type - Choose the type of winds to display. Remember that the system events will not trigger Event type - Choose the type of winds to display. Remember that the system events will not trigger
recording. to press ENTER or +/- recording. to press ENTER or +/- recording. to press ENTER or +/-
• source ID - The source which generated the event. For detections of motion detection will be the source ID - The source which generated the event. For detections of motion detection will be the
camera 1,2,3 or 4, for the alarms input 1,2,3 o4. to press
ENTER or +/- ENTER or +/-
Log - Based on previous settings will all winds in memory. E 'can highlight every wind, and: (1) Log - Based on previous settings will all winds in memory. E 'can highlight every wind, and: (1)
Press Play ( Press Play (
) for
reproduce the combined event movie, (2) press BACKUP to save the recording to external media reproduce the combined event movie, (2) press BACKUP to save the recording to external media reproduce the combined event movie, (2) press BACKUP to save the recording to external media
via USB without playing the video on the monitor. This will open the backup window that we will see
below in section 8.4. This type of backup is performed in the background to almost all DVR functions
are accessible.
Page 65

USER MANUAL
DIGITAL VIDEO RECORDER DR-N16
Page: - 65 - Page: - 65 - Page: - 65 -
DSE srl - ITALY - WWW.DSE.EU
8.3 Search files stored
The search function allows to search files stored among the videos previously saved to external media
via USB. :
The active functions are:
• ▲ ▼
Press these buttons to navigate the menu.
• ESC
Press this button to exit the current screen
Below is a brief description of each item and its shares
specifications:
• Backup Device - if you have not yet established a connection with the external device (see chapter) Backup Device - if you have not yet established a connection with the external device (see chapter)
press ENTER to bring up the login window. The device connected to the USB port will appear in the press ENTER to bring up the login window. The device connected to the USB port will appear in the press ENTER to bring up the login window. The device connected to the USB port will appear in the
list below and to the left will appear the archived files. Choose the file and press
ENTER or PLAY to play. E 'you can also press MODE to delete the file. ENTER or PLAY to play. E 'you can also press MODE to delete the file. ENTER or PLAY to play. E 'you can also press MODE to delete the file. ENTER or PLAY to play. E 'you can also press MODE to delete the file.
NOTE: The stored files are named as follows:
camNN-YYYYMMDD-hhmmss.h264
Page 66

USER MANUAL
DIGITAL VIDEO RECORDER DR-N16
Page: - 66 - Page: - 66 - Page: - 66 -
DSE srl - ITALY - WWW.DSE.EU
where NN is the number of the camera
YYYY is the year, MM is the month, DD is the day, hh hour, mm minute, and ss is the seconds.
Page 67

USER MANUAL
DIGITAL VIDEO RECORDER DR-N16
Page: - 67 - Page: - 67 - Page: - 67 -
DSE srl - ITALY - WWW.DSE.EU
8.4 Playback
During playback of a recorded movie you can be activated the following commands:
• Play / Pause (
)
Start / Pause playback at normal speed 1X. The sound is only audible at this speed.
• Stop (
)
Stops playback. Pressing later
playback begins
from the beginning
• Fast Forward (
/ ► on the remote control, ► on DVR)/ ► on the remote control, ► on DVR)/ ► on the remote control, ► on DVR)/ ► on the remote control, ► on DVR)
Fast forward. Each press increases the forward speed to 2X, 4X, 8X, up to 16X.
• Fast Backward (
/ ◄ on the remote control, ◄ on DVR)/ ◄ on the remote control, ◄ on DVR)/ ◄ on the remote control, ◄ on DVR)/ ◄ on the remote control, ◄ on DVR)
Playing in fast reverse. Each press increases the forward speed to 2X, 4X, 8X, up to 16X.
• Single Step (
/ ▼ on the remote control, ▼ on DVR)/ ▼ on the remote control, ▼ on DVR)/ ▼ on the remote control, ▼ on DVR)/ ▼ on the remote control, ▼ on DVR)
Press this to frame-by-frame playback ..
• Call / Backup
Press to save the file on an external storage device connected to the USB port. It appears the backup
window
Page 68

USER MANUAL
DIGITAL VIDEO RECORDER DR-N16
Page: - 68 - Page: - 68 - Page: - 68 -
DSE srl - ITALY - WWW.DSE.EU
The available commands are:
• ▲ ▼ ◄►▲ ▼ ◄►
Press these buttons to navigate the menu.
• CALL / BACKUP
Press to start the backup. A scrolling text will indicate the backup is in progress which may also
take some time. When backing up you can still use your VCR normally.
• STOP
Press to stop the backup
• ESC
Press this button to exit the screen
Below is a brief description of each item and its specific actions:
• Backup Device - the backup device that will be connected to the USB port. Backup Device - the backup device that will be connected to the USB port.
And 'necessary that the device is connected before you can use (To see section 5.4)
• Speed - the backup speed to vary +/- Press Speed - the backup speed to vary +/- Press
• Directory - The folder to place the videos to be edited as text Directory - The folder to place the videos to be edited as text
Page 69

USER MANUAL
DIGITAL VIDEO RECORDER DR-N16
Page: - 69 - Page: - 69 - Page: - 69 -
DSE srl - ITALY - WWW.DSE.EU
• Cameras - The cameras to be saved. Press +/- to changeCameras - The cameras to be saved. Press +/- to change
• end - Date and time of end of the period to be saved. end - Date and time of end of the period to be saved.
Page 70

USER MANUAL
DIGITAL VIDEO RECORDER DR-N16
Page: - 70 - Page: - 70 - Page: - 70 -
DSE srl - ITALY - WWW.DSE.EU
9. Remote Access
By connecting the DR-N16 to a LAN or the Internet you can connect to it from a remote PC. For remote
access using a standard Web browser such as Internet Explorer.
Connect the DR-N16 network
First you need to connect the DVR to the network via the pto network. It 'also need to set the network
parameters in the settings as described in section 6.10 based on the characteristics of its network.
Before you connect remotely
Before access DVR carry out the following preliminary operations. Note that in almost all computers the
only truly indispensable step is the third.
1. Check the IP address assigned to the DVR in SETTINGS / NETWORK.
2. Verify that DirectX ® End-User Runtime 9.0 or higher installed on your 2. Verify that DirectX ® End-User Runtime 9.0 or higher installed on your 2. Verify that DirectX ® End-User Runtime 9.0 or higher installed on your 2. Verify that DirectX ® End-User Runtime 9.0 or higher installed on your 2. Verify that DirectX ® End-User Runtime 9.0 or higher installed on your
your computer. This step is unnecessary in most PCs. If you use an old PC and you need to
download the DirectX you can do so for free at www.microsoft.comdownload the DirectX you can do so for free at www.microsoft.com
3. Open the Internet Explorer browser on the PC you want to connect making hotel and enter the IP
address of the DVR from the Trusted Sites. To do this, access to INTERNET OPTIONS /
SECURITY / TRUSTED SITES uncheck of ASK CHECK HTTPS and enter the IP address (or
domain name if you use DDNS) of the DVR in the list. In IE7 you have to set the security level for
this zone to LOW.
4. Make sure the download and execution of ActiveX controls is not disabled. go
in OPTIONS INTERNET> PROTECTION> LEVEL
CUSTOM and enable all the items related to ActiveX management.
5. Verify that the port 67 (control) and port 68 (data) is not blocked by your router, firewall or ISP.
6. If the PC was used to access previous versions of the product, go to Internet Options and delete all
temporary files.
Page 71

USER MANUAL
DIGITAL VIDEO RECORDER DR-N16
Page: - 71 - Page: - 71 - Page: - 71 -
DSE srl - ITALY - WWW.DSE.EU
7. To maximize your enjoyment of images set the Windows display of STYLE WindowsXP (in CONTROL
PANEL> DISPLAY> Appearance and select a screen resolution of at least 1024x768 in 32-bit color.
Access
After checking the points described in the preceding paragraph must restart your browser and enter the
DVR IP address (or domain name if you use a DDNS service) in the address bar: Example http://192.168.0.8DVR IP address (or domain name if you use a DDNS service) in the address bar: Example http://192.168.0.8
If the previous tests were done correctly the control interface will be installed automatically and will
appear on the screen a window asking you access to the DVR password.
Depending on your PC configuration, you may request the installation of Microsoft Visual C ++ that is
permitted. You will see the remote control window of the DR-N16.
NOTE: Maximum 5 users Remote can connect the DR-N16
at the same time.
Remote PC Control
The control mask is as follows.
Page 72

USER MANUAL
DIGITAL VIDEO RECORDER DR-N16
Page: - 72 - Page: - 72 - Page: - 72 -
DSE srl - ITALY - WWW.DSE.EU
The display window can be divided into several boxes containing 1 or 4 cameras. The cameras whose
name is followed by the letter L are viewing LIVE, those followed by the letter P in the playback mode.
The cameras As highlighted in white are detecting intrusion (Motion).
Note 1: The number of received frames per second is limited by the bandwidth available in
the network and the number of IPS recorded by the DVR. Note 2: The picture quality
depends on the recording resolution
set and the quality of the camera.
Briefly describe the available commands from remote PC
• In the window of each camera by clicking the right button a menu appears that allows you to: 1) Set
the camera full screen FULL SCREEN 2) Set the PLAYBACK / LIVE mode 3) FREEZE Freeze the
picture 4) Print the image RELEASE 4 ) Activate cycle scan SEQ 5) Save a snapshot of the image in
BMP format.
These icons let you change the screen division.
Page 73

USER MANUAL
DIGITAL VIDEO RECORDER DR-N16
Page: - 73 - Page: - 73 - Page: - 73 -
DSE srl - ITALY - WWW.DSE.EU
Enable and stop SEQ cyclical scan mode.
Change all cameras to Live mode to playback mode and vice versa.
Freeze screen all camera images. Press again to resume normal vision.
By clicking this icon the signal from your PC's microphone it will be sent to the DR-N16 and reproduced.
Press again to mute (MUTE). By default, this signal is not active.
Enable audio playback from the DR-N16 and combined with the selected camera at the time. default,
this signal is not active.
Playback controls allow control of the playback of recorded images, from left to right: Rewind, Fast Playback controls allow control of the playback of recorded images, from left to right: Rewind, Fast
Forward, Forward frame, normal Play, Pause, Stop, and Copy.
The copy command is used to save both LIVE reproductions that recorded images. By pressing the copy
button opens a window where you have to select the camera to save and the location to save the file.
Page 74

USER MANUAL
DIGITAL VIDEO RECORDER DR-N16
Page: - 74 - Page: - 74 - Page: - 74 -
DSE srl - ITALY - WWW.DSE.EU
PTZ controls. If the selected camera is a dome camera connected to the DVR you can control it PTZ controls. If the selected camera is a dome camera connected to the DVR you can control it
remotely. The control panel includes Tilt Up / Down, Pan Left / Right, Zoom In / Out, Focus Near, Focus
Far, Iris - (darker), Iris + (brighter).
Room
/
the camera status indicators (GREEN for normal, RED pending motion alarm) E 'can click the icon to
select the corresponding camera.
Alarm In /
Status indicators for alarm inputs (GREEN for normal, RED alarm in progress)
Alarm Out
/
Status indicators of the alarm outputs (GREEN for normal, RED active alarm output). The administrator
can also click on this icon to enable / disable the outputs remotely manually.
Click to call up the TIME SEARCH window. Choose the date and time to search for play back images
recorded in the DR-N16. Be sure to modify before the state of / and camera / and you want to search by
LIVE PLAYBACK. Why search is successful it is necessary that at least one of the cameras is set in a
state PLAYBACK (right mouse button) Once play starts, you can act on the playback controls.
Page 75

USER MANUAL
DIGITAL VIDEO RECORDER DR-N16
Page: - 75 - Page: - 75 - Page: - 75 -
DSE srl - ITALY - WWW.DSE.EU
Click to call up the EVENT SEARCH window. It will appear on the screen the event memory of the video
recorder which is composed of dioverse pages scroll with UP / DOWN keys. E 'can select the type of
event and the camera of interest to you, then you must press REFRESH to see the LOG on the
selection. Once you start playing you can act on the playback controls.
This button allows you to play video files (.H264) previously saved to the computer hard disk. It appears
a search window to locate the file on your PC and play it.
Clicking this icon displays the PTZ control panel on the selected camera. This panel can be moved freely
within the screen and allows all speed dome control operations available from the keyboard.
This icon accesses to program settings and DVR setup. A list where you will see the connected VCR. By
clicking on the MODIFY button you can set the following parameters:
• First name - Name the DVR First name - Name the DVR
• Address - IP address or domain name of Address - IP address or domain name of
• Control Port - The control port. By default 67 Control Port - The control port. By default 67
• Data Port - The data port. By default 68 Data Port - The data port. By default 68
• Username - The username to access the DVR to be inserted into the user's DVR list. Depending on Username - The username to access the DVR to be inserted into the user's DVR list. Depending on
the level of access will also be enabled remotely the same constraints that exist at the local.
• Password - The correct password linked to the user Password - The correct password linked to the user
• Auto Connection - automatic connection when Auto Connection - automatic connection when
• Default directory - The default folder to save the DVR configurations Default directory - The default folder to save the DVR configurations
Page 76

USER MANUAL
DIGITAL VIDEO RECORDER DR-N16
Page: - 76 - Page: - 76 - Page: - 76 -
DSE srl - ITALY - WWW.DSE.EU
connected
Contemporary Connection with multiple DVRs
E 'can be entered with the command ADD up to 4 video recorders DR-N16 to connect to. It will be
possible via the front keypad recall them as desired with keys DVR1 and DVR2 DVR3 DVR4 also see
them on the monitor together with the subdivision of keys 25, 36, 49, 64.
Remote programming
Highlighting a VCR and clicking PROPERTIES 'leads to its complete programming (only
ADMINISTRATOR). E 'can be reprogrammed in its entirety and then send it to the DVR with the
UPLOAD command. The sending of the new program will require you to repeat the connection. E 'can
also save programming the DR-N16 in a folder on your PC so you can then refill with the OPEN button
and send to another VCR using the UPLOAD command.
This button allows you to update your DR-N16 firmware remotely. This operation should be
performed only when actually needed. And 'necessary that the path is? Formatted hard disk
inside the DVR to upgrade.
After the upgrade the DVR will restart and the connection is lost. Before reconnecting you have to
delete all temporary files in Internet Explorer and restart your browser.
Minimum Requisitri the remote PC
• PC
IBM PC / AT compatible.
• CPU
Intel ® Pentium ® 4, 1.4 GHz or higher Intel ® Pentium ® 4, 1.4 GHz or higher Intel ® Pentium ® 4, 1.4 GHz or higher Intel ® Pentium ® 4, 1.4 GHz or higher Intel ® Pentium ® 4, 1.4 GHz or higher
• OS
MicroSoft ® Windows ® XP, MicroSoft ® Windows ® Vista or Windows ® 2000 MicroSoft ® Windows ® XP, MicroSoft ® Windows ® Vista or Windows ® 2000 MicroSoft ® Windows ® XP, MicroSoft ® Windows ® Vista or Windows ® 2000 MicroSoft ® Windows ® XP, MicroSoft ® Windows ® Vista or Windows ® 2000 MicroSoft ® Windows ® XP, MicroSoft ® Windows ® Vista or Windows ® 2000 MicroSoft ® Windows ® XP, MicroSoft ® Windows ® Vista or Windows ® 2000 MicroSoft ® Windows ® XP, MicroSoft ® Windows ® Vista or Windows ® 2000 MicroSoft ® Windows ® XP, MicroSoft ® Windows ® Vista or Windows ® 2000 MicroSoft ® Windows ® XP, MicroSoft ® Windows ® Vista or Windows ® 2000 MicroSoft ® Windows ® XP, MicroSoft ® Windows ® Vista or Windows ® 2000 MicroSoft ® Windows ® XP, MicroSoft ® Windows ® Vista or Windows ® 2000
Page 77

USER MANUAL
DIGITAL VIDEO RECORDER DR-N16
Page: - 77 - Page: - 77 - Page: - 77 -
DSE srl - ITALY - WWW.DSE.EU
with SP4.
• Monitor
1024 x 768 or higher
• Memory (DRAM)
512MB.
• Network interface
Ethernet, 10/100 Base-T.
• Web Browser
MicroSoft ® Internet Explorer ® 6.0 or higher. MicroSoft ® Internet Explorer ® 6.0 or higher. MicroSoft ® Internet Explorer ® 6.0 or higher. MicroSoft ® Internet Explorer ® 6.0 or higher. MicroSoft ® Internet Explorer ® 6.0 or higher.
• DirectX
MicroSoft ® DirectX ® 9.0 or higher. MicroSoft ® DirectX ® 9.0 or higher. MicroSoft ® DirectX ® 9.0 or higher. MicroSoft ® DirectX ® 9.0 or higher. MicroSoft ® DirectX ® 9.0 or higher.
Page 78

USER MANUAL
DIGITAL VIDEO RECORDER DR-N16
Page: - 78 - Page: - 78 - Page: - 78 -
DSE srl - ITALY - WWW.DSE.EU
9.1 Remote Access with mobile phone / PDA 2G 3.5G ~
E 'can access the DR-N16 VCR even using a browser installed on a mobile phone or PDA that supports
xHTML formats MJPEG and has a screen resolution of at least 240x320 pixels. You must enter in the
browser the domain name (if you use a DDNS) or the IP address of the DVR to the Internet. You usually
need to enter the IP address es http://145.123.32.20 and the DVR will automatically send back to the need to enter the IP address es http://145.123.32.20 and the DVR will automatically send back to the need to enter the IP address es http://145.123.32.20 and the DVR will automatically send back to the
correct page
http://145.123.32.20/wap.htm . If this does not happen to type the full address into your browser. http://145.123.32.20/wap.htm . If this does not happen to type the full address into your browser.
Press to send content to the DVR.
Channel Selection: Q1 = CH 1; CH2 = Q2, Q3 = CH 3. ... .. or 1 = QUAD.
Select the car image refresh rate: 1 second, 2 seconds, etc. Or press next to update the image.
Alarm outputs 1-4 (Check mark if active). You 'can turn them on by inserting the check mark.
Alarm inputs 1-5 (top row)), 6-10, and 11-16
(check mark if active)
function keys
Page 79

USER MANUAL
DIGITAL VIDEO RECORDER DR-N16
Page: - 79 - Page: - 79 - Page: - 79 -
DSE srl - ITALY - WWW.DSE.EU
10 Utilities
The CD supplied with the DR-N16 contains a utility that you should install on your PC. It contains three useful
functions:
- H.264 Video Player
It is a freely distributable free reader that allows you to play .H264 files that are saved on the DVR on the
external media. This way you can see movies on any PC without being in connection with the DVR. The user
interface of this program is quite similar to the remote management program that appears in Internet
Explorer, but many functions can not be accessed because it is a utility aimed at only one playing a video file.
The program allows you to print images.
- H.264 files to AVI Converter
This small program allows you to convert files saved by .H264 DVR to AVI files playable on any player such
as Windows Media Player. This allows the production of distributable files to third parties without these
encounter problems reading. However, given the time needed for the conversion, you should export only
short films. If you need to provide third parties with long-lasting films should leave the file in its original format
and attach the SETUP.EXE installation file of HEM player.
The H264 decoder must be installed on the PC to be able to play the converted AVI files.
- Keyboard Control Simulator.
This program allows to simulate the control panel of a speed dome camera, and then to control speed dome
cameras (with Pelco-D protocol) connecting them to the serial port of the PC.
Generally you require a RS232 / RS485 adapter to connect the serial port of the speed dome to that of the
PC.
Page 80

USER MANUAL
DIGITAL VIDEO RECORDER DR-N16
Page: - 80 - Page: - 80 - Page: - 80 -
DSE srl - ITALY - WWW.DSE.EU
10 Software for the control panel with graphical maps
The CD supplied with the DR-N16 is including a powerful centralized control program that allows you to
control from a single most VCRs connected via LAN / Internet PC supervisor simultaneously.
The program allows the creation of custom graphical maps, and allows to insert all the components VCRs
elements (cameras, alarm inputs, outputs, etc.) within explanatory immediately understandable graphics. The
manual to use the software is under preparation. Contact the technical department for more information.
Page 81

USER MANUAL
DIGITAL VIDEO RECORDER DR-N16
Page: - 81 - Page: - 81 - Page: - 81 -
DSE srl - ITALY - WWW.DSE.EU
12 control with mouse
The DR-N16 VCR can be used in all its basic functions with the front keys. More advanced features are
available on the remote control. To provide the convenience of use typical of PC-based video recorders,
the DR-N16 is also equipped with with mouse control possibilities.
The mouse is supplied as standard and must be connected to the back door before the VCR.
To view the mouse menu, move the cursor to the bottom of the screen. A menu will appear to allow you
to click the mouse all the functions described so far with the traditional controls.
Menu Search for Leave Sequence
Fold tools Rewind fast
forward
Next to frames
Unfold
tools
Play / Pause Stop Copy
alarm
reset
Live / Playba
ck
PTZ Full
screen
Volume Page up Page down Close
Page 82

USER MANUAL
DIGITAL VIDEO RECORDER DR-N16
Page: - 82 - Page: - 82 - Page: - 82 -
DSE srl - ITALY - WWW.DSE.EU
12.1 Setting the motion detection with the mouse
Select the
highlighted area
Select the
entire image
Sensitivity Test
12.2 PTZ control with the mouse
Page 83

USER MANUAL
DIGITAL VIDEO RECORDER DR-N16
Page: - 83 - Page: - 83 - Page: - 83 -
DSE srl - ITALY - WWW.DSE.EU
Go to Reduce Zoom increase
Preset
position
Focus Auto Focus Iris
SEQ Auto pan Speed Mark
12.3 video control with the mouse
Default Values
this camera
Default Values
all cameras
Restore Default
12.4 Common icons
On Down enter Code
Left Right Clear back space
Confirmation Space Select + / -
12.5 Numerical icons
Page 84

USER MANUAL
DIGITAL VIDEO RECORDER DR-N16
Page: - 84 - Page: - 84 - Page: - 84 -
DSE srl - ITALY - WWW.DSE.EU
Appendix A - Specifications
System OS Embedded Linux 2.6
Multiplex Exaplex - Simultaneous recording, live viewing, playback,
backup, configuration, and remote access.
Video Format PAL / NTSC or CCIR / EIA
Inputs CH-16, BNC, 1 Vp-p / 75ohm
Monitor 1 2 BNC x 1 1 Vp-p / 75ohm
PC Monitor VGA
Alarm No Video Yes
Motion detection Yes
Audio Inputs 1 RCA-jack connectors, line-in level
(100mV-2Vrms)
Outputs 1 RCA-jack connectors, line-out level (up to 2Vrms)
Registration. Compression Video: H.264 Audio:
ADPCM
Frame rate (IPS) &
Resolution
NTSC - 60/720 * 480, 120/720 * 240, 240 /
360 * 240
PAL - 50/720 * 576, 100/720 * 288, 200 /
360 * 288
Rec Mode. Manual / Schedule / Alarm / Motion Pre-registration
0-10 seconds
After Recording 0-60 minutes
Monitor Max Resolution NTSC - 720 * 480, PAL - 720 * 576
Multivision 1/4/7/9/10/13/16
Frame rate Up to 30 (NTSC) / 25 (PAL) IPS Window
Freeze Function Yes
Cyclic Programmable
digital zoom X2, X4
Playback Frame rate (IPS) &
Resolution
NTSC - 60/720 * 480, 120/720 * 240, 240 /
360 * 240
PAL - 50/720 * 576, 100/720 * 288, 200 /
360 * 288
Search Date / Time, Camera, Alarm, Motion, No Video &
Control
playback
Play, Fast Forward, Backward, Pause, Stop, etc.
Storage HDD Max 2 pcs. 3.5 "SATA HDD,
Page 85

USER MANUAL
DIGITAL VIDEO RECORDER DR-N16
Page: - 85 - Page: - 85 - Page: - 85 -
DSE srl - ITALY - WWW.DSE.EU
Max. 2TB each.
Partitions Storage Spaces separate alarms and normal recording
mode and programmable overwrite
Backup 1 USB 2.0 port for USB 2.0 Hard Disk, DVD + RW
recorders, DVD + R, DVD-R, and Readers USB sticks
Alarms Inputs 16 NO / NC contacts
Outputs 2 NO + 2 NC
Buzzer Yes
buzzer Sensors, Video lost, motion, technical Causes
alarm Log 1000 events
Network Ethernet 1 RJ-45 port 10 / 100BaseT Ethernet
Web Remote configuration, monitor, backup & remote
software upgrade
E-mail Send e-mail to 5 addresses on event
Video Full screen / quad
Audio Bidirectional
Protocol TCP / IP, HTTP, PPPoE, DHCP, DDNS, TSP
remote Users Up to 5 simultaneous connections
Internet Explorer Access Software Access from
mobile / PDA
Yes
Controls I / R 1 remote control
RS-485 2-pin control for speed dome prot Pelco D /
Samsung
Config. Local Yes
remote Yes
Multi-language Yes
Power failure igniting Igniting and recovery after power failure
Watch Dog Timer Yes
Timer Integrated
Safety 3 levels of access - 18 users
Power supply DC12V-6A provided
Consumption 60W Max.
operating temperature 0 or C ~ + 50 or C 0 or C ~ + 50 or C 0 or C ~ + 50 or C 0 or C ~ + 50 or C 0 or C ~ + 50 or C
Page 86

USER MANUAL
DIGITAL VIDEO RECORDER DR-N16
Page: - 86 - Page: - 86 - Page: - 86 -
DSE srl - ITALY - WWW.DSE.EU
Appendix B - Table time zones
Area Offset DST DST start End of daylight saving time
samoa GMT - 11:00
Hawaii GMT - 10:00
Alaska GMT - 9:00 ˇ Mar 2nd Sun, Nov 2:00 pm, 1st Sun, 2:00 GMT - 9:00 ˇ Mar 2nd Sun, Nov 2:00 pm, 1st Sun, 2:00 GMT - 9:00 ˇ Mar 2nd Sun, Nov 2:00 pm, 1st Sun, 2:00
Pacific Time (US & Canada) GMT - 8:00 ˇ Mar 2nd Sun, Nov 2:00 pm, 1st Sun, 2:00 GMT - 8:00 ˇ Mar 2nd Sun, Nov 2:00 pm, 1st Sun, 2:00 GMT - 8:00 ˇ Mar 2nd Sun, Nov 2:00 pm, 1st Sun, 2:00
Arizona, US Mountain GMT - 7:00
Chihuahua, La Paz, Mazatlan GMT - 7:00 ˇ May, 1st Sun, Sep 2:00, last Sun, 2:00 GMT - 7:00 ˇ May, 1st Sun, Sep 2:00, last Sun, 2:00 GMT - 7:00 ˇ May, 1st Sun, Sep 2:00, last Sun, 2:00
Mountain Time (US & Canada) GMT - 7:00 ˇ Mar 2nd Sun, Nov 2:00 pm, 1st Sun, 2:00 GMT - 7:00 ˇ Mar 2nd Sun, Nov 2:00 pm, 1st Sun, 2:00 GMT - 7:00 ˇ Mar 2nd Sun, Nov 2:00 pm, 1st Sun, 2:00
Central America, Saskatchewan GMT - 06:00
Central Time (US & Canada) GMT - 06:00 ˇ Mar 2nd Sun, Nov 2:00 pm, 1st Sun, 2:00 GMT - 06:00 ˇ Mar 2nd Sun, Nov 2:00 pm, 1st Sun, 2:00 GMT - 06:00 ˇ Mar 2nd Sun, Nov 2:00 pm, 1st Sun, 2:00
Guadalajara, Mexico City,
Monterrey
GMT - 06:00 ˇ May, 1st Sun, Sep 2:00, last Sun, 2:00 GMT - 06:00 ˇ May, 1st Sun, Sep 2:00, last Sun, 2:00 GMT - 06:00 ˇ May, 1st Sun, Sep 2:00, last Sun, 2:00
Bogota, Lima, Quito, Indiana (East) GMT - 05:00 Eastern Time
(US & Canada) GMT - 5:00 ˇ Mar 2nd Sun, Nov 2:00 pm, 1st Sun, 2:00 GMT - 5:00 ˇ Mar 2nd Sun, Nov 2:00 pm, 1st Sun, 2:00 GMT - 5:00 ˇ Mar 2nd Sun, Nov 2:00 pm, 1st Sun, 2:00
Atlantic Time (Canada) GMT - 04:00 ˇ Mar 2nd Sun, Nov 2:00 pm, 1st Sun, 2:00 GMT - 04:00 ˇ Mar 2nd Sun, Nov 2:00 pm, 1st Sun, 2:00 GMT - 04:00 ˇ Mar 2nd Sun, Nov 2:00 pm, 1st Sun, 2:00
Caracas, La Paz GMT - 04:00
Santiago GMT - 04:00 ˇ Oct, 2nd Sun, 0:00 Sea, 2nd Sun, 12:00 GMT - 04:00 ˇ Oct, 2nd Sun, 0:00 Sea, 2nd Sun, 12:00 GMT - 04:00 ˇ Oct, 2nd Sun, 0:00 Sea, 2nd Sun, 12:00
Newfoundland GMT - 3:30 ˇ Apr, 1st Sun, Oct 2:00, last Sun, 2:00 GMT - 3:30 ˇ Apr, 1st Sun, Oct 2:00, last Sun, 2:00 GMT - 3:30 ˇ Apr, 1st Sun, Oct 2:00, last Sun, 2:00
Brasilia GMT - 03:00 ˇ Oct, 3rd Sun, 2:00 GMT - 03:00 ˇ Oct, 3rd Sun, 2:00 GMT - 03:00 ˇ Oct, 3rd Sun, 2:00 February, 3rd Sun, 2:00
Buenos Aires, Georgetown GMT - 03:00 ˇ Oct, 3rd Sun, 2:00 GMT - 03:00 ˇ Oct, 3rd Sun, 2:00 GMT - 03:00 ˇ Oct, 3rd Sun, 2:00 February, 2nd Sun, 2:00
greenland GMT - 03:00 ˇ Sea last Sun, 1:00 Oct, last Sun, 1:00 GMT - 03:00 ˇ Sea last Sun, 1:00 Oct, last Sun, 1:00 GMT - 03:00 ˇ Sea last Sun, 1:00 Oct, last Sun, 1:00
Mid-Atlantic GMT - 02:00 ˇ Sea last Sun, Sep 2:00, last Sun, 2:00 GMT - 02:00 ˇ Sea last Sun, Sep 2:00, last Sun, 2:00 GMT - 02:00 ˇ Sea last Sun, Sep 2:00, last Sun, 2:00
Azores GMT - 01:00 ˇ Sea last Sun, Oct 2:00, last Sun, 3:00 GMT - 01:00 ˇ Sea last Sun, Oct 2:00, last Sun, 3:00 GMT - 01:00 ˇ Sea last Sun, Oct 2:00, last Sun, 3:00
Cape Verde GMT - 01:00
Casablanca, Monrovia 00:00 GMT +
Dublin, London 00:00 GMT + ˇ Sea last Sun, 1:00 Oct, last Sun, 2:00 00:00 GMT + ˇ Sea last Sun, 1:00 Oct, last Sun, 2:00 00:00 GMT + ˇ Sea last Sun, 1:00 Oct, last Sun, 2:00
Western Europe, Central Europe 01:00 GMT + ˇ Sea last Sun, Oct 2:00, last Sun, 3:00 01:00 GMT + ˇ Sea last Sun, Oct 2:00, last Sun, 3:00 01:00 GMT + ˇ Sea last Sun, Oct 2:00, last Sun, 3:00
West Central Africa 01:00 GMT +
Eastern Europe 02:00 GMT + ˇ Sea last Sun, Oct 12:00, last Sun, 1:00 02:00 GMT + ˇ Sea last Sun, Oct 12:00, last Sun, 1:00 02:00 GMT + ˇ Sea last Sun, Oct 12:00, last Sun, 1:00
Cairo 02:00 GMT + ˇ Apr, last Fri, 2:00 02:00 GMT + ˇ Apr, last Fri, 2:00 02:00 GMT + ˇ Apr, last Fri, 2:00 Sep, last Fri, 2:00
Harare, Pretoria 02:00 GMT +
Helsinki, Kiev, Riga, Sofia, Tallinn 02:00 GMT + ˇ Sea last Sun, Oct 2:00, last Sun, 3:00 Helsinki, Kiev, Riga, Sofia, Tallinn 02:00 GMT + ˇ Sea last Sun, Oct 2:00, last Sun, 3:00 Helsinki, Kiev, Riga, Sofia, Tallinn 02:00 GMT + ˇ Sea last Sun, Oct 2:00, last Sun, 3:00
Jerusalem 02:00 GMT + ˇ April 1st, 2:00 02:00 GMT + ˇ April 1st, 2:00 02:00 GMT + ˇ April 1st, 2:00 Oct, 2nd Sun, 2:00
Baghdad 03:00 GMT + ˇ April 1st, 3:00 03:00 GMT + ˇ April 1st, 3:00 03:00 GMT + ˇ April 1st, 3:00 Oct 1, 4:00
Kuwait, Riyadh, Nairobi 03:00 GMT +
Moscow, St. Petersburg, Volgograd 03:00 GMT + ˇ Sea last Sun, Oct 2:00, last Sun, 3:00 Moscow, St. Petersburg, Volgograd 03:00 GMT + ˇ Sea last Sun, Oct 2:00, last Sun, 3:00 Moscow, St. Petersburg, Volgograd 03:00 GMT + ˇ Sea last Sun, Oct 2:00, last Sun, 3:00
Tehran 03:30 GMT + ˇ Mar 4th Tue, Sep 2:00 pm, Thu 4th, 2:00 03:30 GMT + ˇ Mar 4th Tue, Sep 2:00 pm, Thu 4th, 2:00 03:30 GMT + ˇ Mar 4th Tue, Sep 2:00 pm, Thu 4th, 2:00
Abu Dhabi, Muscat 04:00 GMT +
Baku, Tbilisi, Yerevan 04:00 GMT + ˇ Sea last Sun, Oct 2:00, last Sun, 3:00 04:00 GMT + ˇ Sea last Sun, Oct 2:00, last Sun, 3:00 04:00 GMT + ˇ Sea last Sun, Oct 2:00, last Sun, 3:00
Kabul 04:30 GMT +
Ekaterinburg 05:00 GMT + ˇ Sea last Sun, Oct 2:00, last Sun, 3:00 05:00 GMT + ˇ Sea last Sun, Oct 2:00, last Sun, 3:00 05:00 GMT + ˇ Sea last Sun, Oct 2:00, last Sun, 3:00
Islamabad, Karachi, Tashkent 05:00 GMT +
Chennai, Mumbai, New Delhi 05:30 GMT +
Kathmandu 05:45 GMT +
Page 87

USER MANUAL
DIGITAL VIDEO RECORDER DR-N16
Page: - 87 - Page: - 87 - Page: - 87 -
DSE srl - ITALY - WWW.DSE.EU
Almaty, Novosibirsk 06:00 GMT + ˇ Sea last Sun, Oct 2:00, last Sun, 3:00 06:00 GMT + ˇ Sea last Sun, Oct 2:00, last Sun, 3:00 06:00 GMT + ˇ Sea last Sun, Oct 2:00, last Sun, 3:00
Astana, Dhaka, Sri Lanka 06:00 GMT +
Rangoon 06:30 GMT +
Bangkok, Hanoi, Jakarta 07:00 GMT +
Krasnoyarsk 07:00 GMT + ˇ Sea last Sun, Oct 2:00, last Sun, 3:00 07:00 GMT + ˇ Sea last Sun, Oct 2:00, last Sun, 3:00 07:00 GMT + ˇ Sea last Sun, Oct 2:00, last Sun, 3:00
Irkutsk, Ulaan Baatar 08:00 GMT + ˇ Sea last Sun, Oct 2:00, last Sun, 3:00 08:00 GMT + ˇ Sea last Sun, Oct 2:00, last Sun, 3:00 08:00 GMT + ˇ Sea last Sun, Oct 2:00, last Sun, 3:00
Beijing, Chingqing, HK, Urumqi 08:00 GMT +
Kuala Lumpur, Perth, Singapore 08:00 GMT +
Taipei 08:00 GMT +
Osaka, Seoul, Tokyo 09:00 GMT +
Yakutsk 09:00 GMT + ˇ Sea last Sun, Oct 2:00, last Sun, 3:00 09:00 GMT + ˇ Sea last Sun, Oct 2:00, last Sun, 3:00 09:00 GMT + ˇ Sea last Sun, Oct 2:00, last Sun, 3:00
Adelaide 09:30 GMT + ˇ Oct, last Sun, 2:00 Sea, last Sun, 3:00 09:30 GMT + ˇ Oct, last Sun, 2:00 Sea, last Sun, 3:00 09:30 GMT + ˇ Oct, last Sun, 2:00 Sea, last Sun, 3:00
Darwin 09:30 GMT +
Brisbane, Guam, Port Moresby 10:00 GMT +
Canberra, Melbourne, Sydney 10:00 GMT + ˇ Oct, last Sun, 2:00 Sea, last Sun, 3:00 10:00 GMT + ˇ Oct, last Sun, 2:00 Sea, last Sun, 3:00 10:00 GMT + ˇ Oct, last Sun, 2:00 Sea, last Sun, 3:00
Hobart 10:00 GMT + ˇ Oct, 1st Sun, 2:00 Sea, last Sun, 3:00 10:00 GMT + ˇ Oct, 1st Sun, 2:00 Sea, last Sun, 3:00 10:00 GMT + ˇ Oct, 1st Sun, 2:00 Sea, last Sun, 3:00
Vladivostok 10:00 GMT + ˇ Sea last Sun, Oct 2:00, last Sun, 3:00 10:00 GMT + ˇ Sea last Sun, Oct 2:00, last Sun, 3:00 10:00 GMT + ˇ Sea last Sun, Oct 2:00, last Sun, 3:00
Magadan, Solomon Is. 11:00 GMT +
Auckland, Wellington 24:00 GMT + ˇ Oct, 1st Sun, 2:00 Sea, 3rd Sun, 2:00 24:00 GMT + ˇ Oct, 1st Sun, 2:00 Sea, 3rd Sun, 2:00 24:00 GMT + ˇ Oct, 1st Sun, 2:00 Sea, 3rd Sun, 2:00
fiji 24:00 GMT +
Kamchatka 24:00 GMT + ˇ Sea last Sun, Oct 2:00, last Sun, 3:00 24:00 GMT + ˇ Sea last Sun, Oct 2:00, last Sun, 3:00 24:00 GMT + ˇ Sea last Sun, Oct 2:00, last Sun, 3:00
Anadyr 13:00 GMT + ˇ Sea last Sun, Oct 2:00, last Sun, 3:00 13:00 GMT + ˇ Sea last Sun, Oct 2:00, last Sun, 3:00 13:00 GMT + ˇ Sea last Sun, Oct 2:00, last Sun, 3:00
Nuku'alofa 13:00 GMT +
Page 88

USER MANUAL
DIGITAL VIDEO RECORDER DR-N16
Page: - 88 - Page: - 88 - Page: - 88 -
DSE srl - ITALY - WWW.DSE.EU
Appendix C - Table recording capacity
indicative PAL recording capacity (in hours)
HARD DISK reference (GB): 200
Resolution Quality
Average Frame rate recording (IPS)
frame size
(KB) *
100 50 25 12.5 8 4
720x576
9 42.0 26 53 106 165 331
(Full D1)
8 36.0 31 62 123 193 386
7 27.3 40 81 163 254 509
6 21.3 52 104 209 326 652
5 18.3 60 121 243 379 759
4 14.7 75 151 302 472 945
3 10.0 111 222 444 694 1389
2 7.3 146 304 609 951 1903
1
4.7
231 473 946 1478 2955
720x288
9 21.0 53 106 212 331 661
(Half D1)
8 18.0 31 62 123 247 386 772
7 13.6 41 82 163 327 511 1021
6 10.7 52 104 208 415 649 1298
5 9.2 60 121 242 483 755 1510
4 7.4 75 150 300 601 938 1877
3 5.0 111 222 444 889 1389 2778
2 3.7 150 300 601 1201 1877 3754
1
2.4
231 463 926 1852 2894 5787
360x288
9 10.5 26 53 106 212 423 661 1323
(CIF)
8 8.5 31 62 123 247 494 772 1543
7 7.2 41 82 163 327 654 1021 2042
6 5.7 51 103 206 412 823 1286 2572
5 5.0 60 121 242 483 966 1510 3019
4 4.0 75 150 300 601 1201 1877 3754
3 2.8 111 222 444 889 1778 2778 5556
2 2.2 146 292 585 1170 2339 3655 7310
1
1.4
231 463 926 1852 3704 5787 11574
 Loading...