

Page 1
INSTALLATION MANUAL
Network Video Recorders NVR Series DN vers. 3
Page: 1 Page: 1
DN Series Video Recorders NVR
network ( Version 3) network ( Version 3)
NVR for IP cameras ONVIF
Installation manual
How to connect components
How to perform the network configuration
DSE SRL - ITALY - WWW.DSE.EU
Page 2

INSTALLATION MANUAL
Network Video Recorders NVR Series DN vers. 3
Page: 2 Page: 2
Contents of this handbook
The range of VCRs DN series is designed to allow the management and the recording of IP CCTV cameras based on ONVIF protocol.
This manual describes how to properly install the NVR and how to make the network connections to access the VCR remote.
DSE SRL - ITALY - WWW.DSE.EU
Page 3

INSTALLATION MANUAL
Network Video Recorders NVR Series DN vers. 3
Page: 3 Page: 3
Product description
The DN series network video recorders are digital video recorders intended for video surveillance
systems to IP. This type of equipment, also known as NVR (network video recorder) is used to
view, manage and videotaping IP network cameras. The DN range can handle all IP cameras
based on the international standard ONVIF protocol, whether of our manufacturing or other
manufacturers, up to a maximum resolution of 5 megapixels.
The use NVR in an IP system makes it easier and immediate configuration of the
system and makes the use of the plant possible even without the use of a computer.
DSE SRL - ITALY - WWW.DSE.EU
Page 4

INSTALLATION MANUAL
Network Video Recorders NVR Series DN vers. 3
Page: 4 Page: 4
main Functions
The NVR DN series are the latest generation of video recorders that can integrate all the latest functions required by video surveillance
applications over IP.
LIVE VIEW
The NVR series DN feature a variety of video outputs for displaying the cameras in real-time. E 'can connect the computer monitor to the
VGA port or HDMI video output of TV sets. It is high-resolution outputs able to make the maximum FullHD resolution.
And 'possible to view each camera full screen, the cyclical scanning and multivision
4, 9 or 16 cameras simultaneously.
The optimum monitor video format is widescreen 16: 9 However, you can also use the monitor in various formats such as 4: 3.
RESOLUTION TO 5 MEGAPIXEL
It can connect NVR cameras of each D1 resolution, HD 720P, 960P, 1080P Full HD, 3MP and 5MP
RECORDING VIDEO / AUDIO H264
The recording takes place with H264 compression in continuous mode, motion detection or alarm, with a time-controlled. The audio and
video are synchronized.
100% REAL TIME
Unlike more economic end appliances, the NVR DN series are always able to record all channels at maximum 5 Megapixel resolution and
maximum frame rate of 25 F / sec to provide increasingly higher level of quality images. The maximum limit NVR is its maximum input
bandwidth which is 130MB on all models
PLAYBACK AND BACKUP
The NVR have different search systems to enable quick handling of recordings. Use the time line allows you to move quickly between
times of the day. Through the USB port you can be connected to external storage media such as USB drives, external hard drives, etc.
and save the interest clips in AVI format.
Playback allows modes: Slow motion, fast forward, reverse playback and
DSE SRL - ITALY - WWW.DSE.EU
Page 5

INSTALLATION MANUAL
Network Video Recorders NVR Series DN vers. 3
Page: 5 Page: 5
Play frame by frame. During video playback, the time and date can be displayed on screen.
INTELLIGENT DIGITAL ZOOM
E 'can easily zoom in on details by using the mouse wheel on the screen, both in real-time view that in recordings playback.
CONTROL WITH MOUSE AND MENU IN ITALIAN
All functions are controlled with the mouse in a simple and quick. The usage and configuration menu is entirely in Italian and does not
require time for learning.
Hexaplex
NVRs are able to continue recording during playback of recorded files, viewing real-time, remote access, backup, configuration etc.
PTZ CONTROL
The NVR support the PTZ control of motorized cameras speed dome directly through the onvif protocol, or through the RS485 port. The
camera's movement is easily controlled via the keyboard, remote control, mouse, and even in remote access from a PC or mobile phone.
MOTION DETECTION
The NVR posssono generate alarms based on motion detection, video loss, blinding of a camera
NETWORK FUNCTIONS
Through the network port can be remotely monitored in real time, searching and playback of video stored remotely and control PTZ
Speed Dome cameras. And the complete configuration of programming 'also possible.
Remote access is done from a PC using the Internet Explorer browser or the supplied software centralises management of the NVR. E
'can also access by mobile phone or tablet with the free application.
ALARM FUNCTIONS
In case of alarm it is possible to generate a variety of actions such as, the buzzer alarm output activation or the recall of preset positions
of the speed dome cameras. E 'can also send e-mail and real-time notifications.
REMOTE CONNECTION P2P
The NVR DN series include P2P / CLOUD technology that allows you to connect through your Intenet without the need to subscribe
DDNS services, or to program the mapping of router ports.
DSE SRL - ITALY - WWW.DSE.EU
Page 6

INSTALLATION MANUAL
Network Video Recorders NVR Series DN vers. 3
Page: 6 Page: 6
Major Specifications
DN-IP4 DN-IP9 DN-IP16
Type of camera IP IP IP
Video Inputs / IP audio 4 9 16
auxiliary analog audio inputs 1 RCA 1 RCA 1 RCA
HDMI Video Output 1 1 1
VGA video output 1 1 1
BNC video output - - -
HDMI Output Resolution 1080P 1080P 1080P
VGA Output Resolution 800x600 1024x768 1280x1024 1440x900 720P 1080i 50/60
50/60 50/60 1080P
Analog Audio Output 1 RCA 1 RCA 1 RCA
Network port 1 RJ45 10M / 100M
Serial port for PTZ RS485 RS485 RS485
USB 2.0 Ports 2 2 2
USB 3.0 ports 1 1 1
mouse Support Yes Yes Yes
Alarm inputs - - -
Alarm outputs - - -
standard Video PAL / NTSC PAL / NTSC PAL / NTSC
video Compression H.264 H.264 H.264
audio Compression ADPCM ADPCM ADPCM
Recording resolution D1 (704x576), WD1 960H (960x576), 720P (1280x720), 960P
(1280x960), 1080P (1920x1080), SXGA (1280x1024), 3MP
(2048x1536 and 2304x1299), 5 MP (2560x1920 and 2592x1920)
Frame rate per channel (f / sec) Up to 25 f / sec per channel (real time) at full resolution
Maximum input Banda 130 Mb / s 130 Mb / s 130 Mb / s
Hexaplex Yes Yes Yes
Consumption (excluding HDD) 16-18W 16-18W 16-18W
DSE SRL - ITALY - WWW.DSE.EU
Page 7

INSTALLATION MANUAL
Network Video Recorders NVR Series DN vers. 3
Page: 7 Page: 7
Supply 12VDC 4A 12VDC 4A 12VDC 4A
modular rack unit 1U 1U 1U
Dimensions (mm) 335x252X50
Locations for Hard Disk 2 SATA 2 SATA 2 SATA
Capacity max. Hard Disk 3 TB 3 TB 3 TB
included Accessories Mouse, power supply 220VAC / 12VDC, remote
control
Weight kg.) 2 2 2
temperature function - 10 to + 55 ° C - 10 to + 55 ° C - 10 to + 55 ° C
DSE SRL - ITALY - WWW.DSE.EU
Page 8
INSTALLATION MANUAL
Network Video Recorders NVR Series DN vers. 3
Page: 8 Page: 8
front Panel
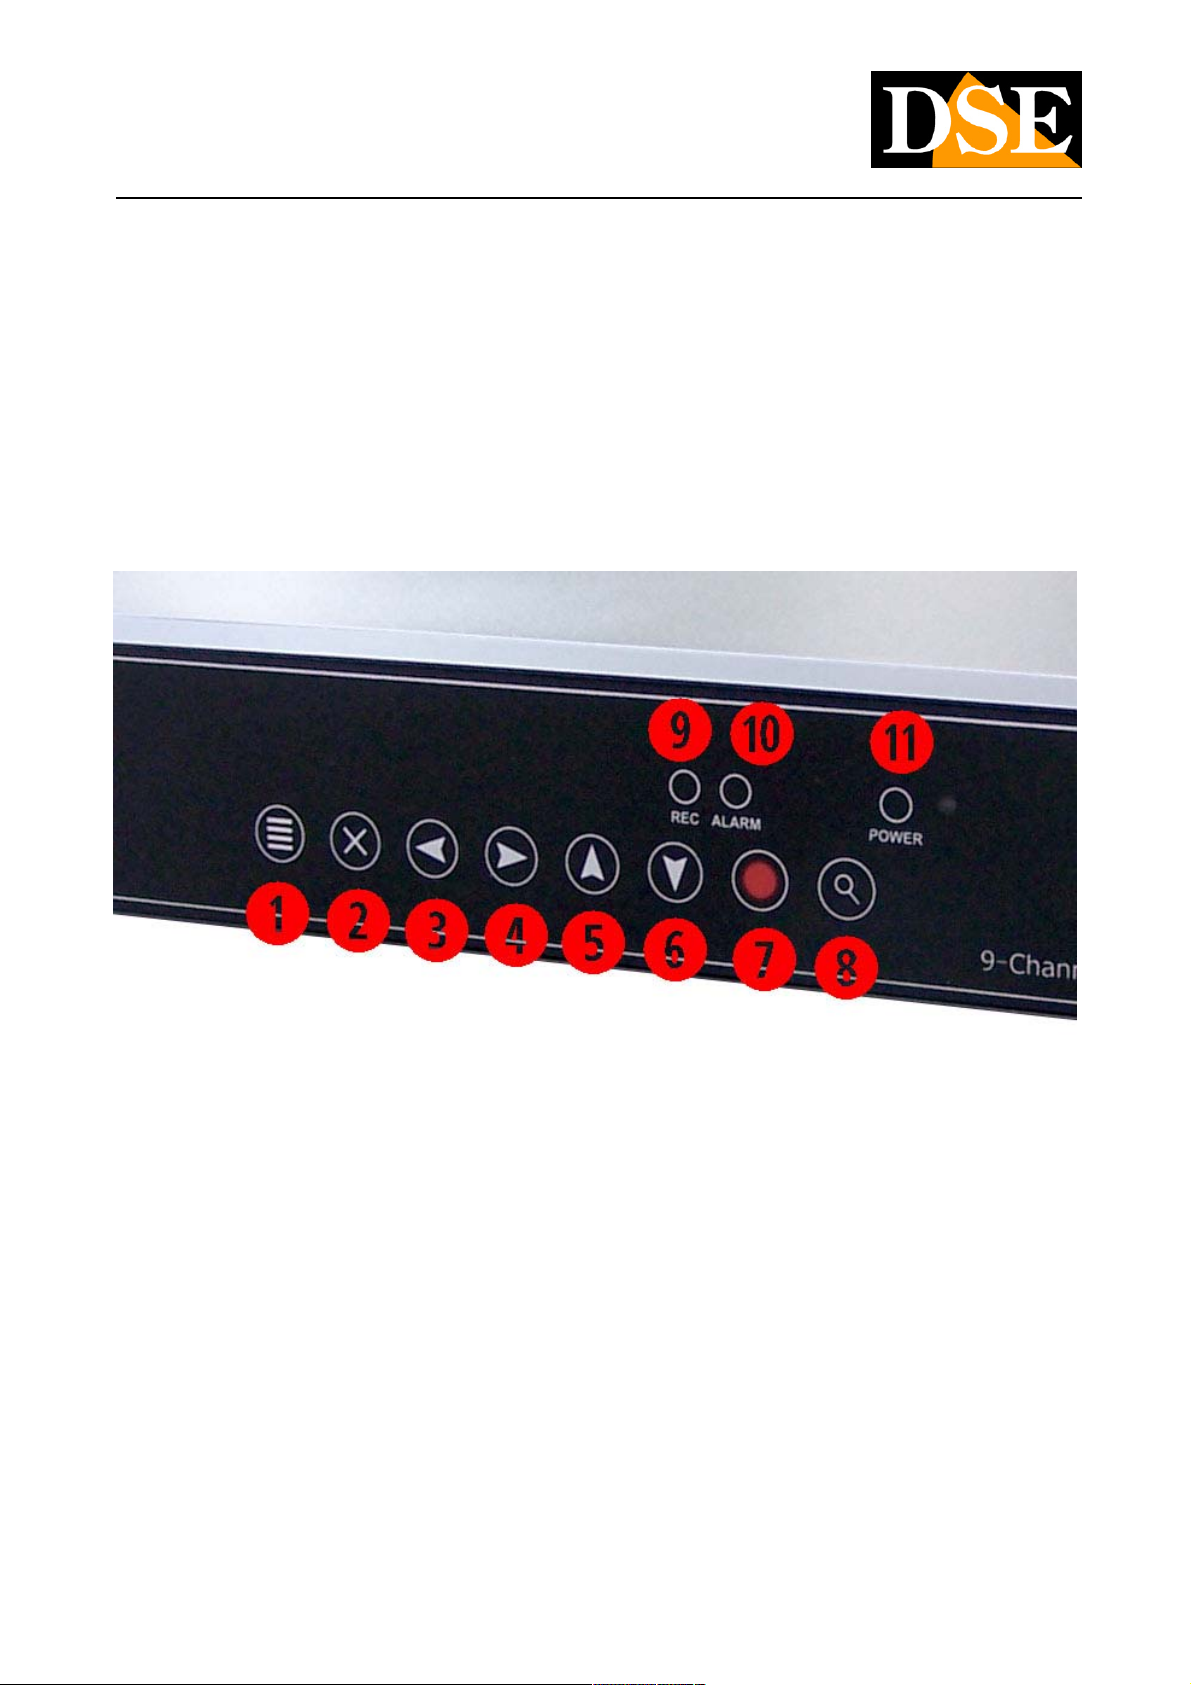
The NVR NVR keyboard allows control of all its functions. However, it is also very practical menu to use than the mouse and therefore its
use and only recommended in applications where the mouse is not physically used. On the front panel there are also some LEDs that
give an immediate idea of the device status especially useful if the display is not connected.
1 - KEY MENU - Accesses the configuration menu. Even function ENTER / CONFIRM 2 - BUTTON EXIT - Exits the displayed window
function EXIT / CANCEL 3 4 5 6 - ARROW KEYS - Used to navigate the screen options. 7 - REC BUTTON - Opens the Settings page of
the recording modes. Note that the security video recorders is not necessary to press the REC button to record but you set the recording
mode based on the time and day. 8 - KEY PLAY - Opens the playback window for searching movies stored 9 - REC LED - signal that is
being recorded in continuous mode, motion or alarm 10 - LED ALARM - E 'being an alarm event (motion , input or technical event) 11 -
LED POWER - Signal the NVR in operation.
DSE SRL - ITALY - WWW.DSE.EU
Page 9
INSTALLATION MANUAL
Network Video Recorders NVR Series DN vers. 3
Page: 9 Page: 9
Connections
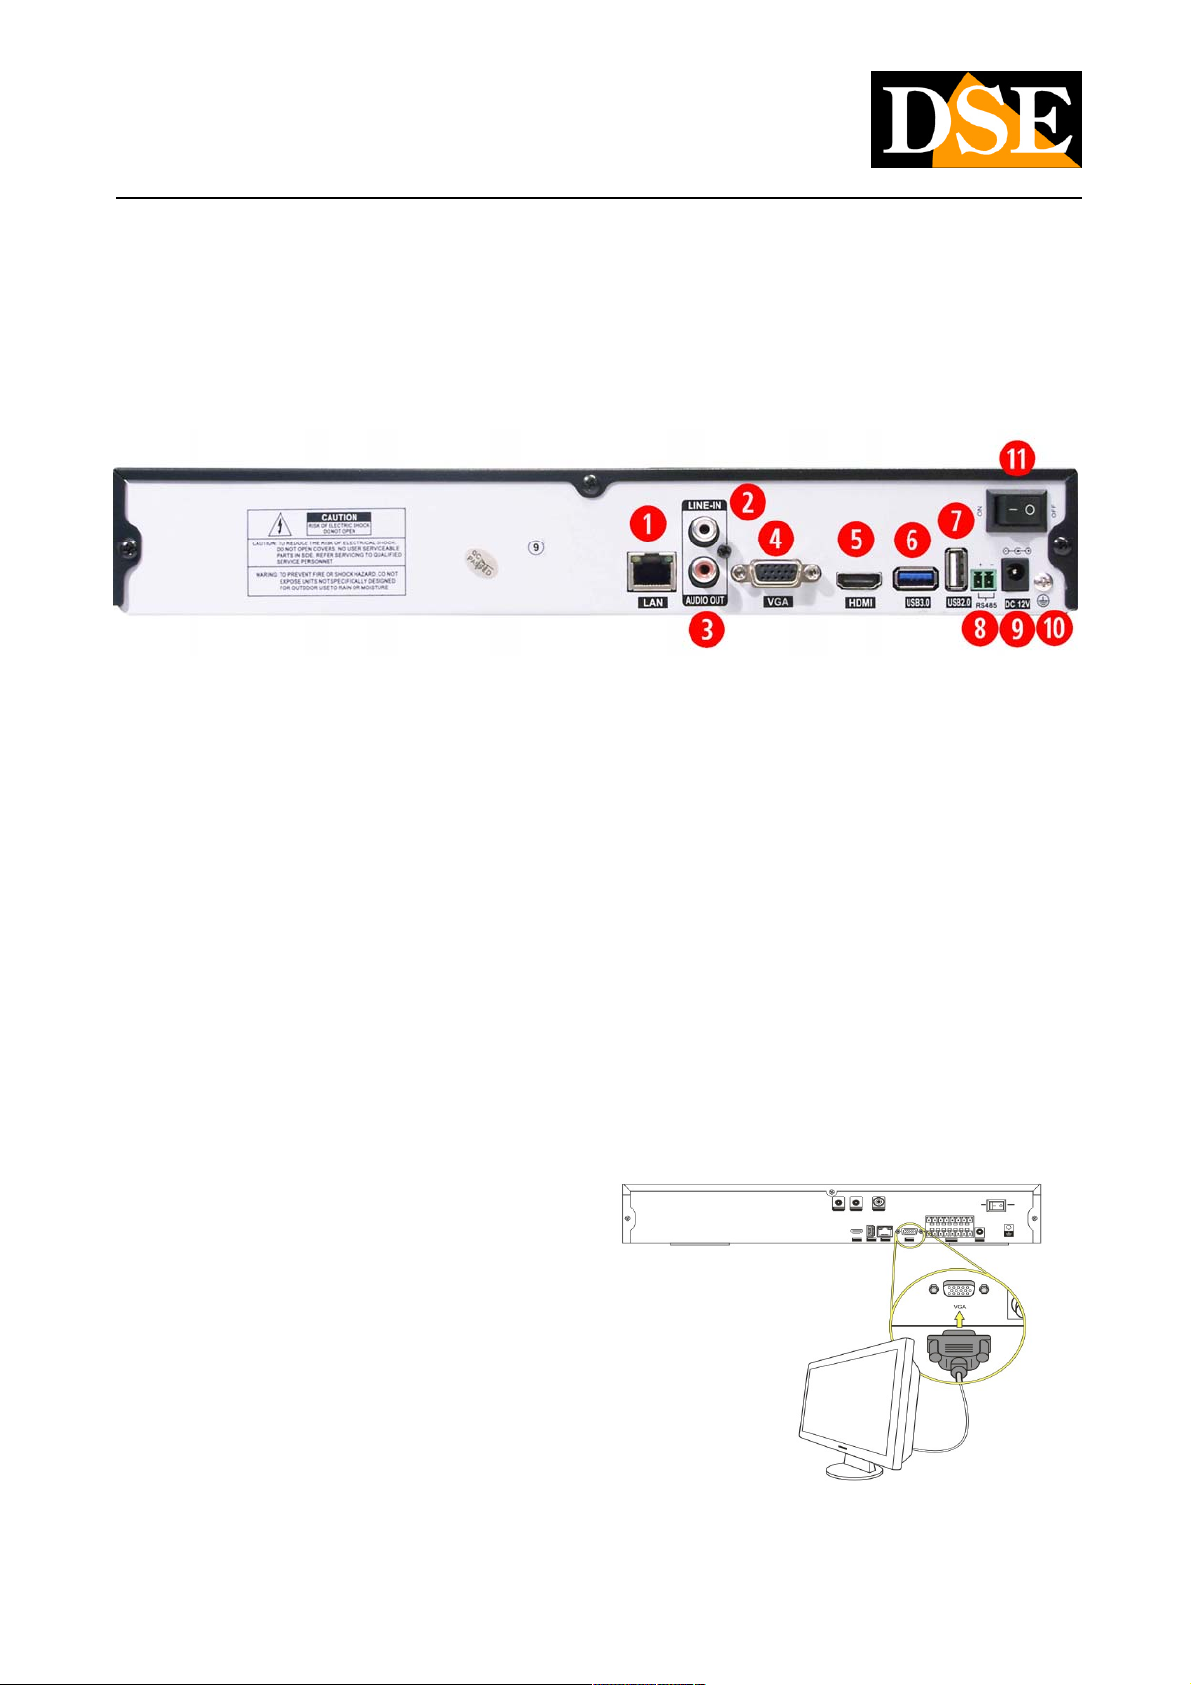
The connections of the NVR are located on the back.
1 - NETWORK PORT - RJ45 connector to connect the NVR to a LAN 10M / 100M network. Before using the LAN connection set network
parameters in the DVR setup menu. In NVR the network connection is crucial because it is the only communication port toward the
implant devices. Check that the yellow and green LEDs light up both when connected to the switch the NVR.
2 - AUDIO IN - Auxiliary audio input for connecting an audio input which can be useful if you use two-way audio. Unlike analog cameras,
IP cameras in the audio management coming from the camera does not require a separate entrance as the audio is embedded in the
digital stream.
3 - AUDIO OUTPUT - mono RCA audio output for connecting an external speaker that allow you to hear the audio of the live cameras
and recordings.
4 - VGA OUT - Used to connect a PC monitor. It is a door in high resolution up to 1440x900 and even HD and FullHD. The PC monitors
are now the best solution if you are looking for a monitor with an excellent value for money. The VGA video output resolution is set in the
configuration of the NVR. It must take great care to set resolutions supported by your monitor, because if the resolution does not prove
supported will be forced to connect another BNC or HDMI monitor can edit it. Special attention must be made before choosing the 1080p
and 720p options that not all PC monitors are capable of handling.
DSE SRL - ITALY - WWW.DSE.EU
Page 10

INSTALLATION MANUAL
Network Video Recorders NVR Series DN vers. 3
Page: 10 Page: 10
5 - HDMI OUTPUT - Used to connect a FullHD monitor with HDMI input. It is a high-resolution brings FullHD used among other things as
all the latest generation of TV sets. The HDMI output is always recommended, especially if you want to connect a large monitor.
6 - USB 3.0 PORT - The NVRs are equipped with one rear USB port complies with the latest USB 3.0 standard. This port can be used as
a normal USB 2.0 port (see next item), but if you have back-up units that support this standard should connect to this port to a higher
transfer rate.
7 - USB 2.0 PORT - The NVRs are equipped with a rear USB 2.0 ports. An additional USB port
2.0 is placed laterally to the left of the keyboard. On the USB ports connect the supplied mouse, and USB storage devices such as USB
HDD or USB flash drives for backing up movies. The ports are all the same so you can connect the mouse to the door of your choice. 8 -
PORT RS485 - From the RS485 port part on the bus going to control PTZ or speed dome cameras and that enters and exits from each
camera by connecting them in cascade to the last. The RS485 BUS is performed with a twisted pair that connects to the terminal RS485A
and RS485B. Take care to respect the order of the connections A (+) and B (-) in all cameras NVRs DN series PelcoD support the
protocol used by the DSE speed dome cameras, and various other protocols from other manufacturers.
9 - 12VDC – Connettore di alimentazione dove collegare lo spinotto dell’alimentatore incluso 10 – GND – Presa di terra
11 - ON/OFF – Interruttore di accensione
DSE SRL - ITALY - WWW.DSE.EU
Page 11
MANUALE DI INSTALLAZIONE
Videoregistratori di rete NVR Serie DN vers. 3
Pagina: 11 Pagina: 11
Installazione dell’Hard Disk
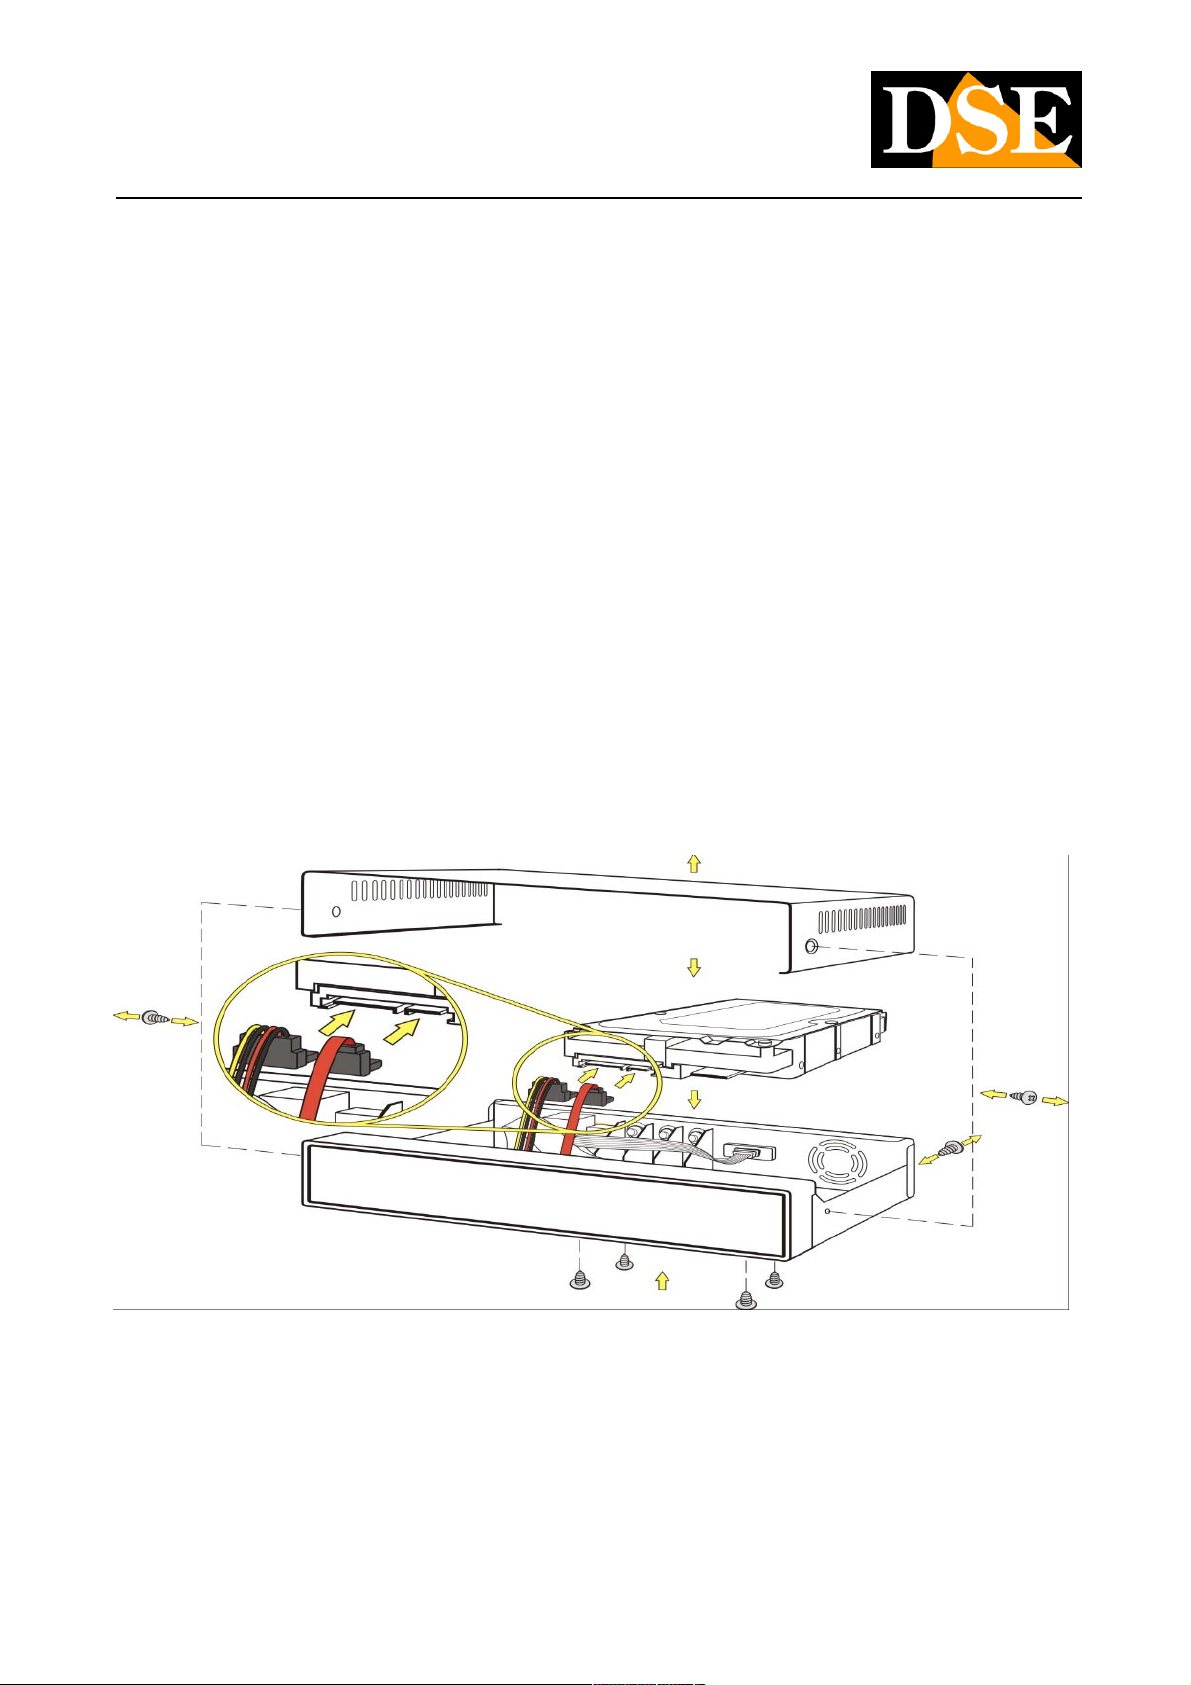
Perché il NVR sia in grado di registrare è necessario installare almeno un hard disk all’interno dell’apparecchiatura. Il NVR è fornito
sempre senza Hard Disk, per cui la prima operazione necessaria è l’installazione del disco.
I NVR possono ospitare 1 o 2 Hard disk di qualsiasi marca purchè con connettore SATA. La
capacità massima gestibile è di 3000 GB (3 TB) per ogni HDD. Procedere all’installazione dell’hard-disk come segue: capacità massima gestibile è di 3000 GB (3 TB) per ogni HDD. Procedere all’installazione dell’hard-disk come segue:
1. Spegnere l’apparecchio aprire il videoregistratore rimuovendo la protezione superiore svitando le viti di fissaggio laterali.
2. Fissare il disco rigido all’apparecchio nell’apposita sede mediante le viti di fissaggio.
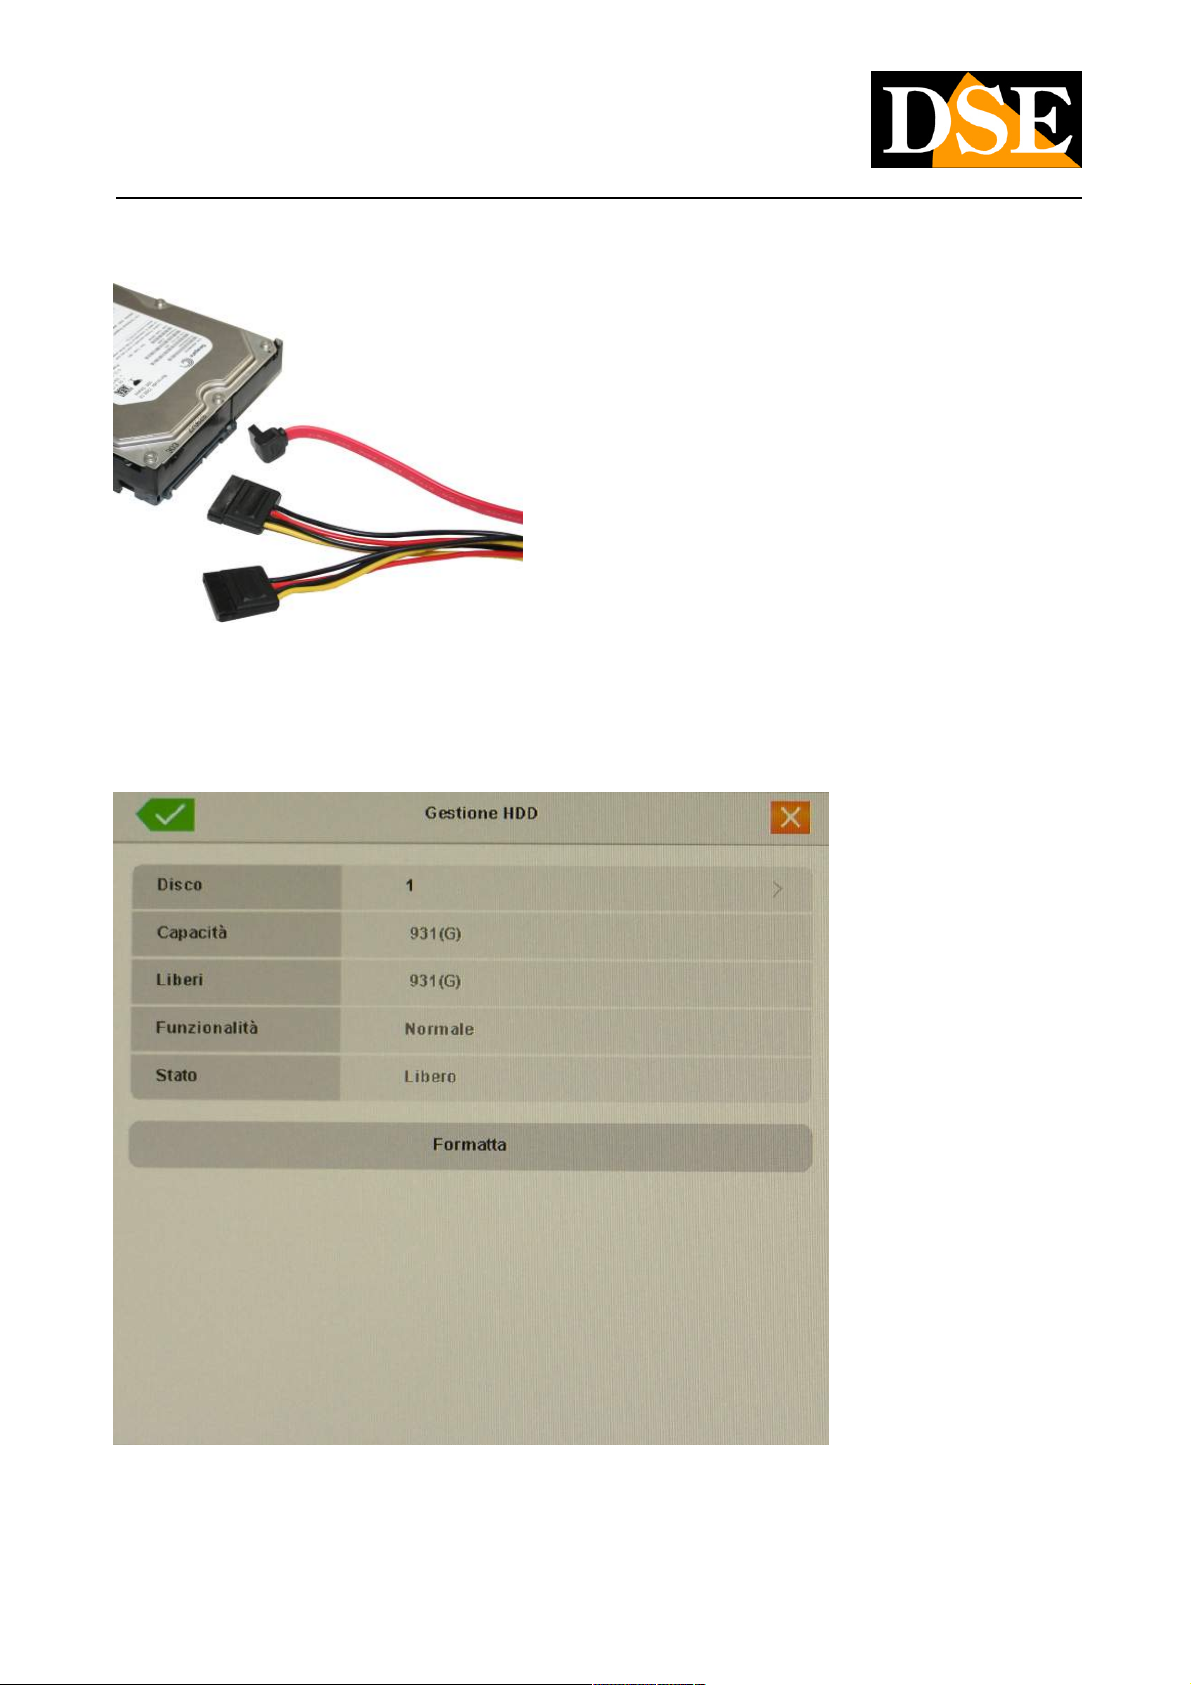
3. Connettere il cavo rosso SATA per i dati e il cavo di alimentazione fra Hard Disk e scheda madre.
4. Chiudere l’apparecchio con il coperchio riavvitando le viti.
DSE SRL – ITALY – WWW.DSE.EU
Page 12
MANUALE DI INSTALLAZIONE
Videoregistratori di rete NVR Serie DN vers. 3
Pagina: 12 Pagina: 12
ATTENZIONE: Prima di iniziare la registrazione occorre eseguire la formattazione fisica del disco rigido nel menu di configurazione alla ATTENZIONE: Prima di iniziare la registrazione occorre eseguire la formattazione fisica del disco rigido nel menu di configurazione alla ATTENZIONE: Prima di iniziare la registrazione occorre eseguire la formattazione fisica del disco rigido nel menu di configurazione alla
GESTIONE HDD. Vedere le istruzioni riportate nel
manuale di configurazione. L’NVR non sarà in grado di registrare fino a che non avrete completato la formattazione. manuale di configurazione. L’NVR non sarà in grado di registrare fino a che non avrete completato la formattazione.
DSE SRL – ITALY – WWW.DSE.EU
Page 13

MANUALE DI INSTALLAZIONE
Videoregistratori di rete NVR Serie DN vers. 3
Pagina: 13 Pagina: 13
Installazione del mouse
Gli NVR serie DN si controllano principalmente con il mouse incluso. Il
mouse va collegato a una porta USB del NVR. Potete collegare il
mouse alla porta USB che preferite, tuttavia si consiglia di utilizzare la
porta USB 2.0 posteriore in modo da lasciare la porta laterale, di più
facile accesso, libera per inserire chiavette rimovibili.
Il mouse può essere collegato hot-swap, con l’NVR in funzione.
Le funzioni del NVR si possono controllare anche
tramite il telecomando o addirittura solo con i pulsanti frontali della tastiera. Si tratta però di metodi di controlli meno intuitivi per cui si
consiglia di prevedere sempre, dove possibile, l’installazione del mouse.
In questo manuale si fa sempre riferimento al controllo del NVR tramite il mouse.In questo manuale si fa sempre riferimento al controllo del NVR tramite il mouse.
Si noti che mentre si sta controllando l’NVR con il mouse è in corso la registrazione per cui la CPU impegnata nella codifica può causare
occasionalmente ritardi nella percezione del click del mouse.
DSE SRL – ITALY – WWW.DSE.EU
Page 14
MANUALE DI INSTALLAZIONE
Videoregistratori di rete NVR Serie DN vers. 3
Pagina: 14 Pagina: 14
Configurazione di rete
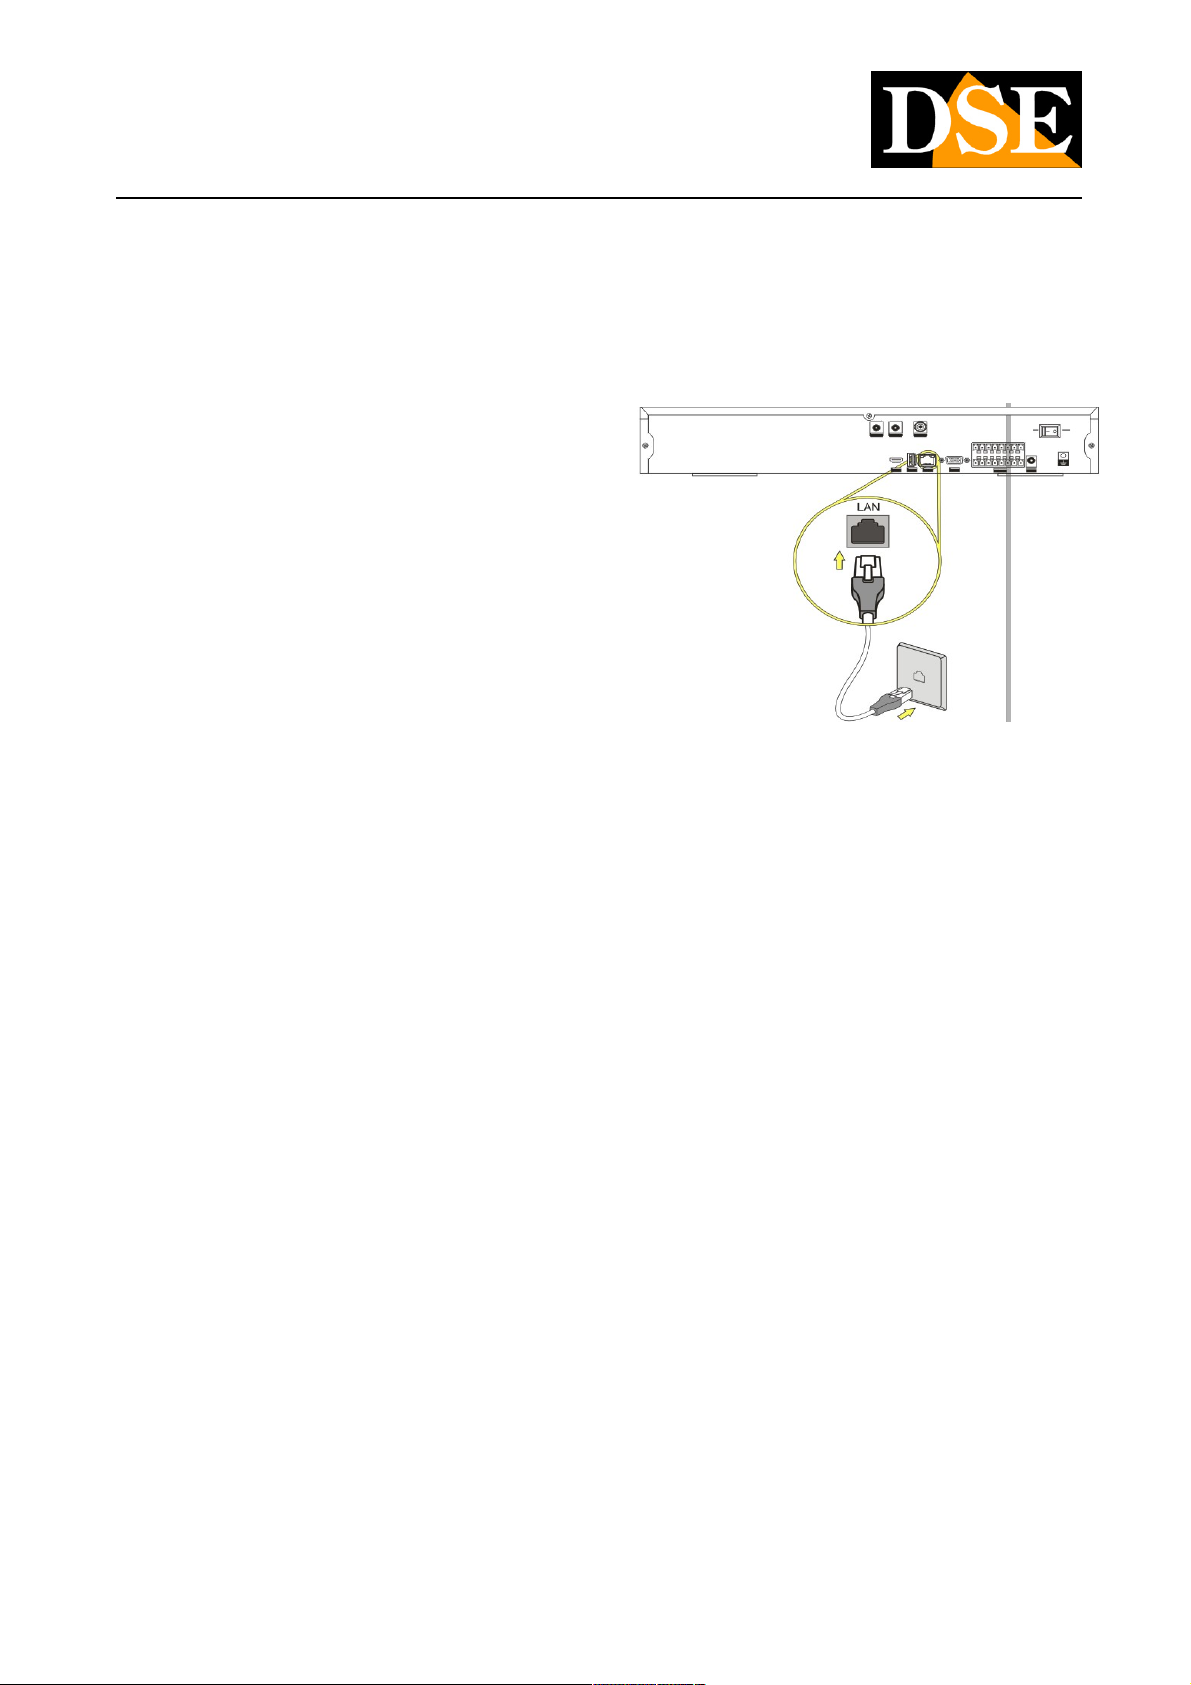
Gli NVR sono videoregistratori di rete dove tutta la comunicazione fra il
dispositivo e le telecamera transita sulla rete LAN.
La prima cosa da fare per poter utilizzare il vostro NVR è pertanto
collegare la presa di rete a uno switch di rete e configurarlo
correttamente per poter dialogare con PC e telecamere. Per collegarsi
a una rete LAN, come prima cosa occorre collegare la porta di rete
posteriore a una porta dello swicth di rete utilizzando un cavo di
rete di tipo diritto. Appena collegherete il cavo i LED giallo e verde posti sul connettore dello switch e sulla porta del NVR devono
accendersi. Se questo non avviene controllare la buona funzionalità del cavo.
ASSEGNAZIONE DELL’INDIRIZZO IP
I NVR sono in grado di supportare l’ assegnazione indirizzo automatica (DHCP). Questo significa che una volta collegati alla rete
acquisiranno automaticamente i parametri di rete da un server DHCP, in genere il router o lo switch di rete. Questa modalità, pur
da un lato molto semplice, non è consigliabile nelle applicazioni di videosorveglianza in quanto il NVR potrebbe in seguito a un
riavvio modificare il proprio indirizzo e si renderebbe necessario riconfigurare molte impostazioni. E’ assai più consigliabile
assegnare al NVR un indirizzo fisso che non correrà il rischio di modificarsi.
Prima di procedere occorre ottenere dall’amministratore di rete alcune informazioni circa la gestione degli indirizzi IP utilizzata nella
vostra rete. E’ necessario conoscere un indirizzo IP da poter assegnare al NVR che non sia uguale a nessun altro dispositivo già
presente in rete. Le prime 3 cifre dell’indirizzo IP dovranno essere le stesse utilizzate dagli altri computer, altrimenti non vi sarà
comunicazione fra i componenti della rete.
CONOSCERE I PARAMETRI DI RETE DA COMPUTER
Se siete incerti sul funzionamento della vostra rete e non sapete che indirizzo IP assegnare al NVR potete utilizzare alcuni
comandi nel PROMPT DOS
DSE SRL – ITALY – WWW.DSE.EU
Page 15
MANUALE DI INSTALLAZIONE
Videoregistratori di rete NVR Serie DN vers. 3
Pagina: 15 Pagina: 15
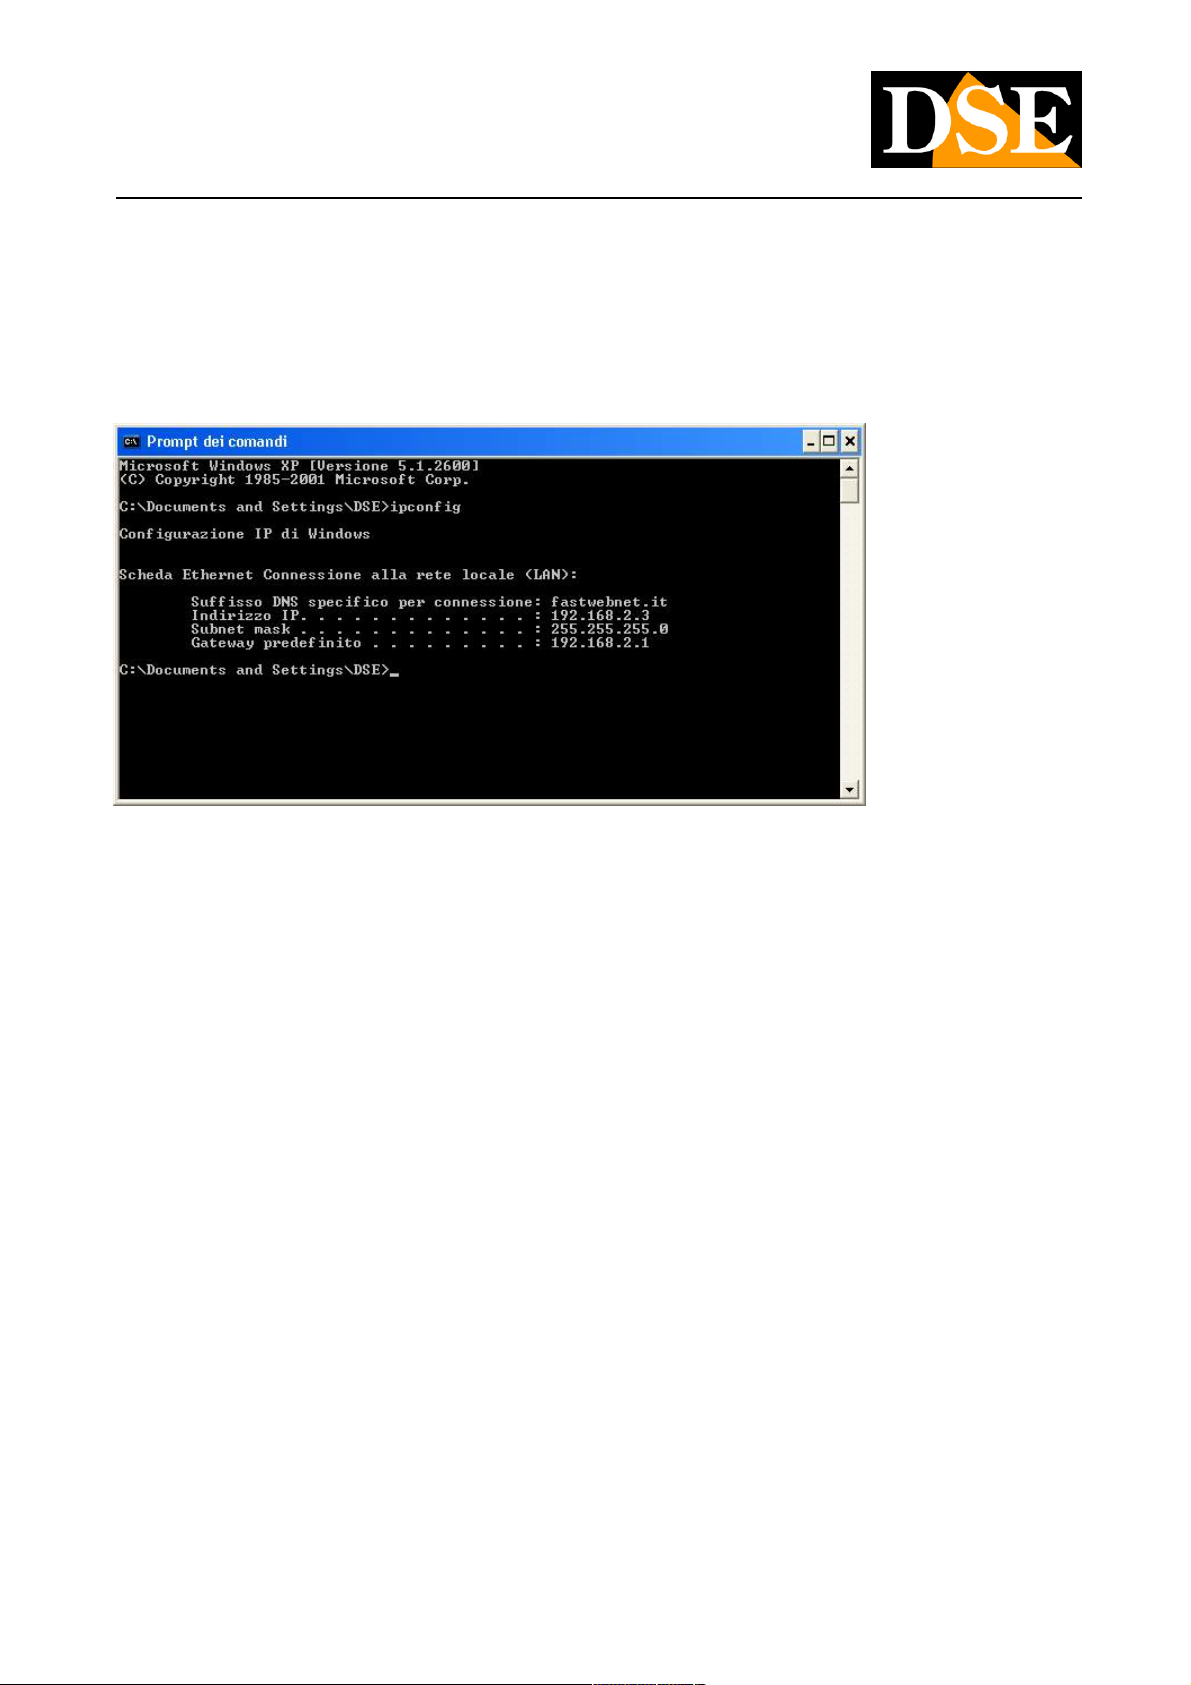
Su un PC collegato in rete lanciate una finestra DOS disponibile fra i programmi accessori di Windows.
Digitate IPCONFIG nel prompt dei comandi e premete ENTER. Appariranno i parametri TCP/IP. La seconda linea è l’indirizzo IP
assegnato al vostro computer.
Nell’esempio qui sopra l’indirizzo del PC su cui si sta lavorando è 192.168.2.3 e la subnet mask utilizzata è la classica
255.255.255.0. Al NVR potrete pertanto assegnare un indirizzo a scelta del tipo 192.168.2.XXX, dove XXX sta per un numero
compreso fra 0 e 255. E’
importante scegliere un indirizzo che non sia già utilizzato da altre apparecchiature di rete. Per verificare che l’indirizzo importante scegliere un indirizzo che non sia già utilizzato da altre apparecchiature di rete. Per verificare che l’indirizzo importante scegliere un indirizzo che non sia già utilizzato da altre apparecchiature di rete. Per verificare che l’indirizzo
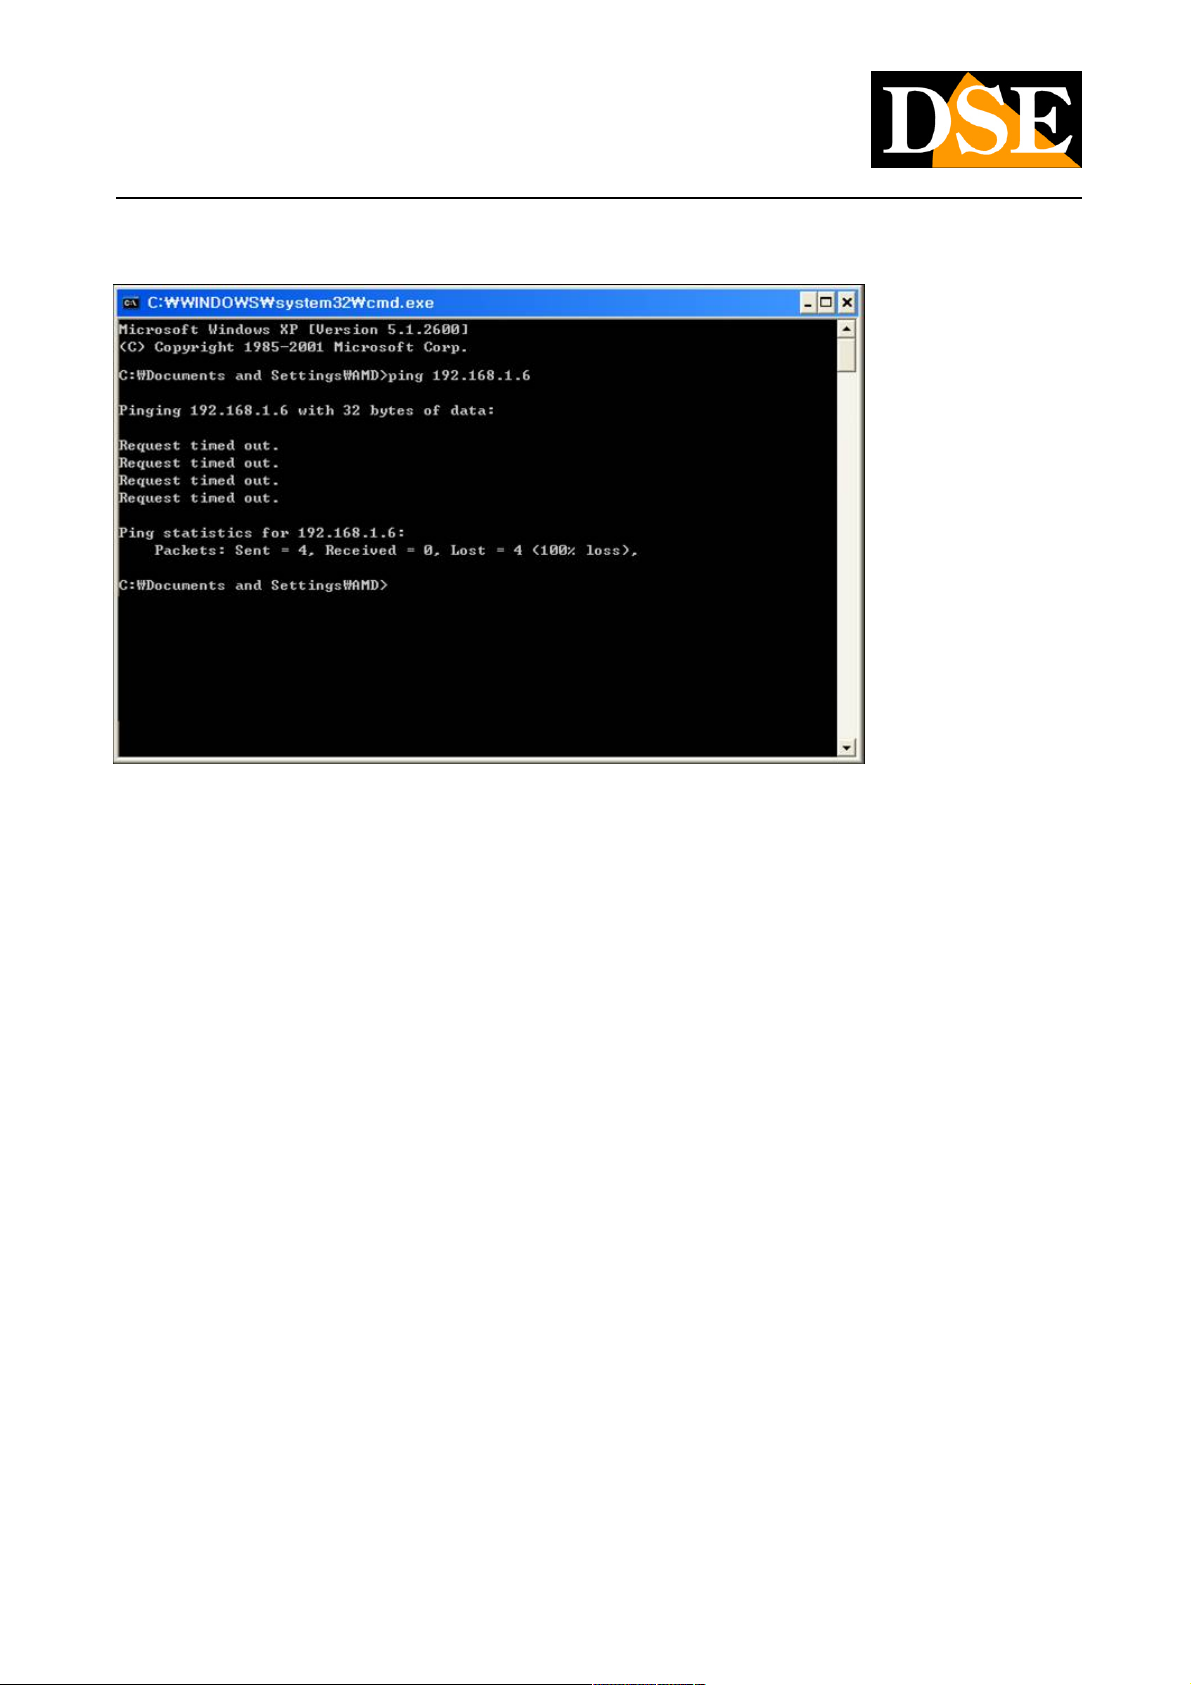
scelto sia libero, provate ad effettuare un PING dalla stessa finestra DOS digitando PING seguito da uno spazio e dall’IP che
desiderate assegnare alla telecamera. Premete ENTER. Se non esiste nessun apparecchio rispondente a quell’indirizzo,
riceverete 4 REQUEST TIME OUT. In questo esempio si sta verificando che non esista in rete un dispositivo con indirizzo IP
192.168.1.6 digitando: PING
192.168.1.6
DSE SRL – ITALY – WWW.DSE.EU
Page 16
MANUALE DI INSTALLAZIONE
Videoregistratori di rete NVR Serie DN vers. 3
Pagina: 16 Pagina: 16
L’indirizzo 192.168.1.6 è libero per essere utilizzato ed assegnato al NVR.
CONOSCERE I PARAMETRI DI RETE DAL NVR CON IL DHCP
Sebbene l’assegnazione automatica dell’IP in modalità DHCP non sia consigliabile nella videosorveglianza essa è utile negli NVR sia
perché consente di collegare l’NVR in rete con la certezza di non creare nessun conflitto, sia perché permette di conoscere subito i
parametri di rete che possiamo assegnare al nostro NVR.
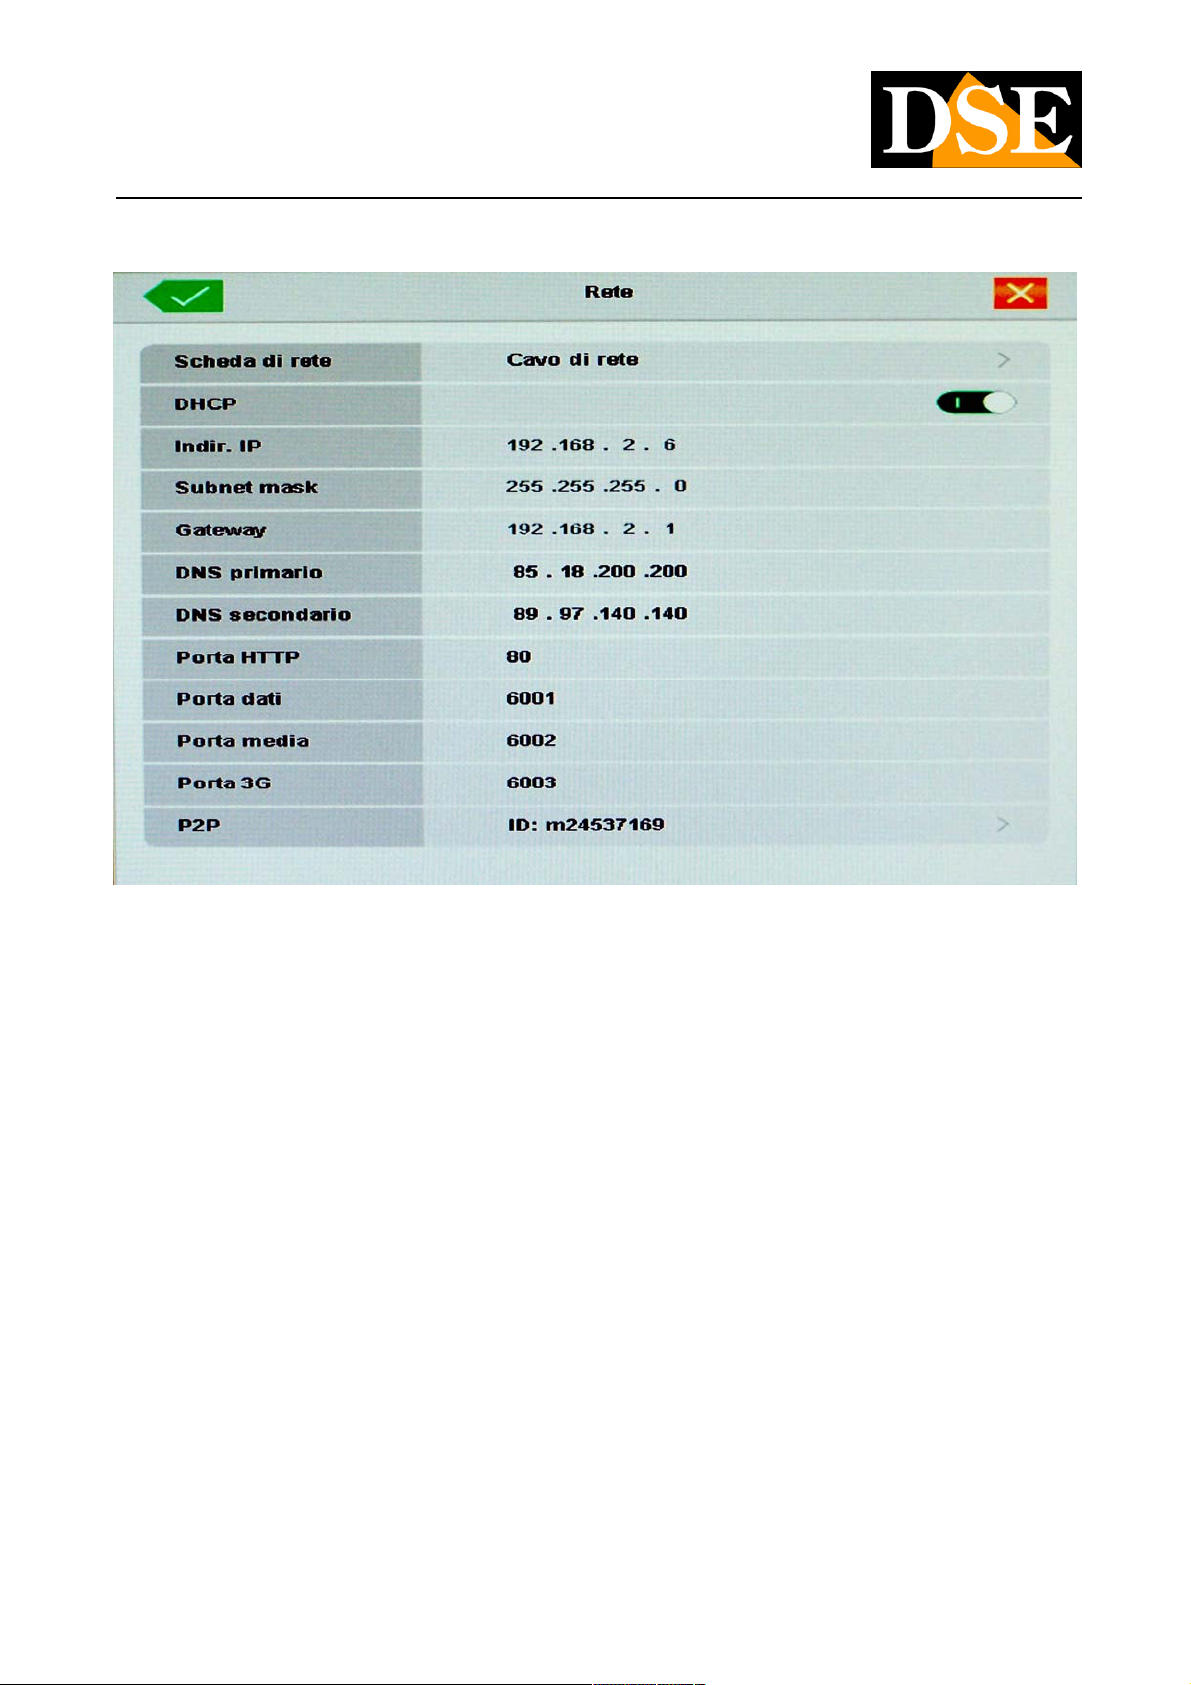
Se colleghiamo l’NVR alla rete e ci rechiamo nella pagina di configurazione OSD sezione SISTEMA/RETE troveremo già dei parametri di
rete corretti per il nostro NVR
DSE SRL – ITALY – WWW.DSE.EU
Page 17
MANUALE DI INSTALLAZIONE
Videoregistratori di rete NVR Serie DN vers. 3
Pagina: 17 Pagina: 17
Non ci resterà che disabilitare l’assegnazione DHCP e abilitare l’assegnazione manuale ricopiando i dati che il server DHCP aveva
assegnato in modo automatico.
CONFIGURAZIONE DI RETE COMPLETATA
Se avete assegnato al vostro NVR un indirizzo IP fisso e la subnet mask corretta utilizzata dalla rete potete già tentare il primo
collegamento da un altro PC della rete. Per completare la configurazione di rete è tuttavia consigliabile inserire anche il gateway verso
Internet, di regola l’indirizzo xxx.xxx.xxx.1, e l’indirizzo del server DNS del vostro provider per consentire al vostro NVR di accedere a siti
internet.
DSE SRL – ITALY – WWW.DSE.EU
Page 18
MANUALE DI INSTALLAZIONE
Videoregistratori di rete NVR Serie DN vers. 3
Pagina: 18 Pagina: 18
Configurazione delle telecamere
In questo manuale si presume che le telecamere IP del sistema siano già state installate in rete e siano pienamente funzionanti. Per
ottenere questa situazione è necessario avvalersi della manualistica fornita insieme alle telecamere per configurarne gli indirizzi IP. Una
volta connesso l’NVR in rete occorrerà fornirgli i dati di collegamento per raggiungere le telecamere IP del sistema.
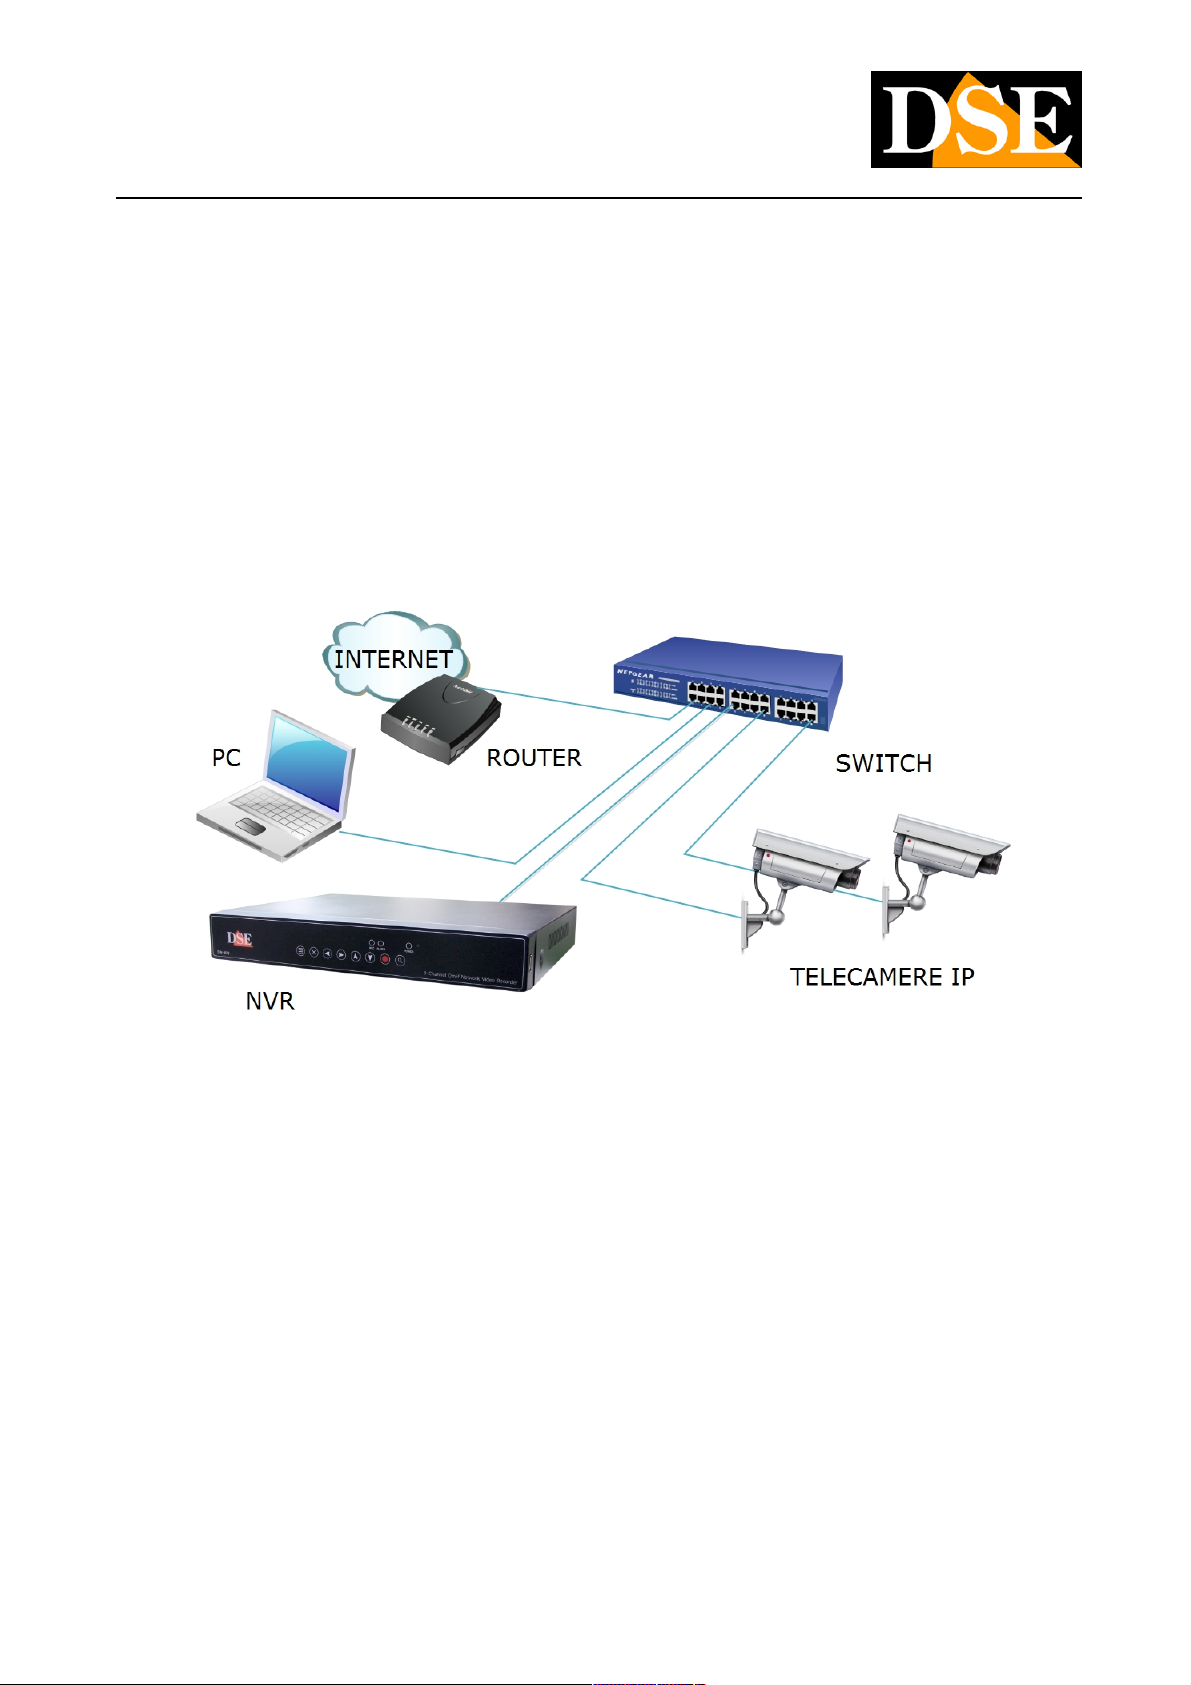
In una visione molto semplificata una sistema di telecamere IP si può schematizzare come segue.
Se le telecamere sono correttamente configurate in rete, ognuna con il suo indirizzo IP, è possibile procedere con la
configurazione delle telecamere nel NVR.
CONFIGURAZIONE AUTOMATICA DELLE TELECAMERE
Gli NVR serie RN sono in grado di ricercare automaticamente in rete tutte le telecamere IP DSE e tutte le telecamere in grado di gestire
in modo corretto il protocollo ONVIF. Si noti che l’NVR non è in grado di riconoscere telecamere IP con indirizzo IP non coerente con
quello dell’NVR, cioè con una classe di indirizzo (primi 3 numeri dell’indirizzo) diversa. Se non avete ancora reso gli indirizzo IP delle
telecamere coerenti con la vostra rete munitevi del manuale delle telecamere ed utilizzate i software di configurazione a corredo delle
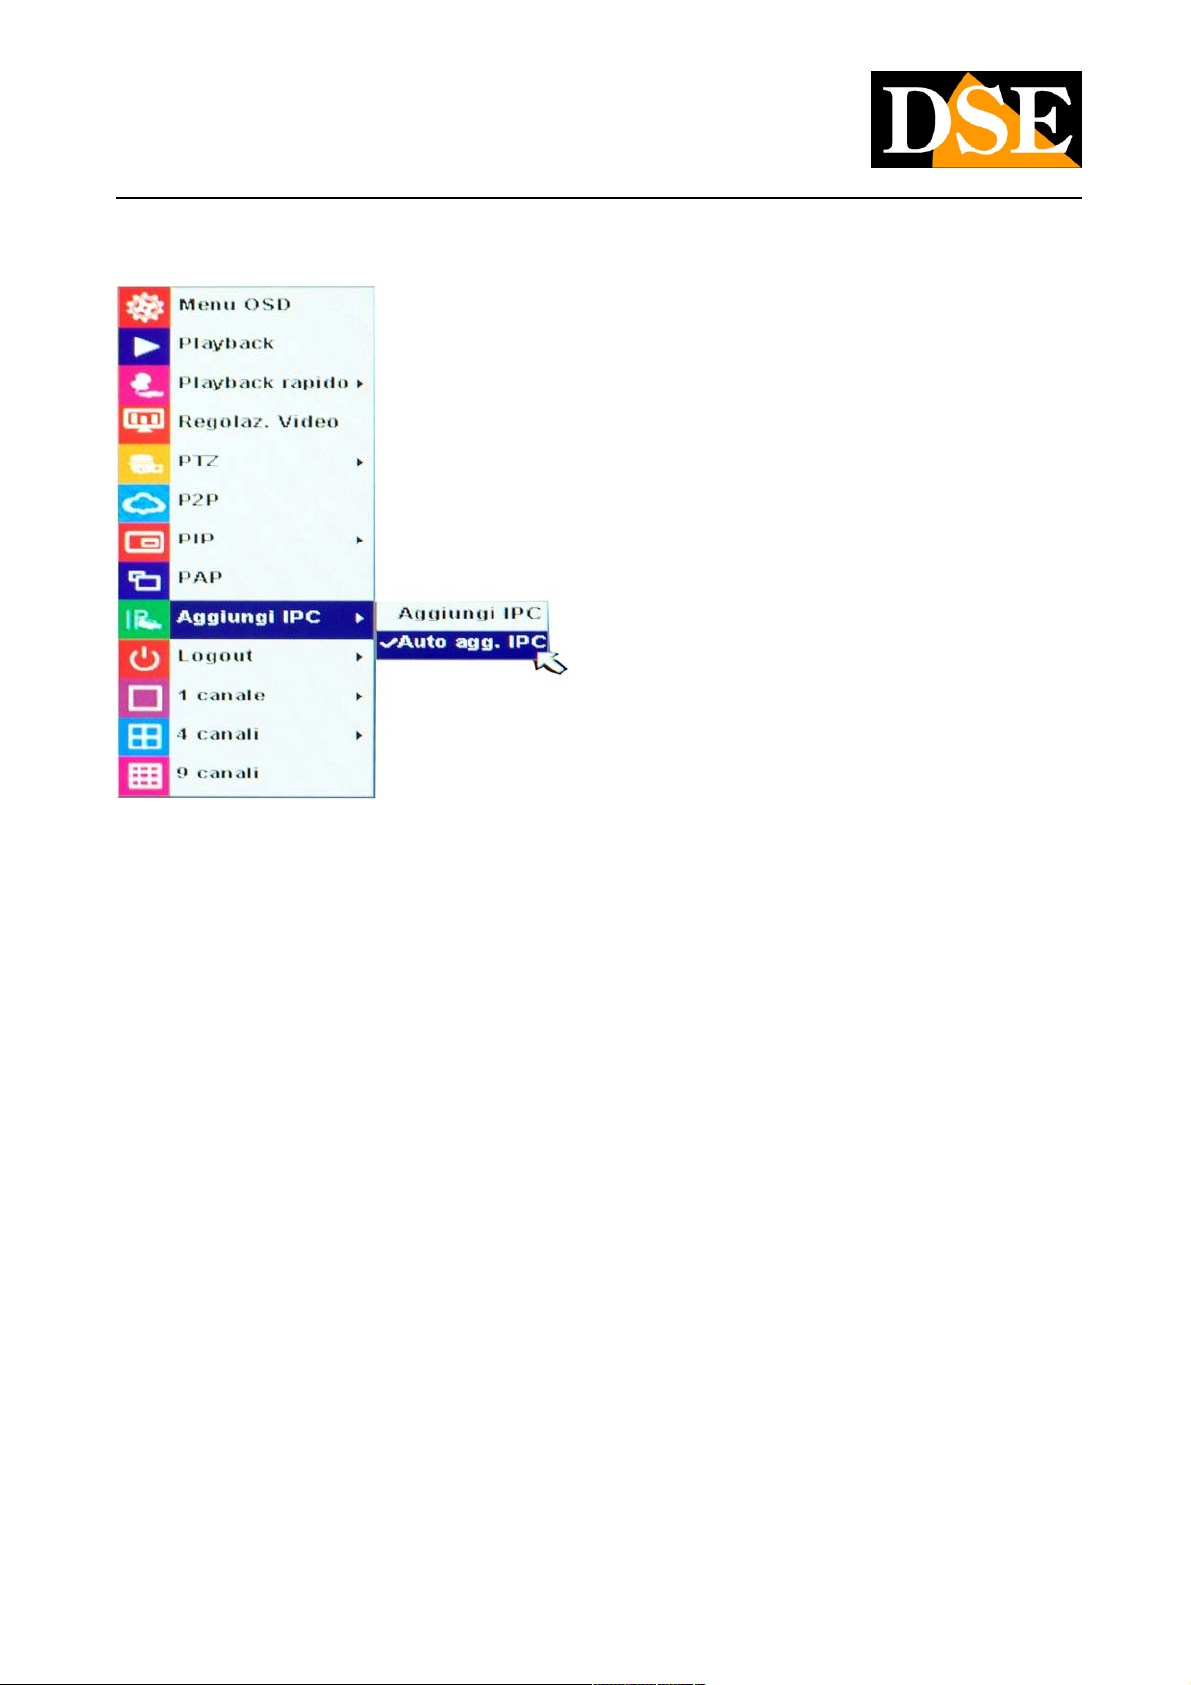
stesse. Per configurare le telecamere in modo automatico bisogna avviare l’NVR e cliccare con il tasto destro del mouse in modo da far
apparire il menu operativo, quindi scegliere AUTO AGGIUNGI IPC
DSE SRL – ITALY – WWW.DSE.EU
Page 19
MANUALE DI INSTALLAZIONE
Videoregistratori di rete NVR Serie DN vers. 3
Pagina: 19 Pagina: 19
The NVR will automatically search the IP cameras on the network and configure onvif ino automatically. If you have not logged on to
the NVR you will have to LOG-IN to the system with the default credentials
USER: admin
PASSWORD: leave blank
Once you added automatically cameras it is always advisable to go in the OSD menu of the NVR and verify the individual settings that
are assigned to the cameras. Typically you need to select the resolution you prefer and enter the login credentials. CAUTION: If you
leave enabled the automatic addition of a function of each cameras installed in the network camera will be automatically added to the
NVR and you can not eliminate cameras in manual mode.
AUTOMATIC CONFIGURATION ADVANCED CAMERA
The configuration of the fully automatic cameras seen in the previous chapter is not the user leaves a large control solla camera
management. Alternatively, it is possible to proceed in semi-automatic mode, equally rapid procedure, but that more leaves a greater
possibility of customization during configuration.
DSE SRL – ITALY – WWW.DSE.EU
Page 20
INSTALLATION MANUAL
Network Video Recorders NVR Series DN vers. 3
Page: 20 Page: 20
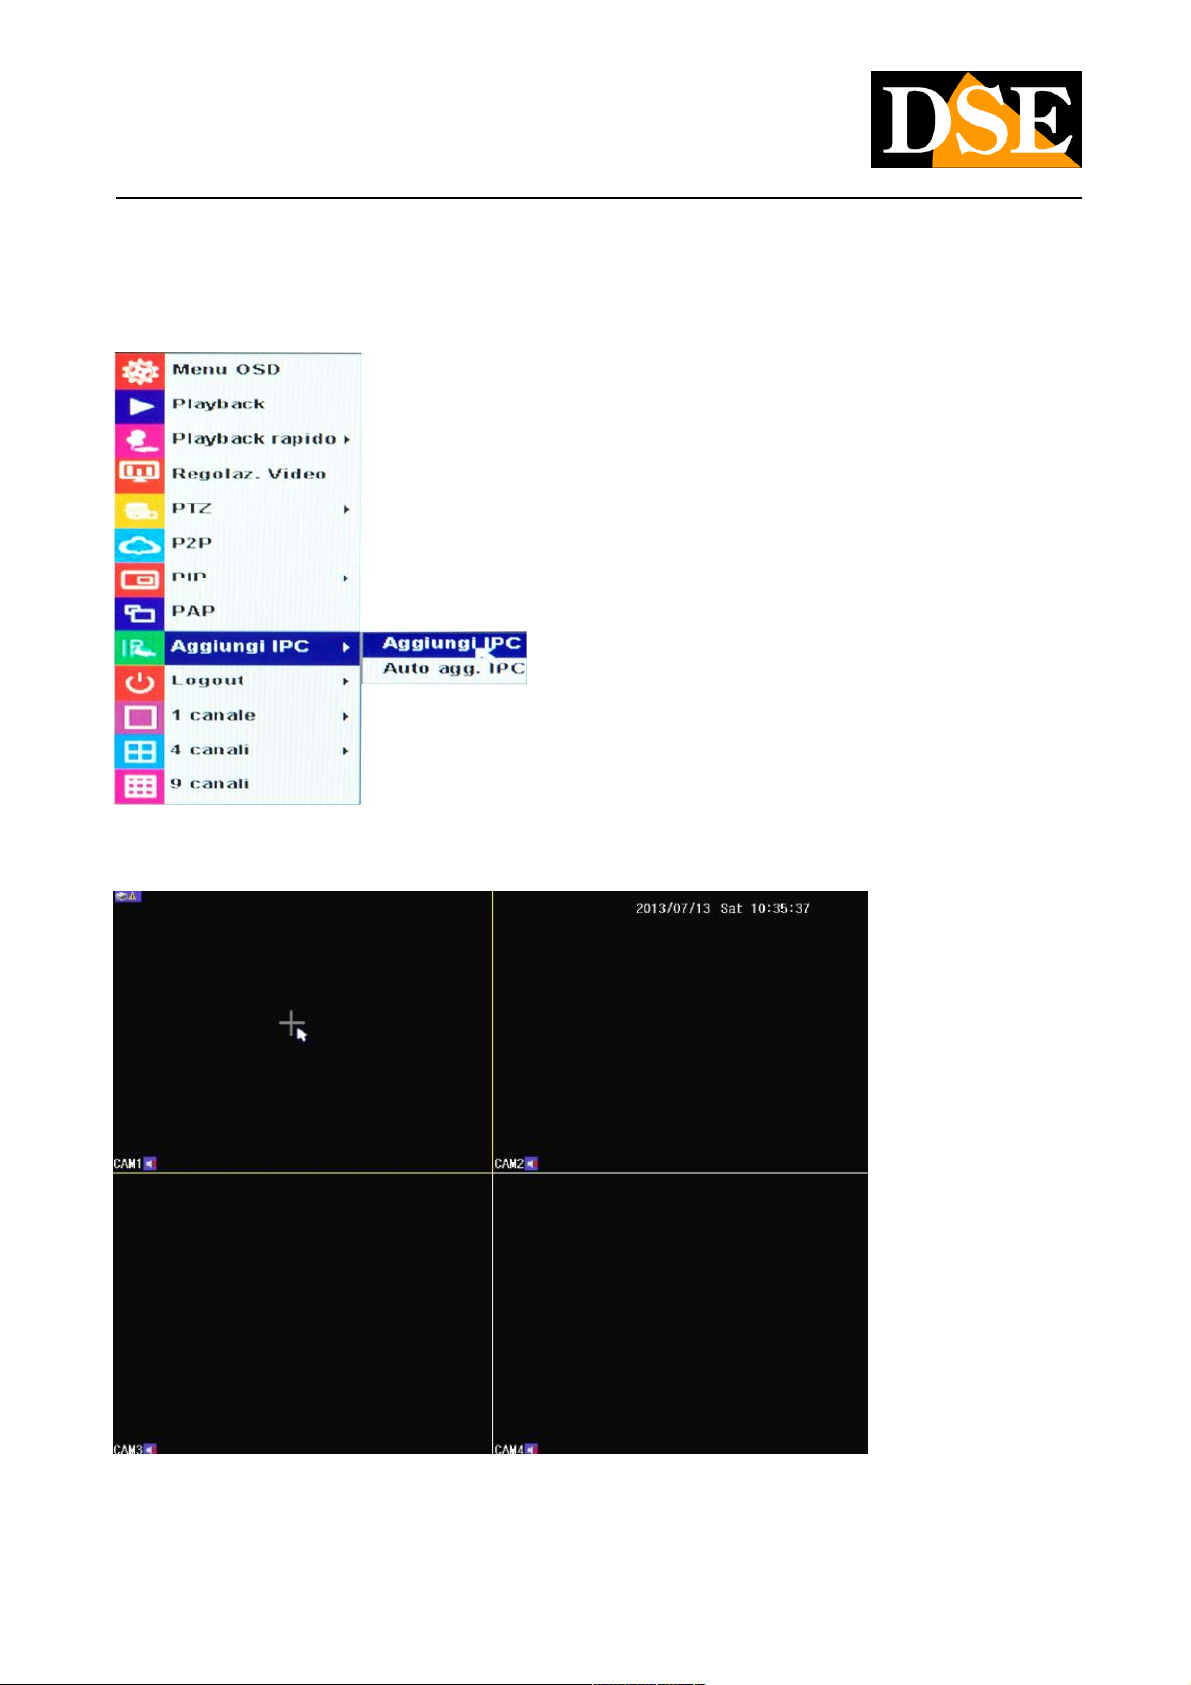
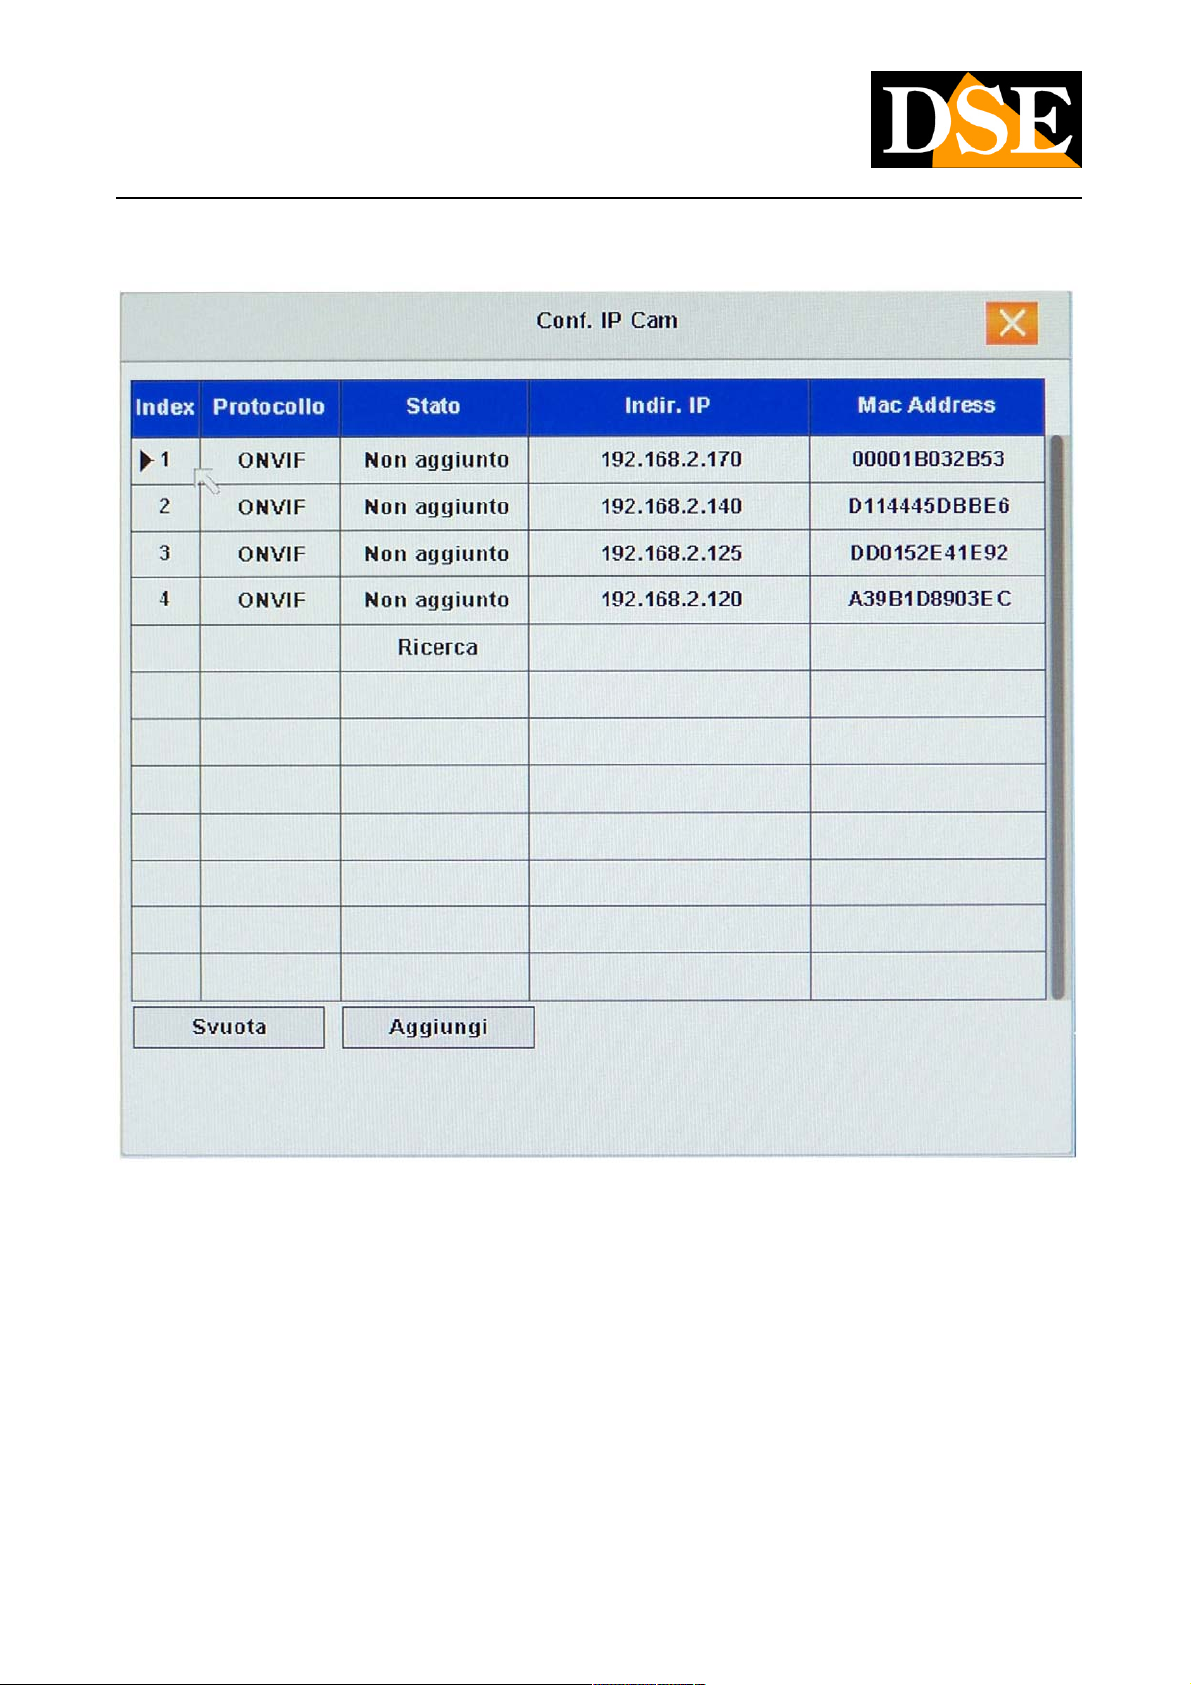
To perform this configuration, click the right button to display the menu and then choose ADD IPC
Alternatively you can also click on the little + icon that appears leaving the mouse for a few moments on a live window is not assigned to
any camera.
The window that appears automatically shows all available cameras on the network.
DSE SRL - ITALY - WWW.DSE.EU
Page 21
INSTALLATION MANUAL
Network Video Recorders NVR Series DN vers. 3
Page: 21 Page: 21
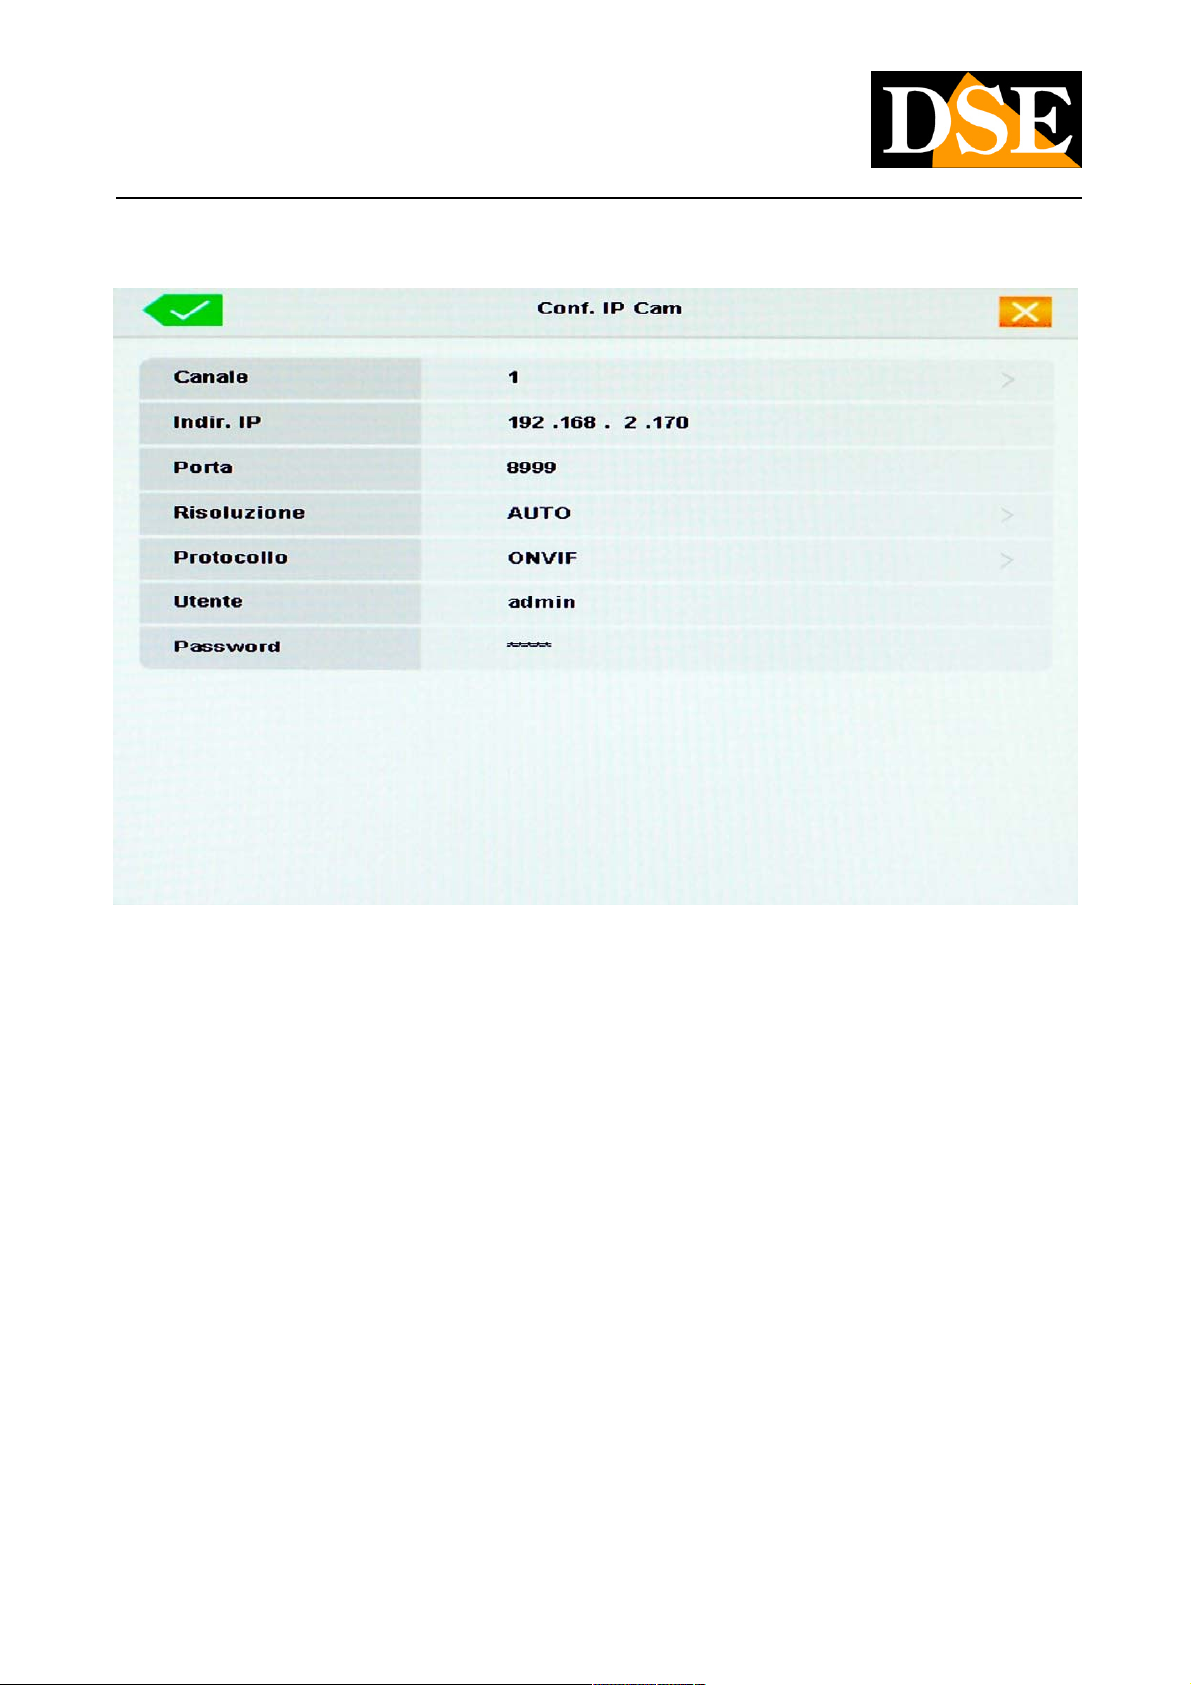
Select a camera and press ADD, you will see the camera setup window where you can maintain the recommended parameters or
change them at will. In particular it may be important to specify the video resolution to use if the camera it can support different.
However, it is noted that these parameters are also editable in the configuration menu as described in the manual.
DSE SRL - ITALY - WWW.DSE.EU
Page 22
INSTALLATION MANUAL
Network Video Recorders NVR Series DN vers. 3
Page: 22 Page: 22
ADDITIONAL OPTIONS CONFIGURATION CAMERAS
In the configuration manual explains how to access the camera management page and intervene further with the possibility of inserting
also manual and channel organization.
CONFIGURATION REMOTE CAMERAS WITH BROWSER
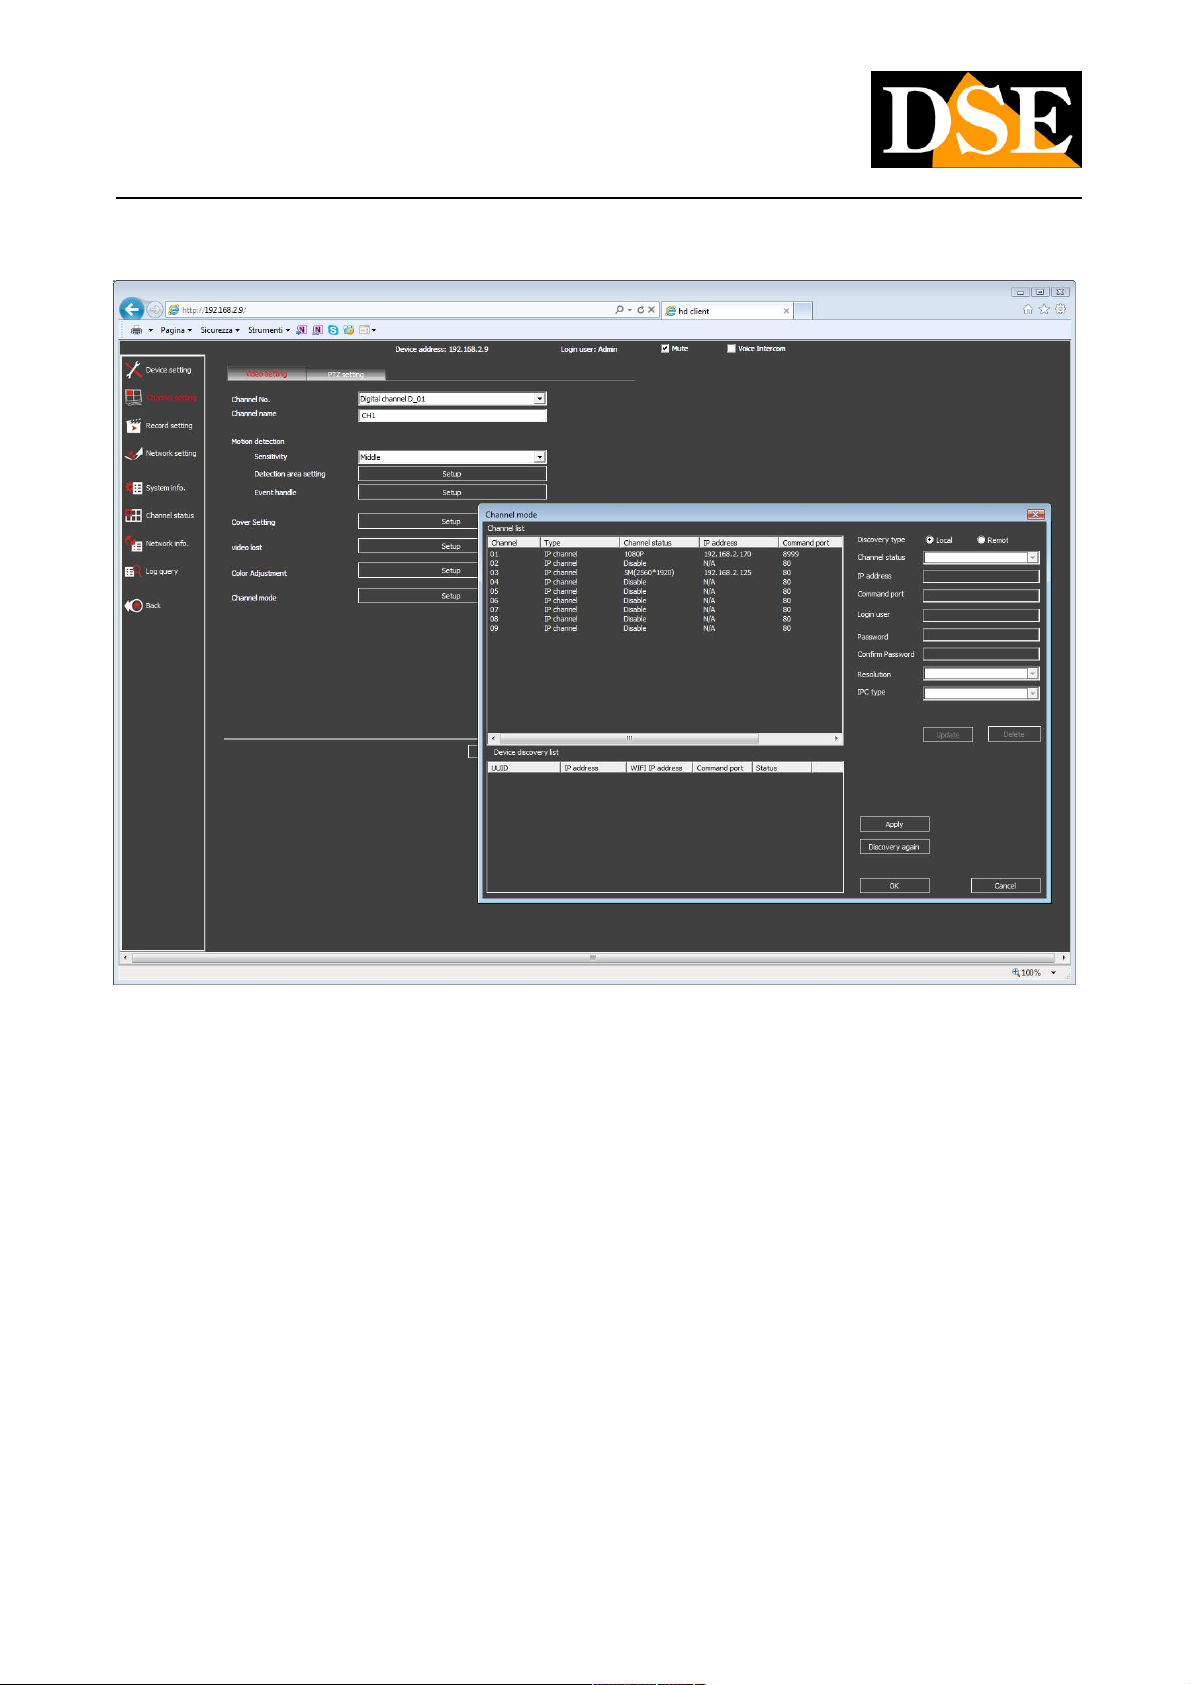
The camera configuration is also possible to remotely working with Internet Explorer. It is recommended not to use this remote
configuration to the first installation, but to restrict the use in subsequent additions, especially in case the NVR is not easily accessible. To
access the camera from browser configuration (see next section) it acts in the section CHANNEL SETTING / CHANNEL MODE
DSE SRL - ITALY - WWW.DSE.EU
Page 23
INSTALLATION MANUAL
Network Video Recorders NVR Series DN vers. 3
Page: 23 Page: 23
DSE SRL - ITALY - WWW.DSE.EU
Page 24
INSTALLATION MANUAL
Network Video Recorders NVR Series DN vers. 3
Page: 24 Page: 24
Connection with IE browser
The easiest way to connect to an NVR DN series through a computer using the Internet browser. The reference browser for use with DN
NVR series Internet Explorer albeit with appropriate plug-in is also possible to use other browsers (see below). NVR series Internet Explorer albeit with appropriate plug-in is also possible to use other browsers (see below). NVR series Internet Explorer albeit with appropriate plug-in is also possible to use other browsers (see below).
ENABLE PERFORMANCE OF ACTIVEX
When you first connect the 'NVRs installed in the Internet Explorer browser the necessary activeX components. Without these
components, your browser can not display the image. However, Internet Explorer contains security settings that may prevent the
installation. Before attempting to connect must be enabled download and execution of ActiveX not marked as safe. In Internet installation. Before attempting to connect must be enabled download and execution of ActiveX not marked as safe. In Internet installation. Before attempting to connect must be enabled download and execution of ActiveX not marked as safe. In Internet
Explorer, select TOOLS / INTERNET OPTIONS
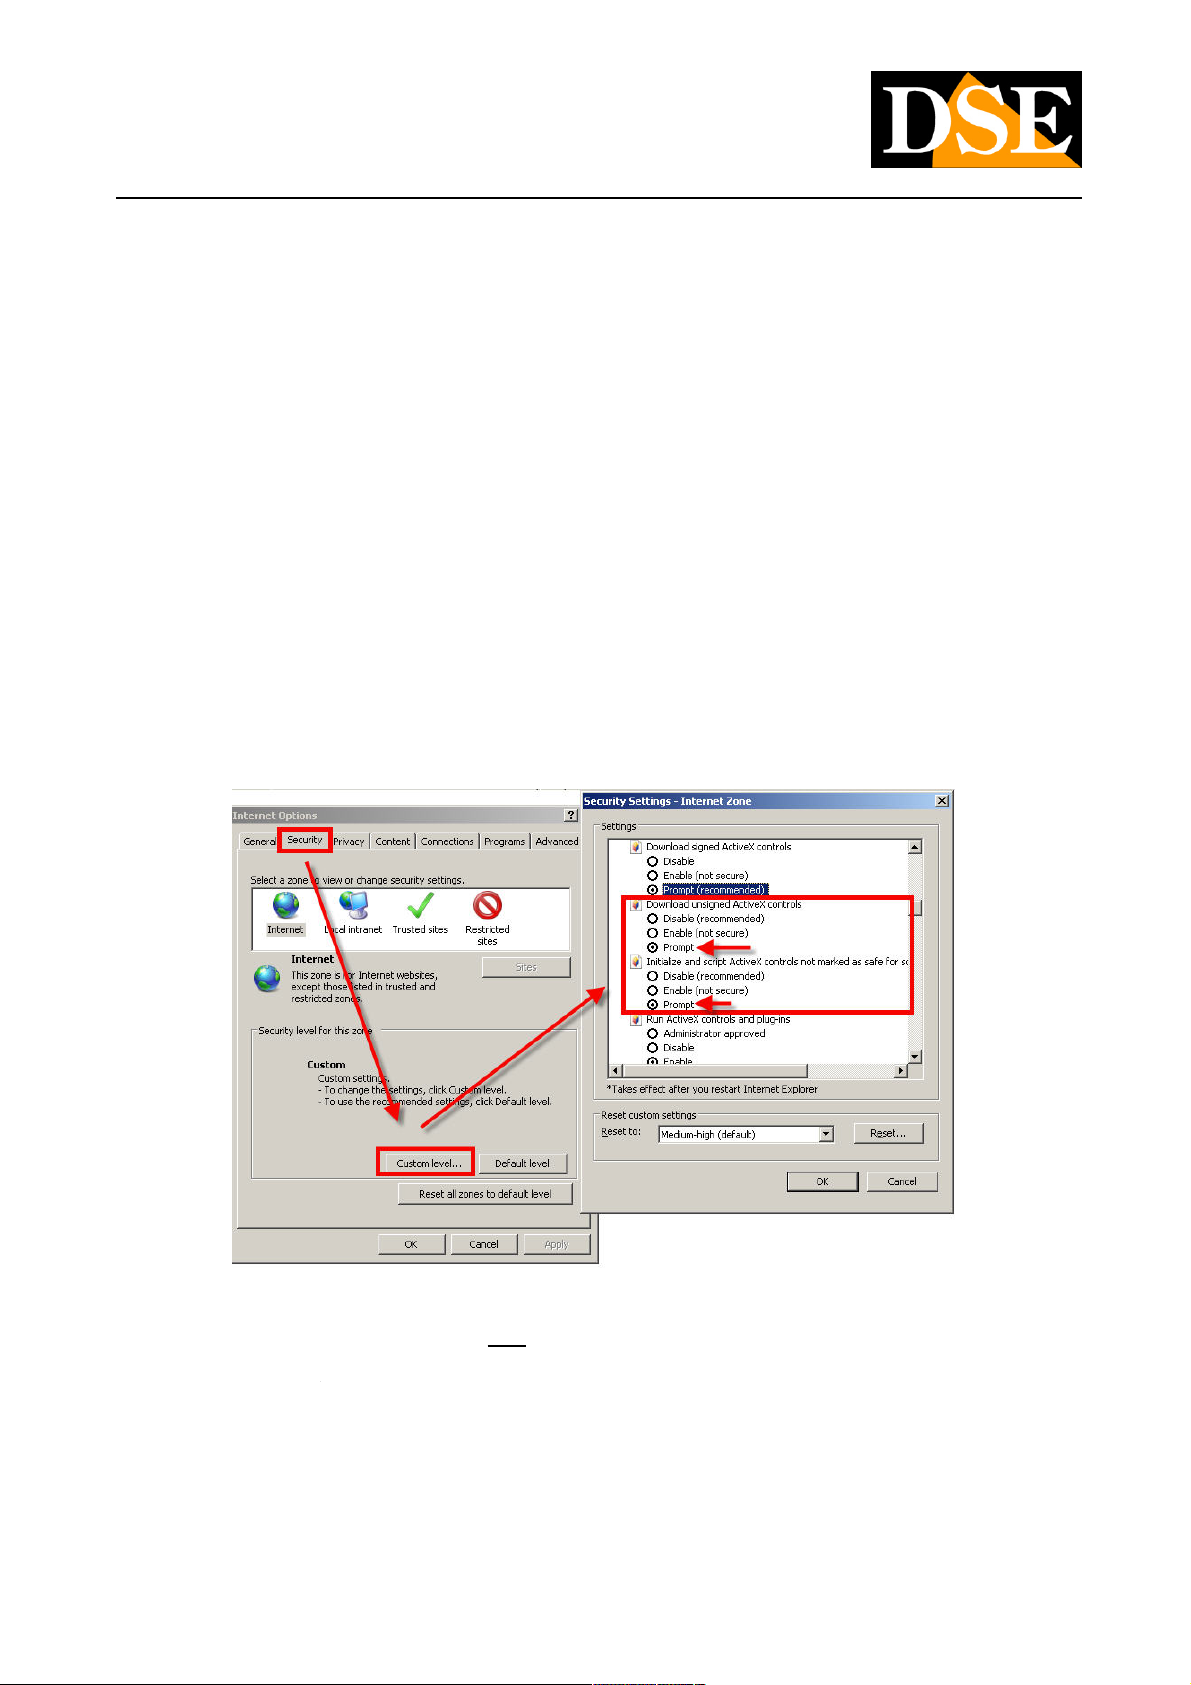
In the folder PROTECTION choose the area of interest (Internet or local network) and click CUSTOM LEVEL. Enable all items for the
download and execution of ActiveX particularly those NOT marked safe. E 'can set the items either ENABLE or ASK FOR download and execution of ActiveX particularly those NOT marked safe. E 'can set the items either ENABLE or ASK FOR download and execution of ActiveX particularly those NOT marked safe. E 'can set the items either ENABLE or ASK FOR
CONFIRMATION. ASK FOR CONFIRMATION setting the browser will prompt you to click OK to confirm the installation of the
component. Finally, save and restart the browser.
DSE SRL - ITALY - WWW.DSE.EU
Page 25
INSTALLATION MANUAL
Network Video Recorders NVR Series DN vers. 3
Page: 25 Page: 25
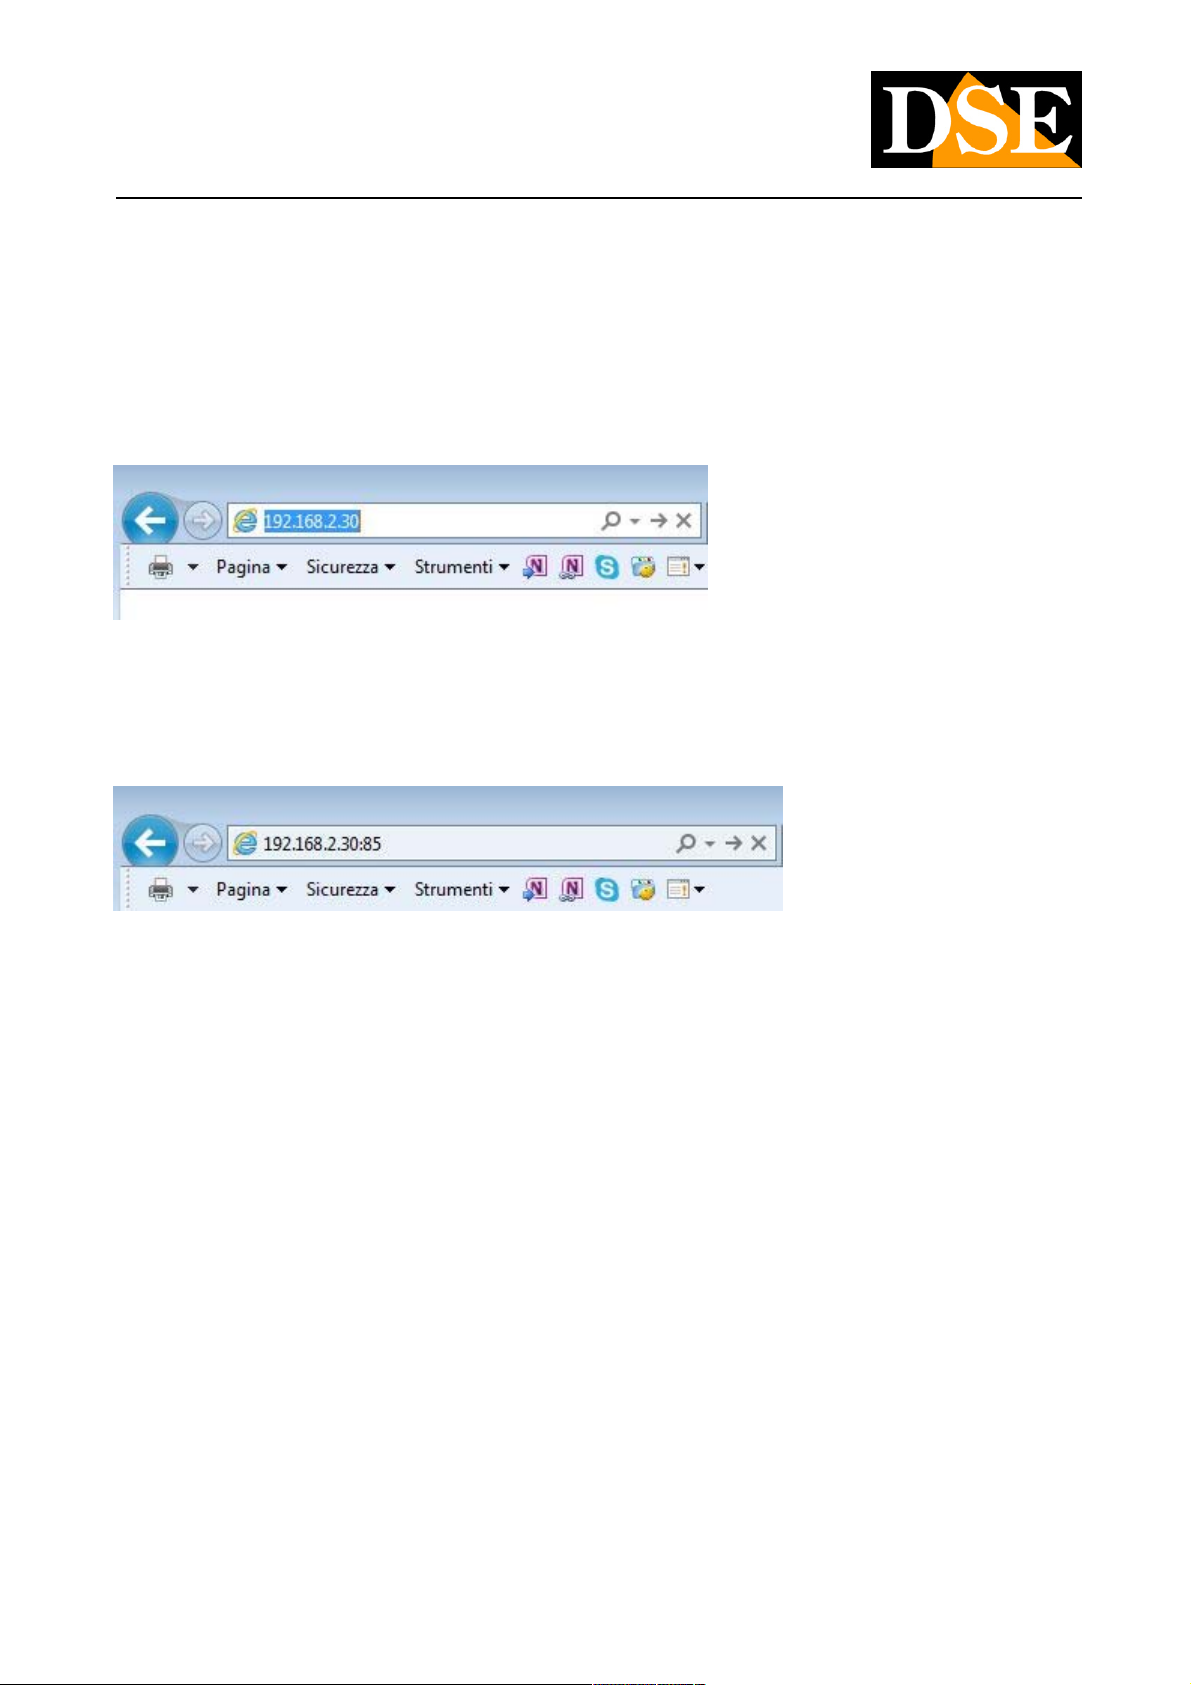
ENTERING THE ADDRESS OF THE DOOR AND WEB NVR
To access the NVR with Internet Explorer, type in the address box, the IP address that you assigned to the NVR. In the example below
we provide a link on the internal network to the NVR with IP address 192.168.2.30.
All NVR DN series incorporate Factory WEB port 80. Port 80 is the one that browsers use if none is specified another.
Note that if you change the web port in NVR setting you will need to specify it in the address bar. The following after the IP address of the
NVR web port is specified 85
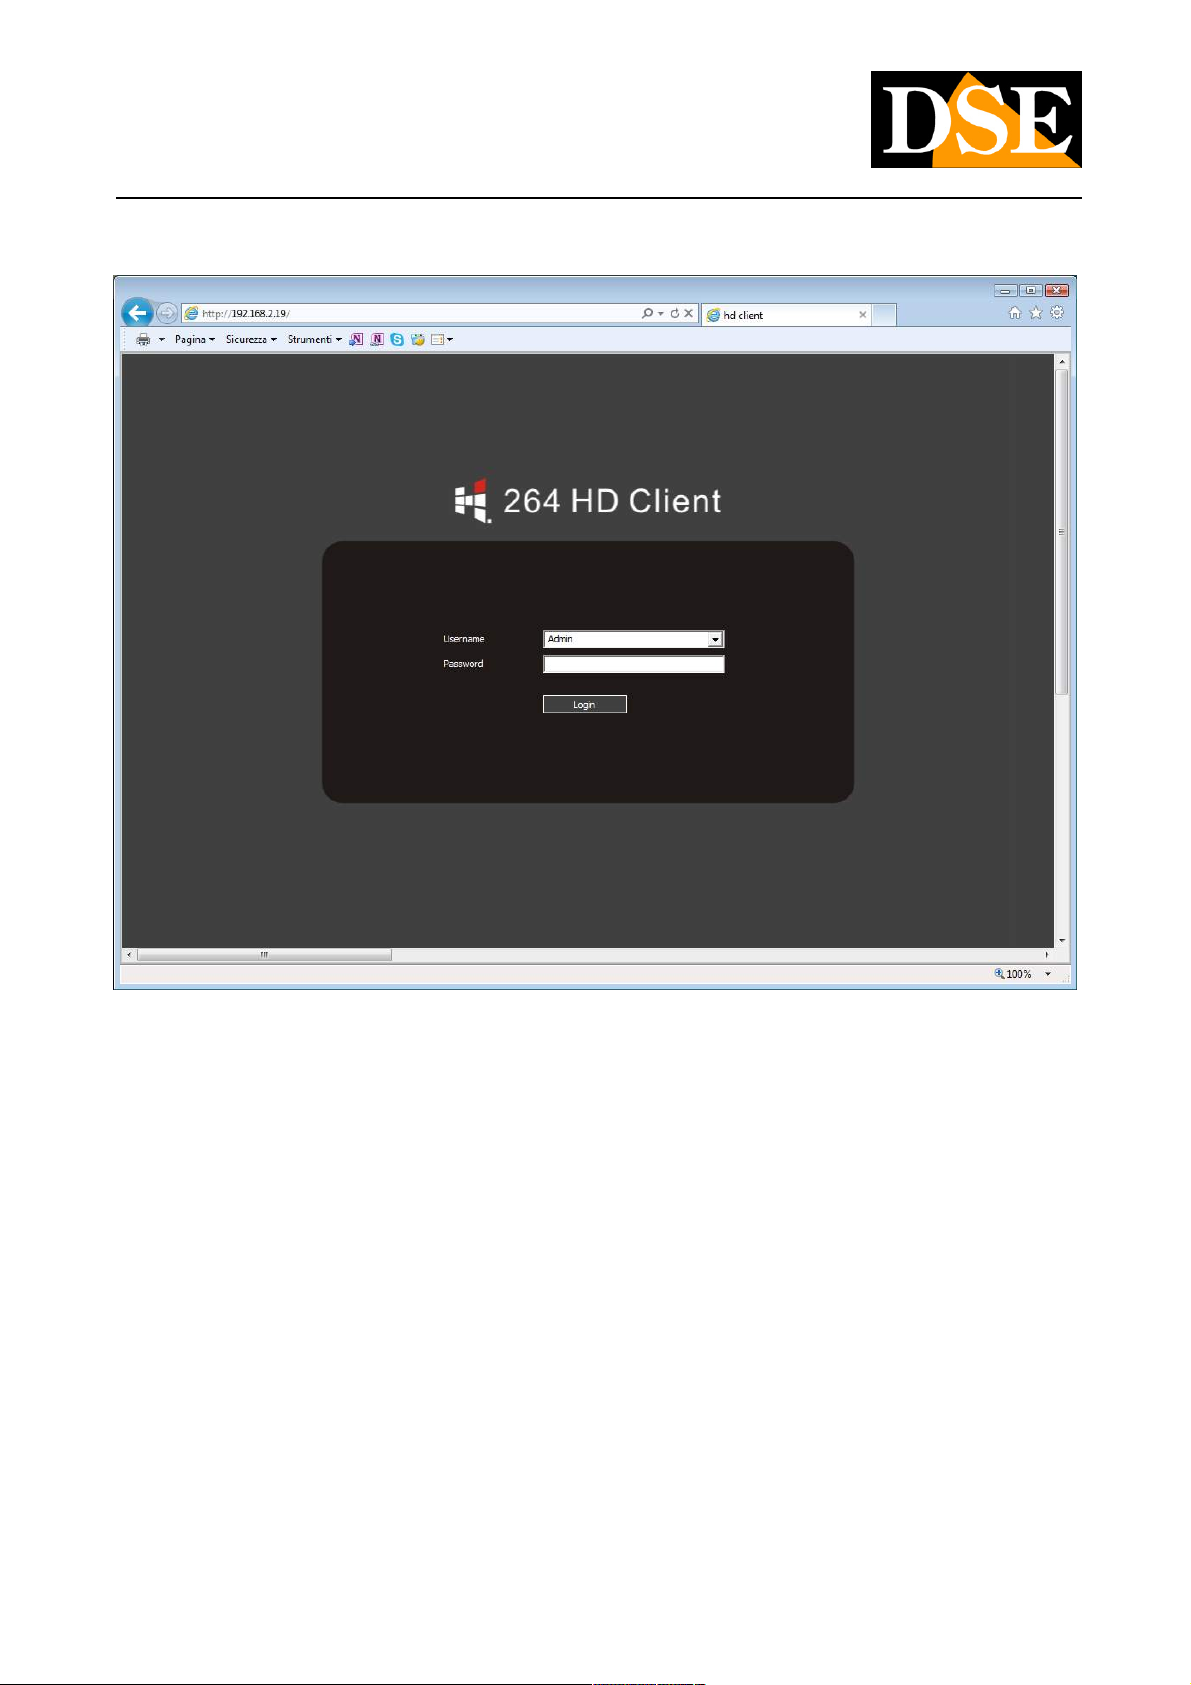
It will present the log-in window of NVR
DSE SRL - ITALY - WWW.DSE.EU
Page 26
INSTALLATION MANUAL
Network Video Recorders NVR Series DN vers. 3
Page: 26 Page: 26
If you have not changed the factory can use user credentials: Admin and leave the password field blank.If you have not changed the factory can use user credentials: Admin and leave the password field blank.If you have not changed the factory can use user credentials: Admin and leave the password field blank.
At the first access, depending on the security settings you have chosen there could be shown a confirmation request to install the
component activeX where necessary to give consent. If the installation of activeX component does not happen the screen will be divided
into quadrants, and not be necessary to review the Internet Explorer security settings and check some settings for the implementation of
the activeX is not left disabled.
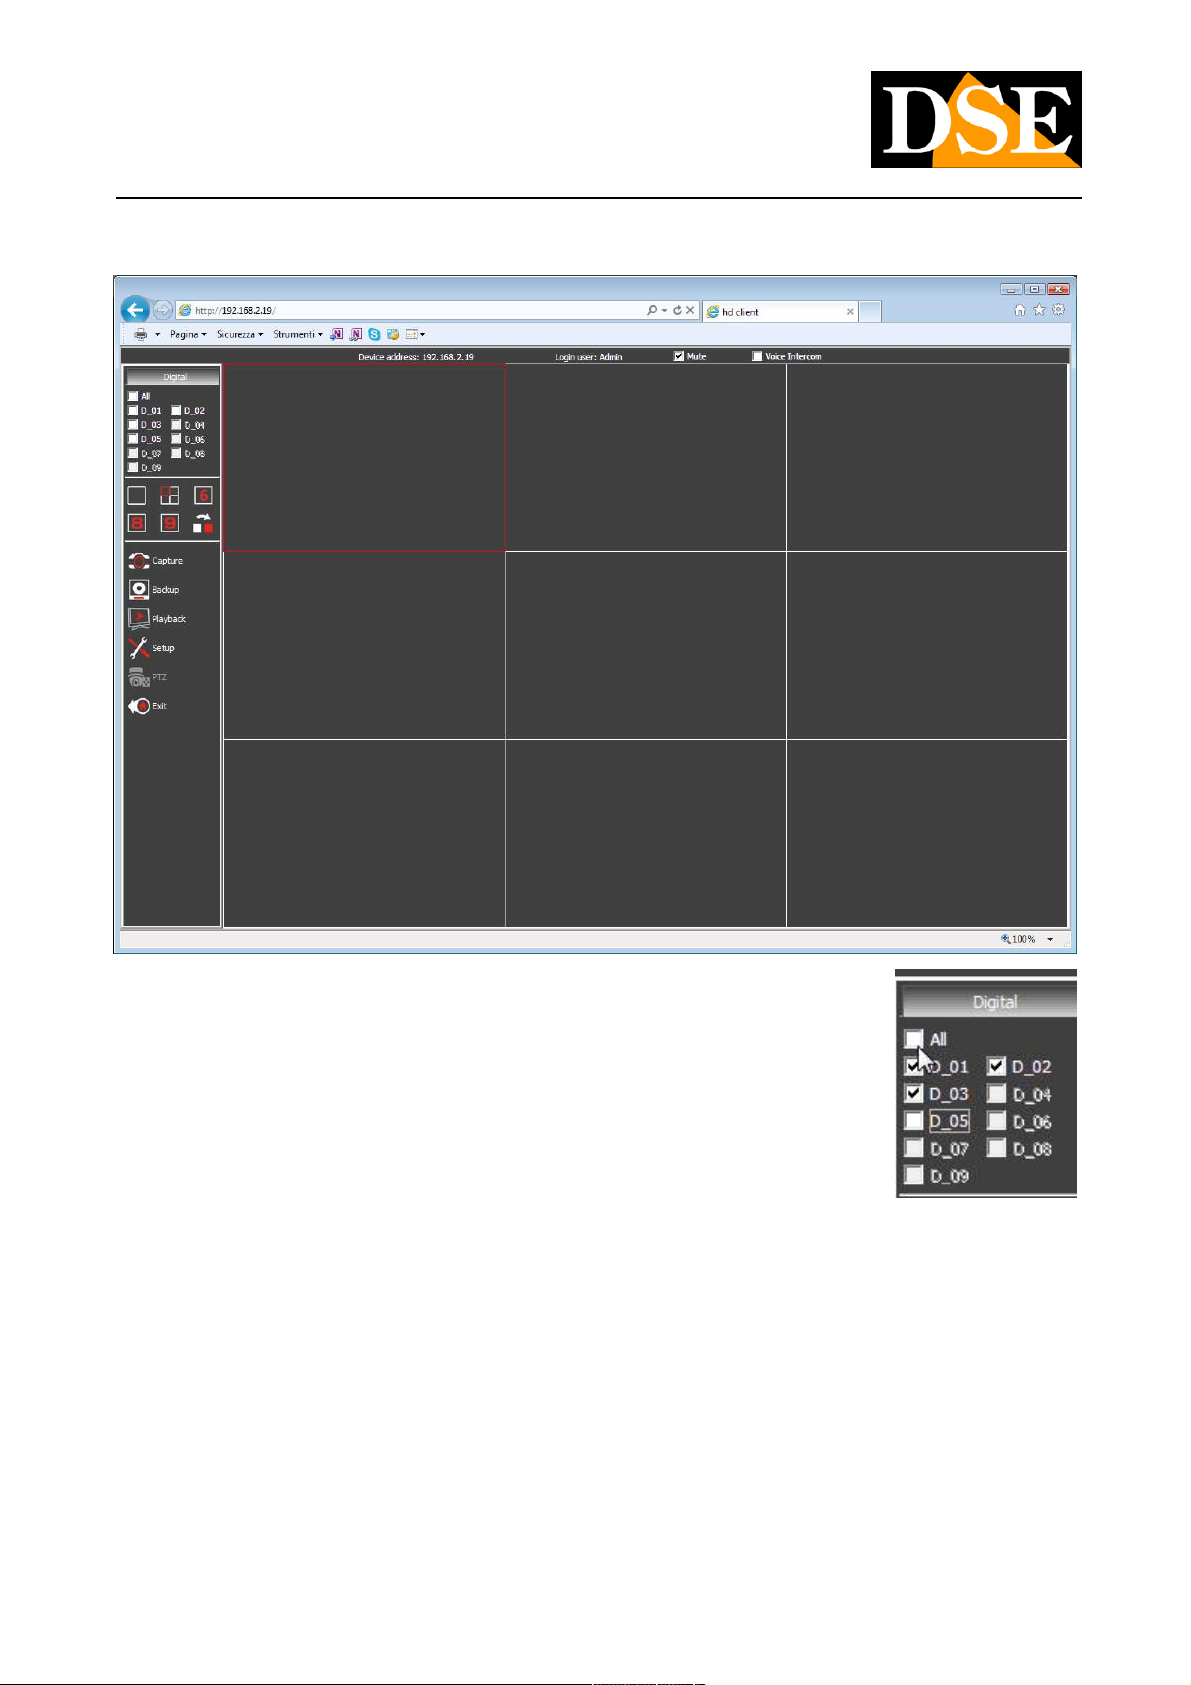
LIVE VIEWING
Here is the exemplary playback screen of NVR DN-IP8.
DSE SRL - ITALY - WWW.DSE.EU
Page 27
INSTALLATION MANUAL
Network Video Recorders NVR Series DN vers. 3
Page: 27 Page: 27
To start watching the cameras simply select ALL in the top left corner. In this way, the NVR will automatically
open the channels for which a camera has been programmed. E 'can close and open each channel placing or
removing the checkmark. There are accessible channels the NVR where it is not a camera configured.
DSE SRL - ITALY - WWW.DSE.EU
Page 28
INSTALLATION MANUAL
Network Video Recorders NVR Series DN vers. 3
Page: 28 Page: 28
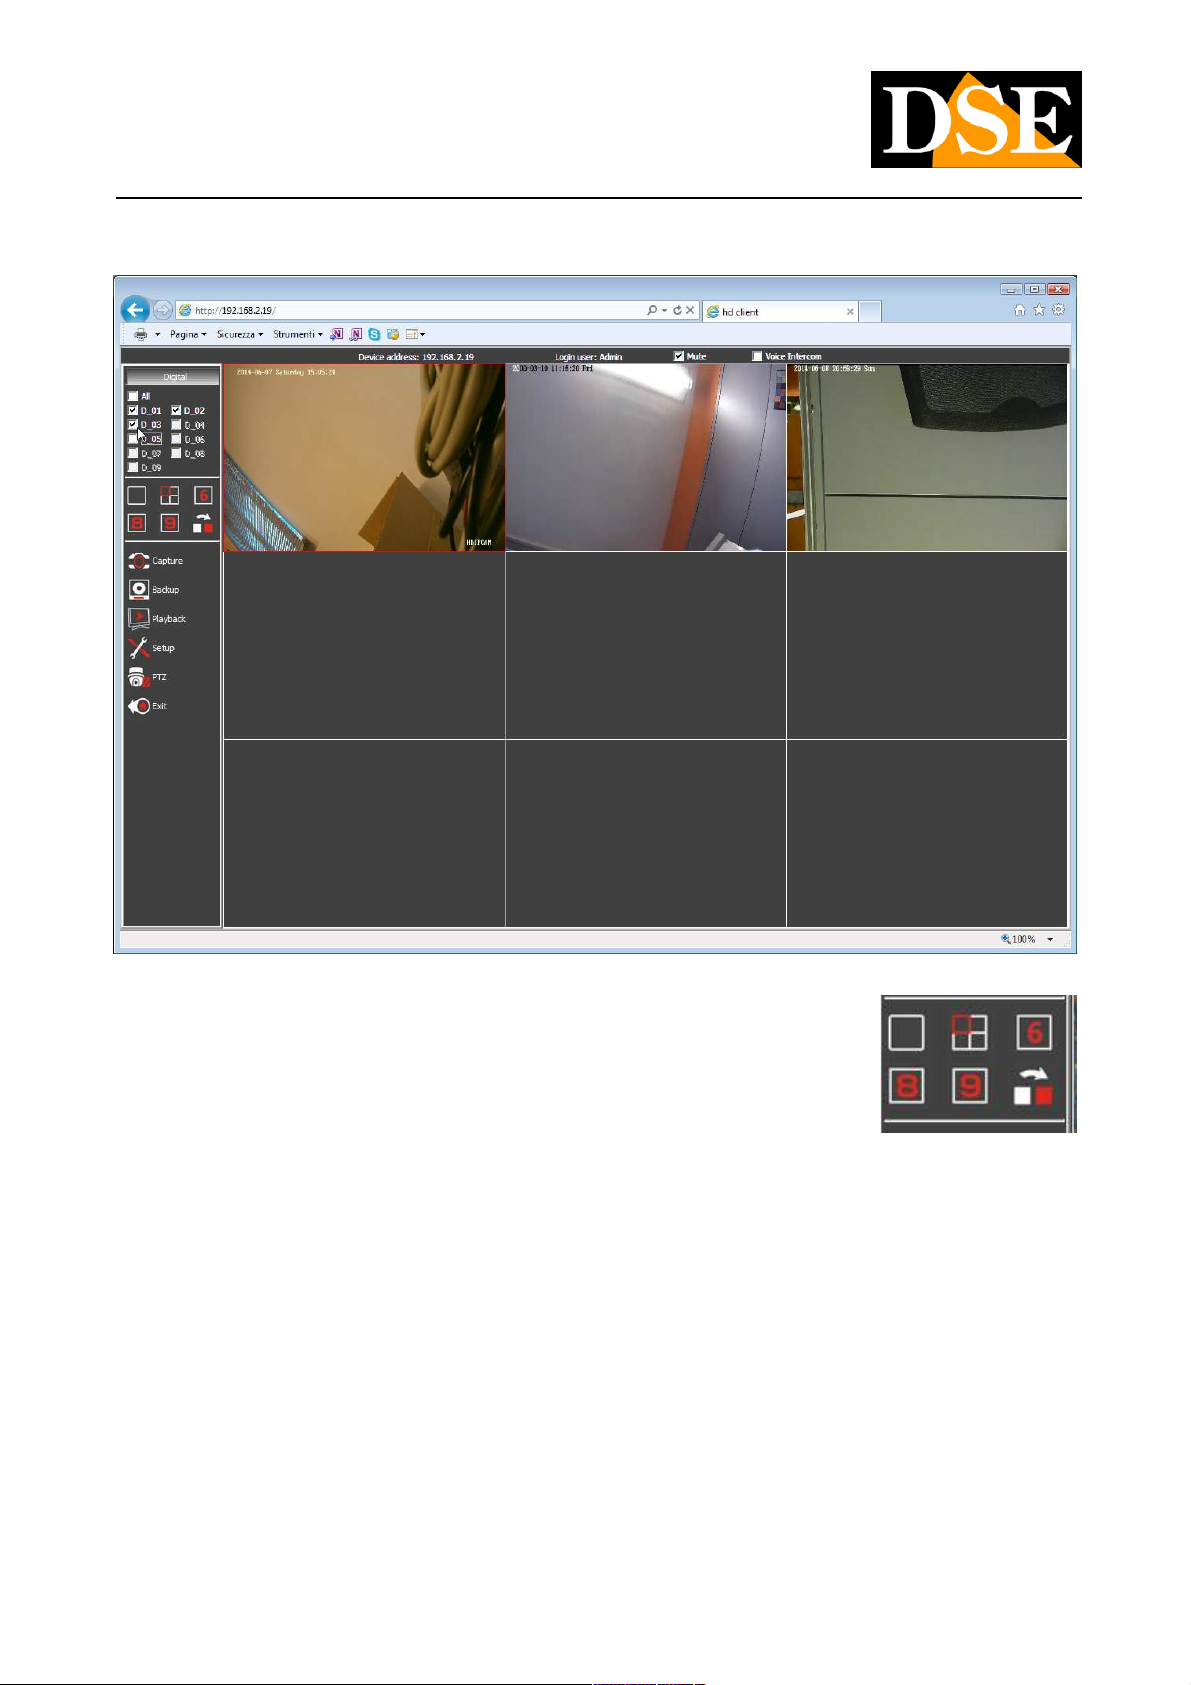
In the vision of the live cameras remotely it is possible to change the split screen as desired with the buttons that allow you to divide the
screen into different modes depending on the number of channels of the NVR. The last button multivision acts in the full-screen view of a
camera and allows you to move to the next channel.
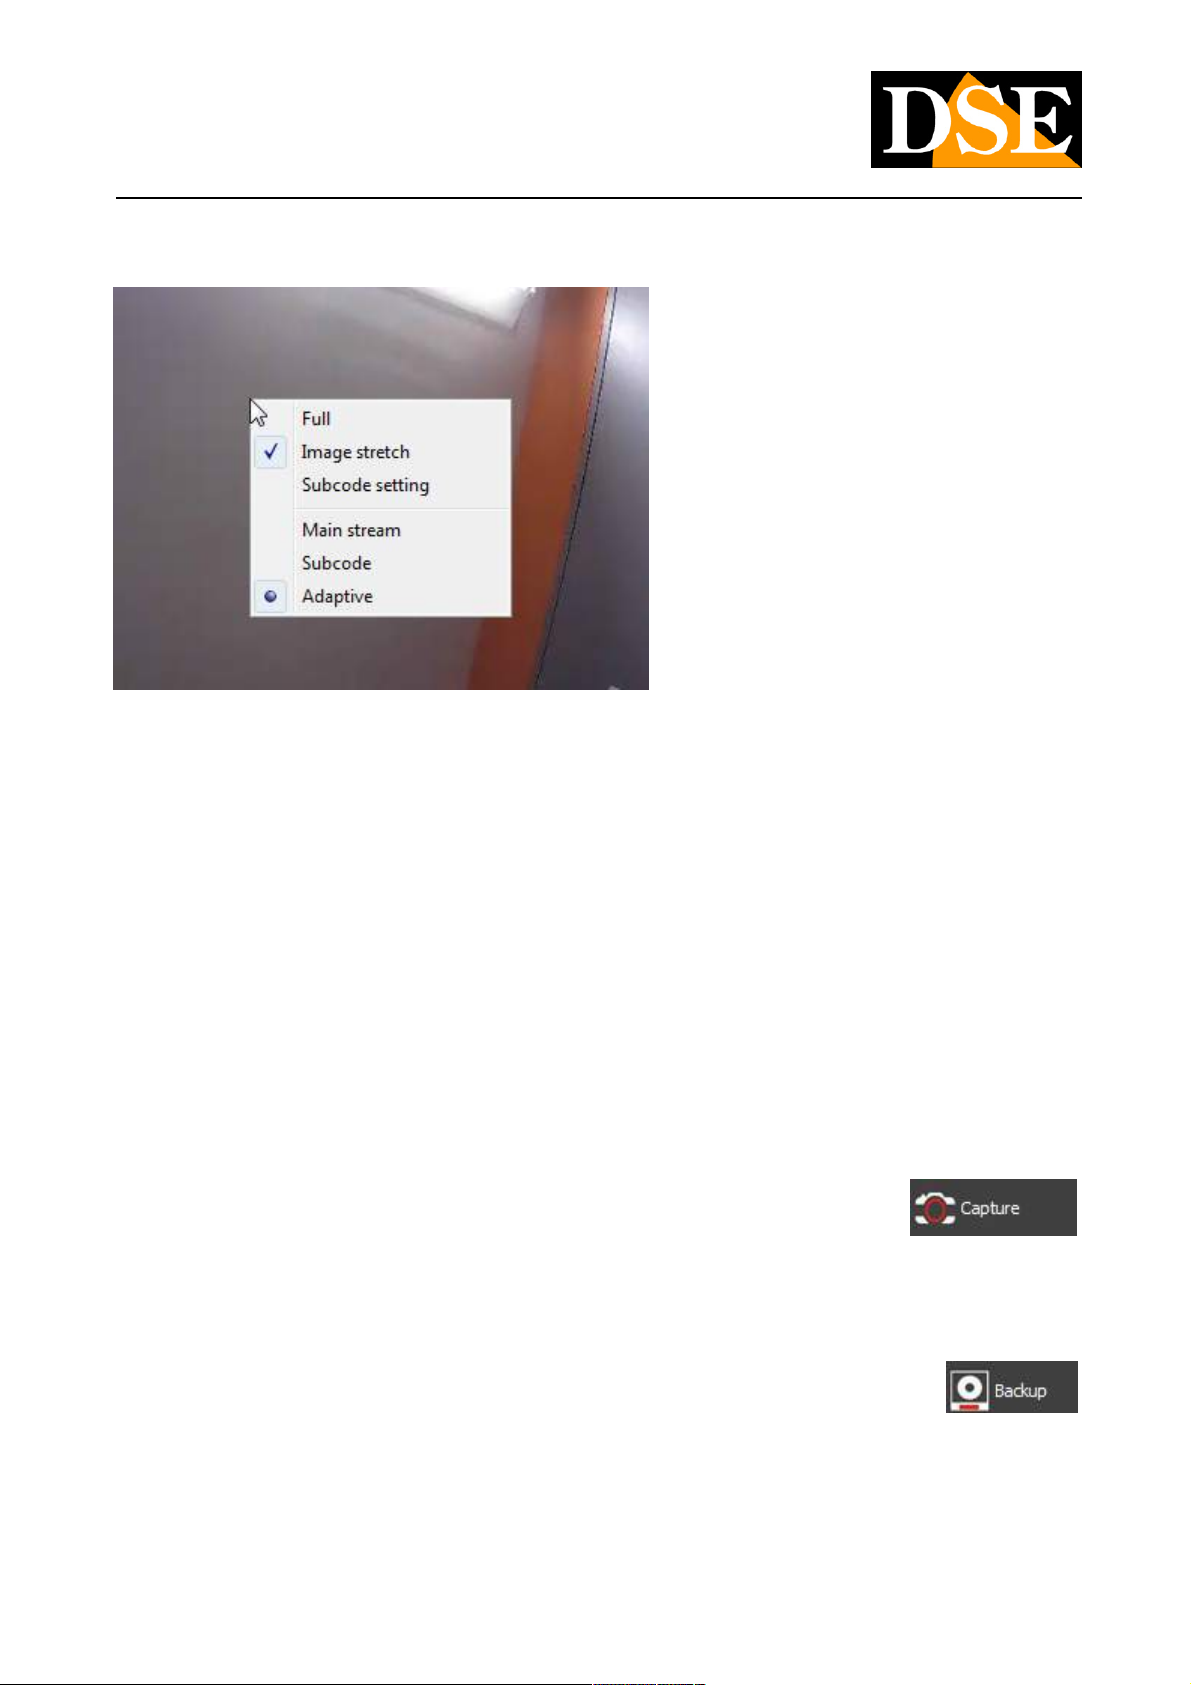
By clicking the right mouse button on each image you can set the following options:
DSE SRL - ITALY - WWW.DSE.EU
Page 29
INSTALLATION MANUAL
Network Video Recorders NVR Series DN vers. 3
Page: 29 Page: 29
FULL - Take full screen IMAGE STRETCH - If
enabled, the image windows are resized
automatically to fill the available pane. If disabled it is always preserves the original aspect ratio. E 'can also change this setting in
SETUP. SUBCODE SETTING - Allows you to adjust the camera settings substream (Frame Rate and Bit Rate)
MAIN STREAM / SUBCODE / ADAPTIVE - Allows you to choose whether to receive the main stream of the cameras (MAIN STREAM) or
SUB-STREAM, more suitable in connection with insufficient bandwidth available, for example via the Internet. It 'also available
ADAPTIVE option to automatically choose the stream to the client to be used depending on the bandwidth availability. E 'can also change
this setting in SETUP.
CAPTURE FRAME
During live view, you can press the CAPTURE button and save a photo of all the active channels in the hard disk
of the local PC desk (BMP). The rescue persorso can be set in the SETUP section (see below)
BACKUP
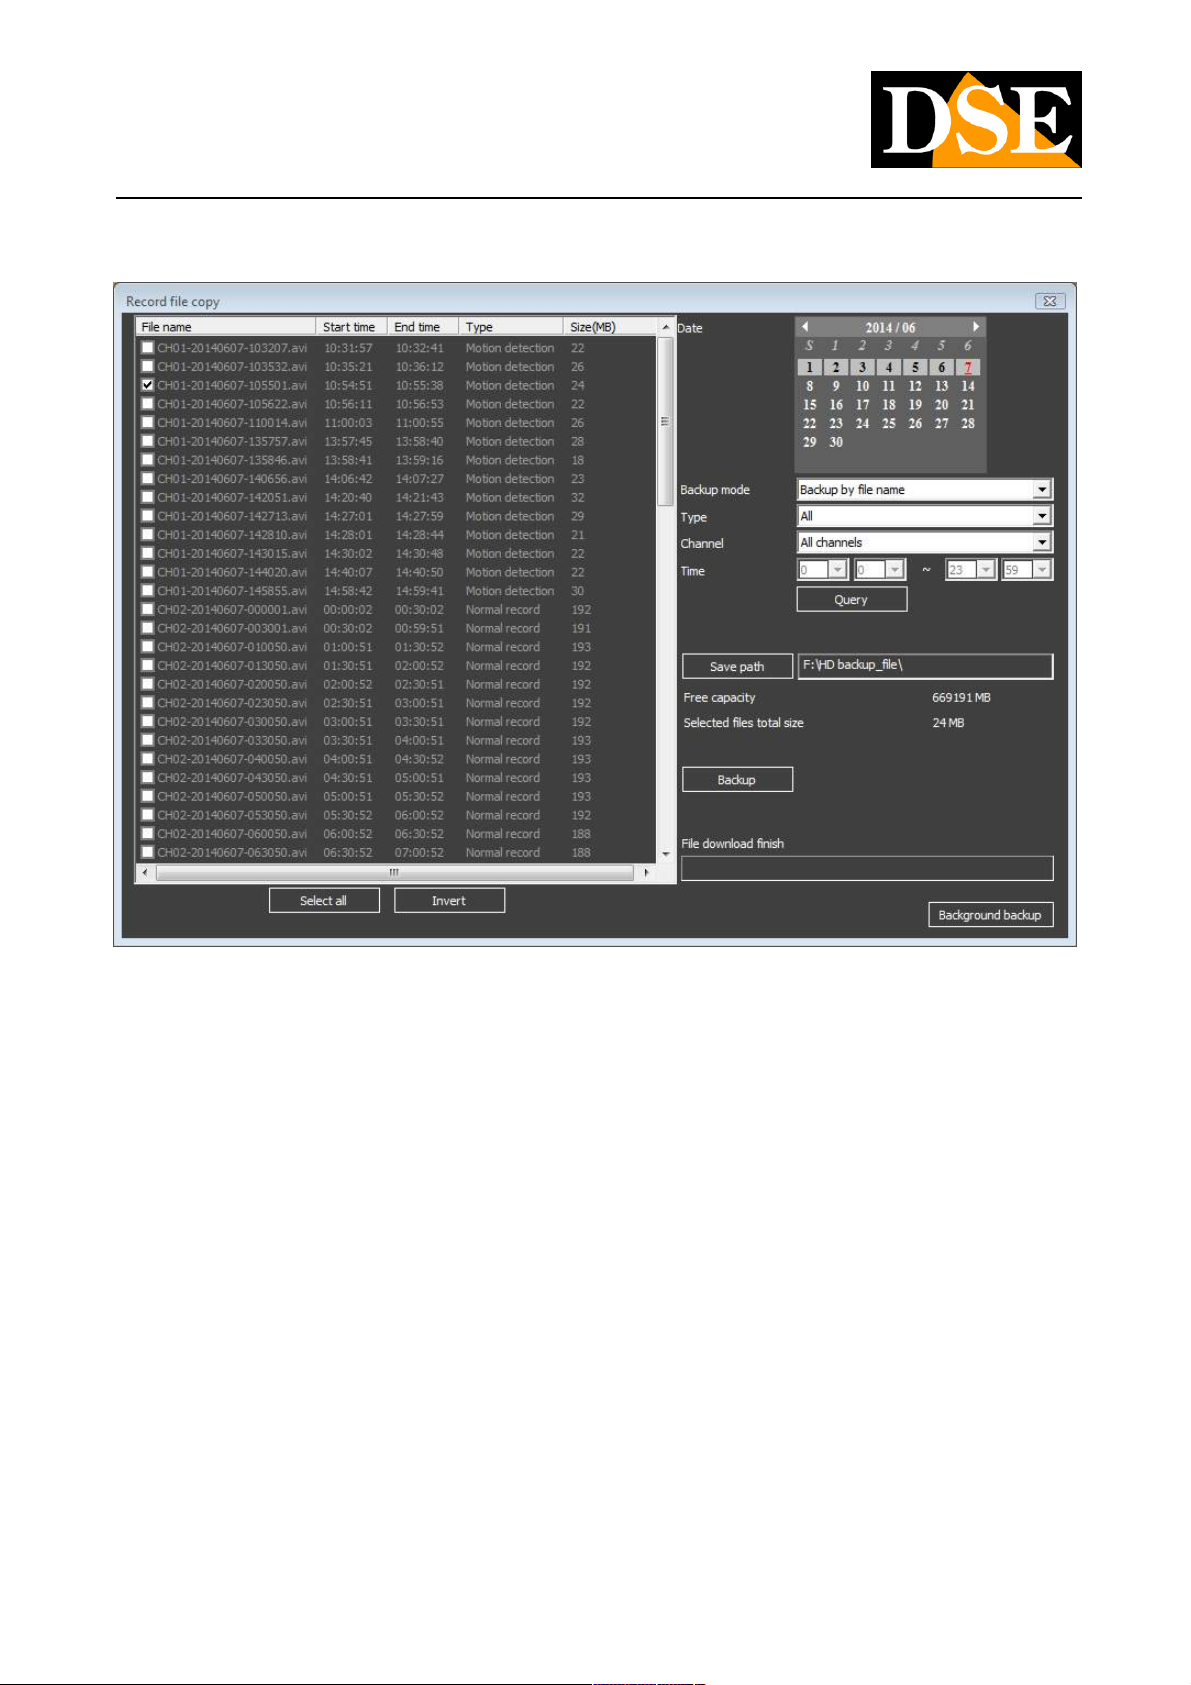
The BACK button is used to download movies stored in NVR hard disk of the local computer.
DSE SRL - ITALY - WWW.DSE.EU
Page 30
INSTALLATION MANUAL
Network Video Recorders NVR Series DN vers. 3
Page: 30 Page: 30
I comandi sulla destra permettono di ricercare i file video e successivamente di scaricarli sul PC. DATE – Scegliere il giorno in cui si
intende ricercare il video registrato nel NVR BACKUP MODE – Ordina i files video da ricercare per nome (BY NAME) o per ora (BY
TIME) TYPE – Permette di scegliere quale tipo di registrazione ricercare (Tutte, Continue, Motion, Allarme, Evento tecnico,
Accecamento)
CHANNEL - Scegliere il canale di cui ricercare la registrazione oppure lasciare ALL per cercare tutti i canali.
TIME – Definire la fascia oraria della ricerca
QUERY – Premere questo pulsante per avviare la ricerca nella memoria del NVR. La lista delle registrazioni archiviate nel NVR apparirà
nella finestra a sinistra. SAVE PATH – Scegliere il percorso dove salvare i files
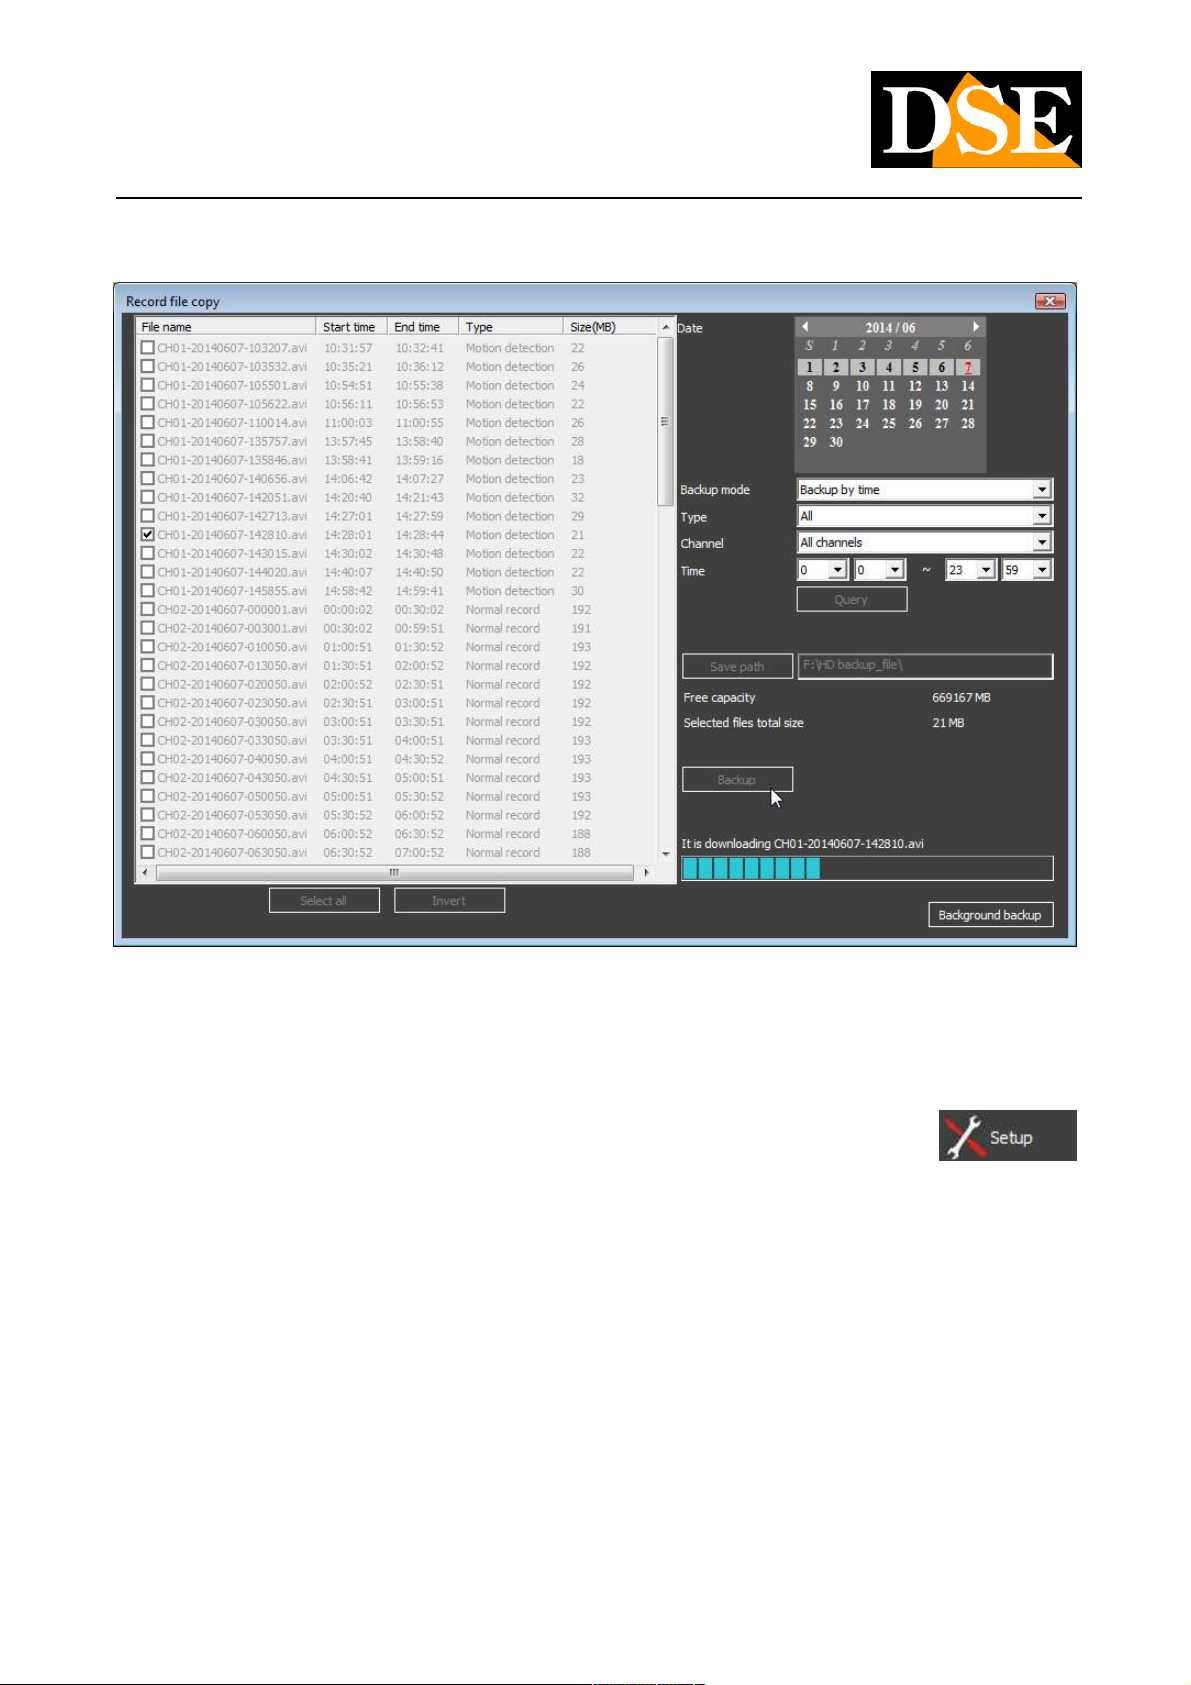
BACKUP - After selecting the files to be downloaded in the table on the left, press the button to start the download
DSE SRL - ITALY - WWW.DSE.EU
Page 31
INSTALLATION MANUAL
Network Video Recorders NVR Series DN vers. 3
Page: 31 Page: 31
The downloaded video files are saved on the NVR PC in AVI format to be able to be played by any player (WMP, VLC etc.)
SETUP
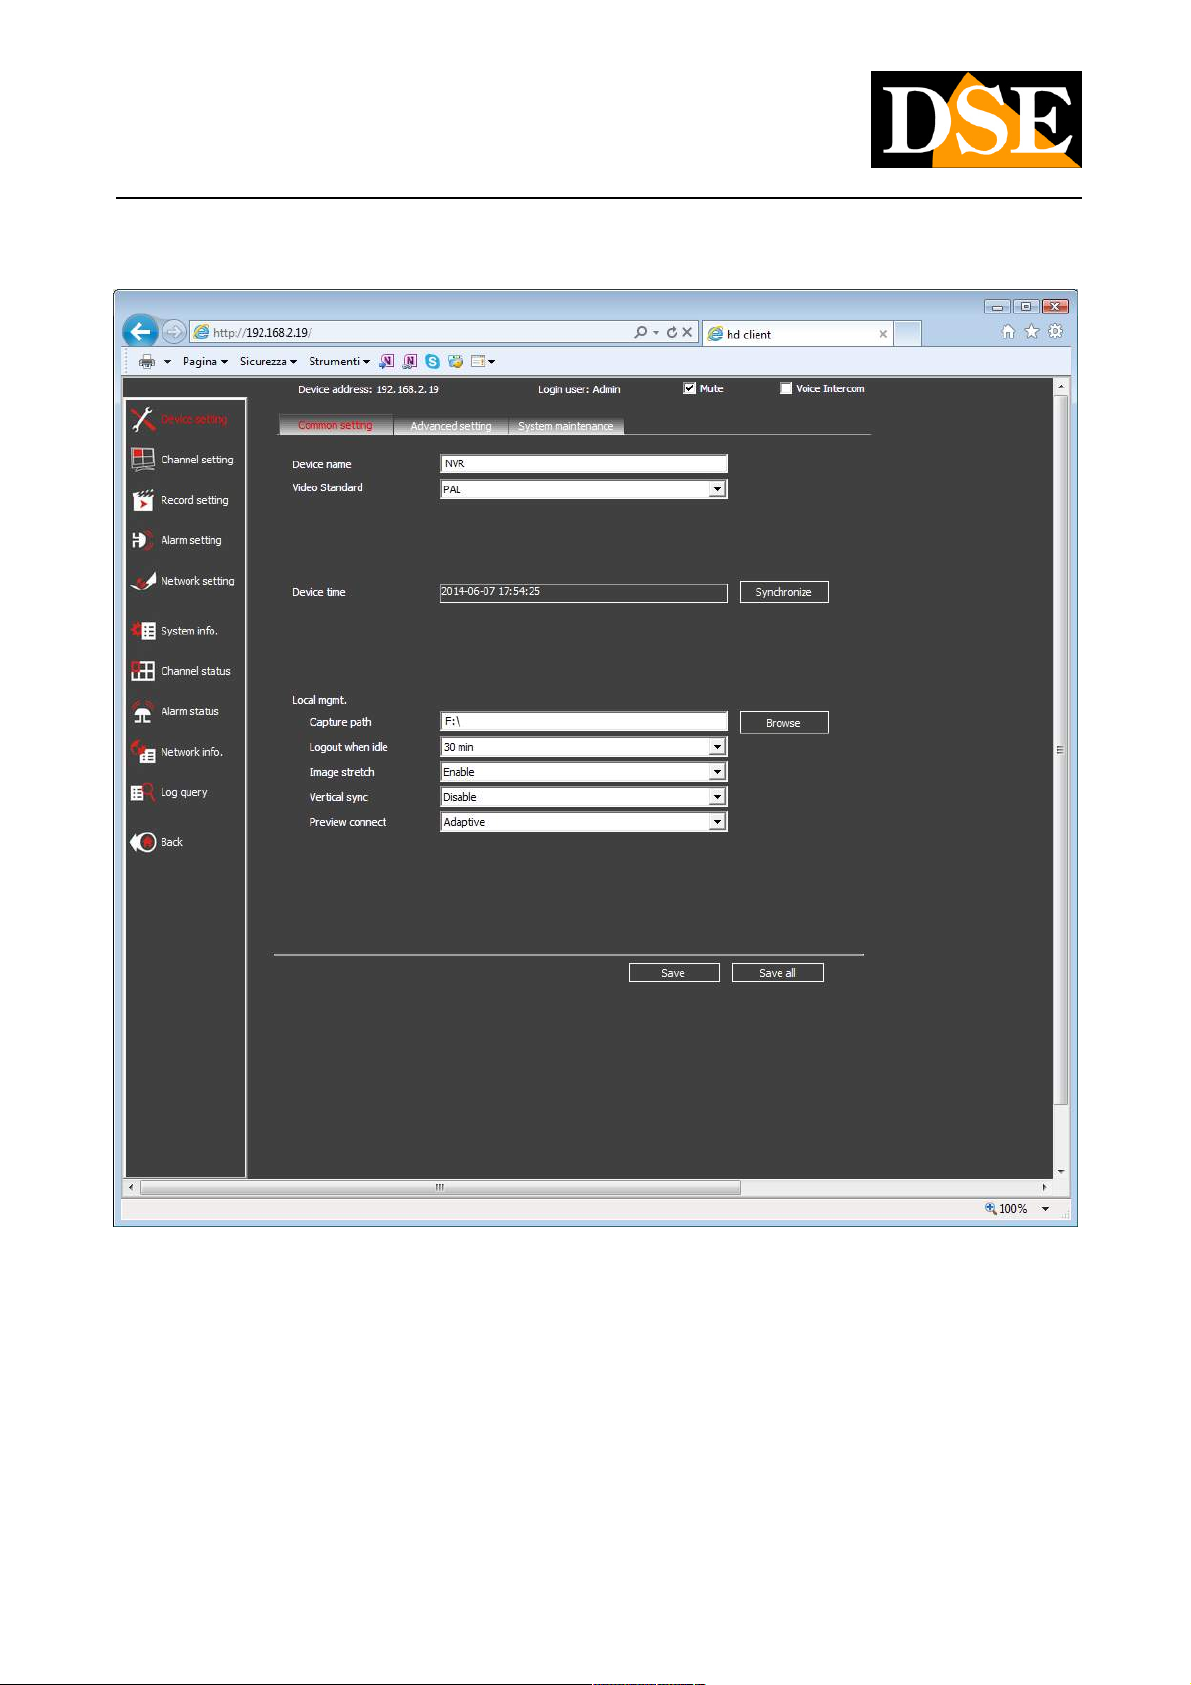
The SETUP button is used to access the remote configuration of the NVR. In this section you can program all the
DVR configuration options, the same as they are configured in the local OSD device.
DSE SRL - ITALY - WWW.DSE.EU
Page 32
INSTALLATION MANUAL
Network Video Recorders NVR Series DN vers. 3
Page: 32 Page: 32
For details of each option refer to the configuration of the NVR manual. The only part of this section does not apply to the remote NVR is
the section SETTING DEVICE / LOCAL MGMT. where they set up options regarding the behavior of the browser Internet Explorer Local.
CAPTURE PATH - Define where to save fotogrammai caught with the CAPTURE button LOGOUT WHEN IDLE - Defines the idle time
after which there will be the automatic logout from the NVR
DSE SRL - ITALY - WWW.DSE.EU
Page 33
INSTALLATION MANUAL
Network Video Recorders NVR Series DN vers. 3
Page: 33 Page: 33
IMAGE STRETCH - If enabled, the image windows are automatically resized to fill the available pane. If disabled it is always preserves
the original aspect ratio. E 'can change this setting by clicking the right button on the live images.
PREVIEW CONNECT - Allows you to choose whether to receive the main stream of the cameras (MAIN STREAM) or SUB-STREAM,
more suitable in connection with insufficient bandwidth available, for example via the Internet. It 'also available ADAPTIVE option to
automatically choose the stream to the client to be used depending on the bandwidth availability.
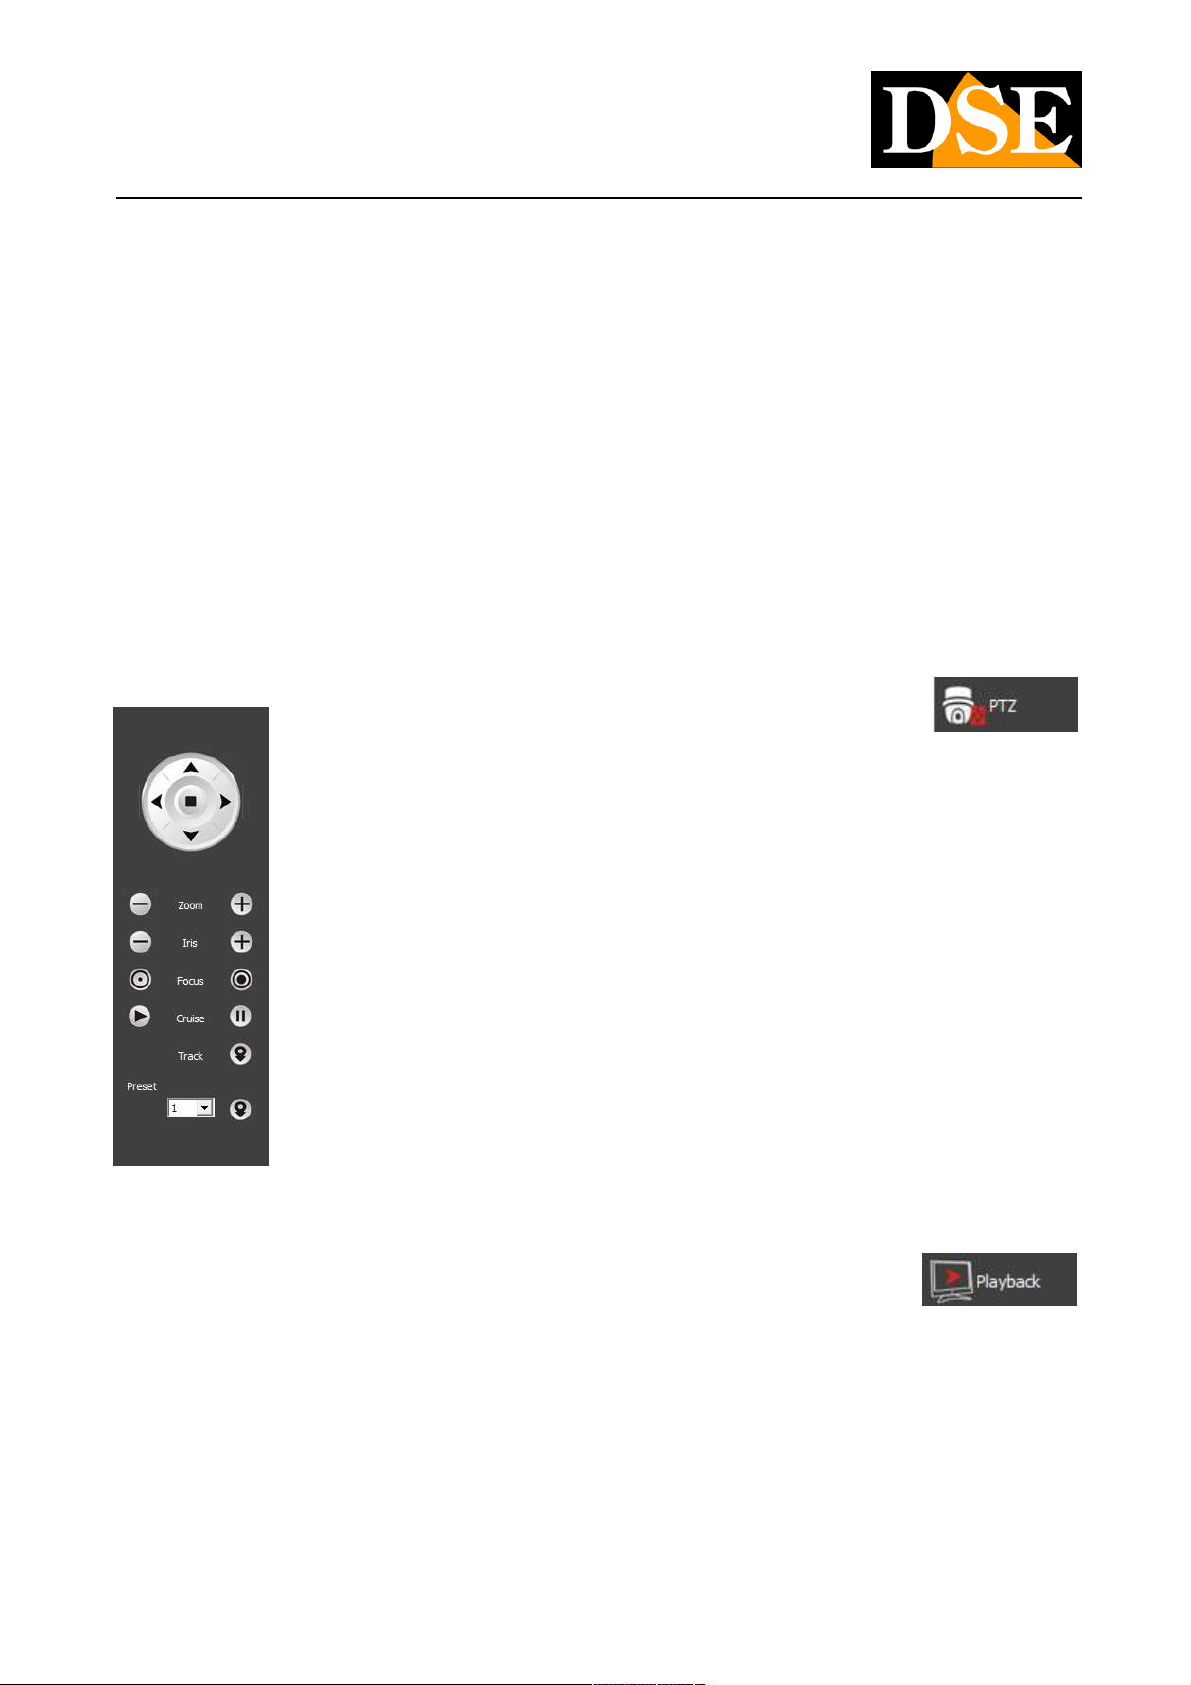
PTZ
The PTZ button to control the movements of speed dome cameras
.
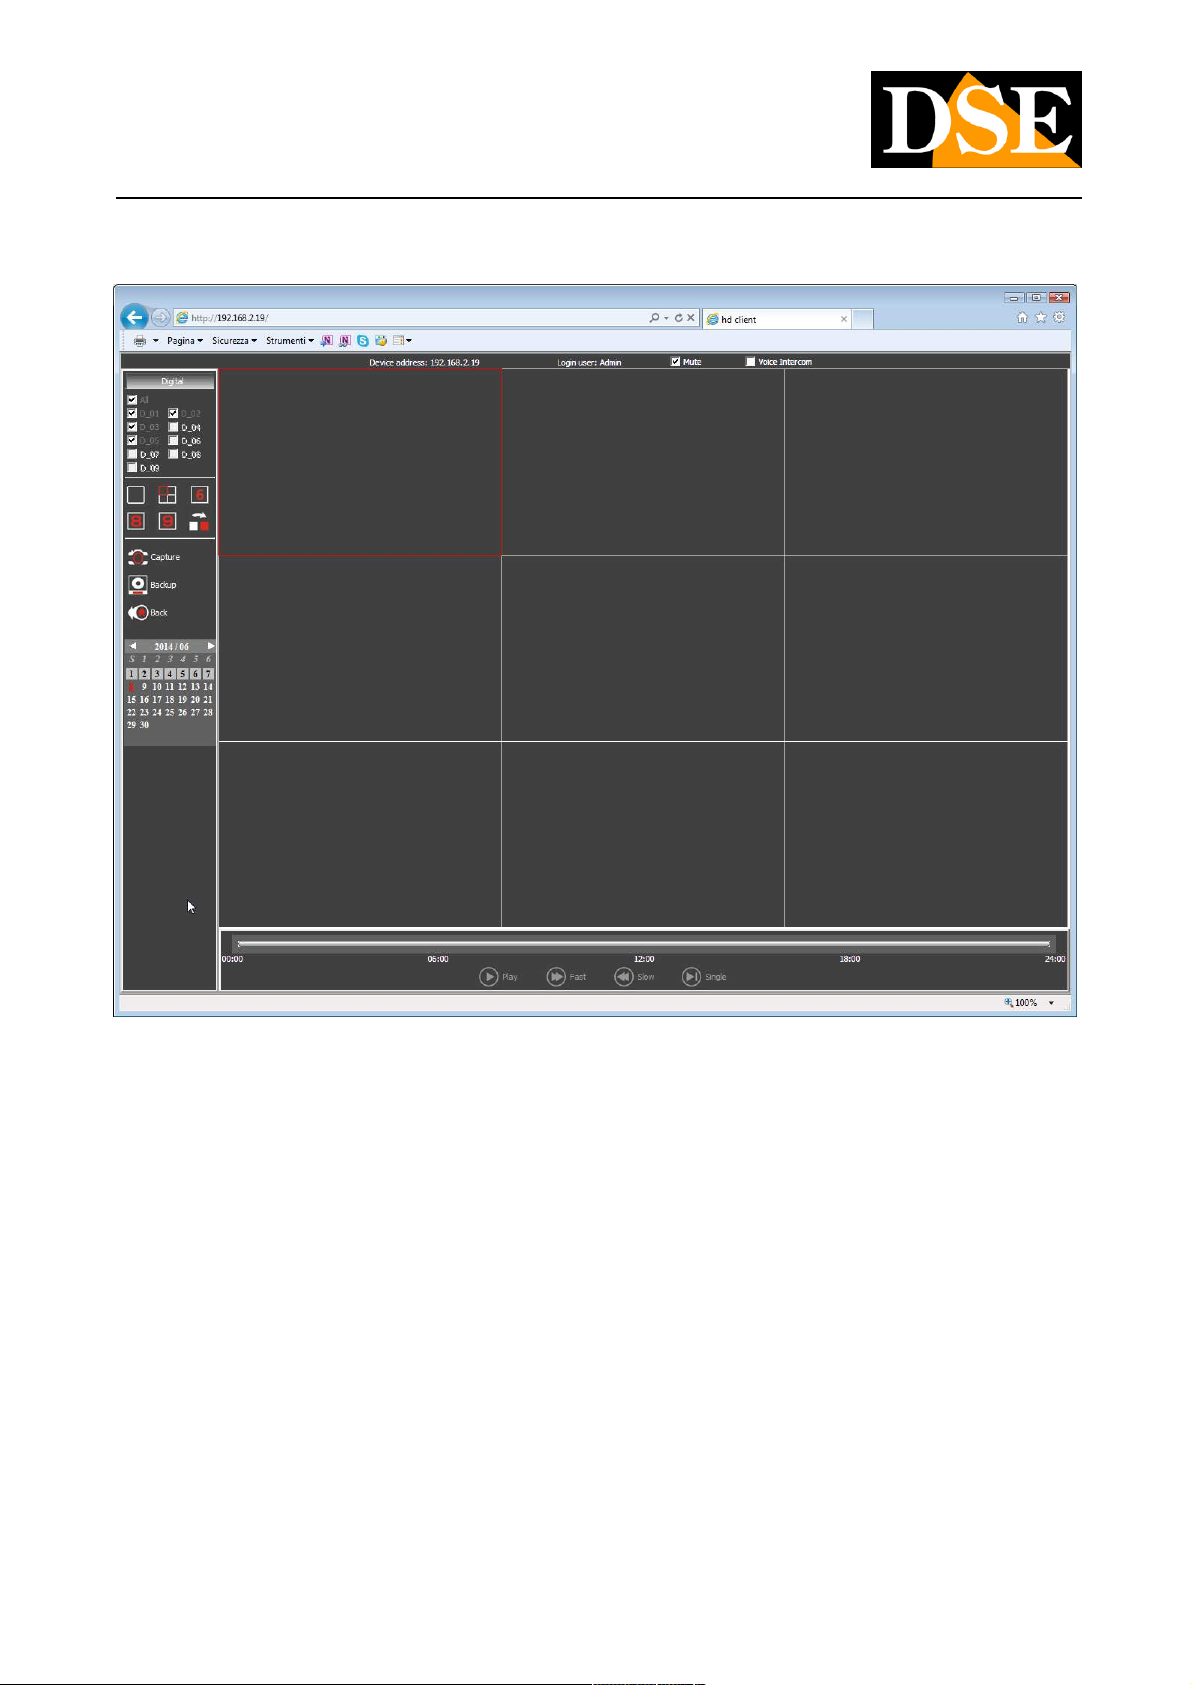
PLAYBACK
Through remote access with the browser you can search among the records stored in the NVR and play. The
playback button lets you open the search page
DSE SRL - ITALY - WWW.DSE.EU
Page 34
INSTALLATION MANUAL
Network Video Recorders NVR Series DN vers. 3
Page: 34 Page: 34
To review the records left simply select the channels you want to play, and the day to search. At the bottom there is a timeline cone 24
hours of the day to move in reproduction at will by simply clicking Dulla scroll bar. E 'can slow down or speed up playback up to 16x.
In the riporoduzione window to the CAPTURE BACKUP commands are available to save stills and video with the same features already
described in the live view.
MAXIMUM NUMBER OF CONNECTED CLIENTS
E 'can connect to the NVR up to a maximum of 30 clients connected simultaneously in various types (IE, CMS, 3G)
ACCESS TO OTHER BROWSER
Although IE is the reference browser for remote connection to the NVR DN series it is also
DSE SRL - ITALY - WWW.DSE.EU
Page 35
INSTALLATION MANUAL
Network Video Recorders NVR Series DN vers. 3
Page: 35 Page: 35
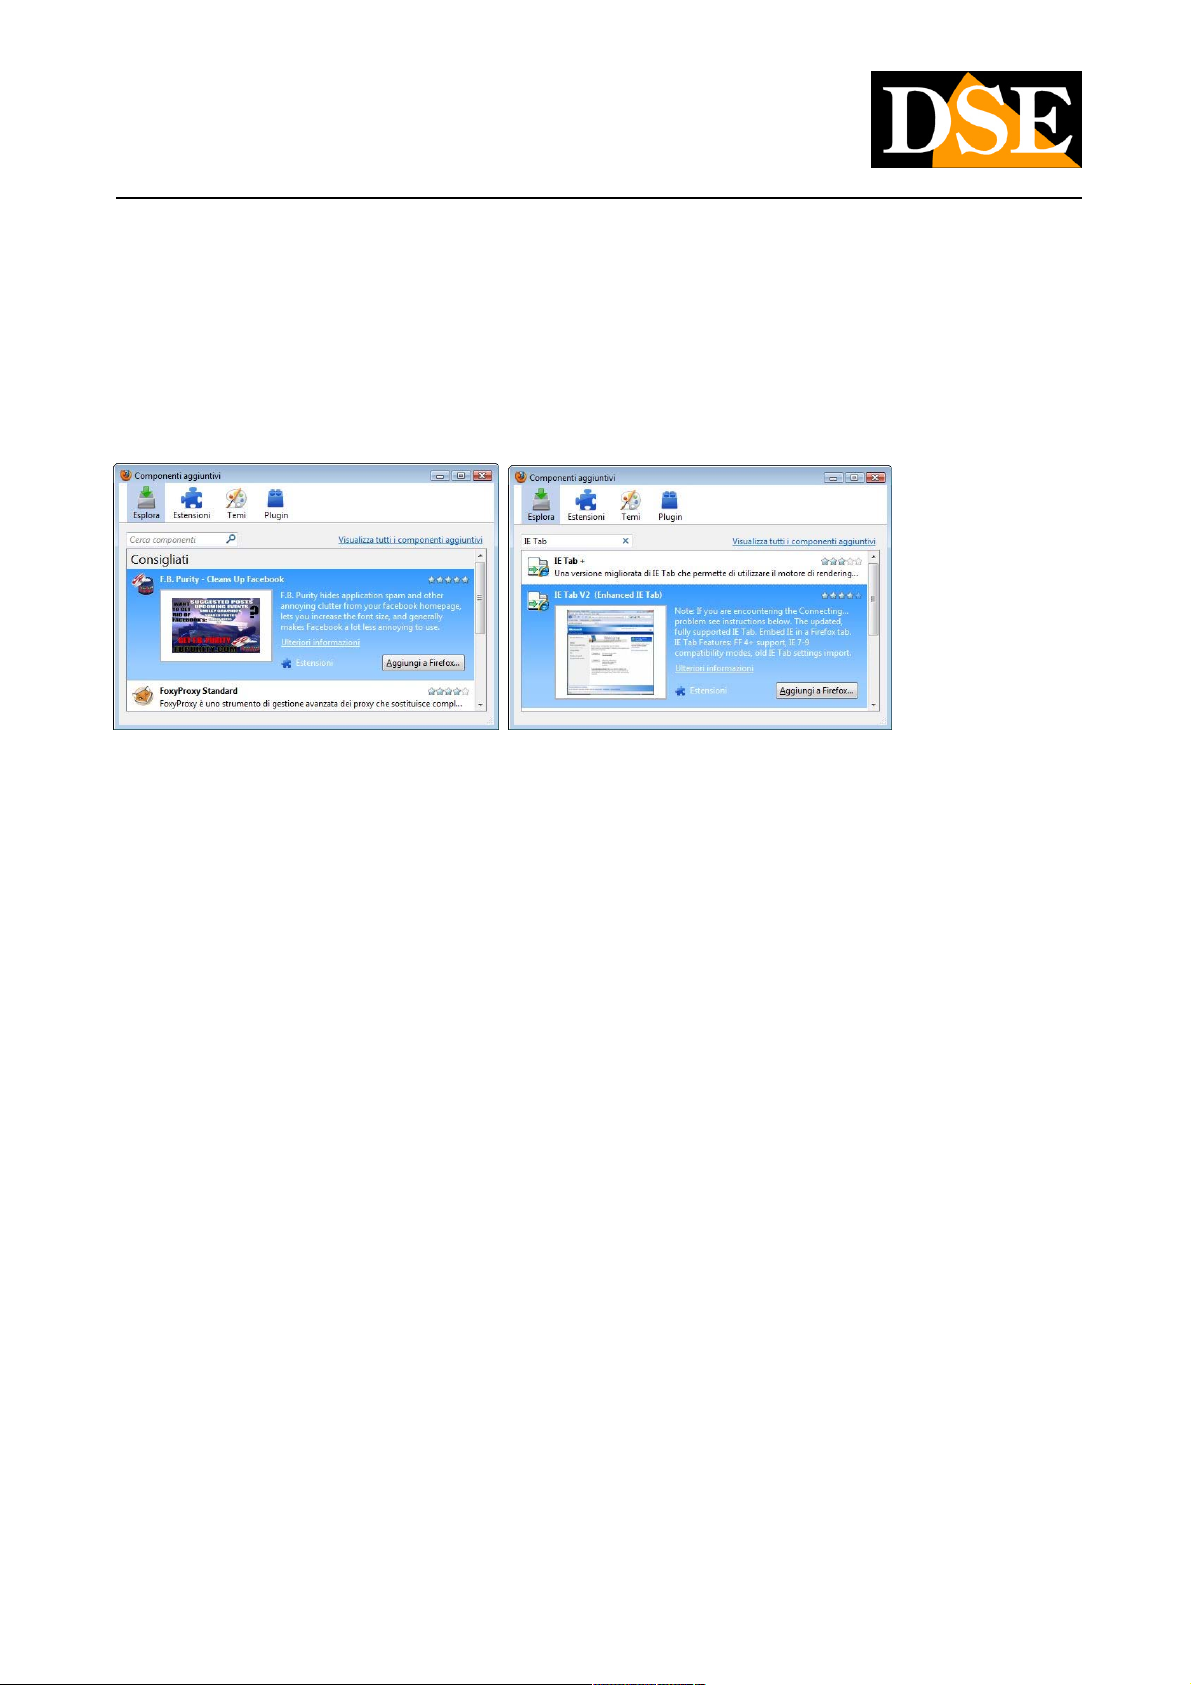
You can use other browsers such as Firefox or Google Chrome. To do this you need to install a free add-on called IE Tab V2.
The installation is performed by accessing the browser add-ons management and looking into the search box: IE TAB Following the
example with Firefox
This plugin, once installed lets you press a button to recreate in Firefox or Chrome an Internet Explorer window.
DSE SRL - ITALY - WWW.DSE.EU
Page 36

INSTALLATION MANUAL
Network Video Recorders NVR Series DN vers. 3
Page: 36 Page: 36
Internet Connection
Un NVR viene di regola collegato a una rete locale LAN che si collega ad Internet attraverso un ROUTER. Se ci colleghiamo al NVR
utilizzando un PC interno alla rete, l’indirizzo del NVR (in genere del tipo 192.168.XXX.XXX) sarà direttamente raggiungibile. Se invece
desideriamo stabilire la connessione attraverso Internet utilizzando un PC posto in altra sede, gli indirizzi interni della rete non saranno
più raggiungibili direttamente in quanto l’unico indirizzo IP visibile dal web sarà quello che il nostro router avrà dal suo lato WAN ossia
verso il mondo esterno di Internet.
L’indirizzo IP che il router possiede verso Internet è assegnato dal provider (ISP). E’ consigliabile ottenere dal provider un indirizzo IP
fisso ad ogni connessione. Se non vi è la possibilità è necessario ricorrere ai servizi DDNS oppure utilizzare il nostro servizio cloud
(vedere in seguito).
Non è tuttavia sufficiente digitare nel browser l’indirizzo IP del router lato wan per potersi collegare al NVR. Il router infatti funge da filtro e
lascia cadere ogni chiamata esterna a cui non sia prima corrisposta una chiamata uscente dall’interno della rete. Per potersi collegare al
NVR è perciò necessario inserire all’interno del router delle istruzioni di direzionamento porte che a seconda dei costruttori dei router
vengono denominate NAT, PORT FORWARDING, PORT MAPPING etc.
To access the NVR from the Internet is therefore necessary to enter the router configuration and insert instructions so that this direct calls
coming from outside, to the inside IP address of the NVR.
Obviously the directing is only performed for the communication ports that are used by the NVR and that will be detailed below.
For information on how to operate in the router, refer to your router's manual or technical all'assitenza of its builder.
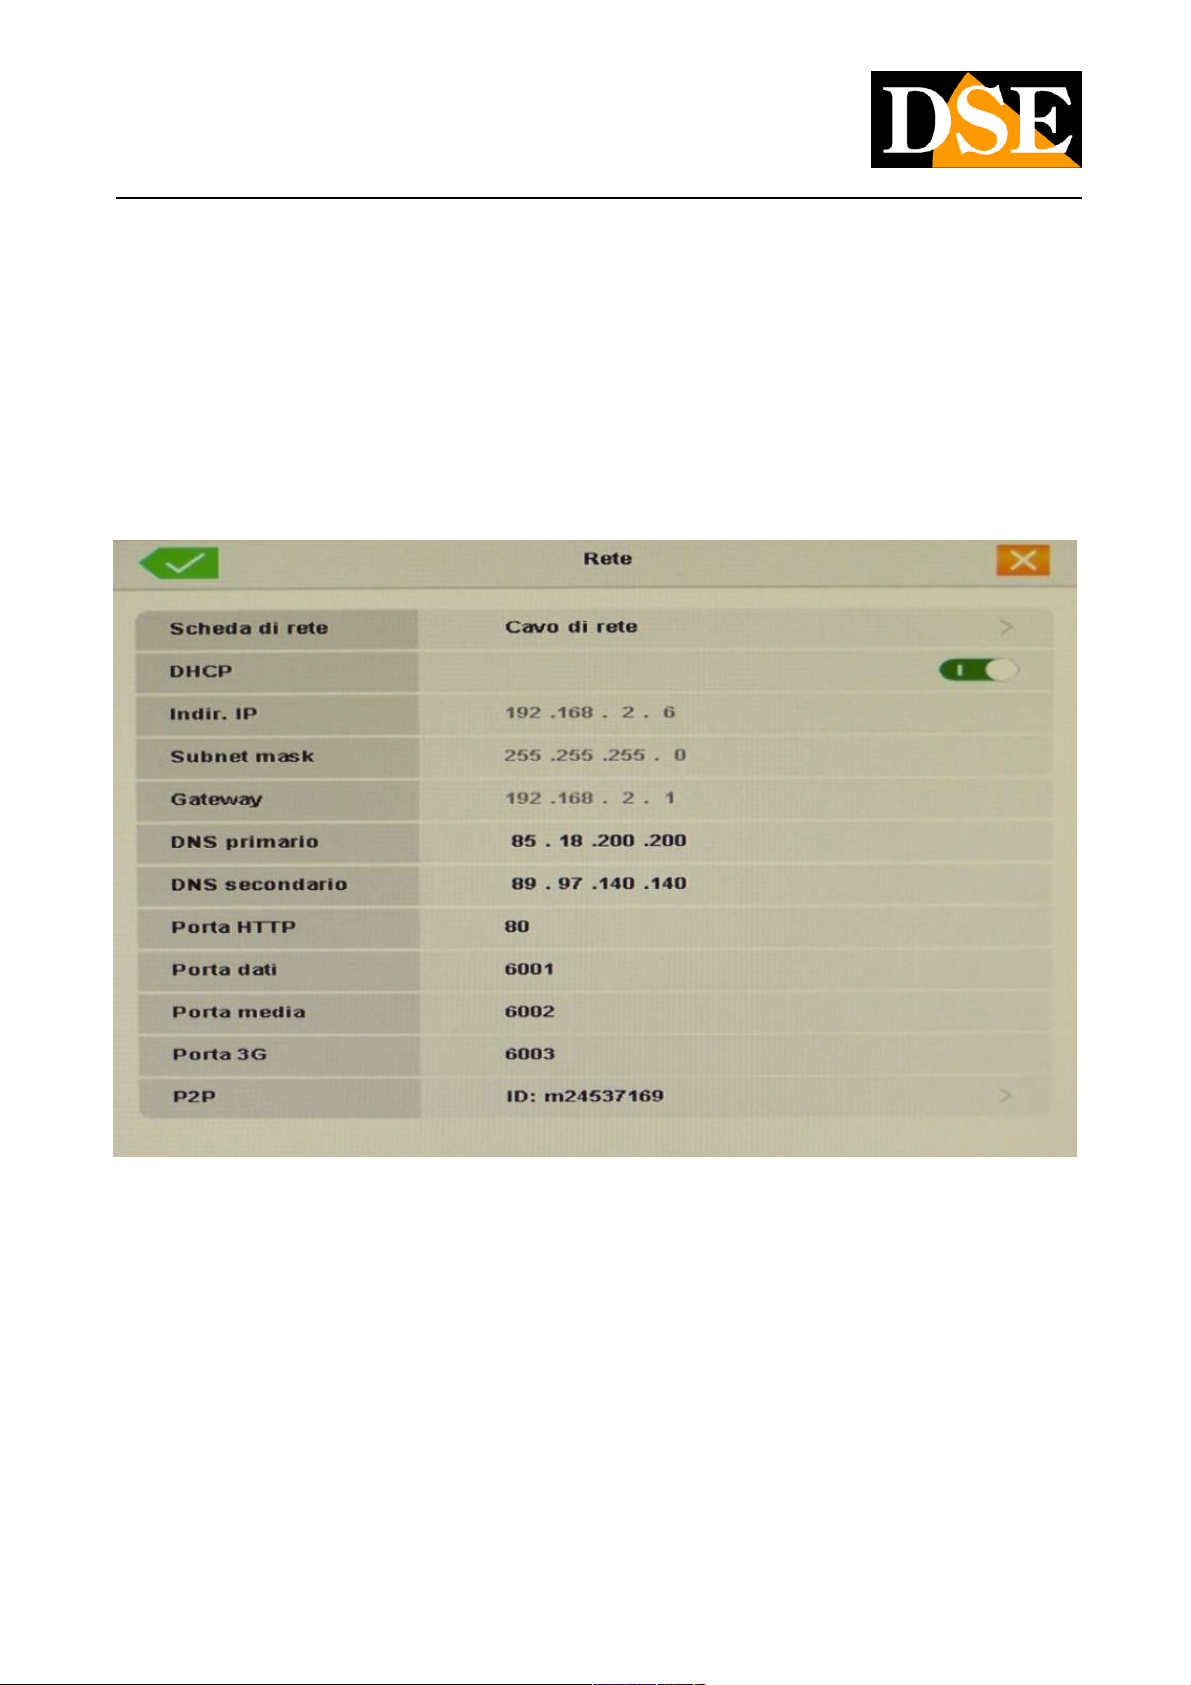
The communication ports used by NVR DN series are as follows:
WEB PORT: Default 80. And 'the port used by the NVR to communicate with the browser. Browsers such as Internet Explorer use the WEB PORT: Default 80. And 'the port used by the NVR to communicate with the browser. Browsers such as Internet Explorer use the
factory port 80 for communication. For example, if we type in the browser address bar: http://212.12.34.201 will be called the 'factory port 80 for communication. For example, if we type in the browser address bar: http://212.12.34.201 will be called the '
212.12.34.201 IP address on port 80.
If in the configuration of the NVR is set different from a WEB port 80 (eg. The door 85
DSE SRL - ITALY - WWW.DSE.EU
Page 37
INSTALLATION MANUAL
Network Video Recorders NVR Series DN vers. 3
Page: 37 Page: 37
factory) needs to be clarified in the browser which port to use for the call after pointing the address with ":" to separate it. If, for example.
http://212.12.34.201:85 we type will be called the IP address of 212.12.34.201 on port 85.
CMD PORT: Default 6001. And 'the port used by the CMS centralized management program CMD PORT: Default 6001. And 'the port used by the CMS centralized management program
MEDIA PORT TCP: Default 6002. And 'the port used for streaming video MEDIA PORT TCP: Default 6002. And 'the port used for streaming video
PORT 3G: Default 6003. And 'the port used by APP for smartphones Meye Super E' can change the factory gates in the PORT 3G: Default 6003. And 'the port used by APP for smartphones Meye Super E' can change the factory gates in the
configuration of the NVR
All these ports are mapped from the WAN side of the router to the internal IP address of the NVR. Note that many routers require that
each directing NAT is also combined with a rule in the firewall section that determines the opening of the affected port. Consult your
router's manual for details on how to program the port mapping
INTERNET CONNECTION P2P WITHOUT MAPPING OF DOORS
The NVR DN series are able to allow connection via the Internet even without having performed the port mapping thanks to P2P
technology.
DSE SRL - ITALY - WWW.DSE.EU
Page 38

INSTALLATION MANUAL
Network Video Recorders NVR Series DN vers. 3
Page: 38 Page: 38
This makes network installation of these simple NVR even if you do not have computer skills or if you do not have access to the router's
configuration. To use this type of access is necessary to use our CLOUD services that are described in the following chapter. The
mapping of ports on your router, if feasible, is still always advisable to allow more connection options.
DSE SRL - ITALY - WWW.DSE.EU
Page 39

INSTALLATION MANUAL
Network Video Recorders NVR Series DN vers. 3
Page: 39 Page: 39
CLOUD P2P Service
Each user of an NVR NVR DN series acquires along with the ability to freely make use of a CLOUD service to its online service to make
connection to the NVR via the Internet simple.
These services allow to solve with a few mouse clicks the two main issues in the Internet connection to the NVR, ie:
- Signing of a DDNS service if you do not have a fixed IP Internet
- Mapping of router ports
THE PROBLEM OF DDNS
To connect to a NVR via the Internet you must know the IP address of the router that connects to the Internet. To find out which IP
address has its own router from the WAN side that is towards Internet just consult the router configuration or by qualasiasi internal PC to
the network visit a site like www.whatismyip.com or similar.
Even in the NVR you information panel shows the address to the Internet (WAN side) If you can get from your Internet service provider
(ISP) a fixed IP address, basterà prendere nota di questo indirizzo IP per poter chiamare il proprio router in qualsiasi momento. Molte (ISP) a fixed IP address, basterà prendere nota di questo indirizzo IP per poter chiamare il proprio router in qualsiasi momento. Molte (ISP) a fixed IP address, basterà prendere nota di questo indirizzo IP per poter chiamare il proprio router in qualsiasi momento. Molte
volte però i provider non rilasciano indirizzi IP fissi oppure richiedono al cliente di acquistarli. Senza un IP fisso il router avrà un indirizzo IP
variabile che potrà pertanto modifcarsi nel tempo rendendo impossibile il collegamento remoto.
In questo caso è possibile utilizzare i servizi DDNS che permettono di sapere in qualsiasi momento l’indirizzo IP del proprio router/NVR.
Gli NVR serie DN supportano molti servizi DDNS molto popolari in rete come dyndns, no-ip, 3322 etc. , tuttavia questi servizi sono spesso
a pagamento e comunque non sempre semplici da configurare.
Con i servizi CLOUD dei NVR serie DN non vi occorre né ottenere un indirizzo IP fisso dal vostro provider, né sottoscrivere un
abbonamento DDNS.
MAPPING THE PROBLEM OF THE DOORS
Almost always among the NVR and the Internet it stands a ROUTER. This device can become a major obstacle in connection to the NVR
as it does not allow external calls to penetrate to the internal network. To allow this step you need to enter in which we discussed in
chapters router programming of mapping instructions
DSE SRL - ITALY - WWW.DSE.EU
Page 40

INSTALLATION MANUAL
Network Video Recorders NVR Series DN vers. 3
Page: 40 Page: 40
previous.
Operate these instructions is not always easy because each router has its own configuration menu terminologies to rules often not
unique.
In addition to this difficulty you may find yourself in situations where the router configuration is inhibited by the provider or not possible
due to complesità the network scenario. With CLOUD services NVR series DN, thanks to P2P technology can connect your NVR without
the need to perform any configuration on the router, and you will be ready to be accessed remotely in minutes.
The mapping of ports on your router, if feasible, is always advisable to allow more connection options.
The CLOUD SERVER FOR NVR SERIES DN
The cloud server for NVR RN series is available at the following address
WWW.DDDNS.ORG
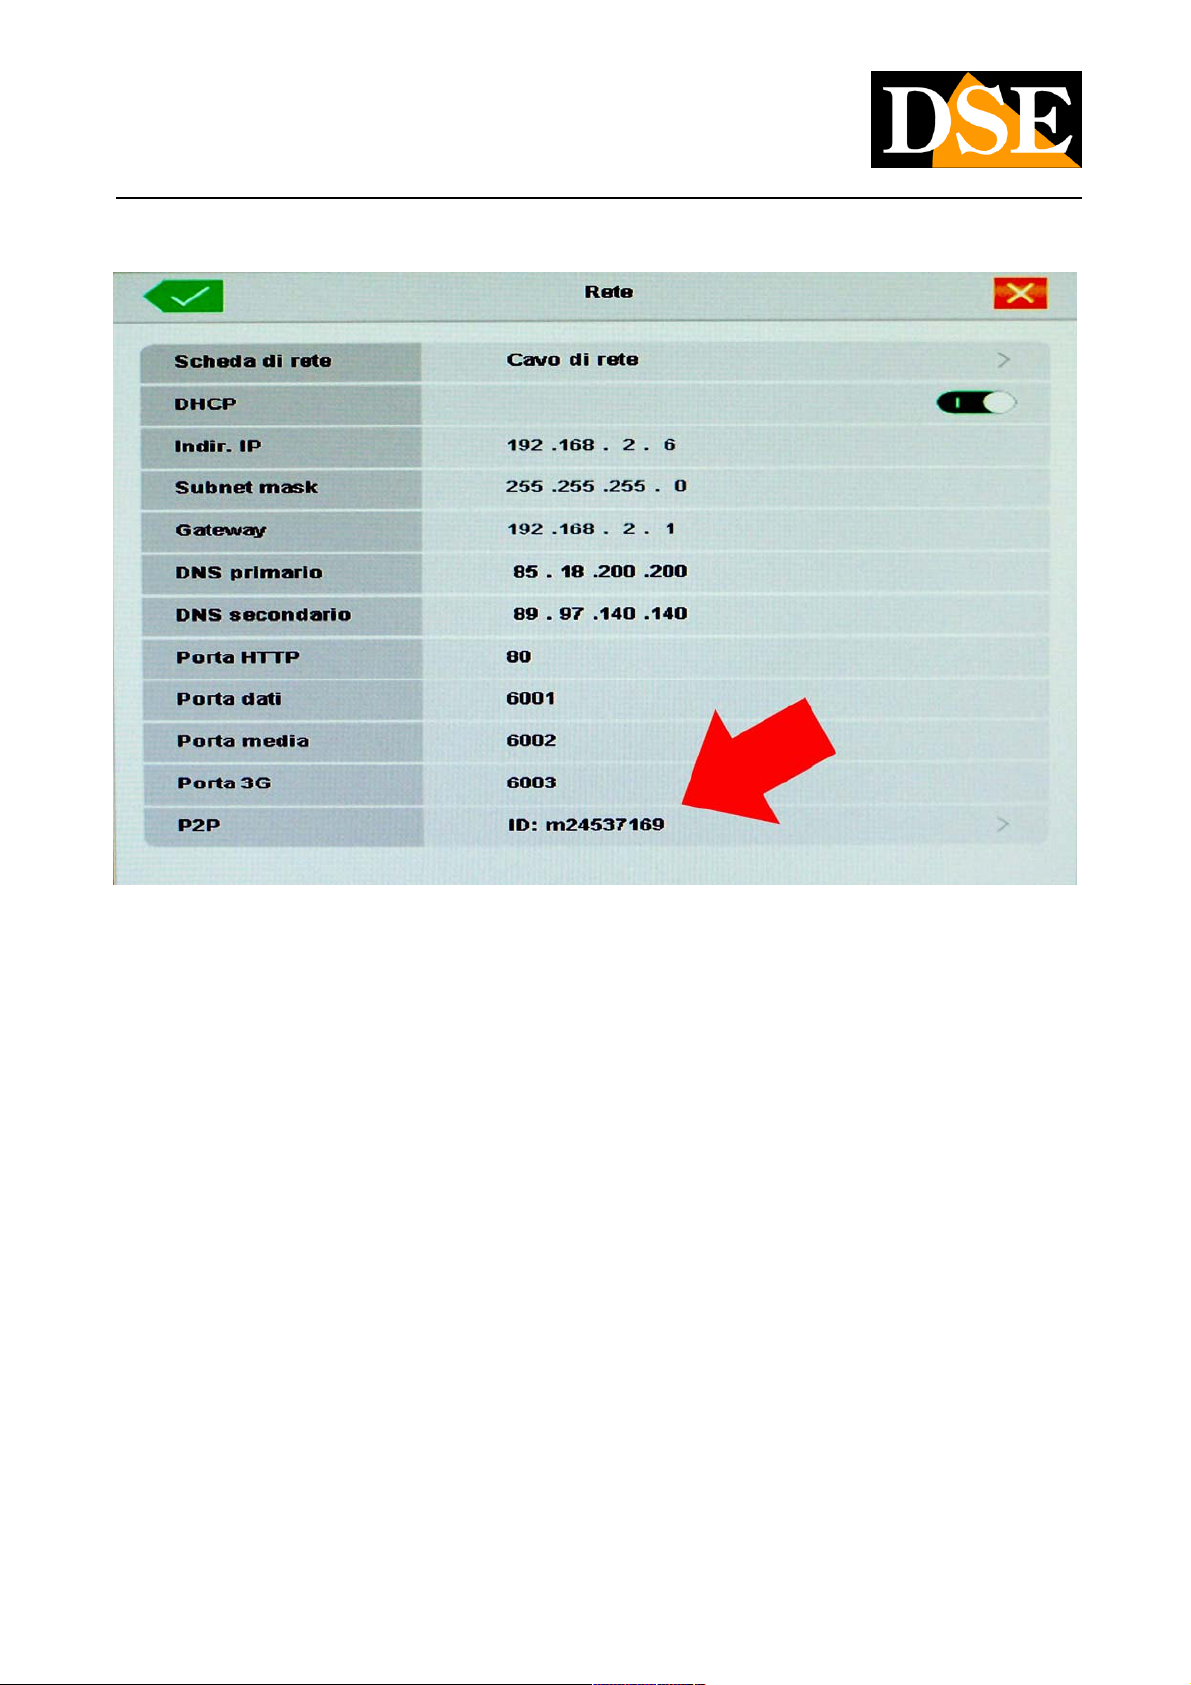
THE SERIAL NUMBER (ID) of NVR
L 'NVR you purchased is already registered in our cloud server and is distinguished by a unique ID. The NVR ID is located on a sticker
on the device and also in the panel of the NVR NETWORK menu. And 'even remotely readable link.
If you must enter the ID of the NVR in the cell by applying Super Meye adhesive label of the NVR it is also a QR code will be scanned to
avoid manual typing.
DSE SRL - ITALY - WWW.DSE.EU
Page 41
INSTALLATION MANUAL
Network Video Recorders NVR Series DN vers. 3
Page: 41 Page: 41
ACTIVATE THE CLOUD NVR
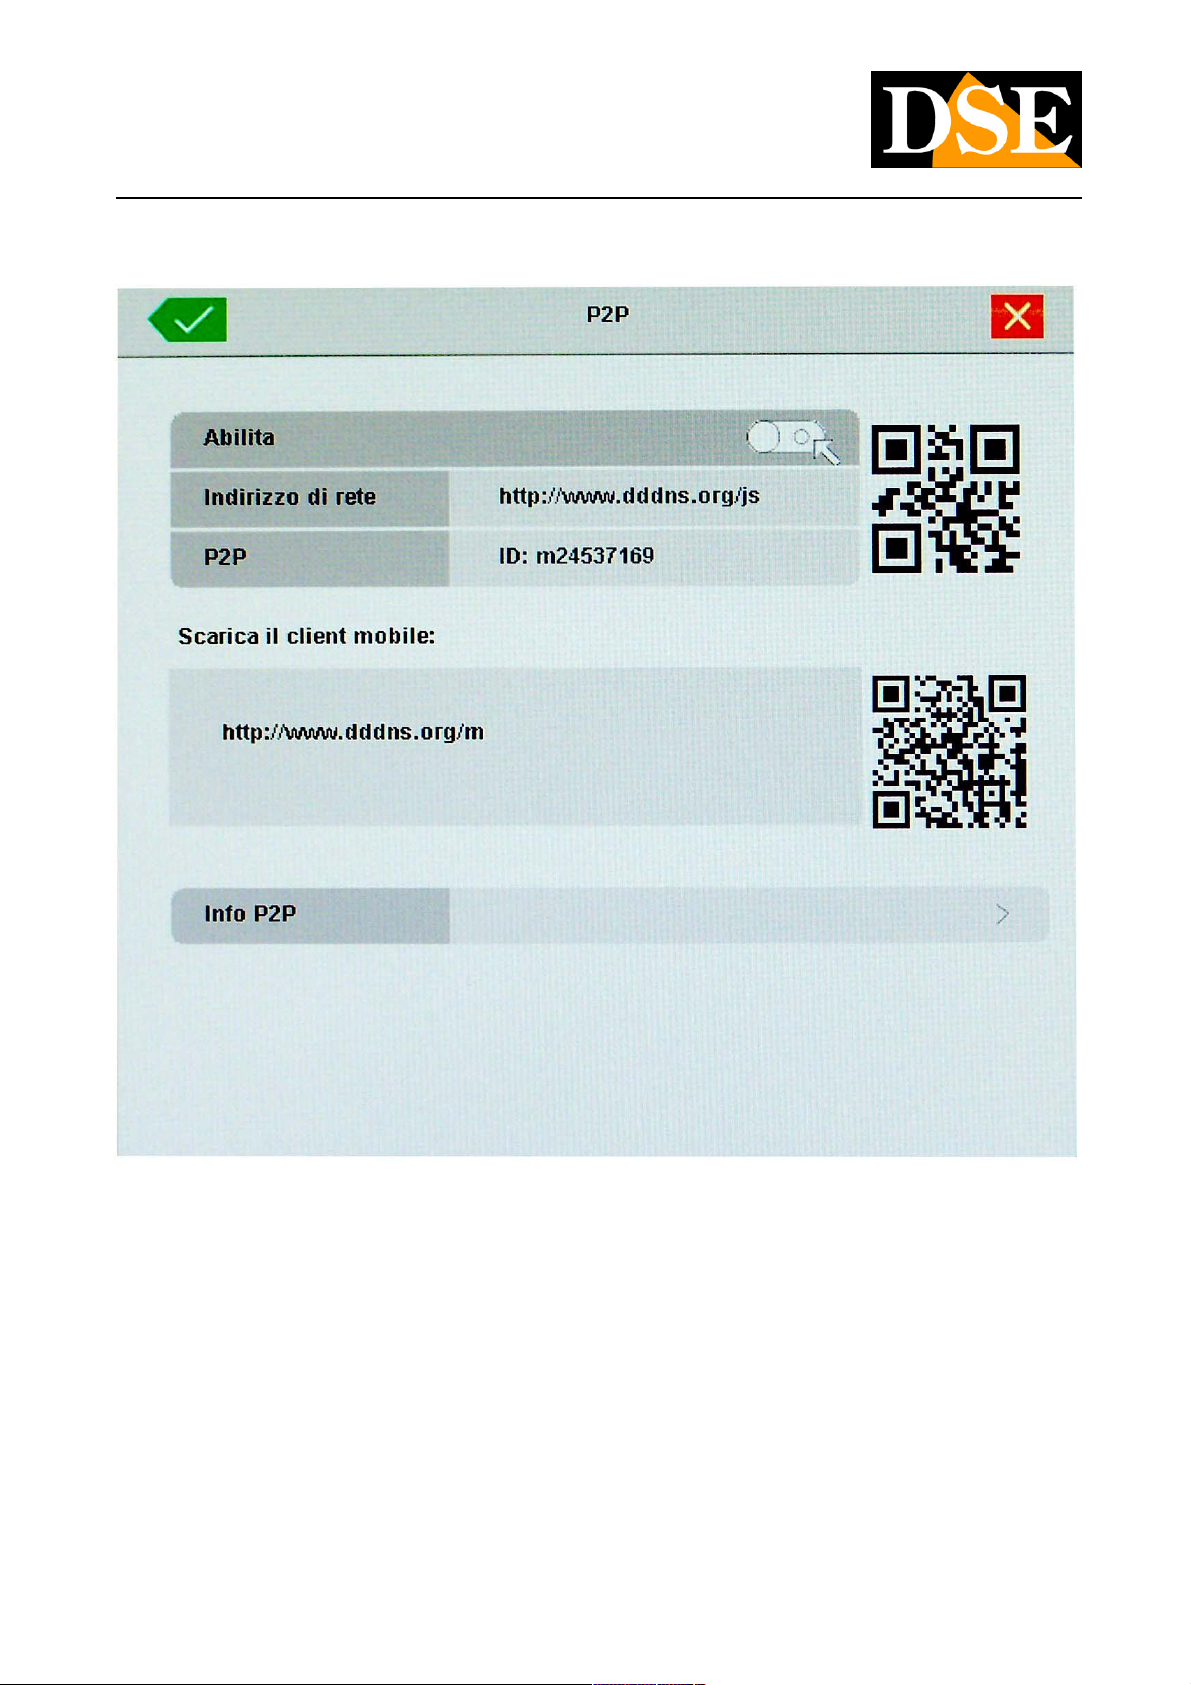
The first thing to do in order to benefit of cloud servers and enable the cloud server management P2P in the NVR configuration, as
explained in the configuration guide. The cloud server setting is located in Settings / P2P NETWORK must click on the item and enable
the management of servers CLOUD.
DSE SRL - ITALY - WWW.DSE.EU
Page 42
INSTALLATION MANUAL
Network Video Recorders NVR Series DN vers. 3
Page: 42 Page: 42
ACCESS TO CLOUD
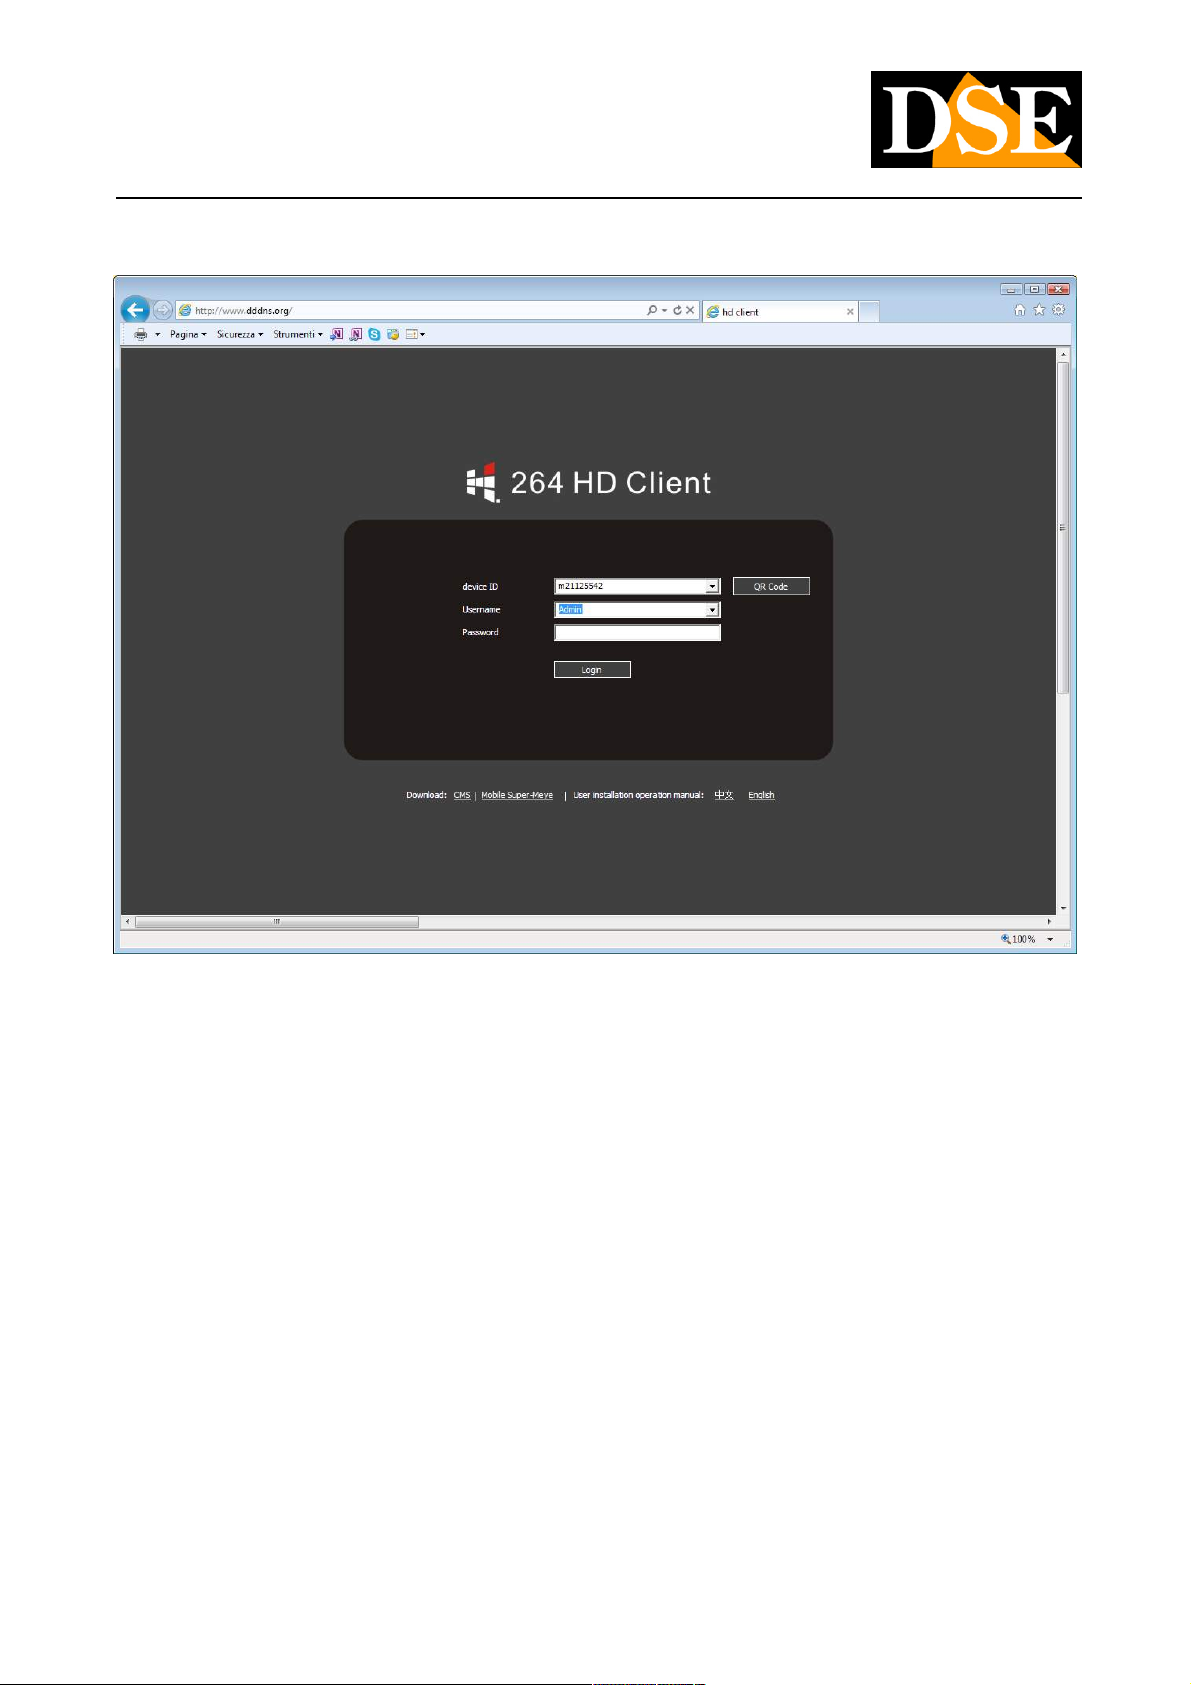
To use the P2P cloud servers connect to the site WWW.DDDNS.ORG Remember to use your
browser Internet Explorer.browser Internet Explorer.
After installing the software components that should be authorized simply insert in the mask log-in ID of the NVR, the user name and
password.
Click LOGIN to access the DVR without the need for static IP, DDNS and mappatuta router ports.
DSE SRL - ITALY - WWW.DSE.EU
Page 43
INSTALLATION MANUAL
Network Video Recorders NVR Series DN vers. 3
Page: 43 Page: 43
ACCESS TO CLOUD WITH PROGRAM AND MOBILE CMS
I can use the services of CLOUD NVR DN series not only through the Internet Explorer browser, but also with the client program for
Windows CMS and the app for smartphone / tablet. See the manuals of the two applications for details.
DSE SRL - ITALY - WWW.DSE.EU
Page 44

INSTALLATION MANUAL
Network Video Recorders NVR Series DN vers. 3
Page: 44 Page: 44
firmware Update
The internal software of the NVR can be updated if this is necessary. Before you upgrade you must obtain the update file by downloading
it from the DSE website. The file must be copied into a USB pen.
Insert the key into a USB port of the NVR and update the firmware in the programming menu, UPDATE FIRMWARE button.
E 'can also carry out the firmware update remotely using the Internet Explorer browser interface section SETUP / DEVICE SETTING /
SYSTEM maintanance
DSE SRL - ITALY - WWW.DSE.EU
 Loading...