

DSE DK-V2 Quick Start Manual
Document: DK-V2 1M8
Page: 1
QUICK START GUIDE Camera DK-V2 Black Box car
DSE srl - Digital Surveillance Equipment - www.dse.eu
DK-V2
Camera and video recorder black
box for cars
Product description
DK-V2 is a video recorder for car equipped with a doubleintegrated camera. It’s ideal to be mounted on the
windshield with the included bracket and monitor
everything that happens in front of and inside the vehicle.
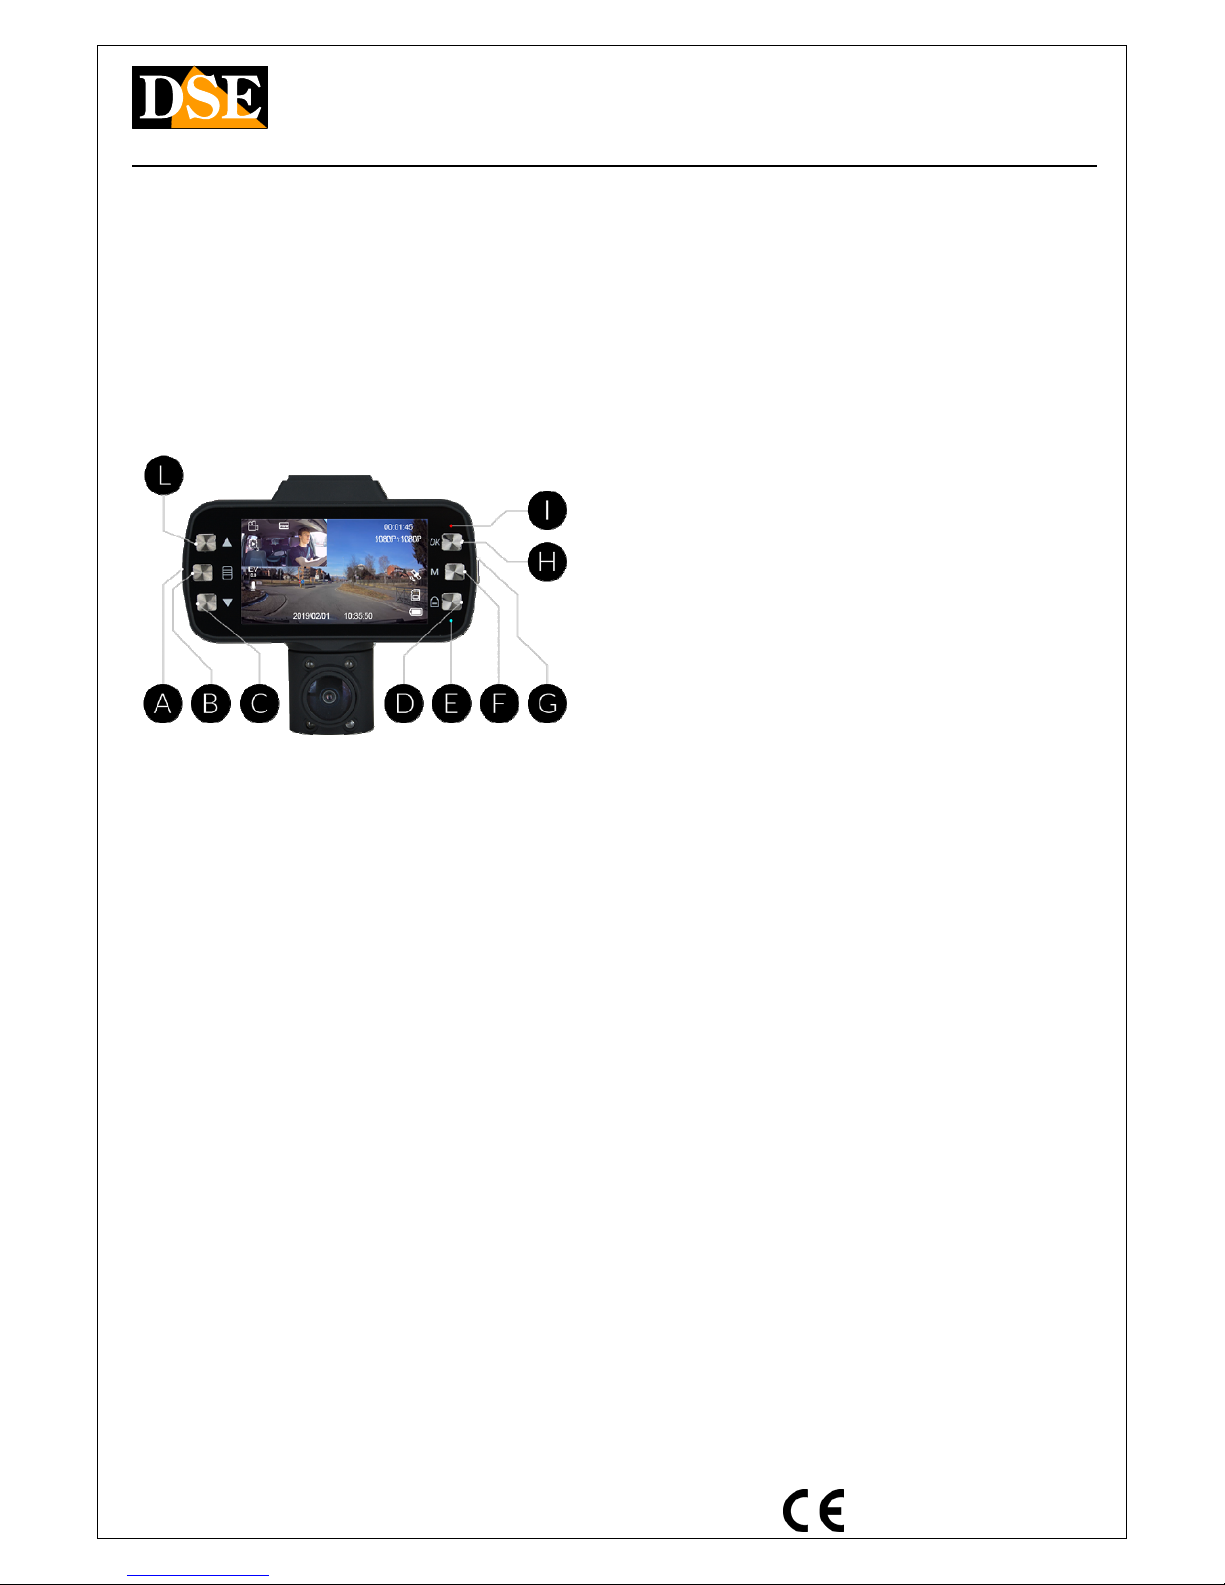
A - SD CARD SLOT
B - MENU 'CONFIGURATION
C - PREVIOUS / AUDIO ON / OFF
D - PROTECT FROM OVERWRITING
E - BLUE LED: Steady = ON = Flashing RECORDING
F - RULES ': Video - - Playback
G - ON / OFF
H - ENTER / STOP RECORDING
I - RED LED Steady = battery charging
L - NEXT / SCREEN CHANGE shots
QUICK START GUIDE
Below are the steps to follow to start recording on
your new black box camera.
1) Charging the battery
The camera is powered via the cable car's cigarette
lighter, but is able to work even with the sole po wer of its
internal battery. Before using the equipment it is
advisable to fully charge the battery. To do this connect
the USB port of the DVR to the computer, a USB charger,
with cable provided, or the cigarette lighter of the vehicl e
with the supplied cable.
During charging, the LED lights RED (I) which turns off
charging is completed.
2) Insert the SD Card
The first thing to do if you want to make recordings, you
insert the micro SD card into the slot of DVR (A)
E 'can use micro SD card with capacity of up to 128 GB
CLASS 10 or higher. The SD card is not included in the
package.
Just inserted the SD card format is recommended. To do it
twice press the MENU 'button (B) and select, the FORMA T
item.
3) LED indication
It 'important to understand the operation of the LEDs.
The LED BLU (E) is switched off if the camera is turned
off, it remains fixed if the camera is turned on, and
flashes when the camera is recording.
The RED LED (I) remains on while the ba ttery is charging,
and turns off when the battery is charged or when it is not
in charge.
4) Place and connect the camera
System the camera wherever you most need it. The
position that allows the best shots is directly below the
rearview mirror.
Connect the camera to the cigarette lighter socket with
the mains cable supplied in the package. Pass the cable so
that no space while driving.
The cable supplied is 3 meters long and can possibly make
it pass behind the parsole fin and then under the
dashboard in order to avoid exposed cables.
Check if your cigarette lighter socket provides power even
at ignition off. If the supplies careful not to leave the
camera connected in continuous recording mode for more
than 24 hours as it may deplete your vehicle's battery.
5) Continuous recording
This is the active Factory recording mode. In this mode,
the camera automatically starts recordi ng when th e power
is supplied, and stops recording when the power sup ply is
interrupted.
During recording, the blue LED (E) blinks and flashes red
icon on the screen.
6) Overwriting, file protection, collision
detection
When the memory is full, the camera continue s to record
over the oldest files.
If you want to avoid that an important file is overwritten
by the camera, press the PROTECT button (D). The KEY
icon will appear on the screen and the video being
recorded will be protected from being overwritten.
In the event of a collision while driving, the camera
automatically protects the event video files (COLLISION)
7) motion detection function
This camera can also record in MOTION DETECTION
mode. This mode offers an alternative to the continuous
recording and allows to economize on memory space by
recording only if there are movements in front of the front
camera. This function is very useful if you keep active
recording during parking record only when someone
approaches the vehicle.
The recording lasts up to 10 seconds after t he end of the
movement. Video files recorded in this mode are
automatically protected against overwriting.
To activate this function press the M ENU 'button (B) and
activates the voice MOTION DETECTION.
The motion detection is active only on the front camera.
8) Impact detection function
This is a handy feature to monitor your car when parking.
If you activate this function the camera does not turn off
completely when power take off or press the off b utton,
but remains in detection mode bumps, consuming very
little battery. If the vehicle is bumped, the camera turns
on, start recording for 20 seconds.
Files recorded in this mode are automatically protected
against overwriting.
Document: DK-V2 1M8
Page: 2
QUICK START GUIDE Camera DK-V2 Black Box car
DSE srl - Digital Surveillance Equipment - www.dse.eu
The shock detection is battery operated so you can u se it
in the parking lot even if your car is not supplying power
from the cigarette lighter in the ignition switched off.
To activate this mode, double tap the Menu 'button (B)
and select the item PARKING SURVEILLANCE. AUTO will
appear ZZZ icon to indicate the active mode. You can
adjust the bump detection sensitivity by pressing the
MENU 'button (B) and selecting G SENSOR.
9) photo mode
In this mode you can take still pho tos. To switch to this
mode, the video mode awards once MODE 'button (F).
Press OK to take a picture.
If you want you can set in the configuration menu, a
shutter lag.
10) GPS Functi on
Right on the camera screen is the GPS icon that can hav e
the following meanings:
- Fixed with a red symbol if no GPS signal
- Flashing light with a red symbol in the signal
connection search
- Fixed red symbol without a GPS connection
established
11) Playback of video files
To play the video files recorded by your camera there are
several ways.
MONITOR- You can play the videos directly on the
camera screen by switching to playback mode. To do so,
the video mode, double tap the button MODE '(G). Sele ct
the video you want to play using the arrow keys and press
OK (H) to start playback.
PC - You can also play videos from a PC. To do that you
can connect the camera to the computer with th e supplie d
USB cable, or you can remove the SD card and insert it
into an SD card in your PC.
SMARTPHONE - You can also play back movies on the
phone with the provided utility described below.
12) Application for Smartphones
Download to your phone RoadCam the application.
To log in to your camera you have to switch th e camera
wifi pressing MENU twice 'button (B) and selecting the
WIFI voice.
The fact WiFi is automatically disabled i n the absence of
active links. Once you activated you will find the wifi
network camera available between wireless networks on
your phone.
Connect now to WiFi in your camera with your
smartphone. The default password is 12345678. Once
connected, open the RoadCam application and press the
orange button in the center of the screen to connect.
With RoadCam you can:
- See the VIDEO LIVE
- Changing the picture of the monitor with the
square button in the center
- Open the album video files recorded in the
camera, with RECORDED VIDEO button on the
left
- Download / Delete video in the recorded video
- Open the album of photo files with the PICTURE
button on the right
- Download / Delete photos in the pictures section
- Start / Stop camera recording with round orange
button
- Taking photos with the bottom button-shaped
camera
- Change camera settings with the gear button at
the top right
- Download videos and photos on mobile phone
13) View historical GPS
To view the map of the vehicle's movements during the
videos you download on smartphones by applying the
video you're interested in examining. To do that you must
be connected to the camera. Once downloaded, y ou can
also disconnect.
Open the application and press the ALBUM button in the
bottom bar. Open the desired video and press the GPS
icon that appears below the window where the video is
played.
You can view the exact location of the vehicle on the road
map in every moment of the video.
Localization is not available when the GPS connection was
not available while shooting.
14) Deactivating acoustic signals
You can deactivate the audible signa ls of the buttons and
on / off which can be annoying.
To do it twice press the MENU 'button (B) and select the
item BEEP.
15) Screen lock
If you want to leave the recording to cam era battery, you
can reduce power consumption by turning off the screen.
To do so, briefly press the ON / OFF button (G).
16) Shutdown
To turn off the camera Press and hold the ON / OFF button
(G) for a few seconds.
CAUTION. If it is active the PARKI NG function the camera
will automatically restart the detection of a collision.
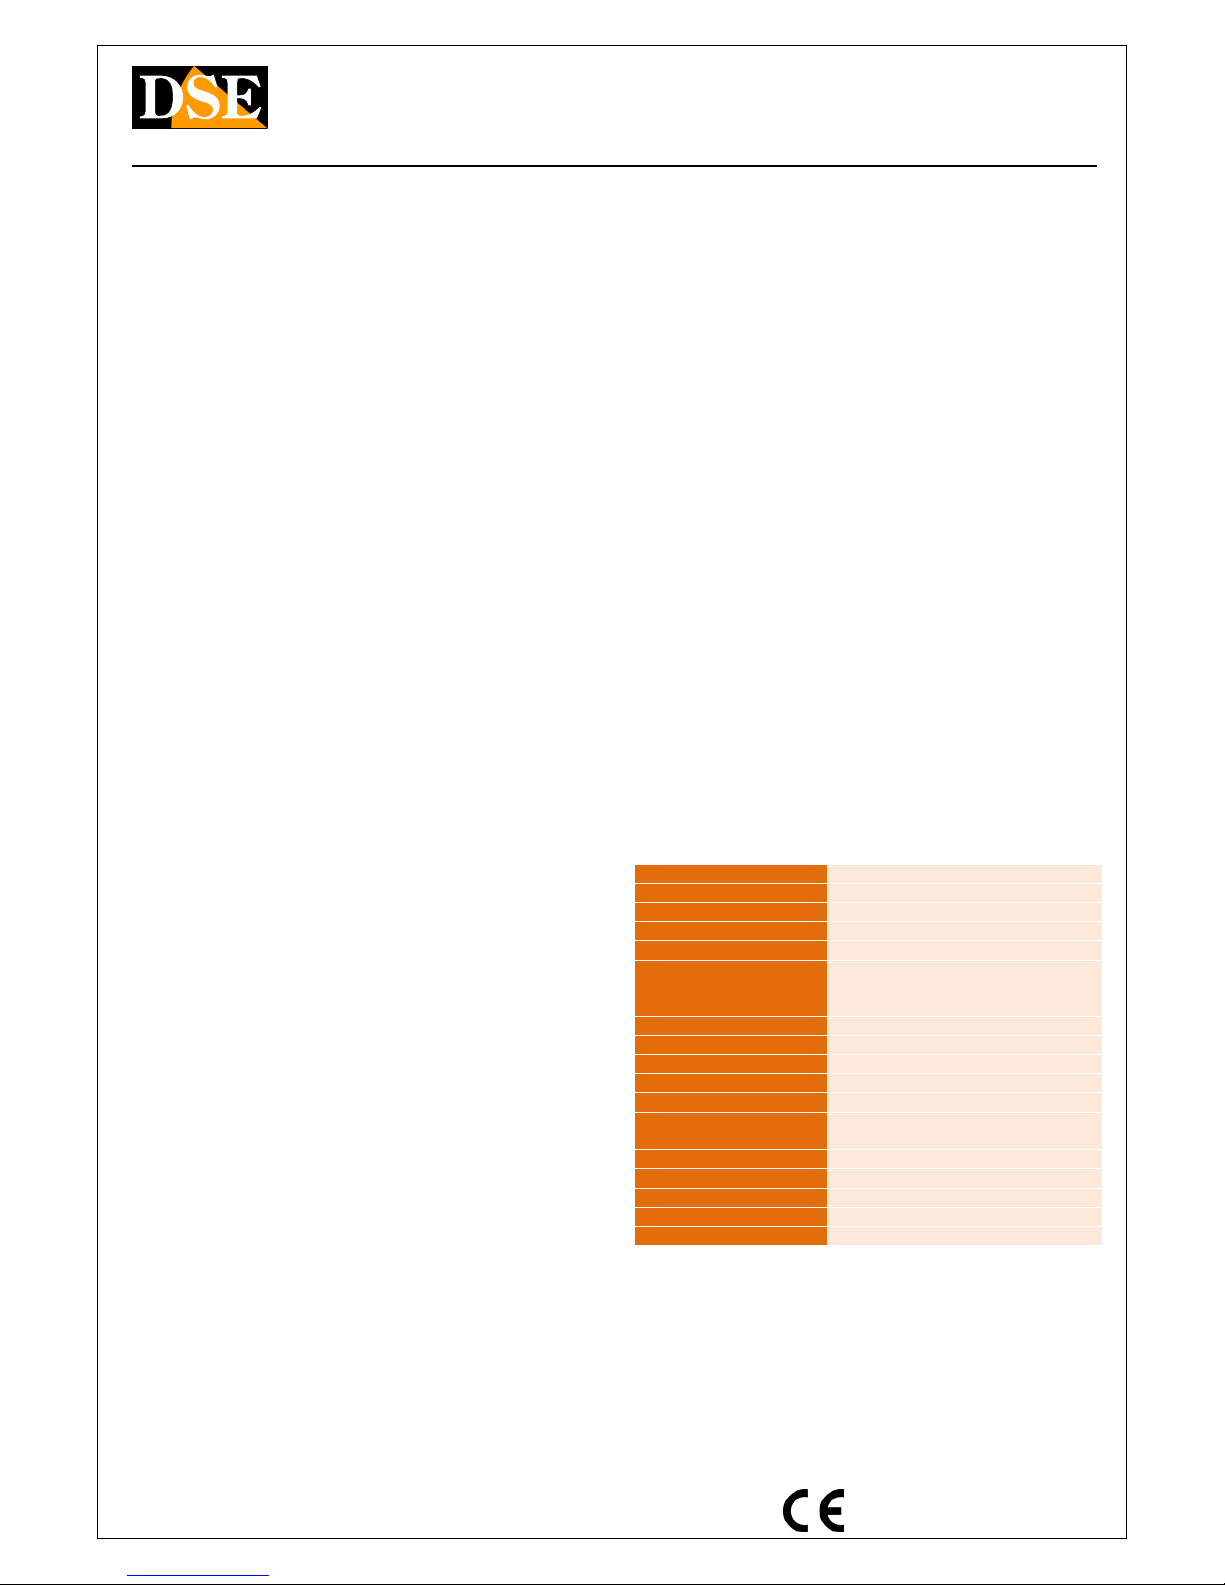
Main technical features
Sensor CMOS
maximum resolution Full HD 1080p (1920x1080)
Frame rate 30 f / sec
video Format MP4 (H264)
overlay Time Date (excludable)
Functions continuous Recording
Registration motion
parking Registration
WiFi Control Capacity 10 m.
audio Microphone incorporated
audio Speaker incorporated
IR Illuminator Rear
video Archiving About 24 hours a 128GB 1080P
Operating
temperature
-20 ° to + 70 ° C
Memory MicroSD Class 10 or higher
Memory Capacity Up to 128 GB
Notifications Sonora + 2 LED
Supply 5VDC
Battery 3.7V 380 mAh
 Loading...