

DSE DK-PV500W Owner's Manual
Document: 1N7 DK-PV500W Document: 1N7 DK-PV500W Document: 1N7 DK-PV500W
Page: 1 Page: 1
OWNER'S MANUAL DK-PV500W Portable Digital Video Recorder
DSE srl - Digital Surveillance Equipment - www.dse.eu
Portable Digital Video
Recorder
Product description
The DK-PV500W product is a portable video recorder miniature pocket-size. It works with its
digital cameras to cover up the DK series TCN9W-- available in a variety of outfits. This DVR
does not work with analog or generic digital cameras.
DK-PV500W allows the realization of hidden cameras FullHD high video quality suitable for
professional applications.
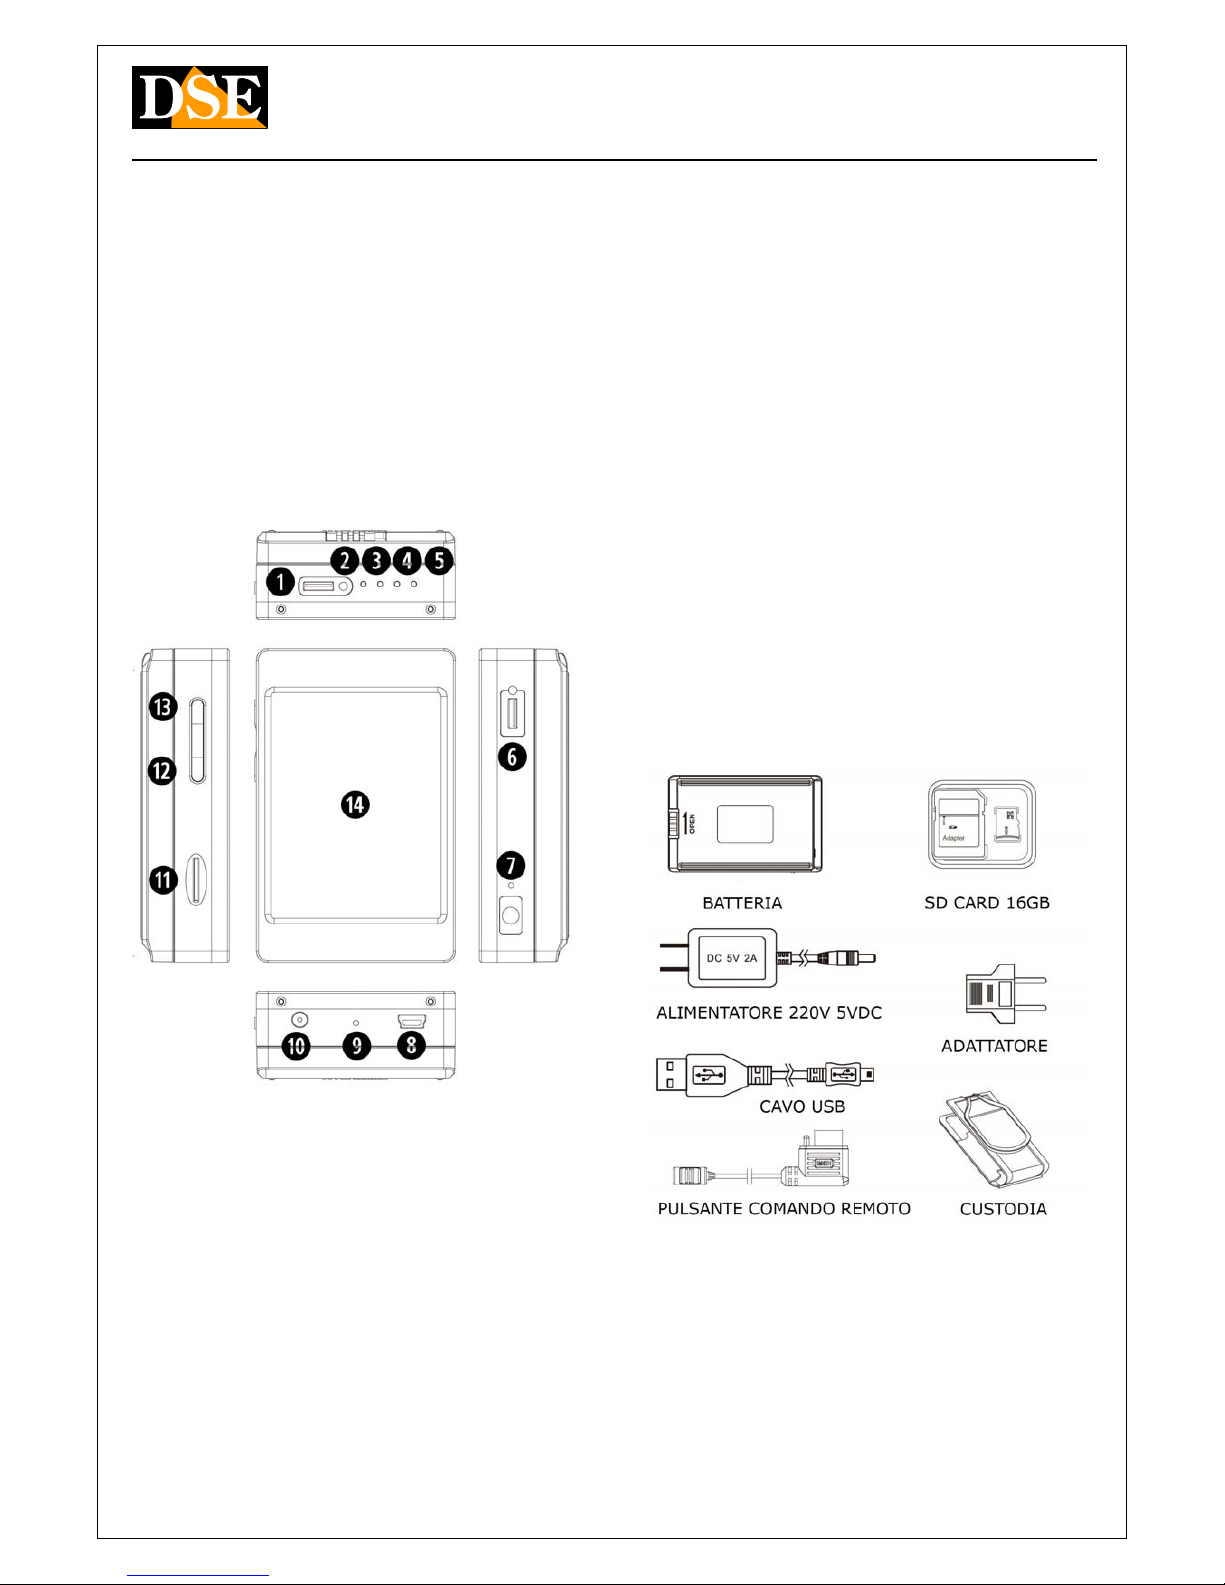
1 - Connection digital camera (DK-TCN9W--) 2 - Led blue ignition
3 - orange LED, flashes: wifi on, fixed: wifi connected 4 - Red LED lit indicates recording in
progress 5 - Green LED, lit indicates battery charging in progress 6 - Control connector for the
included command button 7 - Hole DEFAULT to restore the factory settings 8 - USB2 port for PC
connection 9 - Hole reset
10 - AC adapter connector 5VDC included 11 - Slot for micro SD card
12 - REC button to start recording / Pause 13 - Power ON / OFF button and start
WIFI 14 - LCD display with touchscreen
General characteristics
• Compression H264 1080P allows about 6 hours recording on 32GB SD Compression H264 1080P allows about 6 hours recording on 32GB SD
card.
•
Recording on Micro SD card or SD card capacity up to 32 GB. Insensitivity to Recording on Micro SD card or SD card capacity up to 32 GB. Insensitivity to Recording on Micro SD card or SD card capacity up to 32 GB. Insensitivity to
vibration and shock
•
Management of 1 audio / digital video Management of 1 audio / digital video
•
built-in Monitor TFT 3 "touchscreenbuilt-in Monitor TFT 3 "touchscreen
•
Programming Menu screen graphicProgramming Menu screen graphic
•
Wifi for smartphone control Wifi for smartphone control
•
Motion detection to start recording only if clearly intrusionMotion detection to start recording only if clearly intrusion
•
Overwrite of memory. It allows uninterrupted recording automatically delete the Overwrite of memory. It allows uninterrupted recording automatically delete the
oldest files once exhausted the memory capacity
•
Lithium battery capable of providing power to the video recorder and camera. Lithium battery capable of providing power to the video recorder and camera.
Battery life of about 260 minutes recording with LCD and WIFI off. 220 minutes with
WIFI access, 180 minutes with LCD and WIFI turned on.
•
High resolution video up to 1920x1080 pixels 30 f / sHigh resolution video up to 1920x1080 pixels 30 f / s
•
5VDC power supply. 220V adapter supplied. The adapter is used to recharge the 5VDC power supply. 220V adapter supplied. The adapter is used to recharge the
battery, but it can remain plugged in and in this way the unit records without range
limitations.
•
Door USB for PC connection. The files simply by browsing with Windows Explorer and Door USB for PC connection. The files simply by browsing with Windows Explorer and Door USB for PC connection. The files simply by browsing with Windows Explorer and
reproduce with Windows Media Player or similar player like VLC etc.
•
Saving movies in MOV format Saving movies in MOV format
Package Contents
Connections
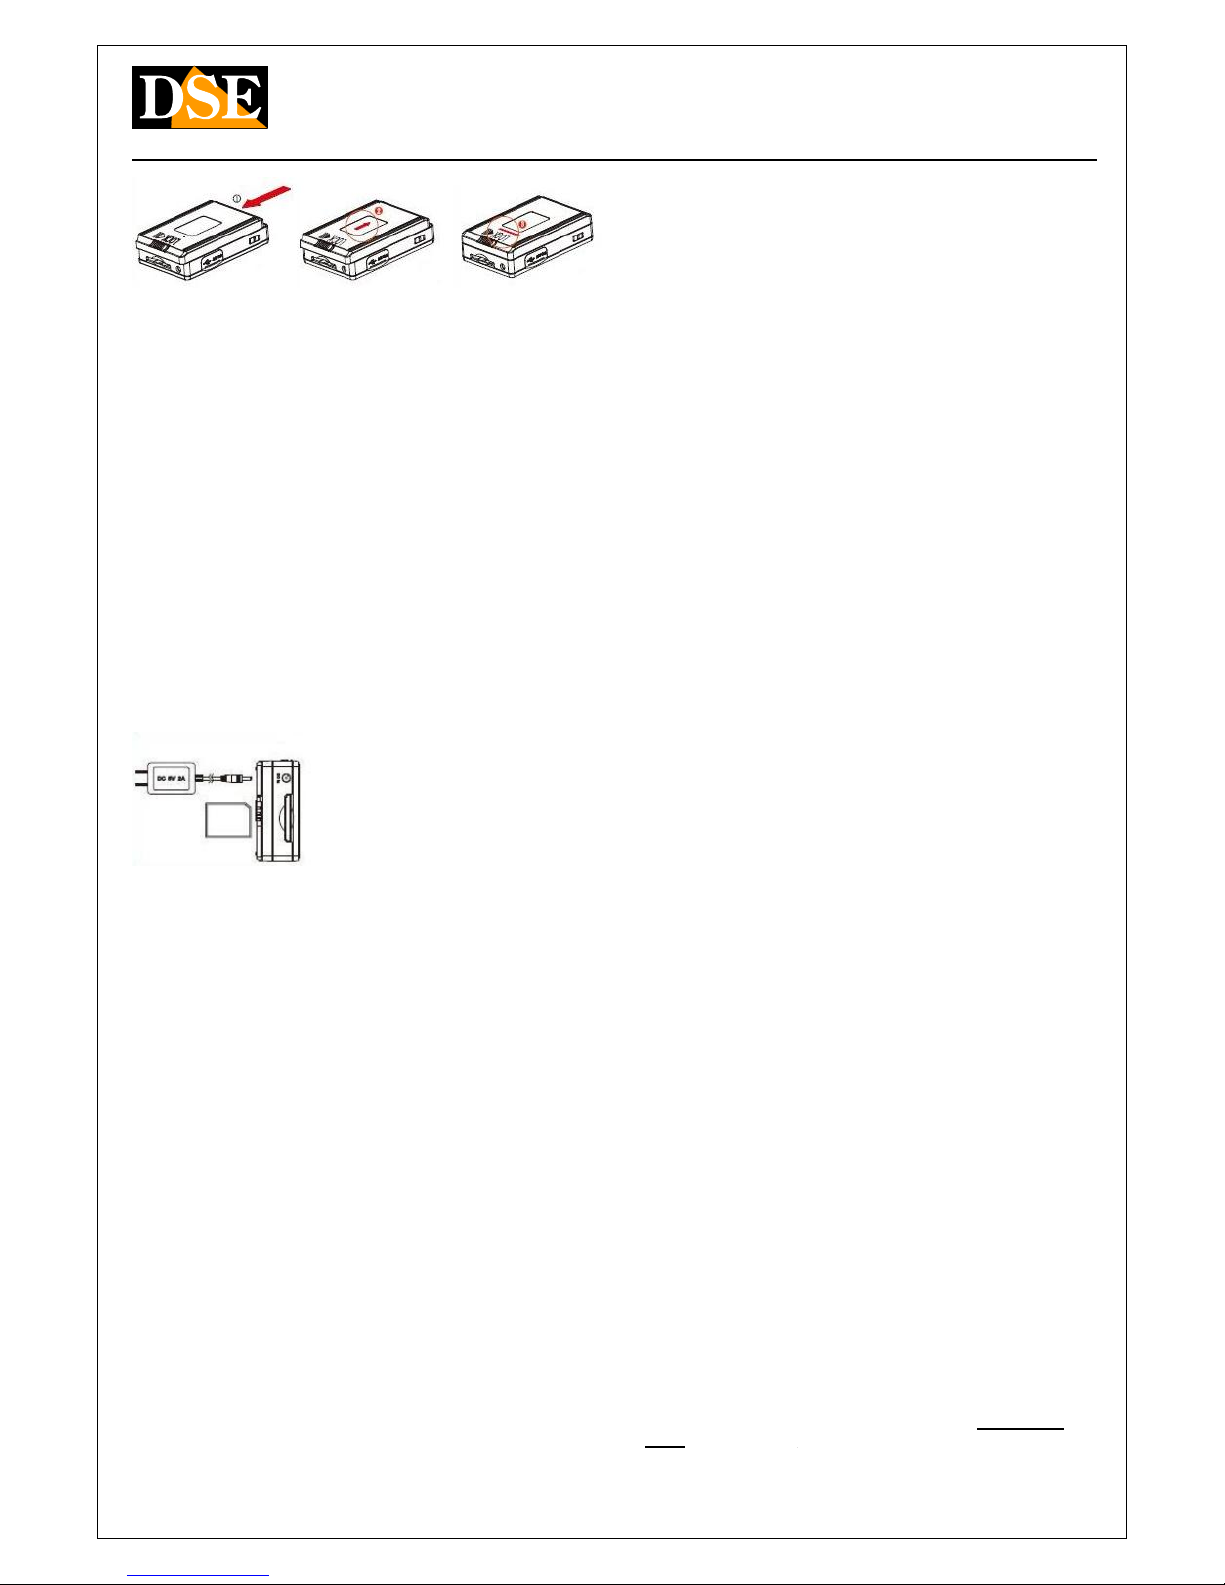
Insert battery - And 'it provided a battery that will fit on the back of the rear sliding it along the Insert battery - And 'it provided a battery that will fit on the back of the rear sliding it along the
guides, and blocking it with the LOCK button.
Document: 1N7 DK-PV500W Document: 1N7 DK-PV500W Document: 1N7 DK-PV500W
Page: 2 Page: 2
OWNER'S MANUAL DK-PV500W Portable Digital Video Recorder
DSE srl - Digital Surveillance Equipment - www.dse.eu
Inserting SD card - Before turning on the DVR, the first thing to do is to install the SD card. Inserting SD card - Before turning on the DVR, the first thing to do is to install the SD card.
Without SD card DVR does not start.
E 'comes with the product a micro SD card to 16 GB. E 'but you can use any micro-SD card up to
32GB capacity.
The SD card is inserted into the side (11). The insertion position is rendered unique by the shape
of the card. It should push the SD card in its seat until you feel the engagement.
To remove the SD card, push the nail up to unhook it and then pull it out. The DVR will
automatically format the SD card when inserted for the first time. If necessary, you can format it in
OSD menu as described below.
It is never necessary to format the SD card using a PC before inserting it into the DVR.
Charger - Before using the equipment it is advisable to charge the battery for a few hours. Charger - Before using the equipment it is advisable to charge the battery for a few hours.
Connect the power supply to the DC input IN and verify that the green LED turns on charging.
The green LED turns off when fully charged.
Connection with DSE cameras DK-TCN9W-- - The digital video recorder DK-PV500W is Connection with DSE cameras DK-TCN9W-- - The digital video recorder DK-PV500W is
designed to work only with its digital cameras DK-TCN9W-Piò series and not work with other
cameras.
These cameras send a digital signal to the DVR RAW that provides a definition video not
achievable with analog cameras.
The camera connects to the connector (1) located next to the LEDs.
In this way the DVR picks up the signal A / V digital camera and provides you with contextually
power.
Built-in Monitor - The DVR is equipped with an LCD monitor 3 "where you can see the Built-in Monitor - The DVR is equipped with an LCD monitor 3 "where you can see the
configuration options, the live images of the cameras and recorded video. The monitor is of type touch configuration options, the live images of the cameras and recorded video. The monitor is of type touch
screen and it allows to control all screen and it allows to control all
options DVR by pressing
directly on-screen buttons.
Remote Control - The DK-PV500W VCR is supplied with a wired remote control useful to turn on Remote Control - The DK-PV500W VCR is supplied with a wired remote control useful to turn on
and turn off the DVR even if kept in your pocket or purse. The remote control is connected to the
CONTROL connector (6).
E 'can start the DVR holding the slide button pressed for 3 seconds and turn it off in the same
way. Using the remote control allows you to activate the DVR only when needed thus saving the
battery and without arousing any suspicion.
CAUTION. The presence of the wired remote controller inhibit
the arrest of recording and the
off via the button on the DVR.
PC Connection - The DK-PV500W can be connected to PC so that movies and images saved on PC Connection - The DK-PV500W can be connected to PC so that movies and images saved on
the SD card can be easily downloaded to your computer.
For connection to a PC using the supplied USB cable and the USB port (8) on the unit. As soon
as the device is connected to the PC operating system will recognize the device. The VCR is
seen from the PC as any external memory that can be browsed with EXPLORER.
Alternatively you can also take out the SD card and connect to the PC via an external SD card
reader.
Switching on the DVR
To turn on and turn off the DVR hold for a few seconds the power ON / OFF button on the DVR
(13). If you entered the wired remote control using the button on the remote control as the ON /
OFF button on the DVR it is partially disabled.
CAUTION: Before turning on the DVR Micro SD card must be inserted into its slot
Automatic Start recording - The DVR begins recording automatically after power in continuous Automatic Start recording - The DVR begins recording automatically after power in continuous
mode or motion as programmed.
A ball red appears in
superimposed on the top left of the screen.
REC / STOP - On the top edge of the DVR is the REC / STOP button (12) that allows you to start REC / STOP - On the top edge of the DVR is the REC / STOP button (12) that allows you to start
and stop recording. This button also has another function: when pressed for 3 seconds allows
access to the configuration menu.
Start Recording
The DVR allows you to start recording in different ways, some
of Which They were already described.
Note that with either of these commands lets you choose the mode of
registration or CONTINUE
MOTION. In the DVR configuration it is possible to indicate which recording mode used by default
when the REC command is activated.
Automatic Start recording
The DVR will start recording automatically part in the continuous or motion depending on the
programming.
Start recording with REC,
And 'possible to start and stop recording by pressing the REC button (12) on the DVR.
Start recording by touchscreen
To activate the touchscreen buttons hold for 3 seconds REC. It starts recording by tapping REC
and you take a photo by touching CAP. When the recording is in progress lights up LED redand you take a photo by touching CAP. When the recording is in progress lights up LED red
beside the DVR, and a red icon appears in the top left of the screen.
Accessing the setup menu
The Control menu allows you to configure the DVR to suit your needs. To access the menu
control stop there
recording with the REC / STOP button and then press the same button REC / STOP for 3 recording with the REC / STOP button and then press the same button REC / STOP for 3
seconds . They appear on the screen 4 touch buttons:seconds . They appear on the screen 4 touch buttons:
 Loading...