

Page 1

DSE Model 521 Remote Start Engine Management System - Operators Manual
DSE 521 ISSUE 4 4/4/02 MR 1
Deep Sea Electronics Plc
MODEL 521
REMOTE START ENGINE
MANAGEMENT SYSTEM
Author:- Miles Revell
Deep Sea Electronics Plc
Highfield House
Hunmanby
North Yorkshire
YO14 OPH
England
Tel: +44 (0) 1723 890099
Fax: +44 (0) 1723 893303
E-Mail: Sales@Deepseaplc.com
Page 2

DSE Model 521 Remote Start Engine Management System - Operators Manual
DSE 521 ISSUE 4 4/4/02 MR
2
TABLE OF CONTENTS
Section Page
INTRODUCTION ................................................................................................................................3
CLARIFICATION OF NOTATION USED WITHIN THIS PUBLICATION........................................3
1. OPERATION...................................................................................................................................4
1.1 CONTROL.................................................................................................................................4
FIG 1.....................................................................................................................................4
1.2 AUTOMATIC MODE OF OPERATION.....................................................................................4
1.3 MANUAL OPERATION .............................................................................................................5
MANUAL OPERATION WITH EXTERNAL START AND STOP PUSHBUTTONS ....................6
2. PROTECTIONS ..........................................................................................................................7
2.1 WARNINGS...............................................................................................................................7
2.2 SHUTDOWNS...........................................................................................................................7
3. INSTALLATION INSTRUCTIONS ..................................................................................................9
3.1 PANEL CUT-OUT .....................................................................................................................9
FIG 2.....................................................................................................................................9
3.2 COOLING..................................................................................................................................9
3.3 UNIT DIMENSIONS ..................................................................................................................9
FIG 3.....................................................................................................................................9
3.4 FRONT PANEL LAYOUT........................................................................................................10
FIG 4...................................................................................................................................10
3.5 REAR PANEL LAYOUT ..........................................................................................................10
FIG 5...................................................................................................................................10
4. ELECTRICAL CONNECTIONS ....................................................................................................11
4.1 CONNECTION DETAILS ........................................................................................................11
PLUG “A” 13 WAY.....................................................................................................................11
PLUG “B” 10 WAY.....................................................................................................................11
4.2 CONNECTOR FUNCTION DETAILS .....................................................................................12
PLUG “A” 13 WAY.....................................................................................................................12
PLUG “B” 10 WAY.....................................................................................................................12
CALIBRATION SOCKET...........................................................................................................13
5. SPECIFICATION...........................................................................................................................13
6. COMMISSIONING........................................................................................................................14
PRE-COMMISSIONING ............................................................................................................14
7. FAULT FINDING...........................................................................................................................14
8. TYPICAL WIRING DIAGRAM.......................................................................................................16
9. CALIBRATION..............................................................................................................................17
9.1 PC INTERFACE MODULE 808...............................................................................................17
10. ICON DESCRIPTIONS...............................................................................................................17
10.1 ICONS...................................................................................................................................17
11. APPENDIX.................................................................................................................................18
11.1 LED IDENTIFICATION DIAGRAM........................................................................................18
FIG 6..............................................................................................................................................18
11.2 FACTORY DEFAULT CONFIGURATION ............................................................................18
Page 3
DSE Model 521 Remote Start Engine Management System - Operators Manual
DSE 521 ISSUE 4 4/4/02 MR 3
INTRODUCTION
The DSE 521 Remote Start Module, has been designed to allow the OEM to meet most of the
industry’s complex specifications. It has been primarily designed to start a generator when a remote
start signal from a remote transfer switch or other monitoring system applies an earthing signal to
the remote start input of the 521. Transfer the load to the generator when the operating criteria
have been met, then shutdown the engine on removal of the remote start signal.
Once activated the 521 module carries out all the start and stop procedures of the engine,
indicating the operational status and fault conditions; automatically shutting down the engine and
giving a true first up fault condition of an engine failure by a flashing LED and other simultaneous
faults by a steady LED. This information is indicated by the LED’s on the front panel.
Selective operational sequences, timers and alarm trips can be altered by the customer. Alterations
to the system are made by using a PC with the 808 interface.
Access to critical operational sequences and setting for use by qualified engineers, are barred by a
security code. Timers are protected by a separated code allowing operator changes to be made.
The module is housed in a robust plastic case for the front panel mounting. Connections to the
module are via locking plug and sockets.
CLARIFICATION OF NOTATION USED WITHIN THIS PUBLICATION.
NOTE:
Highlights an essential element of a procedure to ensure
correctness.
CAUTION!:
Indicates a procedure or practice which, if not strictly observed,
could result in damage or destruction of equipment.
WARNING!:
Indicates a procedure or practice which could result in injury to
personnel or loss of life if not followed correctly.
ãããã
DEEP SEA ELECTRONICS PLC own the copyright to this manual,
which cannot be copied, reproduced or disclosed to a third party
without prior written permission.
Page 4
DSE Model 521 Remote Start Engine Management System - Operators Manual
DSE 521 ISSUE 4 4/4/02 MR
4
1. OPERATION
On connection of the DC power supply to the module, the module becomes active. This is
indicated by the Power On LED illuminating.
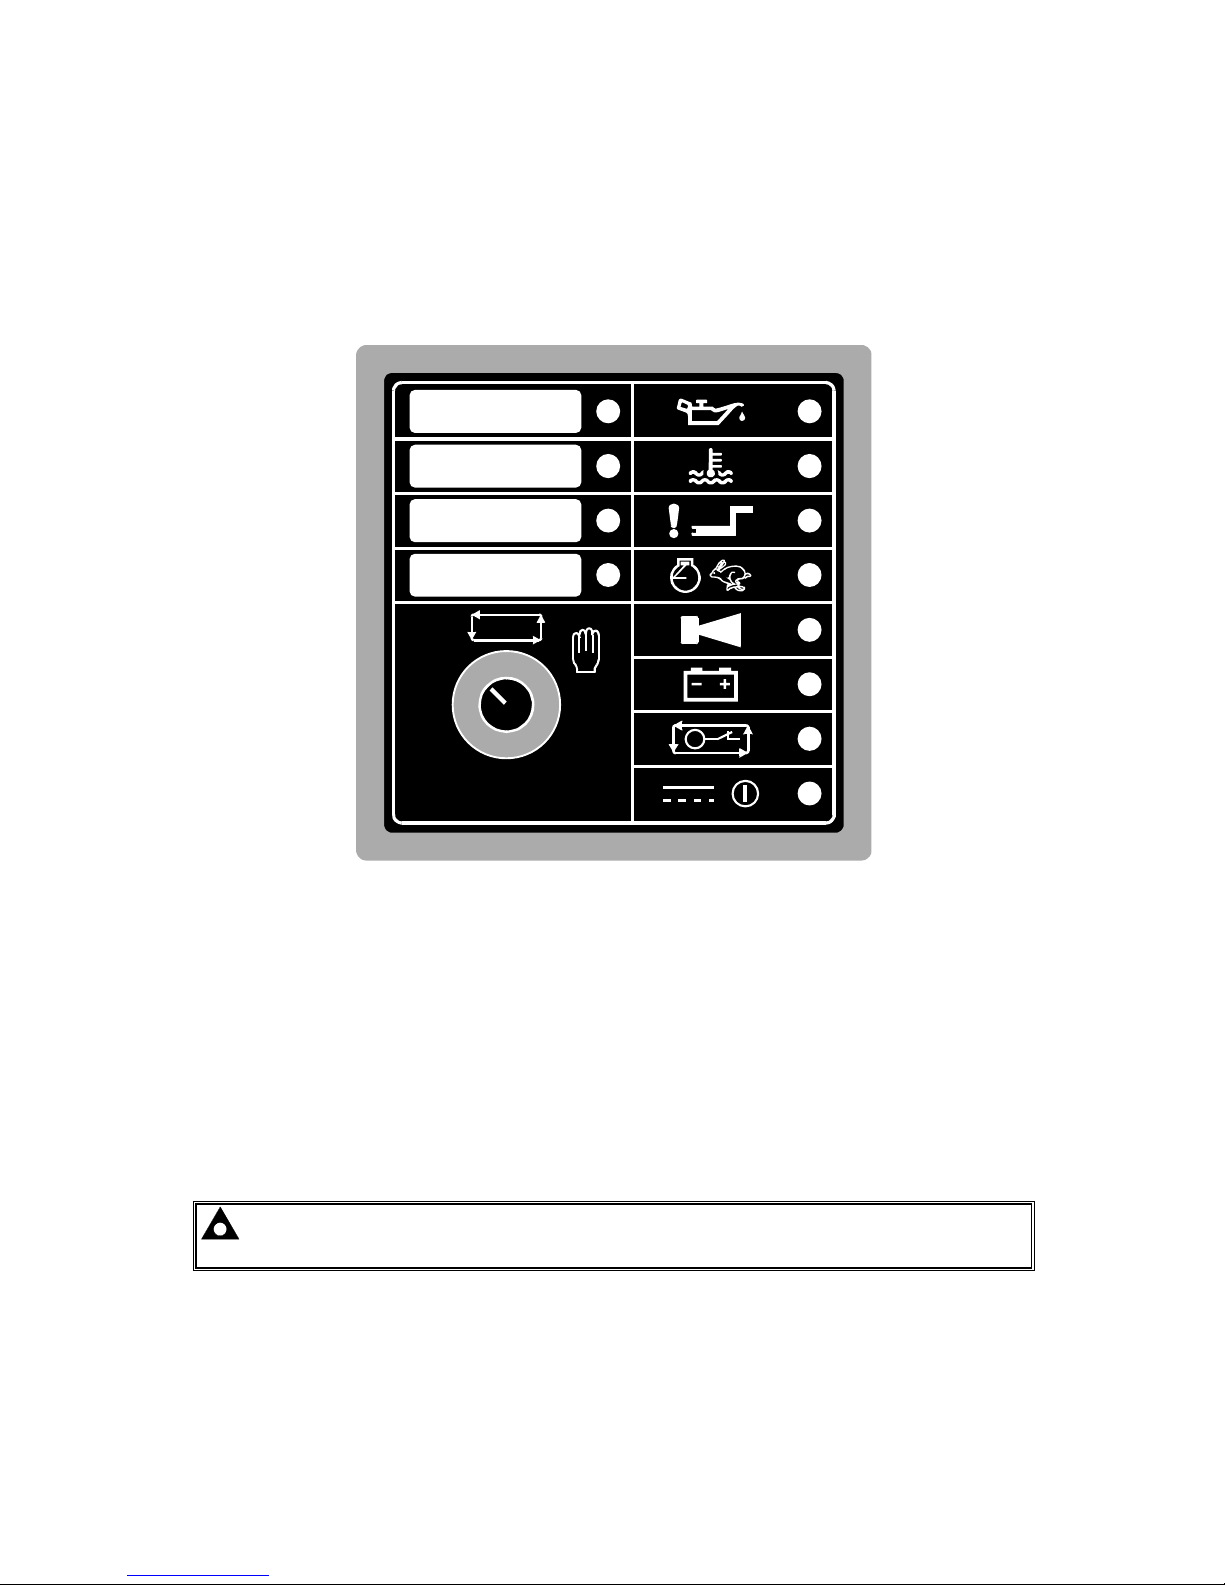
1.1 CONTROL
Control of the 521 module is by a three position rotary switch or key-switch (specified on ordering),
mounted on the front of the module with OFF, AUTO and MANUAL positions.
O
I
AUTO
Deep Se a Elect roni cs plc
Model 521
FIG 1
1.2 AUTOMATIC MODE OF OPERATION
The module is activated by turning the selector switch to the AUTO position.
When a
Remote Start signal is applied to the remote start input, the following sequence is
initiated:The
Remote Start Present LED illuminates.
To allow for false signals the
Start Delay timer is initiated, after this delay, if the pre-heat output
option is selected this timer is then initiated, and the corresponding auxiliary output which is
selected energises.
NOTE:- If the Remote Start signal is removed during the Start Delay timer the unit will
return to a stand-by state.
After the above delays the Fuel Solenoid is energised, then the Starter Motor is engaged.
The engine is cranked for a pre-set time period. If the engine fails to fire during this cranking
attempt then the starter motor is disengaged for the pre-set rest period. Should this sequence
continue beyond the set number of attempts, the start sequence will be terminated and
Fail to
Start
fault will be displayed by a flashing LED.
Page 5
DSE Model 521 Remote Start Engine Management System - Operators Manual
DSE 521 ISSUE 4 4/4/02 MR 5
When the engine fires, the starter motor is disengaged and locked out at a pre-set frequency from
the Alternator output. Alternatively a Magnetic Pickup mounted on the flywheel housing can be used
for speed detection. (This is selected by PC using the
808 interface.) The warning lamp output of
the charge alternator can also be used to disconnect the starter motor, however it cannot be used
for underspeed or overspeed. This is explained in the calibration section.
After the starter motor has disengaged, the
Safety On timer is activated, allowing Oil Pressure,
High Engine Temperature, Underspeed, Charge Fail and any delayed Auxiliary fault inputs to
stabilise without triggering the fault.
Once the engine is running, the
Warm Up timer, if selected is initiated, allowing the engine to
stabilise before accepting the load.
If an auxiliary output has been selected to give a
load transfer signal, this would then activate.
NOTE:-A load transfer will not be initiated until the O il Pressure has risen and the Oil
Pressure switch has operated. Thus preventing excessive wear on the engine.
On removal of the Remote Start signal, the Stop delay timer is initiated, once it expires the load
Transfer
signal is de-energised, removing the load. The Cooling timer is then initiated, allowing the
engine a cooling down period off load before shutting down. Once the
Cooling timer expires the
Fuel Solenoid is de-energised, bringing the generator to a stop.
Should the
Remote Start signal be re-activated during the cooling down period, the set will return
on load after the Warming Timer has expired.
1.3 MANUAL OPERATION
NOTE:- The following sequence is only applicable to controllers not using external
start/stop push-button control.
To initiate a start sequence in MANUAL, turn the selector switch to MANUAL.
NOTE:- There is no Start Delay in this mode of operation.
If the pre-heat output option is selected this timer is then initiated, and the auxiliary output selected
is energised.
After the above delay the
Fuel Solenoid is energised, then the Starter Motor is engaged.
The engine is cranked for a pre-set time period. If the engine fails to fire during this cranking
attempt then the starter motor is disengaged for the pre-set rest period. Should this sequence
continue beyond the set number of attempts, the start sequence will be terminated and
Fail to
Start
fault will be displayed by a flashing LED.
When the engine fires, the starter motor is disengaged and locked out at a pre-set frequency from
the Alternator output. Alternatively a Magnetic Pickup mounted on the flywheel housing can be used
for speed detection. (This is selected by PC using the
808 interface.) The warning lamp output of
the charge alternator can also be used to disconnect the starter motor, however it cannot be used
for underspeed or overspeed.
After the starter motor has disengaged, the
Safety On timer is activated, allowing Oil Pressure,
High Engine Temperature, Underspeed, Charge Fail and any delayed Auxiliary fault inputs to
stabilise without triggering the fault.
Once the engine is running, the
Warm Up timer, if selected is initiated, allowing the engine to
stabilise before it can be loaded.
Page 6

DSE Model 521 Remote Start Engine Management System - Operators Manual
DSE 521 ISSUE 4 4/4/02 MR
6
The generator will run off load, unless a
Remote Start signal is applied, and if Load Transfer has
been selected as a control source, the appropriate auxiliary output selected will active.
If the
Remote Start signal is removed, the generator will continue to run On load until the selector
switch is turned to
Auto. The Remote Stop Delay Timer will time out, the load is then
disconnected. The generator will then run
off load allowing the engine a cooling down period.
Turning the selector to
STOP de-energises the FUEL SOLENOID, bringing the generator to a stop.
MANUAL OPERATION WITH EXTERNAL START AND STOP PUSHBUTTONS
If the module has been configured to use external Start and Stop pushbuttons the normal ‘Manual’
mode of operation is over-ridden and the following sequence is observed;
Turn the selector switch to
MANUAL.
To start the set operate the
‘Start’ Push-button, the pre-heat output (if selected) will energise and
the timer is initiated.
Once the above delay has expired the
Fuel Solenoid is energised, then the Starter Motor is
engaged.
The engine is cranked for a pre-set time period. If the engine fails to fire during this cranking
attempt then the starter motor is disengaged for the pre-set rest period. Should this sequence
continue beyond the set number of attempts, the start sequence will be terminated and
Fail to
Start
fault will be displayed by a flashing LED.
When the engine fires, the starter motor is disengaged and locked out at a pre-set frequency from
the Alternator output. Alternatively a Magnetic Pickup mounted on the flywheel housing can be used
for speed detection. (This is selected by PC using the
808 interface.) The warning lamp output of
the charge alternator can also be used to disconnect the starter motor, however it cannot be used
for underspeed or overspeed.
After the starter motor has disengaged, the
Safety On timer is activated, allowing Oil Pressure,
High Engine Temperature, Underspeed, Charge Fail and any delayed Auxiliary fault inputs to
stabilise without triggering the fault.
Once the engine is running, the
Warm Up timer, if selected is initiated, allowing the engine to
stabilise before it can be loaded.
The generator will run off load, unless a
Remote Start signal is applied, and then if Load Transfer
has been selected as a control source, the appropriate auxiliary output selected will be activated.
If the
Remote Start signal is removed, the generator will continue to run On load until the selector
switch is turned to
Auto. The Remote Stop Delay Timer will time out, the load is then
disconnected. The generator will then run
off load allowing the engine a cooling down period.
Turning the selector to
STOP or pressing the ‘Stop’ Pushbutton de-energises the FUEL
SOLENOID
, bringing the generator to a stop.
Page 7

DSE Model 521 Remote Start Engine Management System - Operators Manual
DSE 521 ISSUE 4 4/4/02 MR 7
2. PROTECTIONS
The LED’s will indicate the fault condition and one of the auxiliary outputs if selected to be a
common alarm output, will activate. First up fault is indicated by a flashing
LED, subsequent faults
which happen simultaneously are indicated by a steady
LED. Warnings are also indicated by a
steady
LED. Indications are fed directly from the appropriate input and are indicated by a steady
LED which will be present for as long as the input is active, this feature can be used to allow the
module to operate as an Annunciator.
NOTE 1:-An auxiliary output may be configured as one of three alarm options,
Shutdown, Warning or Common Alarm (Shutdown and Warnings). This is in addition to the
list of other control sources from which it may be driven.
NOTE 2:-There is a Common alarm LED on the front panel which illuminates to indicate
all Shutdown and Warning faults, this is mainly used to indicate f ault conditions such as
Emergency Stop, Fail to Stop, Underspeed, Sensor Fail and Oil Pressure Switch which do
not have their own individual LED to indicate the fault. A warning indication is illuminated
steady, while shutdown indications flash.
NOTE 3:- A corrupt configuration is indicated by all the LED’s flashing. The mod u le
must then be re-configured.
2.1 WARNINGS
Warnings are self resetting, once the fault has been removed the input is reset.
CHARGE FA IL, If charge alternator voltage falls below the pre-set trip voltage after the end of
safety on timer. The
Charge Fail LED is illuminated.
AUXILIARY INPUTS, if an auxiliary input has been configured as a warning the appropriate LED
will illuminate.
OIL PRESSURE SWITCH, the 521 will only attempt to crank the engine if the Oil Pressure is
initially low, (engine at rest, not running). It is also possible that this could indicate that the Oil
Pressure switch is faulty if engine not running. The
Common Alarm LED will illuminate.
2.2 SHUTDOWNS
Shutdowns are latching and stop the Generator. The selector switch must be turned to Stop Reset
and the fault removed to reset the module.
EMERGENCY STOP, removal of the +ve DC Supply from the Emergency Stop input initiates the
following sequence, firstly it will initiate a controlled shutdown of the Generator and prevent any
attempt to restart the Generator until the Emergency Stop push-button has been reset. Secondly it
removes the
+ve DC supply from both the Fuel Solenoid and Starter Solenoid. This input is always
active when
AUTO or MANUAL is selected.
NOTE:- The Emergency Stop signal must be present otherwise the unit will shutdown.
LOW OIL PRESSURE, activation of the Low Oil Pressure input after the Safety On timer has
expired, initiates a shutdown. The
Low Oil Pressure LED will flash.
HIGH ENGINE TEMPERATURE, activation of the High Engine Temperature input after the Safety
On
timer has expired, initiates a shutdown. The High Engine Temperature LED will flash.
Page 8

DSE Model 521 Remote Start Engine Management System - Operators Manual
DSE 521 ISSUE 4 4/4/02 MR
8
OVERSPEED, if the engine speed exceeds the pre-set trip a shutdown is initiated. The Overspeed
LED
will flash. Overspeed is not delayed, it is an immediate shutdown.
FAIL TO START, if the engine fails to fire after the pre-set number of attempts to crank, the start
sequence is terminated. The
Fail to Start LED will flash.
FAIL TO STOP, if the generator fails to stop after the pre-set time, the Common Alarm LED will
flash. Two conditions must be met to signal that the generator has stopped, Oil Pressure has gone
low, and that no speed is sensed from either Magnetic Pickup or Alternator speed sensing sources.
UNDERSPEED, if the engine speed falls below the pre-set trip after the Safety On timer has
expired a shutdown is initiated. The
Common Alarm LED will flash.
SENSOR FAIL, if the speed sensing signal is lost during cranking, the Generator will shutdown
and the
Common Alarm LED will flash.
NOTE:- This will only occur if the speed sens ing sig nal is lost during crank ing or during
the safety on timer. If the signal is lost during normal operation the Generator will
shutdown with an Underspeed alarm.
AUXILIARY INPUTS, if an auxiliary input has been configured as a Shutdown the appropriate LED
will illuminate.
NOTE:- It is possible for the LED’s to be configured to indicate any of the 32 diff erent
control sources in addition to the shutdowns and warnings detail above. Please refer to
the 808 Software Manual for detail on how to achieve this.
Page 9

DSE Model 521 Remote Start Engine Management System - Operators Manual
DSE 521 ISSUE 4 4/4/02 MR 9
3. INSTALLATION INSTRUCTIONS
The model 521 Remote Start Module has been designed for front panel mounting. Fixing is by 2
spring loaded clips for easy assembly.
3.1 PANEL CUT-OUT
90.00mm
90.00mm
FIG 2
In conditions of excessive vibration the module should be mounted on suitable anti-vibration
mountings.
3.2 COOLING
The module has been designed to operate over a wide temperature range -30 to +55º C. However
allowances should be made for the temperature rise within the control panel enclosure. Care should
be taken
NOT to mount possible heat sources near the module unless adequate ventilation is
provided. The relative humidity inside the control panel enclosure should not exceed 85%.
3.3 UNIT DIMENSIONS
All dimensions in mm.
96.0mm
96.0mm
89.0mm
133.0mm
7.5mm
Panel Cut-out: 90mmx90mm
521 Auto Start Unit Arrangement
FIG 3
Page 10

DSE Model 521 Remote Start Engine Management System - Operators Manual
DSE 521 ISSUE 4 4/4/02 MR
10
3.4 FRONT PANEL LAYOUT
O
I
AUTO
Deep Se a Elect roni cs plc
Model 521
FIG 4
3.5 REAR PANEL LAYOUT
1 2 3 4 5 6 7 8 9 10111213
1415161718192021
2223
Prog
Serial Number
Model 521
Auto Start Unit
FIG 5
Page 11

DSE Model 521 Remote Start Engine Management System - Operators Manual
DSE 521 ISSUE 4 4/4/02 MR 11
4. ELECTRICAL CONNECTIONS
Connections to the 521 Module are via plug and sockets.
4.1 CONNECTION DETAILS
The following describes the connections and recommended cable sizes to the 2 plugs and sockets
on the rear of the
521 Module. See rear panel layout FIG 5.
PLUG “A” 13 WAY
PIN
No
DESCRIPTION CABLE
SIZE
NOTES
1 DC Plant Supply Input
(-ve)
2.5mm
2 DC Plant Supply Input
(+ve)
2.5mm (Recommended Fuse 18A)
3 Emergency Stop Input 2.5mm Plant Supply +ve. Also supplies fuel & start
outputs.(Recommended Fuse 32A)
4 Fuel relay Output 2.5mm Plant Supply +ve from pin 3. 1 6 Amp rated.
5 Start relay Output 2.5mm Plant Supply +ve from pin 3. 16 Amp rated.
6 Auxiliary Output relay 1 1.0mm Plant Supply +ve. 5 Amp r ated.
7 Auxiliary Output relay 2 1.0mm Plant Supply +ve. 5 Amp r ated.
8 Charge Fail Input/
Excitation Output
1.0mm Must NOT be connected to plant supply -ve
if not used.
9 Low Oil Pressure Input 0.5mm Switch to -ve
10 High Engine Temp Input 0.5mm Switch to -ve
11 Auxiliary Input 1 0.5mm Switch to -ve
12 Auxiliary Input 2 0.5mm Switch to -ve
13 Remote Start Input 0.5mm Switch to -ve
PLUG “B” 10 WAY
PIN
No
DESCRIPTION CABLE
SIZE
NOTES
14 Alternator Input L1 1.0mm Do not connect if not used. (2A Fuse)
15 Alternator Input N 1.0mm Do not connect if not used.
16 DO NOT USE Ensure no connection is made to this pin.
17 Auxiliary Output 3 1.0mm Plant Supply +ve. 5 Amp rated.
18 Auxiliary Input 3 0.5mm Switch to -ve
19 Auxiliary Input 4 0.5mm Switch to -ve
20 Magnetic Pickup Input
(+ve)
0.5mm Connect to Magnetic Pickup device
21 Magnetic Pickup Input
(-ve)
0.5mm Connect to Magnetic Pickup device
22 Tachometer Output (+ve) 0.5mm Optional, specified on ordering.
Tachometer must be completely isolated.
23 Tachometer Output (-ve) 0.5mm Optional, specified on ordering.
Tachometer must be completely isolated.
NOTE:- Screened cable must be used for connecting the Magnetic Pickup, ensuring
that the screen is earthed at one end ONLY.
Page 12

DSE Model 521 Remote Start Engine Management System - Operators Manual
DSE 521 ISSUE 4 4/4/02 MR
12
4.2 CONNECTOR FUNCTION DETAILS
The following describes the functions of the 2 connectors on the rear of the module. See rear panel
layout
FIG 5.
PLUG “A” 13 WAY
PIN
No
DESCRIPTION
1 DC Supply -ve. System DC negative input. (Battery Negative).
2 DC Supply +ve. System DC positive input. (Battery Positive).
3 Emergency Stop input. Internally linked to Starter and Fuel outputs. If this input is
not connected to positive the module will be locked out, and if the engine is
running will shutdown immediately. Positive Supply also removed from Starter and
Fuel therefore only a single pole Emergency Shutdown button is required.
4 Fuel Relay output. Plant Supply +ve from pin 3. Used to control the fuel solenoid.
5 Starter Relay output. Plant Supply +ve from pin 3. Used to control the Starter Motor.
6 Auxiliary Relay output 1. Plant Supply +ve. Configurable output, see Calibration
Manual for options available.
7 Auxiliary Relay output 2. As for Auxiliary output 1 (Pin No 6).
8 Charge Fail input / Excitation output. Supplies excitation to the Plant Battery
Charging Alternator, also an input for the Charge Fail detection circuitry.
9 Low Oil Pressure input. This is a negative switched input, it is possible to calibrate
the input to be a normally closed signal or a normally open signal. This input is
used to signal to the module that the oil pressure is low.
10 High Engine Temperature input. This is a negative switched input, it is possible to
calibrate the input to be a normally closed s ignal or a normally open signal. This
input is used to signal to the module that the engine temperature is high.
11 Auxiliary input 1. This is a negative switched configurable input, see Calibration
Manual for options available. It is possible to configure the input to be a normally
closed signal or a normally open signal.
12 Auxiliary input 2. As for Auxiliary input 1 (Pin 11).
13 Remote Start input. This is a negative switched input which will start the generator
when Auto is selected. It is possible to configure the input to be a normally open
signal or a normally closed signal.
PLUG “B” 10 WAY
PIN
No
DESCRIPTION
14 Alternator Input L1. Used for Alternator speed sensing.
15 Alternator Input N. Used for Alternator speed sensing.
16 DO NOT USE
17 Auxiliary Relay output 3. Plant Supply +ve. Configurable output, see Calibration
Manual for options available.
18 Auxiliary input 3. This is a negative switched configurable input, see Calibration
Manual for options available. It is possible to configure the input to be a normally
closed signal or a normally open signal.
19 Auxiliary input 4. As for Auxiliary input 3 (Pin 18).
20 Magnetic Input +ve. An AC signal from the magnetic pickup +ve for speed sensing.
21 Magnetic Input -ve. An AC signal from the magnetic pickup -ve for speed sens ing.
22 Tachometer output +ve. 0.5 or 1.0 mA Tachometer can be used.
23 Tachometer output -ve. ---------------------- “ ----------------------------
Page 13

DSE Model 521 Remote Start Engine Management System - Operators Manual
DSE 521 ISSUE 4 4/4/02 MR 13
CALIBRATION SOCKET
PIN
No
DESCRIPTION
1 Ground
2 Transmit Data
3 Receive Data
4 +5 Supply
CAUTION!:- THIS SOCKET IS FOR THE CO NNECT ION OF APPROPRIATE PRODUCTS
MANUFACTURED BY DEEP SEA ELECTRONICS PLC ONLY , CONNECTION OF ANY OTHER
DEVICE MAY CAUSE DAMAGE AND WILL INVALIDATE THE WARRANTY.
5. SPECIFICATION
DC Supply
8.0 to 35 V Continuous.
Cranking Dropouts
Able to survive 0 V for 50 mS, providing supply was at least
10 V before dropout and supply recovers to 5V
Max. Operating Current
290 mA at 12 V. 210 mA at 24 V.
Max. Standby Current
50 mA at 12 V. 30 mA at 24 V.
Alternator Input Range
15 - 300 V ac RMS
Alternator Input Frequency
50 - 60 Hz at rated engine speed.
Magnetic Input Range
0.5 V to +/- 70 V (Clamped by transient suppressors)
Magnetic Input Frequency
10Hz to 10,000 Hz at rated engine speed.
Start Relay Output
16 Amp DC at supply voltage.
Fuel Relay Output
16 Amp DC at supply voltage.
Auxiliary Relay Outputs
5 Amp DC at supply voltage.
Dimensions
96 X 96 X 140.5 (Excluding Key-switch or Knob)
Charge Fail / Excitation Range
0 V to 35 V
Operating Temperature Range
-30 to +55°C
Page 14

DSE Model 521 Remote Start Engine Management System - Operators Manual
DSE 521 ISSUE 4 4/4/02 MR
14
6. COMMISSIONING
PRE-COMMISSIONING
Before the system is started, it is recommended that the following checks are made:-
6.1. The unit is adequately cooled and all the wiring to the module is of a standard and rating
compatible with the system.
6.2. The unit
DC supply is fused and connected direct to the battery and of correct polarity.
6.3. The Emergency Stop input is wired to an external normally closed switch connected to
DC
positive.
NOTE:- If Emergency Stop feature is not required link this input to the DC Positive.
6.1. To check the start cycle take appropriate measures to prevent the engine from starting
(disable the operation of the fuel solenoid). After a visual inspection to ensure it is safe to
proceed, connect the battery supply. Turn the selector switch to
“MANUAL”. The unit start
sequence will commence.
6.2. The starter will engage and operate for the pre-set crank period. After the starter motor has
attempted to start the engine for the pre-set number of attempts
“FAILED TO START” LED
will be illuminated. Turn to OFF to reset the unit.
6.3. Restore the engine to operational status (reconnect the fuel solenoid), again select
“MANUAL” and this time the engine should start and the starter motor should disengage
automatically. If not then check that the engine is fully operational (fuel available, etc.) and
that the fuel solenoid is operating. The engine should now run up to operating speed. If not,
and an alarm is present, check the alarm condition for validity, then check input wiring. The
engine should continue to run for an indefinite period.
6.4. Select
AUTO on the front panel, the engine will run for the pre-set cooling down period, then
shutdown. The generator should stay in the standby mode. If not check that there is not a
signal present on the
Remote Start input.
6.5. Initiate a remote start by grounding the
Remote Start input. The start sequence will start and
the engine will run up to operational speed. If one of the Auxiliary Outputs has been
configured for Load Transfer, the Generator will accept the load. If not, check the wiring to the
Generator Contactor Coil. Check the Warming timer has timed out.
6.6. Remove the Remote Start signal, the return sequence will start. After the pre-set time period,
the load will be removed from the generator. The generator will then run for the pre-set
cooling down period, then shutdown.
6.7. All internal timers and selections should now be adjusted to the customers specifications or to
the engine and alternator manufacturers recommendations.
6.8. If despite repeated checking of the connections between the
521 and the customers system,
satisfactory operation cannot be achieved, then the customer is requested to contact the
factory for further advise on:-
INTERNATIONAL TEL: 44 (0) 1723 377566
INTERNATIONAL FAX: 44 (0) 1723 354453
E-mail: Support@Deepseaplc.com
7. FAULT FINDING
Page 15

DSE Model 521 Remote Start Engine Management System - Operators Manual
DSE 521 ISSUE 4 4/4/02 MR 15
SYMPTOM POSSIBLE REMEDY
Unit is inoperative
Select
AUTO on the front panel. Check the battery and
wiring to the unit. Check the DC supply. Check the DC
fuse.
Unit shuts down Check DC supply voltage is not above 35 Volts or below 8
Volts
Check the operating temperature is not above 55 °C.
Check the DC fuse.
Unit locks out on Emergency Stop If an Emergency Stop Switch is not fitted, ensure that a
positive is connected to the Emergency Stop input. Check
emergency stop switch is functioning correctly. Check
Wiring is not open circuit.
Intermittent sensor fault Ensure that Magnetic pick-up screen is only connected at
one end, if connected at both ends this enables the screen
to act as an aerial and will pick up random voltages.
Low oil Pressure fault operates after
engine has fired
Check engine oil pressure. Check oil pressure switch and
wiring. Check configured polarity is correct.
High engine temperature fault
operates after engine has fired.
Check engine temperature. Check switch and wiring.
Check configuration of input i.e. Normally Open or
Normally Closed.
Shutdown fault operates Check relevant switch and wiring of illuminated fault LED.
Check configuration of input. If only common alarm LED
illuminated, please refer to section 2, note 2.
Warning fault operates Check relevant switch and wiring of illuminated fault LED.
Check configuration of input. If only common alarm LED
illuminated, please refer to section 2, note 2.
Fail to Start is activated after pre-set
number of multi attempts to start
Check wiring of fuel solenoid. Check fuel. Check battery
supply. Check battery supply is present on the Fuel output
of the module. Check the speed sensing signal is present
on the
521 inputs. Refer to engine manual.
Continuous starting of generator
when in
AUTO
Check that there is no signal present on the Remote Start
input. Check configured polarity is correct.
Generator fails to start on receipt of
Remote Start signal
Check Start Delay timer has timed out. Check signal is on
Remote Start input.
Pre-heat inoperative Check wiring to engine heater plugs. Check battery supply.
Check battery supply is present on the Pre-heat output of
module. Check pre-heat has been selected in the
configuration menu.
Starter motor inoperative Check wiring to starter solenoid. Check battery supply.
Check battery supply is present on the Starter output of
module. Ensure that the Emergency Stop input is at +Ve.
Engine runs but generator will not
take load
Check Warm up timer has timed out. Check configuration
to ensure output has been selected to give Load Transfer.
NOTE:- Fault finding can be assisted greatly by utilising the Diagnostic feature
available from the PC Interface. This will display the mod u le s tate, any alarm conditions
present and the state of all inputs and outputs. It is recommended that diagnostics are
used to aid fault finding where-ever possible.
Page 16

DSE Model 521 Remote Start Engine Management System - Operators Manual
DSE 521 ISSUE 4 4/4/02 MR
16
8. TYPICAL WIRING DIAGRAM
Remote start
Engine Temp. Switch
Oil Pressure Switch
Tachometer Output
Magnetic Pickup
Page 17

DSE Model 521 Remote Start Engine Management System - Operators Manual
DSE 521 ISSUE 4 4/4/02 MR 17
9. CALIBRATION
The 521 module can be calibrated by using either a PC with Interface Module 808 .
9.1 PC INTERFACE MODULE 808
The PC interface 808 kit comprises the following:-
• 808 Interface Module
• 25 to 9 way adapter
• FCC 68 (4 Pin) Connecting Lead
• Floppy disc with configuration software
10. ICON DESCRIPTIONS
The DSE P521 module is available with graphical icons instead of text. This is for use where text in
the English language may cause problems and also allows for a standard module for all world
markets to be used.
10.1 ICONS
Symbol Meaning Description
Stop/Reset Stop the generator and reset any alarm conditions.
Refer to Section 1 of this Manual.
Auto The controller will automatically start the generator
when given a remote start command. Refer to
section 1.2 of this Manual.
Manual The controller will start the generator under manual
control. Refer to section 1.3 of this Manual.
Low Oil Pressure A low oil pressure shutdown has occurred. Refer to
section 2.2 of this Manual.
High Engine Temperature A High Engine Temperature shutdown has occurred.
Refer to section 2.2 of the Manual.
Overspeed An overspeed shutdown has occurred. Refer to
section 2.2 of this Manual.
Fail to start/Over-crank The engine has failed to start after the pre-set
number of attempts. Refer to section 2.2 of this
manual
Charge Fail The charge alternator on the engine is not giving
sufficient output. Refer to section 2.1 of this Manual.
Common Alarm An alarm condition has been detected. Refer to
section 2 of this Manual.
(
Warning = Steady, Shutdown = Flashing)
I
Remote Start Active The remote start signal is being applied to the
module.
DC Power On The module is being supplied with a suitable DC
supply.
Page 18

DSE Model 521 Remote Start Engine Management System - Operators Manual
DSE 521 ISSUE 4 4/4/02 MR
18
11. APPENDIX
11.1 LED IDENTIFICATION DIAGRAM
O
AUTO
Deep Se a Elec troni cs plc
Model 521
LED 11
LED 10
LED 9
LED 8
LED 7
LED 6
LED 5
LED 4
LED 3
LED 2
LED 1
FIXED
FIG 6
Note:- The Software disk supplied with the Calibration Interface (808) contains a
Microsoft Word document for the automatic creation of suitable label inserts for the
Auxiliary LED’s.
11.2 FACTORY DEFAULT CONFIGURATION
The 521 module when shipped contains the following configuration, allowing it to be used as a
standard module if no configuration interface is available.
P52x Configuration
Title: Standard default settings factory set
Created by: Miles Revell
Date: 4 March 1997
Filename: P521A
MISCELLANEOUS ITEMS
Item Value
Start attempts 3
Alternator frequency input present Yes
Nominal frequency 50Hz
Alternator poles 4
Magnetic pickup input present No
Flywheel teeth 118
Nominal RPM 1500
Lamp test enabled No
Start button None
Stop button None
Safety on delay time termination Premature
Load transfer mode Normal
Pre-heat mode Normal
Tachometer full scal e current 0.5mA
Tachometer full scal e RPM 2500
Electrical trip enabled No
Page 19

DSE Model 521 Remote Start Engine Management System - Operators Manual
DSE 521 ISSUE 4 4/4/02 MR 19
CONFIGURABLE INPUTS
Input channel Polarity Type Activation time
Remote start Close to activate
Low oil pressure Close to activate Shutdown Active from safety on
High engine temp. Close to activate Shutdown Active from safety on
Auxiliary input 1 Close to activate Warning Always active
Auxiliary input 2 Close to activate Warning Active from safety on
Auxiliary input 3 Close to activate Shutdown Active from safety on
Auxiliary input 4 Close to activate Indication Always active
RELAY OUTPUTS
Output channel Polarity Control source
Auxiliary output 1 Energize 1 Pre-heat
Auxiliary output 2 Energize 18 Common alarm
Auxiliary output 3 Energize 4 Load transfer
FRONT PANEL LED'S
LED Polarity Control source
LED 1 Lit 25 Remote start present
LED 2 Lit 21 Charge fail alarm
LED 3 Lit 18 Common alarm
LED 4 Lit 20 Overspeed alarm
LED 5 Lit 7 Fail to start alarm
LED 6 Lit 28 High engine temp. Alarm
LED 7 Lit 27 Low oil pressure alarm
LED 8 Lit 32 Auxiliary IP 4 active
LED 9 Lit 31 Auxiliary IP 3 active
LED 10 Lit 30 Auxiliary IP 2 active
LED 11 Lit 29 Auxiliary IP 1 active
SYSTEM TIMERS
Timer Mins:secs
Remote start delay time 0:05
Remote stop delay time 0:30
Cranking time 0:10
Crank rest time 0:10
Safety on delay time 0:10
Warm up time 0:05
Cooling time 0:30
Fail to stop time 0:30
ETS hold time 0: 00
Pre-heat time 0: 00
Sensor fail delay time 0:02
Smoke limit i ng t i me 0:00
Smoke limit i ng ramp time 0:00
ANALOGUE LEVEL S
Level Value
Overspeed on alternator frequency 57.0 Hz
Overspeed on magnetic pick up 1750 RPM
Overspeed overshoot during safety on delay 0 %
Underspeed on alternator frequency 30.0 Hz
Underspeed on magnetic pick up 1250 RPM
Crank disconnect on alternator frequency 21.0 Hz
Crank disconnect on magnet ic pickup 600 RPM
Crank disconnect charge alt ernat or voltage 30.0 V
Charge fail voltage 8.0 V
 Loading...