

Page 1
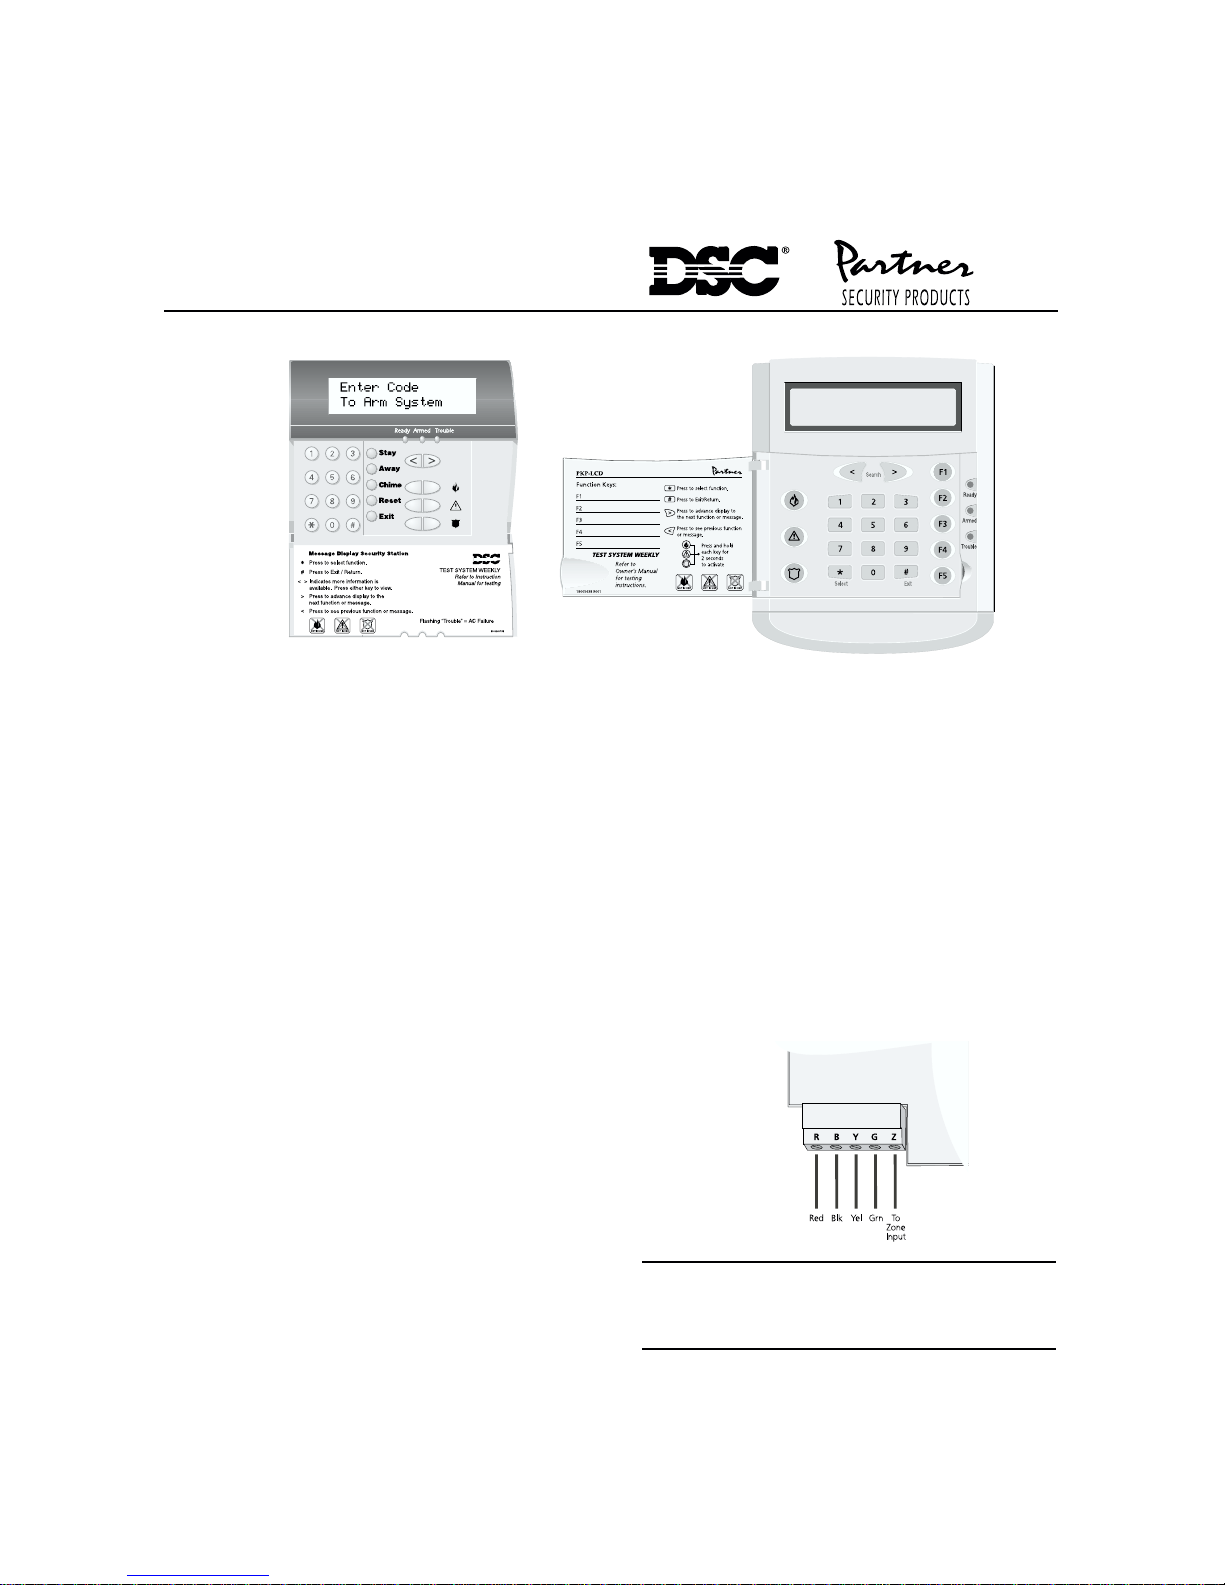
LCD5500Z / PKP-LCD
v3.x Installation Instructions
Introduction
The LCD5500Z / PKP-LCD keypad displays system
status using an LCD screen. The keypad can be
used on PowerSeries security systems with up to 64
zones.
Specifications
• Connects to control panel via 4-wire Keybus
• One keypad zone input
• Current draw: 45mA (standby); 85mA (max)
• Five programmable function keys
• Ready (green), Armed (red) and Trouble (yellow)
status lights
Installation
Unpacking
The LCD5500Z / PKP-LCD package includes the
following parts:
• One LCD5500Z / PKP-LCD keypad
• Four mounting screws
• One set of Fire, Auxiliary and Panic key labels
Mounting
You should mount the keypad where it is accessible
to designated points of entry and exit. Once you
have selected a dry and secure location, perform the
following steps to mount the keypad:
1. For the PKP-LCD, remove the end-cap located at
the bottom of the keypad. This can be done by gently
inserting a small flathead screwdriver into the groove
separating the end-cap and the rest of the keypad.
TM
2. Remove the keypad backplate by removing the
two screws located at the base of the unit.
3. Secure the keypad backplate to the wall in the
desired location. Use the screws provided.
4. Before attaching the keypad to its backplate,
complete the keypad wiring as described in the
next section.
Wiring
1. Before beginning to wire the unit, ensure that all
power (AC transformer and battery) is
disconnected from the control panel.
2. Connect the four Keybus wires from the control
panel (red, black, yellow and green) to the keypad
terminals (R B Y G). Consult the diagram below:
WARNING: Please refer to the System Installation
Manual for information on limitations regarding
product use and function and information on the
limitations as to liability of the manufacturer.
Page 2

Applying Power
Once all wiring is complete, apply power to the
control panel:
1. Connect the battery leads to the battery.
2. Connect the AC transformer.
For more information on control panel power
specifications, see the control panel
Manual
.
Installation
NOTE: Do not connect the power until all wiring is
complete.
Enrolling the Keypad
Once all wiring is complete, you will need to enter a
2-digit number that tells the system the partition
and slot assignment of the keypad.
If your system has partitions, you will also need to
assign the keypad to a partition (1st digit).
The slot assignment (2nd digit) tells the panel
which keypad slots are occupied. The panel can
then generate a fault when a keypad supervisory
signal is not present. There are eight available slots
for keypads. LCD5500Z / PKP-LCD keypads are
always assigned to slot 1 by default. You will need
to assign each keypad to its own slot (1 to 8).
Enter the following at each keypad installed on the
system:
1. Enter Installer Programming by pressing
[✱][8][Installer Code]
2. Press [000] for Keypad Programming
3. Press [0] for Partition and Slot Assignment
4. Enter a two digit number to specify the partition
and slot assignment.
NOTE: If your system does not have partitions, enter
[1] for the first digit.
1st digit Enter 0 for Global Keypad
Enter 1-8 for Partition1-8 Keypad
2nd digit Enter 1-8 for Slot Assignment
5. Press the [#] key twice to exit programming.
6. After assigning all keypads, perform a supervisory
reset by entering [✱][8][Installer Code][902]. The
panel will now supervise all assigned keypads and
enrolled modules on the system.
v3.X Keypad Programming
1. From the LCD keypad, enter [✱][8][Installer Code].
2. The keypad will display "Enter Section _ _ _".
3. Now Press the [✱] key. The LCD will display "Enter
LCD Section _ _"
4. Now enter a section as described below for
programming the keypad.
5. Sections [120] - [151] will display "Output Label"
on the top line of the label, and cannot be
changed.
[001] - [064] Zone Labels
DefaultDefault
Default
DefaultDefault
Z o n e_ _ _ _ _ 1 _ _ _ _
I___ _I__ __I__ __I__ __I__ __I_ _ __I___ _I___ _I___ _I___ _I___ _I___ _I___ _I___ _I
DefaultDefault
Default
DefaultDefault
Z o n e_ _ _ _ _ 6 4 _ _ _
I___ _I__ __I__ __I__ __I__ __I_ _ __I___ _I___ _I___ _I___ _I___ _I___ _I___ _I___ _I
[065] Fire Alarm Label
DefaultDefault
Default
DefaultDefault
F i r e _ Z o n e _ _ _ _ _
I___ _I__ __I__ __I__ __I__ __I_ _ __I___ _I___ _I___ _I___ _I___ _I___ _I___ _I___ _I
[066] Fail to Arm Event Message
DefaultDefault
Default
DefaultDefault
S y s t e m _ H a s _ _ _ _ _ _
I___ _I__ __I__ __I__ __I__ __I_ _ __I___ _I___ _I___ _I___ _I___ _I___ _I___ _I___ _I
F a i l e d _ t o _ A r m _ _ _
I___ _I__ __I__ __I__ __I__ __I_ _ __I___ _I___ _I___ _I___ _I___ _I___ _I___ _I___ _I
[067] Alarm When Armed Event Message
DefaultDefault
Default
DefaultDefault
A l a r m _ O c c u r r e d _ _
I___ _I__ __I__ __I__ __I__ __I_ _ __I___ _I___ _I___ _I___ _I___ _I___ _I___ _I___ _I
W h i l e _ A r m e d _ _ _ <>
I___ _I__ __I__ __I__ __I__ __I_ _ __I___ _I___ _I___ _I___ _I___ _I___ _I___ _I___ _I
2
Page 3

[070] First User Display Mask
DefaultDefault
Default Option ON Option OFF
DefaultDefault
ON I___I Option 1 Hold [P] Key Prompt ON Hold [P] Key Prompt OFF
ON I___I Option 2 Zone Bypassing Prompt ON Zone Bypass Prompt OFF
ON I___I Option 3 Troubles Prompt ON Troubles Prompt OFF
ON I___I Option 4 Alarm Memory Prompt ON Alarm Memory Prompt OFF
ON I___I Option 5 Door Chime Control Prompt ON Door Chime Control Prompt OFF
ON I___I Option 6 Access Codes Prompt ON Access Codes Prompt OFF
ON I___I Option 7 User Functions Prompt ON User Functions Prompt OFF
ON I___I Option 8 Output Control Prompt ON Output Control Prompt OFF
[071] Second User Display Mask
Default Option ON Option OFF
OFF I___I Option 1 Installer Programming Prompt ON Installer Programming Prompt OFF
ON I___I Option 2 At-Home Arm Prompt ON At-Home Arm Prompt OFF
ON I___I Option 3 Quick Arm Prompt ON Quick Arm Prompt OFF
ON I___I Option 4 Interior Arm Prompt ON Interior Arm Prompt OFF
OFF I___I Option 5 Quick Exit Prompt ON Quick Exit Prompt OFF
ON I___I Option 6 View Event Buffer Prompt ON View Event Buffer Prompt OFF
Off I___I Option 7 For Future Use
OFF I___I Option 8 Music Input ON Music Input OFF
[072] Third User Display Mask
Default Option ON Option OFF
ON I___I Option 1 System Test Prompt ON System Test Prompt OFF
ON I___I Option 2 Time and Date Prompt ON Time and Date Prompt OFF
ON I___I Option 3 Auto-arm Control Prompt ON Auto-arm Days Prompt OFF
ON I___I Option 4 Auto-arm Time Prompt ON Auto-arm Time Prompt OFF
ON I___I Option 5 Download Enable Prompt ON Download Enable Prompt OFF
ON I___I Option 6 Brightness Control Prompt ON Brightness Control Prompt OFF
ON I___I Option 7 Contrast Control Prompt ON Contrast Control Prompt OFF
ON I___I Option 8 Buzzer Control Prompt ON Buzzer Control Prompt OFF
[073] Downloaded LCD Message Duration
Default 003__ __ __
(This number represents the number of times the downloaded message is cleared by pressing any key while the
message is up after timeout)
(Valid entries are 000-255, 000 = Unlimited Message Display)
[074] Key Options
Default Option ON Option OFF
ON I___I Option 1 [F] Key Enabled [F] Key Disabled
ON I___I Option 2 [A] Key Enabled [A] Key Disabled
ON I___I Option 3 [P] Key Enabled [P] Key Disabled
Off I___I Option 4-8 For Future Use
3
Page 4

[075] Fourth User Display Mask
Default Option ON Option OFF
ON I___I Option 1 User-initiated Callup Prompt ON User-initiated Callup Prompt OFF
OFF I___I Option 2 Last Code to Disarm/Arm Prompt ON Last Code to Disarm/Arm Prompt OFF
OFF I___I Option 3 Walk Test Prompt ON Walk Test Prompt OFF
ON I___I Option 4 Command Output #1 Prompt ON Command Output #1 Prompt OFF
ON I___I Option 5 Command Output #2 Prompt ON Command Output #2 Prompt OFF
OFF I___I Option 6 Command Output #3 Prompt ON Command Output #3 Prompt OFF
OFF I___I Option 7 Command Output #4 Prompt ON Command Output #4 Prompt OFF
Off I___I Option 8 For Future Use
Note: Options 2 and 3 are supported by the PC1575 only.
[076] Keypad Options
Default Option ON Option OFF
ON I___I Option 1 Display Code When Programming Display Xs When Programming
ON I___I Option 2 Local Clock Display Enabled Local Clock Display Disabled
OFF I___I Option 3 Local Clock Displays 24-hr. Time Local Clock Displays AM/PM
ON I___I Option 4 Auto Alarm Scroll Enabled Auto Alarm Scroll Disabled
OFF I___I Option 5 Local Display of Temperature Enabled Local Display of Temperature Disabled
OFF I___I Option 6 Bypass Options Prompt ON Bypass Options Prompt OFF
OFF I___I Option 7-8 For Future Use
[077] Fifth User Display Mask
Default Option ON Option OFF
OFF I___I Option 1 Thermostat CTRL Prompt ON Thermostat CTRL Prompt OFF
OFF I___I Option 2 Temperature Setting Prompt ON Temperature Setting Prompt OFF
OFF I___I Option 3 Occupancy Mode Prompt ON Occupancy Mode Prompt OFF
OFF I___I Option 4 Thermostat Mode Prompt ON Thermostat Mode Prompt OFF
OFF I___I Option 5 Fan Control Prompt ON Fan Control Prompt OFF
OFF I___I Option 6 For Keypad View Prompt ON For Keypad View Prompt OFF
OFF I___I Option 7-8 For Future Use
[078] Sixth User Display Mask
Default Option ON Option OFF
OFF I___I Option 1 Occupancy Mode Auxiliary Prompt ON Occupancy Mode Auxiliary Prompt OFF
OFF I___I Option 2 Occupancy Mode Day Prompt ON Occupancy Mode Day Prompt OFF
OFF I___I Option 3 Occupancy Mode Away Prompt ON Occupancy Mode Away Prompt OFF
OFF I___I Option 4 Occupancy Mode Night Prompt ON Occupancy Mode Night Prompt OFF
OFF I___I Option 5-8 For Future Use
[101] Partition 1 Label
Default
P a r t i t i o n _ 1 _ _ _ _ _
I____I____I____I____I____I____I____I____I____I____I____I____I____I____I
[102] Partition 2 Label
Default
P a r t i t i o n _ 2 _ _ _ _ _
I____I____I____I____I____I____I____I____I____I____I____I____I____I____I
4
Page 5

[103] Partition 3 Label
Default
P a r t i t i o n _ 3 _ _ _ _ _
I____I____I____I____I____I____I____I____I____I____I____I____I____I____I
[104] Partition 4 Label
Default
P a r t i t i o n _ 4 _ _ _ _ _
I____I____I____I____I____I____I____I____I____I____I____I____I____I____I
[105] Partition 5 Label
Default
P a r t i t i o n _ 5 _ _ _ _ _
I____I____I____I____I____I____I____I____I____I____I____I____I____I____I
[106] Partition 6 Label
Default
P a r t i t i o n _ 6 _ _ _ _ _
I____I____I____I____I____I____I____I____I____I____I____I____I____I____I
[107] Partition 7 Label
Default
P a r t i t i o n _ 7 _ _ _ _ _
I____I____I____I____I____I____I____I____I____I____I____I____I____I____I
[108] Partition 8 Label
Default
P a r t i t i o n _ 8 _ _ _ _ _
I____I____I____I____I____I____I____I____I____I____I____I____I____I____I
[120] Partition 1 Command Output #1 Label
Default
Command_O/P_1_
I____I____I____I____I____I____I____I____I____I____I____I____I____I____I
[121] Partition 1 Command Output #2 Label
Default
Command_O/P_2_
I____I____I____I____I____I____I____I____I____I____I____I____I____I____I
[122] Partition 1 Command Output #3 Label
Default
Command_O/P_3_
I____I____I____I____I____I____I____I____I____I____I____I____I____I____I
[123] Partition 1 Command Output #4 Label
Default
Command_O/P_4_
I____I____I____I____I____I____I____I____I____I____I____I____I____I____I
[124] Partition 2 Command Output #1 Label
Default
Command_O/P_1_
I____I____I____I____I____I____I____I____I____I____I____I____I____I____I
[125] Partition 2 Command Output #2 Label
Default
Command_O/P_2_
I____I____I____I____I____I____I____I____I____I____I____I____I____I____I
[126] Partition 2 Command Output #3 Label
Default
Command_O/P_3_
I____I____I____I____I____I____I____I____I____I____I____I____I____I____I
5
Page 6

[127] Partition 2 Command Output #4 Label
Default
Command_O/P_4_
I____I____I____I____I____I____I____I____I____I____I____I____I____I____I
[128] Partition 3 Command Output #1 Label
Default
Command_O/P_1_
I____I____I____I____I____I____I____I____I____I____I____I____I____I____I
[129] Partition 3 Command Output #2 Label
Default
Command_O/P_2_
I____I____I____I____I____I____I____I____I____I____I____I____I____I____I
[130] Partition 3 Command Output #3 Label
Default
Command_O/P_3_
I____I____I____I____I____I____I____I____I____I____I____I____I____I____I
[131] Partition 3 Command Output #4 Label
Default
Command_O/P_4_
I____I____I____I____I____I____I____I____I____I____I____I____I____I____I
[132] Partition 4 Command Output #1 Label
Default
Command_O/P_1_
I____I____I____I____I____I____I____I____I____I____I____I____I____I____I
[133] Partition 4 Command Output #2 Label
Default
Command_O/P_2_
I____I____I____I____I____I____I____I____I____I____I____I____I____I____I
[134] Partition 4 Command Output #3 Label
Default
Command_O/P_3_
I____I____I____I____I____I____I____I____I____I____I____I____I____I____I
[135] Partition 4 Command Output #4 Label
Default
Command_O/P_4_
I____I____I____I____I____I____I____I____I____I____I____I____I____I____I
[136] Partition 5 Command Output #1 Label
Default
Command_O/P_1_
I____I____I____I____I____I____I____I____I____I____I____I____I____I____I
[137] Partition 5 Command Output #2 Label
Default
Command_O/P_2_
I____I____I____I____I____I____I____I____I____I____I____I____I____I____I
[138] Partition 5 Command Output #3 Label
Default
Command_O/P_3_
I____I____I____I____I____I____I____I____I____I____I____I____I____I____I
[139] Partition 5 Command Output #4 Label
Default
Command_O/P_4_
I____I____I____I____I____I____I____I____I____I____I____I____I____I____I
6
Page 7

[140] Partition 6 Command Output #1 Label
Default
Command_O/P_1_
I____I____I____I____I____I____I____I____I____I____I____I____I____I____I
[141] Partition 6 Command Output #2 Label
Default
Command_O/P_2_
I____I____I____I____I____I____I____I____I____I____I____I____I____I____I
[142] Partition 6 Command Output #3 Label
Default
Command_O/P_3_
I____I____I____I____I____I____I____I____I____I____I____I____I____I____I
[143] Partition 6 Command Output #4 Label
Default
Command_O/P_4_
I____I____I____I____I____I____I____I____I____I____I____I____I____I____I
[144] Partition 7 Command Output #1 Label
Default
Command_O/P_1_
I____I____I____I____I____I____I____I____I____I____I____I____I____I____I
[145] Partition 7 Command Output #2 Label
Default
Command_O/P_2_
I____I____I____I____I____I____I____I____I____I____I____I____I____I____I
[146] Partition 7 Command Output #3 Label
Default
Command_O/P_3_
I____I____I____I____I____I____I____I____I____I____I____I____I____I____I
[147] Partition 7 Command Output #4 Label
Default
Command_O/P_4_
I____I____I____I____I____I____I____I____I____I____I____I____I____I____I
[148] Partition 8 Command Output #1 Label
Default
Command_O/P_1_
I____I____I____I____I____I____I____I____I____I____I____I____I____I____I
[149] Partition 8 Command Output #2 Label
Default
Command_O/P_2_
I____I____I____I____I____I____I____I____I____I____I____I____I____I____I
[150] Partition 8 Command Output #3 Label
Default
Command_O/P_3_
I____I____I____I____I____I____I____I____I____I____I____I____I____I____I
[151] Partition 8 Command Output #4 Label
Default
Command_O/P_4_
I____I____I____I____I____I____I____I____I____I____I____I____I____I____I
[997] View Software Version
[998] Initiate Global Label Broadcast
[999] Reset LCD EEPROM to Factory Defaults
7
Page 8

LIMITED WARRANTY
Digital Security Controls Ltd. warrants the original purchaser that for a period
of twelve months from the date of purchase, the product shall be free of
defects in materials and workmanship under normal use. During the warranty
period, Digital Security Controls Ltd. shall, at its option, repair or replace
any defective product upon return of the product to its factory, at no charge
for labour and materials. Any replacement and/or repaired parts are warranted for the remainder of the original warranty or ninety (90) days,
whichever is longer. The original purchaser must promptly notify Digital
Security Controls Ltd. in writing that there is defect in material or
workmanship, such written notice to be received in all events prior to
expiration of the warranty period. There is absolutely no warranty on software
and all software products are sold as a user license under the terms of the
software license agreement included with the product. The Customer assumes
all responsibility for the proper selection, installation, operation and
maintenance of any products purchased from DSC. Custom products are
only warranted to the extent that they do not function upon delivery. In such
cases, DSC can replace or credit at its option.
International Warranty
The warranty for international customers is the same as for any customer
within Canada and the United States, with the exception that Digital Security Controls Ltd. shall not be responsible for any customs fees, taxes, or
V A T that may be due.
Warranty Procedure
To obtain service under this warranty, please return the item(s) in question
to the point of purchase. All authorized distributors and dealers have a
warranty program. Anyone returning goods to Digital Security Controls Ltd.
must first obtain an authorization number. Digital Security Controls Ltd.
will not accept any shipment whatsoever for which prior authorization has
not been obtained.
Conditions to Void Warranty
This warranty applies only to defects in parts and workmanship relating to
normal use. It does not cover:
• damage incurred in shipping or handling;
• damage caused by disaster such as fire, flood, wind, earthquake or lightning;
• damage due to causes beyond the control of Digital Security Controls Ltd.
such as excessive voltage, mechanical shock or water damage;
• damage caused by unauthorized attachment, alterations, modifications or
foreign objects;
• damage caused by peripherals (unless such peripherals were supplied by
Digital Security Controls Ltd.);
• defects caused by failure to provide a suitable installation environment for
the products;
• damage caused by use of the products for purposes other than those for
which it was designed;
• damage from improper maintenance;
• damage arising out of any other abuse, mishandling or improper application of the products.
Items Not Covered by Warranty
In addition to the items which void the Warranty, the following items shall
not be covered by Warranty: (i) freight cost to the repair centre; (ii) products
which are not identified with DSC's product label and lot number or serial
number; (iii) products disassembled or repaired in such a manner as to adversely
affect performance or prevent adequate inspection or testing to verify any warranty
claim. Access cards or tags returned for replacement under warranty will be
credited or replaced at DSC's option. Products not covered by this warranty, or
otherwise out of warranty due to age, misuse, or damage shall be evaluated, and
a repair estimate shall be provided. No repair work will be performed until a
valid purchase order is received from the Customer and a Return Merchandise
Authorisation number (RMA) is issued by DSC's Customer Service.
Digital Security Controls Ltd.’s liability for failure to repair the product under this
warranty after a reasonable number of attempts will be limited to a replacement of
the product, as the exclusive remedy for breach of warranty . Under no circumstances shall Digital Security Controls Ltd. be liable for any special, incidental, or
consequential damages based upon breach of warranty, breach of contract, negligence, strict liability, or any other legal theory. Such damages include, but are not
limited to, loss of profits, loss of the product or any associated equipment, cost of
capital, cost of substitute or replacement equipment, facilities or services, down
time, purchaser’s time, the claims of third parties, including customers, and injury
to property. The laws of some jurisdictions limit or do not allow the disclaimer of
consequential damages. If the laws of such a jurisdiction apply to any claim by or
against DSC, the limitations and disclaimers contained here shall be to the greatest
extent permitted by law . Some states do not allow the exclusion or limitation of
incidental or consequential damages, so that the above may not apply to you.
Disclaimer of Warranties
This warranty contains the entire warranty and shall be in lieu of any and all other
warranties, whether expressed or implied (including all implied warranties of merchantability or fitness for a particular purpose) and of all other obligations or
liabilities on the part of Digital Security Controls Ltd. Digital Security Controls
Ltd. neither assumes responsibility nor authorizes any other person purporting to
act on its behalf to modify or to change this warranty, nor to assume for it any
other warranty or liability concerning this product.
This disclaimer of warranties and limited warranty are governed by the laws
of the province of Ontario, Canada.
WARNING: Digital Security Controls Ltd. recommends that the entire
system be completely tested on a regular basis. However, despite frequent
testing, and due to, but not limited to, criminal tampering or electrical
disruption, it is possible for this product to fail to perform as expected.
Out of Warranty Repairs
Digital Security Controls Ltd. will at its option repair or replace out-of-warranty
products which are returned to its factory according to the following conditions. Anyone returning goods to Digital Security Controls Ltd. must first obtain
an authorization number. Digital Security Controls Ltd. will not accept any
shipment whatsoever for which prior authorization has not been obtained.
Products which Digital Security Controls Ltd. determines to be repairable will
be repaired and returned. A set fee which Digital Security Controls Ltd. has
predetermined and which may be revised from time to time, will be charged for
each unit repaired.
Products which Digital Security Controls Ltd. determines not to be repairable will be replaced by the nearest equivalent product available at that time.
The current market price of the replacement product will be charged for each
replacement unit.
For outside North America, please contact your local distributor
©2001 Digital Security Controls Ltd.
Toronto, Canada • www.dsc.com
Technical Support: 1-800-387-3630 (N.A. only)
Partner Technical Support: 1-888-646-6817
Printed in Canada 29004488 R001
 Loading...