

Page 1

Panorama Nova PE/ESA
de
Gebrauchsanweisung
2
en
Instructions for Use
10
Page 2
2
Zu Ihrer Sicherheit
Gebrauchsanweisung beachten
Jede Handhabung an der Vollmaske setzt die genaue Kenntnis und
Beachtung dieser Gebrauchsanweisung voraus.
Die Vollmaske ist nur für die beschriebene Verwendung bestimmt.
Instandhaltung
Die Vollmaske muss regelmäßig Inspektionen und Wartungen durch
Fachleute unterzogen werden.
Instandsetzungen nur durch Fachleute vornehmen lassen.
Wir empfehlen, einen Service-Vertrag mit Dräger abzuschließen und
alle Instandsetzungen durch Dräger durchführen zu lassen.
Bei Instandhaltung nur Original-Dräger-Teile verwenden.
Kapitel "Instandhaltungsintervalle" beachten.
Zubehör
Nur das in der Bestellliste aufgeführte Zubehör verwenden.
Einsatz in explosionsgefährdeten Bereichen
Vollmasken, die in explosionsgefährdeten Bereichen genutzt werden
und nach nationalen, europäischen oder internationalen Explosionsschutz-Richtlinien geprüft und zugelassen sind, dürfen nur unter den
in der Zulassung angegebenen Bedingungen und unter Beachtung
der relevanten gesetzlichen Bestimmungen eingesetzt werden.
Änderungen dürfen an den Betriebsmitteln nicht vorgenommen werden.
Der Einsatz von defekten oder unvollständigen Teilen ist unzulässig.
Bei Instandsetzung an diesen Geräten oder Bauteilen müssen die
entsprechenden Bestimmungen beachtet werden.
Beschreibung
Was ist was
Beschreibung/Verwendungszweck
Die Vollmaske schützt Gesicht und Augen gegen aggressive Medien.
Für Brillenträger lässt sich eine Maskenbrille einsetzen. Temperatur
im Einsatz -30 °C bis +60 °C.
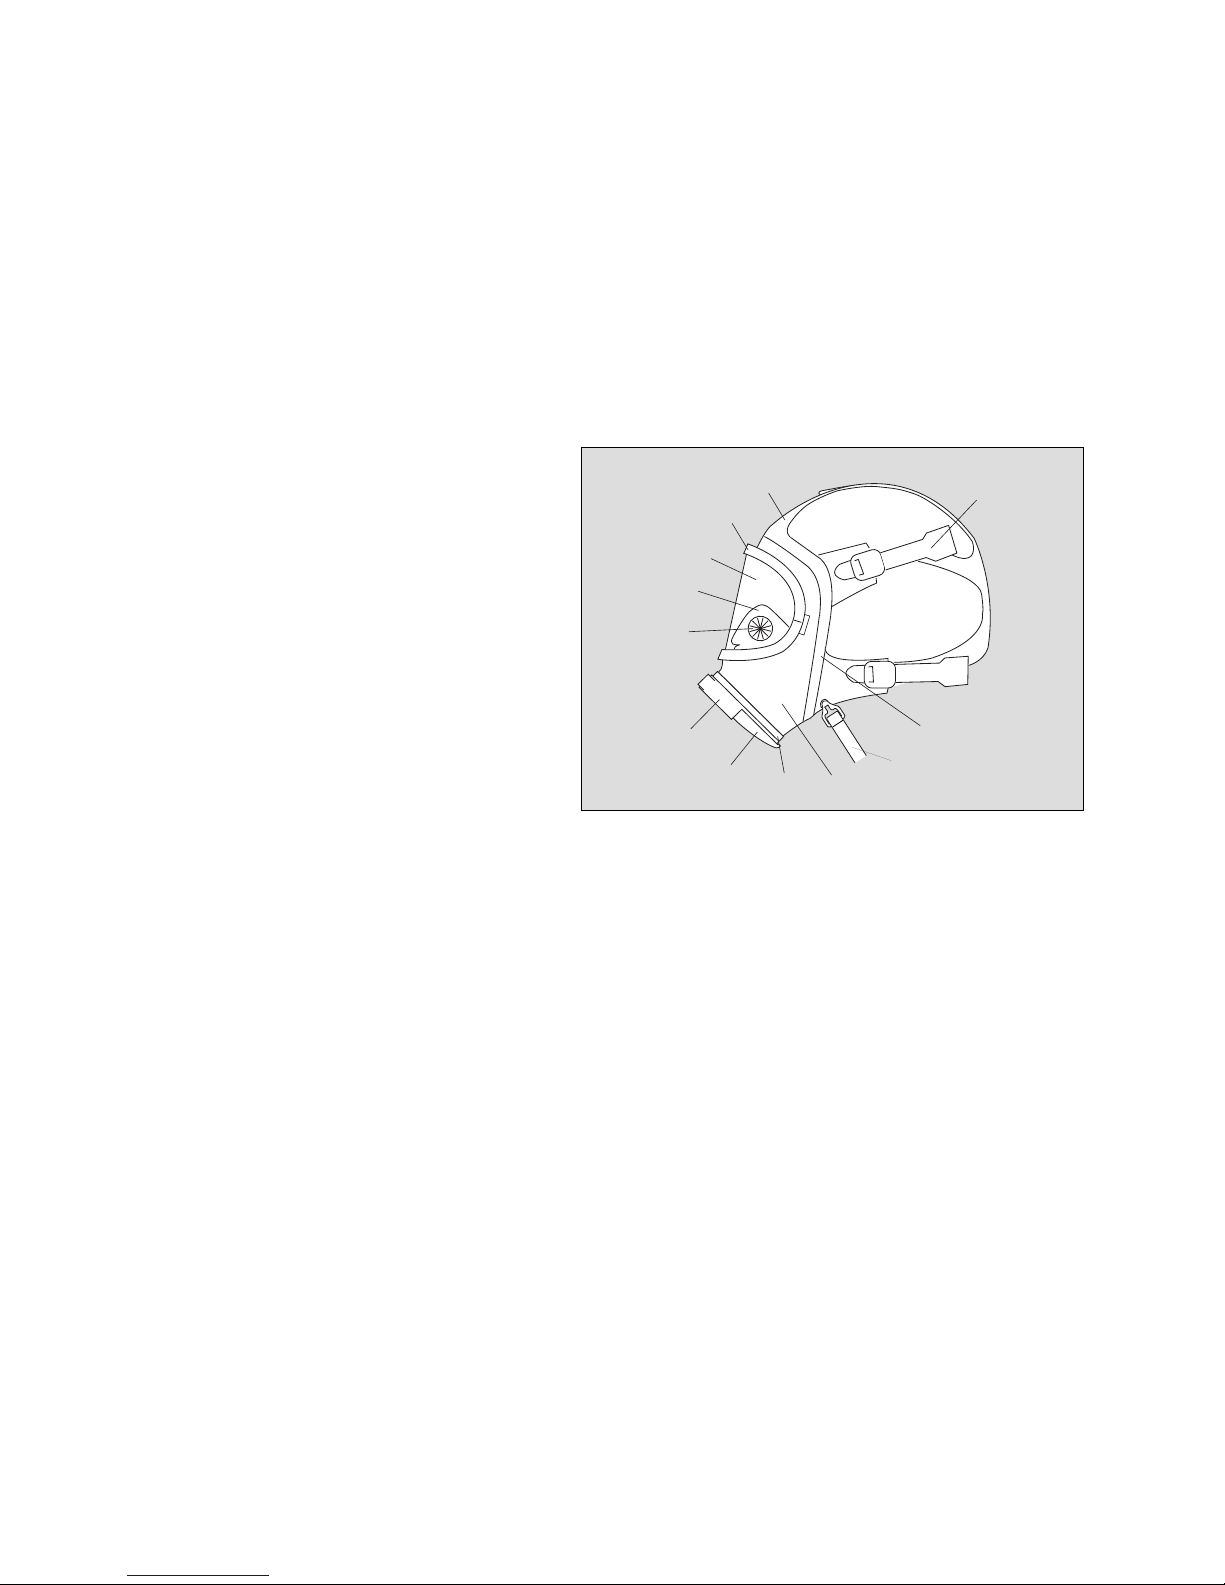
1 Anschlussstück 7 Bänderung
2 Steuerventil 8 Dichtrahmen
3 Innenmaske 9 Trageband
4 Sichtscheibe 10 Maskenkörper
5 Spannrahmen 11 Schelle
6 Stirnbandlasche 12 Ausatemventil-Schutzkappe
1
3
4
2
5
11
6
7
9
10
8
00921453.eps
12
Page 3

3
Die Vollmaske hat einen Einheitssteckanschluss nach DIN 58 600
und ein Gewinde Rd 40x1/7" nach EN 148-1. An den Einheitssteckanschluss dürfen nur zugelassene Überdruck-Pressluftatmer oder Überdruck-Schlauchgeräte angeschlossen werden. An das Gewinde
dürfen nur zugelassene Atemfilter, Normaldruck-Pressluftatmer und
Normaldruck-Schlauchgeräte angeschlossen werden.
Typidentische Kennzeichnungen
Die Vollmasken der Serie Panorama Nova PE/ESA sind unterschiedlich gekennzeichnet:
Zulassungen
Die Vollmasken sind Atemanschlüsse nach EN 136 CL. 3 und mit CE
gekennzeichnet. Zusätzlich erfüllen sie die Anforderung der Totalbeflammung (flame engulfment) nach EN 137.
Werden die Vollmasken mit Atemschutzgeräten verwendet, die einen
Gewindeanschluss nach EN 148-1 besitzen, so entsprechen die Vollmasken hinsichtlich des Ausatemwiderstandes nicht der EN 136. Die
Vollmasken erfüllen jedoch die Anforderungen der PSA-Richtlinie 89/
686/EWG.
Die Vollmasken sind gemäß 94/9/EC für den Gebrauch in explosionsgefährdeten Bereichen geprüft und erreichen folgende Schutzklassen:
Vollmasken, deren Sichtscheiben mit "L" gekennzeichnet sind:
Maskenkörper EPDM oder SI
EN 136 CL. 3, CE0158
Anschlussstück PE/ESA
Sichtscheibe PC bzw. PC/CC (innen antibeschlag-/
außen antikratz-beschichtet) oder L
I M1
II 1 G IIC T6
1)
II 1D
1) -30 °C ≤ Ta ≤ +60 °C
I M1
II 1 G IIB T6
1)
II 1D
I M1
II 1 G IIA T6
1)
II 1D
Vollmasken, deren Sichtscheiben mit "PC" oder "PC/CC" gekennzeichnet sind:
Gebrauch
Voraussetzungen für den Gebrauch
Der Unternehmer/Anwender muss vor dem ersten Gebrauch Folgendes sicherstellen (siehe Europäische Richtlinie 89/656/EWG):
– die Passform muss richtig sein, damit z. B. einwandfreier Dichtsitz
gewährleistet ist,
– die Persönliche Schutzausrüstung muss mit jeder anderen gleich-
zeitig getragenen Persönlichen Schutzausrüstung (z. B. Schutzjacke) zusammenpassen,
– die Persönliche Schutzausrüstung muss für die jeweiligen Ar-
beitsplatzbedingungen geeignet sein,
– die Persönliche Schutzausrüstung muss den ergonomischen An-
forderungen und den gesundheitlichen Erfordernissen des jeweiligen Atemschutzgeräteträgers entsprechen.
Vollmaske für den Gebrauch vorbereiten
z Bänderung bis zum Anschlag öffnen.
z Trageband um den Nacken legen und in der Bereitstellungsposi-
tion befestigen.
I M1
II 1 G IIB T6
1)
II 1D
1) -30 °C ≤ Ta ≤ +60 °C
I M1
II 1 G IIA T6
1)
II 1D
Page 4
4
Vollmaske anlegen und Funktionsfähigkeit prüfen
z Trageband ausknöpfen.
z Bänderung ausbreiten und Kinn in die
Kinnmulde des Maskenkörpers legen.
z Bänderung über den Kopf ziehen und
nach hinten streifen.
z Vollmaske zurechtrücken.
z Zuerst die Nackenbänder (1), dann die
Schläfenbänder (2) und zuletzt das
Stirnband (3) gleichmäßig straff spannen.
z Helm
1)
aufsetzen, Kinnriemen schließen und prüfen, dass der Helm fest am
Kopf sitzt. Ggf. Kinnriemen nachziehen.
z Anschlussstück mit der Hand dichthal-
ten und einatmen, bis ein Unterdruck entsteht.
z Luft kurzzeitig anhalten.
Der Unterdruck soll bestehen bleiben, sonst Bänder nachziehen.
z Die letzten 2 Schritte zweimal wiederholen.
z Anschlussstück dichthalten und kräftig ausatmen. Die ausgeat-
mete Luft muss ungehindert entweichen können, sonst siehe
“Ausatemventil sichtprüfen” auf Seite 6.
z Pressluftatmer, Schlauchgerät oder Atemfilter anschließen
1)
.
WARNUNG
Bärte und Koteletten im Dichtungsbereich der Vollmaske verursachen Leckagen! Entsprechende Personen sind für das Tragen der
Vollmaske ungeeignet. Brillenbügel im Dichtungsbereich verursachen ebenfalls Leckagen. Maskenbrille verwenden.
WARNUNG
Einsatz nur mit dichter Vollmaske antreten!
Wenn die Vollmaske undicht ist, besteht Vergiftungsgefahr!
00321453.eps
00421453.eps
2
1
3
z Durch Drehen und kräftiges Ziehen am Lungenautomaten den
festen Sitz überprüfen. Die Festigkeit und korrekte Verbindung
durch eine zweite Person überprüfen lassen.
Gebrauch mit Atemfilter
Voraussetzungen
– Der Sauerstoffgehalt der Umgebungsluft darf nicht unter folgende
Grenzwerte sinken:
17 Vol.-% in Europa mit Ausnahme der Niederlande, Belgien, UK
19 Vol.-% in den Niederlanden, Belgien, UK, Australien, Neuseeland.
Für andere Länder nationale Vorschriften beachten!
– Unbelüftete Behälter, Gruben, Kanäle usw. dürfen mit Filtergerä-
ten nicht betreten werden.
– Die Art der Schadstoffe muss bekannt sein, entsprechendes
Atemfilter einsetzen.
Atemfilter einschrauben
z Verschlussstreifen vollständig entfernen und Atemfilter im Uhrzei-
gersinn fest in das Anschlussstück einschrauben.
Gebrauchsdauer
Die Gebrauchsdauer ist u. a. abhängig von Art und Konzentration der
Schadstoffe sowie von der Art des Atemfilters
1)
.
Extreme Einsatzbedingungen
Tiefe Temperaturen
Nicht beschichtete Sichtscheibe innen mit Klarsichtmittel "klar-pilot"
Gel gegen Beschlagen schützen
1)
. Beschichtete Sichtscheiben nicht
abwischen.
1) Zugehörige Gebrauchsanweisung beachten.
Page 5

5
Hohe Temperaturen/Thermische Wechselbelastung
Bei den mit PC/CC gekennzeichneten Sichtscheiben kann sich die
Beschichtung stellenweise ablösen. Die Funktion der Vollmaske wird
dadurch nicht eingeschränkt. Sie ist bis zum Ende des Einsatzes gebrauchsfähig. Sichtscheibe nach dem Einsatz austauschen.
Chemikalien
Einige Stoffe können vom Material der Vollmaske aufgenommen werden und ggf. auch eindiffundieren. Weiterführende Informationen sind
bei Dräger erhältlich.
Nach Gebrauch
z Lungenautomat bzw. Atemfilter lösen1).
z Atemfilter entsorgen
1)
.
z Vollmaske abnehmen:
Zeigefinger hinter die Laschen der Nackenbänder stecken, mit den Daumen
die Klemmschnallen nach vorn drücken und gleichzeitig die Vollmaske
vom Gesicht weg über den Kopf
ziehen.
Wartung
z Nach Instandhaltungsarbeiten und/oder Austausch von Bauteilen
erneut Dichtheit prüfen.
Reinigung und Desinfektion
Zubehör vor der Reinigung von der Vollmaske abnehmen und gesondert reinigen
1)
.
WARNUNG
Wenn Bläschen in der Sichtscheibe auftreten, ist das ein Zeichen
dafür, dass die Sichtscheibe weich wird. In diesem Fall den Gefahrenbereich sofort verlassen, da die Vollmaske undicht werden kann.
1) Zugehörige Gebrauchsanweisung beachten.
00521453.eps
Vollmaske nach jedem Einsatz reinigen und desinfizieren.
Vollmaske folgendermaßen reinigen und desinfizieren:
z Vollmaske mit Wasser (max. 30 °C) unter Zusatz von Universal-
reinigungsmittel Sekusept Cleaner
®1)
(0,5-1,0 %ige Lösung) reinigen. Das Reinigungsmittel sofort mit fließendem Wasser vollständig entfernen.
z Vollmaske 15 Min. ins Desinfektionsbad (max. 30 °C) mit Desin-
fektionsmittel Incidur
®1)
(2 %ige Lösung) legen. Das Desinfekti-
onsmittel sofort mit fließendem Wasser vollständig entfernen.
WARNUNG
Der Maskenkörper muss so gründlich gereinigt werden, dass keine
Rückstände von Hautpflege-Produkten am Maskenkörper bleiben.
Andernfalls kann die Elastizität im Dichtbereich verloren gehen und
die Vollmaske sitzt nicht mehr richtig.
Wird diese Warnung nicht beachtet, kann dies zu Vergiftung oder
zum Tod führen.
VORSICHT
Zum Reinigen keine Lösungsmittel wie Aceton, Alkohol u. ä. verwenden. Nur die unten genannten Reinigungs- und Desinfektionsmittel verwenden. Zu hohe Dosierung und zu lange Einwirkzeiten,
die von den hier beschriebenen Angaben bzw. von den Angaben
des Reinigungs- und Desinfektionsmittelherstellers abweichen, können Schäden an der Vollmaske hervorrufen, z. B. kann die Sichtscheibe spröde werden.
Vollmasken mit einer Sichtscheibe, die mit "PC/CC" gekennzeichnet
ist, auf der Innenseite nicht mit einem Lappen reinigen oder trocknen, da hierbei die Beschichtung beschädigt werden kann. Diese
Vollmasken sollten nach dem Trocknen mindestens für einen Tag
bei Normalklima nach DIN EN ISO 291 unverpackt ablüften, damit
sich die Beschichtung regenerieren kann und eine optimale
Gebrauchsdauer erreicht wird.
Page 6
6
z Vollmaske im Trockenschrank oder an der Luft vollständig trock-
nen lassen. Temperatur max. 60 °C. Nicht dem direkten Sonnenlicht aussetzen.
Prüfen
Vollmaske gemäß den Prüf- und Instandhaltungsintervallen prüfen.
Prüf- und Instandhaltungsintervalle
Die folgenden Angaben sind Empfehlungen gemäß der in Deutschland gültigen BGR 190. Nationale Richtlinien beachten.
Sprechmembran sichtprüfen
z Sprechmembran ausbauen (siehe “Sprechmembran bzw. O-Ring
austauschen” auf Seite 8).
Einatemventil sichtprüfen
z Das Einatemventil ist im Anschlussstück sichtbar. Durch Hinein-
blasen prüfen, ob die Ventilscheibe frei beweglich ist. Ventilscheibe ggf. austauschen.
Art der durchzuführenden
Arbeiten
Vor Gebrauch
Nach Gebrauch
Halbjährlich
alle 2 Jahre
alle 4 Jahre
alle 6 Jahre
Kontrolle durch den Geräteträger X
Sicht-, Funktions- und Dichtprü-
fung
X
X
1)
1) Bei luftdicht verpackten Masken alle 2 Jahre.
Reinigung und Desinfektion X
X
2)
2) Bei luftdicht verpackten Masken, sonst halbjährlich.
Wechsel der
Ausatemventilscheibe
X
Wechsel der Sprechmembran X
Ausatemventil sichtprüfen
z Ausatemventil-Schutzkappe vom An-
schlussstück abziehen.
z Einen Schenkel nach außen ziehen
und Federbrücke abnehmen.
z Ventilscheibe am Nippel anfassen und
aus der Führung herausziehen.
z Ventilscheibe und -sitz müssen sauber und unbeschädigt sein,
sonst reinigen oder austauschen.
z Ventilscheibe mit Wasser befeuchten und einsetzen. Die Ventil-
scheibe muss durch ihr Eigengewicht in die Führung hineingleiten.
z Federbrücke so einsetzen, dass beide Schenkel seitlich einras-
ten. Sie ist mit "L" = links und "R" = rechts gekennzeichnet und
steht angewinkelt.
Dichtprüfungen
Prüfgerät und -zubehör: Testor (R 53 400)
1)
, Quaestor1), Adapter
(R 53 345), Ausatemventil-Stopfen (R 53 346).
(1) Dichtheit prüfen
z Dichtrahmen innen mit Wasser befeuchten und Vollmaske auf
dem Prüfkopf montieren (siehe “Vollmaske anlegen und Funktionsfähigkeit prüfen” auf Seite 4).
z Prüfkopf aufblasen, bis der Dichtrahmen überall anliegt.
z Anschlussstück mit Adapter dichtsetzen.
z 10 mbar Unterdruck erzeugen.
Die Vollmaske gilt als dicht, wenn die Druckänderung nach 1 Minute
nicht mehr als 1 mbar beträgt. Sonst folgt (2).
(2) Prüfung mit dichtgesetztem Ausatemventil
z Ausatemventilscheibe ausbauen.
z Ausatemventil-Stopfen einsetzen und mit Federbrücke befesti-
gen.
z 10 mbar Unterdruck erzeugen.
1) Zugehörige Gebrauchsanweisung beachten.
00621453.eps
L R
Page 7

7
z Bei Druckänderung kleiner als 1 mbar nach 1 Minute Ausatem-
ventil-Stopfen entfernen, neue Ventilscheibe einsetzen und Dichtprüfung wiederholen.
Sonst folgt (3).
(3) Dichtprüfung unter Wasser
z Prüfkopf einschließlich Vollmaske ins Wasser eintauchen.
z Ca. 10 mbar Überdruck erzeugen und Prüfkopf unter der Was-
seroberfläche langsam drehen.
Austretende Luftblasen zeigen die undichte Stelle an.
z Prüfkopf und Vollmaske aus dem Wasser herausnehmen, undich-
te Stellen abdichten.
z Ausatemventil-Stopfen entfernen und Ausatemventil montieren.
z Dichtprüfung wiederholen.
Öffnungsdruck des Ausatemventils prüfen
Bei Verwendung des Prüfgerätes Quaestor soll der Öffnungsdruck bei
konstantem Durchfluss von 10 Litern pro Minute durch die Vollmaske
mindestens 4,2 mbar betragen. Sonst Feder austauschen und Prüfung wiederholen. Bei Verwendung eines Prüfgerätes, das diesen
konstanten Durchfluss nicht erlaubt (z. B. Testor) soll der Öffnungsdruck mindestens 4,5 mbar betragen.
Nach der Prüfung
z Adapter entfernen.
z Vollmaske vom Prüfkopf abnehmen und ggf. trocknen.
z Ausatemventil-Schutzkappe aufsetzen, muss einrasten.
Besondere Wartungsarbeiten
Sichtscheibe austauschen
z Vollmasken mit Metall-Spannrahmen:
Schrauben herausdrehen, dabei Sechskantmuttern festhalten.
z Vollmasken mit Kunststoff-Spannrahmen:
Schrauben herausdrehen.
z
Spannrahmen an den Verbindungsstellen mit einem Schraubendreher auseinanderdrücken, dann nach oben und unten abziehen.
z Ggf. Stützblech entfernen (siehe “Anschlussstück austauschen”
auf Seite 7).
z Alte Sichtscheibe aus der Gummifassung knüpfen.
z Neue Sichtscheibe zuerst in den oberen, dann in den unteren Teil
der Gummifassung einsetzen.
Die Mittenmarkierungen auf der Sichtscheibe sollen sich mit der
Naht auf dem Maskenkörper decken.
z Gummifassung rechts und links über den Rand der Sichtscheibe
ziehen.
z Gummifassung außen und Spannrahmen innen mit Seifenwasser
befeuchten.
z Zuerst den oberen, dann den unteren Spannrahmen aufpressen.
z Ggf. Stützblech einsetzen.
z Vollmasken mit Metall-Spannrahmen:
Schrauben in die Sechskantmuttern hineinschrauben und so weit
anziehen, bis der Abstand zwischen den Spannnocken 3 bis
0,5 mm beträgt.
z Vollmasken mit Kunststoff-Spannrahmen:
Schrauben einsetzen und festziehen, bis kein Spalt mehr zwischen oberem und unterem Spannrahmen ist.
Anschlussstück austauschen
z Innenmaske herausziehen.
z Schelle mit Hilfe eines Schraubendrehers aufhebeln.
z Schelle sowie Gleitring und Stützblech abnehmen.
z Anschlussstück aus dem Maskenkörper herausziehen.
z Neues Anschlussstück mit Sprechmembran sowie Aus- und Ein-
atemventil bestücken und so einsetzen, dass sich die Mittenmarkierungen von Anschlussstück und Maskenkörper decken.
z Gleitring und neue Schelle montieren.
z Haken so einhängen, dass die Schelle möglichst stramm sitzt.
z Stützblech zwischen Schelle und Gleitring schieben, an den un-
teren Spannrahmen klemmen und ausrichten.
z Nase der Schelle mit Hilfe der Zange R 53 239 zusammendrü-
cken, bis das Anschlussstück fest im Maskenkörper sitzt.
Page 8

8
z Innenmaske einknöpfen. Darauf achten, dass der Rand rundher-
um in der Nut liegt. Die Mittenmarkierungen am Anschlussstück
und an der Innenmaske müssen sich decken.
Ventilscheiben für Steuerventile austauschen
z Alte Ventilscheiben nach innen herausziehen.
z Zapfen der neuen Ventilscheiben von innen in die Bohrung ste-
cken und in Richtung Sichtscheibe ziehen, bis der Hinterschnitt
des Zapfens sichtbar wird.
Die Ventilscheiben sollen innen gleichmäßig anliegen.
Sprechmembran bzw. O-Ring austauschen
z Innenmaske aus der Nut des
Schraubrings herausziehen.
z Schraubring mit Stiftschlüssel
R 26 817 herausschrauben.
z Stiftschlüssel umdrehen und vorsichtig
in die Löcher des Schutzgitters stecken, Membranfolie nicht beschädigen.
z Sprechmembran durch Drehen lösen und herausnehmen.
z O-Ring mit Dichtringausheber R 21 519 aus dem Anschlussstück
herausnehmen.
z Sprechmembran und O-Ring prüfen und ggf. austauschen.
z Innenmaske einknöpfen. Darauf achten, dass der Rand rundher-
um in der Nut liegt. Die Mittenmarkierungen am Anschlussstück
und an der Innenmaske müssen sich decken.
Ausatemventilscheibe austauschen
z Ausatemventilscheibe austauschen (siehe “Ausatemventil sicht-
prüfen” auf Seite 6).
z Ausatemventil-Schutzkappe aufsetzen, muss einrasten.
Einatemventil bzw. -ventilscheibe austauschen
z Einatemventil mit einem stumpfen Gegenstand oder dem
Dichtringausheber R 21 519 an der Rundgewindedichtung anheben und herausziehen.
z Alte Ventilscheibe ab- und neue Ventilscheibe aufknüpfen.
z Danach Einatemventilsitz mit Ventilscheibe V-förmig am Umfang
eindrücken und so in das Anschlussstück einschnappen lassen,
dass er rundherum aufliegt. Die Ventilscheibe darf nicht eingeklemmt sein. Die Scheibe zeigt nach innen, die Stege zeigen nach
außen.
Lagern
z Bänderung bis zum Anschlag (Grifflasche) öffnen.
z Nicht beschichtete Sichtscheiben mit einem Antistatiktuch abwi-
schen. Beschichtete Sichtscheiben nicht abwischen.
z Vollmaske in zugehörigem Beutel oder Maskendose verpacken.
z Ohne Verformung trocken und staubfrei lagern.
Lagertemperatur -15 °C bis +25 °C.
Vor direkter Licht- und Wärmestrahlung schützen.
ISO 2230 "Rubber Products - Guidelines for Storage" und nationale
Richtlinien für Lagerung, Wartung und Reinigung von Gummierzeugnissen beachten.
Dräger Gummiwaren sind mit einem Mittel gegen vorzeitiges Altern
geschützt, das in einigen Fällen als grauweißer Belag sichtbar wird.
Dieser Belag kann mit Seifenwasser und Bürste abgewaschen werden.
Page 9

9
Bestellliste
Benennung und Beschreibung Bestellnummer
Panorama Nova – EPDM – PC – PE/ESA R 55 001
Panorama Nova – EPDM – PC/CC – PE/ESA R 55 003
Panorama Nova – EPDM – L – PE/ESA R 55 004
Panorama Nova – SI – PC – PE/ESA R 55 005
Maskenbrille R 51 548
"klar-pilot" Gel R 52 560
Sekusept Cleaner 79 04 071
Incidur 79 04 072
Tragedose Mabox I R 53 680
Tragedose Mabox II R 54 610
Tragedose Wikov V R 51 019
Page 10

10
For your safety
Strictly follow the operating manual
Any use of the full face mask requires full understanding and strict
observation of this operating manual.
The full face mask may only be used for the purposes specified here.
Maintenance
The full face mask must be regularly inspected and maintained by
specialists.
Only have repairs carried out by specialists.
We recommend taking out a service contract with Dräger and having
all repairs carried out by Dräger.
Only original Dräger parts may be used for maintenance.
Note the instructions in the chapter entitled "Maintenance intervals".
Accessories
Only use the accessories listed in the ordering list.
Use in potentially explosive atmospheres
Full face masks that are used in potentially explosive atmospheres
and have been tested and approved to national, European or
international explosion protection standards, may only be used under
the conditions specified in the approval and with regard to the relevant
statutory regulations.
No modifications may be made to the equipment.
The use of defective or incomplete parts is not permissible.
The corresponding regulations must be observed when carrying out
repairs to these components or apparatus.
Description
What’s what
Description/Purpose
The full face mask protects the face and eyes from hostile media.
Wearers of spectacles can use mask spectacles. Usable over a
temperature range of -30 °C to + 60 °C.
1 Connector 7 Harness
2 Control valve 8 Face seal
3 Inner mask 9 Carrier strap
4 Visor 10 Mask body
5 Visor frame 11 Clamping ring
6 Front head strap 12 Exhalation valve cover
1
3
4
2
5
11
6
7
9
10
8
00921453.eps
12
Page 11

11
The full face mask has a plug-in connector conforming to DIN 58 600
and an Rd 40x1/7" thread conforming to EN 148-1. Only approved
positive pressure self-contained breathing apparatus or positive
pressure hose breathing respirators should be connected to the plugin connector. Only approved breathing filters, normal pressure selfcontained breathing apparatus and normal pressure hose breathing
respirators may be connected to the thread.
Type identity markings
The full face masks in the Panorama Nova PE/ESA range are marked
differently:
Approvals
The full face masks are breathing connections conforming to
EN 136 CL. 3 and carry the CE mark. In addition, they meet the
requirement for flame engulfment according to EN 137.
If the full face masks are used with respiratory protective devices that
have a threaded connection conforming to EN 148-1, then the full face
masks do not comply with the EN 136 in terms of exhalation
resistance. The full face masks do however comply with the
requirements of the PSA guideline 89/686/EEC.
The full face masks are tested in accordance with 94/9/EC for use in
potentially explosive atmospheres and meet the following protection
classes:
Full face masks with visors marked with "L":
Mask body EPDM or SI
EN 136 CL. 3, CE0158
Connector PE/ESA
Visor PC or PC/CC (inside anti-mist / outside
anti-scratch coated) or L
I M1
II 1 G IIC T6
1)
II 1D
1) -30 °C ≤ Ta ≤ +60 °C
I M1
II 1 G IIB T6
1)
II 1D
I M1
II 1 G IIA T6
1)
II 1D
Full face masks with visors marked with "PC" or "PC/CC":
Use
Preliminary requirements for use
Before using the mask for the first time, the employer/user must
ensure the following (see European Directive 89/656/EEC):
– the fit must be correct, so that, e.g., proper seating of the seal is
guaranteed,
– the personal protection equipment must match with any other
personal protection equipment (e.g., protective jacket) worn at the
same time,
– the personal protection equipment must be suitable for the
prevailing workplace conditions,
– the personal protection equipment must conform to the ergonomic
requirements and the health needs of the respective breathing
apparatus wearer.
Preparing the full face mask for use
z Open the harness as far as possible.
z Position the carrier strap around the neck and fasten it in the
standby position.
I M1
II 1 G IIB T6
1)
II 1D
1) -30 °C ≤ Ta ≤ +60 °C
I M1
II 1 G IIA T6
1)
II 1D
Page 12

12
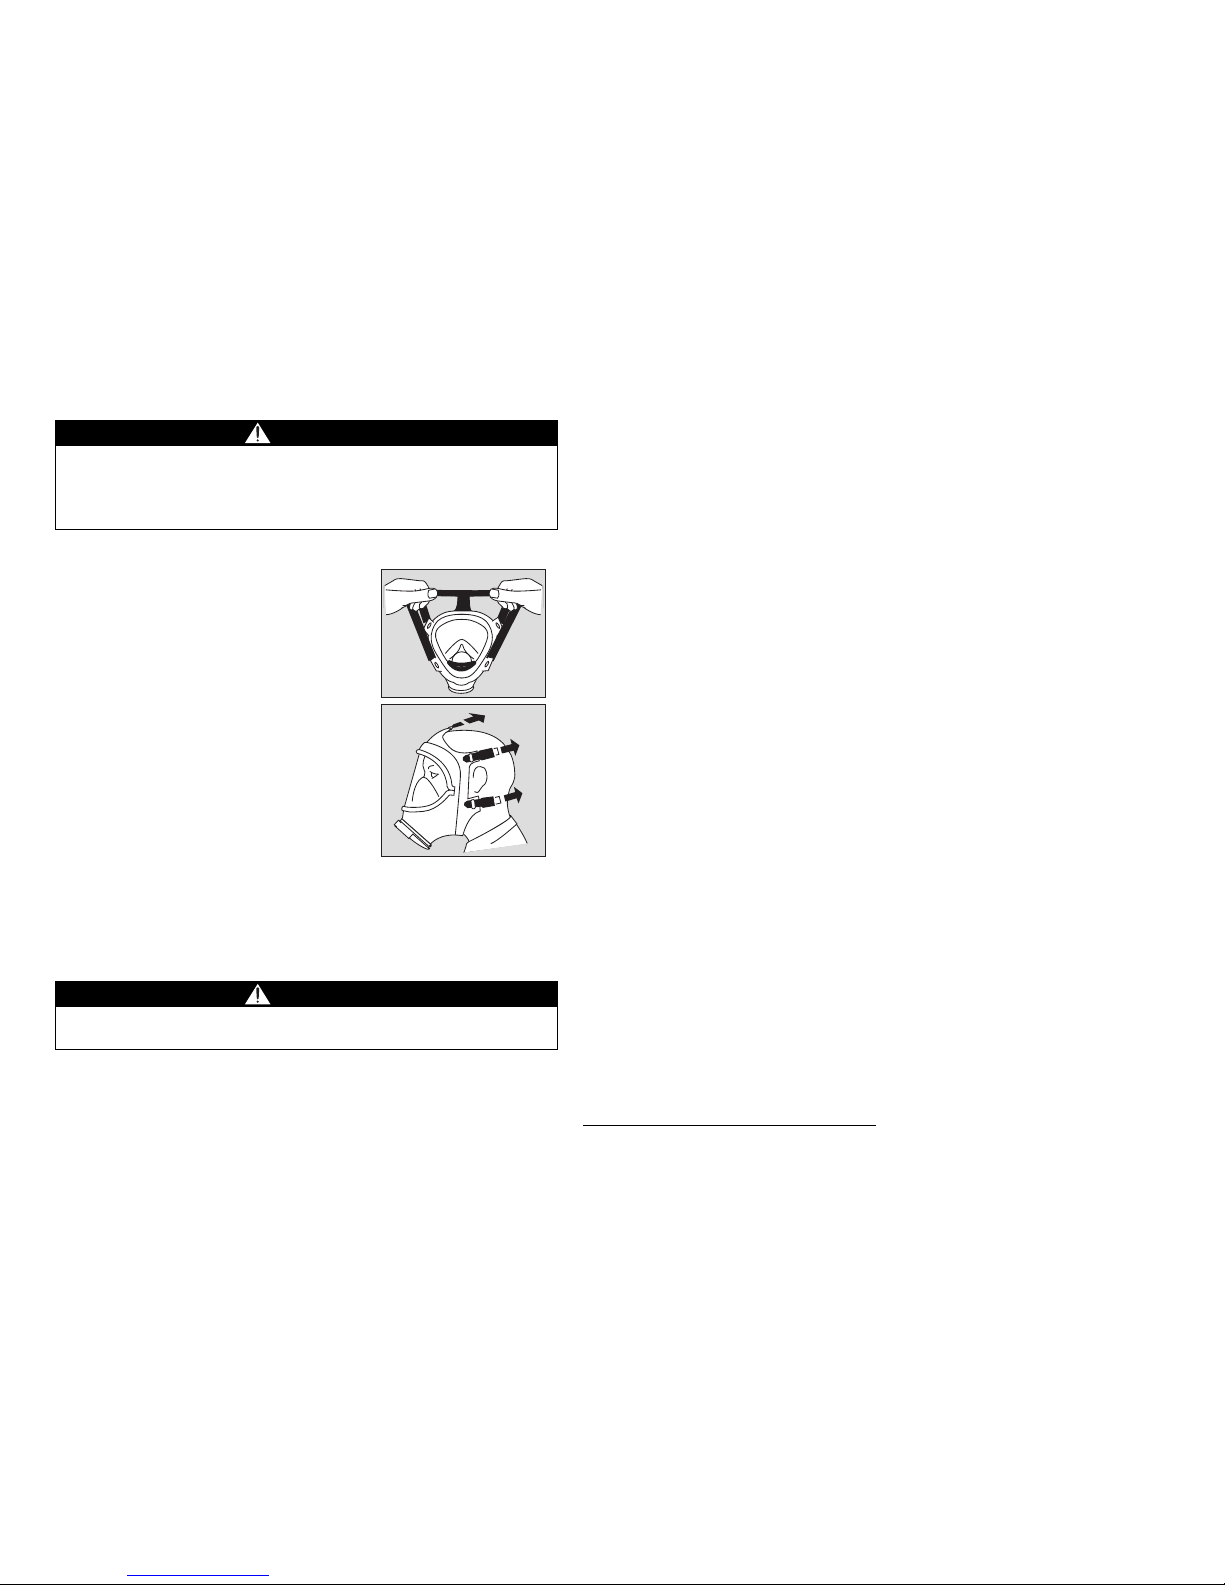
Fitting the full face mask and checking its operability
z Undo the carrier strap.
z Open out the harness and place the
chin in the chin piece in the mask body.
z Pull the harness over the head and pull
it back.
z Adjust the full face mask until it fits
properly.
z First tighten the neck straps (1) evenly,
then the temple straps (2) and finally
the front strap (3).
z Fit the helmet
1)
, close the chin strap
and check that the helmet is sitting
firmly on the head. Retighten the chin
strap if necessary.
z Manually seal the connector and
breathe in to produce a negative
pressure.
z Hold your breath for a moment.
The negative pressure should be maintained. If not, retighten the
straps.
z Repeat the last 2 steps twice.
z Seal the connector and breathe out forcefully. It must be possible
for the exhaled air to escape without obstruction. If not, see
“Visually inspect the exhalation valve” on page 14.
WARNING
Beards and sideburns in the sealing area of the full face mask will
cause leaks! Therefore the full face mask should not be used by
anyone with facial hair of this sort. Spectacle frames in the sealing
area also cause leaks. Use special mask spectacles.
WARNING
Never use a full face mask that leaks!
If the full face mask leaks, there is a risk of poisoning!
00321453.eps
00421453.eps
2
1
3
z Connect the self-contained breathing apparatus, hose breathing
respirator or breathing filter
1)
.
z Check that the demand valve is securely fitted by turning it and
pulling on it forcefully. Have the tightness and correct connection
checked by a second person.
Use with a breathing filter
Preliminary requirements
– The oxygen content of the ambient air must not fall below the
following thresholds:
17 vol.-% in Europe with the exception of the Netherlands,
Belgium and the UK
19 vol.-% in the Netherlands, Belgium, UK, Australia and New
Zealand.
Observe the national directives for other countries!
– Non-ventilated containers, pits, channels etc. must not be entered
with filter devices.
– The type of pollutant must be known and the appropriate
breathing filter used.
Screwing in the breathing filter
z Completely remove the seal strips and firmly screw in the
breathing filter into the connector in a clockwise direction.
Working life
Among other things, the working life is dependent on the type and
concentration of pollutant as well as the type of breathing filter
1)
.
Extreme operating conditions
Low temperatures
If it is not already coated, treat the inside of the visor with "klar-pilot"
anti-misting gel to prevent it from fogging up
1)
. Do not wipe coated
visors.
1) Note the corresponding Instructions for Use.
Page 13

13
High temperatures/Thermal cycling
For visors marked PC/CC, the coating of the visor may blister and
come off in places. The function of the full face mask will not be
restricted as a result. It will continue to be usable until the end of the
deployment. Replace the visor after use.
Chemicals
Some substances can be absorbed by the material of the full face
mask or may even diffuse through it. Further information can be
obtained from Dräger.
After use
z Release the demand valve or breathing filter1).
z Dispose of the breathing filter
1)
.
z Remove the full face mask:
Insert index finger behind the tabs on
the neck straps and press the buckles
forwards with the thumbs whilst
simultaneously pulling the full face
mask forward off your face and then up
and back over your head.
Maintenance
z Always test for leaks after servicing and/or replacing components.
Cleaning and disinfection
Before cleaning, remove any accessories from the mask and clean
them separately
1)
.
WARNING
If bubbles appear in the visor, it is a sign that the visor is becoming
soft. In this case, leave the danger zone immediately, as the full face
mask can start to leak.
1) Note the corresponding Instructions for Use.
00521453.eps
The full face mask must be cleaned and disinfected after every use.
Clean and disinfect the full face mask as follows:
z Clean the full face mask using water (max. 30 °C) with a universal
cleaning agent, Sekusept Cleaner
®1)
(0.5-1.0 % solution).
Immediately afterwards, remove the cleaning agent completely
under running water.
z Immerse the full face mask for 15 minutes in the disinfectant bath
(max. 30 °C) with Incidur
®1)
disinfectant (2 % solution).
Immediately afterwards, remove the disinfectant completely under
running water.
z Leave the full face mask to dry thoroughly in a drying cabinet or in
the open air. Temperature max. 60 °C. Do not expose to direct
sunlight.
WARNING
The mask body must be cleaned sufficiently thoroughly that no
residues from skin care products remain on it.
Otherwise there could be a loss of elasticity in the sealing area and
the mask will no longer sit correctly.
Failure to heed this warning could result in poisoning or death.
CAUTION
Do not use solvents such as acetone, alcohol or similar for cleaning.
Use only the cleaning agents and disinfectants listed below.
Excessive dosing and extended exposure times that deviate from
the specifications described here or from the specifications of the
manufacturer of the cleaning and disinfection agent, can cause
damage to the full face mask, e.g. the visor can become brittle.
Do not use a cloth to clean or dry the inside of full face masks with
visors that are marked "PC/CC", as the coating can be damaged as
a result. After drying, these full face masks should be aired
unpacked for at least one day under standard climatic conditions
according to DIN EN ISO 291, so that the coating can regenerate
and the optimum working life is achieved.
Page 14

14
Testing
Test the full face mask in accordance with the test and maintenance
intervals.
Test and maintenance intervals
The following details are recommendations based on the BGR 190
applicable in Germany. Observe your own national guidelines.
Visually inspect the speech diaphragm
z Remove the speech diaphragm (see “Replacing the speech
diaphragm or O-ring” on page 16).
Visually inspect the inhalation valve
z The inhalation valve is visible in the connector. Check by blowing
into it that the valve disc moves freely. If necessary, replace the
valve disc.
Work required on a full face
mask
Before use
After use
Every 6 months
Every 2 years
Every 4 years
Every 6 years
Check by the wearer X
Visually inspect, check correct
function and leak-proofing
X
X
1)
1) For airtight packed masks, every 2 years.
Cleaning and disinfection X
X
2)
2) For airtight packed masks, otherwise every 6 months.
Replace the exhalation valve
disc
X
Replace the speech diaphragm X
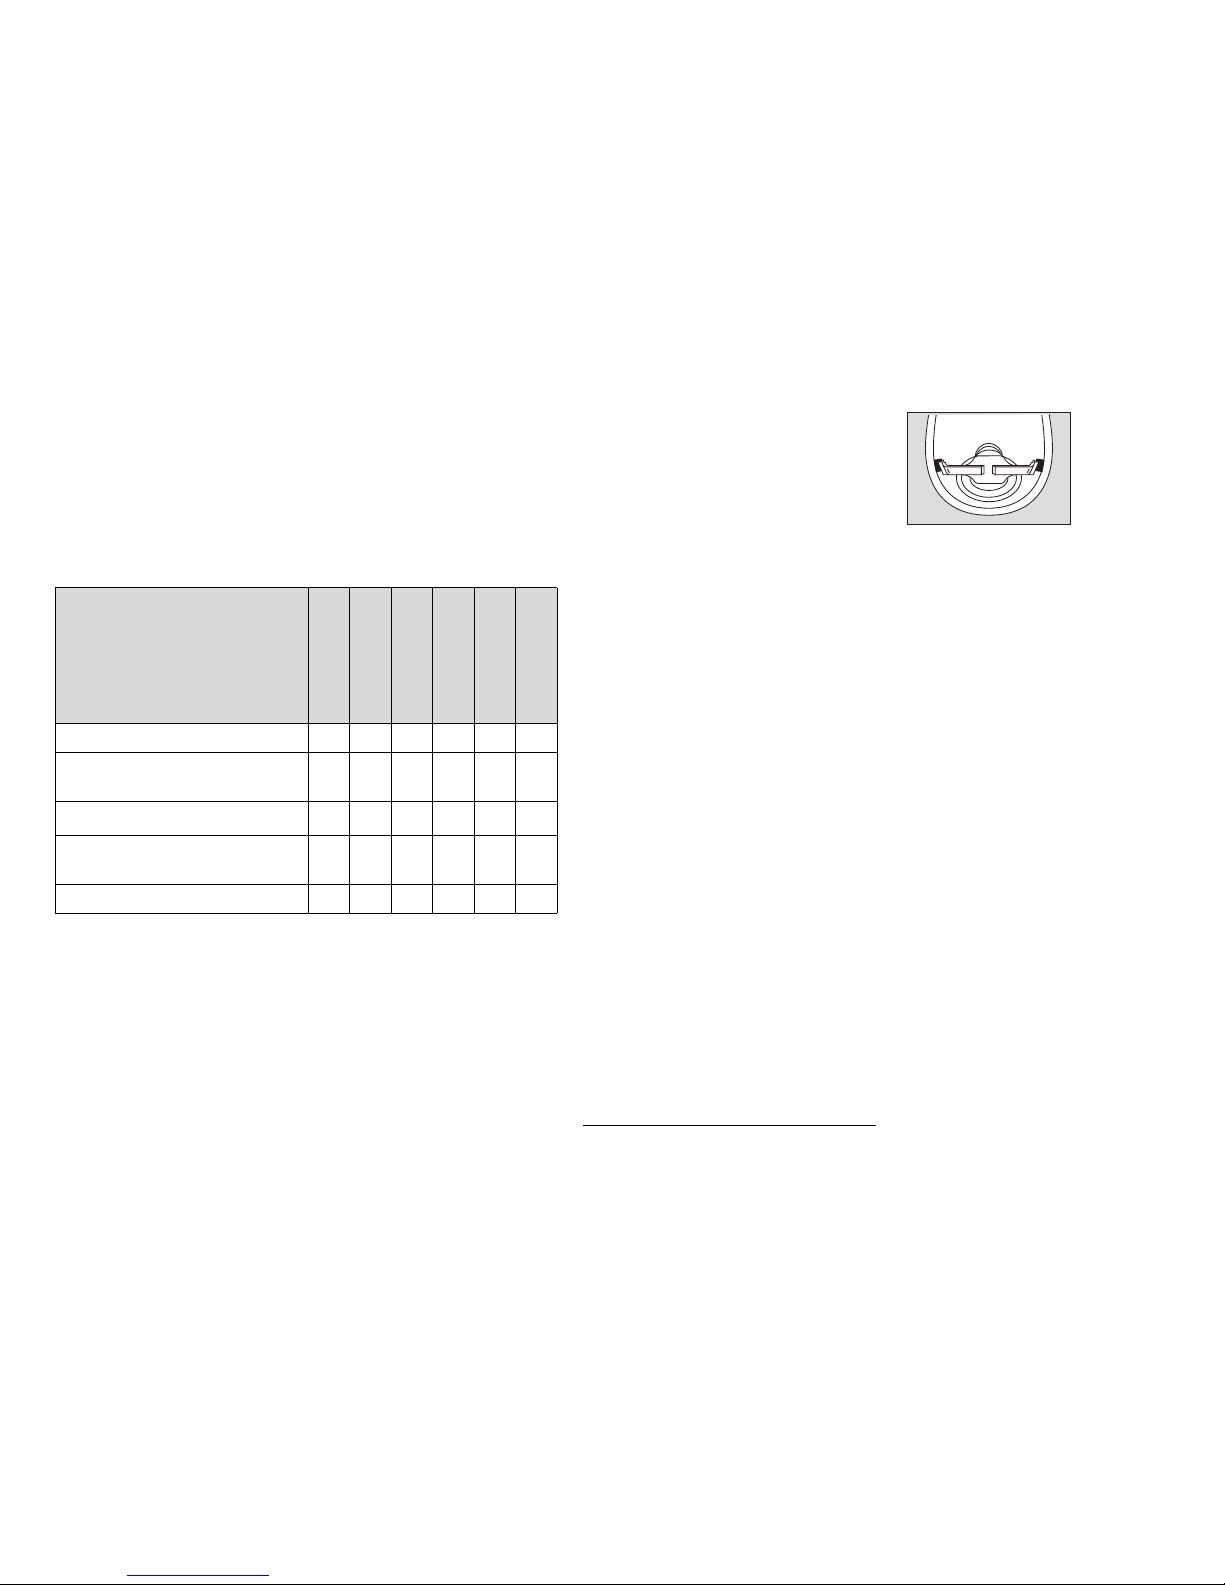
Visually inspect the exhalation valve
z Pull off the exhalation valve cover from
the connector.
z Pull one arm outwards and remove the
spring clamp.
z Hold the valve disc by the nipple and lift
out of guide.
z The valve disc and seat must be clean and undamaged. Clean or
replace if necessary.
z
Moisten the valve disc with water and refit. When the seat is horizontal, the valve disc must slide into the guide under its own weight.
z Fit the spring clamp and spring so that both arms engage laterally.
The spring clamp is marked "L"= left and "R" = right and fits at an
angle.
Leak tests
Test equipment and test accessories: Testor (R 53 400)
1)
,
Quaestor
1)
, adapter (R 53 345), exhalation valve plug (R 53 346).
(1) Checking for leak tightness
z Moisten the inside of the face seal with water and fit the mask to
the test head (see “Fitting the full face mask and checking its
operability” on page 12).
z Inflate the test head until the face seal fits snugly all round.
z Seal the connector with the adapter.
z Generate a negative pressure of 10 mbar.
The full face mask is considered leak-proof if the pressure change
after 1 minute is no more than 1 mbar. If not, perform (2).
(2) Test with sealed exhalation valve
z Remove the exhalation valve.
z Insert the exhalation valve plug and secure with the spring clamp.
z Generate a negative pressure of 10 mbar.
z If the pressure change is less than 1 mbar after 1 minute, remove
exhalation valve plug, insert a new valve disc and repeat the leak
test.
If not, perform (3).
1) Note the corresponding Instructions for Use.
00621453.eps
L R
Page 15

15
(3) Underwater leak test
z
Immerse the test head together with the full face mask in the water.
z Generate a positive pressure of approx. 10 mbar and rotate the
test head slowly under the water.
Escaping air bubbles indicate the source of any leak(s).
z Remove the test head and full face mask from the water.
Seal any leaks found.
z Remove the exhalation valve plug and fit the exhalation valve.
z Repeat the leak test.
Checking the opening pressure of the exhalation valve
If using the Quaestor tester, the opening pressure must be at least
4.2 mbar with a constant flow of 10 litres/minute through the full face
mask. If not, replace the spring and repeat the test. If using test
equipment that does not permit this constant flow rate (e. g. Testor),
the minimum opening pressure must be 4.5 mbar.
After testing
z Remove the adapter.
z Remove the full face mask from the test head and dry it if
necessary.
z Fit the exhalation valve cover. Ensure that it engages.
Special maintenance and care
Replacing the visor
z Full face mask with metal visor frame:
Unscrew the screws whilst holding on tightly to the hexagon nuts.
z Full face mask with plastic visor frame:
Unscrew the screws.
z
Use a screwdriver to pry apart the clamping frame at the joints,
then pull the top and bottom halves apart.
z Remove the support plate if necessary (see “Replacing the
connector” on page 15).
z Detach the old visor from the rubber frame.
z Insert the new visor first in the upper and then the lower half of the
rubber frame.
The central markings on the visor must line up with the seam on
the mask body.
z Pull the rubber frame to the right and left over the rim of the visor.
z Moisten the outside of the rubber frame and the inside of the
clamping frame with soapy water.
z Press on the clamping frame, top half first.
z Insert the support plate if necessary.
z Full face mask with metal visor frame:
Screw the screws into the hex nuts and tighten them until the
distance between the clamping pins is 3 to 0.5 mm.
z Full face mask with plastic visor frame:
Insert the screws and tighten them until there is no longer a gap
between the upper and lower visor frames.
Replacing the connector
z Pull out the inner mask.
z Use a screwdriver to open the clip.
z Remove the clip and also the slip ring and support plate.
z Pull the connector off the mask body.
z Fit the speech diaphragm and inhalation and exhalation valves to
the new connector and insert the connector so that the centre
markings of the connector and mask body line up.
z Fit the slip ring and new clip.
z Hook the clip into place so that it is as tight as possible.
z Push the support plate between the clip and the slip ring; fit it into
the lower visor frame and align.
z Use R 53 239 pliers to squeeze the tip of the clip until the
connector fits tightly in the mask.
z Press the inner mask back into place. In doing so, ensure that the
entire edge fits in the groove. The centre markings on the
connector and the inner mask must line up.
Page 16

16
Replacing the valve discs on the control valves
z Pull out the old valve disc towards the inside.
z Insert the stud of the new disc into the hole from inside, and pull it
towards the visor until the recess of the stud is visible.
The valve discs should make even contact with the inside surface.
Replacing the speech diaphragm or O-ring
z Pull the inner mask out of the groove in
the screw ring.
z Use the socket wrench R 26 817 to
unscrew the screw ring.
z Turn the socket wrench around and
carefully insert it in the holes of the
protective screen. Do not damage the
diaphragm.
z Twist the speech diaphragm loose and remove it.
z Use sealing ring extractor R 21 519 to remove the O-ring out of
the connector.
z Check the speech diaphragm and O-ring, and replace if
necessary.
z Press the inner mask back into place. In doing so, ensure that the
entire edge fits in the groove. The centre markings on the
connector and the inner mask must line up.
Replacing the exhalation valve disc
z Replace the exhalation valve disc (see “Visually inspect the
exhalation valve” on page 14).
z Fit the exhalation valve cover. Ensure that it engages.
Replacing the inhalation valve or valve disc
z Use a blunt object or the sealing ring extractor R 21 519 on the
round thread seal to lift and pull out the inhalation valve.
z Remove the old valve disk and fasten the new disk.
00721453.eps
z Press in the inhalation valve seat with valve disc in a V shape
around the circumference and allow it to snap into the connector
in such a way that it fits perfectly all around. The valve disc must
not become jammed. The disc points inwardly, the studs point
outwards.
Storage
z Loosen the harness as far as possible (handle tab).
z Wipe uncoated visors with an anti-static cloth.
Do not wipe coated visors.
z Pack the full face mask in its bag or storage box.
z Store it in a dry, dust-free place where it is not deformed.
Storage temperature -15 °C to +25 °C.
Keep out of direct sunlight and heat.
Observe ISO 2230 "Rubber Products - Guidelines for Storage", and
national guidelines for the storage, maintenance and cleaning of
rubber products.
Dräger rubber products are treated with an agent to protect against
premature aging which in some cases is visible as a grey-white
coating. This coating can be washed off with a brush and soapy water.
Page 17

17
Order list
Designation and description Part number
Panorama Nova – EPDM – PC – PE/ESA R 55 001
Panorama Nova – EPDM – PC/CC – PE/ESA R 55 003
Panorama Nova – EPDM – L – PE/ESA R 55 004
Panorama Nova – SI – PC – PE/ESA R 55 005
Mask spectacles R 51 548
"klar-pilot" gel R 52 560
Sekusept cleaner 79 04 071
Incidur 79 04 072
Mabox I carry-box R 53 680
Mabox II carry-box R 54 610
Wikov V carry-box R 51 019
Page 18

18
Page 19

19
Page 20

Dräger Safety AG & Co. KGaA
Revalstrasse 1
D-23560 Lübeck
Germany
Phone +49 451 882-0
Fax +49 451 882-2080
www.draeger.com
Notified body:
DEKRA EXAM GmbH
Dinnendahlstraße 9
D-44809 Bochum
Germany
Reference number:
90 21 453 - GA 1412.552 de/en
© Dräger Safety AG & Co. KGaA
Edition 03 - September 2009 (Edition 01 - July 1996)
Subject to alteration
0158
 Loading...