

Page 1
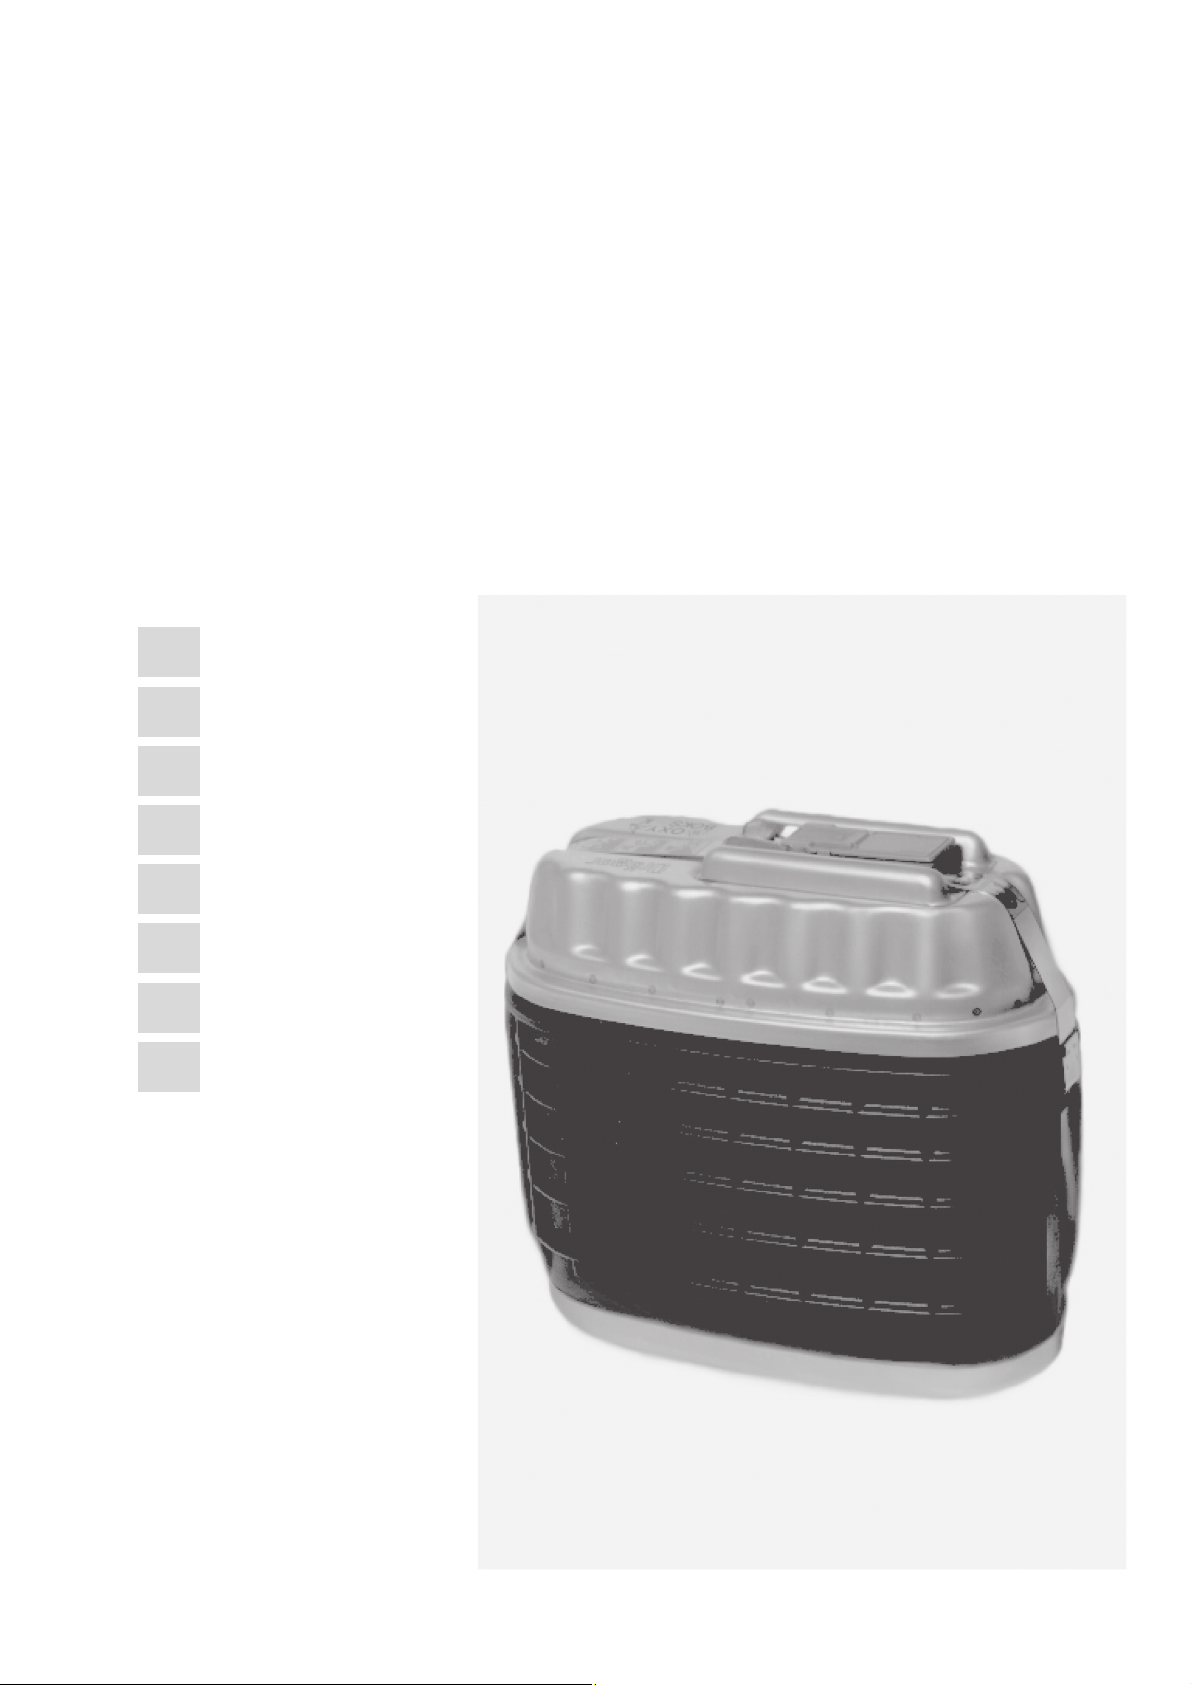
Oxyboks K 25
Gebrauchsanweisung
de
2
D
Instructions for Use
en
7
Mode d’emploi
fr
12
Instrucciones de Uso
es
17
Istruzioni per I'uso
it
22
Gebruiksaanwijzing
nl
27
Brugsanvisning
da
32
Bruksanvisning
no
37
00121371.eps
Page 2

Inhaltsverzeichnis
Zu Ihrer Sicherheit . . . . . . . . . . . . . . . . . . . . . . . . . . . . . . . . . . . . . . . . . . . . . . 3
Beschreibung . . . . . . . . . . . . . . . . . . . . . . . . . . . . . . . . . . . . . . . . . . . . . . . . . . 3
Verwendungszweck . . . . . . . . . . . . . . . . . . . . . . . . . . . . . . . . . . . . . . . . . . . . . 3
Tragweise . . . . . . . . . . . . . . . . . . . . . . . . . . . . . . . . . . . . . . . . . . . . . . . . . . . . . 3
Tägliches Überprüfen . . . . . . . . . . . . . . . . . . . . . . . . . . . . . . . . . . . . . . . . . . . 3
Umgang mit dem Sauerstoffselbstretter . . . . . . . . . . . . . . . . . . . . . . . . . . 3
Anlegevorgang . . . . . . . . . . . . . . . . . . . . . . . . . . . . . . . . . . . . . . . . . . . . . . . . . 4
Wichtige Fluchtregeln . . . . . . . . . . . . . . . . . . . . . . . . . . . . . . . . . . . . . . . . . . . 4
Gebrauchsende . . . . . . . . . . . . . . . . . . . . . . . . . . . . . . . . . . . . . . . . . . . . . . . . 4
Entsorgen . . . . . . . . . . . . . . . . . . . . . . . . . . . . . . . . . . . . . . . . . . . . . . . . . . . . . 5
Transportvorschriften . . . . . . . . . . . . . . . . . . . . . . . . . . . . . . . . . . . . . . . . . . . 5
Instandhaltung . . . . . . . . . . . . . . . . . . . . . . . . . . . . . . . . . . . . . . . . . . . . . . . . . 5
Inspektion und Wartung . . . . . . . . . . . . . . . . . . . . . . . . . . . . . . . . . . . . . . . . . 5
Sauerstoff-Produktion . . . . . . . . . . . . . . . . . . . . . . . . . . . . . . . . . . . . . . . . . . . 5
Technische Daten . . . . . . . . . . . . . . . . . . . . . . . . . . . . . . . . . . . . . . . . . . . . . . 5
Was ist was . . . . . . . . . . . . . . . . . . . . . . . . . . . . . . . . . . . . . . . . . . . . . . . . . . . . 6
Bestell-Liste . . . . . . . . . . . . . . . . . . . . . . . . . . . . . . . . . . . . . . . . . . . . . . . . . . . . 6
2
Page 3
Zu Ihrer Sicherheit
Gebrauchsanweisung beachten
Jede Handhabung an dem Sauerstoffselbstretter setzt die genaue Kenntnis und Beachtung dieser Gebrauchsanweisung voraus.
Der Sauerstoffselbstretter ist nur für die beschriebene Verwendung
bestimmt.
Instandhaltung
Der Sauerstoffselbstretter muss regelmäßig Inspektionen und Wartungen
durch Fachleute unterzogen werden.
Instandsetzungen am Sauerstoffselbstretter nur durch Fachleute vornehmen lassen.
Wir empfehlen, einen Service-Vertrag mit Dräger Safety abzuschließen und
alle Instandsetzungen durch Dräger Safety durchführen zu lassen.
Bei Instandhaltung nur Original-Dräger-Teile verwenden.
Kapitel "Instandhaltung" beachten.
Zubehör
Nur das in der Bestell-Liste aufgeführte Zubehör verwenden.
Haftung für Funktion bzw. Schäden
Die Haftung für die Funktion des Sauerstoffselbstretters geht in jedem Fall
auf den Eigentümer oder Betreiber über, soweit der Sauerstoffselbstretter
von Personen, die nicht Dräger Safety angehören, unsachgemäß gewartet
oder instandgesetzt wird oder wenn eine Handhabung erfolgt, die nicht
der bestimmungsgemäßen Verwendung entspricht.
Für Schäden, die durch die Nichtbeachtung der vorstehenden Hinweise
eintreten, haftet Dräger Safety nicht.
Gewährleistungs- und Haftungsbedingungen der Verkaufs- und Lieferbedingungen von Dräger werden durch vorstehende Hinweise nicht erweitert.
Entsorgung
Gebrauchte oder geöffnete Geräte müssen fachgerecht entsorgt werden,
da sich mit Luftfeuchtigkeit aus den eingesetzten Chemikalien aggressive
Lauge bilden kann.
Dräger Safety AG & Co. KGaA
Beschreibung
Dräger Oxyboks K 25 ist ein von der Umgebungsatmosphäre unabhängiger Sauerstoffselbstretter mit geschlossenem Pendelatmungssystem auf
der Basis von chemisch gebundenem Sauerstoff.
Dräger Oxyboks K 25 hat eine nominelle Haltezeit von 25 Minuten nach
DIN EN 13794.
Verwendungszweck
Dräger Oxyboks K 25 ist ein Notfallgerät für die Flucht aus Bereichen, in
denen Rauch, toxische Gase oder Sauerstoffmangel vorliegen.
Tragweise
Das Dräger Oxyboks K 25 wird am Leibgurt auf der rechten oder linken
Körperseite getragen.
● Gurt durch die Gürtelschlaufen zie-
hen.
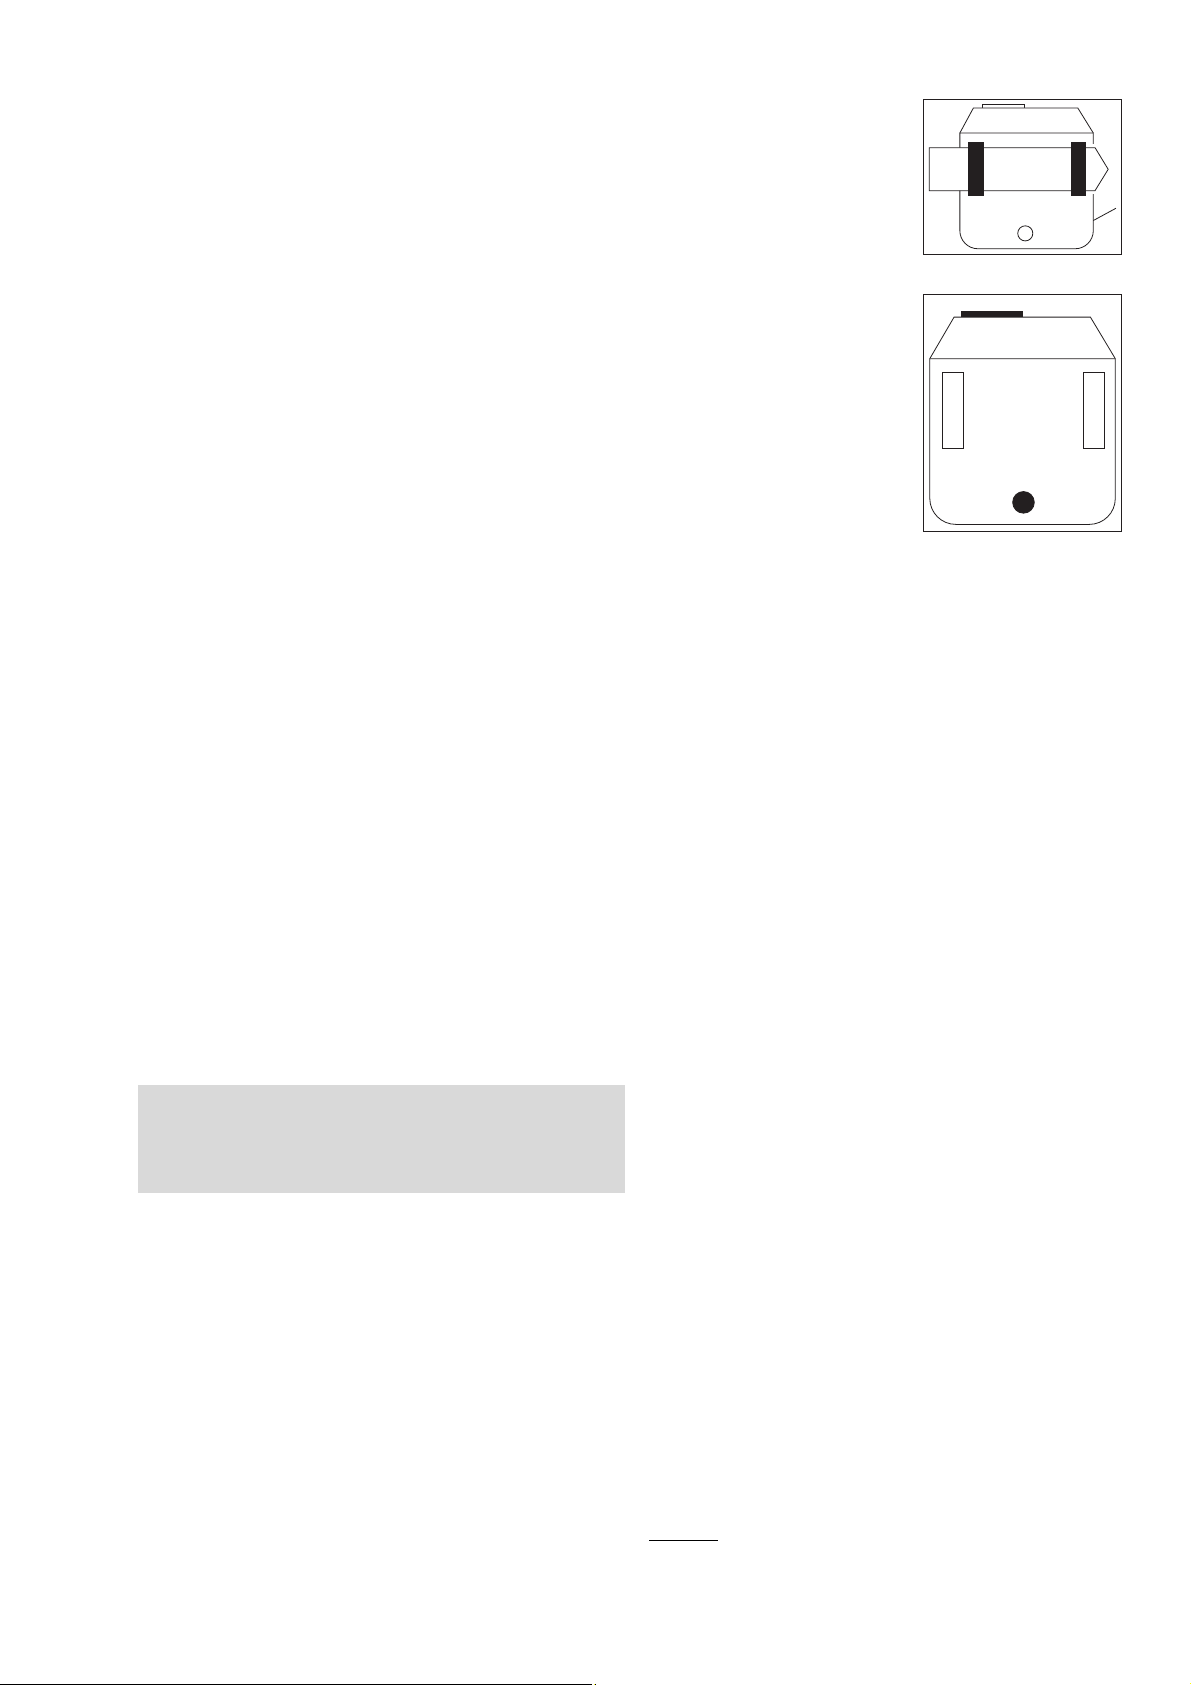
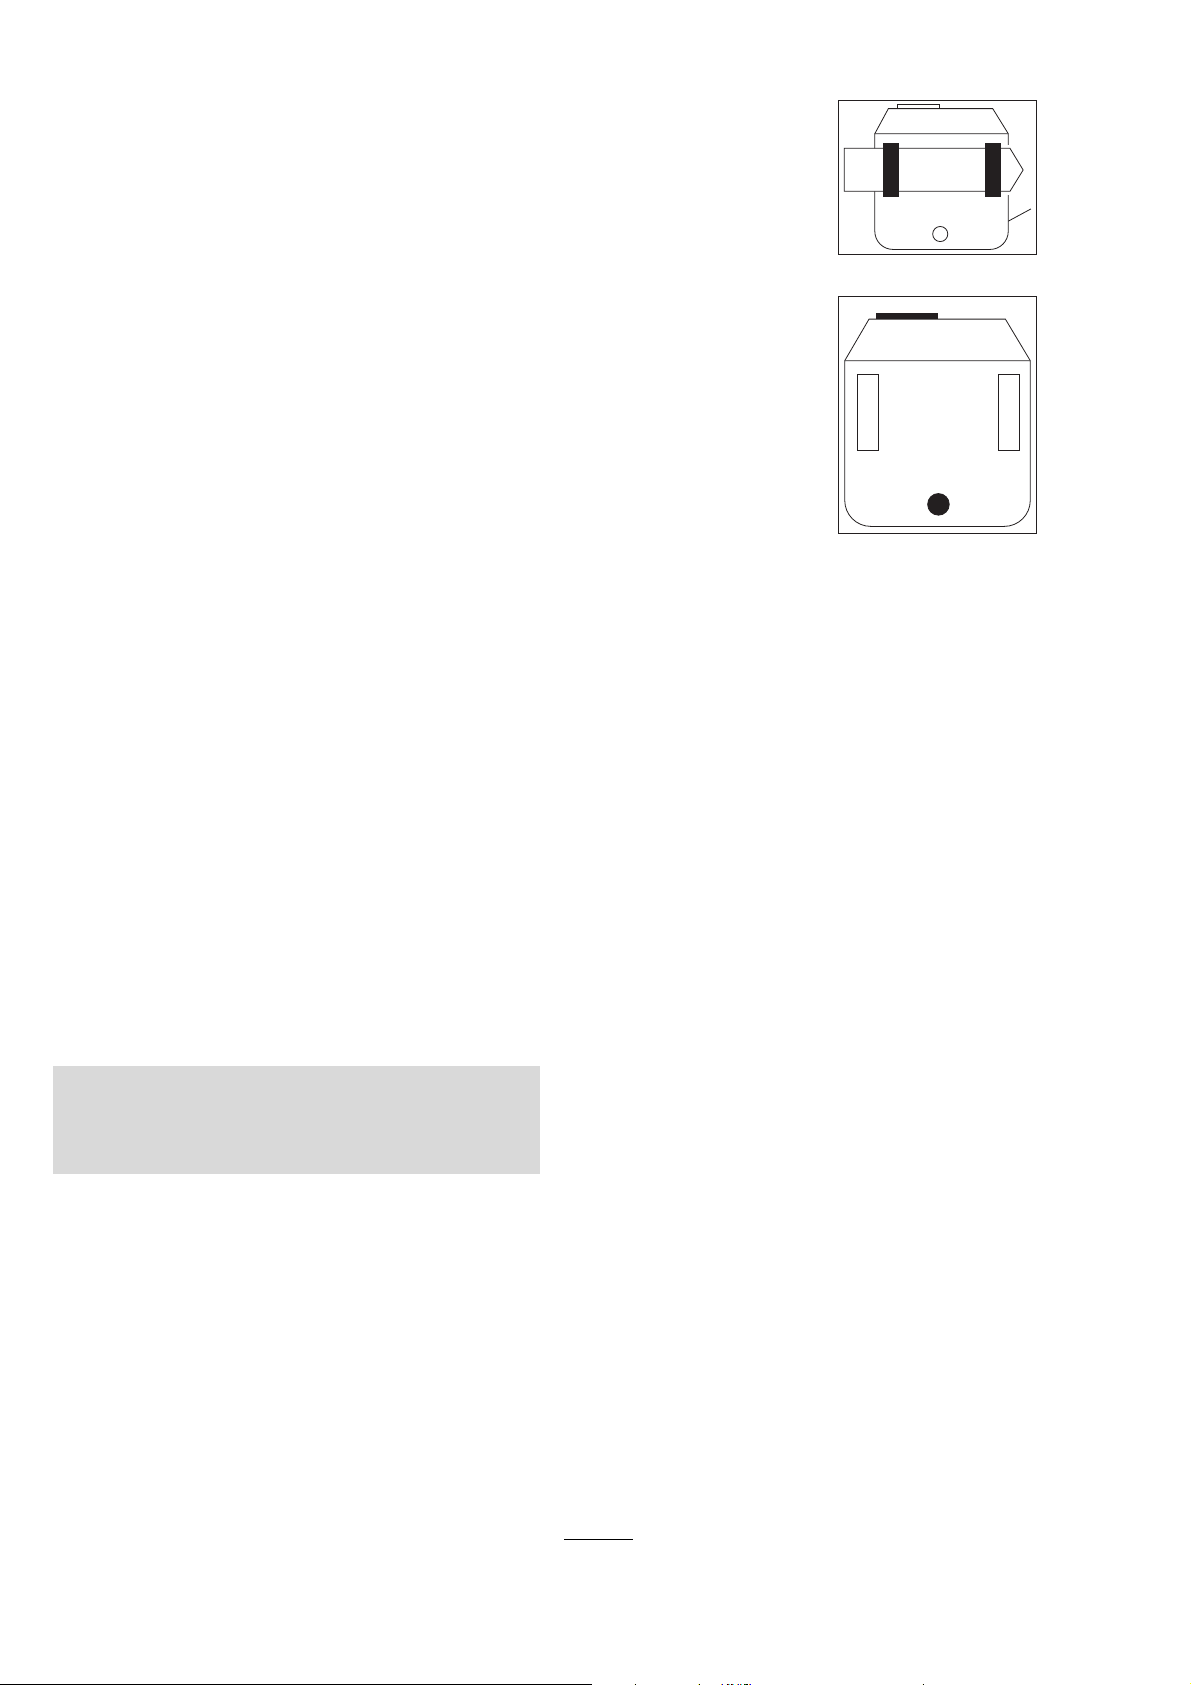
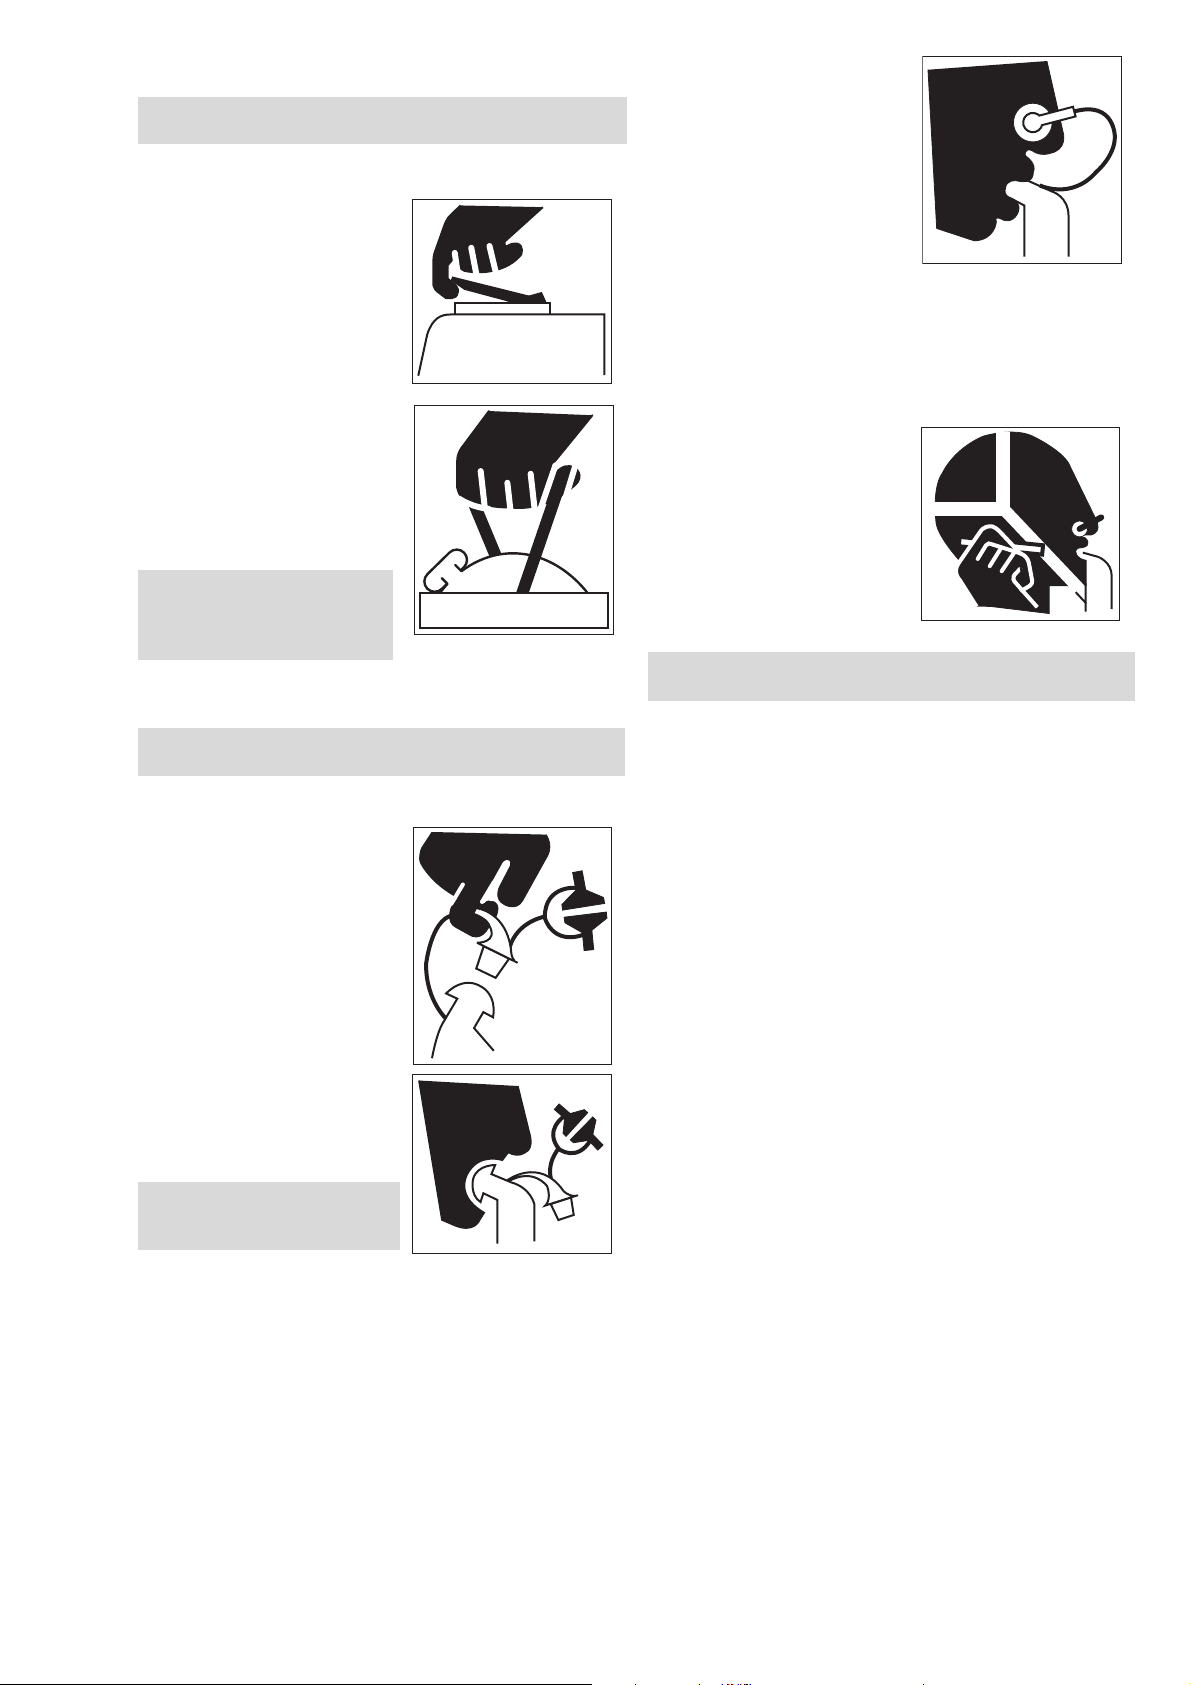
Tägliches Überprüfen
Sichtprüfung:
1 Plombe ist unbeschädigt.
— Deckel geschlossen und
Verschluss verriegelt.
— Das Gehäuse weist keine Risse,
Löcher oder andere Beschädigungen auf, die tiefer als 1,5 mm sind.
2 Indikator zeigt eine tiefblaue Farbe.
Beträchtlicher Verlust der blauen
Farbe (50 % der Partikel haben ihre
Farbe von tiefblau zu hellblau oder
farblos geändert) bedeutet, dass
der Sauerstoffselbstretter nicht
mehr benutzt werden darf.
In diesem Fall wenden Sie sich bitte an Dräger Safety.
1
2
Umgang mit dem Sauerstoffselbstretter
— Sauerstoffselbstretter nur für den Einsatz öffnen!
Sonst dringt Feuchtigkeit aus der Umgebungsluft in den offenen
Sauerstoffselbstretter ein und beeinträchtigt dessen Funktion.
— Sauerstoffselbstretter täglich überprüfen.
— Sauerstoffselbstretter nur einmal benutzen.
— Vermeiden, dass brennbare Stoffe (Benzin, Fett, Lösungsmittel usw.)
vor oder während des Gebrauchs in den Sauerstoffselbstretter
gelangen, sonst Brandgefahr!
Ebenso besteht Zündgefahr, wenn bei Zerstörung des
Sauerstoffselbstretters die sauerstoffabspaltende Chemikalie mit
brennbaren Substanzen, z. B. Kohle, in Berührung kommt.
Geöffnete Geräte gelten als gebraucht und dürfen nicht gelagert werden.
Sie müssen entsorgt werden (siehe “Entsorgen” auf Seite 5).
1)
Zum regelmäßigen Üben der Handhabung sollte das Trainingsgerät
Dräger Oxyboks KT verwendet werden (siehe “Bestell-Liste” auf Seite 6).
003 21371.ep s
00221371.eps
WARNUNG!
Dräger Oxyboks K 25 nicht in Luftgemischen mit Gasen oder Dämp-
fen einsetzen, die eine Zündtemperatur niedriger als 300 oC haben!
Dräger Oxyboks K 25 nicht unter 0 oC lagern, da die Gerätetempera-
tur des einsatzfähigen Gerätes 0 oC nicht unterschreiten darf.
Befolgen Sie die Hinweise in dieser Gebrauchsanweisung.
Dräger Oxyboks K 25 kann Ihr Leben retten!
1) nicht Bestandteil der EG-Baumusterprüfung.
3
Page 4
Anlegevorgang
Falsches Anlegen verursacht Verzögerungen beim Einsatz des Sauerstoffselbstretters in Notfällen.
Die folgenden Handhabungschritte unbedingt in der beschriebenen
Reihenfolge durchführen.
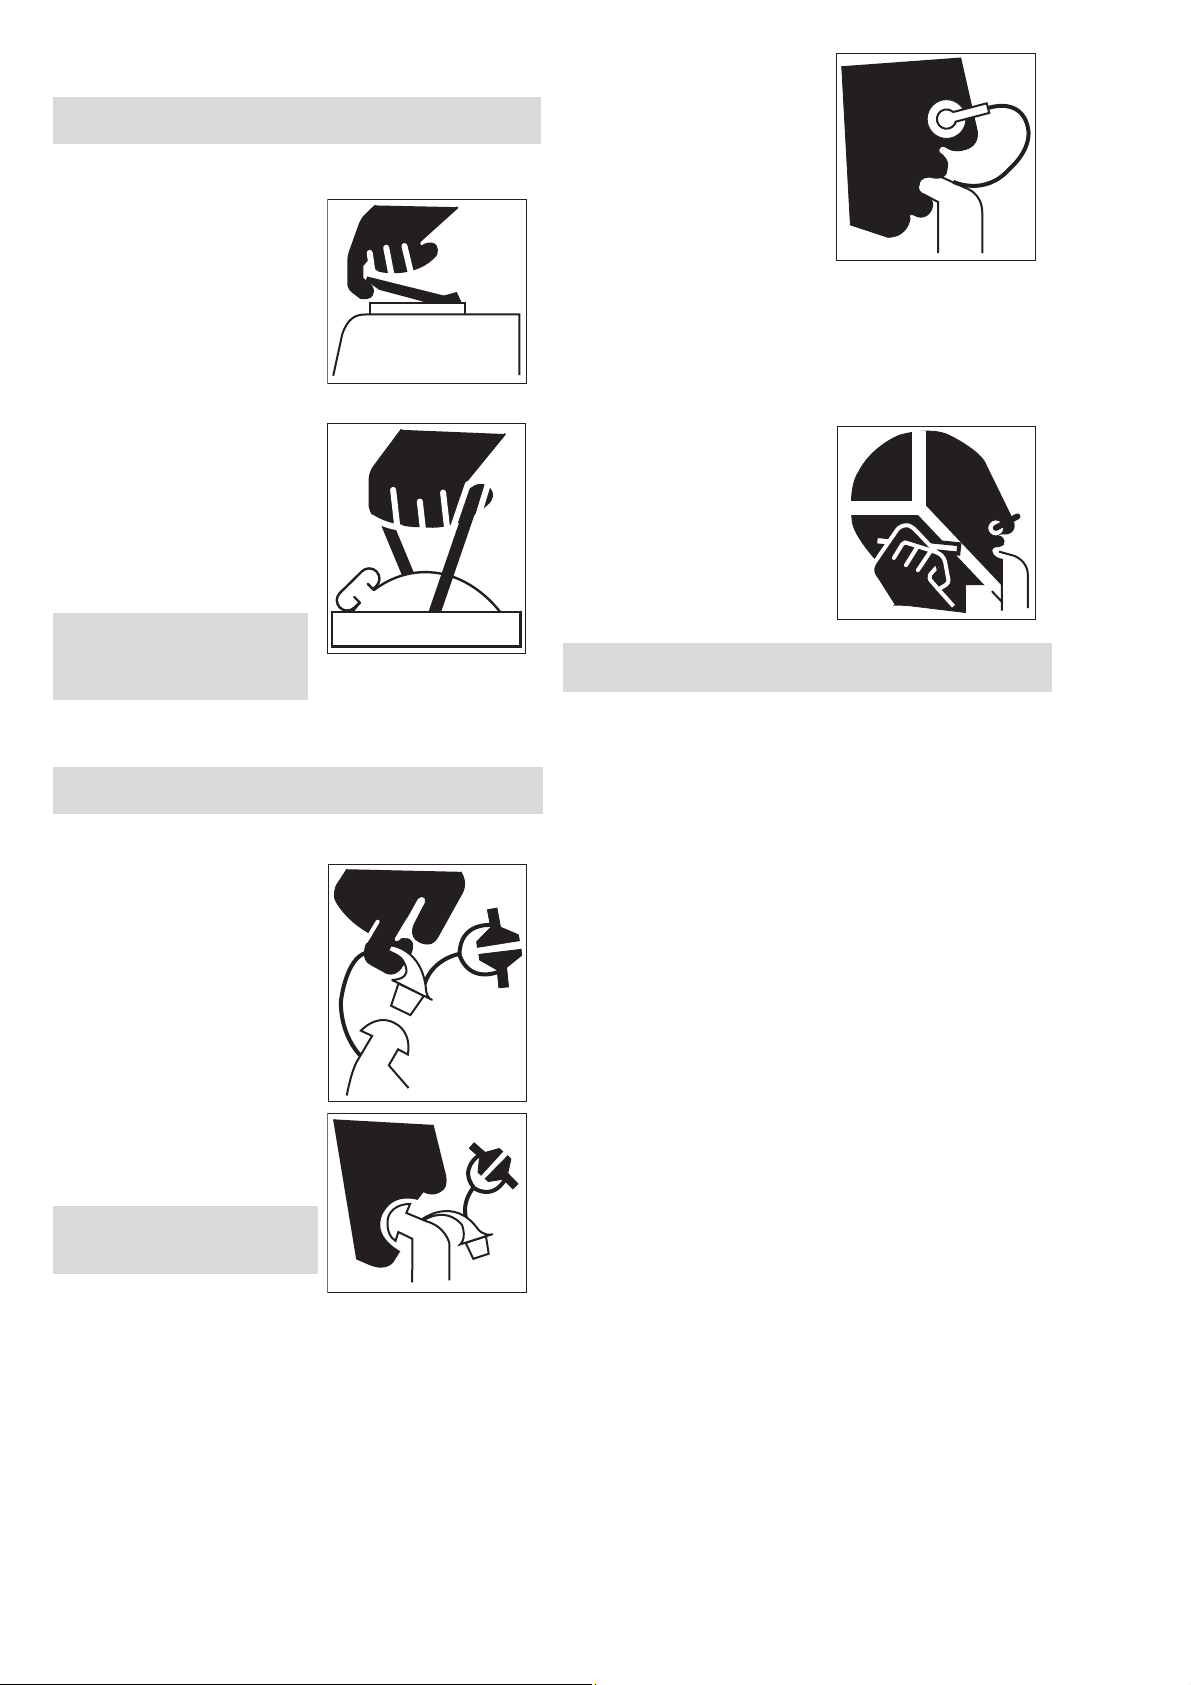
Behälter öffnen
● Hebel mit dem Zeigefinger oder
Daumen soweit hochziehen, bis die
Klemmbänder lose sind und abspringen.
● Deckel abnehmen.
Sauerstoffselbstretter herausziehen
● Den freiliegenden Geräteteil am
oberen Ende an der roten Schlaufe
mit einem Zug ganz aus dem
Gehäuse ziehen.
Die Starterpatrone wird dabei automatisch aktiviert; nach ca. 6 Sekunden füllt sich der gelbe Atembeutel
mit Sauerstoff. Die losen Verpakkungsteile fallen ab oder können
entfernt werden.
ACHTUNG!
Der aktivierte Starter wird heiß!
Nicht berühren, es besteht Verbrennungsgefahr.
● Das Entfalten des Atembeutels
mit den Händen unterstützen.
Die nächsten Anlegeschritte ohne Unterbrechung innerhalb von
ca. 20 Sekunden durchführen.
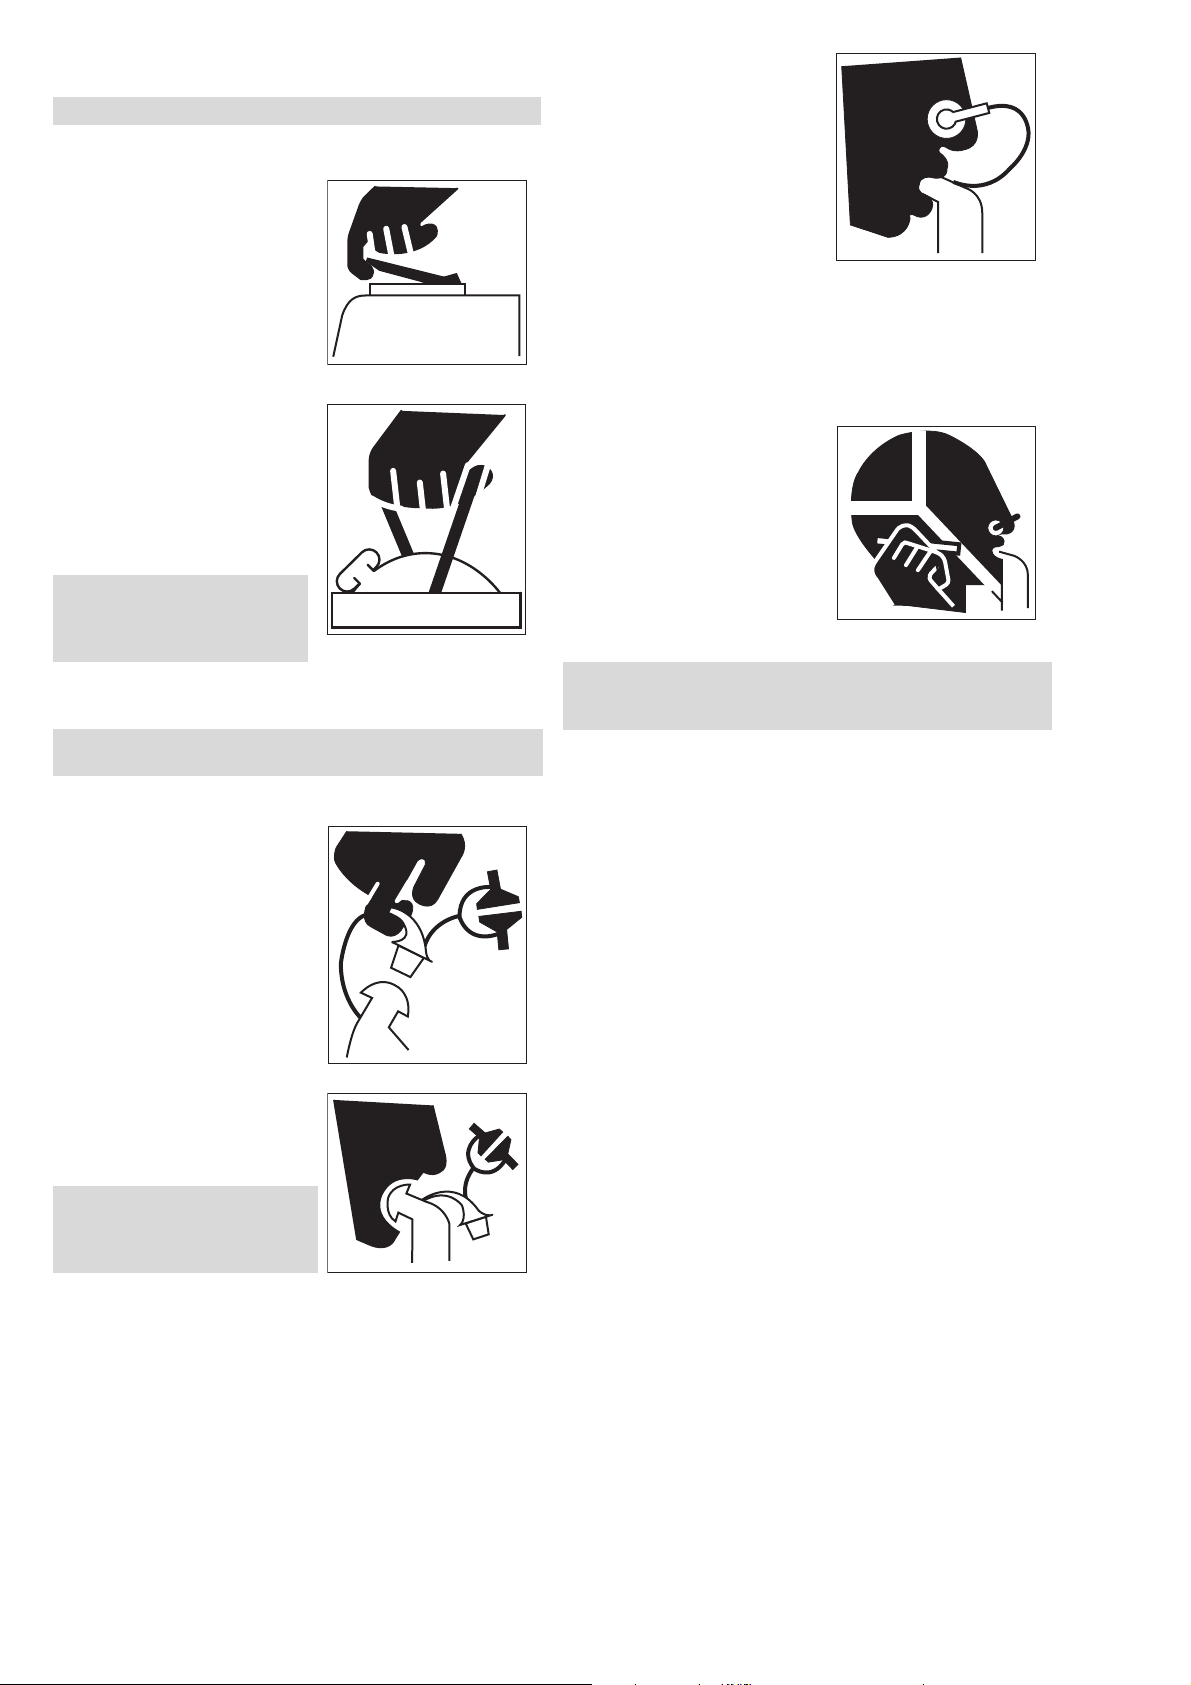
Mundstück vorbereiten und einführen
● Stopfen aus dem Mundstück her-
ausziehen.
● Sauerstoffselbstretter so halten,
dass der Atembeutel vom Körper
wegzeigt.
Nasenklemme aufsetzen
● Nasenklemme auseinanderziehen
und auf die Nasenflügel setzen.
Die Nase muss dicht sein.
Wenn sich der Atembeutel noch nicht gefüllt hat
● Den Atembeutel durch mehrere tiefe Ausatmungen füllen. Die Feuch-
tigkeit und die CO2-Anteile in der Ausatemluft starten dann die Sauerstoffproduktion.
● Ruhig atmen.
00421371.eps
Kopfbänderung anlegen und festziehen
● Helm abnehmen.
● Kopfbänderung unverdreht über
den Kopf ziehen.
● Jedes Gurtende gleichmäßig mit
einer Hand nach oben ziehen, bis
ein guter Sitz erreicht ist. Bänderung dabei ggf. mit der anderen
Hand in Kinnhöhe festhalten.
● Helm wieder aufsetzen.
00521371.eps
Hinweis
Dräger empfiehlt, diesen Vorgang mit dem Trainingsgerät zu üben.
Wichtige Fluchtregeln
— Flucht ruhig beginnen, nicht hetzen.
— Fluchtweg planen, kürzesten Weg in sichere Umgebungsluft wählen!
— Mit Bedacht flüchten. Bei hastiger, schneller Atmung wird mehr
Sauerstoff verbraucht!
— Immer darauf achten, dass das Mundstück fest zwischen Zähnen und
Lippen sitzt und dicht von den Lippen umschlossen wird!
— Die Luft aus dem Sauerstoffselbstretter ist warm und trocken, das ist
ein Zeichen für die korrekte Funktion des Sauerstoffselbstretters. Auch
ein eventueller Eigengeschmack ist normal und ungefährlich.
— Atembeutel nicht beschädigen oder zusammendrücken, sonst Verlust
des lebensnotwendigen Sauerstoffs.
— Bei Erbrechen Mundstück aus dem Mund nehmen und mit dem
Daumen verschließen. Nicht in den Sauerstoffselbstretter erbrechen!
Um keine schadstoffhaltige Luft aus der Umgebung einzuatmen,
sollte nach erneutem Einführen des Mundstücks in den Mund aus
dem Sauerstoffselbstretter eingeatmet werden.
00821371.eps
00921371.eps
● Mundstück in den Mund führen und
tief in den Sauerstoffselbstretter
ausatmen.
Das Gummistück soll zwischen den
Zähnen und den Lippen sitzen.
WARNUNG!
Für Gebissträger ist die Mundstück-
garnitur nur bedingt geeignet.
● Mundstück dicht mit den Lippen
umschließen.
4
00621371.eps
Gebrauchsende
— Der Sauerstoffvorrat geht zur Neige, wenn die Einatmung schwerer
wird und der Atembeutel beginnt, zusammenzufallen.
— Im Bergbau untertage eingesetzte Sauerstoffselbstretter müssen in
den übertägigen Bereich gebracht werden.
00721371.eps
Page 5

Entsorgen
Der Sauerstoffselbstretter muss nach Gebrauch entsorgt werden.
Gebrauchten Sauerstoffselbstretter deaktivieren
— Vermeiden, dass brennbare Stoffe (Benzin, Fett, Lösungsmittel usw.)
vor oder nach dem Gebrauch in den Sauerstoffselbstretter gelangen,
sonst besteht Brandgefahr!
— Schutzbrille und Handschuhe benutzen!
— Starter aus Gehäuse ausbauen und gemäß den örtlichen Vorschriften
entsorgen.
-Patrone aus Gehäuse ausbauen.
—KO
2
— Ausgebaute KO2-Patrone ganz in Wasser legen, bis keine Gasblasen
mehr entweichen. Die entstandene Lösung mit 3 %iger Säure, z. B.
Salzsäure (HCl), im Verhältnis 1:1 neutralisieren.
— Alle Kunststoffe sind gekennzeichnet und können sortenrein
gesammelt und verwertet werden.
Sauerstoff-Produktion
Der zur Atmung notwendige Sauerstoff wird aus einer festen chemischen
Substanz, dem Kaliumdioxid (KO2), gewonnen. Sie reagiert mit dem Kohlenstoffdioxid (CO2) und dem Wasserdampf (H2O) der ausgeatmeten Luft.
Diese beiden Komponenten der Atemluft werden vom KO2 absorbiert,
wodurch der im KO2 chemisch gebundene Sauerstoff (O2) freigesetzt
wird. Die vereinfacht wiedergegebenen Reaktionsformeln sind:
2 KO2 + H2O → 2 KOH + 3/2 O2 + Wärme
2 KOH + CO
2 KO2 + CO
ist O2-Quelle und CO2-Absorber zugleich. Im Wechsel von Einat-
KO
2
mung und Ausatmung strömt Atemluft aus dem Atembeutel durch die KO2Patrone zum Wärmetauscher und wieder zurück.
Ein Auslassventil begrenzt das Volumen im Atembeutel.
→ K2CO3 + H2O + Wärme
2
→ K2CO3 + 3/2 O2 + Wärme
2
Wir entsorgen für Sie! (Preis auf Anfrage)
Beschädigte, geöffnete1), veratmete und abgelaufene Sauerstoffselbstretter senden Sie bitte in einer zugelassenen Verpackung gemäß Transportvorschriften an folgende Adresse:
Dräger Intek GmbH
Bochstraße 1
D-23569 Lübeck
Tel. (04 51) - 882 - 1813
Fax (04 51) - 882 - 3549
e-mail: recycling@draeger.com
Transportvorschriften
Sauerstoff-Atemschutzgeräte unterliegen beim Transport internationalen
Transportvorschriften.
Sauerstoff-Atemschutzgeräte sind eingestuft unter:
UN 3356 "Oxygen generator, chemical" Class 5.1, packing group II
Bei geöffneten und teilweise verbrauchten oder beschädigten SauerstoffAtemschutzgeräten ist vor dem Transport der Starter auszulösen. Nach
dem Erkalten ist das Sauerstoff-Atemschutzgerät in einem Kunststoffbeutel luftdicht zu verpacken. Es muss in einer zugelassenen Verpackung (z. B.
Dräger Transportverpackung 63 04 511) in den Versand gebracht werden.
Das Versandgut ist eingestuft unter:
UN 3085, Oxidizing solid, corrosive, n.o.s. (Potassium Superoxide,
Potassium Hydroxide), Class 5.1, packing group I
Ggf. Sondervorschriften der beauftragten Verkehrsträger beachten.
Instandhaltung
Der Anwender kann folgende Instandsetzungsmaßnahmen selbst durchführen:
Technische Daten
zugelassen nach DIN EN 13 794
Temperaturklasse in Anlehnung an CEN 50014
max. Oberflächentemperatur 300 oC
Lagertemperatur 0 oC...+50 oC
Niedrigste Einsatztemperatur -5 oC
Nominelle Haltezeit 25 Minuten
Haltezeit
bei 10 L/min Atemminutenvolumen
bei 30 L/min Atemminutenvolumen
bei 35 L/min Atemminutenvolumen
bei 100 L/min Atemminutenvolumen
Volumen des Atembeutels >6 Liter
Einatem-/Ausatemwiderstand
bei 35 L/min sinusförmigem Fluss
am Anfang der Gebrauchszeit
bei 35 L/min sinusförmigen Fluss
während der Gebrauchszeit
CO2-Gehalt
in der Einatemluft
in der Einatemluft während der Gebrauchszeit
Temperatur der Einatemluft
am Ende der Gebrauchszeit max. 70 oC
Gewicht
ungeöffnet
im Einsatz
Abmessungen (B x H x T) 205 x 189 x 89 mm
Lebensdauer
täglich mitgeführt
im Depot gelagert
1) Einschichtbetrieb max. 8 Stunden täglich; 5 Arbeitstage pro Woche; im Mehr-
schichtbetrieb entsprechend verkürzt.
1)
120 Minuten
30 Minuten
25 Minuten
8 Minuten
4 mbar
max. 10 mbar
kleiner als 1 Vol.%
max. 2,5 Vol.%
(trockene Luft)
ca. 2,1 kg
ca. 1,2 kg
5 Jahre
10 Jahre
Indikatorfenster (67 33 647) ersetzen
● Das defekte Indikatorfenster mit einem Schraubendreher vorsichtig
ausheben.
● Das neue Indikatorfenster mit leichtem Druck in das Indikatorgehäuse
einsetzen.
Piktogramm (63 33 682/67 33 910) ersetzen
● Das defekte Piktogramm z. B. mit einer Rasierklinge ablösen.
● Fläche mit Entfettungsmittel reinigen.
● Neues Piktogramm aufkleben.
Inspektion und Wartung
● Tägliche Überprüfungen durchführen (siehe “Tägliches Überprüfen”
auf Seite 3).
1) Wenn geöffnete Sauerstoffselbstretter zurückgeschickt werden sollen, ist
vvvvoooorrrrhhhheeeerrrr der Starter auszulösen!
Anschließend Sauerstoffselbstretter in einem geschlossenen PE-Beutel einschweißen.
5
Page 6
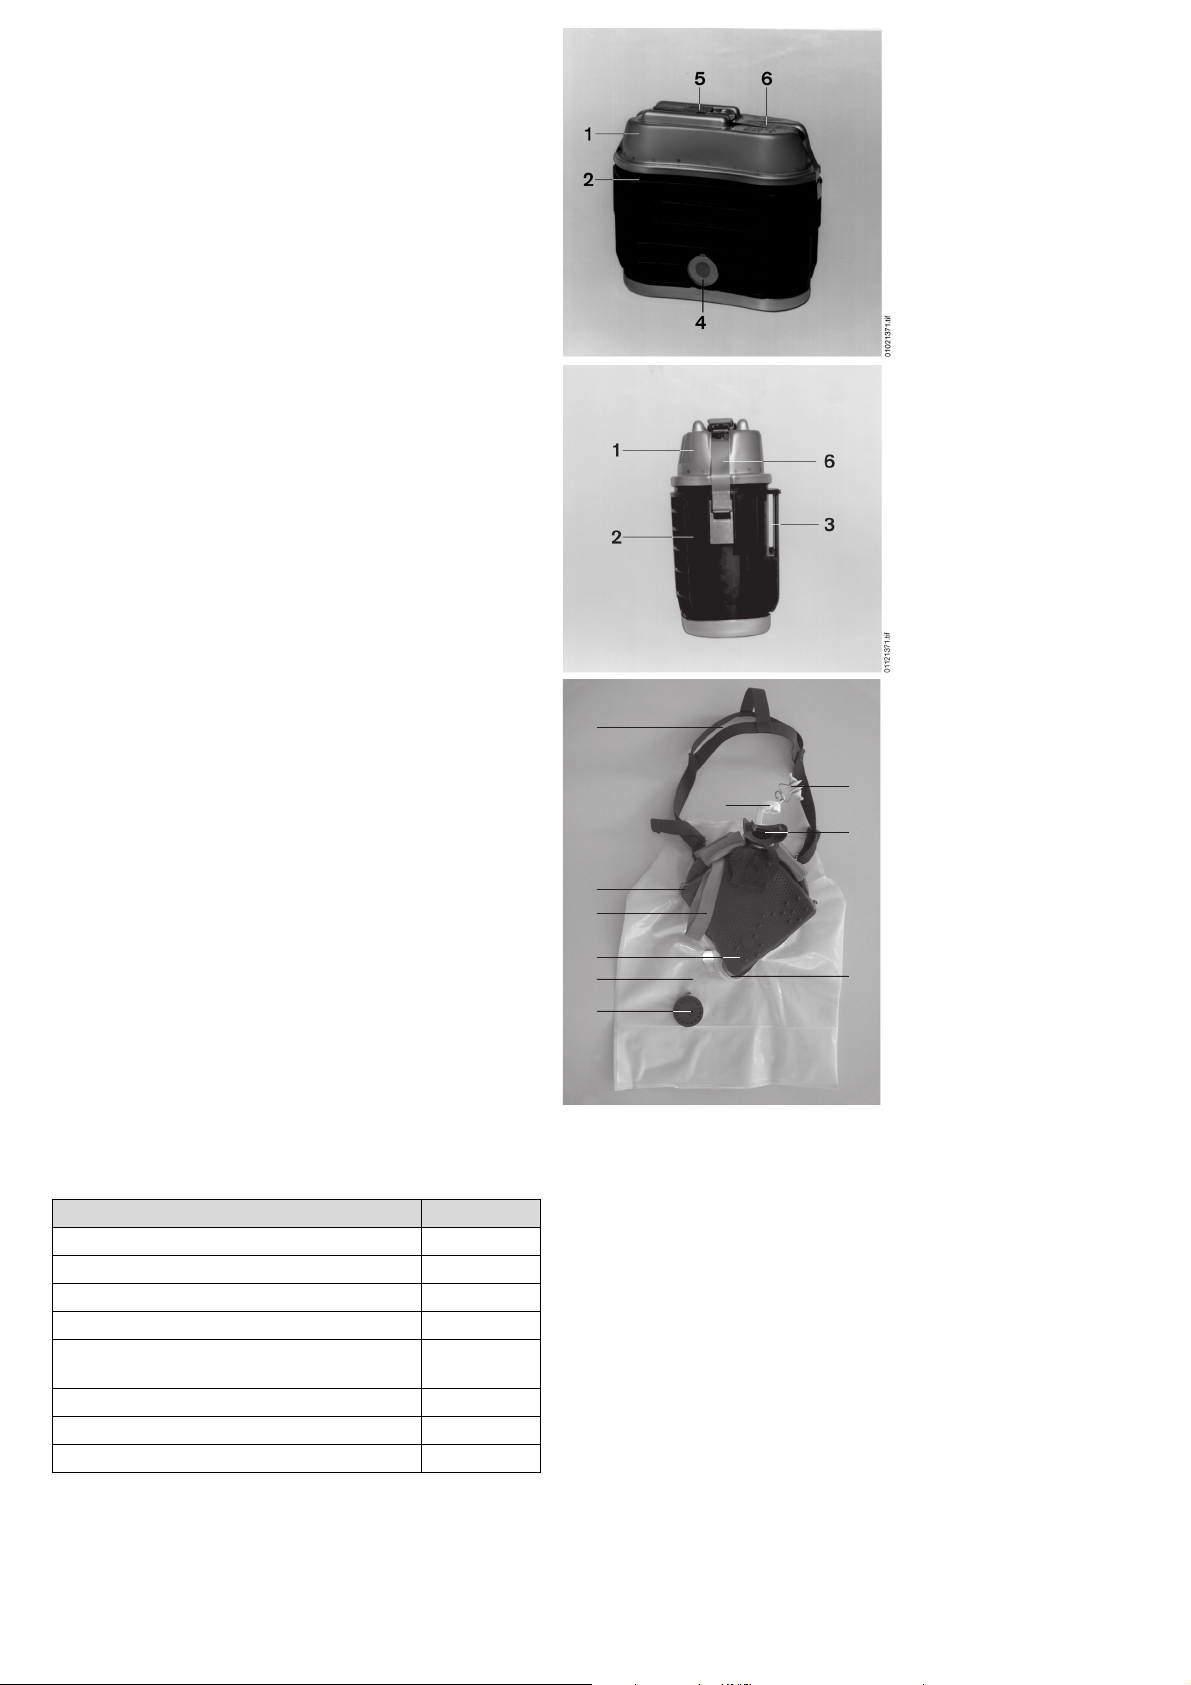
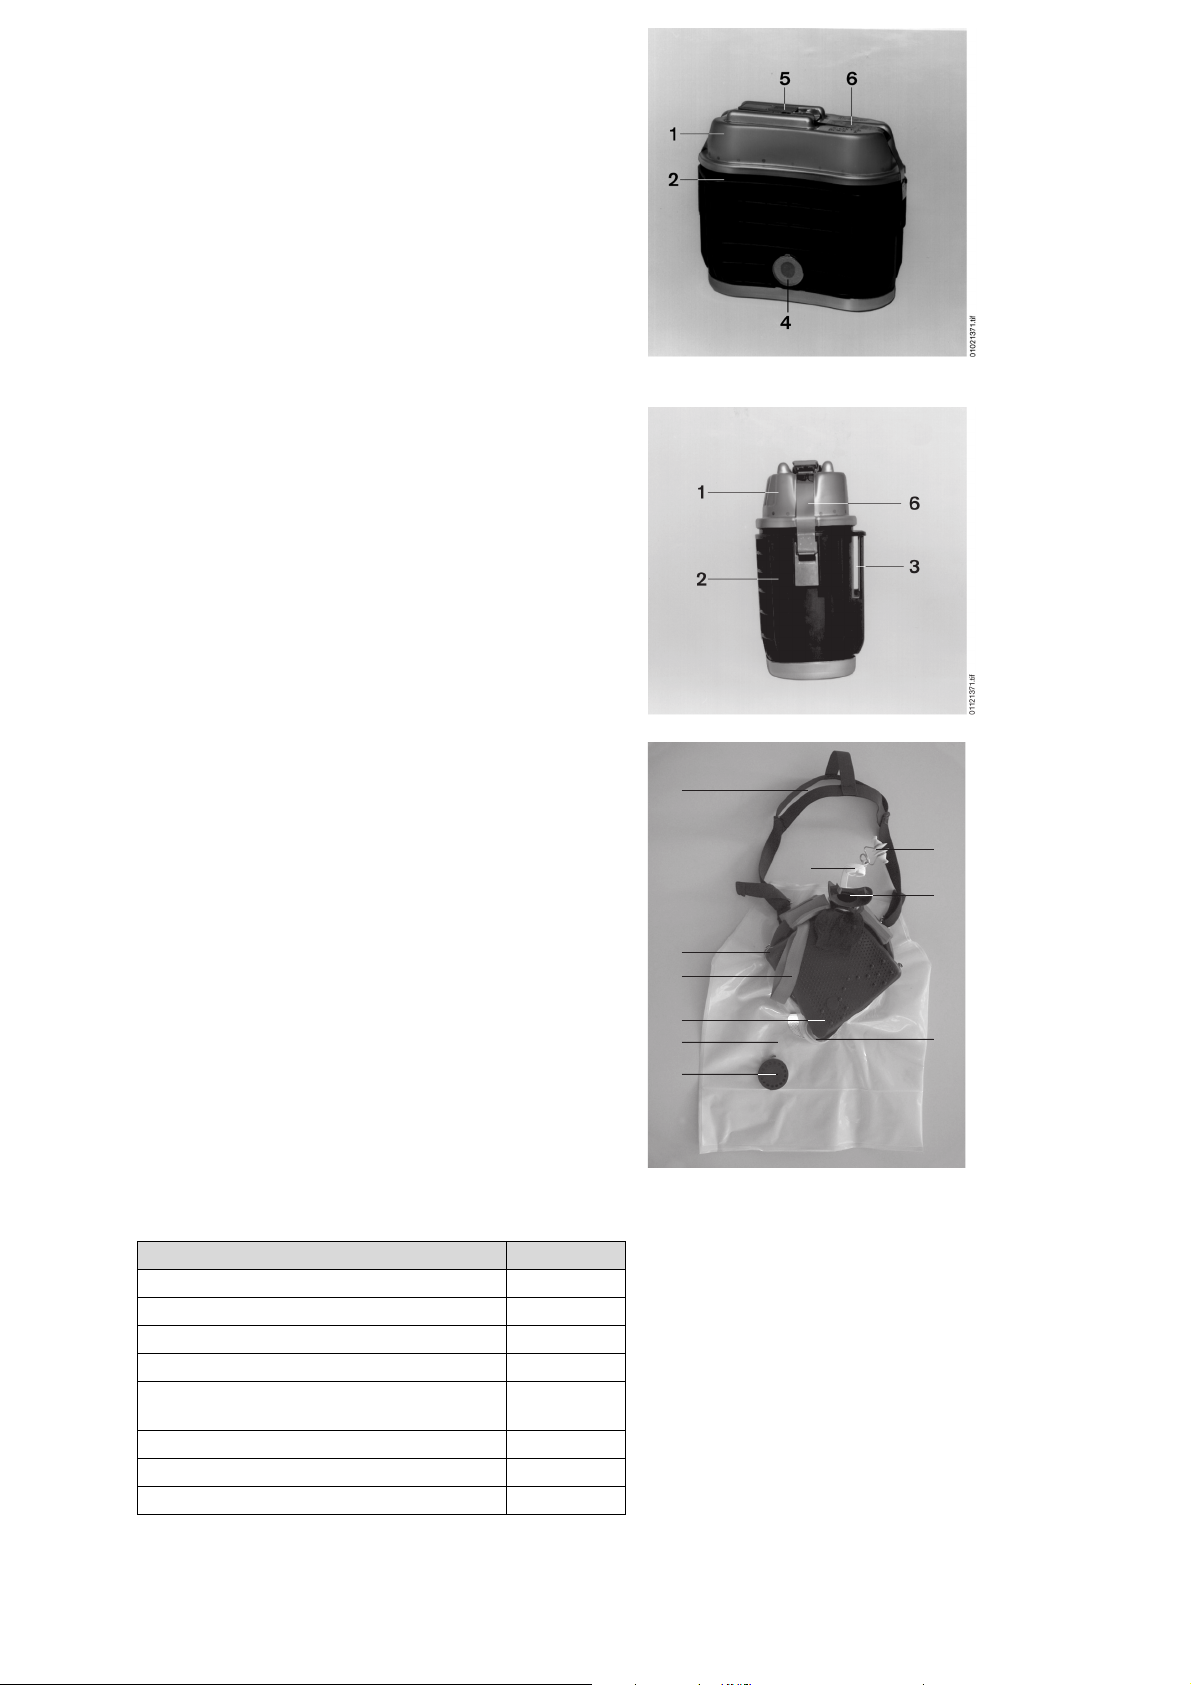
Was ist was
1 Deckel
2 Gehäuse
3 Gürtelschlaufe
4 Indikator
5 Hebel mit Plombe
6 Klemmbänder
7 Schlaufe
8 Mundstück
9 Mundstück-Stopfen
10 Nasenklemme
11 Wärmetauscher
12 Luftverteiler
13 Kopfbänderung
14 Atembeutel
15 Auslassventil
16 Chlorat-Starter
Bestell-Liste
Benennung und Beschreibung Bestell-Nr.
Dräger Oxyboks K 25 63 03 666
Gürtel 67 33 934
Brillentasche 67 33 935
Schutzbrille 63 03 670
Piktogramm (nur paarweise) 67 33 682/
67 33 910
Indikatorfenster 67 33 647
Dräger Transportverpackung 63 04 511
Dräger Oxyboks KT (Trainingsgerät) 67 33 466
13
11
12
14
15
9
10
8
7
16
01321371.eps
6
Page 7

Contents
For Your Safety . . . . . . . . . . . . . . . . . . . . . . . . . . . . . . . . . . . . . . . . . . . . . . . . 8
Description . . . . . . . . . . . . . . . . . . . . . . . . . . . . . . . . . . . . . . . . . . . . . . . . . . . . 8
Intended Use . . . . . . . . . . . . . . . . . . . . . . . . . . . . . . . . . . . . . . . . . . . . . . . . . . 8
Carrying Method . . . . . . . . . . . . . . . . . . . . . . . . . . . . . . . . . . . . . . . . . . . . . . . 8
Daily Inspection . . . . . . . . . . . . . . . . . . . . . . . . . . . . . . . . . . . . . . . . . . . . . . . . 8
Advice on Use . . . . . . . . . . . . . . . . . . . . . . . . . . . . . . . . . . . . . . . . . . . . . . . . . 8
Donning Procedure . . . . . . . . . . . . . . . . . . . . . . . . . . . . . . . . . . . . . . . . . . . . . 9
Important Rules for Escaping . . . . . . . . . . . . . . . . . . . . . . . . . . . . . . . . . . . 9
End of Use . . . . . . . . . . . . . . . . . . . . . . . . . . . . . . . . . . . . . . . . . . . . . . . . . . . . 9
Disposal . . . . . . . . . . . . . . . . . . . . . . . . . . . . . . . . . . . . . . . . . . . . . . . . . . . . . 10
Despatch Rules . . . . . . . . . . . . . . . . . . . . . . . . . . . . . . . . . . . . . . . . . . . . . . . 10
Maintenance . . . . . . . . . . . . . . . . . . . . . . . . . . . . . . . . . . . . . . . . . . . . . . . . . . 10
Inspection and Service . . . . . . . . . . . . . . . . . . . . . . . . . . . . . . . . . . . . . . . . 10
Oxygen Generation . . . . . . . . . . . . . . . . . . . . . . . . . . . . . . . . . . . . . . . . . . . . 10
Technical Data . . . . . . . . . . . . . . . . . . . . . . . . . . . . . . . . . . . . . . . . . . . . . . . . 10
What is What . . . . . . . . . . . . . . . . . . . . . . . . . . . . . . . . . . . . . . . . . . . . . . . . . . 11
Order List . . . . . . . . . . . . . . . . . . . . . . . . . . . . . . . . . . . . . . . . . . . . . . . . . . . . 11
7
Page 8
For Your Safety
Strictly follow the Instructions for Use
Any use of the oxygen self-rescuer requires full understanding and strict
observation of these instructions.
The oxygen self-rescuer is only to be used for purposes specified here.
Maintenance
The oxygen self-rescuer must be inspected and serviced regularly by trained service personnel.
Repair and general overhaul of the oxygen self-rescuer may only be carried
out by trained service personnel.
We recommend that a service contract be obtained with Dräger Safety and
that all repairs also be carried out by them.
Only authentic Dräger spare parts may be used for maintenance.
Observe chapter "Maintenance".
Accessories
Only use accessories mentioned in the order list.
Liability for proper function or damage
The liability for the proper function of the oxygen self-rescuer is irrevocably
transferred to the owner or operator to the extent that the oxygen selfrescuer is improperly serviced or repaired by personnel not employed or
authorized by Dräger Safety or if the oxygen self-rescuer is used in a
manner not conforming to its intended use.
Dräger Safety cannot be held responsible for damage caused by noncompliance with the recommendations given above.
The warranty and liability provisions of the terms of sale and delivery of
Dräger Safety are likewise not modified by the recommendations given
above.
Disposal
Used or opened units have to be disposed professionally, since the
reaction between the air humidity and the used chemical can generate an
aggressive base.
Dräger Safety AG & Co. KGaA
Description
The Dräger Oxyboks K 25 is an oxygen self-rescuer, independent of the
ambient air, with a closed to-and-fro breathing system which uses chemically-bound oxygen.
The Dräger Oxyboks K 25 has a nominal duration of 25 minutes according
to DIN EN 13794.
Intended Use
The Dräger Oxyboks K 25 is intended for emergency escape from areas
filled with smoke or toxic gases or lacking oxygen.
Carrying Method
The Dräger Oxyboks K 25 is carried on a belt on the right or left hand side
of the body.
● Push the belt through the two loops.
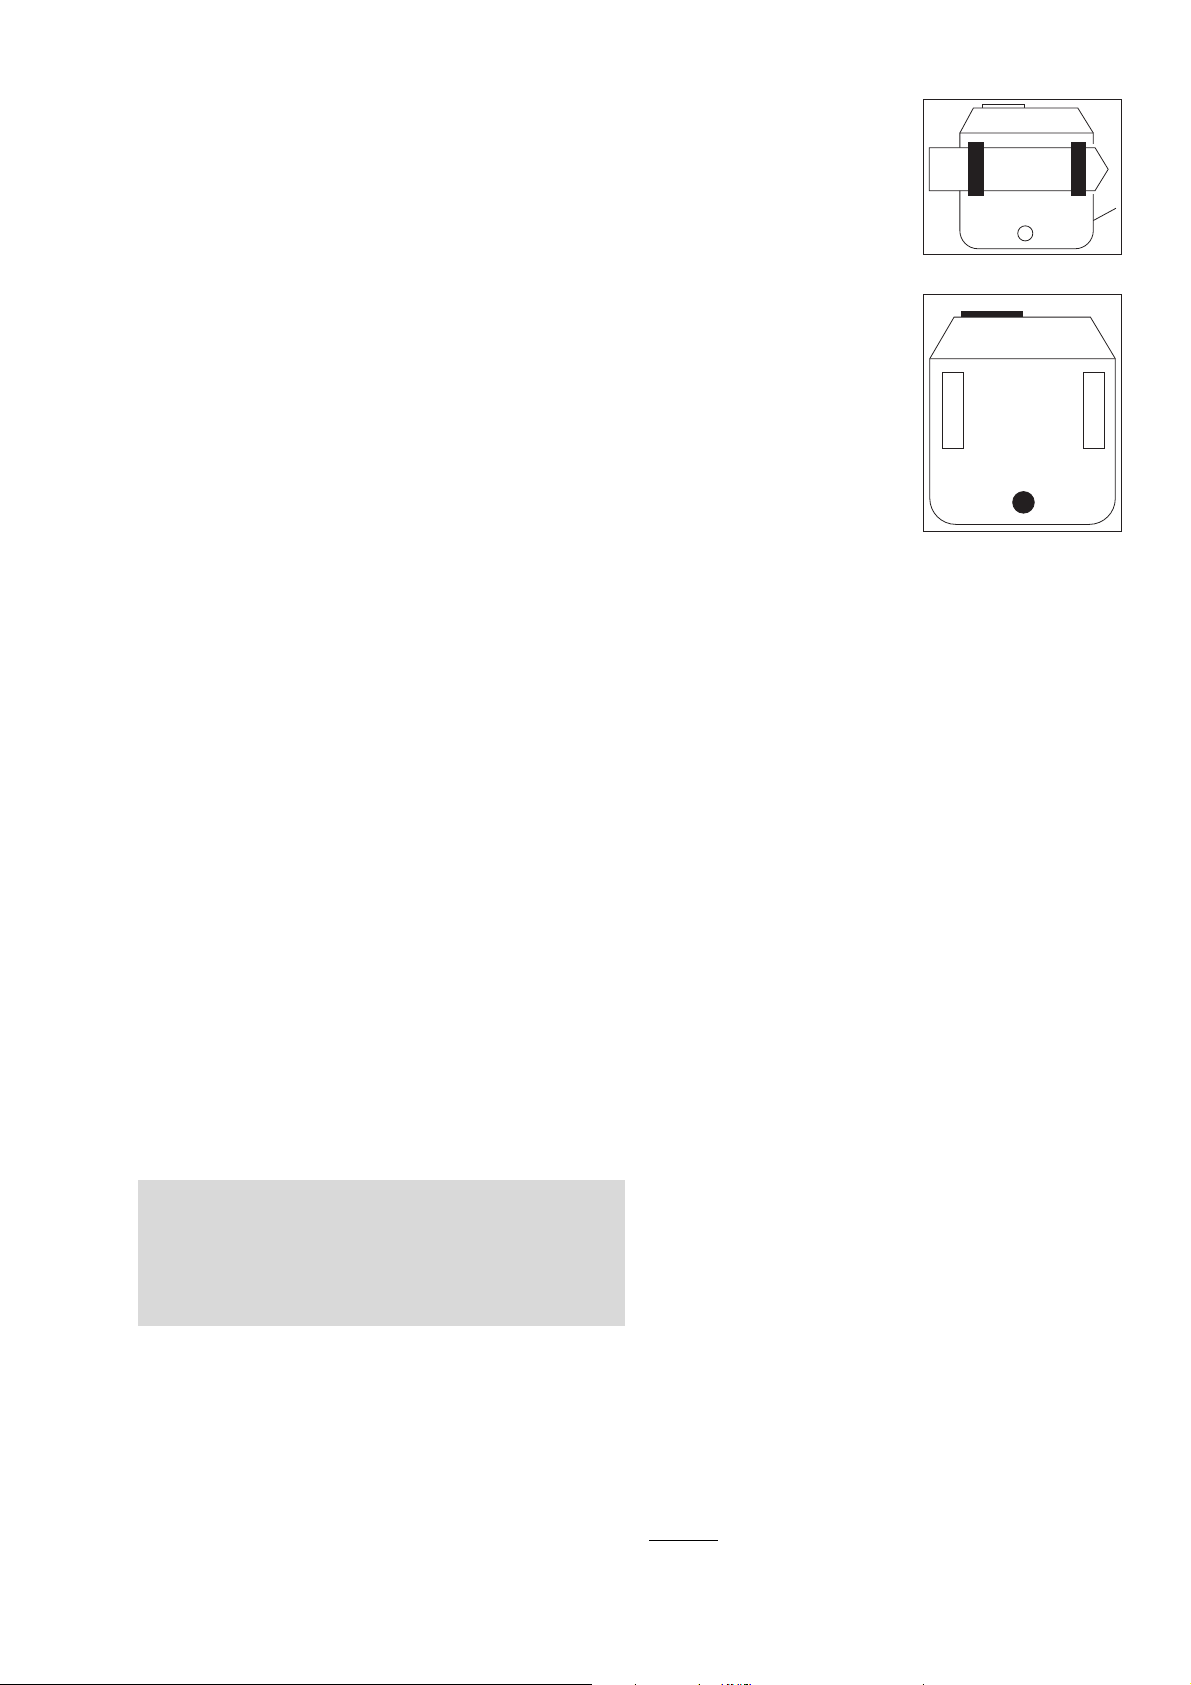
Daily Inspection
Check before use every time:
1 Seal is undamaged.
— Lid is closed and closure locked.
— No cracks, holes or other damage
more than 1.5 mm in depth can be
seen on the casing.
2 Indicator is dark blue in colour.
If there is a significant loss of blue
colour (50 % of the particles have
changed colour from dark blue to
light blue or neutral) the oxygen selfrescuer must not be used any more.
Pack the oxygen self-rescuer and send to Dräger Safety.
1
2
Advice on Use
— Do not open the oxygen self-rescuer until it is required for use.
Humidity in the atmosphere may penetrate the open oxygen self-rescuer
and impair its function.
— Inspect the oxygen self-rescuer daily.
— Use the oxygen self-rescuer only once.
— To avoid risk of fire, make sure that no flammable materials (petrol,
grease, solvents etc.) can get into the oxygen self-rescuer before or
during operation.
There is also danger of ignition if the oxygen-releasing chemicals come
into contact with combustible substances such as coal when the oxy-
gen self-rescuer is damaged.
Opened units are classified as used and it is not allowed to store them.
They have to be recycled (see “Disposal” on page 10).
1)
unit
For routine training purposes, use the training
“Order List” on page 11).
Oxyboks KT (see
003 21371.eps
00221371.eps
WARNING
Do not use the Dräger Oxyboks K 25 in air which contains gases or
vapours which can ignite below 300 oC.
Do not store the Dräger Oxyboks K 25 at temperatures below 0 oC
because the temperature of the device must be above 0 oC.
Follow the advice given in these Instructions for Use.
Dräger Oxyboks K 25 can save your life!
8
1) not CE-approved.
Page 9
Donning Procedure
If the oxygen self-rescuer is not donned correctly, there could be a delay in
starting in an emergency.
Perform the following donning steps according to the described
order.
Opening the container
● Pull the lever up with forefinger or
thumb as far as it will go until the
fixing straps loosen.
● Remove lid.
Pulling the oxygen self-rescurer out
● Get hold of the red loop on the
exposed part and pull the oxygen
self-rescuer out of the housing
smoothly in one go; doing so will
automatically activate the starter
cartridge and the yellow breathing
bag will fill with oxygen after about
6 seconds. The loose packaging
will fall off or may be removed.
CAUTION!
The activated starter will
become hot!
Do not touch, danger of burning!
● Support unfolding of the breathing bag with your hands.
Fitting the nose clip
● Pull the nose clip apart and fit over
your nostrils so that your nose is
completely sealed.
If the breathing bag has not yet inflated
● Exhale several times to fill the breathing bag. The humidity and CO
content in the exhaled air will start the oxygen production.
● Breathe steadily.
00421371.eps
Fitting and tightening head straps
● Take off your helmet.
● Untangle headstraps and pull over
head.
● Pull the red ends of the band evenly
towards the headstraps until tight.
● Put your helmet on again.
00521371.eps
Note
Dräger suggests to practice this procedure with the training unit.
00821371.eps
2
00921371.eps
Quickly perform the following donning steps within approx.
20 seconds.
Preparing and inserting the mouthpiece
● Remove the mouthpiece plug from
the mouthpiece.
● Hold the oxygen self-rescuer with
the breathing bag pointing away
from your body.
● Put mouthpiece in your mouth
and exhale vigorously into the
gen self-rescuer
.
oxy-
The rubber gum plate must be
inserted between your teeth and
lips
.
WARNING
The mouthpiece is of limited use for
persons wearing dentures.
● Tightly seal round the mouthpiece
with your lips.
Important Rules for Escaping
— Begin your escape calmly; do not rush.
— Plan your escape so that you use the shortest route to safety.
— Behave calmly. Hurrying makes you breathe more quickly and uses up
more oxygen.
— Make sure that the mouthpiece is gripped firmly between the teeth and
lips and is completely sealed by the lips.
— If the air from the oxygen self-rescuer is warm and dry, this is a sign that
the oxygen self-rescuer is functioning correctly.
Any off-taste is quite normal and not dangerous.
— Take care not to damage or squash the breathing bag and so waste life-
saving oxygen.
— If you have to vomit, take the mouthpiece out of your mouth but keep it
sealed with the thumb. Do not vomit into the oxygen self-rescuer.
Do not start to inhale again until you have put the mouthpiece back
into your mouth so that you do not inhale toxic substances from the
00621371.eps
ambient air.
End of Use
— When breathing becomes more difficult and the breathing bag begins
to deflate, the oxygen supply is coming to an end.
— Any oxygen self-rescuer used underground must be brought to the
surface.
00721371.eps
9
Page 10

Disposal
The oxygen self-rescuer is to be discarded after use.
Deactivating used oxygen self-rescuer
— Prevent combustible substances (petrol, grease, solvents etc.) from
entering the oxygen self-rescuer to prevent danger of fire!
— Use protective goggles and gloves.
— Remove starter from the case and discard it according to local
regulations.
— Remove KO
— Immerse dismantled KO2 cartridge completely in water, until gas
bubbles no longer emerge. Neutralize the resulting solution with a 3 %
acid e.g. HCl in a 1:1 ratio.
— All plastic components are identified and can be collected according to
their material characteristics for recycling.
cartridge from the case.
2
Oxygen Generation
The oxygen required for breathing is supplied by a solid chemical
substance, potassium dioxide (KO2), which reacts with the carbon dioxide
(CO2) and water vapour (H2O) in exhaled air. These two components of the
exhaled air are absorbed by the KO2 to release the chemically-bound
oxygen (O2) in KO2. The simplified reaction formulas are as follows:
2 KO2 + H2O → 2 KOH + 3/2 O2 + heat
2 KOH + CO
2 KO2 + CO2→ K2CO3 + 3/2 O2 + heat
is both O2 source and CO2 absorber at the same time. Alternating
KO
2
between inhalation and exhalation, the breathing air flows from the
breathing bag through the KO2 cartridge to the heat exchanger and then
back again. A relief valve controls the volume in the breathing bag.
→ K2CO3 + H2O + heat
2
We dispose for you! (price on request)
Please send damaged, opened1), used and expired oxygen self-rescuers in
an approved packaging to the following address:
Dräger Intek GmbH
Bochstrasse 1
D-23569 Luebeck
Germany
Phone ++49 451 882 1813
Fax ++49 451 882 3549
e-mail: recycling@draeger.com
Despatch Rules
Hazard regulations apply when this breathing protective device is in transit.
Breathing protective devices are classified as:
UN 3356 "Oxygen generator, chemical" Class 5.1, packing group II
Starters of damaged and/or opened and partly used breathing protective
devices must be activated before transit. After cooling down, the breathing
protective device has to be sealed in a plastic bag. The breathing protective
device has to be dispatched in an approved packaging (e.g. Dräger
Transport packaging 63 04 511).
The shipment is classified as:
UN 3085, Oxidizing solid, corrosive, n.o.s. (Potassium Superoxide,
Potassium Hydroxide), Class 5.1, packing group I
Please note special regulations for shipping by airfreight.
Maintenance
The user may carry out the following repair procedures himself:
Technical Data
approved according to DIN EN 13 794
Temperature class in acc. with CEN 50014
max. surface temperature 300 oC
Storage temperature 0 oC...+50 oC
Lowest temperature for use -5 oC
Nominal service life 25 minutes
Service life
at 10 L/min minute volume
at 30 L/min minute volume
at 35 L/min minute volume
at100 L/min minute volume
Volume of breathing bag >6 litres
Inhalation/exhalation resistance
at 35 L/min sinusoidal flow
at the beginning of the operating period
at 35 L/min sinusoidal flow
during use
CO2 content
in inhaled air
in inhaled air during use
Temperature of inhaled air
at the end of the operating period max. 70 oC
Weight
unopened
during use
Dimensions (W x H x D) 205 x 189 x 89 mm
Service Life
carried daily
stored in depot
1) Single shift operation max. 8 h a day, 5 working days a week; during multi shift ope-
ration the intervals reduced accordingly.
1)
120 minutes
30 minutes
25 minutes
8 minutes
4 mbar
max. 10 mbar
less than 1% by vol.
max. 2.5 % by vol.
(dry air)
approx. 2.1 kg
approx. 1.2 kg
5 years
10 years
Replacing the indicator window (67 33 647)
● Carefully remove the defective indicator window using a screw driver.
● Insert the new indicator window into the indicator housing exerting
slight pressure.
Replacing the pictograph (67 33 682/ 67 33 910)
● Remove the defective pictograph, e.g. with a razor blade.
● Clean the surface using a degreasing agent.
● Affix new pictograph.
Inspection and Service
— Daily inspection (see “Daily Inspection” on page 8).
1) Before you send the oxygen self-rescuer, please activate the starter!
Afterwards please seal the oxygen self-rescuer in a PE bag.
10
Page 11
What is What
1 Lid
2 Housing
3 Belt loop
4 Indicator
5 Lever and seal
6 Fixing straps
7 Loop
8 Mouthpiece
9 Mouthpiece plug
10 Nose clip
11 Heat exchanger
12 Air distributor
13 Head straps
14 Breathing bag
15 Relief valve
16 Chlorate Starter
Order List
Designation and description Order No.
Dräger Oxyboks K 25 63 03 666
Belt 67 33 934
Bag for goggles 67 33 935
Protection goggles 63 03 670
Pictograph (only in pairs) 67 33 682/
67 33 910
Indicator window 67 33 647
Dräger Transport packaging 63 04 511
Dräger Oxyboks KT (training unit) 67 33 466
13
11
12
14
15
9
10
8
7
16
01321371.eps
11
Page 12

Table des matières
Pour votre sécurité . . . . . . . . . . . . . . . . . . . . . . . . . . . . . . . . . . . . . . . . . . . . 13
Description . . . . . . . . . . . . . . . . . . . . . . . . . . . . . . . . . . . . . . . . . . . . . . . . . . . 13
Champ d‘application . . . . . . . . . . . . . . . . . . . . . . . . . . . . . . . . . . . . . . . . . . . 13
Mode de port . . . . . . . . . . . . . . . . . . . . . . . . . . . . . . . . . . . . . . . . . . . . . . . . . 13
Contrôle journalier . . . . . . . . . . . . . . . . . . . . . . . . . . . . . . . . . . . . . . . . . . . . . 13
Utilisation de l'autosauveteur à oxygène . . . . . . . . . . . . . . . . . . . . . . . . . 13
Procédure de mise en place . . . . . . . . . . . . . . . . . . . . . . . . . . . . . . . . . . . . 14
Règles de fuite importantes . . . . . . . . . . . . . . . . . . . . . . . . . . . . . . . . . . . . 14
Fin d'utilisation . . . . . . . . . . . . . . . . . . . . . . . . . . . . . . . . . . . . . . . . . . . . . . . . 14
Elimination . . . . . . . . . . . . . . . . . . . . . . . . . . . . . . . . . . . . . . . . . . . . . . . . . . . 15
Instructions de transport . . . . . . . . . . . . . . . . . . . . . . . . . . . . . . . . . . . . . . . 15
Entretien . . . . . . . . . . . . . . . . . . . . . . . . . . . . . . . . . . . . . . . . . . . . . . . . . . . . . 15
Contrôle et entretien . . . . . . . . . . . . . . . . . . . . . . . . . . . . . . . . . . . . . . . . . . . 15
Production d'oxygène . . . . . . . . . . . . . . . . . . . . . . . . . . . . . . . . . . . . . . . . . . 15
Caractéristiques techniques . . . . . . . . . . . . . . . . . . . . . . . . . . . . . . . . . . . . 15
Les éléments individuels . . . . . . . . . . . . . . . . . . . . . . . . . . . . . . . . . . . . . . . 16
Liste de commande . . . . . . . . . . . . . . . . . . . . . . . . . . . . . . . . . . . . . . . . . . . . 16
12
Page 13
Pour votre sécurité
Respecter le manuel
Toute utilisation de l'autosauveteur à oxygène requiert une compréhension
approfondie de ces instructions et leur respect complet.
L'autosauveteur à oxygène est uniquement prévu pour l'utilisation décrite
dans ce manuel.
Entretien
L'autosauveteur à oxygène doit être régulièrement soumis à des contrôles
et entretiens effectués par du personnel expert.
Les réparations effectuées sur les autosauveteurs à oxygène ne doivent
être effectuées que par des spécialistes.
Nous recommandons de conclure un contrat de maintenance avec Dräger
Safety et de faire effectuer toutes les remises en état par Dräger Safety.
Dans le cadre de travaux d'entretien, utiliser seulement des pièces d'origine de Dräger.
Respecter les consignes du chapitre "Maintenance".
Accessoires
Utiliser seulement les accessoires indiqués dans la liste de commande.
Responsabilité pour le bon fonctionnement ou bien pour des dommages
La responsabilité pour le fonctionnement de l'autosauveteur à oxygène est
automatiquement transmise au propriétaire ou à l'exploitant si l'autosauveteur à oxygène est entretenu ou remis en état de manière inadéquate par
des personnes qui n'appartiennent pas à Dräger Safety ou si l'autosauveteur est manipulé d'une manière qui ne correspond pas à l'utilisation conforme.
Dräger Safety décline toute responsabilité pour des dommages résultant
d'un non-respect des informations données ci-dessus.
Les conditions de garantie et de responsabilité figurant dans les
conditions de vente et de livraison de la Société Dräger ne sont pas étendues par les remarques ci-dessus.
Elimination
Les appareils utilisés ou ouverts doivent être éliminés conformément aux
réglementations techniques applicables car l'exposition des produits chimiques utilisés à l'humidité contenue dans l'air peut entraîner la formation de
lessives alcalines agressives.
Dräger Safety AG & Co. KGaA
Description
L'autosauveteur à oxygène Dräger Oxyboks K 25 est un autosauveteur à
oxygène indépendant de l'air ambiant avec un système respiratoire oscillant
à base d'oxygène chimique.
L'appareil Dräger Oxyboks K 25 présente un temps d‘utilisation nominal de
25 minutes selon DIN EN 13794.
Champ d‘application
L'autosauveteur Dräger Oxyboks K 25 est un appareil d'urgence qui est utilisé pour quitter des zones dans lesquelles il y a de la fumée, des gaz toxiques ou un manque d'oxygène.
Mode de port
L'équipement Dräger Oxyboks K 25 se porte à la ceinture, sur le côté droit
ou gauche du corps.
● Faire passer la sangle par la boucle
de la ceinture.
Contrôle journalier
Contrôle visuel :
1 Le plomb ne présente aucun
endommagement.
— Le couvercle est fermé et la
fermeture est verrouillée.
— Le boîtier ne présente pas de
fissures, ni de trous ou d'autres
dommages ayant une profondeur
supérieure à 1,5 mm.
2 L'indicateur présente une couleur
bleu foncé.
Une diminution importante de la
couleur bleue (50 % des particules
ont viré du bleu foncé au bleu clair
ou transparent) signifie qu'il ne faut plus utiliser l'autosauveteur à oxygène.
Dans ce cas, contactez Dräger Safety.
1
2
Utilisation de l'autosauveteur à oxygène
— N'ouvrir l'autosauveteur à oxygène que pour l'utilisation !
Sinon, l'humidité provenant de l'air ambiant pénètre l'autosauveteur à
oxygène ouvert et nuit à son fonctionnement.
— Contrôler chaque jour l'autosauveteur à oxygène.
— N'utiliser l'autosauveteur à oxygène qu'une seule fois.
— Eviter que des substances combustibles (essence, graisse, solvant,
etc.) pénètrent dans l'autosauveteur à oxygène avant ou pendant son
utilisation. Il y a sinon un risque d'incendie !
De même, il y a un danger d'allumage lorsque la substance chimique
séparant l'oxygène entre en contact avec des substances
combustibles, comme le charbon par ex., quand l'autosauveteur à
oxygène est endommagé.
Les appareils ouverts sont considérés comme ayant été utilisés et ne doivent pas être stockés. Ils doivent être éliminés (voir “Elimination” à la
page 15).
1)
Il faut utiliser l'appareil d'entraînement
s'exercer régulièrement à l'utilisation de l'équipement (voir “Liste de
commande” à la page 16).
Dräger Oxyboks KT afin de
003 21371.ep s
00221371.eps
AVERTISSEMENT !
Ne pas utiliser l'autosauveteur Dräger Oxyboks K 25 dans une
atmosphère comprenant des gaz ou des vapeurs ayant une température d'inflammation inférieure à 300 oC !
Ne pas stocker l'équipement Dräger Oxyboks K 25 à une température inférieure à 0 oC car la température de l'appareil ne doit pas être
inférieure à 0oC.
Observez les notes comprises dans les présentes instructions de service.
L'autosauveteur Dräger Oxyboks K 25 peut vous sauver la vie !
1) ne fait pas partie de l'approbation du modèle type CE.
13
Page 14
Procédure de mise en place
Une mise en place incorrecte entraîne des retards lors de l'utilisation de
l'autosauveteur à oxygène en cas d'urgence.
Il faut absolument effectuer les étapes suivantes dans l'ordre décrit.
Ouvrir le réservoir
● Soulever le levier avec l'index ou le
pouce jusqu'à ce que les colliers de
serrage soient desserrés et se détachent.
● Retirer le couvercle.
Retrait de l'autosauveteur à oxygène
● Tirer la boucle rouge d’un seul mou-
vement souple afin de retirer l’autosauveteur à oxygène du boîtier.
La cartouche de démarrage est
alors automatiquement activée ; au
bout d'env. 6 secondes, le sac respiratoire jaune se remplit d'oxygène.
Les pièces détachées tombent et
peuvent être éliminées.
AVERTISSEMENT !
La cartouche de démarrage acti-
vée devient très chaude ! Ne pas
toucher. Risque de brûlure.
● Utilisez vos mains pour accompagner le déploiement du sac respira-
toire.
Effectuer l'étape suivante sans interruption dans un délai
d'env. 20 secondes.
Préparation et insertion de l'embout buccal
● Retirer le bouchon de l'embout buc-
cal.
● Tenir l'autosauveteur à oxygène de
manière à ce que le sac respiratoire
pointe dans la direction opposée à
celle du corps.
● Insérer l'embout buccal dans la bou-
che et expirer dans l'autosauveteur
à oxygène.
La pièce en caoutchouc doit être
placée entre les dents et les lèvres.
AVERTISSEMENT !
Si vous portez un appareil dentaire,
l'ensemble embout buccal n'est
adapté qu'à certaines conditions.
● Serrer fermement l'embout buccal
avec les lèvres.
Mise en place du pince-nez
● Ecarter le pince-nez et le placer sur
l'aile du nez.
Le nez doit être hermétique.
Si le sac respiratoire ne s'est pas encore rempli
● Remplir le sac respiratoire en effectuant plusieurs inspirations profon-
des. L'humidité et le CO2 présents dans l'air expiré initient alors la production d'oxygène.
00421371.eps
● Respirer calmement.
Mise en place et fixation des brides
● Retirer le casque.
● Placer les brides sur la tête sans les
tordre.
● Tirer chaque extrémité de bride uni-
formément avec une main vers le
haut jusqu'à aboutir à un ajustage
adéquat. Le cas échéant, retenir les
brides avec l'autre main à la hauteur
du menton.
● Remettre le casque en place.
00521371.eps
REMARQUE
Dräger recommande de pratiquer cette procédure avec l'appareil
d'entraînement.
Règles de fuite importantes
— Rester calme.
— Planifier la voie de secours, choisir le chemin le plus court dans l'air
ambiant sûr !
— Fuir de manière réfléchie. Une respiration précipitée et rapide
consomme plus d'oxygène !
— Faire toujours attention à ce que l'embout buccal soit maintenu
fermement entre les dents et les lèvres et qu'il soit entouré de manière
étanche par les lèvres !
— L'air de l'autosauveteur à oxygène est chaud et sec ce qui est un signe
d'un fonctionnement correct de l'autosauveteur à oxygène. Même un
goût spécial éventuel est normal et sans risque.
— Ne pas endommager ou presser le sac respiratoire, sinon il y a une
perte de l'oxygène vital.
— En cas de vomissements, retirer l'embout buccal de la bouche et le
00621371.eps
bloquer avec le pouce. Ne pas vomir dans l'autosauveteur à oxygène !
Afin de ne pas aspirer l'air toxique de l'environnement, il faut
respirer l'air de l'autosauveteur à oxygène après avoir réinséré
l'embout buccal dans la bouche.
Fin d'utilisation
— La réserve d'oxygène est épuisée lorsque l'inspiration devient plus
difficile et que le sac respiratoire commence à se replier.
— Les autosauveteurs à oxygène utilisés dans l'exploitation au fond
(mines) doivent être transportés à la surface.
00721371.eps
00821371.eps
00921371.eps
14
Page 15

Elimination
L'autosauveteur à oxygène doit être éliminé après son utilisation.
Désactiver l'autosauveteur à oxygène utilisé
— Eviter que des substances combustibles (essence, graisse, solvant,
etc.) ne pénètrent dans l'autosauveteur à oxygène avant ou après
l'utilisation. Il y a sinon un risque d'incendie !
— Porter des lunettes protectrices et des gants !
— Démonter la cartouche de démarrage du carter et l'éliminer selon les
règlements locaux.
— Démonter la cartouche KO
— Placer la cartouche de KO2 complètement démontée dans l'eau jusqu'à
ce qu'il n'y ait plus de bulles de gaz. Neutraliser la solution produite au
moyen d'un acide à 3 %, par ex. de l'acide chlorhydrique (HCl) à une
concentration 1:1.
— Toutes les matières plastiques sont marquées et peuvent être
collectées et récupérées selon leur type.
du carter.
2
Production d'oxygène
L'oxygène nécessaire à la respiration est obtenu d'une substance chimique
solide, le dioxyde de potassium (KO2). Cette substance réagit avec le
dioxyde de carbone (CO2) et la vapeur d'eau (H2O) de l'air expiré. Ces
deux substances de l'air de respiration sont absorbées par le KO2, l'oxygène (O2) lié chimiquement dans le KO2 étant libéré. Les formules de réaction simplifiées sont indiquées ci-dessous :
2 KO2 + H2O → 2 KOH + 3/2 O2 + chaleur
2 KOH + CO
2 KO2 + CO2 → K2CO3 + 3/2 O2 + chaleur
est la source d'O2 et l'absorbeur CO2 en même temps. En alter-
Le KO
2
nance avec l'inspiration et l'expiration, l'air de respiration sort du sac respiratoire à travers la cartouche de KO2vers l'échangeur thermique et
retourne ensuite dans le sac respiratoire.
Un clapet de sûreté limite le volume dans le sac respiratoire.
→ K2CO3 + H2O + chaleur
2
Nous nous chargeons de l'élimination ! (prix sur demande)
Veuillez envoyer les autosauveteurs à oxygène endommagés, ouverts1),
ayant déjà été utilisés et usés dans un emballage adéquat conforme aux
instructions de transport à l'adresse suivante :
Dräger Intek GmbH
Bochstraße 1
D-23569 Lübeck
Tél. (04 51) - 882 - 1813
Fax (04 51) - 882 - 3549
e-mail : recycling@draeger.com
Instructions de transport
Les appareils de protection respiratoire à l'oxygène sont soumis, lors de
leur transport, aux réglementations internationales régissant les transports
de marchandises.
Les appareils de protection respiratoire à oxygène sont classifiés sous la
rubrique :
UN 3356 "Oxygen generator, chemical" Class 5.1, packing group II
Sur les appareils de protection respiratoire à l'oxygène ouverts et partiellement utilisés ou endommagés, la cartouche de démarrage doit être déclenchée avant le transport de l'équipement. Après refroidissement, l'appareil
de protection respiratoire à l'oxygène doit être placé dans un sac en plastique étanche à l'air. Il doit être expédié dans un emballage conforme (par ex.
dans un emballage de transport Dräger 63 04 511).
La marchandise expédiée est classifiée sous la rubrique :
UN 3085, Oxidizing solid, corrosive, n.o.s. (Potassium Superoxide,
Potassium Hydroxide), Class 5.1, packing group I
Le cas échéant, respecter les prescriptions particulières du transporteur.
Entretien
L'utilisateur peut effectuer lui-même les mesures d'entretien suivantes :
Caractéristiques techniques
homologué selon DIN EN 13 794
Classe de température conformément à la norme
CEN 50014
Température de surface maximale 300 oC
Température de stockage 0 oC...+50 oC
Température d'utilisation minimale -5 oC
Durée nominale de fonctionnement 25 minutes
Durée de fonctionnement
à un volume respiratoire minute de 10 l/min
à un volume respiratoire minute de 30 l/min
à un volume respiratoire minute de 35 l/min
à un volume respiratoire minute de 100 l/min
Volume du sac respiratoire >6 litres
Résistance à l'inspiration/l'expiration
pour un débit sinusoïdal de 35 l/min au début
de la durée d'utilisation et pour un débit sinusoï-
dal de 35 l/min pendant la durée d'utilisation
Contenu en CO
dans l'air inhalé
dans l'air inhalé pendant la durée d'utilisation
Température de l'air inhalé
à la fin de la durée d'utilisation max. 70 oC
Poids
non ouvert
en cours d'utilisation
Dimensions (L x L x H) 205 x 189 x 89 mm
Durée de vie
Utilisation quotidienne
Stocké dans un dépôt
1) Service à une équipe max. 8 heures chaque jour ; 5 jours par semaine ; durée d'uti-
lisation proportionnellement réduite en cas de service à plusieurs équipes.
2
1)
120 minutes
30 minutes
25 minutes
8 minutes
4 mbars
10 mbars max.
inférieur à 1 % Vol.
max. 2,5 % Vol.
(air sec)
env. 2,1 kg
env. 1,2 kg
5 ans
10 ans
Remplacer la fenêtre d'indicateur (67 33 647)
● Enlever avec précaution la fenêtre d'indicateur défectueuse au moyen
d'un tournevis.
● Monter avec une légère pression la nouvelle fenêtre d'indicateur dans
le carter d'indicateur.
Remplacer le pictogramme (63 33 682/67 33 910)
● Détacher le pictogramme défectueux par ex. au moyen d'une lame de
rasoir.
● Nettoyer la surface à l'aide d'un dégraissant.
● Coller le nouveau pictogramme.
Contrôle et entretien
●
Effectuer les contrôles quotidiens (voir “Contrôle journalier” à la
page 13)
.
1) Si les autosauveteurs à oxygène ouverts doivent être retournés, déclencher
au préalable la cartouche de démarrage !
Ensuite, emballer sous vide l'autosauveteur à oxygène dans un sac fermé en
PE.
15
Page 16

Les éléments individuels
1 Couvercle
2 Boîtier
3 Boucle de la ceinture
4 Indicateur
5 Levier avec plomb
6 Colliers de serrage
7 Boucle
8 Embout buccal
9 Bouchon d'embout buccal
10 Pince-narines
11 Échangeur thermique
12 Diffuseur d'air
13 Jeu de brides
14 Sac respiratoire
15 Clapet de sûreté
16 Cartouche de démarrage au chlorate
Liste de commande
Désignation et description No de référence
Dräger Oxyboks K 25 63 03 666
Ceinture 67 33 934
Trousses à lunettes 67 33 935
Lunettes de protection 63 03 670
Pictogramme (par paire uniquement) 67 33 682/
67 33 910
Fenêtre d'indicateur 67 33 647
Emballage de transport de Dräger 63 04 511
Dräger Oxyboks KT (appareil d'entraînement) 67 33 466
13
11
12
14
15
9
10
8
7
16
01321371.eps
16
Page 17

Contenido
Para su seguridad . . . . . . . . . . . . . . . . . . . . . . . . . . . . . . . . . . . . . . . . . . . . . 18
Descripción . . . . . . . . . . . . . . . . . . . . . . . . . . . . . . . . . . . . . . . . . . . . . . . . . . 18
Finalidad de uso . . . . . . . . . . . . . . . . . . . . . . . . . . . . . . . . . . . . . . . . . . . . . . 18
Transporte . . . . . . . . . . . . . . . . . . . . . . . . . . . . . . . . . . . . . . . . . . . . . . . . . . . 18
Controles diarios . . . . . . . . . . . . . . . . . . . . . . . . . . . . . . . . . . . . . . . . . . . . . . 18
Utilización del equipo . . . . . . . . . . . . . . . . . . . . . . . . . . . . . . . . . . . . . . . . . . 18
Modo de aplicación . . . . . . . . . . . . . . . . . . . . . . . . . . . . . . . . . . . . . . . . . . . 19
Reglas importantes para escape . . . . . . . . . . . . . . . . . . . . . . . . . . . . . . . 19
Final de uso . . . . . . . . . . . . . . . . . . . . . . . . . . . . . . . . . . . . . . . . . . . . . . . . . . 19
Desecho . . . . . . . . . . . . . . . . . . . . . . . . . . . . . . . . . . . . . . . . . . . . . . . . . . . . . 20
Condiciones de transporte . . . . . . . . . . . . . . . . . . . . . . . . . . . . . . . . . . . . . 20
Mantenimiento . . . . . . . . . . . . . . . . . . . . . . . . . . . . . . . . . . . . . . . . . . . . . . . . 20
Inspección y servicio . . . . . . . . . . . . . . . . . . . . . . . . . . . . . . . . . . . . . . . . . . 20
Proceso operativo . . . . . . . . . . . . . . . . . . . . . . . . . . . . . . . . . . . . . . . . . . . . . 20
Características técnicas . . . . . . . . . . . . . . . . . . . . . . . . . . . . . . . . . . . . . . . 20
Qué es qué . . . . . . . . . . . . . . . . . . . . . . . . . . . . . . . . . . . . . . . . . . . . . . . . . . . 21
Lista para pedidos . . . . . . . . . . . . . . . . . . . . . . . . . . . . . . . . . . . . . . . . . . . . 21
17
Page 18

Para su seguridad
Observar las Instrucciones de Uso
Cualquier uso del equipo requiere la comprensión y el cumplimiento estricto de estas instrucciones.
Este equipo tan sólo debe ser usado para los propósitos indicados aquí.
Mantenimiento
El auto rescatador de oxígeno debe someterse regularmente a inspecciones y mantenimiento por personal técnico cualificado.
Las reparaciones solo pueden llevarse a cabo por personal técnico especializado.
Se recomienda establecer un Contrato de Mantenimiento con el Servicio
Técnico de Dräger.
Utilizar solamente repuestos Dräger para el mantenimiento del equipo.
Observar el apartado "Mantenimiento".
Accesorios
Utilizar sólo los accesorios incluidos en la lista de referencias.
Responsabilidad por buen funcionamiento o daños
La responsabilidad por el buen funcionamiento del equipo se transfiere
irrevocablemente al propietario o usuario en toda su extensión si el equipo
ha sido manipulado o reparado por personal no empleado o autorizado por
el Servicio Técnico de Dräger, o si ha sido utilizado de una manera que no
está en conformidad con estas Instrucciones de Uso.
Dräger no será responsable de los daños causados por el incumplimiento
de las instrucciones descritas más adelante.
La garantía y las provisiones de responsabilidad de las condiciones de
venta y suministro de Dräger, no son modificadas asimismo por las recomendaciones mencionadas más arriba.
Eliminación
Los dipositivos utilizados o abiertos deben eliminarse adecuadamente, ya
que con la humedad del aire se pueden formar lejías agresivas a partir de
las sustancias químicas que contiene.
Dräger Safety AG & Co. KGaA
Descripción
El Oxyboks K 25 es un auto rescatador de oxígeno que trabaja independientemente de la atmósfera por medio de un sistema respiratorio bidireccional en circuito cerrado y basado en el principio del oxígeno ligado
químicamente.
Transporte
Oxyboks K 25 de Dräger se coloca en el cinturón a la derecha o izquierda
del cuerpo.
● Pasar la correa del cinturón a través
de los ojales.
Controles diarios
Comprobar antes de uso:
1 El precinto está intacto.
— La tapa está cerrada y el cierre
ajustado.
— La carcasa no presenta ninguna
fisura, agujeros o cualquier otro
daño superiores a 1,5 mm de
profunidad.
2 El color del indicador es azul
oscuro.
Una pérdida significativa del color
azul, es decir, que por lo menos
más del 50 % de las partículas
hayan cambiado su color de azul
oscuro a azul claro, requiere que el aparato sea retirado.
En ese caso póngase en contacto con Dräger.
1
2
Utilización del equipo
— No abrir el Oxyboks de uso real.
El vapor de agua de la atmósfera podría entrar, lo que perjudicaría el
correcto funcionamiento del equipo.
— Chequear el equipo diariamente.
— Utilizar el Oxyboks K 25 solo una vez.
— Evitar que sustancias combustibles (petróleo, gasolina, grasa,
disolventes, etc.) entren en el equipo antes o después del uso. ¡Hay
riesgo de incendio!
Existe un riesgo de incendio cuando el equipo es destruido y el
compuesto químico generador de oxígeno entra en contacto con
sustancias combustibles, como por ejemplo, carbón.
003 21371.ep s
00221371.eps
Oxyboks K 25 de Dräger tiene un tiempo de parada nominal de 25 minutos
según DIN EN 13794.
Finalidad de uso
Oxyboks K 25 de Dräger es un dispositivo de emergencia para la huida de
lugares donde hay humo, gases tóxicos o escasez de oxígeno.
¡ADVERTENCIA!
No usar el Oxyboks K en presencia de mezclas de aire que conten-
gan gases o vapores, cuyas temperaturas de ignición sean inferiores
a 300ºC.
No almacenar Oxyboks K 25 de Dräger a menos de 0 oC, ya que la
temperatura del dispositivo no puede sobrepasar los 0 oC para su
aplicación.
Observar estrictamente las Instrucciones de Uso.
¡Oxyboks K 25 de Dräger le puede salvar la vida!
Los dispositivos abiertos se consideran utilizados y no se pueden almacenar. Deben eliminarse (ver “Desecho” en página 20).
Para entrenamiento regular utilizar el Dräger Oxyboks KT de
entrenamiento
1)
(ver “Lista para pedidos” en página 21).
18
1) no es parte de examen CE de tipo.
Page 19

Modo de aplicación
Una técnica de utilización impropia pudiera producir un retraso, en el caso
de que este equipo se requiera en una emergencia.
Realizar los siguientes pasos respetando el orden descrito.
Apertura de la caja:
● Levantar la palanca con el dedo
índice o pulgar hasta que las cintas
de ajuste se suelten y salten.
● Tirar la tapa.
Sacando el equipo
● Asir el lazo rojo expuesto del equipo
y tirar de él hacia arriba, sacando el
equipo de la caja de un modo uniforme y de una sola vez.
Al hacer esto, se activa automáticamente el cartucho arrancador (started) y la bolsa respiratoria amarilla
se llenará de oxígeno en aprox. 6
segundos. El alojamiento del
euqipo (caja inferior) puede
desecharse ollevarse puesto.
¡ATENCIÓN!
¡El iniciador se calentará! No tocar,
peligro de quemaduras.
● Elimine cualquier pliegue
de la bolsa respiratoria ayudándose con las manos.
Los pasos siguientes deben ser realizados sin interrupción durante
un tiempo de unos 20 segundos.
Preparar y colocar la boquilla
● Retirar el tapón de la boquilla.
● Mantener el auto rescatador de oxí-
geno de tal manera que la bolsa
respiratoria mire hacia fuera del
cuerpo.
● Colocar la boquilla en la boca y
respirar profundamente en el auto
rescatador de oxígeno.
La pieza de goma debe colocarse
entre los dientes y los labios.
¡ADVERTENCIA!
Para los que llevan prótesis denta-
les, el juego de boquilla respiratoria
solo es apto bajo determinadas condiciones.
● Apretar estrechamente la boquilla con los labios.
Colocación de la pinza nasal
● Separar las pinzas nasales y coloca-
res sobre las aletas de la nariz. La
nariz debe quedar totalmente sellada.
Si todavía no se ha llenado la bolsa respiratoria
● Llenar la bolsa respiratoria mediante varias respiraciones profundas. La
humedad y las acciones de el CO2 en el aire de expiración inician
entonces la producción de oxígeno.
00421371.eps
● Respirar con tranquilidad.
Colocar los atalajes de cabeza y ajustar
● Apretar el casco.
● Colocar los atalajes sobre la cabeza
sin torceduras.
● Llevar hacia arriba los cabos de las
bandas con una mano hasta que se
haya ajustado correctamente. Dado
el caso, ajustar las cintas con la otra
mano a la altura de la barbilla.
● Ponerse de nuevo el casco.
00521371.eps
Nota
Dräger recomienda realizar varias ensayos con el dispositivo de
prueba.
Reglas importantes para escape
— Proceder con calma durante el escape. No correr.
— ¡Planifique cuidadosamente su ruta de escape que le lleve por la vía
más corta hacia la seguridad!
— ¡No corra! Si lo hace, acelera su respiración y aumenta el consumo de
oxígeno.
— Asegúrese de que lleva firmemente sujeta la boquilla entre los dientes
y los labios.
— El aire suministrado por el auto rescatador de oxígeno está caliente y
seco, lo que indica un correcto funcionamiento del aparato. Un posible
sabor propio es normal y no peligroso.
— No dañe ni perfore la bolsa respiratoria ya que se perdería oxígeno vital.
— Si siente necesidad de vomitar, retire la boquilla de la boca y ciérrela
con su pulgar ¡No vomite dentro del equipo!
En cuanto se vuelva a poner la boquilla comience a respirar.
00621371.eps
Final de uso
— El aparato estará próximo a agotarse cuando la respiración se vuelva
dificultosa y el volumen de la bolsa respiratoria disminuya.
— El equipo usado en minas subterráneas debe ser llevado a superficie
para su neutralización.
00721371.eps
00821371.eps
00921371.eps
19
Page 20

Desecho
El equipo no puede ser reacondicionado y debe ser desechado después
de su uso.
Desactivación después de utilización
— Evitar que sustancias combustibles (petróleo, gasolina, grasa,
disolventes, etc.) entren en el equipo antes o después del uso. ¡Hay
riesgo de incendio!
— ¡Usar gafas de protección y guantes!
— Retirar el arrancador de su alojamiento y desecharlo.
— Separar el cartucho de KO
— Sumergir totalmente este cartucho de KO2 en agua, hasta que no se
produzcan burbujas. Neutralizar la solución resultante con ácido
diluido al 3% del HCl en una proporción 1:1 (agua:acido diluido).
— Todos los componentes de plástico está identificados y deben ser
recogidos para su reciclado de acuerdo con las características del
material.
de su alojamiento.
2
Proceso operativo
El oxígeno requerido para la respiración se obtiene de una sustancia química sólida, peróxido de potasio (KO2) que reacciona con el dióxido de
carbono (CO2) y el vapor de agua (H2O) contenido en el aire espirado.
Estos dos componentes del aire exhalado son absorbidos por el KO2, con
lo que se libera el oxígeno ligado (O2) químicamente. Las fórmulas simplificadas de la reacción son:
2 KO2 + H2O → 2 KOH + 3/2 O2 + Calor
2 KOH + CO
2 KO2 + CO2 → K2CO3 + 3/2 O2 + Calor
es a la vez fuente de oxígeno y absorbedor del CO2. En los cam-
El KO
2
bios de inhalación a exhalación, el aire respiratorio fluye desde la bolsa
respiratoria a través del cartucho de KO2 y el intercambiador de calor y así
continuamente.
Una válvula de sobrepresión limita el volumen en la bolsa respiratoria.
→ K2CO3 + H2O + Calor
2
Nosotros eliminamos por usted (Precio a petición)
Envíenos los auto rescatadores de oxígeno que presenten daños, abier-
tos1), utilizados o pasados de fecha en un embalaje adecuado, según las
condiciones de transporte a la siguiente dirección:
Dräger Intek GmbH
Bochstraße 1
D-23569 Lübeck
Alemania
Tel. (04 51) - 882 - 1813
Fax (04 51) - 882 - 3549
correo electrónico: recycling@draeger.com
Condiciones de transporte
Los equipos de protección respiratoria de oxígeno están sujetos a las disposiciones de transporte internacionales para su transporte.
Los equipos de protección respiratoria de oxígeno están clasificados
según:
UN 3356 "Oxygen generator, chemical" Class 5.1, packing group II
En caso de equipos de protección respiratoria de oxígeno, es necesario
desactivar el iniciador antes del transporte. Después de que se haya
enfriado, hay que embalar el equipo de protección respiratoria de oxígeno
en una bolsa de plástica al vacío. Es obligatorio utilizar una embalaje adecuado para el envío (p.ej. embalaje de trasporte de Dräger 63 04 511).
El bien de envío está clasificado según:
UN 3085, Oxidizing solid, corrosive, n.o.s. (Potassium Superoxide,
Potassium Hydroxide), Class 5.1, packing group I
Dado el caso, tener en cuenta las condiciones del transportista contratado.
Características técnicas
De acuerdo con DIN EN 13 794
Temperatura clase CEN 50014
Máxima temperatura superficial 300 oC
Temperatura de almacenamiento 0 oC...+50 oC
Temperatura mínima de utilización -5 oC
Tiempo de parada nominal 25 minutos
Duración
a 10 l/min volumen minutos respiración
a 30 l/min volumen minutos respiración
a 35 l/min volumen minutos respiración
a 100 l/min volumen minutos respiración
Volumen de la bolsa respiratoria >6 litros
Resistencia inhalatoria/ exhalatoria
a 35 l/min flujo sinusoidal
al iniciar el tiempo de uso
a 35 l/min flujo sinusoidal
hacia final del uso
Contenido de CO
en el gas inhalado
en el gas inhalado hacia el final del uso
Temperatura del gas inhalado
al final del uso max. 70 oC
Peso
transportado
en uso
Dimensiones (ancho x altura x profundidad) 205 x 189 x 89 mm
Vida útil
llevado diariamente
en almacenamiento
1) Funcionamiento de un turno de máx. 8 horas diarias; 5 días laborales por semana;
En más turnos, se reduce proporcionalmente.
2
1)
120 minutos
30 minutos
25 minutos
8 minutos
4 mbar
max. 10 mbar
<1 Vol.%
max. 2,5 Vol.%
(aire seco)
aprox. 2,1 kg
aprox. 1,2 kg
5 años
10 años
Mantenimiento
El usuario puede realizar por sí mismo las siguientes medidas de mantenimiento:
Sustituir la ventana del indicador (67 33 647)
● Retirar con cuidado la ventana del indicador defectuosa con un destor-
nillador.
● Colocar la nueva ventana del indicador con una ligera presión en la car-
casa del indicador.
Colocar el pictograma (63 33 682/67 33 910)
● Quitar el pictograma defectuoso, p.ej. con una hoja de afeitar.
● Limpiar las superficies con un producto desengrasante.
● Pegar el nuevo pictrograma.
Inspección y servicio
● Chequear el equipo diariamente (ver “Controles diarios” en página 18).
1) Si se va a devolver un auto rescatador de oxígeno abierto, es necesario desconectar el iniciador previamente.
Por último, se debe plastificar el auto rescatador de oxígeno en una bolsa cerrada
de auto-cierre.
20
Page 21

Qué es qué
1 Tapa del equipo
2 Carcasa
3 Ajuste para el cinturón
4 Indicador de Mantenimiento
5 Precinto de cierre
6 Atalajes de cierre
7 Correa
8 Boquilla
9 Cierre de la boquilla
10 Pinza nasal
11 Intercambiador de calor
12 Distribuidor de aire
13 Atalajes de cabeza
14 Bolsa respiratoria
15 Válvula de seguridad
16 Arrancador de clorato
Lista para pedidos
Denominación y descripción Referencia
Dräger Oxyboks K 25 63 03 666
Cinturón 67 33 934
Bolsa 67 33 935
Gafas 63 03 670
Pictograma (solo por parejas) 67 33 682/
67 33 910
Ventana del indicador 67 33 647
Embalaje de transporte de Dräger 63 04 511
Oxyboks KT de Dräger (equipo de prueba) 67 33 466
13
11
12
14
15
9
10
8
7
16
01321371.eps
21
Page 22

Sommario
Per la vostra sicurezza . . . . . . . . . . . . . . . . . . . . . . . . . . . . . . . . . . . . . . . . 23
Descrizione . . . . . . . . . . . . . . . . . . . . . . . . . . . . . . . . . . . . . . . . . . . . . . . . . . 23
Scopo d'impiego . . . . . . . . . . . . . . . . . . . . . . . . . . . . . . . . . . . . . . . . . . . . . 23
Indossamento . . . . . . . . . . . . . . . . . . . . . . . . . . . . . . . . . . . . . . . . . . . . . . . . 23
Controllo quotidiano . . . . . . . . . . . . . . . . . . . . . . . . . . . . . . . . . . . . . . . . . . 23
Impiego dell'apparecchio ad ossigeno per autosalvataggio . . . . . . . 23
Come indossare l'apparecchio . . . . . . . . . . . . . . . . . . . . . . . . . . . . . . . . . . 24
Regole importanti da osservare in caso di fuga . . . . . . . . . . . . . . . . . . . 24
Fine d'impiego . . . . . . . . . . . . . . . . . . . . . . . . . . . . . . . . . . . . . . . . . . . . . . . . 24
Smaltimento . . . . . . . . . . . . . . . . . . . . . . . . . . . . . . . . . . . . . . . . . . . . . . . . . 25
Disposizioni di trasporto . . . . . . . . . . . . . . . . . . . . . . . . . . . . . . . . . . . . . . 25
Manutenzione . . . . . . . . . . . . . . . . . . . . . . . . . . . . . . . . . . . . . . . . . . . . . . . . 25
Ispezione e manutenzione . . . . . . . . . . . . . . . . . . . . . . . . . . . . . . . . . . . . . 25
Produzione di ossigeno . . . . . . . . . . . . . . . . . . . . . . . . . . . . . . . . . . . . . . . 25
Specifiche tecniche . . . . . . . . . . . . . . . . . . . . . . . . . . . . . . . . . . . . . . . . . . . 25
Identificazioni delle parti . . . . . . . . . . . . . . . . . . . . . . . . . . . . . . . . . . . . . . 26
Lista d'ordine . . . . . . . . . . . . . . . . . . . . . . . . . . . . . . . . . . . . . . . . . . . . . . . . 26
22
Page 23

Per la vostra sicurezza
Osservare attentamente le istruzioni per l’uso
Ogni utilizzo dell'apparecchio ad ossigeno per autosalvataggio presuppone la perfetta conoscenza e osservanza di queste istruzioni per l'uso.
L'apparecchio ad ossigeno per autosalvataggio deve essere utilizzato
esclusivamente per gli scopi qui di seguito specificati.
Manutenzione
È indispensabile sottoporre l'apparecchio ad ossigeno per autosalvataggio
a regolari ispezioni e manutenzioni da parte di personale esperto e competente.
Fare eseguire interventi di riparazione all'apparecchio ad ossigeno per
autosalvataggio solo da personale esperto e competente.
Si consiglia la stipulazione di un contratto di assistenza con Dräger Safety
facendo svolgere tutti gli eventuali interventi di riparazione a Dräger Safety.
Per la manutenzione utilizzare solo ricambi originali Dräger.
Osservare il capitolo "Manutenzione".
Accessori
Utilizzare solo gli accessori riportati sulla lista d'ordine.
Responsabilità per funzionamento improprio o danni
La responsabilità in caso di funzionamento improprio dell’apparecchio ad
ossigeno per autosalvataggio è in ogni caso imputabile al proprietario o
gestore, qualora l'apparecchio ad ossigeno per autosalvataggio è collaudato o riparato da personale non alle dipendenze o autorizzato da Dräger
Safety o se utilizzato non in conformità al suo impiego specifico.
Dräger Safety non risponde per danni risultanti dalla mancata osservanza
delle indicazioni sopra specificate.
I termini di garanzia e di responsabilità, espressi nelle condizioni di vendita
e di consegna di Draeger, non sono modificate dalle raccomandazioni di
cui sopra.
Smaltimento
Apparecchi esauriti o aperti vanno smaltiti in osservanza delle norme
vigenti in materia, considerato che le sostanze chimiche impiegate possono formare delle soluzioni alcaline corrosive se combinate con l'umidità
presente nell'aria.
Draeger Safety Italia
Corsico – Milano
Descrizione
Dräger Oxyboks K 25 è un apparecchio ad ossigeno per autosalvataggio
indipendente dall'atmosfera circostante, dotato di sistema di respirazione
va-e-vieni a base di ossigeno legato chimicamente.
Dräger Oxyboks K 25 ha una durata di mantenimento di 25 minuti in
accordo alla specifica DIN EN 13794.
Scopo d'impiego
Dräger Oxyboks K 25 è un apparecchio per la fuga in emergenza da settori
in cui prevale il livello di fumo, gas tossici o dove l'ossigeno è presente in
quantità insufficiente.
Indossamento
Dräger Oxyboks K 25 è posizionato in vita con una cintura, a scelta sulla
destra o sulla sinistra.
● Infilare la cintura nei passanti.
Controllo quotidiano
Controllo visivo:
1 Il sigillo di piombo non è danneg-
giato.
— Il coperchio è abbassato e la
chiusura è bloccata.
— L'involucro non presenta fenditure,
fori o altri danneggiamenti con una
profondità superiore a 1,5 mm.
2 L'indicatore indica un colore blu
scuro.
In caso di considerevole perdita del
colore blu (il 50 % delle particelle
sono passate da blu scuro a blu
chiaro o sono addirittura incolore),
non sarà più consentito utilizzare l'apparecchio ad ossigeno per autosalvataggio.
Si prega di rivolgersi in tal caso a Dräger Safety.
1
2
Impiego dell'apparecchio ad ossigeno per
autosalvataggio
— Aprire l'apparecchio ad ossigeno per autosalvataggio solo in caso di
intervento!
In caso contrario l'umidità presente nell'aria ambiente penetra
nell'apparecchio ad ossigeno per autosalvataggio aperto
pregiudicandone il rispettivo funzionamento.
— Controllare l'apparecchio ad ossigeno per autosalvataggio
quotidianamente.
— Utilizzare l'apparecchio ad ossigeno per autosalvataggio una volta sola.
— Impedire a sostanze combustibili (benzina, grasso, solventi ecc.) di
penetrare prima o durante l'impiego all'interno dell'apparecchio ad
ossigeno per autosalvataggio, altrimenti sussiste il pericolo di incendio!
Il pericolo di accensione sussiste altresì, se a seguito di distruzione
dell'apparecchio ad ossigeno per autosalvataggio la sostanza chimica
responsabile dello sprigionamento di ossigeno entra in contatto con
sostanze combustibili, per es. carbone.
Apparecchi aperti sono da considerarsi esauriti e non vanno più conservati. Procedere in tal caso allo smaltimento conforme, (vedi Smaltimento” a
pagina 25).
Al fine di svolgere regolari esercitazioni sul corretto utilizzo si consiglia
l'uso dell'apparecchio d'addestramento
d'ordine” a pagina 26).
1)
Dräger Oxyboks KT, (vedi Lista
003 21371.ep s
00221371.eps
AVVERTENZA!
Non impiegare Dräger Oxyboks K 25 in presenza di miscele di aria e
gas o vapori con una temperatura di ignizione inferiore a 300o C!
Non conservare Dräger Oxyboks K 25 ad una temperatura inferiore
agli 0o C visto che la temperatura di un apparecchio pronto per l'uso
immediato non deve scendere al di sotto di 0o C.
Seguire le indicazioni riportate nel presente manuale d'istruzioni per l’uso.
Dräger Oxyboks K 25 può salvare la vostra vita!
1) Non parte integrante della prova di omologazione CE.
23
Page 24

Come indossare l'apparecchio
L'errato indossamento causa inutili ritardi trovandosi ad utilizzare l'apparecchio ad ossigeno per autosalvataggio in casi di emergenza.
Attenersi pertanto assolutamente alle procedure nell'ordine qui
descritto.
Aprire il contenitore
● Sollevare la leva con l'aiuto di indice
e pollice fino a quando i nastri di fissaggio sono allentati staccandosi
dall'involucro.
● Rimuovere il coperchio.
Estrarre l'apparecchio ad ossigeno per autosalvataggio
● Estrarre completamente dall'involu-
cro la parte libera afferrandola
all'estremità superiore e tirandola
con uno strappo dal passante
rosso.
La cartuccia di innesco è quindi attivata automaticamente; dopo ca. 6
secondi il sacchetto di respirazione
giallo si riempie di ossigeno. Le
parti della confezione non utilizzate
cadano giù o possono essere
rimosse.
ATTENZIONE!
Lo starter attivato si surriscalda!
Evitare il contatto, pericolo di
ustione.
● Assistere l'apertura del sacchetto di respirazione
con le mani.
Svolgere la seguente procedura di indossamento senza alcuna interruzione entro ca. 20 secondi.
Predisporre ed introdurre il boccaglio
● Estrarre il tampone dal boccaglio .
● Tenere l'apparecchio ad ossigeno
per autosalvataggio in modo che il
sacchetto di respirazione è rivolto
via dal corpo.
● Introdurre il boccaglio nella bocca
espirando a fondo dentro l'apparecchio ad ossigeno per autosalvataggio.
Posizionare la parte in gomma tra
denti e labbra.
AVVERTENZA!
Il boccaglio si presta solo limitata-
mente all'uso da parte di portatori di
dentiere.
● Racchiudere strettamente il boccaglio con le labbra.
Posizionare la molletta sul naso
● Allargare la molletta nasale posizio-
nandola sulle narici.
Il naso deve essere chiuso a tenuta d'aria.
Se il sacchetto di respirazione non si fosse ancora riempito
● Riempire il sacchetto di respirazione compiendo diverse profonde espi-
razioni. L'umidità e le particelle di CO2-presenti nell'aria di espirazione
innescano quindi la produzione di ossigeno.
● Respirare con calma.
00421371.eps
Posizionare la bardatura sulla testa e stringere saldamente
● Togliere l'elmetto.
● Passare la bardatura sulla testa evi-
tando di intorcigliare i nastri.
● Tirare uniformemente ogni estre-
mità della cintura manualmente
verso sopra fino a quando non sono
in corretta posizione. Tenere se
necessario ferma la bardatura con
l'altra mano all'altezza del mento.
● Indossare infine di nuovo l'elmetto.
00521371.eps
Nota
Dräger consiglia di esercitare questa procedura utilizzando l'appo-
sito apparecchio d'addestramento.
Regole importanti da osservare in caso di fuga
— Iniziare la fuga con calma, non correre.
— Progettare la via di fuga, scegliere il percorso più corto con aria
ambiente sicura!
— Procedere alla fuga con avvedutezza. Una respirazione precipitosa e
frettolosa consuma una quantità maggiore di ossigeno!
— Fare sempre attenzione che il boccaglio sia stretto tra denti e labbra,
racchiudendo le labbra a tenuta d'aria!
— L'aria proveniente dall'apparecchio ad ossigeno per autosalvataggio è
calda e secca, cosa che indica il corretto funzionamento
dell'apparecchio ad ossigeno per autosalvataggio. Anche la presenza
di un sapore specifico è normale e innocuo.
— Non danneggiare o comprimere il sacchetto di respirazione visto che
l'ossigeno necessario a sopravvivere potrebbe fuoriuscire.
— In presenza di stimolo al vomito, estrarre il boccaglio dalla bocca
tenendolo chiuso con il pollice. Evitare di vomitare dentro l'apparecchio
ad ossigeno per autosalvataggio!
Per evitare di respirare l'aria circostante inquinata da sostanze tossiche,
respirare sempre dall'apparecchio ad ossigeno per autosalvataggio
00621371.eps
dopo aver nuovamente introdotto il boccaglio in bocca.
Fine d'impiego
— Un'inspirazione pesante e il sacchetto di respirazione che inizia a
sgonfiarsi indicano che la riserva di ossigeno è pressappoco
consumata.
— Apparecchi ad ossigeno per autosalvataggio impiegati nell'industria
estrattiva sotterranea devono essere necessariamente portati in
superficie.
00721371.eps
00821371.eps
00921371.eps
24
Page 25

Smaltimento
Alla fine dell'impiego è necessario smaltire l'apparecchio ad ossigeno per
autosalvataggio.
Disattivare l'apparecchio ad ossigeno per autosalvataggio usato
— Evitare di fare giungere sostanze infiammabili (benzina, grasso,
solventi, ecc.) prima o dopo l'impiego nell'apparecchio ad ossigeno per
autosalvataggio considerato il pericolo d'incendio!
— Adoperare occhiali di sicurezza e guanti di protezione!
— Rimuovere lo starter dalla custodia e smaltire in osservanza delle
disposizioni in vigore a livello locale.
— Rimuovere la cartuccia di KO
— Immergere in acqua le cartucce di KO2 smontate fino a quando non si
osserva più la fuoriuscita di bolle di gas. Neutralizzare la soluzione risultante
con un acido al 3 %, per es. acido cloridrico (HCl), in rapporto 1:1.
— Tutte le materie plastiche sono contrassegnate per consentire una
raccolta e un successivo smaltimento differenziati.
Offriamo di compiere lo smaltimento per voi! (Prezzo su richiesta)
Si prega di spedire gli apparecchi ad ossigeno per autosalvataggio dan-
neggiati, aperti1), esauriti e scaduti all'interno di una confezione omologata
in osservanza delle disposizioni in vigore in materia di trasporti al seguente
indirizzo:
Dräger Intek GmbH
Bochstraße 1
D-23569 Lübeck
Tel. +49 (0)4 51 - 882 - 1813
Fax +49 (0)4 51 - 882 - 3549
e-mail: recycling@draeger.com
dalla custodia.
2
Disposizioni di trasporto
In sede di trasporto i respiratori ad ossigeno sono soggetti all'osservanza
delle disposizioni internazionali sui trasporti.
Respiratori ad ossigeno sono classificati come segue:
UN 3356 "Oxygen generator, chemical" Class 5.1, packing group II
In presenza di respiratori ad ossigeno aperti e consumati in parte o danneggiati, rilasciare lo starter prima di procedere al trasporto. Dopo che il
respiratore ad ossigeno si è raffreddato, riporre l'apparecchio all'interno di
un sacchetto in plastica e conservare in sottovuoto. Per spedire l'apparecchio è necessario utilizzare una confezione omologata (per es. confezione
per trasporto Dräger 63 04 511).
La merce spedita è classificata come:
UN 3085, Oxidizing solid, corrosive, n.o.s. (Potassium Superoxide,
Potassium Hydroxide), Class 5.1, packing group I
Osservare, se applicabili, le disposizioni speciali valide per il mezzo di trasporto incaricato.
Manutenzione
Le seguenti misure di manutenzione possono essere svolte in proprio
dall'utente:
Produzione di ossigeno
L'ossigeno necessario alla respirazione è ottenuto da una sostanza chimica solida, l'ossido di potassio (KO2). La sostanza chimica provoca una
reazione con l'anidride carbonica (CO2) ed il vapore acqueo (H2O) contenuto nell'aria di espirazione. Questi due componenti presenti nell'aria di
respirazione sono assorbiti da KO2, reazione che libera l'ossigeno (O2)
legato chimicamente presente in KO2. Le formule di reazione semplificate
sono riportate qui di seguito:
2 KO2 + H2O → 2 KOH + 3/2 O2 + calore
2 KOH + CO
2 KO2 + CO
è fonte di O2e assorbente di CO2al contempo. Nell'alternarsi di inspi-
KO
2
razione ed espirazione, l'aria di respirazione passa dal sacchetto di respirazione attraverso la cartuccia di KO2e torna quindi indietro allo scambiatore
termico.
Una valvola di scarico limita e controlla il volume nel sacchetto di
respirazione.
→ K2CO3 + H2O + calore
2
→ K2CO3 + 3/2 O2 + calore
2
Specifiche tecniche
omologato ai sensi di DIN EN 13 794
Classe di temperatura in accordo alla specifica CEN
50014
Temperatura di superficie max. 300o C
Temperatura di conservazione 0o C...+50o C
Temperatura d'impiego minima -5o C
Durata di mantenimento nominale 25 minuti
Durata di mantenimento
con volume per minuti di respirazione 10 L/min
con volume per minuti di respirazione 30 L/min
con volume per minuti di respirazione 35 L/min
con volume per minuti di respirazione 100 L/min
Volume del sacchetto di respirazione >6 litri
Resistenza inspiratoria/espiratoria
con flusso sinusoidale 35 L/min
all'inizio del tempo di utilizzo
con flusso sinusoidale 35 L/min
durante il tempo di utilizzo
Contenuto di CO
nell'aria di inspirazione
nell'aria di inspirazione durante la durata di utilizzo
Temperatura dell'aria di inspirazione
alla fine della durata di utilizzo max. 70
Peso
non aperto
in sede di impiego
Dimensioni (L x H x P) 205 x 189 x 89 mm
Durata utile
condotto con sé quotidianamente
conservato in magazzino
1) Esercizio con un turno di max. 8 ore la giorno; 5 giorni lavorativi per settimana; con
esercizio a più turni gli intervalli di intervento sono rispettivamente ridotti.
2
1)
120 minuti
30 minuti
25 minuti
8 minuti
4 mbar
max. 10 mbar
inferiore a 1 vol.%
max. 2,5 vol.%
o
C
(aria secca)
ca. 2,1 kg
ca. 1,2 kg
5 anni
10 anni
Sostituzione della finestra dell'indicatore (67 33 647)
● Rimuovere cautamente con un cacciavite la finestra dell'indicatore difet-
tosa.
● Inserire la nuova finestra dell'indicatore nel rispettivo alloggiamento
con una leggera pressione.
Sostituzione del pittogramma (63 33 682/67 33 910)
● Rimuovere il pittogramma difettoso, per es. con una lama di rasoio.
● Ripulire la superficie con uno detergente sgrassante.
● Incollare un nuovo pittogramma.
Ispezione e manutenzione
● Eseguire controlli giornalieri (vedi Controllo quotidiano” a pagina 23).
1) PPPPrrrriiiimmmmaaaa di spedire indietro apparecchi ad ossigeno per autosalvataggio, rilasciare necessariamente lo starter!
Sigillare quindi gli apparecchi ad ossigeno per autosalvataggio in un sacchetto in polietilene chiuso.
25
Page 26

Identificazioni delle parti
1 Coperchio
2 Involucro
3 Passante
4 Indicatore
5 Leva con sigillo di piombo
6 Nastri di fissaggio
7 Passante
8 Boccaglio
9 Tampone del boccaglio
10 Molletta nasale
11 Scambiatore termico
12 Diffusore d'aria
13 Bardatura
14 Sacchetto di respirazione
15 Valvola di scarico
16 Starter di clorato
Lista d'ordine
Denominazione e descrizione N. ordine
Dräger Oxyboks K 25 63 03 666
Cintura 67 33 934
Tasca portaocchiali 67 33 935
Occhiali di protezione 63 03 670
Pittogramma (solo in coppia) 67 33 682/
67 33 910
Finestra per indicatore 67 33 647
Confezione per trasporto Dräger 63 04 511
Dräger Oxyboks KT (apparecchio d'addestramento) 67 33 466
13
11
12
14
15
9
10
8
7
16
01321371.eps
26
Page 27

Inhoudsopgave
Voor uw veiligheid . . . . . . . . . . . . . . . . . . . . . . . . . . . . . . . . . . . . . . . . . . . . . 28
Beschrijving . . . . . . . . . . . . . . . . . . . . . . . . . . . . . . . . . . . . . . . . . . . . . . . . . . 28
Doelmatig gebruik . . . . . . . . . . . . . . . . . . . . . . . . . . . . . . . . . . . . . . . . . . . . 28
Aanleggen . . . . . . . . . . . . . . . . . . . . . . . . . . . . . . . . . . . . . . . . . . . . . . . . . . . . 28
Dagelijkse controle . . . . . . . . . . . . . . . . . . . . . . . . . . . . . . . . . . . . . . . . . . . . 28
Omgaan met het zuurstof vluchttoestel . . . . . . . . . . . . . . . . . . . . . . . . . . 28
Instructies voor het aanleggen . . . . . . . . . . . . . . . . . . . . . . . . . . . . . . . . . 29
Belangrijke vluchtregelingen . . . . . . . . . . . . . . . . . . . . . . . . . . . . . . . . . . . 29
Buiten werking stellen . . . . . . . . . . . . . . . . . . . . . . . . . . . . . . . . . . . . . . . . . 29
Afkeuren en recycling . . . . . . . . . . . . . . . . . . . . . . . . . . . . . . . . . . . . . . . . . 30
Transportvoorschriften . . . . . . . . . . . . . . . . . . . . . . . . . . . . . . . . . . . . . . . . . 30
Onderhoud en reparaties . . . . . . . . . . . . . . . . . . . . . . . . . . . . . . . . . . . . . . 30
Inspectie en onderhoud . . . . . . . . . . . . . . . . . . . . . . . . . . . . . . . . . . . . . . . 30
Zuurstofproductie . . . . . . . . . . . . . . . . . . . . . . . . . . . . . . . . . . . . . . . . . . . . . 30
Technische gegevens . . . . . . . . . . . . . . . . . . . . . . . . . . . . . . . . . . . . . . . . . 30
Wat is wat? . . . . . . . . . . . . . . . . . . . . . . . . . . . . . . . . . . . . . . . . . . . . . . . . . . . 31
Bestellijst . . . . . . . . . . . . . . . . . . . . . . . . . . . . . . . . . . . . . . . . . . . . . . . . . . . . 31
27
Page 28

Voor uw veiligheid
Gebruiksaanwijzing in acht nemen
Elk gebruik van het zuurstof vluchttoestel veronderstelt de precieze kennis
en het naleven van deze gebruiksaanwijzing.
Het zuurstof vluchttoestel mag alleen worden gebruikt zoals voorgeschreven.
Onderhoud en reparaties
De onderhoudswerkzaamheden en inspecties van het zuurstof vluchttoestel moeten regelmatig door deskundigen worden uitgevoerd.
Reparaties aan het zuurstof vluchttoestel mogen alleen door deskundigen
worden verricht.
Wij raden aan om een serviceovereenkomst af te sluiten en alle onderhoudswerkzaamheden door Dräger Safety te laten verrichten.
Gebruik alleen originele onderdelen van Dräger voor reparaties en onderhoud.
Hoofdstuk "Onderhoud en reparaties" in acht nemen.
Accessoires
Gebruik alleen de accessoires die op de bestellijst vermeld zijn.
Aansprakelijkheid voor juiste werking of schade.
De aansprakelijkheid voor een juiste werking wordt overgedragen aan de
eigenaar of gebruiker, wanneer het zuurstof vluchttoestel wordt onderhouden of gerepareerd door personeel dat niet in dienst is of niet geautoriseerd is door Dräger Safety, of wanneer het toestel wordt gebruikt op een
wijze die niet overeenstemt met het beoogde gebruik.
Dräger kan niet aansprakelijk worden gesteld voor schade die voortvloeit
uit het niet naleven van de hierboven aangegeven instructies.
De garantie- en aansprakelijkheidscondities van de verkoop- en leveringsvoorwaarden van Dräger worden niet uitgebreid door de hierboven vermelde opmerkingen.
Afkeuren en verwerken
Buiten werking gestelde of geopende toestellen dienen volgens te voorschriften te worden afgevoerd en verwerkt omdat de gebruikte chemicaliën
een sterk loog kunnen vormen in verband met de luchtvochtigheid.
Dräger Safety AG & Co. KGaA
Beschrijving
Dräger Oxyboks K 25 is een zuurstof vluchttoestel dat onafhankelijk van de
omgevingsatmosfeer werkt. Het toestel is voorzien van een gesloten kringloopademhalingssysteem op basis van chemisch gebonden zuurstof.
Aanleggen
Dräger Oxyboks K 25 wordt met de heupriem aan de rechter- of linkerzijde
van het lichaam gedragen.
● Riem door de riemlussen trekken.
Dagelijkse controle
Visuele controle:
1 Loodje is onbeschadigd.
— Deksel gesloten en sluiting
vergrendeld.
— De behuizing toont geen scheuren,
gaten of andere beschadigingen
die dieper zijn dan 1,5 mm.
2 Indicator is diepblauw gekleurd.
Een aanzienlijk verlies van de
blauwe kleur (50 % van de deeltjes
zijn niet meer diepblauw maar helderblauw of kleurloos) betekent dat
het zuurstof vluchttoestel niet meer
mag worden gebruikt.
Neem in dit geval contact op met Dräger Safety.
1
2
Omgaan met het zuurstof vluchttoestel
— Open het zuurstof vluchttoestel alleen voor het gebruik!
Anders raakt het vocht uit de omgevende lucht in het open zuurstof
vluchttoestel waardoor de werking belemmerd wordt.
— Controleer het zuurstof vluchttoestel dagelijks.
— Gebruik het zuurstof vluchttoestel slechts één keer.
— Voorkom dat brandbare stoffen (benzine, vet, oplosmiddelen enz.) voor
of tijdens het gebruik in het zuurstof vluchttoestel raken. Anders bestaat
het gevaar van branden!
Bovendien bestaat ontstekingsgevaar wanneer bij vernietiging van het
zuurstof vluchttoestel de zuurstof afsplitsende chemicaliën in contact
komen met brandbare stoffen, bijv. kool.
Geopende toestellen gelden als verbruikt en mogen niet worden opgeborgen. U dient deze toestellen af te keuren (zie “Afkeuren en recycling” op
blz. 30).
003 21371.ep s
00221371.eps
Dräger Oxyboks K 25 heeft een nominale gebruiksduur van 25 minuten
conform DIN EN 13794.
Doelmatig gebruik
Dräger Oxyboks K 25 is een toestel om in noodgevallen te vluchten uit
gebieden waarin rook, toxische gassen of een onvoldoende zuurstofgehalte aanwezig is.
WAARSCHUWING!
Gebruik Dräger Oxyboks K 25 niet in luchtmengsels met gassen of
dampen die een ontstekingstemperatuur beneden de 300 oC hebben!
Dräger Oxyboks K 25 niet bij temperaturen beneden de 0 oC opbergen omdat de toesteltemperatuur van het te gebruiken toestel niet
minder dan 0 oC mag zijn.
Volg de instructies op die in deze gebruiksaanwijzing vermeld zijn.
Dräger Oxyboks K 25 kan uw leven redden!
1)
Wij adviseren het trainingstoestel
de hantering te oefenen (zie “Bestellijst” op blz. 31).
Dräger Oxyboks KT te gebruiken om
28
1) niet deel van het EG-typeonderzoek.
Page 29

Instructies voor het aanleggen
Verkeerd aanleggen kan in noodgevallen leiden tot vertragingen bij het
gebruik van het zuurstof vluchttoestel.
Voer daarom de volgende stappen in de aangegeven volgorde uit.
Verpakking openen
● Hendel met de wijsvinger of duim zo
ver omhoog trekken totdat de klembanden losgeraakt zijn.
● Deksel verwijderen.
Zuurstof vluchttoestel eruit trekken
● Het openliggende toestelgedeelte
aan de bovenzijde met de rode lus
met één enkele trek uit de behuizing
trekken.
De starterpatroon wordt daarbij
automatisch geactiveerd; na ca. 6
seconden wordt het gele ademzakje met zuurstof gevuld. De losgeraakte verpakkingsdelen gaan los of
kunnen worden verwijderd.
OPGELET!
De geactiveerde starter wordt heet!
Niet aanraken, er bestaat gevaar
voor verbrandingen.
● Het openvouwen van het ademzakje
met de handen ondersteunen.
Neusklem plaatsen
● Neusklem uit elkaar trekken en op
de neusvleugels zetten.
De neus moet dicht zijn.
Wanneer het ademzakje nog niet gevuld is
● Het ademzakje vullen door herhaaldelijk diep in het zakje te ademen.
De vochtigheid en het CO2 gehalte van de uitgeademde lucht start vervolgens de zuurstofproductie.
00421371.eps
● Rustig ademen.
Hoofdband omdoen en vasttrekken
● Helm afnemen.
● Hoofdband over het hoofd trekken
zonder de band te verdraaien.
● De riemuiteinden gelijkmatig met
één hand omhoog trekken om een
goede zitting te maken. De band
daarbij evt. met de andere hand in
kinhoogte vasthouden.
● Helm weer opzetten.
00521371.eps
Opmerking
Dräger beveelt aan deze stap te oefenen met het trainingstoestel.
00821371.eps
00921371.eps
De volgende stappen voor het aanleggen zonder onderbreking binnen ca. 20 seconden uitvoeren.
Mondstuk voorbereiden en plaatsen
● Stop uit het mondstuk eruit trekken.
● Zuurstof vluchttoestel zodanig vast-
houden dat het ademzakje wegwijst
van het lichaam.
● Mondstuk in de mond steken en
diep in het zuurstof vluchttoestel uitademen.
Het rubberenstuk tussen de tanden
en lippen plaatsen.
WAARSCHUWING!
Het mondstukgarnituur is slechts
beperkt geschikt voor kunstgebitdragers.
● Mondstuk met de lippen omsluiten,
niet bijten.
Belangrijke vluchtregelingen
— Rustig beginnen met de vlucht; niet haasten.
— Vluchtweg plannen, de kortste weg in veilige omgevingslucht kiezen!
— Weloverwogen vluchten. Bij gehaaste en snelle ademhaling wordt
meer zuurstof verbruikt!
— Zorg altijd ervoor dat het mondstuk vast tussen de tanden en lippen zit
en dicht omsloten is door de lippen!
— De lucht uit het zuurstof vluchttoestel is warm en droog. Dit is een teken
dat het zuurstof vluchttoestel goed werkt. Ook een evt. aanwezige
eigensmaak is normaal en ongevaarlijk.
— Ademzakje niet beschadigen of samenpersen, anders bestaat het
gevaar dat de noodzakelijke zuurstof verloren gaat.
— Bij braken het mondstuk uit de mond nemen en met de duim
dichtsluiten. Niet in het zuurstof vluchttoestel braken!
Om geen schadelijke omgevingslucht in te ademen, is het
aanbevolen na het herplaatsen van het mondstuk in de mond uit het
zuurstof vluchttoestel in te ademen.
00621371.eps
Buiten werking stellen
— De zuurstofvoorraad is beperkt en bijna leeg wanneer het inademen
moeilijker gaat en het ademzakje begint ineen te zakken.
— Zuurstof vluchttoestellen die in de mijnbouw gebruikt worden dienen uit
de mijn naar boven te worden gebracht.
00721371.eps
29
Page 30

Afkeuren en recycling
Het zuurstof vluchttoestel dient na het gebruik te worden verwijderd/verwerkt.
Verbruikt zuurstof vluchttoestel deactiveren
— Voorkom dat brandbare stoffen (benzine, vet, oplosmiddelen enz.) voor
of na het gebruik in het zuurstof vluchttoestel raken. Anders bestaat het
gevaar van branden!
— Draag een gezichtsscherm en handschoenen!
— Starter uit de behuizing uitbouwen en conform de plaatselijke
voorschriften verwijderen/verwerken.
patroon uit de behuizing uitbouwen.
—KO
2
— Uitgebouwde KO2 patroon volledig in water plaatsen totdat geen
luchtbellen meer ontsnappen. De ontstane oplossing met 3 % zuur, bijv.
zoutzuur (HCl), neutraliseren in een verhouding van 1:1.
— Alle kunststoffen zijn gekenmerkt en kunnen apart worden verzameld
en verwerkt.
Wij vergaren het toestel om het te verwerken! (Prijs op aanvraag)
Zend beschadigde, geopende1), verbruikte en vervallen zuurstof vluchttoe-
stellen in een geschikte verpakking en conform de transportvoorschriften
naar het volgende adres:
Dräger Intek GmbH
Bochstraße 1
D-23569 Lübeck
Tel. (04 51) - 882 - 1813
Fax (04 51) - 882 - 3549
e-mail: recycling@draeger.com
Transportvoorschriften
Zuurstof vluchttoestellen zijn bij het transport onderhevig aan de internationale transportvoorschriften.
Zuurstof vluchttoestellen zijn geclassificeerd in:
UN 3356 "Oxygen generator, chemical" Class 5.1, packing group II
Bij geopende en gedeeltelijk verbruikte of beschadigde zuurstof vluchttoestellen dient u vóór het transport de starter in werking te zetten. Verpak het
zuurstof vluchttoestel na het afkoelen in een luchtdicht kunststofzakje. Het
zakje dient in een toegelaten verpakking (bijv. Dräger transportverpakking
63 04 511) te worden verstuurd.
Het postgoed is geclassificeerd in:
UN 3085, Oxidizing solid, corrosive, n.o.s. (Potassium Superoxide,
Potassium Hydroxide), Class 5.1, packing group I
Zo nodig speciale instructies van de met de postdienst belaste onderneming in acht nemen.
Zuurstofproductie
De zuurstof die gebruikt wordt voor het ademen wordt gewonnen uit een
vaste chemische substantie: kaliumdioxide (KO2). Deze stof reageert met
de kooldioxide (CO2) en de waterdamp (H2O) uit de uitgeademde lucht.
Deze beide componenten uit de ademlucht worden door de KO2 geabsorbeerd waardoor de in de KO2 gebonden zuurstof (O2) ontsnappen kan. De
vereenvoudigde reactieformules zijn:
2 KO2 + H2O → 2 KOH + 3/2 O2 + warmte
2 KOH + CO
2 KO2 + CO
is tegelijkertijd een O2 bron en een CO2 absorber. Bij de wisseling
KO
2
tussen inademen en uitademen stroomt ademlucht uit het ademzakje door
de KO2 patroon naar de warmtewisselaar en weer terug.
Een uitlaatklep beperkt het volume van het ademzakje.
→ K2CO3 + H2O + warmte
2
→ K2CO3 + 3/2 O2 + warmte
2
Technische gegevens
Toegelaten volgens DIN EN 13 794
Temperatuurklasse in aansluiting aan CEN 50014
Max. oppervlaktemperatuur 300 oC
Opslagtemperatuur 0 oC...+50 oC
Laagste gebruikstemperatuur -5 oC
Nominale gebruiksduur 25 minuten
Gebruiksduur
bij 10 L/min ademminuutvolume
bij 30 L/min ademminuutvolume
bij 35 L/min ademminuutvolume
bij 100 L/min ademminuutvolume
Volume van het ademzakje >6 liter
Inadem-/uitademweerstand
bij 35 L/min sinusvormige stroming
aan het begin van de gebruiksduur
bij 35 L/min sinusvormige stroming
tijdens de gebruiksduur
CO2 gehalte
in de inademlucht
in de inademlucht tijdens de gebruiksduur
Temperatuur van de inademlucht
aan het einde van de gebruiksduur max. 70 oC
Gewicht
niet geopend
tijdens het gebruik
Afmetingen (b x h x d) 205 x 189 x 89 mm
Technische levensduur
dagelijks meegenomen
opgeborgen in het depot
1) Eenploegensysteem: max. 8 h per dag; 5 werkdagen per week; meerploegensys-
teem: overeenkomstig korter.
1)
120 minuten
30 minuten
25 minuten
8 minuten
4 mbar
max. 10 mbar
kleiner dan 1 Vol.%
max. 2,5 Vol.%
(droge lucht)
ca. 2,1 kg
ca. 1,2 kg
5 jaar
10 jaar
Onderhoud en reparaties
De gebruiker kan de volgende onderhoudswerkzaamheden zelf verrichten:
Indicatorruitje (67 33 647) vervangen
● Het defecte indicatorruitje met een schroevendraaier voorzichtig eruit
halen.
● Het nieuwe indicatorruitje met lichte druk in de indicatorbehuizing
plaatsen.
Pictogram (63 33 682/67 33 910) vervangen
● Het defecte pictogram verwijderen, bijv. met behulp van een scheer-
mesje.
● Vlak met een ontvettingsmiddel schoonmaken.
● Nieuw pictogram vastplakken.
Inspectie en onderhoud
● Dagelijkse controles uitvoeren (zie “Dagelijkse controle” op blz. 28).
1) Wanneer u een geopende zuurstof vluchttoestel wilt terugzenden dient u
eerst de starter in werking te zetten!
Daarna het zuurstof vluchttoestel in een gesloten PE-zakje verpakken.
30
Page 31

Wat is wat?
1 Deksel
2 Behuizing
3 Riemlus
4 Indicator
5 Hendel met loodje
6 Klembanden
7 Lus
8 Mondstuk
9 Mondstuk-stop
10 Neusklem
11 Warmtewisselaar
12 Luchtverdeler
13 Hoofdbanden
14 Ademzakje
15 Uitlaatklep
16 Chloraat-starter
Bestellijst
Naam en beschrijving Bestel nr.
Dräger Oxyboks K 25 63 03 666
Riem 67 33 934
Brillenkoker 67 33 935
Gezichtsscherm 63 03 670
Pictogram (alleen paarsgewijs) 67 33 682/
67 33 910
Indicatorruitje 67 33 647
Dräger transportverpakking 63 04 511
Dräger Oxyboks KT (trainingstoestel) 67 33 466
13
11
12
14
15
9
10
8
7
16
01321371.eps
31
Page 32

Indholdsfortegnelse
Sikkerhedsanvisninger . . . . . . . . . . . . . . . . . . . . . . . . . . . . . . . . . . . . . . . . 33
Beskrivelse . . . . . . . . . . . . . . . . . . . . . . . . . . . . . . . . . . . . . . . . . . . . . . . . . . 33
Anvendelsesformål . . . . . . . . . . . . . . . . . . . . . . . . . . . . . . . . . . . . . . . . . . . 33
Bæremåde . . . . . . . . . . . . . . . . . . . . . . . . . . . . . . . . . . . . . . . . . . . . . . . . . . . 33
Daglig kontrol . . . . . . . . . . . . . . . . . . . . . . . . . . . . . . . . . . . . . . . . . . . . . . . . 33
Omgang med oxygen-selvredderen . . . . . . . . . . . . . . . . . . . . . . . . . . . . . 33
Påtagning . . . . . . . . . . . . . . . . . . . . . . . . . . . . . . . . . . . . . . . . . . . . . . . . . . . 34
Vigtige flugtregler . . . . . . . . . . . . . . . . . . . . . . . . . . . . . . . . . . . . . . . . . . . . 34
Udløb af brugstiden . . . . . . . . . . . . . . . . . . . . . . . . . . . . . . . . . . . . . . . . . . 34
Bortskaffelse . . . . . . . . . . . . . . . . . . . . . . . . . . . . . . . . . . . . . . . . . . . . . . . . 35
Transportbestemmelser . . . . . . . . . . . . . . . . . . . . . . . . . . . . . . . . . . . . . . . 35
Vedligeholdelse . . . . . . . . . . . . . . . . . . . . . . . . . . . . . . . . . . . . . . . . . . . . . . 35
Inspektion og service . . . . . . . . . . . . . . . . . . . . . . . . . . . . . . . . . . . . . . . . . 35
Oxygen-produktion . . . . . . . . . . . . . . . . . . . . . . . . . . . . . . . . . . . . . . . . . . . 35
Tekniske data . . . . . . . . . . . . . . . . . . . . . . . . . . . . . . . . . . . . . . . . . . . . . . . . 35
Hvad er hvad . . . . . . . . . . . . . . . . . . . . . . . . . . . . . . . . . . . . . . . . . . . . . . . . . 36
Bestillingsliste . . . . . . . . . . . . . . . . . . . . . . . . . . . . . . . . . . . . . . . . . . . . . . . 36
32
Page 33

Sikkerhedsanvisninger
Overhold brugsanvisningen
Enhver håndtering af oxygen-selvredderen forudsætter et nøje kendskab og
overholdelse af denne brugsanvisning.
Oxygen-selvredderen er kun beregnet til den beskrevne anvendelse.
Vedligeholdelse
Oxygen-selvredderen skal regelmæssigt underkastes inspektioner og serviceeftersyn af fagfolk.
Reparationer på oxygen-selvredderen må kun foretages af fagfolk.
Vi anbefaler, at indgå en service-aftale med Dräger Safety og at alle repara-
tioner udføres af Dräger Safety.
Til vedligeholdelsen må der kun anvendes originale dele fra Dräger.
Vær opmærksom på kapitlet "Vedligeholdelse".
Tilbehør
Der må kun anvendes det i bestillingslisten angivne tilbehør.
Erstatningsansvar for funktion og skader
Erstatningsansvaret for oxygen-selvredderen overgår i hvert tilfælde til ejeren eller brugeren, for så vidt oxygen-selvredderen på ukyndig vis vedligeholdes eller repareres af personer, som ikke hører til Dräger Safety, eller
hvis den håndteres på en måde, som ikke er i overensstemmelse med den
bestemmelsesmæssige anvendelse.
Dräger Safety hæfter ikke for skader, som opstår på grund af at ovenstående ikke iagttages.
Mangelsansvars- og erstatningsbetingelserne fra Drägers salgs- og leveringsbetingelser udvides ikke af de foregående anvisninger.
Bæremåde
Dräger Oxyboks K 25 bæres i livremmen i højre eller venstre side af kroppen.
● Træk bæltet gennem bæltestrop-
perne.
Daglig kontrol
Visuel kontrol:
1 Plomben er ubeskadiget.
— Låget er lukket og låsen låst.
— Huset har ingen ridser, huller eller
andre beskadigelser, som er dybere
end 1,5 mm.
2 Indikatoren har en dybblå farve.
En betydelig reduktion af den blå
farve (50 % af partiklerne har
ændret farve fra dybblå til lyseblå
eller farveløs) betyder, at oxygenselvredderen ikke må anvendes
længere.
I dette tilfælde bedes du kontakte
Dräger Safety.
1
2
003 21371.ep s
00221371.eps
Bortskaffelse
Brugte eller åbnede apparater skal bortskaffes på behørig måde, da de
anvendte kemikalier sammen med luftfugtigheden kan danne aggressive
forbindelser.
Dräger Safety AG & Co. KGaA
Beskrivelse
Dräger Oxyboks K 25 er en oxygen-selvredder, som er uafhængig af omgivelsesluften, med lukket kredsløbssystem på basis af kemisk bundet oxygen.
Dräger Oxyboks K 25 har en nominel holdetid på 25 minutter iht.
DIN EN 13794.
Anvendelsesformål
Dräger Oxyboks K 25 er redningsudstyr til flugt fra områder, i hvilke der er
røg, toksiske gasser eller iltmangel.
ADVARSEL!
Dräger Oxyboks K 25 må ikke anvendes i luftblandinger med gasser
eller dampe, som har en antændelsestemperatur, der er lavere end
300 oC!
Dräger Oxyboks K 25 må ikke opbevares ved temperaturer på under
0 oC, da apparatets brugstemperatur ikke må komme under 0 oC.
Følg anvisningerne i denne brugsanvisning.
Dräger Oxyboks K 25 kan redde dit liv!
Omgang med oxygen-selvredderen
— Oxygen-selvredderen må kun åbnes, når den skal anvendes!
Der vil i modsat fald trænge fugt fra den omgivende luft ind i den åbne
oxygen-selvredder og påvirke dens funktion.
— Oxygen-selvredderen skal kontrolleres dagligt.
— Oxygen-selvredderen må kun anvendes en gang.
— Undgå at der trænger brændbare stoffer (benzin, fedt,
opløsningsmiddel osv.) ind i oxygen-selvredderen før eller under
brugen, da der ellers er fare for brand!
Der er ligeledes fare for antændelse, når oxygenspaltende kemikalier
ved ødelæggelsen af oxygen-selvredderen kommer i berøring med
brændbare substanser, f.eks. kul.
Åbne selvreddere gælder som brugte og må ikke opbevares. De skal bortskaffes (se “Bortskaffelse” på side 35).
For regelmæssigt at få øvelse i håndteringen bør man anvende
træningsapparatet
1)
Dräger Oxyboks KT (se “Bestillingsliste” på side 36).
1) ikke del af EU-typegodkendelsestesten.
33
Page 34

Påtagning
Hvis oxygen-selvredderen tages forkert på, vil det i nødstilfælde forsinke
anvendelsen.
Det er ubetinget nødvendigt,at udføre håndteringstrinene i den
beskrevne rækkefølge.
Åbn beholderen
● Træk håndtaget så langt op med
pegefingeren eller tommelfingeren
til spændebåndene er løse og springer af.
● Tag låget af.
Træk oxygen-selvredderen ud
● Den fritliggende del af apparatet
trækkes helt ud af huset ved at rykke
i den røde strop
Herved aktiveres starterpatronen;
efter ca. 6 sekunder fyldes den gule
respirationspose med ilt. De løse
emballeringsdele falder af eller kan
fjernes.
OBS!
Den aktiverede starter bliver meget
varmt! Pas på ikke at røre den, forbrændingsfare!
● Tag hænderne til hjælp,
når respirationsposen folder sig ud.
De næste trin for påtagning af apparatet skal udføres i løbet af ca. 20
sekunder.
Forbered mundstykket og før det ind
● Træk proppen ud af mundstykket .
● Hold oxygen-selvredderen således,
at respirationsposen peger væk fra
kroppen.
● Sæt mundstykket ind i munden og
ånd dybt ud i oxygen-selvredderen.
Gummistykket skal sidde mellem
tænderne og læberne.
ADVARSEL!
For personer med gebis er bide-
mundstykket kun betinget egnet.
● Omslut mundstykket tæt med
læberne.
Sætte næseklemmen på
● Træk næseklemmen fra hinanden
og sæt den på næsefløjene.
Næsen skal være lukket helt.
Hvis respirationsposen endnu ikke er blevet fyldt
● Fyld respirationsposen ved at udånde dybt flere gange. Fugtigheden og
CO2-indholdet i udåndingsluften starter så iltproduktionen.
● Ånd roligt.
00421371.eps
Læg hovedbåndene på og stram dem
● Tag hjelmen af.
● Træk hovedbåndene over hovedet
uden at dreje dem.
● Hvert båndende trækkes jævnt op
med en hånd, indtil den sidder godt.
Hold herved båndene evt. fast i
hagehøjde med den anden hånd.
● Tag hjelmen på igen.
Bemærk
Dräger anbefaler, at man gennengår denne procedure med trænings-
00521371.eps
apparatet.
Vigtige flugtregler
— Begynd flugten roligt, skynd dig ikke.
— Planlæg flugtvejen, vælg den korteste vej til sikker omgivelsesluft!
— Flygt med omtanke. Ved en forjaget, hurtigt vejrtrækning forbruges
mere ilt!
— Sørg altid for at mundstykket sidder godt fast mellem tænder og læber
og omsluttes tæt af læberne!
— Luften fra oxygen selvredderen er varm og tør, det er et tegn på, at
oxygen-selvredderen fungerer korrekt. Det er også normalt og ufarligt,
at der er en evt. bismag.
— Respirationsposen må ikke beskadiges eller trykkes sammen, da man
ellers vil miste den livsnødvendige ilt.
— Skal man kaste op, tages mundstykket ud af munden og lukkes med
tommelfingeren. Man må ikke kaste op i oxygen-selvredderen!
For ikke at indånde luft fra omgivelserne, som indeholder skadelige
stoffer, bør luften indåndes fra oxygen-selvredderen, når man atter
har ført mundstykket ind i munden.
00621371.eps
Udløb af brugstiden
— Iltbeholdningen er ved at slippe op, når indåndingen bliver vanskeligere
og iltmasken begynder at falde sammen.
— Oxygen selvreddere, som anvendes ved underjordisk bjergværksdrift,
skal bringes over jorden.
00721371.eps
00821371.eps
00921371.eps
34
Page 35

Bortskaffelse
Efter brugen skal oxygen-selvredderen bortskaffes.
Brugte oxygen-selvreddere deaktiveres
— Undgå, at der trænger brændbare stoffer (benzin, fedt,
opløsningsmiddel osv.) ind i oxygen-selvredderen før eller efter brugen,
da der ellers er fare for brand!
— Bær beskyttelsesbriller og handsker!
— Afmonter starteren fra huset og bortskaf den iht. til de lokale forskrifter.
-patronen demonteres fra huset.
—KO
2
— Demonterede KO2-patroner lægges fuldstændigt i vand, indtil der ikke
kommer flere gasbobler. Den dannede opløsning neutraliseres med en
3 % syre, f.eks. saltsyre (HCl), i forholdet 1:1.
— Alle kunststoffer er mærkede og kan sorteres efter type og genbruges.
Vi bortskaffer det for dig! (pris på forespørgsel)
Oxygen-selvreddere, som er åbnede1), hvor ilten er brugt og hvor udløbsda-
toen er overskredet sendes venligst iht. til transportbestemmelserne i tilladt
emballage til følgende adresse:
Dräger Intek GmbH
Bochstraße 1
D-23569 Lübeck
Tlf. +49 (0)451 - 882 - 1813
Fax +49 (0)451 - 882 - 3549
e-mail: recycling@draeger.com
Transportbestemmelser
Oxygen-åndedrætsværn er under transporten underkastet internationale
transportbestemmelser.
Oxygen-åndedrætsværn er klassificeret under:
UN 3356 "Oxygen generator, chemical" klass. 5.1, emballagegruppe II
Ved åbnede og delvist brugte eller beskadigede oxygen-åndedrætsværn
skal starteren udløses inden transporten. Efter afkøling skal oxygen-åndedrætsværnet pakkes lufttæt ned i en plastpose. Den skal sendes i en tilladt
emballage (f.eks. Dräger transportemballage 63 04 511).
Forsendelsesgodset er klassificeret under:
UN 3085, Oxidizing solid, corrosive, n.o.s. (Potassium Superoxide,
Potassium Hydroxide), Class 5.1, packing group I
Vær opmærksom på de forskellige transportørers særlige bestemmelser.
Vedligeholdelse
Brugeren kan selv udføre følgende reparationsforanstaltninger:
Udskifte indikatorvindue (67 33 647).
● Løft det defekte indikatorvindue ud med en skruetrækker.
● Isæt det ny indikatorvindue i indikatorhuset med et let tryk.
Oxygen-produktion
Den til vejrtrækningen nødvendige ilt udvindes af et fast kemisk stof, kaliumdioxid (KO2). Den reagerer med kuldioxid (CO2) og vanddampen (H2O)
i den udåndede luft. Disse to komponenter i åndeluften absorberes af KO2,
hvorved den i KO2 kemisk bundne ilt (O2) frigøres. De forenklet gengivne
reaktionsformler er:
2 KO2 + H2O → 2 KOH + 3/2 O2 + varme
2 KOH + CO
2 KO2 + CO
er O2-kilde og CO2-absorber på samme tid. Ved den skiftevise ind- og
KO
2
udånding strømmer åndeluften fra respirationsposen gennem KO2-patronen til varmeveksleren og tilbage igen.
En afgangsventil begrænser volumet i respirationsposen
→ K2CO3 + H2O + varme
2
→ K2CO3 + 3/2 O2 + varme
2
Tekniske data
godkendt ihr. DIN EN 13 794
Temperaturklasse iht. CEN 50014
maks. overfladetemperatur 300 oC
Opbevaringstemperatur 0 oC...+50 oC
Laveste anvendelsestemperatur -5 oC
Nominel holdetid 25 minutter
Holdetidbei 10 L/min minutvolumen ved 30 L/min
minutvolumen ved 35 L/min minutvolumen ved
100 L/min minutvolumen
Respirationsposens volumen >6 liter
Indåndings-/udåndingsmodstand
ved 35 L/min sinusformet flow
i begyndelsen af brugstiden
ved 35 L/min sinusformet flow
under brugen
CO2-indhold
i indåndingsluften
i indåndingsluften under brugen
Indåndingsluftens temperatur
ved slutningen af brugstiden maks. 70 oC
Vægt
uåbnet
under brugen
Mål (B x H x D) 205 x 189 x 89 mm
Levetid
medført dagligt
opbevaret i depot
1) Ved etholdsskifte maks. 8 timer pr. dag; 5 arbejdsdage pr. uge; nedsat tilsvarende
ved flerholdsskifte.
1)
120 minutter
30 minutter
25 minutter
8 minutter
4 mbar
maks. 10 mbar
lavere end 1 vol.%
maks. 2,5 vol.%
(tør luft)
ca. 2,1 kg
ca. 1,2 kg
5 år
10 år
Skifte piktogram (63 33 682/67 33 910)
● Løsn det defekte piktogram med f.eks. et barberblad.
● Rengør fladen med et affedtningsmiddel.
● Påklæb et nyt piktogram.
Inspektion og service
● Udføre daglig kontrol (se “Daglig kontrol” på side 33).
1) Hvis åbnede oxygen-selvreddere skal returneres skal starteren fffføøøørrrrsssstttt udløses!
Derpå svejses oxygen-selvredderen ind i en lukket plastpose.
35
Page 36

Hvad er hvad
1 Låg
2 Hus
3 Bæltestrop
4 Indikator
5 Håndtag med plombe
6 Spændebånd
7 Strop
8 Mundstykke
9 Mundstykke-prop
10 Næseklemme
11 Varmeveksler
12 Luftfordeler
13 Hovedbåndsystem
14 Respirationspose
15 Afgangsventil
16 Klorat-starter
Bestillingsliste
Betegnelse og beskrivelse Bestillings-nr.
Dräger Oxyboks K 25 63 03 666
Bælte 67 33 934
Brilletaske 67 33 935
Beskyttelsesbriller 63 03 670
Piktogram (kun parvis) 67 33 682/
67 33 910
Displayvindue 67 33 647
Dräger transportemballage 63 04 511
Dräger Oxyboks KT (træningsapparat) 67 33 466
13
11
12
14
15
9
10
8
7
16
01321371.eps
36
Page 37

Innholdsfortegnelse
For din sikkerhet . . . . . . . . . . . . . . . . . . . . . . . . . . . . . . . . . . . . . . . . . . . . . . 38
Beskrivelse . . . . . . . . . . . . . . . . . . . . . . . . . . . . . . . . . . . . . . . . . . . . . . . . . . . 38
Bruksområde . . . . . . . . . . . . . . . . . . . . . . . . . . . . . . . . . . . . . . . . . . . . . . . . . 38
Bæremåte . . . . . . . . . . . . . . . . . . . . . . . . . . . . . . . . . . . . . . . . . . . . . . . . . . . . 38
Daglig kontroll . . . . . . . . . . . . . . . . . . . . . . . . . . . . . . . . . . . . . . . . . . . . . . . . 38
Håndtering av oksygenselvredderen . . . . . . . . . . . . . . . . . . . . . . . . . . . . 38
Ta på . . . . . . . . . . . . . . . . . . . . . . . . . . . . . . . . . . . . . . . . . . . . . . . . . . . . . . . . 39
Viktige regler for rømning . . . . . . . . . . . . . . . . . . . . . . . . . . . . . . . . . . . . . . 39
Slutt på brukstid . . . . . . . . . . . . . . . . . . . . . . . . . . . . . . . . . . . . . . . . . . . . . . 39
Destruere . . . . . . . . . . . . . . . . . . . . . . . . . . . . . . . . . . . . . . . . . . . . . . . . . . . . 40
Transportforskrifter . . . . . . . . . . . . . . . . . . . . . . . . . . . . . . . . . . . . . . . . . . . 40
Vedlikehold . . . . . . . . . . . . . . . . . . . . . . . . . . . . . . . . . . . . . . . . . . . . . . . . . . . 40
Inspeksjon og vedlikehold . . . . . . . . . . . . . . . . . . . . . . . . . . . . . . . . . . . . . 40
Oksygen-produksjon . . . . . . . . . . . . . . . . . . . . . . . . . . . . . . . . . . . . . . . . . . 40
Tekniske data . . . . . . . . . . . . . . . . . . . . . . . . . . . . . . . . . . . . . . . . . . . . . . . . 40
Hva er hva . . . . . . . . . . . . . . . . . . . . . . . . . . . . . . . . . . . . . . . . . . . . . . . . . . . . 41
Bestillingsliste . . . . . . . . . . . . . . . . . . . . . . . . . . . . . . . . . . . . . . . . . . . . . . . . 41
37
Page 38

For din sikkerhet
Følg bruksanvisningen
Hver håndtering av selvredderen forutsetter nøye kunnskap av bruksanvisningen og at denne følges.
Oksygenselvredderen skal kun brukes til det formål som er beskrevet.
Vedlikehold
Oksygenselvredderen må inspiseres og vedlikeholdes regelmessig av fagfolk.
Reparasjoner på oksygenselvredderen må kun foretas av fagfolk.
Vi anbefaler å inngå en serviceavtale med Dräger Safety og la alle repara-
sjoner gjennomføres av Dräger Safety.
Bruk kun originale Dräger reservedeler til vedlikehold.
Ta hensyn til kapittelet "Vedlikehold".
Tilbehør
Benytt kun tilbehør oppført i bestillingslisten.
Ansvar for funksjon hhv. skader
Dersom ukyndige personer som ikke tilhører DrägerService foretar vedlikeholds- eller reparasjonsarbeider på oksygenselvredderen, overtar eier eller
bruker av denne ansvaret for dens funksjon; dette gjelder også dersom
oksygenselvredderen ikke brukes til det formål den er bestemt for.
Dräger overtar ikke ansvar for skader som oppstår som en følge av at ovenstående bestemmelser ikke blir fulgt.
Garanti- og ansvarsbetingelsene i Drägers salgs- og leveringsbetingelser
utvides ikke av de ovenstående henvisninger.
Avfallshåndtering
Brukte eller åpnede apparater må destrueres fagmessig, da det med luftfuktigheten kan dannes aggressiv base av de brukte kjemikalier.
Dräger Safety AG & Co. KGaA
Beskrivelse
Dräger Oxyboks K 25 er en oksygenselvredder uavhengig av omgivelsesluften med lukket pendelluftsystem på basis av kjemisk bundet oksygen.
Dräger Oxyboks K 25 har en nominell brukstid på 25 minutter til DIN EN
13794.
Bruksområde
Dräger Oxyboks K 25 er et apparat for bruk i nødsituasjoner for rømning
fra områder hvor det finnes røyk, toksiske gasser eller mangel på surstoff.
Bæremåte
Dräger Oxyboks K 25 bæres i beltet på høyre eller venstre side.
● Trekk beltet gjennom beltestrop-
pene.
Daglig kontroll
Visuell kontroll:
1 Plombe er uskadet.
— Deksel lukket og låst.
— Huset har ingen risper, hull eller
andre skader som er dypere enn 1,5
mm.
2 Indikator viser en dypblå farge.
Betraktelig tap av den blå fargen
(50 % av partiklene har forandret fargen fra dypblå til lyseblå eller fargeløs) betyr at oksygenselvredderen
ikke må benyttes lenger.
I dette tilfellet henvender du deg til
Dräger Safety.
1
2
Håndtering av oksygenselvredderen
— Oksygenselvredderen må kun åpnes for bruk!
Lagres den åpen vil fuktighet fra omgivelsesluften trenge inn i den åpne
oksygenselvredderen og påvirke dens funksjon negativt.
— Kontroller oksygenselvredderen daglig.
— Oksygenselvredderen må benyttes kun en gang.
— Unngå at brennbare stoffer (bensin, fett, løsemidler osv.) kommer inn i
oksygenselvredderen før eller under bruk, ellers brannfare!
Det er tilsvarende brannfare dersom den oksygenspaltende
kjemikalien, ved ødeleggelse av oksygenselvredderen, kommer i
berøring med brennbare substanser, f.eks. kull.
Åpnede apparat anses som brukte og må ikke lagres. De må destrueres (se
“Destruere” på side40).
1)
For regelmessig øvelse av håndtering bør treningsapparatet
Oxyboks KT benyttes (se “Bestillingsliste” på side41).
Dräger
003 21371.eps
00221371.eps
ADVARSEL!
Dräger Oxyboks K 25 må ikke benyttes i luftblandinger med gasser
eller damper som har en tenntemperatur lavere enn 300 oC!
Dräger Oxyboks K 25 må ikke lagres under 0 oC , da apparattempe-
raturen ikke må underskride 0 oC.
Følg henvisningene i denne bruksanvisningen.
Dräger Oxyboks K 25 kan redde livet ditt!
1) ikke del av EF-typeprøvingen.
38
Page 39

Ta på
Dersom den tas på feil vil det forårsake forsinkelser ved bruk av oksygenselvredderen i nødstilfeller.
Det er helt nødvendig å gjennomføre håndteringstrinnene i beskrevet
rekkefølge.
Åpne beholder
● Trekk hendelen så langt opp med
pekefinger eller tommel at klembåndene løsner og spretter av.
● Ta av deksel.
Sett på neseklemme
● Trekk neseklemmen fra hverandre
og sett den på nesevingene.
Nesen må være tett.
Hvis pusteposen ennå ikke er blitt fylt
● Fyll pusteposen ved å puste dypt ut flere ganger. Fuktigheten og CO
innholdet i luften som pustes ut starter da oksygenproduksjonen.
● Pust rolig.
00821371.eps
-
2
Trekk ut oksygenselvredderen
● Trekk den frittliggende delen av
apparatet på den øvre enden helt ut
av huset med ett trekk på den røde
stroppen.
Startpatronen aktiveres derved
automatisk; etter ca. 6 sekunder fylles den gule pusteposen med oksygen. De løse emballasjedelene
faller av eller kan fjernes.
ADVARSEL!
Den aktiverte starteren blir varm!
Må ikke berøres, det er fare for forbrenning.
● Hjelp til med hendene for å folde ut pusteposen.
De neste trinn må gjennomføres uten avbrudd innen ca. 20 sekunder.
Forbered munnstykket og før det inn
● Trekk proppen ut av munnstykket.
● Hold oksygenselvredderen slik at
pusteposen peker bort fra kroppen.
● Før munnstykket inn i munnen og
pust dypt ut i oksygenselvredderen.
Gummistykket skal sitte mellom tennene og leppene.
ADVARSEL!
IKKE egnet for de som bruker
gebiss.
● Omslutt munnstykket tett med lep-
pene.
00421371.eps
Legg på hodebånd og stram til
● Ta av hjelmen.
● Trekk hodebåndene over hodet
uten at de vris.
● Trekk hver belteende jevnt oppover
med en hånd til det sitter godt. Hold
båndet da eventuelt fast med den
andre hånden på høyden av haken.
● Sett hjelmen på igjen.
Henvisning
00521371.eps
Dräger anbefaler å øve på ovenstående med treningsapparatet.
Viktige regler for rømning
— Start rømningen rolig, ikke jag av sted.
— Planlegg rømningsveien, velg den korteste veien til sikker
omgivelsesluft!
— Røm med omtanke. Ved hastig, rask pusting forbrukes mer oksygen!
— Pass på at munnstykket hele tiden sitter fast mellom tenner og lepper
og omsluttes tett av leppene!
— Luften fra oksygenselvredderen er varm og tørr, det er et tegn på at
oksygenselvredderen fungerer korrekt. En eventuell bismak er normal
og ufarlig.
— Pusteposen må ikke skades eller trykkes sammen, da tap av
livsnødvendig oksygen vil forekomme.
— Ved oppkast må munnstykket tas ut av munnen og lukkes med
tommelen. Du må ikke kaste opp i oksygenselvredderen!
For ikke å puste inn luft med skadestoffer fra omgivelsene, bør det
pustes inn fra oksygenselvredderen etter at munnstyket er ført inn
i munnen på nytt.
00621371.eps
Slutt på brukstid
— Oksygenbeholdningen begynner å ta slutt når det blir tyngre å puste inn
og pusteposen begynner å falle sammen.
— Oksygenselvreddere som benyttes i gruvedrift må bringes opp i dagen.
00721371.eps
00921371.eps
39
Page 40

Destruere
Oksygenselvredderen må destrueres etter bruk.
Brukte oksygenselvreddere må deaktiveres
— Unngå at brennbare stoffer (bensin, fett, løsemidler osv.) kommer inn i
oksygenselvredderen før eller etter bruk, det kan oppstå brann!
— Bruk vernebriller og hansker!
— Fjern starter fra huset og destruer den ifølge lokale bestemmelser.
— Fjern KO
— Legg den demonterte KO2-patronen ned i vann til det ikke slipper ut
flere gassbobler. Løsningen som oppstår nøytraliseres med 3 % syre,
f.eks. saltsyre (HCl), i forholdet 1:1.
— Alle kunststoffer er merket for sortering og gjenbruk.
Vi destruerer for deg! (Pris på forespørsel)
Vennligst send skadde, åpnede1), brukte og utløpte oksygenselvreddere i
en godkjent emballasje (i henhold til transportforskrifter) til følgende
adresse:
Dräger Safety Norge AS
Nils Hansensvei 2
NO -0667 Oslo
Tlf: 23 06 95 01
Faks: 23 06 95 01
eMail: recycling@draeger.com
-patron fra huset.
2
Transportforskrifter
Oksygen-åndedrettsvernutstyr er ved transport underlagt internasjonale
transportforskrifter.
Oksygen-åndedrettsvernutstyr er klassifisert under:
UN 3356 "Oxygen generator, chemical" Class 5.1, packing group II
Ved åpnet og delvis brukt eller skadd oksygen-åndedrettsvernutstyr må
starteren utløses før transporten. Etter avkjøling må oksygen-åndedrettsvernutstyret pakkes i lufttett plastpose. Denne må sendes i godkjent emballasje (f.eks. Dräger transportemballasje 63 04 511).
Transportgodset er klassifisert under:
UN 3085, Oxidizing solid, corrosive, n.o.s. (Potassium Superoxide,
Potassium Hydroxide), Class 5.1, packing group I
Ta eventuelt hensyn til de forskjellige transportørenes spesielle forskrifter.
Vedlikehold
Brukeren kan selv gjennomføre følgende vedlikehold:
Skifte ut indikatorvindu (67 33 647)
● Ta det defekte indikatorvinduet forsiktig ut med et skrujern.
● Sett det nye indikatorvinduet med et lett trykk inn i indikatorhuset.
Oksygen-produksjon
Oksygenet som er nødvendig for åndedrettet utvinnes av en fast kjemisk
substans, kaliumdioksid (KO2). Det reagerer med karbondioksidet (CO2)
og vanndampen (H2O) til luften som utåndes. Disse to komponentene til
innhalert luft absorberes av KO2herved frigjøres oksygen (O 2) kjemisk
bundet i KO 2. De forenklet gjengitte reaksjonsformler er:
2 KO2 + H2O → 2 KOH + 3/2 O2 + varme
2 KOH + CO
2 KO2 + CO
er O2-kilde og CO2-absorbator samtidig. Vekselvis med inn- og utån-
KO
2
ding strømmer innhalert luft ut av pusteposen gjennom KO2-patronen til
varmeutveksleren og tilbake igjen.
En utblåsingsventil begrenser volumet i pusteposen.
→ K2CO3 + H2O + varme
2
→ K2CO3 + 3/2 O2 + varme
2
Tekniske data
godkjent etter DIN EN 13 794
Temperaturklasse analogt til CEN 50014
maks. overflatetemperatur 300 oC
Lagringstemperatur 0 oC...+50 oC
Laveste brukstemperatur -5 oC
Nominell brukstid 25 minutter
Varighet
ved 10 l/min pustevolum
ved 30 l/min pustevolum
ved 35 l/min pustevolum
ved 100 l/min pustevolum
Pusteposens volum 6 liter
Innåndings-/utåndingsmotstand
ved 35 L/min sinusformet strøm ved start av
brukstiden
ved 35 L/min sinusformet strøm i løpet av brukstiden
CO2-innhold
i innåndingsluften
i innåndingsluften i løpet av brukstiden
Temperatur i innåndingsluften
på slutten av brukstiden maks. 70 oC
Vekt
uåpnet
i bruk
Mål (B x H x D) 205 x 189 x 89 mm
Holdbarhet
daglig medført
lagret i depot
1) Ettskiftsdrift maks. 8 timer daglig; 5 arbeidsdager pr. uke; i flerskiftsdrift tilsva-
rende forkortet.
1)
120 minutter
30 minutter
25 minutter
8 minutter
4 mbar
maks. 10 mbar
mindre enn 1 vol.%
maks. 2,5 vol.%
(tørr luft)
ca. 2,1 kg
ca. 1,2 kg
5 år
10 år
Skift ut piktogram (63 33 682/67 33 910)
● Løsne det defekte piktogrammet med f.eks. et barberblad.
● Rengjør flaten med et avfetningsmiddel.
● Lim på nytt piktogram.
Inspeksjon og vedlikehold
● Foreta daglige kontroller (se “Daglig kontroll” på side38).
1) Når åpnede oksygenselvreddere skal sendes tilbake, må fffføøøørrrrsssstttt starteren utløses!
Deretter sveises oksygenselvredderen inn i en lukket PE pose.
40
Page 41

Hva er hva
1 Deksel
2 Hus
3 Beltestropp
4 Indikator
5 Hendel med plombe
6 Klembånd
7 Stropp
8 Munnstykke
9 Munnstykke-propp
10 Neseklemme
11 Varmeutveksler
12 Luftfordeler
13 Hodesele
14 Pustepose
15 Utblåsingsventil
16 Klorat-starter
Bestillingsliste
Betegnelse og beskrivelse Apparat
Delenummer
Dräger Oxyboks K 25 63 03 666
Belte 67 33 934
Brillelomme 67 33 935
Vernebriller 63 03 670
Piktogram (kun parvis) 67 33 682/
67 33 910
Indikatorvindu 67 33 647
Dräger transportemballasje 63 04 511
Dräger Oxyboks KT (treningsapparat) 67 33 466
13
11
12
14
15
9
10
8
7
16
01321371.eps
41
Page 42

42
Page 43

43
Page 44

Dräger Safety AG & Co. KGaA
Revalstrasse 1
D-23560 Lübeck
Germany
Tel. +49 451 8 82 - 0
Fax +49 451 8 82 - 20 80
www.draeger.com
90 21 371 - GA 1167.465 MUL028
© Dräger Safety AG & Co. KGaA
Edition 07 - 07/2009
(Edition 01 - 04/1999)
Subject to alteration
 Loading...