

Page 1
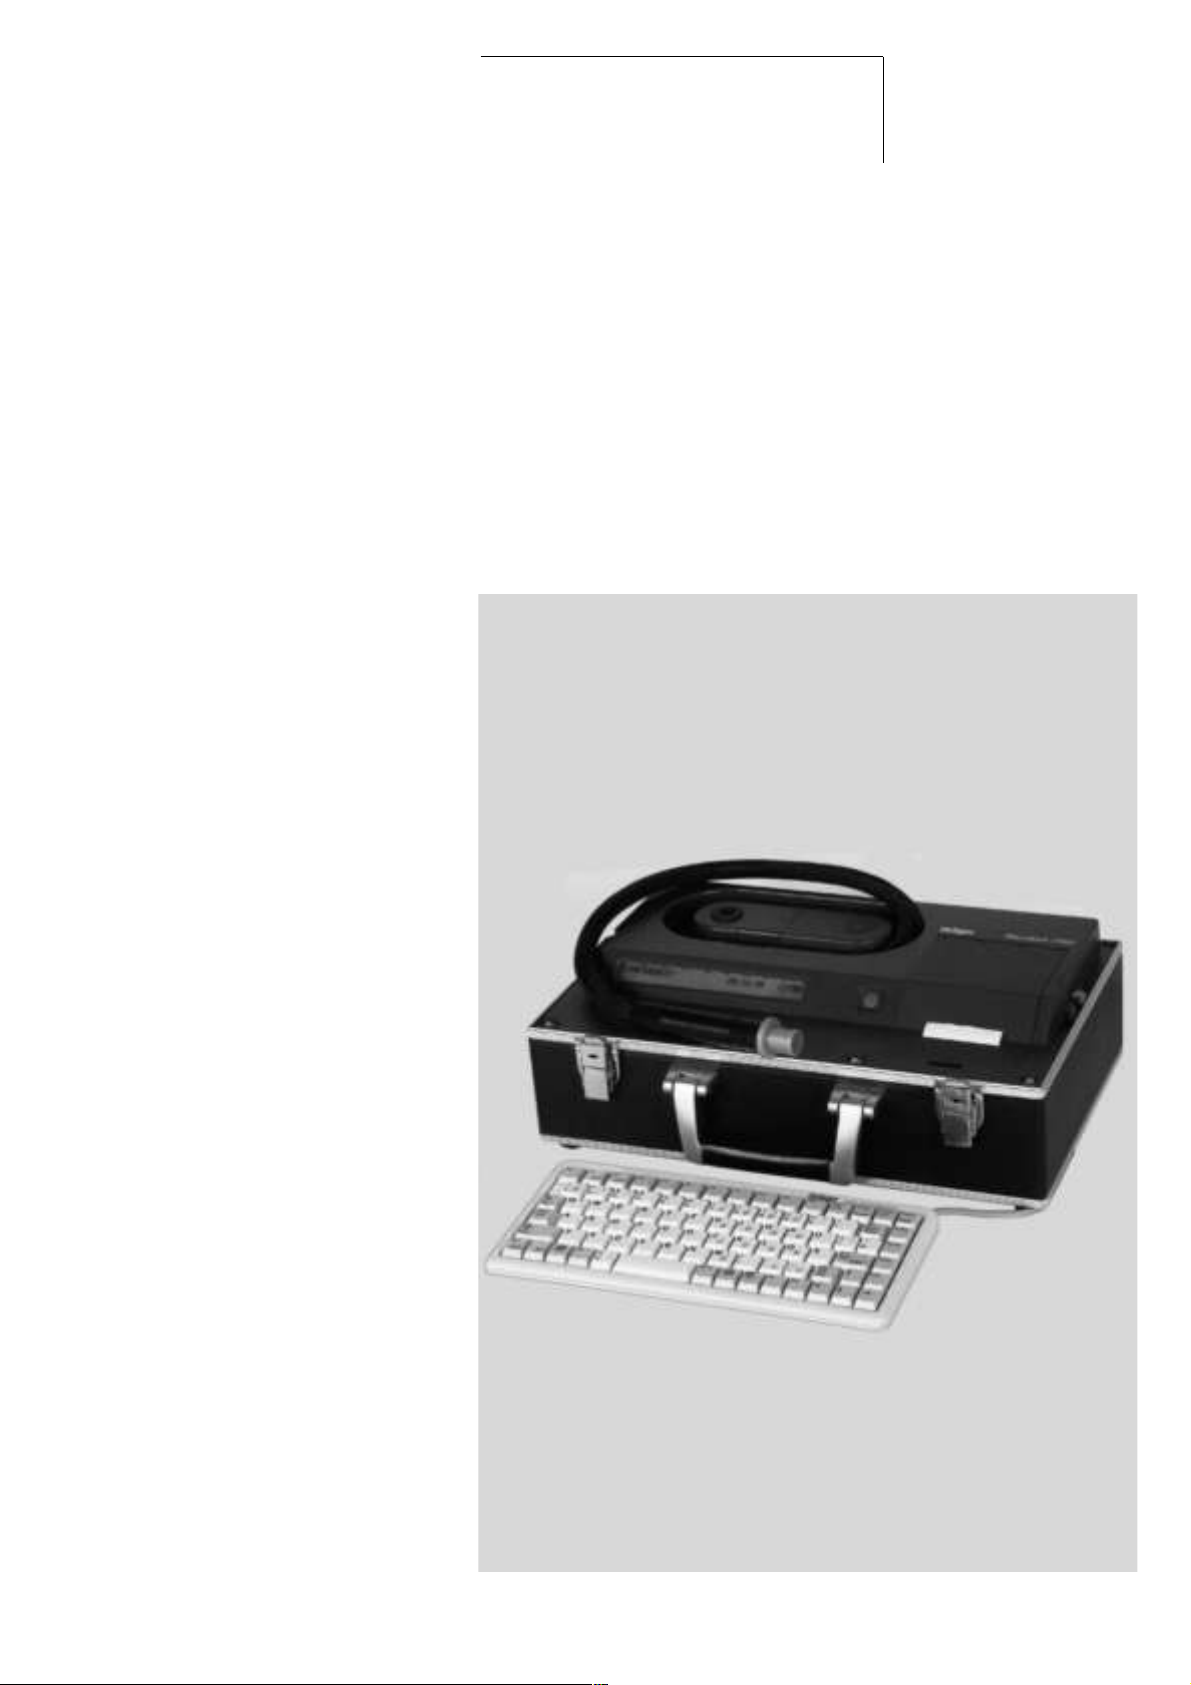
Dräger Safety
D
Alcotest 7110 Standard IR / IR + EC
Atemalkoholmessgerät
Breath Alcohol Measuring Instrument
Gebrauchsanweisung
Instructions for Use
711002.tiff
Page 2

Inhalt
Contents
Inhalt
Seite
Zu Ihrer Sicherheit .................................................................... 3
Verwendungszweck .................................................................. 4
Funktionsbeschreibung ........................................................... 4
Messablauf ................................................................................... 4
Tastatur ......................................................................................... 4
Transport und Lagerung .......................................................... 5
Inbetriebnahme .......................................................................... 6
Messung vorbereiten ................................................................. 6
Stationärer Betrieb ..................................................................... 6
Mobiler Einsatz ............................................................................ 6
Umgebungsbedingungen für den Einsatz ............................. 7
Betriebsbereitschaft herstellen ............................................ 8
Warmlaufphase und Selbsttest ............................................... 8
Messung durchführen ........................................................... 10
Voraussetzungen ...................................................................... 10
Kontrollzeit vor der Messung ................................................. 10
Messung auslösen ................................................................... 10
Abgabe der Atemproben ........................................................ 12
Messzyklus beenden ............................................................... 13
Messprotokoll ausdrucken ..................................................... 13
Fehler während des Messablaufes ...................................... 13
Contents
Page
For Your Safety .......................................................................... 3
Intended use ............................................................................... 4
Functional description ............................................................. 4
Measuring procedure ................................................................. 4
Keyboard ....................................................................................... 4
Transportation and Storage ................................................... 5
Putting into operation .............................................................. 6
Preparation of measurement .................................................... 6
Stationary use .............................................................................. 6
Mobile use .................................................................................... 6
Ambient conditions for measurement .................................... 7
Establishing readiness for operation .................................. 8
Warm-up phase and self-test .................................................... 8
Making measurement ........................................................... 10
Conditions ................................................................................. 10
Control time before measurement ....................................... 10
Starting measurement ............................................................. 10
Delivering breath samples ...................................................... 12
Finishing the measuring cycle ............................................... 13
Printing measurement protocol ............................................. 13
Failings during measurement cycle ...................................... 13
Messprotokoll .......................................................................... 15
Erläuterungen zum Protokoll ................................................. 15
Geräteeinstellungen, Geräteabfragen ............................. 16
Übersicht .................................................................................... 16
Sommerzeit / Winterzeit umstellen ...................................... 17
Messung abbrechen – "Quick Reset" ................................. 17
Service ....................................................................................... 18
Überprüfungen ......................................................................... 18
Papierrolle einsetzen ............................................................... 18
Farbbandkassette wechseln .................................................. 19
Sicherungen wechseln ........................................................... 19
Gerät reinigen ........................................................................... 19
Gerät entsorgen ....................................................................... 19
Fehler – Ursache – Abhilfe .................................................. 20
Was ist was ............................................................................... 24
Technische Daten ................................................................... 25
Umgebungsbedingungen ....................................................... 25
Messsystem ............................................................................... 25
Charakteristische Betriebsdaten .......................................... 26
Bestell-Liste .............................................................................. 27
Stichwortverzeichnis .............................................................. 28
Measurement protocol .......................................................... 15
Explanations of the protocol .................................................. 15
Instrument settings, instrument downloads ................... 16
Overview ..................................................................................... 16
Switching summer time / winter time .................................. 17
Interruption of measurement – Quick Reset ...................... 17
Service ....................................................................................... 18
Check ......................................................................................... 18
Inserting paper .......................................................................... 18
Changing ribbon cassette ...................................................... 19
Replacing fuses ........................................................................ 19
Cleaning instrument ................................................................ 19
Disposal of the instrument ..................................................... 19
Fault, Cause and Remedy .................................................... 22
What's What .............................................................................. 24
Technical Data ......................................................................... 25
Ambient conditions .................................................................. 25
Measuring system .................................................................... 25
Typical operational data .......................................................... 26
Order List .................................................................................. 27
Index ........................................................................................... 28
2
Page 3

Zu Ihrer Sicherheit
For Your Safety
Zu Ihrer Sicherheit
Gebrauchsanweisung beachten
Jede Handhabung an dem Gerät setzt die genaue Kenntnis
und Beachtung dieser Gebrauchsanweisung voraus.
Das Gerät ist nur für die beschriebene Verwendung bestimmt.
Instandhaltung
Das Gerät ist mindestens jährlich durch fachkundige
Personen zu prüfen.
Instandsetzungen am Gerät nur durch Fachleute.
Für den Abschluss eines Service-Vertrages sowie für Instandsetzungen empfehlen wir den DrägerService.
Bei der Instandhaltung nur Original-Dräger-Teile verwenden.
Kein Betrieb in explosionsgefährdeten Bereichen
Das Gerät ist nicht für den Betrieb in explosionsgefährdeten
Bereichen zugelassen.
For Your Safety
Strictly follow the Instructions for Use
Any use of the instrument requires full understanding and
strict observation of these instructions.
The apparatus is only to be used for purposes specified
here.
Maintenance
The instrument has to be inspected by experts at least
annually.
Repair of the instrument may only be carried out by trained
service personnel.
We recommend that a service contract be obtained with
DrägerService and that all repairs also be carried out by
them.
Only authentic Dräger spare parts may be used for
maintenance.
Not for use in areas of explosion hazard
The instrument is neither approved nor certified for use in
areas where combustible or explosive gas mixtures are
likely to occur.
Kopplung mit elektrischen Geräten
Elektrische Kopplung mit Geräten, die nicht in dieser
Gebrauchsanweisung erwähnt sind, nur mit Zustimmung der
Dräger Safety AG & Co. KGaA.
Haftung für Funktion bzw. Schäden
Die Haftung für die Funktion des Gerätes geht in jedem Fall
auf den Eigentümer oder Betreiber über, soweit das Gerät von
Personen, die nicht dem DrägerService angehören, unsachgemäß gewartet oder instandgesetzt wird oder wenn eine
Handhabung erfolgt, die nicht der bestimmungsgemäßen
Verwendung entspricht.
Für Schäden, die durch die Nichtbeachtung der vorstehenden
Hinweise eintreten, haftet Dräger nicht.
Gewährleistungs- und Haftungsbedingungen der Verkaufsund Lieferbedingungen von Dräger werden durch vorstehende
Hinweise nicht erweitert.
Dräger Safety AG & Co. KGaA
Coupling with electrical instruments
Electrical coupling with instruments not mentioned in
these instructions for use only with agreement of
Dräger Safety AG & Co. KGaA.
Liability for proper function or damage
The liability for the proper function of the instrument is
irrevocably transferred to the owner or operator to the
extent that the apparatus has been serviced or repaired by
personnel not employed by DrägerService or if the
instrument is used in a manner not conforming to its
intended use.
Dräger cannot be held responsible for damage caused by
non-compliance with the recommendations given above.
The warranty and liability provisions of the terms of sale and
delivery of Dräger are likewise not modified by the
recommendations given above.
Dräger Safety AG & Co. KGaA
3
Page 4

Verwendungszweck
Funktionsbeschreibung
Intended Use
Functional description
Verwendungszweck
Das Alcotest 7110 Standard ist ein Messgerät zur Ermittlung
der Atemalkoholkonzentration (AAK).
Hierbei wird die Ethanolkonzentration in der Ausatemluft
gemessen.
Es ist für den Einsatz an einem festen Aufstellort und für den
mobilen Einsatz in Kraftfahrzeugen konzipiert.
Funktionsbeschreibung
Messablauf
Das Alcotest 7110 Standard führt für die Bestimmung der
Atemalkoholkonzentration einen Messzyklus mit einer
einzelnen Atemprobe durch.
Bei der Abgabe der Atemprobe wird mit einem Mundstück bei
forcierter Expiration Atemluft in das Messgerät geführt.
Für die Konzentrationsbestimmung kommt ein infrarotoptischer Sensor (Alcotest 7110 Standard IR) oder eine Kombination aus einem infrarotoptischen und einem elektrochemischen Sensor mit unterschiedlicher analytischer Spezifität
(Alcotest 7110 Standard IR + EC) zur Anwendung.
Intended use
Alcotest 7110 Standard is a measuring instrument for the
determination of the breath alcohol concentration (BrAC).
It measures the ethanol concentration in the exhaled air.
It is intended to be used stationary as well as mobile in
motor vehicles.
Functional description
Measuring procedure
The Alcotest 7110 Standard performs a measuring cycle with
a single breath sample to determine the breath alcohol
concentration.
During the delivery of the breath sample by forced expiration
the exhaled air is led through a mouth-piece into the
instrument.
For the determination of the concentration an infrared optical
sensor (Alcotest 7110 Standard IR) or a combination of an
infrared optical and an electrochemical sensor with different
analytical specificity (Alcotest 7110 Standard IR + EC) is used.
Die notwendigen Handlungen des Bedieners und des
Probanden werden durch kurze Mitteilungen und Anweisungen auf dem Display des Alcotest 7110 Standard angezeigt. Erst wenn alle Teilschritte der Atemalkoholbestimmung
korrekt durchgeführt sind und keines der internen Prüfkriterien
außerhalb der Toleranz liegt, wird das Endergebnis der Atemalkoholmessung und ein Protokoll mit dem integrierten
Drucker ausgegeben.
Tastatur
Tastatur verwenden
An das Alcotest 7110 Standard kann eine Tastatur angeschlossen werden.
Die Tastatur wird verwendet für:
● die Eingabe von Probandendaten für das Protokoll.
● die Eingabe und Abfrage von Geräteparametern, festen
Texten etc. (wie z. B. Dienststelle, Datum).
Für die Eingabe der Daten in das Gerät muss eine der als
Zubehör aufgeführten Tastaturen verwendet werden.
Eine Verwendung anderer Tastaturen ist ohne Zustimmung
der Dräger Safety AG & Co. KGaA nicht gestattet.
Intern verarbeitet das Alcotest 7110 Standard alle Buchstaben
als Großbuchstaben. Umlaute und „ß“ können nicht eingegeben werden. Eingabekorrekturen können mit der "Backspace"-Taste vorgenommen werden.
The necessary activities of the operator and of the person
being tested are shown by short messages and instructions on
the display of the Alcotest 7110 Standard. Only if all single
steps of the breath alcohol determination are performed
correctly and if none of the internal test criteria is outside of the
admitted tolerance, the final result of the breath alcohol
measurement is given and a protocol is printed on the internal
printer.
Keyboard
Keyboard operation
A keyboard may be connected to the Alcotest 7110
Standard.
The keyboard is used for:
● entering data of the person being tested for the protocol.
● entering and downloading of instrument parameters and
defined wordings (as for example location, date).
For entering data into the instrument only a keyboard
listed as accessory has to be used.
The use of other keyboards is not permissible without
agreement of Dräger Safety AG & Co. KGaA.
The Alcotest 7110 Standard processes internally all letters
as capital letters. Umlauts and "ß" may not be entered. Input
corrections may be done by using the backspace button.
4
Page 5

Funktionsbeschreibung
Functional description
Tastatureingaben für Geräteeinstellungen
Typische Reihenfolge beim Arbeiten mit einer Tastatur zur
Eingabe bzw. Änderung von Geräteeinstellungen ist:
● Betätigen der Taste [ ESC ].
Nachfolgend wird in der Anzeige angegeben:
FUNKTION: FUNCTION:
Ein Codewort für die gewünschte Funktion kann nun eingegeben werden.
Die verfügbaren Funktionen sind auf Seite 16 aufgeführt.
Alle Eingaben müssen mit der Taste [ ENTER ] bzw.
[ RETURN ] abgeschlossen werden.
Wenn eine ausgewählte Funktion nicht oder nicht mehr ausgeführt werden soll, kann sie durch Betätigen der Taste [ ESC ]
abgebrochen bzw. unterbrochen werden.
Erfolgt nach Aufruf einer Funktion innerhalb von 2 Minuten
keine Eingabe, geht das Alcotest 7110 Standard wieder in die
normale Startbereitschaft zurück.
Keyboard inputs for instrument settings
Typical sequence using a keyboard for entering resp.
changing instrument settings is:
● press key [ ESC ].
The following is displayed:
A code for the required function may now be entered.
The available functions are listed on page 16.
All inputs are finished by actuating key [ ENTER ] resp.
[ RETURN ].
If a selected function is not to be performed or is to be
interrupted it may be stopped resp. interrupted by actuating
key [ ESC ].
If within 2 minutes after calling a function no input occurs,
the Alcotest 7110 Standard returns again to the normal
ready status.
Transport und Lagerung
Beim Transport des Gerätes sollten übliche Vorsichtsmaßnahmen eingehalten werden.
Übermäßige mechanische Spannungen, Stöße und Vibrationen sollten beim Transport vermieden werden.
Das Gerät sollte in trockenen Räumen gelagert werden.
Transportation and Storage
Usual precautions should be taken for transportation of the
instrument.
Excessive mechanical strains, shocks and vibrations should
be avoided when transporting the instrument.
The instrument should be stored in dry rooms.
5
Page 6
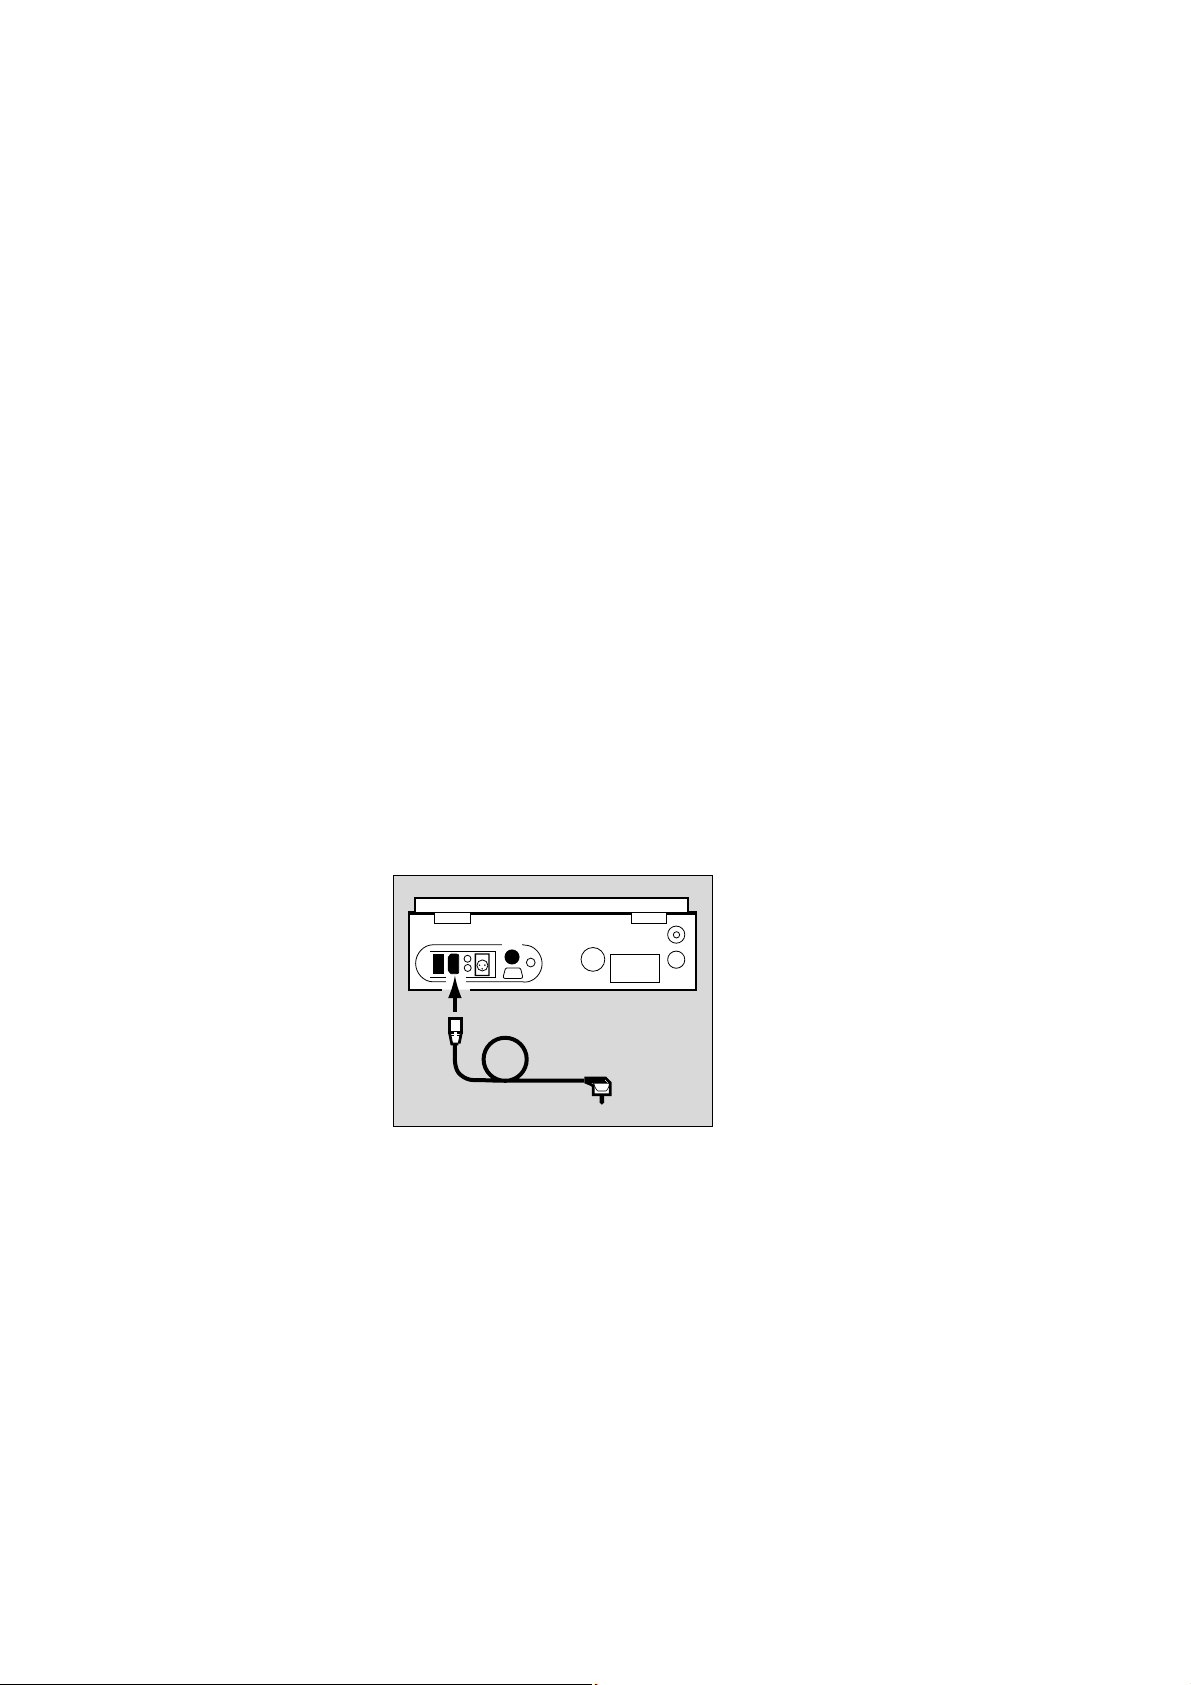
Inbetriebnahme
Putting into operation
Inbetriebnahme
Messung vorbereiten
Den Aufstellort so wählen, dass der
Gasauslass auf der Rückseite des
Gerätes nicht versperrt ist und direkte
Sonneneinstrahlung auf das Gerät
vermieden wird.
● Auf genügend Platz für Zubehör
achten (Tastatur, etc.).
● Das Gerät auf ebener und fester
Unterlage aufstellen.
● Deckel des Gerätekoffers
abnehmen.
Putting into operation
Preparation of measurement
Choose the place the instrument such
that the gas release on the rear of the
instrument is not obstructed and that
direct sun light on the instrument is
avoided.
● Pay attention to sufficient space for
accessories (keyboard, etc.).
● Place instrument on an even and
solid surface.
● Remove the case cover.
Stationärer Betrieb
● Netzspannungsangabe auf dem
Typenschild überprüfen.
1 Hauptschalter auf "0“ (AUS) stellen.
2 Tastatur anschließen, falls Betrieb
mit Tastatur (vgl. Zubehör und
Seite 4).
3 Netzkabel anschließen.
1 Hauptschalter auf "I“ (EIN) stellen.
– Das Alcotest 7110 Standard beginnt
mit der Warmlaufphase.
Mobiler Einsatz
Bei Batteriebetrieb (12 V-Anschluss)
benötigt das Alcotest 7110 Standard
eine Gleichspannung von mindestens
11,5 V. Bei zu niedriger Eingangsspannung schaltet sich das Gerät ab.
Eine Tiefentladung der Versorgungsbatterie ist dadurch ausgeschlossen.
Stationary use
● Observe power supply voltage on
the instrument plate.
2
1
3
1 Bring main switch into position "0“
(OFF).
2 Connect keyboard, if operation
with keyboard (see accessories
and page 4).
3 Connect power cable.
00523632
1 Bring main switch into position "I“
(ON).
– The Alcotest 7110 Standard
begins with the warming-up phase.
Mobile use
A minimum DC voltage of 11.5 V for
battery operation (12 V connection) of
the Alcotest 7110 Standard is
required. At too low input voltage the
instrument is switched off.
An over-discharging of the supply
battery is precluded.
6
Page 7
Inbetriebnahme
Putting into operation
Deshalb:
● Für guten Ladezustand der KFZ-
Batterie sorgen oder eine Zusatzbatterie bereitstellen.
4 Tastatur anschließen, falls Betrieb
mit Tastatur (vgl. Zubehör und
Seite 4).
5 12 V-Anschlusskabel anschließen
und sichern (vgl. Zubehör).
6 Stecker des Anschlusskabels in
12 V-Steckdose des KFZ oder in die
Zigarettenanzünderbuchse (mit
Adapter) stecken.
7 Schalter am 12 V-Kabel auf "I“
stellen.
Das Alcotest 7110 Standard beginnt mit
der Warmlaufphase.
(Der Hauptschalter des Gerätes ist bei
12 V-Betrieb nicht aktiv.)
Therefore:
● ensure a good charging condition
of the motor vehicle battery or
provide an additional battery.
4 Connect keyboard, if operation
4
5
I 0
7
6
with keyboard (see accessories
and page 4).
5 Connect and secure 12 V connec-
ting cable (see accessories).
6 Insert connector of the connecting
cable into the 12 V socket of the
motor vehicle or into the socket of
the cigarette lighter (with adapter).
00823632
7 Bring switch of the 12 V cable into
position "I".
The Alcotest 7110 Standard begins
with the warming-up phase.
(The main switch of the instrument is
not active at 12 V operation.)
Umgebungsbedingungen für
die Messung
Einhaltung der zulässigen Umgebungsbedingungen (Seite 25) sicherstellen.
Das Alcotest 7110 Standard IR + EC
prüft die Umgebungsluft hinsichtlich
möglicher Einflüsse auf das Ergebnis.
Detektiert das Gerät solche Einflüsse
(Meldung im Display: » ALKOHOL IN
DER UMGEBUNGSLUFT « oder
» FEHLER NULLWERT «), ist eine
Messung nicht möglich.
Im Fall einer solchen Meldung sind
Vorkehrungen zum Verbessern der
Umgebungsluft zu treffen (Lüften, veränderter Aufstellort etc.).
Ambient conditions for measurement
Ensure compliance with the admissible
ambient conditions (page 25).
The Alcotest 7110 Standard IR + EC
tests the ambient air for possible
influences on the result. If the
instrument detects such influences
(message in the display: » ALCOHOL
IN THE ENVIRONMENT « or » BLANK
CHECK INCORRECT «), a measure-
ment is not possible.
In case of such a message measures
have to be taken to improve the
ambient air (airing, different place of
the instrument, etc.).
7
Page 8

Betriebsbereitschaft herstellen
Establishing readiness for operation
Betriebsbereitschaft herstellen
Warmlaufphase und Selbsttest
Nach dem Einschalten führt das Gerät einen Selbsttest durch,
der etwa 30 Sekunden dauert. Die fehlerfreie Funktion des
Gerätes wird mit folgender Meldung auf der Anzeige bestätigt:
SELBSTTEST OK
Akustisches Signal: 1 x Piepton
Danach erscheinen folgende Anzeigen:
WARMLAUFPHASE
NICHT BEREIT
Anschließend erscheint die Bezeichnung der Dienststelle in
der Anzeige:
DIENSTSTELLE: KLINIK HAMBURG
zusätzlich werden Datum und Uhrzeit angezeigt:
03.02.01 08:30 W
Establishing readiness for operation
Warm-up phase and self-test
After switching on the instrument a self-test is performed
which takes approximately 30 seconds. The faultless function
of the instrument is shown with the following display:
AUTOTEST OK
Audible signal: 1 x beep
Then the following is displayed:
WARMING UP
NOT READY
Afterwards the location is displayed:
LOCATION: CLINIC HAMBURG
additionally date and time are shown:
03.02.01 08:30 W
S=Sommerzeit, W=Winterzeit
In der Warmlaufphase werden alle Gerätekomponenten, die
mit der Atemprobe in Kontakt kommen, auf über 40 °C
geheizt, um etwaige Kondensatbildung aus der Atemluft im
Gerät zu verhindern.
Bis zum Erreichen der für die Betriebsbereitschaft vorgegebenen Temperaturen erscheint abwechselnd im Display:
WARMLAUFPHASE
NICHT BEREIT
Die Dauer der Warmlaufphase beträgt in der Regel weniger
als 15 Minuten. Bei niedrigen Temperaturen verlängert sich
diese Phase, kann aber durch Abdecken des Gerätes mit dem
Gerätedeckel verkürzt werden. Ist nach 30 Minuten die Warmlaufphase nicht abgeschlossen, wird eine Fehlermeldung
ausgegeben.
Die Messbereitschaft meldet das Gerät mit der Anzeige:
STARTBEREIT 03.02.01 08:45 READY 03.02.01 08:45
S = summer time, W = winter time
During the warming-up phase all instrument components
which come into contact with the breath sample are heated
to above 40 °C to avoid any condensation from the breath
air in the instrument.
Until readiness for measurement is reached the following is
displayed alternately:
WARMING UP
NOT READY
The duration of the warm-up phase is normally less than
15 minutes. At low temperatures this phase is elongated,
but may be shortened by covering the instrument with the
case cover. If the warming-up phase is not finished after
30 minutes, a fault message will be given.
When readiness for measurement is reached the following
is displayed:
Akustisches Signal: 2 x Piepton
Messung durchführen, Seite 10.
8
Audible signal: 2 x beep
Making measurement, page 10.
Page 9

Betriebsbereitschaft herstellen
Establishing readiness for operation
Wird 15 Minuten lang keine Messung durchgeführt,
wechselt das Gerät in einen Energiesparmodus mit der
Anzeige:
STAND-BY (BEREIT ➜ STARTKNOPF DRÜCKEN) STAND-BY (READY ➜ PUSH BUTTON)
Aus diesem Modus kann die Betriebsbereitschaft in ca.
3 Minuten wiederhergestellt werden.
Das Alcotest 7110 Standard ist grundsätzlich für den Dauerbetrieb geeignet, sollte aber bei Verwendungspausen von
mehr als einer Woche ausgeschaltet werden.
When for 15 minutes no measurement has been
performed, the instrument switches into a stand-by mode
for saving power displaying:
From this mode the readiness for measurement may be
obtained again in approx. 3 minutes.
Basically the Alcotest 7110 Standard is suitable for
continuous operation, but it should be switched off in case
of operation interruptions of more than one week.
9
Page 10

Messung durchführen
Making measurement
Messung durchführen
Voraussetzungen
Die Messungen der Atemalkoholkonzentration mit dem Alcotest 7110 Standard dürfen nur von dazu an dem Gerät ausgebildeten Personen durchgeführt werden!
Die Einhaltung der zulässigen Umgebungsbedingungen ist
sicherzustellen (Seite 25).
Kontrollzeit vor der Messung
Grundsätzlich gilt für die Durchführung der Atemalkoholmessungen:
– In einem Zeitraum von mindestens 10 Minuten vor
der Messung muss nachweislich die Aufnahme von
Substanzen durch Mund oder Nase ausgeschlossen sein.
Restalkohol im Mund kann die Messung verfälschen.
Auch bei aromatischen Getränken (z. B. Fruchtsaft), alkoholischen Mundsprays, medizinischen Säften und Tropfen
und nach Aufstoßen und Erbrechen können Verfälschungen auftreten.
Eine Mundspülung mit Wasser oder nichtalkoholischen
Getränken ersetzt die Kontrollzeit nicht!
Making measurement
Conditions
The measurements of the breath alcohol concentration with
the Alcotest 7110 Standard are to be performed only by
persons trained with the instrument!
Ensure compliance with the admissible ambient conditions
(page 25).
Control time before measurement
Basically for measuring breath alcohol the following has to
be considered:
– Within a period of at least 10 minutes before the
measurement the intake of substances through mouth
or nose has surely to be precluded. Actual residues of
alcohol may give false measurements. This may also
occur by aromatic drinks (e.g. fruit juices), alcoholic
mouth sprays, medicines and drops, as well as by
burping and vomiting.
Rinsing out the mouth with water or non-alcoholic
drinks do not substitute for an interval!
Messung auslösen
● Startknopf drücken
Falls das Gerät im Energiesparmodus auf "STAND-BY" steht,
angezeigt durch die Meldung » STAND-BY (BEREIT ➜
STARTKNOPF DRÜCKEN) «, vor dem eigentlichen Starten
zuerst die normale Betriebsbereitschaft mit dem Startknopf
herstellen.
Vor der Messung kann je nach Geräteeinstellung (Seite 16)
die Eingabe der Probandendaten erfolgen.
Die Eingabe entsprechender Daten ist jeweils durch Betätigen
der Taste [ ENTER ] zu beenden und nochmals zu bestätigen.
Die erste Eingabeaufforderung lautet:
NAME PROBAND:
Der Name des Probanden ist über die Tastatur einzugeben.
Für den Namen können bis zu 23 Buchstaben eingegeben
werden. Bei Namen mit mehr als 23 Buchstaben/Zeichen wird
an der 23. Stelle das letzte Eingabezeichen angenommen.
Die Eingabe ist durch Bestätigung mit der Taste [ ENTER ]
abzuschließen, der eingegebene Name wird nochmals angezeigt und muss erneut bestätigt werden.
Danach wechselt die Displayanzeige zu:
VORNAME PROBAND:
Starting measurement
● Press start button
If the instrument is in the stand-by mode shown by
» STAND-BY (READY ➜ PUSH BUTTON) «, push the start
button firstly to obtain instrument readiness for
measurement.
Before the measurement the data of the person being
tested may be entered depending on the instrument setting
(page 16).
The input of respective data has to be finished and
acknowledged again by pushing the key [ ENTER ].
The first input request is:
NAME SUBJECT:
The name of the person being tested has to be entered via
the keyboard. Up to 23 characters may be entered for the
name. For names with more than 23 characters the last
character is accepted at the 23th position. The input has to
be finished with the key [ ENTER ], the entered name is
shown again and has to be acknowledged once more.
Afterwards the display shows:
FIRST NAME SUBJECT:
Als zweite Information ist der Vorname des Probanden mit
wiederum bis zu 23 Buchstaben einzugeben. Die Eingabe
wird ebenfalls mit der Taste [ ENTER ] beendet und muss
nochmals bestätigt werden.
10
As second information the first name of the person being
tested has to be entered with again up to 23 characters.
The input is also finished with the key [ ENTER ] and has to
be acknowledged again.
Page 11

Messung durchführen
Making measurement
Als dritte Information wird das Geburtsdatum der Person angefordert mit der Anzeige:
GEBURTSDATUM PROBAND: TT.MM.JJ
Für diese Dateneingabe sind nur die Ziffern für den
Geburtstag (TT), den Geburtsmonat (MM) und das Geburtsjahr (JJ) einzugeben.
● Es müssen jeweils zwei Ziffern für den Tag, den Monat und
das Jahr eingegeben werden (z. B. » 04 « für Monat April).
Intern wird die Dateneingabe auf Konsistenz geprüft
bezüglich Tages- und Monatsangaben. Der 31.04.56
würde z. B. nicht akzeptiert werden. Bei der Eingabe nicht
sinnvoller Datumsangaben wird nach Betätigung der Taste
[ ENTER ] die Übernahme der Daten verweigert und
erneut zu einer Datumseingabe aufgefordert.
Nach Eingabe der Probandendaten erscheint in der Anzeige:
EINGABE PROBANDENDATEN ABGESCHLOSSEN
Bis zu diesem Zeitpunkt können alle vorherigen Eingaben
durch Betätigen der Taste [ ESC ] wieder in das Display
zurückgerufen werden.
Sie können entweder durch Neueingabe verändert werden,
oder durch Betätigung der Taste [ ENTER ] bestätigt werden.
As third information the date of birth of the person is
requested with the display showing:
DATE OF BIRTH SUBJECT: DD/MM/YY
For this input only the digits for the day of birth (DD), the
month of birth (MM), and the year of birth (YY) have to be
entered.
● Two digits have to be entered respectively for the day, the
month and the year (e.g. » 04 « for month April). Internally
the data input is checked for consistency concerning day
and month. The 31.04.56 would for example not be
accepted. For input of a non reasonable date the
acceptance of the date after pushing the key [ ENTER ] is
refused and a new input of date is requested.
After entering the data of the person being tested the
display shows:
DATE ENTRIES READY
So far all previous inputs may be called back again on the
display by pushing the key [ ESC ].
It may be changed by a new input or may be acknowledged
by pushing the key [ ENTER ].
Mit dem Betätigen der Taste [ ENTER ] als Bestätigung der
obigen Displayanzeige beginnt direkt der Messvorgang –
ein Zurückblättern in vorherige Eingaben durch die Taste
[ ESC ] ist nun nicht mehr möglich.
Mit Abschluss der Eingabe dieser Daten wird der Messablauf
fortgesetzt mit der Anzeige:
SPÜLEN MIT UMGEBUNGSLUFT
Im Alcotest 7110 Standard IR + EC wird die eingesogene
Umgebungsluft auf alkoholische Dämpfe untersucht. In der
Anzeige erscheint:
PRÜFUNG DER UMGEBUNGSLUFT
Wenn durch diese Prüfung Einflüsse durch die Umgebungsluft ausgeschlossen werden können, erfolgt die Bestimmung
des Nullwertes, angezeigt durch:
BESTIMMUNG NULLWERT
Nach diesem Vorgang fordert das Alcotest 7110 Standard zur
Abgabe einer Atemprobe auf:
ATEMPROBE ABGEBEN >
Akustisches Signal: 1 x Piepton
When pushing the key [ENTER] as acknowledgement of
the display shown above the measurement cycle begins
immediately – a return to the previous inputs by the key
[ ESC ] is no longer possible.
When finishing the data input the measurement procedure
is continued with the display showing:
PURGING
In the Alcotest 7110 Standard IR + EC the air drawn in is
analysed for alcoholic vapours. The display shows:
ENVIRONMENT CHECK
If influences of the ambient air are excluded due to this test
the zero value is determined shown by:
BLANK CHECK
The Alcotest 7110 Standard now requests for a breath
sample:
PLEASE BLOW >
Audible signal: 1 x beep
Die Verpackung eines neuen Mundstückes (siehe BestellListe) öffnen, den Probenschlauch aus der Ablagemulde
herausnehmen und das Mundstück unter Verwendung der
Verpackung ohne Hautkontakt in den Handgriff am Ende des
Atemschlauches einsetzen.
Open the packaging of a new mouth-piece (see Order List),
remove the sampling hose from the storage recess, and
insert the mouth-piece into the handle at the end of the
sampling hose without skin contact by using the packaging.
11
Page 12

Messung durchführen
Making measurement
Abgabe der Atemproben
Das Bedienpersonal hat sicherzustellen, dass in der
Kontrollzeit (mindestens 10 Minuten) vor Abgabe der
Atemprobe der Proband keinerlei Substanzen durch Mund
oder Nase aufgenommen hat, und dass das sonstige
Verhalten des Probanden einer erfolgreichen Abgabe der
Atemprobe nicht entgegensteht.
Mit Beginn der Anzeige » ATEMPROBE ABGEBEN « ist das
Gerät für 2 Minuten messbereit. In diesem Zeitraum muss der
Proband die erste Atemprobe abgeben.
● Den Probanden auffordern, ruhig einzuatmen und kontinu-
ierlich und gleichmäßig die Atemprobe durch das Mundstück abzugeben, bis alle "Sterne" im Display erschienen
sind.
Bei Abgabe der Atemprobe erscheinen die Sterne dem Fortgang der Atemprobe entsprechend in der Anzeige.
Die Länge der noch leeren Sternenzeile ist ein Anhaltspunkt
für das noch abzugebende Volumen bis zum Erreichen des
Mindestvolumens.
ATEMPROBE ABGEBEN >
Auch wenn alle Sterne im Display schon erschienen sind, kann
die Abgabe der Atemprobe fortgesetzt werden. Die Messung
wird hierdurch nicht beeinträchtigt.
Bei Unterschreitung des Mindestflusses der Atemluft am
Ende der Atemprobe erscheint im Display:
* * * * *
STOP
Delivering breath samples
The operator of the instrument has to ensure that during
the control time (at least 10 minutes) before the delivery
of the breath sample the person being tested did not
take in any substances through mouth or nose, and that
the behaviour of the person is not conflicting with the
successful delivery of a breath sample.
When the display starts to show » PLEASE BLOW « the
instrument is ready for measurement for 2 minutes. Within
this time period the person being tested has to deliver the
breath sample.
● Request the person being tested to inhale calmly and
then to blow continuously and evenly into the mouthpiece until all asterisks are shown in the display.
During the delivery of the breath sample the asterisks are
shown in the display according to the progress. The length
of the still empty asterisk line is an indication for the volume
still to be delivered until the minimal volume is reached.
PLEASE BLOW >
Even if all asterisks are already shown in the display, the
delivery of the breath sample may be continued. The
measurement will not be influenced by this.
When breath flow falls below the minimal flow at the end of
the delivery of the breath sample the display shows:
* * * * *
STOP
Die Abgabe der Atemprobe ist sofort zu beenden.
Ein Wiederansetzen (Nachatmen) ist unbedingt zu
vermeiden.
Sind die Anforderungen an die Abgabe der Atemprobe bezüglich Dauer, Volumen und Kontinuität erfüllt, ist nach der Aufforderung
MUNDSTÜCK ABZIEHEN
das Mundstück unter Verwendung der Mundstückverpackung
aus dem Handgriff am Ende des Atemschlauches zu ziehen
und zu entsorgen. Der Atemschlauch ist in die Ablagemulde
zurück- bzw. seitlich am Gerät abzulegen.
Das Messsystem wird wieder gespült und ein weiterer, interner
Abgleich durchgeführt, angezeigt durch:
SPÜLEN MIT UMGEBUNGSLUFT
BESTIMMUNG NULLWERT
The delivery of the breath sample has to be stopped
immediately.
A reblowing has absolutely to be avoided!
If the requirements for the delivery of the breath sample are
fulfilled concerning duration, volume and continuity, the
mouth-piece has to be removed from the handle at the end
of the sampling hose after the request
REMOVE MOUTHPIECE
using the packaging of the mouth-piece and has to be
disposed. The breath hose has to be placed into the
storage recess or besides the instrument.
The measuring system is purged again and a further
internal alignment is performed shown by:
PURGING
BLANK CHECK
12
Page 13

Messung durchführen
Making measurement
Anschließend wird, sofern alle Randbedingungen des
Ablaufes eingehalten wurden, das Endergebnis im Display
angezeigt. Beispiel:
MESSERGEBNIS 0.46 mg/I
Messergebnisse unter 0,025 mg/l bzw. 0,05 ‰ werden als
0,00 mg/l bzw. ‰ ausgegeben.
Der Ausdruck des Protokolls beginnt.
Messzyklus beenden
Nach Ende des Ausdruckvorganges erscheint im Display:
KOPIE? BITTE STARTKNOPF DRÜCKEN
Diese Wahlmöglichkeit zur Erzeugung eines weiteren Protokolls bleibt für 10 Sekunden im Display stehen. Mit Betätigen
der Taste [ ESC ] kann der Ablauf direkt fortgesetzt werden.
Wenn keine Kopie angefordert wird, beendet das Gerät den
Messzyklus endgültig.
Die Betriebsbereitschaft für den nächsten Messzyklus ist
wieder hergestellt, angezeigt durch
STARTBEREIT 03.02.01 08:55
Afterwards the final result is shown in the display if all
requirements of the procedure are fulfilled.
Example:
RESULT 0.46 mg/I
Measurement results below 0.025 mg/l resp. 0.05 ‰ are
given as 0.00 mg/l resp. ‰.
The print-out of the protocol starts.
Finishing the measuring cycle
After the end of the print-out the display shows:
COPY? PRESS BUTTON PLEASE
This possibility to print a further protocol is shown in the
display for 10 seconds. By pressing the key [ ESC ] the
procedure may continued immediately.
If no copy has been required the instrument finishes the
measuring cycle finally.
The instrument returns to readiness for operation for the
next measuring cycle shown by:
READY 03.02.01 08:55
Akustisches Signal: 2 x Piepton
Messprotokoll ausdrucken
Zu einem späteren Zeitpunkt, bevor die nächste Messung
gestartet worden ist, kann durch ein doppeltes Drücken
("Doppel-Klick“) des Papiervorschubtasters (Seite 18) eine
Kopie des letzten Ausdruckes ausgelöst werden.
Für 10 Sekunden erscheint nach dem "Doppel-Klick“ im
Display die Aufforderungszeile:
KOPIE? BITTE STARTKNOPF DRÜCKEN
Betätigen des Startknopfes löst den Druckvorgang aus. Nach
Ausschalten des Gerätes ist diese Möglichkeit nicht mehr
gegeben.
Ein nachträglich erzeugter Ausdruck enthält alle Daten der
Messung.
Fehler während des Messablaufes
Zu jedem Zeitpunkt der Messung wird eine Vielzahl von Gerätekontrollen durchgeführt, jede Atemprobe wird anhand
bestimmter Kriterien auf die Verwertbarkeit und richtige
Abgabe geprüft.
Werden Fehler im Ablauf erkannt, werden diese auf der
Anzeige angegeben und, je nach Art des Fehlers, muss die
Abgabe der Atemprobe wiederholt werden, bzw. der Messzyklus wird ganz abgebrochen.
Audible signal: 2 x beep
Printing measurement protocol
At a later time before the next measurement has been
started a copy of the last print-out may be initiated by
pushing twice (double click”) the paper-feed button
(page 18).
After the double-click the display shows for 10 seconds:
COPY? PRESS BUTTON PLEASE
Pushing the start button starts the print-out. After switching
off the instrument the possibility does no longer exist.
An afterwards initiated print-out contains all data of the
measurement.
Failings during measurement cycle
At each time of the measurement cycle a considerable
number of instrument controls is performed, each breath
sample is checked concerning certain criteria to see
whether it is usable and correctly delivered.
If failings in the measurement cycle are detected, a corresponding remark appears on the display and depending on
the failing the breath sample has to be delivered again or
the measurement cycle is stopped completely.
13
Page 14

Messung durchführen
Making measurement
Bei zu kleinem Volumen der abgegebenen Atemprobe wird
z. B. in der Anzeige
ATEMVOLUMEN ZU KLEIN
angegeben. Die Abgabe der Atemprobe muss wiederholt
werden. (Insgesamt sind 2 Fehlversuche bei einem Messvorgang erlaubt.)
Die Wiederholung der Atemprobe wird angekündigt mit:
WIEDERHOLUNG DES TESTS
Das Gerät stellt erneut automatisch die Messbereitschaft her.
In identischer Weise wird der Messzyklus fortgesetzt, wenn
z. B. aufgrund einer zu kurzen Abgabe der Atemprobe
(weniger als 3 Sekunden) die Meldung
ATEMPROBE ZU KURZ
angezeigt wird.
Bei Atemproben, die sowohl ein zu geringes Ausatemvolumen
als auch eine zu kurze Ausatemdauer aufweisen, wird die
Fehlermeldung bezüglich des Atemvolumens angegeben.
Bei dem dritten Fehlversuch wird der Messzyklus mit der
Meldung:
If for example the exhaled breath volume is too small the
display shows:
MINIMUM VOLUME NOT ACHIEVED
The delivery of the breath sample has to be repeated.
(Totally 2 unsuccessful attempts are admitted for one
measuring cycle.)
The repetition of the breath sample is noticed by:
TEST REPEATED
The instrument becomes automatically ready for measurement again.
Identically the measuring cycle is continued, if e.g. due to a
too short delivery of the breath sample (less than
3 seconds) the remark
BLOWING TIME TOO SHORT
is shown.
For breath samples with a too small exhalation volume as
well as a too short exhalation time the fault message
concerning the breath volume is shown.
After a third insufficient attempt the measuring cycle is
stopped with the remark:
ABBRUCH DES TESTS
abgebrochen und eine entsprechende Meldung auf dem
Drucker mit dem Protokoll ausgegeben.
Wenn aus dem Konzentrations-Zeit-Profil der Atemprobe
die Anwesenheit von Mundrestalkohol erkannt wird, erfolgt
die Meldung:
MUNDRESTALKOHOL
Der Messzyklus wird sofort abgebrochen und ein Protokoll mit
entsprechender Angabe ausgedruckt.
Wird nach dem Beginn der Aufforderung » ATEMPROBE
ABGEBEN> « nicht innerhalb von 2 Minuten mit der Abgabe
einer Atemprobe begonnen, wird der Messzyklus ebenfalls
abgebrochen, die entsprechende Meldung im Display ist:
MESSBEREITSCHAFT ABGELAUFEN
Ein Protokoll mit entsprechender Angabe wird ausgedruckt.
TEST ABORTED
and a corresponding remark is printed on the protocol.
If the presence of mouth alcohol is detected in the breath
sample by monitoring the concentration over time the
display shows:
MOUTH ALCOHOL
The measurement cycle is stopped immediately and a
protocol with a respective remark is printed.
If within 2 minutes after the request » PLEASE BLOW « the
delivery of the breath sample is not started, the
measurement cycle is also stopped and the display shows:
READINESS TO BLOW EXPIRED
A protocol with a respective remark is printed.
14
Page 15

Measurement protocolMessprotokoll
Messprotokoll
(Beispiel: normale Messung) (Beispiel: Abbruch des Messzyklus)
***************************************
0 1 2 3 4 5 6 7 8 9
***************************************
DRÄGER ALCOTEST 7110
SERIENNUMMER: ARME–0088
PROBENNUMMER: 246
KALIBRIERNR.: 00006
KALIBRIER-ENDE: 05.01
DATUM: 03.02.01
UHRZEIT START: 08:43 W
ENDE : 08:50 W
***************************************
DIENSTSTELLE:
KLINIK HAMBURG
........................................................................
***************************************
NAME PROBAND:
MUSTERMANN
.........................................................................
VORNAME:
MANFRED
.........................................................................
GEBURTSDATUM:
12.03.54
***************************************
PROBANDENMESSUNG
FEHLVERSUCHE : 0
ATEMVOLUMEN : 4.3 l
ATEMZEIT : 13.1 s
PROBAND : 0.00
***************************************
* MESSERGEBNIS *
**
* 0.00 mg/l *
* *
***************************************
NAME BEDIENER:
.......................................................................
***************************************
UNTERSCHRIFT BEDIENER:
........................................................................
***************************************
0 1 2 3 4 5 6 7 8 9
***************************************
***************************************
0 1 2 3 4 5 6 7 8 9
***************************************
DRÄGER ALCOTEST 7110
SERIENNUMMER: ARME–0088
PROBENNUMMER: 250
KALIBRIERNR.: 00006
KALIBRIER-ENDE: 05.01
DATUM: 03.02.01
UHRZEIT START: 16:32 W
ENDE : 16:40 W
***************************************
DIENSTSTELLE::
KLINIK HAMBURG
........................................................................
***************************************
NAME PROBAND:
MUSTERMANN
.........................................................................
VORNAME:
MANFRED
.........................................................................
GEBURTSDATUM:
12.03.54
***************************************
PROBANDENMESSUNG
FEHLVERSUCHE : 3
ATEMVOLUMEN : 0.9 l
ATEMZEIT : 3.4 s
PROBAND : –.––
***************************************
* MESSERGEBNIS *
**
* ATEMVOLUMEN ZU KLEIN *
**
***************************************
NAME BEDIENER:
......................................................................
***************************************
UNTERSCHRIFT BEDIENER:
......................................................................
***************************************
0 1 2 3 4 5 6 7 8 9
***************************************
Measurement protocol
(Example: normal measurement) (Example: stopped measurement)
***************************************
0 1 2 3 4 5 6 7 8 9
***************************************
DRÄGER ALCOTEST 7110
SERIAL NO.: ARME–0088
TEST NO.: 246
CALIBR.NO.: 00006
NEXT CAL. DATE: 05.01
DATE: 03.02.01
START: 08:43 W
END : 08:50 W
***************************************
LOCATION:
CLINIC HAMBURG
........................................................................
***************************************
NAME SUBJECT:
SMITH
.........................................................................
FIRST NAME:
PETER
.........................................................................
DATE OF BIRTH:
12.03.54
***************************************
SUBJECT MEASUREMENT
FAILED BLOWINGS : 0
BLOWING VOLUME : 4.3 l
BLOWING TIME : 13.1 s
PROBAND : 0.00
***************************************
* RESULT *
**
* 0.00 mg/l *
* *
***************************************
NAME OPERATOR:
.......................................................................
***************************************
SIGNATURE OPERATOR:
........................................................................
***************************************
0 1 2 3 4 5 6 7 8 9
***************************************
***************************************
0 1 2 3 4 5 6 7 8 9
***************************************
DRÄGER ALCOTEST 7110
SERIAL NO.: ARME–0088
TEST NO.: 250
CALIBR. NO.: 00006
NEXT CAL. DATE: 05.01
DATE: 03.02.01
START: 16:32 W
END : 16:40 W
***************************************
LOCATION::
CLINIC HAMBURG
........................................................................
***************************************
NAME SUBJECT:
SMITH
.........................................................................
FIRST NAME:
PETER
.........................................................................
DATE OF BIRTH:
12.03.54
***************************************
SUBJECT MEASUREMENT
FAILED BLOWINGS : 3
BLOWING VOLUME : 0.9 l
BLOWING TIME : 3.4 s
PROBAND : –.––
***************************************
* RESULT *
**
* MIN. VOL. NOT ACHIEVED *
**
***************************************
NAME OPERATOR:
......................................................................
***************************************
SIGNATURE OPERATOR:
......................................................................
***************************************
0 1 2 3 4 5 6 7 8 9
***************************************
Erläuterungen zum Protokoll
Die Angaben im oberen Teil des Protokolls erlauben
die eindeutige Identifikation des Messgerätes, mit dem die
Messung durchgeführt und das Protokoll erzeugt wurde.
– Seriennummer: Eindeutige Angabe (4 Buchstaben,
4 Ziffern), die genau einem Gerät zugeordnet ist.
– Probennummer: Anzahl der Messungen mit Protokollaus-
gabe nach dem letzten Service, bei dem der Zähler zurückgesetzt wurde.
– Kalibriernummer: Kontrollziffer, die sich bei Justierung des
Gerätes ändert.
Die übrigen Angaben auf dem Protokoll sind selbsterklärend.
Explanations of the protocol
The information given in the upper part of the protocol
enables the unambiguous identification of the measuring
instrument used for the measurement and which printed the
protocol.
– Serial number: unambiguous information (4 characters,
4-digit number) exactly related to one instrument.
– Test number: number of measurements with print-out of
a protocol after the last service at which the numerator
has been zeroed.
– Calibration number: control number which is changed
when adjusting the instrument.
The other information in the protocol is self-explaining.
15
Page 16

Geräteeinstellungen, Geräteabfragen
Instrument settings, instrument downloads
Geräteeinstellungen,
Geräteabfragen
Übersicht
Das Alcotest 7110 Standard bietet dem Bediener einige Funktionen zur Anzeige von Daten bzw. zur Auswahl von Einstellungen an.
Die Funktionen sind während der Durchführung eines Messzyklus nicht anwählbar.
Das Auswählen und Arbeiten mit diesen Funktionen über die
Tastatur ist auf Seite 4 bis 5 erläutert.
Die folgende Aufstellung gibt die dem Bediener zur Verfügung
stehenden Funktionen an, die für eine Bedienung des Alcotest
7110 Standard angewendet werden können.
Eingabe (Codewort) Funktion/Reaktion des Gerätes
» ORT « Eingabe des Standortes bzw.
Betreibers des Gerätes.
Die Angabe erscheint im Protokoll.
» ZEIT « Datum und Uhrzeit mit
Sekundenangabe werden im Display
für 10 Sekunden angezeigt.
Instrument settings,
instrument downloads
Overview
The Alcotest 7110 Standard offers to the operator several
functions to show data or to select settings.
It is not possible to call up the functions during the
sequence of a measuring cycle.
The selection and the use of these functions via the
keyboard is explained on pages 4 to 5.
The following list contains the functions available for the
operator of the Alcotest 7110 Standard.
Input (code word) Function/Reaction of the instrument
» LOCATION « Input of location or operator of the
instrument.
The information is printed on
protocol.
» TIME « Date and time with seconds are
shown on the display for 10 seconds.
» DATUM «
» AUS « Das Gerät wird "elektronisch"
» ZEITUMSTELLUNG « Die Umstellung zwischen Sommer-
» KOPIE « Möglichkeit, von der letzten
»KALIBRIERUNG« Zeigt den Ablauf der Kalibriergültigkeit
» MINUTE « Verändern der aktuellen Uhrzeit um
» STAND - BY « Das Gerät wird in den Energiespar-
Datum und Uhrzeit mit
Sekundenangabe werden im Display
für 10 Sekunden angezeigt.
ausgeschaltet. Mit Drücken
des Startknopfs kann es wieder eingeschaltet werden.
und Winterzeit wird durchgeführt.
durchgeführten Messung ein weiteres
Protokoll zu erzeugen.
an (Monat und Jahr).
+/– 1 Minute (nur einmal pro Tag
möglich).
modus umgeschaltet.
Nach Drücken des Startknopfes wird
es wieder betriebsbereit.
» DATE «
» OFF « The instrument is switched off "elec-
» CHANGE - TIME « The switching between summer time
» COPY « Possibility to print out
» VERIFY « Shows the expiry date of the
» MINUTE « Change of the actual time by
» STAND - BY « The instrument is switched into the
Date and time with seconds
are shown on the display
for 10 seconds.
tronically”.
By pushing the start button it may be
switched on again.
and winter time is performed.
a further protocol of the last
measurement.
verification interval (month and year).
+/– 1 minute (possible only once per
day).
stand-by mode.
After pushing the start button it is
becoming ready again.
» SPRACHE « Auswahl der Geräte-Sprache
möglich.
» UHR « Eingabe von Uhrzeit und Datum.
16
» LANGUAGE « Selection of instrument language
possible.
» SET - CLOCK « Input of time and date.
Page 17

Geräteeinstellungen, Geräteabfragen
Instrument settings, instrument downloads
Eingabe (Codewort) Funktion/Reaktion des Gerätes
»PROTOKOLL« 1. Eingabe der Anzahl gedruckter
Protokolle.
2. Einstellung, ob Probandendaten
eingegeben werden sollen
(Auswahl mit Leertaste).
3. Eingabe der Probennummer.
Sommerzeit / Winterzeit umstellen
Die jeweils eingestellte Zeit im Alcotest 7110 Standard wird
durch den Zusatzbuchstaben an der Zeitangabe kenntlich
gemacht. Zur Umstellung ist beim Einschalten des Gerätes der
Startknopf ständig gedrückt zu halten, bis in der Anzeige
UMSTELLUNG SOMMERZEIT - WINTERZEIT
erscheint.
Input (code word) Function/Reaction of the instrument
»PRINTOUT« 1. Input of number of printed
protocols.
2. Selection of data input of the
person being tested
(selection by blank key).
3. Input of test number.
Switching summer time / winter time
The respective time chosen in the Alcotest 7110 Standard
is noticed by the additional character at the time
information. For switching keep start button pressed during
switching on the instrument until the following is displayed:
SUMMER TIME - WINTER TIME
Die Uhrzeit ist automatisch um eine Stunde vor- oder zurückgestellt, der entsprechend andere Zusatzbuchstabe ist ausgewählt.
Bemerkung: Die Umstellung ist zwischen 23.00 Uhr und 1.00
Uhr nicht möglich.
Messung abbrechen – "Quick Reset“
Der Messablauf kann abgebrochen werden, indem der Startknopf mindestens 2 Sekunden gedrückt wird. Der Abbruch
wird mit der Meldung
ABBRUCH DER MESSUNG
im Display angezeigt.
The time is set automatically one hour forward resp.
backward, the respective additional character is chosen.
Note: Switch over cannot be performed between 23.00
hours and 01.00 hours.
Interruption of measurement - Quick Reset
The measuring cycle can be stopped by keeping the start
button pressed at least 2 seconds.
The stop is noted in the display by:
QUICK RESET
17
Page 18

Service
Service
Service
Überprüfungen
Inspektionen des Alcotest 7110 Standard sind von fachkundigen Personen,
z. B. vom DrägerService oder durch vom
DrägerService autorisierte Personen
durchzuführen.
Instandhaltungsintervalle:
empfohlen: 6 Monate
höchstens: 12 Monate
Papierrolle einsetzen
Das Alcotest 7110 Standard prüft nach
Auslösen einer Messung, ob noch
ausreichend Papier vorhanden ist. Nicht
ausreichender Papiervorrat wird mit der
Meldung » PAPIER ÜBERPRÜFEN «
angezeigt.
Service
Check
Inspections of the Alcotest 7110
Standard have to be performed by
experts, e g. by DrägerService or
persons authorised by DrägerService
Maintenance intervals:
recommended: 6 months
maximal: 12 months
Inserting paper
After start of the measurement the
Alcotest 7110 Standard checks
whether sufficient paper is in the
printer. Not sufficient paper is
displayed with the message » NO
PRINTER PAPER «.
Wenn der rote Streifen auf dem
Ausdruck sichtbar wird, ist eine neue
Papierrolle einzusetzen.
● Klappe des Druckers öffnen.
1 Durch Betätigen des roten Papiervor-
schubtasters noch vorhandene
Papierreste entfernen.
2 Den Anfang des Papiers hinter der
Metallführung hindurchführen und in
den Schlitz des Druckwerks
schieben.
1 Den Papiervorschubtaster gedrückt
halten, bis das Papier einige Zentimeter durch das Druckwerk transportiert ist.
– Das Papier muss zwischen Farbband
und Farbbandkassette durchlaufen.
● Papierrolle in der Aufnahmemulde
positionieren.
● Papieranfang von unten durch den
Schlitz in der Klappe schieben,
Klappe schließen.
When a red strip appears on the
paper a new paper roll has to be
inserted.
● Open flap of printer.
1 Remove remaining paper by
pressing red paper feed button.
2
1
2 Feed start of paper behind the
metal guide and push it into the
slot of the printing mechanism.
1 Keep paper feed button pressed
until paper is transported several
centimetres through the printing
00123632
mechanism.
– Paper has to run between type-
writer ribbon and ribbon cassette.
● Position paper roll in the recess.
● Insert start of paper from below
through the slot in the flap, close
flap.
18
00223632
Page 19

Service
Service
Farbbandkassette wechseln
● Klappe des Druckers öffnen.
● Verbrauchte Kassette entfernen: Auf
die mit "PUSH" bezeichnete Seite
der Farbbandkassette drücken,
Kassette herausnehmen.
● Spannen des Farbbandes durch
Drehen des gezahnten Kopfes im
Uhrzeigersinn.
● Neue Kassette einlegen und
andrücken.
● Papier muss zwischen Farbband und
Farbbandkassette durchlaufen.
● Klappe schließen.
Sicherungen wechseln
● Schraubendreher mit geeigneter
Spitze verwenden.
1 Beide Sicherungskappen entfernen.
● Alte Sicherungen durch neue
ersetzen.
Nur die vorgeschriebenen Sicherungen verwenden, Seite 26.
1 Beide Sicherungskappen wieder
schließen.
Changing ribbon cassette
● Open flap of printer.
● Remove consumed cassette: press
ribbon cassette on spot marked
with "PUSH”, take cassette out.
● Tension ribbon of new cassette by
turning toothed knob clockwise.
● Insert and press on new cassette.
● Paper has to run between type-
0092363200723632
writer ribbon and ribbon cassette.
● Close flap.
Replacing fuses
● Use screwdriver with appropriate
blade.
1 Remove both fuse tops.
1
● Replace old fuses by new ones.
Only use the prescribed fuses,
page 26.
1 Close both fuse tops again.
Gerät reinigen
● Gerät von der elektrischen Versorgung trennen.
● Oberflächen von Gerät und Schlauch mit einem feuchten
Tuch abwischen.
● Mit einem trockenen Tuch gründlich trockenwischen.
Keine alkoholhaltigen Reinigungsmittel verwenden!
Keine Flüssigkeiten in den Schlauch gelangen lassen!
Gerät entsorgen
– am Ende der Nutzungsdauer.
● Gerät entsprechend den nationalen Abfallbeseitigungs-
vorschriften entsorgen,
oder
● Gerät von einem geeigneten Entsorgungsunternehmen
entsorgen lassen.
Auskünfte erteilen die Umwelt- und Ordnungsämter.
Cleaning instrument
● Disconnect instrument from the power supply.
● Wipe over surfaces of instrument and hose with a damp
cloth.
● Dry thoroughly with a dry cloth.
Do not use any cleaning agents containing alcohol!
Do not allow any liquid to ingress into the hose.
Disposal of the instrument
– at the end of its service life.
● Dispose of the instrument in accordance with national
waste disposal regulations
or
● Ask a suitable disposal contractor to dispose of the
instrument.
The local environmental agency can supply further details.
19
Page 20

Fehler – Ursache – Abhilfe
Fehler – Ursache – Abhilfe
Fehler / Displayanzeige (Druckertext) Ursache Abhilfe
Keine Funktion nach
Anschalten
FEHLER NULLWERT
(NULLWERTFEHLER)
MUNDRESTALKOHOL
(MUNDRESTALKOHOL)
ATEMVOLUMEN ZU KLEIN
(ATEMVOLUMEN ZU KLEIN)
ATEMPROBE ZU KURZ
(ATEMZEIT ZU KURZ)
ATEMPROBE NICHT ZULÄSSIG
(ATEMTEST UNZULÄSSIG)
MESSBEREITSCHAFT ABGELAUFEN
(MESSBEREIT. ABGELAUFEN)
ALKOHOL IN DER UMGEBUNGSLUFT
(ALKOHOL IN UMGEBUNG)
Sicherungen evtl. defekt. Die Sicherungen prüfen, erneuern.
Energieversorgung unzureichend. Energieversorgung prüfen.
Nullabgleich fehlerhaft. Für alkoholfreie und saubere Umge-
bungsluft sorgen. Prüfraum lüften.
Restalkohol im Mund des Probanden.
Proband hat unmittelbar vor dem Test
Alkohol zu sich genommen bzw.
aufgestoßen.
Das abgegebene Volumen ist kleiner als
das geforderte Mindestvolumen.
Die Dauer der Abgabe der Atemprobe ist
kleiner als die geforderte Mindestzeit.
Abgabe der Atemprobe zu einem nicht
erlaubten Zeitpunkt; keine Messbereitschaft. (Nachblasen)
Messbereitschaft von 2 Minuten ist
abgelaufen. Atemprobe wurde in dieser
Zeit nicht begonnen.
Kontamination der Umgebungsluft wurde
festgestellt.
Ursache abstellen.
Messung nach einer Wartezeit
wiederholen.
Kontrollzeit beachten.
Das Gerät fordert automatisch zu einer
Wiederholung der Atemprobe auf.
Das Gerät fordert automatisch zu einer
Wiederholung der Atemprobe auf.
Probanden auf korrekte Abgabe der
Atemprobe hinweisen.
Neue Messung starten.
Neue Messung starten.
Für alkoholfreie und saubere Umgebungsluft sorgen. Prüfraum lüften.
FUNKTION NICHT MÖGLICH Falsche Eingabe eines Codewortes. Codewort überprüfen.
Eingabe wiederholen.
FEHLER BEIM SPÜLEN
(FEHLER BEIM SPÜLEN)
INTERFERENZ
(INTERFERENZ)
Zum Spülen des Messsystems
notwendiges Spülvolumen nicht erreicht.
Die beiden unabhängigen Messsysteme
(nur Alcotest 7110 Standard IR + EC)
haben eine unzulässige Beeinflussung
der Messwerte durch Fremdsubstanzen
im Atem detektiert.
Einlass des Atemschlauches prüfen.
Falls keine Auffälligkeit, erneut Messung
starten. Tritt Fehler wieder auf:
DrägerService informieren.
Ursache dieser Beeinflussung identifizieren, wenn möglich abstellen. Eventuell
andere, beweissichernde Maßnahmen
auslösen.
20
Page 21

Fehler / Displayanzeige (Druckertext) Ursache Abhilfe
Fehler – Ursache – Abhilfe
Folgende Fehler werden in Englisch
angegeben:
ERROR [XXX]
..MAIN-SYSTEM
..IR-SYSTEM
..EC-SYSTEM
..FLOW-SYSTEM
..PRESSURE-SYS
..HEATER-SYSTEM
(Meldung wird zusätzlich ausgedruckt)
Beispiel:
ERROR [075] HEATER-SYSTEM
Instrument defekt
(XXX = Ziffer, die den Fehler spezifiziert).
Instrument blockiert automatisch beim
Erkennen des Fehlers alle Messabläufe.
Die Soll-Temperatur für den Sensor bzw.
den Schlauch ist nicht erreicht.
Gerät ausschalten.
Prüfen, ob nach Wiedereinschalten der
Fehler erneut auftaucht. Wenn ja:
DrägerService informieren.
Gerät zur Instandhaltung geben.
Einhaltung der Umgebungsbedingungen
sicherstellen. Gerät ausschalten, eventuell mit dem Gerätedeckel abdecken
und wieder einschalten.
Wenn nach Wiedereinschalten Fehler
wieder auftaucht,
DrägerService informieren.
21
Page 22

Fault, Cause and Remedy
Fault, Cause and Remedy
Fault / Display (Printer text) Cause Remedy
No function after switching instrumentonFuses eventually defective. Check fuses, replace.
Power supply insufficient. Check power supply.
BLANK CHECK INCORRECT
(BLANK CHECK INCORRECT)
MOUTH ALCOHOL
(MOUTH ALCOHOL)
MINIMUM VOLUME NOT ACHIEVED
(MIN. VOL. NOT ACHIEVED)
BLOWING TIME TOO SHORT
(BLOWING TIME TOO SHORT)
BLOWING NOT ALLOWED
(NOT ALLOWED BLOWING)
READINESS TO BLOW EXPIRED
(READIN. TO BLOW EXP.)
ALCOHOL IN THE ENVIRONMENT
(ALCOHOL-ENVIRONMENT)
FUNCTION NOT POSSIBLE Incorrect input of a code word. Check code word.
Zero adjustment incorrect. Ensure that ambient air is clean and
free of alcohol. Air test room.
Residual alcohol in the mouth of the
person being tested. Person have had
alcohol immediately prior to
measurement or had belched.
The supplied volume is smaller than the
minimum volume required.
The time of the supplied breath sample
is shorter than the minimum time
required.
Delivery of the breath sample at a not
permitted time; no readiness for operation. (Reblowing)
Readiness to blow of 2 minutes is
expired. No delivery of breath sample
within this time.
Contamination in the ambient air is
detected.
Remedy cause.
Repeat measurement after waiting time.
Observe control time.
The instrument automatically requests
to repeat the breath sample.
The instrument automatically requests
to repeat the breath sample.
Remind the person to be tested of the
correct delivery of the breath sample.
Repeat measurement.
Repeat measurement.
Ensure that ambient air is clean and
free of alcohol. Air test room.
Repeat input.
PURGING ERROR
(PURGING ERROR)
INTERFERENCE
(INTERFERENCE)
22
Necessary volume for purging the
measuring system not reached.
The two independent measuring
systems (only Alcotest 7110 Standard
IR + EC) have detected an inadmissible
influence on the measured values by
foreign substances in the breath.
Check inlet of the breath hose.
If no conspicuousness, repeat
measurement. If fault message
reappears: inform DrägerService.
Identify cause of the influence, remedy,
if possible. Eventually initiate other
evidential measures.
Page 23

Fault / Display (Printer text) Cause Remedy
Fault, Cause and Remedy
ERROR [XXX] Instrument defective
(XXX = number specifying the error)
..MAIN-SYSTEM
..IR-SYSTEM
..EC-SYSTEM
..FLOW-SYSTEM
..PRESSURE-SYS
..HEATER-SYSTEM
(Message is printed out additionally)
Example:
ERROR [075] HEATER-SYSTEM The predetermined temperature of the
Instrument blocks automatically all
measurement sequences when error is
detected.
sensor or the hose is not reached.
Switch off instrument.
Check whether the error message
reappears after switching on again. If
yes: inform DrägerService. Bring
instrument to repair.
Ensure compliance with the ambient
conditions. Switch instrument off,
eventually close the instrument cover
and switch on again.
If the error message reappears after
switching on, inform DrägerService.
23
Page 24

Was ist was
What's What
Was ist was
Frontansicht
1 Startknopf
2 Druckerklappe / Papierrolle /
Papiervorschubtaster
3 Tastatur
4 Display
5 Geheizter Probenschlauch in der
Ablage
Rückansicht
6 Hauptschalter
7 Anschluss, Versorgungsspannung
8 Sicherungen
What's What
Front view
12
5
4
3
13 12
1 Start button
2 Printer flap / Paper roll /
Paper feed button
3 Keyboard
4 Display
5 Heated sampling hose in the
storage recess
01023632
Rear view
6 Mains switch
7 Connector for power supply
8 Fuses
9 Anschluss 12 V
10 RS 232-Anschluss
11 Typenschild
12 Eingang Funktionsstecker
13 Anschluss Tastatur
[ Warnhinweise:
Anschluss 12 V
Es dürfen nur Batterien angeschlossen
werden oder Gleichspannungsnetzgeräte mit Netztrennung (zum Beispiel
nach VDE 0551).
6 7 8 9 10 11
9 Connector 12 V
10 RS 232 connector
11 Type plate
12 Socket hard key plug
13 Connector keyboard
01123632
[ Warning:
Connector 12 V
Only batteries or DC power supplies
with mains separation (for example
according to VDE 0551) have to be
connected.
24
Page 25

Technische Daten
Technical Data
Technische Daten
Umgebungsbedingungen
Betrieb
Temperatur 0 °C bis 40 °C
Luftdruck 850 bis 1050 hPa
Lagerung
Temperatur –25 °C bis 60 °C
Messsystem
Messbereich
Atemalkoholkonzentration 0 bis 3 mg/l
0 bis 300 µg/100 ml
(Ethanol-Masse pro Atemvolumen bei 34 °C und
1013 hPa)
Bultalkoholkonzentration 0 bis 6 ‰
0 bis 6 g/l
0 bis 0,6 %
(Ethanol-Masse pro Blutvolumen bei 20 °C und
1013 hPa. Bei der Angabe
dieser Daten wird ein Umrechnungsfaktor von 2100
zwischen Atem- und Blutalkoholkonzentrations-Angaben verwendet.)
Technical Data
Ambient conditions
For operation
Temperature 0 °C to 40 °C
Ambient pressure 850 to 1050 hPa
For storage
Temperature –25 °C to 60 °C
Measuring system
Measurement range
Breath alcohol concentration 0 to 3 mg/l
0 to 300 µg/100 ml
(Ethanol mass per breath
volume at 34 °C and
1013 hPa)
Blood alcohol concentration 0 to 6 ‰
0 to 6 g/l
0 to 0.6 %
(Ethanol mass per blood
volume at 20 °C and
1013 hPa.
By giving this data a
conversion factor
of 2100 between breath
and blood alcohol concentrations is used.)
Auflösung Endergebnis 0,01 mg/l
1 µg/100 ml
0,01 ‰
0,01 g/l
0,001 %
Dauer einer Messung 2 Minuten
(typisch)
Blasdauer >3 Sekunden
Atemvolumen >1,5 l
Wiederholpräzision:
(entsprechend
DIN VDE 0405-2) Standardabweichung
kleiner als
0 bis 0,4 mg/l 0,006 mg/l
0 bis 40 µg/100 ml 0,6 µg/100 ml
0 bis 0,8 ‰ 0,012 ‰
0 bis 0,8 g/l 0,012 g/l
0 bis 0,08 % 0,0012 %
über 0,4 bis 1,0 mg/l Variationskoeffizient
über 40 bis 100 µg/100 ml kleiner als 1,5 %
über 0,8 bis 2,0 ‰
über 0,8 bis 2,0 g/l
über 0,08 bis 0,20 %
Resolution final result 0.01 mg/l
1 µg/100 ml
0.01 ‰
0.01 g/l
0.001 %
Duration of measuring 2 minutes
cycle (typically)
Blowing time >3 seconds
Volume > 1.5 l
Repeatability
(according to
DIN VDE 0405-2) standard deviation
smaller than
0 to 0.4 mg/l 0.006 mg/l
0 to 40 µg/100 ml 0.6 µg/100 ml
0 to 0.8 ‰ 0.012 ‰
0 to 0.8 g/l 0.012 g/l
0 to 0.08 % 0.0012 %
above 0.4 to 1.0 mg/l variation coefficient
above 40 to 100 µg/100 ml smaller than 1.5 %
above 0.8 to 2.0 ‰
above 0.8 to 2.0 g/l
above 0.08 to 0.20 %
25
Page 26

Technische Daten
Technical Data27Order ListBestell-Liste
über 1,0 bis 2,0 mg/l Variationskoeffizient
über 100 bis 200 µg/100 ml kleiner als 3 %
über 2,0 bis 4,0 ‰
über 2,0 bis 4,0 g/l
über 0,20 bis 0,40 %
über 2,0 mg/l Variationskoeffizient
über 200 µg/100 ml kleiner als 6 %
über 4,0 ‰
über 4,0 g/l
über 0,40 %
Drift des Messergeb- < 0,01 mg/l
nisses in 6 Monaten bei < 1 µg/100 ml
0,4 mg/l (entsprechend < 0,02 ‰
DIN VDE 0405-2; bei < 0,02 g/l
identischen Betriebsbe- < 0,002 %
dingungen)
Kalibrierintervall abhängig von der gefor-
derten Messgenauigkeit,
empfohlen: 6 Monate
maximal: 12 Monate
above 1.0 to 2.0 mg/l variation coefficient
above 100 to 200 µg/100 ml smaller than 3 %
above 2.0 to 4.0 ‰
above 2.0 to 4.0 g/l
above 0.20 to 0.40 %
above 2.0 mg/l variation coefficient
above 200 µg/100 ml smaller than 6 %
above 4.0 ‰
above 4.0 g/l
above 0.40 %
Drift of the measurement < 0.01 mg/l
result in 6 months < 1 µg/100 ml
at 0.4 mg/l (according < 0.02 ‰
to DIN VDE 0405-2; under < 0.02 g/l
identical operational < 0.002 %
conditions)
Calibration interval depends on the required
accuracy,
recommended: 6 months
maximal: 12 months
Charakteristische Betriebsdaten
Versorgungsspannung 230 V ~, –15 % bis +10 %
50 Hz ±2 %
11,5 V bis 15,5 V DC
Leistungsaufnahme max. 70 W
Sicherungen Netzteil 5 x 20 mm, T2/250 V,
IEC 127-2/III , 2 Stück
Drucker Matrix-Nadeldrucker mit
Farbbandkassette
Standardpapier, 58 mm
breit
Zeitangabe Tag/Monat/Jahr
Stunde: Minute
Sommer-, Winterzeit
Aufwärmphase kleiner 15 Minuten bei
Raumtemperatur
Abmessungen B x H x T ca. 400 mm x 130 mm x
265 mm
Gewicht etwa 8.5 kg
Typical operational data
Power supply voltage 230 V ~, –15 % to +10 %
50 Hz ± 2 %
11.5 V to 15.5 V DC
Power consumption max. 70 W
Fuses power supply 5 x 20 mm, T2/250 V
IEC 127-2/III, 2 pieces
Printer Dot matrix printer with
ribbon cassette
Standard paper, 58 mm
wide
Time display Day/month/year
hour:minute
Summer, winter time
Warm-up phase less than 15 minutes at
room temperature
Dimensions W x H x D approx. 400 mm x 130
mm x 265 mm
Weight approx. 8.5 kg
CE-Kennzeichnung Elektromagnetische
Verträglichkeit
(Richtlinie 89/336/EWG)
Niederspannungsrichtlinie
(Richtlinie 72/23/EWG)
26
CE marking electromagnetic
compatibility
(directive 89/336/EEC)
Low voltage directive
(directive 72/23/EEC)
Page 27

Bestell-Liste Order List
Benennung Sach-Nr.
Alcotest 7110 Standard IR 83 15 080
Alcotest 7110 Standard IR + EC 83 15 800
Verbrauchsteile und Zubehör
Tastatur "standard" 83 13 215
Tastatur "compact" 83 15 497
12 V-Kabel (mit ON/OFF) 83 12 641
Druckerpapier ( 5 Rollen) 81 00 318
Farbbandkassette 81 00 284
Mundstück mit Rückatemsperre
(25 Stück)
68 05 703
Name Part no.
Alcotest 7110 Standard IR 83 15 080
Alcotest 7110 Standard IR + EC 83 15 800
Consumables and Accessories
Keyboard "standard" 83 13 215
Keyboard "compact" 83 15 497
12 V cable (with ON/OFF switch) 83 12 641
Printer paper ( 5 rolls) 81 00 318
Ribbon cassette 81 00 284
Mouth piece with non-return valve
(25 pieces)
68 05 703
Page 28

Stichwortverzeichnis
Index
Stichwortverzeichnis Index
Abgabe der Atemprobe ......................................................... 12
Abmessungen .......................................................................... 26
Auflösung Endergebnis ......................................................... 25
Aufwärmphase ......................................................................... 26
Ausdruck ............................................................................ 13, 15
Batteriebetrieb ........................................................................... 6
Bestell-Liste .............................................................................. 28
Betriebsbereitschaft herstellen ............................................... 8
CE-Kennzeichnung ................................................................. 26
Charakteristische Betriebsdaten ......................................... 25
Codewort ..................................................................................... 5
Dauer einer Messung ............................................................ 25
Drift des Messergebnisses ................................................... 26
Druckvorgang ........................................................................... 13
Accessories .............................................................................. 28
Ambient conditions ................................................................. 25
Ambient conditions for measurement ................................... 7
Areas of explosion hazard ........................................................ 3
Battery operation ....................................................................... 6
CE marking ............................................................................... 26
Changing ribbon cassette ..................................................... 19
Check ......................................................................................... 18
Cleaning instrument ............................................................... 19
Code word ................................................................................... 5
Conditions ................................................................................ 10
Consumables ........................................................................... 28
Control time .............................................................................. 12
Control time before measurement ....................................... 10
Coupling with electrical instruments ..................................... 3
Eingabe (Codewort) ............................................................... 16
Eingabe der Daten ..................................................................... 4
Einsatztemperatur ................................................................... 25
Energiesparmodus ............................................................. 9, 10
Erläuterungen zum Protokoll ................................................ 15
Explosionsgefährdete Bereiche .............................................. 3
Farbbandkassette wechseln ................................................. 19
Fehler während des Messablaufes ..................................... 13
Fehler – Ursache – Anhilfe ................................................... 20
Frontansicht .............................................................................. 24
Funktionsbeschreibung ............................................................ 4
Gerät entsorgen ...................................................................... 19
Gerät reinigen .......................................................................... 19
Geräteabfragen ....................................................................... 16
Geräteeinstellung .................................................................... 16
Gewicht ..................................................................................... 26
Data of the person .................................................................. 10
Delivering breath samples ..................................................... 12
Determination of the concentration ....................................... 4
Dimensions ............................................................................... 26
Disposal of the instrument .................................................... 19
Drift of the measurement result ............................................ 26
Duration of measuring cycle ................................................. 25
Entering data .............................................................................. 4
Establishing readiness for operation ..................................... 8
Explanations of the protocol ................................................. 15
Failings during measurement cycle .................................... 13
Fault, Cause and Remedy ..................................................... 22
Finishing the measuring cycle .............................................. 13
Front view .................................................................................. 24
Functional description .............................................................. 4
Fuses .......................................................................................... 26
28
Page 29

Stichwortverzeichnis
Index
Haftung ........................................................................................ 3
Inbetriebnahme .......................................................................... 6
Instandhaltung ............................................................................ 3
Instandhaltungsintervalle ....................................................... 18
Kontrollzeit ............................................................................... 12
Kontrollzeit vor der Messung ................................................ 10
Konzentrationsbestimmung ..................................................... 4
Kopplung mit elektrischen Geräten ....................................... 3
Lagertemperatur ...................................................................... 25
Lagerung ...................................................................................... 5
Leistungsaufnahme ................................................................. 26
Messablauf .................................................................................. 4
Messbereich ............................................................................. 25
Messbereitschaft ........................................................................ 8
Messergebniss ........................................................................ 13
Messprotokoll ........................................................................... 15
Messprotokoll ausdrucken .................................................... 13
Messsystem .............................................................................. 25
Messung abbrechen ............................................................... 17
Messung auslösen .................................................................. 10
Messung durchführen ............................................................ 10
Messung vorbereiten ................................................................ 6
Messvorgang ............................................................................ 11
Messzyklus beenden .............................................................. 13
Mobiler Einsatz ........................................................................... 6
Mundspülung ........................................................................... 10
Mundstück ................................................................................ 11
Nachatmung ............................................................................. 12
Papierrolle einsetzen .............................................................. 18
Probandendaten ...................................................................... 10
Input (code word) .................................................................... 16
Inserting paper ......................................................................... 18
Instrument downloads ............................................................ 16
Instrument settings .................................................................. 16
Intended use ............................................................................... 4
Interruption of measurement ................................................ 17
Keyboard ..................................................................................... 4
Keyboard inputs ......................................................................... 5
Keyboard operation ................................................................... 4
Liability ......................................................................................... 3
Maintenance ............................................................................... 3
Maintenance intervals ............................................................. 18
Making measurement ............................................................. 10
Measurement protocol ........................................................... 15
Measurement range ................................................................ 25
Measurement result ................................................................ 13
Measuring procedure ................................................................ 4
Measuring system ................................................................... 25
Mobile use ................................................................................... 6
Mouth-piece .............................................................................. 11
Operating temperature .......................................................... 25
Order List .................................................................................. 28
Overview .................................................................................... 16
Power consumption ............................................................... 26
Power supply voltage ............................................................. 26
Preparation of measurement ................................................... 6
Print-out .............................................................................. 13, 15
Printing measurement protocol ............................................ 13
Putting into operation ................................................................ 6
Quick Reset ............................................................................. 17
Quick Reset ............................................................................. 17
29
Page 30

IndexStichwortverzeichnis
Reaktion des Gerätes ............................................................ 16
Restalkohol ............................................................................... 10
Rückansicht .............................................................................. 24
Selbsttest .................................................................................... 8
Service ....................................................................................... 18
Sicherheit ..................................................................................... 3
Sicherung .................................................................................. 26
Sicherung wechseln ............................................................... 19
Sommerzeit ............................................................................... 17
Stationärer Betrieb .................................................................... 6
Tastatur ........................................................................................ 4
Tastatur verwenden ................................................................... 4
Tastatureingaben ....................................................................... 5
Technische Daten ................................................................... 25
Transport ...................................................................................... 5
Reaction of the instrument .................................................... 16
Readiness for measurement .................................................... 8
Rear view ................................................................................... 24
Reblowing ................................................................................. 12
Repeatability ............................................................................. 25
Replacing fuses ....................................................................... 19
Residues of alcohol ................................................................ 10
Resolution final result ............................................................. 25
Rinsing out the mouth ............................................................ 10
Safety ........................................................................................... 3
Service ....................................................................................... 18
Stand-by mode ..................................................................... 9, 10
Starting measurement ............................................................ 10
Stationary use ............................................................................. 6
Storage ......................................................................................... 5
Storage temperature .............................................................. 25
Summer time ............................................................................ 17
Umgebungsbedingungen ..................................................... 25
Umgebungsbedingungen für die Messung ......................... 7
Überprüfungen ......................................................................... 18
Übersicht ................................................................................... 16
Verbrauchsteile ....................................................................... 28
Versorgungsspannung ........................................................... 26
Verwendungszweck ................................................................... 4
Voraussetzungen für die Messung ...................................... 10
Warmlaufphase .......................................................................... 8
Was ist was .............................................................................. 24
Wiederholpräzision ................................................................. 25
Winterzeit .................................................................................. 17
Zeitangabe ............................................................................... 26
Zubehör ..................................................................................... 28
Technical Data ......................................................................... 25
Time display .............................................................................. 26
Transportation ............................................................................. 5
Typical operational data ......................................................... 26
Warm-up phase ................................................................... 8, 26
Weight ....................................................................................... 26
What's What ............................................................................. 24
Winter time ............................................................................... 17
30
Page 31

Page 32

Dräger Safety AG & Co. KGaA
Germany
z Revalstraße 1
D-23560 Lübeck
y +49 451 8 82 - 0
x 26 80 70
FAX +49 451 8 82-20 80
! http://www.draeger.com
http://www.alcotest.com
Dräger Safety AG & Co. KGaA
Germany
z Revalstraße 1
D-23560 Lübeck
y +49 451 8 82 - 0
x 26 80 70
FAX +49 451 8 82-20 80
! http://www.draeger.com
http://www.alcotest.com
Niederlassungen in Deutschland
Vertrieb Atemschutz, tragbare Gasmeßgeräte, Breathing Gas Systems,
DrägerDive
Hamburg
Albert-Schweitzer-Ring 22
<
22045 Hamburg
y (0 40) 6 68 67 - 0
Fax (0 40) 6 68 67 - 150
vertrieb.nord@draeger.com
Krefeld
Kimpler Straße 284
<
47807 Krefeld
y (0 21 51) 37 35 - 0
Fax (0 21 51) 37 35 - 50
vertrieb.west@draeger.com
Leipzig
An der Harth 10 B
<
04416 Markkleeberg
y (03 41) 35 34 - 660
Fax (03 41) 35 34 - 661
vertrieb.ost@draeger.com
Stuttgart
Vor dem Lauch 9
<
70567 Stuttgart
y (07 11) 7 21 99 - 0
Fax (07 11) 7 21 99 - 50
vertrieb.sued@draeger.com
Tochtergesellschaften in Österreich und
der Schweiz
Dräger Austria GmbH
Wallackgasse 8
A-1230 Wien
y (1) 6 09 36 02 - 0
Fax (1) 69 62 42
Dräger (Schweiz) AG
Aegertweg 7
CH-8305 Dietlikon
y (1) 8 05 82 82
Fax (1) 8 05 82 80
draeger.sicherheit@draeger.com
90 23 632 - GA 4753.202 de/en
Dräger Safety AG & Co. KGaA
1. Ausgabe - Juli 2001
Änderungen vorbehalten
90 23 632 - GA 4753.202 de/en
Dräger Safety AG & Co. KGaA
1st edition - July 2001
Subject to alteration
 Loading...