

Page 1

Andote
Manual
Model: ZA-35
www.drzamps.com
Page 2

This symbol warns the user of dangerous voltage levels localized within the enclosure.
This symbol advises the user to read all accompanying literature for safely operang
the unit
Important Safety Instrucons
1) Read these instrucons.
2) Keep these instrucons.
3) Heed all warnings.
4) Follow all instrucons.
5) Do not use this apparatus near water.
6) Clean only with dry cloth.
7) Do not block any venlaon openings. Maintain at least 3 feet of distance around all sides of amplifier.
Do not block any venlaon openings with items such as newspapers, tablecloths, curtains, etc.
8) Do not install near any heat sources such as radiators, heat registers, stoves, or other
apparatus (including amplifiers) that produce heat.
9) Do not defeat the safety purpose of the polarized or grounding-type plug. A polarized plug
has two blades with one wider than the other. A grounding type plug has two blades and a third
grounding prong. The wide blade or the third prong are provided for your safety. If the provided
plug does not fit into your outlet, consult an electrician for replacement of the obsolete outlet.
10) Protect the power cord from being walked on or pinched parcularly at plugs, convenience
receptacles, and the point where they exit from the apparatus.
11) Only use aachments/accessories specified by the manufacturer.
12) Use only with the cart, stand, tripod, bracket, or table specified by the manufacturer, or sold
with the apparatus. When a cart is used, use cauon when moving the cart/apparatus
combinaon to avoid injury from p-over.
13) Unplug this apparatus during lightning storms or when unused for long periods of me.
14) Refer all servicing to qualified service personnel. Servicing is required when the apparatus
has been damaged in any way, such as power-supply cord or plug is damaged, liquid has been
spilled or objects have fallen into the apparatus, the apparatus has been exposed to rain or
moisture, does not operate normally, or has been dropped.
15) Avoid placing any liquids on or near the amplifier that may splash or drip such as those contained in
boles, cans, glasses, etc.
*Dr Z amplifiers are capable of producing very high sound pressure levels which can cause temporary or
permanent hearing damage.
*If any screw that is actually on the amp chassis needs to be replaced contact Dr Z Amps for the proper size.
Screw size is crical for inner chassis clearances.
Page 3

General Informaon
The Andote connues Dr. Z’s tradion of merging classic designs with innovave ideas to produce amplifiers
that stand on their own.
The heart of this design is its matched pair of KT66 power tubes paired with an ultra-linear output transformer. KT66 tubes were originally intended to be paired with this type of transformer and the Andote is
the only way to experience the unique tone this combinaon produces in a current producon amp.
The amp’s front end is similar to our earlier Remedy design… a player friendly revision of the two channel
format where one input feeds high/normal simultaneously, allowing the player to blend them. When
matched with the Andote’s 4 band EQ, this setup makes an incredible number of gain and tone variaons
possible.
The Andote also features a “Vintage/Modern” circuit which gives the user the ability to me warp the
amp’s voicing from mid 60’s to early 70’s and back again with the flip of a switch (yes, we refer to the 70’s as
modern).
When overdriven, the Andote is smooth as silk. The mids and balance of top and boom are strong and
thick when pushed with a Humbucker. The addicve blend of bell-like high end shimmer and thick punchy
lows results in a sound that is difficult to unplug from. In the good doctor’s words: “it already sounds like a
record…but cranked”.
Located on the rear panel is a jack for the foot-switchable EQ bypass funcon which dramacally increases
gain and thickness in both channels when acvated. This can be used as a lead boost or a higher gain channel as the amp’s High/Normal volume controls can sll be used to adjust the gain and tone even with the EQ
bypassed. New for 2016 the EQ bypass footswitch features a variable boost control. This added knob allows
the player to dial in the amount of boost needed.
The Andote is hand-wired with the best components available to create an amplifier that goes far beyond
the classic designs it’s rooted in. We feel that the Dr Z philosophy of “Vintage Tone for Today” is fully realized
in this addion to our line.
Specificaons
Power Output 45 was
Output Tubes 2 - KT66
Preamp Tubes 3 - 12AX7
Recfier 5AR4
Controls Blended Volume High and Volume Low, Modern/Vintage Voicing Toggle, Treble,
Mid, Bass, Presence and Footswitchable EQ Bypass
Other 4, 8, 16 Ohm, EQ bypass (variable boost footswitch included)
Configuraons Head
Colors Black, Blonde, Red
Dimension & Weight 19”W x 9 ¾H x 9 ½D 27 lbs.
Page 4
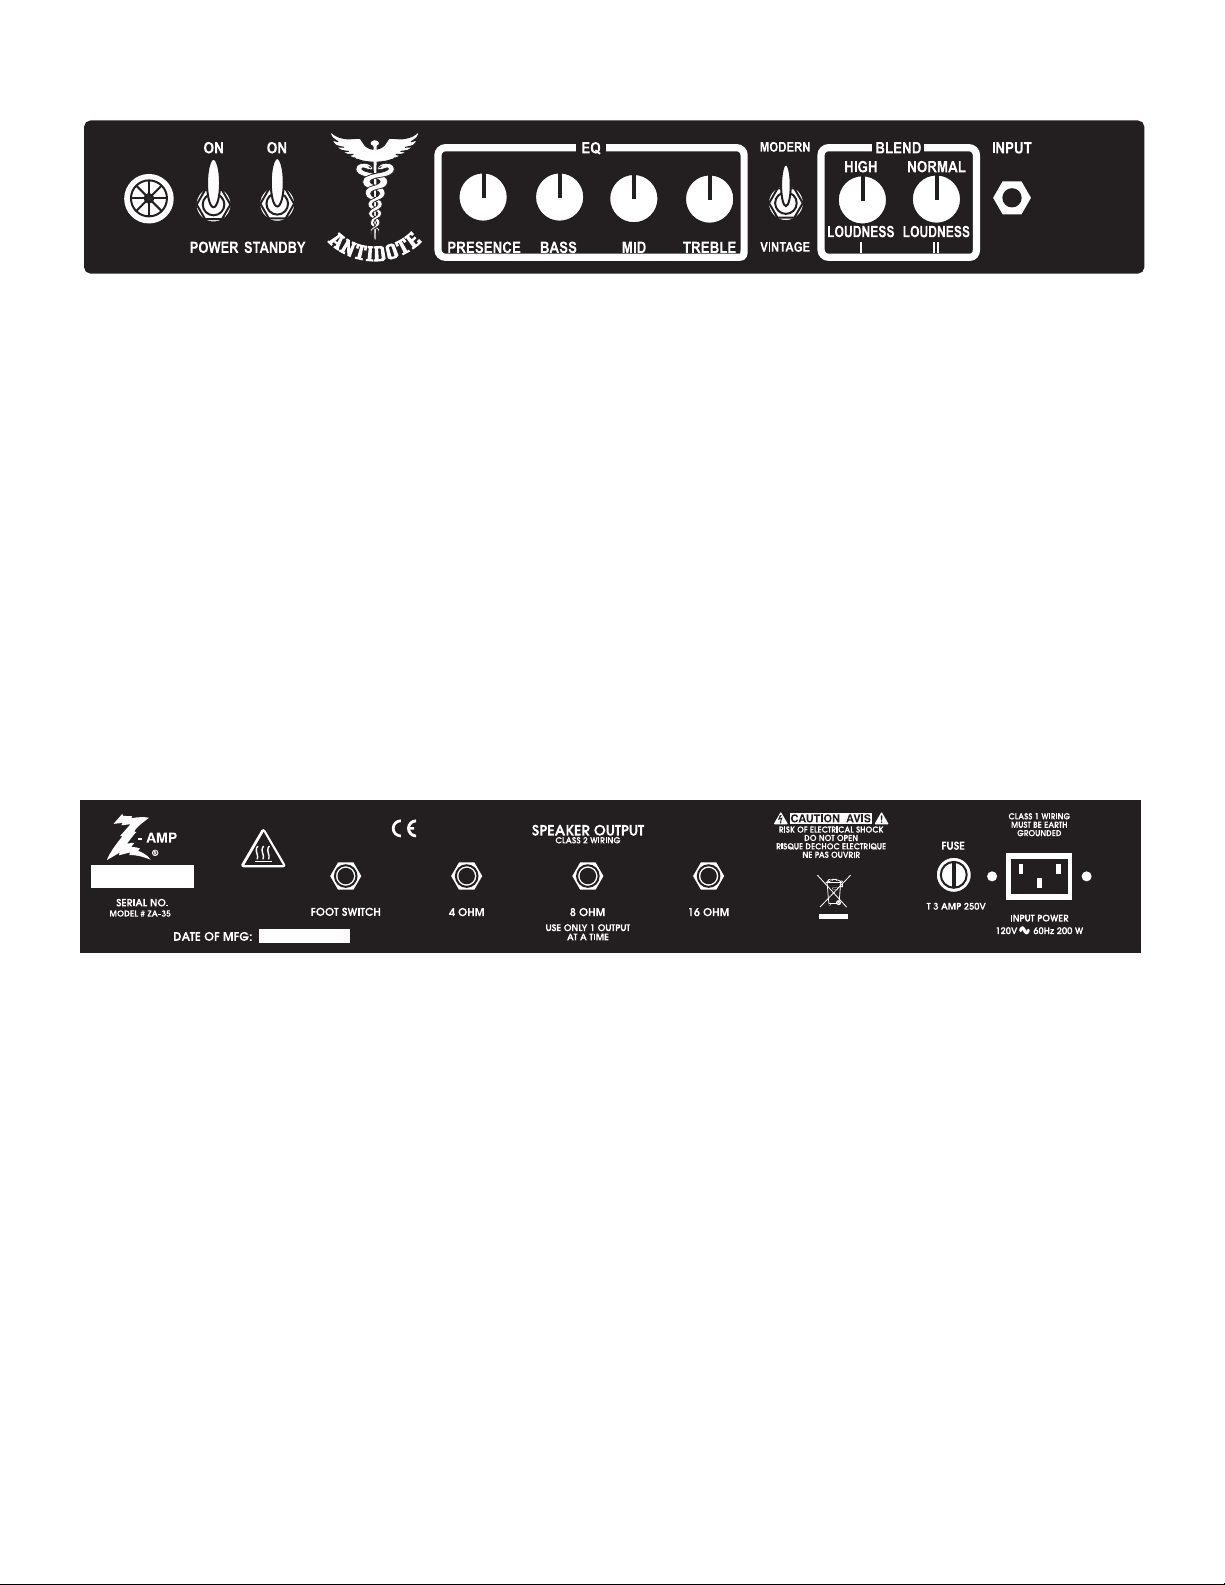
FRONT PANEL
1 2 3 4 5 6 7 8
1. Power Indicator: Lights up when power is switched on. If bulb fails replace with type T47.
2. Power: Switch up to turn on amplifier. Switch down to turn off amplifier.
3. Stand-By: Leave in off posion for 1 minute when powering up the amp. Turn on for play. Place in off posion for
extended break periods.
4. Presence: This control gives your tone more bite by adding higher frequencies. Your sound will appear closer (more
present) without increasing volume.
5. Bass: Controls overall low frequency response.
6. Mid: Controls overall mid frequency response.
7. Treble: Controls overall high frequency response.
8. Vintage/Modern Toggle Switch: Changes the amp’s voicing from mid 60’s (vintage) to an early 70’s (modern) tone.
9. Loudness I (High): This volume control has a higher treble response. Use this to achieve a clearer top end.
10. Loudness II (Normal): This volume control will give you a much fuller sound. Use this to add thickness to your
tone.
11. Input: Input jack for your guitar. This input jack feeds both volume controls (high/normal).
9 10 11
REAR PANEL
12 13
12. EQ Bypass Footswitch Jack: Plug supplied single buon footswitch in here. This will enable you to engage
the EQ bypass/gain boost mode. The new variable boost footswitch features an added knob to control the
amount of boost. Simply turn this knob clockwise to increase the amount of boost.
13. 4 OHM Speaker Jack: Plug in 4 ohm speaker here. Always have a speaker plugged into the amp when it is
powered on. Always match the speaker impedance to the proper speaker out jack. This will allow the amp to
sound its best and avoid damage.
14. 8 OHM Speaker Jack: Plug in 8 ohm speaker here. Always have a speaker plugged into the amp when it is
powered on. Always match the speaker impedance to the proper speaker out jack. This will allow the amp to
sound its best and avoid damage.
15. 16 OHM Speaker Jack: Plug in 16 ohm speaker here. Always have a speaker plugged into the amp when it is
powered on. Always match the speaker impedance to the proper speaker out jack. This will allow the amp to
sound its best and avoid damage.
16. Fuse: The fuse protects the amp from electrical faults. Replace only with the same rang and type stated
below fuse holder. If the amp repeatedly blows the fuse contact your dealer or Dr Z Amps.
17. AC Inlet: (Class I Wiring). This device is used for disconnecon from power mains and must remain readily
opearable. The power indicator light does not indicate connecon to power mains. The power cord must be
disconnected to disconnect amplifier from power mains.
14 1615 17
Page 5

MODEL: ___________________
SERIAL NUMBER: ___________
INPUT VOLTAGE: ____________
MADE IN USA
Page 6

 Loading...