

Page 1

Carmen Ghia
Manual
Model: ZA-7
drzamps.com
Page 2

This symbol warns the user of dangerous voltage levels localized within the enclosure.
This symbol advises the user to read all accompanying literature for safely operating the
unit.
Important Safety Instructions
1) Read these instructions.
2) Keep these instructions.
3) Heed all warnings.
4) Follow all instructions.
5) Do not use this apparatus near water.
6) Clean only with dry cloth.
7) Do not block any ventilation openings. Maintain at least 3 feet of distance around all sides of amplier. Do not block any ventilation openings with items such as newspapers, tablecloths, curtains,
etc.
8) Do not install near any heat sources such as radiators, heat registers, stoves, or other
apparatus (including ampliers) that produce heat.
9) Do not defeat the safety purpose of the polarized or grounding-type plug. A polarized plug
has two blades with one wider than the other. A grounding type plug has two blades and a third
grounding prong. The wide blade or the third prong are provided for your safety. If the provided
plug does not t into your outlet, consult an electrician for replacement of the obsolete outlet.
10) Protect the power cord from being walked on or pinched particularly at plugs, convenience
receptacles, and the point where they exit from the apparatus.
11) Only use attachments/accessories specied by the manufacturer.
12) Use only with the cart, stand, tripod, bracket, or table specied by the manufacturer, or sold
with the apparatus. When a cart is used, use caution when moving the cart/apparatus
combination to avoid injury from tip-over.
13) Unplug this apparatus during lightning storms or when unused for long periods of time.
14) Refer all servicing to qualied service personnel. Servicing is required when the apparatus
has been damaged in any way, such as power-supply cord or plug is damaged, liquid has been
spilled or objects have fallen into the apparatus, the apparatus has been exposed to rain or
moisture, does not operate normally, or has been dropped.
15) Avoid placing any liquids on or near the amplier that may splash or drip such as those contained
in bottles, cans, glasses, etc.
*Dr Z ampliers are capable of producing very high sound pressure levels which can cause temporary
or permanent hearing damage.
*If any screw that is actually on the amp chassis needs to be replaced contact Dr Z Amps for the
proper size. Screw size is critical for inner chassis clearances.
Page 3
Overview:
At rst glance, the Carmen Ghia looks rather, well, modest. This is why the Ghia leaves so many
people oored from the rst note. Clean notes come out with a warmth, complexity, and sustain like
one has never heard from such a small amp. Every note has a hugeness to it that seems far beyond
an 18 watt head. All this comes before the amp really starts to sing. As you turn the Volume clockwise, the fun factor increases. The big clean notes get even BIGGER than they were before. Sustain
becomes as smooth and musical as you have ever heard it. Notes seem to sing forever. This is an
incredibly fun amp, and you’ll have trouble putting your guitar down. The Carmen Ghia interacts with
the player because the player can feel the power tube distortion.
This amp has become a favorite in recording studios around the world. It’s also a great little amp for
small clubs. While many other small amps have trouble cutting through the mix and have a rather
atulent low end, your Dr. Z Carmen Ghia will always cut through the mix tightly and musically.
Front Panel:
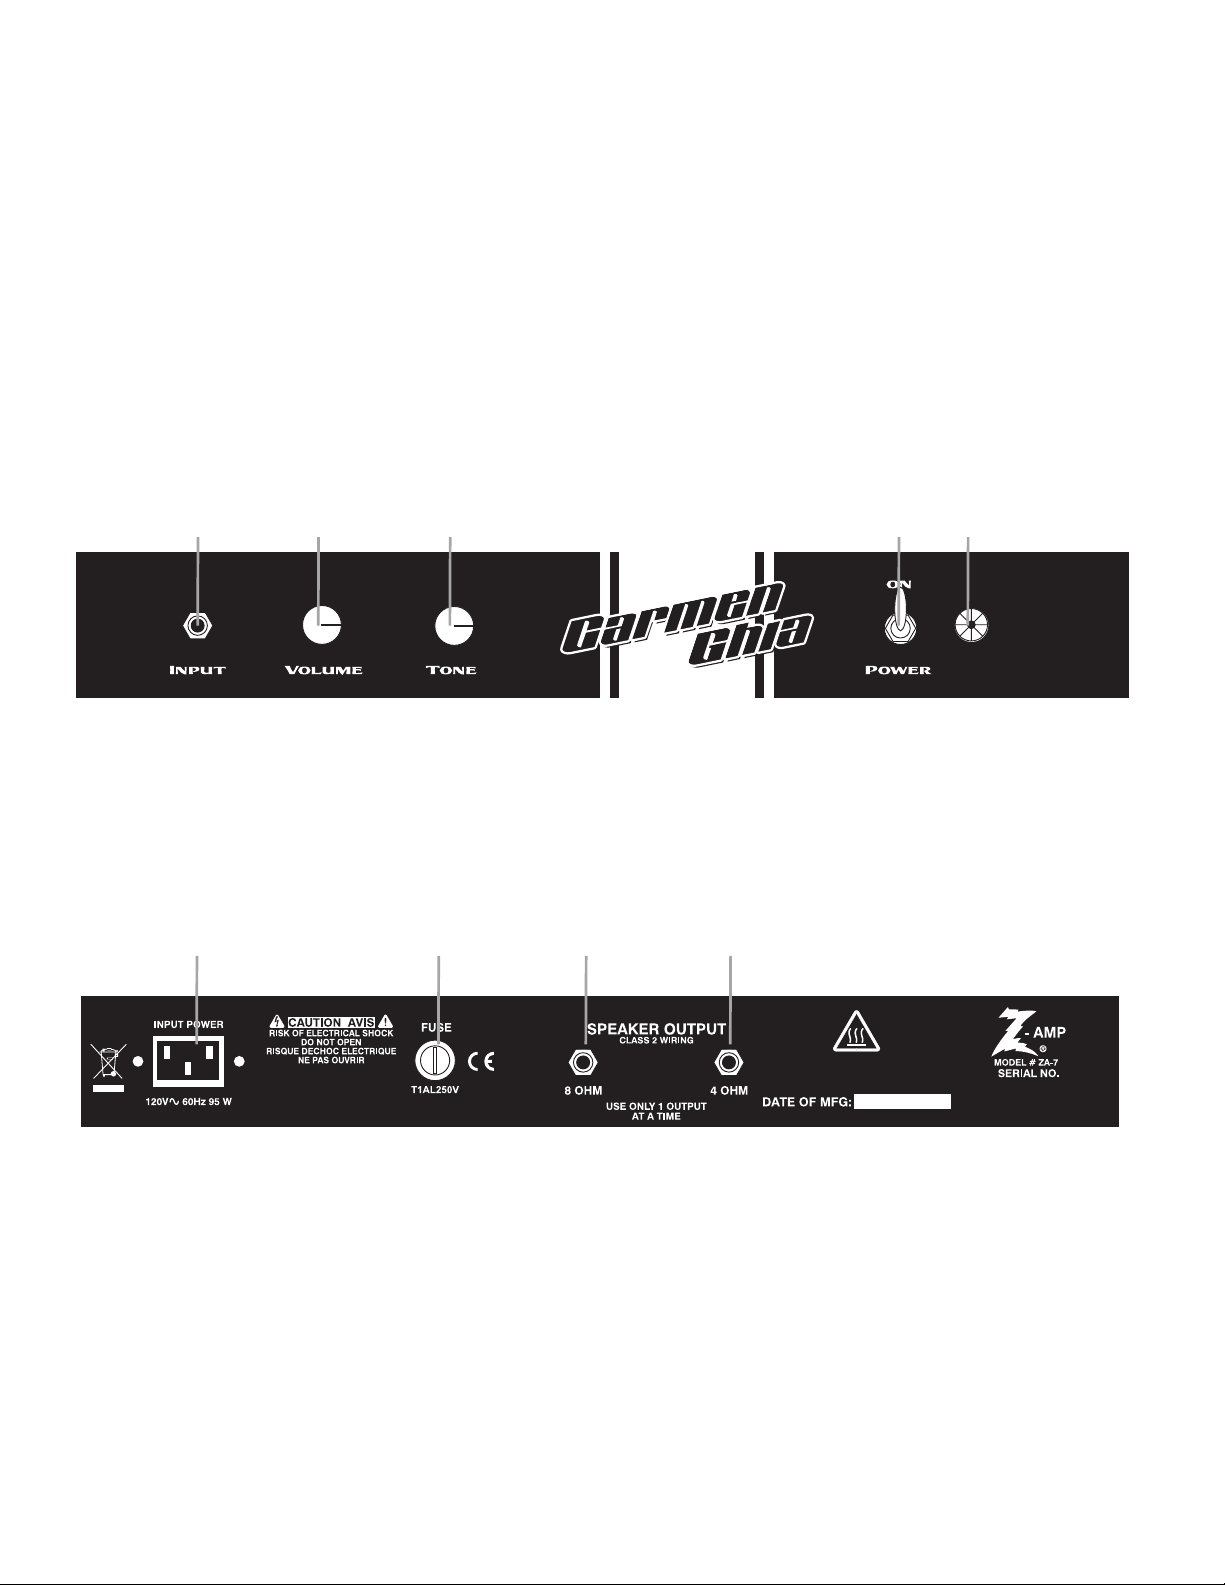
1 2 3 4 5
1.) INPUT: Plug guitar in here.
2.) VOLUME: Controls loudness of amp.
3.) TONE: Controls overall tone of amp.
4.) POWER: Switch up to turn on amplier. Switch down to turn off amplier.
5.) POWER INDICATOR: Lights up when power is switched on. If bulb fails replace with type T47.
Rear Panel:
6 7 8 9
6.) AC INLET: This device is used for disconnectionfrom power mains and must remain readily operable. The power indicator lightdoes not indicate connection to power mains. The power cord must be
disconnected to disconnect amplier from the power mains.
7.) FUSE: The fuse protects the amp from electrical faults. Replace only with the same rating and
type stated below fuse holder. If the amp repeatedly blows the fuse contact your dealer or Dr Z
Amps.
8.) 8 OHM SPEAKER JACK: Plug in 8 ohm speaker here. Always have a speaker plugged into the
amp when it is powered on. Always match the speaker impedence to the proper speaker out jack.
This will allow the amp to sound its best and avoid damage.
9.) 4 OHM SPEAKER JACK: Plug in 4 ohm speaker here. Always have a speaker plugged into the
amp when it is powered on. Always match the speaker impedence to the proper speaker out jack.
This will allow the amp to sound its best and avoid damage.
Page 4

Specications (US only)
Part Number: ZA-7
Power: Input 120V (AC line cord)
Output: 20 watts @ 8 ohms, 30 watts peak
Impedance: Input: 1M Ω
Output: 4 Ω or 8 Ω, 4 Ω min load
Fuse Type: 1 Amp 125v or 250v
Tube Compliment: V1: JJ ECC83S, V2:5751, V3/4, JJ EL84s (matched pair), V5: 5Y3
Specications subject to change without notice.
Go to www.drzamps.com for more info.
 Loading...