

DryTek VigorAP 900 User Manual

VigorAP 900 User’s Guide
i

VigorAP 900 User’s Guide
ii

VigorAP 900 User’s Guide
iii
VViiggoorrAAPP 990000
CCoonnccuurrrreenntt DDuuaall BBaanndd AAPP
UUsseerr’’ss GGuuiiddee
Version: 1.7
Firmware Version: V1.1.8.1
Date: July 25, 2016

VigorAP 900 User’s Guide
iv
Intellectual Property Rights (IPR) Information
Copyrights
© All rights reserved. This publication contains information that is protected by
copyright. No part may be reproduced, transmitted, transcribed, stored in a retrieval
system, or translated into any language without written permission from the copyright
holders.
Trademarks
The following trademarks are used in this document:
Microsoft is a registered trademark of Microsoft Corp.
Windows, Windows 95, 98, Me, NT, 2000, XP, Vista, 7 and Explorer are
trademarks of Microsoft Corp.
Apple and Mac OS are registered trademarks of Apple Inc.
Other products may be trademarks or registered trademarks of their respective
manufacturers.
Safety Instructions and Approval
Safety
Instructions
Read the installation guide thoroughly before you set up the modem.
The modem is a complicated electronic unit that may be repaired only be
authorized and qualified personnel. Do not try to open or repair the modem
yourself.
Do not place the modem in a damp or humid place, e.g. a bathroom.
The modem should be used in a sheltered area, within a temperature range of +5
to +40 Celsius.
Do not expose the modem to direct sunlight or other heat sources. The housing
and electronic components may be damaged by direct sunlight or heat sources.
Do not deploy the cable for LAN connection outdoor to prevent electronic shock
hazards.
Keep the package out of reach of children.
When you want to dispose of the modem, please follow local regulations on
conservation of the environment.
Warranty
We warrant to the original end user (purchaser) that the modem will be free from any
defects in workmanship or materials for a period of one (1) year from the date of
purchase from the dealer. Please keep your purchase receipt in a safe place as it serves
as proof of date of purchase. During the warranty period, and upon proof of purchase,
should the product have indications of failure due to faulty workmanship and/or
materials, we will, at our discretion, repair or replace the defective products or
components, without charge for either parts or labor, to whatever extent we deem
necessary tore-store the product to proper operating condition. Any replacement will
consist of a new or re-manufactured functionally equivalent product of equal value, and
will be offered solely at our discretion. This warranty will not apply if the product is
modified, misused, tampered with, dam aged by an act of God, or subjected to abnormal
working conditions. The warranty does not cover the bundled or licensed software of
other vendors. Defects which do not significantly affect the usability of the product will
not be covered by the warranty. We reserve the right to revi se the m anual and onli ne
documentation and to make changes from time to time in the contents hereof without
obligation to notify any person of such revision or changes.
Be a Registered
Owner
Web registration is preferred. You can register your Vigor modem via
http://www.draytek.com.
Firmware & Tools
Updates
Due to the continuous evolution of DrayTek technology, all modems will be regularly
upgraded. Please consult the DrayTek web site for more information on newest
firmware, tools and documents.
http://www.draytek.com

VigorAP 900 User’s Guide
v
European Community Declarations
Manufacturer: DrayTek Corp.
Address: No. 26, Fu Shing Road, Hukou Township, Hsinchu Industrial Park, Hsinchu County, Taiwan 303
Product: VigorAP 900
DrayTek Corp. declares that VigorAP 900 is in compliance with the following essential requirements and other
relevant provisions of R&TTE Directive 1999/5/EC, ErP 2009/125/EC and RoHS 2011/65/EU.
The product conforms to the requirements of Electro-Magnetic Compatibility (EMC) Directive 2004/108/EC by
complying with the requirements set forth in EN55022/Class B and EN55024/Class B.
The product conforms to the requirements of Low Voltage (LVD) Directive 2006/95/EC by complying with the
requirements set forth in EN60950-1.
This product is designed for 2.4GHz/5GHz WLAN network throughout the EC region and Switzerland with
restrictions in France.
Federal Communication Commission Interference Statement
This equipment has been tested and found to comply with the limits for a Class B digital device, pursuant to Part
15 of the FCC Rules. These limits are designed to provide reasonable protection against harmful interference in a
residential installation. This equipment generates, uses and can radiate radio frequency energy and, if not installed
and used in accordance with the instructions, may cause harmful interference to radio communications. However,
there is no guarantee that interference will not occur in a particular installation. If this equipment does cause
harmful interference to radio or televisio n recept i on , whi ch can be determined by turning the equipment of f and
on, the user is encouraged to try to correct the interference by one of the following measures:
Reorient or relocate the receiving antenna.
Increase the separation between the equipment and receiver.
Connect the equipment into an outlet on a circuit different from that to which the receiver is connected.
Consult the dealer or an experienced radio/TV technician for help.
This device complies with Part 15 of the FCC Rules. Operation is subject to the following two conditions:
(1) This device may not cause harmful interference, and
(2) This device may accept any interference received, including interference that may cause undesired operation.
The antenna/transmitter should be kept at least 20 cm away from human body.
Please visit http://www.draytek.com for more information.
You are cautioned that changes or modifications not expressly approved by the party responsible for compliance
could void your authority to operate the equipment.
FCC RF Radiation Exposure Statement
1. This Transmitter must not be co-located or operating in conjunction with any other antenna or transmitter.
2. This equipment complies with FCC RF radiation exposure limits set forth for an uncontrolled environment.
This equipment should be installed and operated with a minimum distance of 20 centimeters between the
radiator and your body.

VigorAP 900 User’s Guide
vi

VigorAP 900 User’s Guide
vii
TTaabbllee ooff CCoonntteennttss
Introduction .................................................................................................1
1.1 Introduction ............................................................................................................................. 1
1.2 LED Indicators and Connectors.............................................................................................. 3
1.3 Hardware Installation .............................................................................................................. 5
1.3.1 Wired Connection for PC in LAN...................................................................................... 5
1.3.2 Wired Connection for Notebook in WLAN........................................................................ 6
1.3.3 Wireless Connection......................................................................................................... 7
1.3.4 POE Connection............................................................................................................... 8
Network Configuration................................................................................9
2.1 Windows 7 IP Address Setup..................................................................................................9
2.2 Windows 2000 IP Address Setup...........................................................................................11
2.3 Windows XP IP Address Setup............................................................................................. 12
2.4 Windows Vista IP Address Setup.......................................................................................... 13
2.5 Accessing to Web User Interface.......................................................................................... 14
2.6 Changing Password.............................................................................................................. 15
2.7 Quick Start Wizard................................................................................................................ 16
2.7.1 Configuring 2.4GHz Wireless Settings – General .......................................................... 16
2.7.2 Configuring 2.4GHz Wireless Settings based on the Operation Mode.......................... 18
2.7.3 Configuring 2.4GHz Security Settings............................................................................ 23
2.7.4 Configuring 5GHz Wireless Settings.............................................................................. 25
2.7.5 Configuring 5GHz Security Settings............................................................................... 26
2.7.6 Finishing the Wireless Settings Wizard.......................................................................... 28
2.8 Online Status......................................................................................................................... 28
Advanced Configuration.................................................................................31
3.1 Operation Mode .................................................................................................................... 32
3.2 LAN .......................................................................................................................................33
3.2.1 General Setup................................................................................................................. 33
3.2.2 Port Control..................................................................................................................... 36
3.3 Central AP Managem ent.......................................................................................................37
3.3.1 General Setup................................................................................................................. 37
3.3.2 APM Log......................................................................................................................... 37
3.3.3 Function Support List...................................................................................................... 38
3.3.4 Overload Management................................................................................................... 38
3.3.5 Status of Settings............................................................................................................ 39

VigorAP 900 User’s Guide
viii
3.4 General Concepts for Wireless LAN (2.4GHz/5GHz)........................................................... 40
3.5 Wireless LAN Settings for AP Mode..................................................................................... 43
3.5.1 General Setup................................................................................................................. 44
3.5.2 Security........................................................................................................................... 48
3.5.3 Access Control................................................................................................................ 51
3.5.4 WPS................................................................................................................................ 52
3.5.5 Advanced Setting............................................................................................................ 53
3.5.6 AP Discovery.................................................................................................................. 53
3.5.7 WMM Configuration........................................................................................................ 55
3.5.8 Bandwidth Management................................................................................................. 57
3.5.9 Airtime Fairness.............................................................................................................. 58
3.5.10 Band Steering............................................................................................................... 60
3.5.11 Station Control.............................................................................................................. 64
3.5.12 Roaming ....................................................................................................................... 65
3.5.13 Station List.................................................................................................................... 67
3.6 Wireless LAN Settings for AP Bridge-Point to Point/AP Bridge-Point to Multi-Point Mode .. 68
3.6.1 General Setup................................................................................................................. 69
3.6.2 Advanced Setting............................................................................................................ 72
3.6.3 AP Discovery.................................................................................................................. 73
3.6.4 WDS AP Status .............................................................................................................. 74
3.7 Wireless LAN Settings for AP Bridge-WDS Mode ................................................................ 75
3.7.1 General Setup................................................................................................................. 75
3.7.2 Security........................................................................................................................... 80
3.7.3 Access Control................................................................................................................ 83
3.7.4 WPS................................................................................................................................ 84
3.7.5 Advanced Setting............................................................................................................ 85
3.7.6 AP Discovery.................................................................................................................. 85
3.7.7 WDS AP Status .............................................................................................................. 87
3.7.8 WMM Configuration........................................................................................................ 87
3.7.9 Bandwidth Management................................................................................................. 89
3.7.10 Airtime Fairness............................................................................................................ 90
3.7.11 Band Steering............................................................................................................... 92
3.7.12 Station Control.............................................................................................................. 95
3.7.13 Roaming ....................................................................................................................... 97
3.7.14 Station List.................................................................................................................... 99
3.8 Wireless LAN Settings for Universal Repeater Mode......................................................... 101
3.8.1 General Setup............................................................................................................... 102
3.8.2 Security......................................................................................................................... 106
3.8.3 Access Control.............................................................................................................. 109
3.8.4 WPS.............................................................................................................................. 110
3.8.5 Advanced Setting.......................................................................................................... 111
3.8.6 AP Discovery................................................................................................................ 111
3.8.7 Universal Repeater....................................................................................................... 113
3.8.8 WMM Configuration...................................................................................................... 115
3.8.9 Bandwidth Management............................................................................................... 117
3.8.10 Airtime Fairness.......................................................................................................... 118
3.8.11 Band Steering............................................................................................................. 120
3.8.12 Station Control............................................................................................................ 123
3.8.13 Roaming ..................................................................................................................... 125
3.8.14 Station List.................................................................................................................. 127
3.9 Wireless LAN (5GHz) Settings for AP Mode....................................................................... 129
3.9.1 General Setup............................................................................................................... 129
3.9.2 Security......................................................................................................................... 131
3.9.3 Access Control.............................................................................................................. 134
3.9.4 WPS.............................................................................................................................. 135

VigorAP 900 User’s Guide
ix
3.9.5 Advanced Setting.......................................................................................................... 136
3.9.6 AP Discovery................................................................................................................ 136
3.9.7 WMM Configuration...................................................................................................... 137
3.9.8 Bandwidth Management............................................................................................... 138
3.9.9 Airtime Fairness............................................................................................................ 139
3.9.10 Station Control............................................................................................................ 141
3.9.11 Roaming ..................................................................................................................... 142
3.9.12 Station List.................................................................................................................. 145
3.10 Wireless LAN (5GHz) Settings for Universal Repeater Mode .......................................... 147
3.10.1 General Setup............................................................................................................. 147
3.10.2 Security....................................................................................................................... 149
3.10.3 Access Control............................................................................................................ 152
3.10.4 WPS............................................................................................................................ 153
3.10.5 Advanced Setting........................................................................................................ 154
3.10.6 AP Discovery.............................................................................................................. 154
3.10.7 Universal Repeater..................................................................................................... 156
3.10.8 WMM Configuration.................................................................................................... 158
3.10.9 Bandwidth Management............................................................................................. 160
3.10.10 Airtime Fairness........................................................................................................ 161
3.10.11 Station Control.......................................................................................................... 163
3.10.12 Roaming ................................................................................................................... 164
3.10.13 Station List................................................................................................................ 166
3.1 1 RADIUS Setting................................................................................................................. 168
3.11.1 RADIUS Server........................................................................................................... 168
3.11.2 Certificate Management ............................................................................................. 169
3.12 Applications....................................................................................................................... 170
3.12.1 Schedule..................................................................................................................... 170
3.12.2 Apple iOS Keep Alive ................................................................................................. 172
3.12.3 Temperature Sensor................................................................................................... 174
3.13 Mobile Device Management ............................................................................................. 176
3.13.1 Detection..................................................................................................................... 176
3.13.2 Policy ..........................................................................................................................177
3.13.3 Statistics ..................................................................................................................... 178
3.14 System Maintenance......................................................................................................... 179
3.14.1 System Status............................................................................................................. 179
3.14.2 TR-069........................................................................................................................ 181
3.14.3 Administrator Password.............................................................................................. 183
3.14.4 Configuration Backup ................................................................................................. 184
3.14.5 Syslog/Mail Alert......................................................................................................... 185
3.14.6 Time and Date............................................................................................................ 186
3.14.7 SNMP.......................................................................................................................... 187
3.14.8 Management............................................................................................................... 188
3.14.9 Reboot System........................................................................................................... 189
3.14.10 Firmware Upgrade.................................................................................................... 189
3.15 Diagnostics........................................................................................................................ 190
3.15.1 System Log................................................................................................................. 190
3.15.2 Speed Test ................................................................................................................. 190
3.15.3 Traffic Graph............................................................................................................... 191
3.15.4 WLAN (2.4GHz) Statistics ..........................................................................................191
3.15.5 WLAN (5GHz) Statistics ............................................................................................. 192
3.15.6 Station Statistics......................................................................................................... 193
3.16 Support Area..................................................................................................................... 195

VigorAP 900 User’s Guide
x
Applications.............................................................................................197
4.1 How to set different segments for different SSIDs in VigorAP 900..................................... 197
4.2 How to use VigorAP in Universal Repeater Mode?............................................................ 201
Trouble Shooting.....................................................................................209
5.1 Checking If the Hardware Status Is OK or Not....................................................................209
5.2 Checking If the Network Connection Settings on Your Computer Is OK or Not ................. 210
5.3 Pinging the Modem from Y our Computer............................................................................ 213
5.4 Backing to Factory Default Setting If Necessary ................................................................ 214
5.5 Contacting DrayTek............................................................................................................. 215
VigorAP 900 User’s Guide
1
IInnttrroodduuccttiioonn
NNoottee:: TThhiiss iiss aa ggeenneerriicc IInntteerrnnaattiioonnaall vveerrssiioonn ooff tthhee
uusseerr gguuiiddee.. SSppeecciiffiiccaattiioonn,, ccoommppaattiibbiilliittyy aanndd ffeeaattuurreess
vvaarryy bbyy rreeggiioonn.. FFoorr ssppeecciiffiicc uusseerr gguuiiddeess ssuuiittaabbllee ffoorr
yyoouurr rreeggiioonn oorr pprroodduucctt,, pplleeaassee ccoonnttaacctt llooccaall
ddiissttrriibbuuttoorr..
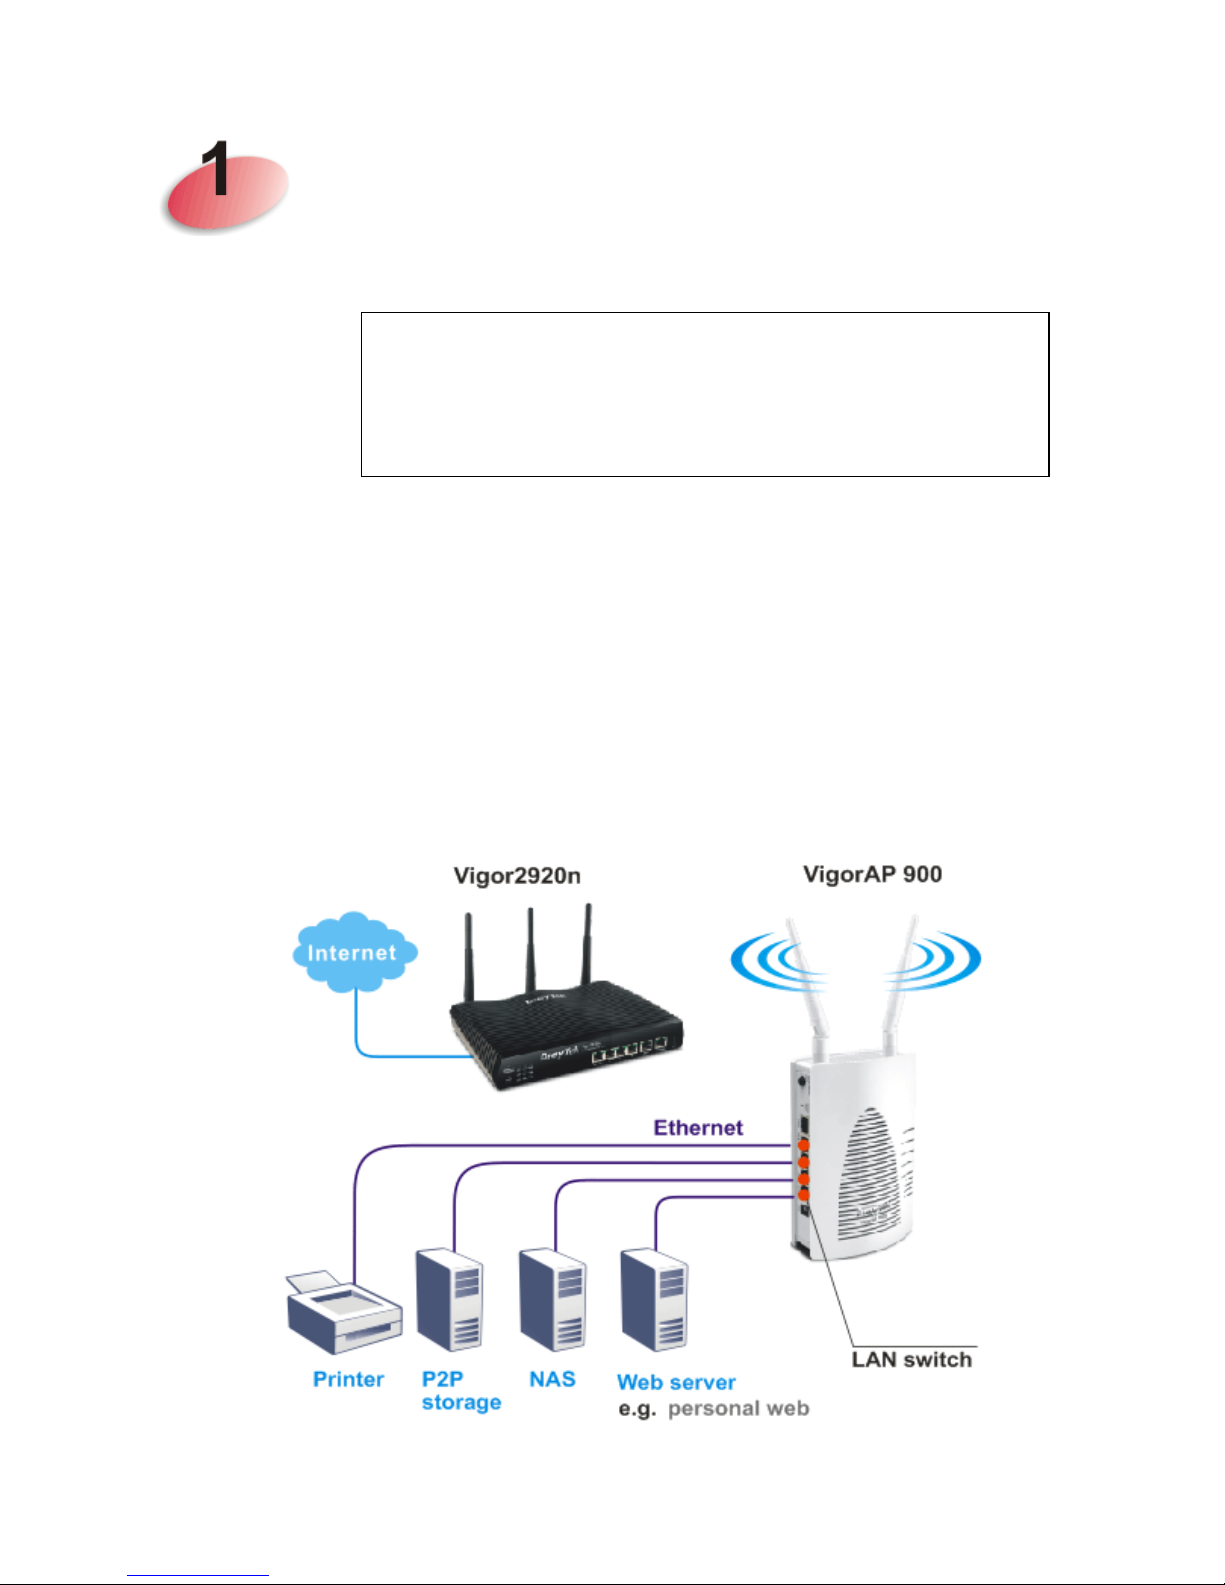
11..11 IInnttrroodduuccttiioonn
Thank you for purchasing this VigorAP 900, the concurrent dual band wireless (2.4G/5G)
access point offering high-speed data transmission. With this high cost-efficiency VigorAP
900, computers and wireless devices which are compatible with 802.11n/802.11a can
connect to existing wired Ethernet network via this VigorAP 900, at the speed of 300Mbps.
Easy install procedures allows any computer users to setup a network environment in very
short time - within minutes, even inexperienced users. Just follow the instructions given in
this user manual, you can complete the setup procedure and release the power of this access
point all by yourself!
VigorAP 900 also is a Power over Ethernet Powered Device which adopts the technology of
PoE for offering power supply and transmitting data through the Ethernet cable.

VigorAP 900 User’s Guide
2
AAPP MMaannaaggeemmeenntt
The VigorAP900 can operate in standalone mode for your office network or a classroom or a
waiting room of some transportation terminals (e.g. ferry terminal, bus station, train station)
or a clinic's waiting room ; connected to your LAN and offering you with wireless access. If
your network requires several VigorAP900 units, to centrally manage and monitor them
individually as a group will be expected. DrayTek central wireless management (AP
Management) lets control, efficiency, monitoring and security of your company-wide
wireless access easier be managed. Inside the web user interface, we call “central wireless
management” as Central AP Management which supports mobility, client monitoring /
reporting and load-balancing to multiple APs. For central wireless management, you will
need a Vigor2860 or Vigor2925 series router; there is no per-node licensing or subscription
required. With the unified user interface of Vigor2860 Combo WAN series and Vigor2925
Triple WAN series, the multiple deployment of VigorAP900 can be clear at the first sight.
For multiple wireless clients to apply the AP Load Balancing to the multiple APs, AP
management will manage wireless traffic with smooth flow and enhanced efficiency.

VigorAP 900 User’s Guide
3
11..22 LLEEDD IInnddiiccaattoorrss aanndd CCoonnnneeccttoorrss
Before you use the Vigor modem, please get acquainted with the LED indicators and
connectors first.
LED Status Explanation
Off The system is not ready or is failed. ACT
Blinking The system is ready and can work normally.
On A USB device is connected and active. USB
Blinking The data is transmitting.
On Wireless function is ready.
Off Wireless function is not ready.
2.4G
Blinking Data is transmitting (sending/receiving).
On Wireless function is ready.
Off Wireless function is not ready.
5G
Blinking Data is transmitting (sending/receiving).
On A normal connection (rate with 100M/1000M) is
through its corresponding port.
Off LAN is disconnected.
LAN A1 - A4
Blinking Data is transmitting (sending/receiving).
On A normal connection (rate with 100M/1000M) is
through its corresponding port.
Off LAN is disconnected.
LAN B
Blinking Data is transmitting (sending/receiving).
VigorAP 900 User’s Guide
4
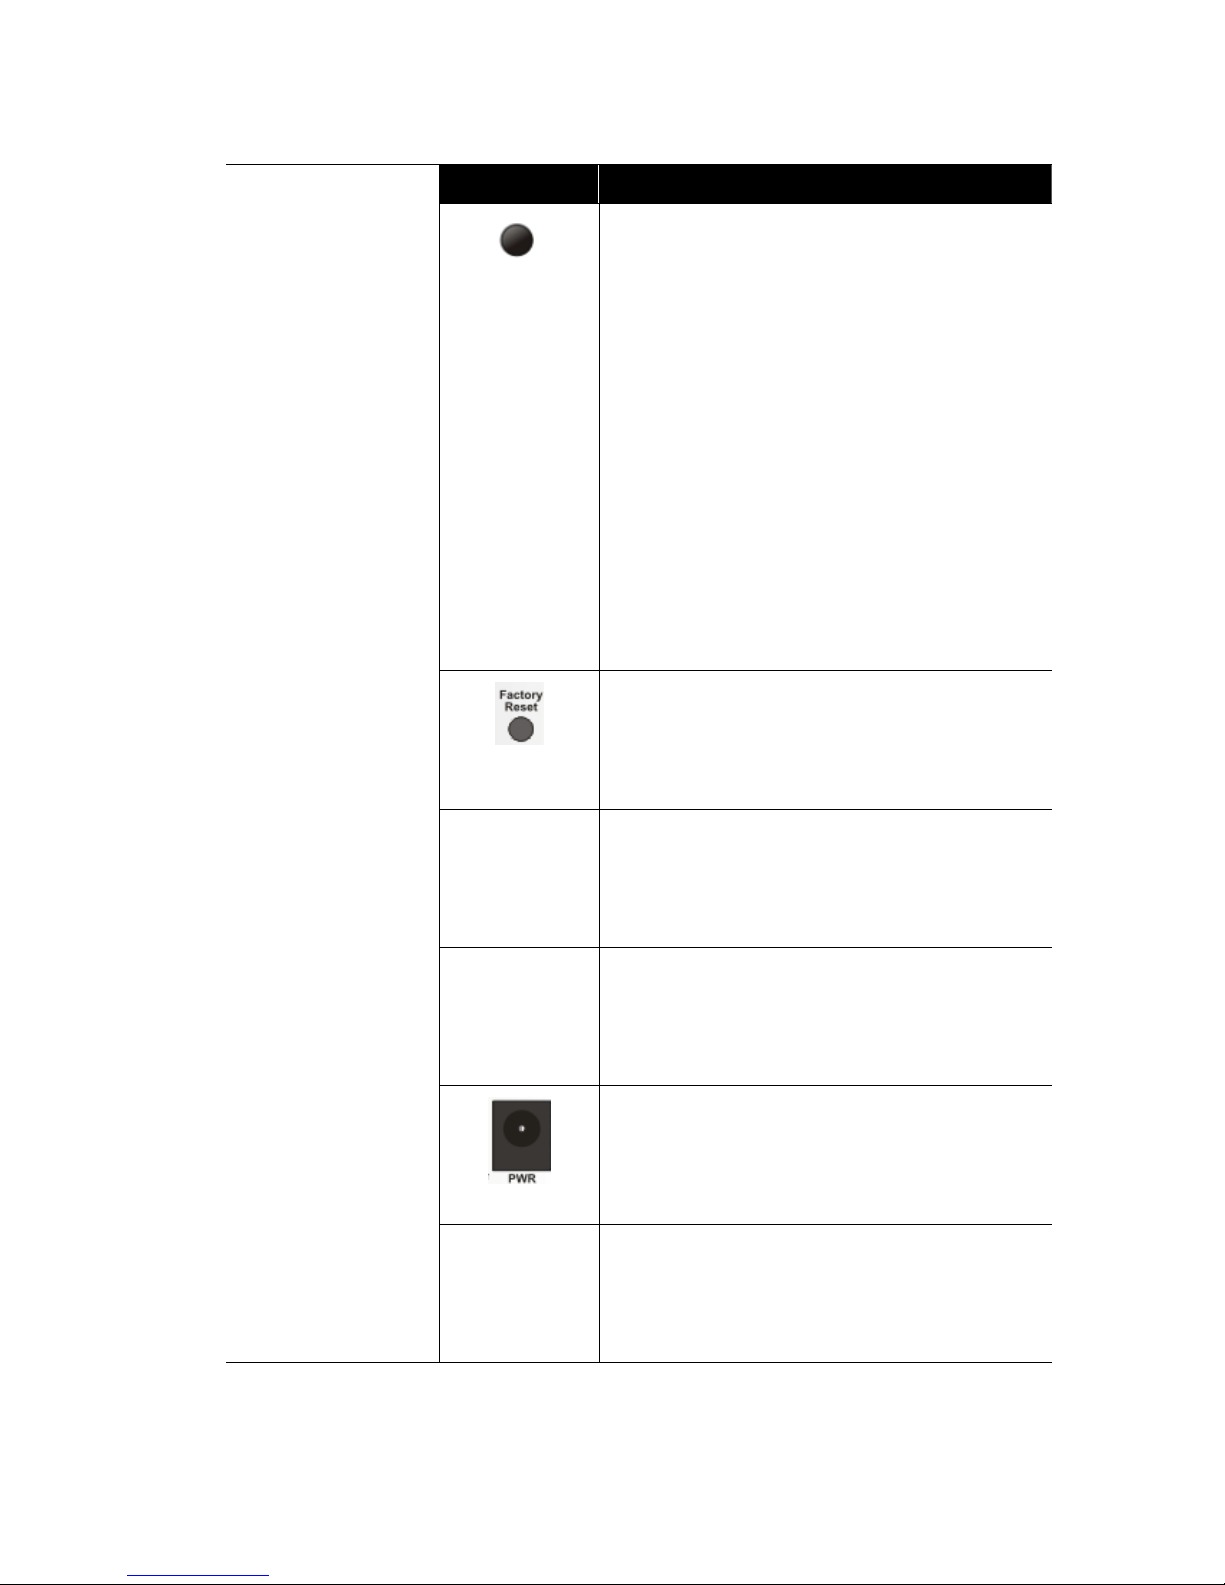
Interface Description
WLAN
ON/OFF WPS
WLAN ON - Press the button and release it within
2 seconds. When the wireless function is ready,
the 2.4G/5G blue LED on front panel will be on.
WLAN OFF - Press the button and release it
within 2 seconds to turn off the WLAN function.
When the wireless function is not ready, 2.4G/5G
blue LED on front panel will be off.
WPS - When WPS function is enabled by web
user interface, press this button for more th an 2
seconds. This device will wait for any wireless
client connecting to it through WPS.
WPS – Press the button for more than 6 seconds,
VigorAP 900 will disable the option of Enable
AP Management under LAN>>General Setup
and reset to the factory IP address, 192.168.1.2.
Note that the disabled AP Management must be
enabled manually if enabled AP Management is
required.
Restore the default settings. Usage: Turn on
VigorAP 900. Press the button and keep for more
than 10 seconds. Then the device will restart with
the factory default configuration.
LAN B Connecter for xDSL / Cable modem (Giga level)
or router.
LAN A1 (PoE) -
A4
Connecter for xDSL / Cable modem (Giga level) /
computer or router.
PWR: Connecter for a power adapter.
USB
Connector for a printer.
VigorAP 900 User’s Guide
5
ON/OFF: Power switch.
11..33 HHaarrddwwaarree IInnssttaallllaattiioonn
This section will guide you to install the VigorAP 900 through hardware connection and
configure the device’s settings through web browser.
Before starting to configure VigorAP 900, you have to connect your devices correctly.
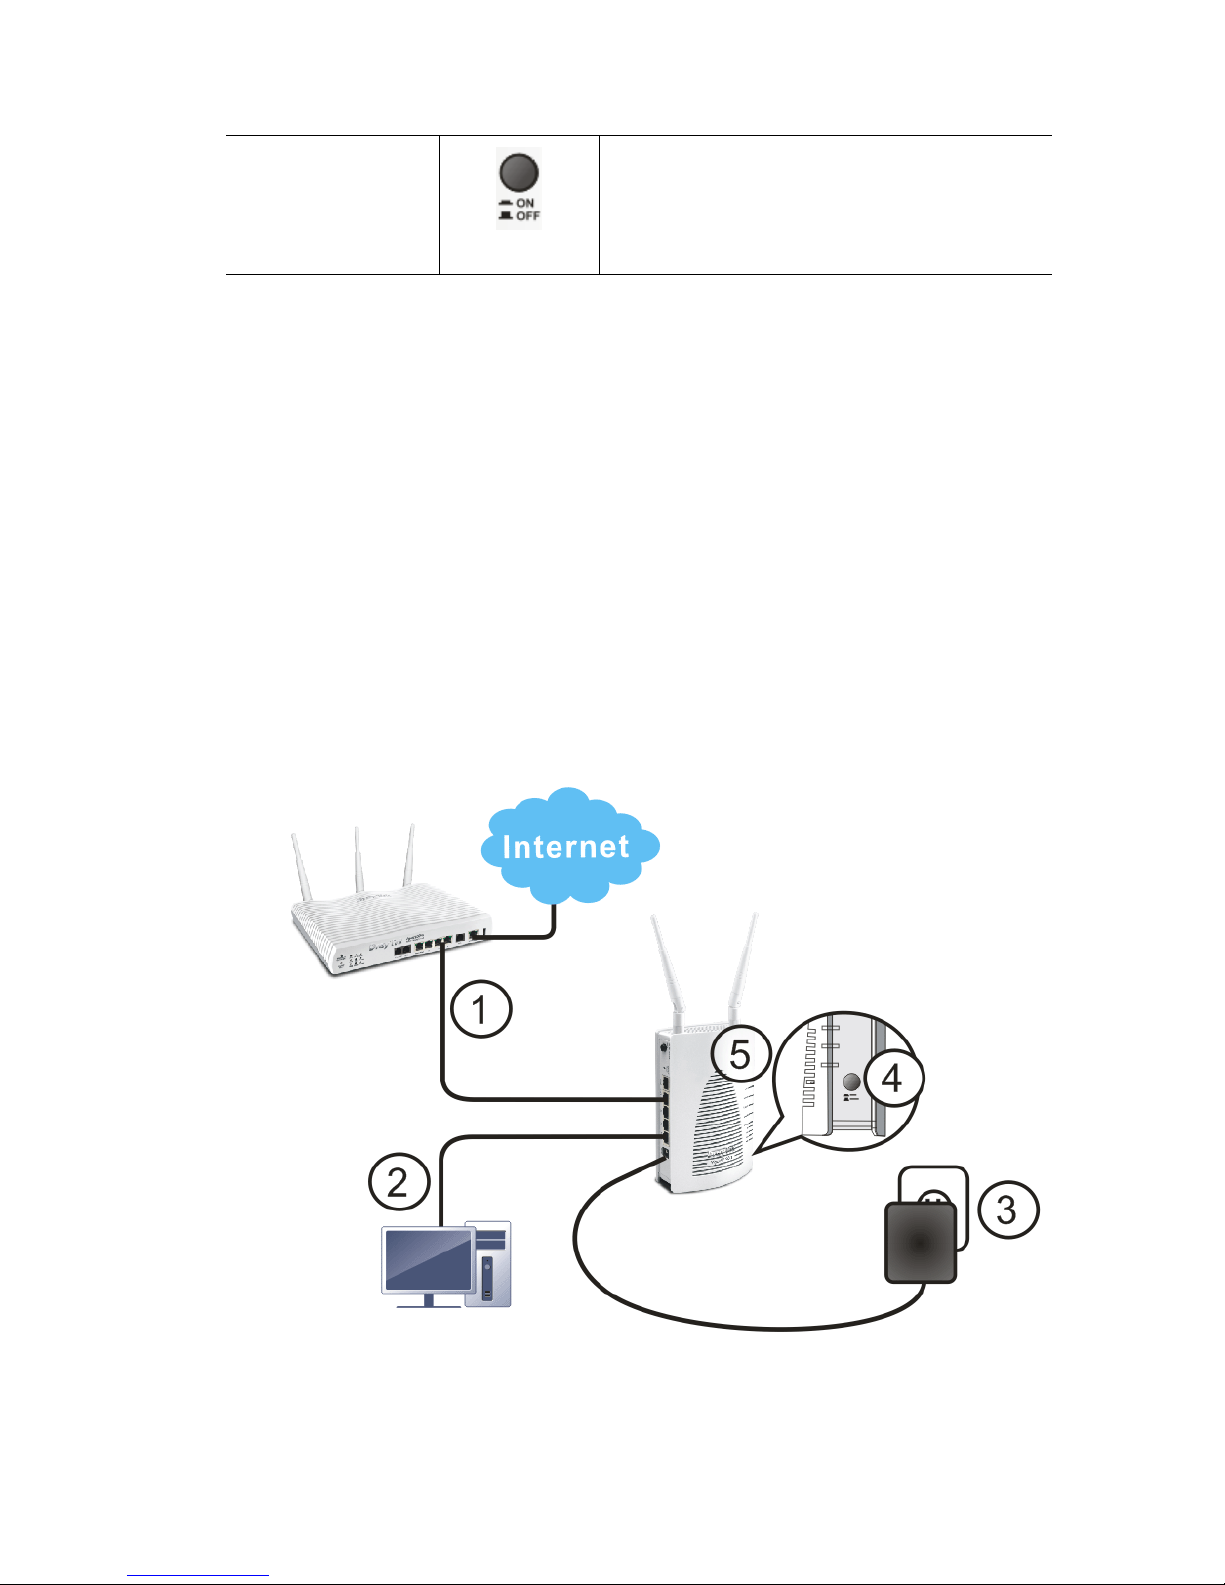
11..33..11 WWiirreedd CCoonnnneeccttiioonn ffoorr PPCC iinn LLAANN
1. Connect VigorAP 900 to ADSL modem, router, or switch/hub in your network through
the LAN A port of the access point by Ethernet cable.
2. Connect a computer to other available LAN A port. Make sure the subnet IP address of
the PC is the same as VigorAP 900 management IP, e.g., 192.168.1.X.
3. Connect the A/C power adapter to the wall socket, and then connect it to the PWR
connector of the access point.
4. Power on VigorAP 900.
5. Check all LEDs on the front panel. ACT LED should blink and LAN LEDs should be
on if the access point is correctly connected to the ADSL modem or router.
(For the detailed information of LED status, please refer to section 1.2.)
VigorAP 900 User’s Guide
6
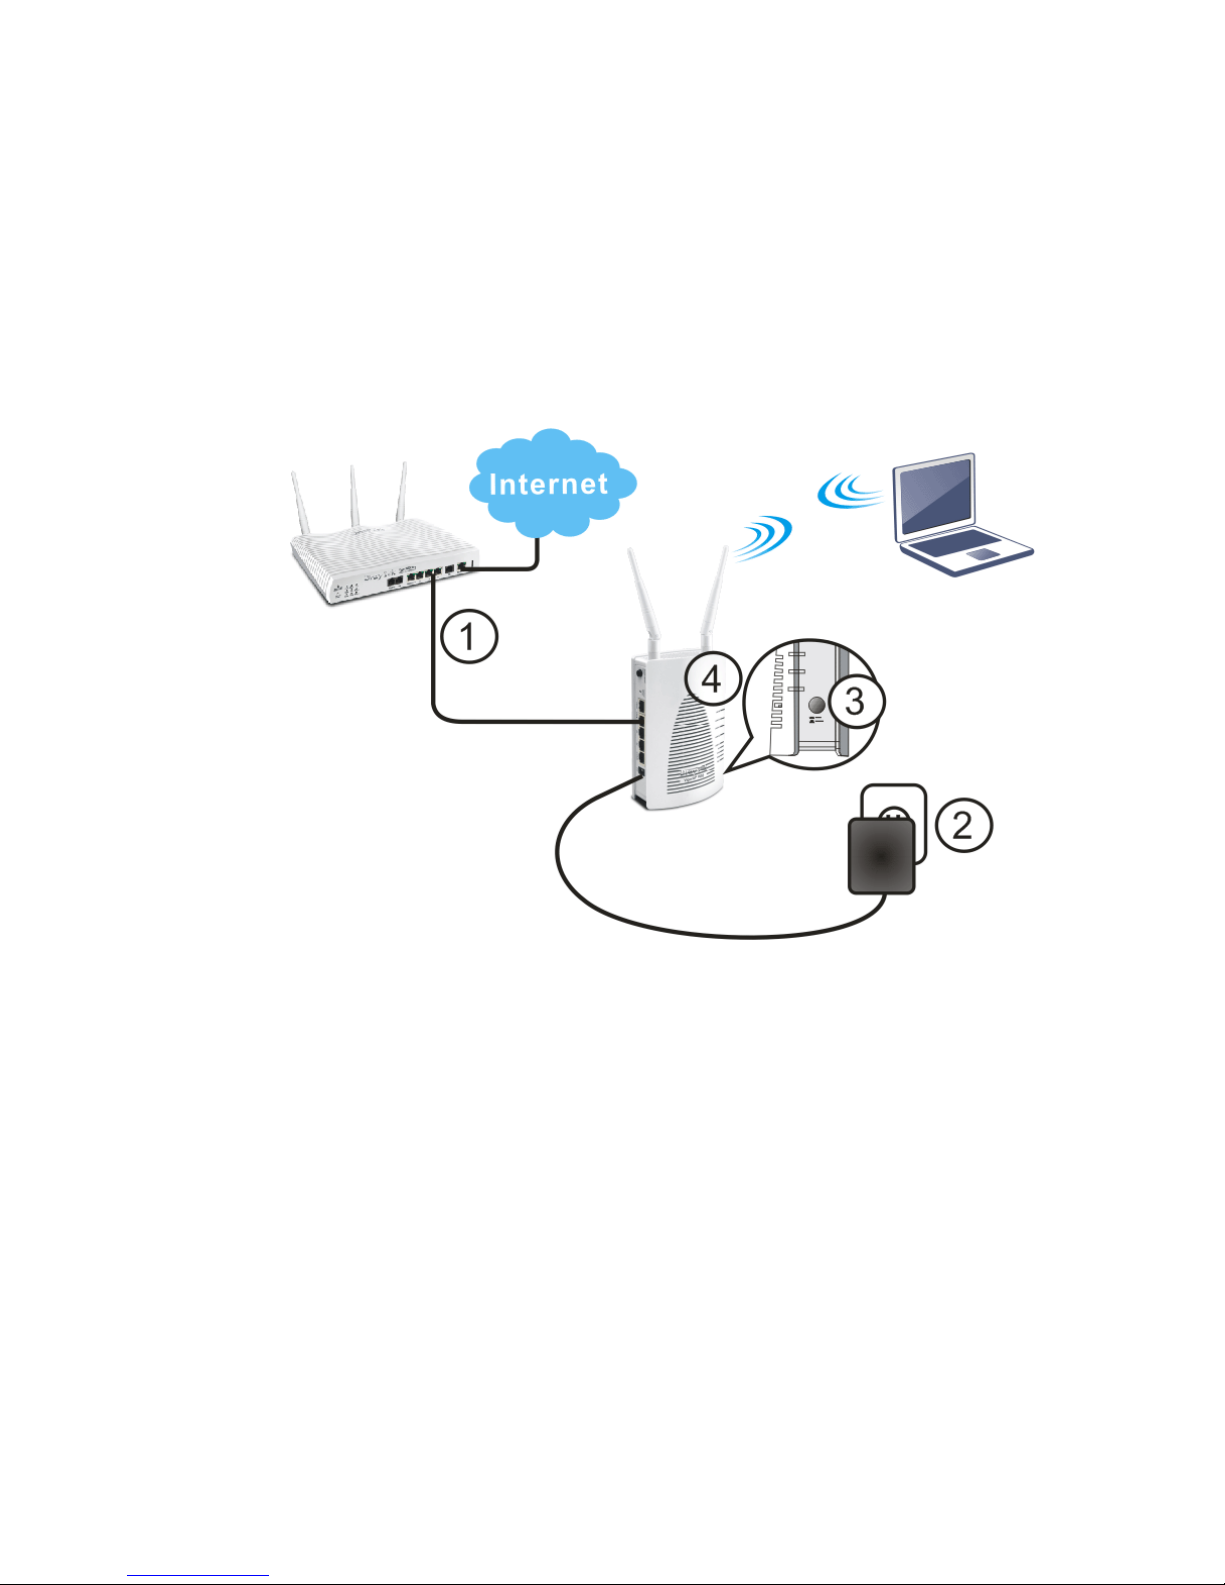
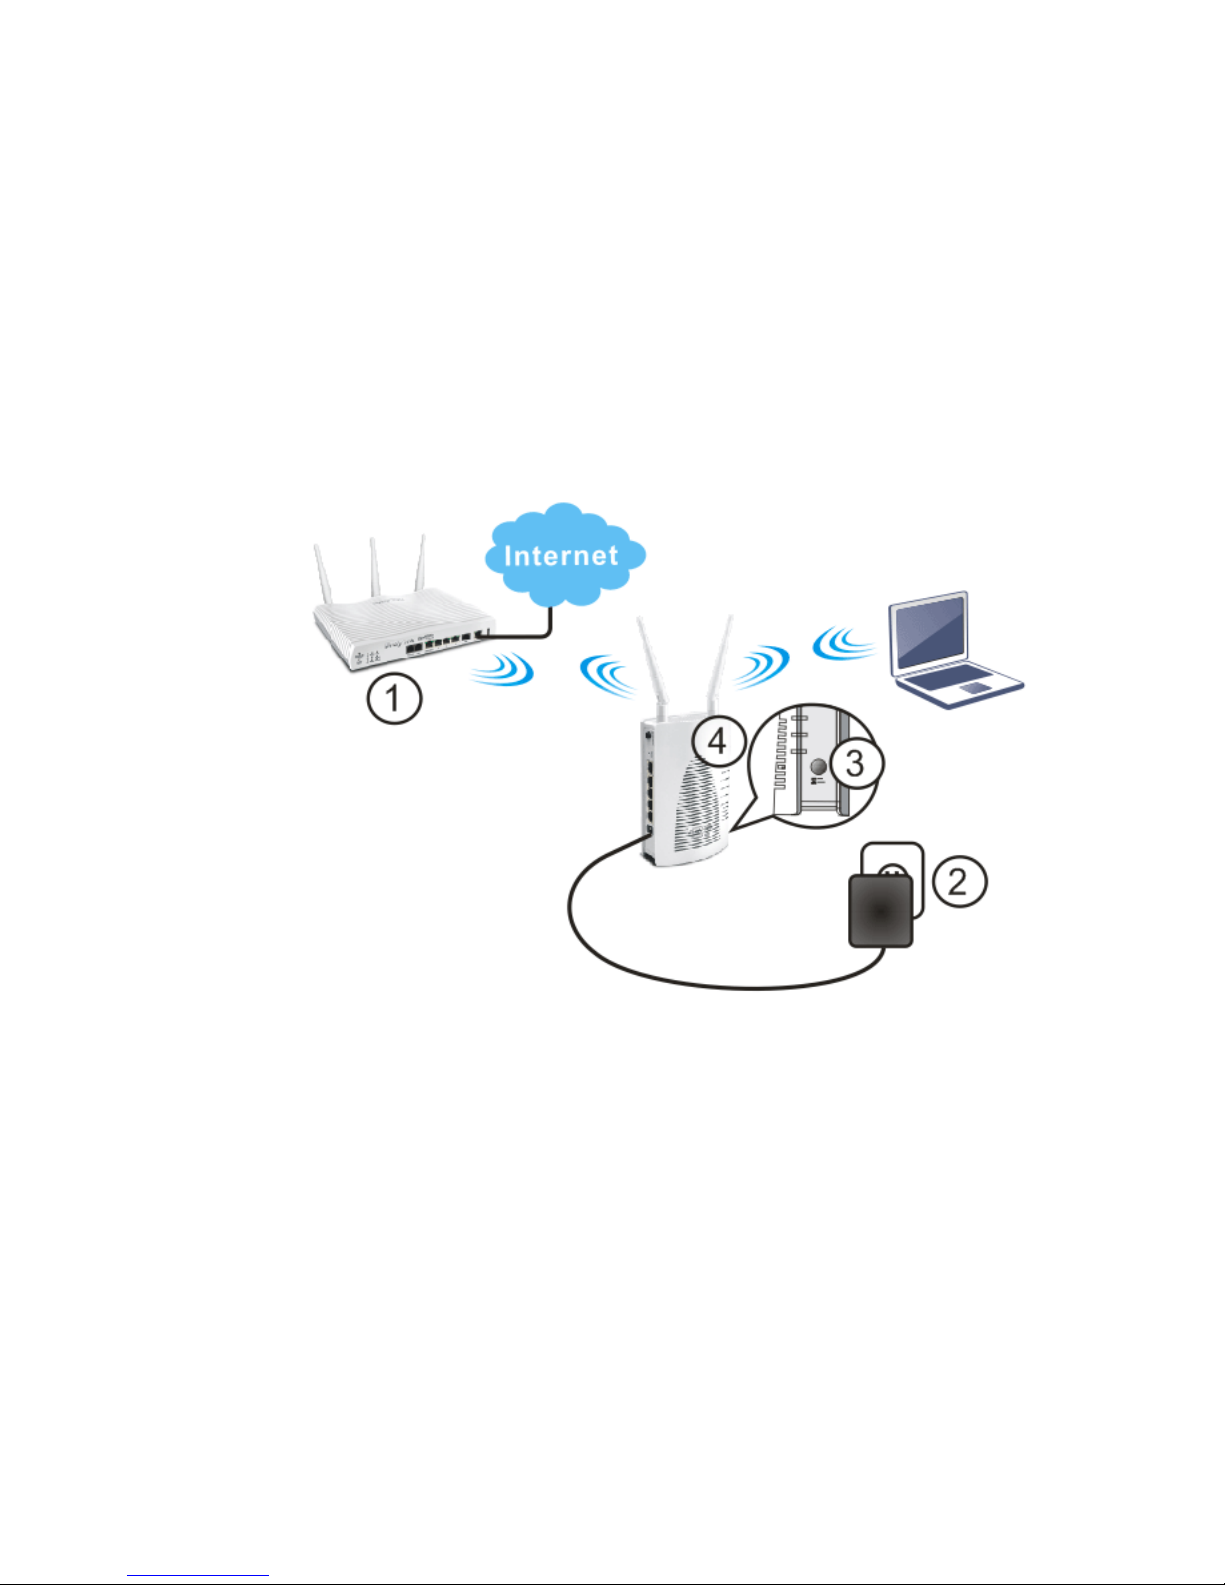
11..33..22 WWiirreedd CCoonnnneeccttiioonn ffoorr NNootteebbooookk iinn WWLLAANN
1. Connect VigorAP 900 to ADSL modem or router in your network through the LAN A
port of the access point by Ethernet cable.
2. Connect the A/C power adapter to the wall socket, and then connect it to the PWR
connector of the access point.
3. Power on VigorAP 900.
4. Check all LEDs on the front panel. ACT LED should be steadily on, LAN LEDs
should be on if the access point is correctly connected to the ADSL modem or router.
(For the detailed information of LED status, please refer to section 1.2.)
VigorAP 900 User’s Guide
7
11..33..33 WWiirreelleessss CCoonnnneeccttiioonn
VigorAP 900 can access Internet via an ADSL modem, router, or switch/hub in your
network through wireless connection.
1. Connect VigorAP 900 to ADSL modem or router via wireless network.
2. Connect the A/C power adapter to the wall socket, and then connect it to the PWR
connector of the access point.
3. Power on VigorAP 900.
4. Check all LEDs on the front panel. ACT LED should be steadily on, LAN LEDs
should be on if VigorAP 900 is correctly connected to the ADSL modem, router or
switch/hub.
(For the detailed information of LED status, please refer to section 1.2.)
VigorAP 900 User’s Guide
8
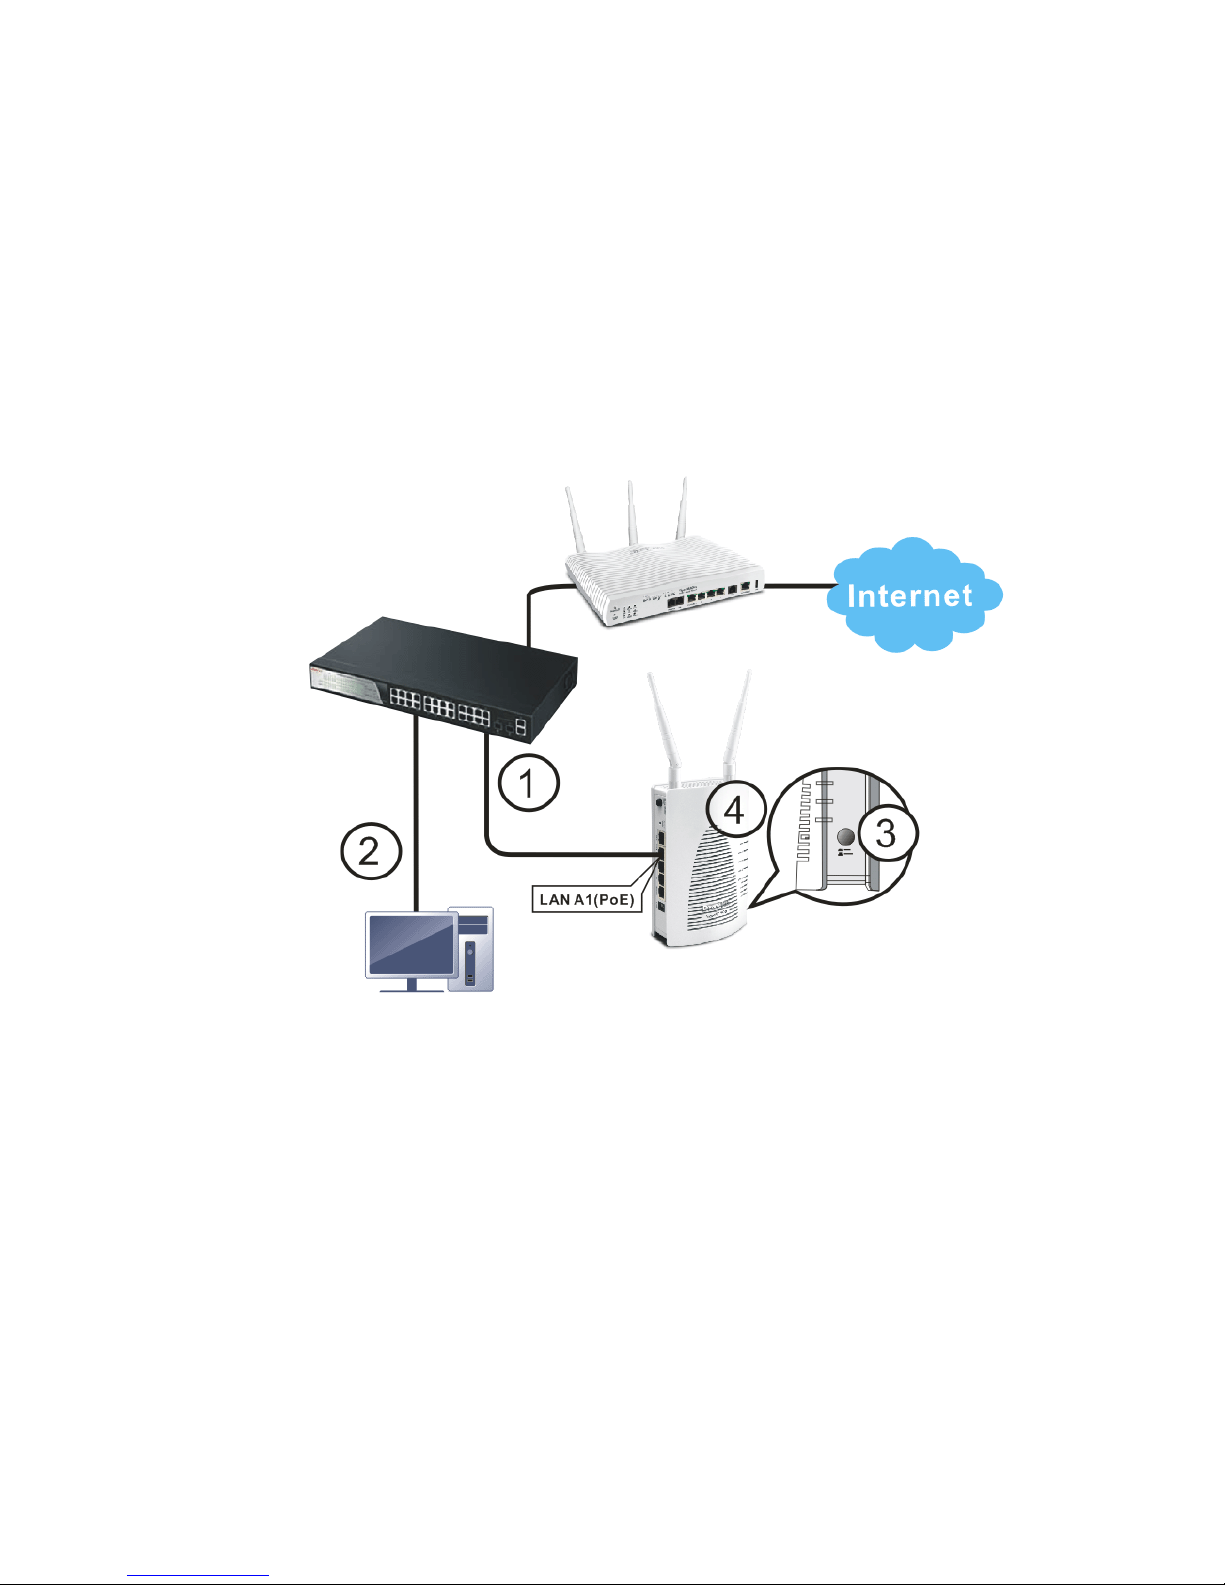
11..33..44 PPOOEE CCoonnnneeccttiioonn
VigorAP 900 can gain the power from the connected switch, e.g., VigorSwitch P2260. PoE
(Power over Ethernet) can break the install limitation caused by the fixed power supply.
1. Connect VigorAP 900 to a switch in your network through the LAN A1 (PoE) port of
the access point by Ethernet cable.
2. Connect a computer to VigorSwitch P2260. Make sure the subnet IP address of the PC
is the same as VigorAP 900 management IP, e.g., 192.168.1.X.
3. Power on VigorAP 900.
4. Check all LEDs on the front panel. ACT LED should be steadily on, LAN LEDs
should be on if the access point is correctly connected to the ADSL modem, router or
switch/hub.

VigorAP 900 User’s Guide
9
N
Neett
w
woorrkk
C
Coonnffiigguurraattiioonn
After the network connection is built, the next step you should do is setup VigorAP 900 with
proper network parameters, so it can work properly in your network environment.
Before you can connect to the access point and start configuration procedures, your
computer must be able to get an IP address automatically (use dynamic IP address). If it’s set
to use static IP address, or you’re unsure, please follow the following instructions to
configure your computer to use dynamic IP address:
For the default IP address of this AP is set “192.168.1.2”, we recommend you to use
“192.168.1.X (except 2)” in the field of IP address on this section for your computer.
If the operating system of your computer is…
Windows 7 - please go to section 2.1
Windows 2000 - please go to section 2.2
Windows XP - please go to section 2.3
Windows Vista - please go to section 2.4
22..11 WWiinnddoowwss 77 IIPP AAddddrreessss SSeettuupp
Click Start button (it should be located at lower-left corner of your computer), then click
Control Panel. Double-click Network and Internet, and the following window will appear.
Click Network and Sharing Center.
Next, click Change adapter settings and click Local Area Connection.
VigorAP 900 User’s Guide
10
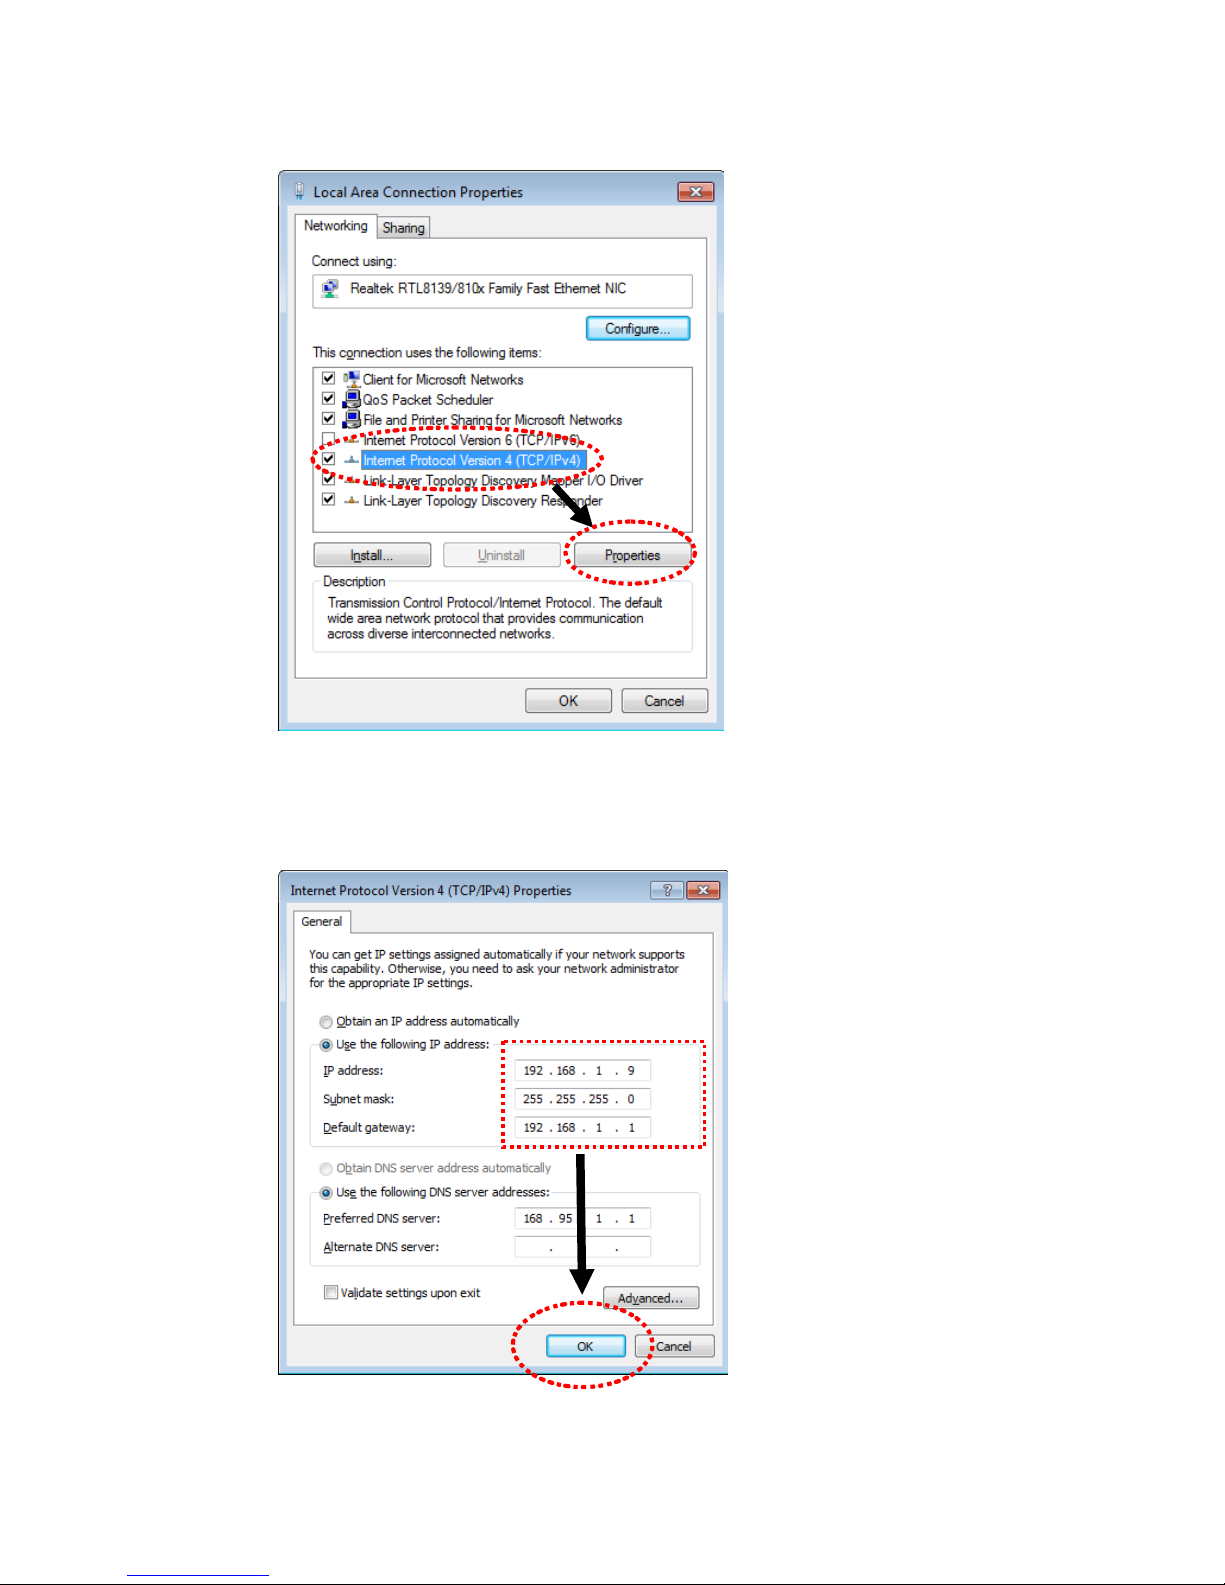
Then, select Internet Protocol Version 4 (TCP/IPv4) and click Properties.
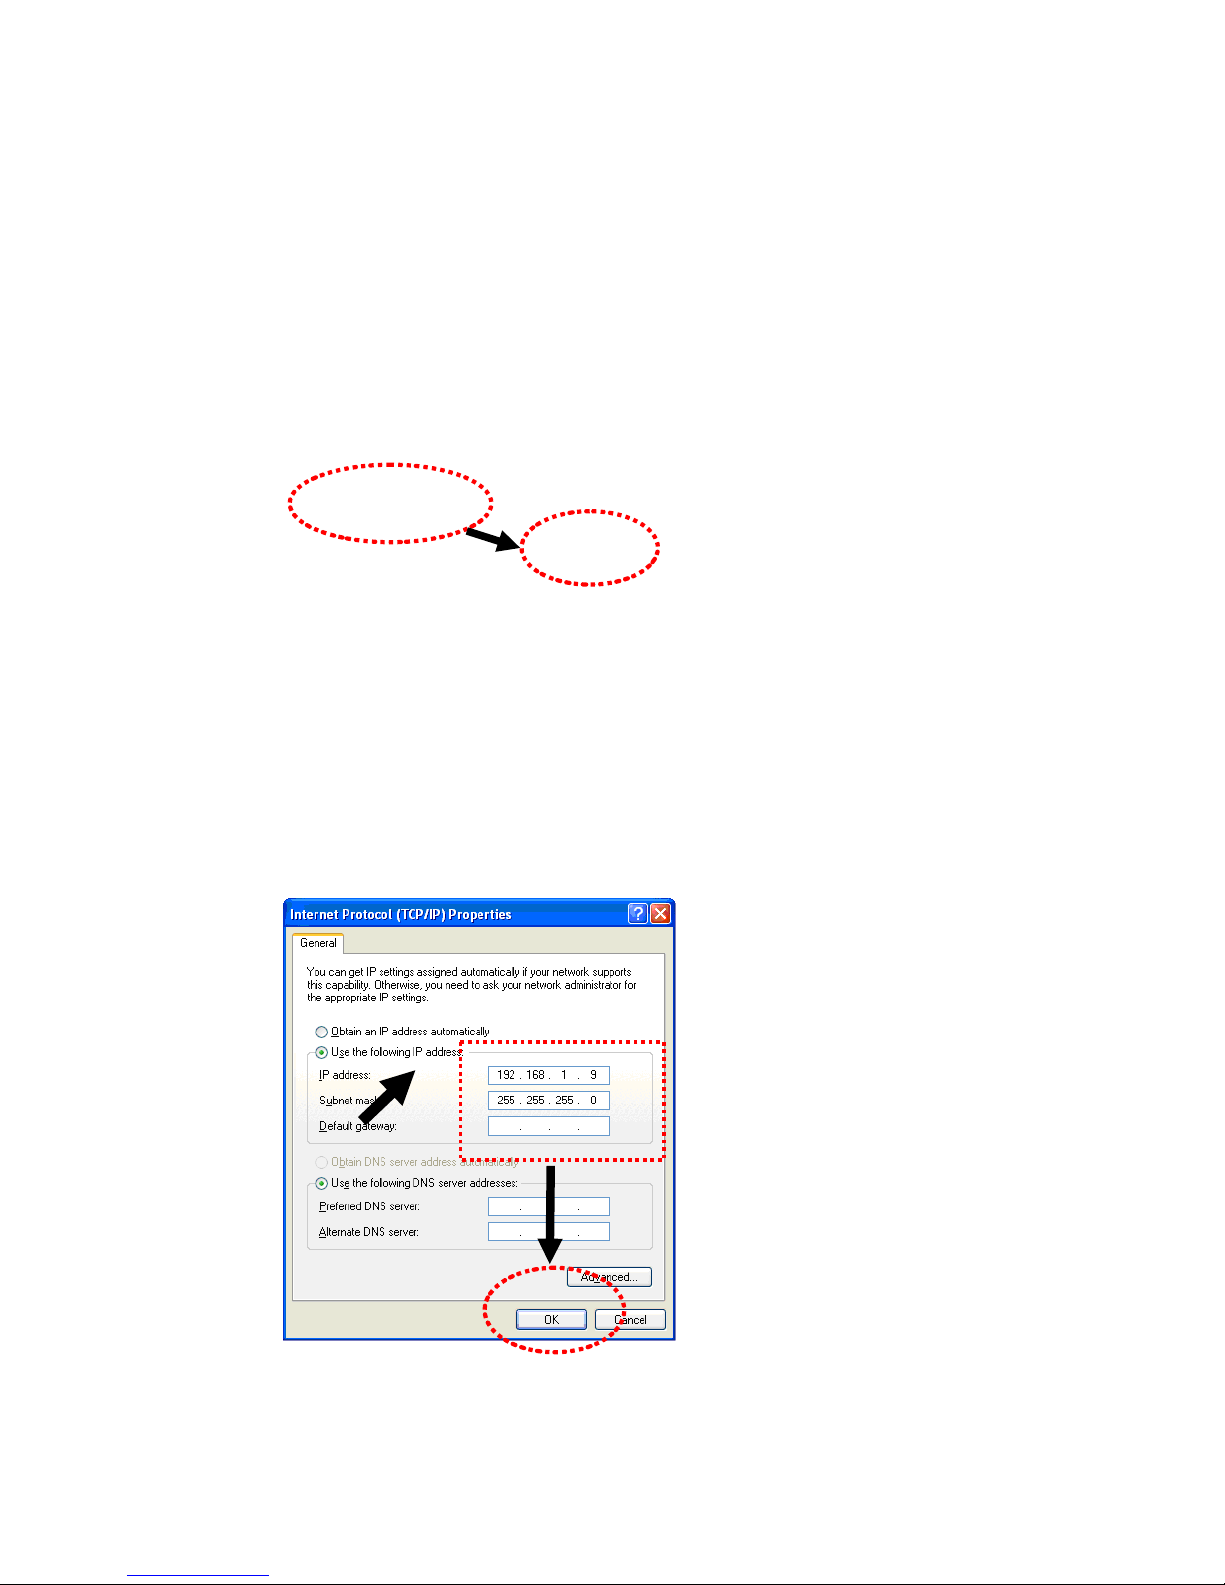
Under the General tab, click Use the following IP address. Then input the following
settings in respective field and click OK when finish.
IP address: 192.168.1.9
Subnet Mask: 255.255.255.0
VigorAP 900 User’s Guide
11
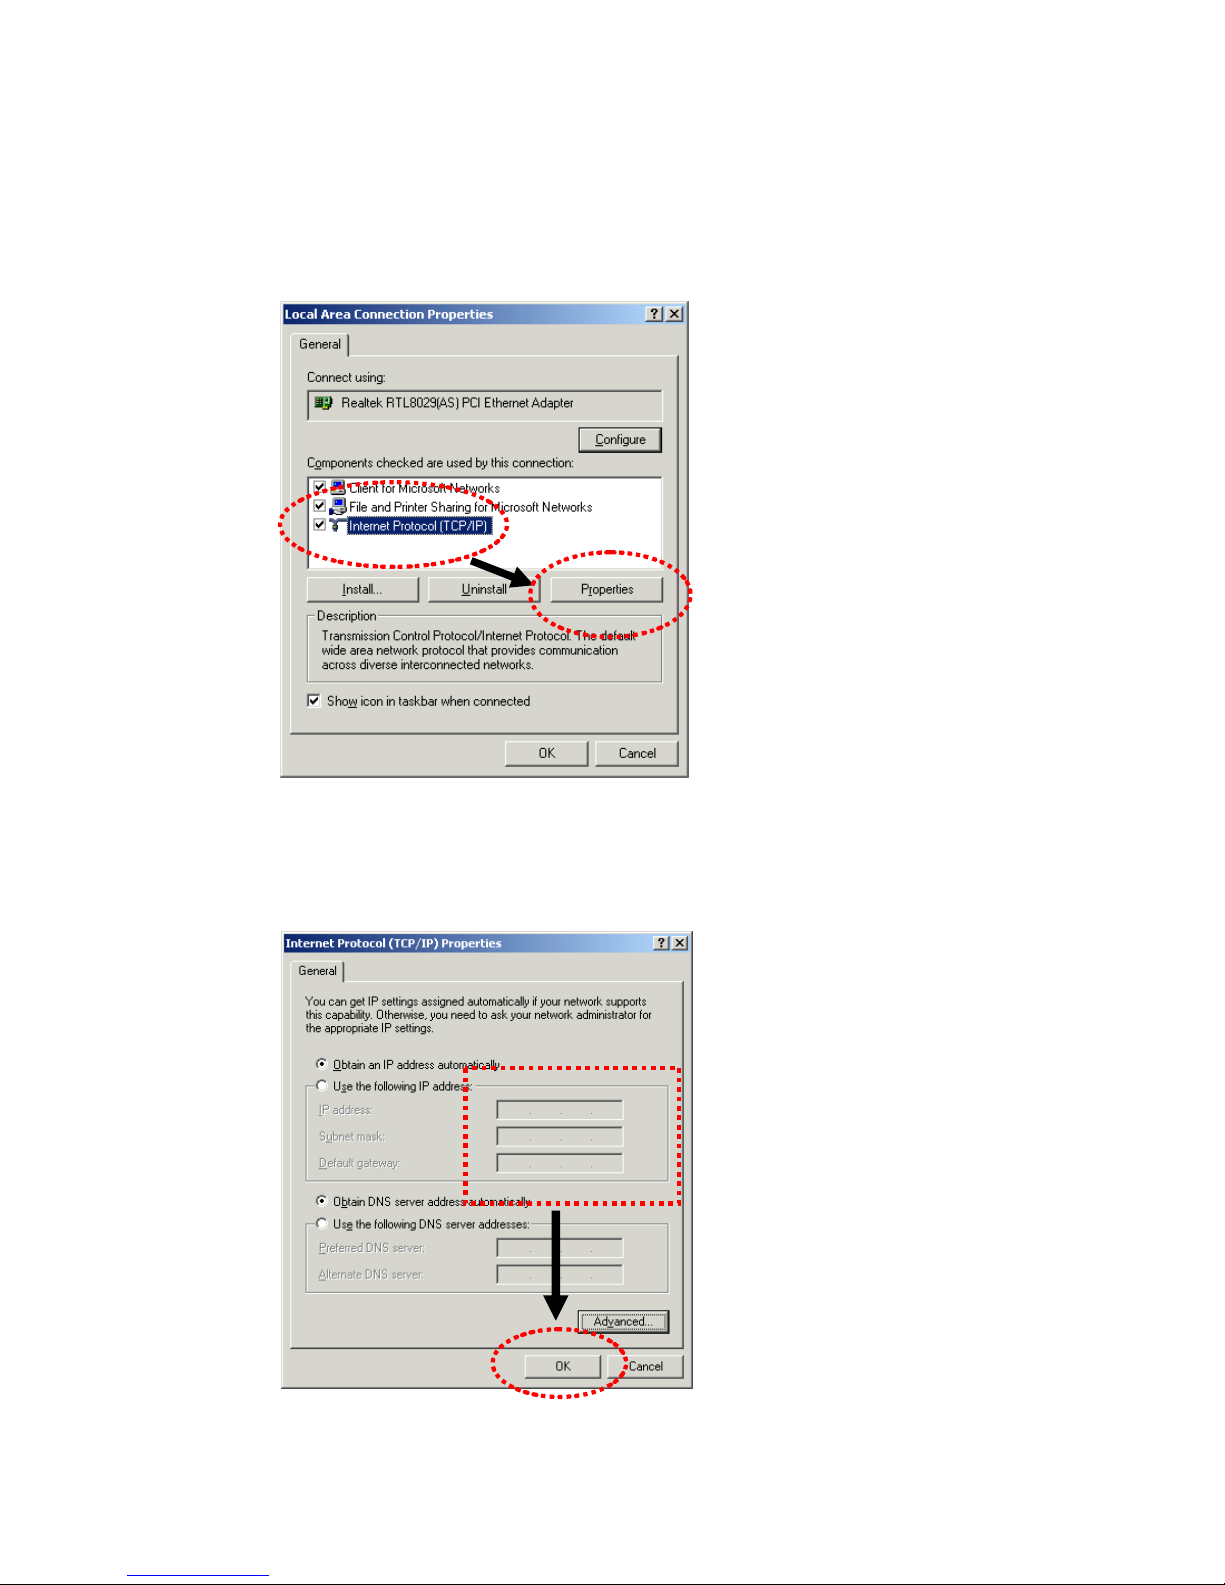
22..22 WWiinnddoowwss 22000000 IIPP AAddddrreessss SSeettuupp
Click Start button (it should be located at lower-left corner of your computer), then click
control panel. Double-click Network and Dial-up Connections icon, double click Local
Area Connection, and Local Area Connection Properties window will appear. Select
Internet Protocol (TCP/IP), then click Properties.
Select Use the following IP address, then input the following settings in respective field and
click OK when finish.
IP address: 192.168.1.9
Subnet Mask: 255.255.255.0
VigorAP 900 User’s Guide
12
22..33 WWiinnddoowwss XXPP IIPP AAddddrreessss SSeettuupp
Click Start button (it should be located at lower-left corner of your computer), then click
control panel. Double-click Network and Internet Connections icon, click Network
Connections, and then double-click Local Area Connection, Local Area Connection
Status window will appear, and then click Properties.
Select Use the following IP address, then input the following settings in respective field and
click OK when finish:
IP address: 192.168.1.9
Subnet Mask: 255.255.255.0.

VigorAP 900 User’s Guide
13
22..44 WWiinnddoowwss VViissttaa IIPP AAddddrreessss SSeettuupp
Click Start button (it should be located at lower-left corner of your computer), then click
control panel. Click View Network Status and Tasks, then click Manage Network
Connections. Right-click Local Area Netwrok, then select ‘Properties’. Local Area
Connection Properties window will appear, select Internet Protocol Version 4 (TCP /
IPv4), and then click Properties.
Select Use the following IP address, then input the following settings in respective field and
click OK when finish:
IP address: 192.168.1.9
Subnet Mask: 255.255.255.0.
VigorAP 900 User’s Guide
14
22..55 AAcccceessssiinngg ttoo WWeebb UUsseerr IInntteerrffaaccee
All functions and settings of this access point must be configured via web user interface.
Please start your web browser (e.g., Firefox).
1. Make sure your PC connects to the VigorAP 900 correctly.
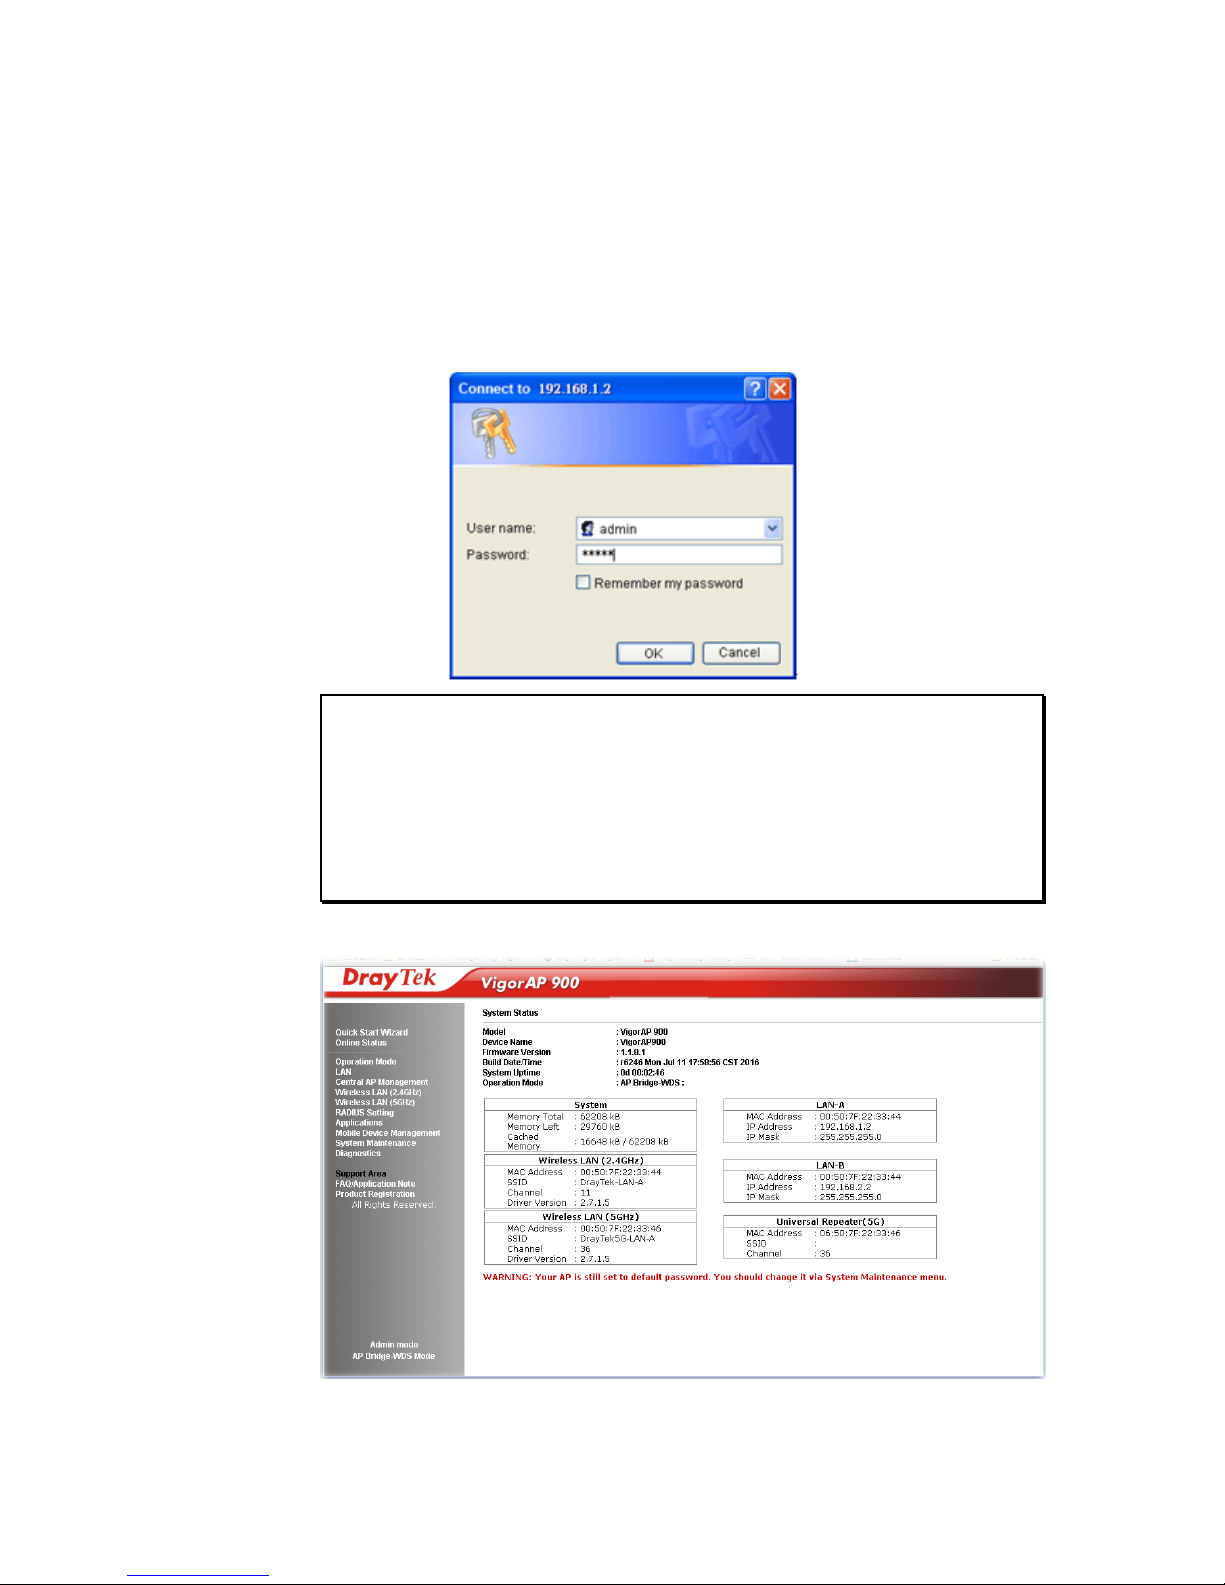
2. Open a web browser on your PC and type http://192.168.1.2. A pop-up window will
open to ask for username and password. Pease type “admin/admin” on
Username/Password and click OK.
Note 1: You may either simply set up your computer to get IP dynamically from the
router or set up the IP address of the computer to be in the same subnet as the IP
address of VigorAP 900.
If there is no DHCP server on the network, then VigorAP 900 will have an IP
address of 192.168.1.2.
If there is DHCP available on the network, then VigorAP 900 will receive it’s
IP address via the DHCP server.
3. The Main Screen will pop up.
VigorAP 900 User’s Guide
15
Note: If you fail to access to the web configuration, please go to “Trouble
Shooting” for detecting and solving your problem. For using the device properly, it
is necessary for you to change the password of web configuration for security and
adjust primary basic settings.
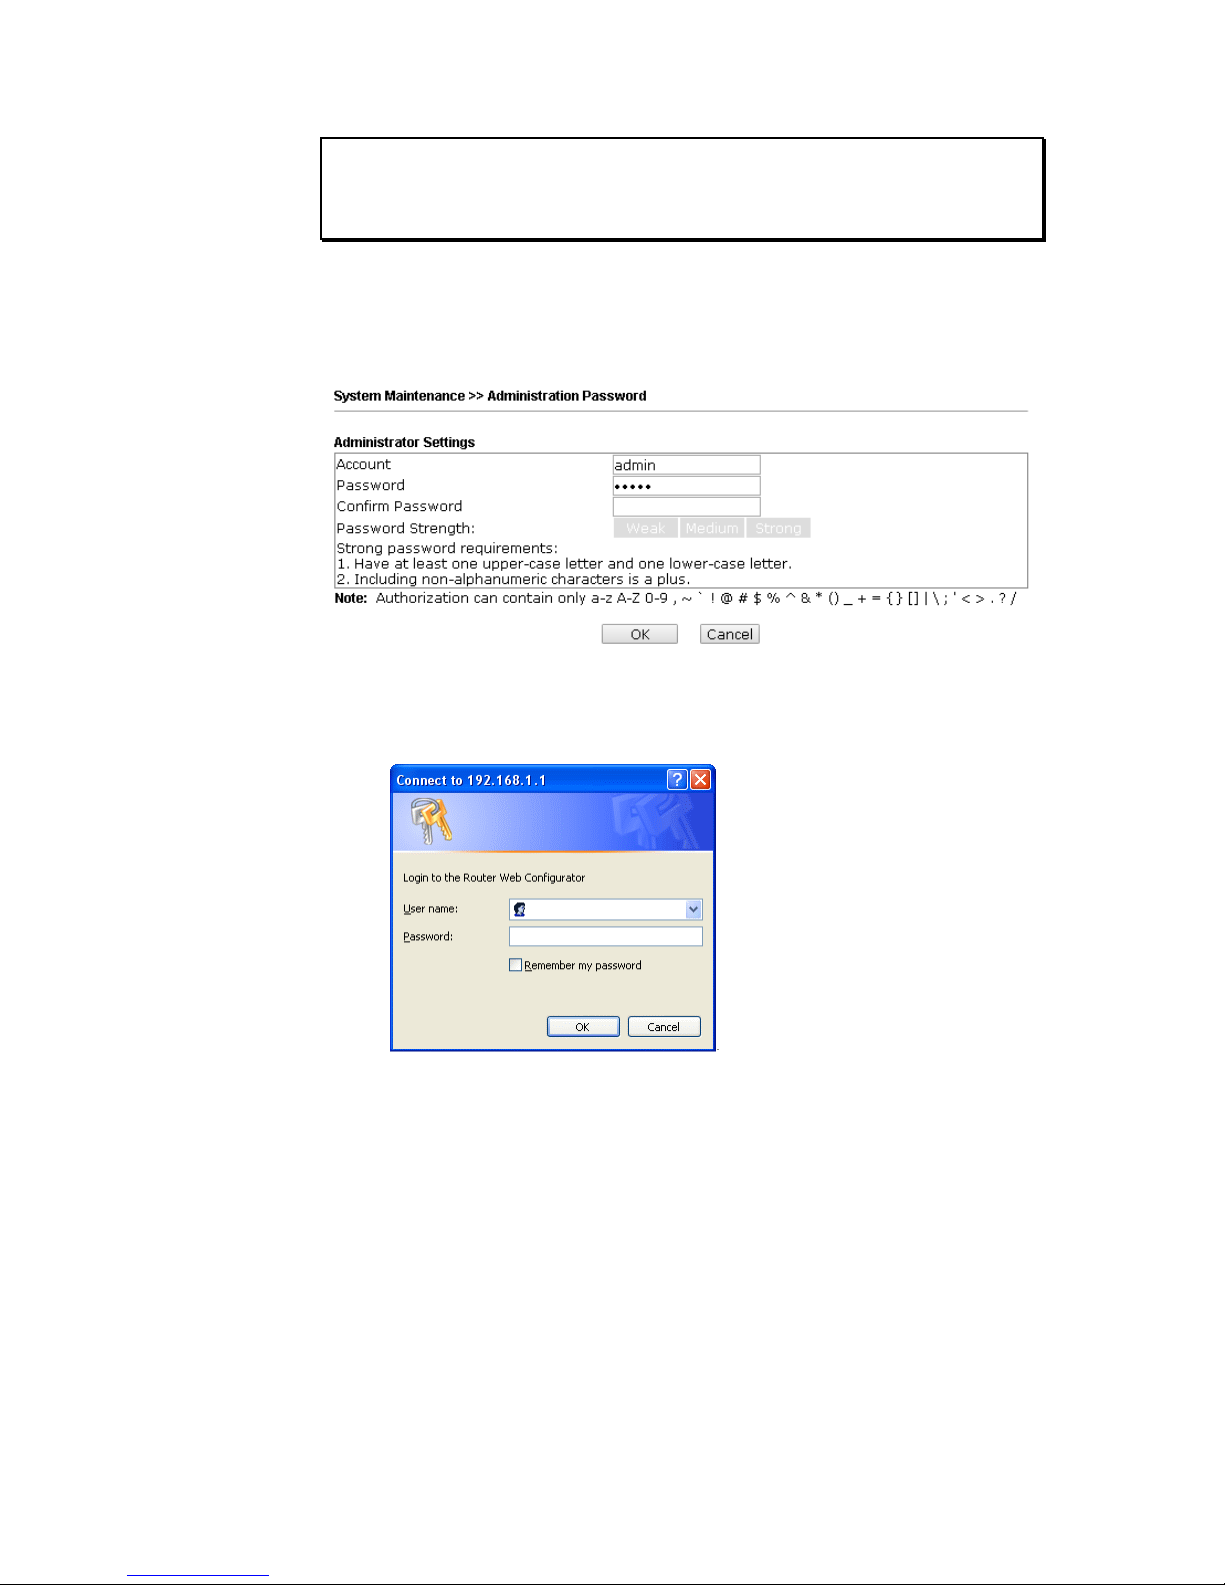
22..66 CChhaannggiinngg PPaasssswwoorrdd
1. Please change the password for the original security of the modem.
2. Go to System Maintenance page and choose Administrator Password.
3. Enter the new login password on the field of Password. Then click OK to continue.
4. Now, the password has been changed. Next time, use the new password to access the
Web User Interface for this modem.
VigorAP 900 User’s Guide
16
22..77 QQuuiicckk SSttaarrtt WWiizzaarrdd
Quick Start Wizard will guide you to configure 2.4G wireless setting, 5G wireless setting
and other corresponding settings for Vigor Access Point step by step.
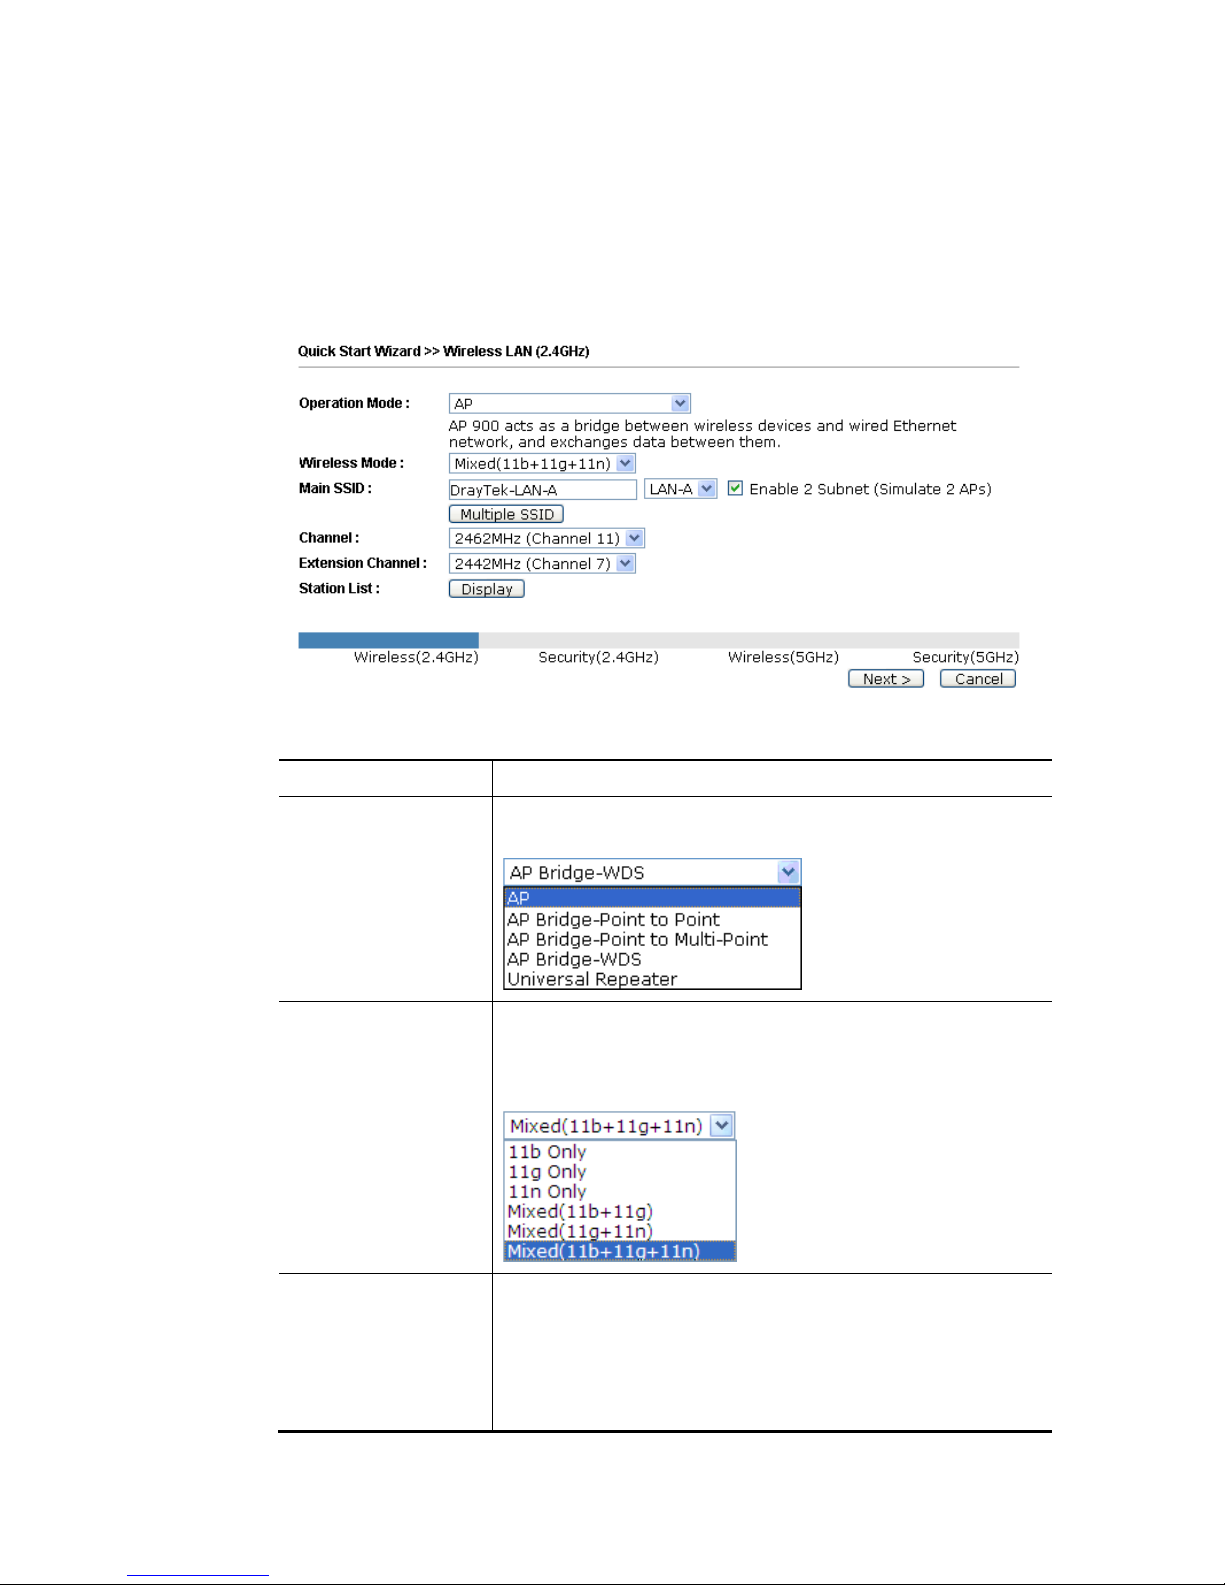
22..77..11 CCoonnffiigguurriinngg 22..44GGHHzz WWiirreelleessss SSeettttiinnggss –– GGeenneerra
all
This page displays general settings for the operation mode selected.
Available settings are explained as follows:
Item Description
Operation Mode
There are five operation modes for wireless connection. Settings
for each mode are different.
Wireless Mode
At present, VigorAP 900 can connect to 11b only, 11g only, 11n
only, Mixed (11b+11g), Mixed (11g+11n) and Mixed
(11b+11g+11n) stations simultaneously. Simply choose Mixed
(11b+11g+11n) mode.
Main SSID
Set a name for VigorAP 900 to be identified.
Enable 2 Subnet (Simulate 2 APs) - Check the box to enable
the function for two independent subnets. Once you enable this
function, LAN-A and LAN-B would be independent. Next, you
can connect one router in LAN-A, and another router in LAN-B.
Such mechanism can make you feeling that you have two
VigorAP 900 User’s Guide
17
independent AP/subnet functions in one VigorAP 900.
If you disable this function, LAN-A and LAN-B ports are in the
same domain. You could only connect one router (no matter
connecting to LAN-A or LAN-B) in this environment.
Multiple SSID - When Enable 2 Subnet is enabled, you can
specify subnet interface (LAN-A or LAN-B) for each SSID by
using the drop down menu.
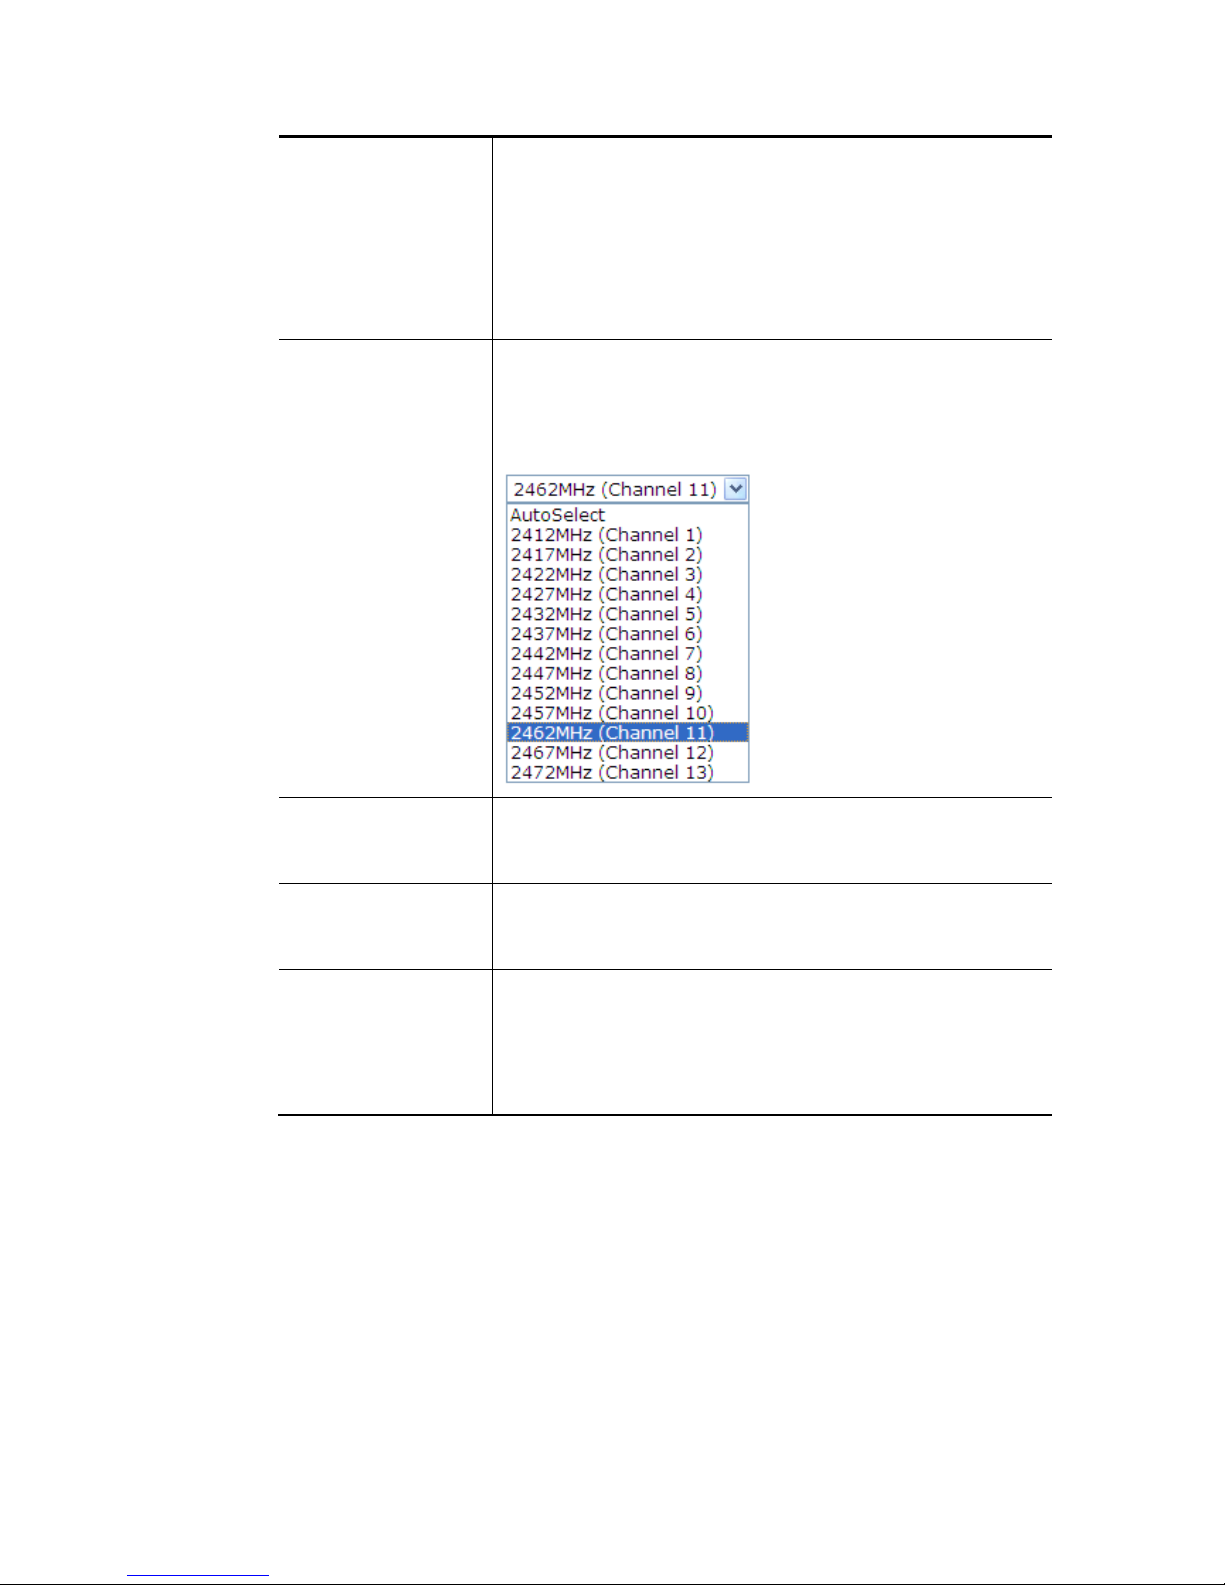
Channel
Means the channel frequency of the wireless LAN. The default
channel is 6. You may switch channel if the selected channel is
under serious interference. If you have no idea of choosing the
frequency, please select AutoSelect to let system determine for
you.
Extension Channel
With 802.11n, there is one option to double the bandwidth per
channel. The available extension channel options will be varied
according to the Channel selected above.
Station List
Click the Display button to open the Station List dialog. It
provides the knowledge of connecting wireless clients now
along with its status code.
AP Discovery
Click this button to open the AP Discovery dialog. VigorAP 900
can scan all regulatory channels and find working APs in the
neighborhood.
This option is not available when AP is selected as the
Operation Mode.
After finishing this web page configuration, please click Next to continue.
VigorAP 900 User’s Guide
18
22..77..22 CCoonnffiigguurriinngg 22..44GGHHzz WWiirreelleessss SSeettttiinnggss bbaasseedd oon
n tthhee OOppeerraattiioonn MMooddee
In this page, the advanced settings will vary according to the operation mode chosen on
2.7.1.
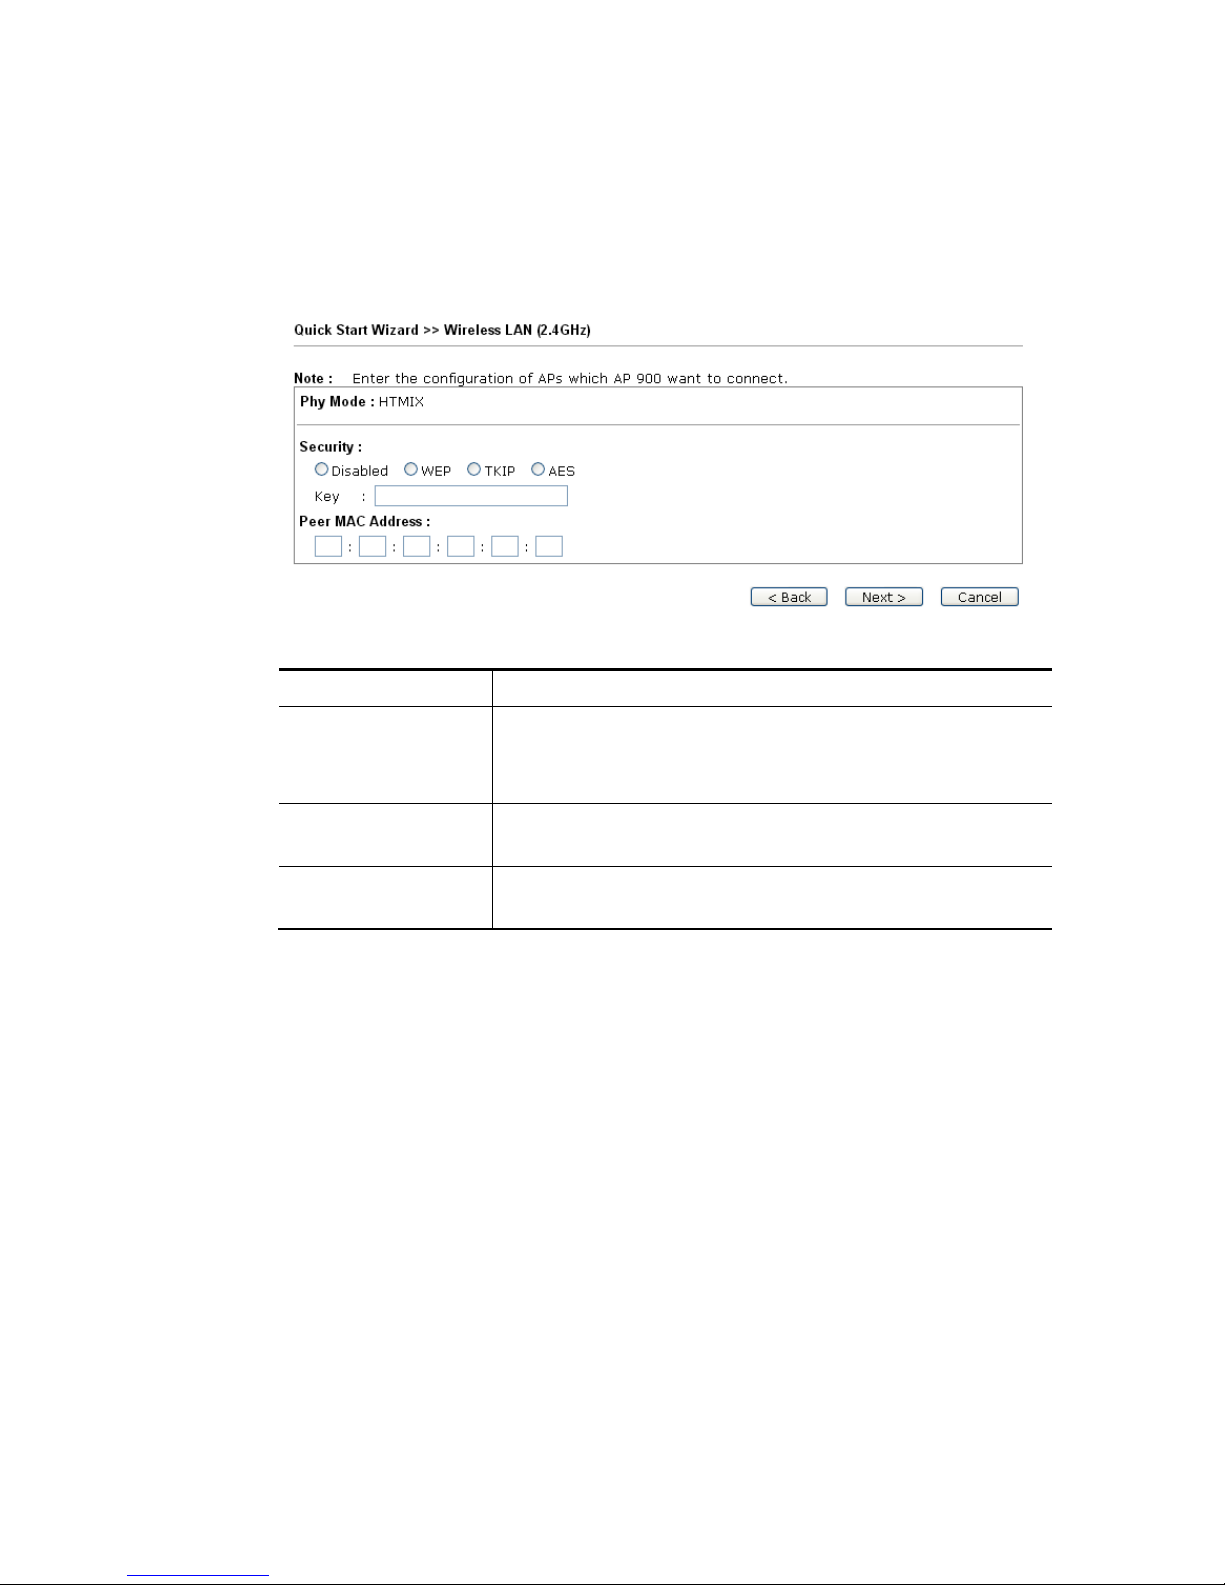
AAddvvaanncceedd SSeettttiinnggss ffoorr AAPP BBrriiddggee--PPooiinntt ttoo PPooiinntt
When you choose AP Bridge-Point to Point, you will need to configure the following page.
Available settings are explained as follows:
Item Description
Phy Mode
Data will be transmitted via HTMIX mode.
Each access point should be setup to the same Phy mode for
connecting with each other.
Security
Select WEP, TKIP or AES as the encryption algorithm. Type the
key number if required.
Peer MAC Address
Type the peer MAC address for the access point that VigorAP
900 connects to.
VigorAP 900 User’s Guide
19
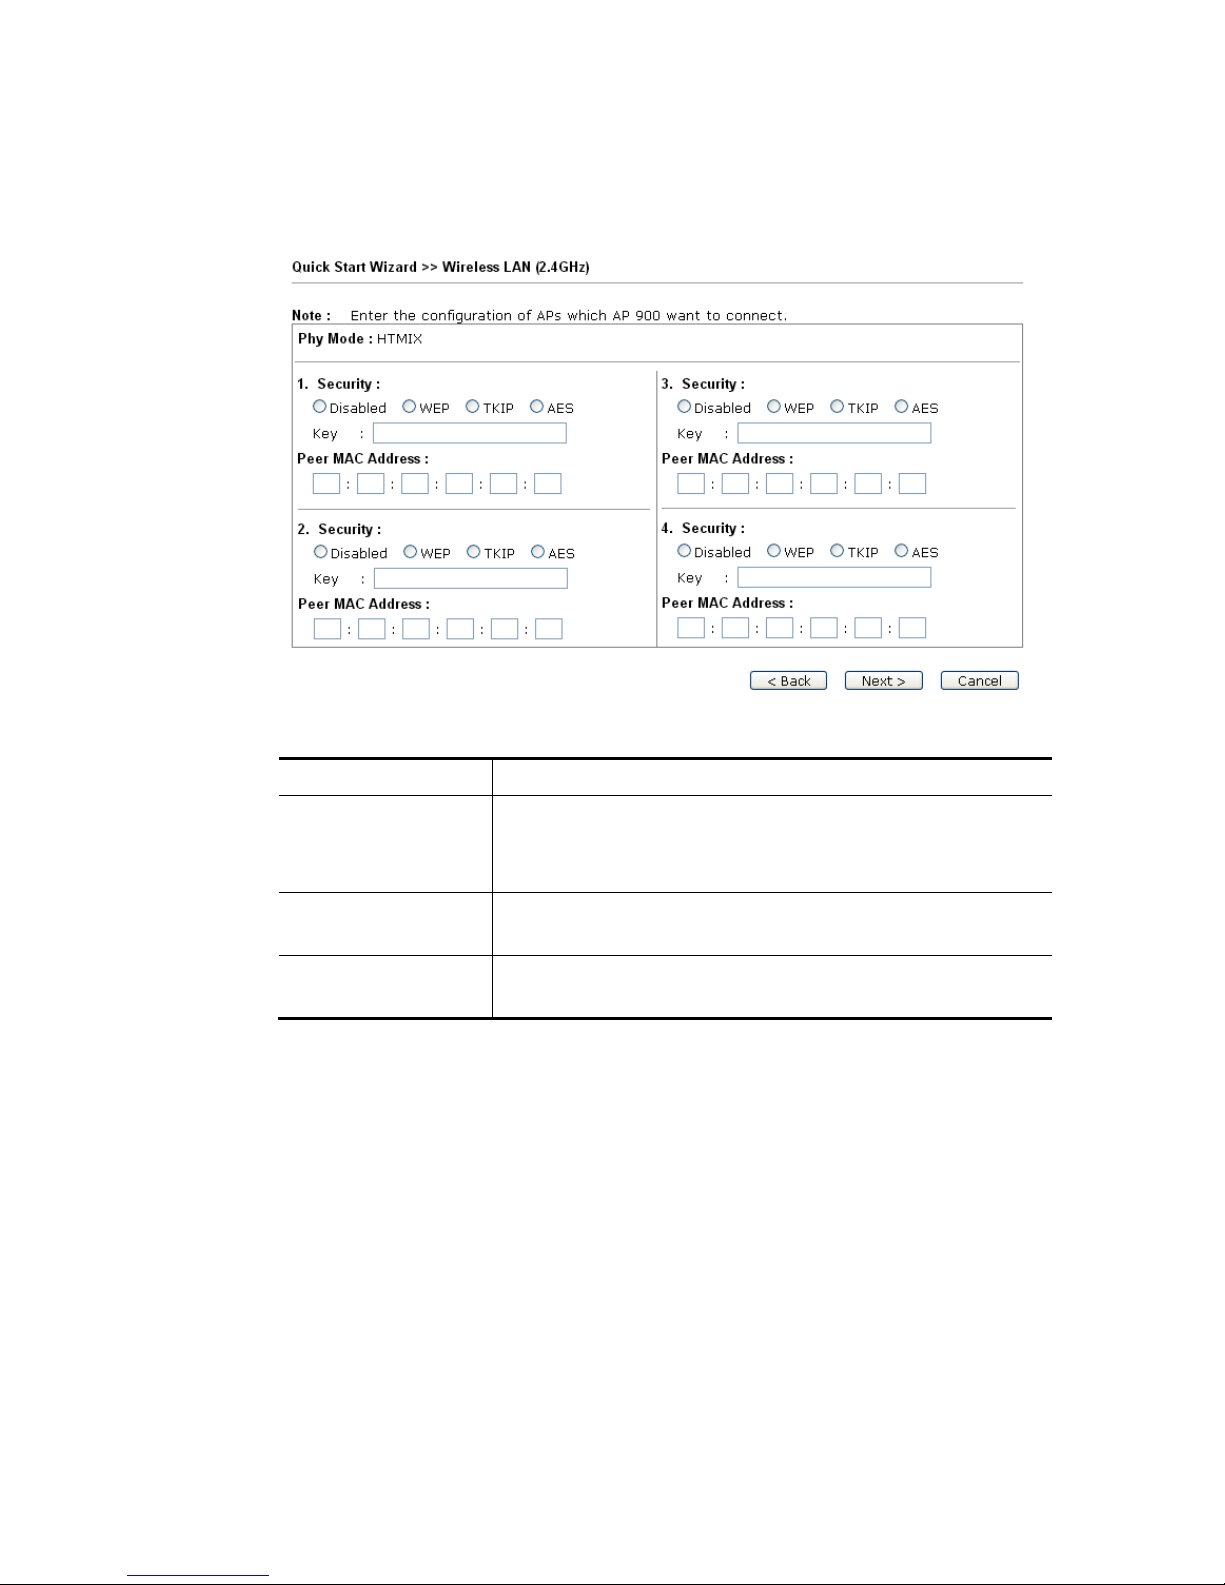
AAddvvaanncceedd SSeettttiinnggss ffoorr AAPP BBrriiddggee--PPooiinntt ttoo MMuullttii--PPooiinntt
When you choose AP Bridge-Point to Multi-Point, you will need to configure the following
page.
Available settings are explained as follows:
Item Description
Phy Mode
Data will be transmitted via HTMIX mode.
Each access point should be setup to the same Phy mode for
connecting with each other.
Security
Select WEP, TKIP or AES as the encryption algorithm. Type the
key number if required.
Peer MAC Address
Type the peer MAC address for the access point that VigorAP
900 connects to.
VigorAP 900 User’s Guide
20
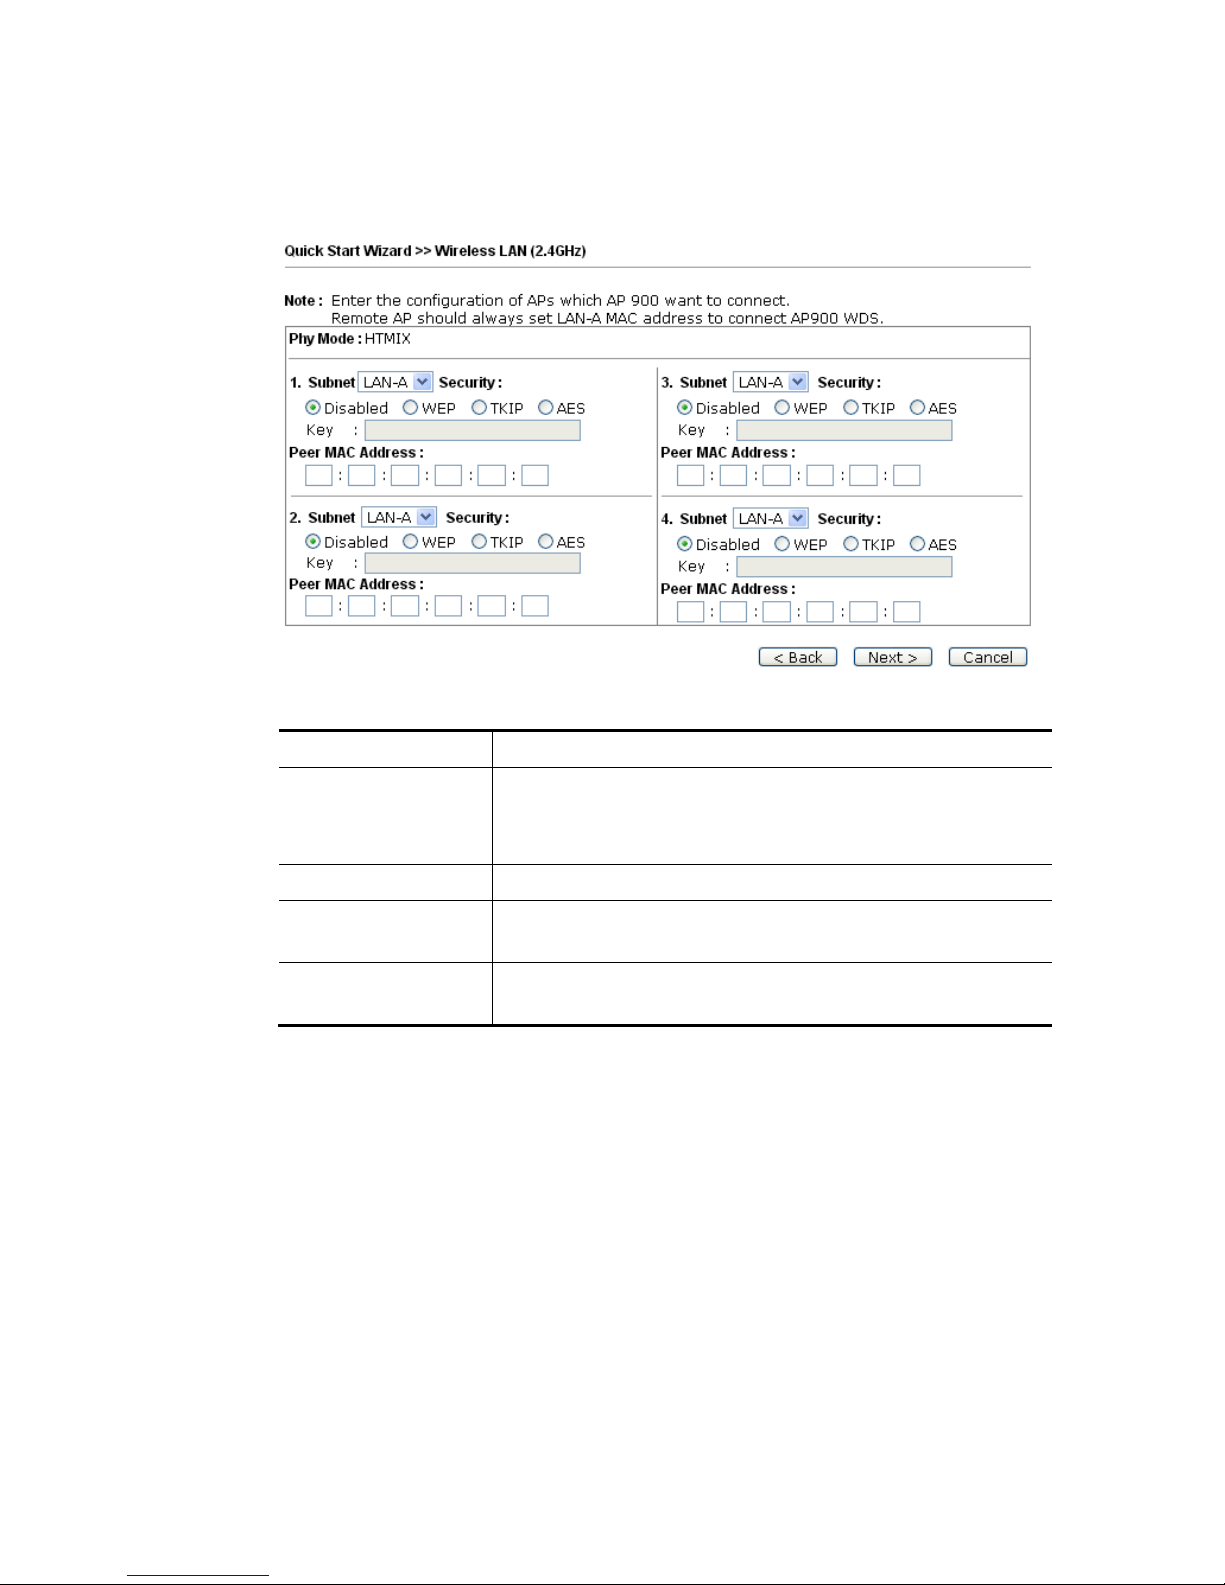
AAddvvaanncceedd SSeettttiinnggss ffoorr AAPP BBrriiddggee--WWDDSS
When you choose AP Bridge-WDS, you will need to configure the following page.
Available settings are explained as follows:
Item Description
Phy Mode
Data will be transmitted via HTMIX mode.
Each access point should be setup to the same Phy mode for
connecting with each other.
Subnet
Choose LAN-A or LAN-B for each SSID.
Security
Select WEP, TKIP or AES as the encryption algorithm. Type the
key number if required.
Peer MAC Address
Type the peer MAC address for the access point that VigorAP
900 connects to.
 Loading...