

Page 1
AL-MEISTER PLS3311 INSTRUCTION MANUAL <Rev.3>
Rev 9/22/11 bj
Rev 4/26/13 bj
Rev 2/20/14 bj
Page 2

AL-MEISTER PLS3311 INSTRUCTION MANUAL <Rev.3>
Thank you for purchasing the PLS3311!
For safe and correct use of this machine, please read through this manual before operation.
Please keep this manual and refer to it whenever necessary.
MAIN FEATURES
PLS3311 PLUSTER is a fully automatic single sided hot laminator. Once setup for the type of work to be done, it's
as easy as setting the printed paper on the Feeder Tray and pressing the [START] key.
1. Laminating size/Laminating film
The paper size for the PLS3311 is A3 wide.
The film is specially produced for the PLUSTER line of laminators.
There are two types of film: glossy and matt with film thickness of 30mic.
2. Separator
Laminated papers are separated and stacked automatically.
3. Feeding capacity: 300 sheets
The automatic feeder enables continuous lamination. The total capacity of the feeder tray is 300 sheets of
0.032lbs/ft
4. Processing speed
Finishes 100 sheets of A3 wide single sided lamination in 15min. Feeding, laminating, decurling, and separating
are done automatically.
5. Energy saving
When the machine is idle for 15 minutes it enters Eco Mode which saves energy.
2
paper.
Page 3
AL-MEISTER PLS3311 INSTRUCTION MANUAL <Rev.3>
IMPORTANT
The following safety precautions must be observed for your safety during the operation of this product. Please
read the cautions and warnings carefully. Please keep this manual and refer to it whenever necessary.
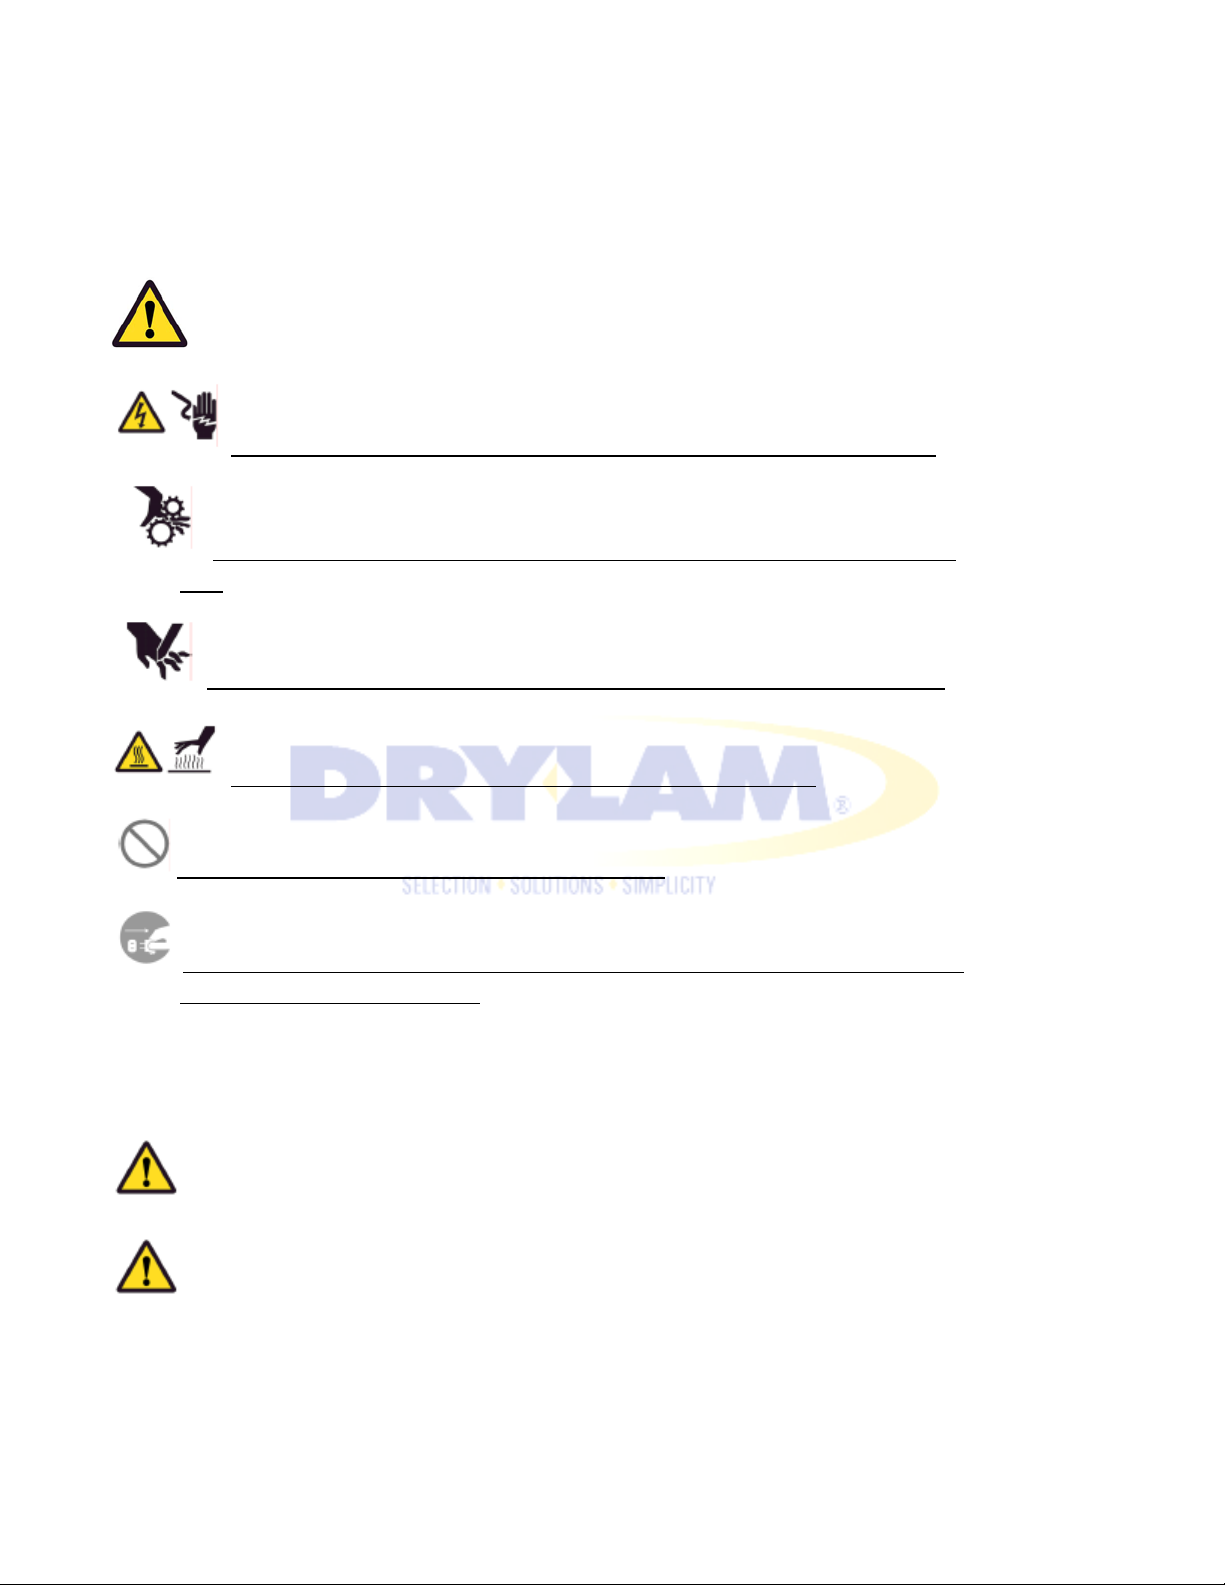
General Caution
Electric Shock Indicates possible electric shocks under the specified conditions.
Tangle Warning Indicates possible injuries caused by tangling in a rotating machine
part.
Amputation Warning Indicates possible serious injuries such as finger amputation.
Heat Warning Indicates possible injuries caused by extreme heat.
Don’t do Indicates unspecified acts that are forbidden.
Unplug immediately Indicates there may be a dangerous situation that requires you to
unplug the machine immediately.
WARNING AND CAUTION FOR SAFETY
These two different words are used on warning stickers placed on the machine according to the level of danger.
WARNING ・・・To indicate that incorrect use can cause serious injury.
CAUTION ・・・To indicate that incorrect use can cause serious injury to the operator or damage to
equipment. There can also be a machine malfunction.
Page 4
AL-MEISTER PLS3311 INSTRUCTION MANUAL <Rev.3>
STORAGE/INSTALLATION
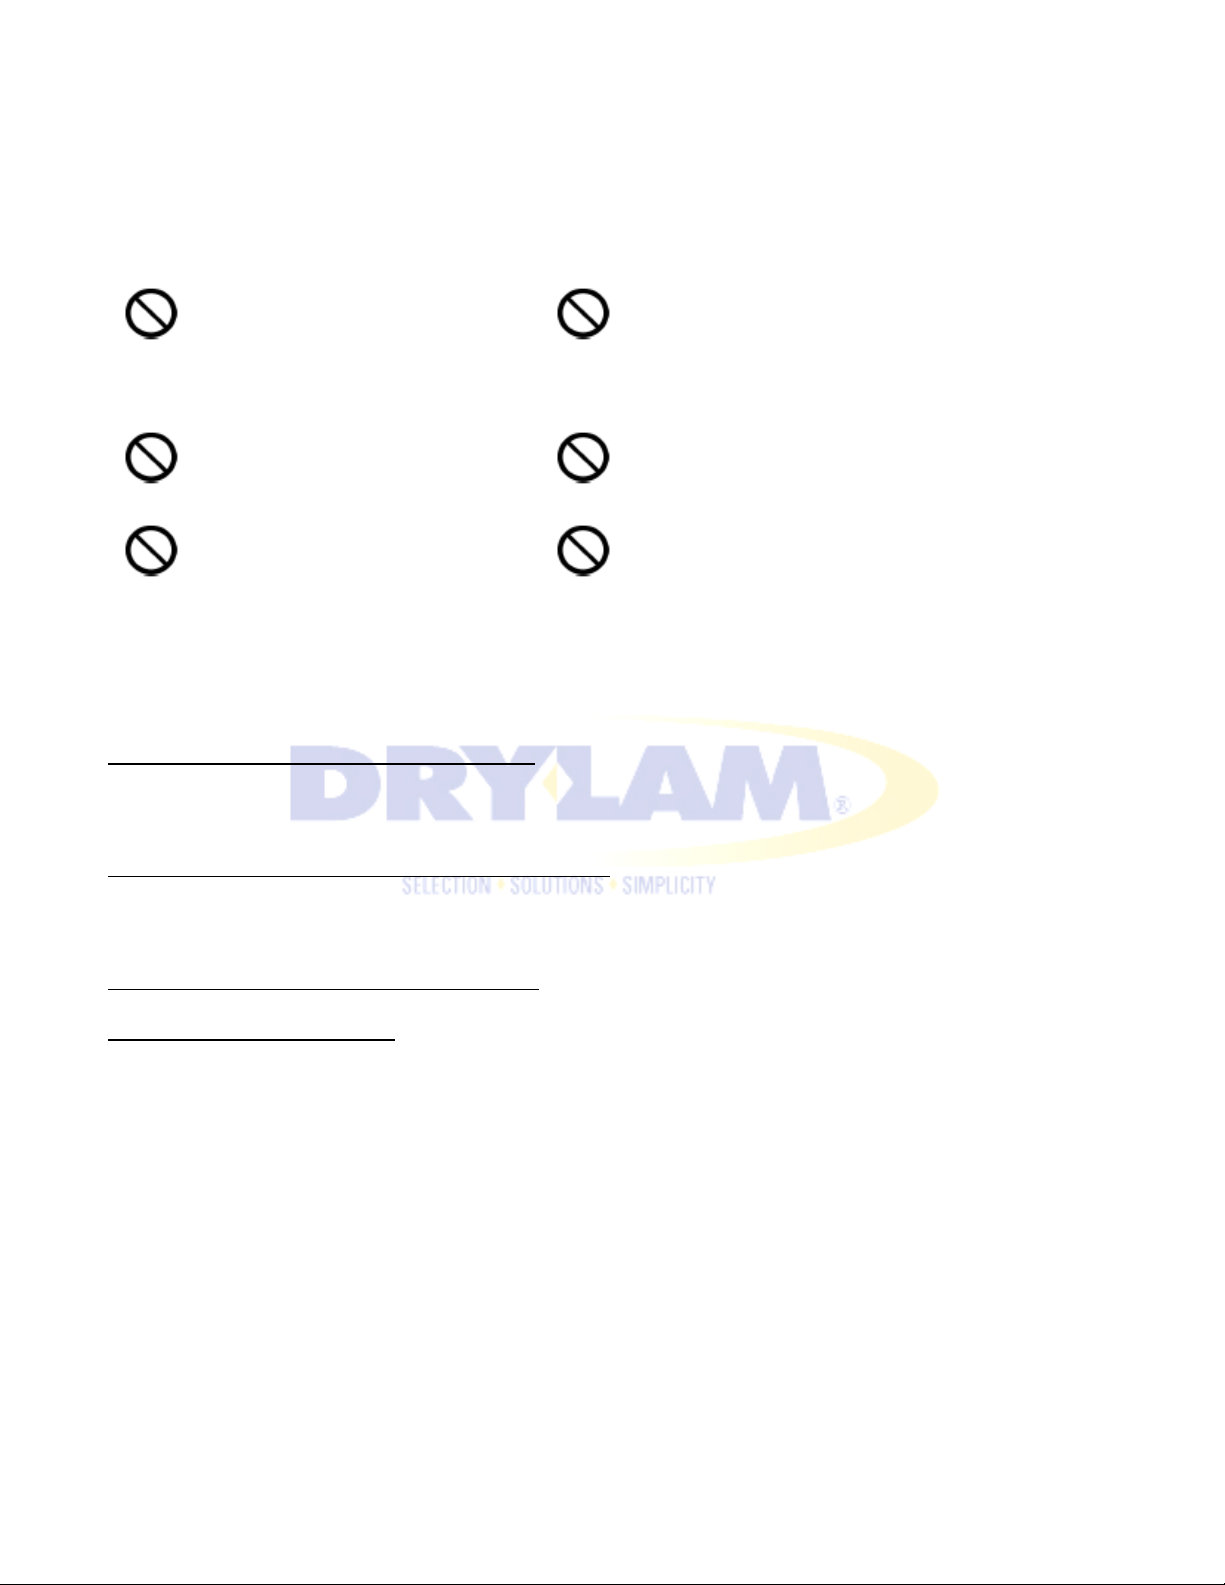
To avoid fire, electric shock, or any danger, do not store or install the machine:
In direct sunshine. In/near a heating appliance, near an
air conditioner or an extremely hot area.
In an extremely cold area. On a weak or shaky floor or platform.
In an extremely humid/dry area. In a dusty area.
WARNING: POWER CONSUMPTION:
1. Use appropriate power outlet for 3-pin plugs. Always connect to AC120V. Unstable voltage may cause electric
shock, fire, or damage to the machine. Always avoid using multiple outlet connections. Do not use an extension
cord.
2. Pay attention to the amperage on the “house” circuit. If the amperage of the circuit is not high enough, or if
other equipment on the circuit creates an overloaded condition there is chance of a fire or malfunction. Do not
share the electrical outlet with other devices.
3. Ensure a ground connection is correctly made to avoid any danger or electrical problems.
4. Handle power cord with care. Do not set the machine on the power cord. Do not pull the power cord forcibly.
Do not alter the power cord. Damage to the power cord many cause fire, electric shock and/or damage to the
machine.
Page 5
AL-MEISTER PLS3311 INSTRUCTION MANUAL <Rev.3>
GENERAL CAUTIONS
Always follow these instructions for safe operation.
1) What to wear
In order to avoid any possible danger,
・ do not wear neck-ties or necklaces that may get caught in the machine.
・ do not wear loose clothes. Be careful that your hair does not get caught in the machine.
・ if entangled, turn off the power or unplug immediately.
2) Operation
・ always close covers.
・ always use in a well ventilated room.
・ do not spill liquids on the machine or handle it with wet hands.
・ it is recommended to check a large operation from time to time.
・ both the Feeder and Rear Exit Trays are detachable. Be sure not to drop them on your foot during the
installation.
3) In an emergency
・ if a malfunction occurs, switch off and unplug immediately.
・ contact your dealer or Dry Lam’s service department.
・ do not attempt to disassemble/repair/alter the machine yourself.
・ contact your administrator or Dry Lam for maintenance and service issues.
4) Others
Always follow these instructions in order to avoid serious injury/electric shock/fire/damage of the machine.
・ do not use the machine for any other purposes.
・ do not put heavy stuff on the machine. Avoid heavy impacts.
・ always unplug the machine before moving it.
・ remember that laminated objects can be very hot.
・ machine may smoke when incorrectly threaded and operated.
・ do not leave metals such as paper clips or staples inside the machine.
・ do not remove the covers or other parts from the machine.
・ never attempt to modify the machine.
・ do not remove caution labels from the machine.
・ always use Fujipla’s exclusive PLUSTER FILM.
Page 6
AL-MEISTER PLS3311 INSTRUCTION MANUAL <Rev.3>
REQUIREMENTS OF PAPER TO BE LAMINATED
Do not laminate:
・Paper money or valuable securities
・Paper with staples
・Material that is affected by heat such as vinyl chloride or polyethylene
・Very precious articles that are unique and irreplaceable
・Paper thicker than 0.02” (including film thickness)
・Paper that discolors and changes with heat such as thermal papers and crayoned pictures
・Paper that contains a lot of moisture
・Things other than paper
CLEANING
Be sure that the machine is unplugged. Before cleaning the machine, turn off the power and let the machine
cool down. Wipe off stains with a soft cloth. When stains are persistent, use a firmly squeezed soft cloth soaked
in a small quantity of water and detergent. Wipe off the residue of detergent with a cloth soaked in water.
USEFUL INFORMATION – FILM END
Fujipla’s exclusive PLUSTER FILM has a special feature that allows the machine to detect the end of the film.
Because the last 20” of the film is black a lamination, or ‘film end’ error will be displayed and operation will stop
immediately. Always prepare more prints than are necessary for the run to avoid the black section from
appearing on the last document. Regularly check the remaining amount of film on the display (see section 5-4).
Page 7
AL-MEISTER PLS3311 INSTRUCTION MANUAL <Rev.3>
CONTENTS
PAGE
1.
COMPONENTS
2.
NAMES AND FUNCTIONS
2-1.
OVERVIEW
8
2-2.
INTERIOR
9
2-3.
OPERATION PANEL
10
2-4.
LCD DISPLAY
11
2-5.
OTHER SWITCHES AND KEYS
12
3.
INSTALLATION
3-1.
INSTALLING THE PLS3311
13
3-2.
SET FEEDER TRAY
13
3-3.
SET REAR EXIT TRAY
14
3-4.
ATTACH POWER CORD
15
4.
OPERATION
4-1.
WARM UP
16
4-2.
SET PAPER
17
4-3.
SETTING FILM
18
4-4.
ADJUST REAR EXIT TRAY
23
4-5.
START LAMINATION
24
4-6.
STOP LAMINATION
25
4-7.
FINISH OPERATION
26
5.
CHANGE SETTINGS
5-1.
SET TEMPERATURE
27
5-2.
SET SPEED
28
5-3.
ADJUST PAPER OVERLAP (during operation)
29
5-4.
CHECK FILM INFO
30
5-5.
CHECK FILM LOT NUMBER
31
5-6.
SET CUT TIMING
32
5-7.
ADJUST PAPER OVERLAP (while not running)
33
5-8.
SET COUNTER
35
5-9.
TOTAL COUNTER
37
5-10.
ADJUST BLADE READY POSITION
38
5-11.
SET CUT MODE
40
5-12.
DECURLING
42
5-13.
ADJUST FEEDING PRESSURE
43
5-14.
ADJUST PAPER POSITIONING
43
5-15.
ADJUST FILM TENSION
44
6.
CLEANING
6-1.
CLEANING OF FEEDER SECTION
48
Page 8

6-2.
CLEANING OF LAMINATION SECTION
48
6-2.
CLEANING OF EXIT SECTION
49
7.
TROUBLE SHOOTING
50
8.
SPECIFICATIONS
56
AL-MEISTER PLS3311 INSTRUCTION MANUAL <Rev.3>
Page 9

AL-MEISTER PLS3311 INSTRUCTION MANUAL <Rev.3>
1.COMPONENTS
Please check all these components are included with the laminator.
• PLS3311
• Feeder Tray
• Extension Tray
• Feeder guard
• Rear Exit Tray
• Stacker Paper Guard
• Power Cord
• Instruction Manual
• Film Spacer
• Stand
• Stand Assembly Instruction
Page 10
AL-MEISTER PLS3311 INSTRUCTION MANUAL <Rev.3>
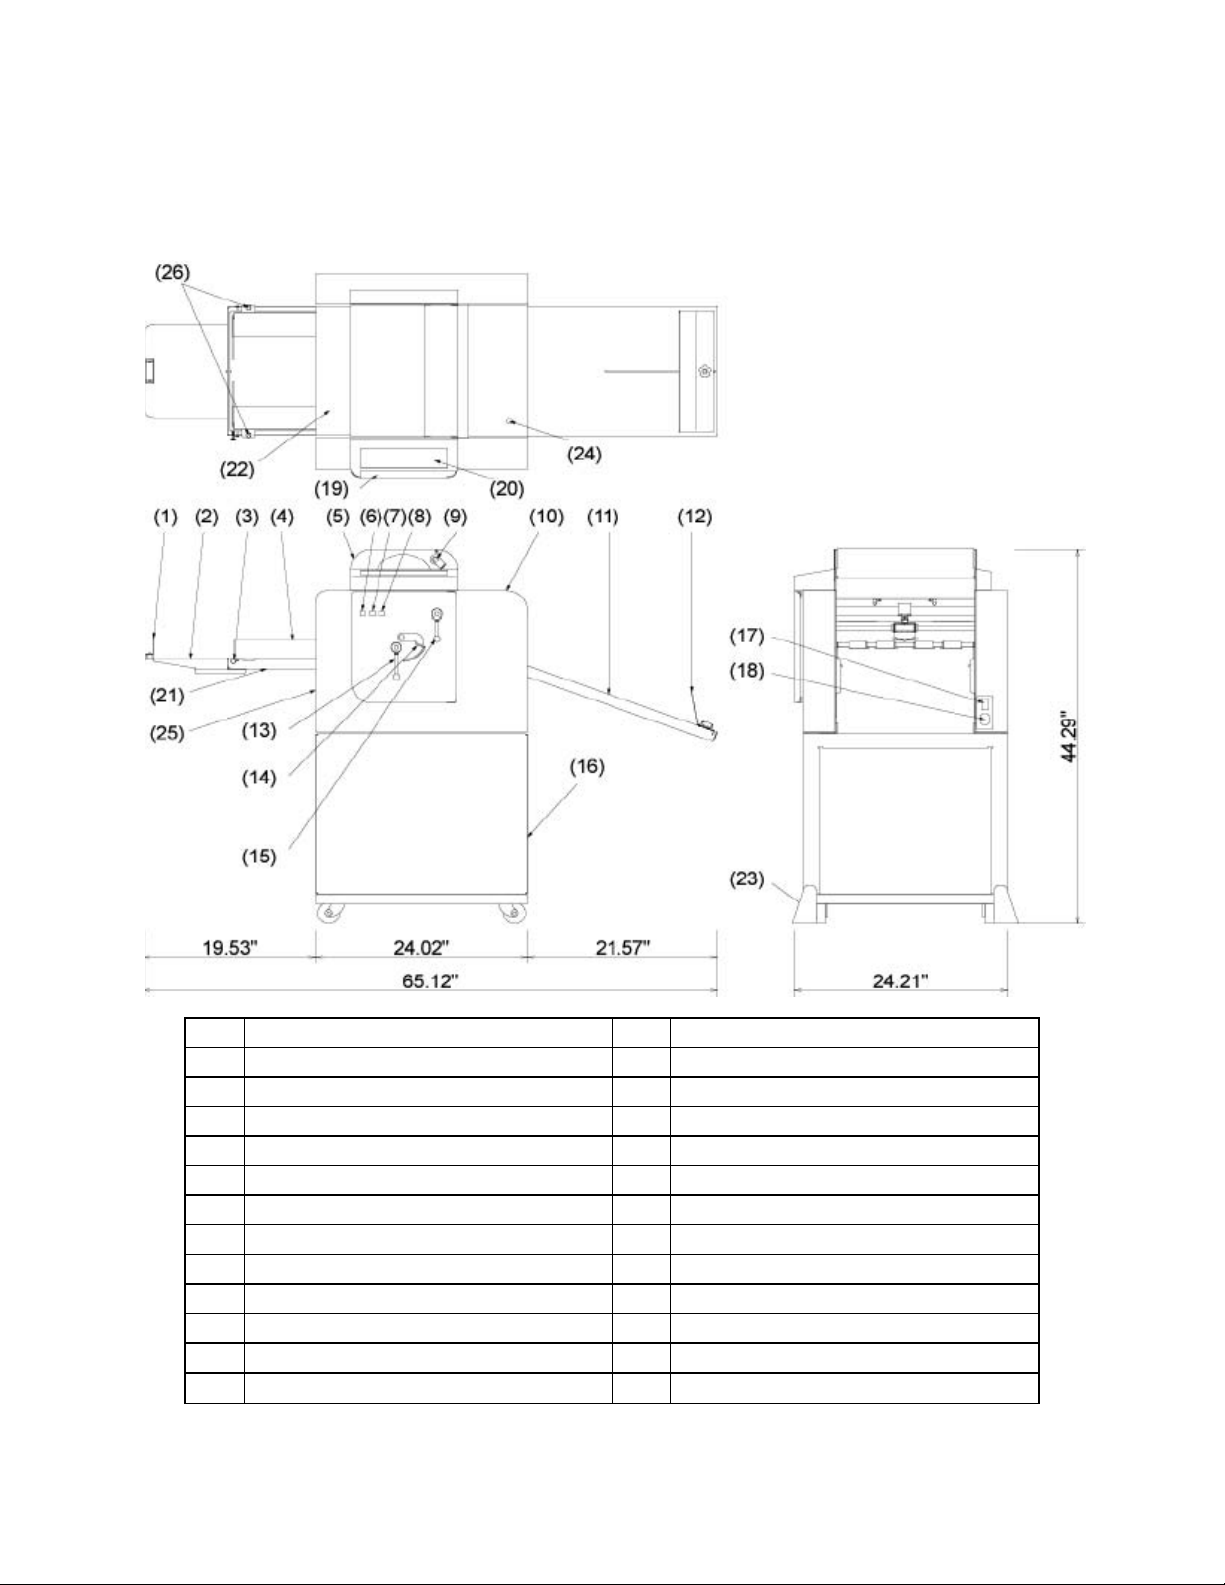
(1)
Feeder Guard
(14)
Decurling Lever
(2)
Extension Tray
(15)
Pull Roller Lever
(3)
Feeder Adjustment Knob
(16)
Stand
(4)
Feeder Paper Guide
(17)
Power Switch
(5)
Film Cover
(18)
Power Socket
(6)
Feeder Elevation Switch
(19)
Front Cover
(7)
Manual Feed Switch
(20)
Operation Panel
(8)
Film Setting Switch
(21)
Feeder Tray
(9)
Film Tension Knob
(22)
Feeder Cover
(10)
Cutter Cover
(23)
Metal Foot
(11)
Rear Exit Tray
(24)
Blade Position Adjustment Knob
(12)
Stacker Guard
(25)
Pressure Knob
(13)
Heating Roller Lever
(26)
Paper Guide Adjustment Knob
2.NAMES AND FUNCTIONS
2-1. OVERVIEW
Page 11
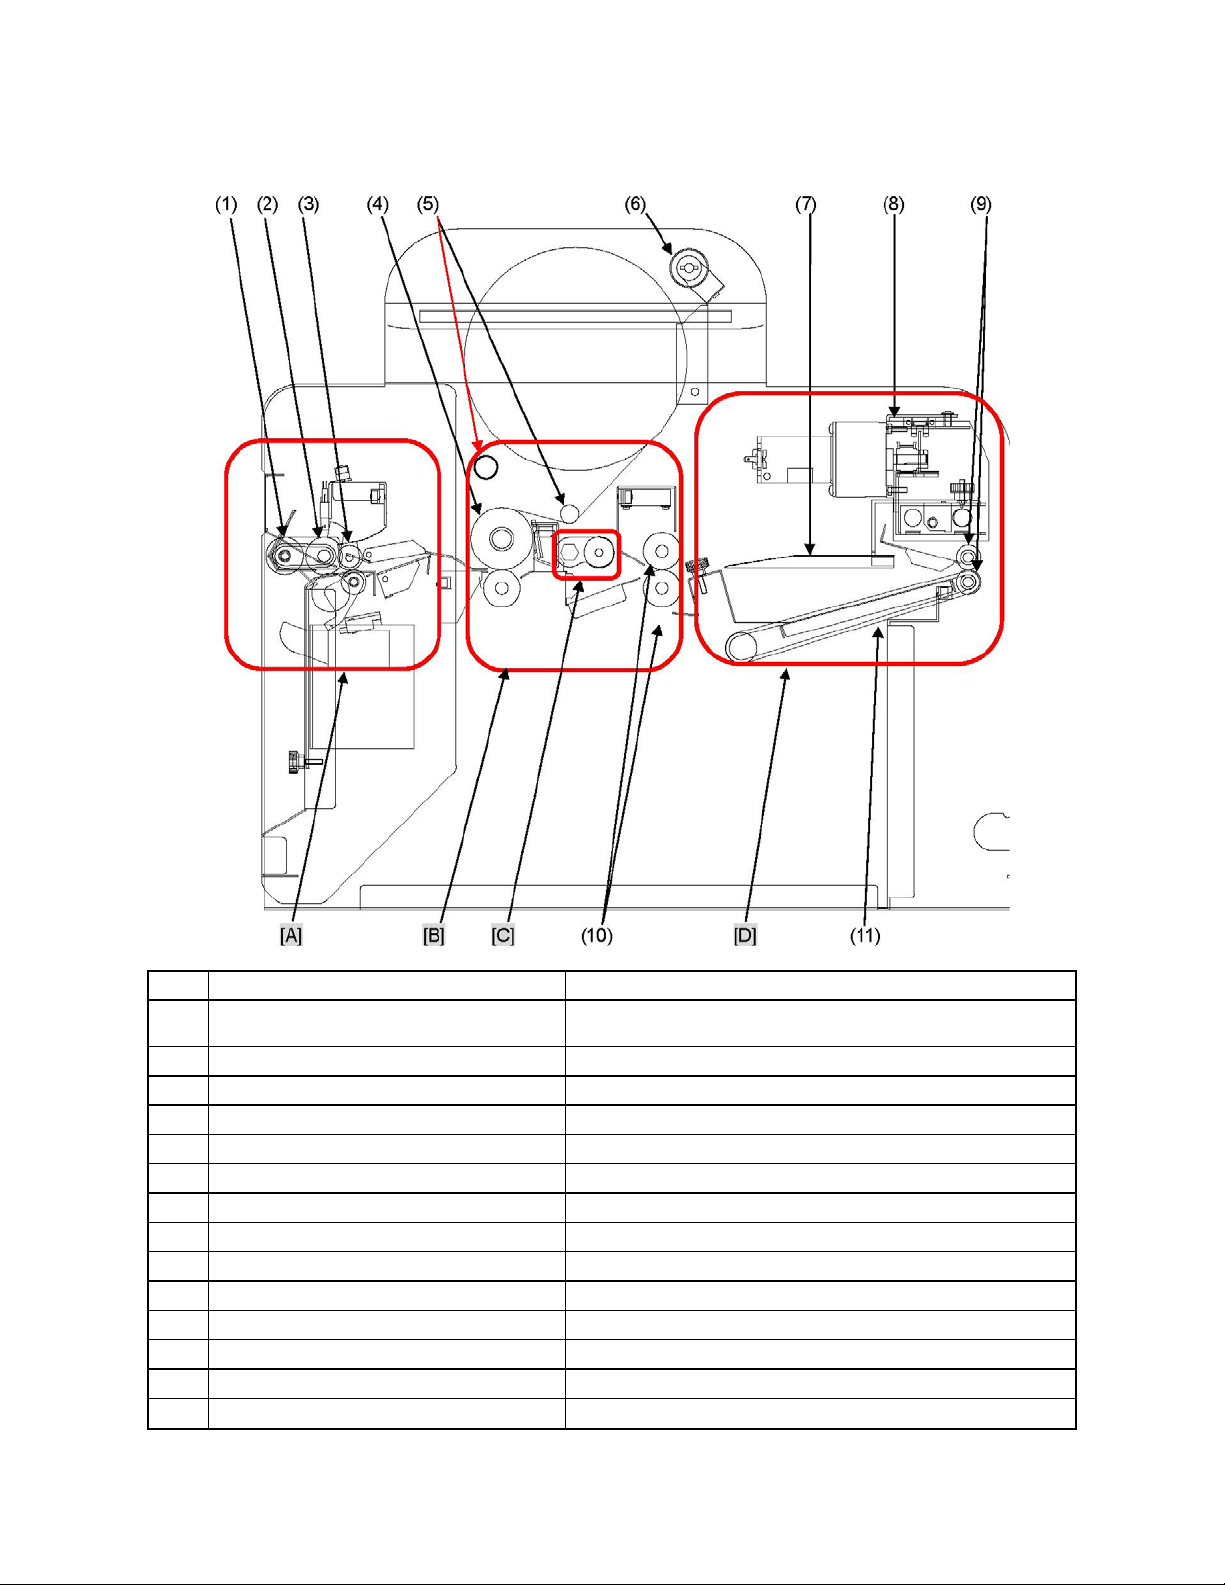
In conjunction with the resistance roller below it only one paper enters at
2-2. INTERIOR
AL-MEISTER PLS3311 INSTRUCTION MANUAL <Rev.3>
(1) (Upper) Feeding Roller 1 Picks up papers
(2) (Upper) Feeding Roller 2
(3) Transport Roller Transports paper to the machine
(4) Heating Roller Laminates film and paper with heat
(5) Film Guide Bar Position can be adjustable
(6) Film Tension Roller Controls film tension
(7) Blade Cuts film and separates papers
(8) Blade Unit Drives the separator blade
(9) Discharge Rollers Discharges the laminated papers
(10) Pull Rollers Transports laminated papers to the separator blade
(11) Transport Belt Transports laminated paper to the discharge roller
[A] Feeder Section Picks up one sheet and transports it to the lamination section
[B] Lamination Section Laminates the paper
[C] De-Curling Section De-curls the laminated paper
[D] Separation Section Separates sheets at the overlap and discharges
a time.
Page 12
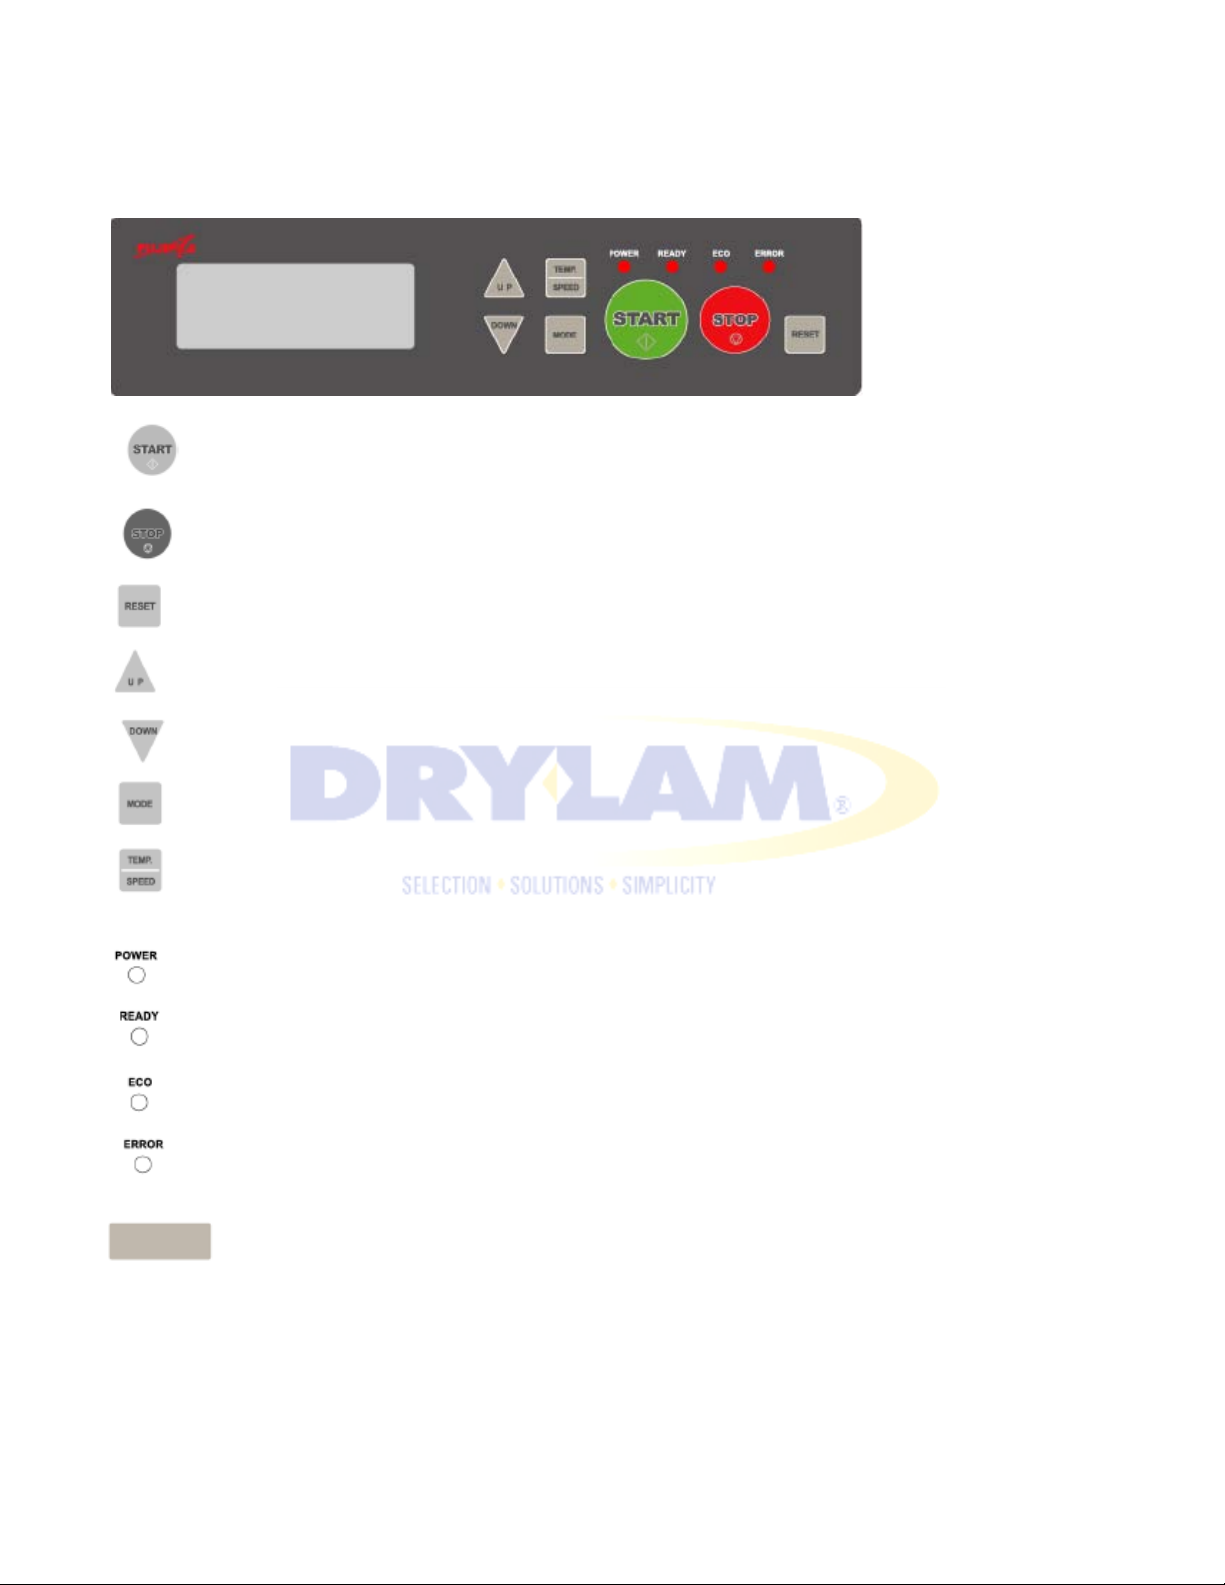
2-3. OPERATION PANEL
START key. Press to start operation
STOP key. Press to stop operation.
RESET key. Press to return to the operation mode and to reset the counter.
AL-MEISTER PLS3311 INSTRUCTION MANUAL <Rev.3>
SCROLL key (UP). Press to raise set value.
SCROLL key (DOWN). Press to reduce set value.
MODE key. Press to select MODE setting.
TEMP/SPEED key. Press to select temperature or speed setting. Hold
continuously to see the current temperature.
POWER LAMP. Indicates the power is on.
READY LAMP. Indicates that the set temperature has been achieved.
ECO LAMP. Lights during the power saving mode.
ERROR LAMP. Lights when an operation error occurs. To aid in servicing note
the error message that is generated on the LCD display.
LCD DISPLAY. Shows the status of the settings. See Chapter 2-4. LCD DISPLAY.
Page 13
AL-MEISTER PLS3311 INSTRUCTION MANUAL <Rev.3>
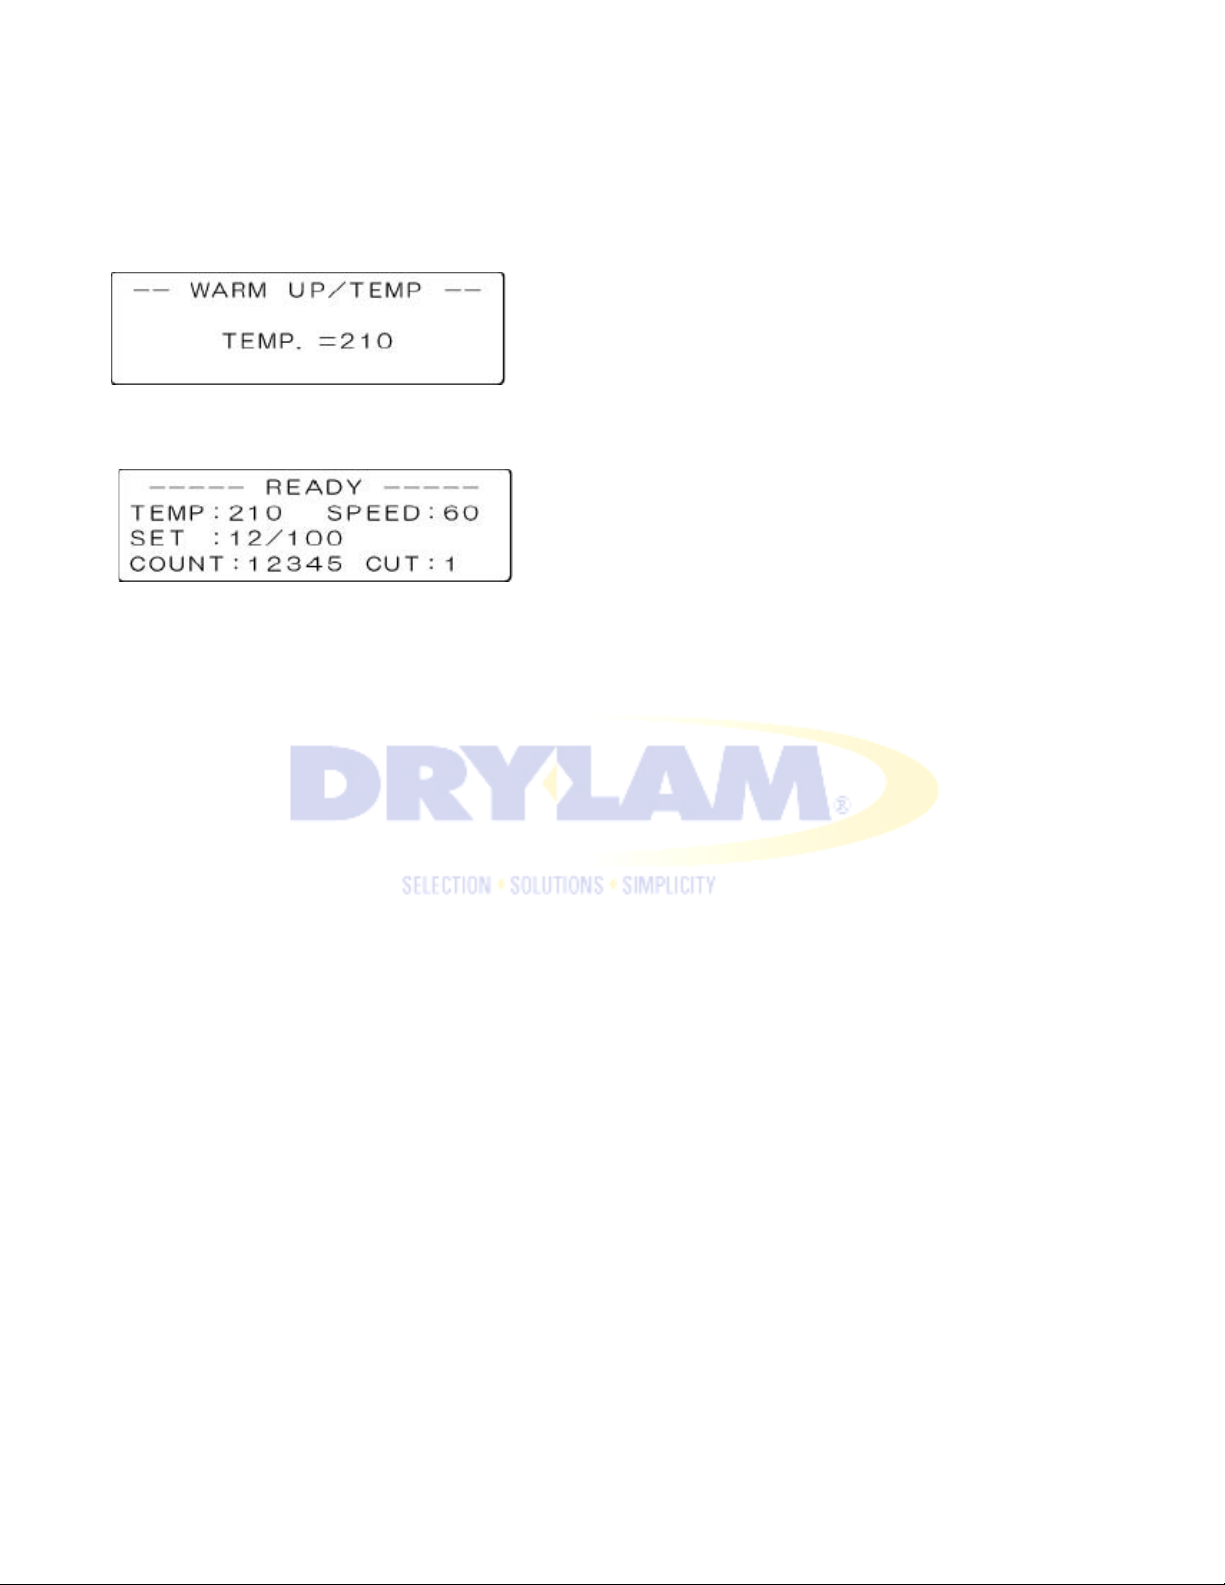
2-4. LCD DISPLAY
WARM UP
Indicates the set temperature.
Indicates the machine is being heated up. Operation is not
possible during this display.
DEFAULT DISPLAY
When the machine is heated up, buzzer beeps three times.
[TEMP] Indicates the set temperature of the heating roller.
[SPEED] Indicates the set speed. Example SPEED: 60 means 60” per minute
[SET] Indicates the set count. Example FREE: laminates all the papers in the feeder tray. EXAMPLE: 12/100: 12
sheets of 100 have been laminated with 88 remaining.
[COUNT] Indicates the total number of lamination during the operation. When 99999 is reached the counter
returns to 0 (zero).
[CUT] Indicates the cutting mode.
1 --- Two way cut (cut alternate from each side)
2 --- One way cut (always starts cut from the operator side)
NOTE
・Refer to SET CUT MODE in section 5-11 for more details.
Page 14
AL-MEISTER PLS3311 INSTRUCTION MANUAL <Rev.3>
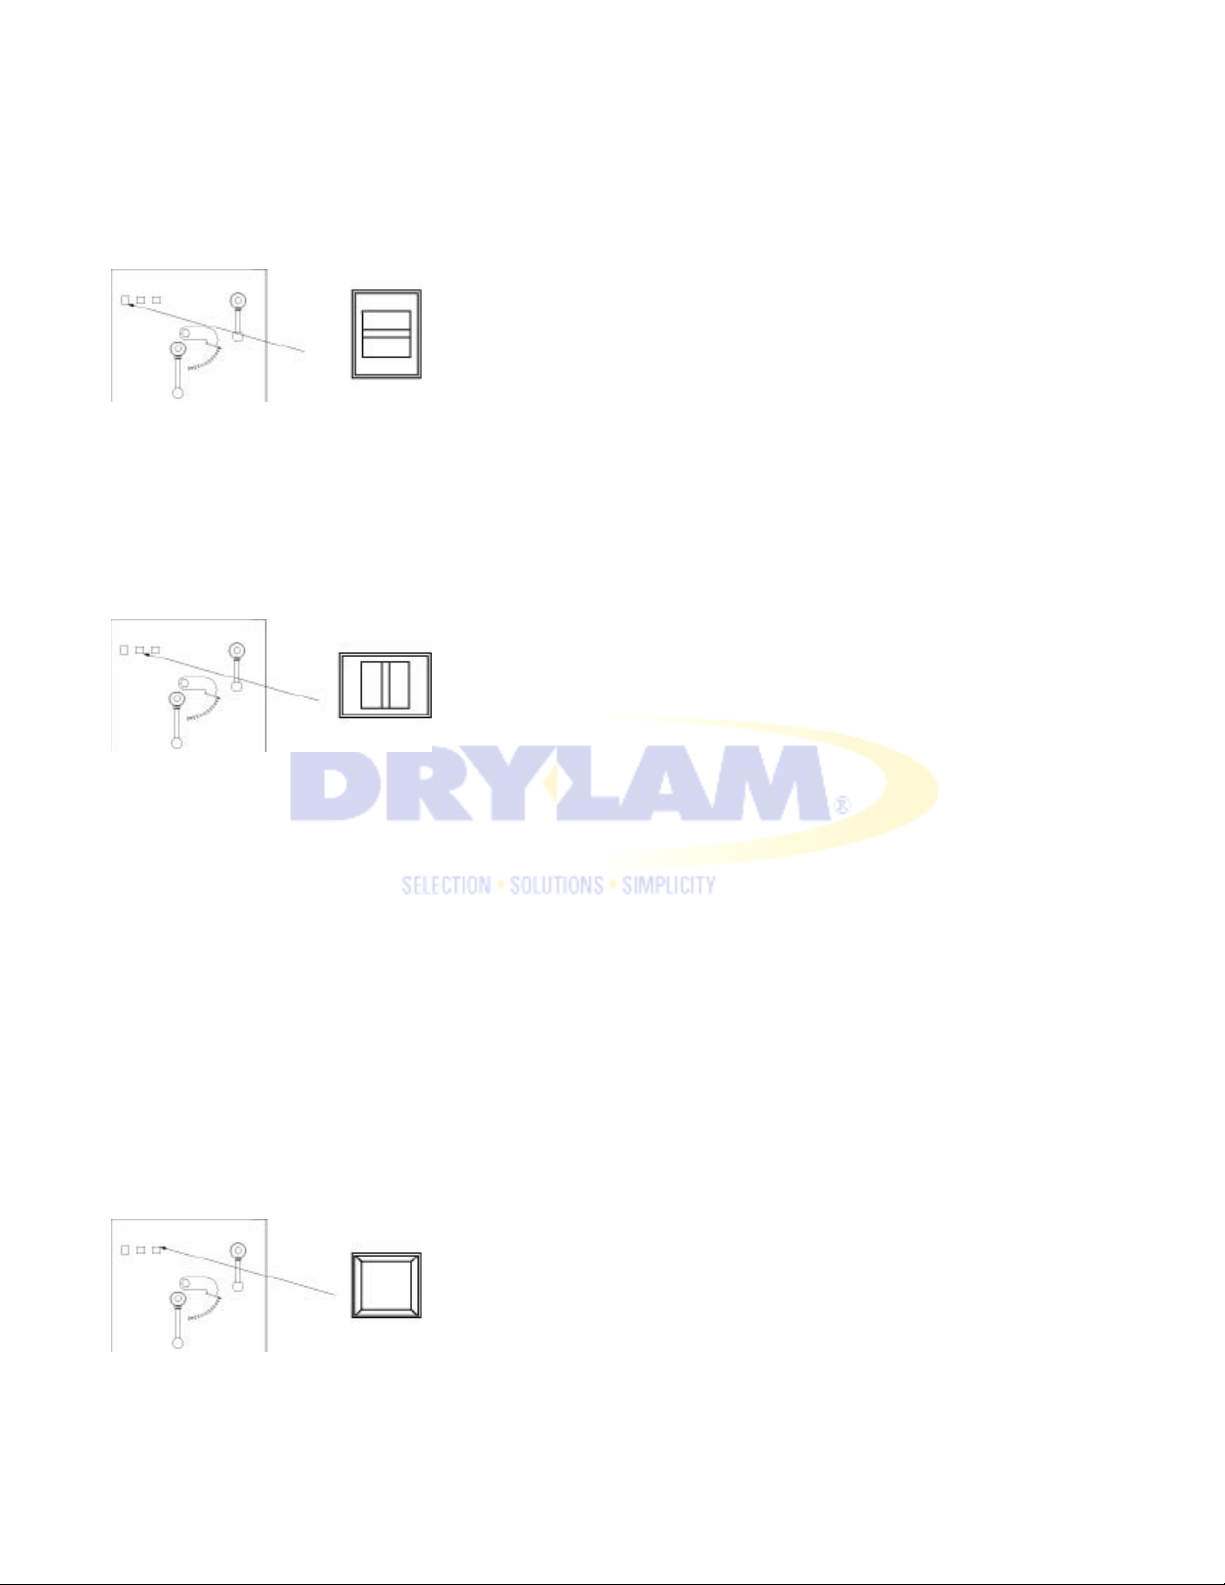
2-5. OTHER SWITCHES AND KEYS
FEEDER ELEVATION SWITCH
Raises or lowers the position of Feeder Tray for paper setting.
UP: the position of the Feeder Tray is raised.
DOWN: the position of the Feeder Tray is lowered.
MANUAL FEED SWITCH
Use to set film or to solve paper jam problems.
To feed backward, turn the switch to the left.
To feed forward, turn the switch to the right.
NOTE
・ When the Feeder Cover, Film Cover, or Separator Cover are open, motors cease to function for safety
reasons. The machine will continue to heat, however.
・ Use Manual Feed Switch only when you need to remove jammed paper, or when you need to feed
paper in the event of "Paper Jam" error.
FILM SETTING SWITCH
Use to set film. This should be done in the event of a “Control Film/Paper” error.
Page 15
AL-MEISTER PLS3311 INSTRUCTION MANUAL <Rev.3>
1
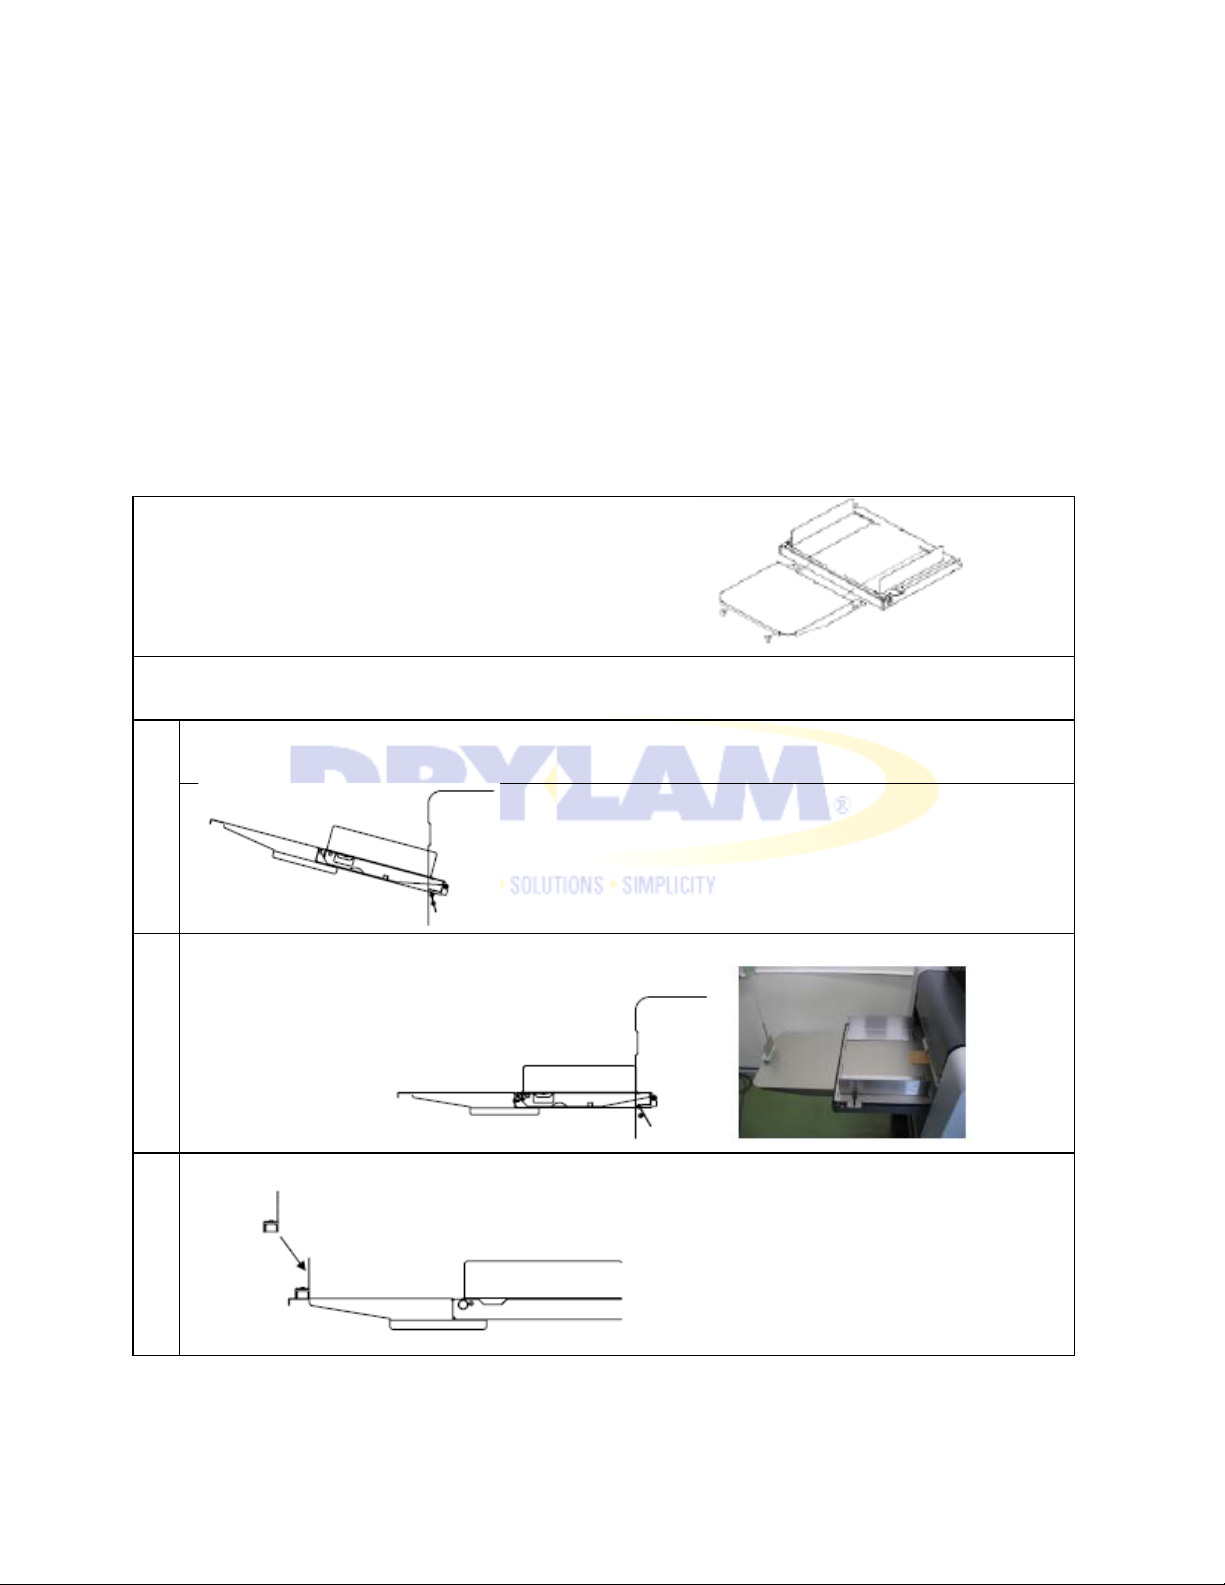
Attach the feeder tray assembly using both your hands.
Insert it on an angle shown in the illustration:
2
Fit the protruded parts of the machine into
3
Attach the feeder guard according to the paper
3.INSTALLATION
CAUTION
・Read the safety instructions carefully regarding installation and about proper grounding on page 3.
・When you install the Feeder Tray and Rear Exit Tray, avoid dropping them on your foot during the installation.
・Should there be any problem during the installation, please contact your administrator, dealer or Dry Lam’s
Tech-Line.
3-1. INSTALLING THE PLS3311
Allow a space of about 60 cm around the machine for flawless operation. Always make sure that the
four level stoppers are securely set.
3-2. SET FEEDER TRAY
Attach the Extension Tray to the Feeder Tray as shown.
the holes of the tray.
length.
Page 16
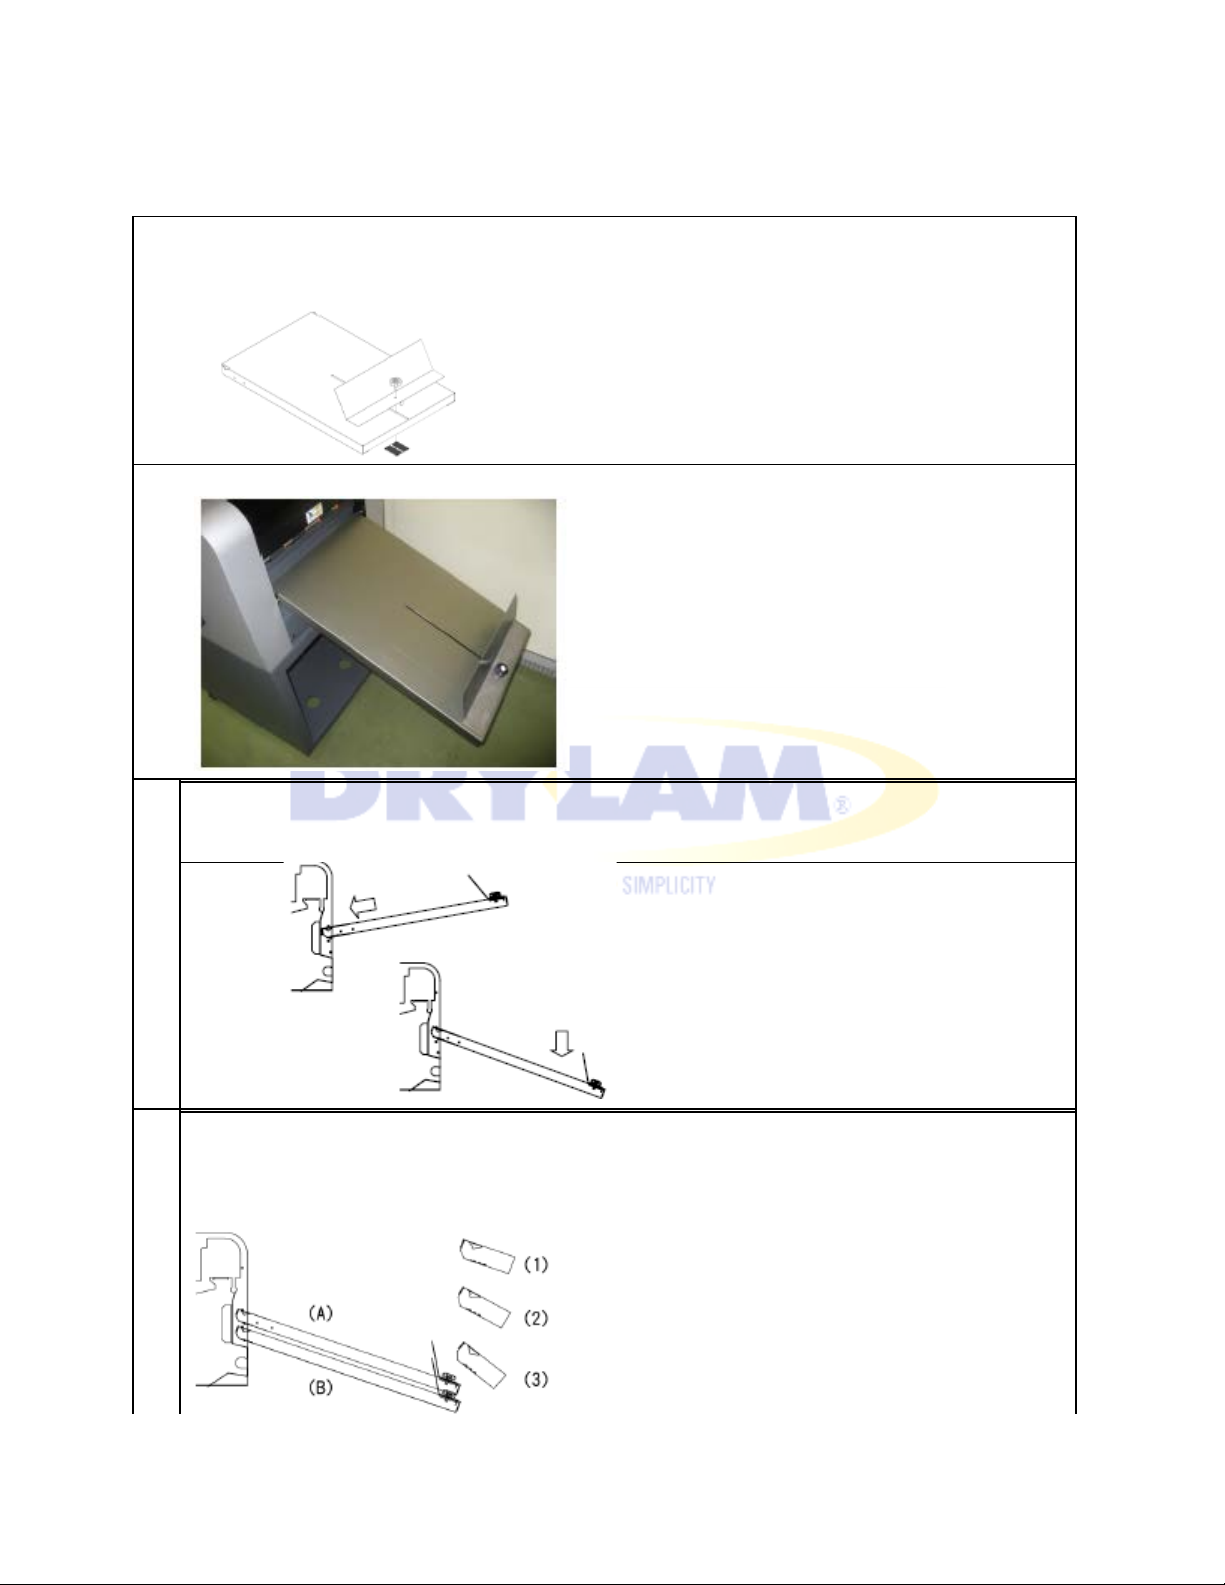
Remove the knob screw from the rear exit tray.
Apply Exit Tray Guard and fasten the knob
The picture shows the rear exit tray installed in its correct position.
1
Hold the rear exit tray with both your hands.
Fit it as shown in the illustration. Make sure that the Exit Tray is securely
2
The Rear Exit Tray can be adjusted in two positions (high/low) with three different angles each.
3-3. SET REAR EXIT TRAY
AL-MEISTER PLS3311 INSTRUCTION MANUAL <Rev.3>
attached.
Select the appropriate position for the paper used. (A) and (3) for thin paper (B) and (1) for thick
paper.
Page 17
AL-MEISTER PLS3311 INSTRUCTION MANUAL <Rev.3>
3
Rear Exit Tray can be stored in a vertical position.
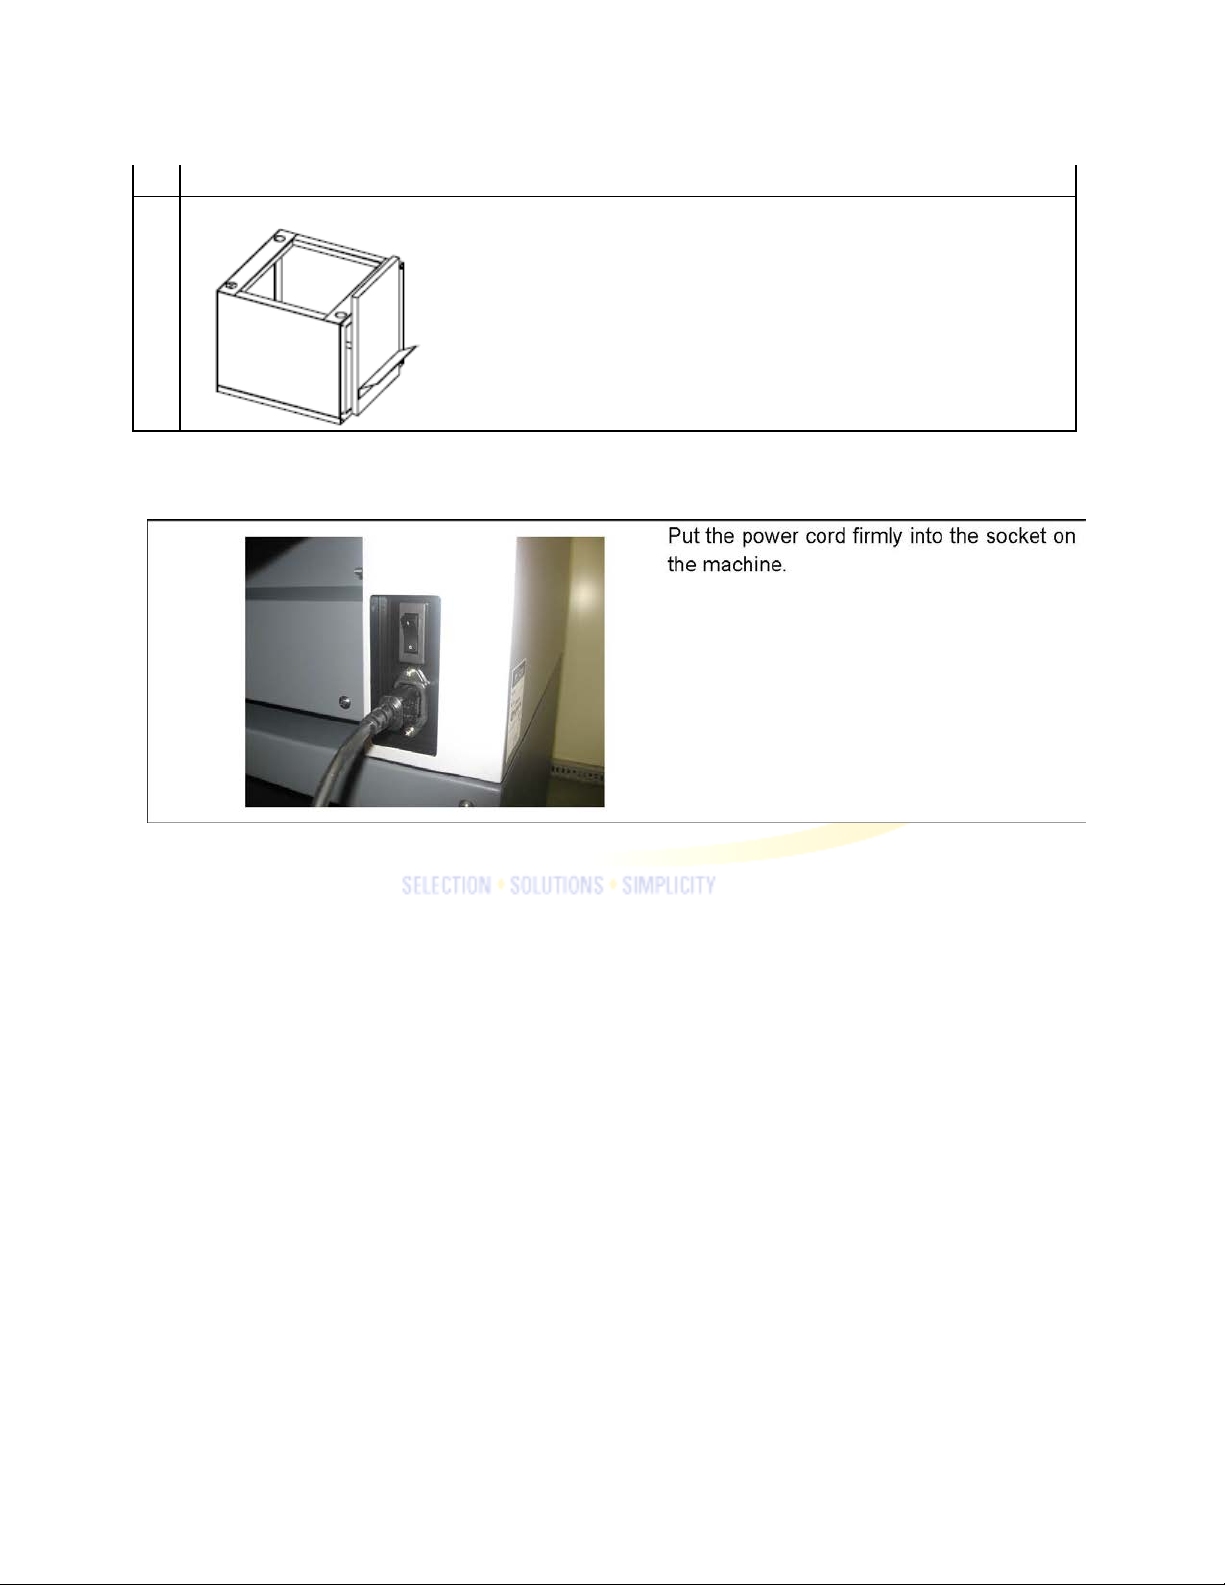
3-4. ATTACH POWER CORD
Page 18
AL-MEISTER PLS3311 INSTRUCTION MANUAL <Rev.3>
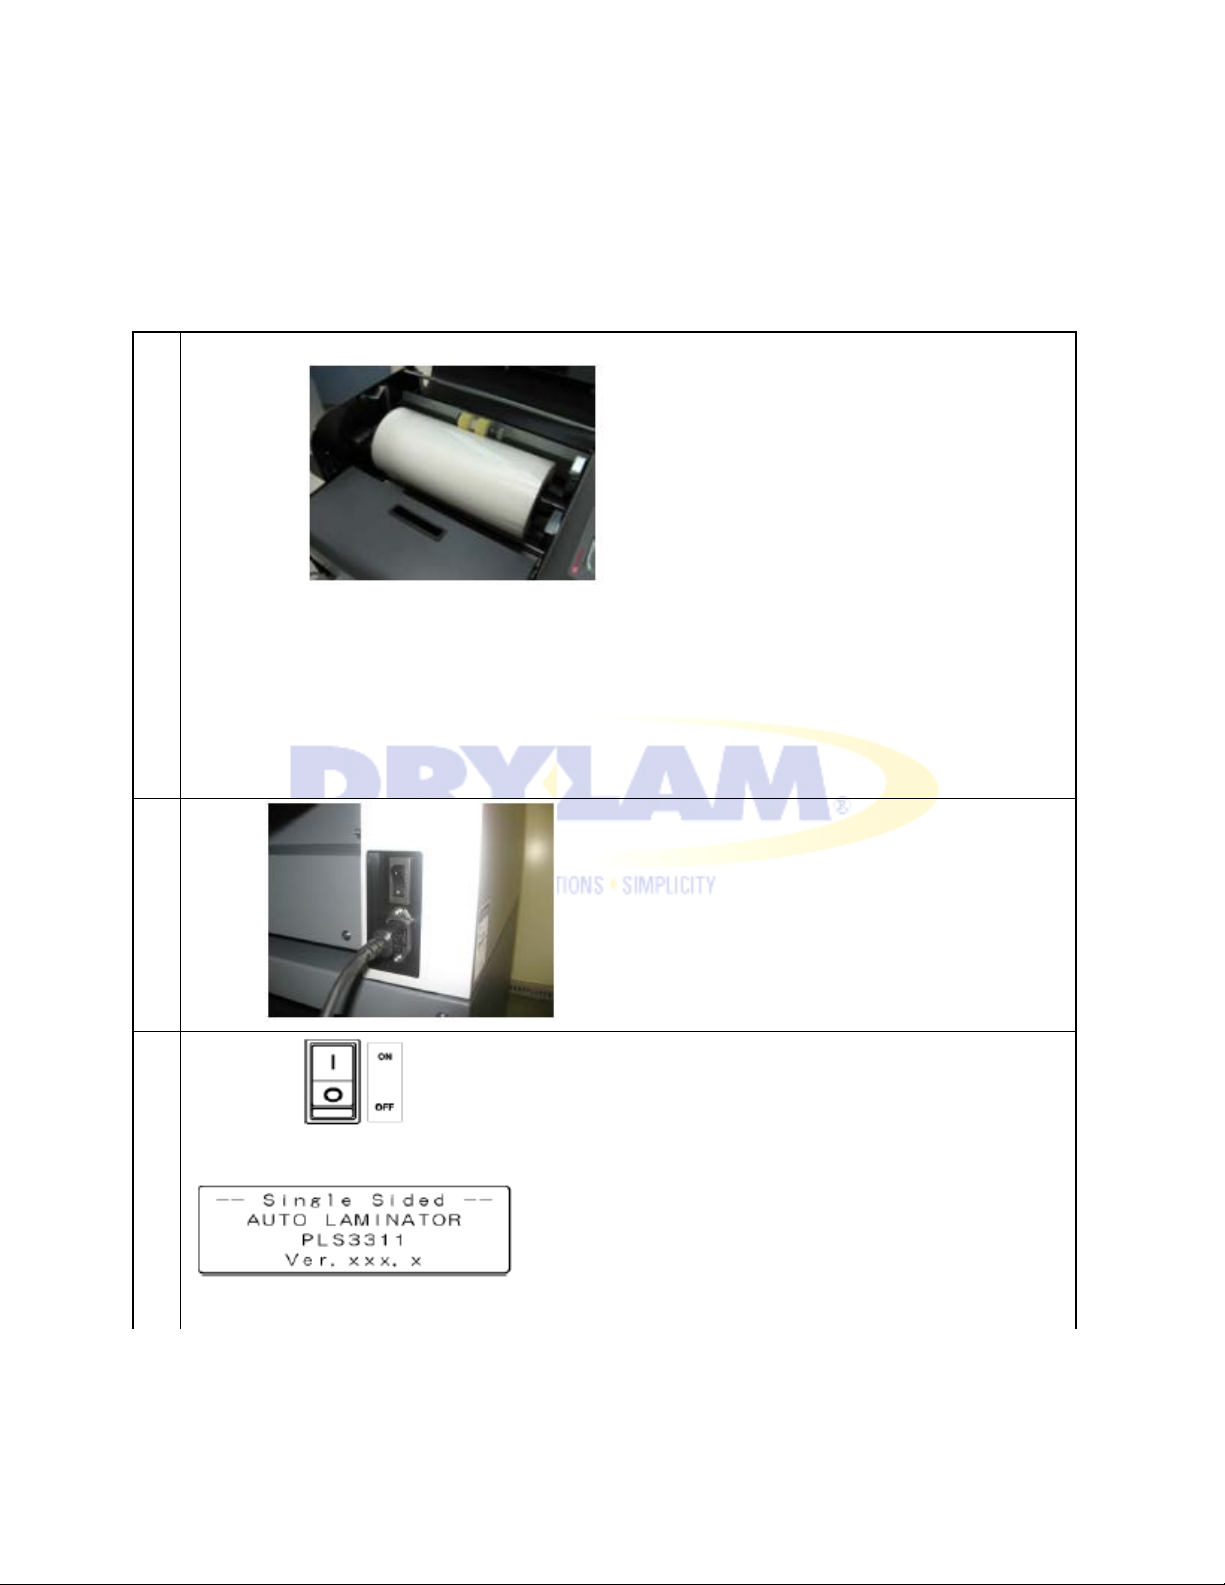
Set PLUSTER FILM in the socket. The end of the film will come off the BOTTOM of the roll when
2
3
4.OPERATION
4-1. WARM UP
CAUTION: The PLS3311 will not heat up or operate without PLUSTER FILM.
1
properly set.
Plug in.
Switch ON.
Buzzer beeps. This display appears for 3 seconds.
Page 19
AL-MEISTER PLS3311 INSTRUCTION MANUAL <Rev.3>
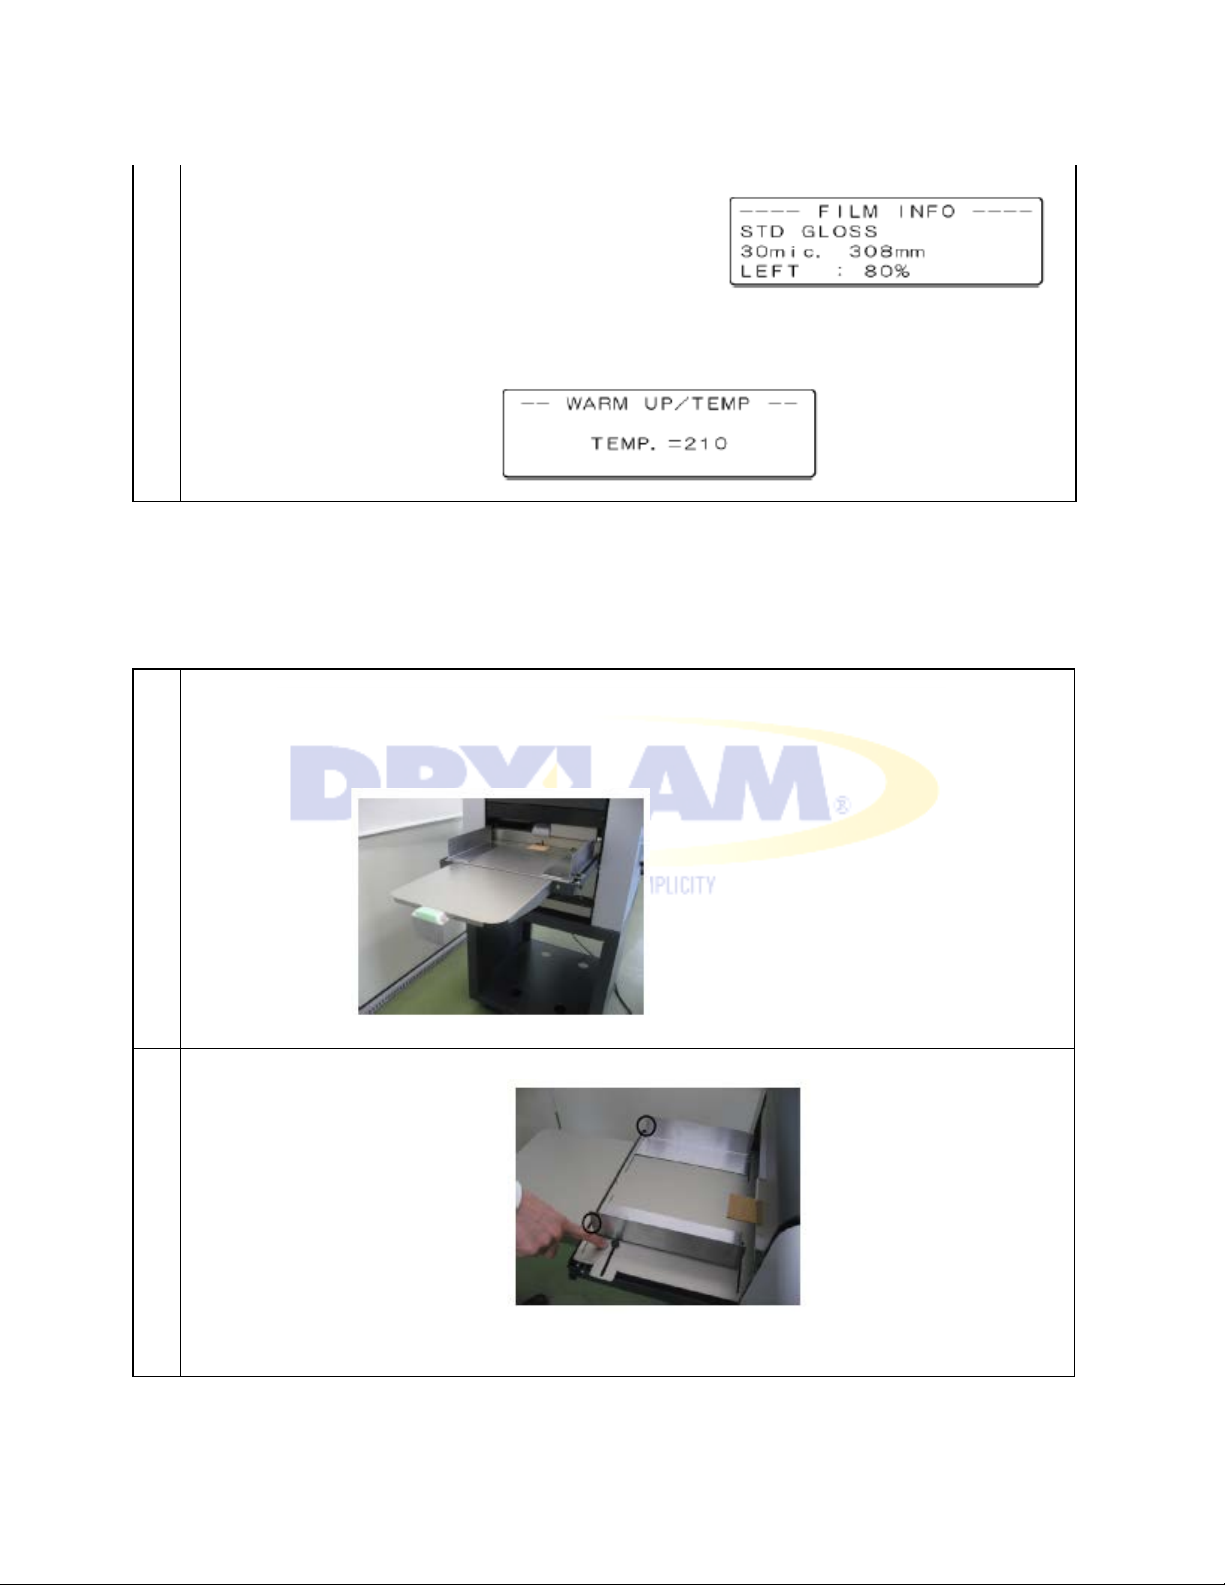
1
2
Widen the paper guide at both sides by loosening the knob. Hold both ends (marked with a
Information about the installed film appears for 5 seconds.
“WARM UP” display appears. POWER lamp lights. NOTE ・These displays will only appear when
the PLUSTER FILM is correctly set.
4.OPERATION
4-2. SETTING PAPER
Turn the feeder guard to outer side. NOTE ・Lower the feeder tray by using Feeder
Elevation Switch.
circle) and move the paper guides.
Page 20
AL-MEISTER PLS3311 INSTRUCTION MANUAL <Rev.3>
3
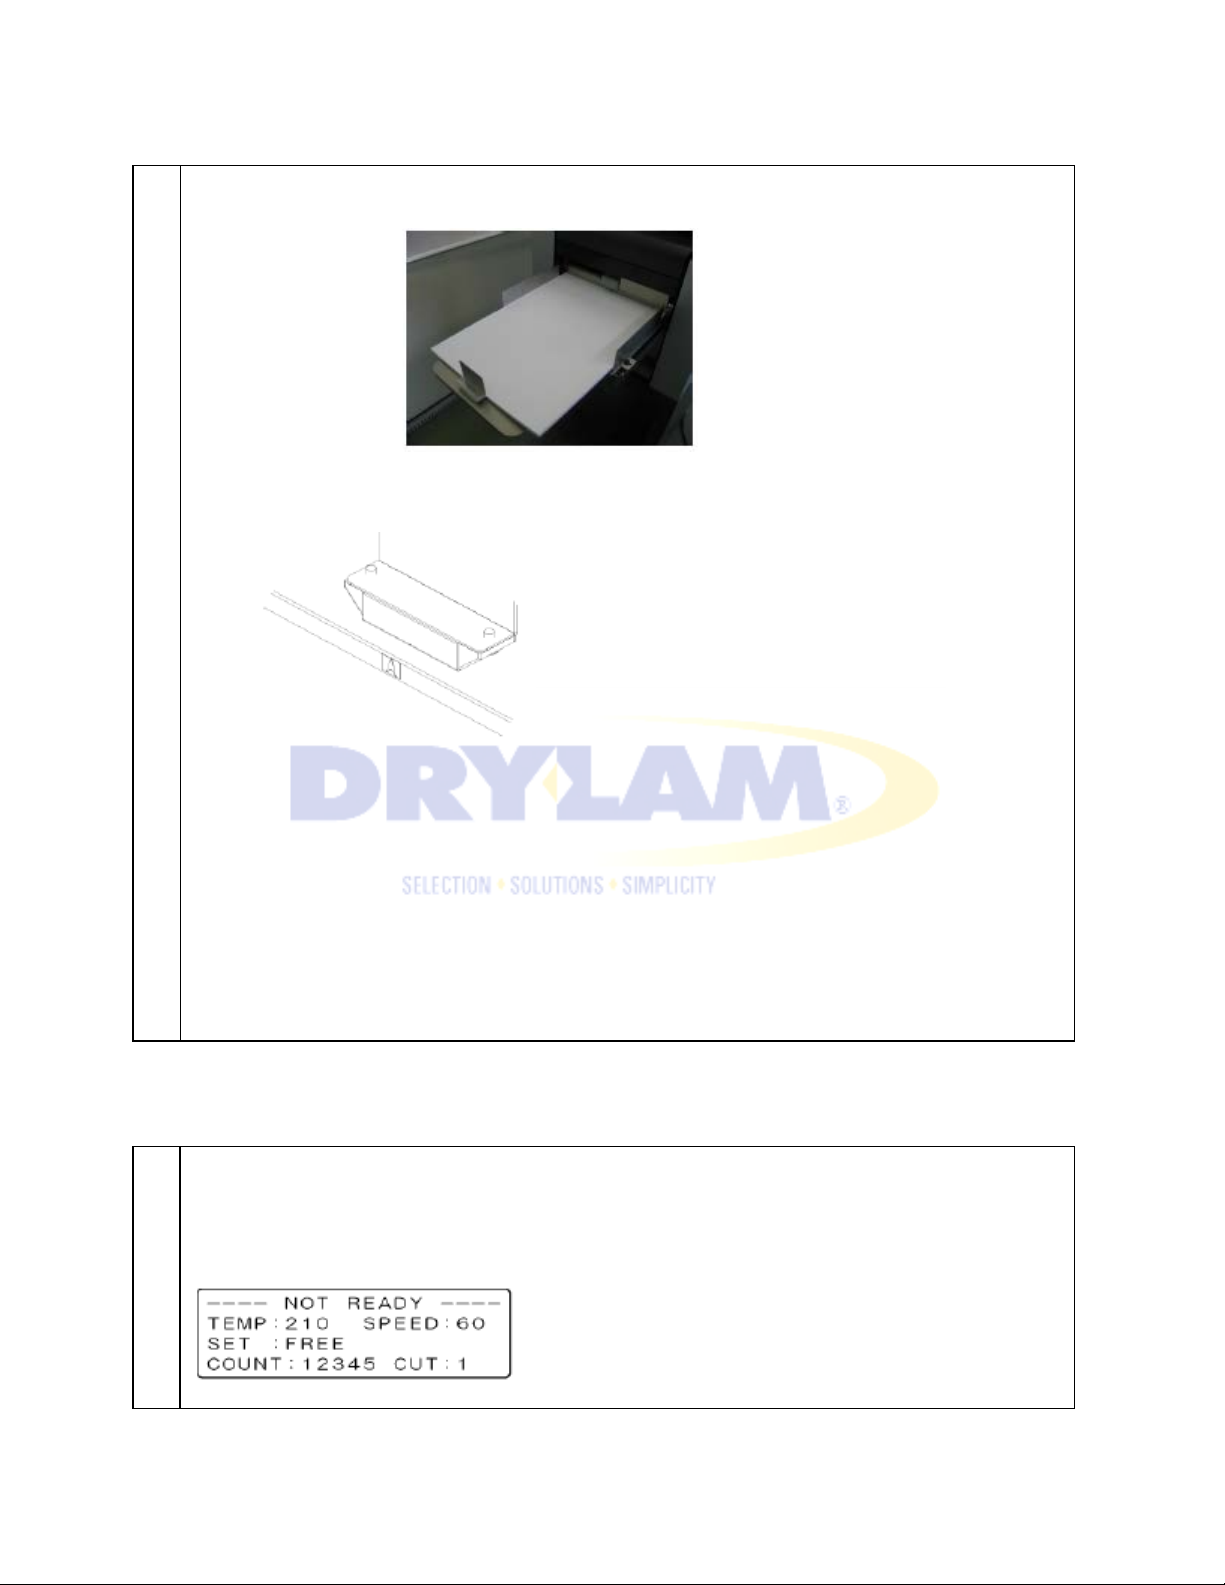
Place a few sheets of paper in the Feeder Tray so that the position is flush at the center of the
Even when the machine is warmed up, the display “NOT READY” will appear. The film can be set
paper and the center mark of the feeder Tray. Fix both paper guides. Make sure that the paper is
touching the entrance.
Put Feeder Guard up against the
paper.
NOTE ・It is recommended to set paper that is the same type and the same size as the actual
material you wish to laminate and to do test laminations first. CAUTION ・Before opening the
feeder cover, remove any papers from the feeder tray first.
4-3. SETTING FILM
1
at this point.
Page 21
AL-MEISTER PLS3311 INSTRUCTION MANUAL <Rev.3>
2
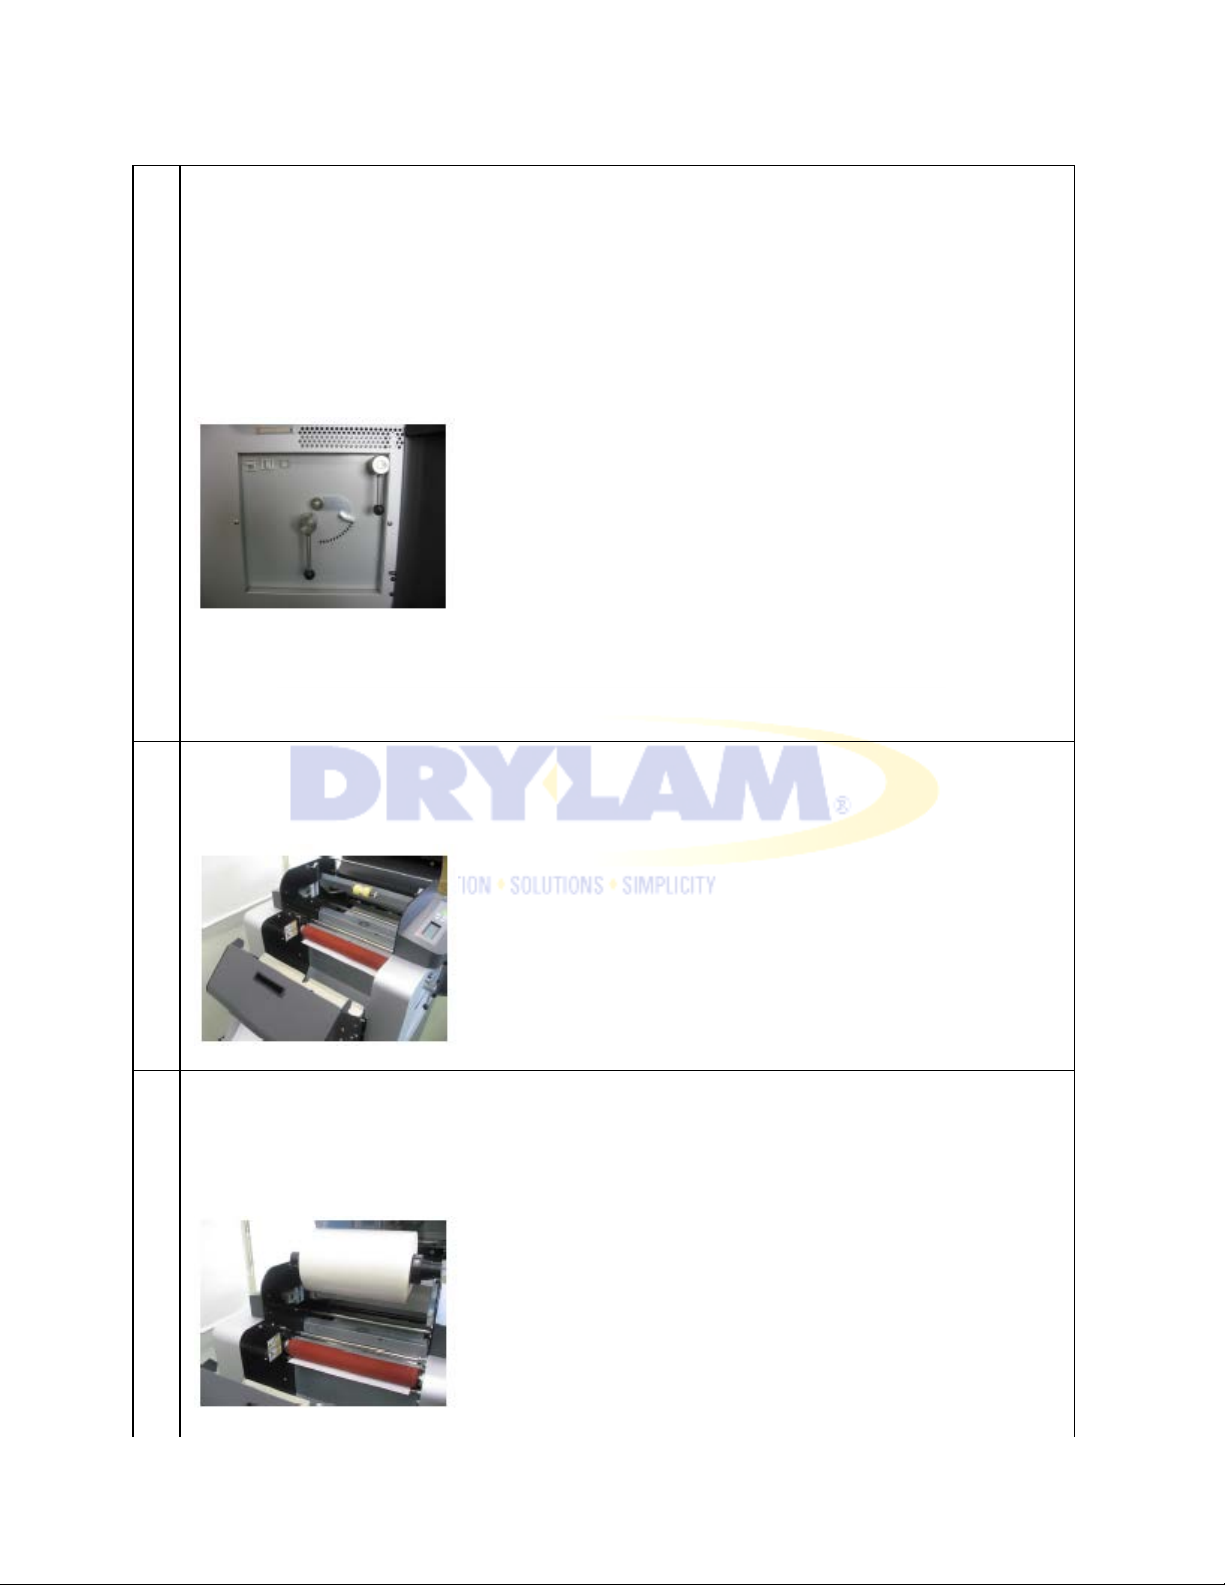
Make sure that:
A) Place the heating roller lever and the pull roller lever are in the down position.
3
When the first paper comes to a stop remove any remaining paper from the Feeder Tray (you
Hold the film roll and place both film ends on the upper film rack (above the socket where the
NOTE ・The display shows FILM ERROR when you remove the film roll. This is normal. It will go
B) Set the de-curling lever in the position marked FREE at the right end of the scale.
C) Press FILM SETTING switch. NOTE ・The first paper is picked up and fed.
may leave the tray on the machine, if you wish) and open both the Film and Feeder Covers.
4
film sits in normal operation). This places it out of the way which aids in threading the machine.
back to its original display when the film roll is set in its proper operating position.
Page 22
AL-MEISTER PLS3311 INSTRUCTION MANUAL <Rev.3>
5
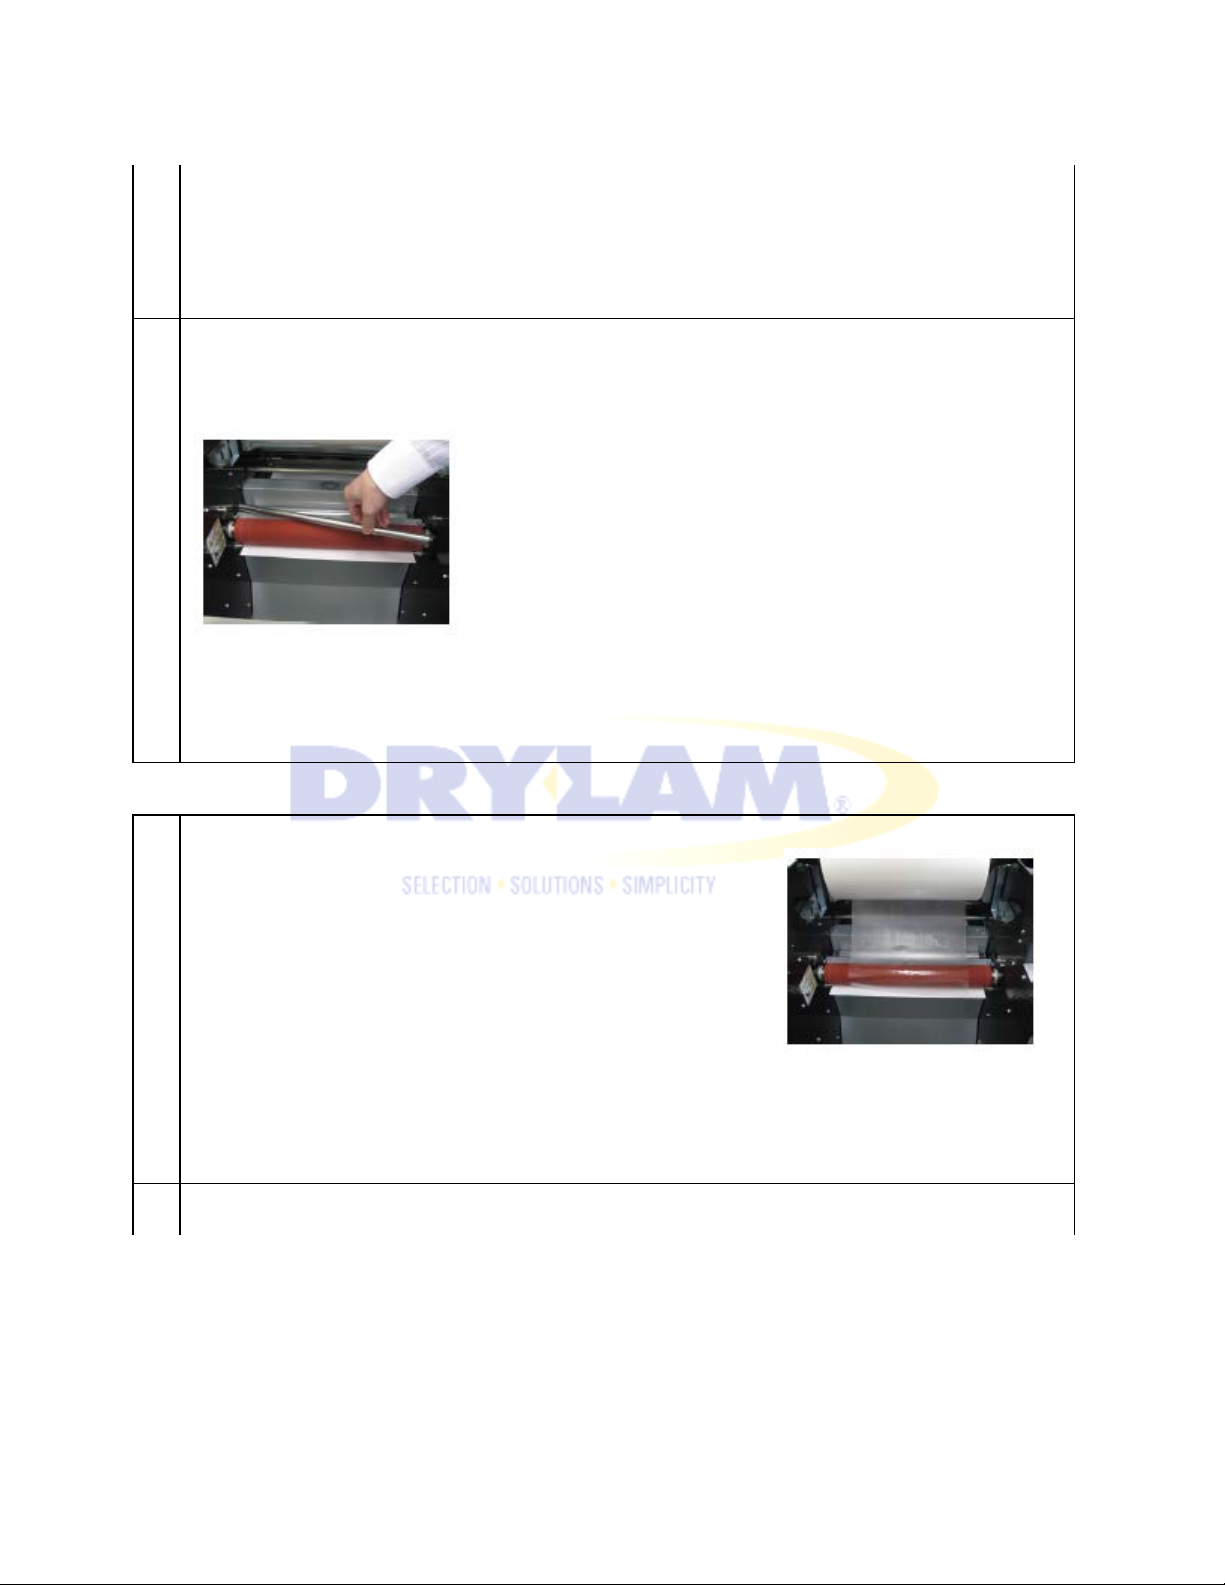
Remove Film Guide Bar.
To remove the guide bar, push the bar to one side to depress the spring. The other side of the
.
6
7
Stick the film end to the paper as shown in the picture. The film adhesive is melted and easily
guide bar should now be free, and allow the bar to be lifted out of the machine.
CAUTION ・Heating rollers and guide bar may be HOT!
Pull out about 20” of film. NOTE ・PLUSTER FILM must be set in the right direction (feeding off
the bottom of the roll), otherwise adhesive will get on the rollers.
Page 23
AL-MEISTER PLS3311 INSTRUCTION MANUAL <Rev.3>
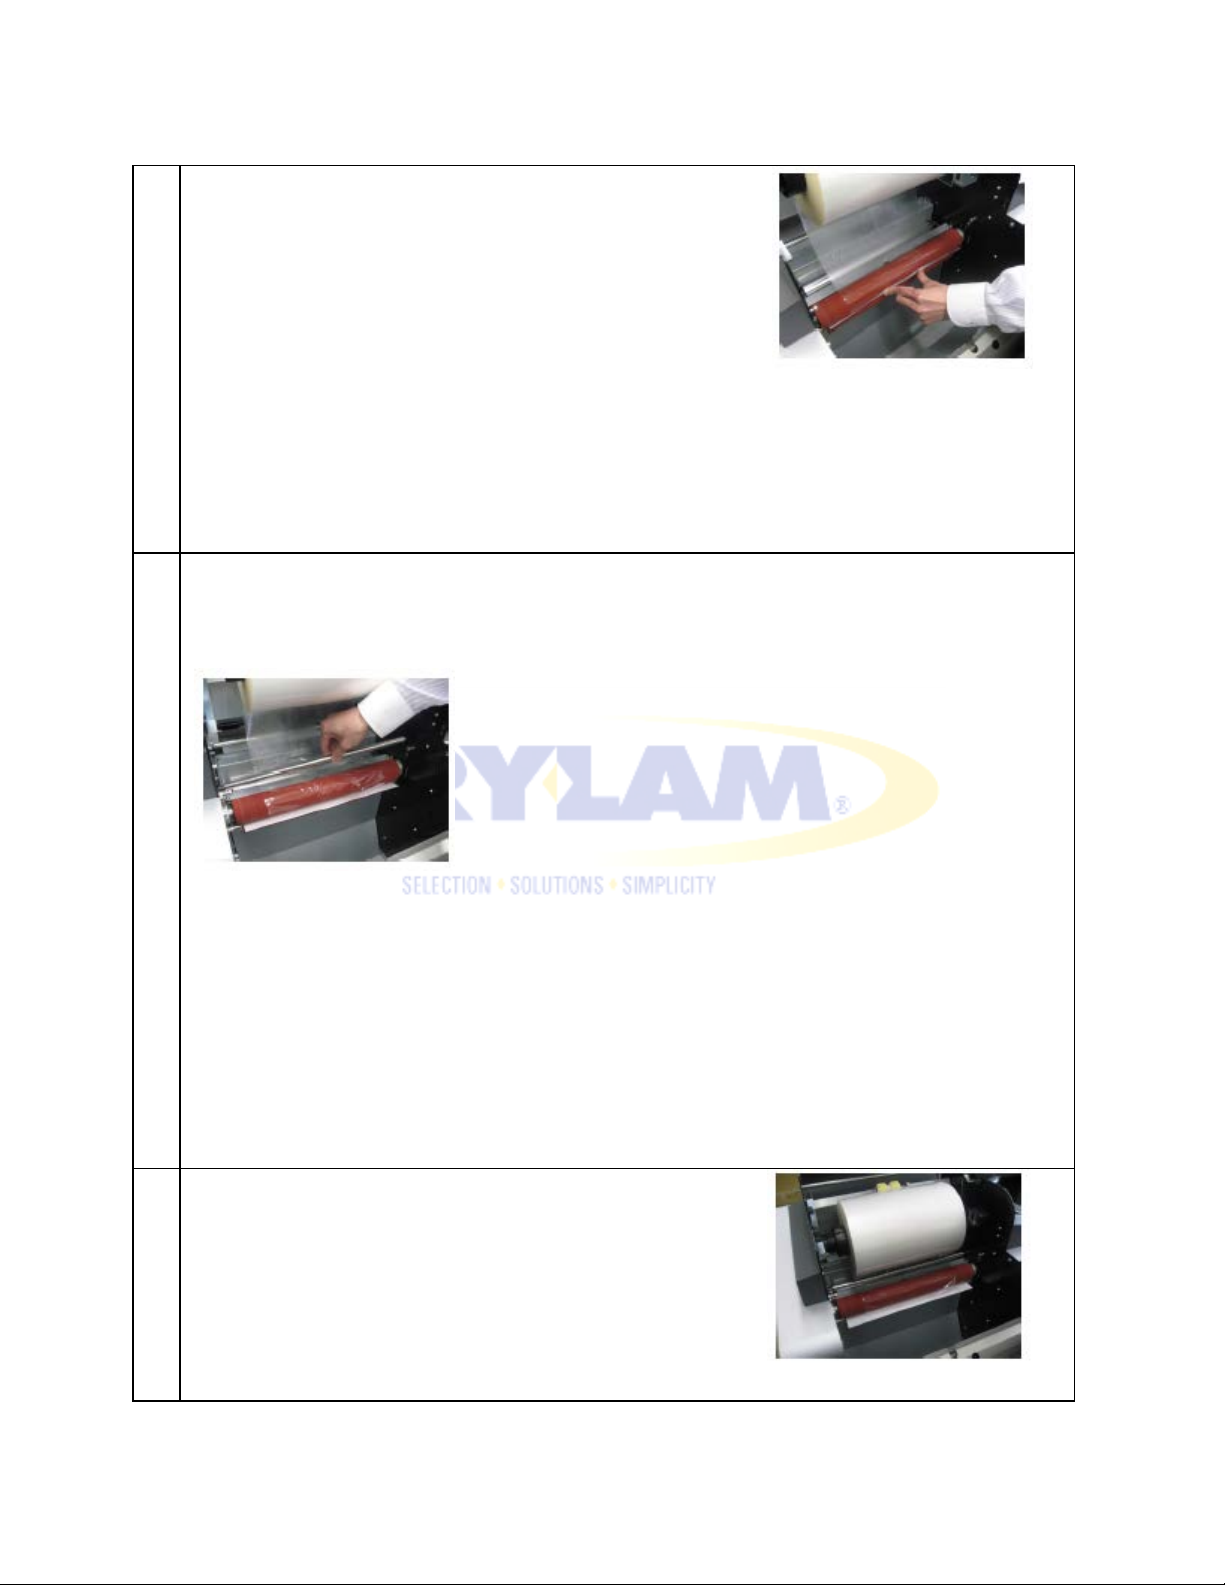
Reinstall the film guide bar end into the left hand side first, depress spring by pushing to the left
9
sticks to the paper. CAUTION ・The heating roller gets very hot.
and re-locate the right hand end of the bar. NOTE ・You can move the position of the film guide
8
bar. The positions are shown in the chart 2-2 INTERIOR, P.9.
Put the film roll back in its correct position in the lower sockets.
Page 24
AL-MEISTER PLS3311 INSTRUCTION MANUAL <Rev.3>
10
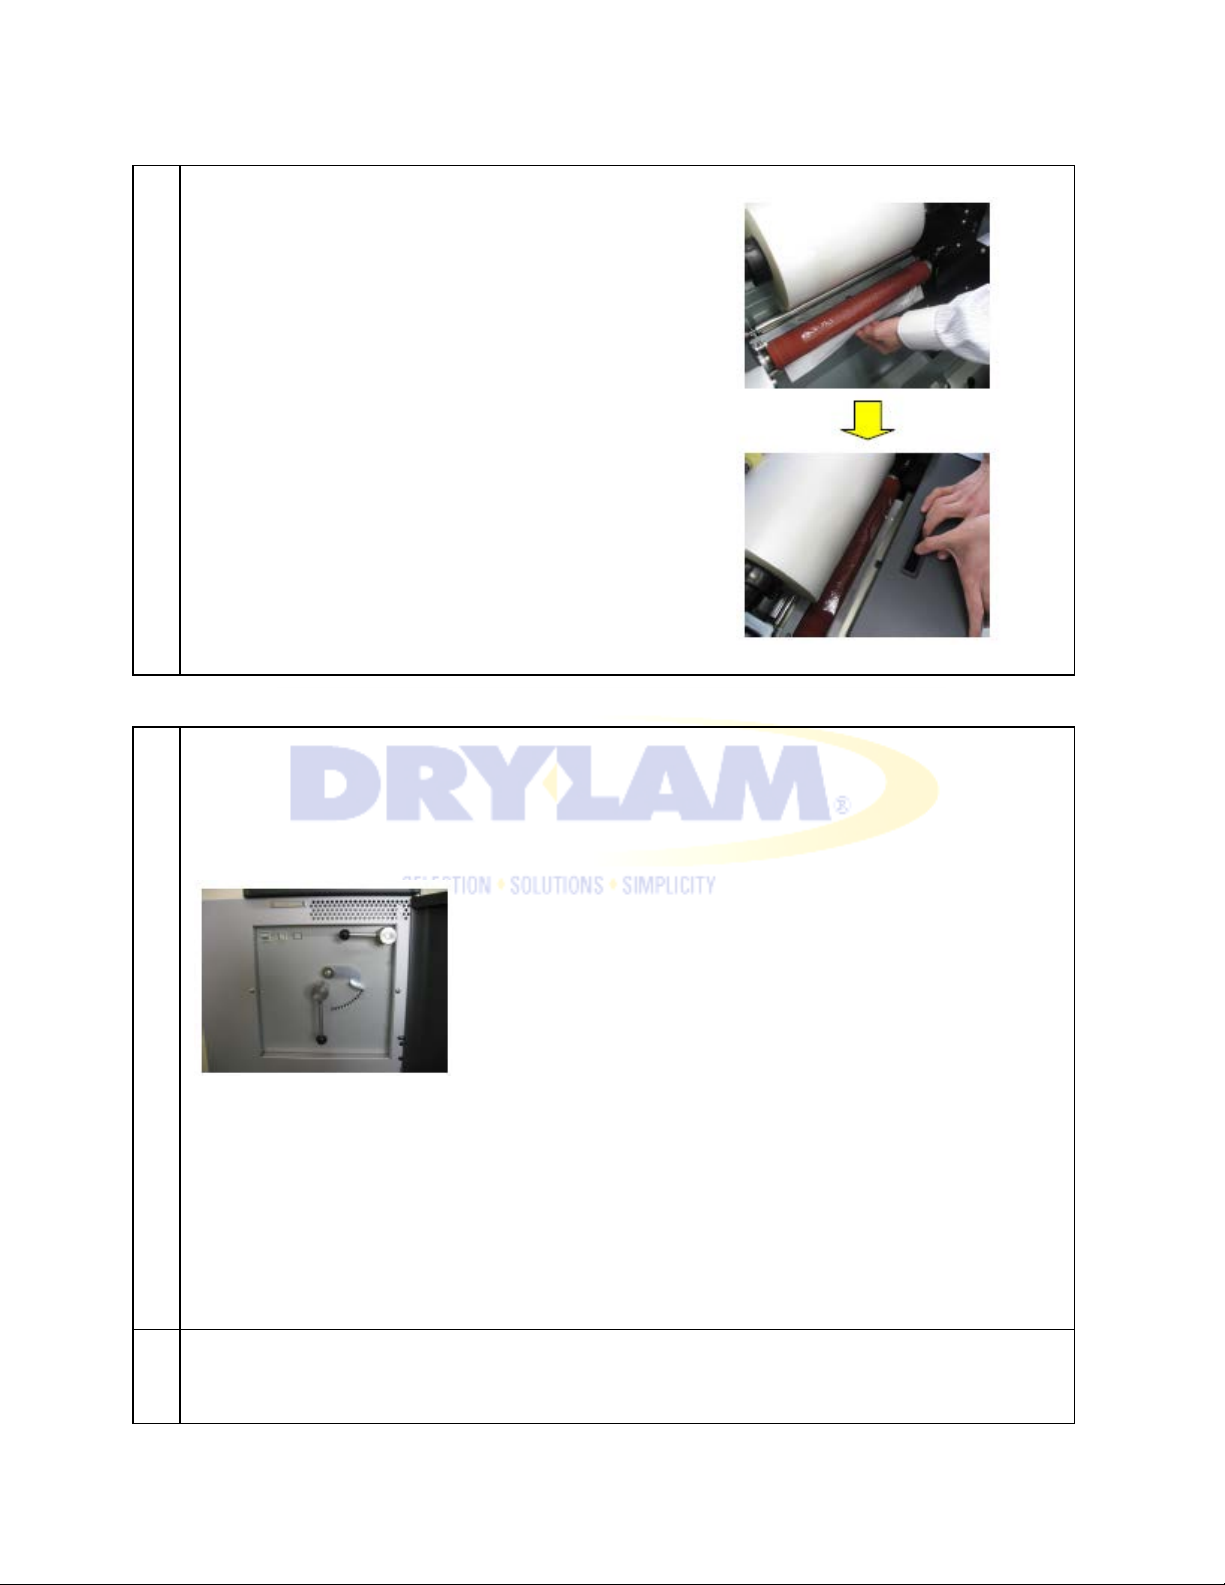
Close the feeder cover while holding the paper end as shown in the picture. NOTE: Make sure
11
Turn Pull Roller lever to UP position
12
Close the film cover.
that the paper stays flat, or underneath the lip of the feeder.
Move De-curling lever to center “0” position.
Then, turn Pull Roller Lever to DOWN position again.
NOTE:
• While the Pull Roller Lever is in the UP position pull and move the de-curling Lever to the
position you want. By releasing the lever it will be locked into place.
• For paper thicker than 0.043lbs/ft2 it is recommended to keep de-curling Lever at FREE
position for test lamination.
• Make sure the Pull Roller Lever is in the UP position when you move the de-curling Lever.
Load some paper on the Feeder Tray
Press the FILM SETTING switch.
Page 25
AL-MEISTER PLS3311 INSTRUCTION MANUAL <Rev.3>
The paper will be laminated and exit. A new sheet will be drawn in and set.
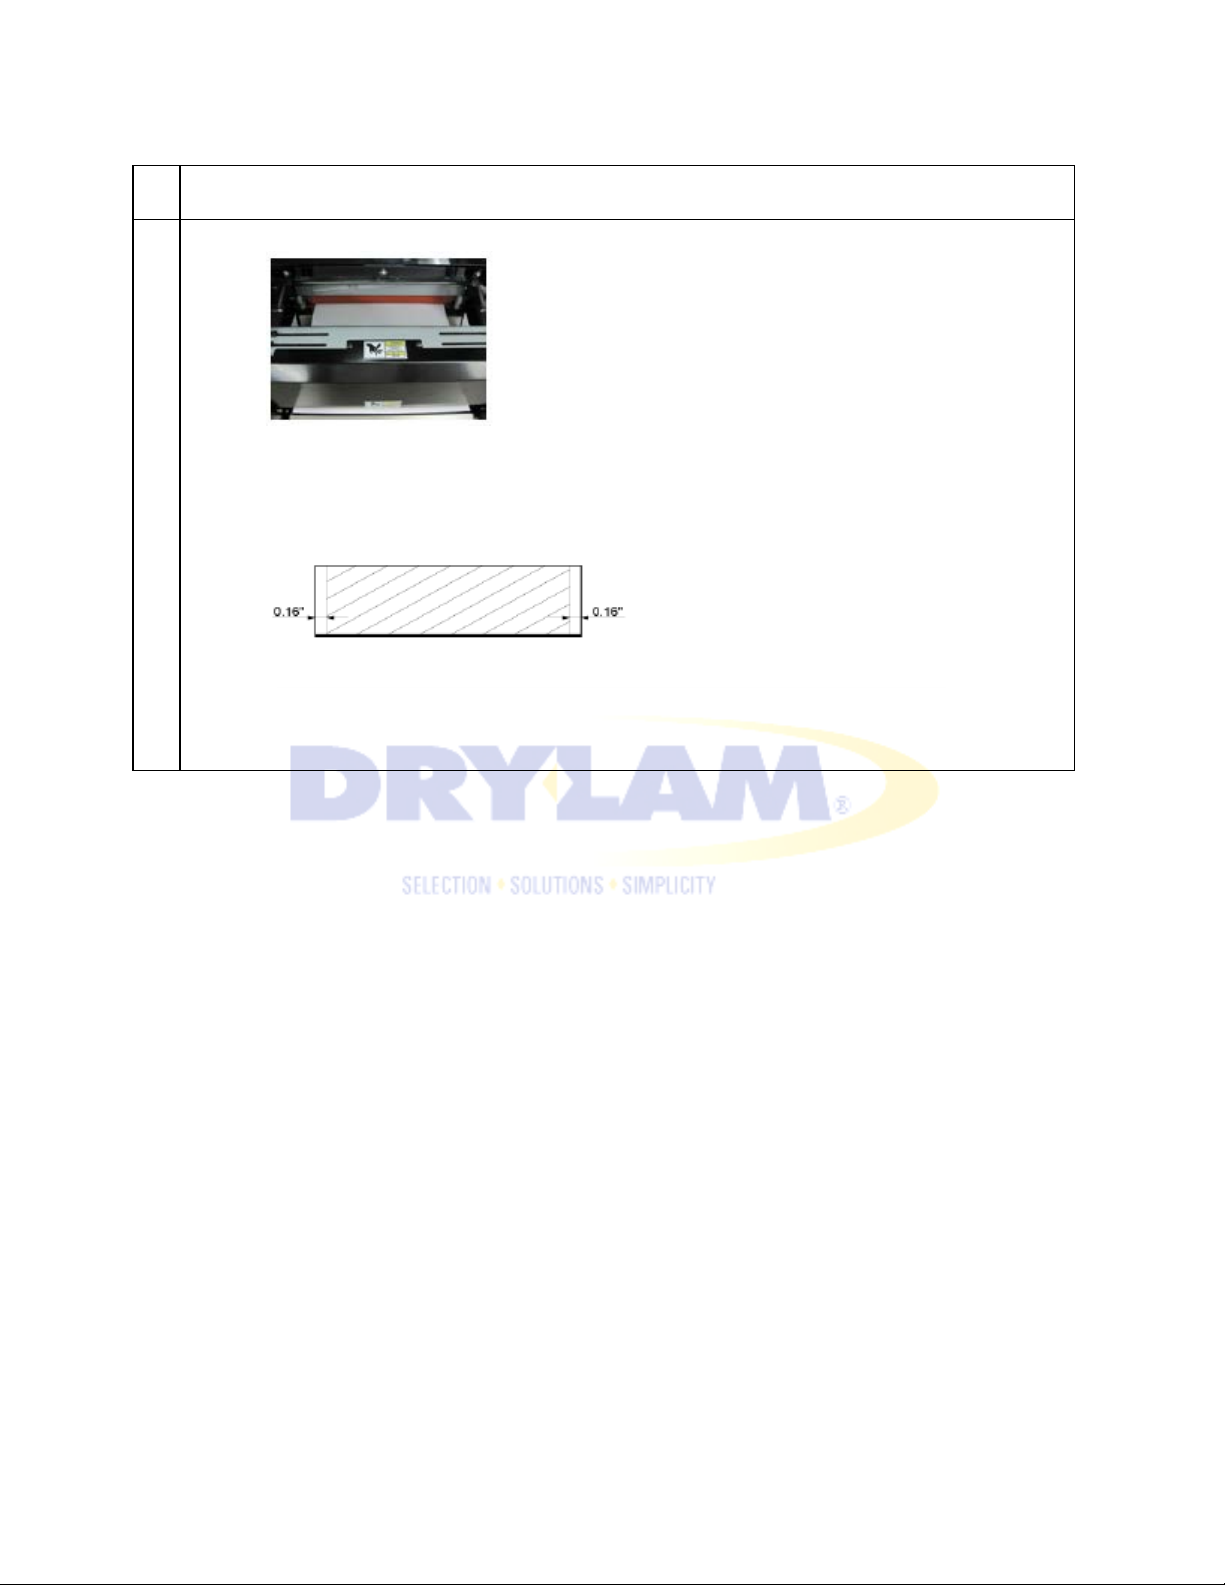
13
Open the Cutter Cover. Look at the new sheet that was set.
Check that the film position is correct of the paper margins. If not correct, adjust the
paper position in the procedure 5-14. ADJUST PAPER POSITIONING.
Close the Cutter Cover.
Press [START] key and do the lamination until creases/curling are gone.
CAUTION: In order to avoid cutting errors, film must be 0.16” smaller than paper at both
sides.
NOTE: To adjust the curling, refer to 5-12 ADJUST DE-CURLING.
Page 26
AL-MEISTER PLS3311 INSTRUCTION MANUAL <Rev.3>
1
2
4-4. ADJUST REAR EXIT TRAY
4-5. START LAMINATION
CAUTION
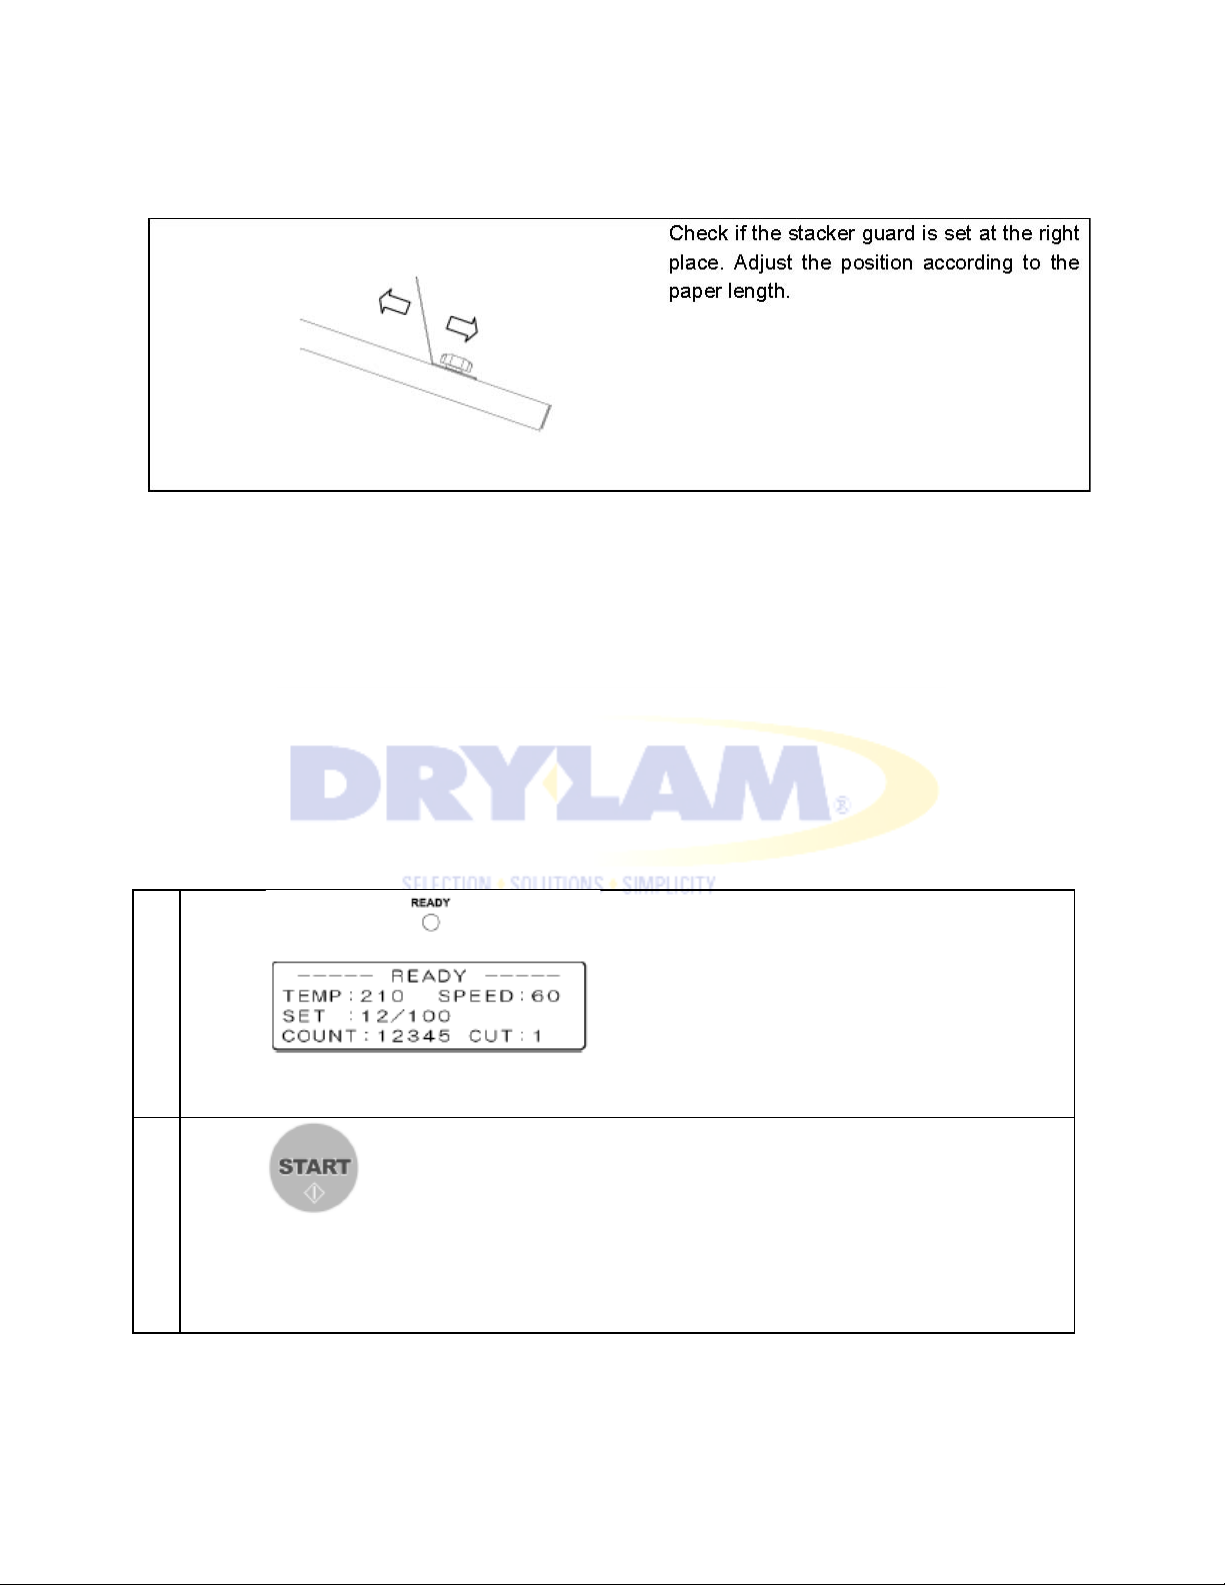
・ Open the front cover. Check that the heating roller lever and the pull roller lever are both in the
down position.
・ Check that the feeder cover, film cover, and cutter cover are closed.
Check settings. Check that the READY lamp lights. Check that the display shows “READY”.
Press START key. Lamination starts.
NOTE: To adjust curling, refer to 5-12 ADJUST CURLING.
Page 27
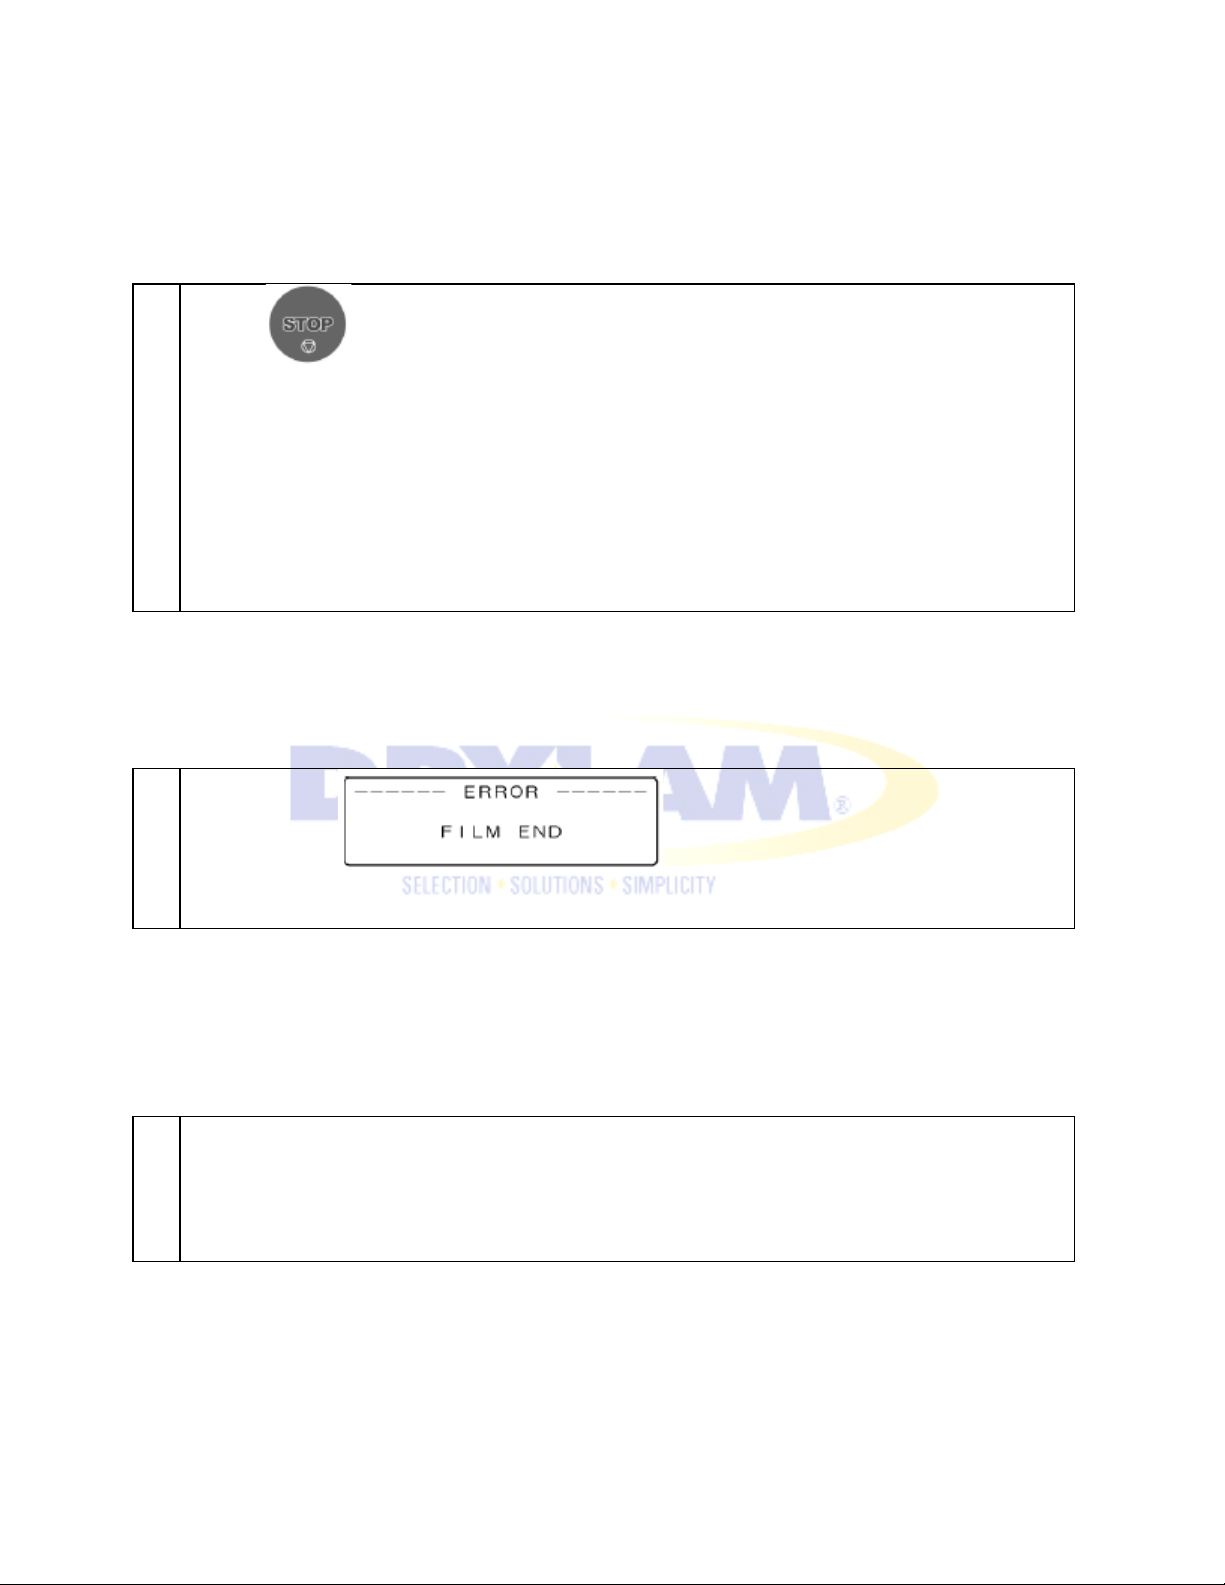
When problems occur operation will stop. The ERROR light will illuminate and an
4-6. STOP LAMINATION
4-6-1. STOP MANUALLY
During lamination you can stop at any time by pressing the STOP key.
NOTE:
• Lamination will stop when the laminated paper has exited.
• A sheet of paper will be kept in the machine to prevent heating roller from
getting sticky.
• Some longer paper sizes may not completely exit. This is normal. Do not try to
remove it.
AL-MEISTER PLS3311 INSTRUCTION MANUAL <Rev.3>
4-6-2. STOP AT FILM END
The display “FILM END” will appear and operation will stop.
4-6-3. STOP BY OPERATION [ERROR]
error message will appear on the display. It is important to note the exact error
message(s) as this information will aid in troubleshooting. See 7 TROUBLE
SHOOTING for more details.
Page 28
1
2
NOTE
ECO MODE
AL-MEISTER PLS3311 INSTRUCTION MANUAL <Rev.3>
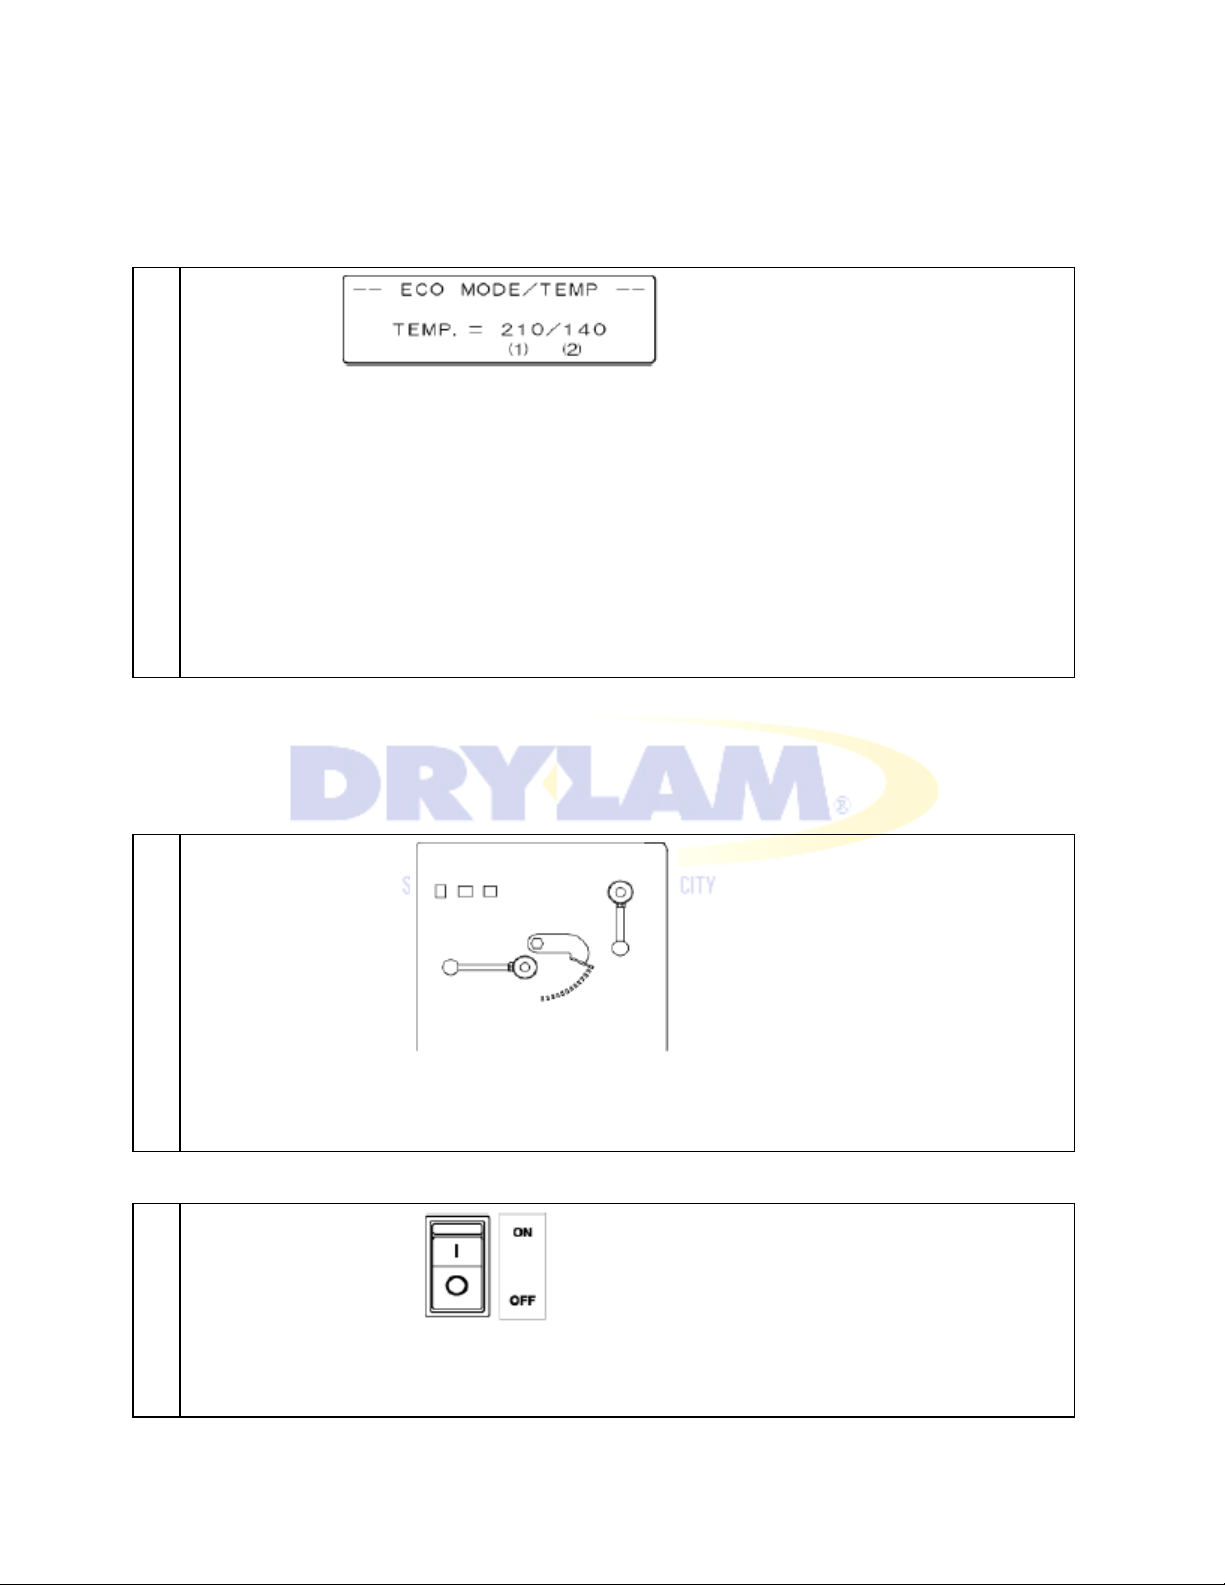
• The machine enters ECO MODE when the machine is idle of the
operation panel has not been operated for more than 30 minutes.
1) Shows the current temperature.
2) Shows the ECO MODE (target) temperature that is to be maintained
in ECO MODE.
• Buzzer will beep one minute before entering ECO MODE.
• Press any key to override the upcoming ECO MODE and return to normal
operation mode.
• The heater will turn off when the machine is idle for one hour.
4-7. FINISH LAMINATION
When you finish the operation turn the heating roller lever to the UP
position to release pressure on the rollers.
Turn the switch off and unplug.
Page 29
AL-MEISTER PLS3311 INSTRUCTION MANUAL <Rev.3>
1
2
3
5.CHANGE SETTINGS
5-1. SET TEMPERATURE
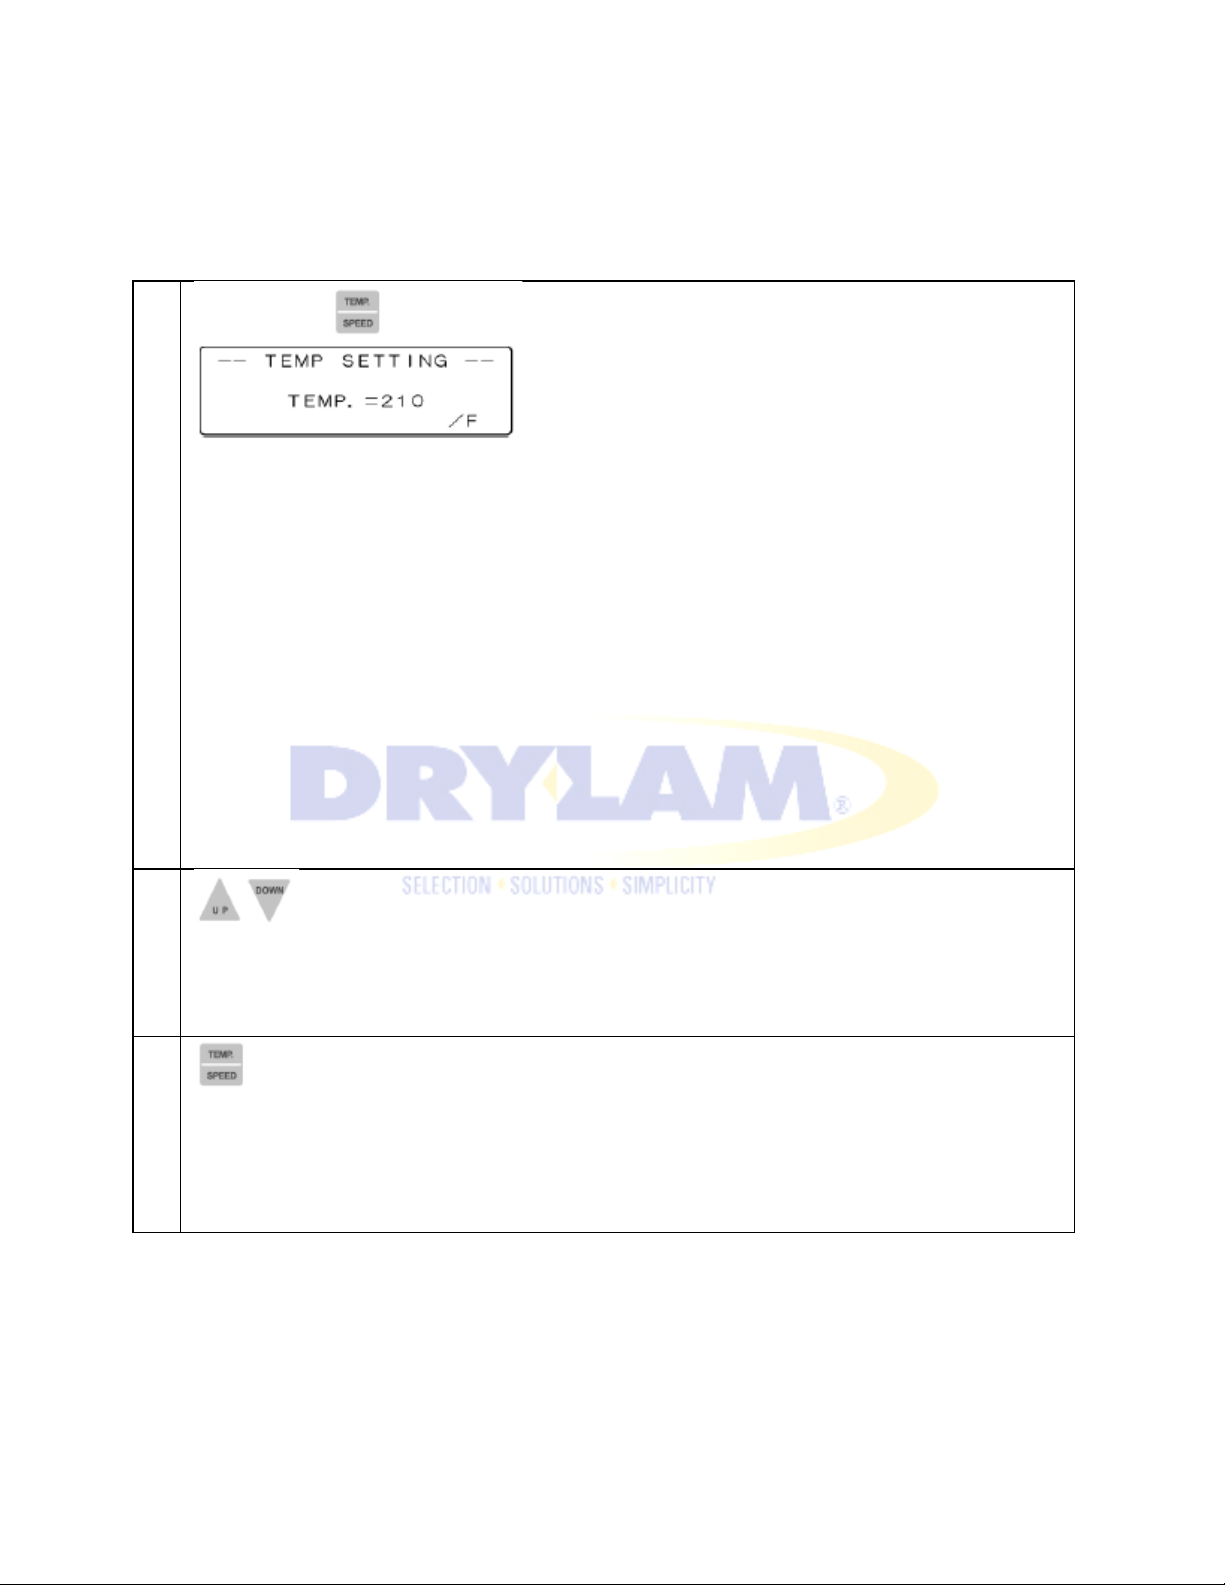
Press [TEMP./SPEED] key. This display appears.
NOTE:
• The default is the set temperature stored in the film.
Press [UP] or [DOWN] scroll key to set temperature. Temperature can be set in 5 or 10°F
increments. The temperature display blinks during set mode.
Press [TEMP/SPEED] to confirm. The temperature also confirms if [TEMP/SPEED] key is not
pressed for 10 sec. The display returns to the initial display or the warm-up display. When the set
temperature is 140°F, press DOWN scroll key, and the display shows “OFF”.
Page 30
AL-MEISTER PLS3311 INSTRUCTION MANUAL <Rev.3>
1
This display appears.
2
3
The display returns to the initial display or the warm-up display.
NOTE CURRENT TEMPERATURE
Press [TEMP/SPEED] to confirm.
The temperature also confirms if [TEMP/SPEED] key is not pressed for 10 sec. The display returns
to the initial display or the warm-up display.
When the set temperature is 140°F, press DOWN scroll key, and the display shows “OFF”.
5-2. SET SPEED
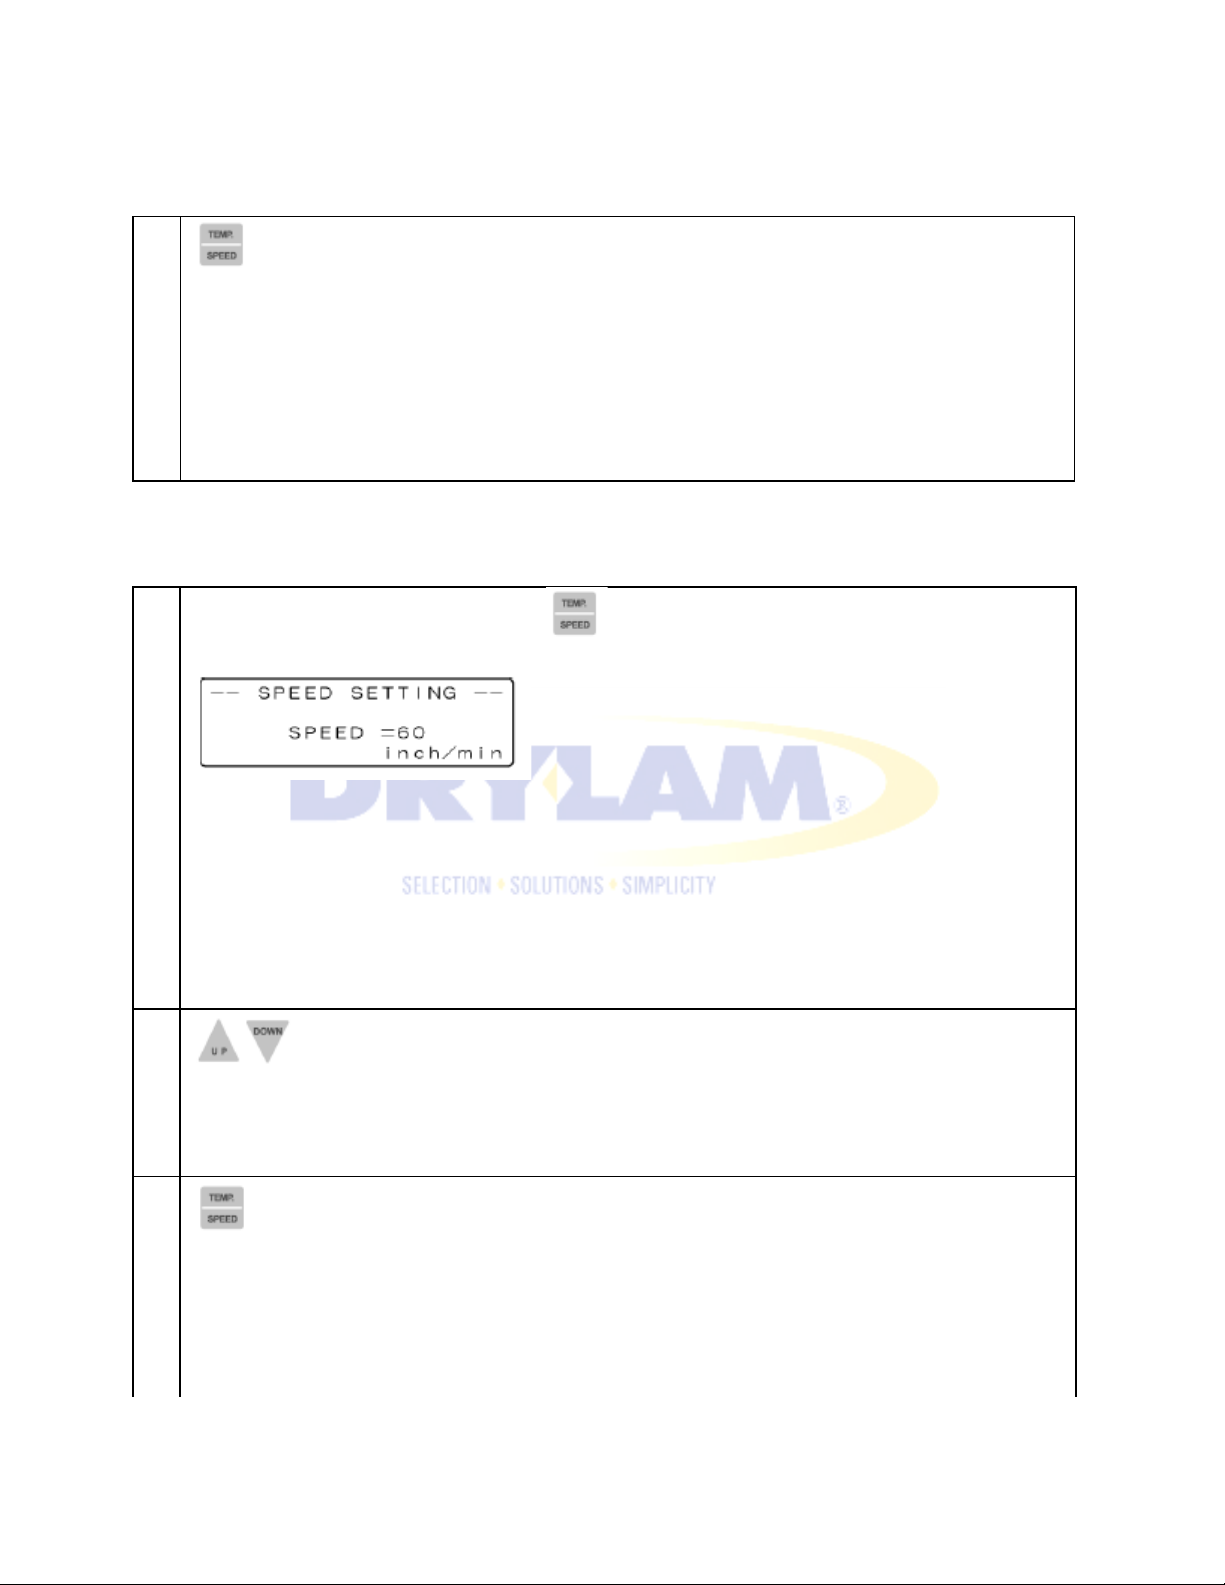
Press [TEMP/SPEED] key two (2) times.
NOTE
• The default is the set speed stored in a microchip in the film core.
Press [UP] or [DOWN] scroll key to set speed. Speed can be set by 4”/min increments. The speed
display blinks.
Press [TEMP/SPEED] key again to confirm. The speed also confirms if [TEMP/SPEED] key is not
pressed for 10 seconds.
Page 31
AL-MEISTER PLS3311 INSTRUCTION MANUAL <Rev.3>
NOTE
1
2
When no keys are pressed for 10 seconds,
the set value is confirmed and the display returns to the initial display or the warm-up
display.
• The speed setting range is from 40~120”/min.
5-3. ADJUST PAPER OVERLAP (during operation)
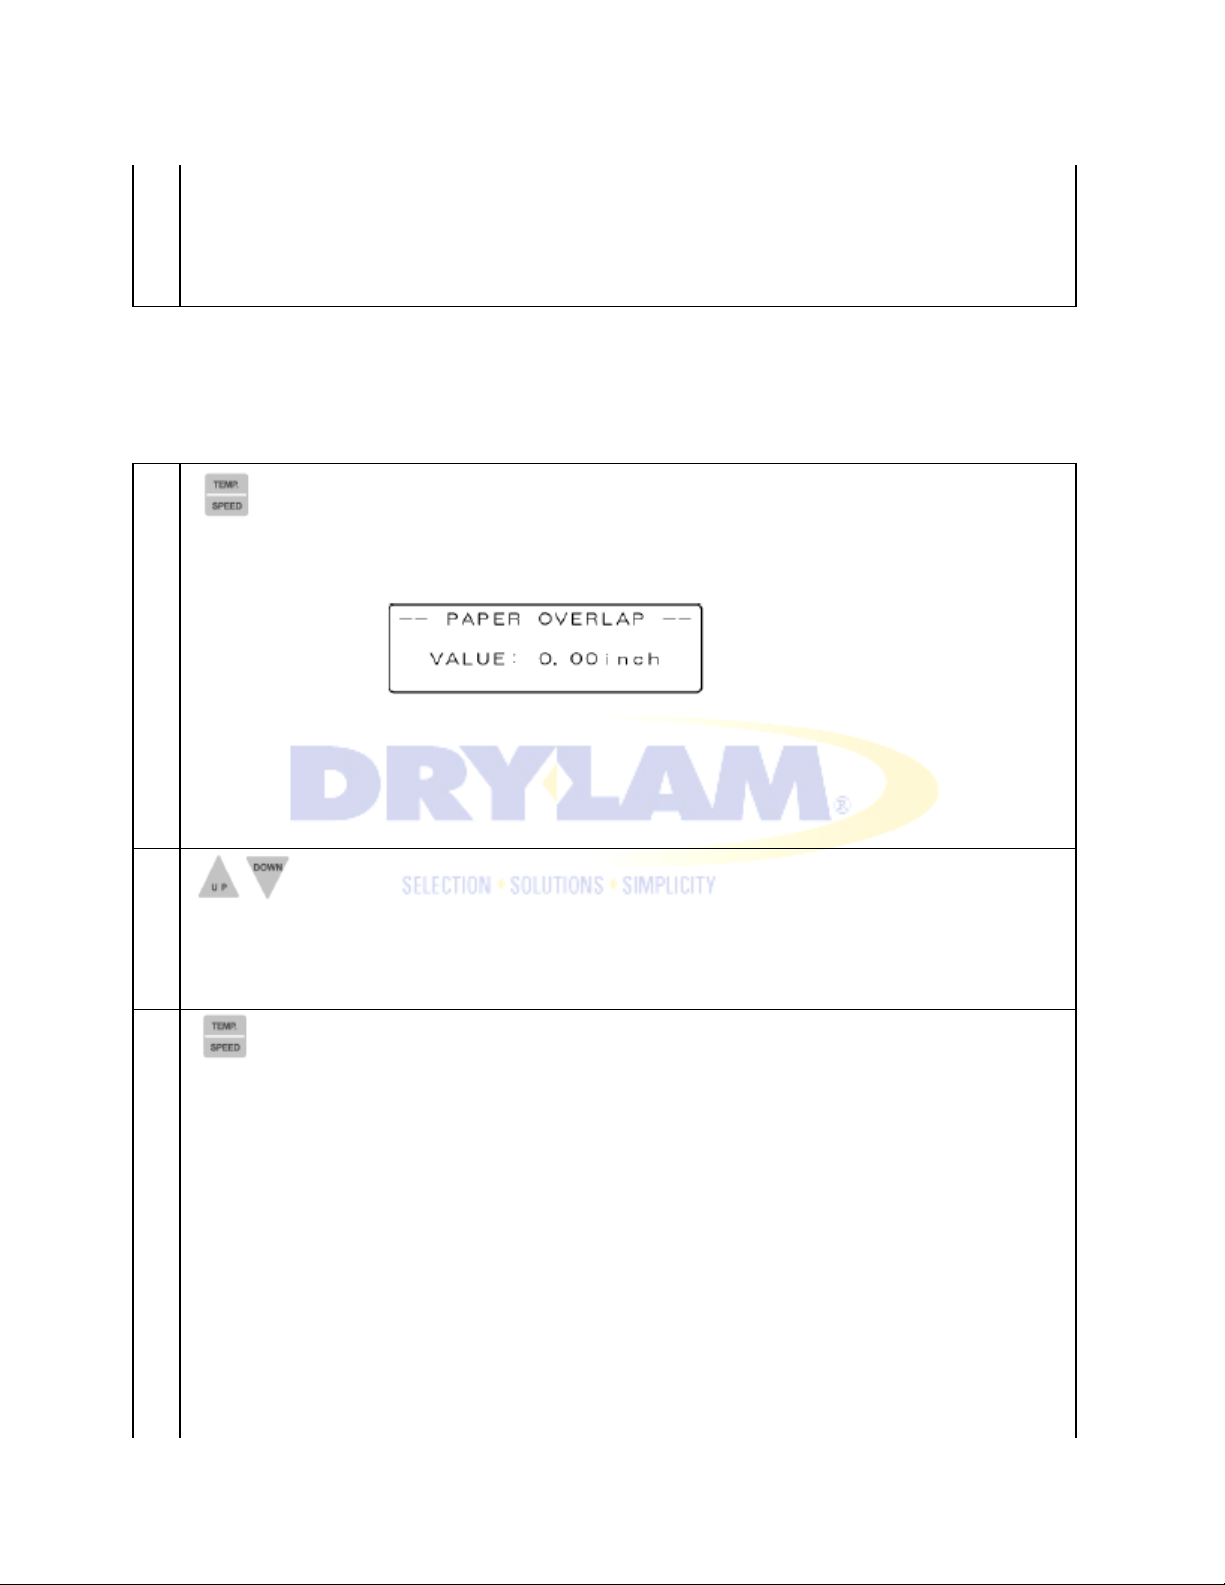
Press [TEMP/SPEED] key three times.
This display appears.
NOTE
• The initial value is set at 0.00”.
Select the value you want by pressing [UP] or [DOWN] scroll key. The amount of overlap can be
set in increments of 0.04 and vice versa.
3
Press [TEMP/SPEED] key again to confirm.
NOTE
• Overlap can be adjusted within the range of +/- 0.32.
• The amount of overlap can be set in increments of 0.04 and vice versa. The scale 0.04
means approximately 0.04”. This amount is subject to paper and settings.
Page 32
• This value is retained in memory after power off.
1
2
3
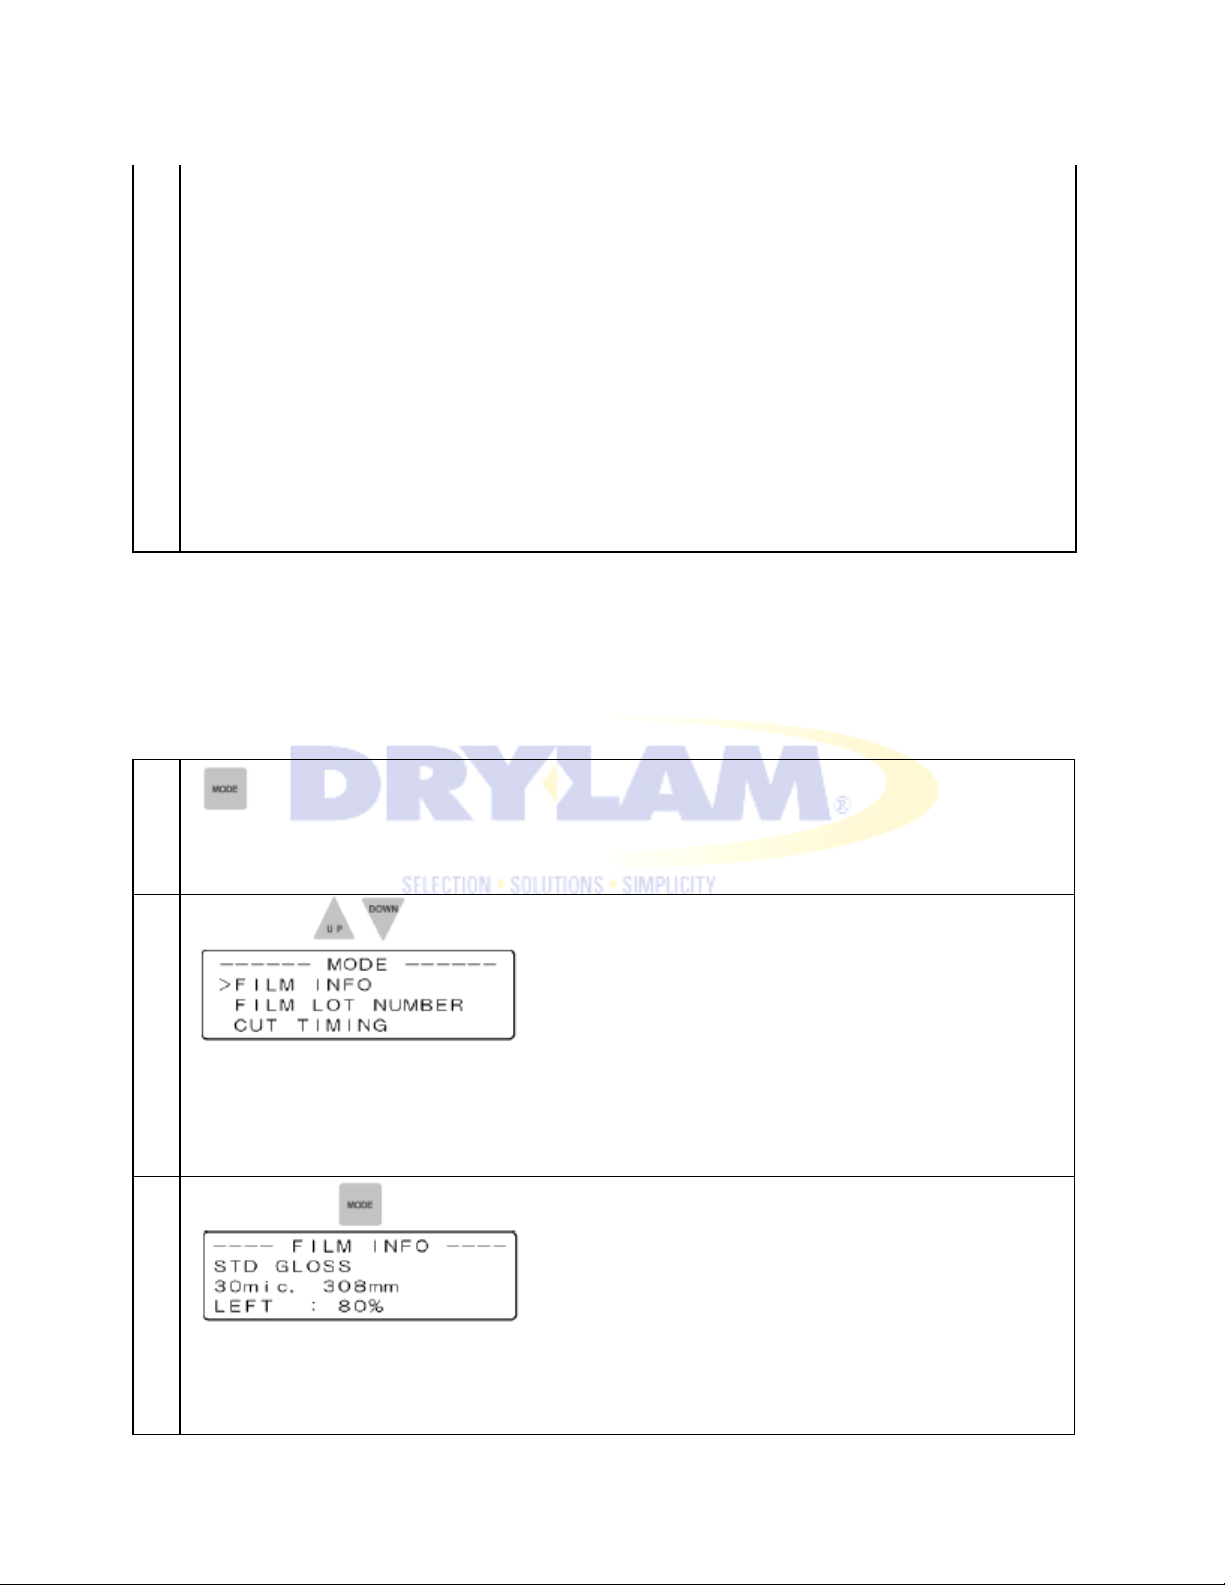
5-4. CHECK FILM INFO
AL-MEISTER PLS3311 INSTRUCTION MANUAL <Rev.3>
Control the set data of the film on the FILM DATA mode.
Press [MODE] key.
Select FILM INFO by pressing [UP] or [DOWN] scroll key.
Press [MODE] key. This display appears. Control film specifications and the amount of film
Page 33
AL-MEISTER PLS3311 INSTRUCTION MANUAL <Rev.3>
remaining. NOTE ・The type of film and the amount of film remaining are shown in the display.
1
or [DOWN] scroll key.
4
Press [MODE] key again to return to the initial display. The display returns to the initial display or
the warm-up display when no keys are pressed for 5 sec.
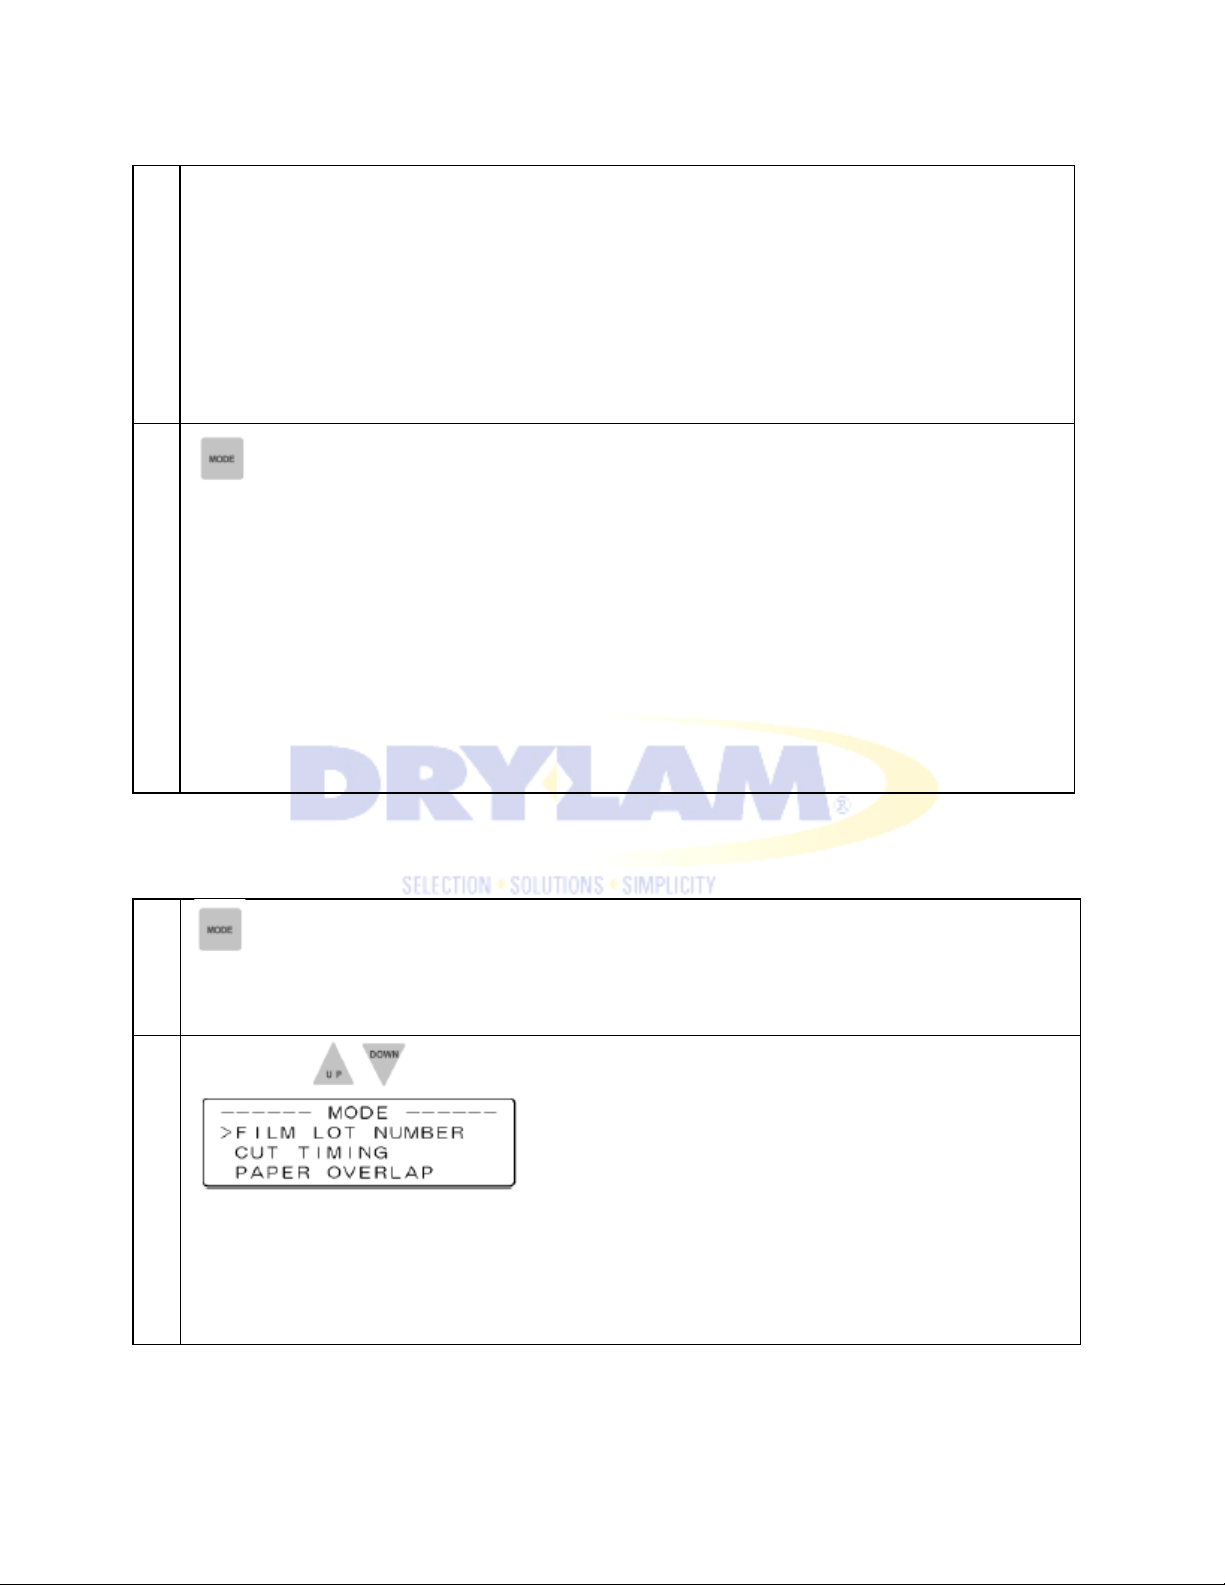
5-5. CHECK FILM LOT NUMBER
Press [MODE] key.
2
Select FILM LOT NUMBER by pressing [UP]
Page 34
3
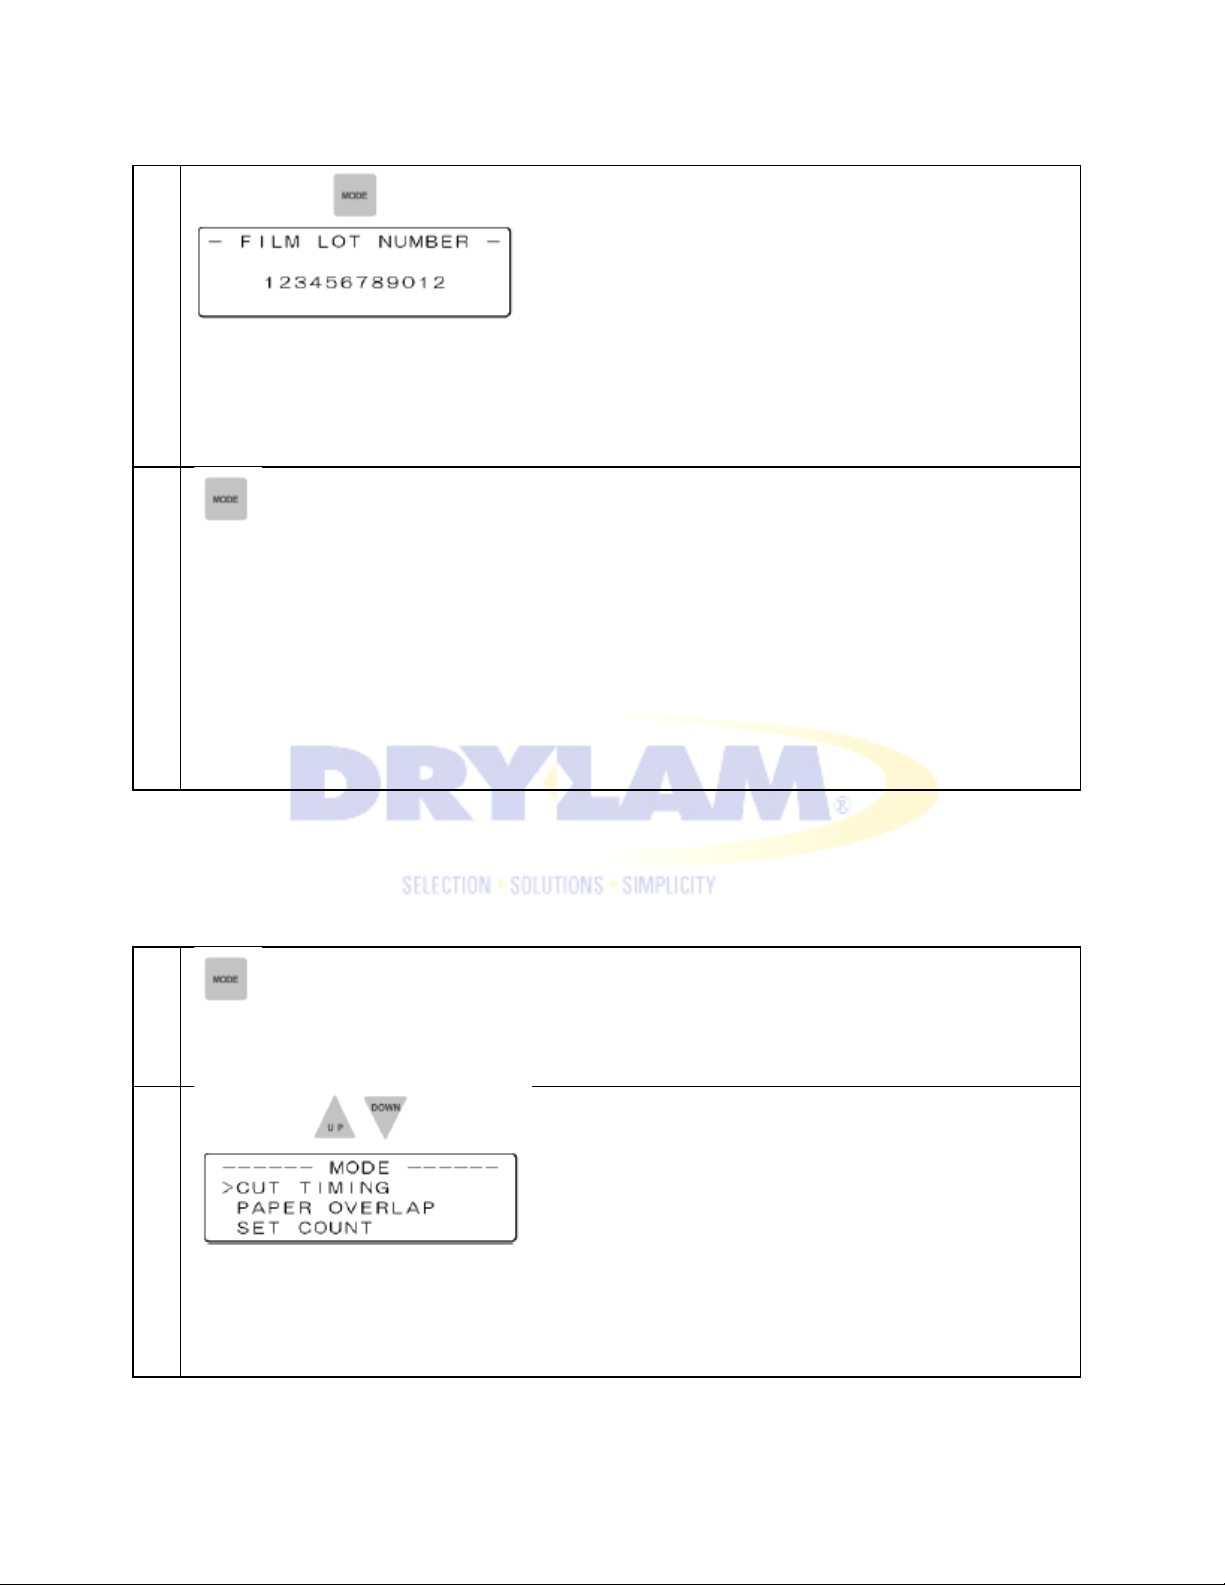
The film lot number is displayed.
1
Press [MODE] key.
AL-MEISTER PLS3311 INSTRUCTION MANUAL <Rev.3>
4
Press [MODE] key again to return to the initial display. The display returns to the initial display or
the warm-up display when no keys are pressed for 5 sec.
5-6. SET CUT TIMING
When “CUTTING ERROR” is displayed, adjust the cutting position by setting the CUT TIMING parameter.
Press [MODE] key.
2
Select CUT TIMING by pressing [UP] or [DOWN] scroll key.
Page 35
AL-MEISTER PLS3311 INSTRUCTION MANUAL <Rev.3>
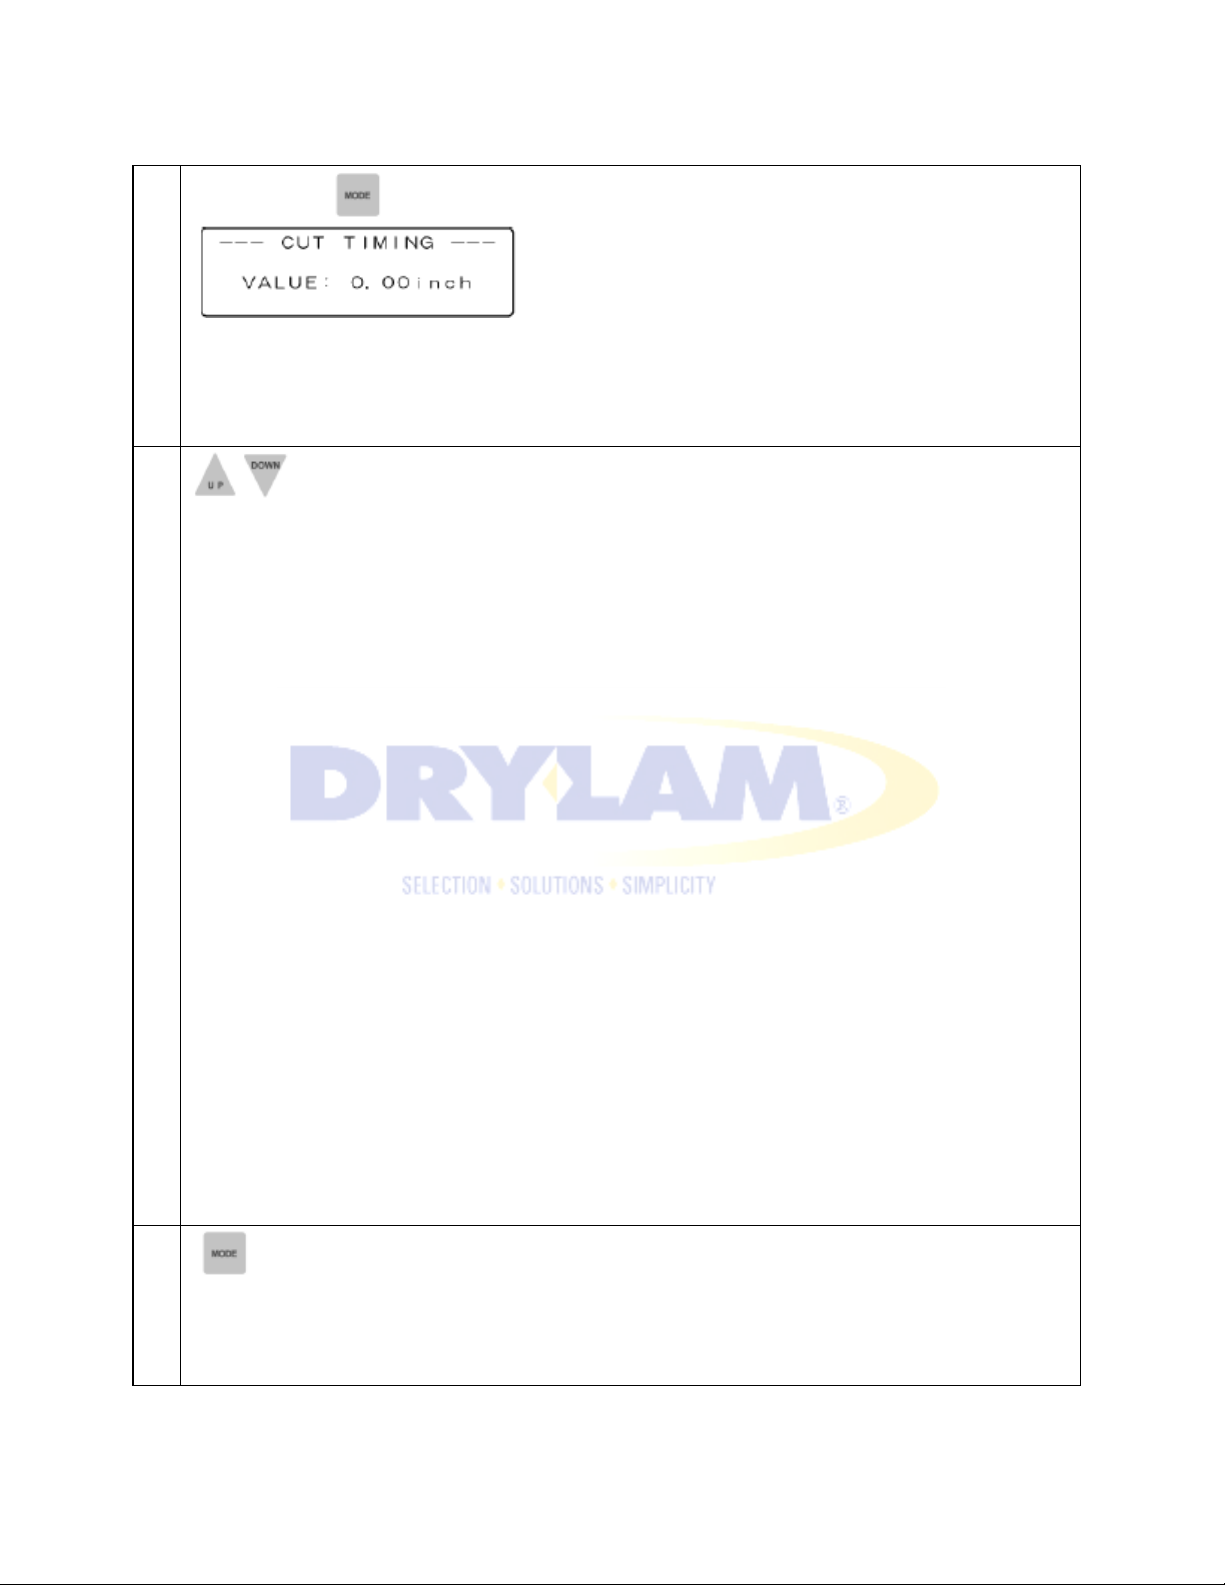
3
5
Press [MODE] key. This display appears. NOTE ・The initial value is set at 0.00”.
Select the value you want by pressing [UP] or [DOWN] scroll key. NOTE ・The starting point of the
blade varies within the range of +/- 1.20”.
4
• [▲] Every time the UP key is pushed, the blade moves 0.04” to the outer side (the cut
starts later, separation is made closer to the base of the blade).
• [▼] Every time the DOWN key is pushed, the blade moves 0.04” to the inner side (the cut
starts sooner, separation is made closer to the tip of the blade).
• The cutting must be done on the straight side of the blade, not the V-shaped side of the
blade.
Press [MODE] key again to confirm. The display returns to the initial display or the warm-up
display when no keys are pressed for 5 sec. This value is retained in memory even after power off.
Page 36
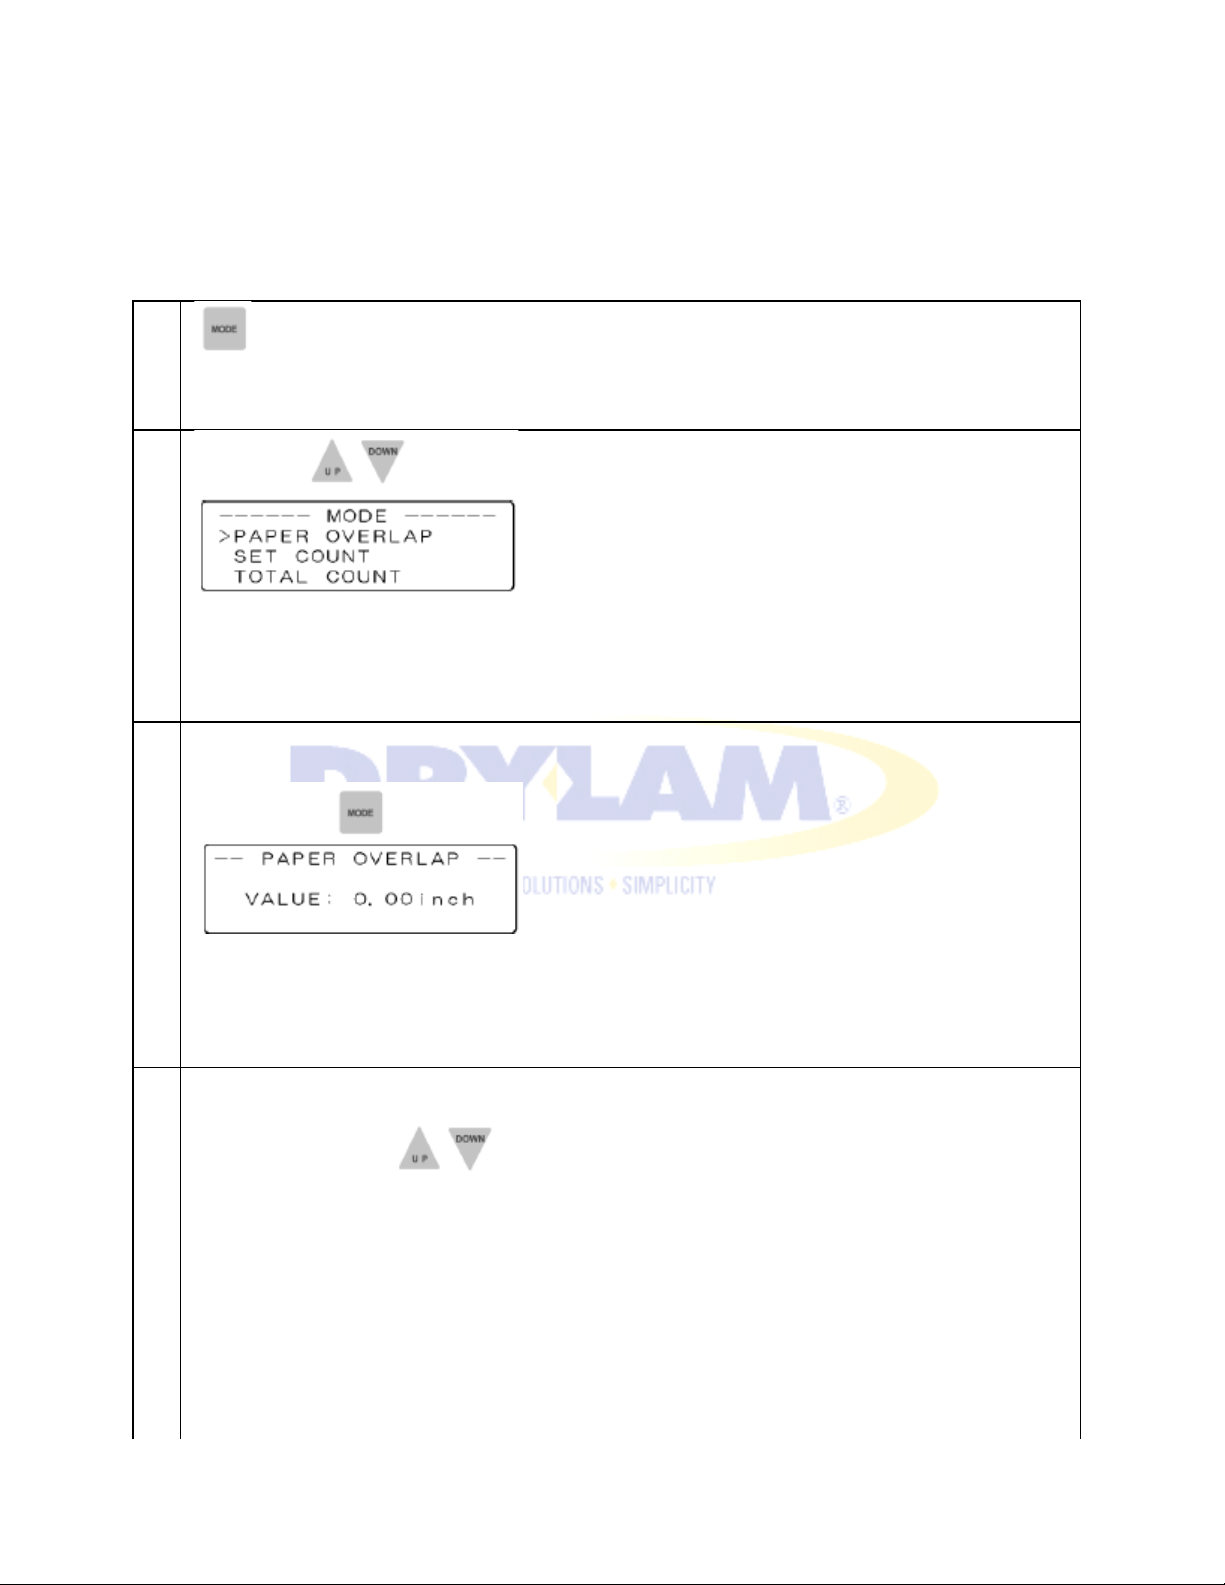
AL-MEISTER PLS3311 INSTRUCTION MANUAL <Rev.3>
1
3
Press [MODE] key.
4
Select the value you want by pressing [UP]
range of +/- 0.32”.
The scale 0.04 means approximately 0.04”. This amount is subject to paper and settings.
5-7. ADJUST PAPER OVERLAP (while not running)
When the display shows OVERLAP ERROR, adjust the amount of paper overlap on PAPER OVERLAP
mode.
Press [MODE] key.
2
Select PAPER OVERLAP by pressing [UP] or [DOWN] scroll key.
This display appears.
NOTE
• The default is set to 0.00”.
or [DOWN] scroll key. NOTE ・Overlap can be adjusted within the
・
Page 37
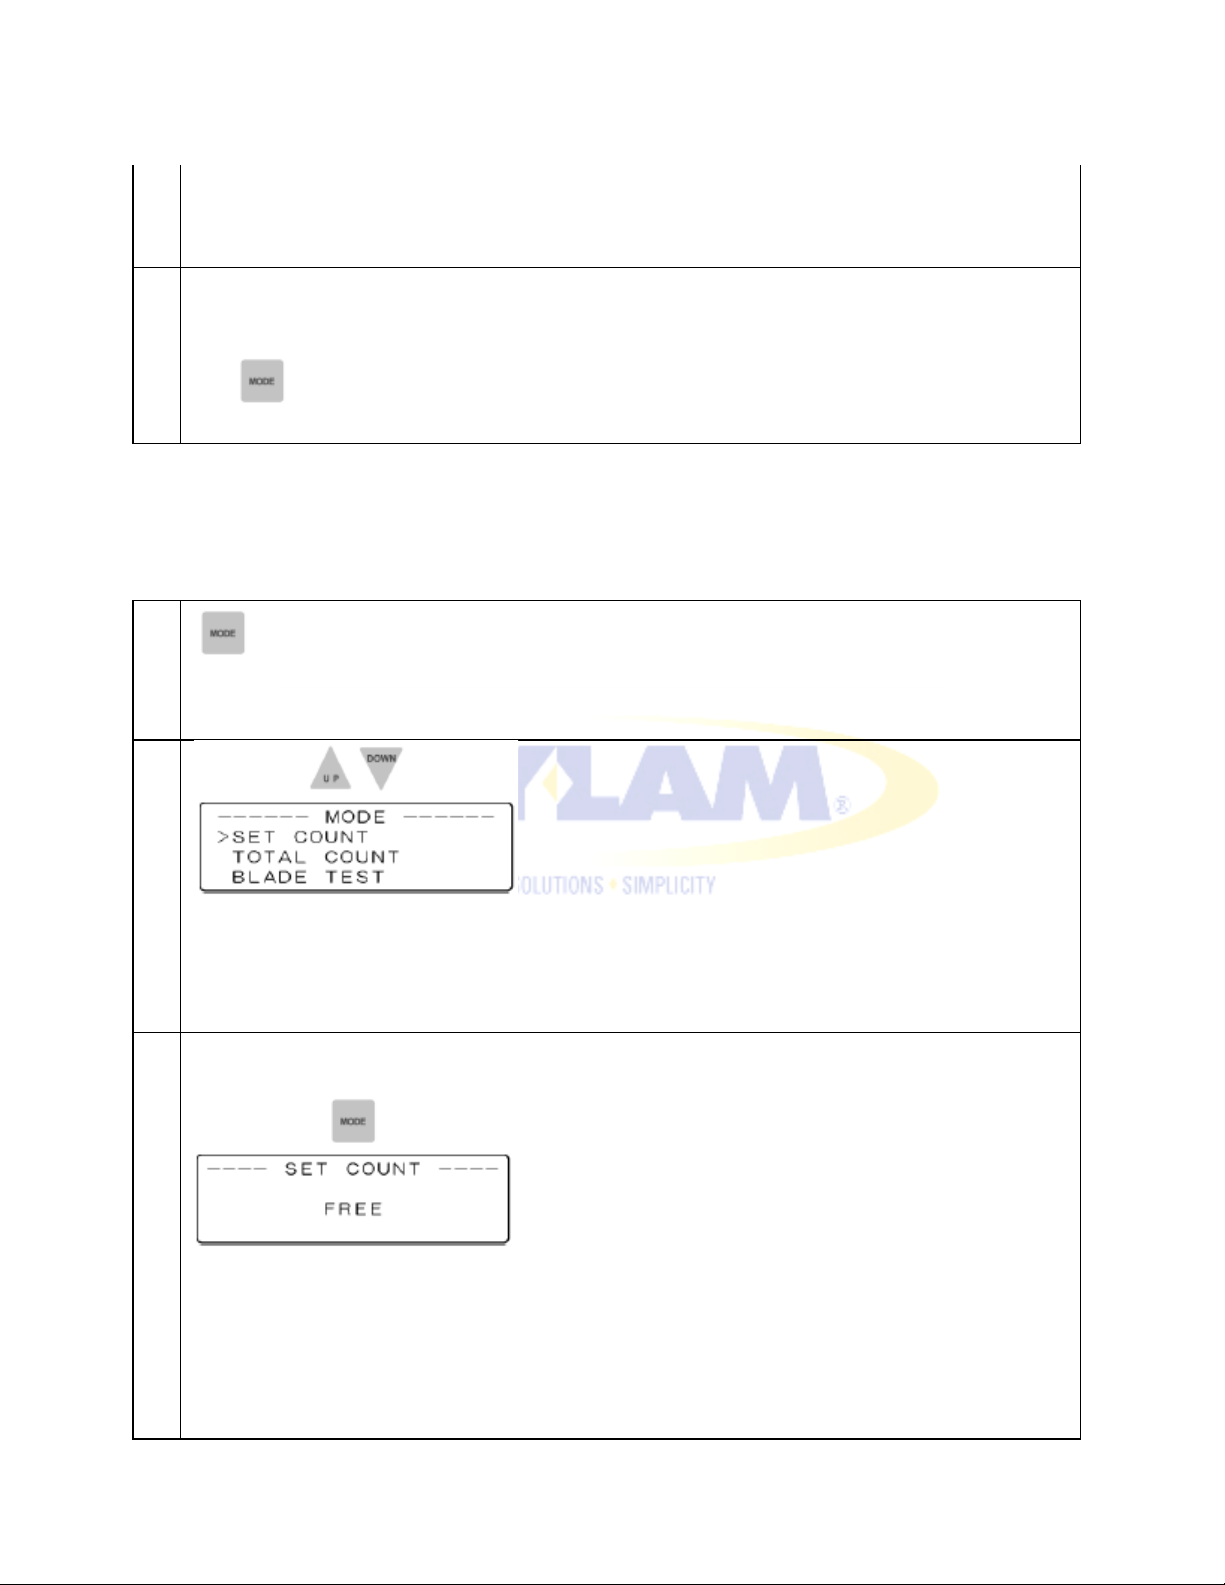
AL-MEISTER PLS3311 INSTRUCTION MANUAL <Rev.3>
5
Press [MODE] key again to confirm.
The display returns to the initial display or the warm-up display when no keys are pressed for 5
1
3
Press [MODE] key.
sec. This value is retained in memory even after power off.
5-8. SET COUNTER
Set the number you want to laminate on SET COUNTER mode.
Press [MODE] key.
2
Select SET COUNT by pressing [UP] or [DOWN] scroll key.
This display appears.
NOTE
• The default is set to FREE.
Page 38
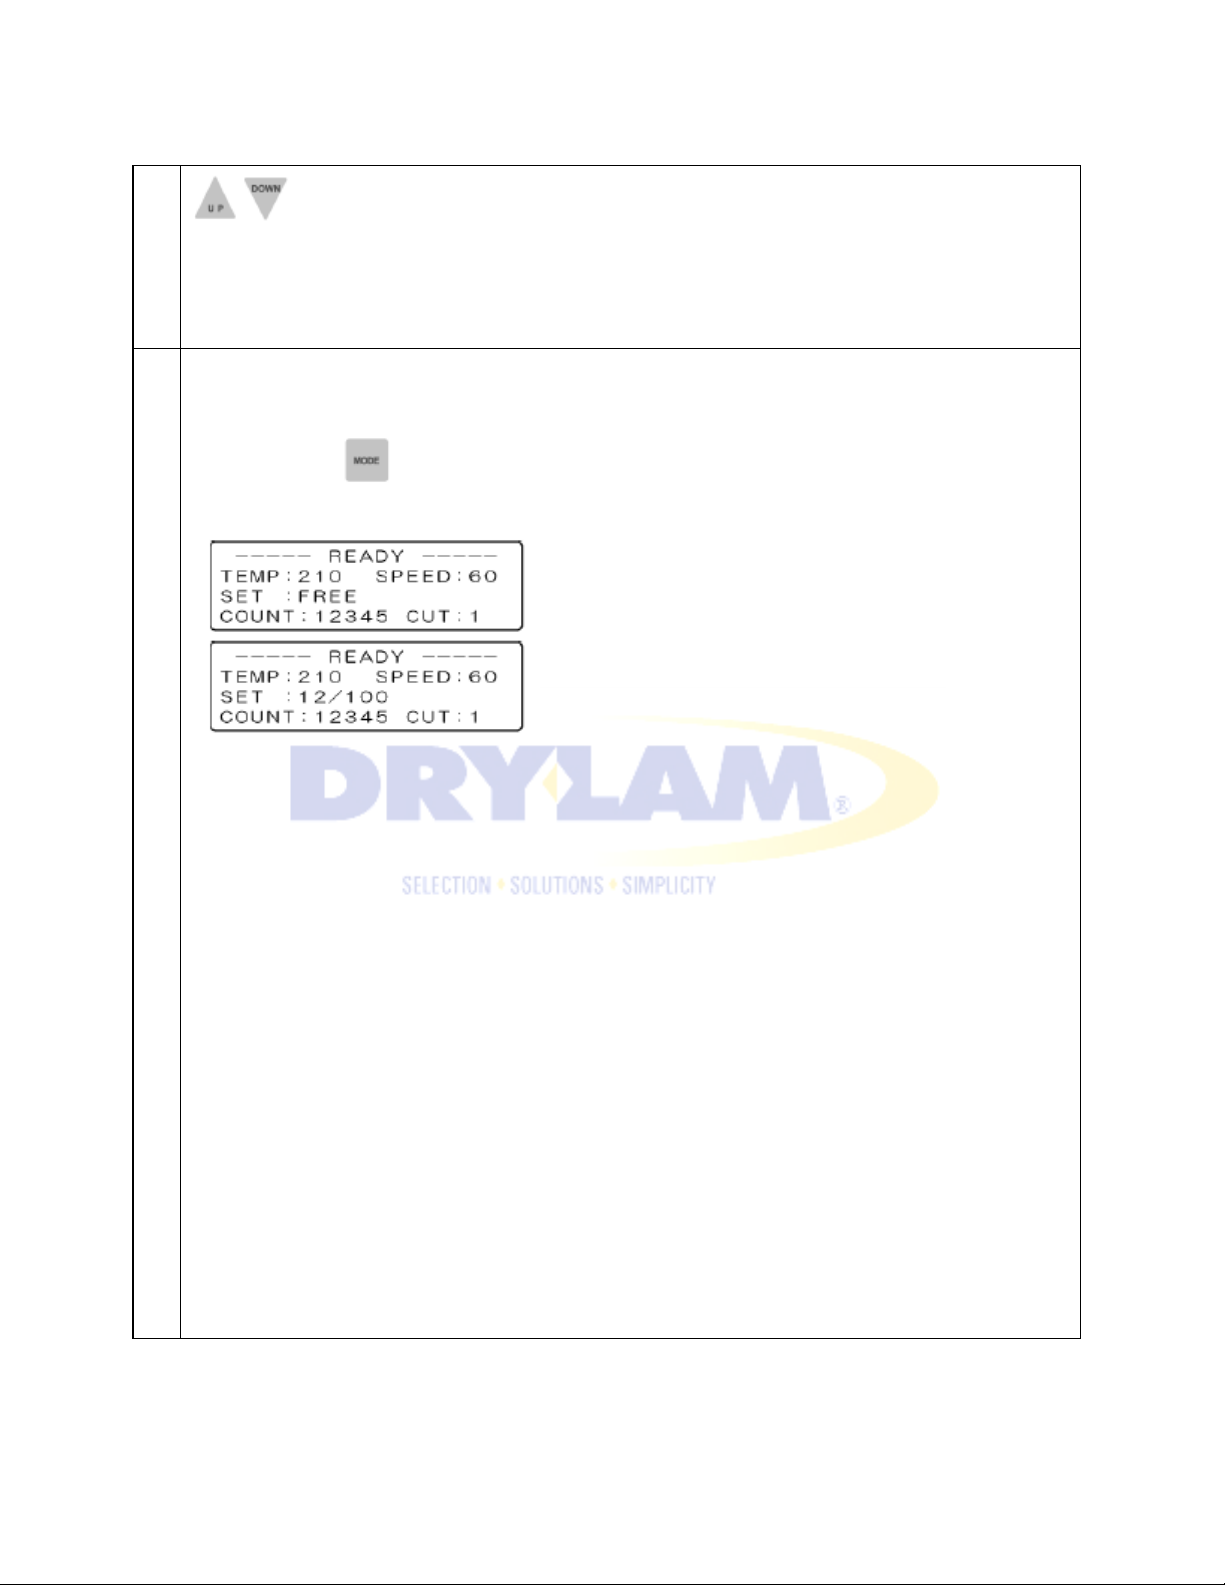
AL-MEISTER PLS3311 INSTRUCTION MANUAL <Rev.3>
5
Press [MODE] key to confirm. When no keys are pressed for 5 seconds, the set value is confirmed
4
Press [UP] or [DOWN] scroll key to enter numeric values. You can set up to 300.
and the display returns to the initial display or the warm-up display.
This display shows an example of setting FREE. This display shows an example of setting 100
sheets.
CAUTION
• The counter may count the sheet if an error should occur.
• This value is not retained in memory after power off.
Page 39
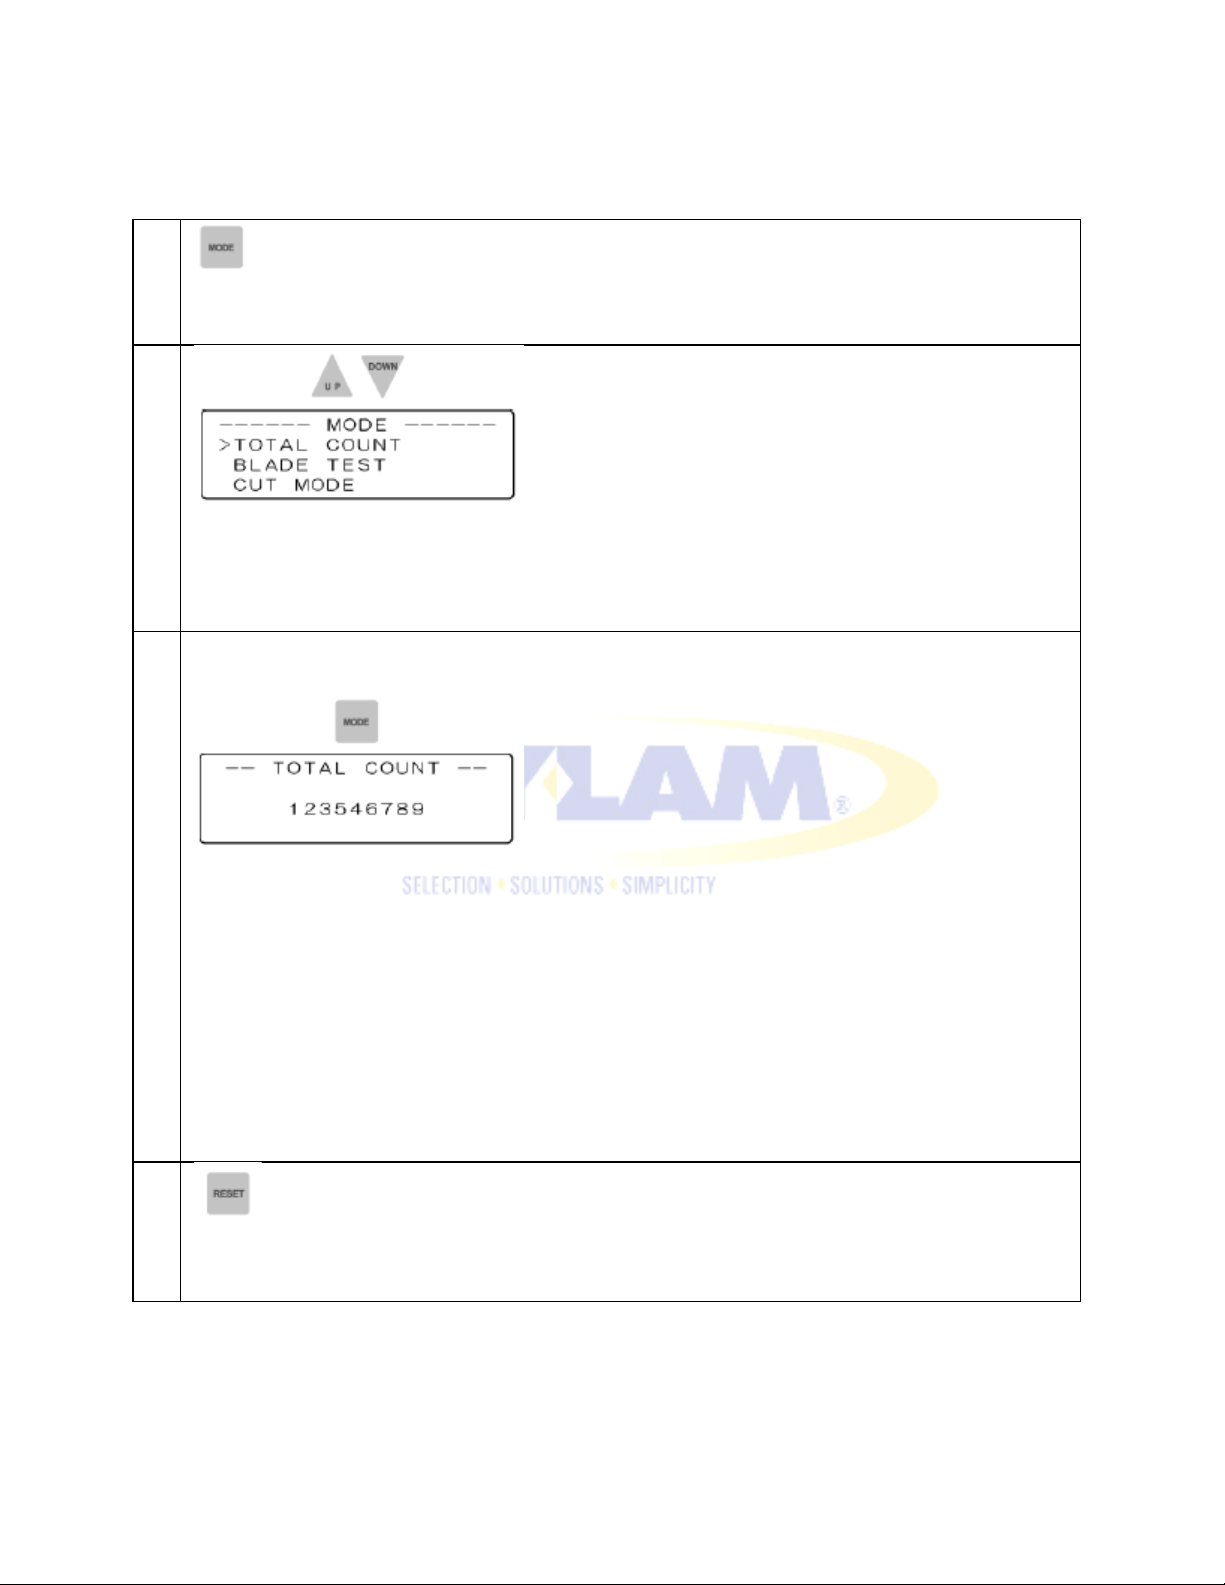
AL-MEISTER PLS3311 INSTRUCTION MANUAL <Rev.3>
1
3
Press [MODE] key.
NOTE
5-9. TOTAL COUNTER
Press [MODE] key.
2
Select TOTAL COUNT by pressing [UP] or [DOWN] scroll key.
The number of total count is shown in the display.
• The accumulated number of laminations is displayed. Counts up to 999999999 until
counter is reset.
4
Press [RESET] key to clear the accumulated number and return to 0.
Page 40
AL-MEISTER PLS3311 INSTRUCTION MANUAL <Rev.3>
5
1
3
Press [MODE] key.
The display returns to the initial display or the warm-up display when [MODE] is pressed or no
keys are pressed for 5 sec.
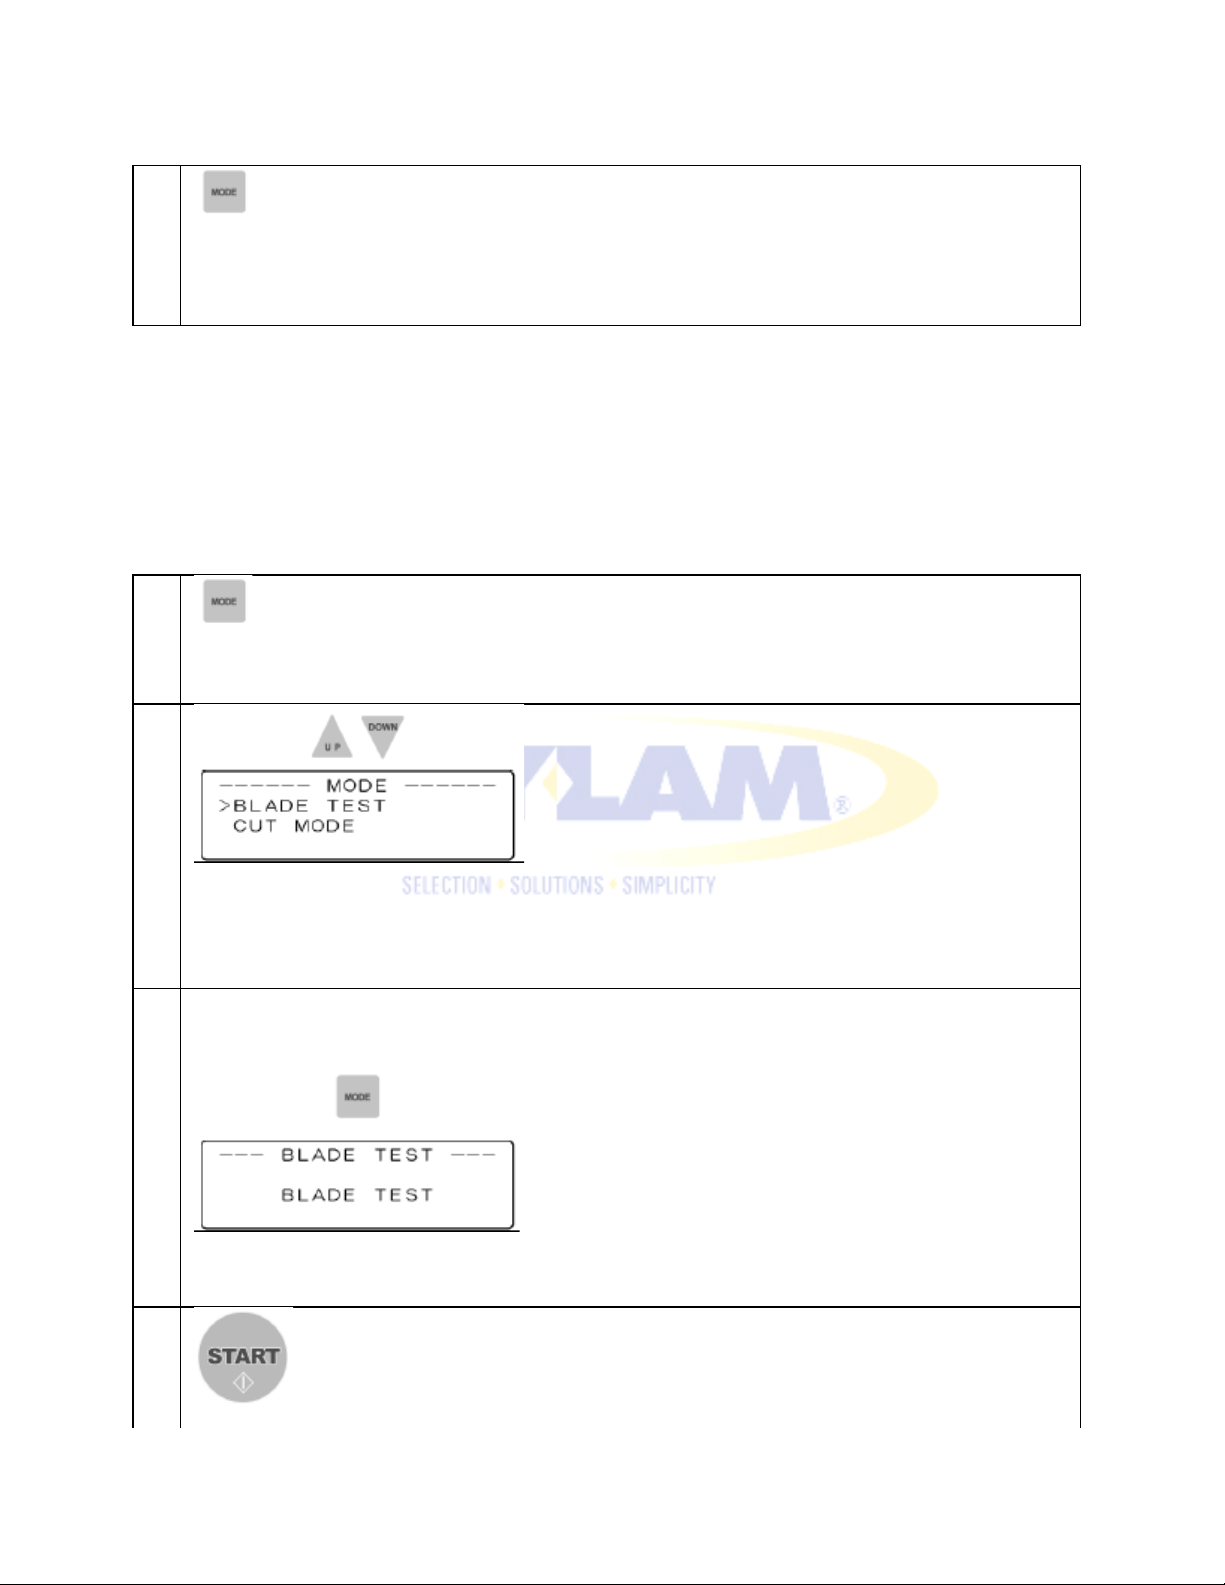
5-10. ADJUST BLADE READY POSITION
Adjust the starting point of the blade according to the width of PLUSTER FILM. The Blade Test will not
operate with any of the top covers open. Adjustments to the Feeder Tray and Decurling Bar should be
made first before cutter blade adjustments are made. The position of the paper should be finalized
before any detailed adjustment of the cutter blade is attempted.
Press [MODE] key.
2
Select BLADE TEST by pressing [UP] or [DOWN] scroll key.
This display appears.
4
Page 41
AL-MEISTER PLS3311 INSTRUCTION MANUAL <Rev.3>
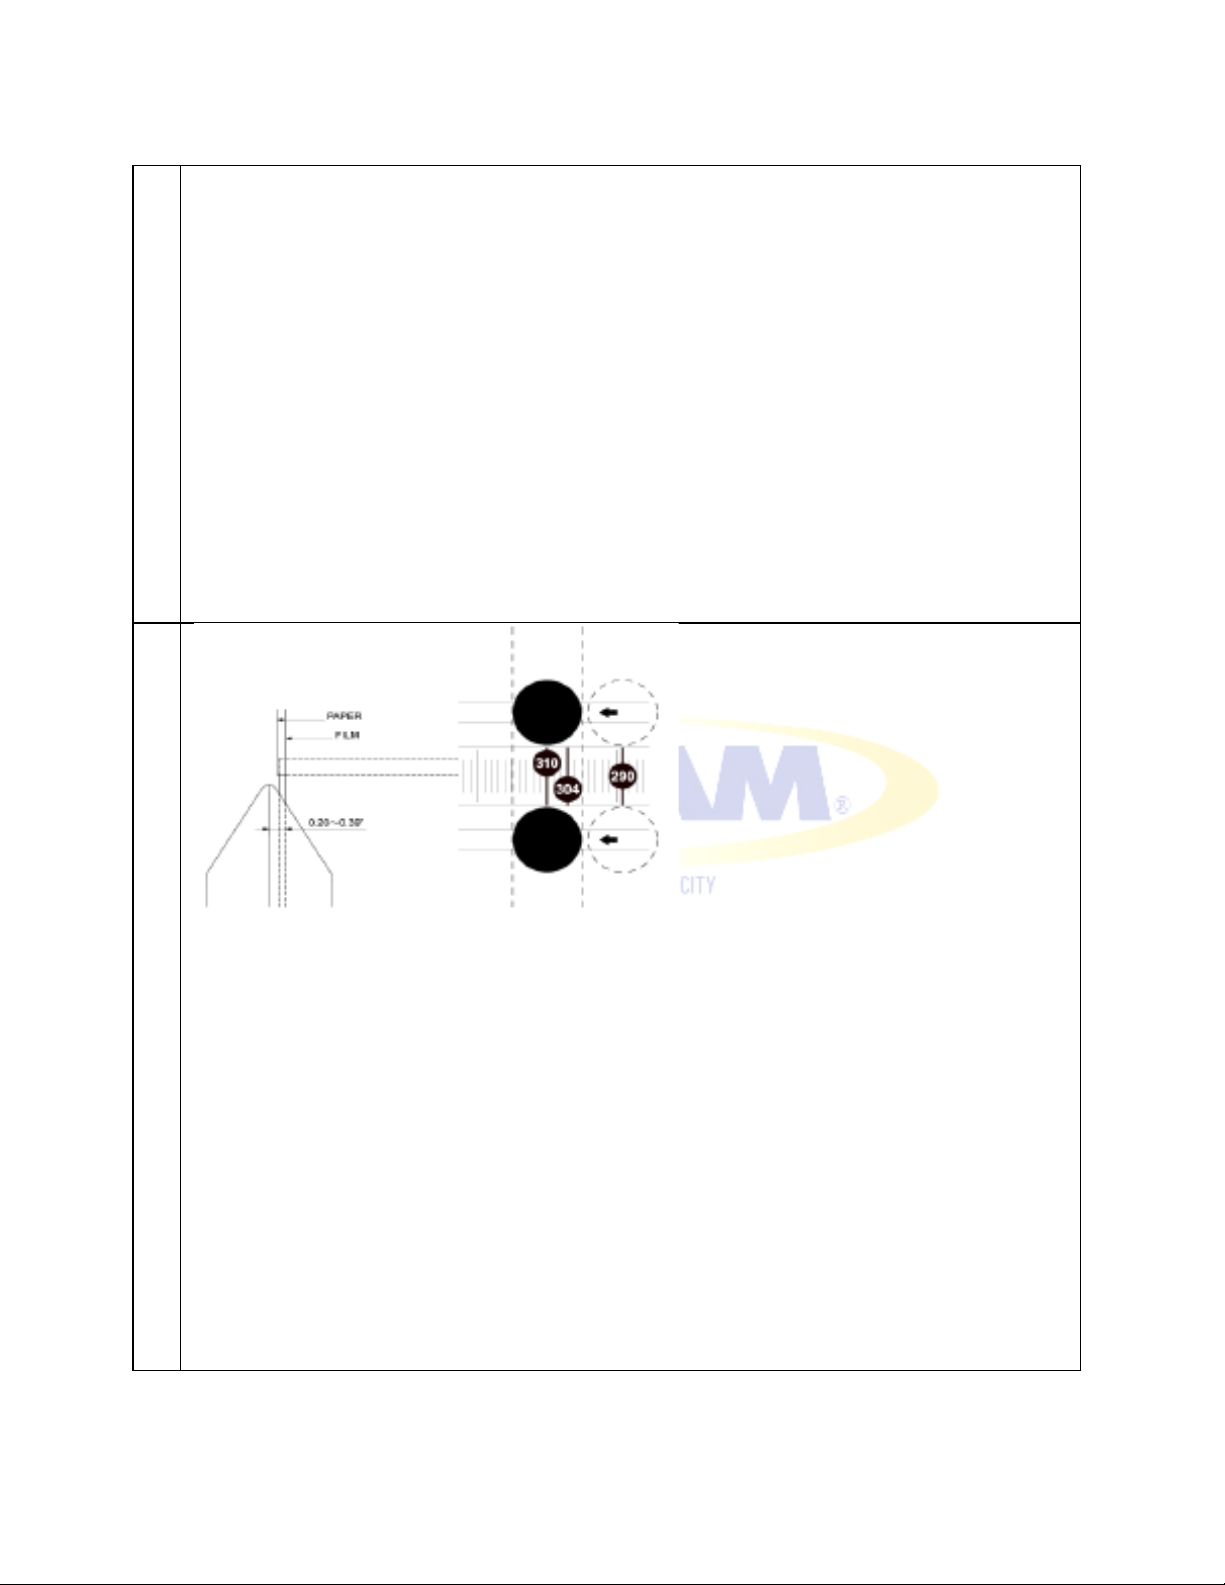
Press [START] key.
The blade moves to its ready position. Press [START] key again. The blade moves to the starting
point at the opposite side. Press [START] key again. The blade moves to its ready position. The
blade moves in this order by pressing the [START] key.
Adjust the ready position so that the blade is in the recommended position of 0.20~0.39” as
shown in the diagram. By moving the knobs to the left or right, the blade ready position can be
altered. NOTE ・Use the divisions at the blade position knobs to find out the right position.
Page 42

AL-MEISTER PLS3311 INSTRUCTION MANUAL <Rev.3>
5
Press [STOP] key. The display returns to the initial display. When no keys are pressed for 5
seconds, the display returns the initial display.
Page 43
AL-MEISTER PLS3311 INSTRUCTION MANUAL <Rev.3>
1
3
Press [MODE] key.
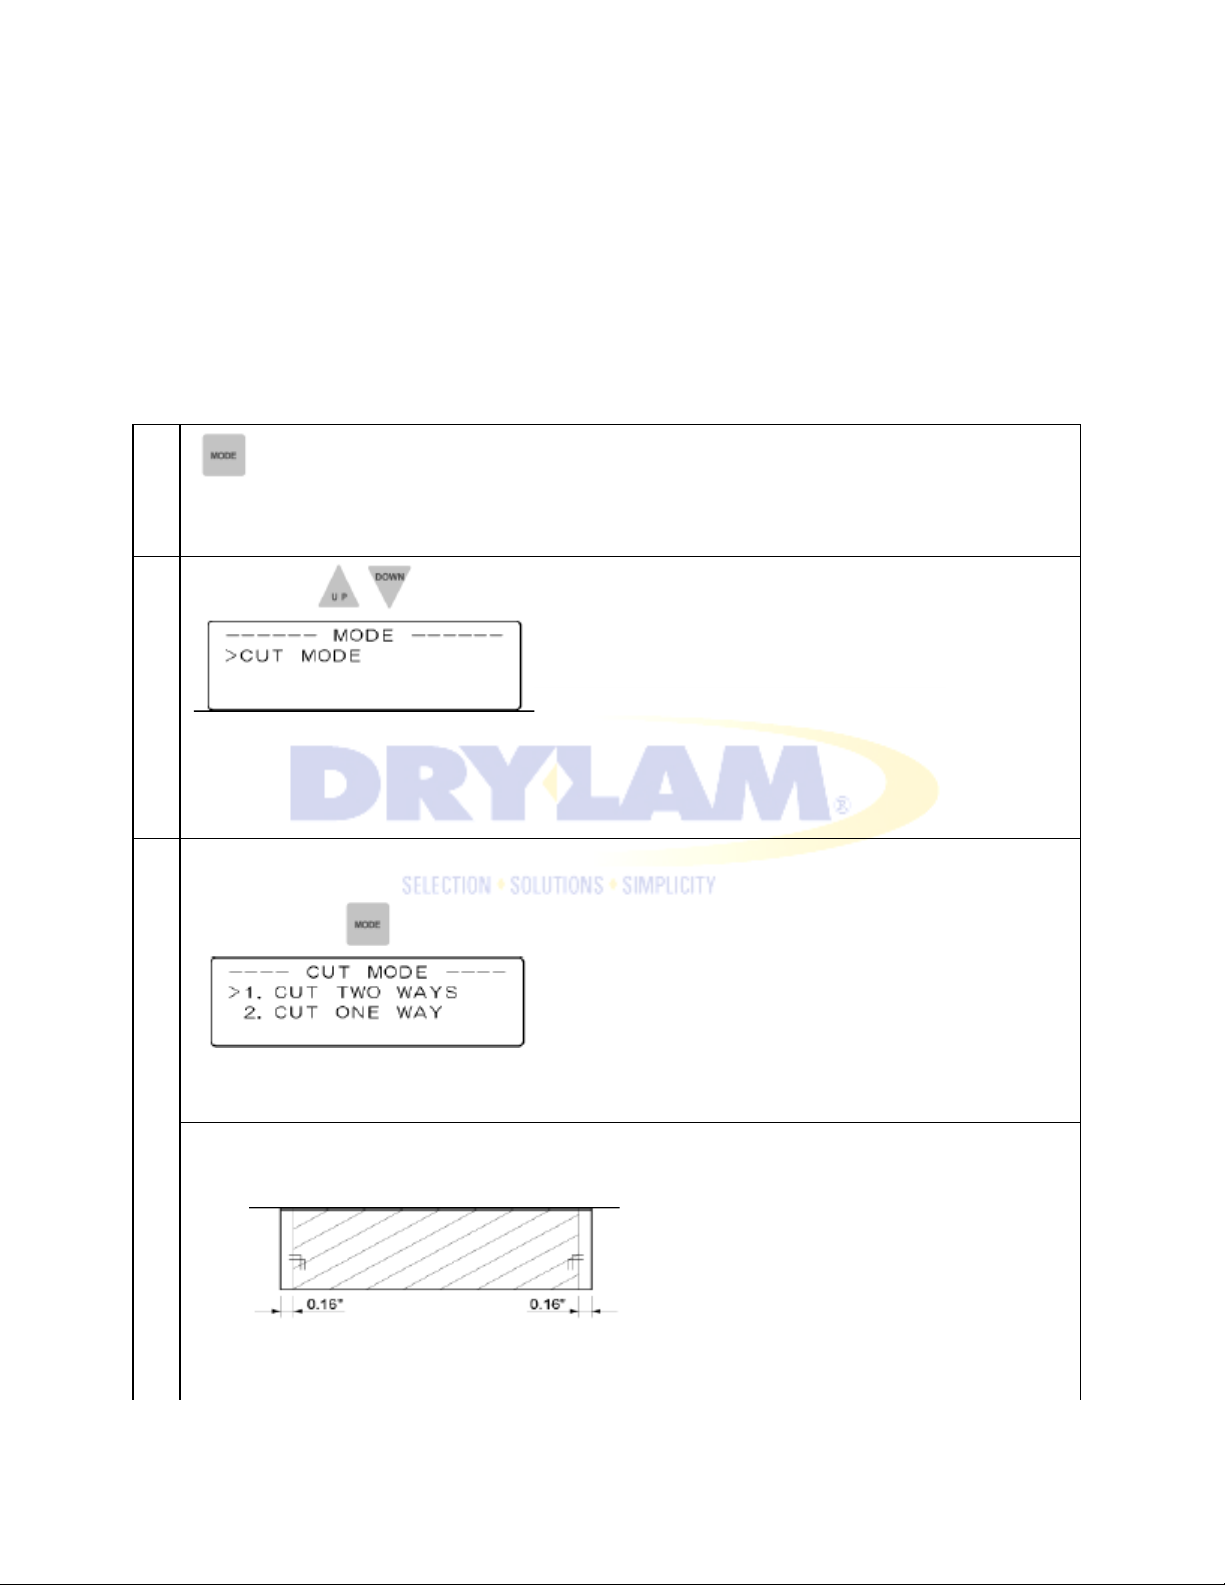
Blade moves and does cutting in both directions. Paper margin requires 0.16” and more at both
5-11. SET CUT MODE
Blade movement can be set to either one way cutting or two way cutting. The one way cutting is applied
when: The paper margins on both sides are not equal because the printing surface is not centered on
the paper leaving less margin on one side (i.e. less than 0.16”). Adjustments to the Feeder Tray and decurling Bar should be made first before cutter blade adjustments are made. The position of the paper
and the setting of the de-curling Bar should be finalized before any detailed adjustment of the cutter
blade should be attempted.
Press [MODE] key.
2
Select BLADE TEST by pressing [UP] or [DOWN] scroll key.
This display appears.
【CUT TWO WAYS 】
sides.
Page 44
AL-MEISTER PLS3311 INSTRUCTION MANUAL <Rev.3>
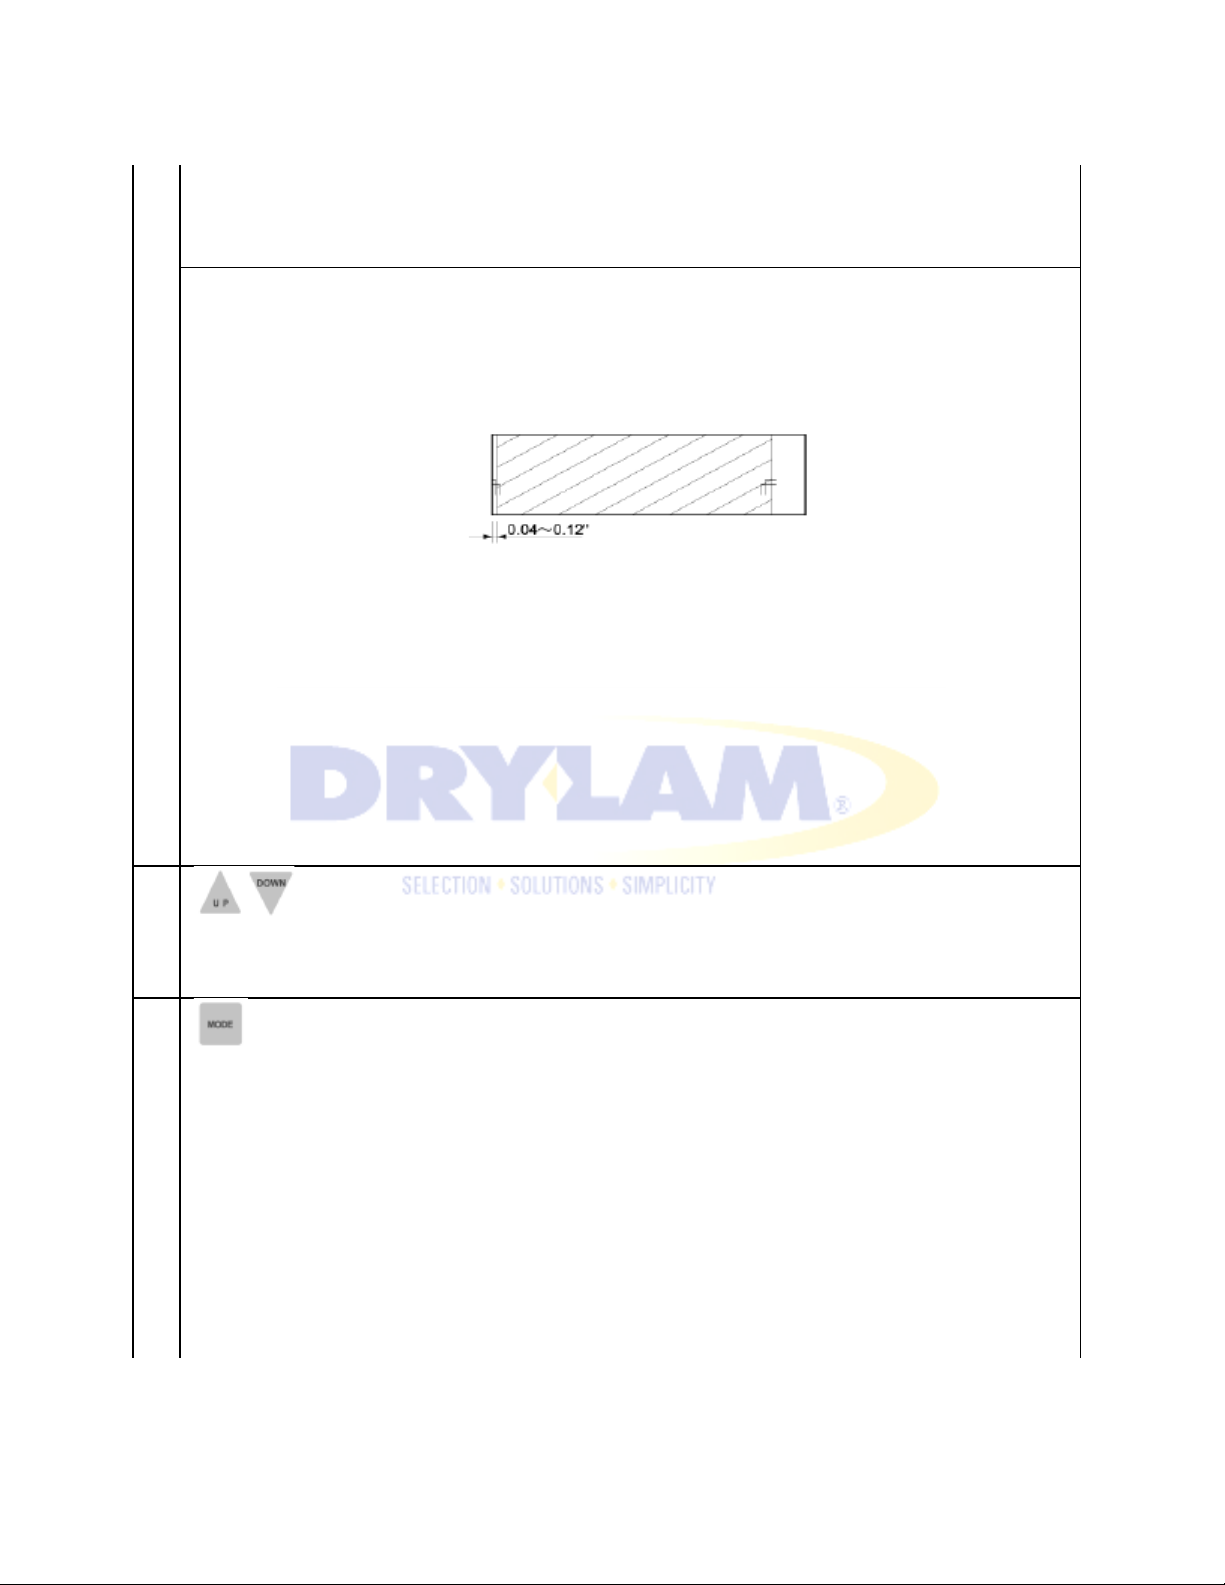
CUT ONE WAY 】
Blade does cutting from operation panel side only and goes back to the ready position on the
The display returns to the initial display or the warm-up display when no keys are pressed for 5
【
operator side of the machine. This mode applies to the paper which has fewer margin than 0.12”
at the opposite side. NOTE ・The paper must be positioned on the Feeder Tray so that the wider
margin is on the operator side.
4
5
seconds.
NOTE
• One way cutting will always start from the operation side. When the blade is at the
• This setting is not retained in memory after power off.
Choose [1] or [2] by pressing [UP] or [DOWN] key.
Press [MODE] key to confirm.
opposite side (non-operator side) it will move back to the operation side when this mode
is selected.
Page 45
AL-MEISTER PLS3311 INSTRUCTION MANUAL <Rev.3>
.
CAUTION
The adjustment must be done while the machine is not running. Do not attempt to adjust the Decurling
Bar while laminations are being made.
Page 46
AL-MEISTER PLS3311 INSTRUCTION MANUAL <Rev.3>
1
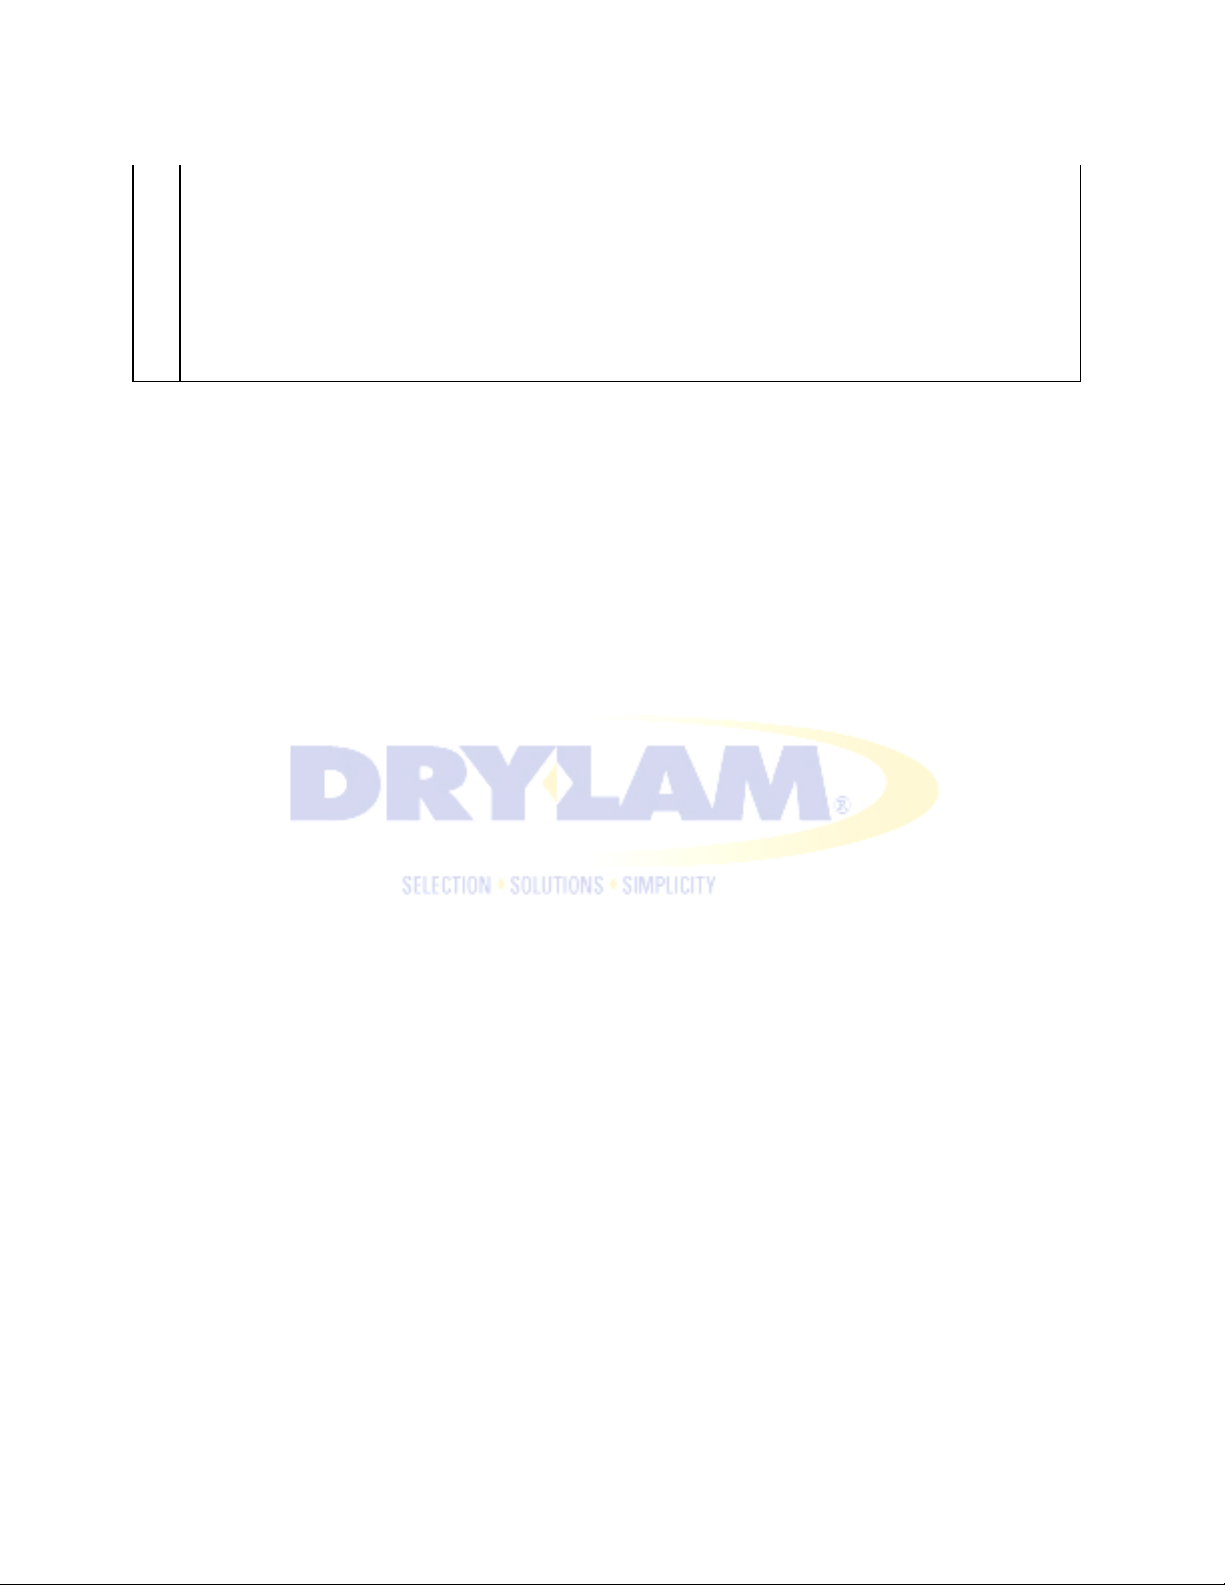
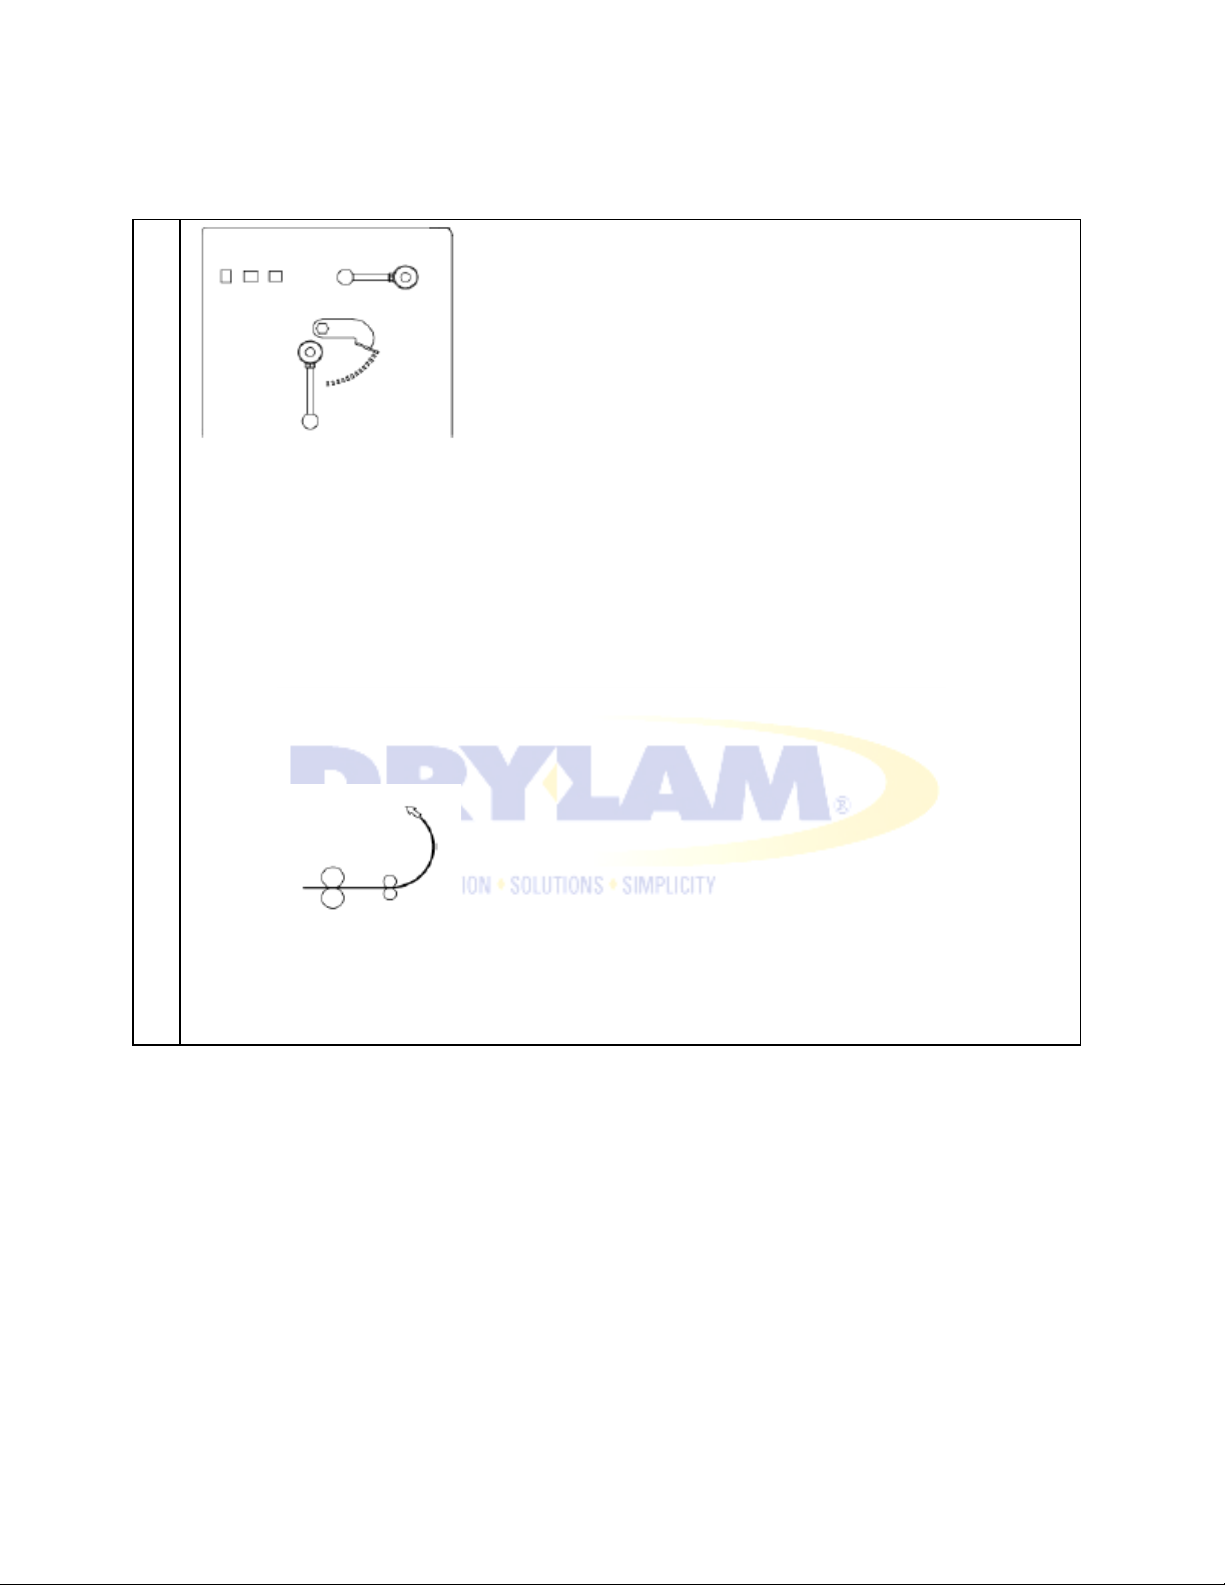
5-12. DE-CURLING
Turn the pull roller lever to the UP position. The heating roller stays in the DOWN position.
Pull and move the de-curling lever to the position you want. By leasing the lever it will lock into
place.
It is recommended to start lamination setting the de-curling Lever to the center “0”. The amount
of de-curling will increase with the lever towards the left side.
Thinner paper to the left (more positive, or more de-curl)
Thicker paper to the right (more negative, or less de-curl)
NOTE:
Hot lamination has a tendency to curl upwards, therefore more de-curl will necessary.
Page 47
AL-MEISTER PLS3311 INSTRUCTION MANUAL <Rev.3>
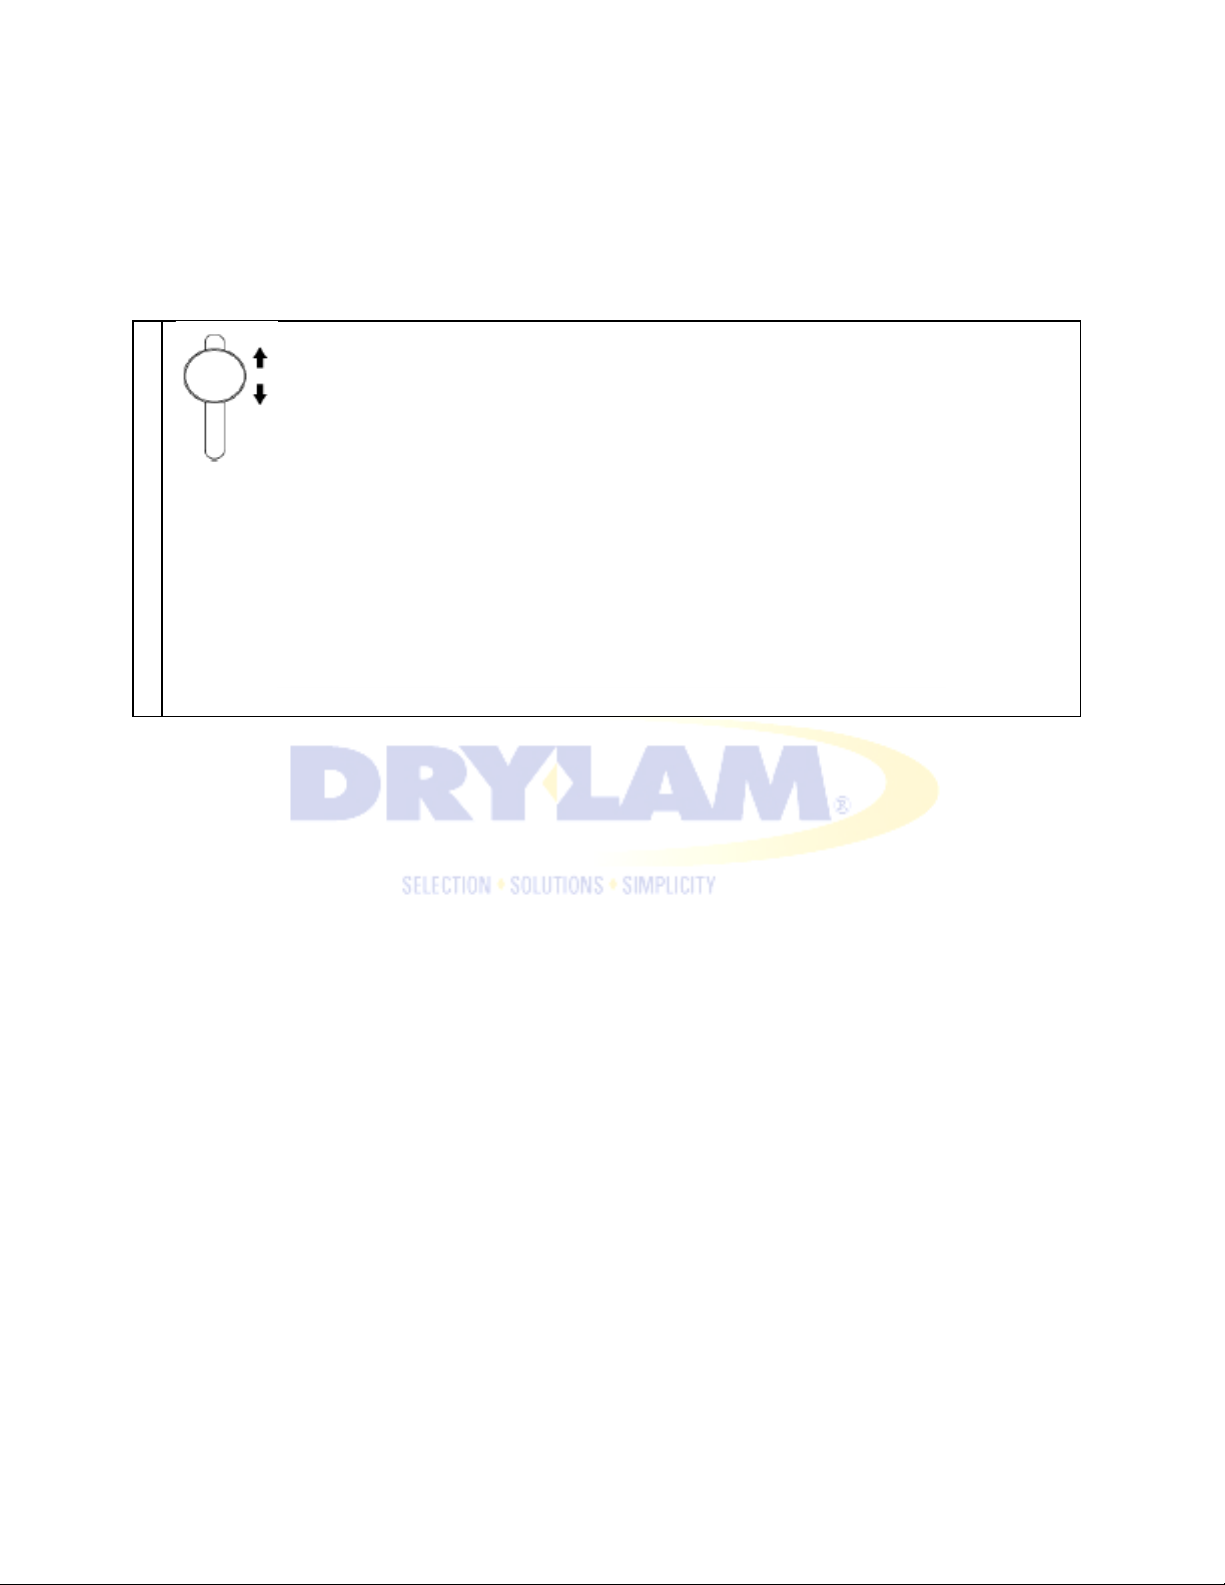
5-13. ADJUST FEEDING PRESSURE
Adjust the feeding pressure when feeding has a problem or more than one sheet is fed.
Loosen the pressure knob. Adjust the pressure by raising/lowering the knob. The knob
should be securely fastened.
NOTE
• If the paper is thick, increase the pressure. If the paper is thin, decrease the pressure. The
amount of adjustment varies according to paper specifications.
Page 48
AL-MEISTER PLS3311 INSTRUCTION MANUAL <Rev.3>
1
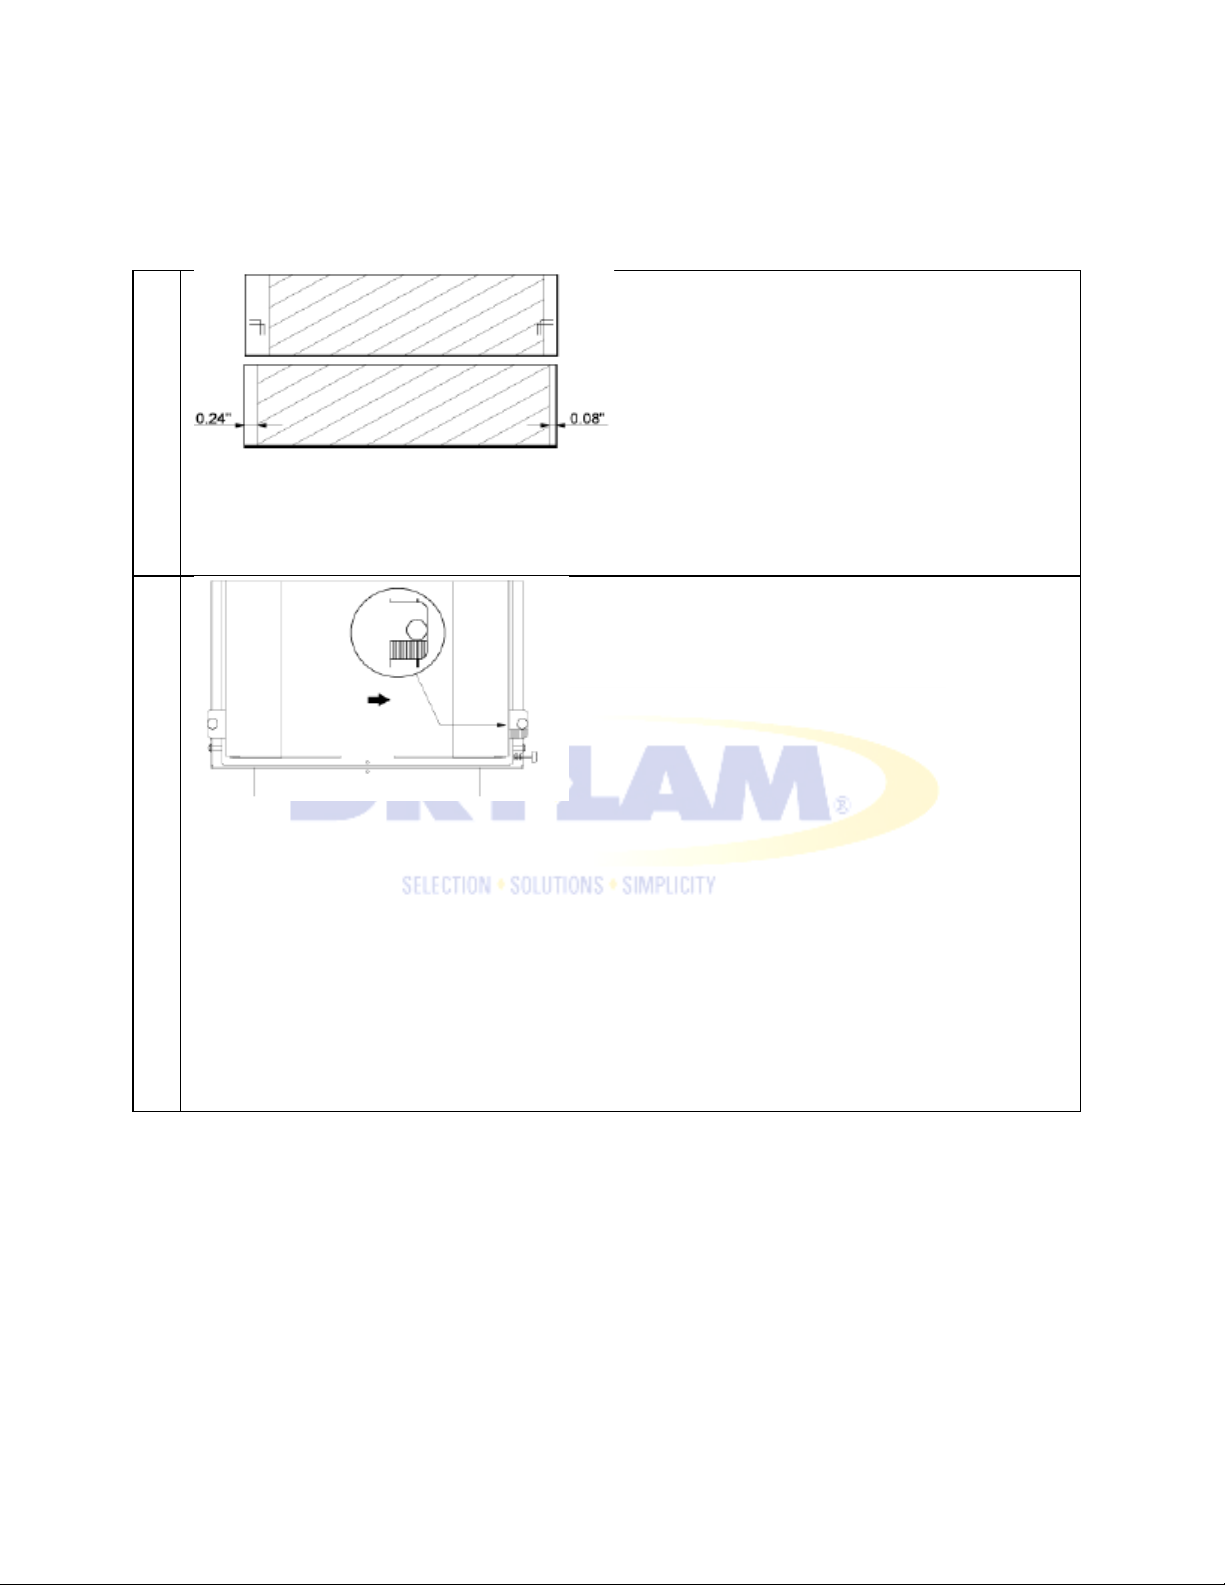
5-14. ADJUST PAPER POSITIONING
The position of the paper in the feeding tray is decided based on the center point marked on the tray.
If the positioning is not good, figure out the amount and direction you want to adjust.
2
Adjust the amount and direction of the feeder tray by using the Feed Adjustment Knob.
NOTE
• In order to avoid cutting error, film must be more than 0.16” smaller than paper at both
sides.
Page 49
AL-MEISTER PLS3311 INSTRUCTION MANUAL <Rev.3>
1
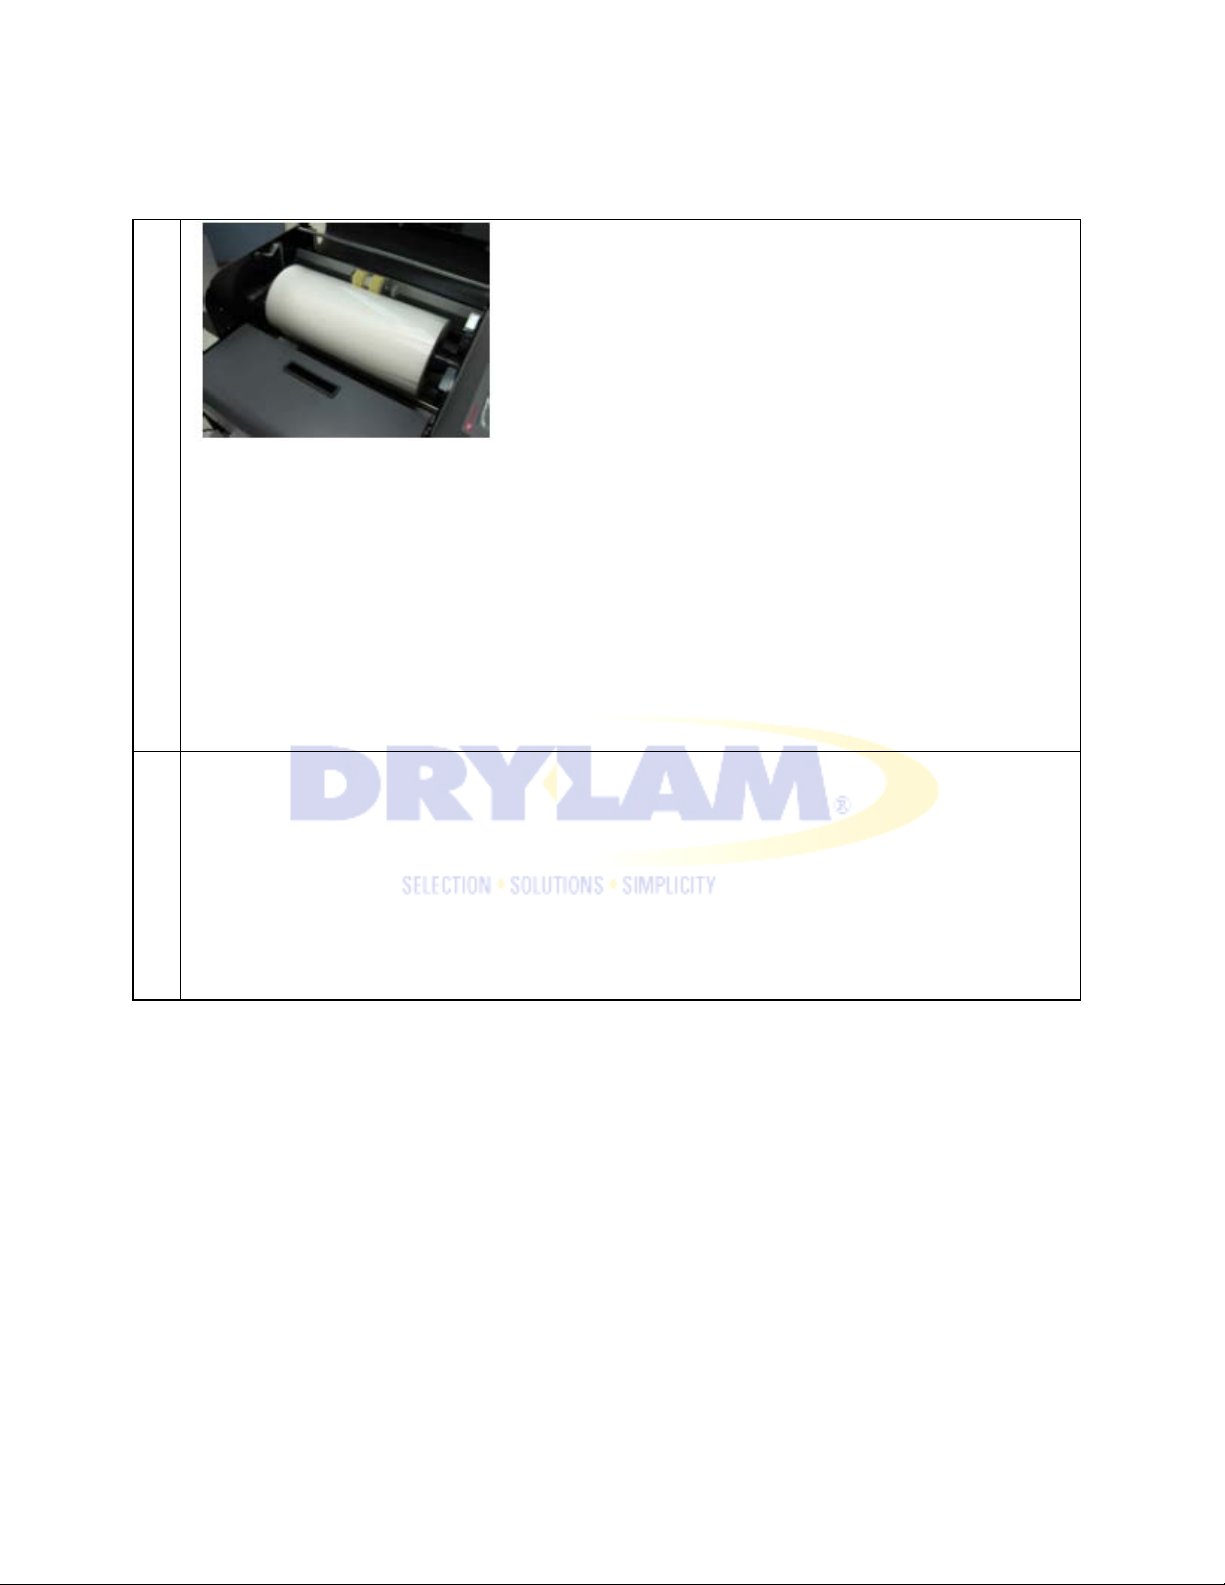
5-15. ADJUST FILM TENSION
Adjust the film tension by loosening or tightening the adjustment screw shown in the picture.
When the film is too loose, slowly turn the dial clockwise. If the film tension is too tight, turn the
dial counter-clockwise.
NOTE
• Normally the film tension does not need much adjustment.
When the film tension is tight, films tends to shrink. You can prevent this by slightly
2
moving the film guide bar to your direction.
NOTE
• It is recommended to cut the film after the operation to prevent further shrinkage.
Page 50
AL-MEISTER PLS3311 INSTRUCTION MANUAL <Rev.3>
1
1
6.CLEANING
NOTE
Be sure that the machine is unplugged.
Before cleaning the machine, turn off and let the machine cool down, as the machine gets very hot.
Wipe off stains with a soft cloth.
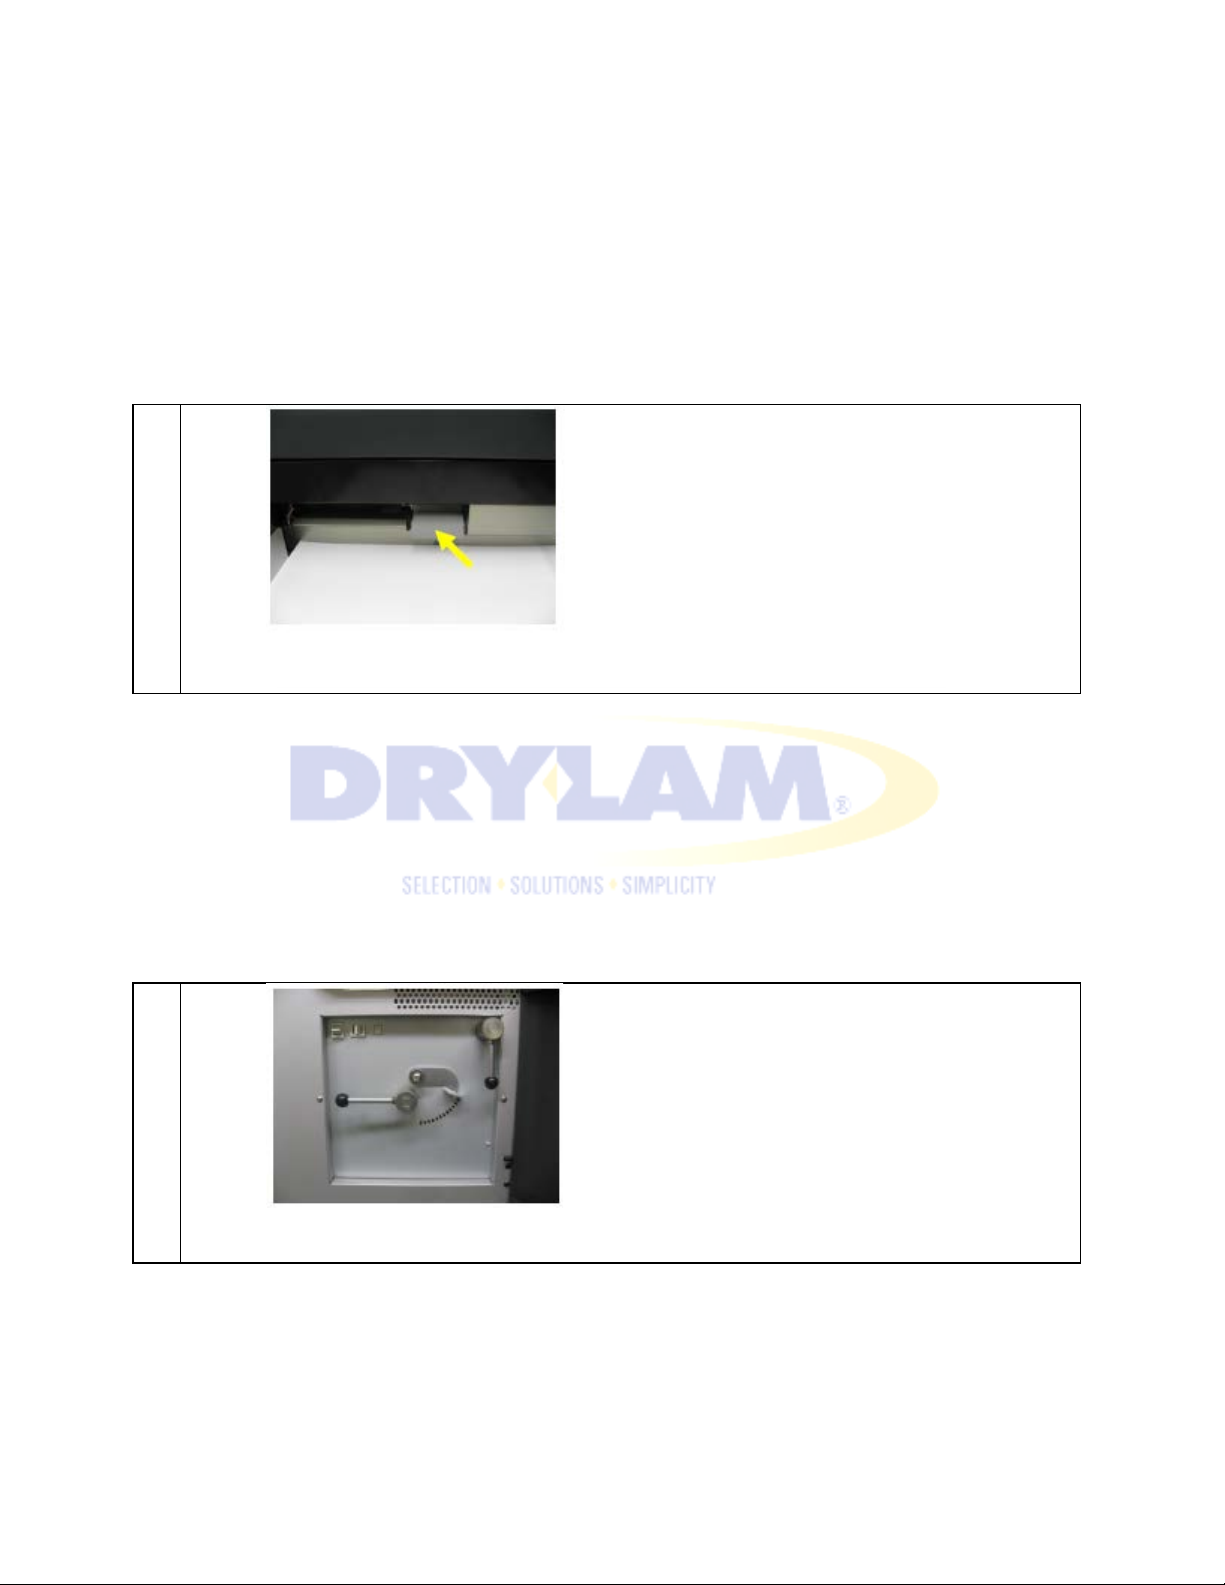
6-1. CLEANING OF FEEDER SECTION
Clean the roller with a soft cloth. Remove any stuck paper.
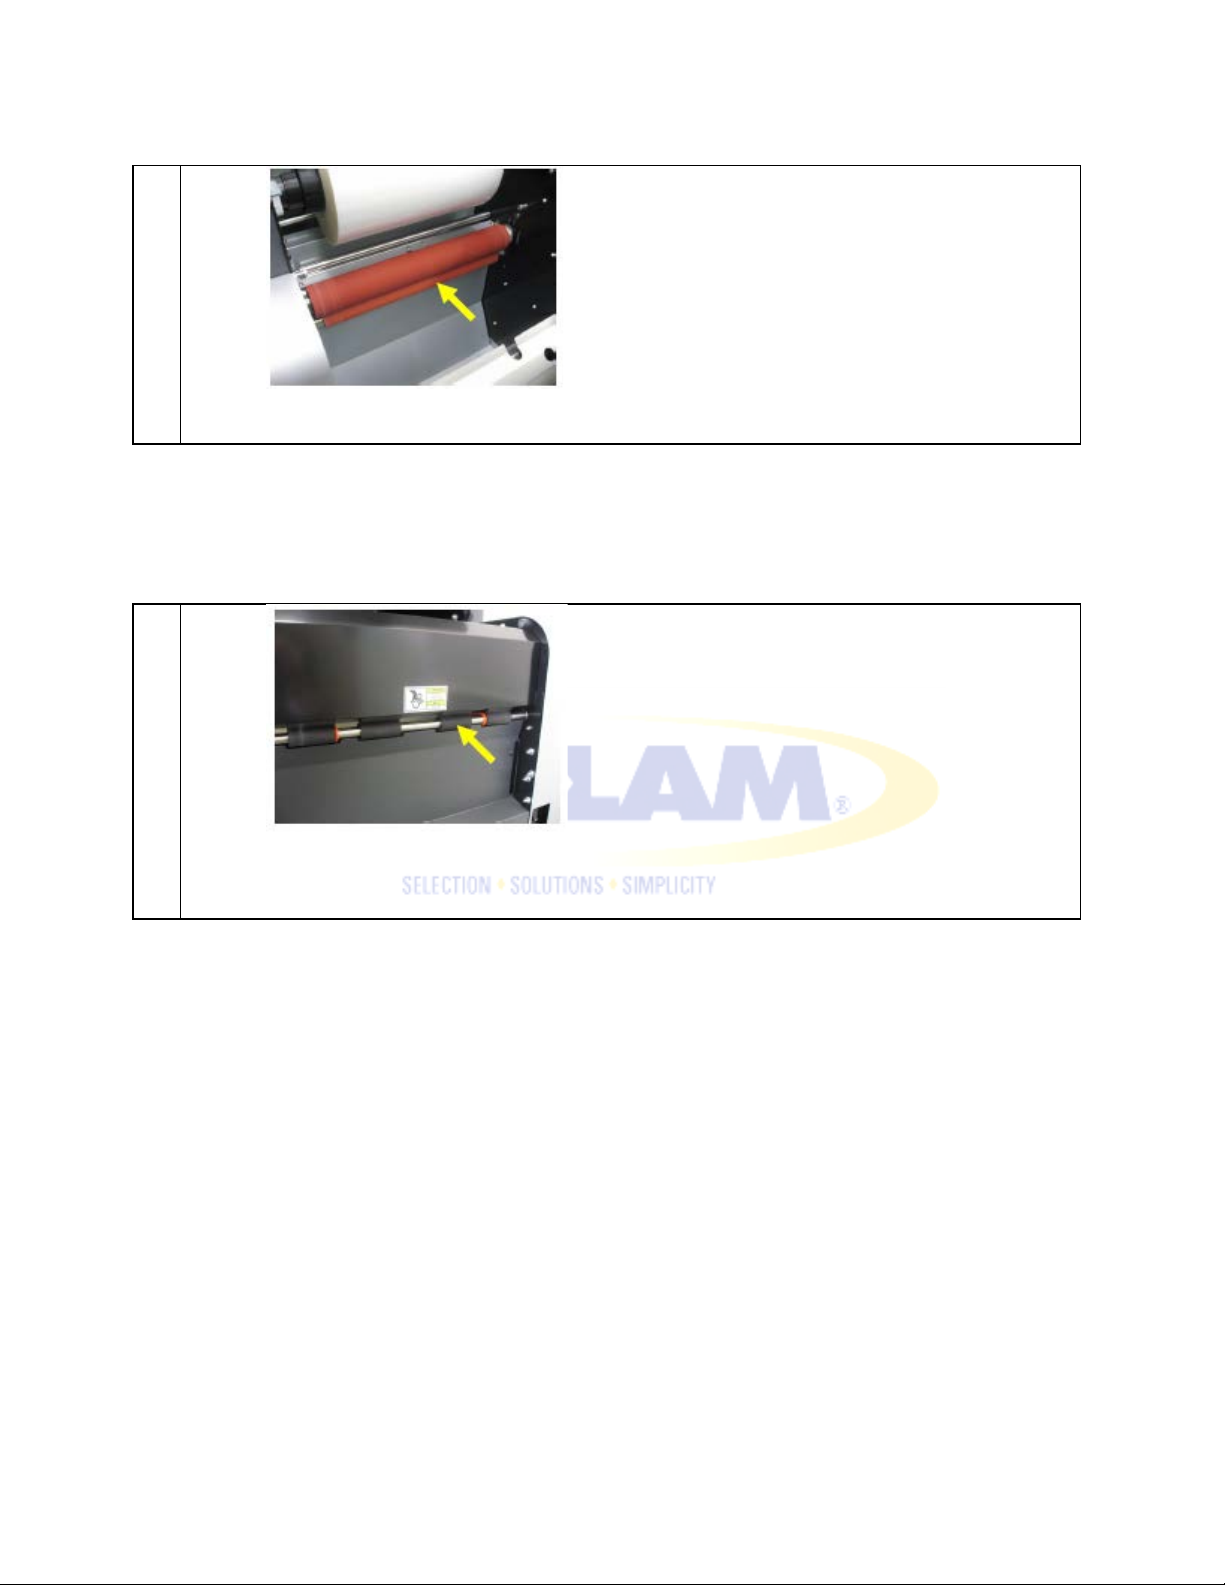
6-2. CLEANING OF LAMINATION SECTION
NOTE
Lamination section gets very hot. Be careful not to get burned.
Turn the heating roller to UP position. Remove any stuck paper.
Page 51
AL-MEISTER PLS3311 INSTRUCTION MANUAL <Rev.3>
2
1
Clean the heating roller. Remove any stuck paper.
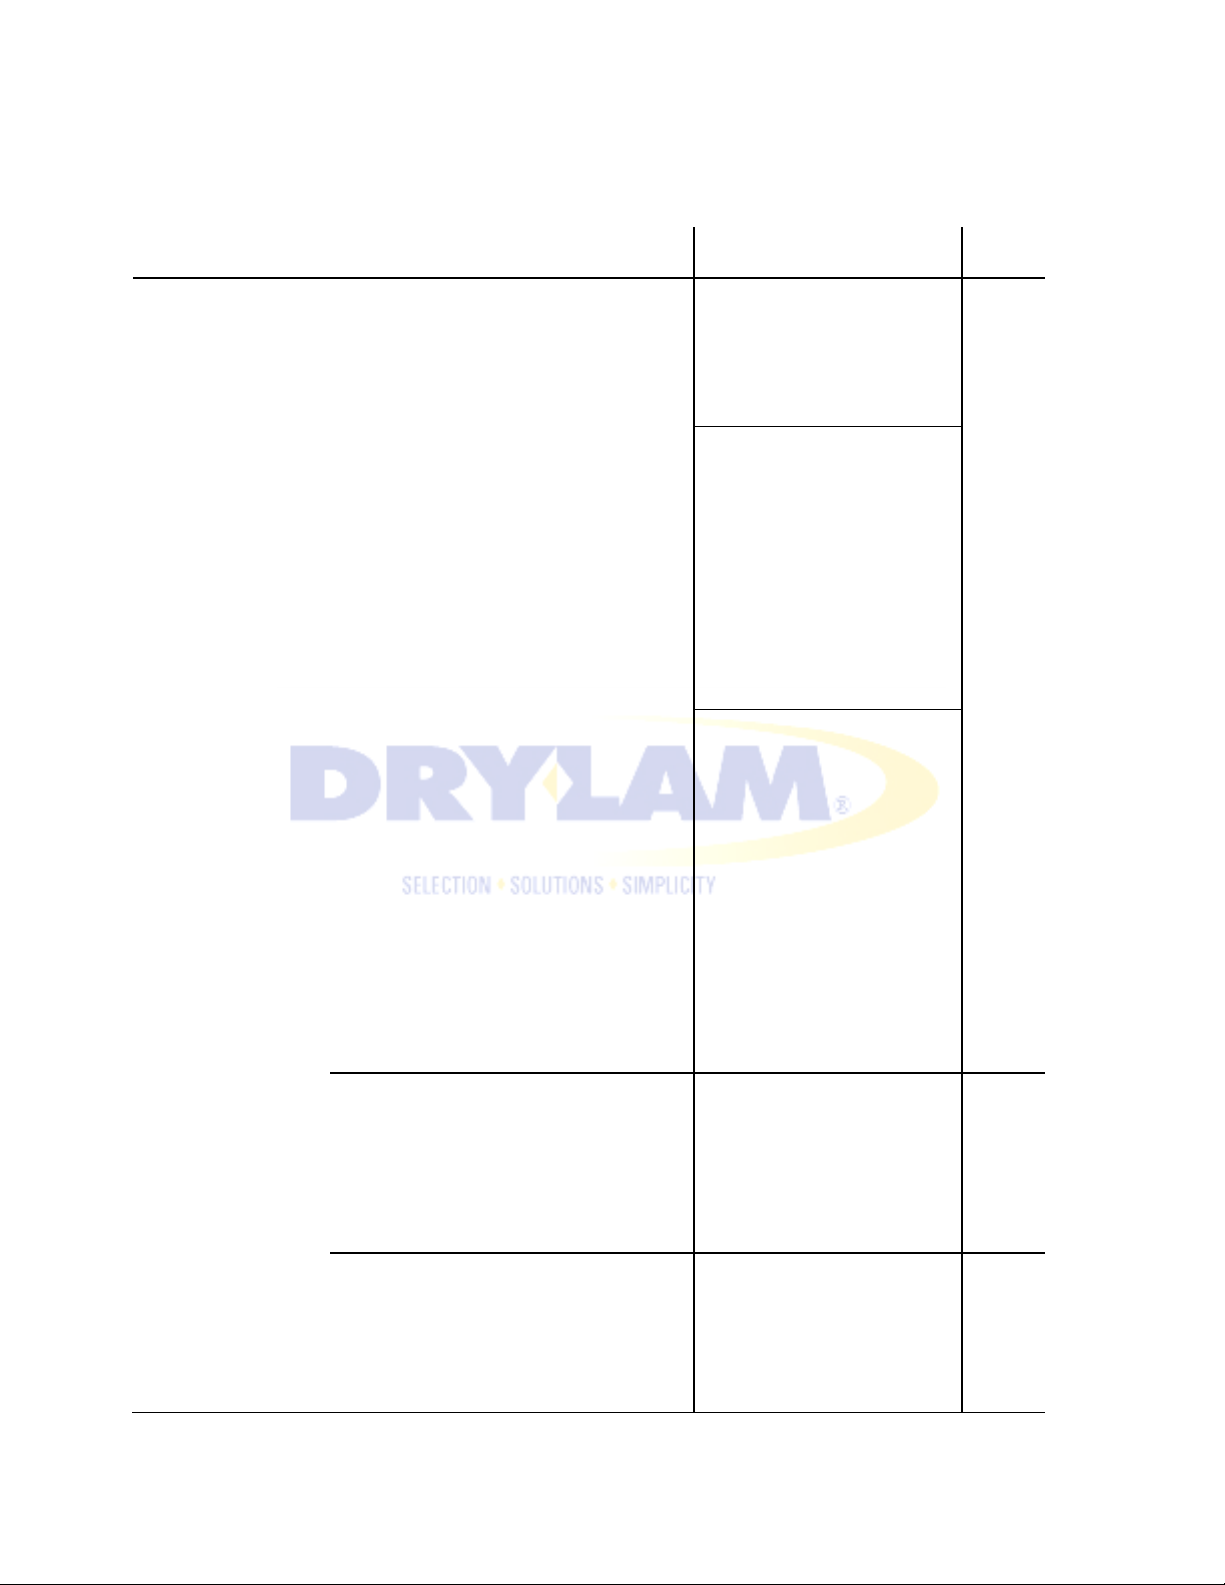
6-3. CLEANING OF DISCHARGE
Clean the discharge rollers.
Remove any stuck paper.
Page 52
AL-MEISTER PLS3311 INSTRUCTION MANUAL <Rev.3>
PROBLEM
CHECK IF
SOLUTION
PAGE
● CUTTING ERROR
Cutting blade is not working properly.
Close the cutter cover.
・
CAUTION: Do not touch
Close the cutter cover.
CAUTION Be careful that
clothes do not get caught
Turn the pull roller lever
Laminated upward
paper
curls
47
The margin of the paper and film is
The starting point of the cutting blade
7.TROUBLE SHOOTING
Paper is jammed inside the machine.
・
・Press [RESET] key to put
the cutting blade back into
the starting position.
the cutter unit.
・
・By using the manual
feed switch, remove the
jammed paper. ・Press
[RESET] key. 14
43
less than 0.16”.
is not correct. Paper is cut irregularly.
・
your fingers or
in the rollers.
・
upward. Adjust the decurling lever to decrease
the curling.
・Adjust the paper
position in the feeder tray.
・The film must always be
smaller than the paper by
0.16” at both sides.
・Change the value of cut
timing. ・The cutting must
be done on the straight
portion of the blade, not
the V-shaped portion of
49
37
Page 53
AL-MEISTER PLS3311 INSTRUCTION MANUAL <Rev.3>
the blade.
● PICK ERROR
The first sheet of paper is
Make the paper flush on
21
Press [RESET] key.
More than two sheets are fed
Remove the paper. ・Hold
Paper is not fed at right angle.
Remove the papers.
The feeding roller is dirty.
Remove the papers.
PROBLEM CHECK IF SOLUTION PAGE
・Slide the paper back to the
partially fed into the machine.
magnetic stop on the Feeder
Tray.
・
the tray.
・
into the machine.
・
the stack of paper vertically
and tamp it down and fan the
paper well. ・If papers are
curling, make them flat.
・Control the level of feeding
pressure by raising it upward
to resist multiple sheets.
・Press [RESET] key.
・
・Control the level of feeding
pressure. ・Fix the feeder
paper guide firmly in the right
position. ・Press [RESET] key.
・
・Clean the feeding roller
with soft cloth.
47
21
47
Page 54
AL-MEISTER PLS3311 INSTRUCTION MANUAL <Rev.3>
Press [RESET] key.
50
● FEEDING ERROR
Paper is stuck between the
Open the feeder cover.
11
● DISCHARGE ERROR
Laminated paper is stuck in
Open the feeder cover and
Press [RESET] key.
CAUTION Laminating
11
Be careful that your fingers
Heating roller lever or Pull
Turn the pull roller lever
・
PROBLEM CHECK IF SOLUTION PAGE
・
feeder section and the
lamination section.
・Remove all the jammed
paper.
・Press [RESET] key.
CAUTION ・Laminating rollers
get hot. Be careful not to get
burned.
the lamination section and/or
the cutter section.
roller lever is in UP position.
・
the cutter cover. ・Remove
the jammed paper by using
the manual feed switch.
・
・
rollers get hot. Be careful not
to get burned.
・
or clothes do not get caught in
the rollers.
・
and heating roller lever to
DOWN position. ・Press
[RESET] key.
14
23
Page 55
AL-MEISTER PLS3311 INSTRUCTION MANUAL <Rev.3>
Film has ended.
Remove the empty film roll
CONTROL FILM/PAPER
Occurs when paper is not
● COVER OPEN ERROR
One or more covers are open.
Close all covers.
● OVERHEAT ERROR
Then turn the power back
on. Normally the problem
will be solved.
-
If this problem occurs
many times, contact your
dealer.
● TEMP.SENSOR CUT
Turn off the power.
(disconnected) ERROR
Contact your dealer.
・
・Press [RESET] key.
・Change film roll.
CAUTION ・Laminating rollers
get hot. Be careful not to get
burned.
23
ERROR
PROBLEM CHECK IF SOLUTION PAGE
set correctly in the
lamination area. Press
“FILM SET”
・
-
・Press [RESET] key.
・Turn off the power.
・
・
・
・
CAUTION ・Do not dismantle
the machine.
-
Page 56
AL-MEISTER PLS3311 INSTRUCTION MANUAL <Rev.3>
● TEMP. SENSOR
Turn off the power.
SHORT (short- circuited)
Contact your dealer.
ERROR
CAUTION Do not dismantle
-
● MAIN MOTOR ERROR
Turn off the power. Then
● Blade does not cut well.
Contact your dealer.
● Paper and/or film has
Turn the heating roller lever
● The laminated film has
Film Tension Knob is too
・
・
・
the machine.
・
turn the power back on.
Normally the problem will be
solved.
・If this problem occurs many
times, contact your dealer.
-
PROBLEM CHECK IF SOLUTION PAGE
been entangled on the
heating roller.
・Blade may be worn out.
・
CAUTION ・Do not dismantle
the machine.
・
to UP position. ・Remove
paper and/or film carefully by
using the manual feed switch.
This switch can work only
when all the covers are
closed. Repeat the manual
feed forward or backward
until the paper and/or film is
removed. ・If glue has stuck
to the rollers, wipe it off.
-
14
50
creases.
loose.
・Tighten the film tension.
Page 57
49
● [NOT READY] appears
After solving problems, [NOT
● More than two sheets
Each sheet of paper is too
Hold the stack of paper
Paper is curling.
De-curl paper.
-
Open the feeder cover and
11
Due to too much resistance by
Paper is curling.
Be certain paper lies flat
-
on the display and cannot
clear.
are transported at one
time.
AL-MEISTER PLS3311 INSTRUCTION MANUAL <Rev.3>
・Remove paper in the
READY] appears.
tightly stacked.
machine. Set film again.
・
vertically and tamp it down
and fan the paper well. Even it
up.
・
・Adjust the feeding
pressure.
-
47
PROBLEM CHECK IF SOLUTION PAGE
● Paper in the feeder tray
is not picked up.
Due to paper not being pulled
by the feeding roller.
the paper pressure lever
・
inspect for any debris. Also,
clean the rollers.
・Lower the paper pressure
lever
・
before placing it on the
Feeder Tray.
Page 58
AL-MEISTER PLS3311 INSTRUCTION MANUAL <Rev.3>
Rear Stacker Max.
Stock: 14” (W) × 19-5/8” (L)
Max. Laminating
8.SPECIFICATIONS
Model PLS3311
Processing Speed 40~120” /min (360 sheets/hour based on 12.59” x 17.71” size)
Warm-Up Time 10 min.
Temperature Setting 140~270°F at room temperature*
Laminating Film Exclusive PLUSTER FILM, available in several formulations and widths
Feeder Max. Load 1.6” (Equivalent to 300 sheets of 0.032lbs/ft2 [157g/m2] paper)
Load
2.4” (approx. 450 sheets)
Paper Thickness 0.021~0.064lbs/ft2 [104.7 ~ 314.0g/m2] 38-116 lb. cover (104.7-314.0 gsm)
(4/18/11- Current software will process 25” maximum paper
Max. Paper Size
length, however, feed and exit trays will require modification for that length. Feed table will accept 20.5”
maximum- bj)
Min. Paper Size 10-23/32” (W) × 11-7/8” (L)
Thickness
0.02” (Incl. film thickness)
Power Supply AC120V (60Hz)
Power Consumption 1,000W
Dimensions 65.12” (W) x 24.21” (D) x 44.29” (H) (with Feeder Tray and Rear Stacker)
Weight 204.1lbs (Laminator 189.6lbs, Feeder Tray 7.9lbs, Rear Stacker 6.6lbs)
Condition of use 32~105°F (better at 68±40°F) / not above an altitude of 6560’
Page 59

AL-MEISTER PLS3311 INSTRUCTION MANUAL <Rev.3>
Feeder Tray, Extension Tray, Feeder guard, Rear Stacker, Stacker Paper
Accessories
Guard, Film Spacer, Power Cable, Stand, Instruction Manual, Stand
assembly instruction
* Warm-up time may differ according to the environment and the settings.
(end)
 Loading...