

Page 1
Laveo
Model DF1045
Portable Toilet
User’s Manual
Patented
CAGE CODE: 6NNM4
Waterless Toilets
126 S. Turnpike Rd, Ste 3
Wallingford, CT 06492
(203) 248-4440
www.dry-flush.com
Please visit the "Owner Tips
& Tricks" section on our
website for helpful
YouTube videos and more!
Rev 11 8/16/22
0
Page 2

TABLE OF CONTENTS
Precautions……………………………………………………..... 2
Setup…………………………………………………………….. 3
Getting your Laveo ready for use……………………………….... 7
Electrical Connections…………………………………………... 8
Installing the Refill………………………………………………10
Removing the Waste and Empty Cartridge……………………...11
How to Use your Laveo………………………………………....12
Trouble Shooting Guide………………………………………....13
Specifications…………………………………………………....14
1
Page 3

PRECAUTIONS
DO NOT stand
personal injury.
NEVER use the Laveo for any use other than that for which it was designed.
Use the Quick Floor Mount Kit by Dry Flush if you are going to install your Laveo
in a moving craft or vehicle.
Use ONLY power sources supplied by Dry Flush with the Laveo. Using alternate
power sources may damage the unit and void the warranty.
Your Laveo is water resistant, but NOT waterproof. Please do not store or install
the Laveo in unprotected areas.
Supervise children when using the Laveo.
DO NOT put sharp objects such as broken glass into the Laveo as it may puncture
on the Laveo. Standing on the Laveo may cause damage or
the containment material.
If the toilet has turned on its side, check to make sure the Octagon Container is
properly seated on the Square Key inside the toilet before using.
PLEASE DISCARD WASTE RESPECTFULLY.
Waterless Toilets strives to maintain good relationships with recreational facilities
and waste management personnel. We ask for your support in this effort by
always properly disposing of waste in a manner that does not cause an issue.
2
Page 4
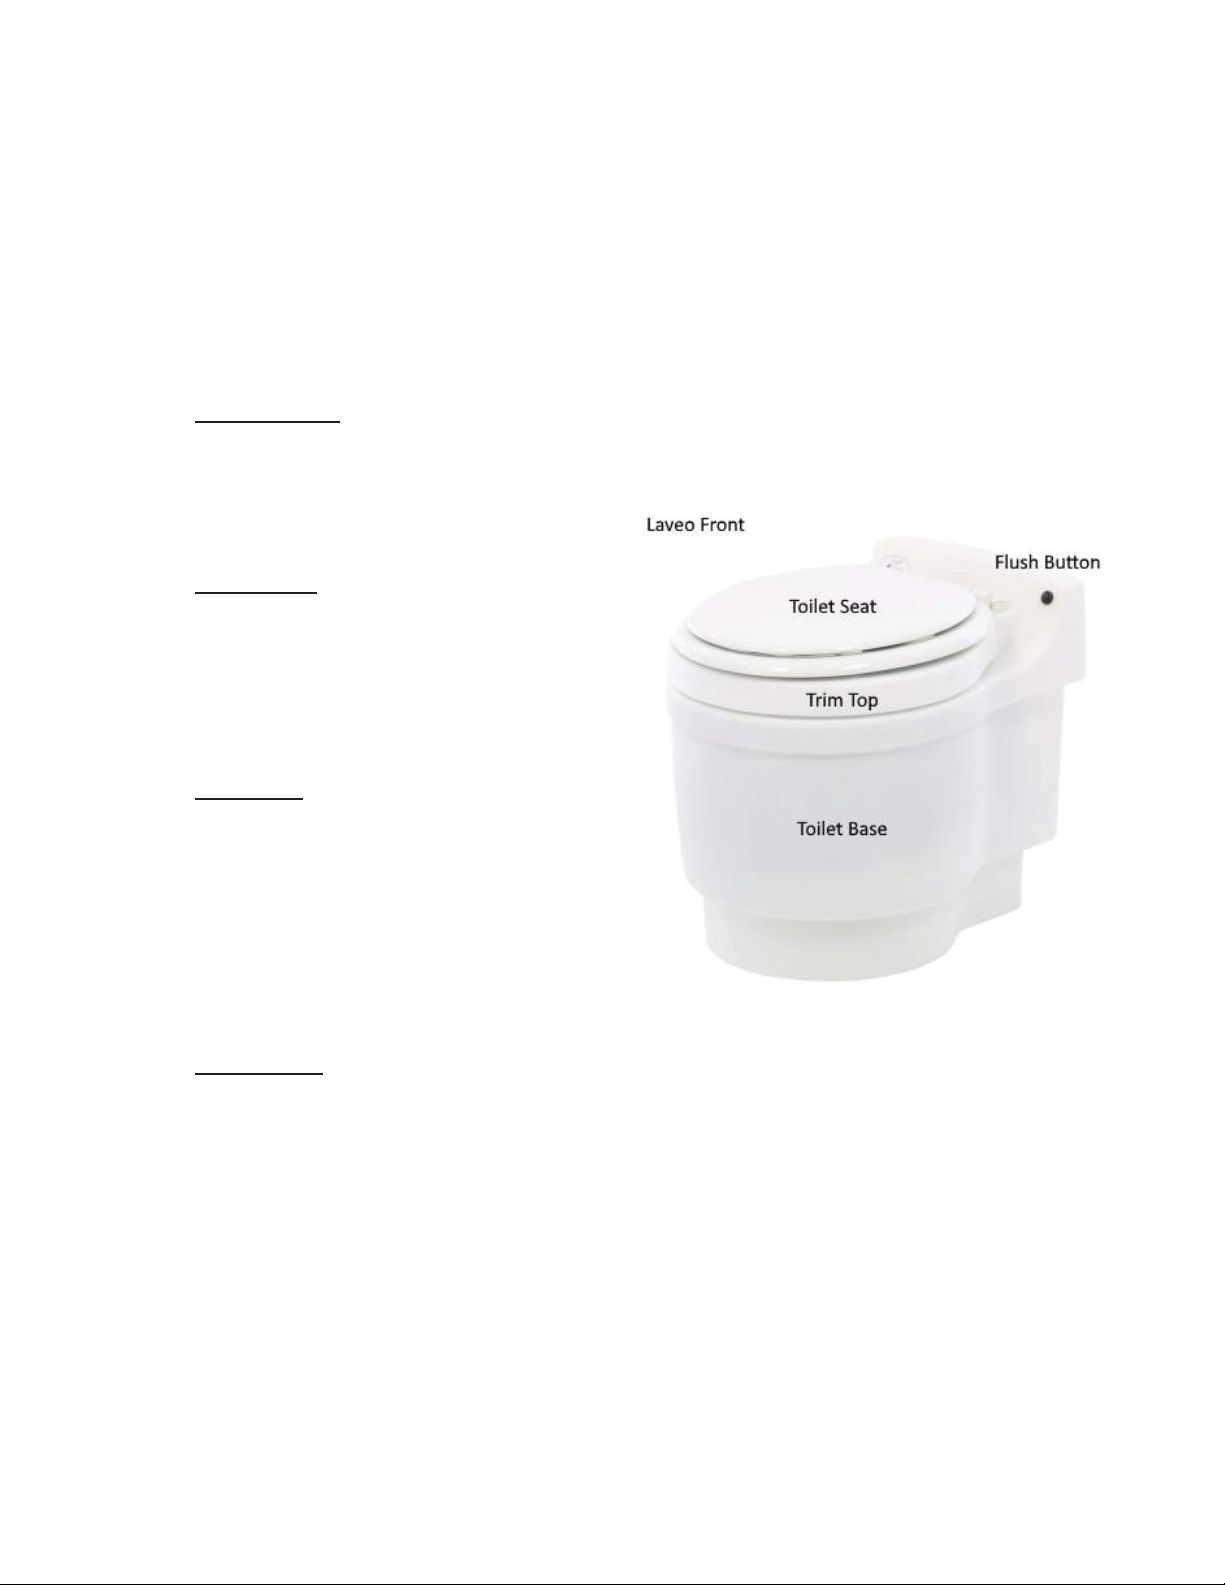
SETUP
Befor
parts that make it work. You can come back to these pictures during set-up, or in
the unlikely chance that you will have to call for technical support.
Pictured here are the various parts found on the front side of the Laveo.
The Flush Button activates the flush cycle. A single press and release starts the
flush cycle. During the flush cycle, the button becomes inactive so you don’t have
to worry about flushing twice by accident.
The Toilet Seat is a standard round seat
found in any Home Store. Enjoy the
comfort of the provided seat, or change
it to fit your style!
The Trim Top sits below the Toilet Seat
e you begin using your new Laveo, let’s take a moment to review some of the
and is a trim piece that covers the
cartridge. No tools needed to remove
the Trim Top. Simply lift the seat up
and place the Trim Top aside to change
the Refill Cartridge.
The Toilet Base. Made of durable high impact plastic, our Toilet Base is made to
last! Clean the base with your cleaner of choice.
3
Page 5
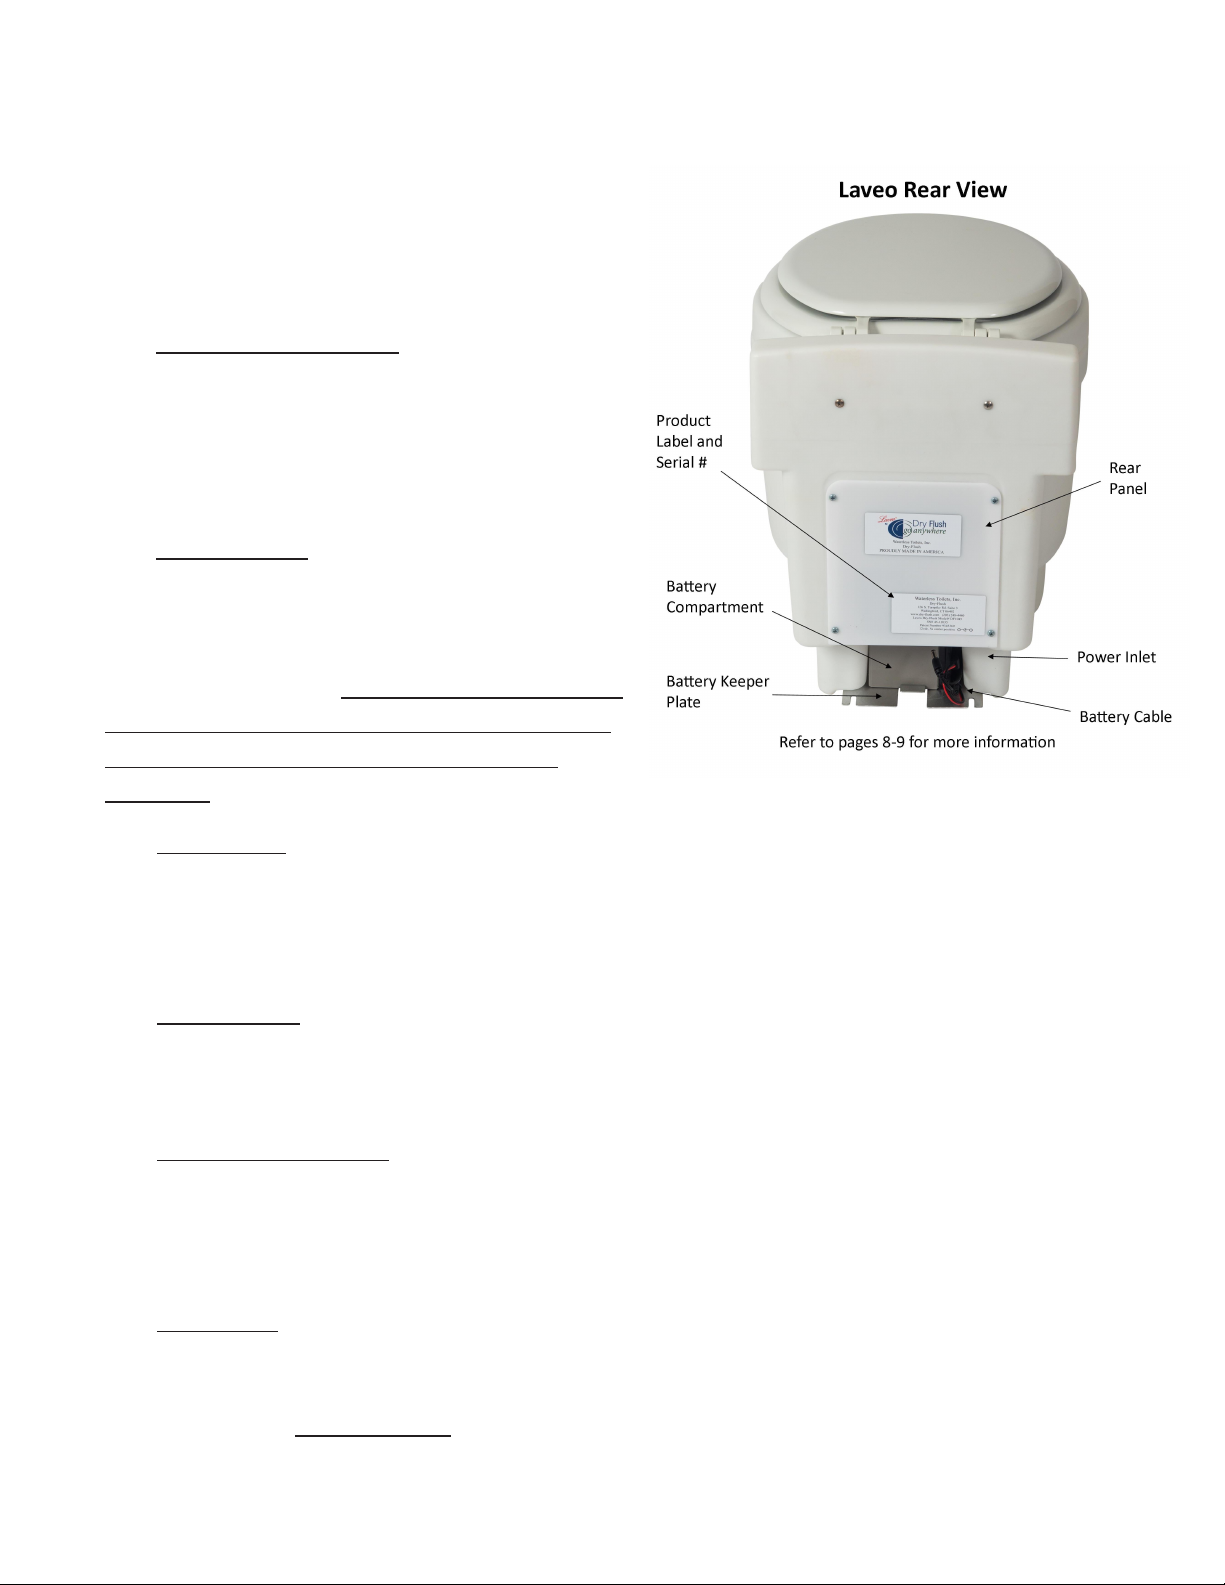
This picture shows the rear of your Laveo.
This is where you can find the electrical
connections that are used to power the Laveo.
The Battery Compartment is located at the
bottom of the Laveo. It is designed to give the
easiest access possible. No tools are needed to
remove the battery from the compartment.
The Charge Cable is stored in the open edge
of the Battery Compartment. Untuck the cable,
remove the plastic cap, and plug into the
supplied Battery Charger when you need to
recharge the battery. To avoid damage to your
battery, please disconnect the battery charger
from the battery cable after two hours of
charging.
The Power Inlet can be found above the top-right corner (Facing) the Battery Comp
artment.
Whether you are using the 12V Battery we supply, or the optional AC (110 volt) Power
Adapter, the Power Inlet is where you will plug in to power your Laveo.
The Power Cable plugs into the Power Inlet and supplies power from the Battery to your
Laveo.
The Battery Keeper Plate can be found below the Battery Compartment. The tab in the
middle holds the Battery in place. The Battery Keeper Plate is also one of the connecting
points for our optional Quick Floor Mount Kit.
The Rear Panel covers the Printed Circuit Board, and its connections. There isn’t any need
to remove this panel, in fact we recommend you DO NOT remove the panel unless
instructed to do so by a Dry Flush Customer Support. On the outside of the panel is where
you can find the Product Label. This label also has the serial number of your Laveo printed
on it.
4
Page 6
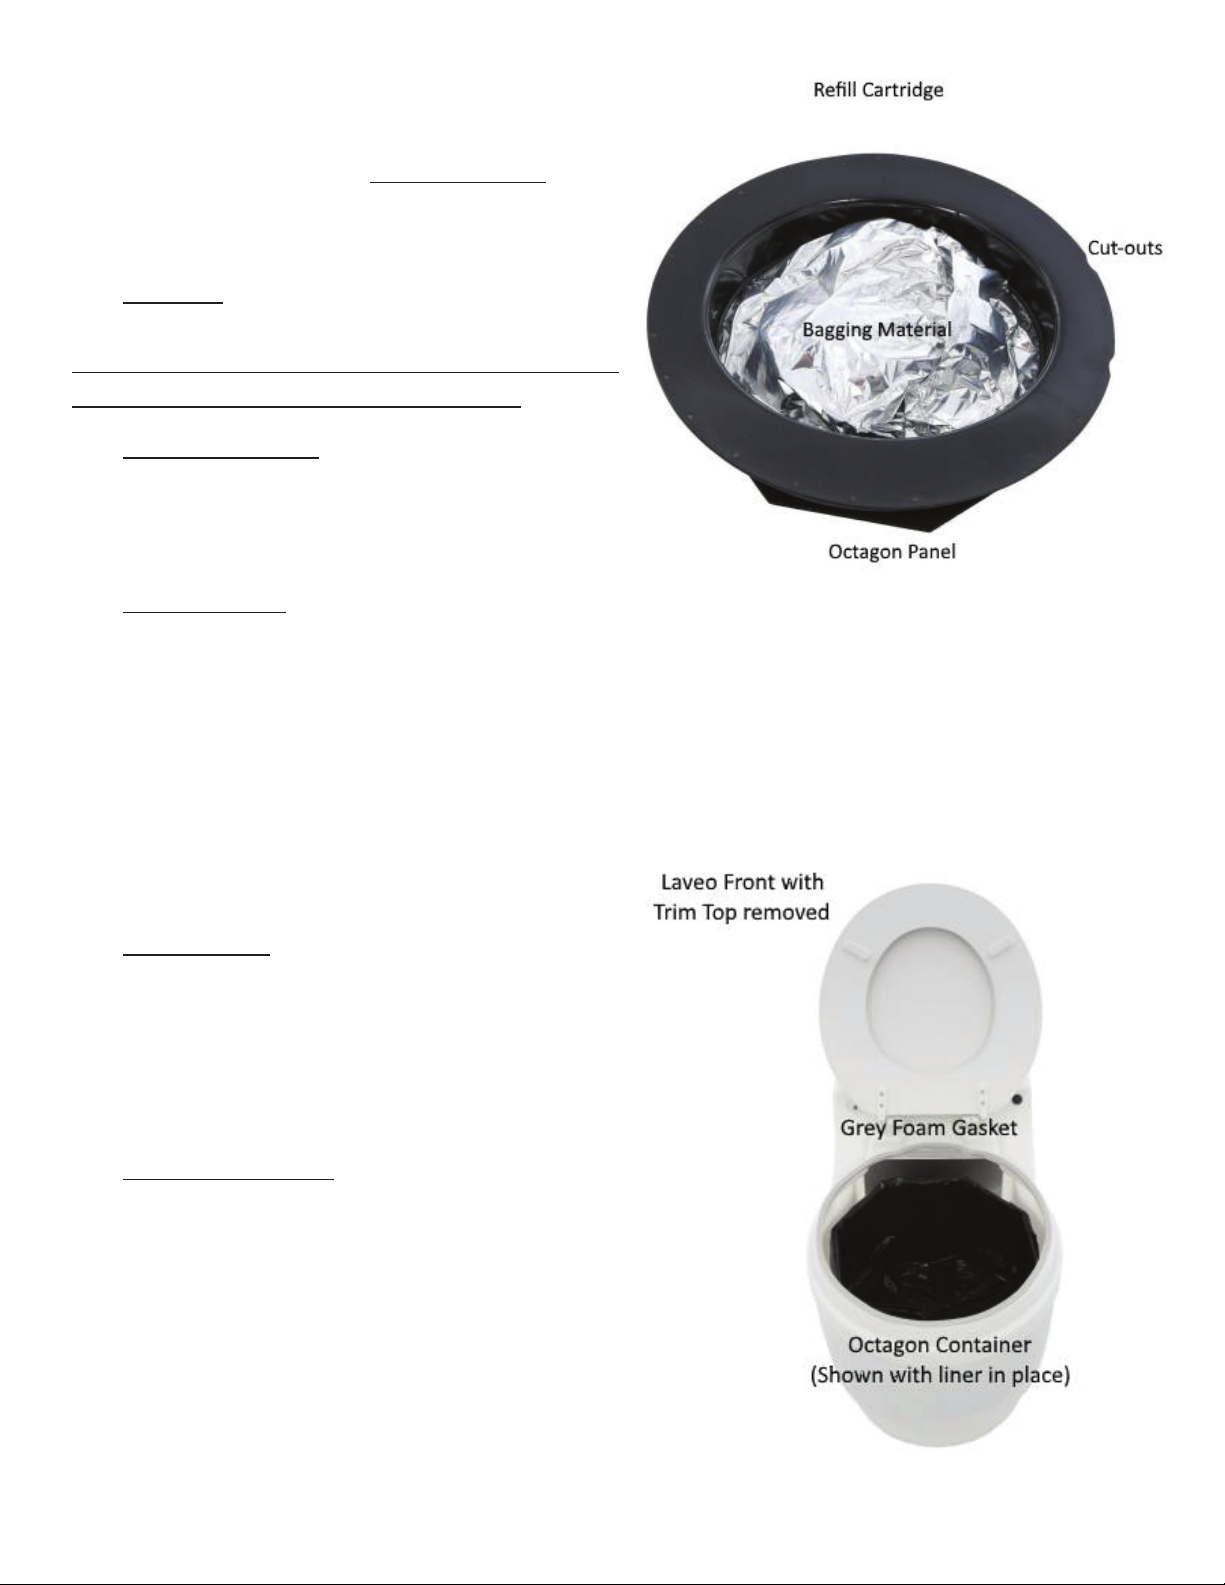
Pictured to the right is the Refill Cartridge. The
Cartridge sits below the Trim Top. This is where
waste is
wrapped and stored.
The Cut Outs are provided as a visual aid to
align your cartridge correctly within the Laveo.
The cartridge is installed into the Laveo with the
Cut Outs pointing to the rear of the unit.
The Bagging Material is a continuous tube of
material over 17’ long. This proprietary material
is what locks the waste and smell away for up to
several months.
The Octagon Panel is used as a Key to ensure
that the Bagging Material twists during the flush
cycle. The Octagon Panel sits at the bottom of
the Octagon Container.
The next image shows the inside of the Laveo
with the Refill Cartridge and Trim Top removed.
The
Foam Gasket assists in making a good seal
against the underside of the Refill Cartridge and
the lip of the Toilet Base. Should this gasket
become damaged it should be replaced. Contact
Dry Flush if you need to replace your Foam
Gasket.
The Octagon Container supplies rigid support to
the liner and bagging material while waste is
being stored within the Laveo. Simply lift the
Octagon Container up, and remove it from the
unit when you need to put a new liner in. The
container should not come in contact with waste
during normal usage, but if it does, you can clean
the container with the cleaner of your choice.
5
Page 7
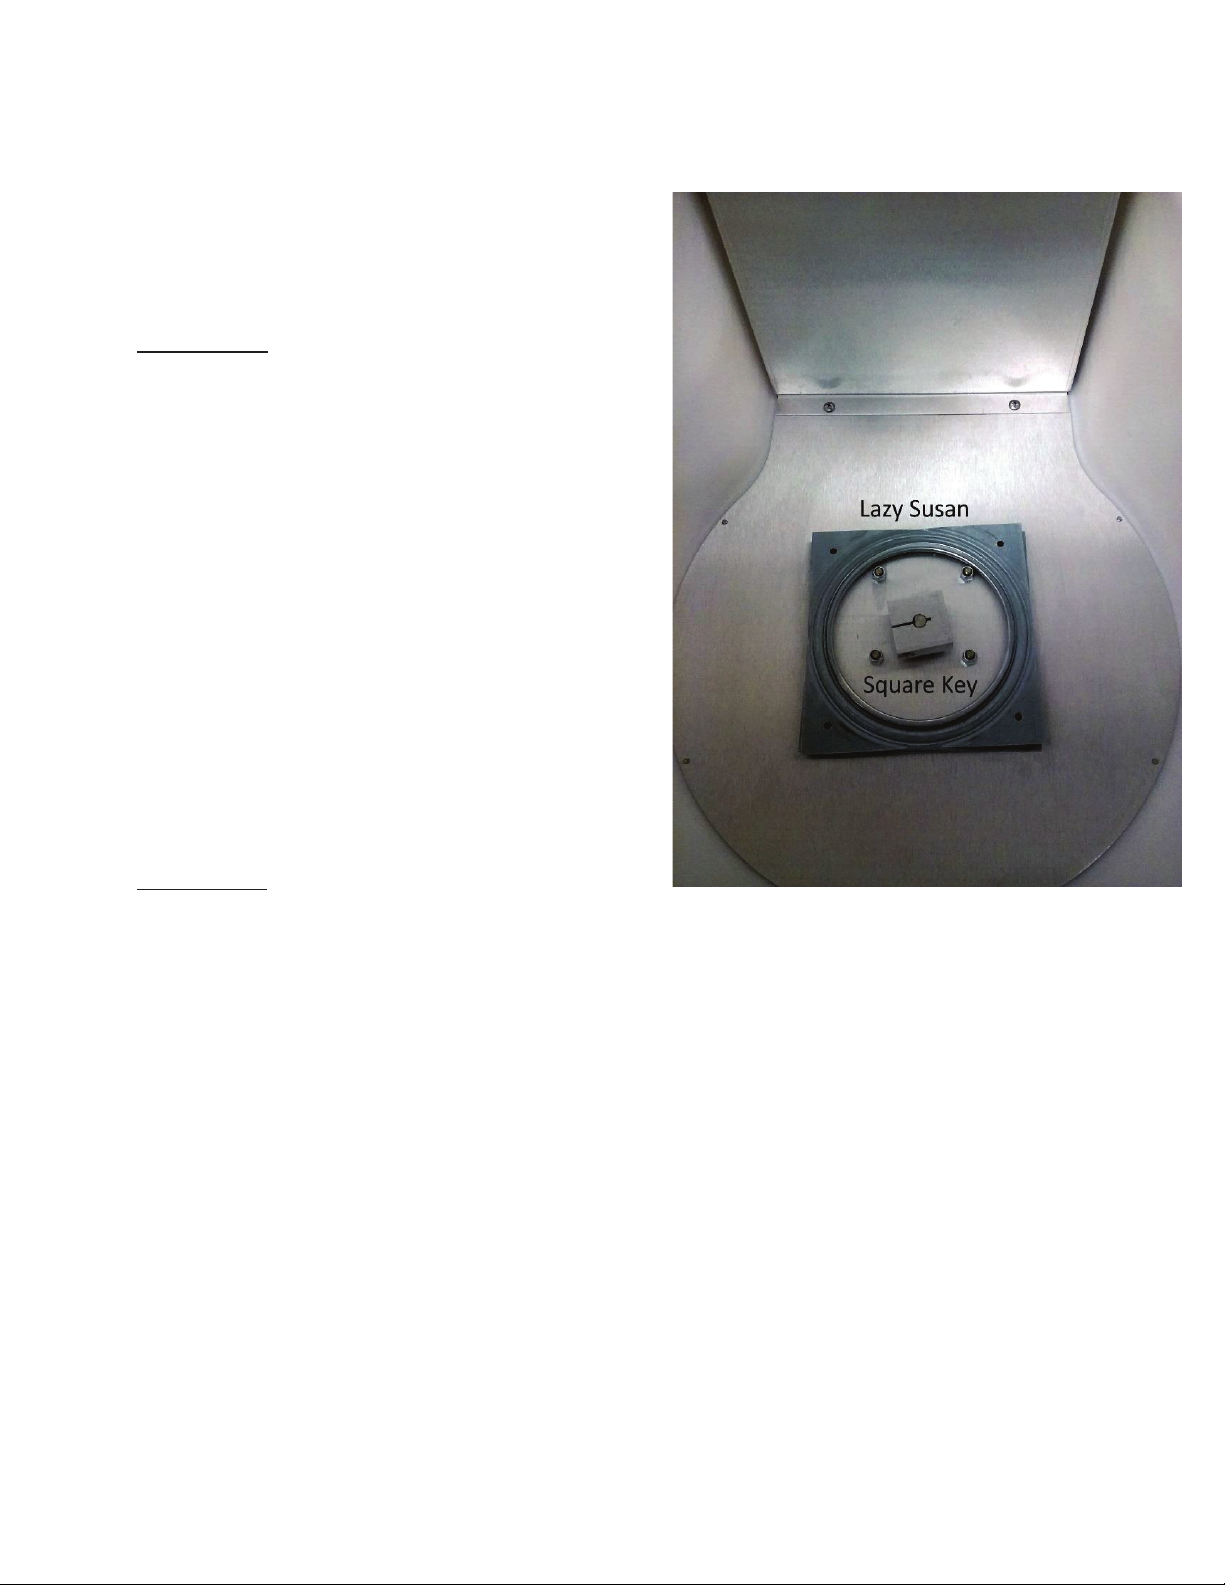
To the right is the view of the inside of the
Laveo. This view shows the floor panel located
below the Octagon Container.
Th
e
is connected to the shaft of the
gear box (not shown), and is the part
responsible for turning the Octagon Container
during the flush cycle. The Octagon Container
sits on top of the Square Key, and when the
Octagon Container is properly aligned, the
square hole in the container will drop down on
top of the key. You can tell that the Octagon
Container is sitting correctly on the Square Key
by giving the Octagon Container a gentle turn
in the clockwise direction. You should hear the
gear motor making a wh
rotate the container, and there should be a
reasonable amount of resistance as you apply a
little force to turn the container.
The
helps to support the Octagon
container, and to assist in the turning of the
container during the twist cycle.
Square Key
irring noise as you
Lazy Susan
6
Page 8

Getting your Laveo ready for use
Your Laveo Portable Toilet comes fully equipped and almost completely ready to
use out of the box, but due to shipping regulations and the shipping environment,
we ask that you please perform the following:
1. Lift up the toilet seat and remove the white Trim Top beneath it.
2. Carefully remove the Refill Cartridge and ensure that the Octagon Container
is sitting properly on the Square Key. As you turn the container clockwise
ou should feel a little resistance and possibly hear the motor being turned
y
below. If you do not, lift the container up an inch or two, place it back
down, and turn the container slowly clockwise until the container sits itse
upon the key. You should be able to feel this as it happens. Place the refill
back onto the Laveo. Please note that the Cut Outs on the refill go to the
rear of the Laveo.
3. Each refill cartridge has a black Octagon Panel attached to the Bagging
Material. This is so the Bagging Material twists when the motor turns the
Octagon Container. Use your hand to ensure that the black plastic octagon
is fully seated in the bottom of the container, and then use your hand to push
the barrier material to create a “bowl”.
4. Plug the Power Cable into the Power Inlet. This is located at the rear of the
unit. A picture of the connection and more information can be found on the
xt page
ne
La
veo Placement
The Laveo is highly portable and may be placed on any level surface, indoors or
out. Please remember that your Laveo is water resistant, and not waterproof. Do
not place your Laveo anywhere where water may pool. Also, be sure that the
.
lf
surface supports the toilet and that the toilet does not become unstable. If more
stability is required, an optional floor mounting kit will mount your Laveo firmly
to most surfaces. A Comfort Lift Package including 3" base, deluxe handrail with
comfort grips and wide base is also available for anyone who needs a little more
stability, or a hand getting up. Please visit Dry-Flush.com to order.
Installing in Vehicles, Boats, or Planes
If you plan to use the toilet within a vehicle, we recommend that you secure the
toilet to prevent movement. A Quick Floor Mounting Kit designed for your Laveo
can be purchased from us online at Dry-Flush.com.
7
Page 9
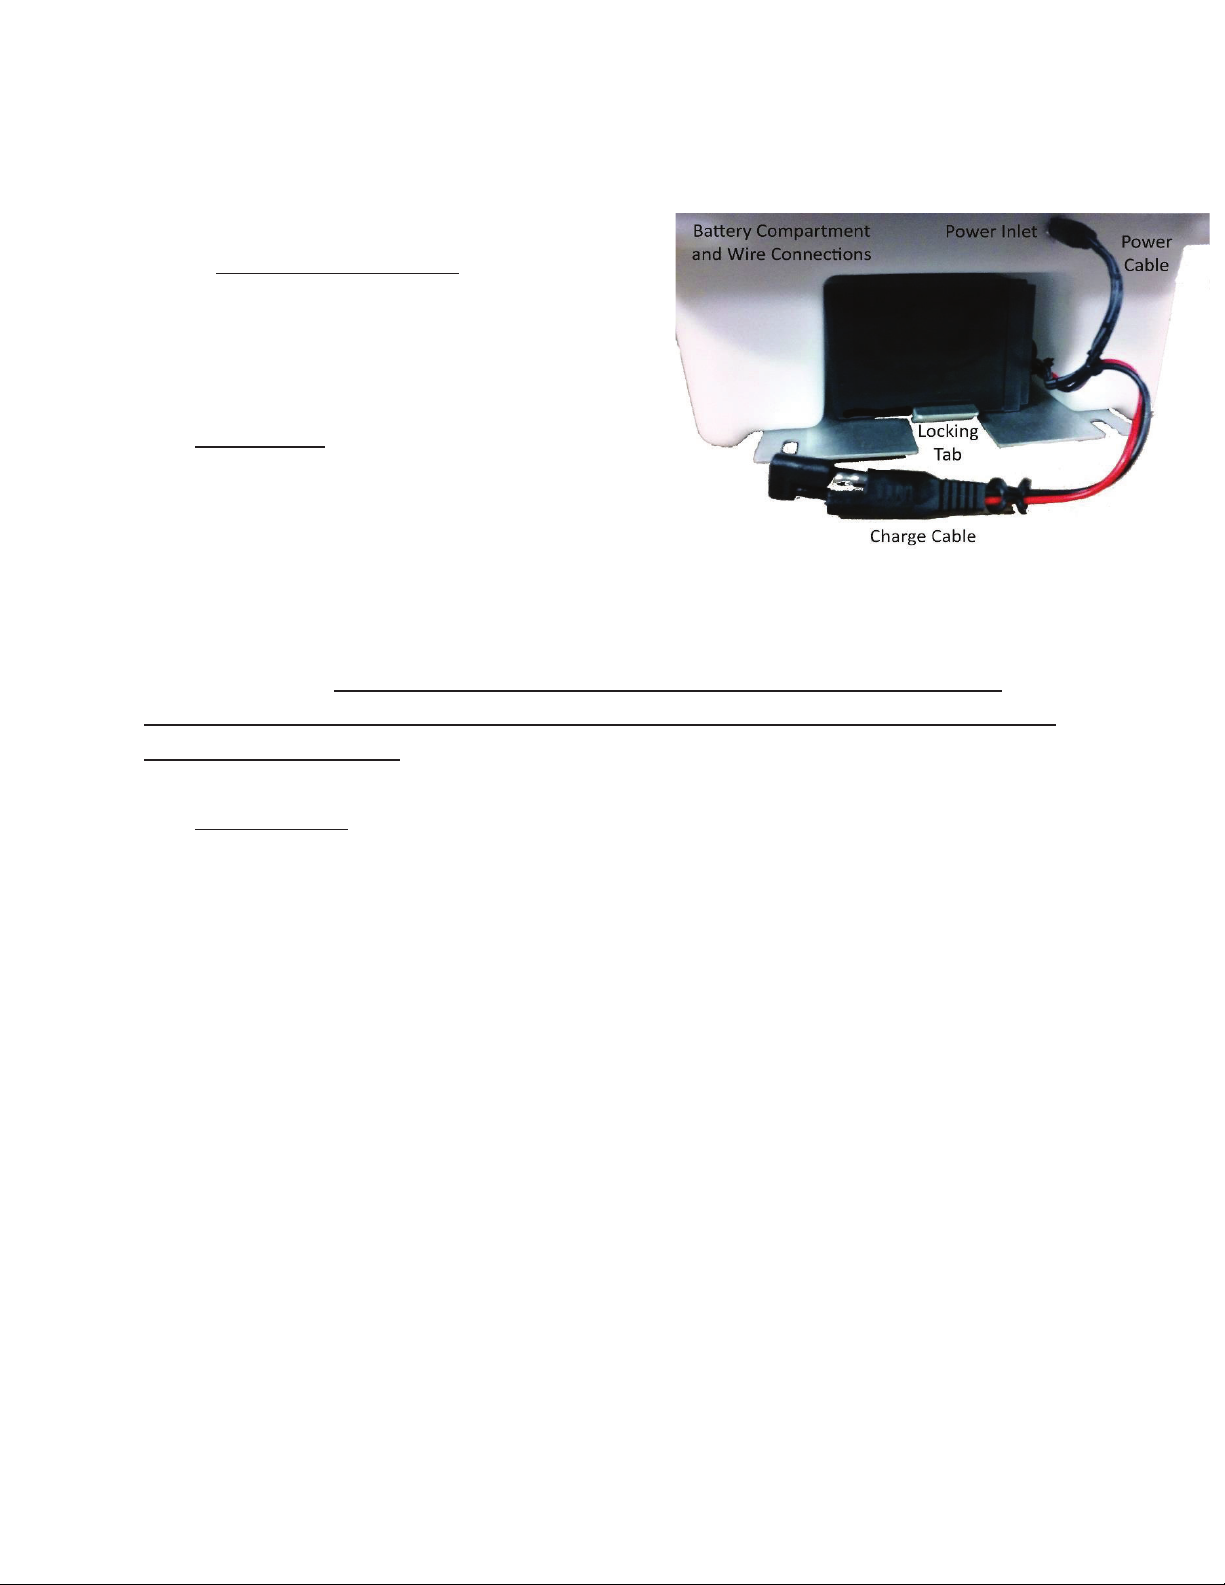
ELECTRICAL CONNECTIONS
The pi
of the Battery Compartment. We have already
discussed the parts that make up this section
on Page 4, but now we will discuss how to
use these components.
The Power Inlet is where the Laveo receives
power from the Battery, or from our optional
AC Power Adapter. The end of the Power
Cable, and AC Power Adapter both use a
round Barrel Style connector. This is the
same sort of cable used to provide power on many laptop computers. We chose
this style of cable for its ease of use. Simply plug it in with no worry of having it
in the right way. WARNING: Never plug in an AC Adapter that is rated for
output above 12 Volts and 5 Amps. Doing so could cause damage to your Laveo,
and could cause a fire.
cture to the right shows a close-up
The Char
to recharge the battery. The Laveo is designed to draw almost no power at all
when the toilet is not in use. We recommend that the Laveo be charged for an hour
or two if the toilet has been sitting for extended periods. If you have been using
your Laveo more steadily it is recommended that you charge the Laveo for an hour
or two each month of use. This recommended charging time will ensure your
Laveo has plenty of power when you need it. Please remember to unplug your
charger after a few hours. If you wish to have your Laveo connected to AC
(standard wall outlet) for power all the time, we suggest purchasing our optional
AC Power Adapter.
To release the Battery from the Battery Compartment: First, unplug the Power
Cable. Next, grab the Power Cable and the Charge Cable in the same hand; with
your other hand, press down the Locking Tab on the Battery Keeper Plate. With
the Tab pressed down, gently pull the cables and battery out of the Battery
Compartment. When putting the Battery back inside the Laveo, the Battery should
be placed on its side with the Battery Connections to the right, and then slid into
ge Cable is where you will connect your Battery Charger when it is time
the opening with the connection side of the Battery going first.
8
Page 10
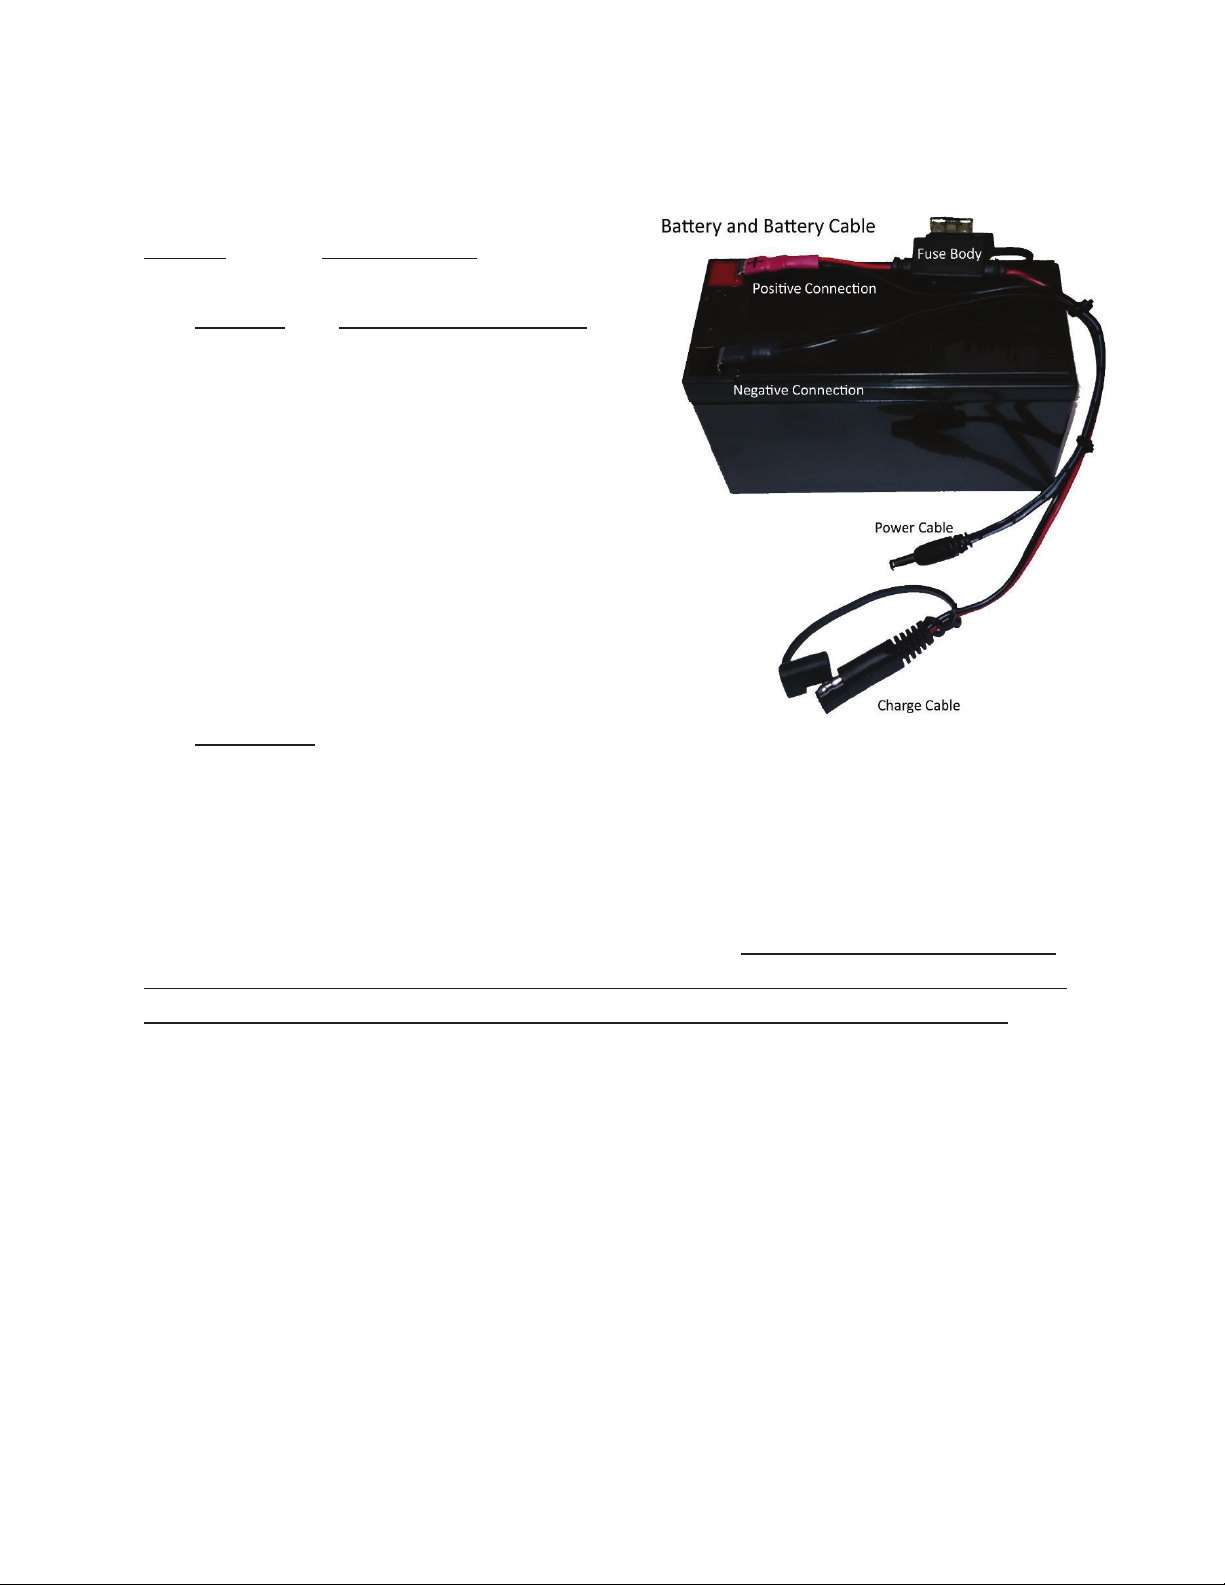
The p
icture to the right depicts the
Battery and the Battery Cable.
he Positive and Negative Connections
T
are made with a Quick Disconnect style
Terminal. Gently wiggle the wire
connection left to right as you gently
pull away from the Battery Terminal to
disconnect the Battery Cable from the
Battery. The connections to the Battery
have been color coded to ensure that the
Battery Cable is plugged in correctly
when reconnecting the Battery Cable to
the Battery.
The Fuse Body houses a 7.5 Amp ATO/ATC style fuse. This fuse can be removed
from the body by gently wiggling the fuse along its length, while gently tugging
away from the Fuse Body. If your Laveo suddenly stops working, a blown fuse is
a likely cause. A fuse is considered blown when the strip of metal between the two
blades is no longer connecting. Replacement fuses can be purchased at most big
box stores, Dry Flush, or auto parts shops. It’s generally best to bring the old fuse
with you to ensure you buy the correct replacement. WARNING: Never replace
any fuse with a fuse that is rated higher than the fuse you are replacing. Adding a
fuse with a rating above 7.5 Amps could damage your Laveo, or cause a fire.
9
Page 11
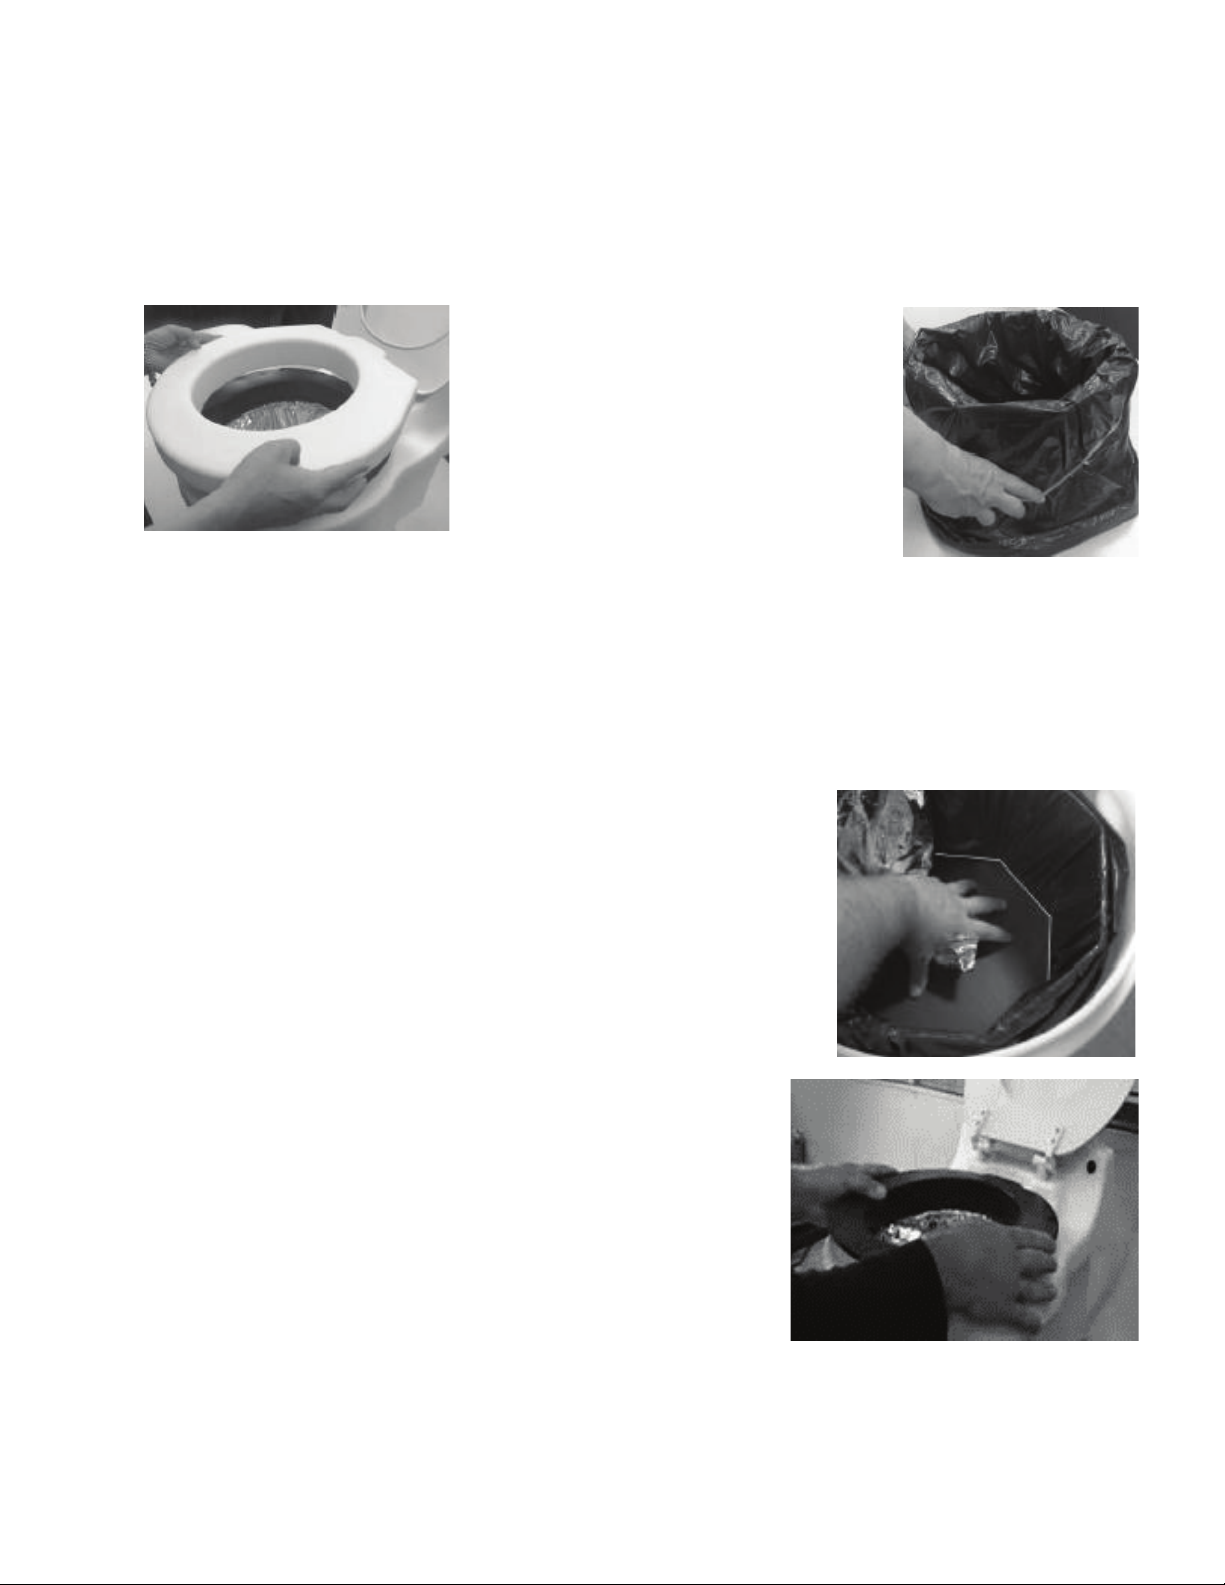
INSTALLING THE REFILL
1. Raise t
place the lined container back inside of the Laveo. NOTE: When
you replace the container inside the Laveo, be sure that the Octagon Container is
properly seated upon the Square Key. Twisting the container gently in a clockwise
direction should result in some resistance from the twist motor. When properly
seated, a mechanical “whirring” noise may also be heard.
he toilet seat and lift off the white trim top piece.
2. Rem
from
d
isposal liner into the Octagon
Container, and roll the top down
around the rim as you would a tras
can
lar
ove the Octagon Contai
the Laveo. Place the blac
liner. Secure the bag with th
ge rubber band supplied, and then
ner
k
h
e
he refill dispenser has an 8-sided panel attached to th
3. T
ba
gging material. Pull as little bagging material as possib
ut of the dispenser while inserting the panel into th
o
bottom
4. Place
the B
Cartridge to the rear of the opening. Replace the wh
Trim
our hands, or just push the black button to initia
y
flu
efill Cartridge is manufactured with a Red Line to
R
inform the user that the cartridge is empty and needs
b
e changed. Please change the Cartridge when this re
li
ne appear
of the liner.
the Refill Cartridge onto the round open
ase. Be sure to align the cut-outs on the Refill
Top piece. Form the bag into a bowl shape
sh. You are ready to use your Laveo.
s.
NOTE: The
e
ing of
using
te a
e
le
ite
to
d
10
Page 12
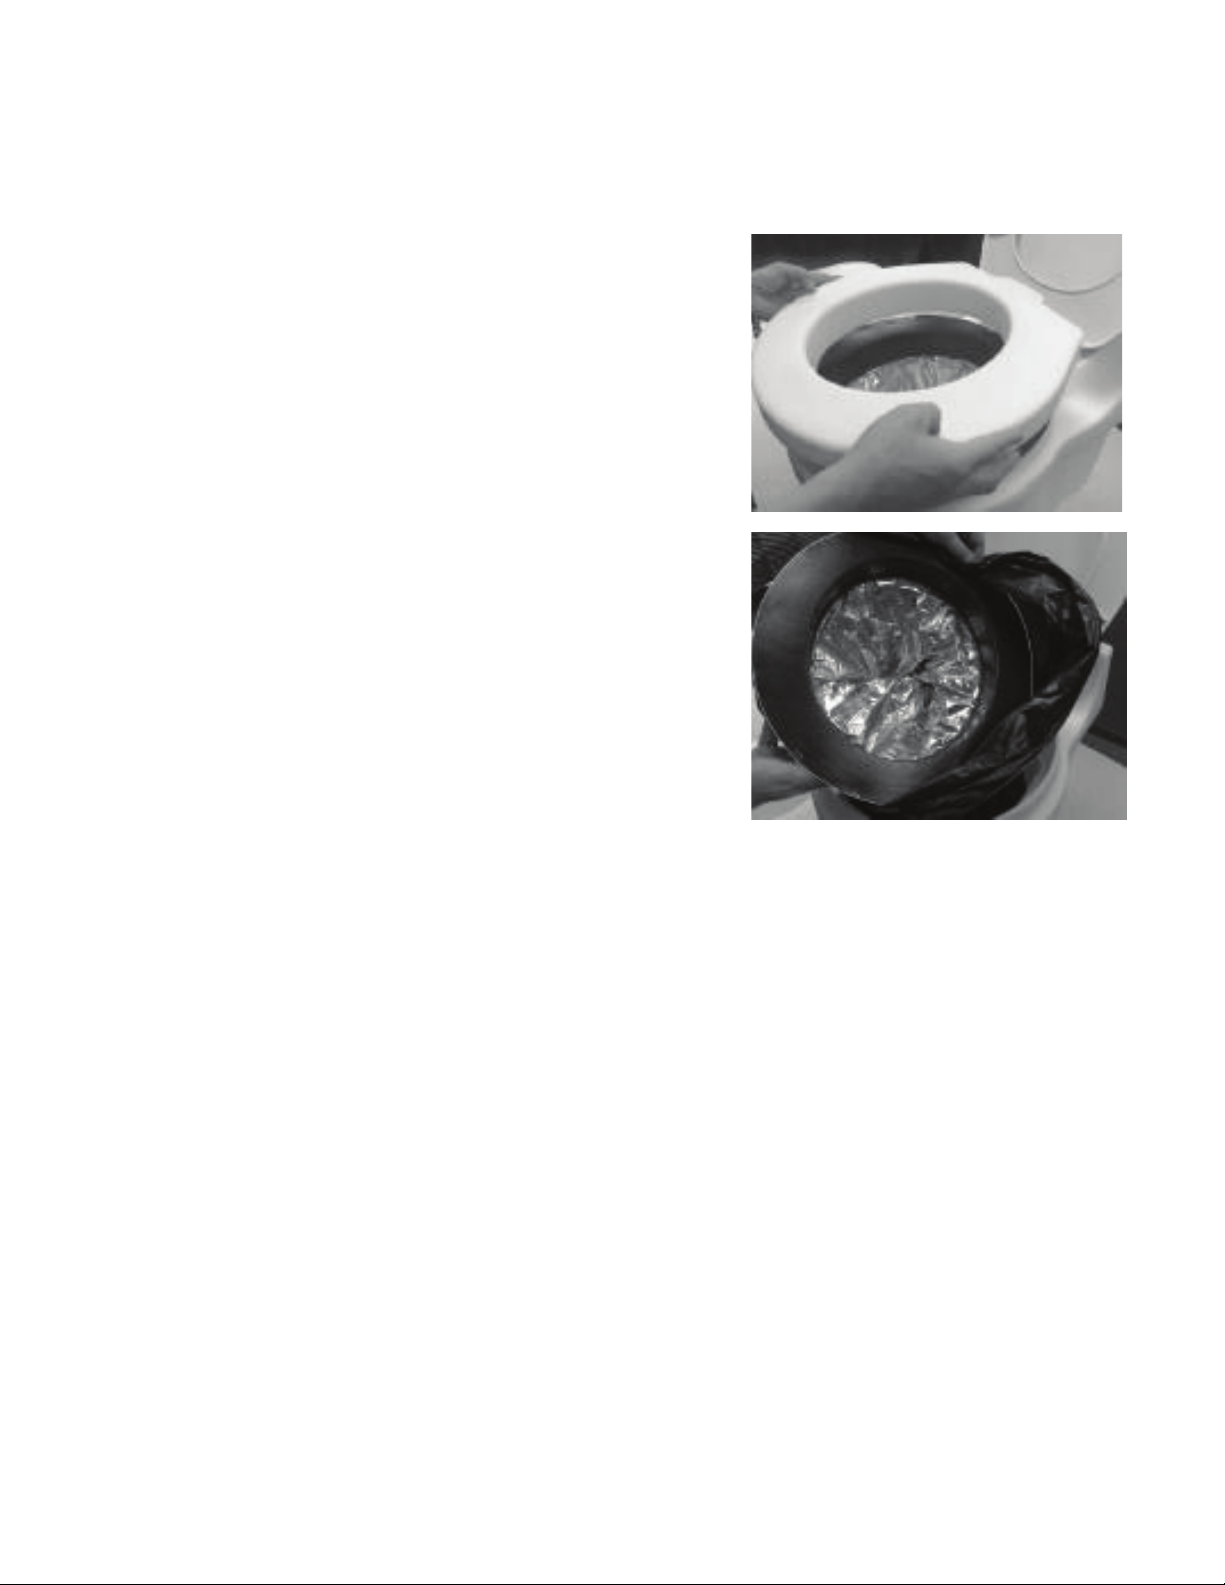
REMOVING WASTE AND EMPTY REFILL
1. L
ift the toilet seat and remove the underlyi
ite Trim Top piece.
wh
2. Grab
the edge to expose the lined Octagon Co
bel
of t
up and over the plastic shell of the Refill Cartridge.
3. U
black liner bag. Discard in any trash receptacle.
NOTE: All known landfills accept human waste if it is sealed, but please be
the edge of the Refill Cartridge and lift up
ow. With the edge of the cartridge sitting on t
he container, pull the liner inside of the container
sing the supplied bag twist tie, twist and seal the
ng
ntainer
op
considerate when discarding into trash cans. Ensure the bag is sealed.
PLEASE DISCARD WASTE THOUGHTFULLY.
Some trash cans may not be as suitable as others and may be prone to investigation
by animals, or even humans. Raccoons and other creatures can easily puncture the
Laveo barrier material and make a mess within, or even outside of a trash
receptacle. Please help us maintain a good reputation and don’t throw waste in just
any trash can.
We want Dry-Flush customers welcome everywhere.
11
Page 13

HOW TO USE YOUR LAVEO
In most respects your Laveo works like an ordinary porcelain toilet. After use,
press the Flush Button. Your Laveo will turn on and run through a 16 second cycle
that will close the Bagging Material around the waste, by twisting and compacting
the waste, finally creating a new “bowl” that is ready for use. The seat can be in an
upright, or closed position according to your preference.
Your Laveo has enough capacity within the Octagon Container to support the
claim of 15-17 flushes per cartridge. For each use, one flush is removed from the
cartridge, and one allotment of space is filled in the container. For example, you
cannot use the Laveo ten times before flushing and expect to have another 14-16
flushes remaining. The result is using the Laveo 10 times before flushing is that
you have used the allotted space in the Octagon Container for 10 of the 15-17
flushes available within the cartridge.
Using Pee Powder
Since we pee a lot more than we poop, we released our Pee Powder to save you
money by allowing yo to comfortably get more uses per flush. This amazing
powder solidifies and deodorizes urine. Since urine takes up less space in the
container you may extend your use per bowl for urine to 3:1, or three pees to a
flush. We do not recommend this with poo.
12
Page 14

TROUBLESHOOTING
PROBLEM
Toilet does not flush - no power
Toilet runs very slowly
Material rises above seat when
flushing.
Liquid leaked into the next bowl.
SOLUTION
Ensure that your Battery is fully
charged. (Page 8)
Ensure that the Power Cable is securely
plugged into the Power Inlet. (Page 8)
Remove the Battery and check to
ensure the Battery Cable connections
are connected securely. (Page 9)
Check to see that the Fuse is intact.
(Page 9)
Charge the Battery. (Page 8)
Add a 12oz cup of water to your next
flush.
Much like a porcelain toilet, sometimes
there can be a little left over in the next
bowl. Our Pee Powder greatly reduces
the chance of this happening by
solidifying the urine before the next
flush and, better yet, you save money!
Please read more about our wonderful
Pee Powder online at Dry-Flush.com.
13
Page 15

SPECIFICATIONS
Electr
Dimensions:
Weight:
ical:
12 vdc 5amp during flush, 0.5 u-amp idle.
Power Inlet 5.5mm OD, 2.1mm ID, 12mm Length
18.25”
16” (407 mm) wide
20” (508 mm) deep
(464 mm) high
23.25 lbs. (10.57 kg)
29.00 lbs. (13.18 kg) with battery
14
 Loading...