

Page 1

HORIZON
Model 24-AH
Operator’s Manual
Operator’s Manual ........................................................... 1
Manual del Operador ....................................................... 13
Manuel de l’utilisateur ...................................................... 25
Benutzerhandbuch ........................................................... 37
Manual do Operador ........................................................ 49
Manuale dell’operatore .................................................... 61
03-0-0002-0148 Rev. A
Page 2

Page 3

Operator’s Manual
ABLE OF CONTENTS
T
Model Description ........................................................................................................................................ 2
Features ..................................................................................................................................................... 2
Intended Use .............................................................................................................................................. 2
Warranty ................................................................................................................................................... 2
Initial Setup ................................................................................................................................................... 3
Quick Start .................................................................................................................................................... 4
Settings ......................................................................................................................................................... 5
Standard Settings ...................................................................................................................................... 5
Review Cycle Time and Speed Settings ...................................................................................................... 5
Changing Cycle Time and Speed Settings .................................................................................................. 5
Labeling Cycles .......................................................................................................................................... 6
Operation ...................................................................................................................................................... 6
Balancing Loads ............................................................................................................................................ 7
Care and Preventative Maintenance ............................................................................................................ 8
Cleaning and Disinfection ............................................................................................................................. 8
Troubleshooting ............................................................................................................................................ 9
General Specifications .................................................................................................................................. 11
Calculating the G-Force ................................................................................................................................. 11
Drucker Diagnostics | +1-814-692-7761 | CustomerService@DruckerDiagnostics.com | 1
Page 4

MODEL DESCRIPTION
HORIZON is a versatile line of centrifuges pre-programmed with the most convenient cycle settings for platelet
rich plasma (PRP) processing. Select the recommended preset using the two-button interface.
FEATURES
o Simple 2-Button interface.
o Three (3) easily selectable pre-set cycles are conveniently labeled for your lab’s most common applications. Use
the default cycles or customize them as needed. An LED light indicates the current selected setting.
o If desired, the control panel can be locked on one preset cycle for error-free reproducibility.
o Lid lighting indicates the centrifuge’s status (ready, running, done), informing the operator when tubes are ready
for the analyzer and preventing tubes from being left in the centrifuge longer than necessary (patent pending).
o A traditional audible alert indicates the completion of the cycle.
o Cool–Flow design prevents overheating of samples by using ambient air to keep specimens at room temperature.
o The tube holders are fiber reinforced for high strength, durability, and years of trouble-free use.
o A clear lid permits safe observation of samples and optical calibration of speed.
o The lid safety system prevents the centrifuge from operating unless the lid is closed and latched.
o The lid safety system only allows entry into the centrifuge after the rotor has completely stopped.
o The high-power brushless motors provide years of operation with no routine maintenance.
INTENDED USE
This centrifuge is a laboratory product designed to separate components by generation of relative centrifugal force.
It separates human and animal samples – such as blood, urine and other body fluids -- collected in appropriate
specimen receptacles, either alone or with reagents or other additives. As a general purpose laboratory centrifuge,
it is designed to also run other containers filled with chemicals (non-flammable, non-explosive, non-volatile, and
non-highly reactive only), environmental samples, and other non-human body samples. This centrifuge should be
operated by trained personnel only. This centrifuge is an IVD accessory, and therefore subject to the former EU IVD
Directive 98/79/EC and the current EU IVD Regulation 2017/746. Any use other than those intended by the
Manufacturer is explicitly prohibited. Maximum sample density is 1.15 grams/mL.
WARRANTY
Drucker Diagnostics warranties that this centrifuge is free from defects in workmanship and parts for 6
months.
Drucker Diagnostics | +1-814-692-7761 | CustomerService@DruckerDiagnostics.com | 2
Page 5

WARNING: For the safety of both the operator and service personnel, care should be taken when using
this centrifuge if handling substances that are known to be toxic, radioactive or contaminated with
pathogenic microorganisms. Use appropriate personal protection equipment (PPE). When Risk Group II
materials are used, (as identified in the World Health Organization “Laboratory Bio-Safety Manual”), a BioSeal should be employed. In the event that materials of a higher risk group are being used, more than one
level of protection must be provided. The use of flammable or explosive materials as well as those
materials which have a vigorous chemical reaction is prohibited.
Unplug the centrifuge before cleaning or performing maintenance.
WARNING: Inspect centrifuge for cracks or physical damage to cabinet, lid, rotor, or tube holders. Damage
may result in unsafe operation. Discontinue use until repairs have been performed.
This equipment generates, uses, and can radiate radio frequency energy, and if not installed and used in
accordance with this operator manual, may cause interference to radio communications.
Operation of this equipment in a residential area may cause interference, in which case the user will be
required to correct the interference at his own expense.
INITIAL SETUP
o Unpack and verify that all the following are included:
• Centrifuge
• Power cord
• Tube holders
• Operating manual
o Setup the centrifuge on flat and level surface. A bench top clearance height of 21” (54 cm) is required to open
the lid.
o The centrifuge should have 6” (15 cm) of clear space around the centrifuge. Proper ventilation is necessary to
prevent the overheating of samples as well as premature failure of the centrifuge. Choose an area which allows
unencumbered air flow, and where the temperature remains between 16°C and 32°C.
o No hazardous material shall be permitted in the clearance envelope during operation.
o The operator time within the envelope shall be limited to the time necessary for loading, unloading, and
centrifuge operation only.
o Plug the line cord into the centrifuge.
o Plug the line cord into an approved electrical outlet.
BE SURE THE ELECTRICAL OUTLET IS ALWAYS ACCESSIBLE AS THE LINE CORD IS THE
DISCONNECTION!
Drucker Diagnostics | +1-814-692-7761 | CustomerService@DruckerDiagnostics.com | 3
MEANS OF EMERGENCY
Page 6
Setting A
This setting is factory preset to 1,500 RPM @ 5 minutes
Setting B
This setting is factory preset to 2,500 RPM @ 4 minutes
Setting C
This setting is factory preset to 1,500 RPM @ 4 minutes
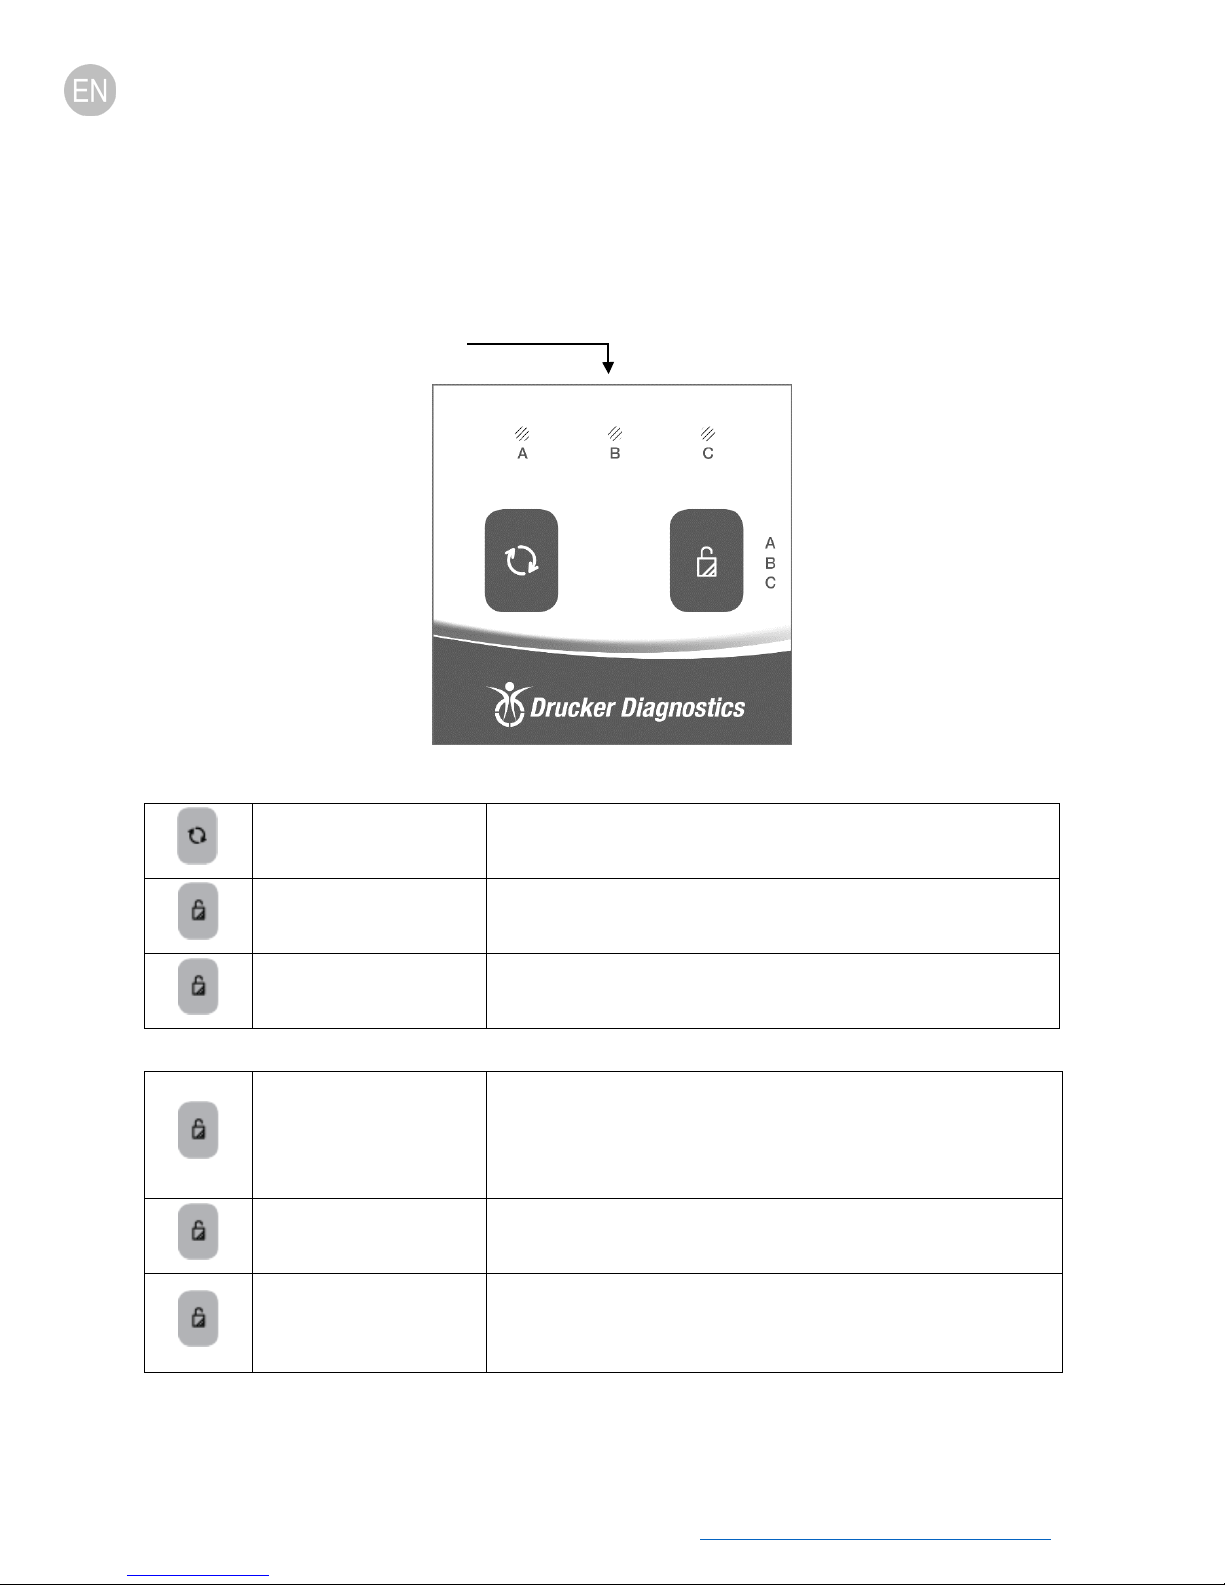
QUICK START
The LED indicator light is on for the cycle currently selected:
Indicator Lights
Start
Unlock
Stop
Cycle Selection
Lock Cycle Selection
Unlock Cycle Selection
Begins running the cycle indicated by the cycle indicator LED light.
The lid must be closed.
Allows access into the rotor chamber by engaging the unlocking
mechanism. Entry is only possible when the rotor is stopped.
Pressing the UNLOCK button during operation will terminate the run
and unlock the lid after the rotor has come to a stop.
The LED light is on for the cycle currently selected. To change the
selected cycle, press the UNLOCK button in succession until the
desired cycle is selected. Two seconds after selection, the button
reverts to its UNLOCK function.
Select desired cycle. Press and hold the UNLOCK button for 5
seconds. Two beeps will confirm that cycle selection is locked.
To re-enable cycle selection, press and hold the UNLOCK button for
5 seconds. Three beeps will confirm that cycle selection is now
unlocked.
Drucker Diagnostics | +1-814-692-7761 | CustomerService@DruckerDiagnostics.com | 4
Page 7

RPM
1,500
2,500
1,500
SETTINGS
STANDARD SETTINGS
Setting A Setting B Setting C
Time 5 min 4 min 4 min
REVIEW CYCLE TIME AND SPEED SETTINGS
Factory programmed cycles are shown on the rear of the centrifuge, on the Factory Set Cycles label. To review
current settings, follow this procedure:
o The lid must be open to review the selected cycle time and speed.
o Press and hold the START button until you hear a beep.
o Release the START button. The centrifuge will beep and the LED light will flash once for each minute of run time
in the current cycle. 10 beeps / flashes equal 10 minutes of run time. Run time starts when the rotor reaches 90%
of desired speed and stops when the rotor starts decelerating.
o Pressing the START button again will cause the unit to beep and the LED light to flash once for each 100 rpm in
the current cycle. 38 beeps / flashes equal 38 x 100 or 3,800 Revolutions per Minutes (RPM).
o
The centrifuge will automatically revert to normal mode at the end.
HANGING CYCLE TIME AND SPEED SETTINGS
C
o The lid must be open to change the selected cycle time and speed.
o Select the cycle you wish to change.
o Press and hold the START and UNLOCK buttons together until the LED light flashes.
o Press the START button for each minute of run time.
o
Move to speed setting mode by pressing the UNLOCK button.
o Press the START button once for each 100 rpm.
o Press the UNLOCK button to exit setting mode.
Drucker Diagnostics | +1-814-692-7761 | CustomerService@DruckerDiagnostics.com | 5
Page 8

LABELING CYCLES
Factory programmed cycles are shown on the rear of the centrifuge, on the Factory Set Cycle Label. To facilitate daily
error-free use, an erasable label is affixed on top of the centrifuge for cycle identification. This label allows you to
identify your cycles by the name you use in your lab (for example: Chem, Coag, blue top, 10 minutes…) or by the
cycle parameters (5 minutes @ 1,800 xg).
Use a permanent marker to resist cleaning with a bleach solution and to allow erasing with rubbing alcohol. For
further protection, the label can be taped over with transparent tape after writing.
OPERATION
o Place the tubes into the tube holders. Be sure to follow the rules for balanced loads as listed in the next section.
o Close the lid and turn the lid knob clockwise to its complete stop position.
o The front panel LED is illuminated for the currently selected cycle. To select another cycle, press the UNLOCK
button in succession until the desired cycle is selected.
o Pushing the START button on the control panel will start the spin cycle.
o When the cycle is completed, the rotor will slow to a complete stop and the lid light will flash.
o The unlocking mechanism will engage for 60 seconds allowing entry into the rotor chamber. To unlock after more
than 60 seconds have elapsed, press the UNLOCK button. The lid will unlock for another 15 seconds.
o Turn the lid knob counterclockwise and open the lid. The lid light will turn off.
o
You may now safely remove the samples.
Drucker Diagnostics | +1-814-692-7761 | CustomerService@DruckerDiagnostics.com | 6
Page 9

BALANCING LOADS
Your centrifuge must contain a balanced load to work properly. Spinning balanced loads will extend the life of the
centrifuge and produce better results. Use the following rules when loading the rotor.
is to be spun, fill a tube with water to match the weight of the unpaired sample and place it across from this sample.
Opposing tube holders must be equally loaded or empty or loaded with equally weighted samples.
When loading only 3 tubes, they must be of equal weight.
If an odd number of samples
Buckets can be placed around the rotor in any of the rotor loading configurations shown.
Each bucket must be loaded symmetrically with tubes as above.
Drucker Diagnostics | +1-814-692-7761 | CustomerService@DruckerDiagnostics.com | 7
Page 10

CARE AND PREVENTATIVE MAINTENANCE
With proper care and maintenance, your centrifuge will provide years of laboratory service. For proper care, the
following steps should be taken:
o Always Spin Balanced Loads: Make certain that you are always spinning a balanced load, as shown in the
previous section. These centrifuges have a unique counter balanced motor mounting design which produces
excellent vibration dampening. However, out–of–balance loads may break glass test tubes and may produce
unsatisfactory separation results. Proper load balancing will improve sample separation and extend the life of
the centrifuge.
o Motor and Electrical Maintenance: The highest quality electrical components have been selected for the
centrifuges and should not need maintenance or servicing for the life of the centrifuge.
o Tube Holder Replacement: It is recommended that the tube holders be replaced after 24 months of use.
Inspect tube holders regularly for cracks. If cracks are discovered, replace immediately.
o Remove Accessories Before Moving: All tube holders, samples, and caps must be removed from the rotor
chamber before transporting or storing the centrifuge to prevent damage and injury.
CLEANING AND DISINFECTION
To prolong the life of the centrifuge, cleaning and disinfection is recommended every six months or whenever there
is a spillage or tube breakage. Contaminants must be removed immediately or corrosion and premature
degradation of components can occur. Before using any cleaning or decontamination methods other than those
recommended by the manufacturer, users should verify with the manufacturer that the proposed method will not
damage the equipment.
o Unplug the centrifuge before cleaning.
o Use appropriate personal protective equipment (PPE).
o Apply cleaning solutions with a towel or cloth. Do not submerge the centrifuge in water or other cleaning
solutions as this will cause damage and void the warranty.
o ONLY isopropyl alcohol or a 10% (5,500 PPM) bleach solution should be used to disinfect the centrifuge and its
accessories.
o All surfaces must be dried immediately after cleaning and disinfecting.
TBQ GERMICIDAL PRODUCTS ARE NOT RECOMMENDED AS THEY MAY CAUSE DAMAGE TO THE
CENTRIFUGE
. WIPE OFF THOROUGHLY AFTER USE TO PREVENT VOIDING THE WARRANTY.
o Fully/partially halogenated hydrocarbons, ketones, esters, ethers, benzyls, ethyl benzenes, and all other
chemicals not prescribed by the manufacturer shall not be used as they may cause damage to the rotor chamber,
rotor, tube holders, accessories and centrifuge exterior and void the warranty.
Drucker Diagnostics | +1-814-692-7761 | CustomerService@DruckerDiagnostics.com | 8
Page 11

The centrifuge does not run
o
The rotor does not spin freely
The centrifuge makes a rattling noise
o Stop the centrifuge. Open the lid.
Excessive noise or vibration when the
o
The centrifuge stops and beeps
The centrifuge is stuck on one of the
The cycle time and speed are not set to
TROUBLESHOOTING
NOTE: The latch must be turned completely clockwise to its stop position for the centrifuge to operate.
o Verify that the centrifuge is powered. One of the LED lights
should be on.
o Make sure the lid latch is turned completely clockwise to its stop
position.
If the centrifuge still does not run, contact Customer Service.
o Make sure nothing has fallen into the rotor chamber,
following the procedure above.
o If nothing obstructs the rotor, the rotor may be damaged.
Contact Customer Service for further assistance.
when running
centrifuge is running
continuously
settings
o Wearing PPE, remove tubes and tube holders/buckets and
look for fallen objects or debris. Carefully reach inside the
rotor chamber with a tool to remove them.
o Inspect the rotor, tube holders or buckets for damage.
o If the tube holders or buckets have any damage, even slight,
safely dispose of them and replace them.
o If the rotor appears damaged, contact Customer Service for
further assistance.
o Verify that all four centrifuge feet are properly seated on a flat
surface.
o Insure that the load is balanced according to instructions in the
“Balancing Loads” section of this manual.
Make sure that nothing has fallen into the rotor chamber.
The load is not balanced. Press the UNLOCK button, open the lid,
and balance the load as recommended elsewhere in this manual.
Cycle selection is locked. Press the UNLOCK button for 5 seconds.
the desired value
Drucker Diagnostics | +1-814-692-7761 | CustomerService@DruckerDiagnostics.com | 9
Check the setting by following the instructions in the section on
Changing Cycle Settings. If the preset is not the desired length,
follow the procedure on the same page to change the preset time.
Page 12
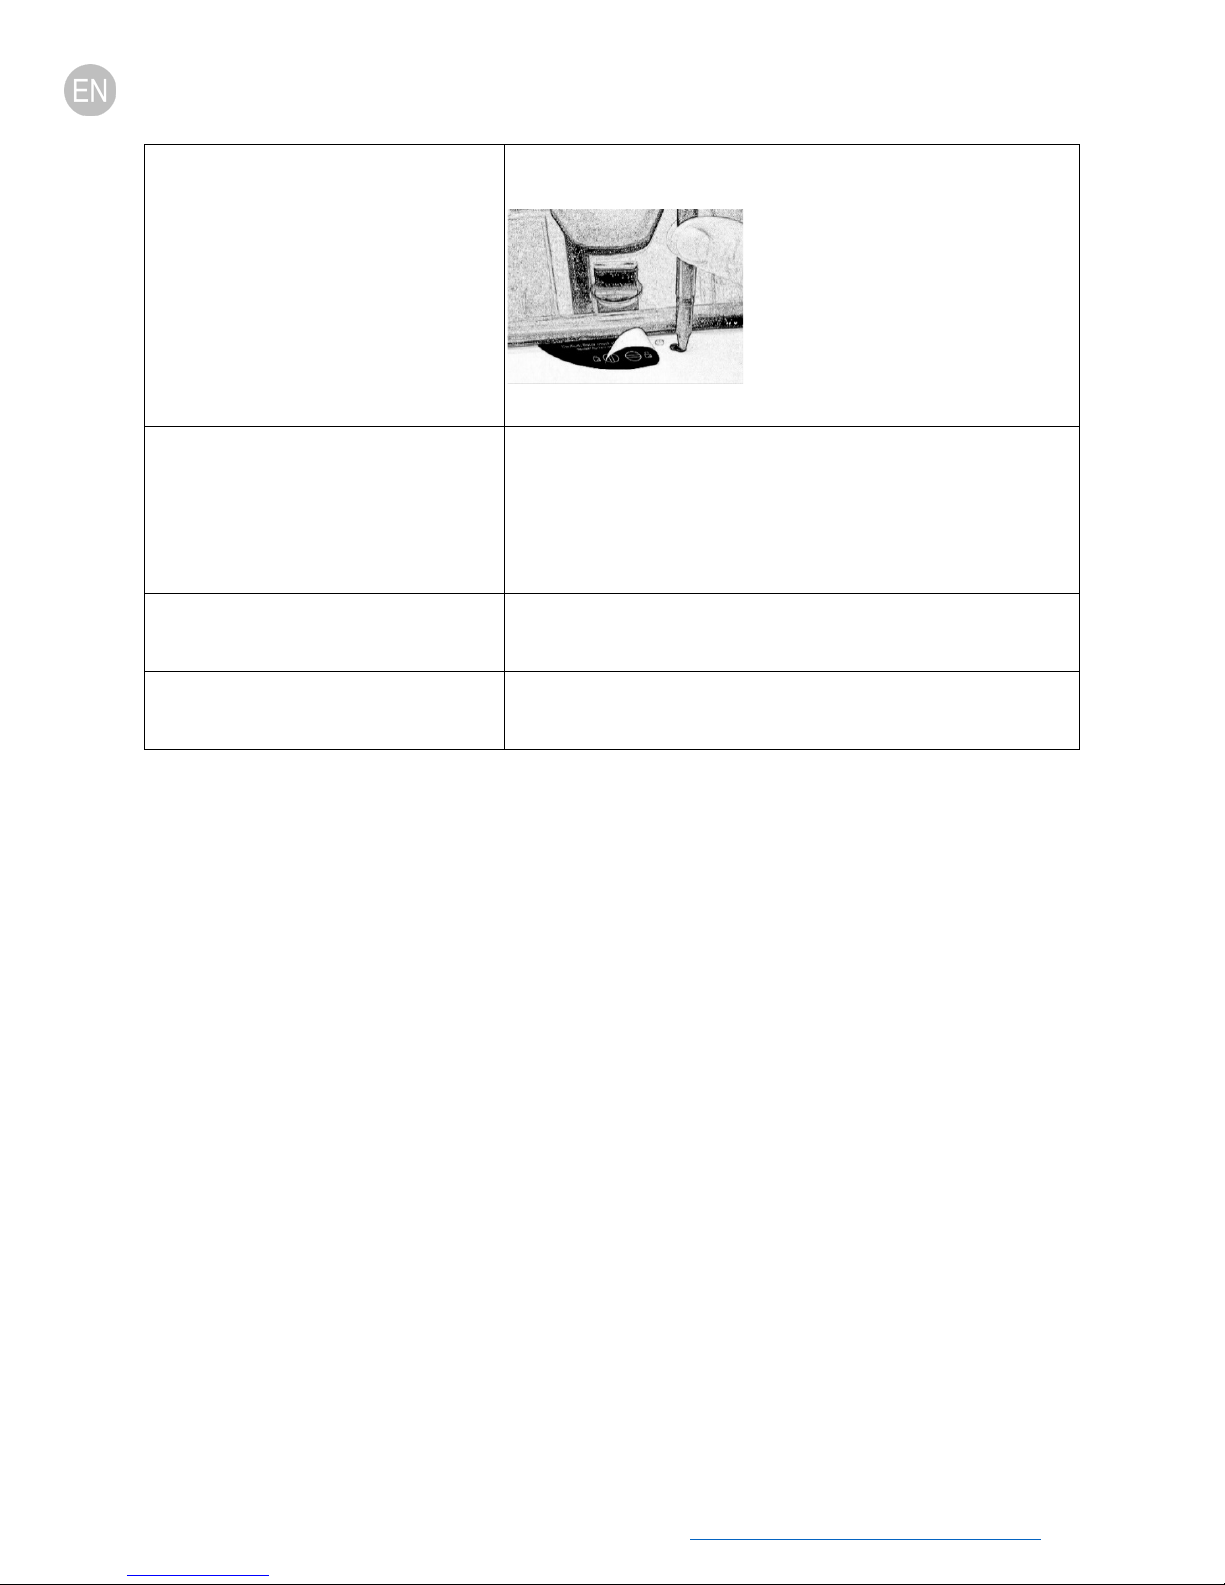
The centrifuge does not unlock after a
o Wait until the rotor has come to a complete stop. If the lid knob
o If the unit is damaged, contact Customer Service for assistance.
The lid does not open
o Insure that the lid knob is turned fully counterclockwise.
for assistance.
Clicking noise during braking gets loud
Lid does not stay up
run is completed
still cannot be rotated, press the UNLOCK button and try again.
o If no LED light is on, the unit is
not powered and the lid will not
unlock by conventional means.
Remove the latch label and use a pen
to manually disengage the locking
mechanism. Pull the mechanism
towards the control panel and then
unlatch and open the lid.
o If the knob cannot be turned counterclockwise, turn it fully
clockwise, press UNLOCK, and turn counterclockwise.
o If the lid remains locked after this and will not unlock, the
electronics may have been damaged. Contact customer service
o Make sure that the screw in the center of the rotor is tight.
o Tighten the center screw on the lid hinge.
Drucker Diagnostics | +1-814-692-7761 | CustomerService@DruckerDiagnostics.com | 10
Page 13

In Centimeters:
In Inches:
Radius
6 in. (15.3 cm)
GENERAL SPECIFICATIONS
The rotor and accessories are rated for the maximum rotation frequency shown in the table below.
Tube Capacity 24 tubes (3-6 mL)
6 tubes up to 60 mL
Dimensions (H x W x D)
Weight 39 lbs. (17 kg)
Sound Level 59 dB A
Environmental Range 16 – 32 °C
Voltage 95 -253 VAC
Frequency 50/60 Hz
Power Requirement 280 Watts
Centrifuge Motor ½ H.P. Brushless DC
Cycle Time (in Minutes) 1-30 (+/- 2%)
Max Speed 2,500 RPM
15 in x 17 in x 9 in
(38 cm x 43 cm x 23 cm)
CALCULATING THE G-FORCE
The I.F.U.s of tube manufacturers recommend cycles at a minimum G-Force, which can be calculated if you know
the RPM and the radius. Use the formula below or go to www.druckerdiagnostics.com/g-force-calculator/
RCF or G-force = 0.00001118 x
Rotor Radius (cm) x (RPM)
Drucker Diagnostics | +1-814-692-7761 | CustomerService@DruckerDiagnostics.com | 11
.
2
RCF or G-force = 0.0000284 x
Rotor Radius (in) x (RPM)
2
Page 14
Product Family: HORIZON (HORIZON 24-AH, 24-AV)
Complies with UL61010-1/CSA C22.2 No. 61010-1 and IEC61010-2-020
Protected by U.S. Patents #6,811,531, # 7,422,554, #D718,463, & #D734,489. Other Patents Pending
FDA LISTED
RoHS
Compliant
INSTRUCTIONS FOR DISPOSAL OF WEEE BY USERS IN THE EUROPEAN UNION
This product must not be disposed of with other waste. Instead, it is the user’s responsibility to
dispose of their waste equipment by handing it over to a designated collection point for the
recycling of waste electrical and electronic equipment. The separate collection and recycling of
your waste equipment at the time of disposal will help to conserve natural resources and ensure
that it is recycled in a manner that protects human health and the environment. For more
information about where you can drop off your waste equipment for recycling, please contact
your local city office, waste disposal service, or where you purchased the product.
200 SHADY LANE, SUITE 170 – PHILIPSBURG, PA 16866, USA
+1-877-231-3115
CUSTOMERSERVICE@DRUCKERDIAGNOSTICS.COM
DRUCKERDIAGNOSTICS.COM
Drucker Diagnostics | +1-814-692-7761 | CustomerService@DruckerDiagnostics.com | 12
(U.S. ONLY) - +1-814-692-7661
Page 15

Manual del Operador
TABLA DE CONTENIDO
Descripción del Modelo ................................................................................................................................ 14
Características ........................................................................................................................................... 14
Uso Previsto ............................................................................................................................................... 14
Garantía..................................................................................................................................................... 14
Configuración Inicial ..................................................................................................................................... 15
Inicio Rápido ................................................................................................................................................. 16
Configuraciones ............................................................................................................................................ 17
Configuraciones Estándar .......................................................................................................................... 17
Revisión de las Configuraciones de Duración y Velocidad del Ciclo ........................................................... 17
Cambio de las Configuraciones de Duración y Velocidad del Ciclo ............................................................ 17
Etiquetado de Ciclos .................................................................................................................................. 18
Operación ..................................................................................................................................................... 18
Balanceo de las Cargas .................................................................................................................................. 19
Cuidado y Mantenimiento Preventivo .......................................................................................................... 20
Limpieza y Desinfección ................................................................................................................................ 20
Resolución de Problemas .............................................................................................................................. 21
Especificaciones Generales ........................................................................................................................... 23
Cálculo de la Fuerza g ................................................................................................................................... 23
Drucker Diagnostics | +1-814-692-7761 | CustomerService@DruckerDiagnostics.com | 13
Page 16

DESCRIPCIÓN DEL MODELO
CARACTERÍSTICAS
o Interfaz simple de 2 botones.
o Tres (3) ciclos preestablecidos de fácil selección están convenientemente etiquetados para las aplicaciones más
comunes de su laboratorio. Use los ciclos por defecto o personalícelos según sea necesario. Una luz LED indica la
configuración actualmente seleccionada.
o Si lo desea, el panel de control puede ser bloqueado en un ciclo preestablecido para una reproducibilidad libre
de errores.
o Las luces en la tapa indican el estado de la centrífuga (lista para iniciar el proceso, proceso en curso, proceso
finalizado) para informarle al operador cuándo es que los tubos están listos para el analizador y para evitar que
los tubos sean dejados en la centrífuga más tiempo del necesario (patente pendiente).
o Una alerta audible tradicional indica la finalización del ciclo.
o El diseño Cool–Flow evita el sobrecalentamiento de las muestras por medio de la utilización del aire del ambiente
para mantener a los especímenes a temperatura ambiente.
o Los soportes para tubos están reforzados con fibra para una alta resistencia, durabilidad y años de uso libre de
problemas.
o Una tapa transparente permite la observación segura de las muestras y la calibración óptica de la velocidad.
o El sistema de seguridad de la tapa evita que la centrífuga pueda funcionar a menos que la tapa esté cerrada y
asegurada.
o El sistema de seguridad de la tapa solo permite el acceso a la centrífuga una vez que el rotor se ha detenido por
completo.
o Los motores de alta potencia sin escobillas proporcionan años de operación sin mantenimiento de rutina.
USO PREVISTO
Esta centrífuga es un producto de laboratorio diseñado para separar componentes por medio de la generación de
una fuerza centrífuga relativa. Separa muestras de origen humano y animal (tales como sangre, orina y otros fluidos
corporales) recolectadas en recipientes apropiados para especímenes, ya sea por sí solas o con reactivos u otros
aditivos. Al ser una centrífuga de laboratorio de uso general, está diseñada para también procesar otros
contenedores llenos de bioquímicos (solo aquellos que no sean inflamables, explosivos, volátiles ni altamente
reactivos), muestras ambientales y otras muestras corporales no humanas. Esta centrífuga debería ser operada
exclusivamente por personal capacitado. Esta centrífuga es un accesorio de diagnóstico in vitro (IVD), y por lo tanto
está sujeta a la anterior Directiva IVD 98/79/EC de la Unión Europea y a la actual Regulación IVD 2017/746 de la
Unión Europea. Cualquier otro uso distinto a aquellos previstos por el Fabricante está expresamente prohibido. La
densidad máxima de la muestra es de 1,15 gramos/mL.
GARANTÍA
Drucker Diagnostics garantiza que esta centrífuga está libre de defectos de fabricación y partes por 6 meses.
Drucker Diagnostics | +1-814-692-7761 | CustomerService@DruckerDiagnostics.com | 14
Page 17

ADVERTENCIA: Para la seguridad del operador y del personal de servicio, se debe tener cuidado al usar esta
centrífuga cuando se manipulen sustancias cuya toxicidad, radioactividad o contaminación con microorganismos
patógenos sean conocidas. Use equipos adecuados de protección personal (PPE, por sus siglas en inglés). Cuando se
utilicen materiales del Grupo de Riesgo II (según se identifica en el "Manual de Bioseguridad en el Laboratorio" de
la Organización Mundial de la Salud), debería emplearse un sello biológico. En caso de que se utilicen materiales de
un grupo de riesgo más alto, se deberá proporcionar más de un nivel de protección. El uso de materiales inflamables
o explosivos, así como de materiales que tengan reacciones bioquímicas fuertes, está prohibido.
Desconecte la centrífuga antes de limpiarla o de realizar un mantenimiento.
ADVERTENCIA: Inspeccione la centrífuga para descartar la presencia de roturas o daños físicos en la cabina,
la tapa, el rotor o los soportes para tubos. Los daños podrían resultar en una operación insegura. Suspenda
su uso hasta que se hayan llevado a cabo las reparaciones necesarias.
Este equipo genera, utiliza y puede irradiar energía en forma de frecuencias de radio, y podría causar
interferencia en las comunicaciones por radio de no ser instalado y utilizado de acuerdo a este manual del
operador.
La operación de este equipo en un área residencial podría causar interferencia, en cuyo caso el usuario
deberá corregir la interferencia y pagar por los gastos de dicha corrección.
CONFIGURACIÓN INICIAL
o Desembale el equipo y verifique que todo lo siguiente esté incluido:
• Centrífuga
• Cable de alimentación
• Soportes para tubos
• Manual de operación
o Coloque la centrífuga sobre una superficie plana y nivelada. Se necesita un espacio libre de 21 pulg. (54 cm) de
altura por encima de la centrífuga para poder abrir la tapa.
o La centrífuga debería tener 6 pulg. (15 cm) de espacio libre alrededor de ella. Deberá contar con ventilación
adecuada para evitar tanto el sobrecalentamiento de las muestras como la avería prematura de la centrífuga.
Elija un área que permita un flujo de aire libre de obstrucciones y donde la temperatura permanezca entre 16°C
y 32°C.
o Ningún material peligroso deberá ser permitido en el envoltorio de seguridad durante la operación.
o El tiempo que el operador pase dentro del envoltorio deberá estar limitado exclusivamente al tiempo necesario
para las operaciones de carga, descarga y centrifugado.
o Conecte el cable de alimentación a la centrífuga.
o Enchufe el cable de alimentación en una toma eléctrica aprobada.
¡ASEGÚRESE DE QUE LA TOMA ELÉCTRICA SIEMPRE ESTÉ ACCESIBLE, YA QUE EL CABLE DE ALIMENTACIÓN ES EL
MEDIO DE
DESCONEXIÓN DE EMERGENCIA!
Drucker Diagnostics | +1-814-692-7761 | CustomerService@DruckerDiagnostics.com | 15
Page 18
Configuración A
1.500 RPM @ 5 min
Configuración B
2.500 RPM @ 4 min
Configuración C
1.500 RPM @ 4 min
Permite el acceso a la cámara del rotor activando el mecanismo
Presionar el botón de DESBLOQUEAR (UNLOCK) durante la
La luz LED está encendida para el ciclo actualmente seleccionado.
Seleccione el ciclo deseado. Presione y mantenga presionado el
Para volver a habilitar la selección de ciclo, presione y mantenga
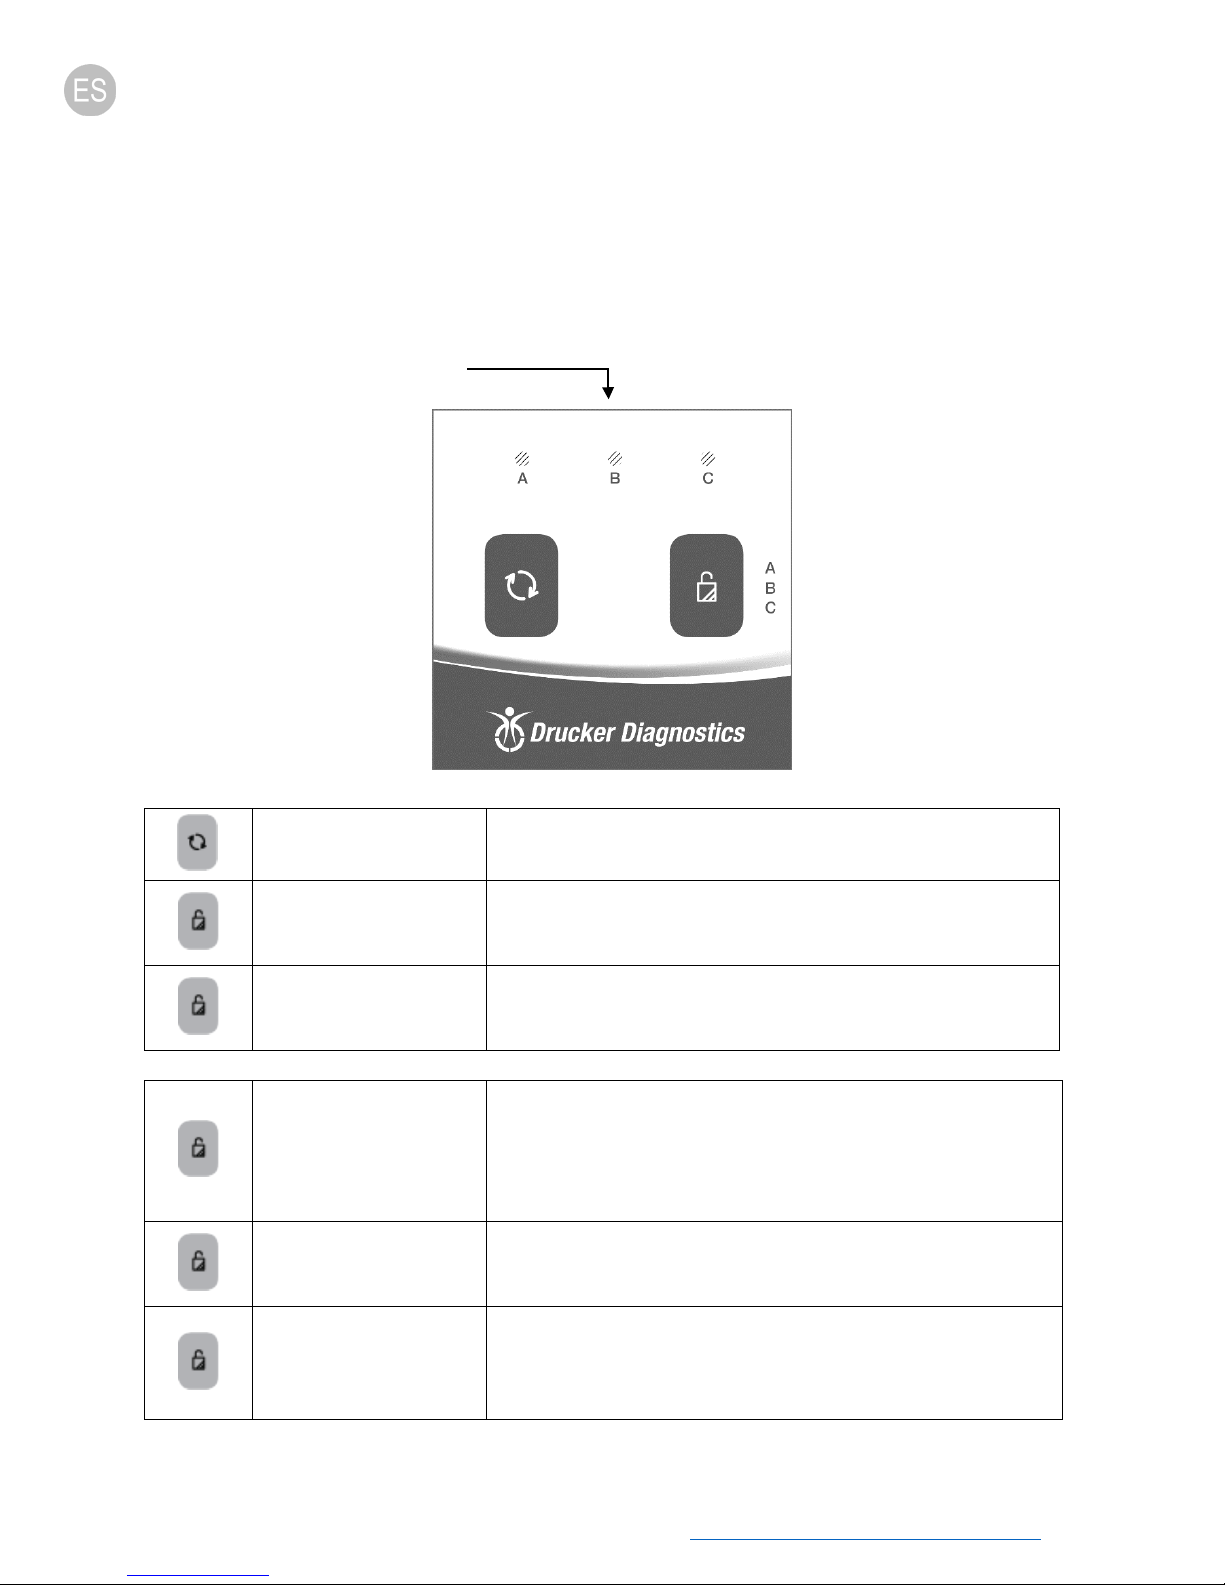
INICIO RÁPIDO
La luz indicadora LED está encendida para el ciclo actualmente seleccionado:
Luces Indicadoras
Inicio
Desbloqueo
Finalización
Selección de Ciclo
Bloqueo de la Selección
de Ciclo
Da inicio al ciclo indicado por la luz LED indicadora de ciclo. La tapa
debe estar cerrada.
de desbloqueo. El acceso solo es posible cuando el rotor se ha
detenido.
operación dará por terminado el proceso y desbloqueará la tapa
una vez que el rotor se haya detenido.
Para cambiar el ciclo seleccionado, presione el botón de
DESBLOQUEAR (UNLOCK) varias veces seguidas hasta que el ciclo
deseado haya sido seleccionado. Dos segundos después de la
selección, el botón se revertirá a su función de DESBLOQUEAR.
botón de DESBLOQUEAR (UNLOCK) durante 5 segundos. Dos "bips"
confirmarán que la selección de ciclo ha sido bloqueada.
Desbloqueo de la
Selección de Ciclo
Drucker Diagnostics | +1-814-692-7761 | CustomerService@DruckerDiagnostics.com | 16
presionado el botón de DESBLOQUEAR (UNLOCK) durante 5
segundos. Tres "bips" confirmarán que la selección de ciclo ha sido
desbloqueada.
Page 19

RPM
1.500
2.500
1.500
Duración
5 min
4 min
4 min
C
ONFIGURACIONES
CONFIGURACIONES ESTÁNDAR
Configuración A Configuración B Configuración C
REVISIÓN DE LAS CONFIGURACIONES DE DURACIÓN Y VELOCIDAD DEL CICLO
Los ciclos programados por la fábrica se encuentran en la parte posterior de la centrífuga en la etiqueta de Ciclos
Establecidos por la Fábrica. Para revisar las configuraciones actuales, siga este procedimiento:
o La tapa debe estar abierta para revisar la duración y la velocidad del ciclo seleccionado.
o Presione y mantenga presionado el botón de INICIAR (START) hasta que escuche un "bip".
o Deje de presionar el botón de INICIAR (START). La centrífuga emitirá un "bip" y la luz LED emitirá un destello por
cada minuto que dure el proceso del ciclo actual. 10 "bips" / destellos equivalen a 10 minutos de tiempo de
duración del proceso. El tiempo de proceso empieza cuando el rotor alcanza el 90 % de la velocidad deseada y
termina cuando el rotor empieza a desacelerar.
o Presionar nuevamente el botón de INICIAR (START) causará que la unidad emita un "bip" y que la luz LED emita
un destello por cada 100 rpm en el ciclo actual. 38 "bips" / destellos equivalen a 38 x 100 o 3.800 Revoluciones
por Minuto (RPM).
o
La centrífuga se revertirá automáticamente al modo normal al final.
AMBIO DE LAS CONFIGURACIONES DE DURACIÓN Y VELOCIDAD DEL CICLO
C
o La tapa debe estar abierta para cambiar la duración y velocidad del ciclo seleccionado.
o Seleccione el ciclo que desea cambiar.
o Presione y mantenga presionados los botones de INICIAR (START) y DESBLOQUEAR (UNLOCK) al mismo tiempo
hasta que la luz LED emita un destello.
o Presione el botón de INICIAR (START) por cada minuto de tiempo de duración del proceso.
o
Cambie al modo de configuración de la velocidad presionando el botón de DESBLOQUEAR (UNLOCK).
o Presione el botón de INICIAR (START) una vez por cada 100 rpm.
o Presione el botón de DESBLOQUEAR (UNLOCK) para salir del modo de configuración.
Drucker Diagnostics | +1-814-692-7761 | CustomerService@DruckerDiagnostics.com | 17
Page 20

ETIQUETADO DE CICLOS
Los ciclos programados por la fábrica se encuentran en la parte posterior de la centrífuga en la etiqueta de Ciclos
Establecidos por la Fábrica. Para facilitar el uso diario libre de errores, se incluye una etiqueta borrable adherida a la
parte superior de la centrífuga para la identificación de ciclos. Esta etiqueta le permite identificar sus ciclos de
acuerdo al nombre que utilice en su laboratorio (por ejemplo: Quím., Coag., tapa azul, 10 minutos, etc.) o de acuerdo
a los parámetros del ciclo (5 minutos a 1.800 xg).
Use un marcador permanente para que resista la limpieza con una solución de lejía y para que pueda ser borrado
con alcohol de uso tópico. Para mayor protección, la etiqueta puede ser cubierta con cinta adhesiva transparente
después de escribir sobre ella.
OPERACIÓN
o Coloque los tubos en los soportes para tubos. Asegúrese de seguir las reglas para cargas balanceadas según lo
descrito en la siguiente sección.
o Cierre la tapa y gire la perilla de la tapa en sentido horario hasta que llegue a su tope.
o La luz LED del panel frontal está iluminada para el ciclo actualmente seleccionado. Para seleccionar otro ciclo,
presione el botón de DESBLOQUEAR (UNLOCK) varias veces seguidas hasta que el ciclo deseado haya sido
seleccionado.
o Presione el botón de INICIAR (START) en el panel de control para dar inicio al ciclo de centrifugado.
o Cuando el ciclo haya terminado, el rotor desacelerará hasta detenerse por completo y la luz de la tapa emitirá un
destello.
o El mecanismo de desbloqueo se activará durante 60 segundos para permitir el ingreso a la cámara del rotor. Para
desbloquear una vez que hayan pasado más de 60 segundos, presione el botón de DESBLOQUEAR (UNLOCK). La
tapa se desbloqueará durante 15 segundos adicionales.
o Gire la perilla de la tapa en sentido antihorario y abra la tapa. La luz de la tapa se apagará.
o
Usted podrá ahora retirar las muestras de forma segura.
Drucker Diagnostics | +1-814-692-7761 | CustomerService@DruckerDiagnostics.com | 18
Page 21

Carga Adecuada de los Vasos
Centrífugas de 24 Tubos
Carga del Rotor de Balance
BALANCEO DE LAS CARGAS
Su centrífuga debe contener una carga balanceada para funcionar adecuadamente. El centrifugado de cargas
balanceadas extenderá la vida de su centrífuga y producirá mejores resultados. Siga las siguientes reglas al cargar el
Si se va a centrifugar un número impar de muestras, llene un tubo con agua para que tenga el mismo peso
rotor.
que la muestra impar y colóquelo en el lado opuesto a dicha muestra.
Los soportes para tubos opuestos deben tener cargas iguales, estar vacíos o estar cargados con muestras del
mismo peso.
Cuando cargue solo 3 tubos, estos deben tener el mismo peso.
Los vasos pueden ser colocados alrededor del rotor en cualquiera de las configuraciones de carga de rotor
mostradas.
Cada vaso debe estar cargado con tubos de manera simétrica como se muestra en la figura anterior.
Drucker Diagnostics | +1-814-692-7761 | CustomerService@DruckerDiagnostics.com | 19
Page 22

CUIDADO Y MANTENIMIENTO PREVENTIVO
Con cuidados y mantenimiento adecuados, su centrífuga le proporcionará años de servicio en el laboratorio. Para
cuidados adecuados se deben seguir los siguientes pasos:
o Siempre Centrifugue Cargas Balanceadas: Asegúrese de siempre centrifugar cargas balanceadas de acuerdo a
lo mostrado en la sección anterior. Estas centrífugas cuentan con un exclusivo diseño contrabalanceado de
montaje del motor que produce una excelente amortiguación de vibraciones. Sin embargo, las cargas
desbalanceadas podrían romper los tubos de ensayo de vidrio y podrían producir resultados insatisfactorios
de separación. Un balanceo adecuado de las cargas mejorará la separación de las muestras y extenderá la vida
de la centrífuga.
o Mantenimiento del motor y de los componentes eléctricos: Se seleccionaron los componentes eléctricos de
la más alta calidad para las centrífugacentrífugas y no deben de necesitar mantenimiento ni servicio durante
el ciclo de vida de la centrífugacentrífuga.
o Reemplazo del Soporte para Tubos: Se recomienda que los soportes para tubos sean remplazados luego de
24 meses de uso. Inspeccione los soportes de tubos regularmente para descartar la presencia de roturas. Si se
descubren roturas, reemplácelos inmediatamente.
o Retire los Accesorios Antes de Mover el Equipo: Todos los soportes para tubos, muestras y tapas deben ser
retirados de la cámara del rotor antes de transportar o almacenar la centrífuga para prevenir daños y lesiones.
LIMPIEZA Y DESINFECCIÓN
Para alargar la vida de la centrífuga, se recomienda realizar una limpieza y desinfección cada seis meses o siempre
que ocurran derrames o roturas de tubos. Los contaminantes deben ser eliminados inmediatamente, o podrían
causar corrosión y degradación prematura de los componentes. Antes de utilizar cualquier método de limpieza o
descontaminación distinto a los recomendados por el fabricante, los usuarios deberían consultar con el fabricante
para asegurarse de que el método propuesto no dañará el equipo.
o Desconecte la centrífuga antes de limpiarla.
o Use equipos adecuados de protección personal (PPE, por sus siglas en inglés).
o Aplique las soluciones de limpieza con una toalla o paño. No sumerja la centrífuga en agua o en otras soluciones
de limpieza, ya que esto causará daños y anulará la garantía.
o Debería utilizarse ÚNICAMENTE alcohol isopropílico o una solución de lejía al 10 % (5.500 PPM) para desinfectar
la centrífuga y sus accesorios.
o Todas las superficies deben ser secadas inmediatamente después de su limpieza y desinfección.
NO SE RECOMIENDA EL USO DE PRODUCTOS GERMICIDAS TBQ, YA QUE PODRÍAN CAUSAR DAÑOS A
LA CENTRÍFUGA. LIMPIE DETALLADAMENTE CON UN PAÑO DESPUÉS DEL USO PARA EVITAR LA
ANULACIÓN DE LA GARANTÍA
.
o No se deberán utilizar hidrocarburos, cetonas, ésteres, éteres, bencilos, etilbencenos y cualesquiera otros
bioquímicos total o parcialmente halogenados no prescritos por el fabricante, ya que podrían causar daños a la
cámara del rotor, al rotor, a los soportes para tubos, a los accesorios y al exterior de la centrífuga y anular la
garantía.
Drucker Diagnostics | +1-814-692-7761 | CustomerService@DruckerDiagnostics.com | 20
Page 23

La centrífuga no funciona
o
El rotor no gira con libertad
La centrífuga hace un ruido de
cascabeleo cuando está en
o Detenga la centrífuga. Abra la tapa.
para recibir asistencia adicional.
Exceso de ruido o vibración cuando la
o Verifique que las cuatro bases de la centrífuga estén
rotor.
La centrífuga se detiene y emite "bips"
La centrífuga está atorada en una de las
La selección de ciclo está bloqueada. Presione el botón de
RESOLUCIÓN DE PROBLEMAS
NOTA: El seguro debe estar girado completamente en sentido horario hasta su tope para que la centrífuga
funcione.
o Verifique que la centrífuga esté conectada. Una de las luces LED
debería estar encendida.
o Asegúrese de que el seguro de la tapa esté completamente
girado en sentido horario hasta su tope.
Si la centrífuga sigue sin funcionar, llame a Servicio al Cliente.
o Asegúrese de que nada se haya caído dentro de la cámara del
rotor siguiendo el procedimiento mostrado anteriormente.
o Si nada está obstruyendo el rotor, este podría estar dañado.
Contacte a Servicio al Cliente para recibir asistencia adicional.
funcionamiento
centrífuga está funcionando
continuamente
o Use su equipo de protección personal y retire los tubos,
soportes para tubos/vasos y busque objetos o residuos que
puedan haber caído. Retírelos cuidadosamente del interior
de la cámara del rotor con una herramienta.
o Inspeccione el rotor, los soportes para tubos o los vasos para
descartar la presencia de daños.
o Si los soportes para tubos o los vasos presentan daños, por
más mínimos que sean, deséchelos adecuadamente y
reemplácelos.
o Si el rotor parece estar dañado, contacte a Servicio al Cliente
adecuadamente apoyadas sobre una superficie plana.
o Asegúrese de que la carga esté balanceada de acuerdo a las
instrucciones en la sección de "Balanceo de las Cargas" de este
manual.
o Asegúrese de que nada haya caído dentro de la cámara del
La carga no está balanceada. Presione el botón de DESBLOQUEAR
(UNLOCK), abra la tapa y balancee la carga como se recomienda en
este manual.
configuraciones
Drucker Diagnostics | +1-814-692-7761 | CustomerService@DruckerDiagnostics.com | 21
DESBLOQUEAR (UNLOCK) durante 5 segundos.
Page 24

La duración y velocidad del ciclo no están
Revise la configuración de acuerdo a las instrucciones en la sección
La centrífuga no se desbloquea una vez
o Espere a que el rotor se haya detenido por completo. Si la perilla
recibir asistencia.
La tapa no se abre
o Asegúrese de que la perilla de la tapa esté completamente
eléctrico. Contacte a Servicio al Cliente para recibir asistencia.
El sonido de frenado ("clics") es
La tapa no permanece en posición
configuradas en el valor deseado
terminado el ciclo
de Cambio de las Configuraciones del Ciclo. Si el tiempo
preestablecido no tiene la duración deseada, siga el procedimiento
en la misma página para cambiar el tiempo preestablecido.
de la tapa sigue sin poder ser girada, presione el botón de
DESBLOQUEAR (UNLOCK) e inténtelo nuevamente.
o Si ninguna luz LED está
encendida, la unidad no está
recibiendo un suministro de energía y
la tapa no se desbloqueará por
medios convencionales. Retire la
etiqueta del seguro y utilice un
bolígrafo para desactivar
manualmente el mecanismo de
bloqueo. Tire del mecanismo hacia el panel de control y luego
quite el seguro y abra la tapa.
o Si la unidad está dañada, contacte a Servicio al Cliente para
girada en sentido antihorario.
o Si la perilla no puede ser girada en sentido antihorario, gírela
completamente en sentido horario, presione el botón de
DESBLOQUEO (UNLOCK), y gírela en sentido antihorario.
o Si la tapa permanece bloqueada después de esto y sigue sin
poder ser desbloqueada, podría haber un daño en el sistema
demasiado fuerte
abierta
o Asegúrese de que el tornillo en el centro del rotor esté ajustado.
o Ajuste el tornillo central en la bisagra de la tapa.
Drucker Diagnostics | +1-814-692-7761 | CustomerService@DruckerDiagnostics.com | 22
Page 25

En Centímetros:
En Pulgadas:
Radio
6 pulg. (15,3 cm)
ESPECIFICACIONES GENERALES
El rotor y los accesorios están calificados para la máxima frecuencia de rotación mostrada en la tabla a
continuación.
Capacidad de los Tubos 24 tubos (3-6 mL)
6 tubos (60 mL)
Dimensiones (An. X Alt. X Prof.)
Peso 39 lbs. (17 kg)
Nivel de Sonido 59 dB A
Rango Ambiental 16 – 32 grados C
Voltaje 95 -253
Frecuencia 50/60 Hz
Potencia Requerida 280 Watts
Motor de la Centrífuga ½ H.P. sin escobillas DC
Duración del Ciclo (em Minutos) 1-30 (+/- 2%)
Velocidad Máxima 2.500 RPM
15 pulg. x 17 pulg. x 9 pulg.
(38 cm x 43 cm x 23 cm)
ÁLCULO DE LA FUERZA G
C
Las Instrucciones de Uso de los fabricantes de tubos recomiendan ciclos a una Fuerza g mínima, la cual puede ser
calculada si conoce las RPM y el radio del rotor. Use la fórmula a continuación o ingrese a
www.druckerdiagnostics.com/g-force-calculator/
RCF o Fuerza g = 0,00001118 x
Radio del Rotor (cm) x (RPM)
Drucker Diagnostics | +1-814-692-7761 | CustomerService@DruckerDiagnostics.com | 23
.
2
RCF o Fuerza g = 0,0000284 x
Radio del Rotor (pulg.) x (RPM)
2
Page 26

Cumple con
RoHS
Familia de Productos: Serie HORIZON (HORIZON 24-AH, 24-AV)
Cumple con UL61010-1/CSA C22.2 Núm. 61010-1 y IEC61010-2-020
Protegido por las Patentes de EE. UU. #6,811,531, # 7,422,554, #D718,463 y #D734,489. Otras Patentes Pendientes
REGISTRADO ANTE LA FDA
INSTRUCCIONES PARA EL DESECHO DE RESIDUOS DE APARATOS ELÉCTRICOS Y ELECTRÓNICOS POR PARTE DE LOS USUARIOS EN
LA UNIÓN EUROPEA
Este producto no debe ser desechado junto con otros desperdicios. En cambio, es responsabilidad
del usuario desechar adecuadamente sus residuos de aparatos entregándolos a un punto de
recolección designado para el reciclaje de residuos de aparatos eléctricos y electrónicos. La
recolección por separado y el reciclaje de sus residuos de aparatos al momento de ser desechados
ayudará a conservar recursos naturales y asegurará que sean reciclados de una manera que
proteja la salud humana y el medio ambiente. Para más información sobre lugares donde puede
dejar sus residuos de aparatos para que sean reciclados, por favor contacte a la oficina municipal
o al servicio de desecho de residuos de su localidad, o al lugar donde compró el producto.
200 SHADY LANE, SUITE 170 – PHILIPSBURG, PA 16866, USA
+1-877-231-3115
CUSTOMERSERVICE@DRUCKERDIAGNOSTICS.COM
DRUCKERDIAGNOSTICS.COM
(SOLO EE. UU.) - +1-814-692-7661
Drucker Diagnostics | +1-814-692-7761 | CustomerService@DruckerDiagnostics.com | 24
Page 27

Manuel de l’utilisateur
TABLE DES MATIERES
Description du modèle .................................................................................................................................. 26
Caractéristiques ......................................................................................................................................... 26
Utilisation prévue ...................................................................................................................................... 26
Garantie ..................................................................................................................................................... 26
Configuration initiale .................................................................................................................................... 27
Démarrage rapide ......................................................................................................................................... 28
Réglages ........................................................................................................................................................ 29
Réglages standard ..................................................................................................................................... 29
Examen de la durée des programmes et des réglages de vitesse ............................................................. 29
Modification de la durée des programmes et des réglages de vitesse ...................................................... 29
Étiquetage des programmes ..................................................................................................................... 30
Utilisation ...................................................................................................................................................... 30
Équilibrage des charges ................................................................................................................................ 31
Entretien et maintenance préventive ........................................................................................................... 32
Nettoyage et désinfection ............................................................................................................................ 32
Dépannage .................................................................................................................................................... 33
Spécifications générales ............................................................................................................................... 35
Calcul de la force G ....................................................................................................................................... 35
Drucker Diagnostics | +1-814-692-7761 | CustomerService@DruckerDiagnostics.com | 25
Page 28

DESCRIPTION DU MODÈLE
CARACTÉRISTIQUES
o Interface simple à 2 boutons.
o Trois (3) programmes prédéfinis faciles à sélectionner étiquetés de façon pratique pour les applications les plus
courantes de votre labo. Utilisez les programmes par défaut ou personnalisez-les si nécessaire. Un voyant
lumineux à LED indique le réglage actuellement sélectionné.
o Si désiré, le panneau de commande peut être bloqué sur un programme prédéfini pour une reproductibilité sans
erreur.
o L’éclairage sur le couvercle indique l’état de la centrifugeuse (prêt, en cours, terminé) pour informer l’utilisateur
lorsque les tubes sont prêts pour l’analyseur et éviter que les tubes soient laissés dans la centrifugeuse plus
longtemps que nécessaire (brevet en instance).
o Une alerte sonore traditionnelle indique la fin du programme.
o La conception Cool-Flow empêche la surchauffe des échantillons en utilisant l’air ambiant pour les maintenir à
température ambiante.
o Les supports des tubes sont en fibre renforcée pour assurer solidité, résistance et des années d’utilisation sans
problème.
o Un couvercle transparent permet une observation en toute sécurité des échantillons et un étalonnage optique
de la vitesse.
o Le système de sécurité du couvercle empêche la centrifugeuse de fonctionner à moins que le couvercle soit fermé
et verrouillé.
o Ce système permet uniquement l’entrée dans la centrifugeuse après l’arrêt complet du rotor.
o Les moteurs haute puissance sans balai assurent des années d’utilisation sans entretien courant.
UTILISATION PRÉVUE
Cette centrifugeuse est un produit de laboratoire conçu pour séparer les composants par la génération d’une force
centrifuge relative. Elle sépare les échantillons humains et animaux, tels que le sang, l’urine et autres liquides
corporels, collectés dans des récipients appropriés pour échantillons, seuls ou avec des réactifs ou autres additifs.
En tant que centrifugeuse universelle, elle est également conçue pour traiter d’autres récipients contenant des
produits chimiques (non inflammables, non explosifs, non volatils et non hautement réactifs uniquement), des
prélèvements environnementaux et autres échantillons corporels non humains. Cette centrifugeuse doit être
utilisée par du personnel formé uniquement. Il s’agit d’un accessoire de diagnostic in vitro, par conséquent soumis
à l’ancienne directive de l’UE 98/79/EC et au nouveau règlement de l’UE relatif au DIV 2017/746. Toute utilisation
autre que celle prévue par le fabricant est explicitement interdite. La densité maximale des échantillons est de 1,15
grammes/ml.
GARANTIE
Drucker Diagnostics garantit cette centrifugeuse pendant 6 mois contre les vices de fabrication et de pièces.
Drucker Diagnostics | +1-814-692-7761 | CustomerService@DruckerDiagnostics.com | 26
Page 29

AVERTISSEMENT : Pour la sécurité de l’utilisateur et du personnel d’entretien, il convient de prendre des
précautions lors de l’utilisation de cette centrifugeuse en cas de manipulation de substances connues pour
être toxiques, radioactives ou contaminées par des microorganismes pathogènes. Utilisez un équipement
de protection individuelle approprié (ÉPI). En cas d’utilisation des matériaux du groupe de risque II (tel
qu’identifié dans le « Manuel de sécurité biologique en laboratoire » de l’Organisation Mondiale de la
Santé), vous devriez utiliser une fermeture étanche biologique. En cas d’utilisation de matériaux d’un
groupe à risque plus élevé, plusieurs niveaux de protection doivent être assurés. L’utilisation de matériaux
inflammables ou explosifs ainsi que de matériaux à forte réaction chimique est interdite.
Débranchez la centrifugeuse avant de la nettoyer ou de procéder à son entretien.
AVERTISSEMENT : Inspectez la centrifugeuse pour vérifier l’absence de fissures ou de dommages
physiques sur l’appareil, le couvercle, le rotor ou les supports de tubes. Un endommagement peut
entraîner une utilisation dangereuse. Cessez l’utilisation jusqu’à ce que les réparations soient effectuées.
Cet équipement génère, utilise et peut émettre un rayonnement de fréquence radio et, s’il n’est pas
installé et utilisé conformément à ce manuel de l’utilisateur, peut entraîner des interférences avec les
communications radio.
L’utilisation de cet équipement dans une zone résidentielle peut entraîner des interférences, que
l’utilisateur devra corriger à ses frais.
CONFIGURATION INITIALE
o Déballez l’équipement et vérifiez la présence de tous les éléments suivants :
• Centrifugeuse
• Cordon d’alimentation
• Supports de tubes
• Manuel d’utilisation
o Installez la centrifugeuse sur une surface plane. Un dégagement sur le dessus de la paillasse de21" (54 cm) de
haut est nécessaire pour ouvrir le couvercle.
o Il doit y avoir un espace dégagé de 6" (15 cm) autour de la centrifugeuse. Une bonne aération est nécessaire pour
empêcher la surchauffe des échantillons, ainsi qu’une défaillance prématurée de la centrifugeuse. Choisissez une
zone qui permet à l’air de bien circuler et où la température reste entre 16 et 32 °C.
o Aucun matériau dangereux ne doit être autorisé dans la zone de dégagement pendant l’utilisation.
o Le temps passé par l’utilisateur avec cette zone doit être limité au temps nécessaire au chargement, au
déchargement et à l’utilisation de la centrifugeuse uniquement.
o Branchez le cordon d’alimentation sur la centrifugeuse.
o Branchez ce cordon dans une prise électrique approuvée.
VEILLEZ À CE QUE LA PRISE ÉLECTRIQUE SOIT TOUJOURS ACCESSIBLE CAR LE CORDON D’ALIMENTATION EST LE
MOYEN DE DÉBRANCHEMENT D
’URGENCE !
Drucker Diagnostics | +1-814-692-7761 | CustomerService@DruckerDiagnostics.com | 27
Page 30

Réglage A
1 500 RPM @ 5 min
Réglage B
2 500 RPM @ 4 min
Réglage C
1 500 RPM @ 4 min
Permet d’accéder au logement du rotor en engageant le
Appuyer sur le bouton DÉVERROUILLAGE pendant l’utilisation
Le voyant lumineux à LED est allumé pour le programme
Sélectionnez le programme désiré. Appuyez sur le bouton
Pour réactiver la sélection de programme, appuyez sur le bouton
DÉMARRAGE RAPIDE
Le voyant lumineux à LED est allumé pour le programme actuellement sélectionné :
Voyants lumineux
Démarrage
Déverrouillage
Arrêt
Sélection de programme
Verrouillage de la
sélection de programme
Lance le programme indiqué par le voyant lumineux à LED. Le
couvercle doit être fermé.
mécanisme de déverrouillage. L’entrée n’est possible que si le
rotor est arrêté.
mettra fin au fonctionnement et déverrouillera le couvercle après
l’arrêt du rotor.
actuellement sélectionné. Pour changer de programme, appuyez à
plusieurs reprises sur le bouton DÉVERROUILLAGE jusqu’à ce que le
programme désiré soit sélectionné. Deux secondes après la
sélection, le bouton revient à sa fonction de DÉVERROUILLAGE.
DÉVERROUILLAGE et maintenez-le enfoncé pendant 5 secondes.
Deux bips sonores confirmeront le verrouillage de la sélection du
programme.
Déverrouillage de la
sélection de programme
Drucker Diagnostics | +1-814-692-7761 | CustomerService@DruckerDiagnostics.com | 28
DÉVERROUILLAGE et maintenez-le enfoncé pendant 5 secondes.
Trois bips sonores confirmeront le déverrouillage de la sélection du
programme.
Page 31

RPM
1 500
2 500
1 500
Durée
5 min
4 min
4 min
RÉGLAGES
RÉGLAGES STANDARD
Réglage A Réglage B Réglage C
EXAMEN DE LA DURÉE DES PROGRAMMES ET DES RÉGLAGES DE VITESSE
Les programmes définis à l’usine sont indiqués au dos de la centrifugeuse, sur l’étiquette Programmes définis à
l’usine. Pour examiner les réglages actuels, suivez cette procédure :
o Le couvercle doit être ouvert pour examiner la durée du programme et la vitesse sélectionnées.
o Appuyez sur le bouton DÉMARRAGE et maintenez-le enfoncé jusqu’à ce que vous entendiez un bip sonore.
o Relâchez le bouton DÉMARRAGE. La centrifugeuse émettra un bip sonore et le voyant lumineux à LED clignotera
une fois pour chaque minute de temps écoulé du programme en cours. 10 bips sonores/clignotements équivalent
à 10 minutes de temps écoulé. Le temps écoulé démarre lorsque le rotor atteint 90 % de la vitesse désirée et
s’arrête lorsque le rotor commence à décélérer.
o Le fait d’appuyer à nouveau sur le bouton DÉMARRAGE émettra un bip sonore de l’appareil et fera clignoter le
voyant lumineux à LED une fois pour chaque 100 rpm du programme en cours. 38 bips sonores/clignotements
équivalent à 38 x 100, soit 3 800 tours par minute (RPM).
o
La centrifugeuse reviendra automatiquement au mode normal à la fin.
ODIFICATION DE LA DURÉE DES PROGRAMMES ET DES RÉGLAGES DE VITESSE
M
o Le couvercle doit être ouvert pour modifier la durée du programme et la vitesse sélectionnées.
o Sélectionnez le programme que vous souhaitez modifier.
o Appuyez sur les boutons DÉMARRAGE et DÉVERROUILLAGE en même temps et maintenez-les enfoncés jusqu’à
ce que le voyant lumineux à LED clignote.
o Appuyez sur le bouton DÉMARRAGE pour chaque minute de temps écoulé.
o
Passez au mode de réglage de vitesse en appuyant sur le bouton DÉVERROUILLAGE.
o Appuyez sur le bouton DÉMARRAGE une fois pour 100 RPM.
o Appuyez sur le bouton DÉVERROUILLAGE pour quitter le mode de réglage.
Drucker Diagnostics | +1-814-692-7761 | CustomerService@DruckerDiagnostics.com | 29
Page 32

ÉTIQUETAGE DES PROGRAMMES
Les programmes définis à l’usine sont indiqués au dos de la centrifugeuse, sur l’étiquette Programmes définis à
l’usine. Pour faciliter une utilisation quotidienne sans erreur, une étiquette effaçable est apposée sur le dessus de la
centrifugeuse pour identifier les programmes. Cette étiquette vous permet d’identifier vos programmes par le nom
que vous utilisez en laboratoire (par exemple : Chim., Coag., dessus bleu, 10 minutes…) ou par les paramètres du
programme (5 minutes à 1 800 xg).
Utilisez un marqueur indélébile qui résiste au nettoyage avec une solution à l’eau de Javel pour permettre l’effaçage
avec de l’alcool à friction. Pour une meilleure protection, l’étiquette peut être collée avec du ruban adhésif
transparent après avoir écrit dessus.
UTILISATION
o Placez les tubes dans les supports. Veillez à bien suivre les règles en matière d’équilibrage des charges tel
qu’indiqué à la section suivante.
o Fermez le couvercle et tournez le bouton du couvercle dans le sens des aiguilles d’une montre jusqu’à la position
d’arrêt complet.
o Le voyant à LED du panneau avant s’allume pour le programme actuellement sélectionné. Pour sélectionner un
autre programme, appuyez à plusieurs reprises sur le bouton DÉVERROUILLAGE jusqu’à ce que le programme
désiré soit sélectionné.
o Appuyez sur le bouton DÉMARRAGE sur le panneau de commande pour lancer le programme.
o Lorsque le programme est terminé, le rotor ralentira jusqu’à l’arrêt complet et le voyant du couvercle clignotera.
o Le mécanisme de déverrouillage s’engagera pendant 60 secondes pour permettre l’entrée dans la chambre du
rotor. Pour déverrouiller après plus de 60 secondes, appuyez sur le bouton DÉVERROUILLAGE. Le couvercle sera
déverrouillé pendant 15 secondes de plus.
o Tournez le bouton du couvercle dans le sens inverse des aiguilles d’une montre et ouvrez le couvercle. Le voyant
du couvercle s’éteindra.
o
Vous pouvez désormais retirer les échantillons en toute sécurité.
Drucker Diagnostics | +1-814-692-7761 | CustomerService@DruckerDiagnostics.com | 30
Page 33

Chargement de godet correct
Centrifugeuses à 24 tubes
ÉQUILIBRAGE DES CHARGES
Votre centrifugeuse doit contenir une charge équilibrée pour fonctionner correctement. Faire tourner des charges
équilibrées prolongera la durée de vie de la centrifugeuse et produira de meilleurs résultats. Respectez les règles
suivantes lors du chargement du rotor.
pour atteindre le poids de l’échantillon dépareillé et placez-le en face de cet échantillon.
Les supports de tubes opposés doivent être chargés de façon égale, ou vides ou chargés d’échantillons de poids
Si vous chargez 3 tubes uniquement, ils doivent être de poids égal.
Si un nombre impair d’échantillons doit être tourné, remplissez un tube d’eau
égal.
Chargement de rotor équilibré
Les godets peuvent être placés autour du rotor dans l’une des configurations de chargement de rotor illustrées.
Chaque godet doit être chargé de façon symétrique avec les tubes comme ci-dessus.
Drucker Diagnostics | +1-814-692-7761 | CustomerService@DruckerDiagnostics.com | 31
Page 34

ENTRETIEN ET MAINTENANCE PRÉVENTIVE
Grâce à un entretien et une maintenance appropriés, votre centrifugeuse fournira des années de service au
laboratoire. Pour un bon entretien, il faut respecter les étapes suivantes :
o Toujours faire tourner des charges équilibrées : Veillez à toujours faire tourner une charge équilibrée, tel
qu’indiqué à la section précédente. Ces centrifugeuses ont une conception de montage de moteur
contrebalancée unique qui assure un excellent amortissement des vibrations. Cependant, les charges
déséquilibrées peuvent faire casser les tubes à essai en verre et produire des résultats de séparation
insatisfaisants. Un équilibrage correct des charges améliorera la séparation des échantillons et prolongera la
durée de vie de la centrifugeuse.
o Moteur et maintenance électrique : les composants électriques de la plus haute qualité ayant été sélectionnés
pour équiper la centrifugeuse, aucune opération de maintenance ou d’entretien ne devrait être nécessaire
pendant toute la durée de vie de l’appareil.
o Remplacement des supports de tubes : Il est recommandé de remplacer les supports de tubes au bout de 24
mois d’utilisation. Inspectez régulièrement les supports de tubes pour vérifier l’absence de fissures. Si des
fissures sont détectées, remplacez immédiatement les supports.
o Retrait des accessoires avant tout déplacement : L’ensemble des supports de tubes, des échantillons et des
bouchons doivent être retirés de la chambre du rotor avant de transporter ou de stocker la centrifugeuse pour
éviter tout dommage et toute blessure.
NETTOYAGE ET DÉSINFECTION
Pour prolonger la durée de vie de la centrifugeuse, un nettoyage et une désinfection sont recommandés tous les
six mois ou en cas de renversement ou de bris de tube. Les contaminants doivent être retirés immédiatement, sous
peine de provoquer de la corrosion et une dégradation prématurée des composants. Avant d’utiliser une méthode
de nettoyage ou de décontamination autre que celles recommandées par le fabricant, les utilisateurs doivent
vérifier auprès du fabricant que la méthode proposée n’endommagera pas l’équipement.
o Débranchez la centrifugeuse avant le nettoyage.
o Utilisez un équipement de protection individuelle approprié (ÉPI).
o Appliquez les solutions de nettoyage avec une serviette ou un chiffon. N’immergez pas la centrifugeuse dans
l’eau ni dans d’autres solutions de nettoyage car ceci l’endommagera et annulera la garantie.
o Utilisez UNIQUEMENT de l’alcool isopropylique ou une solution d’eau de Javel à 10 % (5 500 RPM) pour
désinfecter la centrifugeuse et ses accessoires.
o Toutes les surfaces doivent être séchées immédiatement après le nettoyage et la désinfection.
LES PRODUITS GERMICIDES TBQ NE SONT PAS RECOMMANDÉS CAR ILS PEUVENT ENDOMMAGER LA
CENTRIFUGEUSE
GARANTIE.
. ESSUYEZ RIGOUREUSEMENT APRÈS UTILISATION POUR ÉVITER D’ANNULER LA
o Les hydrocarbures entièrement/partiellement halogénés, les cétones, les esters, les benzyles, les éthylbenzènes
et tous les autres produits chimiques non prescrits par le fabricant ne doivent pas être utilisés car ils peuvent
endommager la chambre du rotor, le rotor, les supports de tubes, les accessoires et l’extérieur de la centrifugeuse
et annuler la garantie.
Drucker Diagnostics | +1-814-692-7761 | CustomerService@DruckerDiagnostics.com | 32
Page 35

La centrifugeuse ne fonctionne pas
o Vérifiez que la centrifugeuse est alimentée. Un des voyants
service à la clientèle.
Le rotor ne tourne pas librement
La centrifugeuse fait un bruit de
o Arrêtez la centrifugeuse. Ouvrez le couvercle.
clientèle pour obtenir de l’aide.
Excès de bruit ou de vibrations lorsque la
o
La centrifugeuse s’arrête et émet des
La charge n’est pas équilibrée. Appuyez sur le bouton
La centrifugeuse est bloquée sur l’un des
La sélection de programme est bloquée. Appuyez sur le bouton
DÉPANNAGE
REMARQUE : Le verrou doit être complètement tourné dans le sens des aiguilles d’une montre à sa position d’arrêt
pour que la centrifugeuse fonctionne.
lumineux à LED doit être allumé.
o Veillez à ce que le verrou du couvercle soit complètement
tourné dans le sens des aiguilles d’une montre à sa position
d’arrêt.
o Si la centrifugeuse ne fonctionne toujours pas, contactez le
o Vérifiez que rien n’est tombé dans la chambre du rotor en
suivant la procédure ci-dessus.
o Si rien n’obstrue le rotor, ce dernier peut être endommagé.
Contactez le service à la clientèle pour obtenir de l’aide.
claquement lorsqu’elle fonctionne
centrifugeuse fonctionne
bips sonores en continu
o En portant l’ÉPI, retirez les tubes et les supports de
tubes/godets et vérifiez l’absence d’objets ou de débris
tombés. En prenant les précautions nécessaires, retirez-les
de la chambre du rotor à l’aide d’un outil.
o Inspectez le rotor, les supports de tubes ou les godets pour
vérifier qu’ils ne sont pas endommagés.
o Si les supports de tubes ou les godets sont endommagés,
même légèrement, jetez-les en toute sécurité et remplacezles.
o Si le rotor semble endommagé, contactez le service à la
o Vérifiez que les quatre pieds de votre centrifugeuse sont
correctement installés sur une surface plane.
o Veillez à ce que la charge soit équilibrée selon les instructions de
la section « Équilibrage des charges » de ce manuel.
Veillez à ce que rien ne soit tombé dans la chambre du rotor.
DÉVERROUILLAGE, ouvrez le couvercle et équilibrez la charge selon
les recommandations de ce manuel.
réglages
Drucker Diagnostics | +1-814-692-7761 | CustomerService@DruckerDiagnostics.com | 33
DÉVERROUILLAGE pendant 5 secondes.
Page 36

La durée du programme et la vitesse ne
Vérifiez le réglage en suivant les instructions de la section
La centrifugeuse ne se déverrouille pas à
o Patientez jusqu’à ce que le rotor soit complètement arrêté. Si le
pour obtenir de l’aide.
Le couvercle ne s’ouvre pas
o Veillez à ce que le bouton du couvercle soit complètement
service à la clientèle pour obtenir de l’aide.
Un bruit de cliquetis pendant la
Le couvercle ne reste pas ouvert
sont pas définies à la valeur désirée
la fin d’un programme
Modification des réglages de programme. Si le préréglage n’est pas
à la longueur désirée, suivez les procédures à la même page pour
modifier la durée préréglée.
bouton du couvercle ne tourne toujours pas, appuyez sur le
bouton DÉVERROUILLAGE et réessayez.
o Si aucun voyant lumineux à LED
n’est allumé, l’appareil n’est pas
alimenté et le couvercle ne se
déverrouillera pas par le moyen
habituel. Retirez l’étiquette du
verrou et utilisez un stylo pour
débloquer manuellement le
mécanisme de verrouillage. Tirez le
mécanisme vers le panneau de commande, puis déverrouillez et
ouvrez le couvercle.
o Si l’appareil est endommagé, contactez le service à la clientèle
tourné dans le sens inverse des aiguilles d’une montre.
o Si le bouton ne tourne pas dans le sens inverse des aiguilles
d’une montre, tournez-le dans l’autre sens jusqu’au bout,
appuyez sur DÉVERROUILLAGE, puis tournez dans le sens
inverse des aiguilles d’une montre.
o Si le couvercle reste verrouillé après cela et ne se déverrouille
pas, il se peut que l’électronique soit endommagé. Contactez le
décélération s’amplifie
o Veillez à ce que la vis au centre du rotor soit bien serrée.
o Serrez la vis centrale sur la charnière du couvercle.
Drucker Diagnostics | +1-814-692-7761 | CustomerService@DruckerDiagnostics.com | 34
Page 37

Durée du programme (en
En centimètres :
En pouces :
Rayon
6 po (15,3 cm)
SPÉCIFICATIONS GÉNÉRALES
Le rotor et les accessoires sont évalués pour la fréquence de rotation maximale indiquée dans le tableau ci-dessous.
Capacité des tubes 24 tubes (3-6 mL)
6 tubes (60 mL)
Dimensions
(H x L x P)
Poids 39 lb (17 kg)
Niveau sonore 59 dB A
Plage environnementale 16 – 32 degrés C
Tension 95 -253
Fréquence 50/60 Hz
Puissance nécessaire 280 watts
Moteur de la centrifugeuse ½ CV, sans balai
Minutes)
Vitesse max. 2 500 RPM
15 po x 17 po x 9 po
(38 cm x 43 cm x 23 cm)
1-30 (+/- 2%)
CALCUL DE LA FORCE G
Les instructions d’utilisation des fabricants de tubes recommandent des programmes à une force G minimale, qui
peut être calculée si vous connaissez les RPM et le rayon. Utilisez la formule ci-dessous ou consultez
www.druckerdiagnostics.com/g-force-calculator/
RCF ou force G = 0,00001118 x
Rayon du rotor (cm) x (RPM)
.
2
RCF ou force G = 0,0000284 x
Rayon du rotor (po) x (RPM)
2
Drucker Diagnostics | +1-814-692-7761 | CustomerService@DruckerDiagnostics.com | 35
Page 38

Gamme de produits : Série HORIZON (HORIZON 24-AH, 24-AV)
Conforme aux normes UL61010-1/CSA C22.2 n° 61010-1 et IEC61010-2-020
Protégé par les brevets des États-Unis n° 6,811,531, n° 7,422,554, n° D718,463 et n° D734,489. Autres brevets en instance
ENREGISTREE AVEC LA FDA
RoHS
Compatible
INSTRUCTIONS POUR L’ÉLIMINATION DES DEEE PAR LES UTILISATEURS DANS L’UNION EUROPÉENNE
Ce produit ne doit pas être éliminé avec d’autres déchets. Il incombe à l’utilisateur de jeter son
équipement en le remettant à un point de collecte destiné au recyclage des équipements
électriques et électroniques jetés. La collecte et le recyclage séparés de votre équipement au
moment de sa mise au rebut aideront à préserver les ressources naturelles et à veiller à ce qu’il
soit recyclé de façon à protéger la santé humaine et l’environnement. Pour en savoir plus sur les
lieux où vous pouvez déposer votre équipement pour le recyclage, veuillez contacter le bureau
local de votre ville, le service de traitement des déchets ou l’endroit où vous avez acheté le
produit.
200 SHADY LANE, SUITE 170 – PHILIPSBURG, PA 16866, ÉTATS-UNIS
+1-877-231-3115
CUSTOMERSERVICE@DRUCKERDIAGNOSTICS.COM
DRUCKERDIAGNOSTICS.COM
Drucker Diagnostics | +1-814-692-7761 | CustomerService@DruckerDiagnostics.com | 36
(ÉTATS-UNIS UNIQUEMENT) - +1-814-692-7661
Page 39

Benutzerhandbuch
INHALTSVERZEICHNIS
Modellbeschreibung ..................................................................................................................................... 38
Funktionen ................................................................................................................................................. 38
Bestimmungsgemäße Verwendung .......................................................................................................... 38
Gewährleistung ......................................................................................................................................... 38
Ersteinrichtung .............................................................................................................................................. 39
Schnellstart ................................................................................................................................................... 40
Einstellungen ................................................................................................................................................ 41
Spezifische Einstellungen ........................................................................................................................... 41
Überprüfung der Zykluszeit- und Geschwindigkeitseinstellungen ............................................................. 41
Zykluszeit- und Geschwindigkeitseinstellungen ändern ............................................................................ 41
Beschriftungszyklen ................................................................................................................................... 42
Bedienung ..................................................................................................................................................... 42
Ausgleichende Lasten ................................................................................................................................... 43
Pflege und vorbeugende Wartung ................................................................................................................ 44
Reinigung und Desinfektion .......................................................................................................................... 44
Fehlerbehebung ............................................................................................................................................ 45
Allgemeine Spezifikationen........................................................................................................................... 47
Berechnung der G-Kraft ................................................................................................................................ 47
Drucker Diagnostics | +1-814-692-7761 | CustomerService@DruckerDiagnostics.com | 37
Page 40

MODELLBESCHREIBUNG
FUNKTIONEN
o Einfache 2-Tasten-Schnittstelle.
o Drei (3) leicht auswählbare voreingestellte Zyklen sind für die gängigsten Anwendungen in Ihrem Labor gut
gekennzeichnet. Verwenden Sie die standardmäßigen Zyklen oder passen Sie sie nach Bedarf an. Eine LEDLeuchte zeigt die aktuell gewählte Einstellung an.
o Auf Wunsch kann das Bedienfeld auf einen voreingestellten Zyklus arretiert werden, um eine fehlerfreie
Reproduzierbarkeit zu gewährleisten.
o Die Beleuchtung des Deckels zeigt den Status der Zentrifuge an (bereit, in Betrieb, fertig), informiert den
Bediener, wenn die Röhrchen für den Analysator bereit sind und verhindert, dass sie länger als nötig in der
Zentrifuge verbleiben (Patent angemeldet).
o Ein traditioneller akustischer Alarm zeigt das Ende des Zyklusses an.
o Das Cool-Flow-Design verhindert eine Überhitzung der Proben, indem die Proben mit Umgebungsluft auf
Raumtemperatur gehalten werden.
o Die Halterungen der Röhrchen sind faserverstärkt für hohe Festigkeit, Haltbarkeit und jahrelangen störungsfreien
Einsatz.
o Ein klarer Deckel ermöglicht die sichere Beobachtung der Proben und die optische Kalibrierung der
Geschwindigkeit.
o Wenn der Deckel nicht geschlossen und verriegelt ist, verhindert das Sicherheitssystem den Betrieb der
Zentrifuge.
o Die Deckelsicherung erlaubt den Eintritt in die Zentrifuge erst nach vollständigem Stillstand des Rotors.
o Die bürstenlosen Hochleistungsmotoren bieten einen jahrelangen Betrieb ohne routinemäßige Wartung.
BESTIMMUNGSGEMÄßE VERWENDUNG
Diese Zentrifuge ist ein Laborprodukt zur Trennung von Komponenten durch Erzeugung einer relativen
Zentrifugalkraft. Es trennt menschliche und tierische Proben - wie Blut, Urin und andere Körperflüssigkeiten - in
geeigneten Probenbehältern, entweder allein oder mit Reagenzien oder anderen Zusätzen. Als UniversalLaborzentrifuge ist sie auch für den Betrieb von anderen Behältern mit Chemikalien (nicht brennbare, nicht explosiv,
nicht flüchtig und nicht hochreaktiv), Umweltproben und anderen nicht menschlichen Körperproben geeignet. Diese
Zentrifuge darf nur von geschultem Personal bedient werden. Diese Zentrifuge ist ein IVD-Zubehör und unterliegt
somit der früheren EU-IVD-Richtlinie 98/79/EG und der aktuellen EU-IVD-Verordnung 2017/746. Jede andere als die
vom Hersteller vorgesehene Verwendung ist ausdrücklich untersagt. Die maximale Probendichte beträgt 1,15 g/mL.
GEWÄHRLEISTUNG
Drucker Diagnostics garantiert, dass diese Zentrifuge 6 Monate lang frei von Verarbeitungs- und Teilefehlern ist.
Drucker Diagnostics | +1-814-692-7761 | CustomerService@DruckerDiagnostics.com | 38
Page 41

ACHTUNG: Für die Sicherheit des Bedieners und des Servicepersonals ist beim Umgang mit Stoffen, die als
giftig, radioaktiv oder mit pathogenen Mikroorganismen kontaminiert bekannt sind, Vorsicht geboten.
Geeignete persönliche Schutzausrüstung (PSA) verwenden. Bei Verwendung von Materialien der
Risikogruppe II (wie im "Laboratory Bio-Safety Manual" der Weltgesundheitsorganisation festgelegt) sollte
ein BioSeal verwendet werden. Für den Fall, dass Materialien einer höheren Risikogruppe verwendet
werden, muss mehr als ein Schutzniveau vorgesehen werden. Die Verwendung von brennbaren oder
explosiven Stoffen sowie solchen, die eine starke chemische Reaktion zeigen, ist verboten.
Trennen Sie die Zentrifuge vom Netz, bevor Sie sie reinigen oder warten.
ACHTUNG: Prüfen Sie die Zentrifuge auf Risse oder Beschädigungen an Gehäuse, Deckel, Rotor oder
Röhrchenhalter. Beschädigungen können zu unsicherem Betrieb führen. Unterbrechen Sie den Betrieb, bis
Reparaturen durchgeführt wurden.
Dieses Gerät erzeugt, verwendet und kann Hochfrequenzenergie abstrahlen, und wenn es nicht gemäß
dieser Bedienungsanleitung installiert und verwendet wird, kann es Störungen der Funkkommunikation
verursachen.
Der Betrieb dieses Geräts in einem Wohngebiet wird wahrscheinlich Störungen hervorrufen, in diesem Fall
ist der Benutzer verpflichtet, die Störungen auf eigene Kosten zu beheben.
ERSTEINRICHTUNG
o Packen Sie aus und vergewissern Sie sich, dass alle folgenden Teile enthalten sind:
• Zentrifuge
• Netzkabel
• Rohrhalter
• Bedienungsanleitung
o Zentrifuge auf ebener und waagerechter Fläche aufstellen. Zum Öffnen des Deckels ist eine lichte Höhe von 21”
(54 cm) erforderlich.
o Die Zentrifuge sollte einen Freiraum von 6” (15 cm) um die Zentrifuge herum haben. Eine gute Belüftung ist
notwendig, um eine Überhitzung der Proben sowie einen vorzeitigen Ausfall der Zentrifuge zu vermeiden.
Wählen Sie einen Bereich, der einen unbelasteten Luftstrom erlaubt und in dem die Temperatur zwischen 16°C
und 32°C bleibt.
o Während des Betriebes dürfen sich keine gefährlichen Stoffe im Freiraum befinden.
o Die Bedienerzeit innerhalb des Umkreises ist auf die Zeit beschränkt, die nur für das Be- und Entladen und den
Betrieb der Zentrifuge erforderlich ist.
o Stecken Sie das Netzkabel in die Zentrifuge.
o Schließen Sie das Netzkabel an eine zugelassene Steckdose an.
ACHTEN SIE DARAUF, DASS DIE STECKDOSE IMMER ZUGÄNGLICH IST, DA DAS NETZKABEL DAS MITTEL DER
NOTABSCHALTUNG IST!
Drucker Diagnostics | +1-814-692-7761 | CustomerService@DruckerDiagnostics.com | 39
Page 42

Einstellung A
1.500 RPM @ 5 min
Einstellung B
2.500 RPM @ 4 min
Einstellung C
1.500 RPM @ 4 min
Ermöglicht den Zugang zur Rotorkammer durch Einrasten des
Ein Druck auf die UNLOCK-Taste während des Betriebs beendet den
Gewünschten Zyklus wählen. Drücken Sie die Taste UNLOCK für 5
SCHNELLSTART
Die LED-Anzeige leuchtet für den aktuell gewählten Zyklus:
Kontrollleuchten
Starten
Aufschließen
Halt
Zyklus-Auswahl
Zyklusauswahl sperren
Zyklusauswahl
entsperren
Beginnt mit der Ausführung des Zyklus, der durch die LED-Anzeige
des Zyklus angezeigt wird. Der Deckel muss geschlossen sein.
Verriegelungsmechanismus. Der Eintritt ist nur bei Stillstand des
Rotors möglich.
Lauf und entriegelt den Deckel, nachdem der Rotor zum Stillstand
gekommen ist.
Die LED leuchtet für den aktuell gewählten Zyklus. Um den
gewählten Zyklus zu ändern, drücken Sie nacheinander die Taste
UNLOCK, bis der gewünschte Zyklus ausgewählt ist. Zwei Sekunden
nach der Auswahl kehrt die Taste zu ihrer UNLOCK-Funktion zurück.
Sekunden. Zwei Pieptöne bestätigen, dass die Zyklusauswahl
gesperrt ist.
Um die Zyklusauswahl wieder zu aktivieren, halten Sie die Taste
UNLOCK 5 Sekunden lang gedrückt. Drei Pieptöne bestätigen, dass
die Zyklusauswahl nun entsperrt ist.
Drucker Diagnostics | +1-814-692-7761 | CustomerService@DruckerDiagnostics.com | 40
Page 43

RPM
1.500
2.500
1.500
Zeit
5 min
4 min
4 min
EINSTELLUNGEN
SPEZIFISCHE EINSTELLUNGEN
Einstellung A Einstellung B Einstellung C
ÜBERPRÜFUNG DER ZYKLUSZEIT- UND GESCHWINDIGKEITSEINSTELLUNGEN
Die werkseitig programmierten Zyklen sind auf der Rückseite der Zentrifuge auf dem Etikett "Factory Set Cycles"
aufgeführt. Um die aktuellen Einstellungen zu überprüfen, gehen Sie wie folgt vor:
o Der Deckel muss geöffnet sein, um die gewählte Zykluszeit und Geschwindigkeit zu überprüfen.
o Halten Sie die START-Taste gedrückt, bis Sie einen Signalton hören.
o Lassen Sie die START-Taste los. Die Zentrifuge piept und die LED-Anzeige blinkt einmal pro Minute Laufzeit im
aktuellen Zyklus. 10 Pieptöne / Blitze entsprechen 10 Minuten Laufzeit. Die Laufzeit beginnt, wenn der Rotor 90%
der Solldrehzahl erreicht und endet, wenn der Rotor zu bremsen beginnt.
o Durch erneutes Drücken der START-Taste ertönt ein Signalton und die LED-Anzeige blinkt einmal pro 100 U/min
im aktuellen Zyklus. 38 Pieptöne / Blitze gleich 38 x 100 oder 3.800 Umdrehungen pro Minute (RPM).
o
Die Zentrifuge kehrt am Ende automatisch in den Normalbetrieb zurück.
YKLUSZEIT- UND GESCHWINDIGKEITSEINSTELLUNGEN ÄNDERN
Z
o Der Deckel muss geöffnet sein, um die gewählte Zykluszeit und Geschwindigkeit zu ändern.
o Markieren Sie den Zyklus, den Sie ändern möchten.
o Halten Sie die Tasten START und UNLOCK zusammen, bis die LED-Anzeige blinkt.
o Drücken Sie die START-Taste für jede Minute der Laufzeit.
o Gehen Sie in den Geschwindigkeitseinstellmodus, indem Sie die Taste UNLOCK drücken.
o Drücken Sie die START-Taste einmal pro 100 U/min.
o Drücken Sie die Taste UNLOCK, um den Einstellungsmodus zu verlassen.
Drucker Diagnostics | +1-814-692-7761 | CustomerService@DruckerDiagnostics.com | 41
Page 44

BESCHRIFTUNGSZYKLEN
Die werkseitig programmierten Zyklen sind auf der Rückseite der Zentrifuge auf dem Etikett "Factory Set Cycles"
aufgeführt. Um die tägliche fehlerfreie Anwendung zu erleichtern, wird ein löschbares Etikett auf die Zentrifuge
geklebt. Dieses Etikett ermöglicht es Ihnen, Ihre Zyklen anhand des Namens zu identifizieren, den Sie in Ihrem Labor
verwenden (z. B: Chem, Coag, blue top, 10 Minuten....) oder durch die Zyklusparameter (5 Minuten @ 1800 xg).
Verwenden Sie einen Permanentmarker, um der Reinigung mit einer Bleichlösung zu widerstehen und das Löschen
mit Reinigungsalkohol zu ermöglichen. Zum weiteren Schutz kann das Etikett nach dem Schreiben mit transparentem
Klebeband überklebt werden.
BEDIENUNG
o Legen Sie die Röhrchen in die Röhrchenhalter. Beachten Sie unbedingt die im nächsten Abschnitt aufgeführten
Regeln für ausgeglichene Lasten.
o Schließen Sie den Deckel und drehen Sie den Deckelknopf im Uhrzeigersinn bis zum Anschlag.
o Die Frontplatten-LED leuchtet für den aktuell gewählten Zyklus. Um einen anderen Zyklus auszuwählen, drücken
Sie nacheinander die Taste UNLOCK, bis der gewünschte Zyklus ausgewählt ist.
o Durch Drücken der START-Taste auf dem Bedienfeld wird der Schleuderzyklus gestartet.
o Wenn der Zyklus beendet ist, wird der Rotor bis zum vollständigen Stillstand abgebremst und die
Deckelbeleuchtung blinkt.
o Der Entriegelungsmechanismus rastet für 60 Sekunden ein und ermöglicht den Eintritt in den Rotorraum. Um die
Sperre nach Ablauf von mehr als 60 Sekunden aufzuheben, drücken Sie die Taste UNLOCK. Der Deckel wird für
weitere 15 Sekunden entriegelt.
o Drehen Sie den Deckelknopf gegen den Uhrzeigersinn und öffnen Sie den Deckel. Das Deckellicht erlischt.
o
Sie können nun die Proben sicher entnehmen.
Drucker Diagnostics | +1-814-692-7761 | CustomerService@DruckerDiagnostics.com | 42
Page 45

Richtiges Laden der Schaufel
24 Rohrzentrifugen
AUSGLEICHENDE LASTEN
Ihre Zentrifuge muss eine ausbalancierte Last enthalten, damit sie einwandfrei funktioniert. Das Schleudern
ausgewogener Lasten verlängert die Lebensdauer der Zentrifuge und führt zu besseren Ergebnissen. Beachten Sie
beim Beladen des Rotors die folgenden Regeln.
füllen Sie eine Röhre mit Wasser, um das Gewicht der ungepaarten Probe anzupassen, und stellen Sie sie dieser
Probe gegenüber.
Gegenüberliegende Röhrchenhalter müssen gleich beladen oder leer oder mit gleichgewichtigen Proben beladen
Wenn nur 3 Röhrchen geladen werden, müssen sie das gleiche Gewicht haben.
Wenn eine ungerade Anzahl von Proben gesponnen werden soll,
sein.
Ausgeglichene Rotorbelastung
Die Schaufeln können um den Rotor herum in jeder der dargestellten Rotorbelastungskonfigurationen platziert
werden. Jede Schaufel muss symmetrisch mit Rohren wie oben beschrieben beladen werden.
Drucker Diagnostics | +1-814-692-7761 | CustomerService@DruckerDiagnostics.com | 43
Page 46

PFLEGE UND VORBEUGENDE WARTUNG
Bei richtiger Pflege und Wartung bietet Ihre Zentrifuge einen jahrelangen Betrieb im Labor. Für die richtige Pflege
sollten die folgenden Schritte eingehalten werden:
o Immer ausgewogene Lasten drehen: Stellen Sie sicher, dass Sie immer eine ausgewogene Last drehen, wie im
vorherigen Abschnitt gezeigt. Diese Zentrifugen haben ein einzigartiges, gegenläufig ausgewuchtetes
Motorlager, welche eine hervorragende Schwingungsdämpfung erzeugt. Allerdings können unausgewogene
Belastungen die Glasröhrchen brechen lassen und zu unbefriedigenden Trennergebnissen führen. Die richtige
Lastverteilung verbessert die Probentrennung und verlängert die Lebensdauer der Zentrifuge.
o Wartung des Motors und der Elektronik: Für die Zentrifugen wurden elektrische Komponenten höchster
Qualität ausgewählt. Wartung oder Reparatur sollte für die Lebensdauer der Zentrifuge daher nicht notwendig
sein.
o Austausch des Röhrchenhalters: Es wird empfohlen, die Röhrchenhalter nach 24 Monaten im Gebrauch
auszutauschen. Prüfen Sie die Röhrchenhalter regelmäßig auf Risse. Wenn Risse entdeckt werden, diese sofort
ersetzen.
o Zubehör vor dem Transport entfernen: Alle Röhrchenhalter, Proben und Kappen müssen vor dem Transport
oder der Lagerung der Zentrifuge aus dem Rotorraum entfernt werden, um Beschädigungen und Verletzungen
zu vermeiden.
REINIGUNG UND DESINFEKTION
Um die Lebensdauer der Zentrifuge zu verlängern, wird alle sechs Monate eine Reinigung und Desinfektion oder
auch bei Verschütten oder Rohrbruch empfohlen. Verunreinigungen müssen sofort entfernt werden sonst kann es
zu Korrosion und vorzeitigem Abbau von Bauteilen kommen. Bevor Sie andere als die vom Hersteller empfohlenen
Reinigungs- oder Dekontaminationsmethoden anwenden, sollten Sie sich bei dem Hersteller vergewissern, dass
die vorgeschlagene Methode das Gerät nicht beschädigt.
o Ziehen Sie den Stecker der Zentrifuge vor der Reinigung heraus.
o Geeignete persönliche Schutzausrüstung verwenden (PSA).
o Reinigungslösungen mit einem Handtuch oder einem Tuch auftragen. Tauchen Sie die Zentrifuge nicht in Wasser
oder andere Reinigungslösungen, da dies Schäden verursacht und die Garantie erlischt.
o Zur Desinfektion der Zentrifuge und des Zubehörs sollte NUR Isopropylalkohol oder eine 10%ige (5500 PPM)
Bleichlösung verwendet werden.
o Alle Oberflächen müssen sofort nach der Reinigung und Desinfektion getrocknet werden.
TBQ KEIMTÖTENDE PRODUKTE WERDEN NICHT EMPFOHLEN, DA SIE DIE ZENTRIFUGE BESCHÄDIGEN
KÖNNEN. NACH GEBRAUCH GRÜNDLICH ABWISCHEN, DAMIT DIE GARANTIE NICHT ERLISCHT.
o Vollständig oder teilweise halogenierte Kohlenwasserstoffe, Ketone, Ester, Ether, Benzyle, Ethylbenzole und alle
anderen vom Hersteller nicht vorgeschriebenen Chemikalien dürfen nicht verwendet werden, da sie Schäden am
Rotorraum, Rotor, Röhrchenhaltern, Zubehör und an der Zentrifugenaußenseite verursachen und die Garantie
ungültig machen können.
Drucker Diagnostics | +1-814-692-7761 | CustomerService@DruckerDiagnostics.com | 44
Page 47

Die Zentrifuge läuft nicht
o Stellen Sie sicher, dass die Zentrifuge mit Strom versorgt wird.
den Kundendienst.
Der Rotor dreht sich nicht frei
o Stellen Sie sicher, dass nichts, wie oben beschrieben, in den
Unterstützung.
Die Zentrifuge macht beim Laufen ein
o Stoppen Sie die Zentrifuge. Öffnen Sie den Deckel.
Kundendienst.
Übermäßige Geräusche oder
o Überprüfen Sie, ob alle vier Zentrifugenfüße auf einer ebenen
o Stellen Sie sicher, dass nichts in den Rotorraum gefallen ist.
Die Zentrifuge stoppt und piept
Die Last ist nicht ausgeglichen. Drücken Sie die Taste UNLOCK,
Die Zentrifuge bleibt auf einer der
Die Zyklusauswahl ist gesperrt. Drücken Sie die Taste UNLOCK für 5
FEHLERBEHEBUNG
HINWEIS: Für den Betrieb der Zentrifuge muss die Verriegelung vollständig im Uhrzeigersinn bis zum Anschlag
gedreht werden.
Eine der LEDs sollte leuchten.
o Vergewissern Sie sich, dass die Deckelverriegelung vollständig
im Uhrzeigersinn bis zum Anschlag gedreht ist.
o Wenn die Zentrifuge immer noch nicht läuft, wenden Sie sich an
Rotorraum gefallen ist.
o Wenn nichts den Rotor behindert, kann der Rotor beschädigt
sein. Kontaktieren Sie den Kundendienst für weitere
Klappergeräusch
Vibrationen bei laufender Zentrifuge
kontinuierlich
o PSA tragen, Röhrchen und Röhrchenhalter/Eimer entfernen
und nach heruntergefallenen Gegenständen oder
Fremdkörpern suchen. Mit einem Werkzeug vorsichtig in den
Rotorraum greifen, um sie zu entfernen.
o Überprüfen Sie den Rotor, die Rohrhalterungen oder die
Schaufel auf Beschädigungen.
o Wenn die Röhrchenhalter oder Schaufeln beschädigt sind,
entsorgen Sie sie sicher und ersetzen Sie sie.
o Sollte der Rotor beschädigt sein, wenden Sie sich bitte an den
Fläche stehen.
o Vergewissern Sie sich, dass die Last gemäß den Anweisungen im
Abschnitt "Auswuchten von Lasten" in diesem Handbuch
ausgewuchtet ist.
öffnen Sie den Deckel und gleichen Sie die Last aus, wie an anderer
Stelle in diesem Handbuch empfohlen.
Einstellungen hängen
Drucker Diagnostics | +1-814-692-7761 | CustomerService@DruckerDiagnostics.com | 45
Sekunden.
Page 48

Zykluszeit und Geschwindigkeit werden
nicht auf den gewünschten Wert
Überprüfen Sie die Einstellung, indem Sie den Anweisungen im
Die Zentrifuge entriegelt sich nach einem
o Warten Sie, bis der Rotor zum Stillstand gekommen ist. Wenn
Kundendienst.
Der Deckel öffnet sich nicht
o Vergewissern Sie sich, dass der Deckelknopf vollständig gegen
Sie den Kundendienst für weitere Unterstützung.
Klickgeräusche beim Bremsen werden
Der Deckel bleibt nicht oben
eingestellt
Abschnitt Zykluseinstellungen ändern folgen. Wenn die
Voreinstellung nicht die gewünschte Länge hat, gehen Sie wie auf
der gleichen Seite beschrieben vor, um die voreingestellte Zeit zu
ändern.
Lauf nicht
laut
der Deckelknopf immer noch nicht gedreht werden kann,
drücken Sie die Taste UNLOCK und versuchen Sie es erneut.
o Wenn keine LED leuchtet, wird
das Gerät nicht mit Strom versorgt
und der Deckel kann nicht mit
herkömmlichen Mitteln entriegelt
werden. Entfernen Sie das Etikett
und verwenden Sie einen Stift, um
den Verriegelungsmechanismus
manuell zu lösen. Ziehen Sie den
Mechanismus in Richtung Bedienfeld, entriegeln und öffnen Sie
den Deckel.
o Wenn das Gerät beschädigt ist, wenden Sie sich an den
den Uhrzeigersinn gedreht ist.
o Wenn der Knopf nicht gegen den Uhrzeigersinn gedreht werden
kann, drehen Sie ihn ganz im Uhrzeigersinn, drücken Sie
UNLOCK und drehen Sie ihn gegen den Uhrzeigersinn.
o Wenn der Deckel danach verriegelt bleibt und nicht entriegelt
wird, kann die Elektronik beschädigt worden sein. Kontaktieren
o Stellen Sie sicher, dass die Schraube in der Mitte des Rotors fest
sitzt.
o Ziehen Sie die mittlere Schraube am Deckelscharnier an.
Drucker Diagnostics | +1-814-692-7761 | CustomerService@DruckerDiagnostics.com | 46
Page 49

In Zentimetern:
In Zoll:
Radius
6 Zoll (15,3 cm)
ALLGEMEINE SPEZIFIKATIONEN
Der Rotor und das Zubehör sind für die in der folgenden Tabelle angegebene maximale Drehfrequenz ausgelegt.
Rohrkapazität 24 Röhrchen (3-6 mL)
6 Röhrchen (60 mL)
Abmessungen (B x H x T)
Gewicht 39 Pfund. (17 kg)
Schallpegel 59 dB A
Umweltbedingungen 16 – 32 Grad C
Spannung 95 -253 VAC
Frequenz 50/60 Hz
Spannungsversorgung 280 Watt
Zentrifugenmotor ½ H.P. Bürstenlos
Zykluszeit (in Minuten) 1-30 (+/- 2%)
Max. Geschwindigkeit 2.500 RPM
15 Zoll x 17 Zoll x 9 Zoll
(38 cm x 43 cm x 23 cm)
BERECHNUNG DER G-KRAFT
Die I.F.U.s der Rohrhersteller empfehlen Zyklen mit einer minimalen G-Kraft, die man berechnen kann, wenn man
die Drehzahl und den Radius kennt. Verwenden Sie die folgende Formel oder gehen Sie auf
www.druckerdiagnostics.com/g-force-calculator/
.
RCF oder G-Kraft = 0,00001118 x
Rotor Radius (cm) x (RPM)
Drucker Diagnostics | +1-814-692-7761 | CustomerService@DruckerDiagnostics.com | 47
2
RCF oder G-Kraft = 0,0000284 x
Rotor Radius (Zoll) x (RPM)
2
Page 50

RoHS
Produktfamilie: HORIZON (HORIZON 24-AH, 24-AV)
Entspricht UL61010-1/CSA C22.2 Nr. 61010-1 und IEC61010-2-020
Geschützt durch US-Patente #6,811,531, #7,422,554, #D718,463, & #D734,489. Andere angemeldete Patente
FDA GELISTET
Konform
ANWEISUNGEN ZUR ENTSORGUNG VON WEEE DURCH ANWENDER IN DER EUROPÄISCHEN UNION
Dieses Produkt darf nicht mit anderem Abfall entsorgt werden. Stattdessen liegt es in der
Verantwortung des Benutzers, seine Altgeräte zu entsorgen, indem er sie einer dafür
vorgesehenen Sammelstelle für das Recycling von Elektro- und Elektronik-Altgeräten übergibt.
Die getrennte Sammlung und Verwertung Ihrer Altgeräte zum Zeitpunkt der Entsorgung trägt
dazu bei, die natürlichen Ressourcen zu schonen und eine umwelt- und gesundheitsschonende
Verwertung zu gewährleisten. Für weitere Informationen darüber, wo Sie Ihre Altgeräte zum
Recycling abgeben können, wenden Sie sich bitte an Ihre örtliche Stadtverwaltung, Ihren
Abfallentsorgungsdienst oder an den Ort, an dem Sie das Produkt erworben haben.
200 SHADY LANE, SUITE 170 - PHILIPSBURG, PA 16866, USA
+1-877-231-3115
CUSTOMERSERVICE@DRUCKERDIAGNOSTICS.COM
DRUCKERDIAGNOSTICS.COM
(NUR USA) - +1-814-692-7661
Drucker Diagnostics | +1-814-692-7761 | CustomerService@DruckerDiagnostics.com | 48
Page 51

Manual do Operador
NDICE
Í
Descrição do Modelo .................................................................................................................................... 50
Características ........................................................................................................................................... 50
Aplicação ................................................................................................................................................... 50
Garantia..................................................................................................................................................... 50
Configuração Inicial ....................................................................................................................................... 51
Começo Rápido ............................................................................................................................................. 52
Configurações ............................................................................................................................................... 53
Configurações Padrão ............................................................................................................................... 53
Revisão das configurações de tempo e velocidade do ciclo ...................................................................... 53
Como Alterar as Configurações de Tempo e Velocidade do Ciclo ............................................................. 53
Como Identificar os Ciclos .......................................................................................................................... 54
Operação ....................................................................................................................................................... 54
Balanceamento das Cargas ........................................................................................................................... 55
Cuidados e Manutenção Preventiva ............................................................................................................. 56
Limpeza e Desinfecção .................................................................................................................................. 56
Solução de Problemas ................................................................................................................................... 57
Especificações Gerais .................................................................................................................................... 59
Cálculo da Força G ........................................................................................................................................ 59
Drucker Diagnostics | +1-814-692-7761 | CustomerService@DruckerDiagnostics.com | 49
Page 52

DESCRIÇÃO DO MODELO
CARACTERÍSTICAS
o Interface simples de 2 botões.
o Três (3) ciclos predefinidos facilmente selecionáveis estão convenientemente identificados para as aplicações
mais comuns do seu laboratório. Use os ciclos padrão ou personalize-os conforme necessário. Uma luz LED indica
a configuração atual selecionada.
o Se desejado, o painel de controle pode ser bloqueado em um ciclo predefinido para reprodutividade sem erros.
o A iluminação da tampa indica o status da centrífuga (pronta, funcionando, concluído), informando ao operador
quando os tubos estão prontos para o analisador e evitando que os tubos permaneçam na centrífuga por mais
tempo do que o necessário (patente pendente).
o Um alerta sonoro tradicional indica a conclusão do ciclo.
o O projeto Cool–Flow evita o superaquecimento das amostras usando ar ambiente para manter as amostras à
temperatura ambiente.
o Os porta-tubos são reforçados com fibra para alta resistência, durabilidade e anos de uso sem problemas.
o Uma tampa transparente permite a observação segura das amostras e a calibração ótica da velocidade.
o O sistema de segurança da tampa impede que a centrífuga funcione, a não ser que a tampa esteja fechada e
travada.
o O sistema de segurança da tampa só permite a entrada na centrífuga após o rotor ter parado completamente.
o Os motores de alta potência sem escova proporcionam anos de operação sem manutenção de rotina.
APLICAÇÃO
Esta centrífuga é um produto de laboratório projetado para separar componentes pela geração de força centrífuga
relativa. Ele separa amostras humanas e de animais – como sangue, urina e outros fluidos corporais – coletadas em
recipientes de amostras apropriados, isoladamente ou com reagentes ou outros aditivos. Como uma centrífuga de
laboratório de uso geral, foi projetada para também operar com outros recipientes contendo produtos bioquímicos
(não inflamáveis, não explosivos, não voláteis e não altamente reativos), amostras ambientais e outras amostras de
corpos não humanos. Esta centrífuga deve ser operada somente por pessoal capacitado. Esta centrífuga é um
acessório de DIV e, portanto, está sujeita à antiga Diretiva DIV da UE 98/79/EC e ao atual Regulamento DIV da UE
2017/746. Qualquer uso que não seja o previsto pelo fabricante é explicitamente proibido. A densidade máxima da
amostra é de 1,15 gramas/ml.
GARANTIA
A Drucker Diagnostics garante que esta centrífuga está livre de defeitos de fabricação e das peças por 6 meses.
Drucker Diagnostics | +1-814-692-7761 | CustomerService@DruckerDiagnostics.com | 50
Page 53

ATENÇÃO: Para a segurança, tanto do operador quanto do pessoal de manutenção, deve-se tomar cuidado
ao usar esta centrífuga se for manusear substâncias tóxicas, radioativas ou contaminadas por
microrganismos patogênicos. Use equipamento de proteção individual (EPI) apropriado. Quando materiais
do Grupo de Risco II forem usados, (conforme identificado na “Manual de Biossegurança de Laboratório”
da Organização Mundial de Saúde), um Bio-Selo deve ser utilizado. No caso de materiais de um grupo de
maior risco serem usados, mais de um nível de proteção deve ser fornecido. É proibido o uso de materiais
inflamáveis ou explosivos, bem como os materiais que têm reações bioquímicas intensas.
Tire a centrífuga da tomada antes de limpar ou realizar manutenção.
ATENÇÃO: Inspecione a centrífuga quanto à presença de rachaduras ou danos físicos aos suportes do
gabinete, da tampa, do rotor ou do tubo. Danos podem comprometer a segurança da operação.
Interrompa o uso até que os devidos reparos tenham sido feitos.
Este equipamento gera, usa e pode irradiar energia de radiofrequência e, se não for instalado e usado de
acordo com este manual de operações, poderá causar interferência nas comunicações de rádio.
A operação deste equipamento em áreas residenciais pode causar interferência, caso em que o usuário
deverá corrigir a interferência por conta própria.
CONFIGURAÇÃO INICIAL
o Desembale e verifique se todos os itens a seguir estão incluídos:
• Centrífuga
• Cabo de alimentação
• Suportes de tubo
• Manual de operação
o Coloque a centrífuga em uma superfície plana e nivelada. É necessário um afastamento de segurança de 21” (54
cm) da bancada superior para abrir a tampa.
o Deve haver 6” (15 cm) de espaço livre ao redor da centrífuga. É necessária ventilação adequada para evitar o
superaquecimento das amostras, bem como avarias prematuras da centrífuga. Escolha uma área que permita o
fluxo de ar livre e onde a temperatura permaneça entre 16 °C e 32 °C.
o Nenhum material perigoso será permitido no espaço livre durante a operação.
o O tempo do operador dentro do espaço livre deve ser limitado apenas ao tempo necessário para carregar,
descarregar e operar a centrífuga.
o Conecte o fio elétrico à centrífuga.
o Conecte o fio elétrico a uma tomada elétrica aprovada.
CERTIFIQUE-SE DE QUE A TOMADA ELÉTRICA ESTEJA SEMPRE ACESSÍVEL, POIS O FIO ELÉTRICO É O MEIO DE
DESCONEXÃO DE EMERGÊNCIA!
Drucker Diagnostics | +1-814-692-7761 | CustomerService@DruckerDiagnostics.com | 51
Page 54

Configuração A
1.500 RPM @ 5 min
Configuração B
2.500 RPM @ 4 min
Configuração C
1.500 RPM @ 4 min
COMEÇO RÁPIDO
A luz indicadora do LED está acesa para o ciclo atualmente selecionado:
Luzes Indicadoras
Iniciar
Destravar
Parar
Seleção de Ciclo
Bloqueio da Seleção de
Ciclo
Desbloqueio da Seleção de
Ciclo
Começa a executar o ciclo indicado pela luz de LED do indicador de ciclo. A
tampa deve estar fechada.
Permite o acesso à câmara do rotor, desengatando o mecanismo de
bloqueio . A entrada só é possível quando o rotor está parado.
Pressionar o botão UNLOCK (DESTRAVAR) durante a operação concluirá a
operação e destravará a tampa depois que o rotor tiver parado.
A luz do LED está acesa para o ciclo atualmente selecionado. Para alterar o
ciclo selecionado, pressione o botão UNLOCK sucessivamente até que o
ciclo desejado seja selecionado. Dois segundos após a seleção, o botão
retorna à sua função UNLOCK.
Selecione o ciclo desejado. Pressione e segure o botão UNLOCK por 5
segundos. Dois bipes confirmarão que a seleção do ciclo está bloqueada.
Para reativar a seleção de ciclos, pressione e segure o botão UNLOCK por 5
segundos. Três bipes confirmarão que a seleção de ciclos está
desbloqueada.
Drucker Diagnostics | +1-814-692-7761 | CustomerService@DruckerDiagnostics.com | 52
Page 55

RPM
1.500
2.500
1.500
Tempo
5 min
4 min
4 min
CONFIGURAÇÕES
CONFIGURAÇÕES PADRÃO
Configuração A Configuração B Configuração C
REVISÃO DAS CONFIGURAÇÕES DE TEMPO E VELOCIDADE DO CICLO
Os ciclos programados de fábrica são exibidos na parte traseira da centrífuga, na etiqueta Factory Set Cycles (Ciclos
Programados de Fábrica). Para revisar as configurações atuais, siga este procedimento:
o A tampa deve estar aberta para revisar o tempo e a velocidade do ciclo selecionado.
o Pressione e segure o botão START (INÍCIO) até ouvir um bipe.
o Solte o botão START. A centrífuga emitirá um sinal sonoro e a luz de LED piscará uma vez para cada minuto de
tempo de execução no ciclo atual. 10 bipes/flashes equivalem a 10 minutos de tempo de operação. O tempo de
operação começa quando o rotor alcança 90% da velocidade desejada, e para quando o rotor começa a
desacelerar.
o Pressionar o botão START novamente fará com que a unidade apite e a luz de LED pisque uma vez para cada 100
rpm no ciclo atual. 38 bipes/flashes equivalem a 38 x 100 ou 3.800 revoluções por minuto (RPM).
o
A centrífuga voltará automaticamente ao modo normal no final.
OMO ALTERAR AS CONFIGURAÇÕES DE TEMPO E VELOCIDADE DO CICLO
C
o A tampa deve estar aberta para alterar o tempo e a velocidade do ciclo selecionado.
o Selecione o ciclo que você deseja alterar.
o Pressione e mantenha pressionados os botões START e UNLOCK até que a luz de LED pisque.
o Pressione o botão START para cada minuto do tempo de execução.
o
Mova para o modo de ajuste de velocidade , pressionando o botão UNLOCK.
o Pressione o botão START uma vez para cada 100 rpm.
o Pressione o botão UNLOCK para sair do modo de configuração.
Drucker Diagnostics | +1-814-692-7761 | CustomerService@DruckerDiagnostics.com | 53
Page 56

COMO IDENTIFICAR OS CICLOS
Os ciclos programados de fábrica são mostrados na parte traseira da centrífuga, na etiqueta Factory Set Cycle. Para
facilitar o uso diário sem erros, uma etiqueta apagável é afixada na parte superior da centrífuga para identificação
do ciclo. Esta etiqueta permite identificar os ciclos pelo nome que você utiliza em seu laboratório (por exemplo:
Quím, Coagulação, tampa azul, 10 minutos…) ou pelos parâmetros do (5 minutos em 1800 xg).
Use um marcador permanente que resista à limpeza com soluções à base de água sanitária e cujo apagamento seja
possível com álcool para assepsia. Para proteção adicional, o rótulo pode ser coberto com fita transparente após a
gravação.
OPERAÇÃO
o Coloque os tubos nos porta-tubos. Respeite as regras para cargas balanceadas, conforme listado na próxima
seção.
o Feche a tampa e gire o botão da tampa em sentido horário, até a posição de parada completa.
o O LED do painel frontal fica iluminado para o ciclo selecionado atualmente. Para selecionar outro ciclo, pressione
o botão UNLOCK sucessivamente até que o ciclo desejado seja selecionado.
o Pressionar o botão START no painel de controle iniciará o ciclo de centrifugação.
o Quando o ciclo estiver concluído, o rotor desacelerará até parar completamente e a luz da tampa piscará.
o O mecanismo de desbloqueio será acionado por 60 segundos, permitindo a entrada na câmara do rotor. Para
desbloquear após mais de 60 segundos, pressione o botão UNLOCK. A tampa será desbloqueada por mais 15
segundos.
o Gire o botão da tampa em sentido anti-horário e abra a tampa. A luz da tampa será desligada.
o
Agora você pode remover as amostras com segurança.
Drucker Diagnostics | +1-814-692-7761 | CustomerService@DruckerDiagnostics.com | 54
Page 57

Carregamento adequado da Caçamba
Centrífugas de 24 Tubos
BALANCEAMENTO DAS CARGAS
Sua centrífuga deve ter uma carga balanceada para funcionar corretamente. Centrifugar cargas balanceadas
prolongará a vida útil da centrífuga e produzirá melhores resultados. Use as seguintes regras ao carregar o rotor.
um número ímpar de amostras tiver de ser centrifugado, encha um tubo com água para corresponder ao peso da
amostra não pareada e coloque-o na amostra.
Porta-tubos opostos devem estar igualmente carregados ou vazios, ou com amostras de mesmo peso.
Ao carregar apenas 3 tubos, eles devem ter o mesmo peso.
Balanceamento de Carga do Rotor
Se
As caçambas podem ser colocadas ao redor do rotor em qualquer uma das configurações de carregamento do
rotor exibidas.
Cada caçamba deve ser carregada com tubos de maneira simétrica, conforme mostrado acima.
Drucker Diagnostics | +1-814-692-7761 | CustomerService@DruckerDiagnostics.com | 55
Page 58

CUIDADOS E MANUTENÇÃO PREVENTIVA
Com cuidado e manutenção adequados, sua centrífuga terá anos de serviço de laboratório. Para um cuidado
adequado, os seguintes passos devem ser tomados:
o Sempre Centrifugue Cargas Balanceadas: Certifique-se de que você esteja sempre centrifugando uma carga
balanceada, conforme mostrado na seção anterior. Essas centrífugas possuem um projeto exclusivo
balanceado de montagem de motor que proporciona um excelente amortecimento das vibrações. No entanto,
cargas fora de balanceamento podem romper os tubos de ensaio de vidro e produzir resultados de separação
insatisfatórios. O balanceamento adequado da carga melhorará a separação da amostra e prolongará a vida
útil da centrífuga.
o Manutenção elétrica e do motor: Componentes elétricos da mais alta qualidade foram selecionados para as
centrífugas, e não deverão precisar de manutenção ou serviço durante toda a vida útil da centrífuga.
o Substituição do Porta-tubos: Recomenda-se que os porta-tubos sejam substituídos após 24 meses de uso.
Inspecione os porta-tubos regularmente, em busca de rachaduras. Se descobrir rachaduras, substitua
imediatamente.
o Remova os Acessórios Antes de Movimentar: Todos os porta-tubos, amostras e tampas devem ser removidos
da câmara do rotor antes de transportar ou armazenar a centrífuga, para evitar danos e ferimentos.
LIMPEZA E DESINFECÇÃO
Para prolongar a vida útil da centrífuga, limpeza e desinfecção são recomendadas a cada seis meses ou sempre que
houver algum derramamento ou ruptura dos tubos. Os contaminantes devem ser removidos imediatamente ou
pode ocorrer corrosão e degradação prematura dos componentes. Antes de usar qualquer método de limpeza ou
descontaminação além dos recomendados pelo fabricante, os usuários devem verificar com o fabricante se o
método proposto não danificará o equipamento.
o Desconecte a centrífuga antes de limpar.
o Use equipamento de proteção individual (EPI) apropriado.
o Aplique as soluções de limpeza com uma toalha ou pano. Não mergulhe a centrífuga em água ou qualquer solução
de limpeza, pois isso causará danos e invalidará a garantia.
o APENAS álcool isopropílico ou uma solução de alvejante a 10% (5500 PPM) devem ser usados para desinfetar a
centrífuga e seus acessórios.
o Todas as superfícies devem ser secas imediatamente após a limpeza e desinfecção.
PRODUTOS GERMICIDAS TBQ NÃO SÃO RECOMENDADOS, POIS PODEM CAUSAR DANOS À
CENTRÍFUGA
. LIMPE COMPLETAMENTE APÓS O USO, PARA EVITAR A ANULAÇÃO DA GARANTIA.
o Hidrocarbonetos totalmente/parcialmente halogenados, cetonas, ésteres, éteres, benzilas, etilbenzenos e todos
os outros produtos bioquímicos não prescritos pelo fabricante não devem ser usados, pois podem causar danos
à câmara do rotor, rotor, porta-tubos, acessórios e exterior da centrífuga e anular a garantia.
Drucker Diagnostics | +1-814-692-7761 | CustomerService@DruckerDiagnostics.com | 56
Page 59

A centrífuga não funciona
o Verifique se a centrífuga está energizada. Uma das luzes do LED
Atendimento ao Cliente.
O rotor não gira livremente
o Certifique-se de que nada tenha caído na câmara do rotor,
cliente para ter mais assistência.
A centrífuga faz um ruído estridente ao
o Pare a centrífuga. Abra a tampa.
Atendimento ao Cliente para ter mais assistência.
Ruído excessivo ou vibração quando a
o Verifique se todos os quatro pés da centrífuga estão bem
o Certifique-se de que nada esteja caído na câmara do rotor.
A centrífuga para e bipa continuamente
A carga não está balanceada. Pressione o botão UNLOCK, abra a
A centrífuga travou em uma das
A seleção de ciclo está bloqueada. Pressione o botão UNLOCK por 5
O tempo e a velocidade do ciclo não
Verifique a configuração seguindo as instruções na seção Como
SOLUÇÃO DE PROBLEMAS
OBSERVAÇÃO: A trava deve ser girada completamente em sentido horário, até a posição de parada para a
centrífuga operar.
deve estar acesa.
o Verifique se a trava da tampa está totalmente girada em sentido
horário, até a posição de parada.
o Se a centrífuga ainda não funcionar, entre em contato com o
seguindo o procedimento acima.
o Se nada estiver obstruindo o rotor, significa que ele pode
estar danificado. Entre em contato com o atendimento ao
funcionar
centrífuga está funcionando
configurações
o Usando EPI, retire os tubos e suportes de tubos/caçambas e
procure objetos ou detritos caídos. Cuidadosamente,
inspecione o interior da câmara do rotor, usando uma
ferramenta para removê-los.
o Inspecione o rotor, porta-tubos ou caçambas quanto a danos.
o Se os porta-tubos ou caçambas tiverem algum dano, mesmo
que pequeno, descarte-os com segurança e substitua-os.
o Se o rotor parecer danificado, entre em contato com o
apoiados em uma superfície plana.
o Certifique-se de que a carga esteja equilibrada, de acordo com
as instruções na seção “Balanceamento de Cargas” desse
manual.
tampa e equilibre a carga conforme recomendado em outras partes
desse manual.
segundos.
estão definidos para o valor desejado
Drucker Diagnostics | +1-814-692-7761 | CustomerService@DruckerDiagnostics.com | 57
Alterar as Configurações do Ciclo. Se a predefinição não tiver o
comprimento desejado, siga o procedimento na mesma página
para alterar o tempo predefinido.
Page 60

A centrífuga não desbloqueia após a
o Espere até o rotor parar completamente. Se o botão da tampa
Atendimento ao Cliente para ter assistência.
A tampa não abre
o Certifique-se de que o botão da tampa esteja totalmente virado
em contato com o atendimento ao cliente para ter assistência.
O ruído audível durante a travagem é
A tampa não fica levantada
o Aperte o parafuso central na dobradiça da tampa.
conclusão de uma operação
alto
ainda não puder ser girado, pressione o botão UNLOCK e tente
novamente.
mecanismo em direção ao painel de controle e, em seguida,
destrave e abra a tampa.
o Se a unidade estiver danificada, entre em contato com o
em sentido contrário ao dos ponteiros do relógio.
o Se o botão não puder ser girado em sentido anti-horário, gire-o
totalmente em sentido horário, pressione UNLOCK e gire em
sentido anti-horário.
o Se a tampa continuar travada depois disso e não for destravada,
os componentes eletrônicos podem ter sido danificados. Entre
o Certifique-se de que o parafuso no centro do rotor esteja
apertado.
o Se nenhuma luz LED estiver
acesa, significa que a unidade não
está ligada na energia e a tampa não
será destravada pelos meios
convencionais. Remova a etiqueta da
trava e use uma caneta para
desengatar manualmente o
mecanismo da trava. Puxe o
Drucker Diagnostics | +1-814-692-7761 | CustomerService@DruckerDiagnostics.com | 58
Page 61

Tempo de Ciclo (em
Em Centímetros:
Em Polegadas:
Raio
6 in (15,3 cm)
ESPECIFICAÇÕES GERAIS
O rotor e os acessórios são classificados para a frequência máxima de rotação exibida na tabela abaixo.
Capacidade dos Tubos 24 tubos (3-6 mL)
6 tubos (60 mL)
Dimensões (L x A x P)
Peso 39 lbs. (17 kg)
Nível de Ruído 59 dB A
Faixa Ambiental 16 – 32 graus C
Voltagem 95 -253 VCA
Frequência 50/60 Hz
Necessidade Energética 280 Watts
Motor da Centrífuga ½ H.P. Brushless
Minutos)
Velocidade Máxima 2.500 RPM
15 in x 17 in x 9 in
(38 cm x 43 cm x 23 cm)
1-30 (+/- 2%)
CÁLCULO DA FORÇA G
Os I.F.U.s dos fabricantes de válvulas recomendam ciclos com um mínimo de força G, que podem ser calculados se
você souber o RPM e o raio. Use a fórmula abaixo ou vá para www.druckerdiagnostics.com/g-force-calculator/.
RCF ou força G = 0,00001118 x
Raio do Rotor (cm) x (RPM)
Drucker Diagnostics | +1-814-692-7761 | CustomerService@DruckerDiagnostics.com | 59
2
RCF ou força G = 0,0000284 x
Raio do Rotor (in) x (RPM)
2
Page 62

Família de Produtos: Série HORIZON (HORIZON 24-AH, 24-AV)
Em conformidade com UL61010-1/CSA C22.2 No. 61010-1 e IEC61010-2-020
Protegido por Patentes dos EUA #6,811,531, # 7,422,554, #D718,463, & #D734,489. Outras Patentes Pendentes
APROVADO PELA FDA
RoHS
Compliant
INSTRUÇÕES PARA A ELIMINAÇÃO DE REEE POR USUÁRIOS NA UNIÃO EUROPEIA
Este produto não deve ser descartado com outros resíduos. Em vez disso, é responsabilidade do
usuário descartar o equipamento usado entregando-o a um ponto de coleta designado para a
reciclagem de equipamentos elétricos e eletrônicos. A coleta seletiva e reciclagem de seu
equipamento no momento do descarte ajudará a conservar os recursos naturais e a garantir que
ele seja reciclado de uma maneira que proteja a saúde humana e o meio ambiente. Para obter
mais informações sobre onde você pode deixar seu equipamento para reciclagem, entre em
contato com a prefeitura local, o serviço de coleta de lixo ou onde você adquiriu o produto.
200 SHADY LANE, SUITE 170 – PHILIPSBURG, PA 16866, USA
+1-877-231-3115
CUSTOMERSERVICE@DRUCKERDIAGNOSTICS.COM
DRUCKERDIAGNOSTICS.COM
(APENAS EUA) - +1-814-692-7661
Drucker Diagnostics | +1-814-692-7761 | CustomerService@DruckerDiagnostics.com | 60
Page 63

Manuale dell’operatore
NDICE
I
Descrizione modello ..................................................................................................................................... 62
Caratteristiche ........................................................................................................................................... 62
Utilizzo previsto ......................................................................................................................................... 62
Garanzia .................................................................................................................................................... 62
Configurazione iniziale .................................................................................................................................. 63
Avvio rapido .................................................................................................................................................. 64
Impostazioni.................................................................................................................................................. 65
Impostazioni standard ............................................................................................................................... 65
Rivedere le impostazioni del tempo e della velocità del ciclo .................................................................... 65
Modificare le impostazioni del tempo e della velocità del ciclo ................................................................ 65
Etichettatura dei cicli ................................................................................................................................. 66
Operazione .................................................................................................................................................... 66
Bilanciamento dei carichi .............................................................................................................................. 67
Cura e manutenzione preventiva ................................................................................................................. 68
Pulizia e disinfezione ..................................................................................................................................... 68
Risoluzione dei problemi .............................................................................................................................. 69
Specifiche generali ........................................................................................................................................ 71
Calcolare la forza g ........................................................................................................................................ 71
Drucker Diagnostics | +1-814-692-7761 | CustomerService@DruckerDiagnostics.com | 61
Page 64

DESCRIZIONE MODELLO
CARATTERISTICHE
o Interfaccia semplice a 2 bottoni.
o Tre (3) cicli preimpostati facilmente selezionabili sono opportunamente etichettati per le applicazioni di
laboratorio più comuni. Utilizzare i cicli predefiniti o personalizzarli secondo necessità. Una luce a LED indica
l'impostazione corrente selezionata.
o Se lo si desidera, il pannello di controllo può essere bloccato su un ciclo preimpostato per una riproducibilità
senza errori.
o L'illuminazione del coperchio indica lo stato della centrifuga (pronto, in funzione, concluso), informando
l'operatore quando le provette sono pronte per l'analizzatore e impedendo che esse rimangano nella centrifuga
più a lungo del necessario (in attesa di brevetto).
o Un avviso acustico tradizionale indica il completamento del ciclo.
o Il design Cool-Flow impedisce il surriscaldamento dei campioni utilizzando l’aria circostante per mantenerli a
temperatura ambiente.
o I portaprovette sono rinforzati con fibra per garantire resistenza, durata e anni di utilizzo senza problemi.
o Un coperchio trasparente consente l'osservazione sicura dei campioni e la calibrazione ottica della velocità.
o Il sistema di sicurezza del coperchio impedisce che la centrifuga entri in funzione a meno che esso non sia chiuso
e bloccato.
o Il sistema di sicurezza del coperchio consente l'accesso nella centrifuga solo dopo che il rotore si è
completamente arrestato.
o I motori brushless ad alta potenza garantiscono anni di funzionamento senza manutenzione ordinaria.
UTILIZZO PREVISTO
Questa centrifuga è un prodotto da laboratorio progettato per separare le componenti generando una forza
centrifuga relativa. Separa campioni umani e animali - come sangue, urine e altri fluidi corporei - raccolti in appositi
contenitori di campioni, da soli o con reagenti o altri additivi. Come centrifuga da laboratorio per uso generale, è
progettata per gestire anche altri contenitori riempiti con sostanze chimiche (non infiammabili, non esplosivi, non
volatili e non altamente reattivi), campioni ambientali e altri campioni di corpi non umani. Questa centrifuga deve
essere utilizzata esclusivamente da personale qualificato. Questa centrifuga è un accessorio IVD e pertanto soggetta
alla precedente Direttiva 98/79/CE dell'UE IVD e all'attuale Regolamento UE IVD 2017/746. Qualsiasi uso diverso da
quelli autorizzati dal produttore è esplicitamente proibito. La densità massima del campione è 1,15 grammi/ml.
GARANZIA
Drucker Diagnostics garantisce che questa centrifuga è esente da difetti di manodopera e garantisce
materiali per 6 mesi.
Drucker Diagnostics | +1-814-692-7761 | CustomerService@DruckerDiagnostics.com | 62
Page 65

AVVERTENZE: Per la sicurezza dell'operatore e del personale di assistenza, è necessario prestare
attenzione quando si utilizza questa centrifuga se si maneggiano sostanze riconosciute come tossiche,
radioattive o contaminate da microrganismi patogeni. Utilizzare dispositivi di protezione individuale
adeguati (DPI). Quando vengono utilizzati materiali del Gruppo di rischio 2 (come identificato dal "Manuale
di Biosicurezza del laboratorio" dell'Organizzazione Mondiale della Sanità), dovrebbe essere utilizzato un
Bio-sigillo. Nel caso in cui vengano utilizzati materiali di un gruppo di rischio più elevato, è necessario
fornire più di un livello di protezione. È vietato l'uso di materiali infiammabili o esplosivi, nonché di
materiali che hanno una forte reazione chimica.
Scollegare la centrifuga prima di pulirla o di eseguire la manutenzione.
AVVERTENZE: Ispezionare la centrifuga per individuare eventuali crepe o danni fisici ad armadietto,
coperchio, rotore o supporti delle provette. Eventuali danni possono causare operazioni non sicure.
Interrompere l'utilizzo fino a quando le riparazioni non siano state eseguite.
Questa apparecchiatura genera, utilizza e può irradiare energia in radiofrequenza e, se non installata e
utilizzata conformemente a questo manuale, potrebbe causare interferenze alle comunicazioni radio.
L'utilizzo di questa apparecchiatura in un'area residenziale può causare interferenze, nel qual caso l'utente
sarà tenuto a correggere l'interferenza a proprie spese.
CONFIGURAZIONE INIZIALE
o Disimballare e verificare che sia incluso quanto segue:
• Centrifuga
• Cavo di alimentazione
• Portaprovette
• Istruzioni per l’utilizzo
o Disporre la centrifuga su una superficie piatta e in piano. Per aprire il coperchio è necessaria un'altezza di
sicurezza dal banco di 21” (54 cm).
o La centrifuga dovrebbe avere 6” (15 cm) di spazio libero attorno a sé. È necessaria una ventilazione adeguata per
evitare il surriscaldamento dei campioni e un guasto prematuro della centrifuga. Scegliere un'area che consenta
un flusso d'aria senza impedimenti e dove la temperatura rimanga tra 16° C e 32° C.
o Nessun materiale pericoloso deve essere permesso nella zona libera durante il funzionamento.
o Il tempo dell'operatore all'interno della zona libera essere limitato al solo tempo necessario per il carico, lo scarico
e l'operazione di centrifuga.
o Inserire il cavo di alimentazione nella centrifuga.
o Collegare il cavo di alimentazione a una presa elettrica a norma.
ASSICURARSI CHE LA PRESA ELETTRICA SIA SEMPRE ACCESSIBILE POICHÉ IL CAVO DI ALIMENTAZIONE È IL
MEZZO DI DISCONNESSIONE DI EMERGENZA
Drucker Diagnostics | +1-814-692-7761 | CustomerService@DruckerDiagnostics.com | 63
!
Page 66

Impostazion A
1.500 RPM @ 5 min
Impostazion B
2.500 RPM @ 4 min
Impostazion C
1.500 RPM @ 4 min
Selezionare il ciclo desiderato. Premere e tenere premuto il pulsante
AVVIO RAPIDO
La spia LED è accesa per il ciclo attualmente selezionato:
Indicatori luminosi
Avvio
Sblocca
Arresta
Selezione ciclo
Selezione blocco ciclo
Selezione sblocco ciclo
Inizia l'esecuzione del ciclo indicato dalla spia a LED del ciclo. Il coperchio
deve essere chiuso.
Consente l'accesso alla camera del rotore tramite il meccanismo di
sblocco. L'accesso è consentito solo quando il rotore è fermo.
Premendo il pulsante SBLOCCA durante l'operazione si termina la corsa e si
sblocca il coperchio dopo che il rotore si è fermato.
La spia LED è accesa per il ciclo attualmente selezionato. Per modificare il
ciclo selezionato, premere ripetutamente il pulsante SBLOCCA fino a
selezionare il ciclo desiderato. Due secondi dopo la selezione, il pulsante
ritorna alla sua funzione SBLOCCA.
SBLOCCA per 5 secondi. Due bip confermeranno che la selezione del ciclo è
bloccata.
Per riattivare la selezione del ciclo, premere e tenere premuto il pulsante
SBLOCCA per 5 secondi. Tre bip confermeranno che la selezione del ciclo è
sbloccata.
Drucker Diagnostics | +1-814-692-7761 | CustomerService@DruckerDiagnostics.com | 64
Page 67

RPM (giri/min)
1.500
2.500
1.500
Tempo
5 min
4 min
4 min
IMPOSTAZIONI
IMPOSTAZIONI STANDARD
Impostazion A Impostazion B Impostazion C
RIVEDERE LE IMPOSTAZIONI DEL TEMPO E DELLA VELOCITÀ DEL CICLO
I cicli programmati in fabbrica sono indicati sul retro della centrifuga, sull’etichetta delle impostazioni di fabbrica.
Per rivedere le impostazioni correnti, seguire la seguente procedura:
o Il coperchio deve essere aperto per rivedere il tempo e la velocità del ciclo selezionati.
o Premere e tenere premuto il pulsante AVVIO fino a quando non si sente un bip.
o Rilasciare il pulsante AVVIO. La centrifuga emetterà un segnale acustico e la luce a LED lampeggerà una volta per
ogni minuto di esecuzione nel ciclo corrente. 10 bip / flash equivalgono a 10 minuti di esecuzione. Il tempo di
esecuzione inizia quando il rotore raggiunge il 90% della velocità desiderata e si arresta quando il rotore inizia a
decelerare.
o Premendo di nuovo il pulsante AVVIO, l'unità emetterà un segnale acustico e il LED lampeggerà una volta ogni
100 giri/min nel ciclo corrente. 38 bip / flash equivalgono a 38 x 100 o 3.800 giri al minuto (RPM).
o
Alla fine la centrifuga tornerà automaticamente alla modalità normale.
ODIFICARE LE IMPOSTAZIONI DEL TEMPO E DELLA VELOCITÀ DEL CICLO
M
o Il coperchio deve essere aperto per modificare il tempo e la velocità del ciclo selezionato.
o Selezionare il ciclo che si desidera modificare.
o Premere e tenere premuti i pulsanti AVVIO e SBLOCCA contemporaneamente finché la luce LED non lampeggia.
o Premere il pulsante AVVIO per ogni minuto di esecuzione.
o Passare alla modalità di impostazione della velocità premendo il pulsante SBLOCCA.
o Premere il pulsante AVVIO una volta per ogni 100 giri/min.
o Premere il pulsante SBLOCCA per uscire dalla modalità di impostazione.
Drucker Diagnostics | +1-814-692-7761 | CustomerService@DruckerDiagnostics.com | 65
Page 68

ETICHETTATURA DEI CICLI
I cicli programmati in fabbrica sono indicati sul retro della centrifuga, sull’etichetta delle impostazioni di fabbrica.
Per facilitare l'uso quotidiano senza errori, un'etichetta cancellabile è apposta sopra la centrifuga per
l’identificazione del ciclo. Questa etichetta consente di identificare i cicli in base al nome che l’utente utilizza in
laboratorio (ad esempio: Chim, Coag, top blu, 10 minuti ...) o dai parametri del ciclo (5 minuti a 1800 xg).
Utilizzare un pennarello indelebile affinché resista alla pulizia con una soluzione di candeggina e per consentire la
cancellazione con alcol denaturato. Per ulteriore protezione, attaccare dello scotch trasparente sopra l’etichetta
dopo aver scritto.
OPERAZIONE
o Posizionare le provette nei portaprovette. Assicurarsi di seguire le regole per i carichi equilibrati come elencato
nella sezione seguente.
o Chiudere il coperchio e ruotare il pomello del coperchio in senso orario fino alla posizione di arresto completa.
o Il LED del pannello anteriore è illuminato per il ciclo attualmente selezionato. Per selezionare un altro ciclo,
premere ripetutamente il pulsante SBLOCCA fino a selezionare il ciclo desiderato.
o Premendo il pulsante AVVIO sul pannello di controllo si avvierà la centrifuga.
o Quando il ciclo è completato, il rotore rallenterà fino all'arresto completo e la luce del coperchio lampeggerà.
o Il meccanismo di sblocco si attiverà per 60 secondi consentendo l'ingresso nella camera del rotore. Per sbloccare
dopo più di 60 secondi, premere il pulsante SBLOCCA. Il coperchio si sbloccherà per altri 15 secondi.
o Ruotare la manopola del coperchio in senso antiorario e aprire il coperchio. La luce del coperchio si spegnerà.
o
È ora possibile rimuovere i campioni in sicurezza.
Drucker Diagnostics | +1-814-692-7761 | CustomerService@DruckerDiagnostics.com | 66
Page 69

Corretto carico del cestello
Centrifughe a 24 provette
Caricamento bilanciato del rotore
BILANCIAMENTO DEI CARICHI
La centrifuga deve contenere un carico bilanciato per funzionare correttamente. La centrifuga di carichi bilanciati
prolungherà la vita della centrifuga e produrrà risultati migliori. Attenersi alle seguenti regole quando si carica il
rotore.
corrispondere il peso del campione non appaiato e posizionarla di fronte ad esso.
Se deve essere centrifugato un numero dispari di campioni, riempire una provetta con acqua per far
I portaprovette opposti devono essere ugualmente carichi o vuoti o caricati con campioni ugualmente pesati.
Quando si caricano solo 3 provette, devono avere lo stesso peso.
I cestelli possono essere posizionati attorno al rotore in qualsiasi configurazione di carico del rotore mostrata.
Ogni cestello deve essere caricato simmetricamente con le provette come sopra.
Drucker Diagnostics | +1-814-692-7761 | CustomerService@DruckerDiagnostics.com | 67
Page 70

CURA E MANUTENZIONE PREVENTIVA
Con la cura e la manutenzione adeguate, la centrifuga garantirà molti anni di servizio di laboratorio. Per un'adeguata
cura, dovrebbero essere adottate le seguenti misure:
o Centrifugare sempre carichi bilanciati: Assicurarsi di far ruotare sempre un carico bilanciato, come mostrato
nella sezione precedente. Queste centrifughe hanno un esclusivo design di montaggio del motore
controbilanciato che produce un eccellente smorzamento delle vibrazioni. Tuttavia, i carichi non bilanciati
possono rompere le provette di vetro e possono produrre risultati di separazione insoddisfacenti. Un corretto
bilanciamento del carico migliorerà la separazione del campione e prolungherà la vita della centrifuga.
o Manutenzione elettrica e del motore: per queste centrifughe sono stati selezionati componenti elettrici della
più alta qualità, che non dovrebbero aver bisogno di manutenzione o servizio per tutta la durata della
centrifuga.
o Sostituzione del portaprovette: Si consiglia di sostituire i portaprovette dopo 24 mesi di utilizzo. Ispezionare
regolarmente i portaprovette per individuare eventuali crepe. Se vengono individuate delle crepe, sostituirli
immediatamente.
o Rimuovere gli accessori prima degli spostamenti: Tutti i portaprovette, i campioni e i tappi devono essere
rimossi dalla camera del rotore prima di trasportare o mettere via la centrifuga per evitare danni e lesioni.
PULIZIA E DISINFEZIONE
Per prolungare la vita della centrifuga, si consiglia la pulizia e la disinfezione ogni sei mesi o ogni volta che si verifica
una fuoriuscita o una rottura di una provetta. I contaminanti devono essere rimossi immediatamente altrimenti si
potrebbe incorrere in corrosione e degradamento prematuro dei componenti. Prima di utilizzare metodi di pulizia
o decontaminazione diversi da quelli raccomandati dal produttore, gli utenti dovrebbero verificare con il
produttore che il metodo proposto non danneggi l'apparecchiatura.
o Scollegare la centrifuga prima di pulirla.
o Utilizzare i dispositivi di protezione individuale adeguati (DPI).
o Applicare soluzioni detergenti con un asciugamano o un panno. Non immergere la centrifuga in acqua o altre
soluzioni di pulizia poiché ciò potrebbe causare danni e invalidare la garanzia.
o Usare SOLO alcool isopropilico o una soluzione di candeggina al 10% (5500 PPM) per disinfettare la centrifuga e
i suoi accessori.
o Tutte le superfici devono essere asciugate immediatamente dopo la pulizia e la disinfezione.
SI SCONSIGLIA L’USO DI PRODOTTI GERMICIDI TBQ IN QUANTO POSSONO CAUSARE DANNI ALLA
CENTRIFUGA. PULIRE ACCURATAMENTE DOPO L'USO PER EVITARE DI INVALIDARE LA GARANZIA.
o Idrocarburi, chetoni, esteri, eteri, benzili, etilbenzeni completamente/parzialmente alogenati e tutti gli altri
prodotti chimici non prescritti dal produttore, non devono essere utilizzati in quanto possono causare danni alla
camera del rotore, al rotore, ai portaprovette, agli accessori e all’esterno della centrifuga e annullare la garanzia.
Drucker Diagnostics | +1-814-692-7761 | CustomerService@DruckerDiagnostics.com | 68
Page 71

La centrifuga non funziona
o Verificare che la centrifuga sia alimentata. Una delle luci a LED
l'assistenza clienti.
Il rotore non gira liberamente
o Assicurarsi che nulla sia caduto nella camera del rotore,
assistenza.
La centrifuga emette un rumore
o Arrestare la centrifuga. Aprire il coperchio.
per ulteriore assistenza.
Rumore o vibrazione eccessivi quando la
o
La centrifuga si arresta ed emette un
Il carico non è bilanciato. Premere il pulsante SBLOCCA, aprire il
La centrifuga è bloccata su una delle
La selezione del ciclo è bloccata. Premere il pulsante SBLOCCA per
Il tempo e la velocità del ciclo non sono
Controllare le impostazioni seguendo le istruzioni nella sezione
RISOLUZIONE DEI PROBLEMI
NOTE: Il fermo deve essere ruotato completamente in senso orario fino alla sua posizione di arresto affinché la
centrifuga funzioni.
dovrebbe essere accesa.
o Assicurarsi che il fermo del coperchio sia ruotato
completamente in senso orario nella sua posizione di arresto.
o Se la centrifuga continua a non funzionare, contattare
seguendo la procedura di cui sopra.
o Se nulla ostruisce il rotore, questo potrebbe essere
danneggiato. Contattare il servizio clienti per ulteriore
tintinnante durante la corsa
centrifuga è in funzione
segnale acustico continuo
impostazioni
o Indossare DPI, rimuovere provette e portaprovette/cestelli e
cercare oggetti caduti o detriti. Raggiungere con cautela
l'interno della camera del rotore con uno strumento per
rimuoverli.
o Controllare se il rotore, i portaprovette o i cestelli sono
danneggiati.
o Se i portaprovette o i cestelli presentano danni, anche lievi,
smaltirli in modo sicuro e sostituirli.
o Se il rotore appare danneggiato, contattare il servizio clienti
o Verificare che tutti e quattro i piedini della centrifuga siano
correttamente posizionati su una superficie piana.
o Assicurarsi che il carico sia bilanciato secondo le istruzioni nella
sezione “Bilanciamento dei carichi” di questo manuale.
Assicurarsi che nulla sia caduto nella camera del rotore.
coperchio e bilanciare il carico come consigliato altrove in questo
manuale.
5 secondi.
impostati sul valore desiderato
Drucker Diagnostics | +1-814-692-7761 | CustomerService@DruckerDiagnostics.com | 69
Modifica delle impostazioni del ciclo. Se l’impostazione predefinita
non corrisponde con la lunghezza desiderata, seguire la procedura
sulla stessa pagina per modificare il tempo preimpostato.
Page 72

La centrifuga non si sblocca al termine di
o Attendere fino a quando il rotore si è fermato completamente.
ulteriore assistenza.
Il coperchio non si apre
o Assicurarsi che la manopola del coperchio sia girata
assistenza.
Un rumore a scatti diventa rumoroso
Il coperchio non sta alzato
o Stringere la vite centrale sulla cerniera del coperchio.
una corsa
durante la fase di arresto
Se la manopola del coperchio non può ancora essere ruotata,
premere il pulsante SBLOCCA e riprovare.
o Se nessuna luce a LED è accesa,
l'unità non è alimentata e il
coperchio non si sblocca con i mezzi
convenzionali. Rimuovere l'etichetta
del fermo e utilizzare una penna per
disinnestare manualmente il
meccanismo di blocco. Tirare il
meccanismo verso il pannello di
controllo e quindi sbloccare il coperchio e aprirlo.
o Se l’unità è danneggiata, contattare il servizio clienti per
completamente in senso antiorario.
o Se la manopola non può essere ruotata in senso antiorario,
ruotarla completamente in senso orario, premere SBLOCCA e
girare in senso antiorario.
o Se dopo di ciò il coperchio rimane bloccato, potrebbe essere
stata danneggiata l'elettronica. Contattare il servizio clienti per
o Assicurarsi che la vite al centro del rotore sia stretta.
Drucker Diagnostics | +1-814-692-7761 | CustomerService@DruckerDiagnostics.com | 70
Page 73

Tempo del ciclo (in
In centimetri:
In pollici:
Raggio
6” (15,3 cm)
SPECIFICHE GENERALI
Il rotore e gli accessori sono classificati per la massima frequenza di rotazione indicata nella tabella seguente.
Capacità delle provette 24 provette (3-6 mL)
6 provette (60 mL)
Dimensioni (L x H x P)
Peso 39 lb. (17 kg)
Livello audio 59 dB A
Condizioni ambientali 16 – 32° C
Voltaggio 95 -253 VAC
Frequenza 50/60 Hz
Requisiti di potenza 280 Watt
Motore centrifuga ½ H.P. Brushless
Minuti)
Velocità massima 2.500 giri/min
15” x 17” x 9”
(38 cm x 43 cm x 23 cm)
1-30 (+/- 2%)
CALCOLARE LA FORZA G
Le istruzioni d’uso dei produttori di provette raccomandano cicli con una forza g minima, che può essere calcolata
se si conoscono il numero di giri al minuto e il raggio. Utilizzare la formula di seguito o visitare il sito
www.druckerdiagnostics.com/g-force-calculator/
RCF o forza g = 0,00001118 x
Raggio del rotore (cm) x (giri/min)
Drucker Diagnostics | +1-814-692-7761 | CustomerService@DruckerDiagnostics.com | 71
.
2
RCF o forza g = 0,0000284 x
Raggio del rotore (pollici) x (giri/min)
2
Page 74

Compatibilità
Famiglia di prodotti: HORIZON (HORIZON 24-AH, 24-AV)
Conforme a UL61010-1 / CSA C22.2 N. 61010-1 e IEC61010-2-020
Protetto dai brevetti statunitensi n. 6.811.531, n. 7.422.554, n. D718.463 e n. D734.489. In attesa di ulteriori brevetti
APPROVAZIONI FDA
RoHS
ISTRUZIONI PER LO SMALTIMENTO DEI RAEE PER UTENTI NELL'UNIONE EUROPEA
Questo prodotto non deve essere smaltito con altri rifiuti. Invece, l’utente è responsabile dello
smaltimento delle proprie apparecchiature di scarto consegnandole a un punto di raccolta
designato per il riciclaggio di rifiuti elettrici ed elettronici. La raccolta differenziata e il riciclaggio
di tali rifiuti al momento dello smaltimento contribuiranno a conservare le risorse naturali e a
garantire che vengano riciclate in modo da proteggere la salute umana e l'ambiente. Per ulteriori
informazioni su dove è possibile consegnare il materiale di scarto per il riciclaggio, contattare
l'ufficio comunale locale, il servizio di smaltimento rifiuti o il punto vendita in cui è stato
acquistato il prodotto.
200 SHADY LANE, SUITE 170 – PHILIPSBURG, PA 16866, USA
+1-877-231-3115
CUSTOMERSERVICE@DRUCKERDIAGNOSTICS.COM
DRUCKERDIAGNOSTICS.COM
(SOLO USA) - +1-814-692-7661
Drucker Diagnostics | +1-814-692-7761 | CustomerService@DruckerDiagnostics.com | 72
 Loading...