

Page 1
Operator’s Manual
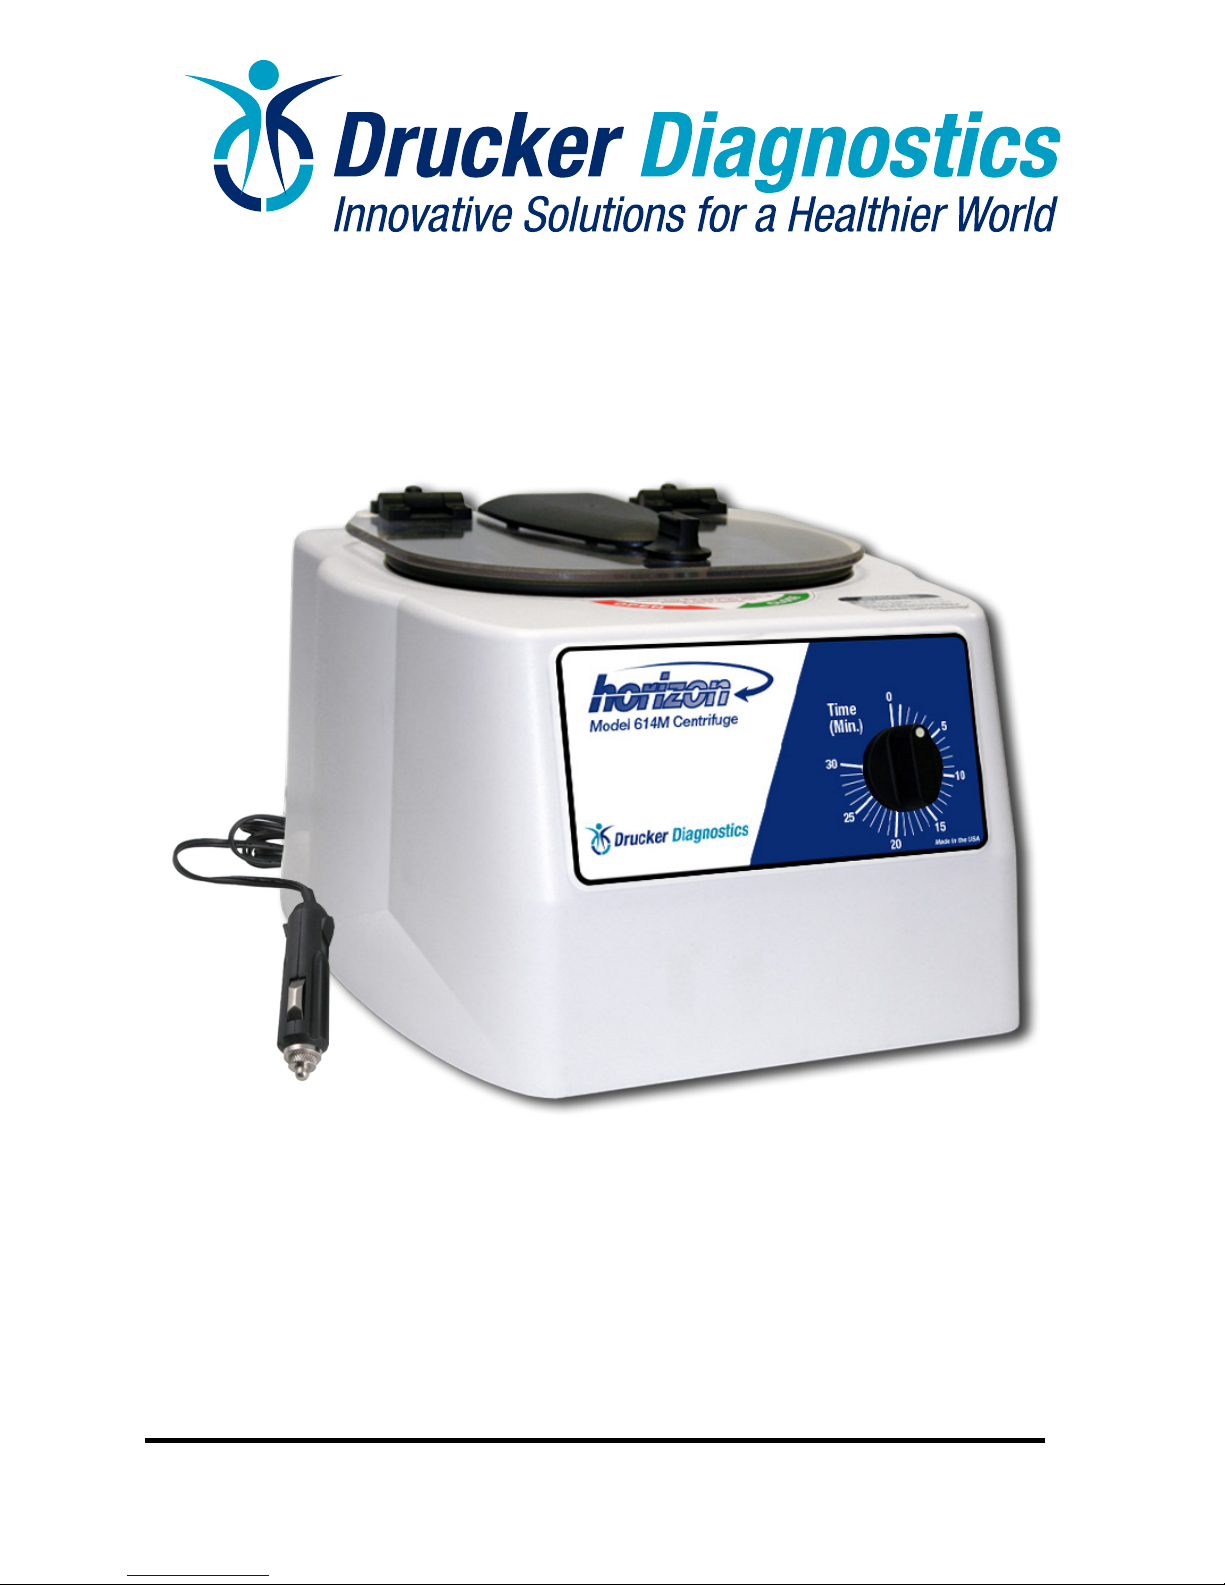
Model 614M • 12VDC Mobile Laboratory Centrifuge
P/N 03-0-0002-0105 Rev. B
Page 2

Model Description:
The Model 614M is a 12VDC continuous-duty, electronically-controlled xed-angle
centrifuge intended for mobile applications where the Vehicle has a 12VDC power
supply (cigarette lighter). The unit is controlled by a mechanical timer settable from 1
to 30 minutes. Samples can be safely viewed through the transparent lid. In the event
that the lid is opened during a run, the power to the motor is disconnected.
For warranty information, turn to page 12.
Intended Use:
This centrifuge is an IVD accessory, and therefore subject to the former EU IVD
Directive 98/79/EC and the current EU IVD Regulation 2017/746. It is a laboratory
product designed to separate components by generation of relative centrifugal force.
It separates human and animal samples – such as blood, urine and other body uids
-- collected in appropriate specimen receptacles, either alone or with reagents or other
additives. As a general purpose laboratory centrifuge, it is designed to also run other
containers lled with chemicals (non-ammable, non-explosive, non-volatile, and non-
highly reactive only), environmental samples, and other non-human body samples.
This centrifuge should be operated by trained personnel only. Any use other than
those intended by the Manufacturer is explicitly prohibited. [Maximum sample density
is 1.15 grams/mL].
Supplied Equipment:
The following items come standard with each Model 614M centrifuge:
1. One (1) six-place xed-angle rotor
2. Six (6) 125 mm tube holders
3. Six (6) 75/100 mm tube holders
WARNING: Use universal precautions when
handling laboratory specimens. All human specimens
of blood, blood compounds, or bo–dily uids are
potentially biohazardous and may contain hepatitis
B virus, hepatitis C virus, human immunodeciency
virus or other disease causing agents. For the safety of
both the operator and service personnel, care should
be taken when handling substances that are known to
be toxic, radioactive, or contaminated with pathogenic
microorganisms when using this centrifuge. When
Risk Group II materials are used
(As identied in the World Health Organization
“Laboratory Bio-Safety Manual”) the use of a Bio-Seal
should be employed. More than one level of protection
must be provided in the case of materials of a higher
group. The use of ammable or explosive materials
as well as those materials which chemically react
vigorously is prohibited. Any use of the equipment in a
manner not specied in these instructions may impair
the level protection provided by the equipment.
Table of Contents
Model Description ............................... pg. 2
Intended Use ....................................... pg. 2
Supplied Equipment ............................ pg. 2
Technical Specications ...................... pg. 3
Initial Setup Procedure ........................ pg. 3
Front Panel Controls ........................... pg. 4
Operation ............................................ pg. 5
Tube Holder Congurations ................ pg. 6
Rotor Removal and Installation ........... pg. 7
Care and Maintenance ........................ pg. 7
Cleaning and Disinfection ................... pg. 8
Troubleshooting ................................... pg. 9
Safety .................................................. pg. 10
Emergency Rotor Chamber Entry ....... pg. 10
Calibration and Ground Testing ........... pg. 11
Replacement Parts .............................. pg. 12
Available Accessories ......................... pg. 12
p/n 7786047
p/n 7713032
p/n 7713079
The rotor and rotor accessories are rated for a rotation frequency of 4,000 RPM.
Page 2
Page 3

Page 3
Initial Setup Procedure:
If any problems are found during the initial setup procedure, refer
to the troubleshooting section on page 9. For further assistance,
contact Drucker Diagnostics at 814-342-6205 or 814-692-7661.
1. Plug the power cord into the automobile’s 12V accessory outlet.
2. Turn the latch counter–clockwise and open the lid.
3. Spin the rotor by hand; check for free and level rotation.
4. Close the lid. Rotate the lid knob clockwise to its complete stop position.
5. Turn the centrifuge on by turning the timer to 10 minutes.
6. Listen to the centrifuge. A smooth whirring sound should be heard.
After the centrifuge has passed this procedure it is ready for operation.
Technical Specications:
General Specications for the Model 614M Centrifuge
Voltage: ................................................ 13.8V DC
Power: ................................................. 100 Watts
Maximum load: .................................... 6 x 15mL
Maximum Sample Density: .................. 1.15 grams / mL
Nominal Speed (125 mm holders): ...... 3,750 (± 175) RPM
Nominal RCF (125 mm holders): ......... 1,700 xg
Nominal Speed (75/100 mm holders): . 3,850 (± 175) RPM
Nominal RCF (75/100 mm holders): .... 1,450 xg
Environmental Conditions for Use:
- For In-vehicle / Indoors only
- Ambient temperature: ........................ 2°C - 35°C
- Humidity: ........................................... 90% Max
Noise: .................................................. ≤ 65 dB(A)
Dimensions:
- Height: ............................................... 8.75 in (22 cm)
- Width: ................................................ 11.75 in (30 cm)
- Depth: ................................................ 14.00 in (35 cm)
Weight: ................................................ Approximately 12 lbs. (5.4 kg)
Any use other than those specied by the Manufacturer is explicitly prohibited.
* Maximum sample density is 1.15 grams / mL, (water density = 1.0 grams / mL)
Page 4

Page 4
This page was left intentionally blank
Page 5

Page 5
Operation:
NOTE: Follow the initial setup procedure on page 3 before initial operation.
a) If any problems are found during the initial setup procedure, refer to the
troubleshooting section.
b) Plug the power cord into the automobile’s 12V accessory outlet.
c) Turn the latch counterclockwise and open the lid.
d) Spin the rotor by hand; check for smooth rotation free from excessive wobble.
e) Place six test tube holders (supplied) of the same type inside the rotor (as
shown to the right), and verify that they are seated properly.
f) Close the lid. Rotate the lid knob clockwise to its stop position.
g) Start a centrifugation cycle by rotating the timer knob.
h) Listen to the sound of the centrifuge. A smooth whirring sound should be heard.
Page 6

Page 6
Tube Holder Congurations:
The xed-angle rotor that came with your Model 614M is capable of spinning test tubes
up to 17 mm x 125 mm. Use the following chart and drawing to determine which tube
holder and cushion combination should be used with your application.
DIRECTIONS:
1. Compare the tube to be spun with the four boxes shown below.
2. Find the box that most closely matches the tube’s length. NOTE: The
tube length with its stopper or cap must be shorter then the chosen
box or the tube will not t properly in the tube holder.
3. Match the letter from the chosen box with one of the congurations shown.
B.
C.
D.
A.
D.
A.
75/100
mm
Tube
Holder
75/100
mm
Tube
Holder
with
1525
cushion*
125 mm
Tube
Holder
B & C
For Example: A tube is found to be as long as box B. Accordingly, we can
use a 125 mm tube holder with a 1525 cushion or a 75/100 mm tube holder
with no cushion, (conguration B).
* This part is available as an accessory. Contact Drucker Diagnostics for assistance.
Page 7

Page 7
Installation and Removal of the Rotor:
a) The rotor is secured with a single nut, visible with the lid open. The nut is
located in the center of the rotor.
b) Use a 1/2” nut driver to loosen the nut (turn counter-clockwise).
c) Lift the rotor straight up and out of the rotor chamber.
To install the rotor, reverse steps A and B above.
d) Take care to align the hub splines with the rotor hub.
e) Tighten the rotor nut by hand with a ½” nut driver until snug. One full
thread showing above the nut is a good indicator of proper installation.
a) Centrifuging balanced loads will extend the life of the centrifuge and
produce better results.
b) Opposing tube holders must be identical and must contain the same
cushion or none at all.
c) Opposing tube holders must be empty or loaded with equally weighted
samples.
d) If an odd number of samples is to be spun, ll a tube with water to match
the weight of the unpaired sample and place it across from this sample.
Care and Preventative Maintenance:
With proper care and maintenance your centrifuge will provide years of laboratory
service. For proper care, the following steps should be taken:
1. Provide Adequate Ventilation: For cooling purposes, the Model 614M draws in
ambient air through the air intake cover on the top of the lid and exhausts
this air in the rear of the base. The centrifuge should be placed on a hard
smooth surface for good air circulation.
2. Always Spin Balanced Loads: Make certain that you are always spinning a
balanced load. The Model 614M has been designed to provide excellent
vibration dampening. However, out–of–balance loads may break
glass test tubes and may produce unsatisfactory separation results.
Proper load balancing will improve sample separation and extend the life of
the centrifuge.Use the following rules when loading the rotor.
3. Keep the Tube Holders Clean: NOTE: Always follow the safety guidelines of
your laboratory to properly clean up and/or dispose of materials in the event
that a substance known to be potentially toxic, radioactive or contaminated
with a pathogenic microorganism is spilt in or on the centrifuge. Small glass
fragments left in the tube holder after a tube breakage may adhere to
the next test tube inserted in that holder. When this tube is handled, these
fragments may puncture protective gloves and lacerate the operator’s
ngers or hand. Remaining fragments may provide stress points on
subsequent tubes and result in additional breakage. If a tube breakage
occurs, carefully remove the tube holder. Properly dispose of the sample
and tube fragments and thoroughly clean both the inside and outside of the
tube holder. Insert a new tube cushion (if necessary) and replace the tube
holder in the rotor.
Page 8

Cleaning and Disinfection:
To prolong the life of the centrifuge cleaning and disinfection is recommended every
six months, or whenever there is a spillage or tube breakage. Contaminants must be
removed immediately, or corrosion and premature degradation of components can
occur.
a) Unplug the centrifuge before cleaning.
b) Autoclaving of any component of the centrifuge is prohibited.
c) Apply cleaning solutions with a towel or cloth. Do not submerge the centrifuge
in water or other cleaning solutions as this will cause damage and void the
warranty.
d) ONLY isopropyl alcohol, soap and water, or a 10% (5500 PPM) bleach solution
should be used for cleaning and disinfection of the centrifuge and accessories.
e) All surfaces must be dried immediately after cleaning and disinfecting.
f) TBQ Germicidal products shall not be used, as they will cause damage to the
centrifuge and void the warranty.
g) The use of fully/partially halogenated hydrocarbons, ketones, esters, ethers,
benzyls, ethyl benzenes, and all other chemicals not prescribed by the
manufacturer shall not be used as they may cause damage to the rotor
chamber, rotor, tube holders, accessories and centrifuge exterior and void the
warranty.
h) It may be necessary to remove the rotor and clean the rotor chamber. Refer to
the Installation and removal of the rotor section of this manual.
4. Motor and Electrical Maintenance: The Model 614M motor should not
need servicing for the life of the centrifuge. The electrical components are
selected for high reliability and should not need service.
5. Tube Holder Replacement: It is recommended that the tube holders be
replaced after 24 months of use. Inspect tube holders regularly for cracks. If
cracks are discovered, replace immediately.
Page 8
Page 9

Page 9
Problem:
The rotor does not spin freely.
Solutions: – Make sure nothing has fallen into the rotor chamber.
– If there is nothing obstructing the rotor, the rotor may be damaged
Contact Drucker Diagnostics for further assistance.
Problem: Excessive noise when the centrifuge is running.
Solutions: – Check to see that the load is balanced.
– Make sure that nothing has fallen into the rotor chamber.
– Make sure that the nut in the center of the rotor is tight.
– Have a technician test the motor and replace it if necessary.
Problem: The centrifuge does not run.
Solutions: – Check the electrical outlet.
– Make sure the lid latch is turned completely clockwise to its stop
position. When the lid is closed properly, the latch light on the control
panel will illuminate.
– Check the fuse in the end of the power cord. If the lament is broken,
the fuse has blown and must be replaced with a fuse of the same
type and rating. Contact Drucker Diagnostics for further assistance.
Troubleshooting:
NOTE:
The latch must be turned completely clockwise to its stop position in order
for the centrifuge to operate.
For servicing information or additional technical support, contact
Drucker Diagnostics at 814-342-6205 or 814-692-7661.
1.
2.
3.
Page 10

Safety:
- The centrifuge should be placed on a stable, at surface.
- Before using the centrifuge, check the rotor. Do not operate the centrifuge if
the rotor is loose, or does not rotate freely.
- Rotors and accessories that show evidence of damage or corrosion or are to
be taken out of service.
- The centrifuge must be taken out of service if safety related damages are
found in the rotor chamber.
- Do not open the lid until the rotor has come to a complete stop.
- For use only on smooth level surfaces, or approved centrifuge stands.
- Do not move the centrifuge while it is plugged in or running.
- Do not operate the centrifuge in a moving automobile.
Lid Safety Switch:
The lid is secured to the top of the cabinet by a latching knob and pawl system.
When the knob is rotated clockwise, the pawl grips the underside of the cabinet
opening and prevents the lid from opening. A mechanical stop positions the
pawl and prevents it from rotating completely. When rotated to the stop position,
the pawl makes contact with a switch that is mounted underneath the cabinet
top. This “lid safety switch” prevents the centrifuge from operating while the lid
is open.
Over Current Protection:
The centrifuge is provides protection from overcurrents with a fused power cord.
In the event of an overcurrent condition, the fuse will blow - cutting power to the
centrifuge, while protecting the internal electronics.
Page 10
Page 11

Page 11
Calibration and Earth Ground Testing:
It is recommended that the top speed, ground continuity and line leakage be
tested every two years for continued safe operation. Contact Drucker Diagnostics for further information or testing availability.
Transportation:
During transportation, accessories can become dislodged from the rotor and
fall into the rotor chamber where they can remain unnoticed.
Before transporting the centrifuge in a vehicle; make certain that the centri-
fuge is secured suciently to prevent shifting sliding or rolling, and that there
are no tube holders or accessories in the rotor or rotor chamber.
Notes on Repaired Centrifuges:
For verication of the safe state of the centrifuge following factory service or
repair, refer to the date on the calibration label (located on the back of the
centrifuge). This is the date that the repaired centrifuge was last factory tested and calibrated. For additional servicing information and technical support,
contact Drucker Diagnostics or your authorized distributer.
Disposal:
This device is labeled with the WEEE symbol (a crossed out “waste bin”). The
nal user should not discard this product along with other household waste. It
should be collected and treated separately.
Replacement Parts:
Part No. Description
7724037 Foot, rubber
7751068 Switch, lid safety
7786047 Rotor, six-place, xed angle
7760016 Power Cord
7735054 Motor
7751079 Fuse
7714101 Pawl, latch, lid
7714103 Knob, latch, lid
7724071 Hinge, friction
7732018 Seal, lid gasket
7713079 Shield for 75/100 mm tubes
7713032 125 mm tube holders
02-002-1-0011 Lid Assembly
Page 12

Available Accessories:
Shield caps
p/n 7713011
1” Tube cushion
p/n 1525
Made in the USA by
0.5 to 1 mL
Tube Adapter
p/n 7713068
13 x 75 mm Insert
p/n 7713064
13 x 100 mm Insert
p/n 7713066
SmartView™ Platform
p/n 00-079-009-001
1.5 to 2 mL
Tube Adapter
p/n 7713065
200 Shady Lane, Suite 170 • Philipsburg, PA 16866
+1-866-265-1486 (U.S. only) or +1-814-692-7661 • Fax: 814-692-7662
www.druckerdiagnostics.com
WARRANTY:
Drucker Diagnostics warranties that this centrifuge is free from
defects in workmanship and parts for 2 years.
0.25” Tube cushion
p/n 9150
Protected by U.S. Patents #6,811,531, #D718,463 & #D734,489
Other Patents Pending
 Loading...