

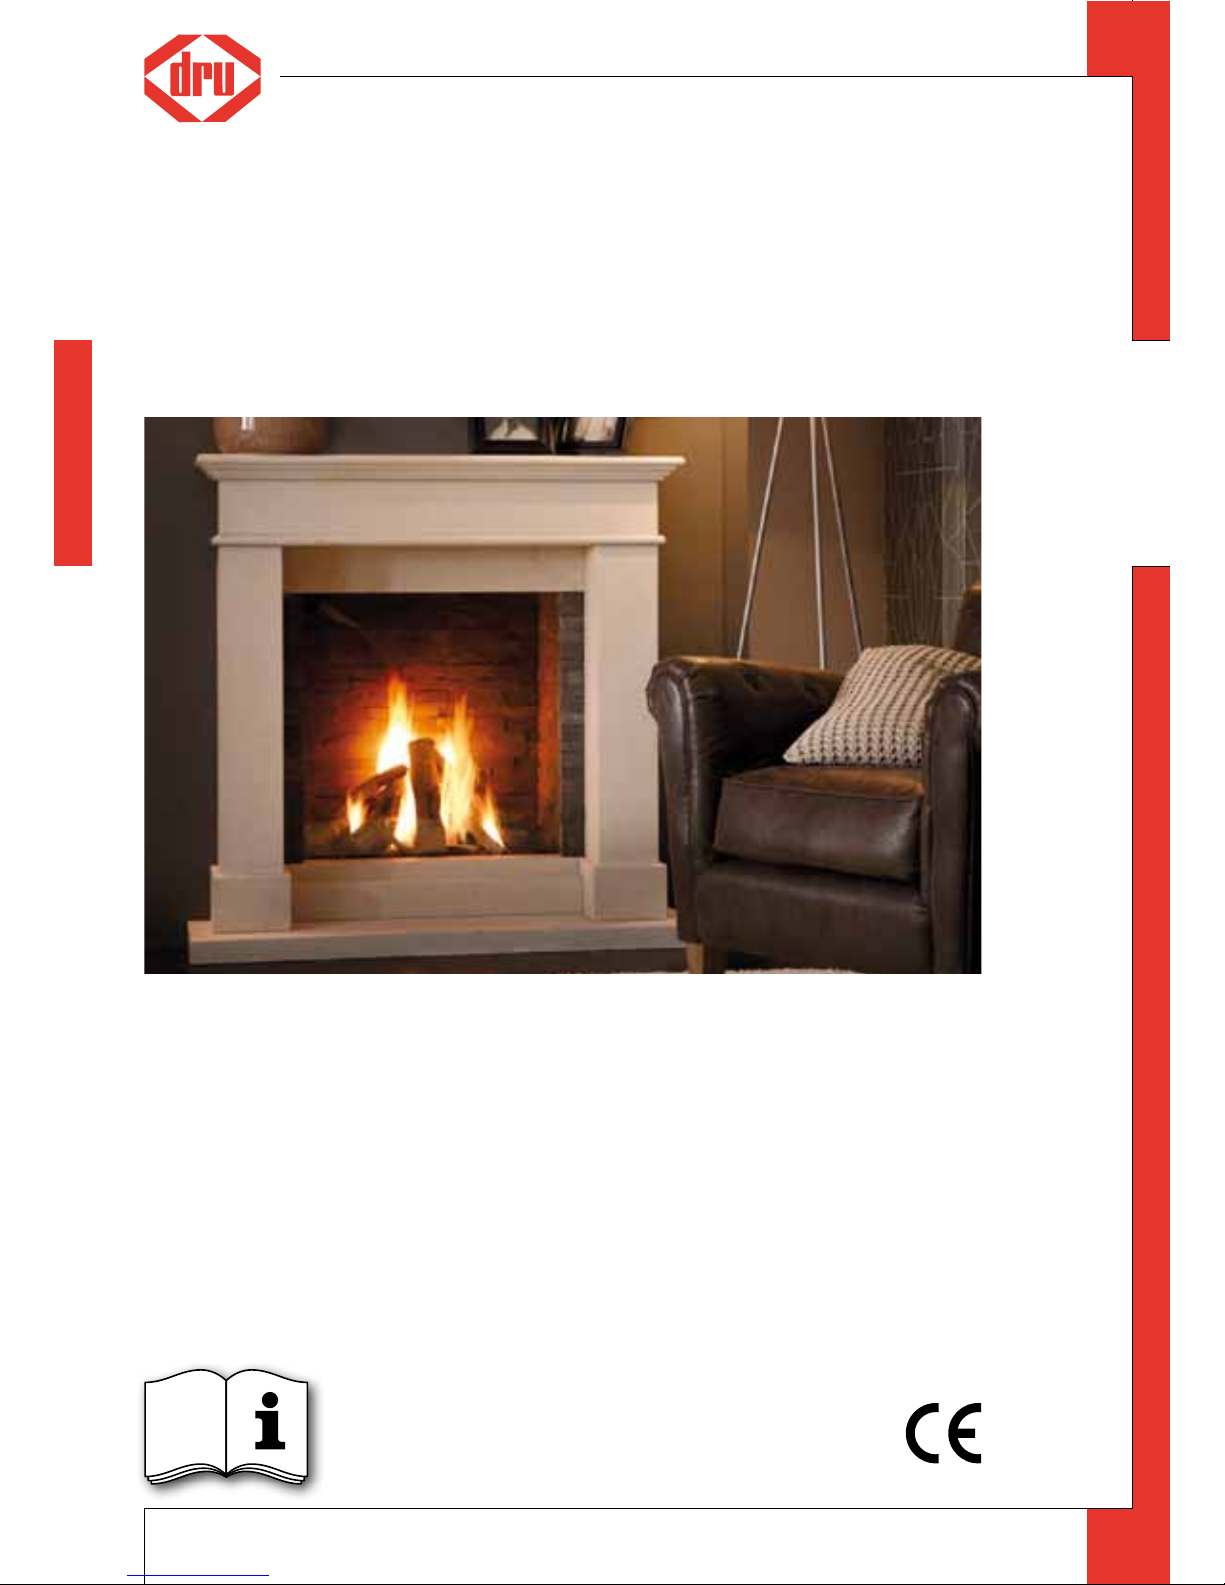
Dru Room-sealed atmospheric gas-fired heating appliance User Manual
1
English
Read this document and store it carefully
User manual (GB / IE)
for appliances supplied with a Honeywell remote control
1
958.016.03.
uk
UK

2
o p e r at i n g i n s t r u c t i o n s
English
Contents
page
Preface 3
1. Introduction 4
2. SAFETY 4
2.1 General 4
2.2 Precautions / safety instructions 4
3. Taking the appliance in operation 5
3.1 For the first time 5
3.2 Protection 5
3.3 Discoloration of walls and ceilings 6
4. Radiographic remote control 6
4.1 Flame Symbol 6
4.2 Batteries 6
4.3 Receiver 7
5. Time and day 7
6. Operation 8
6.1 Manual Operation 8
6.2 Temperature control 10
6.3 Alternative operation 10
7. Time Schedule 11
7.1 Temporarily changing the temperature set point 11
7.2 Temporarily interrupting the time schedule 11
8. User Menu 12
8.1 Eco wave 12
8.2 Switch contact (if applicable) 13
8.3 Omnivent (if applicable) 13
8.4 Manually or Time Schedule 13
8.5 Setting Time and Day 14
8.6 Setting the Time Schedule 14
9. Installation Menu 15
9.1 12- or 24-hours time representation 15
9.2 Time schedule 15
9.3 Day Time Periods 16
9.4 Selection settings Eco-wave, Switch contact and Omnivent 16
10. Receiving Sensitivity 16
11. Replacing the Batteries 17
12. Troubleshooter 18
13. Maintenance 18
13.1 Cleaning the glass pane 19
14. Environment 20
14.1 General 20
14.2 Appliance 20
15. Warranty 20
Appendix 1: Display and keys 21
Appendix 2: Display 22
UK

3
o p e r at i n g i n s t r u c t i o n s
English
Preface
DRU develops and produces products that comply with the highest quality,
performance and safety requirements.
This will enable you to enjoy using this product for many years to come.
The appliance is provided with a CE mark. Gas-fired appliances that comply
with the requirements for safety, environment and energy consumption (the
so-called essential requirements) of the European gas appliance directive, are
entitled to carry the CE mark.
Your appliance should be installed and maintained by a competent installer.
Two manuals are supplied with the appliance: the installation manual and the
user manual.
The user manual will give you the information you need to operate the appliance properly and safely.
Carefully read this user manual prior to using the appliance.
Keep the user manual AND the installation manual in a safe place.
As a user you are only entitled to perform the work described in the user
manual. Any other work requires a competent installer.
In case of questions or doubts, please contact your installer.
The following symbols are used in the user manual to indicate important
information:
➠
Work to be performed
!Tip
Suggestions and recommendations
!Caution
You will need these instructions to prevent problems that might occur during
use
!Caution
You need these instructions to prevent re, personal injury or other serious
damages
UK

4
o p e r at i n g i n s t r u c t i o n s
English
1. Introduction
Your appliance is a room-sealed atmospheric gas-fired heating appliance. A
room-sealed appliance does not extract the combustion air from the living
environment, but from outside. This is done by means of a combined flue gas
discharge system / combustion air supply system. This system can be installed through the wall or through the roof. If necessary, the appliance will be
built in a chimney breast. A chimney breast must always be ventilated in order
to be able to discharge heat properly.
2. SAFETY
2.1 General
!Caution
- Carefully read this chapter on safety;
- Observe the precautions/instructions in this manual.
2.2 Precautions / safety instructions
Carefully observe the following precautions/regulations:
➠
your appliance should be installed and maintained by a competent installer;
➠
do not make any changes to the appliance yourself;
➠
have your appliance maintained for at least 1x per year;
➠
close the gas tap if the appliance ignites with a pop sound and/or poorly and
contact the installer;
➠
close the gas tap in case of malfunctions and/or poor performance of the appli-
ance, contact the installer and make sure there is no voltage on the appliance;
➠
If the appliance does not ignite after three restarts and enters hard lockout, it may
never be reset by disconnecting it from the power supply. Ask your dealer/installer
what you should do.
➠
In case of a broken or torn glass pane, do not use the appliance and close the gas
tap. Have the glass pane replaced immediately;
➠
make sure that combustible objects and/or materials such as curtains have a
distance from the appliance and/or the ues of at least 50 cm;
➠
do not dry clothes, towels etc. on and/or near the appliance, in order to prevent
re;
➠
avoid contact with hot parts of the appliance to prevent burns;
➠
do not leave children and persons who cannot judge the consequences of their
actions alone with a burning appliance;
➠
place the remote control out of reach from children and persons who cannot pro-
perly judge the consequences of their actions;
➠
make sure the control hatch is closed, because of electric voltage;
➠
If the appliance will not be used for an extended period of time, we recommend
removing the batteries from the remote control and receiver. This will prevent damage to the appliance due to leaking batteries.
UK

5
o p e r at i n g i n s t r u c t i o n s
English
!Caution
Appliance is supplied with 230VAC 50Hz.
!Caution
The control of the appliance is provided with strict safety requirements. It is pos-
sible that the burning appliance switches o automatically and immediately switches on again. This is not a malfunction, but a check. From the moment that the
appliance’s control is connected to the power supply, the control will perform this
check every 24 hours. If the appliance is burning at that moment, it will extinguish
and immediately switch on again. If you wish to prevent this, you can remove the
plug and reconnect it, at a time when the appliance never (or hardly ever) burns.
3. Taking the appliance in operation
3.1 For the first time
When using a chimney breast, it has to be dry before you take the appliance
into operation. This is to prevent shrinkage cracks.
!Caution
If the chimney breast is made of stone-like materials or has been nished in stuc-
co, it should be left to dry for at least 6 weeks prior to taking it into operation.
In order to be able to use the wireless remote control, you must set a communication code between the remote control and the receiver, prior to putting
the appliance into operation; for this, see chapter 4.3.1.
When the appliance is stoked up for the first time, an unpleasant smell may
occur as volatile components evaporate from paint, materials, etc. This may
take a number of hours.
!Caution
- Pets and birds in particular can be sensitive to the vapours that are released;
- In the beginning the flame picture is affected by the evaporation of volatile
components.
!Tip
- Set the appliance to its highest level to speed up the evaporation process;
- Keep the room well ventilated;
- Remove pets from the room.
3.2 Protection
To prevent unsafe situations, you should carefully observe the following measures/instructions.
!Caution
- When controlling the appliance with the remote control on thermostat function, or by means of a tablet with app, or a domotics system, the appliance may
be switched on while you are not present. Therefore, please take measures to
prevent damage to goods or persons in such a case;
UK

6
o p e r at i n g i n s t r u c t i o n s
English
- Make sure that combustible objects and/or materials such as curtains have a
distance from the appliance and/or the ues of at least 50 cm;
- Do not dry clothes, towels etc. on and/or near the appliance, in order to
prevent fire;
- Avoid contact with hot parts of the appliance to prevent burns;
- Do not leave children and persons who cannot judge the consequences of
their actions alone with a burning appliance;
- Place the remote control out of reach from children and persons who cannot properly judge the consequences of their actions.
3.3 Discoloration of walls and ceilings
A brown discoloration is an unpleasant and difficult to solve problem. Brown
discoloration can be caused by burning substances as a result of insufficient
ventilation, smoking, burning candles, oil lamps, etc. Cigarette and cigar smoke contain tar substances that are deposited on colder walls.
These problems can be (partly) solved through a proper ventilation of the
room where the appliance is placed.
4. Radiographic remote control
The appliance is supplied with a wireless, radiographic remote control. This
allows you to control the appliance manually, as well as by means of a time
schedule.
The temperature and flame height can be controlled manually; the time schedule will only control the temperature.
The possible time schedules are:
- A time schedule with the same settings for each day.
- A time schedule with separate settings for the week days (Monday to
Friday) and the weekend.
- A time schedule with separate settings for each day.
For each day, two, four or six different time periods can be set.
The time schedule can easily be set by setting the begin time and the temperature set point of each period.
4.1 Flame Symbol
A flame symbol indicates that the burner of your appliance has been switched
on.
4.2 Batteries
Before you can take the remote control in operation, the two supplied ‘penlite’
batteries (type AA) have to be placed. After the batteries have been placed,
UK
7
o p e r at i n g i n s t r u c t i o n s
English
the remote control is ready for manual operation with flame height control. To
save battery life, some time after the last key pressure, the display goes blank,
unless the appliance is switched on.
4.3 Receiver
The receiver is located near the appliance.
4.3.1 Setting the communication code
The remote control will only be able to communicate
with the appliance after the remote control has been
registered at the appliance.
➠
Make sure the voltage of the appliance is not switched
o for longer than 5 minutes.
➠
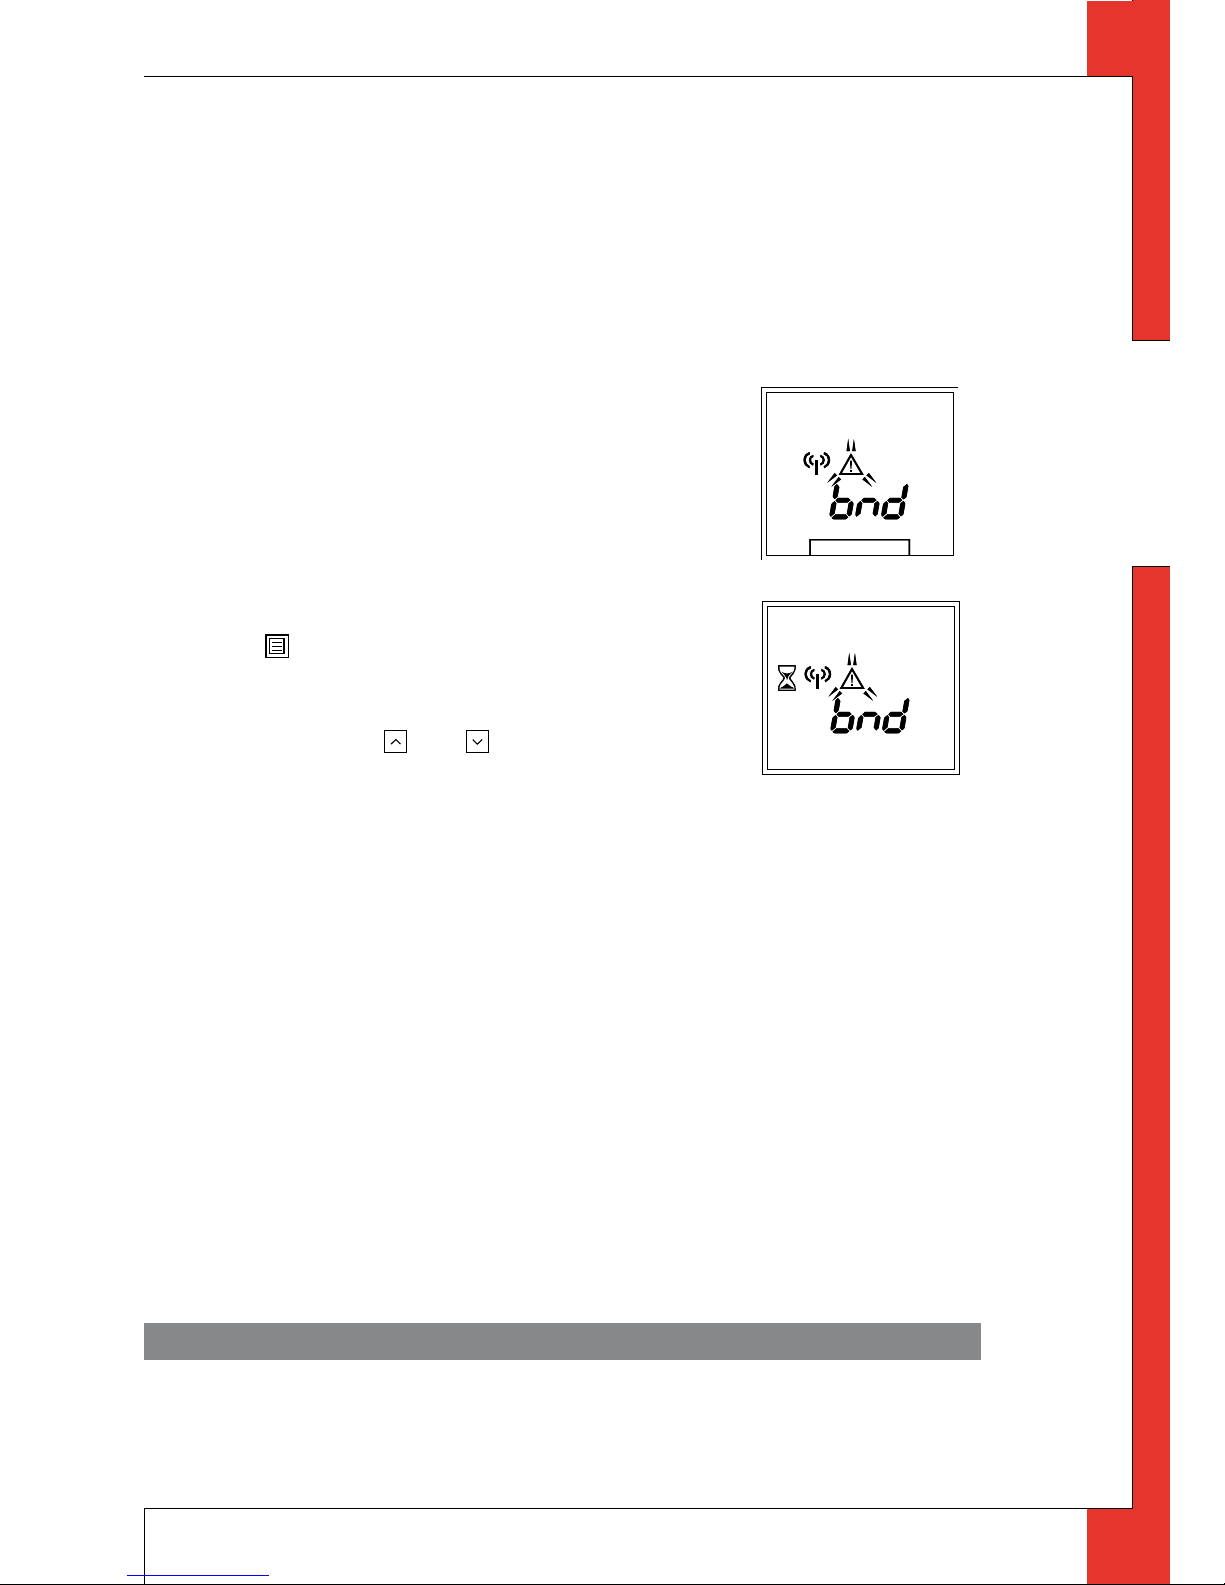
If the remote control does not have the “BND” state,
the following operations must be performed; Press
the
key of the remote control for 10 seconds,
then briefly press the same key a few times until the
display (see fig. 1) appears.
➠
Briey press the and keys simultaneously. The
following display will appear (see g. 2).
As soon as
logging on is finished, the start screen will appear. If logging on failed, a different screen will appear (see fig. 1).
!Caution
Although highly improbable, we cannot rule out that your appliance’s ignition
process can be started unintentionally through other remote controls.
This could be the remote control of your neighbours’ gas heater, but also car
keys and garage door openers.
The result will be that your appliance will burn when you do not want it to.
Unintended ignition of your appliance could be solved/prevented by:
- setting a new communication code between remote control and receiver
- closing the gas tap near your appliance. This is the safest precaution, if the
appliance will not be used for a longer period;
- Observe stated precautions / safety instructions - even if the appliance is
not in use.
5. Time and day
The time schedule of the remote control can only be used if the time has been
set. The time and day can be set in the User Menu, see section 8.2 ‘Setting
Time and Day’. The time representation, 12-hours or 24-hours, can be set in
the Installation Menu, see section 9.1 ‘Choice 12- or 24-Hours Representation’.
1
2
UK
8
o p e r at i n g i n s t r u c t i o n s
English
6. Operation
The remote control is equipped with a display and four keys. Because of this
the appliance can be easily operated and settings easily be adjusted.
There are two setting menus available:
- a User Menu (see chapter 8)
- an Installation Menu (see chapter 9)
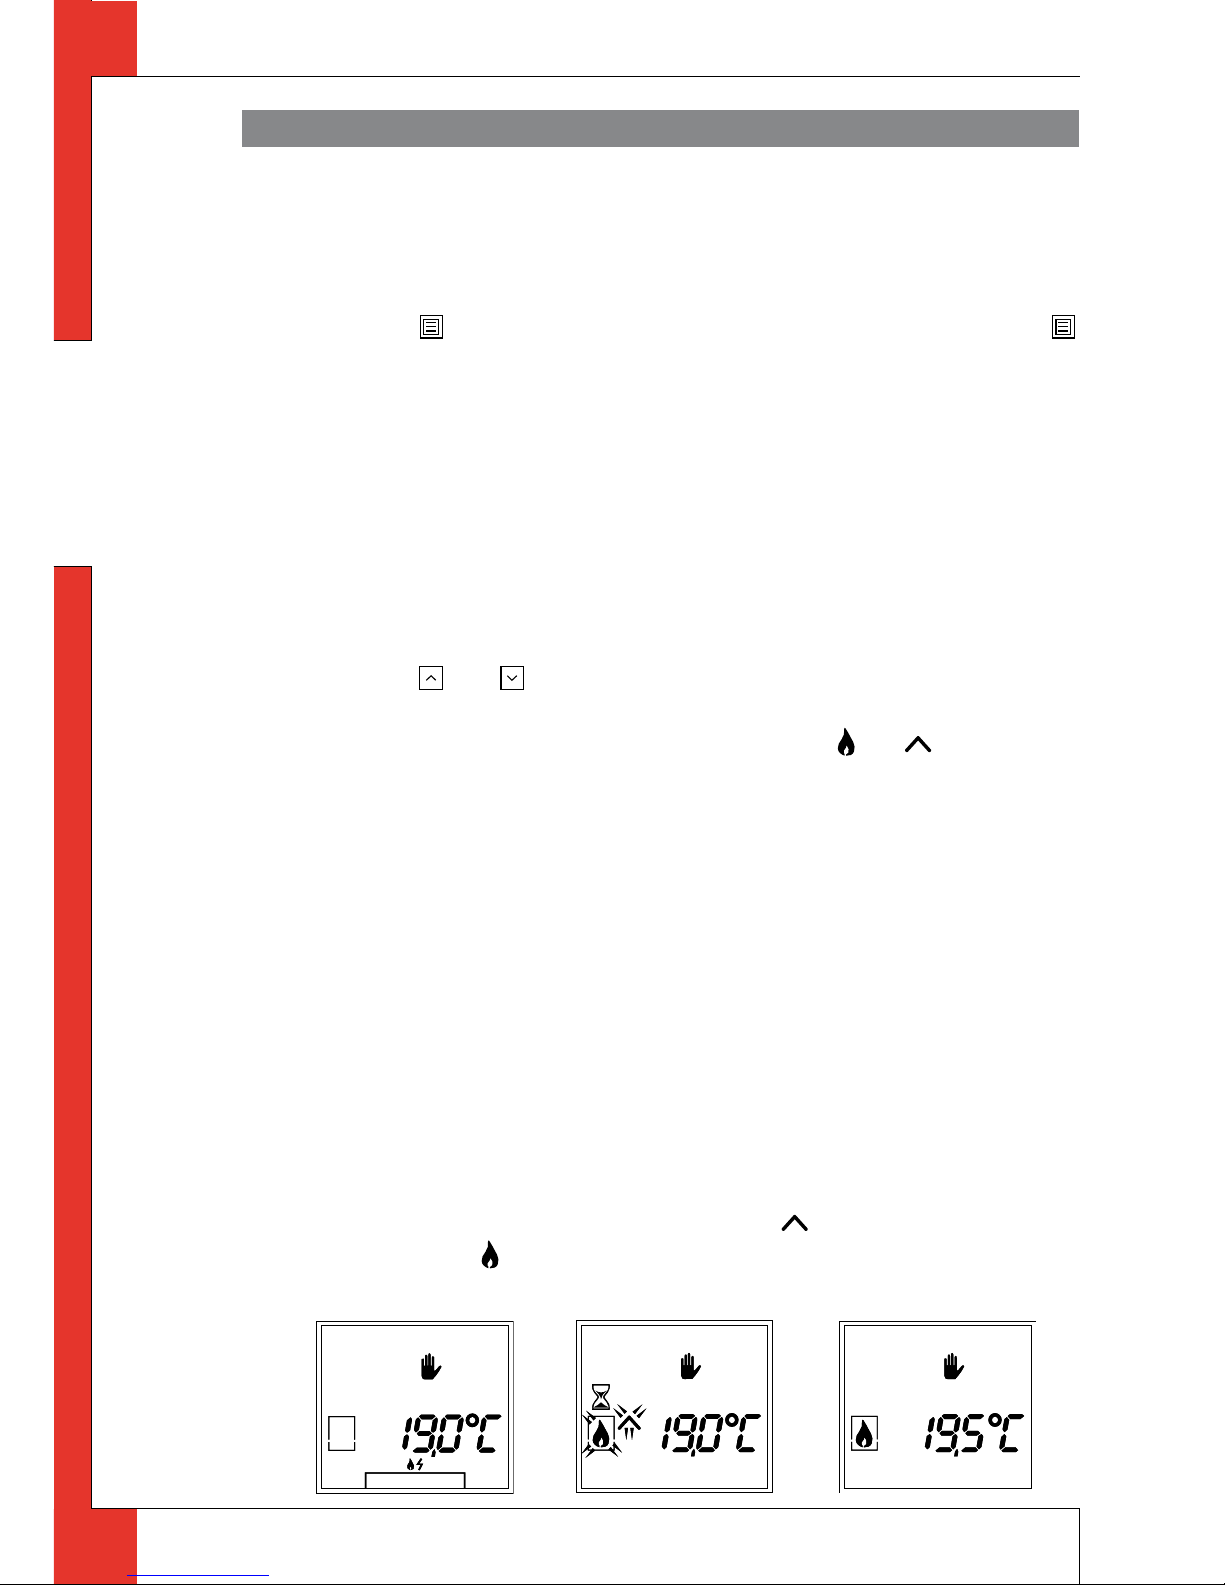
Press key
for at least 2 seconds to select the ‘User Menu’, or keep key
pressed for ten seconds to select the ‘Installation Menu’.
6.1 Manual Operation
Depending on the choice made in the ‘User Menu’, the temperature or the
flame height can be controlled manually.
6.1.1 Flame height control
The appliance must be switched on and off manually.
6.1.2 Igniting the appliance
Press the and keys simultaneously for at least 2 seconds (see fig. 3).
The display shown in figure 4 appears. The symbols
and are flashing to
indicate the appliance is being ignited.
!Caution
If you own a propane appliance, the following applies: wait 3 minutes after swit-
ching o the appliance before restarting it. If you do perform a start-up on the
remote control within those 3 minutes, the start-up symbol will appear in the display (see gure 4). After the 3 minutes have passed, the appliance will ignite after
all.
!Caution
If the appliance does not ignite after three restarts and enters hard lockout, it may
never be reset by disconnecting it from the power supply. Ask your dealer/installer
what you should do.
!Caution
If PowerVent is used, it will take at least 8 seconds before the appliance ignites.
The main burner will be ignited at 50%. The symbol in the display disappears and the
symbol stops flashing. If a flame is detected, the appliance
will switch to full capacity. The second burner is ignited (if applicable).
3 4 5
UK
 Loading...