

Page 1

INSTALLATIEVOORSCHRIFT EN GEBRUIKERSHANDLEIDING NL/BE
INSTRUCTIONS FOR INSTALLATION AND OPERATION GB/IE
INSTALLATIONSVORSCHRIFT UND GEBRAUCHSANWEISUNG DE/AT/BE/LU/CH
INSTRUCTIONS D’INSTALLATION ET MODE D’EMPLOI FR/BE/LU/CH
NORME PER L’INSTALLAZIONE E INSTRUZIONE PER L’USO IT
MANUAL DE INSTALACIÓN Y GUÍA DEL USUARIO ES
INSTRUÇÔES DE INSTALAÇÂO E O INSTRUÇÂO PT
FIRE COUNTRY RC
FIRE 30 RC
FIRE 50 RC
Bewaar dit document zorgvuldig
Please retain this document carefully
Bewahren Sie dieses Dokument sorgfältig auf
Conservez soigneusement cette notice
Conservare con cura uesto manuale dell’utente
Guarde cuidadosamente esta guía para el usuario
Conserva esta instruçâo cuidadosamente.
957.508.09
DRU VER W ARMING B.V.
HOLLAND
Page 2

Hierbij verklaren wij dat de DRU modellen Fire in overeenstemming zijn met het CE
type-onderzoekscertificaat E 1490 en dat zij voldoen aan de Europese richtlijn inzake
gastoestellen 90/396/EEC.
We here by declare that the DRU models Fire are in conformity with the types as
described in EC type-certificate E 1490 and that they are in compliance with the
European Council gas appliance directive 90/396/EEC.
Hiermit erklären wir, dass die DRU-Modelle Fire mit dem CE TypenUntersuchungszertifikat übereinstimmen E 1490 und dass diese den Richtlinien für
Gasgeräte 90/396/EEG entsprechen.
Nous déclarons par la présente que les modèles DRU Fire sont conformes au certificat
d'examen de type CE E 1490 et qu’ils satisfont à la directive européenne relative aux
appareils à gaz 90/396/CEE.
Con la presente dichiariamo che i modelli DRU Fire sono conformi al Certificato di
esame CE di tipo E 1490 e soddisfano i requisiti della direttiva europea 90/396/CEE in
materia di apparecchi a gas.
Por la presente declaramos que los modelos de DRU Fire están en conformidad con el
tipo descrito en el certificado de examen CE de tipo E 1490 y que cumplen con la
Directiva Europea relativa a los aparatos de gas 90/396/EEC.
Pelo presente declaramos que os modelos de DRU Fire estão em conformidade com
o tipo descrito no certificado de exame de CE de tipo E 1490 e que cumprem a
Directiva Europeia respeitante aos aparelhos a gás 90/396/EEC.
Page 3

Nederlands
INHOUD
Woord vooraf . . . . . . . . . . . . . . . . . . . . . . . . . . . . . . .2
Uitpakken . . . . . . . . . . . . . . . . . . . . . . . . . . . . . . . . . . .2
Aansluiten . . . . . . . . . . . . . . . . . . . . . . . . . . . . . . . . . .2
Installatievoorschrift . . . . . . . . . . . . . . . . . . . . . . . . . .2
Gassoort . . . . . . . . . . . . . . . . . . . . . . . . . . . . . . . . . . .2
Belangrijk . . . . . . . . . . . . . . . . . . . . . . . . . . . . . . . . . . .2
Plaatsbepaling . . . . . . . . . . . . . . . . . . . . . . . . . . . . . . . .2
Plaatsen van de Fire country . . . . . . . . . . . . . . . . . . . .2
Plaatsen van de Fire 30 / Fire 50 . . . . . . . . . . . . . . . . .3
Aansluiting van de gastoevoer . . . . . . . . . . . . . . . . . . .3
Plaatsen van de houtblokken . . . . . . . . . . . . . . . . . . . .3
Draadloze bediening . . . . . . . . . . . . . . . . . . . . . . . . . .4
Aansluiten van de ontvanger . . . . . . . . . . . . . . . . . . . .4
Vervangen van de batterijen in de ontvanger . . . . . . .4
Plaatsen of vervangen van de batterijen
in de afstandsbediening . . . . . . . . . . . . . . . . . . . . . . . .4
Gebruikershandleiding . . . . . . . . . . . . . . . . . . . . . . . . .5
Aansteken . . . . . . . . . . . . . . . . . . . . . . . . . . . . . . . . . .5
Afstandsbediening . . . . . . . . . . . . . . . . . . . . . . . . . . . .5
Waakvlamstand . . . . . . . . . . . . . . . . . . . . . . . . . . . . . .5
Uitschakelen . . . . . . . . . . . . . . . . . . . . . . . . . . . . . . . . .5
Belangrijk . . . . . . . . . . . . . . . . . . . . . . . . . . . . . . . . . . .5
Algemene opmerkingen . . . . . . . . . . . . . . . . . . . . . . . .6
Rookgasbeveiliging . . . . . . . . . . . . . . . . . . . . . . . . . . . .6
Onderhoud en reiniging . . . . . . . . . . . . . . . . . . . . . . .6
Verkleuring . . . . . . . . . . . . . . . . . . . . . . . . . . . . . . . . . .6
Eerste maal stoken . . . . . . . . . . . . . . . . . . . . . . . . . . .6
Extra bescherming . . . . . . . . . . . . . . . . . . . . . . . . . . . .6
Afdanken . . . . . . . . . . . . . . . . . . . . . . . . . . . . . . . . . . .6
Garantie . . . . . . . . . . . . . . . . . . . . . . . . . . . . . . . . . . . .6
Technische gegevens . . . . . . . . . . . . . . . . . . . . . . . . .43
Fire
INHOUD
1
Page 4
Woord vooraf
Geachte klant,
Vriendelijk bedankt voor de aankoop van dit DRU product. Onze producten zijn ontwikkeld en gefabriceerd volgens de hoogst mogelijke kwaliteits-, prestatie- en veiligheidseisen. Hierdoor kunt u rekenen op jarenlang probleemloos gebruiksplezier. Dit DRU product kunt u
gebruiken als sfeervuur in een schouw of openhaard, het
toestel is echter niet te gebruiken als ruimteverwarming.
In dit boekje vindt u instructies voor installatie en gebruik
van uw nieuwe blokkenvuur. Lees de instructies en
gebruikershandleiding goed door, zodat u zich vertrouwd
maakt met het toestel.Wilt u meer ondersteuning, neem
dan contact op met uw leverancier.
Uitpakken
Wanneer u klaar bent met uitpakken, dient de verpakking
via de reguliere weg te worden afgevoerd.
Aansluiten
Dit toestel dient te worden aangesloten door een bevoegd
installateur.
INSTALLATIEVOORSCHRIFT
Gassoort
Dit toestel is bestemd voor het land en geschikt voor de
gassoort dat is vermeld op de typeplaat. Controleer of de
gassoort en de gasdruk ter plaatse overeenkomen met de
vermelding op het typeplaatje. Bij de Fire country bevind
dit typeplaatje zich aan de binnenzijde van het frame, bij de
Fire 30 en Fire 50 bevind dit typeplaatje zich op de metalen plaat aan het kettinkje. Houdt u aan de gasinstallatievoorschriften en eventuele plaatselijke voorschriften.
Het toestel dient door een bevoegd installateur te worden
aangesloten.
Belangrijk
• Zorg ervoor dat evt. overgordijnen of andere brandbare
materialen minstens 50 cm van het toestel verwijderd zijn.
• Let op! Aanraking van hete delen kan brandblaren
veroorzaken!
• Het toestel dient door een erkend installateur
geïnstalleerd te worden.
Plaatsbepaling
• Het toestel mag alleen geplaatst worden in een goed
geventileerde ruimte, zodat er altijd voldoende
luchttoevoer is.
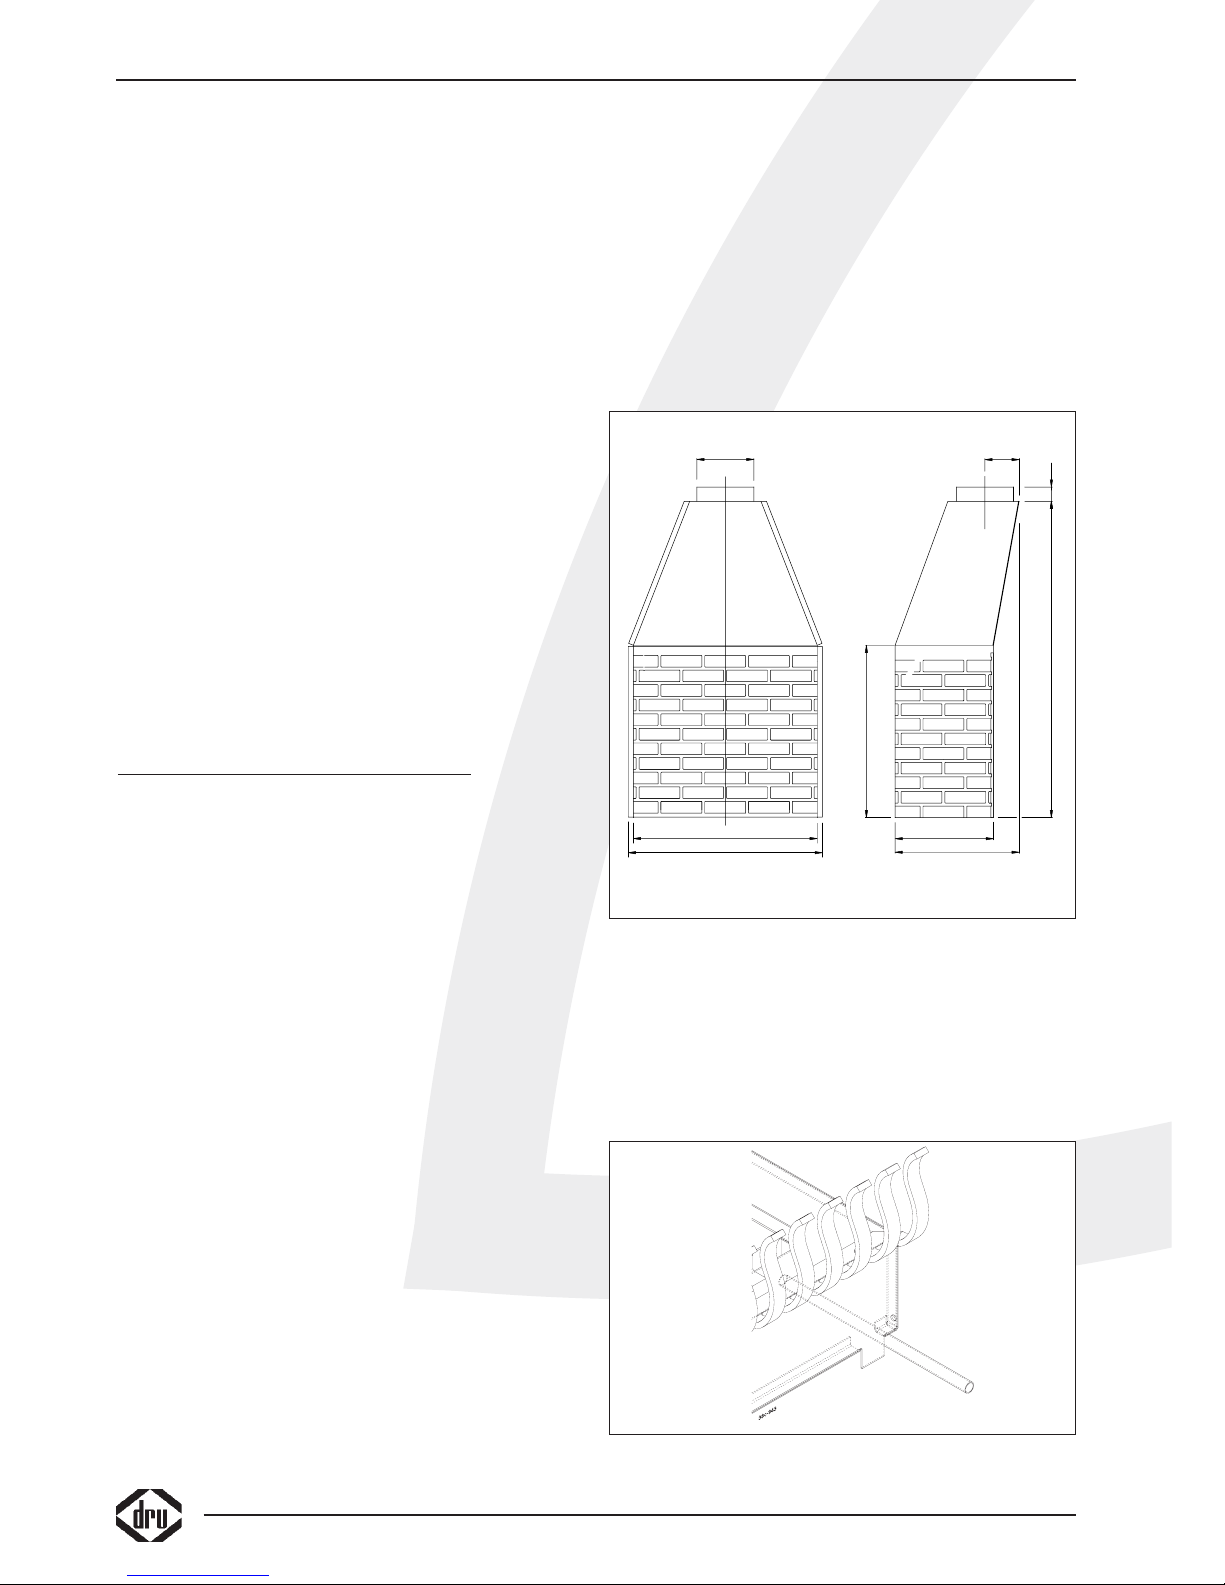
• Het toestel is alleen geschikt voor plaatsing in een vuurplaats of schouw van vuurvast materiaal.
• De maten van de vuurplaats of schouw moeten voor de
Fire country minimaal 645x345 mm, voor de Fire 50 mini
maal 500x300 mm en voor de Fire 30 minimaal
400x300 mm zijn.
• Het gewicht van de Fire Country is 19 kg.
Het gewicht van de Fire 30 en Fire 50 is 6 kg.
• De minimale hoogte van het rookkanaal is 600mm.
• De schoorsteen moet ten minste een diameter van
200 mm hebben.
• Een eventueel aanwezige klep, schuif of ander obstakel in
de schoorsteen dient te worden verwijderd.
• Het hart van het toestel mag maximaal 60 mm uit het hart
van het afvoerkanaal staan.
• De schoorsteen moet worden geveegd voordat het toestel wordt geïnstalleerd en het rookkanaal moet zijn getest
overeenkomstig de nationale richtlijn.
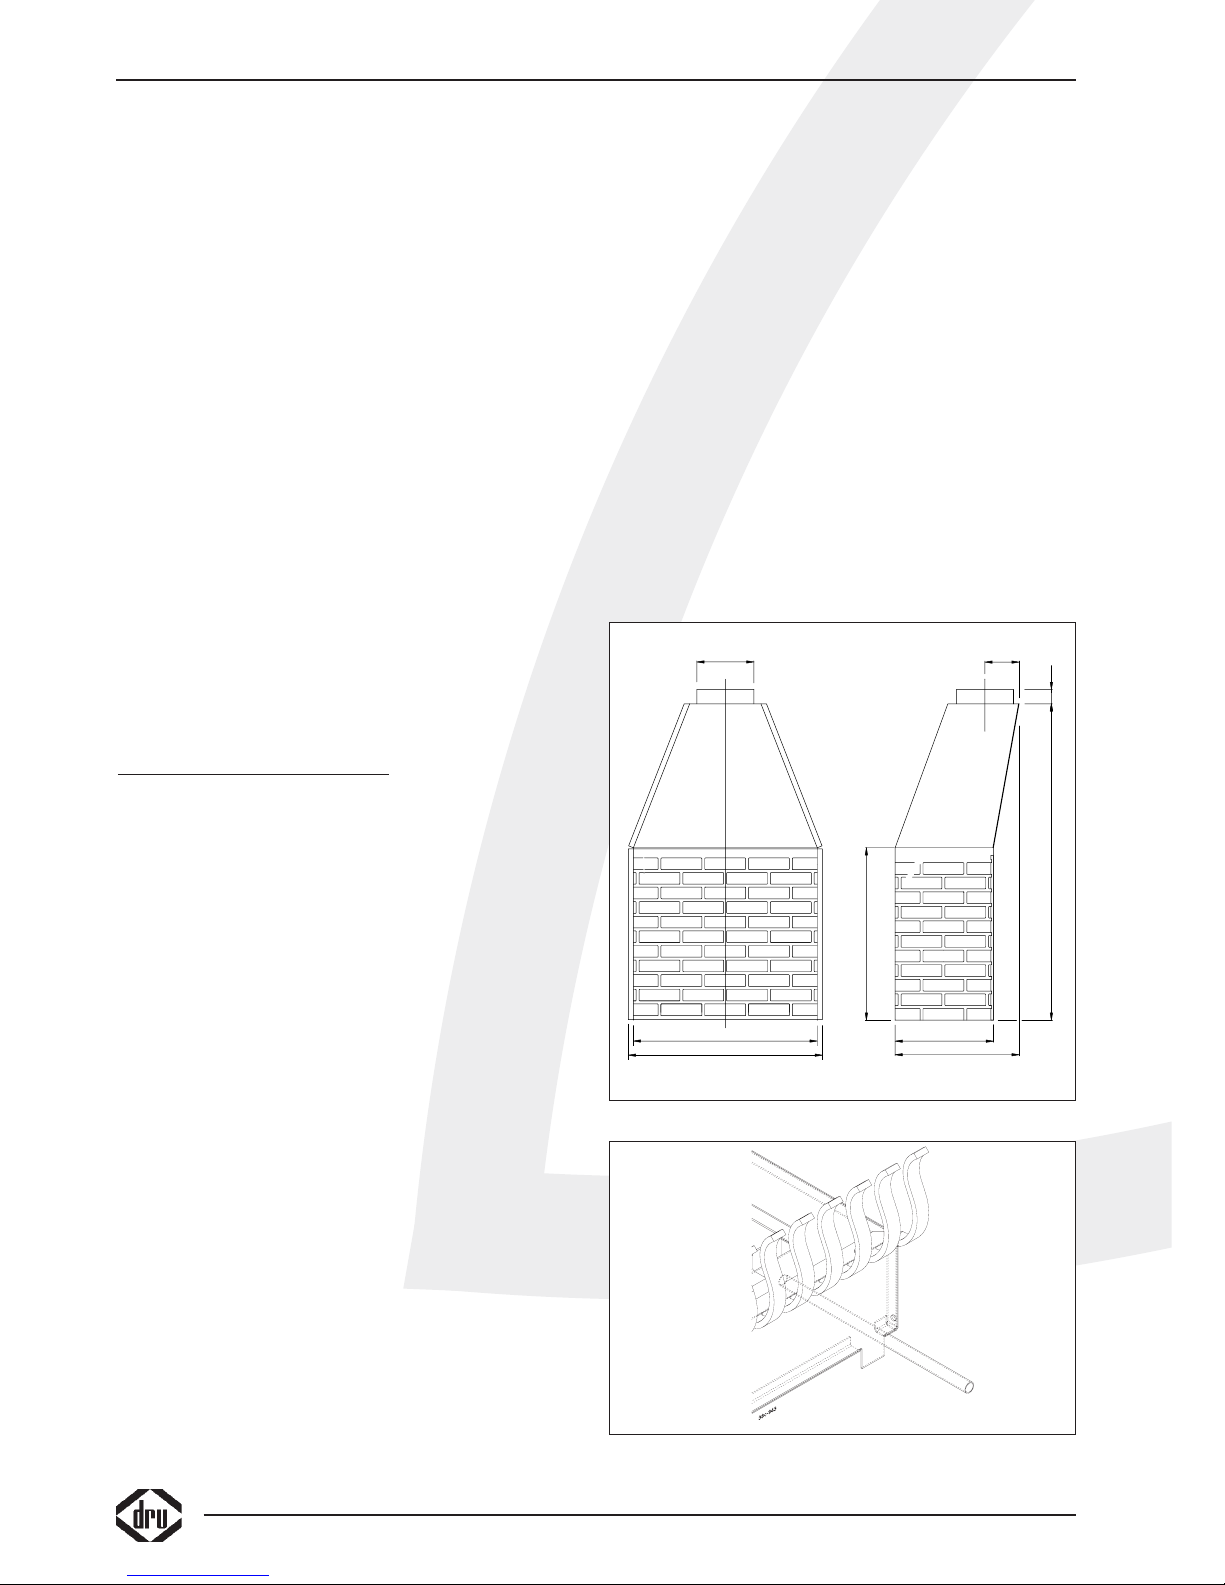
Plaatsen van de Fire country
De Fire country is bedoeld om te plaatsen in een nieuw te
bouwen haard om te plaatsen in een bestaande openhaard
zonder vuurkorf (principe volgens fig. 1). Bovengenoemde
inbouwkast is bij uw Installateur te bestellen.
INSTALLATIEVOORSCHRIFT
2
650
453
346
600
Ø 202 (inw)
50
1113
118
38C-755
677
fig. 1
fig. 2
Page 5
Nederlands
• Verwijder indien nodig de voorgemonteerde sierhekken
welke niet nodig zijn, zodat u het toestel bijvoorbeeld in
een linker of rechterhoek kunt plaatsen.
• Als de gas aanvoerleiding via de zijkant het toestel moet
binnenkomen, deze achter de poot van het toestel over
de bodem plaatsen (zie fig. 2).
• Plaats het toestel tegen de achterwand en indien van
toepassing de zijwand
Zorg ervoor dat de luchtspleet aan de onderzijde van het
toestel vrij blijft voor de beluchting van de brander, als dit
niet in acht wordt genomen kunnen er schadelijke gassen
ontstaan.
Plaatsen van de Fire 30 / Fire 50 (fig. 3)
De Fire 30 en de Fire 50 zijn bedoeld om te plaatsen op
de vuurkorf van een openhaard. Ga als volgt te werk:
• Maak indien nodig een gat van minimaal ø 22 in het
bestaande rooster.
• De gasaansluiting onder aan de branderbak dient door
het rooster te worden gestoken.
• Plaats de sluitring (B) op de gasaansluiting en draai de
branderbak vast met de messing moer (C).
• Draai vervolgens de tweede messing moer (D) en de
kniekoppeling (E) met pakkingmateriaal op de
gasaansluiting.
• Plaats tussen moer D en koppeling E de beugel met het
gasregelblok (A).
• Draai de messing moer (D) definitief vast.
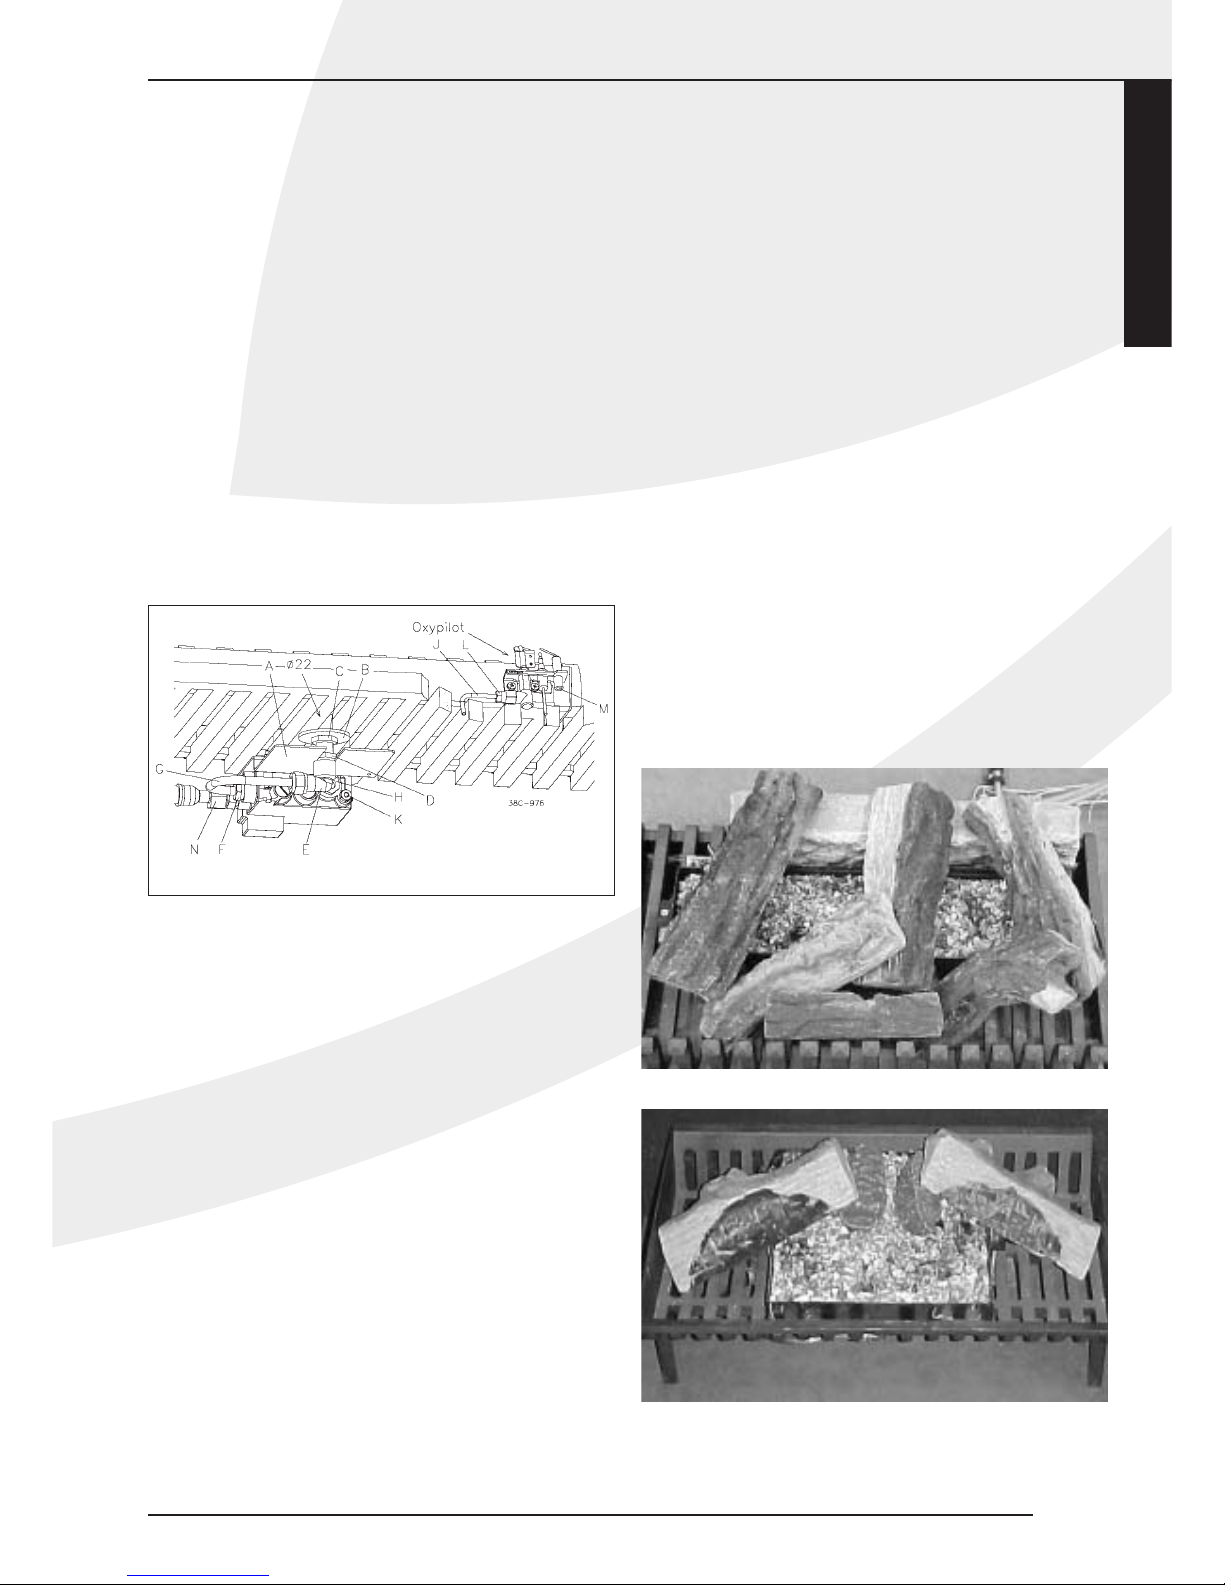
• Verbind aansluiting F op het gasregelblok met kniekoppeling (E) d.m.v. de leiding (G).
• Draai de aansluiting van de oxypilot in het gasregelblok
(aansluiting H).
Let op:
bij het aansluiten van de oxypilot moet de wartel in
aansluiting (H) handvast gedraaid worden waarna deze met
een steek sleutel een kwartslag aangedraaid moet worden.
• Verbind m.b.v. de waakvlamleiding (J) de waakvlambrander
met het gasregelblok (aansluiting K en L).
• Plaats de steker van de ontstekingskabel op bougie M van
de waakvlambrander.
• Indien er een aslade aanwezig is, deze aanpassen door de
achterzijde te verwijderen.
• Controleer de aansluitingen op gasdichtheid.
Aansluiting van de gastoevoer
Gebruik in de toevoerleiding een gekeurde aansluitkraan
met koppeling (voor België moet deze B.G.V. gekeurd
zijn).Verder geldt:
• Ontlucht de toevoerleiding voordat het toestel wordt
vastgekoppeld.
• De bedieningskraan mag niet verdraaid worden bij het
aansluiten aan de gastoevoerleiding.
• Vermijd spanningen op de bedieningskraan en leidingen.
• Controleer de aansluitingen op gasdichtheid.
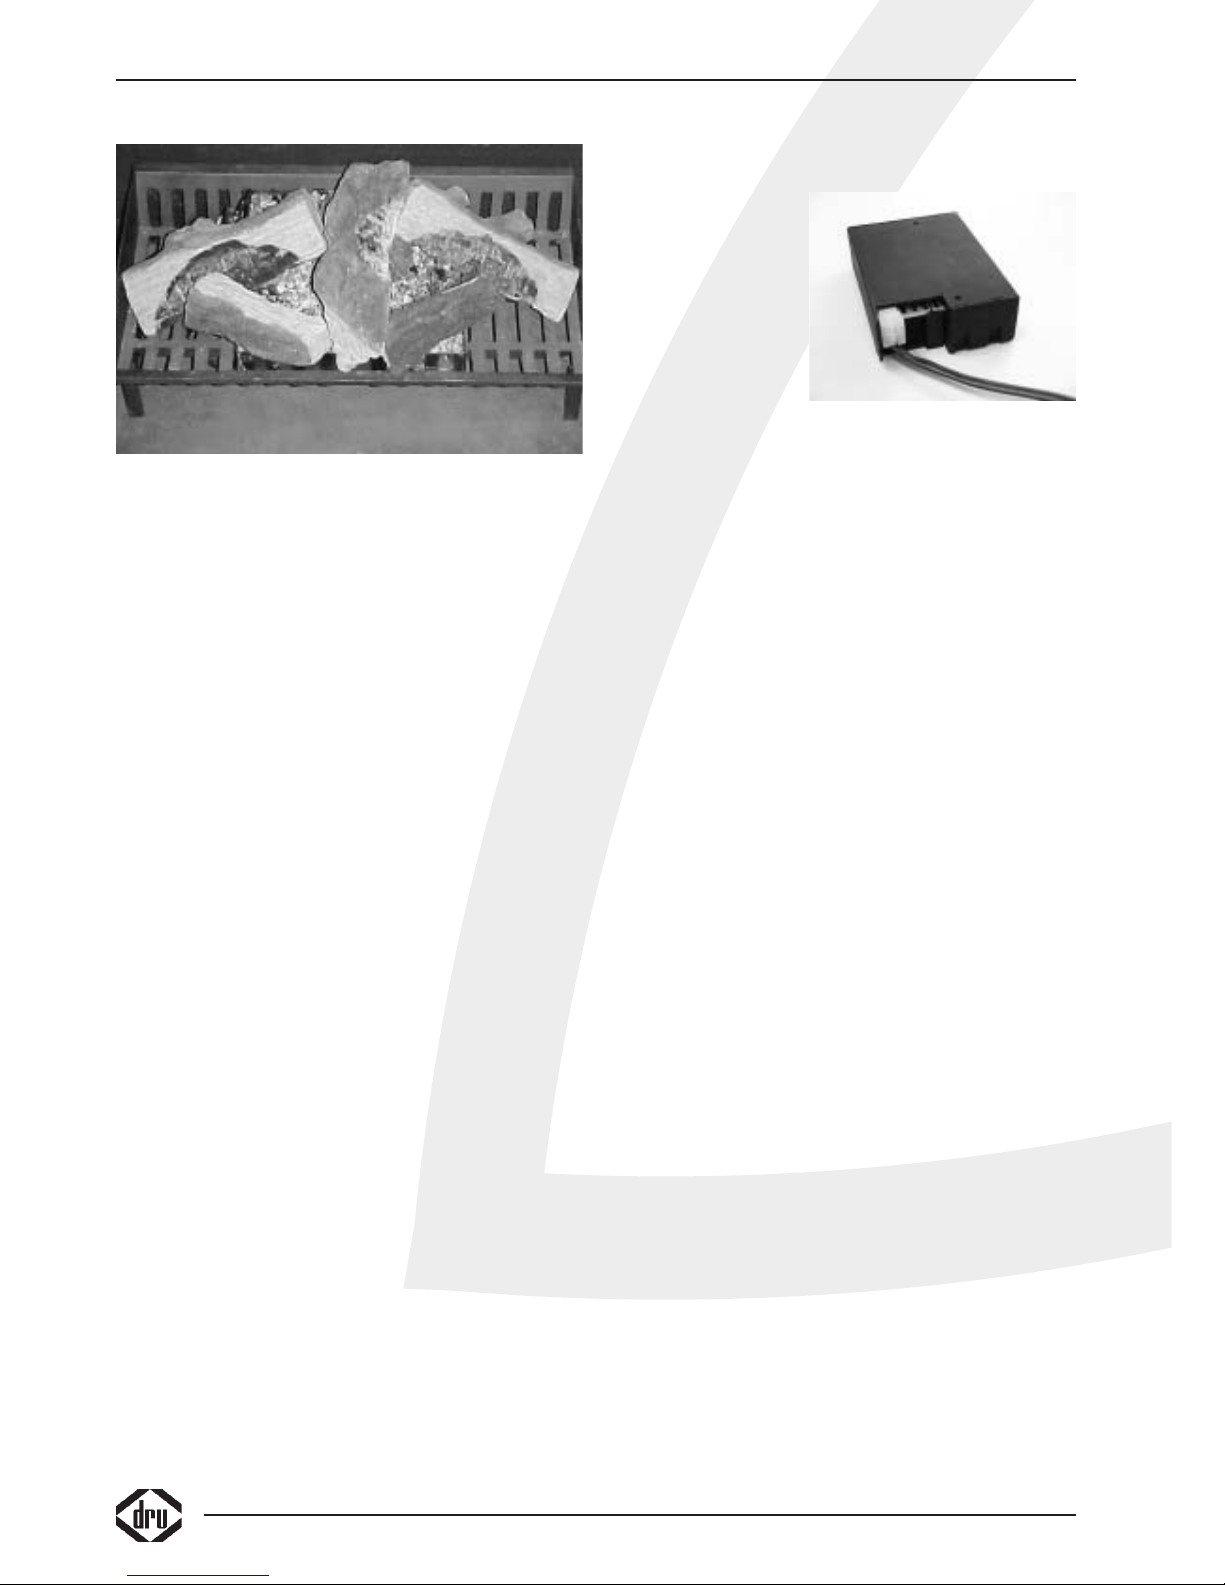
Plaatsen van de houtblokken
Plaats de houtblokken bij de Fire country en Fire 50 als
volgt (fig. 6):
• Leg het grote blok tegen de achterwand.
• Vul de branderbak met vermiculite (4 zakjes).
• Let op dat er geen vermiculite op of tussen de oxypilot
komt, dit kan de goede werking van de waakvlam verstoren.
• Verdeel boven op het vermiculite het zakje embers (het
zakje met de zwarte inhoud), dit geeft een gloeieffect op
het branderbed.
• Plaats vervolgens de overige blokken zoals in de figuur is
aangegeven.
Plaats de houtblokken bij de Fire 30 als volgt (fig 7,8):
Fire
INSTALLATIEVOORSCHRIFT
3
fig. 3
fig. 7
fig. 6
Page 6
• Vul de branderbak met vermiculite (4 zakjes).
• Let op dat er geen vermiculite op of tussen de oxypilot
komt, dit kan de goede werking van de waakvlam verstoren.
• Verdeel boven op het vermiculite het zakje embers (het
zakje met de zwarte inhoud), dit geeft een gloeieffect op
het branderbed.
• Plaats vervolgens de overige blokken zoals in de figuur is
aangegeven.
De blokken mogen niet op een andere manier neergelegd
worden, omdat dan roetvorming kan ontstaan, ook mogen
de blokken niet tegen de oxypilot aan liggen daar dit de
werking van de rookgasbeveiliging nadelig kan beïnvloeden.
Gebruik geen andere materialen dan die meegeleverd zijn.
Er mag niets op het branderbed worden gegooid, ook geen
afval, uitsluitend de voorgeschreven materialen met de
houtblokkenset. De meegeleverde materialen zijn onbrandbaar en speciaal voor dit toestel gemaakt.
Draadloze bediening
De haard wordt standaard geleverd met een draadloze
bediening. Het toestel is voorzien van een traploos regelbaar gasregelblok. De elektrische voeding wordt verzorgd
door batterijen. De levensduur van de batterijen is
ongeveer één jaar. De draadloze bediening werkt alleen
wanneer de waakvlambrander is ontstoken.
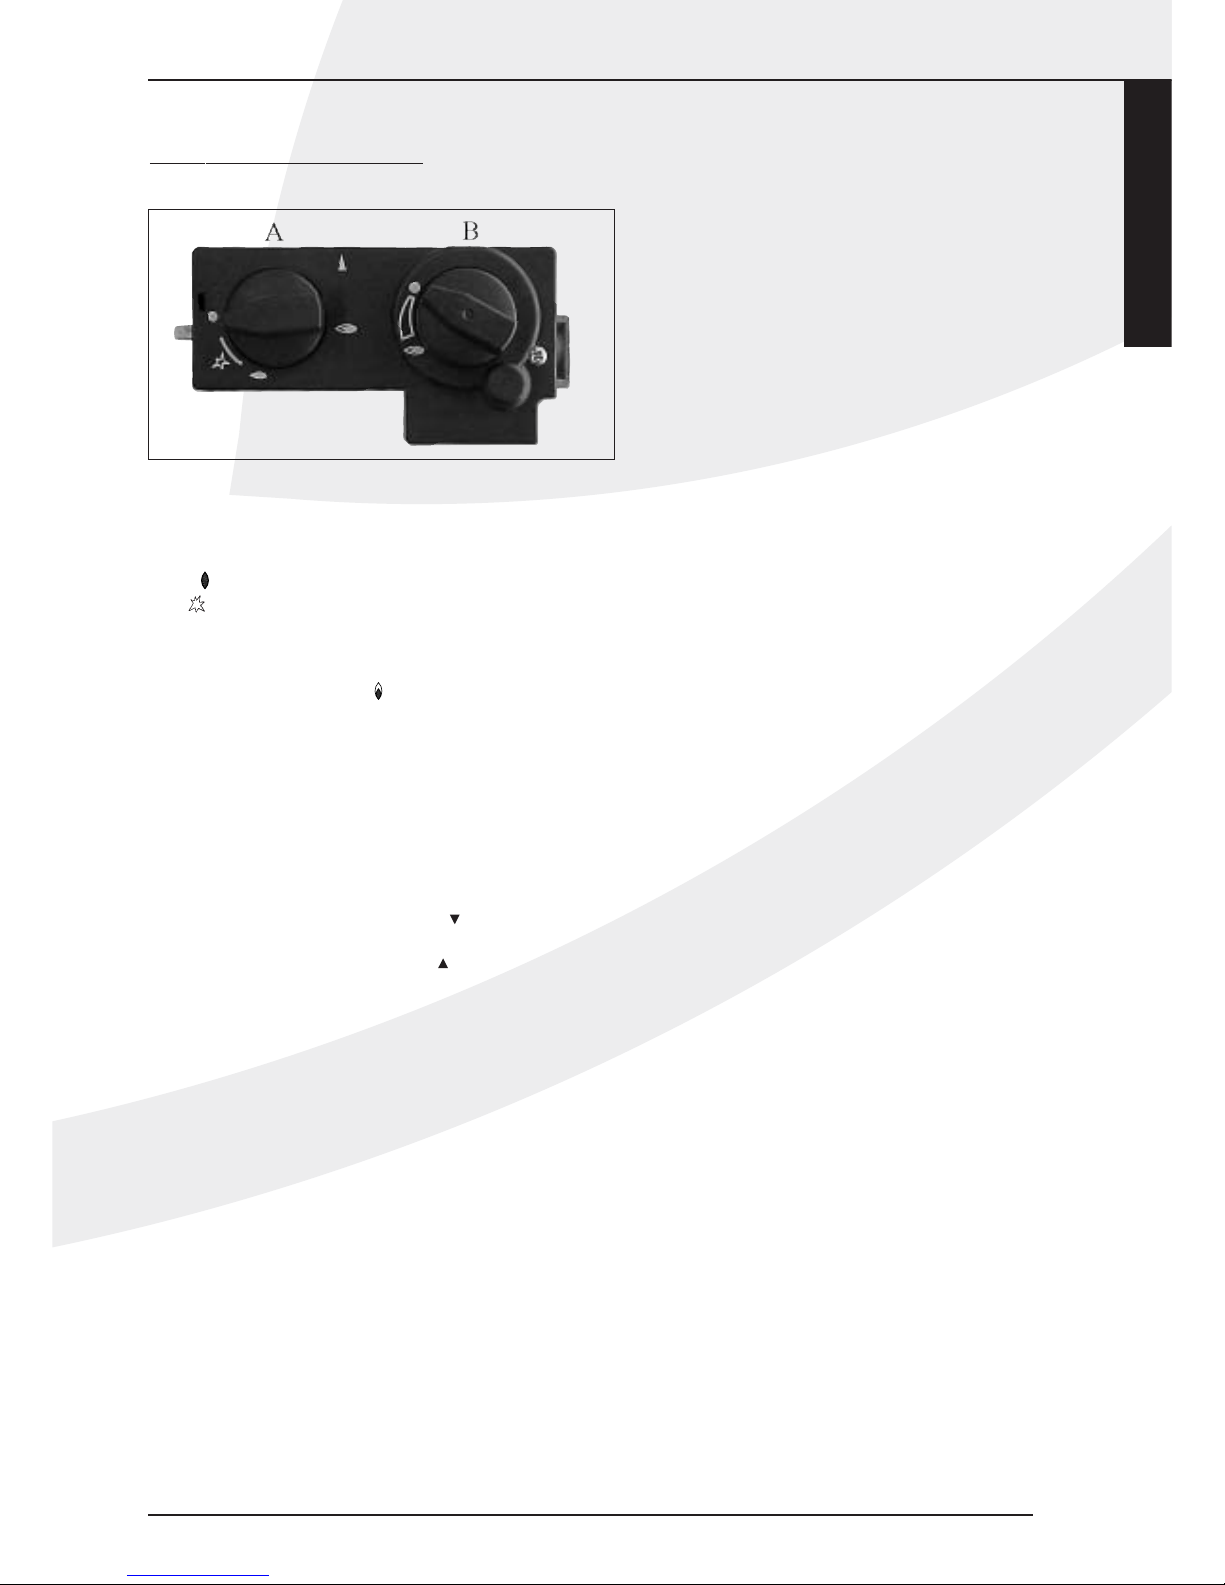
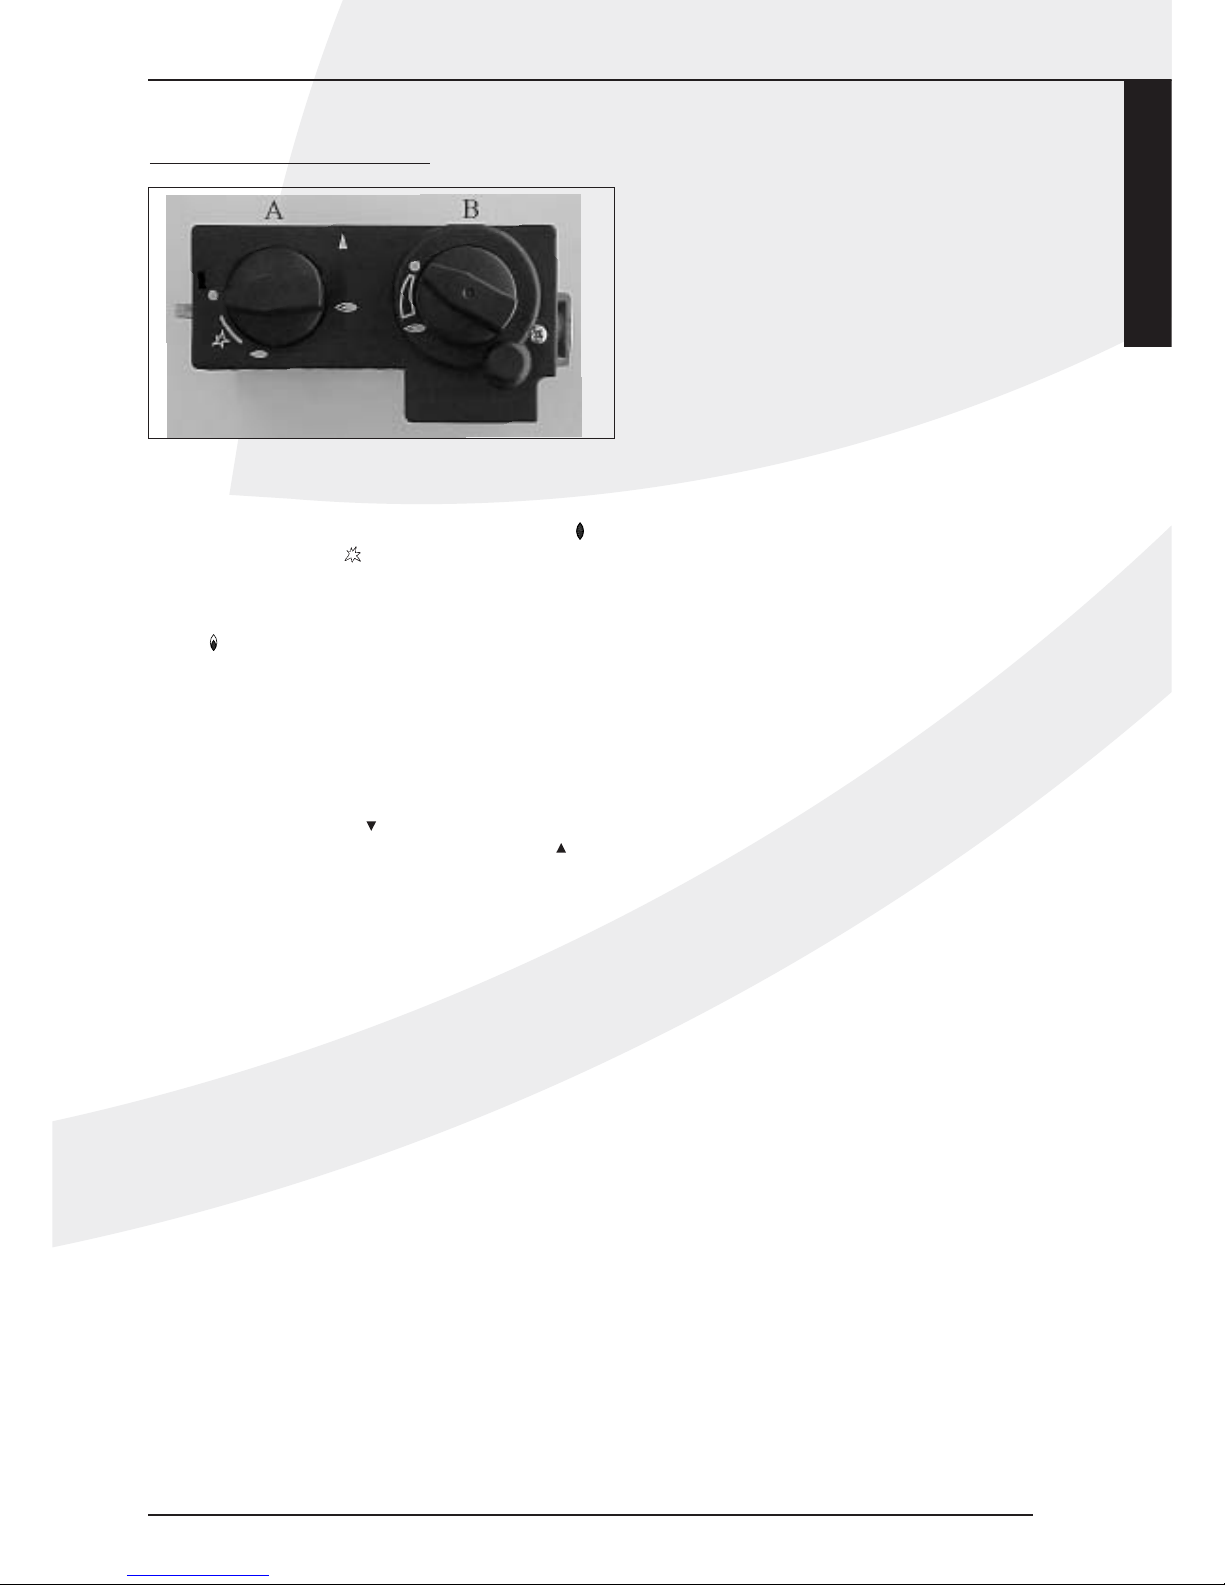
Aansluiten van de ontvanger
De draadloze bediening bestaat uit een ontvanger en een
afstandsbediening. Deze zijn samen verpakt in een doos.
De ontvanger moet worden aangesloten in het toestel
voordat de batterijen worden gemonteerd.
Ga hiervoor als volgt te werk:
• Neem de ontvanger uit de verpakking.
• Schuif de stekker van het aansluitsnoer achterop de print-
plaat van de ontvanger (fig. 9).
• Sluit de snoeren aan op de connectoren van het gasregelblok. De stekkers hebben verschillende maten en corresponderen met de connectoren op het gasregelblok.
• Neem de deksel los.
• Plaats de 4 penlite batterijen (type AA). Let op de juiste
poolrichtingen.
• Plaats de deksel terug.
• Leg de ontvanger los in de aslade.
Zorg ervoor dat de rode LED naar voren wijst.
•
LET OP:
Plaats de ontvanger,
als het kan, zo ver
mogelijk van de
branderbak zodat de
ontvanger niet
te
warm kan worden.
Vervangen van de batterijen in de ontvanger
• Open de klep aan de voorzijde.
• Pak de ontvanger en open de deksel.Achter deze deksel
bevindt zich de batterijhouder.
• Verwijder de oude batterijen en plaats de nieuwe, let daarbij op de + en – aansluiting van de batterijen en de houder; deze moeten overeenkomen.
Plaatsen of vervangen van de batterijen in de
afstandsbediening
• Verwijder de deksel aan de onderzijde van de afstandsbediening.
• Sluit de blokbatterij (type 6LR61) aan op de clip.
• Plaats de batterij in de houder.
• Sluit de deksel.
• In het display staat de temperatuur aangegeven in
Fahrenheit, door beide knoppen enkele seconden
ingedrukt te houden, verandert dit in Celsius.
Let op: oude batterijen mogen niet bij het huisvuil maar
moeten bij het Klein Chemisch Afval.
4
INSTALLATIEVOORSCHRIFT
fig. 8
fig. 9
Page 7
Nederlands
GEBRUIKERSHANDLEIDING
Aansteken
Knop A in drukken en linksom draaien tot de kleine
vlam .
Bij zal het toestel ontsteken. Controleer of de
waakvlam brandt. Indien de waakvlam brandt, knop A nog
ca. 5 sec. geheel ingedrukt houden. Daarnaknop A loslaten
en controleren of de waakvlam blijft branden. Draai nu
knop A naar de grote vlam . Hierdoor zal de hoofdklep
van het regelblok opengaan.Afhankelijk van de stand van
de regelknop B zal de hoofdbrander door de waakvlam
ontstoken worden en zullen hogere of lagere vlammen te
zien zijn.Als de ontsteking niet normaal werkt, het
aansteken herhalen.
Afstandsbediening
Met de afstandsbediening kan de vlamhoogte worden
geregeld. Knop B op het gasregelblok zal hierdoor
draaien. Door op de onderste knop ( ) van de afstandsbediening te drukken zal de vlam kleiner worden. Drukt
u gelijkertijd op de bovenste knop ( ) en het kleine
knopje van de afstandsbediening dan zal de vlam hoger
worden. Indien knop B met de hand bediend wordt zal
hetzelfde resultaat worden bereikt. Het verdraaien van
knop B moet met enige kracht gebeuren, het klinken van
tikken is hierbij volstrekt normaal.
Waakvlamstand
Wanneer de kachel niet gebruikt wordt maar wel de
waakvlam moet branden kan knop A naar de kleine vlam
worden gedraaid. Hierdoor wordt de gastoevoer naar de
hoofdbrander afgesloten
Uitschakelen
Draai knop A rechtsom naar de "0" stand. De gastoevoer
naar de hoofd- en de waakvlambrander is dan gesloten.
Belangrijk
Een ingebouwde veiligheidsvergrendeling treedt in werking
wanneer het toestel op ,"UIT" (gesloten stand) wordt
gezet.Wacht daarom 5 minuten alvorens het toestel
opnieuw te ontsteken. Probeer binnen deze tijd niet de
aansteekknop in te drukken, daar deze door de veiligheids
vergrendeling geblokkeerd is. Forceer de knop niet, omdat
het mechanisme dan kan worden beschadigd.
GEBRUIKERSHANDLEIDING
fig. 10
Fire
5
Page 8

ALGEMENE OPMERKINGEN
Rookgasbeveiliging
Door onvoldoende luchttoevoer of door het slecht functioneren van het schoorsteenkanaal kan de zuurstofconcentratie in de ruimte dusdanig afnemen dat er te weinig zuurstof
aanwezig blijft voor volledige verbranding van het gas, met als
gevolg vorming van koolmonoxide. De luchttoevoer moet
overeenkomstig de nationale richtlijn zijn.
Dit toestel is uitgevoerd met een zgn. oxypilot (waakvlambrander), welke onder andere voorkomt dat er een gevaarlijke concentratie van verbrandingsproducten in de ruimte kan ontstaan
door onvolledige verbranding van het gas. De installateur moet
na 10 min. stoken controleren of alle rookgassen worden
afgevoerd.
Er is geen onderhoud mogelijk aan de waakvlambrander. Indien
de waakvlambrander defect is kunt u een nieuwe bestellen via
uw installateur. Men mag uitsluitend gebruik maken van authentieke vervangende onderdelen. De waakvlambrander mag op
geen enkele wijze worden aangepast of bijgesteld.De installateur mag in geen enkel geval het waakvlamsysteem kortsluiten.
Onderhoud en reiniging
Uw toestel dient eenmaal per jaar door een gekwalificeerd
bedrijf te worden gecontroleerd, en waar nodig, hersteld of
gereinigd. De controle en het onderhoud dient in ieder geval
een goede en veilige werking van het toestel te omvatten. U
kunt hiervoor gebruik maken van uw gasinstallateur of een
gespecialiseerd onderhoudsbedrijf. Het verdient aanbeveling om
vóór en tijdens het stookseizoen het toestel enkele malen
stofvrij te maken. Bij het reinigen van het toestel geen bijtende
of schurende middelen gebruiken.De schoorsteen moet regelmatig worden gecontroleerd, om zeker te stellen dat alle rookgassen via de schoorsteen worden afgevoerd. Er op toezien en
voorkomen dat er overmatige roetopbouw plaatsvindt in de
schoorsteen. Het roet dat zich vormt moet worden verwijderd,
uitsluitend in koude toestand met een borstel of stofzuiger. De
ventilatie moet regelmatig worden gecontroleerd, om zeker te
zijn dat er geen belemmeringen zijn.
Verkleuring van wanden en plafonds
Bruinverkleuring is een vervelend probleem en is moeilijk op te
lossen. Bruinverkleuring kan worden veroorzaakt door onder
andere stofverbranding veroorzaakt door te weinig ventilatie,
door het roken van sigaretten of het branden van kaarsen.
Deze problemen kunnen worden voorkomen door:
Het vertrek waar het toestel zich bevind goed te ventileren.
Een goede richtlijn hiervoor is:
Bij nieuwbouw : 3.24 m
3
/ uur per m
2
vloeroppervlak van een vertrek.
Bij bestaande bouw : 25.20 m3/ uur voor een vertrek.
Maak zo weinig mogelijk gebruik van kaarsen en olielampjes en
houd het verbrandingslontje zo kort mogelijk. Deze "sfeerbrengers" zorgen voor aanzienlijke hoeveelheden vervuilde en ongezonde roetdeeltjes in uw woning. Rook van sigaretten en sigaren bevat o.a.teerstoffen die bij verhitting eveneens op koudere en vochtige muren zullen neerslaan.Bij een nieuw gemetselde schouw of na een verbouwing wordt aanbevolen minimaal 6
weken te wachten voordat men gaat stoken, het bouwvocht
moet namelijk geheel verdwenen zijn uit wanden, vloer en plafond.
Eerste maal stoken
Tijdens de eerste maal stoken kan er een onaangename geur
ontstaan, die wordt veroorzaakt door het uitdampen van de
lak. Dit verdwijnt na enkele uren. Daarom raden wij u aan het
toestel de eerste maal op de hoogste stand te stoken terwijl u
tevens het vertrek waarin de kachel staat goed ventileert.
Extra bescherming
Indien het toestel in een vertrek geïnstalleerd wordt waar
jonge kinderen of hulpbehoevende mensen zonder toezicht
verblijven, is het wenselijk het toestel af te schermen.
Afdanken
Indien u het toestel vervangt of verwijdert, moet u het toestel
via de reguliere weg afvoeren.Voordat tot demontage wordt
overgegaan eerst de aansluitkraan met koppeling dichtdraaien.
De koppeling tussen aansluitkraan en toestel losdraaien. Het
gehele toestel kan nu worden gedemonteerd en afgevoerd.
Garantie
De garantie op uw DRU toestel wordt verleend via uw leverancier. In geval van storingen dient u altijd met hem contact op
te nemen. Uw leverancier zal DRU inschakelen indien hij dit
noodzakelijk acht. De fabrieksgarantie op uw toestel bedraagt
2 jaar na datum van aankoop.
ALGEMENE OPMERKINGEN
6
Page 9

CONTENTS
CONTENTS
Foreword . . . . . . . . . . . . . . . . . . . . . . . . . . . . . . . . . . .8
Unpacking . . . . . . . . . . . . . . . . . . . . . . . . . . . . . . . . . . .8
Connection . . . . . . . . . . . . . . . . . . . . . . . . . . . . . . . . .8
Instructions for installation . . . . . . . . . . . . . . . . . . . . .8
Type of gas . . . . . . . . . . . . . . . . . . . . . . . . . . . . . . . . . .8
Important . . . . . . . . . . . . . . . . . . . . . . . . . . . . . . . . . . .8
Positioning the fire . . . . . . . . . . . . . . . . . . . . . . . . . . . .8
Installing the Fire Country . . . . . . . . . . . . . . . . . . . . .8
Installing the Fire 30 / Fire 50 . . . . . . . . . . . . . . . . . . .9
Connecting the Gas Supply . . . . . . . . . . . . . . . . . . . . .9
Positioning the logs . . . . . . . . . . . . . . . . . . . . . . . . . . .9
Remote control . . . . . . . . . . . . . . . . . . . . . . . . . . . . .10
Connecting the Receiver . . . . . . . . . . . . . . . . . . . . . .10
Replacing the batteries in the receiver . . . . . . . . . . .10
Inserting or replacing the batteries
in the remote control . . . . . . . . . . . . . . . . . . . . . . . .10
Operating Instructions . . . . . . . . . . . . . . . . . . . . . . .11
Lighting . . . . . . . . . . . . . . . . . . . . . . . . . . . . . . . . . . . .11
Remote Control . . . . . . . . . . . . . . . . . . . . . . . . . . . .11
Pilot light setting . . . . . . . . . . . . . . . . . . . . . . . . . . . .11
Switching off . . . . . . . . . . . . . . . . . . . . . . . . . . . . . . . .11
Important . . . . . . . . . . . . . . . . . . . . . . . . . . . . . . . . . .11
General notes . . . . . . . . . . . . . . . . . . . . . . . . . . . . . .12
Flue-gas protection . . . . . . . . . . . . . . . . . . . . . . . . . .12
Gas safety regulations (for installation & use), 1998 12
Maintenance and Cleaning . . . . . . . . . . . . . . . . . . . . .12
Discoloration of walls an ceiling . . . . . . . . . . . . . . . .12
Lighting the heater for the first time . . . . . . . . . . . .12
Extra protection . . . . . . . . . . . . . . . . . . . . . . . . . . . .12
Disposa . . . . . . . . . . . . . . . . . . . . . . . . . . . . . . . . . . .12
Guarantee . . . . . . . . . . . . . . . . . . . . . . . . . . . . . . . . .12
Technical specifications . . . . . . . . . . . . . . . . . . . . . . .43
English
Fire
7
Page 10
Foreword
Dear Customer,
We would like to thank you for buying this DRU product.
Our products have been designed and produced to meet
the highest possible quality, performance and safety
requirements, allowing you to enjoy years of problem-free
use. This DRU product is ideal as a decorative fire in an
open hearth or fireplace and not intended to heat an
entire room.
In this booklet you will find instructions for the installation
and use of your new log fire. Please read these instructions
and the manual carefully to familiarize yourself with the
appliance. If you require any further support, please do
not hesitate to contact your supplier.
Unpacking
Once the heater has been unpacked, all packaging should
be disposed of in the regular manner.
Connection
This appliance should be connected by a registered
installer.
INSTRUCTIONS FOR INSTALLATION
Type of gas
This appliance can only be used and is only suitable for the
country and the type of gas mentioned on the type identification tag. Please check that the local gas and pressure
correspond with the specifications on the type identification tag.This tag can be found on the inside of the frame
of the Fire Country. The Fire 30 and Fire 50 have a chain
with a metal type identification tag.All regulations regarding gas installation, including any local regulations, must be
observed at all times. The appliance is to be installed by a
registered installer.
Important
• Keep curtains and any other flammable materials at least
50cm away form the appliance.
• Caution! Touching the heater when hot can cause burns
and blisters!
• The appliance should be installed and maintained by a registered installer.
Positioning the fire
• The gas fire may only be installed in a well-ventilated room
allowing a constant air supply.
• The appliance is suitable for installation in a fireplace or
hearth made of incombustible materials only.
• The minimal dimensions for the fireplace or hearth are
645x345 mm for the Fire Country, 500x300 mm for the
Fire 50, and 400x300 mm for the Fire 30.
• The weight of the Fire Country is 19 kg.
The weight of the Fire 30 and Fire 50 is 6 kg.
• The minimal height of the flue duct is 600mm.
• The chimney must be at least 200 mm in diameter.
• A flap or chimney damper, or any other kind of obstacle
present, should be removed.
• The centre of the appliance must be no more than 60 mm
from the centre of the flue duct.
• The chimney must be swept before the appliance is
installed and the flue duct must be tested in accordance
with national guidelines.
Installing the Fire Country
The Fire Country is intended for installation in a new fireplace using in an existing fireplace without a grate
(principle according to fig. 1).
An inset box can be ordered from your installer.
• Remove any unnecessary ornamental fireguards as
required so that the appliance can be fitted in the left or
8
INSTRUCTIONS FOR INSTALLATION
650
453
346
600
Ø 202 (inw)
50
1113
118
38C-755
677
fig. 1
fig. 2
Page 11
English
Fire
INSTRUCTIONS FOR INSTALLATION
9
right-hand corner.
• If the gas supply hose is to enter the appliance at the
side, lay it across the bottom behind the foot of the
heater (see fig. 2).
• Stand the appliance against the back and, if applicable, the
side.
Ensure that the air gap under the heater stays open to
allow a constant air supply to the burner; failure to
observe this could result in the formation of harmful
gasses.
Installing the Fire 30 / Fire 50 (fig. 3)
The Fire 30 and the Fire 50 are intended for installation
on the grate of an existing fireplace. To do this:
• If necessary, make a hole of at least ø 22 in the existing
grate.
• The gas connection at the bottom of the burner tray
should be poked through the grate.
• Put the washer (B) on the gas connection and fix the
burner tray tightly with the brass nut (C).
• Now screw the second brass nut (D) and the elbow joint
with packing (E) onto the gas connection.
• Fit the bracket with gas control block (A) between the
nut (D) and the joint (E).
• Tighten the brass nut (D) firmly.
• Connect the gas control block (connection F) with an
elbow joint (E) to the piping (G).
• Screw the oxypilot connection into the gas control block
(connection H).
N.B.: when connecting the oxypilot, the coupling nut in
connection H should first be tightened by hand and then
tightened another quarter turn with an open-ended
spanner.
• Connect the pilot light to the gas control block
(connections K and L) using the pilot-light pipe (J).
• If there is an ashpan, remove the back to make it fit.
• Check that all connections are gastight.
Connecting the Gas Supply
An approved connecting tap with coupling should be
used in the supply hose (In Belgium this must be B.G.V.
approved). Furthermore:
• Expel all air from the supply pipes/hoses before coupling
to the appliance.
• Do not turn the coupling tap when connecting it to the
gas supply.
• Avoid any pressure on the control tap and pipes.
• Check that all connections are gastight.
Positioning the logs
Position the logs for the Fire Country and the Fire 50 as
follows (fig. 6):
• Lay the large log against the back of the fire.
• Fill the burner tray with vermiculite (4 bags).
• Make sure that no vermiculite gets onto or into the
oxypilot, as this could prevent the pilot light from
working correctly.
• Sprinkle the bag of embers (the bag with black contents)
on top of the vermiculite to create a glowing effect on
the burner bed.
• Now lay the other logs as illustrated.
Position the logs for the Fire 30 as follows (fig 7+8):
• Fill the burner tray with vermiculite (4 bags).
• Make sure that no vermiculite gets onto or into the
oxypilot, as this could prevent the pilot light from
working correctly.
fig. 3
fig. 6
fig. 7
Page 12
• Sprinkle the bag of embers (the bag with black contents),
on top of the vermiculite to create a glowing effect on the
burner bed.
• Now lay the other logs as illustrated.
The logs should not be laid in any other way as this could
cause the formation of soot. Neither should the logs touch
the oxypilot as this could influence the flue-gas safety
device.
Do not use any materials other than those supplied.
Nothing should be thrown on the burner bed, no rubbish
either, except the intended materials with the log set. The
supplied materials are incombustible and have been manufactured specifically for this appliance.
For safety reasons a guard should be placed in
front of the fire at all times.
Remote control
Remote control is supplied as a standard accessory.The
heater has a freely adjustable. Batteries, with a life
expectancy of approximately one year, feed the electrical
supply.The remote control will only work if the pilot light
is lit.
Connecting the Receiver
The remote control system comprises a receiver and a
remote control, packed together in one box. The receiver
must be connected to the appliance fitting the batteries.
This is done as follows:
• Take the receiver out of the box.
• Slide the plug of the cable onto the receiver circuit board
(fig. 9).
• Connect the wires to the connectors on the gas control
valve.The different sized plugs correspond with the connectors on the gas control valve.
• Open the lid.
• Insert 4 penlight batteries (type AA). Make sure they are
the right way round.
• Replace the lid.
• Place the reciever in the ashpan. Make sure that the red
LED points to the front.
•
NB: Fit the receiver
as far away from the
burner tray as possible to prevent the
receiver from
getting too hot.
Replacing the batteries in the receiver
• Open the flap at the front.
• Take the reciever and open the cover.The batteries are
under that cover.
• Remove the old batteries and insert the new ones, making
sure that the + and – signs on the batteries correspond
with those in the holder.
Inserting or replacing the batteries
in the remote control
• Remove the cover on the back of the remote control.
• Connect a square battery (type 6LR61) to the clip.
• Fit the battery in the holder.
• Replace the cover.
• The temperature is shown on the display in Fahrenheit,
press both buttons for a few seconds and it will change to
Celsius.
NB: Do not throw old batteries in the dustbin.They
should be treated as Chemical Waste.
10
INSTRUCTIONS FOR INSTALLATION
fig. 8
fig. 9
Page 13
English
OPERATING INSTRUCTIONS
Lighting
Press button A and turn to the left to the small flame .
The flame will ignite at . Check that the pilot is alight.
If that is the case, hold button A firmly pressed for another 5 seconds.Then release button A and check that the
pilot light is still burning. Now turn button A to the large
flame , which will open the main valve of the control
block. Depending on the setting of the control button B,
high or low flames will be visible. If the ignition does not
work properly, relight.
Remote Control
The height of the flames can be regulated by remote control, which will turn button B on the gas control block.
Press the bottom button ( ) on the remote control for
a smaller flame.When you push the button above ( )
and the little button at the remote control at the same
time, the flames become higher. Manually adjusting button
B will have the same effect.A certain force is required
when rotating button B, a clicking sound is quite normal.
Pilot light setting
If the heater is not in use but you would like the pilot
light to remain alight, set button A to the small flame.
The gas supply to the main burner will then be disconnected.
Switching off
Turn button A to the "0" setting.The gas supply to the
burners will then be disconnected.
Important
A built-in safety lock is activated when the appliance is
switched to "OFF" (closed down setting).Therefore, wait
5 minutes before relighting the heater.Within this period,
do not try to push the lighting button, as this has been
blocked by the safety lock. Do not force the button, as
this may result in damage to the mechanism.
OPERATING INSTRUCTIONS
fig. 10
Fire
11
Page 14

GENERAL NOTES
Flue-gas protection
An insufficient air supply or a malfunctioning chimney duct could
reduce the concentration of oxygen in the room to such an
extent that there would not be enough oxygen left for complete
combustion of the gas, resulting in the formation of carbon
monoxide.The air supply must comply with national guidelines.
This appliance is fitted with an ‘oxypilot’ (pilot-light burner),
which also prevents a dangerous concentration of combustion
products forming in the room as a result of incomplete gas combustion.The installer should allow the fire to burn for 10 mins.
and then check that the flue gases are discharged properly.
The pilot-light burner cannot be serviced. If it is defective, you
can order a new one via your installer. Only authentic replacement parts are to be used.The pilot-light burner must not be
adjusted or altered in any way whatsoever.The installer must not
short-circuit the pilot-light system in any way whatsoever.
Gas Safety Regulations (for installation & use) 1998
In your own interest and that of safety, it is law that all gas appliances are installed by competent persons in accordance with the
above regulations. Failure to install appliances correctly could
lead to prosecution.
NB:The Confederation of Registered Gas Installers,
whose members are identified by the emblem shown
here, are all required to work to the recognised standards.
Maintenance and Cleaning
The appliance should be inspected once a year by a qualified
company, and cleaned and/or repaired as necessary.The inspection and maintenance must at least ensure that the appliance is
working correctly and safely.This can be done by your own
gasinstaller or a specialised maintenance company. It is advisable
to remove any dust from the appliance several times before and
during the heating season. Do not use any caustic or abrasive
agents when cleaning the appliance.The chimney must be
inspected regularly to make sure that all flue gases are discharged through the chimney. Do not allow excesses of soot to
build up in the chimney. Any soot that has formed in the chimney should be removed,only when it cold, with a brush or a vacuum cleaner.The ventilation should be checked regularly to
make sure that there is no obstruction.
Discoloration of walls and ceiling
Brown discoloration is an annoying problem, which is difficult to
solve. It can be caused by dust burning as a result of poor ventilation, for example, or by cigarette smoke or candles.
These problems can be avoided by ensuring that the room
the heater is in is properly ventilated.A good guideline for
ventilation is:
New buildings : 3.24 m3/ hour per m2floor
surface of the room.
Existing buildings : 25.20 m3/ hour for a room.
Use candles and oil lamps as little as possible, keeping the wick
as short as possible.While they enhance the atmosphere, candles
and oil lamps also cause the formation of large quantities of
unhealthy soot particles in your home. Cigarette and cigar
smoke contains tar, which upon heating will precipitate on cold
or damp walls. If you have a newly cemented chimney or have
had any other reconstructions / renovations done, you are
advised to wait at least 6 weeks before lighting your fire, to
allow the walls, floor and ceiling to dry out completely.
Lighting the heater for the first time
There can be an unpleasant smell when you light the heater for
the first time.This is caused by the varnish evaporating and will
disappear after a few hours.We therefore advise you, on initial
use, to heat the appliance at the highest setting while ventilating
the room it is installed in well.
Extra protection
This heater meets the normal safety standards regarding surface
temperatures, but physical contact with heated surfaces should
be avoided where possible. An additional guard is recommended
to protect young children and elderly, infirmed or handicapped
people.
Disposal
When replacing or otherwise removing the appliance, it should
be disposed of in compliance with current regulations.
Shut off the connecting tap with coupling before commencing
disassembly. Undo the coupling between the connecting tap and
the appliance.The whole appliance can now be disassembled and
removed.
Guarantee
The warranty for your DRU appliance will be provided by your
supplier. In case of malfunctions, you should always contact him.
You supplier will contact DRU if he feels this is necessary.The
factory warranty for your appliance is valid for 2 years after date
of purchase.
GENERAL NOTES
12
Page 15

Deutsch
Fire
13
INHALT
Einige kurze Worte . . . . . . . . . . . . . . . . . . . . . . . . . .14
Auspacken . . . . . . . . . . . . . . . . . . . . . . . . . . . . . . . . .14
Anschluss . . . . . . . . . . . . . . . . . . . . . . . . . . . . . . . . . .14
Installationsvorschrift . . . . . . . . . . . . . . . . . . . . . . . . .14
Gassorte . . . . . . . . . . . . . . . . . . . . . . . . . . . . . . . . . .14
Wichtig . . . . . . . . . . . . . . . . . . . . . . . . . . . . . . . . . . . .14
Platzbestimmung . . . . . . . . . . . . . . . . . . . . . . . . . . . .14
Aufstellen des Fire Country . . . . . . . . . . . . . . . . . . .14
Aufstellen des Fire 30 / Fire 50 . . . . . . . . . . . . . . . . .15
Anschluß der Gaszufuhr . . . . . . . . . . . . . . . . . . . . . .15
Einlegen der Holzblöcke . . . . . . . . . . . . . . . . . . . . . .16
Drahtlose Bedienung . . . . . . . . . . . . . . . . . . . . . . . . .16
Anschliessen des Empfängers . . . . . . . . . . . . . . . . . .16
Ersetzen der Batterien im Empfänger . . . . . . . . . . . .16
Einlegen oder Ersetzen der
Batterien in der Fernbedienung . . . . . . . . . . . . . . . .16
Gebrauchsanweisung . . . . . . . . . . . . . . . . . . . . . . . . .17
Zünden . . . . . . . . . . . . . . . . . . . . . . . . . . . . . . . . . . . .17
Fernbedienung . . . . . . . . . . . . . . . . . . . . . . . . . . . . . .17
Zündflammenstand . . . . . . . . . . . . . . . . . . . . . . . . . .17
Ausschalten . . . . . . . . . . . . . . . . . . . . . . . . . . . . . . . .17
Wichtig . . . . . . . . . . . . . . . . . . . . . . . . . . . . . . . . . . . .17
Allgemeine Bemerkungen . . . . . . . . . . . . . . . . . . . . .18
Rauchgassicherung . . . . . . . . . . . . . . . . . . . . . . . . . . .18
Wartung und Reinigung . . . . . . . . . . . . . . . . . . . . . . .18
Verfärbung von Wänden und Decken . . . . . . . . . . . .18
Zum ersten Mal heizen . . . . . . . . . . . . . . . . . . . . . . .18
Extra Schutz . . . . . . . . . . . . . . . . . . . . . . . . . . . . . . . .18
Entsorgen . . . . . . . . . . . . . . . . . . . . . . . . . . . . . . . . . .18
Garantie . . . . . . . . . . . . . . . . . . . . . . . . . . . . . . . . . . .18
Technische Spezifikation . . . . . . . . . . . . . . . . . . . . . .43
INHALT
Page 16

Einige kurze Worte
Sehr geehrter Kunde,
Herzlichen Dank für den Kauf dieses DRU Produktes.
Unsere Produkte sind nach den höchst möglichen
Qualitäts- Leistungs- und Sicherheitsanforderungen
entwickelt und fabriziert. Hierdurch haben Sie jahrelanges,
problemloses Gebrauchsvergnügen. Dieses DRU –Produkt
können Sie als Stimmungsfeuer in einer offenen Feuerstelle
oder im offenen Kamin gebrauchen. Das Gerät ist aber
nicht für die Raumheizung geeignet.
In diesem Buch finden Sie Instruktionen zur Installation
und zum Gebrauch Ihres neuen Blockfeuers. Lesen Sie die
Instruktionen und die Gebrauchsanleitung gut nach, so daß
Sie sich mit dem Gerät vertraut machen können. Möchten
Sie mehr Unterstützung haben, nehmen Sie dann Kontakt
mit Ihrem Lieferanten auf.
Auspacken
Nach dem Auspacken muss die Verpackung auf dem regulären Weg entsorgt werden.
Anschluss
Dieses Gerät muß von einem zugelassenen Installateur
angeschlossen werden.
INSTALLATIONSVORSCHRIFT
Gassorte
Dieses Gerät ist bestimmt und geeignet für die auf der
Typenplatte genannten Land und Gassorte. Kontrollieren
Sie, ob die örtliche Gassorte und der Gasdruck mit dem
der Typenplatte übereinstimmt. Bei dem Fire Country
befindet sich diese Typenplatte an der Innenseite des
Gestells, bei dem Fire 30 und Fire 50 befindet sich die
Typenplatte auf der Metallplatte an der Kette. Halten Sie
sich an die Gasinstallationsvorschriften und eventuelle
örtliche Vorschriften. Das Gerät muss von einem anerkannten Installateur angeschlossen werden.
Wichtig
• Sorgen Sie dafür, dass Gardinen und andere brennbare
Materialien mindestens 50 cm vom Gerät entfernt sind.
• Achtung! Anfassen von heissen Teilen kann Brandblasen
verursachen!
• Das Gerät muss von einem anerkannten Installateur installiert und gewartet werden.
Platzbestimmung
• Das Gerät darft nur ein einem gut zu lüftenden Raum
aufgestellt werden, so daßjederzeit eine ausreichende
Luftzufuhr vorhanden ist.
• Das Gerät ist nur geeignet zum Aufstellen in einem
Feuerplatz oder Kaminumbau von feuerfestem Material.
• Die Maße des Feuerplatzes oder des Kaminumbaus
müssen für den Fire Country minimal 654x 345 mm, für
den Fire 50 minimal 500x300 mm und für den Fire 30
minimal 400x300 mm sein
• Das Gewicht von dem Fire Country ist 19 kg.
Das Gewicht von dem Fire 30 und Fire 50 ist 6 kg.
• Die minimale Höhe des Rauchkanals ist 600 mm.
• Der Schornstein muß mindestens einen Durchmesser von
200 mm haben.
• Eine eventuell vorhandene Klappe, ein Schieber oder
anderes Hindernis im Schornstein muß entfernt werden.
• Die Mitte des Geräts darf maximal 60 mm aus der Mitte
des Abluftkanals stehen.
• Der Schornstein muß gefegt werden, bevor das Gerät
installiert wird und der Rauchkanal muß nach den
nationalen Richtlinien getestet sein.
Aufstellen des Fire Country
Der Fire Country ist entworfen für einen neu zu bauenden
Ofen für einen bestehenden offenen Kamin ohne
Feuerkorb (Prinzip lt. Zeichng. 1).Vorgenanntes
Einbaugehäuse kann bei Ihrem Installateur bestellt werden.
• Entfernen Sie das vormontierte Ziergitter, falls es nicht
benötigt wird, so daß Sie das Gerät z. B. in einer linken
oder rechten Ecke aufstellen können.
• Wenn die Gaszufuhrleitung über die Seite des Geräts
hereinkommen muß, diese hinter dem Fuß des Geräts
über dem Boden verlegen (siehe Zeichng.2)
• Stellen Sie das Gerät an der Rückwand bzw. der
Seitenwand auf.
14
INSTALLATIONSVORSCHRIFT
650
453
346
600
Ø 202 (inw)
50
1113
118
38C-755
677
fig. 1
Page 17

Deutsch
Fire
15
Sorgen Sie dafür, das der Luftschlitz an der Unterseite des
Geräts für die Belüftung des Brenners frei bleibt.Wird
dies nicht beachtet, können schädliche Gase entstehen.
Aufstellen des Fire 30 / Fire 50 (fg. 3)
Der Fire 30 und der Fire 50 ist entworfen für das
Aufstellen auf den Feuerkorb eines offenen Kamins.
Arbeiten Sie folgendermaßen:
• Machen Sie, falls nötig, ein Loch von minimal ø22 in den
bestehenden Rost.
• Der Gasanschluß unten am Brennerkasten muß durch
den Rost gesteckt werden.
• Befestigen Sie den Verschlußring (B) am Gasanschluß und
drehen Sie den Brennerkasten mit der Messingschraube
(C) fest.
• Schrauben Sie danach die zweite Messingschraube (D)
und die Kniekupplung (E) mit der Packung an den
Gasanschluß.
• Bringen Sie zwischen Mutter (D) und Kupplung (E) den
Bügel mit dem Gasregelblock (A) an.
• Drehen Sie die Messingmutter (D) endgültig fest.
• Verbinden Sie den Anschluß F des Gasregelblocks und der
Kniekupplung (E) mit der Leitung (G).
• Schrauben Sie den Anschluß des Oxypiloten in den
Gasregelblock (Anschluß H).
Achtung: Beim Anschließen des Oxypilots muß der Warl
beim Anschluß H leicht angezogen werden, wonach er mit
einem Steckschlüssel um ein Viertel gedreht werden muß.
• Verbinden Sie mit der Zündflammenleitung (J) den Zünd-
flammenbrenner und den Gasregelblock (Anschluß K und L).
• Befestigen Sie den Stecker des Zündkabels an der Zündkerze M des Zündflammenbrenners.
• Falls eine Aschenlade vorhanden ist, diese durch Entfernen
der Rückseite anpassen.
• Kontrollieren Sie die Anschlüsse auf Gasdichtheit.
Anschluß der Gaszufuhr
Gebrauchen Sie bei der Zufuhrleitung einen farbigen
Anschlußhahn mit Koppelung (für Belgien muß dieser
B.G.V.-geprüft sein.) Weiterhin gilt:
• Entlüften Sie die Zufuhrleitung, bevor das Gerät daran festgekoppelt wird.
• Der Bedienungshahn darf beim Anschließen an die
Gaszufuhrleitung nicht verdreht werden.
• Vermeiden Sie Spannungen auf Bedienungshahn und
Leitungen.
• Kontrollieren Sie die Anschlüsse auf Gasdichtheit.
INSTALLATIONSVORSCHRIFT
fig. 2
fig. 3
fig. 6
fig. 7
Page 18

Einlegen der Holzblöcke
Legen Sie die Holzblöcke bei Fire Country und Fire 50 als
folgt ein (Zeichng. 6):
• Legen Sie den großen Block an die Rückwand.
• Füllen Sie den Brennerkasten mit Vermiculite (4 Tütchen).
• Achten Sie darauf, daß kein Vermiculit auf oder zwischen
den Oxypilot kommt. Dies kann die Funktionalität der
Zündflamme beeinträchtigen.
• Verteilen Sie über das Vermiculite das Tütchen Embers (die
Tüte mit schwarzem Inhalt). Dies gibt einen Glüheffekt auf
dem Brennerbett.
• Danach legen Sie die übrigen Blöcke lt. Zeichnung ein.
Legen Sie die Holzblöcke bei Fire 30 folgendermaßen ein
(Zeichng.7+8):
• Füllen Sie den Brennerkasten mit Vermiculite (4 Tütchen).
• Achten Sie darauf, daß kein Vermiculit auf oder zwischen
den Oxypilot kommt. Dies kann die Funktionalität der
Zündflamme beeinträchtigen.
• Verteilen Sie über das Vermiculite das Tütchen Embers (die
Tüte mit schwarzem Inhalt). Dies gibt einen Glüheffekt auf
dem Brennerbett.
• Danach die übrigen Blöcke lt. Zeichnung einlegen.
Die Blöcke dürfen nicht auf eine andere Weise eingelegt
werden, weil sonst Rußbildung entstehen kann.Auch
dürfen die Blöcke nicht am Oxypilot anliegen, da dies die
Wirkung der Rauchgassicherung nachteilig beeinflussen
kann.
Gebrauchen Sie keine anderen Materialien als die mitgelieferten. Es darf nichts auf das Brennbett geworfen werden, auch kein Abfall, ausschließlich das vorgeschriebene
Material mit dem Holzblocksatz gebrauchen. Die mitgelieferten Materialien sind nicht brennbar und spezial für
dieses Gerät angefertigt.
Drahtlose Bedienung
Der Ofen wird Standard mit einer drahtlosen Bedienung
geliefert. Das Gerät ist mit einem stufenlos regelbaren
Gasregelblock versehen. Die elektrische Speisung geschieht
mittels Batterien. Die Lebensdauer der Batterien ist ungef
äht ein Jahr. Die drahtlose Bedienung funktioniert nur
dann, wenn der Zündflammenbrenner brennt.
Anschliessen des Empfängers
Die drahtlose Bedienung besteht aus einem Empfänger und
einer Fernbedienung. Diese sind zusammen in einem
Karton verpackt. Der Empfänger muss im Gerät
angeschlossen werden, bevor die Batterien montiert sind.
Arbeiten Sie hierfür folgendermassen:
• Nehmen Sie den Empfänger aus der Verpackung.
• Schieben Sie den Stecker des Anschlußkabels hinten auf
die Printplatte des Empfängers (Fig. 9).
• Schliessen Sie die Kabel an die Konnektoren des
Gasregelblocks an. Die Stecker haben verschiedene Masse
und korrespondieren mit den Konnektoren des
Gasregelblocks.
• Öffnen Sie den Deckel.
• Legen Sie die 4 Penlite Batterien (Type AA) ein.Achten Sie
auf die richtigen Polrichtungen.
• Bringen Sie den Deckel wieder auf seinen Platz.
• Legen Sie den Empfänger lose in die Aschenlade. Sorgen
Sie dafür, daß die rote LED nach vorne zeigt.
•
Achtung:
Bringen
Sie, wenn möglich,
den Empfänger so
weit wie möglich vom
Brennerkasten entfernt an, so daß der
Empfänger nicht zu
warm werden kann.
Ersetzen der Batterien im Empfänger
• Öffnen Sie die Klappe an der Vorderseite.
• Nehmen Sie den Empfänger und öffnen Sie die Deckel.
Hinter diesem Deckel befindet sich die Batterienhalterung.
• Entfernen Sie die alten Batterien und legen sie die Neuen
ein.Achten Sie dabei auf den + und –An-schluss der
Batterien und der Halterung; diese müssen übereinstimmen.
Einlegen oder Ersetzen der Batterien in der
Fernbedienung
• Entfernen Sie den Deckel an der Unterseite der
Fernbedienung.
• Schliessen Sie die Blockbatterien (Type 6LR61) an die
Klemme an.
• Legen Sie die Batterie in die Halterung.
• Schliessen Sie den Deckel.
• Im Display ist die Temperatur angegeben in Fahrenheit,
wenn Sie beide Knöpfe einige Sekunden eingedrückt halten, verändert dies in Celsius.
Achtung:Alte Batterien gehören nicht zum Hausabfall
sondern in die Tonne für kleine, chemische Abfälle.
16
INSTALLATIONSVORSCHRIFT
fig. 8
fig. 9
Page 19

Deutsch
GEBRAUCHSANWEISUNG
Zünden
Knopf A eindrücken und links herum drehen, bis zum
Zeichen
Bei wird das Gerät zünden. Kontrollieren Sie, ob die
Zündflamme brennt. Brennt die Zündflamme, Knopf A
noch ca. 5 Sek. ganz eingedrückt halten. Danach Knopf A
loslassen und kontrollieren, ob die Zündflamme anbleibt.
Drehen Sie nun Knopf A zur grossen Flamme
Hierdurch wird sich die Hauptklappe des Regelblocks öffnen.Abhängig vom Stand des Bedienungsknopfes B werden höhere oder niedrigere Flammen sichtbar.Wenn die
Zündung nicht normal arbeitet, das Zünden wiederholen.
Fernbedienung
Mit der Fernbedienung kann die Flammenhöhe geregelt
werden. Knopf B auf dem Gasregelblock wird sich hierdurch drehen. Indem Sie den untersten Knopf ( ) der
Fernbedienung eindrücken, wird die Flammen kleiner werden. Drücken Sie gleichzeitig die oberste Taste ( ) und
die kleine Taste der Fernbedienung, dann wird die Flamme
größer. Sollten Sie Knopf B mit der Hand bedienen, erreichen Sie das gleiche Resultat. Das Verdrehen von Knopf B
muß mit ein wenig Kraft geschehen. Das Klicken und
Ticken ist hierbei völlig normal.
Zündflammenstand
Wenn der Ofen nicht benutzt wird, aber wohl die
Zündflamme brennen muss, kann Knopf A zur kleinen
Flamme hin gedreht werden. Hierdurch wird die
Gaszufuhr zum Hauptbrenner abgeschlossen.
Ausschalten
Drehen Sie Knopf A zum „0"- Stand. Die Gaszufuhr zum
Brenner ist dann abgeschlossen.
Wichtig
Eine eingebaute Sicherheitsverriegelung tritt ein, wenn das
Gerät auf „UIT"(Aus-Stand) gestellt wird.Warten Sie
darum 5 Minuten, bevor Sie das Gerät wieder aufs neue
zünden.Versuchen Sie in dieser Zeit nicht, den Zündknopf
einzudrücken, da dieser durch die Sicherheitsverriegelung
blockiert ist. Drehen Sie nicht mit Gewalt an dem Knopf,
weil der Mechanismus beschädigt werden könnte.
GEBRAUCHSANWEISUNG
fig. 10
Fire
17
Page 20

ALLGEMEINE BEMERKUNGEN
Rauchgassicherung
Durch unzureichende Luftzufuhr oder durch schlechtes
Funktionieren des Schornsteinkanals kann die
Sauerstoffkonzentration im Raum so abnehmen, daß für die
vollständige Verbrennung des Gases zu wenig Sauerstoff übrig
bleibt, so daß Kohlenmonoxyd entsteht. Die Luftzufuhr muß mit
den nationalen Richtlinien übereinstimmen.
Dieses Gerät ist mit einem sogenannten Oxypilot
(Zündflammenbrenner) ausgestattet, der unter anderem verhindert, daß durch unvollständige Verbrennung von Gas eine
gefährliche Konzentration von Verbrennungsprodukten im
Raum entsteht. Der Installateur muß nach 10 Minuten heizen
kontrollieren, ob alle Rauchgase abgeführt werden.
Am Zündflammenbrenner ist keine Wartung möglich. Sollte
dieser defekt sein, können Sie über Ihren Installateur einen
Neuen bestellen. Man darf ausschließlich von authentischen
Ersatzteilen Gebrauch machen. Der Zündflammenbrenner darf
auf keinerlei Weise angepaßt oder beigestellt werden. Der
Installateur darf auf keinen Fall das Zündflammensystem kurz
schließen.
Wartung und Reinigung
Ihr Gerät muss einmal pro Jahr von einem qualifizierten Betrieb
kontrolliert werden und falls nötig,repariert oder gereinigt
werden. Die Kontrolle und die Wartung muss auf jeden Fall
eine gute und sichere Funktion des Gerätes garantieren. Sie
können hierfür von Ihrem Gasinstallateur oder einem spezialisierten Reparaturbetrieb Gebrauch machen. Es wird empfohlen, vor und während der Heizsaison das Gerät einige Male
staubfrei zu machen. Beim Reinigen des Geräts keine beißenden
oder scheuernden Mittel gebrauchen. Der Schornstein muß
regelmäßig kontrolliert werden um sicher zu sein, daß alle
Rauchgase durch den Schornstein abgeführt werden.
Darauf achten und verhindern, daß sich im Schornstein übermäßig viel Ruß bildet. Der sich formende Ruß muß entfernt
werden.Ausschließlich in kaltem Zustand mit einer Bürste oder
dem Staubsauger säubern.
Die Ventilation muß regelmäßig kontrolliert werden,um sicher
zu sein, daß es keine Behinderungen gibt.
Verfärbung von Wänden und Decken
Braunverfärbung ist ein ärgerliches Problem und ist schwierig
aufzulösen. Braunverfärbung kann z. B. durch Staubverbrennung verursacht werden, durch zu wenig Ventilation,
durch rauchen von Zigaretten oder brennende Kerzen.
Diese Probleme können vermieden werden, wenn der Raum,
in dem sich das Gerät befindet, gut ventiliert wird. Eine gute
Richtlinie hierfür ist:
Bei Neubau : 3.24 m3/ Stunden pro m
2
Bodenoberfläche eines Raums
Bei bestehendem Bau : 25.20 m3/ Stunden für einen Raum.
Gebrauchen Sie möglichst wenig Kerzen und Öllampen und
halten Sie den Verbrennungsdocht so kurz wie möglich. Diese
"Stimmungsmacher" sorgen für ziemliche Mengen schmutziger
und ungesunder Rußteilchen in Ihrer Wohnung.Rauch von
Zigaretten und Zigarren enthält u.a.Teer, der sich bei
Erwärmung ebenfalls auf kältere und feuchte Mauern niederschlägt. Bei einem neu gemauerten Kaminumbau oder nach
einem Umbau wird empfohlen, minimal 6 Wochen zu warten,
bevor man heizt. Die Baufeuchtigkeit muß nämlich vollkommen aus Wänden, Böden und Decken verschwunden sein.
Zum ersten Mal heizen
Wenn zum ersten Mal mit dem Gerät geheizt wird, kann ein
unangenehmer Geruch entstehen. Dieser wird durch
Lackdämpfe verursacht und verschwindet nach einigen
Stunden von selbst.Wir empfehlen Ihnen deshalb, das Gerät
bei der ersten Inbetriebnahme in den höchsten Stand zu
stellen, wobei Sie gleichzeitig den Raum, in dem der Ofen
steht, gut lüften.
Extra Schutz
Sollte das Gerät in einem Raum installiert sein, in dem sich
unbeaufsichtigte kleine Kinder oder hilfsbedürftige Menschen
aufhalten, sollte das Gerät nach Möglichkeit abgeschirmt werden.
Entsorgen
Sollten Sie das Gerät ersetzen oder entfernen, muss es auf
dem regulären Weg geschehen. Bevor zur Demontage übergegangen wird, erst den Anschlusshahn mit Koppelung zudrehen.
Die Koppelung zwischen Anschlusshahn und Gerät lösen. Das
ganze Gerät kann nun demontiert und entfernt werden.
Garantie
Für die Garantie auf Ihr DRU-Gerät ist Ihr Lieferant
zuständig. Bei Störungen wenden Sie sich bitte auf jeden Fall
an ihn. Ihr Lieferant schaltet DRU ein, wenn er das für
notwendig hält. Die fabriksseitige Garantie auf Ihr Gerät
beträgt zwei Jahre ab dem Kaufdatum.
ALLGEMEINE BEMERKUNGEN
18
Page 21

TABLE DES MATIÈRES
Préface . . . . . . . . . . . . . . . . . . . . . . . . . . . . . . . . . . . .20
Déballage de l’appareil . . . . . . . . . . . . . . . . . . . . . . . .20
Raccordement de l’appareil . . . . . . . . . . . . . . . . . . . .20
Instructions d’ installation . . . . . . . . . . . . . . . . . . . . .20
Sorte de gaz . . . . . . . . . . . . . . . . . . . . . . . . . . . . . . . .20
Important . . . . . . . . . . . . . . . . . . . . . . . . . . . . . . . . . .20
Conditions d'installation . . . . . . . . . . . . . . . . . . . . . .20
Installation du Fire country . . . . . . . . . . . . . . . . . . . .20
Installation du Fire 30 / Fire 50 . . . . . . . . . . . . . . . . .21
Connexion de l'alimentation en gaz . . . . . . . . . . . . .21
Positionnement des bûches . . . . . . . . . . . . . . . . . . . .21
Commande sans fil . . . . . . . . . . . . . . . . . . . . . . . . . .22
Le branchement du récepteur . . . . . . . . . . . . . . . . .22
Remplacement des batteries dans le récepteur . . . .22
Placement ou remplacement des batteries
dans la télécommande . . . . . . . . . . . . . . . . . . . . . . . .22
Mode d’emploi . . . . . . . . . . . . . . . . . . . . . . . . . . . . . .23
Allumage . . . . . . . . . . . . . . . . . . . . . . . . . . . . . . . . . . .23
Télécommande . . . . . . . . . . . . . . . . . . . . . . . . . . . . .23
La position veilleuse . . . . . . . . . . . . . . . . . . . . . . . . . .23
Extinction . . . . . . . . . . . . . . . . . . . . . . . . . . . . . . . . . .23
Important . . . . . . . . . . . . . . . . . . . . . . . . . . . . . . . . . .23
Remarques générales . . . . . . . . . . . . . . . . . . . . . . . . .24
Protection contre les émanations de gaz toxiques .24
Entretien et nettoyage . . . . . . . . . . . . . . . . . . . . . . . .24
La première mise en service . . . . . . . . . . . . . . . . . . .24
Changement de couleur des murs et plafonds . . . . .24
Protection supplémentaire . . . . . . . . . . . . . . . . . . . .24
Mise aux déchets . . . . . . . . . . . . . . . . . . . . . . . . . . . .24
Garantie . . . . . . . . . . . . . . . . . . . . . . . . . . . . . . . . . . .24
Détails techniques . . . . . . . . . . . . . . . . . . . . . . . . . . .43
Français
Fire
TABLE DES MATIÈRES
19
Page 22

Introduction
Cher client,
Nous vous remercions d'avoir acheté cet article fabriqué
par DRU.Tous nos articles sont conçus et fabriqués dans
le respect des consignes les plus sévères de qualité, de
performance et de sécurité.Ainsi, vous êtes assuré de
profiter de votre achat pendant des années, sans aucun
problème. Cet appareil de DRU peut être utilisé pour
créer un feu d'ambiance dans une cheminée mais n'a
cependant pas été conçu pour le chauffage.
Dans ce livret, vous trouverez des instructions pour l'installation et l'utilisation de votre nouveau feu de bûches.
Lisez avec attention toutes les instructions ainsi que le
manuel de l'utilisateur afin de vous familiariser avec cet
appareil. Pour toute assistance supplémentaire, veuillez
contacter votre fournisseur.
Déballage de l’appareil
Après avoir déballé l’appareil, jetez l’emballage conformément aux règles en vigueur.
Branchement
Cet appareil doit être branché par un installateur compétent.
INSTRUCTIONS D’INSTALLATION
Sorte de gaz
Cet appareil est destiné au la pays et adapté au type de gaz
spécifié sur la plaque signalétique.Vérifiez que le type et la
pression du gaz sur les lieux de l'installation sont conformes aux informations figurant sur la plaquette de type.
Sur le Fire country,cette plaque se trouve à l'intérieur du
châssis, sur les appareils Fire 30 et Fire 50, la plaque de
type se trouve sur la plaque attachée avec une chaînette.
Respectez les consignes d'installation relatives au gaz ainsi
que toute prescription locale. L'appareil doit être branché
par un installateur compétent.
Important
• Veillez à ce que les rideaux ou tout autre matériel inflammable soient au moins à une distance de 50 cm de
l’appareil.
• Attention: vous pouvez vous brûler si vous touchez des
parties chaudes de l’appareil!
• L’appareil doit être installé et entretenu par un installateur
agréé.
Conditions d'installation
• L'appareil doit être installé uniquement dans un local bien
ventilé afin de garantir une amenée d'air suffisante.
• L'appareil est uniquement conçu pour être installé dans
une cheminée en matériaux réfractaires.
• Les dimensions de la cheminée doivent être au moins de
645x345 mm pour le Fire country,de 500x300 mm pour
le Fire 50 et de 400x300 mm pour le Fire 30.
• Le poids de le Fire Countru est de 19 kg.
Le poids de le Fire 30 et Fire 50 est de 6 kg.
La hauteur minimale du conduit de fumée est de 600 mm.
• Le conduit d'évacuation (cheminée) doit avoir un diamètre
minimal de 200 mm.
• Tout volet, trappe ou autre obstacle se trouvant dans la
cheminée doivent être retirés.
• Le centre de l'appareil doit se trouver au maximum à 60
mm du centre du conduit d'évacuation.
• La cheminée doit être nettoyée avant d’installer l’appareil
et le conduit de fumée doit être testé conformément à la
réglementation nationale.
Installation du Fire country
Le Fire country peut être installé soit dans une nouvelle
cheminée à construire dans une cheminée déjà existante
ne comportant pas de grille (principe selon fig. 1).
20
INSTRUCTIONS D’INSTALLATION
650
453
346
600
Ø 202 (inw)
50
1113
118
38C-755
677
fig. 1
fig. 2
Page 23

Vous pouvez commander le manteau à encastrer ci-dessus
mentionné chez votre installateur.
• Si nécessaire, retirez les grilles d'ornement dont vous n'aurez pas besoin, afin de placer l'appareil dans un coin droit
ou dans un coin gauche.
• Si le conduit d'alimentation en gaz doit se trouver sur le
côté, placez-le derrière le pied de l'appareil sur le fond
(voir fig. 2).
• Positionnez l'appareil contre la cloison arrière ou contre la
cloison latérale si nécessaire.
Assurez-vous que l'ouverture d'admission d'air dans la partie inférieure de l'appareil reste dégagée pour pouvoir alimenter le brûleur en air. Le non-respect de cette consigne
peut entraîner l'émanation de gaz nocifs.
Installation du Fire 30 / Fire 50 (fig. 3)
Le Fire 30 et le Fire 50 sont conçus pour être placés sur la
grille d'une cheminée. Procédez de la manière suivante :
• Si nécessaire, faites une ouverture d'au moins ø 22 dans la
grille existante.
• L'allumage du gaz en dessous du bac de brûleur doit se
faire à travers la grille.
• Placer la bague de fermeture (B) sur le raccordement du
gaz et fixer le bac du brûleur au moyen de l’écrou en
laiton (C).
• Visser ensuite le deuxième écrou en laiton (D) et le rac-
cord coudé avec le joint sur la conduite de gaz.
• Placer le collier avec le bloc de réglage (A) du gaz entre
l’écrou D et le raccord E.
• Finir de serrer l’écrou en laiton (D).
• Joindre le raccordement (F) sur le bloc de réglage du gaz
au raccord coudé (E) au moyen du tuyau (G).
• Visser l’oxypilot au bloc de réglage du gaz (raccordement
H).
Attention: pour fermer l’Oxypilote, l’écrou du raccordement H doit être vissé à la main puis tourné d’un quart de
tour avec une clé plate.
•
Joindre le brûleur de la veilleuse au bloc de réglage du gaz
(raccordement K et L) au moyen du conduit de la veilleuse (J)
• Placer la prise du câble d’allumage sur la bougie M du
brûleur de la veilleuse.
• S'il y a un cendrier, adaptez ce dernier en retirant la partie
arrière.
• Vérifiez que les branchements ne laissent pas échapper de
gaz.
Connexion de l'alimentation en gaz
Dans le conduit d'alimentation, utilisez un robinet d'arrêt
agréé avec raccord.(En Belgique, ce robinet doit être
agréé par B.G.V.). Par ailleurs, respectez les consignes suivantes :
• Faites le vide d'air du conduit d'alimentation avant de
brancher définitivement l'appareil.
• Il est interdit de tourner le robinet de commande lors du
branchement à l'alimentation en gaz.
• Évitez toute tension sur les conduits et sur le robinet de
commande.
• Vérifiez que les branchements ne laissent pas échapper de
gaz
.
Positionnement des bûches
Pour le Fire country et pour le Fire 50, placez les bûches
de la manière suivante (fig. 6) :
• Posez la plus grosse bûche contre la paroi arrière.
• Remplissez le bac du brûleur de vermiculite (4 sachets).
• Assurez-vous qu'aucune vermiculite ne se trouve sur ou
entre la veilleuse, cela peut gêner le bon fonctionnement
de cette dernière.
Français
Fire
21
INSTRUCTIONS D’INSTALLATION
fig. 3
fig. 6
fig. 7
Page 24

• Répartissez le sachet de braises (le petit sac avec un
contenu noir) sur la vermiculite, cela donne l'effet d'un lit
de braises rougeoyantes.
• Placez ensuite les autres morceaux comme indiqué sur la
figure.
Pour le Fire 30, placez les morceaux de bois de la manière
suivante (fig 7+8) :
• Remplissez de vermiculite le bac du brûleur (4 sachets).
• Assurez-vous qu'aucune vermiculite ne se trouve sur ou
entre la veilleuse, cela peut gêner le bon fonctionnement
de cette dernière.
• Sur la vermiculite, répartissez le sachet de braises (le petit
sac avec un contenu noir) cela donne l'effet d'un lit de
braises rougeoyantes.
• Sur la vermiculite, répartissez le sachet de braises, cela
donne l'effet d'un lit de braises rougeoyantes.
• Placez ensuite les autres bûches comme indiqué sur la fig-
ure.
Les bûches doivent être placées de la manière indiquée,
sinon de la suie peut se former. Les bûches ne doivent pas
non plus être posées contre la veilleuse, car cela peut avoir
un effet négatif sur le dispositif de protection contre les
gaz toxiques.
N'utilisez pas d'autres matériaux que ceux fournis. Il est
interdit de jeter quoi que ce soit, pas même des déchets,
sur le foyer, si ce n’est les matériaux prescrits pour le jeu
de bûches. Ces matériaux sont ininflammables et spécialement conçus pour cet appareil
Commande sans fil
Le poêle est livré standard avec une commande sans fil.
L’appareil est pourvu d’un bloc régulateur de gaz réglable
sans degrés. L’alimentation électrique est assuré par des
batteries. La durée des batteries est environ un an. La
commande sans fil fonctionne seulement quand le brûleur
de la veilleuse est allumé.
Le branchement du récepteur
La commande sans fil se compose d’un récepteur et d’une
télécommande. Ceux-ci sont emballés ensemble dans un
carton. Le récepteur doit être connecté dans l’appareil
avant de placer les batteries.
Pour cela agissez comme suit:
• Retirez le récepteur de son emballage.
• Enfoncer la prise du câble de raccordement à l’arrière de
la plaque du circuit imprimé du recepteur (schéma 9).
• Reliez les fils sur les connecteurs du bloc régulateur de
gaz. Les fiches ont de différentes dimensions et correspon
dent avec les connecteurs sur le bloc régulateur de gaz.
• Ouvrez le couvercle
• Placez les 4 batteries (penlites type AA). Faites attention à
la bonne direction des pôles.
• Remettez le couvercle.
• Placer le récepteur dans le bac à cendres.Assurez-vous
que la diode rouge est orientée vers l'avant.
•
ATTENTION :
Placez le récepteur
le plus loin possible
du bac du brûleur,
afin que le récepteur ne devienne
pas trop chaud.
Remplacement des batteries dans le récepteur
• Ouvrez le clapet du devant.
• Posez le receveur sous l’appareil. Derrière ce couvercle se
trouve le porteur de batteries.
• Retirez les vieilles batteries et placez les nouvelles. Faites
attention aux pôles + et – des batteries et du porteur;
ceux-ci doivent correspondre.
Placement ou remplacement
des batteries dans la télécommande
• Enlevez le couvercle de la face inférieure de la télécom-
mande.
• Branchez la pile (un bloc du type 6LR61) sur le clip.
• Placez la pile dans le porteur.
• Refermez le couvercle.
• L’affichage donne la température en Fahrenheit, pour
l’avoir en Celsius, il suffit d’appuyer pendant quelques secondes sur les deux boutons
Attention: Ne jetez pas les batteries usées dans les
déchets domestiques mais dans les déchets chimiques.
22
INSTRUCTIONS D’INSTALLATION
fig. 8
fig. 9
Page 25

MODE D’EMPLOI
Les boutons servant au fonctionnement de l’appareil sont
situés sur le devant de l’appareil derrière la petite porte
de droite.
Allumage
Enfoncer la touche A et tourner vers la gauche jusqu’à la
petite flamme .
A l’appareil sera allumé.
Contrôler si la veilleuse est. Si la veilleuse est allumée,
maintenir le bouton A encore appuyé pendant 5 secondes
environ. Puis relâcher le bouton A et contrôler si la
veilleuse reste allumée.
Tourner ensuite le bouton A vers la grande flamme .
Maintenant le clapet principal du bloc de réglage s’ouvrira.
En fonction de la position du bouton de réglage B le
brûleur principal sera allumé par la veilleuse. En fonction
de la position du bouton de réglage B les flammes seront
plus basses ou plus hautes. Si l’allumage ne se fait pas normalement, répéter l’opération.
Télécommande
La télécommande permet de régler la hauteur de la
flamme, ce qui a aussi pour conséquence de faire tourner
le bouton B sur le bloc de réglage du gaz. En appuyant sur
le bouton inférieur ( ) de la télécommande, vous faites
baisser la flamme. Poussez simultanément sur le bouton
supérieur ( ) et sur le petit bouton de la commande à
distance et la flamme grandira. Le même résultat peut être
obtenu en faisant tourner manuellement le bouton B. Le
bouton B doit être tourné avec une certaine force et
entraîne un bruit de cliquetis parfaitement normal.
La position veilleuse
Si le poêle n’est pas utilisé, mais si vous désirez que la
veilleuse soit quand même allumée, vous pouvez tourner le
bouton A vers la petite flamme.Vous coupez ainsi l’arrivée
du gaz dans le brûleur principal.
Extinction
Tournez le bouton A sur la position ‘0’. L’alimentation en
gaz du brûleur principal et de la veilleuse est alors coupée.
Important
Un verrouillage de sécurité incorporé se déclenche quand
l’appareil est mis sur "Éteint" (position fermée). C’est
pourquoi il faut attendre 5 minutes avant de rallumer l’appareil. N’essayez pas d’appuyer sur le bouton d’allumage
pendant ce temps, car celui-ci est bloqué par le système de
verrouillage de sécurité. Ne forcez pas le bouton, sinon
cela pourrait en- dommager le mécanisme.
Français
MODE D’EMPLOI
fig. 10
Fire
23
Page 26

REMARQUES GÉNÉRALES
Protection contre les émanations de gaz
toxiques
À cause d'une alimentation en air insuffisante ou d'un mauvais
tirage du conduit de la cheminée, la concentration d'oxygène
dans l'air peut se réduire de telle sorte qu'il en reste trop peu
pour permettre une combustion complète du gaz.Ainsi se forme
du monoxyde de carbone. L’arrivée d’air doit être conforme à la
réglementation nationale.
Cet appareil est équipé d'un détecteur d'appauvrissement en
oxygène (brûleur à flamme-pilote). Ce système évite, entre
autres, l'accumulation dangereuse de résidus de combustion
gazeux liée à une combustion incomplète du gaz. L’installateur
doit contrôler 10 mn après l’allumage si tous les gaz s’évacuent
bien.
Le brûleur de la flamme-pilote ne peut pas être réparé. S'il est
en panne, commandez-en un nouveau auprès de votre installateur.Vous ne devez utiliser que des pièces de rechange authentiques et le brûleur de la flamme-pilote ne doit en aucune
manière être adapté ou mis au point. L'installateur ne doit en
aucun cas court-circuiter le système de la flamme-pilote.
Entretien et nettoyage
Votre appareil doit être contrôlé chaque année par une entreprise qualifiée. Le contrôle et l’entretien doivent dans tous les
cas déboucher sur un fonctionnement correct et sans risque de
l’appareil.Vous pouvez pour cela faire appel à votre gazinstallateur ou à une société d’entretien spécialisée. Il est grandement
conseillé de dépoussiérer l’appareil plusieurs fois avant et pendant la saison froide. Lors du nettoyage de l'appareil, n'utilisez
pas de produit corrosif ou abrasif.Le conduit de cheminée doit
être régulièrement contrôlé pour s’assurer que tous les gaz de
combustion s’évacuent bien par ce conduit.
Vérifier et prévenir un dépôt excessif de suie dans le conduit de
cheminée. La suie qui s’est déposée doit être nettoyée. Ne
ramoner que lorsque la cheminée est froide, au moyen d’une
brosse ou d’un aspirateur. La ventilation doit être régulièrement
contrôlée pour vérifier qu’il n’y a pas d’obstructions.
Changement de couleur des murs et plafonds
La teinte marron que prennent les murs et plafonds est un véritable problème qui est difficile à résoudre. Cette pellicule marron peut notamment provenir de la combustion des matériaux,
d’un manque de ventilation, de la fumée de cigarettes ou de bougies. Ce problème peut être évité en ventilant suffisamment la
pièce où l’appareil se trouve. La règle à respecter est la suivante:
Pour les nouvelles constructions : 3.24 m
3
/ heure par m
2
de surface au sol dans la
pièce
Pour les constructions existantes : 25.20 m
3
/ heure pour la
pièce.
Il est recommandé d’utiliser le moins souvent possible des bougies et des lampes à huile et, si c’est le cas, la mèche devrait être
la plus courte possible. Ces "éléments d’ambiance" sont à l’origine de quantités considérables de particules de suie salissantes et
malsaines dans votre logement. La fumée de sigarettes et sigares
contient notamment des particules de goudron qui, réchauffées,
se déposent sur les murs frais et humides.Au cas où le
manteau de cheminée vient d’être fait ou après des travaux de
modification, il est conseillé d’attendre au moins 6 semaines
pour chauffer jusqu’à ce que l’humidité de la construction disparaisse complètement des murs, du sol et du plafond.
La première mise en service
Lors de la première mise en service, l’évaporation de la laque
peut provoquer une odeur désagréable. Cette odeur disparaîtra
après quelques heures. Nous vous conseillons de chauffer la première fois l’appareil au maximum en prenant soin de bien aérer
la pièce où la cheminée est installée.
Protection supplémentaire
Si l’appareil est installé dans une pièce dans laquelle peuvent séjourner de petits enfants ou des personnes moins valides sans surveillance, il est préférable de prévoir une grille autour de l’appareil.
Mise aux déchets
Si vous remplacez ou enlevez l’appareil, vous êtes tenu de le
mettre aux déchets en respectant les normes prévues à cet
effet.Avant de démonter l’appareil, fermez d’abord le robinet de
raccordement avec le raccord. Dévissez le raccord entre le robinet de raccordement et l’appareil.Vous pouvez maintenant
démonter l’appareil et l’apporter à une déchetterie.
Garantie
La garantie sur votre appareil DRU est accordée via votre fournisseur. En cas de pannes, veuillez toujours prendre contact avec
ce dernier.Votre fournisseur contactera DRU s’il l’estime nécessaire. La garantie d’usine sur votre appareil s’étend sur 2 ans à
compter de la date d’achat.
REMARQUES GÉNÉRALES
24
Page 27

INDICE
Prefazione . . . . . . . . . . . . . . . . . . . . . . . . . . . . . . . . . .26
Disimballaggio . . . . . . . . . . . . . . . . . . . . . . . . . . . . . .26
Allacciamento . . . . . . . . . . . . . . . . . . . . . . . . . . . . . . .26
Prescrizioni per l’installazione . . . . . . . . . . . . . . . . . .26
Tipo di gas . . . . . . . . . . . . . . . . . . . . . . . . . . . . . . . . .26
Importante . . . . . . . . . . . . . . . . . . . . . . . . . . . . . . . . .26
lnstallazione . . . . . . . . . . . . . . . . . . . . . . . . . . . . . . . .26
Installazione del Fire Country . . . . . . . . . . . . . . . . . .26
Installazione del Fire 30 o del Fire 50 . . . . . . . . . . .27
Allacciamento all’alimentazione del gas . . . . . . . . . .27
Sistemazione dei ceppi di legno . . . . . . . . . . . . . . . .27
Comando a distanza senza filo . . . . . . . . . . . . . . . . .28
Collegamento del ricevitore . . . . . . . . . . . . . . . . . . .28
Sostituzione delle pile nel ricevitore . . . . . . . . . . . . .28
Sistemazione o sostituzione delle pile
nel comando a distanza . . . . . . . . . . . . . . . . . . . . . . .28
Instruzioni per l’uso . . . . . . . . . . . . . . . . . . . . . . . . . .29
Accensione . . . . . . . . . . . . . . . . . . . . . . . . . . . . . . . . .29
Telecomando . . . . . . . . . . . . . . . . . . . . . . . . . . . . . . .29
Funzionamento limitato alla fiamma pilota . . . . . . . .29
Spegnimento totale . . . . . . . . . . . . . . . . . . . . . . . . . .29
Importante . . . . . . . . . . . . . . . . . . . . . . . . . . . . . . . . .29
Indicazioni generali . . . . . . . . . . . . . . . . . . . . . . . . . .30
Protezione contro i fumi di combustione . . . . . . . . .30
Manutenzione e pulizia . . . . . . . . . . . . . . . . . . . . . . .30
Inscurimento delle pareti e dei soffitti . . . . . . . . . . .30
Prima accensione . . . . . . . . . . . . . . . . . . . . . . . . . . . .30
Misure extra di sicurezza . . . . . . . . . . . . . . . . . . . . .30
Messa fuori uso . . . . . . . . . . . . . . . . . . . . . . . . . . . . .30
Garanzia . . . . . . . . . . . . . . . . . . . . . . . . . . . . . . . . . . .30
Specifiche tecniche . . . . . . . . . . . . . . . . . . . . . . . . . . .43
Italiono
Fire
25
INDICE
Page 28

Prefazione
Gentile cliente,
Siamo lieti che abbia scelto di acquistare questo apparecchio DRU. I nostri prodotti sono studiati e fabbricati per
soddisfare le norme più severe di qualità, di rendimento e
di sicurezza e per questo possono essere usati per anni
senza problemi. Il prodotto DRU da lei scelto può essere
usato come fuoco ad effetto decorativo in un caminetto o
un focolare aperto, ma non come fonte di calore per uno
spazio.
In questo manuale troverà le istruzioni per l’installazione e
l’uso del fuoco di ceppi in legno da lei acquistato. Legga
con attenzione le istruzioni e le indicazioni per l’uso, per
imparare a conoscere l’apparecchio. Se desidera avere
maggiore assistenza, si rivolga al suo fornitore.
Disimballaggio
Una volta terminato il disimballaggio, i materiali di imballo
vanno eliminati secondo le norme vigenti.
Allacciamento
L’apparecchio deve essere allacciato alla rete del gas da un
tecnico autorizzato.
PRESCRIZIONI PER L’INSTALLAZIONE
Tipo di gas
L’apparecchio è destinato per questo paese ed è idoneo
per il tipo di gas riportato sulla targhetta di fabbricazione.
Controllare che il tipo di gas e la pressione del gas del
posto siano conformi a quanto riportato sulla targhetta
d’identificazione. Nel Fire Country la targhetta si trova
nella parte interna della struttura, nei modelli Fire 30 e
Fire 50 la targhetta si trova sulla piastra metallica fissata da
una catenella. Osservare le norme per l’installazione di
apparecchi a gas e le norme vigenti sul posto.
L’allacciamento dell’apparecchio alla rete del gas deve
essere effettuato da un tecnico autorizzato.
Importante
• Fare attenzione a che eventuali tende o altri materiali infiammabili non si trovino mai ad una distanza inferiore ai 50
cm dall’apparecchio.
• Attenzione! Il contatto con le parti calde può causare
scottature e vesciche!
• L’apparecchio deve essere installato da un installatore
autorizzato.
lnstallazione
• L’apparecchio può essere installato soltanto in uno spazio
ben ventilato, in modo che vi sia sempre sufficiente immissione d’aria.
• L’apparecchio può essere installato soltanto in un focolare
o in un caminetto di materiale refrattario.
•
Le misure del focolare o del caminetto per il Fire Country
devono essere almeno di 645x345 mm, per il Fire 50
almeno 500x300 mm e per il Fire 30 almeno 400x300 mm.
• Il peso di il Fire Country è 19 kg.
Il peso di il Fire 30 e Fire 50 è 6 kg.
• L’altezza minima della canna fumaria è 600mm.
•
La canna fumaria deve avere un diametro minimo di 200 mm.
• Sarà necessario eliminare una valvola per i fumi, una saracinesca o qualsiasi altro ostacolo eventualmente presente
nella canna fumaria.
• Il centro dell’apparecchio deve essere ad una distanza massima di 60 mm dal centro del canale d’emissione dei gas di
combustione.
Installazione del Fire Country
Il Fire Country può essere installato in focolare di nuova
costruzione sistemando l’apparecchio in un focolare aperto
senza gabbia portaceppi (principio in base alla fig. 1).
26
PRESCRIZIONI PER L’INSTALLAZIONE
fig. 2
650
453
346
600
Ø 202 (inw)
50
1113
118
38C-755
677
fig. 1
Page 29

La cassa ad incasso sopramenzionato potrà essere ordinato presso l’installatore.
• Rimuovere se necessario gli alari premontati che abbiano
scopo esclusivamente decorativo in modo da poter
posizionare l’apparecchio nell’angolo sinistro o destro.
• Se la conduttura d’alimentazione del gas deve passare dal
lato dell’apparecchio, sistemarla sul fondo, dietro al piede
dell’apparecchio (vedere fig.2).
• Sistemare l’apparecchio contro la parete posteriore e, se
necessario, la parete laterale
Assicurarsi che la presa d’aria al lato inferiore dell’apparecchio rimanga libera per consentire l’immissione d’aria per
il bruciatore; in caso contrario possono venire a formarsi
gas pericolosi.
Installazione del Fire 30 o del Fire 50 (fig. 3)
Il Fire 30 e il Fire 50 sono ideati per essere installati sulla
gabbia portaceppi di un focolare aperto. Procedere come
indicato qui di seguito:
• Se necessario, fare un foro di almeno ø 22 nella griglia
esistente.
• L’allacciamento al gas sotto la vaschetta portabruciatore
deve essere infilato attraverso la griglia.
• Collocare la rondella di chiusura (B) sul punto di allaccia-
mento del gas e fissare il contenitore del bruciatore avvi-
tando il dado di ottone (C).
• Avvitare, poi, il secondo dado di ottone (D) ed il giunto a
gomito (E) con materiale di guarnizione sul punto di allacciamento del gas.
• Mettere la staffa con il blocco regolatore del gas (A) tra il
dado D ed il giunto E.
• Avvitare il dado di ottone (D) fino a fissarlo definitivamente.
• Collegare l'allacciamento F sul blocco regolatore del gas
con il giunto a gomito (E) mediante il tubetto (G).
• Avvitare il collegamento della spia ad ossigeno nel blocco
regolatore del gas (collegamento H).
Attenzione: al momento del collegamento dell’oxypilot, il
cappellotto deve essere girato manualmente nel raccordo
H e quindi essere serrato per un altro quarto di giro con
una chiave doppia fissa.
• Servendosi del tubetto della fiamma pilota (J) unire il bru-
ciatore della fiamma pilota con il blocco regolatore del gas
(collegamenti K ed L).
• Inserire il cappuccio del cavo di accensione nella candela
M del bruciatore della fiamma pilota.
• In presenza di un cassetto delle ceneri, modificarlo eliminandone il lato posteriore.
• Controllare che gli allacciamenti siano a tenuta.
Allacciamento all’alimentazione del gas
Usare per la tubatura d’alimentazione un rubinetto con
marchio d’approvazione con accoppiamento (per il Belgio
il marchio deve essere B.G.V.). Fare attenzione anche ai
seguenti punti:
• Sfiatare la tubatura d’alimentazione prima che
l’apparecchio venga collegato.
• Non torcere il rubinetto di comando facendo
l’allacciamento alla tubatura d’alimentazione del gas.
• Evitare tensioni sul rubinetto rubinetto di comando e le
tubature.
• Controllare che gli allacciamenti siano a tenuta.
Sistemazione dei ceppi di legno
Sistemare i ceppi di legno del Fire Country e del Fire 50
nel modo seguente (fig. 6):
• Mettere il ceppo grande contro la parete posteriore.
• Riempire la vaschetta portabruciatore di vermiculite (4
sacchetti).
• Fare attenzione che non venga a trovarsi della vermiculite
sopra o tra l’oxypilot; infatti ciò potrebbe disturbare il
buon funzionamento della fiamma pilota.
• Spargere sopra la vermiculite il sacchettino con le braci (il
sacchetto con il contenuto nero), per creare l’effetto dei
tizzoni ardenti sul piano bruciatore.
• Sistemare quindi gli altri ceppi come indicato nella figura.
Sistemare i ceppi in legno del Fire 30 nel modo seguente
(fig 7+8):
• Riempire la vaschetta portabruciatore di vermiculite (4
sacchetti).
Italiono
Fire
27
PRESCRIZIONI PER L’INSTALLAZIONE
fig. 3
fig. 6
Page 30

• Fare attenzione che non venga a trovarsi della vermiculite
sopra o tra l’oxypilot; infatti ciò potrebbe disturbare il
buon funzionamento della fiamma pilota.
• Spargere sopra la vermiculite il sacchettino con le braci (il
sacchetto con il contenuto nero), per creare l’effetto dei
tizzoni ardenti sul piano del bruciatore.
• Sistemare quindi gli altri ceppi come indicato nella figura.
Non è possibile sistemare i ceppi in nessun altro modo,
per evitare la formazione di fuliggine. Essi non devono
essere posati contro l’oxypilot della fiamma pilota perché
ciò può diminuire l’efficacia del funzionamento del sistema
di sicurezza per i fumi di combustione.
Utilizzare esclusivamente gli articoli dati in dotazione. Sul
piano del bruciatore non devono trovarsi oggetti o rifiuti,
ma soltanto il materiale indicato nelle istruzioni assieme al
set di blocchi di legno. Essi sono prodotti con materiali
refrattari e sono fabbricati appositamente per questo
apparecchio.
Comando a distanza senza filo
Il caminetto ha in dotazione standard un comando a distanza senza filo. L’apparecchio è provvisto di un dispositivo
di regolazione del gas a variabilità continua. L’alimentazione
è a pile, con una durata di vita di circa un anno. Il comando
a distanza funziona soltanto se è accesa la fiamma pilota.
Collegamento del ricevitore
Il comando senza filo si compone di un ricevitore e di un
comando a distanza, imballati in una stessa scatola. Il ricevitore va inserito nell’apparecchio prima ancora di montare
le pile. Procedere nel modo seguente:
• Togliere il ricevitore dalla scatola.
• Springere la spina del cavo di connessione dietro la scheda
di circuito stampato del ricevitore, (fig 9).
• Allacciare i cavi ai connettori del dispositivo di regolazione
del gas. Le spine hanno misure diverse e corrispondono ai
connettori del dispositivo di regolazione del gas.
• Staccare il coperchio.
• Sistemare le quattro pile penlite (tipo AA). Attenzione a
mettere i poli nel verso giusto.
• Rimettere al suo posto il coperchio.
• Posizionare il ricevitore, sciolto, nel ceneratoio.Assicurarsi
che il led rosso si trovi nella parte anteriore.
•
ATTENZIONE:
sistemare la ricevitore più lontano
possibile dalla
vaschetta portabruciatore, per evitare
che il ricevitore si
surriscaldi.
Sostituzione delle pile nel ricevitore
• Aprire lo sportellino sul lato anteriore.
• Prendere il ricevitore e aprire il coperchio; dietro di esso
si trova il vano portabatterie.
• Rimuovere le pile vecchie e sostituirle con le nuove; fare
attenzione a che i poli + e - delle pile e del contenitore
coincidano
Sistemazione o sostituzione delle pile nel
comando a distanza
• Rimuovere il coperchio sul lato inferiore del comando a
distanza.
• Fissare con la molletta la pila (tipo 6LR61).
• Mettere la pila nel contenitore.
• Chiudere il coperchio.
• Il display riporta la temperatura in gradi Fahrenheit.
Tenendo premuti entrambi i pulsanti per alcuni minuti
avviene la conversione in gradi Celsius.
Attenzione: le pile vecchie non vanno buttate via tra i rifiuti domestici, ma devono essere consegnate agli appositi
centri di raccolta.
28
PRESCRIZIONI PER L’INSTALLAZIONE
fig. 8
fig. 7
fig. 9
Page 31

ISTRUZIONI PER L’USO
Accensione
Premere la manopola A e girarla verso sinistra fino al
segno che rappresenta la fiamma piccola .
Quando l’indice della manopola passerà per il segno ,
l’apparecchio si accenderà. Controllare che la fiamma
pilota sia accesa. Se è accesa la fiamma pilota, tenere premuta fino in fondo la manopola A per 5 secondi. Smettere
di premere la manopola A e controllare che la fiamma
pilota resti accesa. Girare poi la manopola A fino a raggiungere il segno che rappresenta la fiamma grande .
A questo punto si aprirà la valvola principale del dispositivo di regolazione. Messa in una determinata posizione la
manopola B, la fiamma pilota accenderà il bruciatore principale. La posizione della manopola B determina anche l’altezza delle fiamme. Se l’accensione non avviene correttamente, ripetere l’operazione.
Telecomando
Il telecomando permette di regolare l’altezza delle fiamme,
facendo girare la manopola B sul blocco comandi del gas.
Premendo sul tasto in basso ( ) le fiamme diverranno più
piccole. Premere contemporaneamente il pulsante superiore e il piccolo pulsante del telecomando e la fiamma
diverrà più alta. Se la manopola B viene manovrata manualmente si otterrà lo stesso risultato. Si dovrà girare la
manopola B con un po’ di forza, il ticchettio che accompagna questa operazione è assolutamente normale.
Funzionamento limitato alla fiamma pilota
Se non si usa l’apparecchio, ma la fiamma pilota deve
restare accesa, si può posizionare la manopola A sulla
fiamma piccola. In tal modo si impedisce che l’alimentazione possa somministrare gas al bruciatore principale.
Spegnimento totale
Girare la manopola A fino alla posizione "0". In tal modo si
chiude l’accesso del gas al bruciatore principale e a quello
della fiamma pilota.
Importante
Quando l’apparecchio è messo in posizione di spegnimento
totale ("OFF" / "SPENTO" / "UIT") entra in funzione un dispositivo di sicurezza che blocca l’accensione. Perciò bisogna
aspettare 5 minuti prima di riaccendere l’apparecchio. Non
si tenti di premere la manopola di accensione prima che sia
passato questo intervallo di tempo, perché la manopola è
bloccata dal dispositivo di sicurezza. Non forzare la manopola, perché facendolo si può danneggiare il meccanismo.
Italiono
ISTRUZIONI PER L’USO
fig. 10
Fire
29
Page 32

INDICAZIONI GENERALI
Protezione contro i fumi di combustione
In caso di ventilazione insufficiente o di cattivo funzionamento
del canale della canna fumaria, la concentrazione d’ossigeno
nella stanza può diminuire al punto tale da essere insufficiente
per una combustione completa del gas, con la conseguente formazione di ossido di carbonio. La presa dell’aria deve essere
conforme alla direttiva del paese.
L’apparecchio è dotato di un cosiddetto oxypilot (bruciatore
della fiamma pilota), che tra l’altro previene il rischio che una
pericolosa concentrazione di prodotti di combustione venga a
formarsi nello spazio a causa di una combustione parziale del
gas. L’installatore dovrà controllare che tutti i fumi di combustione vengano eliminati dopo aver fatto funzionare l’apparecchio per 10 min.
Non è necessaria alcuna manutenzione per il bruciatore della
fiamma pilota. Qualora il bruciatore della fiamma pilota fosse
guasto, sarà possibile ordinarlo tramite l’Installatore. Si deve
infatti fare uso esclusivamente di pezzi di ricambio autentici. Il
bruciatore della fiamma pilota non deve essere in alcun modo
modificato o regolato.L’installatore non dovrà mai mettere in
corto circuito l’impianto della fiamma pilota.
Manutenzione e pulizia
L’apparecchio deve essere controllato una volta l’anno da
un’impresa abilitata e, se necessario, riparato o pulito. Il controllo e la manutenzione devono in ogni caso comprendere un funzionamento ottimo e sicuro dell’apparecchio. Per questi interventi rivolgetevi al vostro installatore o un’impresa di manutenzione specializzata. Si raccomanda, prima e durante la stagione
fredda, di eliminare varie volte la polvere dall’apparecchio.
Non usare detergenti corrosivi o abrasivi per pulire l’apparecchio. Controllare regolarmente il camino, per avere la certezza
che tutti i fumi di combustione vengano eliminati tramite l’apposito canale.
Controllare e prevenire l’eccessiva formazione di fuliggine nel
camino. La fuliggine che si è depositata dovrà essere rimossa
con una spazzola o con l’aspirapolvere quando la superficie è
fredda. È necessario controllare regolarmente la ventilazione
per accertarsi che non vi siano ostacoli.
Inscurimento delle pareti e dei soffitti
L'inscurimento è un problema fastidioso e di difficile soluzione.
Esso può essere causato, tra l'altro, dalla combustione della polvere provocata da una scarsa ventilazione, dal fumo di sigarette
o di candele.
Il problema può essere prevenuto arieggiando bene la
stanza dove si trova l'apparecchio. Una buona direttiva a tale
proposito è la seguente:
in edifici di nuova costruzione: 3,24 m
3
/ora per m2di superfi-
cie di una stanza
in edifici già esistenti: 25,20 m
3
/ora per una stanza.
Limitare l'uso di candele e di lumi ad olio e tenere lo stoppino
più corto possibile. Queste luci creano un'atmosfera
accogliente, ma producono una notevole quantità di particelle
di fuliggine inquinanti e sporche nelle abitazioni. Il fumo di
sigarette e sigari contiene, tra l'altro, sostanze catramose che in
caso di riscaldamento si depositeranno sui muri più freddi e
umidi. Con un camino di nuova costruzione o dopo una ristrutturazione, si consiglia di attendere almeno 6 settimane prima di
iniziare a riscaldare, per dare il tempo all'umidità di evaporare
da pareti, pavimenti e soffitti.
Prima accensione
Quando si accende l’apparecchio per la prima volta, è possibile
che emani un odore sgradevole, causato dall’evaporazione della
lacca. L’odore svanisce dopo poche ore. Per questo consigliamo,
quando si accende l’apparecchio per la prima volta, di mantenerlo acceso al massimo, assicurando una buona ventilazione del
locale in cui si trova il caminetto.
Misure extra di sicurezza
È consigliabile rendere impossibile l’accesso all’apparecchio, se è
collocato alla porta di bambini, invalidi o disabili senza sorveglianza.
Messa fuori uso
Se l’apparecchio viene sostituito o rimosso,deve essere eliminato come previsto dalle norme vigenti. Prima di procedere allo
smontaggio, chiudere il rubinetto dell’allacciamento. Svitare il
manicotto che collega il rubinetto all’apparecchio.A questo
punto è possibile smontare e rimuovere tutto l’apparecchio.
Garanzia
La garanzia sul vostro apparecchio DRU viene data dal vostro
rivenditore. In caso di guasti dovete sempre prendere contatto
con lui. Il rivenditore coinvolgerà DRU se lo riterrà necessario.
La garanzia di fabbrica sul vostro apparecchio è di 2 anni dalla
data di acquisto.
INDICAZIONI GENERALI
30
Page 33

CONTENIDO
Preámbulo . . . . . . . . . . . . . . . . . . . . . . . . . . . . . . . . .32
Desembalaje . . . . . . . . . . . . . . . . . . . . . . . . . . . . . . . .32
Instalación . . . . . . . . . . . . . . . . . . . . . . . . . . . . . . . . .32
Instrucciones de instalacion . . . . . . . . . . . . . . . . . . .32
Tipo de gas . . . . . . . . . . . . . . . . . . . . . . . . . . . . . . . .32
Importante . . . . . . . . . . . . . . . . . . . . . . . . . . . . . . . . .32
Delimitación del lugar . . . . . . . . . . . . . . . . . . . . . . .32
Colocación del modelo Fire country . . . . . . . . . . . .32
Colocación del Fire 30 / Fire 50 . . . . . . . . . . . . . . .33
Conexión de la cañería de gas . . . . . . . . . . . . . . . . .33
Colocación de los tacos de leña . . . . . . . . . . . . . . . .33
Manejo a distancia . . . . . . . . . . . . . . . . . . . . . . . . . . .34
Conexión del recibidor de señal . . . . . . . . . . . . . . . .34
Cambio de las pilas en el recibidor de señal . . . . . .34
Colocación o sustitución de las pilas en
el mando a distancia . . . . . . . . . . . . . . . . . . . . . . . . .34
Guía del usuario . . . . . . . . . . . . . . . . . . . . . . . . . . . . .35
Encendido . . . . . . . . . . . . . . . . . . . . . . . . . . . . . . . . . .35
Mando a distancia . . . . . . . . . . . . . . . . . . . . . . . . . . .35
Posición de llama contínua . . . . . . . . . . . . . . . . . . . .35
Apagado . . . . . . . . . . . . . . . . . . . . . . . . . . . . . . . . . . .35
Importante . . . . . . . . . . . . . . . . . . . . . . . . . . . . . . . . .35
Recomendaciones generales . . . . . . . . . . . . . . . . . . .36
Sistema de seguridad del humo de gas . . . . . . . . . .36
Mantenimiento y limpieza . . . . . . . . . . . . . . . . . . . . .36
Cambios en el color de paredes y technos . . . . . . .36
Puesta en servicio por primera vez . . . . . . . . . . . . .36
Protección extra . . . . . . . . . . . . . . . . . . . . . . . . . . . .36
Puesta fuera de servicio . . . . . . . . . . . . . . . . . . . . . .36
Garantía . . . . . . . . . . . . . . . . . . . . . . . . . . . . . . . . . .36
Especificaciones técnicas . . . . . . . . . . . . . . . . . . . . . .43
Español
Fire
31
CONTENIDO
Page 34

Preámbulo
Estimado cliente:
Muchas gracias por la compra de este producto DRU.
Nuestros productos han sido fabricados según las más
altas exigencias de calidad, prestaciones y seguridad, por
ello puede Vd. confiar durante años de un disfrute y uso
sin problemas. Este producto DRU puede Vd. usarlo como
fuego ambiental en una chimenea, El aparato no puede ser
usado como calefacción ambiental.
En este librito encuentra Vd. las instrucciones para instalación y uso de su nuevo bloque de fuego. Lea con atención la guía de instrucciones y uso de forma que Vd. llegue
a conocer bien el aparato. Si necesita más ayuda póngase
en contacto con su proveedor.
Desembalaje
Una vez que Vd. la haya desembalado, el material de embalaje tiene que ser desechado segun las normas locales.
Instalación
Este aparato tiene que ser instalado por un instalador
autorizado
INSTRUCCIONES DE INSTALACION
Tipo de gas
Este aparato está destinado al país y es adecuado al tipo
de gas indicado en la placa de identificación. Controle si el
tipo de gas y la presión del mismo coinciden con los mencionados en la plaquita de especificación del tipo de gas. En
el modelo Fire encontrará esta plaquita en la parte interior del armazón, en los modelos Fire 30 y Fire 50 esta
plaquita se encuentra en la placa metálica con la cadenita.
Tenga en cuenta con las normas de instalación para gas
además las posibles normas locales. El aparato tiene que
ser instalado por un instalador autorizado.
Importante
• Preste atención de que cortinas u otro tipo de material
combustible guarde como mínimo una distancia de 50 cm
del aparato.
• No olvide que tocar zonas incandescentes puede originar
quemaduras.
• La instalación y mantenimiento del aparato tienen que ser
realizados por un instalador reconocido
Delimitación del lugar
• El aparato sólo se puede colocar en un lugar bien ventilado de tal manera que siempre haya suficiente ventilación.
• El aparato sólo es apto para su colocación en un lugar
para fuego o chimenea de materiales resistentes al fuego.
• Las medidas del lugar de fuego o chimenea tienen que ser
como mínimo, para el modelo Fire country de 645 x 345
mm., para el Fire 50 de 500 x 300 mm.Y para el Fire 30 de
400 x 300 mm.
• El peso de el Fire Country es 19 kg.
El peso de el Fire 30 y Fire 50 es 6 kg.
• La altura mínima de la salida de humos es de 600mm.
• La salida de la chimenea tiene que tener como mínimo un
diámetro de 200 mm.
• La presencia de una trampilla o cualquier otro obstáculo
tiene que ser retirada.
• La distancia máxima entre el centro del aparato y el centro de la salida de humos puede ser de 60mm.
• La chimenea tiene que ser limpiada antes de instalar el
aparato y la salida de humos tiene que haber sido probado
conforme a las normas nacionales vigentes.
Colocación del modelo Fire country
El modelo Fire country es apropiado para colocarlo en
una chimenea de nueva construcción que cuente para
colocarlo en una chimenea existente desprovista de parrilla de fuego (según el principio de la fig.1)
32
INSTRUCCIONES DE INSTALACION
650
453
346
600
Ø 202 (inw)
50
1113
118
38C-755
677
fig. 1
fig. 2
Page 35

El armario de empotrado arriba mencionado puede encargarlo a través de su proveedor.
• Retire en caso necesario los embellecedores de protección premontados ya que no son necesarios de forma que
Vd. pueda colocar el aparato en un rincón de izquierda o
de derecha
• En caso de que la toma de gas tenga que entrar por un
lateral, colóquelo detrás de la pata del aparato por encima
de la base (ver fig.2)
• Coloque el aparato contra la pared trasera o en caso
necesario contra el lateral.
Preste atención de que la ranura de de ventilación en la
parte baja del aparato esté libre para la ventilación del
quemador, si esto no fuese descuidado pueden aparecer
gases perjudiciales para la salud.
Colocación del Fire 30 / Fire 50 (fig. 3)
Los modelos Fire 30 y Fire 50 son aptos para colocarlos
en la parrilla de fuego de una chimenea. Proceda como
sigue:
• Haga en caso necesario un agujero de ø 22 en la regilla
existente
• La conexión de gas debajo del quemador tiene que ser
encendida a través de la regilla.
• Coloque la arandela de cierre (B) en la toma de gas y
ajuste el quemador con ayuda de la tuerca de cierre (C).
• A continuación gire la segunda tuerca de cierre (D) y el
codo de conexión (E) a la toma de gas.
• Coloque entre la tuerca (D) y el codo de conexión (E) el
soporte con el bloque regulador de gas (A).
• Gire la tuerca (D) hasta ajustarla bien.
• Conecte la conexión (F) al bloque regulador del gas con la
conexión a presión (E) haciendo uso del tubo (G).
• Gire la conexión del oxipiloto al bloque regulador de gas
(conexión H).
Preste atención: al conectar el oxipiloto, el cabezal de la
conexión H tiene que estar girado con la firmeza del puño
después tendrá que ser apretado un cuarto de vuelta con
ayuda de una llave.
• Conecte usando el tubo de la llama contínua (J) el que-
mador de la llama contínua con el bloque regulador de gas
(conexiones K y L).
• Coloque el encendedor del cable de encendido en la bujía
(M) del quemador de llama contínua.
• En caso de que haya un recipiente para ceniza, adaptar
este quitándole la parte trasera.
• Compruebe si las conexiones de gas están bien ajustadas
Conexión de la cañería de gas
Use en la tubería de gas una llave de conexión autorizada
por lo demás:
• Deje salir el aire de la cañería del gas antes de conectar el
aparato
• La llave de paso no puede ser forzada al conectarla a la
cañería del gas
• Evite toda tensión en la llave de paso y en las cañerías
• Compruebe si las conexiones de gas están bien ajustadas
Colocación de los tacos de leña
Coloque los tacos de leña en los modelos Fire country y
Fire 50 como sigue ( fig. 6):
• Coloque el taco más largo contra la parte trasera
• Llene el recipiente del quemador con la fermiculita
(4 saquitos)
• Preste atención de que la fermiculita no esté encima o
entre el chivato, esto podría entorpecer el buen funcionamieto de la llama contínua.
Español
Fire
33
INSTRUCCIONES DE INSTALACION
fig. 3
fig. 6
fig. 7
Page 36

• Esparza por encima de la fermiculita el saquito de astillitas
(el saquito con contenido negro), esto proporciona un
efecto incandescente a la brasa
• Coloque a continuación el resto de los tacos como se
indica en la figura
Coloque los tacos de leña en el modelo Fire 30 como
sigue (fig. 7+8)
• Llene el recipiente del quemador con la fermiculita (4
saquitos)
• Preste atención de que la fermiculita no esté encima o
entre el chivato, esto podría entorpecer el buen funcionamieto de la llama contínua.
• Esparza por encima de la fermiculita el saquito de astillitas
(el saquito con contenido negro), esto proporciona un
efecto incandescente a la brasa
• Coloque a continuación el resto de los tacos como se
indica en la figura.
Los tacos no se pueden colocar de otra forma por que
podría aparecer hollín, tampoco puden apoyarse contra el
quemador de llama contínua por que podría dañar el sistema de detección de gases de quemado.
No use otros materiales que los que le han sido facilitados. No arroje nada sobre el quemador, tampoco suciedad
, use solamente los materiales prescritos en el juego de
bloques de leña. Los materiales facilitados no pueden arder
y han sido especialmente fabricados para este aparato
Manejo a distancia
La chimenea se facilita de manera estandar con un manejo
a distancia. El aparato está provisto con un bloque regulador del gas. La alimentación eléctrica está facilitada por
pilas. La duración de las pilas viene a ser de un año. El
mando a distancia funciona sólo cuando la llama contínua
está encendida.
Conexión del recibidor de señal
El manejo a distancia consta de un recibidor de señal y de
un mando a distancia.Ambos han sido juntos empaquetados en una caja.Antes de montar las pilas tiene que ser
conectado el recibidor de señal al aparato, siga para ello
los pasos siguientes:
• Saque el recibidor de su embalaje
• Recorra la pegatina del cable de conexión en la parte
trasera del recibidor de señal, (fig. 9).
• Conecte los cables al bloque regulador del gas. Los
enchufes tienen medidas diferentes y pasan sólo en su
conector en bloque regulador de gas.
• Suelte la tapa
• Coloque las cuatro pilas (tipo AA). Preste atención a la
correcta dirección de los polos
• Coloque la tapa otra vez en su sitio
• Coloque el recibidor de señal en el cajón de ceniza. Cuide
de que el indicador rojo señale hacia delante.
•
ATENCION:
Coloque la recibidor
de señal, si es posible,
lo más distante posible de la caja del quemador de forma que
el recibidor no se
caliente demasiado.
Cambio de las pilas en el recibidor de señal
• Abra la trampilla del frente
• Coja el recibidor de señal y abra la tapa detras de esta se
encuentra la pieza donde se colocan las pilas.
• Quite las pilas viejas y sustituyalas por otras nuevas, preste
atención a las indicaciones + y - de los polos en
donde se colocan las pilas.
Colocación o sustitución de las pilas en el
mando a distancia
• Retire la trampilla de la parte inferior del mando a distancia
• Conecte la pila de bloque (tipo 6LR61) a su conector
• Introduzca la pila en su lugar
• Cierre la trampilla
• En la pantalla la temperatura se anuncia en grados
Fahrenheit. Si apreta simultaneamente los dos botones varios segundos cambia a grados Celsius.
Atención, las pilas viejas no se pueden tirar junto a la
basura de casa sino aparte como desechos químicos.
34
INSTRUCCIONES DE INSTALACION
fig. 8
fig. 9
Page 37

GUÍA DEL USUARIO
Encendido
Apretar el mando A y girarlo a la izquierda hasta la
llamita .
Cuando esté en encenderá el aparato. Controle si arde
la llama contínua, en caso afirmativo mantener apretado el
mando A durante 5 segundos más, despues soltar el
mando A y controlar si la llama contínua permanece
encendida. Gire a continuación el mando A en dirección de
mayor llama por esto la válvula principal del regulador
se abrirá. Dependiendo de la posición del mando B la llama
contínua encenderá o no el quemador.
Dependiendo de la posición del mando B se verán llamas
más o menos grandes. Si el encendedor no funciona de
forma normal, repita el encendido.
Mando a distancia
Con el mando a distancia puede regular la intensidad de la
llama. El botón B en el bloque regulador del gas girará
como consecuencia de ello.
Apretando al botón ( ) en el mando a distancia la llama
disminuirá. Si Vd. apreta al mismo tiempo al botón superior
y al botoncito del mando a distancia la llama aumentará de
tamaño. En caso de actuar manualmente sobre el botón B
se consigue el mismo resultado. Girar el botón B cuesta un
poco esfuerzo si oye ‘tics’ es normal.
Posición de llama contínua
Cuando la chimenea no se use pero si tenga que permanecer encendida la llama contínua el mando A puede
ser girado a la posición de llama pequeña, con esto el paso
de gas al quemador principal se cierra.
Apagado
Gire el mando A hacia la derecha a la posición "0". El paso
de gas tanto hacia el quemador principal como hacia la
llama contínua se cierra.
Importante
Un cierre de seguridad incorporado se pone en funcionamiento cuando el aparato se pone en situación de apagado " uit ". Si quiere volver a encender el aparato deberá
esperar 5 minutos.
En este tiempo no intente apretar al mando de encendido
ya que este mando bloquea el mecanismo de seguridad. No
fuerce el mando ya que esto puede estropear el mecanismo.
Español
GUÍA DEL USUARIO
fig. 10
Fire
35
Page 38

RECOMENDACIONES GENERALES
Sistema de seguridad del humo de gas
Una entrada insuficiente de aire o un mal funcionamiento de la
salida de la chimenea pueden aminorar la concentración de
oxigeno en el recinto de tal manera que el oxigeno necesario
para la quema completa del gas no sea suficiente y como consecuencia pueda aparecer monóxido de carbono.La toma de
aire tiene que ser conforme a las normas nacionales vigentes.
Este aparato ha sido acabado con un chivato (quemador de
llama contínua) que evita, entre otras cosas, que aparezca una
concentración peligrosa en el recinto de productos derivados
de la quema debidos a un quemado insuficiente del gas. El instalador tiene que controlar después de10 minutos de encendido
si todos los gases de la combustión son expulsados bien.
No hay mantenimiento posible del quemador de la llama contínua. En caso de que se estropee puede Vd. encargar otro a
través de su instalador. Sólo se pueden usar repuestos auténticos. El quemador de llama contínua no puede ser adaptado o
ajustado de ninguna otra manera. El instalador no puede en
ningún caso anular el sistema de llama contínua.
Mantenimiento y limpieza
Su aparato debe ser revisado una vez al año, y si es necesario,
reparado o limpiado, por una empresa cualificada. La revisión y
el mantenimiento deberán incluir por lo menos la comprobación de que el aparato funciona correctamente y su uso no
entraña riesgos. Esta revisión puede ser realizada por su instalador de gas o una empresa especializada en mantenimiento. Es
recomendable eliminar el polvo del aparato varias veces antes y
durante la temporada de encendido.Al limpiar el aparato no
usar productos corrosivos o que puedan rayar. La chimenea
tiene que ser controlada con regularidad para estar seguro de
que los humos son expulsados correctamente. Preste atención
y prevenga la formación de hollín en la chimenea.El hollín que
se haya formado en la chimenea tiene que ser eliminado en
situación de apagado por medio de un cepillo o con la aspiradora. La ventilación tiene que ser controlada con regularidad
para asegurarse de que no hay impedimentos.
Cambios en el color de paredes y techos
El obscurecido marrón que aparece es un problema de
difícil solución. Puede estar ocasionado entre otras cosas
por la quema de polvo, por una mala ventilación, por el
humo del tabaco o por quema de velas. Estos problemas
puede ser evitados ventilando la habitación donde se
encuentra el aparato de manera adecuada.A título de
información:
Para construcciones nuevas : 3.24 m3/ hora por cada
m2de suelo de habitación
Para construcciones existentes : 25.20m3/ hora por
habitación.
Use velas y lámparas de aceite lo menos posible y mantenga la mecha lo más corto posible. Estos dos tipos de crear
ambiente en su interior originan muchos humos, suciedad
y son poco sanos en su vivienda. El humo del tabaco contiene alquitrán que cuando se calienta se adhiere a las
paredes frias o humedas. En caso de una chimenea de construcción o después de una renovación es aconsejable
esperar 6 semanas antes de encenderla por primera vez, la
humedad del cemento y los ladrillos tiene que haber desaparecido de los laterales, del suelo y del techo.
Puesta en servicio por primera vez
Durante el primer encendido puede aparecer un olor
desagradable, esto se produce por los vapores de la pintura.
despues de unas horas desaparece este olor por eso le aconsejamos que la primera vez encienda el aparato en su posición de
máximo y ventile bien la habitación en que está instalado el
mismo.
Protección extra
En caso de que el aparato se instale en un lugar dedicado al
juego para niños o personas que necesiten ayuda y no haya
supervisión es recomendable una protección exterior del
aparato.
Puesta fuera de servicio
En caso de que Vd. sustituya o retire de servicio el aparato
tiene que hacerlo Vd. según las normas regulares.
Antes de la desconexión cierre en primer lugar la llave de paso.
Desconecte la conexión entre la llave y el aparato, una vez
hecho esto puede Vd. desmontar el aparato completamente.
Garantía
La garantía de su aparato DRU será prestada a través de su
proveedor. Es la persona a quien siempre debe recurrir en caso
de avería. Si su proveedor lo estima necesario, se pondrá en
contacto con DRU. La garantía de fábrica de su aparato es de 2
años a partir de la fecha de compra.
RECOMENDACIONES GENERALES
36
Page 39

INDICE
Nota prévia . . . . . . . . . . . . . . . . . . . . . . . . . . . . . . . .38
Desempacotar . . . . . . . . . . . . . . . . . . . . . . . . . . . . . .38
Ligação . . . . . . . . . . . . . . . . . . . . . . . . . . . . . . . . . . . .38
Instruçoes de instalação . . . . . . . . . . . . . . . . . . . . . .38
Tipos de gás . . . . . . . . . . . . . . . . . . . . . . . . . . . . . . . .38
Importante . . . . . . . . . . . . . . . . . . . . . . . . . . . . . . . . .38
O lugar de instalação . . . . . . . . . . . . . . . . . . . . . . . . .38
Instalar o Fire country . . . . . . . . . . . . . . . . . . . . . . . .38
Instalar o Fire 30 / Fire 50 . . . . . . . . . . . . . . . . . . . .39
Ligar a admissão de gás . . . . . . . . . . . . . . . . . . . . . . .39
Colocar os blocos de lenha . . . . . . . . . . . . . . . . . . .39
Governo sem fios . . . . . . . . . . . . . . . . . . . . . . . . . . .40
Ligar do receptor . . . . . . . . . . . . . . . . . . . . . . . . . . . .40
Substituição das baterías no receptor . . . . . . . . . . .40
Colocar o substituir das baterías no governo
a distância . . . . . . . . . . . . . . . . . . . . . . . . . . . . . . . . . .40
Modo de uso . . . . . . . . . . . . . . . . . . . . . . . . . . . . . . .41
Acender . . . . . . . . . . . . . . . . . . . . . . . . . . . . . . . . . . .41
Comando a distância . . . . . . . . . . . . . . . . . . . . . . . . .41
O nivel do bico piloto . . . . . . . . . . . . . . . . . . . . . . . .41
Desligar . . . . . . . . . . . . . . . . . . . . . . . . . . . . . . . . . . .41
Importante . . . . . . . . . . . . . . . . . . . . . . . . . . . . . . . . .41
Observaçoes gerais . . . . . . . . . . . . . . . . . . . . . . . . . .42
Protecção contra o ar viciado . . . . . . . . . . . . . . . . . 42
Manutenção e limpeza . . . . . . . . . . . . . . . . . . . . . . .42
Descoloração de paredes e tectos . . . . . . . . . . . . .42
Queimar para a primeira vez . . . . . . . . . . . . . . . . . .42
Protecção extra . . . . . . . . . . . . . . . . . . . . . . . . . . . . .42
Abolir . . . . . . . . . . . . . . . . . . . . . . . . . . . . . . . . . . . . .42
Garantía . . . . . . . . . . . . . . . . . . . . . . . . . . . . . . . . . . .42
Especificaçôes técnicas . . . . . . . . . . . . . . . . . . . . . . .43
Português
Fire
37
INDICE
Page 40

Nota prévia
Prezado cliente,
Agradecemo-lhe a aquisição deste produto DRU. Os nossos produtos foram desenvolvidos e fabricados de acordo
com as mais severas exigências de qualidade, desempenho
e segurança. Por isso, você poderá contar com uma utilização agradável e sem problemas durante muitos anos. Pode
usar este produto DRU como lume íntimo na lareira aberta. Contudo, o aparelho não é utilizável como aquecedor
de quarto.
Neste manual, você encontra as instruções de instalação e
o modo de emprego do seu novo fogão de blocos.Leia
atentamente as instruções e o modo de emprego, para
familiarizar-se com o aparelho. Se desejar mais assistência,
contacte o seu fornecedor.
Desempacotar
Estando pronto para desempacotar, a embalagem pode ser
levada ao Serviço Municipal de Limpeza.
Ligação
Este aparelho deverá ser ligado por um instalador competente.
INSTRUÇOES DE INSTALAÇÃO
Tipos de gás
Este aparelho destina-se ao país e tipo de gás indicado na
placa de fabricante.Assegure-se de que o tipo de gás e a
pressão de gás local correspondem com a indicação na
placa. No Fire Country, a placa encontra-se no lado interior da armação. No Fire 30 e Fire 50, a placa encontra-se
na chapa de metal presa na corrente pequena. Cumpra as
normas de instalação de aparelhos a gás e as eventuais
normas locais. O aparelho deverá ser ligado por um instalador competente.
Importante
• Ter o cuidado que, as cortinas e outros materiais combustível se encontram por menos a 50 cm do aparelho.
• Atenção! Contacto com as partes quentes pode causar
empolamentos de queimaduras!
• aparelho deve ser instalado e toda a manutenção feita por
um instalador .
O lugar de instalação
• O aparelho só poderá ser instalado num espaço bem ventilado que permita sempre a entrada de ar suficiente.
• O aparelho só serve para ser colocado numa lareira de
material à prova do fogo.
• A lareira deverá ter a dimensão de, no mínimo, 645x345 mm
no caso do Fire Country,no mínimo 500x300 mm no caso
do Fire 50 e no mínimo 400x300 mm no caso do Fire 30.
• O peso de o Fire Country é 19 kg.
O peso de o Fire 30 e Fire 50 é 6 kg.
• A altura mínima da chaminé é 600mm.
•
A chaminé deverá ter um diâmetro de 200 mm no mínimo.
• Um eventual obstáculo dentro da chaminé, por exemplo
uma válvula, deverá ser removido.
• A distância entre o centro do aparelho e o centro do
canal de saída pode ser de 60 mm no máximo.
• A chaminé tem que ser limpo antes da instalação do aparelho e tem que ser testada conforme as directrizes
nacionais.
Instalar o Fire country
O Fire country foi concebido para ser instalado num fogão
de sala novo para ser instalado numa lareira aberta exis-
tente que não tenha grelha de fogo (esquema segundo a
fig. 1). A caixa embutida mencionada poderá ser encomen-
38
INSTRUÇOES DE INSTALAÇÃO
650
453
346
600
Ø 202 (inw)
50
1113
118
38C-755
677
fig. 1
fig. 2
Page 41

dada no seu instalador.
Dado o caso, remover as grades decorativas pré-montadas
de que não precisa, de modo que pode colocar o aparelho
no canto esquerdo ou direito, por exemplo.
• Se o tubo de admissão do gás tiver que entrar pela parte
lateral do aparelho, instalar este tubo detrás do pé do
aparelho por cima do fundo (ver fig. 2).
• Coloque o aparelho contra a parede traseira e, dado o
caso, a parede lateral.
Assegure-se de que a fenda de ar do lado de baixo do
aparelho fique livre para o arejamento do queimador. Se
não o fizer, podem formar-se gases nocivos.
Instalar o Fire 30 / Fire 50 (fig. 3)
O Fire 30 e o Fire 50 foram concebidos para serem colocados na grelha de fogo duma lareira aberta. Proceda do
modo seguinte:
• Se for preciso, faça um orifício de, no mínimo, ø 22 na
grelha existente.
• A ligação de gás no lado de baixo do recipiente do
queimador tem que ser enfiado pela grelha.
• Ponha a anilha (B) na conexão do gás e fixe o tabuleiro do
queimador firmemente com a porca de latão (C).
• Depois aperte a segunda porca de latão (D) e a união com
a embalagem (E) na conexão do gás.
• Coloque o suporte com o bloco de controlo do gás (A)
entre a porca (D) e a união (E).
• Aperte a porca de latão (D) firmemente.
• Conecte o bloco de controlo do gás (conexão F) com
união (E) por meio do tubo (G).
• Aperte a conexão do oxypilot no bloco de controle do
gás (conexão H).
Atenção: para ligar o Oxypilot é preciso apertar a união
de rosca fêmea manualmente na ligação H e, em seguida,
aparafusá-la numa volta de 90 o com uma chave de bocas.
• Conecte o bico piloto ao bloco de controlo do gás
(conexões K e L) usando o tubo do bico piloto (J).
• Coloque a tomada do fio da ignição na vela do bico piloto
(M)
• Se o aparelho estiver provido de um guarda-cinzas, adaptar
o guarda-cinzas retirando o lado de trás.
• Verifique a vedação hermética das ligações.
Ligar a admissão de gás
Na admissão, usar uma torneira de ligação aprovada (na
Bélgica, deverá ter a aprovação B.G.V.).Além disso:
• Deixe escapar o ar da admissão de gás antes de ligar o
aparelho.
• A torneira de admissão não pode ser retorcida quando é
ligada ao tubo de entrada de gás.
• Evite as tensões na torneira de admissão e nos tubos.
• Verifique a vedação hermética das ligações.
Colocar os blocos de lenha
No caso do Fire country e do Fire 50, coloque os blocos de
lenha do modo seguinte (fig. 6):
• Encoste o bloco grande ao lado de trás.
• Enche o recipiente do queimador com vermiculite
(4 saquinhos).
• Faça atenção que não entra vermiculite dentro do ou
entre o oxypilot (piloto), porque pode interromper o bom
funcionamento do piloto.
• Espalhe o carvão (1 saquinho) por cima do vermiculite
(o saco com conteúdos pretos), para dar um efeito de
incandescência ao leito do queimador.
Português
Fire
39
INSTRUÇOES DE INSTALAÇÃO
fig. 3
fig. 6
fig. 7
Page 42

• Em seguida, colocar os outros blocos como está indicado na
figura. No caso do Fire 30, coloque os blocos de lenha do
modo seguinte (fig. 7+8):
• Encha o recipiente do queimador com vermiculite
(4 saquinhos).
• Faça atenção que não entra vermiculite dentro do ou
entre o oxypilot (piloto), porque pode interromper o bom
funcionamento do piloto.
• Espalhe o carvão (1 saquinho) por cima do vermiculite
(o saco com conteúdos pretos) para dar um efeito de
incandescência ao leito do queimador.
• Em seguida, colocar os outros blocos como está indicado
na figura.
Os blocos não podem ser colocados de outra maneira,
porque isto pode causar fuligem. Os blocos também não
podem encostar-se ao oxypilot (piloto), já que isto pode
prejudicar o funcionamento da protecção contra o ar viciado.
Não use outros materiais senão os fornecidos. Nada pode
ser lançado no fundo da lareira, nem lixo, exclusivamente
os materiais prescritos com o conjunto de blocos de
madeira. Os materiais fornecidos são incombustíveis e
foram concebidos especialmente para este aparelho.
Governo sem fios
A lareira é fornecida básicamente com uma operaçâo sem
fios.O aparelho está previsto dum bloco de regulador da
gás e a regulaçâo infinitamente variável.A abastecimento
eléctrico é produzido pelas baterías.A vida destas baterías
é approx. 1 ano. O governo sem fios trabalha unicamente
depois de haver acendido o bico piloto.
Ligar do receptor
A operaçâo sem fios consiste dum receptor e dum governo a distância, dos quais são empacotados numa caixa. O
receptor deve ser ligado ao aparelho antes de que as
baterías sejam montadas. Conserva as instruçôes
seguintes:
• Retira o receptor da caixa
• Empurre o pino do cabo de conexão atrás de place de circuitos internos do receptor, (fig. 9).
• Liga os fios aos conetores do bloco de regulação de gás.
As bujâos têm várias dimensôes e são conforme com os
conetores no bloco de regulação de gás.
• Retira a cobertura
• Coloque as 4 baterías penlite (tipo AA). Conserva as
direções de pólos correctas.
• Novamente coloque a cobertura
• Posicione o receptor coloque no cinzeiro Assegure-se de
que o LED vermelho aponte para a frente.
•
ATENÇÃO:
coloque a receptor,
se possível, o mais
longe possível do
recipiente de
queimador evitando
o aquecimento do
recipiente.
Substituição das baterías no receptor
• Abrir a cobertura ao lado frontal
• Apanhe o receptor e abra a tampa.Atrás desta tampa
encontra-se o suporte da bateria.
• Remover as baterías velhas e colocar as novas.
Conserva as ligaçôes de + e - das baterías e tenedor.
Estas devem ser conforme.
Colocar o substituir das baterías no governo a
distância
• Remover a cobertura do lado inferior do governo a
distância
• Liga a batería de bloco (tipo 6LR61) ao clip
• Coloque a batería no tenedor
• Cerra a cobertura
• A temperatura no mostrador está indicada em Fahrenheit.
Ao manter pressionados ambos os botões por alguns
segundos, a temperatura se transformará em Celsius.
Atenção! As baterías velhas não podem ir para o lixo da
casa, pelo qual devem ser depositados nos locais apropriados para quimicos pequenos.
40
INSTRUÇOES DE INSTALAÇÃO
fig. 8
fig. 9
Page 43

MODO DE USO
Acender
Prensar a botâo A e gira à esquerda até .
O aparelho acenderá na . Controla se o bico está
queimando. Se o bico piloto está queimando, o botão A
deve ser carregado continuadamente mais 5 seg. Depois
largar a botão A e controlar se o bico piloto continua a
queimar. Gira agora a botâo A até o bico grande . Por
isto a vâlvula principal do bloco reguladora ouvrirá.
Dependendo da posição da botão B o queimador principal
seja acendido pelo bico piloto. Depende da posiçâo da
botâo B, podem ver as chamas mais altas o baixas. Quando
a ignição não funciona normalmente, repetir a ignição.
Comando a distância
O comando a distância permite a regulação da altura da
chama. O comando faz girar o botão B no bloco de controlo de gás. Quando se preme o botão inferior ( ) do
comando a distância. Pressione o botão superior e o botão
pequeno do controlo remoto ao mesmo tempo para
aumentar a chama. É possível obter o mesmo resultado
girando o botão B manualmente. Para girá-lo é preciso
alguma força, e é absolutamente normal ouvir-se uns sons.
O nivel do bico piloto
Quando o queimador não é usado, o bico piloto deve
queimar, a botâo A pode ser girado para a chama pequena.
Por isto o abastecimento de gás para o queimador principial esté encerrado.
Desligar
Gira a botâo A até direito para a posiçâo ‘o’. O abastecimento de gás para o bico piloto e principal então está
encerrado .
Importante
Um mecanismo de fixaçâo de segurança montado no aparelho fica activo pondo o aparelho na posição‘ desligada’
(posição encerrada). Espera durante 5 minutos antes de
reacender o aparelho. Não carregue o botão de acender
durante este tempo, estando bloqeando por um mecanismo de fixação de segurança. Não tratar com forçar a
botão, para evitar a danificação do mecanismo.
Português
MODO DE USO
fig. 10
Fire
41
Page 44

OBSERVAÇOES GERAIS
Protecção contra o ar viciado
Em consequência dum fluxo de ar insuficiente ou dum conduto
de chaminé que não funciona bem, a concentração de oxigénio
no espaço pode diminuir tanto que a quantidade de oxigénio
restante não chega para a combustão completa do gás. Isto
resulta na formação de monóxido de carbono.O orifício de
aspiração tem que ser conforme a directriz nacional.
Este aparelho está equipado com um chamado ‘oxypilot’ (piloto). O oxypilot evita, entre outros, que se forme uma concentração perigosa de produtos de combustão no espaço,em
resultado da combustão incompleta do gás. O instalador deve
verificar depois de aquecer durante 10 minutos se todos os
fumos expelidos estão sendo evacuados.
O piloto é livre de manutenção.Em caso de avariação do piloto
é possível encomendar um novo exemplar no seu instalador. Só
é permitido a substituição por peças autênticas. O piloto não
pode ser adaptado ou ajustado de modo nenhum. O instalador
nunca poderá ligar o sistema de piloto em curto-circuito.
Manutenção e limpeza
O seu aparelho deve ser controlado uma vez por ano por uma
empresa qualificada e, se necessário, reparado ou limpo. O controlo e manutenção prestam-se, em todo o caso, a um funcionamento correcto e seguro do aparelho. Pode recorrer aos
serviços da sua empresa instaladora de gás ou a uma empresa
de manutenção especializada. Recomenda-se que limpe o pó do
aparelho antes e durante os períodos de maior utilização.
Não utilizar produtos corrosivos ou abrasivos para a limpeza.
A chaminé deve ser controlada regularmente para ter certeza
que todos os fumos expelidos são evacuados através da chaminé.
Fiscalizar e prevenir a formação excessiva de acumulação de
fuligem na chaminé.A fuligem formada deve ser tirada na
condição fria, exclusivamente com uma escova ou aspirador de
pó.A ventilação deve ser controlada regularmente, para ter
certeza que não há entraves.
Descoloração de paredes e tectos
Descoloração em castanho e um problema fastidioso e é difícil
resolver esse problema.Descoloração em castanho pode ser
causado por, entre outros, combustão de poeira
devido à ventilação insuficiente, por fumar cigarros ou por
acender velas.
Estes problemas podem ser evitados por uma boa ventilação
do quarto onde se encontra o aparelho. Uma boa directiva
para isto:
Em novas construções : 3.24 m3/ hora por m2de
superfície de chão de um
quarto.
Em construções existentes : 25.20 m3/ hora para um
quarto.
Não utiliza muitas velas ou candeias e mantenha o rastilho mais
curto que possível. Estes "criadores de ambiente" provocam
muitas quantidades de partes de fuligem poluídas e insalubres
dentro da sua habitação. Fumo de cigarros e charutos contem
e. o. substâncias alcatroadas que, quando aquecidas, também
abaterão nas paredes mais frias e molhadas. Numa lareira construída novamente ou depois de uma transformação é
recomendado de esperar pelo menos 6 semanas antes de
começar a queimar, porque o molho da transformação tem de
ser desaparecido completamente das paredes, do chão e do
tecto.
Queimar para a primeira vez
Durante a primeira queimadela,, é possível que se presenta um
odor desagradável, Isto é causado pela a vaporização da pintura, do qual desaparecerá depois de algunas horas.
Por isto aconselhamos, que queime o aparelho numa primeira
vez com a posiçâo mais alta, ventilando o espaço aonde o aparelho se encontra, muito bem.
Protecção extra
Se o aparelho é instalado num espaço onde se encontram crianças ou pessoas indigentes sem supervisão, é necessário proteger o aparelho.
Abolir
Se quer substituir o abolir o aparelho,deve descarrega-lo de
por via legal.
Antes de continuar com a desmontagem, desligar a válvula de
ligação com acoplamento em primeiro lugar.
Destornar a valvula de ligação entre a válvula de ligação e o
aparelho.O aparelho completo pode ser desmontado e descarregado.
Garantía
A garantia do seu aparelho DRU é oferecido pelo seu fornecedor. Em caso de falhas técnicas deve sempre contactá-lo. O seu
fornecedor chamará a DRU se achar necessário.O prazo da
garantia de fábrica do seu aparelho é de 2 anos após a data de
compra.
OBSERVAÇOES GERAIS
42
Page 45

Fire
TECHNICAL SPECIFICATIONS
43
Fire 30 Fire 50 / Country
Gassoort,Type of gas, Gassorte, Sorte de gaz,Tipo di gas. G20 G25 G20 G25
Gassdruk, Gas pressure, Gasdruck, Pression de gaz, Pressione di gas,
Presion de gas, Pressao de gas.
mbar 20 25 20 25
Nom. Belasting (Hs), Nom.Load (Hs), Nom. Belastung (Hs), Debit nominal (Hs),
Portata Nominale (Hs), Capacidad nominal (Hs), Capacidade nominale (Hs).
kW 9,0 7,2 10,5 9,8
Nom. Belasting (Hi), Nom.Load (Hi), Nom. Belastung (Hi), Debit nominal (Hi),
Portata Nominale (Hi), Capacidad nominal (Hi), Capacidade nominale (Hi).
kW 8,1 6,5 9,5 8,8
Gasverbruik, Consumption of gas, Gasverbrauch,
Consommation de gaz, Consumo de gas.
m3/h 0,85 0,786 0,995 1,06
NL BE DE GB IT ES PT
Catergorie, Category, Kategorie, Catégorie, Categoria I
2L
I
2E+I2E
I
2H
I
2H
I
2H
I
2H
Page 46

44
Page 47

Fire
45
Page 48

 Loading...