

Page 1

2003
EN
Metal Detector
USER’S GUIDE
FX3000
Page 2

Dear Customer;
Thank you for purchasing the DRS FX3000, a
very practical and easy-to-use, but highly
sophisticated and deep-seeking metal detector.
Enjoy using the DRS FX II very often and make
sure you completely understand the ground
balance procedure, so that you always get the
very best results from your detector
.
This User's Guide is copyright protected property of R2L
Enterprises, Inc, and DRS Electronics USA, Austin, Texas,
USA. and may not be copied or reused without specific
written permission.
Page 3
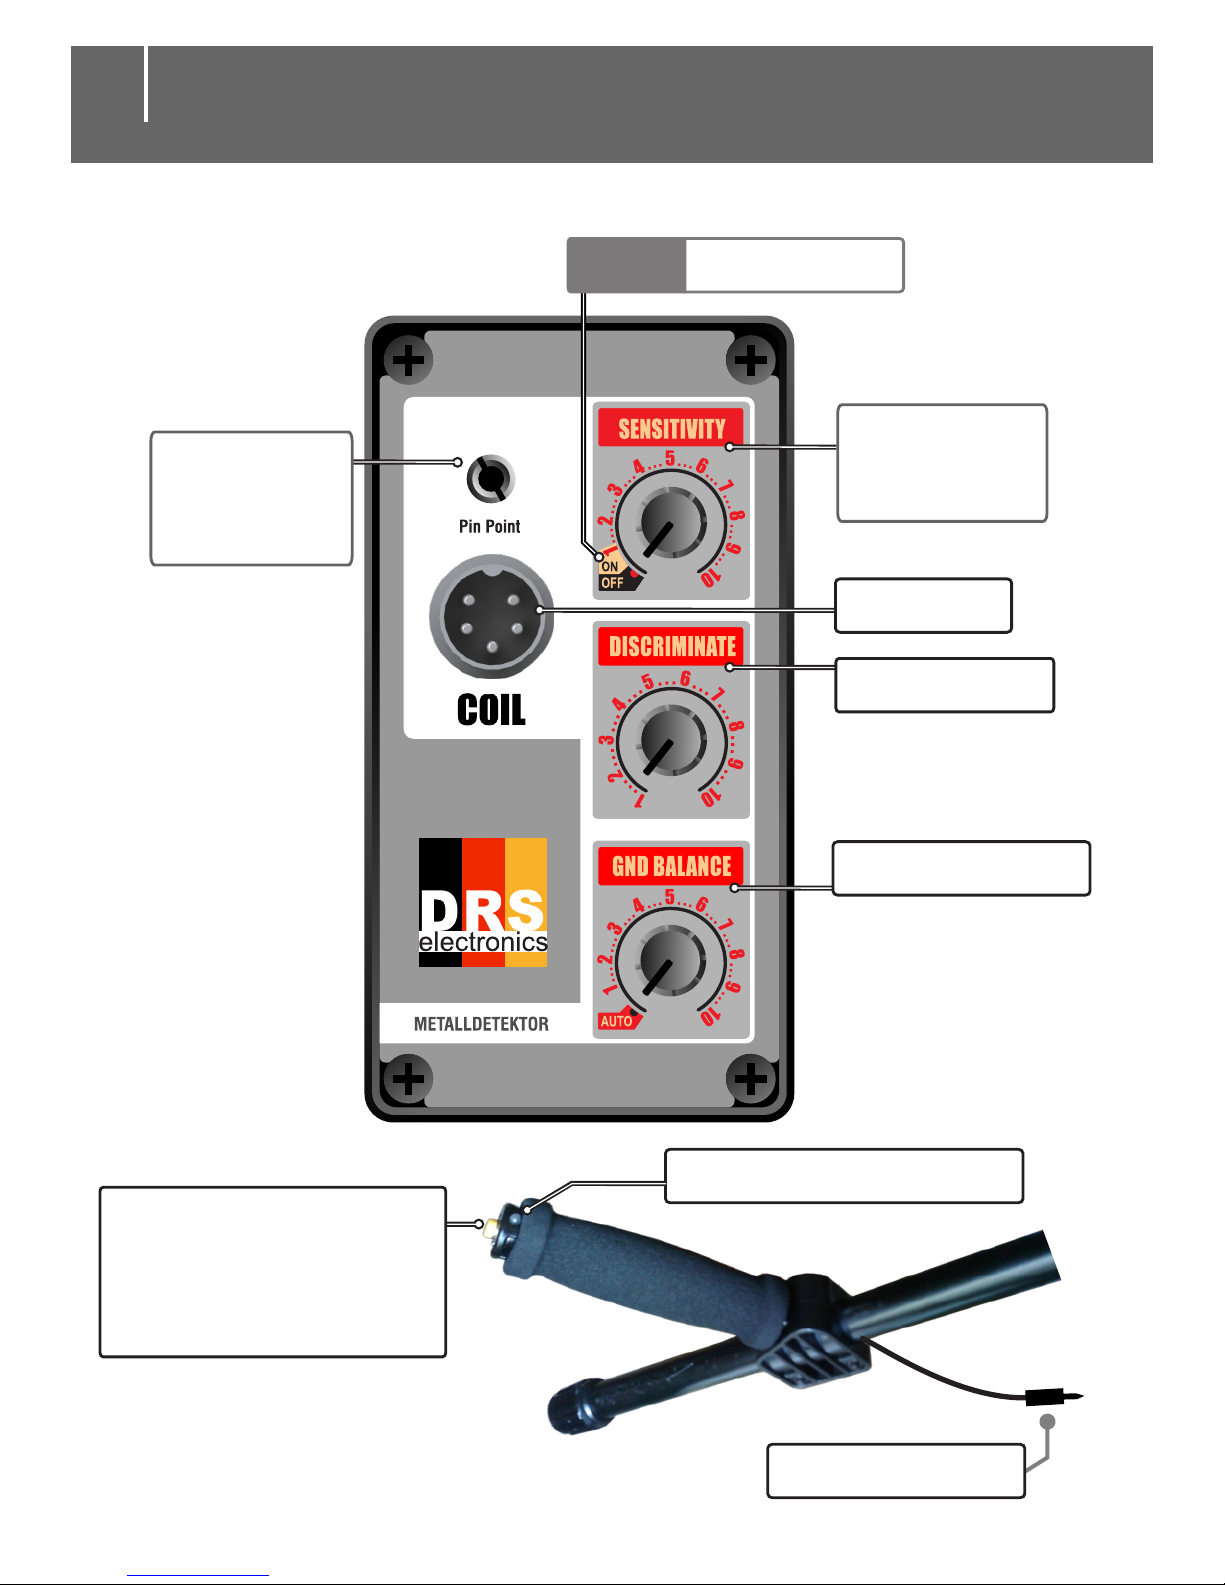
ON-OFF
Valuable metal light.
All metal and
Soil Reset
button. (PinPoint)
Turn On-Off
Sensitivity
Coil plug
Discriminate
Ground Balance
PinPoint
plug input.
PinPoint plug
Front Panel
1
Page 4
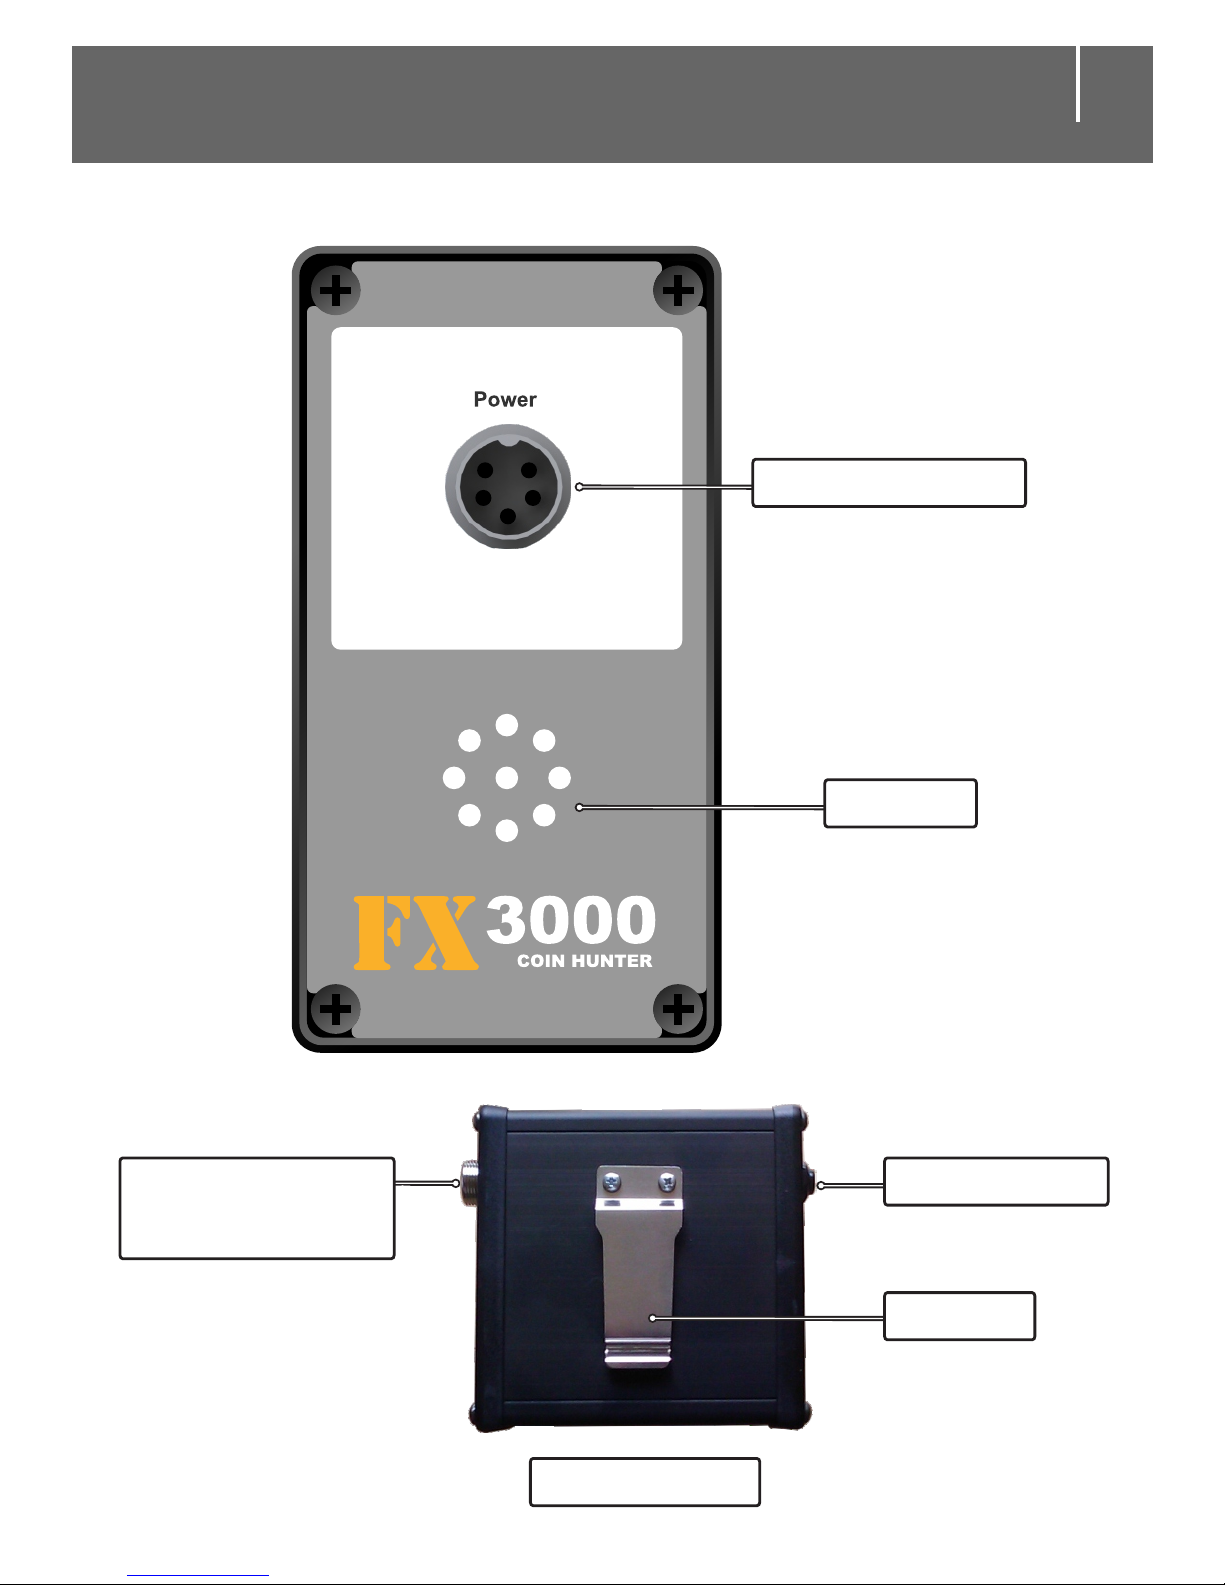
Battery unit
Charging and
connection port.
Battery input
Speaker
Belt clip
During battery
c
harging, disconnect the
battery from the detector.
Attention!
This plug is only for
connection to the battery.
Charger plug used here
will cause detector
damage.
Headphone
Rear Panel
2
Page 5
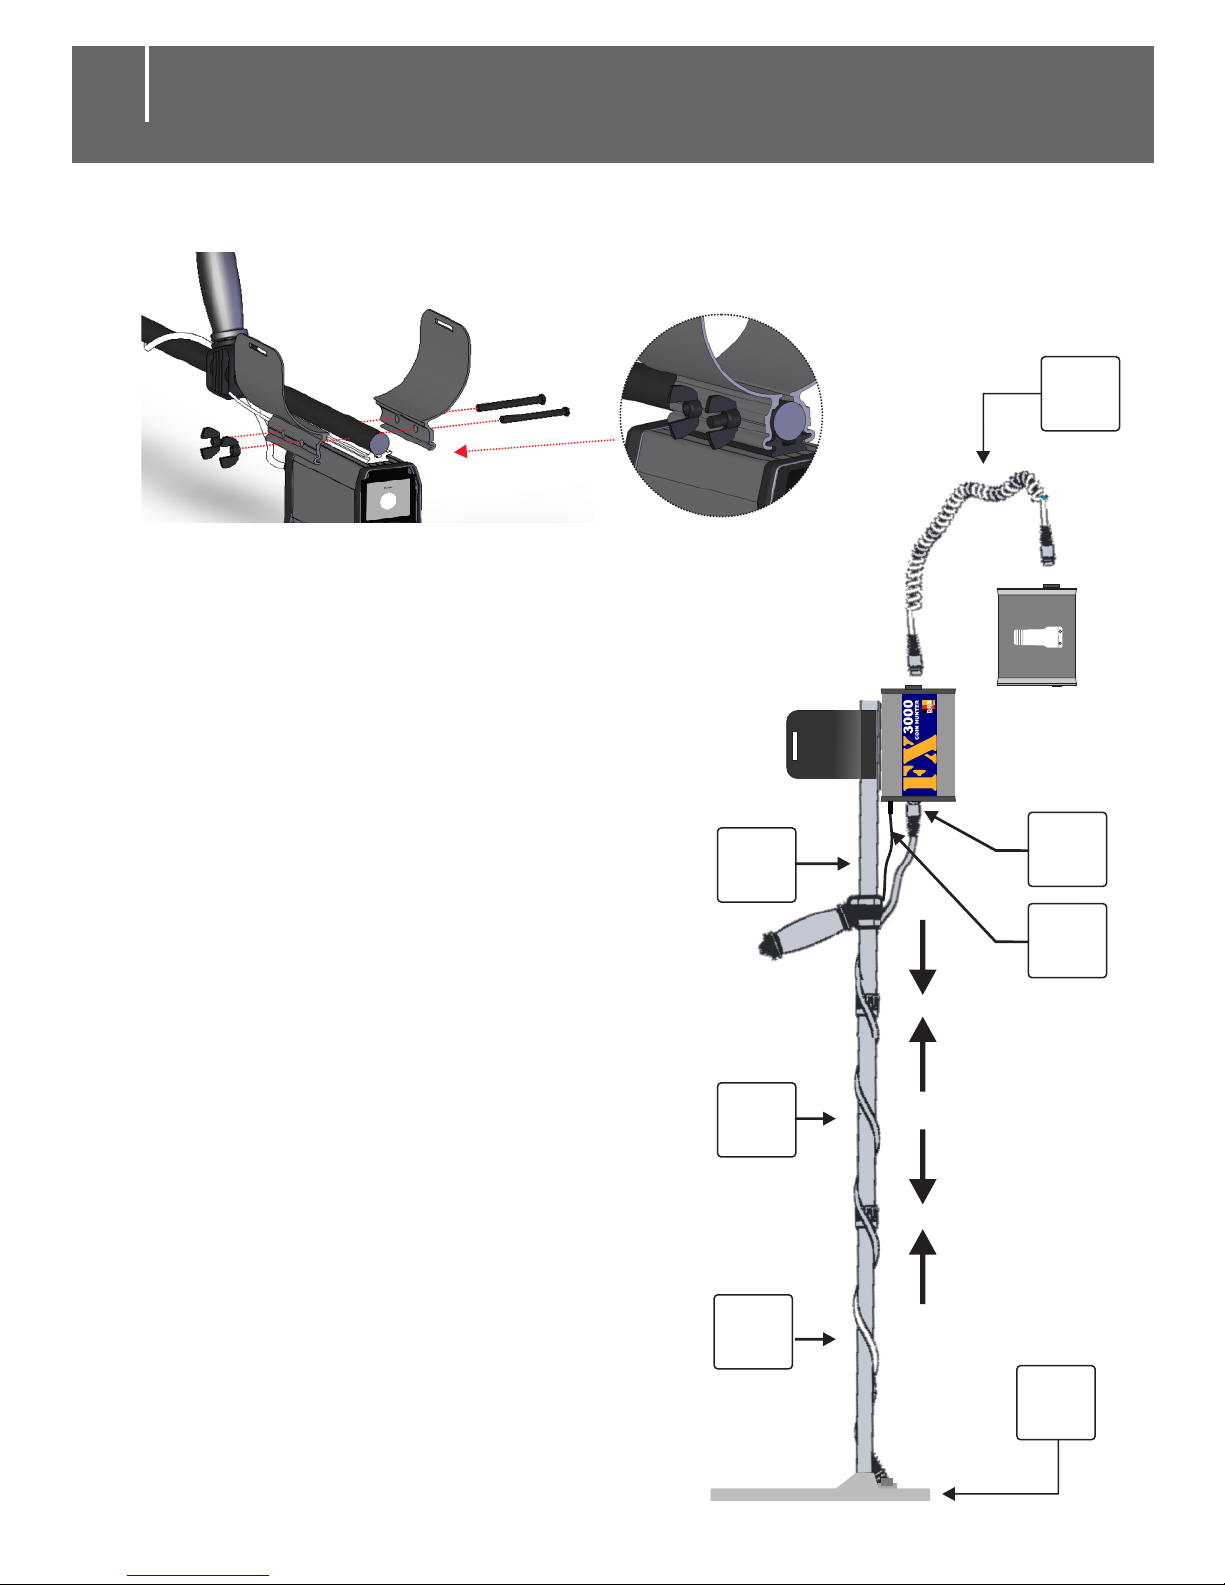
The two-piece coil rods,(1,2) as
shown below are assembled and
attached to the main handle unit. ( 5 )
The search coil (4) is attached with
nylon bolt and wing nut to the end of
the carbon fiber rod (2)
Wrap the coil cable around the full
length of the detector shaft.
Plug the coil cable into the detector
unit socket marked "Coil".
Finally (3), connect
the battery to the
detector unit socket marked "Power".
The battery unit may be clipped onto
the operator's waist belt.
First, attach the Armrest to the Upper Shaft.
2
1
5
6
7
4
3
3
Preparing to use the Detector
Page 6
SENSITIVITY
1.....2.....3.....4.....5.....6.... ....8.....9.....10.7.
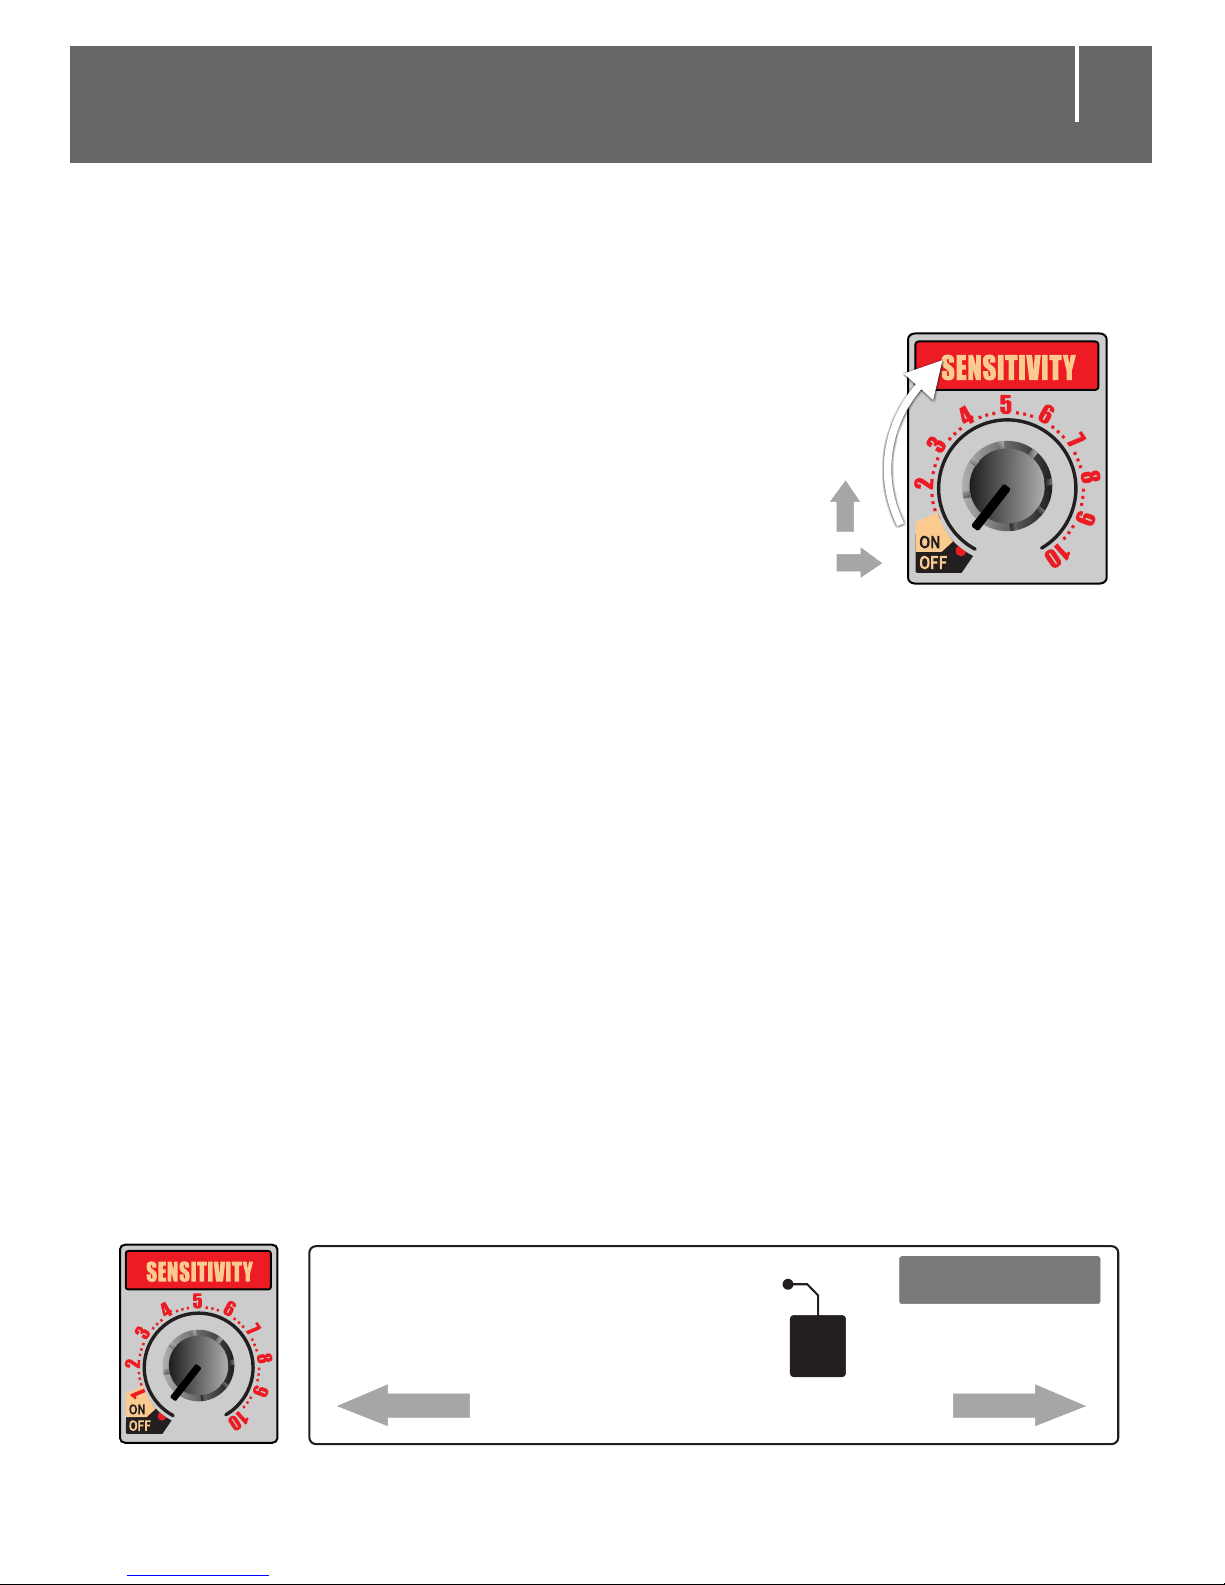
Device is off when SENSITIVITY selector
switch is turned to the far left position.
SENSITIVITY button sets the ground sensitivity of the device.
The sensitivity is minimized at position 1, while position 10
is the most sensitive setting of the detector.
While sensitivity decreases (…3, 2, 1 etc) the sensitivity to
the minerals and metals decreases, ground balance
becomes faster but the detector is not able to detect small
metal objects. Sensitivity and detection of metals improves
with higher sensitivity settings, but high soil mineralization
also affects results more easily. Seek a "balanced"
sensitivity.
Most searches should be conducted at level 7 sensitivity.
Turn the switch to the "ON"
position.
After the opening
melody and two "BEEP" tones are
heard, you can increase the
sensitivity level and start the
search process.
Off Position
On Position
Less sensitive
Precision
Recommended level
Switching on the Detector
4
Page 7
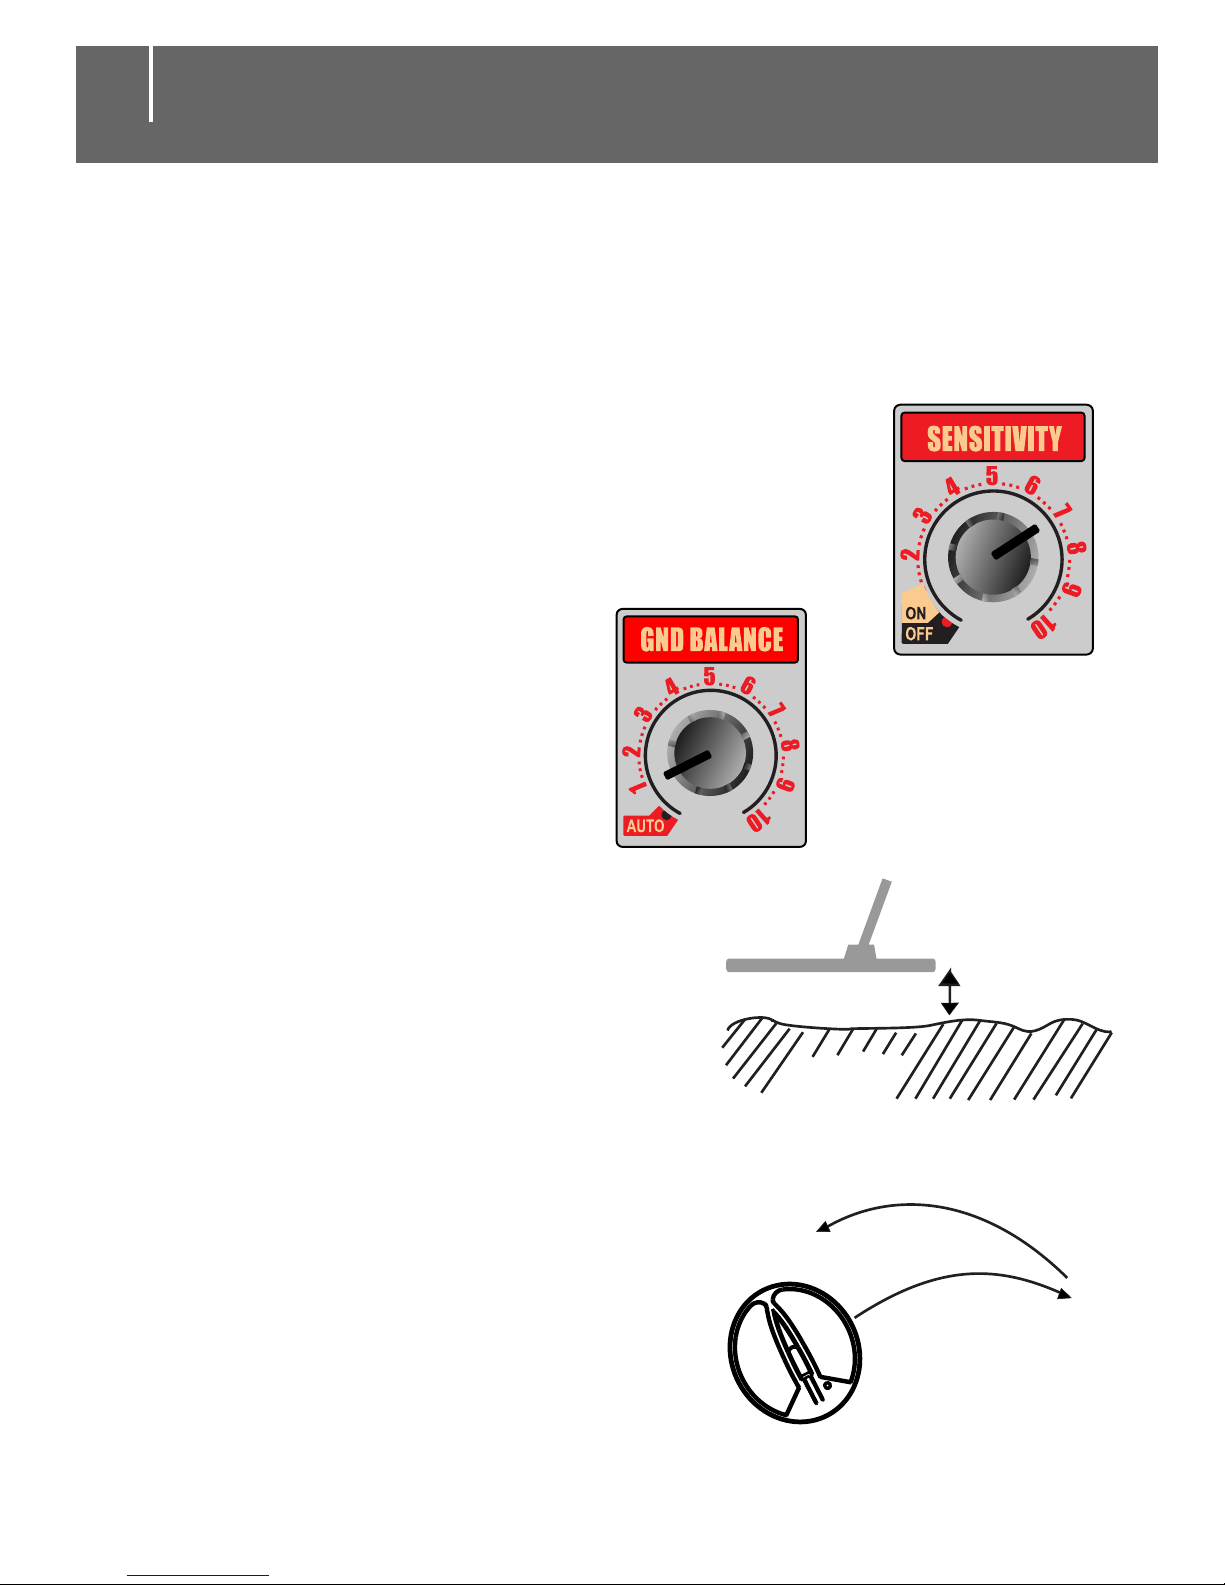
Search coil, 4" to 8" above ground.
Attention!:
Maintain coil at a steady height
between 4" and 8" above the ground.
Move the search coil back-andforth slightly (about 12"). If no
audio signal is received from the
detector, ground balance is set
GRND
10-20 cm.
Search coil
Search coil
In order to remove the mineral effects of the ground,
GROUND BALANCE is performed as described below. Try to
conduct ground balance in an area void of metallic trash.
Turn on the detector and set the sensitivity
level to 7.
Set the GND BALANCE switch
to position 1.
Ground Balance
5
Manual Ground Balance
Page 8
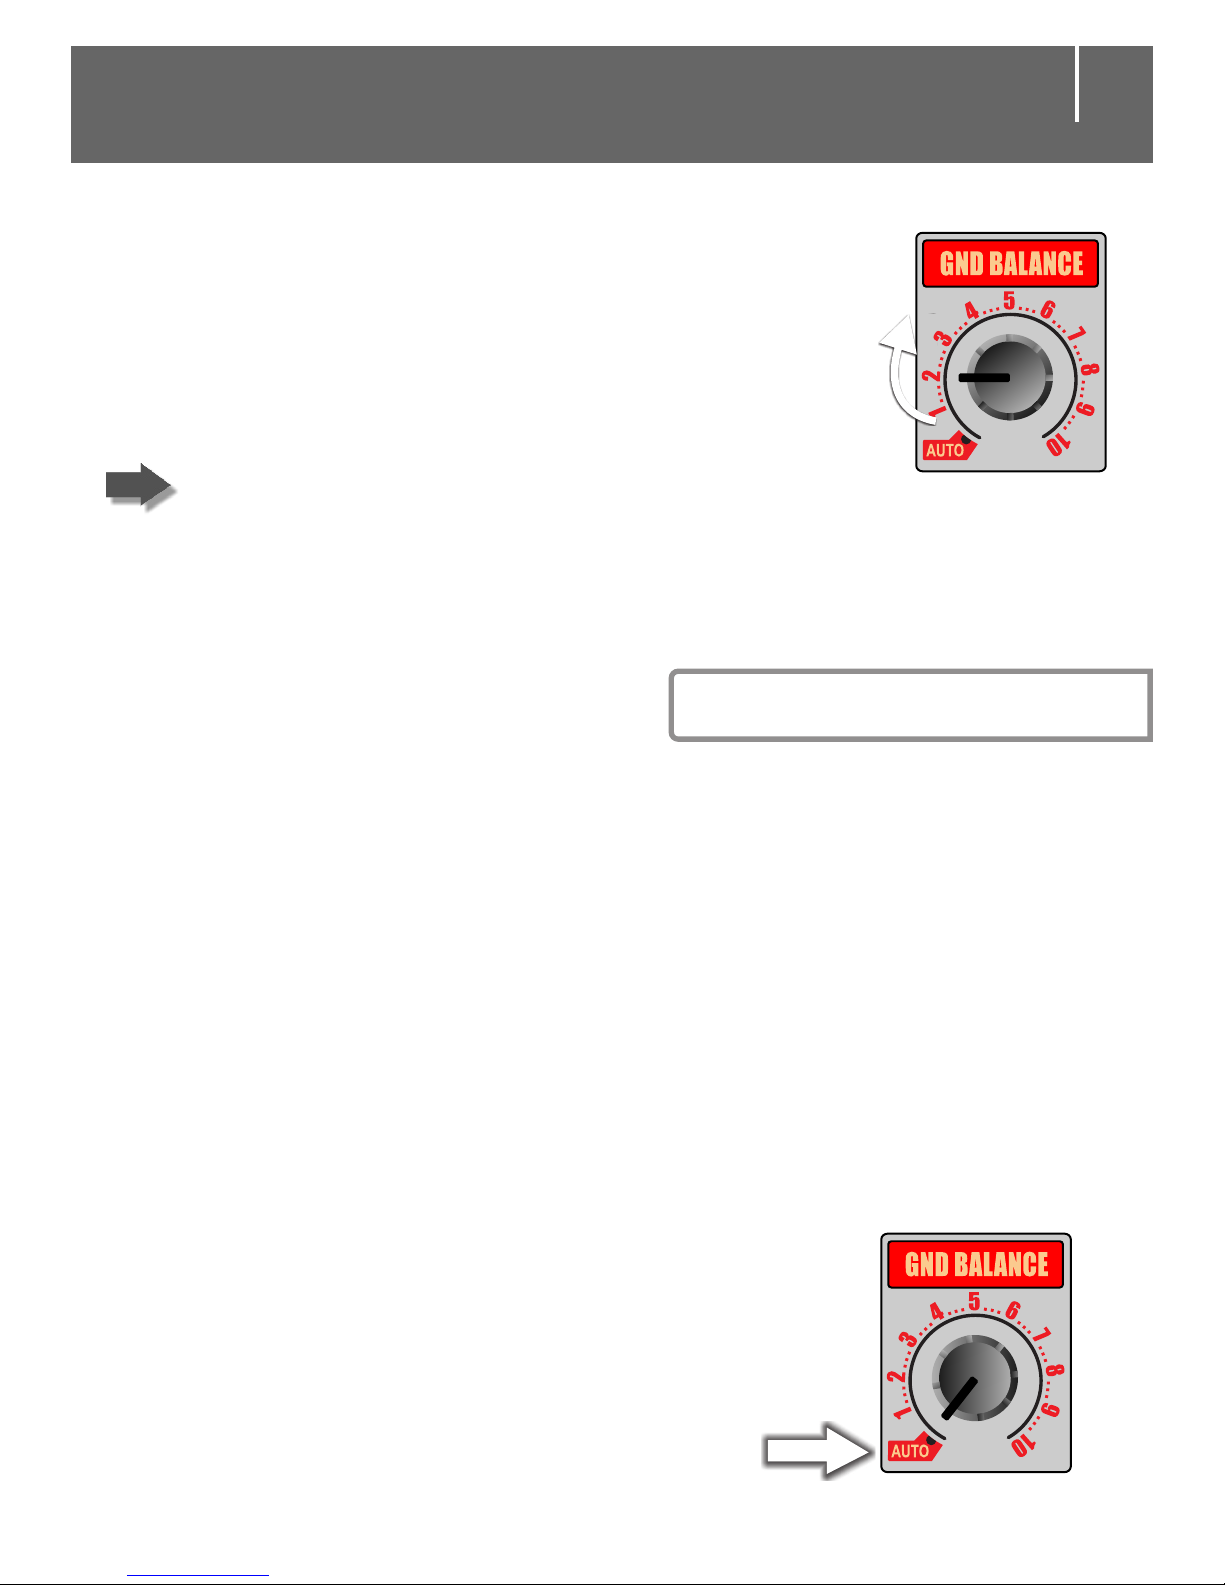
Auto Ground Balance
Your device contains an automatic Ground Balance System.
Auto Ground Balance is an option that can be used when
manual ground balance can not be achieved and/or there
is a indication of high mineral density of the soil in your
search area.
Professional metal detector operators generally prefer
the manual Ground Balance option as it is always more
sensitive to the presence of valuable metals.
Operators who cannot achieve manual
Ground Balance because of high mineral
density in the soil, should try the Automatic
Ground Balancing option.
Automatic Ground
Balancing Option
You will hear a tone if ground balance does
not complete successfully. Repeat the above
steps until the tone is no longer heard. When
you raise and lower the coil within the 4" to 8"
range above the ground, no signal should be
received if ground balance is completed.
If there is no sound when the Coil is
down, however it sounds when it is up, twist the
GND BALANCE switch slightly to the right.
Ground Balance
6
Page 9
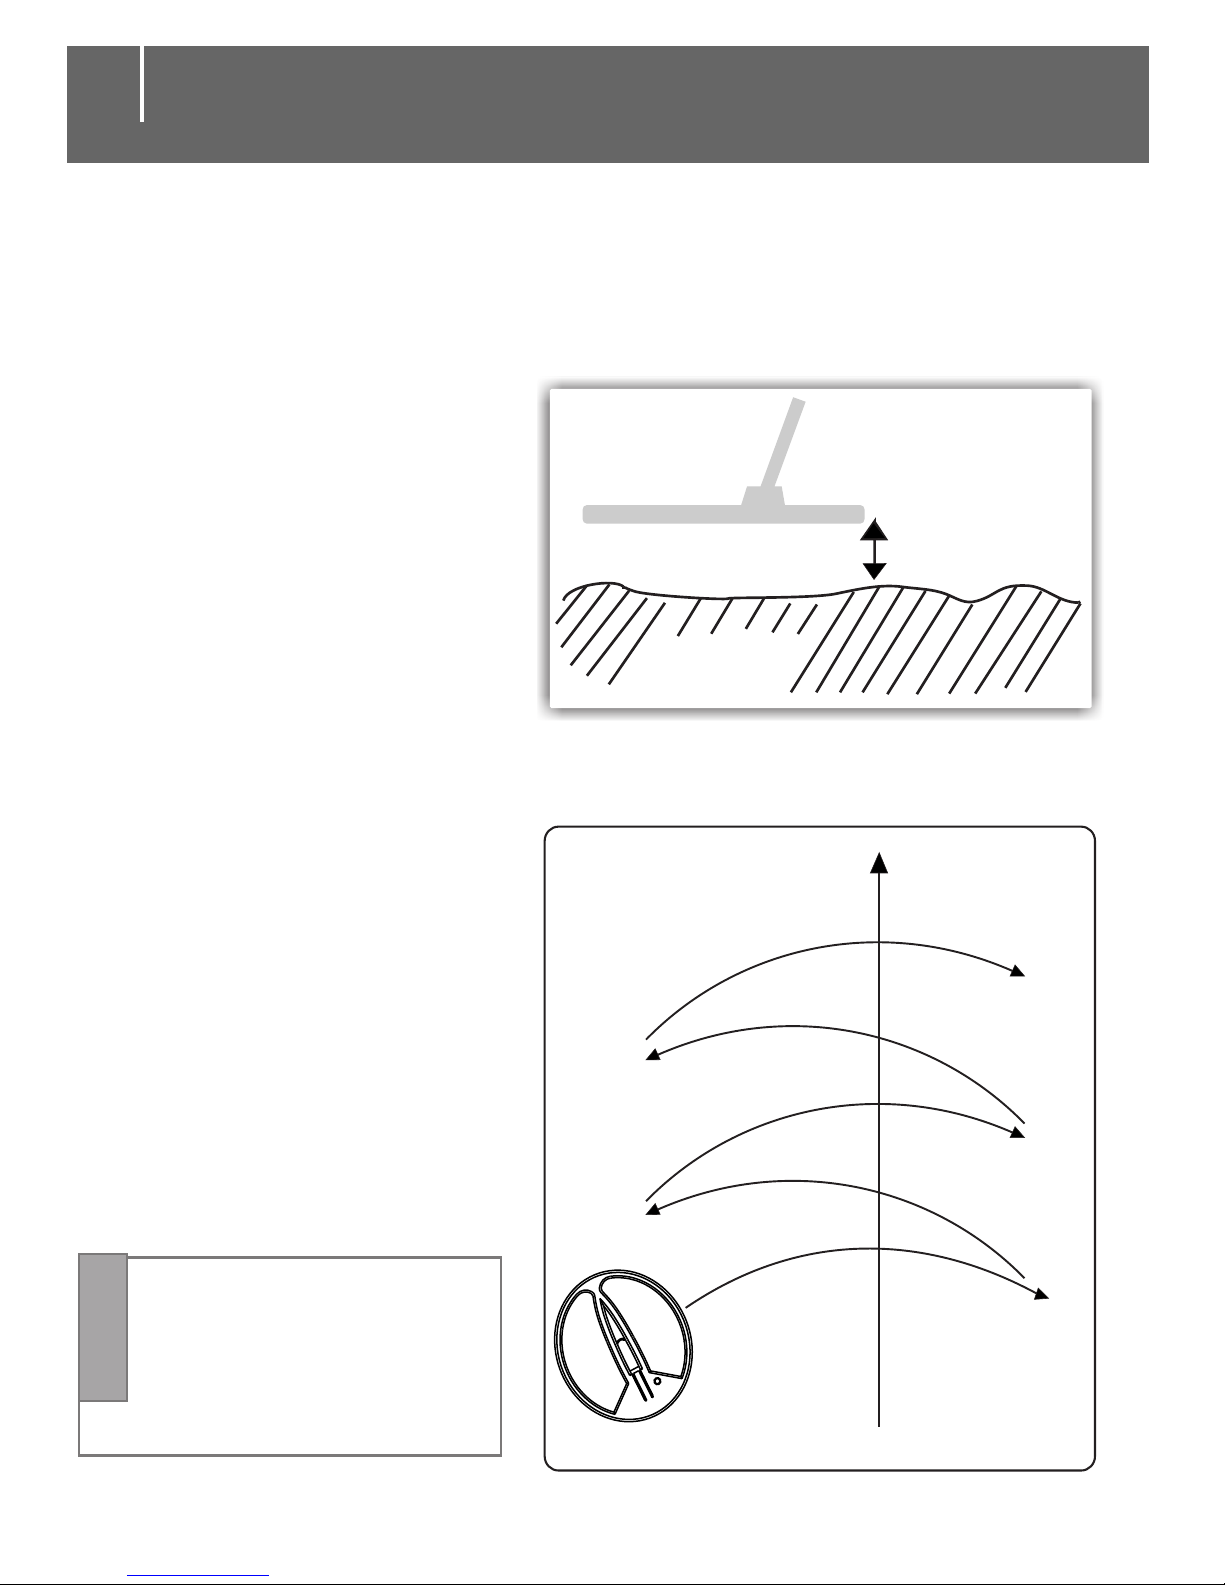
GROUND
5-10 cm
Coil
DO NOT HOLD
THE COIL
STEADYOVER
ANY METAL
Attention
Hold the coil at 2" to 4"
height and go forward
while moving it left and
right harmoniously in a
"brushing" process.
Slightly overlap your
passes so that the whole
search area is covered
completely.
While searching and maintaining proper height above the ground
(2" to 4"), the detector will give an audio and LED signal if any
metal is noted.
After ground balancing,
search can begin if there is
no sound coming from the
detector.
Route
Coil
Direction
Searching
7
Page 10

LED At valuable metals --- SOUND
Page 11

LOW BATTERY condition is indicated by intermittent speaker
tone. When you receive this notice, do not use the detector
until the battery is fully re-charged.
Before charging, turn off your detector by moving
the SENSITIVITY switch to the OFF position.
If your detector is not used for extensive periods, check the
battery charge level every two weeks and re-charge if
indicated. A completely charge-depleted battery will not recharge properly and may cause improper detector operation.
Avoid using alternate battery charging devices.
Charging devices that charge quickly may shorten your
battery's life.
10 hours of average charging duration
12 hours of usage to empty the battery.
Battery Life and Charging
9
Page 12
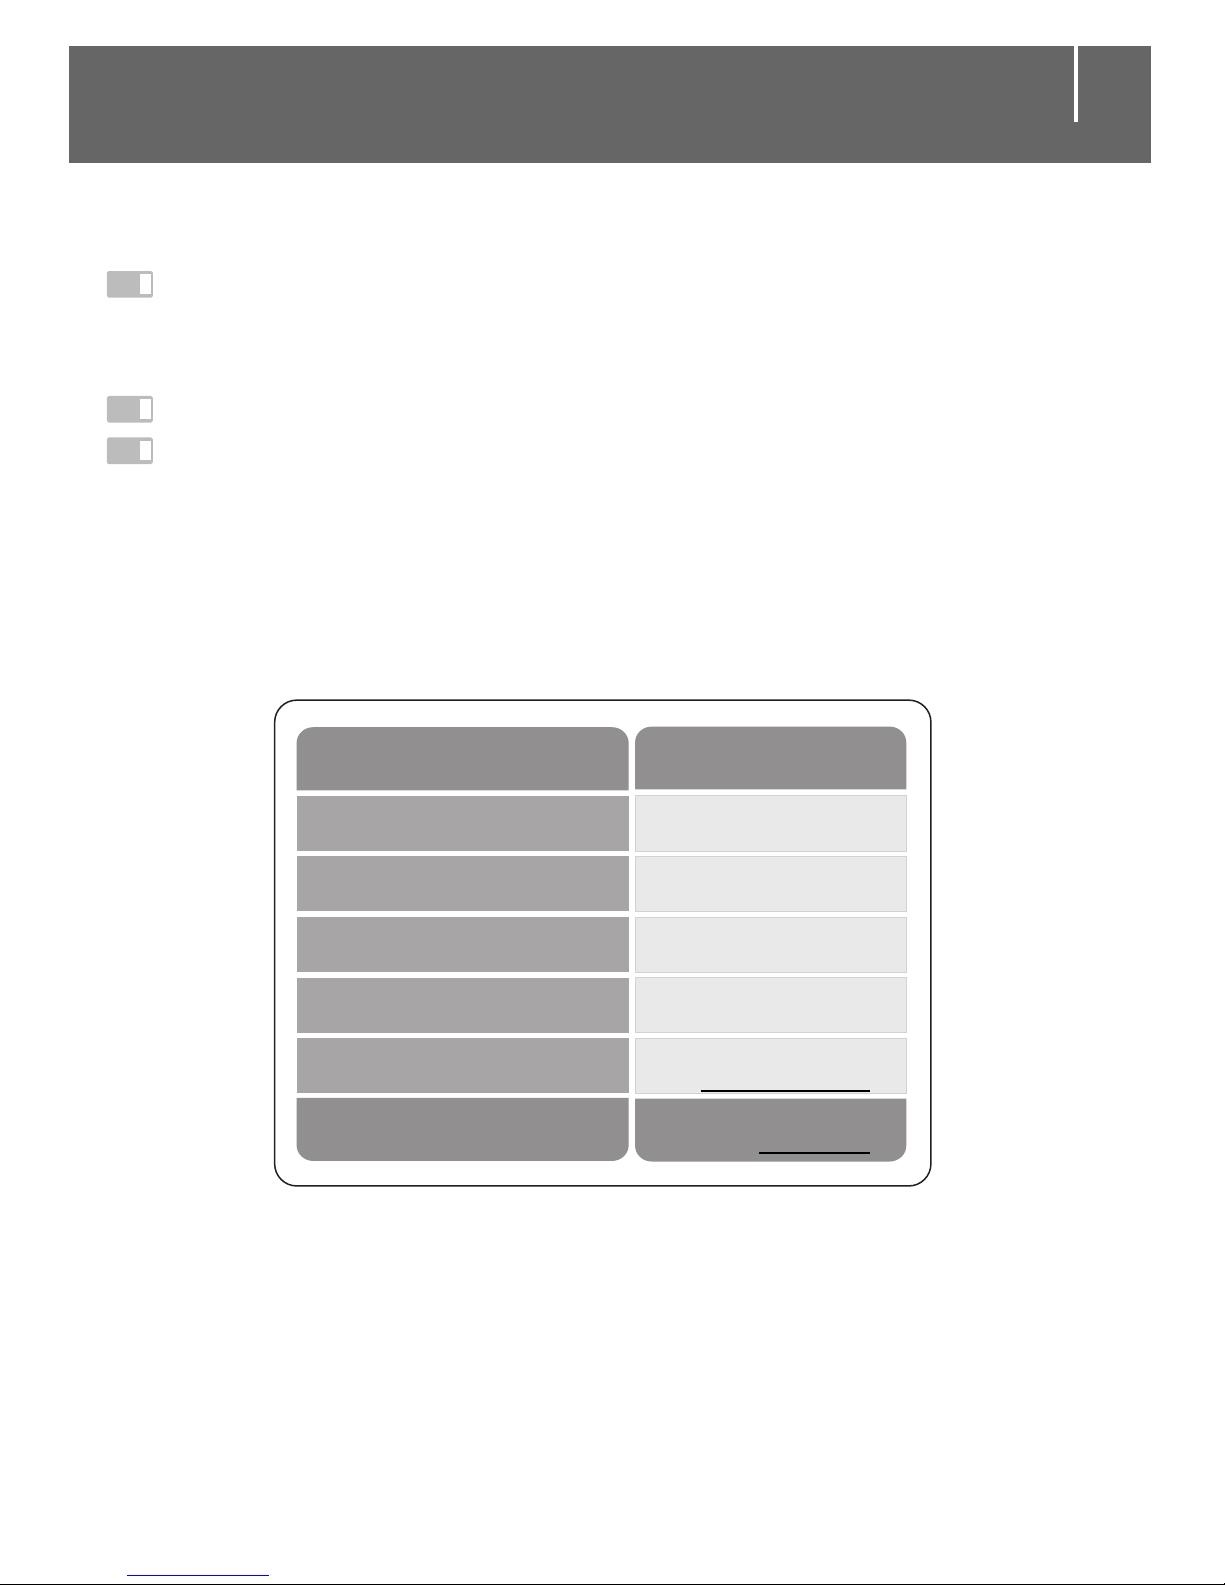
Your detector has a 10 foot detection range. If metallic
objects have been buried for a very long time, detection
range increases.
Do not bang the coil against hard objects.
Do not attempt disassembly of the detector as this will void
your factory warranty. Service should only be performed by
authorized DRS Service Centers.
The above depth values will increase if the metallic objects
have been buried for many years.
DEPTH
18-22 in.
43-48 in.
71-80 in.
90-103 in.
10 feet
Single Metal Coin
Gold Bracelet
Cupper Bath Bowl
Cheese Tinplate
Tin (60 cm diameter)
KIND OF METAL
Maximum Depth
Approximate Depth Table
10
30-32 in.
Page 13

http://drselectronics.de
DRS Electronics GmbH i.G.
Eupenerstr 161a. Halle 72
50933 Köln Germany
DEALER
 Loading...