

Page 1

Chandler Systems
Installation
Manual
Pro Water Softener
Page 2

INTRODUCTION
Thank You for Purchasing a DROP System!
We know you’ll love your improved water quality, leak detection ability and water conservation benefits of
your new DROP Water Management System from Chandler Systems. You’ll soon wonder how you ever
lived without it. Improving your water and protecting your home are just a few of the ways that the DROP
Water Management System can improve your water system.
Be sure to check out the dropconnect.com website periodically for more information about additional DROP
products as they are released.
833.BUY.DROP
(833.289.3767)
To further help you operate your new DROP system, we have provided you with many other resources for
you to learn more. Feel free to call Chandler Systems when you need additional help. We also have many
resources located on our website including instructional videos, and images.
DROP Connect is also active on various social media pages! Feel free to follow us for the most up to date
information and news!
dropconnect.com
@dropconnect
Privacy Statement
For more information about privacy, visit our privacy policy
(https://dropconnect.com/sites/default/files/DROP-Privacy-Statement.pdf) online.
DROP Patents
For the most up-to-date list of patents, visit our patents on our website: dropconnect.com/patents.
2
Page 3

TABLE OF CONTENTS
Introduction................................................................................................... 2
Table of Contents......................................................................................... 3
How to Use Soft Water............................................................................... 4
How to Use Your System.......................................................................... 6
System Operation Modes.......................................................................... 6
Additional Features................................................................................... 6
System Maintenance and Adjustments.................................................... 7
Installation Instructions............................................................................. 8
Contents of Carton.................................................................................... 8
Precautions............................................................................................... 9
System Set Up............................................................................................... 10
System Start Up......................................................................................... 15
Common Questions................................................................................... 18
Your Water Test Results
Hardness ________________ gpg
Iron ____________________ ppm
pH _____________________ number
Chlorine _________________ ppm
CAUTION:
• Do not subject tank to any vacuum. If there is a possibility that a vacuum could occur, a vacuum breaker must be installed.
• Do not locate unit where the tank or any lines (including drain lines) will be subject to temperatures below freezing.
• If there is not at least 10’ of line between the water heater inlet and the outlet of the closest softener/filter, an expansion tank
should be installed.
• Do not use Vaseline or any petroleum-based lubricants on O-rings or rubber seals. Only use food-grade silicone lubricant.
• O-rings are lubricated before leaving the factory and do not require additional lubrication before installation in most cases.
• Do not use pipe dope or any sealant other than Teflon tape on threaded connections. Threads on the control valve and on the
bypass nut connections do not require any tape because they use an O-ring seal. Tape is only required on the inlet/outlet
adapter fittings and on the drain line fitting (if applicable).
3
Page 4
HOW TO USE SOFT WATER
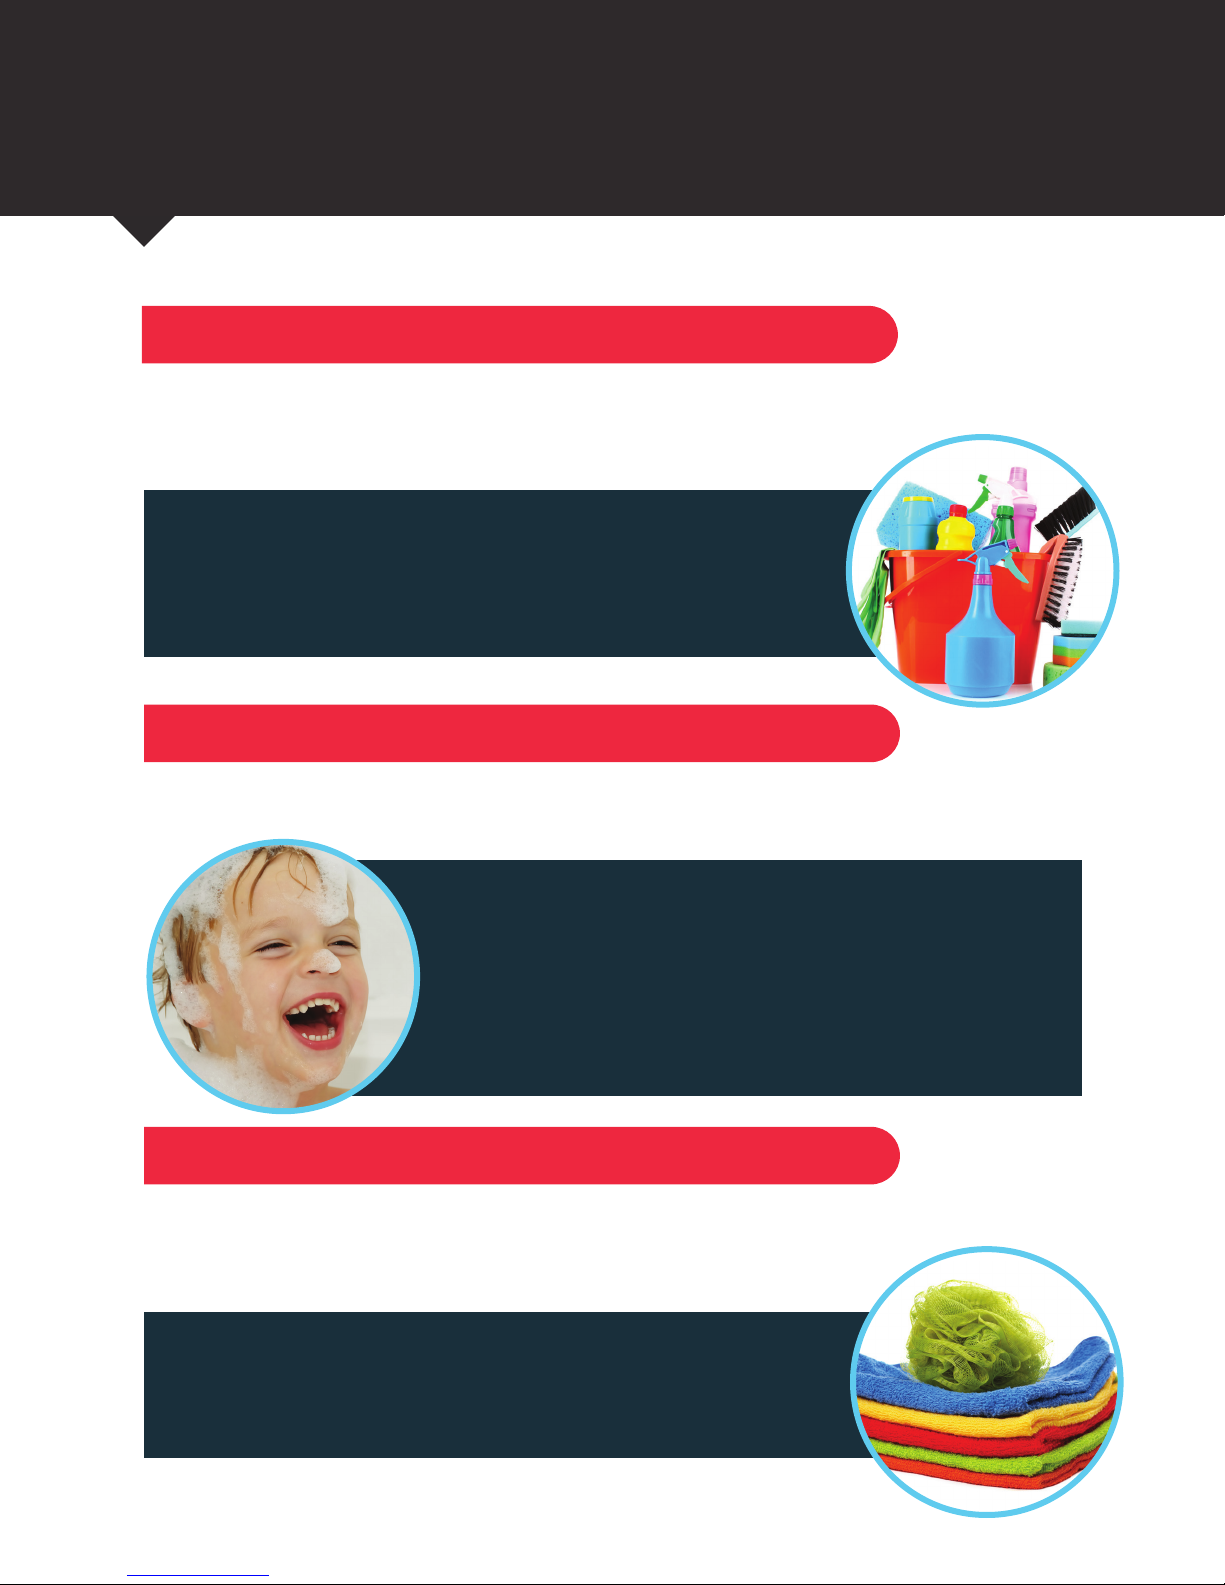
Household Cleaning
Use less soap, detergent and household cleaners. Hardness minerals in water interfere with soap’s
cleaning ability. That’s why most leading brands of soap, shampoo, laundry detergent
and household cleaners contain chemicals that aren’t necessary with soft water.
You can significantly reduce the amount of these products
that you use. You may find you can use as little as one quarter
of the amount you were using before you had soft water! Even
though you’ll use less soap, you’ll get more suds and better
cleaning results.
Bathing
Reduce your use of soaps and shampoos by half or more. Adjust according to your preference
and results.
After bathing in soft water, your skin will feel “silky.” What
you’ll feel is your own smooth skin without any leftover soap
residue. When you bathed in hard water, you were never able
to rinse this residue completely. The soap curd that left a ring
on your bathtub also remained on your skin and hair, possibly
causing drying and cracking. Now that you have soft water, you’ll
feel soft, smooth and clean. And you’ll promote healthier skin
and hair by eliminating the drying effects of hard water.
Laundry
Reduce or eliminate the use of fabric softeners. Fabrics washed in hard water retain soap residue
making them “crackle” when removed from the dryer or stiff if air-dried. Fabric softeners
are necessary with hard water to keep your clothing soft, but with soft water,
you can reduce your use of fabric softeners or eliminate them altogether.
It’s especially important to reduce the amount of laundry detergent
you use by half or more. Washing clothes in soft water means you’ll
need less soap to get your clothes clean and it will rinse completely.
Washing in soft water makes your clothes look whiter and brighter,
and they’ll last longer, too.
4
Page 5
HOW TO USE SOFT WATER
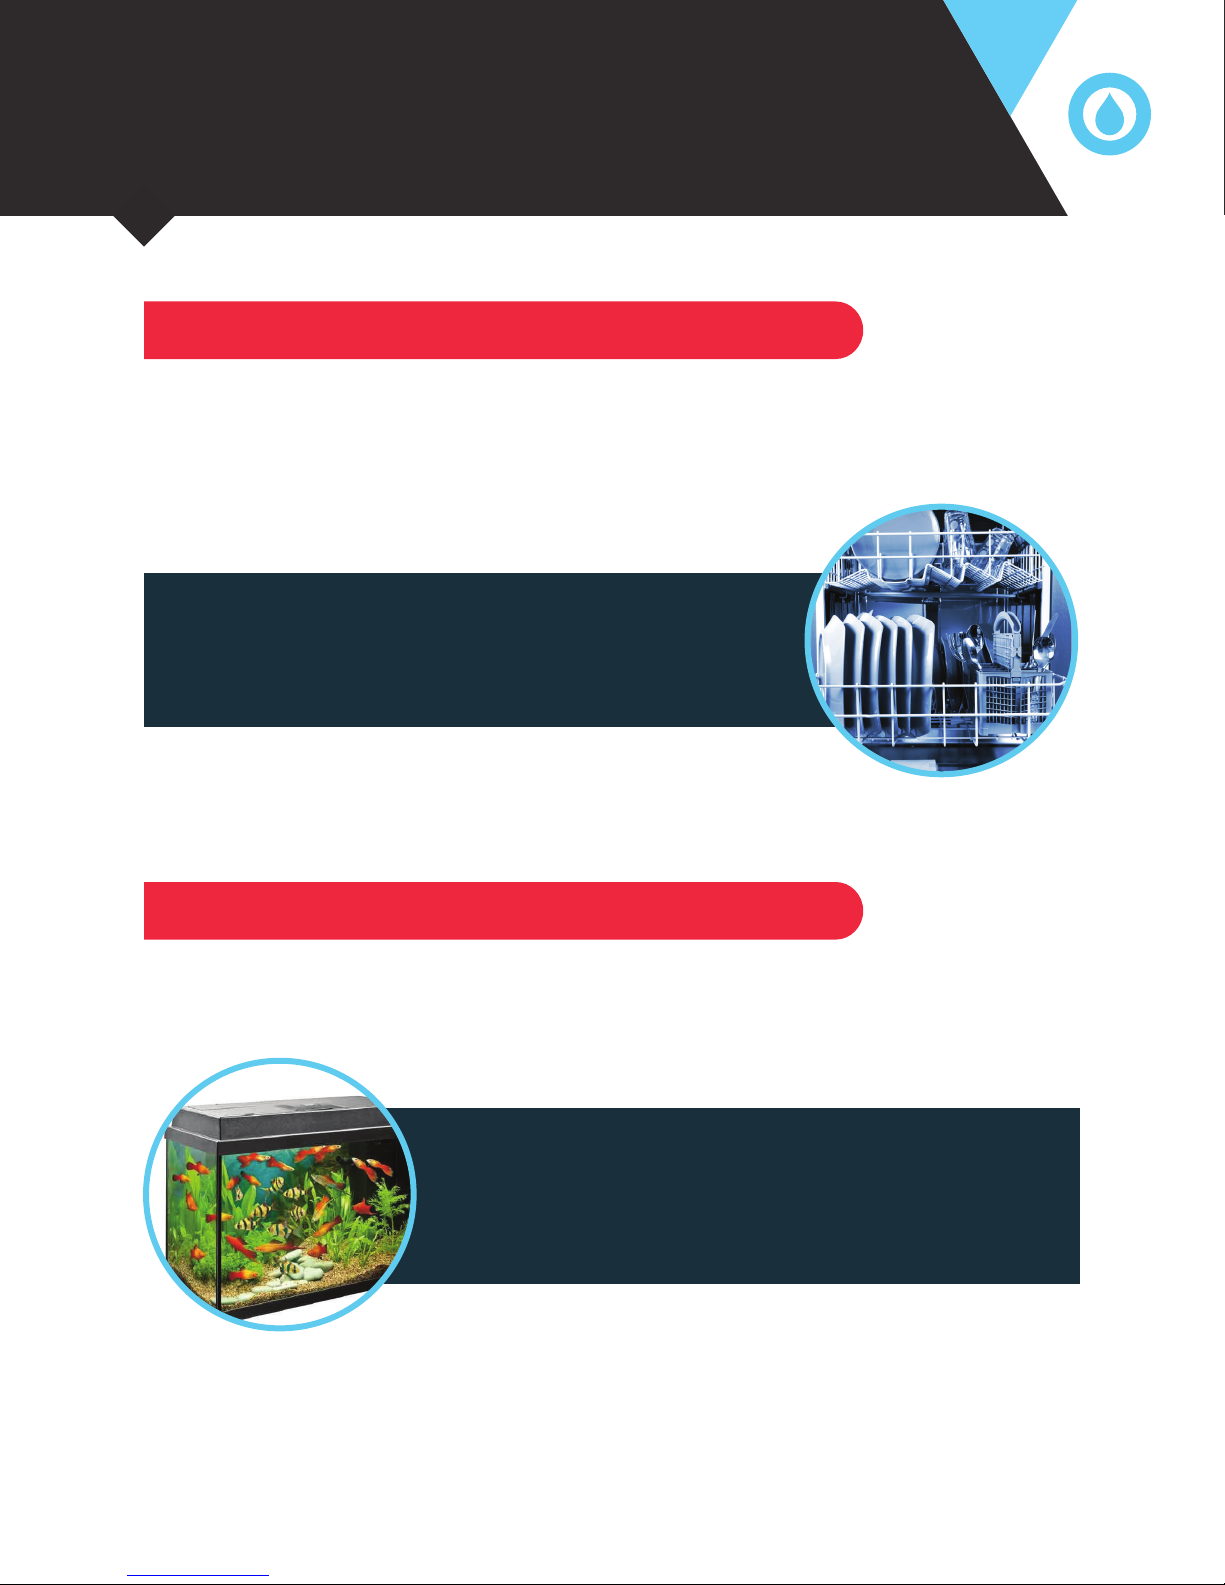
Dishwashing
Reduce the amount of dishwashing detergent you use by half or more, too. Your dishes will get nice and
clean without all of the hardness minerals left over by hard water.
Take special precautions with dishwashers. Caustic phosphates in some dishwasher detergents
and very high temperatures in the dry cycle can etch dishes and glassware if you use soft water. To
prevent this possibility:
• Use the “no heat” dry cycle on your dishwasher.
• Use the minimum amount of a good quality,
low phosphate dishwasher detergent needed to clean
your dishes.
• Wash good china and crystal by hand.
Other Considerations
Special care for plants and fish. Water your lawn, shrubs and outside plants from an outside hard
water faucet, or turn off treatment from your DROP App. You may also prefer to water houseplants with
hard water or water from a reverse osmosis system.
Fish accustomed to hard water may have trouble with an
abrupt change to soft water. Make the change gradually over
a period of seven to 14 days by blending hard and soft water
until the tank contains 100 percent soft water. Once you begin
using soft water, you should notice that your fish tank stays
cleaner longer.
5
Page 6
HOW TO USE YOUR SYSTEM
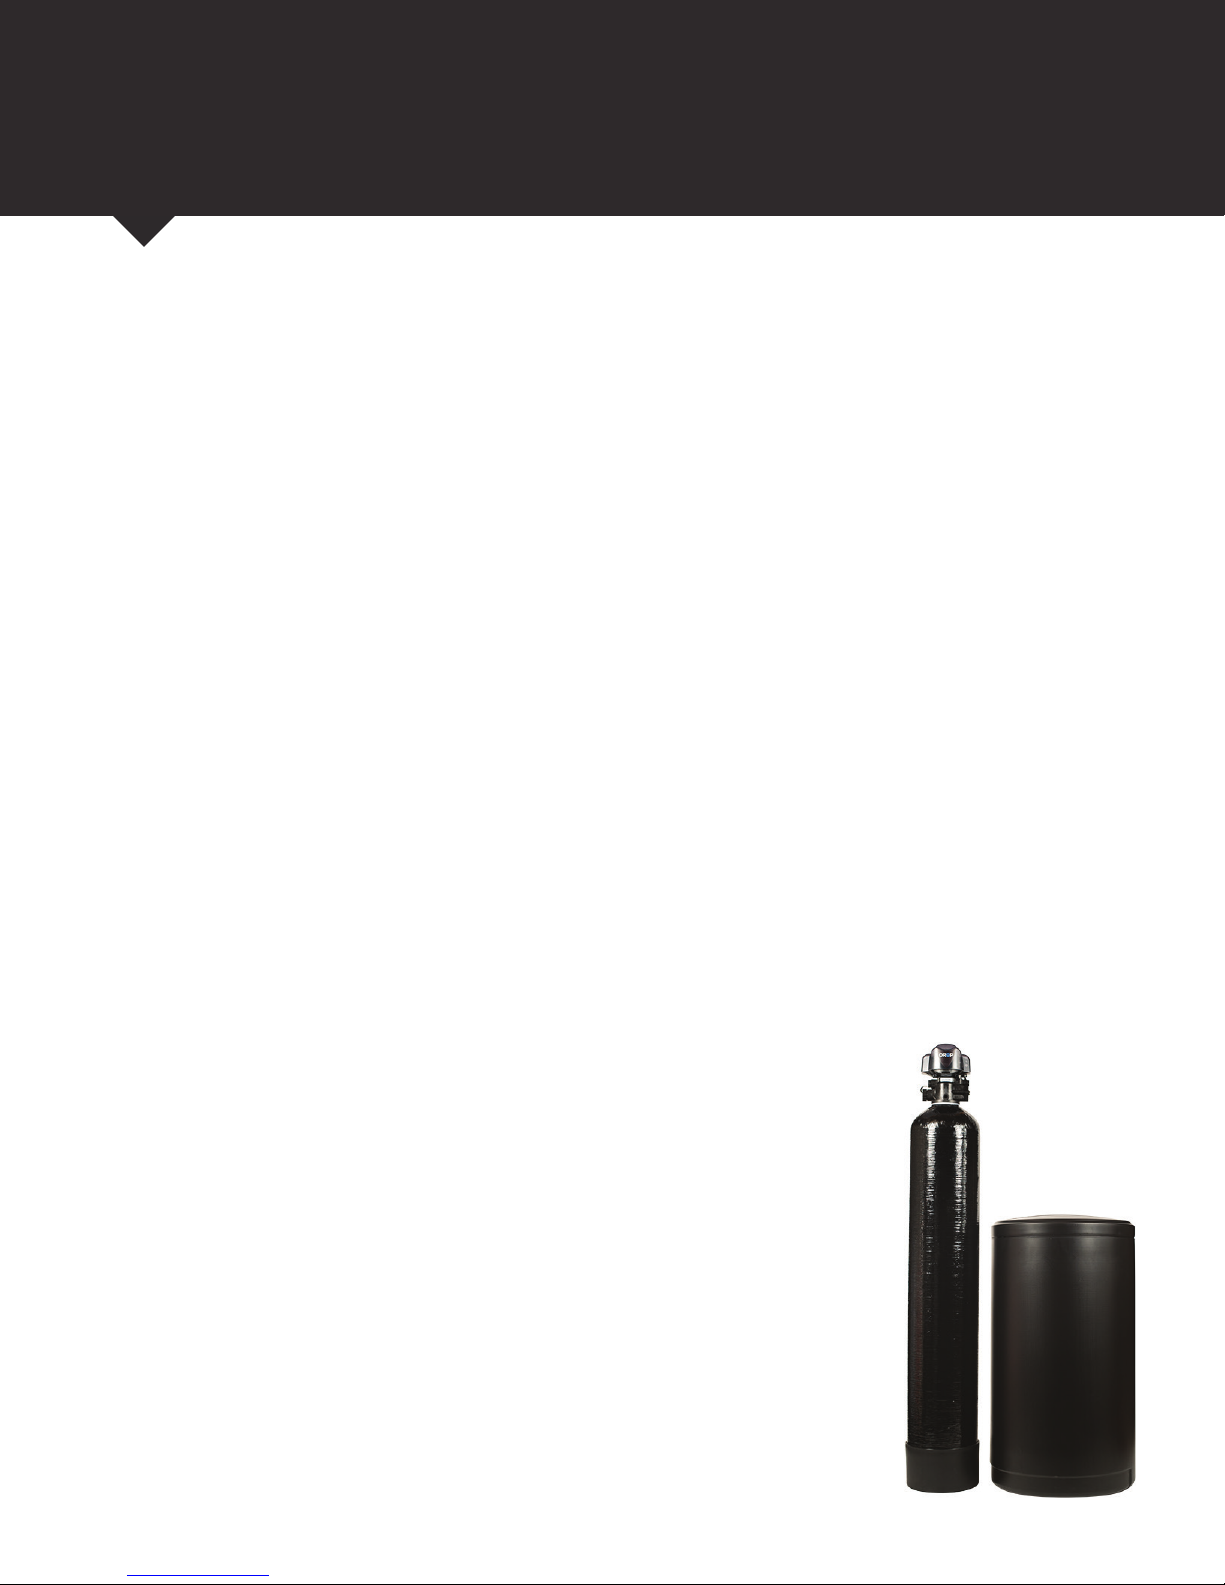
Your DROP Water Management System was selected to address your specific water conditions. Your
system uses advanced technology to deliver effective and efficient water softening to protect your home
plumbing system, deliver optimal water quality to you and your family, protect your home from leaks, and
save you money, all while providing years of trouble-free operation.
Your system operates in two primary modes:
In Service: Your water passes through the softening resin in your system’s media tank to remove the
hardness minerals quickly and effectively.
Regeneration: Your system cleans itself by drawing a salt solution through the softening resin to
dislodge all hardness minerals, backwashing the resin to remove the dislodged hardness minerals and
using a final rinse to ensure the system is clean, before returning to In Service Mode. Water to your home
is not treated while in regeneration.
Additional Features You’ll Find on Your DROP System
• Advanced Electronic Control Valve: Incorporates the latest softener control technology for
optimal performance, efficiency and longevity.
• Optical Sensor Technology: Optical sensors control regeneration for precise performance.
• Demand Operation: Your DROP system meters your water use and regenerates itself when
necessary, saving you salt, water and money. Your system automatically adjusts to heavier or lighter
water use.
• High Flow Media Tank: Your DROP system delivers the high flow rates required by today’s
demanding households.
6
• High Efficiency Softening Media: DROP softening media minimizes salt and water use to
minimize operating expense.
• Soft Water Brining: Treated water refill for better brine saturation and a cleaner
brine tank.
• Integrated By-pass Valve: Allows you to take your system out of service
if necessary.
• Power Backup: To continue to protect your home during power outage
• Water Usage Monitoring - DROP monitors your water usage and provides
real time information including: current water flow, peak flow today, daily
average of the last 90 days, as well as many useful historical charts.
6
Page 7
HOW TO USE YOUR SYSTEM
SERVICE OFF
BYPASS
• Automatic Low Salt Notifications - The DROP salt sensor allows the system to provide
notifications when you are running low on salt BEFORE you run out.
• Automatically integrates with other components on your DROP System - DROP is
a water management system that integrates all of the water related devices in your home including:
water softeners, backwashing filters, leak detectors, sump pump alarms, and many more to come!
• Convenient User Interface on your Smart Phone or Tablet
• LED Light Codes: Alert you to system status at a glance.
• Regeneration Status: During a regeneration, the App will show the cycle and the time remaining in
that cycle.
• Regeneration Cycle Override: During regeneration, you can force the system to move to another
cycle step immediately by selecting a different cycle step in the App.
System Maintenance and Adjustments
Adding Salt: Maintain salt in your system at all times to ensure your softener can properly soften your
water. Only use a quality grade of salt processed especially for use in water softeners. Ensure that the
salt level in the brine tank is always above the water level. If your system ever runs out of salt, refill it,
wait 30 minutes and then follow the procedures in the Extra Cycle / Manual Regeneration section of this
manual.
*
NEVER USE ROCK SALT in your DROP system; the dirt and rocks
inherent in rock salt will damage your system.
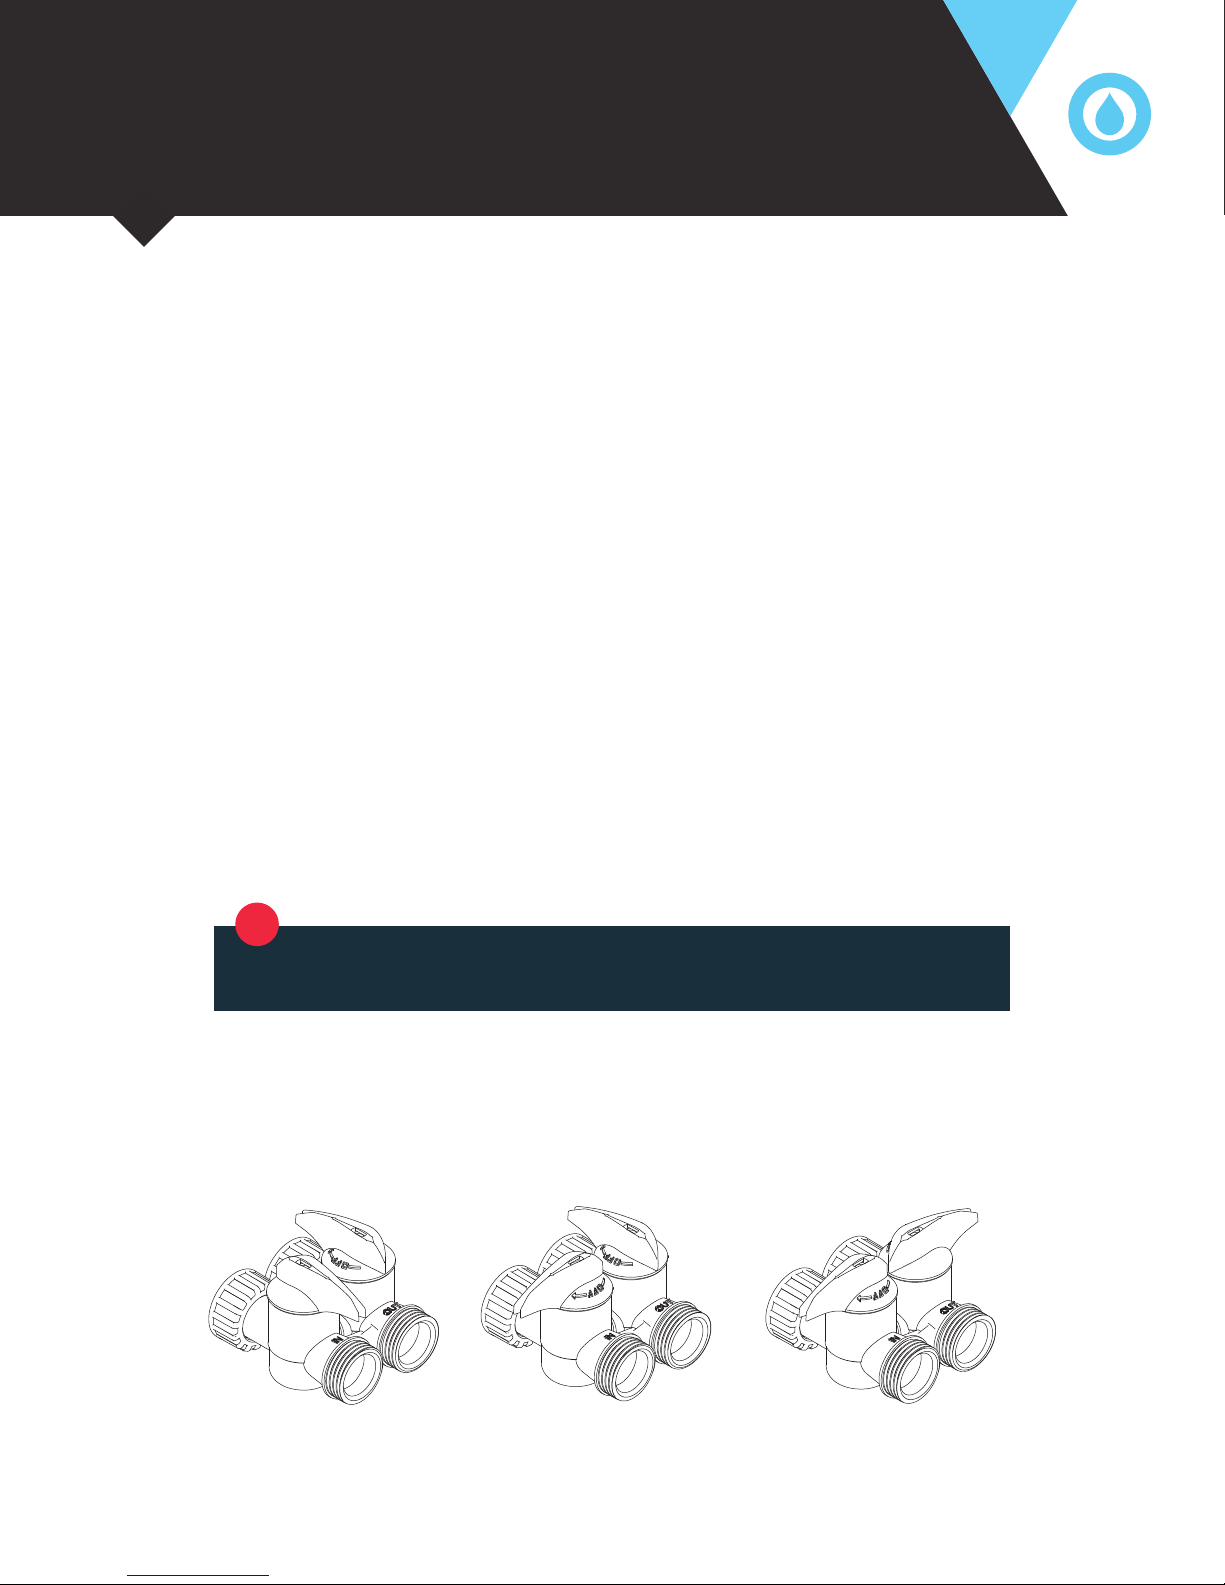
Manually Bypassing Your System: DROP’s integrated bypass valve allows you to bypass your
system should you ever wish to take it out of service. To bypass your system, turn both handles until they
are perpendicular to the system inlet / outlet. To place your system back in service, turn both handles until
they are parallel with the system inlet / outlet.
System In Service -Water
to home is being treated
Water to home and
softener is off
System Out of Service
-Water to home is on and
untreated
7
Page 8
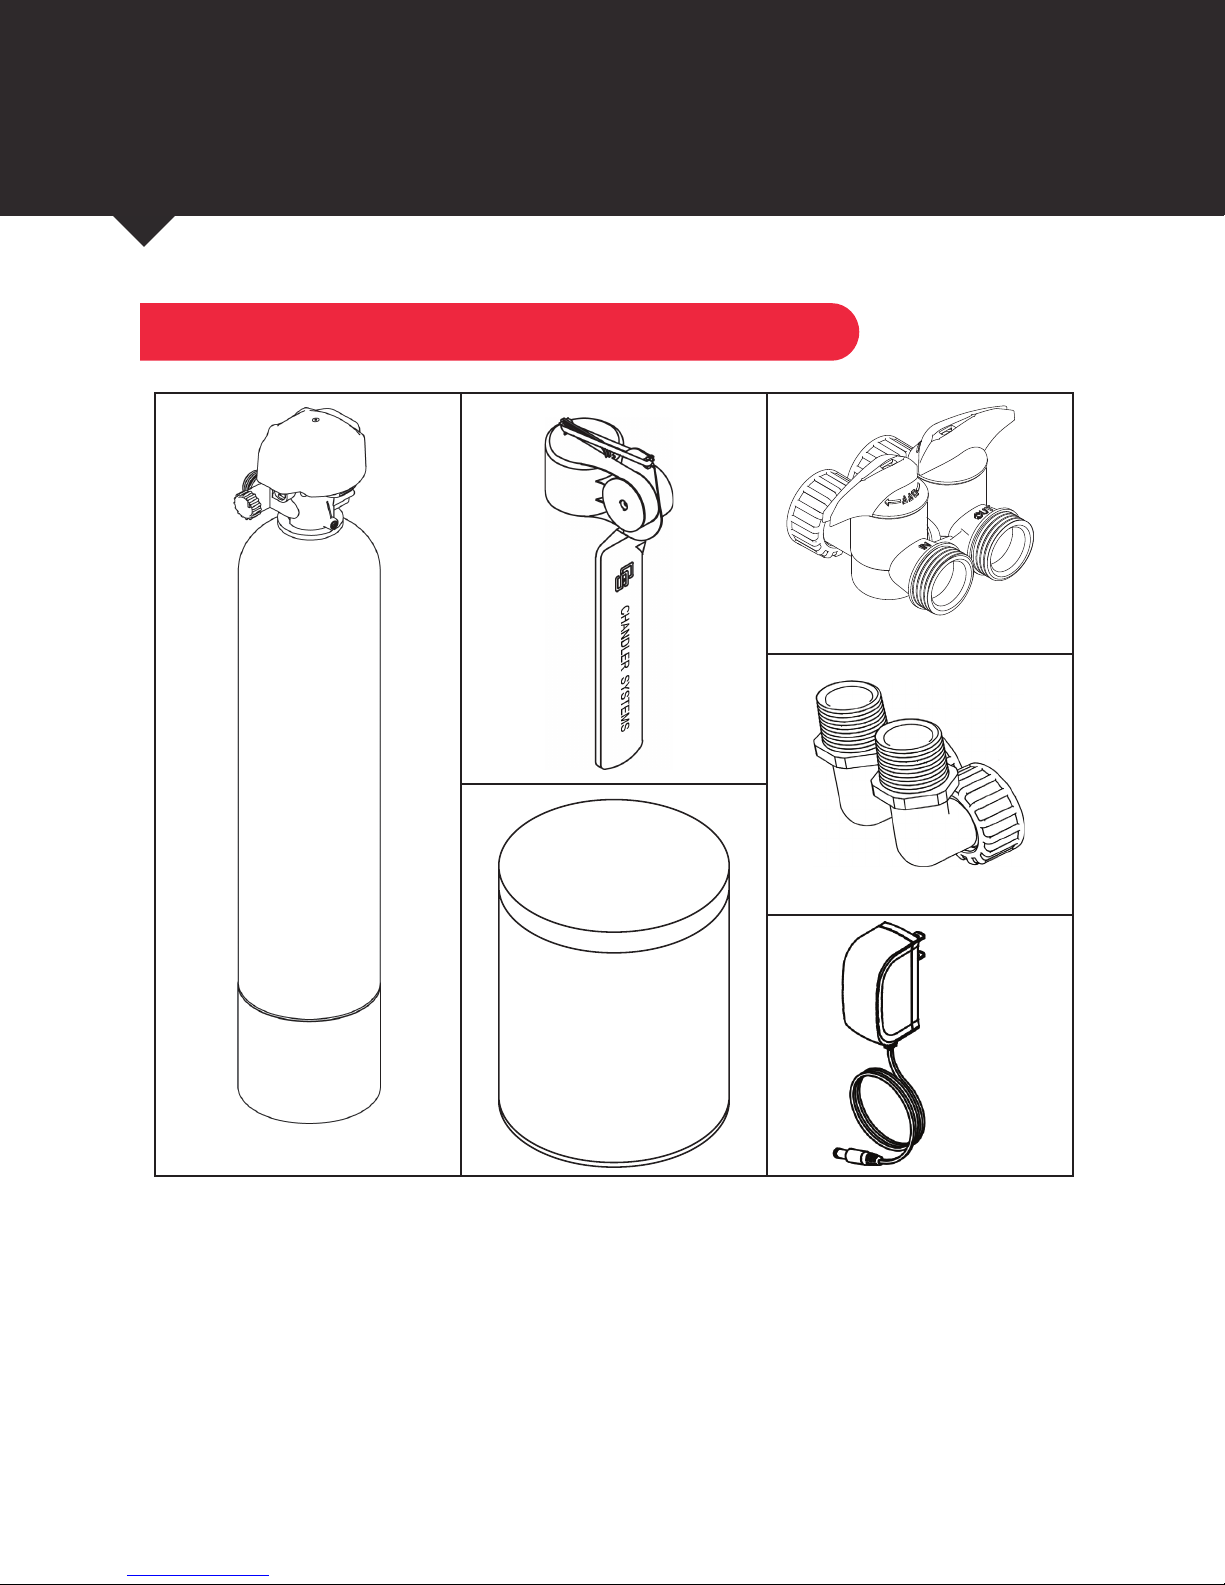
INSTALLATION INSTRUCTIONS
BYPASS
Contents of Carton
BYPASS
SALT
SENSOR
SOFTENER
BRINE TANK
CONNECTORS
POWER
SUPPLY (2)
8
Page 9
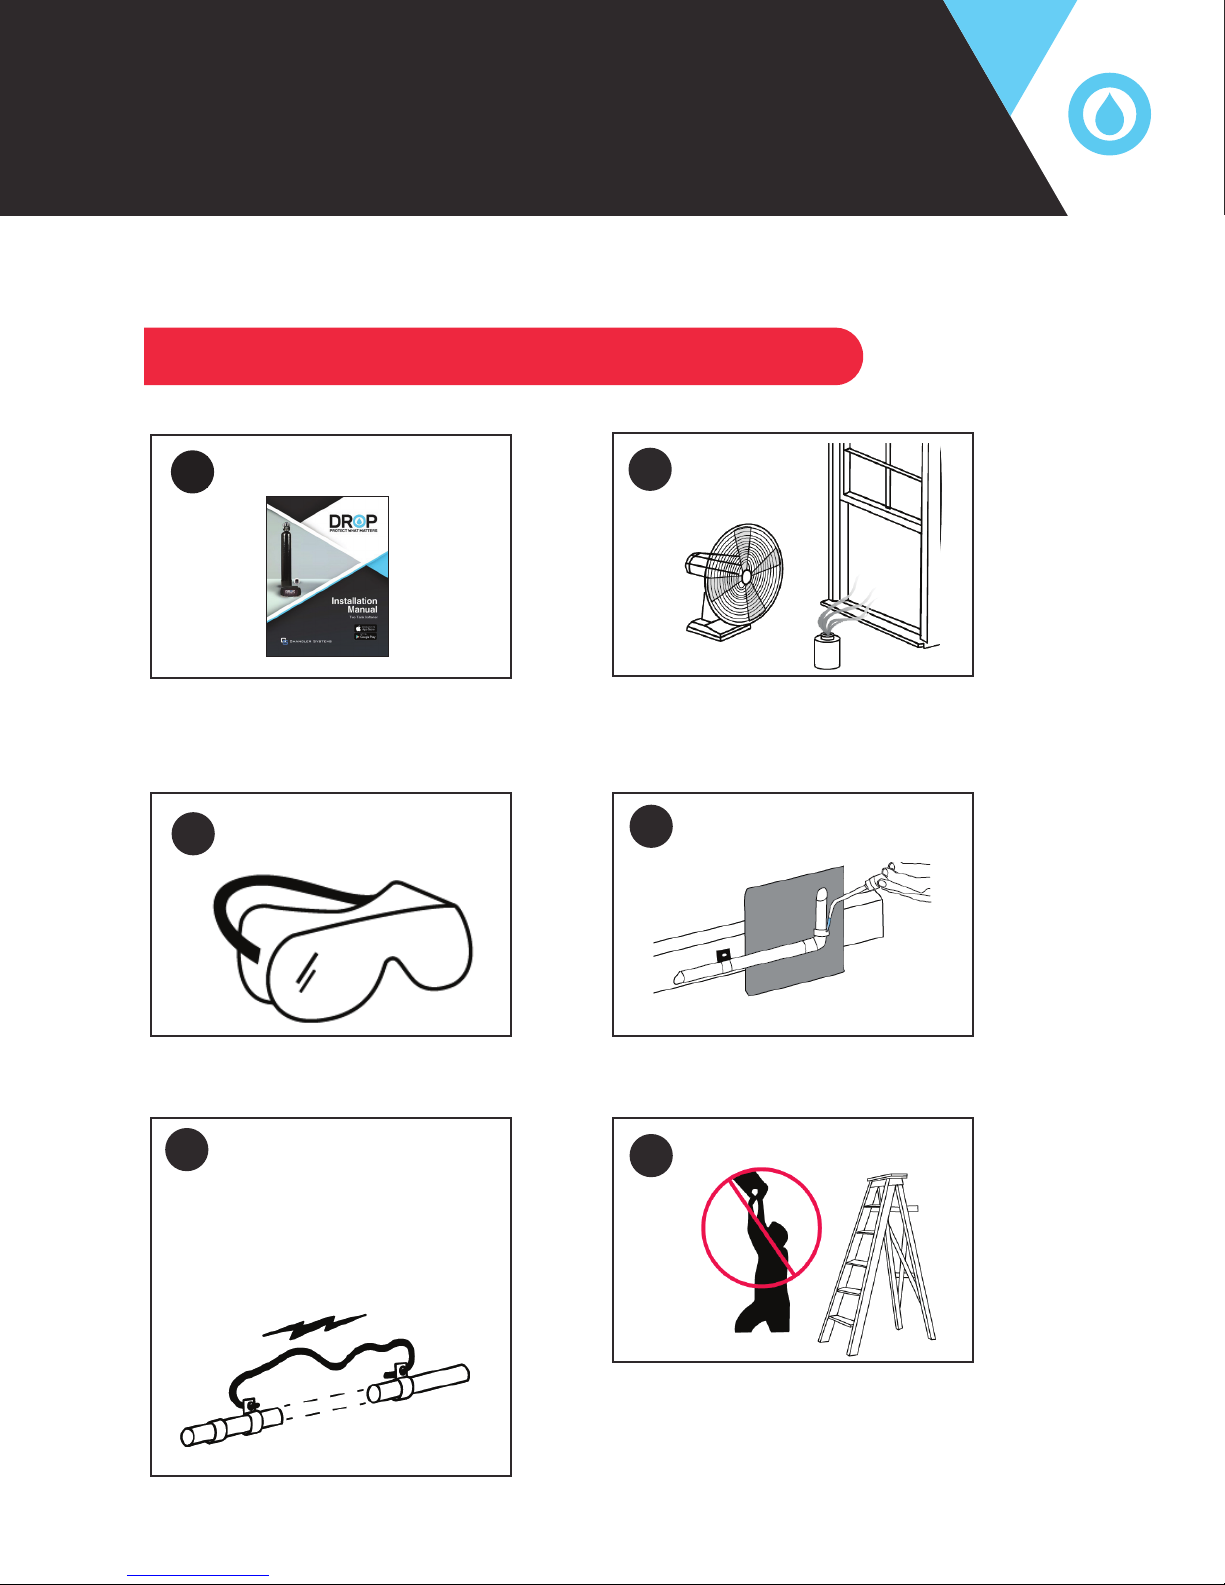
INSTALLATION INSTRUCTIONS
Precautions
1
3
Read
Use Eye Protection
2
4
when soldering.
4
Ventilate
Protect nearby materials
Use only
lead-free solder
copper, install
grounding strap
before creating
plumbing gaps.
If existing plumbing is
5
6
Don’t reach.
9
Page 10
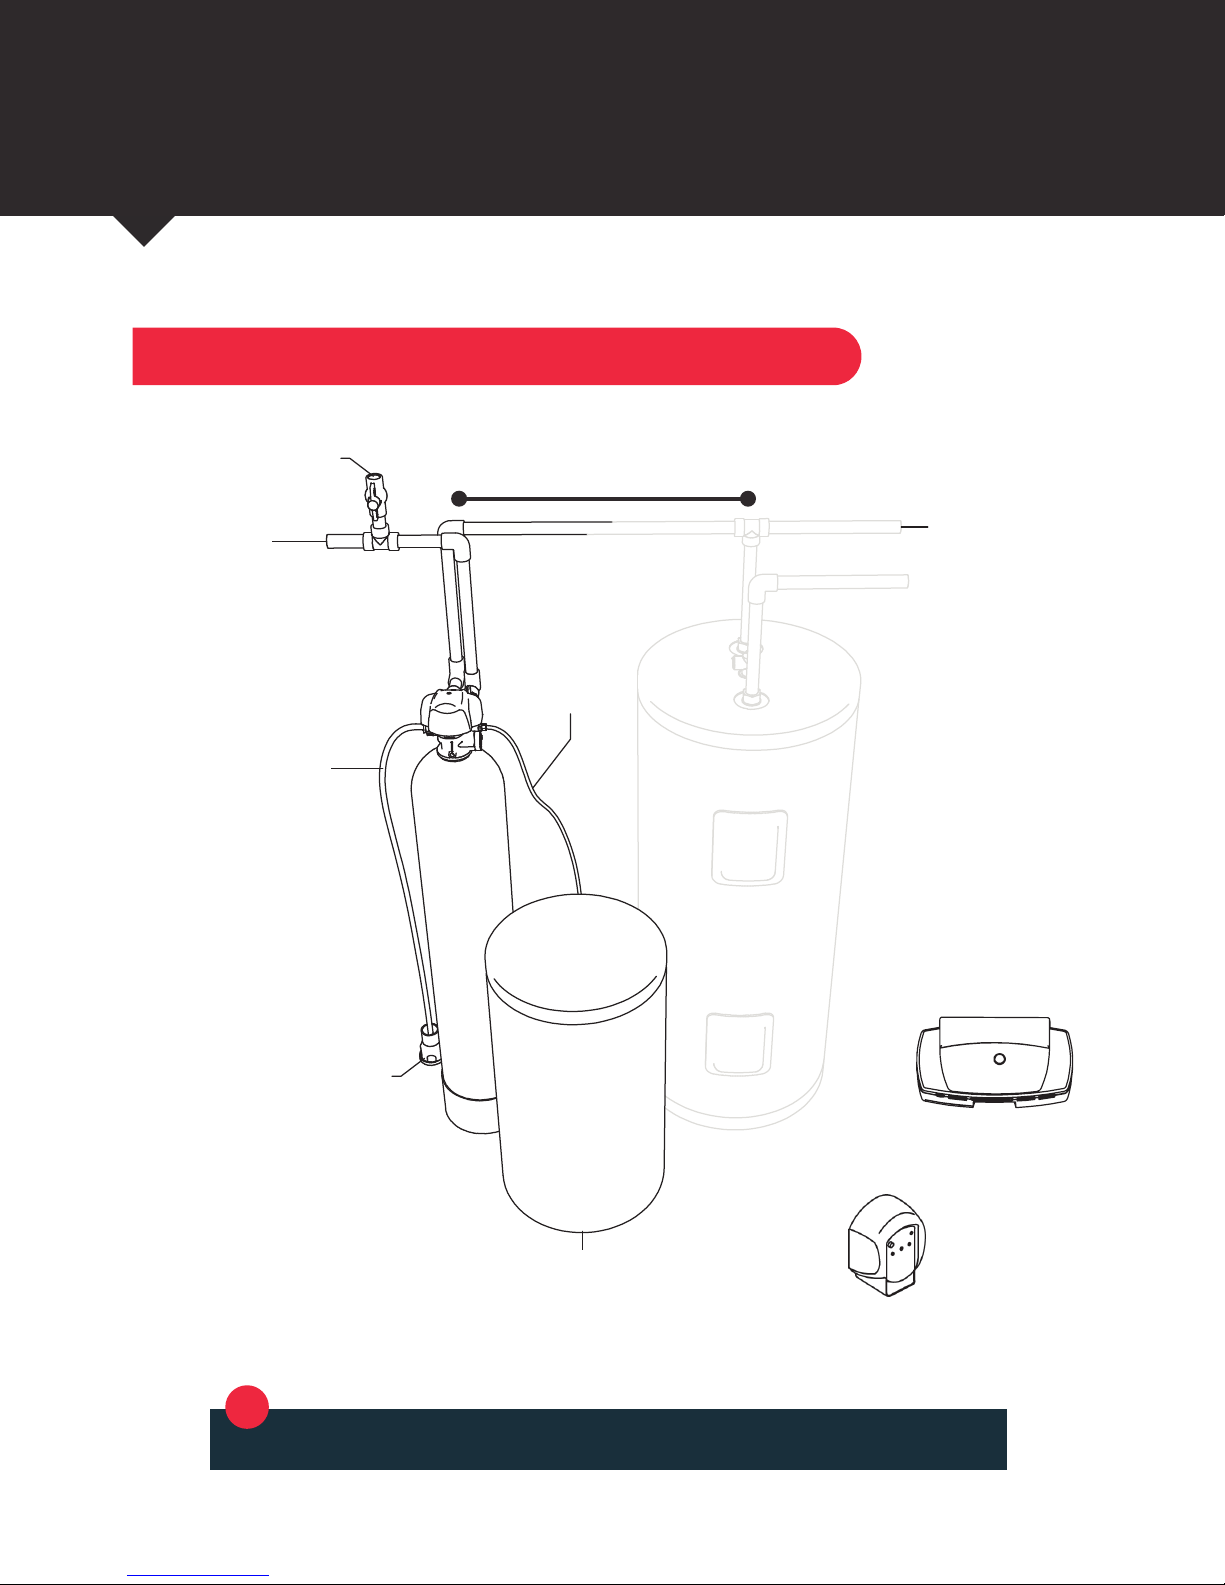
INSTALLATION INSTRUCTIONS
Soft Water
System Setup
Untreatred Water
Untreated Water
Raw Water
Raw Water
Drain Line
Drain Line
Minimum 10 feet required
between softener outlet and water
heater inlet
Brine Line
Brine Line
Soft Water
4" Air Gap Required
Air Gap Required
*
10
Note: Your installation may vary. Follow all local plumbing codes.
Brine Tank
Brine Tank
Hub Required
(not included)
Leak
Detector
Optional
Page 11
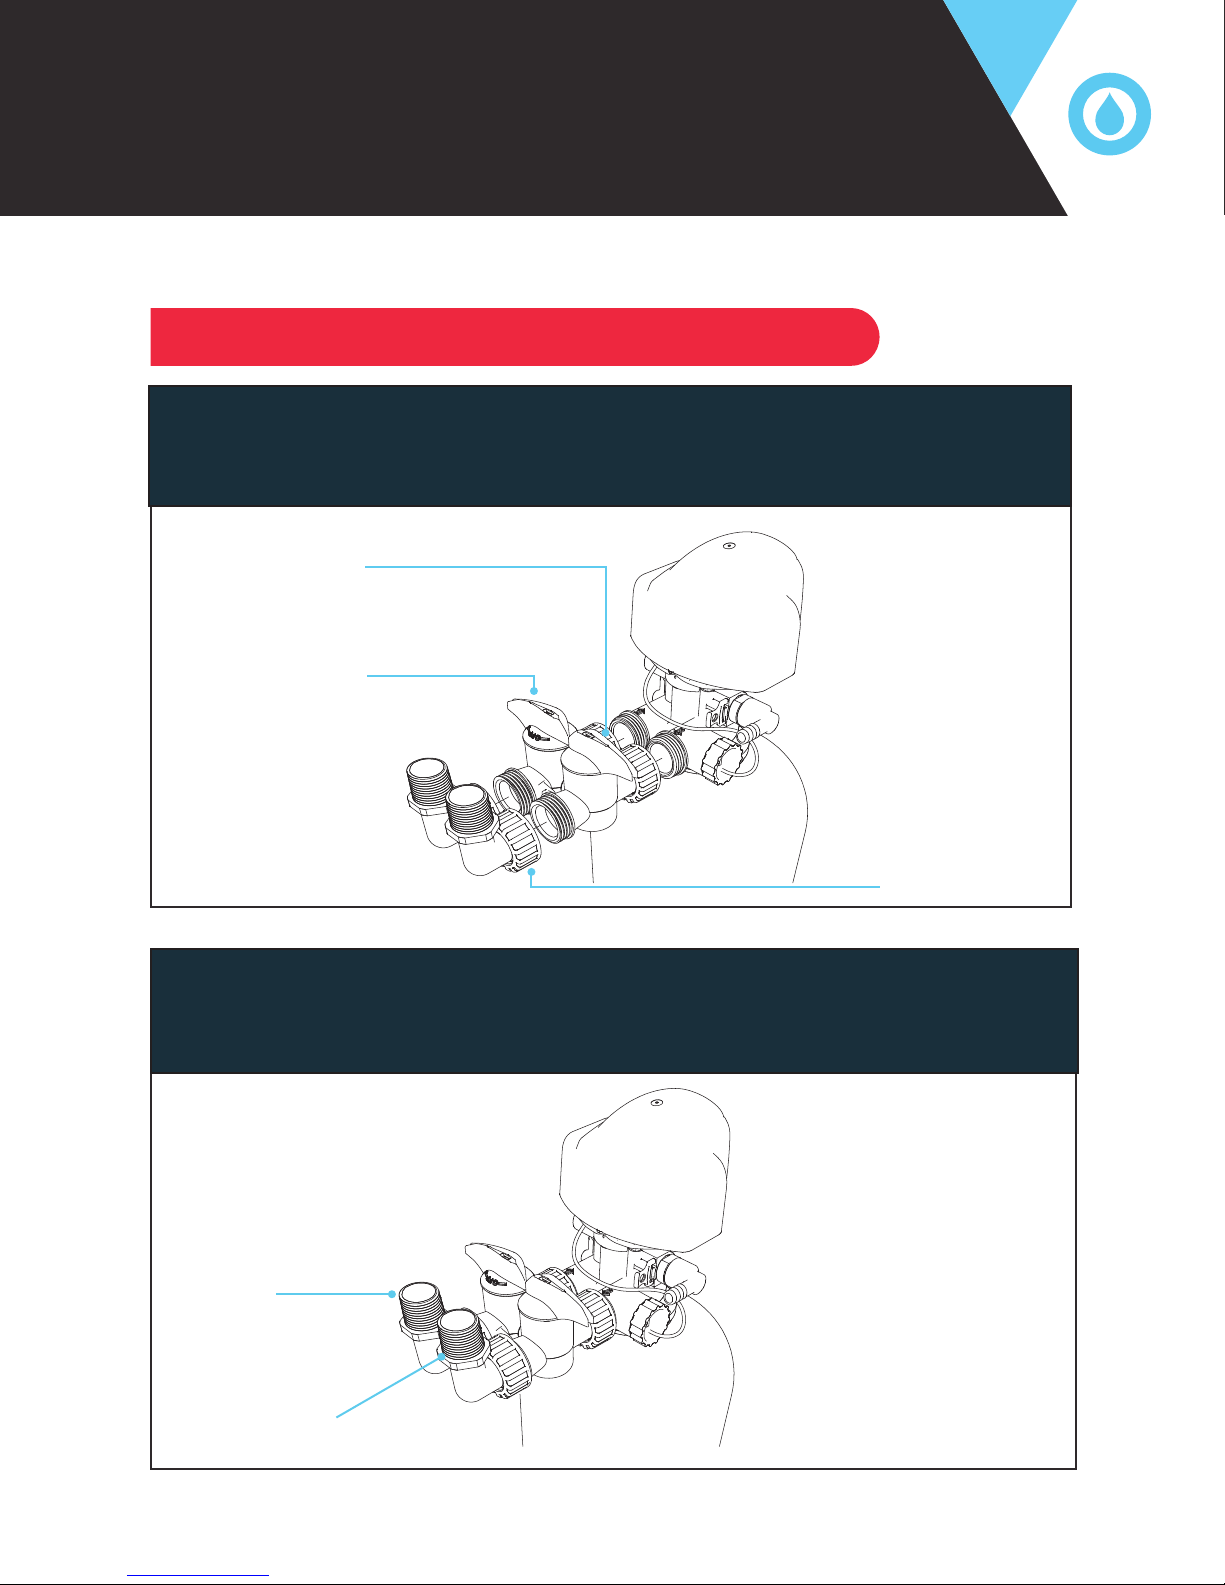
INSTALLATION INSTRUCTIONS
System Setup
Unpack equipment. Connect bypass valve, connectors. Attach components by pushing the
adapters together and tightening the nuts by hand until they feel snug. Position system on
a hard level surface with access to inlet plumbing, drain and electrical outlet.
Bypass Valve
Turn Handles for
Bypass Mode
NOTE: Make sure
bypass valve is in
bypass mode.
Connectors
Turn off main water supply and open nearest cold faucet to relieve pressure. Cut water supply
line, and connect plumbing to the inlet and outlet accordingly.
Note: Inlet and outlet connections are 1” NPT.
Additional piping and / or fittings may be necessary
Inlet
NOTE: When using a sweat adapter,
be sure not to solder plumbing with
Outlet
adapter attached to equipment to
prevent damage to the plastic.
11
Page 12
INSTALLATION INSTRUCTIONS
System Setup
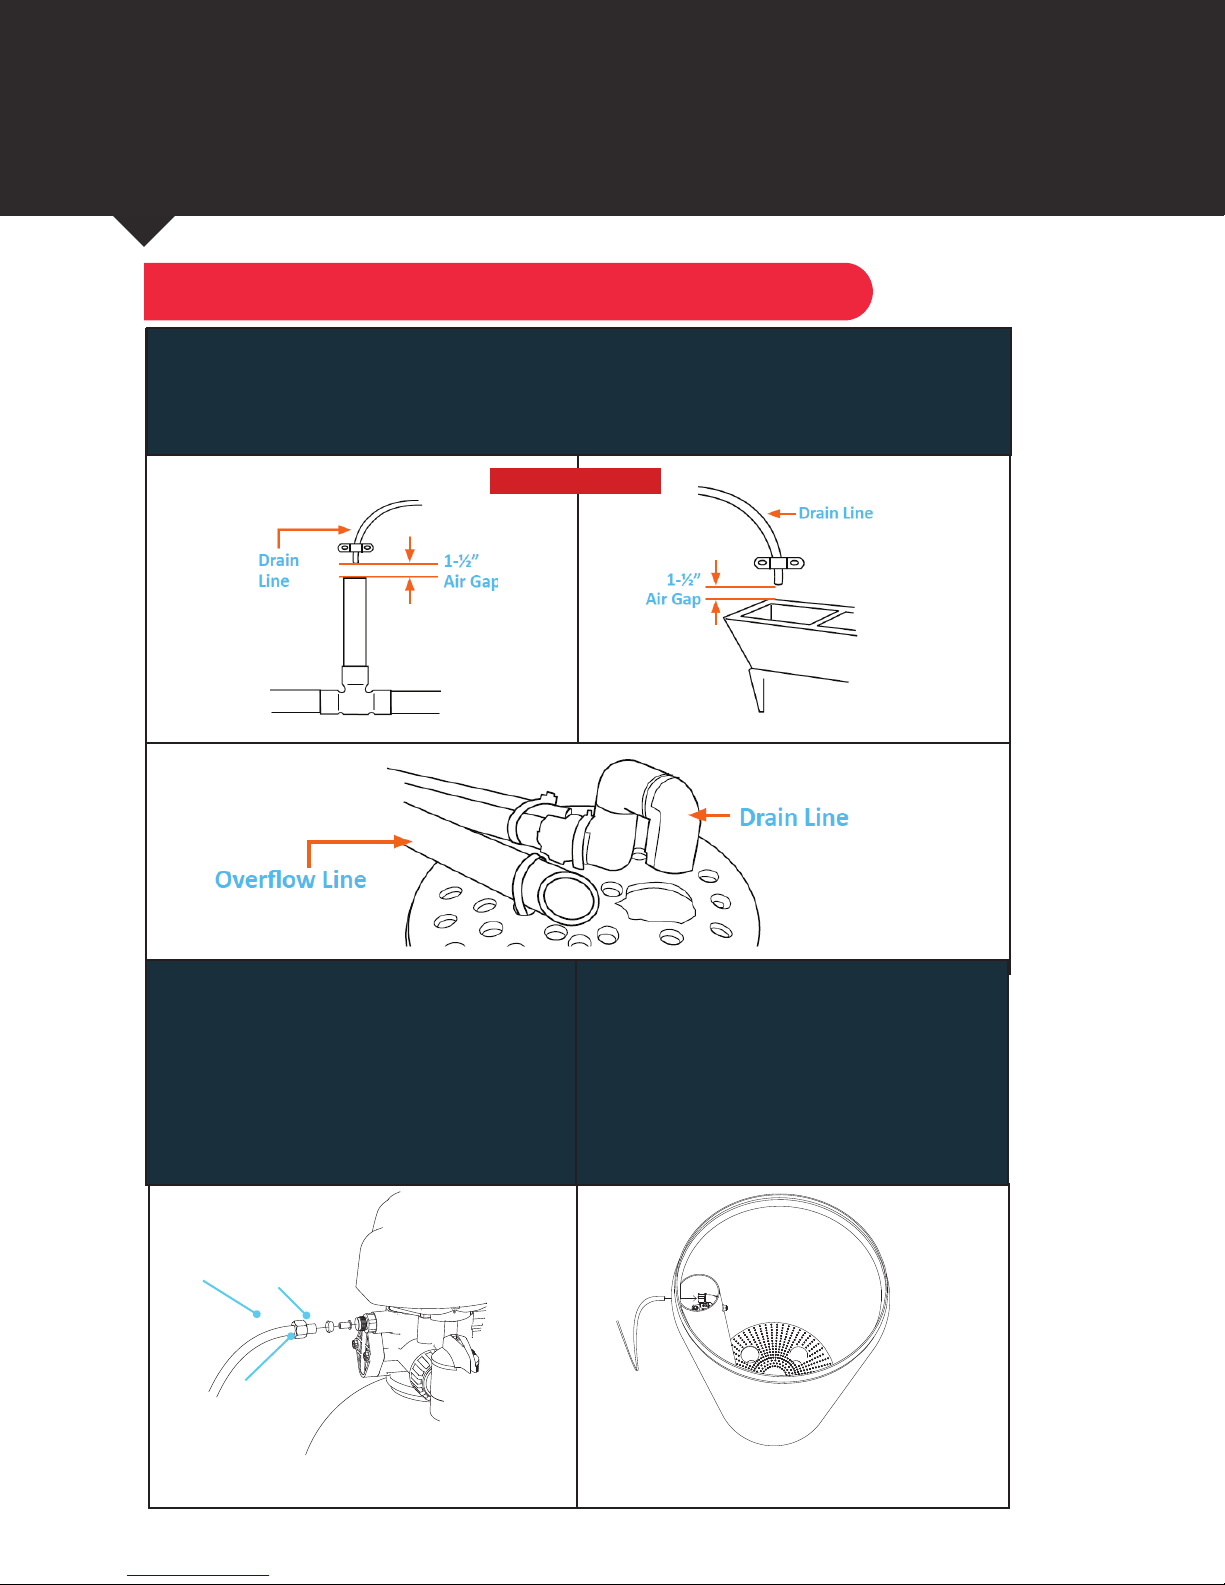
Connect drain line to barbed drain adapter and run to appropriate discharge point. Use
a 1/2” minimum pipe size for the drain. Use a 3/4” drain line for runs that exceed 20 feet.
Make connection to a sanitary waste system through an air gap of 2 pipe diameters or
1”, larger. Do not tee into any other drain lines.
Discharge Options
STAND PIPE
Remove brass compression nut from the
softener control valve. Take brine tubing
(packaged with brine tank) and slide the
brass nut and plastic ferrule onto one end
of the tubing. Find the plastic tubing insert
(taped to the brine well cap inside the brine
tank) and insert it into the end of the tubing.
Next, insert the tubing into the control valve
and tighten the nut.
Nut
Insert
LAUNDRY TUB
FLOOR DRAIN
Inside the brine tank, remove the cap from
the top of the brine well. Feed the other end
of the brine tubing through the hole in the
side of the brine tank, and firmly insert it
all the way into the push-lock elbow fitting
inside the brine well. When this tubing is
fully inserted, the fitting will grab the tubing
and hold it in place.
Ferrule
BRINE LINE CONNECTION TO
CONTROL VALVE
12
BRINE LINE CONNECTION TO
BRINE TANK
Page 13
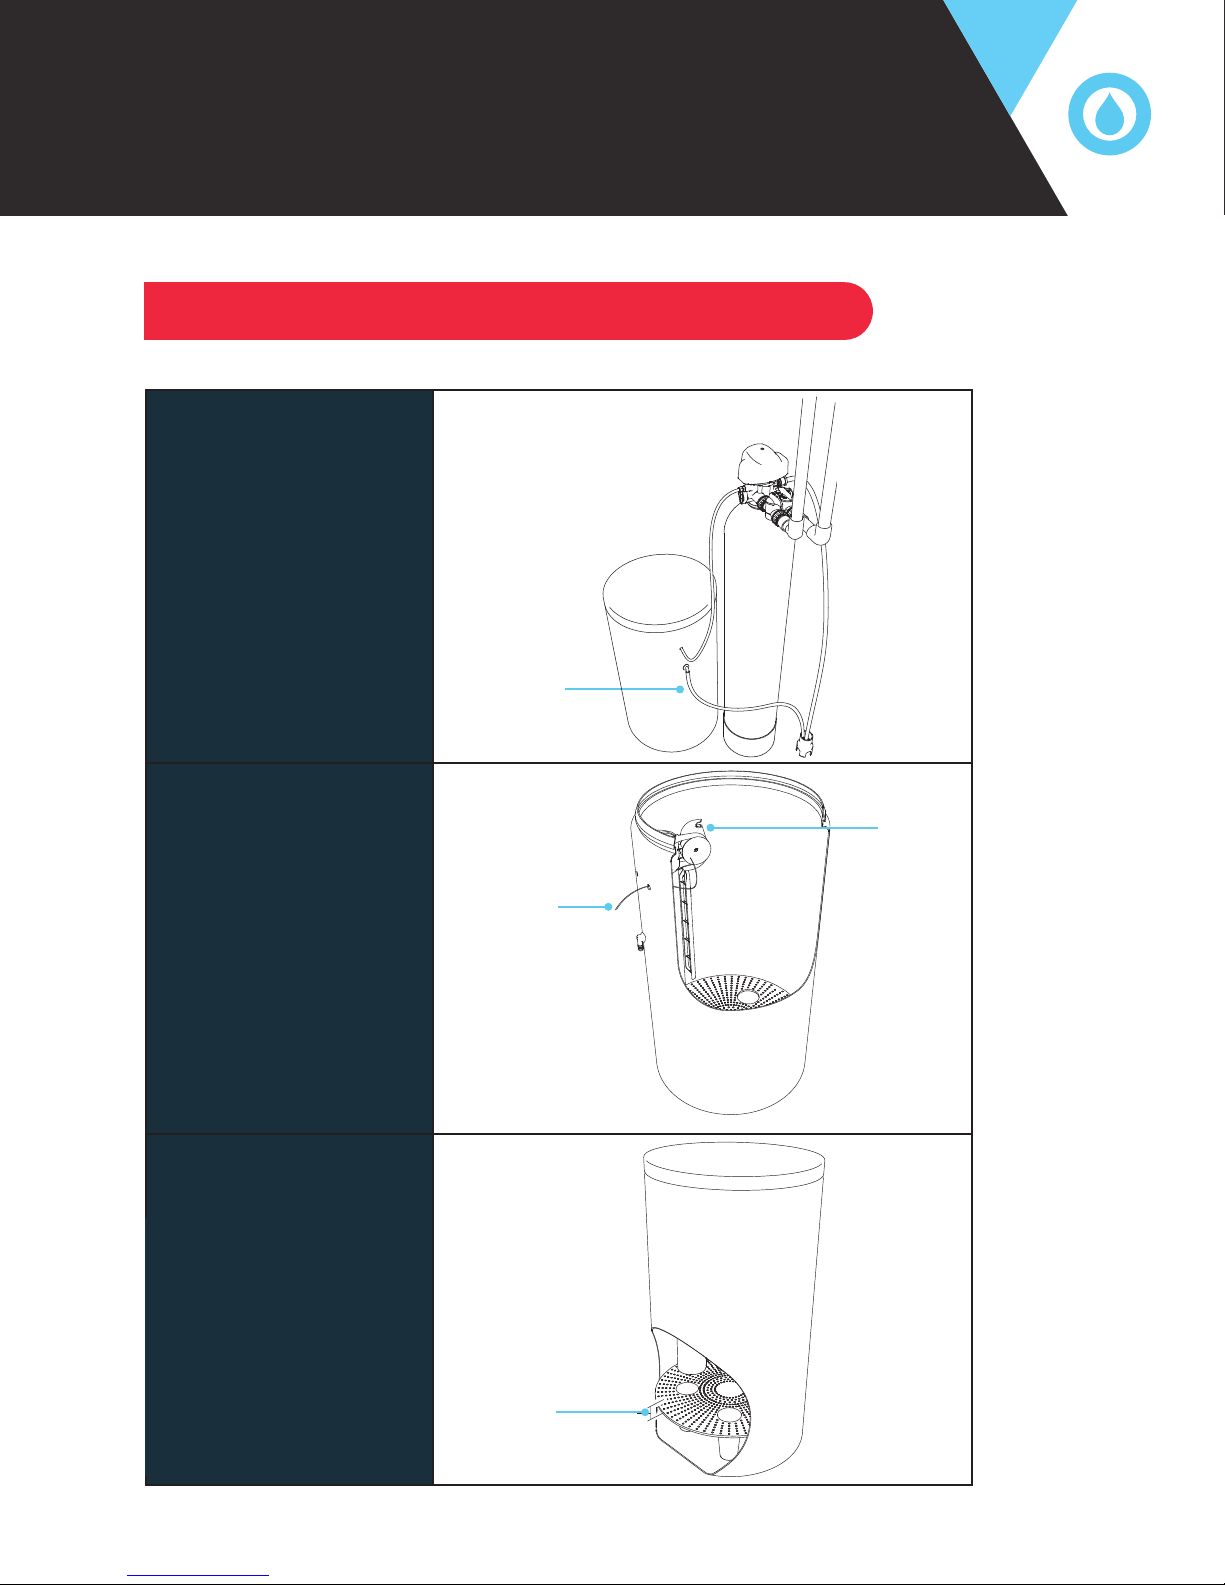
Fill water 1" above
gridplate.
INSTALLATION INSTRUCTIONS
System Setup
Attach safety overflow line
(1/2” tubing) to barbed
fitting on side of brine
tank and run to appropriate
discharge point that is
lower than the overflow
connection on the brine
tank. Do not tee into any
other drains.
1/2” Overflow
Connection
Pass the salt sensor power
cord through the provided
hole from the inside of the
brine tank. Install the salt
sensor unit onto the top
of the brine well. Install the
cord grip around the salt
sensor power cord and
insert it into the hole in the
brine tank. Install the
supplied rubber band onto
the hooks on top of the salt
sensor unit.
Add water to brine tank
approximately 1” above the
grid plate. Do not add salt
to the brine tank at this
time.
Rubber
Band
Power
Cord
Fill water 1”
above grid plate
13
Page 14

INSTALLATION INSTRUCTIONS
System Setup
This information is available in more detail in the USER GUIDE.
With the bypass valve in bypass position, turn on the main water supply. Open a cold soft
water tap nearby and let run a few minutes or until the plumbing is free from foreign material
(usually solder) that may have resulted from the installation. Once clean, close the water tap.
Place the DROP Hub in a central location in your home and plug it in. At this point, you can
download the DROP Connect App on your device. When you open the app, it will walk you through the
process of connecting to your Hub and connecting to WiFi, if desired.
Adding devices to the DROP system
Once you have connected to the Hub, you can use the app to connect your devices (softener, leak
detectors, salt sensor, etc) to the Hub. First, unplug and remove any batteries from the DROP device you
wish to add. Next, navigate to the ‘System’ (selection on left) > ‘Advanced’ (selection at top) page in the
app and enable the ‘Add Device Components’ mode. The hub will enter a state where it will accept new
connections. Plug in the device(s) that you are adding, or for a leak detector, simply install the batteries.
After the device has joined the DROP network you will see it added to the “Manage Device Components”
table, you can then disable the ‘Add Device Components’ mode or simply wait for it to automatically
disable.
When a new device is added to the system, you can rename that device by choosing “System” on the left
navigation menu and scrolling to the bottom of the System Status page. Devices such as the softener
and salt sensor will already be labeled appropriately, but in the case of leak detectors, each individual leak
detector will simply be labeled “leak detector.” In this case, you can rename each leak detector according
to where you put them, such as “water heater” or “kitchen sink.”
Softener Programming
Your softener’s control valve is setup from the factory with some default values that may need to be
adjusted according to your water quality and personal schedule.
System Settings
The first settings that should be reviewed are the Regeneration Time and System Water Source. Choose
“System” on the left navigation menu and it will bring you to the System Status page, where these settings
can be adjusted if needed.
Regeneration Time
This setting controls the time of day when the system will begin to regenerate. While
a softener is in its regeneration cycle, any water used in the house will not be treated.
Therefore, it is important to choose a time of day where water use is least likely. It
is also important to understand how long the regeneration of your system will take. For a
softener with standard settings it will take approximately 1 hour and 30 minutes.
Some DROP installations will require multiple filters and/or softeners. These stages
can require regeneration on the same day and would occur one after the other starting
at the regeneration time, so you should select a regeneration start time that would take
these times into consideration along with your water usage schedule.
14
Page 15

INSTALLATION INSTRUCTIONS
System Start Up
System Water Source
The system water source setting is used by the DROP system to know how to respond
to power outages. It can be set to Private Well or Municipal Supply. If your water supply
is not one of these choices, if your water supply is dependent on power to be available
(i.e. it is supplied by an electric pump) set it to Private Well, otherwise set it to Municipal
Supply.
Water Hardness Setting
The most important setting to adjust when setting up your DROP softener is the water hardness
setting—this setting impacts the efficiency of your softener as well as the ability of your softener to
correctly soften your water. To set the water hardness, select “Devices” on the left navigation menu
and then select the softener from the devices list. You should then be viewing the Softener Status
page. On this page you will be able to adjust your water hardness setting. The water hardness is a
measurement of mineral content (calcium and magnesium) in the water and is measured in Grains
Per Gallon (gpg). A water test should have been done on your water to determine the hardness
measurement of your water source. Use this measurement as the value for the water hardness setting
on your system.
Note: If you have had a water test performed, but the results are listed in Parts Per
Million (ppm) or Milligrams Per Liter (mg/l), you can convert this number to Grains Per
Gallon by dividing the ppm or mg/l by 17.1, and then rounding up to the nearest
whole number.
Note: If the water contains iron and / or manganese, add together the total ppm or
mg/l of iron and manganese, and multiply this number by 4. Then add this number to
the grains per gallon (gpg) of hardness to calculate your compensated hardness. Use
this compensated hardness level when programming the hardness.
System Startup Procedure
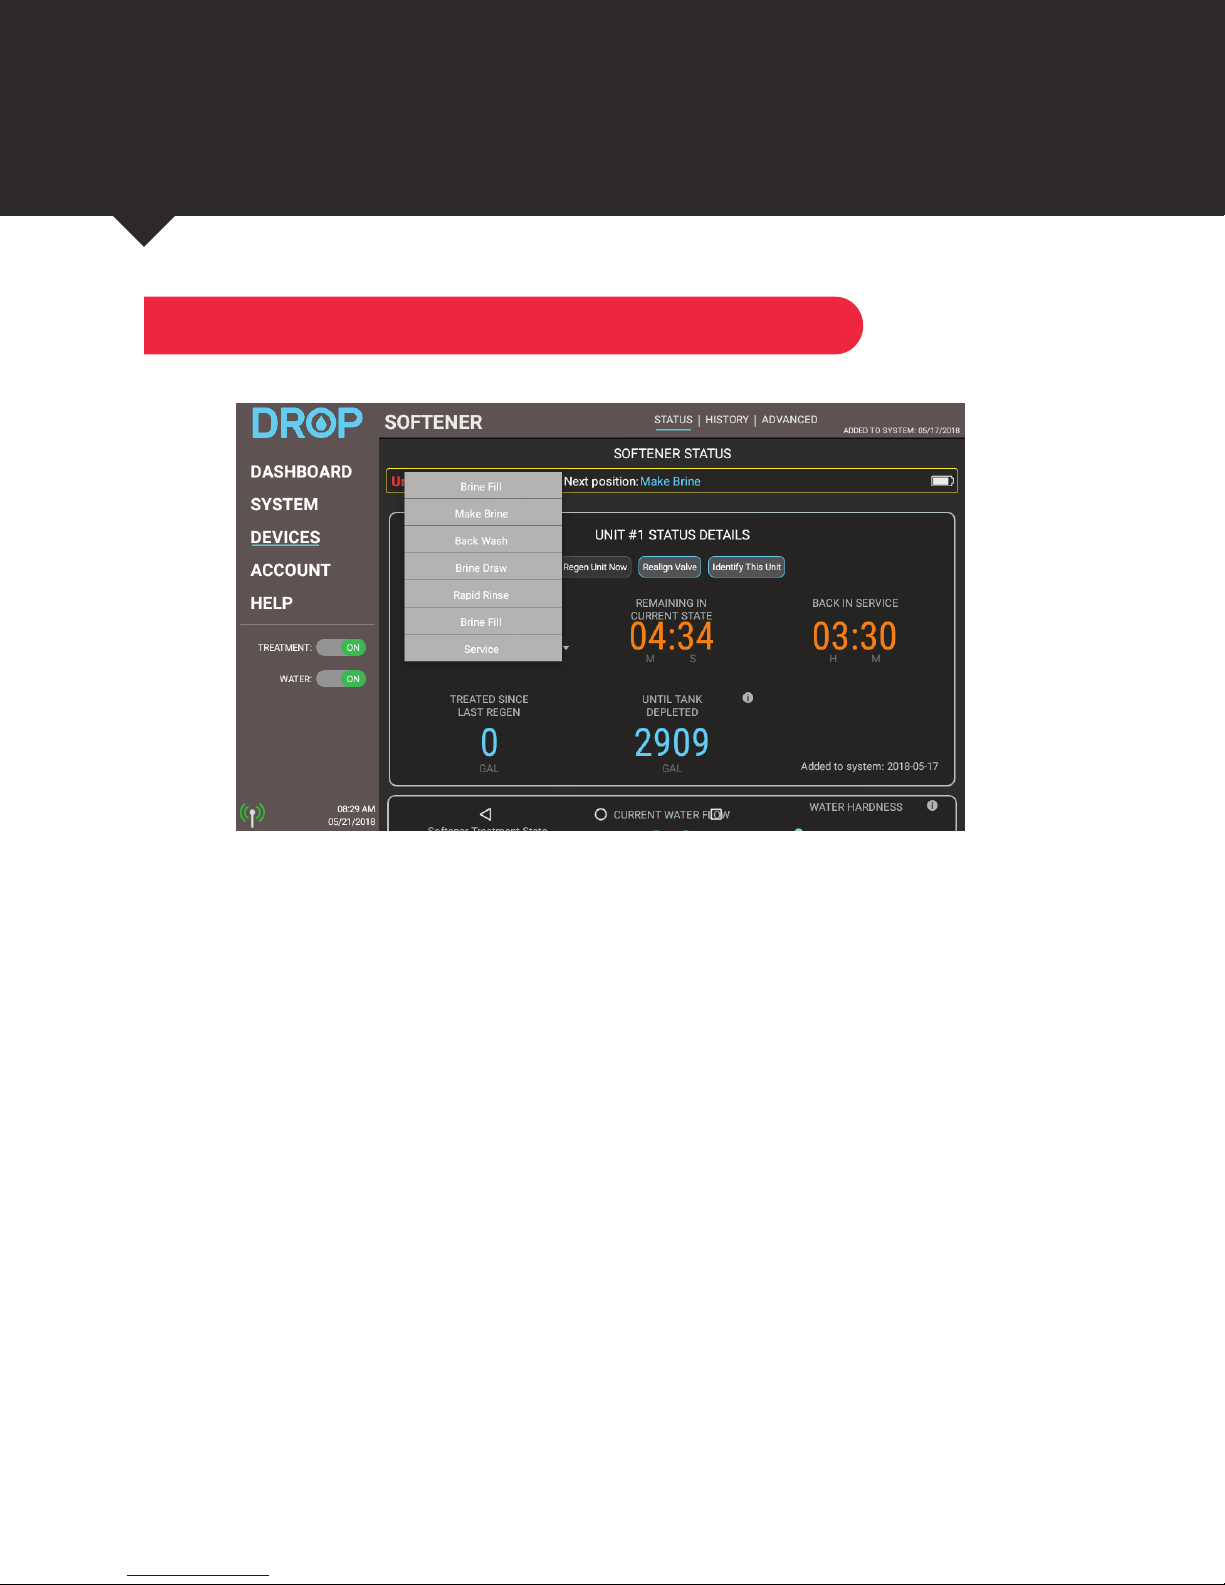
Note: In the steps following it is necessary to skip regeneration cycle steps. To accomplish this, first
you must be on the DEVICES > SOFTENER > STATUS page of the app. At the top, just below the
Softener Status title, tap the softener unit that you are starting up (usually there will only be one choice,
Unit 1). Once the unit is selected, the Unit Status Details will appear. When the unit is in regeneration,
a Current Position will appear on the left. Tap on the Current Position and a list of all the regeneration
positions will expand (see screenshot next page), they will be in order of the regeneration steps. Simply
choose the step that you would like the valve to be in. You can even go back to a previous step if
needed.
15
Page 16
INSTALLATION INSTRUCTIONS
System Start Up
1. Navigate to the DEVICES > SOFTENER > STATUS screen in the app and select the “Start
Regeneration Now” button. Skip the “Brine Fill” and “Make Brine” steps to cycle the softener to the
backwash position.
2. Partially open the inlet valve on the bypass—about halfway—to allow water to slowly begin entering
the softener tank. As water enters the tank, excess air will be expelled out of the drain line.
3. Once there is a steady flow of water coming out of the drain line, slowly open the inlet valve the rest
of the way. After 10 minutes, the softener will enter the brine draw stage of the regeneration cycle.
You do not need to stay in this step for long, but before you skip to the next step, look inside the
brine tank and verify that water is being drawn out in this step. If there is no sign of water being
drawn out, you may need to check the brine tubing connections.
4. Next, you can use the app to the “rapid rinse” step. In this step, there should be a strong flow of water
coming out of the drain line, as there was in the first step. Stay in rapid rinse until the water runs clear.
5. After “rapid rinse”, you can skip to brine fill. The softener does not need to go through a complete refill,
since you already filled the brine tank earlier, but you should stay in this step long enough to observe that
water is entering the brine tank, and to make sure that the water level is at least 1” above the salt grid
plate. Then you can return the control valve to the “Service” position.
6. Open the outlet valve of the bypass so that water is now able to flow through your softener and into your
service lines. Your softener will now begin softening your water.
16
Page 17
INSTALLATION INSTRUCTIONS
System Start Up
7. Last, add salt to your brine tank. When adding salt, make sure that you remove the rubber band from the
top of the salt sensor, and that the salt sensor paddle is laying flush with the brine well. Add several
bags of salt, pouring toward the salt sensor paddle. Once the salt level is high enough to hold the paddle
in place, you can attach the rubber band to the top of it. When your salt level drops below the paddle,
the paddle will flip out and send a signal to the DROP Hub, telling you that you need to add salt. When
you receive a “low salt” indication—don’t panic—you still have several regeneration cycles worth of salt; it
reminds you early enough to make sure that you have plenty of time to remember to get salt. If you
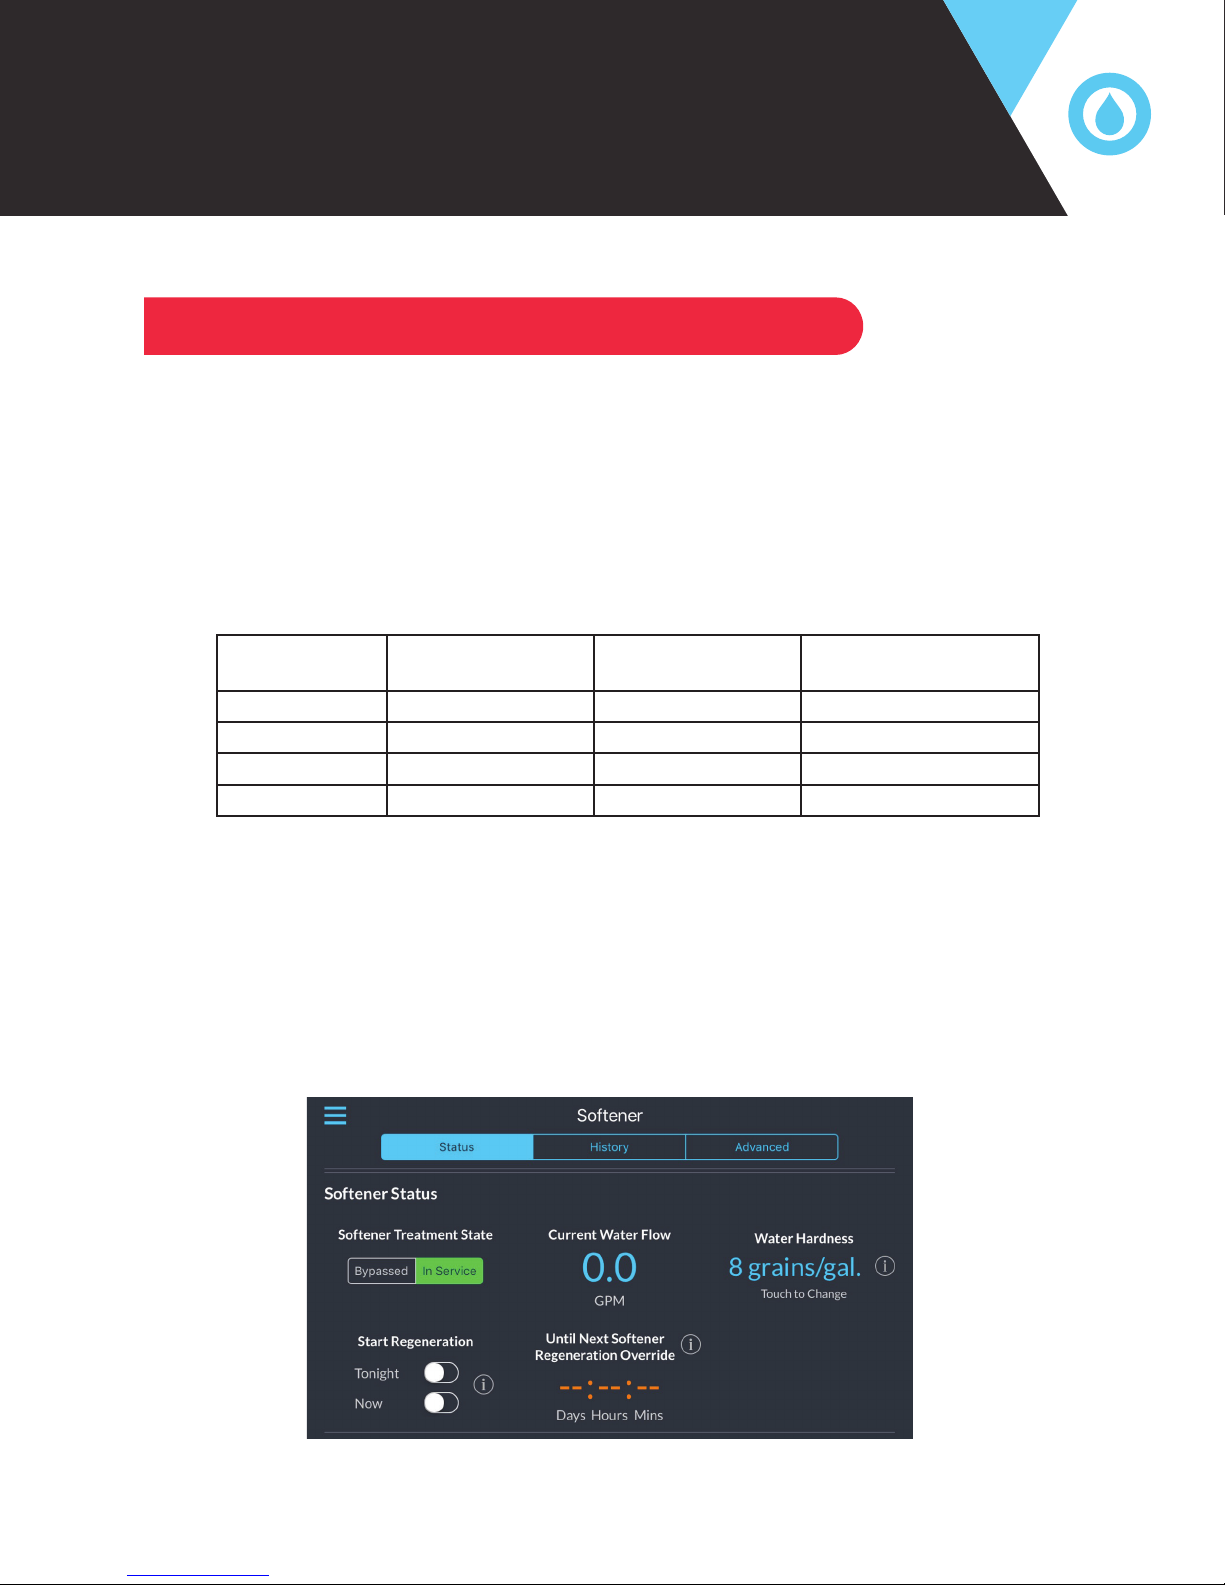
ever run out of salt completely, just add salt and then select the “Start Regeneration Tonight” button in the
Softener Status menu of the app.
RECOMMENDED SALT SETTINGS
MODEL CAPACITY BRINE REFILL
TIME
S-24 20,000 4:30 6.75
S-32 27,000 6:00 9
S-48 40,000 9:00 13.5
S-64 54,000 12:00 18
You will need to check your Brine Refill time setting and resin grains capacity setting and set them
according to the table above. The Brine Refill time setting can be found in the app by going to
DEVICES > SOFTENER > ADVANCED. This setting determines how much salt is used per regeneration.
Do not change this setting away from the recommendation unless you understand the effects of the
changes. Changes to this setting can great effect efficiencies and the softeners ability to make soft water.
SALT LBS. USED PER
REGENERATION
Extra Cycle / Manual Regeneration: Should you ever need to initiate an extra regeneration due to
unexpected higher water use, use the Regenerate Now button in the App.
NOTE: If your hot water tank has refilled with hard water, it may take several days for it to empty and for
your water to feel soft again.
DEVICES > SOFTENER > STATUS
(Navigation description examples can be found in the User Guide)
17
Page 18
COMMON QUESTIONS
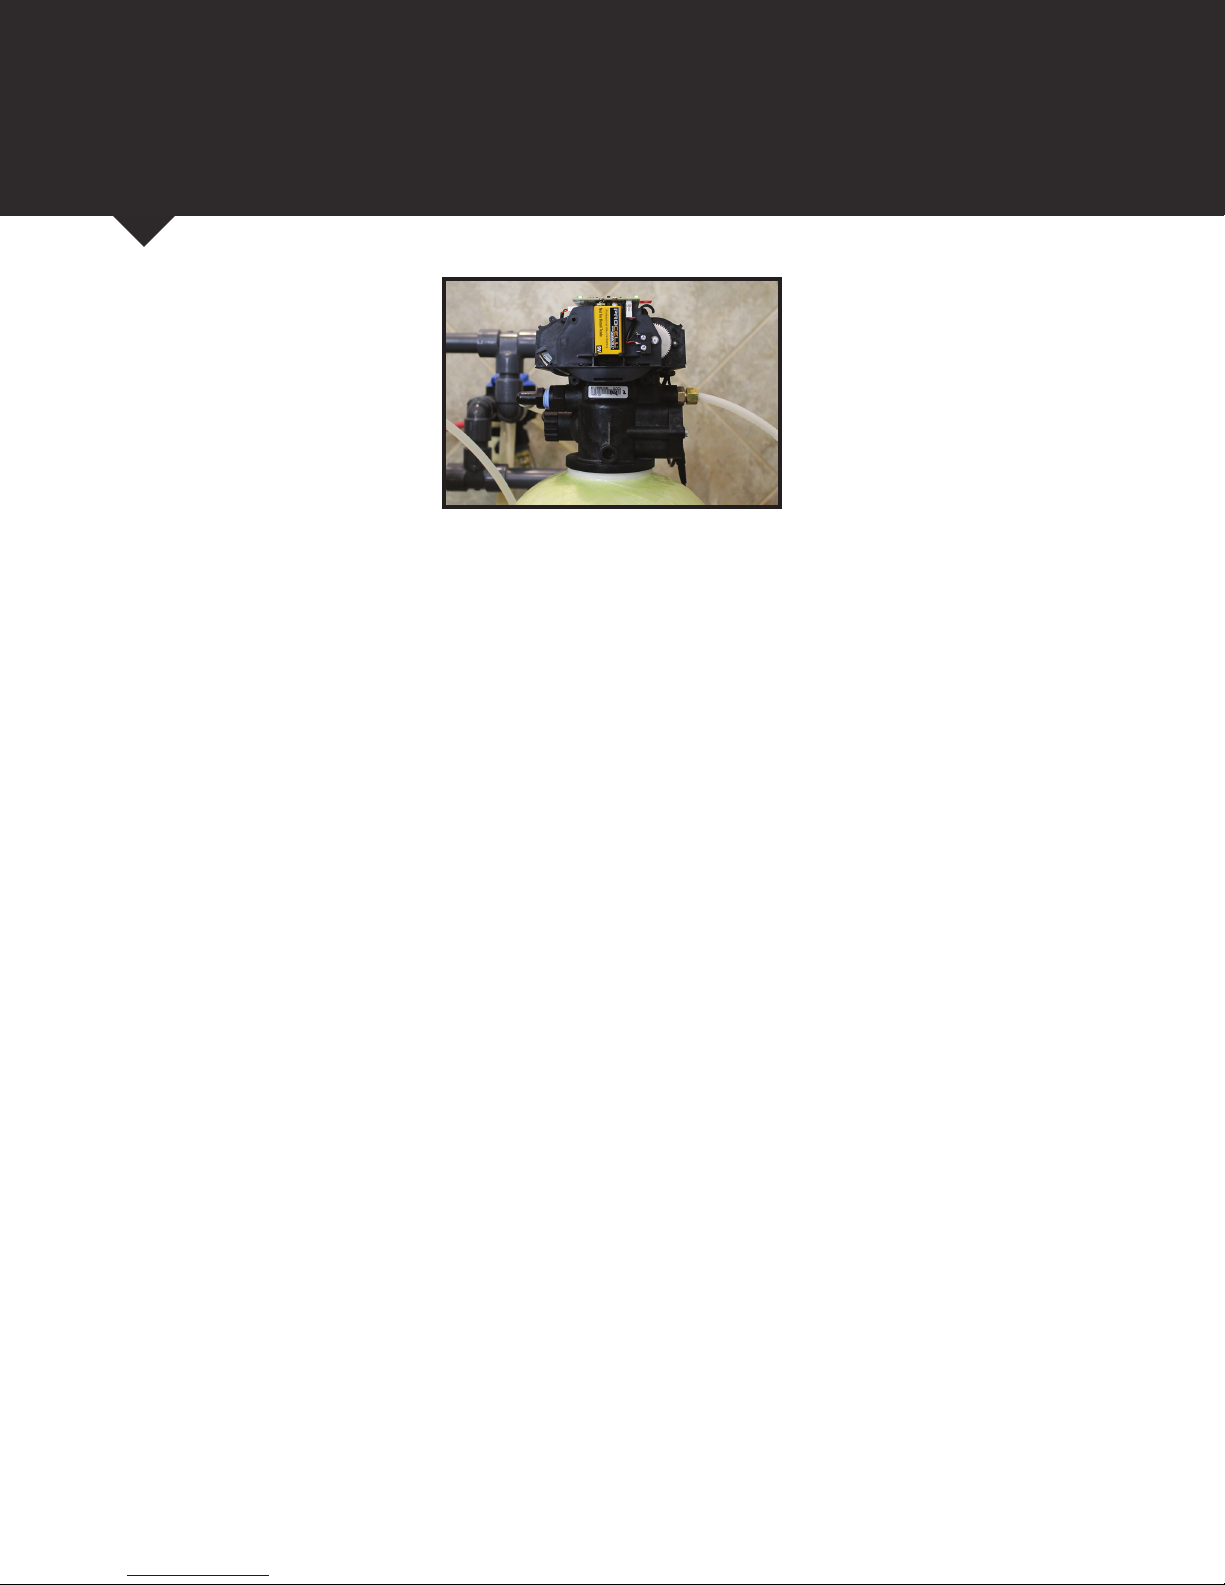
9 Volt Battery back up enables your valve to continue to protect your home
from leaks during a power outage.
There has been a drop in my home’s water pressure. What can be the cause? A reduction in
your home’s water pressure can indicate that it is time to change your prefilter. If you do not have a prefilter
with your system or changing the filter has no effect, contact your authorized DROP Water Management
System representative.
My system seems to be regenerating more frequently. Is this normal?
Remember, your DROP system is demand operated, adjusting automatically to your water usage. If you do
not think that your water usage has increased due to extra house guests, additional laundry or some other
reason, check for any leaky plumbing, dripping faucets or running toilets, all of which can contribute to more
frequent regenerations.
My water doesn’t seem soft. How can I be sure that my system is regenerating properly?
Be sure that the water supply to the softener is not by-passed and there is salt in the brine drum. Follow
the instructions in the “Extra Cycle / Manual Regeneration” section on page 17 to manually regenerate the
softener tank. If the unit does not advance through to the next regeneration automatically, please contact
your DROP Water Management System representative for further assistance.
How will I know when it is time to add salt? DROP Systems provide notification when salt needs to
be added. To check manually, lift the lid of the brine drum to check the level of salt. If you can see water,
it is time to add salt. You can add salt anytime there is enough room to accommodate additional blocks or
pellets.
Is it okay to drink soft water? Yes, soft water is okay for drinking and cooking. If your softener
regenerates with sodium chloride (salt), keep in mind that there will be a small amount of sodium added to
the softened water. People who are on sodium restricted diets should consider the added sodium as part of
their overall sodium intake. If sodium is a concern, potassium based salt (potassium chloride) can be used
as an alternative or an under-counter reverse osmosis system can be installed to remove sodium.
If at any time you feel your system is not operating properly, by-pass the system
and call your authorized DROP Water Management System representative.
18
Page 19

Chandler Systems Inc.
710 Orange St.
Ashland, OH 44805
P. 1 833 BUY-DROP
www.dropconnect.com
Note: This equipment has been tested and found to comply with the limits for a Class B digital device,
pursuant to part 15 of the FCC Rules. These limits are designed to provide reasonable protection against
harmful interference in a residential installation. This equipment generates, uses and can radiate radio
frequency energy and, if not installed and used in accordance with the instructions, may cause harmful
interference to radio communications. However, there is no guarantee that interference will not occur in a
particular installation. If this equipment does cause harmful interference to radio or television reception,
which can be determined by turning the equipment off and on, the user is encouraged to try to correct the
interference by one or more of the following measures:
—Reorient or relocate the receiving antenna.
—Increase the separation between the equipment and receiver.
—Connect the equipment into an outlet on a circuit different from that to which the receiver is connected.
—Consult the dealer or an experienced radio/TV technician for help.
This product may be covered by one or more patents. (https://dropconnect.com/patents)
19
Page 20

DR2TANKV2
Copyright Chandler Systems Inc. DROP is a product of Chandler Systems Inc. All rights reserved.
 Loading...