

Drongo VoiceAlert Instruction Manual
info@drongo co za. .
+27 87 094 1218
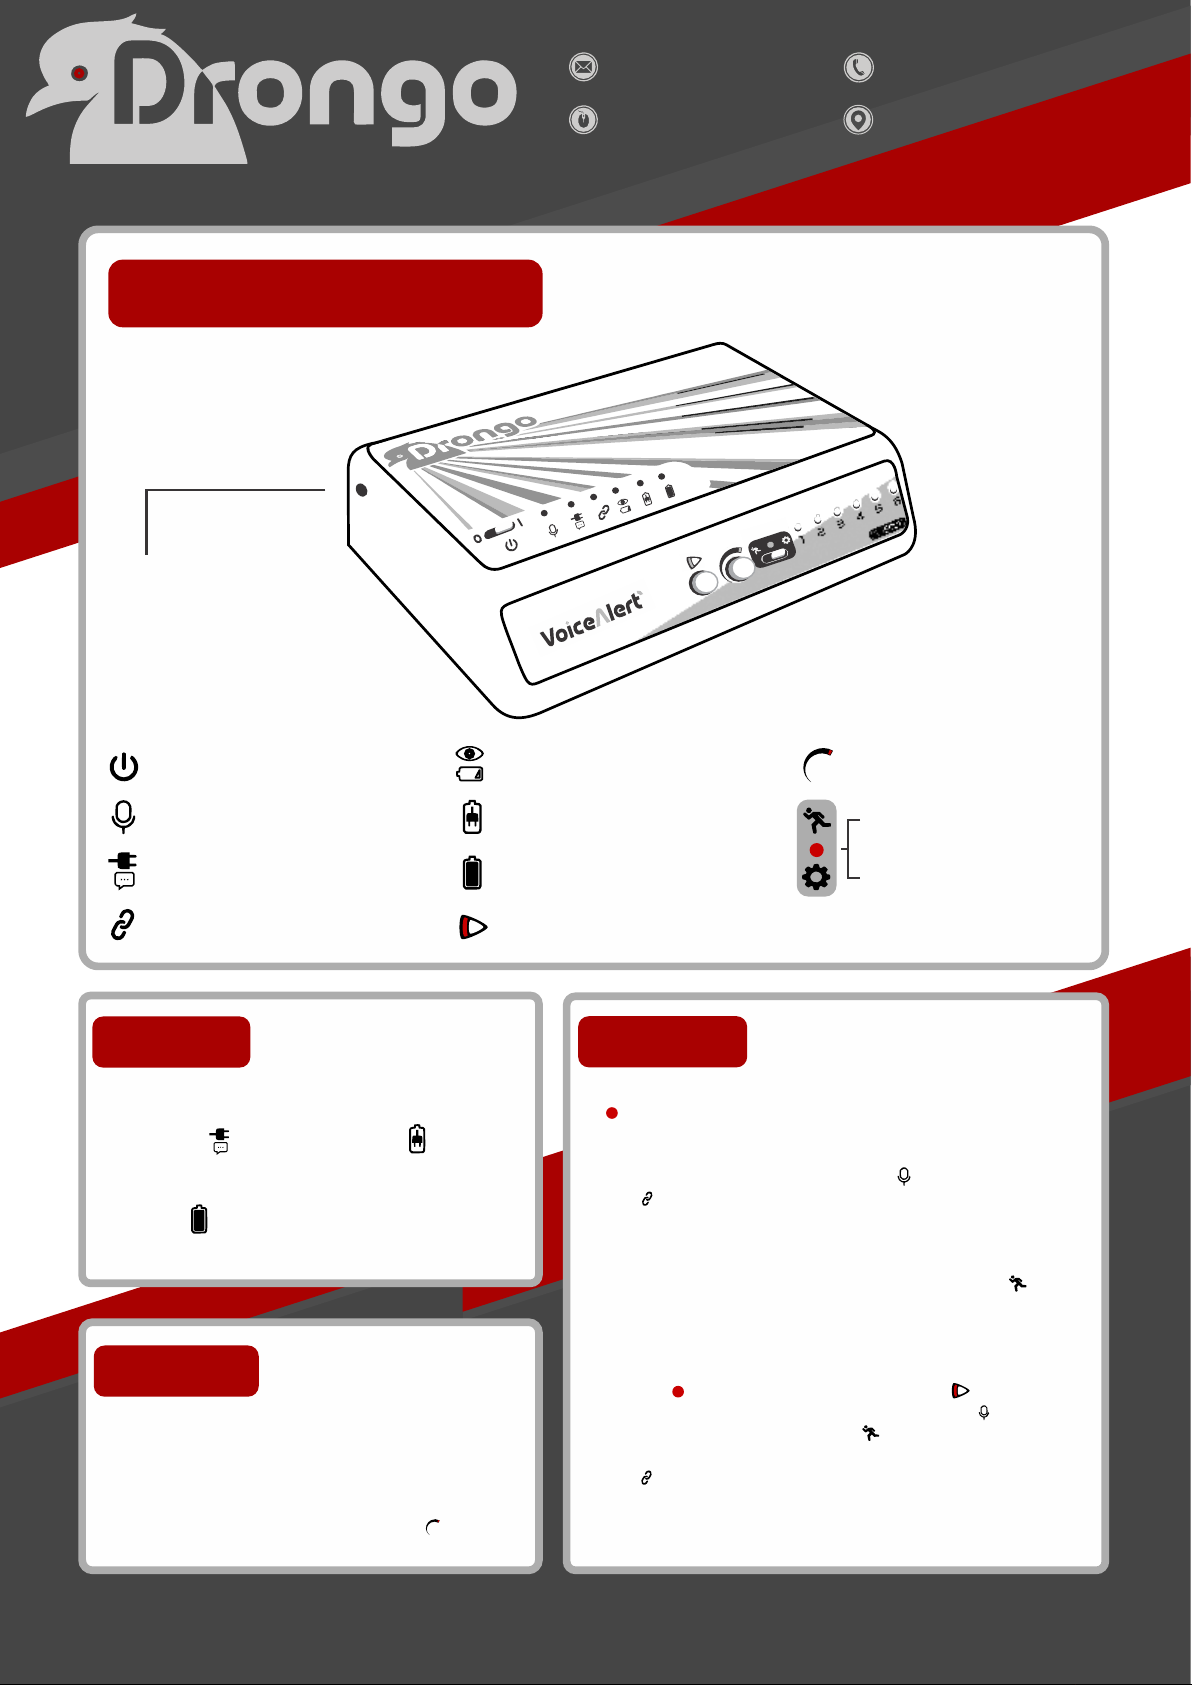
ICONS IN THIS MANUAL
ANTENNA
CONNECTION
POINT
www.drongo.co.za
7 Gert Kotze Street
Springbok Park, Brackenfell CPT
POWER SLIDE SWITCH
MICROPHONE
POWER / MESSAGE LED
LINK LED
SENSOR LOW BATTERY LED
BATTERY CHARGING LED
BATTERY FULL LED
PLAYBACK BUTTON
1 - POWER
Plug in AC adapter into the back of the Voice Alert.
Move the ‘Power slide switch’ to the ON/ I
position. The /Power LED and the /Battery
Charging LED should glow indicating that the
device is on and charging.
When the LED glows, the battery is full
and you can unplug the device.
VOLUME ADJUSTER
RUN
RECORD
LINK MODE
ZONES BUTTONS
1-6
2 - RECORD
To record a voice message, move the slide switch into the
/Record position.
Select the Zone “1" button, hold it down and record your
message by speaking clearly into the /MIC .
The /Link LED will only glow while the desired Zone is
held down. Your message can be no longer than 6 seconds.
Repeat the previous steps to record a message for Zones
2-6. To hear your message, slide the switch into the
/RUN position and select the Zone number you would like
to playback.
3 - INSTALL
Screw supplied antenna to the antenna connection
point until finger-tight.
Place your Drongo Voice Alert in a location suitable
to the following requirements: Up to 300 meters line
of sight from sensors and up to 50 meters indoors
(through walls) Adjust the Volume dial / so that
your voice messages will be heard.
To record a Low Battery reminder, move the slide switch
into the /’Record’ position and hold in the /Playback
button, record your desired notification into the /MIC
and then return the switch to the /RUN position.
The /Link LED will only glow while being held down.
To test the ‘Low Battery reminder’, press the Playback button
for 2 seconds.

SENSOR INSTALLATION
Fig 1.
Remove the front cover of the sensor by pressing down on the release tab at the bottom of the unit. (See Figure 1)
Connect 2 x AAA batteries to the connector.
NOTE:
Once battery has been installed the sensor will not function within the first 2 minutes.
NOTE:
Ÿ Install the sensor at least 2.1 meters above the ground in order to cover a 12m x 12m area with the standard downward fan pattern
(see section below).
Ÿ Install the sensor at right angles to the path of movement, as the sensor functions best when placed so that movement is detected
across the sensor rather than towards the sensor.
Ÿ Install the sensor at least 2.1 meters above the ground in order to cover a 12m x 12m area with the standard downward fan pattern (see section below).
Ÿ Install the sensor at right angles to the path of movement, as the sensor functions best when placed so that movement is detected across the sensor
PUSH
rather than towards the sensor.
Ÿ Always test the installation after setup to insure proper coverage is achieved & that the Drongo Voice Alert is responding to the sensors. If it is not,
Ÿ then try moving the sensor to a slightly different location, possibly closer to the Drongo Voice Alert | DVA-01
Ÿ Ensure that you reposition the rubber gasket around the edge of the sensor when reconnecting the cover, failure to do so may result in weather
Ÿ damage to the inside of your sensor.
Ÿ Install the sensor with 2 x screws (3mm x 19mm) and wall plugs (5mm) at the top and bottom of the sensors swivel plate.
(These are not included with your Drongo Sensors)
Ÿ Install the sensor with at least a 15cm clearance above it to ensure servicing of the battery is possible
For more information refer to the Drongo Voice Alert Manual
Sensor Zone Pattern Adjustment
Choose the sensor pattern for your VA-S01 to meet the needs of each monitored zone.
15.3 cm
The Sensor comes set from the factory with a downward fan pattern [A] that covers a
12m x 12m area, when mounted at 2.3m above the ground. By using one of the [D].
Choose the pattern for either a vertical fan pattern [B] or a horizontal fan pattern [C] (See Figure 2).
To install a pattern adjuster [D];
1. Remove the sensor cover.
2. Insert one edge of the plastic pattern adjuster into the frame behind the lens.
2.3m
12m
12m
12m
12m
3. Gently press the pattern adjuster until the other edge snaps into the opposite side of the lens frame.
Eliminating False Triggers
Ÿ Do not install the sensor in hot or cold air currents such as, Air Conditioners / heaters or drafts, the sensor should be at least 1m away from any such
current.
Ÿ Do not install the sensor on metal surfaces as this will reduce the transmission range of the sensor, however you may install it near to the edge of a
metal framed window.
Ÿ Do not install the sensor with double sided tape, as this may cause the sensor to fall off and break over time.
Ÿ Avoid installing the sensor in front of large objects that can obstruct the detection pattern.
Ÿ Avoid installing the sensor in front of moving objects, such as trees, flags or washing lines.
ADDING ADDITIONAL SENSORS
The sensors included in the Drongo Voice Alert kit are pre-programmed from the factory and will function without modification.
If you decide to change the dipswitch code or add more sensors, follow these steps:
1. Connect the Drongo Voice Alert DVA-01 to a suitable power source and turn the unit ON with the “POWER” switch.
2. The Drongo Voice Alert has a three position slide switch. Move the switch to the “LINK MODE" position
3. Set the 8 dipswitches, different from your other sensor settings (See Figure 3).
4. Activate the sensor by moving your hand in front of the lens and observing the LED flashing on the front.
(The DVA-01 “LINK” LED will glow, indicating that the transmission has been received).
5. While the “LINK” LED is glowing, press the button/zone for the message that you want activated by that
sensor, #1-#6. The “LINK” LED light will stop glowing, indicating that the sensor is now programmed into
the selected voice message.
6. Return the slide switch to the "RUN" position.
7. Repeat step 2 through 4 to program additional sensor to each voice message.
NOTE:
You can have any number of sensors set to the same message/zone by setting it to the same dipswitch code. Programming of the
Drongo Voice Alert message is not necessary for these additional sensors, if the original message has already been programmed.
2 x AAA batteries will give you around 2 years of battery life. The LED and TXP jumpers can each reduce battery life by up to 15%.
For more information on the jumper selection please refer to the manual.
DIPSWITCH
ON
ON
OFF
1 2 3 4 5 6 7 8
Fig 3.
ON
1
2 3 4 5
2
6 7 8
BASIC OPERATIONS:
What if I miss a trigger warning?
When a message is triggered by one or more Sensors the MESSAGE/ LED
will flash, notifying you that a trigger has occurred. By pressing the PLAYBACK
/ button each message that was triggered will play.
The system will then clear the triggered messages and the MESSAGE/ LED
will stop flashing.
What if one of my sensor’s battery runs down?
When one of the sensor’s batteries run down, the LOW BATTERY/ LED
will flash on the top of the Drongo Voice Alert as well as play your “Low Battery
Message”. By pressing the “PLAYBACK” button, you will be able to identify the
specific sensor when the low battery message and the recorded message
for that particular Zone plays. After a new battery is installed, wait 2 minutes
then trigger the sensor to turn off the flashing “LOW BATTERY” LED.
 Loading...