

Page 1
Pluto1.2 User Manual
Page 2

Page 3
Pluto1.2
User Manual
Page 4
.
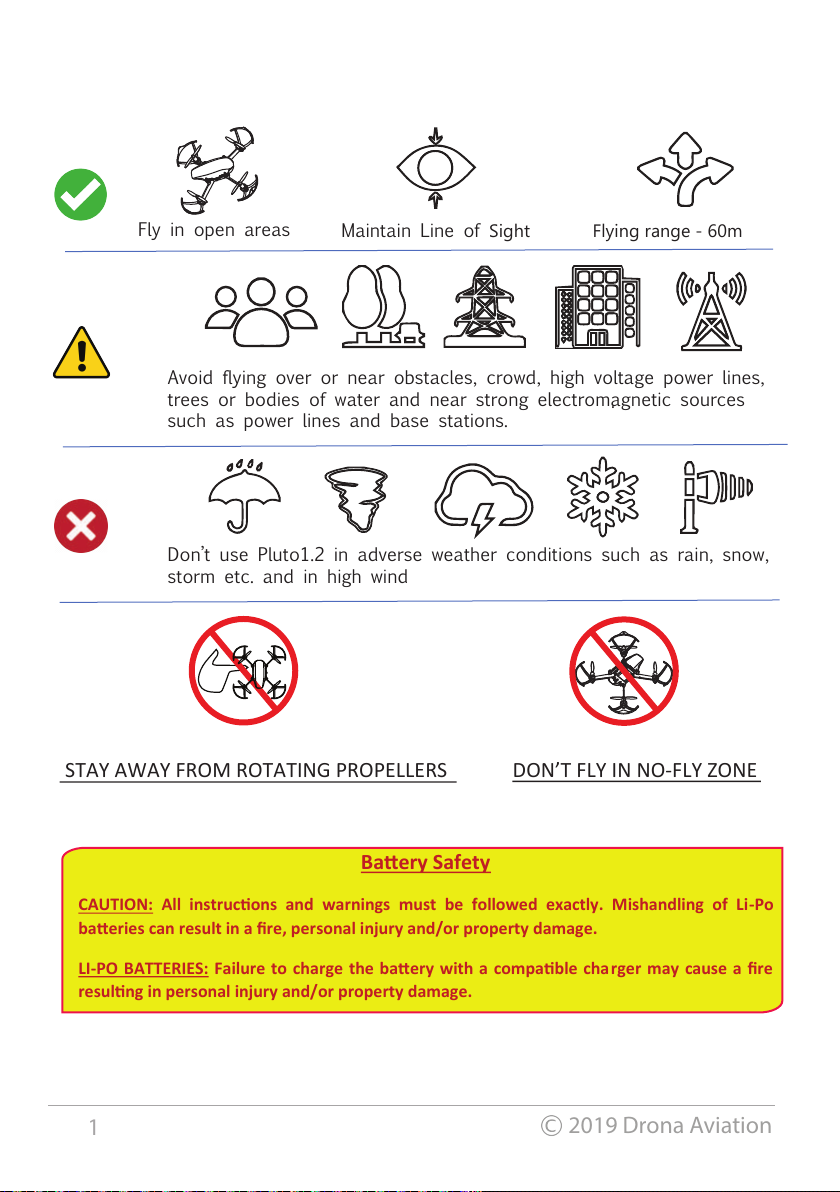
Fly in open areas
Maintain Line of Sight
Flying range - 60m
Avoid flying over or near obstacles, crowd, high voltage power lines,
trees or bodies of water and near strong electromagnetic sources
such as power lines and base stations.
Don’t use Pluto1.2 in adverse weather conditions such as rain, snow,
storm etc. and in high wind
STAY AWAY FROM ROTATING PROPELLERS
DON’T FLY IN NO-FLY ZONE
Baery Safety
CAUTION: All instrucons and warnings must be followed exactly. Mishandling of Li-Po
baeries can result in a fire, personal injury and/or property damage.
LI-PO BATTERIES: Failure to charge the baery with a compable cha rger may cause a fire
resulng in personal injury and/or property damage.
1
2019 Drona Aviation
Page 5
Table of Contents
Introduction
Quick Flight
4
3
Assembly/disassembly
Battery charge
Trim
Control settings
Flight modes
Control Modes
Sensitivity
Max altitude
External Controller
Flight Controller Information
Updating the firmware
Developer Options
Trouble shooting
Specifications
6
11
21
21
21
20
19
22
24
31
23
26
25
28
Box Contents
22
2
2019 Drona Aviation
FAQ 27
Page 6
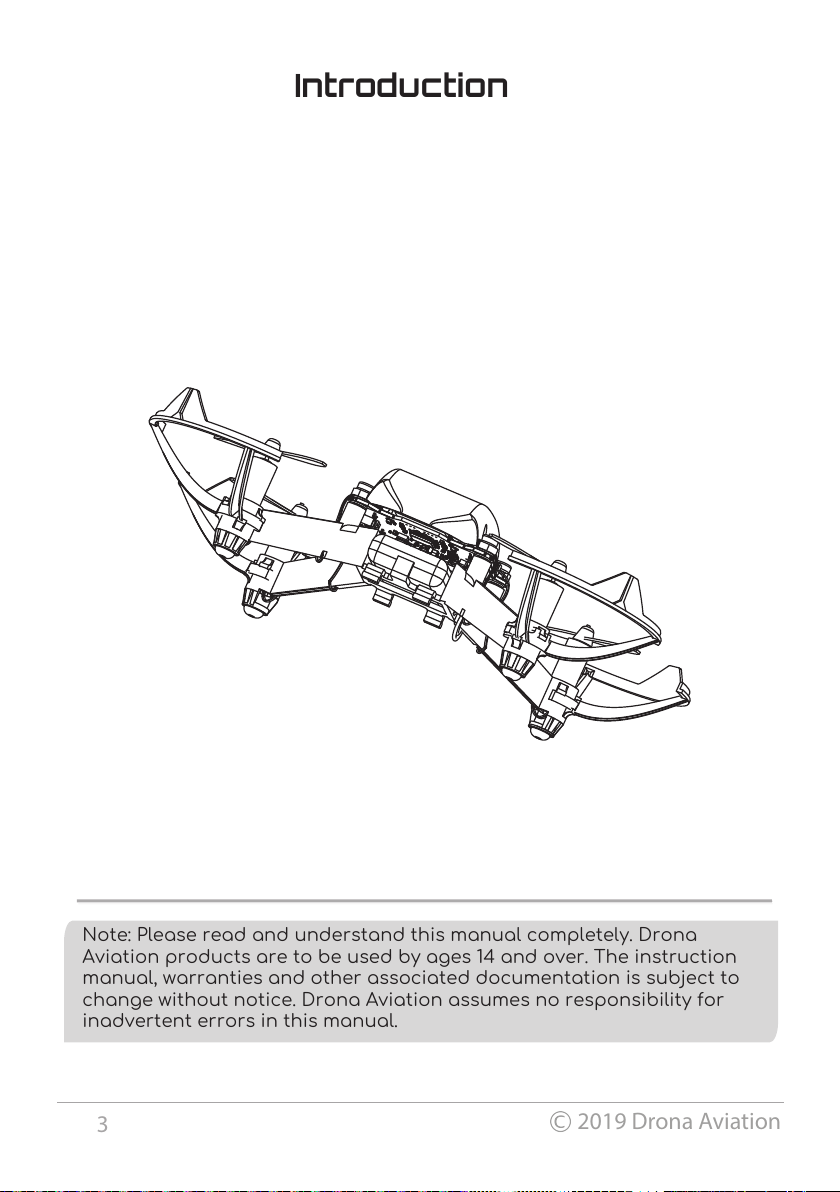
Introduction
Note: Please read and understand this manual completely. Drona
Aviation products are to be used by ages 14 and over. The instruction
manual, warranties and other associated documentation is subject to
change without notice. Drona Aviation assumes no responsibility for
inadvertent errors in this manual.
3
2019 Drona Aviation
Page 7
4
4
2
4
1
1
1
1
1
Box Contents
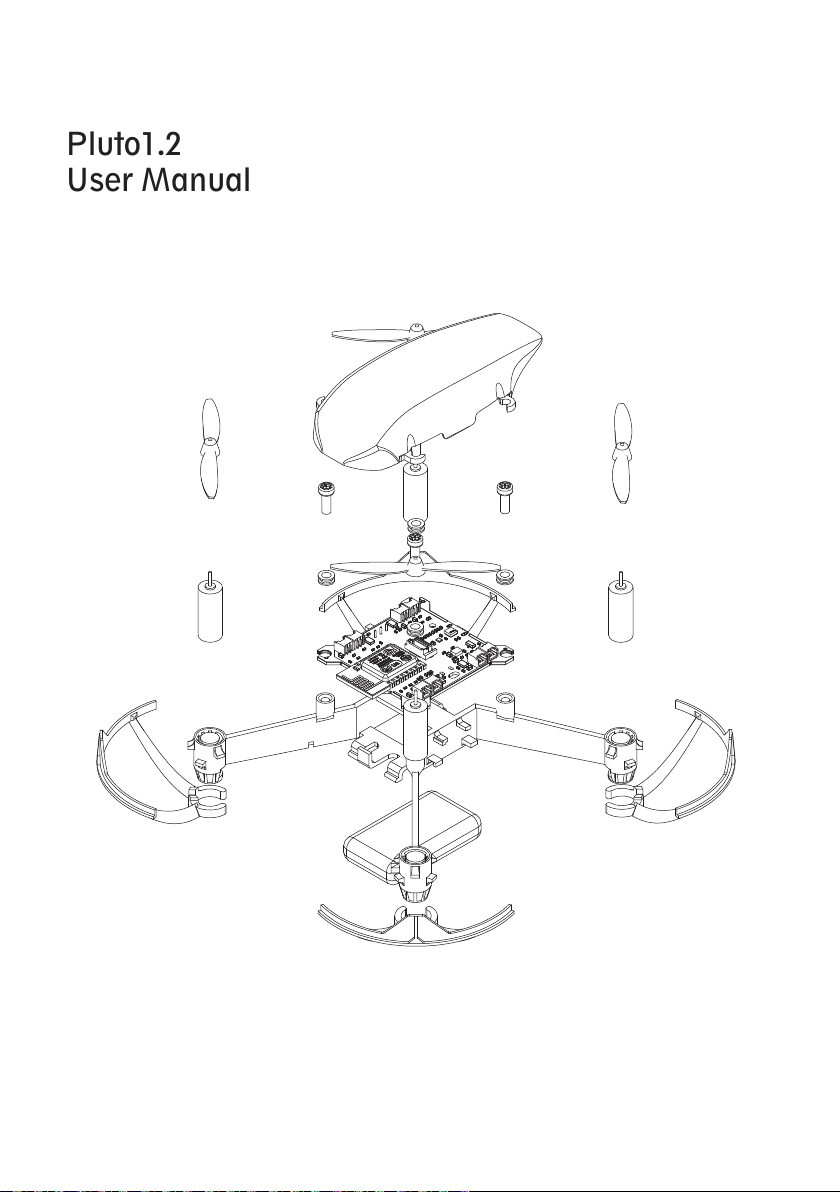
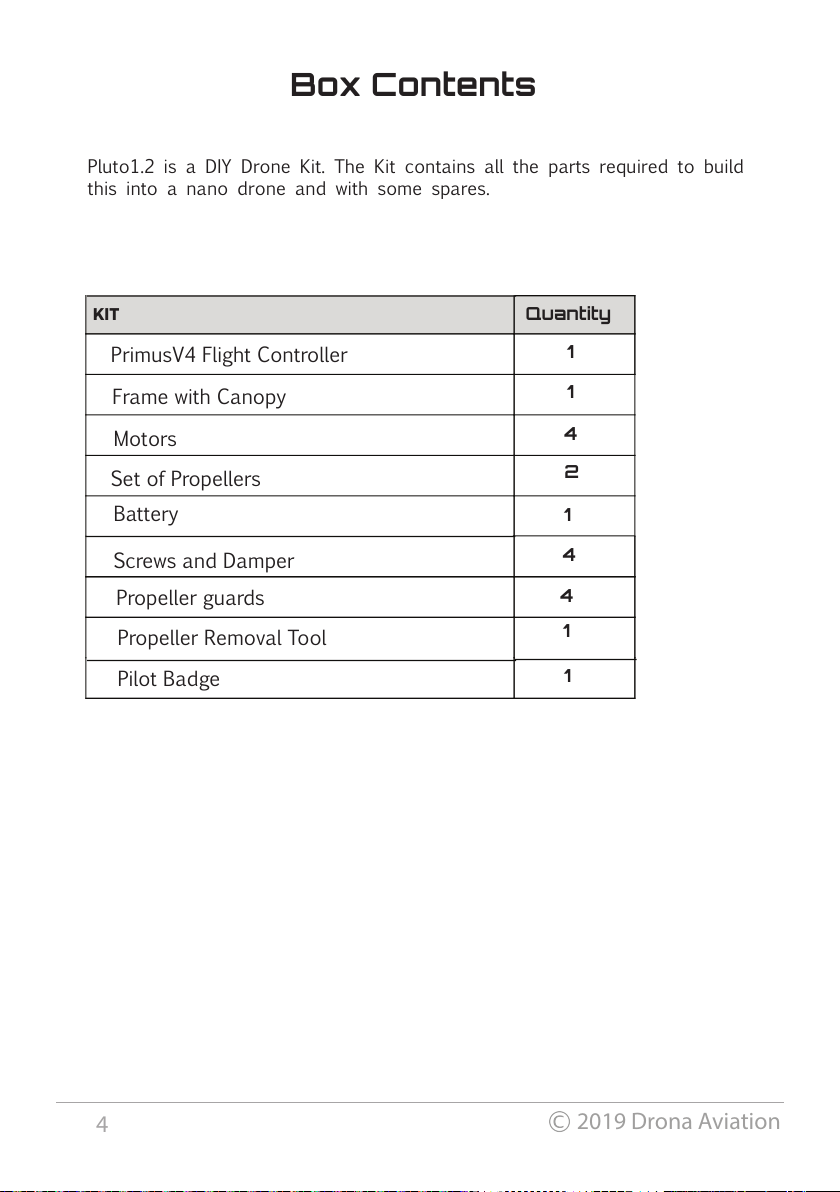
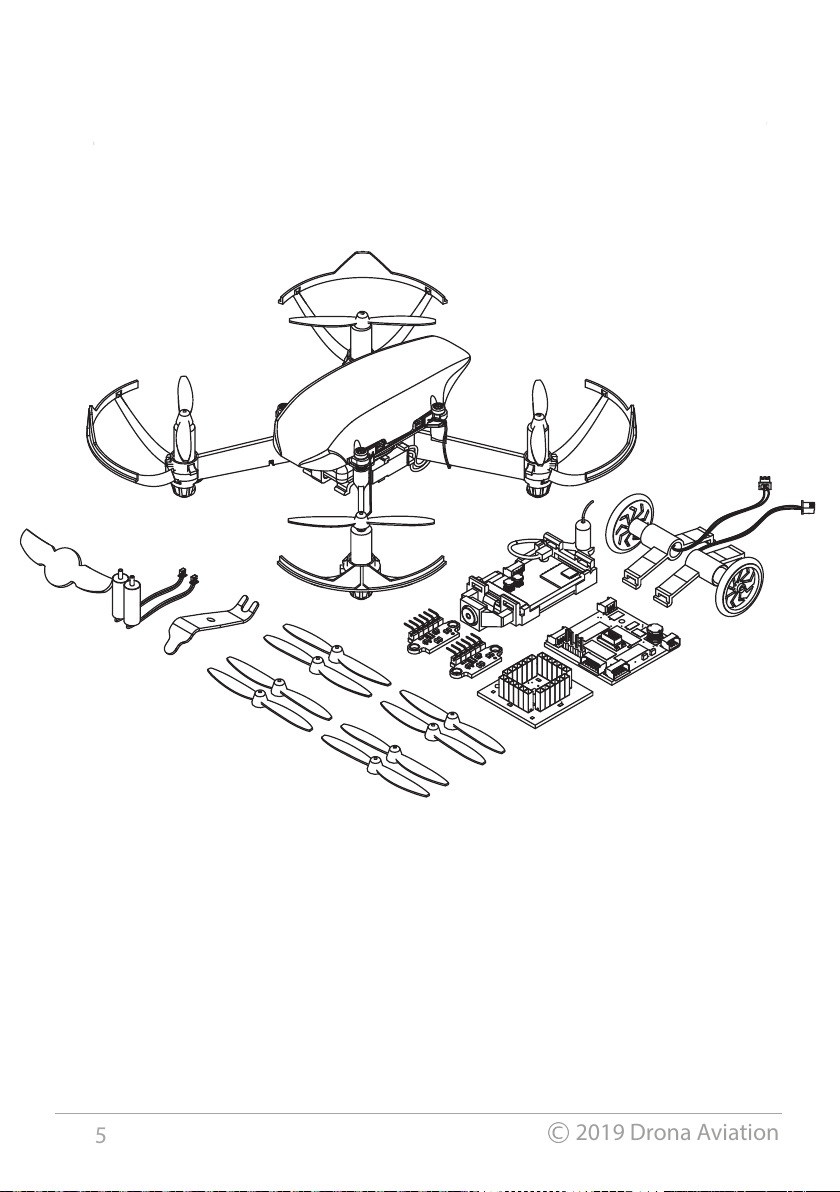
Pluto1.2 is a DIY Drone Kit. The Kit contains all the parts required to build
this into a nano drone and with some spares.
KIT
4
2019 Drona Aviation
PrimusV4 Flight Controller
Frame with Canopy
Motors
Set of Propellers
Pilot Badge
Propeller guards
Battery
Screws and Damper
Propeller Removal Tool
Quantity
Page 8
5
2019 Drona Aviation
Page 9
Assembly/Disassembly
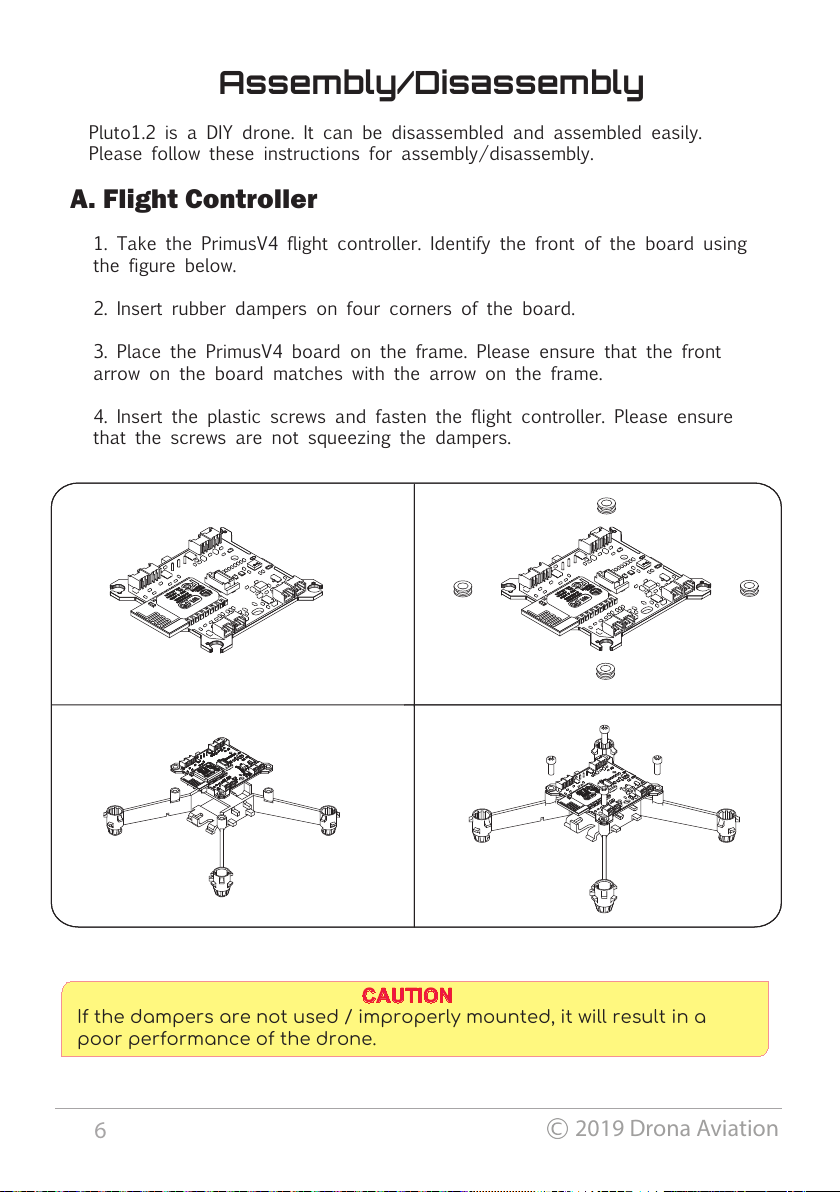
A. Flight Controller
Pluto1.2 is a DIY drone. It can be disassembled and assembled easily.
Please follow these instructions for assembly/disassembly.
1. Take the PrimusV4 flight controller. Identify the front of the board using
the figure below.
2. Insert rubber dampers on four corners of the board.
3. Place the PrimusV4 board on the frame. Please ensure that the front
arrow on the board matches with the arrow on the frame.
4. Insert the plastic screws and fasten the flight controller. Please ensure
that the screws are not squeezing the dampers.
If the dampers are not used / improperly mounted, it will result in a
poor performance of the drone.
CAUTION
6
2019 Drona Aviation
Page 10
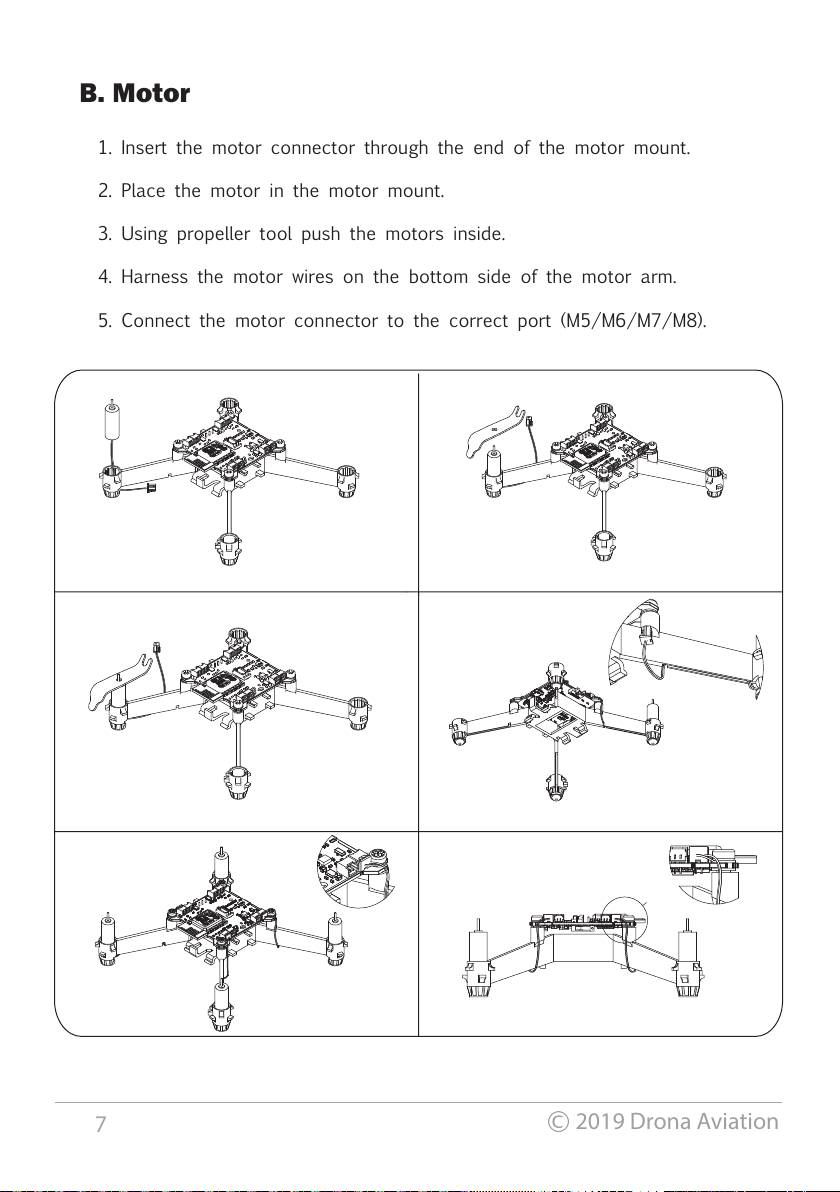
B. Motor
1. Insert the motor connector through the end of the motor mount.
2. Place the motor in the motor mount.
3. Using propeller tool push the motors inside.
4. Harness the motor wires on the bottom side of the motor arm.
5. Connect the motor connector to the correct port (M5/M6/M7/M8).
7
2019 Drona Aviation
Page 11
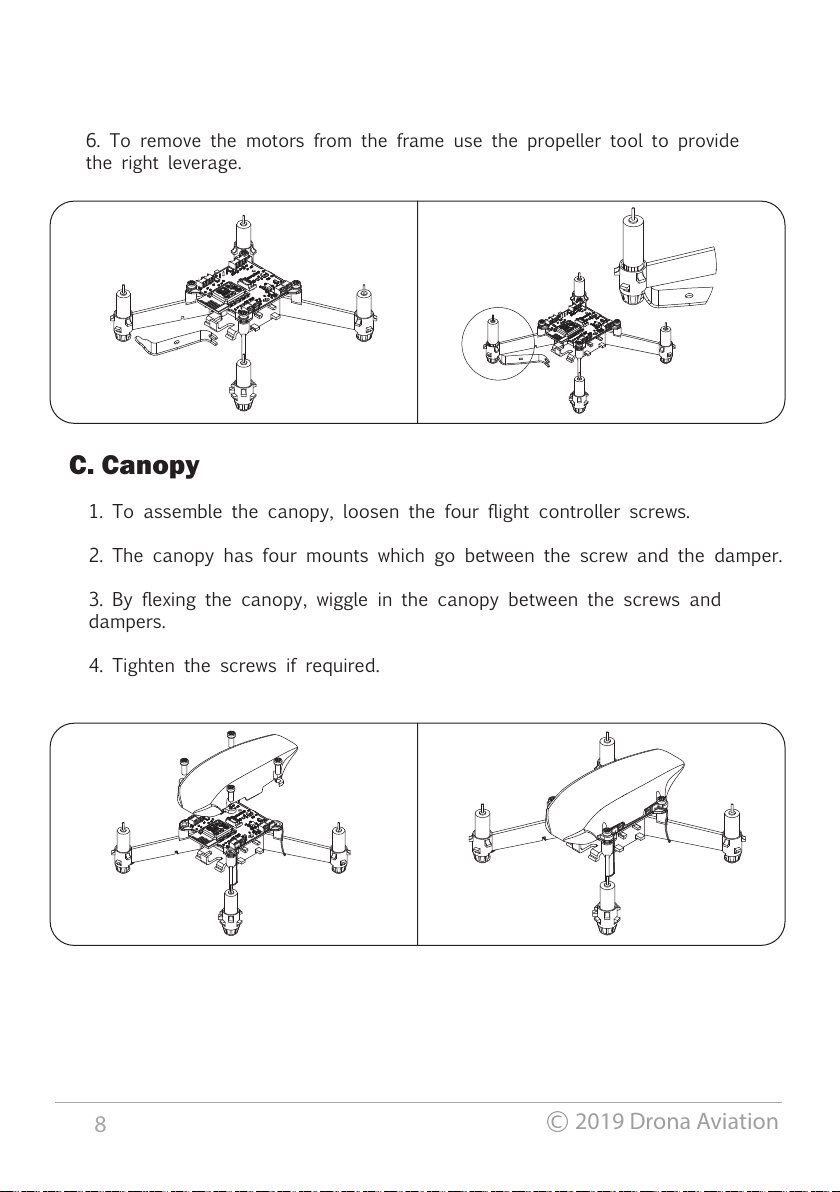
C. Canopy
1. To assemble the canopy, loosen the four flight controller screws.
2. The canopy has four mounts which go between the screw and the damper.
3. By flexing the canopy, wiggle in the canopy between the screws and
dampers.
4. Tighten the screws if required.
6. To remove the motors from the frame use the propeller tool to provide
the right leverage.
8
2019 Drona Aviation
Page 12
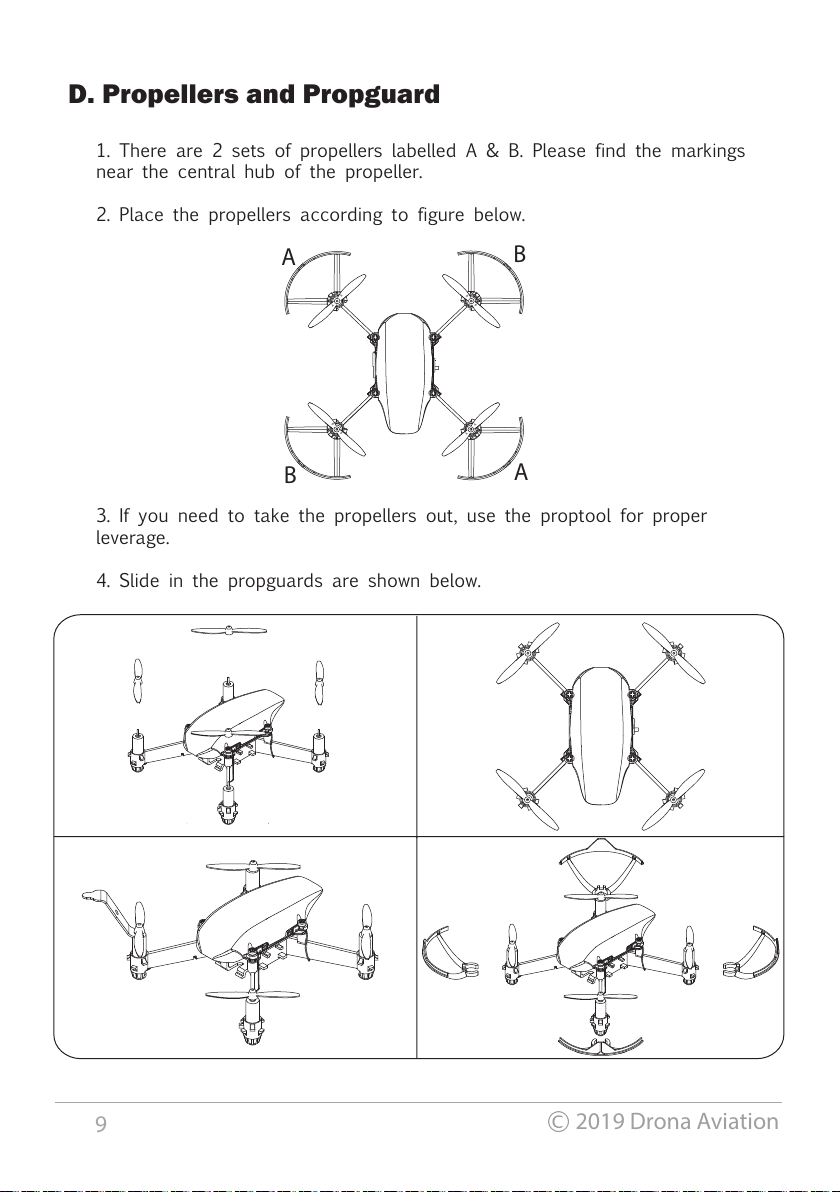
D. Propellers and Propguard
1. There are 2 sets of propellers labelled A & B. Please find the markings
near the central hub of the propeller.
2. Place the propellers according to figure below.
A
A
A
A
B
B
B
B
3. If you need to take the propellers out, use the proptool for proper
leverage.
4. Slide in the propguards are shown below.
9
2019 Drona Aviation
A
A
B
B
Page 13
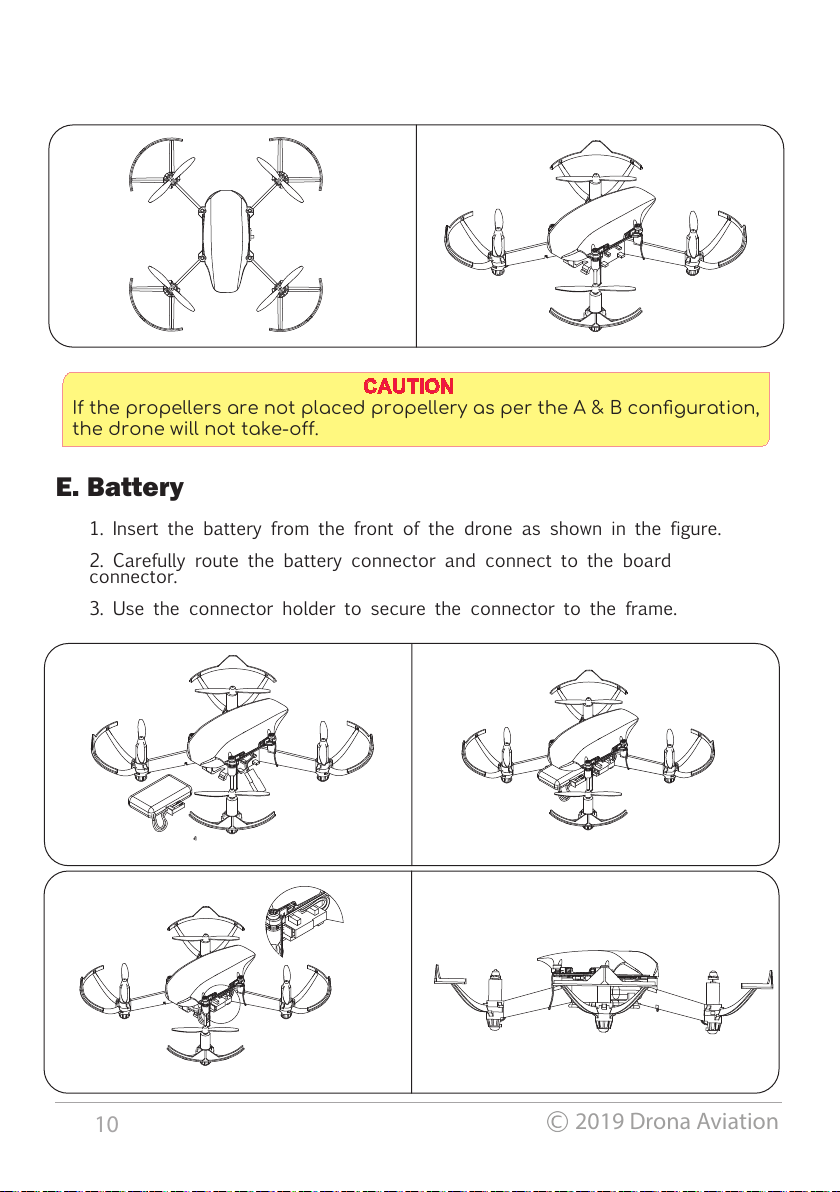
E. Battery
1. Insert the battery from the front of the drone as shown in the figure.
2. Carefully route the battery connector and connect to the board
connector.
3. Use the connector holder to secure the connector to the frame.
If the propellers are not placed propellery as per the A & B configuration,
the drone will not take-o.
CAUTION
10
2019 Drona Aviation
Page 14
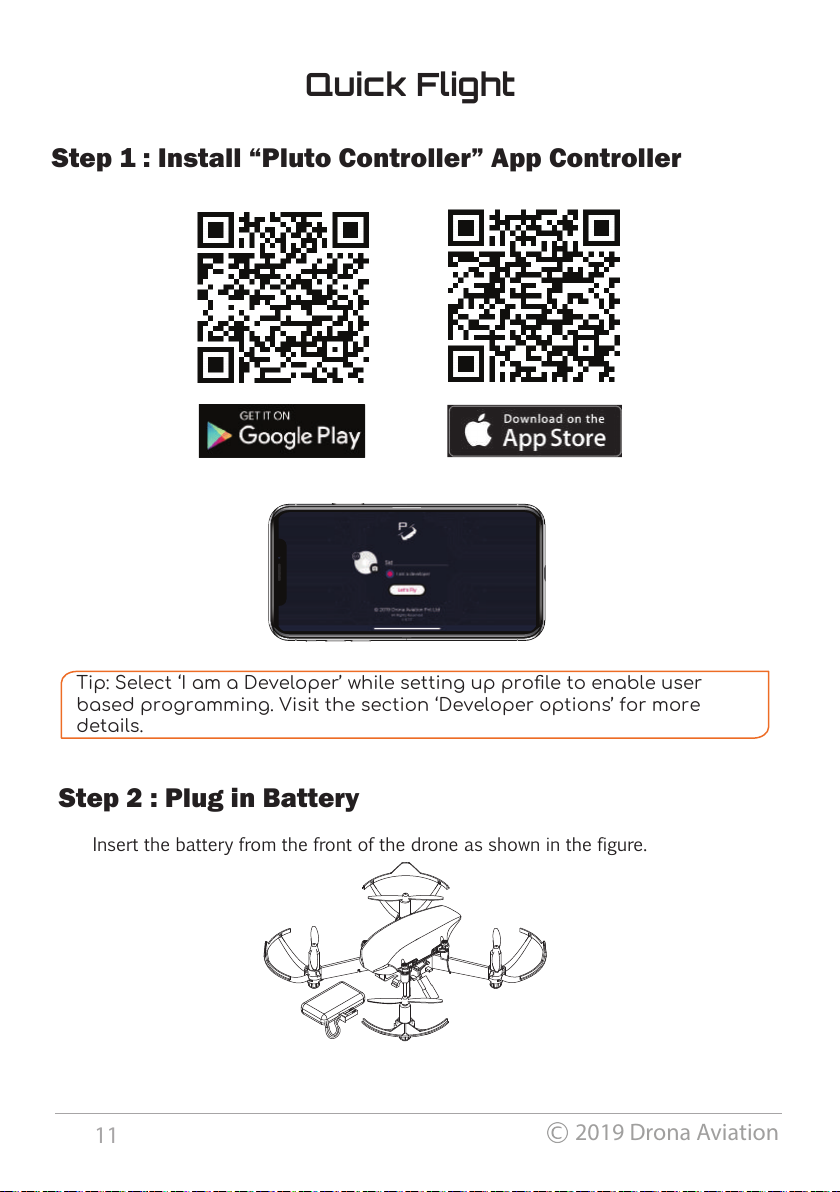
Step 1 : Install “Pluto Controller” App Controller
Quick Flight
Tip: Select ‘I am a Developer’ while setting up profile to enable user
based programming. Visit the section ‘Developer options’ for more
details.
Step 2 : Plug in Battery
Insert the battery from the front of the drone as shown in the figure.
11
2019 Drona Aviation
Page 15
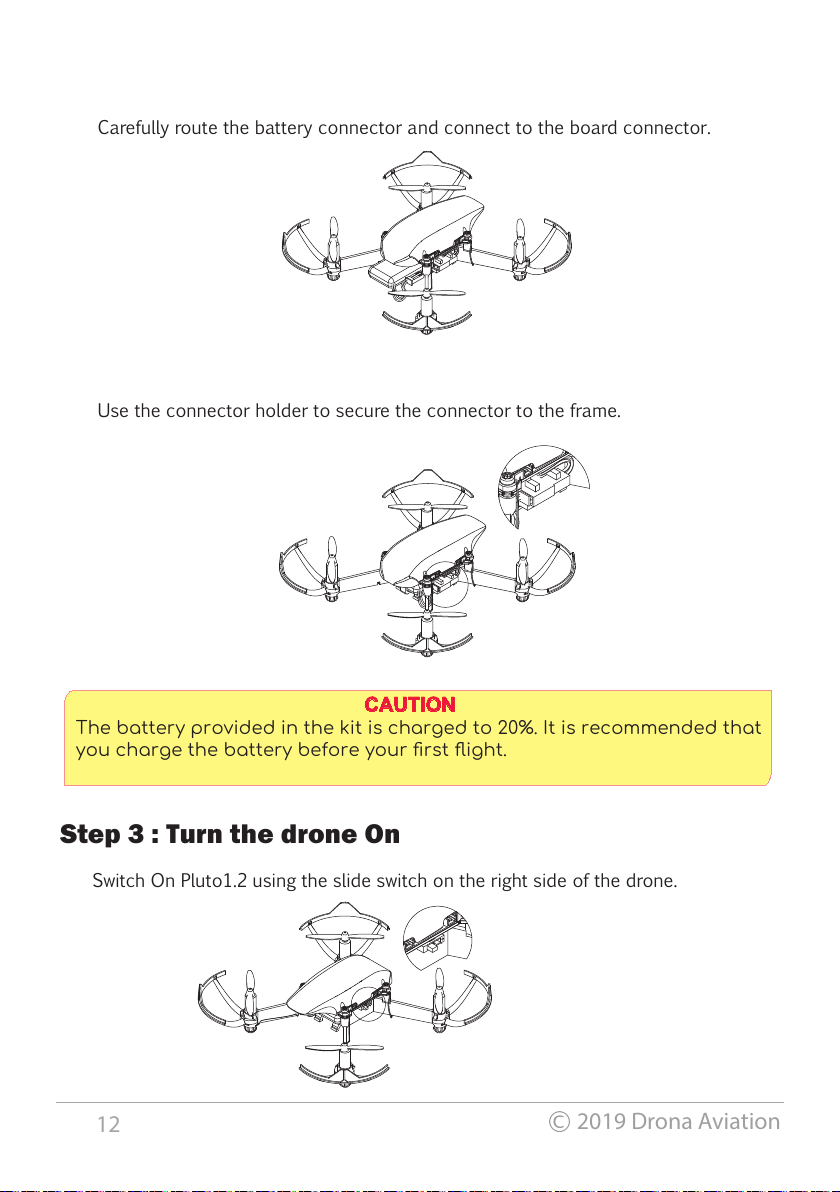
Step 3 : Turn the drone On
Carefully route the battery connector and connect to the board connector.
Use the connector holder to secure the connector to the frame.
The battery provided in the kit is charged to 20%. It is recommended that
you charge the battery before your first flight.
CAUTION
Switch On Pluto1.2 using the slide switch on the right side of the drone.
12
2019 Drona Aviation
Page 16
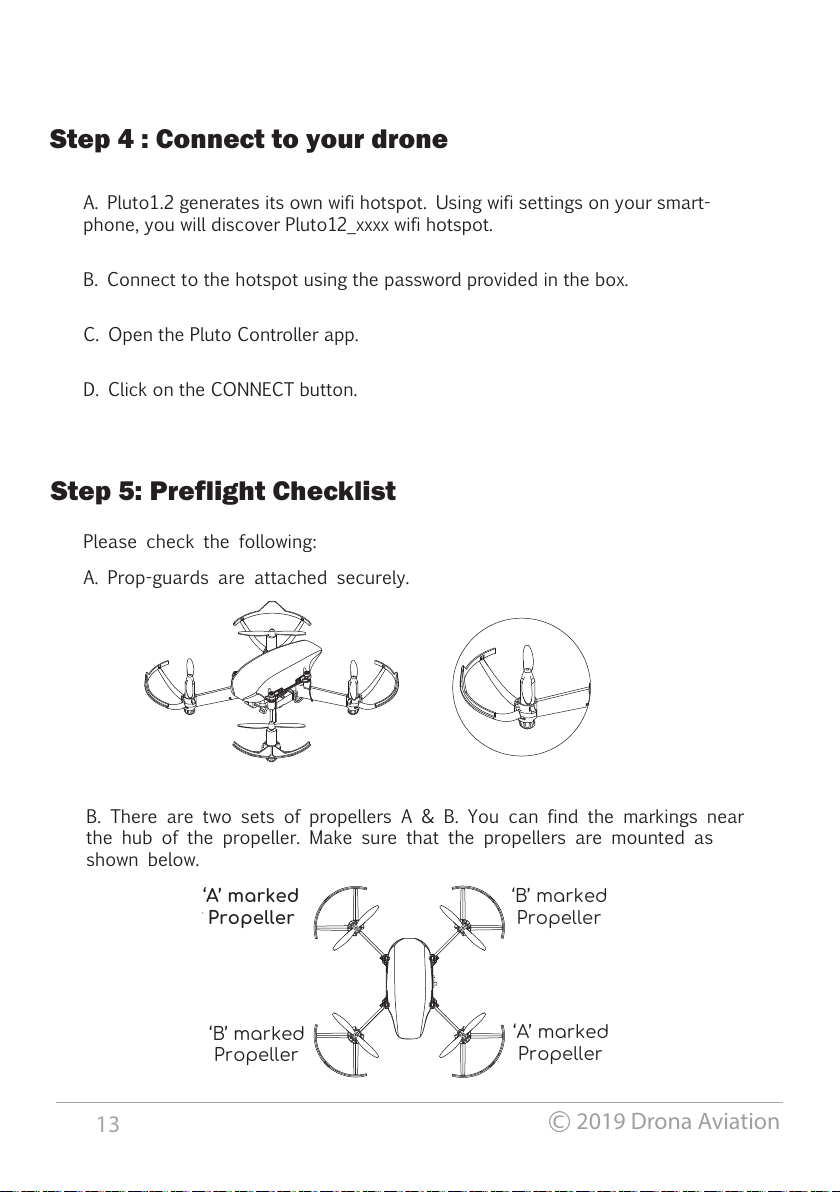
Step 5: Preflight Checklist
Please check the following:
B. There are two sets of propellers A & B. You can find the markings near
the hub of the propeller. Make sure that the propellers are mounted as
shown below.
Step 4 : Connect to your drone
A. Pluto1.2 generates its own wifi hotspot. Using wifi settings on your smart-
phone, you will discover Pluto12_xxxx wifi hotspot.
B. Connect to the hotspot using the password provided in the box.
C. Open the Pluto Controller app.
D. Click on the CONNECT button.
‘A’ marked
Propeller
A. Prop-guards are attached securely.
13
2019 Drona Aviation
‘A’ marked
Propeller
‘B’ marked
Propeller
‘B’ marked
Propeller
Page 17
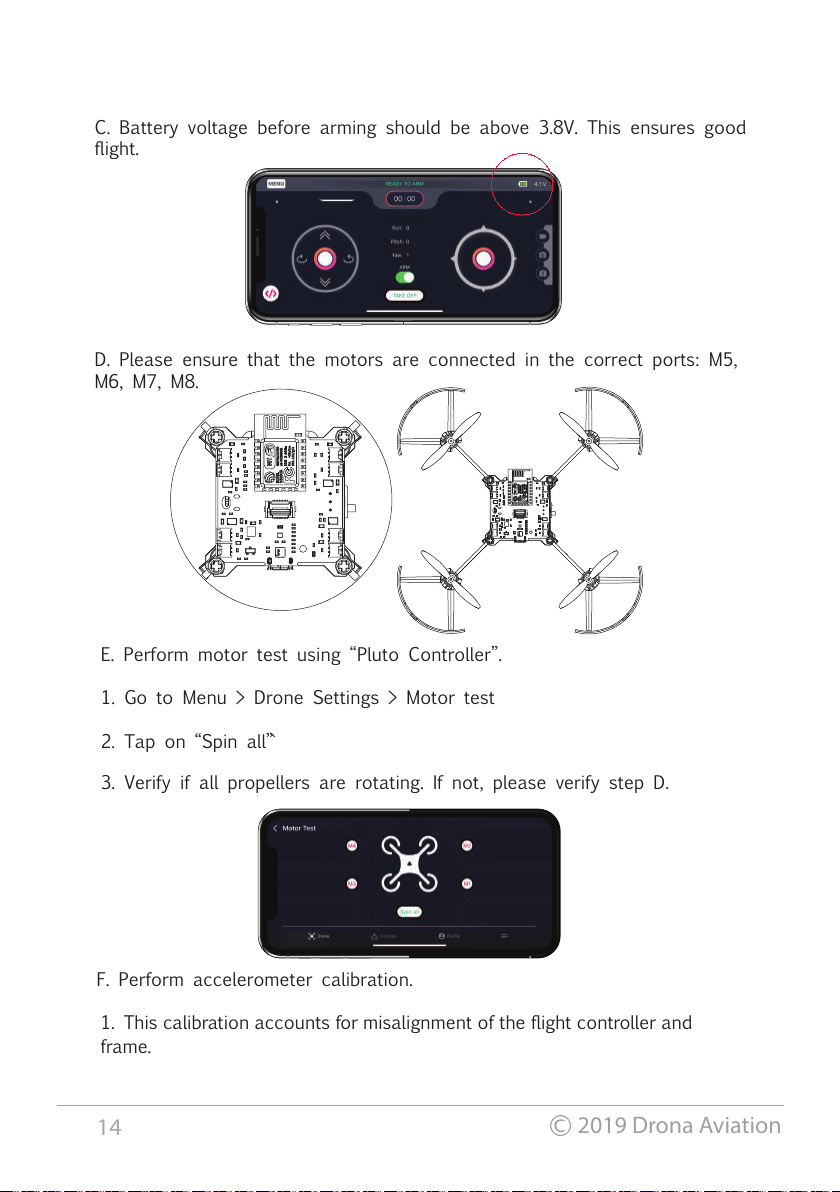
C. Battery voltage before arming should be above 3.8V. This ensures good
flight.
D. Please ensure that the motors are connected in the correct ports: M5,
M6, M7, M8.
E. Perform motor test using “Pluto Controller”.
1. Go to Menu > Drone Settings > Motor test
2. Tap on “Spin all”`
F. Perform accelerometer calibration.
3. Verify if all propellers are rotating. If not, please verify step D.
1. This calibration accounts for misalignment of the flight controller and
frame.
14
2019 Drona Aviation
Page 18
TIP: It's a good practice to perform Magnetometer calibration when:
a. Flying at new location
b. Replaced the motors
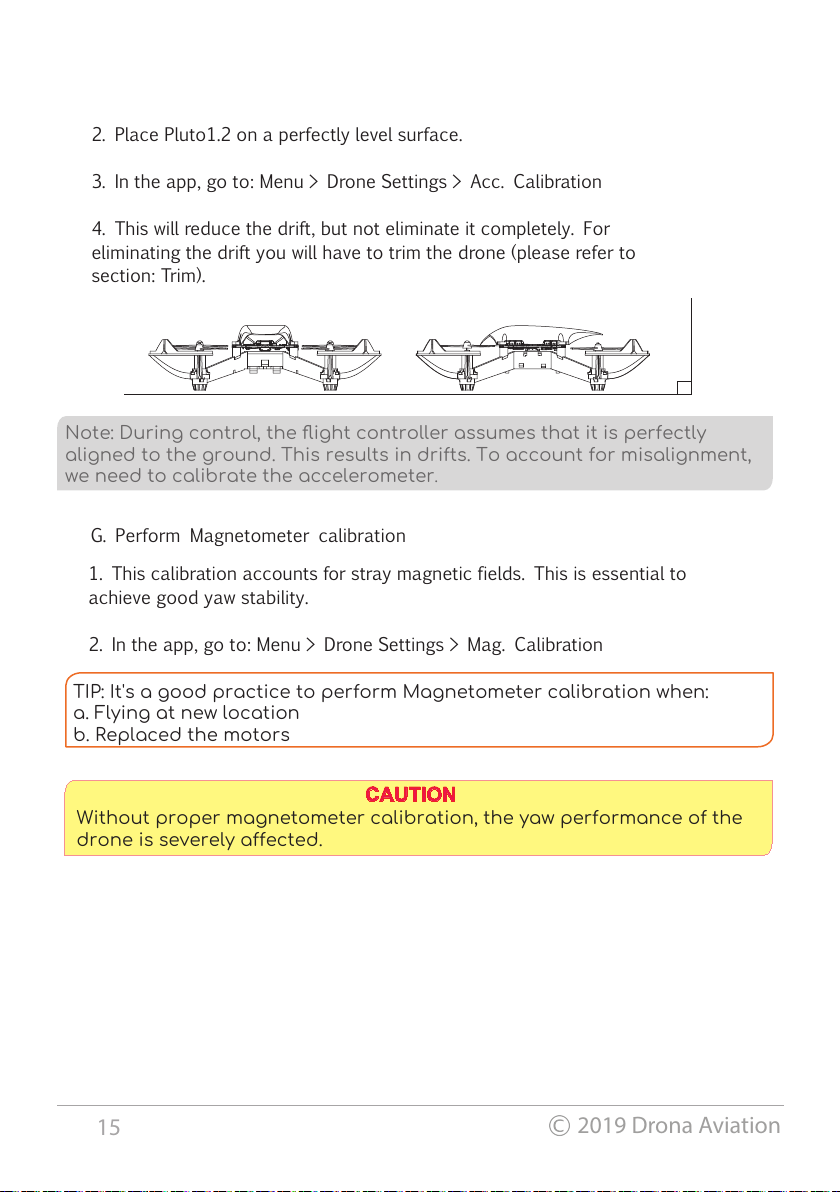
Note: During control, the flight controller assumes that it is perfectly
aligned to the ground. This results in drifts. To account for misalignment,
we need to calibrate the accelerometer.
G. Perform Magnetometer calibration
1. This calibration accounts for stray magnetic fields. This is essential to
achieve good yaw stability.
2. In the app, go to: Menu > Drone Settings > Mag. Calibration
2. Place Pluto1.2 on a perfectly level surface.
3. In the app, go to: Menu > Drone Settings > Acc. Calibration
4. This will reduce the drift, but not eliminate it completely. For
eliminating the drift you will have to trim the drone (please refer to
section: Trim).
Without proper magnetometer calibration, the yaw performance of the
drone is severely aected.
CAUTION
15
2019 Drona Aviation
Page 19
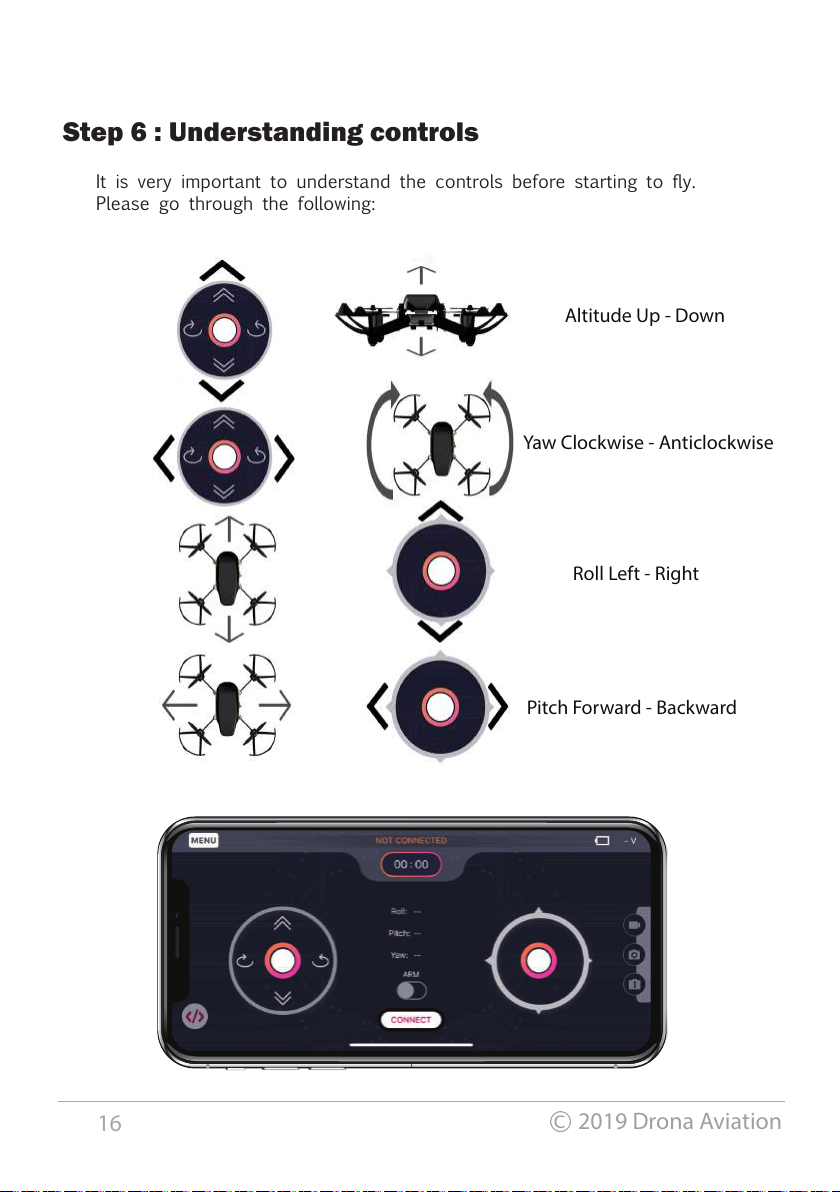
It is very important to understand the controls before starting to fly.
Please go through the following:
Altitude Up - Down
Roll Left - Right
Pitch Forward - Backward
16
2019 Drona Aviation
Step 6 : Understanding controls
Yaw Clockwise - Anticlockwise
Page 20
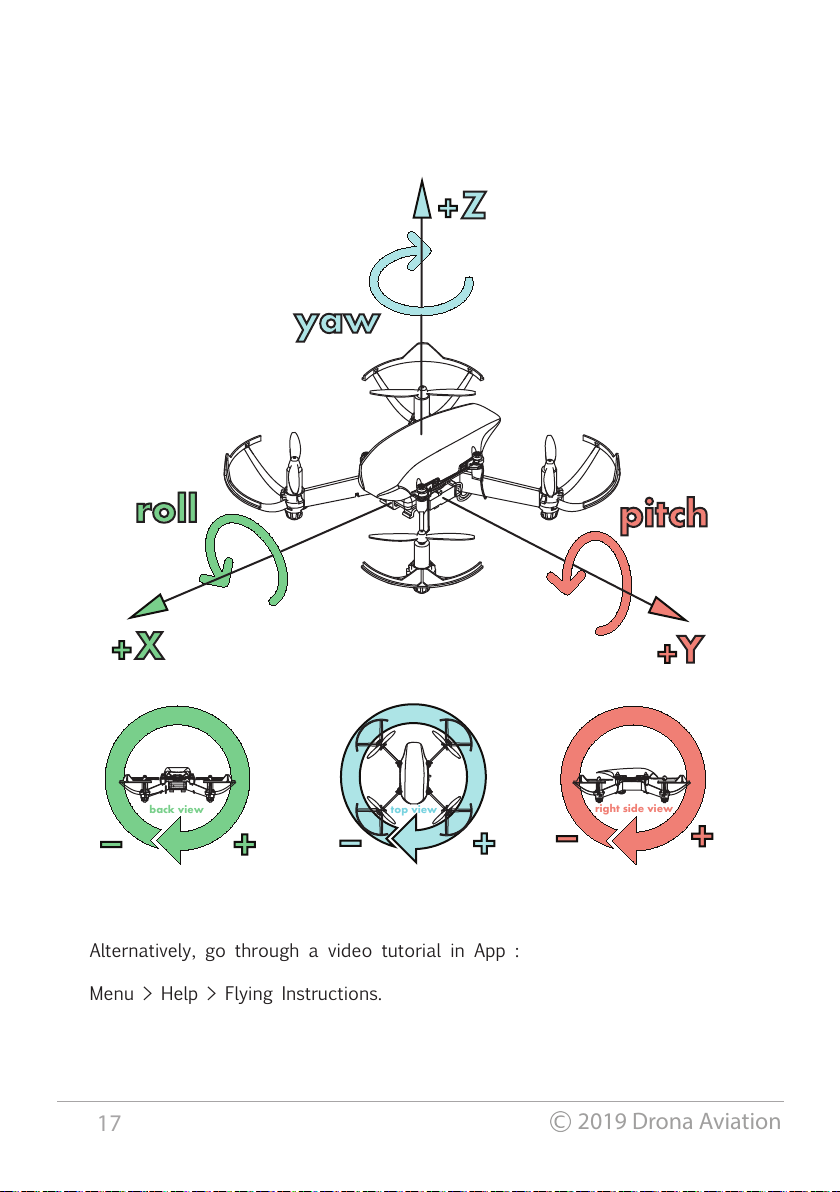
Alternatively, go through a video tutorial in App :
Menu > Help > Flying Instructions.
yaw
pitch
roll
X
Y
Z
back view top view
right side view
17
2019 Drona Aviation
Page 21
Note: In case, the Arm button has not been activated, go back and
recalibrate. A few steps could have been missed out during calibration.
NOTE: If you are a beginner in flying drone, we recommend you to switch
to “Tilt mode”. Go to Menu > Control Settings > Tilt mode
Step 7: Arming the Drone
The ARM switch controls power to the motors. It can be thought of as a
safety switch. If during anypoint you want to shut the motors, you can use
the ARM switch to do so.
Disarming the drone will stop all motors immediately. You can disarm by
clicking on the disarm button.
Note: If you are new to drones, you will crash a number of times before you
learn how to fly. You don’t need to worry about the crash as the drone is
crash resistant.
Step 8: Fly it!
A. Place the drone with its front pointing away from you.
B. Click the ARM button.
C. Make sure you have a lot of open space.
D. Click on the Take-off button. PlutoX should take off to a height of
about 3 feet.
E. Try to control only the roll and pitch of the drone. This significantly
makes the flying task easy.
E. To land drone, press the Land button.
18
2019 Drona Aviation
Page 22
Battery charge
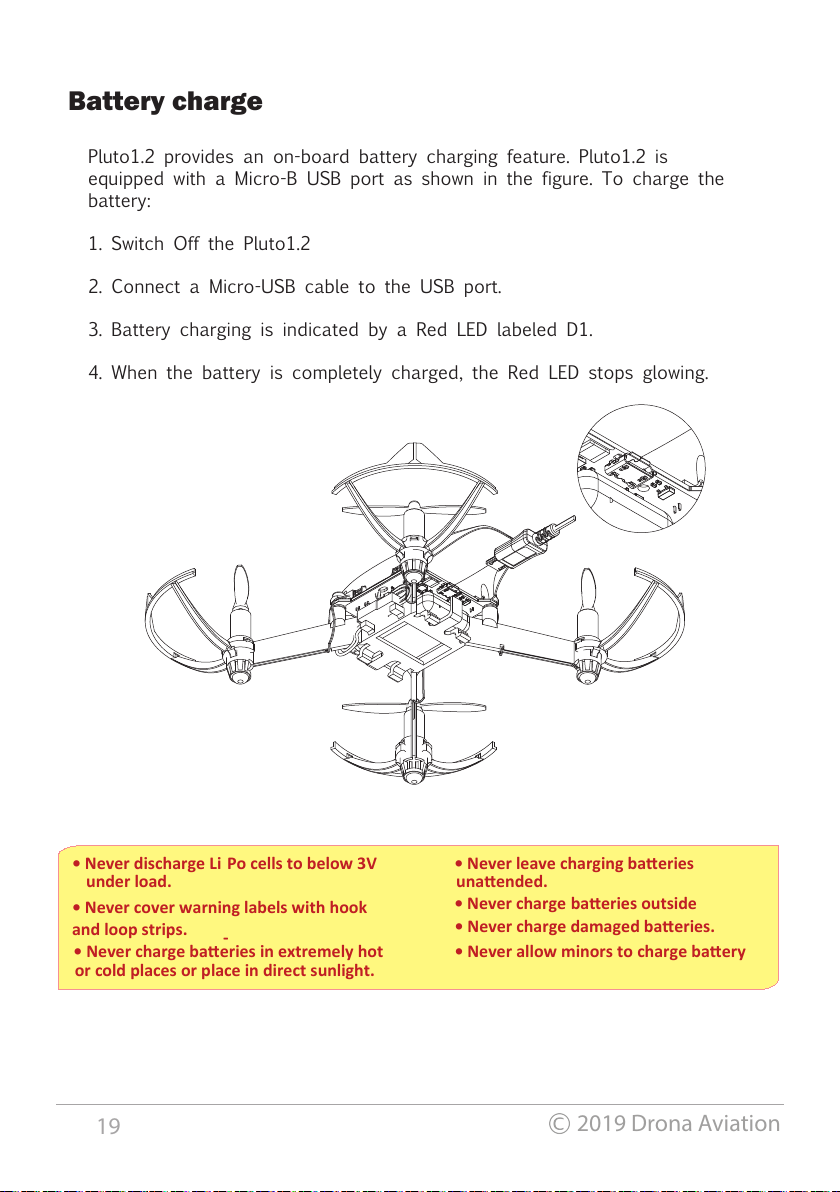
Pluto1.2 provides an on-board battery charging feature. Pluto1.2 is
equipped with a Micro-B USB port as shown in the figure. To charge the
battery:
1. Switch Off the Pluto1.2
2. Connect a Micro-USB cable to the USB port.
3. Battery charging is indicated by a Red LED labeled D1.
4. When the battery is completely charged, the Red LED stops glowing.
• Never discharge Li-Po cells to below 3V
under load.
• Never cover warning labels with hook
and loop strips.
• Never leave charging baeries
unaended.
• Never charge baeries outside
• Never charge damaged baeries.
• Never allow minors to charge baery • Never charge baeries in extremely hot
or cold places
or place in direct sunlight.
19
2019 Drona Aviation
Page 23
Trim is a feature used to ensure very low drifts in your Pluto1.2. You
might have observed that, when you take-off using the take-off button, the
drone drifts in some direction. TRIM is used to ensure very low drifts in
the XY-Plane.
Please perform the following steps:
1. Make sure that your have performed acc calibration before starting
Trim.
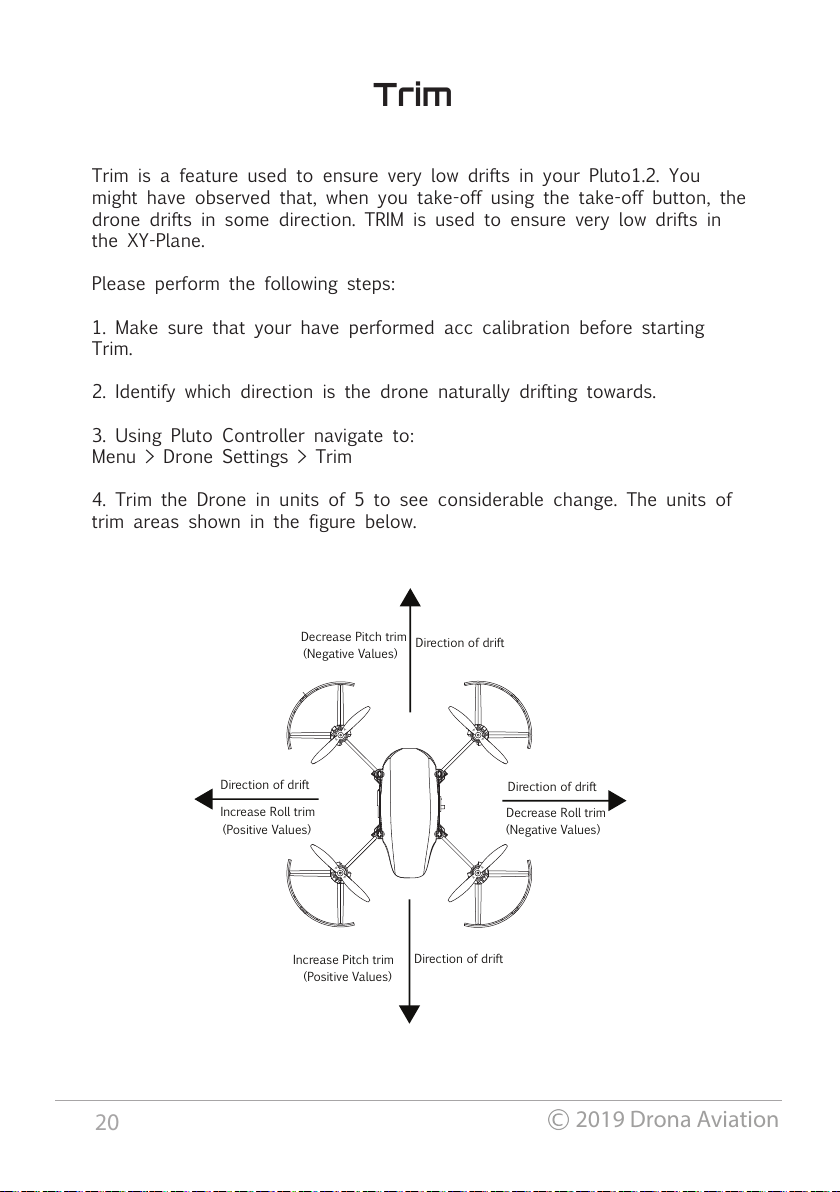
2. Identify which direction is the drone naturally drifting towards.
3. Using Pluto Controller navigate to:
Menu > Drone Settings > Trim
4. Trim the Drone in units of 5 to see considerable change. The units of
trim areas shown in the figure below.
Decrease Roll trim
(Negative Values)
A
A
A
A
B
B
B
B
Direction of drift
Direction of drift
Direction of drift
Direction of drift
Decrease Pitch trim
(Negative Values)
Increase Pitch trim
(Positive Values)
Increase Roll trim
(Positive Values)
20
2019 Drona Aviation
Trim
Page 24
Control Settings
Flight Modes
Pluto1.2 has various flight modes. Changing the flight mode will change
the way you control your drone.
Althold / Throttle mode
This controls how you controls the drone in the Z-axis.
Throttle mode: When you choose this mode, you control the amount of
power supplied to the motors. This essentially controls the acceleration of
the drone in the Z-axis. This mode can be hard for a beginner as you
would constantly need to provide input to maintain altitude.
Althold mode: When you choose this mode, you control the velocity of
the drone in the Z-axis. This is much easier to control. When the control
stick is in the center, the drone tries to maintain its altitude.
Headfree mode: This mode affects the way you control roll and pitch of
the drone. When this mode is Off, the pilot needs to constantly monitor,
the yaw of the drone. If the pilot loses orientation of the drone, it can be
quite challenging to control the drone.
When headfree mode is On, the pilot doesn’t need to worry about the
yaw angle of the drone, the drone manupalites the roll and pitch inputs
accounting for changed yaw. This mode is highly recommended for
beginners.
Joystick/Tilt mode
: This customises how you control the roll/pitch of the
drone.
Joystick mode
: In this mode, the roll/pitch of the drone is controlled by
on screen joystick. As touch screen lacks tactile feedback, it required
some getting used to.
Tilt mode
: In this mode, the roll/pitch of the drone is controlled by the
tilt of your phone. This mode is much easier to fly for beginners.
Control Modes
21
2019 Drona Aviation
Page 25
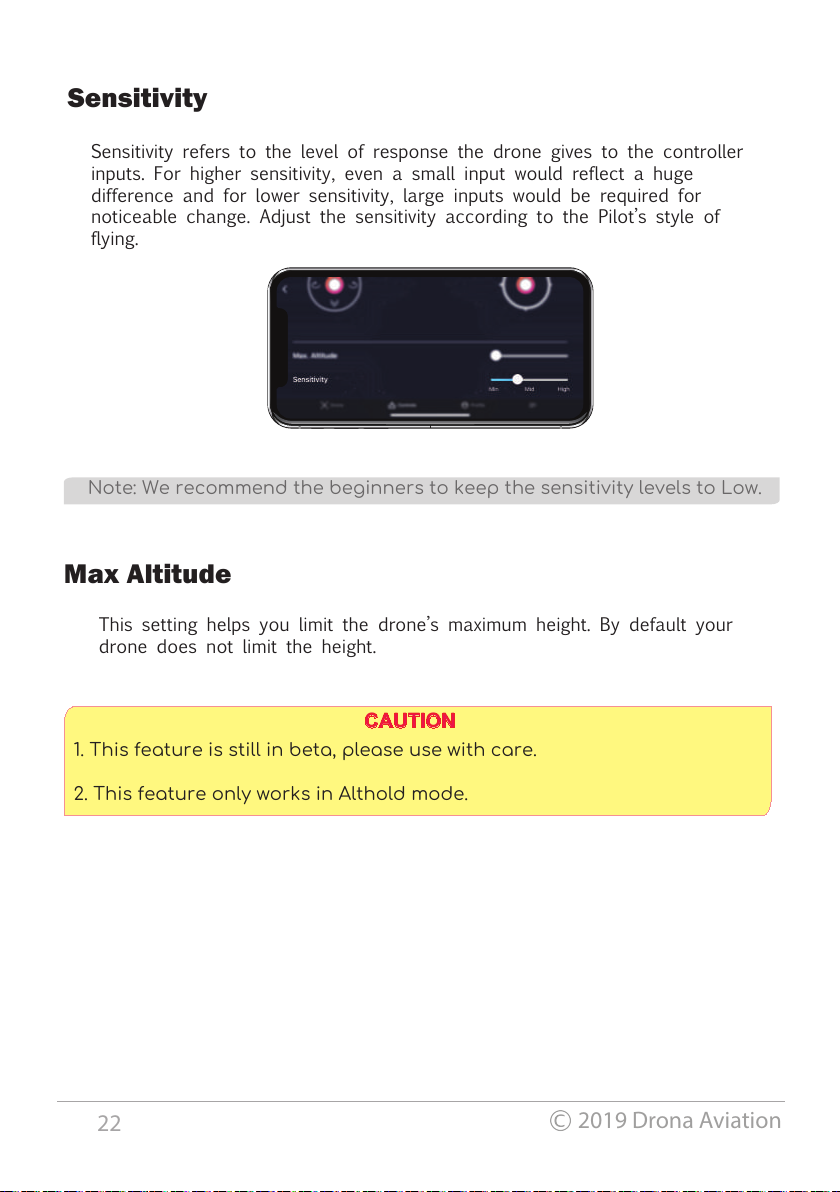
Sensitivity refers to the level of response the drone gives to the controller
inputs. For higher sensitivity, even a small input would reflect a huge
difference and for lower sensitivity, large inputs would be required for
noticeable change. Adjust the sensitivity according to the Pilot’s style of
flying.
This setting helps you limit the drone’s maximum height. By default your
drone does not limit the height.
Sensitivity
Max Altitude
Note: We recommend the beginners to keep the sensitivity levels to Low.
1. This feature is still in beta, please use with care.
2. This feature only works in Althold mode.
CAUTION
22
2019 Drona Aviation
Page 26
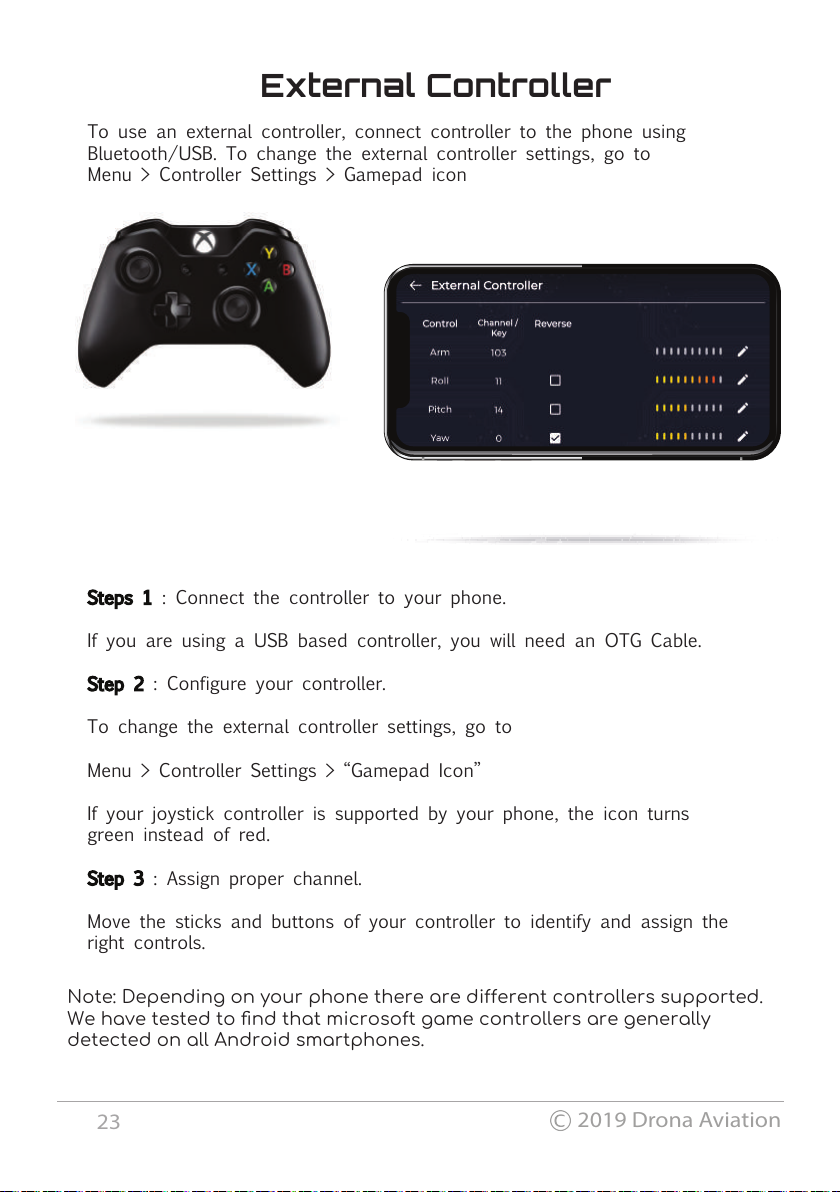
To use an external controller, connect controller to the phone using
Bluetooth/USB. To change the external controller settings, go to
Menu > Controller Settings > Gamepad icon
External Controller
Note: Depending on your phone there are dierent controllers supported.
We have tested to find that microsoft game controllers are generally
detected on all Android smartphones.
Steps 1 : Connect the controller to your phone.
If you are using a USB based controller, you will need an OTG Cable.
Step 2 : Configure your controller.
To change the external controller settings, go to
Menu > Controller Settings > “Gamepad Icon”
If your joystick controller is supported by your phone, the icon turns
green instead of red.
Step 3 : Assign proper channel.
Move the sticks and buttons of your controller to identify and assign the
right controls.
23
2019 Drona Aviation
Page 27
Updating firmware
To update firmware on Pluto1.2, follow these steps:
Step 1 : Go to Menu > Update firmware
Step 2 : Tap on ‘Get Latest Firmware’
Step 3 : Tap on ‘Magis-X2’. This firmware is a stable firmware for Pluto1.2
Step 4 : In case you have downloaded the firmware from internet, you
can also load the firmware using ‘Browse’ button.
Step 5 : Make sure that App is connected to PlutoX and Tap on ‘Flash’
button. This will start flashing your Pluto1.2
1. Please do not flash ‘Magis-V3R’ on Pluto1.2 This will freeze Pluto1.2
microcontroller. If it does happen by mistake, choose the current version
‘Magis-X2’ from the app and flash you drone.
2. Do not turn o Pluto1.2 while Flashing
CAUTION
24
2019 Drona Aviation
Page 28
Pluto1.2 is meant for tinkering. When user want to program the drone, use
the Cygnus IDE to write user code. Along with Cygnus IDE, enable develop-
er mode on App. For more information on programming, use Project Book.
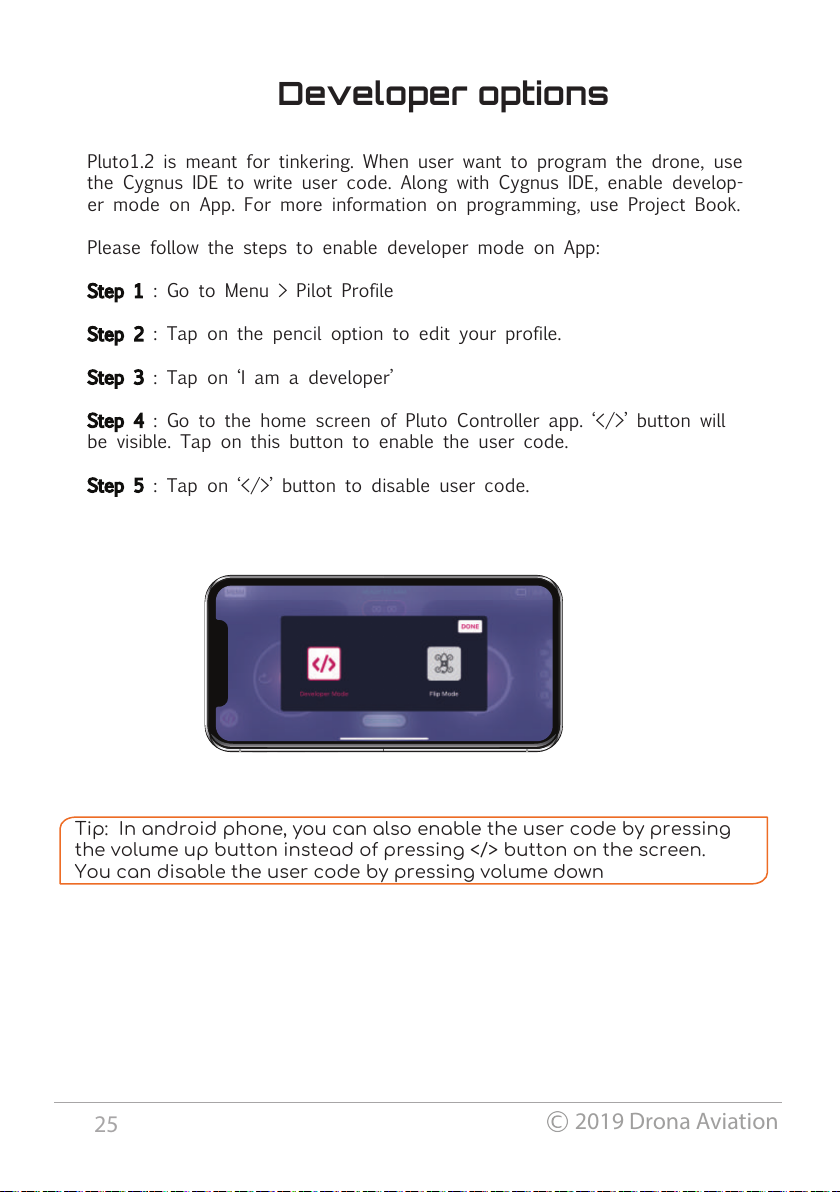
Please follow the steps to enable developer mode on App:
Step 1 : Go to Menu > Pilot Profile
Step 2 : Tap on the pencil option to edit your profile.
Step 3 : Tap on ‘I am a developer’
Step 4 : Go to the home screen of Pluto Controller app. ‘</>’ button will
be visible. Tap on this button to enable the user code.
Step 5
: Tap on ‘</>’ button to disable user code.
Developer options
Tip: In android phone, you can also enable the user code by pressing
the volume up button instead of pressing </> button on the screen.
You can disable the user code by pressing volume down
25
2019 Drona Aviation
Page 29
Troubleshooting
Led status
Failsafe Information
LED Status Indication Action required
G On Connected with App. Ready to ARM -
B On Drone is Armed. -
R On Low battery Charge the battery
Cyclic R, G, B Waiting for the app to connect. Connect using App
G Togg le Pluto is not of a flat surface Keep pluto on flat surface.
B Toggle Signal loss Reconnect to pluto
R Toggle Low battery In-flight Land & Charge the battery
Pink Toggle Gyro not calibrated
Keep Pluto undisturbed /
Perform Acc calibration
Yellow Toggle Mag not calibrated Perform Mag calibration
R long toggle
& short toggle
MPU error Contact support
G long toggle
& short toggle
Baro error Contact support
B long toggle
& short toggle
Crystal error Contact support
For reference: R - Red LED, G - Green LED, B - Blue LED
Failsafe Condition LED Behavior
Low Battery
(Not armed)
Batt voltage < 3.4V Solid red
LED
Does not let you ARM the
drone
Low Battery
(In-flight)
Batt voltage < 3.0V Blinking red
LED
-
Loss of
range
No signal for 2s Blinking
blue LED
Land drone at the current
position
Crash Acceleration > 2g or
Roll/Pitch > 50 degrees
Blinking
pink LED
DisArms the drone
26
2019 Drona Aviation
Page 30
27
2019 Drona Aviation
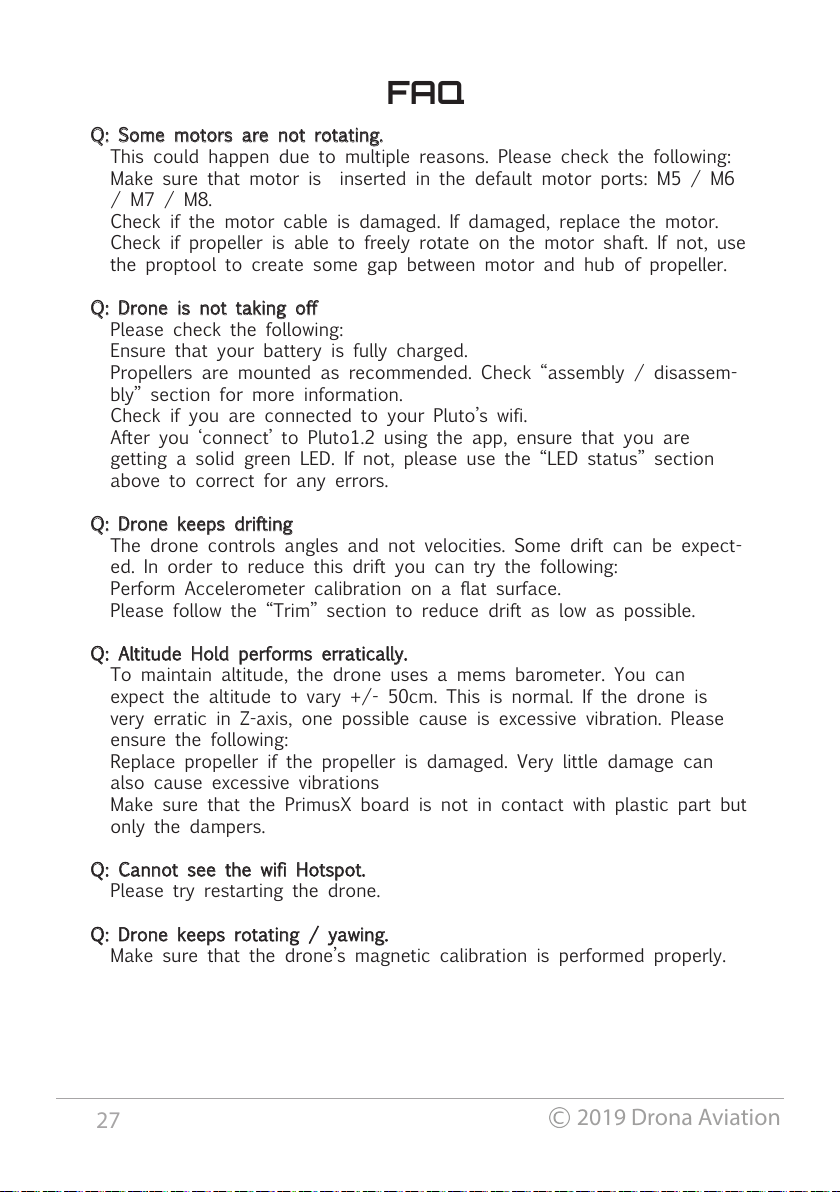
FAQ
Q: Some motors are not rotating.
This could happen due to multiple reasons. Please check the following:
Make sure that motor is inserted in the default motor ports: M5 / M6
/ M7 / M8.
Check if the motor cable is damaged. If damaged, replace the motor.
Check if propeller is able to freely rotate on the motor shaft. If not, use
the proptool to create some gap between motor and hub of propeller.
Q: Drone is not taking off
Please check the following:
Ensure that your battery is fully charged.
Propellers are mounted as recommended. Check “assembly / disassem-
bly” section for more information.
Check if you are connected to your Pluto’s wifi.
After you ‘connect’ to Pluto1.2 using the app, ensure that you are
getting a solid green LED. If not, please use the “LED status” section
above to correct for any errors.
Q: Drone keeps drifting
The drone controls angles and not velocities. Some drift can be expect-
ed. In order to reduce this drift you can try the following:
Perform Accelerometer calibration on a flat surface.
Please follow the “Trim” section to reduce drift as low as possible.
Q: Altitude Hold performs erratically.
To maintain altitude, the drone uses a mems barometer. You can
expect the altitude to vary +/- 50cm. This is normal. If the drone is
very erratic in Z-axis, one possible cause is excessive vibration. Please
ensure the following:
Replace propeller if the propeller is damaged. Very little damage can
also cause excessive vibrations
Make sure that the PrimusX board is not in contact with plastic part but
only the dampers.
Q: Cannot see the wifi Hotspot.
Please try restarting the drone.
Q: Drone keeps rotating / yawing.
Make sure that the drone’s magnetic calibration is performed properly.
Page 31
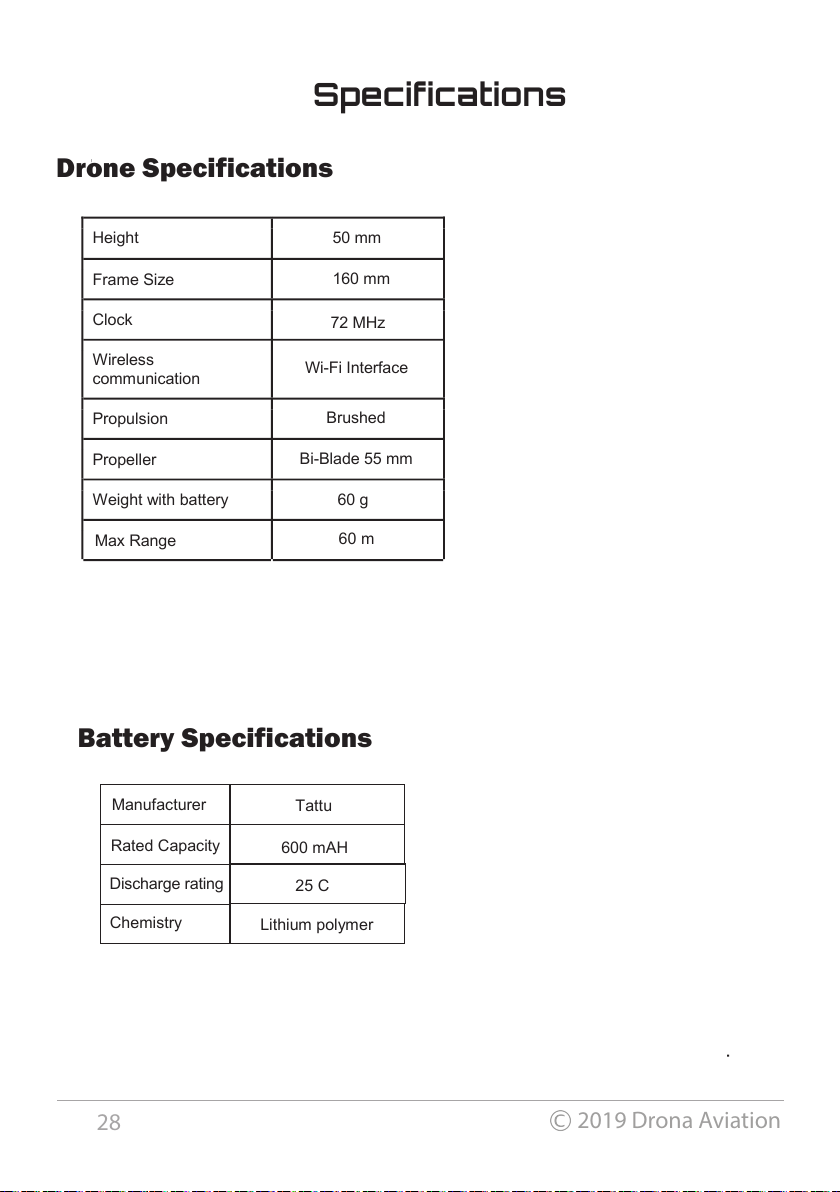
Drone Specifications
Manufacturer
Tattu
Rated Capacity
600 mAH
25 C
Chemistry
Lithium polymer
Battery Specifications
Specifications
Height
Frame Size
Clock
Wireless
communication
Propulsion
Propeller
Weight with battery
28
2019 Drona Aviation
50 mm
72 MHz
Wi-Fi Interface
Brushed
Bi-Blade 55 mm
60 g
60 m
Max Range
160 mm
Discharge rating
Page 32
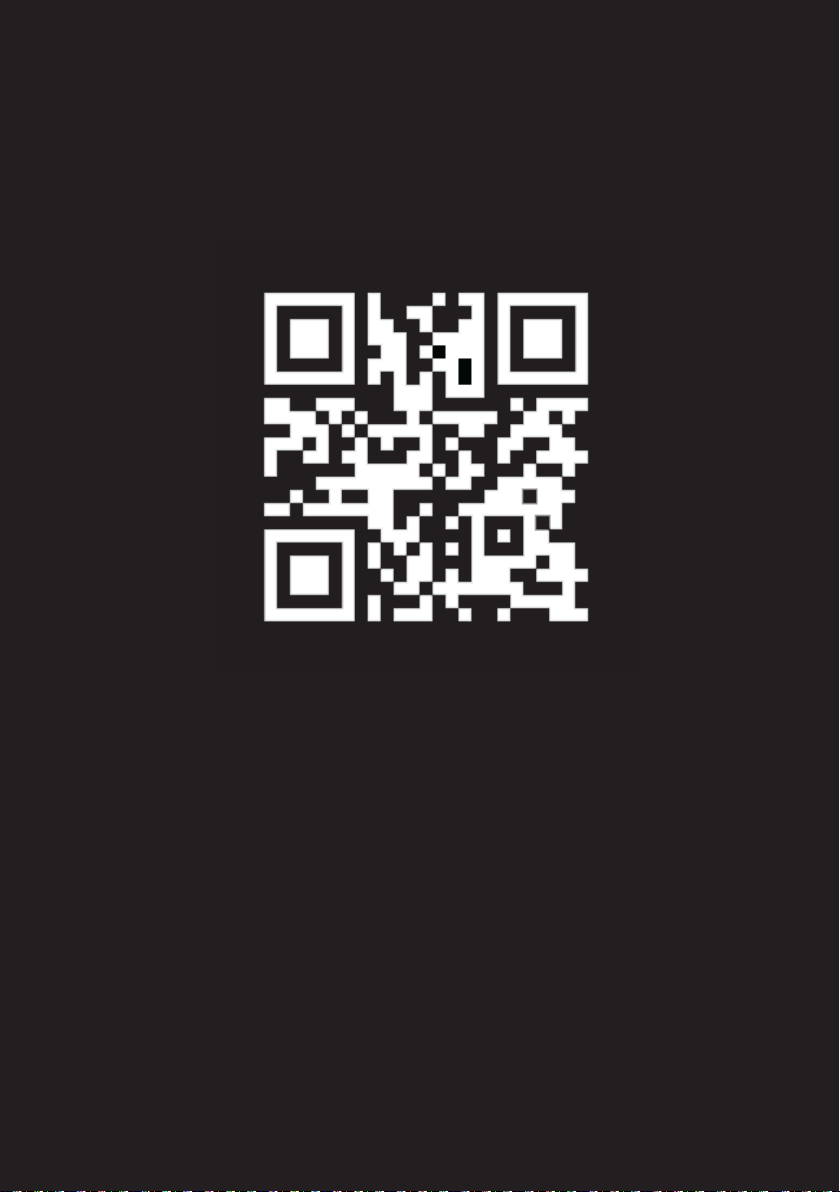
Support
www.dronaaviation.com
For questions and technical help:
Email: [email protected]
GitHub: https://github.com/DronaAviation
Forum: https://www.dronaaviation.com/forum
 Loading...