

Page 1
Operation Manual
READ AND KEEP THIS MANUAL FOR REFERENCE
OUTBACK CHEF WOOD BURNING
COOKSTOVE
(DB04800 Model)
ENGLISHFRANÇAIS
Printed in Canada
Security test made according to
regulations ULC S627 and UL
1482 by an accredited laboratory.
45887OA
2018-01-17
Page 2

Page 3

TABLE DES MATIÈRES
GENERAL INFORMATION ........................................................................................................ 3
Cooking Stove General Features ..........................................................................................3
COMPONENTS LOCATION ...................................................................................................... 5
COMPONENTS DESCRIPTION ................................................................................................ 6
Ash Drawer .........................................................................................................................6
Bypass Rod ........................................................................................................................7
Primary Air Adjustment ........................................................................................................7
Hotplate .............................................................................................................................8
Accessory Drawer ...............................................................................................................8
Warming Drawer .................................................................................................................8
Oven ..................................................................................................................................9
OPERATION ............................................................................................................................ 10
Before the First Use ...........................................................................................................10
First Fires ..........................................................................................................................10
Loading ............................................................................................................................10
ENGLISH
Combustible .....................................................................................................................11
Startup Without Embers .....................................................................................................11
Startup With Embers .........................................................................................................11
COMBUSTION REGIME ......................................................................................................... 12
COOKING STOVE MAINTENANCE ........................................................................................ 13
Combustion Chamber ........................................................................................................13
Window Maintenance ........................................................................................................13
Cleaning of the Exterior .....................................................................................................13
Cleaning Under the Hotplate ..............................................................................................14
Cleaning Under the Oven Plate ..........................................................................................14
COMPONENTS REPLACEMENTS ......................................................................................... 15
Replacing Door Gasket ......................................................................................................15
Replacing the Window Gasket ............................................................................................ 16
Replacing a Broken Door Window ......................................................................................16
MAINTENANCE ...................................................................................................................... 17
Chimney Sweeping ............................................................................................................17
Cleaning Frequency ...........................................................................................................17
Why Sweep the Chimney? .................................................................................................17
Creosote - Formation and Elimination Necessity .................................................................17
TROUBLESHOOTING ............................................................................................................. 18
Page 3Operation manual - Outback Chef Wood Burning Cookstove
Page 4

GENERAL INFORMATION
APPLIANCE PERFORMANCES
Combustible type Dry wood logs
Maximum heat output 11.88 Kw (40 536 BTU / h)
Nominal heat output 10.08 Kw (36 851 BTU / h)
Volume of the combustion chamber 1.08 pi3 (0.028m3)
Oven volume 39 liters (1,38 pi³)
Oven dimensions (W x D x H) 11 ½" x 17¾" x 11 ¾"
(290mm x 450mm x 300mm)
Combustible loading interval 60 min
Maximum log length 16"
ENGLISH
Delivery weight 248 kg (545 lb)
Cooking Stove General Features
If the cooking stove is not properly installed, it could result in a fire, body injuries or even death. To
reduce the risks, follow the installation instructions. Contact your municipal building department or
the municipal fire department to know the installation and inspection requirements and restrictions in
your area.
Read the whole manual before using your new cooking stove. It is important to follow the installation
guidelines completely.
You may have to get a permit for the installation for the cooking stove and for the chimney to which it
is connected. Communicate with the municipal building department or the municipal fire department
before the installation to see if such permit is needed. We also recommend that you ask your house
insurance company if that installation will have an impact on your insurance policy.
BURNING HOT WHEN IN USE. KEEP CHILDREN AWAY, AS WELL AS CLOTHING AND
FURNITURE.
Any skin contact can cause burns. Gloves may be needed to heat the cooking stove and to manipulate
the bypass rod.
Do not use the cooking stove if the window or the vermiculite panels are cracked or broken. That
could be dangerous and damage the cooking stove.
Completely open the air intake before opening the combustion chamber’s door.
The cooking stove is not designed to be used when the doors are open. Open the door only to start
up or to reload the kitchen stove.
Don’t leave unattended when the door is slightly open for startups. Always close the door after ignition.
DO NOT USE FLAMMABLE LIQUIDS SUCH AS GASOLINE, NAPHTHA, FUEL OIL, ENGINE
OIL, KEROSENE, CHARCOAL LIGHTER FUEL, SIMILAR LIQUIDS, OR AEROSOLS TO START,
REVIVE OR NEAR THE FIRE.
Page 4 Operation manual - Outback Chef Wood Burning Cookstove
Page 5

GENERAL INFORMATION
Do not keep the fuel closer than the minimum clearances of the cooking stove.
When the cooking stove is ignited, the secondary air handle becomes very hot.
Only burn dry wood cord.
Do not raise the fire by placing a grate in the combustion chamber.
The cooking stove must be used and maintained according to these instructions.
This cooking stove is designed only for cooking. Any other use that could result in injury or damages
is prohibited.
Do not use the cooking stove as an incinerator for domestic trash.
To open the combustion chamber’s door and the oven door, use the tools included with the appliance.
Do not obstruct the openings to allow combustion air to enter or heat out on the sides of the cooking
stove.
Using components from other appliances, or modify the actual components of the cooking stove is
prohibited and will void the warranty. Any modifications of the cooking stove that did not receive a
written authorization by the homologation authority or by the manufacturer is prohibited and violates
the standards CSA B365 (Canada) and NFPA 211 (USA).
Do not use the cooking stove as stairs or any other support structure.
SBI doesn’t assume any warranty, implicit or explicit, related to the wrong installation or to the lack of
maintenance of the appliance and doesn’t assume any responsibility for any damage that would result
from these.
Contact an authorized dealer to obtain a replacement part. Never use substitution materials. The use
of unapproved parts can result in bad performances and risks for your security.
ENGLISH
Page 5Operation manual - Outback Chef Wood Burning Cookstove
Page 6

COMPONENTS LOCATION
Cast iron
Primary air
Handrail
Hotplate
ENGLISH
Plate
contour
rings
Secondary
air
Combustion
chamber’s door
Ash door
access
Oven door
Page 6 Operation manual - Outback Chef Wood Burning Cookstove
Accessories
Smoke
bypass rod
Page 7
COMPONENTS DESCRIPTION
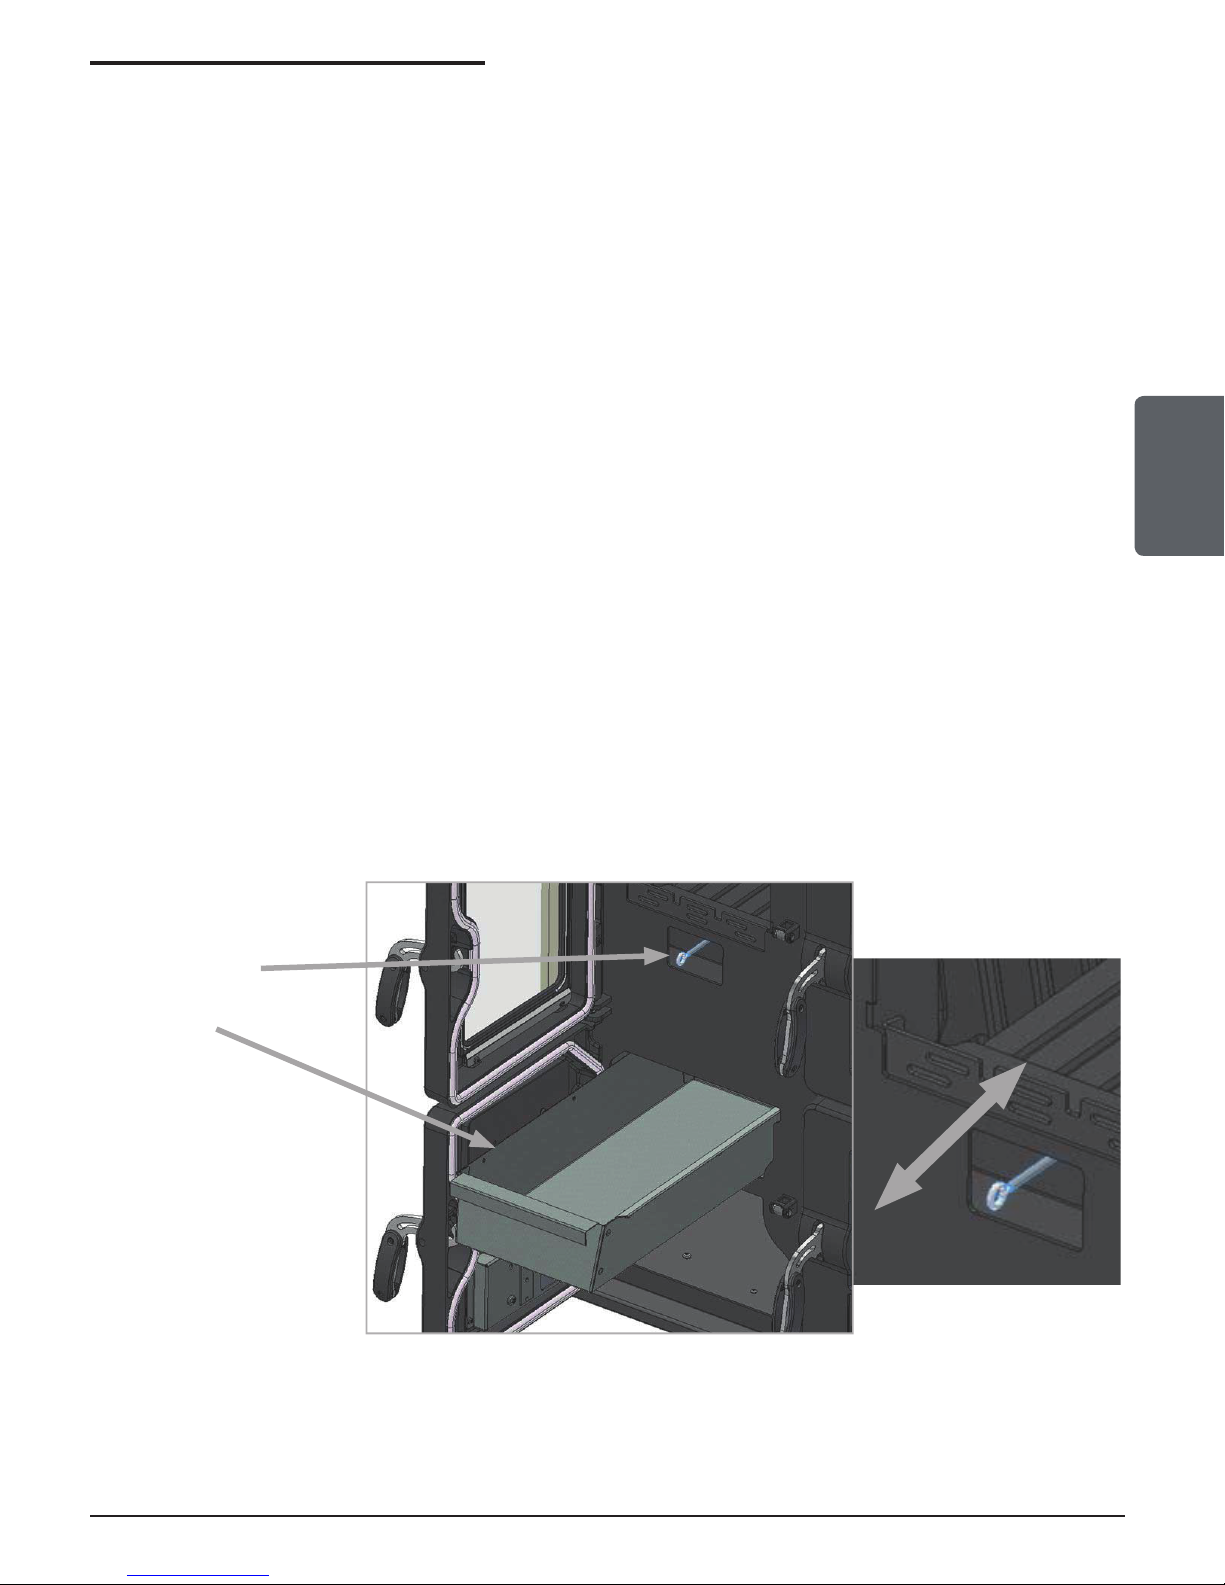
Ash Drawer
The ash drawer is located under the cooking stove, behind the ash door.To avoid the accumulation of
cold ashes in the combustion chamber, pull and push on the ashtray knob. The ashes will fall into the
drawer. The cooking stove will then always be ready to receive a new load of wood and the primary
air will flow correctly in the cooking stove.
The ash drawer must always be in place and the access door must be kept close at all time when the
cooking stove is ignited.
It is recommended that the ash drawer be emptied every day or with every use of the cooking stove.
Use the glove included with the cooking stove to open the ash door and manipulate the ash drawer.
After each emptying, put the drawer back in place. Not doing so could be very dangerous especially
if the cooking stove is ignited.
ENGLISH
The use of a personal, central, or commercial vacuum cleaner to clean up your cooking stove is not
recommended. Ash particles can damage the vacuum engine. Furthermore, hot ashes could ignite the
content of your vacuum. The use of a vacuum for ashes is highly recommended.
Ashtray Knob
Ash drawer
Page 7Operation manual - Outback Chef Wood Burning Cookstove
Page 8
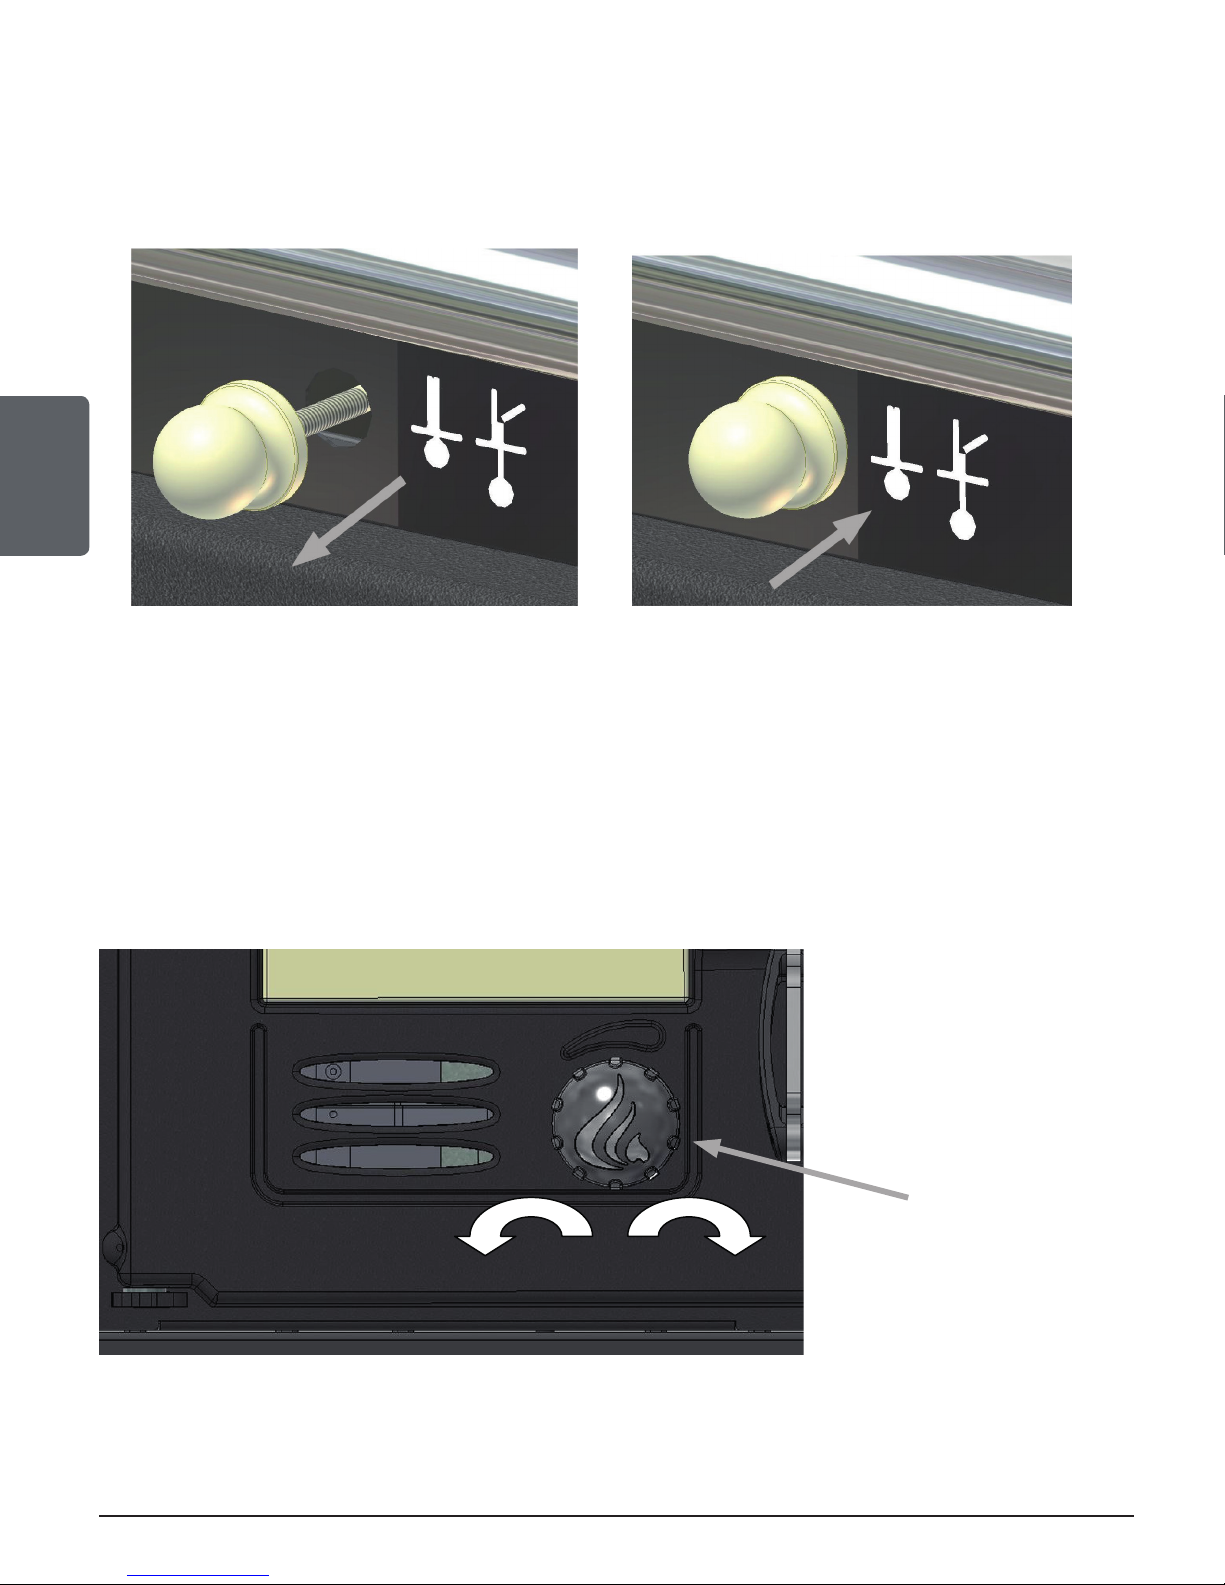
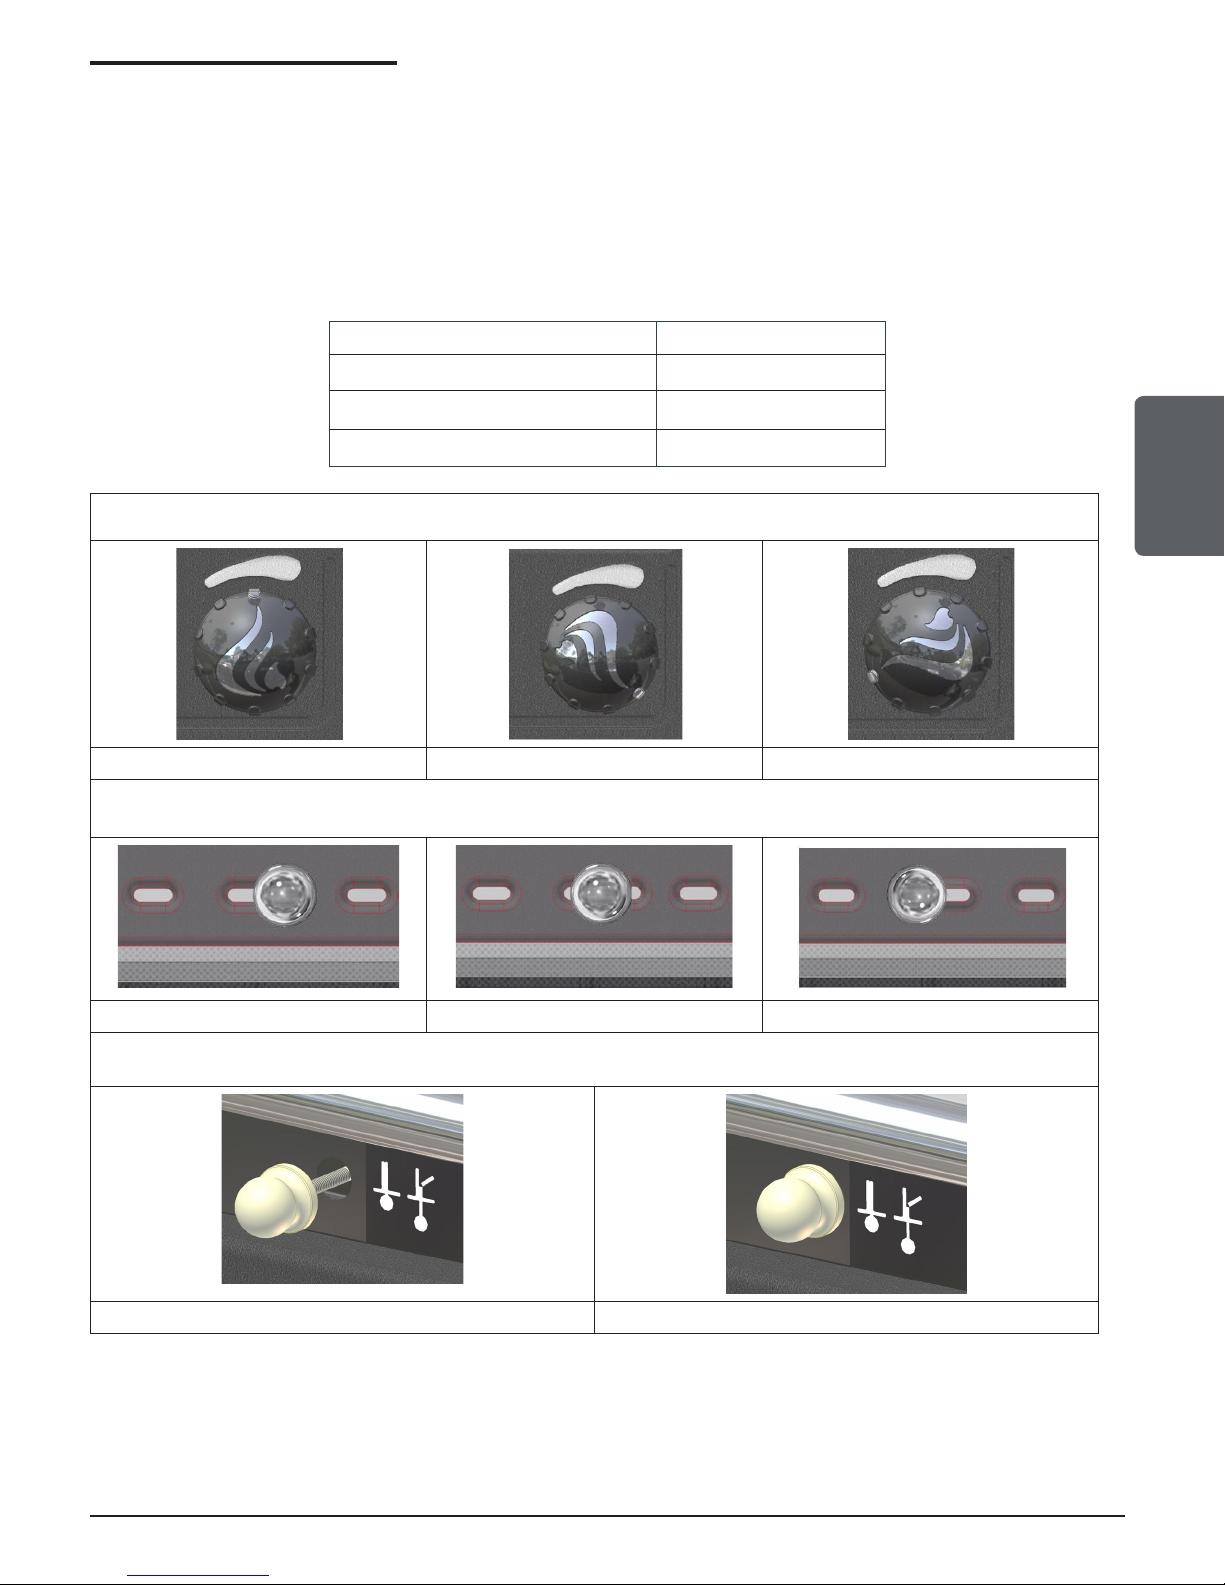
Bypass Rod
MIN
MAX
The bypass rod can be found above the oven door. It is used to improve the efficiency of the cooking
stove, in the startup stage and, also to heat up the cooking stove. The adjustment can be made by
pushing or pulling the rod. When the bypass rod is in the open position, the smoke escapes directly
into the chimney, which improuve draft during ignition
ENGLISH
Open Closed
Primary Air Adjustment
You can adjust the primary airflow by turning the knob located on the ashes access door. This operation
will influence the intensity of the combustion.
MIN= Minimum intensity of combustion
MAX= Maximum intensity of combustion
primary air ow knob
Page 8 Operation manual - Outback Chef Wood Burning Cookstove
Page 9
Hotplate
Accessory drawer
Warmer drawer
Do not overheat the plate.
The hotplate is designed for simple and quick cooking. The hottest part of the plate is located on the
cast iron rings. Therefore, it is the ideal place to quickly heat up a pan. The parts outside of the plate
are ideal to keep the food warm.
For good cooking on the plate, it is necessary to use flat bottom, heat resistant, pans.
When cooking on the hotplate, it is possible to reduce the discomfort due to the heat coming from the
combustion chamber by installing the protection plate, included with the cookstove, outside the door
of the combustion chamber.
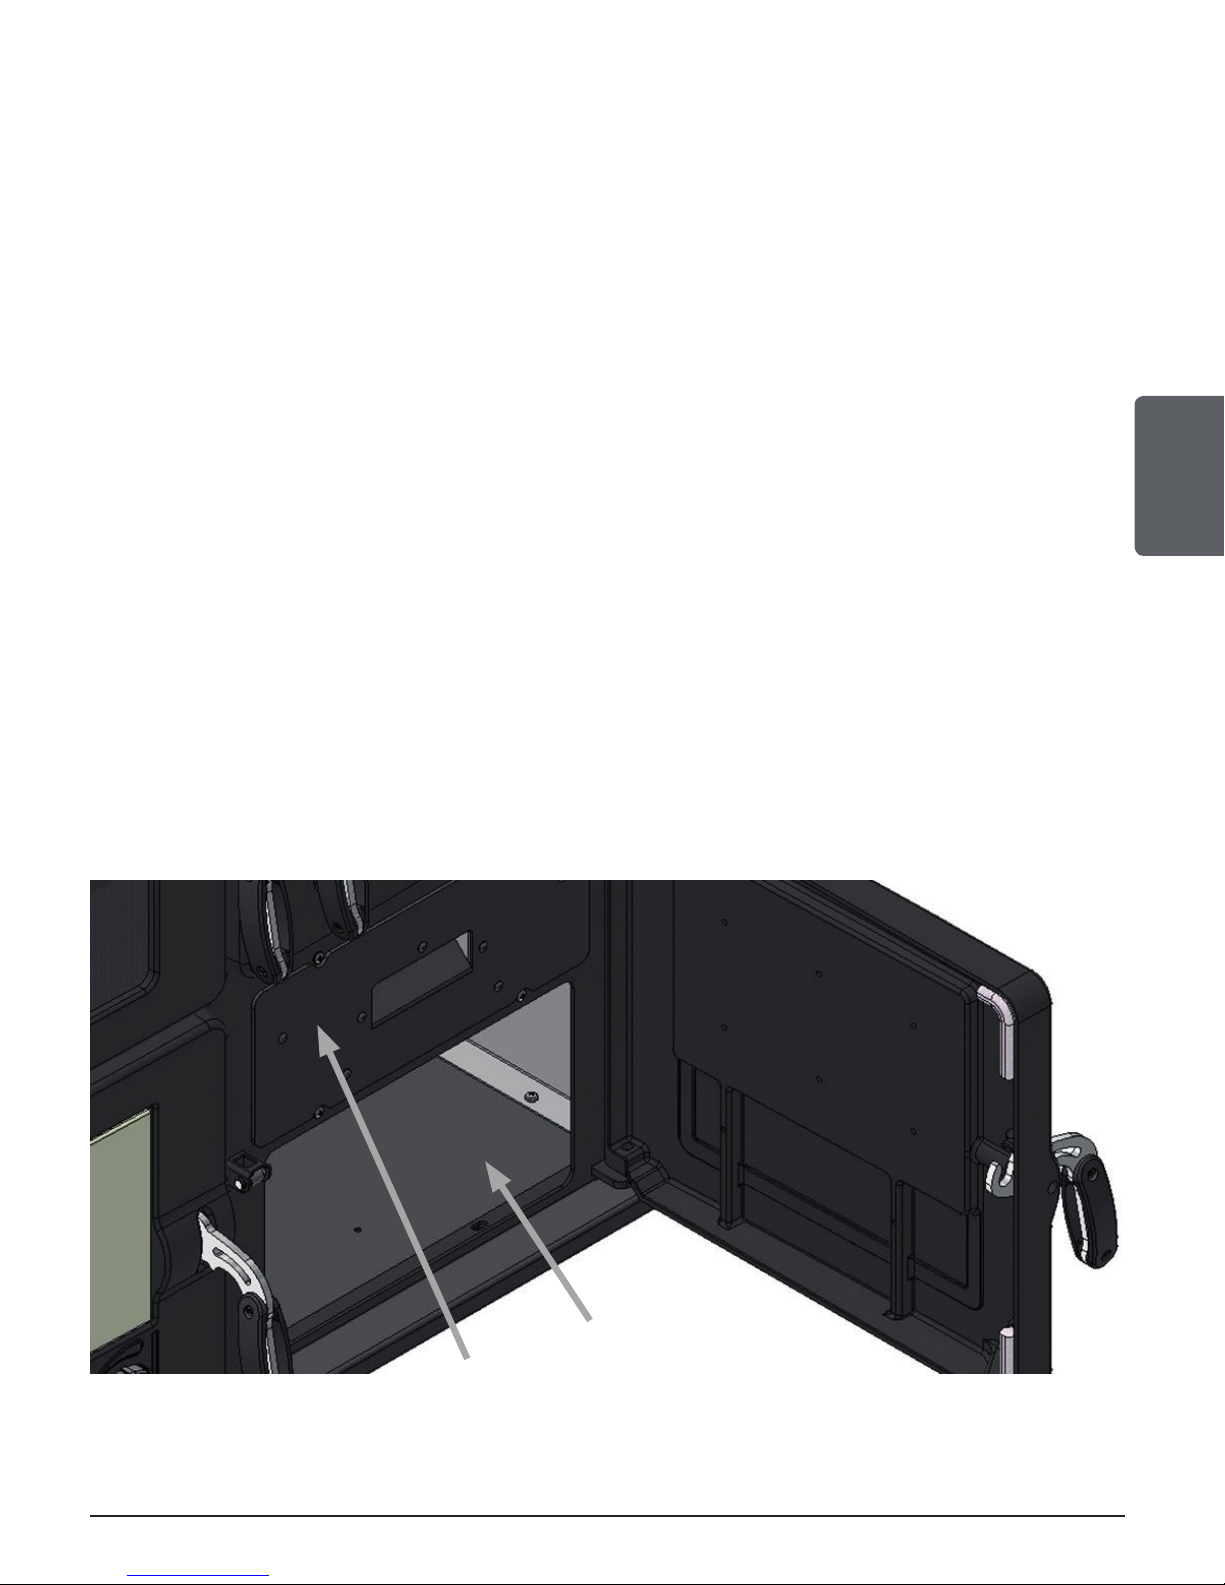
Accessory Drawer
The accessory drawer is located in the lower righthand portion of the appliance. This space is dedicated
to store the tools necessary for the functioning of the cooking stove.
It is prohibited to put or store: alcohol, gasoline, liquid fuel, flammable materials, ashes, paper and wood
in the accessory drawer.
ENGLISH
Warming Drawer
The cooking stove has a warming drawer located under the oven. To access it, open the accessory
drawer located under the oven.
Page 9Operation manual - Outback Chef Wood Burning Cookstove
Page 10
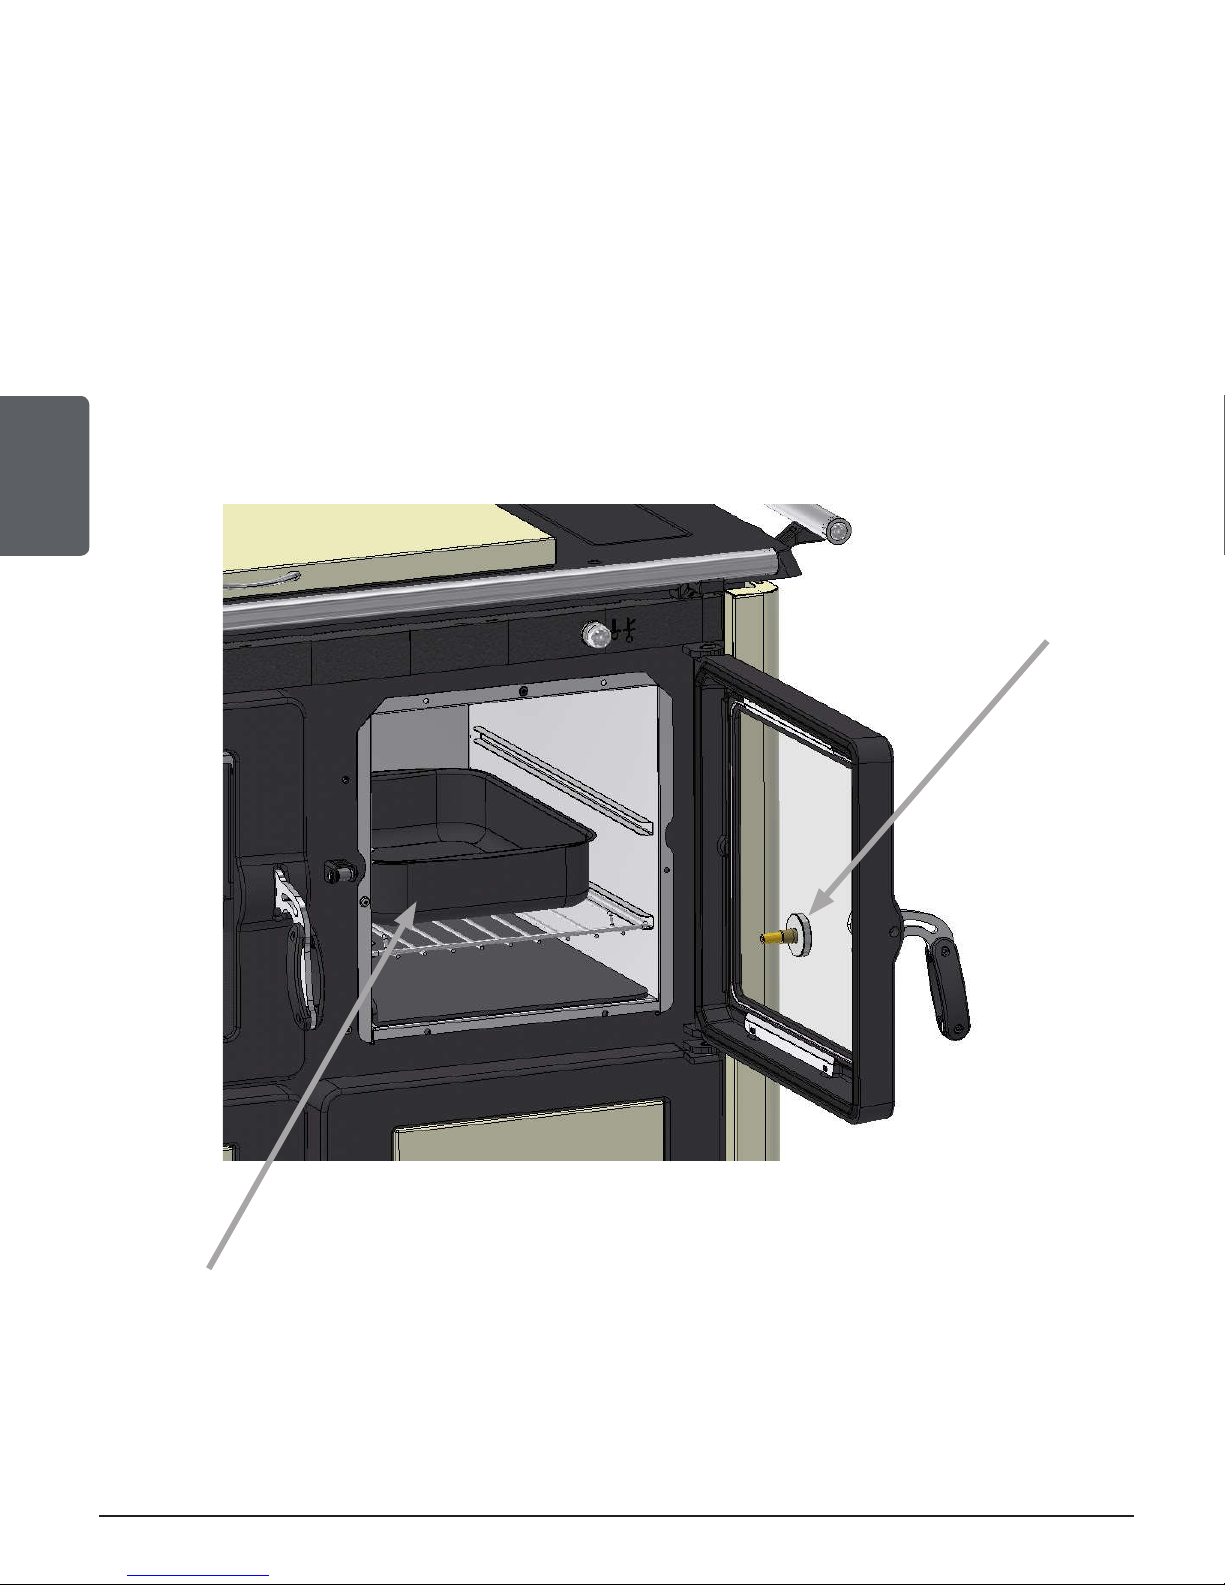
Oven
The kitchen stove has a stainless steel oven for cooking and baking. The oven panoramic window allows
you to see the cooking or baking without having to open the door. The door’s integrated thermometer
simplifies the reading of the oven temperature. The temperature indicated by the thermometer is only
used as a reference for cooking and baking.
Before starting cooking, the stove must operate at an optimal regime (see combustion regime section)
and the bypass valve must have been closed for at least 60 minutes.
The fire must be fuelled with small/medium wood logs to bring the oven to the desired temperature.
When the cooking temperature has been reached, add less wood to maintain a constant temperature
in the oven. After half of the cooking time, turn the pan to obtain an even and optimal cooking result.
During cooking, keep the oven door close to keep a constant temperature.
ENGLISH
Thermometer
Pan
Page 10 Operation manual - Outback Chef Wood Burning Cookstove
Page 11

OPERATION
Before the First Use
The plate has been treated with a lubricant to prevent rust and oxidation. Therefore, it is important to
clean it before the first use.
First Fires
Never use alcohol, gasoline, or any other liquid fuel.
The cover must always be up when the cooking stove is operating. Bring down the cover only when
the cooking stove is cold.
Before ignition, check to make sure the chimney is clean and clear. Check for the good operations of
all the devices related to the cooking stove.
The use of the cooking stove with cracked or broken components, such as the window or the baffle,
could cause dangerous situations and could damage the cooking stove.
The doors must remain closed and locked during the operation. The access panel for the ash drawer
must also be closed during the operation.
ENGLISH
The startup of the cooking stove must be done only when all the installation steps for the cooking
stove and the chimney have been completed.
During the first fires, your cooking stove will give off an unpleasant smell along with a light smoke. This
has to do with the hardening of the paint process. The paint heats up, hardens, and adheres to metal.
The smell and the smoke will disappear when the cooking stove has been heated for several hours.
Increase the fire intensity gradually. Open a window. Get out of the room if needed. Even though the
smoke and the smell are unpleasant, they are nontoxic.
Loading
Do not load the wood through the cast iron rings.
The cooking stove must be loaded manually while functioning.
Load with combustible when the flame is minimum to avoid combustion gas to exit when the combustion
chamber’s door opens.
To add combustible, it is necessary to open the combustion chamber’s door. Load with wood and
close the door.
During this operation, always use the tools provided with the appliance.
Page 11Operation manual - Outback Chef Wood Burning Cookstove
Page 12

Combustible
This cooking stove is designed and approved for wood burning only. The use of any other type of
combustible will void your warranty.
Hardwood cut 25 to 30 cm (12 to 15 inches) such as oak, maple and ash is recommended.
To obtain a perfect combustion, it is necessary to keep combustible in a dry and cool area.
Startup Without Embers
If the cooking stove is lit during a very cold day, it will be necessary to preheat the chimney.
Put an ignition cube or a small quantity of paper. Add small pieces of wood on the ignition cube.
Ignite the paper or the ignition cube and open the air inlets and the bypass rod to the maximum.
ENGLISH
Close the combustion chamber’s door.
When the fire slows down, add bigger pieces of wood. Restart this operation until it reaches a maximum
loading interval of 60 minutes and a maximum load of 27 kg/ h (60 pounds/h). When the desired
temperature is reached, see the “combustion regime” section for the opening of the air inlets.
Startup With Embers
When loading without fire but only with good embers proceed this way:
With the poker, bring the embers to the center of the combustion chamber.
Completely open the primary and secondary air.
The bypass rod should be closed.
Wait for the necessary time until a regular fire starts. Load a few small pieces of wood and let the flame
take over.
Put the primary and secondary air as well as the bypass valve in the position for combustion regime,
as indicated in the section “combustion regime”.
Page 12 Operation manual - Outback Chef Wood Burning Cookstove
Page 13
COMBUSTION REGIME
To get a good compromise between the obtained heat and the wood consumption, it is recommended
to adjust the fire intensity using the primary air, the secondary air and the smoke bypass valve.
The following air command positions are based on an already ignited appliance and are for information
purposes only.
ADJUSTMENT POSITION
Primary air Closed
Secondary air Open
Bypass valve Closed
PRIMARY AIR
ENGLISH
Closed Half open Open
SECONDARY AIR
Closed Half open Open
BYPASS VALVE
Open Closed
Page 13Operation manual - Outback Chef Wood Burning Cookstove
Page 14

COOKING STOVE MAINTENANCE
Before each cleaning operation, the cooking stove must be at room temperature.
Combustion Chamber
The cooking stove cleaning frequency depends on the type and quality of combustible used. A
high humidity rate, ashes, soot, or chemical components in the wood could increase the number of
cleaning necessary. Therefore, it is important to pay attention to the combustible used.
Combustion chamber cleaning: To get the maximum performance from the cooking stove, it must be
cleaned every day.
Grate cleaning : Empty combustion residues (be careful with the hot embers), open up the holes in the
bottom of the grate and empty the ash drawer.
The ashes must be stored in a metallic container with a waterproof lid. This closed container should
be put on a noncombustible surface, away from any flammable material. If the ashes are meant to be
ENGLISH
buried or locally dispersed, they should be kept in a closed container until they are completely cold.
Window Maintenance
Clean the door window as needed. The use of a cleaner especially designed for solid combustible
heating appliances is recommended. A regular window cleaner won’t remove soot and creosote.
Never use an abrasive cleaner on the window. Do not clean the window when it’s hot. Do not force,
hit, slam, or do anything that could weaken the glass door. Do not use the cooking stove if the window
is missing, cracked, or broken.
Cleaning of the Exterior
Steel-cast iron part: Use a cloth and a product specifically designed to clean cast iron.
Glass-ceramic part: Use a sponge and a product specifically designed to clean heating appliances
windows then go over again with a dry cloth.
Varnished part: Use a cloth with a little neutral soap, then go over again with a damp cloth.
Cleaning of the top cooking plate: The stove cooking surface is cast iron. The use of it will change its
colour. This is not a materiel defect but a chemical and physical process due to the continuous heating
of the plate at high temperature. To clean the central part, use a damp cloth and a mild detergent.
Once it has been cleaned and dried up, it must be kept slightly greasy with cooking oil.
Plated surfaces: : Do not use abrasive cleaners. To maintain its original gloss, only use a soft damp
cloth.
Page 14 Operation manual - Outback Chef Wood Burning Cookstove
Page 15

Cleaning Under the Hotplate
1. Remove the cast iron rings
(A)
2. Remove the hotplate by lifting
it upwards (B).
3. You will have access to all the
combustion chamber parts
for cleaning.
4. Remove the combustion
residues with the necessary
tools (poker, brush, shovel,
etc.) These are not included
with the cooking stove.
5. When all the cleaning process
is done, put the hotplate back
in place.
ENGLISH
Cleaning Under the Oven Plate
1. Open the oven door and
remove the base plate by
uplifting it toward you. You will
access all the components for
the smoke pipe. Remove all
the combustion residues with
the necessary tools (poker,
brush, shovel, etc.) These are
not included with the cooking
stove.
2. When all the cleaning process
is done, put the plate back in
place.
3. Pay attention to the
positioning of the folded
part upwards.
Page 15Operation manual - Outback Chef Wood Burning Cookstove
Page 16

COMPONENTS REPLACEMENTS
Replacing Door Gasket
To maintain optimal performance, the door
should always be perfectly sealed with the
combustion chamber. The gasket must be
inspected periodically to get a tight seal.
With time, the door gasket will compress
and harden which will allow air to infiltrate.
You can test the condition of the gasket by
closing and locking the door on a piece of
paper. Check the periphery of the door. If
the paper slides easily at any place around
the door, it is time to change the gasket.
ENGLISH
Use the right gasket that you will find at the
dealer. The right diameter and density of the
gasket are important so that the seal is tight.
Put the door facing down on a soft surface such as a cloth or a carpet. Remove the gasket and
use a screwdriver to scrape the old adhesive. Apply ½ inch (12 mm) high temperature sealant in the
groove of the gasket. Push the gasket into the groove. Do not stretch the gasket while installing. Keep
approximately ½ inch longer when cutting and then push it into the groove. Push away the exceeding
fibres under the gasket. Close the door and do not use the cooking stove for 24 hours.
Page 16 Operation manual - Outback Chef Wood Burning Cookstove
Page 17

Replacing the Window Gasket
It is a good idea to replace the window gasket at
the same time as the door gasket. The gasket is
flat and made with braided fiber glass. Remove
the screws (E) and the window frames (C) and
(D) that hold the window to the door frame (A).
Remove the window (B) and the old gasket (F).
E
D
B
A
It is a good time to thoroughly clean the window!
Follow the same steps to replace a broken
window.
Watch out for cuts: Always
wear appropriate gloves when
handling broken glass.
F
C
ENGLISH
Do not weaken the door by hitting or slamming it. Do not use the cooking stove if the window is
missing, cracked, or broken.
Replacing a Broken Door Window
Delicately remove the broken pieces from the door frame. Discard the window scraps correctly.
A broken window must be replaced by an identical window (ceramic glass). Refer to the replacement
components section.
Always wear gloves when handling broken glass.
Warning: the replacement window should only be bought at an authorized dealer, see section
“component replacement”. Regular or heat tempered glass is not adapted for the high temperatures
of the cooking stove.
Page 17Operation manual - Outback Chef Wood Burning Cookstove
Page 18

MAINTENANCE
Chimney Sweeping
Chimney sweeping can be difficult and dangerous. If you don’t have any experience sweeping
chimneys, you may want to hire a professional sweeper to inspect and clean your system the first
time. After seeing how the sweeping is done, you will know if it is a job you can do yourself.
The most commonly used equipment includes fiberglass rods with threaded connections and plastic
brushes. The brush is forcibly moved from top to bottom of the chimney to remove the creosote by
rubbing.
The chimney connector and its components should always be cleaned at the same time as the
chimney.
Cleaning Frequency
It is impossible to predict how long it will take or how much creosote will form in your chimney.
ENGLISH
Consequently, it is important to check monthly if there are deposits in your chimney until you get used
to your new cooking stove or until you know the creosote rate formation. Even if the creosote forms
slowly in your system, the chimney should be inspected and cleaned annually.
It is recommended to clean the chimney system at the end of each heating season. During summer,
the air is more humid and with minimum air circulation in the appliance, creosote and/or the soot left in
the pipes can produce an acid that will accelerate the corrosion process of steel and may perforate it
prematurely. Consequently, this will not be covered by the warranty. Have the chimney system cleaned
by a professional sweeper.
Contact your municipal or state fire department to get information on how to take care of a chimney
fire. Have an emergency plan in place if a chimney fire would occur.
Why Sweep the Chimney?
Wood smoke can condense inside the chimney and the chimney connector, forming a flammable
deposit called creosote. If the creosote builds up in the evacuation system, it can inflame when the
fire is very hot. An extremely hot fire can progress to the extremity of the fire. Severe chimney fires can
damage even the best chimneys.
Smouldering fires can quickly cause a thick layer of creosote. When those are avoided, the gases
coming out of the chimney are almost transparent. Creosote is therefore formed more slowly. Your
new cooking stove has the necessary characteristics to help you make clean fires producing little or
no smoke. Therefore, less creosote will accumulate in the chimney.
Creosote - Formation and Elimination Necessity
When the wood is burned slowly, it produces tar and other organic vapours. When combined with
the moisture expelled, it forms creosote. Creosote vapours condense in a relatively cold chimney from
a small fire. Consequently, creosote residue accumulates in the chimney. During ignition, creosote
creates an extremely hot fire.
The chimney must be inspected at least twice a year during the heating season to determine when a
creosote accumulation occurred. When the creosote has accumulated, it must be removed to reduce
the risk of chimney fire.
Page 18 Operation manual - Outback Chef Wood Burning Cookstove
Page 19

TROUBLESHOOTING
PROBLEM POSSIBLE CAUSES SOLUTION
Oven window and
/ or combustion
chamber’s window
blackening.
Irregular draw. • Inadequate or dirty chimney.
Black smoke leak
outside the cooking
stove.
• Draft too low < 10 Pa
• Bad air regulations
• Too much combustible in
the cooking stove.
• Wood with a high rate of
relative humidity > 20-25%
• Unregulated combustion.
• Dirt in the combustion
chamber or in the cooking
stove.
• Ignition with green wood.
• Smoke pipe obstructed.
• Check that all the pipes are clean.
• Modify the chimney: increase the height
or check surrondings.
• See section (combustion regime).
• Reduce the quantity of combustible in
the combustion chamber.
• Dry the wood longer.
• Sweep the chimney or have it clean by a
professional.
• Clean the cooking stove. (see section
maintenance and cleaning)
• Ignite the cooking stove with
suitable combustible (see section
combustible).
• Ask for professional qualified assistance.
ENGLISH
Smoke coming out of
the cooking stove.
• Combustion chamber’s door
open while the cooking
stove is heating.
• Insufficient draw < 10 Pa
• Bad adjustments of the air
inlets during startup.
• The cooking stove must be
cleaned.
• Check the door closing and the
tightness of the gaskets.
• Check the isolation of the ducts.
• Eliminate or reduce to minimum the
deviations and the useless horizontal
lengths.
• Check all the chimney sections as well
as its height on the outside.
• Ask for a chimney inspection by a
certified technician.
• Read the instructions in the following
section (combustion regime) and
(Combustible).
• Regularly clean the cooking stove as
indicated.
Page 19Operation manual - Outback Chef Wood Burning Cookstove
Page 20

Cooking stove_Revision :
June 2017
DROLET COOKING STOVE LIMITED LIFETIME WARRANTY
The warranty of the manufacturer extends only to the original retail purchaser and is not transferable. This warranty covers brand new
products only, which have not been altered, modified nor repaired since shipment from factory. Proof of purchase (dated bill of sale),
model name and serial number must be supplied when making any warranty claim to your DROLET dealer.
This warranty applies to normal residential use only. Damages caused by misuse, abuse, improper installation, lack of
maintenance, over firing, negligence or accident during transportation, power failures, downdrafts, venting problems or underestimated heating area are not covered by this warranty. The recommended heated area for a given appliance is defined by the
manufa cturer as its capacity to maintain a mi ni mum acceptable temperature in the designated area in case of a power failure.
This warranty does not cover any scratch, corrosion, distortion, or discoloration. Any defect or damage caused by the use of unauthorized
or other than original parts voids this warranty. An authorized qualified technician must perform the installation in accordance with the
instructions supplied with this product and all local and national building codes. Any service call related to an improper installation is not
covered by this warranty.
The manufacturer may require that defective products be returned or that digital pictures be provided to support the claim. Returned
products are to be shipped prepaid to the manufacturer for investigation. Transportation fees to ship the product back to the purchaser
will be paid by the manufacturer. All parts covered by this warranty are limited according to the table below.
The manufacturer, at its discretion, may decide to repair or replace any part or unit after inspection and investigation of the defect. The
manufacturer may, at its discretion, fully discharge all obligations with respect to this warranty by refunding the wholesale price of any
warranted but defective parts. The manufacturer shall, in no event, be responsible for any uncommon, indirect, consequential damages of
any nature, which are in excess of the original purchase price of the product. A one-time replacement limit applies to all parts benefiting
from lifetime coverage. This warranty applies to products purchased after March 1
st
, 2015.
DESCRIPTION
WARRANTY APPLICATION*
PARTS LABOUR
Combustion chamber (welds only) and cast iron door frame. Lifetime N/A
Surrounds, ash drawer, trims (extrusions), and convector air-mate. 5 years N/A
Removable stainless steel combustion chamber components, deflectors, and
supports.
5 years N/A
Glass retainers, handle assembly, and air control mechanism. 3 years N/A
Carbon steel combustion chamber components. 2 years N/A
Paint (peeling**), plating (defective manufacture**), ceramic glass (thermal
breakage only**), gaskets, insulation, and oven thermometer.
1 year
N/A
Firebricks, vermiculite combustion chamber components, oven mitt, and
cooking accessories.
N/A N/A
All parts replaced under the warranty.
90 days
N/A
*Subject to limitations above. **Picture required.
Shall your unit or a components be defective, contact immediately your DROLET dealer. To accelerate processing of your warranty
claim, make sure to have on hand the following information when calling:
Your name, address and telephone number;
Bill of sale and dealer’s name;
Installation configuration;
Serial number and model name as indicated on the
nameplate fixed to the back of your unit;
Nature of the defect and any relevant information.
Before shipping your unit or defective component to our plant, you must obtain an Authorization Number from your DROLET
dealer. Any merchandise shipped to our plant without authorization will be refused automatically and returned to sender.
Page 21

Page 22

This document is available for free download on the manufacturer’s website. It is a copyrighted document. Resale is strictly
prohibited. The manufacturer may update this document from time to time and cannot be responsible for problems, injuries, or
damages arising out of the use of information contained in any document obtained from unauthorized sources.
Stove Builder International inc.
250, rue de Copenhague,
St-Augustin-de-Desmaures (Québec) Canada
G3A 2H3
Customer service : 418-908-8002
Email : tech@sbi-international.com
www.drolet.ca
Page 23

Manuel d’opération
LIRE LE PRÉSENT MANUEL ET LE CONSERVER POUR CONSULTATION
CUISINIÈRE À BOIS OUTBACK CHEF
(Modèle DB04800)
FRANÇAIS
Imprimé au Canada
Essai de sécurité fait
conformément aux normes
ULC S627 et UL 1482 par
un laboratoire accrédité
45887OF
2018-01-17
Page 24

TABLE DES MATIÈRES
RENSEIGNEMENTS GÉNÉRAUX ........................................................................................... 23
Caractéristiques générales de la cuisinière ..........................................................................23
LOCALISATION DES COMPOSANTS .................................................................................... 25
DESCRIPTION DES COMPOSANTS ...................................................................................... 26
Tiroir à cendres .................................................................................................................26
Valve de contournement ....................................................................................................27
Ajustement de l’air primaire ................................................................................................27
Plaque chauffante..............................................................................................................28
Tiroir à accessoires ...........................................................................................................28
Tiroir réchaud ...................................................................................................................28
Four .................................................................................................................................29
OPÉRATION ............................................................................................................................ 30
Avant la première utilisation ................................................................................................30
Premiers feux ....................................................................................................................30
FRANÇAIS
Chargement ......................................................................................................................30
Combustibles ....................................................................................................................31
Allumage sans braises .......................................................................................................31
Allumage avec braises .......................................................................................................31
RÉGIME DE COMBUSTION ................................................................................................... 32
ENTRETIEN DE LA CUISINIÈRE ............................................................................................ 33
Chambre à combustion ......................................................................................................33
Entretien de la vitre ............................................................................................................33
Nettoyage extérieur ..........................................................................................................33
Nettoyage sous la plaque chauffante ..................................................................................34
Nettoyage sous la plaque du four ......................................................................................34
REMPLACEMENT DE COMPOSANTS .................................................................................. 35
Remplacement du joint d’étanchéité de la porte ..................................................................35
Remplacement du joint d’étanchéité de la vitre ....................................................................36
Remplacement d’une vitre de porte cassée .........................................................................36
ENTRETIEN DES CONDUITS D’ÉVACUATION ...................................................................... 37
Ramonage de la cheminée .................................................................................................37
Fréquence de nettoyage ....................................................................................................37
Pourquoi ramoner la cheminée? .........................................................................................37
Créosote - Formation et nécessité de l’éliminer ...................................................................38
DÉPANNAGE ........................................................................................................................... 39
Page 24
Manuel d’installation - Cuisinière à bois Outback Chef
Page 25

RENSEIGNEMENTS GÉNÉRAUX
PERFORMANCES DE L’APPAREIL
Type de combustible Bûches de bois sec
Puissance thermique maximale (bûches de bois sec) 11.88 Kw (40 536 BTU / h)
Puissance thermique nominale 10.08 Kw (36 851 BTU / h)
Volume de la chambre à combustion 1.08 pi³ (0,028 m³)
Volume du four 39 litres (1,38 pi³)
Dimensions du four (LxPxH) 11 ½" x 17¾" x 11¾"
(290mm x 450mm x 300mm)
Interval de chargement du combustible 60 min
Longueur maximale des bûches 16"
Poids à l’expédition 248 kg (545 lb)
Caractéristiques générales de la cuisinière
Si la cuisinière n’est pas installée correctement, il peut en résulter un incendie, des blessures
corporelles ou même le décès. Pour réduire les risques, suivez les instructions d’installation. Contactez
votre service municipal du bâtiment ou des incendies pour connaître les restrictions et les exigences
d’inspection et d’installation dans votre région.
Lisez ce manuel au complet avant d’utiliser votre nouvelle cuisinière. Il est important de respecter
intégralement les directives d’installation.
Il se peut que vous deviez vous procurer un permis pour l’installation de la cuisinière et de la cheminée
à laquelle elle est branchée. Communiquez avec votre service municipal du bâtiment ou des incendies
avant l’installation pour déterminer la nécessitée de vous en procurer un. Nous vous recommandons
également de demander à votre compagnie d’assurance habitation si cette installation aura une
incidence sur votre police d’assurance.
BRÛLANT LORSQU’EN FONCTION. ÉLOIGNER LES ENFANTS, LES VÊTEMENTS ET LES
MEUBLES.
Tout contact avec la peau peut causer des brûlures. Des gants peuvent être nécessaires pour chauffer
la cuisinière et pour manipuler la valve de contournement.
FRANÇAIS
Ne pas utiliser la cuisinière si la vitre ou les panneaux de vermiculite sont fissurés ou brisés. Cela peut
être dangereux et endommager la cuisinière.
Ouvrir complètement l’admission d’air avant d’ouvrir la porte de la chambre à combustion.
La cuisinière n’est pas conçue pour être utilisée lorsque les portes sont ouvertes. Ouvrez les portes
seulement pour allumer et recharger la cuisinière.
Ne pas laisser sans surveillance lorsque la porte est entrouverte lors de l’allumage. Toujours fermer la
porte après l’allumage.
NE PAS UTILISER DE LIQUIDES INFLAMMABLES COMME L’ESSENCE, LE NAPHTA, LE
MAZOUT, L’HUILE À MOTEUR, LE KÉROSÈNE, DU LIQUIDE ALLUME-BARBECUE, DES
LIQUIDES SIMILAIRES OU DES AÉROSOLS POUR ALLUMER, RAVIVER OU PROCHE DU FEU.
Page 25Manuel d’installation - Cuisinière à bois Outback Chef
Page 26

RENSEIGNEMENTS GÉNÉRAUX
Ne pas entreposer de carburant en deçà des dégagements minimums de la cuisinière.
Lorsque la cuisinière est en fonction, la poignée d’air secondaire devient très chaude.
Brûler seulement du bois de chauffage naturel sec.
Ne pas soulever le feu en plaçant une grille dans la chambre à combustion.
La cuisinière doit être entretenue et utilisée en tout temps conformément aux présentes directives.
Cette cuisinière est conçue uniquement pour la cuisson. Il est interdit de l’employer pour toutes autres
utilisations, qui pourraient causer des lésions ou dommages.
Ne pas utiliser la cuisinière comme incinérateur à ordures ménagères.
Pour ouvrir la porte de la chambre à combustion et celle du four, utiliser les poignées incluses avec
l’appareil.
Ne pas obstruer les ouvertures pour permettre l’entrée d’air de combustion ou la sortie de la chaleur
sur les côtés de la cuisinière.
FRANÇAIS
L’utilisation de composants provenant d’autres appareils, ou la modification des composants actuels
de la cuisinière sont interdites et annuleront la garantie. Toutes les modifications de la cuisinière qui
n’ont pas été approuvées par écrit par l’autorité d’homologation ou le manufacturier sont interdites et
viole les normes CSA B365 (Canada) et NFPA 211 (États-Unis).
Ne pas employer comme un marche pied ou structure d’appui.
SBI n’assume aucune garantie, implicite ou explicite, liée à la mauvaise installation ou au manque
d’entretien de l’appareil et n’assume aucune responsabilité pour tout dommage qui en résulterait.
Contactez un revendeur autorisé pour obtenir une pièce de remplacement. Ne jamais utiliser des
matériaux de substitution. L’utilisation de pièces non approuvées peut entraîner de un mauvais
rendement et des risques pour votre sécurité.
Page 26
Manuel d’installation - Cuisinière à bois Outback Chef
Page 27

LOCALISATION DES COMPOSANTS
chambre à combustion
accessoires au réchaud
contournement de fumée
Anneaux en
fonte
Main
courante
Plaque
chauffante
Contour de
la plaque
FRANÇAIS
Air
secondaire
Porte de la
Porte d'accès
aux cendres
Air
primaire
P
orte d'accès
au four
Porte d’accès aux
Valve de
Page 27Manuel d’installation - Cuisinière à bois Outback Chef
Page 28

DESCRIPTION DES COMPOSANTS
Tiroir à cendres
Le tiroir à cendres se trouve sous la cuisinière, derrière la porte d’accès aux cendres.
Pour éviter l’accumulation de cendres froides dans la chambre à combustion, tirer et pousser sur la
poignée du cendrier. Les cendres tomberont dans le tiroir. La cuisinière sera donc toujours prête à
recevoir une nouvelle charge de bois et l’air primaire circulera correctement dans la cuisinière.
Le tiroir à cendres doit être toujours en place et la porte d’accès doit être maintenue fermée en tout
temps lorsque la cuisinière est en fonction.
Il est recommandé de vider le tiroir à cendres tous les jours ou lors de chaque utilisation. Utilisez les
gants inclus avec la cuisinière pour l’ouverture de la porte et la manipulation du tiroir. Après chaque
vidange, remettre le tiroir en place. Ne pas remettre celui-ci en place est très dangereux, surtout si
l’appareil est en fonction.
L’utilisation d’un aspirateur domestique, central ou commercial pour effectuer l’entretien de votre
cuisinière est déconseillée. Les particules de cendres peuvent endommager le moteur de l’aspirateur.
De plus, les cendres encore chaudes pourraient mettre le feu au contenu de votre aspirateur. L’utilisation
d’un aspirateur à cendres est fortement recommandée.
FRANÇAIS
Page 28
Manuel d’installation - Cuisinière à bois Outback Chef
Page 29

Valve de contournement
La poignée de la valve de contournement se trouve au-dessus de la porte d’accès au four. Elle est
utilisée pour améliorer l’efficacité de la cuisinière, dans la phase d’allumage, ainsi que pour chauffer
la cuisinière. L’ajustement se fait en tirant ou en poussant la poignée. Lorsque la valve est en position
ouverte, la fumée s’échappe directement dans les cheminées. Cela améliore d le tirage lors de
l’allumage.
FRANÇAIS
Valve Ouverte Valve fermée
Ajustement de l’air primaire
Vous pouvez ajuster l’entrée d’air primaire en tournant la poignée située sur la porte d’accès aux
cendres. Cette opération influencera l’intensité de la combustion.
MIN= Intensité de combustion minimum.
MAX= Intensité de combustion maximum.
Page 29Manuel d’installation - Cuisinière à bois Outback Chef
Page 30

Plaque chauffante
Ne surchauffez pas la plaque.
La plaque chauffante est conçue pour cuisiner de façon simple et rapide. La partie la plus chaude de
la plaque se trouve sur les anneaux en fonte. C’est donc l’endroit idéal pour chauffer une casserole
rapidement. Les parties à l’extérieur de la plaque sont idéales pour maintenir les aliments chauds.
Pour une bonne cuisson des aliments sur la plaque, il est nécessaire d’employer des casseroles à
fond plats en fonte, résistants à la chaleur.
Lors de la cuisson sur la plaque, il est possible de diminuer l’inconfort dû à la chaleur provenant de la
chambre à combustion en installant la plaque de protection, incluse avec la cuisinière, à l’extérieur de
la porte de la chambre à combustion.
Tiroir à accessoires
Le tiroir d’accessoires se trouve dans la partie inférieure droite de l’appareil. Cette espace est conçu
pour ranger les outils nécessaires au fonctionnement de la cuisinière.
Il est interdit de mettre ou de ranger: alcool, essence, combustible liquide, matériaux inflammables, cendres,
du bois et du papier dans le tiroir d’accessoires.
FRANÇAIS
Tiroir réchaud
La cuisinière possède un tiroir-réchaud situé sous le four. Pour y accéder, ouvrez la porte du tiroir
d’accessoires située sous le four.
Page 30
Manuel d’installation - Cuisinière à bois Outback Chef
Page 31

Four
La cuisinière possède un four en acier inoxydable qui permet la cuisson des aliments. La vitre
panoramique du four permet de voir la cuisson sans avoir à ouvrir la porte. Le thermomètre intégré
de la porte simplifie la lecture de la température interne du four. La température indiquée par le
thermomètre sert uniquement de référence pour la cuisson.
Avant de débuter la cuisson, la cuisinière doit fonctionner à un régime optimal (voir section régime de
combustion) et la valve de contournement doit être en position fermée depuis au moins 60 minutes.
Le feu doit être alimenté avec du bois de taille petit/moyen pour amener le four à la température
désirée.
Quand la température de cuisson est atteinte, réduire l’ajout de bois pour maintenir la température du
four constante. Pour une cuisson optimale, à la moitié du temps de cuisson, tourner la casserole pour
une cuisson uniforme des aliments.
Pendant la cuisson, laissez la porte du four fermée pour garder une température constante.
FRANÇAIS
Thermomètre
Casserole
Page 31Manuel d’installation - Cuisinière à bois Outback Chef
Page 32

OPÉRATION
Avant la première utilisation
La plaque a été traitée avec un lubrifiant afin de prévenir la formation de rouille et d’oxydation. Il est
donc important de la nettoyer avant de faire le premier feu.
Premiers feux
N’employez jamais d’alcool, d’essence, ou autres combustibles liquides
Le couvercle doit être toujours relevé lorsque la cuisinière est en marche. Abaissez le couvercle de la
cuisinière seulement lorsque celle-ci est froide.
Avant l’allumage, il faut vérifier que la cheminée est propre et non obstruée. Vérifiez le bon fonctionnement
des dispositifs reliés à cuisinière.
L’utilisation de la cuisinière avec des composants fissurés ou brisés, comme la vitre ou le coupe-feu
pourrait causer des situations dangereuses et pourrait endommager la cuisinière.
Les portes doivent demeurer fermées et verrouillées pendant l’utilisation. Le panneau d’accès au tiroir
à cendres doit également être fermé lors de l’utilisation.
FRANÇAIS
La mise en fonction de la cuisinière doit être réalisée seulement lorsque toutes les opérations
d’installation de la cuisinière et de la cheminée sont complétées.
Durant les premiers feux, votre cuisinière dégagera une odeur désagréable accompagnée d’une légère
fumée. Ceci est lié au processus de durcissement de la peinture. La peinture chauffe, durcit et adhère
au métal. L’odeur et la fumée disparaîtront lorsque la cuisinière aura chauffé suffisamment pendant
quelques heures. Augmentez l’intensité du feu graduellement. Ouvrez une fenêtre. Sortez de la pièce
au besoin. Bien que la fumée et son odeur soient désagréables, elles ne sont pas toxiques.
Chargement
La cuisinière doit être chargée manuellement pendant que celle-ci fonctionne.
Effectuer le chargement de combustible quand la flamme est au minimum pour éviter la sortie des gaz
de combustion lors de l’ouverture de la porte de la chambre à combustion.
Pour ajouter du combustible, il est nécessaire d’ouvrir la porte de la chambre à combustion. Introduisez
le bois puis refermez la porte.
Pendant l’opération, employez toujours les outils fournis avec l’appareil.
Ne chargez pas la cuisinière de bois par les anneaux en fonte.
Page 32
Manuel d’installation - Cuisinière à bois Outback Chef
Page 33

Combustibles
Cette cuisinière est conçue et approuvée pour brûler du bois seulement. L’utilisation de tout autre
type de combustible annulera votre garantie.
Nous vous conseillons l’utilisation du bois franc comme le chêne, l’érable et le frêne d’une longueur
de 25 à 30 cm (12 à 15 po).
Dans le but de garantir une combustion parfaite, il est nécessaire de conserver le combustible dans
un endroit frais et sec.
Allumage sans braises
Si la cuisinière est allumée pendant une journée très froide, il sera nécessaire de préchauffer la
cheminée.
Mettre un cube d’allumage ou une petite quantité de papier. Ajoutez du bois de petites dimensions
sur le cube d‘allumage .
Allumez (avec une allumette) le papier ou le cube d’allumage, Ouvrez les entrées d’air et la valve
de contournement au maximum et fermez la porte de la chambre à combustion.
Quand le feu commence à diminuer, ajoutez des morceaux de bois plus gros. Recommencez cette
opération jusqu’à atteindre l’intervalle de chargement maximum qui est de 60 min et une charge
maximale de 27 kg / h (60lbs / h). Quand la température désirée a été atteinte, consulter la section
« régime de combustion » pour l’ouverture des entrées d’air.
Allumage avec braises
Dans le cas de chargement de bois sans la présence de feu, mais seulement avec de bonnes braises,
procédez de la façon suivante:
Avec le tisonnier, concentrer les braises au centre de la chambre à combustion.
Ouvrir complètement l’air primaire, secondaire.
Fermer la valve de contournement.
Attendez le temps nécessaire pour qu’un feu régulier s’installe. Chargez quelques morceaux de bois
de petites dimensions et laissez la flamme prendre.
FRANÇAIS
Positionner les commandes d’air primaire et secondaire ainsi que la valve de contournement, tel
qu’indiqué selon la section « Régime de combustion ».
Page 33Manuel d’installation - Cuisinière à bois Outback Chef
Page 34

RÉGIME DE COMBUSTION
Pour obtenir un bon compromis entre la chaleur obtenue et la consommation de bois, il est conseillé
d’ajuster l’intensité du feu en employant l’air primaire, l’air secondaire et la valve de contournement
de fumée.
Les positions des commandes d’air suivantes, se basent sur un appareil déjà en fonction et sont à
titre indicatif seulement.
AJUSTEMENT POSITION
Air primaire Fermé
Air secondaire Ouvert
Trappe de contournement Fermé
POSITION AIR PRIMAIRE
FRANÇAIS
Fermé Moitié ouvert Ouvert
POSITION AIR SECONDAIRE
Fermé Moitié ouvert Ouvert
POSITIONNEMENT DE LA VALVE DE CONTOURNEMENT
Ouvert Fermé
Page 34
Manuel d’installation - Cuisinière à bois Outback Chef
Page 35

ENTRETIEN DE LA CUISINIÈRE
Avant chaque opération de nettoyage, la cuisinière doit être à la température ambiante.
Chambre à combustion
La fréquence de nettoyage de la cuisinière dépend du type et de la qualité du combustible employé. Un
haut taux d’humidité, de cendres, de suie ou des composants chimiques dans le bois peut augmenter
le nombre de nettoyages nécessaires. Il faut donc porter attention au combustible employé.
Nettoyage de la chambre à combustion : Pour obtenir un rendement optimal de la cuisinière, il faut la
nettoyer tous les jours.
Nettoyage de la grille : Vider les résidus de combustion (faire attention aux tisons chauds), dégager les
trous sur le fond de la grille et vider le tiroir à cendres.
Les cendres doivent être mises dans un contenant métallique avec un couvercle étanche. Ce contenant
fermé devrait être déposé sur une surface non combustible, loin de tout matériau pouvant prendre
feu. Si les cendres sont destinées à être enterrées ou localement dispersées, elles devraient être
maintenues dans le récipient fermé jusqu’à ce qu’elles soient complètement refroidies.
Entretien de la vitre
Nettoyer la vitre de porte au besoin. L’utilisation d’un nettoyant spécialement conçu pour les appareils
de chauffage à combustibles solides est recommandée. Un produit nettoyant standard pour les
fenêtres n’enlèvera pas la suie ou créosote.
Ne jamais utiliser de nettoyants abrasifs sur la vitre. Ne pas nettoyer la vitre lorsqu’elle est chaude. Ne
pas forcer, frapper, claquer ou adopter tout autre comportement qui pourrait fragiliser la porte vitrée.
Ne pas utiliser la cuisinière si la vitre est manquante, fissurée ou cassée.
Nettoyage extérieur
Partie en acier-fonte : Utilisez un chiffon et un produit spécifique au nettoyage de la fonte.
Partie en vitrocéramique : Utilisez une éponge et un produit spécifique pour le nettoyage de vitres
d’appareils de chauffage et repassez avec un chiffon sec.
Partie vernie : Utilisez un chiffon avec un peu de savon neutre, puis repassez avec un chiffon humide.
FRANÇAIS
Nettoyage de la plaque de cuisson supérieure : La surface de cuisson de la cuisinière est en fonte. L’usage
de celle-ci fera changer sa couleur. Ceci n’est pas un défaut du matériel, mais un procédé chimique
et physique causé par le chauffage continu de la plaque à haute température. Pour le nettoyage de la
partie centrale, employez un chiffon humide et un détergent doux. Après l’avoir lavée et séchée, il faut
la maintenir légèrement graisseuse avec de l’huile végétale.
Surfaces plaquées : Ne pas utiliser de nettoyants abrasifs. Pour conserver le lustre original, n’utilisez
qu’un linge doux et humide.
Page 35Manuel d’installation - Cuisinière à bois Outback Chef
Page 36

Nettoyage sous la plaque chauffante
1. Enlevez les anneaux en fontes
(A)
2. Enlevez la plaque chauffante
en la soulevant vers le haut (B).
3. Vous aurez accès à toutes
les parties de la chambre à
combustion pour la nettoyer.
4. Enlevez les résidus de
combustion avec les outils
nécessaires (tisonnier, brosse,
pelle, non inclus…)
5. Une fois les opérations de
nettoyage terminées, remettre
la plaque chauffante en place.
FRANÇAIS
Nettoyage sous la plaque du four
1. Ouvrez la porte du four et enlever la
plaque de base en la soulevant vers
vous. Vous aurez accès à tous les
composants du conduit de fumée.
Enlevez tous les résidus de combustion
avec les outils nécessaires (tisonnier,
brosse, pelle, etc..) Ceux-ci ne sont pas
inclus dans la cuisinière.
2. Terminez les opérations et remettre la
plaque.
3. Attention au positionnement de la
partie pliée vers le haut
4. Une fois les opérations de nettoyage
terminées, remettre la plaque en place.
Page 36
Manuel d’installation - Cuisinière à bois Outback Chef
Page 37

REMPLACEMENT DE COMPOSANTS
Remplacement du joint d’étanchéité de la porte
Pour conserver un rendement optimal, la
porte devrait être toujours parfaitement
étanche avec la chambre à combustion. Le
joint d’étanchéité doit donc être inspecté
périodiquement afin d’obtenir un ajustement
hermétique.
Au fil du temps, le joint d’étanchéité de la
porte se comprimera et deviendra dur, ce
qui permettra à l’air de s’infiltrer. Vérifier
l’état de votre joint de porte en fermant et
verrouillant la porte sur un bout de papier.
inspecter tout le pourtour de la porte. Si le
papier glisse facilement à n’importe quel
endroit, il est temps de remplacer le joint.
Utiliser le bon joint d’étanchéité que vous
obtiendrez chez votre détaillant. Le bon diamètre et la bonne densité du joint sont importants pour
que l’étanchéité soit bonne.
FRANÇAIS
Placer la porte face vers le bas, sur une surface douce comme un chiffon ou un tapis. Retirer le joint
d’étanchéité et utiliser un tournevis pour gratter la vieille colle qui se trouve sur la porte. Appliquer un
joint de scellant haute température de ½ po. (12 mm) dans la rainure du joint d’étanchéité. Pousser
le joint dans la rainure. N’étirer pas le joint en le plaçant. Laisser environ ½ po. de joint dépasser au
moment de le couper et poussez-en l’extrémité dans la rainure. Repousser les fibres qui dépassent
sous le joint. Fermer la porte et n’utilisez pas la cuisinière pendant 24 heures.
Page 37Manuel d’installation - Cuisinière à bois Outback Chef
Page 38

Remplacement du joint d’étanchéité de
la vitre
E
D
Il est bon de remplacer le joint d’étanchéité de la
vitre en même temps que celui de la porte. Le joint
est plat et est fait de fibre de verre tressée. Retirer
les vis (E) ainsi que le cadre (C) et (D) de la vitre qui
retiennent celle-ci au cadre de la porte (A). Retirez la
vitre (B) et enlevez le vieux joint (F).
C’est un bon moment pour bien nettoyer la vitre!
Suivre les mêmes étapes pour remplacer une vitre
cassée.
Attention aux coupures: Toujours
porter des gants lors de la
manipulation de verre brisé.
FRANÇAIS
F
B
A
C
Ne fragiliser pas la porte en la frappant ou en la claquant. Ne pas se servir de l’unité si la vitre est
manquante, craquée ou brisée.
Remplacement d’une vitre de porte cassée
Retirer délicatement les morceaux de vitre du cadre de porte. Disposer de tous les débris de verre
correctement.
Une vitre cassée doit être remplacée par une vitre identique (vitrocéramique). Référez-vous à la section
des pièces de remplacements.
Toujours porter des gants appropriés pendant la manipulation de verre brisé.
Avertissement : La vitre de remplacement devrait être achetée seulement chez un détaillant autorisé
voir section «pièces de remplacement». Le verre trempé ou ordinaire n’est pas adapté pour les
températures élevées de la cuisinière.
Page 38
Manuel d’installation - Cuisinière à bois Outback Chef
Page 39

ENTRETIEN DES CONDUITS D’ÉVACUATION
Ramonage de la cheminée
Le ramonage de la cheminée peut être difficile et dangereux. Si vous n’avez aucune d’expérience
dans le ramonage de cheminées, vous aimerez peut-être mieux engager un ramoneur professionnel
pour inspecter et nettoyer le système pour la première fois. Après avoir vu comment se déroule le
ramonage, vous saurez si c’est un travail que vous pouvez faire.
Le matériel le plus couramment utilisé comprend des tiges en fibre de verre munies de raccords filetés
et de brosses en plastique. On fait glisser de force la brosse de haut en bas de la cheminée pour en
retirer la créosote par frottage.
Le raccord de cheminée et ses éléments devraient toujours être nettoyés en même temps que la
cheminée
Fréquence de nettoyage
Il est impossible de prédire en combien de temps ou combien de créosote se formera dans votre
cheminée. Il est important, par conséquent, de vérifier mensuellement s’il y a des dépôts dans
votre cheminée, pendant que vous vous habituez à votre nouvelle cuisinière ou jusqu’à ce que vous
connaissiez le taux de formation de créosote. Même si le créosote se forme lentement dans votre
système, la cheminée devrait être inspectée et nettoyée chaque année.
FRANÇAIS
Il est recommandé de nettoyer le système de cheminée à la fin de chaque saison de chauffage.
Pendant l’été, l’air est plus humide et avec une circulation d’air minimal dans l’appareil, le créosote et/
ou la suie restant dans les tuyaux peuvent produire un acide qui accélérera le processus de corrosion
de l’acier et peut le perforer prématurément. Ce qui en retour, ne sera pas couvert par la garantie. Il
est recommandé de faire nettoyer le système de cheminée par un ramoneur professionnel.
Contactez votre service d’incendie municipal ou provincial pour obtenir des informations sur la façon
de traiter un feu de cheminée. Ayez un plan d’urgence établi si un feu de cheminée se produisait.
Pourquoi ramoner la cheminée?
La fumée de bois peut se condenser à l’intérieur du raccord de cheminée et de la cheminée, formant
un dépôt inflammable appelé créosote. Si le créosote s’accumule dans le système d’évacuation,
il peut s’enflammer lors d’un feu très chaud. Un feu extrêmement chaud peut progresser jusqu’à
l’extrémité de la cheminée. De graves feux de cheminée peuvent endommager même les meilleures
cheminées.
Les feux fumants peuvent rapidement causer la formation d’une épaisse couche de créosote. Lorsque
ceux-ci sont évités, les gaz sortant de la cheminée sont presque transparents. Le créosote se forme
donc plus lentement. Votre nouvelle cuisinière a les caractéristiques nécessaires pour vous aider à
faire des feux propres produisant peu ou pas de fumés, donc moins de créosote s’accumulera dans
la cheminée.
Page 39Manuel d’installation - Cuisinière à bois Outback Chef
Page 40

Créosote - Formation et nécessité de l’éliminer
Lorsque le bois brûle lentement, il produit du goudron et diverses vapeurs organiques. Elles se
combinent avec l’humidité expulsée pour former du créosote. Les vapeurs de créosote se condensent
dans une cheminée relativement froide. En conséquence, les résidus de créosote s’accumulent dans
la cheminée. Lorsqu’il s’enflamme, le créosote produit un feu extrêmement chaud.
La cheminée doit être inspectée au moins deux fois par an pendant la haute saison de chauffage
pour déterminer le moment ou l’accumulation de créosote s’est produite. Lorsque le créosote s’est
accumulé, il doit être retiré pour réduire le risque de feu de cheminée.
FRANÇAIS
Page 40
Manuel d’installation - Cuisinière à bois Outback Chef
Page 41

DÉPANNAGE
PROBLÈMES CAUSES POSSIBLES SOLUTIONS
Vitre du four et /
ou de la chambre
à combustion qui
noircie.
Tirage irrégulier. • Cheminée inadéquate ou
Fuite de fumée noir
à l’extérieur de la
cuisinière.
• Tirage trop bas < 10 Pa
• Mauvaise régulations d’air
• Trop de combustible dans la
cuisinière
• Bois avec un haut taux
d’humidité relatif > 20±25%.
• Combustible non
réglementaire.
• Chapeau de toit installé
incorrectement.
sale.
• Saleté dans la chambre
à combustion ou dans la
cuisinière.
• Allumage avec bois vert.
• Cheminées obstrués.
• Vérifiez que les conduits soient propre.
• Modifiez la cheminée : Allonger la
cheminée Voir le chapitre (régime de
combustion).
• Réduire la quantité de combustible dans
la chambre à combustion.
• Faire sécher le bois plus longtemps. (Voir
section entretien et nettoyage)
FRANÇAIS
• Ramonez ou faire ramoner par un
professionnel
• Nettoyez la cuisinière. (Voir section
entretien et nettoyage)
• Allumez la cuisinière avec du combustible
convenable, voir section (combustible).
• Demandez l’aide d’un professionnel
qualifié.
Fumée sortant de la
cuisinière.
• Porte de la chambre
à combustion ouverte
pendant que la cuisinière
chauffe.
• Tirage insuffisant < 10 Pa
• Mauvais réglage des entrées
d’air lors du démarrage.
• La cuisinière doit être
nettoyée.
• Vérifiez la fermeture de la porte et
l’étanchéité des joints.
• Vérifiez l’isolation des tuyaux.
• Éliminez ou réduire au minimum les
déviations et longueurs horizontales
inutiles.
• Vérifiez toutes les sections de cheminée
ainsi que la hauteur de la partie extérieur
de celle-ci.
• Demandez l’inspection du conduit par un
technicien certifié.
• Lire les instructions dans la section
« Régime de combustion» et
« Combustible ».
• Nettoyez régulièrement la cuisinière
comme indiqué.
Page 41Manuel d’installation - Cuisinière à bois Outback Chef
Page 42

GARANTIE À VIE LIMITÉE CUISINIÈRE AU BOIS DROLET
La garantie du fabricant ne s’applique qu'à l’acheteur au détail original et n’est pas transférable. La présente garantie ne couvre que les produits
neufs qui n’ont pas été modifiés, altérés ou réparés depuis leur expédition de l’usine. Il faut fournir une preuve d’achat (facture datée), le nom du
modèle et le numéro de série au détaillant DROLET lors d’une réclamation sous garantie.
La présente garantie ne s’applique que pour un usage résidentiel normal. Les dommages provenant d’une mauvaise utilisation, d’un usage
abusif, d’une mauvaise installation, d’un manque d’entretien, d’une surchauffe, d’une négligence, d’un accident pendant le transport,
d’une panne de courant, d’un manque de tirage, d’un retour de fumée ou d’une sous-évaluation de la surface de chauffage ne sont pas
couverts par la présente garantie. La surface de chauffage recommandée pour un appareil est définie par le manufacturier comme sa
capacité à conserver une température minimale acceptable dans l’espace désigné en cas de panne de courant.
La présente garantie ne couvre pas les égratignures, la corrosion, la déformation ou la décoloration. Tout défaut ou dommage provenant de
l’utilisation de pièces non autorisées ou autres que des pièces originales, annule la garantie. Un technicien qualifié autorisé doit procéder à
l’installation en conformité avec les instructions fournies avec le produit et avec les codes du bâtiment locaux et nationaux. Tout appel de service
relié à une mauvaise installation n’est pas couvert par la présente garantie.
Le fabricant peut exiger que les produits défectueux lui soient retournés ou que des photos numériques lui soient fournies pour appuyer la
réclamation. Les produits retournés doivent être expédiés port payé au fabricant pour étude. Les frais de transport pour le retour du produit à
l’acheteur seront payés par le manufacturier. Tous les frais de pièces couverts par la présente garantie sont limités au tableau ci-dessous.
Le fabricant peut, à sa discrétion, décider de réparer ou remplacer toute pièce ou unité après inspection et étude du défaut. Le fabricant peut, à sa
discrétion, se décharger de toutes ses obligations en ce qui concerne la présente garantie en remboursant le prix de gros de toute pièce défectueuse
garantie. Le fabricant ne peut, en aucun cas, être tenu responsable de tout dommage extraordinaire, indirect ou consécutif, quelle qu’en soit la
nature, qui dépasserait le prix d’achat original du produit. Les pièces couvertes par une garantie à vie sont sujettes à une limite d’un seul
remplacement sur la durée de vie utile du produit. Cette garantie s’applique aux produits achetés après le 1
er
mars 2015.
APPLICATION DE LA GARANTIE*
DESCRIPTION
Chambre à combustion (soudures seulement) et cadrage de porte en acier coulé
(fonte).
Habillage, tiroir à cendres, moulures décoratives (extrusions) et échangeur de
chaleur.
Pièces amovibles de la chambre à combustion en acier inoxydable, déflecteurs et
supports.
PIÈCES MAIN-D’ŒUVRE
À vie
s.o.
5 ans s.o.
5 ans
s.o.
Moulures de vitre, ensemble de poignée et mécanisme de contrôle d’air. 3 ans s.o.
Pièces amovibles en acier 2 ans s.o.
Peinture (écaillage**), placage (défaut de fabrication**), verre céramique (bris
thermique seulement**), joints d’étanchéité, isolants et thermomètre du four.
Briques réfractaires, pièces de la chambre à combustion en vermiculite, gant de
cuisson et accessoires de cuisson
Toutes les pièces remplacées au titre de la garantie.
1 an
s.o. s.o.
90 jours
s.o.
s.o.
*Sous réserve des limitations ci-dessus. **Photos exigées.
Si votre appareil ou une pièce sont défectueux, communiquez immédiatement avec votre détaillant DROLET. Avant d’appeler, ayez en main les
renseignements suivants pour le traitement de votre réclamation sous garantie :
Votre nom, adresse et numéro de téléphone;
La facture et le nom du détaillant;
La configuration de l’installation;
Le numéro de série et le nom du modèle tel qu’indiqué sur la
plaque signalétique de l’appareil;
La nature du défaut et tout renseignement important.
Avant d’expédier votre appareil ou une pièce défectueuse à notre usine, vous devez obtenir un numéro d’autorisation de votre détaillant
DROLET. Toute marchandise expédiée à notre usine sans autorisation sera automatiquement refusée et retournée à l'expéditeur.
Cuisinière_Révision : Juin 2017
Page 43

Page 44

Ce manuel peut être téléchargé gratuitement à partir du site web du manufacturier. Il s’agit d’un document dont les droits
d’auteur sont protégés. La revente de ce manuel est formellement interdite. Le manufacturier se réserve le droit de modifier ce
manuel de temps à autre et ne peut être tenu responsable de tous problèmes, blessures ou dommages subis suite à l’utilisation
d’information contenue dans tout manuel obtenu de sources non autorisées.
Fabricant de poêles International inc.
250, rue de Copenhague,
St-Augustin-de-Desmaures (Québec) Canada
G3A 2H3
Service aux consommateurs : 418-908-8002
Courriel : tech@sbi-international.com
www.drolet.ca
 Loading...