

Page 1
Drobo 8D User Guide
Page 2

1 Drobo 8D User Guide ......................................................................................................... 6
1.1 Before You Begin ........................................................................................................ 7
1.1.1 Product Features at a Glance ............................................................................... 8
1.1.2 Checking Box Contents ........................................................................................ 9
1.1.3 Checking System Requirements ........................................................................ 10
1.1.3.1 Operating Systems Supported .................................................................... 11
1.1.3.2 Connectivity Interfaces Supported for Drobo 8D ....................................... 12
1.1.4 Checking the Hardware You Need ..................................................................... 13
1.1.4.1 Selecting Drives .......................................................................................... 14
1.1.4.2 Determining Drive Space Requirements .................................................... 16
1.1.4.3 Using Power Protection .............................................................................. 17
1.2 Setting Up the Drobo 8D .......................................................................................... 18
1.2.1 Migrating a Disk Pack from Another Drobo Device ........................................... 19
1.2.2 Inserting Drives .................................................................................................. 21
1.2.3 Connecting Cables on the Drobo 8D .................................................................. 23
1.2.3.1 Connecting Directly to the Drobo 8D ......................................................... 24
1.2.3.2 Connecting the Drobo in a Daisy Chain ...................................................... 25
1.2.4 Powering On the Drobo 8D ................................................................................ 27
1.2.5 Downloading and Installing Drobo Dashboard .................................................. 28
1.2.5.1 Installing Drobo Dashboard on Apple Mac™ .............................................. 29
1.2.6 Registering the Drobo 8D ................................................................................... 37
1.2.7 Initializing and Updating the Drobo 8D to the Latest Firmware ....................... 40
1.2.8 Formatting the Drives of Drobo 8D ................................................................... 43
Drobo 8D User Guide 2
Page 3
1.2.8.1 Turning On the Drobo 8D and Formatting the Drives ................................ 44
1.2.8.2 Selecting a File System and Volume Size for the Drobo 8D ....................... 48
1.3 Where To Go Next ................................................................................................... 49
1.3.1 Using Best Practices for Protecting Data ........................................................... 50
1.3.2 Using the Online User Guide .............................................................................. 51
1.3.3 Using Context-Sensitive Help ............................................................................. 52
1.3.4 Using Knowledge Base ....................................................................................... 53
1.3.5 Registering the Drobo 8D ................................................................................... 54
1.3.6 Getting Support .................................................................................................. 57
1.4 Using and Managing the Drobo 8D .......................................................................... 58
1.4.1 Using Drobo Dashboard ..................................................................................... 59
1.4.1.1 Downloading and Installing Drobo Dashboard .......................................... 60
Installing Drobo Dashboard on Apple Mac™ ......................................... 61
1.4.1.2 Keeping Your Software Up to Date ............................................................. 69
Checking for Software Updates ............................................................. 70
Manually Updating Firmware from Drobo Website .............................. 71
1.4.1.3 Touring Drobo Dashboard .......................................................................... 72
1.4.2 Renaming the Drobo 8D .................................................................................... 76
1.4.3 Formatting the Drobo 8D ................................................................................... 77
1.4.4 Safely Shutting Down the Drobo 8D .................................................................. 80
1.4.4.1 Safely Shutting Down the Drobo 8D Using Drobo Dashboard ................... 81
1.4.5 Resetting the Drobo 8D ..................................................................................... 83
1.4.6 Blinking Lights to Test Connectivity ................................................................... 84
Drobo 8D User Guide 3
Page 4

1.4.7 Enabling or Disabling Menu Bar ......................................................................... 85
1.5 Modifying Device Settings for Drobo 8D ................................................................. 86
1.5.1 Enabling or Disabling Dual Disk Redundancy ..................................................... 87
1.5.2 Enabling the Disk Drive Spin Down Time ........................................................... 89
1.5.3 Dimming the Lights on Drobo 8D ....................................................................... 90
1.6 Managing Capacity (Drive Space) ............................................................................ 91
1.6.1 Calculating Capacity to Use ................................................................................ 92
1.6.2 Adding Drives ..................................................................................................... 93
1.6.3 Removing Drives ................................................................................................ 95
1.6.4 Inserting a back slot SSD .................................................................................... 97
1.6.5 Removing a back slot SSD ................................................................................ 100
1.7 Checking Storage Usage and Device Status Information ....................................... 101
1.7.1 Checking Storage Usage ................................................................................... 102
1.7.1.1 Viewing Capacity Chart ............................................................................. 103
1.7.1.2 Viewing Storage Usage ............................................................................. 105
1.7.2 Checking the Status of Drobo 8D ..................................................................... 107
1.7.3 Checking the Drobo 8D's Serial Number ......................................................... 109
1.7.4 Checking the Drobo 8D's Firmware Version .................................................... 110
1.7.5 Checking the Current Version of Drobo Dashboard ........................................ 111
1.7.6 Checking System Information .......................................................................... 112
1.7.7 Checking Drive Information ............................................................................. 114
1.7.8 Checking Performance Information ................................................................. 116
1.7.9 Getting Diagnostics on Drobo 8D .................................................................... 117
Drobo 8D User Guide 4
Page 5

1.7.10 Understanding the Indicator Lights ................................................................. 120
1.8 Using On-Screen and E-mail Alerts ........................................................................ 122
1.8.1 Setting Up or Modifying E-mail Alerts ............................................................. 123
1.8.2 Modifying When to Send E-mail Alerts ............................................................ 128
1.8.3 Disabling E-mail Alerts ..................................................................................... 130
1.8.4 Modifying When to Send On-Screen Alerts ..................................................... 131
1.8.5 Disabling On-Screen Alerts .............................................................................. 133
1.9 Using Backup Volume with the Drobo 8D ............................................................. 134
1.10 Intelligent Volume Management ........................................................................... 137
Drobo 8D User Guide 5
Page 6
1 Drobo 8D User Guide
Congratulations on your new Drobo!
This Getting Started section will help you get the Drobo 8D set up and running in just a few steps.
Related topics:
Before You Begin
Setting Up the Drobo 8D
Where to Go Next
Note:
To access the full selection of help topics, click on the folders on the Contents page in the
left window pane of this online user guide.
Drobo 8D User Guide 6
Page 7

1.1 Before You Begin
Before you begin setting up the Drobo 8D, it’s a good idea to check system and hardware
requirements.
Related topics:
Product Features at a Glance
Checking Box Contents
Checking System Requirements
Checking the Hardware You Need
Drobo 8D User Guide 7
Page 8
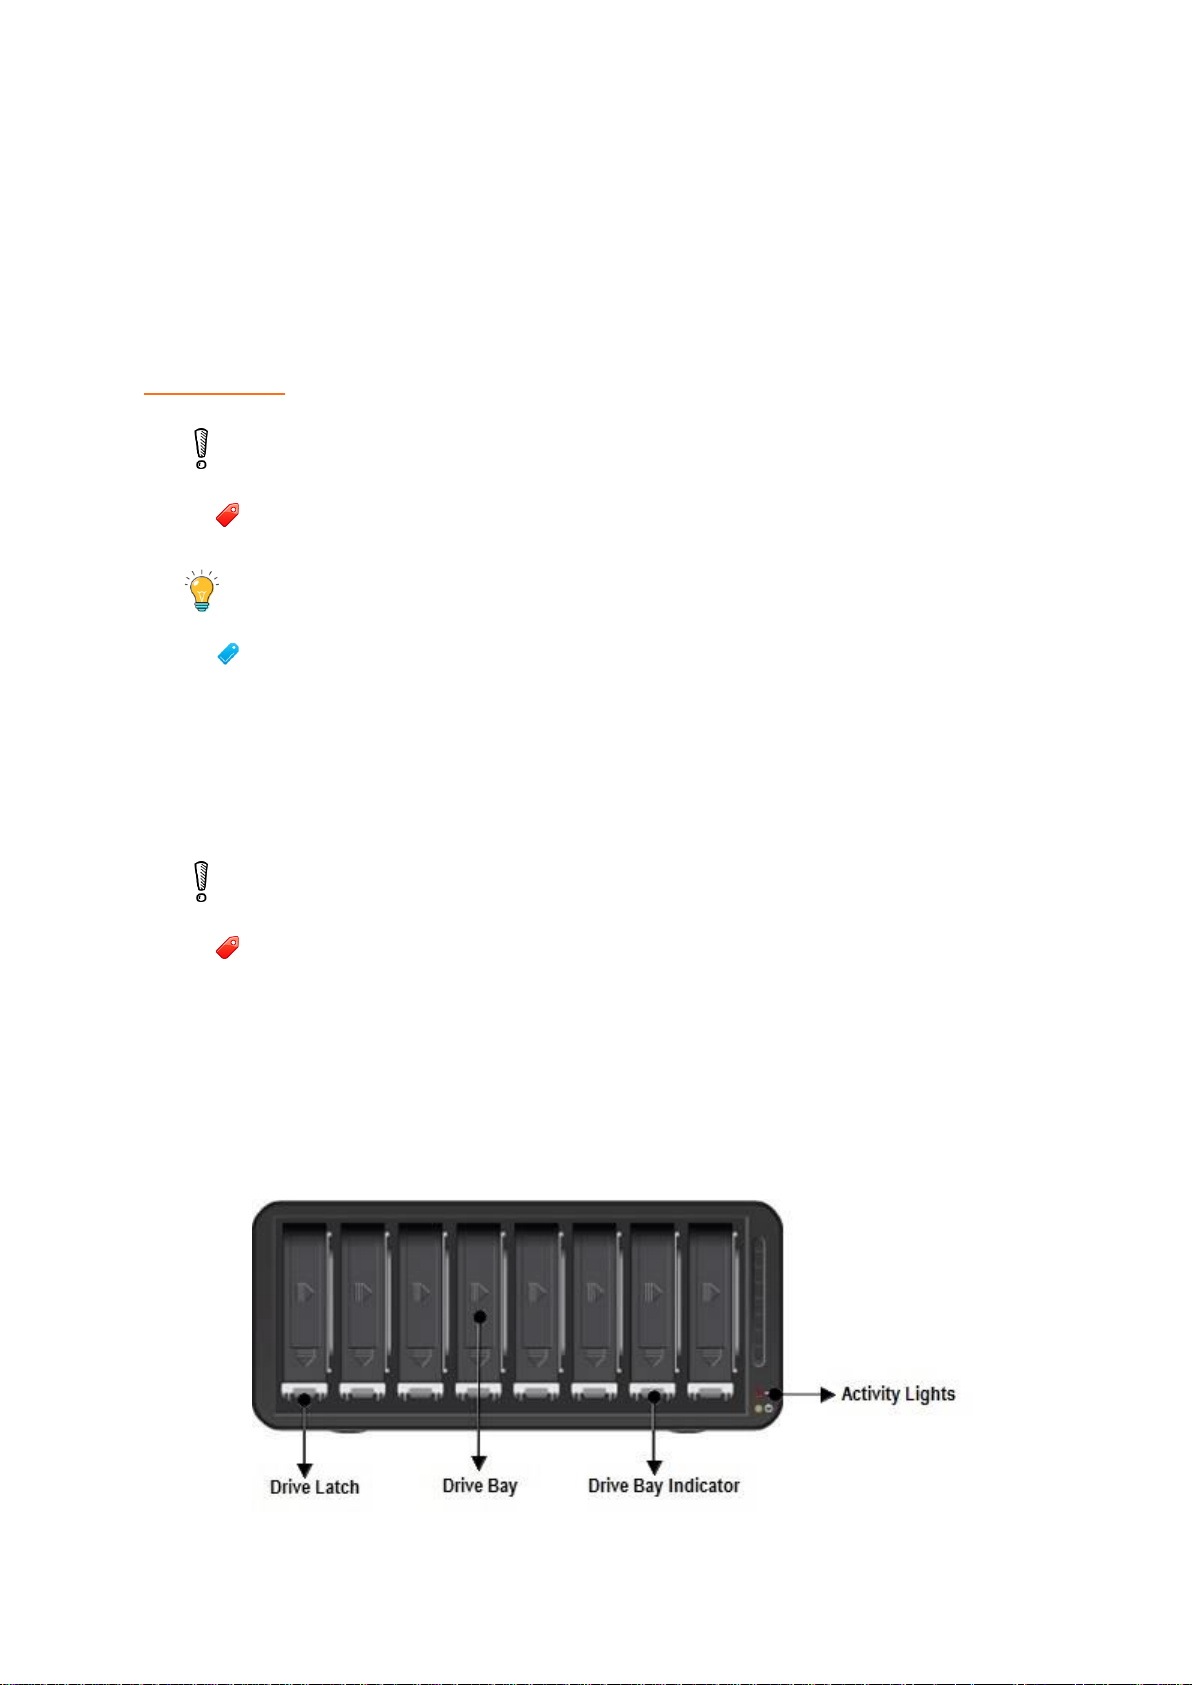
1.1.1 Product Features at a Glance
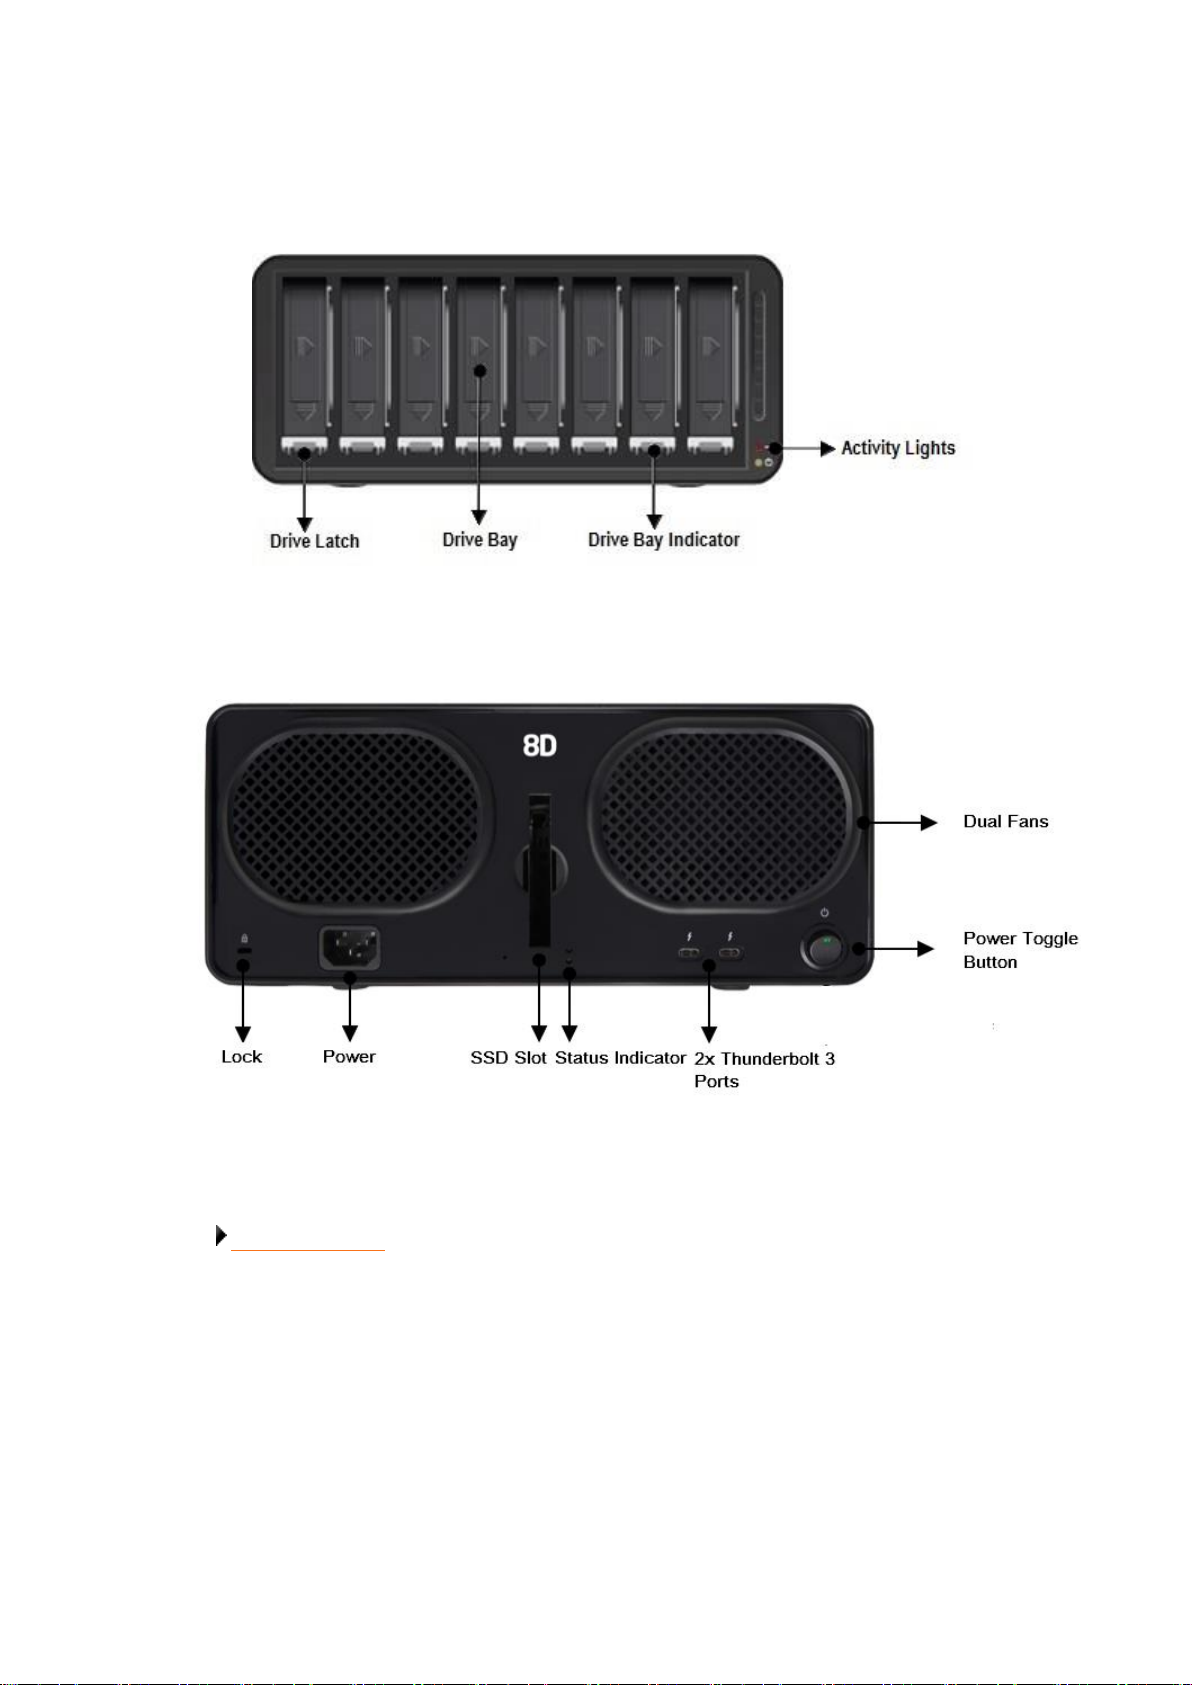
For a quick overview of features of the Drobo 8D, refer to the following images.
Figure 1: Front of the Drobo 8D with the bezel (faceplate) removed.
Related topic:
Before You Begin
Drobo 8D User Guide 8
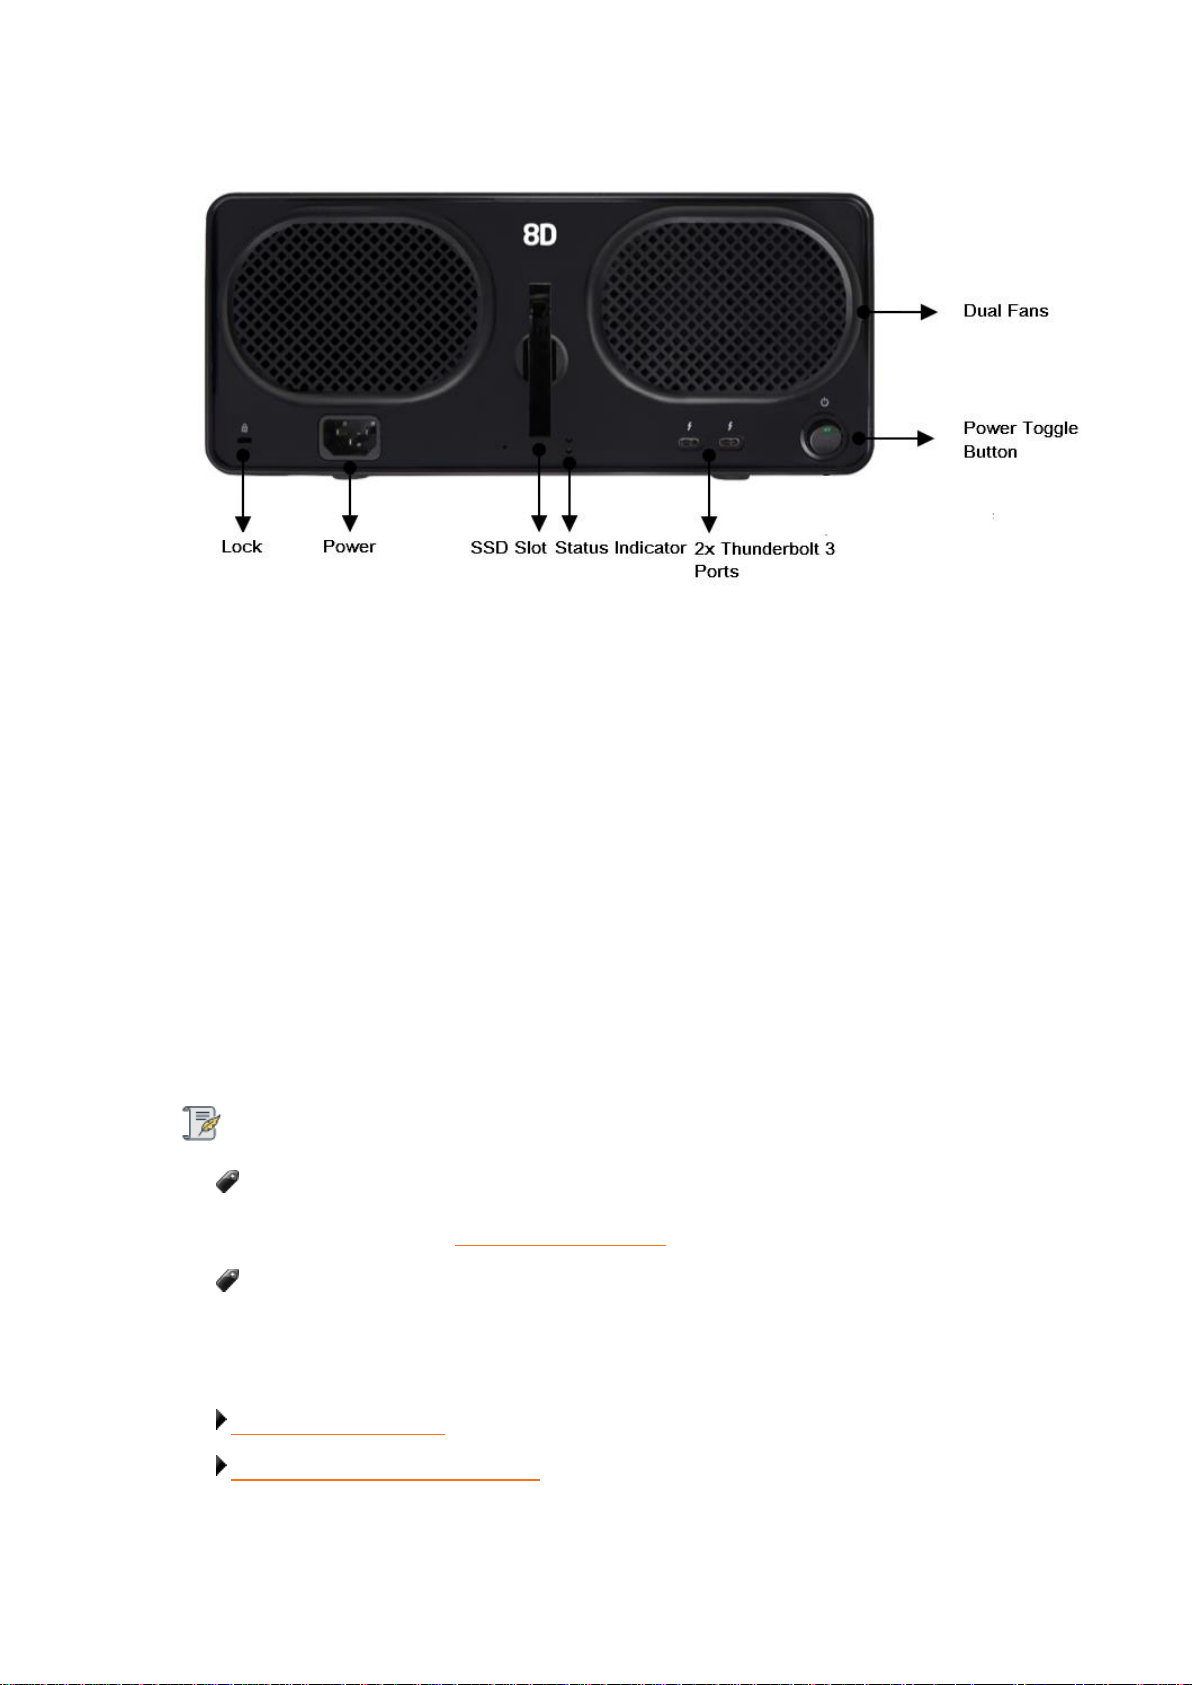
Figure 2: Back of the Drobo 8D
Page 9

1.1.2 Checking Box Contents
Check your product's box to ensure it contains all the components in the list below.
● Drobo 8D
● 1 m Thunderbolt 3 cable (20GB/s)
● 1.8 m power cord with power supply
● Quick Start Card
● Safety and Warranty Guide
Notes:
To connect Thunderbolt and Thunderbolt 2 devices to Thunderbolt 3 (USB-C) ports, you
must have a Thunderbolt 3 (USB-C) to Thunderbolt 2 adapter.
You can purchase it from here: Thunderbolt 3 to Thunderbolt 2 Adapter
Drobo 8D supports only Apple Adapter.
Drobo 8D User Guide 9
Page 10

1.1.3 Checking System Requirements
Check to ensure your operating system and cable interface are supported.
Related topics:
Operating Systems Supported
Connectivity Interfaces Supported for Drobo 8D
Drobo 8D User Guide 10
Page 11

1.1.3.1 Operating Systems Supported
For the most current list of supported operating systems, check the specifications for your products
online at www.drobo.com/products/index.php.
Related topics:
Connectivity Interfaces Supported for the Drobo 8D
Before You Begin
Drobo 8D User Guide 11
Page 12
1.1.3.2 Connectivity Interfaces Supported for Drobo 8D
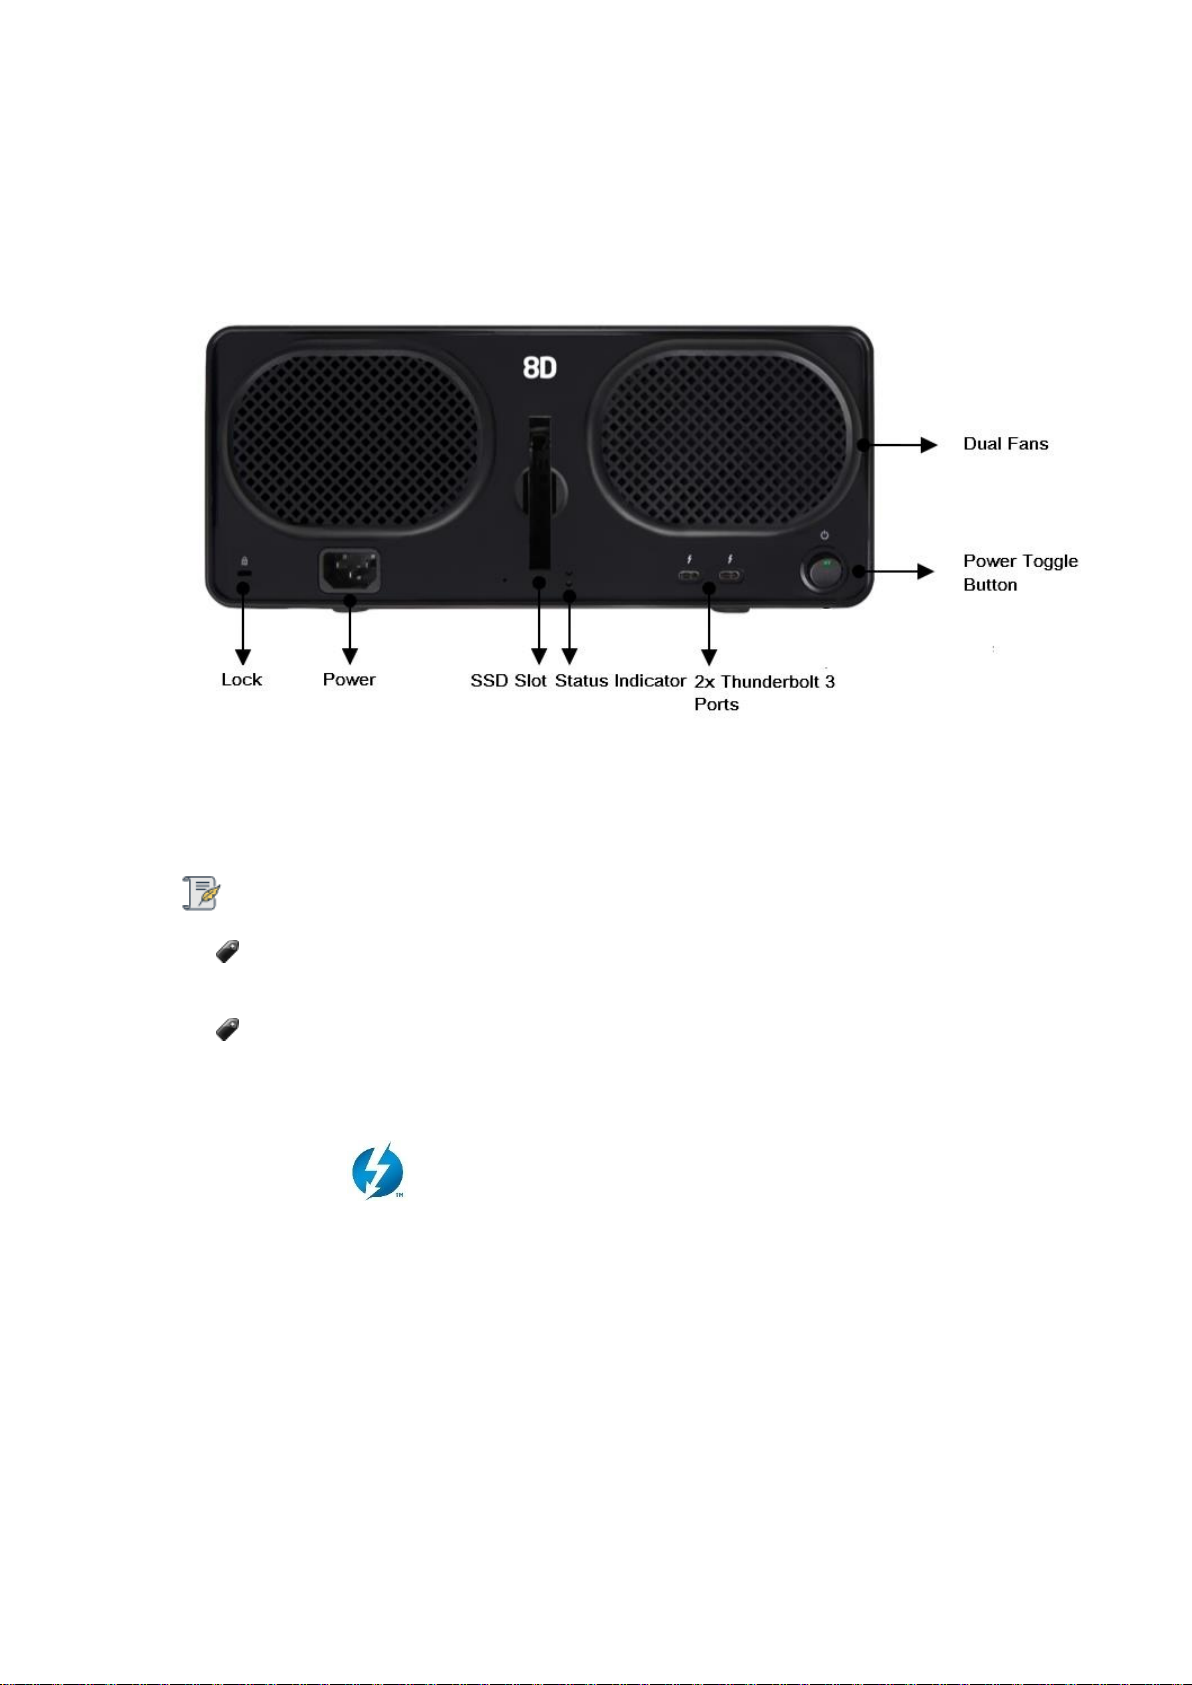
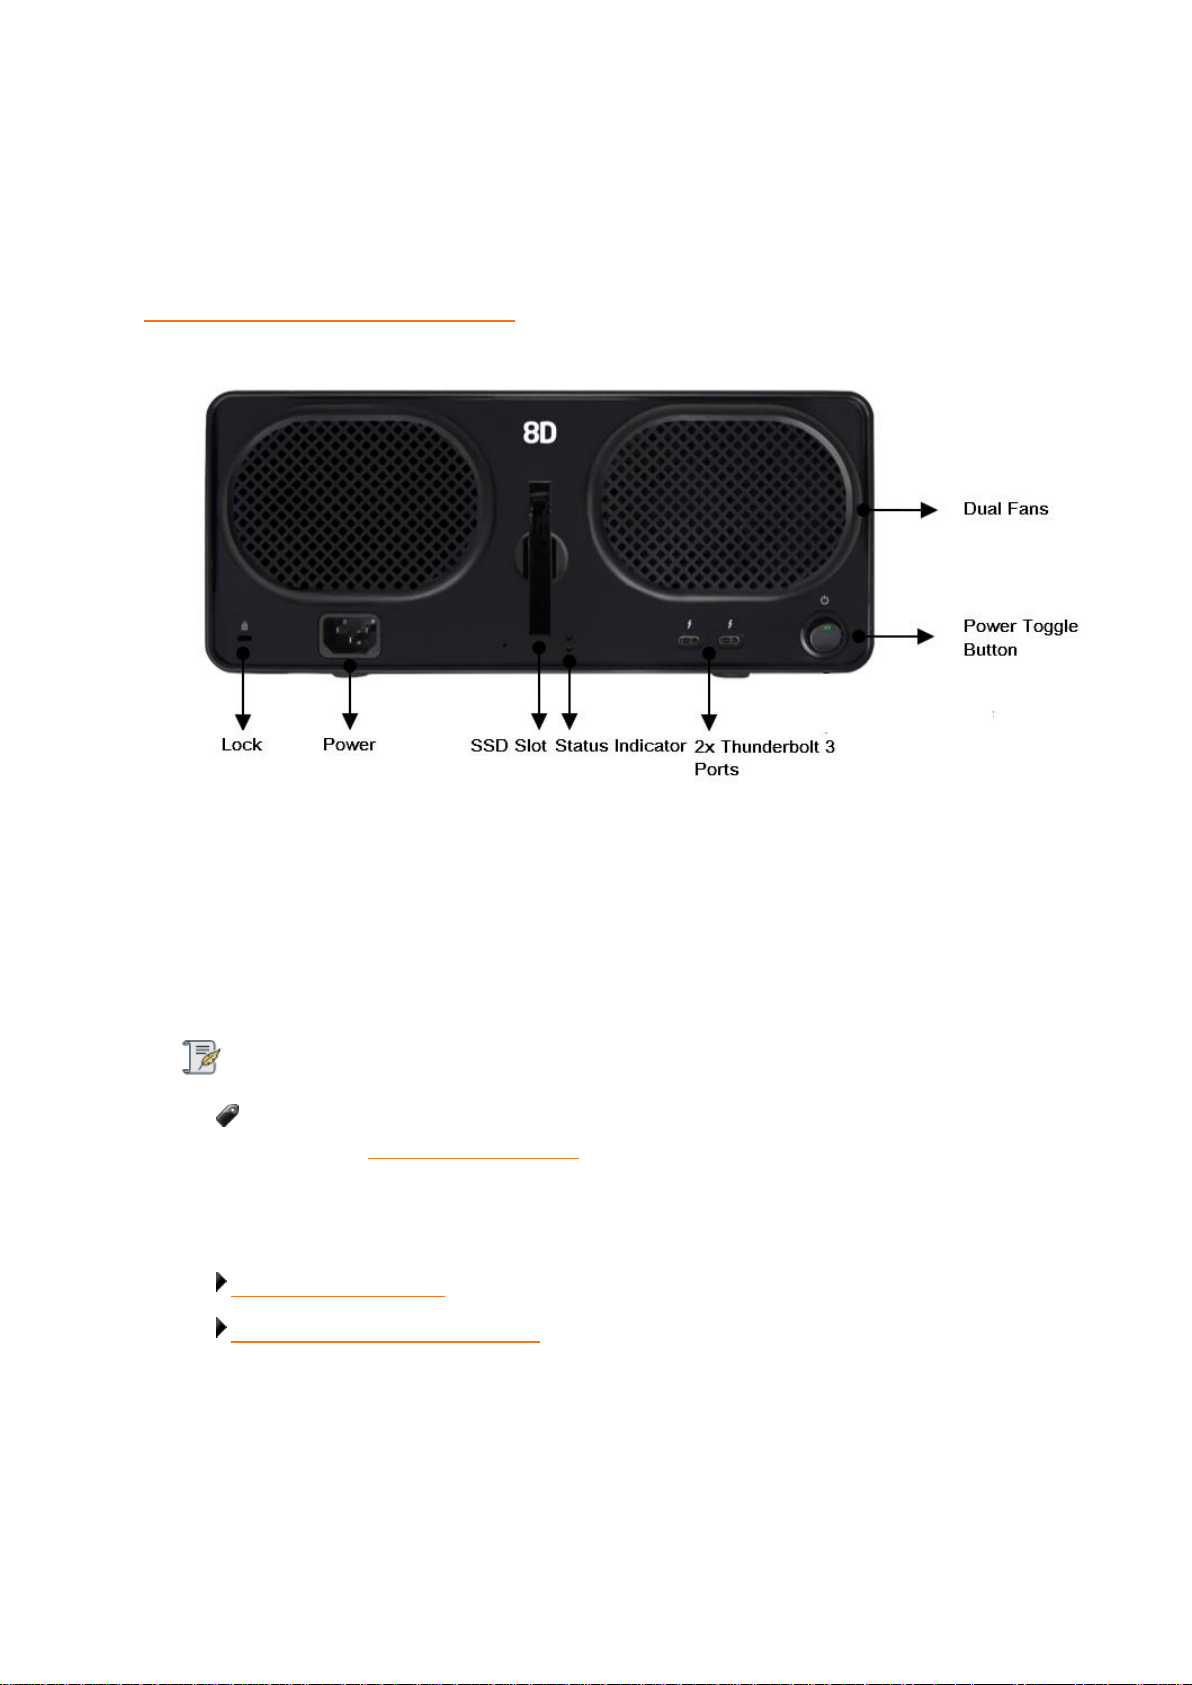
Drobo 8D connects directly to your Apple Mac™ using Thunderbolt 3 interface. 8D has two
Thunderbolt 3 ports.
Figure 1: Back of the Drobo 8D
Notes:
Drobo provides Thunderbolt 3 cable with 8D. Depending on the model of your Apple Mac™,
you may have to buy a Thunderbolt 3 to 2 adapter.
User with a 4 port MacBook Pro is recommended to use the left hand Thunderbolt port to
obtain best performance.
Thunderbolt 3
The Drobo 8D has two Thunderbolt ports, enabling you to take advantage of Thunderbolt's daisychaining capabilities. With Thunderbolt, you can daisy-chain up to six peripheral devices from a
single Apple Mac™. Note that because Thunderbolt has dual-protocol support (with DisplayPort and
PCI Express), you can connect the Drobo to Thunderbolt devices or DisplayPort products. You can
also connect non-Thunderbolt devices at the end of a daisy-chain by using Thunderbolt technology
adapters.
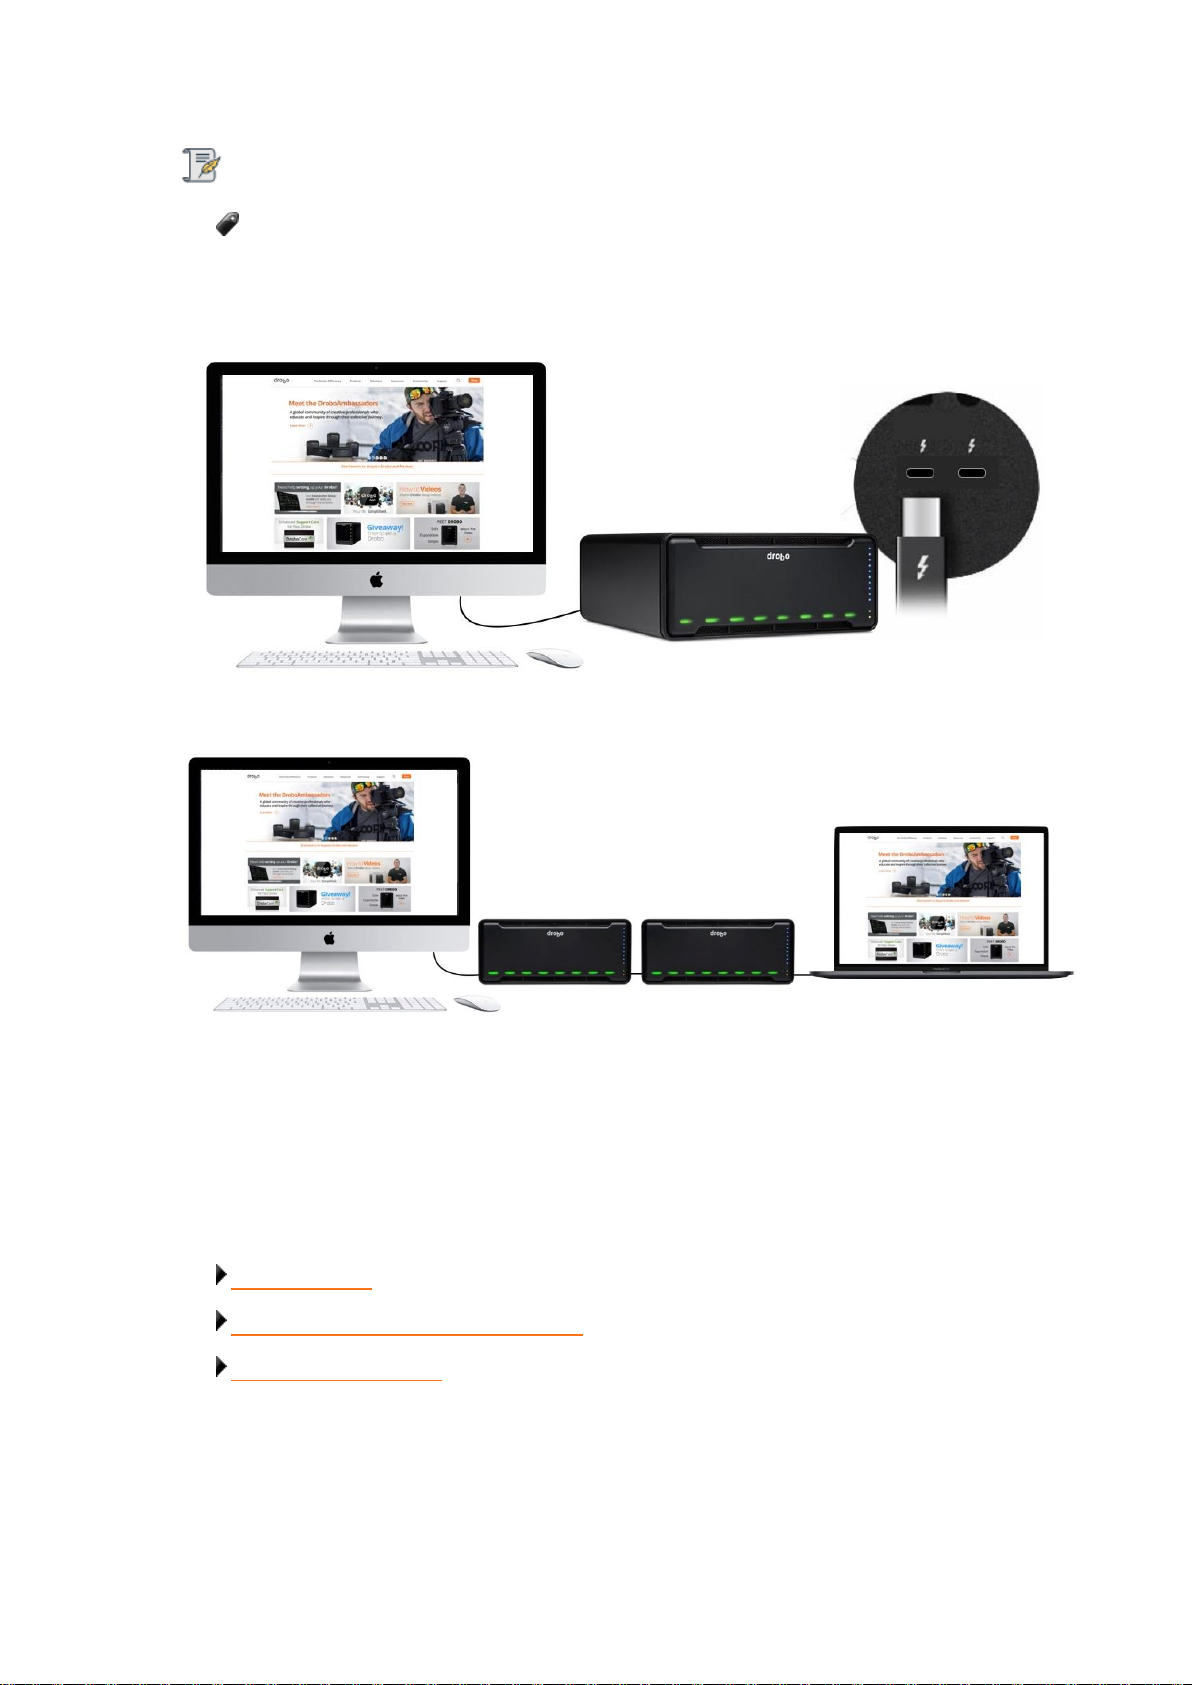
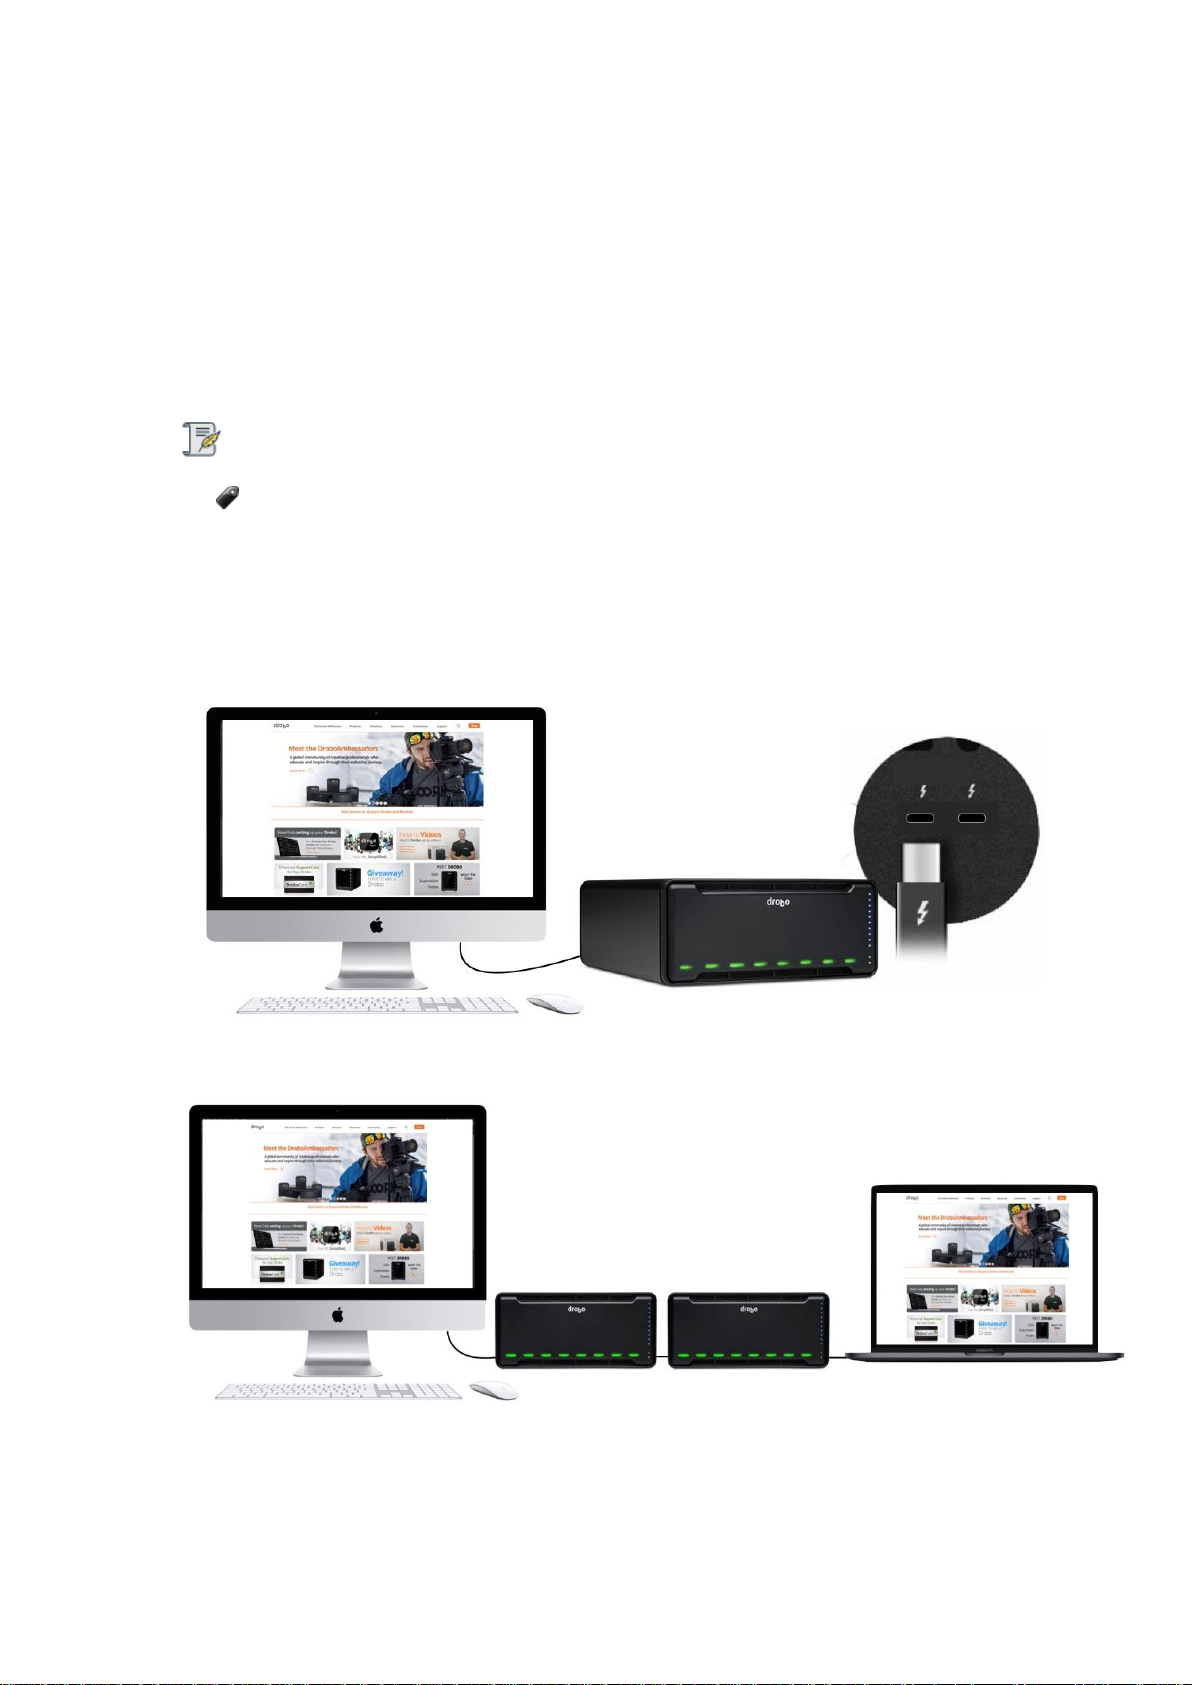
Here is the illustrative examples of the Drobo 8D in a daisy-chain:
There are two options for connecting 8D using its Thunderbolt interface.
Drobo 8D User Guide 12
Page 13
Note:
It is recommended to check the limitations of Daisy Chain before connecting the device in
a daisy-chain.
1. 8D directly connected to Apple Mac™ (with no daisy-chain).
2. Multiple Drobo devices connected in a chain with a DisplayPort monitor at the end.
1.1.4 Checking the Hardware You Need
To use the Drobo 8D, you will need at least two drives. If you plan to use Dual Disk Redundancy,
which protects your data against two simultaneous drive failures, you will need at least three drives.
Related topics:
Selecting Drives
Determining Drive Space Requirements
Using Power Protection
Drobo 8D User Guide 13
Page 14
1.1.4.1 Selecting Drives
The Drobo 8D supports both standard 3.5” SATA hard disk drives (HDDs) as well as SATA solid state
drives (SSDs) for added performance. For HDDs, these drives can be from any manufacturer and with
any capacity. For a complete list of recommended drives, please visit our web page for compatible
drive options.
In addition, the Drobo 8D has a Drobo Accelerator Bay, which accepts an industry-standard SSD.
When the back slot SSD is installed, Drobo’s Data-Aware Caching feature is enabled, accelerating
performance when reading data from the Drobo device. Having a back slot SSD installed leaves all
drive bays available for high-capacity hard disk drives (HDDs) so that you can get both high-capacity
and accelerated performance out of the Drobo device.
Alternatively,using 7200 RPM HDDs in the main drive bays of the Drobo 8D along with an SSD in the
back slot provides fast performance when reading data to and from the Drobo.
Note that you need at least two drives in the drive bays to ensure your data is protected in the event
of drive failure.
Important Notes:
If an incompatible SSD is inserted into the Drobo device, the drive light will blink red,
indicating the need to replace that drive. In the back slot HDDs are NOT supported.
Please refer to our web page on compatible drive options for more information.
The back slot SSD is not part of the disk pack of the Drobo 8D, allowing you to leave it
installed even if you transfer drives from the drive bays to another Drobo device.
SSDs that require 12v are only compatible with the front slots with a converter dock
To achieve better performance, we recommend to use 7200 RPM Seagate Barracuda Pros
or WD Blacks drives in your device.
The Drobo 8D is not compatible with IDE, SCSI, PATA or SAS drives.
The Drobo 8D supports migrating entire disk packs from a Drobo 5D3, Drobo 5Dt, Drobo
5C, Drobo Gen3, Drobo 5D or Drobo S, preserving its data. For more information, and to
ensure a safe and successful migration of the drives, carefully follow the instructions in
Migrating a Disk Pack from Another Drobo Device.
Warning:
Any pre-existing data on the drives will be erased while formatting or resetting the Drobo
8D.
Drobo 8D User Guide 14
Page 15

Related topics:
Determining Drive Space Requirements
Checking the Hardware You Need
Drobo 8D User Guide 15
Page 16
1.1.4.2 Determining Drive Space Requirements
In order to protect your data from drive failure, the Drobo 8D requires more space than what you
will use for your data- double or more amount of space.
The best way to determine how much usable, protected storage space you will have available for
your data, based on the number and capacity of your drives, is to use our Capacity Calculator at
www.drobo.com/calculator.
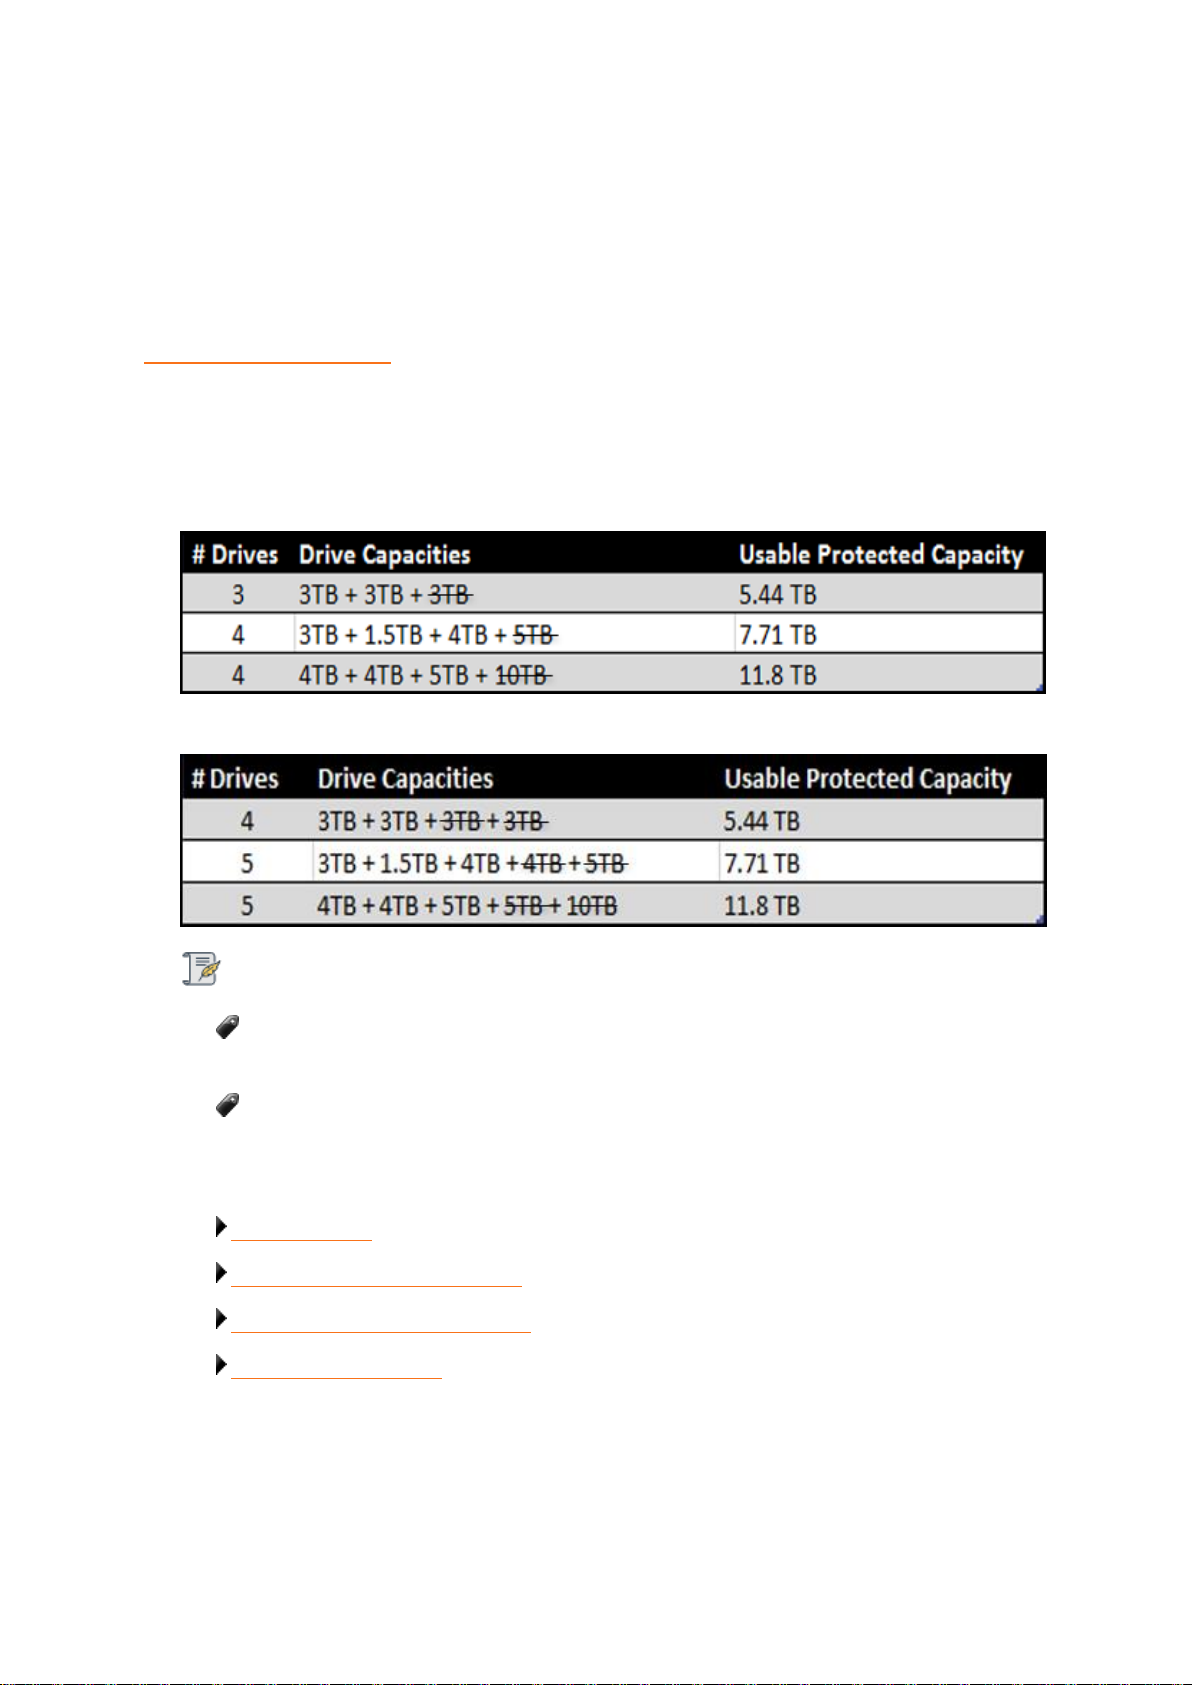
A shortcut to estimating the capacity available for your data is to omit the largest drive and then add
the capacity of the remaining drives. If you plan to use Dual Disk Redundancy, omit the largest two
drives. For example:
Single Disk (Default) Redundancy
Dual Disk Redundancy
Notes:
Actual capacity may vary from the value shown in the above example due to different
systems used for rating capacity. This has nothing to do with Drobo devices.
All the Drobo devices enable you to easily increase storage capacity at any time by simply
inserting additional drives or replacing smaller drives with larger ones.
Related topics:
Selecting Drives
Managing Capacity (Drive space)
Checking the Hardware You Need
Using Power Protection
Drobo 8D User Guide 16
Page 17

1.1.4.3 Using Power Protection
Drobo device has an internal battery to protect critical data during sudden or unexpected power
failures. The device will shutdown without any loss of data, so UPS (uninterruptible power supply) is
not required.
We recommend using the following power protection with the Drobo device:
● A power surge protector to protect against power surges
Related topic:
Checking the Hardware You Need
Drobo 8D User Guide 17
Page 18

1.2 Setting Up the Drobo 8D
Once you have unpacked the Drobo 8D from its box and ensured you meet all system and hardware
requirements, it is time to set up the Drobo 8D for use. This can be done in just a few easy steps!
1. Migrating a Disk Pack from Another Drobo Device
2. Inserting Drives
3. Connecting Cables on Your Drobo 8D
4. Power on the Drobo 8D
5. Downloading and Installing the Drobo Dashboard
6. Registering the Drobo 8D
7. Initializing and Updating the Drobo 8D to the Latest Firmware
8. Formatting the Drives for the Drobo 8D
9. Using Backup Volumes with the Drobo 8D
10. Inserting a back slot SSD (optional)
Note:
The Drobo 8D supports migrating entire disk packs from other devices, preserving its data.
To ensure a safe and successful migration of the drives, carefully follow the instructions in
Migrating a Disk Pack from Another Drobo Device
Drobo 8D User Guide 18
Page 19
1.2.1 Migrating a Disk Pack from Another Drobo
Device
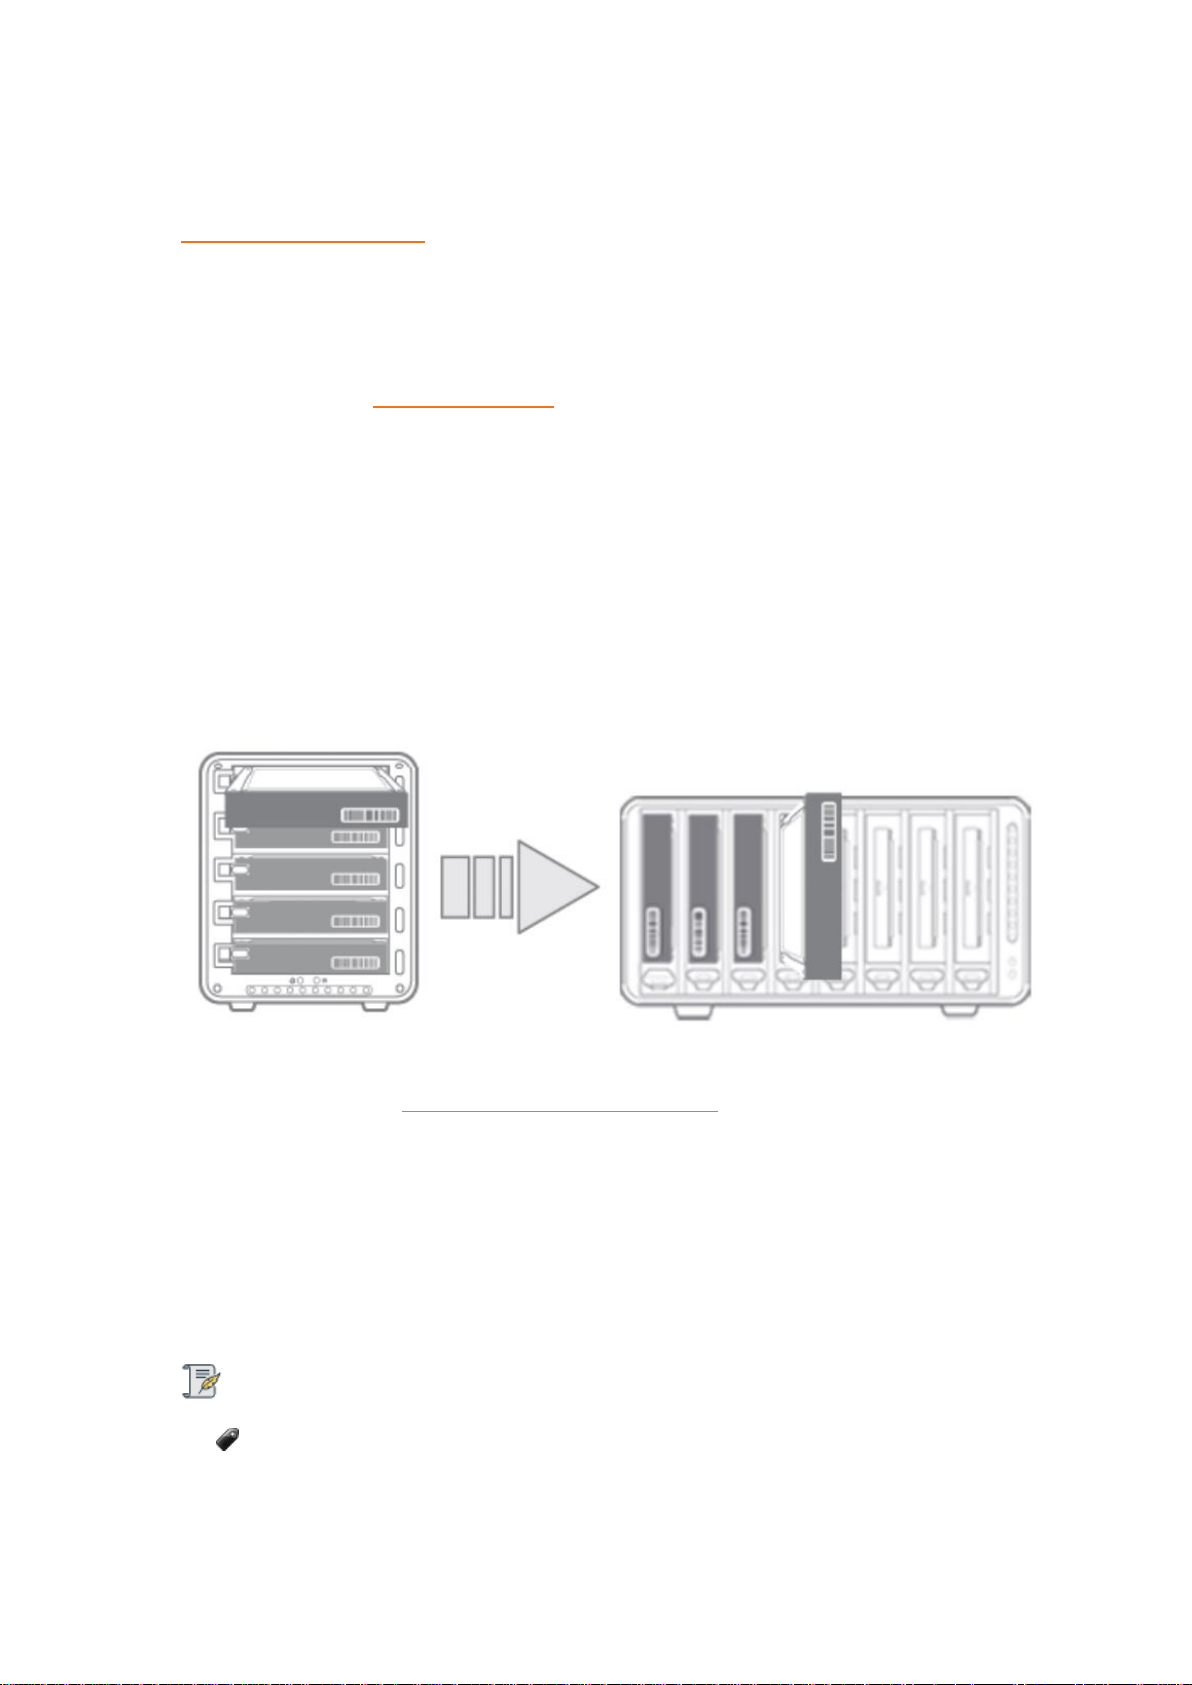
The Drobo 8D supports migrating entire disk packs from another Drobo device to the Drobo 8D,
preserving all the data and volumes you had created. You can also migrate disk packs from one
Drobo 8D to another.
Migration Paths Supported are as shown below:
● From Drobo 5D3 to Drobo 8D is supported
● From Drobo 5D/5Dt to Drobo 8D is supported
● From Drobo 5C to Drobo 8D is supported
● From Drobo Gen3 to Drobo 8D is supported
● From Drobo S to Drobo 8D is supported
Migration Paths Not Supported are as shown below:
● USB and Thunderbolt products cannot be migrated to NAS products or vice versa.
● Migration to Drobo 8D is not supported from Drobo Pro, Drobo Gen1 or Drobo Gen2 devices.
When to use Copy Data?
You can copy the data from Drobo 8D device to another Drobo, if data migration is not supported
between your devices (see above for list of supported devices).
Note:
For information on migration of disk pack see Migrating Your Disk between Drobo Products
Warning:
A disk pack functions as a unit. When you migrate a disk pack, you move ALL the drives
from one Drobo device to another. Only after migration of the disk pack is complete can you
add additional drives to the new Drobo device, one at a time, if desired.
Migration of data to Drobo 8D is a one-way operation. Once you have moved the data to
Drobo 8D, you will not be able to use it on the source Drobo device you are migrating from.
Do not migrate drives when either of the Drobo device is powered on. This can result in
data loss.
Drobo 8D User Guide 19
Page 20
To ensure a safe and successful migration, carefully follow the steps below.
1. Ensure that the latest version of Drobo Dashboard is installed on a host Apple Mac™.
See Installing Drobo Dashboard.
2. Ensure that both the devices are updated to the latest version of firmware by "checking for
updates" in Drobo Dashboard.
To do this:
● Ensure you have set up the Drobo 8D (but without inserting drives) and connected it to your
host Apple Mac™.
● Ensure that the Drobo 5D3, Drobo 5Dt, Drobo 5C, Drobo Gen3, Drobo 5D or Drobo S (with its
drives) is still connected to the host Apple Mac™.
● In Drobo Dashboard, on the All Drobos page, select the Drobo 5D3, Drobo 5Dt, Drobo 5C,
Drobo Gen3, Drobo 5D or Drobo S, and then click the Tools option on the Navigation menu.
● In the Software Updates area of the Tools page, click the Check for Updates option.
● If needed, follow the same steps to ensure the Drobo 8D has the latest firmware.
To migrate a disk pack from another Drobo device to Drobo 8D:
1. Safely shut down the Drobo 5D3, Drobo 5Dt, Drobo 5C, Drobo Gen3, Drobo 5D or Drobo S and
the Drobo 8D. For steps, see Safely Shutting Down the Drobo 8D
2. Remove ALL drives from the Drobo 5D3, Drobo 5Dt, Drobo 5C, Drobo Gen3, Drobo 5D or Drobo
S and insert ALL drives into the Drobo 8D.
3. Turn the Drobo 8D back on by pressing its power toggle button.
4. The Drobo 8D may take a few minutes to boot up. When finished, all the data and volumes will
be available on the Drobo 8D as it was on the Drobo 5D3, Drobo 5Dt, Drobo 5C, Drobo Gen3, Drobo
5D or Drobo S.
Note:
You can also follow the above steps to migrate a disk pack from one Drobo 8D to another
Drobo 8D.
Drobo 8D User Guide 20
Page 21
1.2.2 Inserting Drives
As a first step to set up the Drobo 8D, insert the drives into the Drobo. For more information on
drive requirements, see Selecting Drives.
Also, see this link on the Drobo website: Selecting Drives for the Drobo
Warning:
Any pre-existing data on the drives will be erased, as the drives will be formatted. If you
wish to keep the data, copy it to another drive or medium before using with the Drobo 8D.
How to insert the drives
To insert the drives to the Drobo 8D:
1. Remove the front bezel (faceplate) from the front of the Drobo 8D by pulling it off.
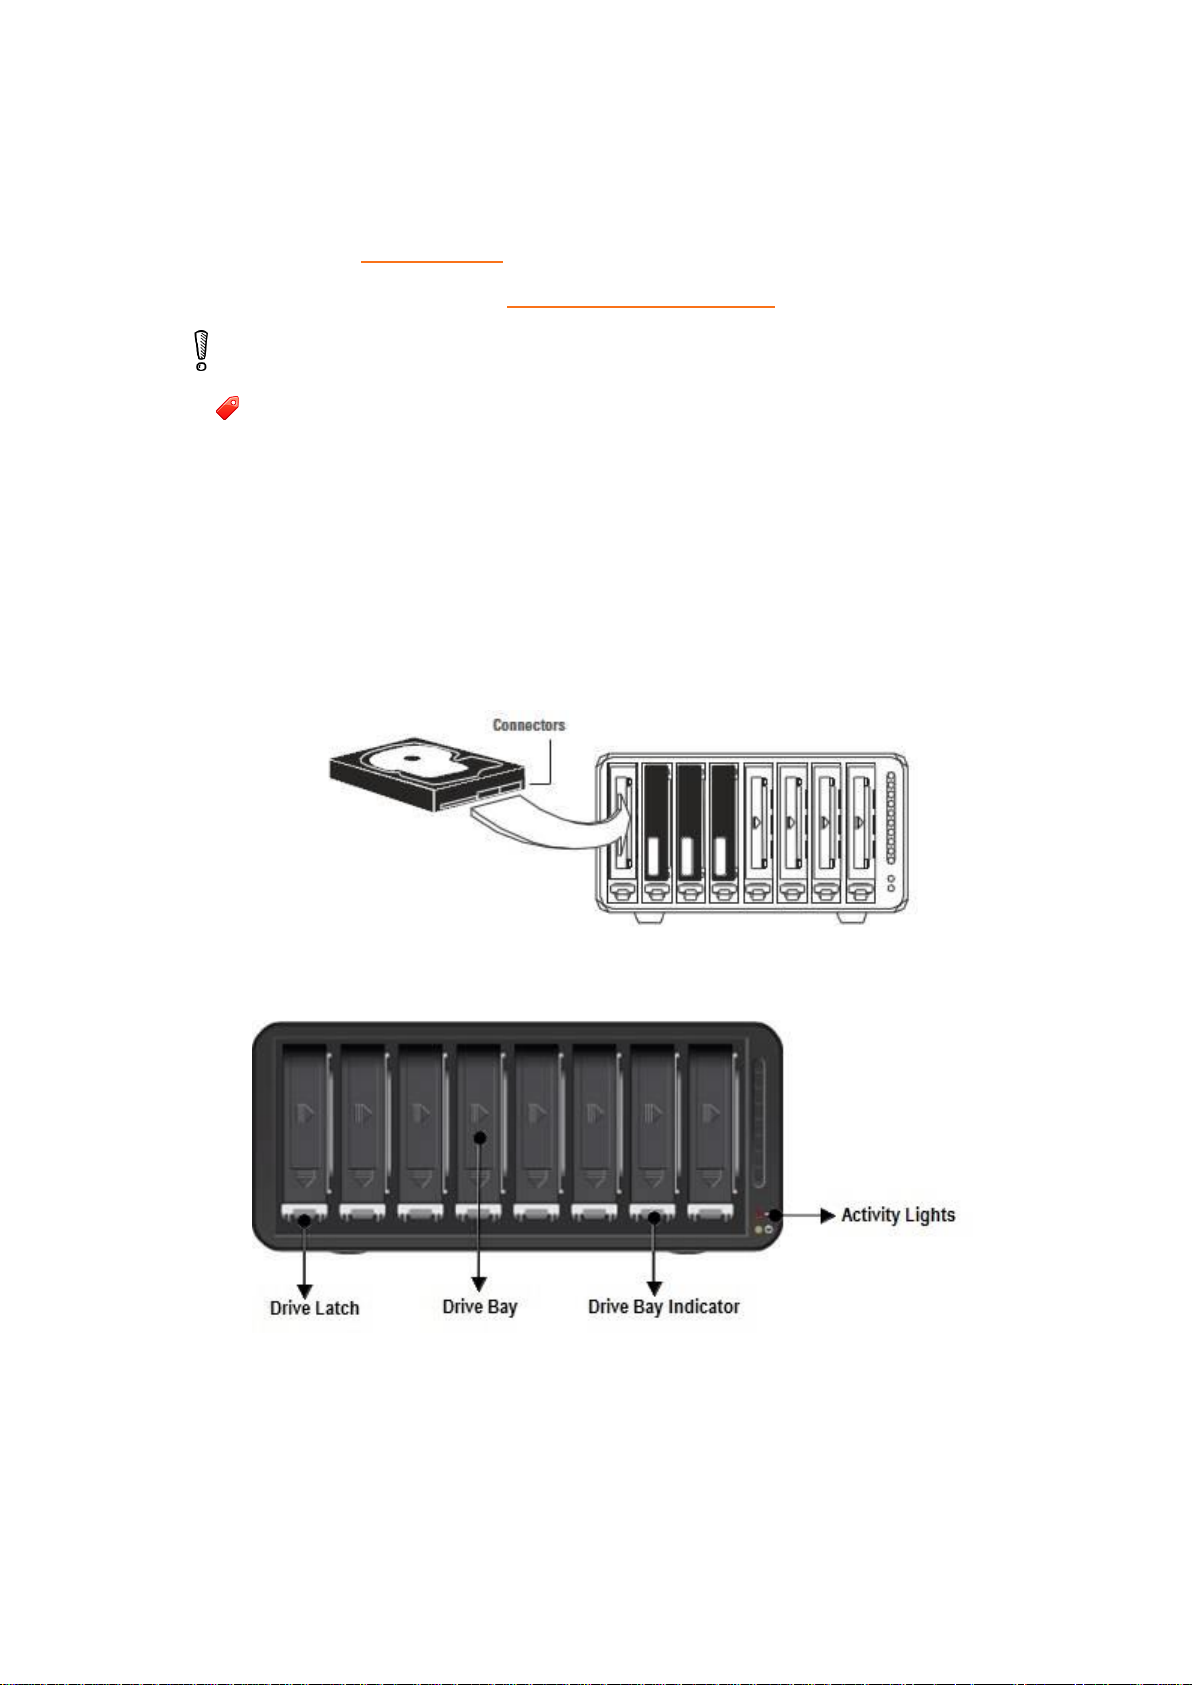
2. Insert drives with the top labels facing the power and capacity lights. With one hand, hold the
hard drive so that its connectors are positioned at the device and toward the left.
Refer to the image below.
3. With your other hand, use your thumb to depress and hold open one of the drive locks to a
selected drive bay. Refer to the image below.
4. Slide the drive into the drive bay, release the drive lock and push the drive into place until you
feel it connect. The drive lock snaps behind the drive, securing it into place.
5. Insert additional drives in the same manner, following steps 2 through 4.
Drobo 8D User Guide 21
Page 22

Notes:
Once you insert the drives into the Drobo 8D, they function as a unit or “pack.” To access
the data on them, you will need the entire pack.
The Drobo 8D supports migrating entire disk packs from other Drobo, preserving its data.
To ensure a safe and successful migration of the drives, carefully follow the instructions in
Migrating a Disk Pack from Another Drobo Device.
By default Drobo 8D creates 128 TB volume size, if required you can create your own volume
size.
6. When finished, replace the faceplate right side up, so that when the Drobo device is turned on,
you will be able to see the indicator lights. For more information on Indicator lights, see Guide to
meaning of indicator lights (LEDs).
You are now ready to connect cables and power on the Drobo device.
Related topics:
Connecting Cables on the Drobo 8D
Return to Setting Up the Drobo 8D
Drobo 8D User Guide 22
Page 23

1.2.3 Connecting Cables on the Drobo 8D
After installing Drobo Dashboard and inserting the drives into the Drobo 8D, you are ready to
connect the power and data cables on the Drobo device.
You can connect the Drobo 8D directly to your Apple Mac™ using the Thunderbolt 3 port. For
information on the connectivity interfaces available and their requirements, see Connectivity
Interfaces Supported for Drobo 8D.
With a Thunderbolt port, you also have the option to connect the Drobo 8D to another Thunderbolt-
enabled device that is attached to your Apple Mac™ (including another Drobo device or a display
monitor) in a daisy-chain manner. The Drobo 8D can be the first in the daisy-chain (directly attached
to your Apple Mac™), in the middle, or at the end.
For more information and steps, see Connecting the Drobo 8D in a Daisy-chain.
Related topics:
Connecting Directly to the Drobo 8D or Connecting the Drobo 8D in a Daisy-chain
Return to Setting Up the Drobo 8D
Drobo 8D User Guide 23
Page 24
1.2.3.1 Connecting Directly to the Drobo 8D
You can connect the Drobo 8D directly to your Apple Mac™ using the Thunderbolt 3 port.
If you are using a Thunderbolt port and would like to connect the Drobo 8D in a daisy-chain, see
Connecting the Drobo 8D in a Daisy-chain.
As you follow the steps below, refer to the following image.
1. Plug one end of the Thunderbolt cable into the back of the Drobo 8D.
2. Plug the other end of the cable into your host Apple Mac™.
3. Connect the power cord to the power connection at the back of the Drobo device.
4. Connect the other end of the power cord to a power source.
5. You are now ready to turn on the Drobo device and format the drives.
Note:
We recommend connecting a surge protector to protect against power surges. For more
information, see Using Power Protection.
Next in the Setup for the Drobo 8D
Power On the Drobo 8D
Return to Setting Up the Drobo 8D
Drobo 8D User Guide 24
Page 25
1.2.3.2 Connecting the Drobo in a Daisy Chain
With the Thunderbolt 3 port, you can connect the Drobo 8D directly to your Apple Mac™ or to
another Thunderbolt-enabled device in a daisy-chain manner. The Drobo 8D performs best when it is
the first in the daisy-chain, but it can also be in the middle or at the end.
You can daisy-chain up to six peripheral devices and one display (which can be a Display Port
monitor) from a single Apple Mac™. The non-Thunderbolt display needs to be at the end of the
chain.
Note:
As long as they are plugged in, Drobo devices do not need to be powered on for
Thunderbolt interfaces to remain active. This enables other devices in the chain to remain
accessible by the Apple Mac™.
Here are two options for connecting the Drobo device using its Thunderbolt interface.
1. The Drobo device directly connected to a Apple Mac™ (with no daisy-chain).
2. Multiple Drobo devices connected in a chain with a DisplayPort monitor at the end.
Drobo 8D User Guide 25
Page 26
As you follow the steps below, refer to the following image.
1. Plug one end of the Thunderbolt cable into the back of the Drobo 8D.
2. Do one of the following:
● Plug the other end of the cable into your host Apple Mac™, so that the Drobo 8D is the first
peripheral in the daisy-chain. Be sure to connect the next Thunderbolt-enabled peripheral or
non-Thunderbolt display monitor to the second port on the Drobo 8D, as needed to extend the
chain.
● Plug the other end of your cable into another Thunderbolt-enabled device that is attached
to your host Apple Mac™. You can optionally connect another Thunderbolt-enabled peripheral
or non-Thunderbolt display monitor to the second port on the Drobo 8D, as needed to extend
the chain.
3. Connect the power cord to the power connection at the back of the Drobo device.
4. Connect the other end of the power supply to a power source.
You are now ready to turn on the Drobo devices in the chain.
Note:
We recommend plugging into a surge protector to protect against power surges.
For more information, see Using Power Protection.
If you want to run 1x 5K monitor, you will need an active 40 gig cable.
Next in the Setup for the Drobo 8D
Power On the Drobo 8D
Return to Setting Up the Drobo 8D
Drobo 8D User Guide 26
Page 27

1.2.4 Powering On the Drobo 8D
To power on the Drobo 8D:
1. Once you attach one end of the power cord to the Drobo 8D and the other end of the cord to a
power source, turn on the Drobo using the power toggle button located on the back.
2. Drobo will take several minutes to complete the power on cycle.
3. When the power on cycle is complete, the Drobo will flash blue and yellow lights.
Note:
The power toggle is only to power on Drobo, proper shutdown should happen within the
Drobo Dashboard.
Drobo 8D User Guide 27
Page 28

1.2.5 Downloading and Installing Drobo Dashboard
The Drobo Dashboard application will help you to set up and manage the Drobo 8D.
Drobo software and firmware updates for Drobo 8D can be downloaded and installed from Drobo
8D Product page.
This section covers the following topics:
● Installing Drobo Dashboard on Apple Mac™
Note:
You need a full admin user account and internet access on the Apple Mac™ on which you
are going to install the Drobo Dashboard.
Related topics:
Using Drobo Dashboard
Touring Drobo Dashboard
Drobo 8D User Guide 28
Page 29
1.2.5.1 Installing Drobo Dashboard on Apple Mac™
To install the Drobo Dashboard on a Apple Mac™ machine:
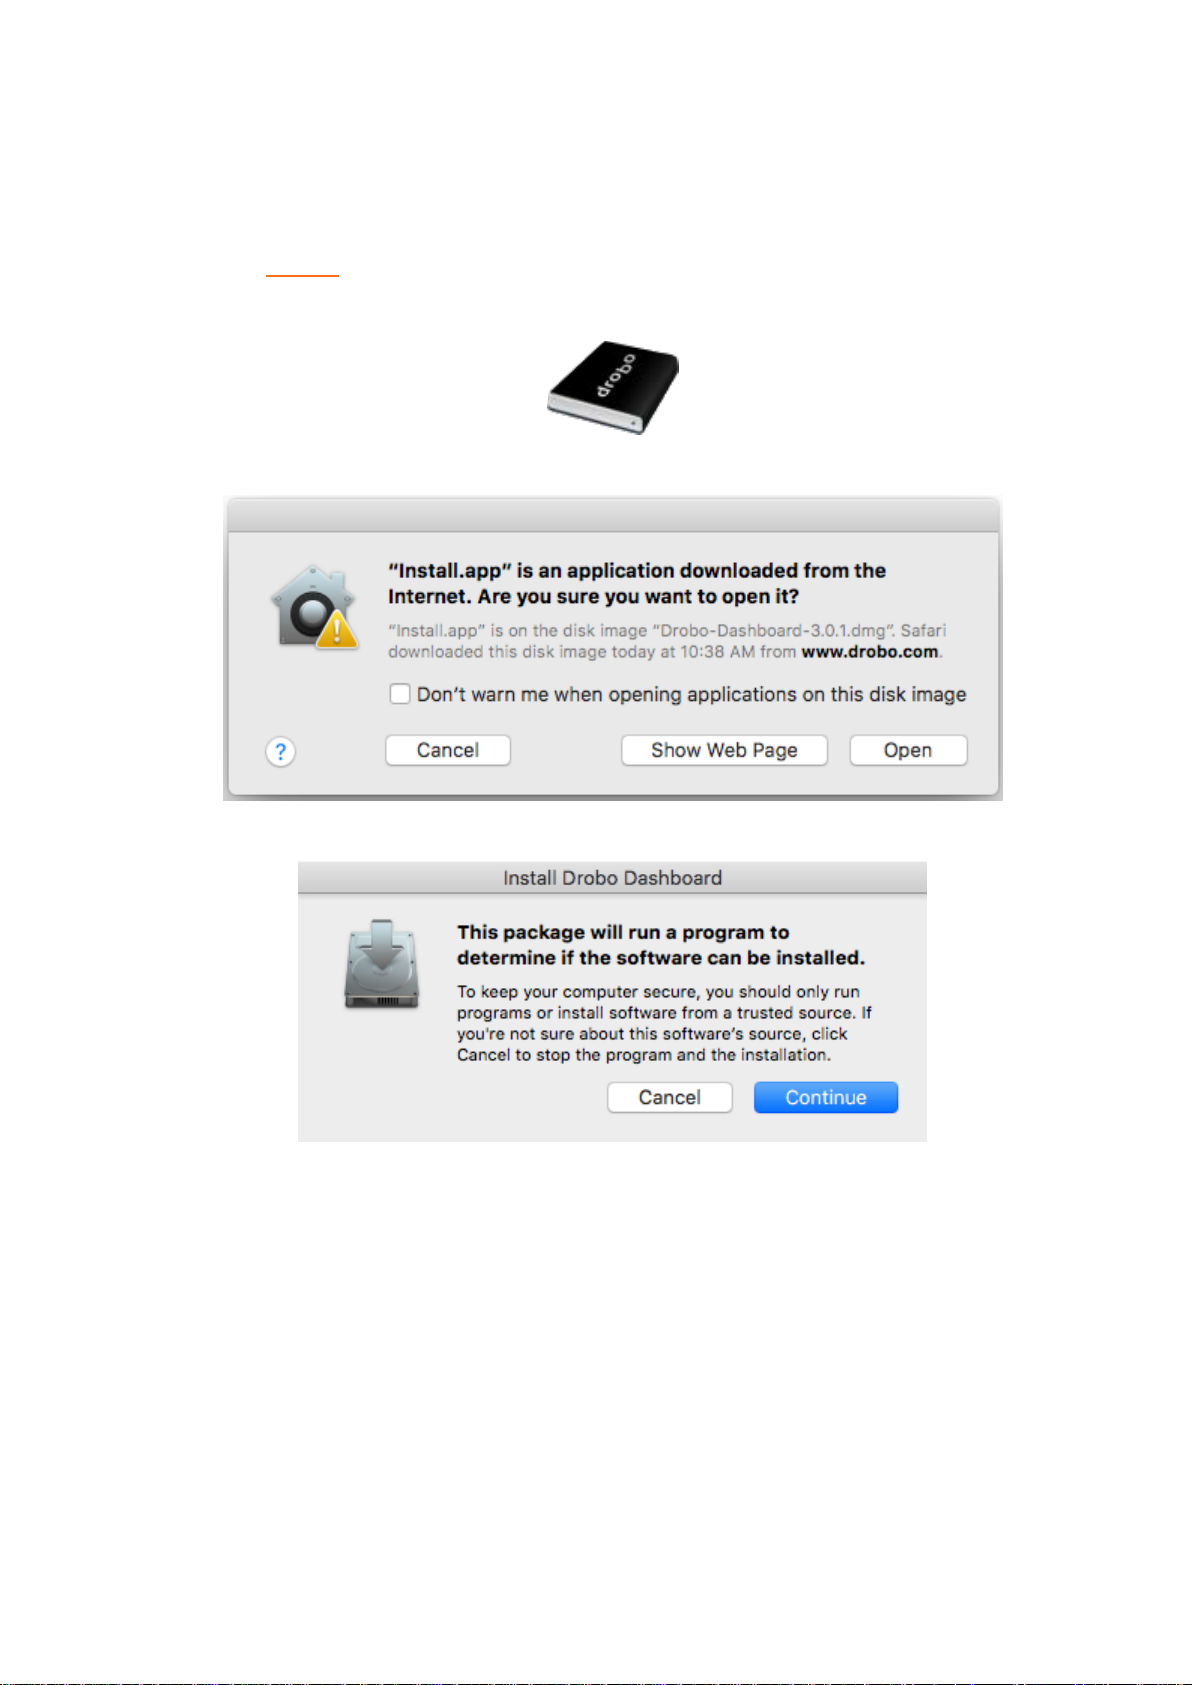
1. Go to the Start 8D page and download the Drobo Dashboard installation file for Apple Mac™.
2. After downloading, double-click the Drobo Dashboard Installer to launch it.
3. A pop up will appear asking whether to open the Installer. Click Open.
4. The Install Drobo Dashboard page will appear. Click Continue to proceed to the next screen.
5. Next, the Installation Wizard page appears. Click Continue to proceed.
Drobo 8D User Guide 29
Page 30
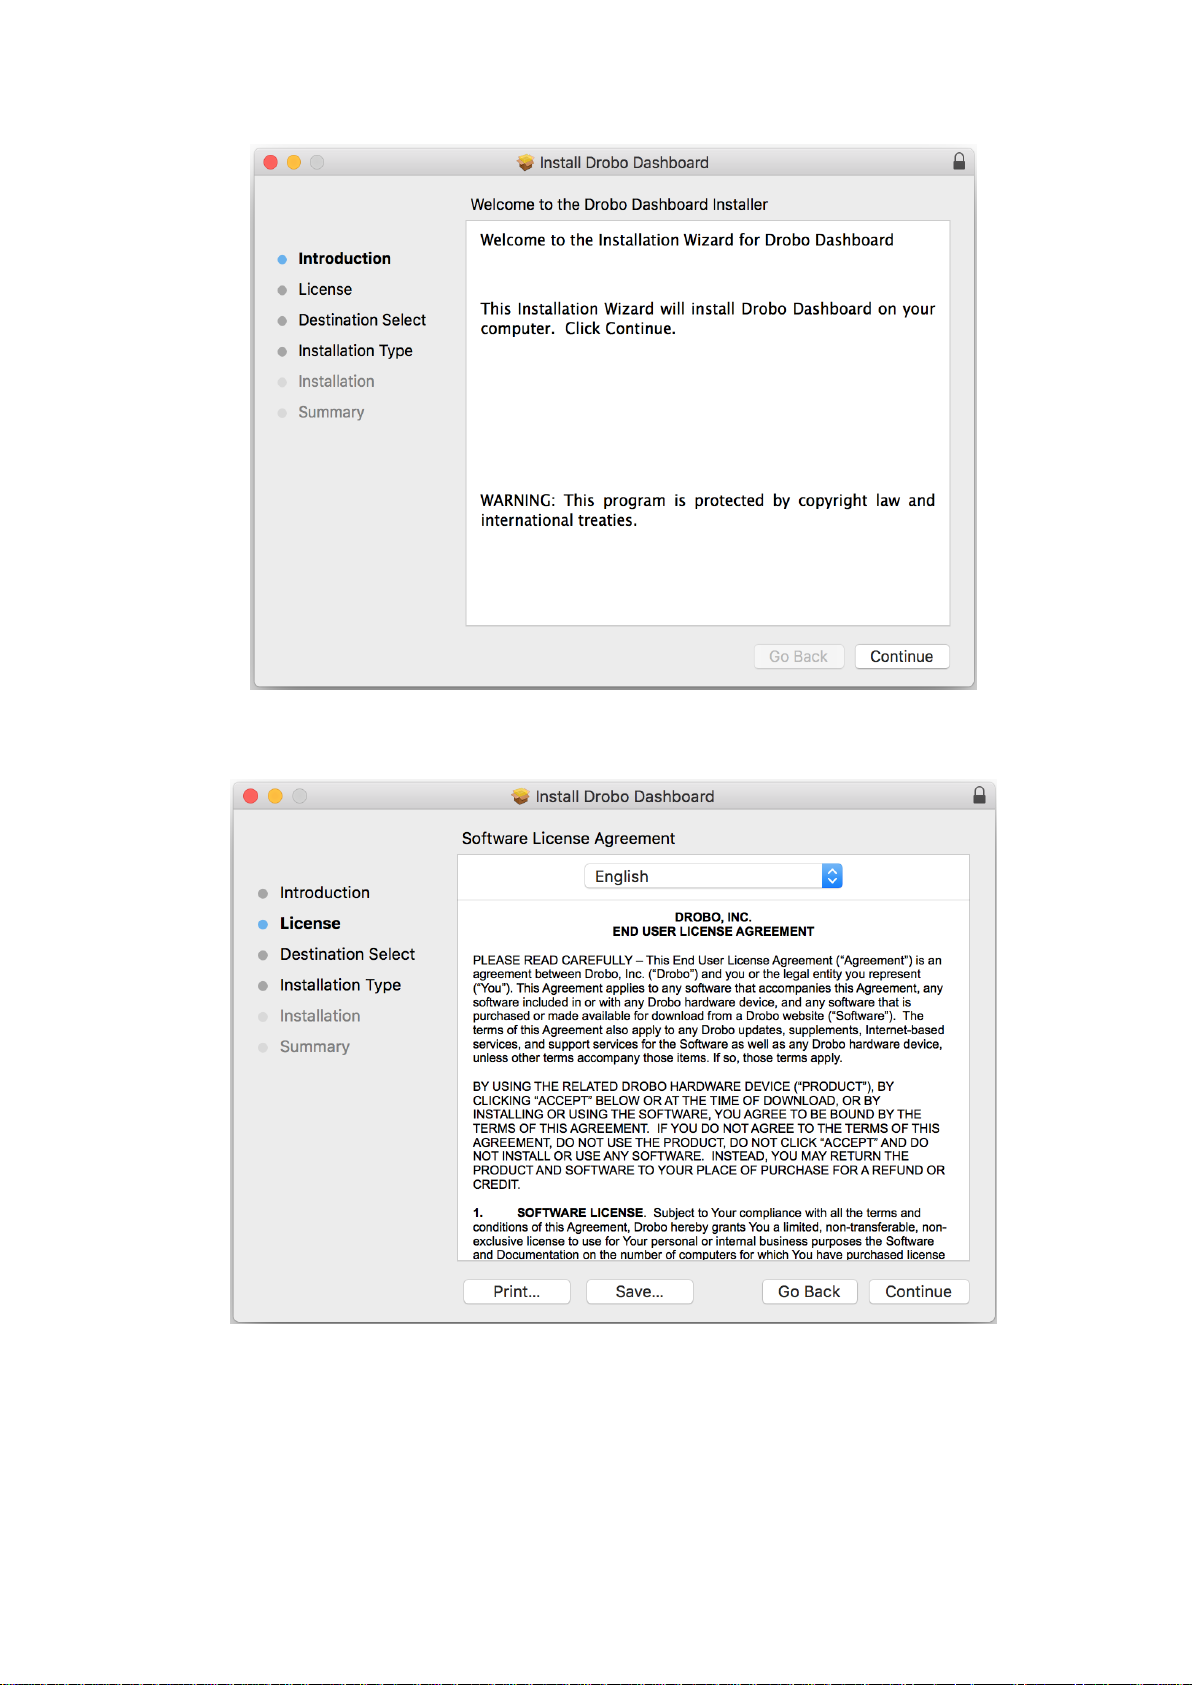
6. The Software License Agreement page appears. From here, you can choose the language in
which you want to proceed the installation process.
7. After choosing the desired language, Click the Continue button.
Drobo 8D User Guide 30
Page 31
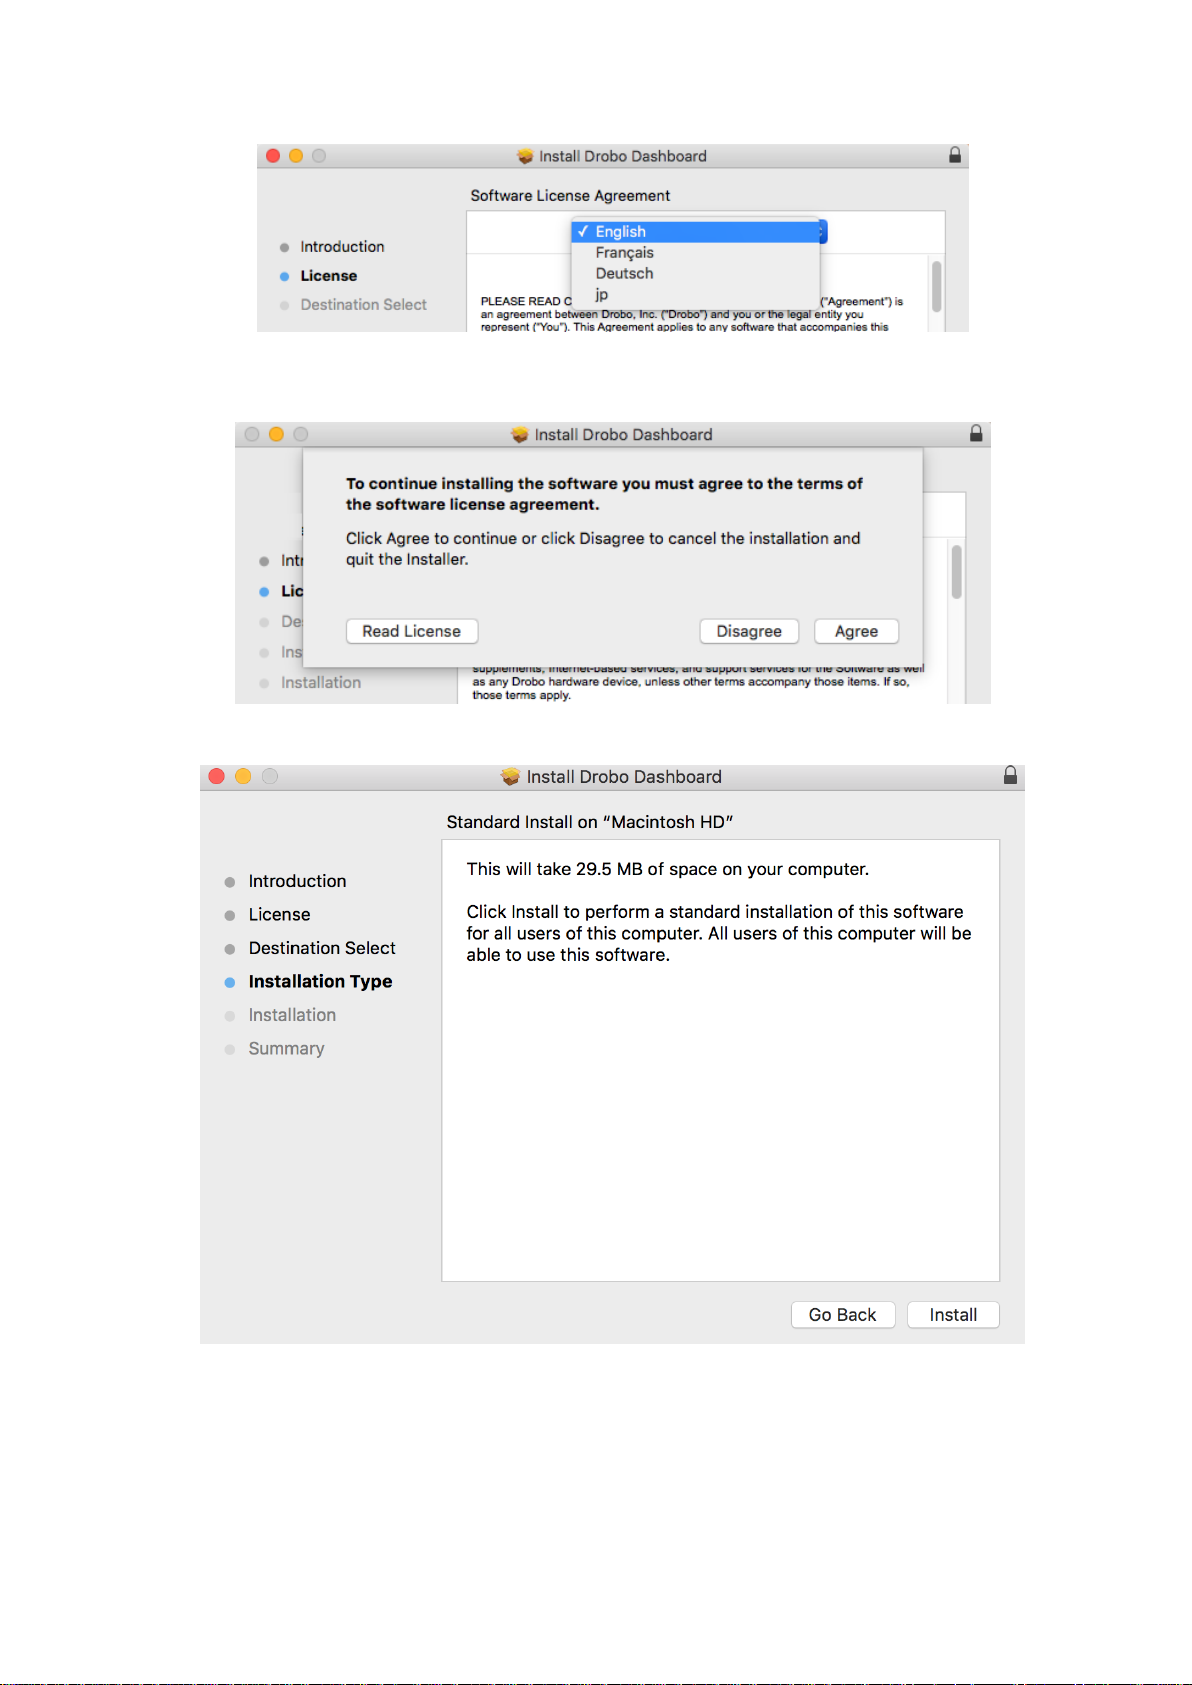
8. A dialog box will appear asking you to Agree or Disagree the terms of the license agreement.
Click Agree to proceed.
9. You will reach the Installation Type section. Click the Install button to proceed.
10. You will be prompted to enter the administrator password. Enter the password and click Install
Software.
Drobo 8D User Guide 31
Page 32
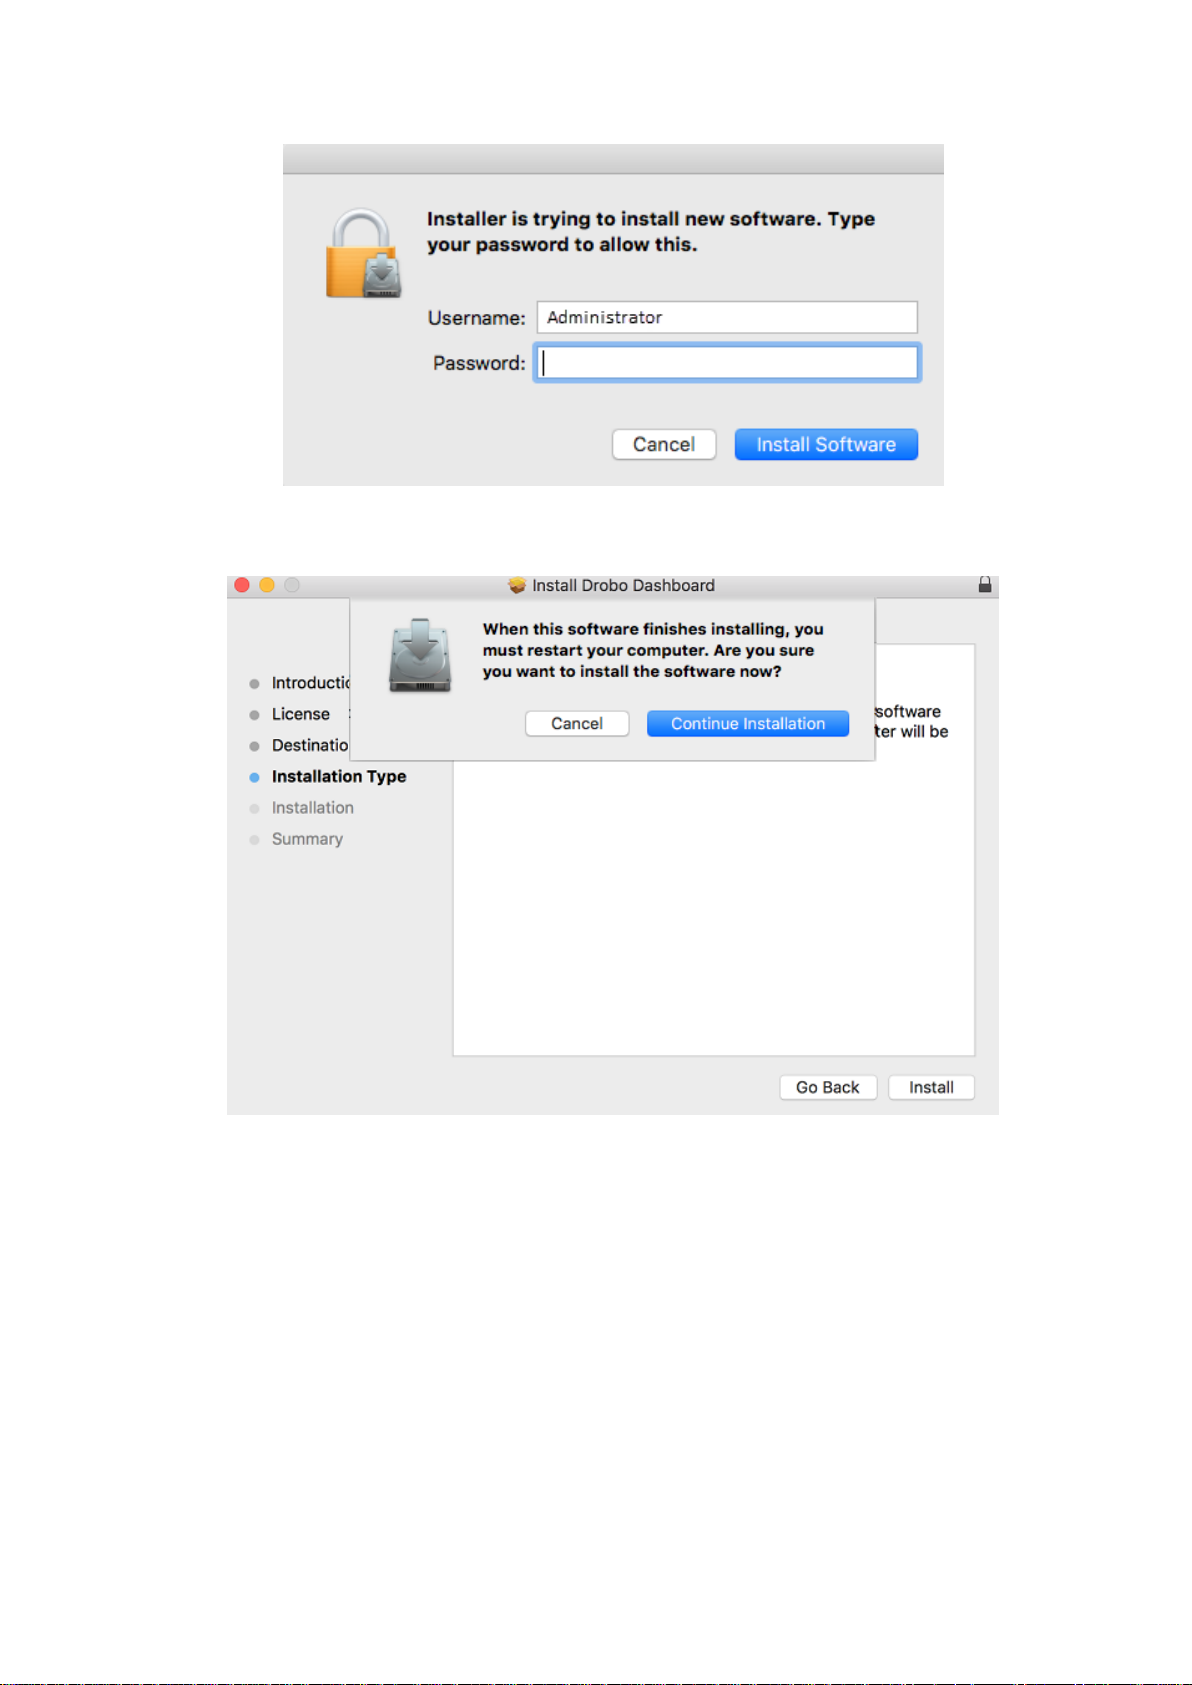
11. Then, you will be prompted to restart your Apple Mac™ in order to complete the installation.
Click Continue Installation to proceed.
12. When the installation completes, you will see the following screen. Click Close and launch the
Dashboard application.
Drobo 8D User Guide 32
Page 33
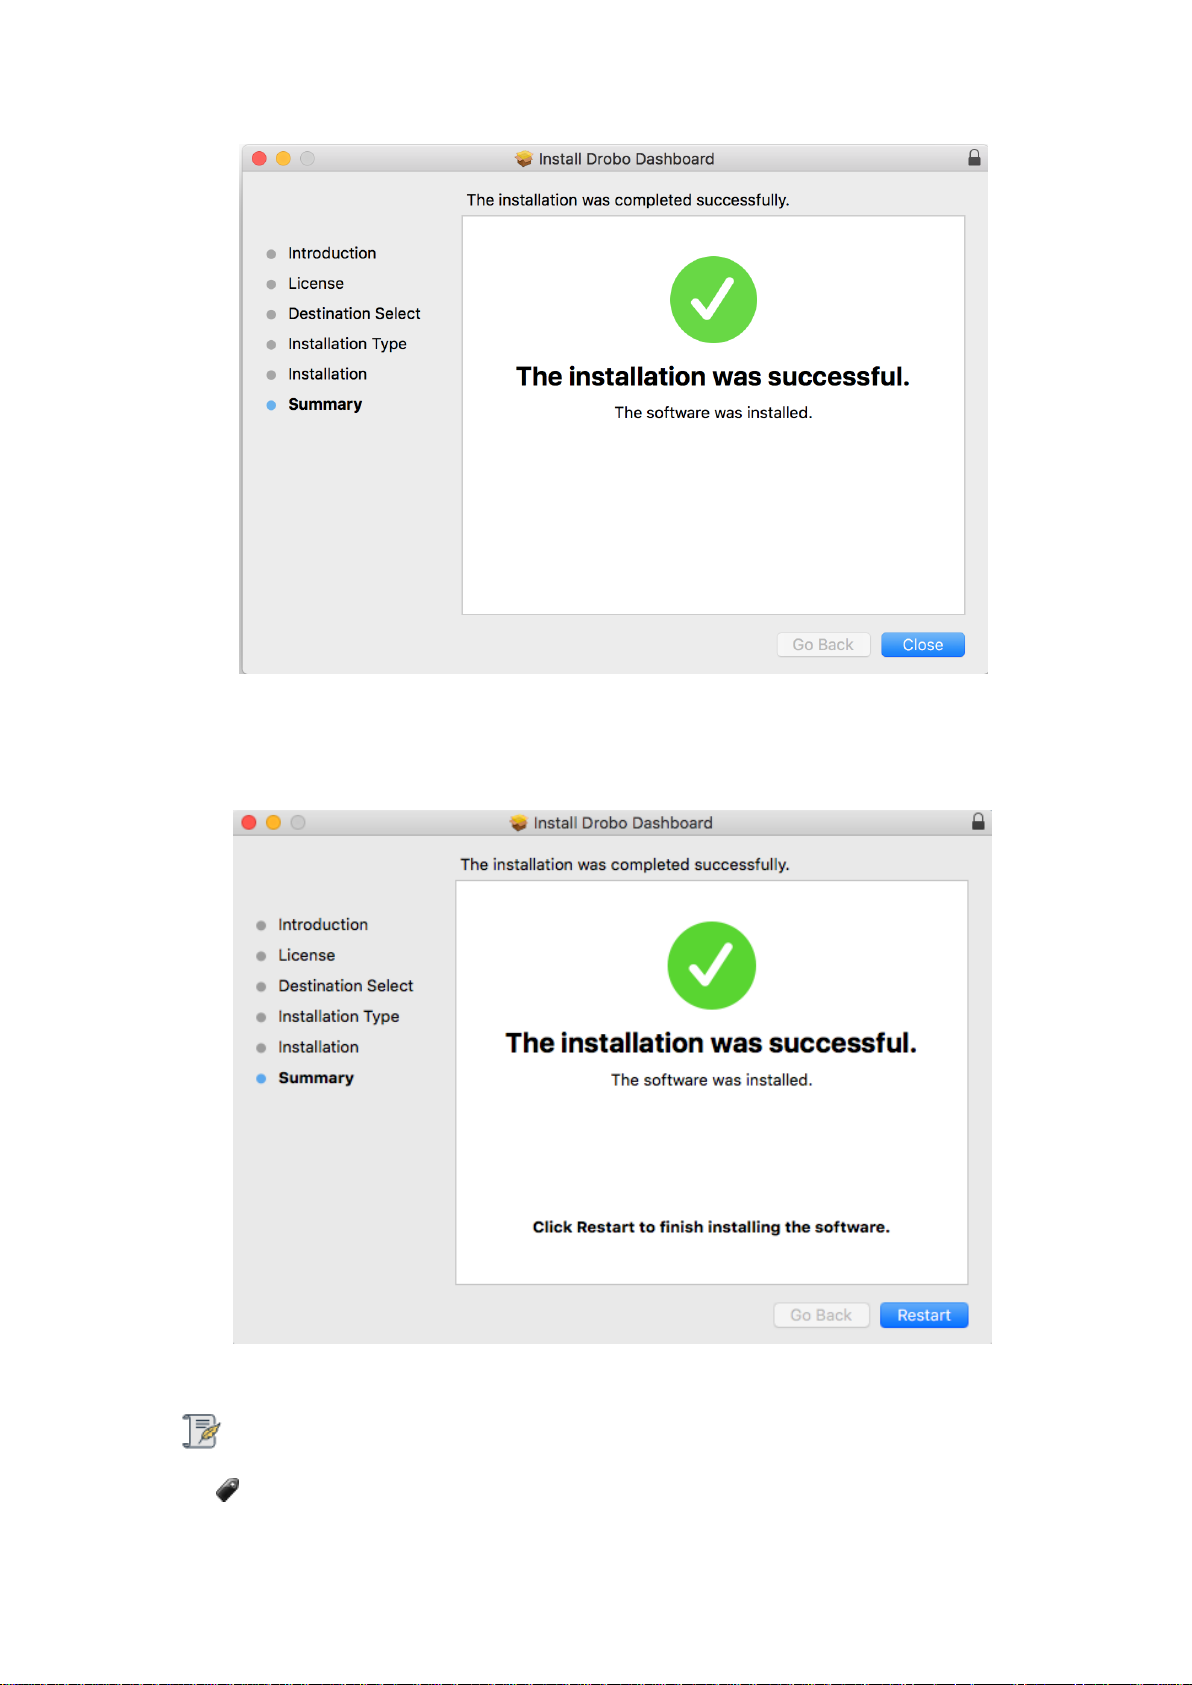
13. If there is a driver change during installation or update, you will see the following screen to
restart the Apple Mac™ to finish the installation. Click Restart.
14. Once the Apple Mac™ restarts, launch the Drobo Dashboard application.
Note:
You may have to allow Drobo Dashboard in System Preferences in order for the Dashboard
to open.
Drobo 8D User Guide 33
Page 34
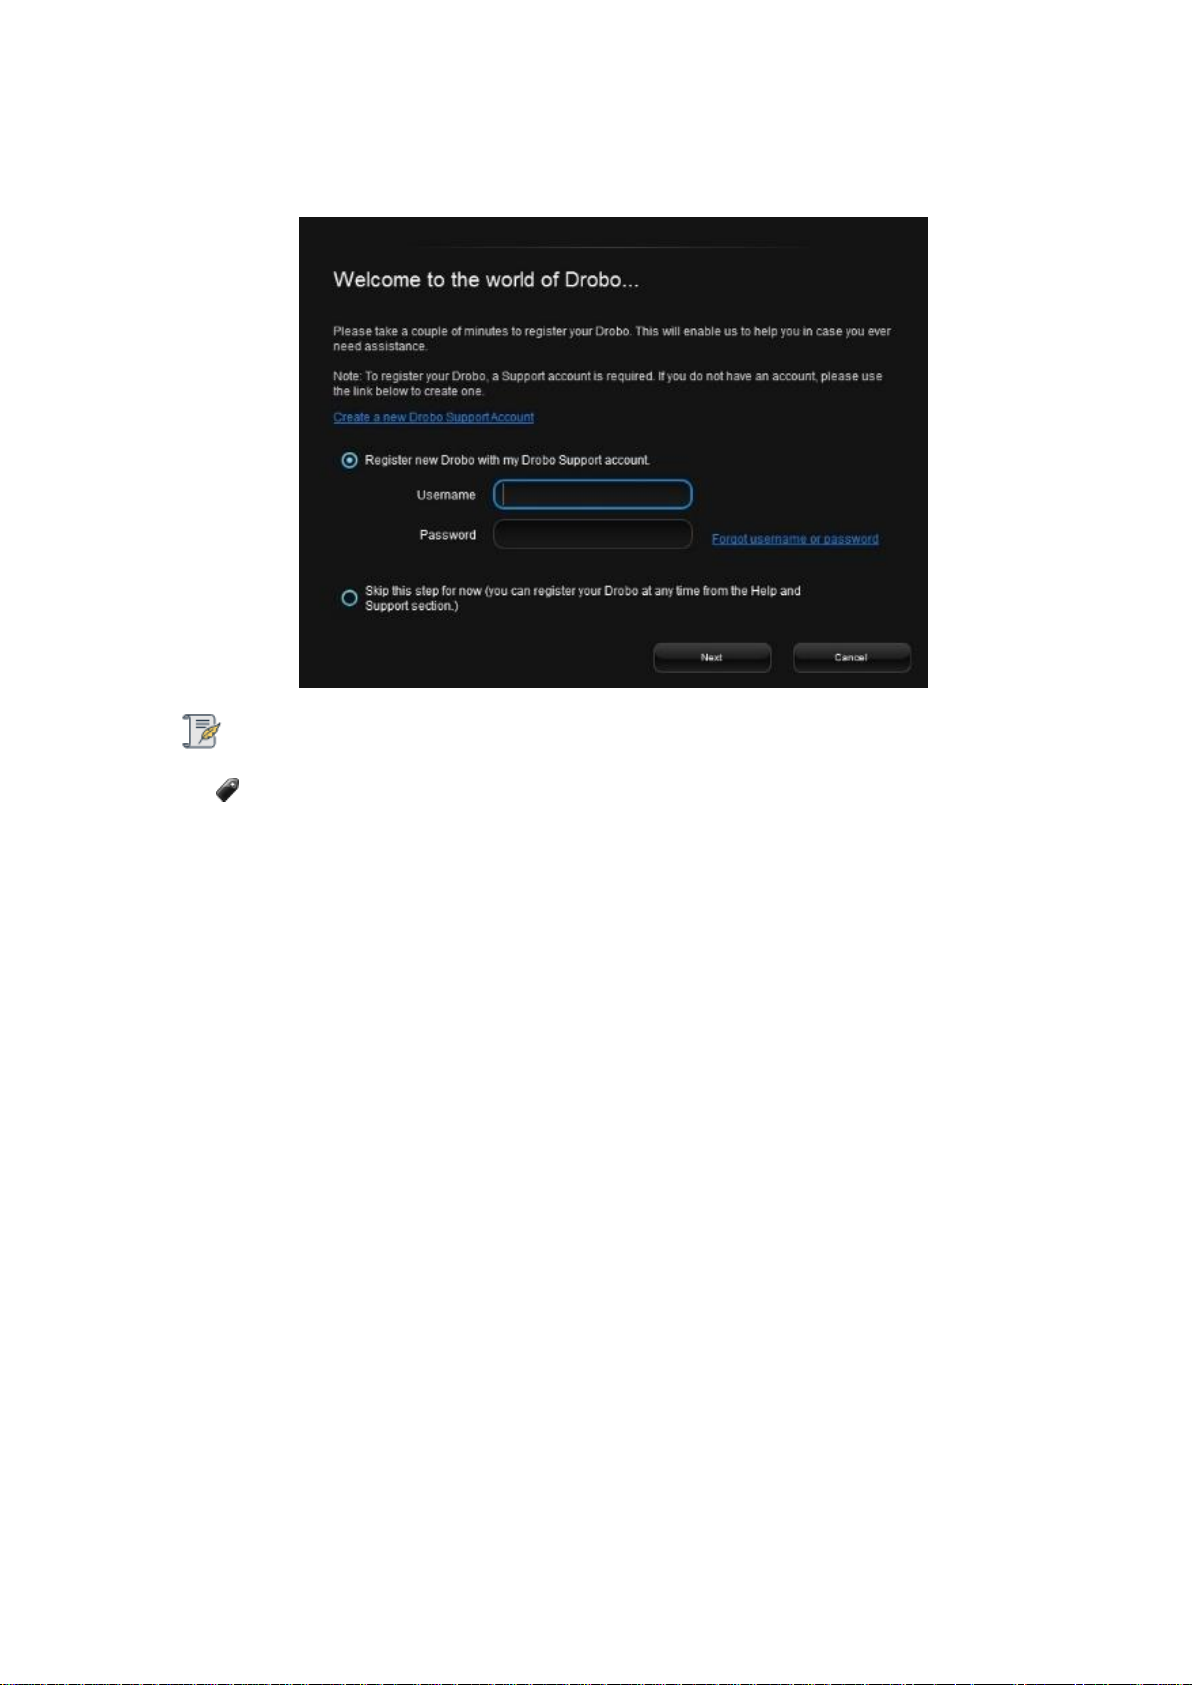
15. The application will prompt you to register the Drobo 8D. You can either register it or skip the
step and register it later. Select an option based on you preference.
Note:
We highly recommend to register your product in order to obtain support.
16. Click the Next button to view the All Drobos page. After a few seconds, Drobo "discovers" all
Drobo devices currently connected and displays them on this page.
Drobo 8D User Guide 34
Page 35
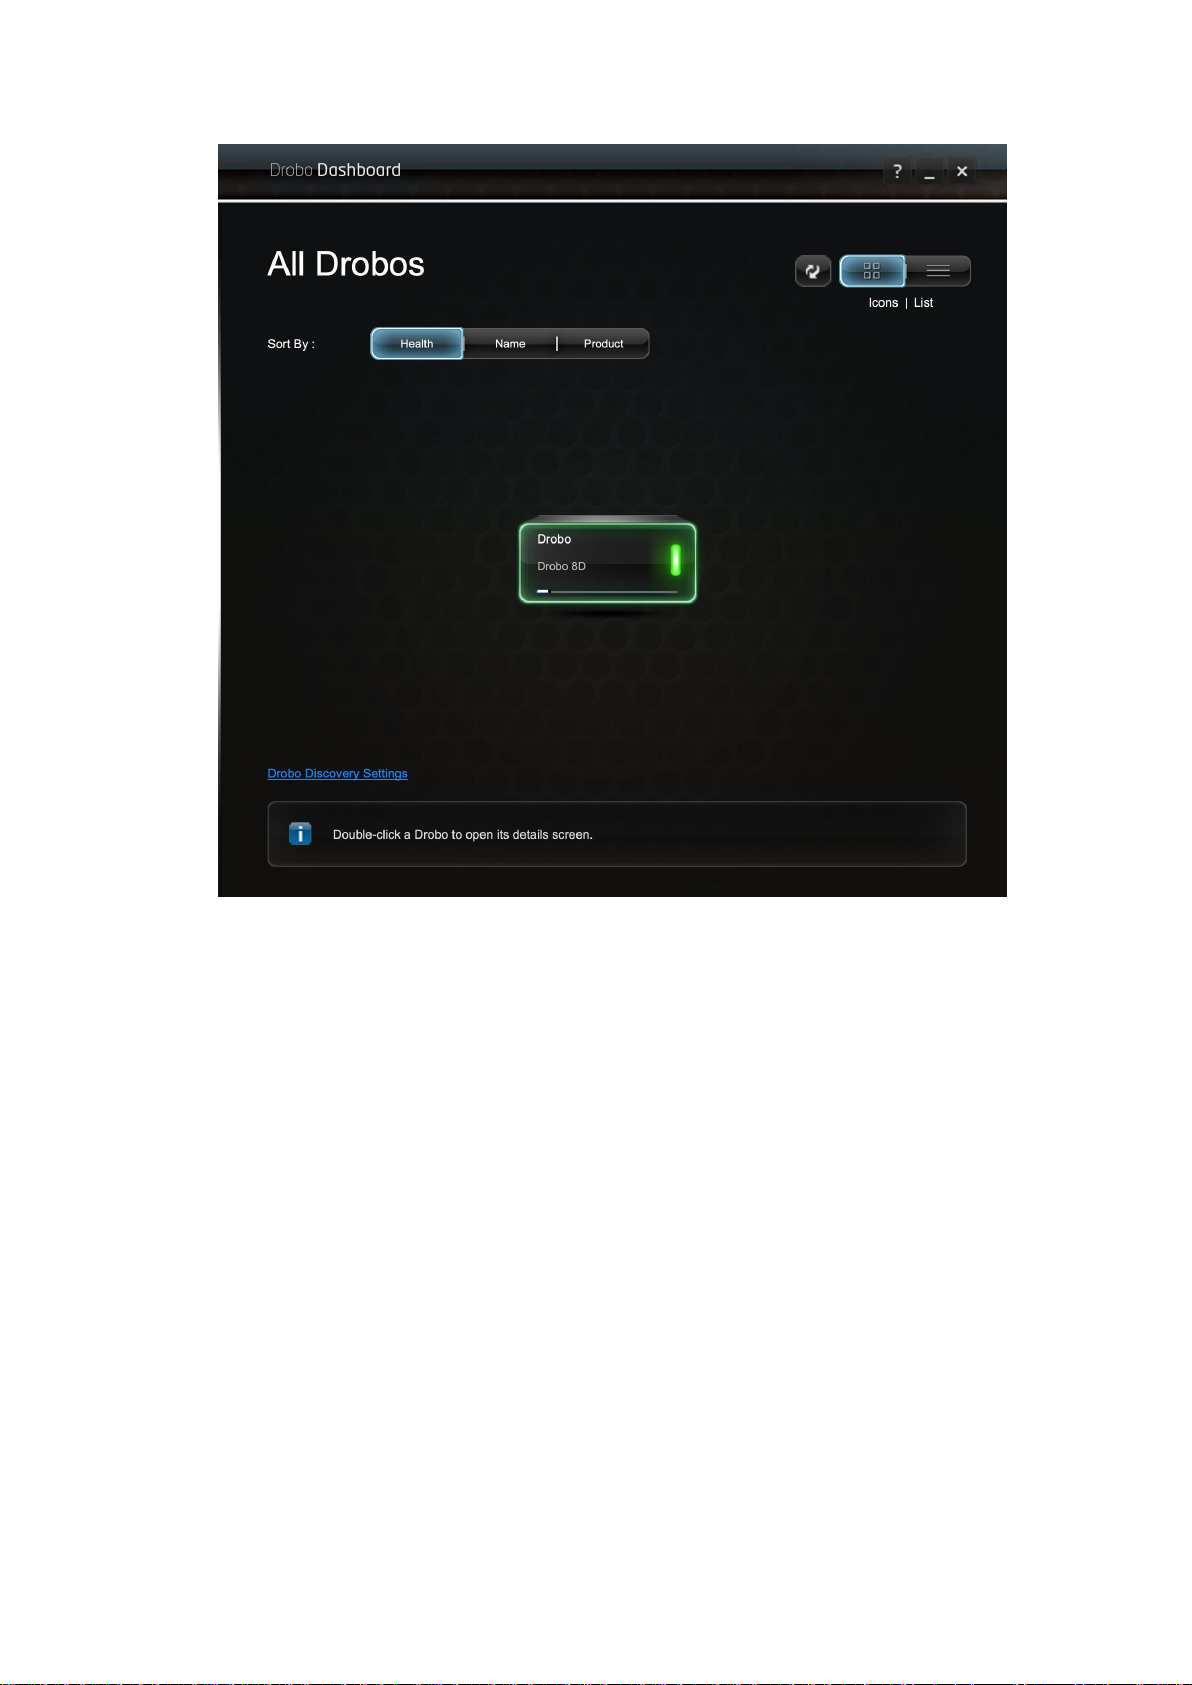
17. If you have no Drobo device connected to the Apple Mac™ or powered on, a "No Drobos
Detected" message displays until you do.
Drobo 8D User Guide 35
Page 36
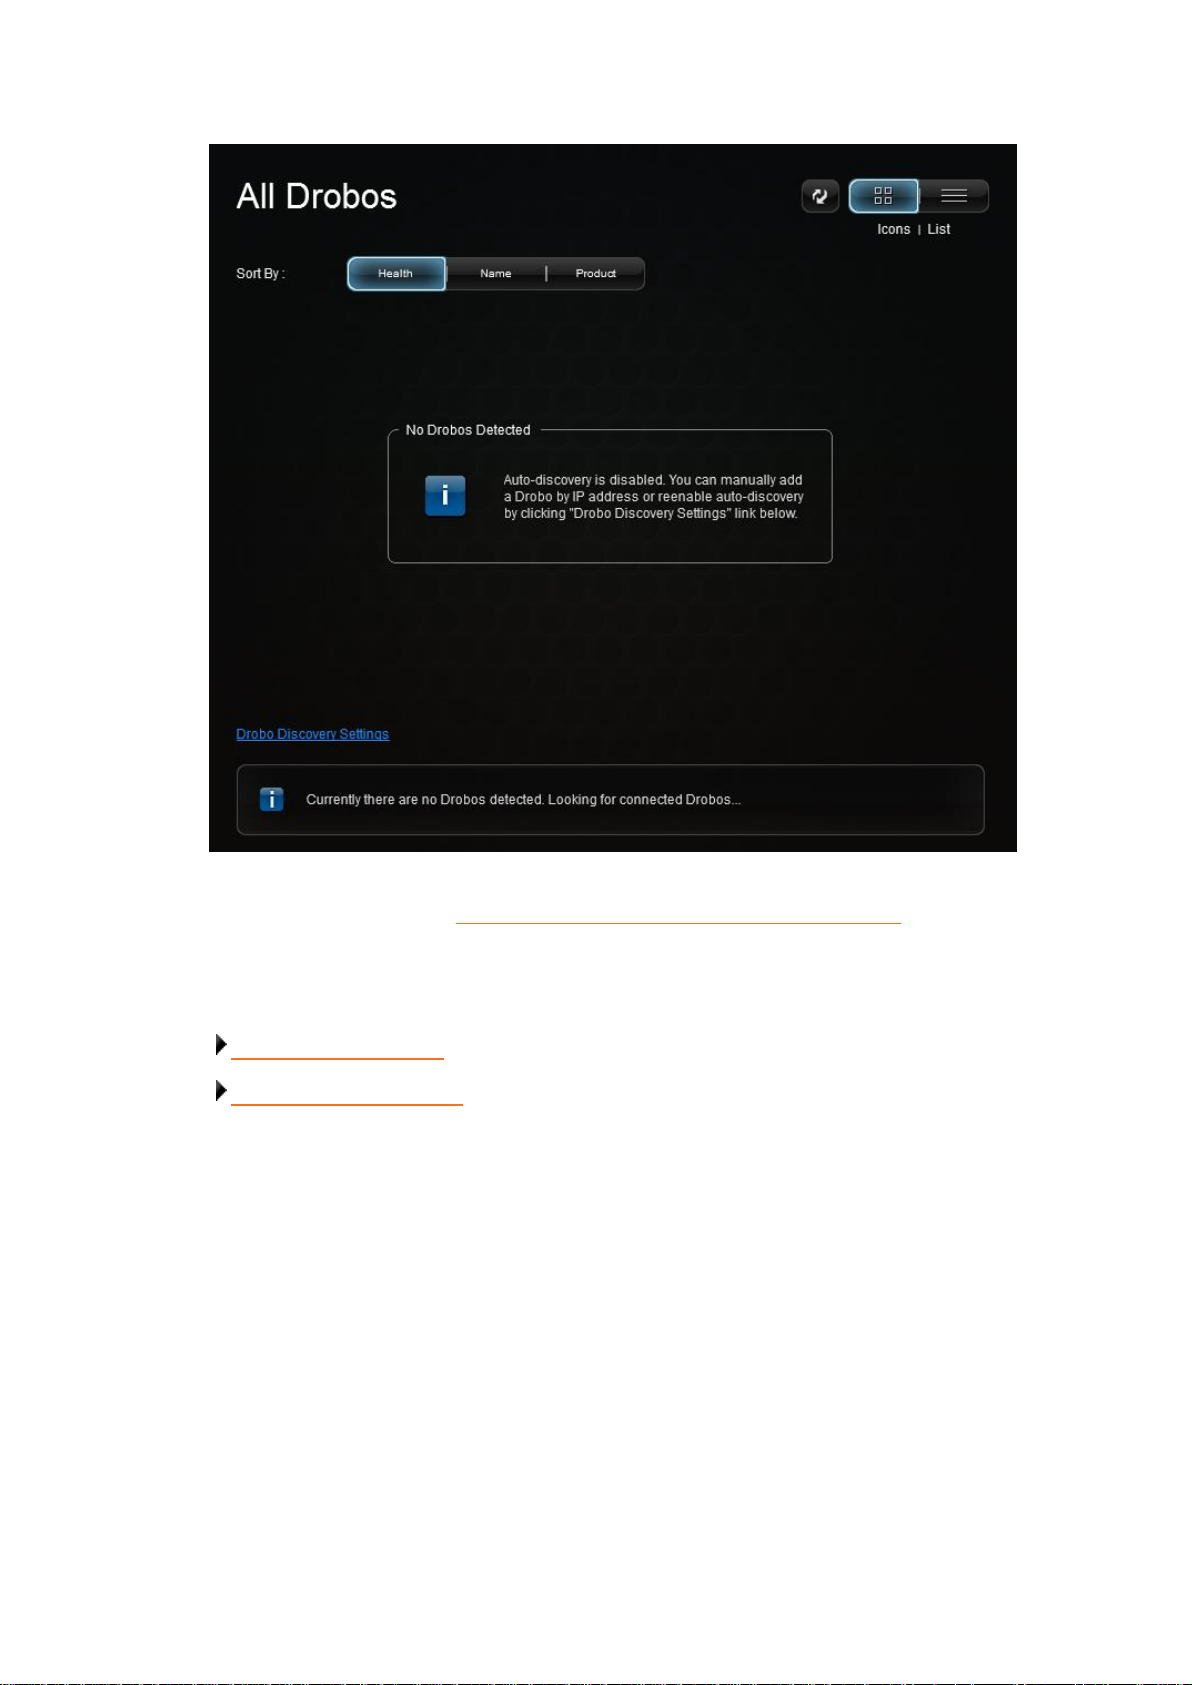
18. The Drobo 8D will not work until you upgrade the firmware. For information on updating the
firmware to the latest version, see Updating the Drobo 8D to the latest firmware.
Related topics:
Using Drobo Dashboard
Touring Drobo Dashboard
Drobo 8D User Guide 36
Page 37
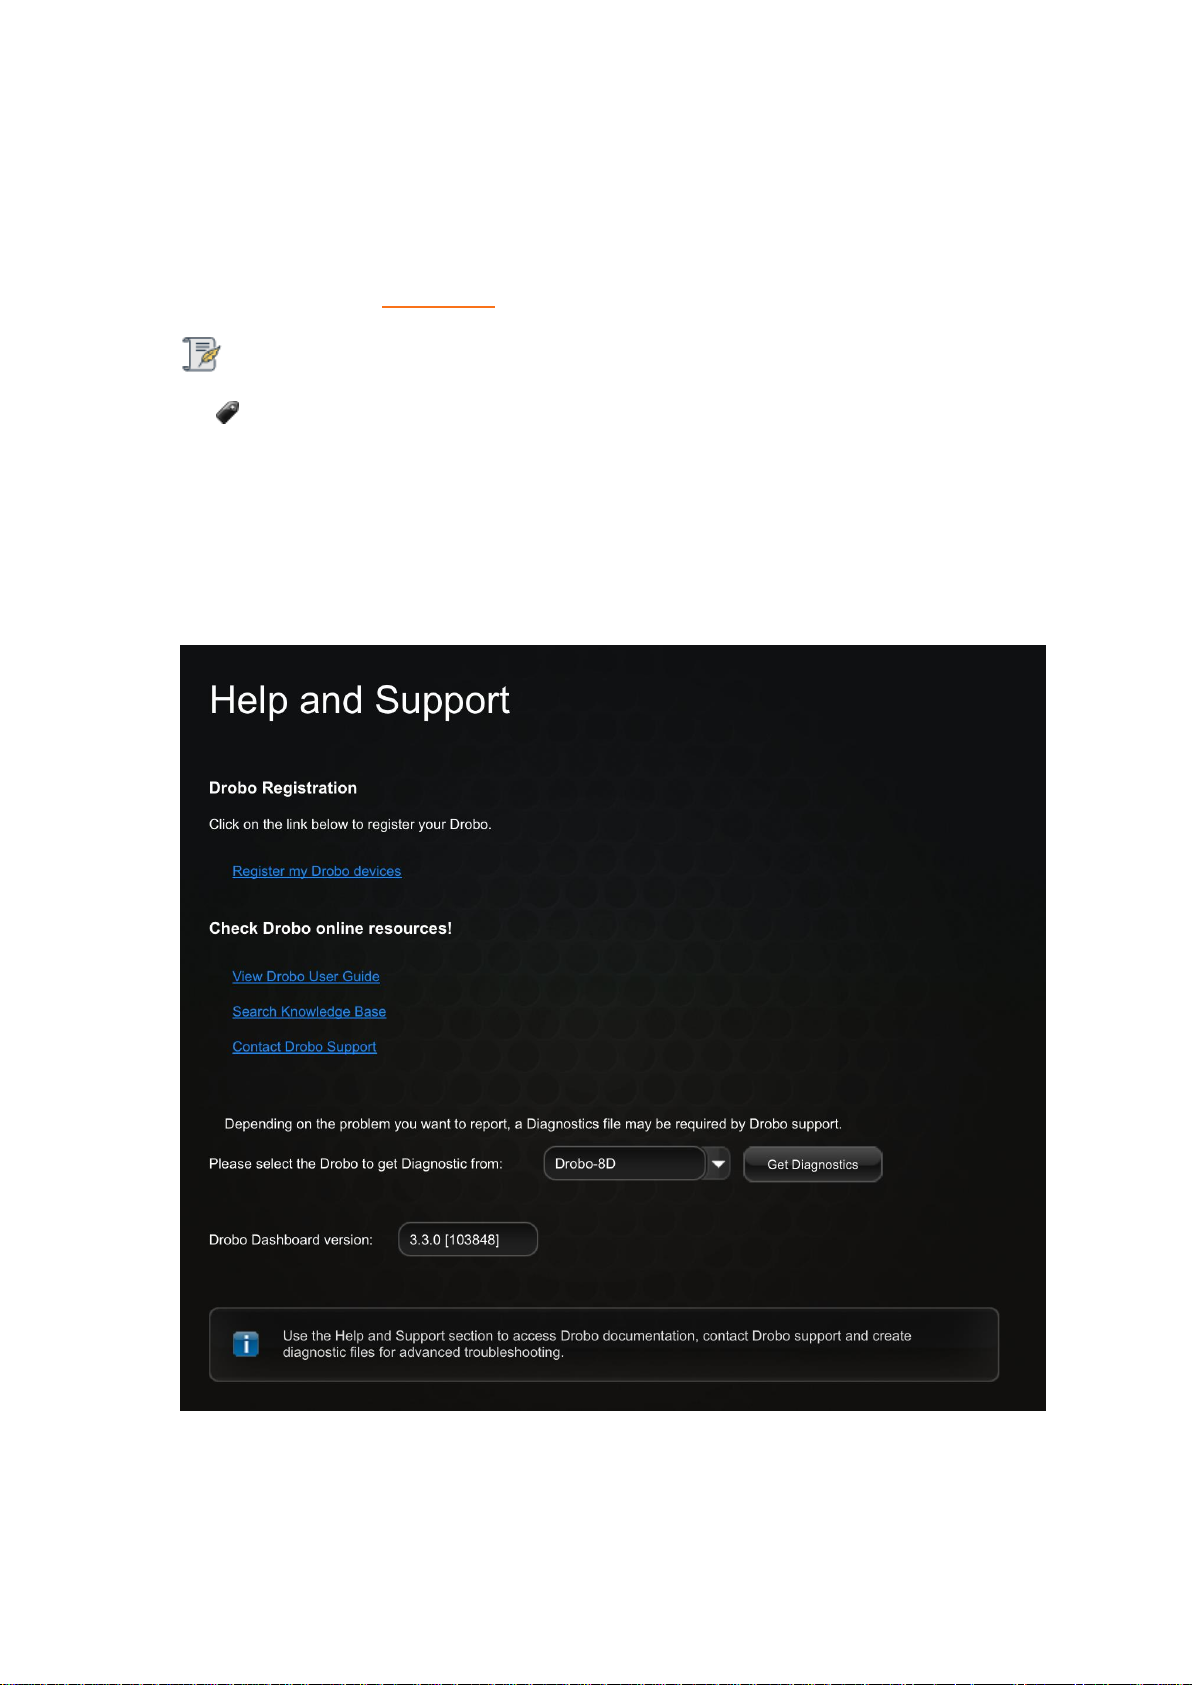
1.2.6 Registering the Drobo 8D
If you did not register the Drobo device during initial setup, you can register the device from the
Drobo Dashboard.
You can also register from My Products page.
Note:
You will need to be connected to the Internet to perform this action.
To register the Drobo 8D follow the steps shown below:
1. Open the Drobo Dashboard and from the All Drobos page, click the Drobo device you need to
register.
2. Then, click the Help and Support option in the Navigation menu. This opens the Help and
Support page for that Drobo device.
3. From the Drobo Registration area, click on the Register my Drobo devices link to open the
Registration page.
Drobo 8D User Guide 37
Page 38
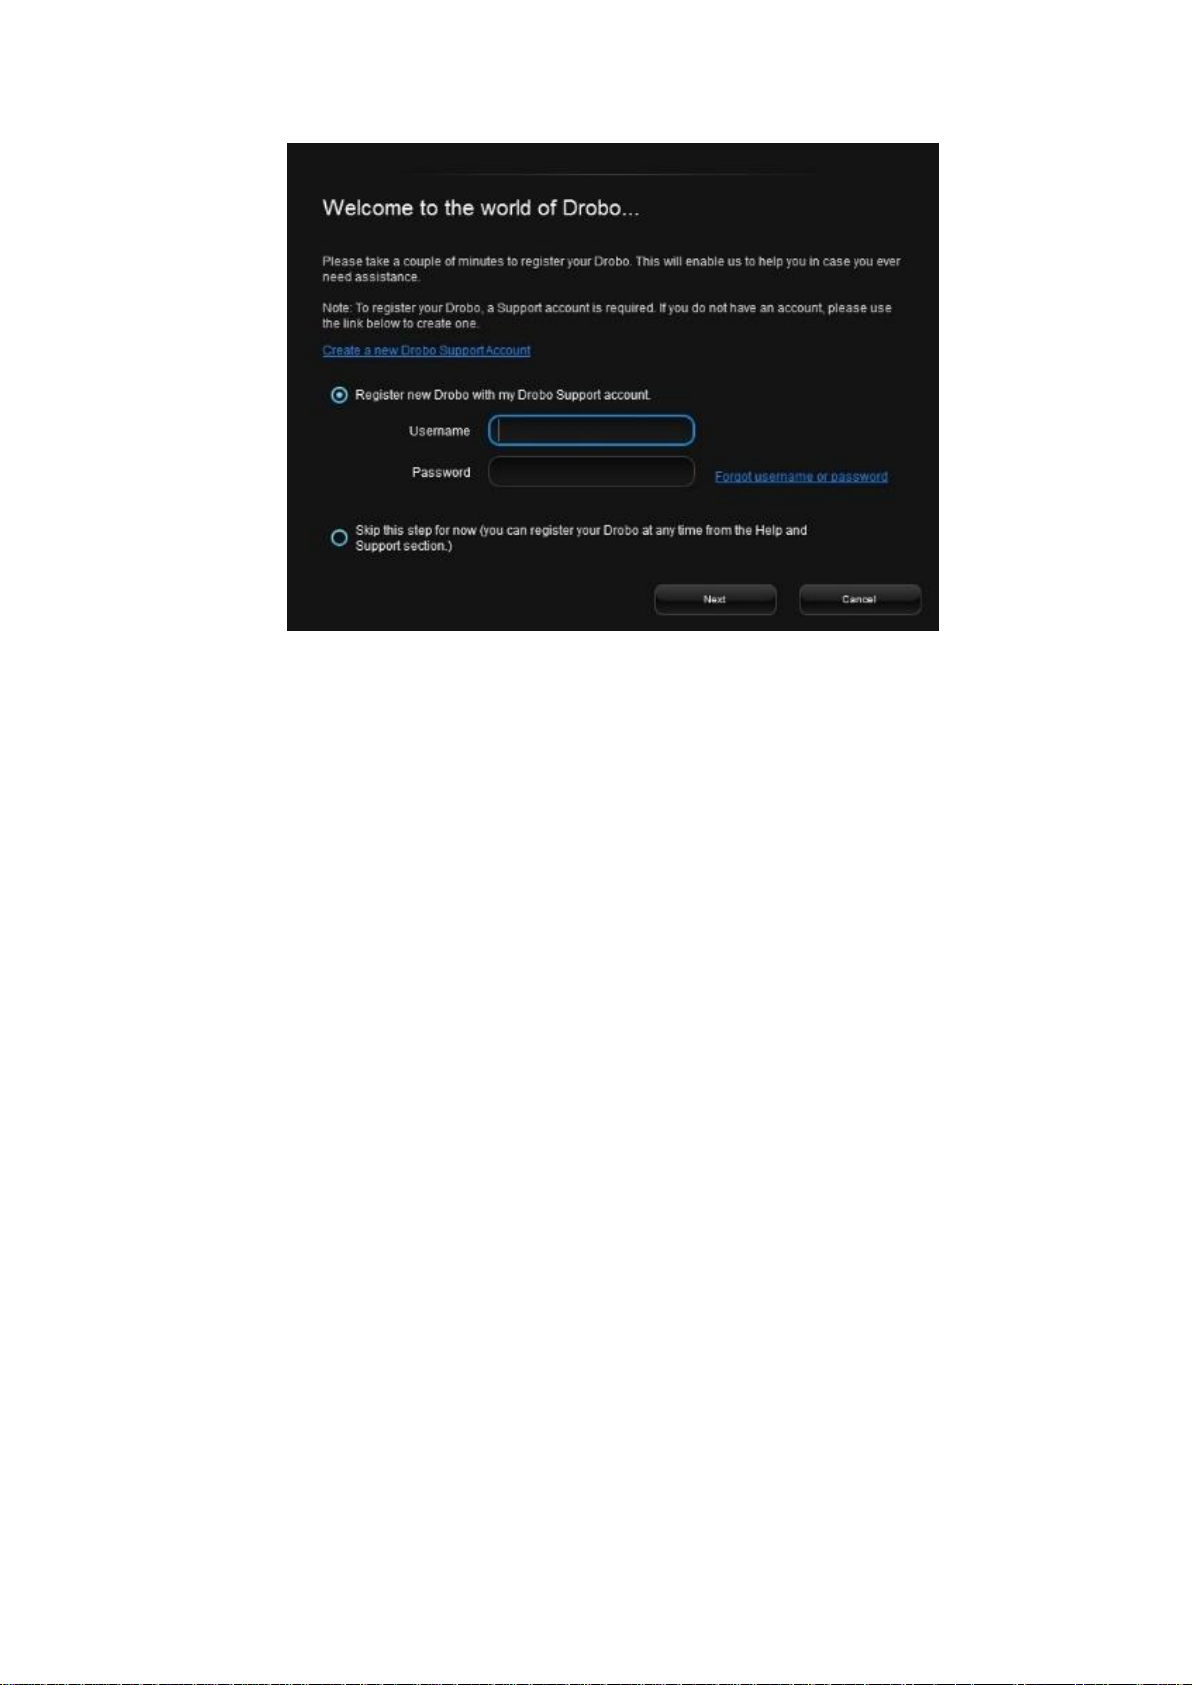
4. Then, do one of the following:
● If you do not have a Drobo account, click the Create a new Drobo Support Account
link. A one-page form opens in your web browser. Fill this in and click Create Account.
Then return to the Registration page to log into your account.
● If you already have a Drobo Support account, select the Register new Drobo with
my Drobo Support Account option, and then enter the Drobo username and password.
You can click the Forgot username or password link if needed. Continue with step 5.
5. Click the Next button. The connected Drobo devices, and their serial numbers will appear.
6. Select the Drobo device you would like to register. Enter its purchase date and select the region
from where you purchased it.
Drobo 8D User Guide 38
Page 39
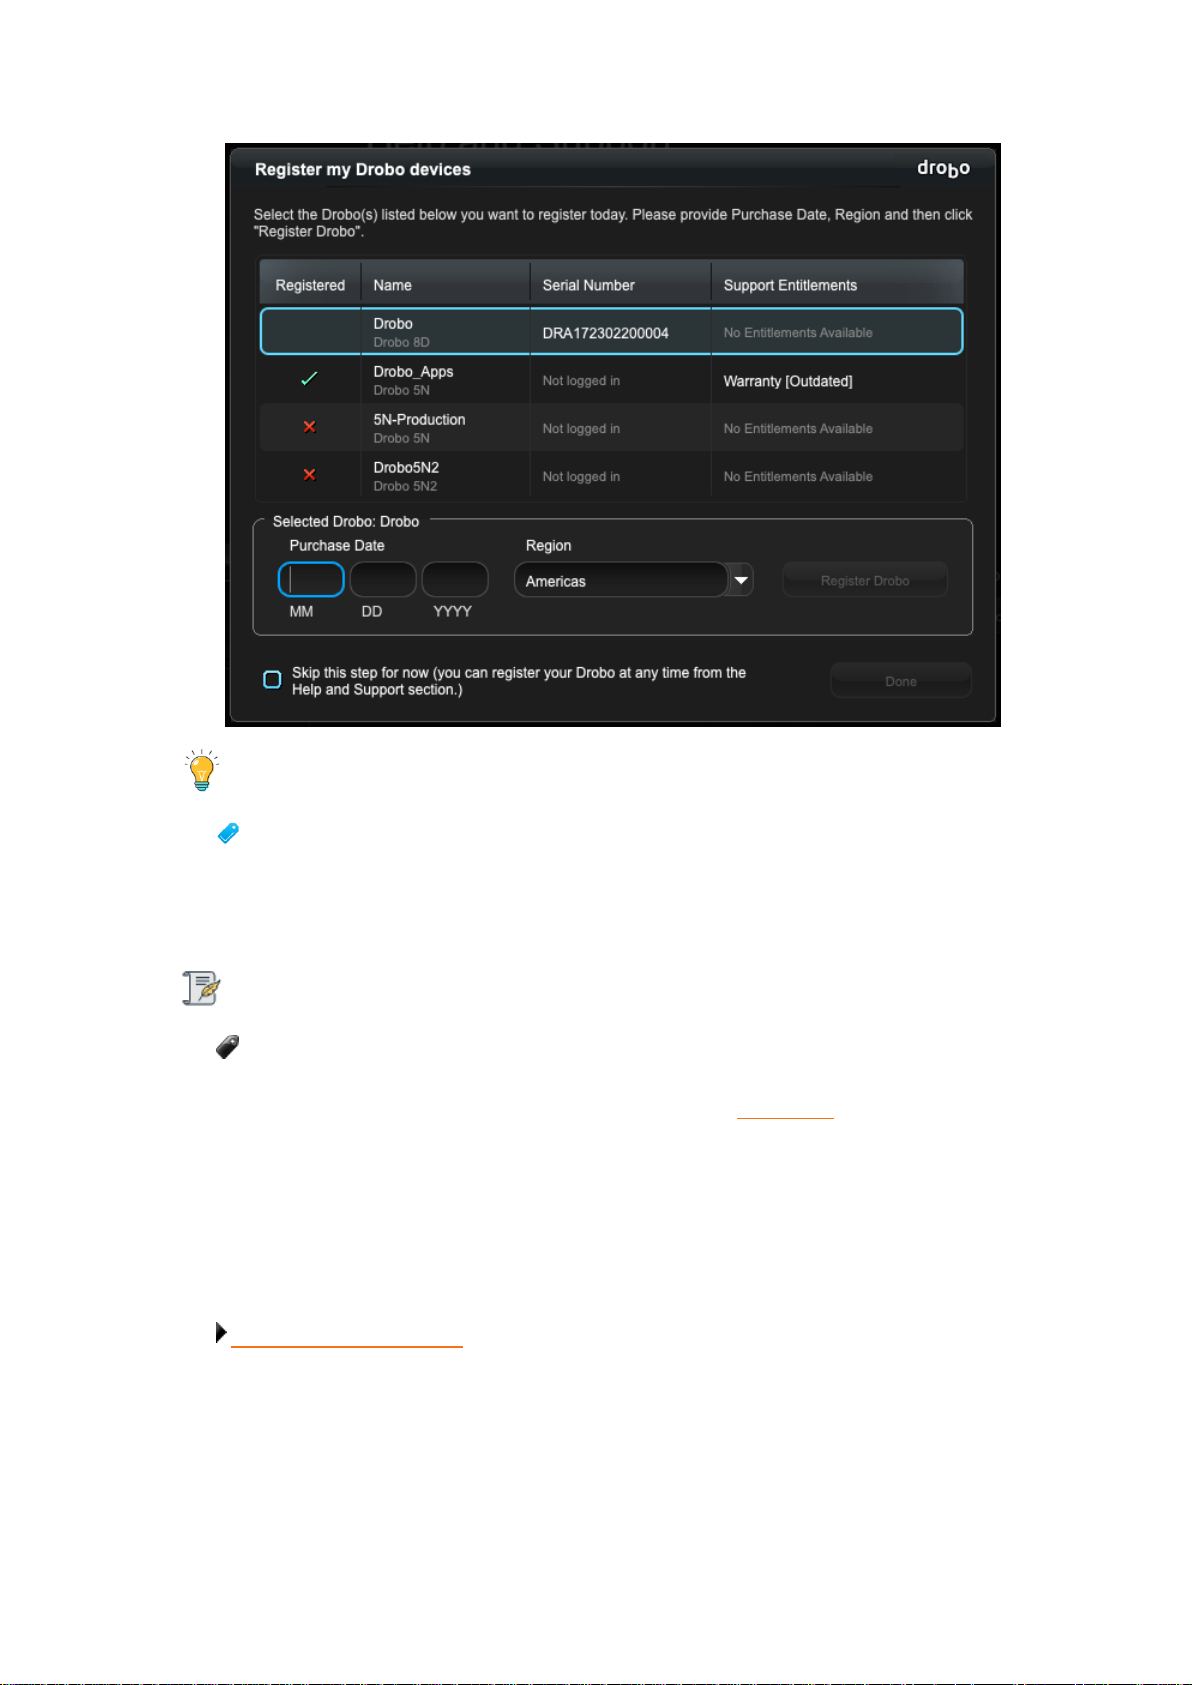
Tip:
You can click the Skip this step for now check box at any time.
7. Once done, click the Register Drobo button.
8. The next page shows with a check mark that your product has been registered.
Note:
You can purchase a DroboCare license by clicking on the Buy additional license link. You
will be redirected to the DroboCare page.
Otherwise you can purchase DroboCare license from here DroboCare.
9. Repeat steps 5 and 6 to register additional Drobo devices.
10. When finished, click the Done button. You will return to the Help and Support page.
Related topic:
Getting Technical Support
Drobo 8D User Guide 39
Page 40

1.2.7 Initializing and Updating the Drobo 8D to the
Latest Firmware
When you first receive a new Drobo 8D device, you must use the Drobo Dashboard application to
update it to the latest firmware release.
Note:
Make sure that you have installed the Drobo Dashboard on your system before following
the steps given below. For more information see Downloading and Installing Drobo
Dashboard.
To update the firmware of the Drobo 8D to the latest one:
1. Connect the Thunderbolt cable to the back of the Drobo 8D.
2. Ensure that the Apple Mac™ you are using for this setup has a valid Internet/network
connection.
3. Verify that the Drobo is powered off.
4. Insert the drives.
5. Power on the Drobo 8D.
Wait for the Drobo device to appear on the Dashboard. The Drobo should appear with a yellow
Drobo device icon on your main dashboard screen. Double click on the Drobo 8D icon.
For further information you can visit Set up the Drobo.
Drobo 8D User Guide 40
Page 41
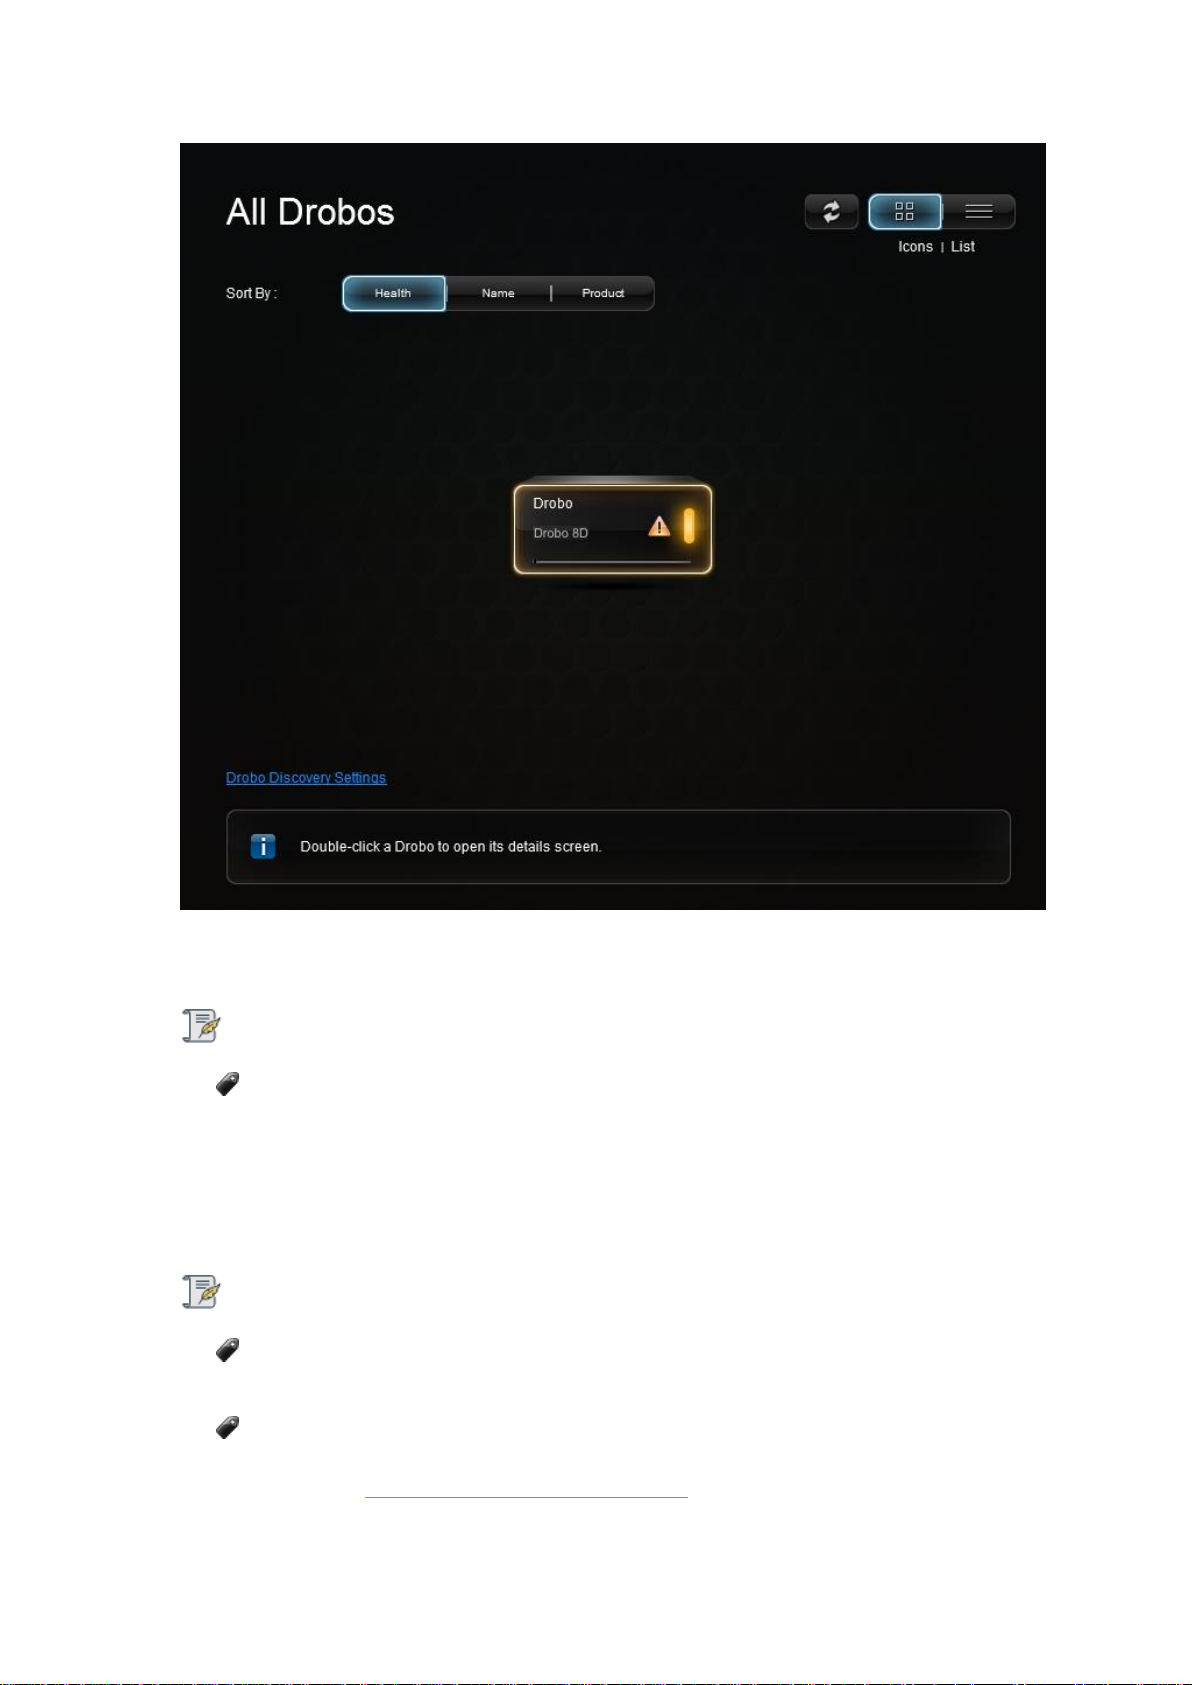
6. The Drobo should begin updating to the latest firmware. Please allow Drobo up to 20 minutes
for the total initialization process.
Note:
Leave the Dashboard idle while the initialization process is going on.
7. Here is what you will see happen:
During initialization, all of the drive slot LEDs will be yellow and the capacity LEDs will blink
blue. When initialization is complete, the Drobo 8D will restart to finish the firmware upgrade
process.
Important Notes:
If the Drobo Dashboard does not detect the Drobo 8D and initialization does not begin,
please disable any firewall and antivirus programs.
If the Drobo Dashboard will still not detect the Drobo 8D and the lights remain solid red,
please call our support line for assistance or open a ticket on your support account. For more
info, please see: How do I contact technical support?
Drobo 8D User Guide 41
Page 42
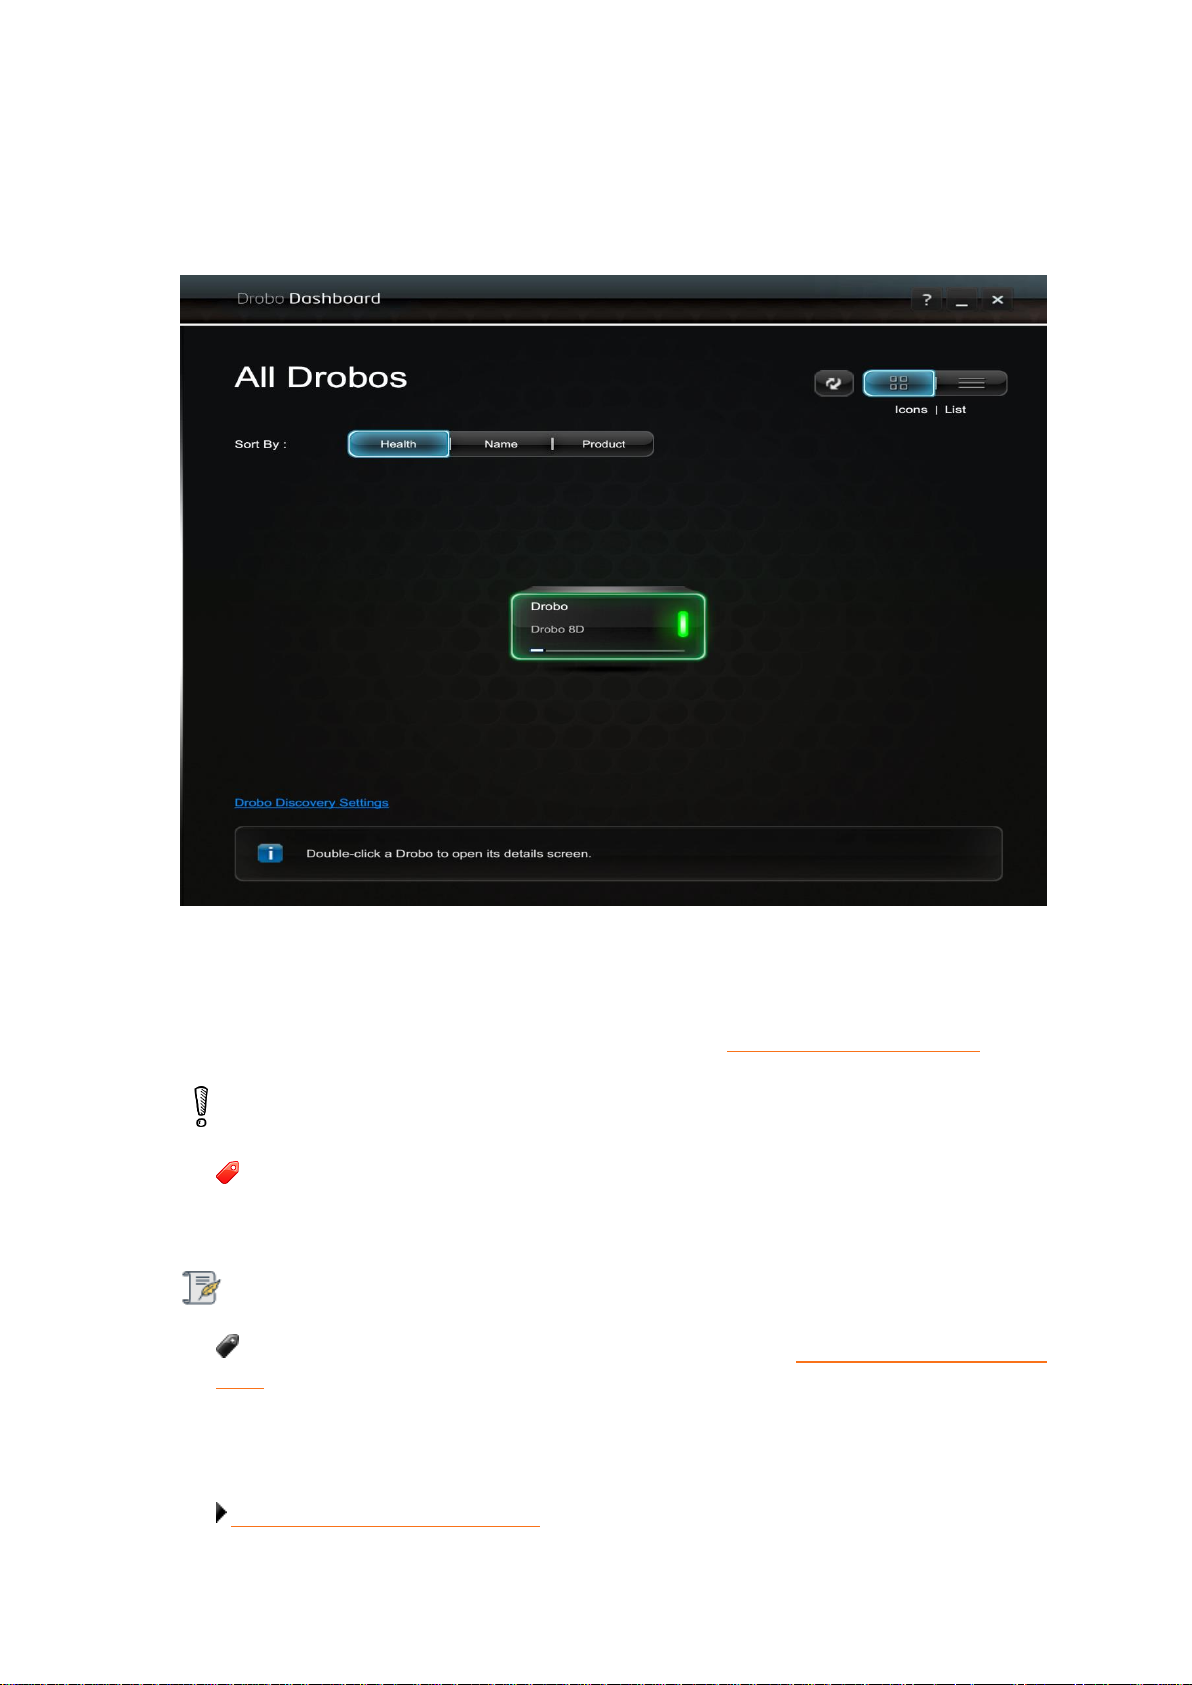
8. The device temporarily disappears from the Dashboard while it is rebooting. After reboot,
Drobo icon will appear green and the drive bay lights will also turn green. Click on the green Drobo
icon in the main dashboard screen and follow the on-screen instructions on the Drobo Dashboard
to format the Drobo device.
9. If the red drive lights reappear (e.g. "Unknown Disk Set"), please go to the Drobo Dashboard's
Tools section and choose Drobo Reset. This process will erase all the data on the disk set. If the issue
still continues, please contact support. For more information see Getting Technical Support.
Warning:
This procedure will erase all data from all drives and return the Drobo 8D to default
settings.
Note:
If you need to assess that the process is moving smoothly, see Understanding the indicator
lights (LEDs).
Related topic:
Return to Setting Up the Drobo 8D
Drobo 8D User Guide 42
Page 43

1.2.8 Formatting the Drives of Drobo 8D
After installing Drobo Dashboard, inserting the drives into the Drobo 8D and connecting cables, you
are ready to turn on the Drobo device and format the drives.
Note:
If you have migrated the entire disk pack from another Drobo device to this one, you do
not need to format the drives as they have already been formatted. For additional
information, see Migrating a Disk Pack from Another Drobo Device.
Related topics:
Selecting a File System and Volume Size for the Drobo 8D
Turning On the Drobo 8D and Formatting the Drives
Drobo 8D User Guide 43
Page 44
1.2.8.1 Turning On the Drobo 8D and Formatting the
Drives
To format the drives:
1. Open the Drobo Dashboard on your Apple Mac™ and press the power toggle button on the back
of the Drobo device once. The Drobo device powers on and appears on the All Drobos page in Drobo
Dashboard.
Note:
Some of the Apple Mac™ operating systems will prompt you to format the drives. Click Cancel
or Ignore, as appropriate, and continue with formatting from Drobo Dashboard.
2. Double-click on the Drobo 8D icon on the All Drobos page. A message appears, asking if you
would like to format the device.
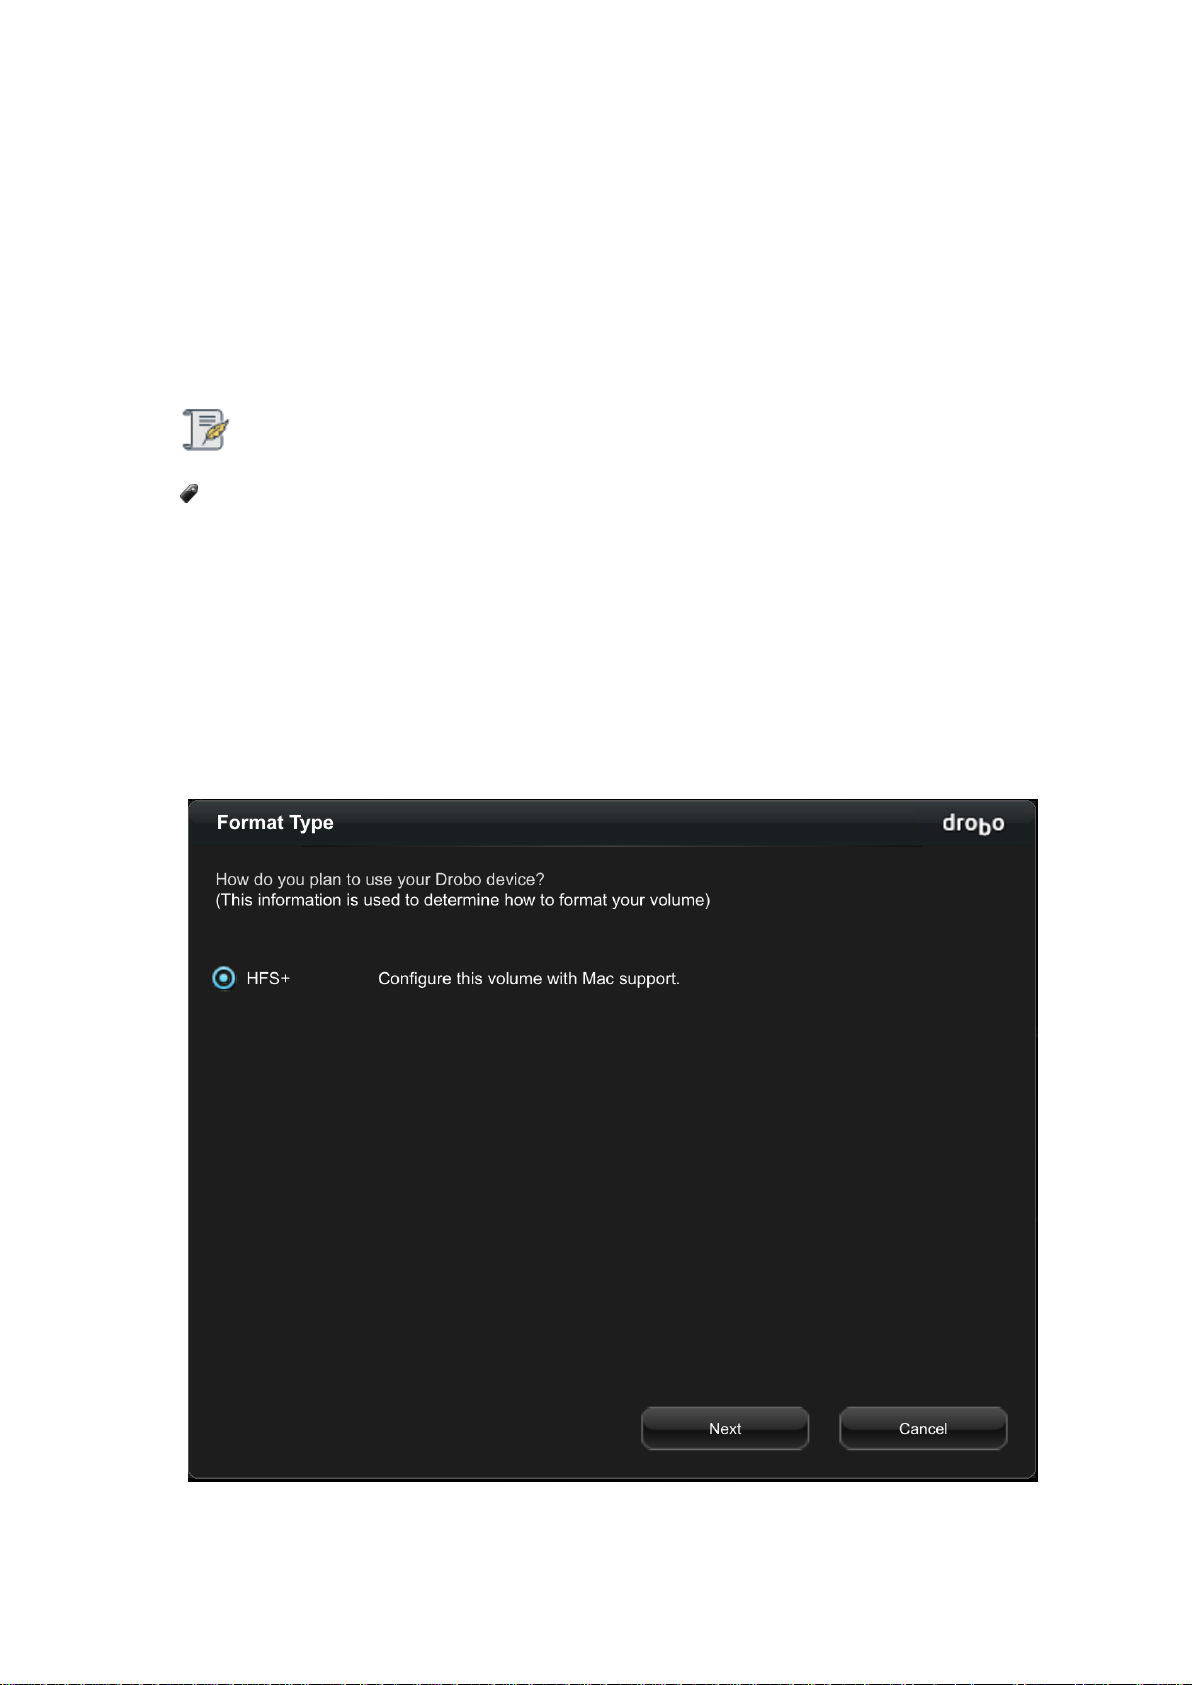
3. Click the Yes button. The Format Type page opens. Depending on your operating system the
page displays with different options.
The File Format page will appear as:
Drobo 8D User Guide 44
Page 45
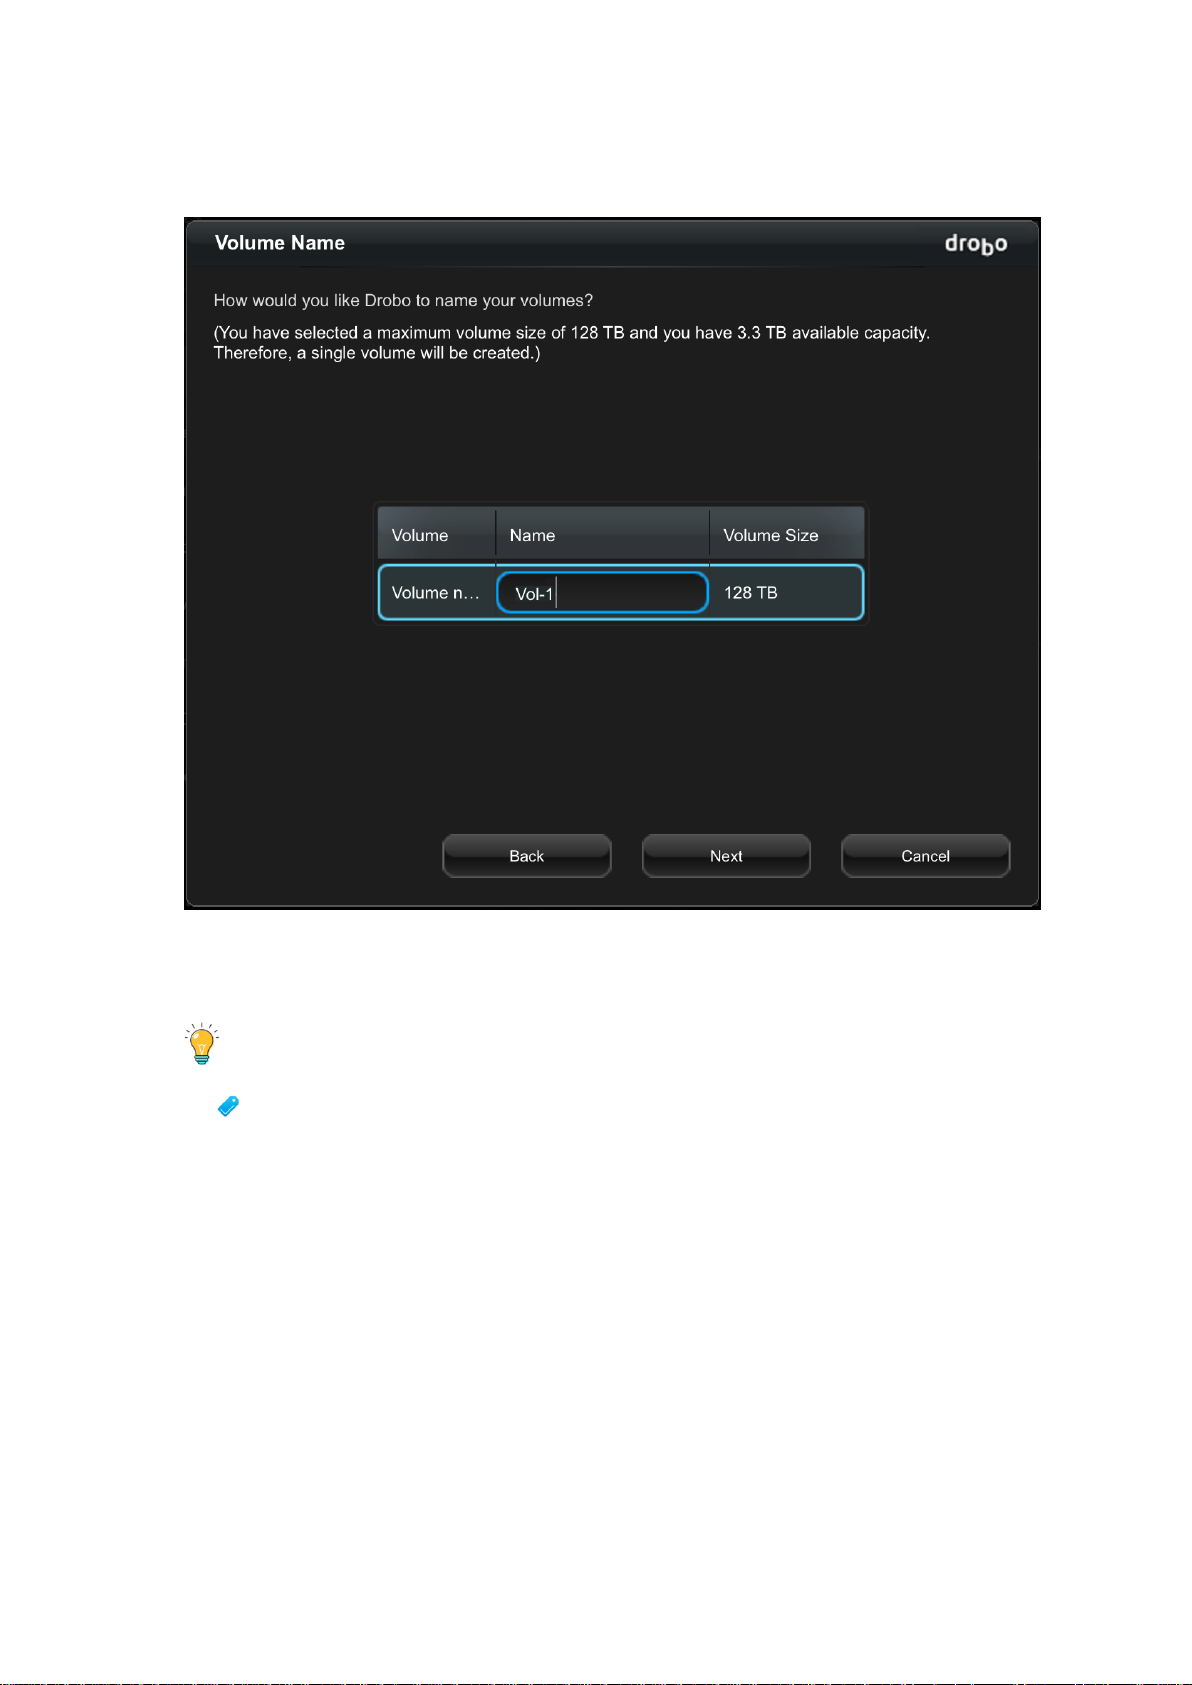
4. Select the appropriate file format for your operating system and click the Next button. The
Volume Name page opens.
5. In the Name text box, modify the default name for the volume as you like.
Tip:
We recommend using the word “volume” in the name so as not to confuse the volume
name with the Drobo device name.
6. Click the Next button. The Confirm Format page opens.
Drobo 8D User Guide 45
Page 46
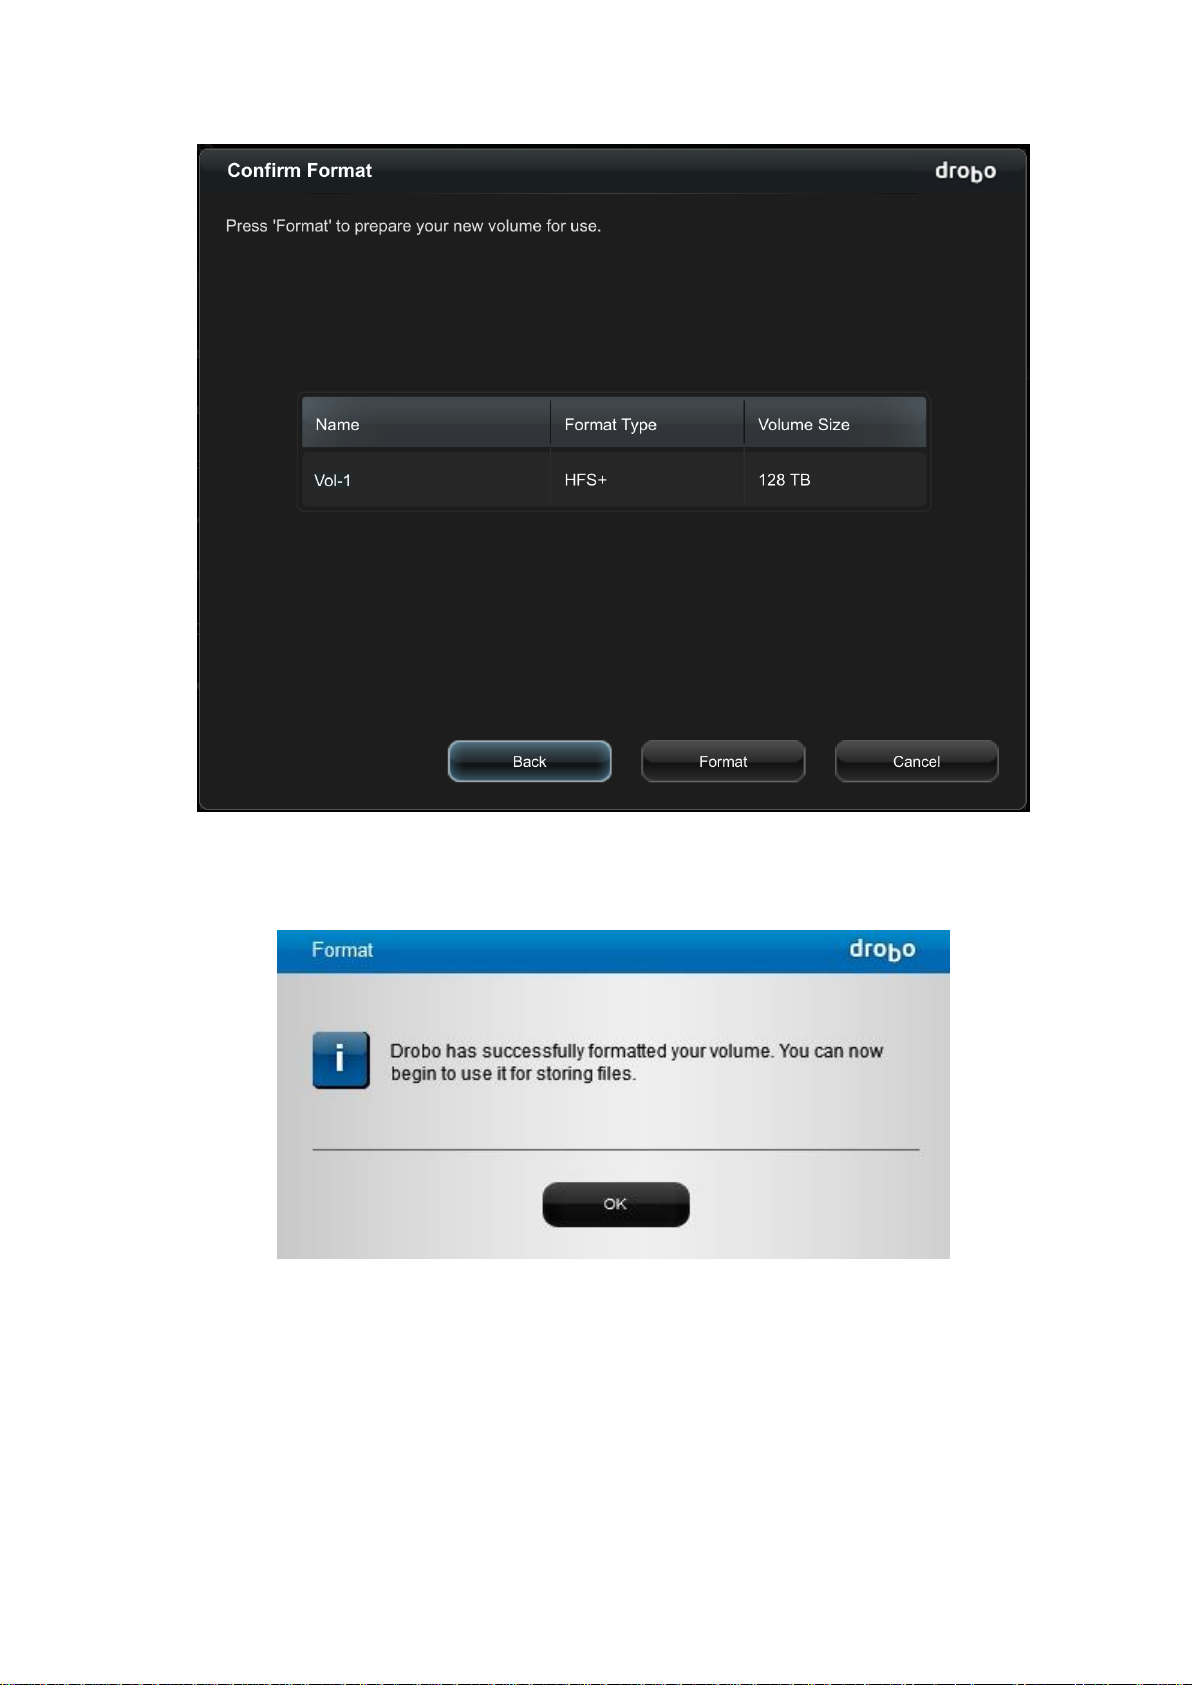
7. Click the Format button. A message appears, informing you that it can take up to five minutes to
format your drives, and that this may require rebooting the Drobo device. Afterwards, the Format
dialog box opens.
8. Click the OK button. The volumes page of Drobo 8D will appear.
Drobo 8D User Guide 46
Page 47
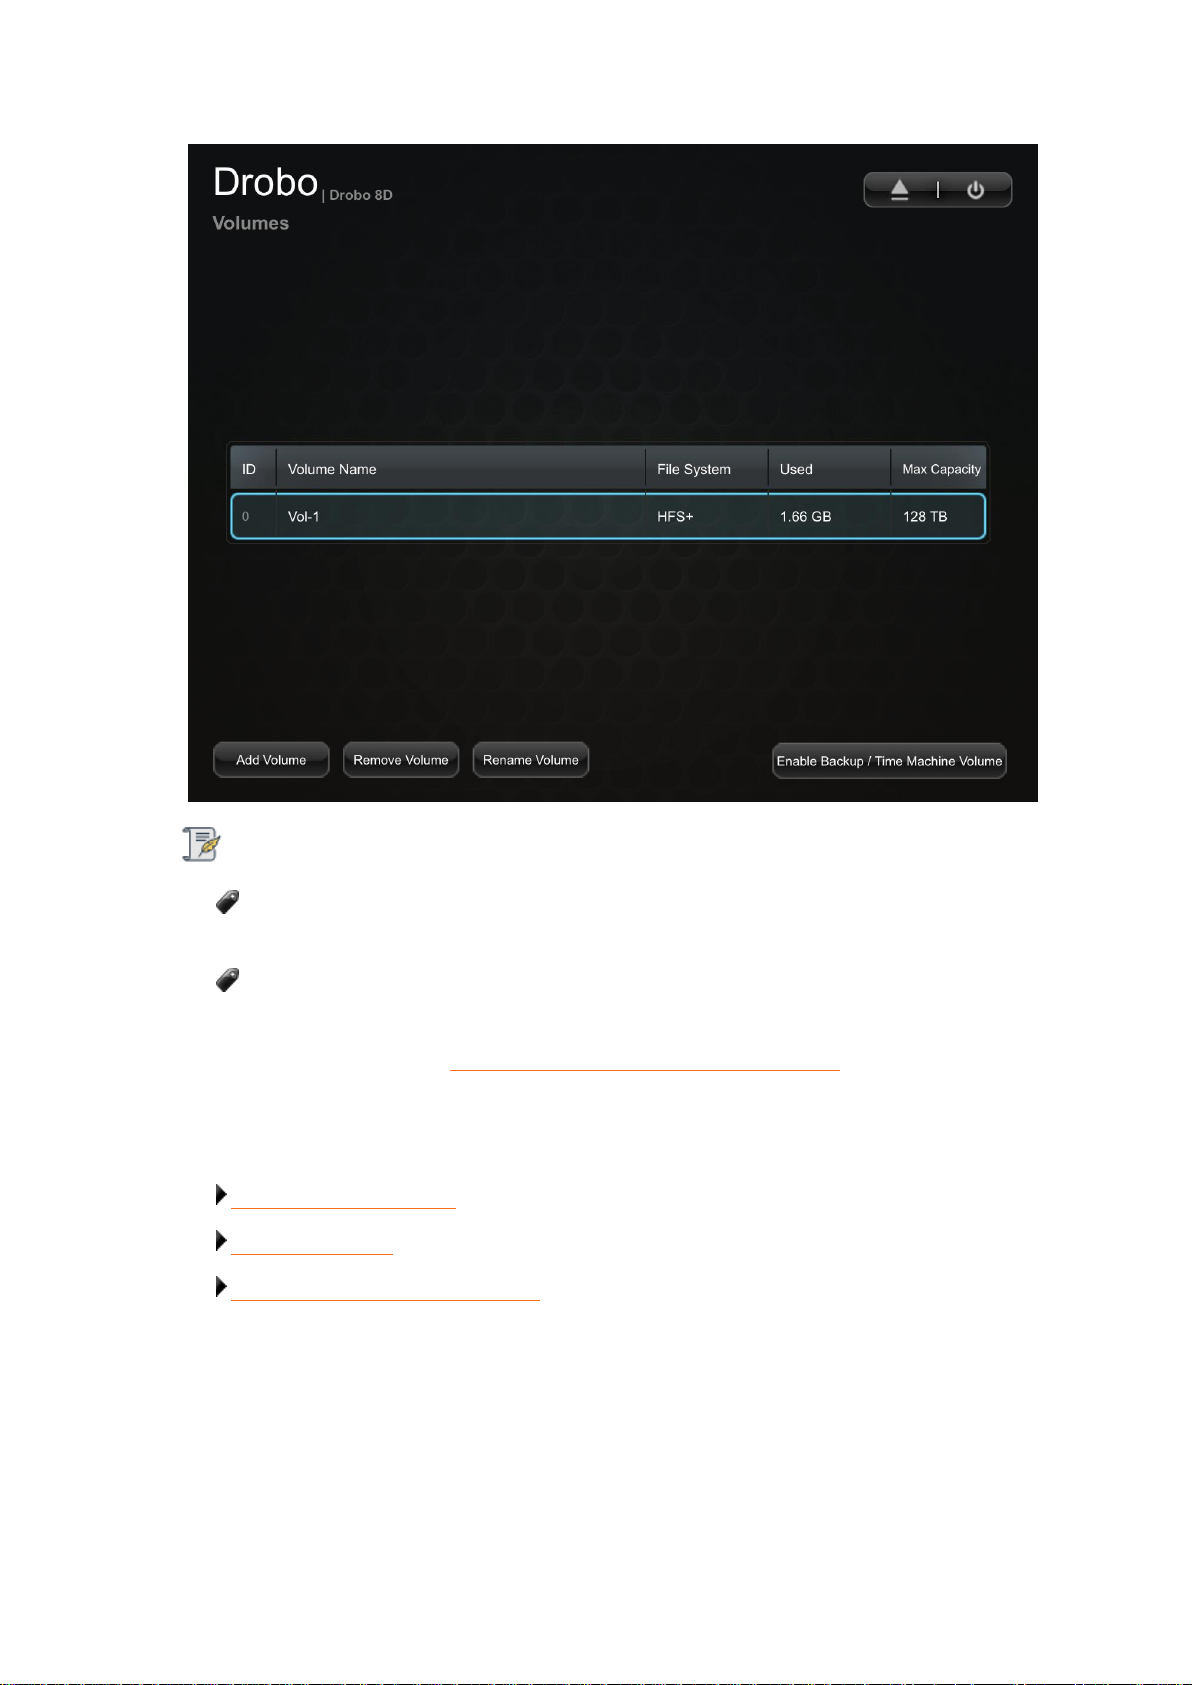
Notes:
Drobo Dashboard automatically assigns “Drobo” as the default name for your device,
which you can rename later.
To use the Drobo's Dual Disk Redundancy feature, you will have to enable the Dual Disk
Redundancy checkbox in the General Settings page.
For more information see Enabling or Disabling Dual Disk Redundancy
Next in the Setup for the Drobo 8D
Registering the Drobo 8D
Where to Go Next
Return to Setting Up the Drobo 8D
Drobo 8D User Guide 47
Page 48
1.2.8.2 Selecting a File System and Volume Size for the
Drobo 8D
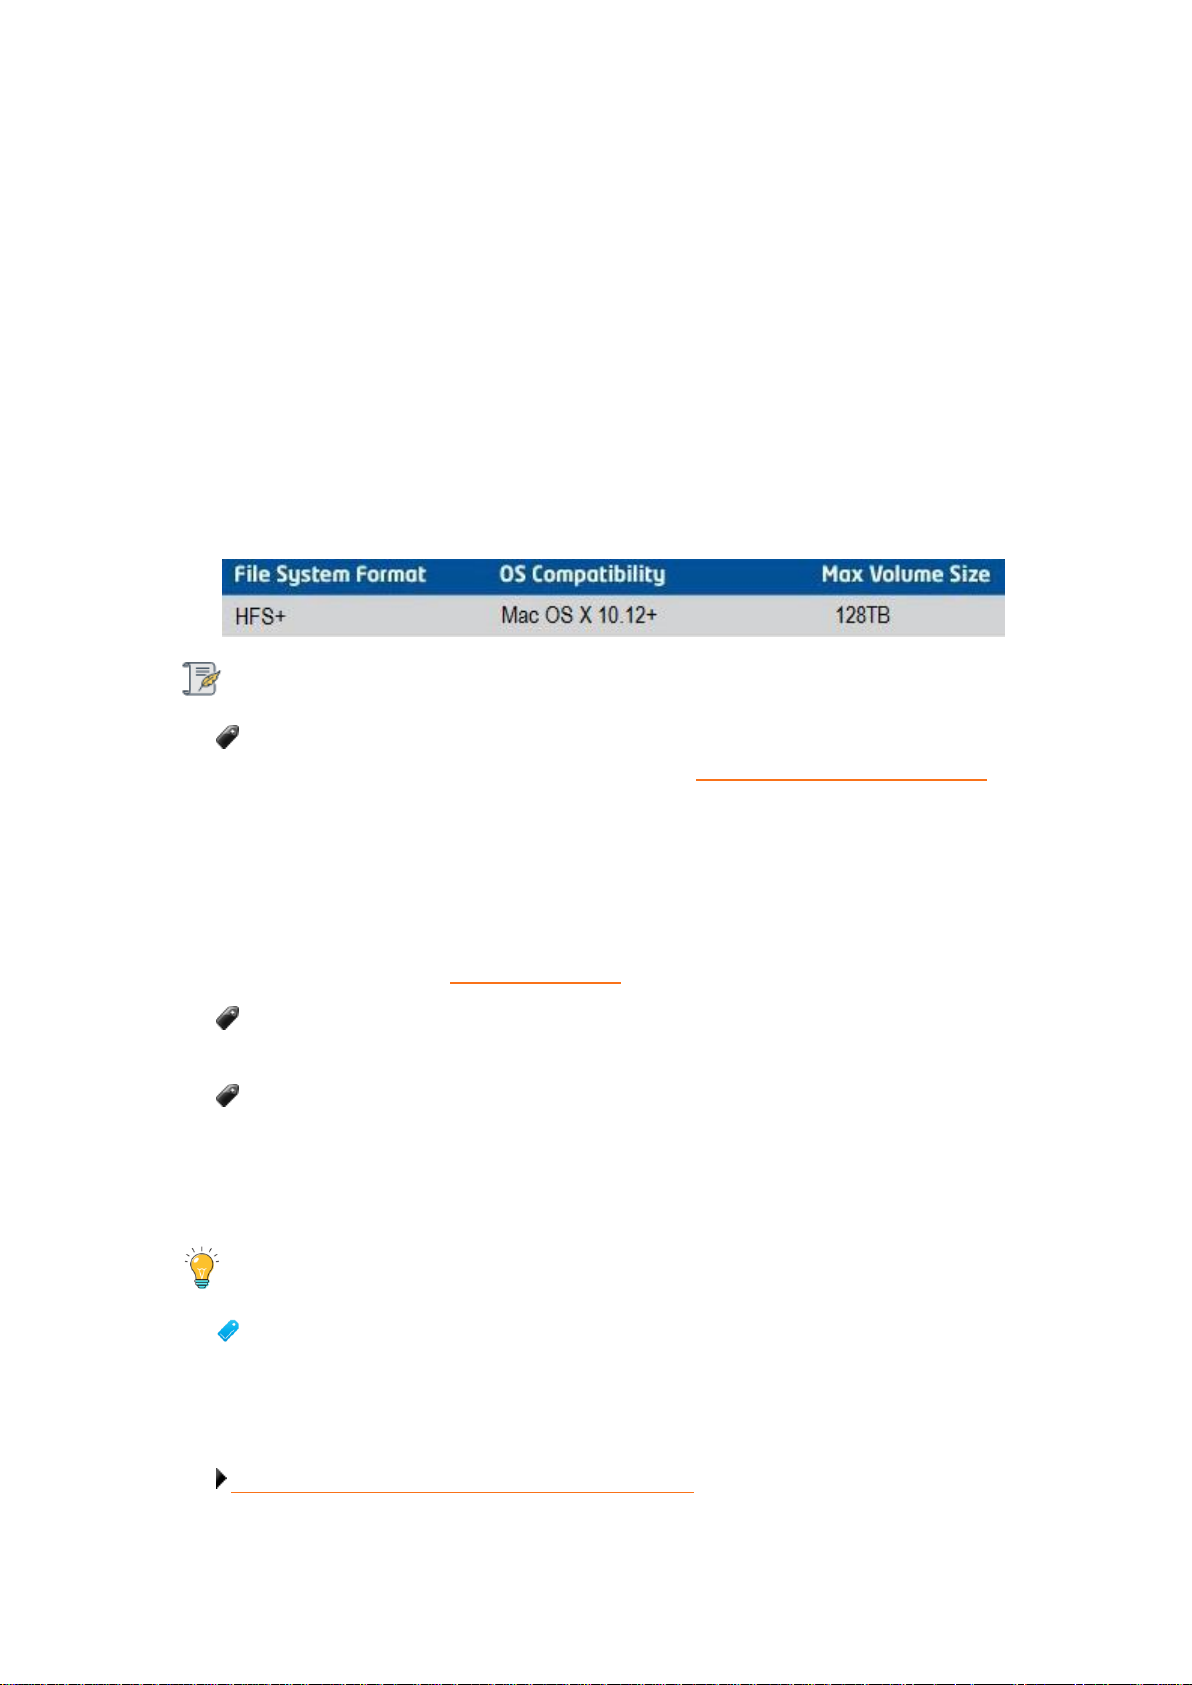
When you turn on the Drobo 8D, you will be prompted to format the drives with a particular file
system. The file system formats available to you depends on your operating system. (See the Figure
below.)
You have to format the Drobo 8D into at least one volume and should choose an appropriate size for
the volume created. A volume is a storage area that has been formatted with a file system format
which your operating system can recognize.
The largest volume size you are allowed depends on the file system format you choose and the total
capacity of the drives in the Drobo device. The following table shows the maximum volume size
allowed for each file system format.
Important Notes:
The term Volume does not represent how much actual storage space is available on the
Drobo 8D.You can also create more volumes by using Intelligent Volume Management.
For example, the Drobo 8D may be loaded with 2TB + of drive space, but you can create a
volume of 128 TB. What this enables you to do is, add more capacity to the Drobo 8D (by
inserting an additional drive or replacing a smaller capacity drive with a larger capacity one)
without having to format an additional volume. The additional capacity may become part of
the same volume you formatted originally.
For more information see Capacity Calculator.
Your operating system may show the virtual space available on the Drobo device, as
defined by the volume size.
If the amount of available, protected storage space in the Drobo 8D ever exceeds the size
of the volume that you chose (this may occur when you add one or more additional drives to
the Drobo 8D), then Drobo Dashboard will automatically create a new volume (or volumes) of
the same size as the original volume. Drobo Dashboard will notify you when this occurs and
ask you to format and name the new volume(s).
Tip:
We would recommend you to choose the largest volume size available for the selected file
system. However,note that smaller volume sizes can be more efficient and manageable in
certain situations, such as when indexing, scanning or searching volumes.
Related topic:
Turning On the Drobo 8D and Formatting the Drives
Drobo 8D User Guide 48
Page 49

1.3 Where To Go Next
After you have set up the Drobo 8D, you are ready to store and back up data.
Click on a topic below to learn more.
Using Best Practices for Data Protection
Using the Online User Guide
Using Context-Sensitive Help
Using Knowledge Base
Registering the Drobo 8D
Getting Technical Support
Drobo 8D User Guide 49
Page 50

1.3.1 Using Best Practices for Protecting Data
Although the Drobo 8D provides redundancy and automatically protects your data against a drive
failure, it should only be one part of an overall digital asset management strategy.
To better safeguard your valuable data, we strongly encourage you to review our guide on Best
Practices.
Our guide offers strategies to protect data beyond drive failures. Following best practices will help
maximize the safety of your data.
Note:
To ensure data protection, it is recommended to back up your data periodically.
Related topic:
Where to Go Next
Drobo 8D User Guide 50
Page 51
1.3.2 Using the Online User Guide
After you have set up the Drobo 8D, you are ready to use it to store and back up data. To learn how
to manage and use the Drobo 8D refer to the Online User Guide for your product available at the
Drobo 8D page.
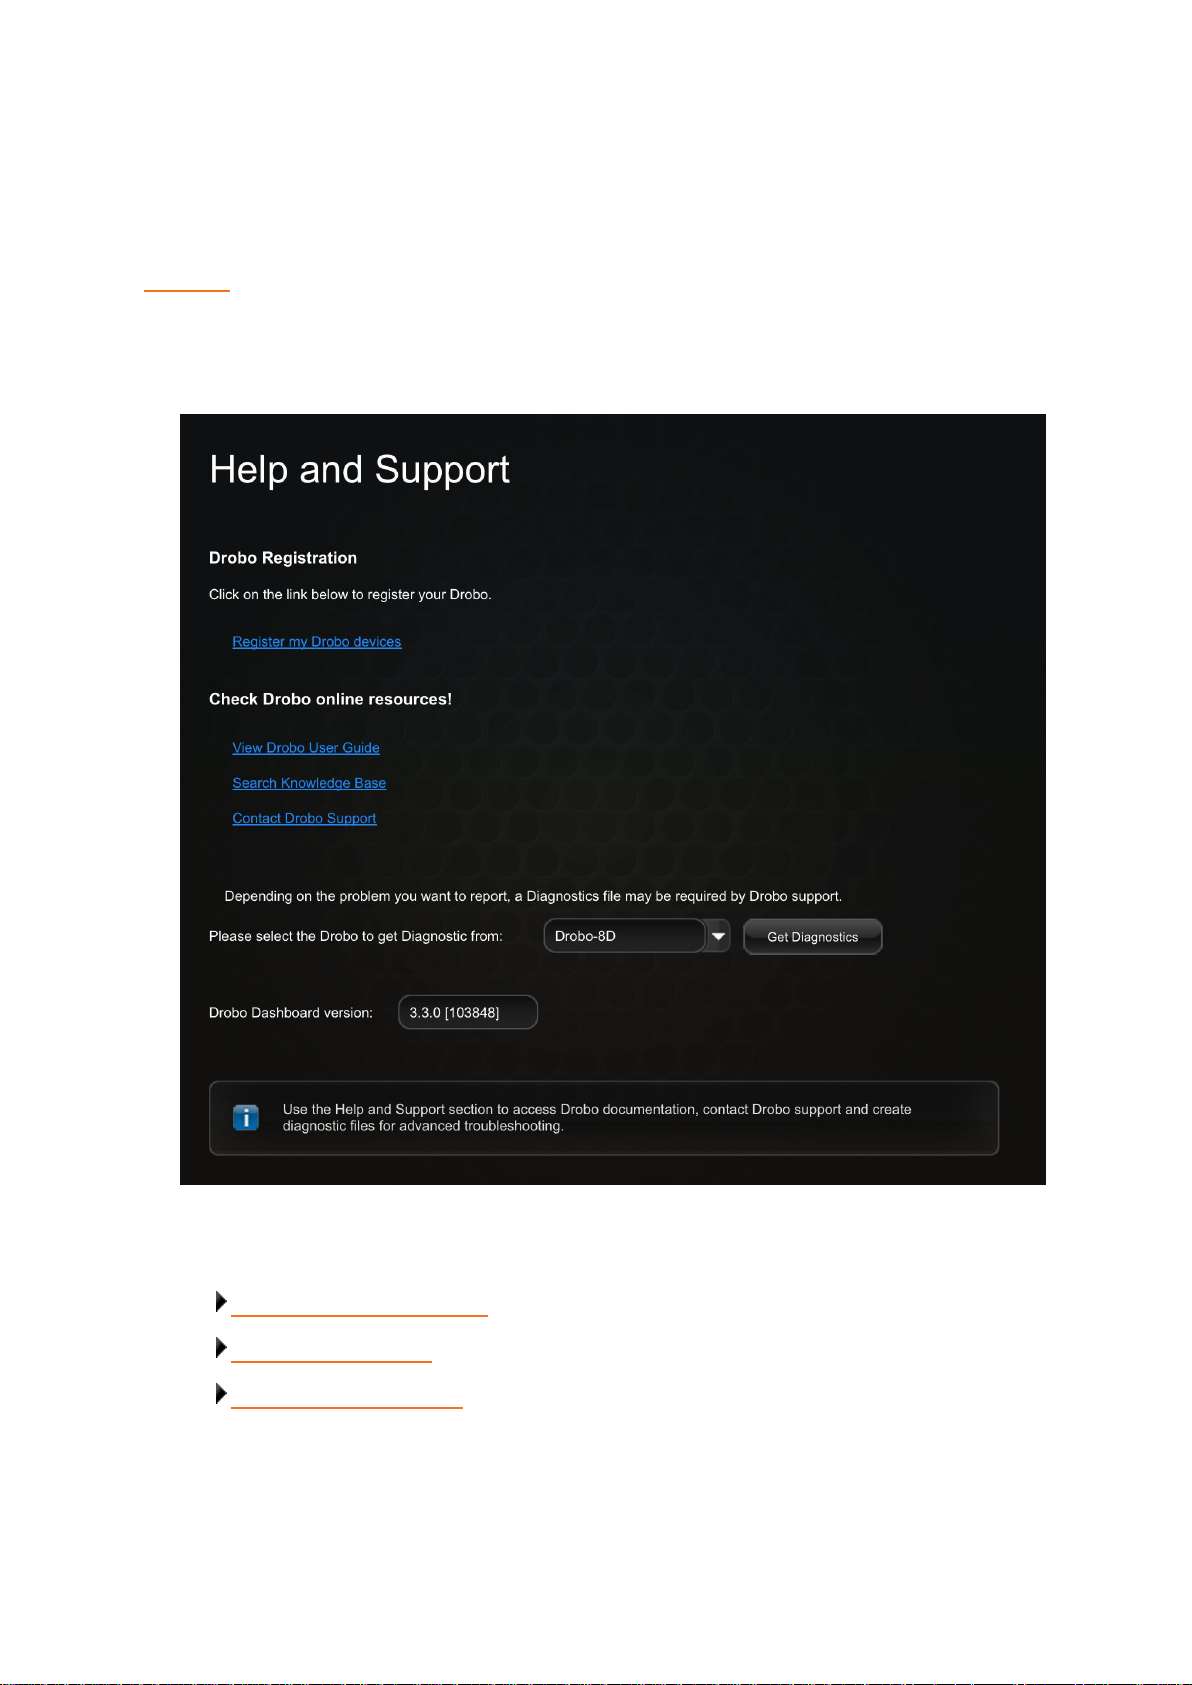
You can also access the user guide from the Drobo Dashboard by clicking the Help & Support option
on the Navigation menu. This will lead to the Help and Support page. From here, click the View
Drobo User Guide link to open the Online User Guide in a web browser.
Related topics:
Using Context-Sensitive Help
Using Knowledge Base
Getting Technical Support
Drobo 8D User Guide 51
Page 52
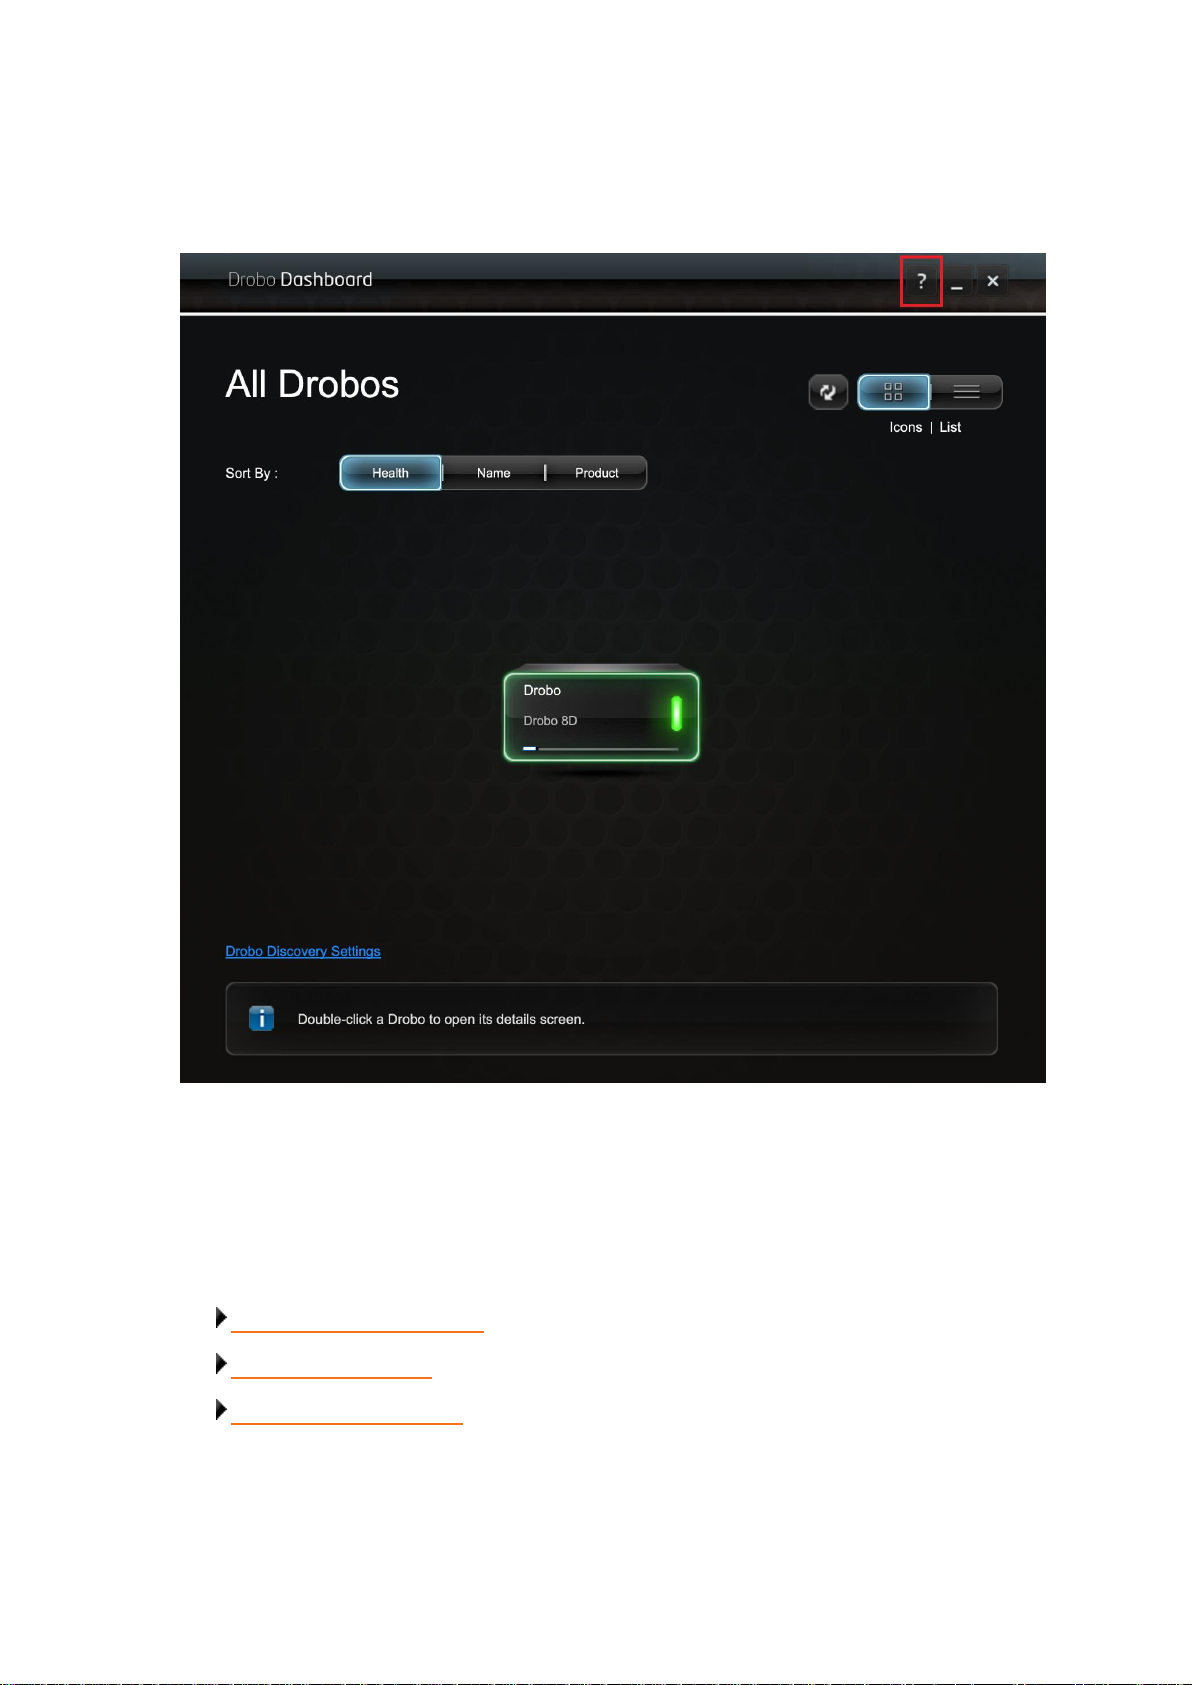
1.3.3 Using Context-Sensitive Help
On the top right corner of the Drobo Dashboard, you will find the Help button (?).
Click this button to view the context-sensitive help. The Help window opens in your Internet browser
providing information particular to the page from which you clicked for help.
Related topics:
Using the Online User Guide
Using Knowledge Base
Getting Technical Support
Drobo 8D User Guide 52
Page 53
1.3.4 Using Knowledge Base
Our searchable knowledge base provides answers to almost any question related to the Drobo 8D
that you cannot find in the Online User Guide.
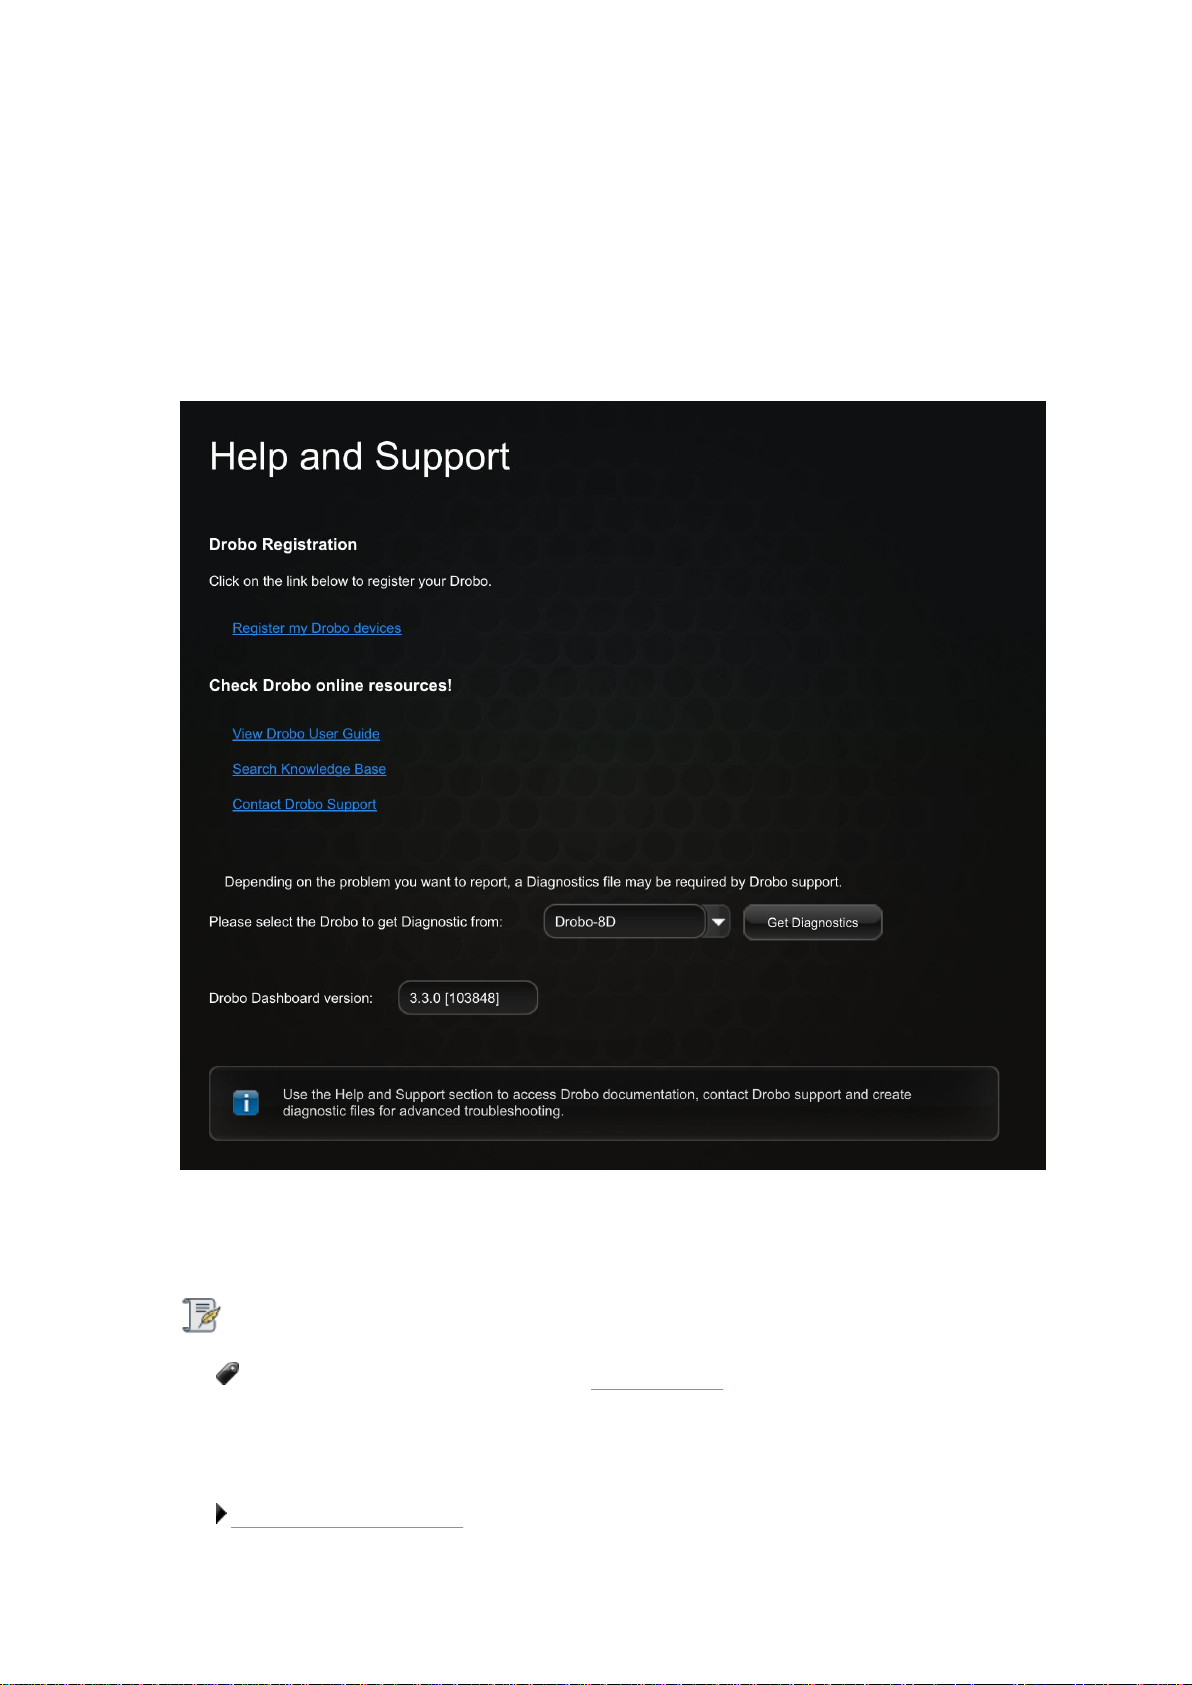
To access our knowledge base, follow the steps below.
1. From the Drobo Dashboard, click the Help and Support option on the Navigation menu. This
opens the Help and Support page.
2. Under the Check Drobo online resources area, click the Search Knowledge Base link to open the
Drobo Knowledge Base web page. From the page, you can search for topics related to you Drobo
device.
Note:
You can access our knowledge base at Drobo Support page.
Related topic:
Getting Technical Support
Drobo 8D User Guide 53
Page 54
1.3.5 Registering the Drobo 8D
If you did not register the Drobo device during initial setup, you can register the device from the
Drobo Dashboard.
You can also register from My Products page.
Note:
You will need to be connected to the Internet to perform this action.
To register the Drobo 8D follow the steps shown below:
1. Open the Drobo Dashboard and from the All Drobos page, click the Drobo device you need to
register.
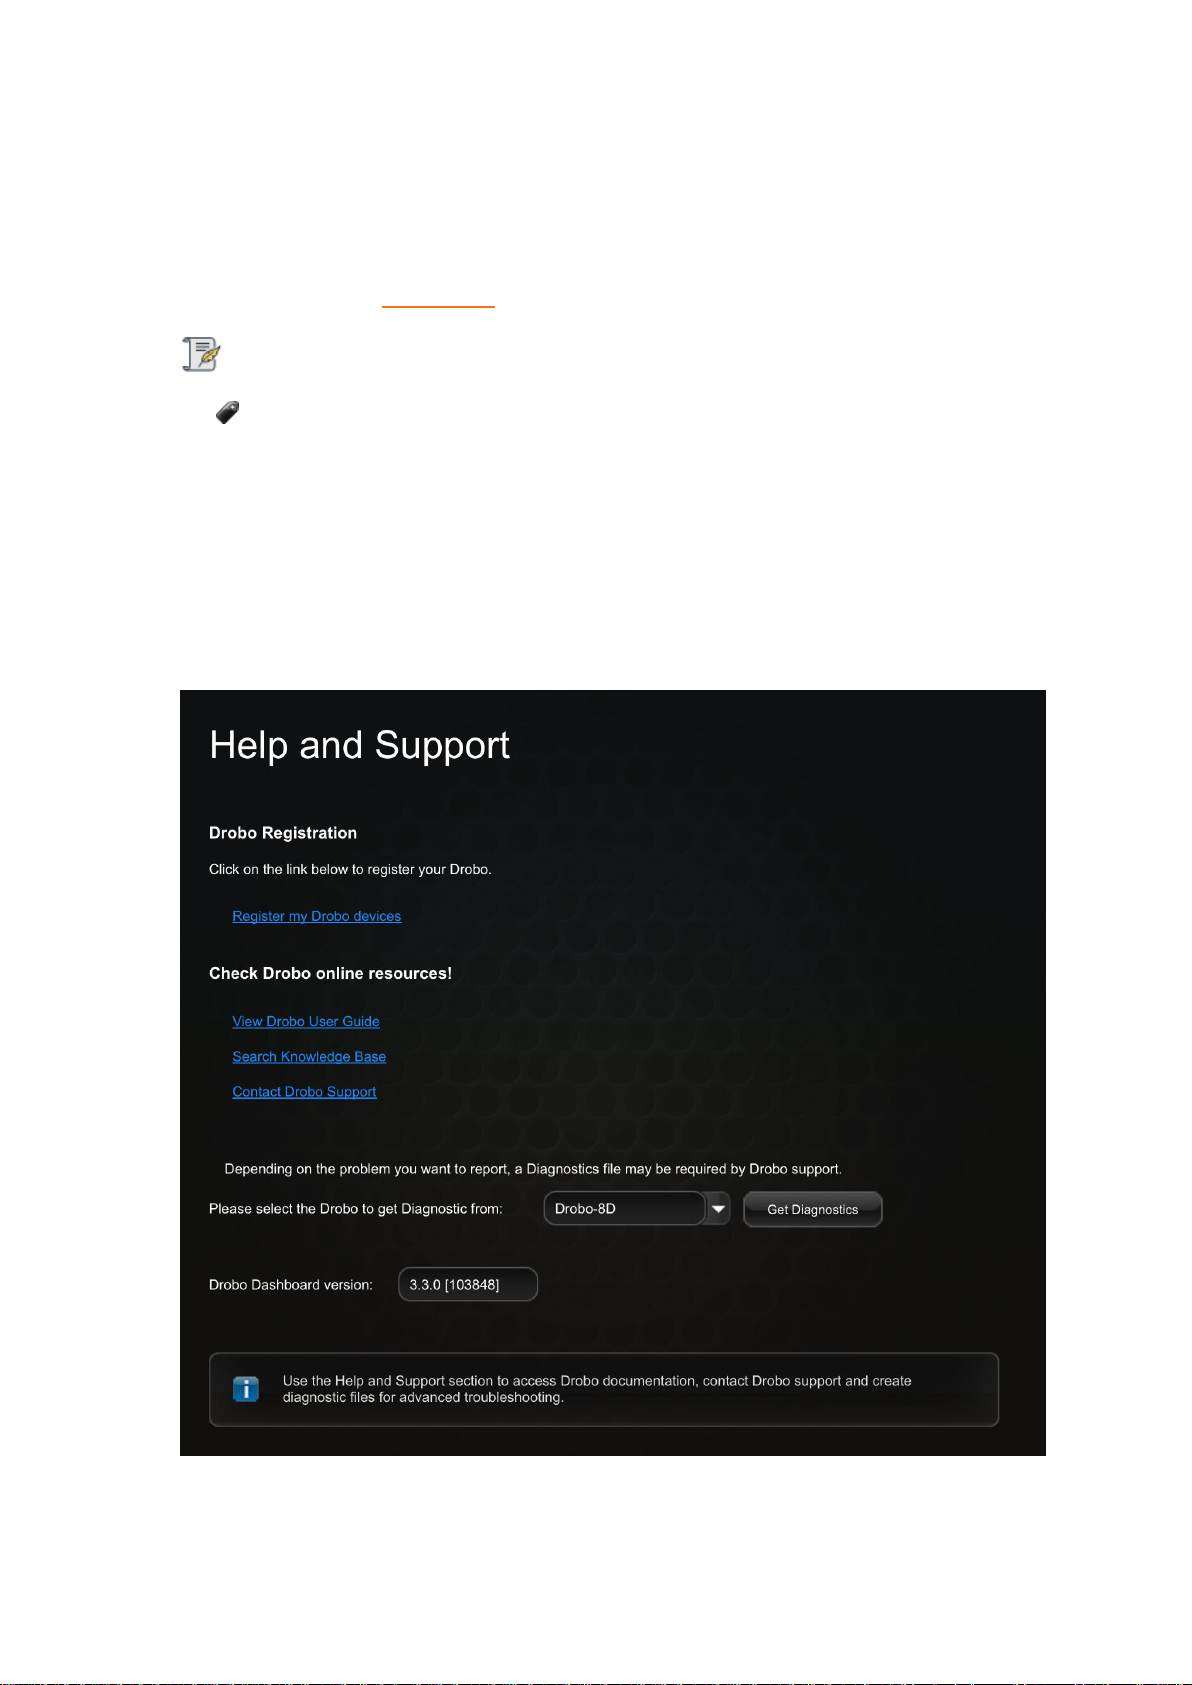
2. Then, click the Help and Support option in the Navigation menu. This opens the Help and
Support page for that Drobo device.
3. From the Drobo Registration area, click on the Register my Drobo devices link to open the
Registration page.
Drobo 8D User Guide 54
Page 55
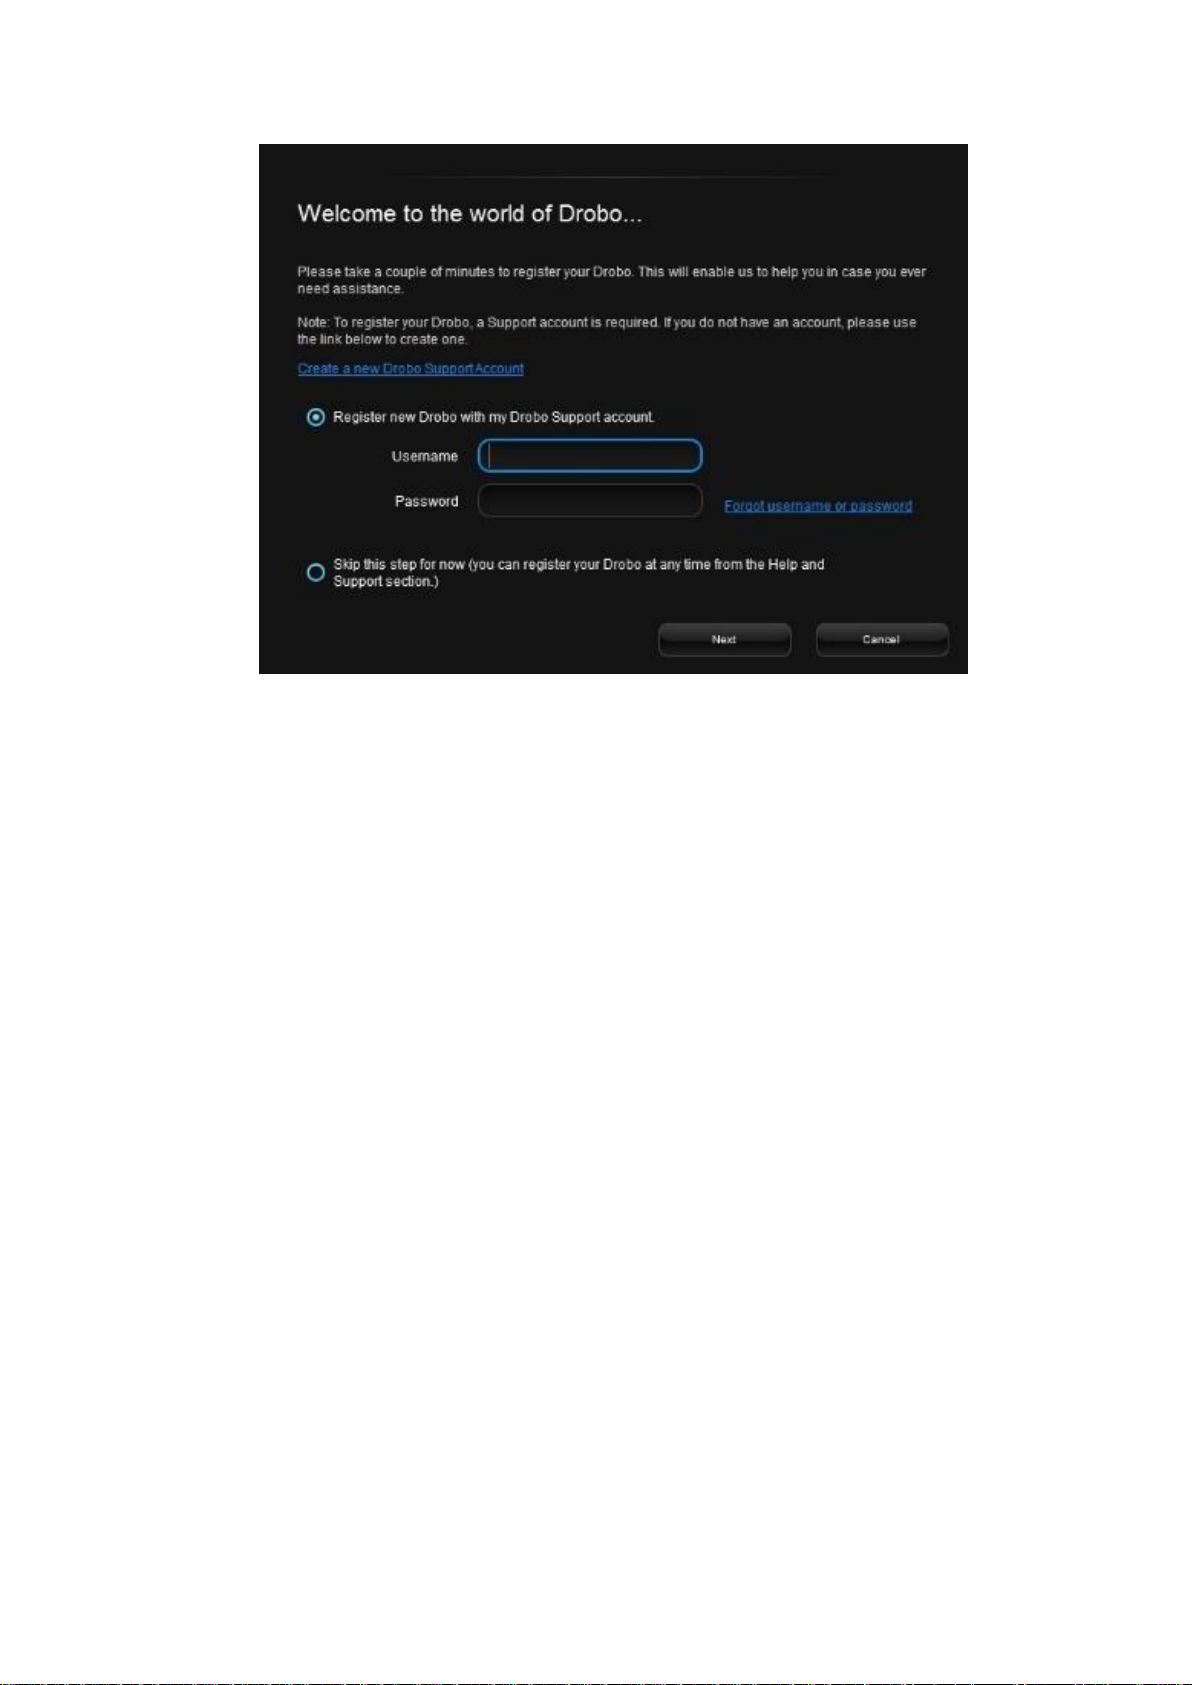
4. Then, do one of the following:
● If you do not have a Drobo account, click the Create a new Drobo Support Account link. A
one-page form opens in your web browser. Fill this in and click Create Account. Then return to
the Registration page to log into your account.
● If you already have a Drobo Support account, select the Register new Drobo with my Drobo
Support Account option, and then enter the Drobo username and password. You can click the
Forgot username or password link if needed. Continue with step 5.
5. Click the Next button. The connected Drobo devices, and their serial numbers will appear.
6. Select the Drobo device you would like to register. Enter its purchase date and select the region
from where you purchased it.
Drobo 8D User Guide 55
Page 56
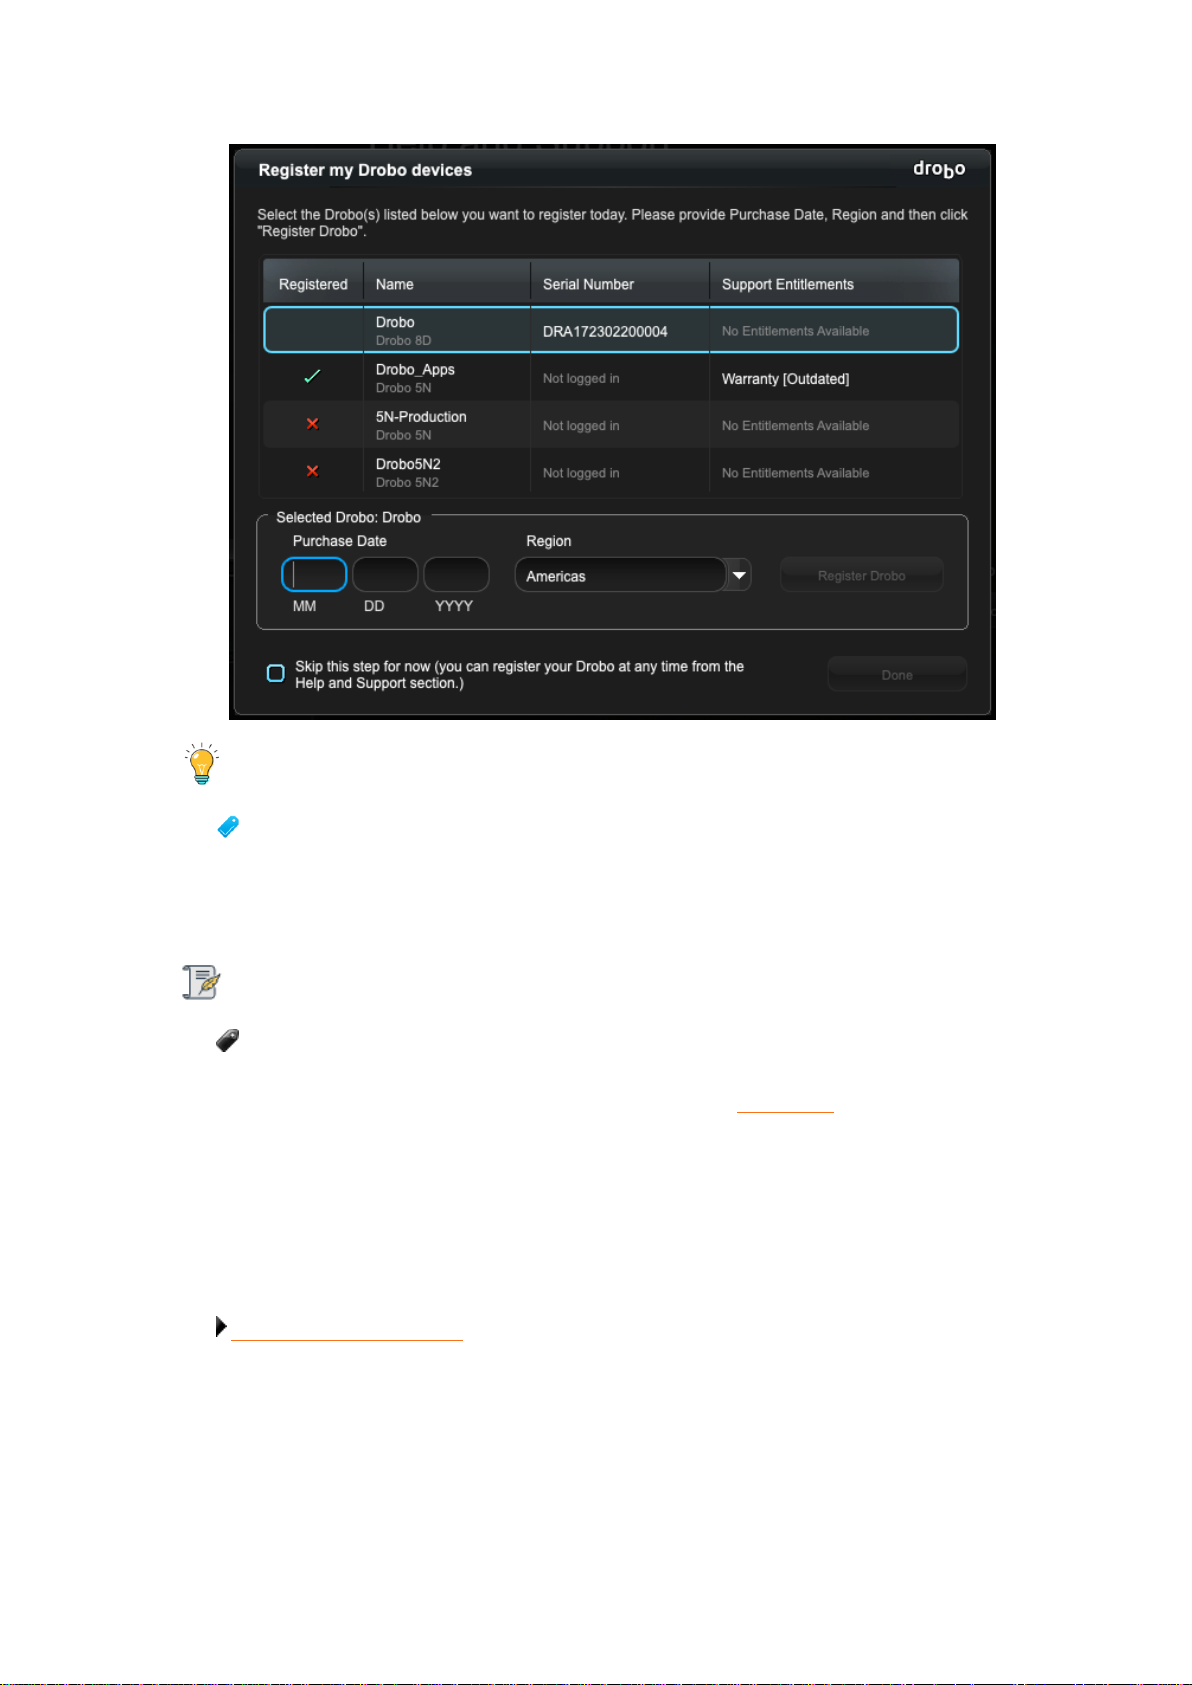
Tip:
You can click the Skip this step for now check box at any time.
7. Once done, click the Register Drobo button.
8. The next page shows with a check mark that your product has been registered.
Note:
You can purchase a DroboCare license by clicking on the Buy additional license link. You
will be redirected to the DroboCare page.
Otherwise you can purchase DroboCare license from here DroboCare.
9. Repeat steps 5 and 6 to register additional Drobo devices.
10. When finished, click the Done button. You will return to the Help and Support page.
Related topic:
Getting Technical Support
Drobo 8D User Guide 56
Page 57
1.3.6 Getting Support
To get support, first be sure to register your product at Register Product, if you have not already
done so.
You can then go to Support for details on how to contact support.
You can also find support in Drobo Dashboard.
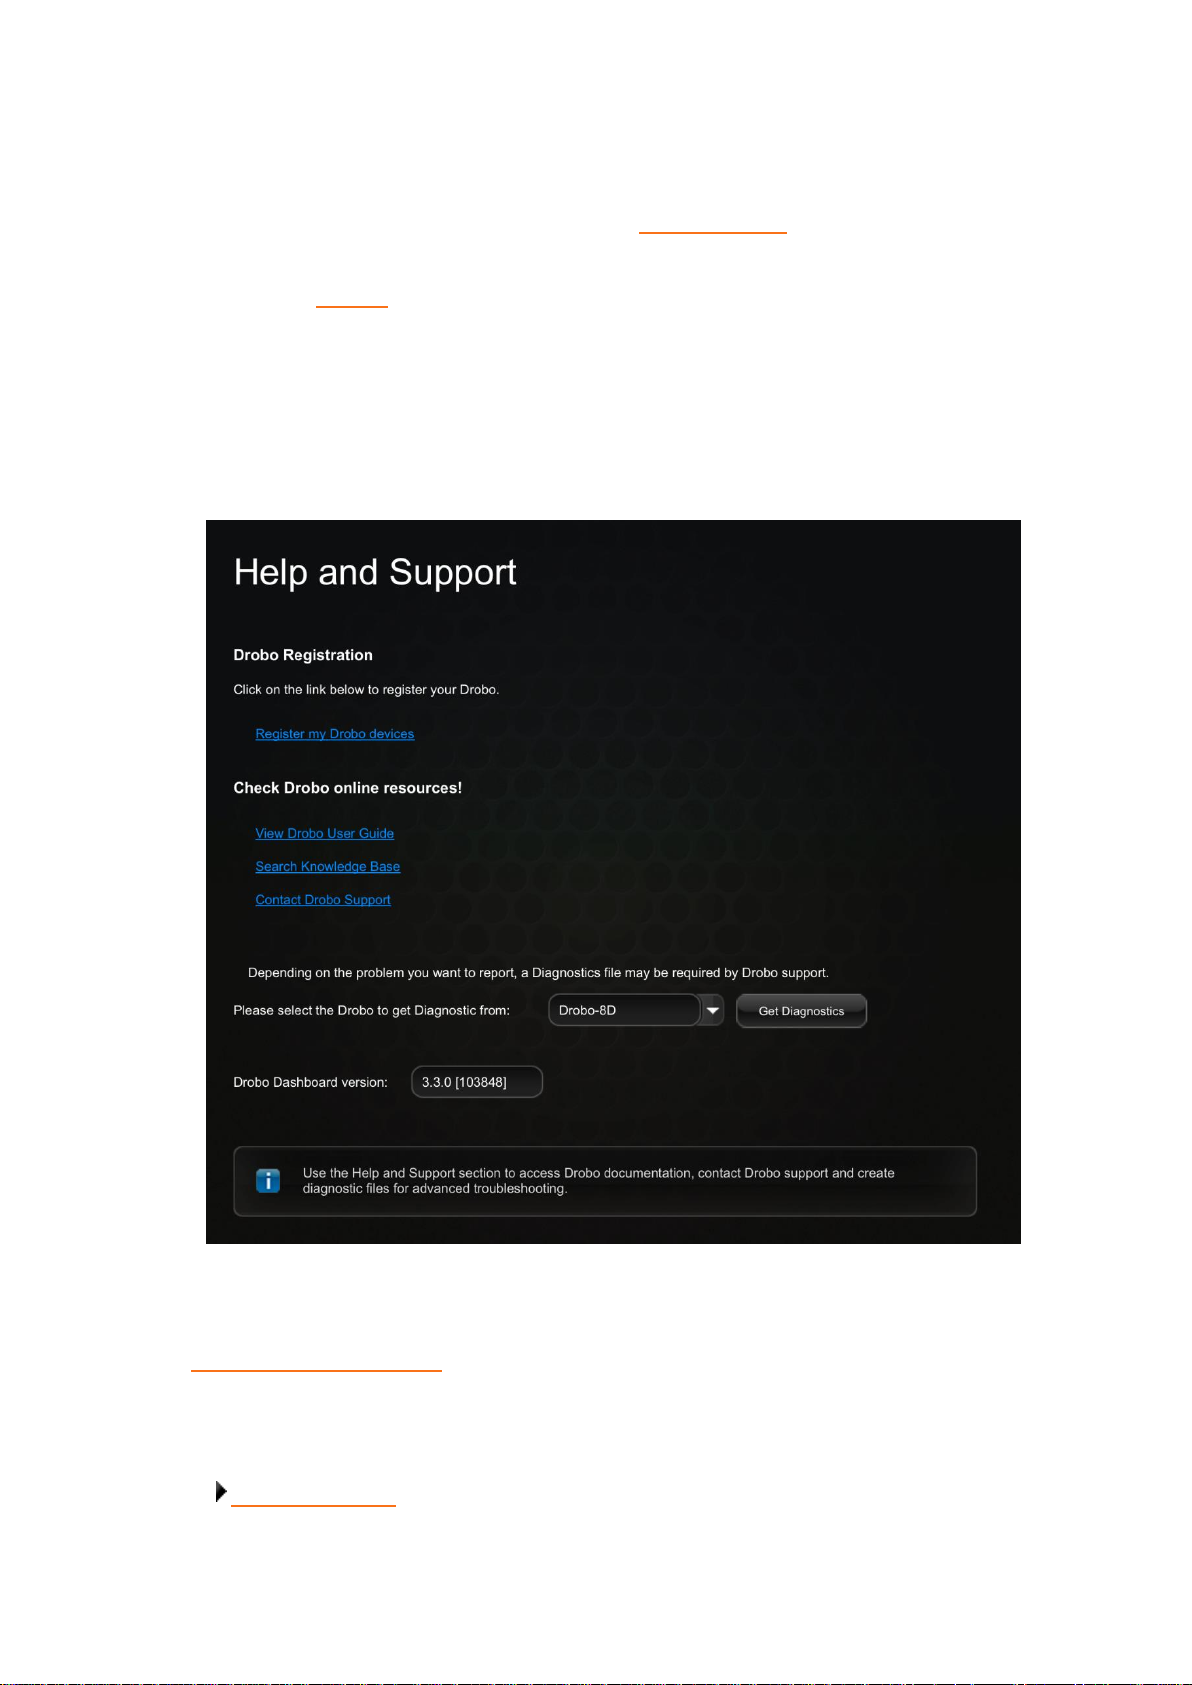
In Drobo Dashboard on the All Drobos page, select the Drobo device for which you need to get
support, and then click the Help and Support option on the Navigation menu.
The Help and Support page opens and allows you to register the Drobo, access the online user guide
and knowledge base, contact the Drobo support team and create a diagnostics file.
You can also obtain additional hardware and phone support by purchasing DroboCare. The
DroboCare™ support program extends your peace of mind beyond the standard warranty term and
phone support that is included with the Drobo product purchase. To learn more about DroboCare
visit: www.drobo.com/drobocare.
Related topic:
Where To Go Next
Drobo 8D User Guide 57
Page 58
1.4 Using and Managing the Drobo 8D
Once you have set up the Drobo device, you are ready to use and manage it.
Related topics:
Using Drobo Dashboard
Renaming the Drobo 8D
Formatting the Drobo 8D
Safely Shutting Down the Drobo 8D
Resetting the Drobo 8D (erasing all data on the drives)
Blinking Lights to Test Connectivity
Enabling or Disabling the Menu Bar
Drobo 8D User Guide 58
Page 59

1.4.1 Using Drobo Dashboard
Drobo Dashboard is the software companion of the Drobo 8D enabling you to easily set up, manage
and use the Drobo device.
Related topics:
Installing Drobo Dashboard
Keeping Your Software Up to Date
Touring Drobo Dashboard
Drobo 8D User Guide 59
Page 60

1.4.1.1 Downloading and Installing Drobo Dashboard
The Drobo Dashboard application will help you to set up and manage the Drobo 8D.
Drobo software and firmware updates for Drobo 8D can be downloaded and installed from Drobo
8D Product page.
This section covers the following topics:
● Installing Drobo Dashboard on Apple Mac™
Note:
You need a full admin user account and internet access on the Apple Mac™ on which you
are going to install the Drobo Dashboard.
Related topics:
Using Drobo Dashboard
Touring Drobo Dashboard
Drobo 8D User Guide 60
Page 61
Installing Drobo Dashboard on Apple Mac™
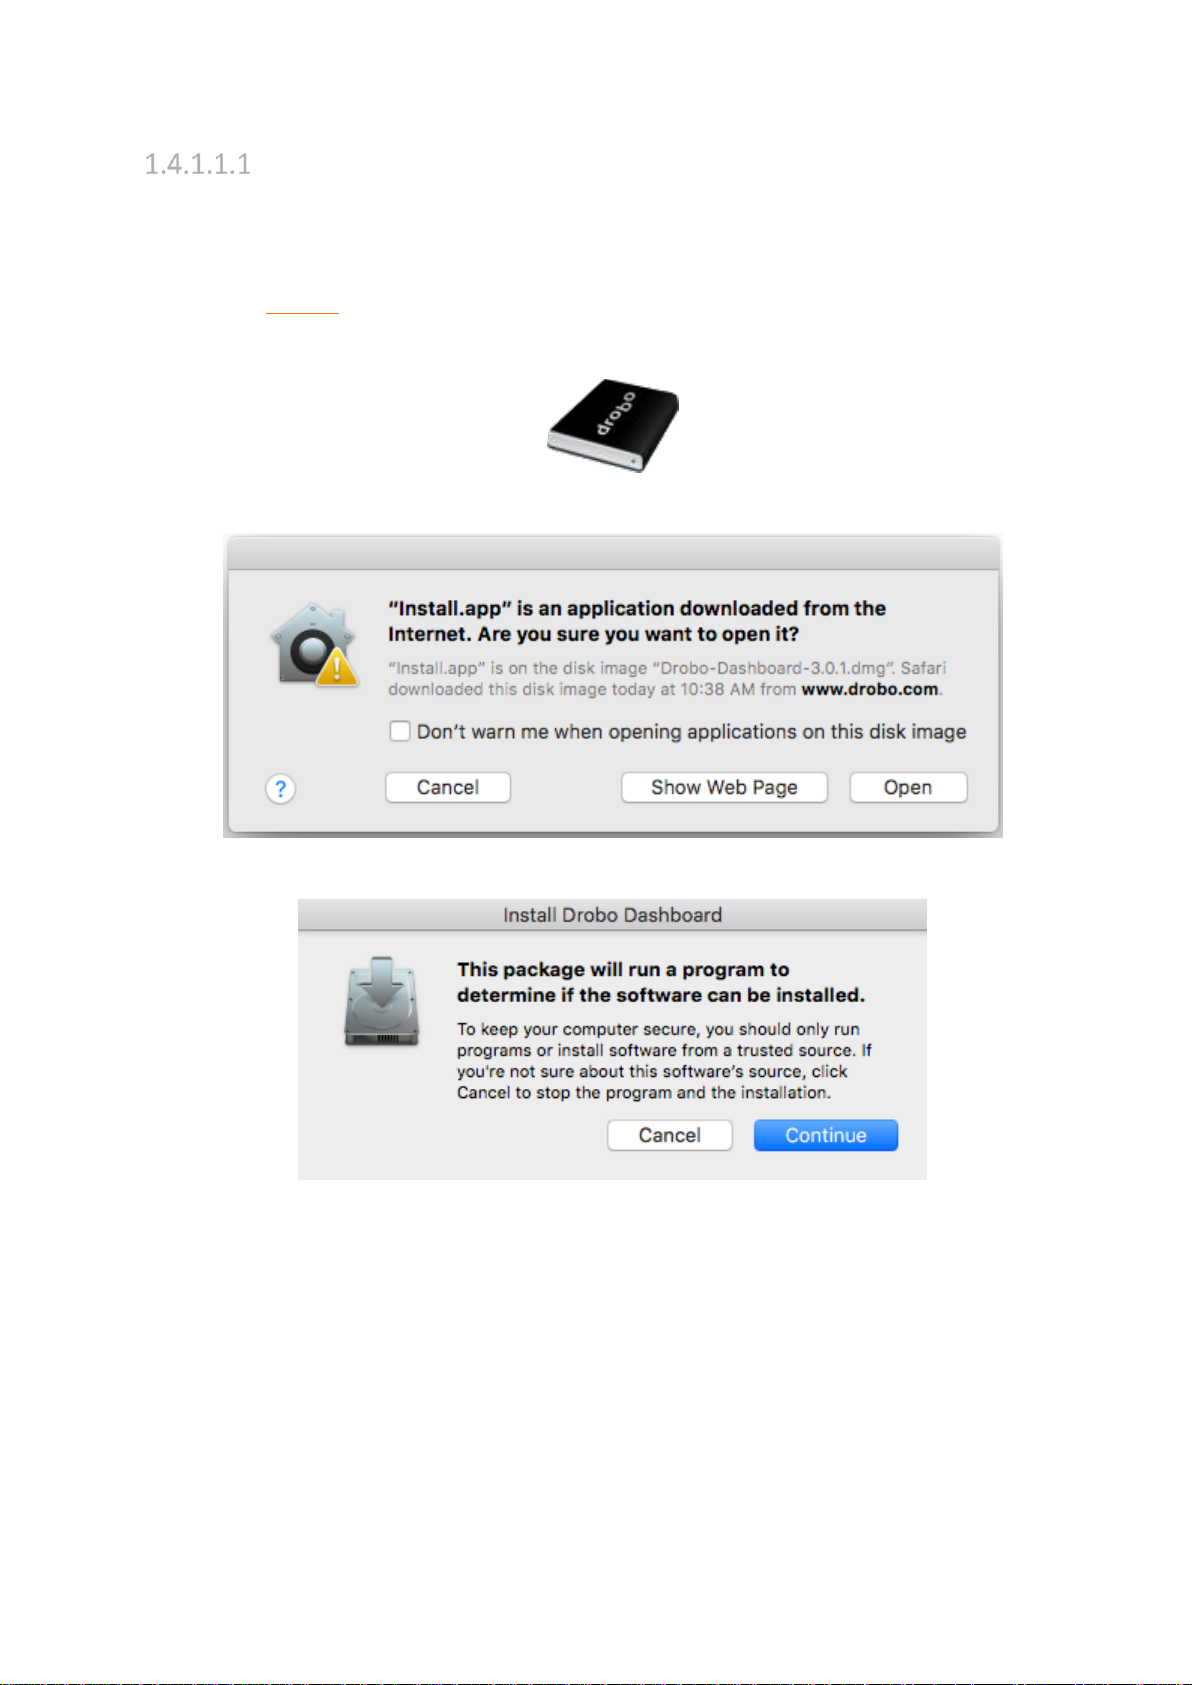
To install the Drobo Dashboard on a Apple Mac™ machine:
1. Go to the Start 8D page and download the Drobo Dashboard installation file for Apple Mac™.
2. After downloading, double-click the Drobo Dashboard Installer to launch it.
3. A pop up will appear asking whether to open the Installer. Click Open.
4. The Install Drobo Dashboard page will appear. Click Continue to proceed to the next screen.
5. Next, the Installation Wizard page appears. Click Continue to proceed.
Drobo 8D User Guide 61
Page 62
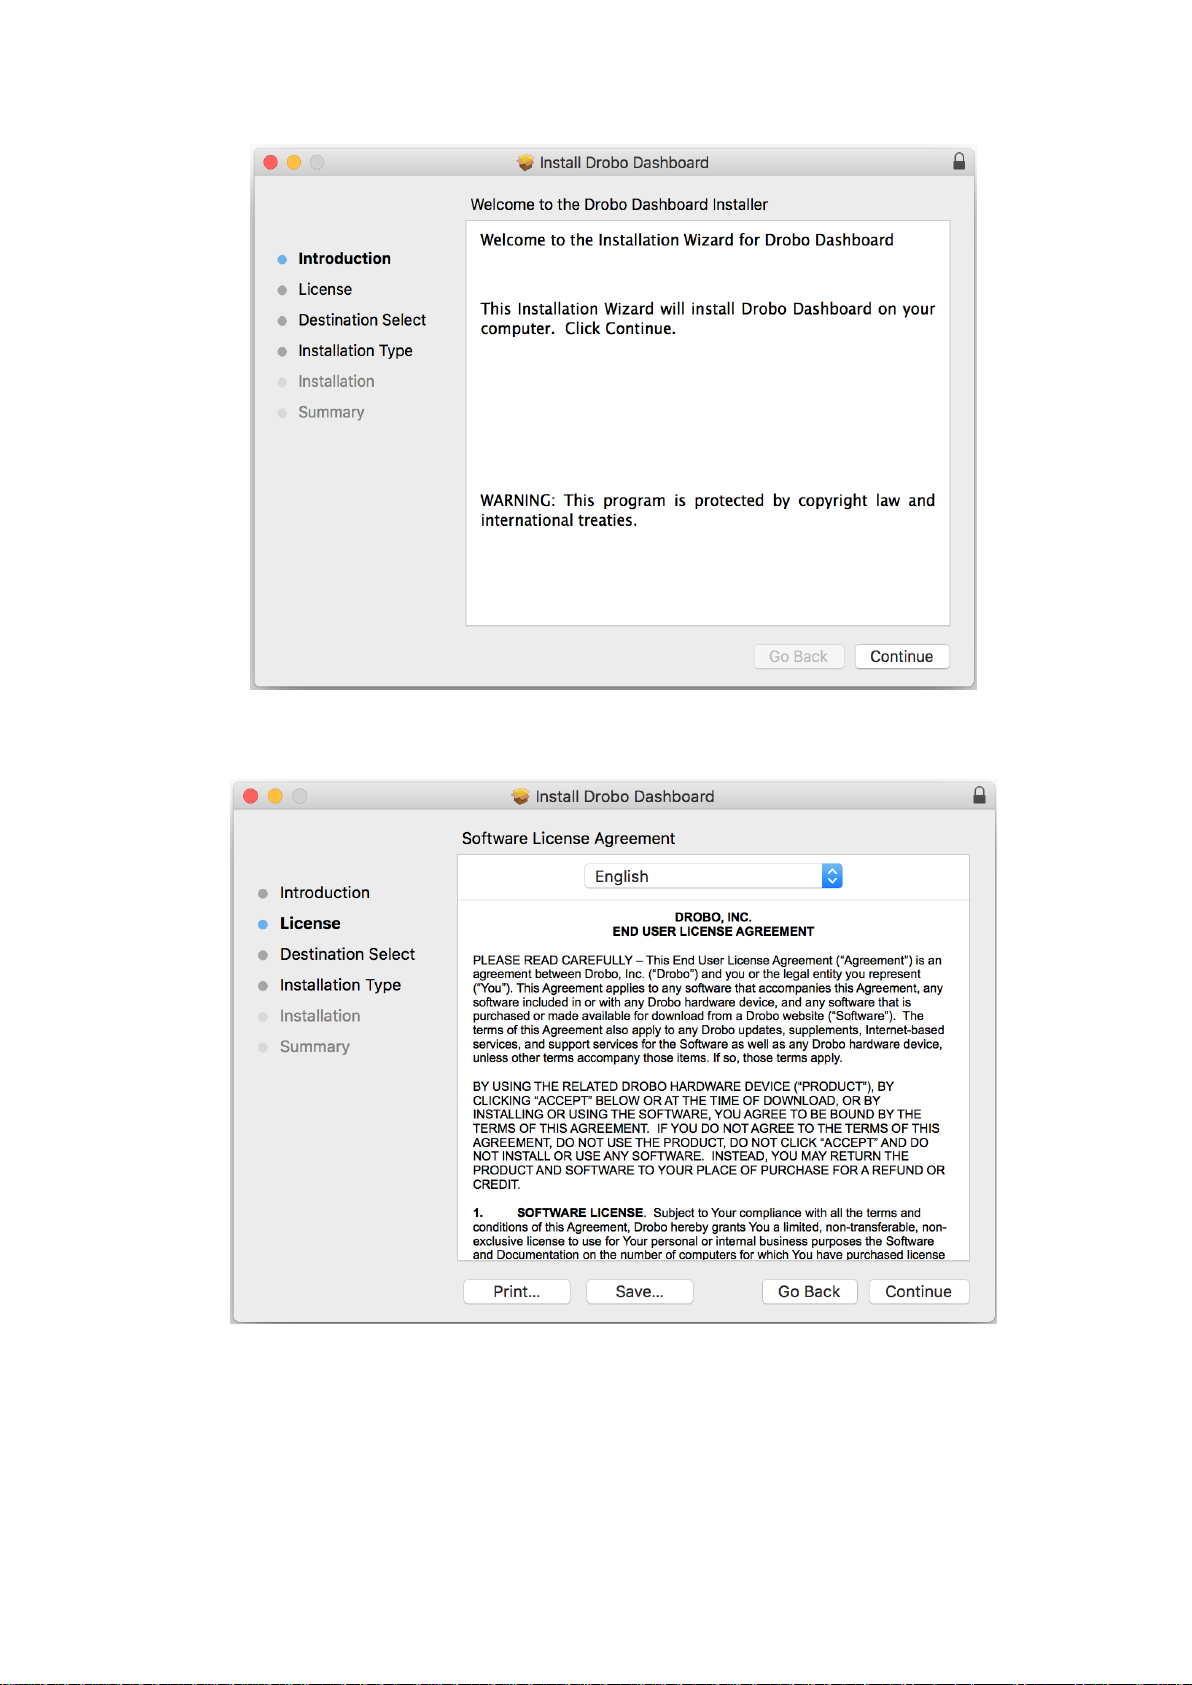
6. The Software License Agreement page appears. From here, you can choose the language in
which you want to proceed the installation process.
7. After choosing the desired language, Click the Continue button.
Drobo 8D User Guide 62
Page 63
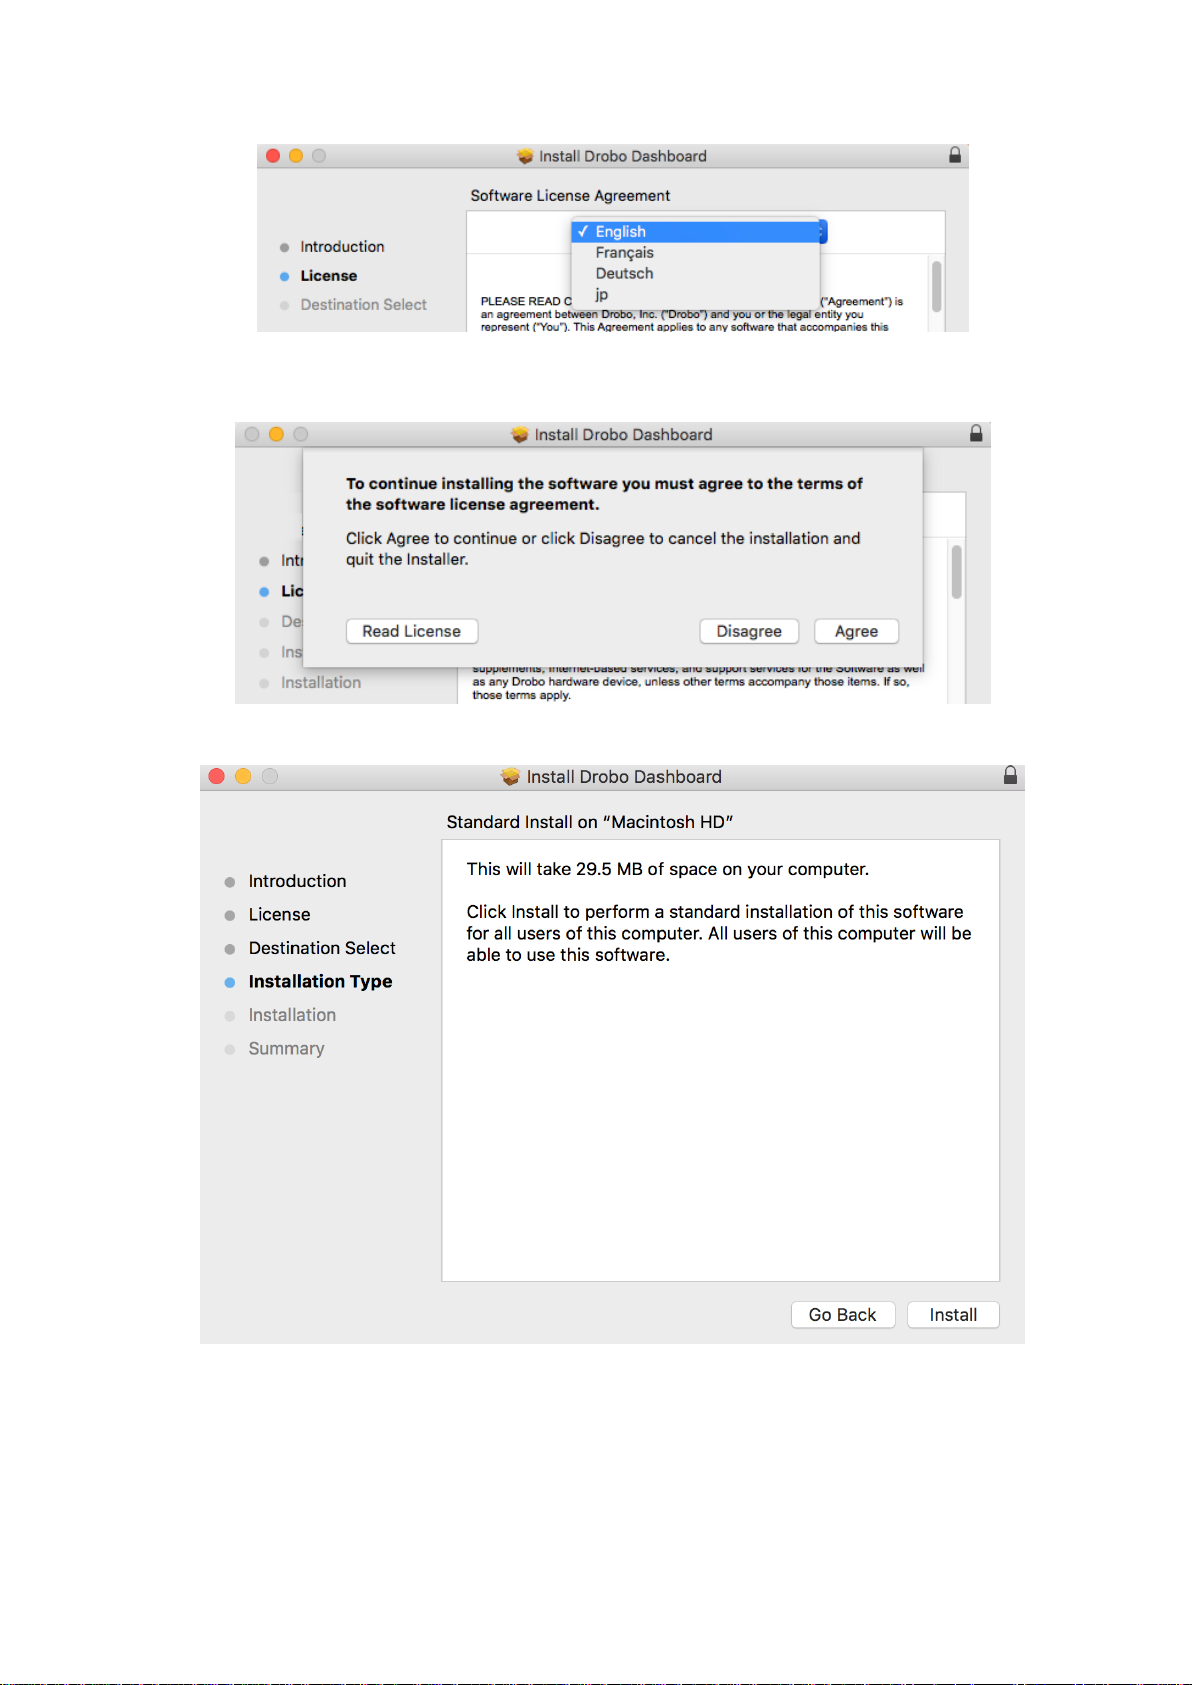
8. A dialog box will appear asking you to Agree or Disagree the terms of the license agreement.
Click Agree to proceed.
9. You will reach the Installation Type section. Click the Install button to proceed.
10. You will be prompted to enter the administrator password. Enter the password and click Install
Software.
Drobo 8D User Guide 63
Page 64
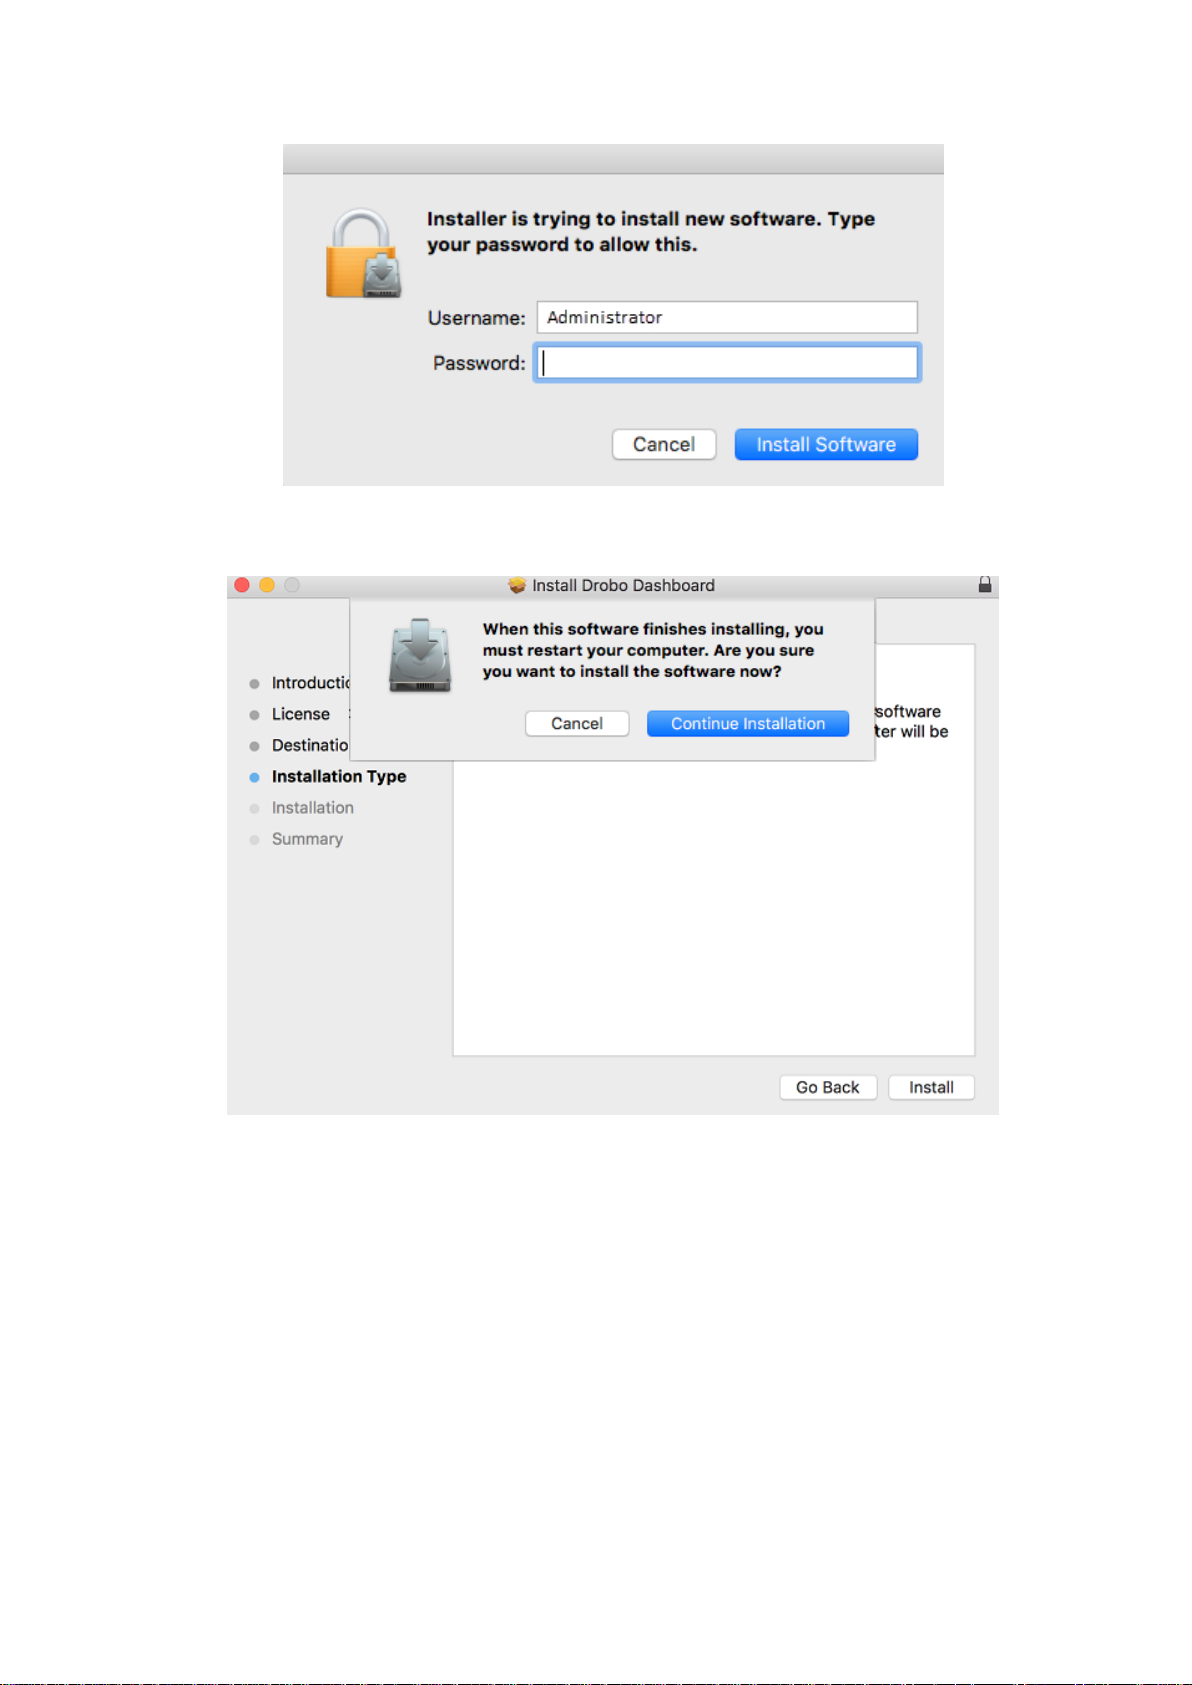
11. Then, you will be prompted to restart your Apple Mac™ in order to complete the installation.
Click Continue Installation to proceed.
12. When the installation completes, you will see the following screen. Click Close and launch the
Dashboard application.
Drobo 8D User Guide 64
Page 65
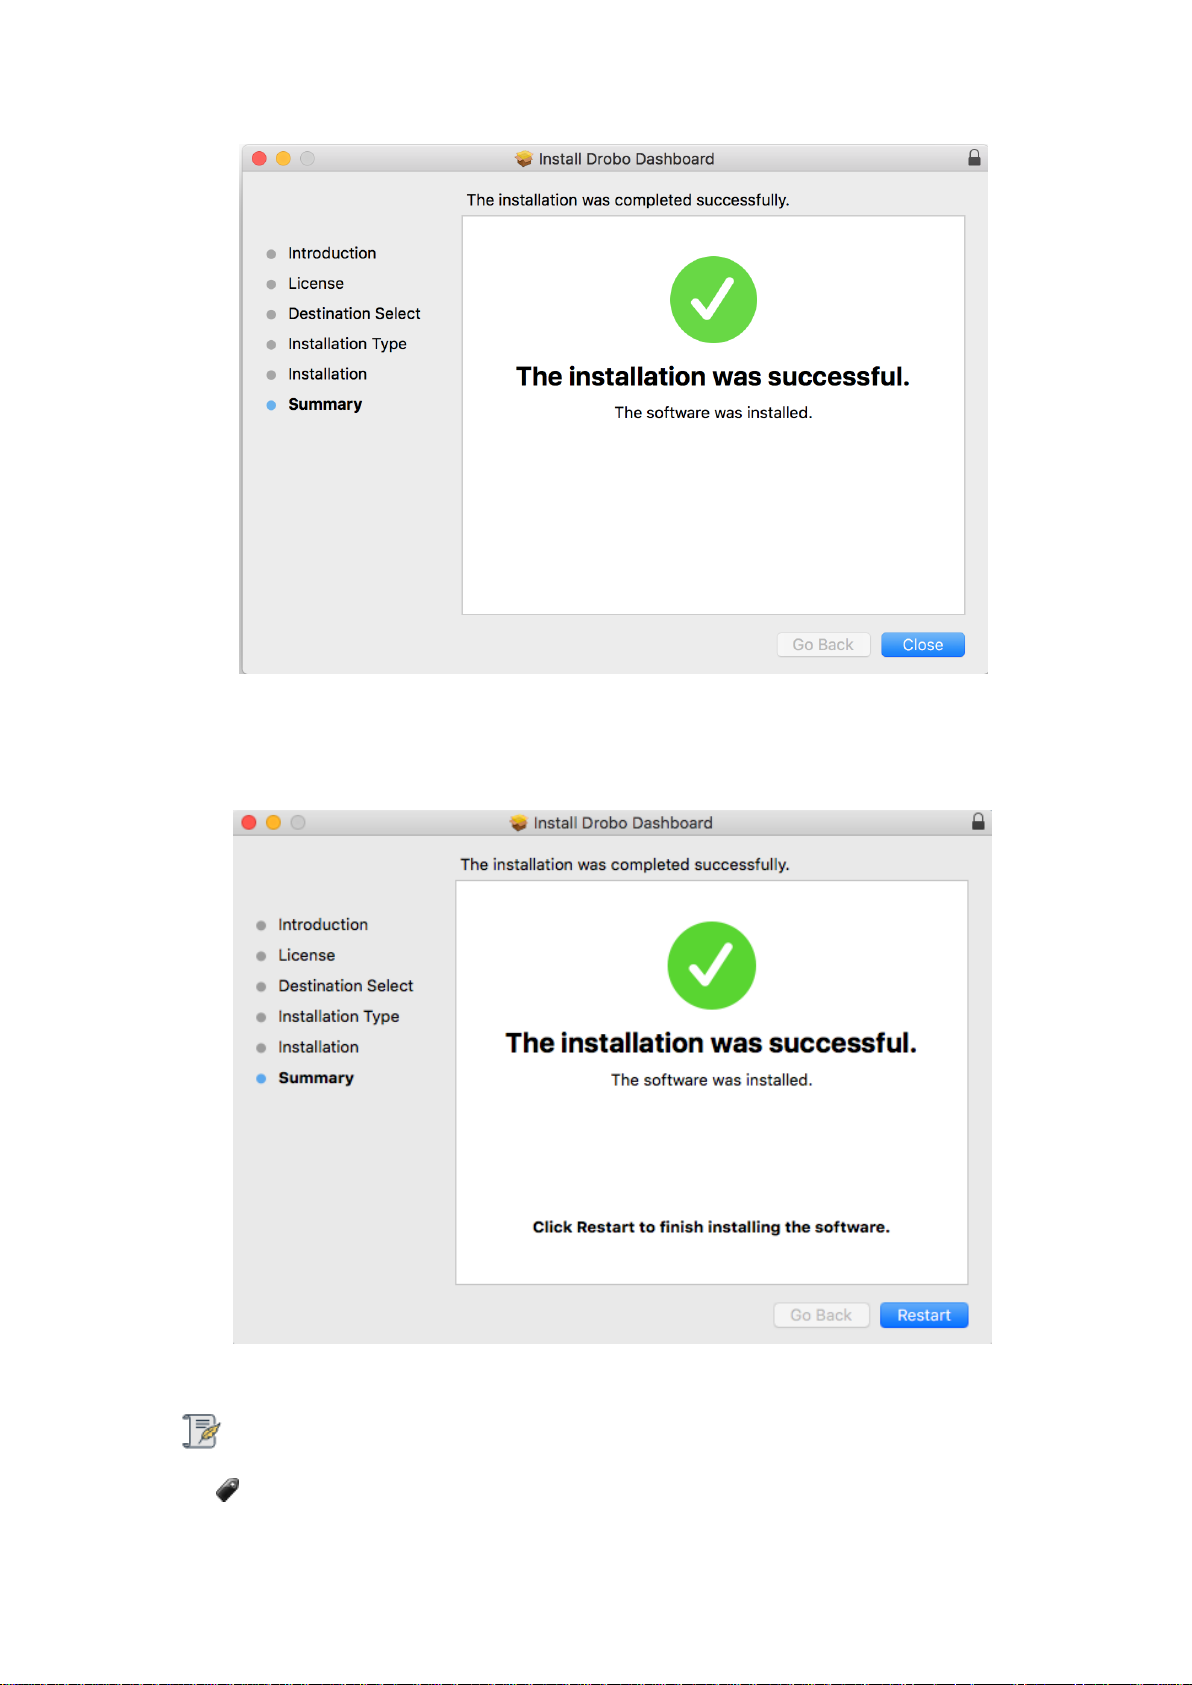
13. If there is a driver change during installation or update, you will see the following screen to
restart the Apple Mac™ to finish the installation. Click Restart.
14. Once the Apple Mac™ restarts, launch the Drobo Dashboard application.
Note:
You may have to allow Drobo Dashboard in System Preferences in order for the Dashboard
to open.
Drobo 8D User Guide 65
Page 66
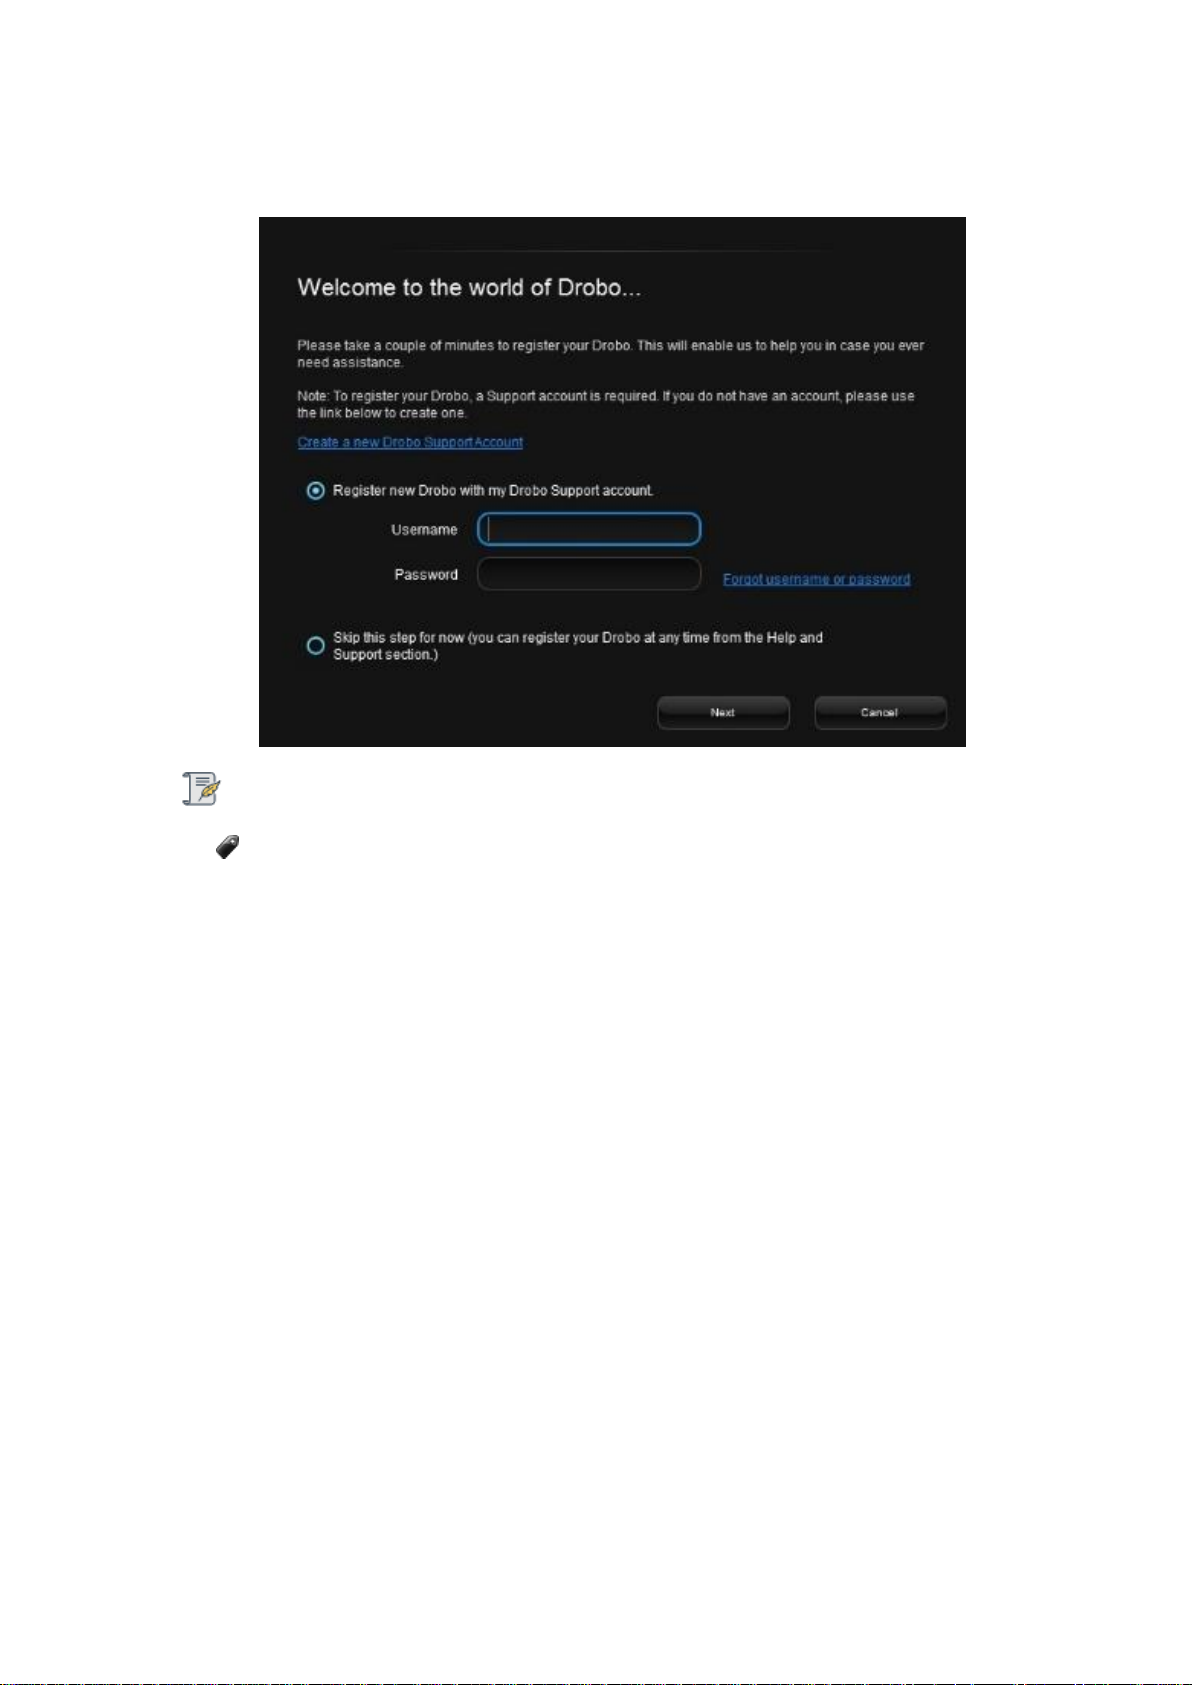
15. The application will prompt you to register the Drobo 8D. You can either register it or skip the
step and register it later. Select an option based on you preference.
Note:
We highly recommend to register your product in order to obtain support.
16. Click the Next button to view the All Drobos page. After a few seconds, Drobo "discovers" all
Drobo devices currently connected and displays them on this page.
Drobo 8D User Guide 66
Page 67
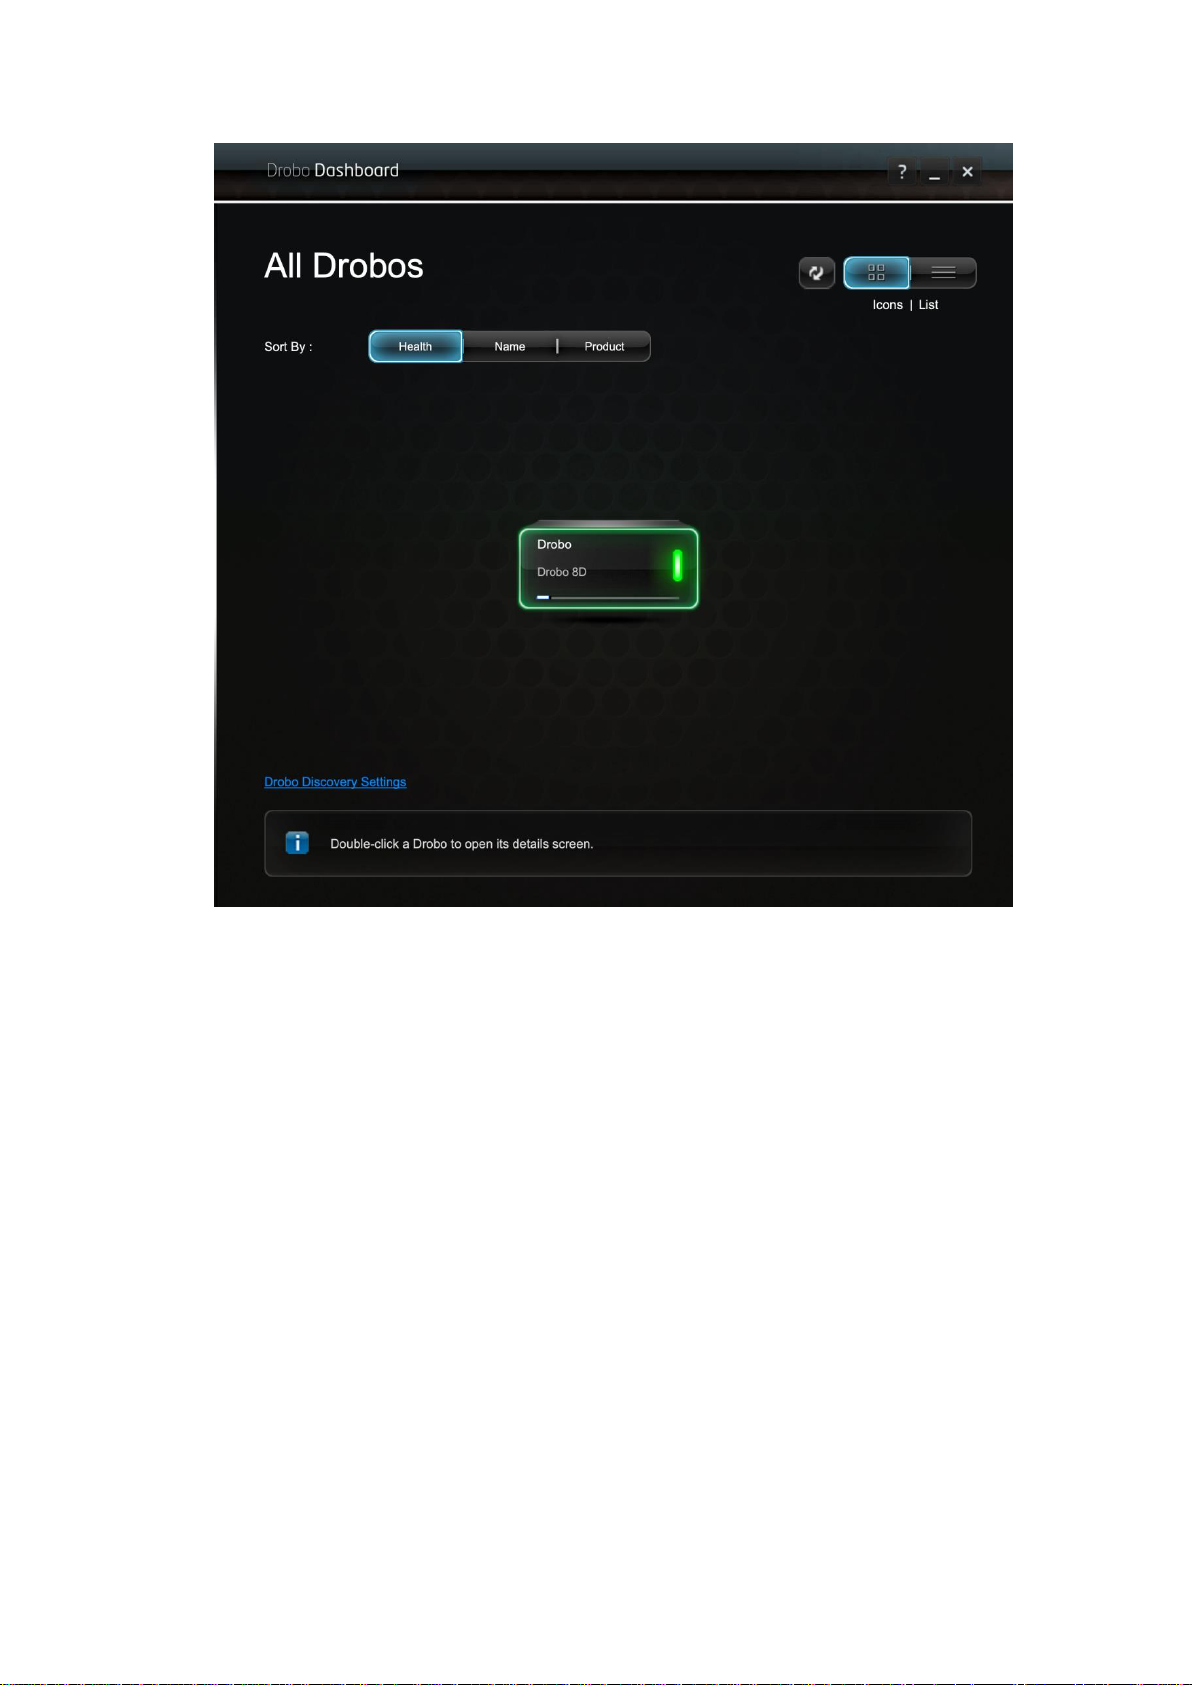
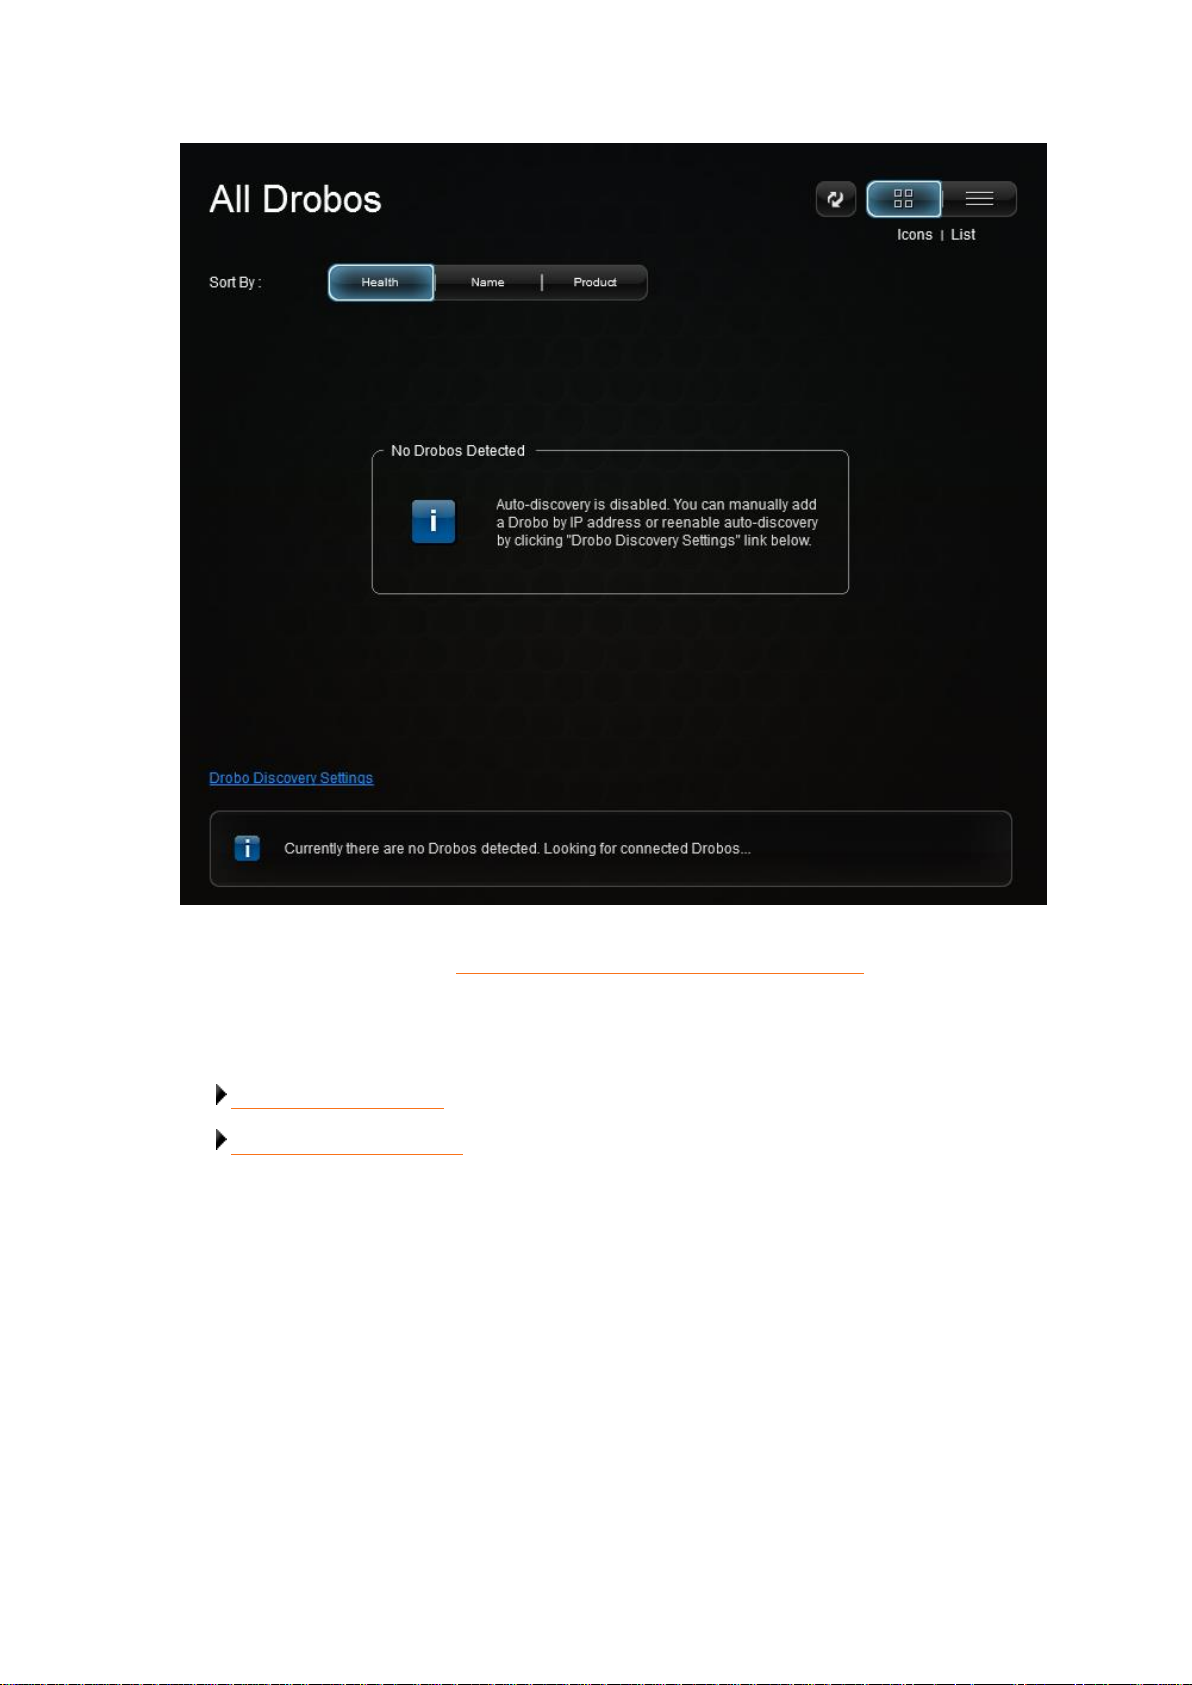
17. If you have no Drobo device connected to the Apple Mac™ or powered on, a "No Drobos
Detected" message displays until you do.
Drobo 8D User Guide 67
Page 68
18. The Drobo 8D will not work until you upgrade the firmware. For information on updating the
firmware to the latest version, see Updating the Drobo 8D to the latest firmware.
Related topics:
Using Drobo Dashboard
Touring Drobo Dashboard
Drobo 8D User Guide 68
Page 69

1.4.1.2 Keeping Your Software Up to Date
To ensure optimal performance, we highly recommend that you set the Drobo device to
automatically check for software updates (you may have already done this during the initial set up).
This feature keeps both the Drobo Dashboard and the firmware of the device up to date.
You can also install updates from the Start 8D page. If you would like to install a firmware update
from the Drobo website, see Manually Updating Firmware from the Website.
Related topic:
Checking for Software Updates
Drobo 8D User Guide 69
Page 70
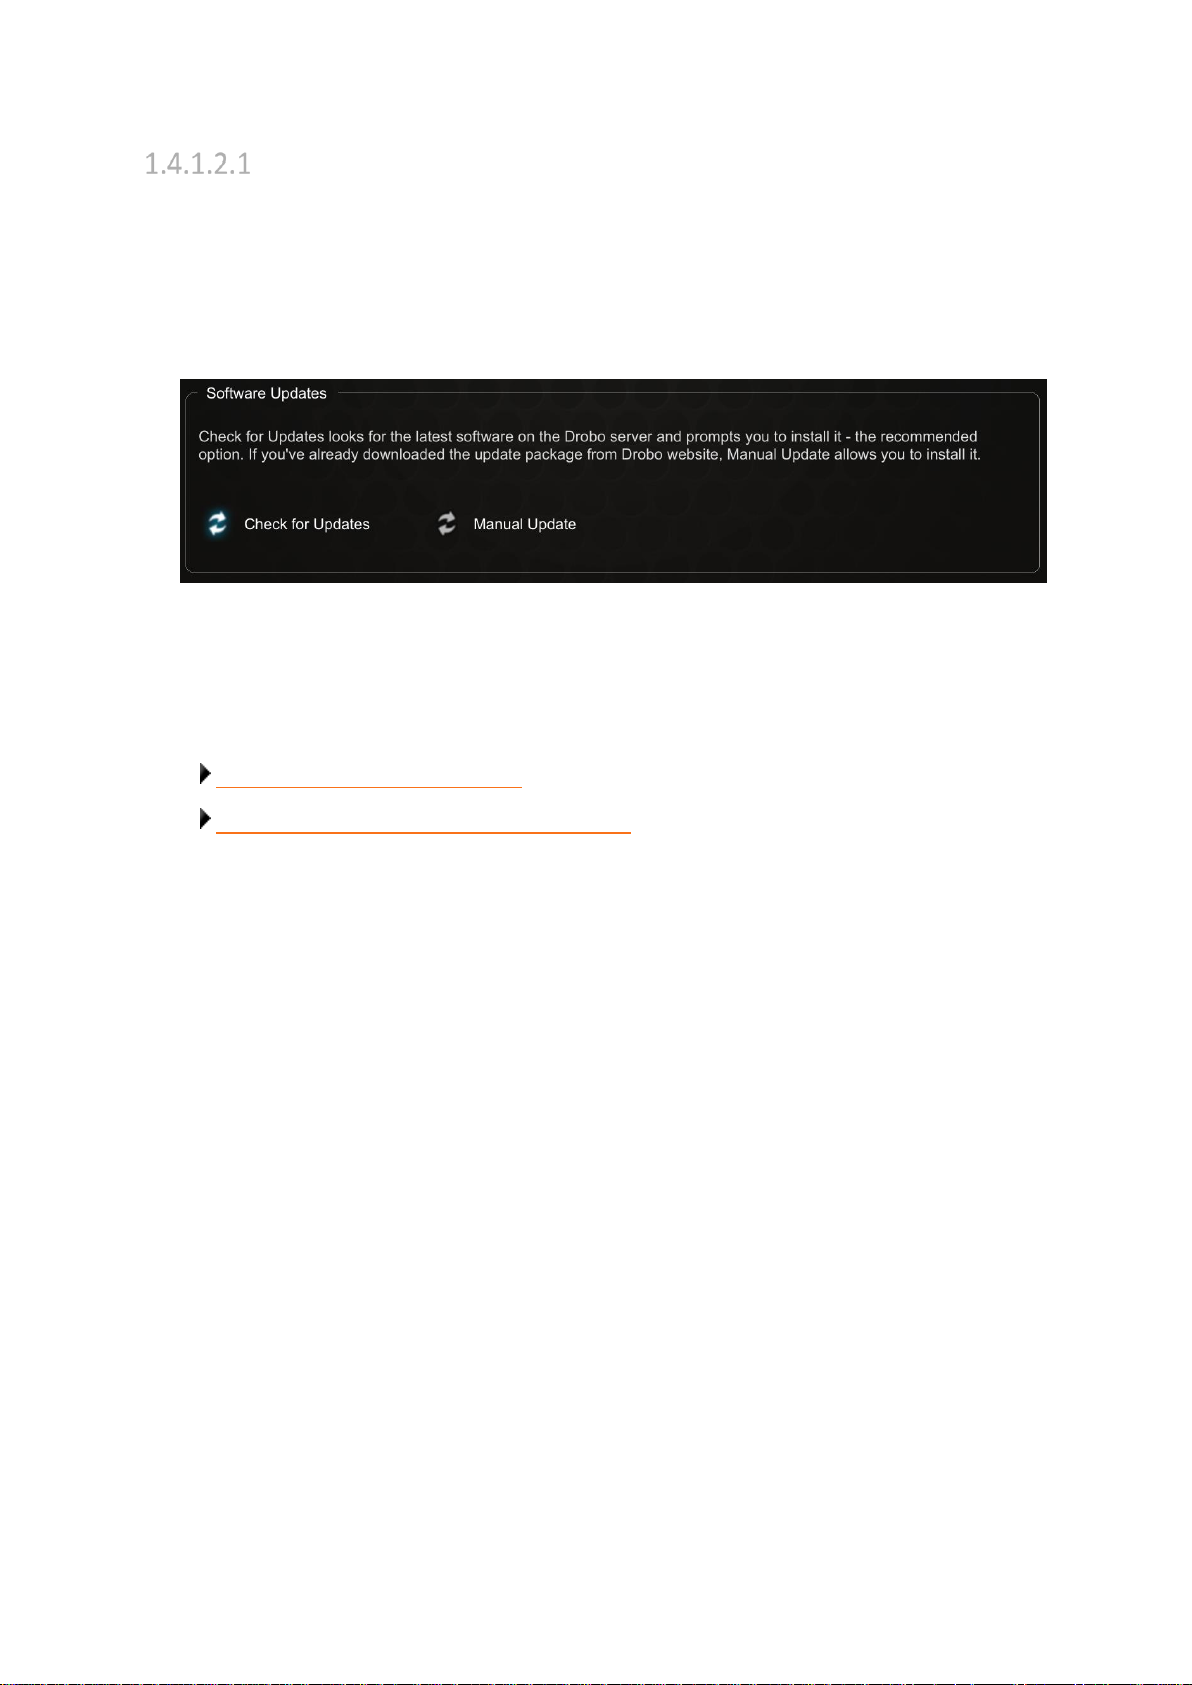
Checking for Software Updates
The following steps ensure that Drobo Dashboard and the firmware of the device are up to date.
1. In Drobo Dashboard, select the Drobo 8D device from the All Drobos page.
2. Click the Tools option on the Navigation menu to open the Tools page.
3. In the Software Updates area of the Tools page, click the Check for Updates option.
4. If a software update is available, a dialog box opens, asking if you would like to install the update.
Click the Yes button and follow the prompts to install the update.
Related topics:
Keeping Your Software Up to Date
Updating the Drobo 8D to the Latest Firmware
Drobo 8D User Guide 70
Page 71
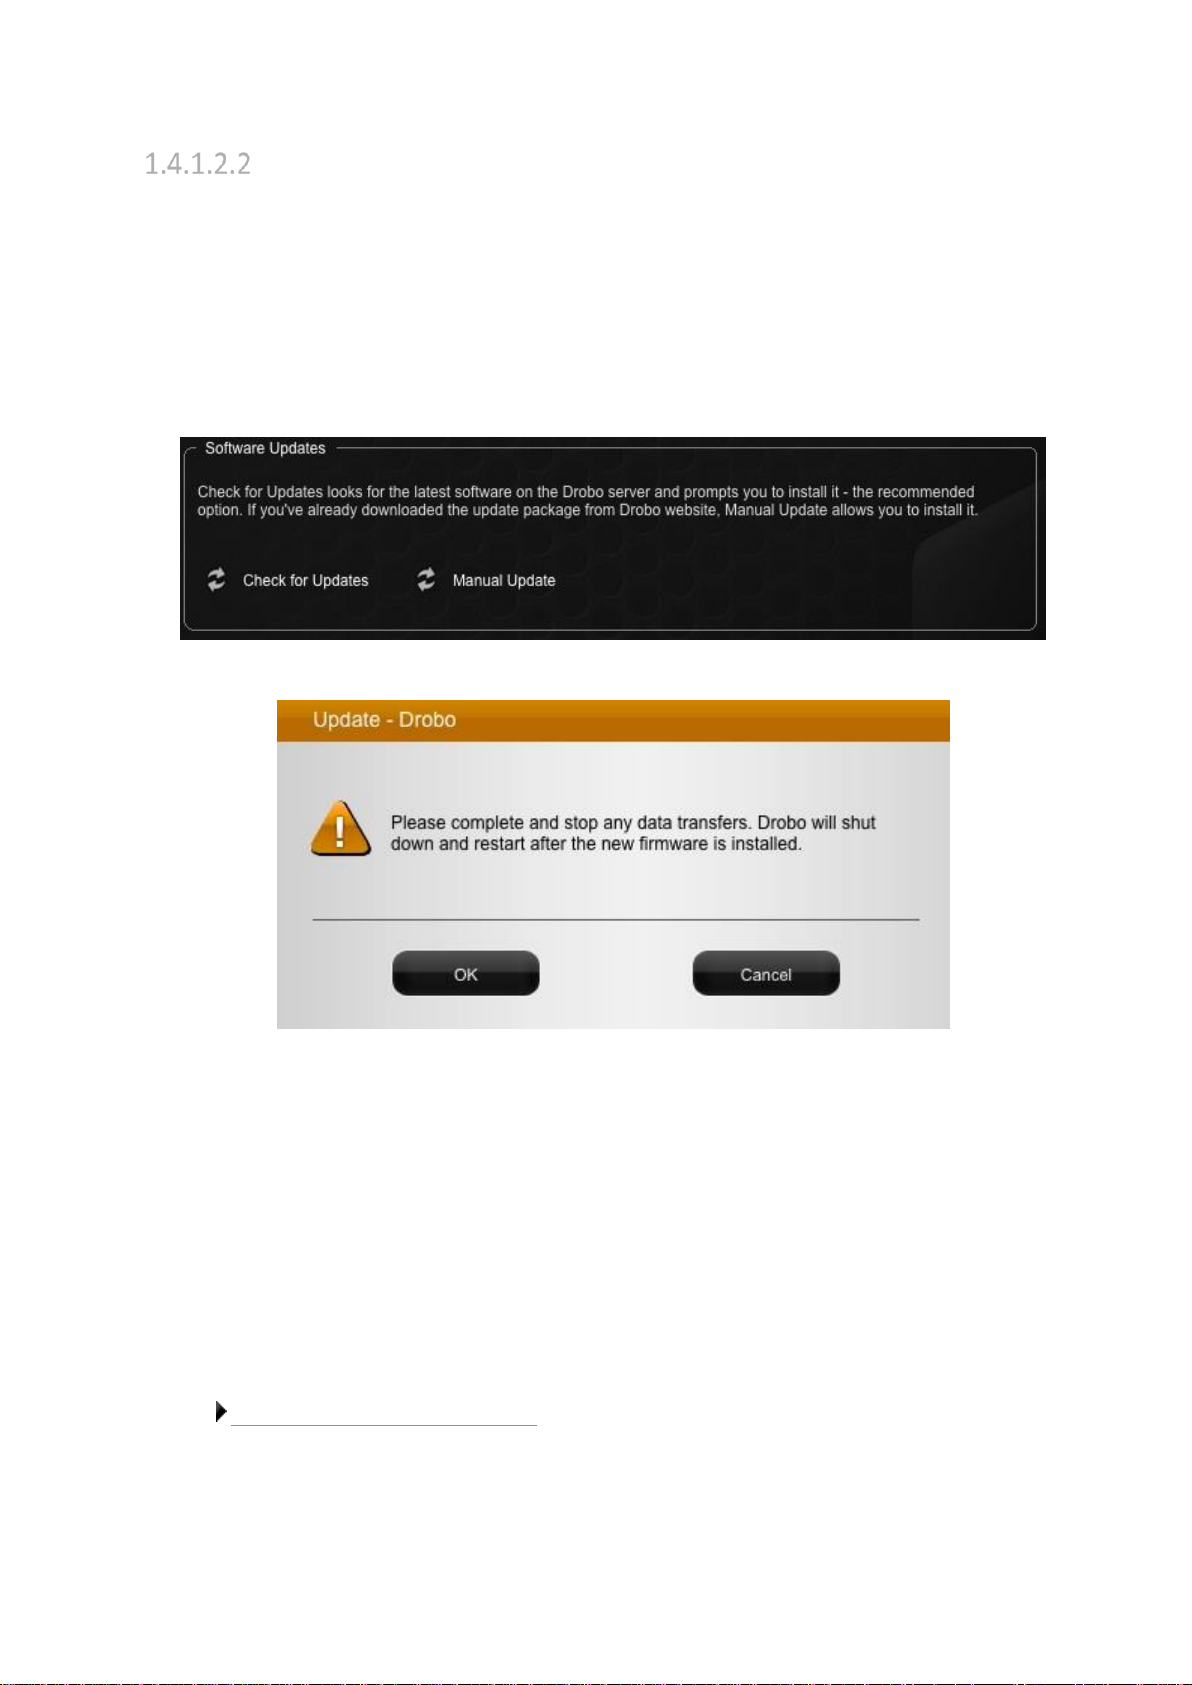
Manually Updating Firmware from Drobo Website
To manually update the firmware from the website, take the following steps.
1. Launch the Drobo Dashboard and select Drobo 8D from the All Drobos page. Also, if applicable,
log in to this Drobo device.
2. Click the Tools option on the Navigation menu for the selected Drobo device to open the Tools
page.
3. From the Software Updates area, click the Manual Update option.
4. A warning message opens, asking you to complete or stop any data transfers.
5. Ensure that the Drobo device is not actively transferring data (blinking yellow and green), and
then click the OK button. A dialog box opens, asking you to locate the zip or TDF file on your Apple
Mac™.
6. Please do so and then click the Open or OK button.
7. Drobo installs the firmware. When finished, a message opens, asking you to reboot the Drobo
device to complete the installation.
8. Click the Yes button. Drobo shuts down and restarts after the new firmware is installed.
Related topic:
Keeping Your Software Up to Date
Drobo 8D User Guide 71
Page 72
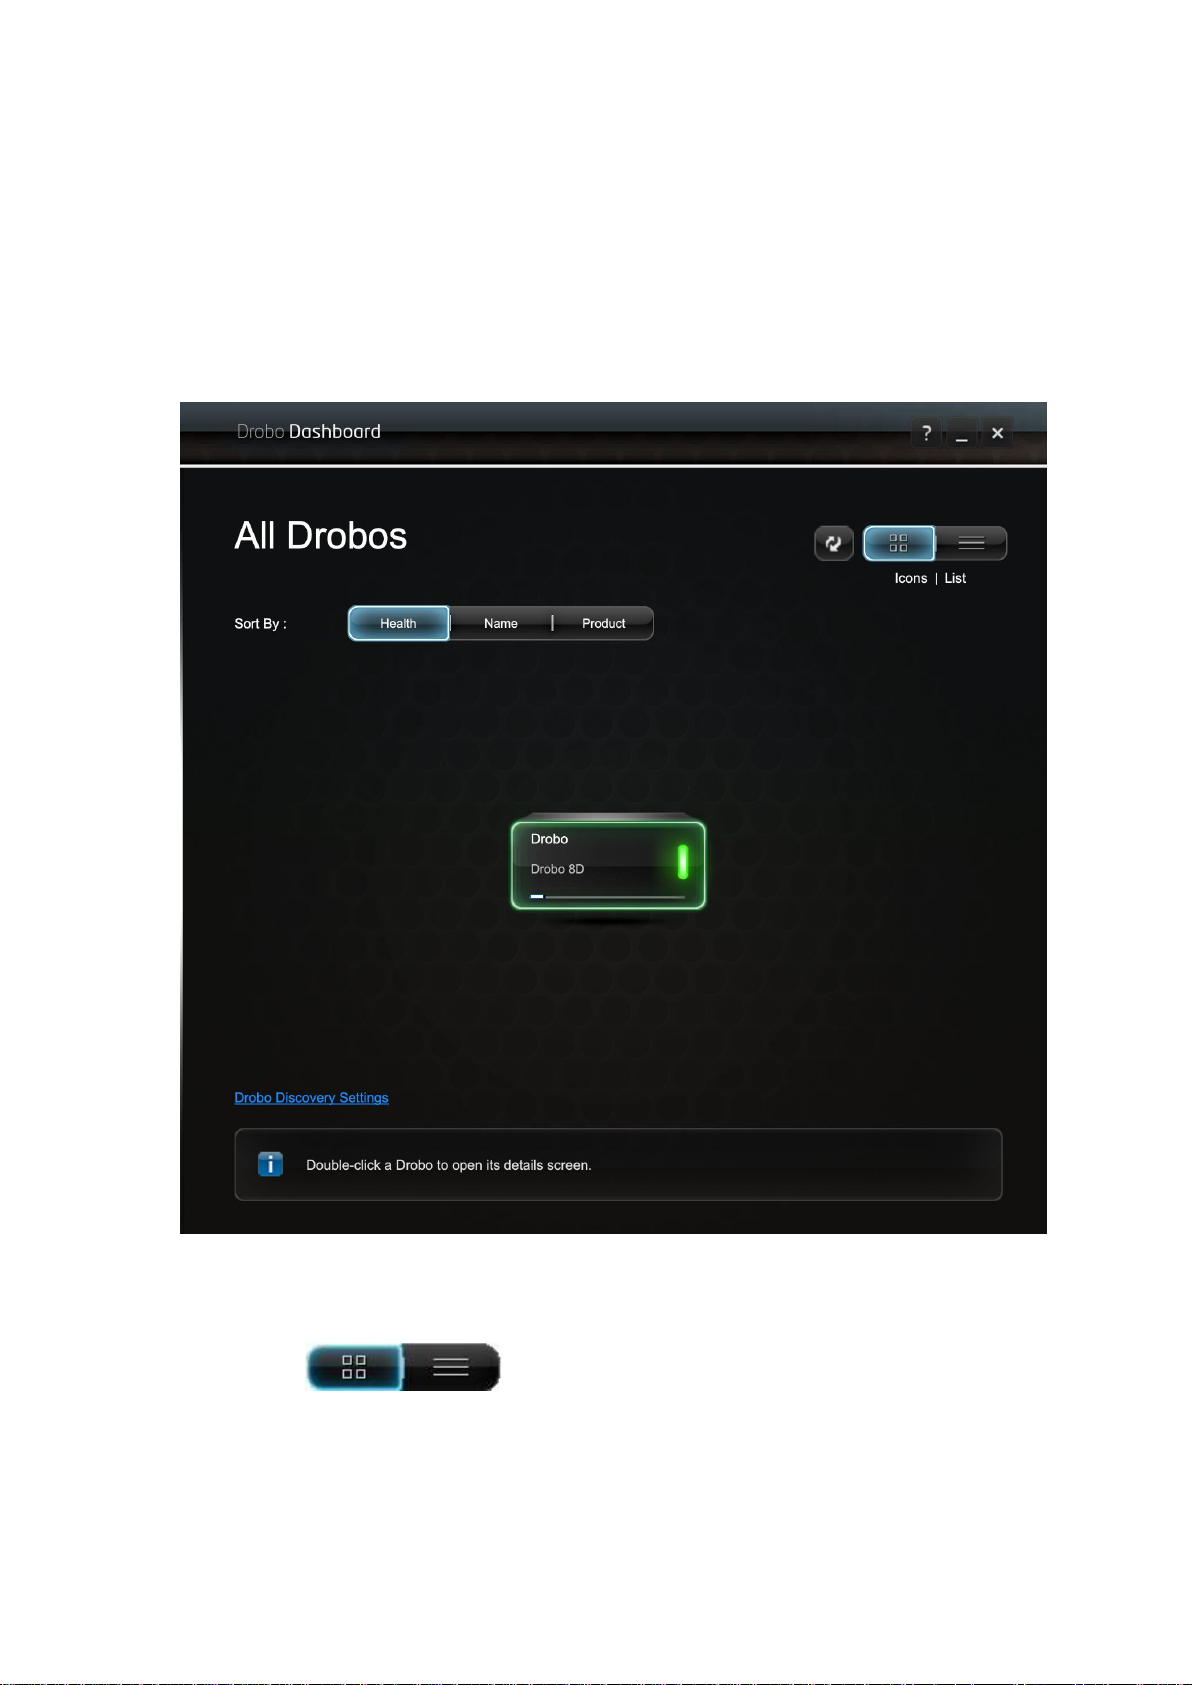
1.4.1.3 Touring Drobo Dashboard
In this topic, the two main areas of Drobo Dashboard are defined for the Drobo 8D: the All Drobos
page and the Navigation menu.
All Drobos Page
When you first open the Drobo Dashboard, by default, the All Drobos page appears displaying all
Drobo devices connected to your Apple Mac™ and/or network.
View
The View buttons in the upper-right corner of the page enable you to view
the Drobo devices in one of the two following ways:
● View by Icon– This button provides a view of the connected Drobo devices displaying each
device as an icon. The selected Drobo device is highlighted with a green border.
Drobo 8D User Guide 72
Page 73
● View as List – This button provides a view of the Drobo devices in table format. Information in
the list includes total protected capacity available for data, used capacity, free capacity, your
device’s serial number and whether you are currently logged in or out (if applicable). The currently
selected Drobo device has a blue border.
For more information on understanding capacity values, see Checking Storage Usage.
You can click on a button to change the view. In both views, Drobo devices appear with green
glowing lights if they are healthy.
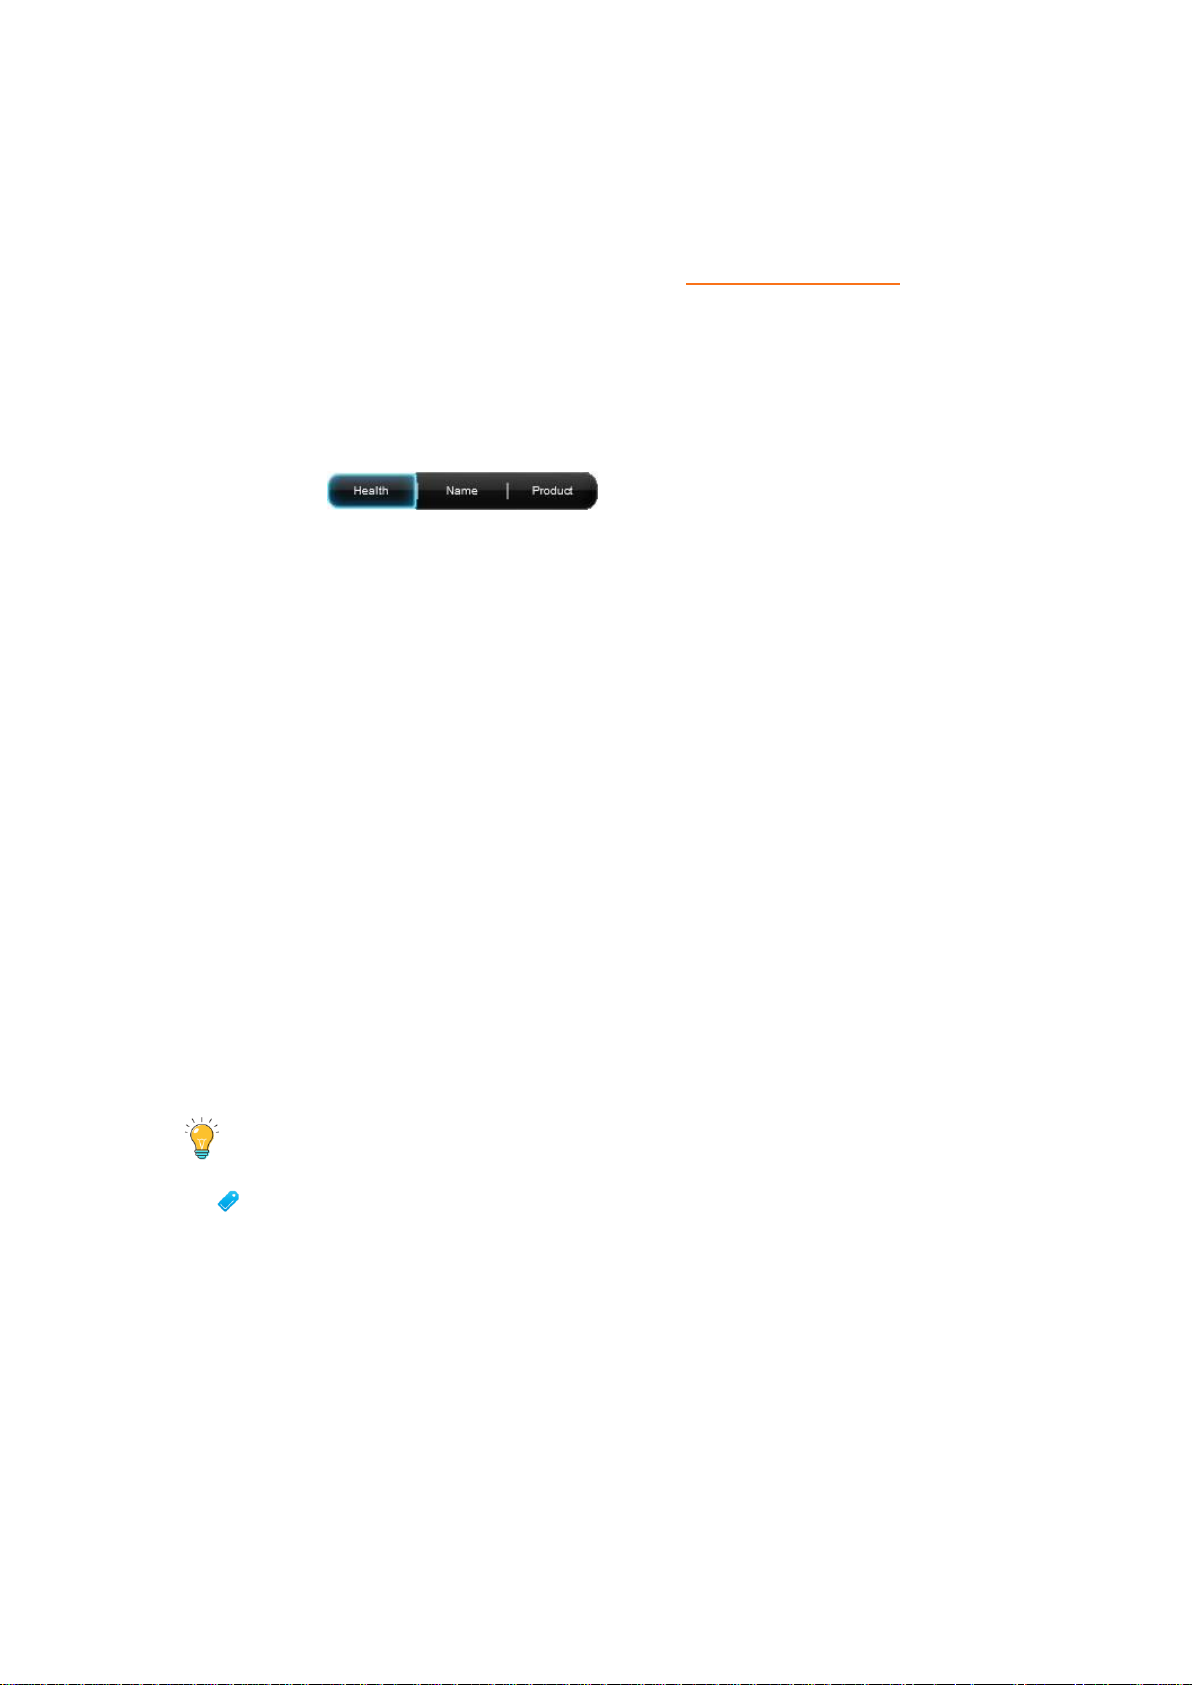
Sort By
The Sort By buttons enable you to sort the Drobo devices in one of
the following ways:
● Health – This button sorts Drobo devices by their health, with Drobo devices in red displayed
first, followed by yellow, and then green. This is the default view.
● Red - indicates the Drobo device is 95% full and you need to add capacity (or
drives), or a drive needs to be replaced, or your data is currently busy working to
protect your data right now. Flashing red indicates that one of the drives needs to be
replaced immediately.
● Yellow - indicates the Drobo device is more than 85% full, but less than 95% full.
● Green - indicates that the Drobo device is less than 85% full and that your data is
protected.
● Name – This button sorts Drobo devices alphabetically by the names you gave them, with Drobo
devices which are directly attached listed first.
● Product – This button sorts Drobo devices alphabetically by their model numbers or product
names, with Drobo devices which are directly attached listed first.
To select a Drobo device, just click on it once on the All Drobos page. All subsequent commands in
Drobo Dashboard (found on the Navigation menu on the left), will apply to the selected device.
Tip:
You can double-click on a Drobo device on the All Drobos page to open the Status page
for that device.
Navigation Menu
The Navigation menu appears on the left side of the screen. Options and commands in this menu
apply to the currently selected Drobo device. (You can select a Drobo device on the All Drobos
page.)
Drobo 8D User Guide 73
Page 74
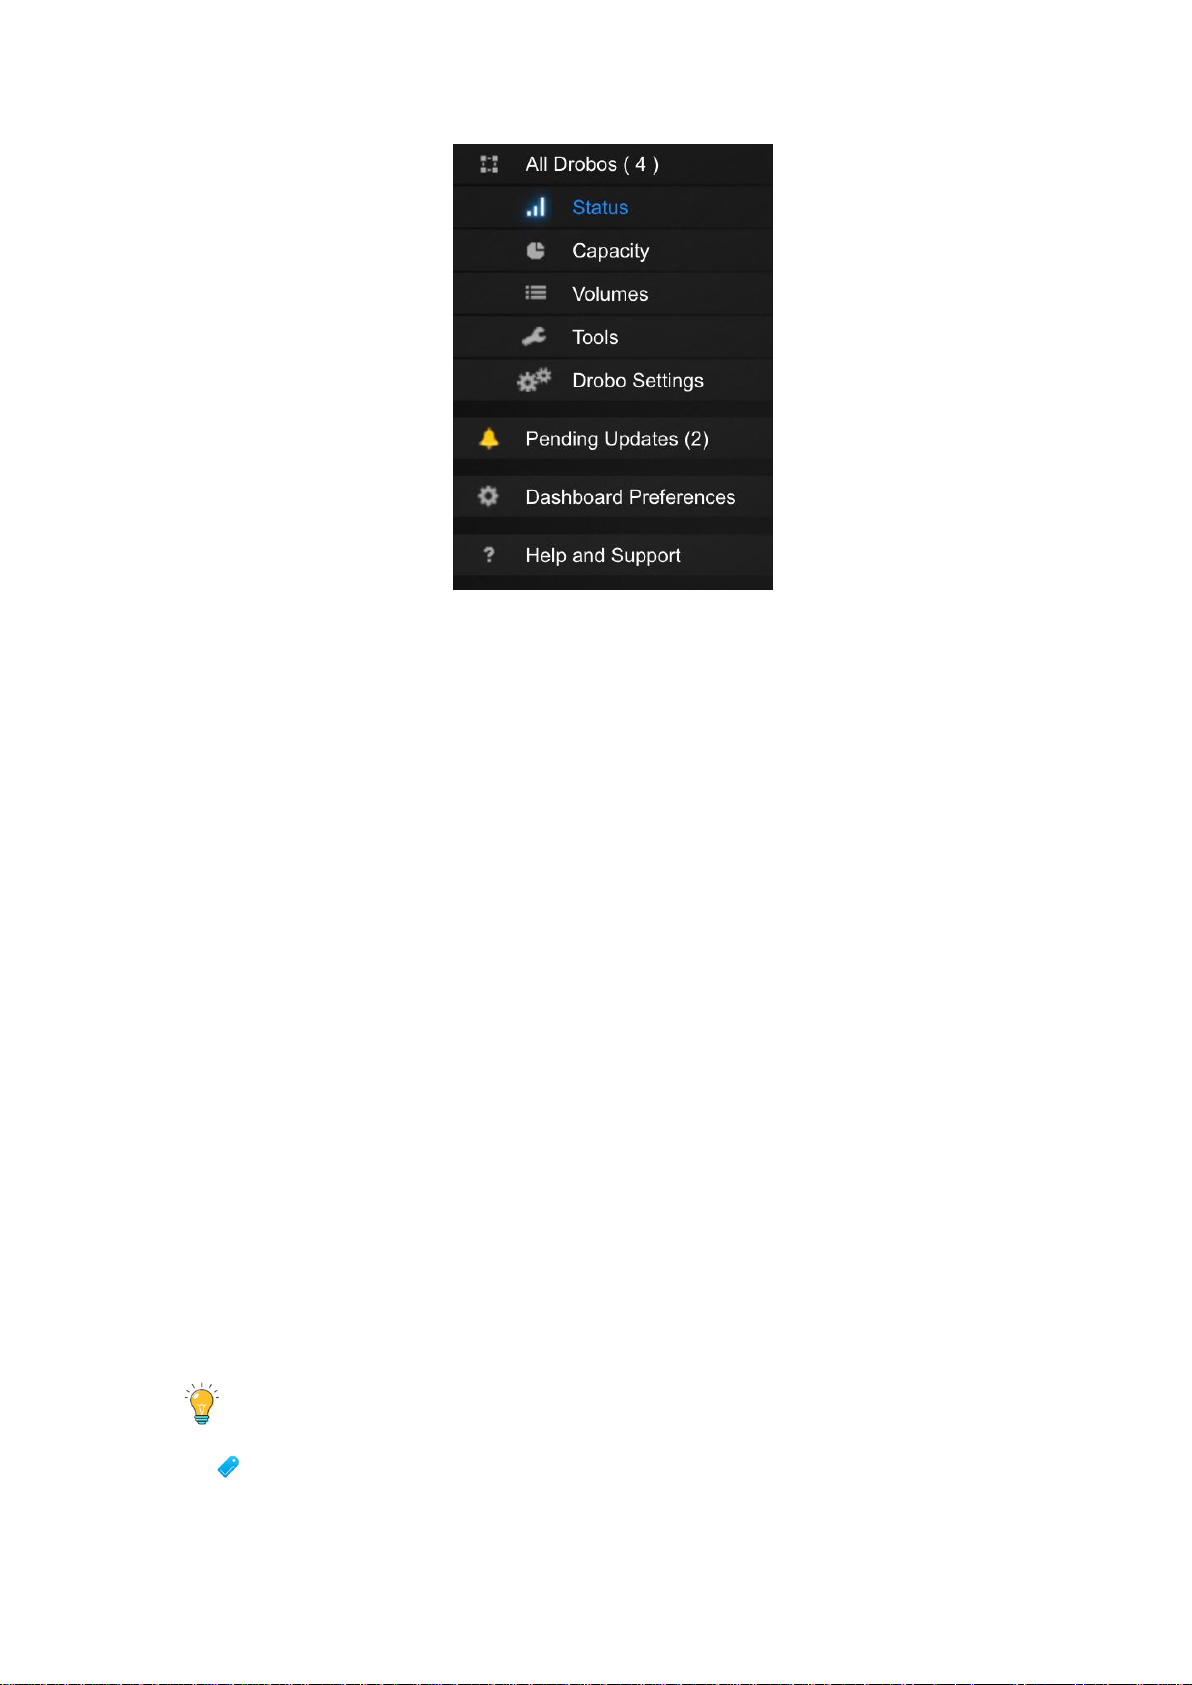
Menu options include the following:
● All Drobos (#), where # is the number of Drobo devices you have connected – Opens the All
Drobos page.
● Status – Opens the Status page, where you can view a variety of status information for the
selected Drobo device, such as drive information, device serial number and more.
● Capacity – Opens the Capacity page, where you can view how the storage capacity of the Drobo
device is being used.
● Volumes – Opens the Volumes page, which enables you to view and manage volumes for the
Drobo device.
● Tools – Opens the Tools page, which provides access to special tools, such as those to restart
the Drobo device or check for software updates.
● Drobo Settings – Opens a sub-menu with the option to modify various types of settings, such as
General, Admin and Network.
● Pending Updates – Opens the Pending Updates page, which will display all the pending Drobo
Dashboard and/or Firmware updates, if any.
This option will be available only if there are any pending updates.
● Dashboard Preferences – Opens the Dashboard Preferences page, which enables you to modify
Dashboard settings, such as those for automatic software updates and e-mail settings. (E-mail
settings enable you to receive e-mail alerts on the status of the Drobo devices).
● Help and Support – Opens the Help and Support page, which provides access to various forms of
help, including the Online User Guide and the Drobo knowledge base.
Tip:
For Status, Capacity, Volumes and Tools pages, you can view the same information for
other connected Drobo devices (if applicable) by clicking the up or down arrow key that
Drobo 8D User Guide 74
Page 75

displays to the left of the Drobo device name, which is in the upper-left corner of the page.
For example, see the arrows in the following image:
Related topics:
Using Drobo Dashboard
Using and Managing the Drobo 8D
Adding Drives
Drobo 8D User Guide 75
Page 76
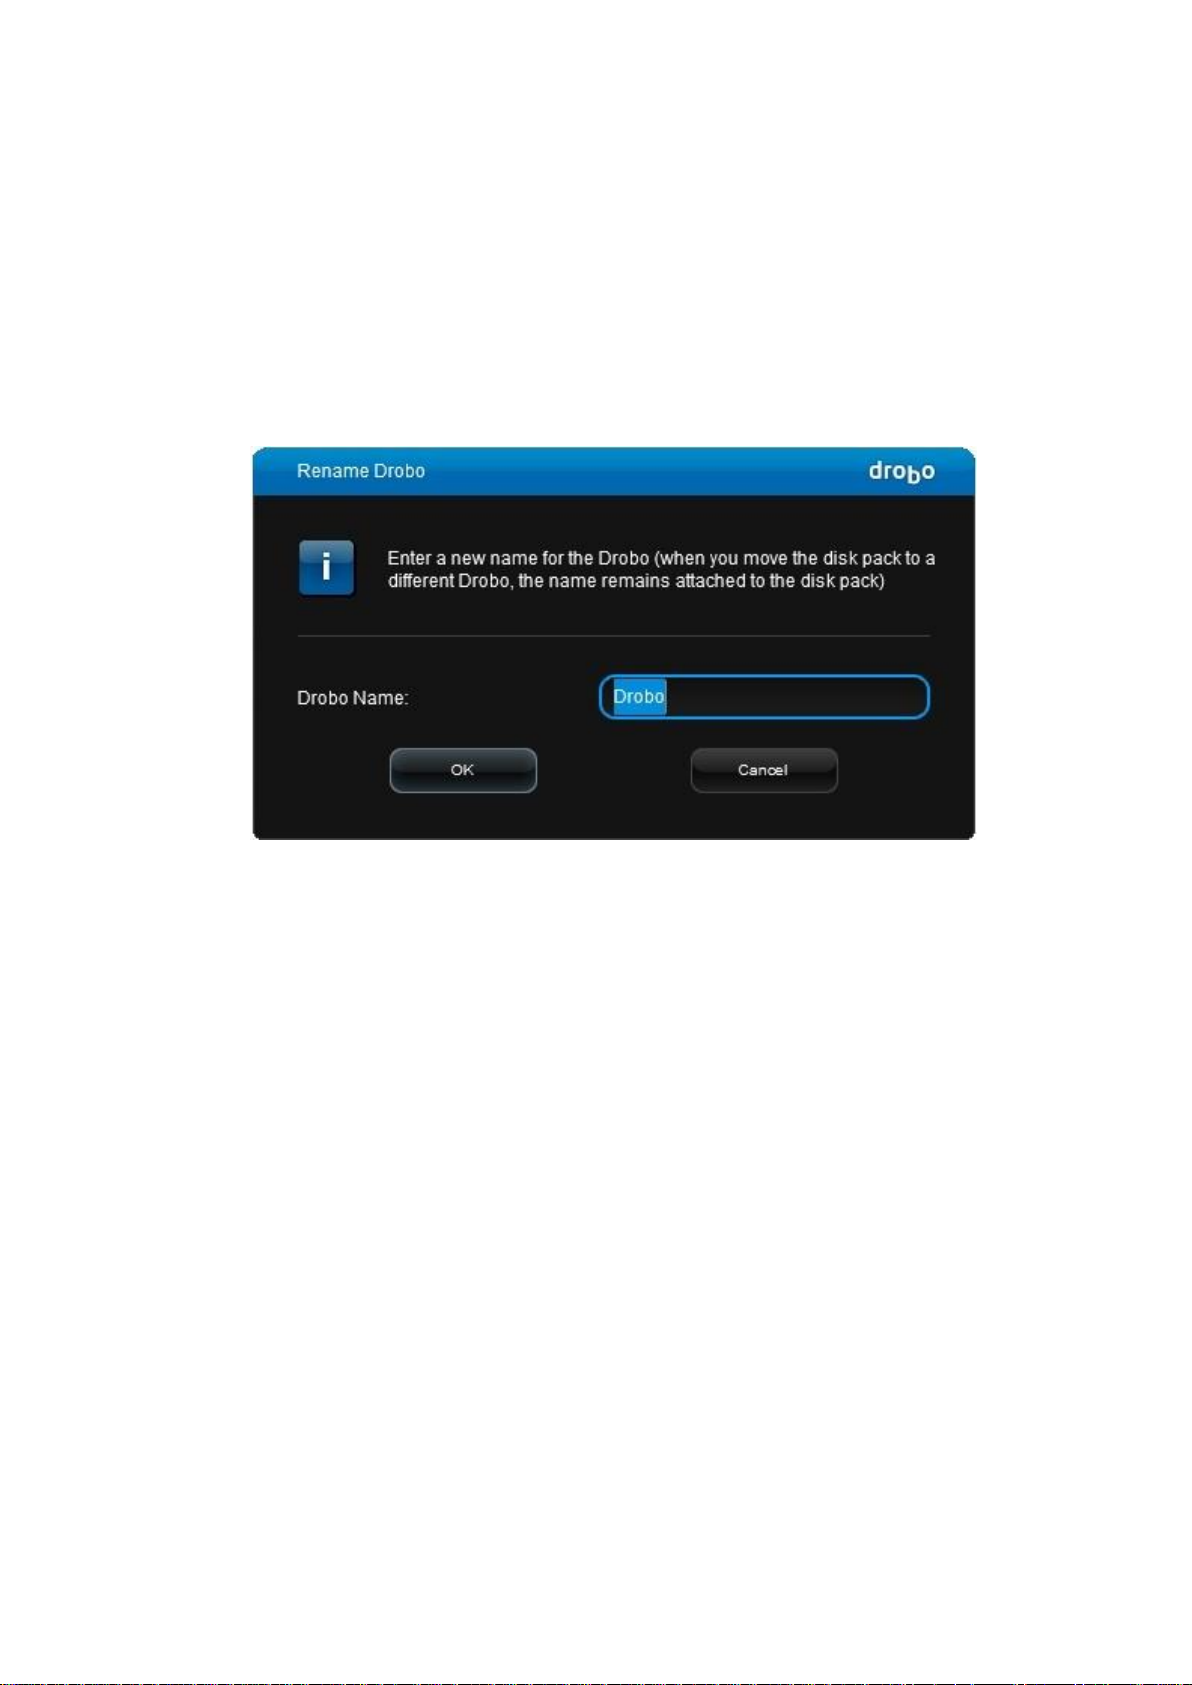
1.4.2 Renaming the Drobo 8D
To rename the Drobo 8D:
1. Open the Drobo Dashboard and select the Drobo device that you would like to rename from the
All Drobos page.
2. Click the Tools option on the Navigation menu. The Tools page for that Drobo device opens.
3. In the Drobo Operations area, click the Rename Drobo option. The Rename Drobo dialog page
opens.
4. Click in the Drobo Name text box and modify the text as desired.
5. When finished, click the OK button. You will return to the Tools page with the new name
displayed on the top.
Drobo 8D User Guide 76
Page 77
1.4.3 Formatting the Drobo 8D
When you first set up the Drobo 8D, you are soon prompted to format the drives in your device. You
may choose to re-format the drives at anytime thereafter.
Warning:
Any data on the drives will be lost when you re-format. Be sure to move the data to another
location first.
Follow these steps to format the Drobo 8D:
1. In Drobo Dashboard on the All Drobos page, select the Drobo device that you would like to
format.
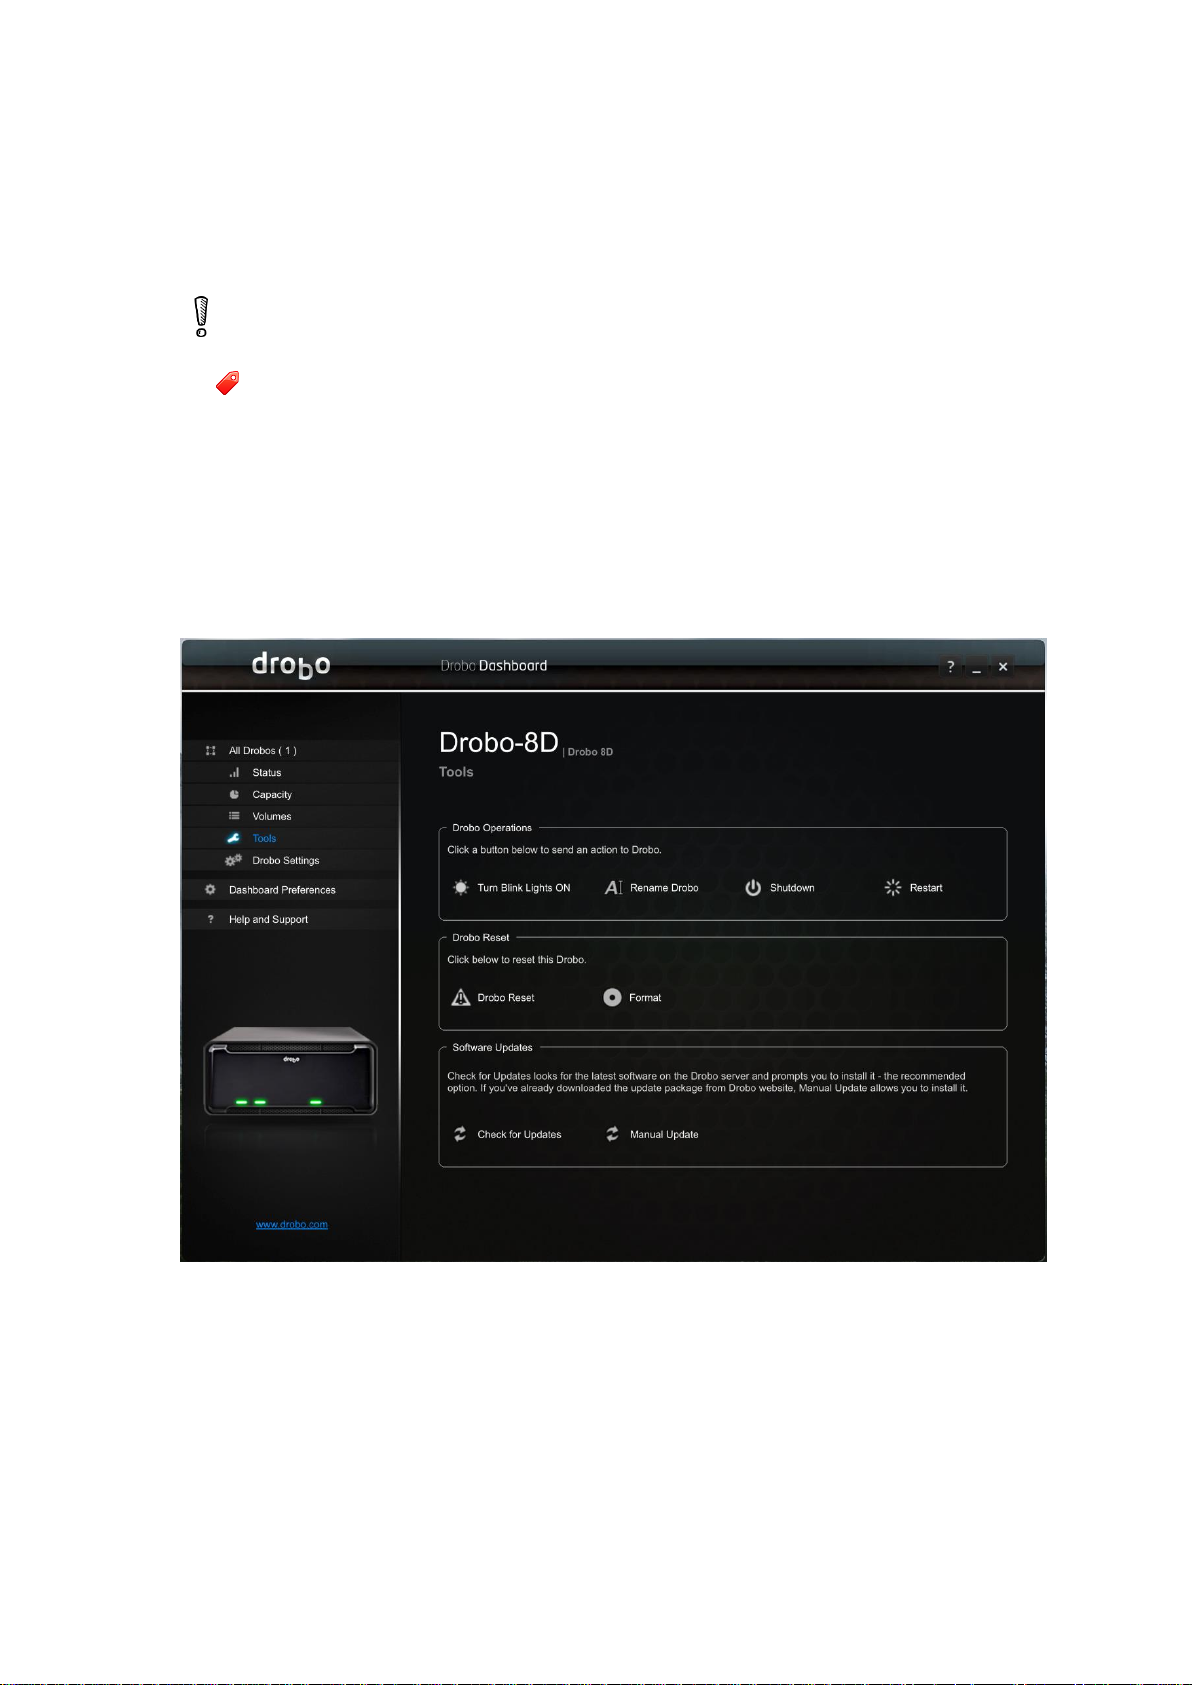
2. Click the Tools option from the Navigation menu. The Tools page for that Drobo device opens.
3. In the Drobo Operations area, click the Format option. A dialog box opens, warning that your
data on the drives will be lost and asking if you would like to continue.
4. Click the Yes button to continue. The Format Type page opens. Depending on your operating
system the page displays with different options.
This is the Format Type page for Drobo 8D
Drobo 8D User Guide 77
Page 78
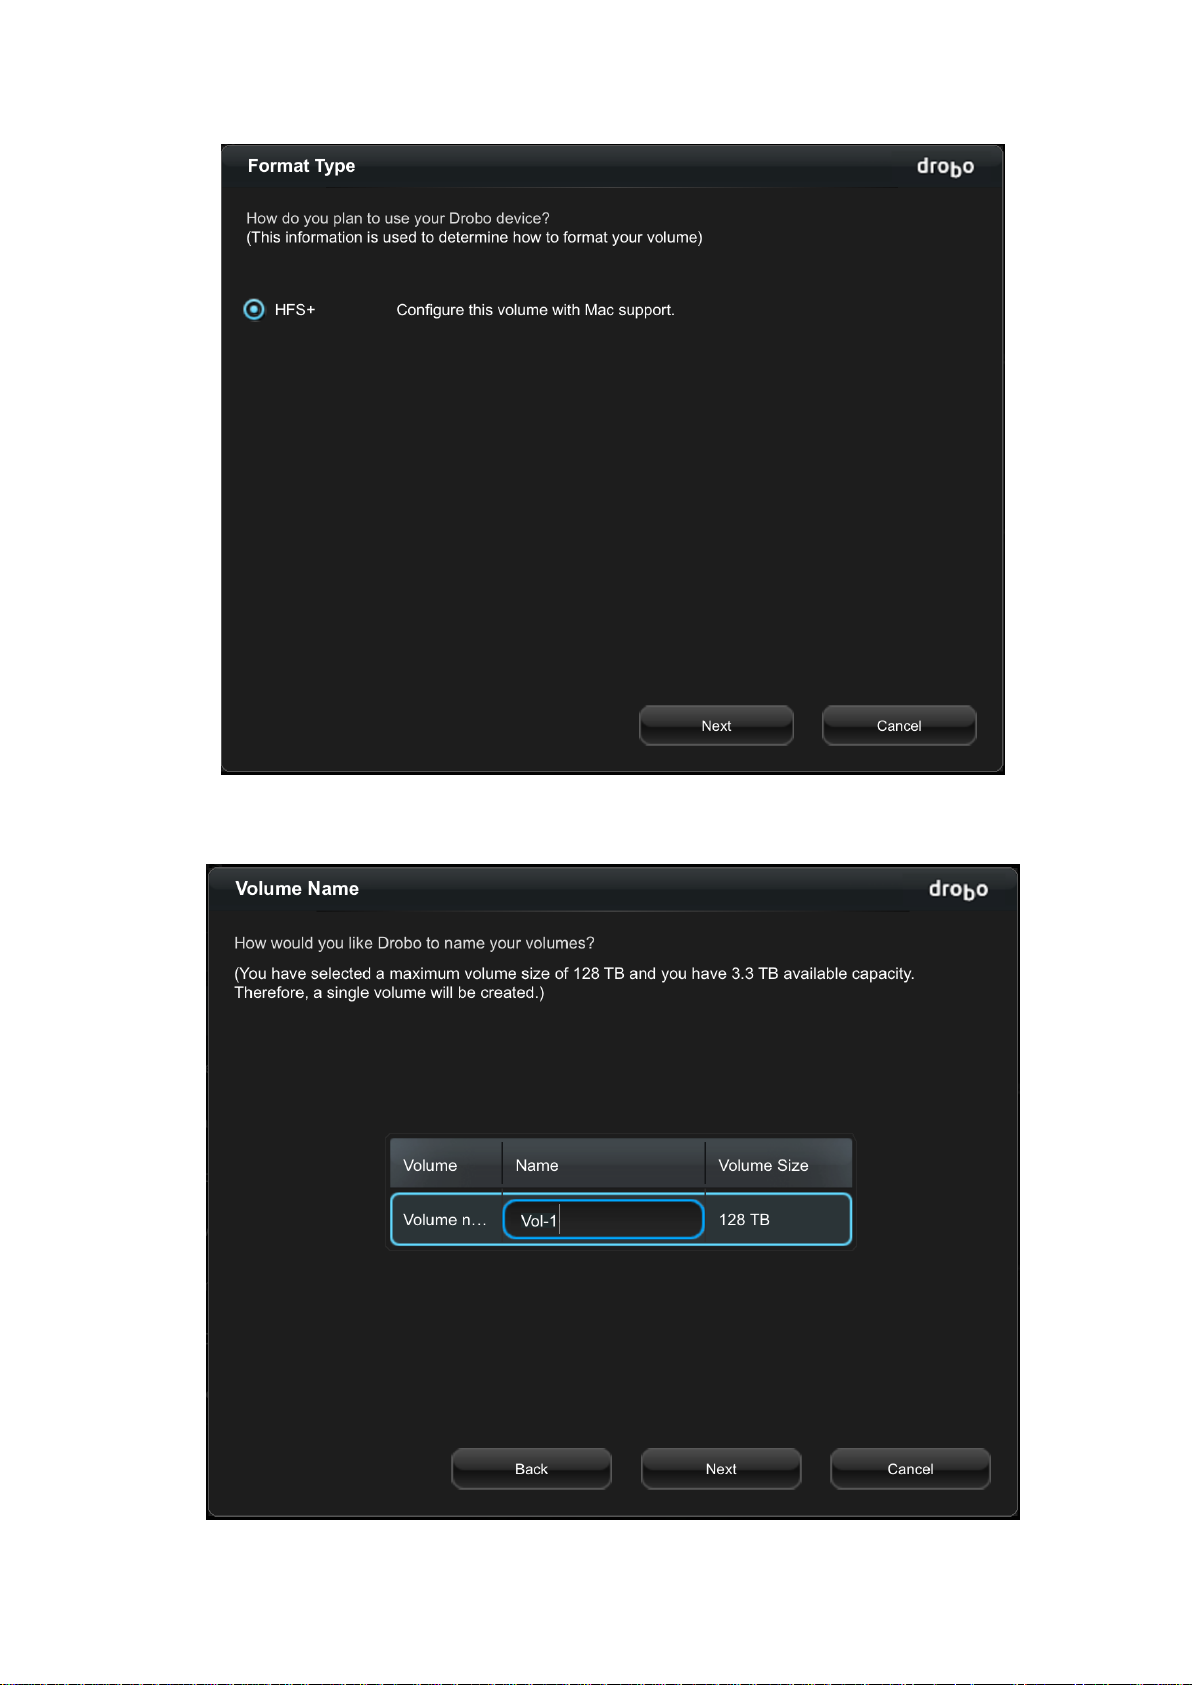
5. Select the appropriate file format for your operating system and click the Next button. The
Volume Name page opens.
Drobo 8D User Guide 78
Page 79
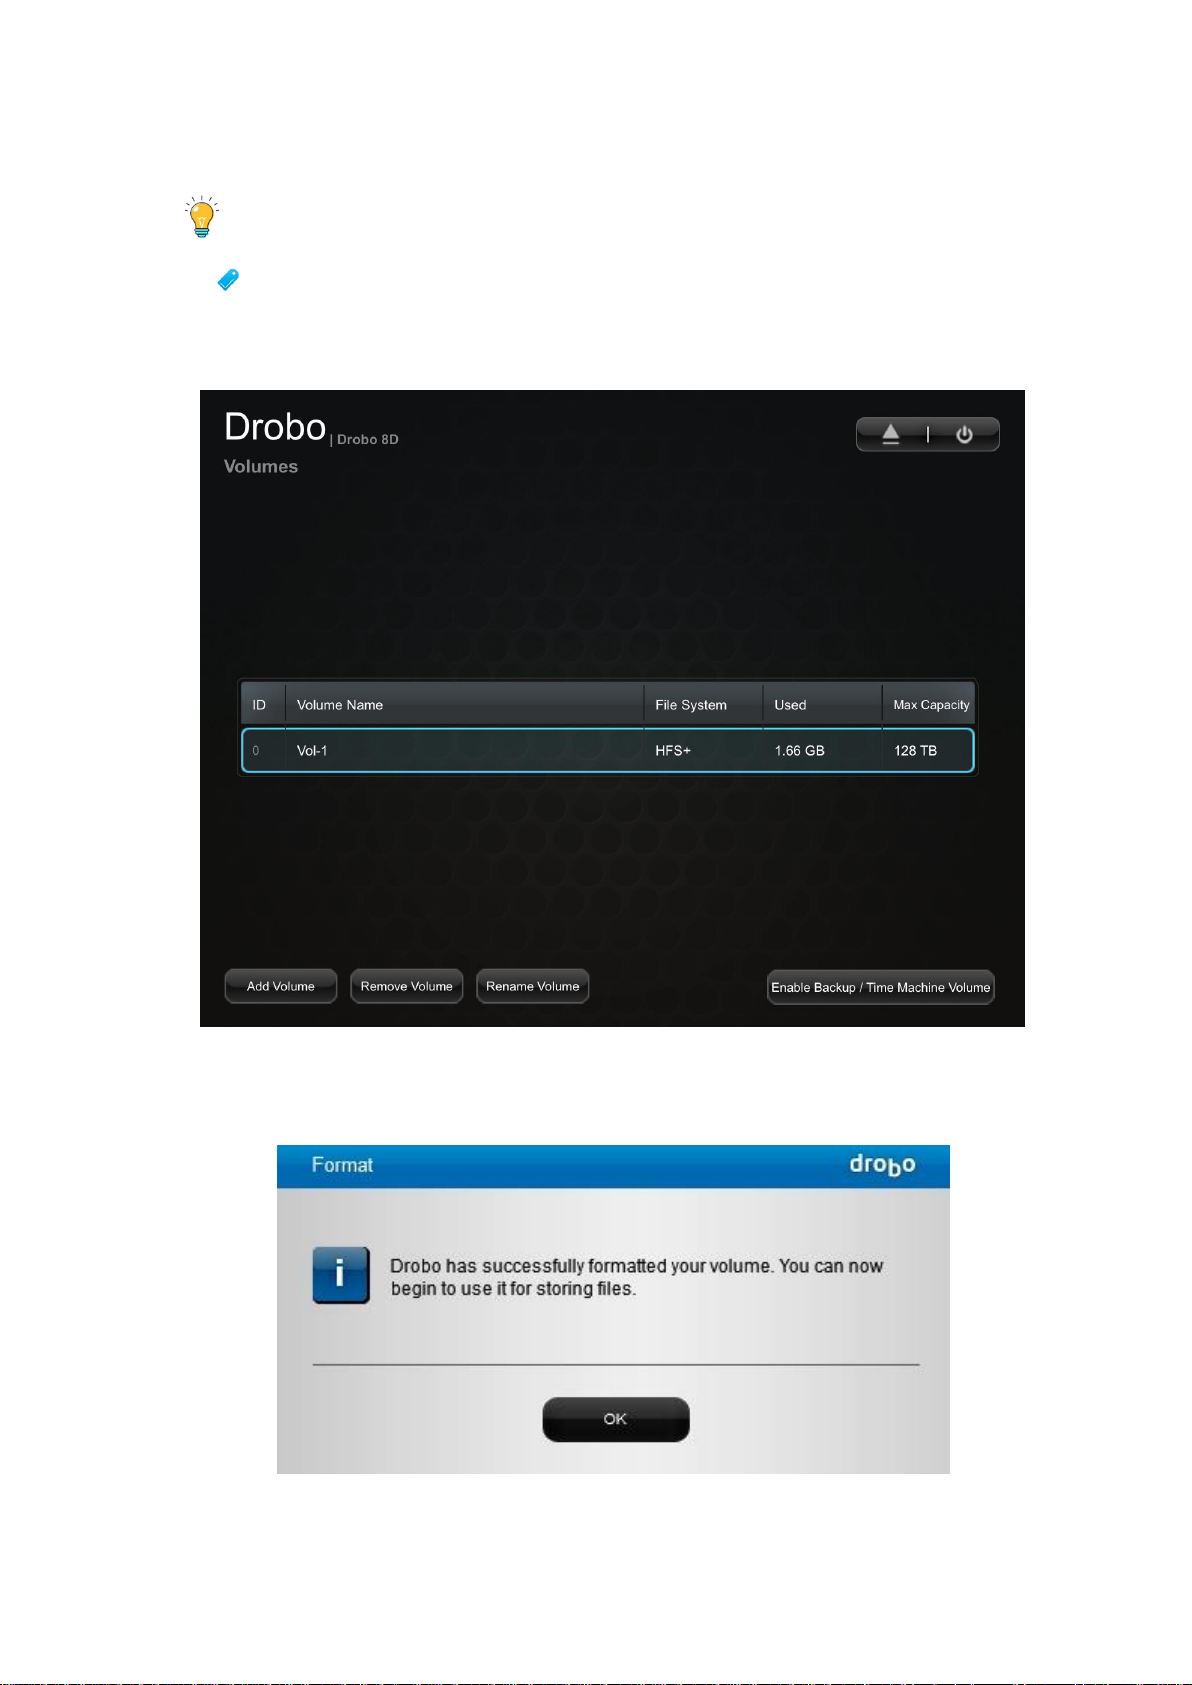
6. In the Name text box, modify the default name for the volume as you like.
Tip:
We recommend using the word “volume” in the name so as to not confuse the volume
name with your device name.
7. Click the Next button. The Confirm Format page opens.
8. Click the Format button. A message opens, informing you that it can take up to five minutes to
format your drives, and that this may require rebooting the Drobo device. Afterwards, the Format
dialog box opens.
9. Click the OK button. the Drobo device displays on the Tools page in Drobo Dashboard.
Drobo 8D User Guide 79
Page 80

1.4.4 Safely Shutting Down the Drobo 8D
If you plan to shut down the Drobo 8D for any reason, it is very important that you always do so
safely. Improper Drobo device shutdowns may cause file corruption and/or data loss.
It is a good idea to shut down the Drobo device before any of the following situations:
● You are not going to be using the Drobo 8D for an extended period
● You are going to disconnect the cable(s) or power cord
● You want to move the Drobo to another location
● You are going to remove the entire disk pack
● You are going to apply operating system updates
Related topic:
Safely Shutting Down the Drobo 8D Using Drobo Dashboard
Drobo 8D User Guide 80
Page 81
1.4.4.1 Safely Shutting Down the Drobo 8D Using Drobo
Dashboard
This is the recommended method for safely shutting down the Drobo device.
To safely shutdown your device:
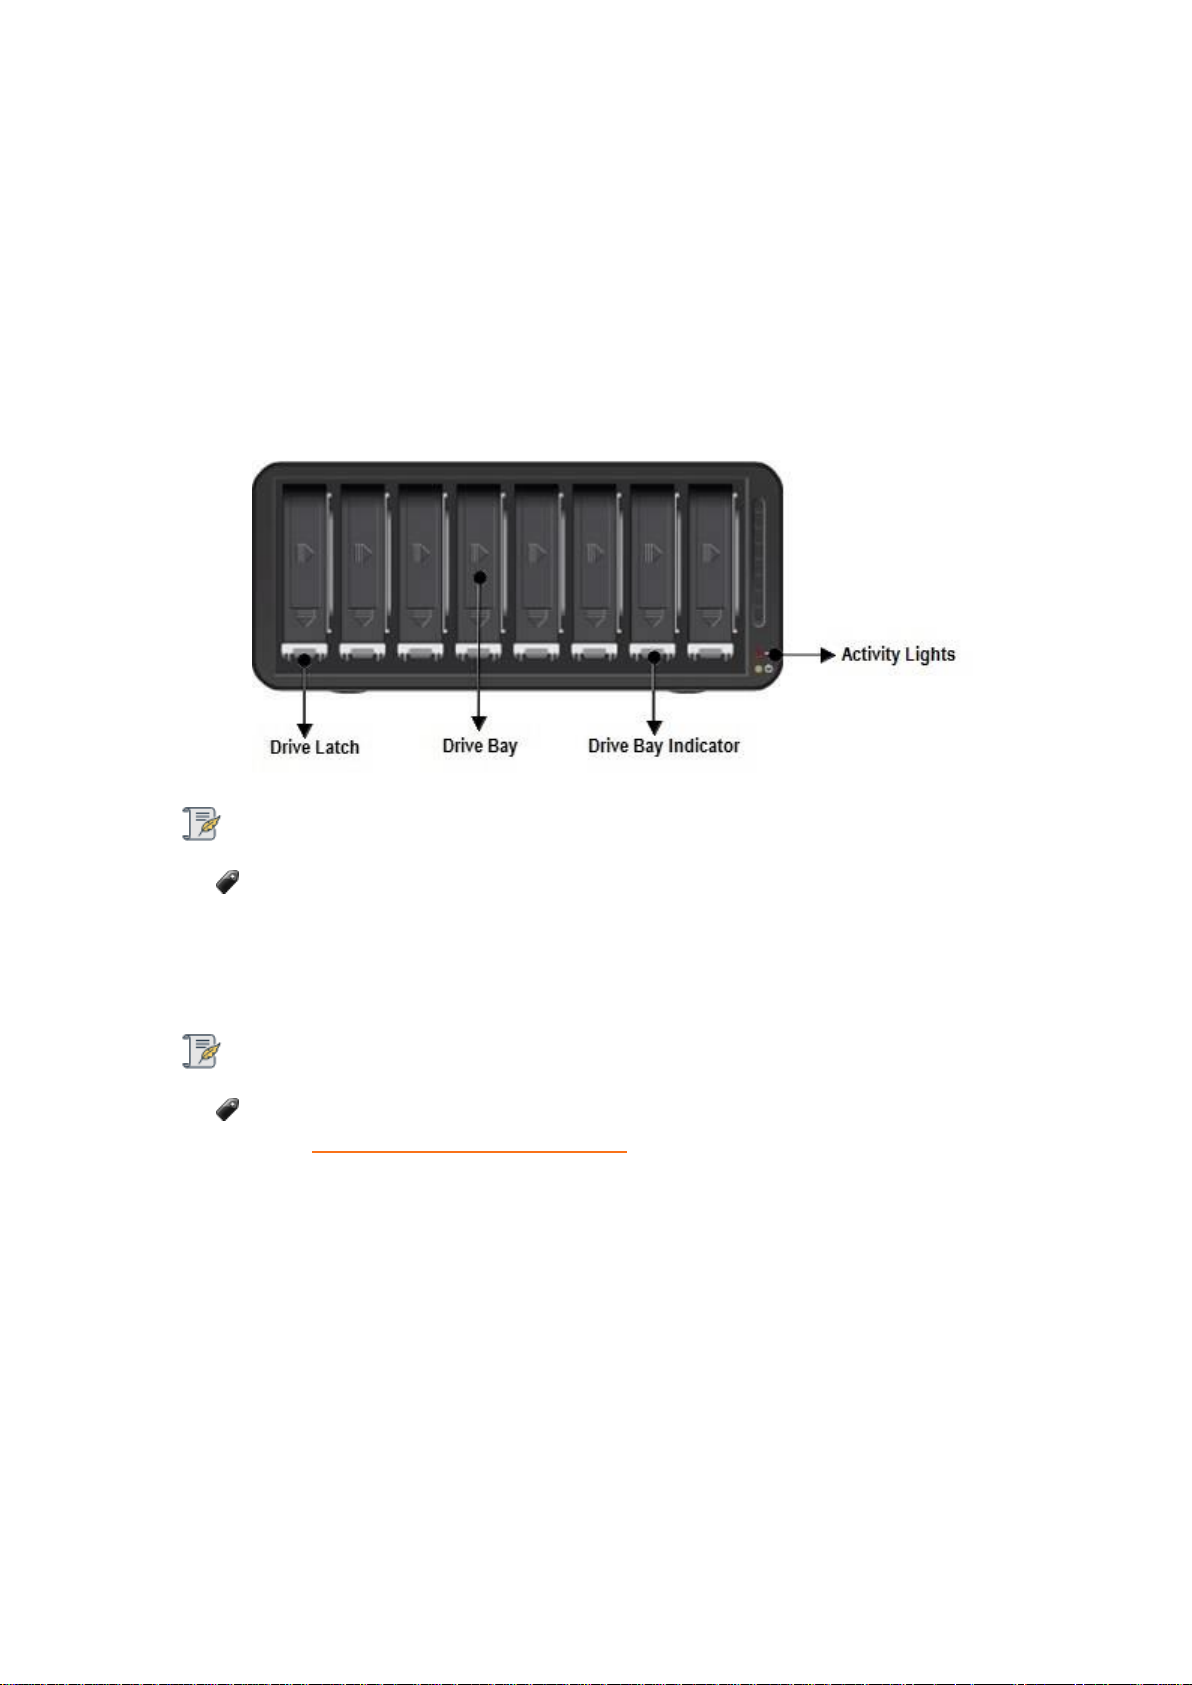
1. Check that the activity light on the Drobo device is off, indicating that no data is actively being
transferred to or from the Drobo device.
Note:
If data is actively being transferred, the activity light will be blinking green.
2. Also check to ensure the drive bay action indicator lights are not blinking alternately between
yellow and green. This indicates that the Drobo device is busy working to protect your data. Wait
until these lights are a solid green.
Note:
If one or more drive bay lights are red, you need to add capacity or replace the current
drive (see Understanding the Indicator Lights). However, you can still safely shut down the
Drobo 8D.
3. In the Drobo Dashboard, select the Drobo 8D that you would like to shut down from the All
Drobos page, and click the Status option on the Navigation menu. The Status page opens.
Drobo 8D User Guide 81
Page 82
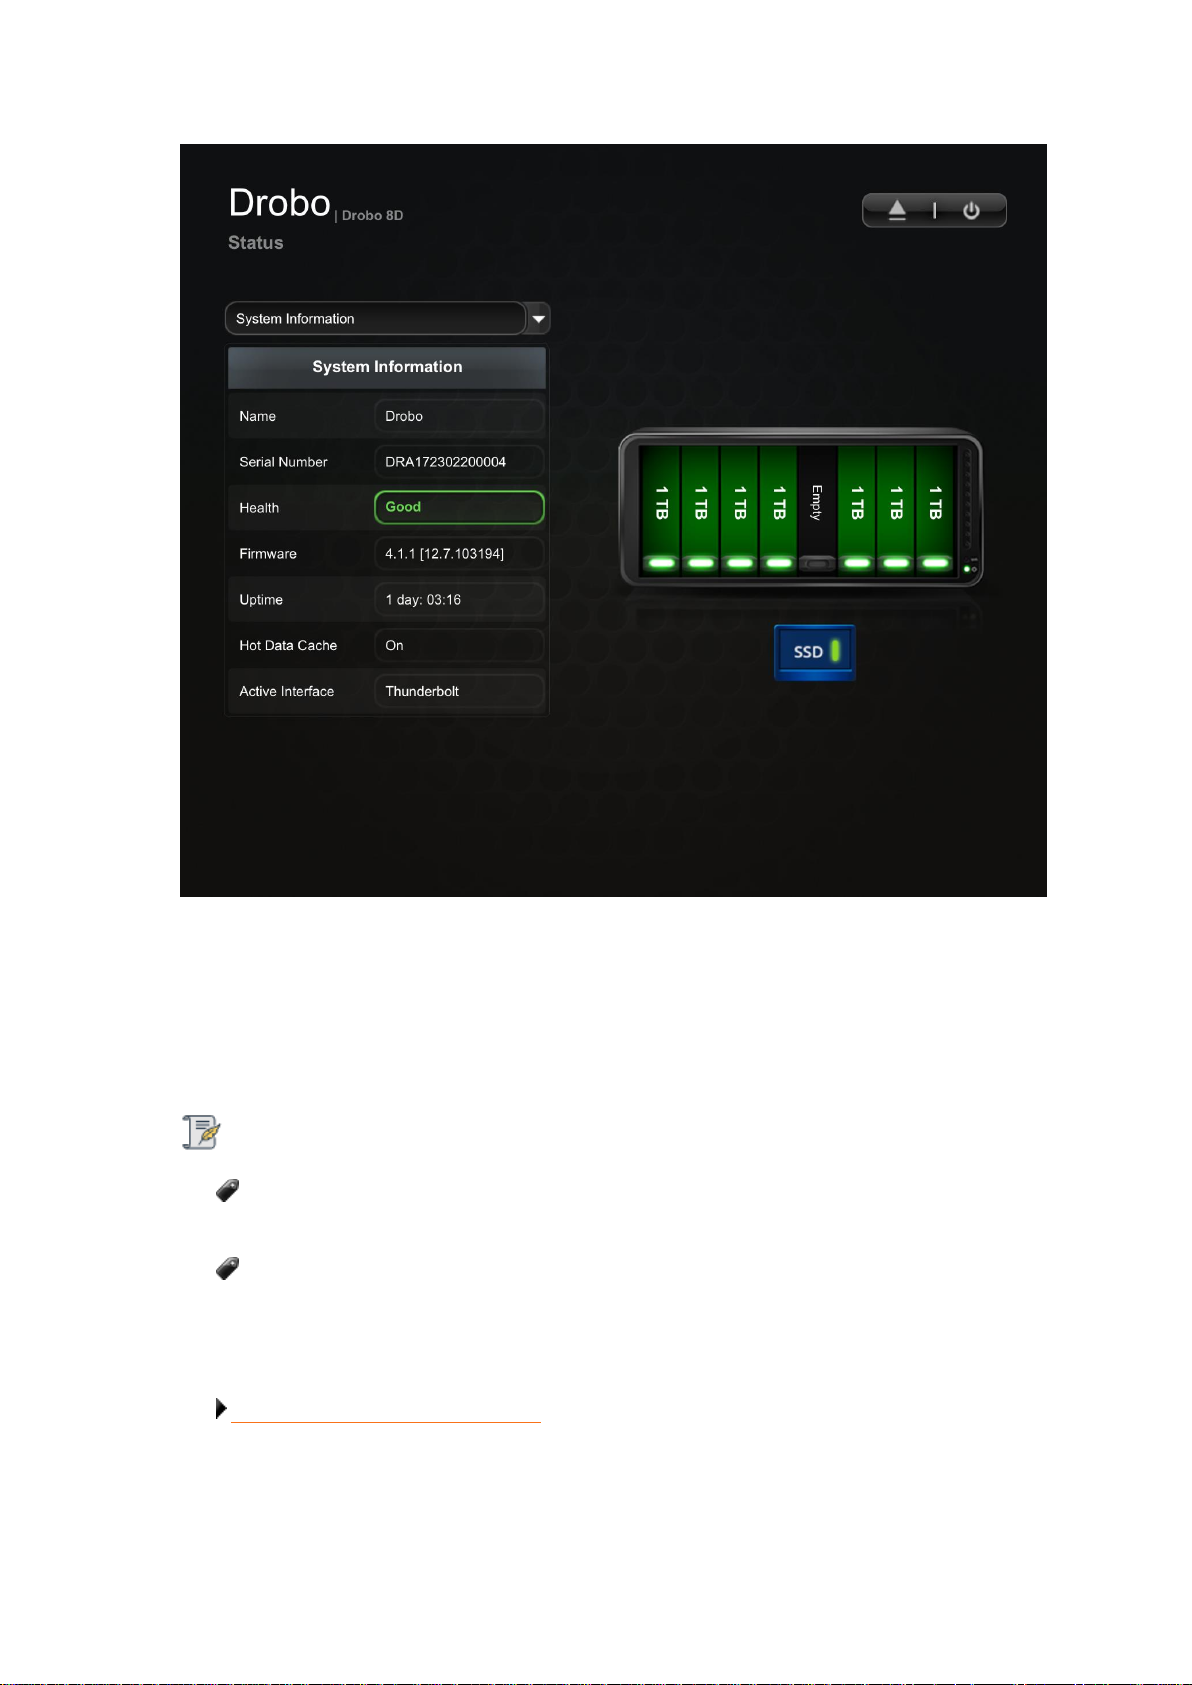
4. At the top right corner, select the Shutdown option. A message box opens, asking you to confirm
the shutdown.
5. Click the Yes button.
6. It can take up to two minutes for the Drobo 8D to power down. Afterwards, the power light
turns off, indicating the Drobo device has shut down.
Note:
Shutdown option can be selected from Volume page and under operations area in Tools
page. It is also available on right clicking the Drobo icon in system tray.
Power toggle is Not the recommended method of shutdown.
Related topic:
Understanding the Indicator Lights
Drobo 8D User Guide 82
Page 83
1.4.5 Resetting the Drobo 8D
You can reset the Drobo device back to its factory defaults.
Warning:
Resetting the Drobo device erases all the data on the drives.
To reset the Drobo 8D:
1. Open the Drobo Dashboard and select the appropriate Drobo device from the All Drobos page.
2. From the Navigation menu, click the Tools option. This opens the Tools page for that Drobo
device.
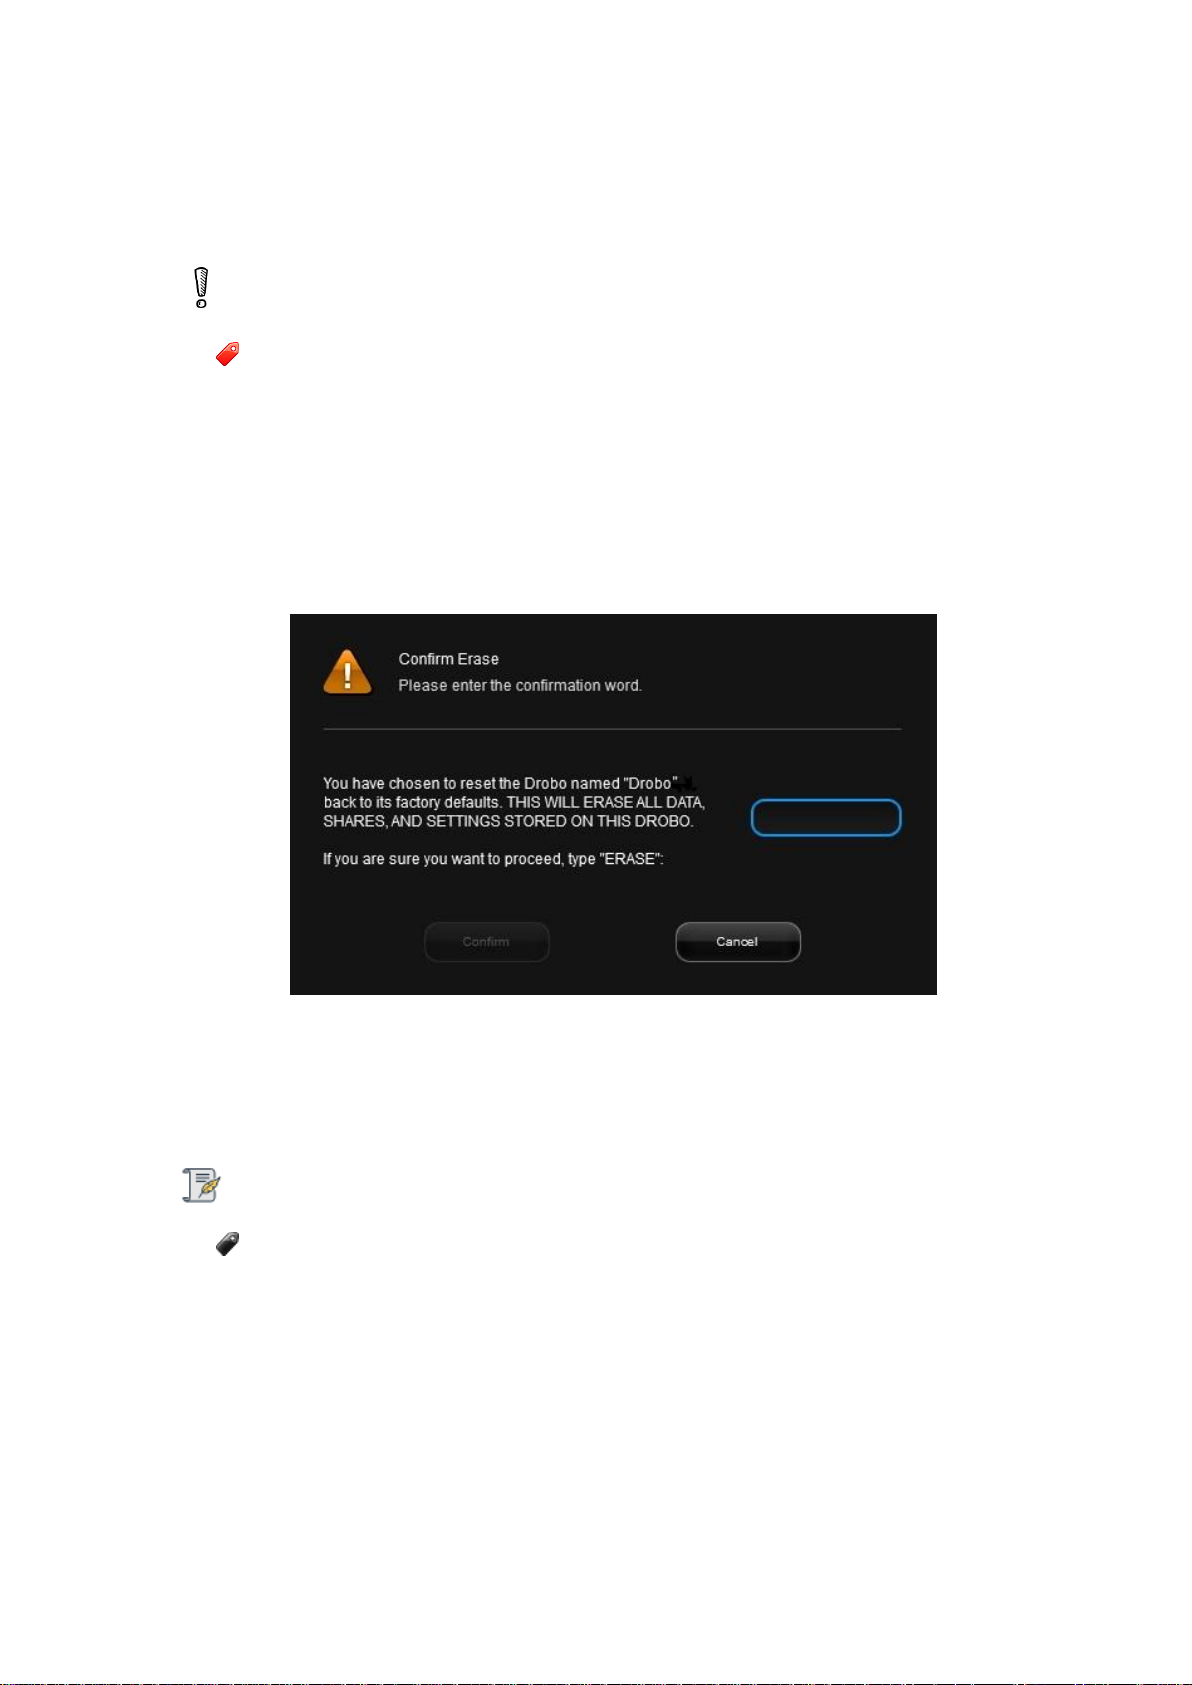
3. In the Drobo Reset area, click the Drobo Reset option. The Confirm Erase dialog page opens.
4. If you are sure you would like to proceed, in the text box, type ERASE and click the Confirm
button.
5. the Drobo device gets reset to its factory settings, which can take a few minutes. Once complete,
this Drobo device will no longer appear in the Drobo Dashboard.
Note:
If the Drobo device remains powered on and connected to your host Apple Mac™, the
Drobo Dashboard will re-discover the Drobo device as if it were new.
Drobo 8D User Guide 83
Page 84
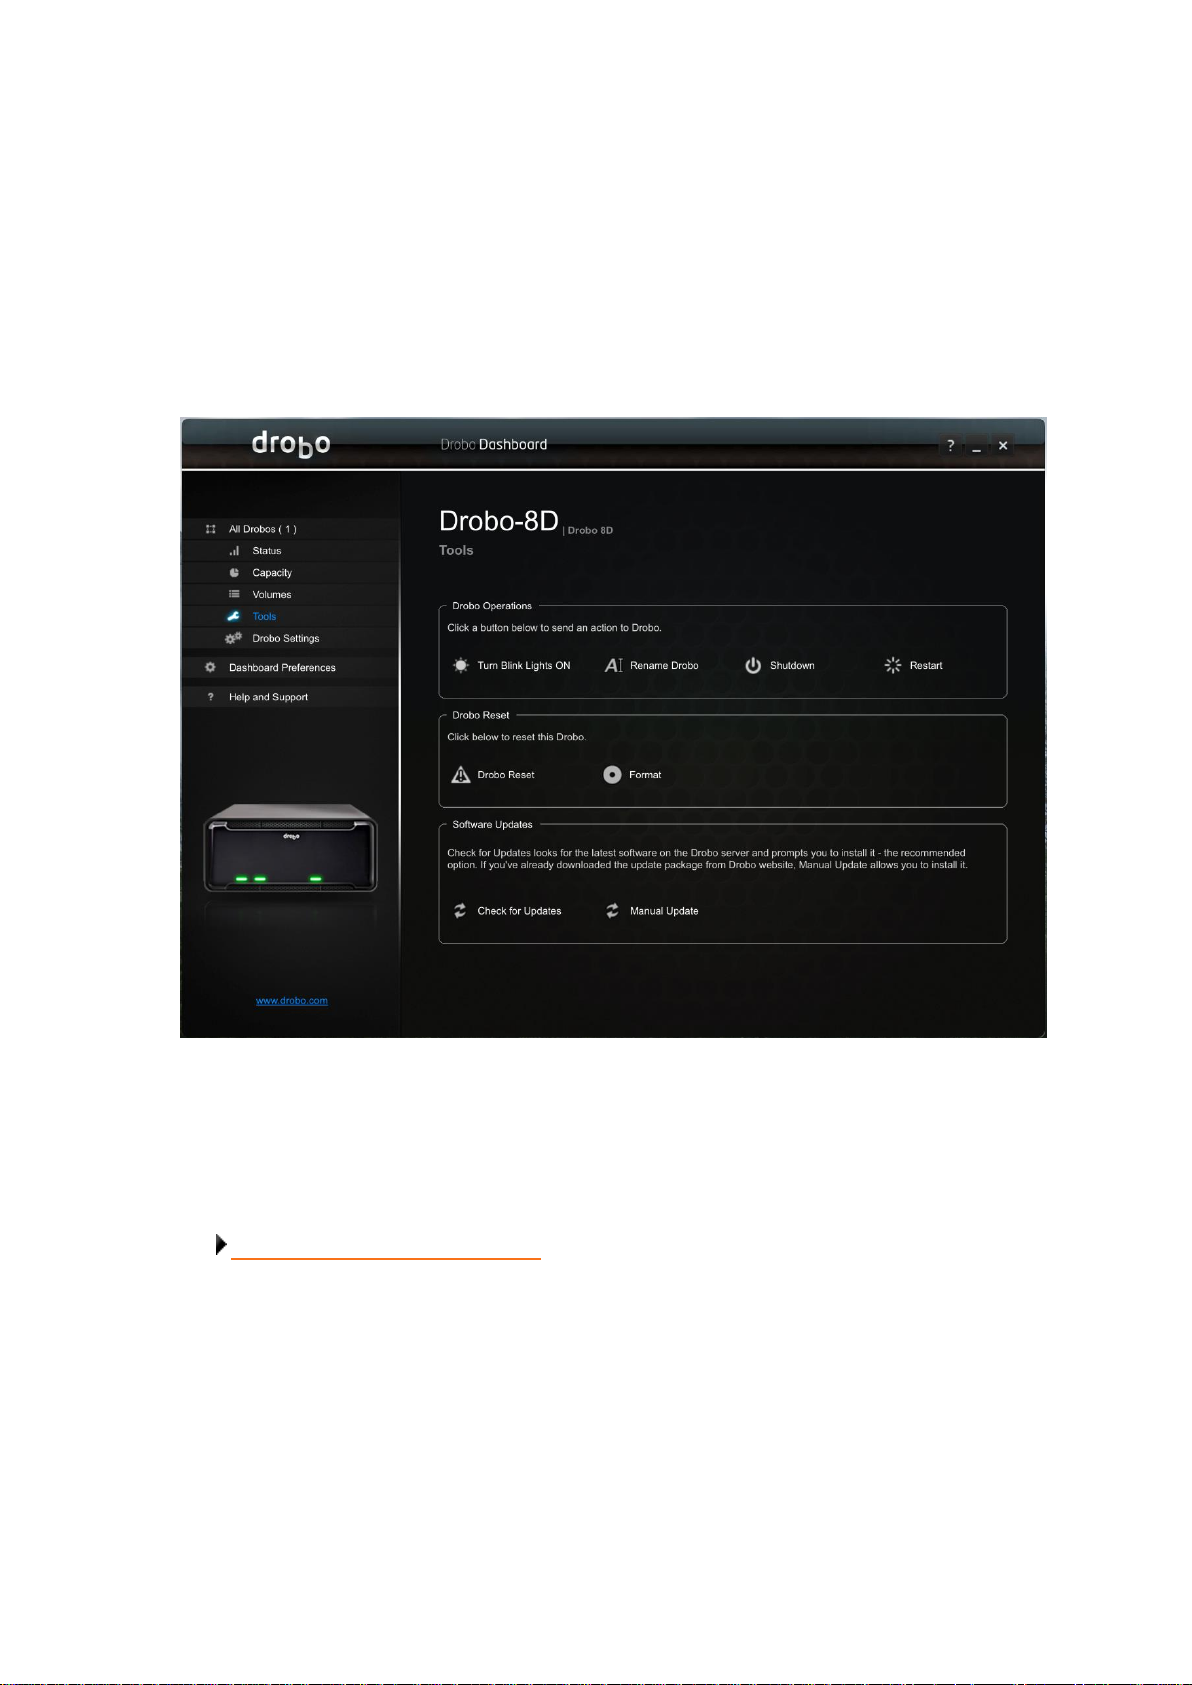
1.4.6 Blinking Lights to Test Connectivity
A simple test to verify that the Drobo 8D is connected, directly or indirectly, to your host Apple
Mac™, is to use Drobo Dashboard to blink the lights on the Drobo device.
To make the lights blink:
1. From the All Drobos page, select the Drobo device whose connectivity you would like to check.
2. Click the Tools option on the Navigation menu. The Tools page for that Drobo device opens.
3. In the Drobo Operations area, click the Turn Blink Lights ON option.
4. The drive lights on the Drobo device blink red and green alternatively for 15 seconds.
Related topic:
Understanding the Indicator Lights
Drobo 8D User Guide 84
Page 85
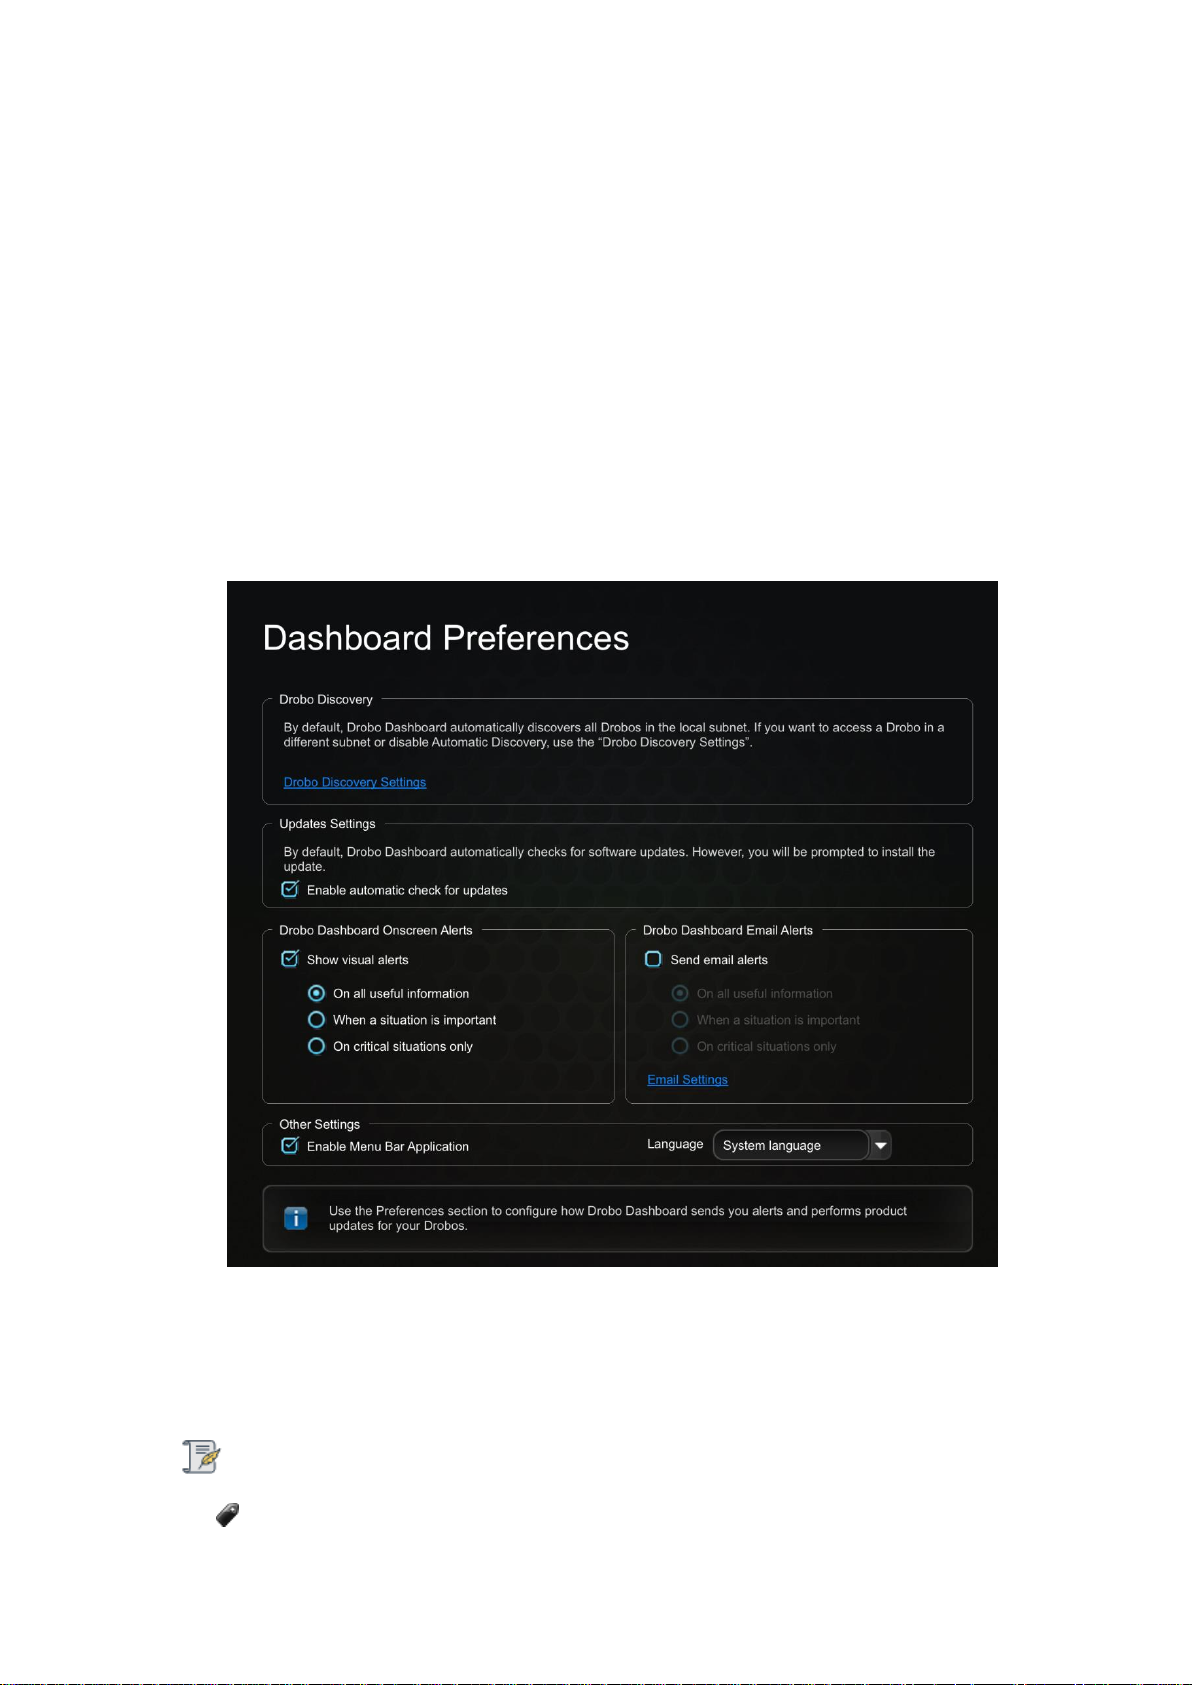
1.4.7 Enabling or Disabling Menu Bar
By default, the Drobo icon appears in your menu bar. When you right-click the Drobo icon, a shortcut menu opens, enabling you to:
● Launch Drobo Dashboard.
● Find out the version of Drobo Dashboard.
● Hide or show alerts for the Drobo device.
You can choose to disable the Drobo shortcut in the menu bar and later enable it at any time.
To enable/disable the menu bar:
1. Open the Drobo Dashboard and click the Dashboard Preferences option on the Navigation
menu. The Dashboard Preferences page opens.
2. If the feature is already enabled, then you will see a tick mark in the Enable Menu Bar
Application check box. If the tick is not present, then you can enable the feature by selecting the
Enable Menu Bar Application check box.
3. If you want to disable the feature, then clear the Enable Menu Bar Application check box.
Note:
If the menu bar option is disabled, on-screen alerts will not be displayed.
Drobo 8D User Guide 85
Page 86

1.5 Modifying Device Settings for Drobo 8D
You can modify various settings for your Drobo device.
Related topics:
Enabling or Disabling Dual Disk Redundancy
Modifying the Disk Drive Spin Down Time
Dimming the Lights on Drobo 8D
Drobo 8D User Guide 86
Page 87
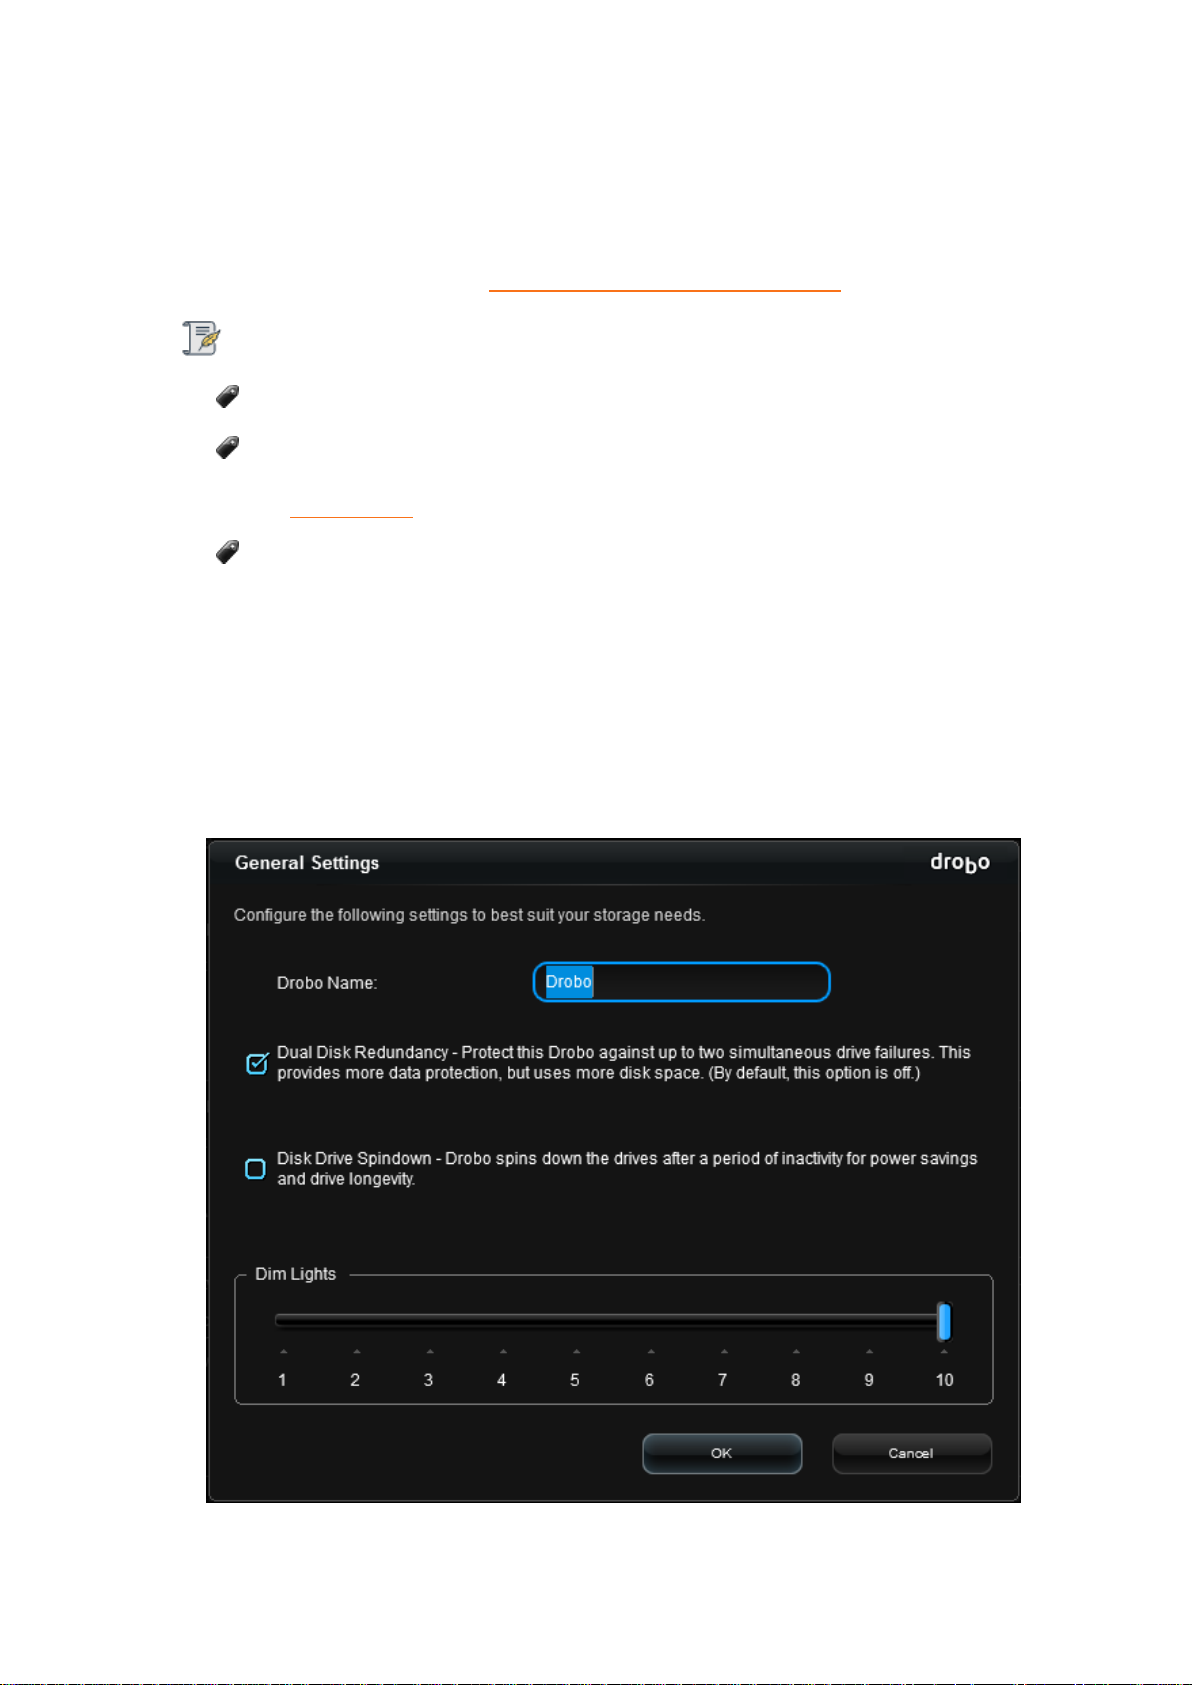
1.5.1 Enabling or Disabling Dual Disk Redundancy
Dual Disk Redundancy protects the Drobo 8D in the event of two simultaneous drive failures.
Although it provides additional protection, it requires more disk space. To learn more about how
much more disk space is required, see Determining Drive Space Requirements.
Note:
Enabling dual disk redundancy will not erase your data.
To use Dual Disk Redundancy, you will need a minimum of three drives. The option will not
be available to you if you do not have a sufficient number of drives or capacity. First, you may
need to Adding Drives.
On enabling Dual Disk Redundancy, Drobo will go through Data Protection (indicated by
yellow and green blinking lights). Do NOT remove the drives or power down the Drobo until
the Drive Bay lights turn solid green.
To enable or disbale dual disk redundancy:
1. In Drobo Dashboard on the All Drobos page, select the Drobo device for which you would like to
enable or disable Dual Disk Redundancy.
2. Click the Drobo Settings option on the Navigation menu, and click General. The General Settings
page opens.
Drobo 8D User Guide 87
Page 88
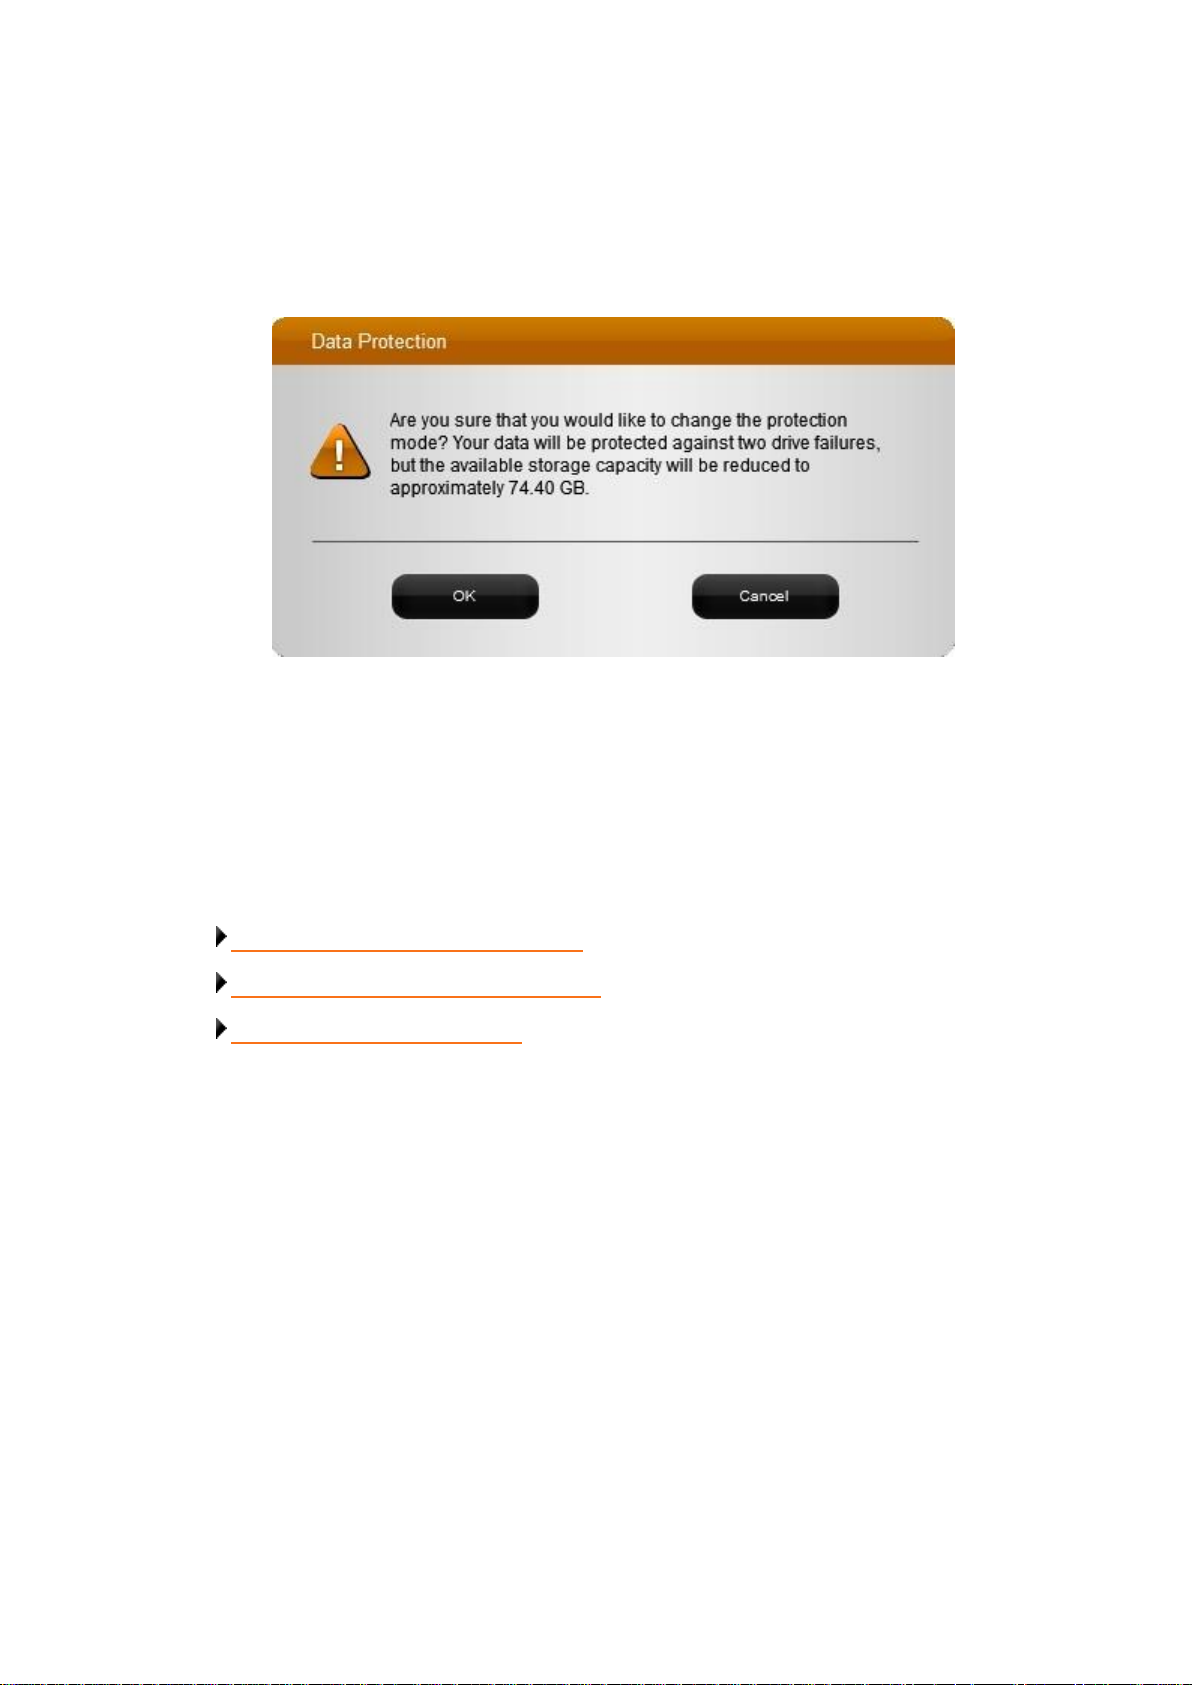
3. Select the Dual Disk Redundancy check box to enable it, or de-select it to disable Dual Disk
Redundancy.
A message box automatically appears, asking you to confirm the change and letting you
know that the protected capacity on the Drobo device will decrease (if enabling Dual Disk
Redundancy) or increase (if disabling).
4. Click the Yes button in the dialog box to continue.
5. In the General Settings page, click the OK button.
6. If you are enabling Dual Disk Redundancy, an "In Progress" status bar may appear on the Status
page, letting you know that data protection is in progress. This may take some time.
Related topics:
Determining Drive Space Requirements
Modifying the Disk Drive Spin Down Time
Dimming the Lights on Drobo 8D
Drobo 8D User Guide 88
Page 89
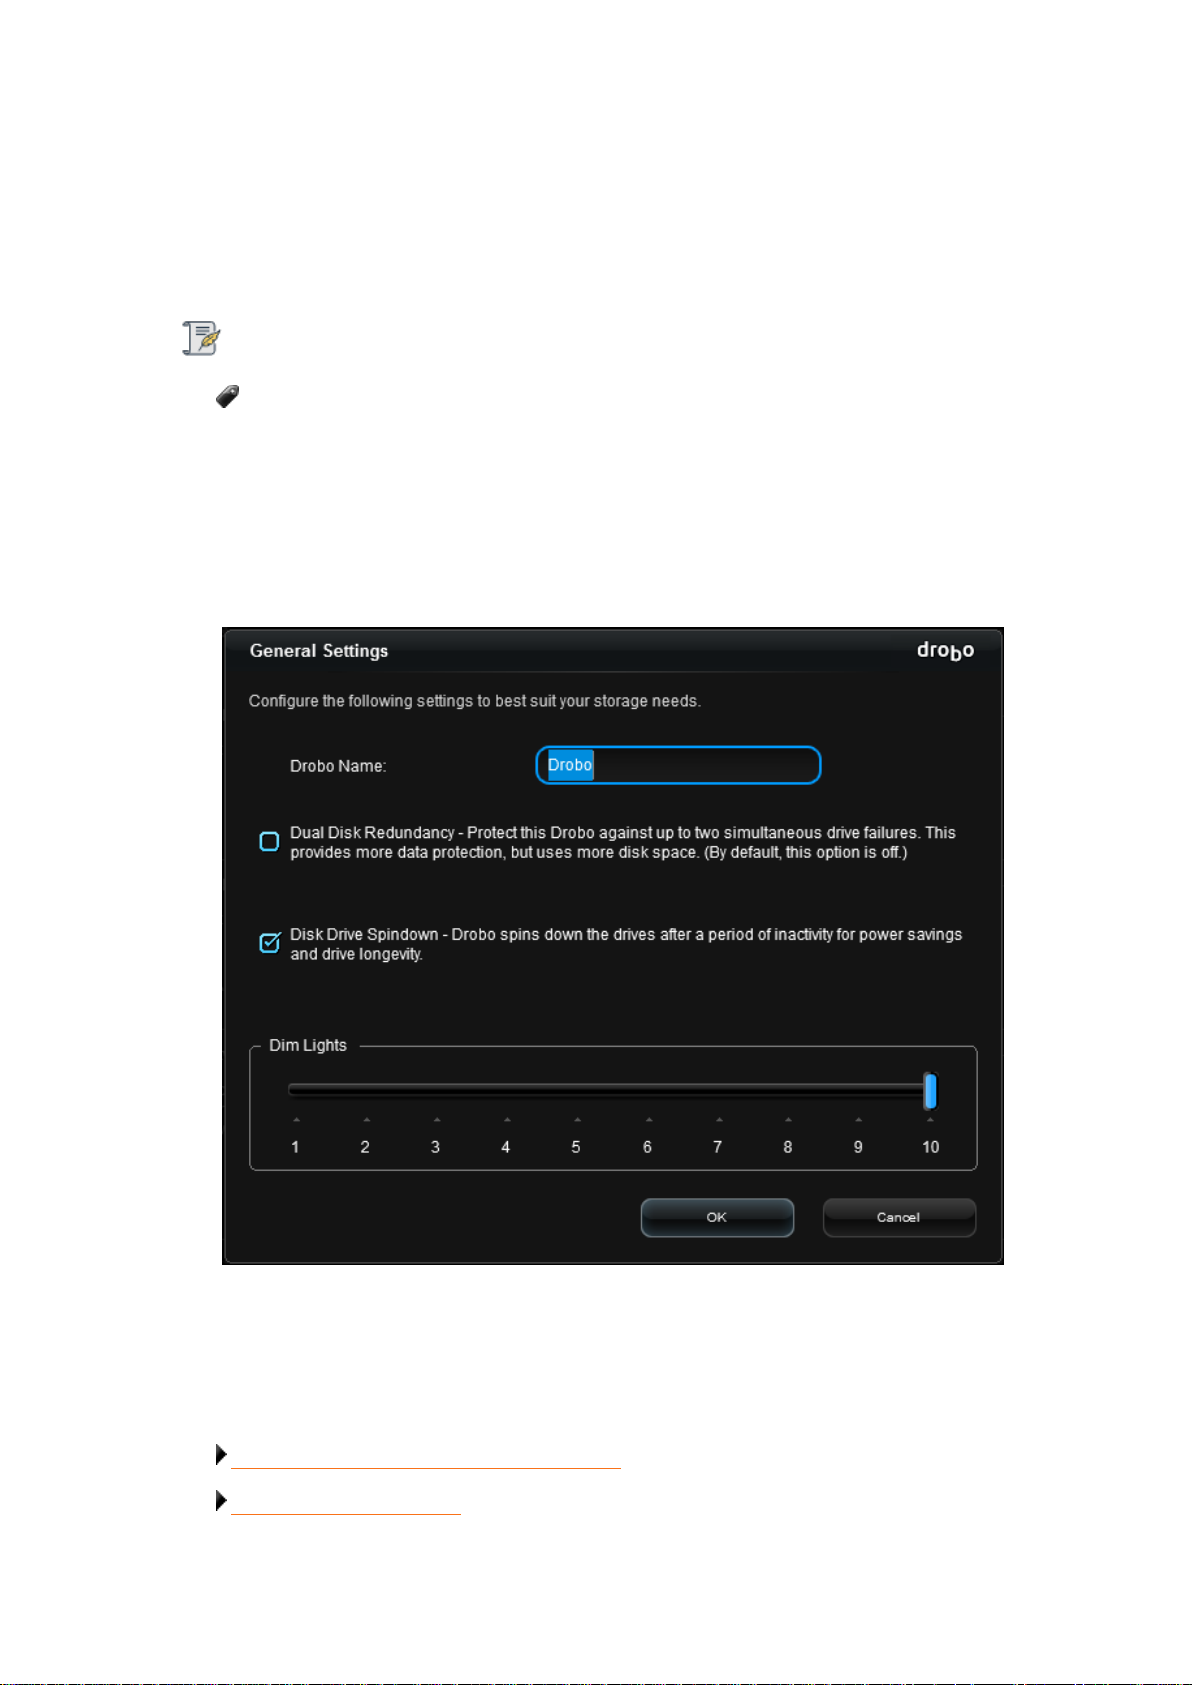
1.5.2 Enabling the Disk Drive Spin Down Time
When the disk drives spin down, it helps to save electricity and can prolong the life of the drives.
Note, however, it will take the Drobo 8D a few moments to spin the drives back up again when
accessed. The default setting for this feature is 15 minutes on most Drobo devices.
Note:
When drives spin down, the lights on the Drobo device will dim. When the drives spin back
up again, the lights will fully illuminate.
To enable the disk drive spin down time:
1. In Drobo Dashboard on the All Drobos page, select the appropriate Drobo device.
2. Click the Drobo Settings option on the Navigation menu, and click General. The General Settings
page opens.
3. Select the Disk Drive Spindown check box to enable it, or de-select it to disable Disk Drive
Spindown.
4. Click the OK button. The setting is changed.
Related topics:
Enabling or Disabling Dual Disk Redundancy
Dimming the Lights on 8D
Drobo 8D User Guide 89
Page 90
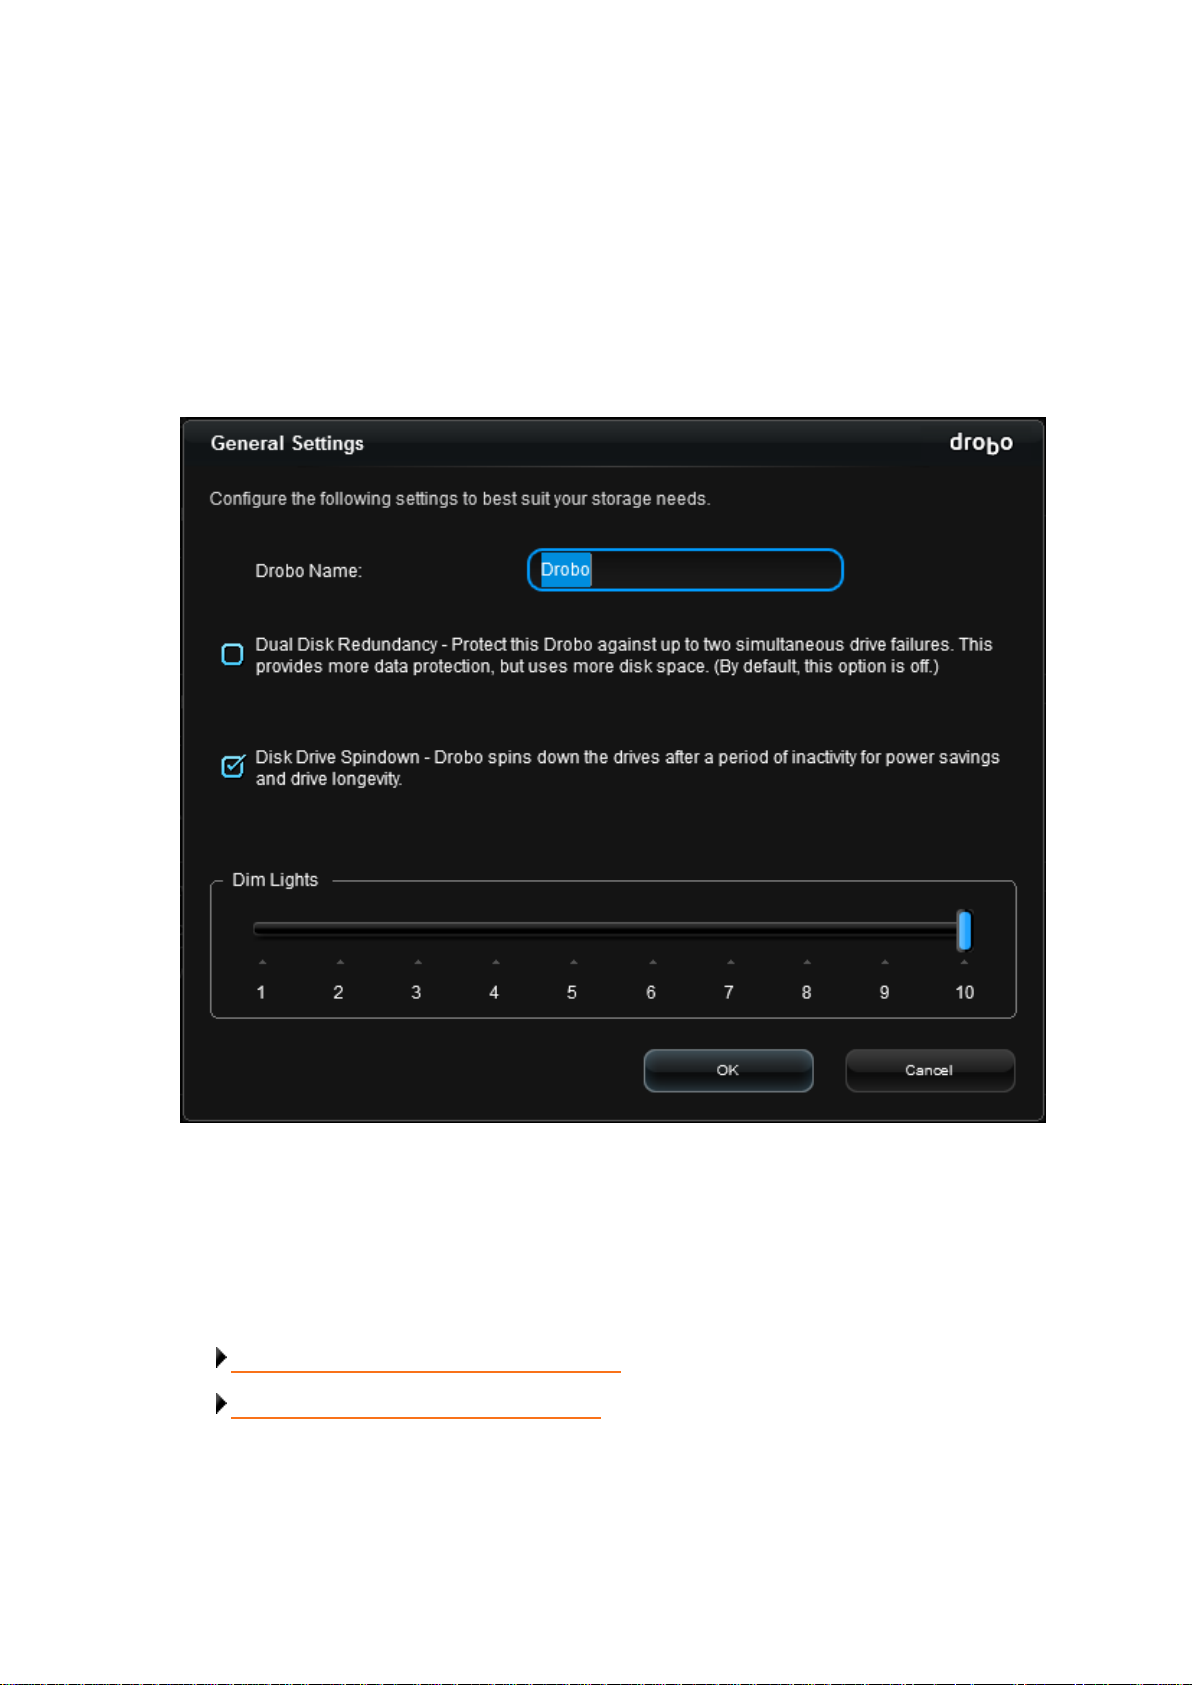
1.5.3 Dimming the Lights on Drobo 8D
On the Drobo 8D, you have the option to dim the lights on your device.
To do so, follow these steps:
1. In Drobo Dashboard on the All Drobos page, select the appropriate Drobo device.
2. Click the Drobo Settings option on the Navigation menu, and click General. The General Settings
page opens.
3. Click and drag to slide the pointer for the Dim Lights to the level of brightness you want, where
10 is the brightest and 1 is the dimmest. The default level of brightness is “10".
4. Click the OK button. The setting is changed.
Related topics:
Enabling or Disabling Dual Disk Redundancy
Modifying the Disk Drive Spin Down Time
Drobo 8D User Guide 90
Page 91
1.6 Managing Capacity (Drive Space)
You should calculate how much capacity you need for the Drobo device in order to ensure your data
is protected.
This section includes the following topics:
Calculating Capacity to Use
Adding Drives
Removing Drives
Inserting a back slot SSD
Removing a back slot SSD
Related topic:
Checking Storage Usage and Device Status Information
Drobo 8D User Guide 91
Page 92
1.6.1 Calculating Capacity to Use
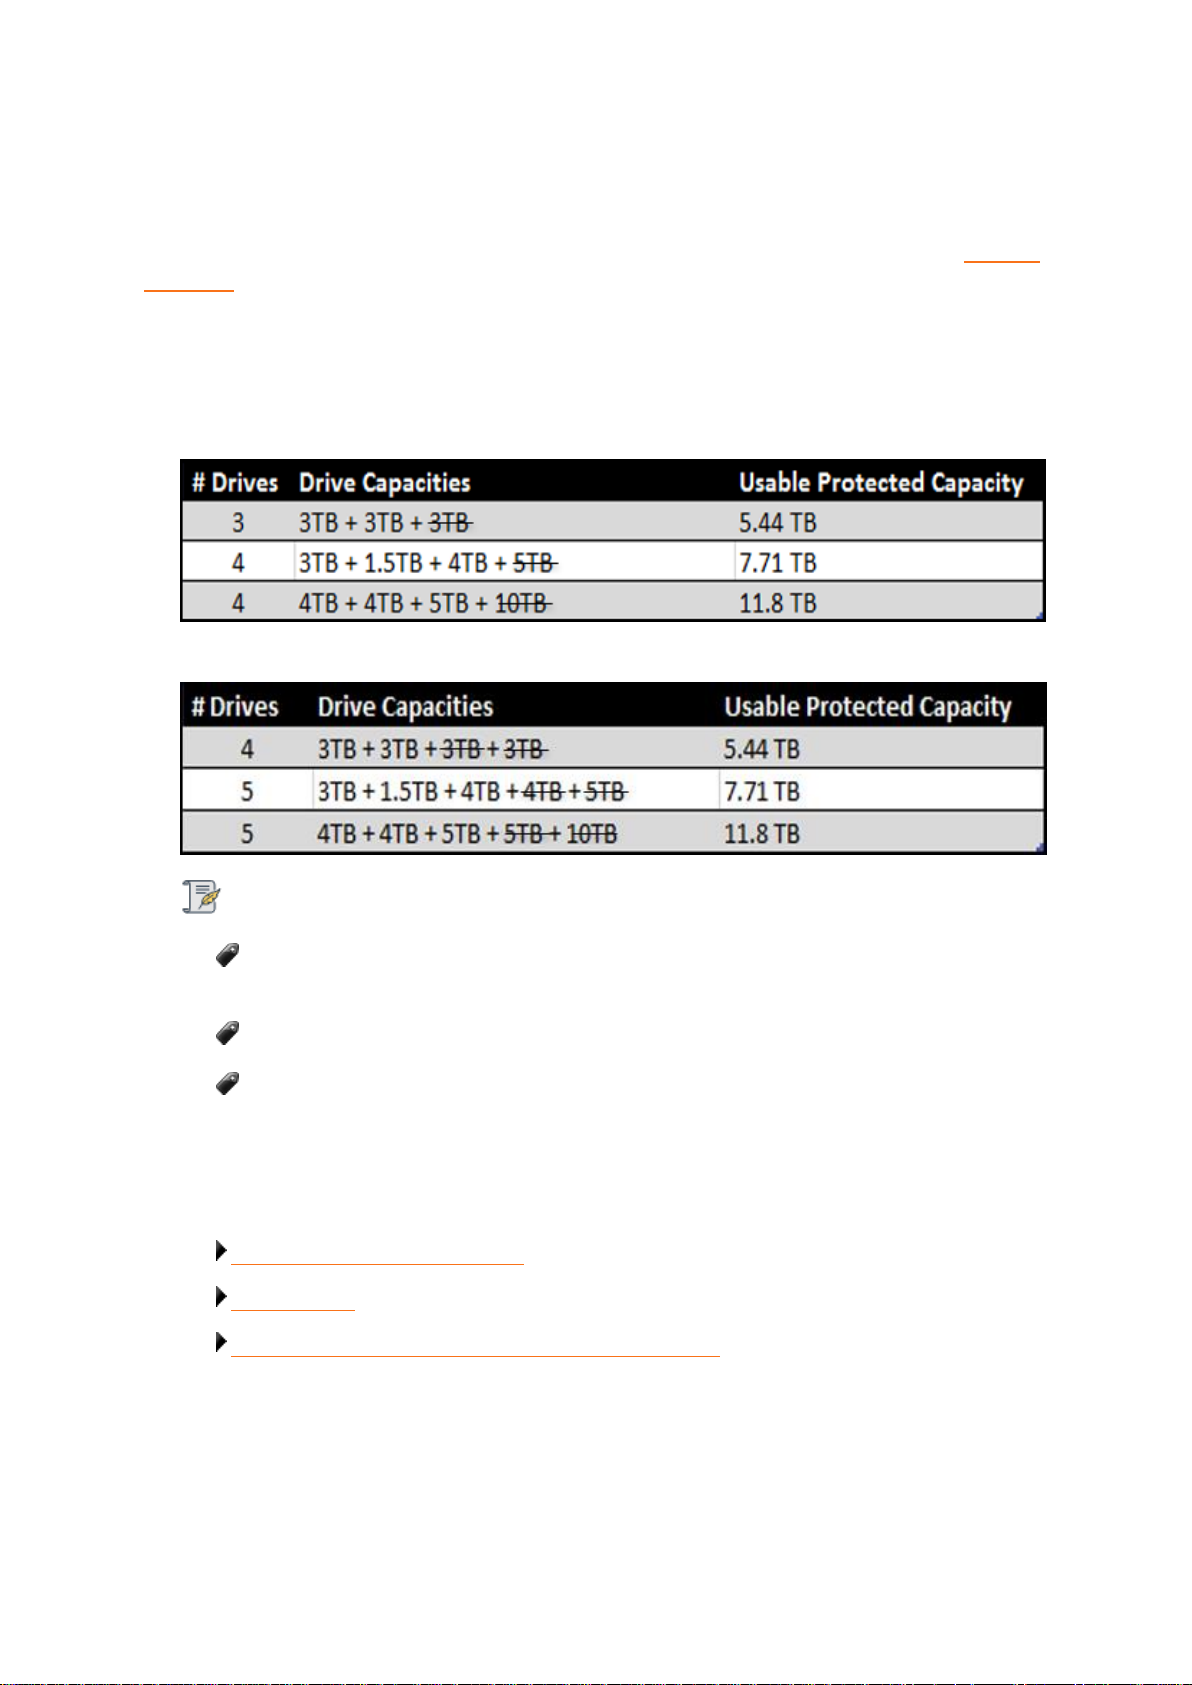
Based on the number and capacity of the drives you use in the Drobo device, the best way to
determine how much usable protected storage space will be available for data is to use our Capacity
Calculator.
A shortcut to estimating the capacity available for your data is to omit the largest drive and then add
the capacity of the remaining drives. If you plan to use Dual Disk Redundancy, omit the largest two
drives. For example:
Single Disk (Default) Redundancy
Dual Disk Redundancy
Notes:
Actual capacity may vary from the value shown in the above example due to different
systems used for rating capacity. This has nothing to do with Drobo devices.
Approximately 91% of the stated capacity will be available for data storage purpose.
Know that all Drobo devices enable you to easily increase storage capacity at any time by
simply inserting additional drives or replacing smaller drives with larger ones.
Related topics:
Managing Capacity (Drive Space)
Adding Drives
Checking Storage Usage and Device Status Information
Drobo 8D User Guide 92
Page 93
1.6.2 Adding Drives
When you find that the Drobo 8D is running low on space, you can easily add capacity by either
replacing a smaller capacity drive with a larger one, or by inserting a new drive in an empty drive bay
of the Drobo device. Note that once you add the new drive, it becomes part of the overall storage
pool, with all drives functioning as a unit or “pack.”
You can use drives from most manufacturers and with any capacity. For more information, see
Selecting Drives.
Warning:
Any pre-existing data on the drives you add will be erased during installation.
Tip:
In the event that the Drobo device becomes nearly full and all the drives are of the same
capacity, you will need to replace two drives, one at a time, in order to increase the overall
amount of protected capacity. Replacing one drive will not increase your overall protected
capacity in this situation.
1. Ensure that the drive lights on the Drobo are not blinking yellow and green, which indicates that
the Drobo device is working to protect your data. Wait until all the bay lights are solid green.
Warning:
Removing or adding a drive during this process may result in loss of data
2. Remove the bezel (faceplate) from the front of the Drobo device by pulling it off.
3. If you are replacing a smaller capacity drive with a larger one, first remove the smaller capacity
drive by using your thumb to depress (and open) the drive lock for the data bay that contains the
drive you would like to remove. Refer to the image below.
Drobo 8D User Guide 93
Page 94
Note:
For added protection we recommend to enable Dual Disk Redundancy feature. Atleast 3
drives should be inserted to the device before enabling redundancy feature.
The Drobo uses largest drive in the disk pack to maintain data redundancy. Since Drobo
uses largest size drive for redundancy, you will need to add a large drive in order to see more
usable capacity. For more information, see: Capacity Calculator.
4. The drive ejects from the drive bay. Carefully remove it.
Note:
The drive light turns a solid red, indicating that you need to add a drive or replace the
current drive with a larger drive. It may stay red for up to 15 minutes after you replace the
drive.
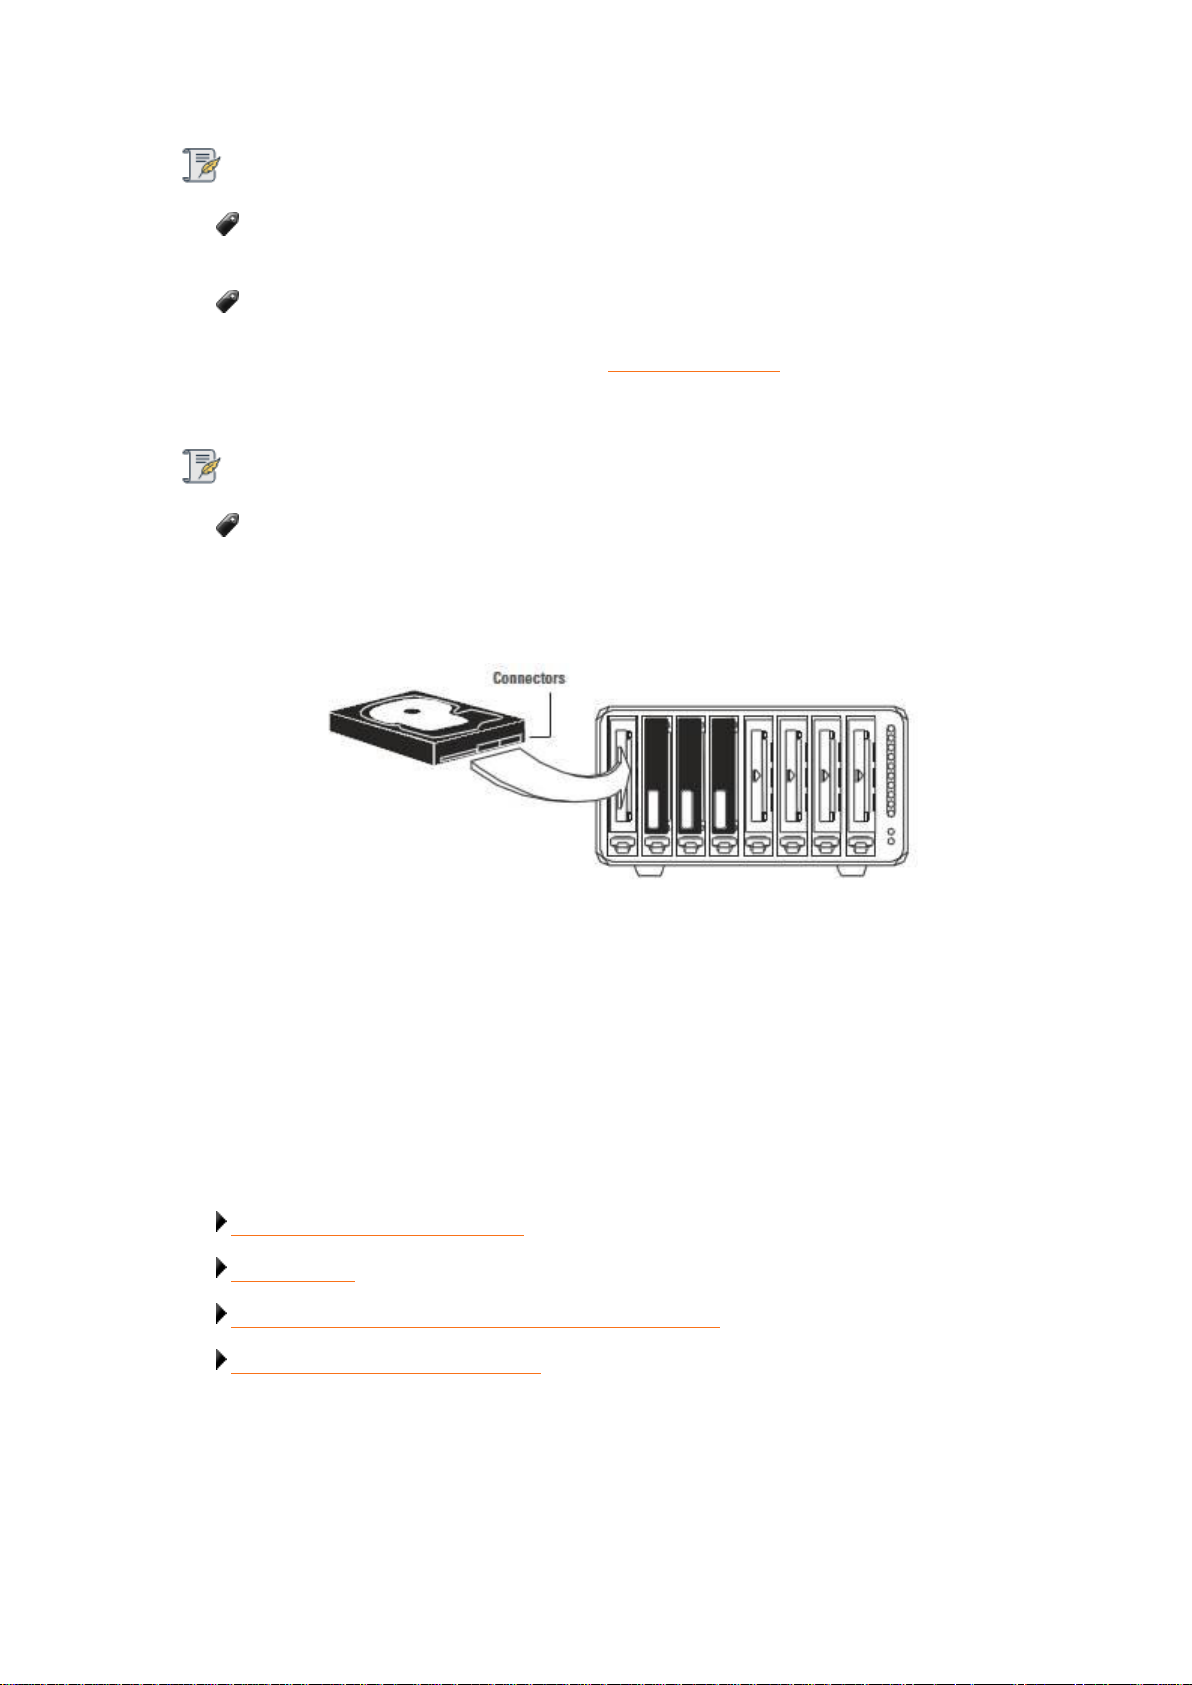
5. Insert drives with the top labels facing the power and capacity lights. Refer to the image below.
6. With your other hand, use your thumb to depress and hold open the drive lock to an empty drive
bay.
7. Slide the drive into the data bay, release the drive lock and push the drive into place until you
feel it connect. The drive lock will snap behind the drive, securing it into place.
8. Add or replace additional drives in the same manner, following steps 3 through 6.
9. When finished, replace the bezel (faceplate) right side up, so that you will be able to see the
indicator lights whenever the Drobo device is turned on.
Related topics:
Managing Capacity (Drive Space)
Adding Drives
Checking Storage Usage and Device Status Information
Understanding the Indicator Lights
Drobo 8D User Guide 94
Page 95

1.6.3 Removing Drives
You may wish to remove one or more drives from the Drobo 8D, thereby reducing overall capacity.
Before doing so, keep the following in mind:
● The Drobo device requires a minimum of two drives, or three drives if you are using Dual Disk
Redundancy, to ensure your data is protected. See Managing Capacity for more information.
● When removing drives, wait until all the bay lights are solid green to let data protection
complete.
● Remove only one drive at a time while the Drobo device is powered on, allowing the Drobo
device to rearrange your data into the safest configuration across the remaining drives.
● If you would like to remove all drives from the Drobo device, first safely shutdown the Drobo 8D,
and then unplug the power.
● Data stored on drives removed from the Drobo device cannot be read by other systems.
If you would like to remove your SSD, see Removing a back slot SSD.
To remove the capacity or drives from you Drobo 8D:
1. Ensure that the drive lights on the Drobo device are not blinking yellow and green, which
indicates that the Drobo device is working to protect your data. Wait until the blinking stops.
Warning:
Removing a drive during data protection may result in loss of data.
2. If you are removing all drives from the Drobo device, first safely shut it down and unplug it from
the power source.
Warning:
Not shutting down safely may result in loss of data.
3. Remove the bezel (faceplate) from the front of the Drobo device by pulling it off.
4. Use your thumb to depress (and open) the drive lock for the drive bay that contains the drive
you would like to remove. Refer to the image below.
Drobo 8D User Guide 95
Page 96
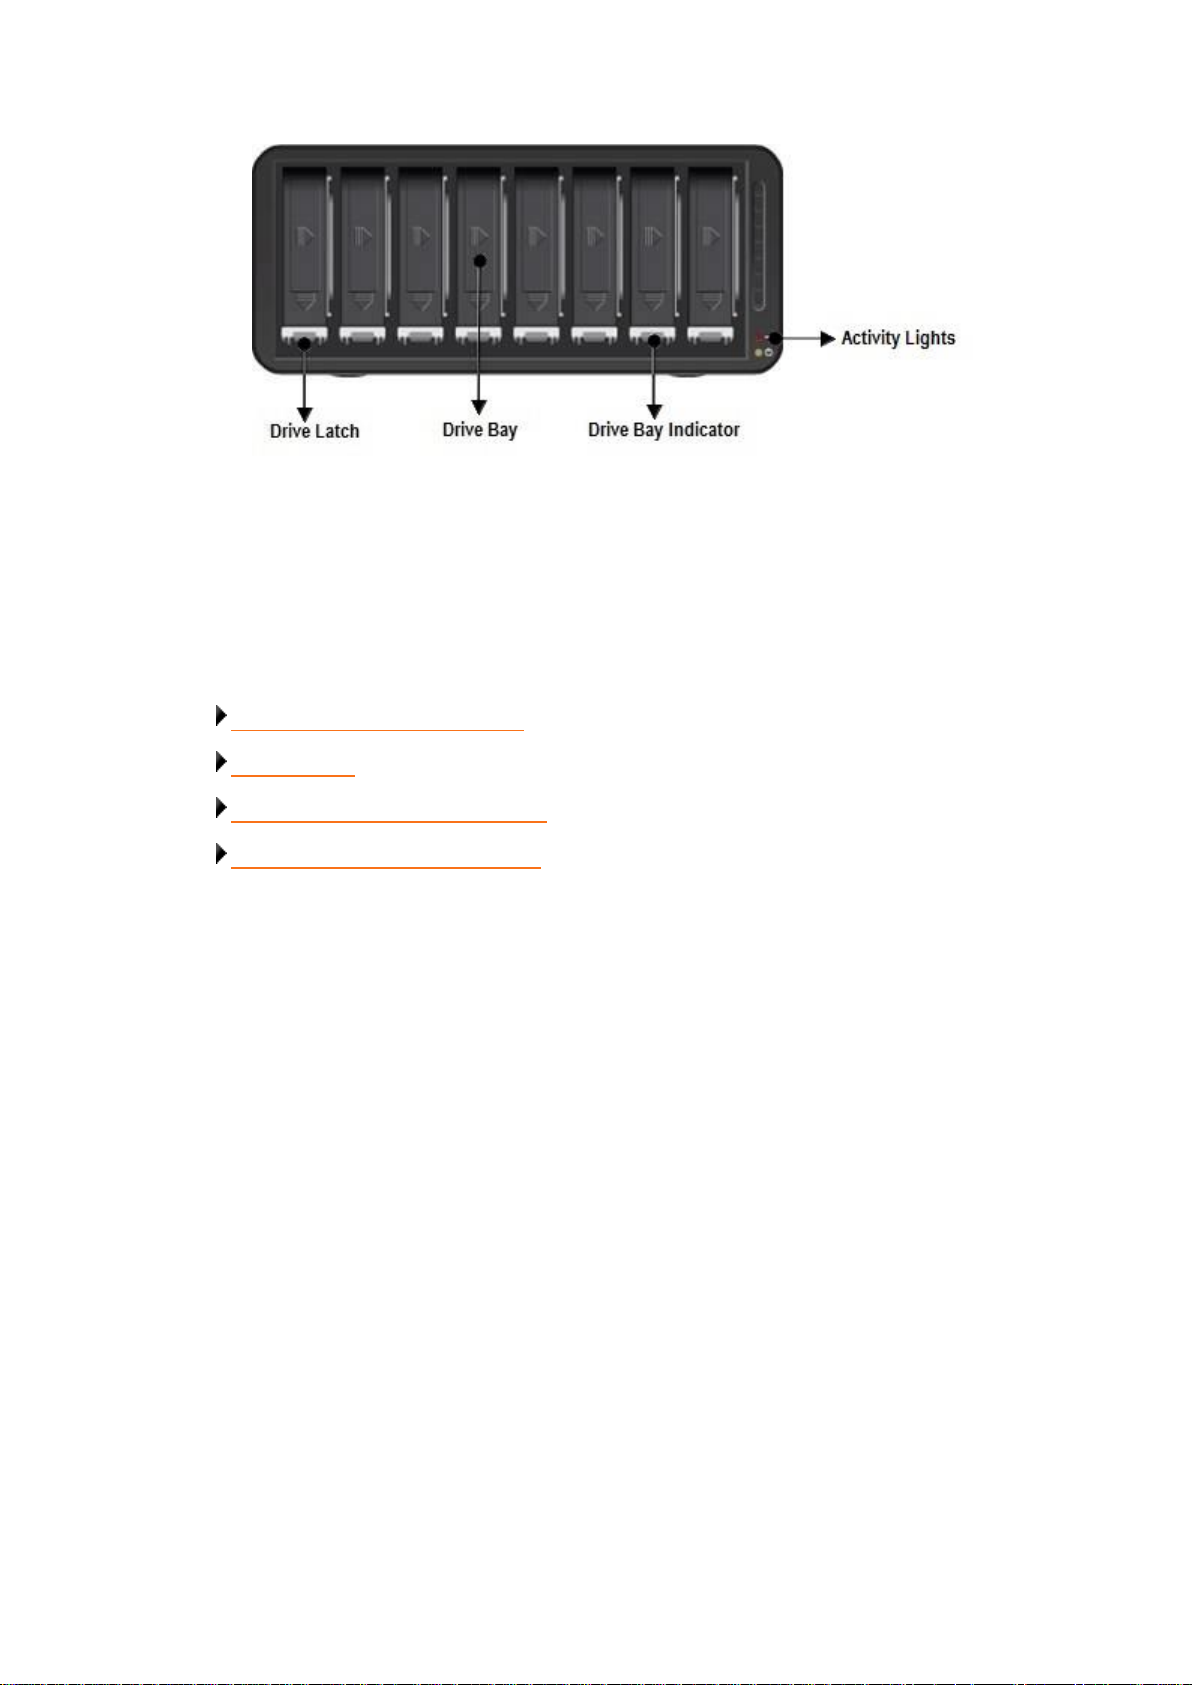
5. The drive ejects from the drive bay. Carefully remove it.
6. Repeat step 4 to remove additional drives.
7. Replace the bezel when finished.
Related topics:
Managing Capacity (Drive Space)
Adding Drives
Safely Shutting Down the Drobo 8D
Understanding the Indicator Lights
Drobo 8D User Guide 96
Page 97
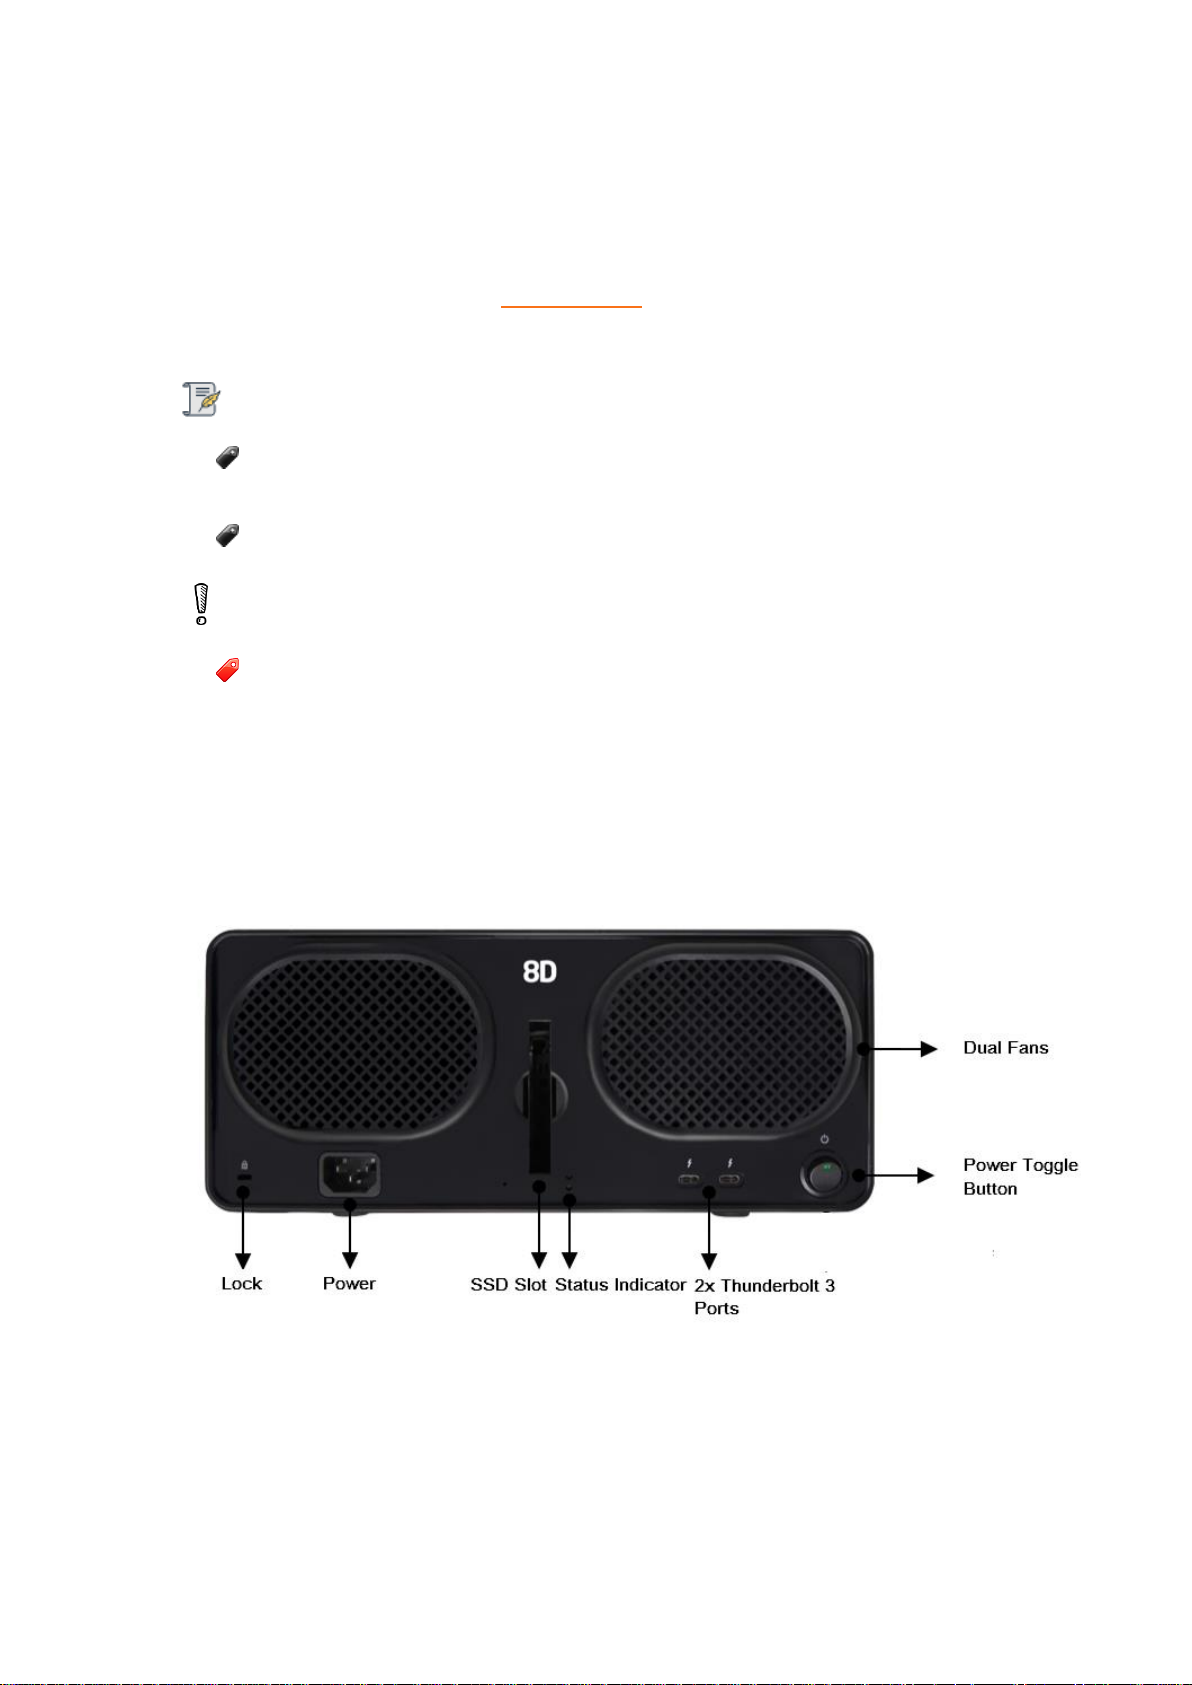
1.6.4 Inserting a back slot SSD
You can install a back slot SSD into the Drobo 8D.
Doing so provides accelerated performance when reading data from the Drobo 8D. For more
information on drive requirements, see Selecting Drives.
The back slot SSD is not part of the Drobo device disk pack, so you can add or remove it at any time.
Important Notes:
It is important to ground yourself before installing the back slot SSD in order to discharge
static electricity. To do so, touch a grounded metal object just before installation.
Back slot SSD supports maximum of 5 volts (5v).
Warning:
If there is any pre-existing data on the back slot SSD, it will be erased. If you wish to keep
the data, copy it to another drive or medium before using with the Drobo device.
To install a back slot SSD, perform these steps:
1. Gently turn the Drobo 8D to access the rear side of the Drobo 8D. In the rear side, you can find a
slot to insert SDD, as depicted in the image below
2. Slide the SSD into the back slot and gently push it down to lock in place.
3. When finished, return the Drobo 8D to its normal position.
4. In the Dashboard, you can see the status of SSD as shown in the figure below.
● Green: Indicates SSD is Good or Healthy.
Drobo 8D User Guide 97
Page 98
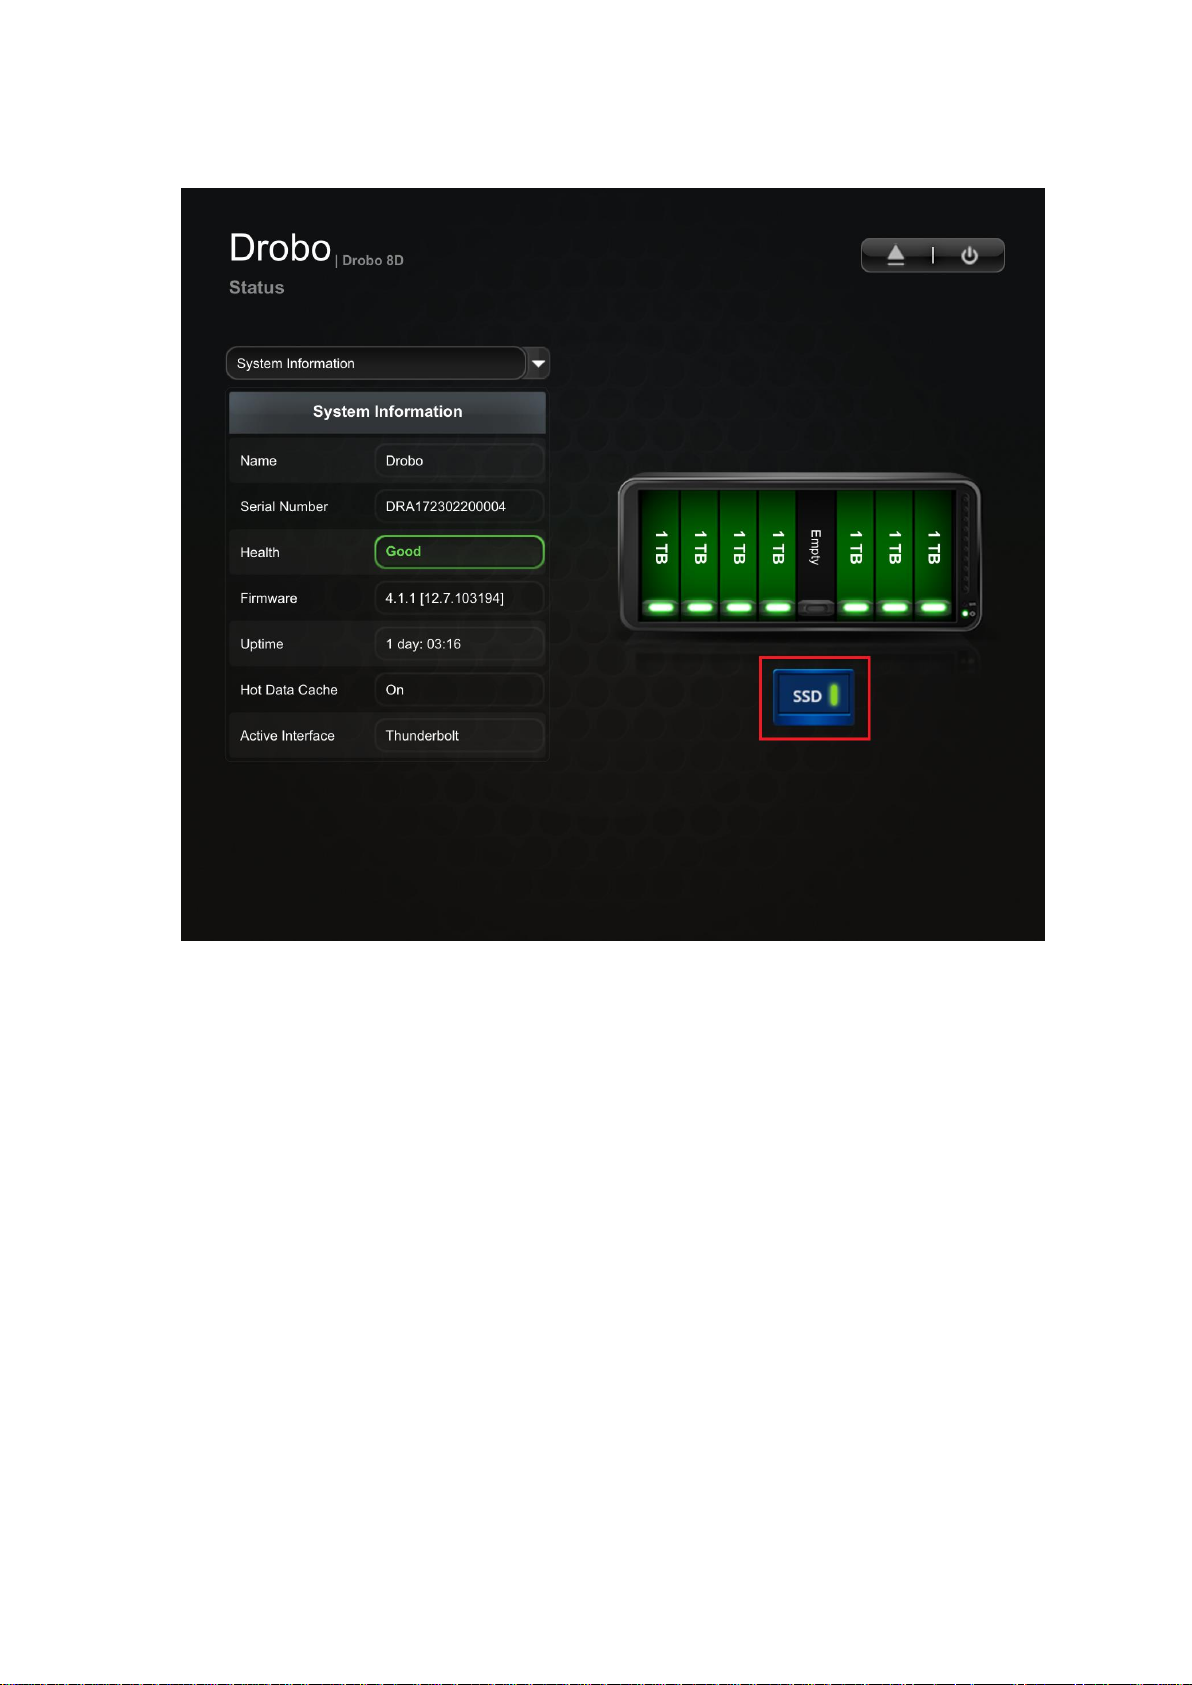
● Red: Indicates SSD is Incompatible or Failed.
Figure 1: Status page of Drobo 8D indicating Good SSD
Drobo 8D User Guide 98
Page 99
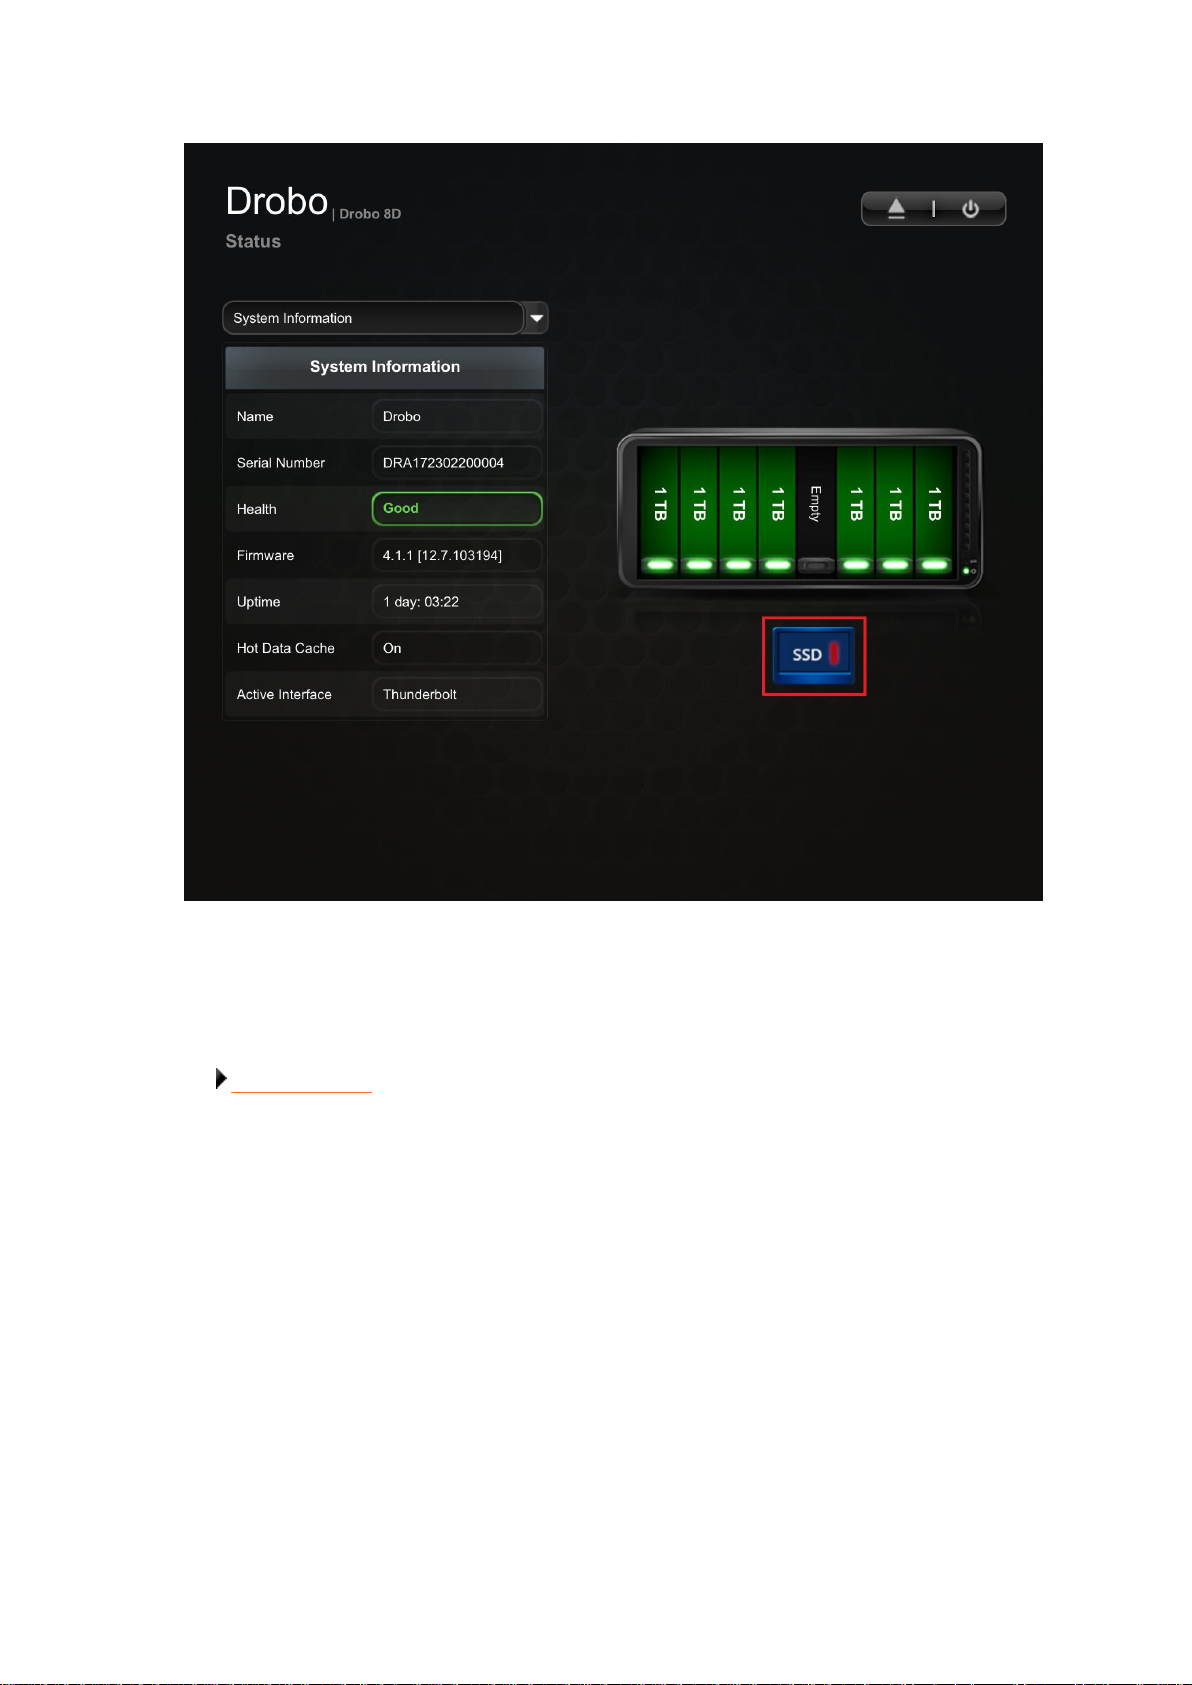
Related topic:
Selecting Drives
Figure 2: Status page of Drobo 8D indicating Failed SSD
Drobo 8D User Guide 99
Page 100
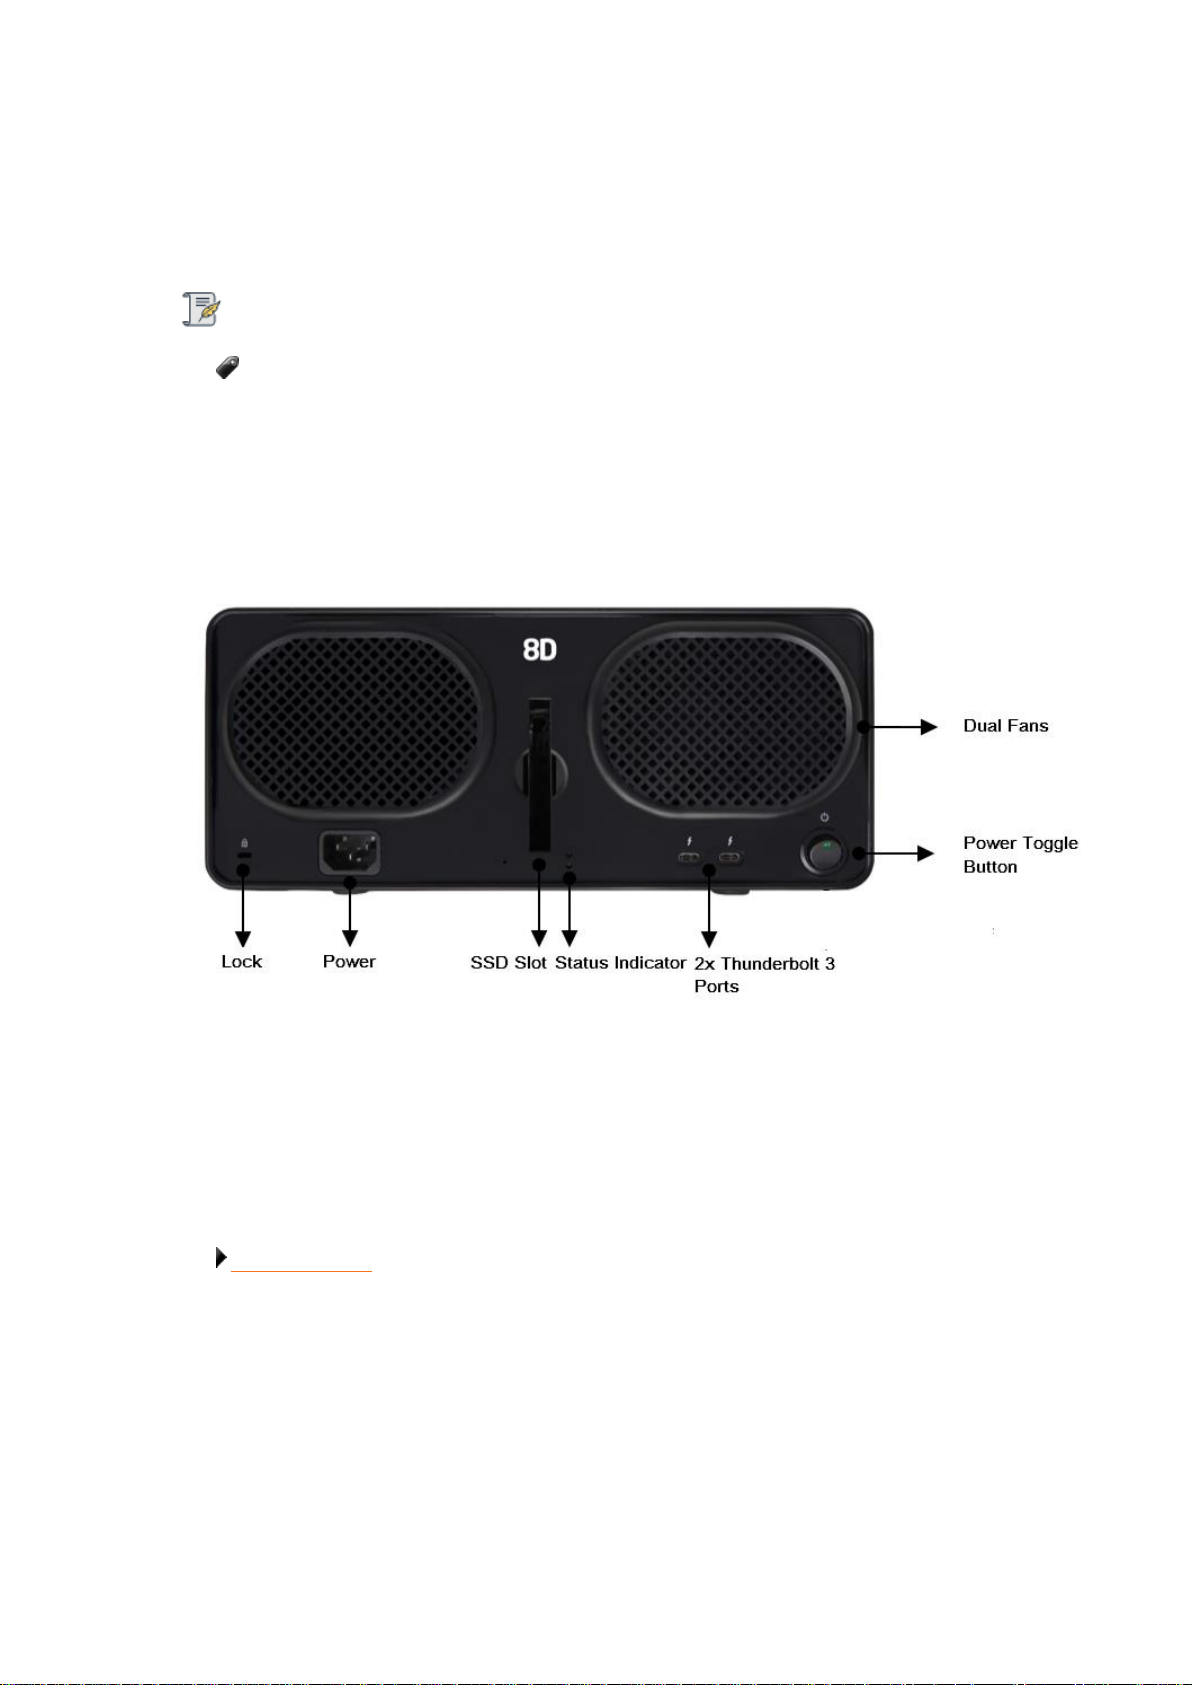
1.6.5 Removing a back slot SSD
Because the back slot SSD card is not part of your device disk pack, you can remove it from the
Drobo 8D at any time.
Note:
It is important to ground yourself before doing this in order to discharge static electricity.
To do so, touch a grounded metal object just before installation.
To remove a back slot SSD:
1. Gently turn the Drobo 8D to access the rear side of the Drobo 8D. In the rear side, you can find a
slot in which SDD is inserted, as depicted in the image below
2. Gently push the SSD to release it from the lock. Once released, take the SSD out from the slot.
3. When finished, return the Drobo 8D to its normal position.
Related topic:
Selecting Drives
Drobo 8D User Guide 100
 Loading...