

Drive Proof DAS-3000HD Introduction Manual
Drive
Proof
HD Car Camera DAS-3000HD
Introduction manual
www.driveproof.com
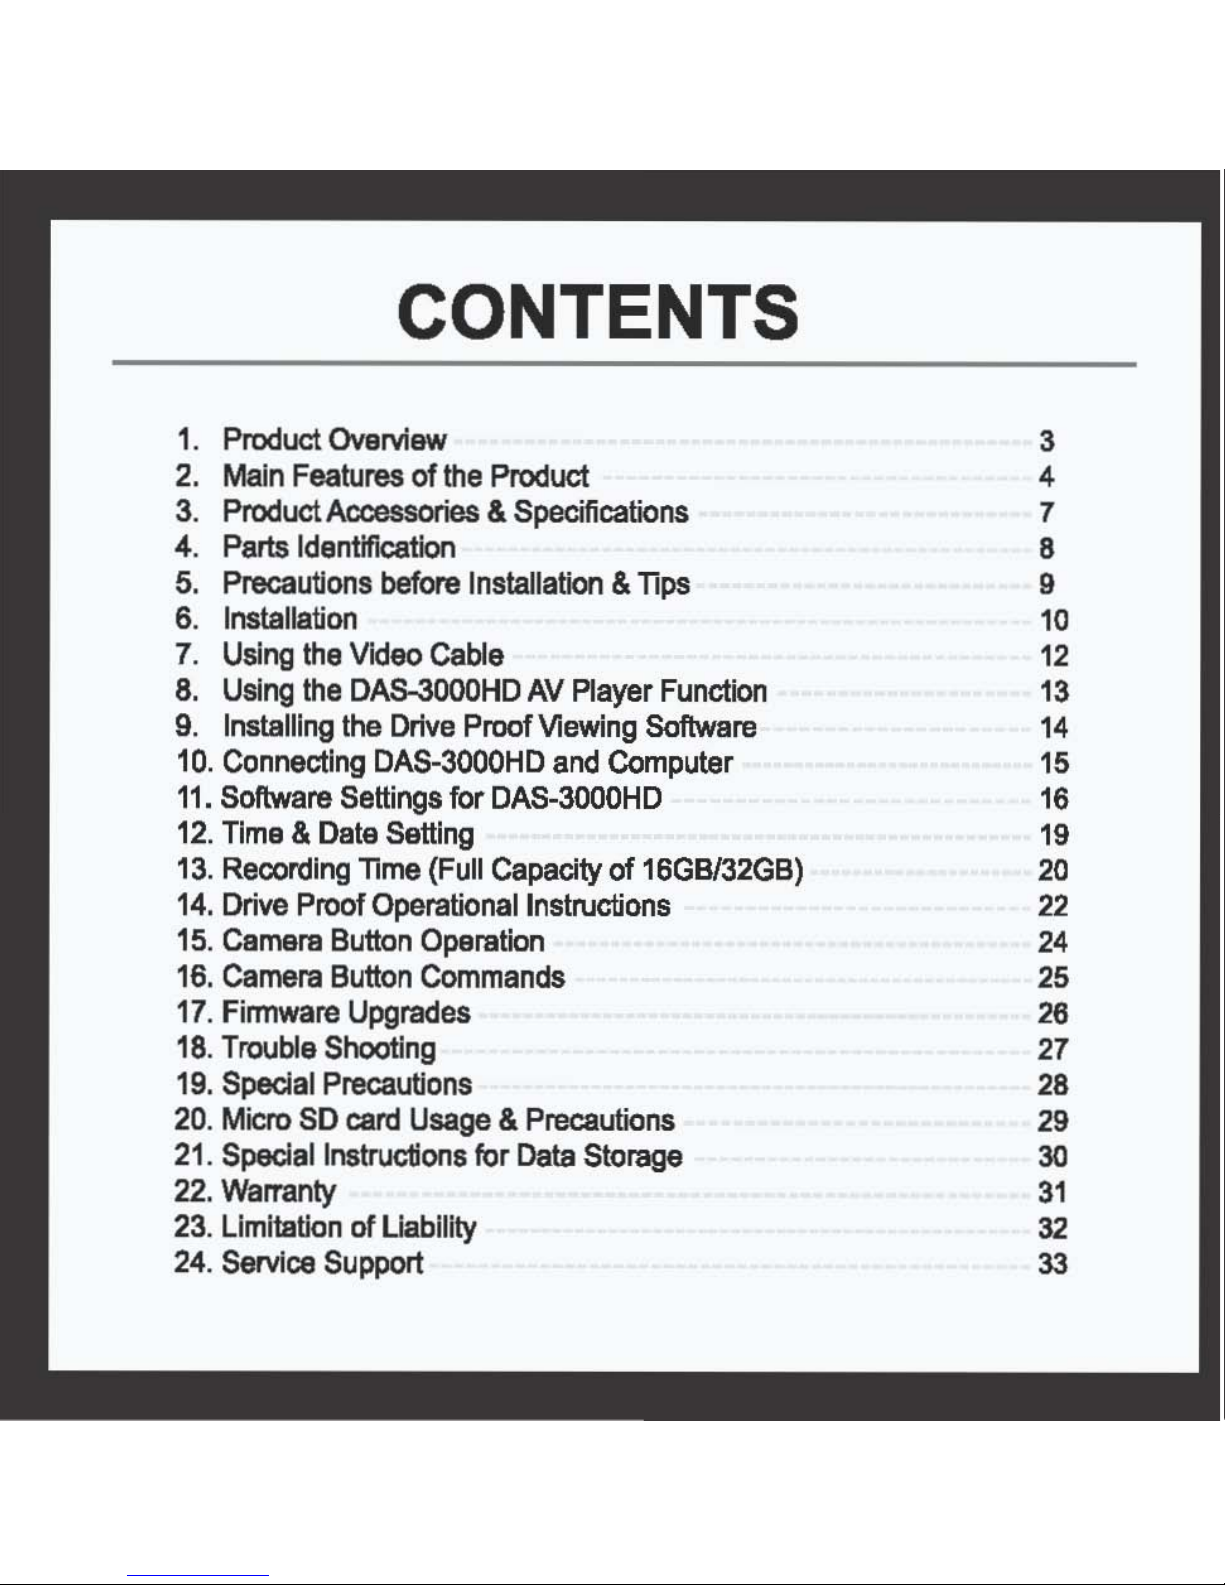
CONTENTS
1. Product Ovsrvtaw
2.
MaIn
Features of Ifle Product
3. Product Accessories & Specifications
4. Parts Identification
5. Precautions
before
Installation &
TIps
6. Installation
7.
Using
the
VIdeo
Cable
8.
Using
the
DAS-3000HD
AV
Player
Function
9.
Installing the
Drive
Proof Viewing Software
10.
Connecting
OAS-3000HO
and
Computer
11.
Software Settings for
DAS-3000HO
12.
Tim. &
Oete
Setting
13.
Recording
TIme
(Full Capacity of 16GB/32GB)
14.
Drive Proof Operationallnstruclions
15. Cemara
Button
Operation
16. Camara
Button
Commands
17
. Finnwara Upgrades
18
. Trouble Shooting
19
. Special Precautions
20.
Micro
SO
card
Usage
& Precautions
21
. Special Instructions for
Data
Storage
22
. warranty
23
. Limitation of liability
24
.
ServIce
Supporl
3
4
7
8
9
10
12
13
14
15
16
19
20
22
24
25
26
27
26
29
30
31
32
33
1. Product Overview
The
DAS-3000HD
is a high
quality vehicle black box video
recorder,
designed
to
provide
you
with
many hours
01
Ramova
word claar High
DellnHlon
10BOP
video & sound
recordings
with
integrated
GPS
location,
speed
and
direction of travel.
(GPS
Module
optional)
The
DAS-3000HD
video
files
can
be
used
as
evidence
in
legal
action,
and
motor vehicle
insurance
claims
to
prove
liability.
Often,
the
quality
of
vehicle
black
box
recorders
is
low,
failing
to
show
number
plates
and
faces dearly for identification.
The
video quality
from
the
DAS-3000HD
is
far
above
that of most ordinary black box
recorders
on
the market
today.
Using
either a
16GB
or
32GB
memory
card,
the
DAS-3000HD
will capture
many
hours
of
continuous
video
divided
into
segmented
data
files for later retrieval
and
viewing. This
model
also
provides
extra
edited
copies of ·special evenr videos that
are
placed
into 8
log
file
system
and
cataloged
based
on
time
and
date.
These
special
avant
vidaos
are
triggered
by
the
internal
gyroscopa that
responds
to
impacts
from
car accidents,
rough
handling,
heavy
braking
and
acceleration.
The
DAS-3000HD
also
announces
status reports
through
voice
prompts
to
aid
the
driver
with
the
operation
of
the
recorder.
There
are
many car recorders on the market
today,
but there
II
only
one
DAS-3000HD.
••
__
...
__
DAS-3OODHD
2"
Main Features
of
the Product
o Continuous
Recording
The
DAS-3000HD
records
continuously
after
powering
up
in
crystal
clear,
Definition"
video
using a 5.0M
Pixels
Color
CMOS
Full
HD
camera.
Vehicle
location,
speed,
direction
of
travel,
date
and
time
are
recorded
through
the
optional
GPS
module
and
saved
to
Micro
SD
card
for
later
retrieval.
The
DAS-3000HD
can
also
be
configured
to
record
while
parked,
recording
vehicle
interference
or
car
accidents
while
you
are
absent.
The
HIGH
DEFINITION
ultra
clear
images
can
be
used
to
identify
vehicle
number
plates
and
can
be
used
as
evidence
in
legal
proceedings
and
insurance
claims
to
datennine
accident
blame
or
liability.
H
Event
Recording
In
addition
to
continuous
recording,
the
DAS-3000HD
automatically
records
special
-Event-
videos
such
as
car
accidents,
into a separate
-Evenr
memory
folder.
Each
evant
video
file
is
triggered
through
the
detection
of
shock
jolting,
sudden
braking
or
acceleration,
and
sharp
swerving
of
the
vehide.
These
edited
·evenf'
videos
are
then
color
coded
for
easy
identification
when
viewed
with
the
Drive
Proof
software.
D
Emergency
Recording
The
DAS-3000HD
is
equipped
with a red
colored
"Emergency
Button"
that
when
manually
trigger,
will
store
an
MEvenr
recording
for
later
viewing.
These
Emergency
Recording
Event
files
are
also
color
coded
"Red-
for
easy
identification
in
the
Drive
Proof
software.
2.
Main Features
of
the
Product
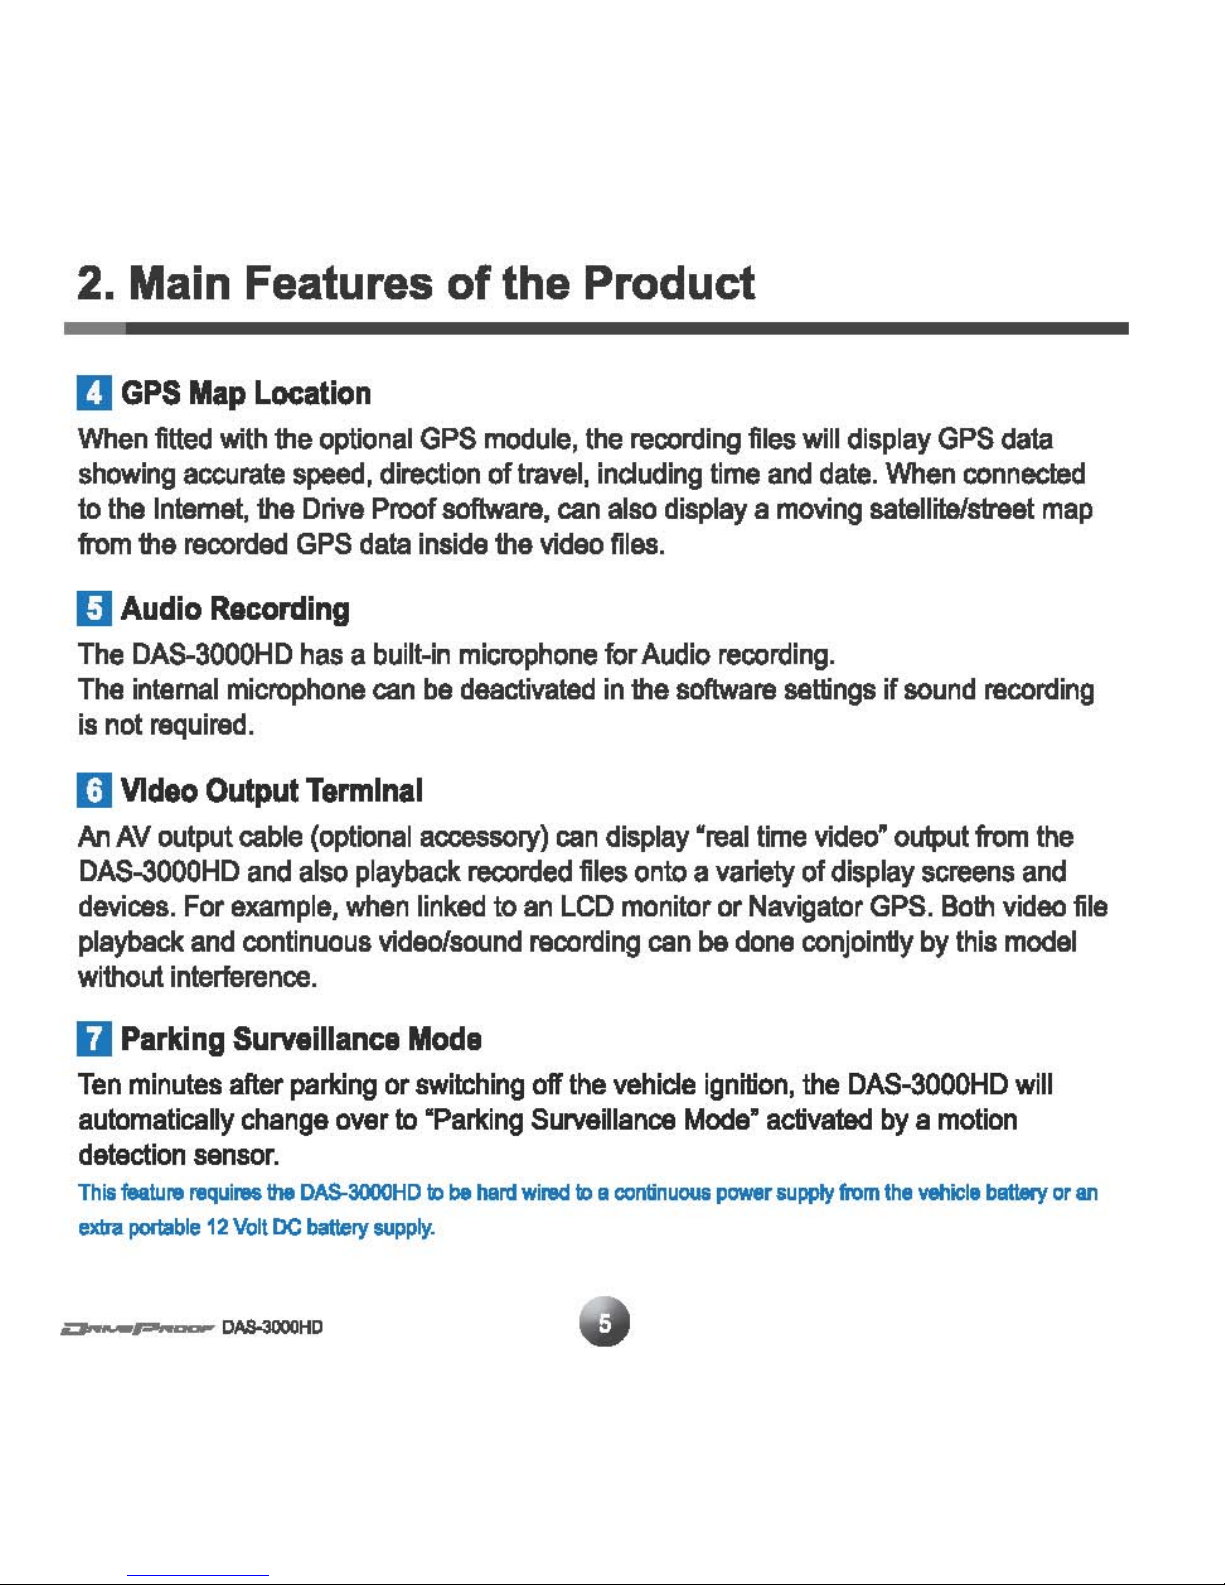
D
GPS
Map
Location
When
fitted
with
the
optional
GPS
module,
the
recording
files will display
GPS
data
showing
accurate
speed,
direction
oftraYel,
including
time
and
date.
When
connected
to
the
Intemat,
the
Drive
Proof
software,
can
also
display a moving
satellite/sb'eet
map
from
the
recorded
GPS
data
inside
the
video
files.
D Audio Recording
The
DAS-3000HD
has a built-in
microphone
for
Audio
recording.
The
internal
microphone
can
be
deactivated
in
the
software
settings
if
sound
recording
is
not
required.
Il
VIdeo
Output
Terminal
Ar1
AV
output
cable
(optional
accessory)
can
display
"real
time
video· output
from
the
DAS-3000HD
and
also
playback
recorded
files
onto
a variety of display
screens
and
devices.
For
example,
when
linked
to
an
LCD
monitor or Navigator
GPS.
Both
video
file
playback
and
continuous
video/sound
recording
can
be
done
conjoinHy
by
this
model
without
interference.
D Parking Surveillance
Mode
Ten
minutes
after
parking
or
switching
off
the
vehicle
ignition,
the
DAS-3000HD
will
automatically
change
over
to
·Parking
Surveillance
Mode-
activated
by a motion
detection
sensor.
This
feature
requil86lhe
DAS-3000HD
to
be
hard
wired
to
a
continuous
power
supply
from
the
vehicle
battery
or
an
extra
portable
12
Volt
DC
battery
supply.
""
..
__
• _ .......... _ _
HD
2.
Main Features
of
the
Product
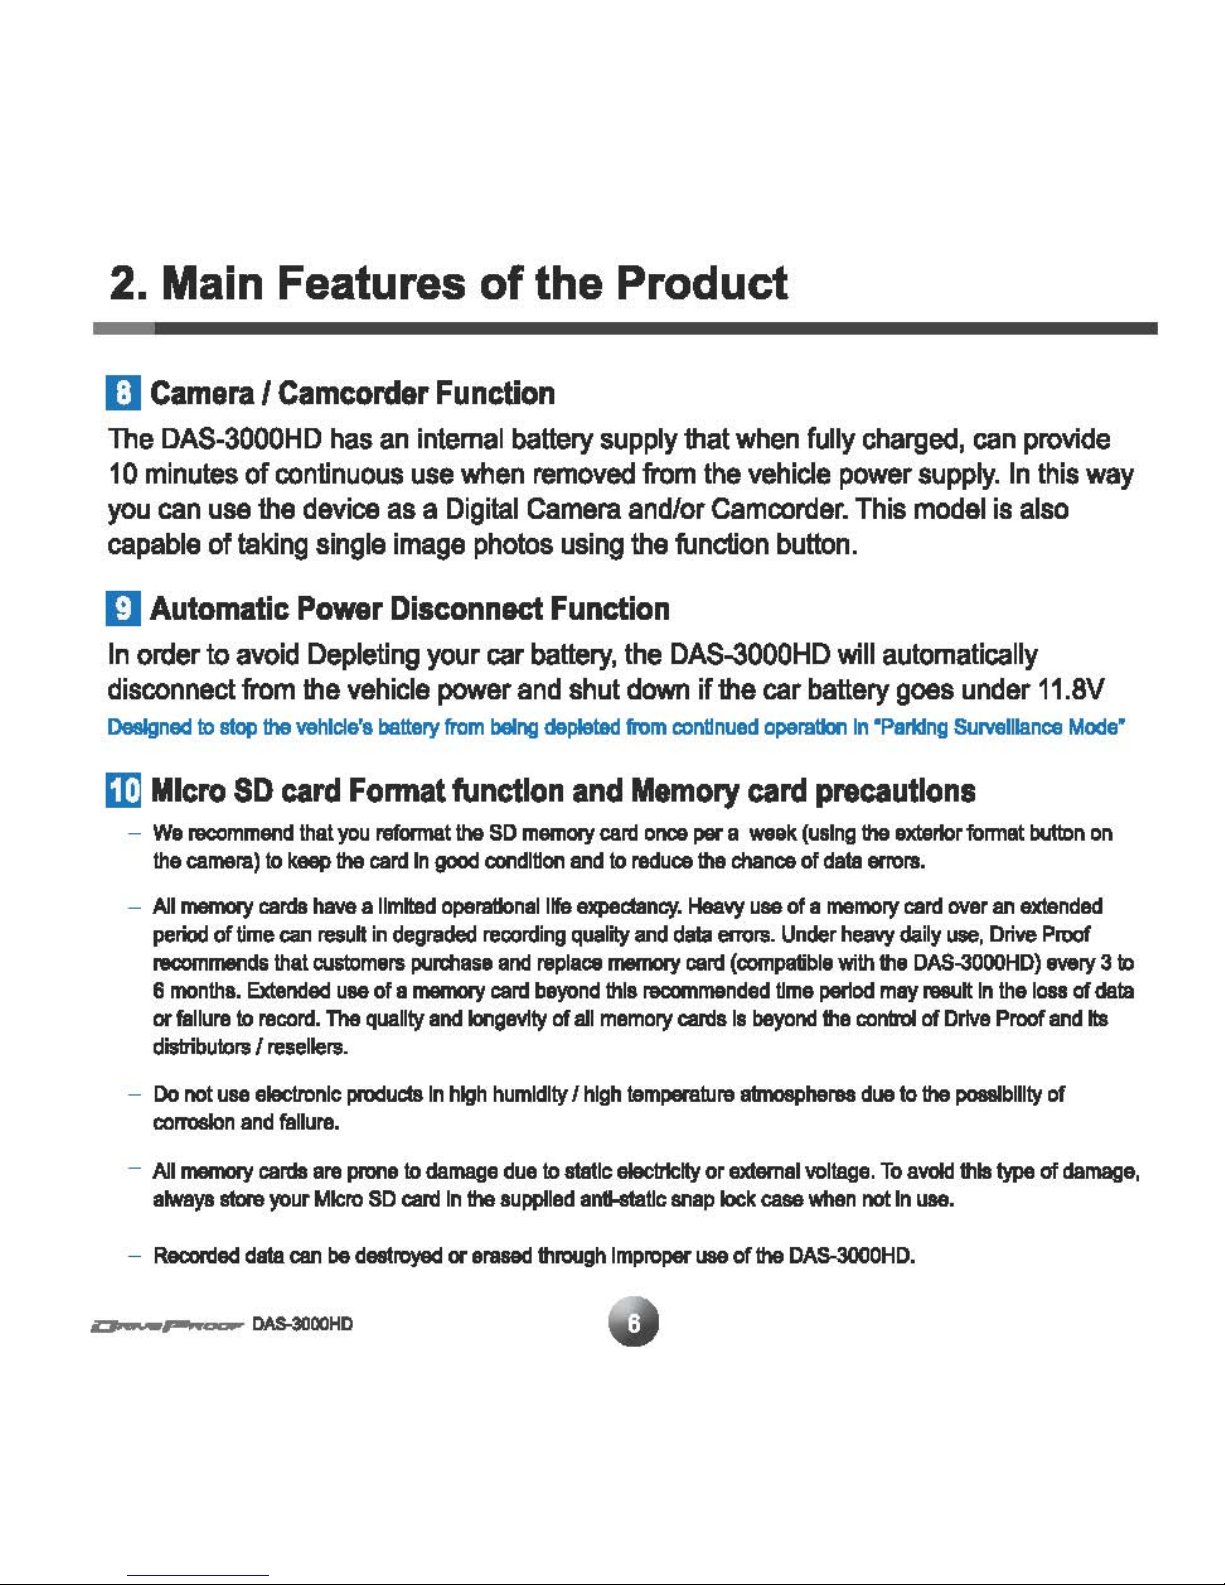
11
Camera
I Camcorder Function
The
DAS-3000HD
has
an
internal
battery
supply
that
when
fully
charged,
can
provide
10
minutes
of
continuous
use
when
removed
from
the
vehicle
power
supply.
In
this
way
you
can
use
the
device
as a Digital
Gamera
and/or camcorder.
This
modal
is
also
capable
of
taking
single
image
photos
using
the
function
button.
[J
Automatic
Power
Disconnect Function
In
order
to
avoid
Depleting
your
car
battery,
the
DAS-3000HD
will
automatically
disconnect
from
the
vehicle
power
and
shut
down
if
the
car
battery
goes
under
11.8V
DesIgned
to
stop the vehicle's
battery
from
being
depleted
from
continued
operation
In
"Parking
SUrveillance
Mode"
rn
Micro
SD
card
Format
function
and
Memory
card
precautions
-
We
recommend
that
you
reformat
the
SO
memory
card
once
par a
week
(using
the exterior format
button
on
the
camera)
to
keep the
carel
In
good
condltlon
and
to
reduce
the
chance
of
data
errors.
- All
memory
carda
have
a
limited
oparatlonaillfe
expectancy.
Heavy
use
of
a
memory
card
over
an
extended
period
of
time
can
resuH
in
degraded
rec:ording
quality
and
data
errors.
Under
heavy
daily
use,
Drive
Proof
recommends
that
customers
purchase
and
replace
memory
card
(compatible
with
the
DAS-3000HD)
every
31D
6
months.
Extended
use
of a
mamory
card
beyond
this
recommendad
Ume
period
may
reeult
In
the
loss
of
data
or
failure
to
record.
Tha quality ancllongevlty
of
all
memory
cards
Is
beyond
the
control
of
Drive
Proof
and
Its
disbibutors I
resellers.
-
Do
not
usa
alectronlc
products
In
high
humidity I high
temparabJre
atmospheres
due
to the
possibility
of
corrosion
and
failure.
- All
mamory
cards
are
prone
to
damage
due
to
static electricity or
external
voltage.
To
avoid
this
type
of
damage,
always
store
your
Micro
SD
card
In
the
supplied
antl-ataUc
snap
lock
case
when
not
In
usa.
-
Recorded
data
can
be
destroyed
or
erased
through
Improper
use
of the
DAS-3OO0HD.
DAS-3DOOHD
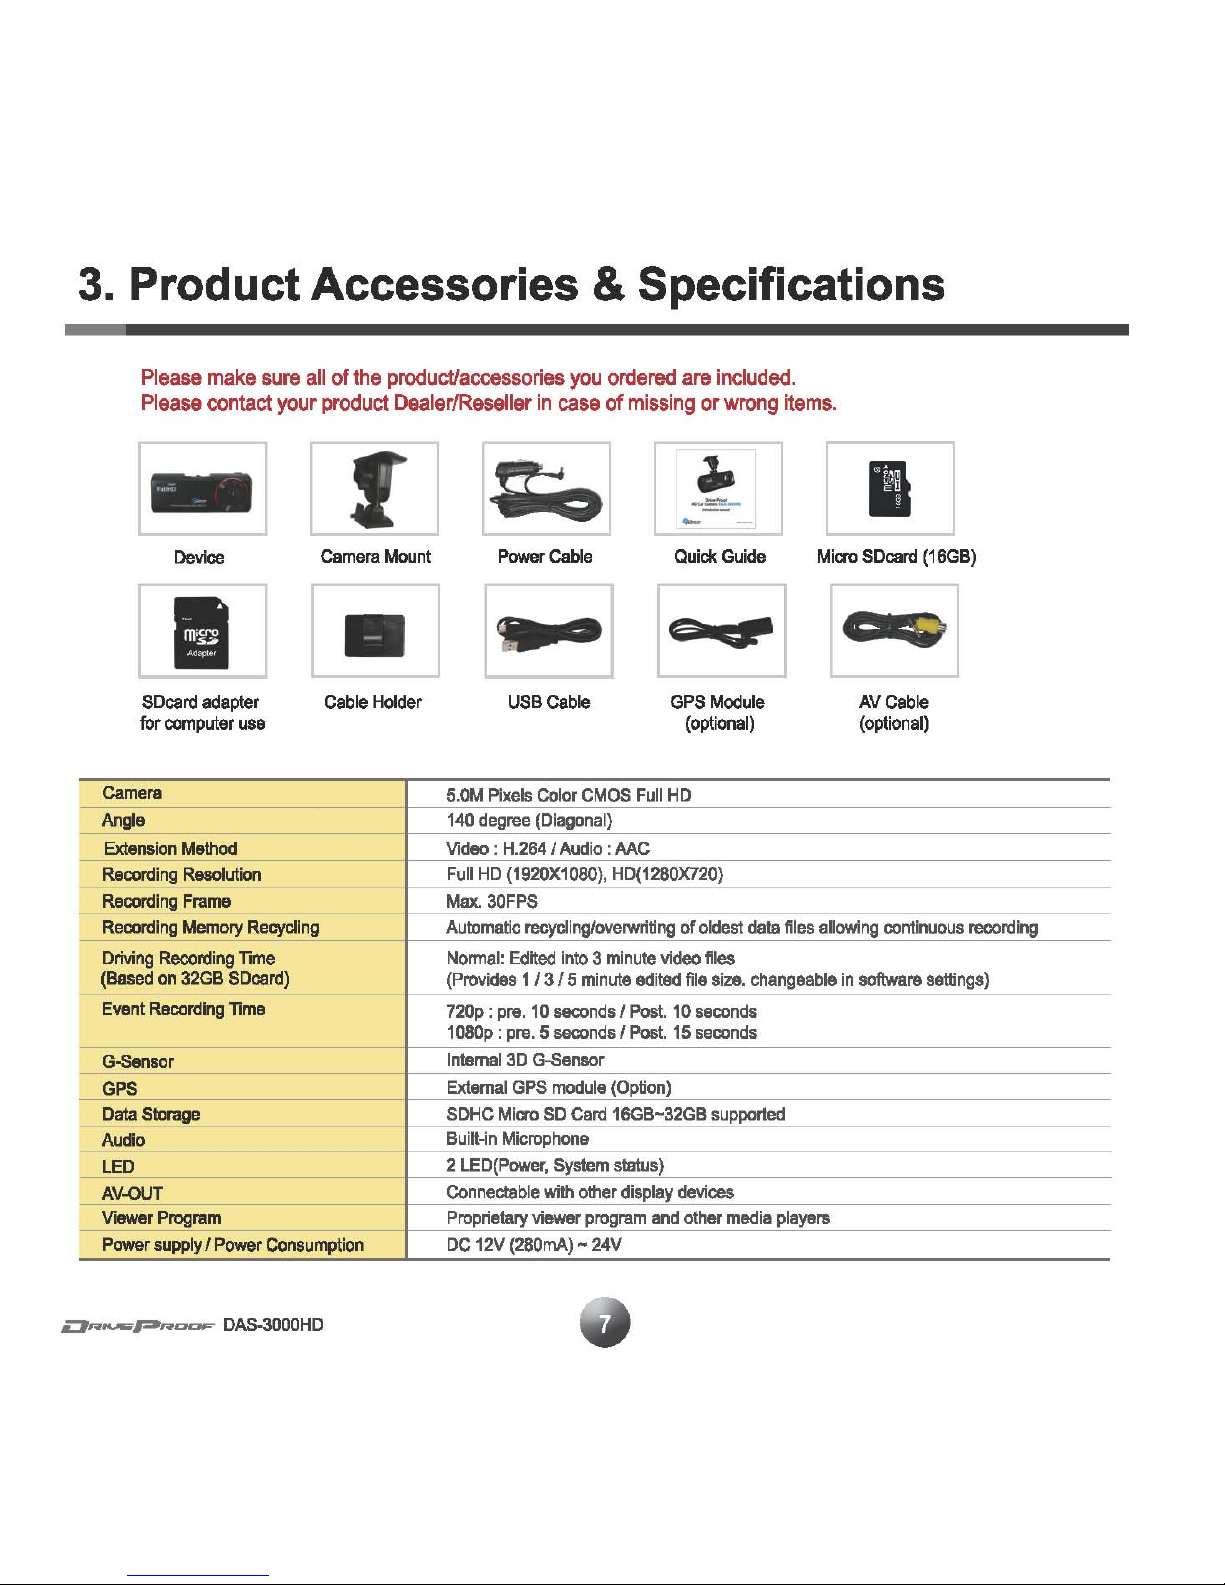
3. Product Accessories & Specifications
Please
make
sure
all
of
the
product/accessories
you
ordered
are
included.
Please
contact
your
product
Dealer/Reseller
in
case
of
missing
or
wrong
items.
-
f
:0
..
I
Device
Camera
Mount
Power
Cable
Quick
Guide
Micro
SDcard
(16GB)
I
•
..-
1
e.t:I!'
SDcard
adapter
Cable
Holder
USB
Csble
GPS
Module
AVCabie
for
computer
use
(optional) (optional)
Camera
5.0M
Pixels
Color
CMOS
Full
HD
--
Angle
140
degree
(Diagonal)
Extension
Method
Video:
H.264
I
Audio:
Me
Recording
Resolution
Full
HD
(1920X1060),
HD(1280X720)
Recording
Frame
Max
30FPS
Recording
Memory
Recycling
Automatic
recycling/ovelWriting
of
oldest
data
files
allowing
continuous
recording
Driving
Recording
Time
Normal:
Edited
into 3 minute
video
files
(Based
on
32GB
SDcard)
(Provides
1/3/5
minute
edited
file
size.
changeable
in
software
settings)
Event
Recording
lime
720p:
pre.
10
seconds!
Post.
10
seconds
1080p : pre. 5 seconds I Post.
15
seconds
--
G-Sensor
Internal
3D
G-Sensor
GPS
External
GPS
module
(Option)
Data
Storage
SDHC
Micro
SO
Card
16GB-32GB
supported
Audio
Built-in
Microphone
LED
2
LED(Power,
System
status)
AV.QUT
Connectable
with
other
display
devices
Viewer
Program
Proprietary
viewer
program
and
other
media
players
Power
supply I Power
Consumption
DC
12V
(280mA) -24V

4.
Parts Identification
SO
memory
card
slot
Power
tanninal
AV-OUT
USB
Port
GPS
Port
...
_
-"
-"-.:
DAS-3000HD

5.
Precautions before Installation & Tip
For
your
safety,
please
read
the
following
precautions
prior to installing
the
device
CD
Tum
off
the
vehicle
ignition
and
removing
the
ignition
key.
(2)
When
Installing
the
unit
please
use a well
lit
environment
to
avoid
accidents.
®
Only
connect
the
power
cable
to a fused
cigarette lighter jack.
(DC
12V-24V)
@
If
you
choose
to
connect
the
DAS-3000HD
directly
to
the
vehicle
battery
supply
using
our
optional
-
long
power
lead
and
battery
analyzer,
please
consult a
professional
installer
who
can
install a fuse
suitable
for
safe
operation
of
your
vehicle.
Ii
iq.
-til
Ii
i.;,
..
Plaase
power
down
the
device
before
inserting
or
ejecting
the
memory
carel
.
.,..._.
__
..
,.
__
DAS-3OOOH'
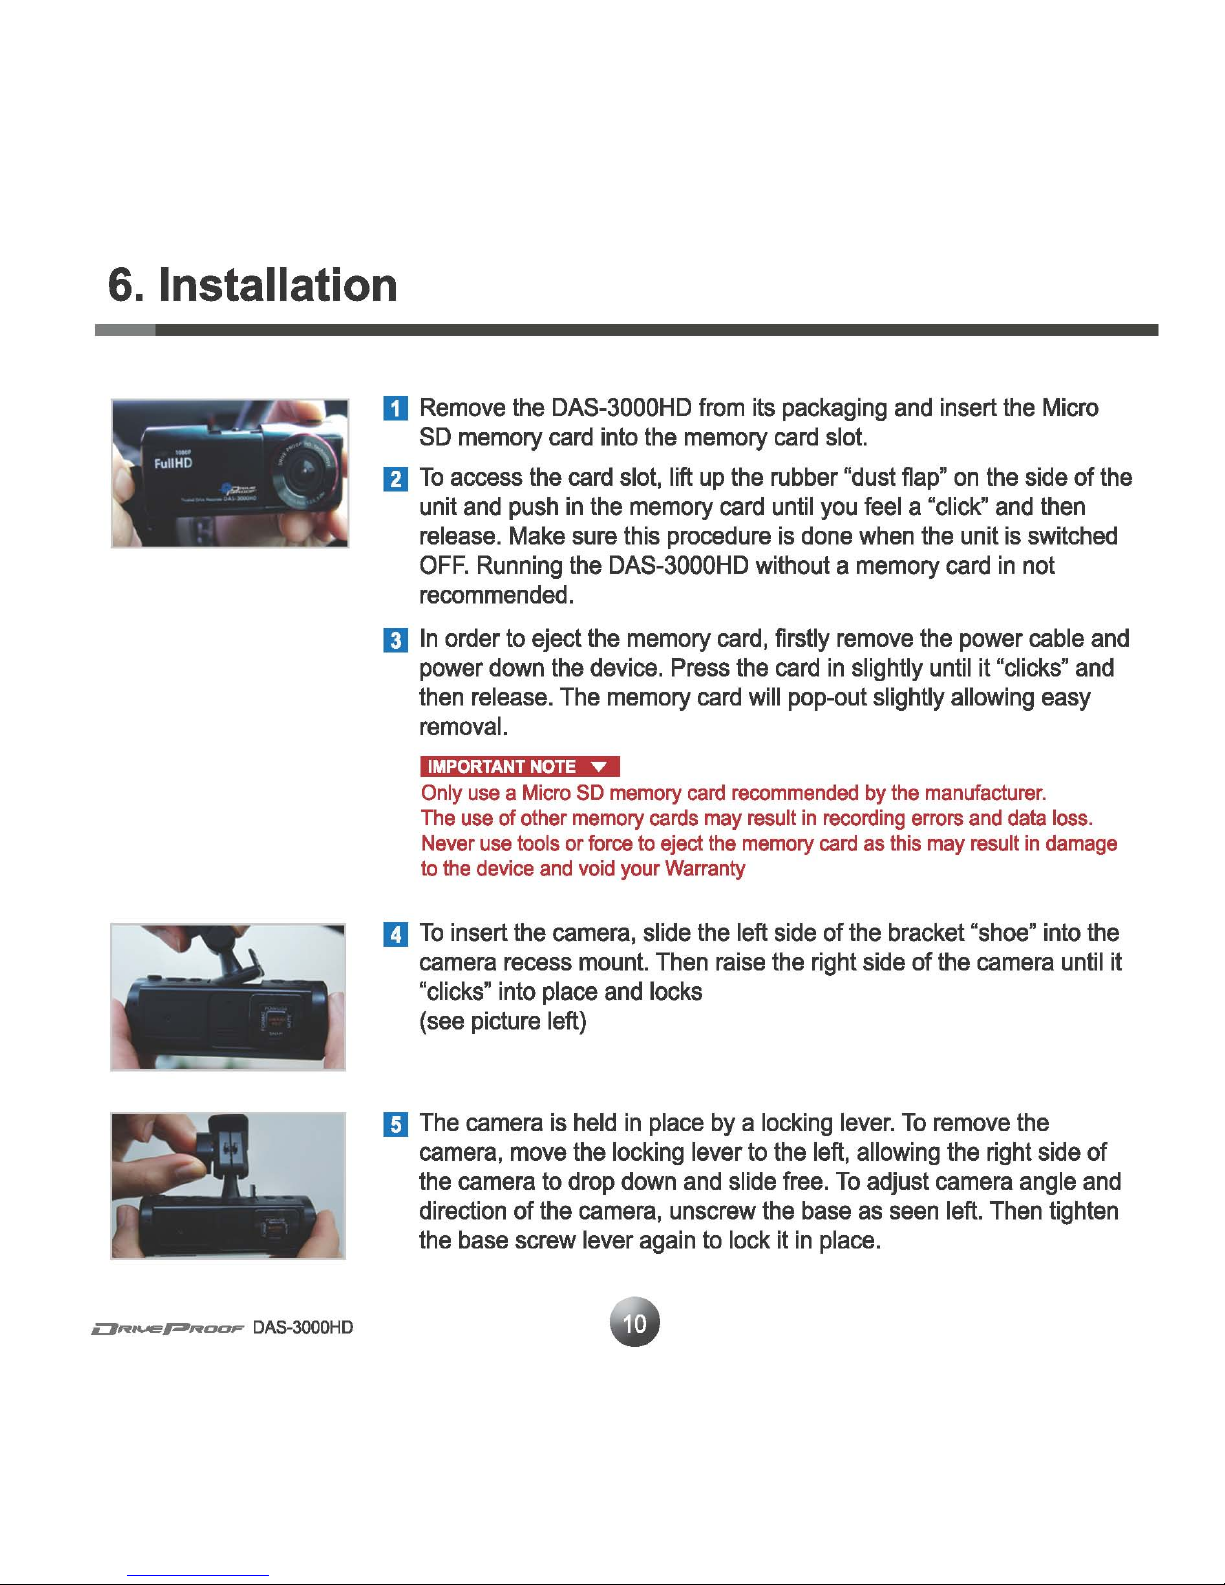
6.
Installation
- - -
...
'.
FuliHO
\
, '--
• •
o
Remove
the
DAS-3000HD
from
its
packaging
and
insert
the
Micro
SD
memory
card
into
the
memory
card
slot.
H
To
access
the
card
slot,
lift
up
the
rubber "dust
flap"
on
the
side of
the
unit
and
push
in
the
memory
card
until
you
feel
a "click"
and
then
release.
Make
sure this procedure
is
done
when
the
unit
is
switched
OFF.
Running
the
DAS-3000HD
without a
memory
card
in
not
recommended.
D
In
order
to
eject
the
memory
card,
firstly
remove
the
power cable
and
power
down
the
device.
Press
the
card
in
slightly
until
it "clicks"
and
then
release.
The
memory
card
will
pop-out slightly allowing
easy
removal.
Ii;
iUtj-jf.Hiidni
••
Only
use a Micro
SO
memory
card
recommended
by
the
manufacturer.
The
use
of other
memory
cards
may
result
in
recording
errors
and
data
loss.
Never
use
tools
or
force
to
eject
the
memory
card
as
this
may
result
in
damage
to
the
device
and
void
your
Warranty
D
To
insert
the
camera,
slide
the
left
side
of
the
bracket
"shoe"
into
the
camera
recess
mount.
Then
raise
the
right side of
the
camera
until
it
"clicks" into
place
and
locks
(see
picture left)
D
The
camera
is
held
in
place
by a locking
lever.
To
remove
the
camera,
move
the
locking lever
to
the
left,
allowing
the
right side of
the
camera
to
drop
down
and
slide
free.
To
adjust
camera
angle
and
direction of
the
camera,
unscrew
the
base
as
seen
left.
Then
tighten
the
base
screw lever
again
to
lock
it
in
place.
6.
Installation
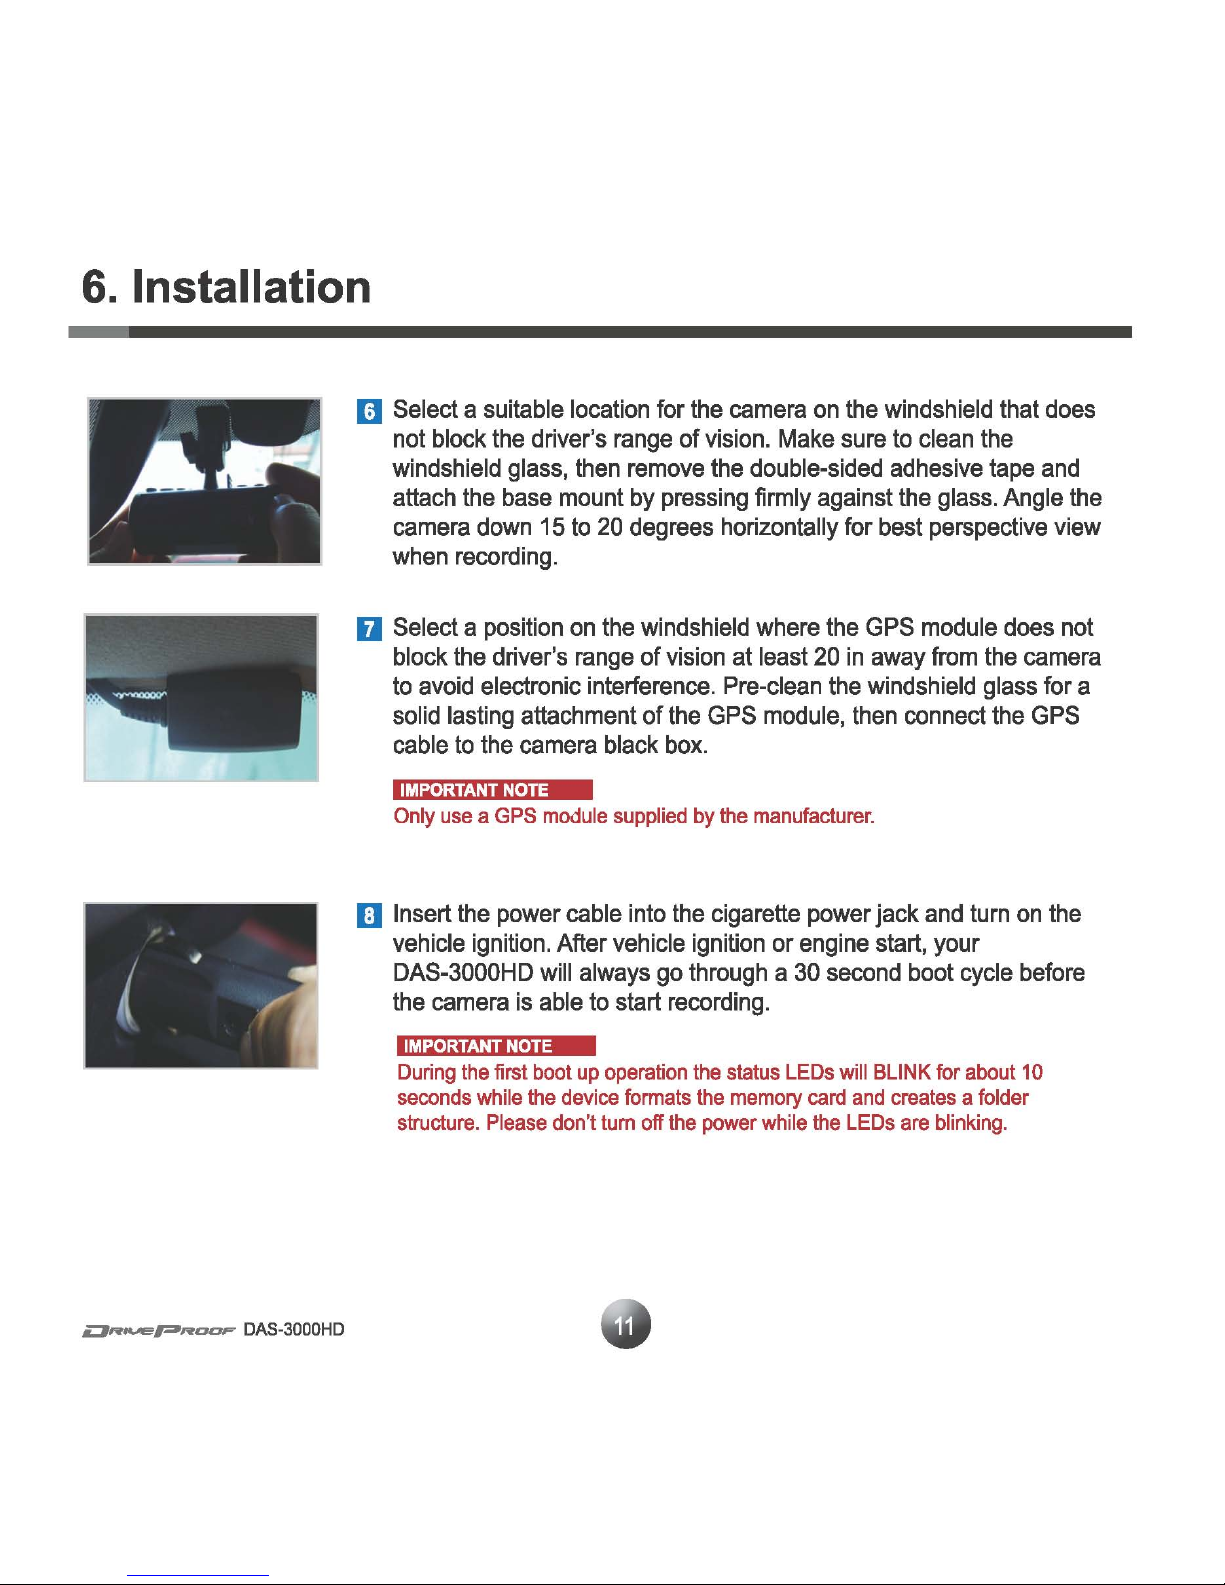
(1)
Select a suitable location for
the
camera
on
the
windshield that
does
not block
the
driver's
range
of vision.
Make
sure
to
clean
the
windshield
glass,
then
remove
the
double-sided adhesive
tape
and
attach
the
base
mount
by
pressing
firmly against
the
glass.
Angle
the
camera
down
15
to
20
degrees horizontally for best perspective view
when
recording.
o Select a position
on
the
windshield
where
the
GPS
module
does
not
block
the
driver's
range
of vision at least
20
in
away
from
the
camera
to
avoid
electronic interference.
Pre-clean
the
windshield
glass
for a
solid lasting attachment of
the
GPS
module,
then
connect
the
GPS
cable
to
the
camera
black
box.
Only
use a GPS
module
supplied
by
the
manufacturer.
IJ Insert
the
power cable into
the
cigarette power jack
and
turn
on
the
vehicle ignition. After vehicle ignition or engine start, your
DAS-3000HD
will
always
go
through a
30
second
boot
cycle
before
the
camera
is
able
to
start
recording.
During
the
first
boot
up
operation
the
status
LEOs
will
BLINK
for
about
10
seconds
while
the
device
formats
the
memory
card
and
creates
a folder
structure.
Please
don't
tum
off
the
power
while
the
LEOs
are
blinking.
 Loading...